Uniform Guidelines This slideshow will illustrate the following:_ How to season your beret? Fastening belt to uniform How to iron the hemlines?

Ndp 2010 tips for beret, belt and hemlines
Jul 15, 2015
Welcome message from author
This document is posted to help you gain knowledge. Please leave a comment to let me know what you think about it! Share it to your friends and learn new things together.
Transcript

Uniform Guidelines
This slideshow will illustrate the following:_
How to season your beret?
Fastening belt to uniform
How to iron the hemlines?

How to season your beret?
(For All Cadets)

Identify the hard flap in the beret which is also the support for the Cap Badge

Press the beret together with the hard flap underneath.

Adjust by folding it further away from you. And press down the surface of the beret which is closer
to you.

Fold up the side of beret which is closer to you towards the other side

Once folded, it will look like this. You can season by putting under a heavy mattress / ironing it.

Ironing your beret
Ensure that the dial on the iron is either set to wool / 4. If you are ironing your beret for the first time, please be aware that there will be a slight
burning smell, and discoloration.

Firstly, press the iron on the arrow shown above.

Open up one of the sides and iron it down flat.

Repeat the same action for
the other side of the beret

Fold back the beret into the formation for seasoning and press the iron on its surface.

Finally, finish off the ironing by repeating step one, which is to
iron on the line as shown in the picture.

Fastening belt to uniform
(For Female Cadets)

This is the front view of the female cadet
uniform.You are encouraged to iron your uniform first.
Focus on the side where the arrow is
pointing.

Open up your uniform and focus on your right

The end of the hook should be placed aligned to the line on the right side of the uniform.
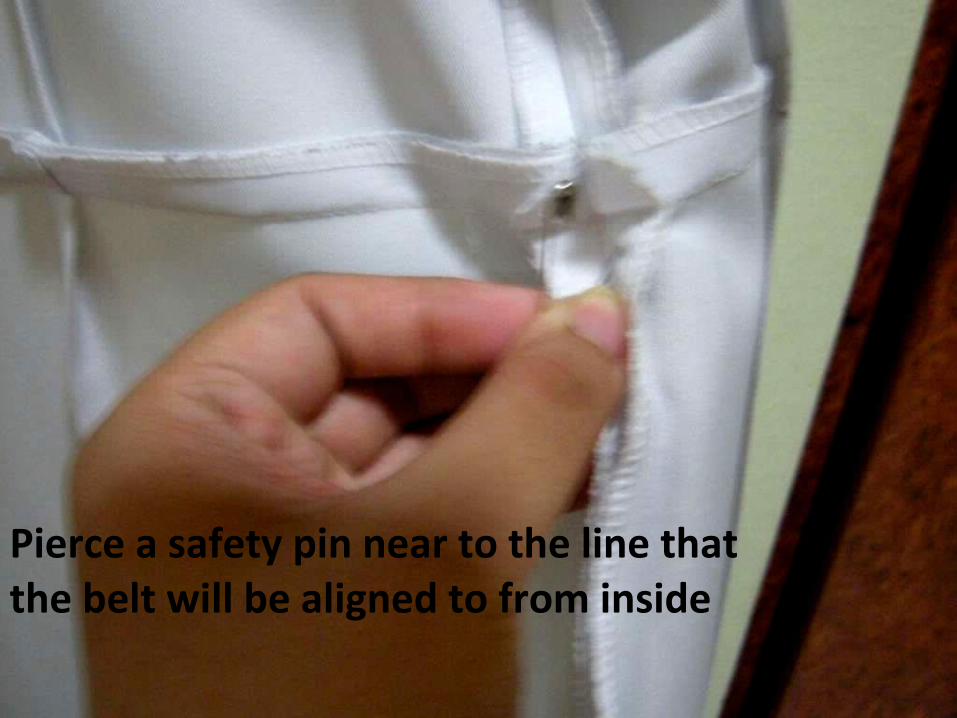
Pierce a safety pin near to the line that the belt will be aligned to from inside

The safety pin will protrude out this way. This is the view if uniform is buttoned.

The belt is made up of 2 layers of cloth. Pierce the belt to the protruding safety pin.Estimate the amount of cloth you want to pin, but not too much.
Do make sure that it only pierce through the first layer of cloth, not both layers so as to not making the safety pin visible.

Fasten the safety pin on the inner side of the uniform

This is how it looks once safety pin has been fasten

How to iron the hemlines?
(For Female Cadets)

This is the top view of the uniform.

This is what you see when you open up the uniform.
Focus on this two hemlines.

Up close picture of hem lines.

Choose one side to start first. Pinch on the outer side of the hem line.

Zoom out view of where to pinch

Fold on one side.
After pinching and estimating, fold into a straight line, and start ironing only one side of the fold. Try to press down iron at the
region where the arrow shows. If it doesn’t work, put some starch / water but ensure that the hot surface of iron is clean.
Related Documents