www.naxo.ch - 1 Useful hints and tips for all NAXO bindings

Naxo Booklet
Nov 27, 2015
Naxo Booklet
Welcome message from author
This document is posted to help you gain knowledge. Please leave a comment to let me know what you think about it! Share it to your friends and learn new things together.
Transcript

www.naxo.ch - 1Useful hints and tips for all NAXO bindings

2 - Useful hints and tips for all NAXO bindings
NAXO Bindings - engineered, designed and manufactured in Switzerland!
This guide provides information on mounting and operation of your NAXO bindings and accessories.
Master the user friendly functions of your NAXO bindings and become an expert with useful practice hints and tips.
Please note that it is highly recommended that specialist retailers assemble your NAXO bindings.
For further information, please visit our website: www.naxo.ch.

www.naxo.ch - 3
Table of contents
1 Mounting instructions p. 4
2 Length adjustment p. 6 3 Toe piece adjustment p. 8 4 Contact pressure control p. 10 5 Setting DIN p. 12
6 Operation instructions for climbing aid p. 14 7 Operation instructions for downhill-LOCK (d-LOCK) p. 16 8 Operation instructions for crampons p. 18 9 Useful hints and tips p. 20

4 - Useful hints and tips for all NAXO bindings
1 Mounting instructions
1. Drilling holes: • Position the mounting template (steel jig or paper overlay) according to the mounting instructions. Recommended drill bit sizes: Metal top sheet: max. 4.1 x 9mm Non metal top sheet: max. 3.9 x 9mm 2. Mounting the Climbing Aid: • Fill holes with appropriate glue. • Position the climbing aid correctly and fasten with a tightening torque of 5Nm.
3. Mounting the toe piece (Climbing Aid MUST be mounted before toe piece): • Make sure shock absorbers are in correct position. • Fill holes with appropriate glue. • Slightly inset and tighten two screws in opposite corners. • Lock binding in downhill mode and proceed to inset and tighten remaining screws. • Finish tightening screws and fasten with a tightening torque of 5Nm.

www.naxo.ch - 5
4. Affixing front toe piece: • Clean the ski surface very well with acetone or other solvent (Do Not use any diluents). • Carefully lift front plate and pull away red film cover. • Press the front plate down onto the ski, with about 20 kg of pressure, for a few seconds.
1
3
14
2

6 - Useful hints and tips for all NAXO bindings
2 Lenght adjustment
Adjustment of the Binding: • Measure the size of the boot (in mm) with a metric tape measure. Boot length may be indicated on the side of the boot (in mm). • Open lever on front side of heel piece. • Adjust heel piece along rails to corresponding boot size (refer to the scale on inside profile of rails). • Insert boot and check for proper fit. Readjust if need be.

www.naxo.ch - 7
Lever

8 - Useful hints and tips for all NAXO bindings
3 Toe piece adjustment
Setting Toe Jaw height: • Insert boot toe under toe jaw and lock the heel into the binding. • Adjust height of the Toe Jaw with the screw on the top of the toe piece. To ascertain the correct height and pressure of the Toe Jaw, pull back on the cuff of the ski boot and press the Anti-Friction device sideways. The Anti-Friction plate should move with the pressure of your finger and snap back into place when released.

www.naxo.ch - 9
Adjusting screw
Anti-Friction plate

10 - Useful hints and tips for all NAXO bindings
4 Contact pressure control
Contact pressure control: • Insert ski boot into binding and lock in place. • Check that the recessed plug, found in between the rails on the back of the toe piece, is in proper position.
Readjust length setting marking ring is still visible or the head of the plug is recessed too far.
NOOKOKNO

www.naxo.ch - 11
Recessed Plug

12 - Useful hints and tips for all NAXO bindings
5 Setting DIN
DIN setting can be adjusted to individual specification. Skier ability, age and weight must be considered when adjusting this setting.
1. Lateral release: • The lateral release setting can be adjusted by using the horizontal adjusting screw on the front side of the toe piece.
2. Forward release: • The forward release setting can be adjusted by using the adjusting screw on the heel piece.

www.naxo.ch - 13
Lateral release
Forward release
Adjusting screw
Adjusting screw

14 - Useful hints and tips for all NAXO bindings
6 Climbing aid
1. Climbing aid in walking mode 0°: • The climbing aid can be completely opened, with the aid of a ski pole. For flat or gently inclined terrain, the climbing aid will lay flat.
2. Climbing aid in walking mode 6°: • For climbing aid level of 6°, pull the climbing aid forward (toward skier) with a ski pole. The Stop lever (colored plastic) will move forward to a position where the back end of the climbing rails can rest. With the next step the climbing aid will snap automatically into locked position.
3. Climbing aid in walking mode 12°: • For climbing aid level 12°, pull the upper lever of the climbing aid to most forward position.
4. Descend position: • To return to descent/ski mode, push the climbing aid back to 0° walking mode. Set binding rails until resting on climbing aid plate and, with your hand, pull clim- bing aid forward to locked position.

www.naxo.ch - 15
1
Upper lever
Stop lever
2
3
4
16 - Useful hints and tips for all NAXO bindings
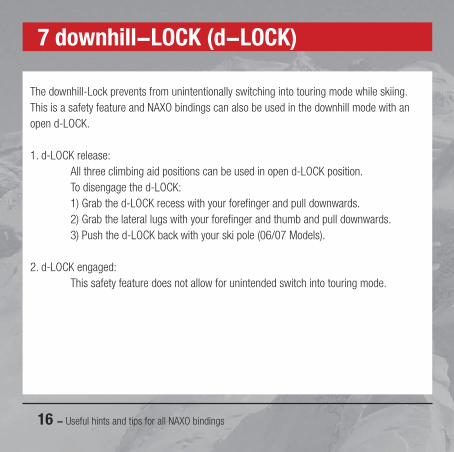
7 downhill-LOCK (d-LOCK)
The downhill-Lock prevents from unintentionally switching into touring mode while skiing. This is a safety feature and NAXO bindings can also be used in the downhill mode with an open d-LOCK.
1. d-LOCK release: All three climbing aid positions can be used in open d-LOCK position. To disengage the d-LOCK: 1) Grab the d-LOCK recess with your forefinger and pull downwards. 2) Grab the lateral lugs with your forefinger and thumb and pull downwards. 3) Push the d-LOCK back with your ski pole (06/07 Models).
2. d-LOCK engaged: This safety feature does not allow for unintended switch into touring mode.

www.naxo.ch - 17
Attention: You must first open d-LOCK before attempting to utilize climbing aid!
If the lever was pressed over the climbing assistance in the engaged d-LOCK position, it is possible to back-press with increased effort into the standard position (e.g. use ski pole as a tool). The operability is thereby not affected.
d-LOCK open d-LOCK engaged
Climbing aid can be used Climbing aid unable to use

18 - Useful hints and tips for all NAXO bindings
8 Crampons
1. Mounting: • Before mounting, push the yellow lever (found on the crampon attachment clip) into open position (backwards). • Then, insert the crampon attachment clip into the binding rails. (1) • Slide the crampon forward along the rails until it snaps into place. (2) • Finally, pull the yellow lever forward to lock crampon to binding. (3)
2. Demounting: • Put the yellow lever back into open position. • Pull the crampon slightly downwards and away until released. (4)

www.naxo.ch - 19
1
3
4
2

20 - Useful hints and tips for all NAXO bindings
9 Useful hints and tips
Switchback technique:
Switchbacks are also made easier with NAXO bindings. Instead of awkward kick turns, just pull your foot back and lift your ski.
The 3rd pivot will allow the ski tip to rise, change direction and continue climbing uphill.

www.naxo.ch - 21

22 - Useful hints and tips for all NAXO bindings
9 Useful hints and tips
• VRS Virtual Rotation Point - triple pivot makes touring feel like it always should: com-pletely natural.
1. The initial pivot point is 65mm further back as compared to other alpine touring bindings.
2. This allows the toe piece to sink, creating an opening angle of 12 degrees. Up to this point, no energy is expended: the skier has only weighted the ball of his or her foot; not lifted the heel.
3. Once the heel is lifted, the opening angle reaches 35 degrees, and the pivot point moves forward. This allows for a more naturally rolling stride with less energy expended. The maxi-mum open angle is 110 degrees, allowing for long, smooth strides.

www.naxo.ch - 23
... safe Energy:
The Virtual Rotation System creates a natural rolling stride.
... easier to track:
The Virtual Rotation System facilitates easier fresh tracks in new snow. This is due to the three different pivot points allowing for the tip of the ski to the surface of the snow.
2.1. 3.

24 - Useful hints and tips for all NAXO bindings
ÜberschriftIt is highly recommended that all assembly and readjustment of NAXO bindings be done by specialist retailers.
Your NAXO retailer:
Related Documents