NATO Chess 2015 Round 6 Highlights Jan Cheung, 1 August 2016 Here are the exercises of round 6. Position 1. Position after 11.Nf3xd4. Black to move. Choose between A) 11...a5, B) 11...Ne5, C) 11...Nc5 and D) 11...Ng4. Position 2. Position after 17...Nc5-d7. White to move. Choose between A) 18.Qd4 and B) 19.f4.

Welcome message from author
This document is posted to help you gain knowledge. Please leave a comment to let me know what you think about it! Share it to your friends and learn new things together.
Transcript

NATO Chess 2015 Round 6 Highlights
Jan Cheung, 1 August 2016
Here are the exercises of round 6.
Position 1.
Position after 11.Nf3xd4. Black to move. Choose between A) 11...a5, B) 11...Ne5, C) 11...Nc5 and D)
11...Ng4.
Position 2.
Position after 17...Nc5-d7. White to move. Choose between A) 18.Qd4 and B) 19.f4.

Position 3.
Position after 39...Bd6-c7. White to move. You have 15 seconds. Choose between A) 40.f3, B) 40.f4,
C) 40.b4 and D) 40.Bd2

Position 4.
Position after 16...d5xe4. White to move.
Position 5.
Position after 49...Nd8xe6. You have 30 seconds. Choose between A) 50.Bxe6 and B) 50.Kxa6.

Position 6.
Position after 58...f3. White to move. You have 15 seconds.
Position 7.
Position after 13...Bg4-h5. White to move. Choose between A) 14.exd5 and B) 14.c4.

Position 8.
Position after 13...Nh6-f5. White to move. Choose between A) 14.Ng6, B) 14.Nc5 and C) 14.Rh1.
Position 9.
Position after 17.Rh1xh5. Black to move.

Position 10.
Position after 40.Ke2-d3. Black to move. Choose between A) 40...Kb4 and B) 40...Bg2.
Position 11.
Position after 20.h2-h3. Black to move.
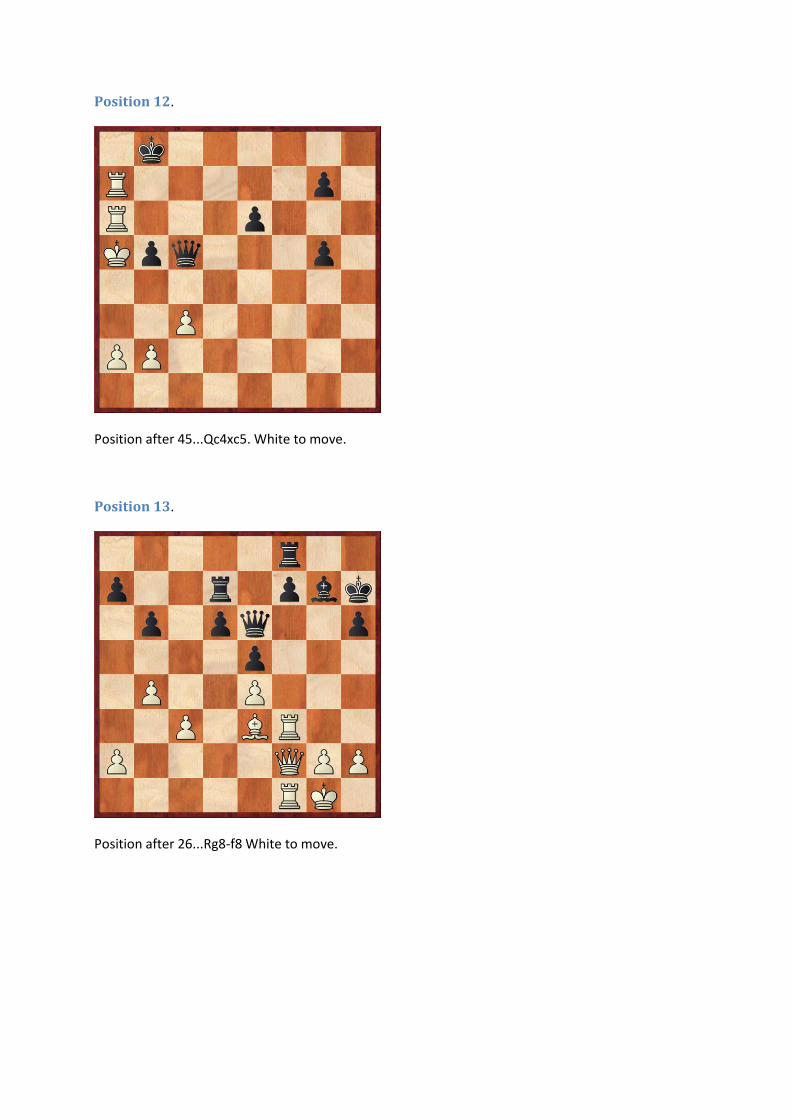
Position 12.
Position after 45...Qc4xc5. White to move.
Position 13.
Position after 26...Rg8-f8 White to move.

Position 14.
Position after 33...Qe4-e7. White to move. Choose between A) 34.c5, B) 34.Qb4, C) 34.Nf1 and D)
34.Nf3.
Position 15.
Position after 40.Rg2-e2. Black to move. Choose between A) 40...Kg8, 40...Nd6 and C) 40...gxf4.
Solutions

Position 1 is the game Helbig - Sypien (6.5).
In this Kings Indian Position black has given up the tension in the centre with the exchange at square
d4. White has more space, but it is hard to find a clear plan against pawn d6 because the knight at d4
is blocking whites activity along the d file.
Black has less space, but apart from the backward pawn at d6, his position has no weaknesses. His
position at the wings can be improved. At square c5 a knight can be posted after he has secured this
square with the pawn thrust a7-a5. This means that …a is a sensible move. Play can continue with
the following variation: 12.h3 Nc5 13.Bf4 Nh5 14.Be3 a4 15.Qd2 Qc7 with a complex middle game.
There are other candidate moves.
…N is a o e that is tr i g to i a te po a o e …a . It is ot a logi al o e as it gi es a a square b4, but is playable. After 12.b4 Ne6 a complex position arises, for example 13.Nc2 Ng4
14.Na4 Nc7.
…Ne , the move played at the game, attacks pawn c4, but this is only temporary because the
knight at e5 is not on a stable square. After 12.b3 Qa5 13.Bb2 black has to play with force to make
something useful of the knight at e5. A sensible move would be …h , trying to win space at the
king side. After 14.h3 h4 19.g4 Bh6!? a complex position arises. In some variations black is ready to
sacrifice a piece at g4 for active play.
The side having less space could have trouble to direct the pieces to active squares. Note square d7.
This is a congestion square for black knights. The knights are practical performing the same tasks. If
black can exchange one of his knights, having less space is no weakness anymore. This means that
…Ng !?
is also a candidate move. This move however, requires calculation because it temporary sacrifices a
pawn. After 12.Nxc6 bxc6 13.Qxg4 Ne5 14.Ne2 Be6 15.b3 Qa5 16.Bd2 Nxc4 17.bxc4 Bxc3 18.Bxc3
Qxc3 a position arises with chances for both sides. Other 12th
moves are not good for white:

12.h3? will be replied with …Q ! exposing the weak diagonal b6-f2. After 13.Nce2 Nge5
14.Qc2 c5! 15.Nb3 Nc6 black has taken possession of square d4.
12.Nde2? will be replied with …Qf ! exposing the weak square f3. After 13.Rf1 Nge5 14.b3
Nf3+ 15.Kh1 g5 black has firm control over the king side.
Conclusion: All four moves are playable, depending on your taste.
…a is a logical move, easy to understand.
…N is illogi al, ut pla a le. …Ne leads to ta ti al pla
…Ng4 leads to a position of reduced pieces after some heavy calculation.
Position 2 is the game Tommasini – Oltean (6.8).
In this position, the queens are playing an important factor at the game. Compare the position with
and without queens. Without queens, blacks position is better because the knight dominates the
bishop because the pawn at square e5 is put at the same colour as the white bishop. Now compare
the situation with queens at the board. For white, it is important to have queens at the board
because she is needed to open files with the thrust c3-c4, to attack the black king. This means that
white should play
18.f4
to defend pawn e5. After this move, white controls the position, for example
…Rg .Rf
Blacks attack at the king side has been stopped. To centralize the pieces,
…Qd
is a reasonable move. …Qe ould alread e a s ered ith . ! d .Qa ith a lot of activity.
20.Rc1.
with plans to open the position with c3-c4.
In the game white played
18.Qd4
After
…Qxd .Bxd R 20.f4 Ke7 21.Kf2 Rhg8 22.Kf3 h5
white has difficulties to improve the position while black has simple moves to improve his position.
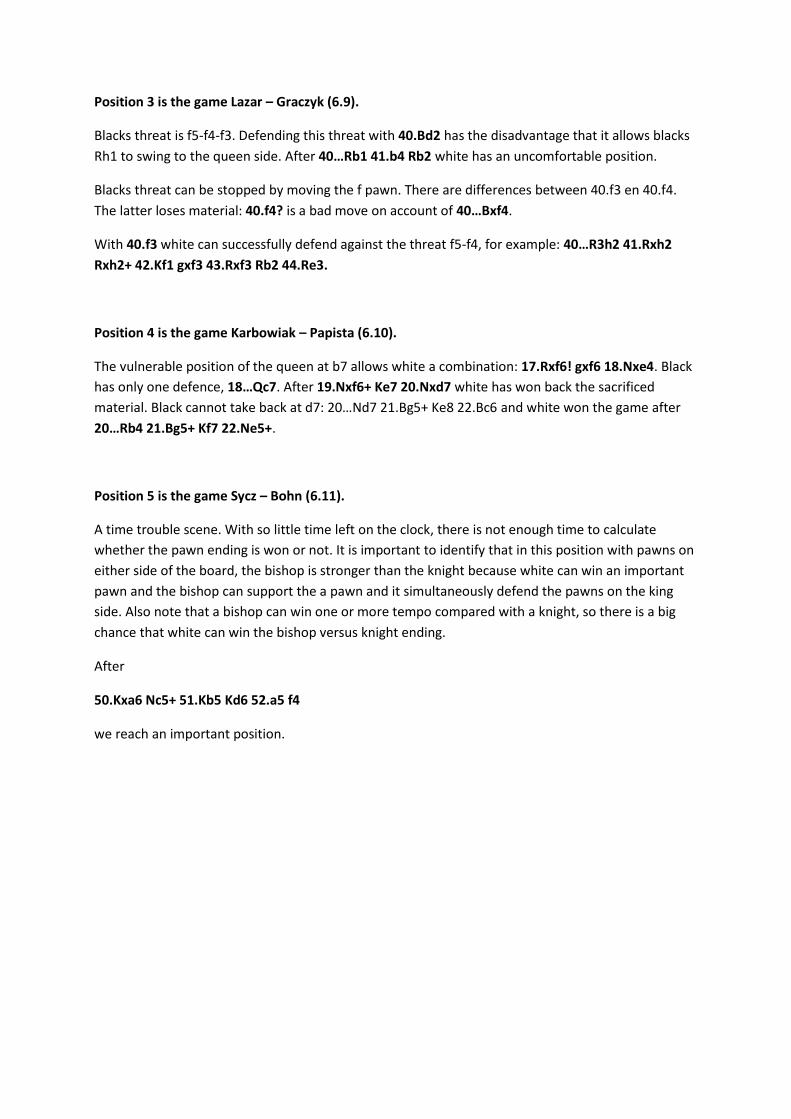
Position 3 is the game Lazar – Graczyk (6.9).
Blacks threat is f5-f4-f3. Defending this threat with 40.Bd2 has the disadvantage that it allows blacks
Rh1 to swing to the queen side. After …R . R white has an uncomfortable position.
Blacks threat can be stopped by moving the f pawn. There are differences between 40.f3 en 40.f4.
The latter loses material: 40.f4? is a bad move on account of …Bxf .
With 40.f3 white can successfully defend against the threat f5-f4, for example: …R h .Rxh Rxh2+ 42.Kf1 gxf3 43.Rxf3 Rb2 44.Re3.
Position 4 is the game Karbowiak – Papista (6.10).
The vulnerable position of the queen at b7 allows white a combination: 17.Rxf6! gxf6 18.Nxe4. Black
has only one defence, …Q . After 19.Nxf6+ Ke7 20.Nxd7 white has won back the sacrificed
aterial. Bla k a ot take a k at d : …Nd .Bg + Ke .B and white won the game after
…R .Bg + Kf .Ne +.
Position 5 is the game Sycz – Bohn (6.11).
A time trouble scene. With so little time left on the clock, there is not enough time to calculate
whether the pawn ending is won or not. It is important to identify that in this position with pawns on
either side of the board, the bishop is stronger than the knight because white can win an important
pawn and the bishop can support the a pawn and it simultaneously defend the pawns on the king
side. Also note that a bishop can win one or more tempo compared with a knight, so there is a big
chance that white can win the bishop versus knight ending.
After
50.Kxa6 Nc5+ 51.Kb5 Kd6 52.a5 f4
we reach an important position.
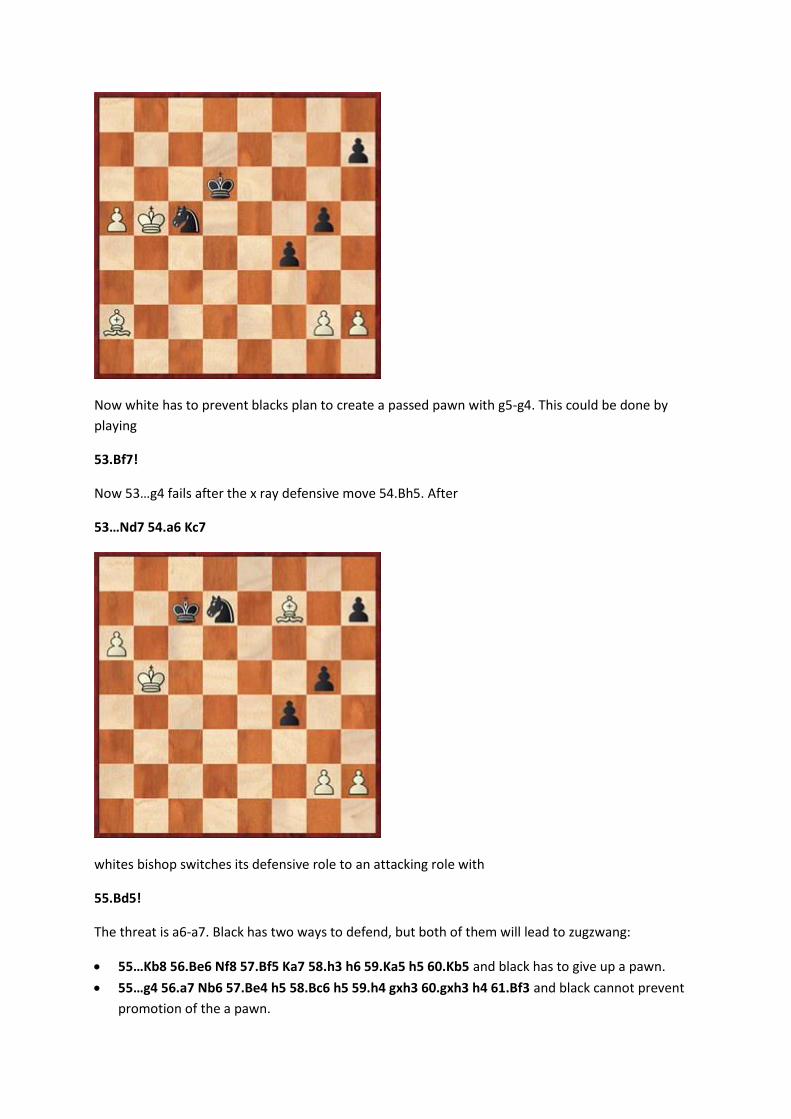
Now white has to prevent blacks plan to create a passed pawn with g5-g4. This could be done by
playing
53.Bf7!
No …g fails after the ra defe si e o e .Bh . After
…Nd7 54.a6 Kc7
whites bishop switches its defensive role to an attacking role with
55.Bd5!
The threat is a6-a7. Black has two ways to defend, but both of them will lead to zugzwang:
…K 56.Be6 Nf8 57.Bf5 Ka7 58.h3 h6 59.Ka5 h5 60.Kb5 and black has to give up a pawn.
…g 56.a7 Nb6 57.Be4 h5 58.Bc6 h5 59.h4 gxh3 60.gxh3 h4 61.Bf3 and black cannot prevent
promotion of the a pawn.

So 50.Kxa6 wins, but it requires to find the key moves 53.Bf7 and 55.Bd5. What about 50.Kxe6, the
move played in de game? After
50.Bxe6 Kxe6 51.Kxa6 f4 52.Kb5 g4 53.Kc4
we arrive at a critical position.
It looks like white is in time to stop the black pawns.
…g ! 54.hxg3 fxg3 55.Kd4 Kd6 56.Ke4 Kc5 57.Kf4 Kb4 58.Kxg3 Kxa4
White has stopped black to create a passed pawn, but now the question is whether this one versus
one pawn end game is sufficient to win. By playing 50.Bxe6 you have to know exactly whether the
positio after …Kxa4 is won or drawn. With so little time left on the clock, it looks more like a
gamble than a precise calculation.
59.Kg4 Kb4 60.Kg5 Kc5 61.Kh6 Kd5 62.g4 Ke5 63.g5 Kf5
with a drawn position!
Position 6 is the game Kersic – HC Andersen (6.13).
Blacks threat is f3-f2-f1Q. It seems that only the white bishop can stop this threat. The best way is an
unconventional one, by moving the piece forward.
59.Bc8!
With this move, white not only stops the f pawn, but it also picks up all pawns of black, securing a
draw.
…f
Or …Bf .K h
60.Bxa6 Kxc6 61.Kxh4 f1Q 62.Bxf1 Bxf1
with a draw. In the game, white played a less accurate move.
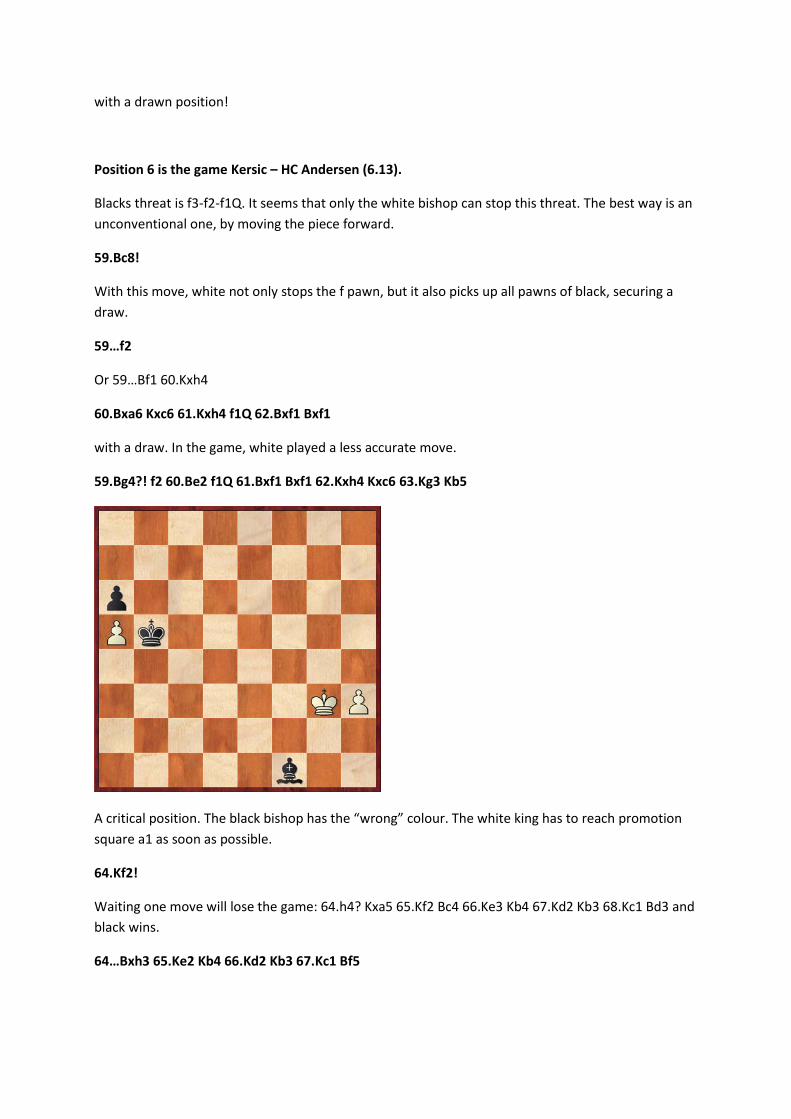
59.Bg4?! f2 60.Be2 f1Q 61.Bxf1 Bxf1 62.Kxh4 Kxc6 63.Kg3 Kb5
A riti al positio . The la k ishop has the ro g colour. The white king has to reach promotion
square a1 as soon as possible.
64.Kf2!
Waiting one move will lose the game: 64.h4? Kxa5 65.Kf2 Bc4 66.Ke3 Kb4 67.Kd2 Kb3 68.Kc1 Bd3 and
black wins.
…Bxh .Ke K .Kd K .K Bf

Although the white king is cut off from the promotion square, the game is still drawn because black
cannot pick up the white pawn and preventing the white king to enter the promotion square
simultaneously.
Position 7 is the game Wagenaar – Picart (6.14).
This position is a kind of a semi slav with reversed colours! Compare this position with the position
after 1.d4 d5 2.c4 c6 3.Nf3 Nf6 4.Nc3 e6 5.e3 Nbd7 6.Bd3 Bd6 7.0-0 dxc4 8.Bxc4 b5 9.Bd3 Bb7 10.e4
e5 11.Bg5 h6 12.Bh4 0-0.
Comparing this position with the position of the exercise, the addition of the moves Kg1-h1 and a7-
a6 favors black. The move Kg1-h1 prepares f2-f4, but has no functional meaning yet, while blacks a7-
a6 is meant to prepare the advance c6-c5. This means that in the position of the exercise, white has a
comfortable position.
Seen from the position of the exercise, white has only one weak square, f4. For black, this is an ideal
square for a knight, so white has to prevent this. This means that white should not play 14.exd5,
what happened in the game. After the inaccurate
14.exd5? Nxd5

black got too much activity – Nd5-f4 and f7-f5. Now a move like
15.Be4
a standard move in the reversed position, will not save white because the black king is not placed at
square g8:
…Nf .Q ? f5!
The pawn at f5 cannot be taken: 17.Bxf5? Rxf5 18.Qxf5 Bg6 19.Qg4 h5 20.Qg5 Be7 (or 20.Qg3 Ne2+))
trapping the queen.
After the correct continuation
14.c4!
the bishop at b2 will be activated and whites weakness at f4 will not be exposed. White need not be
afraid that black can create a passed pawn with d5-d4 as it is blocked by whites pieces and it is
therefore not strong at the moment. For the passed pawn white will get a mobile pawn majority at
the queen side.
14...d4 15.c5 Bc7 16.Rc1
with initiative.
Position 8 is the game Koopmeiners – Mottais (6.23).
In this position, whites pieces are scattered over the board. Coordination between these pieces is
lacking, generally not a good sign to start a king attack. There are some exceptions though, and this
position is one of them! For white, speed is essential because otherwise black can simply centralize
his pieces to stop whites attack. A centralizing move and also a move winning time seems to be
14.Nc5.

After
…Nxh + .Kh !
the black pieces at the h file are blocking each other, which results that white can win time in his
attacking run. After …Qe or …Qg .Q 16.Qb5 Na5 17.Qxa5 whites attack comes first.
Also a good move, but less logical is 14.Ng6 because white is playing at the wrong side of the board.
After …Rg .N Qe .Nxf black can complicate the position with …h ! Although white
still has the upper hand with 17.b5 (Not 17.Qb5? Nd6! Stopping whites attacks) …Nxg .hxg it is not advisable to play 14.Ng6 because the variation is more difficult to play than with 14.Nc5.
In the game white played 14.Rh , ut this o e is too slo after la ks repl …e5, defending
square c5. Speed is essential in such positions. If hites atta ks does ’t su eed , he ill e left ith
an undeveloped queen side.
Position 9 is the same game Koopmeiners - Mottais (6.23).
In positions with opposed castling, speed is essential. Note that white is playing with a rook and a
queen less, so black can sacrifice material to open files. After
1 …Nxg ! .fxg Qg
Blacks attack comes first. The game ended with
19.Rh3 Qxe2+ 20.Kg1 Rh8 21.Rh4 Rfg8.
Note that in the final position, the pieces at whites queen side are still uncoordinated.
Position 10 is the game Bublys - Hernandez (6.32).
A bishop needs room to be active. A knight prefers closed positions. Whites threat is e3-e4, keeping
the position closed. After
…Bg !
The black bishop is kept active, with chances for both sides. For example:
41.Ne4+ Kb4 (less accurate is …B e + .K e K .Kd K a .K K .K a .K 42.Ng5 Kxa4 43.Kc3 Kxb5 44.h4.
Back to the begin position of the exercise. In the game black played …K ? White now could lock
up the bishop with 41.e4! Ba8 42.Kd4 Bb7 43.Nd5+ Kxa4 44.Kc4! Ka3 45.Nxb6 a4 46.e5 and the
white pawns are more dangerous than blacks passed pawn at the a file.
Position 11 is the game Ward – Noviks (6.42).
The knight at g3 allows black to improve his position with tactics. After
…Rxh ! .gxh Rxh
black has destroyed the pawn cover, will win back a piece while the attack continues.
22.Qe2 Rxg3+ 23.Kf2 Re3 24.Qxe3 Bxe3+
This resulting end game clearly favors black, a lot of material plus with no cover for the white king.
Position 12 is the same game Ward - Noviks (6.42).
Black has two threats, Qc5xa7 and b5-b4+. In the game, white neglected the last one and lost:
46.Rxg7?
The cooperation between the two rooks is more important than winning back material.
… + .Ka x +
Now 48.bxc3 is not possible because of …Q + .Ka Q + i i g the rook at g .
Back to whites 46th
move. Better was
46.Ra8+ Kb7
Now the threat of b5-b4 can be stopped with

47.b4!
The blacks queen has to defend square a7 to prevent perpetual check. It is advisable to take no risks
in this end game and to force a draw with
…Qc7+ 48.Kxb5 Qd7+ 49.Ka5
49.Kc4?? Qd5#, 49.Kc5?? Qd5#.
…Qc7+.
Playing an u for ed o e like …Qf ill gi e hite too u h a ti it :
…Qf2? 48.a3 g4
or …Qf .R a + K 50.Rd7 Kc8 51.Rad6 with big chance to win this end game.
49.Re8
with big chance to win this end game.
Position 13 is the game Rosseel - Girdziusas (6.43).
Pawn h6 looks sufficiently defended, but it is in fact vulnerable. After
27.Qh4!
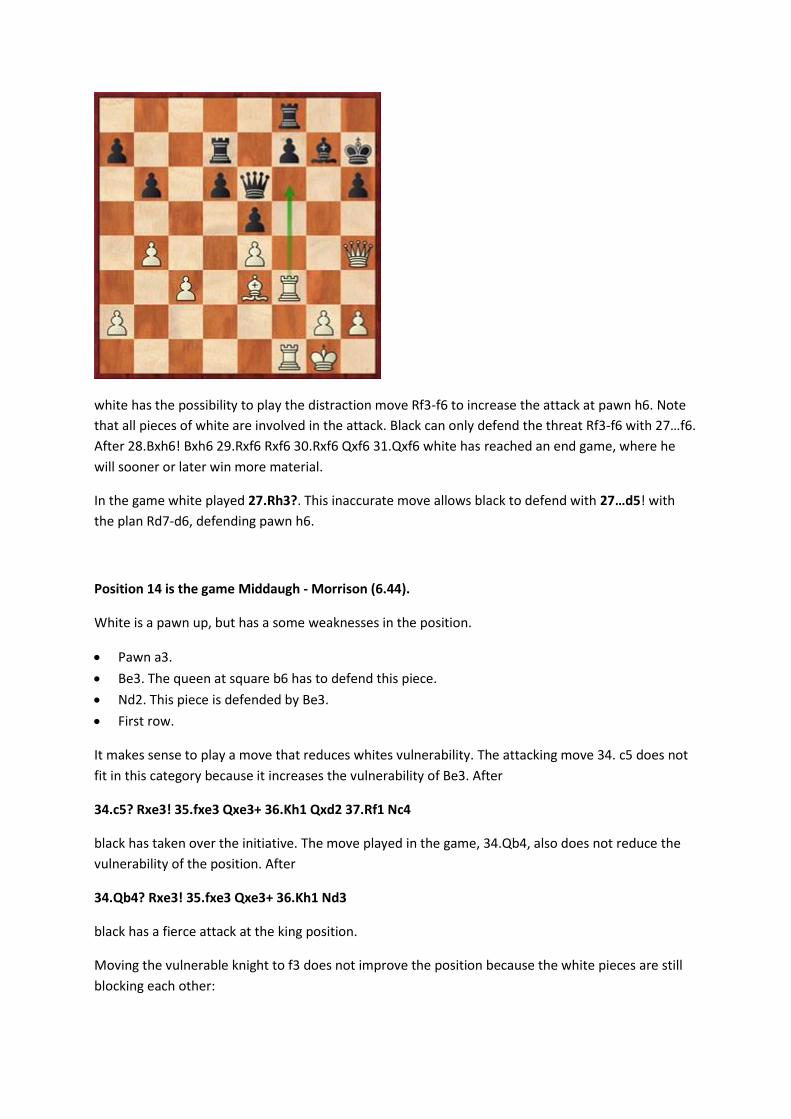
white has the possibility to play the distraction move Rf3-f6 to increase the attack at pawn h6. Note
that all pieces of white are involved in the attack. Black can only defend the threat Rf3-f ith …f . After 28.Bxh6! Bxh6 29.Rxf6 Rxf6 30.Rxf6 Qxf6 31.Qxf6 white has reached an end game, where he
will sooner or later win more material.
In the game white played 27.Rh3?. This inaccurate move allows black to defend with …d ! with
the plan Rd7-d6, defending pawn h6.
Position 14 is the game Middaugh - Morrison (6.44).
White is a pawn up, but has a some weaknesses in the position.
Pawn a3.
Be3. The queen at square b6 has to defend this piece.
Nd2. This piece is defended by Be3.
First row.
It makes sense to play a move that reduces whites vulnerability. The attacking move 34. c5 does not
fit in this category because it increases the vulnerability of Be3. After
34.c5? Rxe3! 35.fxe3 Qxe3+ 36.Kh1 Qxd2 37.Rf1 Nc4
black has taken over the initiative. The move played in the game, 34.Qb4, also does not reduce the
vulnerability of the position. After
34.Qb4? Rxe3! 35.fxe3 Qxe3+ 36.Kh1 Nd3
black has a fierce attack at the king position.
Moving the vulnerable knight to f3 does not improve the position because the white pieces are still
blocking each other:

34.Nf3? Qxa3
and the queen has to defend e3.
The last move 34.Nf1 reduces whites vulnerability of d2 and e3. After
34.Nf1! Qxa3
The white queen can leave the defence of e3 with tempo with
35.Qc7!
After
…Nd .R Nxe .Nxe
White has kept the initiative.
Position 15 is the game Allmann - Langer (6.46).
The notorious 40th
move!
At first sight it looks black has structural advantage:
Strong square e4
Whites backward pawn at square e3.
This means that black dictates the game. The next question is how to improve the position. Although
the knight at e4 is standing at a strong square, it also blocks blacks own heavy pieces at the e file. The
next question is whether the knight has better squares than e4. The squares d6 and c4 are better
squares for the knight. At square d6, the knight defends pawn f5 and it does not block the heavy
pieces at the e file. At c4, it attacks the backward pawn e3. Black has one question to solve, before
moving the knight. That question is whether whites only threat, g3-g4, is playable. Let’s ha e a look. In the game black was perhaps worried about g3-g4 and therefore, black exchanged at f4.
…exf4?
Not necessary, according to the thumb rules of Steinitz elements of chess. Black should play only a
pawn move if the pieces are at their best squares, for example, if black has tripled the heavy pieces
along the e file. White now solved an important weakness and played
41.exf4
Note that tactics along the e file have no effect, which is a sign that blacks 40th
move was weak.
…Qh5
And now white should play 42.Rgg2 holding the position, for example: …Reg .Re Qh .Rg .
Black has a better position, but has difficulties to make progress.

I stead of …e f la k has etter optio s.
…Kg8!? This move prevents any possible threats along the diagonal b1-h7. White has a lot of
options, but for black that should not be a problem because he still has structural advantage. The
pressure is at whites side. White should defend accurately, not at blacks side. Black should sit
and relax, not trying to spend time calculating how to win this position.
o 41.Bc2 Qh5 42.Bd1 Nd6 43.Reg2 Qe8 44.Re2
…Kf !? Black is trying to move the king to the queen side before opening files. 45.Rge1
Ke7, planning Ke7-d7 with structural advantage.
o 41. Qc2 Black has many options, for example … Qh5 42.Reg2 Nd6 43.Re1 Rge7 44.Qc5
g4 45.h4 Nc4 winning pawn e3 sooner or later.
…Nd
A logical move. The threat is g5xf4, fixing the backward pawn at e3. White has many choices, but
none of them are sufficient:

o 41.Rge1? Rge7 42.fxg5 hxg5 43.Kg2 Qh5 44.Rf2 Rh6 45.Rh1 Nc4 winning pawn e3.
o 41.Rgg2? g4 42.h4 Rge7 winning pawn e3.
o 41.fxg5 hxg5 42.g4 Rh7 43.gxf5 Reh6 44.Rg3 Ne4 winning material because of the threat
g5-g4.
o 41.g4! The best defence. This was the move that black perhaps was worried when
de idi g to pla …g f , ut with accurate play black could defend with … gxf 42.gxf5 Rxe3 43.Rxe3 Qxe3 winning a pawn. White best chance is to head to a queen
less ending with 44.Qxe3 fxe3 45.Re1.
Related Documents