NATO Chess 2015 Round 2 Highlights Jan Cheung, 13 February 2016 The hot temperatures dropped fast, making it pleasurable to play two rounds this day. After a short ďƌeakfast the seĐoŶd ƌouŶd ďegaŶ at ϴ o’ĐloĐk. I aŵ suƌe that ŵaŶLJ plaLJeƌs ǁeƌe ǀeƌLJ motivated, witnessing the positions of this round highlight. Soŵetiŵes a loŶg pƌepaƌed plaŶ didŶ’t ǁoƌk out ǁell iŶ pƌaĐtiĐe. AŶ edžaŵple is the following position. If you are looking at this position for the first time and you are not acquainted with modern opening handling, you think that two beginners were plaLJiŶg. HaǀeŶ’t ďegiŶŶiŶg plaLJeƌs learned to glue the f pawn at the start sƋuaƌe? HaǀeŶ’t ďegiŶŶiŶg plaLJeƌs been taught not to move the h pawn two squares so early in the game? Actually, at this position both players have spent more than 1 hour! The player with the white pieces was satisfied with his position, but soon found that this position was ďegiŶŶiŶg to fall apaƌt… You can find this position back in one of the exercises. Disaster could struck too fast. The following game contained 17 moves theory, then the game was over after 2 original moves… Crapulli – Krainski (2.22) 1.e4 e5 2.Nf3 Nc6 3.Bb5 Nge7 4.Nc3 g6 4.d4 exd4 6.Nd5 Bg7 7.Bg5 h6 8.Bf6 Bxf6 9.Nxf6+ Kf8 10.Nxd4 Nf5 11.Nh7+ Rxh7 12.exf5 Qf6 13.Bxc6 dxc6 14.fxg6 fxg6 15.0-0 Rd7 16.Qf3 Qxf3 17.Rxf3 Rd6

Welcome message from author
This document is posted to help you gain knowledge. Please leave a comment to let me know what you think about it! Share it to your friends and learn new things together.
Transcript
NATO Chess 2015 Round 2 Highlights
Jan Cheung, 13 February 2016
The hot temperatures dropped fast, making it pleasurable to play two rounds this day. After a short
eakfast the se o d ou d ega at o’ lo k. I a su e that a pla e s e e e motivated,
witnessing the positions of this round highlight.
So eti es a lo g p epa ed pla did ’t o k out ell i p a ti e. A e a ple is the following
position.
If you are looking at this position for the first time and you are not acquainted with modern opening
handling, you think that two beginners were pla i g. Ha e ’t egi i g pla e s learned to glue the f
pawn at the start s ua e? Ha e ’t egi i g pla e s been taught not to move the h pawn two
squares so early in the game? Actually, at this position both players have spent more than 1 hour!
The player with the white pieces was satisfied with his position, but soon found that this position was
egi i g to fall apa t… You can find this position back in one of the exercises.
Disaster could struck too fast. The following game contained 17 moves theory, then the game was
over after 2 original moves…
Crapulli – Krainski (2.22)
1.e4 e5 2.Nf3 Nc6 3.Bb5 Nge7 4.Nc3 g6 4.d4 exd4 6.Nd5 Bg7 7.Bg5 h6 8.Bf6 Bxf6 9.Nxf6+ Kf8
10.Nxd4 Nf5 11.Nh7+ Rxh7 12.exf5 Qf6 13.Bxc6 dxc6 14.fxg6 fxg6 15.0-0 Rd7 16.Qf3 Qxf3 17.Rxf3
Rd6

If you are looking at the position for the first time, you think there are two possibilities.
1. A quick draw, or
2. A long end game.
You are wrong! The game lasted two more o es….
18.Rad1 Bf5 19.Nd4?? Rad8 0-1
Here are the exercises of round 2.
Position 1.
Position after 10...Bf8-d6. Choose between A) 11.Nxc4 and B) 11.Bxc4.
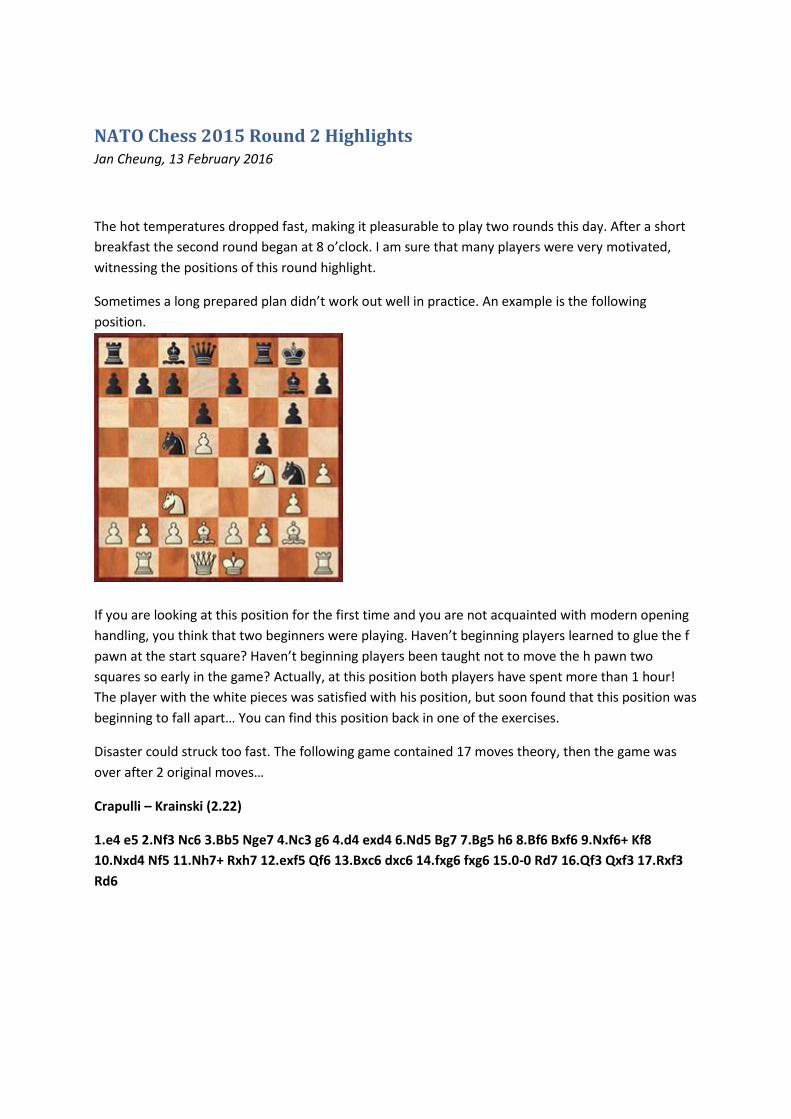
Position 2.
Position after 17.Nc3-e2. Black to move. Choose between A) 17...Nc5, B) 17...Nb6 and C) 17...f6.
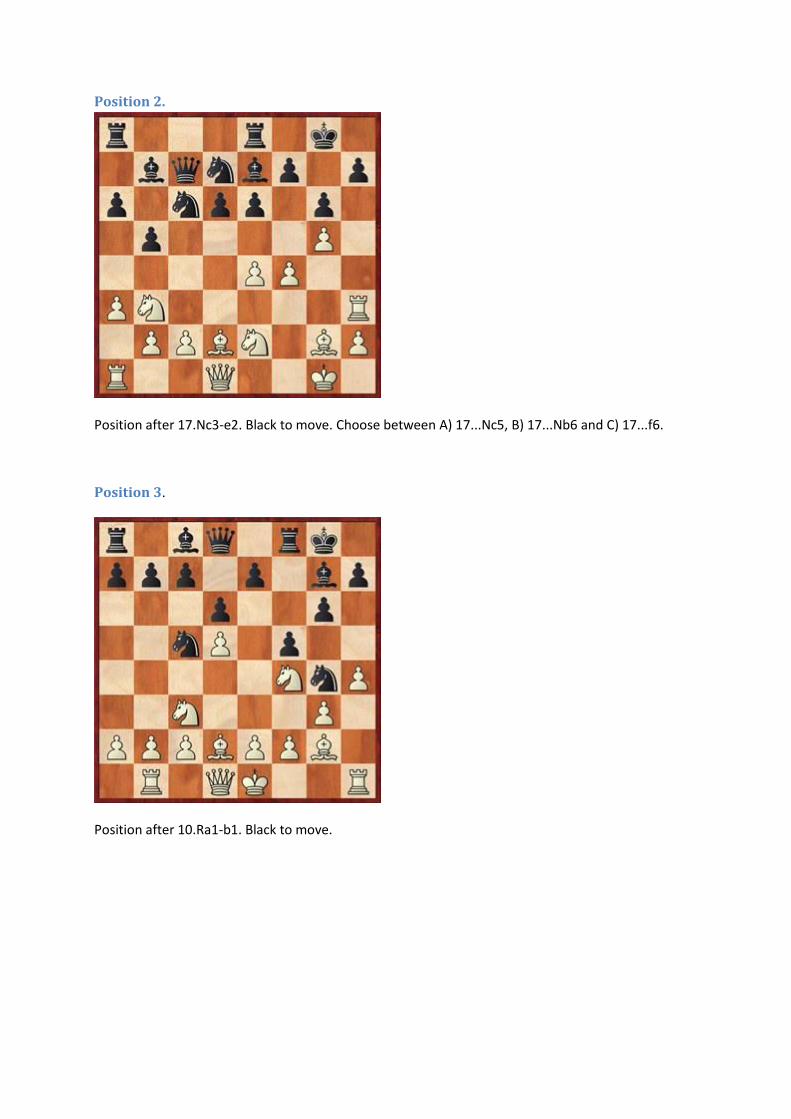
Position 3.
Position after 10.Ra1-b1. Black to move.

Position 4.
Position after 20...Rh8-e8. White to move.
Position 5.
Position after 62...Kc6-b6. White to move.

Position 6.
Position after 16.Qh4 Choose between A) 16...e4 and B) 16...Ba3.
Position 7.
Position after 13.d5. Black to move.

Position 8.
Position after 16...Ba4 White to move.
Position 9.
Position after 19...Ne6. White to play.

Position 10.
Position after 14...fxe4. White to move. Choose between A) 15.Bxe4 and B) 15.fxe4.
Position 11.
Position after 16.g4. Black to move.
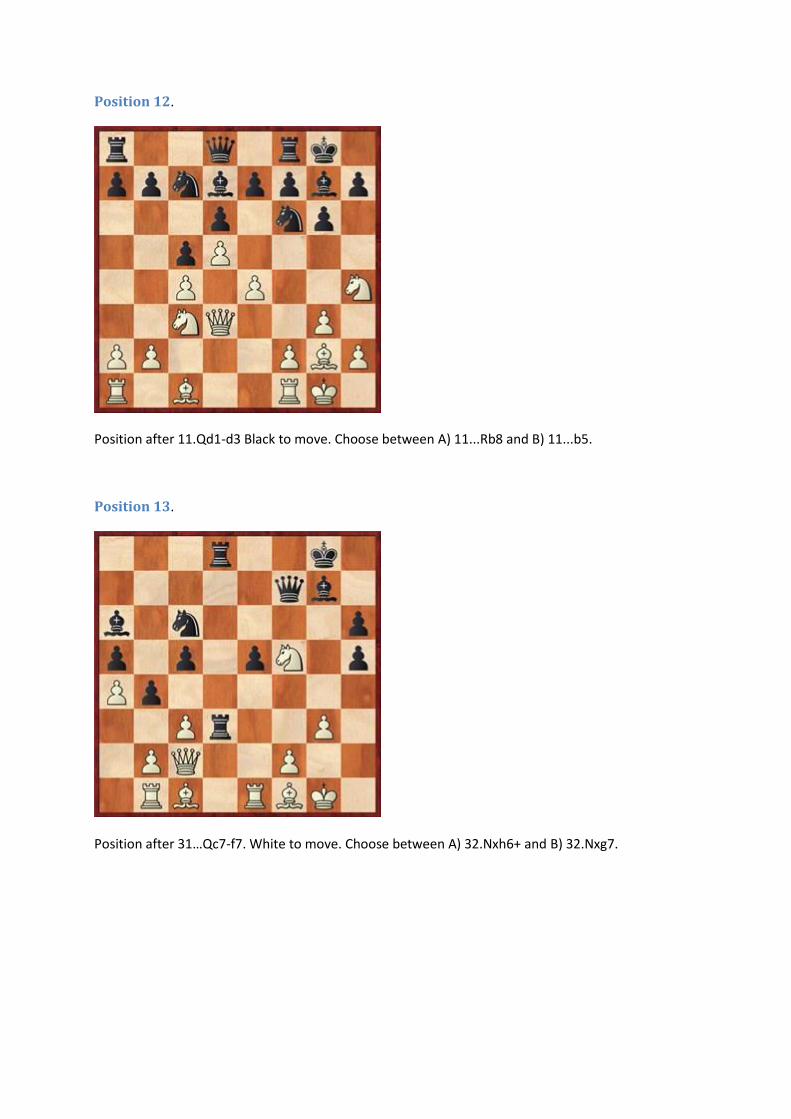
Position 12.
Position after 11.Qd1-d3 Black to move. Choose between A) 11...Rb8 and B) 11...b5.
Position 13.
Positio afte …Q -f7. White to move. Choose between A) 32.Nxh6+ and B) 32.Nxg7.

Position 14.
Position after 45.Kg1-f1. Black to move.
Position 15.
Position after 28.Bd2. Black to move. Choose et ee A …N , B …e a d C …f .
Solutions
Position 1 is the game J.M. Nielsen – Drabke (2.2).

White has one weakness in his position, the diagonal d6-h2. The threat Qd8-h4+ should always be
reckoned with. If he has any time, he should bring his king into safety. First, he should win the pawn
at c4 back, but with which piece?
In your calculation process, you should first consider the forcing move 11.Bxc4. If this cannot be
played, then you should consider 11.Nxc4. After 11.Bxc4 black has two choices.
1. …Bxe .Bxe Qh +
White should keep the d file closed. This calls for 13.g3! After …Bxg + 14.Kd2 the position is
nearly equal, for example …Be + .Qxe Qxe + .Raxe .
2. …Qh + .g Qh Black prevents the short castling, but can castle at the other side of the
board: 13.Qb3! After …Bxe .Bxe Qxe
White has adequate counter changes, for example 15.Qxb7 Bxd4 16.0-0! Bxe3+ 17.Kh1 0-0
18.Qxa8 Qd7 19.Rf3 Na6 20.Qxf8+ Kxf8 21.Rxe3
The variations show that 11.Bxc4 is playable.
In the game white played 11.Nxc4. This o e ho e e , does ’t i p o e hites de elop e t and it
also gives black the opportunity how to continue the game. Black played …Qh + .Kd B . Black
keeps the bishop pair, but 12..Be7 is preferred because it prevents white to control square d6, as we
will see later. Square b4 is a weakness. Now white should play 13.Qb3 to defend this square. After
… .Qa ! white has adequate counter play.
The above variations show that white has more chances to fight for equality with 11.Bxc4 than with
12.Nxc4.
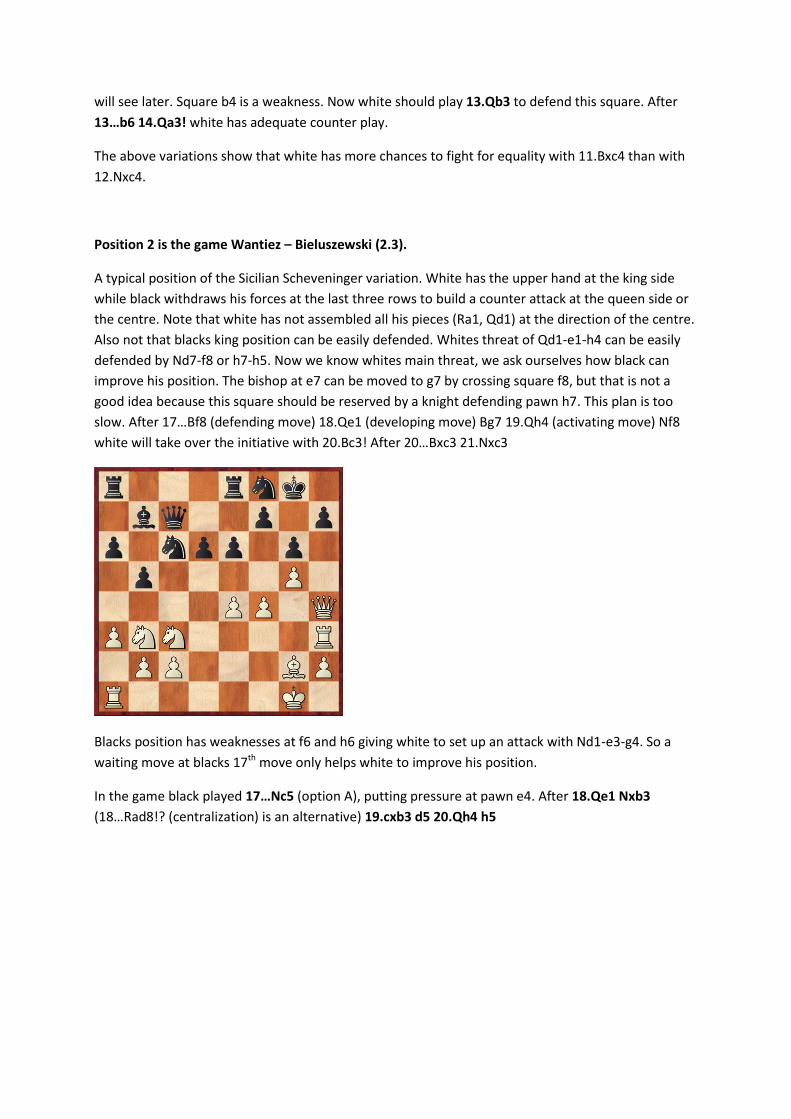
Position 2 is the game Wantiez – Bieluszewski (2.3).
A typical position of the Sicilian Scheveninger variation. White has the upper hand at the king side
while black withdraws his forces at the last three rows to build a counter attack at the queen side or
the centre. Note that white has not assembled all his pieces (Ra1, Qd1) at the direction of the centre.
Also not that blacks king position can be easily defended. Whites threat of Qd1-e1-h4 can be easily
defended by Nd7-f8 or h7-h5. Now we know whites main threat, we ask ourselves how black can
improve his position. The bishop at e7 can be moved to g7 by crossing square f8, but that is not a
good idea because this square should be reserved by a knight defending pawn h7. This plan is too
slo . Afte …Bf defe di g o e .Qe de elopi g o e Bg 19.Qh4 (activating move) Nf8
hite ill take o e the i itiati e ith .B ! Afte …B .N
Blacks position has weaknesses at f6 and h6 giving white to set up an attack with Nd1-e3-g4. So a
waiting move at blacks 17th
move only helps white to improve his position.
In the game black played …Nc5 (option A), putting pressure at pawn e4. After 18.Qe1 Nxb3
…Rad !? e t alizatio is a alte ati e 19.cxb3 d5 20.Qh4 h5

the position is unclear. Now white should continue with 21.Be3, keeping control of the centre.
Besides …N , the e e e othe alte ati es.
1. …N
Heading to c4. White continues with his usual plan to attack h7.
18.Qe1 Nc4 19.Kh1 !?
There was nothing wrong with 19.Bc3, but there is no need to defend pawn b2.
…Nxd2
…N ? .B N .R h !
20.Qxd2 Rac8 21.Rf1 Bf8 22.c3
with an unclear position.
2. In the Sicilian Scheveninger, if white plays f4-f5, then square e5 is an ideal square for a black
knight. In the game, this move could be prepared by weakening whites protection at e5 with the
unusual move
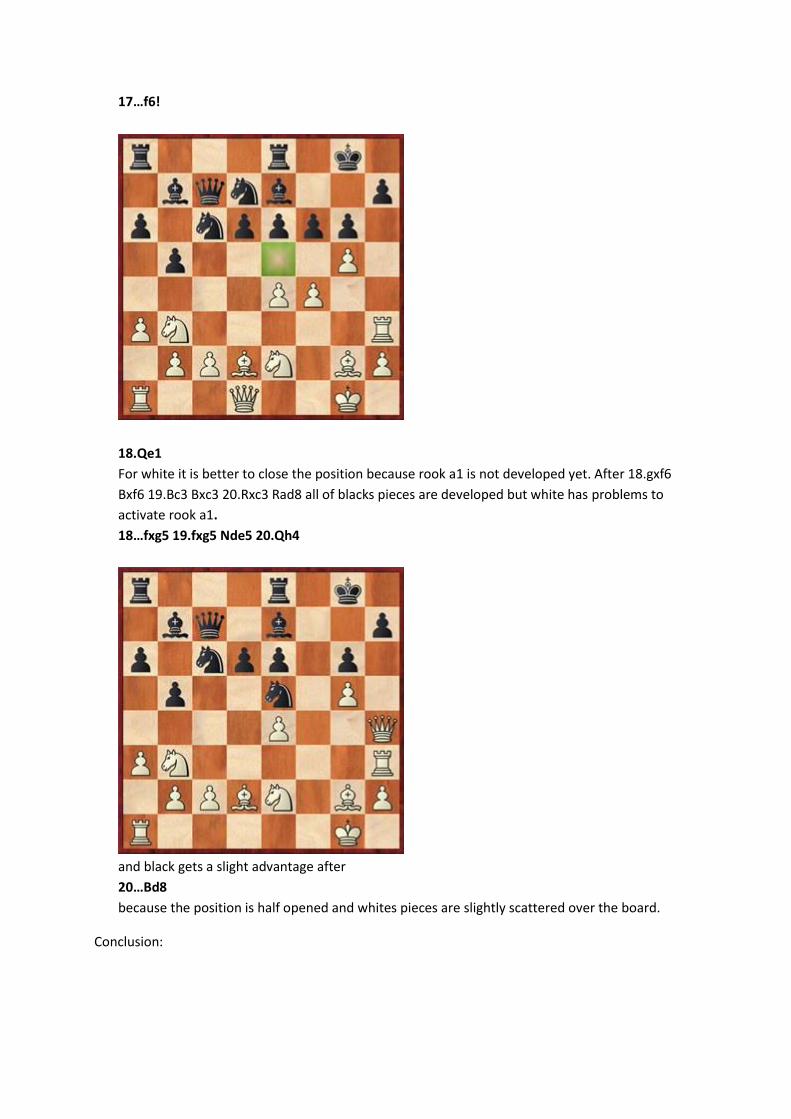
…f !
18.Qe1
For white it is better to close the position because rook a1 is not developed yet. After 18.gxf6
Bxf6 19.Bc3 Bxc3 20.Rxc3 Rad8 all of blacks pieces are developed but white has problems to
activate rook a1.
…fxg .fxg Nde .Qh
and black gets a slight advantage after
…Bd
because the position is half opened and whites pieces are slightly scattered over the board.
Conclusion:

The th ee o es …N , …N a d …f are all playable, ut …f is o e di e t: it sets hite under pressure by trying to create a strong square at e5. White should play accurately, keeping the
position closed until all of his pieces are developed.
Position 3 is the game Cheung – HC Andersen (2.7).
In the position, signs of a Dutch Defence, Leningrad Variation with Ng1-h3 and h2-h4 are clearly
visible. It costed each player more than 1 hour to produce the following moves.
1.d4 f5 2.g3 Nf6 3.Bg2 g6 3.Nh3 Bg7 4.Nf4 d6 5.d5 Na6 7.Nc3 Nc5 8.h4 Ng4 9.Bd2 0-0 10.Rb1
With h2-h4 white was planning to weaken blacks king side with a timed h4-h5. Blacks reply, Nf6-g4
prevents a possible h5-h6, but it weakens square e4. Look at pawn d5. By playing d4-d5 white
wanted to prevent black to open the centre with e7-e5. So at first sight, it looks like that white has a
good position. White last move 10.Ra1-b1, was planned to play b2-b4 driving blacks pieces back and
threatening to open the centre with e2-e4.
There is slight flaw in whites plan. The text move 10.Rb1 as slo . Bette as .h . Afte …g 11.Nd3 Bd4 12.e3 Bxc3 13.bxc3 e5 14.Nxc5 dxc5 15.f3 Nf6 16.c4 e4 17.f4 the position is unclear. Back
to the game. If blacks plays too quiet, his piece at c5 will be driven back. So he should find a radical
move to prevent this. We can say that black has find a way to prevent a structural advantage of
white:
…e ! .dxe
Better was 11.Nd3, keeping the e t e losed. Afte …f .f Nh .g f e f .Q a u usual position arises.
… !
Black will pick up pawn e6 sooner or later and he has increased his influence in the centre. White has
lost the battle in the centre and should play careful. The game continued with

12.e4 Nxe6 13.0-0 fxe4 14.Nxe6 Bxe6 15.Nxe4 Qb6 16.Qe2 Ne5
Black has got the upper hand in the centre. Now white should ignore the threat of Be6-c4 and
continue with 17.Nxd6. This piece could be saved: 17…Q .B .B ! Q d .Rfe B a 21.Rbd1 and white will regain his piece.
Position 4 is the game Tommasini – Mottais (2.10).
White has structural advantage – double f pawns for black, but two pieces are not centralized: the
knight at h4 and the rook at h1. Because white has structural advantage, he should play consolidating
(i.e. defending) moves to keep his advantage. In the game white played 21.Rhe1, centralizing the
rook. The plan was good, but it is possible to centralized both pieces and winning a tempo with the
following move sequence.
21.Nf5! Centralization. Also winning a tempo. …Bf .f Consolidation. …a4 23.Rc1
Consolidation. Because white controls the centre, he is not afraid of the king attack at the flank.
…Re .Rhd Consolidation. …a . h .g

and white has improved his position.
Position 5 is the game Hater – Pietruszewski (2.11).
The white king should be brought to the queen side. The easiest way is the move played in the game.
63.Rh2!
The easiest way to make a draw. Less accurate was 63.Rh4 a5 64.Re4 Rd6 and there are many ways
to make a mistake. Now the following accurate moves should be played to make a draw: 65.Re1! a4
66.Ra1! Kb5 67.Ke2! Kb4 68.Rd1! Rc6 69.Rb1+ Ka3 70.Kd2.
…a .Re2! Rd6 65.Ke3 Kb5 66.Rd2! Re6+ 67.Kd3 Rd6+ 68.Kc3 Rxd2 69.Kxd2 Kb4 70.Kc2 ½-½
Position 6 is the game Almonti – Papista (2.12).
White has many pieces pointing to the king side. This indicates that black should be careful. The
move played in the game,
…e ?

exposes the king side even more, giving white the opportunity to increase the pressure at the king
side with
17.c5! Bxc5 18.Bc4+ Kh8 19.Rxg7! Qxg7
O …K g .Rg + Kh .Q f + Q f .B f + R f .Rg #
20.Rg1 Bg4 21.Ne5
winning material back with interest. Luckil fo la k, hite did ’t find the winning move sequence
a d pla ed .Ng gi i g la k to e ha ge the da ge ous ishop at ith …Ba . That is also the
answer of the exercise. Because white has a majority of attackers at the king side, black should not
leave any opportunity to exchange one of them with
…Ba3!
Position 7 is the game Karbowiak – Pazeriene (2.13).
A position in the Tarrasch Defence with blacks c5-c4. White sacrificed a piece at c4 (Ne5xc4),
planning to regain the piece with the thrust d4-d5.
Looking at the position, black is strong at the black squares. A move like
…Q !
consolidates the squares b2, c5 and d4 and it enables black to develop the rooks. Having a double
pawn is not unusual for black in the Tarrasch. They are not weak because they support the pieces.
After
14.dxc6 bxc6
14.dxe6 is less accurate because of …Qxb2

15.Qc2 Rab8 16.Rab1 Rfd8 17.Na4
…Qb4!
With the idea Rd8-d2.
18.Rfd1 Rdc8
And black has a comfortable position. In the game black played the less accurate move
…Bxd5.
After
14.Qxd5 Qxd5 15.Bxd5
Black got slight problems to solve. The queen side is under pressure and the white bishop dominates
the board. Now black best way to continue the game is playing
…Ra ! .Bx Bx . x Na .Bd Rx
And although material is equal, white is definitely better because the bishop dominates all black
pieces.
Position 8 is the game Tocco – MM Nielsen (2.15).
Blacks bishop is weak because it moves along the same colours of the colours of its pawn chain.
Whites knight at d4 dominates this piece. The centre is fixed. The black pieces at the queen side are
not effective. So we can say that white has structural advantage. A rule of thumb in Steinitz elements
of chess is that in general, a queen trade benefits the side with structural advantage. To see why,
remove the queens off the board in your mind. You will see that in general, the queens task was to
cover weak squares. If you remove the queens off the board, the weak squares will be highlighted. In
the game, white made use of this rule of thumb.

17.Qg5!
Black has two options.
1. The game continuation. …Qxg .hxg Ke Now the most accurate way to continue the
game was 19.Rh4!. After …h .Rdh Nxd .cxd3 Rhg8 22.gxh6 gxh6 23.R1h2 white
has kept his structural advantage.
2. 17..f6 18.exf6 Qxf6 (After …g f .Qg black has too many weaknesses) 19.g3 0-0 20.f4
and white has kept his structural advantage.
Position 9 is the game Musselman – Bohn (2.16).
Black has the bishop pair and has plans to open the position by exchanging at c4. To restrict blacks
bishop pair, white should keep the position closed. Because white has a black squared bishop, his
pawns should be put on the light squares. With the forced move sequence
20.b5 Bb7 21.Bb4 Nc5 23.Rad1
White has closed the queen side and he also has centralized his pieces.
Position 10 is the game Demjen – Onley (2.17).
White has different options to exchange at e4. Both have advantages and disadvantages, but which is
better? Let’s su ea h of the .
1. The advantage of 15.Bxe4 is that it gives white a strong square at e4 for his pieces. The
disadvantages of this move is that pawn d5 will be weak and that Ne7 is suddenly active. It could
move to f5 and then to d4.
On closer inspection we see that this exchange benefits black more than white. Pawn d5 is not
supported by a pawn anymore and for white is not easy to put knight at e4 without losing pawn
d5. After the game continuation
15.Bxe4 Bd7 16.Be3

black gets adequate counter play after
…Nf ,
for example:
17.Bg5 Rc8 18.Rc1 Qe8.
2. The advantage of 15.fxe4 is that keeps Ne7 restricted and that it reinforces pawn d5. The
disadvantages of this move is that it makes Bd3 weak and that square g4 gets available for blacks
pieces.
On closer inspection we see that this exchange benefits white. Square g4 will be available for the
black pieces, but white can defend successfully. After
15.fxe4 Ng4 16.Qe1
white can defend the squares e3 and f2 successfully. White threat is h2-h3. After
…Rxf + .Qxf Q

white is able to defend squares e3 and f2 with
18.Nd1
The threat h2-h3 will drive the knight at g4 away and white problem with weak squares will be
solved. Because black still has an inactive knight at e7, white has the upper hand.
Position 11 is the game Michalski – Christen (2.18).
The bishop at f5 is attacked. Retreating the bishop to e6 gives white structural advantage – more
space. In the game black played
…B
After
17.Kd2 Bb3
white can get an excellent position after
18.gxh5.
Does black have a better option? We see that the rook at e8 and whites king at e1 are on the same
file. This make some tactics long the e file possible. After
…e ! .dxe hxg .hxg
…Be6!
Black will pick up pawn e5 with equal chances for both sides.
Position 12 is the game Fichtner – Dusak (2.19).

Black has to find counter play, otherwise whites centre decides the game. Whites centre could be
attacked by the thrust b7-b5. The question is when to attack. In an opening like the Benko gambit –
1.d4 Nf6 2.c4 c5 3.d5 b5 - this move is already played at move 3! This gambit is known to be sound.
There are also positions in the Kings Indian where black plays a delayed b7-b5 to attack whites
centre, for example 1.d4 Nf6 2.c4 g6 3.Nc3 Bg7 4.e4 d6 5.Bg5 0-0 6.Be2 c5 7.d5 b5!? In this case the
gambit is less sound because white could defend successfully with 8.cxb5 a6 9.a4 Qa5 10.Bd2.
The question whether the pawn sacrifice b7-b5 is sound depends on the positions of the white
pieces. A displaced knight at h4 usually makes the gambit playable.
Assume that … is pla a le, the h dela i g this o e? Afte
… !? . x a . xa B !
followed by Bc8xa6 black gets compensation for the pawn by pressure along the a and b file,
together with the activity of bishop g7.
In the game black played the natural move
…R .
White prevented b7-b5 permanently with
12.a4
but this move weakens square b4. Black responded by moving a knight towards this square.
…Na
After
13.Qe2
Black should play

…N .
After
14.Bf4 a6 15.a5 b6 16.axb6 Qxb6
chances are equal.
Conclusion:
Both o es … a d …R a e pla a le, depe di g o ou st le of pla . If ou p efe a i ala ed positio , pla … . Othe ise pla …R .
Position 13 is the game Sycz – Middaugh (2.28).
Did you see blacks threat? It is b4-b3 and the white queen is trapped. In the game both players
missed this move. Only 32.Nxh6+ is playable. After …Bxh .Bxh h the position is unclear.
Position 14 is the same game Sycz – Middaugh (2.28).
In this imbalanced position black can play
…Rf !
and things are not clear yet. After
46.Rd1 Rxf2+ 47.Qxf2 Nxf2 48.Kxf2 h2
the position will be equal.

I the ga e la k pla ed the less a u ate o e …h ? a d hite o late afte .Ke .
Position 15 is the game Nilsson – Windey (2.29).
White has the bishop pair, but it does not yield advantage because blacks knight at d5 defends
important black squares. White is threat is e3-e4, with the idea Bd2-e3, targeting the weak pawn at
b6. To encounter this threat, black should play …f . Although this pawn is put at a square with the
same colour of the bishop, its function is to restrict the activity of whites light squared bishop.
After
…f !
Black gets a position which can easily be defended:
29.e4 Afte .Kf la k gets full o t ol of s ua e e ith …Nf …fxe
30.Bxe4 Kf7 31.Kf2 Ke7 32.h4 Kd7 33.a4 Kc7 34.g4 Ne7 35.Bc2 Bd5 with an equal position.
30.fxe4 Nf6 31.e5 dxe5 32.dxe5
Black has several methods to defend. An easy method is
…Nd .
Here is an example of a continuation.
33.Bc3 Bd5 34.Bd4 Kf7 35.Kf2 Ke7 36.h4 Kd8 37.g4 Bb3
with an equal position.
You ust e o de i g hethe …e is a ette o e tha …f .With …e lack wants to
est i t hites da k s ua ed ishop. This o e does ’t o k ho e e e ause hite a ope the position, activating the bishop pair. After

…e ?! .e Nf .dxe dxe .B
Bishop c4 is fully dominating blacks counterpart at b7, and at e3, the dark squared bishop fully
dominates the knight by attacking pawn b6. Black has a hard task to defend, for example:
…Kf .Be Nd .Kf Ke .Kg Kf .a g5 36.h4 Kg6 37.h5+ Kg7
38.Kg4 Kf6 39.Bd5 Bc8 40.Kg3
and white has made progress.
Last ut ot least: i the ga e la k pla ed …N . This o e is eak e ause it does not improve
the position. The knight at d5 is active, at c7 not active.
Related Documents