National Guards Health Affairs SSHR – User Guide Process: NGHA Mobile App with TRA This Chapter is about Mobile App with TRA Process This Process having Below Functionalities : 1> View Leave Balance on Dashboard. 2> View Absence Notification. 3> View Purchase requisition notification . 4> View User Profile. 5> View certification of employment and send it to own email account. 6> TRA Request with Apply Ticket (Whole Process). 7> View Pending Request with Cancel and resend option .

Welcome message from author
This document is posted to help you gain knowledge. Please leave a comment to let me know what you think about it! Share it to your friends and learn new things together.
Transcript

National Guards Health Affairs
SSHR – User Guide
Process: NGHA Mobile App with TRA
This Chapter is about Mobile App with TRA Process
This Process having Below Functionalities :
1> View Leave Balance on Dashboard.
2> View Absence Notification.
3> View Purchase requisition notification .
4> View User Profile.
5> View certification of employment and send it to own email account.
6> TRA Request with Apply Ticket (Whole Process).
7> View Pending Request with Cancel and resend option .

8> View E-payment Advice Details.
9> View Personal Information with Mobile Number Updation.
10> View Business leave Status with Approval History.
11> View Professional Leave Status with Approval History.
12> View ESC Loan Status with Approval History.
13> View Housing Advance Status with Approval History.
14> School Fees Status with Approval History.
15>View Honorarium Status.

NGHA Mobile App with TRA
Mobile App with TRA provides you with the features you need to satisfy the following basic business needs. You will be able to address the following:
Employee will be able to see notifications and can take action on notification
In E-service process ,Employee will be able to generate E-Payment Advice
Certification of Employment, Personal Information. And employee can see the pending request too with the action cancel request or resend.
User can see the status on All IVR Reports with Approver details.
Employees will be able to apply for leaves, tickets, early pay and exit-re entry permits using Mobile Application
The applications will be routed to authorized approvers. This will automate the whole process.

Navigation Instructions
Login with oracle application User >

Once you received Verification Code through registered mobile number
Enter the Verification Code and Click on Submit Button .
If not revieved Verification Code before 3 minutes click on Resend Button.
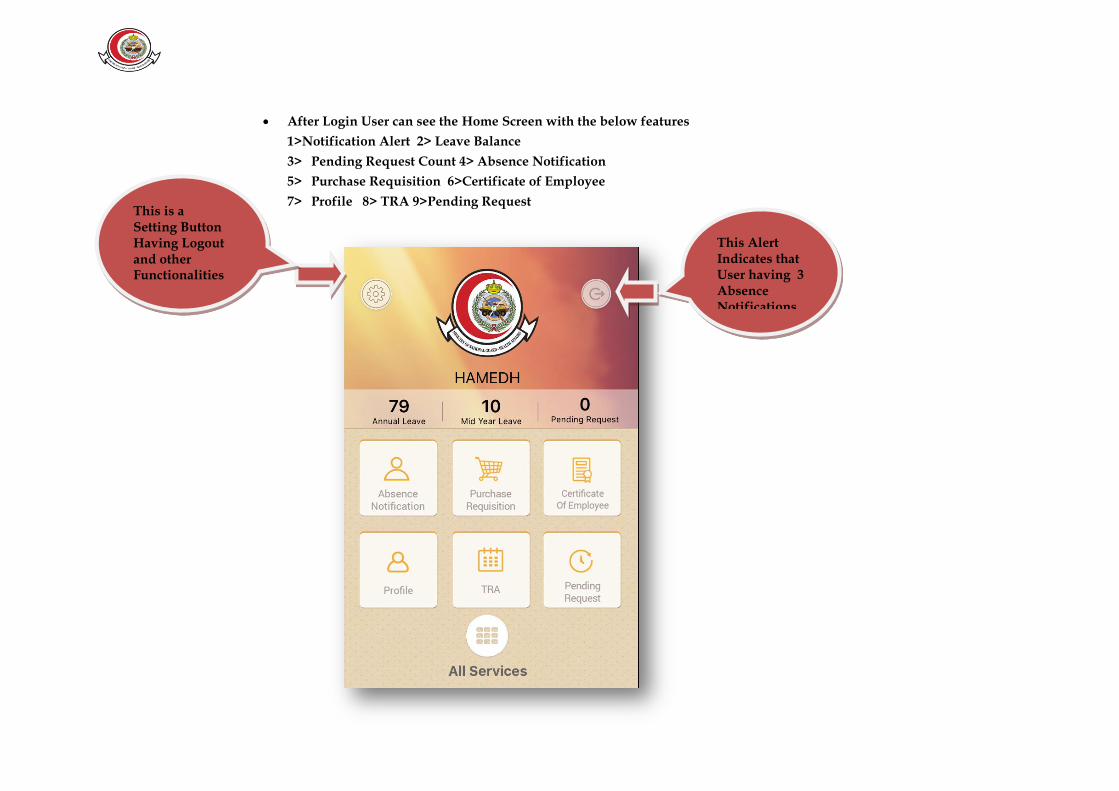
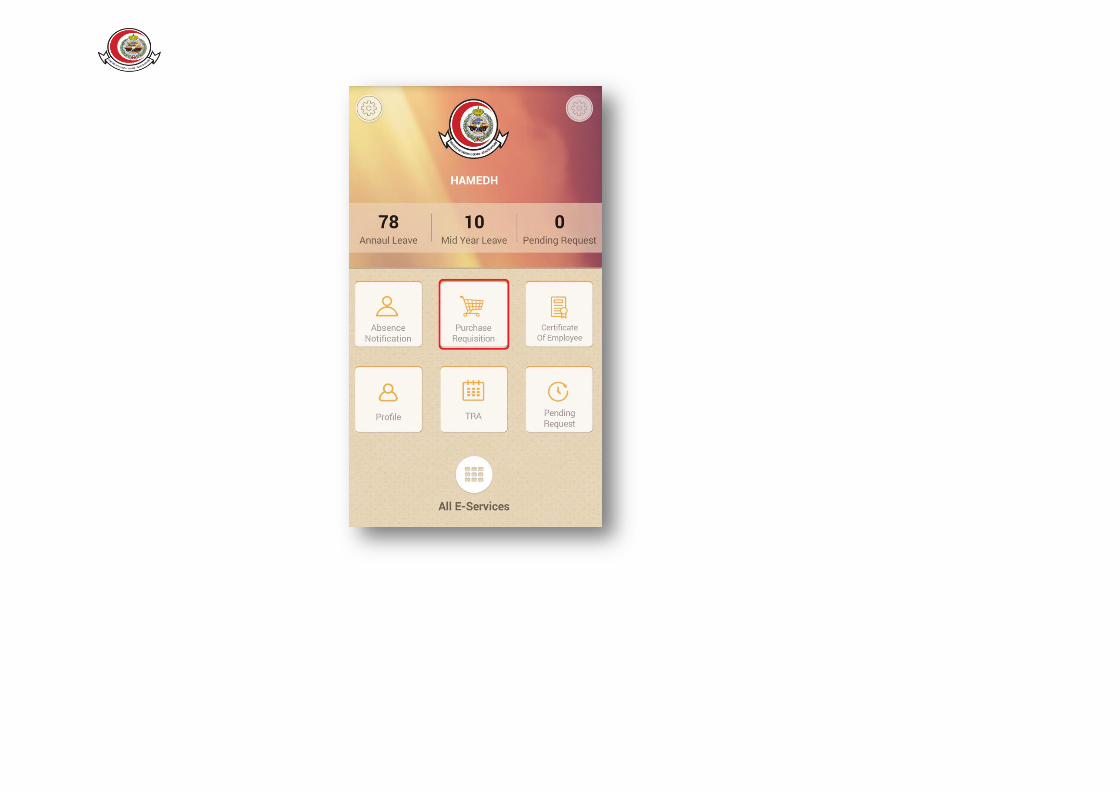
After Login User can see the Home Screen with the below features
1>Notification Alert 2> Leave Balance
3> Pending Request Count 4> Absence Notification
5> Purchase Requisition 6>Certificate of Employee
7> Profile 8> TRA 9>Pending Request
This Alert Indicates that User having 3 Absence Notifications
This is a Setting Button Having Logout and other Functionalities

The Below Screen shows -
Annual Leave Balance Count
Mid Year Leave Balance Count
Pending Request Count
Here shows the Annual and Mid Year leave Balance Count
Here shows the Pending request

Now we see the below features one by one
Business Approvals & Notifications
Notifies Employee whenever there is a business event which needs his attention Helps Employee perform all the actions using his Smart Phone on the Business event – Approve, Reject, Request for More Information, which he can perform from his PC. Provides Employee with all the Information required for decision making in a neat and intuitive layout on his device.
Absence Notification

Absence Notification - Click on the Notification
Click to Switch Main dashboard Page ( Home Page )

In this screen user can see the Basic over view of notification
And in details section user can see the below three Information
Go Back Button

1> Absence Details 2> Action History 3> Ticket Details
Click on the right corner and select action

If User Select Request More Information
Chose default User or Search other User from Search Option

Enter Comment in Comments Box and Click On Submit Button
Select Default User


If User wants to search other User Click on Any Users Option
Enter Key words and click on search button
Select User from the LOV

Click on the User Name

Enter Comment in Comments Box and Click On Submit Button.
If Approver is Purchase Requisition User then he can see the Notifications .

Certificate of Employee – Through this functionality
User can chose the certification option and send email to himself .
We will see how it works on the below screen shots

Click on the Down Arrow

The LOV will populate on the screen
Select request type as per the requirement

Click on Display Salary Down arrow
And select display salary as per requirement

Click on Purpose down arrow
Select Purpose as per requirement

Once Click on Go Button
User will get the certificate details
Click on send email button .

Click on Profile icon

User can see his Profile details

TRA- Create Travel Request In order to create a TRA request, user can perform the following steps:
* Create travel request
* Enter required information
* Submit the request for approval
Click on TRA icon

After clicking on TRA icon user will get the Leave History details page
Click on any TRA request

User will get Request details page
Click on Absence details tab

After clicking absence details tab
User will get absence details information
Click on the Ticket details Tab

After clicking Ticket details tab
User will get Ticket details information
Click on the early pay details

After clicking Early pay details tab
User will get Early pay details information
Click on the Approval List Tab
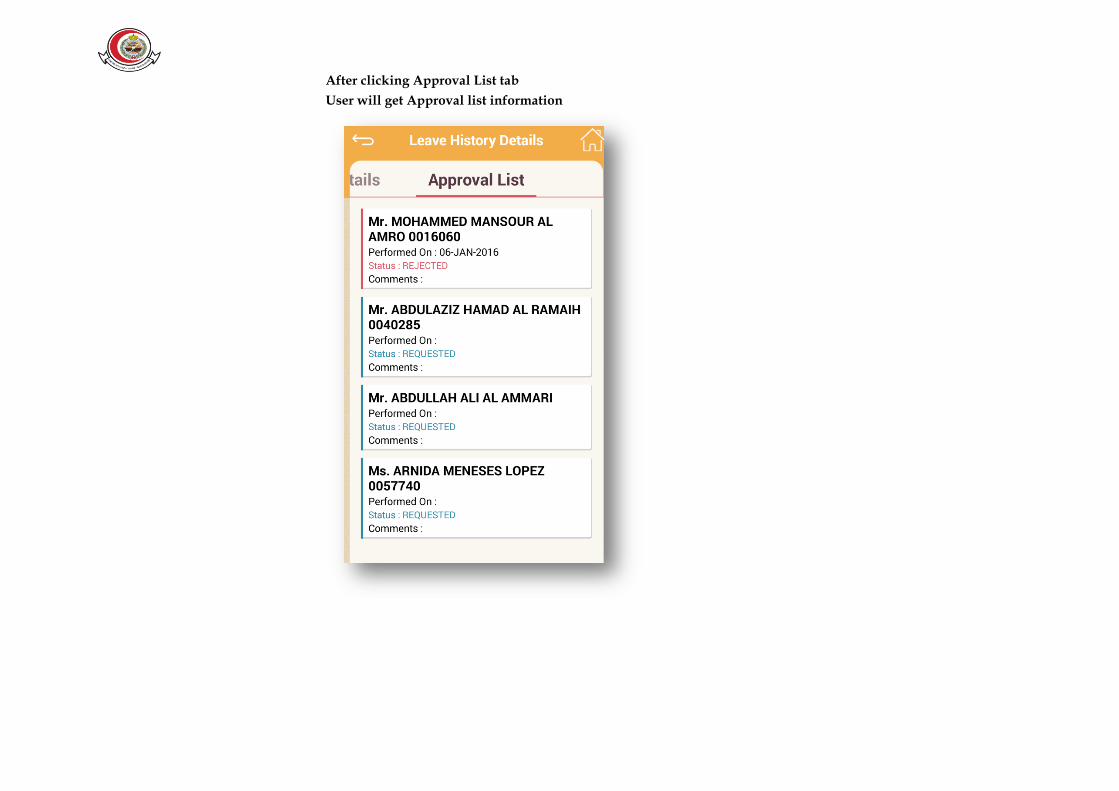
After clicking Approval List tab
User will get Approval list information

Click on TRA Request Tab

After clicking TRA request tab
User will get Leave information page
Click on the Leave request Tab

After clicking Leave request tab
User will get Leave request page
Click on the Leave request Tab
Click on the down arrow and select shift type from LOV
Click on the Start & End Date field
Click on

Select Leave options to click on the check box.
Click on the check box as per required
Click on the Add Absence Tab

After clicking Add Absence tab
User will get Add Absence page

The below stap shows how to delete absence entry
After sliding the absence entry to the left side of screen . Get delete Icon

To add another absence type click on the Add Absence TAB
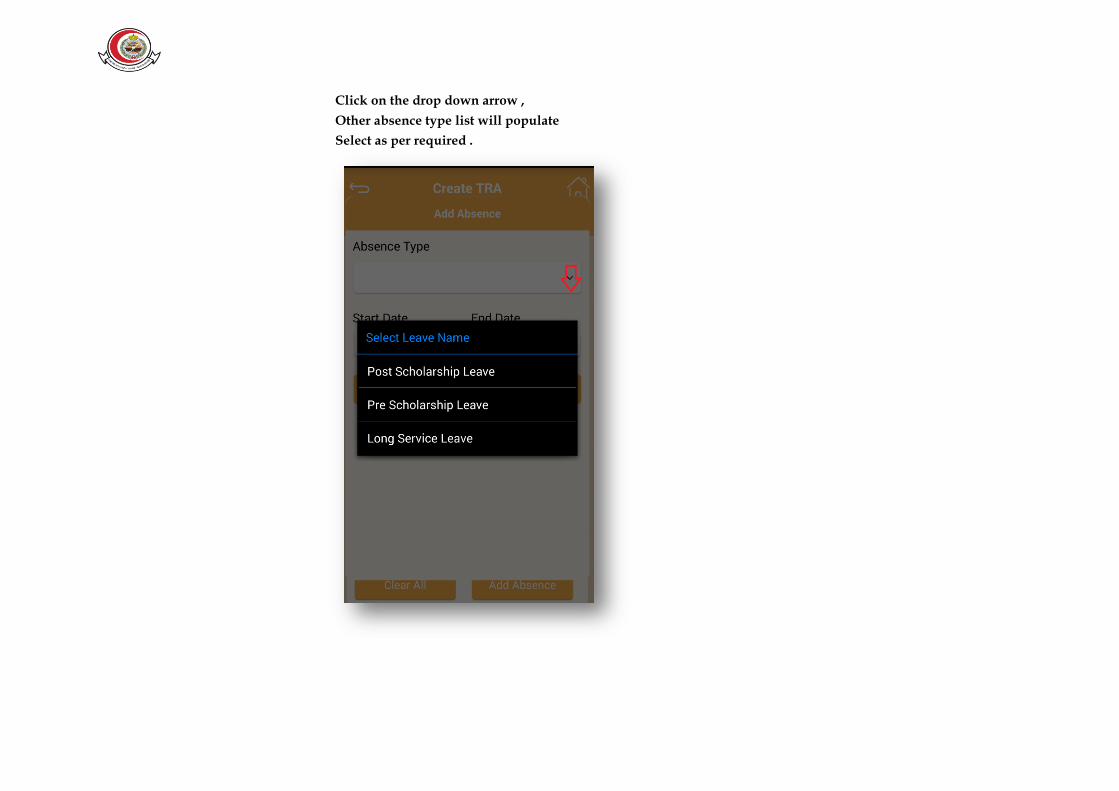
Click on the drop down arrow ,
Other absence type list will populate
Select as per required .

Clicking on the start or end date
Below calander will populate . select the date and click on Done Button
Click on Done

After selecting Absence type and Dates Click on Save Button

Click on Ticket Data Tab

Click on Ticket Required check box
User will get ticket entry option if user having the Ticket balance.

Click on the Ticket required check box.
Enter Departure and Return Date
Select Visa Month from LOV
Select Way Type from LOV
Selct Exit and Entry from LOV

After Entering the All information Click on the Apply to All Button
It is mandatory to populate data in Tickte details .

Click on Annual Ticket TAB
Click on the drop down arrow and get the Ticket details.

Click on the Comment Tab enter the Comment on Cooment Box
Click on the Review Tab

After cllicking on review Tab you well get 1 st Leave request page
Keep Sliding right to left till Approval List page .
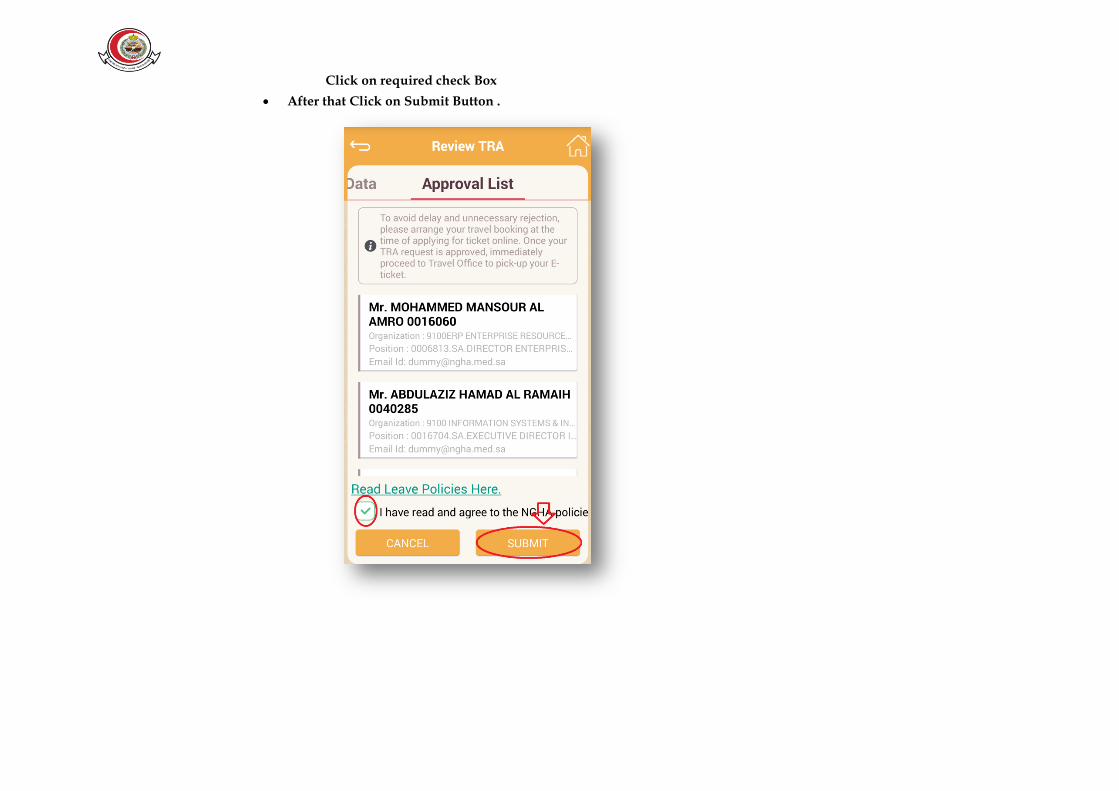
Click on required check Box
After that Click on Submit Button .

Apply Ticket –
Click on Apply Ticket Button.

After Clicking Apply Ticket get the Ticket Entey window.
Click on Required check box
Entered the Departure and Rerurn Date
Select Visa Month from Lov
Select Way Type from Lov
Select Exit & Entry from Lov

Entered the Comment on the Comment BOX
Click on Apply to All Button .

Click on Annual Ticket Tab and see the Ticket Details

Click On Comment Tab
Entered the Comment on Comment Box
Click on review Button.

After Clicking on Review Button , get the Ticket details page for review

Click on Comment Tab
Enter the Comment on Comment Box
Click on Submit Button .

Pending request
Employee will be able to see Pending requests and they can take action on pending requests like cancel or resend .
Click on the Pending request Icon.

Select request and click on the Check Box
Click on the Right Corner Option .

If select resend request action – once again the notification will goes to the approver .
If select Cancle request – the pending request will be cancle .

E-Services –
In E-service process ,Employee will be able to generate E-Payment Advice
Personal Information. and User can see the status on All IVR Reports with Approver details.
Click on E-Services Button .

Click on E-Payment Advice Icon.

Click on the Drop down arrow and select pay period from Calander
After selecing the pay period click on the GO Button .

User can View the Payment details .

Click on the Personal Information Icon.

There are Two sections in personal Infoemation
1> Basic Information – this section is read only User can view the information only.
2> Others- User can chang the Contact Number to using this feature.
Click on the Edit Button .

Change /Update the Contact Number
And Click on Submit Button .

Click on the Business Leave Status Icon.

Select any Business Leave Status entry .

Get the detail of Business Leave
Click on Approval History to get the Approval History details .

User will get the Approval History Details

Click on the Professional Leave Status.

Select any Record to view details .

User can see the details .
Click on Approval History to view the History details.

User can view the Approval Histoey records .

Click on ESC Loan Status Icon.

Select any record to view the details .

User can See the Approval History of ESC Loan.

Click on Housing Advance Status icon.

Select any record to view the Housing Advance details .

User Can View the Approval History of Housing Advance .

Click on School Fees Status Icon.

Select any record to view the School fees details .

Click on Approvl HistoryTab.

User can view the Approval History of School fees .

Click on Honorarium Status icon.

User can view the Status of Honorarium.

Click on Leave Balance icon.

User can view the Leave Balance
Click on the Setting Icon .

Click on the Clear Button to clear the cache to clear the junk files.


If User wants to change Language Option .
Select Arabic Language Check Box and Click on Save Button .

After Changing the language option User will get the Arabic Dashboard .

HOW TO UPDATE THE MOBILE NUMBER IN THE ORACLE SYSTEM
1) Log-in to your Oracle Account
2) Select NGHA Employee Self-Service Personal Information
3) Under Phone Numbers/Email Address block Click Update
4) Select Mobile as a Type Enter your mobile number in the Value field Click Next

5) Review the change under Phone Number block Click Submit
Related Documents