Chapter 4: Service Orders Page 115 CHAPTER 4: SERVICE ORDERS Objectives The objectives are: Create service orders. Create service item lines. Create service lines. Create service quotes. Use service order reports. Introduction Service orders are the documents in the Microsoft Dynamics ® NAV Service Management application area in which you enter information about service (repair and maintenance) on service items. Service orders are created: When a customer requests a service. Automatically by the program at the time intervals defined in service contracts. When you convert a service quote to a service order. A service quote can be used as a preliminary draft for a service order. Service orders and service quotes are composed of: A service header Service item lines Service lines Whether you create a service quote or a service order, use the same service header with the same information, although it will be displayed in different windows. The Service Order/Service Quote window consists of two parts: Service header that contains general information about the service. It has five FastTabs: o General o Invoicing o Shipping o Details o Foreign Trade

Welcome message from author
This document is posted to help you gain knowledge. Please leave a comment to let me know what you think about it! Share it to your friends and learn new things together.
Transcript

Chapter 4: Service Orders
Page 115
CHAPTER 4: SERVICE ORDERS
Objectives
The objectives are:
Create service orders.
Create service item lines.
Create service lines.
Create service quotes.
Use service order reports.
Introduction
Service orders are the documents in the Microsoft Dynamics® NAV Service
Management application area in which you enter information about service
(repair and maintenance) on service items. Service orders are created:
When a customer requests a service.
Automatically by the program at the time intervals defined in service
contracts.
When you convert a service quote to a service order. A service quote
can be used as a preliminary draft for a service order.
Service orders and service quotes are composed of:
A service header
Service item lines
Service lines
Whether you create a service quote or a service order, use the same service
header with the same information, although it will be displayed in different
windows.
The Service Order/Service Quote window consists of two parts:
Service header that contains general information about the service. It
has five FastTabs:
o General
o Invoicing
o Shipping
o Details
o Foreign Trade

Chapter 4: Service Orders
Page 116
Service item lines that contain information about the items that need
to be serviced.
The FastTabs on the service header provide information on the following:
Customer
Contract number
Service order status
Response time
Bill-to customer
Shipments
Starting and finishing dates
Spare parts overview
Currency
The service item lines contain the service item related information, such as:
Service item number
Description
Serial number
Service item group
Fault reporting
Warranty
Response time
The service lines linked to the service order contain information about the service
costs. (For more information about service lines, refer to chapter 5 “Working on
Service Orders”).
The service lines linked to the service order are displayed in the Service Lines
window. The service lines contain information about the service registered on the
service order. This can include spare parts (items), resource hours, G/L account
payments and general costs.
This chapter describes:
The concept behind service orders and service quotes.
How to set them up and use service orders and service quotes.
The related topics, such as creating customers and service items
within service orders and receiving and lending loaners, using the
Customer Service History FactBox.
At the end of the chapter there are exercises and a final assignment that tests the
knowledge you have acquired throughout the chapter.

Chapter 4: Service Orders
Page 117
Creating Service Orders
The Service Order window allows managing data related to specific service
orders. Use the Service Order window to create documents in which you enter
information about a service (repair and maintenance) on service items.
When you create a service order, a few fields need to be filled in on the service
header. Most of the fields are filled in automatically: after the customer and the
bill-to customer numbers are specified, the program retrieves the details from the
customer card to fill in the rest of the fields.
The header enables one to view not only the general information on the customer,
but also the shipping and invoicing details which help to manage service delivery
(for example, location code or shipping advice) and to handle the customer
billing process (for example, payment terms code, payment method code,
whether prices include or exclude VAT).
To create service orders, do the following:
1. Click Home > Service Orders.
2. In the Action Pane of the Service Orders list place, click New to
enter a new service order.
3. In the No. field, enter a number for the service order. Alternatively,
if you have set up number series for service orders in the Service
Mgt. Setup window, you can press ENTER to have the program
enter the next available service order number.
4. In the Customer No. field, click the AssistButton to select the
relevant customer from the list.
The program fills in the customer-related fields with information from the
customer card.

Chapter 4: Service Orders
Page 118
FIGURE 4.1 THE SERVICE ORDER WINDOW
Depending on the settings on the Mandatory Fields FastTab in the Service Mgt.
Setup window, you may need to fill in:
The Service Order Type field on the General FastTab.
The Salesperson Code field on the Invoicing FastTab.
To view and assign dimensions and dimension values for the service header, in
the Action Pane click Related Information > Order > Dimensions.

Chapter 4: Service Orders
Page 119
FIGURE 4.2 THE DOCUMENT DIMENSIONS WINDOW
Notifying Customers
The Notify Customer field on the General FastTab of the service order indicates
in which way the customer wants to be notified that their service items are ready.
There are five options:
No
By Phone 1
By Phone 2
By Fax
By E-Mail
If the E-Mail option is selected and you have set up your system to send e-mail
messages automatically, the program sends an e-mail message to the customer
when you or the program updates the status of a service order to Finished (for
more information, refer to chapter 11 “Job Queue”). You can also send e-mail
messages manually (for more information, refer to chapter 5 “Working on
Service Orders”).
Creating Customers Within Service Orders
When creating service orders for customers that are not registered in your
company, you can create them in the Service Order or Service Quote windows.

Chapter 4: Service Orders
Page 120
It is necessary to set up customer templates before you can create customers
within service orders (refer to chapter 2 “Service Management Setup”).
To create customers within service orders:
1. Click Home > Service Orders.
2. In the Action Pane of the Service Orders list place, click New to
enter a new service order.
3. In the No. field, enter a number for the service order.
4. Fill in the Name, Address, and City fields for the new customer.
5. In the Action Pane, click the Actions button, and then click
Functions > Create Customer. The Customer Templates List
window appears.
FIGURE 4.3 THE CUSTOMER TEMPLATE LIST WINDOW
6. Select the relevant template and click OK.
The program automatically assigns a number to the new customer and creates a
customer card. It fills in the relevant fields in the service order by copying
information from the customer template.
Using the Customer Service History FactBox
To the right of the service header, there is the information FactBox providing the
summary information on the customer specified on the header.
Chapter 4: Service Orders
Page 121
The shortcuts on the FactBox give immediate access to the windows containing
the relevant data.
Shortcut Window
Customer No. Customer Card
Quotes Service List – Quote
Orders Service List – Order
Invoices Service List – Invoice
Credit Memos Service List – Credit Memo
Pstd. Shipments Posted Service Shipments
Pstd. Invoices Posted Service Invoices
Pstd. Credit Memos Posted Service Credit Memos

Chapter 4: Service Orders
Page 122
Creating Service Item Lines
When creating a service order or service quote, you need to create the service
item lines for each service item. On the Lines FastTab, enter the information
about the items you have received for service, including:
Service item number
Description
Item number
Serial number
Service item group, and so on
Use the following steps to create service item lines in a service order/quote:
1. Open the relevant Service Order window.
2. On the Lines FastTab, click the next available empty line to enter a
new service item line.
3. Fill in the Service Item Group, Serial No., Item No., and
Description fields as appropriate.
If the service item is registered, you only need to fill in the Service
Item No. field. The program will automatically fill in the other
service item related fields with the information from the Service Item
Line table.
FIGURE 4.4 THE LINES FASTTAB OF THE SERVICE ORDER WINDOW
The program will fill in the Contract No. field in one of the following ways:
If the service item is already included in more than one active
contract, that is, more than one contract that is signed and not
expired, a dialog box appears.

Chapter 4: Service Orders
Page 123
FIGURE 4.5 ASSIGNING A CONTRACT NUMBER TO THE SERVICE ORDER LINE
If you click Yes, the Service Contract List window appears. Select
the appropriate contract number and click OK to assign a contract
number to the service order line.
FIGURE 4.6 THE SERVICE CONTRACT LIST WINDOW
If you click No, the Contract No. field on the service item line is left
blank. You can, however, manually assign the appropriate contract
number later.
If the service item is included only in one active contract, the
corresponding contract number is assigned automatically.
If the service item is included in a non-active contract, it is added to
the service order line with the Contract No. field left blank.
If the service item is not registered yet, you can register it as a
service item using the Create Service Item function after filling in
the Description field. Fill in the Serial No. and Item No. fields if
appropriate.
NOTE: The program assigns the contract number to a service item line if the
Contract No. is set on the service order header. Also, if the Contract No. field
on the service order header is filled in, you cannot change the contract number
on the service item lines.
4. Depending on the settings on the Mandatory Fields FastTab in the
Service Mgt. Setup window, you may also need to fill in the Fault
Chapter 4: Service Orders
Page 124
Reason Code field. (Use the Choose Column function to add the
field on the lines)
5. Fill in the other fields as appropriate.
The program selects the Initial repair status for the line and calculates the
response date and time, using the appropriate default values.
6. To view and assign dimensions to the service item line, on the Lines
FastTab click Actions > Line > Dimensions.
Repeat steps 2 to 6 for each service item line you want to register.
Creating Service Items Within Service Orders
The program allows the user to create and register new service items, using the
Service Order or Service Quote windows.
To create a service item within a service order/quote, use the following steps:
1. Open the relevant Service Order window.
2. On the Lines FastTab, fill in the Serial No. and Description fields.
3. Click Actions > Functions > Create Service Item, and confirm
the subsequent message.
The program assigns a number to the service item and creates a service item card.
It fills in the Service Item No. field on the service item line with the number of
the new service item.
Response Time
The Response Time (Hours) field contains the estimated number of hours
between the creation of the service order and the time when the repair status of
the service item on the line changes from Initial to In Process.
The program fills in the value in this field as follows:
If the service item on the line is registered, the program copies the
value automatically from the Response Time (Hours) field on the
service item card.
If the service item group on the line has a default response time
specified, the program copies the value from there.
Otherwise, the program copies the value from the Default Response
Time (Hours) field in the service order.
The program uses the Response Time (Hours) field to calculate the response
date and time for the service item line. The calculation is based on the calendar
and on the service hours (the general service hours or, if the service item belongs
to a contract, the service hours for the contract).

Chapter 4: Service Orders
Page 125
The program automatically updates the Response Date and Response Time
fields on the service order itself, using the minimum response date and time of all
the related service item lines.
You can change the response time.
The Ship-to Code Field
Use the Ship-to Code field to include service items with the ship-to-codes that
are different from the one specified in the service order header, or to include
service items with ship-to codes that differ from each other.
To enter service items with a ship-to-code different from the one on the header:
1. Open the relevant service order.
2. Right-click the column headings, and then click Choose Columns.
3. In the Customize Lines window that opens, select Ship-to Code
under Available columns, and click Add.
4. Use the Move Up and Move Down buttons to allocate the field.
5. Click OK.
FIGURE 4.7 USING THE CHOOSE COLUMN FUNCTION
6. Click the AssistButton in the Service Item No. field to open the
service item list. To view the ones with a different ship-to-code, be
sure to remove any filters.
7. Select the service item to register on the line.
The Ship-to Code field is also used in service contracts, with the same function.

Chapter 4: Service Orders
Page 126
Viewing Troubleshooting Guidelines from Service Orders
When you register service item lines in service orders or quotes, you can view
troubleshooting guidelines for the service items in the Troubleshooting window.
To view troubleshooting guidelines for a service item, use the following steps:
1. Open the relevant service order.
2. On the Lines FastTab, click Actions > Line > Troubleshooting.
3. If the program has found the troubleshooting guidelines for the
service item on the line, they appear in the Troubleshooting Setup
window.
4. To open the troubleshooting card for these guidelines, in the Action
Pane, click Related Information > Troublesh. > Card.
FIGURE 4.8 VIEWING TROUBLESHOOTING GUIDELINES FROM SERVICE ORDERS
The program first searches for all troubleshooting guidelines specifically
assigned to this:
Service item
Chapter 4: Service Orders
Page 127
Item
Service item group
The program displays the troubleshooting guidelines it finds first.
The caption of the Troubleshooting window shows whether the guidelines are
assigned to the service item, item, or service item group.
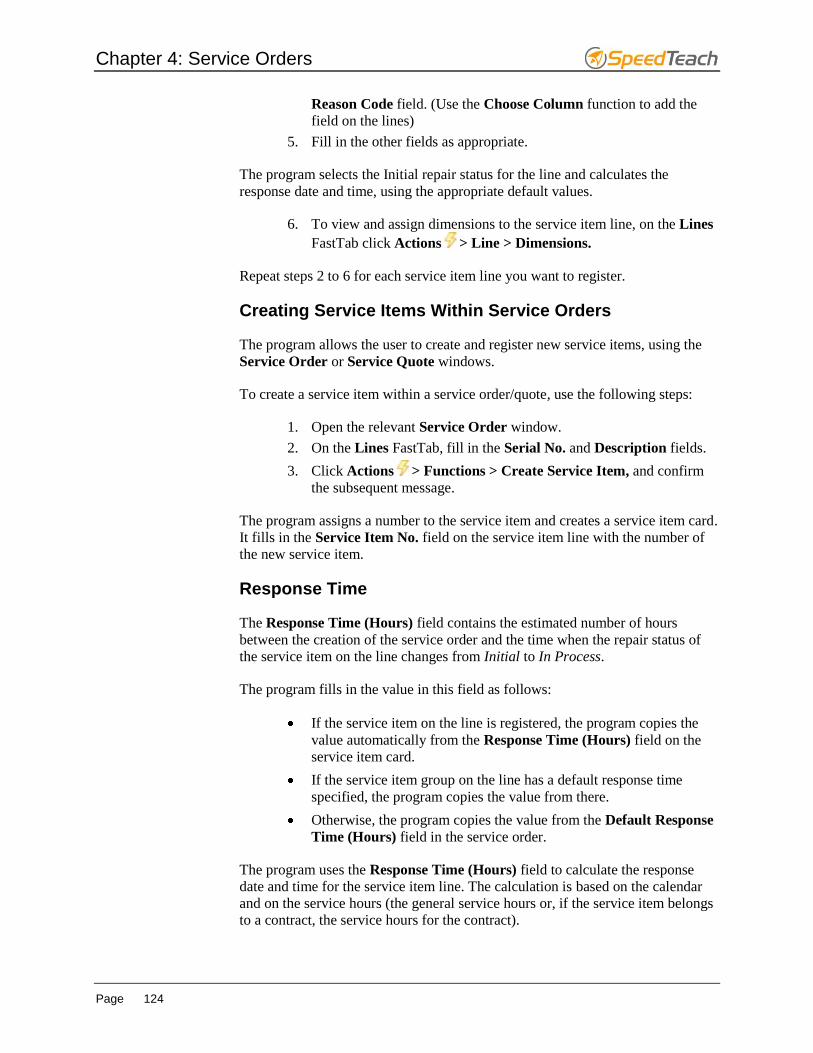
Loaners
You can lend customers loaner items to temporarily replace service items that
you have received for servicing.
Lending and Receiving Loaners
1. Open the relevant service order.
2. On the Lines FastTab, scroll to the right to view the Loaner No.
field.
3. Click the AssistButton in the field to view the available loaners in
the drop-down list that appears.
4. To view the detailed information on the available loaners, click
Advanced at the bottom of the drop-down list.
FIGURE 4.9 THE AVAILABLE LOANERS WINDOW
5. Select the relevant loaner, and click OK to copy it to the field.
6. Press ENTER. A dialog box appears asking whether to lend the
loaner. Click Yes to confirm to lend the loaner.
When receiving a loaner from a customer, you must register the receipt.
7. Select the line containing the loaner, and click Actions >
Functions > Receive Loaner.
8. Click Yes to the message that follows.

Chapter 4: Service Orders
Page 128
Registering Comments on Lent Loaners in Service Orders
To register comments regarding the loaner in a service order:
1. Open the relevant service order and click the service item line
containing the service item that you have lent a loaner for.
2. Click Actions > Line > Comments > Lent Loaners. The Service
Item Loaner Service Comment Sheet window appears.
FIGURE 4.10 REGISTERING COMMENTS ON LENT LOANERS
3. In the Date field, enter a date to have a date entered for the
comment.
4. In the Comment field, enter text with a maximum of 80 characters
(including spaces).
5. To enter additional text, go to the next line. Fill in as many lines as
necessary.
Using the Service Item Line Details FactBox
The Service Item Line Details FactBox to the right of the service order allows the
user to easily access additional information on the service item specified on each
line.
Shortcuts on the FactBox lead to the windows containing the relevant data.
Shortcut Window
Service Item No. Service Item Card
Component List Service Item Component List
Troubleshooting Troubleshooting Setup
Skilled Resources Skilled Resource List

Chapter 4: Service Orders
Page 129
Creating Service Lines
After creating the service order/quote with service item lines, the user can
proceed to work on it and register service performed on the order. The service
can include:
Spare parts
Resource hours
General costs
G/L account payments
Use the service lines associated to the service order/quote to register the service
granted.
The service lines comprise an integral part of the service document the user
creates.
To open the Service Lines window, on the Lines FastTab of the Service Order
window, click Actions > Order > Service Lines.
Similarly, use the relevant path in the Service Quote window to open the Service
Quote Lines window.
In the Service Invoice and Service Credit Memo windows, service lines can be
viewed on the Lines FastTab.
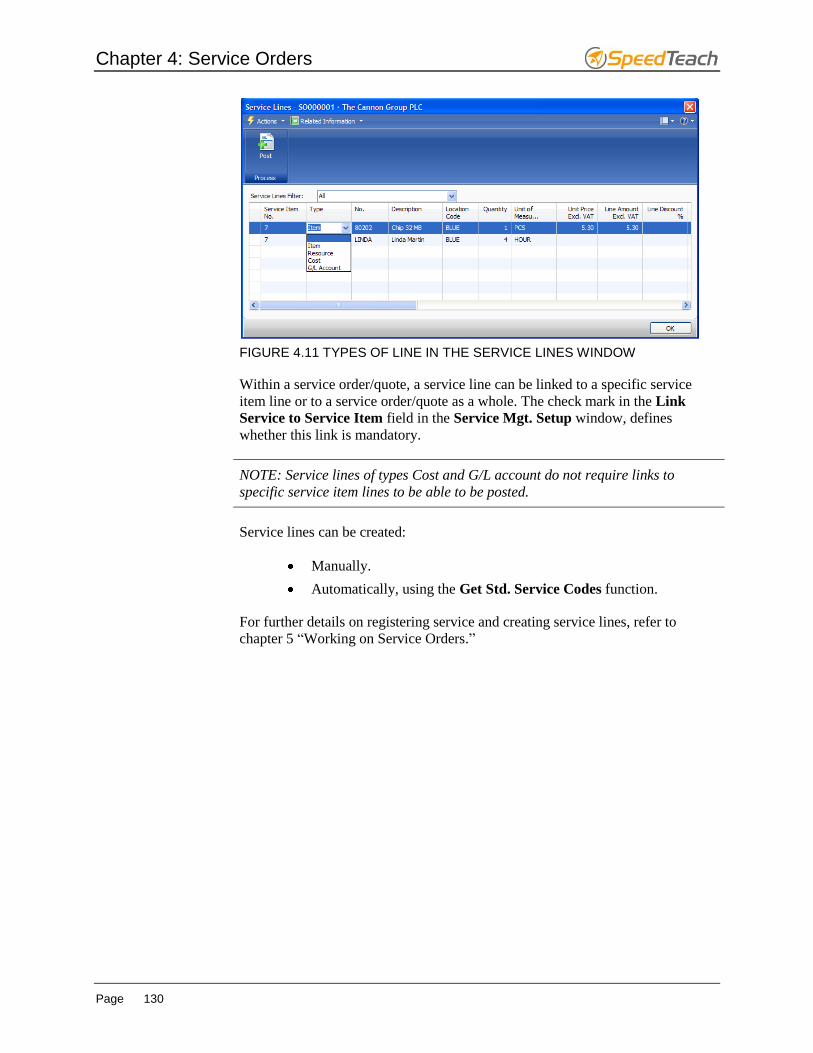
The service lines can be of five different types:
Item
Resource
Cost
G/L Account
Blank
The type of the line is determined by the user and depends on its contents:
Item lines are used to register the use of spare parts.
Resource lines are used to register the use of resource hours.
Cost lines are used to register predefined service costs.
G/L account lines are used to register expenses pertaining to a certain
G/L account.
Blank lines are used to register standard texts, for example, to make
a comment about the line above or below.
Chapter 4: Service Orders
Page 130
FIGURE 4.11 TYPES OF LINE IN THE SERVICE LINES WINDOW
Within a service order/quote, a service line can be linked to a specific service
item line or to a service order/quote as a whole. The check mark in the Link
Service to Service Item field in the Service Mgt. Setup window, defines
whether this link is mandatory.
NOTE: Service lines of types Cost and G/L account do not require links to
specific service item lines to be able to be posted.
Service lines can be created:
Manually.
Automatically, using the Get Std. Service Codes function.
For further details on registering service and creating service lines, refer to
chapter 5 “Working on Service Orders.”

Chapter 4: Service Orders
Page 131
Creating Service Quotes
Service quotes are the forerunners to service orders and look almost identical. A
service quote is composed of the same three parts as a service order:
The header, which contains general, invoice, shipping, foreign trade,
and detailed information about the service quote.
The service item lines, which contain information on the items to be
serviced.
The service lines that contain information on the service registered in
the service quote. You can find more information about service lines
in chapter 5 “Working on Service Orders.”
Use a service quote as a preliminary draft for a service order, and then convert
the quote to a service order.
To create service quotes, do the following:
1. Click Home > Service Quotes.
2. In the Action Pane of the Service Quotes list place, click New. The
Service Quote window appears.
FIGURE 4.12 THE SERVICE QUOTE WINDOW
3. In the No. field, enter a number for the service quote. Alternatively,
if you have set up number series for service quotes in the Service

Chapter 4: Service Orders
Page 132
Mgt. Setup window, you can press enter to have the program enter
the next available service order number.
4. In the Customer No. field, click the AssistButton to select the
relevant customer from the list.
5. The program automatically fills in the relevant customer fields with
information from the customer card.
If this card does not exist for the customer, and you have set up a
customer template, you can create the customer within the service
quote by filling in the relevant fields and clicking Actions >
Functions > Create Customer.
6. Depending on the settings on the Mandatory Fields FastTab in the
Service Mgt. Setup window, you may need to fill in the Service
Order Type field on the General FastTab and the Salesperson
Code field on the Invoicing FastTab.
7. Fill in the service item lines.
8. Register estimated costs in the service lines (refer to chapter 5
“Working on Service Orders”).
Converting Service Quotes to Service Orders
When a customer accepts a service quote, you convert it into a service order.
1. Click Home > Service Quotes.
2. Open the relevant service quote.
3. In the Action Pane of the Service Quote window, click Make
Order.
4. Click Yes to the message that follows.
The program:
Converts the quote to a service order.
Deletes the quote creating a new service order with the next available
number from the service order number series set up in the Service
Mgt. Setup window.
Recalculates the response date and time for the service order, and
sets its status to Pending. It changes the repair status of the service
item lines to Initial.
Searches for allocation entries for all service items in the service
quote with status Active. If it finds such allocation entries, the
program updates their allocation status to Reallocation Needed.
Changes the status of the allocation entries registered for the quote to
Finished, when the service items are reallocated in the service order.

Chapter 4: Service Orders
Page 133
Service Order Reports
Use the reports in the Service Management application area to view and print
information concerning service orders, such as:
Response time for the service orders
Service items included in the service orders
Profit for the service orders and responsibility centers
There are five service order-specific reports:
Service Order – Response Time
Service Item Line Labels
Service Profit (Serv. Orders)
Service Profit (Resp. Centers)
Service Tasks
The Service Order – Response Time Report
This report prints information about the response time for the service orders that
have been shipped.
The report shows the following:
Order number
Customer’s name
Order date
Order time
Actual response time
The Service Item Line Labels Report
This report displays a list of the service items in the service orders.
The report shows the following:
Order number
Service item number
Serial number
Name of the item
The Service Profit (Serv. Orders) Report
This report prints information about service profit for service orders, based on the
difference between service amount and service cost.

Chapter 4: Service Orders
Page 134
The report shows:
Customer number
Serial number
Description
Item number
Contract number
Contract amount
On the Options FastTab, select whether you want the report to show details for
the posted service shipments. Place a check mark in the check box if you want
the report to show the details.
The Service Profit (Resp. Centers) Report
This report prints information about service profit for responsibility centers,
based on the difference between the service amount and service cost.
On the Options FastTab, select whether you want the report to show details for
the posted service shipments. Place a check mark in the check box if you want
the report to show the details.
The Service Tasks Report
This report prints a list of the service tasks entered in the program.
Information includes:
Service order number
Service item description
Repair status
Service item group

Chapter 4: Service Orders
Page 135
Lab 4.1 - Creating a Service Order
In this lab, you will practice creating a service order.
Scenario
A service desk employee at CRONUS International Ltd receives calls from
customers who want to have their items serviced. The company’s existing
customer, Deerfield Graphics, calls and wants to have three items serviced.
Challenge Yourself
Create a service order with three service item lines.
Need a Little Help?
1. Create a service order with the following details:
Customer name: Deerfield Graphics Company
The service order type is Hardware.
The customer wants to be notified by e-mail.
2. The customer wants three items serviced; two of them are registered
service items.
Create service item lines for service items numbers 12 and 16.
3. Create a service item line for a memory card with the description
Ajax memory and the serial number 58361. This service item
belongs to the MEMORY service item group.
4. Insert fault comments for all the service item lines.
5. Check if the troubleshooting set up for the service items might help
solve the problems during a phone call.
Check the troubleshooting guidelines for the service items to find
useful information.
6. The customer needs to have one of the service items serviced fast
and wants to know the response time registered.
Enter 6 hours as the response time for service item number 16.
Step by Step
Create a service order for three service items.
1. Go to Home > Service Orders.
2. In the Action Pane of the Service Orders list place, click New.
3. On the General FastTab, fill in the fields as follow:
Customer No.: “40000”
Click Yes to the check credit limit message that follows.
Notify Customer: By E-Mail
Service Order Type: HARDWARE
4. On the Lines FastTab:
For the first two lines, select 12 and 16 respectively in the Service
Item No. field.

Chapter 4: Service Orders
Page 136
For the second line, scroll to the right and type “6” in the Response
Time (Hours) field.
For the third line, fill in the fields with the following information:
Service Item No.: “44”
Service Item Group Code: MEMORY
Serial No.: “58361”
The program automatically inserts the number of the service item
after running the Create Service Item function.
FIGURE 4.13 CREATING A SERVICE ORDER
Insert fault comments for the service item lines.
1. Click the first line, and then click Actions > Line > Comments >
Faults.
2. In the Fault Service Comment Sheet window, type your fault
comment in the Comment field, and click OK.
3. Repeat steps 5 to 6 to insert fault comments for the next two lines.
Verify the troubleshooting guidelines for the service items.
1. Click the first line, and then click Actions > Line >
Troubleshooting.
2. In the Troubleshooting Setup window, check the troubleshooting
guidelines for the service item.

Chapter 4: Service Orders
Page 137
3. Repeat steps 1 to 2 to check the troubleshooting guidelines for the
next two service items.

Chapter 4: Service Orders
Page 138
Lab 4.2 – Creating a Service Order from a Service Quote
In this lab, you will practice creating a service order from a service quote.
Scenario
As a salesperson working for CRONUS, you and a prospective customer are
discussing the possibility of having you service items for the customer.
Challenge Yourself
Create a service quote to convert it further into a service order.
Need a Little Help?
1. Create a service quote for this new customer with the following
customer details:
Name: Lasse Viren
Address: Holtarshojde 23b, DK-4600 Køge
Phone number: 459 63121
E-mail address: [email protected]
The service is a preventative maintenance service.
2. Create Mr. Viren as a customer from the quote.
3. Mr. Viren recently bought two items from Cronus.
Create service item lines for the following items:
Item no. 80004 with serial number: 4582526
Item no. 80102 with serial number: 545771
4. Mr. Viren has accepted the service quote. Register the items as
service items.
Create service items for both service item lines.
5. Convert the service quote to a service order.
Step by Step
Create a service quote and a new customer from the quote.
1. Click Home > Service Quotes.
2. In the Action Pane of the Service Quotes list place, click New.
3. Fill in the fields on the General FastTab as follow:
Name: “Lasse Viren”
Address: “Holtarshojde 23b”
Post Code: “DK-4600”
Phone No./Phone No. 2: “459 63121”
E-Mail: “[email protected]”
City: “K°ge”
Service Order Type: “PREVMAINT”
4. In the Action Pane of the Service Quote window, click Actions >
Functions > Create Customer.

Chapter 4: Service Orders
Page 139
5. In the Customer Template window that appears, select the
appropriate template and click OK.
The program assigns a number to the new customer and populates
the Customer No. and Contact No. fields with the appropriate
numbers.
Create service item lines.
1. Fill in the fields on the Lines FastTab:
For the first line:
Item No.: “80004”
Serial No.: “4582526”
For the second line:
Item No.: “80102”
Serial No.: “545771”
2. To create service items for service item lines, click the first line, and
then click Actions > Functions > Create Service Item.
3. Click Yes to the message that follows.
4. Repeat steps 2 to 3 to create a service item for item number 80102.
FIGURE 4.14 CREATING A SERVICE QUOTE
Convert the service quote to a service order.
1. In the Action Pane of the Service Quote window, click Make
Order.
2. Click Yes to the message that follows.
The program deletes the service quote and displays an information

Chapter 4: Service Orders
Page 140
message confirming that the quote has been converted to a service
order and specifies the number of the order.
3. Click OK.
4. To view the created service order, go to Home > Service Orders,
and double-click the last order in the list.
FIGURE 4.15 CREATING A SERVICE ORDER FROM A SERVICE QUOTE
Chapter 4: Service Orders
Page 141
Lab 4.3 – Lending and Receiving a Loaner
In this lab, you will practice lending and receiving a loaner.
Scenario
The customer is anxious to have the items serviced and needs a loaner for one of
the items while the service takes place.
Challenge Yourself
Lend the customer an available loaner and register the receipt.
Need a Little Help?
1. Change the response time for item number 80102 to 12 hours.
2. Lend the customer an available loaner.
3. Later, service for item 80102 is finished and the customer arrives to
pick up the finished item and hands in the loaner.
Receive the loaner and check whether the program has updated the
loaner entries for this loaner.
Step by Step
1. Go to Home > Service Orders.
2. In the Service Orders list place, open the order for Customer No.
C00010.
3. On the Lines FastTab, select the line with item number 80102 and
change the value in the Response Time (Hours) field to “12.”
4. In the Loaner No. field, click the AssistButton and select L00002
from the drop-down list.
5. Press ENTER, and then click Yes to the message that follows.
6. Click Actions > Functions > Receive Loaner.
7. Click Yes to the message that follows.
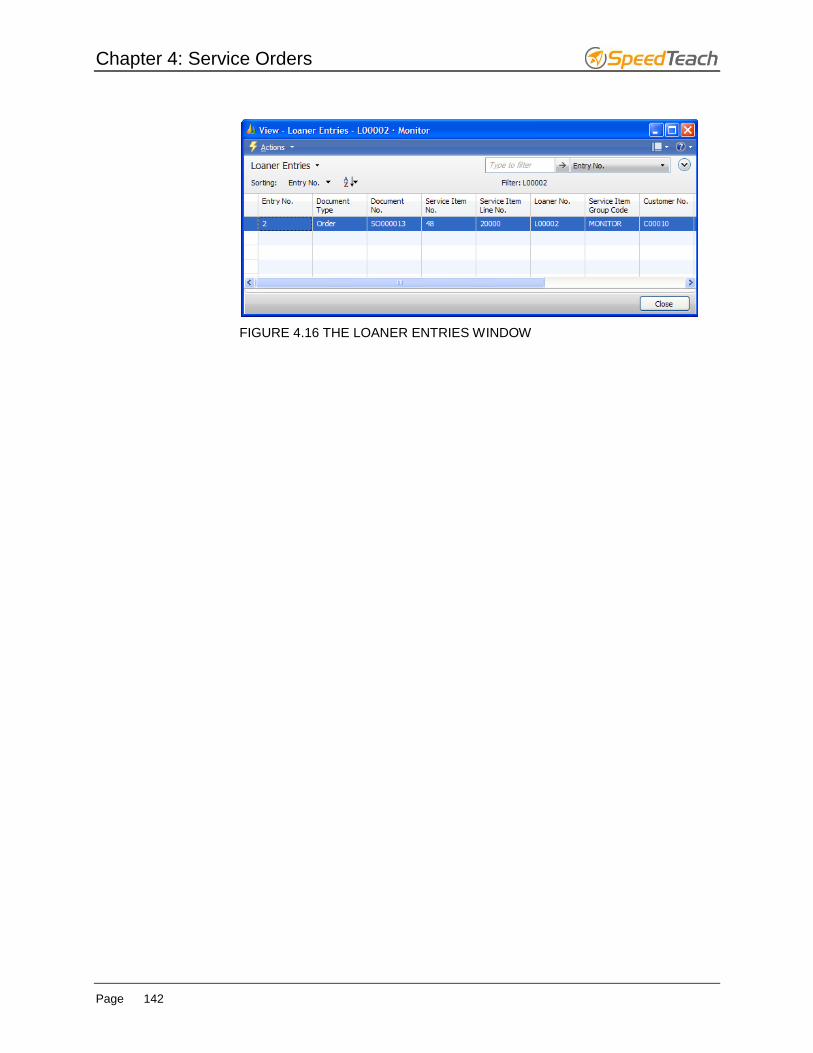
To verify the loaner entries for loaner L00002:
8. Go to Home > Loaners.
9. Double-click loaner number L00002 to open the loaner card.
10. In the Action Pane of the Loaner Card window, click Related
Information > Loaner > Loaner Entries.
Chapter 4: Service Orders
Page 142
FIGURE 4.16 THE LOANER ENTRIES WINDOW

Chapter 4: Service Orders
Page 143
Summary
The chapter describes different methods of service order creation:
Manual (when a customer requests a service)
Automatic
By means of converting a service quote to a service order
The chapter also explains how to create customers and service items within
service orders, how to lend loaners, and describes the service order-specific
reports.

Chapter 4: Service Orders
Page 144
Test Your Knowledge
1. What are the three cases when service orders are created?
2. True or False:
When creating service orders for customers that are not registered in your
company, you can create them in the Service Order or Service Quote
windows.
3. Complete the following sentence:
You can lend customers ___________ _________ to temporarily replace
service items that you have received for servicing.
4. Which type of the service lines is used to register the use of spare parts?
( ) Cost
( ) Resource
( ) Item
( ) G/L Account
5. What parts does the service quote consist of?

Chapter 4: Service Orders
Page 145

Chapter 4: Service Orders
Page 146
Quick Interaction: Lessons Learned
Take a moment to write down three Key Points you have learned from this
chapter:
1.
2.
3.

Chapter 4: Service Orders
Page 147
Solutions
Test Your Knowledge
1. What are the three cases when service orders are created?
MODEL ANSWER:
Service orders are created:
Manually when a customer requests a service.
Automatically by the program at the time intervals defined in service
contracts.
When converting a service quote to a service order.
2. True or False:
When creating service orders for customers that are not registered in your
company, you can create them in the Service Order or Service Quote
windows.
MODEL ANSWER:
True.
3. Complete the following sentence:
You can lend customers ___________ _________ to temporarily replace
service items that you have received for servicing.
MODEL ANSWER:
You can lend customers loaner items to temporarily replace service items that
you have received for servicing.
4. Which type of the service lines is used to register the use of spare parts?
( ) Cost
( ) Resource
(√) Item
( ) G/L Account
5. What parts does a service quote consist of?
MODEL ANSWER:
A service quote consists of the same three parts as a service order:
Header
Service item lines
Service lines
Related Documents