MySQL Essentials November 2009 version 1.3.4 http://coursematerial.nikosdimitrakas.com/mysql/ nikos dimitrakas

Welcome message from author
This document is posted to help you gain knowledge. Please leave a comment to let me know what you think about it! Share it to your friends and learn new things together.
Transcript
MySQL Essentials
November 2009 version 1.3.4
http://coursematerial.nikosdimitrakas.com/mysql/
nikos dimitrakas
DSV MySQL Essentials November 2009 SU/KTH version 1.3.4 nikos dimitrakas
2 (21)
Table of contents 1 INTRODUCTION 3
1.1 MYSQL 3
2 INSTALLATION AND CONFIGURATION 3
2.1 AT DSV 4 2.2 ON ANY COMPUTER 4
3 USER INTERFACE 5
3.1 ADMINISTRATOR 8 3.1.1 CREATING A DATABASE 8 3.1.2 CREATING TABLES 9 3.1.3 CREATING FOREIGN KEYS 11 3.2 QUERY BROWSER 14 3.2.1 EXECUTING SQL STATEMENTS 15 3.2.2 EDITING RESULTS 16 3.3 COMMAND LINE 16 3.3.1 MYSQL 17 3.3.2 MYSQLDUMP 19 3.3.3 OTHER COMMANDS 19
4 EMBEDDED SQL 20
4.1 LINKING MYSQL TO ACCESS 20
5 EPILOGUE 21
DSV MySQL Essentials November 2009 SU/KTH version 1.3.4 nikos dimitrakas
3 (21)
1 Introduction The goal of this compendium is to give a short introduction of the database manager MySQL and some of its most commonly used features. It is assumed that the reader already possesses some basic understanding of relational databases and SQL. This document consists of the following parts:
1. A short introduction to what MySQL is. 2. A description of how to set up the MySQL environment. 3. A presentation of the MySQL user interface, including the Database Administrator,
the Query Browser and some command line options. 4. A short description of how to connect your program to a MySQL database.
This introduction is based on version 5.1 of MySQL, but it should be possible to get something out of it even if you are working with other versions.
1.1 MySQL MySQL is an open source database manager. Even though MySQL does not have as wide support of SQL as other database managers, it is still a popular choice. There is a lot of information about the MySQL product family at www.mysql.com. MySQL consists of several components. In this introduction we will only look at the following:
1. MySQL Database Server (version 5.1.40) This is the actual database engine, and it also includes a few command line tools for performing most database tasks.
2. MySQL Administrator (version 1.2.17) This is a graphical tool for having an overview of most aspects of any MySQL server.
3. MySQL Query Browser (version 1.2.17) This is another graphical tool for working with SQL statements and data in any MySQL database.
Apart for the components mentioned above, MySQL offers tools for database migration, SAP/R3 support, as well as several application programming interfaces (APIs).
2 Installation and Configuration In this chapter we take a quick look at the installation and configuration of the MySQL components mentioned earlier. Since this document is meant to be used mostly by students at the Department of Computer and Systems Sciences at Stockholm University (SU) and the Royal Institute of Technology (KTH), section 2.1 provides a brief introduction to the department's MySQL environment. Section 2.2 provides more generic instructions for installing and configuring MySQL on any Windows platform.
DSV MySQL Essentials November 2009 SU/KTH version 1.3.4 nikos dimitrakas
4 (21)
2.1 At DSV The tools mentioned earlier are currently installed on all the computers at DSV computer rooms, but not on the terminal server. The environment currently installed may differ in minor versions to the one described earlier, but the differences are not significant. At the time this compendium was printed the installed versions were:
• MySQL Database Server (version 5.1.36) • MySQL Administrator (version 1.2.17) • MySQL Query Browser (version 1.2.17)
2.2 On any computer In order to install the previously described environment on any windows computer, you need three files, one for each component. These files can be downloaded from http://dev.mysql.com/downloads/ Here is a list of files that you will need:
• mysql-essential-5.1.40-win32.msi - MySQL Database Server (version 5.1.40) • mysql-gui-tools-5.0-r17-win32.msi – includes:
o MySQL Administrator (version 1.2.17) o MySQL Query Browser (version 1.2.17)
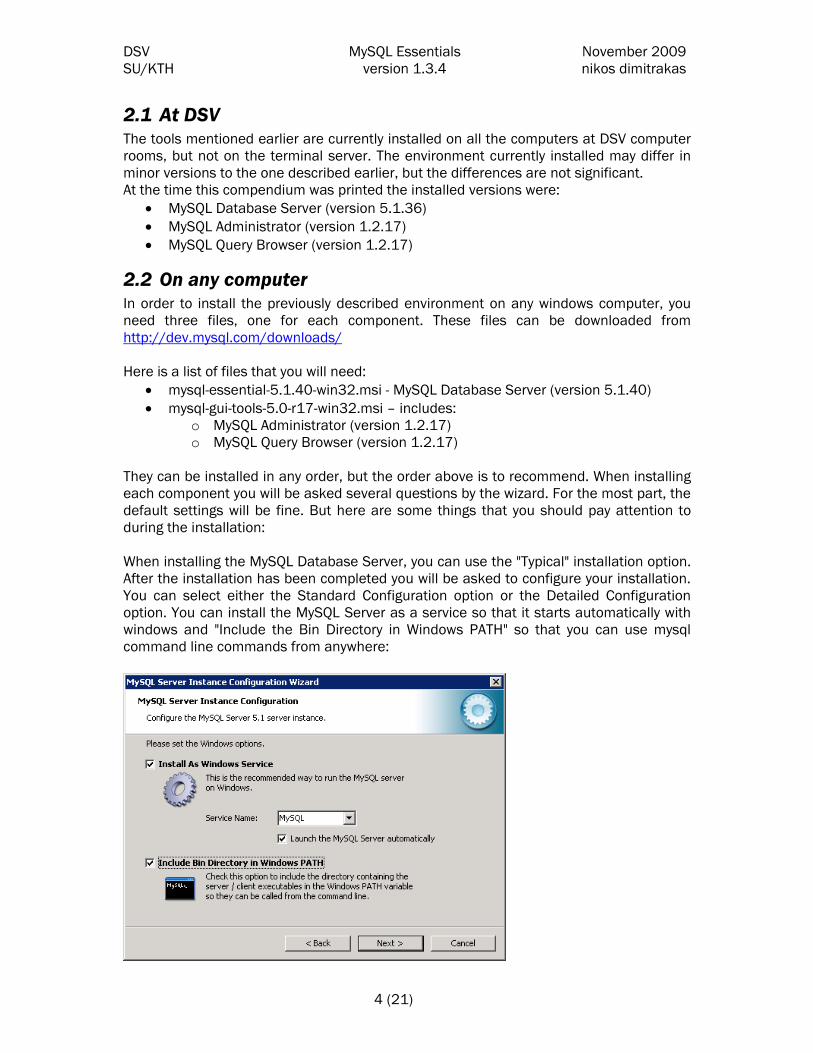
They can be installed in any order, but the order above is to recommend. When installing each component you will be asked several questions by the wizard. For the most part, the default settings will be fine. But here are some things that you should pay attention to during the installation: When installing the MySQL Database Server, you can use the "Typical" installation option. After the installation has been completed you will be asked to configure your installation. You can select either the Standard Configuration option or the Detailed Configuration option. You can install the MySQL Server as a service so that it starts automatically with windows and "Include the Bin Directory in Windows PATH" so that you can use mysql command line commands from anywhere:
DSV MySQL Essentials November 2009 SU/KTH version 1.3.4 nikos dimitrakas
5 (21)
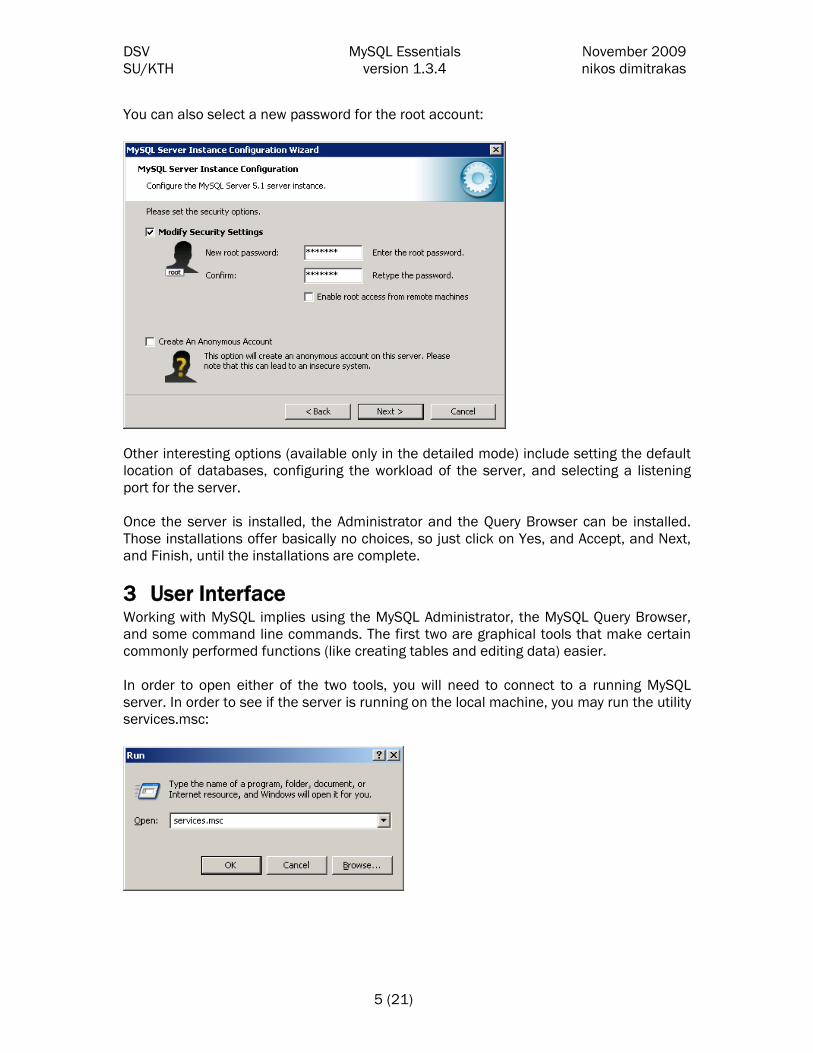
You can also select a new password for the root account:
Other interesting options (available only in the detailed mode) include setting the default location of databases, configuring the workload of the server, and selecting a listening port for the server. Once the server is installed, the Administrator and the Query Browser can be installed. Those installations offer basically no choices, so just click on Yes, and Accept, and Next, and Finish, until the installations are complete.
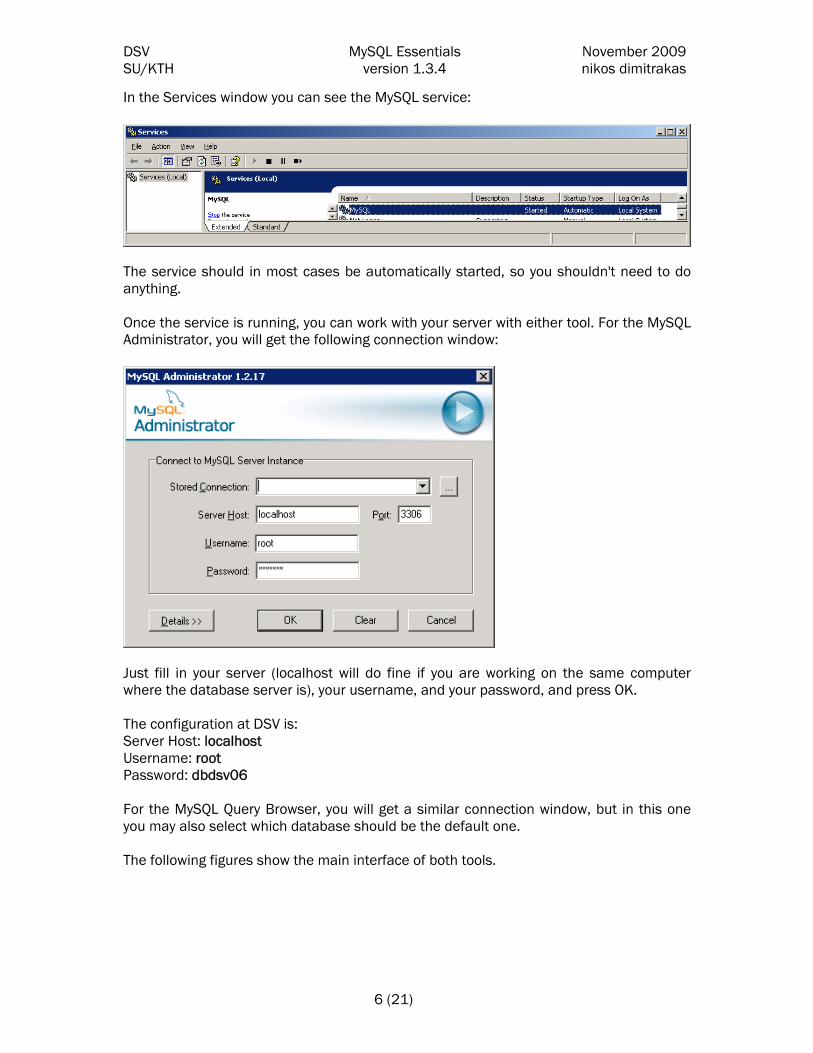
3 User Interface Working with MySQL implies using the MySQL Administrator, the MySQL Query Browser, and some command line commands. The first two are graphical tools that make certain commonly performed functions (like creating tables and editing data) easier. In order to open either of the two tools, you will need to connect to a running MySQL server. In order to see if the server is running on the local machine, you may run the utility services.msc:
DSV MySQL Essentials November 2009 SU/KTH version 1.3.4 nikos dimitrakas
6 (21)
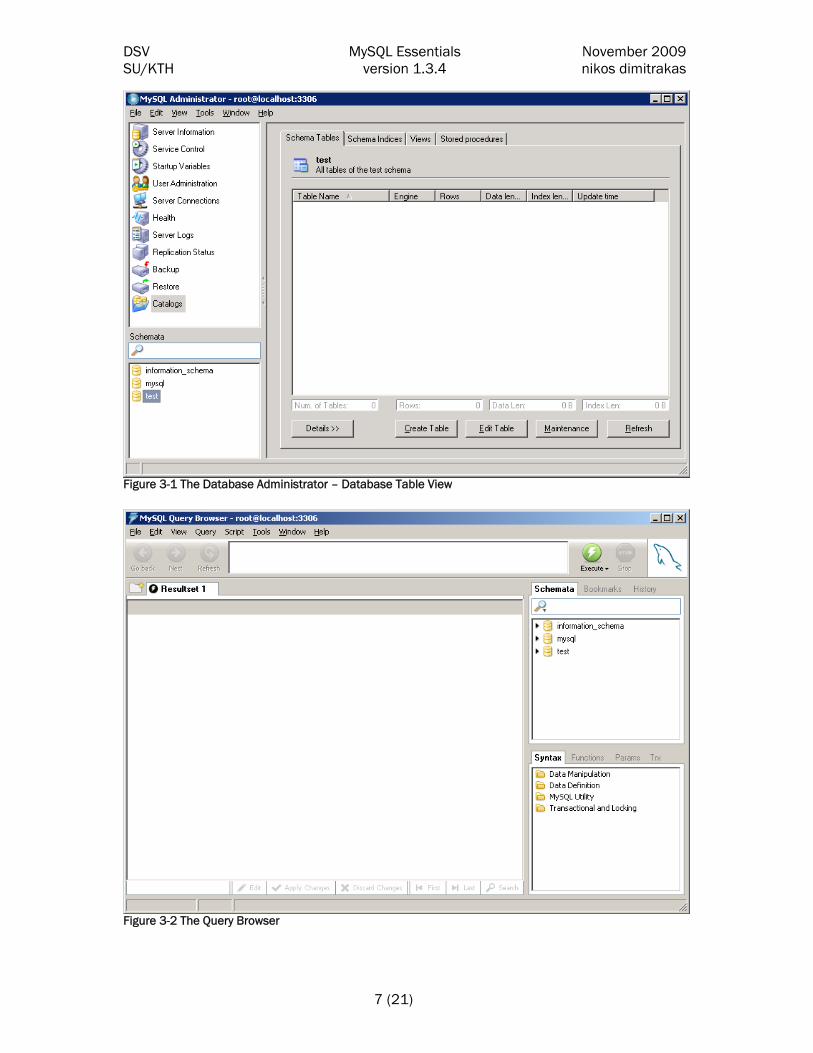
In the Services window you can see the MySQL service:
The service should in most cases be automatically started, so you shouldn't need to do anything. Once the service is running, you can work with your server with either tool. For the MySQL Administrator, you will get the following connection window:
Just fill in your server (localhost will do fine if you are working on the same computer where the database server is), your username, and your password, and press OK. The configuration at DSV is: Server Host: localhost Username: root Password: dbdsv06 For the MySQL Query Browser, you will get a similar connection window, but in this one you may also select which database should be the default one. The following figures show the main interface of both tools.
DSV MySQL Essentials November 2009 SU/KTH version 1.3.4 nikos dimitrakas
7 (21)
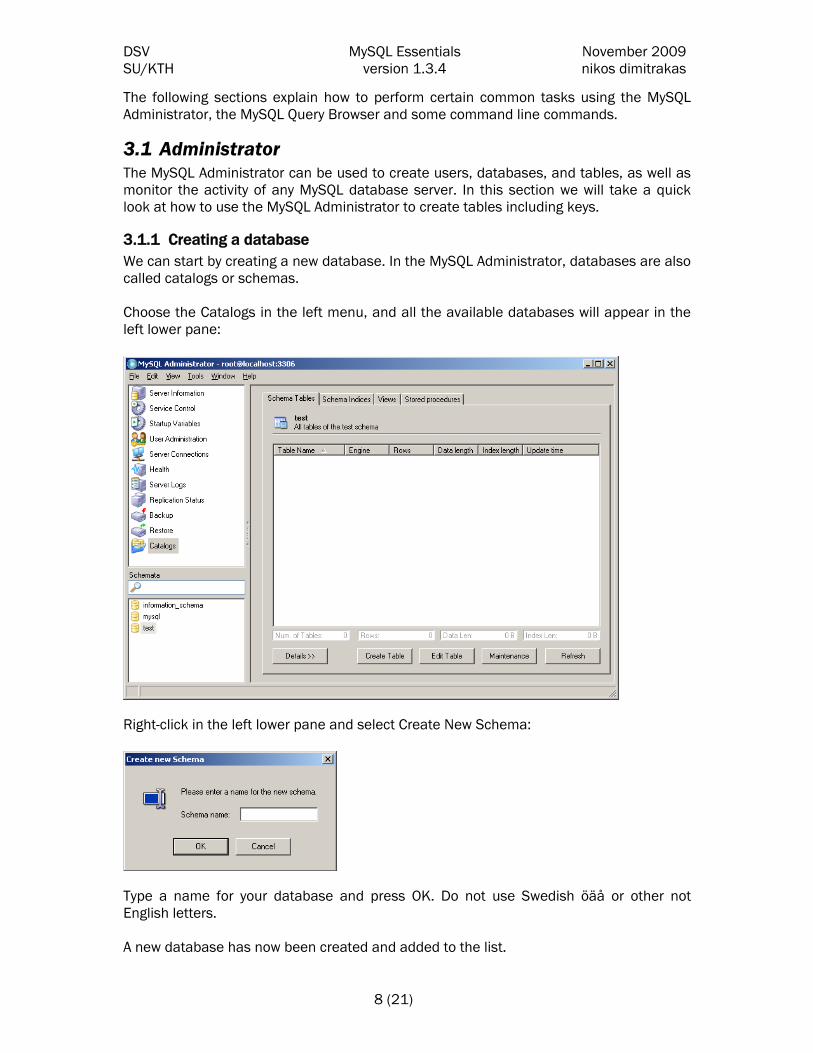
Figure 3-1 The Database Administrator – Database Table View
Figure 3-2 The Query Browser
DSV MySQL Essentials November 2009 SU/KTH version 1.3.4 nikos dimitrakas
8 (21)
The following sections explain how to perform certain common tasks using the MySQL Administrator, the MySQL Query Browser and some command line commands.
3.1 Administrator The MySQL Administrator can be used to create users, databases, and tables, as well as monitor the activity of any MySQL database server. In this section we will take a quick look at how to use the MySQL Administrator to create tables including keys.
3.1.1 Creating a database We can start by creating a new database. In the MySQL Administrator, databases are also called catalogs or schemas. Choose the Catalogs in the left menu, and all the available databases will appear in the left lower pane:
Right-click in the left lower pane and select Create New Schema:
Type a name for your database and press OK. Do not use Swedish öäå or other not English letters. A new database has now been created and added to the list.
DSV MySQL Essentials November 2009 SU/KTH version 1.3.4 nikos dimitrakas
9 (21)
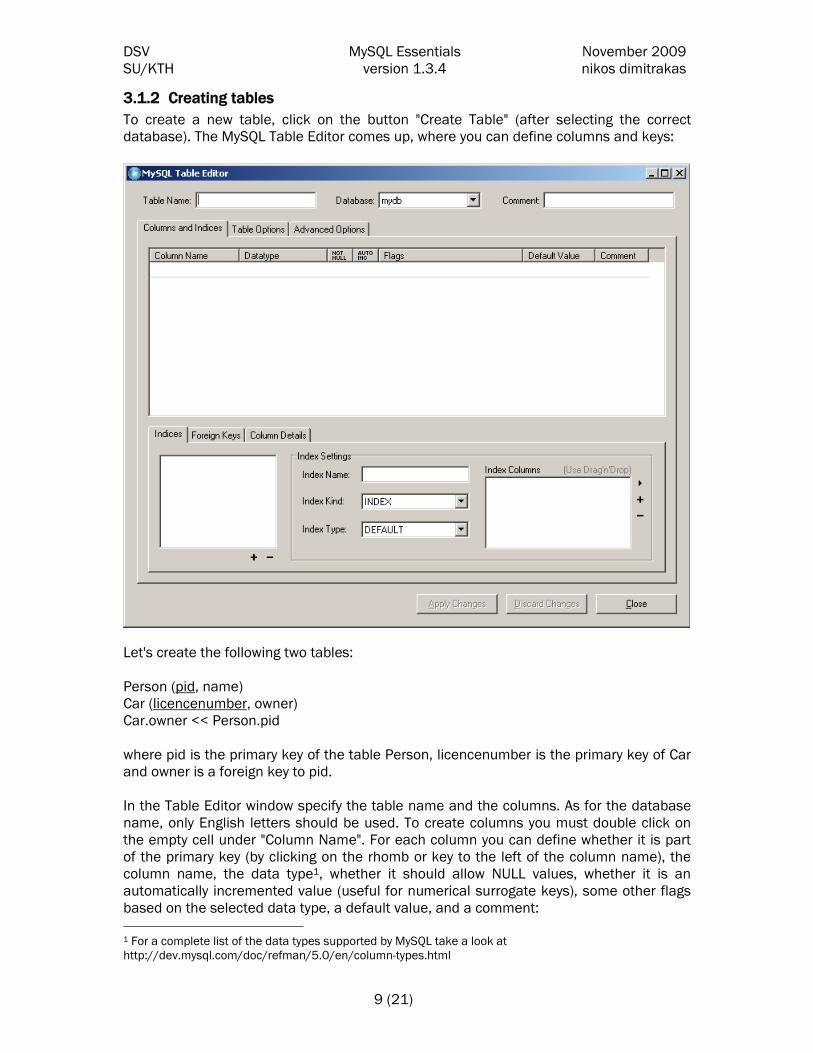
3.1.2 Creating tables To create a new table, click on the button "Create Table" (after selecting the correct database). The MySQL Table Editor comes up, where you can define columns and keys:
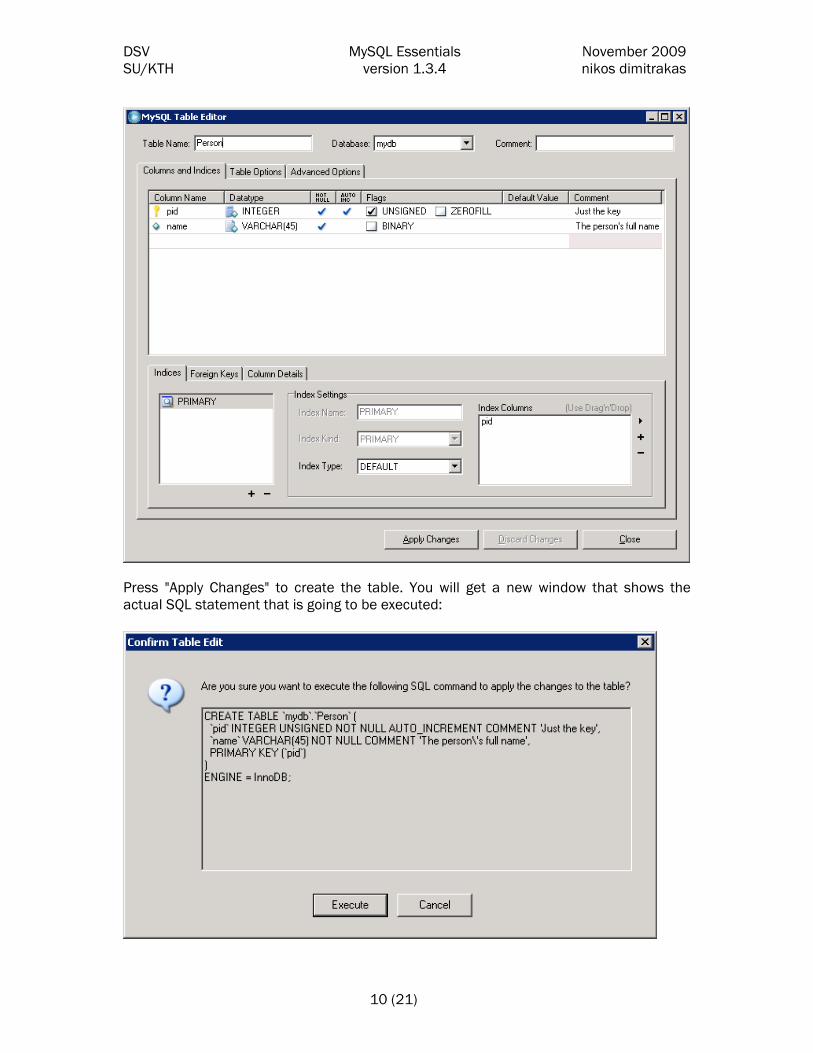
Let's create the following two tables: Person (pid, name) Car (licencenumber, owner) Car.owner << Person.pid where pid is the primary key of the table Person, licencenumber is the primary key of Car and owner is a foreign key to pid. In the Table Editor window specify the table name and the columns. As for the database name, only English letters should be used. To create columns you must double click on the empty cell under "Column Name". For each column you can define whether it is part of the primary key (by clicking on the rhomb or key to the left of the column name), the column name, the data type1, whether it should allow NULL values, whether it is an automatically incremented value (useful for numerical surrogate keys), some other flags based on the selected data type, a default value, and a comment: 1 For a complete list of the data types supported by MySQL take a look at http://dev.mysql.com/doc/refman/5.0/en/column-types.html
DSV MySQL Essentials November 2009 SU/KTH version 1.3.4 nikos dimitrakas
10 (21)
Press "Apply Changes" to create the table. You will get a new window that shows the actual SQL statement that is going to be executed:
DSV MySQL Essentials November 2009 SU/KTH version 1.3.4 nikos dimitrakas
11 (21)
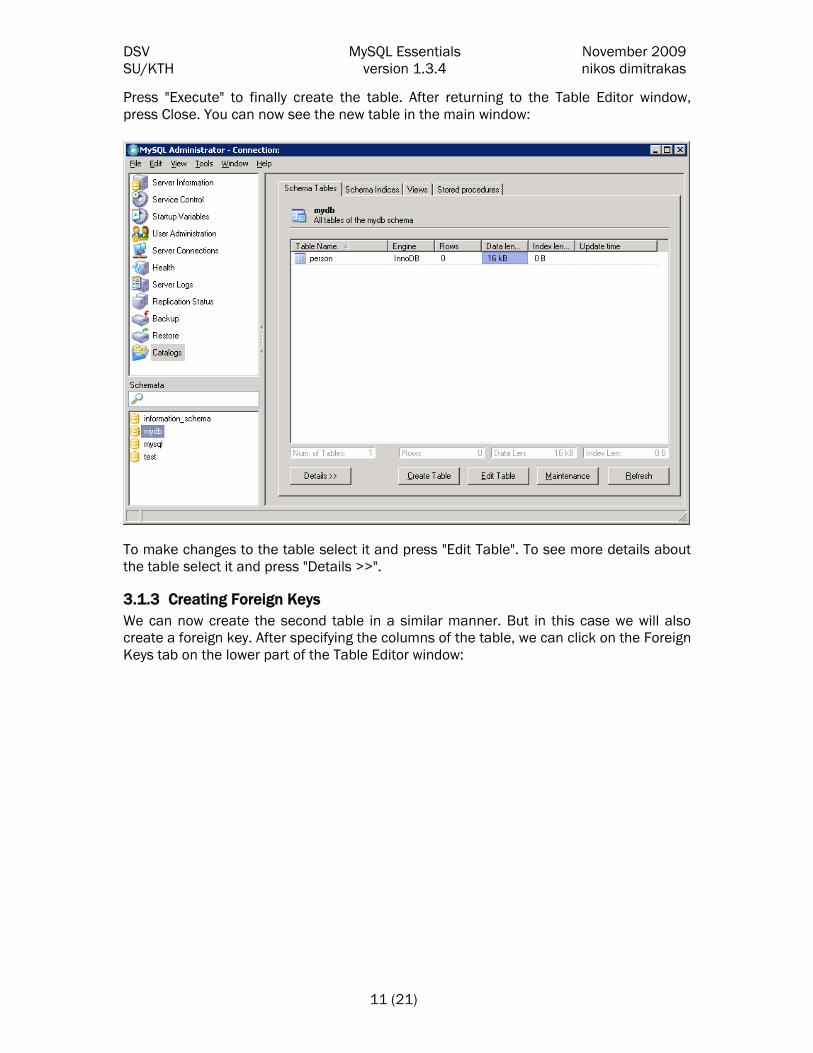
Press "Execute" to finally create the table. After returning to the Table Editor window, press Close. You can now see the new table in the main window:
To make changes to the table select it and press "Edit Table". To see more details about the table select it and press "Details >>".
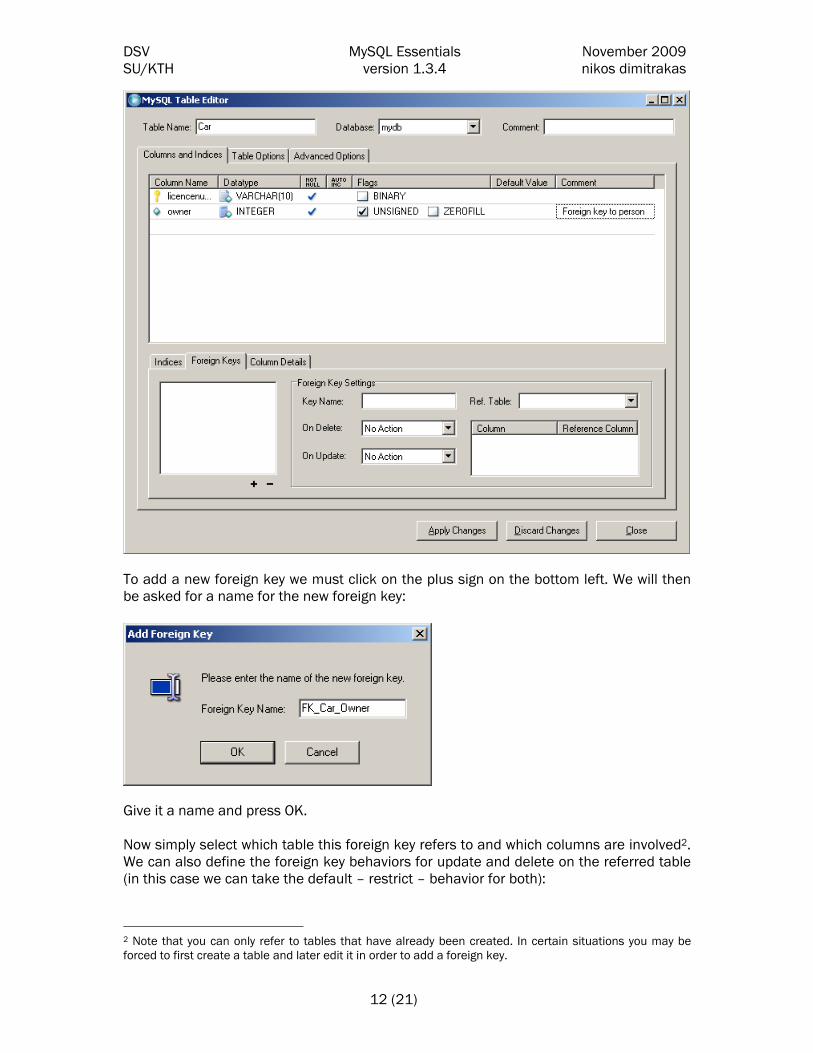
3.1.3 Creating Foreign Keys We can now create the second table in a similar manner. But in this case we will also create a foreign key. After specifying the columns of the table, we can click on the Foreign Keys tab on the lower part of the Table Editor window:
DSV MySQL Essentials November 2009 SU/KTH version 1.3.4 nikos dimitrakas
12 (21)
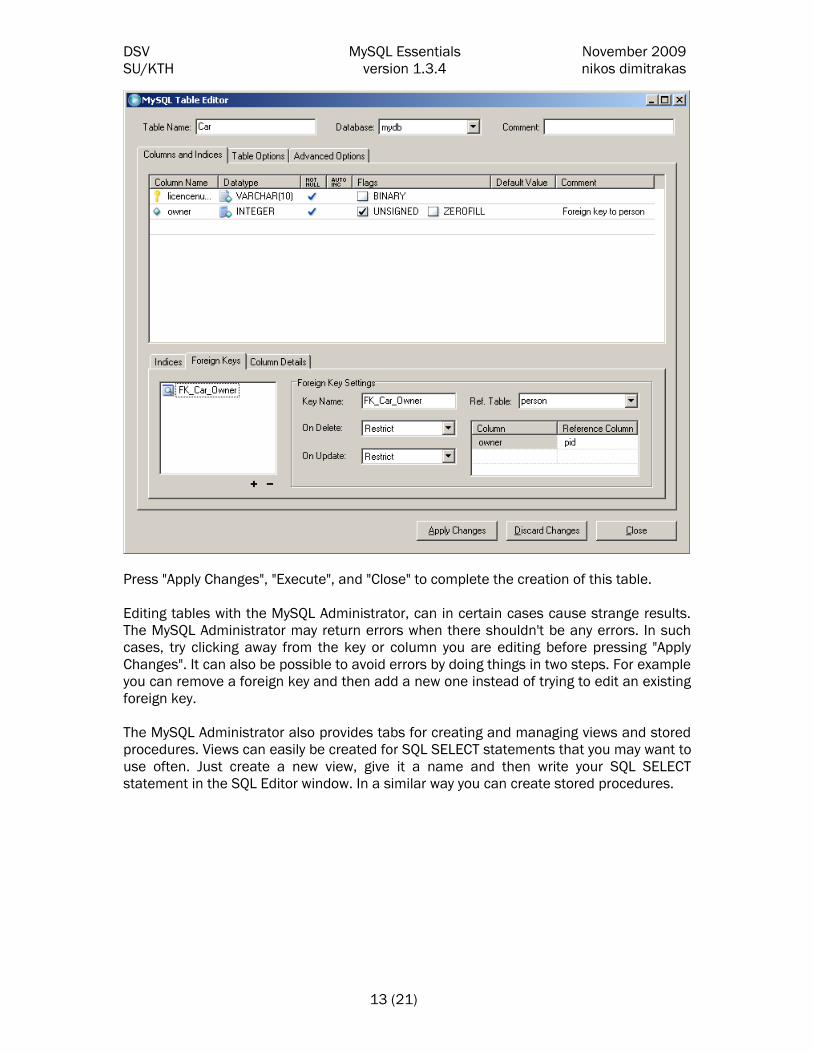
To add a new foreign key we must click on the plus sign on the bottom left. We will then be asked for a name for the new foreign key:
Give it a name and press OK. Now simply select which table this foreign key refers to and which columns are involved2. We can also define the foreign key behaviors for update and delete on the referred table (in this case we can take the default – restrict – behavior for both):
2 Note that you can only refer to tables that have already been created. In certain situations you may be forced to first create a table and later edit it in order to add a foreign key.
DSV MySQL Essentials November 2009 SU/KTH version 1.3.4 nikos dimitrakas
13 (21)
Press "Apply Changes", "Execute", and "Close" to complete the creation of this table. Editing tables with the MySQL Administrator, can in certain cases cause strange results. The MySQL Administrator may return errors when there shouldn't be any errors. In such cases, try clicking away from the key or column you are editing before pressing "Apply Changes". It can also be possible to avoid errors by doing things in two steps. For example you can remove a foreign key and then add a new one instead of trying to edit an existing foreign key. The MySQL Administrator also provides tabs for creating and managing views and stored procedures. Views can easily be created for SQL SELECT statements that you may want to use often. Just create a new view, give it a name and then write your SQL SELECT statement in the SQL Editor window. In a similar way you can create stored procedures.
DSV MySQL Essentials November 2009 SU/KTH version 1.3.4 nikos dimitrakas
14 (21)
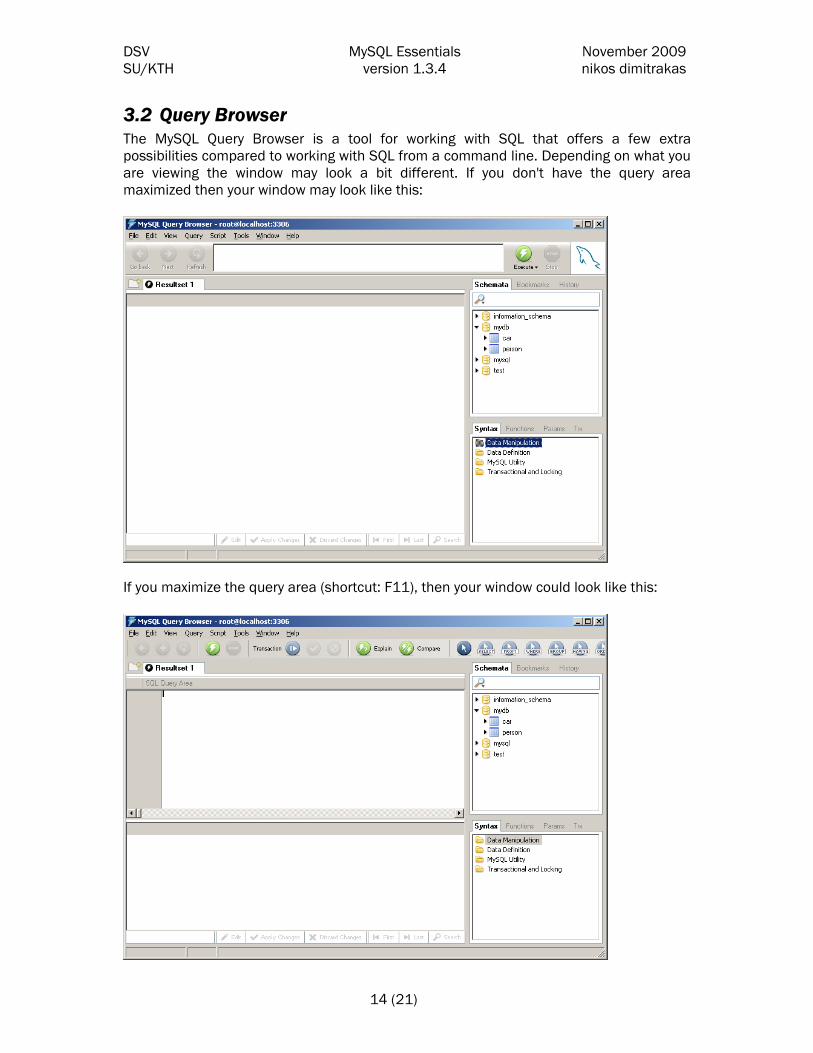
3.2 Query Browser The MySQL Query Browser is a tool for working with SQL that offers a few extra possibilities compared to working with SQL from a command line. Depending on what you are viewing the window may look a bit different. If you don't have the query area maximized then your window may look like this:
If you maximize the query area (shortcut: F11), then your window could look like this:

DSV MySQL Essentials November 2009 SU/KTH version 1.3.4 nikos dimitrakas
15 (21)
The query area is where you can write your SQL statement. You can have several SQL statements open in different query tabs. Under the query area (in each query tab) there is a result area. The result area is where you can see the result of your SQL statement (when there is a result to show). To the right, you can browse your databases and their tables. By double-clicking on a table, you get a ready made SQL statement for selecting all the contents of the table. This part of the Query Browser is like a mini version of the MySQL Administrator. On the right bottom part of the window there is a list of all the commands. Double-click on any command to get help on their syntax. For example about the SELECT statement:
3.2.1 Executing SQL Statements In order to execute an SQL statement that you have written in the query area, you must
either press Control-Space, or click on the Execute button ( ) found either above or to the right of the query area. When you execute a query one of the following will happen:
1. An error message will appear at the bottom if the query is incorrect. 2. The result will appear in the result area if the query is a SELECT statement (or
other statement that returns a result). 3. A success message will appear in the result area if the query is not the kind that
returns any result. Note: When executing a query, it is necessary that MySQL knows which database the tables in the query come from. One way is to right click on the database that you want to use and select the option "Make Default Schema". Then any unqualified tables you use in your query will be assumed to belong to the selected schema/database. Another way is to qualify any tables in your query with the schema name, so instead of writing person, you could write mydb.person.

DSV MySQL Essentials November 2009 SU/KTH version 1.3.4 nikos dimitrakas
16 (21)
3.2.2 Editing Results After executing a SELECT statement, you will see the result in the result area. This result is not just for looking at the data. It is also possible to edit the result (similar to working in Excel). However, the option of editing is not always available. The Edit button under the result indicates whether this result can be edited. Normally only results from queries on one table can be edited. When you are editing a result, you can add, change or remove data. In order to edit the result, you must first click on the Edit button under the result. Then you can start editing you data. No changes are committed to the database until you press the Apply Changes button (next to the Edit button). Until you press the Apply Changes button, any changes you have made will be shown with different colors (blue for changes, green for additions, and red for deletions):
Note that if you have columns that are set to auto increment, then you can leave them empty when inserting new rows. The database manager will create values for them once you have pressed the Apply Changes button.
3.3 Command line In addition to the graphical tools discussed in previous sections, there is the option of working from a command line. The command line can be used to do any of the things described earlier, but it is not as user friendly. So instead of remembering all the commands and typing complicated SQL statements for everything, you can use the graphical tools. But there are certain things that cannot be achieved (yet) through the graphical tools. In this section we will look at a couple of common commands that you may find useful. To use the commands described in the sections that follow, you must start a command prompt window (by executing the command cmd in the Windows Start->Run)
DSV MySQL Essentials November 2009 SU/KTH version 1.3.4 nikos dimitrakas
17 (21)
3.3.1 mysql The command mysql has many functions. One of its functions is to provide an interactive command line environment where you can execute sql statements. If you type mysql ––help in a command prompt, you will see a long list of parameters. The most interesting parameters are:
• -u username Allows you to specify the user name to use when connecting to the database server
• -ppassword (or just –p) Allows you to specify the password to use (or specifies that you should be asked for a password)
• -h host Allows you to specify the address of the database server to connect to. Default is locallhost (the computer you are using)
• -D database Allows you to specify the name of the database to use.
• -e command Allows you to execute one command without entering the command line environment.
• -vvv Forces all commands entered to be echoed. This is especially useful if you are planning to execute a script and you would like to see each command as it is being run.
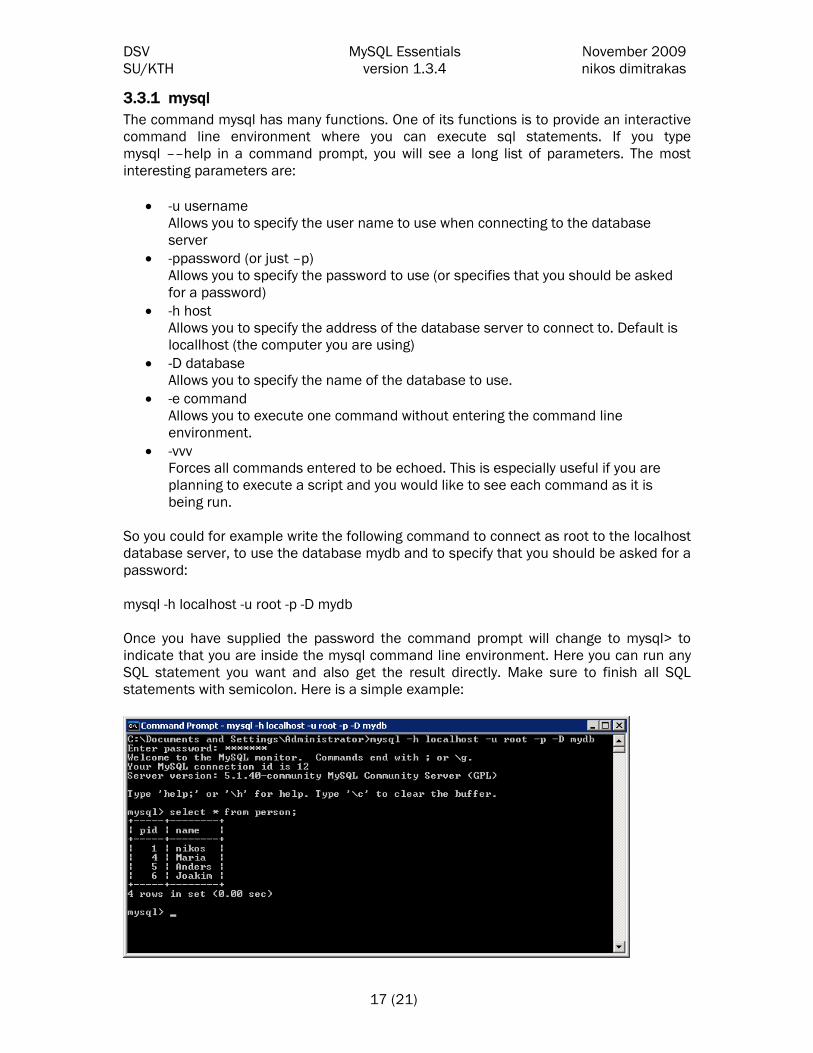
So you could for example write the following command to connect as root to the localhost database server, to use the database mydb and to specify that you should be asked for a password: mysql -h localhost -u root -p -D mydb Once you have supplied the password the command prompt will change to mysql> to indicate that you are inside the mysql command line environment. Here you can run any SQL statement you want and also get the result directly. Make sure to finish all SQL statements with semicolon. Here is a simple example:
DSV MySQL Essentials November 2009 SU/KTH version 1.3.4 nikos dimitrakas
18 (21)
If you type help while inside the mysql command line environment, you will get a list of available commands. A couple of useful commands are:
• source filename Allows you to execute commands stored in a text file. This would be equivalent to writing the commands one by one.
• use database Allows you to change database.
• exit or quit Allows you to return to the windows command prompt.
So if we have a file script.txt with a few commands, we could execute it with any of the following ways:
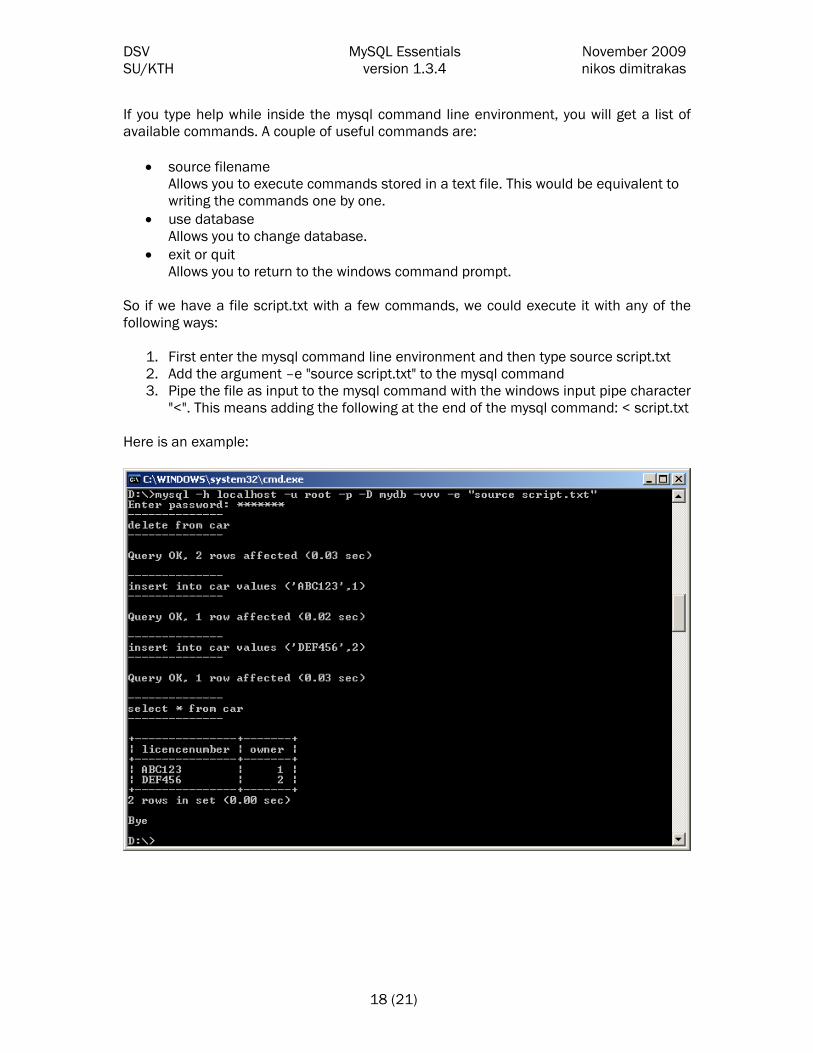
1. First enter the mysql command line environment and then type source script.txt 2. Add the argument –e "source script.txt" to the mysql command 3. Pipe the file as input to the mysql command with the windows input pipe character
"<". This means adding the following at the end of the mysql command: < script.txt Here is an example:
DSV MySQL Essentials November 2009 SU/KTH version 1.3.4 nikos dimitrakas
19 (21)
The content of the file script.txt was: delete from car; insert into car values ('ABC123',1); insert into car values ('DEF456',2); select * from car; The mysql command can be a quite practical tool, especially when it comes to creating a database from a script file. This command together with the mysqldump command, described in the following section, make a very powerful migration and backup combination.
3.3.2 mysqldump The mysqldump command can be used, as the name implies, to create a dump of a database. In this case it means getting a script that creates all the tables (including constraints like foreign keys), views, triggers and any objects that are part of the database, as well as for populating the database. The mysqldump command is quite simple and is similar to the mysql command discussed earlier. It takes the database name as a parameter and it creates a script for it. It can also take the database server address (host address), the user name and the password as parameters, just like the mysql command. We could use the following command to get a script for the database mydb from the local database server: mysqldump -u root -p -h localhost mydb This would of course show the script directly in the command prompt window. If we want to save the script as a file, we can use the output pipe character ">" and specify the filename: mysqldump -u root -p -h localhost mydb >newscript.txt
3.3.3 Other Commands MySQL offers some more command line commands. They will not be covered here, but we can mention a couple of them:
• mysqlcheck This program can be used to CHECK, REPAIR, ANALYZE or OPTIMIZE tables.
• mysqlimport Loads tables with data from text files.
• mysqlshow Shows the structure of a databases, tables and columns.
DSV MySQL Essentials November 2009 SU/KTH version 1.3.4 nikos dimitrakas
20 (21)
4 Embedded SQL In many cases it is relevant to connect a program to your database. In order to do this, your program must know how to communicate with the database. This is done using so called database drivers. For each language and each database manager there are specific drivers. There are MySQL drivers for ODBC, Java, PHP, .NET, and many more languages. The necessary drivers can be downloaded from here: http://dev.mysql.com/downloads/connector/ In order to use the drivers you will need to make sure they are available to your program (and perhaps to the compiler). This procedure is different for each programming language or environment. For example in Java the driver is called com.mysql.jdbc.Driver and to connect to a MySQL server you must use the following connection URL syntax: jdbc:mysql://<host>:<port3306>/<database> For example: jdbc:mysql://localhost:3306/mydb Then the file mysql-connector-java-5.1.10-bin.jar (or another version) must be available to both the Java compiler and the Java execution engine / Java Runtime Environment / Java Virtual Machine. The JAR file is available in the file mysql-connector-java-5.1.10.zip that can be downloaded from the MySQL site.
4.1 Linking MySQL to Access If you want to link you MySQL tables to Microsoft Access, then you will need to create an ODBC alias for your MySQL database. This requires an ODBC driver for MySQL. The MySQL ODBC driver can be downloaded from: http://dev.mysql.com/downloads/connector/ The latest version of the MySQL ODBC driver at the time this compendium was written is 5.1.5. After installing the driver (mysql-connector-odbc-5.1.5-win32.msi) you will be able to create an ODBC alias for your MySQL database. You can read more about this process in the compendium entitled "Introduction to MS Access" found at: http://coursematerial.nikosdimitrakas.com/access/

DSV MySQL Essentials November 2009 SU/KTH version 1.3.4 nikos dimitrakas
21 (21)
5 Epilogue We have reviewed in previous chapters some of the most common tools and functionality offered by MySQL. We have looked at some graphical tools and some command line utilities. With all this, you should have enough information to set up a database with MySQL. The tools we have seen can be compared to similar tools offered by other database managers. DB2's Command Editor, Oracle's SQL Plus or TOAD, and SQL Server's Query Analyzer can be compared to MySQL's Query Browser, while the MySQL Administrator is similar to DB2's Control Center and SQL Server's Enterprise Manager. MySQL is of course not as powerful and complex as database managers such as DB2 or SQL Server, but it can be a fine choice for a prototype or a smaller system. I hope you have found this introduction educational and enjoyable. Please, don't hesitate to send me any comments that could help improve this compendium. The Author nikos dimitrakas
Related Documents