mySalesChain ® Platinum User Manual Revision 3.0 www.SalesChain.com © January 2022 SalesChain L.L.C.

Welcome message from author
This document is posted to help you gain knowledge. Please leave a comment to let me know what you think about it! Share it to your friends and learn new things together.
Transcript

mySalesChain®
PlatinumUser Manual
Revision 3.0www.SalesChain.com© January 2022 SalesChain L.L.C.

Copyright 2022 SalesChain, LLC. All rights reserved.
Information in this document is subject to change without notice. The software described in this document is furnished under a license agreement ornondisclosure agreement. The software may be used or copied only in accordance with those agreements. No part of this publication may be reproduced, storedin a retrieval system, or transmitted in any form or any means electronic or mechanical, including photocopying and recording for any purpose other than thepurchaser’s personal use without the written permission of SalesChain.
2
Writer Date
Version 1.0 Robert Schuldt 2012
Version 2.0 Elijah Pineda 2017
Version 3.0 Mary Ellen Hogan & Matthew Szczygiel 2022
Version History & Disclaimer
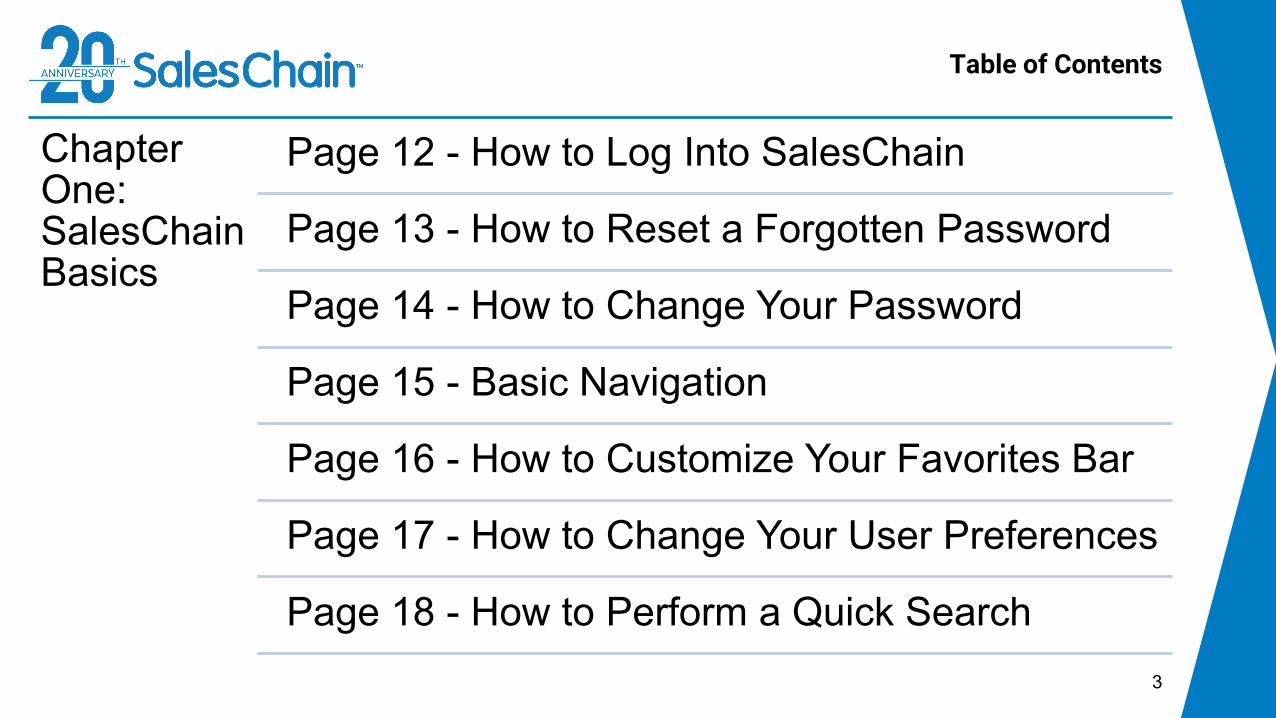
Table of Contents
3
Chapter One: SalesChain Basics
Page 12 - How to Log Into SalesChain
Page 13 - How to Reset a Forgotten Password
Page 14 - How to Change Your Password
Page 15 - Basic Navigation
Page 16 - How to Customize Your Favorites Bar
Page 17 - How to Change Your User Preferences
Page 18 - How to Perform a Quick Search
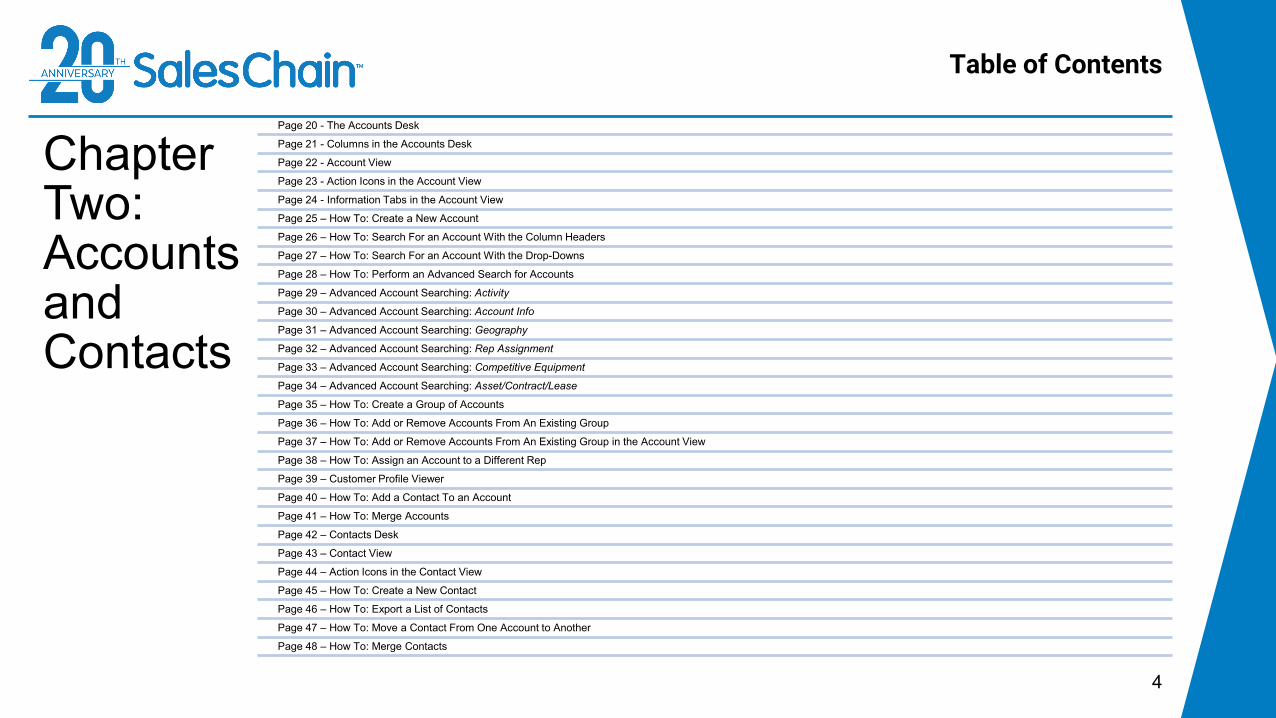
Table of Contents
4
Chapter Two: Accounts and Contacts
Page 20 - The Accounts Desk
Page 21 - Columns in the Accounts Desk
Page 22 - Account View
Page 23 - Action Icons in the Account View
Page 24 - Information Tabs in the Account View
Page 25 – How To: Create a New Account
Page 26 – How To: Search For an Account With the Column Headers
Page 27 – How To: Search For an Account With the Drop-Downs
Page 28 – How To: Perform an Advanced Search for Accounts
Page 29 – Advanced Account Searching: Activity
Page 30 – Advanced Account Searching: Account Info
Page 31 – Advanced Account Searching: Geography
Page 32 – Advanced Account Searching: Rep Assignment
Page 33 – Advanced Account Searching: Competitive Equipment
Page 34 – Advanced Account Searching: Asset/Contract/Lease
Page 35 – How To: Create a Group of Accounts
Page 36 – How To: Add or Remove Accounts From An Existing Group
Page 37 – How To: Add or Remove Accounts From An Existing Group in the Account View
Page 38 – How To: Assign an Account to a Different Rep
Page 39 – Customer Profile Viewer
Page 40 – How To: Add a Contact To an Account
Page 41 – How To: Merge Accounts
Page 42 – Contacts Desk
Page 43 – Contact View
Page 44 – Action Icons in the Contact View
Page 45 – How To: Create a New Contact
Page 46 – How To: Export a List of Contacts
Page 47 – How To: Move a Contact From One Account to Another
Page 48 – How To: Merge Contacts

Table of Contents
5
Chapter Three: Actions Activities and Appointments
Page 50 – Schedule Desk
Page 51 – Schedule Desk: The Task Side bar
Page 52 – Schedule Desk: Task View
Page 53 – How To: Create a New Task From the Account View
Page 54 – How To: Create a New Task From the Task View
Page 55 – How To: Create a Recurring Task
Page 56 – How To: Add a Note to An Account
Page 57 – How To: Create Quick Tasks and Quick Notes
Page 58 – How To: Add a Sales Next Call Date
Page 59 – How To: Insert Tasks in Bulk
Page 60 – How To: Insert Notes in Bulk
Page 61 – How To: Assign A Vertical Class to Accounts in Bulk
Page 62 – How To: Reassign Accounts To A Different Rep in Bulk
Page 63 – How To: Complete a Task
Page 64 – How To: Complete Tasks in Bulk
Page 65 – How To: Reassign Tasks in Bulk
Pate 66 – How To: Change The Due Date of Tasks in Bulk
Page 67 – How To: Edit a Task From the Schedule Desk
Page 68 – How To: Make a New Appointment From the Account View
Page 69 – Outlook 365 Integration
Page 70 – How To: Set Up SalesChain X Outlook 365 Sync
Page 71 – How To: Push Emails From Outlook 365 Into SalesChain
Page 72 – Technical Requirements for Outlook 365 Integration
Page 73 – How To: Send an Email From the Account View
Page 74 – The Email Request Log
Page 75 – How To: Attach a File to An Account
Pate 76 – How To : Generate a Document From the Account View
Page 77 – How To: Add a Competitive Equipment Record

Table of Contents
6
Chapter Four: Deal Pricing
Page 79 – Lead View
Page 80 – Action Icons in the Lead View
Page 81 – How To: Create a New Lead
Page 82 – How To: Edit a Lead
Page 83 – How To: Create a New Proposal From the Lead View
Page 84 – How To: Create a New Proposal From the Account View
Page 85 – How To: Create a New Order From the Account View
Page 86 – How To: Clone a Proposal
Page 87 – How To: Make a Proposal Into An Order
Page 88 – How To: Set a Proposal as the Primary Proposal
Page 89 – How To: Change a Proposal or Order’s Sale Type
Page 90 – How To: Change an Order’s Status
Page 91 – The Order Desk
Page 92 – Account View: The Sales Tab
Page 93 – Tabs in the Order Breakdown
Page 94 – Proposal and Order Pricing: The General Tab
Page 95 – Proposal and Order Pricing: The Products Tab
Page 96 – How To: Add a New Bundle From The Catalog
Page 97 – How To: Manually Add a New Bundle (No Catalog)
Page 98 – How To: Edit a Bundle
Page 99 – How To: Clone a Bundle
Page 100 – The Line-Item View
Page 101 – Proposal and Order Pricing: The Service Tab
Page 102 – Service Tab Vocabulary
Page 103 – How To: Change Your Service Contract Type
Page 104 – How To: Change Service Rates, Allowances, and Overages
Page 105 – How To: Price Blended Service
Page 106 – How To: Price a Service Takeover
Page 107 – How To: Group Machines for Service
Page 108 – Proposal and Order Pricing: The IT Services Tab
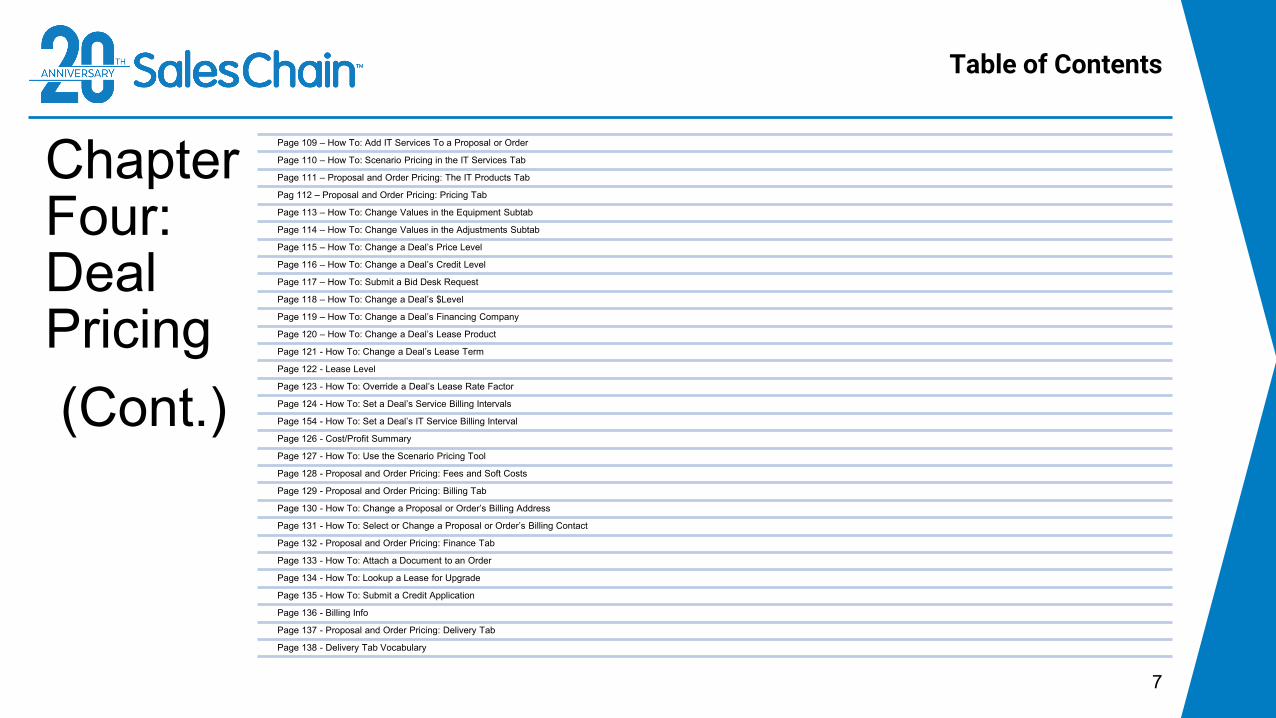
Table of Contents
7
Chapter Four: Deal Pricing(Cont.)
Page 109 – How To: Add IT Services To a Proposal or Order
Page 110 – How To: Scenario Pricing in the IT Services Tab
Page 111 – Proposal and Order Pricing: The IT Products Tab
Pag 112 – Proposal and Order Pricing: Pricing Tab
Page 113 – How To: Change Values in the Equipment Subtab
Page 114 – How To: Change Values in the Adjustments Subtab
Page 115 – How To: Change a Deal’s Price Level
Page 116 – How To: Change a Deal’s Credit Level
Page 117 – How To: Submit a Bid Desk Request
Page 118 – How To: Change a Deal’s $Level
Page 119 – How To: Change a Deal’s Financing Company
Page 120 – How To: Change a Deal’s Lease Product
Page 121 - How To: Change a Deal’s Lease Term
Page 122 - Lease Level
Page 123 - How To: Override a Deal’s Lease Rate Factor
Page 124 - How To: Set a Deal’s Service Billing Intervals
Page 154 - How To: Set a Deal’s IT Service Billing Interval
Page 126 - Cost/Profit Summary
Page 127 - How To: Use the Scenario Pricing Tool
Page 128 - Proposal and Order Pricing: Fees and Soft Costs
Page 129 - Proposal and Order Pricing: Billing Tab
Page 130 - How To: Change a Proposal or Order’s Billing Address
Page 131 - How To: Select or Change a Proposal or Order’s Billing Contact
Page 132 - Proposal and Order Pricing: Finance Tab
Page 133 - How To: Attach a Document to an Order
Page 134 - How To: Lookup a Lease for Upgrade
Page 135 - How To: Submit a Credit Application
Page 136 - Billing Info
Page 137 - Proposal and Order Pricing: Delivery Tab
Page 138 - Delivery Tab Vocabulary

Table of Contents
8
Chapter Four: Deal Pricing(Cont.)
Page 139 - Proposal and Order Pricing: Delivery Tab – Location Subtab
Page 140 – How To: Add Additional Delivery Jobs to an Order
Page 141 – How To: Remove Delivery Jobs From an Order
Page 142 – Proposal and Order Pricing: Delivery Tab – Info Subtab
Page 143 – How To: Request and Schedule a Delivery Date
Page 144 – How To: Allocate Assets to Delivery Jobs
Page 145 – How To: Add Pickup and Move Instructions to a Delivery Job
Page 146 – How To: Edit Pickup and Move Instructions on a Delivery Job
Page 147 - Proposal and Order Pricing: Delivery Tab – Work Items Subtab
Page 148 - Proposal and Order Pricing: Commissions Tab
Page 149 - How To: Change an Order’s Commission Level
Page 150 - How To: Set Up Split Rep Commissions
Page 151 - How To: Set Up Recurring Commissions For An Order
Page 152 – Proposal and Order Pricing: Wizard Tab
Page 153 – How To: Change Pricing Levels for Optional Accessories
Page 154 – How To: Associate Optional Accessories for Upgrades
Page 155 – How To: Customize the Information Shown on a Proposal
Page 156 – How To: Generate a Proposal
Page 157 – Proposal and Order Pricing: Documents Tab
Page 158 – How To: Generate a Document Package
Page 159 – How To: Rename a Document Package
Page 160 - How To: View and Edit a Document Package
Page 161 – How To: Send a Document for e-Sign
Page 162 – How To: e-Sign a Document on the Spot
Page 163 – How To: Revoke a Signature Request
Page 164 - How To: Clone a Document Package
Page 165 – How To: Track e-Sign Progress
Page 166 – How To: Send, Print, and Export Documents

Learn More at www.SalesChain.com/about
SalesChain is a software and services company founded in 2002. We are proud to serve office technology resellers and manufacturers by providing purpose-built cloud-based technology solutions that provide business workflow automation. Our company is based in Waterbury, Connecticut with our primary data center housed at Cyrus One Wappingers Falls, New York.
In the beginning, our focus was to empower sales teams with information, organization, and automation with a specific focus on managing lease portfolio turns. We have expanded our value proposition to include support for the entire enterprise, including proposal pricing, documentation, order fulfillment workflow, service pricing, commissions, delivery workflow automation, and document management.
Along with our expanded functionality, we’ve developed integrations to some of the industry’s most respected companies, including a bi-directional integration to e-Automate, the BTA channel’s ERP system of choice.We are proud to support dealers across North America, with dealers in 46 states and 3 Canadian provinces. The most telling fact about SalesChain, is that many of our customers, like the Gordon Flesch Company, have been with us for over 14 years!
About SalesChain
9

This presentation template was created by Slidesgo, including icons by Flaticon, and infographics & images by Freepik and illustrations by Stories
SupportWould you rather speak to a person or get email support?
Contact our manned help desk using the information below:
[email protected](203) 262-1611 www.SalesChain.com/supportHours: 9am-5pm EST Monday-Friday
10

SalesChain Basics:Basic navigation, login instructions, and customization of user preferences
1
11

Logging into the SalesChain system should feel familiar for any digital native!
• If you’re logging in for the first time, the system will prompt you to change your password for future log ins.
• We support Google Chrome, Mozilla Firefox, Microsoft Edge, Internet Explorer and Safari internet browsers
Quick Tips:
How To: Log Into SalesChain
12
2
1
4
To log into SalesChain:
1. Navigate to www.mysaleschain.com2. Enter your email address, company ID and user ID3. Optional: Check the Remember me box if you are on a
trusted computer4. Click Sign In
View a tutorial video here
3

It is possible to reset your SalesChain account password if you lost or have forgotten it.
To reset a forgotten password:
1. Navigate to www.mysaleschain.com2. Click on Forgot your password? On the login screen:3. Enter your company ID, user ID and email address4. Click Send Reminder5. Password change instructions will be emailed to you. Note: If you don’t see this email, be sure to check your junk or spam folder!
View a tutorial video here
How to: Reset a Forgotten Password
13
1
2
3
4

How To: Change Your Password
14
To change your SalesChain Account Password:1. Navigate to: Menu Sidebar > User Settings > Change Password2. Enter your Current and desired new password3. Click “Ok”
View a tutorial video here.
1
2
3
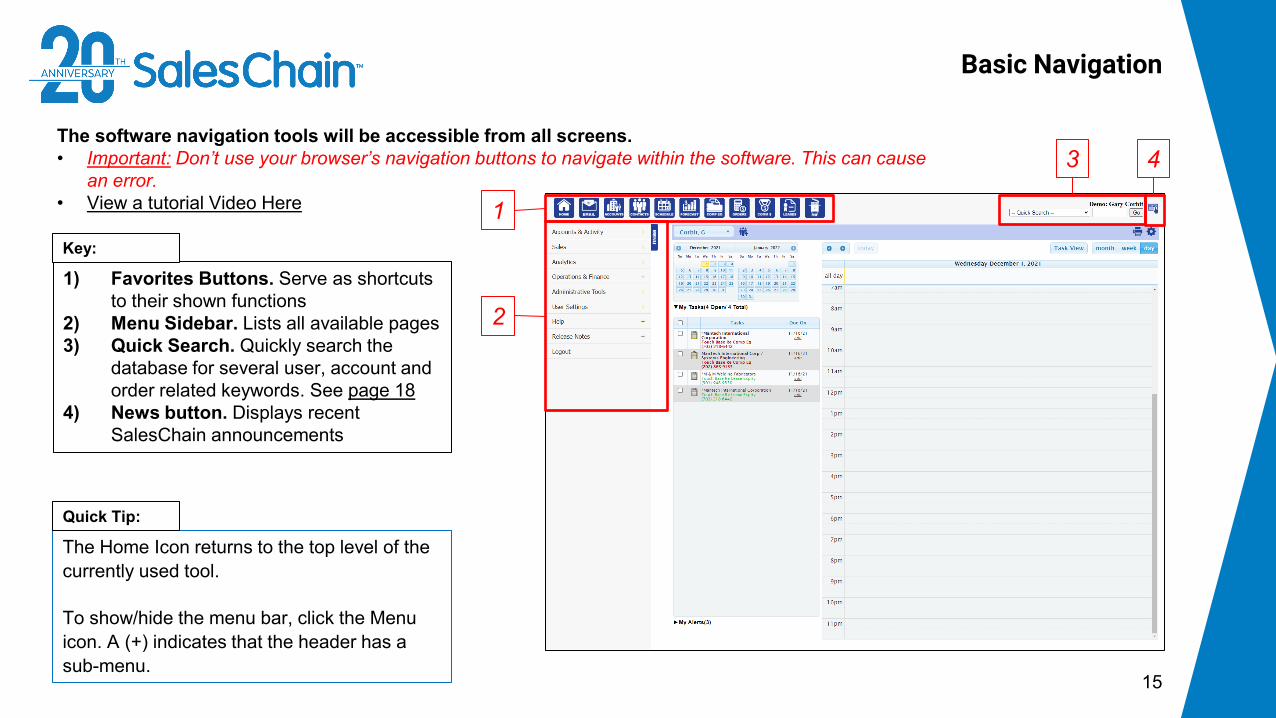
The software navigation tools will be accessible from all screens. • Important: Don’t use your browser’s navigation buttons to navigate within the software. This can cause
an error.• View a tutorial Video Here
Basic Navigation
15
1) Favorites Buttons. Serve as shortcuts to their shown functions
2) Menu Sidebar. Lists all available pages3) Quick Search. Quickly search the
database for several user, account and order related keywords. See page 18
4) News button. Displays recent SalesChain announcements
The Home Icon returns to the top level of the currently used tool.
To show/hide the menu bar, click the Menu icon. A (+) indicates that the header has a sub-menu.
Quick Tip:
Key:
1
2
3 4

How To: Customize Your Favorites Bar
16
To choose which icons show up in your favorites bar:1. Navigate to: Menu Sidebar > User Settings > Favorites.2. Check the box next to the items you wish to have in your favorites bar (or un-check those which you
do not want to see).3. Click “Save”.
1
2
3

How To: Change User Preferences
17
You’re able to change your user settings in the system to better suit your needs.Note: Changing some user preferences can result in major changes to the login or order screens. If you are not sure what a setting does, call the SalesChain help desk before making changes!
1
23
You must log out and log back in for any changes to take effect.
Quick Tip:
To change your user preferences:
1. Navigate to: Menu Sidebar > User Settings > Preferences
2. Make sure the “Use System Default” box is unchecked
3. Make the desired changes to your user settings
4. Click “Save”
View a tutorial Video Here
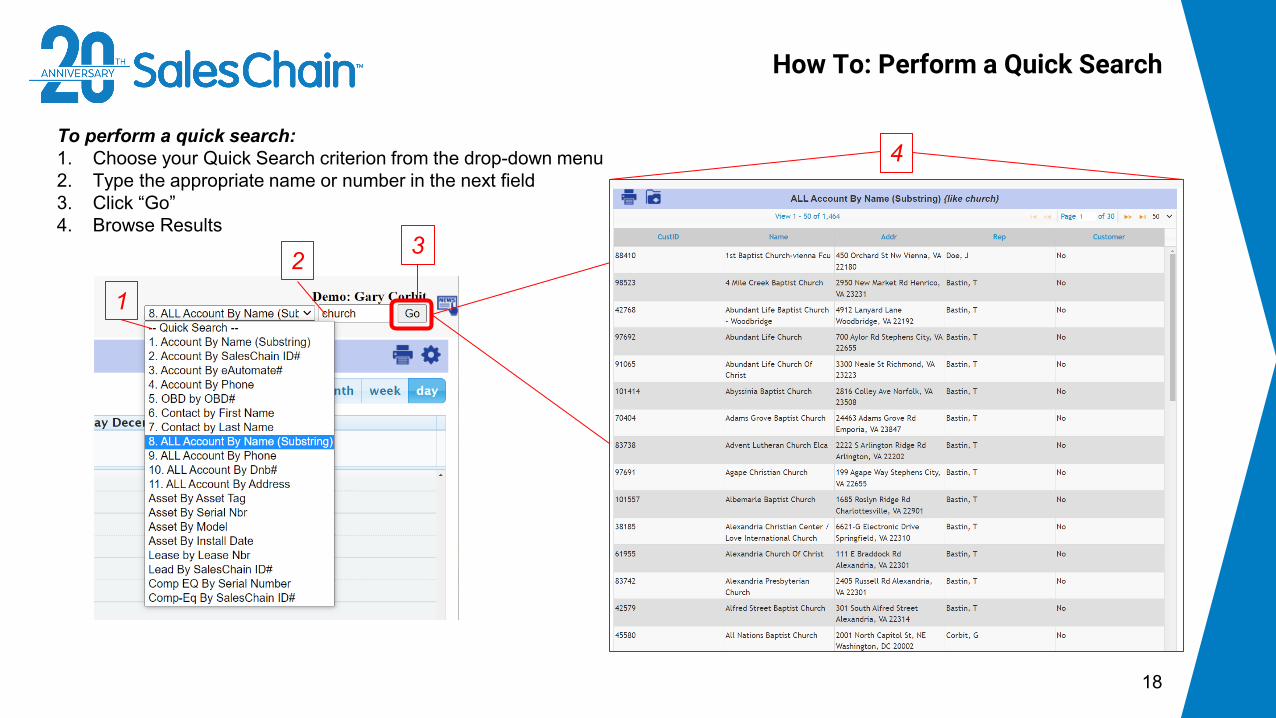
How To: Perform a Quick Search
18
To perform a quick search:1. Choose your Quick Search criterion from the drop-down menu2. Type the appropriate name or number in the next field3. Click “Go”4. Browse Results
1
2 3
4

Accounts and Contacts
CRM functions within the SalesChain system including activity tracking and account management.
2
19

The Accounts Desk
20
The accounts screen displays all company records that are accessible by a user. • To open the accounts desk if you have it set as a favorite, click on the Accounts icon• OR navigate to: Menu Sidebar > Accounts and Activity > Accounts
1) Create a new account2) Print report (permission
pending)3) Advanced profile viewer4) Shows/hides search toolbar5) Column chooser6) Save search criteria as default7) Actions drop down8) Advanced search fields9) Basic search any column
header10) Click on any account to view its
details
Key: 1 32 4 5 6
8
7 9
10

Columns In the Accounts Desk
21
Column Description
C C stands for Customer and indicates the account is a customer.
L L stands for Lead and indicates the account has an active lead.
H H stands for HubSpot and indicates the account is syncing with HubSpot.
ID Displays the account’s SalesChain ID number which is assigned upon account creation. This number helps SalesChain support staff identify the account.
Cust# Cust# is short for Customer Number. This column displays the account’s e-Automate number if a record of this account exists in e-Automate.
Sales Rep Displays the primary sales rep user who is assigned to this account.
Name Displays the name of the company which this account record represents.
LL LL is short for Lease Legal and displays the Legal name of the company which this account record represents.
DBA DBA is short for Doing Business As and displays the formal DBA name of the company which this account record represents.
Address Displays the street address of this company record.
City Displays the city in which this company record is listed.
State Displays the state code in which this company record is listed.
Zip Displays the zip code in which this company record is listed.
Phone Displays the business phone number associated with this account.
URL Displays the URL of the website associated with this account record.
Model Displays the model of machine if you are performing a search with an asset filter.
Class Class is short for for Classification and is highly customizable based on configuration. It displays profile targeting by size, product type, and customer status.
VClass VClass is short for Vertical Class and displays this account records vertical class association.

Account View
22
Clicking on any account will bring you to the corresponding Account View.*See Page 23 for more information regarding the icons & page 24 for more information regarding the tabs in the account view.
1) Action and Activity Icons2) Basic Account Information3) Profile targeting and
Segmentation Icons (if enabled)
4) Save Button (turns blue when there are unsaved changes)
5) Navigation Arrows6) Switch View Layout7) Profile Targeting Selections8) Strategy Box9) Quick Entry Utility10) Next Call Date Utility11) Detailed Information Tabs
Key:
1
6
2
5
8
7
9
10
43
11
The default Account view is the Profiling View (shown above). You can change your default view via Menu Sidebar > User Settings > Preferences
Quick Tip:

Action Icons in the Account View
23
Icon Associated Action
Print the contents of this report. (Permission Pending)
Attach a document to the account.
Generate document(s) for the account.
Create a lead for the account.
Compose a note for the account.
Schedule a task for the account.
Schedule an appointment for the account.
Compose a new email for the account.
Add a new contact to the account.
Add competitor equipment information to the account.
Edit the strategy development opportunity values.
Create a new lease for the account.
Create a new agreement for the account.
Merge to customer account.
Create a new proposal for the account.
Create a new order for the account.
View the Google map to locate this account.
View the detailed profile entry form for the account.
View the quick view entry form for the account.
View the combined entry form for the account.

Information Tabs in the Account View
24
1
Tab Description
Contacts Lists contacts for the account.
Book Lists assets, agreements, and leases, for this account.
Activity Lists emails, notes, tasks, appointments, and documents (attached and generated) for the account only or for all associated records.
TCO Analysis TCO is short for total cost of ownership. It shows operating expenses for the customer’s current machine fleet and proposes changes or additions to that fleet.
Sales Lists leads, proposals, orders, and possibly competitor equipment for the account.
Marketing Lists Dun & Bradstreet profile and marketing profile.
CompEQ CompEQ is short for competitive equipment.
Groups Lists groups that the account is assigned to and allows you to change group assignments.
Workflow Lists workflow processes.
SRA SRA is short for sales rep assignment.
All Lists all items in the tabs.

How To: Create a New Account
25
You can create a new account to add new companies to your SalesChain database. View a tutorial Video Here1. Due Diligence: Perform quick search #8 “All Account By Name (Substring)” to make sure the account does not yet exist.2. Navigate to the accounts screen by clicking on the Accounts icon OR navigate to: Menu Sidebar > Accounts and Activity
> Accounts 3. Click on the new account icon4. Enter account information including basic information, up to three contacts, a note, a follow-up task, and SRA Details.5. Click “Save”
2 3 4
51
You can also create a new account by navigating to Menu Sidebar > Accounts and Activity > NEW account
Quick Tip:
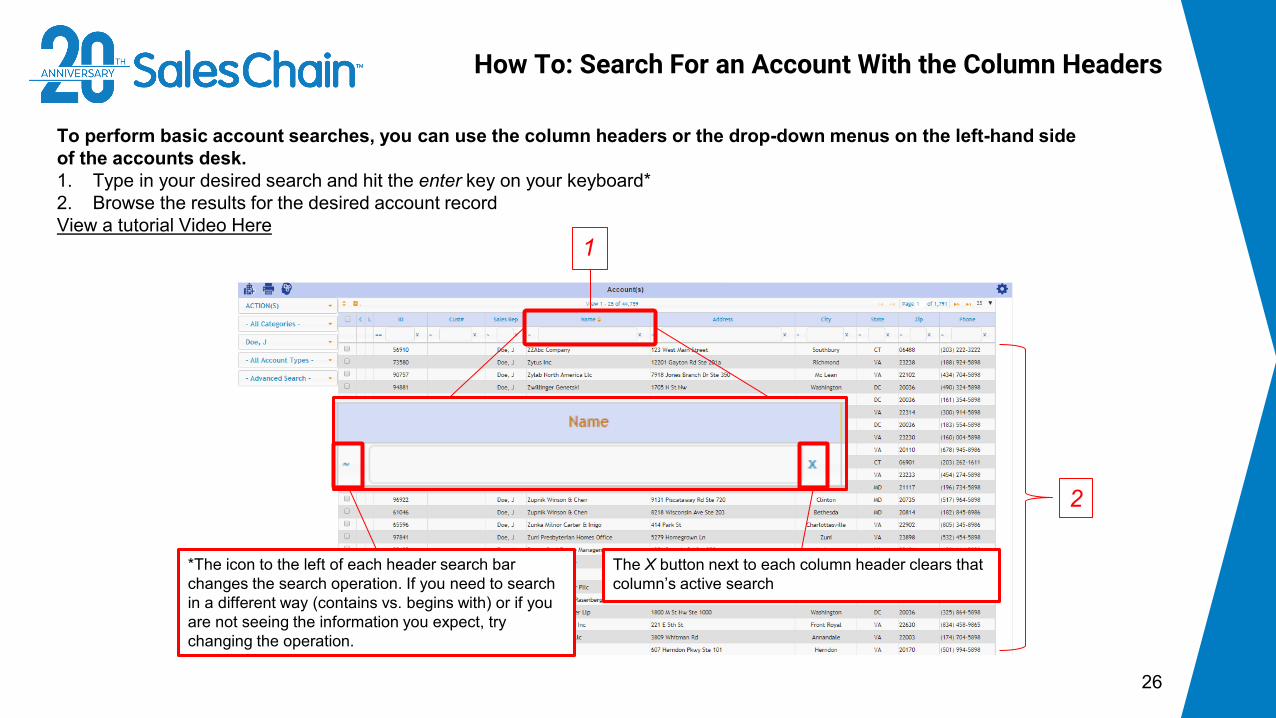
How To: Search For an Account With the Column Headers
26
To perform basic account searches, you can use the column headers or the drop-down menus on the left-hand side of the accounts desk. 1. Type in your desired search and hit the enter key on your keyboard*2. Browse the results for the desired account recordView a tutorial Video Here
*The icon to the left of each header search bar changes the search operation. If you need to search in a different way (contains vs. begins with) or if you are not seeing the information you expect, try changing the operation.
The X button next to each column header clears that column’s active search
1
2

How To: Search For an Account With the Drop-Downs
27
To perform basic account searches, you can use the column headers or the drop-down menus on the left-hand side of the accounts desk. 1. Select the specific criteria you’re looking for from the drop downs shown2. Browse the results for the desired account record
For information on using the advanced search drop down, see pages 28 - 34.
View a tutorial Video Here
1
2
The drop downs shown may differ depending on system configuration or user permission level.
Quick Tip:

How To: Perform an Advanced Search for Accounts
28
To search for more detailed account information than is offered in the column headers or drop-downs, you can perform advanced searches. 1. Click on the advanced search drop down2. Select the category of criteria you would like to search by, account activity in this example. See pages 29 - 34 for more detailed
criteria information3. Enter your desired search in the pop-up window4. Click “Search” 5. Browse the resultsView a tutorial Video Here
1
2
5
3
4

Advanced Account Searching: Activity
29
The advanced search allows you to search for recent user activity on accounts. You can search for the below criteria:
• Life Cycle: Search for the date the account was created or last edited
• Note Contains: Search notes for certain pieces of text with a keyword search
• Last Activity: Search for accounts with past activity within a certain timeframe
• Next Activity: Search for accounts with pending activity scheduled within a certain timeframe
• Next Call Objective: Search for the activity type of the next call date activity
Note: These are the default fields. Additional fields may appear in this pop up depending on your system configuration.
When searching for next or last activity, use the category basic search drop-down to determine which relative rep or reps' activity you’re searching for. If none is selected, you will be searching for all activity, regardless of what user performed that activity.
For example: use sales rep to search for activity by the account’s relative sales rep only.
Quick Tip:
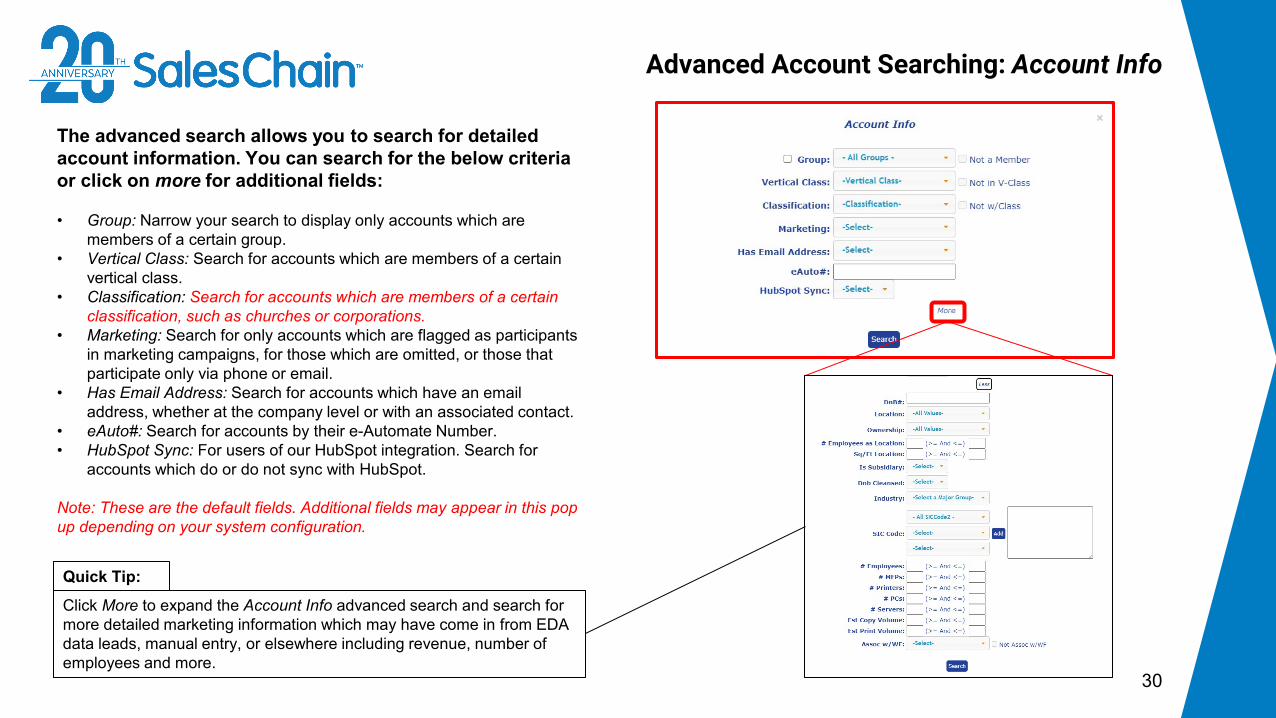
Advanced Account Searching: Account Info
30
The advanced search allows you to search for detailed account information. You can search for the below criteria or click on more for additional fields:
• Group: Narrow your search to display only accounts which are members of a certain group.
• Vertical Class: Search for accounts which are members of a certain vertical class.
• Classification: Search for accounts which are members of a certain classification, such as churches or corporations.
• Marketing: Search for only accounts which are flagged as participants in marketing campaigns, for those which are omitted, or those that participate only via phone or email.
• Has Email Address: Search for accounts which have an email address, whether at the company level or with an associated contact.
• eAuto#: Search for accounts by their e-Automate Number.• HubSpot Sync: For users of our HubSpot integration. Search for
accounts which do or do not sync with HubSpot.
Note: These are the default fields. Additional fields may appear in this pop up depending on your system configuration.
Click More to expand the Account Info advanced search and search for more detailed marketing information which may have come in from EDA data leads, manual entry, or elsewhere including revenue, number of employees and more.
Quick Tip:

Advanced Account Searching: Geography
31
The advanced search allows you to search for accounts based upon their geographical information. You can search for the below criteria:
• Street: Search for one or many street addresses• City: Search for one or many city names• State Code: Search for one or many state codes• Zip Code: Search for one or many zip codes• County: Select a county from the drop-down to search for
accounts in that county. Drop-down options are made available based upon information in your SalesChaindatabase, meaning you will only be able to chose from those counties which exist in the system and to which accounts are assigned.
Note: These are the default fields. Additional fields may appear in this pop up depending on your system configuration.
Advanced Search fields allow you to search for multiple values by creating comma separated lists (such as the example in the screenshot top right). This is particularly helpful when searching for accounts in several zip codes for either blitzing campaigns or initial sales rep assignment.
Quick Tip:

Advanced Account Searching: Rep Assignment
32
The advanced search allows you to modify the basic drop-down searches for rep assignment and category (see figure 1). You can alter the below criteria:
• Not Associated w/Selected Rep: Check this box to invert the Sales Rep basic search drop-down’s operation, and view accounts not associated with that rep
• Show Hidden: Show accounts which otherwise have a hidden status (permission pending)
• Protected: Search for accounts which do or do not have a protected status. This status prevents accounts from falling into the automatic assignment rules based on zip code or other territory assignments.
Note: These are the default fields. Additional fields may appear in this pop up depending on your system configuration.
The rep assignment advanced searches are intended to modify basic searches for Sales Rep and Sales Rep Category, which are performed using the basic search drop-downs. See page 20 for more information and the images to the right for reference.
Quick Tip:
figure 1: Basic searches for sales rep and sales rep category
Advanced Account Searching: Competitive Equipment
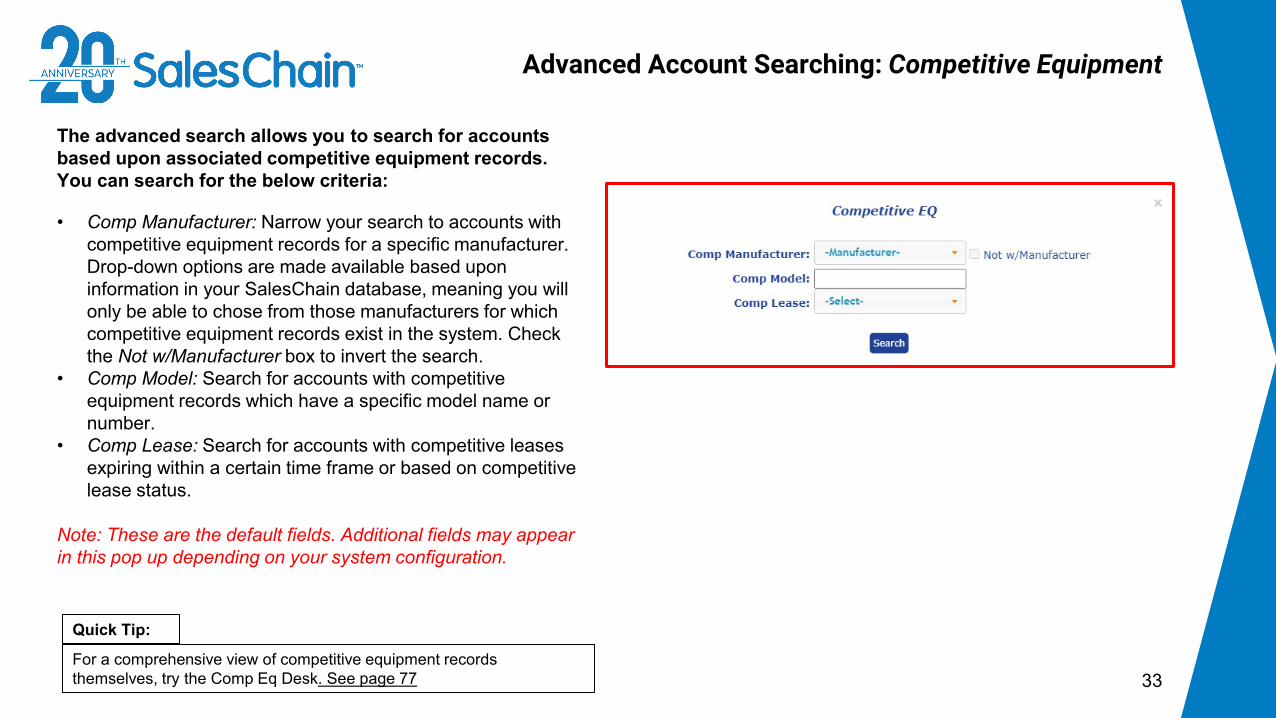
33
The advanced search allows you to search for accounts based upon associated competitive equipment records. You can search for the below criteria:
• Comp Manufacturer: Narrow your search to accounts with competitive equipment records for a specific manufacturer. Drop-down options are made available based upon information in your SalesChain database, meaning you will only be able to chose from those manufacturers for which competitive equipment records exist in the system. Check the Not w/Manufacturer box to invert the search.
• Comp Model: Search for accounts with competitive equipment records which have a specific model name or number.
• Comp Lease: Search for accounts with competitive leases expiring within a certain time frame or based on competitive lease status.
Note: These are the default fields. Additional fields may appear in this pop up depending on your system configuration.
For a comprehensive view of competitive equipment records themselves, try the Comp Eq Desk. See page 77
Quick Tip:

Advanced Account Searching: Asset/Contract/Lease
34
The advanced search allows you to search asset, contract, and lease information from your ERP system right inside of SalesChain. You can search for the below criteria:
• Lease: Search for accounts with leases expiring within a certain time frame, not within a certain time frame, or based on lease status.
• Service: Search for accounts with service contracts expiring within a certain time frame, not within a certain time frame, or based on contract status.
• Service Priority: Search for contracts with different service priority statuses. • Service Calls: Search for accounts based upon a certain volume of service calls within a
time period. For this search, select both a time period and enter a numeric value. • Contract Type: Search for accounts that have certain types of contracts. • # Machines: Search for contracts with a certain number of machines on them with distinct
equipment ID’s. You can enter a greater than or equal to value, less than or equal to value, or both.
• Has Manufacturer: Search for accounts that have a certain manufacturer’s equipment. Check the Not w/Manufacturer box to invert this search.
• Has EA Category: Search for accounts who have equipment of a certain EA Category.• Has Model: Search for accounts that have a specific model name or number. • Install Date: Search for accounts with install dates within a certain time frame or not within
a certain time frame.• Average Usage: Search for accounts generating a certain amount of a certain type of meter
read within a certain period. For this search, select both a time period and enter a numeric value and choose a meter type if you would like. If you do not choose a meter type, the search will display results for all meter types.
Note: These are the default fields. Additional fields may appear in this pop up depending on your system configuration.

It is possible to create a group of accounts for easy reference across the SalesChain system.
View a tutorial Video Here
How To: Create a Group of Accounts
35Check the box next to Public in order to make your group visible to other users of SalesChain at your company. Other users may see the group, but not accounts within it that they would not otherwise have access to.
Quick Tip:
3
4
1
5
6
To create a group of accounts:
1. Navigate to the accounts desk2. Search for the accounts you
would like to add to a new group
3. Select the accounts you would like to add to this group using the check boxes
4. Open the Actions drop-down and click Create Group
5. In the dialogue box, type a name for your new group.
6. Click Save
2

It is possible to add accounts into or remove them from an existing group in bulk from the accounts desk.
View a tutorial Video Here
How To: Add or Remove Accounts From An Existing Group
36
• You can also associate or disassociate an account from a group using the groups tab in the account view itself. See page 24
• The Include Private Groups check box will add user specific groups to the drop down rather than only showing public groups.
Quick Tips:
3
4
1
5
6
To add/remove a group of accounts:
1. Navigate to the accounts desk2. Search for the accounts you would
like to add to/remove from an existing group
3. Select the accounts you would like to add to/remove from this group using the check boxes
4. Open the Actions drop-down and click Group Assign
5. Select the group to which you would like to add or remove these accounts.
6. Click Associate or Disassociate
2
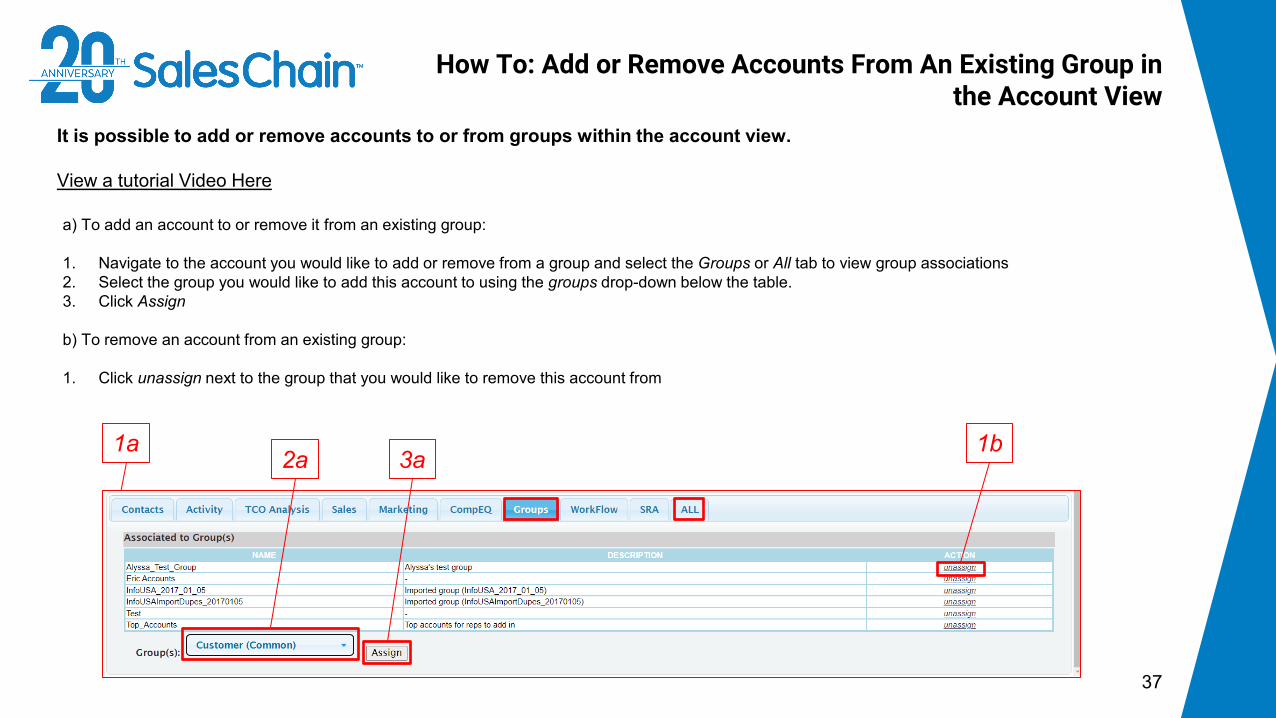
a) To add an account to or remove it from an existing group:
1. Navigate to the account you would like to add or remove from a group and select the Groups or All tab to view group associations2. Select the group you would like to add this account to using the groups drop-down below the table. 3. Click Assign
b) To remove an account from an existing group:
1. Click unassign next to the group that you would like to remove this account from
It is possible to add or remove accounts to or from groups within the account view.
View a tutorial Video Here
How To: Add or Remove Accounts From An Existing Group in the Account View
37
3a1a
2a1b

To change an account’s rep assignment:
1. Navigate to the account you would like to add or remove from a group and select the SRA or All tab to view sales rep assignments
2. Using the drop-downs next to the desired rep category, select the user to whom you would like to assign this account. (In this example, we are assigning Bennet, Tony as the Sales Rep)
3. Click Save at the top right of the account view
It is possible to change an account’s sales rep assignment from the account view.
How To: Assign an Account to a Different Rep
38
3
1 2
It is possible to reassign accounts to a different rep in bulk using the accounts desk. See page 62
Quick Tip:

Customer Profile Viewer
39
The Customer Profile View is geared towards combining basic account searches and industry information with size-oriented searches like revenue and number of employees for specific and detailed account profiling.
1) Go to the account desk (see page 20)
2) Shows/hides search toolbar3) Column chooser4) Save the contents of this
report as your default5) Actions drop-down6) Basic search drop-downs7) Select which profile to view
(ex: Sales Rep, Production Print)
8) Toggle relationship and activity information
9) Basic search any column header
10) Click on any account to view its details
Key:
1 4
5
6
7
8
2 3
9
10
Basic searching via drop-downs and column headers is performed in the same manner as the account desk. See pages 26 and 27 for instructions.
Quick Tip:

How To: Add a Contact To an Account
40
After you have created an account, it is possible to add additional contacts to it. Accounts can have as many contacts as needed.
To add a new contact:
1. View the desired account2. Click the new contact icon3. Enter contact’s information4. Click Save
1 2 3 4
Quick Tip:
SAO is short for Same Address as Office. When checked, this makes the contact’s address the same as the account to which they are associated. If you prefer to enter a different address, uncheck the SAO box.

41
It is possible to merge two accounts in the SalesChainsystem. Merging accounts is a permission granted to certain user types, defined by the customer as part of the onboarding process.Important: A merge of two accounts cannot be reversed. You will also need to be assigned as the sales rep for both accounts unless you have admin permissions. For instructions on changing sales rep assignment, see page 38.
To merge accounts:1. Obtain the SalesChain ID or e-Automate number of the
target account (see quick tip)2. View the source account (The account you wish to merge
into the target) and click on the merge account icon3. Enter either the SalesChain ID or e-Automate number of the
target account Note: DO NOT enter both an e-Automate number and a SalesChain ID.
4. Click Next>>5. Review and confirm the information and Click Merge >>
View a tutorial Video Here
Quick Tip:
The target account is the account you are merging into. Therefore, its information will remain after the merge. This includes name, address, and phone number.
1
2
3
4
5
How To: Merge Accounts
59810
Contacts Desk
42
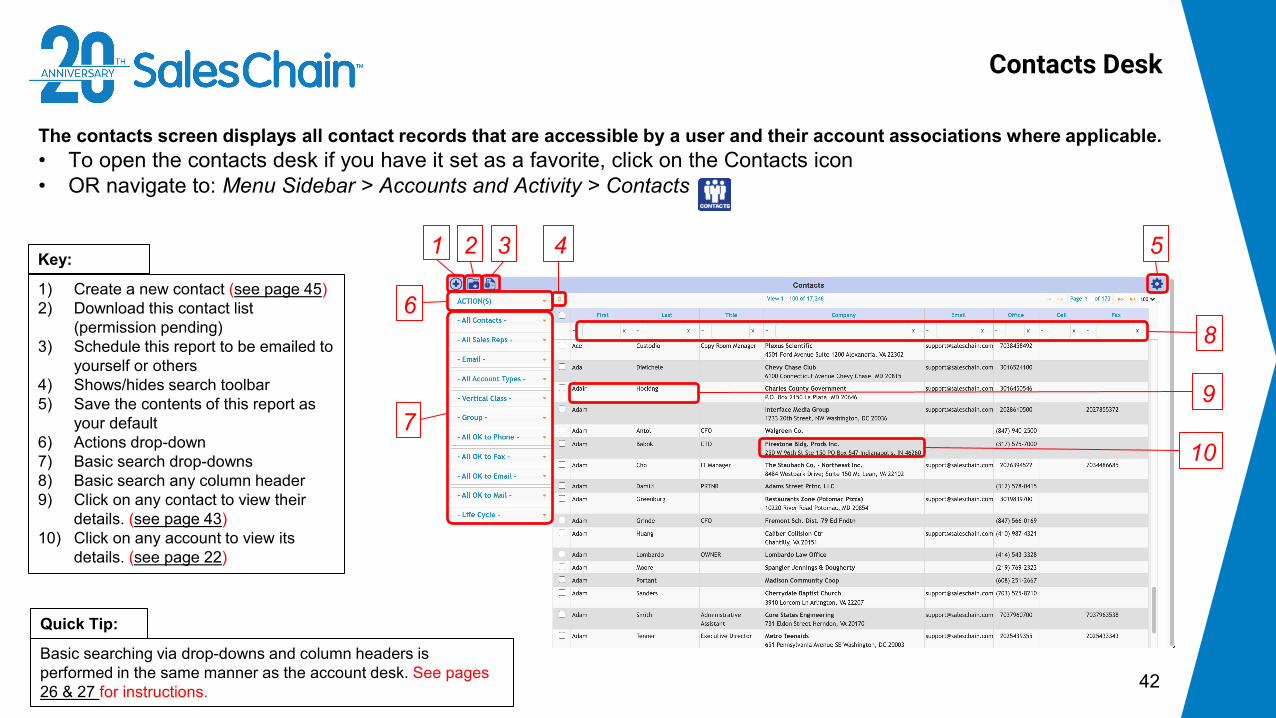
The contacts screen displays all contact records that are accessible by a user and their account associations where applicable.• To open the contacts desk if you have it set as a favorite, click on the Contacts icon• OR navigate to: Menu Sidebar > Accounts and Activity > Contacts
1) Create a new contact (see page 45)2) Download this contact list
(permission pending)3) Schedule this report to be emailed to
yourself or others4) Shows/hides search toolbar5) Save the contents of this report as
your default6) Actions drop-down7) Basic search drop-downs8) Basic search any column header9) Click on any contact to view their
details. (see page 43)10) Click on any account to view its
details. (see page 22)
Key:
Quick Tip:
1 5
6
7
4
8
9
2 3
10
Basic searching via drop-downs and column headers is performed in the same manner as the account desk. See pages 26 & 27 for instructions.

Contact View
43
Clicking on any contact will bring you to the corresponding contact view.*See Page 44 for more information regarding the icons in the contact view.
1) Navigation tree2) Action and Activity Icons3) HubSpot Sync indicator and
link to corresponding HubSpot contact
4) General contact information5) Quick entry dialogue6) Action and activity history
Key:
1 2 3
4
5
6
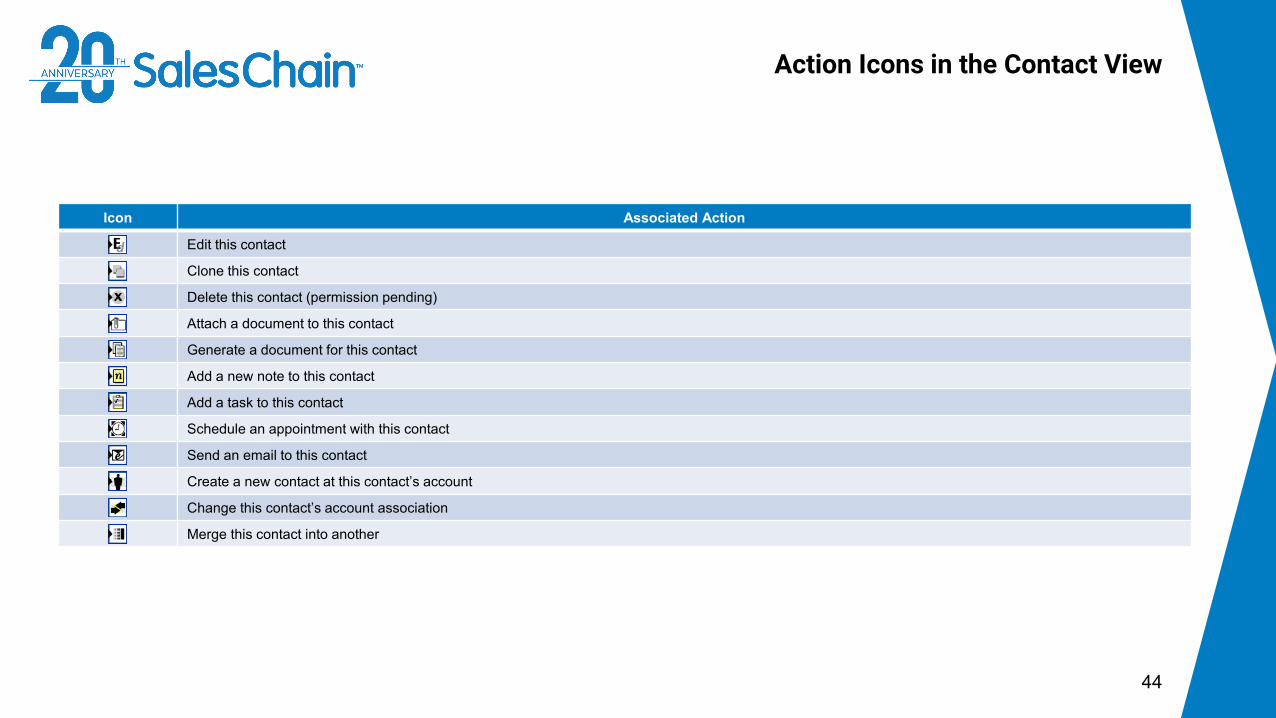
Action Icons in the Contact View
44
Icon Associated Action
Edit this contact
Clone this contact
Delete this contact (permission pending)
Attach a document to this contact
Generate a document for this contact
Add a new note to this contact
Add a task to this contact
Schedule an appointment with this contact
Send an email to this contact
Create a new contact at this contact’s account
Change this contact’s account association
Merge this contact into another

How To: Create a New Contact
45
It is possible to create contacts with no account association.
1 2 3 4To add a new contact:
1. Navigate to the Contacts Desk by clicking on the contacts icon via OR via Menu Sidebar > Accounts and Activity > Contacts
2. Click on the New Contact Icon3. Enter your new contact’s
information4. Click Save
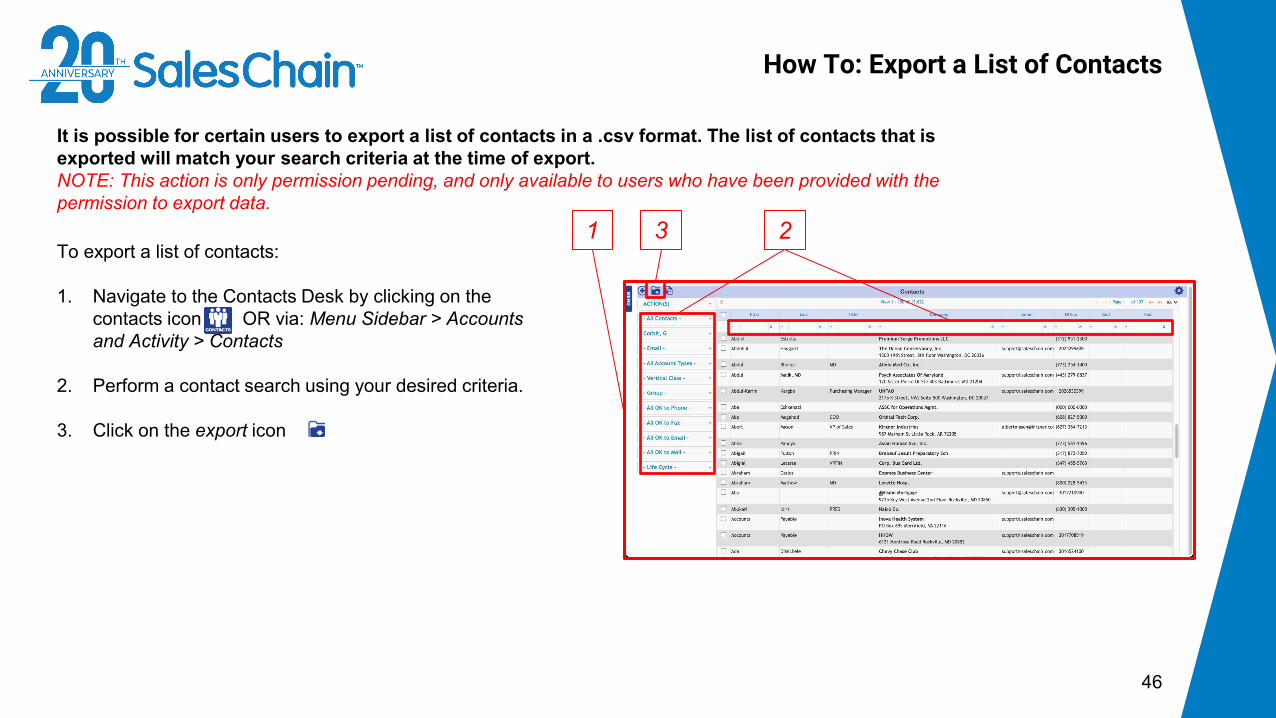
To export a list of contacts:
1. Navigate to the Contacts Desk by clicking on the contacts icon OR via: Menu Sidebar > Accounts and Activity > Contacts
2. Perform a contact search using your desired criteria.
3. Click on the export icon
How To: Export a List of Contacts
46
It is possible for certain users to export a list of contacts in a .csv format. The list of contacts that is exported will match your search criteria at the time of export. NOTE: This action is only permission pending, and only available to users who have been provided with the permission to export data.
31 2
How To: Move a Contact From One Account to Another
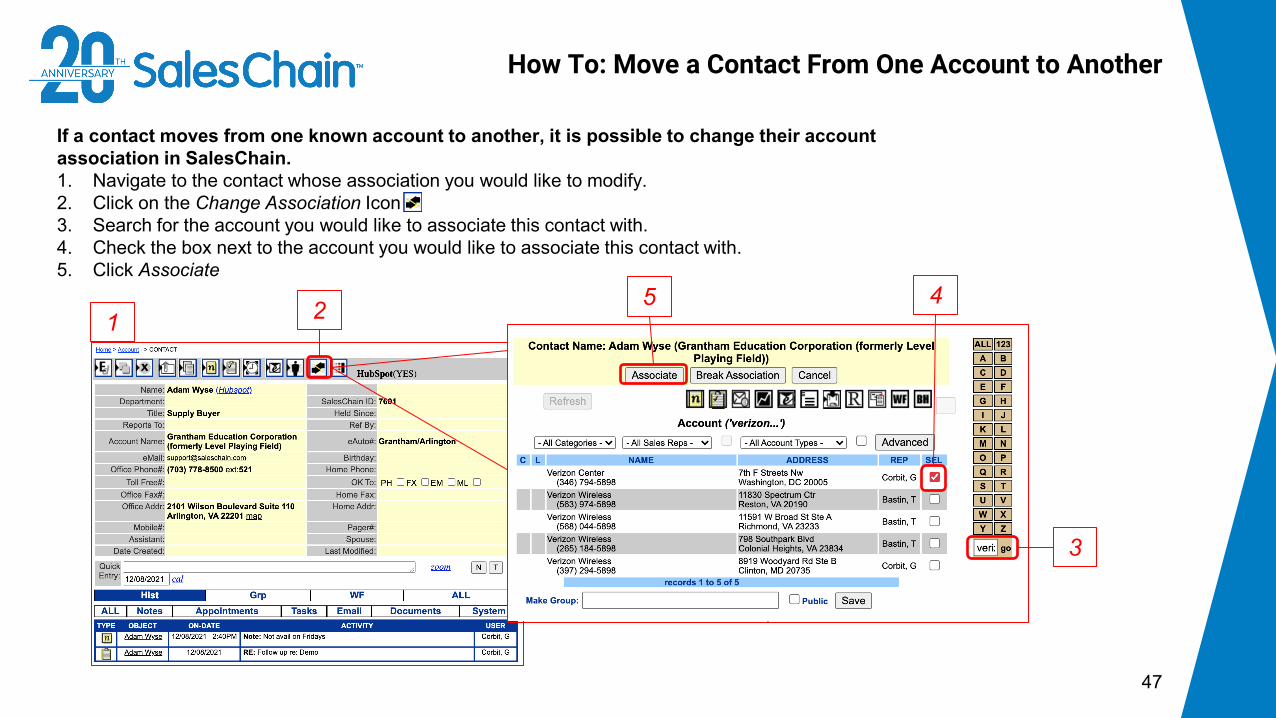
47
If a contact moves from one known account to another, it is possible to change their account association in SalesChain.1. Navigate to the contact whose association you would like to modify.2. Click on the Change Association Icon3. Search for the account you would like to associate this contact with.4. Check the box next to the account you would like to associate this contact with.5. Click Associate
21
3
45

How To: Merge Contacts
48
It is possible to merge contacts together in SalesChain if duplicates exist or information needs to be aggregated.
To merge Contacts:1. Acquire the SalesChain ID from the target contact 2. Navigate to the source contact3. Click on the merge contacts icon4. Enter the target contact’s SalesChain ID5. Recommended: Click Verify & ensure the name that
pops up is the target contact you expect.6. Click Merge
1
2
3
4
5
6

Actions, Activities and Appointments:Tracking activities, maintaining schedules, and taking user actions within the SalesChain system.
3
49

Schedule Desk
50
The schedule desk can be used to create, track and manage your appointments. Your schedule can sync with Microsoft Outlook 365. The schedule desk is the default screen that opens when you log into the SalesChain system. To view the schedule desk:• Click on the schedule icon• OR Navigate to: Menu Sidebar > Accounts and Activity > Schedule
1) User selection for whose schedule you’re viewing
2) Add another user’s schedule to the current view
3) Navigate forward or backward4) Jump back to the current date5) Go to the task view (See page 52)6) Select daily weekly or monthly
view7) Print this report8) Save the current view as your
default (daily, weekly or monthly)9) Date selection. Note: Today shows
up in yellow, the selected day shows up in dark blue
10) Task sidebar (See Page 51)11) Main schedule view
Key:1 2 7 85 62 3 4
9
10 11
If you’re in the week or month view and wish to take a closer look at a specific day, double click on that day.
Quick Tip:

Schedule Desk: The Task Sidebar
51
The task sidebar allows you to view, edit and act on tasks individually or in bulk right from the schedule desk. Note: The task sidebar displays tasks only for the selected day and for days previous, in other words: your outstanding tasks. To see tasks for days in the future, navigate forward to those days.
View a tutorial Video Here
1) Select multiple tasks for bulk actions. When you select a task, the action drop-down (#4) will appear)
2) Click on any icon next to a task to begin a task action (See Page 63-64)
3) Task Summary. Click on the name of the associated account to be taken to its account view (See Page 22)
4) The action drop down allows you to take bulk action on the selected tasks including reassigning them, changing their due date, and changing their completion status
5) Click edit next to any task to make changes to its assignment, instructions, activity type and more.
Key: 1 2 3 4
5

Schedule Desk: Task View
52
The task view displays a comprehensive list of all tasks that you have access to within the system.
To see the task view:• Click on task view in the Schedule Desk (Shown Right)• OR Navigate to: Menu Sidebar > Accounts and Activity >
Tasks
1) Create a new task (See Pages 53-55)
2) Refresh your search for tasks3) Show and hide task details4) Show and hide overdue tasks5) Click on any task’s icon to begin a
task action6) Click on any task’s associated
account to jump to its account view (See Page 22)
7) Filter the tasks displayed8) Sort tasks by any category in the
column headers using the up and down arrows.
Key: 5
6
1 2 3
8
7
4

How To: Create a New Task From the Account View
It is possible to create tasks related to accounts directly from the account view.
View a video tutorial2
To Create a Task:1. Navigate to the account to which you
would like to add an activity (See Page 22)
2. Click on the new task icon3. Enter task information4. Click Save
1 3 4
53Check the box next to Go To Task Action after saving to jump directly to completing this task.
Quick Tip:

How To: Create a New Task From the Task View
54Tasks created from the task view will be created without an account association.
Quick Tip:
It is possible to create tasks with no account association from the task view.
View a video tutorial
To Create a Task:1. Navigate to the task view (See Page
52)2. Click on the New button3. Enter task information4. Click Save
21
3 4
1
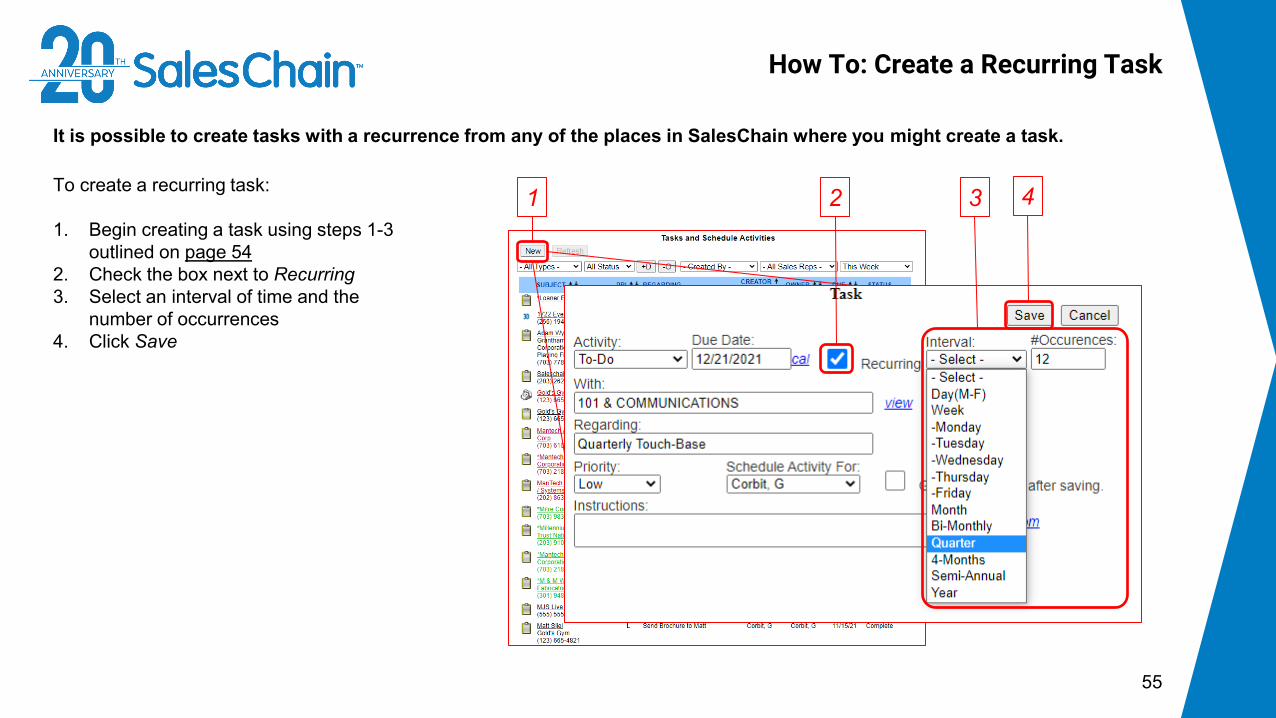
How To: Create a Recurring Task
55
It is possible to create tasks with a recurrence from any of the places in SalesChain where you might create a task.
To create a recurring task:
1. Begin creating a task using steps 1-3 outlined on page 54
2. Check the box next to Recurring3. Select an interval of time and the
number of occurrences4. Click Save
42 3

How To: Add a Note to An Account
56
It is possible to create notes associated with any account within the SalesChain system. Notes are text records for referenceby you and other users.
To add a note to an account:
1. Navigate to the account to which you would like to add a note
2. Click on the new note icon3. Enter the contents of your note using the
Subject and Body fields4. Click Save
Notes can be viewed and edited under the Activity tab of any account.
Quick Tip:
1 2 3 4

How To: Create Quick Tasks and Quick Notes
57
The Quick Entry box in the profiling account view makes it possible to quickly add notes and tasks to that account without clicking on the icons in the top bar.
View a tutorial video here.
To use the quick entry dialogue:
1. Navigate to the account to which you would like to add a note or task.2. Enter the Task or Note information including action type under the log note as drop down3. Click N to save this as a note or T to save this as a task
21
3
Use the Quick Text drop down to quickly add note or task text that is commonly used for repetitive tasks or notes.
Quick Tip:

How To: Add A Sales Next Call Date
58
The Quick Entry section in the profiling account view also includes the sales next call date dialogue. It is possible to have a dedicated task involving the next call date which stands out amongst other tasks and is a searchable field within the system.
To add a sales next call task:
1. Navigate to the account to which you would like to add a note or task.2. Enter the sales next call task information including a date, details in the RE: box, and an objective using the drop-down.3. Click C to save this next call date task.
2
1
3

To add tasks in bulk:
1. Navigate to the accounts desk2. Search for the accounts you would like to add a
task to3. Select the accounts you would like to add this
task to using the check boxes4. Open the Actions drop-down and click on Insert
A Task5. Enter the desired task information (See Page 53)6. Click Save
It is possible to add the same task to many accounts at once.
View a tutorial Video Here
How To: Insert Tasks in Bulk
59
You can assign bulk tasks to the rep assigned to an account rather than assigning them to a specific user. Use the drop down below the word or to select which relative user you would like to assign this task to.
Quick Tip:
4
3
1
6
2
5

How To: Insert Notes in Bulk
60
To add notes in bulk:
1. Navigate to the accounts desk2. Search for the accounts you would like to add a
note to3. Select the accounts you would like to add this
note to using the check boxes4. Open the Actions drop-down and click on Insert
A Note5. Enter the desired note information (See Page 56)6. Click Save
It is possible to add the same note to many accounts at once.
View a tutorial Video Here
4
3
1
6
2
5
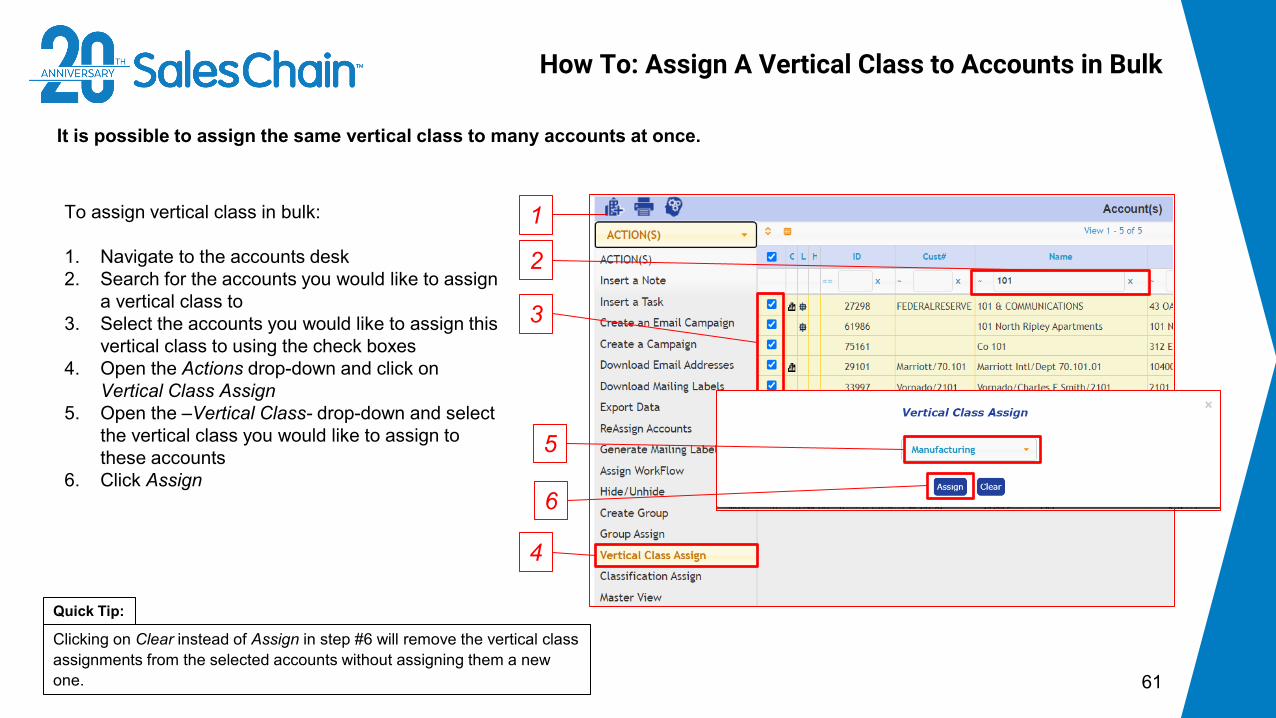
How To: Assign A Vertical Class to Accounts in Bulk
61
To assign vertical class in bulk:
1. Navigate to the accounts desk2. Search for the accounts you would like to assign
a vertical class to3. Select the accounts you would like to assign this
vertical class to using the check boxes4. Open the Actions drop-down and click on
Vertical Class Assign5. Open the –Vertical Class- drop-down and select
the vertical class you would like to assign to these accounts
6. Click Assign
It is possible to assign the same vertical class to many accounts at once.
4
3
1
6
2
5
Clicking on Clear instead of Assign in step #6 will remove the vertical class assignments from the selected accounts without assigning them a new one.
Quick Tip:

How To: Reassign Accounts To A Different Rep in Bulk
62
To assign accounts to a different rep in bulk:
1. Navigate to the accounts desk2. Search for the accounts you would like to reassign to a
different user3. Select the accounts you would like to reassign to a
different user using the check boxes4. Open the Actions drop-down and click on Reassign
Accounts5. Using the drop-downs, select the user to whom you
would like to reassign these accounts to AND an SRA category
6. (Optional) Check any of these boxes to reassign open leads, tasks or appointments to this new user or to send the assignee an email, a lead or a task to notify them of this assignment
7. Click Save
It is possible to assign many accounts to a different sales rep at once.
4
3
1
7
2
5
• Checking the Mark as protected assignments box prevents these accounts from falling into the automatic assignment rules based on zip code or other territory assignments.
Quick Tips:6

To mark a task as completed within the SalesChain system we will perform a Task Action.
View a tutorial Video Here
How To: Complete a Task
63
• Task Actions can be started from any screen in which tasks and their respective icons are displayed.
• Use the Result Drop down to populate the Notes box with quick text suggestions.
Quick Tips:
1
To complete a task:
1. Click on the icon next to the task you would like to complete. Note: Icons will vary based upon action type.
2. Enter Task information including what kind of action you are taking using the Log As drop-down to indicate and any notes
3. Use the Status drop-down to mark the task as “complete”
4. Click Save2
4
3

How To: Complete Tasks in Bulk
To complete tasks in bulk:
1. Navigate to the schedule desk2. In the task sidebar (see page 51), select the
tasks you would like to complete using the check boxes
3. Open the –Select- drop-down and click on Change Status
4. Open second –Select- drop-down and click on Complete
5. Click Save6. Click Ok in the confirmation dialogue box
It is possible to complete many tasks at once.
View a tutorial Video Here3 421 5 6
You can use this method to change the status of various tasks to open, cancelled or hold as well.
Quick Tip:
64

How To: Reassign Tasks in Bulk
To reassign tasks in bulk:
1. Navigate to the schedule desk2. In the task sidebar (see page 51), select the
tasks you would like to complete using the check boxes
3. Open the –Select- drop-down and click on Reassign
4. Open second –Select- drop-down and select the user to whom you would like to reassign these tasks
5. Click Save6. Click Ok In the confirmation dialogue box
It is possible to reassign multiple tasks to a different user at once.
65
3 421 5 6

How To: Change The Due Date of Tasks In Bulk
To change the dates of tasks in bulk:
1. Navigate to the schedule desk2. In the task sidebar (see page 51), select the
tasks you would like to change the due date of using the check boxes
3. Open the –Select- drop-down and click on Move Date
4. Click into the text box and select a date from the calendar to which you would like to reassign these tasks
5. Click Save6. Click Ok In the confirmation dialogue box
It is possible to change the due dates of multiple tasks at once.
66
3 421 5 6

It is possible to make changes to an existing task right from the schedule screen’s task sidebar.
View a tutorial Video Here
How To: Edit a Task From the Schedule Desk
67To reassign tasks in bulk, see page 65Quick Tips:
2
To complete a task:
1. Navigate to the schedule desk2. Click edit next to the task you would like to make
changes to in the task sidebar (see page 51)3. Make the desired changes to this task in the task
dialogue4. Click Save
3
4
1

How To: Make a New Appointment From the Account View
68
It is possible to schedule an appointment with an account right from the account view.
To schedule a new appointment:
1. View the desired account2. Click the new appointment icon. You will
be taken to the schedule desk 3. Click and drag to the desired time on the
desired day4. Click the Schedule Appt Button5. Enter appointment details Note: Be sure to
add “Available Contacts” and “Internal Users” on the right if you want to send a notification of this appointment to certain contacts.
6. Click Save
1 2 3 4
Quick Tip:
If you’re using Microsoft Outlook 365 Integration, This appointment will sync down into your outlook calendar. See pages 69 – 72.
5
6

How To: Log Into Outlook 365 In SalesChain
69
To begin syncing emails and appointments between SalesChain and Outlook 365, you will need to first enter your Outlook 365 credentials into SalesChain.Important: Once you are logged in, SalesChain and Outlook 365 will share appointments (calendar events) automatically. Instructions on pushing emails from Outlook into SalesChain are outlined in the following pages (71 - 72)
View a Tutorial Video
To Log Into Outlook 365 within SalesChain:
1. Navigate to www.mysaleschain.com2. If you are not already logged in, you will be
prompted to enter your MS 365 credentials after entering your SalesChain login credentials (See Page 12)
3. Click Submit
1
3
2

To change your Outlook 365 password in SalesChain:
1. Navigate to Menu -> User Settings -> Change MSO Password
2. Enter your new Outlook 365 credentials
3. Click Submit
How To: Change Outlook 365 Password in SalesChain
70
If your Outlook 365 password has changed, you will need to change it in SalesChain for active sync to continue.Note: If SalesChain detects that your Outlook password has changed, you will be prompted to login with the method outlined on page 69.
1 2
3

How To: Setup SalesChain x Outlook 365 Email Push
71
To set up the SalesChain category in Outlook 365:
1. Open your Outlook 365 desktop application and navigate to the Home tab
2. Under the categorize dropdown, select All Categories…
3. In the pop-up dialogue, click New…4. Under Name, title your new category
“SalesChain” and assign it a color of your choice (blue in this case) and assign it a shortcut Key (CTRL+f12 recommended)
5. Click OK
SalesChain pulls in only marked emails to make sure only pertinent information is in the system. You will need to set up a category called SalesChain in Outlook, so SalesChain knows what emails to pull in.
View a Tutorial Video
1 2
3
4
5
Quick Tip:
Any email marked with this category will be brought into SalesChain under the appropriate account’s Activity Tab assuming the contact to whom you sent it is listed in the SalesChain system. See Page 72 for instructions.

How To: Push Emails From Outlook 365 Into SalesChain
72
Not all Outlook emails are automatically pushed into the SalesChain system. You can choose which to push by marking them with a category in Outlook. When you do, they will automatically be associated with an account, with a contact within that account, and will be logged in your user activity.
View a Tutorial Video
To push emails from Outlook into SalesChain:
1. Open your Outlook 365 desktop or web application
2. Click on an email within Outlook 365 to select it.
3. a) Hit the shortcut key you set up in the manner instructed on page 71 OR b) under the Categorize drop-down select the SalesChain category you created in the manner instructed on page 71
** This email will be marked with the appropriately colored tag and will be pushed into SalesChain within 5 minutes **
1
2
3b

How To: Send an Email From the Account View
73
It is possible to send emails directly to your contacts from inside the SalesChainplatform.
To send an email from SalesChain:
1. View the desired account2. Click the new email icon 3. Craft your email message Note: Use the
drop-downs on the right of each recipient box to quickly select recipients from this account or from your company. You may add as many recipients as you like.
4. Click Send
Quick Tip:
Emails sent from the SalesChain system will be sent from our own internal email servers. Therefore, the first email in the chain (sent from you) will not appear in your email history. See page 74 for how to track emails sent from SalesChain and pages 69 - 72 if you intend to sent emails from Outlook 365 instead (recommended).
1 2 3 4

The Email Request Log
74
To track the process of e-Signed documents sent out of SalesChain, try the e-Sign Desk (See Page 165)
Quick Tip:
The email request log provides a history of all emails sent out of or staged to be sent out of the SalesChain system by the user as well as by the workflow system on behalf of the user.
To find the email desk, you can click on the email icon in your favorites bar OR navigate to Menu Sidebar > Accounts & Activity > Email.
1) Email ID 2) Email Information including subject,
sender, recipient, and date and time sent
3) Status of the email (sent or staged) 4) Refresh button allows you to see new
emails or change search parameters5) The Show drop-down allows you to
change how many emails are displayed
6) The –All Status- drop-down allows you to sort by email status
Key:
4
1 6
5
2
3
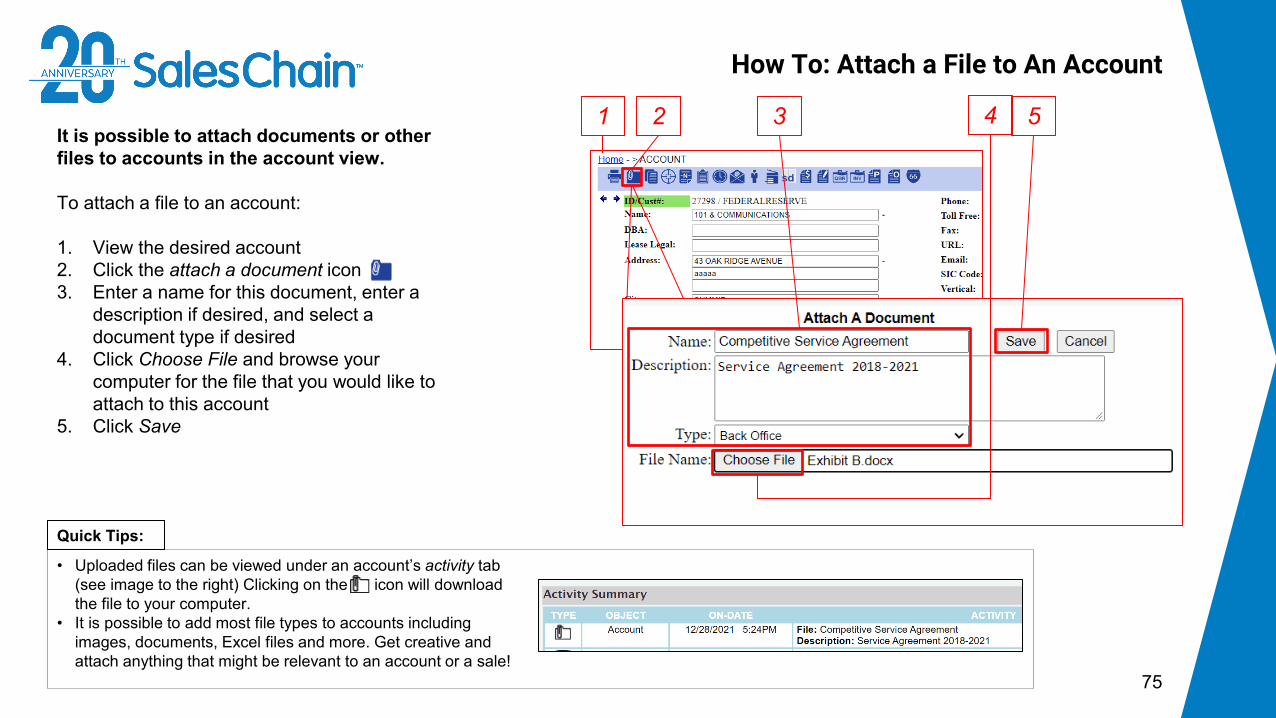
How To: Attach a File to An Account
75
It is possible to attach documents or other files to accounts in the account view.
To attach a file to an account:
1. View the desired account2. Click the attach a document icon 3. Enter a name for this document, enter a
description if desired, and select a document type if desired
4. Click Choose File and browse your computer for the file that you would like to attach to this account
5. Click Save
Quick Tips:
• Uploaded files can be viewed under an account’s activity tab (see image to the right) Clicking on the icon will download the file to your computer.
• It is possible to add most file types to accounts including images, documents, Excel files and more. Get creative and attach anything that might be relevant to an account or a sale!
1 2 3 54
How To: Generate a Document From the Account View
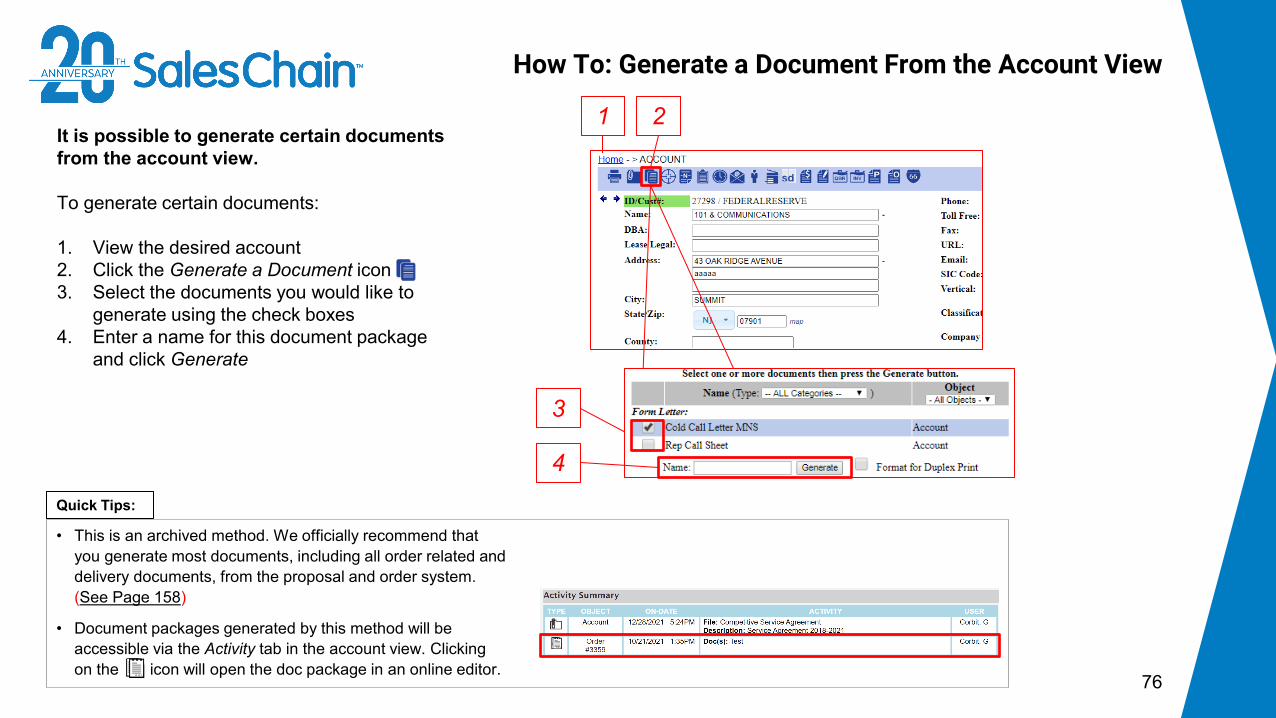
76
It is possible to generate certain documents from the account view.
To generate certain documents:
1. View the desired account2. Click the Generate a Document icon 3. Select the documents you would like to
generate using the check boxes4. Enter a name for this document package
and click Generate
1 2
3
• This is an archived method. We officially recommend that you generate most documents, including all order related and delivery documents, from the proposal and order system. (See Page 158)
• Document packages generated by this method will be accessible via the Activity tab in the account view. Clicking on the icon will open the doc package in an online editor.
Quick Tips:
4
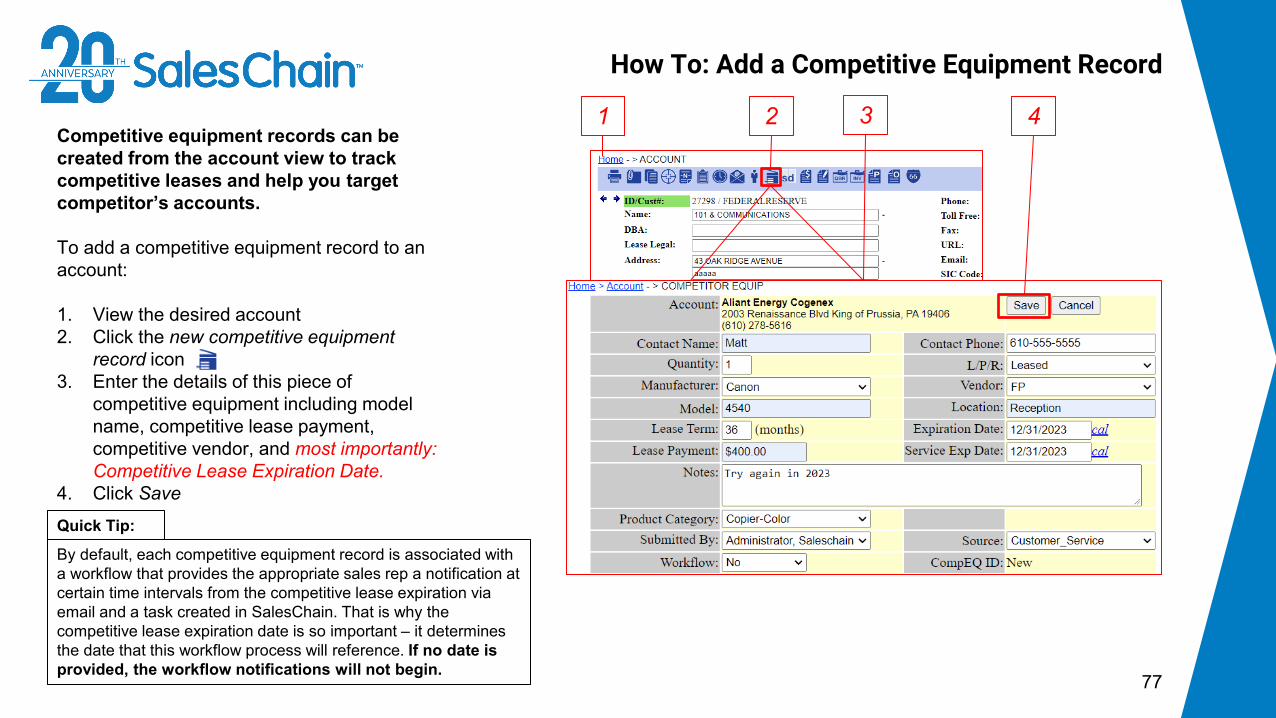
How To: Add a Competitive Equipment Record
77
Competitive equipment records can be created from the account view to track competitive leases and help you target competitor’s accounts.
To add a competitive equipment record to an account:
1. View the desired account2. Click the new competitive equipment
record icon 3. Enter the details of this piece of
competitive equipment including model name, competitive lease payment, competitive vendor, and most importantly: Competitive Lease Expiration Date.
4. Click Save
Quick Tip:
By default, each competitive equipment record is associated with a workflow that provides the appropriate sales rep a notification at certain time intervals from the competitive lease expiration via email and a task created in SalesChain. That is why the competitive lease expiration date is so important – it determines the date that this workflow process will reference. If no date is provided, the workflow notifications will not begin.
1 2 3 4

Deal PricingPricing, Documenting, Delivering and
Funding Processes Within SalesChain
4
78

Lead View
79
Clicking on any contact will bring you to the corresponding contact view.*See page 80 for more information regarding the Action and Activity icons in the lead view.
1) Navigation tree2) Action and Activity Icons3) Link to the associated account4) Lead status drop-down5) General lead information6) Expected close date7) Quick note entry box
Key:
1 2 3
5
6
7
4

Action Icons in the Lead View
80
Icon Associated Action
Edit this lead
Clone this lead
Delete this lead (permission pending)
Attach a document to this lead
Generate a document for this lead
Create a new lead
Add a new note to this lead
Add a task to this lead
Schedule an appointment for this lead
Send an email to contacts at this lead’s account
Create a new contact at this lead’s account
Add a competitive equipment record to this lead’s account
Create a proposal linked to this lead
Create an order linked to this lead

How To: Create a New Lead
81
It is possible to manually create new leads from the account view.
To create a new lead:
1. View the desired account2. Click the new lead icon3. Enter the details of the lead including the
classification, instructions, model name, estimated revenue, and most importantly: Expected Close Date
4. Click Save
1 2
3
• The expected close date is particularly important since, by default, each lead is placed on the forecast within the month of it’s expected close date. If no date is provided, the lead will not populate on the forecast.
• Once a lead is created, you can view it under an account’s Sales tab. One account can have many leads.
Quick Tips:
4
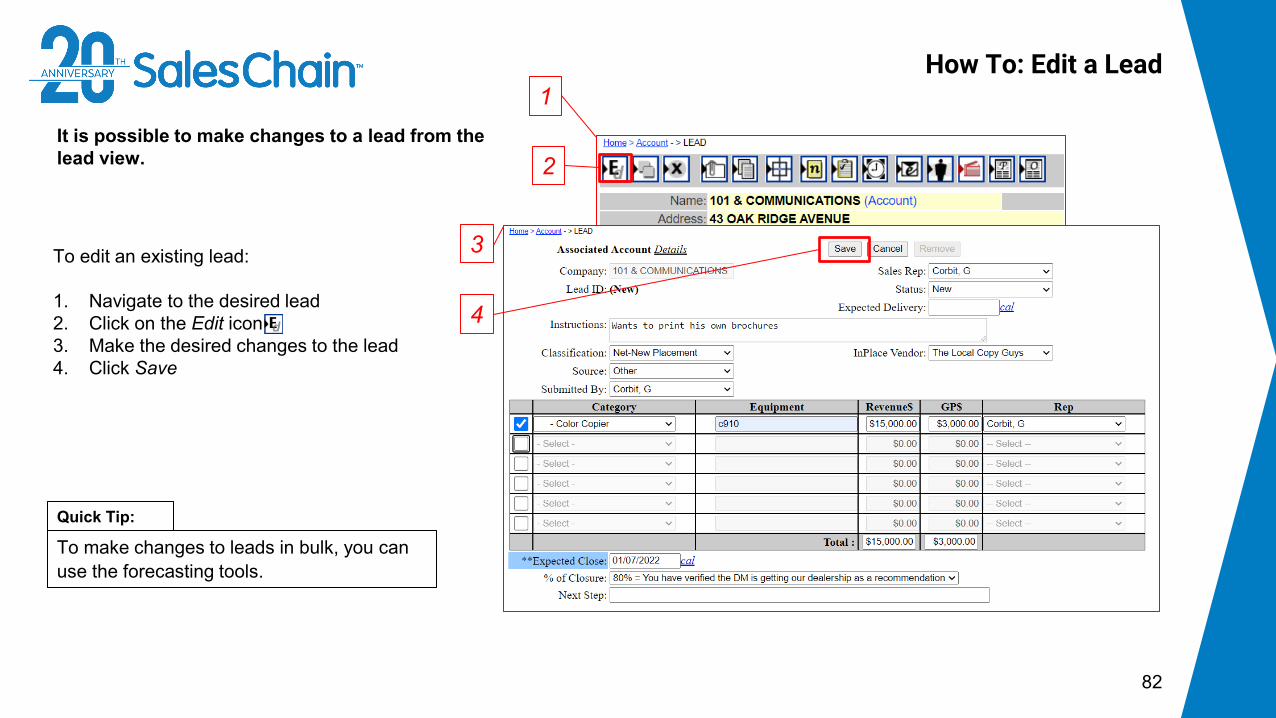
It is possible to make changes to a lead from the lead view.
How To: Edit a Lead
82
To make changes to leads in bulk, you can use the forecasting tools.
Quick Tip:
2
To edit an existing lead:
1. Navigate to the desired lead 2. Click on the Edit icon3. Make the desired changes to the lead4. Click Save
1
3
4

It is possible to save time and avoid potential duplicity by creating a proposal directly from a lead.
How To: Create a New Proposal From the Lead View
83
• Creating a proposal from the lead view will automatically associate that proposal with this lead record, ensuring that nothing is duplicated on your forecast.
• When you create a proposal from a lead, either through this method or the method outlined on page 81, the information from this lead will populate in the General tab of the order breakdown.
Quick Tips:
To create a proposal from a lead:
1. Navigate to the desired lead 2. Click on the New Proposal icon3. You will be taken to the order breakdown screen
for this new proposal
2
1

It is possible to create a proposal from the account view and either make a new lead or associate it with an existing lead.
How To: Create a New Proposal From the Account View
84
To create a new proposal:
1. Navigate to the desired account2. Click on the new proposal icon3. (Conditional) If existing active leads are
associated with this account, you may associate this proposal with one of these leads by clicking the Select button next to that lead. To create a new lead, choose Click here to create a new lead for your proposal.
4. You will be taken to the order breakdown screen for this new proposal
2
1
3
4• Always give your proposals a name in the center column to be able to more easily identify them.
• It is possible to have many proposals associated with one lead. The Primary proposal will be the proposal whose value shows on your forecast. To clone a proposal, see page 86, to make a proposal into an order, see page 87.
Quick Tips:
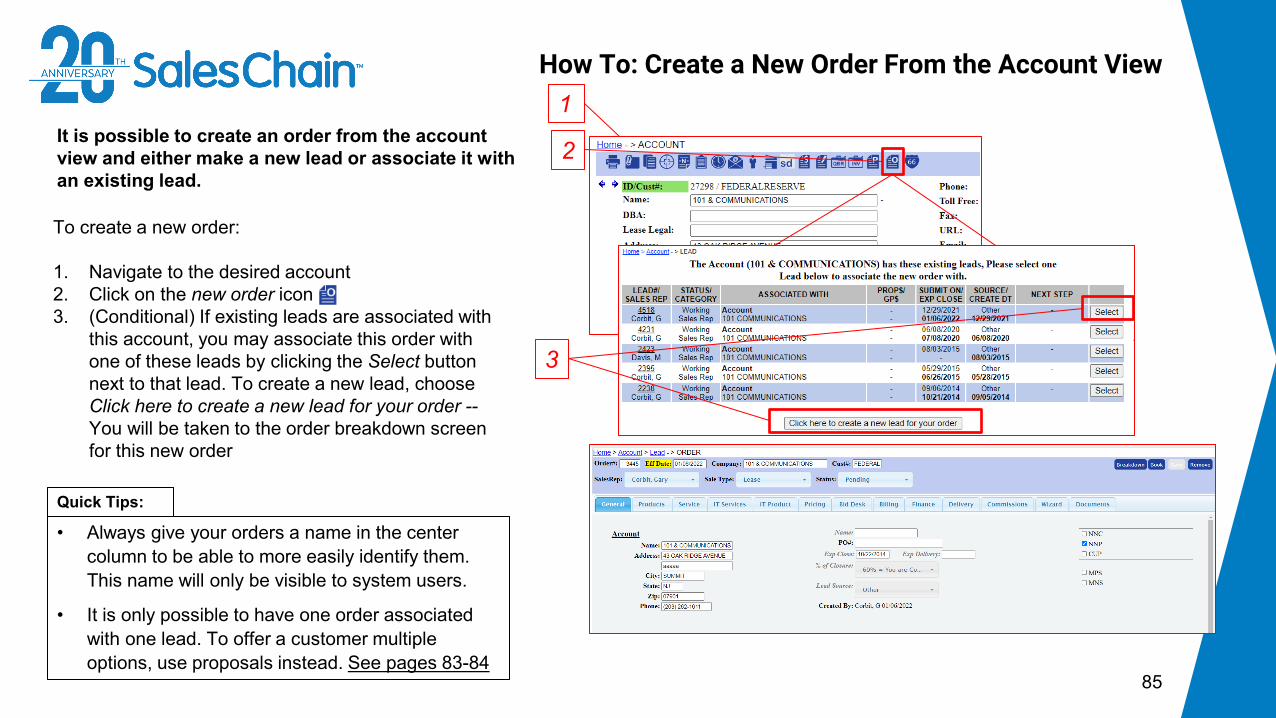
It is possible to create an order from the account view and either make a new lead or associate it with an existing lead.
How To: Create a New Order From the Account View
85
To create a new order:
1. Navigate to the desired account 2. Click on the new order icon3. (Conditional) If existing leads are associated with
this account, you may associate this order with one of these leads by clicking the Select button next to that lead. To create a new lead, choose Click here to create a new lead for your order --You will be taken to the order breakdown screen for this new order
2
1
3
• Always give your orders a name in the center column to be able to more easily identify them. This name will only be visible to system users.
• It is only possible to have one order associated with one lead. To offer a customer multiple options, use proposals instead. See pages 83-84
Quick Tips:

It is possible to clone proposals created in SalesChain to offer similar but slightly different options to potential clients.
How To: Clone a Proposal
86
To clone a proposal:
1. Navigate to the desired proposal 2. Click the Clone button - You will be taken to the
order breakdown screen for this cloned proposal.3. (Recommended) Give this cloned proposal a
name for easy reference later4. Click Save
2
3
• The cloned proposal will not be designated as the primary unless you check the Primary box
• Be sure to name your second proposal for easy reference later. This name will only be visible to system users.
Quick Tips:
1
4

It is possible to convert proposals created in SalesChain into orders as deals progress
How To: Make a Proposal Into an Order
87
To change a proposal into an order:
1. Navigate to the desired proposal 2. If unchecked, check the box next to Primary to
make this the primary proposal (See Page 88)3. Click on the Make Order icon -- You will be taken
to the order breakdown screen for this new order.
3
• When you turn a proposal into an order, all the proposal details including pricing, billing, and financing information, as well as documents that have been generated, will be carried over.
• Only the primary proposal can be changed into an order
Quick Tips:
1 2
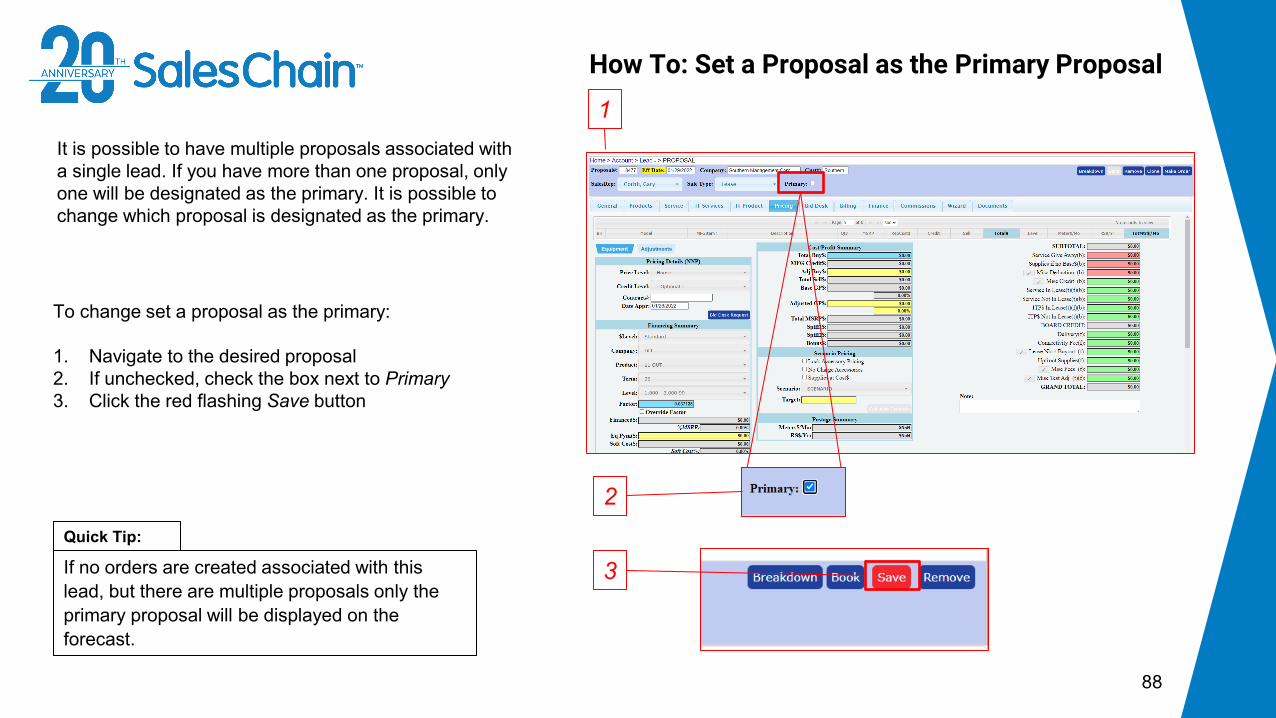
It is possible to have multiple proposals associated with a single lead. If you have more than one proposal, only one will be designated as the primary. It is possible to change which proposal is designated as the primary.
How To: Set a Proposal as the Primary Proposal
88
To change set a proposal as the primary:
1. Navigate to the desired proposal 2. If unchecked, check the box next to Primary3. Click the red flashing Save button
1
2
3If no orders are created associated with this lead, but there are multiple proposals only the primary proposal will be displayed on the forecast.
Quick Tip:

Not every deal will be leased. You can change the sale type of any given proposal or order.Important: some available fields in the proposal and order process – particularly those related to financing –will become unavailable if the sale type is changed away from Lease.
How To: Change a Proposal or Order’s Sale Type
89
To change a proposal or order’s sale type:
1. Navigate to the desired proposal or order2. Select the desired status using the Sale Type
drop-down in the header.
1
2
Sale Type options are customized upon system configuration and may vary greatly.
Quick Tip:

As orders move through the pricing and fulfillment process, you will need to change the order status to trigger workflow steps and send notifications to users within the system.Important: deals set to some statuses may be locked for editing to certain user types. For example: sales reps may not edit signed docs or delivered proposals and orders.
How To: Change an Order’s Status
90
To change a proposal or order’s status:
1. Navigate to the desired proposal or order2. Select the desired status using the Status drop-
down in the header.
1
2
• The Status drop-down will only be displayed on orders, not proposals.
• Order status options are customized upon system configuration and may vary greatly. Consult your system administrator if you’re not sure which status to use at what point in the order process.
Quick Tips:
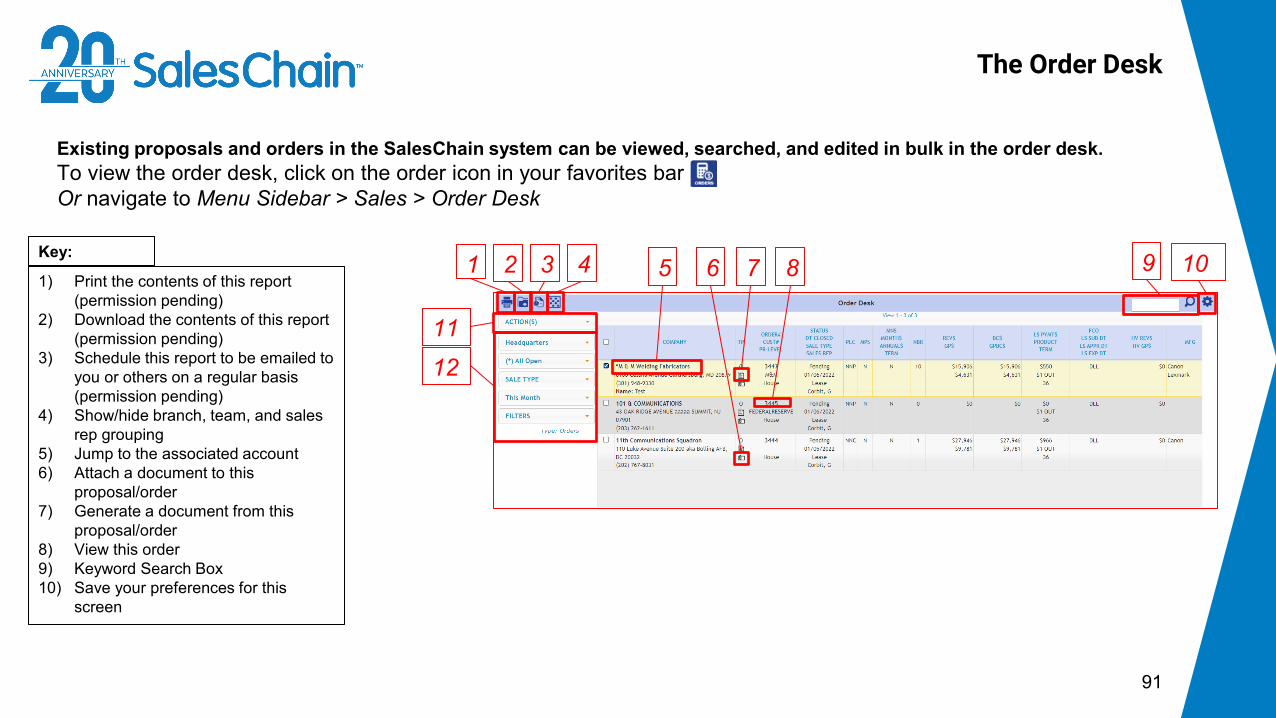
Existing proposals and orders in the SalesChain system can be viewed, searched, and edited in bulk in the order desk.To view the order desk, click on the order icon in your favorites bar Or navigate to Menu Sidebar > Sales > Order Desk
The Order Desk
91
1) Print the contents of this report (permission pending)
2) Download the contents of this report (permission pending)
3) Schedule this report to be emailed to you or others on a regular basis (permission pending)
4) Show/hide branch, team, and sales rep grouping
5) Jump to the associated account6) Attach a document to this
proposal/order7) Generate a document from this
proposal/order8) View this order9) Keyword Search Box10) Save your preferences for this
screen
Key: 1 2 3 4 9 10
1211
8765

Existing leads, proposals, and orders in the SalesChain system can be viewed in the account view’s Sales tab.
Account View: The Sales Tab
92
1) Existing Leads at this account2) Existing Proposals at this account3) Existing Orders at this account
Key: 1
2
3
• Primary proposals will be bolded and marked with a *
• Click on any lead/proposal/order number to jump to that record
Quick Tips:

Tabs in the Order Breakdown
93
Tab Page Number DescriptionGeneral 94 Enter basic account and lead information
Products 95 Add, edit or remove product bundles
Service 101 Configure various service contract options
IT Services 108 Add, edit or remove IT services offerings
IT Product 111 Add, edit or remove any IT product bundles
Pricing 112 Adjust the financial aspects of the deal, configure pricing levels, and process scenario pricing.
Bid Desk* 117 View and process sales rep bid desk requests (*Permission pending)
Billing 129 Provides the account’s ShipTo address
Finance 132 Displays configurable lease information
Delivery** 137 Lists delivery and tracking information (**Only Displayed on Orders)
Commissions 148 Displays commission related information
Documents 152 Lists various generatable documents

The general tab of the order breakdown allows users to view, edit and verify basic account and lead information, name their proposals and orders for easy reference (Highly Recommended), designate this deal as a target within SalesChain’s profile targeting and segmentation tools and more. Basic account and lead information will be automatically populated within this order if that information exists within that account and the associated lead record.
Proposal and Order Pricing: The General Tab
94
1) Basic account information2) Proposal/Order name entry box3) PO# entry box4) Basic lead information5) Sale classification (Net New
Customer (NNC), Net New Placement (NNP), or Customer Upgrade (CUP))
6) Target this account for specialty sales in SalesChain’s profile targeting and segmentation suite
Key: 5 61 2 3 4
Quick Tips:
• Information that is changed in this screen may need to be saved. If the save button flashes red (as in the image to the right) you have changes that are unsaved.
• The red save button serves to indicate that information being saved will make changes not only to this proposal/order but also to other records in the system like accounts or leads.
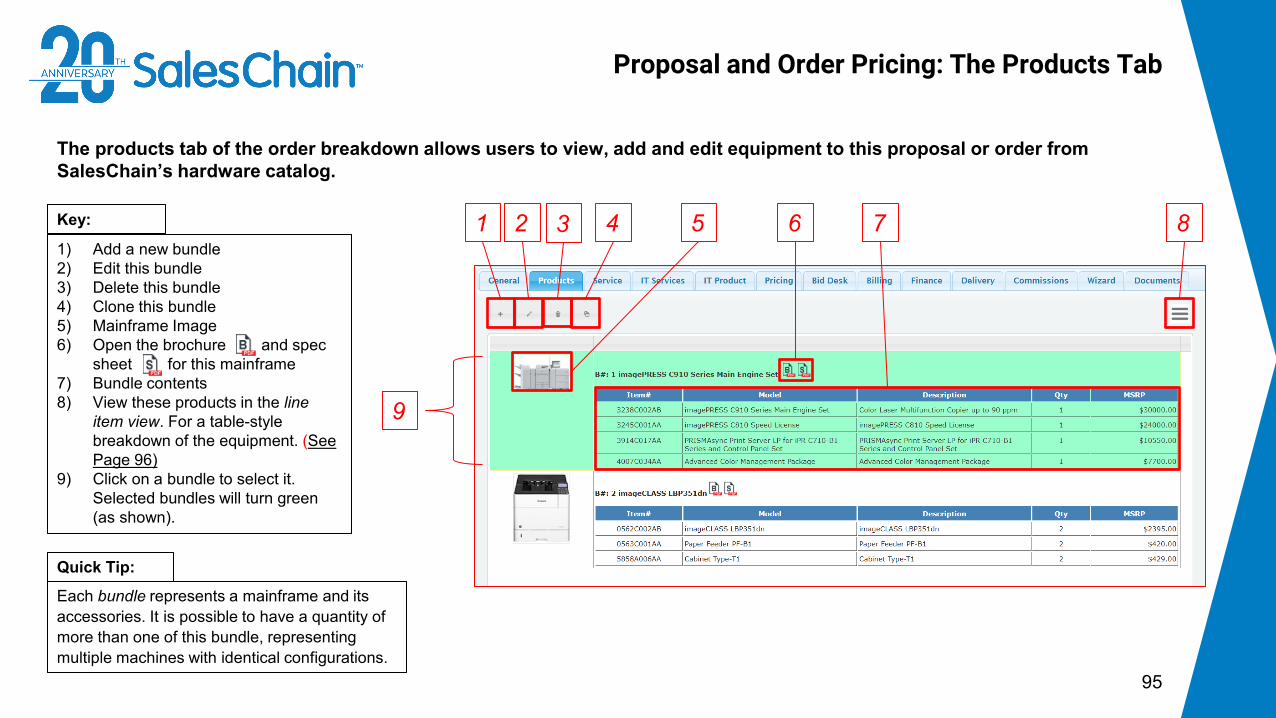
The products tab of the order breakdown allows users to view, add and edit equipment to this proposal or order from SalesChain’s hardware catalog.
Proposal and Order Pricing: The Products Tab
95
1) Add a new bundle2) Edit this bundle3) Delete this bundle4) Clone this bundle5) Mainframe Image6) Open the brochure and spec
sheet for this mainframe7) Bundle contents8) View these products in the line
item view. For a table-style breakdown of the equipment. (See Page 96)
9) Click on a bundle to select it. Selected bundles will turn green (as shown).
Key: 1 2 3 4 86
9
Each bundle represents a mainframe and its accessories. It is possible to have a quantity of more than one of this bundle, representing multiple machines with identical configurations.
Quick Tip:
5 7
In the product tab of a proposal or order, you may add one or many bundles, each representing one mainframe and its accessories.
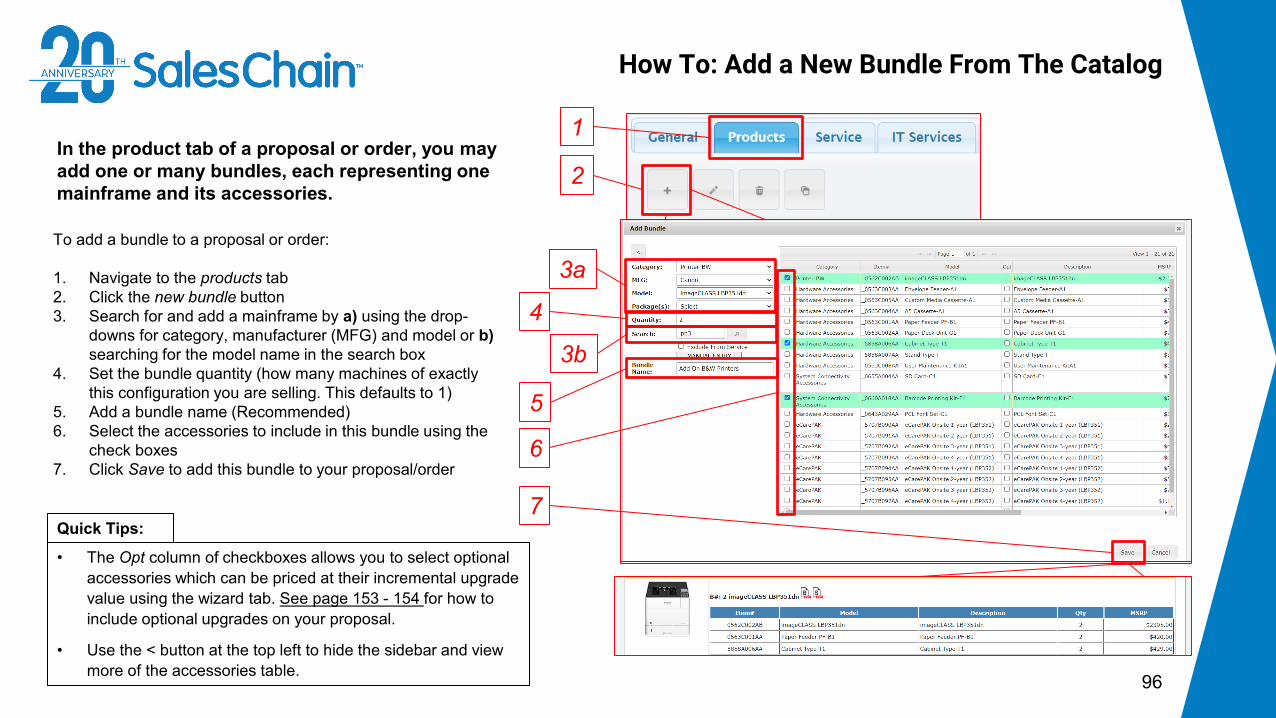
How To: Add a New Bundle From The Catalog
96
To add a bundle to a proposal or order:
1. Navigate to the products tab2. Click the new bundle button3. Search for and add a mainframe by a) using the drop-
downs for category, manufacturer (MFG) and model or b) searching for the model name in the search box
4. Set the bundle quantity (how many machines of exactly this configuration you are selling. This defaults to 1)
5. Add a bundle name (Recommended)6. Select the accessories to include in this bundle using the
check boxes 7. Click Save to add this bundle to your proposal/order
2
• The Opt column of checkboxes allows you to select optional accessories which can be priced at their incremental upgrade value using the wizard tab. See page 153 - 154 for how to include optional upgrades on your proposal.
• Use the < button at the top left to hide the sidebar and view more of the accessories table.
Quick Tips:
1
3a
3b
4
6
7
5
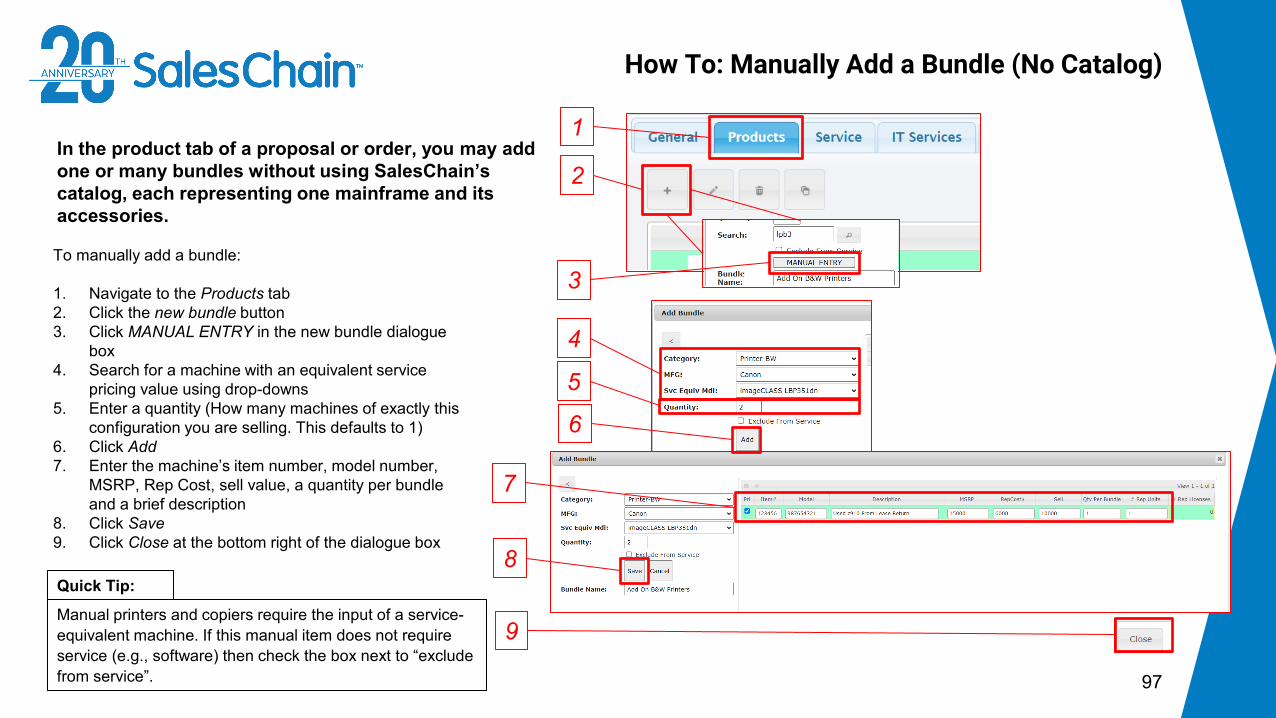
In the product tab of a proposal or order, you may add one or many bundles without using SalesChain’scatalog, each representing one mainframe and its accessories.
How To: Manually Add a Bundle (No Catalog)
97
To manually add a bundle:
1. Navigate to the Products tab2. Click the new bundle button3. Click MANUAL ENTRY in the new bundle dialogue
box4. Search for a machine with an equivalent service
pricing value using drop-downs5. Enter a quantity (How many machines of exactly this
configuration you are selling. This defaults to 1) 6. Click Add7. Enter the machine’s item number, model number,
MSRP, Rep Cost, sell value, a quantity per bundle and a brief description
8. Click Save9. Click Close at the bottom right of the dialogue box
2
1
3
4
5
6
7
8
9Manual printers and copiers require the input of a service-equivalent machine. If this manual item does not require service (e.g., software) then check the box next to “exclude from service”.
Quick Tip:

It is possible to edit bundles created in proposals and orders.
How To: Edit a Bundle
98
To edit a bundle:
1. Navigate to the Products tab2. Select the bundle you would like to edit by
clicking on it. The selected bundle will turn green.3. Click the edit bundle button4. Select the characteristic of the bundle you would
like to edit and make your desired changes
3
1
2
4

How To: Clone a Bundle
99
It is possible to clone bundles created in proposals and orders.
To clone a bundle:
1. Navigate to the Products tab2. Select the bundle you would like to clone by
clicking on it. The selected bundle will turn green.3. Click the clone bundle button4. Make any desired changes to this cloned bundle 5. Click Save
3
1
2
4
5
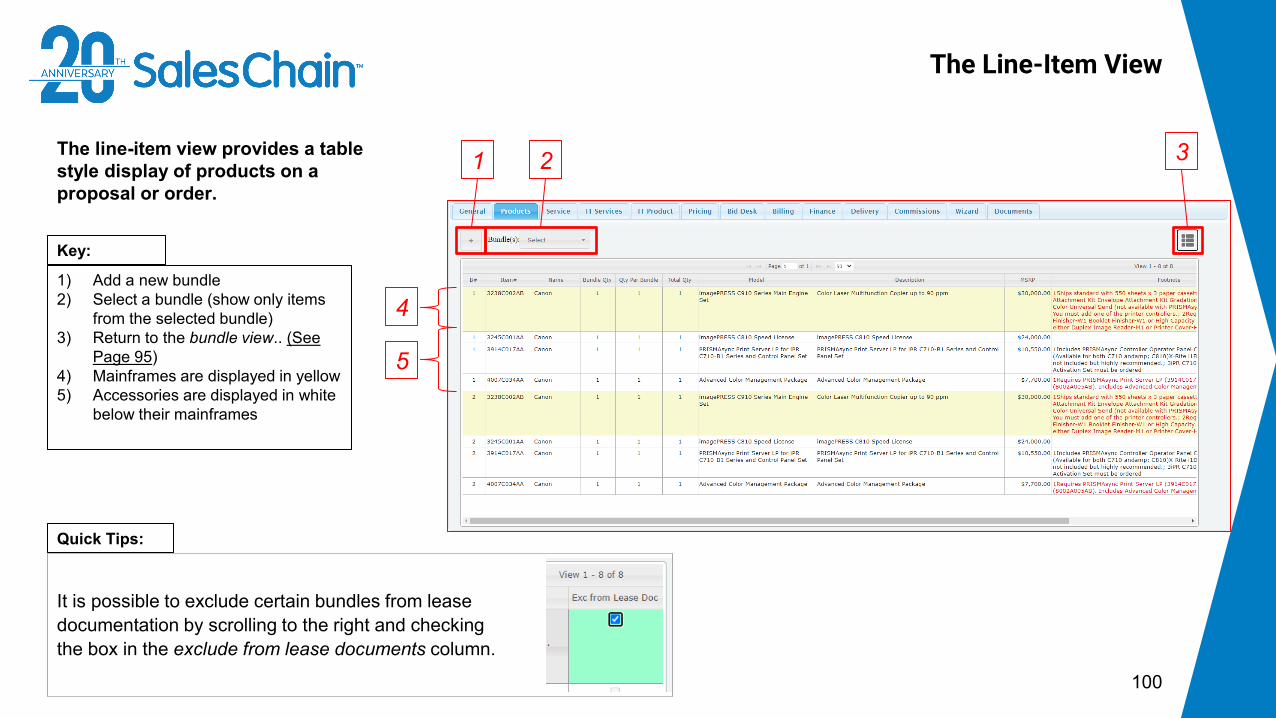
The line-item view provides a table style display of products on a proposal or order.
The Line-Item View
100
It is possible to exclude certain bundles from lease documentation by scrolling to the right and checking the box in the exclude from lease documents column.
Quick Tips:
1) Add a new bundle2) Select a bundle (show only items
from the selected bundle)3) Return to the bundle view.. (See
Page 95)4) Mainframes are displayed in yellow5) Accessories are displayed in white
below their mainframes
Key:
31 2
4
5
The service tab of the order breakdown allows users to comprehensively view, edit and alter service pricing details for this proposal or order.
Proposal and Order Pricing: The Service Tab
101
1) Select contract type and term2) Jump to blended view (See page
105)3) Set service rate to different
pricing tiers (value and number of tiers may vary by system configuration)
4) Switch to the audit view5) Add a zero-cost service item
(See page 106)6) Create a new service group7) Service pricing method (Machine
level or Blended) and group name (Standard is Default)
8) Mainframe name9) Base rate commitment boxes 10) Service details 11) Estimated and Actual Payment
value12) Charge back and override value13) Adjustments (may vary by
system configuration)14) Fixed pricing/escalation controls15) Cost/profit summary
Key: 1 2 3 4 5 6 9
11
12
13
14
15
87 10

Service Tab Vocabulary
102
Column Description
Rate The dollar value charged to the customer for each page printed by this machine. Color machines will display a black & white and a color rate.
Allowance The number of prints from this machine allowed to a customer on a monthly Basis. Any prints over this value will be charged at the overage rate. Color machines will display a black & white and a color allowance.
Overage The dollar value charged to the customer for each page printed in excess of the allowance. Color machines will display a black & white and a color overage.
Fixed Amount A fixed value to be charged to the customer for this machine regardless of print volume.
Sell Rate Additional fixed amount for service on a monthly basis that can be entered.
Total The total value a customer is committing to pay on a monthly basis. This value is calculated as the Rate times the allowance. If this is a CPC contract, this will show as a $0.00 value.
Owned By Designates whether the machine is owned, leased or rented by the customer.

It is possible to have many service contract types configured within the SalesChain system. You may change the contract type of any proposal or order in the Service tab of the order breakdown.
How To: Change Your Service Contract Type
103
To change your service contract type:
1. Navigate to the Service tab2. Open the Contract Type drop-down and select
the contract type you would like 3. Click OK in your browser to confirm this change
You may see changes take effect across the service screen. For example, CPC contracts will un-check all the volume commitment boxes, no service will remove all line items entirely.
Quick Tip:
1
2
3

It is possible to change rates, allowances and overages in the service tab table. See page 102 for an explanation of service pricing terms.
How To: Change Service Rates, Allowances, and Overages
104
To change basic values in the service tab’s table:
1. Navigate to the Service tab2. Click on the number of the value in the table
you would like to edit (Color Allowance In this example)
3. Type the value you would like 4. Hit the Enter key on your keyboard to make the
change take effect
If you have blended your service rates between multiple machines, you will not be able to edit machine level allowances. See page 105 for how to blend and remove blending from your service contract.
Quick Tip:
1
2
3
4

It is possible to price service with a shared allowance (click rates) across multiple machines.
How To: Price Blended Service
105
To price blended service:
1. Navigate to the Service tab2. Click the blended view button3. Click on and change any value in the table 4. Hit Enter on your keyboard. The top will now
display B-CPC instead of M-CPC
• If you have blended your service rates between multiple machines, you will not be able to edit machine level allowances.
• To return to machine level pricing, click the M-CPC button.
Quick Tip:
1
2
3
4

It is possible to add a service contract without adding a machine to the deal (zero cost service) using the service tab in the order breakdown.
How To: Price a Service Takeover
106
To add a service only item:
1. Navigate to the Service tab2. Click the add zero cost service button3. a) Search for the model of the machine (or a service
equivalent machine) that you intend to take over service for. Use the drop-downs or search for the model in the search box. b) Alternatively, import an FMAudit or Printfleet meter read file.
4. Use the Owned By drop down to designate this as a dealer-owned or a customer-owned machine
5. Click Save
Service Takeovers will be highlighted in yellow in the table and can be edited in the same way as other equipment in the deal. Click the blue X to remove this line item.
Quick Tip:
1
2
3a
3b
5
4

It is possible to group machines in the service tab so that you can create multiple bundles or group machines on generated service documents.
How To: Group Machines for Service
107
To create service groups:
1. Navigate to the Service tab2. Click the Group button3. In the group service dialogue box, click the New
Group button4. Enter a name for this new group5. Select the machines that should be added to this new
group6. Click Save & New7. Repeat steps 3-6 for as many groups as you would
like to create.
1
2
3
4
5
6
Group names will be displayed in the group service dialogue, the service tab and will display on generated service documents.
Quick Tip:

The IT Services tab of the order breakdown allows users to add IT services to proposals and orders and target specific price points.
Proposal and Order Pricing: The IT Services Tab
108
1) Add IT Services2) Delete Selected IT Service3) IT Services Details4) Scenario Pricing Tool5) Cost/profit summary
Key: 1
4
32
5

It is possible to add IT services to a proposal or an order by themselves or combine them with print hardware and IT product sales.
How To: Add IT Services To A Proposal or Order
109
To add an IT service item:
1. Navigate to the IT Services Tab2. Click the Add IT Services button3. Select the services you would like to add using the
check boxes4. Click Apply
• When adding products, you can use the column headers in the service catalog dialogue to search for products by name, SKU and more rather than scrolling alphabetically.
• (Right) To adjust quantities, click on the quantity number after adding this service.
Quick Tips:
1
2
3
4

It is possible to manipulate the costs of a series of IT services on a proposal to find round numbers or fit difficult pricing situations using the scenario pricing tool.
How To: Scenario Pricing in the IT Services Tab
110
To use the scenario pricing tool:
1. Navigate to the IT Services Tab2. Select the scenario you would like to solve for from
the SCENARIO drop-down.3. If solving for Cost Per User add the number of users
in the designated field. 4. Enter your target value (in this example 35 represents
$35/user/month.)5. Click GO6. Click the red Save button in the top right-hand corner.
1
2
3
4
5
6

The IT Products tab of the order breakdown allows users to add IT products to proposals and orders and target specific price points.
Proposal and Order Pricing: The IT Products Tab
111
21
7
1) Add IT Products Bundle2) Import QuoteWerks Quote3) Select Payment Terms4) Enter Down Payment Value5) Total and Total GP Values6) Note Entry7) Bundles of IT Products are
displayed in the table. 8) Invoice Summary
Key:
3 4 5 6
8
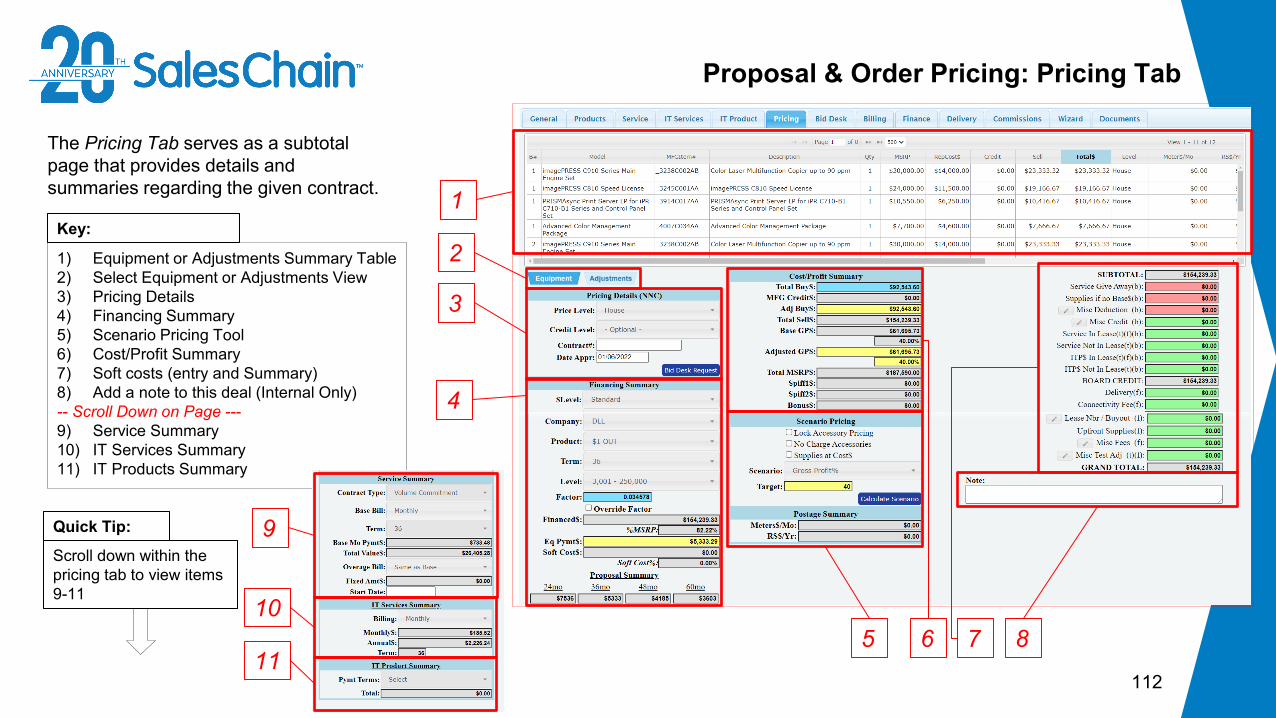
112
Proposal & Order Pricing: Pricing Tab
The Pricing Tab serves as a subtotal page that provides details and summaries regarding the given contract.
1) Equipment or Adjustments Summary Table2) Select Equipment or Adjustments View3) Pricing Details 4) Financing Summary5) Scenario Pricing Tool6) Cost/Profit Summary7) Soft costs (entry and Summary)8) Add a note to this deal (Internal Only)-- Scroll Down on Page ---9) Service Summary 10) IT Services Summary 11) IT Products Summary
Key:1
5
4
2
6 7
3
8
9
10
11
Scroll down within the pricing tab to view items 9-11
Quick Tip:

113
How to: Change Values in the Equipment Subtab
The Equipment subtab provides information regarding equipment cost.Important: Only users with designated permission can change certain values in this table.
To change values in the Equipmentsubtab:
1. Click on the Pricing tab2. Select Equipment from tabs
below the table3. Click on the value you would
like to change. Note: Be sure to click the number, not just the cell in the table
4. Enter the desired value5. Hit enter on your keyboard to
make the change take effect
1
2
4
3
5
Edited fields which have a direct effect on profitability will be highlighted in yellow.
Quick Tip:
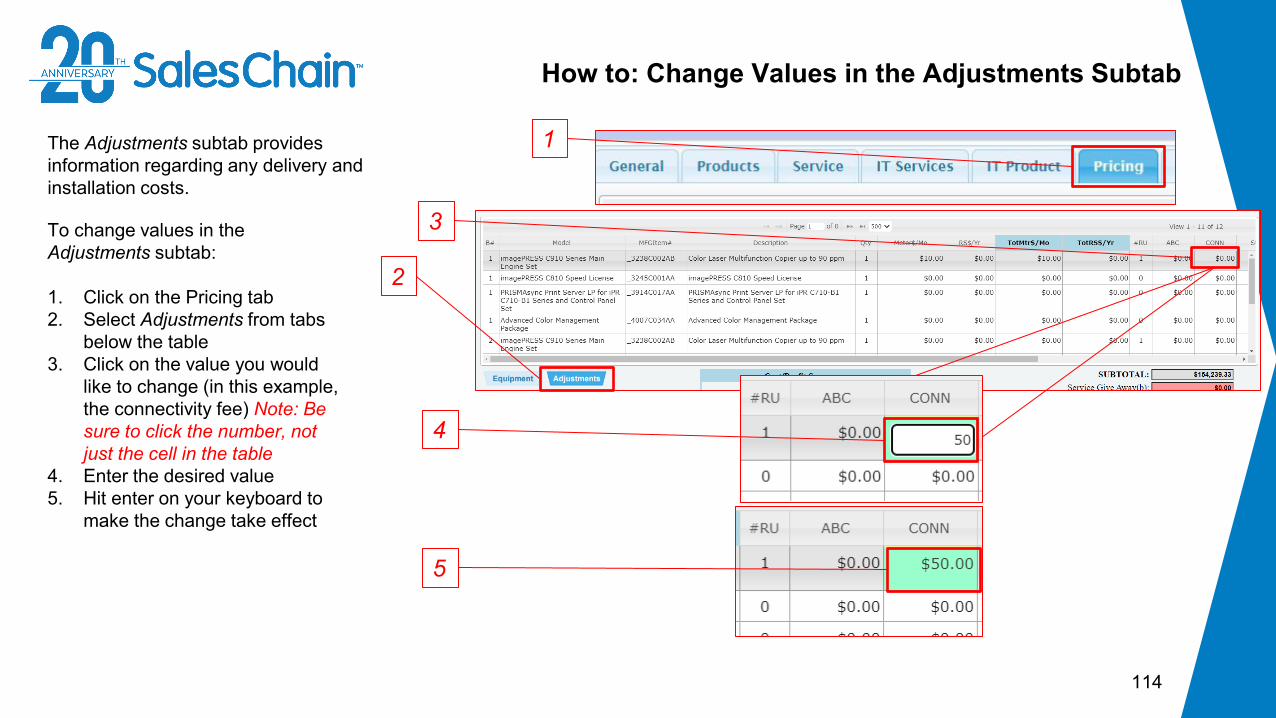
114
How to: Change Values in the Adjustments Subtab
The Adjustments subtab provides information regarding any delivery and installation costs.
To change values in the Adjustments subtab:
1. Click on the Pricing tab2. Select Adjustments from tabs
below the table3. Click on the value you would
like to change (in this example, the connectivity fee) Note: Be sure to click the number, not just the cell in the table
4. Enter the desired value5. Hit enter on your keyboard to
make the change take effect
1
2
4
3
5

115
How to: Change a Deal’s Price Level
The Pricing Details section of the pricing tab allows you to change a proposal or order’s price level. Important: If no pricing data for a selected pricing level exists for certain equipment on the deal, the price level might not change. Consult the Equipment subtab (per step 3 below) to see what price level machines are being priced at.
To change a proposal or order’s price level:
1. Click on the Pricing tab2. In the Pricing Details Section, select the
price level you would like from the Price Level drop down.
3. Reference the Level column in the Equipment subtab to be sure that the price level has changed for all your equipment (See important note above).
Pricing levels can be permissioned so that only certain users have access to certain price levels, like manager discounts. Contact your system administrator if there is a price level that you are not seeing and should have access to or submit a bid desk request (page 117) if you need a deal priced at a level you do not have access to.
Quick Tip:
1
2
3

116
How to: Change a Deal’s Credit Level
The Pricing Details section of the pricing tab allows you to change a proposal or order’s credit level.
To change a proposal or order’s credit level:
1. Click on the Pricing tab2. In the Pricing Details Section, select the
price level you would like from the Credit Level drop down.
Credit levels can be permissioned so that only certain users have access to certain price levels, like manager discounts. Contact your system administrator if there is a credit level that you are not seeing and should have access to or submit a bid desk request (page 117) if you need a deal priced at a level you do not have access to.
Quick Tip:
1
2

117
How to: Submit a Bid Desk Request
1The Pricing Details section of the pricing tab allows sales reps to submit a bid desk request. A bid desk request allows sales reps to ask managers, admins or ownership for assistance in tricky pricing situations by sending them a message.
2
To submit a bid desk request:
1. Click on the Pricing tab2. In the Pricing Details section, click on the
Big Desk Request button 3. Enter a detailed description of the request
you are making to your manager in the text box of the pop up
4. Click Save5. Click OK in the confirmation pop-up
3
4
5
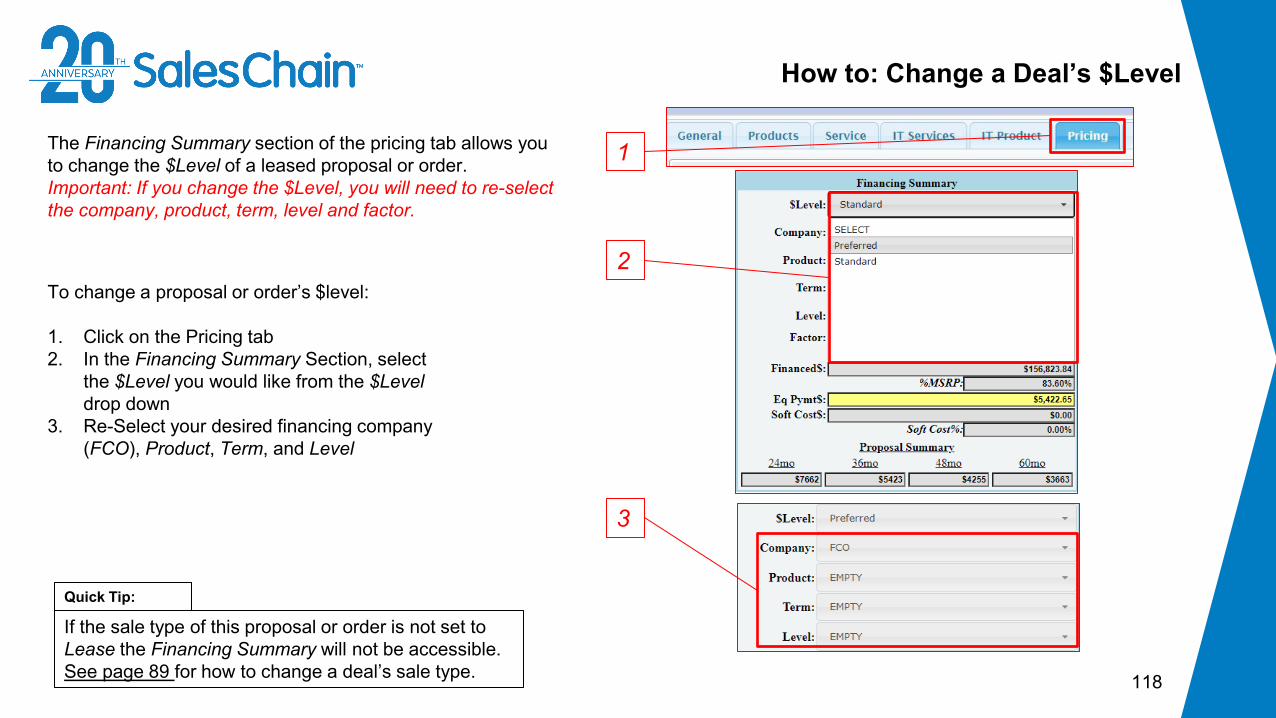
118
How to: Change a Deal’s $Level
Quick Tip:
If the sale type of this proposal or order is not set to Lease the Financing Summary will not be accessible. See page 89 for how to change a deal’s sale type.
1The Financing Summary section of the pricing tab allows you to change the $Level of a leased proposal or order. Important: If you change the $Level, you will need to re-select the company, product, term, level and factor.
To change a proposal or order’s $level:
1. Click on the Pricing tab2. In the Financing Summary Section, select
the $Level you would like from the $Level drop down
3. Re-Select your desired financing company (FCO), Product, Term, and Level
2
3

119
How to: Change a Deal’s Financing Company
Quick Tip:
If the sale type of this proposal or order is not set to Lease the Financing Summary will not be accessible. See page 89 for how to change a deal’s sale type.
1
The Financing Summary section of the pricing tab allows you to change the financing company (FCO) that you would like to work with on a leased proposal or order.
To change a deal’s financing company:
1. Click on the Pricing tab2. In the Financing Summary Section, select
the financing company you would like from the Company drop down
2

120
How to: Change a Deal’s Lease Product
Quick Tip:
If the sale type of this proposal or order is not set to Lease the Financing Summary will not be accessible. See page 89 for how to change a deal’s sale type.
1
The Financing Summary section of the pricing tab allows you to change the leasing product you would like to employ on a leased proposal or order.
To change a deal’s lease product:
1. Click on the Pricing tab2. In the Financing Summary Section, select
the lease product you would like from the Product drop down
2
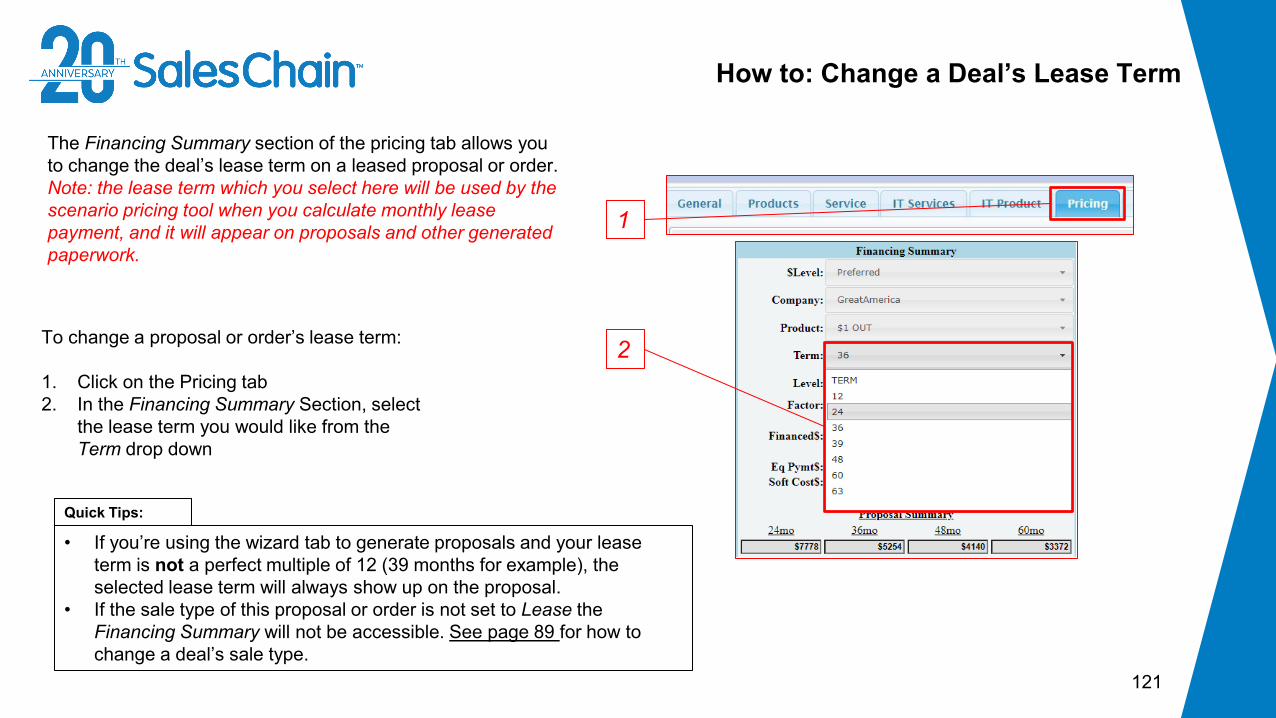
121
How to: Change a Deal’s Lease Term
Quick Tips:
• If you’re using the wizard tab to generate proposals and your lease term is not a perfect multiple of 12 (39 months for example), the selected lease term will always show up on the proposal.
• If the sale type of this proposal or order is not set to Lease the Financing Summary will not be accessible. See page 89 for how to change a deal’s sale type.
1
The Financing Summary section of the pricing tab allows you to change the deal’s lease term on a leased proposal or order. Note: the lease term which you select here will be used by the scenario pricing tool when you calculate monthly lease payment, and it will appear on proposals and other generated paperwork.
To change a proposal or order’s lease term:
1. Click on the Pricing tab2. In the Financing Summary Section, select
the lease term you would like from the Term drop down
2

122
Lease Level
Quick Tip:
If the sale type of this proposal or order is not set to Lease the Financing Summary will not be accessible. See page 89 for how to change a deal’s sale type.
1
The Financing Summary section of the pricing tab allows you to view different lease levels.Important: This will override in the backend, so changing the lease level here will not have any effect. Simply select the leasing company and product and the appropriate level will be assigned to the deal.
2

123
How to: Override a Deal’s Lease Rate Factor
Quick Tip:
If the sale type of this proposal or order is not set to Lease the Financing Summary will not be accessible. See page 89 for how to change a deal’s sale type.
1
The Financing Summary section of the pricing tab allows you to override the lease rate factor and enter a custom one on a leased proposal or order.
To change a proposal or order’s lease rate factor:
1. Click on the Pricing tab2. In the Financing Summary Section, check
the box next to Override Factor. The factortext box will turn yellow and become editable
3. Enter your desired factor in the Factor box and hit Enter on your keyboard
4. Enter your desired lease term in the Termdrop-down
2
3
4
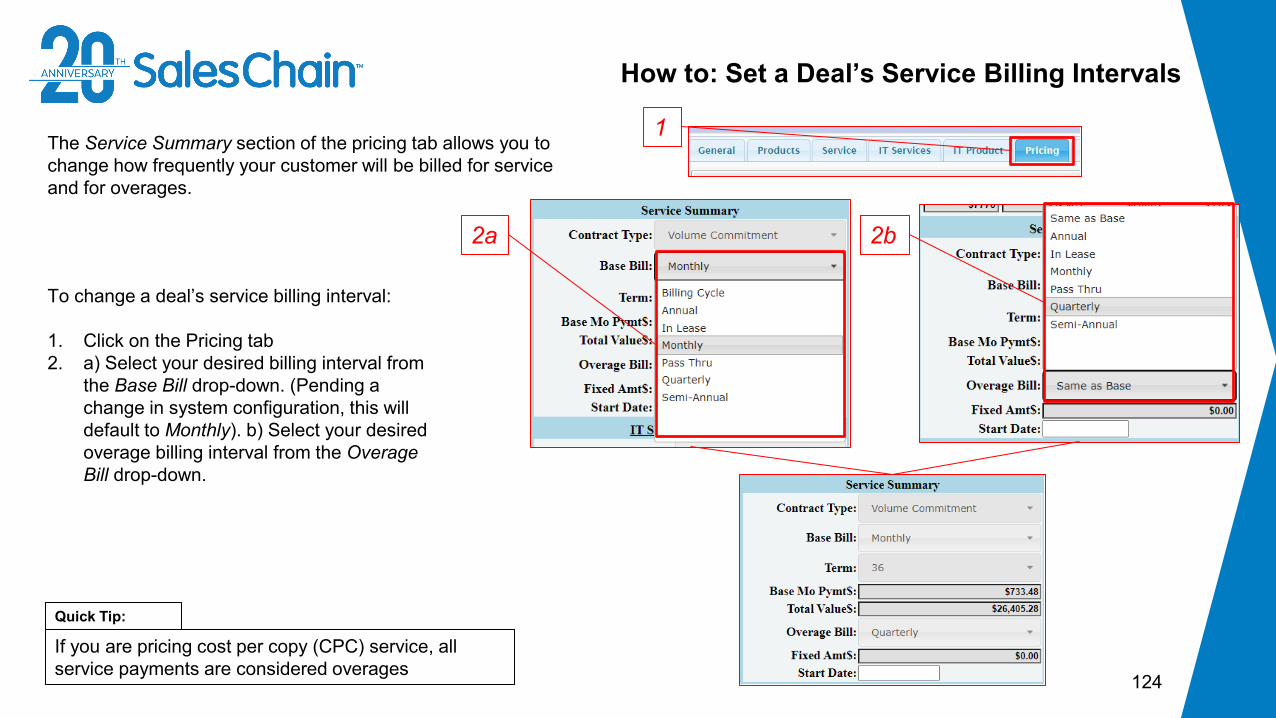
124
How to: Set a Deal’s Service Billing Intervals
The Service Summary section of the pricing tab allows you to change how frequently your customer will be billed for service and for overages.
To change a deal’s service billing interval:
1. Click on the Pricing tab2. a) Select your desired billing interval from
the Base Bill drop-down. (Pending a change in system configuration, this will default to Monthly). b) Select your desired overage billing interval from the Overage Bill drop-down.
1
2a 2b
Quick Tip:
If you are pricing cost per copy (CPC) service, all service payments are considered overages
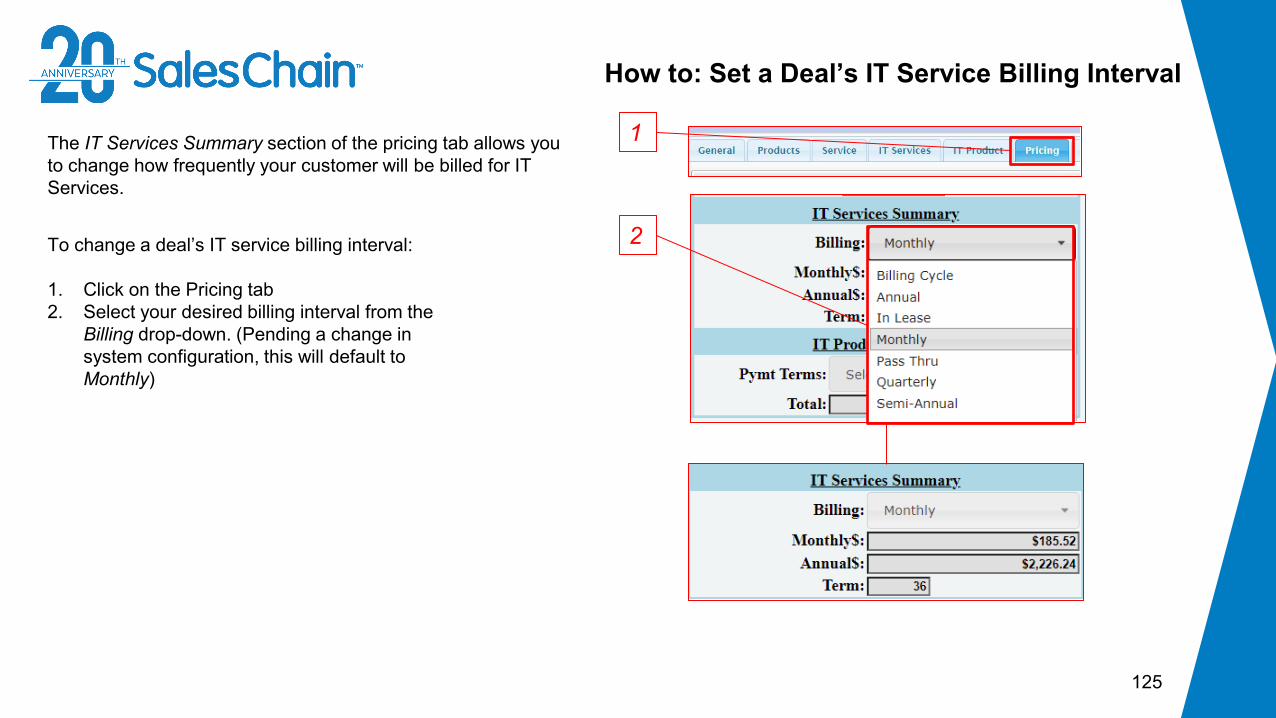
125
How to: Set a Deal’s IT Service Billing Interval
The IT Services Summary section of the pricing tab allows you to change how frequently your customer will be billed for IT Services.
To change a deal’s IT service billing interval:
1. Click on the Pricing tab2. Select your desired billing interval from the
Billing drop-down. (Pending a change in system configuration, this will default to Monthly)
1
2
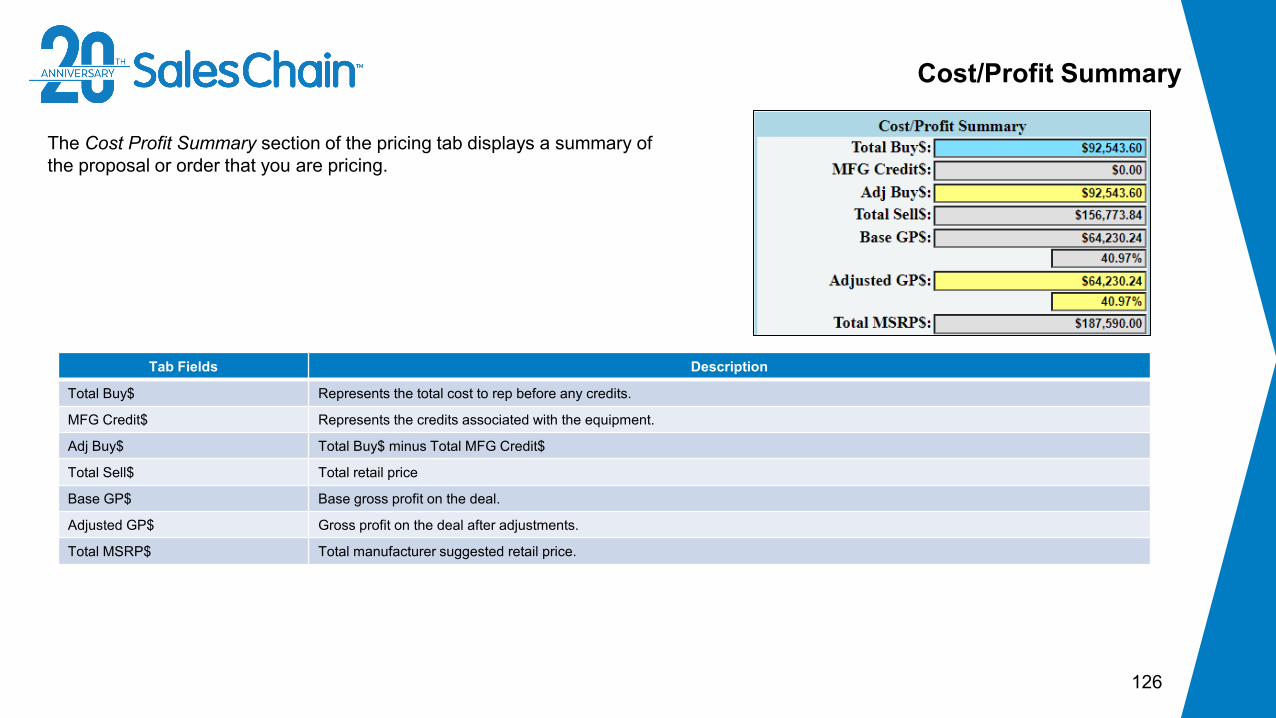
Tab Fields Description
Total Buy$ Represents the total cost to rep before any credits.
MFG Credit$ Represents the credits associated with the equipment.
Adj Buy$ Total Buy$ minus Total MFG Credit$
Total Sell$ Total retail price
Base GP$ Base gross profit on the deal.
Adjusted GP$ Gross profit on the deal after adjustments.
Total MSRP$ Total manufacturer suggested retail price.
126
Cost/Profit Summary
The Cost Profit Summary section of the pricing tab displays a summary of the proposal or order that you are pricing.

127
How To: Use the Scenario Pricing Tool
The Scenario Pricing Tool in the pricing tab allows you to target certain values to make a deal work for you or present your customer with nice round values. You may target lease payments, gross profit percentages and more.
To use the Scenario Pricing tool:
1. Click on the Pricing tab2. (Optional) Check boxes to Lock Accessory Pricing, No
Charge Accessories, or to price Supplies at Cost. 3. Choose the scenario you would like to target from the
Scenario drop-down (In this example, lease payment dollar value).
4. Enter your target value5. Click the Calculate Scenario button
1
3
2
4
5Quick Tip:
If you are targeting a lease payment, the scenario pricing tool will use the lease term and rate factor that is selected in the Financing Summary. See page 121 for instructions on changing the lease term.

128
Proposal and Order Pricing: Soft Costs and Margin Adjustments
The section of the pricing tab on the far right with green and red fields includes all the fees and soft costs that may be associated with the order.Note: This section is highly customizable. Fields that are shown here may vary depending on your configuration.
1. a) Anything in red above the Amount Financed indicates a cost to the customer. Anything in green above Amount Financed is a credit to the customer. b) Anything in green below Amount Financed is a credit to the margin of the deal. Anything below Amount Financed is a debit to the margin of the deal.
2. Costs and fees are associated with these three categories: (b) – board credit (f) – financed (t) – taxable
3. Some fields are editable here while others are meant only for summary display. For example, the connectivity fee is set in the Adjustments subtab (See Page 114) and the total is displayed here, while the lease buyout value is actually entered here.
Key:
2
1a
3
1b

129
Proposal and Order Pricing: Billing Tab
The Billing Tab provides the given account’s bill-to address and billing contact. This information will appear on all proposal and order pricing paperwork that is generated.
11) Select Billing Address from Parent/Child account list
2) Select or create a contact at this account who will receive bills. (Leave blank to generate bills with only a business name)
3) Address entry dialogue
Key:2
3

130
How To: Change a Proposal or Order’s Billing Address
The Billing tab allows you to enter any given deal’s billing address.
1To change a deal’s billing address:
1) Click on the Billing tab2) Select the address you would like to send bills to
using the Customer drop-down or select New entry and enter a new address
3) IF you have entered a new address, click the red Save button at the top right
2
3
Quick Tip:
If you enter a new address, a new account will be created.
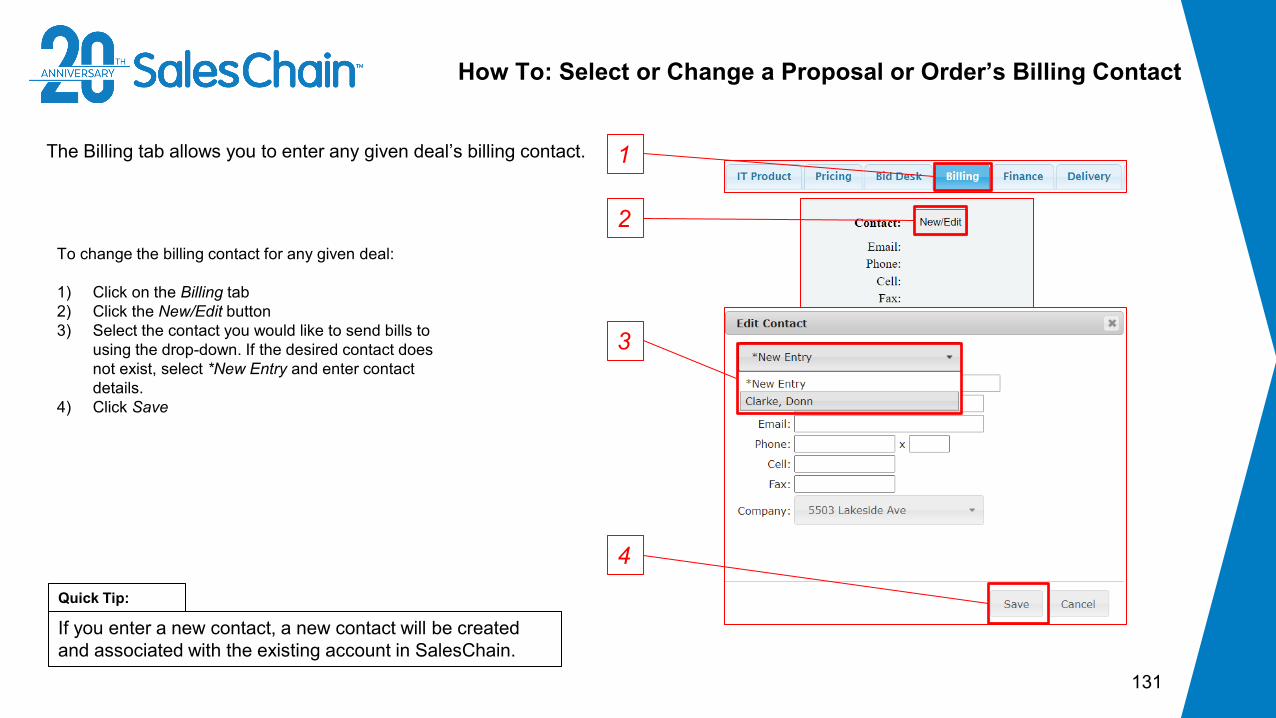
131
How To: Select or Change a Proposal or Order’s Billing Contact
The Billing tab allows you to enter any given deal’s billing contact. 1
To change the billing contact for any given deal:
1) Click on the Billing tab2) Click the New/Edit button3) Select the contact you would like to send bills to
using the drop-down. If the desired contact does not exist, select *New Entry and enter contact details.
4) Click Save
2
4Quick Tip:
If you enter a new contact, a new contact will be created and associated with the existing account in SalesChain.
3

132
Proposal and Order Pricing: Finance Tab
The Finance tab provides configurable information regarding a deal’s lease. You may process lease upgrades, submit credit applications and change detailed billing information.
1) Lease Upgrade Lookup2) Credit Application Summary &
Submit Button3) Billing Information Entry4) Display of linked leases to be
upgraded5) Lease Buyout Value (Pulled from
Pricing Tab - See page 128)6) Lease upgrade type selection7) Attach a document
Key: 1
4
5
6
7
2 3

How To: Attach a Document to an Order
133
It is possible to attach a document to an order via the Finance tab.
To attach a document to an order:
1. Navigate to the Finance tab2. Click on Attachments under the upgrade section3. Click on New Attachment4. Fill out the form and choose an attachment from your
computer 5. Click Save
2
1
3
4
5

How To: Lookup a Lease for Upgrade
134
When you are pricing a deal for an existing customer, it is possible to associate this new deal with an existing lease as an upgrade.
To perform a lease lookup:
1. Navigate to the Finance tab2. Click Lookup3. Choose the appropriate existing lease(s) using the
check box(es).4. Click Save
1
2
3
4

135
How To: Submit a Credit Application
When you are finished pricing a deal and have filled out the financing summary information in the Pricing tab (See page 112) it is possible to submit your credit application directly from the Order Breakdown. Note: This is a permissioned action, and only leasing coordinators are typically allowed to perform this action.
To submit a credit app summary:
1. Navigate to the Finance tab2. Fill out the blanks in the Credit App
Summary box3. Click Submit Application(s)
2
3
1

136
Billing Info
It is possible to add billing information for a customer account in any given order within the Finance tab.
To complete the billing information on an order:
1. Navigate to the Finance tab2. Fill out the blanks in the Billing Info box3. Click the flashing red Save button 2
1
3

137
Proposal and Order Pricing: Delivery Tab
The Delivery tab contains the location, pickup and allocation information used to fulfill an order. There are several Subtabs used to organize and enter delivery information. The purposes and page numbers of each of these subtabs are listed in the table below.
1) Delivery job selection drop-down
2) Total number of delivery jobs display
3) Delivery job status drop-down
4) Delivery job type drop-down5) Coordinator selection drop-
down6) Add or remove delivery jobs7) Subtab Selection8) Information displayed in
each subtab – in this case the Location subtab (See Page 139)
Key:1 2 3 4 5 6
8
7
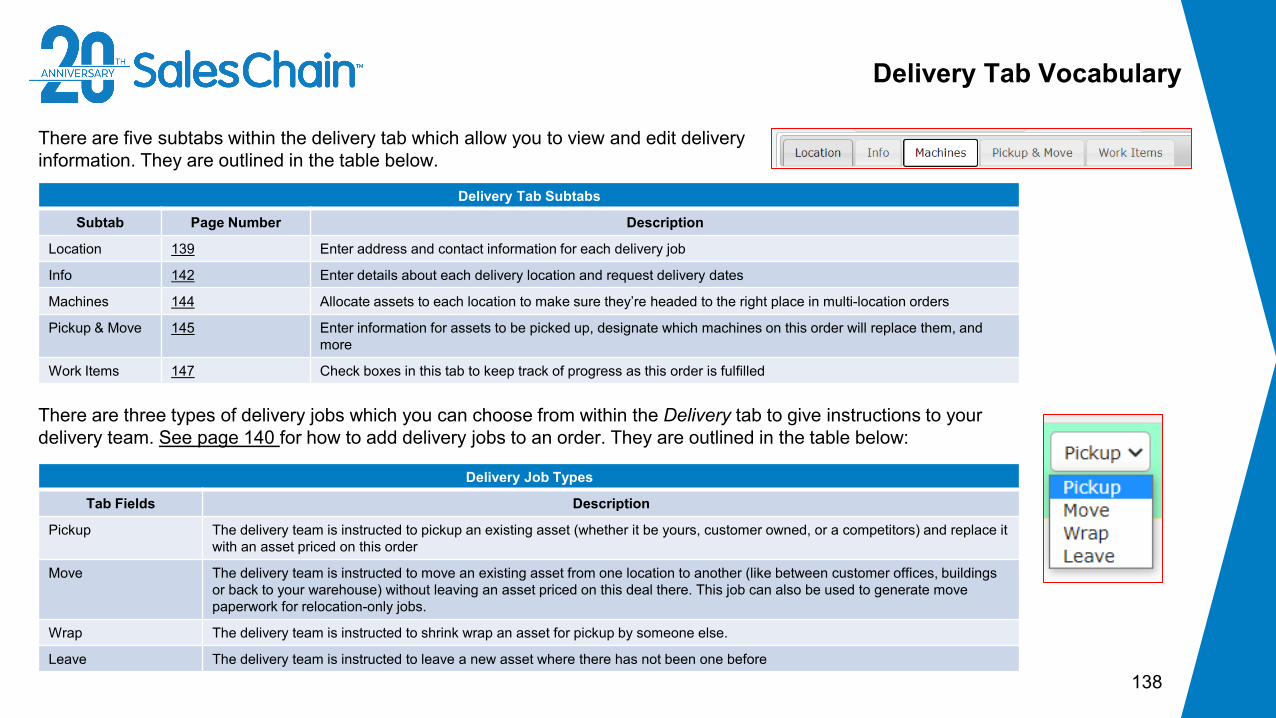
Delivery Job Types
Tab Fields Description
Pickup The delivery team is instructed to pickup an existing asset (whether it be yours, customer owned, or a competitors) and replace it with an asset priced on this order
Move The delivery team is instructed to move an existing asset from one location to another (like between customer offices, buildingsor back to your warehouse) without leaving an asset priced on this deal there. This job can also be used to generate move paperwork for relocation-only jobs.
Wrap The delivery team is instructed to shrink wrap an asset for pickup by someone else.
Leave The delivery team is instructed to leave a new asset where there has not been one before
138
Delivery Tab Vocabulary
There are three types of delivery jobs which you can choose from within the Delivery tab to give instructions to your delivery team. See page 140 for how to add delivery jobs to an order. They are outlined in the table below:
Delivery Tab Subtabs
Subtab Page Number Description
Location 139 Enter address and contact information for each delivery job
Info 142 Enter details about each delivery location and request delivery dates
Machines 144 Allocate assets to each location to make sure they’re headed to the right place in multi-location orders
Pickup & Move 145 Enter information for assets to be picked up, designate which machines on this order will replace them, and more
Work Items 147 Check boxes in this tab to keep track of progress as this order is fulfilled
There are five subtabs within the delivery tab which allow you to view and edit delivery information. They are outlined in the table below.

139
Proposal and Order Pricing: Delivery Tab - Location Subtab
The Location subtab allows you to confirm or enter address information for one or more locations on this order and change the contacts at said location(s).
1) Delivery job nickname entry2) Address selection/lookup drop-
down3) Enter or view address details4) Contact selection/lookup for
Primary, IT, and Meter contacts at this location.
Key:
1
2
3
4
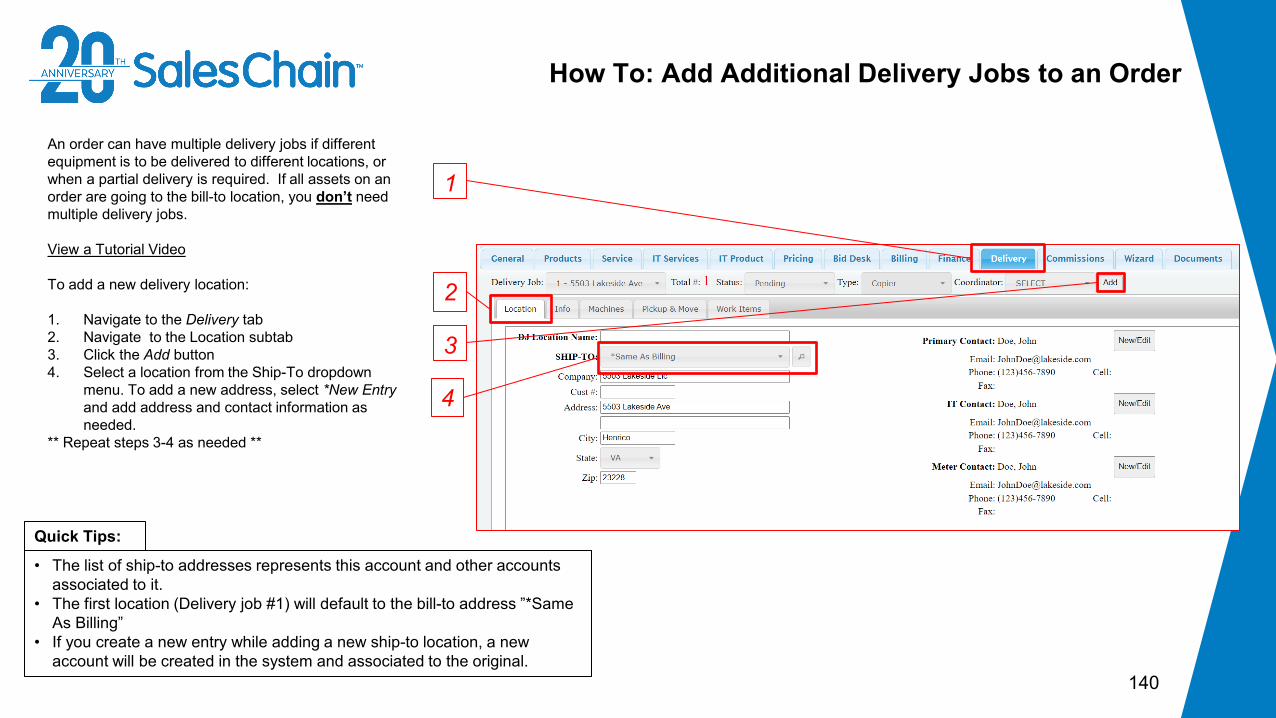
140
How To: Add Additional Delivery Jobs to an Order
Quick Tips:
• The list of ship-to addresses represents this account and other accounts associated to it.
• The first location (Delivery job #1) will default to the bill-to address ”*Same As Billing”
• If you create a new entry while adding a new ship-to location, a new account will be created in the system and associated to the original.
An order can have multiple delivery jobs if different equipment is to be delivered to different locations, or when a partial delivery is required. If all assets on an order are going to the bill-to location, you don’t need multiple delivery jobs.
View a Tutorial Video
To add a new delivery location:
1. Navigate to the Delivery tab2. Navigate to the Location subtab3. Click the Add button4. Select a location from the Ship-To dropdown
menu. To add a new address, select *New Entry and add address and contact information as needed.
** Repeat steps 3-4 as needed **
2
4
3
1

141
How To: Remove Delivery Jobs From an Order
It is possible to remove delivery jobs that have been added to a proposal or order. Note: Machines allocated to this delivery job will no longer be assigned to ANY delivery job. If you delete a job with machines allocated to it, be sure to re-allocate those machines to a different delivery job.
View a Tutorial Video
To remove a delivery job:
1. Navigate to the Delivery tab2. Select the desired address from the
Delivery Job drop-down3. Click Remove4. Click Ok in the pop-up window** Repeat steps 2-4 as needed **
2
3
1
4
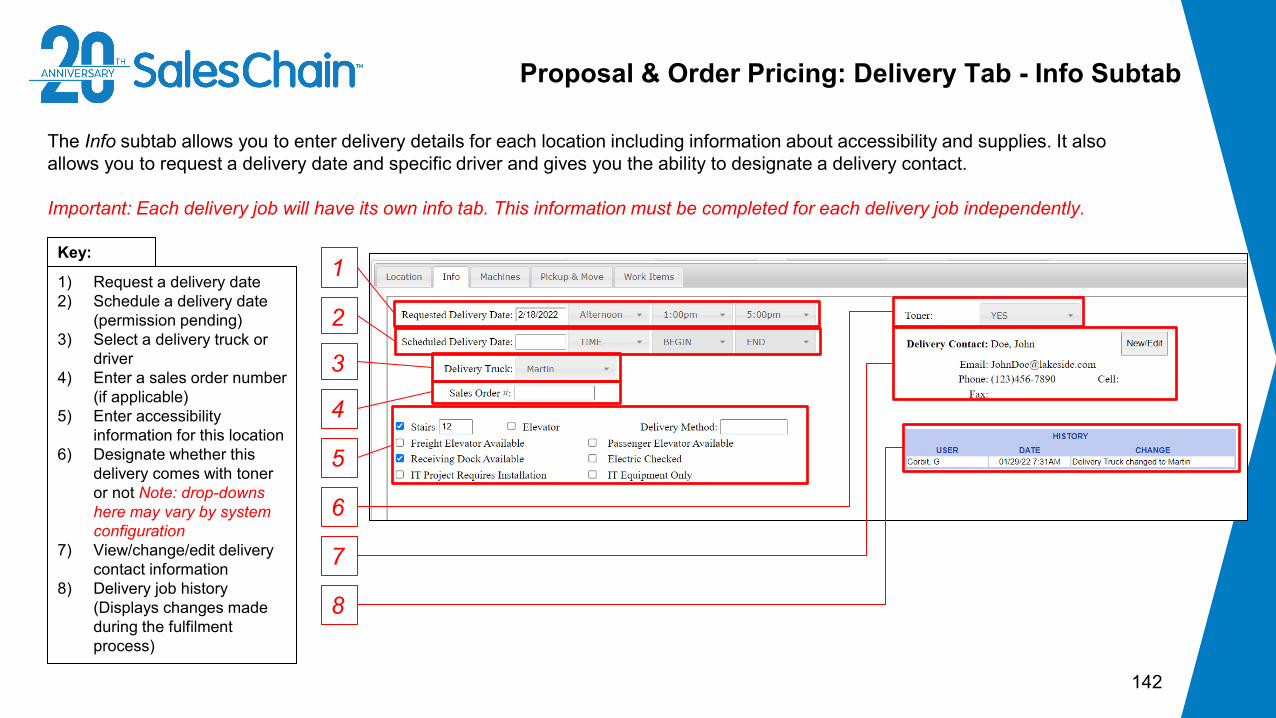
142
Proposal & Order Pricing: Delivery Tab - Info Subtab
The Info subtab allows you to enter delivery details for each location including information about accessibility and supplies. It alsoallows you to request a delivery date and specific driver and gives you the ability to designate a delivery contact.
Important: Each delivery job will have its own info tab. This information must be completed for each delivery job independently.
1) Request a delivery date2) Schedule a delivery date
(permission pending)3) Select a delivery truck or
driver 4) Enter a sales order number
(if applicable)5) Enter accessibility
information for this location6) Designate whether this
delivery comes with toner or not Note: drop-downs here may vary by system configuration
7) View/change/edit delivery contact information
8) Delivery job history (Displays changes made during the fulfilment process)
Key:1
2
3
4
5
6
7
8

143
How To: Request and Schedule a Delivery Date
2
1
3
4
It is possible for sales reps beginning the fulfillment process to request a delivery date and time window for an order.
Note: This sends a message to the fulfillment or management staff to request this date and time while not actually locking the delivery staff into a committed date and time window.
View a Tutorial Video
To request a delivery date:
1. Navigate to the Delivery tab2. Navigate to the Info subtab3. Click into the Requested Delivery Date text box to
pop open a calendar which will allow you to select a date OR simply
4. Optional: Use the TIME, BEGIN, and END drop-downs to designate a time window on the desired date.
** Repeat steps 2-4 for each delivery job**

144
How to: Allocate Assets to Delivery Jobs
If assets are going to different locations, you need to allocate the equipment to each location. However, if all assets are all going to a single location, you don’t need to allocate equipment.
View a Tutorial Video
To allocate assets to delivery jobs:
1. Navigate to the Delivery Tab 2. Navigate to the Machines subtab3. Click Allocate4. Select the desired location from the Assign to
Location dropdown menu5. In the Allocate Machines dialogue, select the
equipment you would like to allocate to this job using the check boxes
6. Click Allocate
2
1
3
5
4
6Quick Tip:
By default, assets are always allocated to location #1 (the default delivery job). You’re always allocating machines away from this location to begin with.
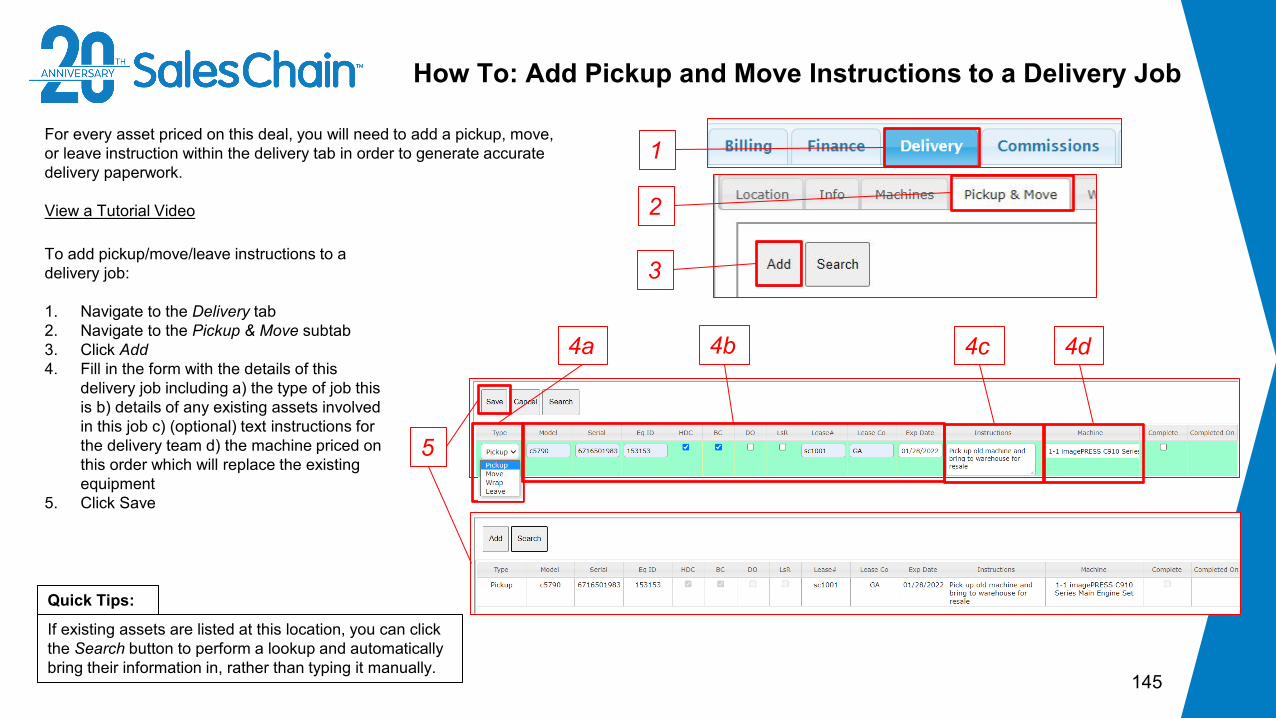
145
How To: Add Pickup and Move Instructions to a Delivery Job
To add pickup/move/leave instructions to a delivery job:
1. Navigate to the Delivery tab2. Navigate to the Pickup & Move subtab 3. Click Add4. Fill in the form with the details of this
delivery job including a) the type of job this is b) details of any existing assets involved in this job c) (optional) text instructions for the delivery team d) the machine priced on this order which will replace the existing equipment
5. Click Save
2
3
1For every asset priced on this deal, you will need to add a pickup, move, or leave instruction within the delivery tab in order to generate accurate delivery paperwork.
View a Tutorial Video
Quick Tips:
If existing assets are listed at this location, you can click the Search button to perform a lookup and automatically bring their information in, rather than typing it manually.
4a
5
4b 4c 4d

146
How To: Edit Pickup and Move Instructions on a Delivery Job
To edit pickup/move/leave instructions to a delivery job:
1. Navigate to the Delivery tab2. Navigate to the Pickup & Move
subtab 3. Click on the desired delivery job to
select it, it will be highlighted in green4. Click Edit5. Make the desired changes 6. Click Save
2
1It is possible to edit delivery jobs you have created to make corrections or adjustments.
4
Quick Tip:
To delete a delivery job rather than editing it, click Remove rather than Edit in step 4.
3
6
5
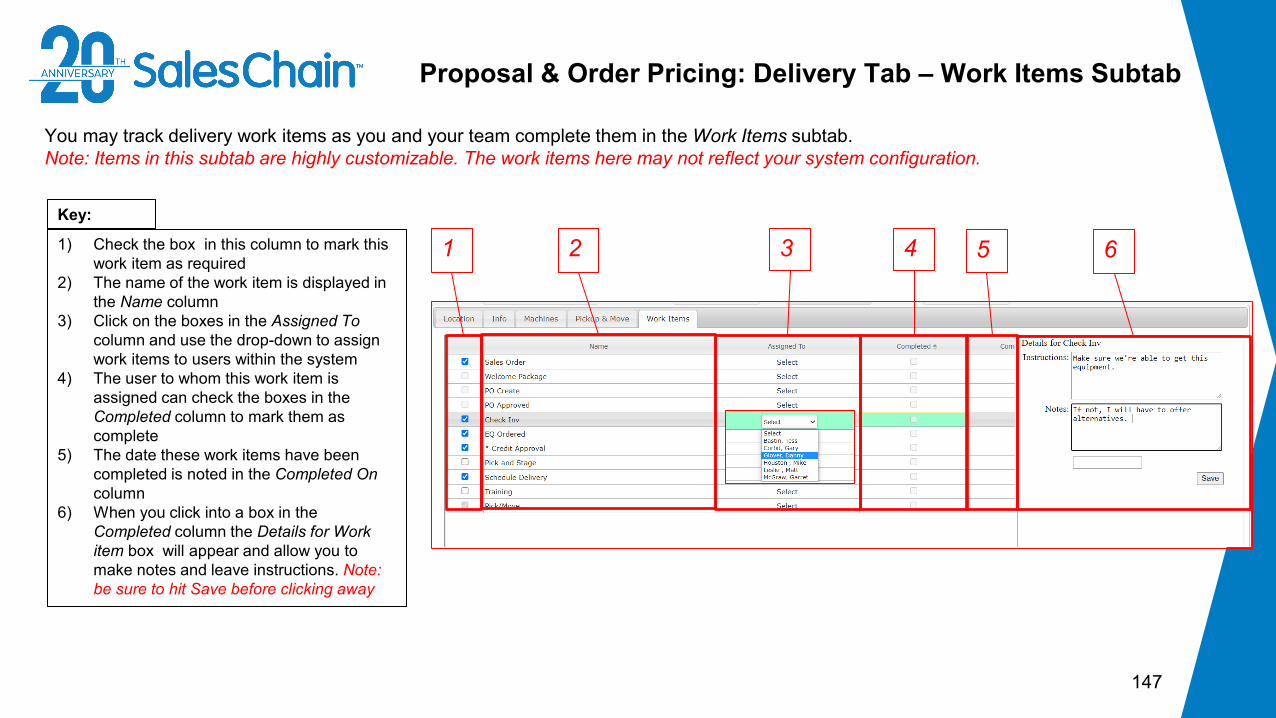
147
Proposal & Order Pricing: Delivery Tab – Work Items Subtab
You may track delivery work items as you and your team complete them in the Work Items subtab. Note: Items in this subtab are highly customizable. The work items here may not reflect your system configuration.
1 2 3 4 5 61) Check the box in this column to mark this work item as required
2) The name of the work item is displayed in the Name column
3) Click on the boxes in the Assigned Tocolumn and use the drop-down to assign work items to users within the system
4) The user to whom this work item is assigned can check the boxes in the Completed column to mark them as complete
5) The date these work items have been completed is noted in the Completed Oncolumn
6) When you click into a box in the Completed column the Details for Work item box will appear and allow you to make notes and leave instructions. Note: be sure to hit Save before clicking away
Key:

148
Proposal and Order Pricing: Commissions Tab
Commission details for an order can be adjusted in the Commissions tab. Important: Sales Commission Rate configuration is set by your company and a Sales Rep can choose from any available configured options. This whole tab can be permissioned to only be editable by certain users depending on your system configuration. Contactyour system administrator with any questions about configuration or commission rates.
Quick Tips:
• Commission level and price level may exclude manufacturer credits and segment bonuses from a transaction. Consult your system administrator or sales manager if you have questions.
• Below the information displayed in this screenshot you will see a Cost Profit Summary, the same as in the Pricing tab. See page 126 for a detailed description.
1) Commission level selection2) Split rep commission
dialogue3) Recurring commission status
selection4) Commission summary5) Commission tracking6) Internal note entry7) Cost/Profit Summary
(Continues below… See quick Note)
Key:
4
5
6
1 2 3
7

149
How To: Change an Order’s Commission Level
To change an order’s commission level:
1. Navigate to the Commissions tab2. Choose the desired commission level
from the Commissions Level drop-down
It is possible to have many different commission levels configured in the SalesChain system, and to select which is paid out for any order.
1
2
Quick Tip:
Your commissions percentage is represented by a multiple to the right of the Primary Rep Text Box. In the example to the right, the commission rate for the deal is 20%.
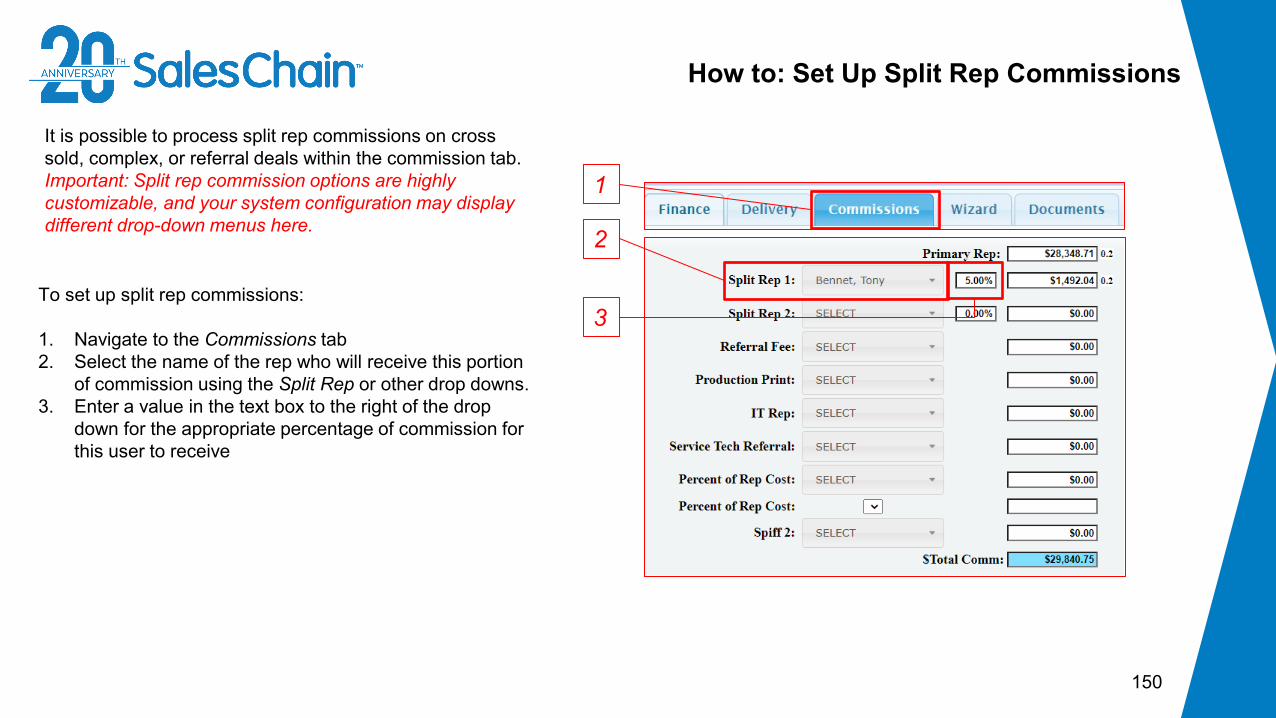
150
How to: Set Up Split Rep Commissions
To set up split rep commissions:
1. Navigate to the Commissions tab2. Select the name of the rep who will receive this portion
of commission using the Split Rep or other drop downs. 3. Enter a value in the text box to the right of the drop
down for the appropriate percentage of commission for this user to receive
2
It is possible to process split rep commissions on cross sold, complex, or referral deals within the commission tab. Important: Split rep commission options are highly customizable, and your system configuration may display different drop-down menus here.
1
3

151
How To: Set Up Recurring Commissions For An Order
To activate recurring commissions:
1. Navigate to the Commissions tab2. Select Active from the Status drop-down button Note:
the dialogue will expand to reveal more information3. Select the sales rep who is to receive recurring
commission from the Sales Rep drop-down4. Enter the revenue information for this recurring
commission5. Select a frequency and start date for this recurring
commission payout
2
1
3
It is possible to process recurring commissions for any order.
Quick Tips:
• Active is an open status for split rep commissions, meaning your rep will continue to get paid out for this deal at the appropriate interval. Complete or Cancelledare closed statuses, which will cease payments.
• You may add an internal only note at the bottom of this dialogue
4
5

152
Proposal and Order Pricing: Wizard Tab
The Wizard Tab allows you to generate custom proposal documents. You can customize the information and pages that are included on proposal documents.
1
2
3
4
5
6
1) Select the price level for optional accessories
2) Optional Accessory dialogue3) Select what information is included on the
proposal document and enter current monthly cost
4) Select which pages are included in the generated proposal document
5) Name and generate a proposal document6) Document generation history
Key:

153
How To: Change Pricing Levels for Optional Accessories
To change the optional accessory pricing level:
1. Navigate to the Wizard Tab2. Select your desired price level from the Accessory
Price Level Drop Down
It is possible to price optional accessories at the same, or at a different value than the order’s pricing rules dictate. This can help you make optional up-sales more appealing in some cases.
Quick Tip:
Selecting the Customprice level will allow you to edit the accessory values in the table (Right)
1
2
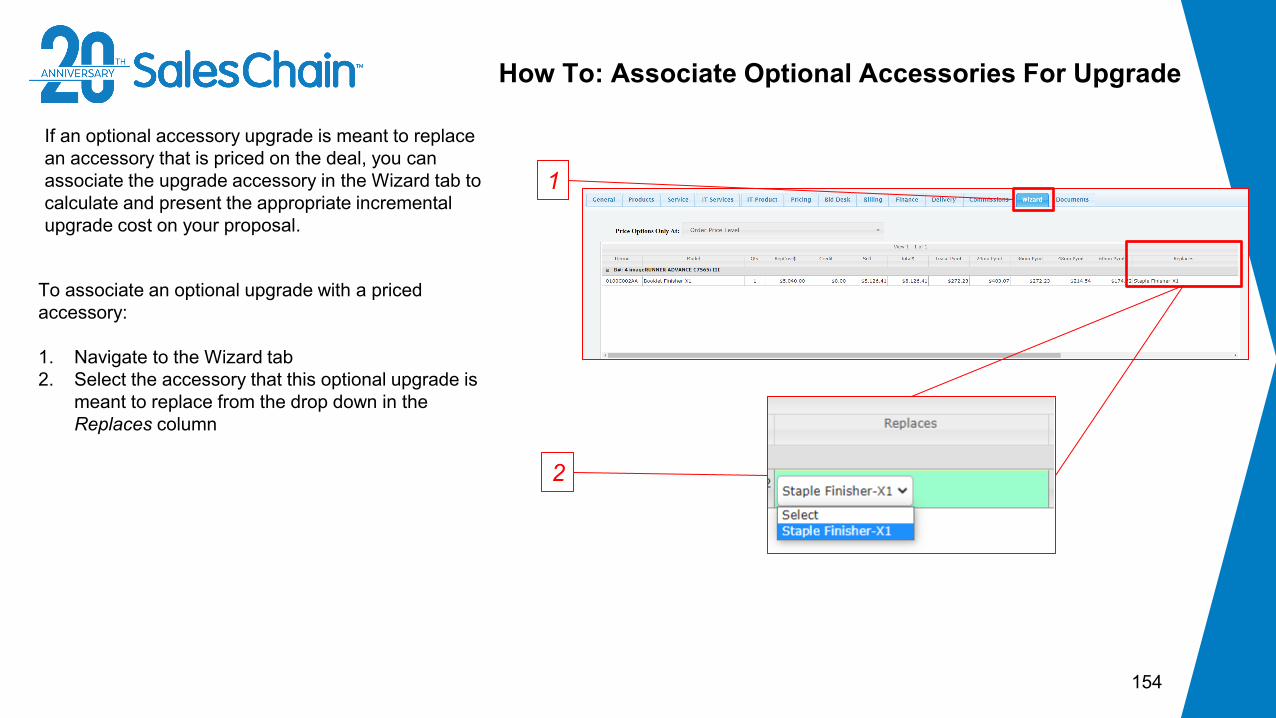
154
How To: Associate Optional Accessories For Upgrade
1
To associate an optional upgrade with a priced accessory:
1. Navigate to the Wizard tab2. Select the accessory that this optional upgrade is
meant to replace from the drop down in the Replaces column
If an optional accessory upgrade is meant to replace an accessory that is priced on the deal, you can associate the upgrade accessory in the Wizard tab to calculate and present the appropriate incremental upgrade cost on your proposal.
2

155
How To: Customize the Information Shown on a Proposal
To Change the information displayed on your proposal document’s solution sheet:
1. Navigate to the Wizard tab2. Use the check boxes below the optional
accessories table to determine what information will be displayed
3. Click the red flashing Save button
The proposal wizard makes it possible to customize what information is displayed or redacted from your proposal’s Solution Sheet. Note: For instructions on generating a proposal after you have made these customizations, see page 156.
Quick Tip:
To include the monthly cost that your prospective customer is paying, you must enter a dollar value in the text box AND check the Include on Proposal box.
2
1
3

156
How To: Generate a Proposal
To generate a proposal:
1. Navigate to the Wizard tab2. Select the pages you would like to include in your
proposal document package. Note: SalesChainimports your proposal document templates, so the available pages will vary, depending on system configuration
3. Click the red flashing Save button4. Give your proposal document package a name
that is easy to remember5. Click Generate Note: this will open a new window
with a document editor where you can view, download, edit or print your proposal document
Once you have customized the information you want to display on your proposal (see page 155) you are able to generate a proposal document. 1
4
5
2
3
Quick Tip:
The Data Sheet (Left) provides stats and pictures for each of the machines priced on your proposal. The Solution Sheet (Right) is the proposal’s financial summary page.
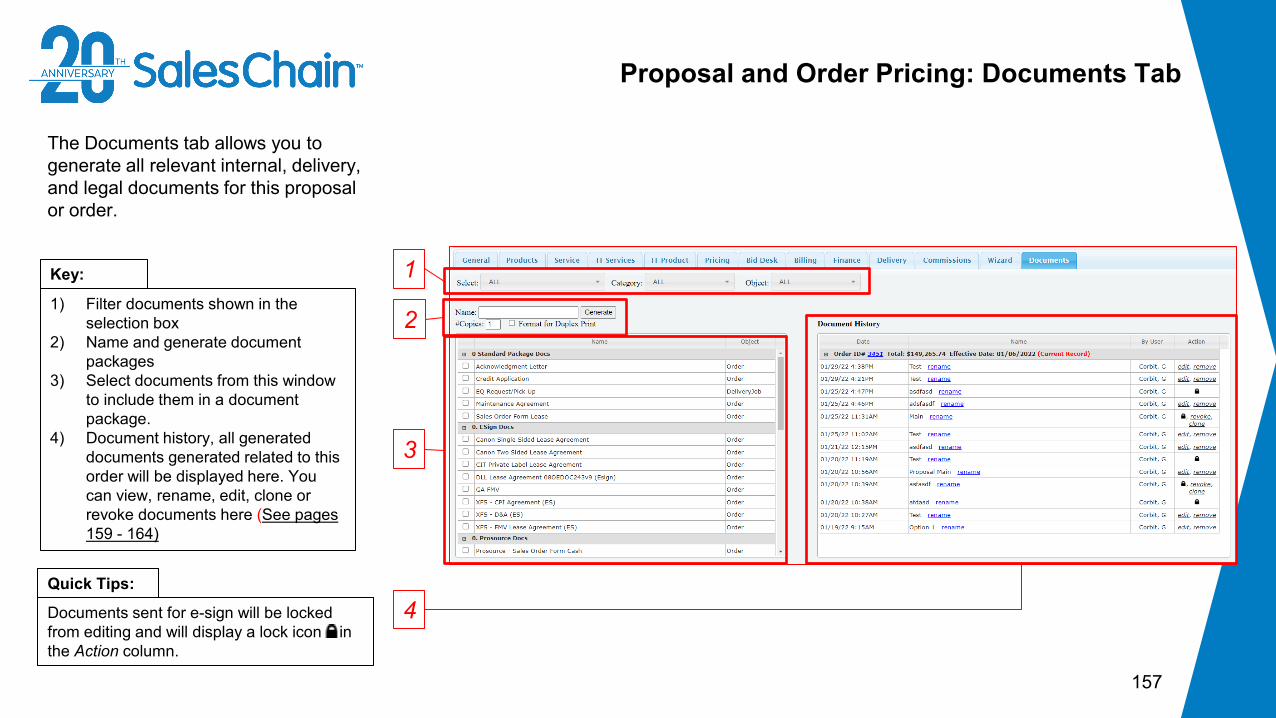
157
Proposal and Order Pricing: Documents Tab
The Documents tab allows you to generate all relevant internal, delivery, and legal documents for this proposal or order.
1) Filter documents shown in the selection box
2) Name and generate document packages
3) Select documents from this window to include them in a document package.
4) Document history, all generated documents generated related to this order will be displayed here. You can view, rename, edit, clone or revoke documents here (See pages 159 - 164)
Key: 1
2
3
4Quick Tips:
Documents sent for e-sign will be locked from editing and will display a lock icon in the Action column.

158
How To: Generate a Document Package
To generate a document package:
1. Navigate to the Documents tab2. Select the documents you would like to include in your
document package. Note: SalesChain imports your document templates, so the available documents will vary depending on system configuration
3. Give your proposal document package a name that is easy to remember
4. Click Generate Note: This will open a new window with a document editor where you can view, download, or print your document package
You are able to generate any documents related to this order from the Documents tab. You can generate single documents or create a package by selecting multiple documents.
1
3
4
2
Quick Tips:
• While your specific documents may vary, there will usually be headers for both e-Sign and non e-Sign documents. Be sure to generate the e-Sign versions of documents if you would like to sign them electronically. Important: you CANNOT mix and match e-sign and non e-sign documents
• If your document package contains e-signable documents, the Sign button will appear. If your document package contains no e-signable documents, the Sign button will not appear.

159
How To: Rename a Document Package
To rename a document package:
1. Navigate to the Documents tab2. Click the blue rename link next to the document
package for which you would like to change the name
3. In the pop-up dialogue, enter your new desired name in the Name text box
4. Click Save
You may rename any document packages you have generated for easy reference, even if they have been locked for e-Sign.
1
2
3
4

160
How To: View and Edit a Document Package
To view or edit a document package:
1. Navigate to the Documents tab2. a) If the document package is not locked, click
the black edit link in the Action column of the document package you would like to view or edit b) If the document package is locked, click on the lock icon in the Action column
You may view any document packages you have generated and edit those which have not been locked for e-Sign. This will open the document package in a document editor. See page 161 - 164 for further actions.Important: You are not able to edit documents which have been locked for e-Sign, but you are able to view them in the document editor. (Step 2b)
1
2a
2b

161
How To: Send a Document for e-Sign
To request an electronic signature via email:
1. Open or generate the desired document package using the methods outlined on pages 158 and 160
2. Click the E-Sign button. Note: this will lock the document package and prevent you from editing it. Be sure to make any changes before clicking the E-Sign button.
3. Click the Request button4. In the pop-up dialogue you may either a) select the
contact you would like to request a signature from using the Select dropdown OR b) click the + icon to add a new contact
5. Click Send6. Make any desired changes to the signature request email
for your contact7. Click Send
SalesChain’s internal electronic signature utility allows you to send documents to be signed via email. Important: Only documents configured for e-Sign can be sent for e-Sign. If you do not see the E-Sign button (Step 1) in the document editor, the documents in your package have not been configured for E-Sign.
2
3
1
4a
4b
5
7
6
Quick Tips:
• The revoke and clone link will both appear when a document has been sent for signature but has not yet been signed.
• You can view a document’s e-Sign process using the Signature desk (See page 165)

162
How To: e-Sign a Document on the Spot
To e-Sign a document on the spot:
1. Open or generate the desired document package using the methods outlined on pages 158 and 160
2. Click the E-Sign button. Note: this will lock the document package and prevent you from editing it. Be sure to make any changes before clicking the E-Sign button.
3. Click the Sign button4. Have your contact enter their name, title, email and draw
their signature in the dialogue box.5. Have your contact click Sign Document
** Repeat step 5 for all signature locations required.**
SalesChain’s internal electronic signature utility allows you to sign documents on the spot with your client using a computer or tablet. Important: Only documents configured for e-Sign can be sent for e-Sign. If you do not see the E-Sign button (Step 1) in the document editor, the documents in your package have not been configured for E-Sign.
2
3
1
Quick Tip:
You can view a document’s e-Sign process using the Signature desk (See page 165)
4
5
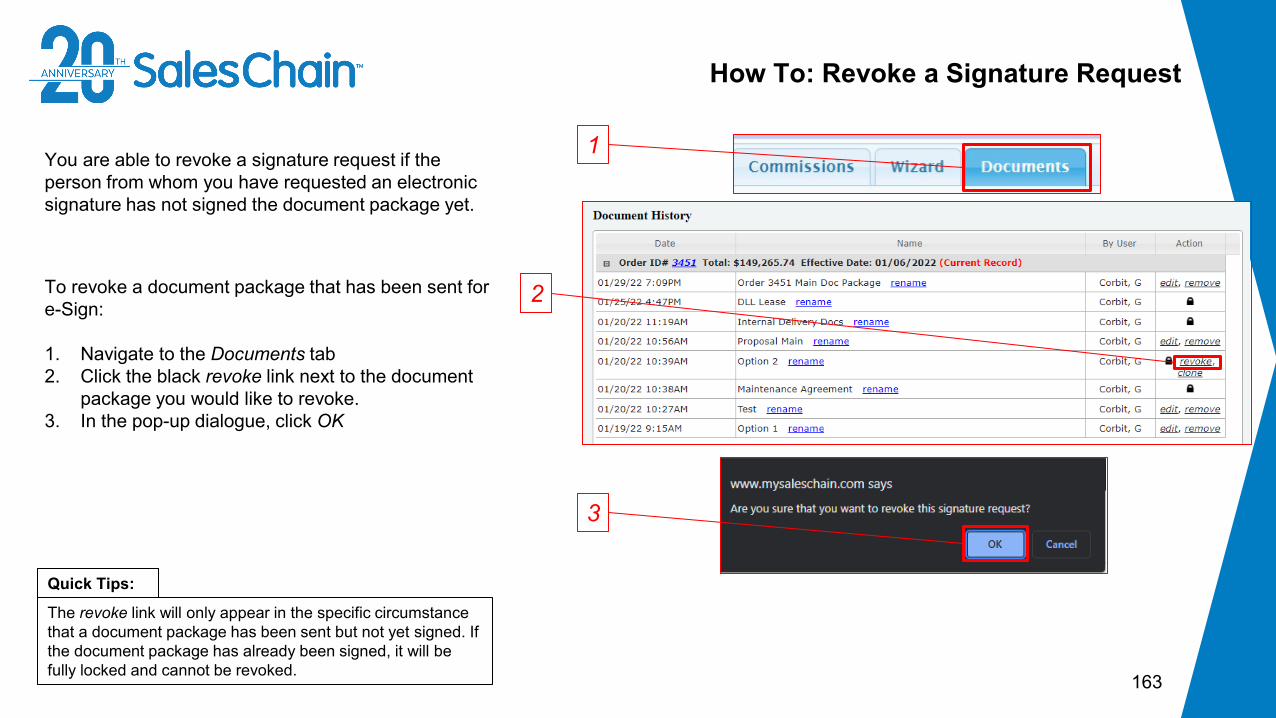
163
How To: Revoke a Signature Request
To revoke a document package that has been sent for e-Sign:
1. Navigate to the Documents tab2. Click the black revoke link next to the document
package you would like to revoke.3. In the pop-up dialogue, click OK
You are able to revoke a signature request if the person from whom you have requested an electronic signature has not signed the document package yet.
1
2
Quick Tips:
The revoke link will only appear in the specific circumstance that a document package has been sent but not yet signed. If the document package has already been signed, it will be fully locked and cannot be revoked.
3

164
How To: Clone a Document Package
To clone a document package:
1. Navigate to the Documents tab2. Important: Enter a name for this cloned
document package in the Name text box3. Click the black clone link next to the document
package which you would like to duplicate.
You are able to clone a document package which has been sent for e-Sign if the person from whom you have requested an electronic signature has not signed the document package yet.
1
3
2
Quick Tips:
• The revoke and clone link will both appear when a document has been sent for signature but has not yet been signed.
• The cloned document will no longer be locked from editing, this method is useful for making changes to e-Sign documents without re-creating the whole document package.

165
How To: Track e-Sign Progress
You are able to track the progress of electronic signatures sent to your customers using the Signature Desk.
1To track the progress of electronic signature requests:
1. Navigate to: Menu Sidebar > User Settings > Signature desk
2. You can view the status, actions taken, and user who took those actions for each document package here.
2
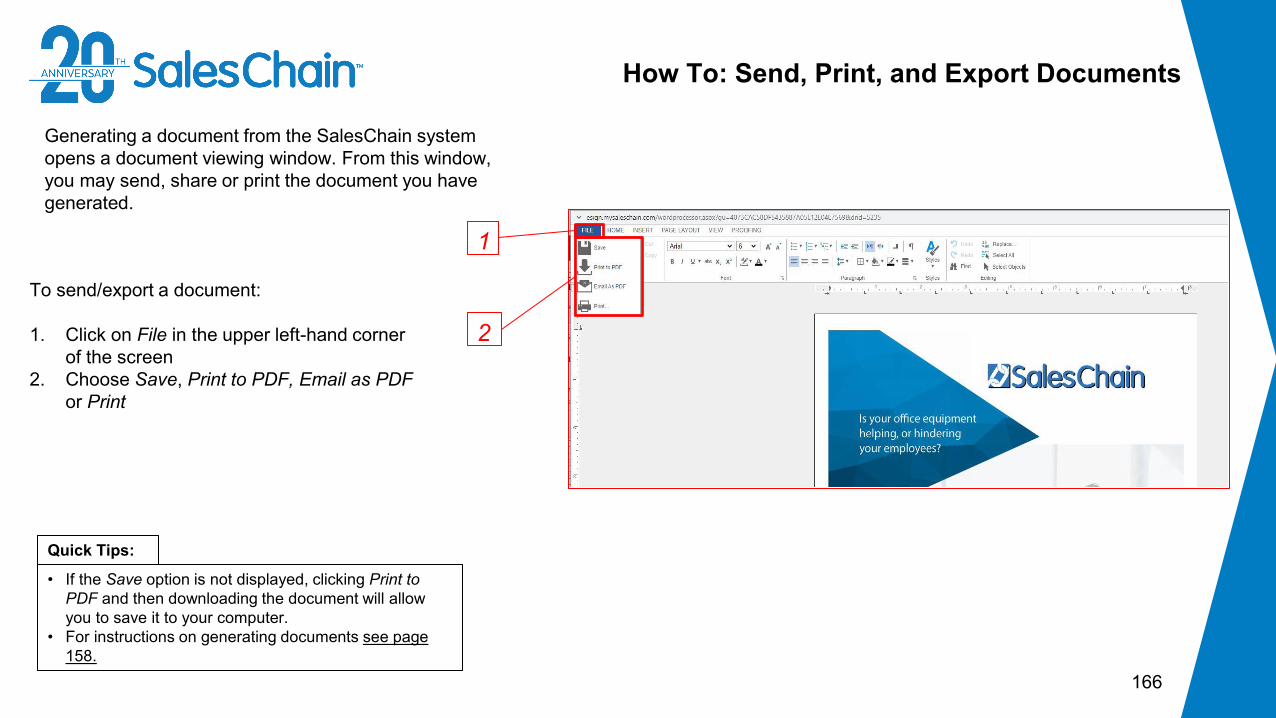
166
How To: Send, Print, and Export Documents
To send/export a document:
1. Click on File in the upper left-hand corner of the screen
2. Choose Save, Print to PDF, Email as PDF or Print
2
1
Generating a document from the SalesChain system opens a document viewing window. From this window, you may send, share or print the document you have generated.
Quick Tips:
• If the Save option is not displayed, clicking Print to PDF and then downloading the document will allow you to save it to your computer.
• For instructions on generating documents see page 158.
Related Documents