Handbook Downloaded from musescore.org on Jan 14 2019 Released under Creative Commons Attribution-ShareAlike

Welcome message from author
This document is posted to help you gain knowledge. Please leave a comment to let me know what you think about it! Share it to your friends and learn new things together.
Transcript
Handbook
Downloaded from musescore.org on Jan 14 2019Released under Creative Commons Attribution-ShareAlike
16
16
161619
1919
1919202020
20212121212122
2222
22
2223
23232323242426
262727282828
2828
28282930
30303030
31
31313131313132
32333333333333
34
시작하기시작하기
설치하기설치하기
WINDOWS에에 설치하기설치하기설치하기
MuseScore 시작하기
문제해결외부 링크
MACOS에에 설치하기설치하기설치하기삭제하기Apple 원격 데스크탑에 설치하기외부 링크
LINUX에에 설치하기설치하기AppImage
1 단계 - 다운로드2 단계 - 실행 권한 부여하기3 단계 - 실행!AppImage를 설치(추가 기능)터미널에서 옵션 사용하기
배포판 패키지Fedora
외부 링크
CHROMEBOOK에에 설치하기설치하기외부 링크
새새 악보악보 만들기만들기Start center새 악보 만들기제목, 작곡가, 기타 정보템플릿의 선택악기의 선택/성부 (옵션)특정 악기에 보표 추가
조표의 선택과 템포 설정박자, 못갖춘 마디 (anacrusis), 및 마디수작성 후 악보의 조정템플릿시스템 템플릿 폴더개인용 템플릿 폴더
함께보기외부 링크
언어설정과언어설정과 변역변역 업데이트업데이트언어 설정번역의 갱신함께 보기
업데이트의업데이트의 체크체크자동 업데이트 체크업데이트 체크함께 보기
기초기초
음표음표 입력입력음표 입력의 기본
Step 1: 시작 위치Step 2: 음표 입력 모드Step 3: 음표값 (음 또는 쉼표 길이)Step 4: 음정(음높이) 또는 쉼표기타 단축키 들
미디 키보드악기의 연주 범위를 벗어나는 음표에 색갈 입히기작음 음표/작은 음표 머리입력된 음표의 변경음 길이의 변경음정(음높이) 변경쉼표를 음표와 vice versa 로 변경
음표의 속성
2
3434
3434343535
3535363636
363636373737
3838
3839393939394040404040
4041414141414141
41
4242424242434343
434444
4444444545
45454646
4646464646
46464647
474747
4747
함께 보기외부 링크
편집편집 모드모드 (EDIT MODE)텍스트의 편집라인의 편집음표의 편집함께 보기
PALETTES AND WORKSPACESWorkspaces
Single Palette ModeDocking/undockingCustom workspace
PalettesOpen/close paletteApply symbols from a palettePreset palettes (Advanced workspace)Custom palettesPalette menu
Behavior of applied text and linesSee also
INSPECTOR AND OBJECT PROPERTIESInspectorInspector categories
ElementElement GroupSegmentChordNoteSelectBeamClef
Properties dialogsArticulation propertiesFretboard diagram propertiesLine propertiesMeasure propertiesStaff propertiesText propertiesTime signature properties
See also
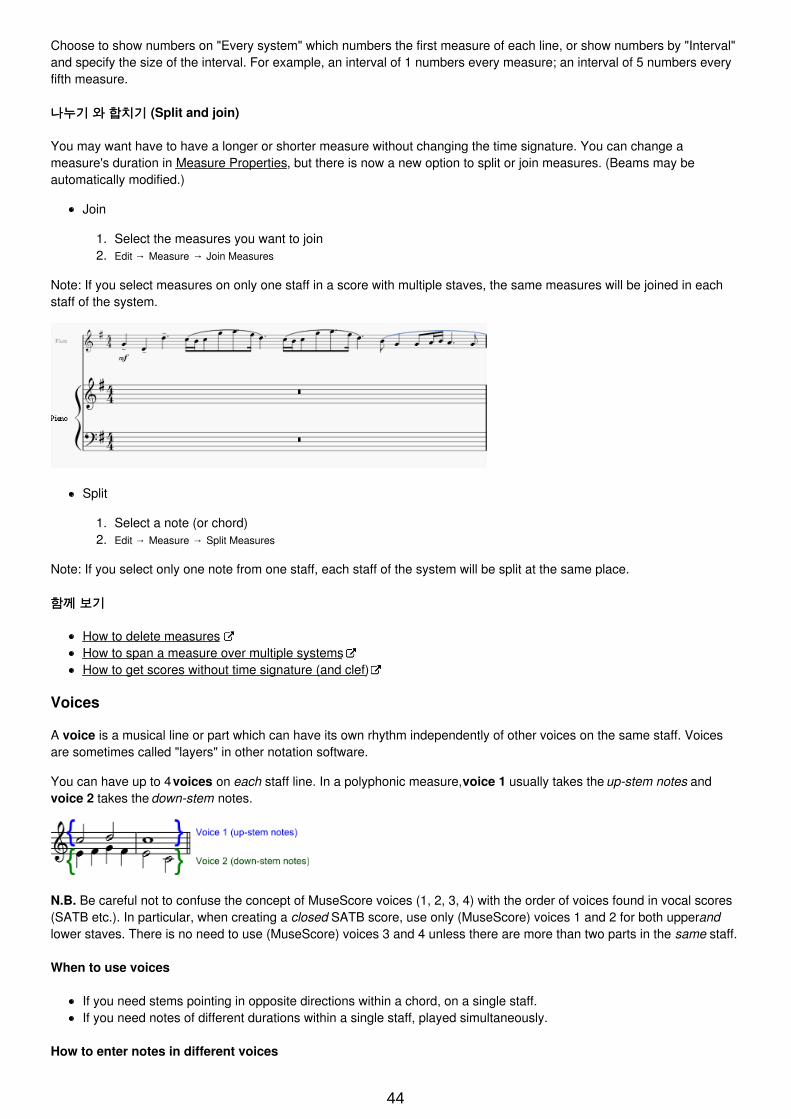
마디의마디의 조작조작추가삽입삭제속성오선 보표마디의 길이기타
Numbering나누기 와 합치기 (Split and join)함께 보기
VOICESWhen to use voicesHow to enter notes in different voicesDeleting and hiding rests
Restoring deleted rests
Exchange voices of notesMove notes to another voice (without swapping)See alsoExternal links
SELECTION MODESSelect a single object
Select a single noteSelect a chordSelect a single measure
Select a continuous range of objects1. Shift selection2. Shift + click selection
Select a range of measures
3. Drag selection4. Select All5. Select section
Select a list of objectsSelect all similar
3
4848
484848494949495050
505050
5051515152
52
5252525252535454
545555555656
56
565657595959
59
596060
60
606060606161
61616162
626262626263
636363
What selections are useful forSee also
VIEWING AND NAVIGATIONView menu
Show sidebars/panelsZoom in/outToolbars (display)Show Status barSplit displayVisibility optionsFull screen
Page/Continuous ViewPage ViewContinuous View
ToolbarsSide panelsNavigation
NavigatorFind
See also
복사하기와복사하기와 붙여넣기붙여넣기복사붙여넣기보다 빠른 반복복제하기선택시의 필터함께보기외부 링크
OPEN/SAVE/EXPORT/PRINTOpenSaveExportPrintSee also
실행취소와실행취소와 다시실행다시실행(UNDO, REDO)
SHARE SCORES ONLINECreate an accountShare a score directly from MuseScoreUpload a score on MuseScore.comEdit a score on MuseScore.com
Switch to the direct method of updating an online score
External links
콘서트콘서트 피치피치함께 보기외부 링크
NOTATION
BARLINESChange barline typeInsert barlineCustom barlinesConnect barlinesSee also
CLEFSAdd a clef
Add clef to beginning of measureAdd mid-measure clef
Courtesy clefsRemove a clefHide clefs
Display clef only in the first measure (for all staves)Display clef only in the first measure (for a particular staff)Hide all clefs in a particular staff
KEY SIGNATURESAdd a new key signature
Add new key signature to all staves
4
63
636363
6364646464
6566666666676768
68686868
686869696969
6970707070
707071
71717171717272
72727272
727273737374
747474757575
757575757575
76767676
Add new key signature to one staff only
Replace an existing key signatureReplace key signature for all stavesReplace key signature for one staff only
Remove a key signatureNaturals on key signature changesKey signature changes and multi-measure restsCourtesy key signaturesCustom key signatures
TIME SIGNATURESAdd a time signature to a scoreDelete a time signatureCreate a time signatureTime signature properties
Change default beamingAdditive (composite) metersLocal time signatures
Pickup measures and cadenzasTime signature changes and breaksSee alsoExternal links
ACCIDENTALSAdd accidentalChange enharmonic spellingRespell pitchesSee alsoExternal links
ARPEGGIOS AND GLISSANDIArpeggiosGlissandi (slides)
Adjust start and end pointsCustom glissandi
Wind instrument articulationsSlide in/outExternal links
ARTICULATIONS AND ORNAMENTSArticulationsOrnamentsAdd articulation/ornament
Add accidental to an ornamentAdd fermata to a barlineKeyboard shortcuts
Adjust positionArticulation propertiesSee alsoExternal links
BENDSApply a bendEdit a bendAdjust heightAdjust positionCustom bends
BEAMSBeam symbolsChange note beamingAdjust beam with the keyboard/mouse
Adjust beam angleAdjust beam height
Adjust beam with the inspectorAdjust beam angleAdjust beam heightMake the beam horizontalAdjust feathered beamsLocal relayout
Flip note beamReset Beam ModeSee alsoExternal links
5
767676777777
77777777
777878787878
7878797980
808080808181
81818181828282
82828282
828383
8383838484
8484848484
85858585
868686
8686
87878787
87
BRACKETSAddDeleteChangeEditStyle
BREATHS AND PAUSESAdd symbolAdjust positionAdjust pause length
GRACE NOTESCreate grace notesChange pitchChange durationManual adjustmentExternal links
HAIRPINSAdd a hairpinAdjust lengthCresc. and dim. linesHairpin playback
LINESApplying lines to the score
To apply a line to just one noteTo apply a line across a range of notesTo apply a line from a note to the end of that measureTo apply a line across a range of measures
Adjust vertical positionChange lengthText linesCustom lines and line propertiesCopying linesExtended ornament linesExternal links
MEASURE RESTSFull measure rest
To create one or more full measure restsTo create a full measure rest in a particular voice
Multimeasure restTo display multimeasure restsBreak multimeasure rest
OCTAVE LINESApply an octave lineChange lengthCustom linesExternal links
SLURSAdd slur in note-input modeAdd slur outside note-input mode
Method 1Method 2
Adjust slurExtended slursDotted slursSee also
TIESTie notes together
Tie chords together
Add tied notes in note input modeAdd a tied chord in note input mode
Tied unison notesFlip a tieSee alsoExternal links
TREMOLO
6
878888888888
89898990
91
91919292929293939393
939394949595
959595969696
96
969797
97
97979798989898
9999
100100
100101101102102
102102103103103104
104104104104105
105105105
105106
106106106106
TUPLETSCreate a tuplet
Create a triplet in normal modeCreate a triplet in note input modeCreate other tupletsCustom tuplets
Delete a tupletChange display of tuplets
Using the InspectorUsing the Style menu
External links
REPEATS AND JUMPSSimple repeats1st and 2nd endingsPlaybackRepeat symbols and textJumpsMarkersExamples of jumpsSee alsoExternal links
VOLTASTo add a volta to the scoreTo change the number of measures that a volta coversTextPlaybackExternal links
TRANSPOSITIONManual transpositionAutomatic transposition
Transpose ChromaticallyBy KeyBy Interval
Transpose Diatonically
Transposing instrumentsConcert pitchChange staff transposition
External links
DRUM NOTATIONPercussion staff typesNote input methods
MIDI keyboardPiano keyboardComputer keyboardMouse
Drum input paletteEdit DrumsetRollExternal links
TABLATURECreate a new tablature staff
With the New Score wizardWith the Instruments dialogBy changing staff type
Edit string dataChange tuningAdd a stringDelete a stringMark unfretted string "open"Change number of instrument frets
Change tablature displayCombine pitched staff with tablature
Create a staff/tablature pair with the New Score wizardCreate a staff/tablature pair in an existing scoreCreate a staff/tablature pair from an existing staff
Enter notes in tablatureUsing a computer keyboard
Historical tablature
Using a mouseSelect note duration
Edit notesNote input modeNon note input modeCrosshead notes
7
106106107
107
107
107107107108
108109109
109110110110110110110
111111111111
111112112112
112113113
113113113
113113114114114115115
115115115116116
117117
117117117118118119119119
119119119120
120120120
120121121121121
Summary of keyboard commandsNote input modeNormal mode
External links
SOUND AND PLAYBACK
MID-STAFF INSTRUMENT CHANGESInstrument changes as of version 2.1Instrument changes in version 2.0
Incompatibilities
Add an instrument changeSee alsoExternal links
MIXERMute and SoloDialsSoundMid-staff sound change (pizz., con sordino, etc.)See alsoExternal links
PLAY MODEPlayback commands
Start/stop playbackDuring playback
Play panelCount inMetronome playbackLoop playback
SWINGApply swing to a score section
Triplet in tempo marking
Return to straight rhythmApply swing globallyExternal links
SYNTHESIZEROverviewSave/Load Synthesizer settingsFluid
To load a soundfontTo reorder the soundfontsTo remove a soundfont
ZerberusVolumeEffects
Zita 1 reverbSC4 compressor
TuningSee also
TEMPOAdd a tempo markingEdit tempoEdit tempo textOverriding the tempo markingRitardando and accelerando playbackFermatasSee also
사운드폰트와사운드폰트와 SFZ 파일파일SF2/SF3 사운드폰트사운드폰트 설치Uninstall
SFZInstall an SFZUninstall
SynthesizerList of downloadable soundfiles
GM SoundFontsOrchestral soundfilesPiano soundfiles
8
121121
122
122122122
122123123123123123123123
123
124124124124125
125125125
125126
127
127127127128129129129
129129
129
130130130130130
130130131131131
131131131131132132
132132
132133133133133133
133
133133133134134134135
SF2 PianosSFZ Pianos
Unzipping downloaded soundfiles
TroubleshootingSee alsoExternal links
DYNAMICSAdd a dynamicAdjusting playback volume for a dynamicAdjusting range for a dynamicList of dynamics in palettesEdit a dynamicSee alsoExternal links
TEXT
TEXT BASICSAdd textFormat textAdjust position of text objectsText anchors
TEXT EDITINGEnter/exit text edit mode
Keyboard shortcuts
Symbols and special charactersSpecial character shortcuts
See also
TEXT STYLES AND PROPERTIESText Style
Edit styleCreate a new text styleApply optionsReset text to styleSave and load text styles
Text PropertiesEdit properties
See also
STAFF AND SYSTEM TEXTStaff textSystem textSee alsoExternal links
CHORD SYMBOLSEnter a chord symbol
Keyboard CommandsChord symbol syntaxEdit a chord symbol
Transpose chord symbolsChord symbol textChord symbol style
AppearanceNote spelling
Automatic Capitalization
PositioningCapo
FINGERINGAdd fingering to a single noteAdd fingering to several notesAdjust position of fingering
Single fingeringMultiple fingering
Edit fingering text
LYRICSEnter a lyrics line
First lineSubsequent linesSpecial charactersMelismaElision (Lyric) slur / Synalepha
9
136136136136137137
137137137137137137
138138138138138
138
138138139139139139139139140
140140141143143143143143143143
144145146147148149149150151152153154155157158159160
161161161161161
162162163
163164164164164165165
165165165165165
166166
Edit LyricsAdjust position of lyricsCopy lyrics to clipboardPaste lyrics from clipboardSee alsoExternal links
REHEARSAL MARKSAdd a rehearsal mark
Manual PlacementAutomatic placement
Add an alphanumeric rehearsal markAdd a measure-number rehearsal mark
Automatically resequence rehearsal marksText styleSearch for a rehearsal markSee alsoExternal links
FORMATTING
LAYOUT AND FORMATTINGWays to affect layoutLayout menu
Page Settings...ResetIncrease Stretch/Decrease StretchReset StretchReset Beam ModeRegroup Rhythms
Style menuGeneral: ScoreGeneral: Page
Distance to page marginsDistance between stavesDistance between systemsLyrics MarginsVertical frame marginsLast system fill thresholdClefs and key signatures
General: Header, Footer, NumbersGeneral: SystemGeneral: MeasureGeneral: BarlinesGeneral: NotesGeneral: ClefsGeneral: ArpeggiosGeneral: BeamsGeneral: Slurs/TiesGeneral: SizesGeneral: Hairpins, Volta, OttavaGeneral: Pedal, TrillGeneral: Chord Symbols, Fretboard DiagramsGeneral: Figured BassGeneral: Articulations, OrnamentsGeneral: AccidentalsGeneral: Tuplets
Apply and OK buttonsApply to all parts in one goSave/Load styleSee alsoExternal links
GENERAL STYLE: MEASUREIntroductionOptions
PAGE SETTINGSPage sizeOdd/Even Page MarginsScalingMiscellaneous
First page numberApply to all Parts
BREAKS AND SPACERSBreaks
Add a break to a measureUsing a keyboard shortcutUsing a palette symbol
Add a break to a frameMove a break
10
166166
166167167167
167
167167167167168
168168168168168169169
169169169
169169170
170170170170
170170170170170171
171171171172172
172172
172
172172172173173174174174175
175175175175
175176176176176176
176177177
177
Delete breaksSection break
SpacersAdd a spacerAdjust a spacerDelete a spacer
See also
FRAMESHorizontal frame
Insert/append horizontal frameAdjust width of horizontal frameAdd text or image to horizontal frame
Vertical frameInsert/append vertical frameAdjust height of vertical frameEdit vertical frame propertiesAdd text or image to vertical frameInsert horizontal frame in vertical frame"Title" frame
Text frameInsert/ append text frameEdit text frame properties
Create a frameInsert a frame into the scoreAppend a frame to the score
Delete a frameApply a breakSee alsoExternal links
IMAGESAdd imageCut/copy and paste imageModify imageSee alsoExternal links
IMAGE CAPTURESave a snapshotImage capture menuSee alsoExternal links
ALIGN ELEMENTSSnap to grid
ADVANCED TOPICS
ACCESSIBILITYIntroductionInitial setupFinding your way aroundThe score windowScore reading
Moving forwards or backwards in timeMoving between notes at a given point in timeFiltering score reading
Score playbackScore editingCustomizationExternal links
ALBUMSCreate albumLoad albumPrint albumJoin scoresSave album
CROSS-STAFF NOTATIONSee alsoExternal links
EARLY MUSIC FEATURES
11
177178
178179179180
180180180180181181181182182
183183185185
185185186186186
186186186186
187187187187187
187188188188188188188188188188
188188
188189189190190
190190
192192193193193
193
193194194194194195195
195195
195195196196
Unbarred (or unmetered) notationExample
MensurstrichAmbitusMensural time signaturesSee also
FIGURED BASSAdding a new figured bass indicationText format
DigitsAccidentalsCombined shapesParenthesesContinuation linesDuration
Editing existing figured bassesStyleProper syntaxSummary of keys
FILE FORMATSMuseScore native format
MuseScore format (*.mscz)Uncompressed MuseScore format (*.mscx)MuseScore backup file (.*.mscz,) or (.*.mscx,)
Graphic files (export only)PDF (*.pdf)PNG (*.png)SVG (*.svg)
Audio files (export only)WAV audio (*.wav)MP3 (*.mp3)FLAC audio (*.flac)Ogg Vorbis (*.ogg)
Share with other music softwareMusicXML (*.xml, *.musicxml)Compressed MusicXML (*.mxl)MIDI (*.mid, *.midi, *.kar)MuseData (*.md) (import only)Capella (*.cap, *.capx) (import only)Bagpipe Music Writer (*.bww) (import only)BB (*.mgu, *.sgu) (import only)Overture (*.ove) (import only)Guitar Pro (*.gtp, *.gp3, *.gp4, *.gp5, *.gpx) (import only)
See alsoExternal links
FRETBOARD DIAGRAMSAdd a fretboard diagramEdit fretboard diagramAdjust position, size, colorFretboard diagram style
MIDI IMPORTAvailable operations
MASTER PALETTESymbols
Find a symbolApply a symbolConnect symbols
See also
NOTE INPUT MODESStep-timeRe-pitchRhythmReal-time (automatic)Real-time (manual)
Real-time Advance shortcut
See alsoExternal links
NOTEHEADSNotehead groupsChange notehead groupChange notehead type
12
196196196197
197
197197198199199199199
199200200200200200
200201202202202202202202202203203203203203203203
203
203203204205205205
206206207207207
207207208209209
209209210210210
210210211212213
213214214215215215216216216217218
Shared noteheadsChange offset noteheads to sharedExamples of notehead sharingRemove duplicate fret marks
External links
PARTSSet up all parts at onceDefine specific partsDelete a PartExport the partsSave the partsPrint a part
PLUGINSOverviewInstallation
WindowsmacOSLinux
Enable/disable pluginsCreate/edit/run pluginsPlugins installed by default
ABC ImportBreak Every X MeasuresNotes → Color NotesCreate ScorehelloQmlNotes → Note NamesPanelrandomrandom2runscorelistScoreViewWalk
See also
PREFERENCESGeneralCanvasNote input
Note InputMIDI Remote Control
ScoreI/O
API / DeviceMIDI Input/Output/Output LatencyJack Audio Server
ImportExportShortcutsUpdateSee also
RECOVERED FILESBehavior of saving after session recoveryFinding recovered filesSee alsoExternal links
SCORE PROPERTIESEdit meta tagsPreexisting meta tagsHeader/FooterSee also
STAFF PROPERTIESStaff TypesStaff Properties: all stavesStaff Properties: plucked strings onlyAdvanced Style Properties
Change staff typeStandard and Percussion staff optionsTablature staff optionsTablature staff options: Fret MarksTablature staff options: Note ValuesPreview
13
218218
218218219219219219
220220220220220
221
221
221221221222222
222
222222222222
222223
223223223223224224
225
225225225225225225226
226
226226226227227227227
227227228228228228228
228228228229
Change instrumentExternal links
TOOLSAdd / Remove system/line breaksExplodeImplode
Apply implode to multiple stavesApply implode to a single staff
Fill with slashesToggle rhythmic slash notationResequence rehearsal marksCopy lyrics to clipboardSee also
NEW FEATURES IN MUSESCORE 2
SEE ALSO
UPGRADE FROM MUSESCORE 1.XHow to upgrade MuseScoreOpening 1.x scores in MuseScore 2RelayoutGetting the sound from MuseScore 1.x
서포트서포트 (SUPPORT)
번역본번역본 향상을향상을 위해위해 도움주는도움주는 방법방법소프트웨어 번역하는 법웹사이트와 handbook 번역추가적인 내용
HOW TO ASK FOR SUPPORT OR FILE BUG REPORTSExternal links
REVERT TO FACTORY SETTINGSMuseScore 2.0.3 and aboveMuseScore 2.0 through 2.0.2
Instructions for WindowsInstructions for MacOSInstructions for Linux
See also
KNOWN INCOMPATIBILITIESHardware incompatibilitiesSoftware incompatibilities
AVG Internet Security hangs MuseScoreFont problem on macOSFont problem on LinuxSave As dialog empty on Linux
APPENDIX
KEYBOARD SHORTCUTSNavigationNote input
DurationVoicesPitchInterval
LayoutArticulationsText entryLyrics entryDisplayMiscellaneousSee also
KNOWN LIMITATIONS OF MUSESCORE 2.XLocal time signaturesRegroup RhythmsTablature staff linked with standard staff
14
229229
229230230231
231234
234
234
234
235
235
235
235
236
236
237
237
MixerHeader & footer
COMMAND LINE OPTIONSQt Toolkit OptionsSee alsoExternal links
GLOSSARYExternal links
TABLE OF CONTENTS
GETTING STARTED
기초기초
NOTATION
SOUND AND PLAYBACK
TEXT
FORMATTING
ADVANCED TOPICS
NEW FEATURES IN MUSESCORE 2.0
SUPPORT
APPENDIX
15
Published on MuseScore (https://musescore.org)
이 핸드북은 버젼 2.0 이후의 뮤즈 스코어를 위한 것으로 MuseScore community에 의해 유지 됩니다. 당신에게 어떤 도움이될지 찾아 보시기 바랍니다 .
시작하기시작하기
이 장에서는 처음으로 설치하고 실행하는 방법과 새로운 악보를 만드는 방법을 설명 합니다.
설치하기설치하기
뮤즈스코어는 Windows, Mac OS X, 다양한 Linux 배포판, BSD와 같은 다양한 종류의 운영체제에서 동작 합니다.아래에서 당신이 사용하는 시스템의 설치 방법을 찾으십시오.
Windows에에 설치하기설치하기
설치하기설치하기
Windows용 설치파일은 MuseScore 웹사이트의 다운로드 페이지에서 내려받을 수 있습니다. 다운로드 링크를 클릭하게되면 웹브라우저에서 다운로드 확인창이 나타나며, 저장을 클릭 하십시오.
다운로드가 끝나면 내려받은 파일을 더블 클릭하여 설치를 시작합니다. 설치 프로그램이 시작되기 전에 보안 경고창이 나타날 수 있습니다. Run을 눌러 계속 진행하십시오. 그러면 아래와 같은 창을 잠시 볼 수 있습니다.
뒤이어 아래 창이 나타날 수 있습니다.
보통의 경우 위의 설치창을 볼 순 없지만 간혹 .msi확장자 설치를 지원하지 않는 경우 위 창이 나타날 수 있습니다. 이 경우.msi 연결 오류를 수정 하거나 MuseScore 휴대용버전 을 대신 사용할 수 있습니다.
계속해서 아래 창을 볼 수 있습니다.
16
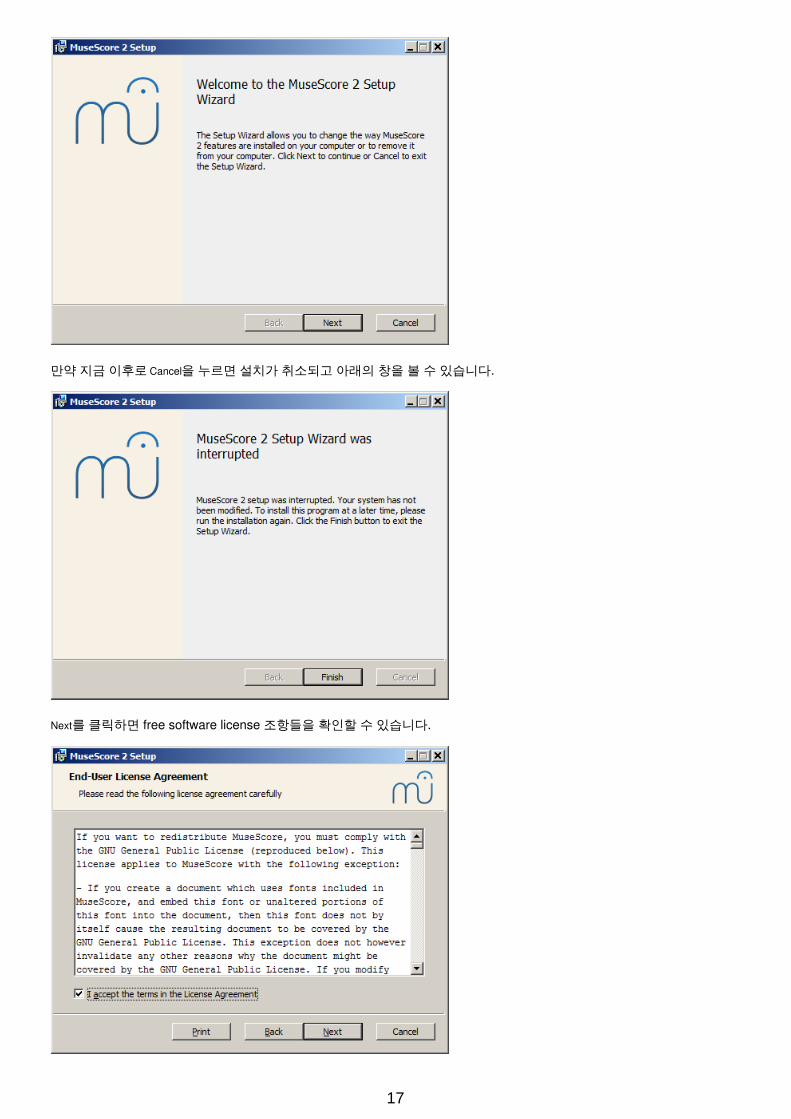
만약 지금 이후로 Cancel을 누르면 설치가 취소되고 아래의 창을 볼 수 있습니다.
Next를 클릭하면 free software license 조항들을 확인할 수 있습니다.
17
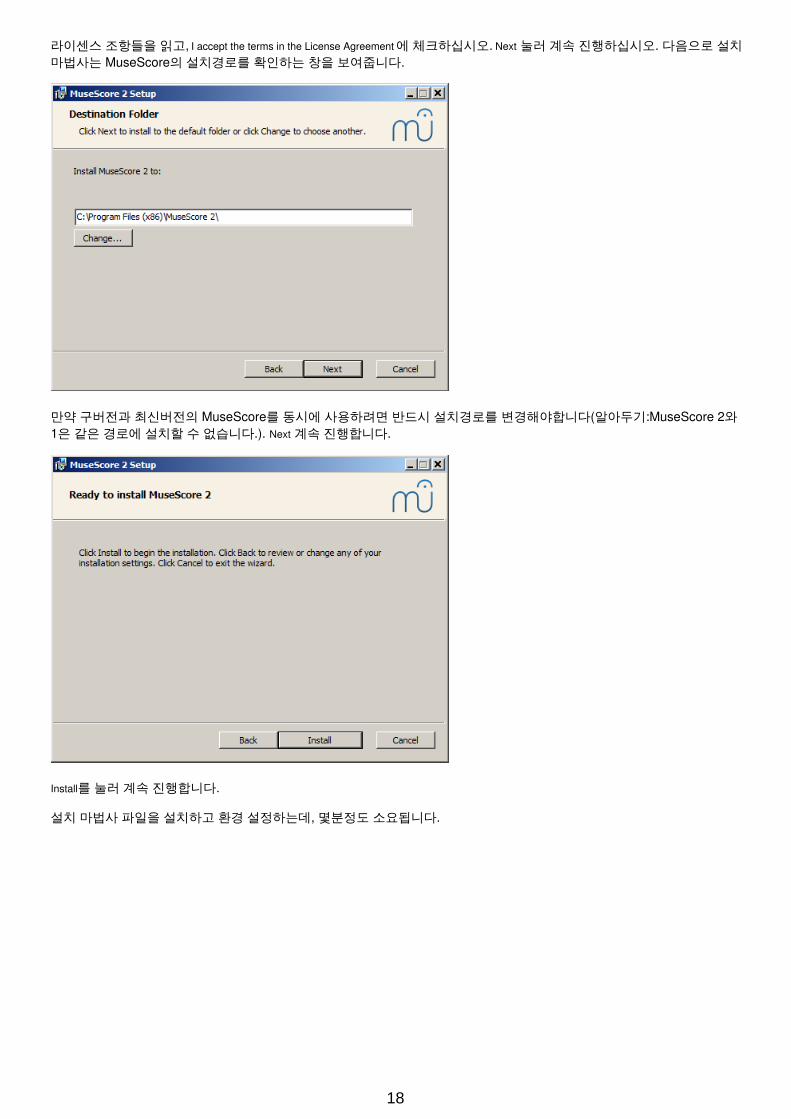
라이센스 조항들을 읽고, I accept the terms in the License Agreement에 체크하십시오. Next 눌러 계속 진행하십시오. 다음으로 설치마법사는 MuseScore의 설치경로를 확인하는 창을 보여줍니다.
만약 구버전과 최신버전의 MuseScore를 동시에 사용하려면 반드시 설치경로를 변경해야합니다(알아두기:MuseScore 2와1은 같은 경로에 설치할 수 없습니다.). Next 계속 진행합니다.
Install를 눌러 계속 진행합니다.
설치 마법사 파일을 설치하고 환경 설정하는데, 몇분정도 소요됩니다.
18
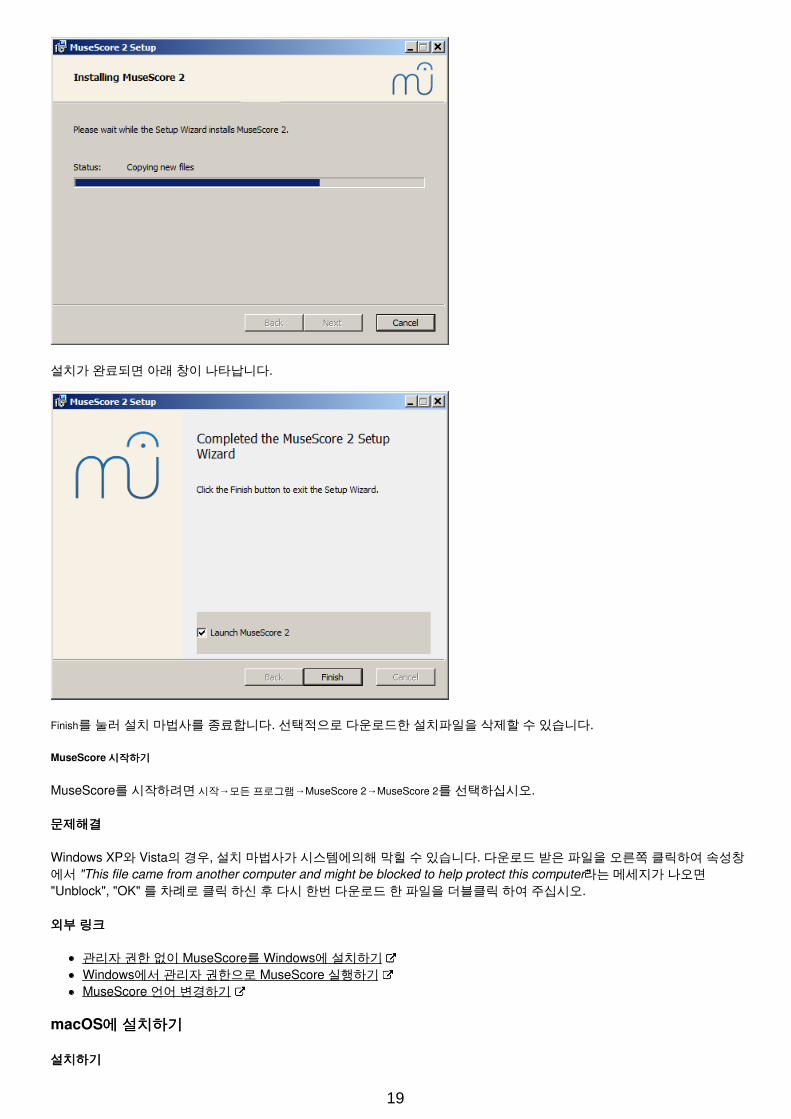
설치가 완료되면 아래 창이 나타납니다.
Finish를 눌러 설치 마법사를 종료합니다. 선택적으로 다운로드한 설치파일을 삭제할 수 있습니다.
MuseScore 시작하기시작하기
MuseScore를 시작하려면 시작→모든 프로그램→MuseScore 2→MuseScore 2를 선택하십시오.
문제해결문제해결
Windows XP와 Vista의 경우, 설치 마법사가 시스템에의해 막힐 수 있습니다. 다운로드 받은 파일을 오른쪽 클릭하여 속성창에서 "This file came from another computer and might be blocked to help protect this computer"라는 메세지가 나오면"Unblock", "OK" 를 차례로 클릭 하신 후 다시 한번 다운로드 한 파일을 더블클릭 하여 주십시오.
외부외부 링크링크
관리자 권한 없이 MuseScore를 Windows에 설치하기Windows에서 관리자 권한으로 MuseScore 실행하기MuseScore 언어 변경하기
macOS에에 설치하기설치하기
설치하기설치하기
19
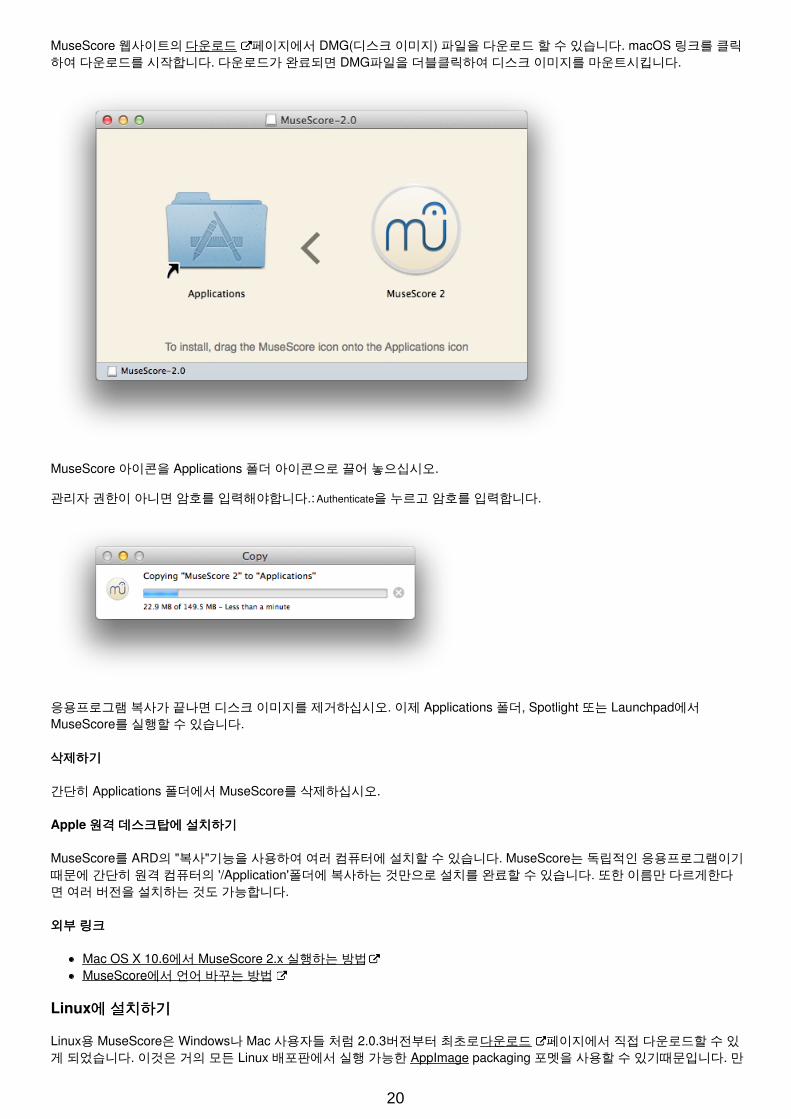
MuseScore 웹사이트의 다운로드 페이지에서 DMG(디스크 이미지) 파일을 다운로드 할 수 있습니다. macOS 링크를 클릭하여 다운로드를 시작합니다. 다운로드가 완료되면 DMG파일을 더블클릭하여 디스크 이미지를 마운트시킵니다.
MuseScore 아이콘을 Applications 폴더 아이콘으로 끌어 놓으십시오.
관리자 권한이 아니면 암호를 입력해야합니다.: Authenticate을 누르고 암호를 입력합니다.
응용프로그램 복사가 끝나면 디스크 이미지를 제거하십시오. 이제 Applications 폴더, Spotlight 또는 Launchpad에서MuseScore를 실행할 수 있습니다.
삭제하기삭제하기
간단히 Applications 폴더에서 MuseScore를 삭제하십시오.
Apple 원격원격 데스크탑에데스크탑에 설치하기설치하기
MuseScore를 ARD의 "복사"기능을 사용하여 여러 컴퓨터에 설치할 수 있습니다. MuseScore는 독립적인 응용프로그램이기때문에 간단히 원격 컴퓨터의 '/Application'폴더에 복사하는 것만으로 설치를 완료할 수 있습니다. 또한 이름만 다르게한다면 여러 버전을 설치하는 것도 가능합니다.
외부외부 링크링크
Mac OS X 10.6에서 MuseScore 2.x 실행하는 방법MuseScore에서 언어 바꾸는 방법
Linux에에 설치하기설치하기
Linux용 MuseScore은 Windows나 Mac 사용자들 처럼 2.0.3버전부터 최초로 다운로드 페이지에서 직접 다운로드할 수 있게 되었습니다. 이것은 거의 모든 Linux 배포판에서 실행 가능한 AppImage packaging 포멧을 사용할 수 있기때문입니다. 만
20
약 이전 방법이 좋으시다면 배포판 패키지 메니져를 통한 이전 설치 방법도 가능합니다(이전 방법은 MuseScore가 업데이트되더라도 패키지 관리자의 업데이트를 기다려야 합니다.). 물론 소스를 통한 컴파일 은 항상 가능합니다.
AppImage
AppImage format 는 Linux응용프로그램을 배포하는 새로운 방법입니다. AppImages는 이동성이 좋고-설치용이 아닙니다.- 다양한 Linux 배포판에서 실행됩니다. 모든 필요한 파일들은 AppImage파일 하나에 포함됩니다.
1 단계단계 - 다운로드다운로드
AppImage파일을 다운로드 하기전에 사용하는 컴퓨터의 프로세서 종류를 알아야합니다. 이는 터미널창에서 아래의 명령으로 확인할 수 있습니다.:
arch
또는
uname -m
실행 결과는 "i686", "x86_64" 또는 "armv7" 중에 하나일 것입니다.:
i686 (또는 비슷한) - 32비트 Intel/AMD 프로세서. (대부분 오래된 컴퓨터에서 확인할 수 있습니다.)x86_64 (또는 비슷한) - 64비트 Intel/AMD 프로세서. (최근의 노트북이나 데스크탑 컴퓨터에서 확인할 수 있습니다.)armv7 (또는 이후버전) - ARM 프로세서. (스마트폰이나 타블렛, Ubuntu Mate를 실행하는 라즈베리 파이 2/3 크롬북에서 확인할 수 있습니다.)
이제 다운로드 페이지로 이동하여 당신의 컴퓨터에 맞는 AppImage를 다운로드 하십시오. 다운로드가 완료되면 다음과 같은 이름으로 된 파일을 확인할 수 있습니다. "MuseScore-X.Y.Z-$(arch).AppImage".
2 단계단계 - 실행실행 권한권한 부여하기부여하기
AppImage파일을 사용하기 위해선 AppImage파일에 실행 권한을 부여해야합니다.
터미널터미널 사용사용:
아래 명령은 사용자(u)에게 AppImage 실행(x)권한을 부여합니다. 이 명령은 모든 Linux 시스템에서 작동합니다.:
cd ~/Downloads chmod u+x MuseScore*.AppImage
알아두기: AppImage가 저장된 디렉토리로 이동하기 위해선 "cd"명령을 사용하십시오.
파일파일 매니져매니져 사용사용:
만약 터미널 사용이 어렵다면 파일 매니져에서 실행권한을 부여하는 방법이 있습니다.
GNOME Files (Nautilus)에서:
1. AppImage에서 오른쪽 클릭, "속성"을 선택합니다.2. "권한"텝을 여십시오.3. "파일을 프로그램으로 실행 허용"에 체크하십시오.
이 과정은 종류가 다른 파일 매니져에선 약간의 차이가 있을 수 있습니다.
3 단계단계 - 실행실행!
이제 AppImage를 더블클릭하여 실행할 수 있습니다!
AppImage를 다운로드하게 되면 보통 다운로드 폴더에 저장됩니다. 하지만 AppImage를 어디든 옮길 수 있습니다.(예를 들어, 확인하기 쉽도록 바탕화면에 둘 수도 있죠.) 만약 필요치 않다면 삭제하셔도 됩니다.
AppImage를를 설치설치(추가추가 기능기능)
AppImage는 설치없이 실행 가능하지만, 데스크탑 환경에 완벽하게 추가하기 위해선 설치를 해야 합니다. 설치는 아래와 같은 이점이 있습니다.:
응용프로그램 메뉴나 런쳐에 AppImage를 추가할 수 있습니다.
21
뮤즈스코어 파일(MSCZ, MSCX)과 MusicXML 파일(MXL, XML)의 아이콘이 정확히 설정됩니다.파일 매니져의 "다른 프로그램으로 열기"메뉴를 통해 AppImage를 실행할 수 있습니다.
설치를 위해선 터미널에서 "install" 옵션을 적용하여 AppImage를 실행하십시오(바로 아래를 보십시오.). 설치는 데스크탑파일과 다양한 아이콘 파일을 복사합니다. 만약 이런 파일들을 삭제하기 원한다면 AppImage를 삭제하기 전에 "remove"옵션을 적용하여 실행하십시오. 이 삭제 작업은 뮤즈스코어로 만들어진 악보에 영향을 주지 않습니다.
터미널에서터미널에서 옵션옵션 사용하기사용하기
터미널에서는 다양한 옵션을 사용하여 AppImage를 실행할 수 있습니다. AppImage는 뮤스스코어의 일반적인 명령 옵션뿐만아니라 특별한 옵션들도 있습니다.
먼저 AppImage가 저장된 디렉토리로 이동(cd)합니다. 예를 들어:
cd ~/Desktop ./MuseScore*.AppImage *option*
또는 AppImage의 경로를 포함해서 실행할 수 있습니다.:
~/desktop/MuseScore*.AppImage *option*
사용 가능한 명령 옵션에 대한 더 자세한 정보를 얻기 위해선 "--help"나 "man" 옵션을 사용하십시오.:
./MuseScore*.AppImage --help # 명령 옵션의 목록을 보여줍니다. ./MuseScore*.AppImage man # 메뉴얼 페이지를 보여줍니다. (옵션 작동을 설명합니다.)
배포판배포판 패키지패키지
Fedora
1. GPG 키 불러오기:
su rpm --import http://prereleases.musescore.org/linux/Fedora/RPM-GPG-KEY-Seve
2. 뮤즈스코어 Nonexistant node nid: 27 페이지로 이동하십시오. Fedora 다운로드 링크를 클릭하고 시스템에 맞는 rpm패키지를 선택하십시오.
3. 뮤즈스코어를 설치하기 위해 시스템에 적당한 명령을 사용하십시오.
i386시스템에 대해
su yum localinstall musescore-X.Y-1.fc10.i386.rpm
x86_64시스템에 대해
su yum localinstall musescore-X.Y-1.fc10.x86_64.rpm
만약 사운드시스템에 문제가 있다면 Fedora 11과 사운드 를 보십시오.
외부외부 링크링크
리눅스에서 뮤즈스코어를 실행하는 방법 - 동영상뮤즈스코어에서 언어를 변경하는 방법
Chromebook에에 설치하기설치하기
뮤즈스코어는 원칙적으로 Chrome OS에서 작동하지 않지만, 몇몇 우회 방법이 있습니다.
1. Crouton 사용 : Chrome OS과 병렬로 실행하는 Linux기반 운영체제를 설치하고, 이 Linux에 뮤즈스코어를 설치 실행할 수 있습니다.
2. Rollapp과 같은 software-on-demand 서비스를 사용 : 단지 웹사이트를 방문함으로 뮤즈스코어를 브라우져에서 실행할 수 있습니다. 하지만 스크레치로부터 악보를 시작할 수 있고 File→Save Online...메뉴를 통해 뮤즈스코어 온라인 계정에만 저장할 수 있습니다. 그리고, 악보를 플레이하여 들어볼 수 없습니다.
22
외부외부 링크링크
Chromebook에서 뮤즈스코어를 실행하는 방법게시물 중 명령어를 사용한 설치 절차 확인뮤즈스코어에서 언어를 변경하는 방법
새새 악보악보 만들기만들기
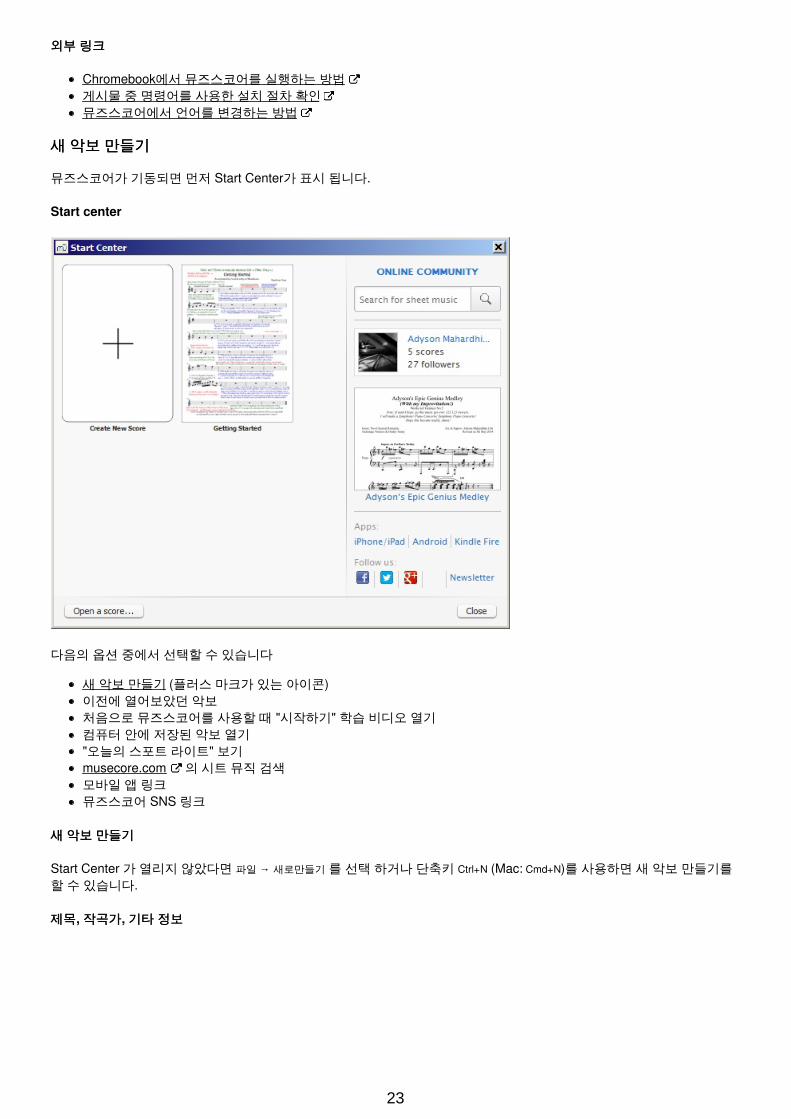
뮤즈스코어가 기동되면 먼저 Start Center가 표시 됩니다.
Start center
다음의 옵션 중에서 선택할 수 있습니다
새 악보 만들기 (플러스 마크가 있는 아이콘)이전에 열어보았던 악보처음으로 뮤즈스코어를 사용할 때 "시작하기" 학습 비디오 열기컴퓨터 안에 저장된 악보 열기"오늘의 스포트 라이트" 보기musecore.com 의 시트 뮤직 검색모바일 앱 링크뮤즈스코어 SNS 링크
새새 악보악보 만들기만들기
Start Center 가 열리지 않았다면 파일 → 새로만들기 를 선택 하거나 단축키 Ctrl+N (Mac: Cmd+N)를 사용하면 새 악보 만들기를할 수 있습니다.
제목제목, 작곡가작곡가, 기타기타 정보정보
23
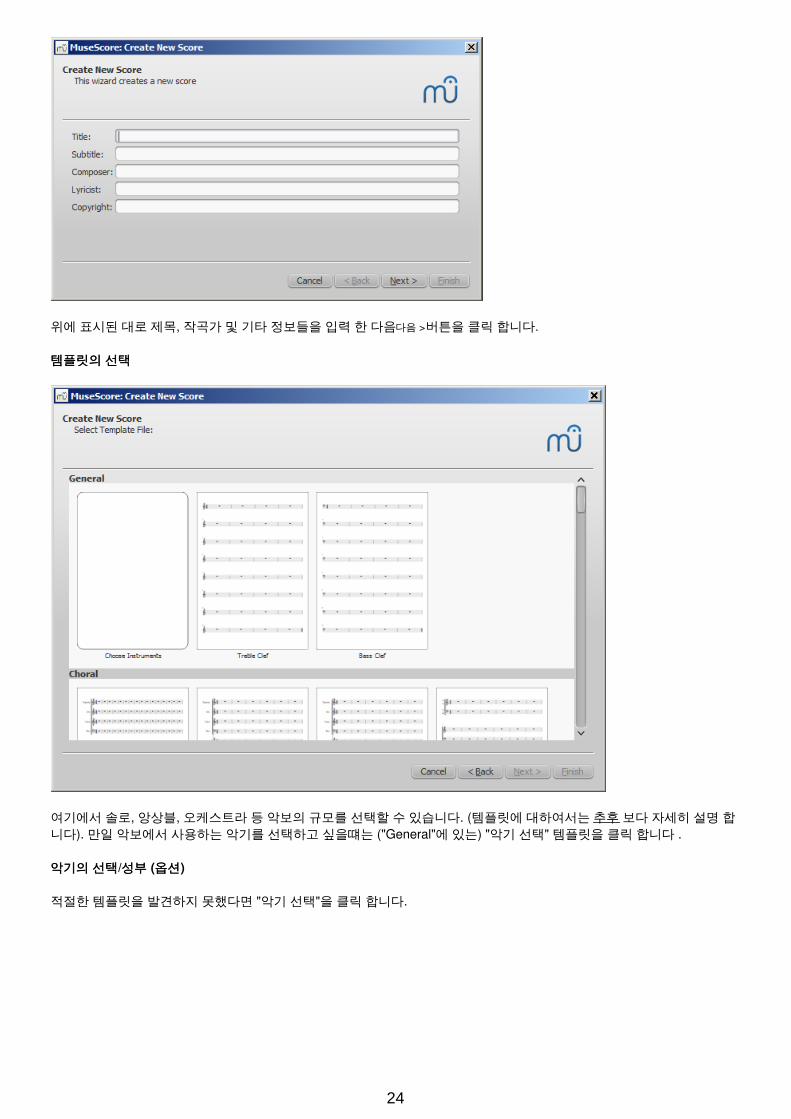
위에 표시된 대로 제목, 작곡가 및 기타 정보들을 입력 한 다음 다음 >버튼을 클릭 합니다.
템플릿의템플릿의 선택선택
여기에서 솔로, 앙상블, 오케스트라 등 악보의 규모를 선택할 수 있습니다. (템플릿에 대하여서는 추후 보다 자세히 설명 합니다). 만일 악보에서 사용하는 악기를 선택하고 싶을떄는 ("General"에 있는) "악기 선택" 템플릿을 클릭 합니다 .
악기의악기의 선택선택/성부성부 (옵션옵션)
적절한 템플릿을 발견하지 못했다면 "악기 선택"을 클릭 합니다.
24
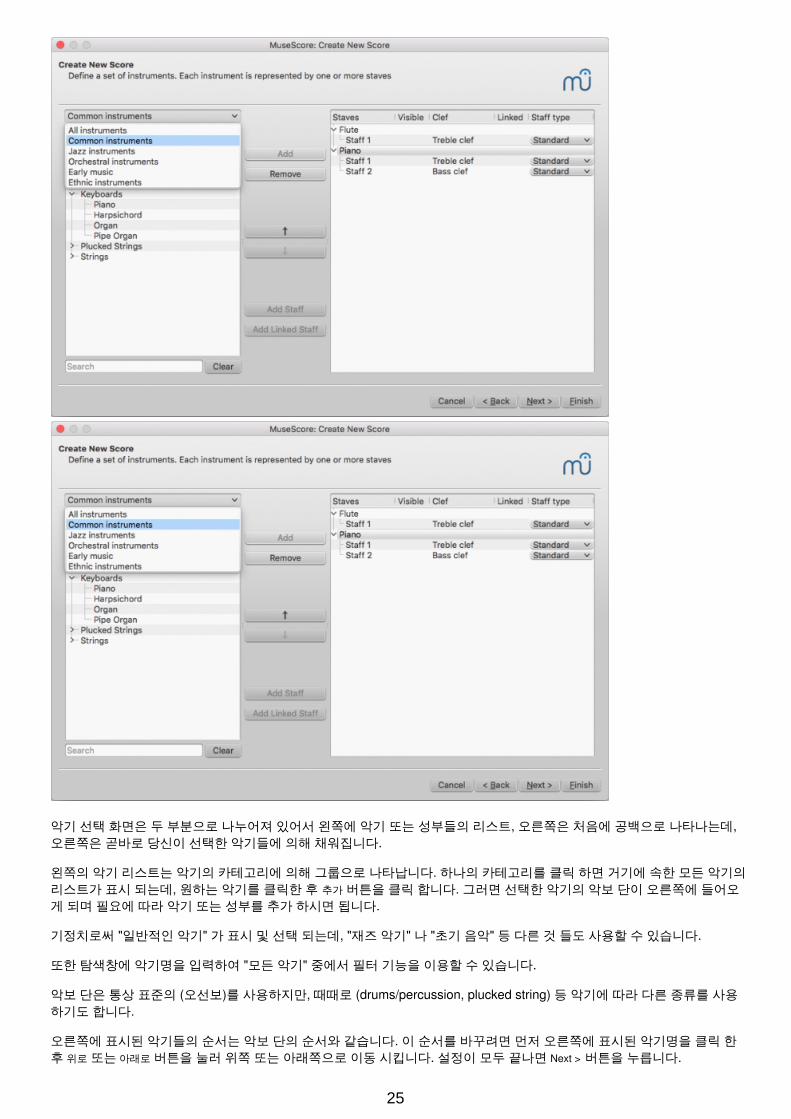
악기 선택 화면은 두 부분으로 나누어져 있어서 왼쪽에 악기 또는 성부들의 리스트, 오른쪽은 처음에 공백으로 나타나는데,오른쪽은 곧바로 당신이 선택한 악기들에 의해 채워집니다.
왼쪽의 악기 리스트는 악기의 카테고리에 의해 그룹으로 나타납니다. 하나의 카테고리를 클릭 하면 거기에 속한 모든 악기의리스트가 표시 되는데, 원하는 악기를 클릭한 후 추가 버튼을 클릭 합니다. 그러면 선택한 악기의 악보 단이 오른쪽에 들어오게 되며 필요에 따라 악기 또는 성부를 추가 하시면 됩니다.
기정치로써 "일반적인 악기" 가 표시 및 선택 되는데, "재즈 악기" 나 "초기 음악" 등 다른 것 들도 사용할 수 있습니다.
또한 탐색창에 악기명을 입력하여 "모든 악기" 중에서 필터 기능을 이용할 수 있습니다.
악보 단은 통상 표준의 (오선보)를 사용하지만, 때때로 (drums/percussion, plucked string) 등 악기에 따라 다른 종류를 사용하기도 합니다.
오른쪽에 표시된 악기들의 순서는 악보 단의 순서와 같습니다. 이 순서를 바꾸려면 먼저 오른쪽에 표시된 악기명을 클릭 한후 위로 또는 아래로 버튼을 눌러 위쪽 또는 아래쪽으로 이동 시킵니다. 설정이 모두 끝나면 Next > 버튼을 누릅니다.
25
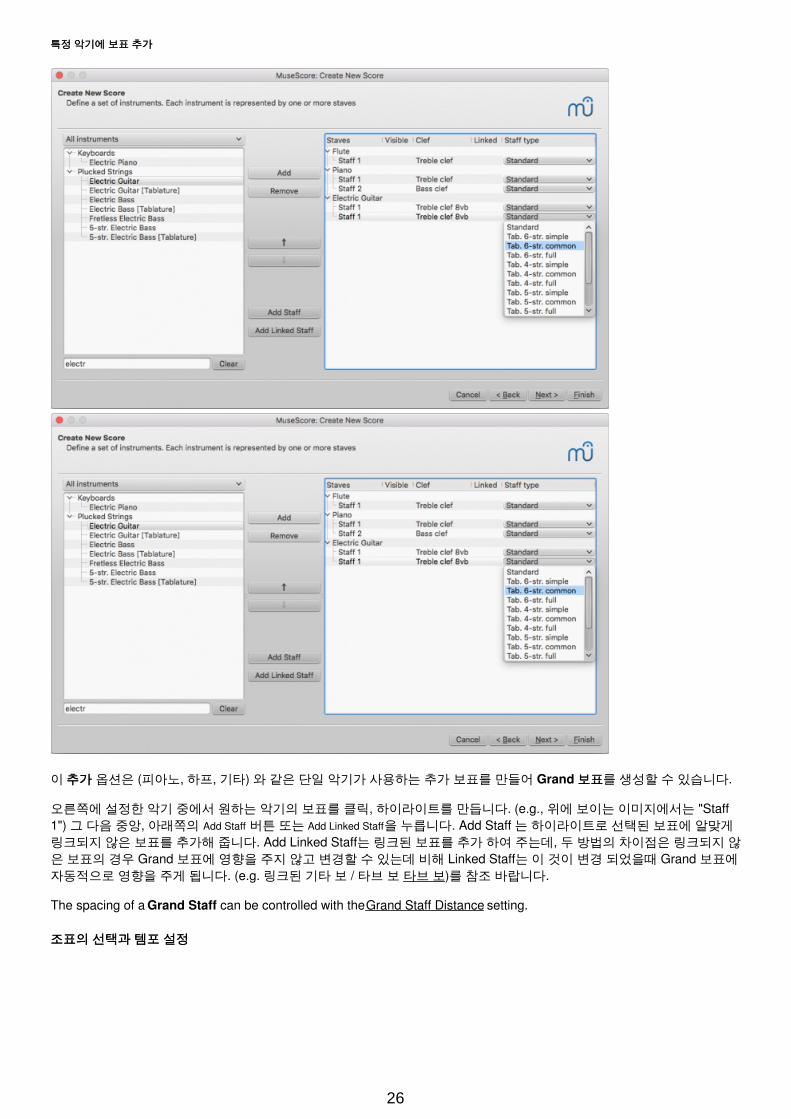
특정특정 악기에악기에 보표보표 추가추가
이 추가추가 옵션은 (피아노, 하프, 기타) 와 같은 단일 악기가 사용하는 추가 보표를 만들어 Grand 보표보표를 생성할 수 있습니다.
오른쪽에 설정한 악기 중에서 원하는 악기의 보표를 클릭, 하이라이트를 만듭니다. (e.g., 위에 보이는 이미지에서는 "Staff1") 그 다음 중앙, 아래쪽의 Add Staff 버튼 또는 Add Linked Staff을 누릅니다. Add Staff 는 하이라이트로 선택된 보표에 알맞게링크되지 않은 보표를 추가해 줍니다. Add Linked Staff는 링크된 보표를 추가 하여 주는데, 두 방법의 차이점은 링크되지 않은 보표의 경우 Grand 보표에 영향을 주지 않고 변경할 수 있는데 비해 Linked Staff는 이 것이 변경 되었을때 Grand 보표에자동적으로 영향을 주게 됩니다. (e.g. 링크된 기타 보 / 타브 보 타브 보)를 참조 바랍니다.
The spacing of a Grand Staff can be controlled with the Grand Staff Distance setting.
조표의조표의 선택과선택과 템포템포 설정설정
26
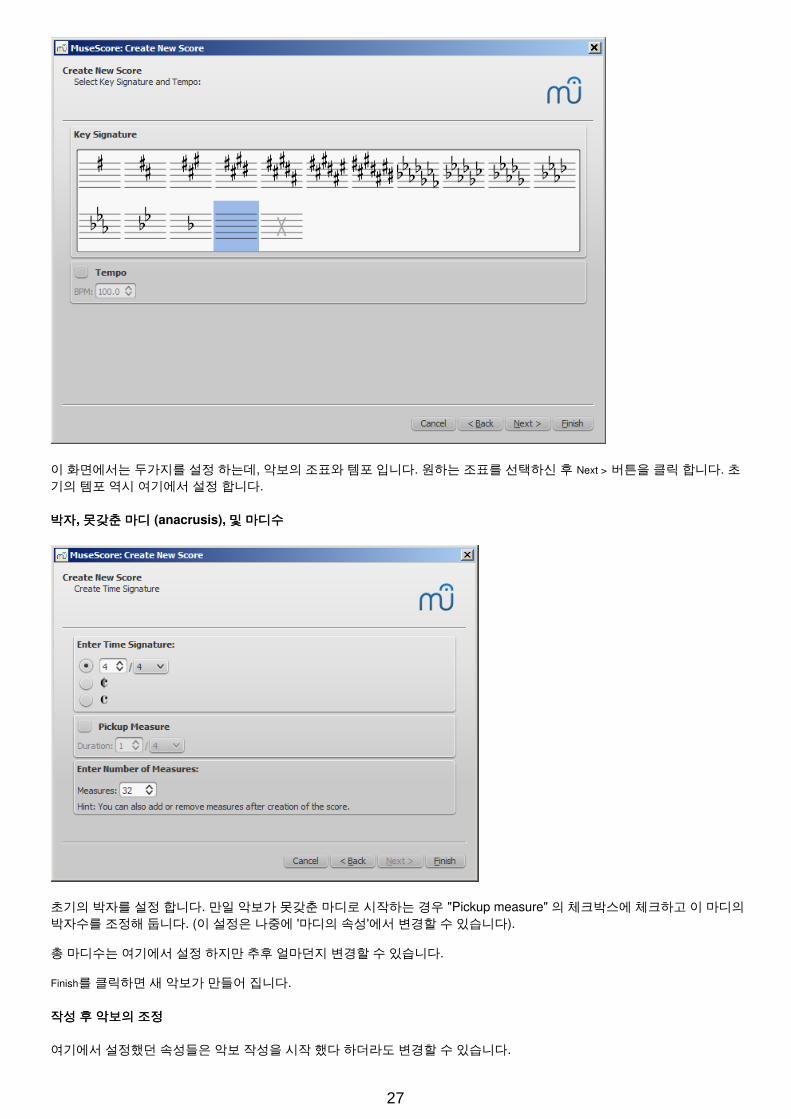
이 화면에서는 두가지를 설정 하는데, 악보의 조표와 템포 입니다. 원하는 조표를 선택하신 후 Next > 버튼을 클릭 합니다. 초기의 템포 역시 여기에서 설정 합니다.
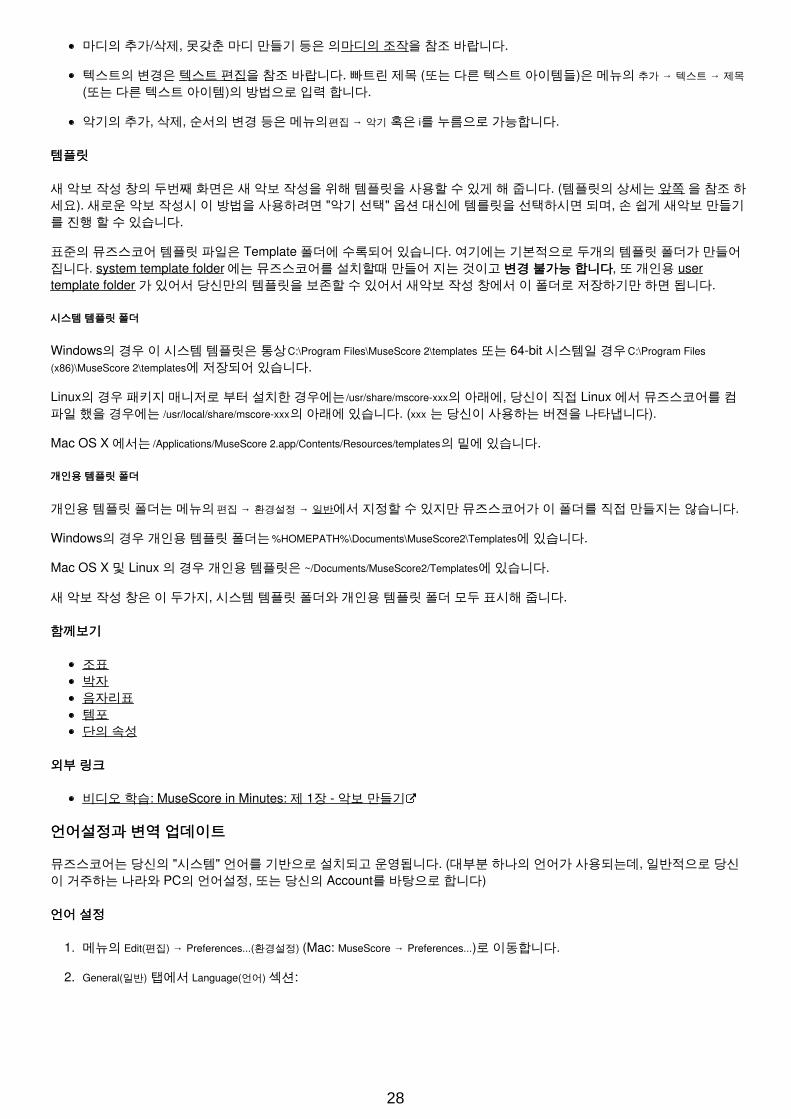
박자박자, 못갖춘못갖춘 마디마디 (anacrusis), 및및 마디수마디수
초기의 박자를 설정 합니다. 만일 악보가 못갖춘 마디로 시작하는 경우 "Pickup measure" 의 체크박스에 체크하고 이 마디의박자수를 조정해 둡니다. (이 설정은 나중에 '마디의 속성'에서 변경할 수 있습니다).
총 마디수는 여기에서 설정 하지만 추후 얼마던지 변경할 수 있습니다.
Finish를 클릭하면 새 악보가 만들어 집니다.
작성작성 후후 악보의악보의 조정조정
여기에서 설정했던 속성들은 악보 작성을 시작 했다 하더라도 변경할 수 있습니다.
27
마디의 추가/삭제, 못갖춘 마디 만들기 등은 의 마디의 조작을 참조 바랍니다.
텍스트의 변경은 텍스트 편집을 참조 바랍니다. 빠트린 제목 (또는 다른 텍스트 아이템들)은 메뉴의 추가 → 텍스트 → 제목
(또는 다른 텍스트 아이템)의 방법으로 입력 합니다.
악기의 추가, 삭제, 순서의 변경 등은 메뉴의 편집 → 악기 혹은 i를 누름으로 가능합니다.
템플릿템플릿
새 악보 작성 창의 두번째 화면은 새 악보 작성을 위해 템플릿을 사용할 수 있게 해 줍니다. (템플릿의 상세는 앞쪽 을 참조 하세요). 새로운 악보 작성시 이 방법을 사용하려면 "악기 선택" 옵션 대신에 템를릿을 선택하시면 되며, 손 쉽게 새악보 만들기를 진행 할 수 있습니다.
표준의 뮤즈스코어 템플릿 파일은 Template 폴더에 수록되어 있습니다. 여기에는 기본적으로 두개의 템플릿 폴더가 만들어집니다. system template folder 에는 뮤즈스코어를 설치할때 만들어 지는 것이고 변경변경 불가능불가능 합니다합니다, 또 개인용 usertemplate folder 가 있어서 당신만의 템플릿을 보존할 수 있어서 새악보 작성 창에서 이 폴더로 저장하기만 하면 됩니다.
시스템시스템 템플릿템플릿 폴더폴더
Windows의 경우 이 시스템 템플릿은 통상 C:\Program Files\MuseScore 2\templates 또는 64-bit 시스템일 경우 C:\Program Files
(x86)\MuseScore 2\templates에 저장되어 있습니다.
Linux의 경우 패키지 매니저로 부터 설치한 경우에는 /usr/share/mscore-xxx의 아래에, 당신이 직접 Linux 에서 뮤즈스코어를 컴파일 했을 경우에는 /usr/local/share/mscore-xxx의 아래에 있습니다. (xxx 는 당신이 사용하는 버젼을 나타냅니다).
Mac OS X 에서는 /Applications/MuseScore 2.app/Contents/Resources/templates의 밑에 있습니다.
개인용개인용 템플릿템플릿 폴더폴더
개인용 템플릿 폴더는 메뉴의 편집 → 환경설정 → 일반에서 지정할 수 있지만 뮤즈스코어가 이 폴더를 직접 만들지는 않습니다.
Windows의 경우 개인용 템플릿 폴더는 %HOMEPATH%\Documents\MuseScore2\Templates에 있습니다.
Mac OS X 및 Linux 의 경우 개인용 템플릿은 ~/Documents/MuseScore2/Templates에 있습니다.
새 악보 작성 창은 이 두가지, 시스템 템플릿 폴더와 개인용 템플릿 폴더 모두 표시해 줍니다.
함께보기함께보기
조표박자음자리표템포단의 속성
외부외부 링크링크
비디오 학습: MuseScore in Minutes: 제 1장 - 악보 만들기
언어설정과언어설정과 변역변역 업데이트업데이트
뮤즈스코어는 당신의 "시스템" 언어를 기반으로 설치되고 운영됩니다. (대부분 하나의 언어가 사용되는데, 일반적으로 당신이 거주하는 나라와 PC의 언어설정, 또는 당신의 Account를 바탕으로 합니다)
언어언어 설정설정
1. 메뉴의 Edit(편집) → Preferences...(환경설정) (Mac: MuseScore → Preferences...)로 이동합니다.
2. General(일반) 탭에서 Language(언어) 섹션:
28
여기에서 언어의 설정 및 번역의 갱신을 Update Translations 버튼을 통하여 할 수 있습니다. 새로운 윈도우가 보이면서 당신의언어가 가장 위에 표시 됩니다. - see below.
언어의 변경, 번역의 갱신 후에는 뮤즈스코어를 다시 기동하여야 적용 됩니다.
번역의번역의 갱신갱신
위의 과정과 같이 '환경설정'을 통하여 번역의 갱신을 할 수 있는데, 또 다른 방법이 있습니다.
1. 메뉴의 Help(도움말) → Resource Manager를 열어서
2. Update 버튼을 클릭 합니다.
번역의 갱신 : 각 나라의 번역 봉사자들이 번역해준 내용을 최신 상태로 유지하기 위함 입니다.
29
이때에도 마찬가지로 뮤즈스코어를 재 기동하여야 갱신이 적용 됩니다.
함께함께 보기보기
번역에 도움주기 및 번역 다듬기
업데이트의업데이트의 체크체크
업데이트 체크에는 두가지 방법이 있습니다.
자동자동 업데이트업데이트 체크체크
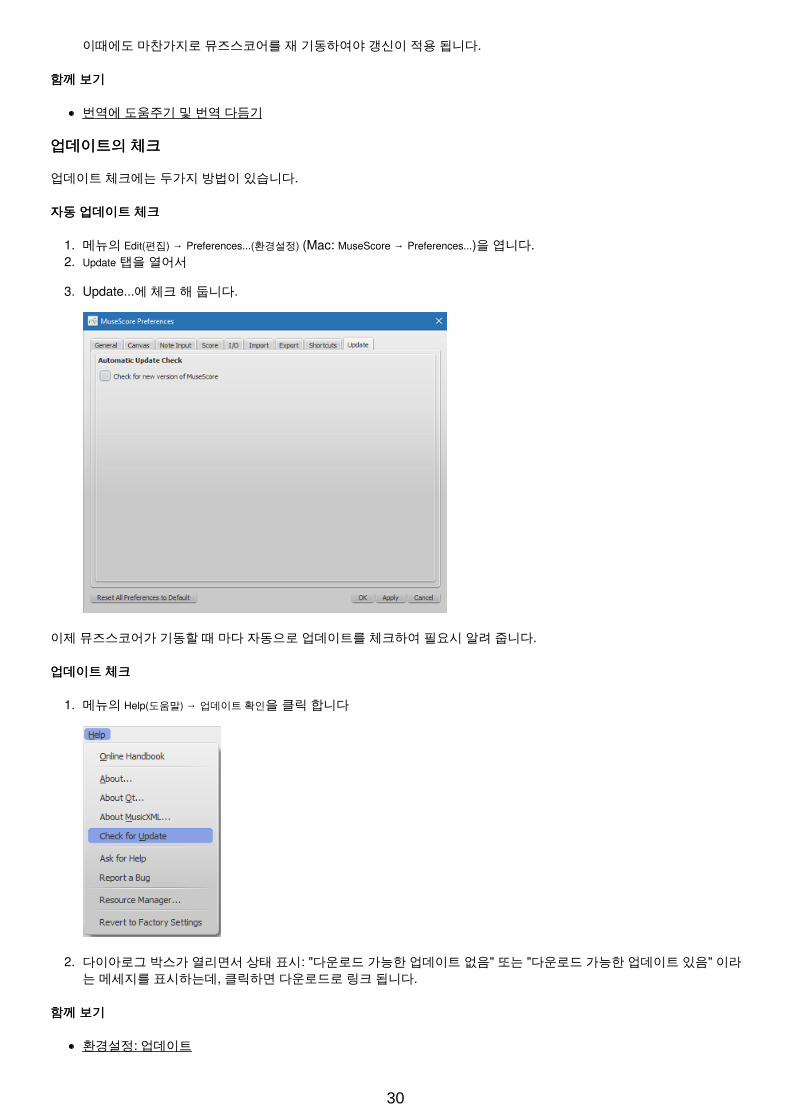
1. 메뉴의 Edit(편집) → Preferences...(환경설정) (Mac: MuseScore → Preferences...)을 엽니다.2. Update 탭을 열어서
3. Update...에 체크 해 둡니다.
이제 뮤즈스코어가 기동할 때 마다 자동으로 업데이트를 체크하여 필요시 알려 줍니다.
업데이트업데이트 체크체크
1. 메뉴의 Help(도움말) → 업데이트 확인을 클릭 합니다
2. 다이아로그 박스가 열리면서 상태 표시: "다운로드 가능한 업데이트 없음" 또는 "다운로드 가능한 업데이트 있음" 이라는 메세지를 표시하는데, 클릭하면 다운로드로 링크 됩니다.
함께함께 보기보기
환경설정: 업데이트
30
기초기초
이전의 "시작하기" 장에서는 새로운 악보 만들기를 위해 설치하는 방법과 과정을 배웠습니다. "기초"장에서는 MuseScore에대한 개요를 제공하고 score를 어떻게 작동시키는지 일반적인 방법에 대해 서술하고있습니다.
음표음표 입력입력
음표음표 입력의입력의 기본기본
음표 입력은 다음 4가지 단계로 입력합니다:
1. 먼저 음표의 시작 위치 를 정 합니다.2. 다음에는 음표 입력 모드로 설정하고3. 원하는 음 길이 의 음표 또는 쉽표를 선택한 다음4. 음정의 입력 (또는 쉽표) 을 키보드 단축키 나 마우스 또는 MIDI keyboard로 입력 합니다.
겹쳐지는 음표들, 시작시작 또는또는 끝이끝이 시간차가시간차가 있는있는 음표들음표들 (polyphony)의의 입력입력 방법은방법은, 성부. 화음 등을 참조 바랍니다.
Step 1: 시작시작 위치위치
먼저 음표 입력을 위해 시작 위치에 있는 음표 또는 쉼표를 선택 합니다. 이 시작위치를 정하지 않고 음표 입력 (아래와 같이)을개시했을때 커서는 악보의 처음을 가르키게 됩니다. 뮤즈스코어의 음표 입력은 현재 보이고 있는 쉼표나 음표 위에 덮어쓰기방식으로 진행 됩니다. (즉, Insert가 아닌 Overwrite 방식 입니다). 그러나 새로운 마디는 어느 위치건 삽입 할 수 있으며 (마디의 조작: 삽입 참조), 또한 복사 및 붙여넣기 로 음표를 입력할 수 있습니다.
Step 2: 음표음표 입력입력 모드모드
음표 입력 도구모음의 맨 왼쪽에 있는 "N" 버튼을 클릭 함으로 음표 입력 모드의 개시 / 종료 를 조작 합니다. 또는 키보드 단축키N 으로 조작 합니다. 음표 입력 모드를 종료 할때는 Esc키로도 가능 합니다.
Step 3: 음표값음표값 (음음 또는또는 쉼표쉼표 길이길이)
음표 입력 모드로 설정 한 후 , 음표 입력 도구 모음에서 해당 음표를 선택 하거나, 적절한 단축키를 이용 합니다.
불규칙한 리듬의 음표 (예를 들어 8분음표 2개 길이에 3개를 넣고자 하는 경우와 같이) 잇단음표 을 참조 바랍니다.
음 길이의 단축키는 다음과 같습니다:
1: 64분음표 (hemidemisemiquaver)2: 32분음표 (demisemiquaver)3: 16분음표 (semiquaver)4: 8분음표 (quaver)5: 4분음표 (crotchet)6: 2분음표 (minim)7: 온음표 (semibreve)8: 겹온음표 (breve)9: 4배온음표(Longa).: 점음표, 선택된 길이를 점음표 (또는 쉼표)로 변경
Step 4: 음정음정(음높이음높이) 또는또는 쉼표쉼표
모든 악기에 대해 (음높이가 없는 타악기 제외) 음 높이를 오선보 위에 마우스로 클릭 함으로 입력할 수 있습니다, (특정 타악기에 대해서는 드럼 음표 입력 을 참조). 또한 보다 빠른 입력을 위해서는 MIDI keyboard (see below), 또는 일반적인 컴퓨터키보드를 이용할 수 있습니다. 다음은 문자 방식의 예 입니다.
음정(음 높이)은 다음과 같이 키보드의 문자에 대응 됩니다: C D E F G A B C
0 (제로) 쉼표를 만듭니다.: 예를 들어 다음 순서로 입력하였을때 C D 0 E 결과는 아래와 같습니다. 음표 입력에 선택된 음 길
31

이 (여기의 샘플 에서는 4분음표)는 변경이 없는 한 쉼표에도 같은 길이로 적용 됩니다.
음표를 입력하는 동안 커서는 자동적으로 다음 음표 입력 위치로 이동 됩니다. 만일 화음과 같이 여러개의 음표를 앞서 입력한 음표에 추가 하고 싶을때는 Shift 키 를 누른 상태에서 음표 문자를 입력합니다: C D Shift+F Shift+A E F
음길이가 다른 화음을 넣고 싶을때는 성부 를 참조 바랍니다.
점음표를 넣을때는 먼저 기본 음표 (또는 키보드로 음길이 단축키)를 선택한 다음 . 을 누릅니다. 예를 들어 다음과 같은 순서로 입력 하면, 5 . C 4 D E F G A 결과는 아래와 같습니다:
키보드로 음표를 입력할 때 뮤즈스코어는 직전 음표와 가장 가까운 곳에 기록 합니다. 화음을 입력하는 경우에는 현재의 음표 에 추가됩니다 (아래에서 위의 순서로). 만약 이러한 기능들로 인해 옥타브가 잘못 입력 되었다면 다음의 단축키를 이용하여 옥타브를 옮김니다.
Ctrl+↑ (Mac: +↑): 한 옥타브 위로 이동.Ctrl+↓ (Mac: +↓): 한 옥타브 아래로 이동.
기타기타 단축키단축키 들들
또 다른 유용한 단축키 들도 음표 입력 모드 에서 사용할 수 있습니다:
↑ (Up): 음표를 반음씩 위로 이동 (♯ 를 붙임 같이).↓ (Down): 음표를 반음씩 아래로 이동 ( 를 붙임 같이).J: 같은소리 다른이름의 음표로 바꿈(e.g., F 를 E#로)Alt+Shift+↑: 조표를 반영 하면서 음표를 위로 이동Alt+Shift+↓: 조표를 반영 하면서 음표를 아래로 이동R: 마지막 음표를 반복 입력Q: 마지막 음표의 절반 음길이인 음표입력W: 마지막 음표의 두배 음길이인 음표입력Backspace: 마지막 음표 되돌리기Shift+←: Exchange last entered note with the note before it (repeat to keep moving note earlier)Shift+→: Exchange note moved with Shift+← with the note that follows itX: 음표 기둥의 방향 바꾸기 (Inspector 에서 자동 위치 재설정 가능)Shift+X: 음표 머리의 방향을 음표기둥의 좌, 우로 바꾸기 ( Inspector에서 자동 위치 재설정 가능)
미디미디 키보드키보드
미디 키보드를 이용하여 음정 (음높이)를 입력할 수 있습니다.
1. 미디 키보드를 컴퓨터에 연결한 후 미디의 전원을 켭니다.2. 뮤즈스코어를 기동 합니다 (반드시 미디 전원이 ON 으로 된 후에후에 뮤즈스코어를 기동 합니다)3. 새 악보 만들기4. 첫번째 마디의 쉼표를 클릭하여 음표 입력의 시작 위치를 정 합니다5. 키보드 N 을 눌러 음표 입력 모드 로 들어 갑니다6. 음길이 선택. 4분음표의 경우 5 를 누르듯 위의 음길이 입력에서 설명한 대로 음길이를 선택 합니다.7. 미디 키보드의 음표를 입력 합니다
그러면 음정 (음높이)이 악보에 삽입 됩니다.
주: 미디 키보드에서는 한번에 하나 또는 화음을 입력 가능 합니다. 이러한 방법 (때로 "step-time entry" 라고 부릅니다) 은 빠르고, 신뢰할수 있습니다. 어떤 음표입력 방법에는 소프트웨어가 이것을 '해석'하는, "real-time entry" 라고도 불리는 것으로음악가가 미디로 연주하면 소프트웨어가 음표로 바꾸어 주는 방법이 있습니다. 아무튼 몇몇 방법은 믿지 못할 결과를 보여줍니다. 뮤즈스코어는 음표 입력에 있어서 신뢰할 수 있는 방법을 목표로 합니다.
32
만일 당신의 컴퓨터에 여러대의 미디 장치가 연결되어 있다면 어떤 장치를 사용할지 정하여 뮤즈스코어에 알려 주어야 합니다. 메뉴의 Edit(편집) → Preferences...(환경설정) (Mac: MuseScore → Preferences...) 를 통하여 결정 합니다. Preferences(환경설정)다이아로그 에서 I/O 탭을 클릭 한 다음 "PortAudio"라는 섹션 아래에 있는 장치 중에서 선택 합니다.
악기의악기의 연주연주 범위를범위를 벗어나는벗어나는 음표에음표에 색갈색갈 입히기입히기
설정된 악기나 성악의 파트별로 연주 가능한 음역의 음표는 검정색으로 표시 하고, 연주 불가능한 음역의 음표는 적색으로표시 됩니다. 어떤 악기들은 연주자의 기량에 따라 표시되는데, 초보자들 에게는 어두운 황색으로 표시되며, 통상 숙달된 연주자 들에게도 연주 불가능한 음역은 적색으로 표시 됩니다.
이 색갈의 표시는 컴퓨터 스크린 상에서의 확인용 이므로 인쇄할때는 검정색으로 찍힙니다. 이 색갈 입히기를 정지시키려면메뉴의 Edit(편집) → Preferences...(환경설정) (Mac: MuseScore → Preferences...)을 열어서, Note Input(음표입력) 탭을 클릭 한 후 "Colornotes outside of usable pitch range(연주 불가능 음역에 색갈 입히기)"의 체크표시를 해제 합니다.
작음작음 음표음표/작은작은 음표음표 머리머리
1. 작은 음표로 만들 음표를 선택 합니다.2. Inspector의 "Small(작게)" 로 표시된 체크박스에 체크마크를 붙입니다. Note(음표) section 에 있는 체크박스는 하나의음표를 작게 해주며, 화음 전체를 작게 하려면 Chord(화음) section 의 체크박스를 사용 합니다. 이 기능에서는 선택 음표의 음표 머리, 음표기둥, 꼬리표 등 모든것에 적용 됩니다.
기정치로써 작음 음표는 통상적인 음표의 70%의 크기로 설정 되는데, 이 설정을 바꾸려면 Style(스타일) → General(일반) →
Sizes(크기)에서 설정 가능 합니다.
입력된입력된 음표의음표의 변경변경
음음 길이의길이의 변경변경
하나의 음표 또는 쉽표의 음 길이 변경 :
1. 음표 입력 모드를 해제 합니다. (현재 note input mode(음표 입력 모드) 라면 Esc 를 눌러 해제 합니다).2. 대상 음표 또는 쉼표를 클릭한 후 음길이 설정의 단축키 above(위에설명)를 사용 하거나, 도구 모음의 음길이 아이콘을클릭 하면 선택된 음표의 길이가 바뀌게 됩니다.
음길이가 증가 되었을 경우 그 다음 뒤따르는 음표까지 덮어쓰기가 되며, 음길이가 감소되는 경우에는 그 다음에 변경된 길이에 맞추어 쉼표가 삽입됩니다.
예를 들어 3개의 16분 쉼표를 1개의 점8분쉼표로 바꾸어 봅시다.
1. 첫번째 16분 음표를 클릭 합니다.2. 키보드의 4 를 눌러 8분쉼표를 만듭니다.3. 키보드의 . 을 누름으로 점8분쉼표로 바꿉니다.
음 길이가 증가되면서 뒤따르는 2개의 16분 쉼표까지 덮어쓰기가 됩니다.
음정음정(음높이음높이) 변경변경
음표 하나의 음높이를 바꾸려면 먼저 Esc 를 눌러 note input mode(음표입력 모드)에서 빠져 나옵니다. 그런 다음 음표머리를 마우스로 누르면서 위, 아래로 드래그 하거나, 또 다른 방법으로 음표를 선택한 후 화살표 키 ↑ (Up) 또는 ↓ (Down) 키로 음높이를변경 합니다. 여기에서도 음정을 의미하는 문자 키로 음 높이를 변경할 수 있고, Ctrl+↓ 나 Ctrl+↑ 로 한 옥타브 변경할 수 있습니다. (Mac: Cmd+↓ or Cmd+↑).
To change the enharmonic spelling of a note, select it and use the J command. For more information, see Accidentals.
To change the pitches of a passage of music by a constant interval, you can use Transposition.
To change the pitches of a passage of music to a different melody, while keeping the rhythm unchanged, use Re-pitchmode .
If your score contains a lot of misspelled accidentals, you might try the Respell Pitches command (see Accidentals:Respell pitches).
쉼표를쉼표를 음표와음표와 vice versa 로로 변경변경
쉼표를 음표로 변경:
33
1. 먼저 note input mode(음표입력 모드) 를 해제 합니다. (Esc 키를 누르면 해제 됩니다).2. 대상 쉼표를 클릭 합니다.3. 음표 입력에 사용되는 음정의 문자(단축키)를 누릅니다.
음표의 음 길이는 바꾸기 전 쉼표의 음 길이와 같아 집니다.
음표를 쉼표로 변경:
1. 먼저 note input mode(음표입력 모드) 를 해제 합니다. ( Esc 키를 누르면 해제 됩니다).2. 대상 음표를 선택 합니다.3. 키보드의 0 (Zero)를 누릅니다.
쉼표의 음 길이는 바꾸기 전 음표의 음 길이와 같아 집니다. 주: 이 조작은 음표입력 모드에서도 가능 합니다.
음표의음표의 속성속성
Layout and formatting을 참조, 특히 다음 sections 들을 보아 주십시요. notes(음표), accidentals(임시표), tuplets(잇단음표)Inspector and object properties 는 음표의 속성 및 선택에 관한 내용 입니다.
함께함께 보기보기
드럼 보타브 보잇단음표성부Shared noteheads환경설정
외부외부 링크링크
화음 입력 방법쉼표 입력 방법두 오선보에 이어지는 음표의 입력Video tutorial: MuseScore in Minutes: Lesson 3 - 음표 입력Video tutorial: MuseScore in Minutes: Lesson 4 - 미디 키보드 입력Video tutorial: MuseScore in Minutes: Lesson 5 - 그외 입력 방법
편집편집 모드모드 (Edit mode)
편집편집 모드모드 는 악보에 입력된 여러 개체를 편집할 때 사용됩니다. 대부분의 개체들이 이 편집 모드에서 수정되어 집니다.
편집 모드로 들어 가려면 : 편집 대상 개체를 더블클릭 합니다.; 또는 개체를 오른쪽 클릭 한 후 요소편집(Edit Element)를 선택 합니다 ; 또는 개체를 한번 클릭한 후 다시 오른쪽 클릭 하여 요소편집 (Edit Element)를 선택 합니다, 또는 단축키 Ctrl+E
(Mac: Cmd+E)를 누릅니다.편집 모드 (edit mode)에서 빠져 나오려면 Esc키를 누릅니다.
텍스트의텍스트의 편집편집
텍스트 편집 모드는 Text editing을 참조 바랍니다.
라인의라인의 편집편집
Lines 및 이와 비슷한 슬러(이음줄), 이르페지오, 대괄호 같은 개체는 편집모드에서 그 선의 핸들을 표시할 수 있으며 키보드명령 또는 마우스의 드래그 기능으로 핸들을 조정, 그 모양을 바꿀 수 있습니다.
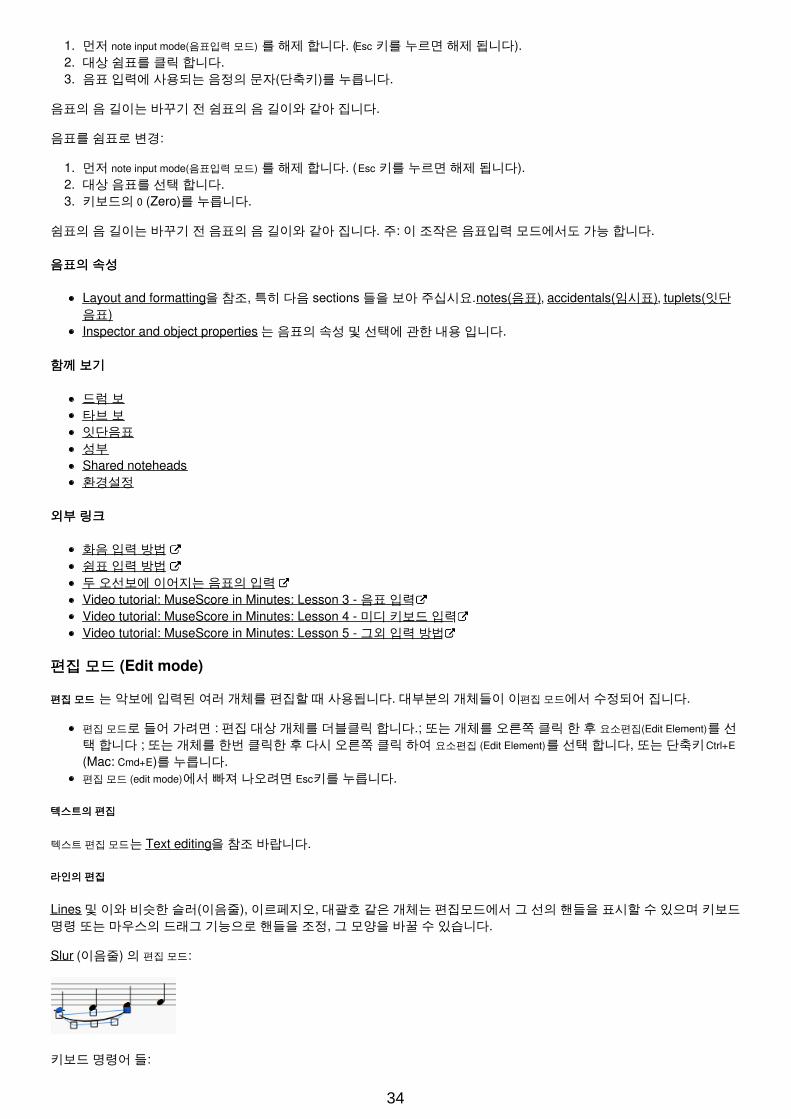
Slur (이음줄) 의 편집 모드:
키보드 명령어 들:
34
←: 핸들을 왼쪽으로 0.1 staff space 이동 ( 1 staff space= 오선보의 두 선사이의 간격, Page Settings에서 설정된다)→: 핸들을 오른쪽으로 0.1 staff space 이동↑: 핸들을 위로 0.1 staff space 이동↓: 핸들을 아래로 0.1 staff space 이동Ctrl+← (Mac: +←): 핸들을 왼쪽으로 1 staff space 이동Ctrl+→ (Mac: +→): 핸들을 오른쪽으로 1 staff space 이동Ctrl+↑ (Mac: +↑): 핸들을 위쪽으로 1 staff space 이동Ctrl+↓ (Mac: +↓): 핸들을 아래쪽으로 1 staff space 이동Alt+←: 핸들을 왼쪽으로 0.01 staff space 이동Alt+→: 핸들을 오른쪽으로 0.01 staff space 이동Alt+↑: 핸들을 위쪽으로 0.01 staff space 이동Alt+↓: 핸들을아래쪽으로 0.01 staff space 이동Shift+←: Move handle's anchor (the note or measure to which it is attached) leftShift+→: Move handle's anchor rightTab: 다음 핸들로 이동
음표의음표의 편집편집
두두 음표음표 사이의사이의 간격간격 조정조정
1. 음표머리를 더블클릭 합니다. (또는 오른쪽 클릭 후 "요소 편집"을 선택 합니다, 또는 음표를 클릭한 후 단축키 Ctrl + E를누릅니다)
2. 좌, 우의 화살표 키로 원하는 만큼의 간격을 조정 합니다.3. 마지막으로 Esc 키를 눌러 변경을 확정 짓습니다. (이로써 음표 시스템이 다시 그려집니다).
주주: 타이 (붙임줄)의 경우 때때로 다시 그릴때 오류가 발생할 수 있으므로 재입력 해야 할 경우가 있습니다.
대안 : 음표를 클릭한 후 "Horizontal offset" 의 설정을 화음화음(Chord) 의 Inspector 에서 설정함으로, 편집 모드 로 들어가지 않고변경할 수 있습니다.
주주e: 편집 모드 는 음표 기둥 에 대해 길이를 바꿀수 있도록 하며, 수평으로 위치조정은 할 수 없습니다. 이것은 클릭 한후Inspector에서 horizontal offset 의 조정을 통하여 할 수 있습니다.
함께함께 보기보기
텍스트 편집슬러 (이음줄)괄호라인BeamHairpin
Palettes and workspaces
To the left of the document window is the Workspace. This can be toggled on and off using the menu command, View →Palettes, or the shortcut, F9.
A workspace, in turn, consists of a number of palettes. Each palette is a folder containing a group of musical symbols.
Workspaces
MuseScore provides two preset workspaces: Basic (the default option) and Advanced (a version with more palettes andsymbols). These contain symbols drawn from the various sections of the Master palette. In addition, you can create yourown custom workspaces (below).
To switch between workspaces: Use the drop-down menu at the bottom of the workspace panel.
35
The names of palettes within a workspace are listed under the title "Palettes."
Single Palette Mode
If you only want to allow one palette to open at a time, right click at the top of the workspace and check the "Singlepalette" box. This will cause a palette to automatically close when you open a different one.
Docking/undocking
To dock or undock a workspace, see Side panels.
Custom workspace
A custom workspace allows you to select which palettes are listed, and to customize the contents of those palettes.
To create a customizable workspace:
1. Select an existing workspace. Use the drop-down list at the bottom of the workspace panel if needed.2. Click the + button, enter a name for the new workspace and press OK. The new workspace is added to the panel.
Alternatively you can use the menu option:
1. Select Edit → Workspaces, and chose a workspace.2. Select New. Fill in the new workspace name and click OK.
Right-clicking over the workspace will display a menu: this has options allowing you to insert, delete, rename and reorderthe palettes within it. The contents of individual palettes can be edited in a similar fashion once you've checked "EnableEditing" for a palette. For more details, see Custom palettes and Palette menu (below).
Palettes
Open/close palette
Click once on the name of the palette or its accompanying side-arrow.
Apply symbols from a palette
A palette symbol may be applied to the score using one of the following methods:
Select one or more score elements and double click the palette symbol.
36
Drag and drop the symbol onto the desired score element in the staff.
Tip: To prevent accidental rearrangement of contents during use, right-click over a palette name and untick "EnableEditing."
For example, to add tenuto marks (—) to a selection of notes:
1. Select the desired notes.2. In the Articulations & Ornaments palette, double-click on the tenuto symbol
Once added to the score, objects can be copied, pasted, and duplicated—see 복사하기와 붙여넣기.
Preset palettes (Advanced workspace)
The more fully-featured Advanced workspace contains the following palettes:
Grace NotesClefsKey SignaturesTime SignaturesBarlinesLinesArpeggios and GlissandiBreaths and pausesBracketsArticulations and OrnamentsAccidentalsDynamicsFingeringNote HeadsTremoloRepeats and JumpsTempoTextBreaks and SpacersBagpipe EmbellishmentsBeam PropertiesFrames and MeasuresFretboard Diagrams
Custom palettes
Once you have created a custom workspace (see above), and enabled editing (see Palette menu below), you cancustomize the palettes within it to your own requirements.
To add an existing score element (such as a line, text, dynamic, fretboard diagram etc.) to a custom palette:
Press and hold Ctrl+Shift (Mac: Cmd+Shift), then drag the symbol onto the palette.
To add a symbol to a custom workspace from the Master palette:
Drag the symbol from the Master Palette window into a custom palette.
To re-arrange a symbol in a custom palette:
Drag the symbol to the cell you want it to display in: it will swap places with the symbol currently occupying that cell.
Palette menu
Right-clicking on the name of a palette in a custom workspace brings up this menu:
Palette Properties...: Adjust the appearance of the open palette:
37
NameCell Size: Width, HeightElement Offset: Adjust the vertical offset of all elements in the palette.Scale: Make all palette elements appear larger or smaller.Show grid: Visually divide the palette into cells, one for each element.Show ‘More Elements…’: Create a cell which opens the Master Palette.
Insert New Palette: Create a new empty palette.Move Palette Up / Move Palette Down: Reorder the palettes.Enable Editing: Allow modifying the contents of the palette.Save Palette: Save as an .mpal file.Load Palette: Load an .mpal file.Delete Palette: Remove the palette from the workspace entirely.
Right-clicking on an element within a palette (if editing of the palette is enabled) brings up this menu:
Clear: Remove the element from the paletteProperties...: Open the Palette Cell Properties dialogue:
Name: The tooltip that appears when you mouse over the element.Content offset (X, Y): Adjust the position of the element in the palette.Content scale: Make the element appear larger or smaller in the palette.Draw staff: Draw the five lines of a musical staff behind the palette element.
More Elements: Open the relevant Master Palette section.
Note: Changing values in "Palette Cell Properties" only affects the appearance of elements in the palette. It does notchange their sizes or offsets on the score page.
Behavior of applied text and lines
If the symbol you are adding to the score from a palette contains a text element (e.g. staff text, dynamic, fingering, voltaetc.), then properties such as font-type, font-size, text color, and alignment will adapt according to the following rules:
1. Text properties which have not been altered by the user will adopt the relevant, prevailing text styles.
2. Custom text-properties—i.e. those changed by the user before saving the symbol to a custom palette—remain ascustomized.
By contrast, the line properties of lines applied from a palette always remain unchanged (i.e. as set by the user beforesaving to a custom workspace, or as predefined in the Basic/Advanced workspaces).
See also
Master palette
Inspector and object properties
Most score elements have properties that can be edited in one of two ways:
Click on any element, and many of its properties can be viewed and changed from the Inspector panel on the right-hand side of your screen.
Right-click on an element and select an option with the word Properties in it. This option opens a dialog withadvanced properties, only available for certain types of elements.
38
Inspector
The Inspector is shown by default on the right of your screen. It can be displayed or hidden from the menu: select View
and check/uncheck Inspector, or use the shortcut F8 (Mac: fn+F8).
In the Inspector, the properties of any selected object are displayed and can be edited. This applies to virtually everysingle element in the score window—notes, text, barlines, articulations etc. Multiple elements can also be selected andedited simultaneously, as long as they are of the same type. However, if the selected objects are of different types, thenthe Inspector restricts you to editing color and visibility only.
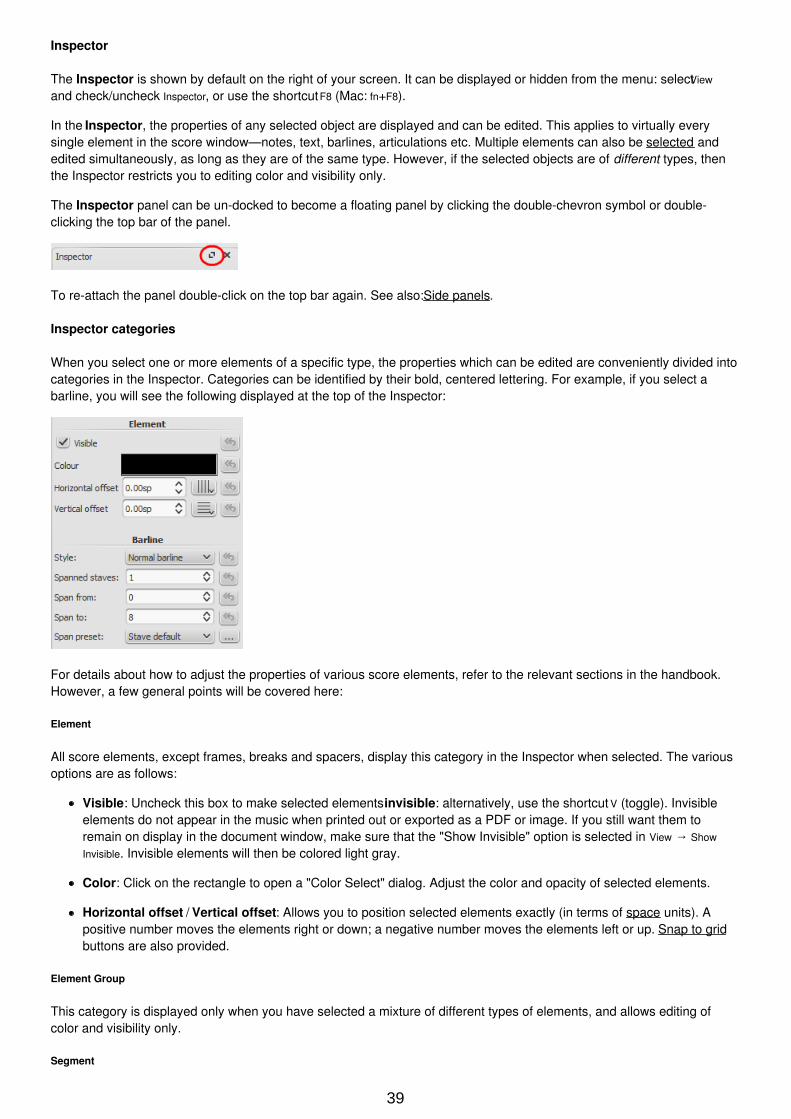
The Inspector panel can be un-docked to become a floating panel by clicking the double-chevron symbol or double-clicking the top bar of the panel.
To re-attach the panel double-click on the top bar again. See also: Side panels.
Inspector categories
When you select one or more elements of a specific type, the properties which can be edited are conveniently divided intocategories in the Inspector. Categories can be identified by their bold, centered lettering. For example, if you select abarline, you will see the following displayed at the top of the Inspector:
For details about how to adjust the properties of various score elements, refer to the relevant sections in the handbook.However, a few general points will be covered here:
Element
All score elements, except frames, breaks and spacers, display this category in the Inspector when selected. The variousoptions are as follows:
Visible: Uncheck this box to make selected elements invisible: alternatively, use the shortcut V (toggle). Invisibleelements do not appear in the music when printed out or exported as a PDF or image. If you still want them toremain on display in the document window, make sure that the "Show Invisible" option is selected in View → Show
Invisible. Invisible elements will then be colored light gray.
Color: Click on the rectangle to open a "Color Select" dialog. Adjust the color and opacity of selected elements.
Horizontal offset / Vertical offset: Allows you to position selected elements exactly (in terms of space units). Apositive number moves the elements right or down; a negative number moves the elements left or up. Snap to gridbuttons are also provided.
Element Group
This category is displayed only when you have selected a mixture of different types of elements, and allows editing ofcolor and visibility only.
Segment
39
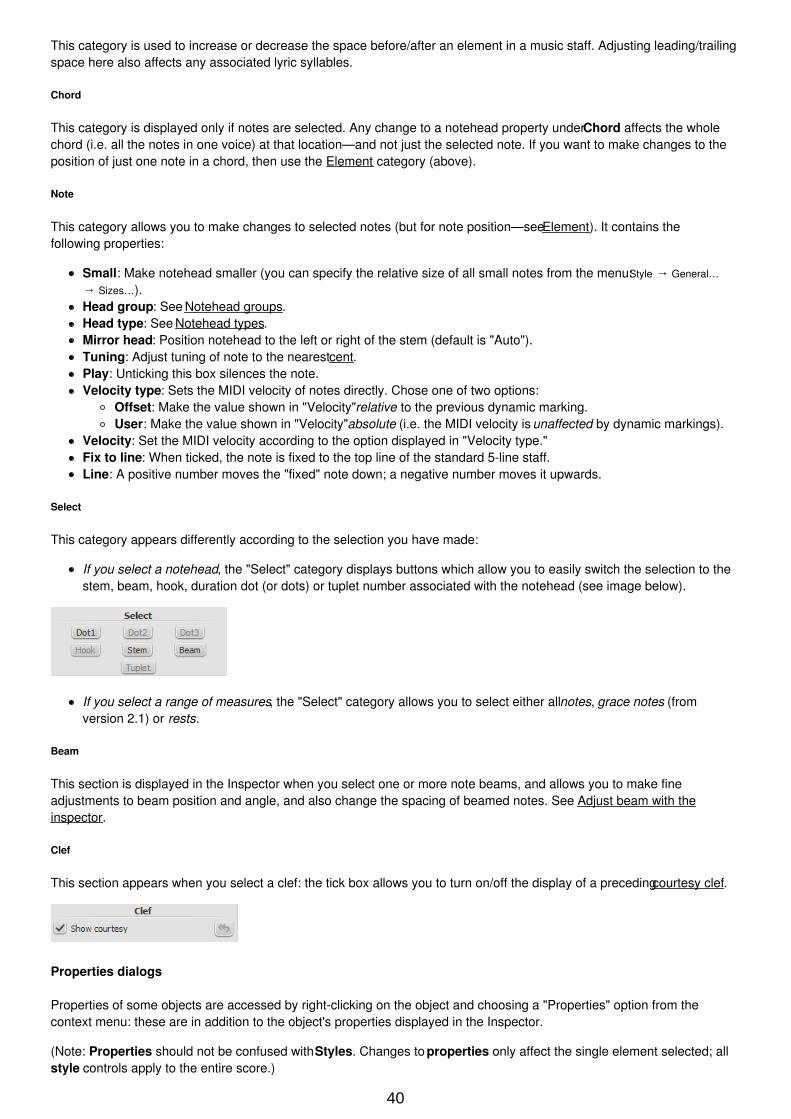
This category is used to increase or decrease the space before/after an element in a music staff. Adjusting leading/trailingspace here also affects any associated lyric syllables.
Chord
This category is displayed only if notes are selected. Any change to a notehead property under Chord affects the wholechord (i.e. all the notes in one voice) at that location—and not just the selected note. If you want to make changes to theposition of just one note in a chord, then use the Element category (above).
Note
This category allows you to make changes to selected notes (but for note position—see Element). It contains thefollowing properties:
Small: Make notehead smaller (you can specify the relative size of all small notes from the menu: Style → General…
→ Sizes…).Head group: See Notehead groups.Head type: See Notehead types.Mirror head: Position notehead to the left or right of the stem (default is "Auto").Tuning: Adjust tuning of note to the nearest cent.Play: Unticking this box silences the note.Velocity type: Sets the MIDI velocity of notes directly. Chose one of two options:
Offset: Make the value shown in "Velocity" relative to the previous dynamic marking.User: Make the value shown in "Velocity" absolute (i.e. the MIDI velocity is unaffected by dynamic markings).
Velocity: Set the MIDI velocity according to the option displayed in "Velocity type."Fix to line: When ticked, the note is fixed to the top line of the standard 5-line staff.Line: A positive number moves the "fixed" note down; a negative number moves it upwards.
Select
This category appears differently according to the selection you have made:
If you select a notehead, the "Select" category displays buttons which allow you to easily switch the selection to thestem, beam, hook, duration dot (or dots) or tuplet number associated with the notehead (see image below).
If you select a range of measures, the "Select" category allows you to select either all notes, grace notes (fromversion 2.1) or rests.
Beam
This section is displayed in the Inspector when you select one or more note beams, and allows you to make fineadjustments to beam position and angle, and also change the spacing of beamed notes. See Adjust beam with theinspector.
Clef
This section appears when you select a clef: the tick box allows you to turn on/off the display of a preceding courtesy clef.
Properties dialogs
Properties of some objects are accessed by right-clicking on the object and choosing a "Properties" option from thecontext menu: these are in addition to the object's properties displayed in the Inspector.
(Note: Properties should not be confused with Styles. Changes to properties only affect the single element selected; allstyle controls apply to the entire score.)
40
Articulation properties
Right-click on an articulation and select Articulation Properties... See Articulations and ornaments.
Fretboard diagram properties
Right-click on a fretboard diagram and select Fretboard Diagram Properties... Allows you to create custom fretboard diagrams.See Edit fretboard diagram.
Line properties
Right-click on a line and select Line Properties... There are settings for the beginning, end, or continuation of the line. Youcan add or remove text, adjust the text's placement, and set the length and angle of optional hooks. Click the ... button toaccess text properties for text included in the line. See Custom lines and line properties.
Measure properties
Right-click on an empty part of the measure and select Measure Properties... Adjust visibility, bar duration, repeats, stretchand numbering. See Measure properties.
Staff properties
Right-click either an empty part of a measure or the name of an instrument and select Staff Properties... This dialog allowsyou to adjust attributes of both the single staff and the instrument it is a part of. See Staff properties.
Text properties
Right click on a text-based element and select Text Properties... See Text styles and properties. If the element is a line withtext in it, see → above.
Time signature properties
Right-click on a time signature and select Time Signature Properties... Used to adjust appearance of time sig. and beamproperties of notes. See Time signatures.
See also
Measure operationsNote inputLayout and formattingStaff propertiesPart extraction
upload첨부첨부 파일파일 파일파일 크기크기
Note inspector.jpg 67.14 KB
Staffproperties.jpg 91.41 KB
Buttonstaffproperties.jpg 1.03 KB
Staffproperties2ndaccess.jpg 22.51 KB
View_en.png 25.03 KB
Note inspector.png133.85KB
Measure Properties 1.png 53.21 KB
notes.png 2.65 KB
inspector_select.png 3.25 KB
Barline inspector.png 10.85 KB
Measure Properties 2.png 60.54 KB
inspector-top-bar.jpg 3.08 KB
Previous_Next_Buttons.png 7.36 KB
Staff_Properties_en.png 30.14 KB
41
clef_inspector.png 2.09 KB첨부첨부 파일파일 파일파일 크기크기
마디의마디의 조작조작
추가추가
악보의 끝에 하나의 빈 마디를 추가하기 위해서는 Ctrl+B (Mac: +B)을 누르거나, 메뉴의 추가(Add) → 마디 (Measures) → 한
마디 추가 (Append One Measure)를 차례로 선택 합니다.
악보의 끝에 여러개의 빈 마디를 추가하기 위해서는 Alt+Shift+B (Mac: Option+Shift+B) 을 누르거나, 메뉴의 추가(Add) → 마
디(Measures) → 마디 추가.. (Append Measures..). 를 선택한 후 표시되는 다이아로그에서 추가하고자 하는 마디수를 설정, OK를 클릭합니다.
삽입삽입
악보에 마디 하나를 삽입하고자 할때에는 먼저 삽입위치의 마디를 선택한 다음 Ins 를 누르거나, 메뉴의 추가(Add) → 마디
(Measures) → 마디하나삽입(Insert Measure)을 차례로 선택하면 처음에 선택했던 마디 앞에 하나의 마디가 삽입 됩니다.
악보에 여러 마디를 삽입하고자 할때에는 먼저 삽입위치의 마디를 선택한 다음 Ctrl+Ins 를 차례로 누르거나, 메뉴의 추가(Add) → 마디(Measures) → 마디삽입..(Insert Measures...)을 차례로 선택한 후 표시되는 다이아로그에 삽입할 마디수를 지정하면 됩니다.
삭제삭제
하나의 마디를 삭제하고자 할때 먼저 삭제할 마디를 선택한 다음 Ctrl+Del (Mac: Cmd+Del)를 누릅니다.
여러 마디를 삭제하고자 할때에는 먼저 삭제할 처음 마디를 선택한 다음 Shift키를 누른 채 삭제할 마지막 마디를 클릭합니다. 그 다음Shift 키를 떼고 Ctrl+Del (Mac: Cmd+Del)키를 누릅니다.
악보의 중간에서 부터 마지막까지 삭제하고자 할때 먼저 삭제할 처음 마디를 선택한 다음 Ctrl+Shift+End (Mac:Cmd+Shift+End)를 눌러 마지막 까지 범위를 정한 다음 Ctrl+Del (Mac: Cmd+Del)을 누릅니다.
악보의 처음부터 중간까지 삭제 하고자 할때에는 삭제할 마지막 마디를 선택한 다음 Ctrl+Shift+Home (Mac:Cmd+Shift+Home)를 눌러 삭제범위를 정한 다음 Ctrl+Del (Mac: Cmd+Del)를 누릅니다.
주 : 오선보에 여러파트가 존재할 경우 하나의 파트에 대한 삭제 조작이 이루어 지더라도 모든 파트의 해당 마디가 함께 삭제됩니다.
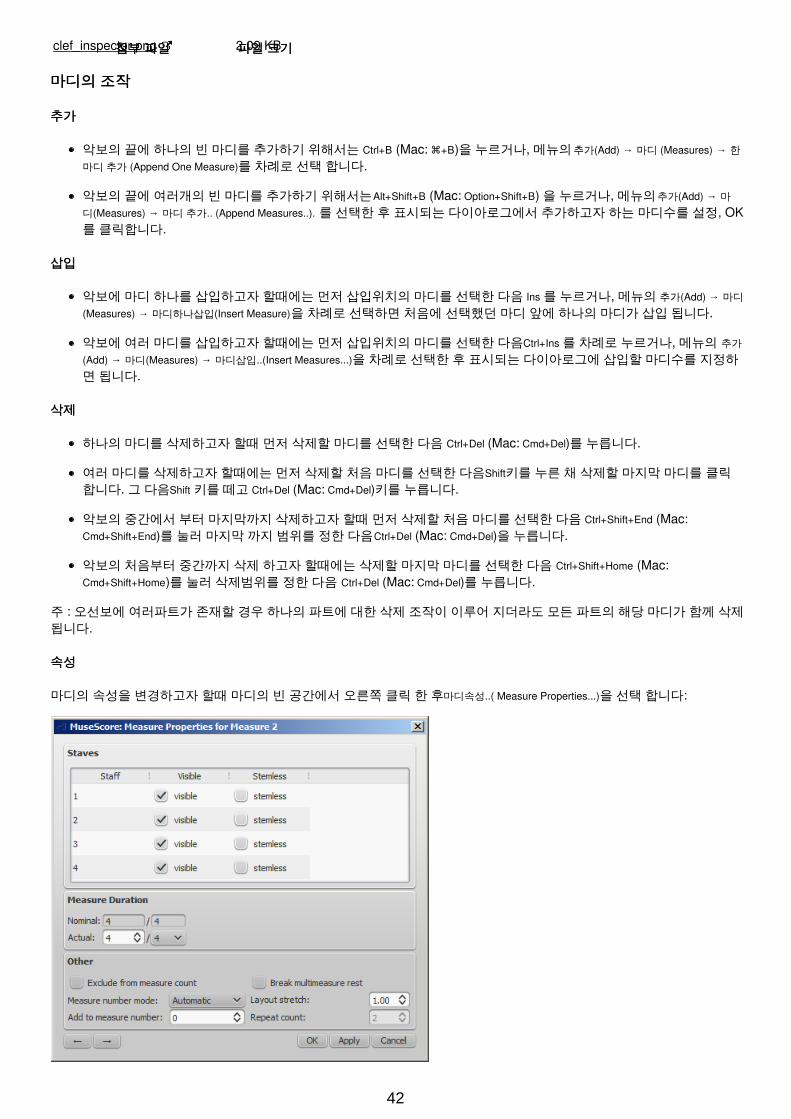
속성속성
마디의 속성을 변경하고자 할때 마디의 빈 공간에서 오른쪽 클릭 한 후 마디속성..( Measure Properties...)을 선택 합니다:
42

마디 속성 윈도우가 표시되었을때 아래쪽 부분의 화살표 키에 의해 이전 마디, 혹은 다음 마디의 속성을 편집할 수 있습니
다.: (주 : 표시 창이 변경되면 처음 선택한 마디가 아니라는 점에 주의하여 주십시요).
오선오선 보표보표
표시 ( visible ) 속성의 설정으로 마디의 음표와 오선보를 표시/비표시 를 지정 할 수 있습니다.음표기둥( stemless) 속성의 설정으로 음표기둥의 표시/비표시 를 지정할 수 있습니다. 단 이 기능은 2분음표와 4분음표에 대해서만 적용됩니다.
마디의마디의 길이길이
명목 Nominal 길이 (변경할 수 없습니다) 는 악보의 박자 기호와 같습니다.실제 Actual 길이는 악보의 박자표에 관계없이 변경 가능 합니다.일반적으로 명목 길이와 실제 길이는 별도로 구분됩니다. 마디의 실제 길이는 못갖춤 마디와 같이 정해진 박자보다 적거나, 죠인트 된 마디와 같이 긴 길이를 가질수 있습니다. ( 다음의 을 참조 바랍니다).
다음 그림에서는 4분음표의 여린박, 즉 못갖춘 마디로 시작 되므로 명목 길이는 4분음표 4개, 4/4 이지만 실제 길이는 1/4 가됩니다. 가운데 두 마디는 명목, 실제 길이 모두 4/4 이며, 마지막 마디는 점2분음표로 끝나므로 실제 길이는 3/4가 됩니다.:
기타기타
마디 번호에서 제외 이 "마디수 제외 Exclude from measure count" 는 "불규칙적인" 마디에 적용 하며, 마디 번호를 부여할 때 계산에서 제외 됩니다. 통상 못갖춘 마디 등 에 "마디수 제외 Exclude from measure count" 기능을 사용합니다.
마디 번호에 추가 이 "마디번호에 추가 Add to measure number" 옵션을 사용하면 마디번호에 영향을 주게되며 양수와 음수를 지정 함으로써 마디번호의 증감 효과를 얻게 됩니다. "-1" 을 지정함으로 마디번호 카운트에서 제외하는 효과를 얻을수 있습니다.
간격 조정 이 기능은 기보 요소들 (음표나 쉼표 등)의 수평 간격을 넓히거나 좁힐 수 있습니다. This provides a more precisecontrol over the exact same measure spacing property as the menu commands or keyboard shortcuts forIncrease/Decrease Stretch ( and ), which are accessed outside of the Measure Properties dialog while a measureis selected.
Repeat count If the measure is the last of a repeat, you can define how often it is played.
Break multimeasure rests This property will separate a multimeasure rest at the start of the selected measure. This option should be checkedbefore you turn on the "Create multimeasure rests" option in Style → General..., in the "Score" tab.Multimeasure rests are automatically broken at important breaks, such as rehearsal marks, time signature changes,double barlines, irregular measures, etc.The default for scores is off, for parts is on.
Numbering
MuseScore automatically numbers the first measure of each System (except for the first system, actually except for ameasure with the number 1), but more numbering options are possible. From the main menu, choose Style → General..., inthe left pane, choose the "Header, Footer, Numbers" tab. At the bottom of the right pane is the "Measure Numbers"("Bar Numbers") section.
Mark the checkbox next to the "Measure Numbers" ("Bar Numbers") to turn on automatic measure numbers.
Mark "Show first" if you want the first measure numbered.
Mark "All staves" if you want numbers on all staves. Otherwise, only the top staff of each system shows measurenumbers.
43
Choose to show numbers on "Every system" which numbers the first measure of each line, or show numbers by "Interval"and specify the size of the interval. For example, an interval of 1 numbers every measure; an interval of 5 numbers everyfifth measure.
나누기나누기 와와 합치기합치기 (Split and join)
You may want have to have a longer or shorter measure without changing the time signature. You can change ameasure's duration in Measure Properties, but there is now a new option to split or join measures. (Beams may beautomatically modified.)
Join
1. Select the measures you want to join2. Edit → Measure → Join Measures
Note: If you select measures on only one staff in a score with multiple staves, the same measures will be joined in eachstaff of the system.
Split
1. Select a note (or chord)2. Edit → Measure → Split Measures
Note: If you select only one note from one staff, each staff of the system will be split at the same place.
함께함께 보기보기
How to delete measuresHow to span a measure over multiple systemsHow to get scores without time signature (and clef)
Voices
A voice is a musical line or part which can have its own rhythm independently of other voices on the same staff. Voicesare sometimes called "layers" in other notation software.
You can have up to 4 voices on each staff line. In a polyphonic measure, voice 1 usually takes the up-stem notes andvoice 2 takes the down-stem notes.
N.B. Be careful not to confuse the concept of MuseScore voices (1, 2, 3, 4) with the order of voices found in vocal scores(SATB etc.). In particular, when creating a closed SATB score, use only (MuseScore) voices 1 and 2 for both upper andlower staves. There is no need to use (MuseScore) voices 3 and 4 unless there are more than two parts in the same staff.
When to use voices
If you need stems pointing in opposite directions within a chord, on a single staff.If you need notes of different durations within a single staff, played simultaneously.
How to enter notes in different voices
44
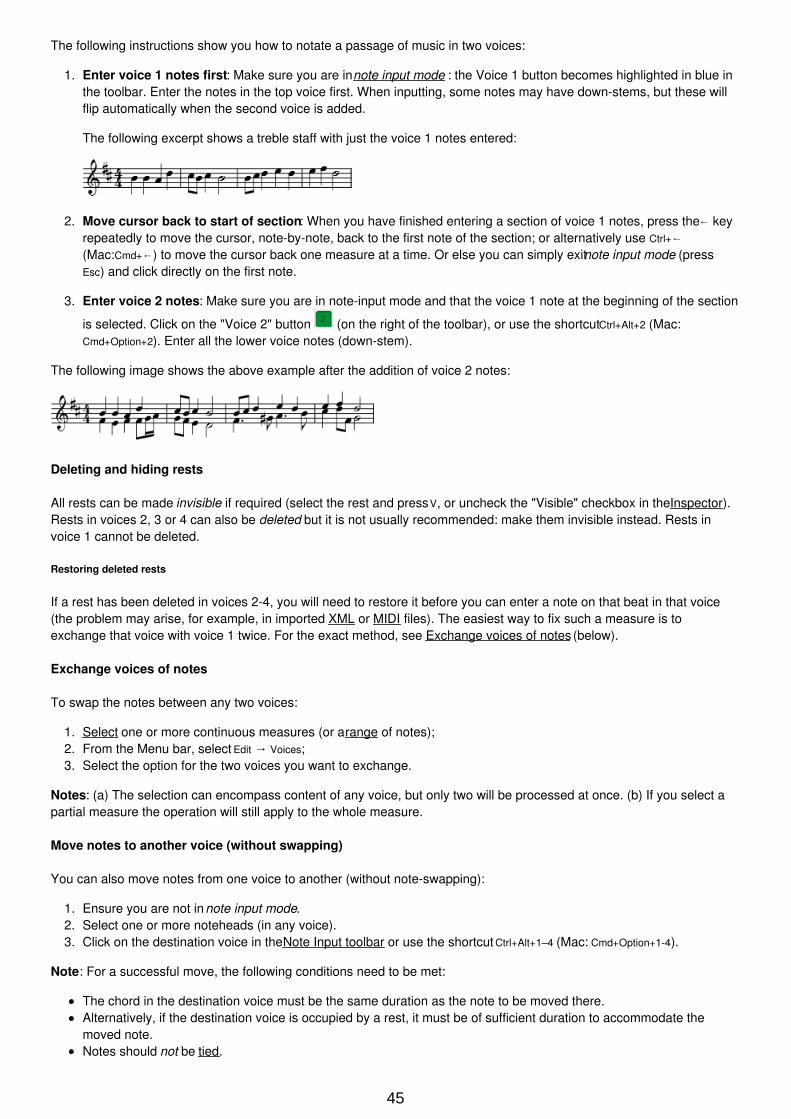
The following instructions show you how to notate a passage of music in two voices:
1. Enter voice 1 notes first: Make sure you are in note input mode : the Voice 1 button becomes highlighted in blue inthe toolbar. Enter the notes in the top voice first. When inputting, some notes may have down-stems, but these willflip automatically when the second voice is added.
The following excerpt shows a treble staff with just the voice 1 notes entered:
2. Move cursor back to start of section: When you have finished entering a section of voice 1 notes, press the ← keyrepeatedly to move the cursor, note-by-note, back to the first note of the section; or alternatively use Ctrl+←
(Mac:Cmd+←) to move the cursor back one measure at a time. Or else you can simply exit note input mode (pressEsc) and click directly on the first note.
3. Enter voice 2 notes: Make sure you are in note-input mode and that the voice 1 note at the beginning of the section
is selected. Click on the "Voice 2" button (on the right of the toolbar), or use the shortcut Ctrl+Alt+2 (Mac:Cmd+Option+2). Enter all the lower voice notes (down-stem).
The following image shows the above example after the addition of voice 2 notes:
Deleting and hiding rests
All rests can be made invisible if required (select the rest and press V, or uncheck the "Visible" checkbox in the Inspector).Rests in voices 2, 3 or 4 can also be deleted but it is not usually recommended: make them invisible instead. Rests invoice 1 cannot be deleted.
Restoring deleted rests
If a rest has been deleted in voices 2-4, you will need to restore it before you can enter a note on that beat in that voice(the problem may arise, for example, in imported XML or MIDI files). The easiest way to fix such a measure is toexchange that voice with voice 1 twice. For the exact method, see Exchange voices of notes (below).
Exchange voices of notes
To swap the notes between any two voices:
1. Select one or more continuous measures (or a range of notes);2. From the Menu bar, select Edit → Voices;3. Select the option for the two voices you want to exchange.
Notes: (a) The selection can encompass content of any voice, but only two will be processed at once. (b) If you select apartial measure the operation will still apply to the whole measure.
Move notes to another voice (without swapping)
You can also move notes from one voice to another (without note-swapping):
1. Ensure you are not in note input mode.2. Select one or more noteheads (in any voice).3. Click on the destination voice in the Note Input toolbar or use the shortcut Ctrl+Alt+1–4 (Mac: Cmd+Option+1-4).
Note: For a successful move, the following conditions need to be met:
The chord in the destination voice must be the same duration as the note to be moved there.Alternatively, if the destination voice is occupied by a rest, it must be of sufficient duration to accommodate themoved note.Notes should not be tied.
45
See also
Keyboard shortcuts: VoicesNoteheads: Shared noteheads
External links
How to merge/combine/implode two staves in one with two voicesVideo tutorial: How To Write Two Parts On One Staff: Voices
Selection modes
Objects in the score—such as notes, measures, articulations etc.—can be selected in several ways: (1) one at a time, (2)as a continuous range, or (3) as a list.
Select a single object
Most score objects can be selected by simply clicking on them in "normal" (i.e. not note-input) mode.
Select a single note
1. Make sure you are not in note input mode;2. Click on a note.
Note: Selecting a single note then copying and pasting it, will only copy and paste the pitch—not duration or otherproperties (such as stemless). To copy the entire note, including all properties, you need to hold down Shift—as for chordselection (below).
Select a chord
1. Make sure you are not in note input mode;2. Press and hold Shift, then click on a note in the chord.
Select a single measure
Click on a blank space within the measure.
Note: To select a range of consecutive measures, see Shift selection and Shift + click selection (below).
Select a continuous range of objects
There are several ways to select a continuous range of notes, chords or measures:
1. Shift selection
1. Make sure you are not in note entry mode;2. Select the first note, chord, rest or measure in the range. You can extend the selection up or down to adjacent
staves, if needed, using Shift+↑ or ↓;3. Then choose one of the following options:
To advance the selection one chord at a time to the right: Press Shift+→.To advance the selection one chord at a time to the left: Press Shift+←.To advance the selection one measure at a time to the right: Press Shift+Ctrl+→ (Mac: Shift+Cmd+→).To advance the selection one measure at a time to the left: Press Shift+Ctrl+← (Mac: Shift+Cmd+←).To advance the selection to the beginning of the line: Press Shift+Home (Mac: Shift+Fn+←).To advance the selection to the end of the line: Press Shift+End (Mac: Shift+Fn+→).To extend the selection to the beginning of the score: Press Shift+Ctrl+Home (Mac: Shift+Cmd+Fn+←).To extend the selection to the end of the score: Press Shift+Ctrl+End (Mac: Shift+Cmd+Fn+→).
2. Shift + click selection
To select a range of notes or rests:
1. Make sure you are not in note entry mode;
46
2. Click on the first note or rest in the range;3. Press and hold Shift, then click on the last desired note or rest.
Note: The final selected element can be in the same staff or in staffs above or below the initial note/rest. All selectedelements will be enclosed in a blue rectangle, including associated lines and articulations (but not voltas). You can repeatthe operation to extend the selected range as required.
Select a range of measures
1. Click on a blank space in the first desired measure;2. Hold down Shift, then click on a space in the last measure of the desired range.
Note: As with selecting notes, the range can be extended vertically as well as horizontally.
3. Drag selection
This method can be used to select notes or rests, or, independently, to select non-note symbols such as staccato dots,lyrics etc.:
Press and hold Shift, then drag the cursor across the desired range.
4. Select All
This method selects the whole musical score including notes, rests and associated elements. Use one of the followingoptions:
Press Ctrl+A (Mac: Cmd+A).From the menu bar, select Edit → Select All.
5. Select section
This method is used to select a section—a region of the score starting and/or ending with a section break:
1. Click on an empty space in a measure in the section;2. From the menu bar, select Edit → Select Section.
Note: See Copy and paste: Selection filter to disable certain types of elements from being selected in a range selection.
Select a list of objects
To select a list (or discontinuous range) of score elements:
1. Click on the first element;2. Hold down Ctrl (Mac: Cmd) and successively click on the desired additional elements.
Note: This method cannot be used to select measures. Use single or range selection instead.
Select all similar
To select all elements of a specific type (e.g., all barlines, all text elements, all staccato markings):
1. Select an element;2. Right click and chose Select…;
3. Several options are available:
All Similar Elements: Selects all elements in the score similar to the chosen object.All Similar Elements in Same Staff: Selects all elements in the same staff similar to the chosen object.All Similar Elements in Range Selection: only applies if a range has been selected. Selects all elements inthe range similar to the chosen object.More...: opens a dialog that lets you fine-tune more options. For example, if you have a notehead selected, thedialog will look something like this (as of version 2.1—previous versions had fewer options):
47
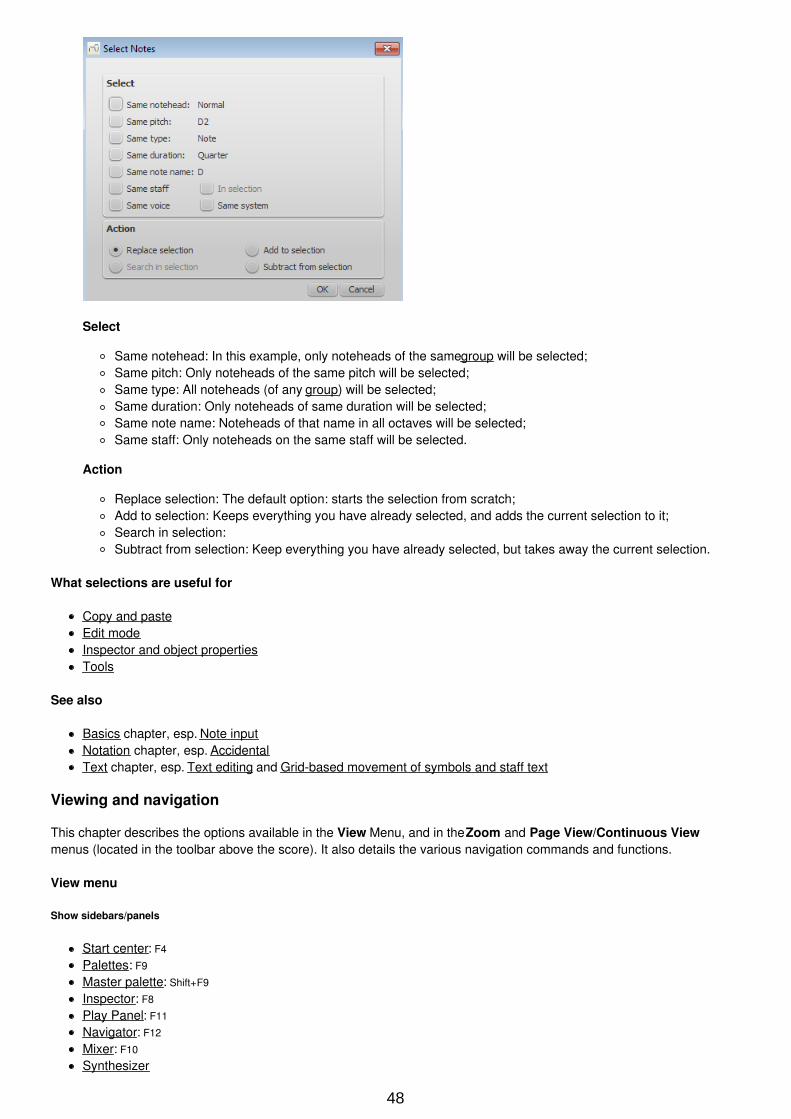
Select
Same notehead: In this example, only noteheads of the same group will be selected;Same pitch: Only noteheads of the same pitch will be selected;Same type: All noteheads (of any group) will be selected;Same duration: Only noteheads of same duration will be selected;Same note name: Noteheads of that name in all octaves will be selected;Same staff: Only noteheads on the same staff will be selected.
Action
Replace selection: The default option: starts the selection from scratch;Add to selection: Keeps everything you have already selected, and adds the current selection to it;Search in selection:Subtract from selection: Keep everything you have already selected, but takes away the current selection.
What selections are useful for
Copy and pasteEdit modeInspector and object propertiesTools
See also
Basics chapter, esp. Note inputNotation chapter, esp. AccidentalText chapter, esp. Text editing and Grid-based movement of symbols and staff text
Viewing and navigation
This chapter describes the options available in the View Menu, and in the Zoom and Page View/Continuous Viewmenus (located in the toolbar above the score). It also details the various navigation commands and functions.
View menu
Show sidebars/panels
Start center: F4
Palettes: F9
Master palette: Shift+F9
Inspector: F8
Play Panel: F11
Navigator: F12
Mixer: F10
Synthesizer
48
Selection filter: F6
Piano keyboard: P
Zoom in/out
There are several ways to zoom the score in or out:
Keyboard shortcut:
Zoom In: Ctrl++ (Mac: Cmd ++)Zoom Out: Ctrl +- (Mac: Cmd +-).
View menu:
Zoom In: View→Zoom In
Zoom Out: View→Zoom Out.
Mouse
Zoom In: Scroll up with the mouse wheel while holding down Ctrl (Mac: Cmd)Zoom Out: Scroll down with the mouse wheel while holding down Ctrl (Mac: Cmd).
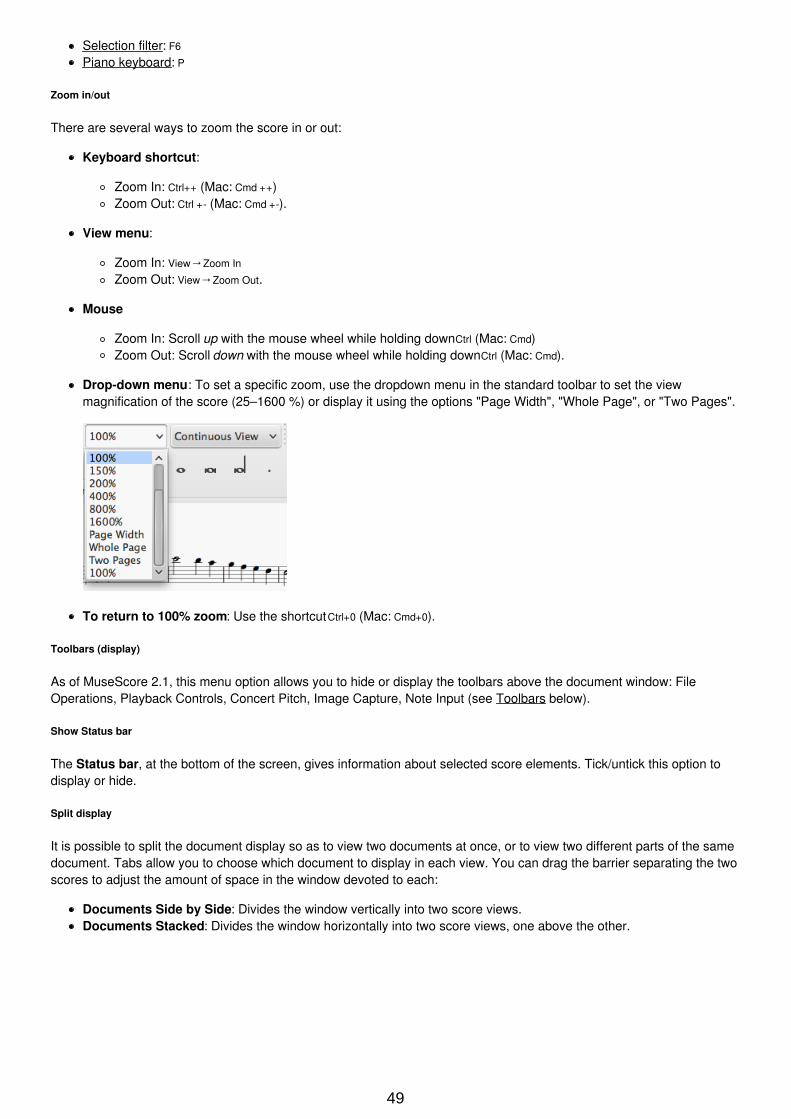
Drop-down menu: To set a specific zoom, use the dropdown menu in the standard toolbar to set the viewmagnification of the score (25–1600 %) or display it using the options "Page Width", "Whole Page", or "Two Pages".
To return to 100% zoom: Use the shortcut Ctrl+0 (Mac: Cmd+0).
Toolbars (display)
As of MuseScore 2.1, this menu option allows you to hide or display the toolbars above the document window: FileOperations, Playback Controls, Concert Pitch, Image Capture, Note Input (see Toolbars below).
Show Status bar
The Status bar, at the bottom of the screen, gives information about selected score elements. Tick/untick this option todisplay or hide.
Split display
It is possible to split the document display so as to view two documents at once, or to view two different parts of the samedocument. Tabs allow you to choose which document to display in each view. You can drag the barrier separating the twoscores to adjust the amount of space in the window devoted to each:
Documents Side by Side: Divides the window vertically into two score views.Documents Stacked: Divides the window horizontally into two score views, one above the other.
49
Visibility options
This section allows you to display or hide various non-printing elements:
Show Invisible: View/hide elements that have been made invisible for printing and export. If this option is ticked,invisible elements are shown in the score window as light gray.Show Unprintable: View/hide breaks and spacer symbols.Show Frames: View/hide the dotted outlines of frames.Show Page Margins: View/hide Page Margins.
Full screen
Full Screen mode expands MuseScore to fill your screen so more content is visible.
Page/Continuous View
You can switch between two different views of the score using the drop-down list in the toolbar area:
To scroll the score:
Vertically: Move the mouse wheel up or down.Horizontally: Press Shift and move the mouse wheel up or down.
Page View
In Page View, the score is formatted as it will appear when printed or exported as a PDF or image file: that is, page bypage, with margins. MuseScore applies system (line) and page breaks automatically, according to the settings made inPage settings and Style: General. In addition, you can apply your own system (line), page or section breaks.
To choose between horizontal or vertical page scrolling, see Preferences: Canvas (Scroll pages).
Continuous View
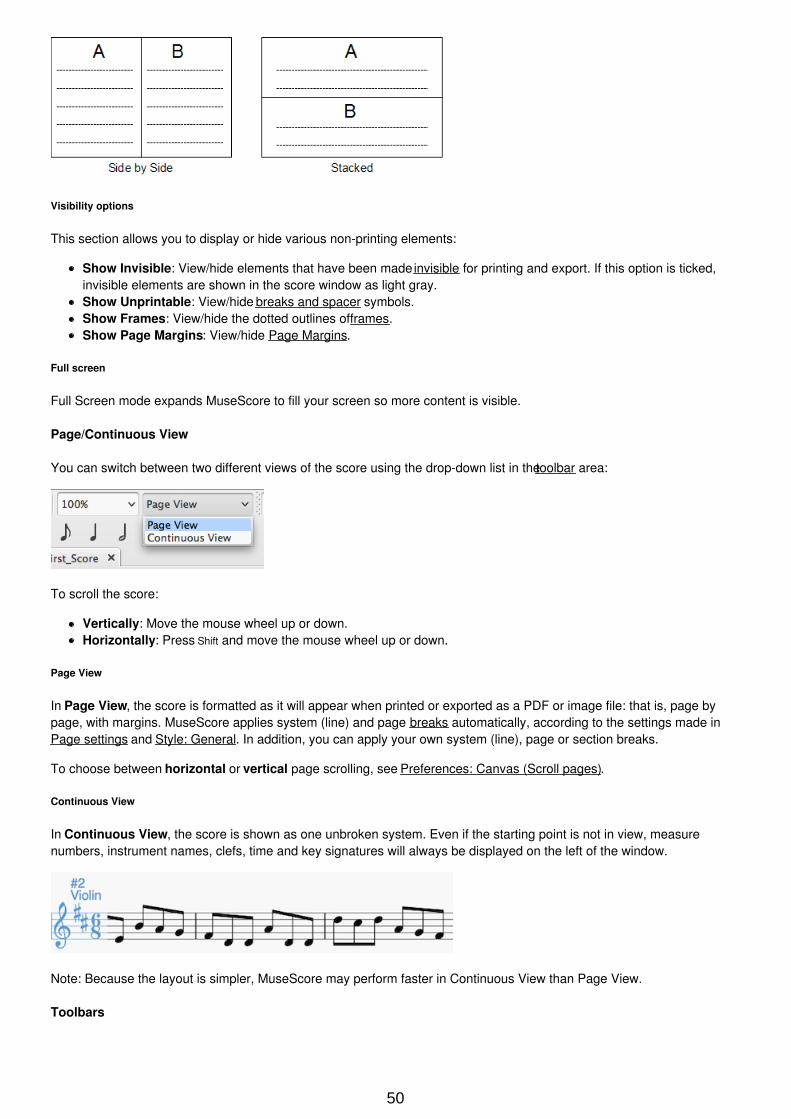
In Continuous View, the score is shown as one unbroken system. Even if the starting point is not in view, measurenumbers, instrument names, clefs, time and key signatures will always be displayed on the left of the window.
Note: Because the layout is simpler, MuseScore may perform faster in Continuous View than Page View.
Toolbars
50
The Toolbar area is located between the Menu bar and document window. It contains symbols which allow you toperform certain operations. It can be divided into the following toolbars:
File Operations: New score, Load score, Save, Print, Undo, Redo.Zoom/Page View.Playback controls: Enable MIDI, Rewind, Play/Stop, Loop, Play Repeats, Metronome.Concert Pitch: Displays score in written or concert (sounding) pitch.Image Capture: Allows you to take a snapshot of part of the score.Note Input: Note entry mode, Duration, Tie, Rest, Accidentals, Flip stem direction, Voice (1, 2, 3, 4).
To choose which toolbars to display, right-click on an empty space in the toolbar area (or on the title bar of the Inspector)and, from the menu, check or uncheck the required options. This menu also allows you to view or hide the Pianokeyboard, Selection sidebar, Palettes, the Inspector, and (if already displayed) the "Drum Tools" (i.e. Drum inputpalette).
These display options can also be accessed in the View menu, and, as of 2.1, in View→Toolbars.
Side panels
The workspaces, Inspector and Selection filter are conveniently displayed as side panels to the left and right of thescore window. To undock a side panel use one of the following methods:
Drag the panel;Click on the double chevron at the top of the panel;Double click in the title area at the top of the panel.
To dock a panel use one of the following procedures:
Drag the panel to the top/bottom of an existing side panel and it will stack vertically above/below that panel.Drag the panel to the middle of an existing side panel and it will overlay that panel. Both panels can then beaccessed by tabs.
Alternatively, double-clicking the title bar of the panel will restore it to its previously docked position.
Navigation
There are various commands available to help you navigate through the score. These are listed under Keyboardshortcuts: Navigation.
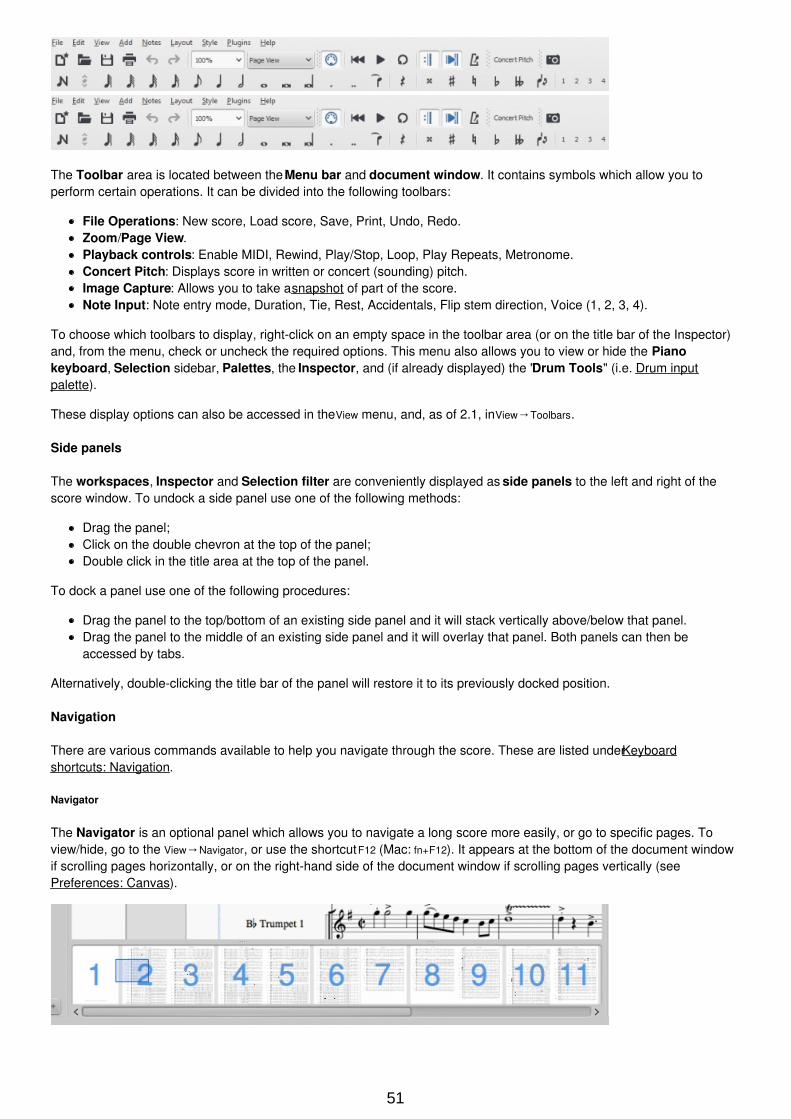
Navigator
The Navigator is an optional panel which allows you to navigate a long score more easily, or go to specific pages. Toview/hide, go to the View→Navigator, or use the shortcut F12 (Mac: fn+F12). It appears at the bottom of the document windowif scrolling pages horizontally, or on the right-hand side of the document window if scrolling pages vertically (seePreferences: Canvas).
51
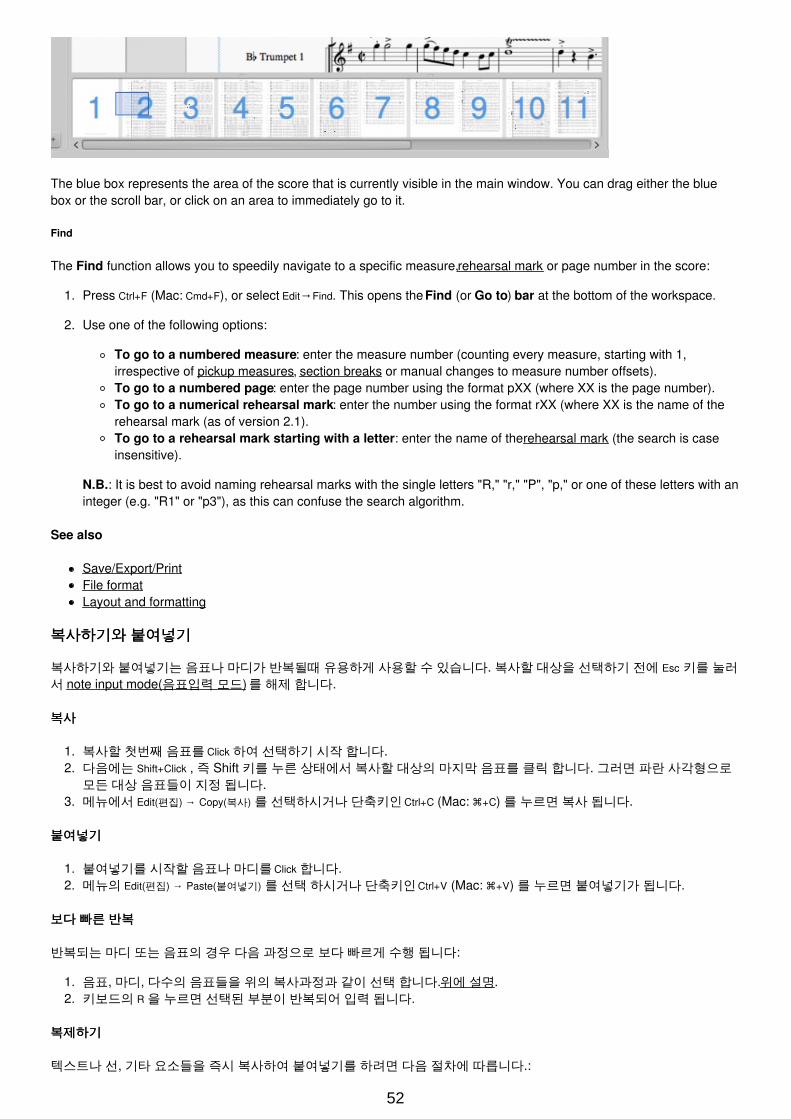
The blue box represents the area of the score that is currently visible in the main window. You can drag either the bluebox or the scroll bar, or click on an area to immediately go to it.
Find
The Find function allows you to speedily navigate to a specific measure, rehearsal mark or page number in the score:
1. Press Ctrl+F (Mac: Cmd+F), or select Edit→Find. This opens the Find (or Go to) bar at the bottom of the workspace.
2. Use one of the following options:
To go to a numbered measure: enter the measure number (counting every measure, starting with 1,irrespective of pickup measures, section breaks or manual changes to measure number offsets).To go to a numbered page: enter the page number using the format pXX (where XX is the page number).To go to a numerical rehearsal mark: enter the number using the format rXX (where XX is the name of therehearsal mark (as of version 2.1).To go to a rehearsal mark starting with a letter: enter the name of the rehearsal mark (the search is caseinsensitive).
N.B.: It is best to avoid naming rehearsal marks with the single letters "R," "r," "P", "p," or one of these letters with aninteger (e.g. "R1" or "p3"), as this can confuse the search algorithm.
See also
Save/Export/PrintFile formatLayout and formatting
복사하기와복사하기와 붙여넣기붙여넣기
복사하기와 붙여넣기는 음표나 마디가 반복될때 유용하게 사용할 수 있습니다. 복사할 대상을 선택하기 전에 Esc 키를 눌러서 note input mode(음표입력 모드) 를 해제 합니다.
복사복사
1. 복사할 첫번째 음표를 Click 하여 선택하기 시작 합니다.2. 다음에는 Shift+Click , 즉 Shift 키를 누른 상태에서 복사할 대상의 마지막 음표를 클릭 합니다. 그러면 파란 사각형으로모든 대상 음표들이 지정 됩니다.
3. 메뉴에서 Edit(편집) → Copy(복사) 를 선택하시거나 단축키인 Ctrl+C (Mac: +C) 를 누르면 복사 됩니다.
붙여넣기붙여넣기
1. 붙여넣기를 시작할 음표나 마디를 Click 합니다.2. 메뉴의 Edit(편집) → Paste(붙여넣기) 를 선택 하시거나 단축키인 Ctrl+V (Mac: +V) 를 누르면 붙여넣기가 됩니다.
보다보다 빠른빠른 반복반복
반복되는 마디 또는 음표의 경우 다음 과정으로 보다 빠르게 수행 됩니다:
1. 음표, 마디, 다수의 음표들을 위의 복사과정과 같이 선택 합니다. 위에 설명.2. 키보드의 R 을 누르면 선택된 부분이 반복되어 입력 됩니다.
복제하기복제하기
텍스트나 선, 기타 요소들을 즉시 복사하여 붙여넣기를 하려면 다음 절차에 따릅니다.:
52
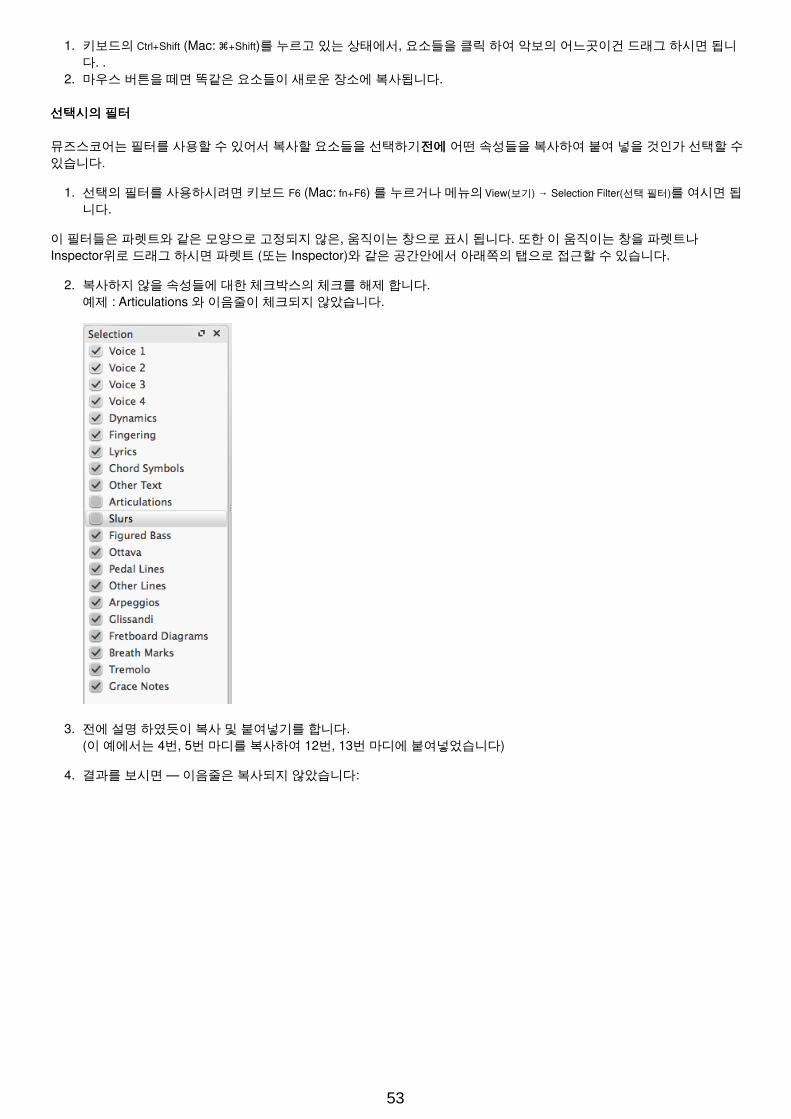
1. 키보드의 Ctrl+Shift (Mac: +Shift)를 누르고 있는 상태에서, 요소들을 클릭 하여 악보의 어느곳이건 드래그 하시면 됩니다. .
2. 마우스 버튼을 떼면 똑같은 요소들이 새로운 장소에 복사됩니다.
선택시의선택시의 필터필터
뮤즈스코어는 필터를 사용할 수 있어서 복사할 요소들을 선택하기 전에전에 어떤 속성들을 복사하여 붙여 넣을 것인가 선택할 수있습니다.
1. 선택의 필터를 사용하시려면 키보드 F6 (Mac: fn+F6) 를 누르거나 메뉴의 View(보기) → Selection Filter(선택 필터)를 여시면 됩니다.
이 필터들은 파렛트와 같은 모양으로 고정되지 않은, 움직이는 창으로 표시 됩니다. 또한 이 움직이는 창을 파렛트나Inspector위로 드래그 하시면 파렛트 (또는 Inspector)와 같은 공간안에서 아래쪽의 탭으로 접근할 수 있습니다.
2. 복사하지 않을 속성들에 대한 체크박스의 체크를 해제 합니다.예제 : Articulations 와 이음줄이 체크되지 않았습니다.
3. 전에 설명 하였듯이 복사 및 붙여넣기를 합니다.(이 예에서는 4번, 5번 마디를 복사하여 12번, 13번 마디에 붙여넣었습니다)
4. 결과를 보시면 — 이음줄은 복사되지 않았습니다:
53
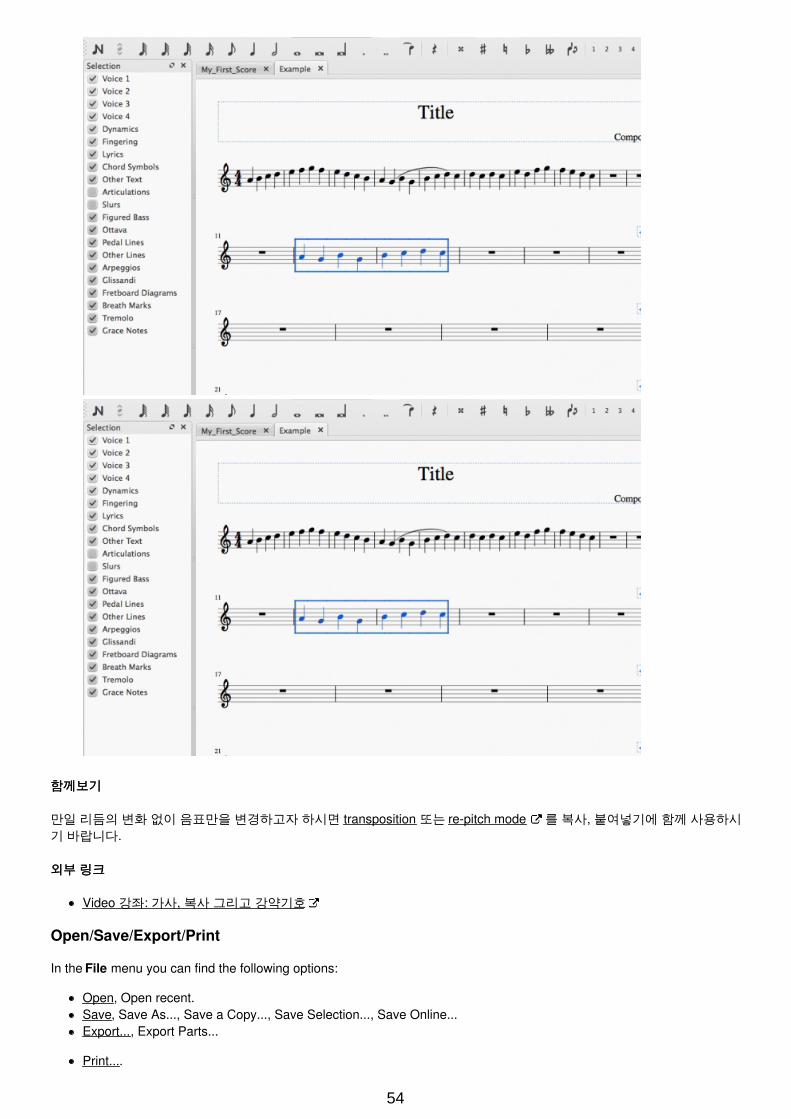
함께보기함께보기
만일 리듬의 변화 없이 음표만을 변경하고자 하시면 transposition 또는 re-pitch mode 를 복사, 붙여넣기에 함께 사용하시기 바랍니다.
외부외부 링크링크
Video 강좌: 가사, 복사 그리고 강약기호
Open/Save/Export/Print
In the File menu you can find the following options:
Open, Open recent.Save, Save As..., Save a Copy..., Save Selection..., Save Online...Export..., Export Parts...
Print....
54
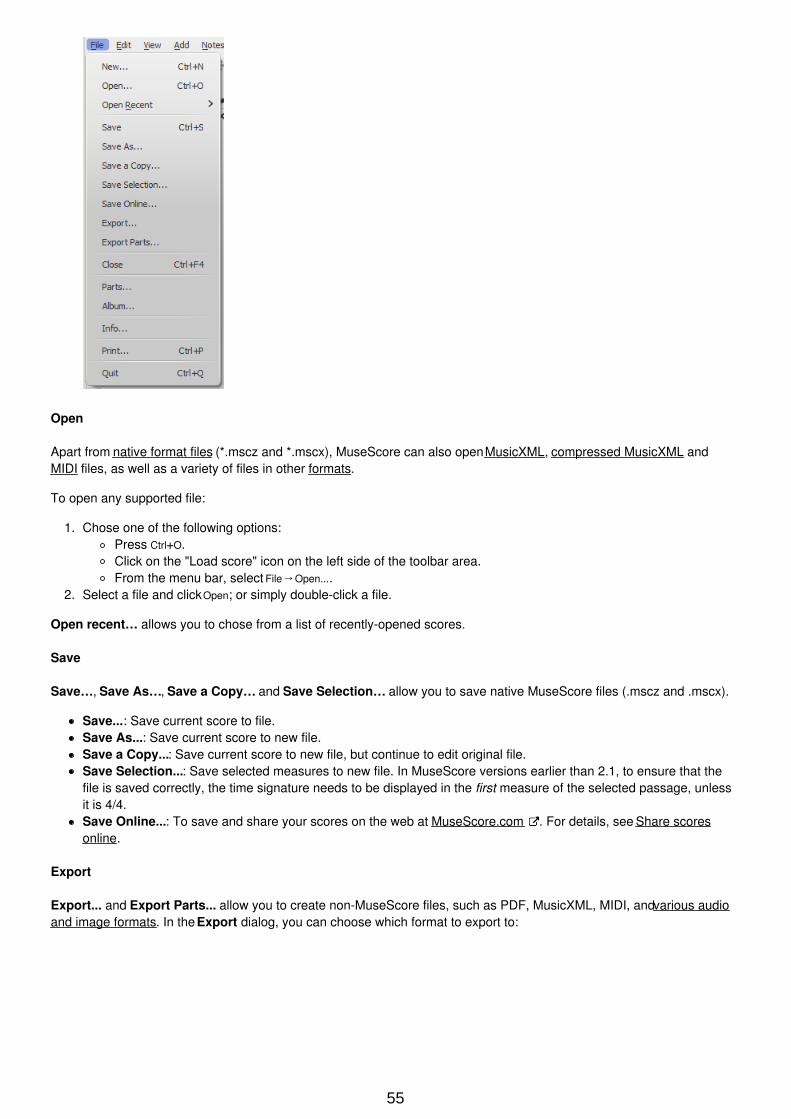
Open
Apart from native format files (*.mscz and *.mscx), MuseScore can also open MusicXML, compressed MusicXML andMIDI files, as well as a variety of files in other formats.
To open any supported file:
1. Chose one of the following options:Press Ctrl+O.Click on the "Load score" icon on the left side of the toolbar area.From the menu bar, select File→Open....
2. Select a file and click Open; or simply double-click a file.
Open recent… allows you to chose from a list of recently-opened scores.
Save
Save…, Save As…, Save a Copy… and Save Selection… allow you to save native MuseScore files (.mscz and .mscx).
Save...: Save current score to file.Save As...: Save current score to new file.Save a Copy...: Save current score to new file, but continue to edit original file.Save Selection...: Save selected measures to new file. In MuseScore versions earlier than 2.1, to ensure that thefile is saved correctly, the time signature needs to be displayed in the first measure of the selected passage, unlessit is 4/4.Save Online...: To save and share your scores on the web at MuseScore.com . For details, see Share scoresonline.
Export
Export... and Export Parts... allow you to create non-MuseScore files, such as PDF, MusicXML, MIDI, and various audioand image formats. In the Export dialog, you can choose which format to export to:
55

Export...: Export current score to format of your choice.Export Parts...: Export current score and all linked parts to separate files in a format of your choice.
MuseScore remembers which format you picked the last time and makes that the default for the next time. Note: There isa known issue with Windows XP and Vista, where you have to manually (un)set the filename's extension when choosing adifferent format than the one selected the previous time.
Print... allows to print your MuseScore file directly to a printer from MuseScore. Depending on your printer you will havedifferent options, but generally you can define the page range, number of copies and collation.
If you have a PDF printer installed, you could also "export" to PDF using Print, but it's usually better to use the native PDFoption under Export for more accurate rendition. Note: For this to work properly with Adobe PDF, make sure to uncheck"Rely on system fonts only, do not use document fonts" in Printer properties.
See also
File formatPart extraction
실행취소와실행취소와 다시실행다시실행(Undo, Redo)
MuseScore는 실행 취소 / 다시 실행 작업을 무제한으로 기억합니다.
기본적인 단축키는:
실행취소 Ctrl+Z (Mac: +Z)다시실행 Ctrl+Shift+Z or Ctrl+Y (Mac: +Shift+Z)
또는 도구창에있는 버튼을 사용하세요:
Share scores online
Go to musescore.com/sheetmusic to view other scores from MuseScore.
You can save and share your scores online at MuseScore.com . You can choose to save a score privately for personalaccess from any computer, or share it publicly. MuseScore.com enables the viewing and playback of scores in your webbrowser - an additional feature entitled VideoScores allows synchronization between the score and a YouTube video. Foruse outside of a web browser, you can download the score in a variety of formats (including PDF, MIDI, MP3, MusicXML,and the original MuseScore file).
Create an account
1. Visit MuseScore.com and click on "Create new account ". Pick a username and enter a valid email and press"Create New Account".
2. Wait a few minutes for an email from MuseScore.com support. If no email arrives, check your spam folder.
56
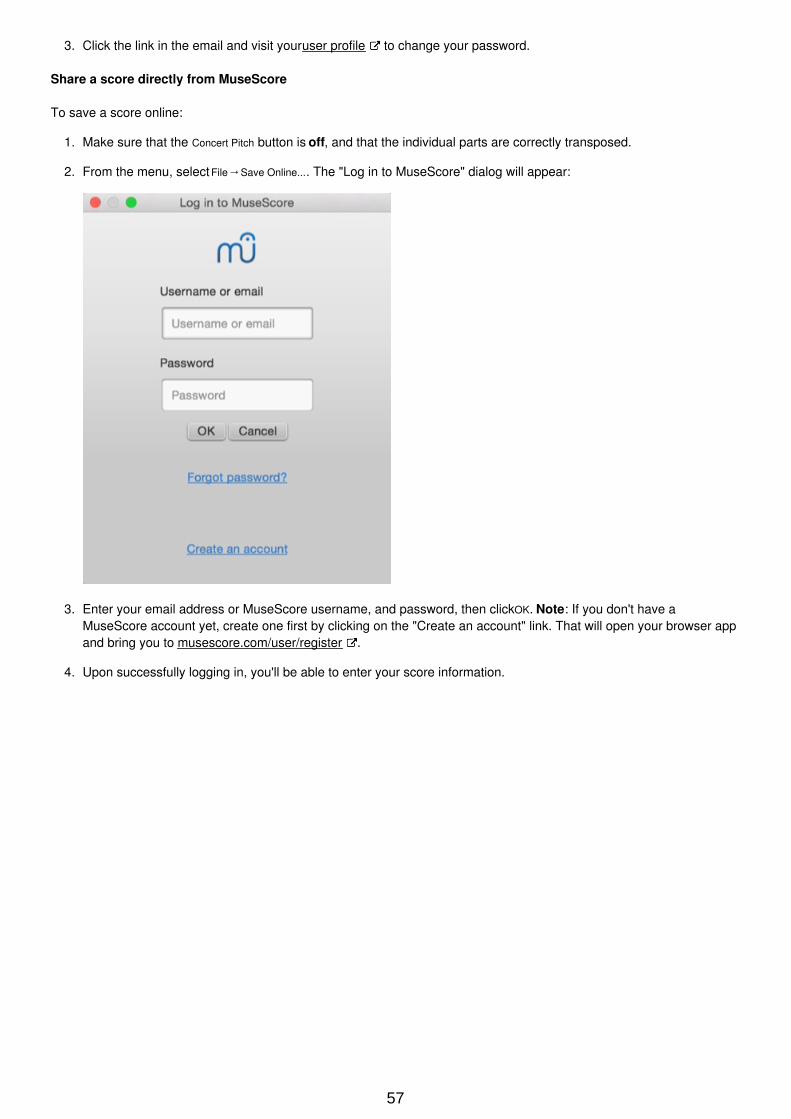
3. Click the link in the email and visit your user profile to change your password.
Share a score directly from MuseScore
To save a score online:
1. Make sure that the Concert Pitch button is off, and that the individual parts are correctly transposed.
2. From the menu, select File→Save Online.... The "Log in to MuseScore" dialog will appear:
3. Enter your email address or MuseScore username, and password, then click OK. Note: If you don't have aMuseScore account yet, create one first by clicking on the "Create an account" link. That will open your browser appand bring you to musescore.com/user/register .
4. Upon successfully logging in, you'll be able to enter your score information.
57
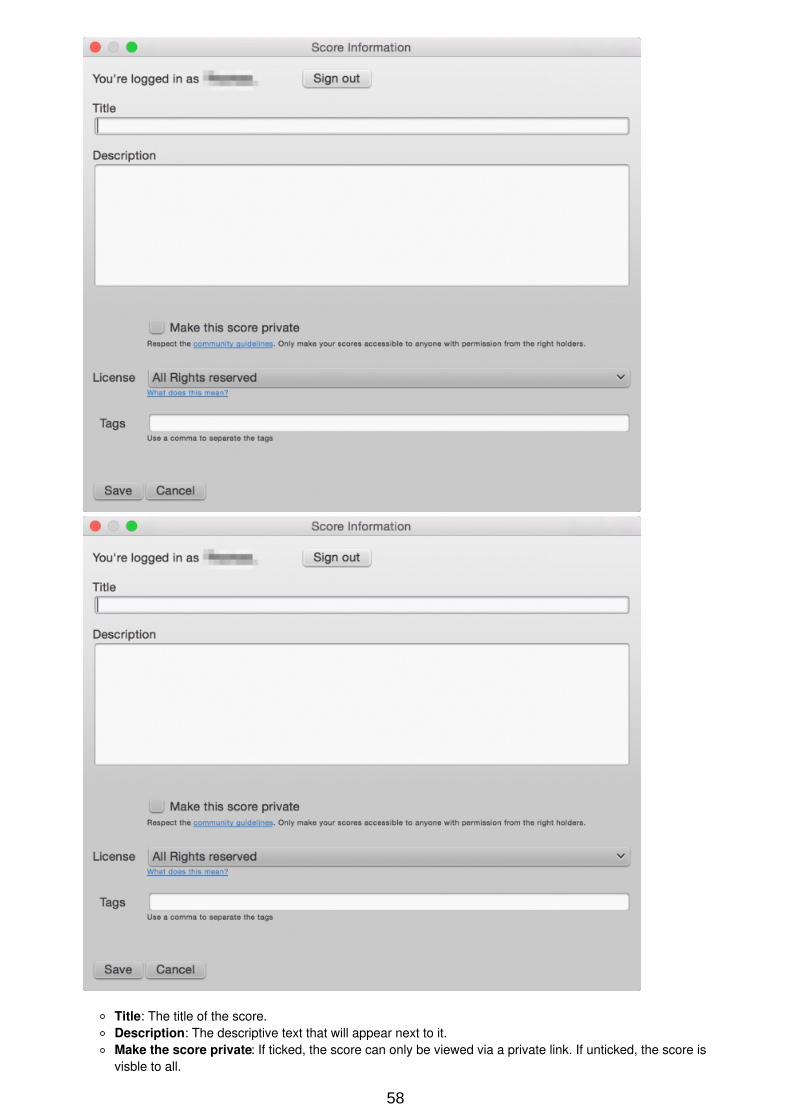
Title: The title of the score.Description: The descriptive text that will appear next to it.Make the score private: If ticked, the score can only be viewed via a private link. If unticked, the score isvisble to all.
58
License: Chose an appropriate copyright license from the drop-down list. Note: Creative Commons license ,allows people to use your scores under certain restrictions.Tags: You can add tags to help identify scores on MuseScore.com. Use commas to separate multiple tags.
5. In case you already saved the score online earlier, it will automatically update the existing one, and, as of version2.1, you can enter some additional information in a changlog section of the dialog, which you can then retrieve onMuseScore.com under "Revision history" for that score. Uncheck Update the existing score to save online as anew score.
6. (As of version 2.1) If you are using a different SoundFont than the default one and if you are able to export MP3 files,a checkbox Upload score audio will be visible:
If the checkbox is checked, MuseScore will render the audio of the score using the current synthesizer settings andupload the audio to MuseScore.com.
Upload a score on MuseScore.com
You can also upload a score directly on MuseScore.com.
1. Click the Upload link on MuseScore.com.2. You have the same options as with the Save Online menu.3. You have also access to more information, such as Genre.
Note: Should you reach the five score upload limit, you can still upload scores directly from MuseScore, but only the lastfive are visible. If you wish more than this amount, upgrade to a Pro Account first.
Edit a score on MuseScore.com
If you want to make changes to one of your scores on MuseScore.com, edit the MuseScore file on your own computer,save it, and then do the following:
If you originally shared the score directly from within MuseScore, simply go to File→Save Online... again to update theonline score.If you originally uploaded the score via the Upload page on MuseScore.com, then you must follow these steps toupdate the online score:
1. Go to the score page on MuseScore.com.2. Click the three dots menu ⋮ on the right and choose "Update this score".3. In the form, you can upload a replacement score file as well as change the accompanying information and
privacy settings.
Switch to the direct method of updating an online score
It is much more convenient to update online scores from directly within MuseScore than by updating the score manuallyfrom the score page. Follow these steps if you originally uploaded the score via the Upload page and now want toswitch to the direct method:
1. Go to the score page on MuseScore.com and copy the URL.2. Open the score file on your computer with MuseScore.3. From the menu, select File→Score Properties... and paste the URL into the "Source" field.
Now whenever you want to update the online score simply go to File→Save Online....
External links
How to delete a score saved on MuseScore.com
콘서트콘서트 피치피치
59
도구모음의 오른쪽에 있는 콘서트 피치 버튼은 각 오선보에 있는 이조 악기의 음표 표시를, 쓰여진 음표와 실제 소리의 음표 간표시를 바꾸어 줍니다. 이 기능은 이조 악기 들 에게 필요하며 이조 악기들은 표시된 음표의 피치(음정)가 실제 소리나는 음정과 다르므로 이 표시의 전환을 해줍니다. 이 기능을 사용하면 조표와 음자리표가 악기에 따라 바뀌어 표시되는 경우가 있습니다.
주의: 인쇄하기 전에 이조악기의 오선보가 포함되어 있다면 이 콘서트 피치 모드를 OFF로 설정하시기 바랍니다. 그렇지 않으면 올바른 조 의 연주가 불가능해 집니다.
함께함께 보기보기
조 바꿈: 이조 악기임시표: Respell pitches
외부외부 링크링크
Concert pitch or not?? (포럼 토론)
Notation
In the previous "Basics" chapter you learn how to enter notes and interact with the palettes. The "Notation" chapterdescribes the different types of notation in more detail, including more advanced music notation.
See also "Advanced topics".
Barlines
Barline symbols are available in the Barlines palette:
Change barline type
To change an existing barline, use one of the following:
Select a barline, then double click on a symbol in the Barlines palette.Drag a symbol from the Barlines palette onto a barline in the score.Drag a symbol from the Barlines palette onto a measure.Select a measure, then double-click on a symbol in the Barlines palette.Select a barline then adjust "Style" in the "Barline" section of the Inspector.
To change a non-single to a single barline:
Select the barline and press Del.
To hide a barline:
Select the line and press V, or uncheck Visible in the Inspector.
Insert barline
To insert a new barline between existing ones, either:
Drag a symbol from the Barlines palette onto a note or rest.Select a note or rest, then double-click a symbol in the Barlines palette.
Custom barlines
It is possible to create custom barlines by selecting one or more barlines, and adjusting the properties in the "Barlines"section of the Inspector:
60
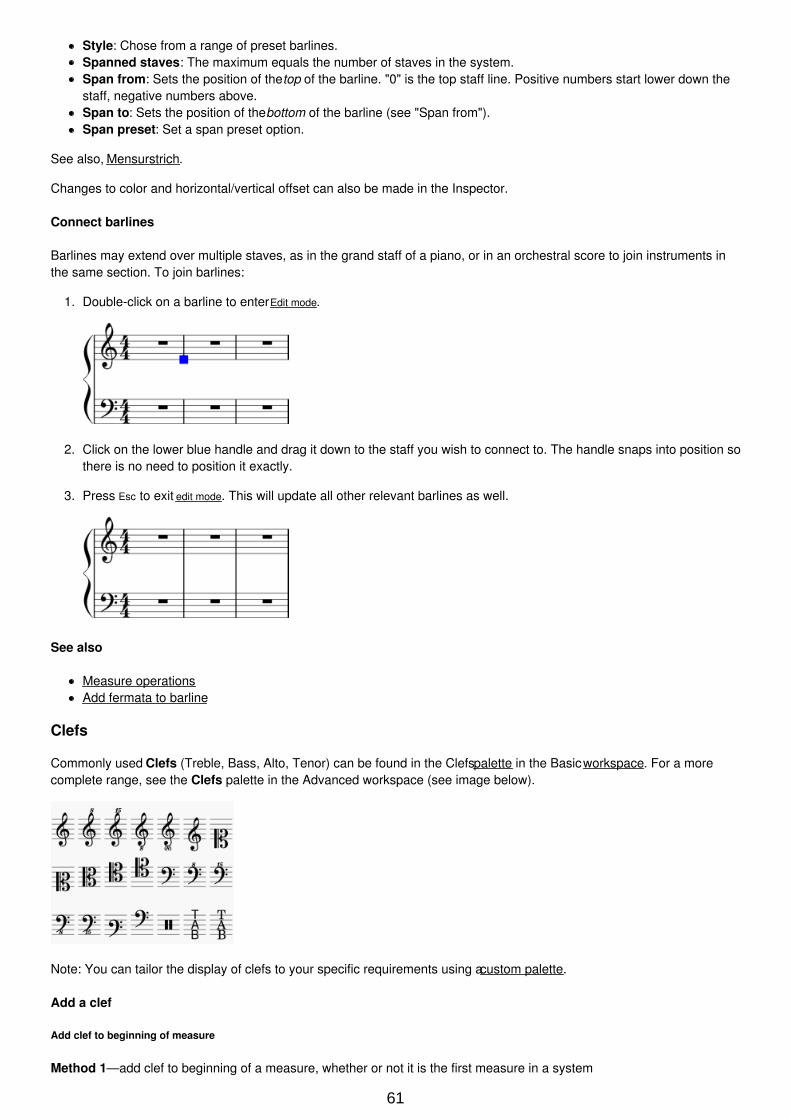
Style: Chose from a range of preset barlines.Spanned staves: The maximum equals the number of staves in the system.Span from: Sets the position of the top of the barline. "0" is the top staff line. Positive numbers start lower down thestaff, negative numbers above.Span to: Sets the position of the bottom of the barline (see "Span from").Span preset: Set a span preset option.
See also, Mensurstrich.
Changes to color and horizontal/vertical offset can also be made in the Inspector.
Connect barlines
Barlines may extend over multiple staves, as in the grand staff of a piano, or in an orchestral score to join instruments inthe same section. To join barlines:
1. Double-click on a barline to enter Edit mode.
2. Click on the lower blue handle and drag it down to the staff you wish to connect to. The handle snaps into position sothere is no need to position it exactly.
3. Press Esc to exit edit mode. This will update all other relevant barlines as well.
See also
Measure operationsAdd fermata to barline
Clefs
Commonly used Clefs (Treble, Bass, Alto, Tenor) can be found in the Clefs palette in the Basic workspace. For a morecomplete range, see the Clefs palette in the Advanced workspace (see image below).
Note: You can tailor the display of clefs to your specific requirements using a custom palette.
Add a clef
Add clef to beginning of measure
Method 1—add clef to beginning of a measure, whether or not it is the first measure in a system
61
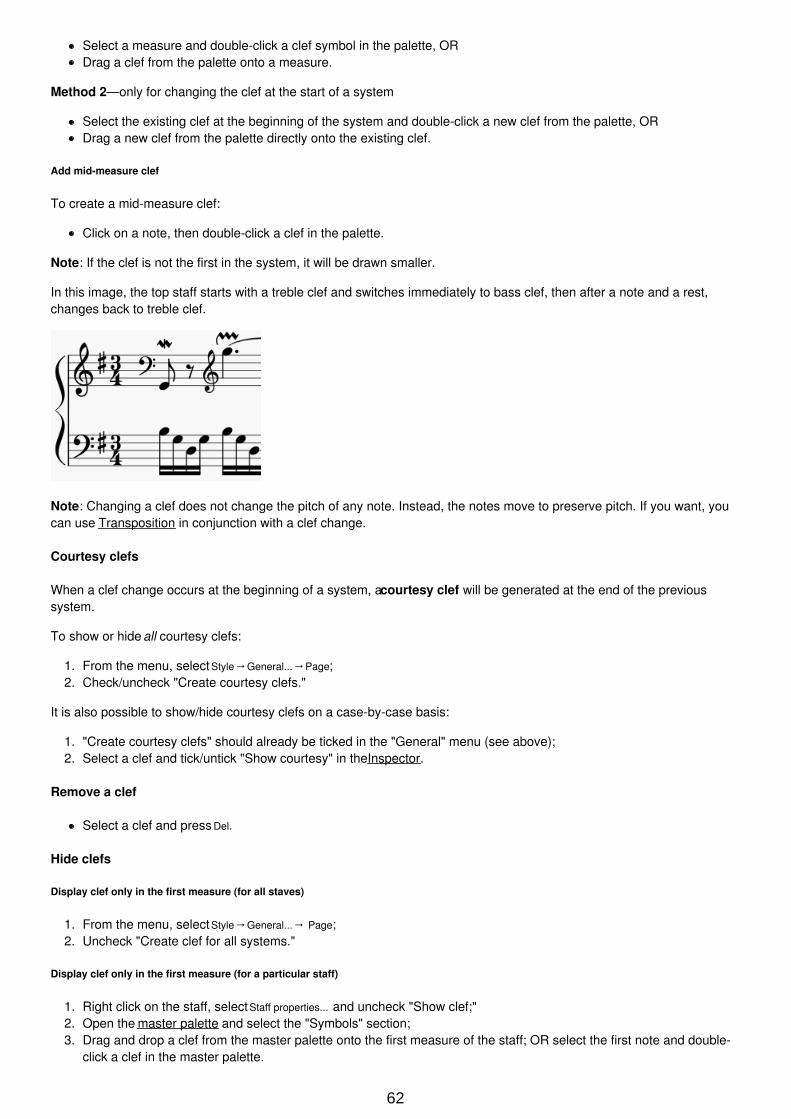
Select a measure and double-click a clef symbol in the palette, ORDrag a clef from the palette onto a measure.
Method 2—only for changing the clef at the start of a system
Select the existing clef at the beginning of the system and double-click a new clef from the palette, ORDrag a new clef from the palette directly onto the existing clef.
Add mid-measure clef
To create a mid-measure clef:
Click on a note, then double-click a clef in the palette.
Note: If the clef is not the first in the system, it will be drawn smaller.
In this image, the top staff starts with a treble clef and switches immediately to bass clef, then after a note and a rest,changes back to treble clef.
Note: Changing a clef does not change the pitch of any note. Instead, the notes move to preserve pitch. If you want, youcan use Transposition in conjunction with a clef change.
Courtesy clefs
When a clef change occurs at the beginning of a system, a courtesy clef will be generated at the end of the previoussystem.
To show or hide all courtesy clefs:
1. From the menu, select Style→General...→Page;2. Check/uncheck "Create courtesy clefs."
It is also possible to show/hide courtesy clefs on a case-by-case basis:
1. "Create courtesy clefs" should already be ticked in the "General" menu (see above);2. Select a clef and tick/untick "Show courtesy" in the Inspector.
Remove a clef
Select a clef and press Del.
Hide clefs
Display clef only in the first measure (for all staves)
1. From the menu, select Style→General...→ Page;2. Uncheck "Create clef for all systems."
Display clef only in the first measure (for a particular staff)
1. Right click on the staff, select Staff properties... and uncheck "Show clef;"2. Open the master palette and select the "Symbols" section;3. Drag and drop a clef from the master palette onto the first measure of the staff; OR select the first note and double-
click a clef in the master palette.
62
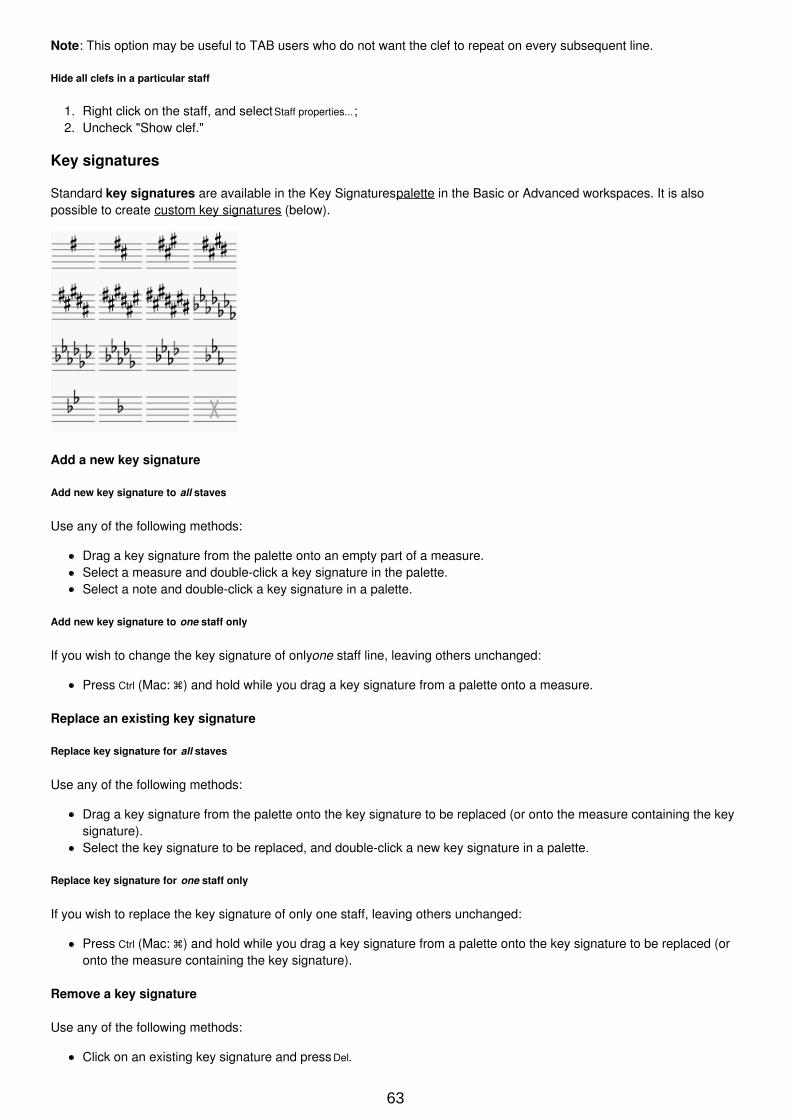
Note: This option may be useful to TAB users who do not want the clef to repeat on every subsequent line.
Hide all clefs in a particular staff
1. Right click on the staff, and select Staff properties...;2. Uncheck "Show clef."
Key signatures
Standard key signatures are available in the Key Signatures palette in the Basic or Advanced workspaces. It is alsopossible to create custom key signatures (below).
Add a new key signature
Add new key signature to all staves
Use any of the following methods:
Drag a key signature from the palette onto an empty part of a measure.Select a measure and double-click a key signature in the palette.Select a note and double-click a key signature in a palette.
Add new key signature to one staff only
If you wish to change the key signature of only one staff line, leaving others unchanged:
Press Ctrl (Mac: ) and hold while you drag a key signature from a palette onto a measure.
Replace an existing key signature
Replace key signature for all staves
Use any of the following methods:
Drag a key signature from the palette onto the key signature to be replaced (or onto the measure containing the keysignature).Select the key signature to be replaced, and double-click a new key signature in a palette.
Replace key signature for one staff only
If you wish to replace the key signature of only one staff, leaving others unchanged:
Press Ctrl (Mac: ) and hold while you drag a key signature from a palette onto the key signature to be replaced (oronto the measure containing the key signature).
Remove a key signature
Use any of the following methods:
Click on an existing key signature and press Del.
63
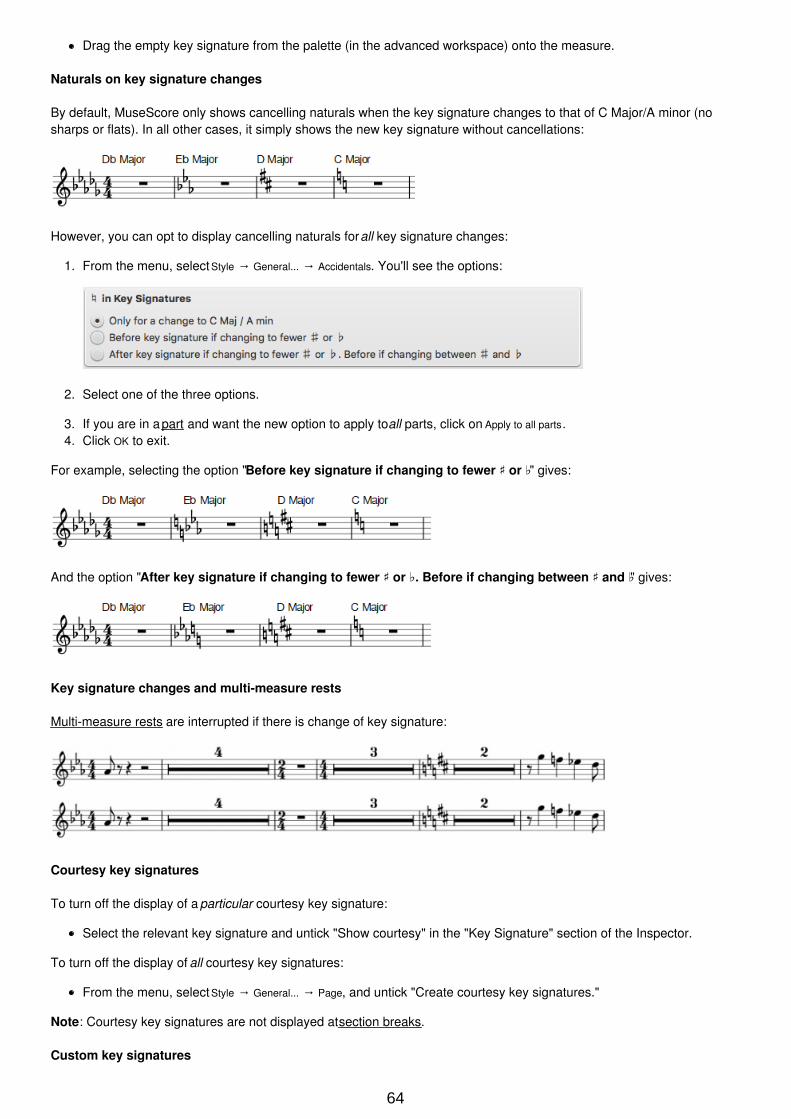
Drag the empty key signature from the palette (in the advanced workspace) onto the measure.
Naturals on key signature changes
By default, MuseScore only shows cancelling naturals when the key signature changes to that of C Major/A minor (nosharps or flats). In all other cases, it simply shows the new key signature without cancellations:
However, you can opt to display cancelling naturals for all key signature changes:
1. From the menu, select Style → General... → Accidentals. You'll see the options:
2. Select one of the three options.
3. If you are in a part and want the new option to apply to all parts, click on Apply to all parts.4. Click OK to exit.
For example, selecting the option "Before key signature if changing to fewer ♯ or " gives:
And the option "After key signature if changing to fewer ♯ or . Before if changing between ♯ and " gives:
Key signature changes and multi-measure rests
Multi-measure rests are interrupted if there is change of key signature:
Courtesy key signatures
To turn off the display of a particular courtesy key signature:
Select the relevant key signature and untick "Show courtesy" in the "Key Signature" section of the Inspector.
To turn off the display of all courtesy key signatures:
From the menu, select Style → General... → Page, and untick "Create courtesy key signatures."
Note: Courtesy key signatures are not displayed at section breaks.
Custom key signatures
64
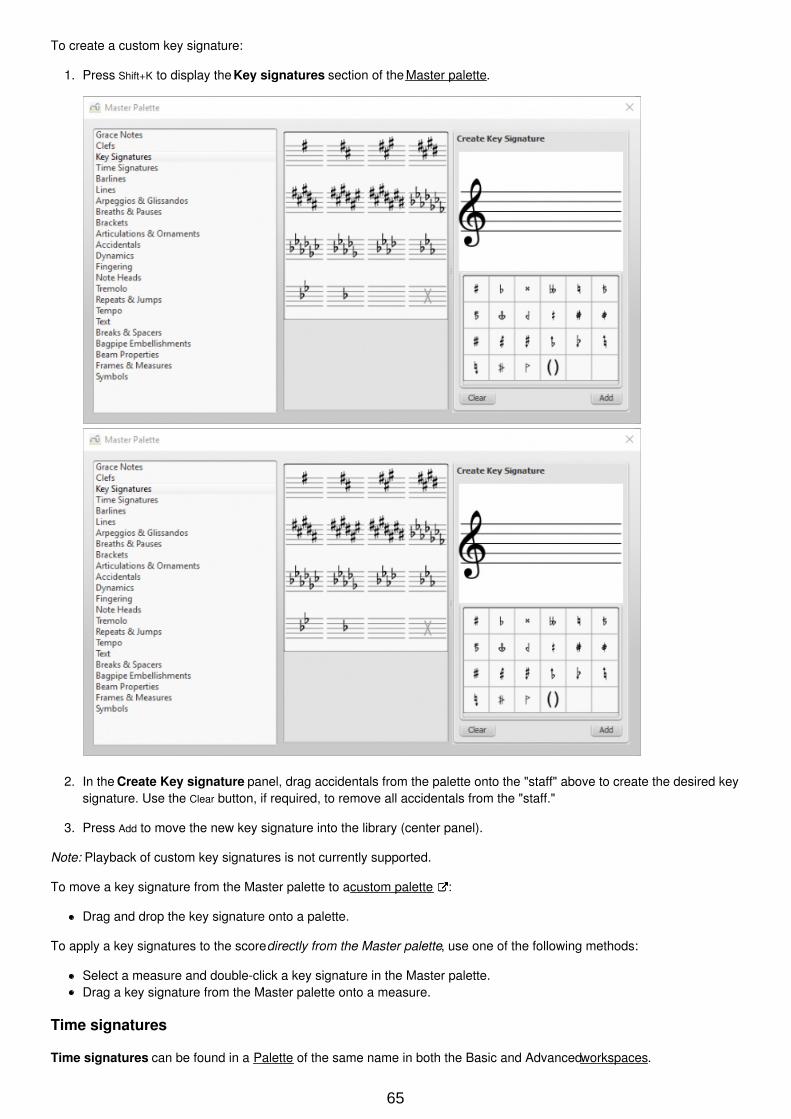
To create a custom key signature:
1. Press Shift+K to display the Key signatures section of the Master palette.
2. In the Create Key signature panel, drag accidentals from the palette onto the "staff" above to create the desired keysignature. Use the Clear button, if required, to remove all accidentals from the "staff."
3. Press Add to move the new key signature into the library (center panel).
Note: Playback of custom key signatures is not currently supported.
To move a key signature from the Master palette to a custom palette :
Drag and drop the key signature onto a palette.
To apply a key signatures to the score directly from the Master palette, use one of the following methods:
Select a measure and double-click a key signature in the Master palette.Drag a key signature from the Master palette onto a measure.
Time signatures
Time signatures can be found in a Palette of the same name in both the Basic and Advanced workspaces.
65
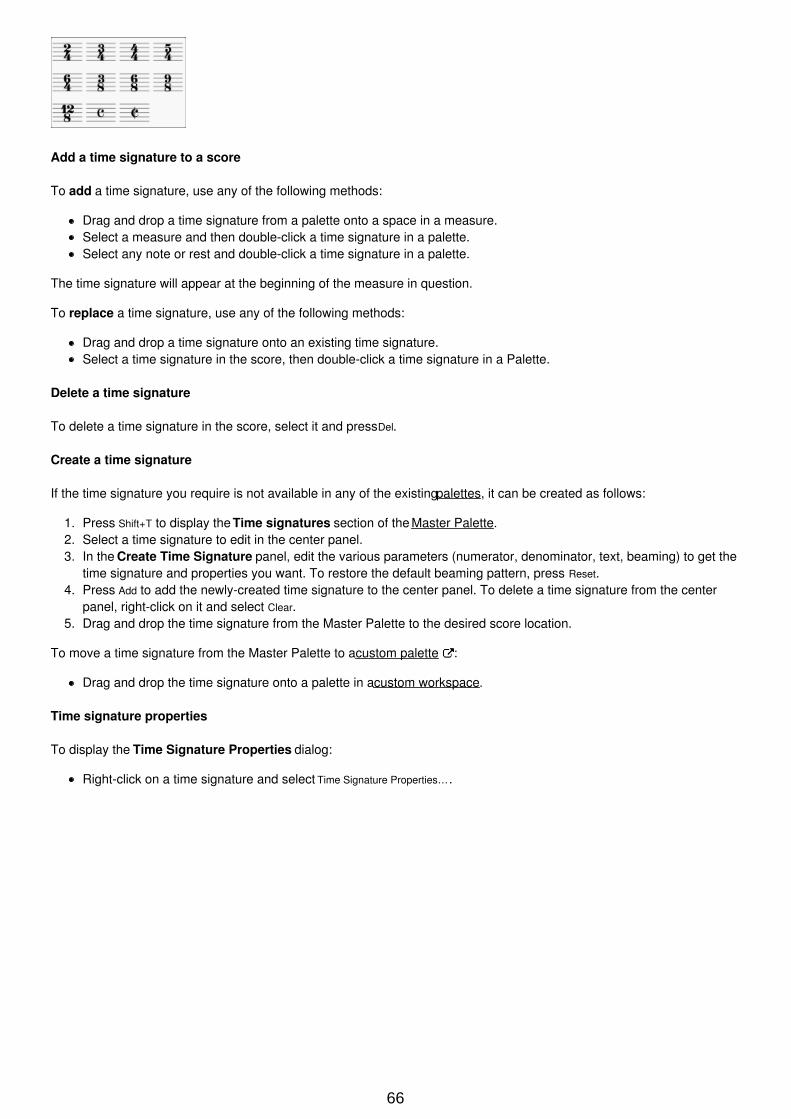
Add a time signature to a score
To add a time signature, use any of the following methods:
Drag and drop a time signature from a palette onto a space in a measure.Select a measure and then double-click a time signature in a palette.Select any note or rest and double-click a time signature in a palette.
The time signature will appear at the beginning of the measure in question.
To replace a time signature, use any of the following methods:
Drag and drop a time signature onto an existing time signature.Select a time signature in the score, then double-click a time signature in a Palette.
Delete a time signature
To delete a time signature in the score, select it and press Del.
Create a time signature
If the time signature you require is not available in any of the existing palettes, it can be created as follows:
1. Press Shift+T to display the Time signatures section of the Master Palette.2. Select a time signature to edit in the center panel.3. In the Create Time Signature panel, edit the various parameters (numerator, denominator, text, beaming) to get the
time signature and properties you want. To restore the default beaming pattern, press Reset.4. Press Add to add the newly-created time signature to the center panel. To delete a time signature from the center
panel, right-click on it and select Clear.5. Drag and drop the time signature from the Master Palette to the desired score location.
To move a time signature from the Master Palette to a custom palette :
Drag and drop the time signature onto a palette in a custom workspace.
Time signature properties
To display the Time Signature Properties dialog:
Right-click on a time signature and select Time Signature Properties….
66
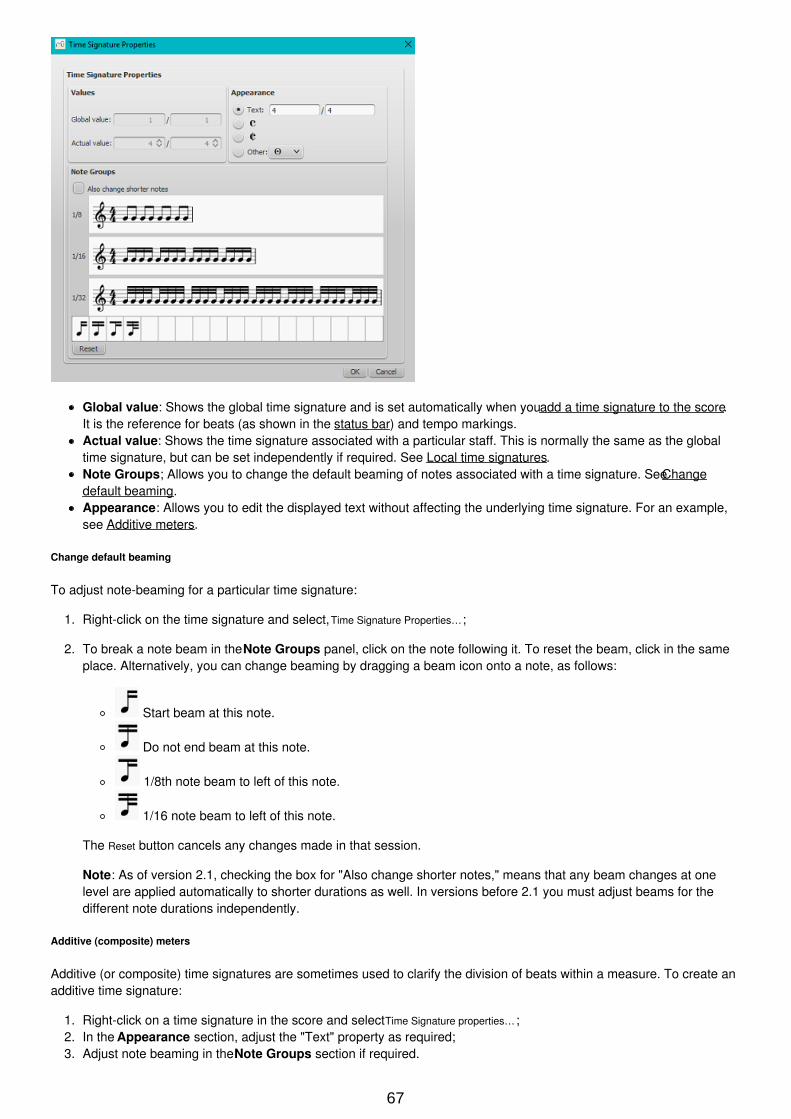
Global value: Shows the global time signature and is set automatically when you add a time signature to the score.It is the reference for beats (as shown in the status bar) and tempo markings.Actual value: Shows the time signature associated with a particular staff. This is normally the same as the globaltime signature, but can be set independently if required. See Local time signatures.Note Groups; Allows you to change the default beaming of notes associated with a time signature. See Changedefault beaming.Appearance: Allows you to edit the displayed text without affecting the underlying time signature. For an example,see Additive meters.
Change default beaming
To adjust note-beaming for a particular time signature:
1. Right-click on the time signature and select, Time Signature Properties…;
2. To break a note beam in the Note Groups panel, click on the note following it. To reset the beam, click in the sameplace. Alternatively, you can change beaming by dragging a beam icon onto a note, as follows:
Start beam at this note.
Do not end beam at this note.
1/8th note beam to left of this note.
1/16 note beam to left of this note.
The Reset button cancels any changes made in that session.
Note: As of version 2.1, checking the box for "Also change shorter notes," means that any beam changes at onelevel are applied automatically to shorter durations as well. In versions before 2.1 you must adjust beams for thedifferent note durations independently.
Additive (composite) meters
Additive (or composite) time signatures are sometimes used to clarify the division of beats within a measure. To create anadditive time signature:
1. Right-click on a time signature in the score and select Time Signature properties… ;2. In the Appearance section, adjust the "Text" property as required;3. Adjust note beaming in the Note Groups section if required.
67
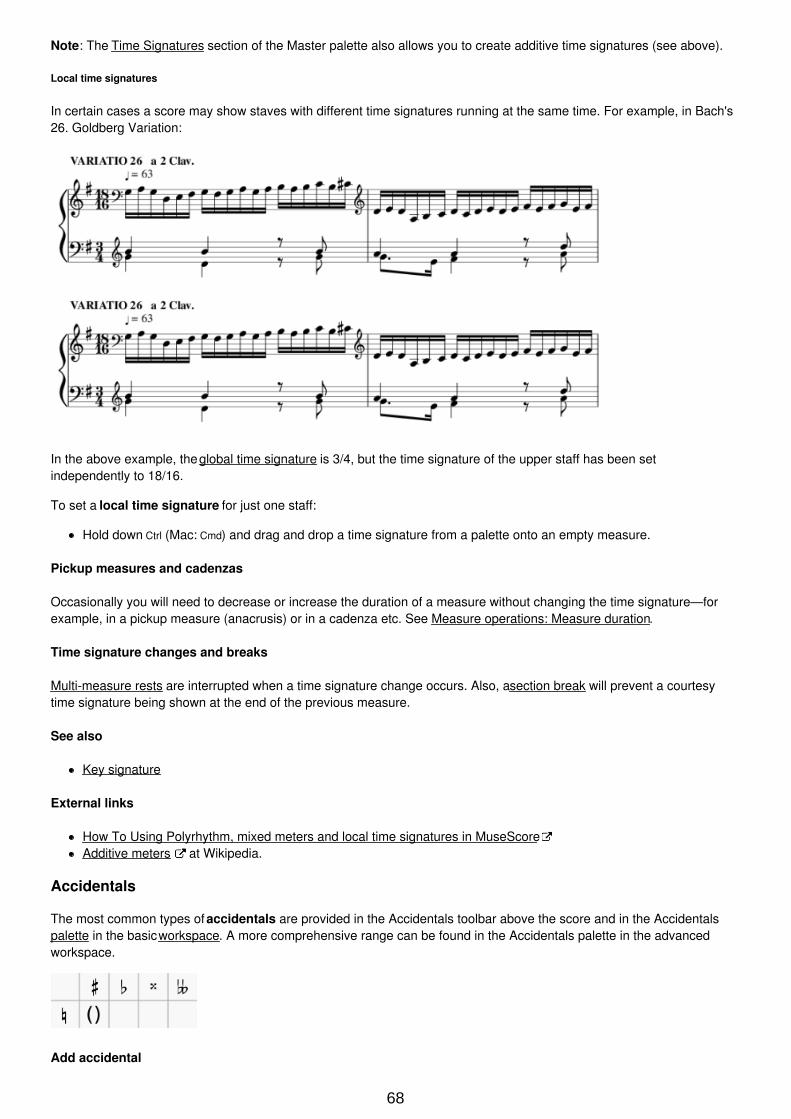
Note: The Time Signatures section of the Master palette also allows you to create additive time signatures (see above).
Local time signatures
In certain cases a score may show staves with different time signatures running at the same time. For example, in Bach's26. Goldberg Variation:
In the above example, the global time signature is 3/4, but the time signature of the upper staff has been setindependently to 18/16.
To set a local time signature for just one staff:
Hold down Ctrl (Mac: Cmd) and drag and drop a time signature from a palette onto an empty measure.
Pickup measures and cadenzas
Occasionally you will need to decrease or increase the duration of a measure without changing the time signature—forexample, in a pickup measure (anacrusis) or in a cadenza etc. See Measure operations: Measure duration.
Time signature changes and breaks
Multi-measure rests are interrupted when a time signature change occurs. Also, a section break will prevent a courtesytime signature being shown at the end of the previous measure.
See also
Key signature
External links
How To Using Polyrhythm, mixed meters and local time signatures in MuseScoreAdditive meters at Wikipedia.
Accidentals
The most common types of accidentals are provided in the Accidentals toolbar above the score and in the Accidentalspalette in the basic workspace. A more comprehensive range can be found in the Accidentals palette in the advancedworkspace.
Add accidental
68
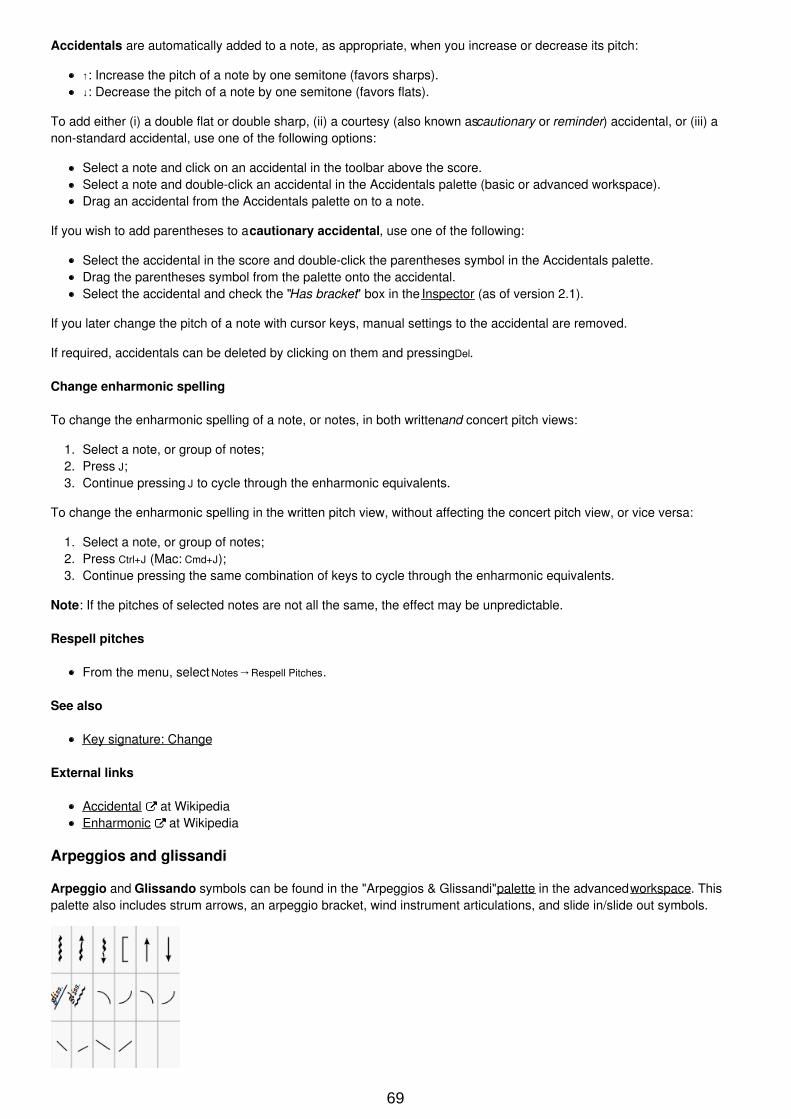
Accidentals are automatically added to a note, as appropriate, when you increase or decrease its pitch:
↑: Increase the pitch of a note by one semitone (favors sharps).↓: Decrease the pitch of a note by one semitone (favors flats).
To add either (i) a double flat or double sharp, (ii) a courtesy (also known as cautionary or reminder) accidental, or (iii) anon-standard accidental, use one of the following options:
Select a note and click on an accidental in the toolbar above the score.Select a note and double-click an accidental in the Accidentals palette (basic or advanced workspace).Drag an accidental from the Accidentals palette on to a note.
If you wish to add parentheses to a cautionary accidental, use one of the following:
Select the accidental in the score and double-click the parentheses symbol in the Accidentals palette.Drag the parentheses symbol from the palette onto the accidental.Select the accidental and check the "Has bracket" box in the Inspector (as of version 2.1).
If you later change the pitch of a note with cursor keys, manual settings to the accidental are removed.
If required, accidentals can be deleted by clicking on them and pressing Del.
Change enharmonic spelling
To change the enharmonic spelling of a note, or notes, in both written and concert pitch views:
1. Select a note, or group of notes;2. Press J;3. Continue pressing J to cycle through the enharmonic equivalents.
To change the enharmonic spelling in the written pitch view, without affecting the concert pitch view, or vice versa:
1. Select a note, or group of notes;2. Press Ctrl+J (Mac: Cmd+J);3. Continue pressing the same combination of keys to cycle through the enharmonic equivalents.
Note: If the pitches of selected notes are not all the same, the effect may be unpredictable.
Respell pitches
From the menu, select Notes→Respell Pitches.
See also
Key signature: Change
External links
Accidental at WikipediaEnharmonic at Wikipedia
Arpeggios and glissandi
Arpeggio and Glissando symbols can be found in the "Arpeggios & Glissandi" palette in the advanced workspace. Thispalette also includes strum arrows, an arpeggio bracket, wind instrument articulations, and slide in/slide out symbols.
69
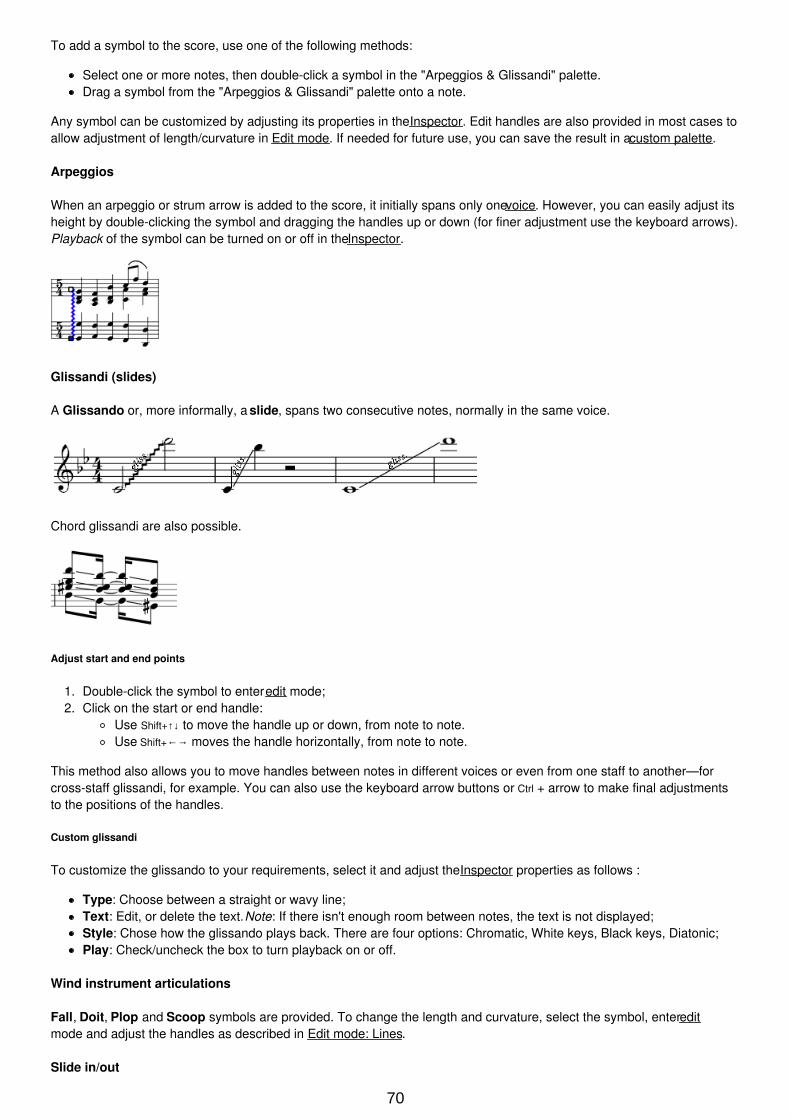
To add a symbol to the score, use one of the following methods:
Select one or more notes, then double-click a symbol in the "Arpeggios & Glissandi" palette.Drag a symbol from the "Arpeggios & Glissandi" palette onto a note.
Any symbol can be customized by adjusting its properties in the Inspector. Edit handles are also provided in most cases toallow adjustment of length/curvature in Edit mode. If needed for future use, you can save the result in a custom palette.
Arpeggios
When an arpeggio or strum arrow is added to the score, it initially spans only one voice. However, you can easily adjust itsheight by double-clicking the symbol and dragging the handles up or down (for finer adjustment use the keyboard arrows).Playback of the symbol can be turned on or off in the Inspector.
Glissandi (slides)
A Glissando or, more informally, a slide, spans two consecutive notes, normally in the same voice.
Chord glissandi are also possible.
Adjust start and end points
1. Double-click the symbol to enter edit mode;2. Click on the start or end handle:
Use Shift+↑↓ to move the handle up or down, from note to note.Use Shift+←→ moves the handle horizontally, from note to note.
This method also allows you to move handles between notes in different voices or even from one staff to another—forcross-staff glissandi, for example. You can also use the keyboard arrow buttons or Ctrl + arrow to make final adjustmentsto the positions of the handles.
Custom glissandi
To customize the glissando to your requirements, select it and adjust the Inspector properties as follows :
Type: Choose between a straight or wavy line;Text: Edit, or delete the text. Note: If there isn't enough room between notes, the text is not displayed;Style: Chose how the glissando plays back. There are four options: Chromatic, White keys, Black keys, Diatonic;Play: Check/uncheck the box to turn playback on or off.
Wind instrument articulations
Fall, Doit, Plop and Scoop symbols are provided. To change the length and curvature, select the symbol, enter editmode and adjust the handles as described in Edit mode: Lines.
Slide in/out
70
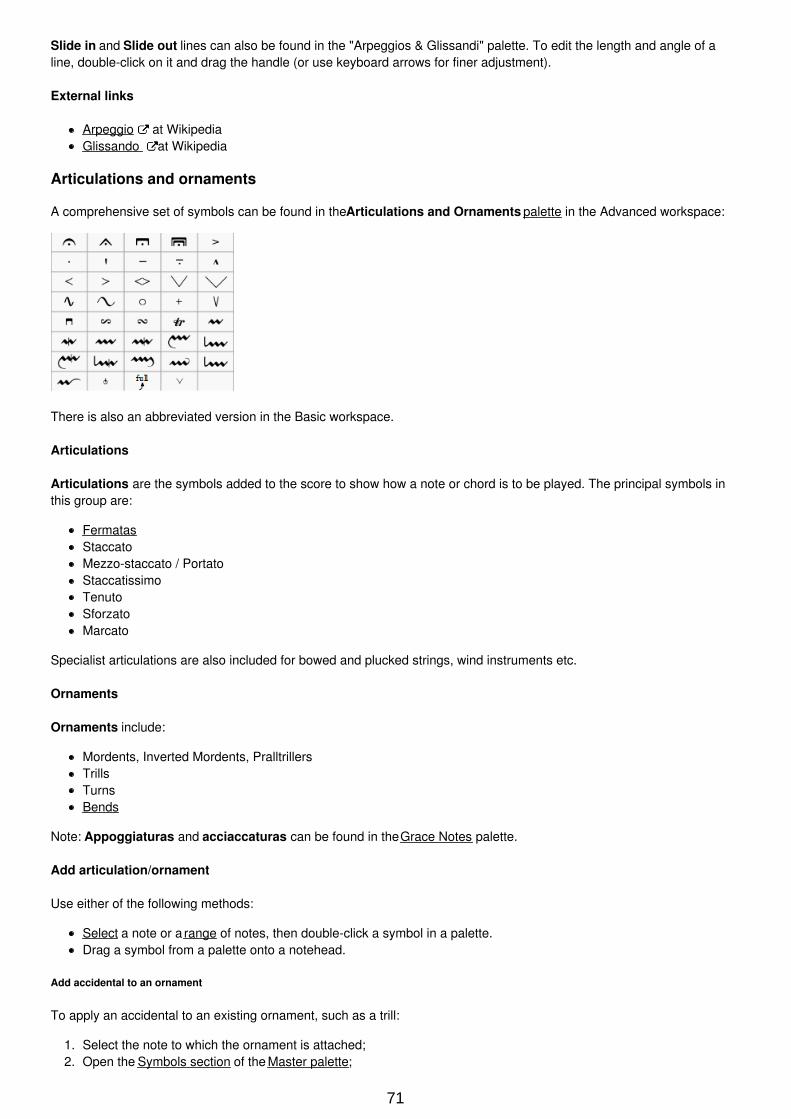
Slide in and Slide out lines can also be found in the "Arpeggios & Glissandi" palette. To edit the length and angle of aline, double-click on it and drag the handle (or use keyboard arrows for finer adjustment).
External links
Arpeggio at WikipediaGlissando at Wikipedia
Articulations and ornaments
A comprehensive set of symbols can be found in the Articulations and Ornaments palette in the Advanced workspace:
There is also an abbreviated version in the Basic workspace.
Articulations
Articulations are the symbols added to the score to show how a note or chord is to be played. The principal symbols inthis group are:
FermatasStaccatoMezzo-staccato / PortatoStaccatissimoTenutoSforzatoMarcato
Specialist articulations are also included for bowed and plucked strings, wind instruments etc.
Ornaments
Ornaments include:
Mordents, Inverted Mordents, PralltrillersTrillsTurnsBends
Note: Appoggiaturas and acciaccaturas can be found in the Grace Notes palette.
Add articulation/ornament
Use either of the following methods:
Select a note or a range of notes, then double-click a symbol in a palette.Drag a symbol from a palette onto a notehead.
Add accidental to an ornament
To apply an accidental to an existing ornament, such as a trill:
1. Select the note to which the ornament is attached;2. Open the Symbols section of the Master palette;
71
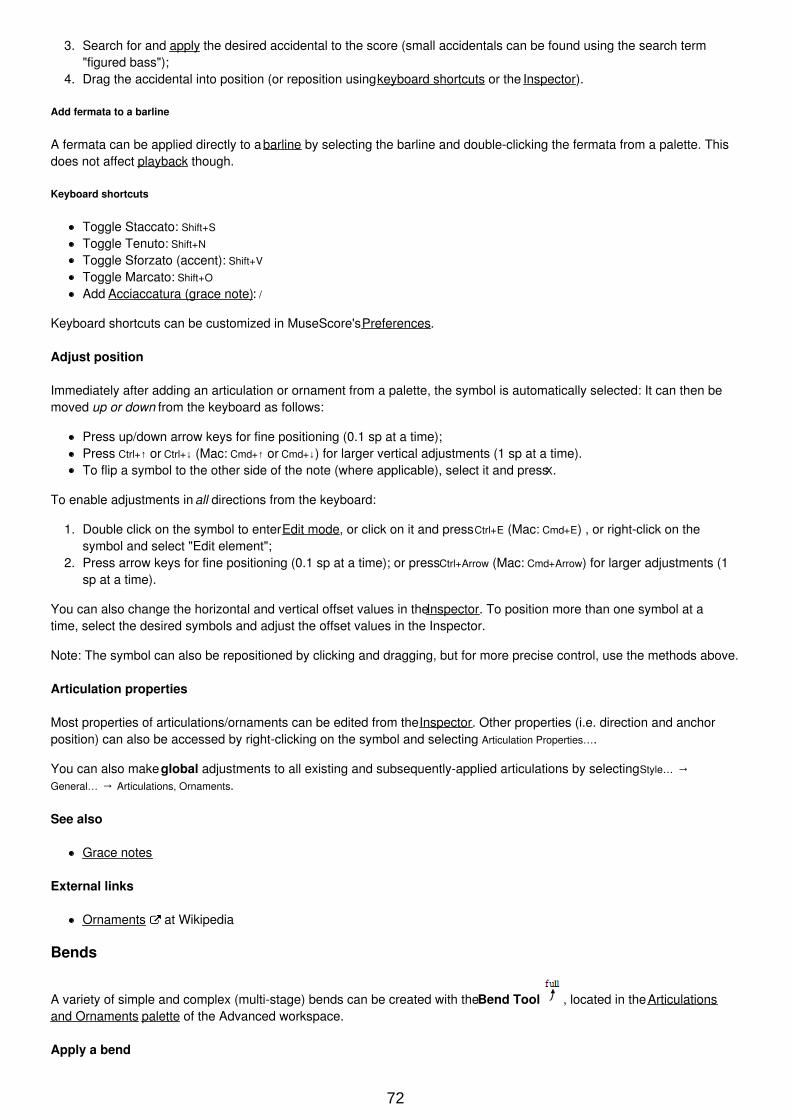
3. Search for and apply the desired accidental to the score (small accidentals can be found using the search term"figured bass");
4. Drag the accidental into position (or reposition using keyboard shortcuts or the Inspector).
Add fermata to a barline
A fermata can be applied directly to a barline by selecting the barline and double-clicking the fermata from a palette. Thisdoes not affect playback though.
Keyboard shortcuts
Toggle Staccato: Shift+S
Toggle Tenuto: Shift+N
Toggle Sforzato (accent): Shift+V
Toggle Marcato: Shift+O
Add Acciaccatura (grace note): /
Keyboard shortcuts can be customized in MuseScore's Preferences.
Adjust position
Immediately after adding an articulation or ornament from a palette, the symbol is automatically selected: It can then bemoved up or down from the keyboard as follows:
Press up/down arrow keys for fine positioning (0.1 sp at a time);Press Ctrl+↑ or Ctrl+↓ (Mac: Cmd+↑ or Cmd+↓) for larger vertical adjustments (1 sp at a time).To flip a symbol to the other side of the note (where applicable), select it and press X.
To enable adjustments in all directions from the keyboard:
1. Double click on the symbol to enter Edit mode, or click on it and press Ctrl+E (Mac: Cmd+E) , or right-click on thesymbol and select "Edit element";
2. Press arrow keys for fine positioning (0.1 sp at a time); or press Ctrl+Arrow (Mac: Cmd+Arrow) for larger adjustments (1sp at a time).
You can also change the horizontal and vertical offset values in the Inspector. To position more than one symbol at atime, select the desired symbols and adjust the offset values in the Inspector.
Note: The symbol can also be repositioned by clicking and dragging, but for more precise control, use the methods above.
Articulation properties
Most properties of articulations/ornaments can be edited from the Inspector. Other properties (i.e. direction and anchorposition) can also be accessed by right-clicking on the symbol and selecting Articulation Properties….
You can also make global adjustments to all existing and subsequently-applied articulations by selecting Style… →General… → Articulations, Ornaments.
See also
Grace notes
External links
Ornaments at Wikipedia
Bends
A variety of simple and complex (multi-stage) bends can be created with the Bend Tool , located in the Articulationsand Ornaments palette of the Advanced workspace.
Apply a bend
72
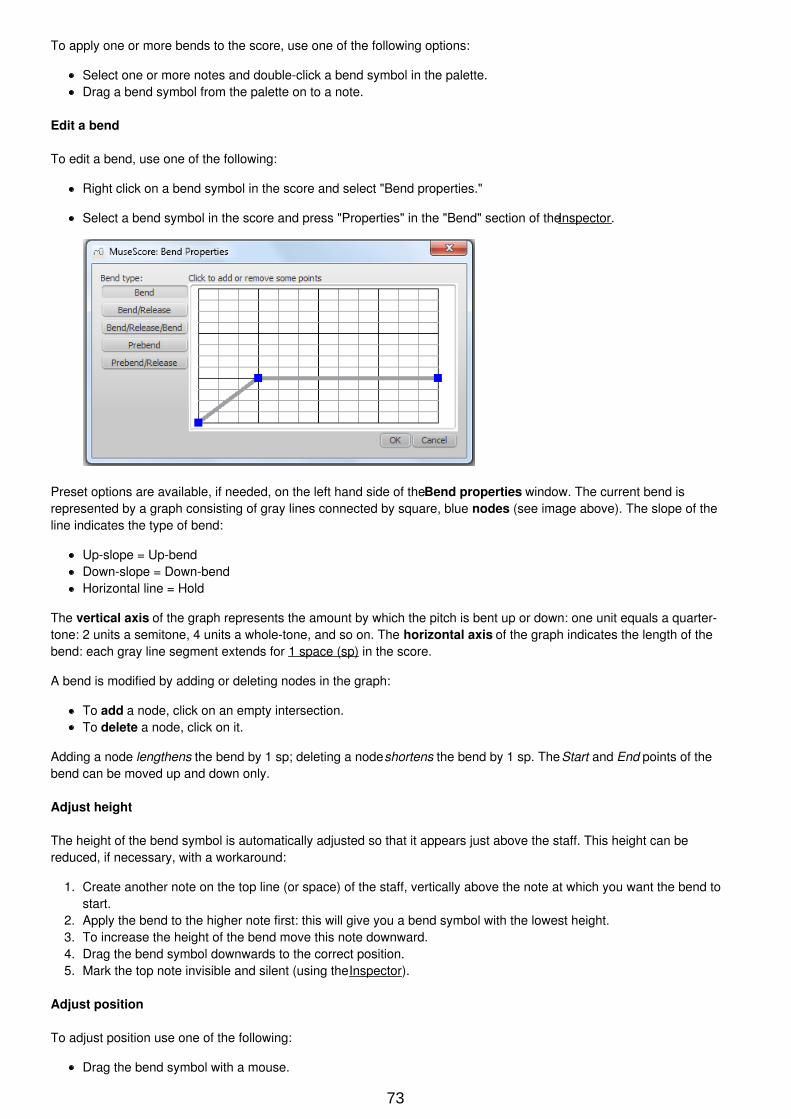
To apply one or more bends to the score, use one of the following options:
Select one or more notes and double-click a bend symbol in the palette.Drag a bend symbol from the palette on to a note.
Edit a bend
To edit a bend, use one of the following:
Right click on a bend symbol in the score and select "Bend properties."
Select a bend symbol in the score and press "Properties" in the "Bend" section of the Inspector.
Preset options are available, if needed, on the left hand side of the Bend properties window. The current bend isrepresented by a graph consisting of gray lines connected by square, blue nodes (see image above). The slope of theline indicates the type of bend:
Up-slope = Up-bendDown-slope = Down-bendHorizontal line = Hold
The vertical axis of the graph represents the amount by which the pitch is bent up or down: one unit equals a quarter-tone: 2 units a semitone, 4 units a whole-tone, and so on. The horizontal axis of the graph indicates the length of thebend: each gray line segment extends for 1 space (sp) in the score.
A bend is modified by adding or deleting nodes in the graph:
To add a node, click on an empty intersection.To delete a node, click on it.
Adding a node lengthens the bend by 1 sp; deleting a node shortens the bend by 1 sp. The Start and End points of thebend can be moved up and down only.
Adjust height
The height of the bend symbol is automatically adjusted so that it appears just above the staff. This height can bereduced, if necessary, with a workaround:
1. Create another note on the top line (or space) of the staff, vertically above the note at which you want the bend tostart.
2. Apply the bend to the higher note first: this will give you a bend symbol with the lowest height.3. To increase the height of the bend move this note downward.4. Drag the bend symbol downwards to the correct position.5. Mark the top note invisible and silent (using the Inspector).
Adjust position
To adjust position use one of the following:
Drag the bend symbol with a mouse.
73
Click on the symbol and adjust the horizontal and vertical offsets in the Inspector.Double click on the symbol; or click on it and press Ctrl+E (Mac: Cmd+E); or right-click on the symbol and select "Editelement." Then use the arrow keys for fine positioning (0.1 sp at a time); or Ctrl+Arrow (Mac: Cmd+Arrow) for largeradjustments (1 sp at a time).
Custom bends
After a bend has been created in the score it can be saved for future use by dragging and dropping the symbol to a palettewhile holding down Ctrl+Shift (Mac: Cmd+Shift). See Custom Workspace
Beams
Note beams are set automatically, based on the time signature. To adjust the default beaming, right-click on a timesignature and select "Time Signature Properties." See Change default beaming for details.
However, if you want to adjust note beaming manually, on a case-by-case basis, use the beam symbols found in theBeam Properties palette in the "Basic" or "Advanced" workspaces:
Beam symbols
The following is a list of beam symbols and their effects:
Start a beam at this note (or rest).
Do not end a beam at this note (or rest).
Do not beam this note.
Start a second level beam at this note.
Start a third level beam at this note.
(back to) Automatic mode: the mode MuseScore chooses on note input, dependent on current time signatureand its beam settings.
Start feathered beam (slower) at this note.
Start feathered beam (faster) at this note.
Change note beaming
To change one or more note beams (except feathered beams, below), use either of the following methods:
Drag and drop a beam symbol from a workspace onto a note in the score.
Select one or more notes in the score and double click the desired workspace beam symbol.
To apply feathered note beams, use either of the following methods:
Drag and drop a feathered-beam symbol from a workspace onto a note beam in the score.
Select one or more note beams in the score, then double click on a feathered-beam symbol in the workspace.
Notes: (1) Feathered beams may use 2 or 3 lines depending on the tempo and the desired rate of the change; (2) Tocreate a 2-line feathered beam, you need to start with a continuous run of beamed sixteenth notes; (3) To create a 3-linefeathered beam, you need to start with continuous run of beamed thirty-second notes; (4) Playback of feathered beams isnot supported.
74
Adjust beam with the keyboard/mouse
Adjust beam angle
1. Double-click on a note beam or select it and press Ctrl+E to put it into edit mode—the right end handle is automaticallyselected.
2. Use the up/down arrows or drag the right end handle to change the angle of the beam.3. Press Esc to exit edit mode.
Adjust beam height
1. Double-click on a note beam or select it and press Ctrl+E to put it into edit mode—the right end handle is automaticallyselected.
2. Press Shift+Tab or click the left handle to select it3. Use the up/down arrows or drag the left end handle to change the height of the beam.4. Press Esc to exit edit mode.
Adjust beam with the inspector
Alternatively, you can use the Inspector for all of these operations:
Adjust beam angle
1. Click on a note beam.2. Tick the "User position" box in the "Beam" section of the Inspector.3. Set the "Position" values to get the desired beam angle.
Adjust beam height
1. Click on a note beam.2. Tick the "User position" box in the "Beam" section of the Inspector.3. Set the "Position" values as desired.
Make the beam horizontal
1. Select a note beam2. Tick the "Horizontal" box in the "Beam" section of the inspector.3. If desired, adjust the beam height with the keyboard/mouse: see above.
If you want all note beams in the score to be horizontal there is a "Flatten all beams" option in Style→General→Beams.
Adjust feathered beams
To adjust feathered beams:
1. Select a note beam.2. Adjust the values in the "Grow left" and "Grow right" boxes in the "Beam" section of the Inspector.
Local relayout
MuseScore (following accepted music engraving practice) spaces notes according to their time values, allowing foraccidentals, lyrics etc. In systems where there is more than one staff, this may result in irregular note spacing, as in thefollowing example:
Local relayout is a tickbox option in the Inspector allowing you to specify those passages in the score where you want
75
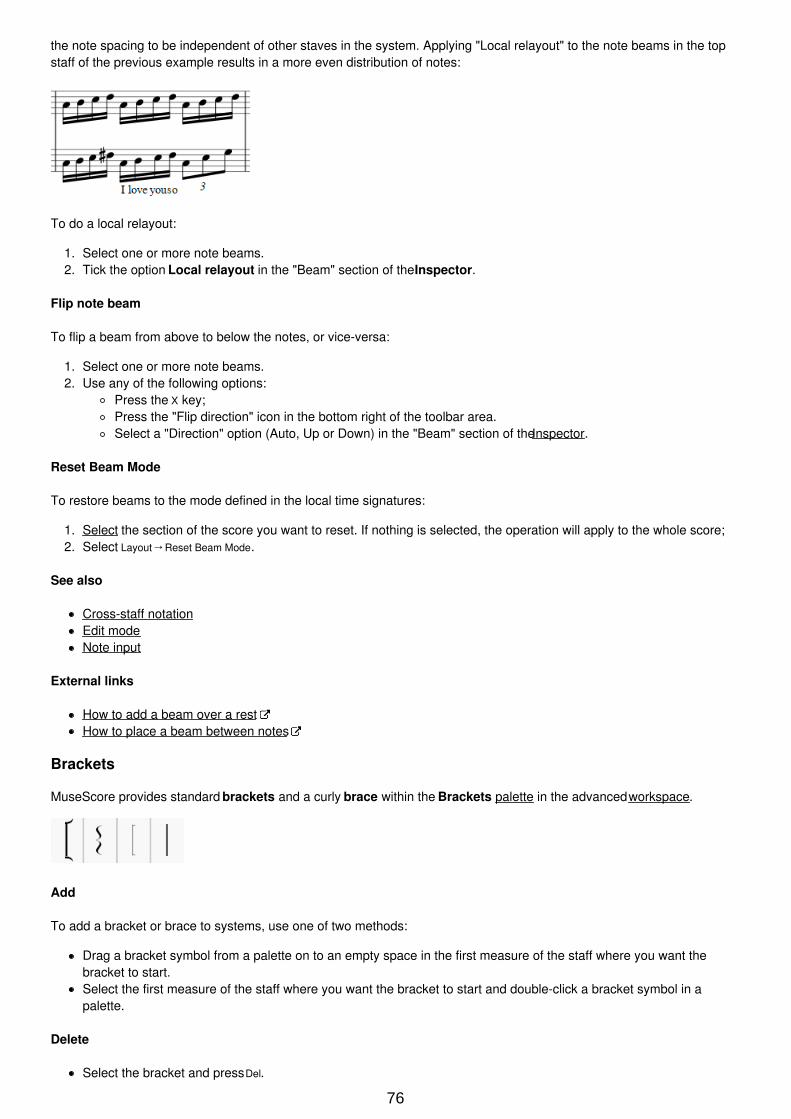
the note spacing to be independent of other staves in the system. Applying "Local relayout" to the note beams in the topstaff of the previous example results in a more even distribution of notes:
To do a local relayout:
1. Select one or more note beams.2. Tick the option Local relayout in the "Beam" section of the Inspector.
Flip note beam
To flip a beam from above to below the notes, or vice-versa:
1. Select one or more note beams.2. Use any of the following options:
Press the X key;Press the "Flip direction" icon in the bottom right of the toolbar area.Select a "Direction" option (Auto, Up or Down) in the "Beam" section of the Inspector.
Reset Beam Mode
To restore beams to the mode defined in the local time signatures:
1. Select the section of the score you want to reset. If nothing is selected, the operation will apply to the whole score;2. Select Layout→Reset Beam Mode.
See also
Cross-staff notationEdit modeNote input
External links
How to add a beam over a restHow to place a beam between notes
Brackets
MuseScore provides standard brackets and a curly brace within the Brackets palette in the advanced workspace.
Add
To add a bracket or brace to systems, use one of two methods:
Drag a bracket symbol from a palette on to an empty space in the first measure of the staff where you want thebracket to start.Select the first measure of the staff where you want the bracket to start and double-click a bracket symbol in apalette.
Delete
Select the bracket and press Del.
76
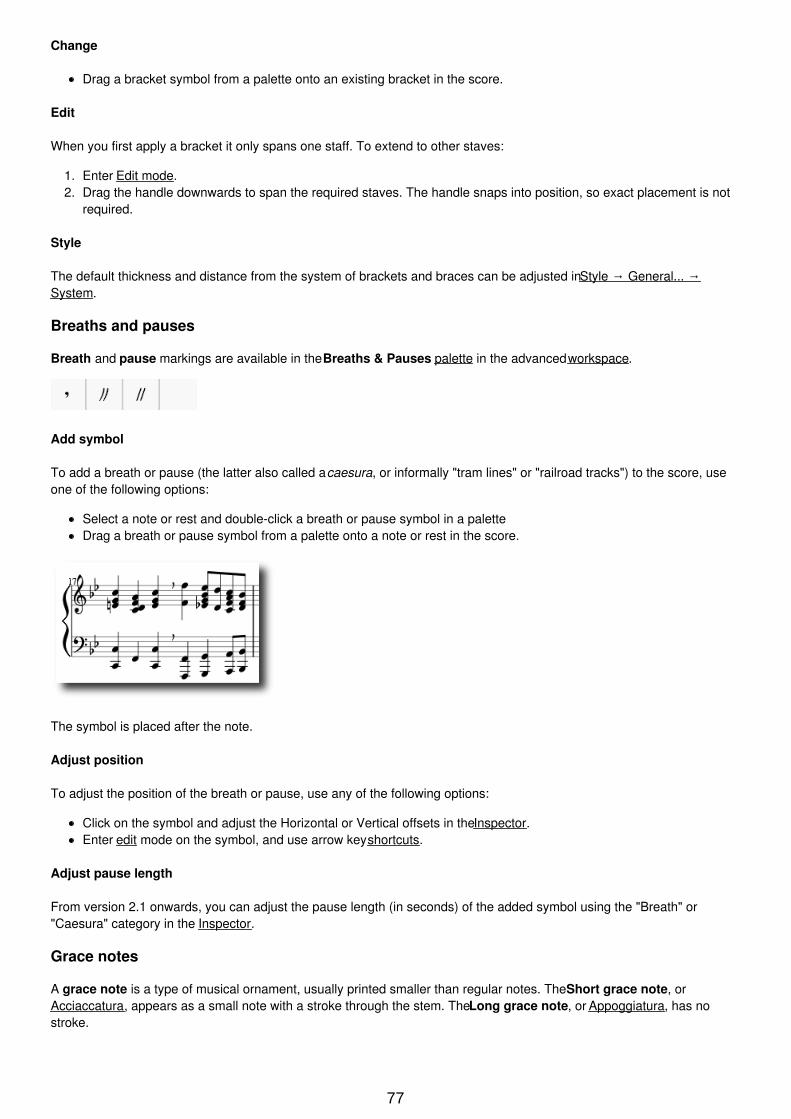
Change
Drag a bracket symbol from a palette onto an existing bracket in the score.
Edit
When you first apply a bracket it only spans one staff. To extend to other staves:
1. Enter Edit mode.2. Drag the handle downwards to span the required staves. The handle snaps into position, so exact placement is not
required.
Style
The default thickness and distance from the system of brackets and braces can be adjusted in Style → General... →System.
Breaths and pauses
Breath and pause markings are available in the Breaths & Pauses palette in the advanced workspace.
Add symbol
To add a breath or pause (the latter also called a caesura, or informally "tram lines" or "railroad tracks") to the score, useone of the following options:
Select a note or rest and double-click a breath or pause symbol in a paletteDrag a breath or pause symbol from a palette onto a note or rest in the score.
The symbol is placed after the note.
Adjust position
To adjust the position of the breath or pause, use any of the following options:
Click on the symbol and adjust the Horizontal or Vertical offsets in the Inspector.Enter edit mode on the symbol, and use arrow key shortcuts.
Adjust pause length
From version 2.1 onwards, you can adjust the pause length (in seconds) of the added symbol using the "Breath" or"Caesura" category in the Inspector.
Grace notes
A grace note is a type of musical ornament, usually printed smaller than regular notes. The Short grace note, orAcciaccatura, appears as a small note with a stroke through the stem. The Long grace note, or Appoggiatura, has nostroke.
77
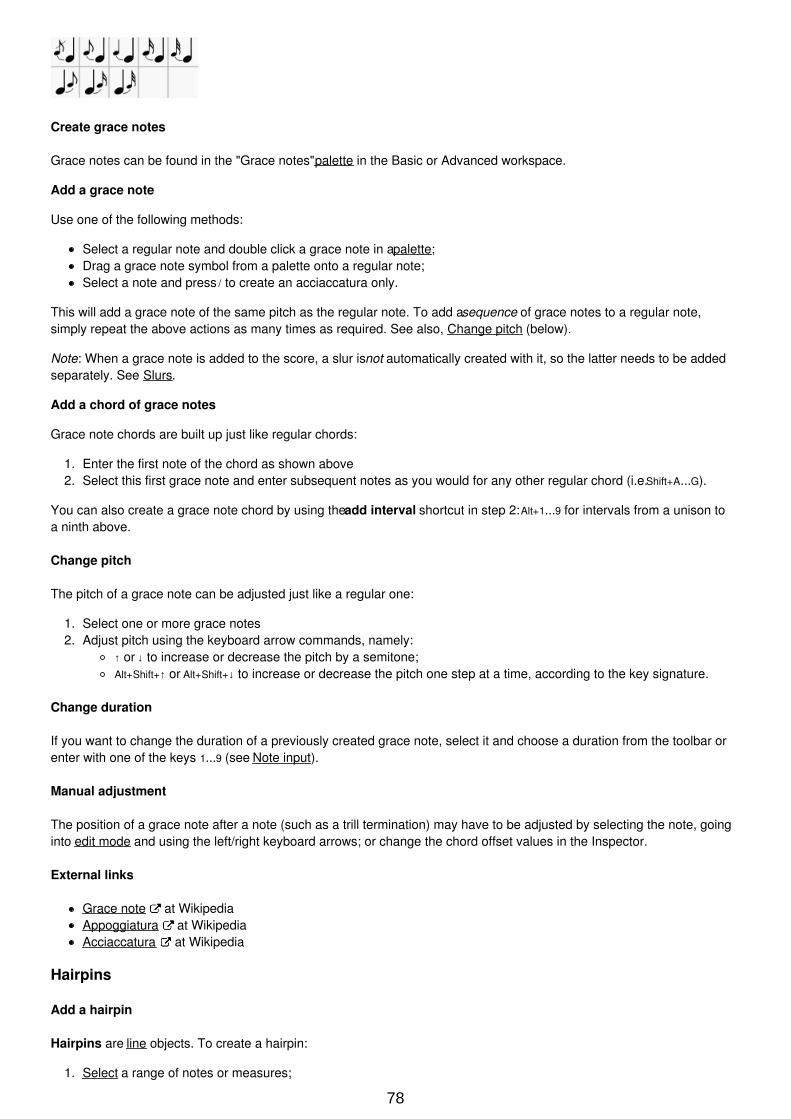
Create grace notes
Grace notes can be found in the "Grace notes" palette in the Basic or Advanced workspace.
Add a grace note
Use one of the following methods:
Select a regular note and double click a grace note in a palette;Drag a grace note symbol from a palette onto a regular note;Select a note and press / to create an acciaccatura only.
This will add a grace note of the same pitch as the regular note. To add a sequence of grace notes to a regular note,simply repeat the above actions as many times as required. See also, Change pitch (below).
Note: When a grace note is added to the score, a slur is not automatically created with it, so the latter needs to be addedseparately. See Slurs.
Add a chord of grace notes
Grace note chords are built up just like regular chords:
1. Enter the first note of the chord as shown above2. Select this first grace note and enter subsequent notes as you would for any other regular chord (i.e. Shift+A...G).
You can also create a grace note chord by using the add interval shortcut in step 2: Alt+1...9 for intervals from a unison toa ninth above.
Change pitch
The pitch of a grace note can be adjusted just like a regular one:
1. Select one or more grace notes2. Adjust pitch using the keyboard arrow commands, namely:
↑ or ↓ to increase or decrease the pitch by a semitone;Alt+Shift+↑ or Alt+Shift+↓ to increase or decrease the pitch one step at a time, according to the key signature.
Change duration
If you want to change the duration of a previously created grace note, select it and choose a duration from the toolbar orenter with one of the keys 1...9 (see Note input).
Manual adjustment
The position of a grace note after a note (such as a trill termination) may have to be adjusted by selecting the note, goinginto edit mode and using the left/right keyboard arrows; or change the chord offset values in the Inspector.
External links
Grace note at WikipediaAppoggiatura at WikipediaAcciaccatura at Wikipedia
Hairpins
Add a hairpin
Hairpins are line objects. To create a hairpin:
1. Select a range of notes or measures;
78

2. Use one of the following shortcuts:<: to create a crescendo hairpin.>: to create a diminuendo hairpin (decrescendo).
Alternatively, use one of the following options:
Select a range of notes or measures, and double-click a hairpin in a palette.Drag and drop a hairpin from a palette onto a staff line.
Adjust length
1. Double-click on the hairpin to enter edit mode. Then click on the end handle that you want to move:
2. Use one of the following shortcuts:
Shift+→ to move the end handle, and its anchor, right by one note or rest.Shift+← to move the end handle, and its anchor, left by one note or rest;
This method of extending or shortening the hairpin maintains playback integrity and allows it to cross line breaks:
3. To change the position of an end handle without changing the position of its anchor, use the following shortcuts:
→ to move the handle right by 0.1 sp.← to move the handle left 0.1 sp.Ctrl+→ (Mac: Cmd+→) to move the handle right one sp.Ctrl+← (Mac: Cmd+→) to move the handle left one sp.
Note: The commands listed in step 3 are only used to tweak the final appearance of the hairpin (e.g. see imagebelow): they do not change its playback extent nor do they allow it to cross line breaks. If you want the latter, use theShift+→ or Shift+← commands instead (step 2).
Note: The "Reset" command (Ctrl+R (Mac: Cmd+R)) will undo these small adjustments, but will not undo anchorchanges.
Cresc. and dim. lines
In addition to hairpins, there are cresc. _ _ _ and dim. _ _ _ lines with the same function in the Lines palette.To change the text (e.g. to cresc. poco a poco, or decresc. instead of dim), right-click on the line and choose Line
Properties....
To turn a hairpin into its equivalent text line:
1. Select the hairpin.2. In the Inspector, set "Line style" to "Wide dashed."
79
3. In the Inspector, select the "Text line" checkbox.
Hairpin playback
Crescendo and diminuendo lines only affect playback from one note to the next: they have no affect (currently) on theplayback of a single note or a series of tied notes.
By default, hairpins will affect playback only if dynamics are used before and after the hairpin. For example, a crescendospanning notes between p and f dynamics will cause a dynamic change on playback. However, between any twosuccessive dynamics only the first appropriate hairpin will have effect: a diminuendo between p and f will be ignored; oftwo or more crescendos between p and f, all but the first will be ignored.
A hairpin may be used without dynamic marks, by adjusting "Velocity change" in the Inspector (values in the range 0 to127).
Lines
The Lines palette of the Advanced workspace includes the following types of lines:
SlurHairpins (crescendo and diminuendo)Volta brackets (1st, 2nd, 3rd time endings etc.)Octave lines (8va, 8vb, 15ma etc)Keyboard pedal markingsExtended ornament lines (Trills etc)Guitar barre lineStraight lineAmbitus (early music symbol)
Applying lines to the score
Most lines (except Slurs, Volta brackets and the Ambitus) can be applied from a palette in the following ways:
To apply a line to just one note
1. Click on a note, then Ctrl+Click on the next note;2. Double-click a line.
To apply a line across a range of notes
80
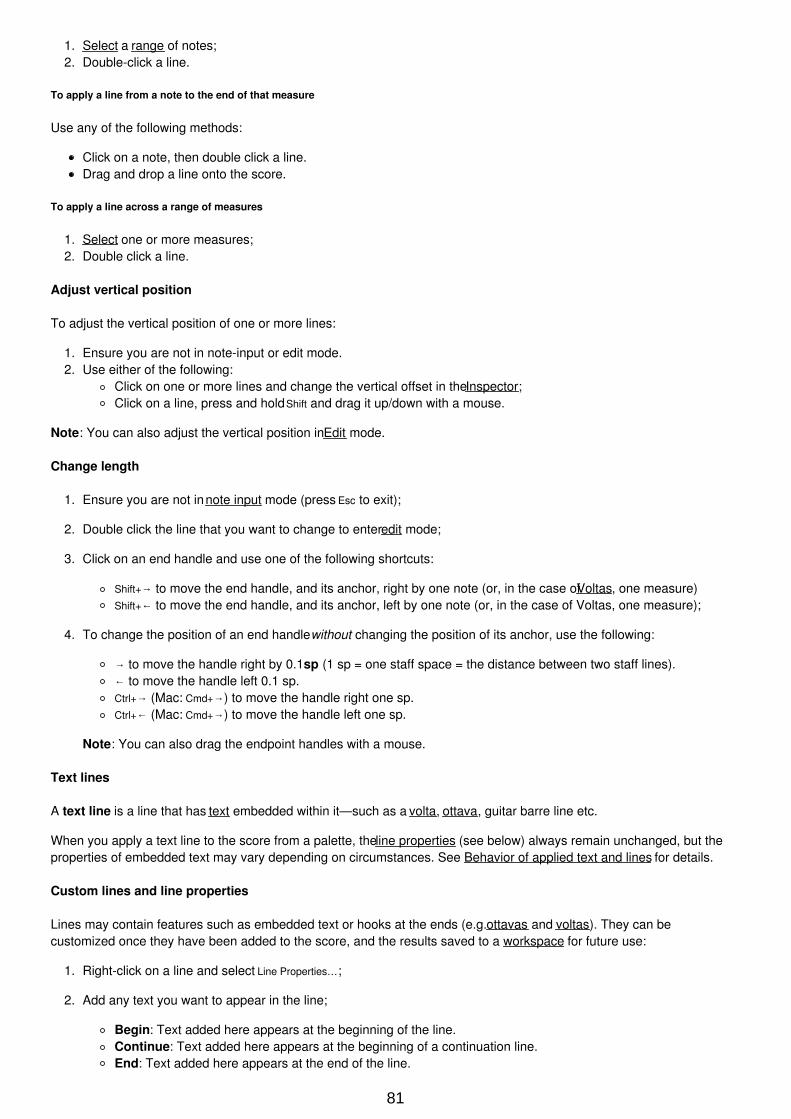
1. Select a range of notes;2. Double-click a line.
To apply a line from a note to the end of that measure
Use any of the following methods:
Click on a note, then double click a line.Drag and drop a line onto the score.
To apply a line across a range of measures
1. Select one or more measures;2. Double click a line.
Adjust vertical position
To adjust the vertical position of one or more lines:
1. Ensure you are not in note-input or edit mode.2. Use either of the following:
Click on one or more lines and change the vertical offset in the Inspector;Click on a line, press and hold Shift and drag it up/down with a mouse.
Note: You can also adjust the vertical position in Edit mode.
Change length
1. Ensure you are not in note input mode (press Esc to exit);
2. Double click the line that you want to change to enter edit mode;
3. Click on an end handle and use one of the following shortcuts:
Shift+→ to move the end handle, and its anchor, right by one note (or, in the case of Voltas, one measure)Shift+← to move the end handle, and its anchor, left by one note (or, in the case of Voltas, one measure);
4. To change the position of an end handle without changing the position of its anchor, use the following:
→ to move the handle right by 0.1 sp (1 sp = one staff space = the distance between two staff lines).← to move the handle left 0.1 sp.Ctrl+→ (Mac: Cmd+→) to move the handle right one sp.Ctrl+← (Mac: Cmd+→) to move the handle left one sp.
Note: You can also drag the endpoint handles with a mouse.
Text lines
A text line is a line that has text embedded within it—such as a volta, ottava, guitar barre line etc.
When you apply a text line to the score from a palette, the line properties (see below) always remain unchanged, but theproperties of embedded text may vary depending on circumstances. See Behavior of applied text and lines for details.
Custom lines and line properties
Lines may contain features such as embedded text or hooks at the ends (e.g. ottavas and voltas). They can becustomized once they have been added to the score, and the results saved to a workspace for future use:
1. Right-click on a line and select Line Properties…;
2. Add any text you want to appear in the line;
Begin: Text added here appears at the beginning of the line.Continue: Text added here appears at the beginning of a continuation line.End: Text added here appears at the end of the line.
81
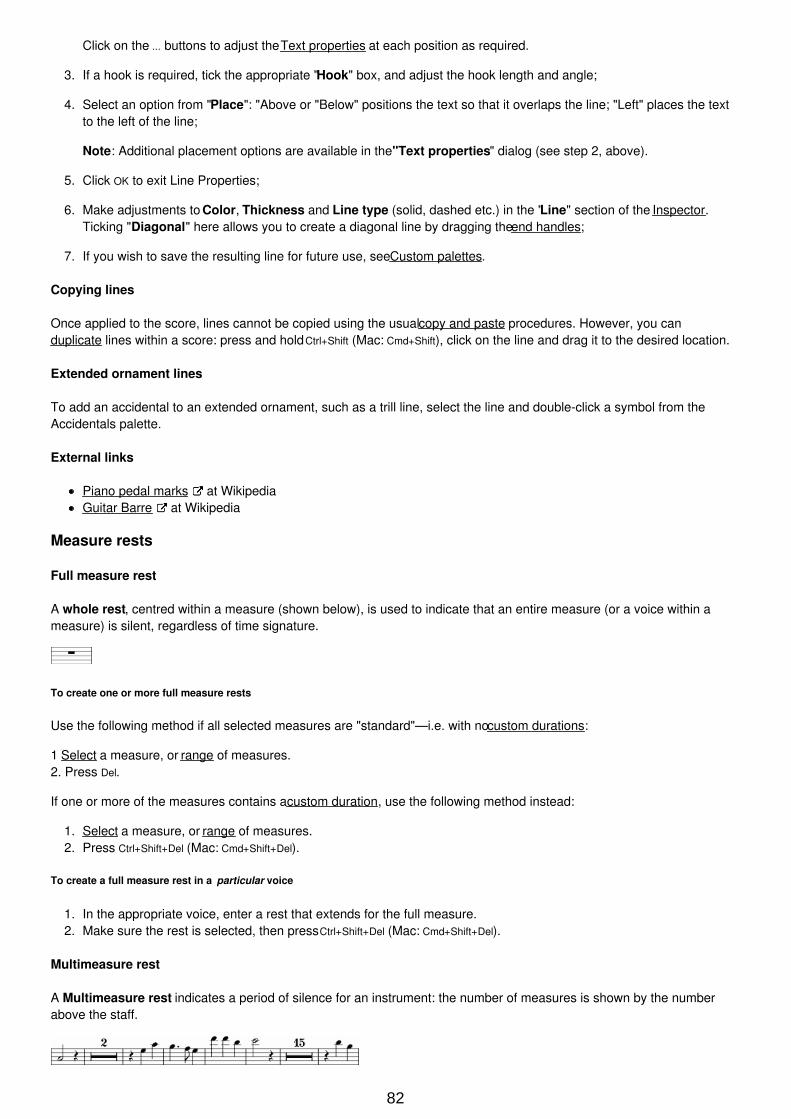
Click on the ... buttons to adjust the Text properties at each position as required.
3. If a hook is required, tick the appropriate "Hook" box, and adjust the hook length and angle;
4. Select an option from "Place": "Above or "Below" positions the text so that it overlaps the line; "Left" places the textto the left of the line;
Note: Additional placement options are available in the "Text properties" dialog (see step 2, above).
5. Click OK to exit Line Properties;
6. Make adjustments to Color, Thickness and Line type (solid, dashed etc.) in the "Line" section of the Inspector.Ticking "Diagonal" here allows you to create a diagonal line by dragging the end handles;
7. If you wish to save the resulting line for future use, see Custom palettes.
Copying lines
Once applied to the score, lines cannot be copied using the usual copy and paste procedures. However, you canduplicate lines within a score: press and hold Ctrl+Shift (Mac: Cmd+Shift), click on the line and drag it to the desired location.
Extended ornament lines
To add an accidental to an extended ornament, such as a trill line, select the line and double-click a symbol from theAccidentals palette.
External links
Piano pedal marks at WikipediaGuitar Barre at Wikipedia
Measure rests
Full measure rest
A whole rest, centred within a measure (shown below), is used to indicate that an entire measure (or a voice within ameasure) is silent, regardless of time signature.
To create one or more full measure rests
Use the following method if all selected measures are "standard"—i.e. with no custom durations:
1 Select a measure, or range of measures.2. Press Del.
If one or more of the measures contains a custom duration, use the following method instead:
1. Select a measure, or range of measures.2. Press Ctrl+Shift+Del (Mac: Cmd+Shift+Del).
To create a full measure rest in a particular voice
1. In the appropriate voice, enter a rest that extends for the full measure.2. Make sure the rest is selected, then press Ctrl+Shift+Del (Mac: Cmd+Shift+Del).
Multimeasure rest
A Multimeasure rest indicates a period of silence for an instrument: the number of measures is shown by the numberabove the staff.
82
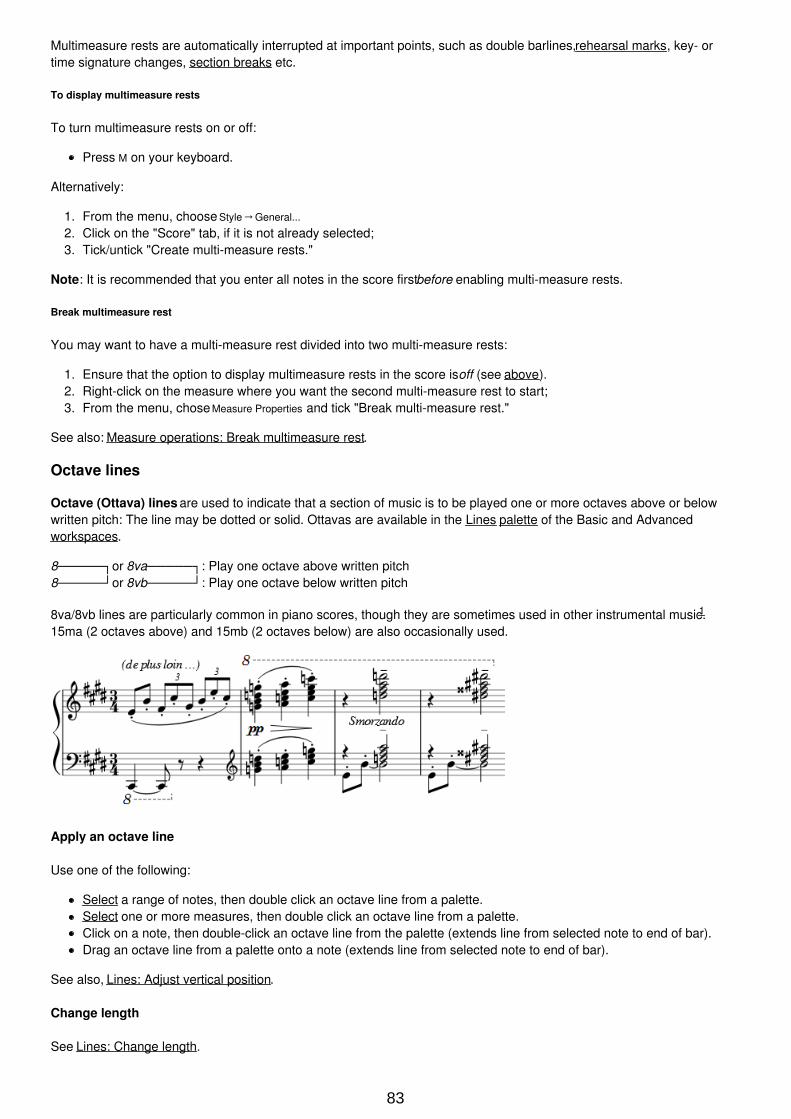
Multimeasure rests are automatically interrupted at important points, such as double barlines, rehearsal marks, key- ortime signature changes, section breaks etc.
To display multimeasure rests
To turn multimeasure rests on or off:
Press M on your keyboard.
Alternatively:
1. From the menu, choose Style→General...
2. Click on the "Score" tab, if it is not already selected;3. Tick/untick "Create multi-measure rests."
Note: It is recommended that you enter all notes in the score first before enabling multi-measure rests.
Break multimeasure rest
You may want to have a multi-measure rest divided into two multi-measure rests:
1. Ensure that the option to display multimeasure rests in the score is off (see above).2. Right-click on the measure where you want the second multi-measure rest to start;3. From the menu, chose Measure Properties and tick "Break multi-measure rest."
See also: Measure operations: Break multimeasure rest.
Octave lines
Octave (Ottava) lines are used to indicate that a section of music is to be played one or more octaves above or belowwritten pitch: The line may be dotted or solid. Ottavas are available in the Lines palette of the Basic and Advancedworkspaces.
8or 8va: Play one octave above written pitch8or 8vb: Play one octave below written pitch
8va/8vb lines are particularly common in piano scores, though they are sometimes used in other instrumental music.1
15ma (2 octaves above) and 15mb (2 octaves below) are also occasionally used.
Apply an octave line
Use one of the following:
Select a range of notes, then double click an octave line from a palette.Select one or more measures, then double click an octave line from a palette.Click on a note, then double-click an octave line from the palette (extends line from selected note to end of bar).Drag an octave line from a palette onto a note (extends line from selected note to end of bar).
See also, Lines: Adjust vertical position.
Change length
See Lines: Change length.
83
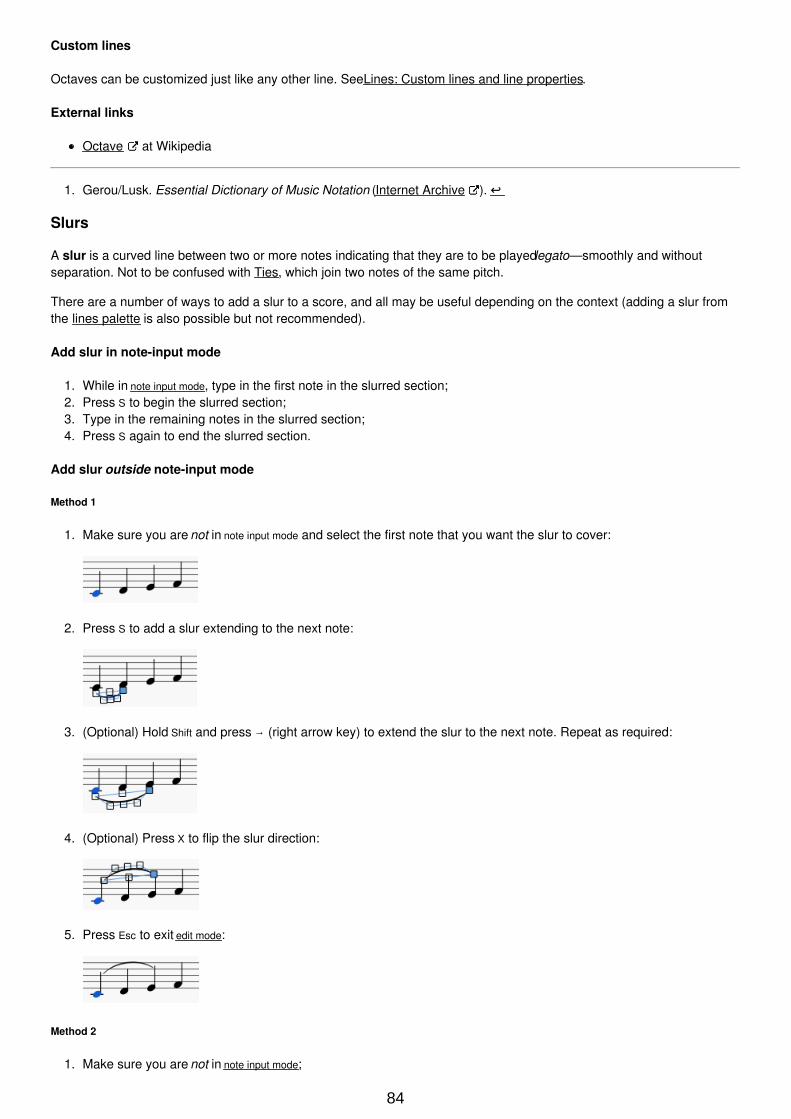
Custom lines
Octaves can be customized just like any other line. See Lines: Custom lines and line properties.
External links
Octave at Wikipedia
1. Gerou/Lusk. Essential Dictionary of Music Notation (Internet Archive ).
Slurs
A slur is a curved line between two or more notes indicating that they are to be played legato—smoothly and withoutseparation. Not to be confused with Ties, which join two notes of the same pitch.
There are a number of ways to add a slur to a score, and all may be useful depending on the context (adding a slur fromthe lines palette is also possible but not recommended).
Add slur in note-input mode
1. While in note input mode, type in the first note in the slurred section;2. Press S to begin the slurred section;3. Type in the remaining notes in the slurred section;4. Press S again to end the slurred section.
Add slur outside note-input mode
Method 1
1. Make sure you are not in note input mode and select the first note that you want the slur to cover:
2. Press S to add a slur extending to the next note:
3. (Optional) Hold Shift and press → (right arrow key) to extend the slur to the next note. Repeat as required:
4. (Optional) Press X to flip the slur direction:
5. Press Esc to exit edit mode:
Method 2
1. Make sure you are not in note input mode;
84
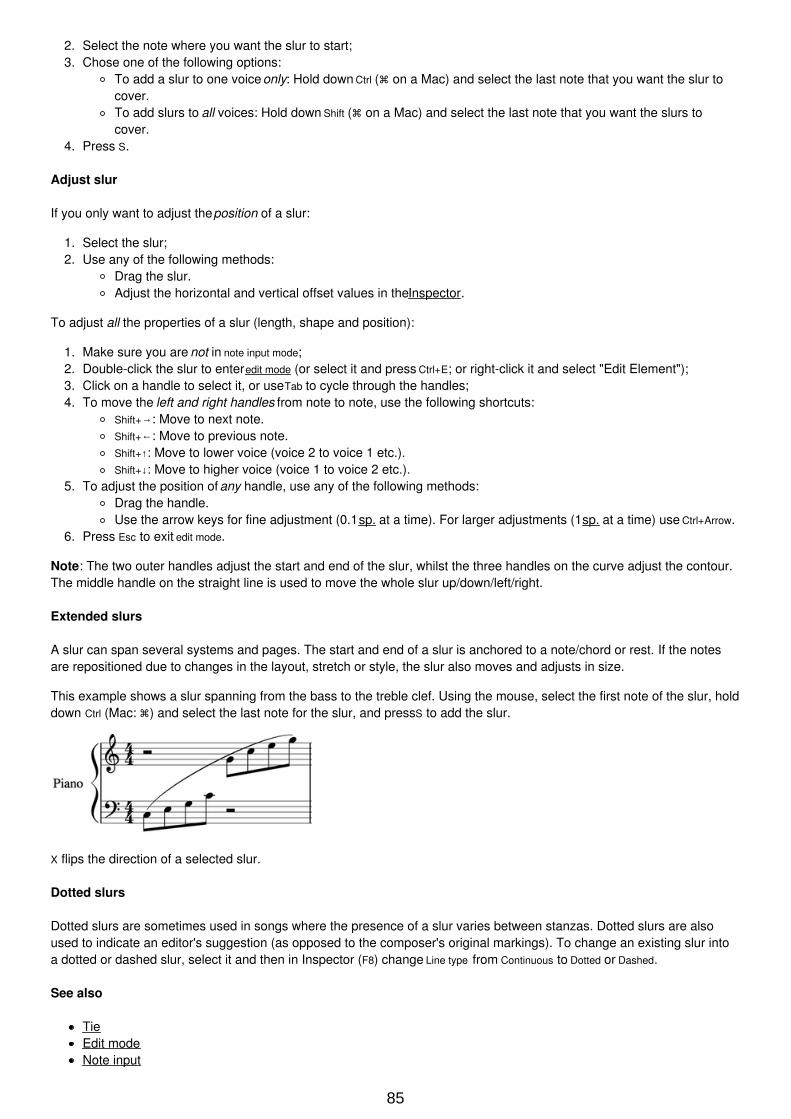
2. Select the note where you want the slur to start;3. Chose one of the following options:
To add a slur to one voice only: Hold down Ctrl ( on a Mac) and select the last note that you want the slur tocover.To add slurs to all voices: Hold down Shift ( on a Mac) and select the last note that you want the slurs tocover.
4. Press S.
Adjust slur
If you only want to adjust the position of a slur:
1. Select the slur;2. Use any of the following methods:
Drag the slur.Adjust the horizontal and vertical offset values in the Inspector.
To adjust all the properties of a slur (length, shape and position):
1. Make sure you are not in note input mode;2. Double-click the slur to enter edit mode (or select it and press Ctrl+E; or right-click it and select "Edit Element");3. Click on a handle to select it, or use Tab to cycle through the handles;4. To move the left and right handles from note to note, use the following shortcuts:
Shift+→: Move to next note.Shift+←: Move to previous note.Shift+↑: Move to lower voice (voice 2 to voice 1 etc.).Shift+↓: Move to higher voice (voice 1 to voice 2 etc.).
5. To adjust the position of any handle, use any of the following methods:Drag the handle.Use the arrow keys for fine adjustment (0.1 sp. at a time). For larger adjustments (1 sp. at a time) use Ctrl+Arrow.
6. Press Esc to exit edit mode.
Note: The two outer handles adjust the start and end of the slur, whilst the three handles on the curve adjust the contour.The middle handle on the straight line is used to move the whole slur up/down/left/right.
Extended slurs
A slur can span several systems and pages. The start and end of a slur is anchored to a note/chord or rest. If the notesare repositioned due to changes in the layout, stretch or style, the slur also moves and adjusts in size.
This example shows a slur spanning from the bass to the treble clef. Using the mouse, select the first note of the slur, holddown Ctrl (Mac: ) and select the last note for the slur, and press S to add the slur.
X flips the direction of a selected slur.
Dotted slurs
Dotted slurs are sometimes used in songs where the presence of a slur varies between stanzas. Dotted slurs are alsoused to indicate an editor's suggestion (as opposed to the composer's original markings). To change an existing slur intoa dotted or dashed slur, select it and then in Inspector (F8) change Line type from Continuous to Dotted or Dashed.
See also
TieEdit modeNote input
85
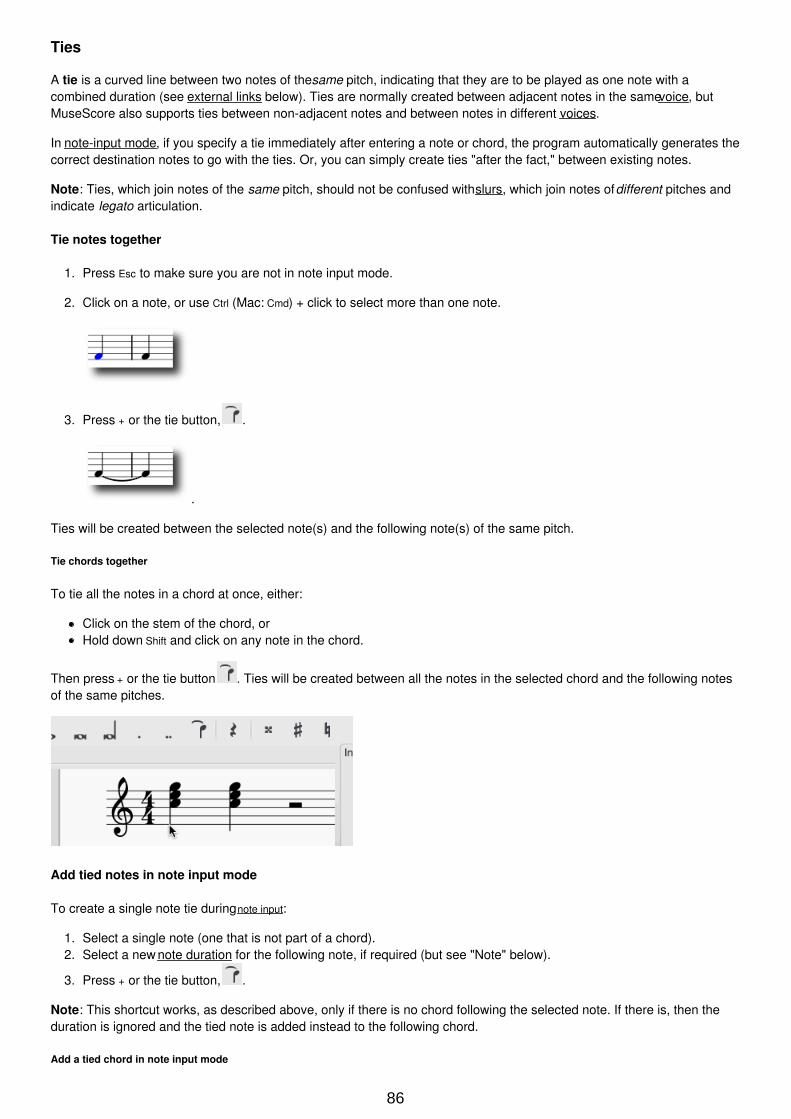
Ties
A tie is a curved line between two notes of the same pitch, indicating that they are to be played as one note with acombined duration (see external links below). Ties are normally created between adjacent notes in the same voice, butMuseScore also supports ties between non-adjacent notes and between notes in different voices.
In note-input mode, if you specify a tie immediately after entering a note or chord, the program automatically generates thecorrect destination notes to go with the ties. Or, you can simply create ties "after the fact," between existing notes.
Note: Ties, which join notes of the same pitch, should not be confused with slurs, which join notes of different pitches andindicate legato articulation.
Tie notes together
1. Press Esc to make sure you are not in note input mode.
2. Click on a note, or use Ctrl (Mac: Cmd) + click to select more than one note.
3. Press + or the tie button, .
.
Ties will be created between the selected note(s) and the following note(s) of the same pitch.
Tie chords together
To tie all the notes in a chord at once, either:
Click on the stem of the chord, orHold down Shift and click on any note in the chord.
Then press + or the tie button . Ties will be created between all the notes in the selected chord and the following notesof the same pitches.
Add tied notes in note input mode
To create a single note tie during note input:
1. Select a single note (one that is not part of a chord).2. Select a new note duration for the following note, if required (but see "Note" below).
3. Press + or the tie button, .
Note: This shortcut works, as described above, only if there is no chord following the selected note. If there is, then theduration is ignored and the tied note is added instead to the following chord.
Add a tied chord in note input mode
86
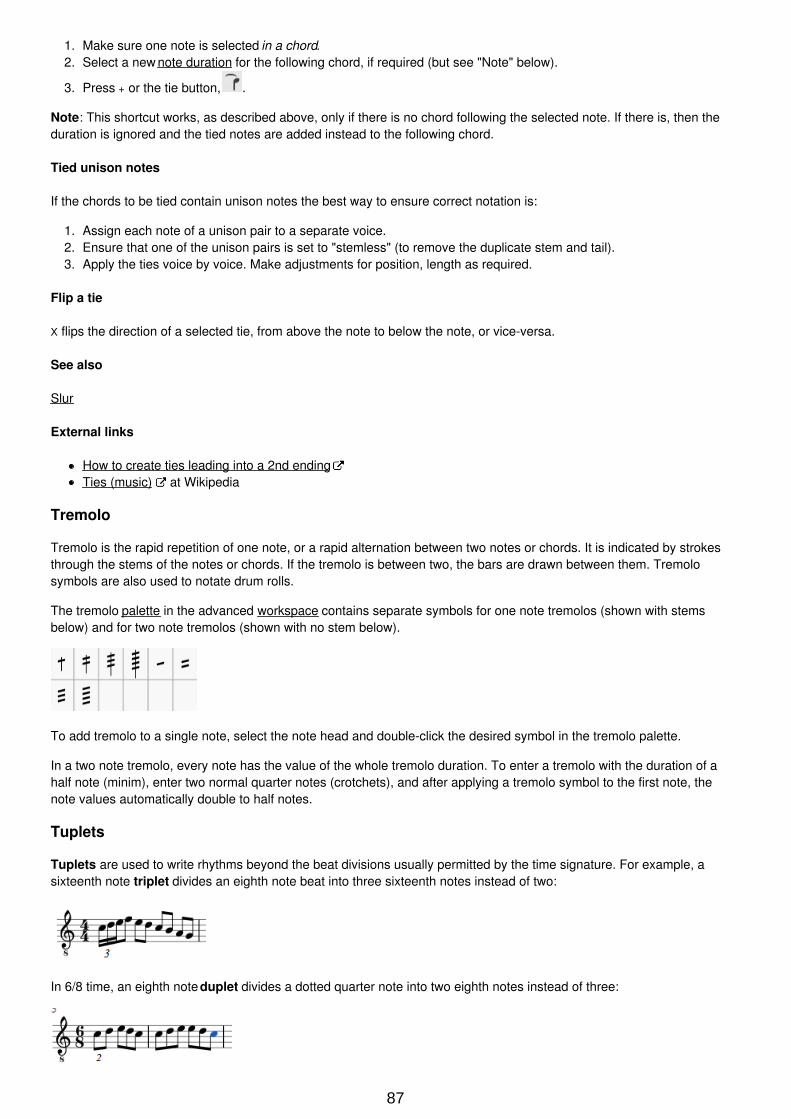
1. Make sure one note is selected in a chord.2. Select a new note duration for the following chord, if required (but see "Note" below).
3. Press + or the tie button, .
Note: This shortcut works, as described above, only if there is no chord following the selected note. If there is, then theduration is ignored and the tied notes are added instead to the following chord.
Tied unison notes
If the chords to be tied contain unison notes the best way to ensure correct notation is:
1. Assign each note of a unison pair to a separate voice.2. Ensure that one of the unison pairs is set to "stemless" (to remove the duplicate stem and tail).3. Apply the ties voice by voice. Make adjustments for position, length as required.
Flip a tie
X flips the direction of a selected tie, from above the note to below the note, or vice-versa.
See also
Slur
External links
How to create ties leading into a 2nd endingTies (music) at Wikipedia
Tremolo
Tremolo is the rapid repetition of one note, or a rapid alternation between two notes or chords. It is indicated by strokesthrough the stems of the notes or chords. If the tremolo is between two, the bars are drawn between them. Tremolosymbols are also used to notate drum rolls.
The tremolo palette in the advanced workspace contains separate symbols for one note tremolos (shown with stemsbelow) and for two note tremolos (shown with no stem below).
To add tremolo to a single note, select the note head and double-click the desired symbol in the tremolo palette.
In a two note tremolo, every note has the value of the whole tremolo duration. To enter a tremolo with the duration of ahalf note (minim), enter two normal quarter notes (crotchets), and after applying a tremolo symbol to the first note, thenote values automatically double to half notes.
Tuplets
Tuplets are used to write rhythms beyond the beat divisions usually permitted by the time signature. For example, asixteenth note triplet divides an eighth note beat into three sixteenth notes instead of two:
In 6/8 time, an eighth note duplet divides a dotted quarter note into two eighth notes instead of three:
87
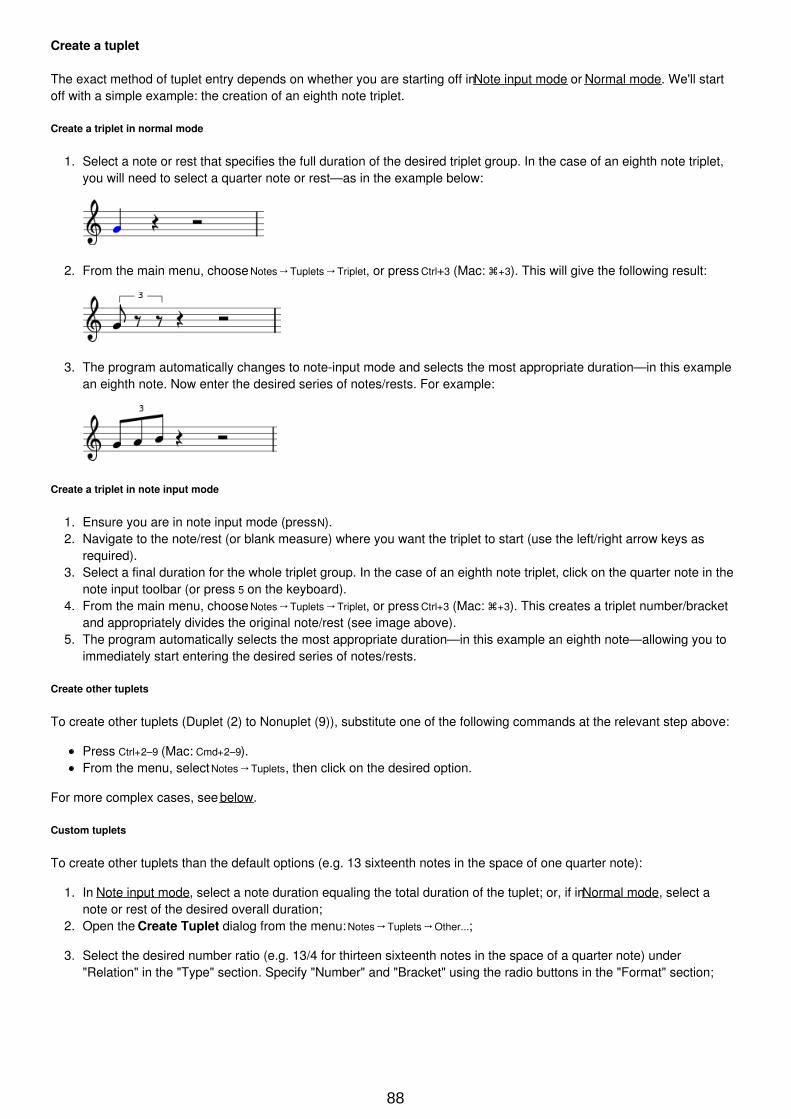
Create a tuplet
The exact method of tuplet entry depends on whether you are starting off in Note input mode or Normal mode. We'll startoff with a simple example: the creation of an eighth note triplet.
Create a triplet in normal mode
1. Select a note or rest that specifies the full duration of the desired triplet group. In the case of an eighth note triplet,you will need to select a quarter note or rest—as in the example below:
2. From the main menu, choose Notes→Tuplets→Triplet, or press Ctrl+3 (Mac: +3). This will give the following result:
3. The program automatically changes to note-input mode and selects the most appropriate duration—in this examplean eighth note. Now enter the desired series of notes/rests. For example:
Create a triplet in note input mode
1. Ensure you are in note input mode (press N).2. Navigate to the note/rest (or blank measure) where you want the triplet to start (use the left/right arrow keys as
required).3. Select a final duration for the whole triplet group. In the case of an eighth note triplet, click on the quarter note in the
note input toolbar (or press 5 on the keyboard).4. From the main menu, choose Notes→Tuplets→Triplet, or press Ctrl+3 (Mac: +3). This creates a triplet number/bracket
and appropriately divides the original note/rest (see image above).5. The program automatically selects the most appropriate duration—in this example an eighth note—allowing you to
immediately start entering the desired series of notes/rests.
Create other tuplets
To create other tuplets (Duplet (2) to Nonuplet (9)), substitute one of the following commands at the relevant step above:
Press Ctrl+2–9 (Mac: Cmd+2–9).From the menu, select Notes→Tuplets, then click on the desired option.
For more complex cases, see below.
Custom tuplets
To create other tuplets than the default options (e.g. 13 sixteenth notes in the space of one quarter note):
1. In Note input mode, select a note duration equaling the total duration of the tuplet; or, if in Normal mode, select anote or rest of the desired overall duration;
2. Open the Create Tuplet dialog from the menu: Notes→Tuplets→Other...;
3. Select the desired number ratio (e.g. 13/4 for thirteen sixteenth notes in the space of a quarter note) under"Relation" in the "Type" section. Specify "Number" and "Bracket" using the radio buttons in the "Format" section;
88
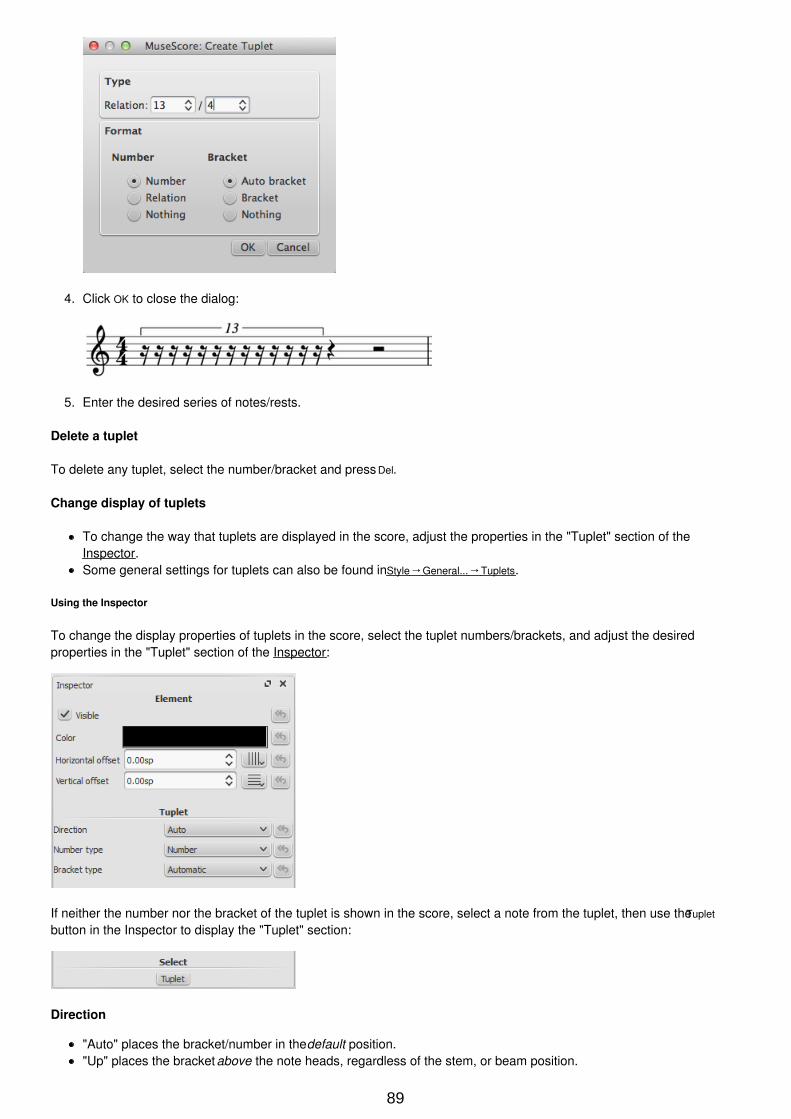
4. Click OK to close the dialog:
5. Enter the desired series of notes/rests.
Delete a tuplet
To delete any tuplet, select the number/bracket and press Del.
Change display of tuplets
To change the way that tuplets are displayed in the score, adjust the properties in the "Tuplet" section of theInspector.Some general settings for tuplets can also be found in Style→General...→Tuplets.
Using the Inspector
To change the display properties of tuplets in the score, select the tuplet numbers/brackets, and adjust the desiredproperties in the "Tuplet" section of the Inspector:
If neither the number nor the bracket of the tuplet is shown in the score, select a note from the tuplet, then use the Tuplet
button in the Inspector to display the "Tuplet" section:
Direction
"Auto" places the bracket/number in the default position."Up" places the bracket above the note heads, regardless of the stem, or beam position.
89
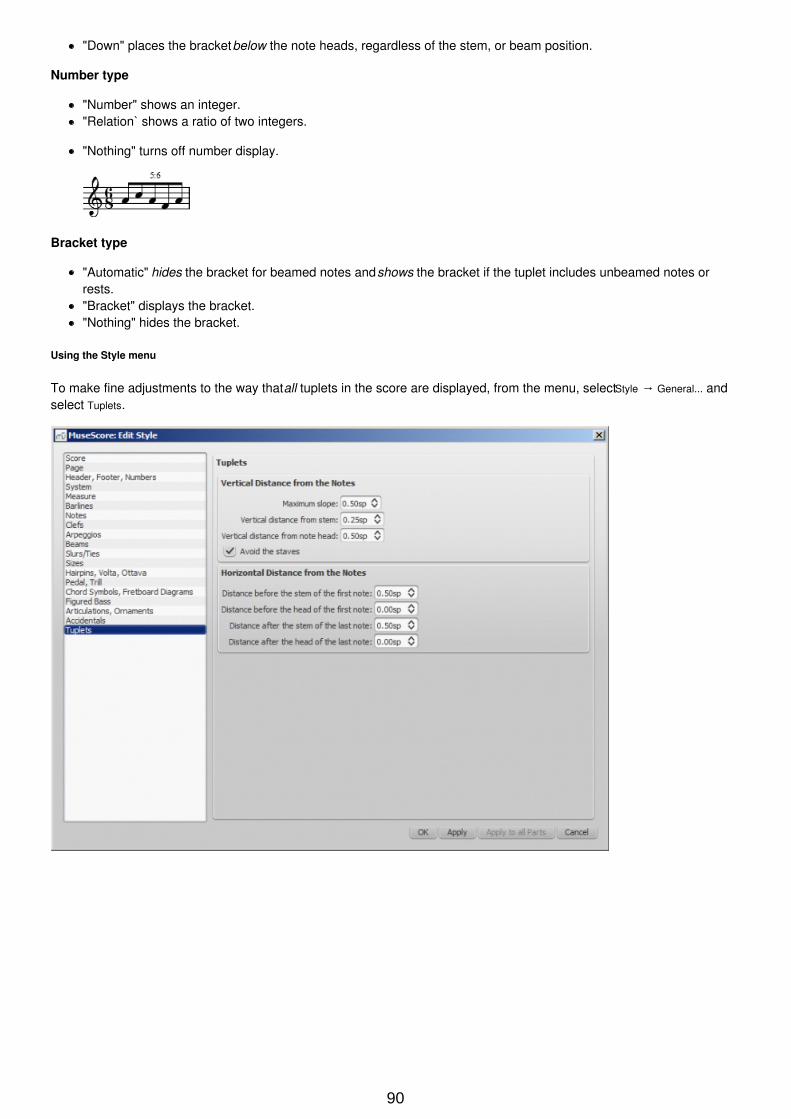
"Down" places the bracket below the note heads, regardless of the stem, or beam position.
Number type
"Number" shows an integer."Relation` shows a ratio of two integers.
"Nothing" turns off number display.
Bracket type
"Automatic" hides the bracket for beamed notes and shows the bracket if the tuplet includes unbeamed notes orrests."Bracket" displays the bracket."Nothing" hides the bracket.
Using the Style menu
To make fine adjustments to the way that all tuplets in the score are displayed, from the menu, select Style → General... andselect Tuplets.
90
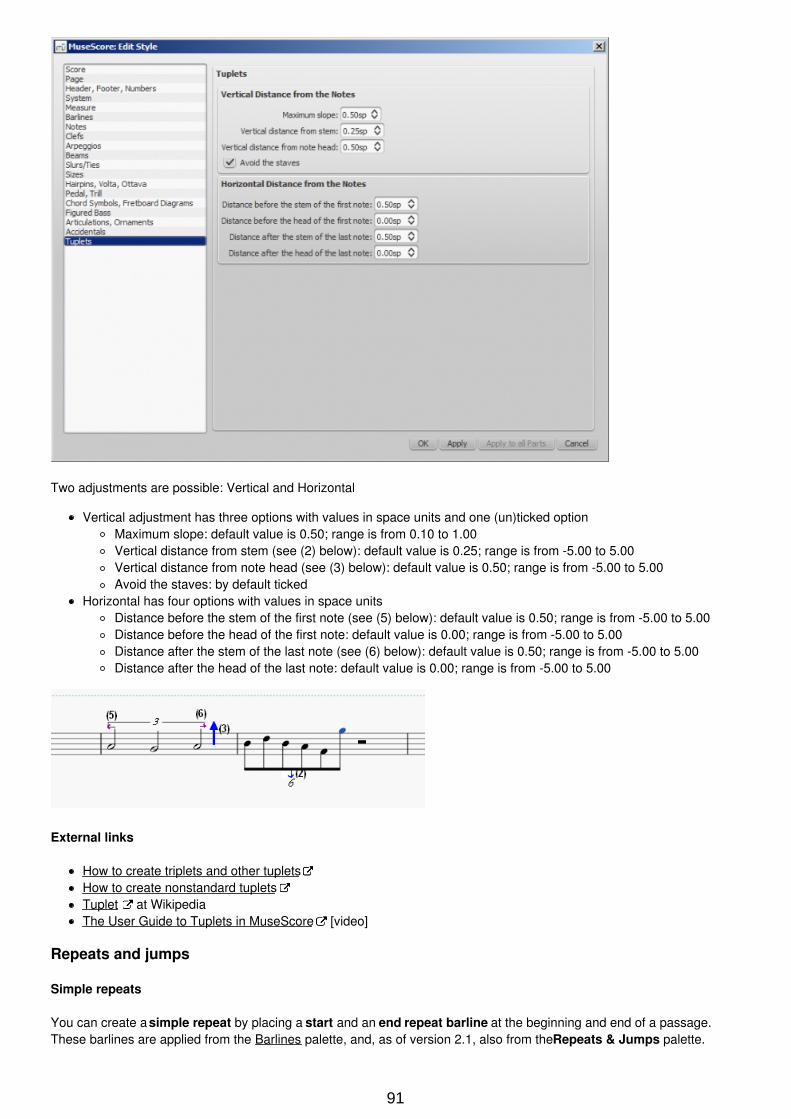
Two adjustments are possible: Vertical and Horizontal
Vertical adjustment has three options with values in space units and one (un)ticked optionMaximum slope: default value is 0.50; range is from 0.10 to 1.00Vertical distance from stem (see (2) below): default value is 0.25; range is from -5.00 to 5.00Vertical distance from note head (see (3) below): default value is 0.50; range is from -5.00 to 5.00Avoid the staves: by default ticked
Horizontal has four options with values in space unitsDistance before the stem of the first note (see (5) below): default value is 0.50; range is from -5.00 to 5.00Distance before the head of the first note: default value is 0.00; range is from -5.00 to 5.00Distance after the stem of the last note (see (6) below): default value is 0.50; range is from -5.00 to 5.00Distance after the head of the last note: default value is 0.00; range is from -5.00 to 5.00
External links
How to create triplets and other tupletsHow to create nonstandard tupletsTuplet at WikipediaThe User Guide to Tuplets in MuseScore [video]
Repeats and jumps
Simple repeats
You can create a simple repeat by placing a start and an end repeat barline at the beginning and end of a passage.These barlines are applied from the Barlines palette, and, as of version 2.1, also from the Repeats & Jumps palette.
91
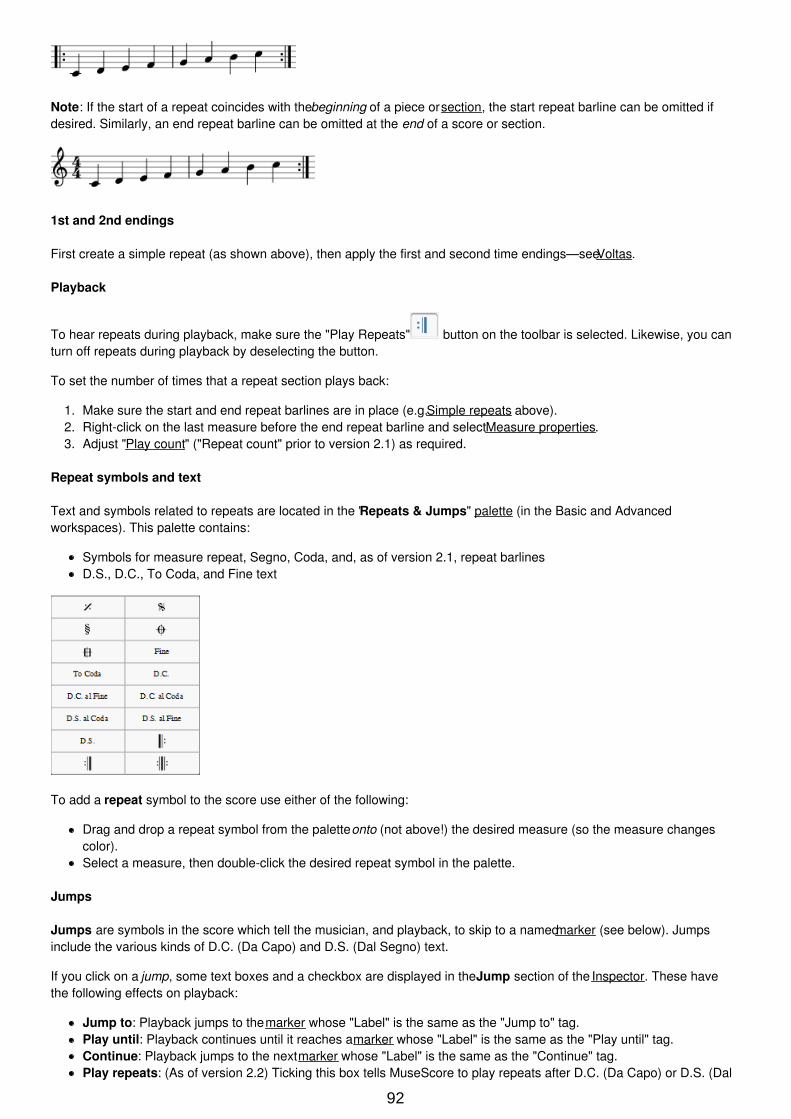
Note: If the start of a repeat coincides with the beginning of a piece or section, the start repeat barline can be omitted ifdesired. Similarly, an end repeat barline can be omitted at the end of a score or section.
1st and 2nd endings
First create a simple repeat (as shown above), then apply the first and second time endings—see Voltas.
Playback
To hear repeats during playback, make sure the "Play Repeats" button on the toolbar is selected. Likewise, you canturn off repeats during playback by deselecting the button.
To set the number of times that a repeat section plays back:
1. Make sure the start and end repeat barlines are in place (e.g. Simple repeats above).2. Right-click on the last measure before the end repeat barline and select Measure properties.3. Adjust "Play count" ("Repeat count" prior to version 2.1) as required.
Repeat symbols and text
Text and symbols related to repeats are located in the "Repeats & Jumps" palette (in the Basic and Advancedworkspaces). This palette contains:
Symbols for measure repeat, Segno, Coda, and, as of version 2.1, repeat barlinesD.S., D.C., To Coda, and Fine text
To add a repeat symbol to the score use either of the following:
Drag and drop a repeat symbol from the palette onto (not above!) the desired measure (so the measure changescolor).Select a measure, then double-click the desired repeat symbol in the palette.
Jumps
Jumps are symbols in the score which tell the musician, and playback, to skip to a named marker (see below). Jumpsinclude the various kinds of D.C. (Da Capo) and D.S. (Dal Segno) text.
If you click on a jump, some text boxes and a checkbox are displayed in the Jump section of the Inspector. These havethe following effects on playback:
Jump to: Playback jumps to the marker whose "Label" is the same as the "Jump to" tag.Play until: Playback continues until it reaches a marker whose "Label" is the same as the "Play until" tag.Continue: Playback jumps to the next marker whose "Label" is the same as the "Continue" tag.Play repeats: (As of version 2.2) Ticking this box tells MuseScore to play repeats after D.C. (Da Capo) or D.S. (Dal
92
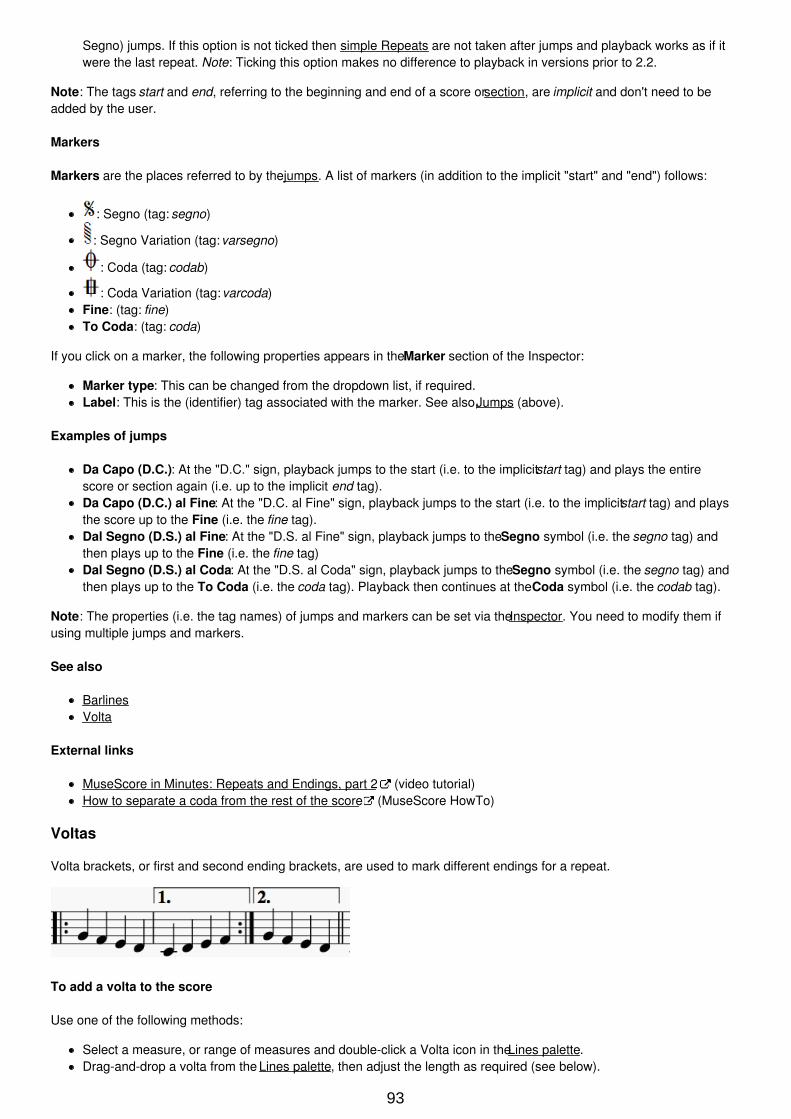
Segno) jumps. If this option is not ticked then simple Repeats are not taken after jumps and playback works as if itwere the last repeat. Note: Ticking this option makes no difference to playback in versions prior to 2.2.
Note: The tags start and end, referring to the beginning and end of a score or section, are implicit and don't need to beadded by the user.
Markers
Markers are the places referred to by the jumps. A list of markers (in addition to the implicit "start" and "end") follows:
: Segno (tag: segno)
: Segno Variation (tag: varsegno)
: Coda (tag: codab)
: Coda Variation (tag: varcoda)Fine: (tag: fine)To Coda: (tag: coda)
If you click on a marker, the following properties appears in the Marker section of the Inspector:
Marker type: This can be changed from the dropdown list, if required.Label: This is the (identifier) tag associated with the marker. See also, Jumps (above).
Examples of jumps
Da Capo (D.C.): At the "D.C." sign, playback jumps to the start (i.e. to the implicit start tag) and plays the entirescore or section again (i.e. up to the implicit end tag).Da Capo (D.C.) al Fine: At the "D.C. al Fine" sign, playback jumps to the start (i.e. to the implicit start tag) and playsthe score up to the Fine (i.e. the fine tag).Dal Segno (D.S.) al Fine: At the "D.S. al Fine" sign, playback jumps to the Segno symbol (i.e. the segno tag) andthen plays up to the Fine (i.e. the fine tag)Dal Segno (D.S.) al Coda: At the "D.S. al Coda" sign, playback jumps to the Segno symbol (i.e. the segno tag) andthen plays up to the To Coda (i.e. the coda tag). Playback then continues at the Coda symbol (i.e. the codab tag).
Note: The properties (i.e. the tag names) of jumps and markers can be set via the Inspector. You need to modify them ifusing multiple jumps and markers.
See also
BarlinesVolta
External links
MuseScore in Minutes: Repeats and Endings, part 2 (video tutorial)How to separate a coda from the rest of the score (MuseScore HowTo)
Voltas
Volta brackets, or first and second ending brackets, are used to mark different endings for a repeat.
To add a volta to the score
Use one of the following methods:
Select a measure, or range of measures and double-click a Volta icon in the Lines palette.Drag-and-drop a volta from the Lines palette, then adjust the length as required (see below).
93
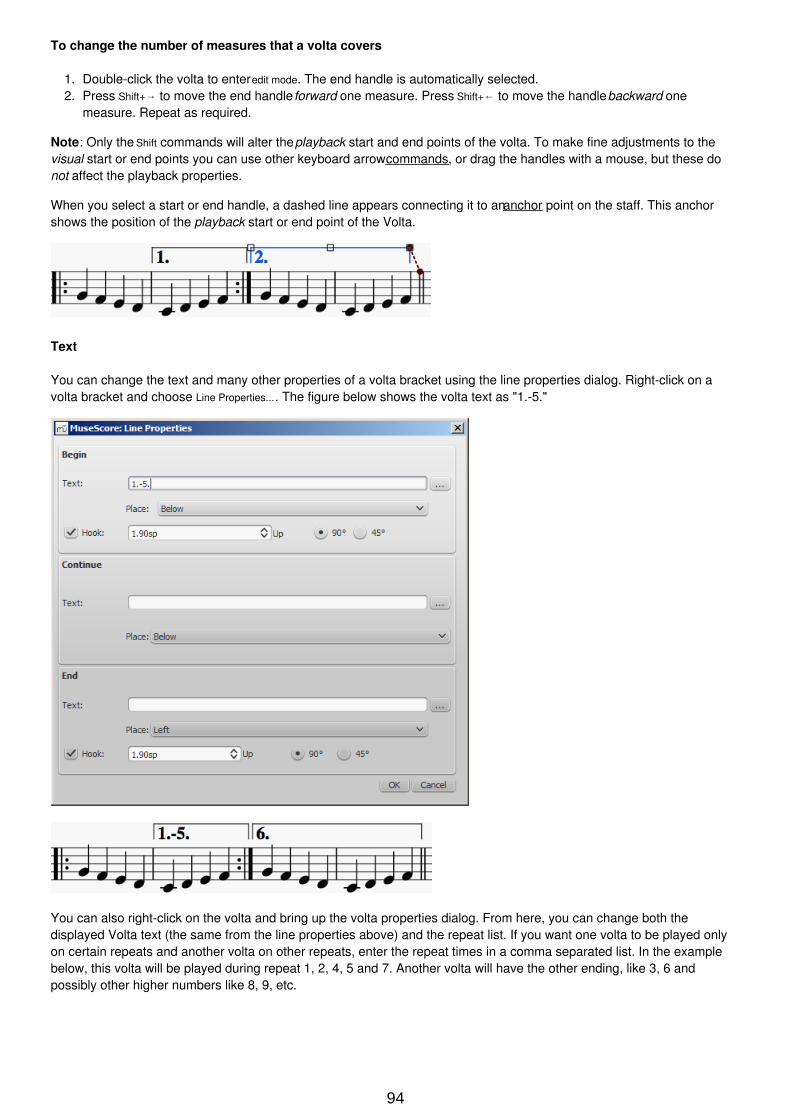
To change the number of measures that a volta covers
1. Double-click the volta to enter edit mode. The end handle is automatically selected.2. Press Shift+→ to move the end handle forward one measure. Press Shift+← to move the handle backward one
measure. Repeat as required.
Note: Only the Shift commands will alter the playback start and end points of the volta. To make fine adjustments to thevisual start or end points you can use other keyboard arrow commands, or drag the handles with a mouse, but these donot affect the playback properties.
When you select a start or end handle, a dashed line appears connecting it to an anchor point on the staff. This anchorshows the position of the playback start or end point of the Volta.
Text
You can change the text and many other properties of a volta bracket using the line properties dialog. Right-click on avolta bracket and choose Line Properties.... The figure below shows the volta text as "1.-5."
You can also right-click on the volta and bring up the volta properties dialog. From here, you can change both thedisplayed Volta text (the same from the line properties above) and the repeat list. If you want one volta to be played onlyon certain repeats and another volta on other repeats, enter the repeat times in a comma separated list. In the examplebelow, this volta will be played during repeat 1, 2, 4, 5 and 7. Another volta will have the other ending, like 3, 6 andpossibly other higher numbers like 8, 9, etc.
94

Playback
Sometimes a repeat plays more than two times. In the figure above, the volta text indicates that it should play five timesbefore it continues. If you want to change the number of times MuseScore plays a repeat, go to the measure containingthe end repeat barline and change its Play count (Repeat Count prior to version 2.1). See Measure operations: Otherproperties for details.
External links
MuseScore in Minutes, Lesson 8: Repeats and Endings, Part 1How to create ties leading into a 2nd ending
Transposition
Transposition is the act of raising or lowering the pitch of a selection of notes by the same interval. You can chose totranspose notes either manually or by using the Transpose dialog.
Manual transposition
1. Select the notes that you wish to transpose;2. Use any of the following options:
To transpose chromatically: Press ↑ or ↓. Repeat as required;To transpose diatonically; Press Alt + Shift + ↑ or ↓. Repeat as required;To transpose by an octave: Press Ctrl + ↑ or ↓ (Mac: Cmd + ↑ or ↓).
Note: In versions prior to 2.1, F2 (Mac: fn+F2) transposes the whole score and key signature UP one semitone. Shift+F2
(Mac: Shift+fn +F2) transposes the score and key signature DOWN one semitone.
Automatic transposition
MuseScore's Transpose dialog gives you more options for transposing notes.
95

Note: By default this dialog opens from the Notes menu, but you can also chose to open it using a keyboard shortcut (seePreferences).
Transpose Chromatically
By Key
To transpose notes up or down to the nearest key:
1. Select the notes you want to transpose; no selection equals "select all.";2. From the menu bar, choose Notes → Transpose...;3. Tick "Transpose Chromatically" and "By key;"4. Tick/untick "Transpose key signature" and "Transpose chord symbols" if required;5. Tick one of "Closest," "Up" or "Down;" and select a destination key signature from the drop-down menu;6. Click OK.
By Interval
To transpose selected notes up or down in semitone increments:
1. Select the notes you want to transpose; no selection equals "select all.";2. From the menu bar, choose Notes → Transpose...;3. Tick "Transpose Chromatically" and "By Interval;"4. Tick/untick "Transpose key signature" and "Transpose chord symbols" if required;5. Tick "Up" or "Down;" and select a transposition interval from the drop-down menu;6. Click OK.
Transpose Diatonically
To transpose selected notes up or down by a diatonic interval:
1. Select the notes you want to transpose; no selection equals "select all.";2. From the menu bar, choose Notes → Transpose...;3. Tick "Transpose Diatonically;"4. Tick/untick "Transpose key signature" and "Transpose chord symbols" if required;5. Tick "Up" or "Down;" and select a transposition interval from the drop-down menu;6. Click OK.
Transposing instruments
96
Transposing instruments, such as the B-flat trumpet or E-flat alto sax, sound lower, or higher than their written pitch.MuseScore has a number of features to facilitate the scoring of these instruments.
Concert pitch
MuseScore's default viewing mode shows the musical notation in written pitch, but you can chose to display the score inconcert pitch instead. In the latter mode, the musical notation of all instruments matches the actual pitches that you hearon playback.
To switch to concert pitch, use one of the following options:
Press the Concert Pitch button to highlight it.From the menu bar, select Notes and tick the Concert Pitch option.
You should ensure that the Concert pitch button is OFF before printing the main score or any parts.
Change staff transposition
Instrument transpositions are already set up in MuseScore. However, if you want a rare instrument or transposition that isnot available in MuseScore, you may need to edit the instrument transposition manually.
1. Right-click an empty part of the instrument staff and select Staff Properties....2. At the bottom of the window, select the interval of transposition, any octave shifts, and whether the interval is "Up"
(sounds higher than written) or "Down" (sounds lower than written).
You can also use the Change Instrument… button in the Staff Properties window to automatically change the transposition tothat of a different standard instrument.
External links
How to transpose (MuseScore How-To)Concert pitch or not?? (forum discussion)
Drum notation
Entering percussion notation is somewhat different to entering notation for pitched instruments (such as the piano orviolin). However, it is recommended that you first read the chapter on Note input for pitched instruments beforeproceeding.
Percussion staff types
When you create a percussion staff using the New Score Wizard or the Instruments dialog, MuseScore automaticallychoses the most appropriate staff type (1-, 3-, or 5-line) for the instrument: this can be changed, if required, using the"Staff type" column on the Chose instruments / Instruments page. Any additional changes (e.g. to a 2-line staff) can bemade from the score itself (see Advanced Style Properties).
On a 5-line percussion staff, each instrument is assigned a vertical staff position (line or space) and a notehead shape.For a drumset, one or two voices can be used. If the latter, voice 1 (the upper voice) usually contains (up-stem) notesplayed by the hands while voice 2 (the lower voice) usually contains (down-stem) notes played by the feet (see imagebelow).
Note input methods
You can add notes to a percussion staff from any of the following:
External MIDI keyboard;Piano keyboard (virtual);Computer keyboard;Mouse.
97

These methods can be used in any desired combination:
MIDI keyboard
To add notes to a percussion staff from a MIDI keyboard:
1. Ensure that the MIDI keyboard is connected and functioning correctly.
Note: If you click on the percussion staff without entering note input mode, you can demo the percussioninstruments from the MIDI keyboard.
2. Click on the note or rest where you want to start.
3. Enter note input mode.4. Select the correct voice. For example, snares, sidesticks and all cymbals are normally added to voice 1; bass drum
to voice 2.5. Set note duration.6. Press an instrument key to add a note to the score. To add another note at the same position, keep the first key held
down while pressing the second key.
Note: Refer to a GM2 drum map for details about which MIDI keyboard key corresponds to which percussion instrument.Some keyboards (e.g., Casio) display percussion symbols next to the keys as an aid to the user.
Piano keyboard
To add notes to a percussion staff from the virtual Piano Keyboard:
1. Ensure that the Piano keyboard is displayed. Press P (or select it from the menu, View → Piano Keyboard).
Note: If you click on the percussion staff without entering note input mode, you can demo the percussioninstruments from the Piano keyboard.
2. Click on the note or rest where you want to start.
3. Enter note input mode.4. Select the correct voice. For example, snares, sidesticks and all cymbals are normally added to voice 1; bass drum
to voice 2.5. Set note duration.6. Click on a (virtual piano) key to add a note to the score.7. To add another note to an existing one, press Shift and hold it while pressing the new note (in versions before 2.1,
use Ctrl (Mac: Cmd)).
Note: Refer to a GM2 drum map for details about which piano key corresponds to which percussion instrument.
By default, the piano keyboard is docked at the bottom of the screen—to the left of the Drum input palette. However youcan undock it by dragging, then dock the panel in several ways:
Drag the panel downwards to the center and it will overlay the Drum input palette, full length. Both panels can thenbe accessed by Tabs.Drag the panel downwards to the right/left and it will dock to the right/left of the Drum input palette.
Computer keyboard
To enter notes on a percussion staff using your computer keyboard:
1. Click on the note or rest where you want to start.2. Enter note input mode. The Drum input palette now appears at the bottom of the screen (see below).3. Select the desired note duration.4. Press the shortcut key (A–G) for the instrument that you wish to enter—refer to the Drum input palette window.5. If you wish to add another note to an existing one in that voice, press Shift + [A–G].
Note: Voice allocation is determined by the color of the note in the drum input palette: blue for voice 1, green for voice 2.
Mouse
To add a note to a percussion staff
98
Use the following method to add a new note or to replace an existing chord.
1. Select the note or rest where you want to start. You can also select a measure.2. Press N to to enter note input mode. The Drum input palette now appears at the bottom of the screen (see below).3. Set note duration.4. Chose one of the following options:
Double-click a note in the Drum input palette.Select a note (e.g. Bass drum, or Snare) in the Drum input palette, then click a note or rest in the score.
To add a note to an existing chord in the percussion staff
1. Ensure you are in note input mode.2. Select a note duration equal to the note you are adding to.3. Click on the new note in the Drum input palette.4. Click above or below the existing note in the percussion staff.
Note: Voice allocation is determined by the color of the note in the drum input palette: blue for voice 1, green for voice 2.
Drum input palette
When a percussion staff is selected and note input mode is ON, a window opens at the bottom of the screen called theDrum input palette. This window is essential for mouse input, and displays shortcuts for computer keyboard input, butcan be ignored if using a MIDI keyboard or the virtual Piano Keyboard.
Each note in the palette represents a percussion instrument: hovering the mouse pointer over the note displays theinstrument name.
The letters A–G (shown above certain notes in the palette) are designated as shortcuts for entering particular instruments(bass drum, snare, closed hi-hat etc.), rather than referring to note pitches. They can be changed or reallocated asdesired in the Edit Drumset window.
When the Drum input palette is open, double-clicking a note in the palette or entering a shortcut letter will add thatinstrument note to the percussion staff. The color of the note in the palette shows the voice allocated for that note—bluefor voice 1, green for voice 2. This can be changed in the Edit Drumset dialog if required.
This voice allocation applies only to keyboard and mouse entry of notes: entry via a MIDI keyboard or the virtual Pianokeyboard allows any voice to be used.
Edit Drumset
To open the Edit Drumset window, use one of the following options:
Click on the Edit Drumset button at the left of the Drum input palette.Right-click on a percussion staff and select "Edit Drumset...".
99
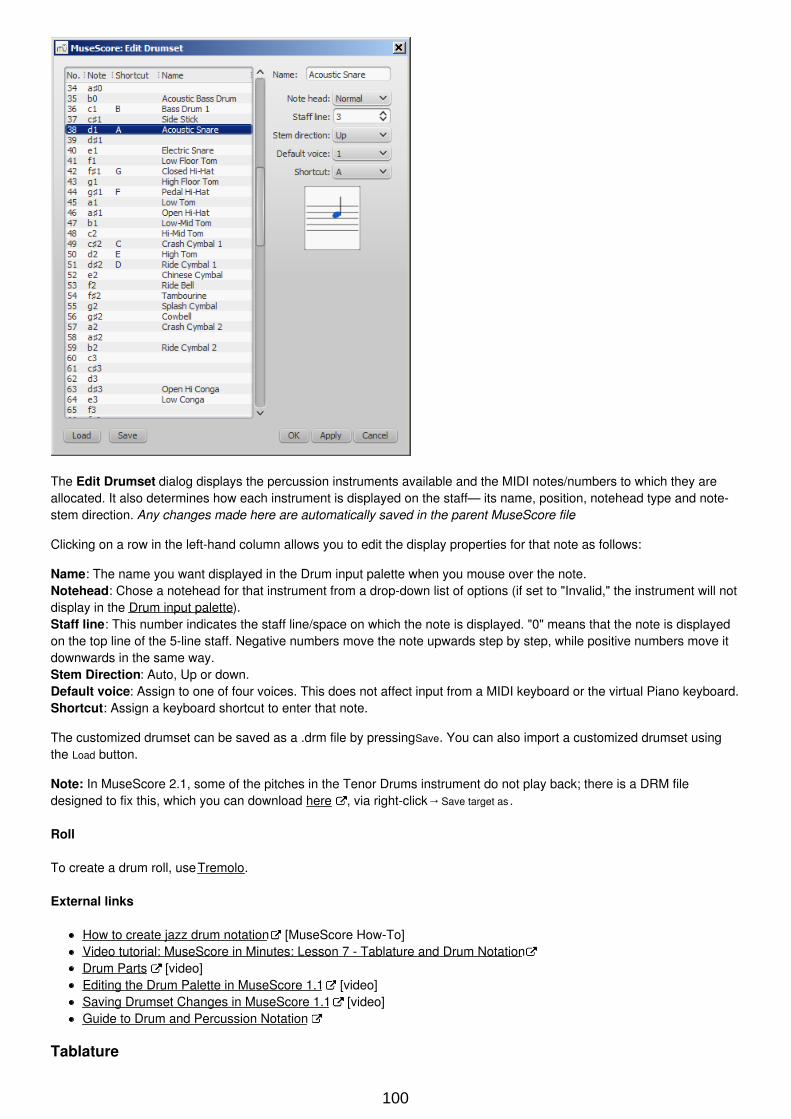
The Edit Drumset dialog displays the percussion instruments available and the MIDI notes/numbers to which they areallocated. It also determines how each instrument is displayed on the staff— its name, position, notehead type and note-stem direction. Any changes made here are automatically saved in the parent MuseScore file.
Clicking on a row in the left-hand column allows you to edit the display properties for that note as follows:
Name: The name you want displayed in the Drum input palette when you mouse over the note.Notehead: Chose a notehead for that instrument from a drop-down list of options (if set to "Invalid," the instrument will notdisplay in the Drum input palette).Staff line: This number indicates the staff line/space on which the note is displayed. "0" means that the note is displayedon the top line of the 5-line staff. Negative numbers move the note upwards step by step, while positive numbers move itdownwards in the same way.Stem Direction: Auto, Up or down.Default voice: Assign to one of four voices. This does not affect input from a MIDI keyboard or the virtual Piano keyboard.Shortcut: Assign a keyboard shortcut to enter that note.
The customized drumset can be saved as a .drm file by pressing Save. You can also import a customized drumset usingthe Load button.
Note: In MuseScore 2.1, some of the pitches in the Tenor Drums instrument do not play back; there is a DRM filedesigned to fix this, which you can download here , via right-click→ Save target as .
Roll
To create a drum roll, use Tremolo.
External links
How to create jazz drum notation [MuseScore How-To]Video tutorial: MuseScore in Minutes: Lesson 7 - Tablature and Drum NotationDrum Parts [video]Editing the Drum Palette in MuseScore 1.1 [video]Saving Drumset Changes in MuseScore 1.1 [video]Guide to Drum and Percussion Notation
Tablature
100
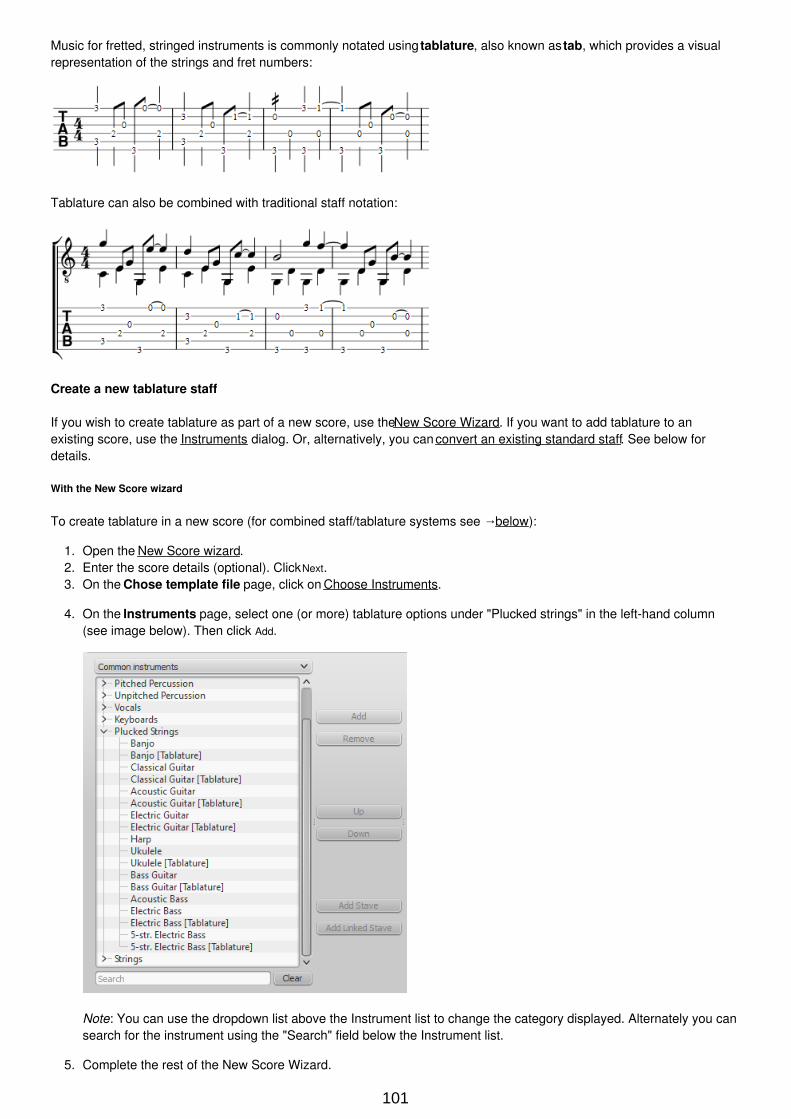
Music for fretted, stringed instruments is commonly notated using tablature, also known as tab, which provides a visualrepresentation of the strings and fret numbers:
Tablature can also be combined with traditional staff notation:
Create a new tablature staff
If you wish to create tablature as part of a new score, use the New Score Wizard. If you want to add tablature to anexisting score, use the Instruments dialog. Or, alternatively, you can convert an existing standard staff. See below fordetails.
With the New Score wizard
To create tablature in a new score (for combined staff/tablature systems see → below):
1. Open the New Score wizard.2. Enter the score details (optional). Click Next.3. On the Chose template file page, click on Choose Instruments.
4. On the Instruments page, select one (or more) tablature options under "Plucked strings" in the left-hand column(see image below). Then click Add.
Note: You can use the dropdown list above the Instrument list to change the category displayed. Alternately you cansearch for the instrument using the "Search" field below the Instrument list.
5. Complete the rest of the New Score Wizard.
101
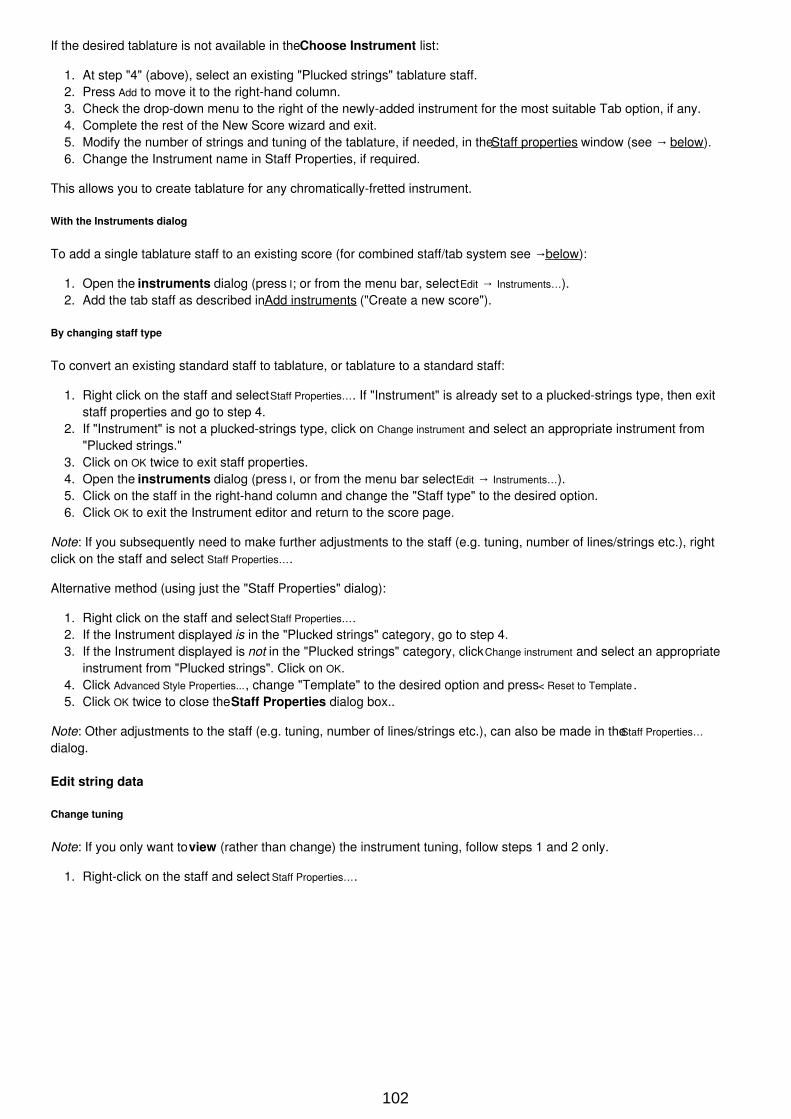
If the desired tablature is not available in the Choose Instrument list:
1. At step "4" (above), select an existing "Plucked strings" tablature staff.2. Press Add to move it to the right-hand column.3. Check the drop-down menu to the right of the newly-added instrument for the most suitable Tab option, if any.4. Complete the rest of the New Score wizard and exit.5. Modify the number of strings and tuning of the tablature, if needed, in the Staff properties window (see → below).6. Change the Instrument name in Staff Properties, if required.
This allows you to create tablature for any chromatically-fretted instrument.
With the Instruments dialog
To add a single tablature staff to an existing score (for combined staff/tab system see → below):
1. Open the instruments dialog (press I; or from the menu bar, select Edit → Instruments…).2. Add the tab staff as described in Add instruments ("Create a new score").
By changing staff type
To convert an existing standard staff to tablature, or tablature to a standard staff:
1. Right click on the staff and select Staff Properties…. If "Instrument" is already set to a plucked-strings type, then exitstaff properties and go to step 4.
2. If "Instrument" is not a plucked-strings type, click on Change instrument and select an appropriate instrument from"Plucked strings."
3. Click on OK twice to exit staff properties.4. Open the instruments dialog (press I, or from the menu bar select Edit → Instruments…).5. Click on the staff in the right-hand column and change the "Staff type" to the desired option.6. Click OK to exit the Instrument editor and return to the score page.
Note: If you subsequently need to make further adjustments to the staff (e.g. tuning, number of lines/strings etc.), rightclick on the staff and select Staff Properties….
Alternative method (using just the "Staff Properties" dialog):
1. Right click on the staff and select Staff Properties….2. If the Instrument displayed is in the "Plucked strings" category, go to step 4.3. If the Instrument displayed is not in the "Plucked strings" category, click Change instrument and select an appropriate
instrument from "Plucked strings". Click on OK.4. Click Advanced Style Properties..., change "Template" to the desired option and press < Reset to Template .5. Click OK twice to close the Staff Properties dialog box..
Note: Other adjustments to the staff (e.g. tuning, number of lines/strings etc.), can also be made in the Staff Properties…
dialog.
Edit string data
Change tuning
Note: If you only want to view (rather than change) the instrument tuning, follow steps 1 and 2 only.
1. Right-click on the staff and select Staff Properties….
102
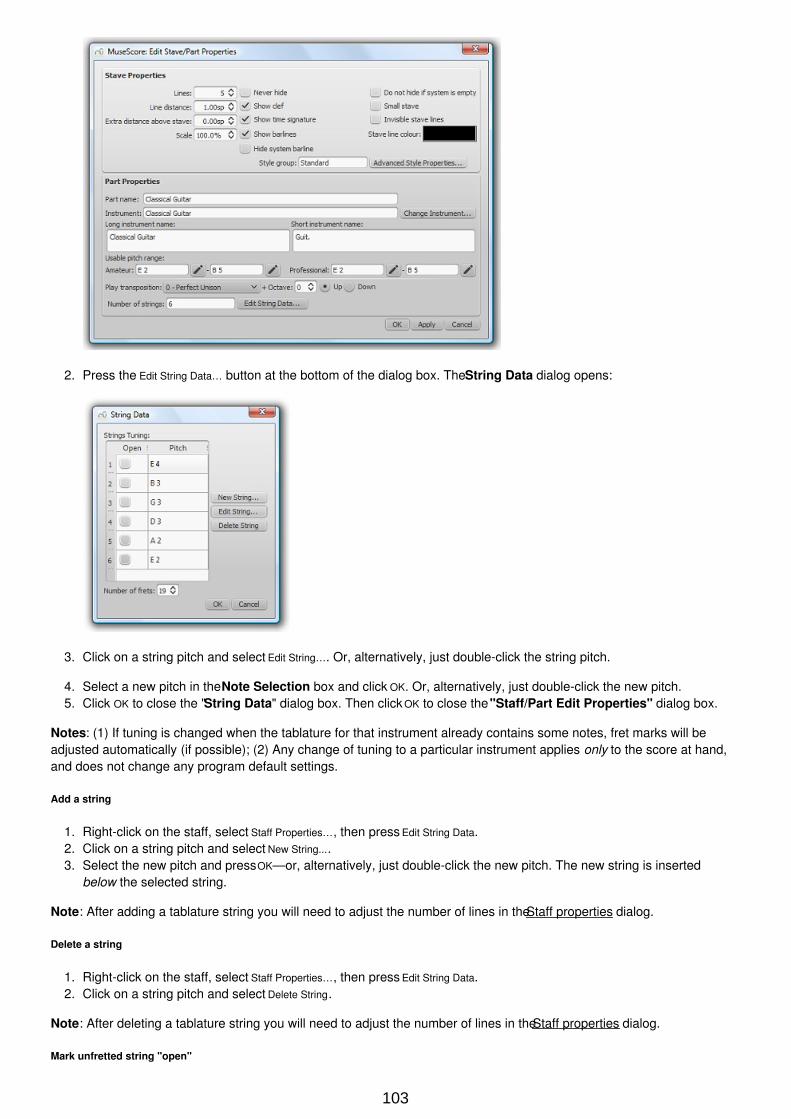
2. Press the Edit String Data… button at the bottom of the dialog box. The String Data dialog opens:
3. Click on a string pitch and select Edit String…. Or, alternatively, just double-click the string pitch.
4. Select a new pitch in the Note Selection box and click OK. Or, alternatively, just double-click the new pitch.5. Click OK to close the "String Data" dialog box. Then click OK to close the "Staff/Part Edit Properties" dialog box.
Notes: (1) If tuning is changed when the tablature for that instrument already contains some notes, fret marks will beadjusted automatically (if possible); (2) Any change of tuning to a particular instrument applies only to the score at hand,and does not change any program default settings.
Add a string
1. Right-click on the staff, select Staff Properties…, then press Edit String Data.2. Click on a string pitch and select New String....3. Select the new pitch and press OK—or, alternatively, just double-click the new pitch. The new string is inserted
below the selected string.
Note: After adding a tablature string you will need to adjust the number of lines in the Staff properties dialog.
Delete a string
1. Right-click on the staff, select Staff Properties…, then press Edit String Data.2. Click on a string pitch and select Delete String.
Note: After deleting a tablature string you will need to adjust the number of lines in the Staff properties dialog.
Mark unfretted string "open"
103
This feature is used to mark a (bass) course as unstopped (i.e. outside of the fingerboard and always sounding open): ason a Baroque lute or Theorbo etc. This means that only "0" (zero) or "a" is accepted as a fret mark: any other fret mark willbe converted to 0/a.
1. Right-click on the staff, select Staff Properties…, then press Edit String Data.2. Check one or more boxes in the "Open" column.
Change number of instrument frets
This property defines the maximum fret number which can be entered on a tablature staff.
1. Right-click on the staff, select Staff Properties…, then press Edit String Data.2. Select or enter a new number in the "Number of frets" spin box.
Change tablature display
You can customize both the appearance of a tablature staff and the way that it displays the fret marks. To access theseoptions:
1. Right click on the staff and select Staff Properties….2. Click on the Advanced Style Properties… button.
Combine pitched staff with tablature
Plucked-string instruments—such as the guitar—are commonly notated using both a music staff and tablature (TAB)together. MuseScore gives you the option of having the two staves either unlinked or linked:
1. Unlinked Staves: You can enter, delete or edit notation in one staff without affecting the other. To transfer musicnotation from one staff to the other, select the desired range and copy and paste it into the other staff.
2. Linked Staves: Any changes you make in one staff are automatically applied to the other staff as well ("mutualtranslation").
A note on fret mark conflicts: When the same note is entered in two different voices, MuseScore tries to ensure that thefret marks do not overlap on the same string. Any overlaps which do occur are marked with red squares: these appearonly in the document window and not on any printed copy. In almost all cases (e.g. frets 0 to 4 on the 6th string),overlapping is the desired result and no further adjustment is required. As of version 2.2, you can hide the red marks byselecting "View" and unticking "Show Unprintable."
Create a staff/tablature pair with the New Score wizard
1. Open the New Score wizard.2. Enter the score details (optional). Click Next.3. On the Chose template file page, click on Choose Instruments.4. Select a pitched staff in the "Plucked strings" section of the left-hand column. Then click Add.5. Select the newly-created staff line (i.e. marked "Staff …") in the right-hand column and chose one of two options:
Click Add Staff to create an unlinked staff/tab pair.Click Add Linked Staff to create a linked staff/tab pair.
6. In the Staff type column, click on the dropdown list for the newly-created staff and select a tablature option (this canbe modified later, if required, on the score page—see Staff Properties).
7. Complete the rest of the New Score Wizard, or click Finish.
Note: To create unlinked staves with separate mixer channels, instead of step "5" (above), select a Tablature staff in theleft-hand column and click Add. Then continue with steps 6 and 7.
Create a staff/tablature pair in an existing score
1. Open the Instruments editor (press I, or from the menu bar, select Edit → Instruments…).2. Select a pitched staff in the "Plucked strings" section of the left-hand column. Then click Add.3. Select the newly-created staff line (i.e. marked "Staff …") in the right-hand column and chose one of two options:
Click Add Staff to create an unlinked staff/tab pair.Click Add Linked Staff to create a linked staff/tab pair.
4. In the Staff type column, click on the dropdown list for the newly-created staff and select a tablature option (this canbe modified later, if required, on the score page—see Staff Properties).
104
5. Change the staff order using the ↑ button if needed.6. Click OK to return to the score.
Note: To create unlinked staves with separate mixer channels, instead of step "3" (above), select a Tablature staff in theleft-hand column and click Add. Then continue with steps 4–6.
Create a staff/tablature pair from an existing staff
To add tablature to a plucked-string staff in the score (or vice versa):
1. Open the Instruments editor (press I, or from the menu bar, select Edit → Instruments…).2. Select the staff line (marked "Staff 1") in the right-hand column that you want to add to.3. Chose one of two options:
Click Add Staff to create an unlinked staff/tab pairClick Add Linked Staff to create a linked staff/tab pair
4. In the Staff type column, click on the dropdown list for the newly-created staff and select an option (this can bemodified later, if required, on the score page—see Staff Properties).
5. Change the staff order using the ↑ button if needed.6. Click OK.
Notes: To create unlinked staves with separate mixer channels, instead of step "3" (above), select an appropriate staff inthe left-hand column and click Add. Then continue with steps 4–6.
Enter notes in tablature
Using a computer keyboard
First, ensure that you are not in note-input mode. Select the measure or existing note from which you want to beginnote entry.Switch to note input mode (N): a short 'blue rectangle' appears around one tablature string: this is the current string.Select the duration of the note or rest that you wish to enter (see below).Press the up/down arrow keys to move the cursor to the desired string. Use the left/right arrow keys to navigatethrough the score.
Press 0 to 9 to enter a fret mark from 0 to 9 on the current string; to enter numbers with several digits press eachdigit in sequence. Keys A to K (skipping I) can also be used: convenient when working in French tablature. For L , M,N, use the alphanumeric keyboard and type respectively 10, 11, 12...
Note: You cannot enter a number higher than the "Number of frets" value set in the Edit String Data dialog.
Press ; (semicolon) to enter a rest of the selected duration.
You can enter notes in different voices if required—just as you would in a standard staff.
See also, Edit notes (below).
Historical tablature
As of version 2.1, period notation for bass strings (lutes and sim.) is supported:
French tablature: letters with prefixed slash-like strokes right under the tab body: i.e. 7th string: "a", 8th string: "/a",9th string: "//a" and so on, all in the first position below the tab body.
Italian tablature: numbers with 'ledger line'- like segment of string above the tab body: i.e. 7th string: "0" oneposition above the tab body with one 'ledger line'; 8th string: "0" two positions above the tab body with two 'ledgerlines' and so on.
Input of is via computer keyboard only: by moving the note entry cursor below (French) or above (Italian) the tab body,'shadow' slashes or ledger lines will indicate the target string to which the fret mark will be applied; pressing one of the fretkeys, will enter (and lay out) the note on that string.
Using a mouse
To enter notes into tablature with a mouse:
105
Enter note input mode and select the note or rest duration (see below).Click on a string to create a note there. Notes are initially created on fret 0 (or a for French tablatures): to correct,type in the right number from the keyboard.You can also increase/decrease the fret mark using Alt+Shift+↑ or Alt+Shift+↓.You can enter notes in different voices if required—just as you would in a standard staff.
See also, Edit notes (below).
Select note duration
In note input mode, you can use any of the following methods to set note duration in tablature:
Press Shift+1 to Shift+9: Sets duration from a 128th note to a longa (availability of these shortcuts may depend on theplatform and/or keyboard layout);Press NumPad 1 to Numpad 9: Sets duration from a 128th note to a longa (if a numeric keypad exists and NumLock ison);Click on a note duration icon in the Note Input toolbar above the document window;Press Q to decrease the selected duration and W to increase it.
Edit notes
Note input mode
To edit an existing fret mark in note-input mode:
Position the cursor above the fret mark and simply retype the number.Increment or decrement the fret mark using Alt+Shift+↑ or Alt+Shift+↓.
Non note input mode
To edit an existing fret mark outside note-input mode:
1. Select one or more fret marks.2. Use any of the following commands:
To increment or decrement, without changing the string: Press ↑ / ↓.To increment or decrement, changing strings, when possible, to minimize the fret number: Press Alt+Shift+↑ / ↓To move to an adjacent string (if the string is free and can produce that note): Press Ctrl+↑ / ↓ (Mac: Cmd+↑ / ↓) .
Note: The fret mark cannot be higher than the "Number of frets" value set in the Edit String Data dialog.
Crosshead notes
To change a fret mark to a crosshead note:
1. Select one or more fret marks (in non-note-input mode).2. Press Shift+X to toggles ghost noteheads on/off.
Summary of keyboard commands
Note input mode
Type: to get:
↑ Select above string as current.
↓ Select below string as current.
Shift+1 to Shift+9Select a duration (128th note to alonga)
NumPad 1 to NumPad
9
Select a duration (128th note to alonga)
Q Decrease current input duration.
W Increase current input duration.
0 to 9 Enter a fret digit / letter.
A to K Enter a fret digit / letter (I excluded).
106
Alt+Shift+↑ Increase current fret mark.
Alt+Shift+↓ Decrease current fret mark.
; (semicolon) Enter a rest
Type: to get:
Normal mode
Type: to get:
0 to 9 Change duration of selected note or rest (128th note to longa)
Alt+Shift+↑ Increase the pitch of the selected note (MuseScore chooses the string).
↑ Increase the pitch without changing string.
Alt+Shift+↓Decrease the pitch of the selected note (MuseScore chooses thestring).
↓ Decrease the pitch without changing string.
Ctrl+↑ (Mac: Cmd+↑) Move note to above string, keeping the pitch.
Ctrl+↓ (Mac: Cmd+↓) Move note to below string, keeping the pitch.
Shift+X Toggle the ghost notehead on/off.
External links
Video tutorial: MuseScore in Minutes: Lesson 7 - Tablature and Drum Notation
Sound and playback
MuseScore has "Sound and playback" capabilities built-in. This chapter covers the playback controls and ways to extendthe instrument sounds.
Mid-staff instrument changes
When a musician is required to double on a different instrument for a section of a piece, the instruction to switchinstruments is generally placed above the staff at the beginning of that section. A return to the primary instrument ishandled in the same manner.
MuseScore enables users to insert a special class of text called Change Instrument text for this purpose. This class oftext is different from either Staff or System text in that it links the text to the playback and changes the sound to the newinstrument.
Instrument changes as of version 2.1
Version 2.1 introduces a greatly improved mid-staff instrument change over previous versions. There are still somelimitations that need to be considered prior to using it.
1. Mid-staff instrument changes are limited to the same type of staff. For example, you cannot change between apercussion staff and a pitched instrument staff or vice versa.
2. The instrument name is not changed in the mixer. It will still be listed under the instrument in the original definition ofthe staff.
3. The key signature is not automatically updated at the instrument change. You must manually change the Keysignature if needed.
4. You can now enter the notes a musician would play once the instrument is changed and the correct key signature isentered if necessary.
5. Unless you are changing the type of staff, you will always use the Change Instrument text.
Instrument changes in version 2.0
There are several limitations to this in version 2.0 which should be understood before attempting to use it.
1. Automatic transposition from concert pitch to the appropriate key for the transposing brass and woodwindinstruments is not currently supported. For changes to instruments notated in a different key (C flute to E flute;
107
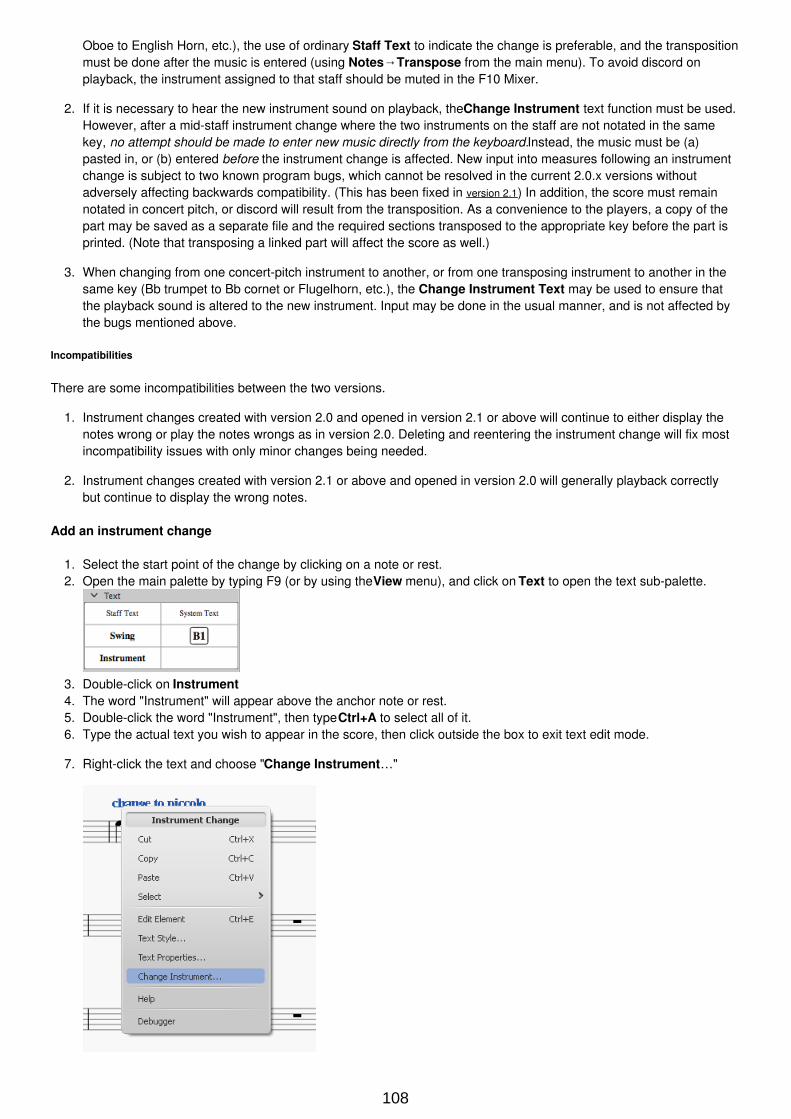
Oboe to English Horn, etc.), the use of ordinary Staff Text to indicate the change is preferable, and the transpositionmust be done after the music is entered (using Notes→Transpose from the main menu). To avoid discord onplayback, the instrument assigned to that staff should be muted in the F10 Mixer.
2. If it is necessary to hear the new instrument sound on playback, the Change Instrument text function must be used.However, after a mid-staff instrument change where the two instruments on the staff are not notated in the samekey, no attempt should be made to enter new music directly from the keyboard. Instead, the music must be (a)pasted in, or (b) entered before the instrument change is affected. New input into measures following an instrumentchange is subject to two known program bugs, which cannot be resolved in the current 2.0.x versions withoutadversely affecting backwards compatibility. (This has been fixed in version 2.1) In addition, the score must remainnotated in concert pitch, or discord will result from the transposition. As a convenience to the players, a copy of thepart may be saved as a separate file and the required sections transposed to the appropriate key before the part isprinted. (Note that transposing a linked part will affect the score as well.)
3. When changing from one concert-pitch instrument to another, or from one transposing instrument to another in thesame key (Bb trumpet to Bb cornet or Flugelhorn, etc.), the Change Instrument Text may be used to ensure thatthe playback sound is altered to the new instrument. Input may be done in the usual manner, and is not affected bythe bugs mentioned above.
Incompatibilities
There are some incompatibilities between the two versions.
1. Instrument changes created with version 2.0 and opened in version 2.1 or above will continue to either display thenotes wrong or play the notes wrongs as in version 2.0. Deleting and reentering the instrument change will fix mostincompatibility issues with only minor changes being needed.
2. Instrument changes created with version 2.1 or above and opened in version 2.0 will generally playback correctlybut continue to display the wrong notes.
Add an instrument change
1. Select the start point of the change by clicking on a note or rest.2. Open the main palette by typing F9 (or by using the View menu), and click on Text to open the text sub-palette.
3. Double-click on Instrument4. The word "Instrument" will appear above the anchor note or rest.5. Double-click the word "Instrument", then type Ctrl+A to select all of it.6. Type the actual text you wish to appear in the score, then click outside the box to exit text edit mode.
7. Right-click the text and choose "Change Instrument…"
108
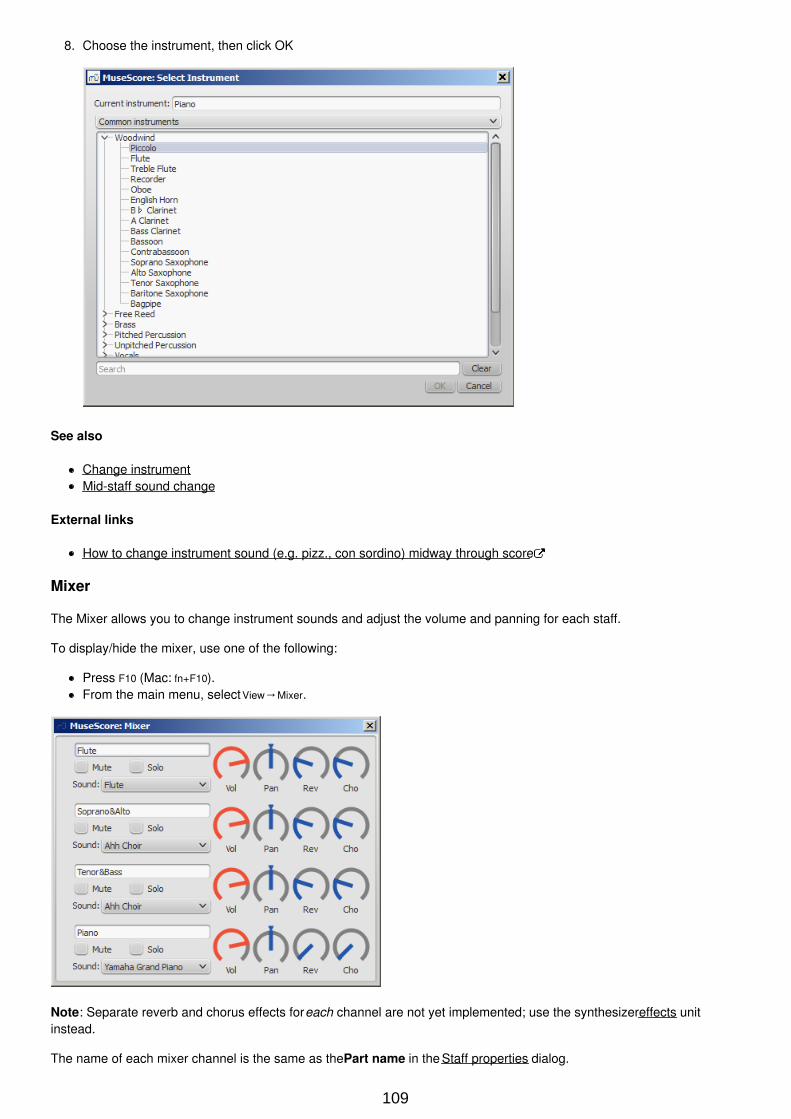
8. Choose the instrument, then click OK
See also
Change instrumentMid-staff sound change
External links
How to change instrument sound (e.g. pizz., con sordino) midway through score
Mixer
The Mixer allows you to change instrument sounds and adjust the volume and panning for each staff.
To display/hide the mixer, use one of the following:
Press F10 (Mac: fn+F10).From the main menu, select View→Mixer.
Note: Separate reverb and chorus effects for each channel are not yet implemented; use the synthesizer effects unitinstead.
The name of each mixer channel is the same as the Part name in the Staff properties dialog.
109
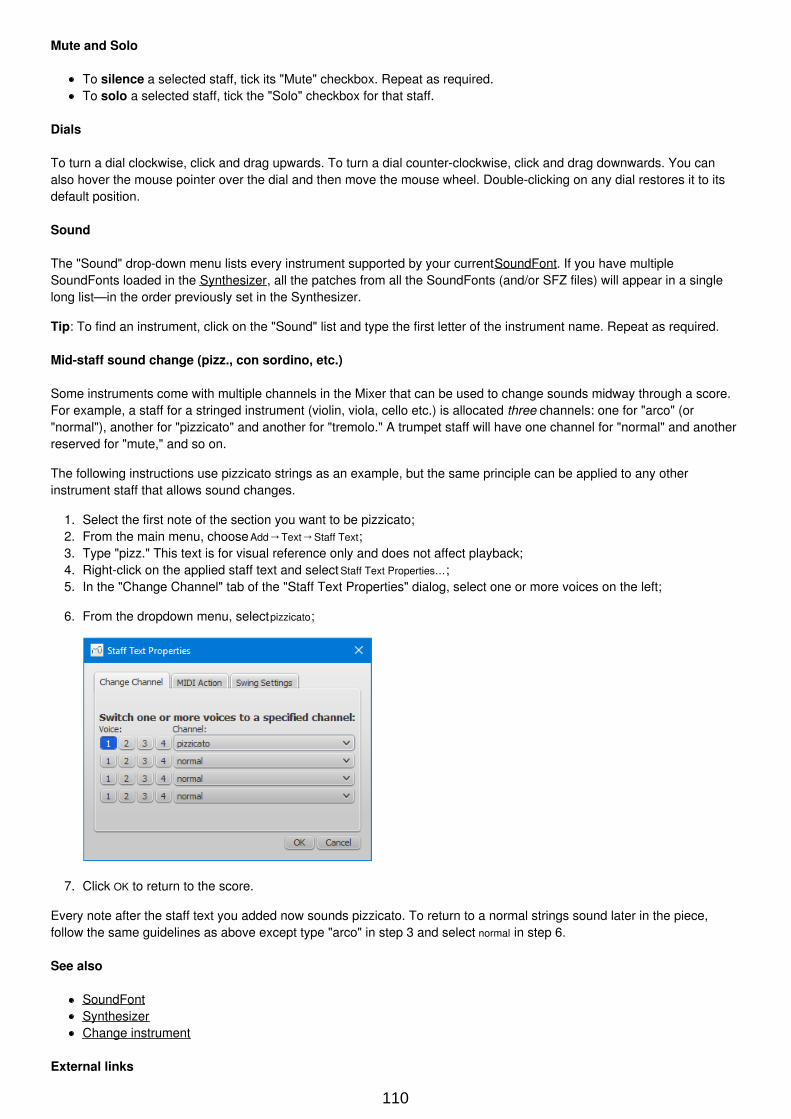
Mute and Solo
To silence a selected staff, tick its "Mute" checkbox. Repeat as required.To solo a selected staff, tick the "Solo" checkbox for that staff.
Dials
To turn a dial clockwise, click and drag upwards. To turn a dial counter-clockwise, click and drag downwards. You canalso hover the mouse pointer over the dial and then move the mouse wheel. Double-clicking on any dial restores it to itsdefault position.
Sound
The "Sound" drop-down menu lists every instrument supported by your current SoundFont. If you have multipleSoundFonts loaded in the Synthesizer, all the patches from all the SoundFonts (and/or SFZ files) will appear in a singlelong list—in the order previously set in the Synthesizer.
Tip: To find an instrument, click on the "Sound" list and type the first letter of the instrument name. Repeat as required.
Mid-staff sound change (pizz., con sordino, etc.)
Some instruments come with multiple channels in the Mixer that can be used to change sounds midway through a score.For example, a staff for a stringed instrument (violin, viola, cello etc.) is allocated three channels: one for "arco" (or"normal"), another for "pizzicato" and another for "tremolo." A trumpet staff will have one channel for "normal" and anotherreserved for "mute," and so on.
The following instructions use pizzicato strings as an example, but the same principle can be applied to any otherinstrument staff that allows sound changes.
1. Select the first note of the section you want to be pizzicato;2. From the main menu, choose Add→Text→Staff Text;3. Type "pizz." This text is for visual reference only and does not affect playback;4. Right-click on the applied staff text and select Staff Text Properties…;5. In the "Change Channel" tab of the "Staff Text Properties" dialog, select one or more voices on the left;
6. From the dropdown menu, select pizzicato;
7. Click OK to return to the score.
Every note after the staff text you added now sounds pizzicato. To return to a normal strings sound later in the piece,follow the same guidelines as above except type "arco" in step 3 and select normal in step 6.
See also
SoundFontSynthesizerChange instrument
External links
110
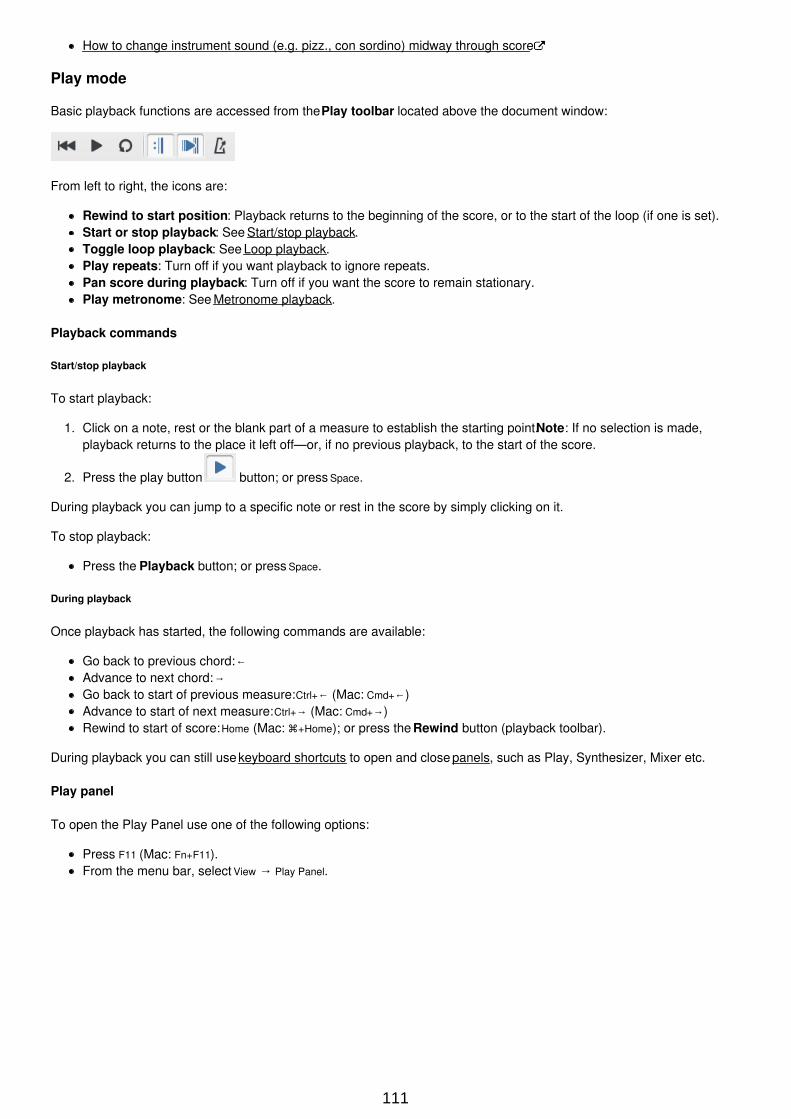
How to change instrument sound (e.g. pizz., con sordino) midway through score
Play mode
Basic playback functions are accessed from the Play toolbar located above the document window:
From left to right, the icons are:
Rewind to start position: Playback returns to the beginning of the score, or to the start of the loop (if one is set).Start or stop playback: See Start/stop playback.Toggle loop playback: See Loop playback.Play repeats: Turn off if you want playback to ignore repeats.Pan score during playback: Turn off if you want the score to remain stationary.Play metronome: See Metronome playback.
Playback commands
Start/stop playback
To start playback:
1. Click on a note, rest or the blank part of a measure to establish the starting point. Note: If no selection is made,playback returns to the place it left off—or, if no previous playback, to the start of the score.
2. Press the play button button; or press Space.
During playback you can jump to a specific note or rest in the score by simply clicking on it.
To stop playback:
Press the Playback button; or press Space.
During playback
Once playback has started, the following commands are available:
Go back to previous chord: ←Advance to next chord: →Go back to start of previous measure: Ctrl+← (Mac: Cmd+←)Advance to start of next measure: Ctrl+→ (Mac: Cmd+→)Rewind to start of score: Home (Mac: +Home); or press the Rewind button (playback toolbar).
During playback you can still use keyboard shortcuts to open and close panels, such as Play, Synthesizer, Mixer etc.
Play panel
To open the Play Panel use one of the following options:
Press F11 (Mac: Fn+F11).From the menu bar, select View → Play Panel.
111
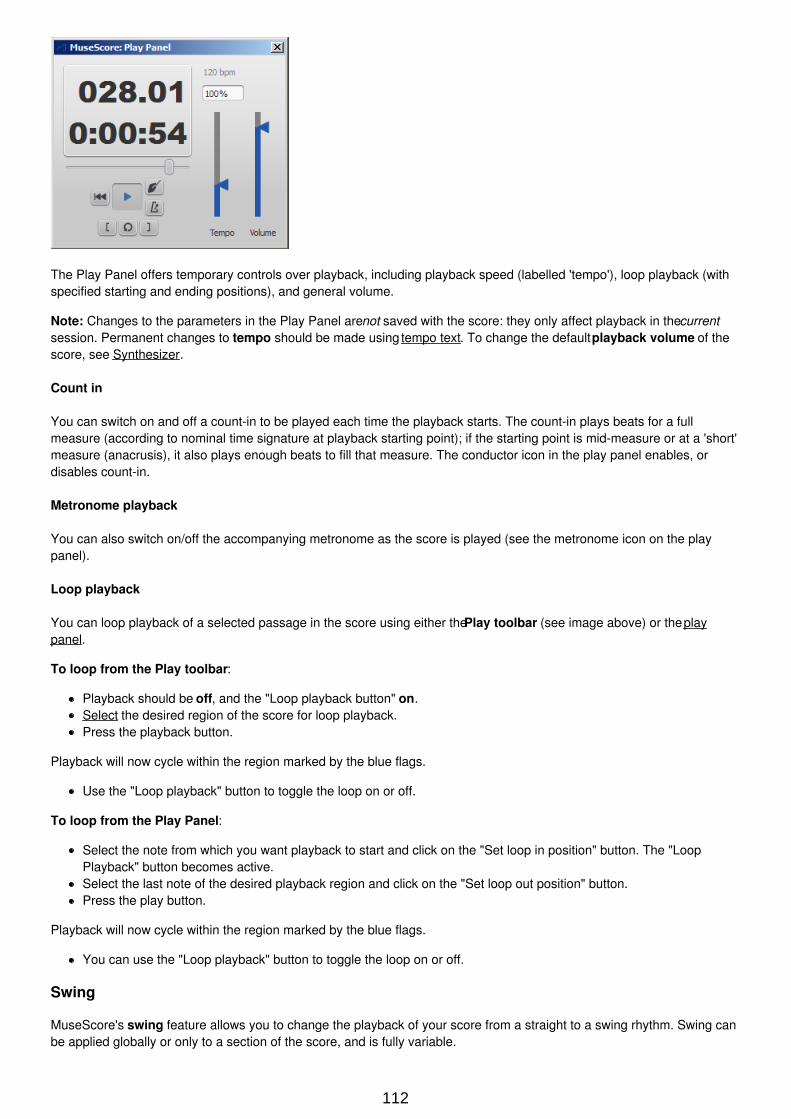
The Play Panel offers temporary controls over playback, including playback speed (labelled 'tempo'), loop playback (withspecified starting and ending positions), and general volume.
Note: Changes to the parameters in the Play Panel are not saved with the score: they only affect playback in the currentsession. Permanent changes to tempo should be made using tempo text. To change the default playback volume of thescore, see Synthesizer.
Count in
You can switch on and off a count-in to be played each time the playback starts. The count-in plays beats for a fullmeasure (according to nominal time signature at playback starting point); if the starting point is mid-measure or at a 'short'measure (anacrusis), it also plays enough beats to fill that measure. The conductor icon in the play panel enables, ordisables count-in.
Metronome playback
You can also switch on/off the accompanying metronome as the score is played (see the metronome icon on the playpanel).
Loop playback
You can loop playback of a selected passage in the score using either the Play toolbar (see image above) or the playpanel.
To loop from the Play toolbar:
Playback should be off, and the "Loop playback button" on.Select the desired region of the score for loop playback.Press the playback button.
Playback will now cycle within the region marked by the blue flags.
Use the "Loop playback" button to toggle the loop on or off.
To loop from the Play Panel:
Select the note from which you want playback to start and click on the "Set loop in position" button. The "LoopPlayback" button becomes active.Select the last note of the desired playback region and click on the "Set loop out position" button.Press the play button.
Playback will now cycle within the region marked by the blue flags.
You can use the "Loop playback" button to toggle the loop on or off.
Swing
MuseScore's swing feature allows you to change the playback of your score from a straight to a swing rhythm. Swing canbe applied globally or only to a section of the score, and is fully variable.
112
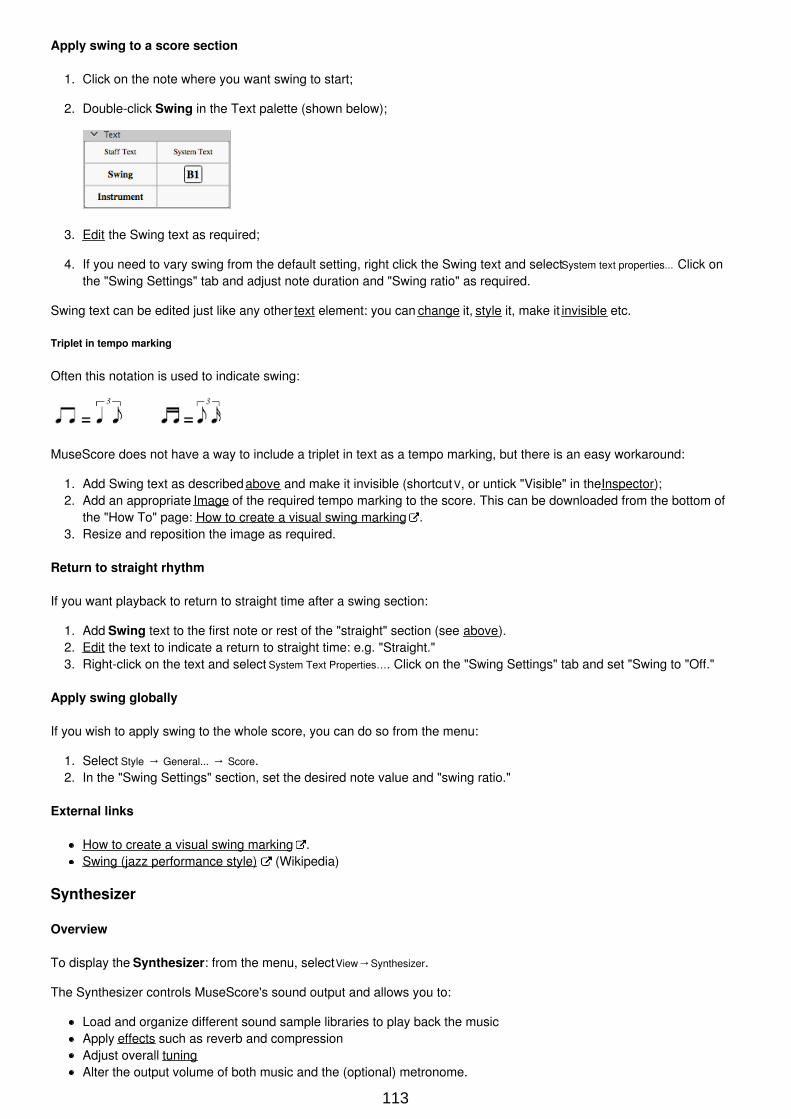
Apply swing to a score section
1. Click on the note where you want swing to start;
2. Double-click Swing in the Text palette (shown below);
3. Edit the Swing text as required;
4. If you need to vary swing from the default setting, right click the Swing text and select System text properties... Click onthe "Swing Settings" tab and adjust note duration and "Swing ratio" as required.
Swing text can be edited just like any other text element: you can change it, style it, make it invisible etc.
Triplet in tempo marking
Often this notation is used to indicate swing:
MuseScore does not have a way to include a triplet in text as a tempo marking, but there is an easy workaround:
1. Add Swing text as described above and make it invisible (shortcut V, or untick "Visible" in the Inspector);2. Add an appropriate Image of the required tempo marking to the score. This can be downloaded from the bottom of
the "How To" page: How to create a visual swing marking .3. Resize and reposition the image as required.
Return to straight rhythm
If you want playback to return to straight time after a swing section:
1. Add Swing text to the first note or rest of the "straight" section (see above).2. Edit the text to indicate a return to straight time: e.g. "Straight."3. Right-click on the text and select System Text Properties…. Click on the "Swing Settings" tab and set "Swing to "Off."
Apply swing globally
If you wish to apply swing to the whole score, you can do so from the menu:
1. Select Style → General... → Score.2. In the "Swing Settings" section, set the desired note value and "swing ratio."
External links
How to create a visual swing marking .Swing (jazz performance style) (Wikipedia)
Synthesizer
Overview
To display the Synthesizer: from the menu, select View→Synthesizer.
The Synthesizer controls MuseScore's sound output and allows you to:
Load and organize different sound sample libraries to play back the musicApply effects such as reverb and compressionAdjust overall tuningAlter the output volume of both music and the (optional) metronome.
113
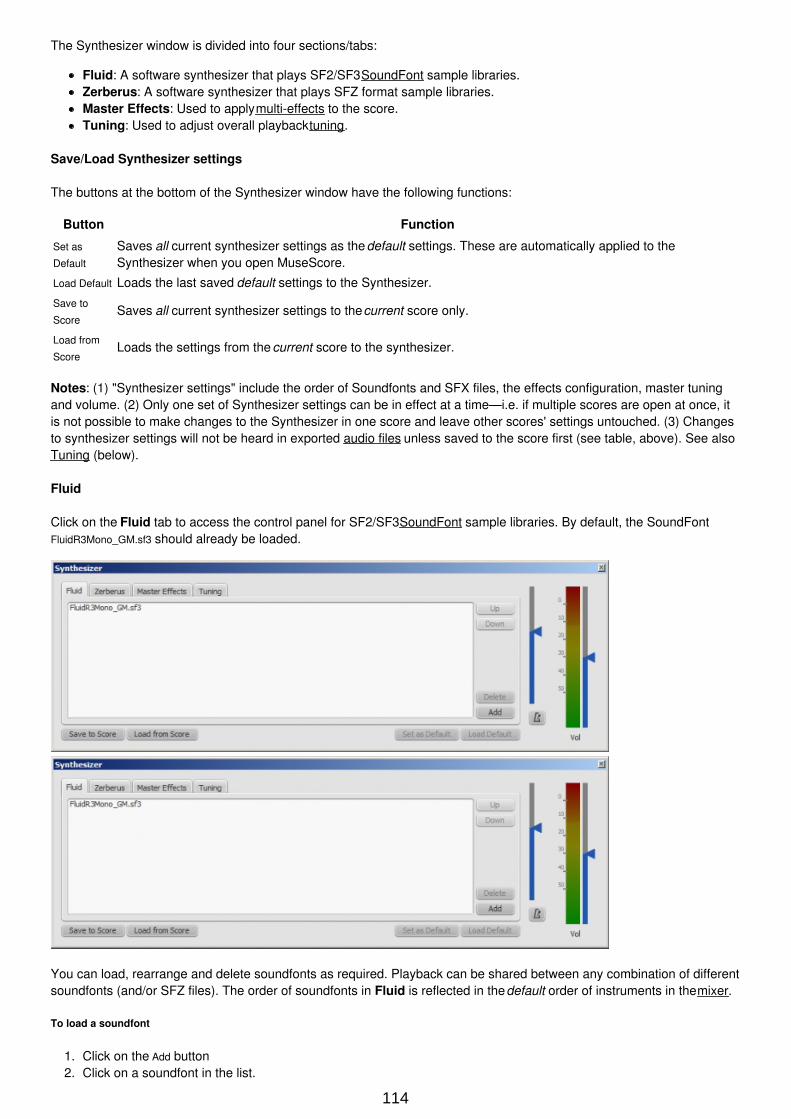
The Synthesizer window is divided into four sections/tabs:
Fluid: A software synthesizer that plays SF2/SF3 SoundFont sample libraries.Zerberus: A software synthesizer that plays SFZ format sample libraries.Master Effects: Used to apply multi-effects to the score.Tuning: Used to adjust overall playback tuning.
Save/Load Synthesizer settings
The buttons at the bottom of the Synthesizer window have the following functions:
Button Function
Set as
Default
Saves all current synthesizer settings as the default settings. These are automatically applied to theSynthesizer when you open MuseScore.
Load Default Loads the last saved default settings to the Synthesizer.
Save to
ScoreSaves all current synthesizer settings to the current score only.
Load from
ScoreLoads the settings from the current score to the synthesizer.
Notes: (1) "Synthesizer settings" include the order of Soundfonts and SFX files, the effects configuration, master tuningand volume. (2) Only one set of Synthesizer settings can be in effect at a time—i.e. if multiple scores are open at once, itis not possible to make changes to the Synthesizer in one score and leave other scores' settings untouched. (3) Changesto synthesizer settings will not be heard in exported audio files unless saved to the score first (see table, above). See alsoTuning (below).
Fluid
Click on the Fluid tab to access the control panel for SF2/SF3 SoundFont sample libraries. By default, the SoundFontFluidR3Mono_GM.sf3 should already be loaded.
You can load, rearrange and delete soundfonts as required. Playback can be shared between any combination of differentsoundfonts (and/or SFZ files). The order of soundfonts in Fluid is reflected in the default order of instruments in the mixer.
To load a soundfont
1. Click on the Add button2. Click on a soundfont in the list.
114
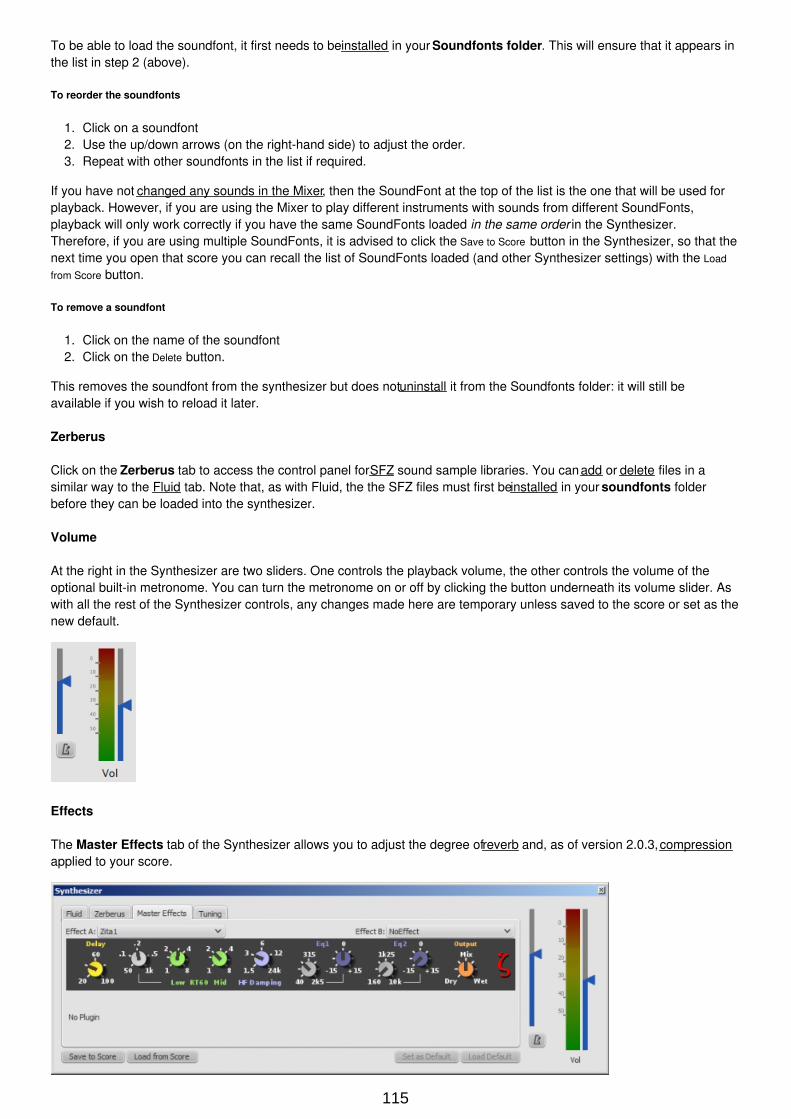
To be able to load the soundfont, it first needs to be installed in your Soundfonts folder. This will ensure that it appears inthe list in step 2 (above).
To reorder the soundfonts
1. Click on a soundfont2. Use the up/down arrows (on the right-hand side) to adjust the order.3. Repeat with other soundfonts in the list if required.
If you have not changed any sounds in the Mixer, then the SoundFont at the top of the list is the one that will be used forplayback. However, if you are using the Mixer to play different instruments with sounds from different SoundFonts,playback will only work correctly if you have the same SoundFonts loaded in the same order in the Synthesizer.Therefore, if you are using multiple SoundFonts, it is advised to click the Save to Score button in the Synthesizer, so that thenext time you open that score you can recall the list of SoundFonts loaded (and other Synthesizer settings) with the Load
from Score button.
To remove a soundfont
1. Click on the name of the soundfont2. Click on the Delete button.
This removes the soundfont from the synthesizer but does not uninstall it from the Soundfonts folder: it will still beavailable if you wish to reload it later.
Zerberus
Click on the Zerberus tab to access the control panel for SFZ sound sample libraries. You can add or delete files in asimilar way to the Fluid tab. Note that, as with Fluid, the the SFZ files must first be installed in your soundfonts folderbefore they can be loaded into the synthesizer.
Volume
At the right in the Synthesizer are two sliders. One controls the playback volume, the other controls the volume of theoptional built-in metronome. You can turn the metronome on or off by clicking the button underneath its volume slider. Aswith all the rest of the Synthesizer controls, any changes made here are temporary unless saved to the score or set as thenew default.
Effects
The Master Effects tab of the Synthesizer allows you to adjust the degree of reverb and, as of version 2.0.3, compressionapplied to your score.
115
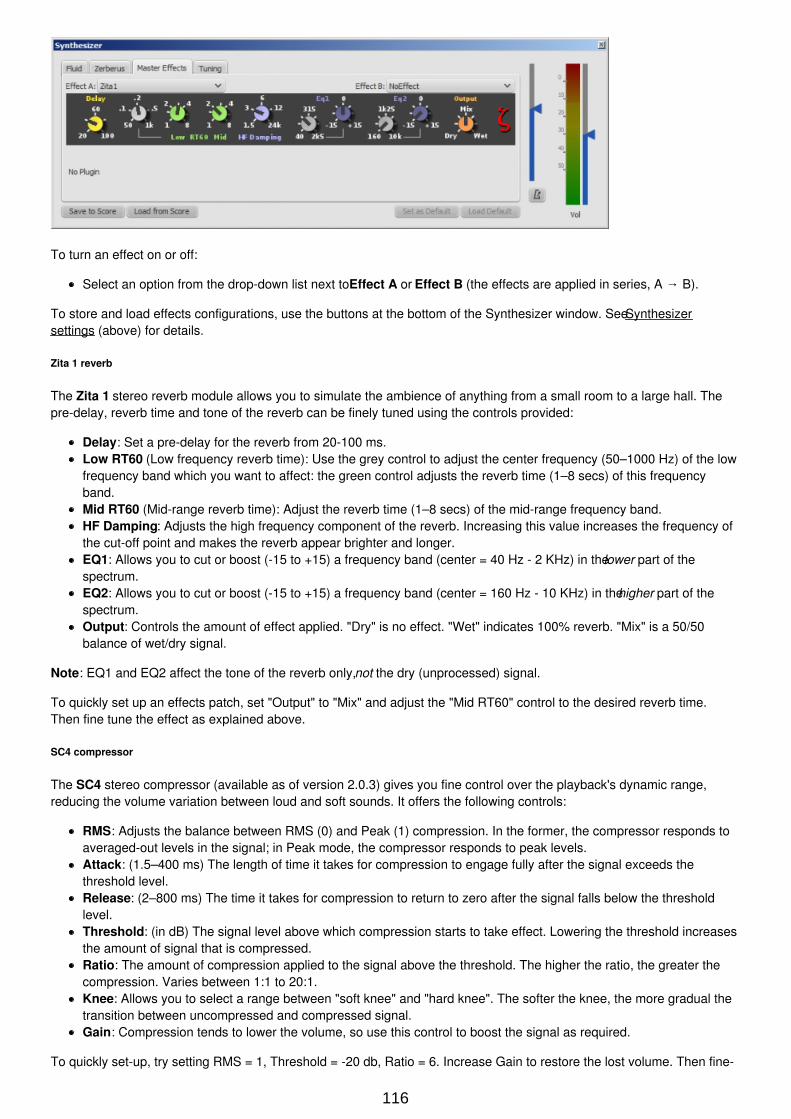
To turn an effect on or off:
Select an option from the drop-down list next to Effect A or Effect B (the effects are applied in series, A → B).
To store and load effects configurations, use the buttons at the bottom of the Synthesizer window. See Synthesizersettings (above) for details.
Zita 1 reverb
The Zita 1 stereo reverb module allows you to simulate the ambience of anything from a small room to a large hall. Thepre-delay, reverb time and tone of the reverb can be finely tuned using the controls provided:
Delay: Set a pre-delay for the reverb from 20-100 ms.Low RT60 (Low frequency reverb time): Use the grey control to adjust the center frequency (50–1000 Hz) of the lowfrequency band which you want to affect: the green control adjusts the reverb time (1–8 secs) of this frequencyband.Mid RT60 (Mid-range reverb time): Adjust the reverb time (1–8 secs) of the mid-range frequency band.HF Damping: Adjusts the high frequency component of the reverb. Increasing this value increases the frequency ofthe cut-off point and makes the reverb appear brighter and longer.EQ1: Allows you to cut or boost (-15 to +15) a frequency band (center = 40 Hz - 2 KHz) in the lower part of thespectrum.EQ2: Allows you to cut or boost (-15 to +15) a frequency band (center = 160 Hz - 10 KHz) in the higher part of thespectrum.Output: Controls the amount of effect applied. "Dry" is no effect. "Wet" indicates 100% reverb. "Mix" is a 50/50balance of wet/dry signal.
Note: EQ1 and EQ2 affect the tone of the reverb only, not the dry (unprocessed) signal.
To quickly set up an effects patch, set "Output" to "Mix" and adjust the "Mid RT60" control to the desired reverb time.Then fine tune the effect as explained above.
SC4 compressor
The SC4 stereo compressor (available as of version 2.0.3) gives you fine control over the playback's dynamic range,reducing the volume variation between loud and soft sounds. It offers the following controls:
RMS: Adjusts the balance between RMS (0) and Peak (1) compression. In the former, the compressor responds toaveraged-out levels in the signal; in Peak mode, the compressor responds to peak levels.Attack: (1.5–400 ms) The length of time it takes for compression to engage fully after the signal exceeds thethreshold level.Release: (2–800 ms) The time it takes for compression to return to zero after the signal falls below the thresholdlevel.Threshold: (in dB) The signal level above which compression starts to take effect. Lowering the threshold increasesthe amount of signal that is compressed.Ratio: The amount of compression applied to the signal above the threshold. The higher the ratio, the greater thecompression. Varies between 1:1 to 20:1.Knee: Allows you to select a range between "soft knee" and "hard knee". The softer the knee, the more gradual thetransition between uncompressed and compressed signal.Gain: Compression tends to lower the volume, so use this control to boost the signal as required.
To quickly set-up, try setting RMS = 1, Threshold = -20 db, Ratio = 6. Increase Gain to restore the lost volume. Then fine-
116
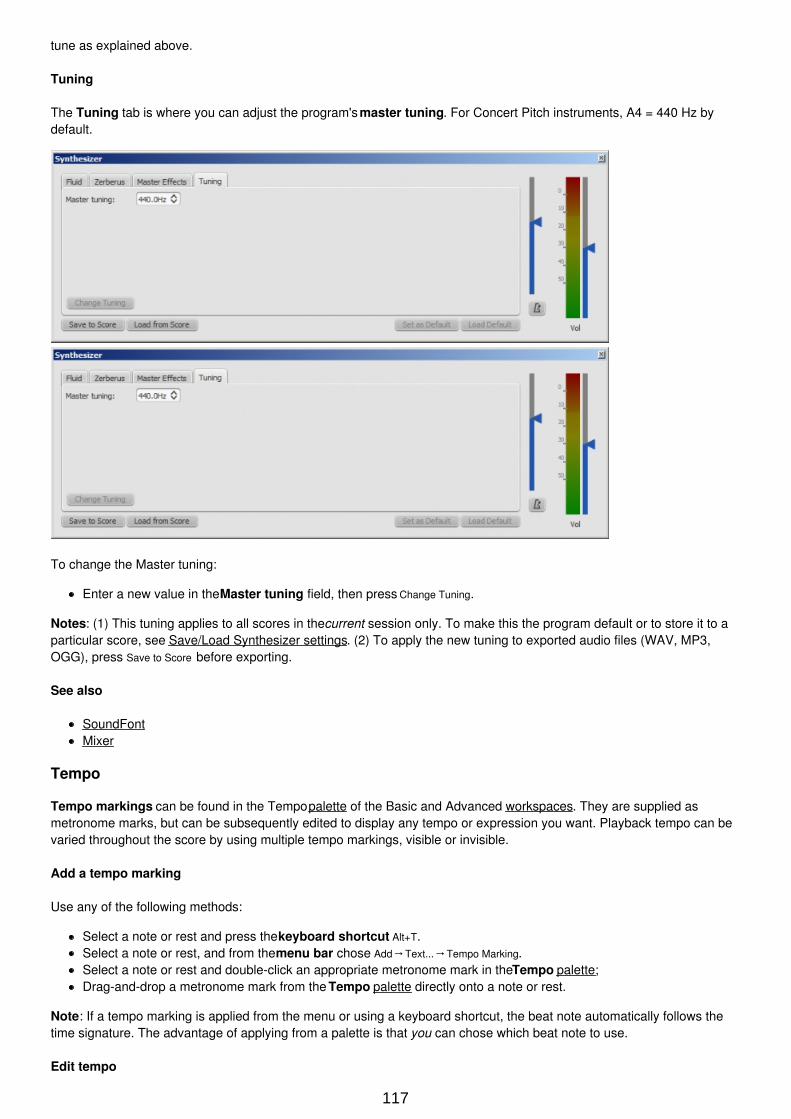
tune as explained above.
Tuning
The Tuning tab is where you can adjust the program's master tuning. For Concert Pitch instruments, A4 = 440 Hz bydefault.
To change the Master tuning:
Enter a new value in the Master tuning field, then press Change Tuning.
Notes: (1) This tuning applies to all scores in the current session only. To make this the program default or to store it to aparticular score, see Save/Load Synthesizer settings. (2) To apply the new tuning to exported audio files (WAV, MP3,OGG), press Save to Score before exporting.
See also
SoundFontMixer
Tempo
Tempo markings can be found in the Tempo palette of the Basic and Advanced workspaces. They are supplied asmetronome marks, but can be subsequently edited to display any tempo or expression you want. Playback tempo can bevaried throughout the score by using multiple tempo markings, visible or invisible.
Add a tempo marking
Use any of the following methods:
Select a note or rest and press the keyboard shortcut Alt+T.Select a note or rest, and from the menu bar chose Add→Text...→Tempo Marking.Select a note or rest and double-click an appropriate metronome mark in the Tempo palette;Drag-and-drop a metronome mark from the Tempo palette directly onto a note or rest.
Note: If a tempo marking is applied from the menu or using a keyboard shortcut, the beat note automatically follows thetime signature. The advantage of applying from a palette is that you can chose which beat note to use.
Edit tempo
117
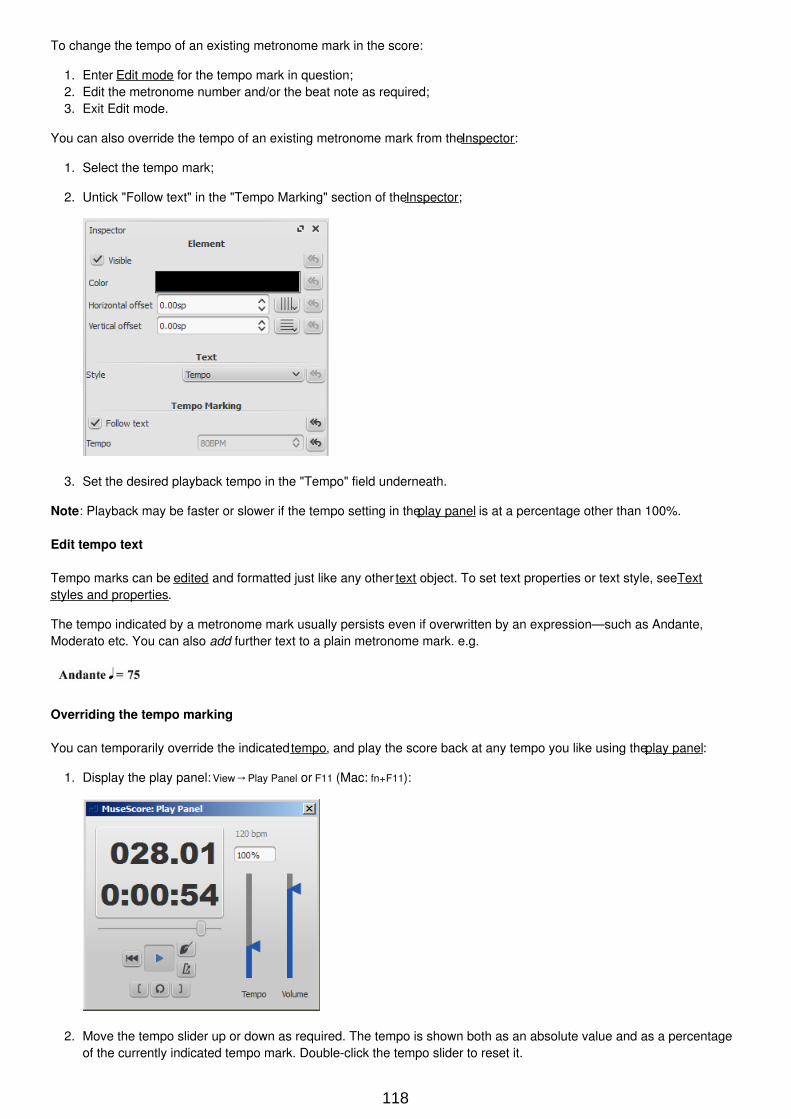
To change the tempo of an existing metronome mark in the score:
1. Enter Edit mode for the tempo mark in question;2. Edit the metronome number and/or the beat note as required;3. Exit Edit mode.
You can also override the tempo of an existing metronome mark from the Inspector:
1. Select the tempo mark;
2. Untick "Follow text" in the "Tempo Marking" section of the Inspector;
3. Set the desired playback tempo in the "Tempo" field underneath.
Note: Playback may be faster or slower if the tempo setting in the play panel is at a percentage other than 100%.
Edit tempo text
Tempo marks can be edited and formatted just like any other text object. To set text properties or text style, see Textstyles and properties.
The tempo indicated by a metronome mark usually persists even if overwritten by an expression—such as Andante,Moderato etc. You can also add further text to a plain metronome mark. e.g.
Overriding the tempo marking
You can temporarily override the indicated tempo, and play the score back at any tempo you like using the play panel:
1. Display the play panel: View→Play Panel or F11 (Mac: fn+F11):
2. Move the tempo slider up or down as required. The tempo is shown both as an absolute value and as a percentageof the currently indicated tempo mark. Double-click the tempo slider to reset it.
118
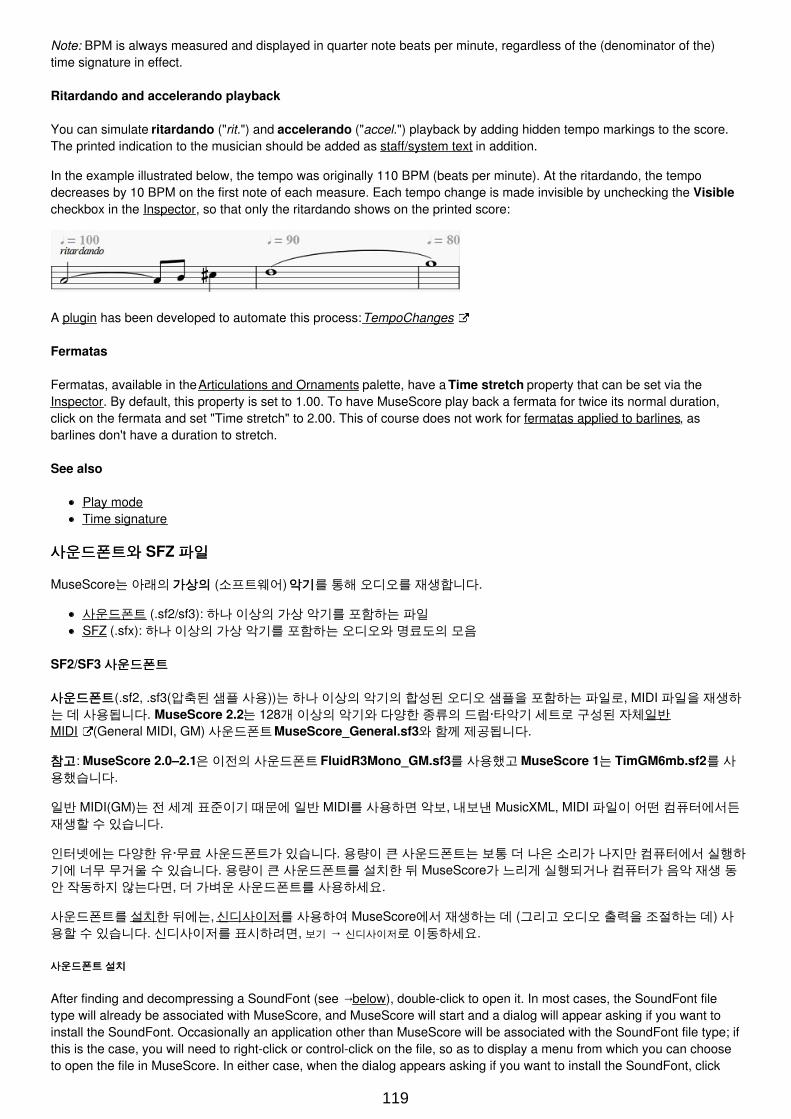
Note: BPM is always measured and displayed in quarter note beats per minute, regardless of the (denominator of the)time signature in effect.
Ritardando and accelerando playback
You can simulate ritardando ("rit.") and accelerando ("accel.") playback by adding hidden tempo markings to the score.The printed indication to the musician should be added as staff/system text in addition.
In the example illustrated below, the tempo was originally 110 BPM (beats per minute). At the ritardando, the tempodecreases by 10 BPM on the first note of each measure. Each tempo change is made invisible by unchecking the Visiblecheckbox in the Inspector, so that only the ritardando shows on the printed score:
A plugin has been developed to automate this process: TempoChanges
Fermatas
Fermatas, available in the Articulations and Ornaments palette, have a Time stretch property that can be set via theInspector. By default, this property is set to 1.00. To have MuseScore play back a fermata for twice its normal duration,click on the fermata and set "Time stretch" to 2.00. This of course does not work for fermatas applied to barlines, asbarlines don't have a duration to stretch.
See also
Play modeTime signature
사운드폰트와사운드폰트와 SFZ 파일파일
MuseScore는 아래의 가상의가상의 (소프트웨어) 악기악기를 통해 오디오를 재생합니다.
사운드폰트 (.sf2/sf3): 하나 이상의 가상 악기를 포함하는 파일SFZ (.sfx): 하나 이상의 가상 악기를 포함하는 오디오와 명료도의 모음
SF2/SF3 사운드폰트사운드폰트
사운드폰트사운드폰트(.sf2, .sf3(압축된 샘플 사용))는 하나 이상의 악기의 합성된 오디오 샘플을 포함하는 파일로, MIDI 파일을 재생하는 데 사용됩니다. MuseScore 2.2는 128개 이상의 악기와 다양한 종류의 드럼·타악기 세트로 구성된 자체 일반MIDI (General MIDI, GM) 사운드폰트 MuseScore_General.sf3와 함께 제공됩니다.
참고참고: MuseScore 2.0–2.1은 이전의 사운드폰트 FluidR3Mono_GM.sf3를 사용했고 MuseScore 1는 TimGM6mb.sf2를 사용했습니다.
일반 MIDI(GM)는 전 세계 표준이기 때문에 일반 MIDI를 사용하면 악보, 내보낸 MusicXML, MIDI 파일이 어떤 컴퓨터에서든재생할 수 있습니다.
인터넷에는 다양한 유·무료 사운드폰트가 있습니다. 용량이 큰 사운드폰트는 보통 더 나은 소리가 나지만 컴퓨터에서 실행하기에 너무 무거울 수 있습니다. 용량이 큰 사운드폰트를 설치한 뒤 MuseScore가 느리게 실행되거나 컴퓨터가 음악 재생 동안 작동하지 않는다면, 더 가벼운 사운드폰트를 사용하세요.
사운드폰트를 설치한 뒤에는, 신디사이저를 사용하여 MuseScore에서 재생하는 데 (그리고 오디오 출력을 조절하는 데) 사용할 수 있습니다. 신디사이저를 표시하려면, 보기 → 신디사이저로 이동하세요.
사운드폰트사운드폰트 설치설치
After finding and decompressing a SoundFont (see →below), double-click to open it. In most cases, the SoundFont filetype will already be associated with MuseScore, and MuseScore will start and a dialog will appear asking if you want toinstall the SoundFont. Occasionally an application other than MuseScore will be associated with the SoundFont file type; ifthis is the case, you will need to right-click or control-click on the file, so as to display a menu from which you can chooseto open the file in MuseScore. In either case, when the dialog appears asking if you want to install the SoundFont, click
119
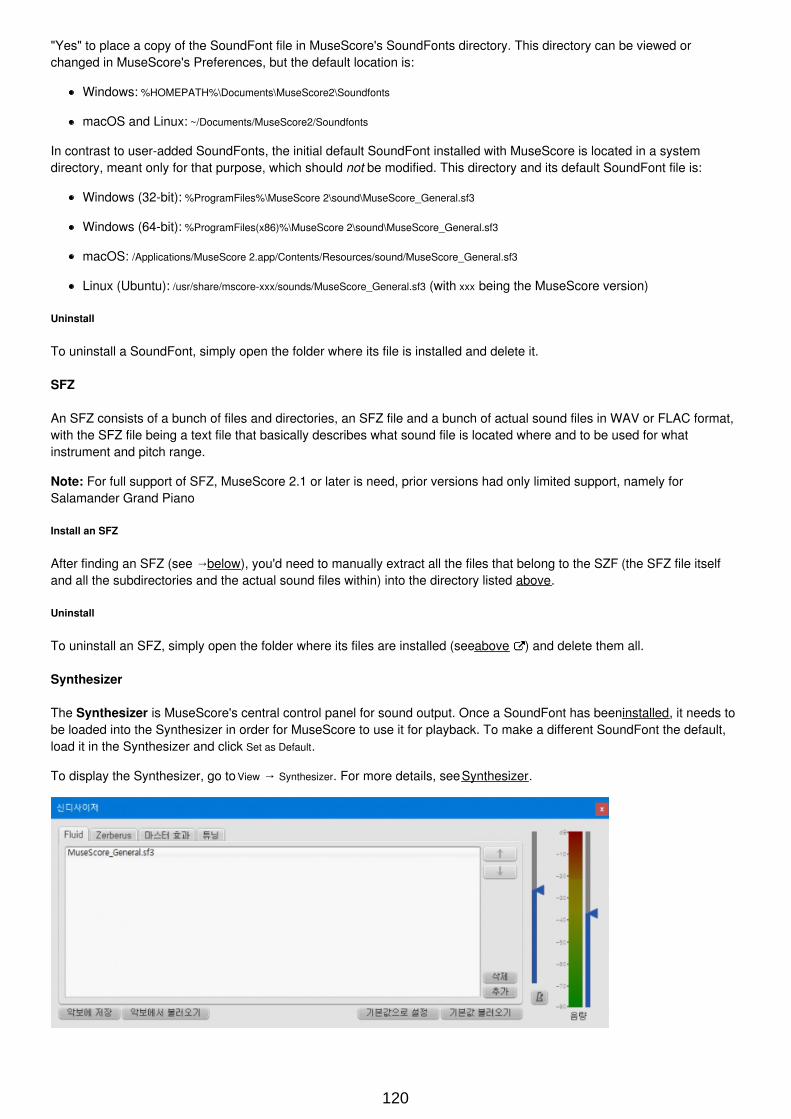
"Yes" to place a copy of the SoundFont file in MuseScore's SoundFonts directory. This directory can be viewed orchanged in MuseScore's Preferences, but the default location is:
Windows: %HOMEPATH%\Documents\MuseScore2\Soundfonts
macOS and Linux: ~/Documents/MuseScore2/Soundfonts
In contrast to user-added SoundFonts, the initial default SoundFont installed with MuseScore is located in a systemdirectory, meant only for that purpose, which should not be modified. This directory and its default SoundFont file is:
Windows (32-bit): %ProgramFiles%\MuseScore 2\sound\MuseScore_General.sf3
Windows (64-bit): %ProgramFiles(x86)%\MuseScore 2\sound\MuseScore_General.sf3
macOS: /Applications/MuseScore 2.app/Contents/Resources/sound/MuseScore_General.sf3
Linux (Ubuntu): /usr/share/mscore-xxx/sounds/MuseScore_General.sf3 (with xxx being the MuseScore version)
Uninstall
To uninstall a SoundFont, simply open the folder where its file is installed and delete it.
SFZ
An SFZ consists of a bunch of files and directories, an SFZ file and a bunch of actual sound files in WAV or FLAC format,with the SFZ file being a text file that basically describes what sound file is located where and to be used for whatinstrument and pitch range.
Note: For full support of SFZ, MuseScore 2.1 or later is need, prior versions had only limited support, namely forSalamander Grand Piano
Install an SFZ
After finding an SFZ (see →below), you'd need to manually extract all the files that belong to the SZF (the SFZ file itselfand all the subdirectories and the actual sound files within) into the directory listed above.
Uninstall
To uninstall an SFZ, simply open the folder where its files are installed (see above ) and delete them all.
Synthesizer
The Synthesizer is MuseScore's central control panel for sound output. Once a SoundFont has been installed, it needs tobe loaded into the Synthesizer in order for MuseScore to use it for playback. To make a different SoundFont the default,load it in the Synthesizer and click Set as Default.
To display the Synthesizer, go to View → Synthesizer. For more details, see Synthesizer.
120
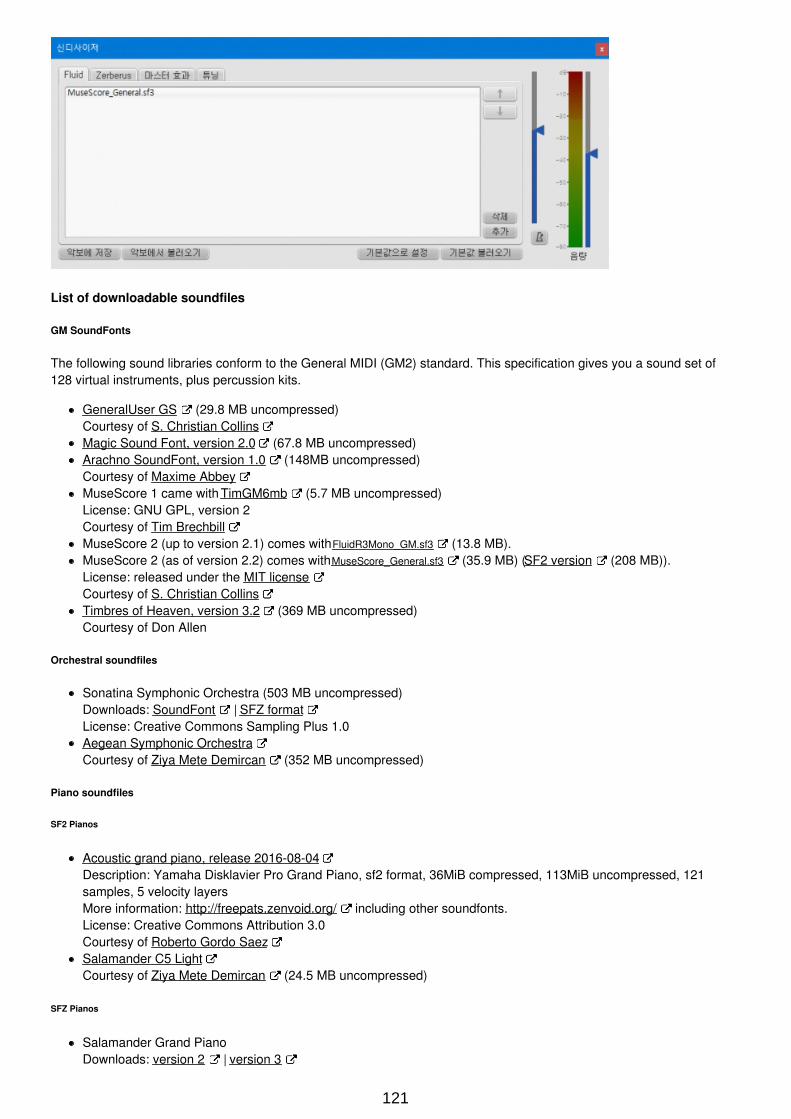
List of downloadable soundfiles
GM SoundFonts
The following sound libraries conform to the General MIDI (GM2) standard. This specification gives you a sound set of128 virtual instruments, plus percussion kits.
GeneralUser GS (29.8 MB uncompressed)Courtesy of S. Christian CollinsMagic Sound Font, version 2.0 (67.8 MB uncompressed)Arachno SoundFont, version 1.0 (148MB uncompressed)Courtesy of Maxime AbbeyMuseScore 1 came with TimGM6mb (5.7 MB uncompressed)License: GNU GPL, version 2Courtesy of Tim BrechbillMuseScore 2 (up to version 2.1) comes with FluidR3Mono_GM.sf3 (13.8 MB).MuseScore 2 (as of version 2.2) comes with MuseScore_General.sf3 (35.9 MB) (SF2 version (208 MB)).License: released under the MIT licenseCourtesy of S. Christian CollinsTimbres of Heaven, version 3.2 (369 MB uncompressed)Courtesy of Don Allen
Orchestral soundfiles
Sonatina Symphonic Orchestra (503 MB uncompressed)Downloads: SoundFont | SFZ formatLicense: Creative Commons Sampling Plus 1.0Aegean Symphonic OrchestraCourtesy of Ziya Mete Demircan (352 MB uncompressed)
Piano soundfiles
SF2 Pianos
Acoustic grand piano, release 2016-08-04Description: Yamaha Disklavier Pro Grand Piano, sf2 format, 36MiB compressed, 113MiB uncompressed, 121samples, 5 velocity layersMore information: http://freepats.zenvoid.org/ including other soundfonts.License: Creative Commons Attribution 3.0Courtesy of Roberto Gordo SaezSalamander C5 LightCourtesy of Ziya Mete Demircan (24.5 MB uncompressed)
SFZ Pianos
Salamander Grand PianoDownloads: version 2 | version 3
121
Description: Yamaha C5, 48kHz, 24bit, 16 velocity layers, between 80 MB and 1.9 GB uncompressedLicense: Creative Commons Attribution 3.0Courtesy of Alexander HolmDetuned Piano (244 MB uncompressed)License: Creative Commons Attribution-ShareAlike 3.0Plucked Piano StringsDescription: 44.1kHz, 16bit, stereo, 168 MB uncompressedLicense: Creative Commons Attribution-ShareAlike 3.0The City PianoDescription: Baldwin Baby Grand, 4 velocity layers, 696 MB uncompressedLicense: Public domainCourtesy of Big Cat InstrumentsKawai Upright Piano, release 2017-01-28Description: 68 samples, 44KHz, 24bit, stereo, 2 velocity layers, 58MiB uncompressedLicense: GNU General Public License version 3 or later, with a special exceptionCourtesy of Gonzalo and Roberto
Unzipping downloaded soundfiles
Since soundfiles are large, they are often zipped (compressed) into a variety of formats, including .zip, .sfArk, and .tar.gz.You need to unzip (decompress) these files before they can be used.
ZIP is standard compression format supported by most operating systems.
sfArk is a compression format designed especially for compressing SoundFont files. Use the special sfArksoftware to decompress it, or use this online service: https://cloudconvert.com/sfark-to-sf2
.tar.gz is a popular compression format for Linux. Windows users can use 7-Zip ; Mac users can use TheUnarchiver , or macOS' built-in Archive Utility. Note that if using 7-Zip, you will need to apply decompression twice—once for GZip and once for TAR.
Troubleshooting
If the toolbar play panel is greyed out, or not visible, follow the instructions below to get your sound working again:
1. Right-click on the menu bar and make sure there is a check mark next to the Playback Controls menu item. If this stepdoes not solve your problem, go to Step 2.
2. If the play panel disappears after changing the SoundFont, go to Edit → Preferences... → I/O tab and click OK withoutmaking any changes. After restarting MuseScore, the play panel should reappear.
If you are setting up a SoundFont for the first time, please use one of the recommended SoundFonts listed above.
If playback stutters, then your computer may not not able to handle the SoundFont being used. The following advice mayhelp:
Reduce the amount of RAM (memory) used by MuseScore by using a smaller SoundFont. See the list above forsuggestions.Increase the amount of RAM available for MuseScore by quitting all applications except MuseScore. If you still haveproblems and a large SoundFont is important to you, consider more RAM for your computer.
See also
SynthesizerMixer
External links
How to change the SoundFont or add anotherThe SFZ Format (for details about the sfz specification)
Dynamics
Dynamics are symbols indicating the loudness of a note or phrase of music. Symbols can be found in the Dynamicspalette in either the Basic or Advanced workspace:
122

Note: Overall playback volume of the score can be changed using the volume slider in the Play Panel or Synthesizer.
Add a dynamic
To apply a dynamic to the score, use one of the following methods:
Select a note and double-click a dynamic symbol in a palette.Drag a dynamic symbol from a palette onto a note.
For additional dynamics use the Master Palette (Shift+F9). You can also create a custom palette for future use.
To create a crescendo or decrescendo sign, see Hairpin.
Adjusting playback volume for a dynamic
Click on the dynamic to select it, and adjust its Velocity in the Inspector—higher for louder, lower for softer.
Adjusting range for a dynamic
Via the Inspector you can set the staves affected by a dynamic. The "Dynamic range" is by default set to "part," whichmeans all staves for an instrument will be affected. Changing this to "staff" will limit the dynamic to the staff it is entered ononly. Changing this to "System" will cause all instruments to play this dynamic.
List of dynamics in palettes
In the Basic workspace, there are 8 options in the Dynamics palette: ppp, pp, p, mp, mf, f, ff, fff.
In the Advanced workspace, there are all of the above plus 15 additional options in the Dynamics palette: fp, sf, sfz, sff,sffz, sfp, sfpp, rfz, rf, fz, m, r, s, z, n.
In the Dynamics section of the Master Palette, there are all of the above plus 6 additional options: pppppp, ppppp, pppp,ffff, fffff, ffffff.
Edit a dynamic
Any dynamic can be edited after being added to the score, just like standard text. See Text editing.
See also
Tempo
External links
Video tutorial: Lesson 10 - Articulations, Dynamics and TextDynamics at Wikipedia
Text
There are many different kinds of text objects in MuseScore (see tables below); text may also be found incorporated intolines. This chapter shows you how to create, format and edit text objects, and also includes information about thefollowing types of text:
Text type Uses
General purpose text attached to a single staff: appearing only in that instrument
123
Staff text part.
System text General purpose text attached to a single staff: appearing in all instrument parts.
Chord symbols Display the chords associated with a melody: usually above the staff.
Fingering Numbers or letters attached to notes showing which fingers to use.
Lyrics Create lyrics attached to a melody.
Rehearsal marks Facilitate rehearsals, divide score into sections, bookmark passages etc.
Text type Uses
For other types of text available in MuseScore, follow the links below:
Text type Uses
Tempo marks Apply metronome and/or expression marks.
Dynamics Indicate the loudness of a note or phrase.
Swing text Change from straight to swing time, and vice versa.
Instrument text Apply mid-staff instrument changes.
Repeats and jumps Da Capo, Dal segno, Fine etc.
Figured bass Period notation for keyboardists.
Frame textTitle/composer/lyricist details at the start of a score; songsheet lyricsetc.
Headers/Footers Page numbers, copyright info etc. at the top/bottom of a page.
Text-lines Voltas, ottavas, pedal lines, guitar barre lines etc.
Text basics
Add text
To add a text-based element to the score, use one of the following general methods:
Keyboard shortcut: For example, press Ctrl+Tto enter Staff text , Ctrl+L to enter Lyrics, and so on.Menu command: Add→Text allows you to chose from a range of text-based elements.Workspace: Select a note and double-click an icon in one of the palettes; or, alternatively, drag a symbol from apalette onto the staff. e.g. Swing text, Tempo text etc.
Notes: (1) The exact method depends on the type of text you are adding (see Text). (2) For general-purpose text boxesattached to staves, see Staff and system text.
Format text
Every text-based element in the score has three levels of formatting:
Text style: This is the highest level of formatting and applies to all text elements in the score of a particular type. Fordetails, see Text style.Text properties: This applies to the style of one specific text object only. For details, see Text properties.Character formatting; The style applied to individual text characters during editing. For details, see Text editing.
Adjust position of text objects
To position a text object, use any of the following methods:
Drag the object.Select the object and adjust the horizontal or vertical offset values in the Inspector.Select the object and apply any of the following keyboard shortcuts:
←: Move text left 0.1 staff space.→: Move text right 0.1 staff space.↑: Move text up 0.1 staff space.↓: Move text down 0.1 staff space.Ctrl+← (Mac: +←): Move text left one staff space.Ctrl+→ (Mac: +→): Move text right one staff space.Ctrl+↑ (Mac: +↑): Move text up one staff space.Ctrl+↓ (Mac: +↓): Moves text down one staff space.
124
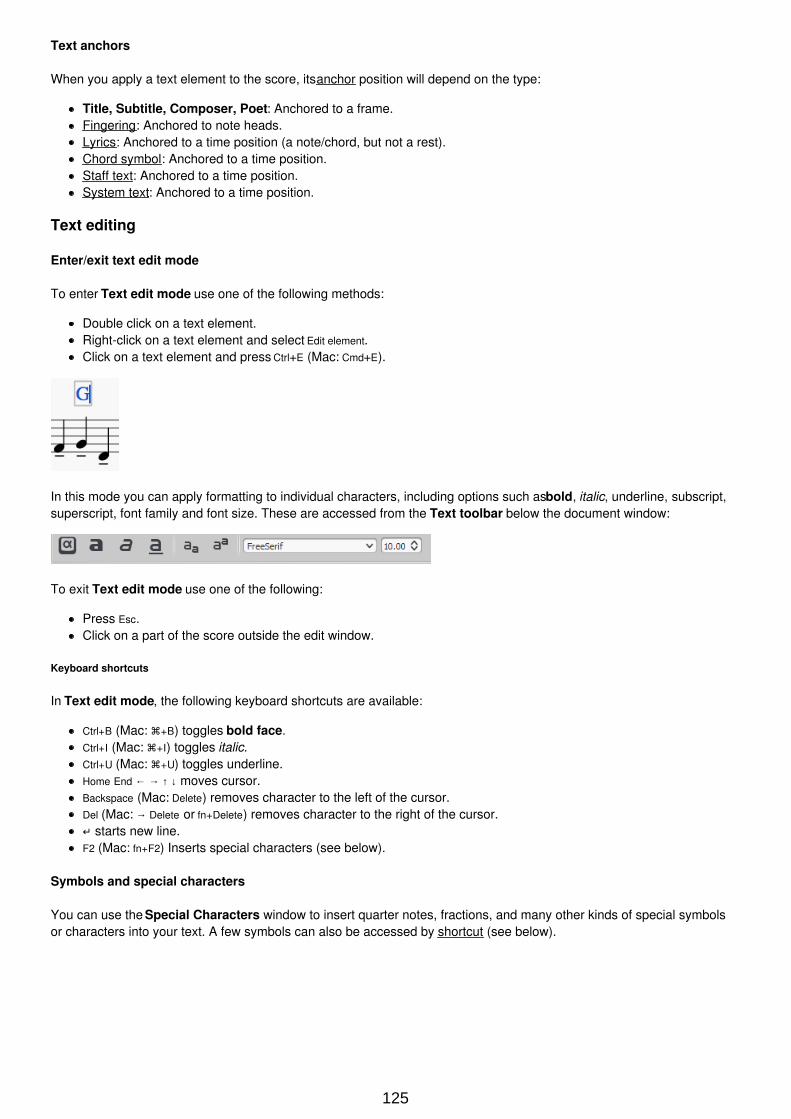
Text anchors
When you apply a text element to the score, its anchor position will depend on the type:
Title, Subtitle, Composer, Poet: Anchored to a frame.Fingering: Anchored to note heads.Lyrics: Anchored to a time position (a note/chord, but not a rest).Chord symbol: Anchored to a time position.Staff text: Anchored to a time position.System text: Anchored to a time position.
Text editing
Enter/exit text edit mode
To enter Text edit mode use one of the following methods:
Double click on a text element.Right-click on a text element and select Edit element.Click on a text element and press Ctrl+E (Mac: Cmd+E).
In this mode you can apply formatting to individual characters, including options such as bold, italic, underline, subscript,superscript, font family and font size. These are accessed from the Text toolbar below the document window:
To exit Text edit mode use one of the following:
Press Esc.Click on a part of the score outside the edit window.
Keyboard shortcuts
In Text edit mode, the following keyboard shortcuts are available:
Ctrl+B (Mac: +B) toggles bold face.Ctrl+I (Mac: +I) toggles italic.Ctrl+U (Mac: +U) toggles underline.Home End ← → ↑ ↓ moves cursor.Backspace (Mac: Delete) removes character to the left of the cursor.Del (Mac: → Delete or fn+Delete) removes character to the right of the cursor.↵ starts new line.F2 (Mac: fn+F2) Inserts special characters (see below).
Symbols and special characters
You can use the Special Characters window to insert quarter notes, fractions, and many other kinds of special symbolsor characters into your text. A few symbols can also be accessed by shortcut (see below).
125
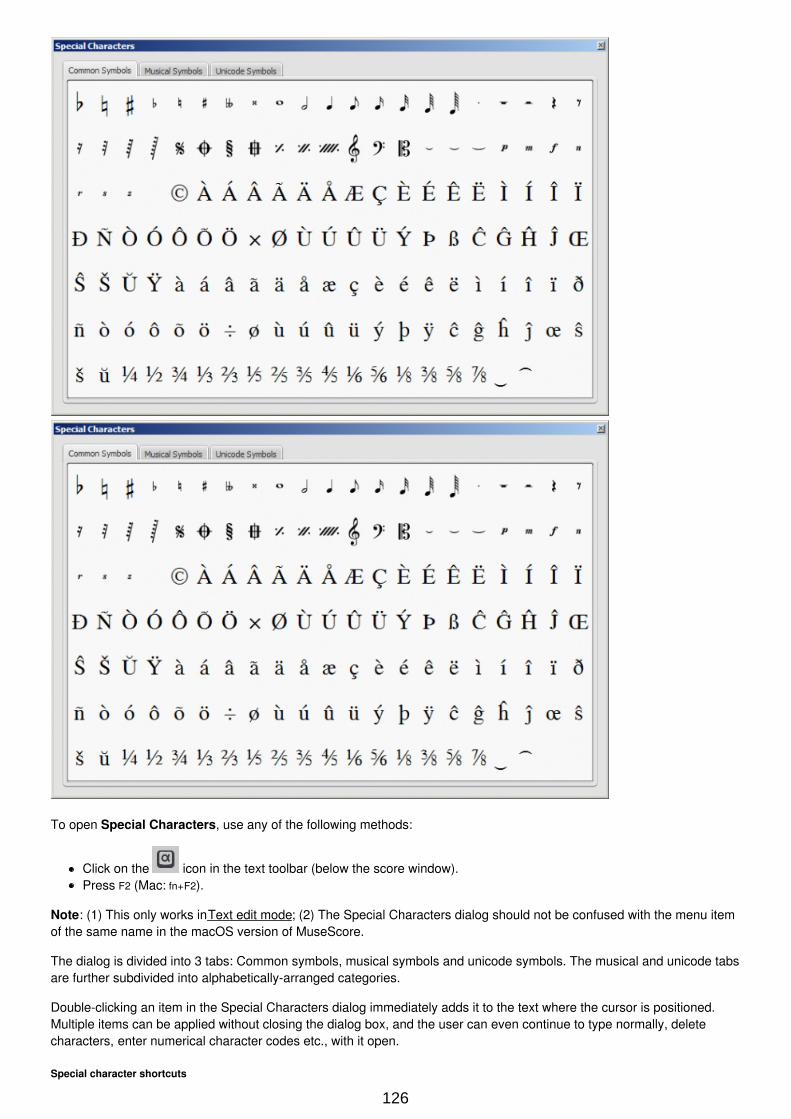
To open Special Characters, use any of the following methods:
Click on the icon in the text toolbar (below the score window).Press F2 (Mac: fn+F2).
Note: (1) This only works in Text edit mode; (2) The Special Characters dialog should not be confused with the menu itemof the same name in the macOS version of MuseScore.
The dialog is divided into 3 tabs: Common symbols, musical symbols and unicode symbols. The musical and unicode tabsare further subdivided into alphabetically-arranged categories.
Double-clicking an item in the Special Characters dialog immediately adds it to the text where the cursor is positioned.Multiple items can be applied without closing the dialog box, and the user can even continue to type normally, deletecharacters, enter numerical character codes etc., with it open.
Special character shortcuts
126
In Text edit mode the following keyboard shortcuts can be used to access certain special characters:
Ctrl+Shift+B: Flat.Ctrl+Shift+F: Forte.Ctrl+Shift+H: Natural.Ctrl+Shift+M: Mezzo.Ctrl+Shift+N: Niente.Ctrl+Shift+P: Piano (dynamic mark).Ctrl+Shift+R: Rinforzando.Ctrl+Shift+S: Sforzando.Ctrl+Shift+Z: Z.Ctrl+Shift+#: Sharp.
See also
Chord symbolLyricsFrameEdit mode
Text styles and properties
Text Style
This is the highest level of text formatting and applies to all text elements in the score of a particular type. Staff textobjects, for example, have a unique style, as do all tempo markings, all lyrics, all chord symbols and so on. Editing a textstyle allows you to change the appearance of all objects which share that style in one go.
Edit style
To edit a text style, use any of the following methods:
From the main menu, chose Style→Text…. Then select the relevant style from the list.Right-click a text object and select Text Style….
This will display the Edit Text Styles dialog:
127
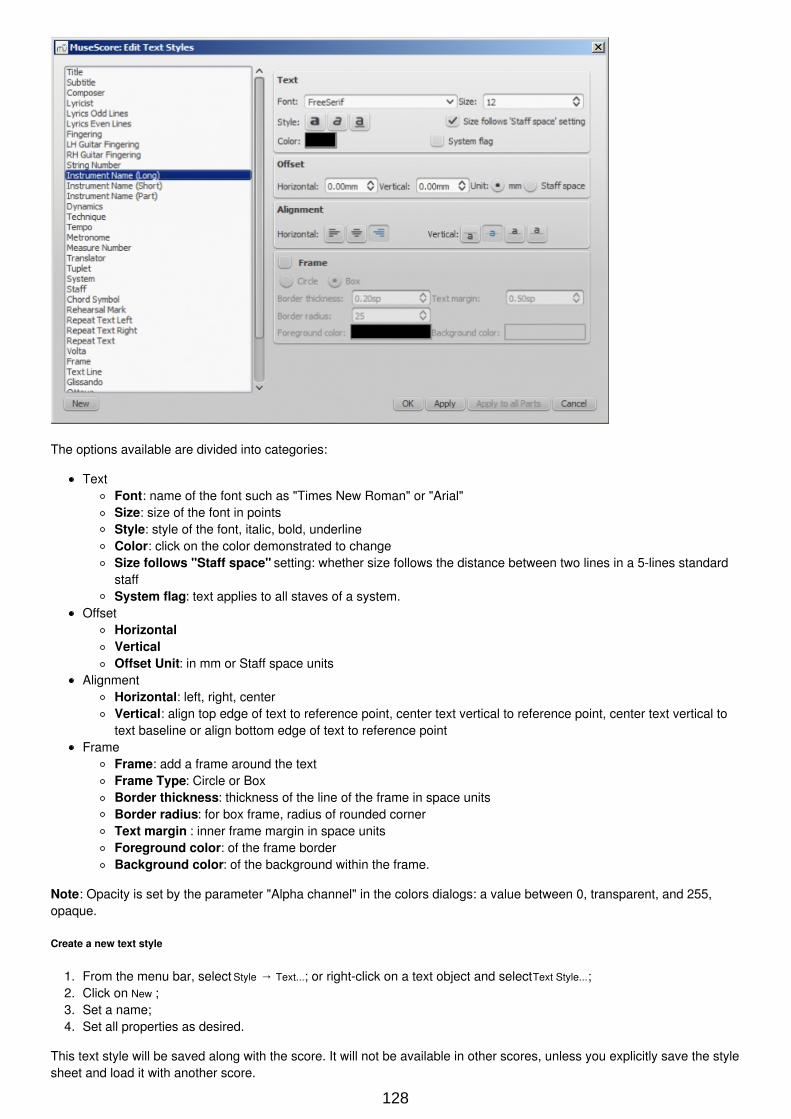
The options available are divided into categories:
TextFont: name of the font such as "Times New Roman" or "Arial"Size: size of the font in pointsStyle: style of the font, italic, bold, underlineColor: click on the color demonstrated to changeSize follows "Staff space" setting: whether size follows the distance between two lines in a 5-lines standardstaffSystem flag: text applies to all staves of a system.
OffsetHorizontalVerticalOffset Unit: in mm or Staff space units
AlignmentHorizontal: left, right, centerVertical: align top edge of text to reference point, center text vertical to reference point, center text vertical totext baseline or align bottom edge of text to reference point
FrameFrame: add a frame around the textFrame Type: Circle or BoxBorder thickness: thickness of the line of the frame in space unitsBorder radius: for box frame, radius of rounded cornerText margin : inner frame margin in space unitsForeground color: of the frame borderBackground color: of the background within the frame.
Note: Opacity is set by the parameter "Alpha channel" in the colors dialogs: a value between 0, transparent, and 255,opaque.
Create a new text style
1. From the menu bar, select Style → Text...; or right-click on a text object and select Text Style...;2. Click on New ;3. Set a name;4. Set all properties as desired.
This text style will be saved along with the score. It will not be available in other scores, unless you explicitly save the stylesheet and load it with another score.
128
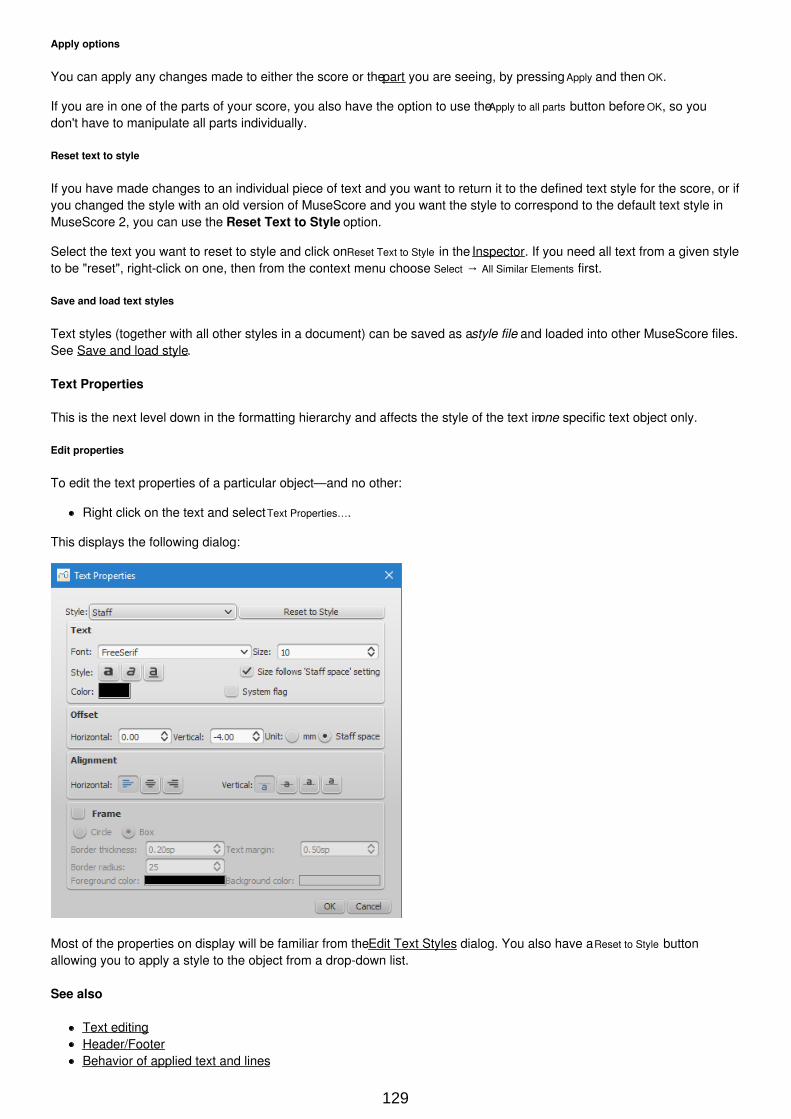
Apply options
You can apply any changes made to either the score or the part you are seeing, by pressing Apply and then OK.
If you are in one of the parts of your score, you also have the option to use the Apply to all parts button before OK, so youdon't have to manipulate all parts individually.
Reset text to style
If you have made changes to an individual piece of text and you want to return it to the defined text style for the score, or ifyou changed the style with an old version of MuseScore and you want the style to correspond to the default text style inMuseScore 2, you can use the Reset Text to Style option.
Select the text you want to reset to style and click on Reset Text to Style in the Inspector. If you need all text from a given styleto be "reset", right-click on one, then from the context menu choose Select → All Similar Elements first.
Save and load text styles
Text styles (together with all other styles in a document) can be saved as a style file and loaded into other MuseScore files.See Save and load style.
Text Properties
This is the next level down in the formatting hierarchy and affects the style of the text in one specific text object only.
Edit properties
To edit the text properties of a particular object—and no other:
Right click on the text and select Text Properties….
This displays the following dialog:
Most of the properties on display will be familiar from the Edit Text Styles dialog. You also have a Reset to Style buttonallowing you to apply a style to the object from a drop-down list.
See also
Text editingHeader/FooterBehavior of applied text and lines
129
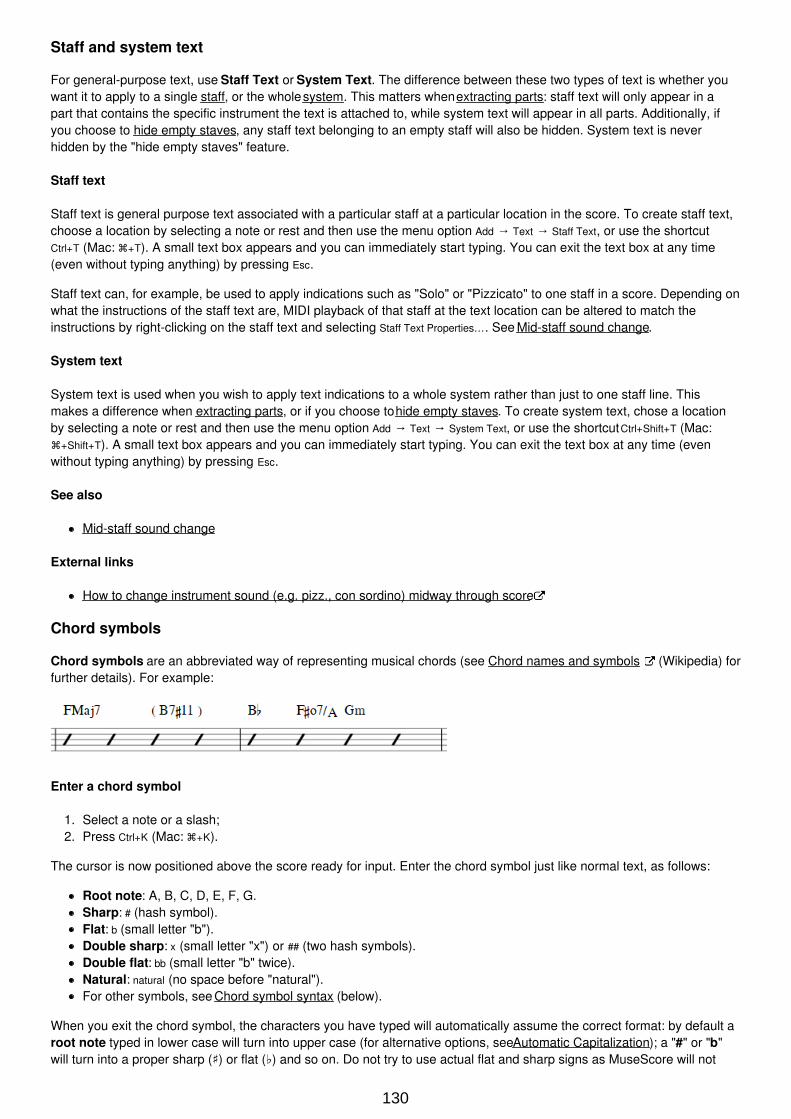
Staff and system text
For general-purpose text, use Staff Text or System Text. The difference between these two types of text is whether youwant it to apply to a single staff, or the whole system. This matters when extracting parts: staff text will only appear in apart that contains the specific instrument the text is attached to, while system text will appear in all parts. Additionally, ifyou choose to hide empty staves, any staff text belonging to an empty staff will also be hidden. System text is neverhidden by the "hide empty staves" feature.
Staff text
Staff text is general purpose text associated with a particular staff at a particular location in the score. To create staff text,choose a location by selecting a note or rest and then use the menu option Add → Text → Staff Text, or use the shortcutCtrl+T (Mac: +T). A small text box appears and you can immediately start typing. You can exit the text box at any time(even without typing anything) by pressing Esc.
Staff text can, for example, be used to apply indications such as "Solo" or "Pizzicato" to one staff in a score. Depending onwhat the instructions of the staff text are, MIDI playback of that staff at the text location can be altered to match theinstructions by right-clicking on the staff text and selecting Staff Text Properties…. See Mid-staff sound change.
System text
System text is used when you wish to apply text indications to a whole system rather than just to one staff line. Thismakes a difference when extracting parts, or if you choose to hide empty staves. To create system text, chose a locationby selecting a note or rest and then use the menu option Add → Text → System Text, or use the shortcut Ctrl+Shift+T (Mac:+Shift+T). A small text box appears and you can immediately start typing. You can exit the text box at any time (evenwithout typing anything) by pressing Esc.
See also
Mid-staff sound change
External links
How to change instrument sound (e.g. pizz., con sordino) midway through score
Chord symbols
Chord symbols are an abbreviated way of representing musical chords (see Chord names and symbols (Wikipedia) forfurther details). For example:
Enter a chord symbol
1. Select a note or a slash;2. Press Ctrl+K (Mac: +K).
The cursor is now positioned above the score ready for input. Enter the chord symbol just like normal text, as follows:
Root note: A, B, C, D, E, F, G.Sharp: # (hash symbol).Flat: b (small letter "b").Double sharp: x (small letter "x") or ## (two hash symbols).Double flat: bb (small letter "b" twice).Natural: natural (no space before "natural").For other symbols, see Chord symbol syntax (below).
When you exit the chord symbol, the characters you have typed will automatically assume the correct format: by default aroot note typed in lower case will turn into upper case (for alternative options, see Automatic Capitalization); a "#" or "b"will turn into a proper sharp (♯) or flat () and so on. Do not try to use actual flat and sharp signs as MuseScore will not
130
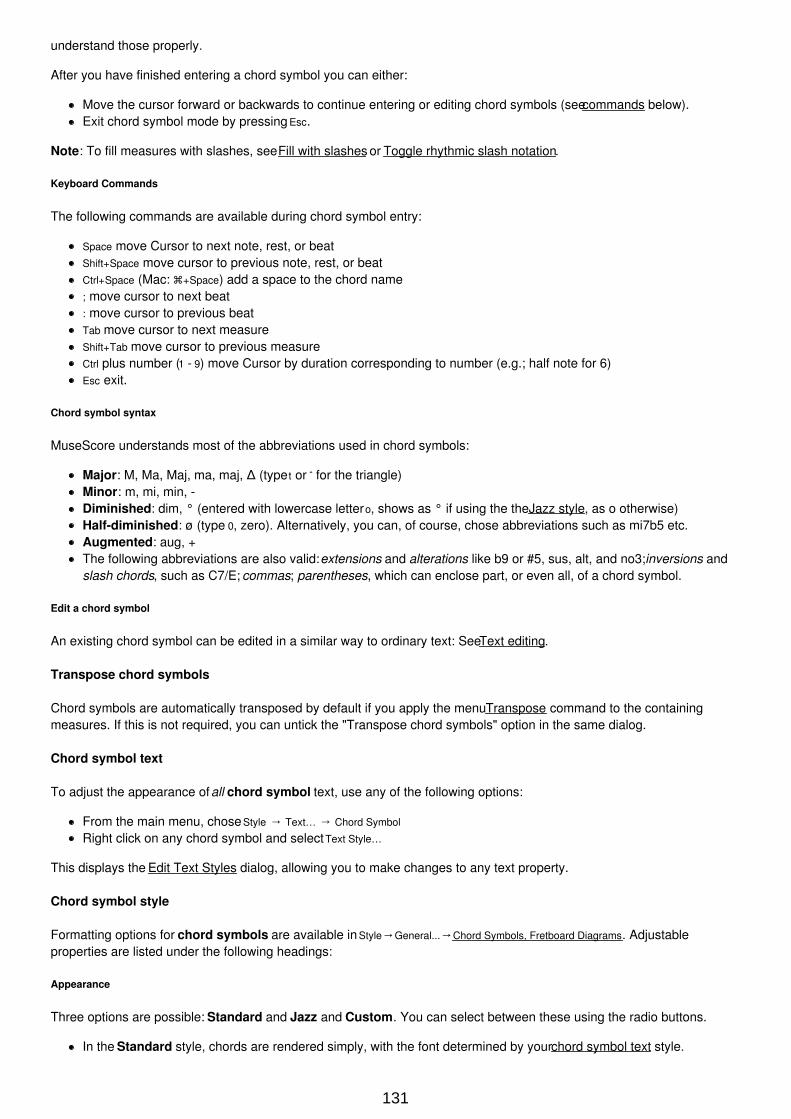
understand those properly.
After you have finished entering a chord symbol you can either:
Move the cursor forward or backwards to continue entering or editing chord symbols (see commands below).Exit chord symbol mode by pressing Esc.
Note: To fill measures with slashes, see Fill with slashes or Toggle rhythmic slash notation.
Keyboard Commands
The following commands are available during chord symbol entry:
Space move Cursor to next note, rest, or beatShift+Space move cursor to previous note, rest, or beatCtrl+Space (Mac: +Space) add a space to the chord name; move cursor to next beat: move cursor to previous beatTab move cursor to next measureShift+Tab move cursor to previous measureCtrl plus number (1 - 9) move Cursor by duration corresponding to number (e.g.; half note for 6)Esc exit.
Chord symbol syntax
MuseScore understands most of the abbreviations used in chord symbols:
Major: M, Ma, Maj, ma, maj, Δ (type t or for the triangle)Minor: m, mi, min, -Diminished: dim, ° (entered with lowercase letter o, shows as ° if using the the Jazz style, as o otherwise)Half-diminished: ø (type 0, zero). Alternatively, you can, of course, chose abbreviations such as mi7b5 etc.Augmented: aug, +The following abbreviations are also valid: extensions and alterations like b9 or #5, sus, alt, and no3; inversions andslash chords, such as C7/E; commas; parentheses, which can enclose part, or even all, of a chord symbol.
Edit a chord symbol
An existing chord symbol can be edited in a similar way to ordinary text: See Text editing.
Transpose chord symbols
Chord symbols are automatically transposed by default if you apply the menu Transpose command to the containingmeasures. If this is not required, you can untick the "Transpose chord symbols" option in the same dialog.
Chord symbol text
To adjust the appearance of all chord symbol text, use any of the following options:
From the main menu, chose Style → Text… → Chord Symbol
Right click on any chord symbol and select Text Style…
This displays the Edit Text Styles dialog, allowing you to make changes to any text property.
Chord symbol style
Formatting options for chord symbols are available in Style→General...→Chord Symbols, Fretboard Diagrams. Adjustableproperties are listed under the following headings:
Appearance
Three options are possible: Standard and Jazz and Custom. You can select between these using the radio buttons.
In the Standard style, chords are rendered simply, with the font determined by your chord symbol text style.
131
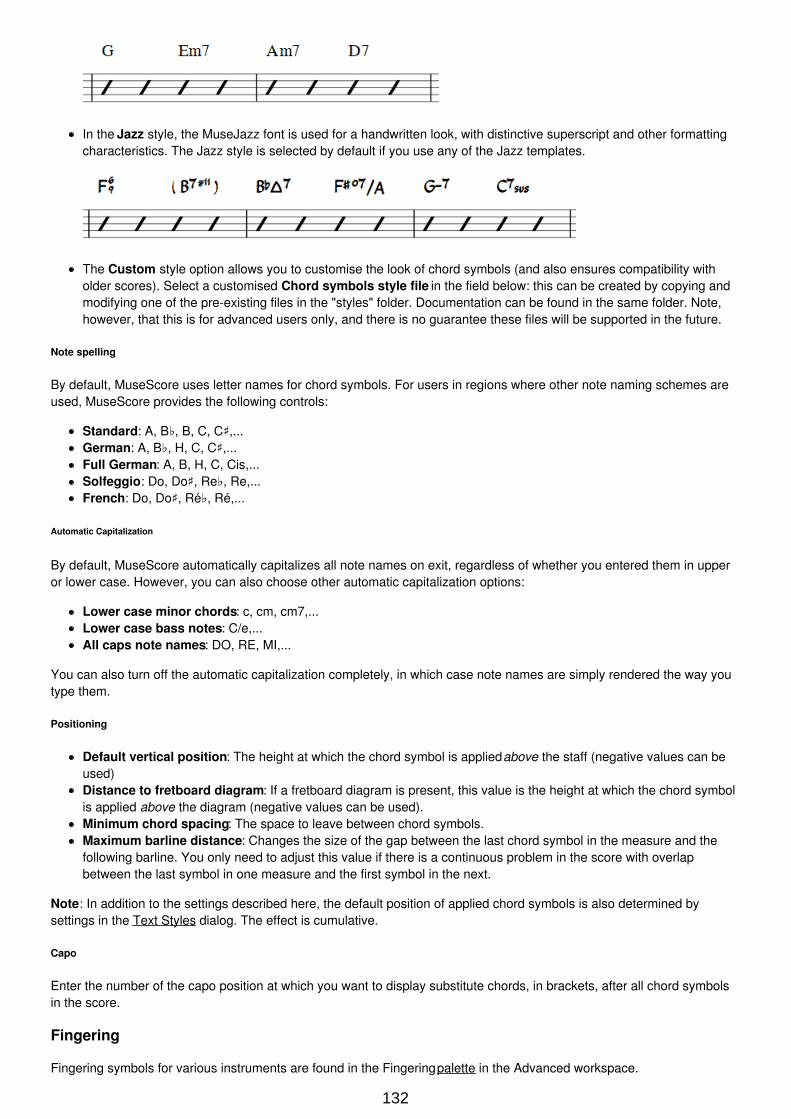
In the Jazz style, the MuseJazz font is used for a handwritten look, with distinctive superscript and other formattingcharacteristics. The Jazz style is selected by default if you use any of the Jazz templates.
The Custom style option allows you to customise the look of chord symbols (and also ensures compatibility witholder scores). Select a customised Chord symbols style file in the field below: this can be created by copying andmodifying one of the pre-existing files in the "styles" folder. Documentation can be found in the same folder. Note,however, that this is for advanced users only, and there is no guarantee these files will be supported in the future.
Note spelling
By default, MuseScore uses letter names for chord symbols. For users in regions where other note naming schemes areused, MuseScore provides the following controls:
Standard: A, B, B, C, C♯,...German: A, B, H, C, C♯,...Full German: A, B, H, C, Cis,...Solfeggio: Do, Do♯, Re, Re,...French: Do, Do♯, Ré, Ré,...
Automatic Capitalization
By default, MuseScore automatically capitalizes all note names on exit, regardless of whether you entered them in upperor lower case. However, you can also choose other automatic capitalization options:
Lower case minor chords: c, cm, cm7,...Lower case bass notes: C/e,...All caps note names: DO, RE, MI,...
You can also turn off the automatic capitalization completely, in which case note names are simply rendered the way youtype them.
Positioning
Default vertical position: The height at which the chord symbol is applied above the staff (negative values can beused)Distance to fretboard diagram: If a fretboard diagram is present, this value is the height at which the chord symbolis applied above the diagram (negative values can be used).Minimum chord spacing: The space to leave between chord symbols.Maximum barline distance: Changes the size of the gap between the last chord symbol in the measure and thefollowing barline. You only need to adjust this value if there is a continuous problem in the score with overlapbetween the last symbol in one measure and the first symbol in the next.
Note: In addition to the settings described here, the default position of applied chord symbols is also determined bysettings in the Text Styles dialog. The effect is cumulative.
Capo
Enter the number of the capo position at which you want to display substitute chords, in brackets, after all chord symbolsin the score.
Fingering
Fingering symbols for various instruments are found in the Fingering palette in the Advanced workspace.
132
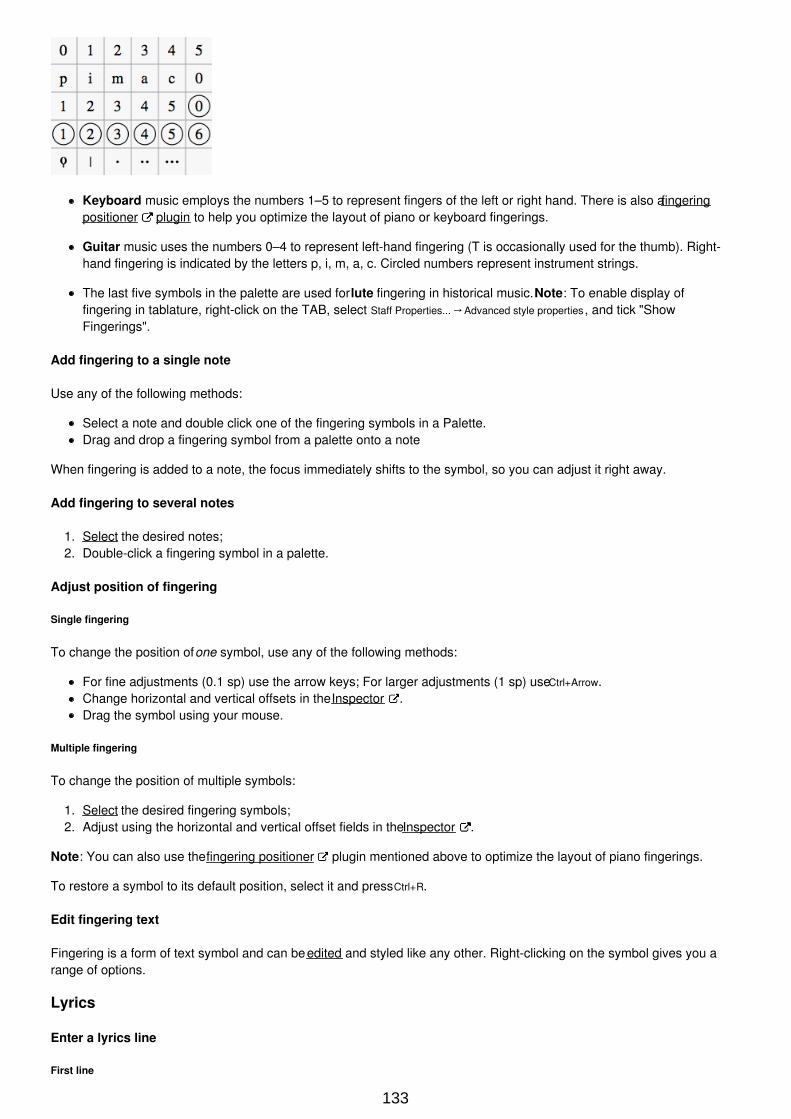
Keyboard music employs the numbers 1–5 to represent fingers of the left or right hand. There is also a fingeringpositioner plugin to help you optimize the layout of piano or keyboard fingerings.
Guitar music uses the numbers 0–4 to represent left-hand fingering (T is occasionally used for the thumb). Right-hand fingering is indicated by the letters p, i, m, a, c. Circled numbers represent instrument strings.
The last five symbols in the palette are used for lute fingering in historical music. Note: To enable display offingering in tablature, right-click on the TAB, select Staff Properties...→Advanced style properties , and tick "ShowFingerings".
Add fingering to a single note
Use any of the following methods:
Select a note and double click one of the fingering symbols in a Palette.Drag and drop a fingering symbol from a palette onto a note
When fingering is added to a note, the focus immediately shifts to the symbol, so you can adjust it right away.
Add fingering to several notes
1. Select the desired notes;2. Double-click a fingering symbol in a palette.
Adjust position of fingering
Single fingering
To change the position of one symbol, use any of the following methods:
For fine adjustments (0.1 sp) use the arrow keys; For larger adjustments (1 sp) use Ctrl+Arrow.Change horizontal and vertical offsets in the Inspector .Drag the symbol using your mouse.
Multiple fingering
To change the position of multiple symbols:
1. Select the desired fingering symbols;2. Adjust using the horizontal and vertical offset fields in the Inspector .
Note: You can also use the fingering positioner plugin mentioned above to optimize the layout of piano fingerings.
To restore a symbol to its default position, select it and press Ctrl+R.
Edit fingering text
Fingering is a form of text symbol and can be edited and styled like any other. Right-clicking on the symbol gives you arange of options.
Lyrics
Enter a lyrics line
First line
133
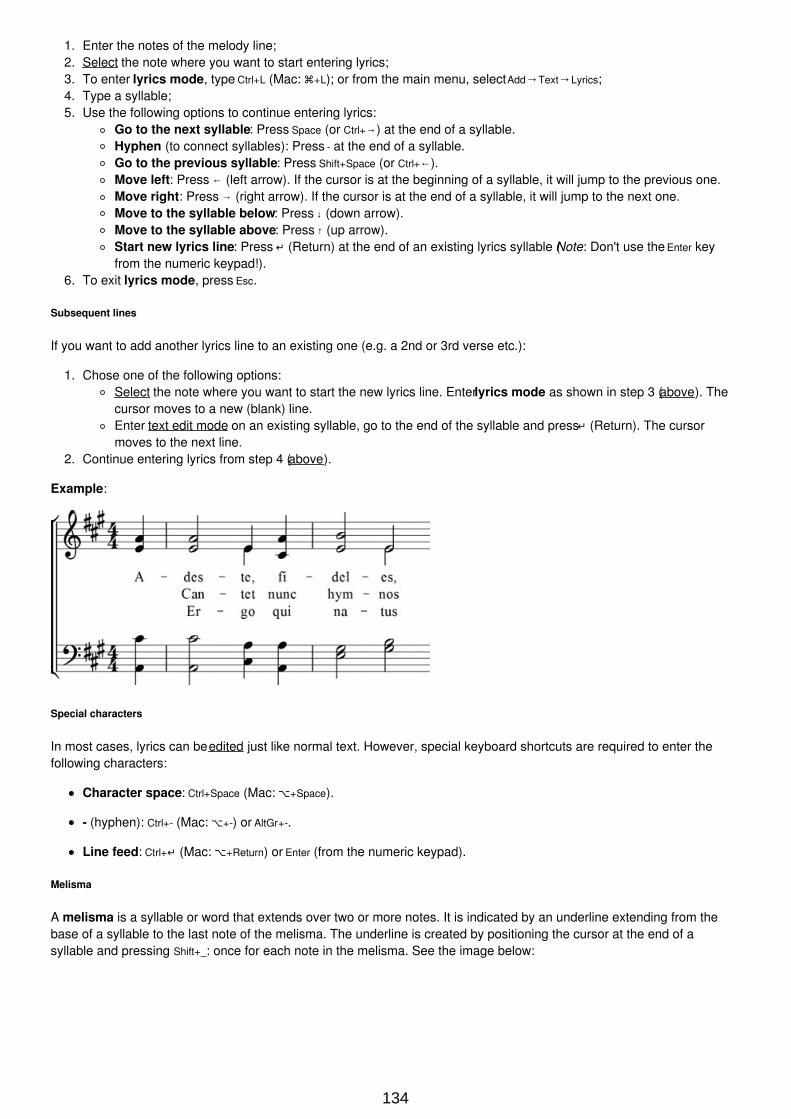
1. Enter the notes of the melody line;2. Select the note where you want to start entering lyrics;3. To enter lyrics mode, type Ctrl+L (Mac: +L); or from the main menu, select Add→Text→Lyrics;4. Type a syllable;5. Use the following options to continue entering lyrics:
Go to the next syllable: Press Space (or Ctrl+→) at the end of a syllable.Hyphen (to connect syllables): Press - at the end of a syllable.Go to the previous syllable: Press Shift+Space (or Ctrl+←).Move left: Press ← (left arrow). If the cursor is at the beginning of a syllable, it will jump to the previous one.Move right: Press → (right arrow). If the cursor is at the end of a syllable, it will jump to the next one.Move to the syllable below: Press ↓ (down arrow).Move to the syllable above: Press ↑ (up arrow).Start new lyrics line: Press ↵ (Return) at the end of an existing lyrics syllable (Note: Don't use the Enter keyfrom the numeric keypad!).
6. To exit lyrics mode, press Esc.
Subsequent lines
If you want to add another lyrics line to an existing one (e.g. a 2nd or 3rd verse etc.):
1. Chose one of the following options:Select the note where you want to start the new lyrics line. Enter lyrics mode as shown in step 3 (above). Thecursor moves to a new (blank) line.Enter text edit mode on an existing syllable, go to the end of the syllable and press ↵ (Return). The cursormoves to the next line.
2. Continue entering lyrics from step 4 (above).
Example:
Special characters
In most cases, lyrics can be edited just like normal text. However, special keyboard shortcuts are required to enter thefollowing characters:
Character space: Ctrl+Space (Mac: +Space).
- (hyphen): Ctrl+- (Mac: +-) or AltGr+-.
Line feed: Ctrl+↵ (Mac: +Return) or Enter (from the numeric keypad).
Melisma
A melisma is a syllable or word that extends over two or more notes. It is indicated by an underline extending from thebase of a syllable to the last note of the melisma. The underline is created by positioning the cursor at the end of asyllable and pressing Shift+_: once for each note in the melisma. See the image below:
134
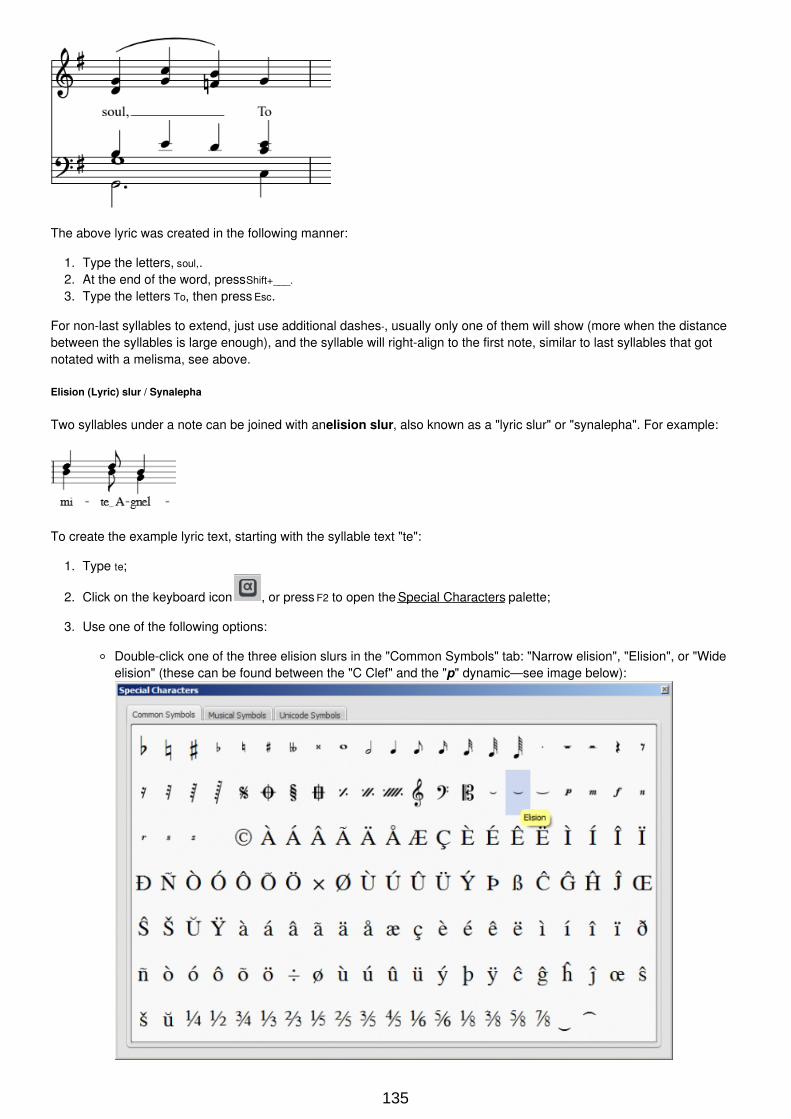
The above lyric was created in the following manner:
1. Type the letters, soul,.2. At the end of the word, press Shift+___.
3. Type the letters To, then press Esc.
For non-last syllables to extend, just use additional dashes -, usually only one of them will show (more when the distancebetween the syllables is large enough), and the syllable will right-align to the first note, similar to last syllables that gotnotated with a melisma, see above.
Elision (Lyric) slur / Synalepha
Two syllables under a note can be joined with an elision slur, also known as a "lyric slur" or "synalepha". For example:
To create the example lyric text, starting with the syllable text "te":
1. Type te;
2. Click on the keyboard icon , or press F2 to open the Special Characters palette;
3. Use one of the following options:
Double-click one of the three elision slurs in the "Common Symbols" tab: "Narrow elision", "Elision", or "Wideelision" (these can be found between the "C Clef" and the "p" dynamic—see image below):
135
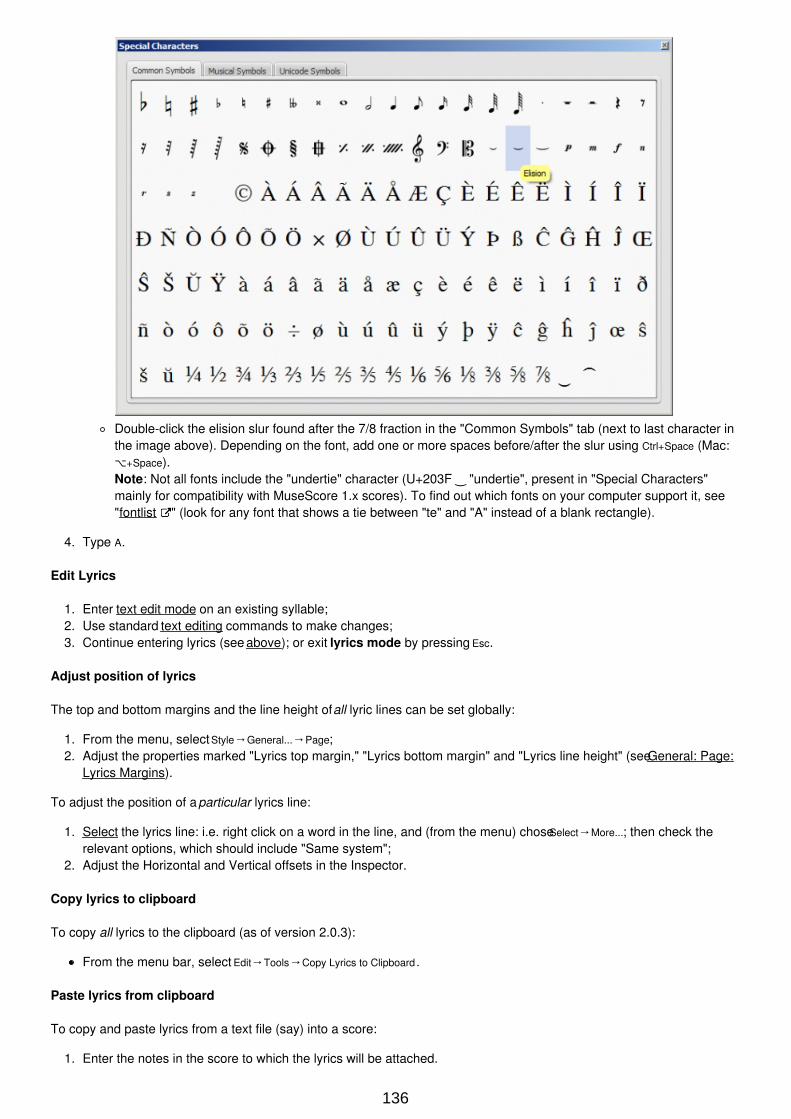
Double-click the elision slur found after the 7/8 fraction in the "Common Symbols" tab (next to last character inthe image above). Depending on the font, add one or more spaces before/after the slur using Ctrl+Space (Mac:+Space).Note: Not all fonts include the "undertie" character (U+203F ‿ "undertie", present in "Special Characters"mainly for compatibility with MuseScore 1.x scores). To find out which fonts on your computer support it, see"fontlist " (look for any font that shows a tie between "te" and "A" instead of a blank rectangle).
4. Type A.
Edit Lyrics
1. Enter text edit mode on an existing syllable;2. Use standard text editing commands to make changes;3. Continue entering lyrics (see above); or exit lyrics mode by pressing Esc.
Adjust position of lyrics
The top and bottom margins and the line height of all lyric lines can be set globally:
1. From the menu, select Style→General...→Page;2. Adjust the properties marked "Lyrics top margin," "Lyrics bottom margin" and "Lyrics line height" (see General: Page:
Lyrics Margins).
To adjust the position of a particular lyrics line:
1. Select the lyrics line: i.e. right click on a word in the line, and (from the menu) chose Select→More...; then check therelevant options, which should include "Same system";
2. Adjust the Horizontal and Vertical offsets in the Inspector.
Copy lyrics to clipboard
To copy all lyrics to the clipboard (as of version 2.0.3):
From the menu bar, select Edit→Tools→Copy Lyrics to Clipboard .
Paste lyrics from clipboard
To copy and paste lyrics from a text file (say) into a score:
1. Enter the notes in the score to which the lyrics will be attached.
136
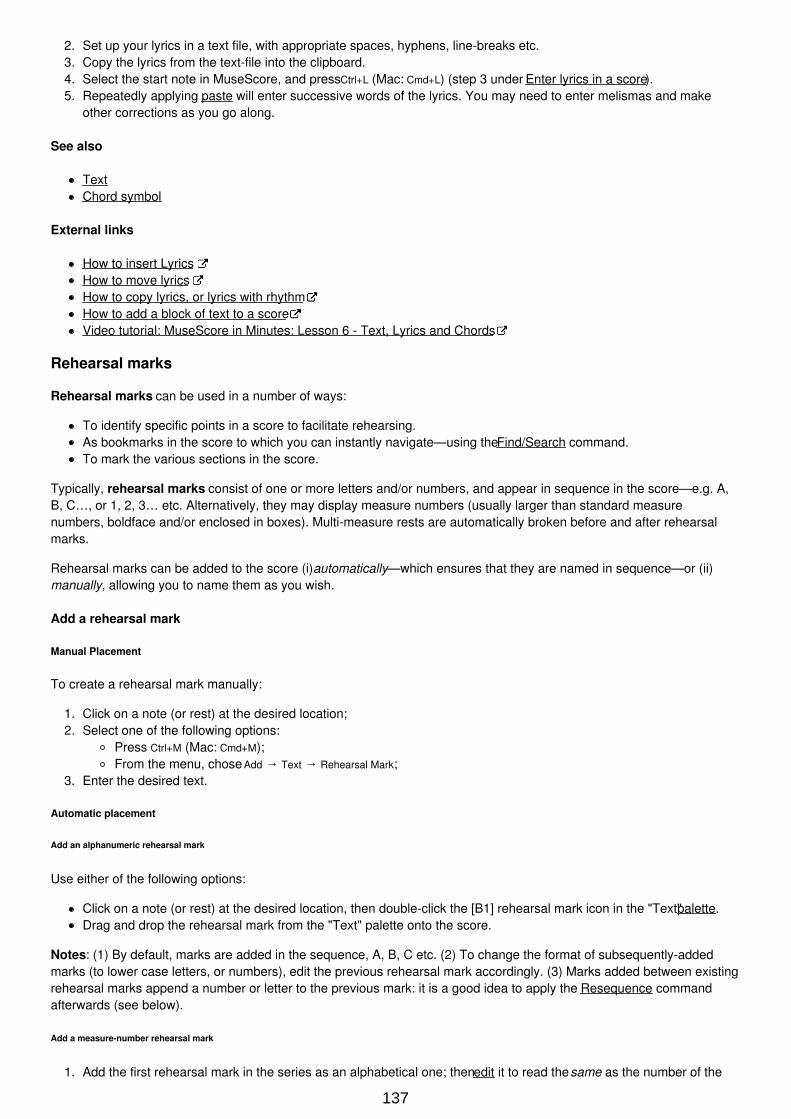
2. Set up your lyrics in a text file, with appropriate spaces, hyphens, line-breaks etc.3. Copy the lyrics from the text-file into the clipboard.4. Select the start note in MuseScore, and press Ctrl+L (Mac: Cmd+L) (step 3 under Enter lyrics in a score).5. Repeatedly applying paste will enter successive words of the lyrics. You may need to enter melismas and make
other corrections as you go along.
See also
TextChord symbol
External links
How to insert LyricsHow to move lyricsHow to copy lyrics, or lyrics with rhythmHow to add a block of text to a scoreVideo tutorial: MuseScore in Minutes: Lesson 6 - Text, Lyrics and Chords
Rehearsal marks
Rehearsal marks can be used in a number of ways:
To identify specific points in a score to facilitate rehearsing.As bookmarks in the score to which you can instantly navigate—using the Find/Search command.To mark the various sections in the score.
Typically, rehearsal marks consist of one or more letters and/or numbers, and appear in sequence in the score—e.g. A,B, C…, or 1, 2, 3… etc. Alternatively, they may display measure numbers (usually larger than standard measurenumbers, boldface and/or enclosed in boxes). Multi-measure rests are automatically broken before and after rehearsalmarks.
Rehearsal marks can be added to the score (i) automatically—which ensures that they are named in sequence—or (ii)manually, allowing you to name them as you wish.
Add a rehearsal mark
Manual Placement
To create a rehearsal mark manually:
1. Click on a note (or rest) at the desired location;2. Select one of the following options:
Press Ctrl+M (Mac: Cmd+M);From the menu, chose Add → Text → Rehearsal Mark;
3. Enter the desired text.
Automatic placement
Add an alphanumeric rehearsal mark
Use either of the following options:
Click on a note (or rest) at the desired location, then double-click the [B1] rehearsal mark icon in the "Text" palette.Drag and drop the rehearsal mark from the "Text" palette onto the score.
Notes: (1) By default, marks are added in the sequence, A, B, C etc. (2) To change the format of subsequently-addedmarks (to lower case letters, or numbers), edit the previous rehearsal mark accordingly. (3) Marks added between existingrehearsal marks append a number or letter to the previous mark: it is a good idea to apply the Resequence commandafterwards (see below).
Add a measure-number rehearsal mark
1. Add the first rehearsal mark in the series as an alphabetical one; then edit it to read the same as the number of the
137
measure it is attached to;2. Add subsequent marks as shown above. They will automatically adopt the measure-number format.
Automatically resequence rehearsal marks
MuseScore allows the user to automatically re-order a series of rehearsal marks if they have got out of sequence for anyreason. Use the following method:
1. Before making a selection, you can, if desired, establish a new format for the rehearsal marks (lower/upper case,number, or measure number) by manually altering the first mark in the range accordingly.
2. Select the range of measures you wish to apply the Resequence command to (if there is no selection then theprogram assumes you wish to resequence all measures).
3. From the menu, select Edit → Tools → Resequence Rehearsal Marks.
MuseScore automatically detects the sequence based on the first rehearsal mark in the selection—all rehearsal marks inthe selection are then altered accordingly. The following sequences are possible:
A, B, C etc.a, b, c etc.Numerical: 1, 2, 3 etc.Numerical: according to measure numbers. This requires the number of the first mark in the series to be equal to thenumber of the measure it is attached to.
Text style
Rehearsal marks are a variety of system text, appearing both on the score and on every part. By default, they are in alarge bold font, and enclosed in frames with rounded corners. All aspects of their appearance can be changed globally viathe rehearsal mark Text style.
Search for a rehearsal mark
See Find (Viewing and navigation).
See also
Text properties
External links
Rehearsal Letter (Wikipedia article)
Formatting
Layout and formatting
Layout and formatting options for the score can be accessed mainly from the Layout and Style menus.
Ways to affect layout
This section lists the main commands and dialogs affecting score layout. Other formatting options are covered in eitherLayout menu or Style menu below (for text, see Text styles and properties).
From the Layout menu:
Page Settings: Adjust the overall dimensions of your score such as page size, page margins, and scaling.
Increase Stretch/Decrease Stretch: Adjust the score spacing by stretching or squashing selected measures.
From the Style menu:
Score Style: Set overall score details, such as music font, display of multi-measure rests, and whether to hide emptystaves.
Page Style: Adjust staff and system spacing, score and lyric margins etc.
138
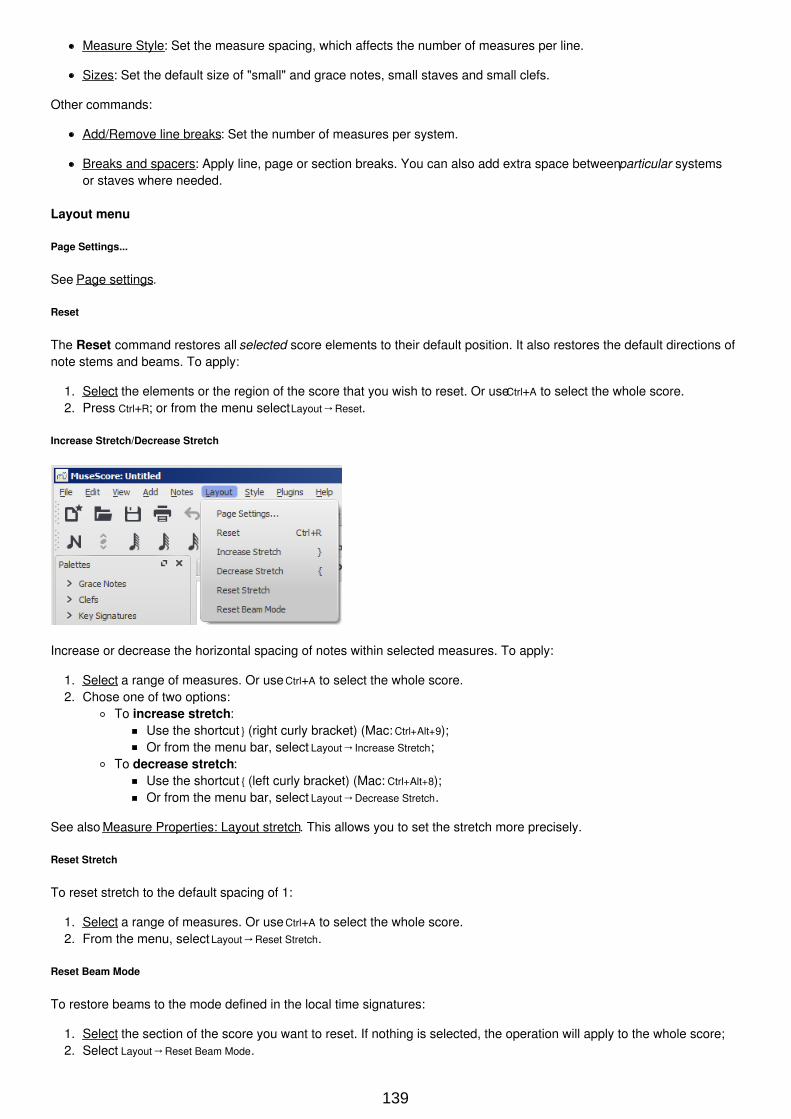
Measure Style: Set the measure spacing, which affects the number of measures per line.
Sizes: Set the default size of "small" and grace notes, small staves and small clefs.
Other commands:
Add/Remove line breaks: Set the number of measures per system.
Breaks and spacers: Apply line, page or section breaks. You can also add extra space between particular systemsor staves where needed.
Layout menu
Page Settings...
See Page settings.
Reset
The Reset command restores all selected score elements to their default position. It also restores the default directions ofnote stems and beams. To apply:
1. Select the elements or the region of the score that you wish to reset. Or use Ctrl+A to select the whole score.2. Press Ctrl+R; or from the menu select Layout→Reset.
Increase Stretch/Decrease Stretch
Increase or decrease the horizontal spacing of notes within selected measures. To apply:
1. Select a range of measures. Or use Ctrl+A to select the whole score.2. Chose one of two options:
To increase stretch:Use the shortcut (right curly bracket) (Mac: Ctrl+Alt+9);Or from the menu bar, select Layout→Increase Stretch;
To decrease stretch:Use the shortcut (left curly bracket) (Mac: Ctrl+Alt+8);Or from the menu bar, select Layout→Decrease Stretch.
See also Measure Properties: Layout stretch. This allows you to set the stretch more precisely.
Reset Stretch
To reset stretch to the default spacing of 1:
1. Select a range of measures. Or use Ctrl+A to select the whole score.2. From the menu, select Layout→Reset Stretch.
Reset Beam Mode
To restore beams to the mode defined in the local time signatures:
1. Select the section of the score you want to reset. If nothing is selected, the operation will apply to the whole score;2. Select Layout→Reset Beam Mode.
139

See also Beams.
Regroup Rhythms
As of version 2.1, this option corrects note ties, durations and beaming so that they are grouped according to standardmusic notation practice. For example:Before:
After:
Any notes that are tied and are the same length as a dotted note will be changed to the dotted note with two limitations. (i)Only the last note of a group of tied notes will have a single dot. Notes with more than one dot are not produced using thisoption. (ii) Dotted notes will not span from one group of beamed notes to another unless their duration is the same as allof the beam groups it covers. Any notes with more than one dot will be regrouped according to the above rules.
To apply:
1. Select the section of the score you want to reset. If nothing is selected, the operation will apply to the whole score;2. Select Layout→Regroup Rhythms.
Note: This is an experimental feature and there are known bugs. Articulations and ornaments are deleted and somepitches respelt. Ties across barlines may be lost on UNDO.
Style menu
General: Score
To open the Score dialog: from the menu, select Style→General...→Score.
140
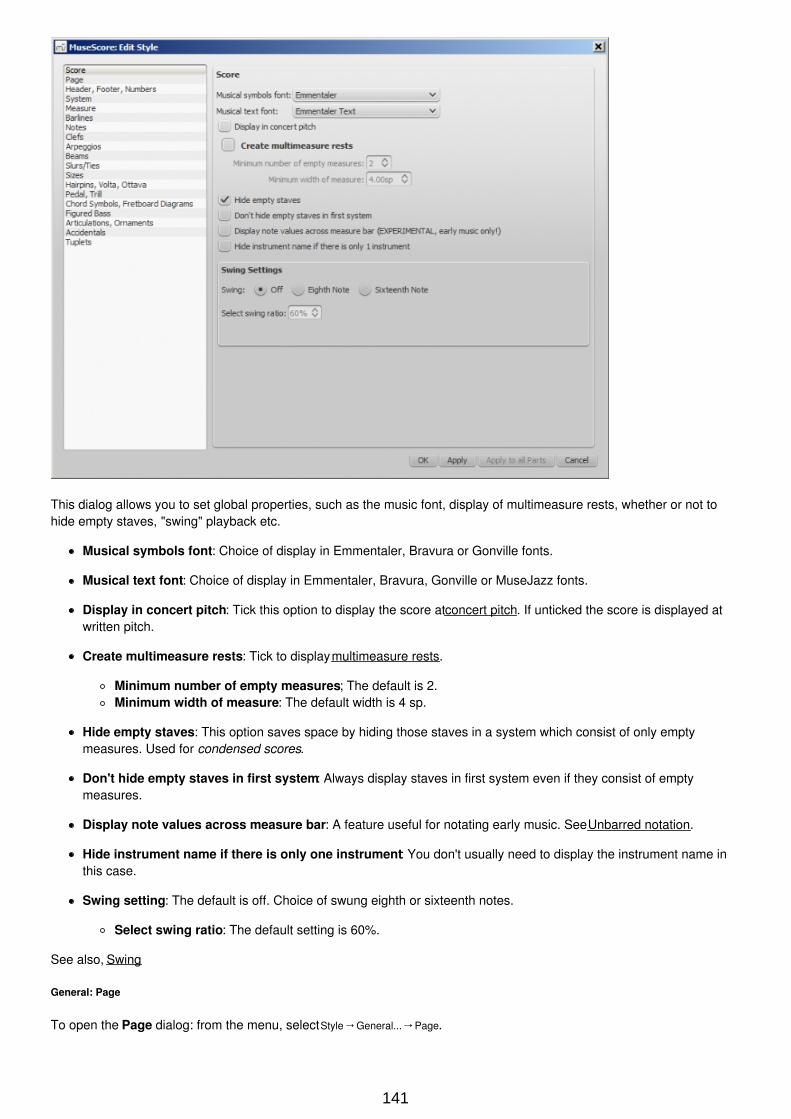
This dialog allows you to set global properties, such as the music font, display of multimeasure rests, whether or not tohide empty staves, "swing" playback etc.
Musical symbols font: Choice of display in Emmentaler, Bravura or Gonville fonts.
Musical text font: Choice of display in Emmentaler, Bravura, Gonville or MuseJazz fonts.
Display in concert pitch: Tick this option to display the score at concert pitch. If unticked the score is displayed atwritten pitch.
Create multimeasure rests: Tick to display multimeasure rests.
Minimum number of empty measures; The default is 2.Minimum width of measure: The default width is 4 sp.
Hide empty staves: This option saves space by hiding those staves in a system which consist of only emptymeasures. Used for condensed scores.
Don't hide empty staves in first system: Always display staves in first system even if they consist of emptymeasures.
Display note values across measure bar: A feature useful for notating early music. See Unbarred notation.
Hide instrument name if there is only one instrument: You don't usually need to display the instrument name inthis case.
Swing setting: The default is off. Choice of swung eighth or sixteenth notes.
Select swing ratio: The default setting is 60%.
See also, Swing
General: Page
To open the Page dialog: from the menu, select Style→General...→Page.
141

This dialog allows you to adjust the space above and below systems, staves, lyrics, and vertical frames; and between thescore and the top/bottom page margins. You can also control the display of key signatures, time signatures and clefs.
142
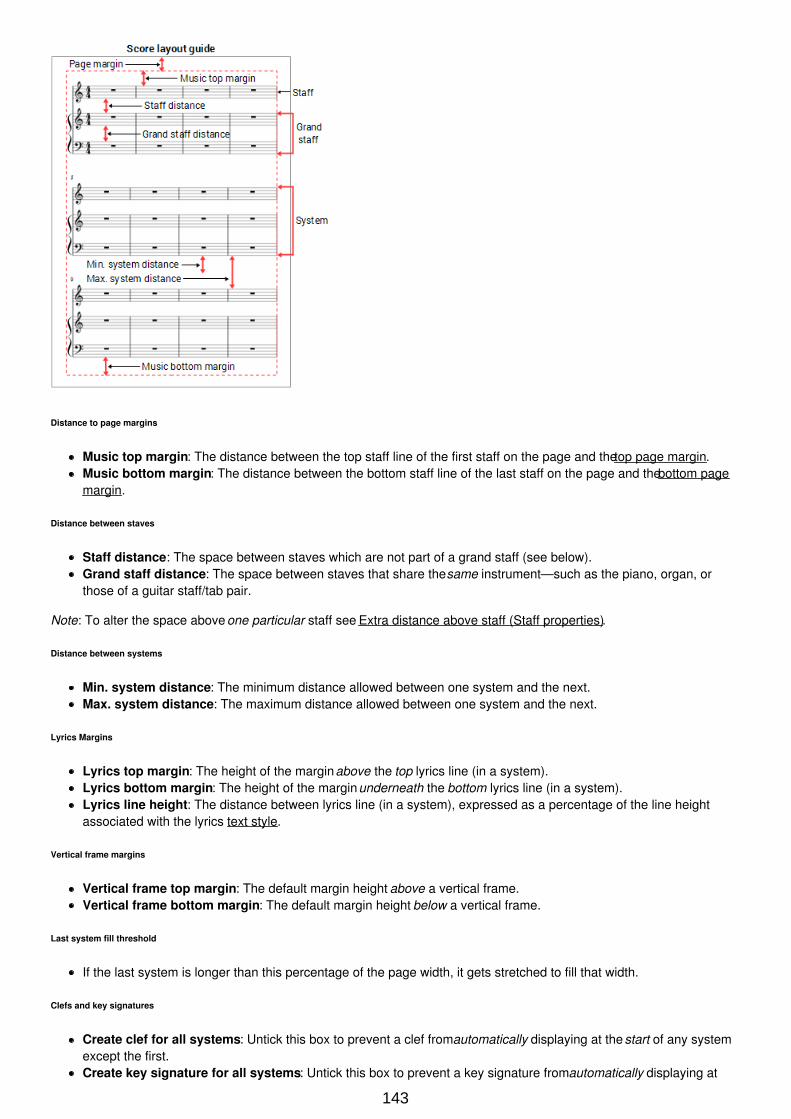
Distance to page margins
Music top margin: The distance between the top staff line of the first staff on the page and the top page margin.Music bottom margin: The distance between the bottom staff line of the last staff on the page and the bottom pagemargin.
Distance between staves
Staff distance: The space between staves which are not part of a grand staff (see below).Grand staff distance: The space between staves that share the same instrument—such as the piano, organ, orthose of a guitar staff/tab pair.
Note: To alter the space above one particular staff see Extra distance above staff (Staff properties).
Distance between systems
Min. system distance: The minimum distance allowed between one system and the next.Max. system distance: The maximum distance allowed between one system and the next.
Lyrics Margins
Lyrics top margin: The height of the margin above the top lyrics line (in a system).Lyrics bottom margin: The height of the margin underneath the bottom lyrics line (in a system).Lyrics line height: The distance between lyrics line (in a system), expressed as a percentage of the line heightassociated with the lyrics text style.
Vertical frame margins
Vertical frame top margin: The default margin height above a vertical frame.Vertical frame bottom margin: The default margin height below a vertical frame.
Last system fill threshold
If the last system is longer than this percentage of the page width, it gets stretched to fill that width.
Clefs and key signatures
Create clef for all systems: Untick this box to prevent a clef from automatically displaying at the start of any systemexcept the first.Create key signature for all systems: Untick this box to prevent a key signature from automatically displaying at
143
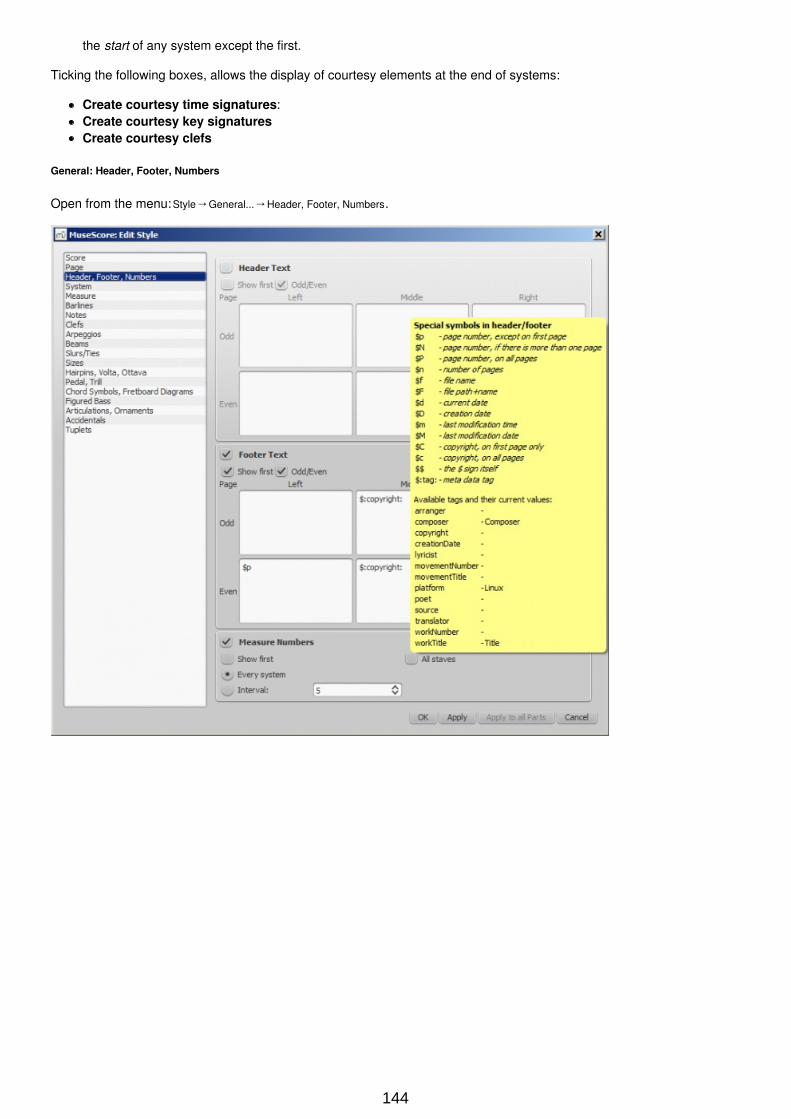
the start of any system except the first.
Ticking the following boxes, allows the display of courtesy elements at the end of systems:
Create courtesy time signatures:Create courtesy key signaturesCreate courtesy clefs
General: Header, Footer, Numbers
Open from the menu: Style→General...→Header, Footer, Numbers.
144
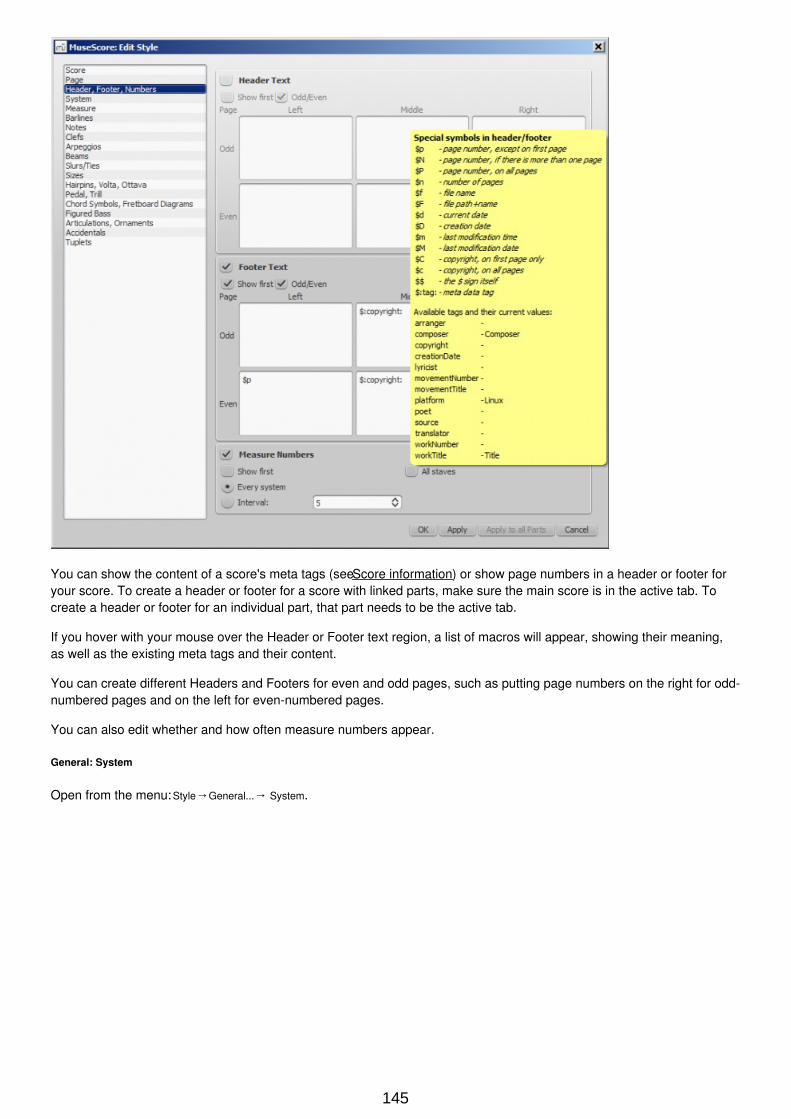
You can show the content of a score's meta tags (see Score information) or show page numbers in a header or footer foryour score. To create a header or footer for a score with linked parts, make sure the main score is in the active tab. Tocreate a header or footer for an individual part, that part needs to be the active tab.
If you hover with your mouse over the Header or Footer text region, a list of macros will appear, showing their meaning,as well as the existing meta tags and their content.
You can create different Headers and Footers for even and odd pages, such as putting page numbers on the right for odd-numbered pages and on the left for even-numbered pages.
You can also edit whether and how often measure numbers appear.
General: System
Open from the menu: Style→General...→ System.
145
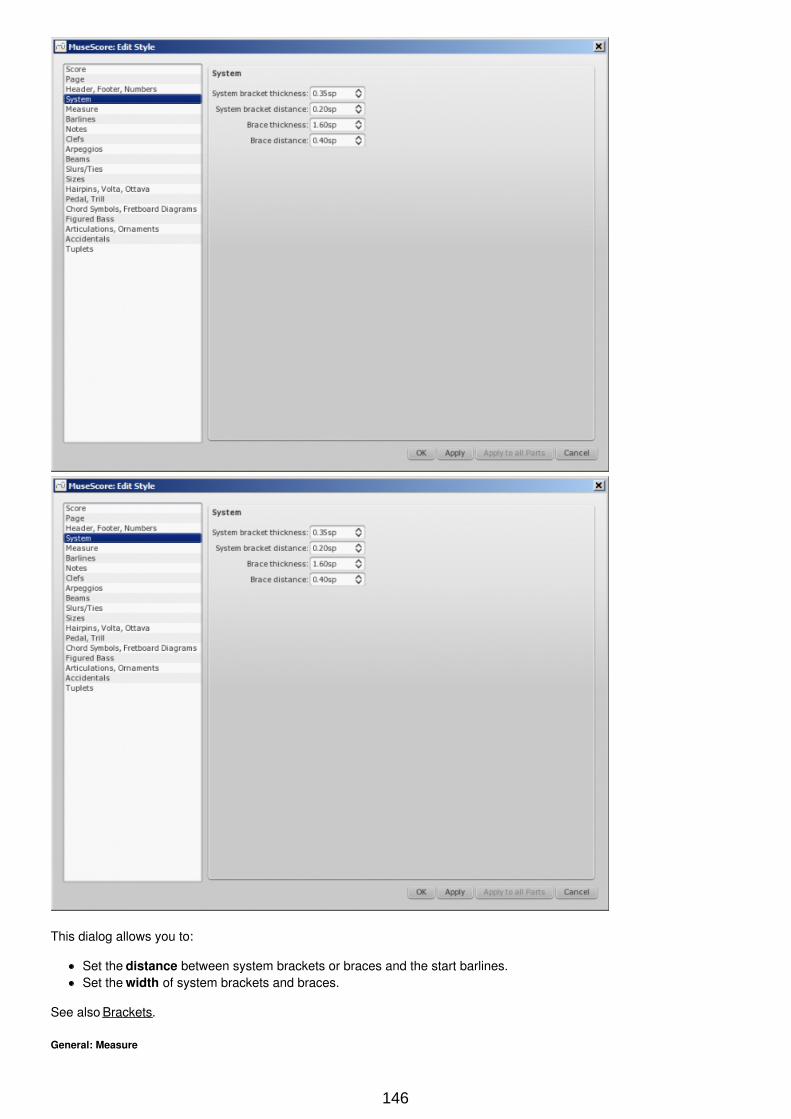
This dialog allows you to:
Set the distance between system brackets or braces and the start barlines.Set the width of system brackets and braces.
See also Brackets.
General: Measure
146
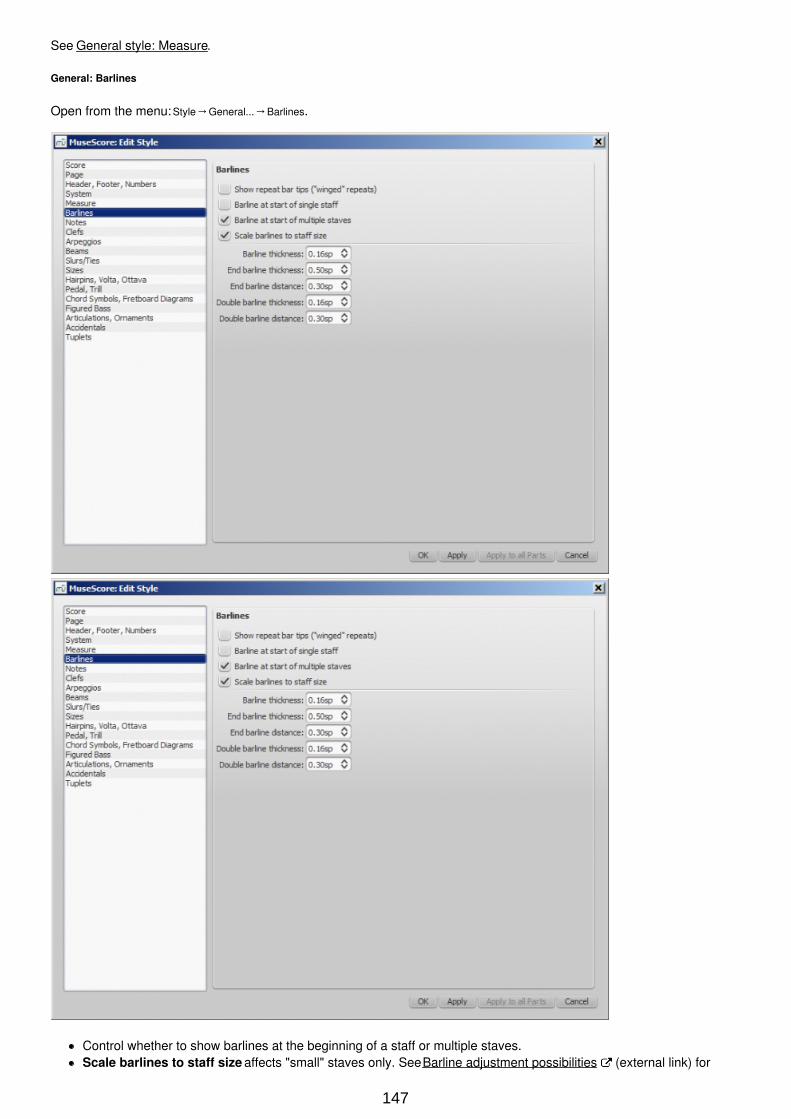
See General style: Measure.
General: Barlines
Open from the menu: Style→General...→Barlines.
Control whether to show barlines at the beginning of a staff or multiple staves.Scale barlines to staff size affects "small" staves only. See Barline adjustment possibilities (external link) for
147
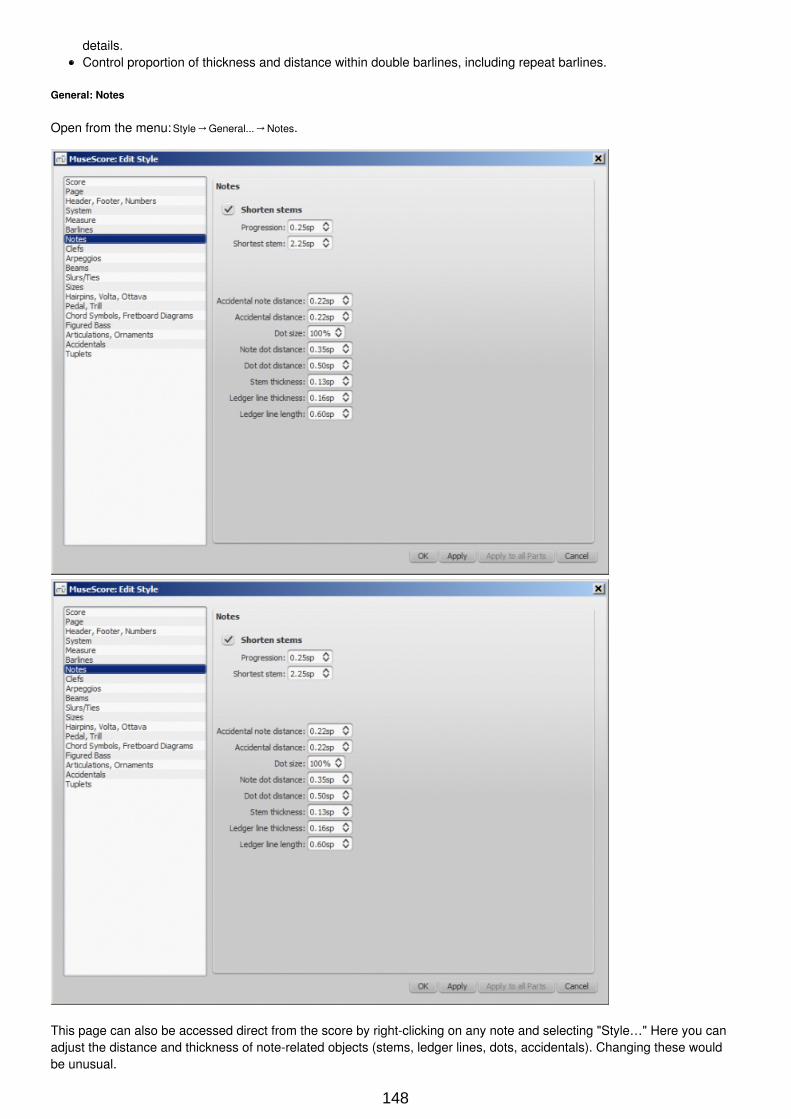
details.Control proportion of thickness and distance within double barlines, including repeat barlines.
General: Notes
Open from the menu: Style→General...→Notes.
This page can also be accessed direct from the score by right-clicking on any note and selecting "Style…" Here you canadjust the distance and thickness of note-related objects (stems, ledger lines, dots, accidentals). Changing these wouldbe unusual.
148
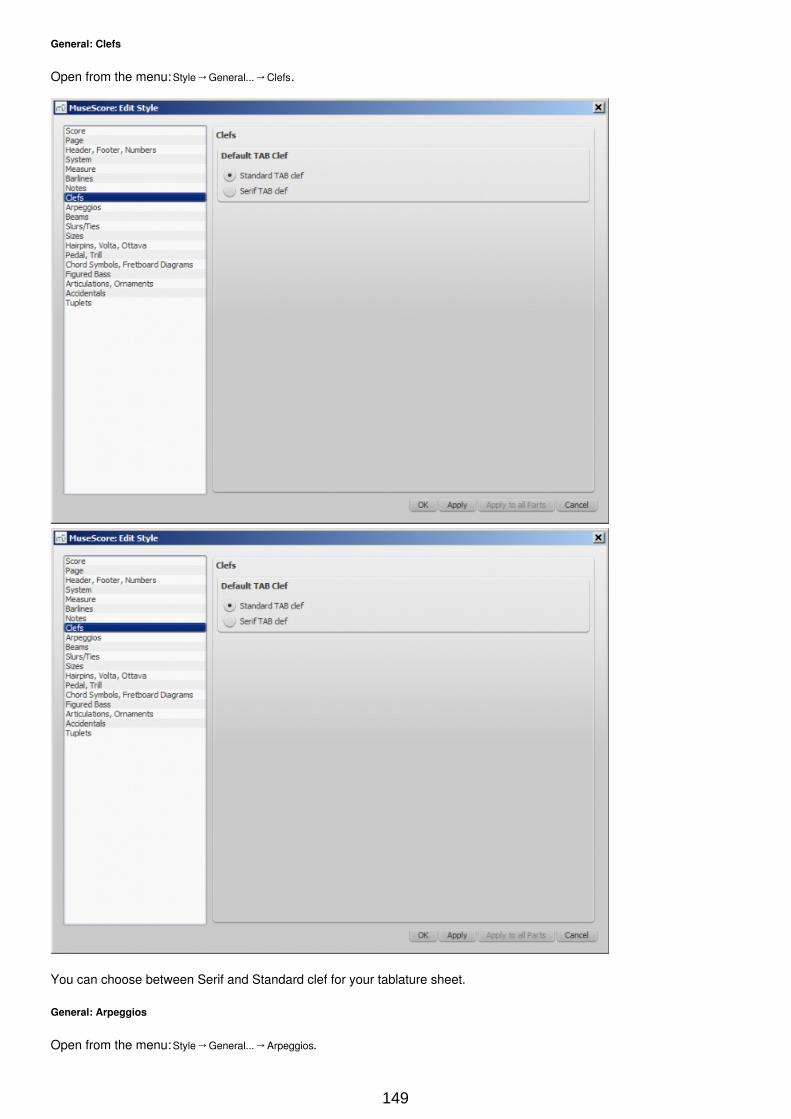
General: Clefs
Open from the menu: Style→General...→Clefs.
You can choose between Serif and Standard clef for your tablature sheet.
General: Arpeggios
Open from the menu: Style→General...→Arpeggios.
149
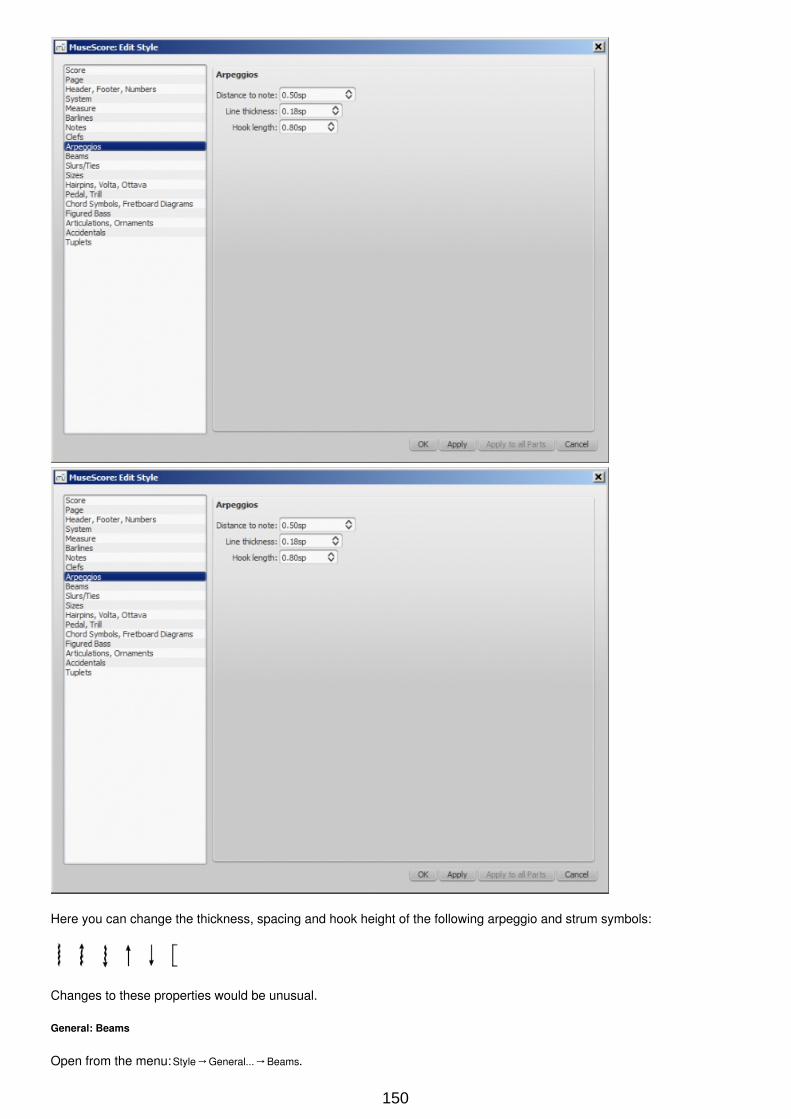
Here you can change the thickness, spacing and hook height of the following arpeggio and strum symbols:
Changes to these properties would be unusual.
General: Beams
Open from the menu: Style→General...→Beams.
150
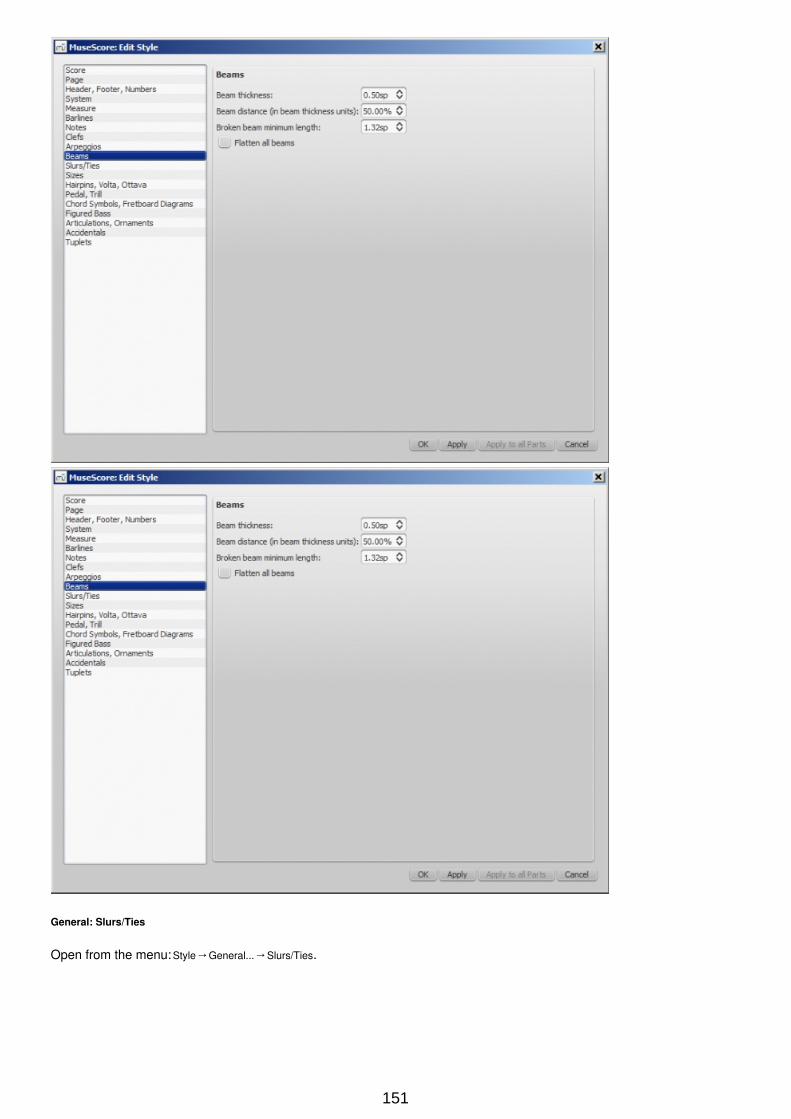
General: Slurs/Ties
Open from the menu: Style→General...→Slurs/Ties.
151
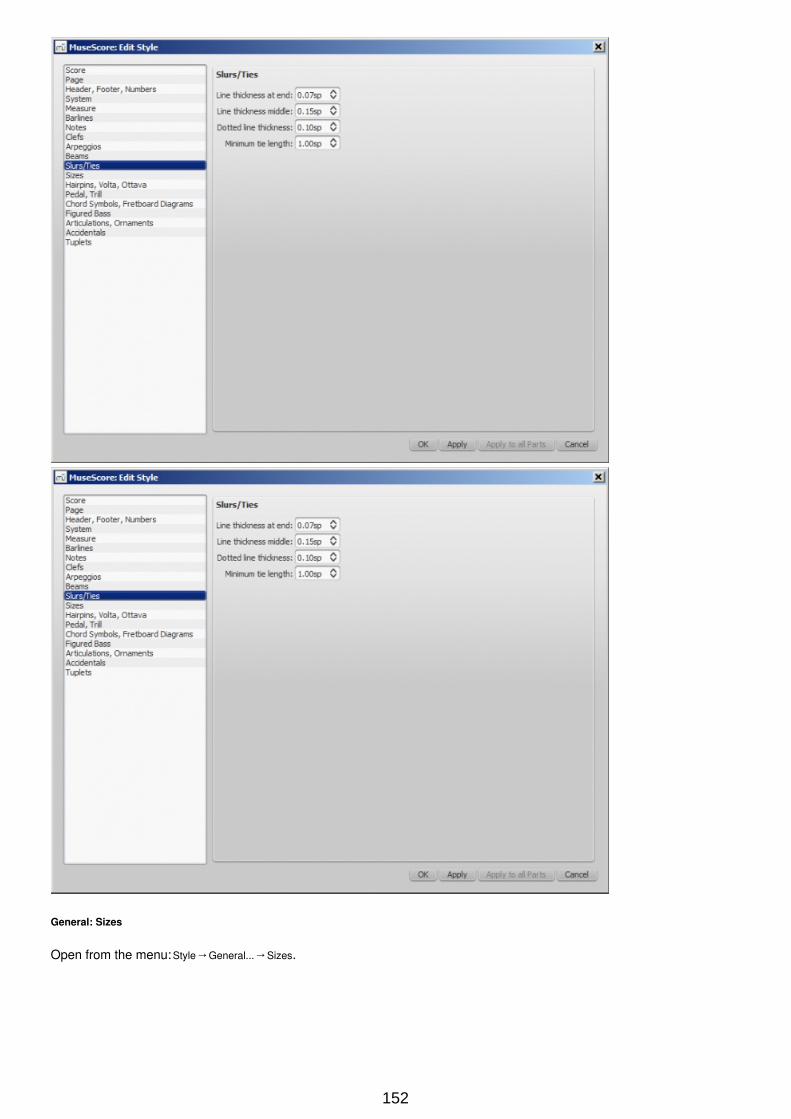
General: Sizes
Open from the menu: Style→General...→Sizes.
152
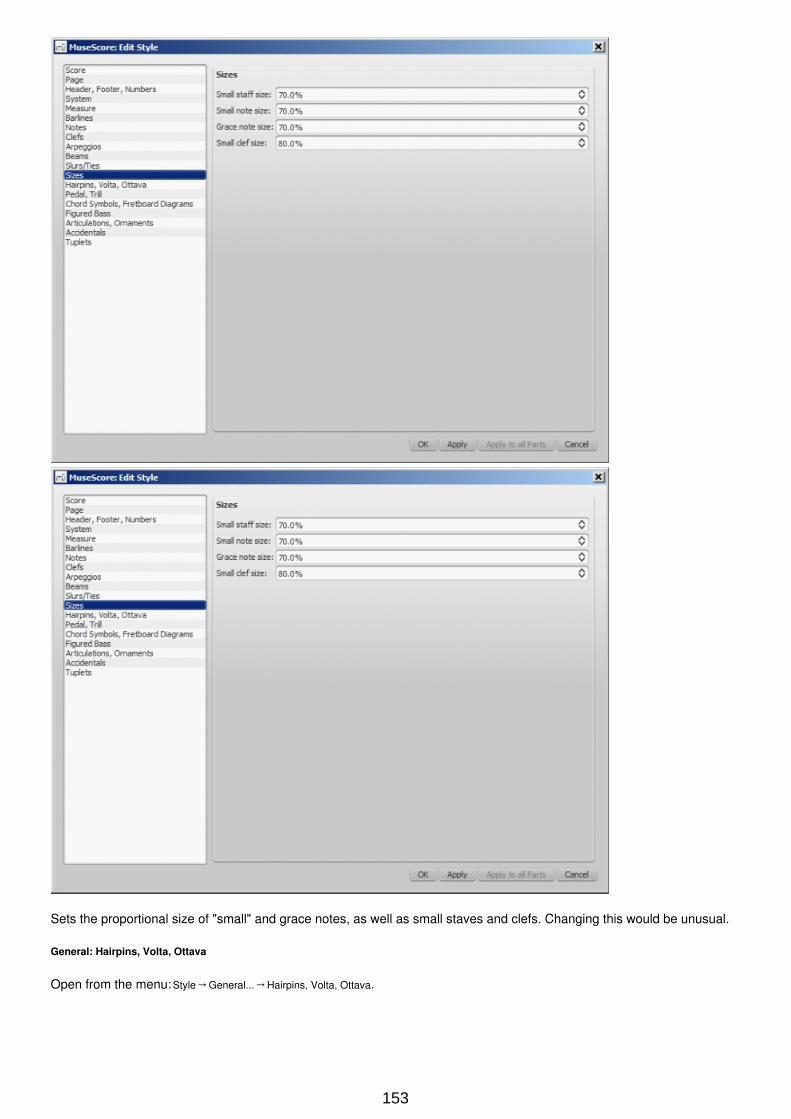
Sets the proportional size of "small" and grace notes, as well as small staves and clefs. Changing this would be unusual.
General: Hairpins, Volta, Ottava
Open from the menu: Style→General...→Hairpins, Volta, Ottava.
153
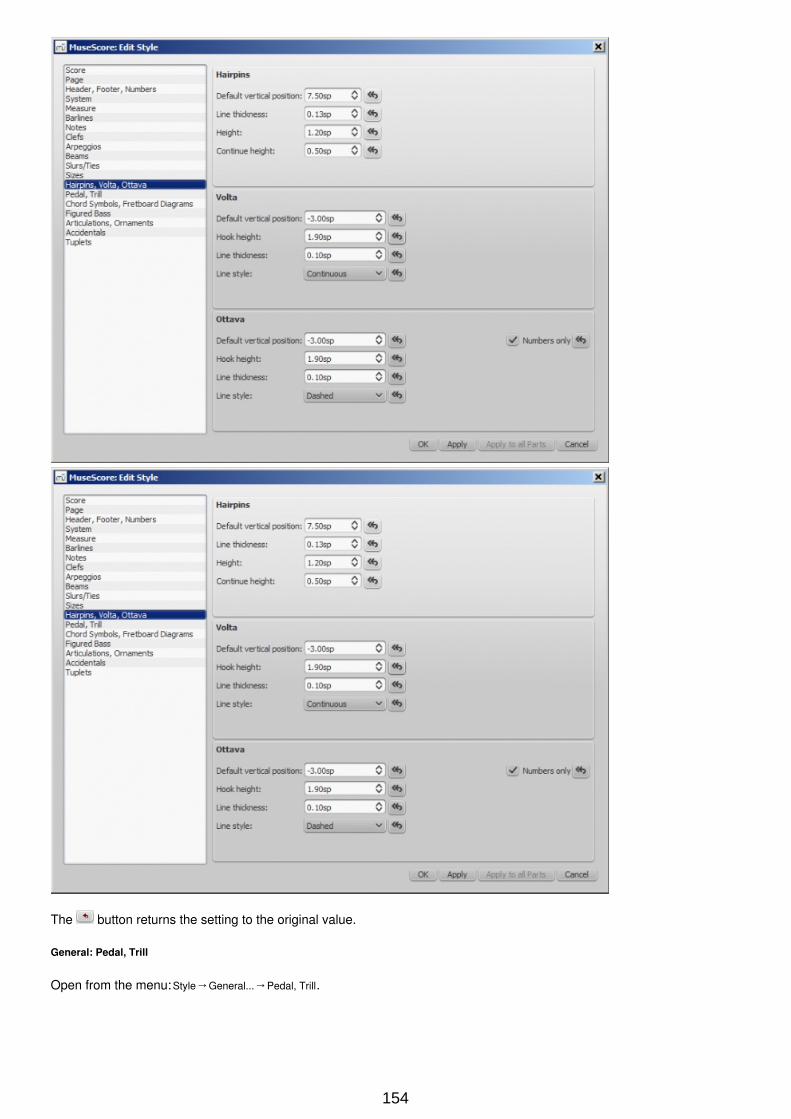
The button returns the setting to the original value.
General: Pedal, Trill
Open from the menu: Style→General...→Pedal, Trill.
154
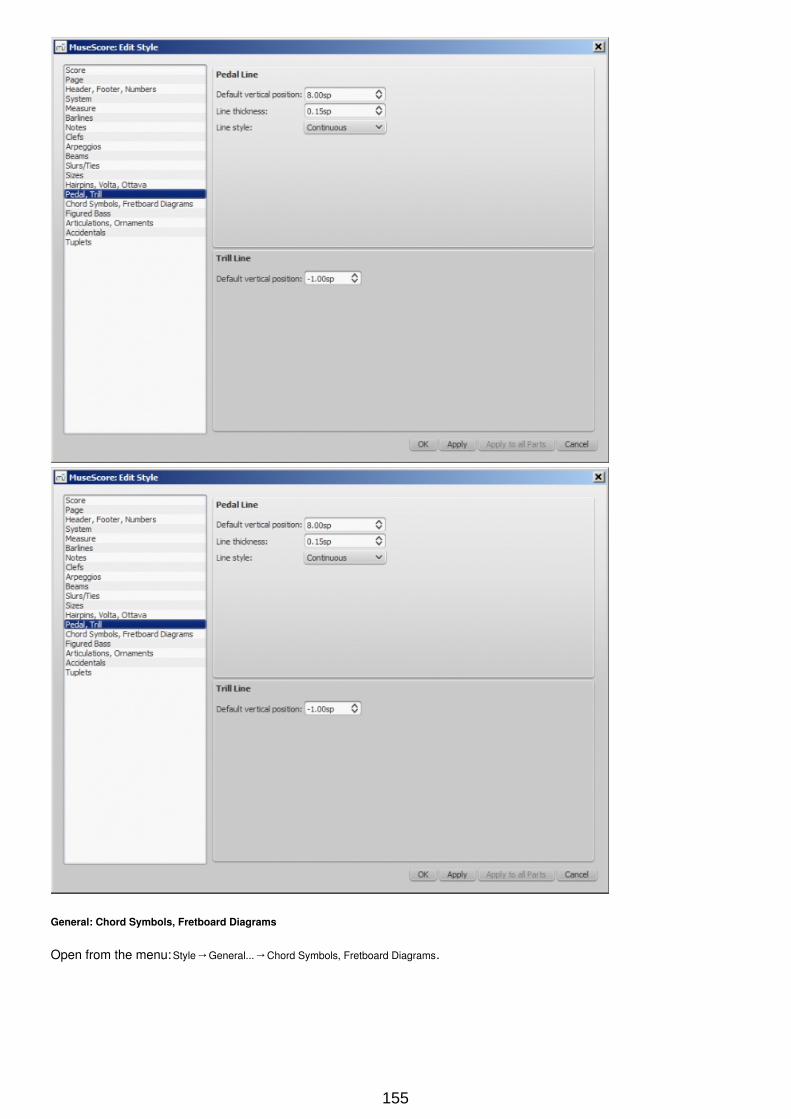
General: Chord Symbols, Fretboard Diagrams
Open from the menu: Style→General...→Chord Symbols, Fretboard Diagrams.
155
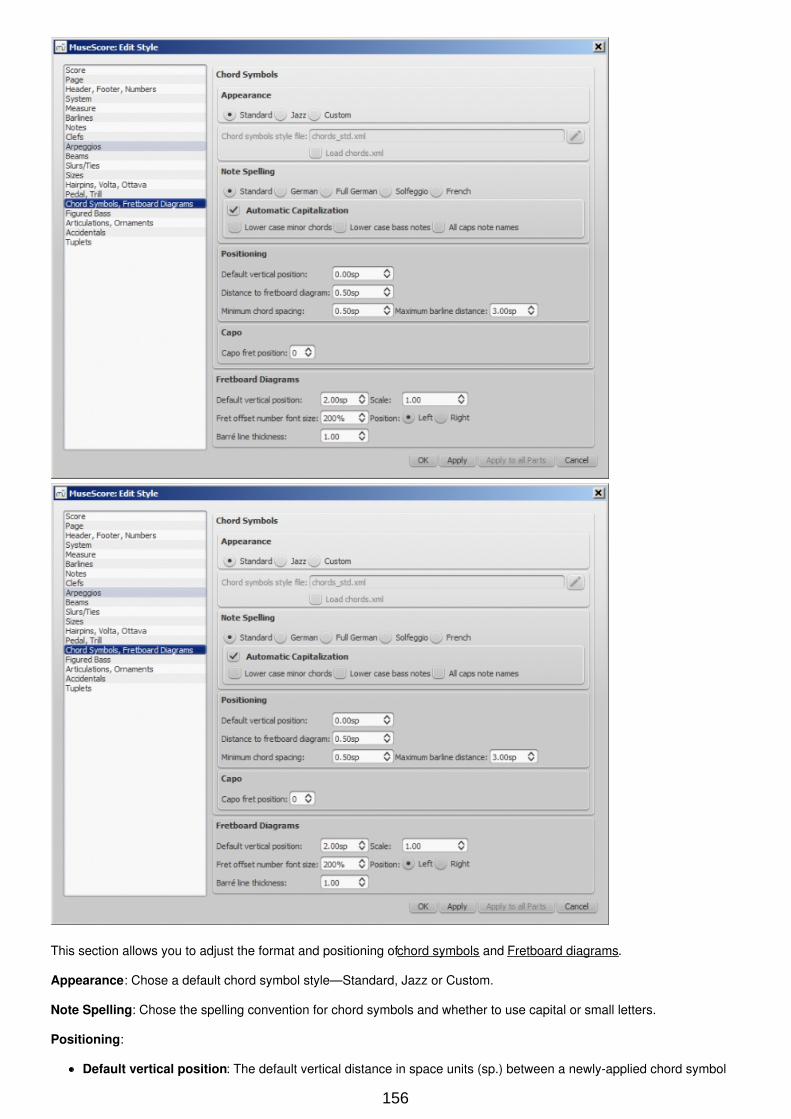
This section allows you to adjust the format and positioning of chord symbols and Fretboard diagrams.
Appearance: Chose a default chord symbol style—Standard, Jazz or Custom.
Note Spelling: Chose the spelling convention for chord symbols and whether to use capital or small letters.
Positioning:
Default vertical position: The default vertical distance in space units (sp.) between a newly-applied chord symbol
156
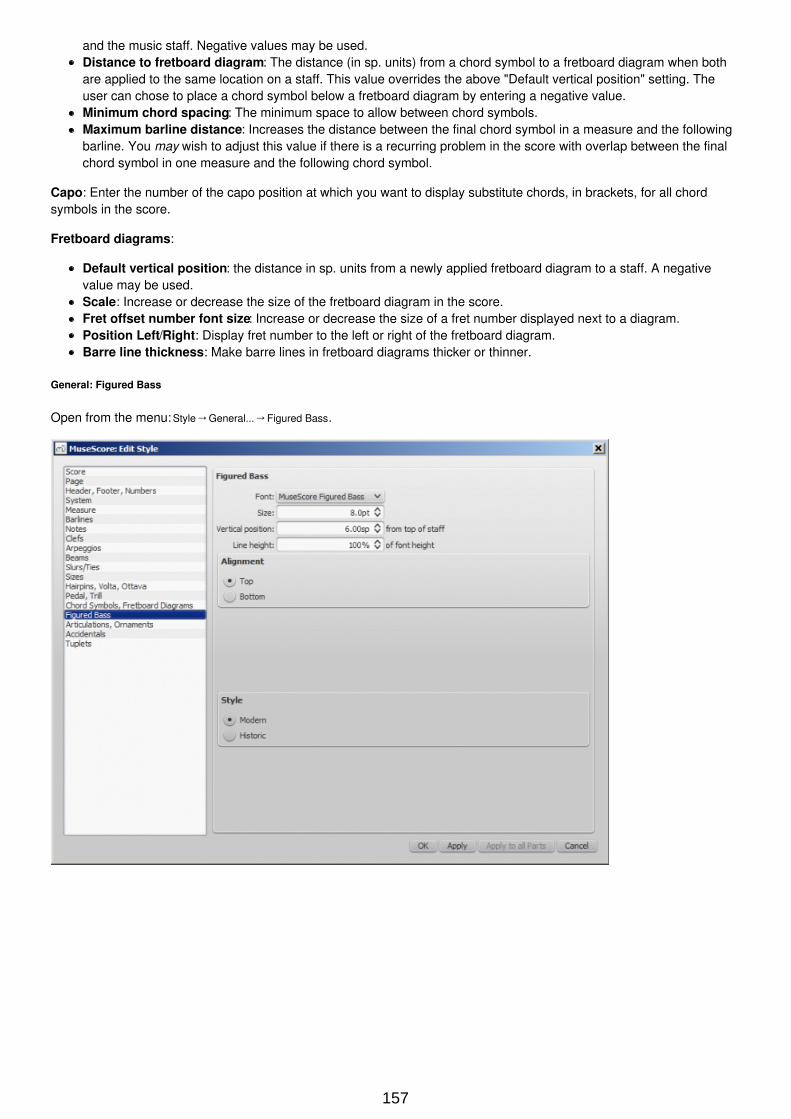
and the music staff. Negative values may be used.Distance to fretboard diagram: The distance (in sp. units) from a chord symbol to a fretboard diagram when bothare applied to the same location on a staff. This value overrides the above "Default vertical position" setting. Theuser can chose to place a chord symbol below a fretboard diagram by entering a negative value.Minimum chord spacing: The minimum space to allow between chord symbols.Maximum barline distance: Increases the distance between the final chord symbol in a measure and the followingbarline. You may wish to adjust this value if there is a recurring problem in the score with overlap between the finalchord symbol in one measure and the following chord symbol.
Capo: Enter the number of the capo position at which you want to display substitute chords, in brackets, for all chordsymbols in the score.
Fretboard diagrams:
Default vertical position: the distance in sp. units from a newly applied fretboard diagram to a staff. A negativevalue may be used.Scale: Increase or decrease the size of the fretboard diagram in the score.Fret offset number font size: Increase or decrease the size of a fret number displayed next to a diagram.Position Left/Right: Display fret number to the left or right of the fretboard diagram.Barre line thickness: Make barre lines in fretboard diagrams thicker or thinner.
General: Figured Bass
Open from the menu: Style→General...→Figured Bass.
157
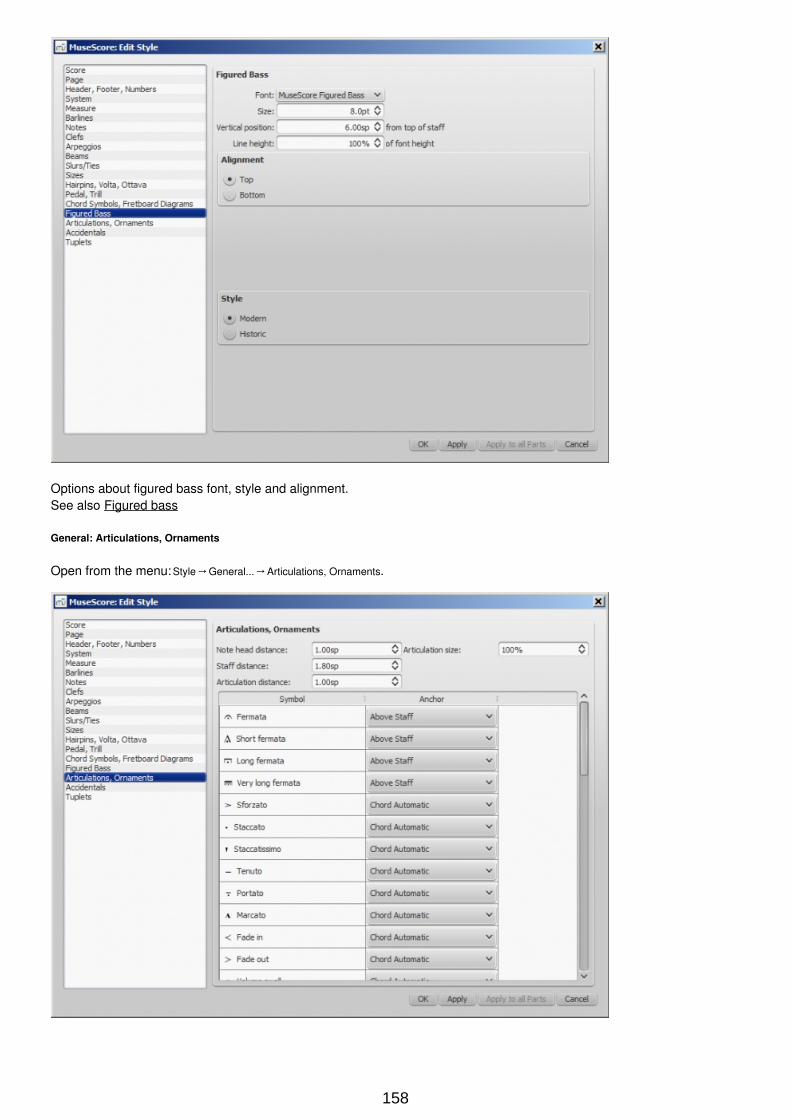
Options about figured bass font, style and alignment.See also Figured bass
General: Articulations, Ornaments
Open from the menu: Style→General...→Articulations, Ornaments.
158
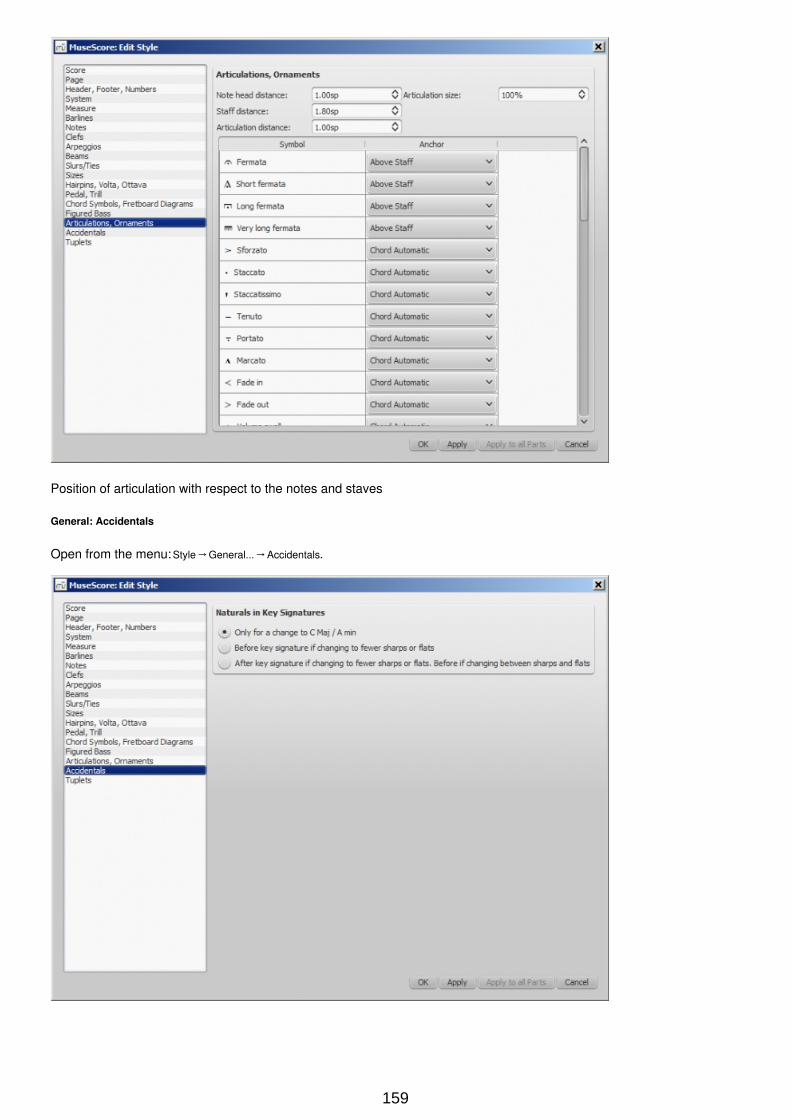
Position of articulation with respect to the notes and staves
General: Accidentals
Open from the menu: Style→General...→Accidentals.
159
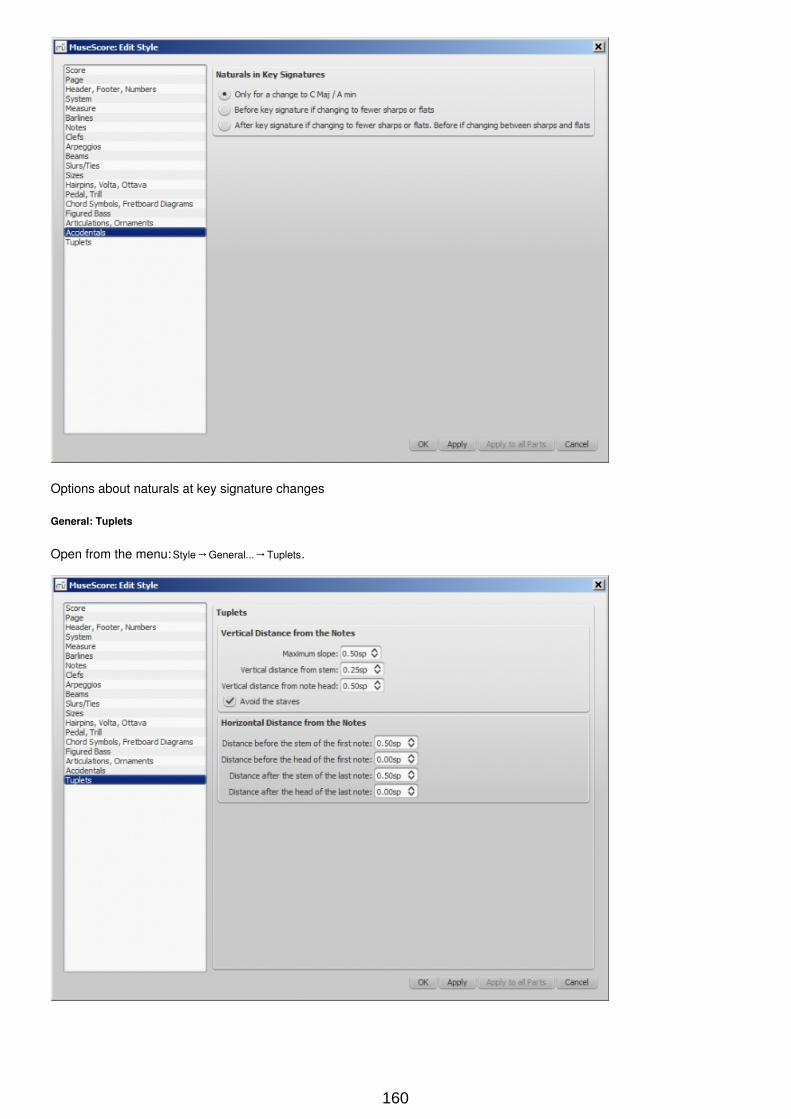
Options about naturals at key signature changes
General: Tuplets
Open from the menu: Style→General...→Tuplets.
160
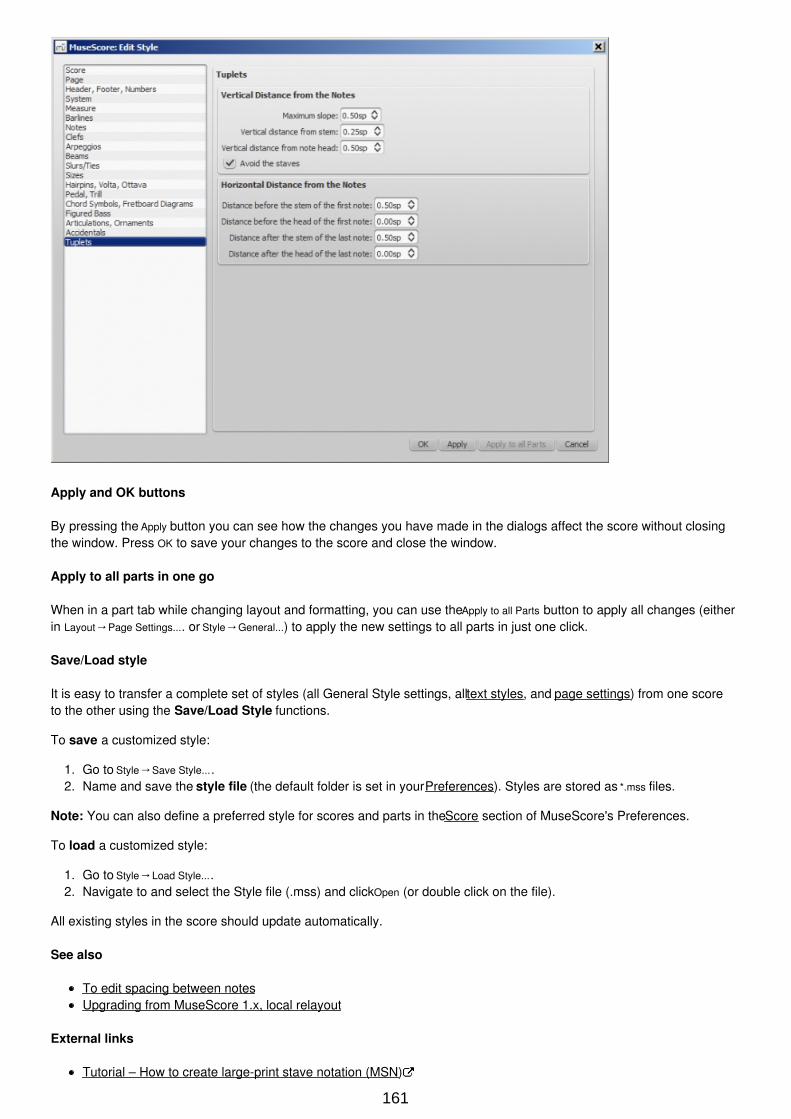
Apply and OK buttons
By pressing the Apply button you can see how the changes you have made in the dialogs affect the score without closingthe window. Press OK to save your changes to the score and close the window.
Apply to all parts in one go
When in a part tab while changing layout and formatting, you can use the Apply to all Parts button to apply all changes (eitherin Layout→Page Settings.... or Style→General...) to apply the new settings to all parts in just one click.
Save/Load style
It is easy to transfer a complete set of styles (all General Style settings, all text styles, and page settings) from one scoreto the other using the Save/Load Style functions.
To save a customized style:
1. Go to Style→Save Style....2. Name and save the style file (the default folder is set in your Preferences). Styles are stored as *.mss files.
Note: You can also define a preferred style for scores and parts in the Score section of MuseScore's Preferences.
To load a customized style:
1. Go to Style→Load Style....2. Navigate to and select the Style file (.mss) and click Open (or double click on the file).
All existing styles in the score should update automatically.
See also
To edit spacing between notesUpgrading from MuseScore 1.x, local relayout
External links
Tutorial – How to create large-print stave notation (MSN)
161
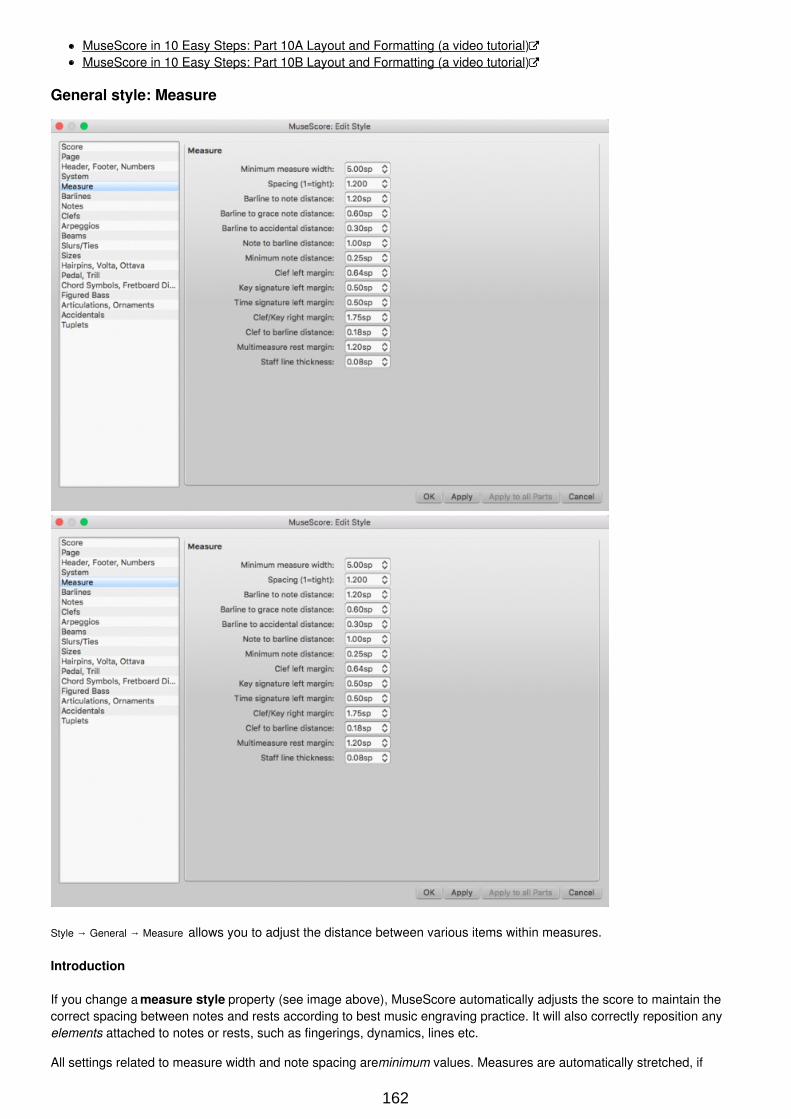
MuseScore in 10 Easy Steps: Part 10A Layout and Formatting (a video tutorial)MuseScore in 10 Easy Steps: Part 10B Layout and Formatting (a video tutorial)
General style: Measure
Style → General → Measure allows you to adjust the distance between various items within measures.
Introduction
If you change a measure style property (see image above), MuseScore automatically adjusts the score to maintain thecorrect spacing between notes and rests according to best music engraving practice. It will also correctly reposition anyelements attached to notes or rests, such as fingerings, dynamics, lines etc.
All settings related to measure width and note spacing are minimum values. Measures are automatically stretched, if
162
necessary, to maintain existing page margins.
All the properties listed below use the staff space (abbreviated to "sp") as the basic unit of measurement. See Pagesettings: Scaling for more details.
Options
Minimum measure widthSets the minimum horizontal length of measures. In measures containing very little content (e.g., a single whole noteor whole measure rest), the measure will only shrink as far as this minimum.
Spacing (1=tight)Condenses or expands the space after notes or rests. This setting thus affects not only space between notes butalso between the last note and the ending barline. For the space between the beginning of the measure and the firstnote or rest, see Barline to note distance (below).
Note: Changes to an individual measure's Stretch (under Layout → Increase Stretch, Decrease Stretch ) are calculated after,and proportional to, the global Spacing setting.
Barline to note distanceSets the distance between the barline which begins a measure and the first note or rest in that measure. For theinitial measures of systems, which start with clefs instead of barlines, use Clef/key right margin (below).
Barline to grace note distanceSets the distance between a barline and a grace note that occurs before the first actual note in a measure(independently of the "Barline to note distance" setting).
Barline to accidental distanceSets the distance between a barline and an accidental placed before the first note in a measure (independently ofthe "Barline to note distance" setting).
Note to barline distance(To be added).
Minimum note distanceSpecifies the smallest amount of space MuseScore will allow after each note (depending on other factors, morespace may be allowed).
Clef left marginSets the distance between the very beginning of each line and the clef. (This option is rarely needed.)
Key signature left marginSets the distance between the key signature and the clef preceding it.
Time signature left marginSets the distance between the time signature and the key signature or clef preceding it.
Clef/key right marginSets the distance between the material at the beginning of each line (such as the clef and key signature) and thefirst note or rest of the first measure on the line. (Note that, although not named in the option, if a time signature ispresent, it is the element from which the spacing begins.)
Clef to barline distanceSets the distance between a barline and a clef change preceding it.
Multi-measure rest marginSets the distance between a multi-measure rest and the barlines on either side.
Staff line thicknessSets the thickness of the lines of the staff, which allows you to make the staff thicker and darker, if you need greatervisibility on your printouts.
Page settings
Page settings allows you to adjust the overall dimensions of your score such as page size, page margins, and scaling. It
163
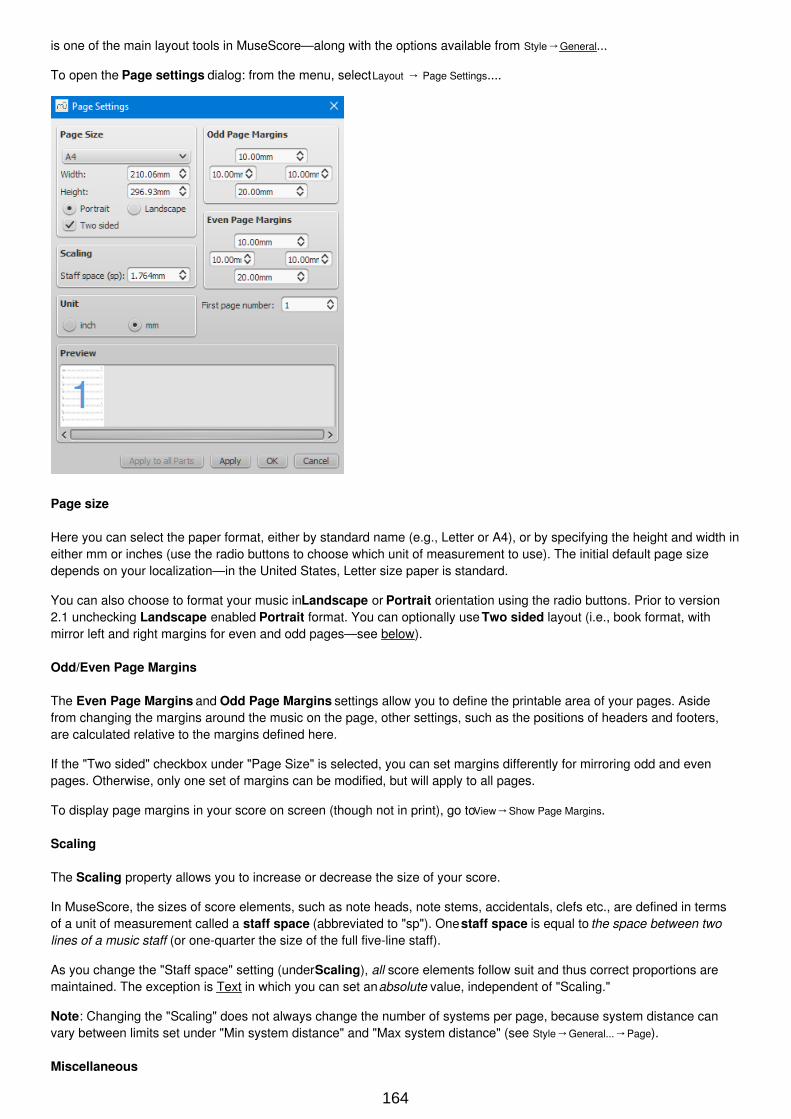
is one of the main layout tools in MuseScore—along with the options available from Style→General...
To open the Page settings dialog: from the menu, select Layout → Page Settings....
Page size
Here you can select the paper format, either by standard name (e.g., Letter or A4), or by specifying the height and width ineither mm or inches (use the radio buttons to choose which unit of measurement to use). The initial default page sizedepends on your localization—in the United States, Letter size paper is standard.
You can also choose to format your music in Landscape or Portrait orientation using the radio buttons. Prior to version2.1 unchecking Landscape enabled Portrait format. You can optionally use Two sided layout (i.e., book format, withmirror left and right margins for even and odd pages—see below).
Odd/Even Page Margins
The Even Page Margins and Odd Page Margins settings allow you to define the printable area of your pages. Asidefrom changing the margins around the music on the page, other settings, such as the positions of headers and footers,are calculated relative to the margins defined here.
If the "Two sided" checkbox under "Page Size" is selected, you can set margins differently for mirroring odd and evenpages. Otherwise, only one set of margins can be modified, but will apply to all pages.
To display page margins in your score on screen (though not in print), go to View→Show Page Margins.
Scaling
The Scaling property allows you to increase or decrease the size of your score.
In MuseScore, the sizes of score elements, such as note heads, note stems, accidentals, clefs etc., are defined in termsof a unit of measurement called a staff space (abbreviated to "sp"). One staff space is equal to the space between twolines of a music staff (or one-quarter the size of the full five-line staff).
As you change the "Staff space" setting (under Scaling), all score elements follow suit and thus correct proportions aremaintained. The exception is Text in which you can set an absolute value, independent of "Scaling."
Note: Changing the "Scaling" does not always change the number of systems per page, because system distance canvary between limits set under "Min system distance" and "Max system distance" (see Style→General...→Page).
Miscellaneous
164
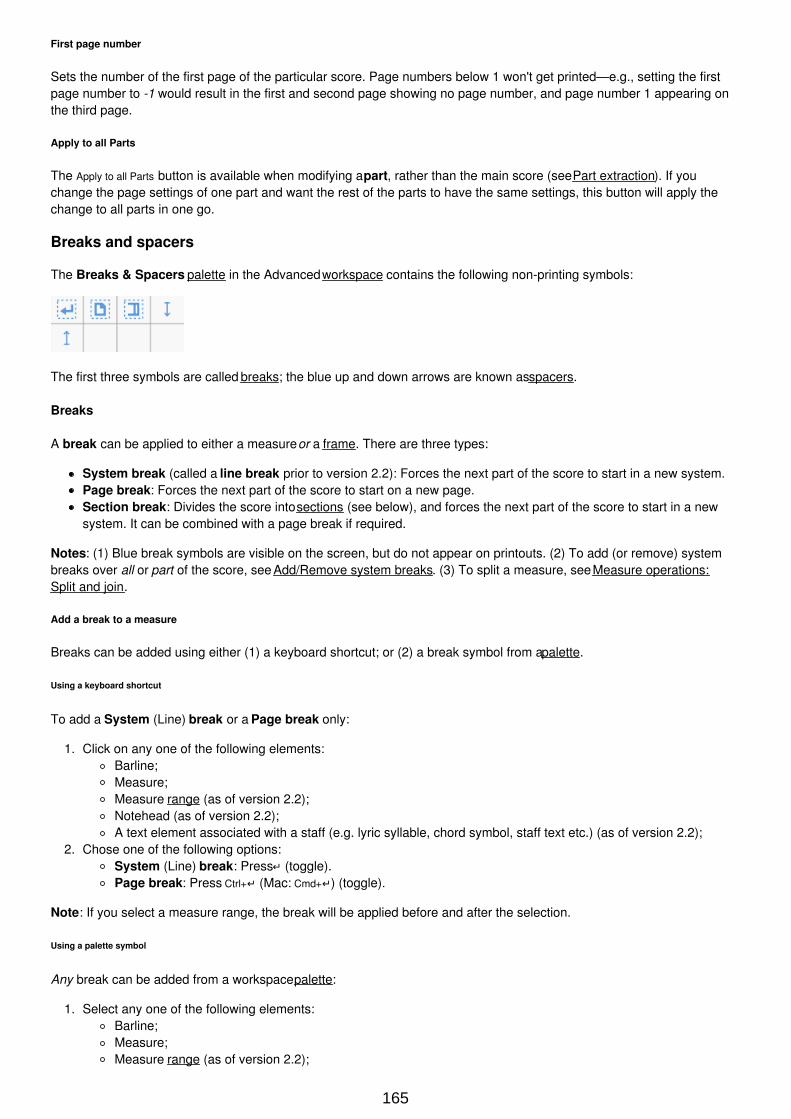
First page number
Sets the number of the first page of the particular score. Page numbers below 1 won't get printed—e.g., setting the firstpage number to -1 would result in the first and second page showing no page number, and page number 1 appearing onthe third page.
Apply to all Parts
The Apply to all Parts button is available when modifying a part, rather than the main score (see Part extraction). If youchange the page settings of one part and want the rest of the parts to have the same settings, this button will apply thechange to all parts in one go.
Breaks and spacers
The Breaks & Spacers palette in the Advanced workspace contains the following non-printing symbols:
The first three symbols are called breaks; the blue up and down arrows are known as spacers.
Breaks
A break can be applied to either a measure or a frame. There are three types:
System break (called a line break prior to version 2.2): Forces the next part of the score to start in a new system.Page break: Forces the next part of the score to start on a new page.Section break: Divides the score into sections (see below), and forces the next part of the score to start in a newsystem. It can be combined with a page break if required.
Notes: (1) Blue break symbols are visible on the screen, but do not appear on printouts. (2) To add (or remove) systembreaks over all or part of the score, see Add/Remove system breaks. (3) To split a measure, see Measure operations:Split and join.
Add a break to a measure
Breaks can be added using either (1) a keyboard shortcut; or (2) a break symbol from a palette.
Using a keyboard shortcut
To add a System (Line) break or a Page break only:
1. Click on any one of the following elements:Barline;Measure;Measure range (as of version 2.2);Notehead (as of version 2.2);A text element associated with a staff (e.g. lyric syllable, chord symbol, staff text etc.) (as of version 2.2);
2. Chose one of the following options:System (Line) break: Press↵ (toggle).Page break: Press Ctrl+↵ (Mac: Cmd+↵) (toggle).
Note: If you select a measure range, the break will be applied before and after the selection.
Using a palette symbol
Any break can be added from a workspace palette:
1. Select any one of the following elements:Barline;Measure;Measure range (as of version 2.2);
165
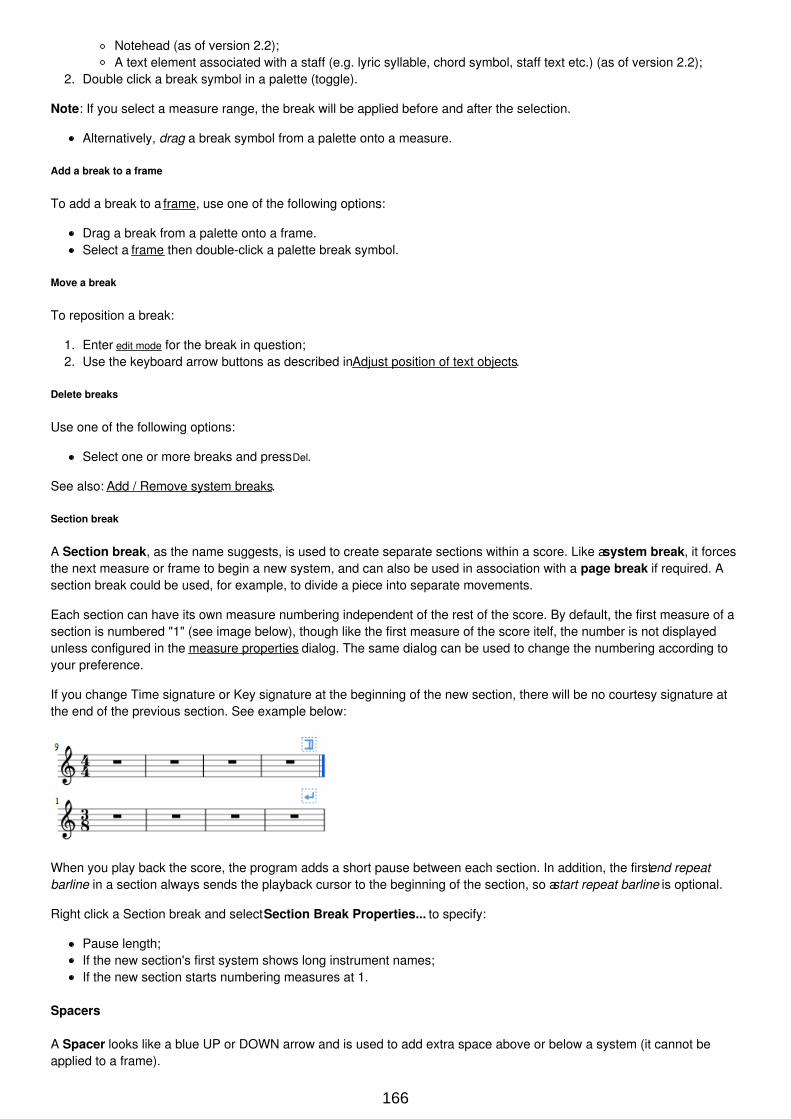
Notehead (as of version 2.2);A text element associated with a staff (e.g. lyric syllable, chord symbol, staff text etc.) (as of version 2.2);
2. Double click a break symbol in a palette (toggle).
Note: If you select a measure range, the break will be applied before and after the selection.
Alternatively, drag a break symbol from a palette onto a measure.
Add a break to a frame
To add a break to a frame, use one of the following options:
Drag a break from a palette onto a frame.Select a frame then double-click a palette break symbol.
Move a break
To reposition a break:
1. Enter edit mode for the break in question;2. Use the keyboard arrow buttons as described in Adjust position of text objects.
Delete breaks
Use one of the following options:
Select one or more breaks and press Del.
See also: Add / Remove system breaks.
Section break
A Section break, as the name suggests, is used to create separate sections within a score. Like a system break, it forcesthe next measure or frame to begin a new system, and can also be used in association with a page break if required. Asection break could be used, for example, to divide a piece into separate movements.
Each section can have its own measure numbering independent of the rest of the score. By default, the first measure of asection is numbered "1" (see image below), though like the first measure of the score itelf, the number is not displayedunless configured in the measure properties dialog. The same dialog can be used to change the numbering according toyour preference.
If you change Time signature or Key signature at the beginning of the new section, there will be no courtesy signature atthe end of the previous section. See example below:
When you play back the score, the program adds a short pause between each section. In addition, the first end repeatbarline in a section always sends the playback cursor to the beginning of the section, so a start repeat barline is optional.
Right click a Section break and select Section Break Properties... to specify:
Pause length;If the new section's first system shows long instrument names;If the new section starts numbering measures at 1.
Spacers
A Spacer looks like a blue UP or DOWN arrow and is used to add extra space above or below a system (it cannot beapplied to a frame).
166
Add a spacer
Use either of the following options:
Select a measure, then double-click a palette spacer symbol.Drag a spacer symbol from a palette onto a measure.
Blue spacer symbols are visible on the screen, but do not appear on printouts.
Note: Spacers are designed for local adjustments only. If you wish to adjust the space between staves across the wholescore, use the settings in Style → General... → Page instead.
Adjust a spacer
To adjust the height of a spacer, chose one of these options:
Double-click the spacer and drag the blue end-handle up and down.Double-click the spacer and use the ↑ ↓ keys and/or Ctrl+↑ ↓ to move the end-handle up and down.Click (or double-click) on the spacer and adjust the height property in the Inspector.
Delete a spacer
Click on the spacer and press the Del key.
See also
Add / Remove system breaks
Frames
A Frame is a rectangular container for empty space, text or pictures in the score. It can be one of three types:
Horizontal: Used to create a break in a particular system. Can contain one or more text objects and/or images.Vertical: Inserted above a system or appended to the last system. Can contain one or more text objects and/orimages.Text: Inserted above a system or appended to the last system. Can contain one text object only.
Horizontal frame
A horizontal frame is used to create a break in a system. For example, you can:
Create a coda, with an adjustable gap separating it from the rest of the score (as in the example below).
Create an offset at the beginning of the score, where there is no staff name to perform the same function.Create an adjustable right margin at the end of a system.Create space for some text or image(s).Create a space between a 'historical incipit' and the beginning of the modern edition.
Insert/append horizontal frame
See Create a Frame (below).
Adjust width of horizontal frame
Use one of the following methods:
Double-click the frame and drag the handle to the right or left.Select the frame and adjust "Width" in the Inspector.
167
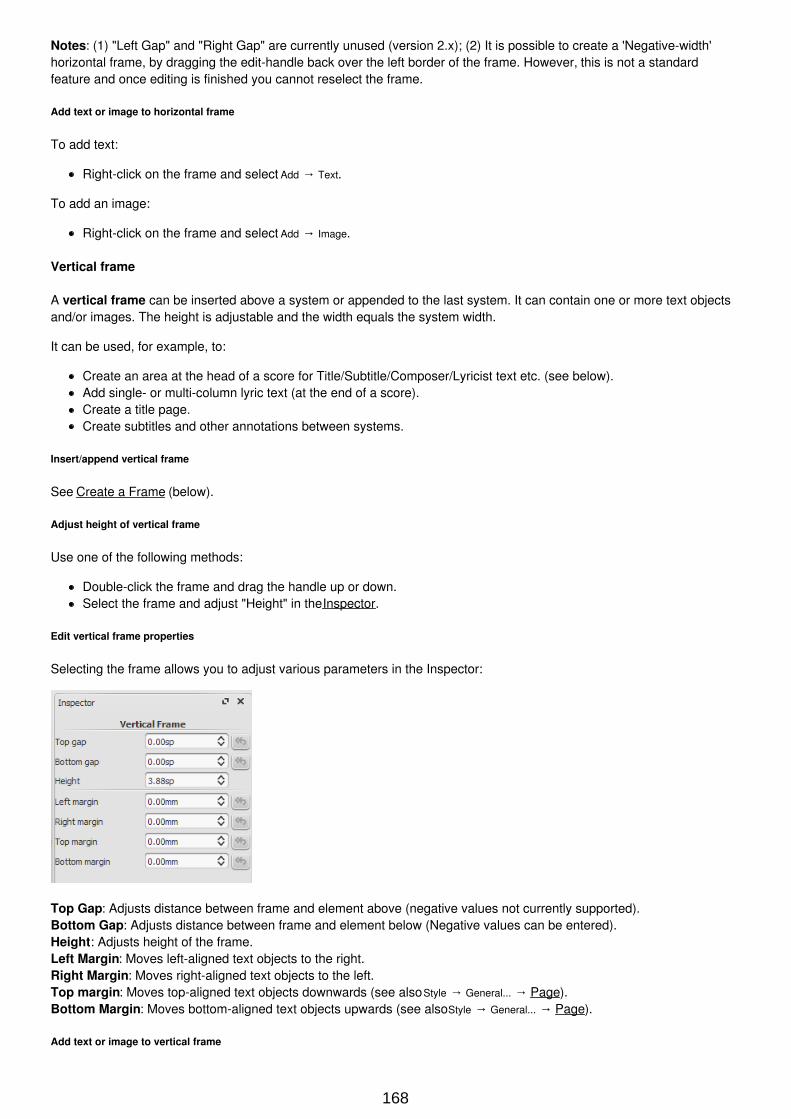
Notes: (1) "Left Gap" and "Right Gap" are currently unused (version 2.x); (2) It is possible to create a 'Negative-width'horizontal frame, by dragging the edit-handle back over the left border of the frame. However, this is not a standardfeature and once editing is finished you cannot reselect the frame.
Add text or image to horizontal frame
To add text:
Right-click on the frame and select Add → Text.
To add an image:
Right-click on the frame and select Add → Image.
Vertical frame
A vertical frame can be inserted above a system or appended to the last system. It can contain one or more text objectsand/or images. The height is adjustable and the width equals the system width.
It can be used, for example, to:
Create an area at the head of a score for Title/Subtitle/Composer/Lyricist text etc. (see below).Add single- or multi-column lyric text (at the end of a score).Create a title page.Create subtitles and other annotations between systems.
Insert/append vertical frame
See Create a Frame (below).
Adjust height of vertical frame
Use one of the following methods:
Double-click the frame and drag the handle up or down.Select the frame and adjust "Height" in the Inspector.
Edit vertical frame properties
Selecting the frame allows you to adjust various parameters in the Inspector:
Top Gap: Adjusts distance between frame and element above (negative values not currently supported).Bottom Gap: Adjusts distance between frame and element below (Negative values can be entered).Height: Adjusts height of the frame.Left Margin: Moves left-aligned text objects to the right.Right Margin: Moves right-aligned text objects to the left.Top margin: Moves top-aligned text objects downwards (see also Style → General... → Page).Bottom Margin: Moves bottom-aligned text objects upwards (see also Style → General... → Page).
Add text or image to vertical frame
168
To add text:
Right-click on the frame and select Add → Text/Title/Subtitle/Composer/Lyricist.
To add an image:
Right-click on the frame and select Add → Image.
You can create as many objects as you like within a frame. Their positions can be adjusted independently by dragging or,more accurately, by altering the offset values in the Inspector. To format text objects, see Text editing and Text styles andproperties.
Insert horizontal frame in vertical frame
Right-click on the frame and select Add → Insert Horizontal Frame.
The horizontal frame is automatically left-aligned and fills the entire vertical frame. To right-align it:
1. Reduce the width of the horizontal frame.2. Deselect the frame then drag it to the right. To restore left-alignment, drag the frame to the left.
"Title" frame
A vertical frame is automatically created at the beginning of a score, showing the title, subtitle, composer, lyricist etc.,when you fill in the information fields provided on page 1 of the New Score Wizard.
If the score does not have a vertical frame at the beginning, you can create one as follows:
Right-click on an empty space in the document window and select Text → Title/Subtitle/Composer/Lyricist.
Text frame
A Text frame looks like a vertical frame, but is specialised for text input: one text object is allowed per frame. The heightautomatically expands to fit the content and there is no height adjustment handle.
A text frame can be used, for example, to:
Create lyric text at the end of a score.Create subtitles and other annotations between systems.
Insert/ append text frame
See Create a Frame (below).
Edit text frame properties
Selecting the frame allows you to adjust various parameters in the Inspector:
Top Gap: Adjusts distance between frame and element above (negative values not currently supported).Bottom Gap: Adjusts distance between frame and element below (negative values can be entered).Height: Not applicable to text frames.Left Margin: Moves left-aligned text objects to the right.Right Margin: Moves right-aligned text objects to the left.Top margin: Moves top-aligned text objects downwards.Bottom Margin: Moves bottom-aligned text upwards.
Create a frame
Insert a frame into the score
1. Select a measure.2. Chose one of the following options:
From the menu select Add → Frames → Insert...
Right-click on an empty space in the score window and select Frames → Insert...
169
Append a frame to the score
Chose one of the following options:
From the menu select Add → Frames → Append...
Right-click on an empty space in the score window and select Frames → Append...
Delete a frame
Select the frame and press Del.
Apply a break
Line, page or section breaks can be applied to frames as well as measures. Use one of two methods:
Select a frame and double-click a palette break symbol (for example, in the Breaks & Spacers palette).Drag a break symbol from a palette onto a frame.
See also
Text Properties: to put a visual frame (border) around text.Insert measures: to insert measures before a frame.
External links
How to add a block of text to a scorePage Formatting in MuseScore 1.1 - 1. Frames, Text & Line Breaks [video]
Images
You can use Images to illustrate scores, or to add symbols that are not included in the standard palettes. MuseScoresupports the following formats:
PNG (*.png)JPEG (*.jpg and *.jpeg)SVG (*.svg) (MuseScore currently does not support SVG shading, blurring, clipping or masking.)
Add image
Use one of the following options:
Drag-and-drop an image file (from outside MuseScore) either into a frame or onto a note or rest in the score.Right-click on a frame, select Add→Picture, then pick an image from the file selector.
Cut/copy and paste image
1. Click on an image in the score.2. Apply any of the standard copy/cut commands.3. Click on a note, rest or frame.4. Apply any of the standard paste commands.
Modify image
To modify the width/height of an image, double-click it and drag any of the handles. If you want to adjust width or heightseparately, untick "Lock aspect ratio" first in the Inspector.
You can adjust the position of an image by simply dragging it.
See also
Image captureCustom palettes
170
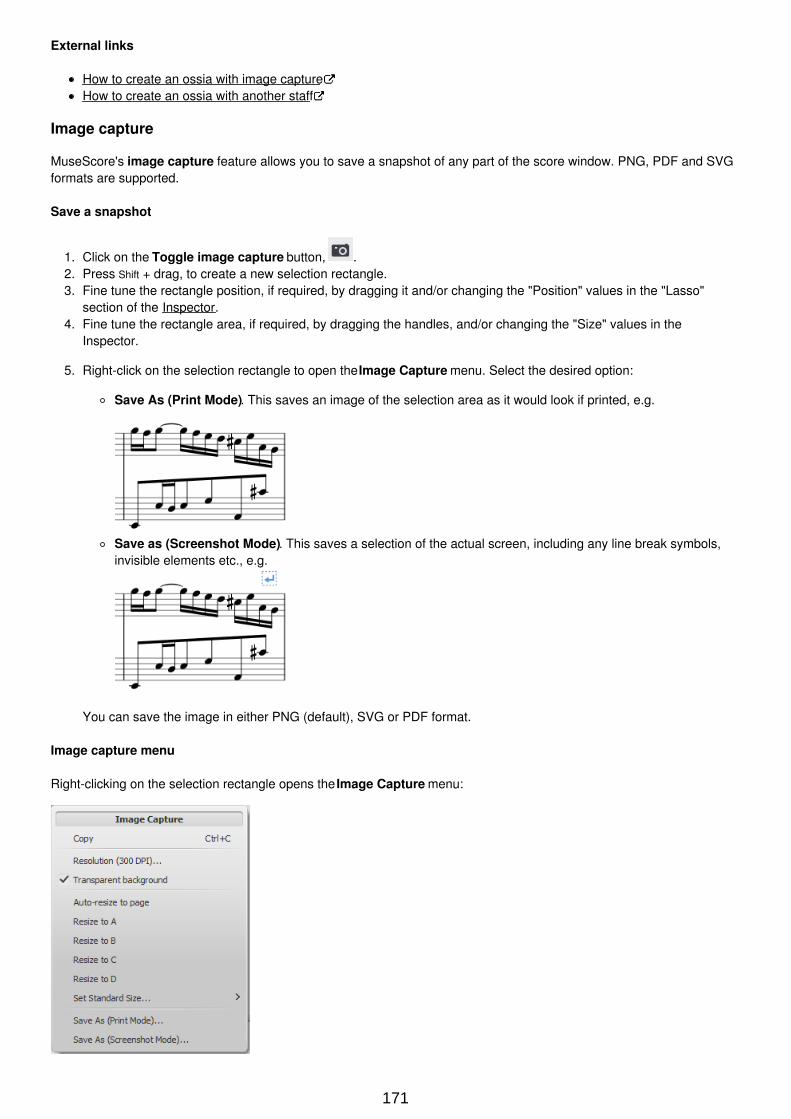
External links
How to create an ossia with image captureHow to create an ossia with another staff
Image capture
MuseScore's image capture feature allows you to save a snapshot of any part of the score window. PNG, PDF and SVGformats are supported.
Save a snapshot
1. Click on the Toggle image capture button, .2. Press Shift + drag, to create a new selection rectangle.3. Fine tune the rectangle position, if required, by dragging it and/or changing the "Position" values in the "Lasso"
section of the Inspector.4. Fine tune the rectangle area, if required, by dragging the handles, and/or changing the "Size" values in the
Inspector.
5. Right-click on the selection rectangle to open the Image Capture menu. Select the desired option:
Save As (Print Mode). This saves an image of the selection area as it would look if printed, e.g.
Save as (Screenshot Mode). This saves a selection of the actual screen, including any line break symbols,invisible elements etc., e.g.
You can save the image in either PNG (default), SVG or PDF format.
Image capture menu
Right-clicking on the selection rectangle opens the Image Capture menu:
171
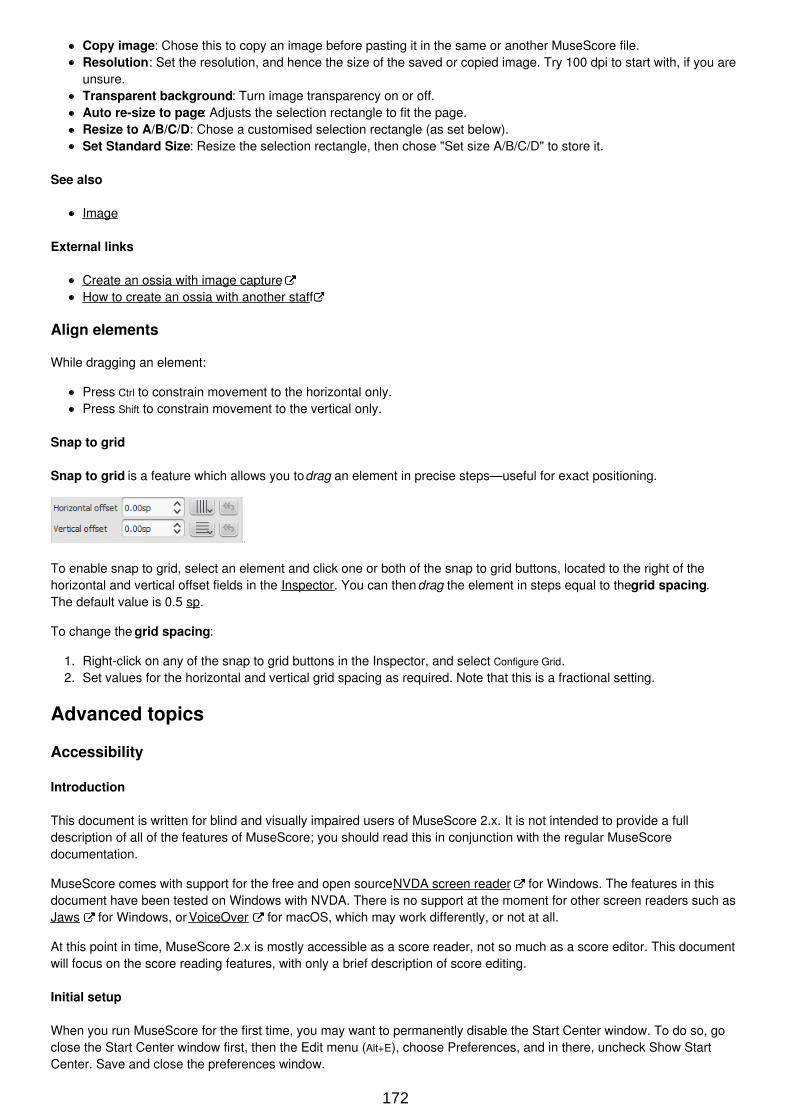
Copy image: Chose this to copy an image before pasting it in the same or another MuseScore file.Resolution: Set the resolution, and hence the size of the saved or copied image. Try 100 dpi to start with, if you areunsure.Transparent background: Turn image transparency on or off.Auto re-size to page: Adjusts the selection rectangle to fit the page.Resize to A/B/C/D: Chose a customised selection rectangle (as set below).Set Standard Size: Resize the selection rectangle, then chose "Set size A/B/C/D" to store it.
See also
Image
External links
Create an ossia with image captureHow to create an ossia with another staff
Align elements
While dragging an element:
Press Ctrl to constrain movement to the horizontal only.Press Shift to constrain movement to the vertical only.
Snap to grid
Snap to grid is a feature which allows you to drag an element in precise steps—useful for exact positioning.
To enable snap to grid, select an element and click one or both of the snap to grid buttons, located to the right of thehorizontal and vertical offset fields in the Inspector. You can then drag the element in steps equal to the grid spacing.The default value is 0.5 sp.
To change the grid spacing:
1. Right-click on any of the snap to grid buttons in the Inspector, and select Configure Grid.2. Set values for the horizontal and vertical grid spacing as required. Note that this is a fractional setting.
Advanced topics
Accessibility
Introduction
This document is written for blind and visually impaired users of MuseScore 2.x. It is not intended to provide a fulldescription of all of the features of MuseScore; you should read this in conjunction with the regular MuseScoredocumentation.
MuseScore comes with support for the free and open source NVDA screen reader for Windows. The features in thisdocument have been tested on Windows with NVDA. There is no support at the moment for other screen readers such asJaws for Windows, or VoiceOver for macOS, which may work differently, or not at all.
At this point in time, MuseScore 2.x is mostly accessible as a score reader, not so much as a score editor. This documentwill focus on the score reading features, with only a brief description of score editing.
Initial setup
When you run MuseScore for the first time, you may want to permanently disable the Start Center window. To do so, goclose the Start Center window first, then the Edit menu (Alt+E), choose Preferences, and in there, uncheck Show StartCenter. Save and close the preferences window.
172
Finding your way around
The user interface in MuseScore works much like other notation programs, or other document-oriented programs ingeneral. It has a single main document window in which you can work with a score. MuseScore supports multipledocument tabs within this window. It also supports a split-screen view to let you work with two documents at once, and youcan have multiple tabs in each window.In addition to the score window, MuseScore has a menu bar that you can access via the shortcuts for the individualmenus:
File: Alt+F
Edit: Alt+E
View: Alt+V
Add: Alt+A
Notes: Alt+N
Layout: Alt+L
Style: Alt+S
Plugins: Alt+P
Help: Alt+H
Of these, only the File menu is of much interest when using MuseScore as a score reader. Once opening a menu, it maytake several presses of the Up or Down keys before everything is read properly.
There are also a number of toolbars, palettes, and subwindows within MuseScore, and you can cycle through the controlsin these using Tab (or Shift+Tab to move backwards through this same cycle). When you first start MuseScore, or load ascore, focus should be in the main score window. Pressing Tab takes you to a toolbar containing a series of buttons foroperations like New, Open, Play, and so forth. Tab will skip any buttons that aren't currently active. The names andshortcuts (where applicable) for these buttons should be read by your screen reader.
Once you have cycled through the buttons on the toolbar, the next window Tab will visit is the Palette. This would be usedto add various elements to a score, but it is not currently accessible except for two buttons that are visited by Tab: a dropdown to select between different workspaces (a saved arrangement of palettes), and a button to create a new workspace.
If you have opened one of the optional windows, such as the Inspector, or the Selection Filter, the Tab key will also visitthese. You can close windows you do not need by going to the View menu and making sure none of the first set ofcheckboxes are selected (the windows that appear before the Zoom settings). By default, only the Start Center, Palettesand Inspector should be selected. See Initial Setup for instructions for disabling the Start Center. F9 can be used to togglethe Palettes while F8 will toggle the Inspector.
To return focus to the score window after visiting the toolbar, or a subwindow, press Esc. This also clears any selectionyou may have made in the score window.
The score window
When you first start MuseScore 2.x, an empty example score entitled “My First Score” is loaded by default. If you wish toexperiment with editing features, this would be a good place to begin. Otherwise, you will probably want to start by loadinga score. MuseScore uses the standard shortcuts to access system commands like Ctrl+O (Mac: Cmd+O) to open a file, Ctrl+S
(Mac: Cmd+S) to save, Ctrl+W (Mac: Cmd+W) to close, etc.
If you press Ctrl+O (Mac: Cmd+O) to load a score, you are presented with a fairly standard file dialog. MuseScore can openscores in its own format (MSCZ or MSCX) as well as import scores in the standard MusicXML format, in MIDI format, orfrom a few other programs such as Guitar Pro, Capella, and Band-in-a-Box. Once you have loaded a score, it is displayedin a new tab within the score window. You can move between the tabs in the score window using Ctrl+Tab (does not applyfor Mac).
There are a few interesting things you can do with a loaded score besides reading it note by note. You can press Space tohave MuseScore play the score for you. You can use File / Export to convert to another format, including PDF, PNG,WAV, MP3, MIDI, MusicXML, etc. And of course, you can print it via File / Print or Ctrl+P (Mac: Cmd+P).
If a score contains multiple instruments, it may already have linked parts generated. Linked parts are presented as parttabs within score tabs, but currently, there is no way to navigate these part tabs using the keyboard. The parts would notnormally contain information different from the score; they would just be displayed differently (each part on its own page).If a score does not already have parts generated, you can do so through File / Parts, and that dialog is accessible. If youwish to print the parts, you can work around the inability of accessing part tabs individually by using the File / Export Partsdialog, which automatically exports PDF’s (or other formats) for all parts in one step.
173
Score reading
When you first load a score, the score window has the keyboard focus, but there will be nothing selected. The first step toreading a score is to select something, and the most natural place to begin is with the first element of the score. Ctrl+Home
(Mac: Cmd+Home) will do this. You will probably also want to use this, should you ever clear your selection by pressingEsc.
As you navigate between elements, your screen reader should give the name of the selected element (most likely the clefat the beginning of the top staff of your score). You will hear it read the name of the element (for example, “Treble clef”)and also give position information (for example, “Measure 1; Beat 1; Staff 1”). The amount of information read is notcurrently customizable, but we tried to place the most important first so you can quickly move on to the next elementbefore it has finished reading, or just ignore the rest of what is read. Pressing Shift currently interrupts the reading, whichmight also be useful.
Most navigation in MuseScore is centered around notes and rests only – it will skip clefs, key signatures, time signatures,barlines, and other elements. So if you just use the standard Right and Left keys to move through your score, you will onlyhear about notes and rests (and the elements attached to them). However, there are two special navigation commandsthat you will find useful to gain a more complete summarization of the score:
Next element: Ctrl+Alt+Shift+Right (Mac: Cmd+Option+Shift+Right)Previous element: Ctrl+Alt+Shift+Left (Mac: Cmd+Option+Shift+Left
These commands include clefs and other elements that the other navigation commands skip, and also navigate throughall voices within the current staff, whereas other navigation commands such as Right and Left only navigate through thecurrently selected voice until you explicitly change voices. For instance, if you are on a quarter note on beat 1 of measure1, and there are two voices in that measure, then pressing Right will move on to the next note of voice 1—which will be onbeat 2—whereas pressing Ctrl+Alt+Shift+Right (Mac: Cmd+Option+Shift+Right) will stay on beat 1 but move to the note on voice2. Only once you have moved through all notes on the current beat on the current staff will the shortcut move you on tothe next beat. The intent is that this shortcut should be useful for navigating through a score if you don’t already knowwhat the contents are.
When you navigate to an element, your screen reader should read information about it. For notes and rests, it will alsoread information about elements attached to them, such as lyrics, articulations, chord symbols, etc. For the time being,there is no way to navigate directly to these elements.One important note: Up and Down by themselves, with Shift, or with Ctrl / Cmd are not useful shortcuts for navigation! Instead,they change the pitch of the currently selected note or notes. Be careful not to inadvertently edit a score you are trying toread. Up and Down should only be used with Alt/Option if your intent is navigation only. See the list of navigation shortcutsbelow.
Moving forwards or backwards in time
The following shortcuts are useful for moving “horizontally” through a score:
Next element: Ctrl+Alt+Shift+Right
Previous element: Ctrl+Alt+Shift+Left
Next chord or rest: Right
Previous chord or rest: Left
Next measure: Ctrl+Right
Previous measure: Ctrl+Left
Go to measure: Ctrl+F
First element: Ctrl+Home
Last element: Ctrl+End
Moving between notes at a given point in time
The following shortcuts are useful for moving “vertically” through a score:
Next element: Ctrl+Alt+Shift+Right
Previous element: Ctrl+Alt+Shift+Left
Next higher note in voice, previous voice, or staff above: Alt+Up
Next lower note in voice, next voice, or staff below: Alt+Down
Top note in chord: Ctrl+Alt+Up
Bottom note in chord: Ctrl+Alt+Down
174
The Alt+Up and Alt+Down commands are similar to the Ctrl+Alt+Shift+Right and Ctrl+Alt+Shift+Left commands in that they aredesigned to help you discover the content of a score. You do not need to know how many notes are in a chord, how manyvoices are in a staff, or how many staves are in a score in order to move vertically through the score using thesecommands.
Filtering score reading
Excluding certain elements like lyrics, or chord names while reading the score is possible by using the Selection filter (F6).Uncheck those elements you don't want to read.
Score playback
The Space bar serves both to start and stop playback. Playback will start with the currently selected note if one is selected;where playback was last stopped if no note is selected; or at the beginning of the score on first playback.
MuseScore supports looped playback so you can repeat a section of a piece for practice purposes. To set the “in” and“out” points for the loop playback via the Play Panel (F11):
1. First select the note in the score window where the loop should start2. Go to the Play Panel and press the Set loop In position toggle button3. Back to the score window, navigate to the note where you want the loop to end4. Switch again to Play Panel, and press the Set loop Out position toggle button5. To enable or disable the loop, press the Loop Playback toggle button
You can also control the loop playback and control other playback parameters, such as overriding the basic tempo of ascore, using the View / Play Panel (F11).
Score editing
Score editing is currently not very accessible – too many score elements require intervention of the mouse in order toplace objects onto a score. Additionally, visual reference and manual adjustment of the position of various elements issometimes necessary due to MuseScore's limited support for conflict avoidance of elements.
In contrast, MuseScore does often provide ample default, and a platform to experiment with the basics of note input.To enter note input mode, first navigate to the measure in which you would like to enter notes, then press “N”. Almosteverything about note input is designed to be keyboard accessible, and the standard documentation should be good tohelp you through the process. Bear in mind that MuseScore can either be in note input or normal mode, and it won’talways be clear which mode of these you are in. When in doubt, press Esc. If you were in note input mode, this will takeyou out. If you were in normal mode, you will stay there, although you will also lose your selection.
Customization
You can customize the keyboard shortcuts using Edit / Preferences / Shortcuts. At some point, we may provide a set ofspecial accessibility-optimized shortcuts and/or a way of saving and loading sets of shortcut definitions.
External links
Creating a New Score in MuseScore with NVDAInputting notes in MuseScore with NVDACreating Modified Stave Notation in MuseScore
Albums
The Album Manager allows you to prepare a list of multiple scores and save the list as an album file ("*.album"), print allthe scores as one long print job with consistent page numbers, or even join the scores into a single new MSCZ score.This is ideal for preparing an exercise book or combining multiple movements of an orchestration.
To open the Album Manager, go to File → Album...
175
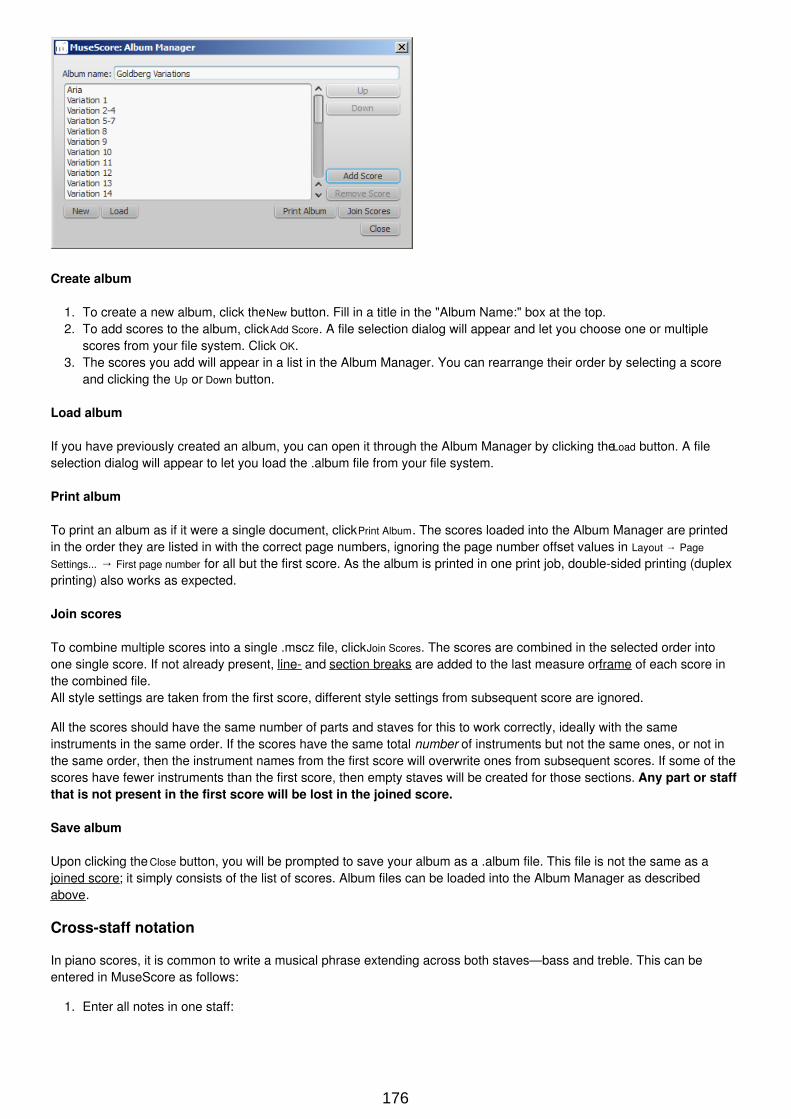
Create album
1. To create a new album, click the New button. Fill in a title in the "Album Name:" box at the top.2. To add scores to the album, click Add Score. A file selection dialog will appear and let you choose one or multiple
scores from your file system. Click OK.3. The scores you add will appear in a list in the Album Manager. You can rearrange their order by selecting a score
and clicking the Up or Down button.
Load album
If you have previously created an album, you can open it through the Album Manager by clicking the Load button. A fileselection dialog will appear to let you load the .album file from your file system.
Print album
To print an album as if it were a single document, click Print Album. The scores loaded into the Album Manager are printedin the order they are listed in with the correct page numbers, ignoring the page number offset values in Layout → Page
Settings... → First page number for all but the first score. As the album is printed in one print job, double-sided printing (duplexprinting) also works as expected.
Join scores
To combine multiple scores into a single .mscz file, click Join Scores. The scores are combined in the selected order intoone single score. If not already present, line- and section breaks are added to the last measure or frame of each score inthe combined file.All style settings are taken from the first score, different style settings from subsequent score are ignored.
All the scores should have the same number of parts and staves for this to work correctly, ideally with the sameinstruments in the same order. If the scores have the same total number of instruments but not the same ones, or not inthe same order, then the instrument names from the first score will overwrite ones from subsequent scores. If some of thescores have fewer instruments than the first score, then empty staves will be created for those sections. Any part or staffthat is not present in the first score will be lost in the joined score.
Save album
Upon clicking the Close button, you will be prompted to save your album as a .album file. This file is not the same as ajoined score; it simply consists of the list of scores. Album files can be loaded into the Album Manager as describedabove.
Cross-staff notation
In piano scores, it is common to write a musical phrase extending across both staves—bass and treble. This can beentered in MuseScore as follows:
1. Enter all notes in one staff:
176
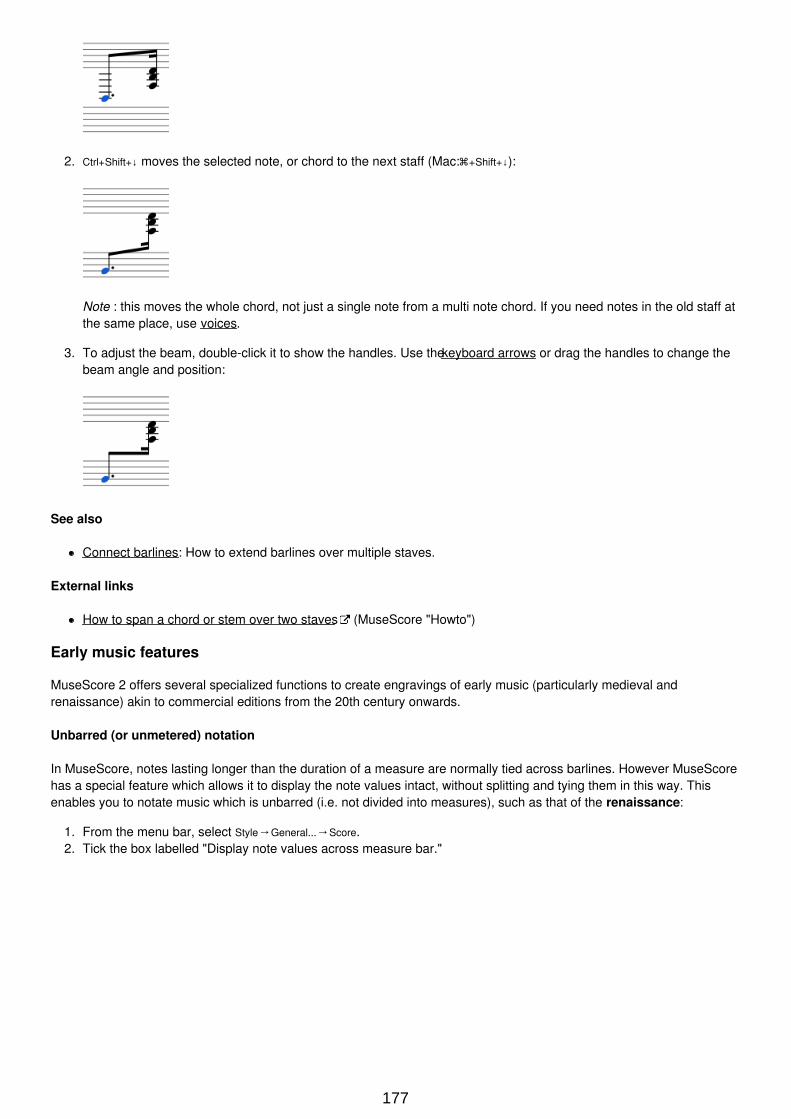
2. Ctrl+Shift+↓ moves the selected note, or chord to the next staff (Mac: +Shift+↓):
Note : this moves the whole chord, not just a single note from a multi note chord. If you need notes in the old staff atthe same place, use voices.
3. To adjust the beam, double-click it to show the handles. Use the keyboard arrows or drag the handles to change thebeam angle and position:
See also
Connect barlines: How to extend barlines over multiple staves.
External links
How to span a chord or stem over two staves (MuseScore "Howto")
Early music features
MuseScore 2 offers several specialized functions to create engravings of early music (particularly medieval andrenaissance) akin to commercial editions from the 20th century onwards.
Unbarred (or unmetered) notation
In MuseScore, notes lasting longer than the duration of a measure are normally tied across barlines. However MuseScorehas a special feature which allows it to display the note values intact, without splitting and tying them in this way. Thisenables you to notate music which is unbarred (i.e. not divided into measures), such as that of the renaissance:
1. From the menu bar, select Style→General...→Score.2. Tick the box labelled "Display note values across measure bar."
177
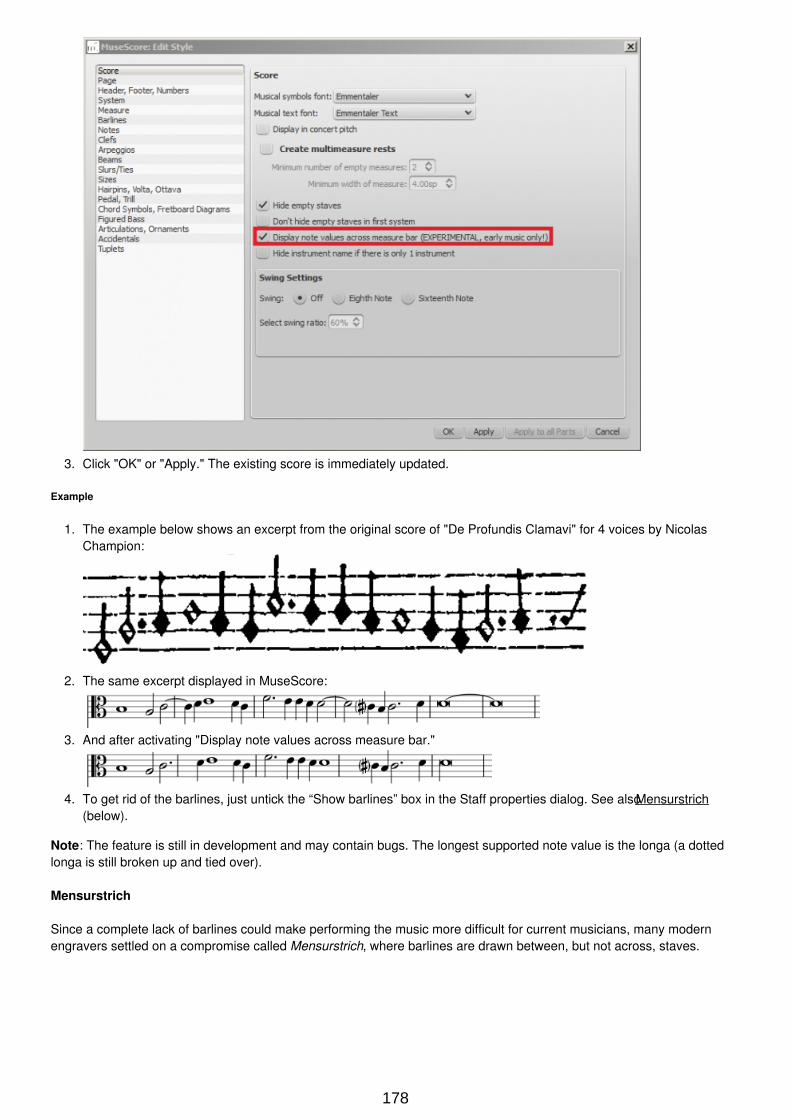
3. Click "OK" or "Apply." The existing score is immediately updated.
Example
1. The example below shows an excerpt from the original score of "De Profundis Clamavi" for 4 voices by NicolasChampion:
2. The same excerpt displayed in MuseScore:
3. And after activating "Display note values across measure bar."
4. To get rid of the barlines, just untick the “Show barlines” box in the Staff properties dialog. See also Mensurstrich(below).
Note: The feature is still in development and may contain bugs. The longest supported note value is the longa (a dottedlonga is still broken up and tied over).
Mensurstrich
Since a complete lack of barlines could make performing the music more difficult for current musicians, many modernengravers settled on a compromise called Mensurstrich, where barlines are drawn between, but not across, staves.
178
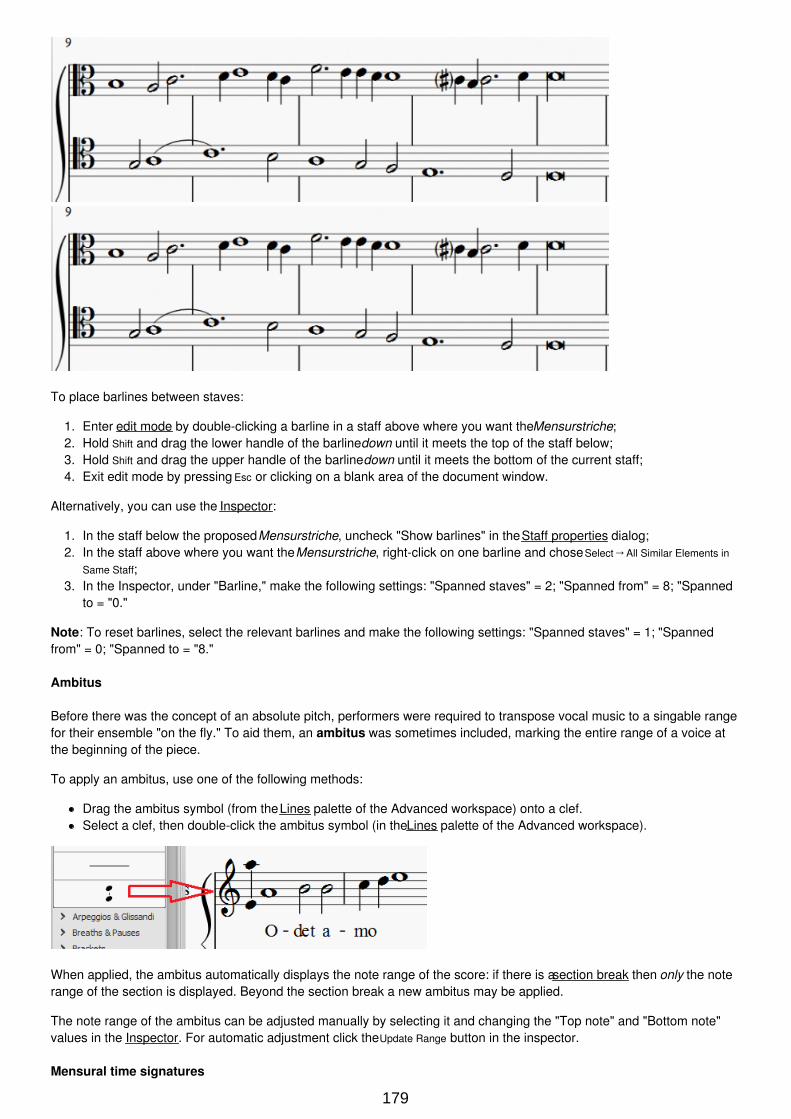
To place barlines between staves:
1. Enter edit mode by double-clicking a barline in a staff above where you want the Mensurstriche;2. Hold Shift and drag the lower handle of the barline down until it meets the top of the staff below;3. Hold Shift and drag the upper handle of the barline down until it meets the bottom of the current staff;4. Exit edit mode by pressing Esc or clicking on a blank area of the document window.
Alternatively, you can use the Inspector:
1. In the staff below the proposed Mensurstriche, uncheck "Show barlines" in the Staff properties dialog;2. In the staff above where you want the Mensurstriche, right-click on one barline and chose Select→All Similar Elements in
Same Staff;3. In the Inspector, under "Barline," make the following settings: "Spanned staves" = 2; "Spanned from" = 8; "Spanned
to = "0."
Note: To reset barlines, select the relevant barlines and make the following settings: "Spanned staves" = 1; "Spannedfrom" = 0; "Spanned to = "8."
Ambitus
Before there was the concept of an absolute pitch, performers were required to transpose vocal music to a singable rangefor their ensemble "on the fly." To aid them, an ambitus was sometimes included, marking the entire range of a voice atthe beginning of the piece.
To apply an ambitus, use one of the following methods:
Drag the ambitus symbol (from the Lines palette of the Advanced workspace) onto a clef.Select a clef, then double-click the ambitus symbol (in the Lines palette of the Advanced workspace).
When applied, the ambitus automatically displays the note range of the score: if there is a section break then only the noterange of the section is displayed. Beyond the section break a new ambitus may be applied.
The note range of the ambitus can be adjusted manually by selecting it and changing the "Top note" and "Bottom note"values in the Inspector. For automatic adjustment click the Update Range button in the inspector.
Mensural time signatures
179
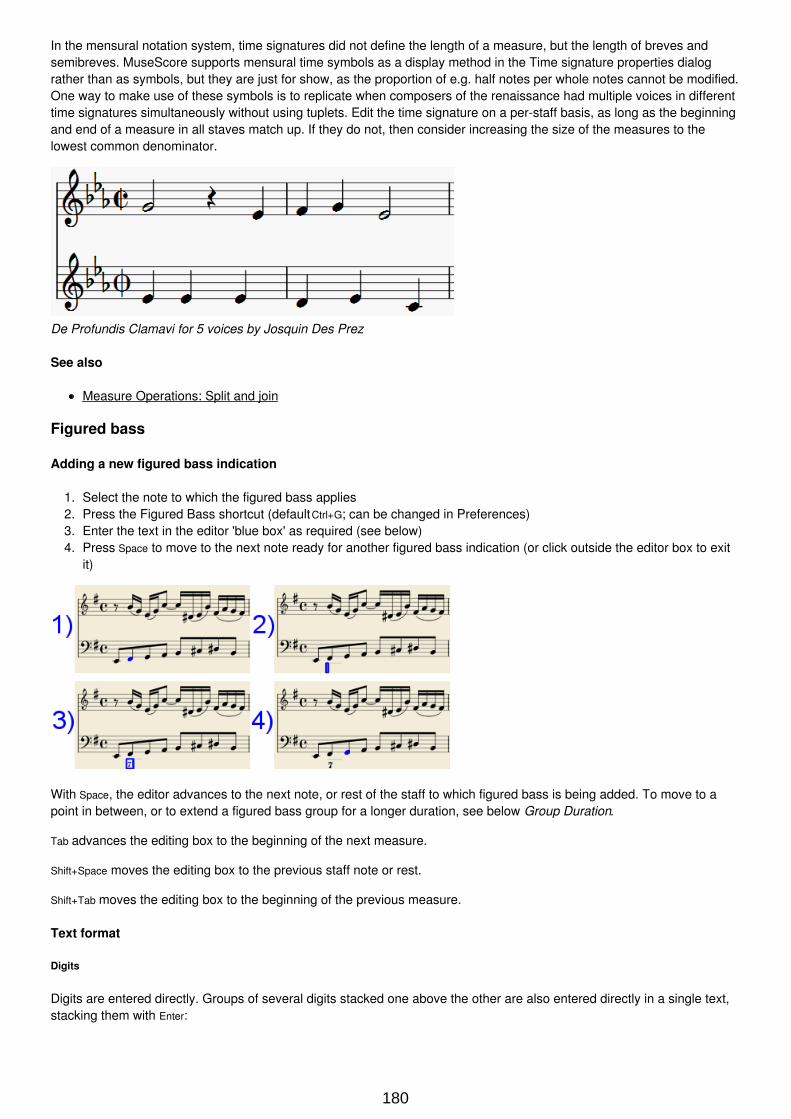
In the mensural notation system, time signatures did not define the length of a measure, but the length of breves andsemibreves. MuseScore supports mensural time symbols as a display method in the Time signature properties dialograther than as symbols, but they are just for show, as the proportion of e.g. half notes per whole notes cannot be modified.One way to make use of these symbols is to replicate when composers of the renaissance had multiple voices in differenttime signatures simultaneously without using tuplets. Edit the time signature on a per-staff basis, as long as the beginningand end of a measure in all staves match up. If they do not, then consider increasing the size of the measures to thelowest common denominator.
De Profundis Clamavi for 5 voices by Josquin Des Prez
See also
Measure Operations: Split and join
Figured bass
Adding a new figured bass indication
1. Select the note to which the figured bass applies2. Press the Figured Bass shortcut (default Ctrl+G; can be changed in Preferences)3. Enter the text in the editor 'blue box' as required (see below)4. Press Space to move to the next note ready for another figured bass indication (or click outside the editor box to exit
it)
With Space, the editor advances to the next note, or rest of the staff to which figured bass is being added. To move to apoint in between, or to extend a figured bass group for a longer duration, see below Group Duration.
Tab advances the editing box to the beginning of the next measure.
Shift+Space moves the editing box to the previous staff note or rest.
Shift+Tab moves the editing box to the beginning of the previous measure.
Text format
Digits
Digits are entered directly. Groups of several digits stacked one above the other are also entered directly in a single text,stacking them with Enter:
180
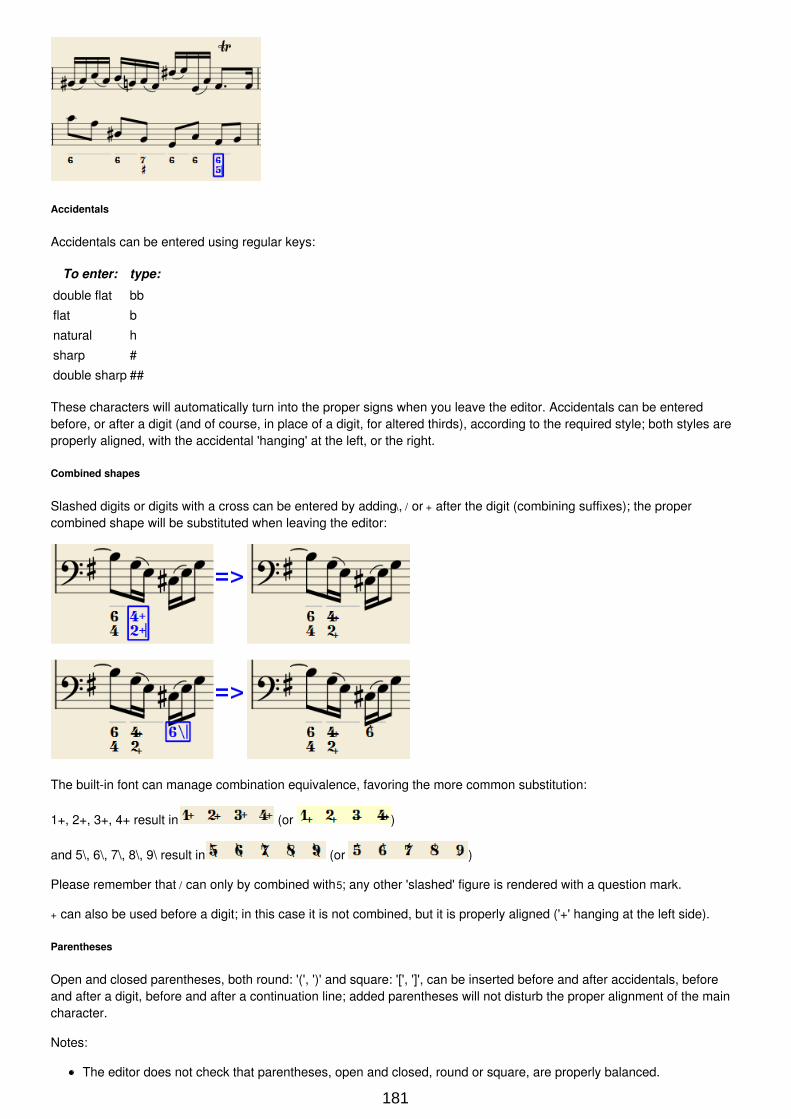
Accidentals
Accidentals can be entered using regular keys:
To enter: type:
double flat bb
flat b
natural h
sharp #
double sharp ##
These characters will automatically turn into the proper signs when you leave the editor. Accidentals can be enteredbefore, or after a digit (and of course, in place of a digit, for altered thirds), according to the required style; both styles areproperly aligned, with the accidental 'hanging' at the left, or the right.
Combined shapes
Slashed digits or digits with a cross can be entered by adding \, / or + after the digit (combining suffixes); the propercombined shape will be substituted when leaving the editor:
The built-in font can manage combination equivalence, favoring the more common substitution:
1+, 2+, 3+, 4+ result in (or )
and 5\, 6\, 7\, 8\, 9\ result in (or )
Please remember that / can only by combined with 5; any other 'slashed' figure is rendered with a question mark.
+ can also be used before a digit; in this case it is not combined, but it is properly aligned ('+' hanging at the left side).
Parentheses
Open and closed parentheses, both round: '(', ')' and square: '[', ']', can be inserted before and after accidentals, beforeand after a digit, before and after a continuation line; added parentheses will not disturb the proper alignment of the maincharacter.
Notes:
The editor does not check that parentheses, open and closed, round or square, are properly balanced.
181
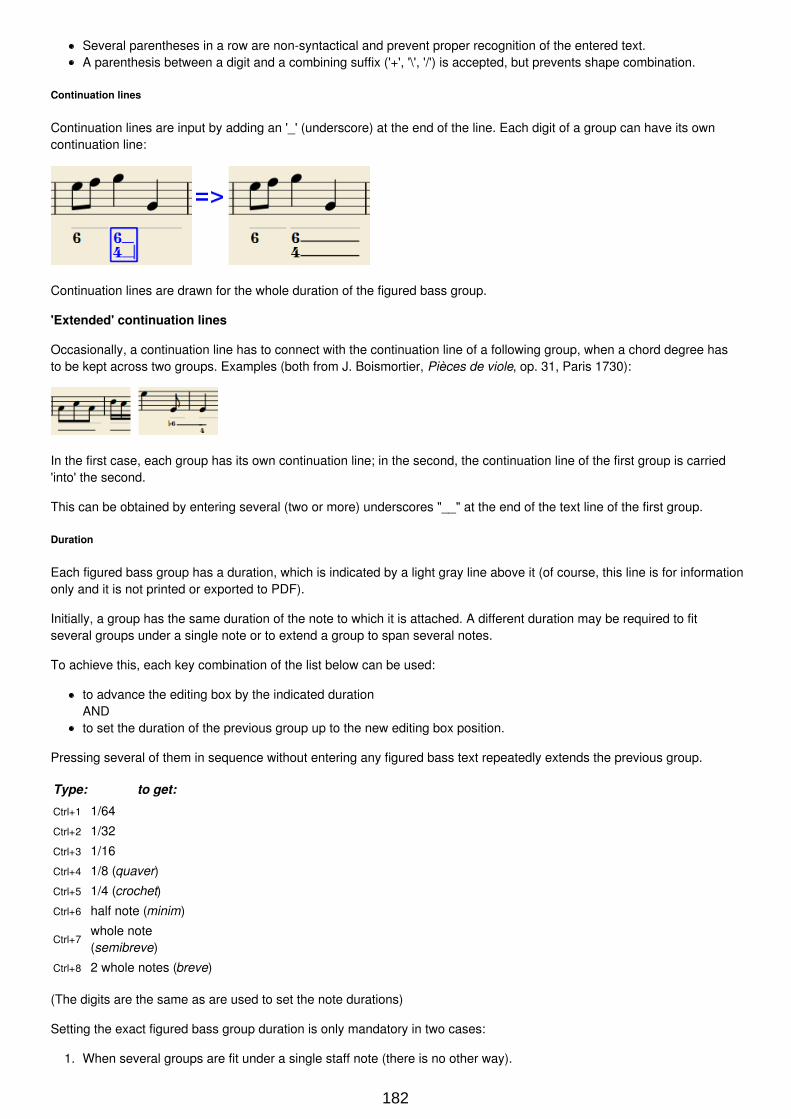
Several parentheses in a row are non-syntactical and prevent proper recognition of the entered text.A parenthesis between a digit and a combining suffix ('+', '\', '/') is accepted, but prevents shape combination.
Continuation lines
Continuation lines are input by adding an '_' (underscore) at the end of the line. Each digit of a group can have its owncontinuation line:
Continuation lines are drawn for the whole duration of the figured bass group.
'Extended' continuation lines
Occasionally, a continuation line has to connect with the continuation line of a following group, when a chord degree hasto be kept across two groups. Examples (both from J. Boismortier, Pièces de viole, op. 31, Paris 1730):
In the first case, each group has its own continuation line; in the second, the continuation line of the first group is carried'into' the second.
This can be obtained by entering several (two or more) underscores "__" at the end of the text line of the first group.
Duration
Each figured bass group has a duration, which is indicated by a light gray line above it (of course, this line is for informationonly and it is not printed or exported to PDF).
Initially, a group has the same duration of the note to which it is attached. A different duration may be required to fitseveral groups under a single note or to extend a group to span several notes.
To achieve this, each key combination of the list below can be used:
to advance the editing box by the indicated durationANDto set the duration of the previous group up to the new editing box position.
Pressing several of them in sequence without entering any figured bass text repeatedly extends the previous group.
Type: to get:
Ctrl+1 1/64
Ctrl+2 1/32
Ctrl+3 1/16
Ctrl+4 1/8 (quaver)Ctrl+5 1/4 (crochet)Ctrl+6 half note (minim)
Ctrl+7whole note(semibreve)
Ctrl+8 2 whole notes (breve)
(The digits are the same as are used to set the note durations)
Setting the exact figured bass group duration is only mandatory in two cases:
1. When several groups are fit under a single staff note (there is no other way).
182
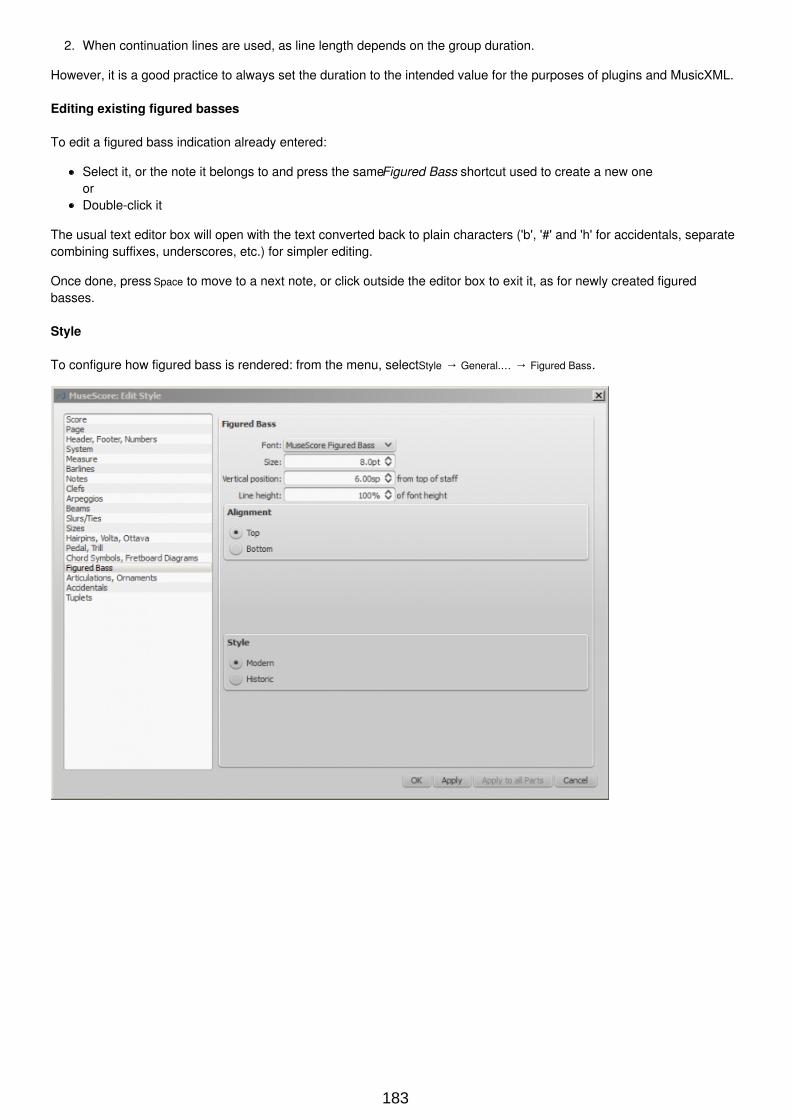
2. When continuation lines are used, as line length depends on the group duration.
However, it is a good practice to always set the duration to the intended value for the purposes of plugins and MusicXML.
Editing existing figured basses
To edit a figured bass indication already entered:
Select it, or the note it belongs to and press the same Figured Bass shortcut used to create a new oneorDouble-click it
The usual text editor box will open with the text converted back to plain characters ('b', '#' and 'h' for accidentals, separatecombining suffixes, underscores, etc.) for simpler editing.
Once done, press Space to move to a next note, or click outside the editor box to exit it, as for newly created figuredbasses.
Style
To configure how figured bass is rendered: from the menu, select Style → General.… → Figured Bass.
183
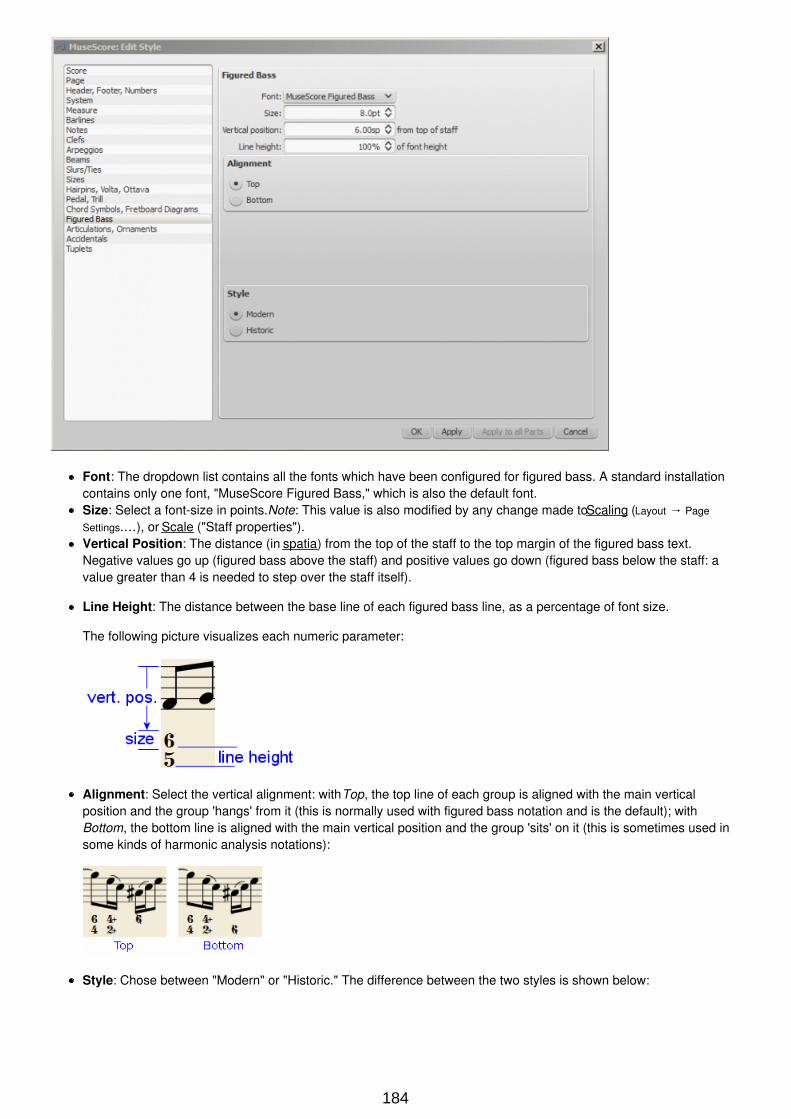
Font: The dropdown list contains all the fonts which have been configured for figured bass. A standard installationcontains only one font, "MuseScore Figured Bass," which is also the default font.Size: Select a font-size in points. Note: This value is also modified by any change made to Scaling (Layout → Page
Settings.…), or Scale ("Staff properties").Vertical Position: The distance (in spatia) from the top of the staff to the top margin of the figured bass text.Negative values go up (figured bass above the staff) and positive values go down (figured bass below the staff: avalue greater than 4 is needed to step over the staff itself).
Line Height: The distance between the base line of each figured bass line, as a percentage of font size.
The following picture visualizes each numeric parameter:
Alignment: Select the vertical alignment: with Top, the top line of each group is aligned with the main verticalposition and the group 'hangs' from it (this is normally used with figured bass notation and is the default); withBottom, the bottom line is aligned with the main vertical position and the group 'sits' on it (this is sometimes used insome kinds of harmonic analysis notations):
Style: Chose between "Modern" or "Historic." The difference between the two styles is shown below:
184
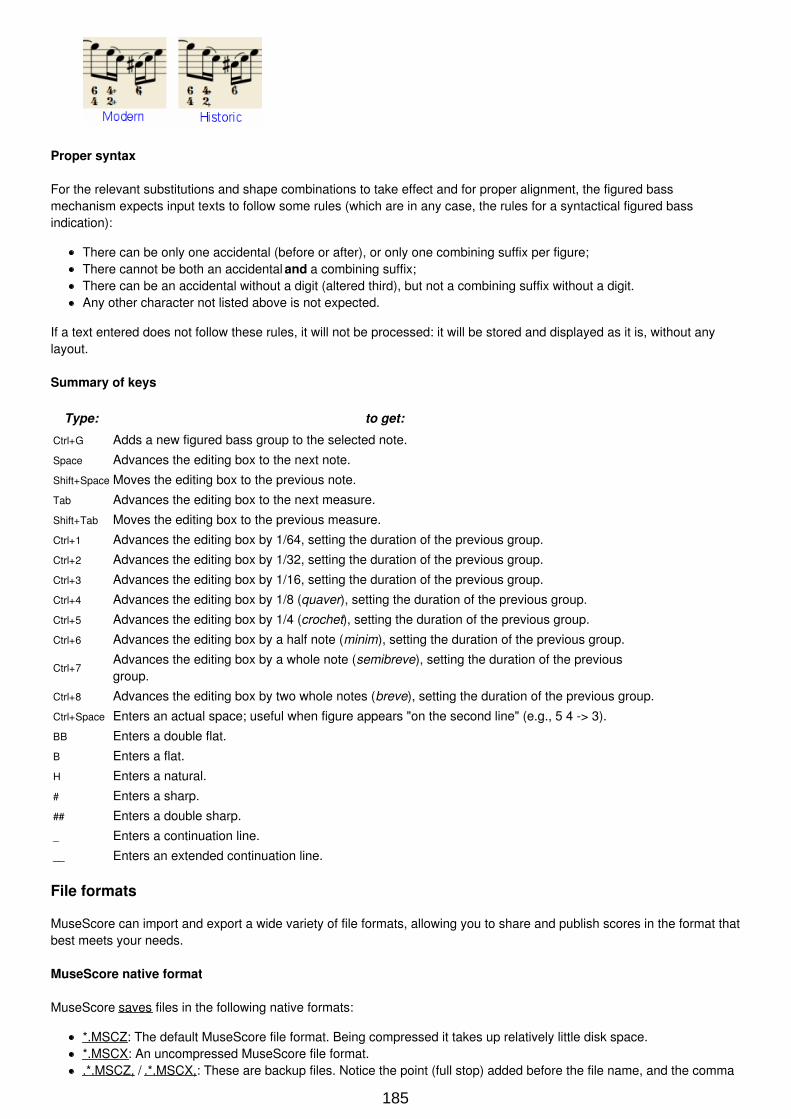
Proper syntax
For the relevant substitutions and shape combinations to take effect and for proper alignment, the figured bassmechanism expects input texts to follow some rules (which are in any case, the rules for a syntactical figured bassindication):
There can be only one accidental (before or after), or only one combining suffix per figure;There cannot be both an accidental and a combining suffix;There can be an accidental without a digit (altered third), but not a combining suffix without a digit.Any other character not listed above is not expected.
If a text entered does not follow these rules, it will not be processed: it will be stored and displayed as it is, without anylayout.
Summary of keys
Type: to get:
Ctrl+G Adds a new figured bass group to the selected note.
Space Advances the editing box to the next note.
Shift+Space Moves the editing box to the previous note.
Tab Advances the editing box to the next measure.
Shift+Tab Moves the editing box to the previous measure.
Ctrl+1 Advances the editing box by 1/64, setting the duration of the previous group.
Ctrl+2 Advances the editing box by 1/32, setting the duration of the previous group.
Ctrl+3 Advances the editing box by 1/16, setting the duration of the previous group.
Ctrl+4 Advances the editing box by 1/8 (quaver), setting the duration of the previous group.
Ctrl+5 Advances the editing box by 1/4 (crochet), setting the duration of the previous group.
Ctrl+6 Advances the editing box by a half note (minim), setting the duration of the previous group.
Ctrl+7Advances the editing box by a whole note (semibreve), setting the duration of the previousgroup.
Ctrl+8 Advances the editing box by two whole notes (breve), setting the duration of the previous group.
Ctrl+Space Enters an actual space; useful when figure appears "on the second line" (e.g., 5 4 -> 3).
BB Enters a double flat.
B Enters a flat.
H Enters a natural.
# Enters a sharp.
## Enters a double sharp.
_ Enters a continuation line.
__ Enters an extended continuation line.
File formats
MuseScore can import and export a wide variety of file formats, allowing you to share and publish scores in the format thatbest meets your needs.
MuseScore native format
MuseScore saves files in the following native formats:
*.MSCZ: The default MuseScore file format. Being compressed it takes up relatively little disk space.*.MSCX: An uncompressed MuseScore file format..*.MSCZ, / .*.MSCX,: These are backup files. Notice the point (full stop) added before the file name, and the comma
185
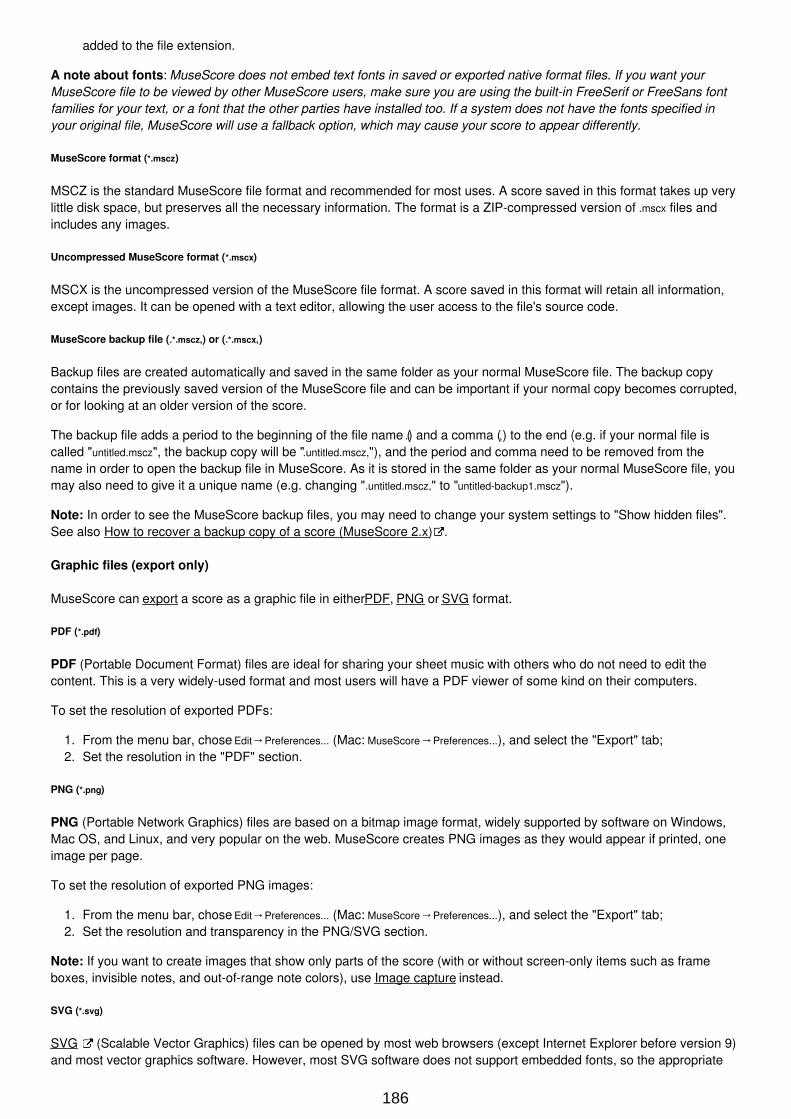
added to the file extension.
A note about fonts: MuseScore does not embed text fonts in saved or exported native format files. If you want yourMuseScore file to be viewed by other MuseScore users, make sure you are using the built-in FreeSerif or FreeSans fontfamilies for your text, or a font that the other parties have installed too. If a system does not have the fonts specified inyour original file, MuseScore will use a fallback option, which may cause your score to appear differently.
MuseScore format (*.mscz)
MSCZ is the standard MuseScore file format and recommended for most uses. A score saved in this format takes up verylittle disk space, but preserves all the necessary information. The format is a ZIP-compressed version of .mscx files andincludes any images.
Uncompressed MuseScore format (*.mscx)
MSCX is the uncompressed version of the MuseScore file format. A score saved in this format will retain all information,except images. It can be opened with a text editor, allowing the user access to the file's source code.
MuseScore backup file (.*.mscz,) or (.*.mscx,)
Backup files are created automatically and saved in the same folder as your normal MuseScore file. The backup copycontains the previously saved version of the MuseScore file and can be important if your normal copy becomes corrupted,or for looking at an older version of the score.
The backup file adds a period to the beginning of the file name (.) and a comma (,) to the end (e.g. if your normal file iscalled "untitled.mscz", the backup copy will be ".untitled.mscz,"), and the period and comma need to be removed from thename in order to open the backup file in MuseScore. As it is stored in the same folder as your normal MuseScore file, youmay also need to give it a unique name (e.g. changing ".untitled.mscz," to "untitled-backup1.mscz").
Note: In order to see the MuseScore backup files, you may need to change your system settings to "Show hidden files".See also How to recover a backup copy of a score (MuseScore 2.x) .
Graphic files (export only)
MuseScore can export a score as a graphic file in either PDF, PNG or SVG format.
PDF (*.pdf)
PDF (Portable Document Format) files are ideal for sharing your sheet music with others who do not need to edit thecontent. This is a very widely-used format and most users will have a PDF viewer of some kind on their computers.
To set the resolution of exported PDFs:
1. From the menu bar, chose Edit→Preferences... (Mac: MuseScore→Preferences...), and select the "Export" tab;2. Set the resolution in the "PDF" section.
PNG (*.png)
PNG (Portable Network Graphics) files are based on a bitmap image format, widely supported by software on Windows,Mac OS, and Linux, and very popular on the web. MuseScore creates PNG images as they would appear if printed, oneimage per page.
To set the resolution of exported PNG images:
1. From the menu bar, chose Edit→Preferences... (Mac: MuseScore→Preferences...), and select the "Export" tab;2. Set the resolution and transparency in the PNG/SVG section.
Note: If you want to create images that show only parts of the score (with or without screen-only items such as frameboxes, invisible notes, and out-of-range note colors), use Image capture instead.
SVG (*.svg)
SVG (Scalable Vector Graphics) files can be opened by most web browsers (except Internet Explorer before version 9)and most vector graphics software. However, most SVG software does not support embedded fonts, so the appropriate
186
MuseScore fonts must be installed to view these files correctly. SVG is the format used on MuseScore.com for all scoressaved online since May 2017 (coinciding with the release of MuseScore 2.1: before this the format was PNG).
To set resolution and transparency of exported SVG files, see the instructions under PNG (above). Note that MuseScoredoes not (yet) support gradients on export (although it does for images in a score).
Audio files (export only)
MuseScore can create normalised, stereo audio of the score in any of the following formats: WAV, MP3, OGG VORBIS,FLAC. To export an audio file:
1. From the menu, select File → Export...;2. Chose the desired format from the dropdown menu, then press Save.
You can adjust the sample rate of all audio formats as follows:
1. From the menu bar, select Edit→Preferences... (Mac: MuseScore→Preferences...), and click on the Export tab;2. Set "Sample rate" in the "Audio" section.
WAV audio (*.wav)
WAV (Waveform Audio Format) is an uncompressed sound format. This was developed by Microsoft and IBM, and iswidely supported by software for Windows, OS X, and Linux. It is an ideal format for use when creating CDs, as full soundquality is preserved. For sharing via email or the internet, use a compressed alternative such as MP3.
MP3 (*.mp3)
MP3 is a very widely-used compressed audio format. MP3 files are ideal for sharing and downloading over the internetdue to their relatively small size.
For Windows and Mac users with an older version of MuseScore (Windows: prior to 2.2, Mac prior to 2.3.2), an additionallibrary, lame_enc.dll (Windows) or libmp3lame.dylib (Mac), must be installed to create MP3 files (for Linux, it is up to thedistribution maintainer whether or not to include this). MuseScore will prompt you for its location on the first attempt of anMP3 export. You can get it at http://lame.buanzo.org/ .
Some Mac users may find MuseScore encounters an error loading the MP3 library, possibly due to that library being a 32-bit library. A 64-bit build that will work with MuseScore is available from http://thalictrum.com/en/products/lame (notethat it is necessary to rename the file to libmp3lame.dylib for MuseScore to recognize it). Homebrew users just need torun brew install lame.
As of version 2.1 you can set the MP3 bitrate:
1. From the menu bar, chose Edit→Preferences... (Mac: MuseScore→Preferences...), and select the "Export" tab;2. Set the MP3 bitrate in the "Audio" section.
FLAC audio (*.flac)
Free Lossless Audio Codec (FLAC) is compressed audio format. FLAC files are approximately half the size ofuncompressed audio and just as good quality. Windows and OS X do not have built-in support for FLAC, but softwaresuch as the free and open source VLC media player can play FLAC files on any operating system.
Ogg Vorbis (*.ogg)
Ogg Vorbis is intended as a patent-free replacement for the popular MP3 audio format (which MuseScore also supports—see above). Like MP3, Ogg Vorbis files are relatively small (often a tenth of uncompressed audio), but some soundquality is lost. Windows and OS X do not have built-in support for Ogg Vorbis. However, software such as VLC mediaplayer and Firefox can play Ogg files on any operating system.
Share with other music software
MuseScore can import and export MusicXML and MIDI files; it is also able to import a variety of native format files fromother music notation programs.
MusicXML (*.xml, *.musicxml)
187
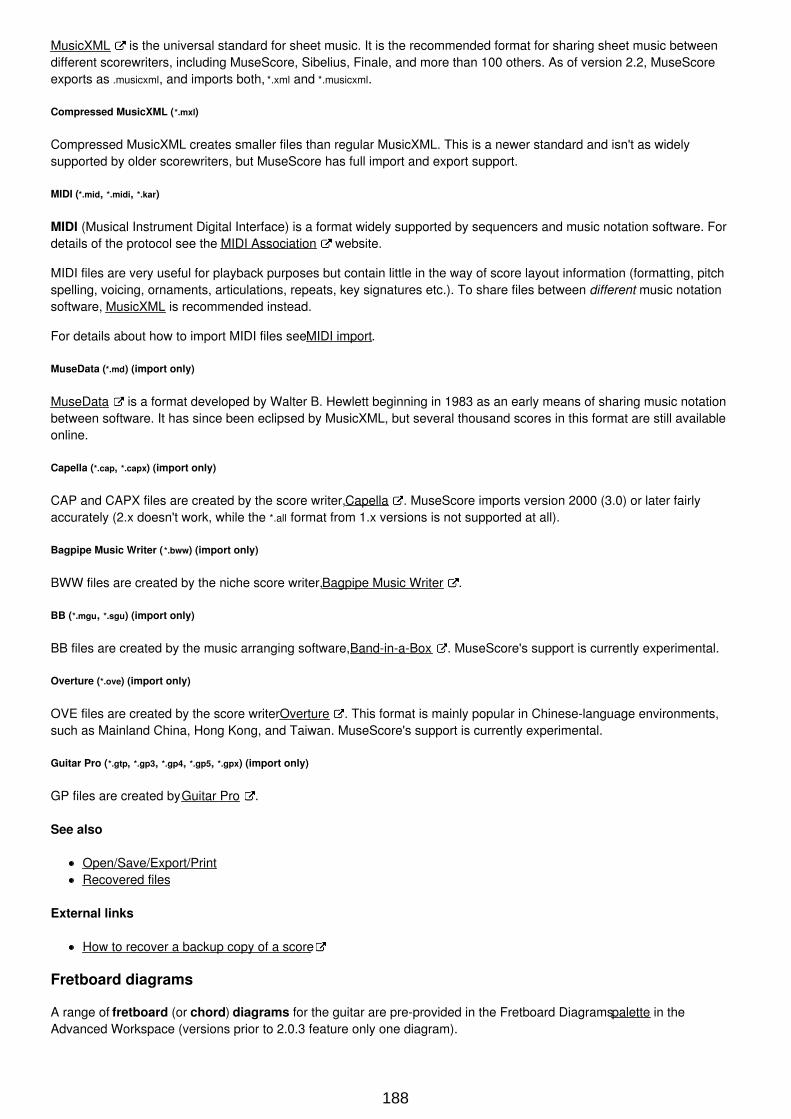
MusicXML is the universal standard for sheet music. It is the recommended format for sharing sheet music betweendifferent scorewriters, including MuseScore, Sibelius, Finale, and more than 100 others. As of version 2.2, MuseScoreexports as .musicxml, and imports both, *.xml and *.musicxml.
Compressed MusicXML (*.mxl)
Compressed MusicXML creates smaller files than regular MusicXML. This is a newer standard and isn't as widelysupported by older scorewriters, but MuseScore has full import and export support.
MIDI (*.mid, *.midi, *.kar)
MIDI (Musical Instrument Digital Interface) is a format widely supported by sequencers and music notation software. Fordetails of the protocol see the MIDI Association website.
MIDI files are very useful for playback purposes but contain little in the way of score layout information (formatting, pitchspelling, voicing, ornaments, articulations, repeats, key signatures etc.). To share files between different music notationsoftware, MusicXML is recommended instead.
For details about how to import MIDI files see MIDI import.
MuseData (*.md) (import only)
MuseData is a format developed by Walter B. Hewlett beginning in 1983 as an early means of sharing music notationbetween software. It has since been eclipsed by MusicXML, but several thousand scores in this format are still availableonline.
Capella (*.cap, *.capx) (import only)
CAP and CAPX files are created by the score writer, Capella . MuseScore imports version 2000 (3.0) or later fairlyaccurately (2.x doesn't work, while the *.all format from 1.x versions is not supported at all).
Bagpipe Music Writer ( *.bww) (import only)
BWW files are created by the niche score writer, Bagpipe Music Writer .
BB (*.mgu, *.sgu) (import only)
BB files are created by the music arranging software, Band-in-a-Box . MuseScore's support is currently experimental.
Overture (*.ove) (import only)
OVE files are created by the score writer Overture . This format is mainly popular in Chinese-language environments,such as Mainland China, Hong Kong, and Taiwan. MuseScore's support is currently experimental.
Guitar Pro (*.gtp, *.gp3, *.gp4, *.gp5, *.gpx) (import only)
GP files are created by Guitar Pro .
See also
Open/Save/Export/PrintRecovered files
External links
How to recover a backup copy of a score
Fretboard diagrams
A range of fretboard (or chord) diagrams for the guitar are pre-provided in the Fretboard Diagrams palette in theAdvanced Workspace (versions prior to 2.0.3 feature only one diagram).
188
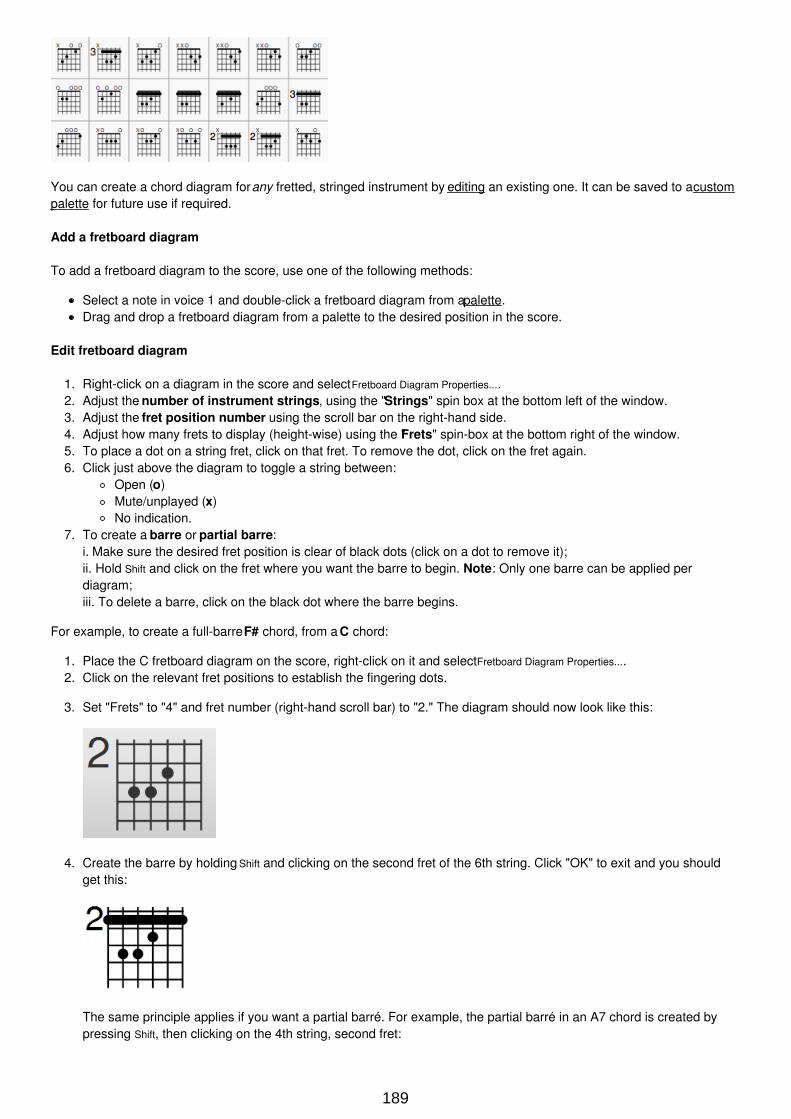
You can create a chord diagram for any fretted, stringed instrument by editing an existing one. It can be saved to a custompalette for future use if required.
Add a fretboard diagram
To add a fretboard diagram to the score, use one of the following methods:
Select a note in voice 1 and double-click a fretboard diagram from a palette.Drag and drop a fretboard diagram from a palette to the desired position in the score.
Edit fretboard diagram
1. Right-click on a diagram in the score and select Fretboard Diagram Properties....2. Adjust the number of instrument strings, using the "Strings" spin box at the bottom left of the window.3. Adjust the fret position number using the scroll bar on the right-hand side.4. Adjust how many frets to display (height-wise) using the "Frets" spin-box at the bottom right of the window.5. To place a dot on a string fret, click on that fret. To remove the dot, click on the fret again.6. Click just above the diagram to toggle a string between:
Open (o)Mute/unplayed (x)No indication.
7. To create a barre or partial barre:i. Make sure the desired fret position is clear of black dots (click on a dot to remove it);ii. Hold Shift and click on the fret where you want the barre to begin. Note: Only one barre can be applied perdiagram;iii. To delete a barre, click on the black dot where the barre begins.
For example, to create a full-barre F# chord, from a C chord:
1. Place the C fretboard diagram on the score, right-click on it and select Fretboard Diagram Properties....2. Click on the relevant fret positions to establish the fingering dots.
3. Set "Frets" to "4" and fret number (right-hand scroll bar) to "2." The diagram should now look like this:
4. Create the barre by holding Shift and clicking on the second fret of the 6th string. Click "OK" to exit and you shouldget this:
The same principle applies if you want a partial barré. For example, the partial barré in an A7 chord is created bypressing Shift, then clicking on the 4th string, second fret:
189
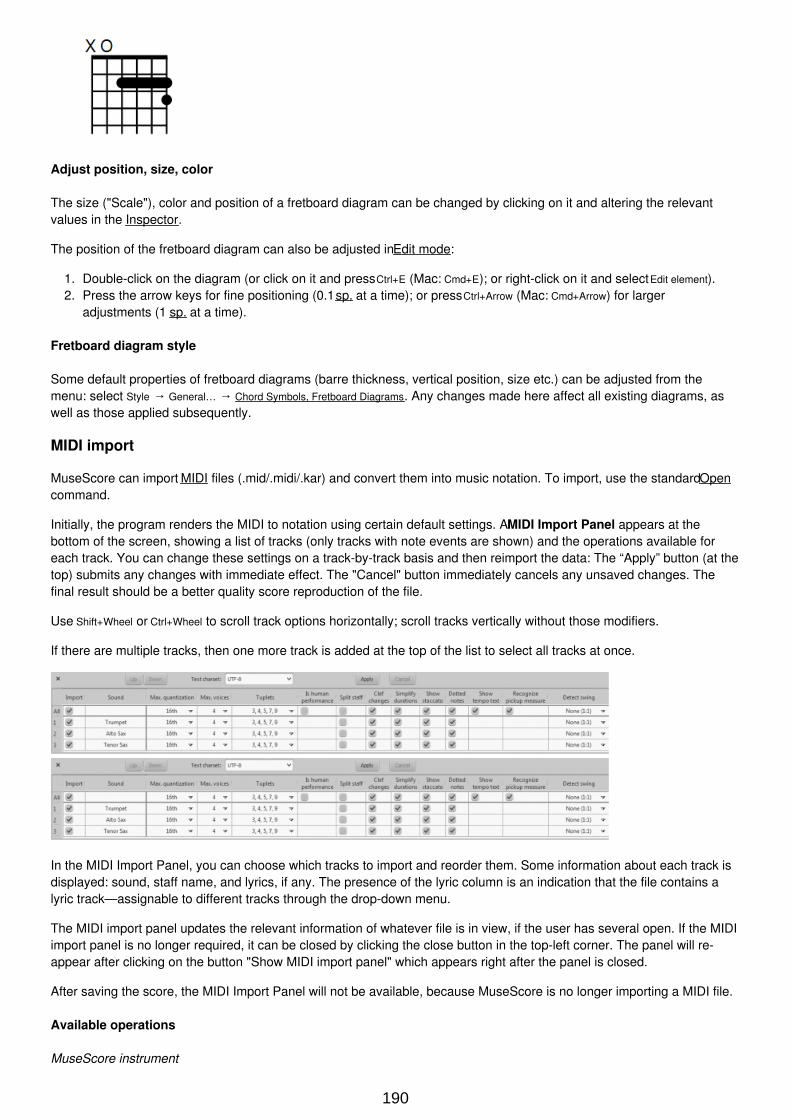
Adjust position, size, color
The size ("Scale"), color and position of a fretboard diagram can be changed by clicking on it and altering the relevantvalues in the Inspector.
The position of the fretboard diagram can also be adjusted in Edit mode:
1. Double-click on the diagram (or click on it and press Ctrl+E (Mac: Cmd+E); or right-click on it and select Edit element).2. Press the arrow keys for fine positioning (0.1 sp. at a time); or press Ctrl+Arrow (Mac: Cmd+Arrow) for larger
adjustments (1 sp. at a time).
Fretboard diagram style
Some default properties of fretboard diagrams (barre thickness, vertical position, size etc.) can be adjusted from themenu: select Style → General… → Chord Symbols, Fretboard Diagrams. Any changes made here affect all existing diagrams, aswell as those applied subsequently.
MIDI import
MuseScore can import MIDI files (.mid/.midi/.kar) and convert them into music notation. To import, use the standard Opencommand.
Initially, the program renders the MIDI to notation using certain default settings. A MIDI Import Panel appears at thebottom of the screen, showing a list of tracks (only tracks with note events are shown) and the operations available foreach track. You can change these settings on a track-by-track basis and then reimport the data: The “Apply” button (at thetop) submits any changes with immediate effect. The "Cancel" button immediately cancels any unsaved changes. Thefinal result should be a better quality score reproduction of the file.
Use Shift+Wheel or Ctrl+Wheel to scroll track options horizontally; scroll tracks vertically without those modifiers.
If there are multiple tracks, then one more track is added at the top of the list to select all tracks at once.
In the MIDI Import Panel, you can choose which tracks to import and reorder them. Some information about each track isdisplayed: sound, staff name, and lyrics, if any. The presence of the lyric column is an indication that the file contains alyric track—assignable to different tracks through the drop-down menu.
The MIDI import panel updates the relevant information of whatever file is in view, if the user has several open. If the MIDIimport panel is no longer required, it can be closed by clicking the close button in the top-left corner. The panel will re-appear after clicking on the button "Show MIDI import panel" which appears right after the panel is closed.
After saving the score, the MIDI Import Panel will not be available, because MuseScore is no longer importing a MIDI file.
Available operations
MuseScore instrument
190

Assign a MuseScore instrument (listed in instruments.xml or in specified custom xml file in Preferences) that definesstaff name, clef, transposition, articulations, etc.
Quantization
Quantize MIDI notes by some regular grid. The grid MAX resolution can be set via the drop-down menu:
Value from preferences (default) - quantization value is taken from the main Preferences dialog of MuseScore(in the “Import” tab)Quarter, Eighth, 16th, 32nd, 64th, 128th - user-defined values
However, the actual quantization grid size is adaptive and reduces when the note length is small, so for each notethe quantization value is different. But there is an upper limit for the quantization value, and that value can be set bythe user as "max. quantization".For example, if some note is long - say, half note, and the max. quantization is set to 8th, then the note will bequantized with the 8th-note grid, not the half- or quarter-note grid as it supposed to be by the algorithm.Such quantization scheme allows to quantize all notes in the score (with different lengths!) adequately.
Max. voicesSets maximum count of allowed musical voices.
Search tupletsWhen enabled, this option attempts to detect tuplets and applies the corresponding quantization grid to the tupletchords.
Is human performanceIf enabled, this option reduces the accuracy of MIDI-to-score conversion in favor of readability. It is useful forunaligned MIDI files, when no regular quantization grid is provided. For such files the automatic beat trackingalgorithm is used which tries to detect the bar positions throughout the piece.
2x less measure countThe option is active for unaligned MIDI files (when "Is human performance" is checked by default). It halves measurecount obtained in the internal beat tracking operation. It may be convenient when the beat tracking gives 2x morefrequent bar subdivision than necessary.
Time signatureThe option is active for unaligned MIDI files. The user can choose an appropriate time signature for the whole pieceif the default detected value is wrong. The option is useful because it handles imported tuplets correctly unlike thedirect time signature setting from the palette.
Split staffThis option is suited mainly for piano tracks - to assign notes to the left or right hand of the performer. It usesconstant pitch separation (the user may choose the pitch via sub-options) or floating pitch separation (depending onthe hand width - sort of a guess from the program point of view).For drum tracks (“Percussion” sound in the track list) it splits the staff into multiple staves, each of which gets onlyone drum pitch (i.e. drum sound). There is also a sub-option to allow/disallow the application of the square bracketfor the newly created set of drum tracks.
Clef changesSmall clefs can be inserted within a staff to keep chords closer to the 5 staff lines. Clef changes depend on theaverage pitch of the chord. Tied groups of notes are not broken by the clef insertion (if it occurs, one can report abug for algorithm in importmidi_clef.cpp). This option is available for non-drum tracks only.
Simplify durationsReduces number of rests to form more "simple" note durations. For drum tracks this option can remove rests andlengthen notes as well.
Show staccatoOption to show/hide staccato markings in the score.
Dotted notesControls whether MuseScore will use dotted notes or ties.
Show tempo textShows/hides tempo text markings in the score.
Show chord namesShows/hides chord names in the score, if any, for XF MIDI file format.
Recognize pickup measureWhen enabled, this option doesn't change the time signature of the first bar that is shorter than the second bar. It isalso called anacrusis. This option is only available for all tracks at once.
Detect swingMuseScore tries to detect swing, and automatically replace a pattern of 4th + 8th notes in triplets (for the mostcommon swing feel, 2:1), or a dotted 8th + 16th pattern (for shuffle, 3:1), with two straight 8ths and a “Swing” or“Shuffle” text at the beginning.
191
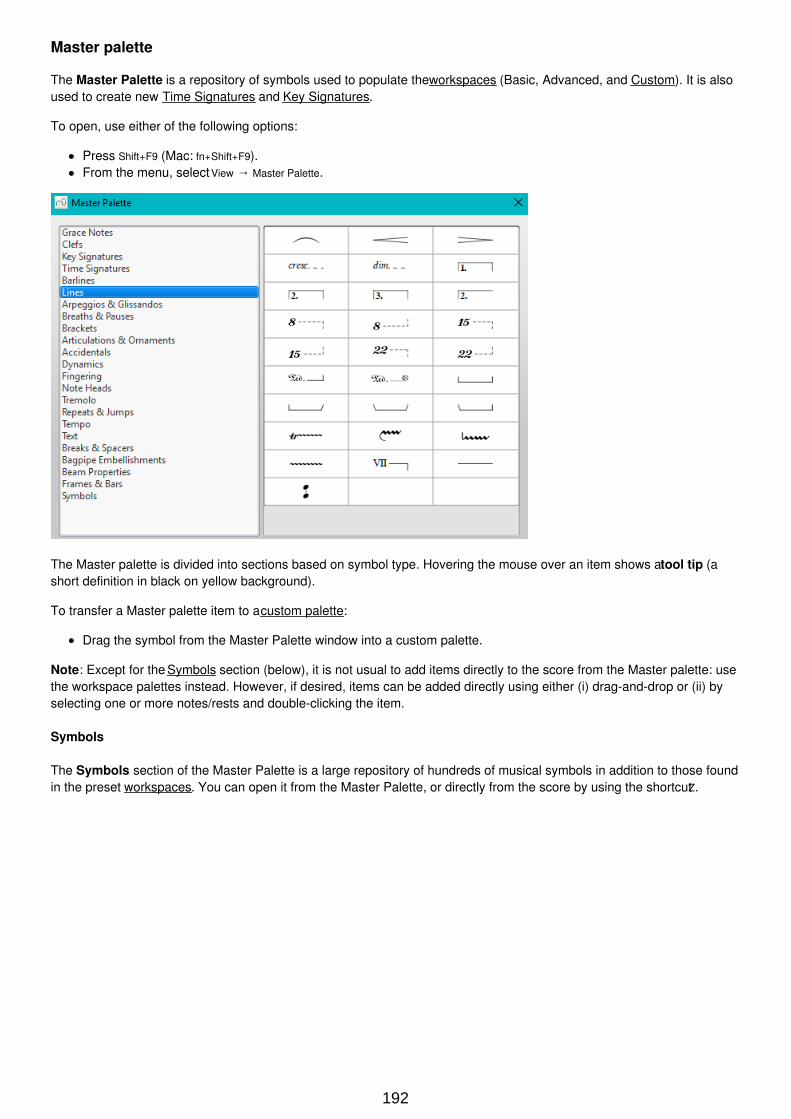
Master palette
The Master Palette is a repository of symbols used to populate the workspaces (Basic, Advanced, and Custom). It is alsoused to create new Time Signatures and Key Signatures.
To open, use either of the following options:
Press Shift+F9 (Mac: fn+Shift+F9).From the menu, select View → Master Palette.
The Master palette is divided into sections based on symbol type. Hovering the mouse over an item shows a tool tip (ashort definition in black on yellow background).
To transfer a Master palette item to a custom palette:
Drag the symbol from the Master Palette window into a custom palette.
Note: Except for the Symbols section (below), it is not usual to add items directly to the score from the Master palette: usethe workspace palettes instead. However, if desired, items can be added directly using either (i) drag-and-drop or (ii) byselecting one or more notes/rests and double-clicking the item.
Symbols
The Symbols section of the Master Palette is a large repository of hundreds of musical symbols in addition to those foundin the preset workspaces. You can open it from the Master Palette, or directly from the score by using the shortcut Z.
192
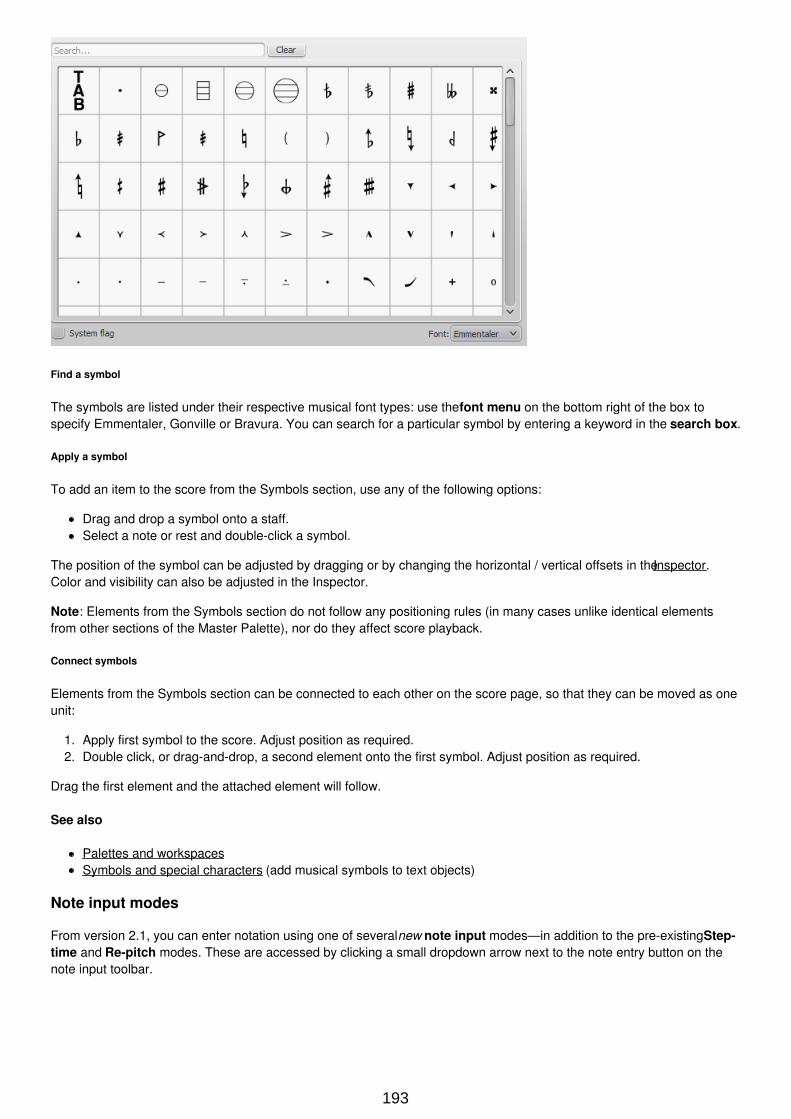
Find a symbol
The symbols are listed under their respective musical font types: use the font menu on the bottom right of the box tospecify Emmentaler, Gonville or Bravura. You can search for a particular symbol by entering a keyword in the search box.
Apply a symbol
To add an item to the score from the Symbols section, use any of the following options:
Drag and drop a symbol onto a staff.Select a note or rest and double-click a symbol.
The position of the symbol can be adjusted by dragging or by changing the horizontal / vertical offsets in the Inspector.Color and visibility can also be adjusted in the Inspector.
Note: Elements from the Symbols section do not follow any positioning rules (in many cases unlike identical elementsfrom other sections of the Master Palette), nor do they affect score playback.
Connect symbols
Elements from the Symbols section can be connected to each other on the score page, so that they can be moved as oneunit:
1. Apply first symbol to the score. Adjust position as required.2. Double click, or drag-and-drop, a second element onto the first symbol. Adjust position as required.
Drag the first element and the attached element will follow.
See also
Palettes and workspacesSymbols and special characters (add musical symbols to text objects)
Note input modes
From version 2.1, you can enter notation using one of several new note input modes—in addition to the pre-existing Step-time and Re-pitch modes. These are accessed by clicking a small dropdown arrow next to the note entry button on thenote input toolbar.
193
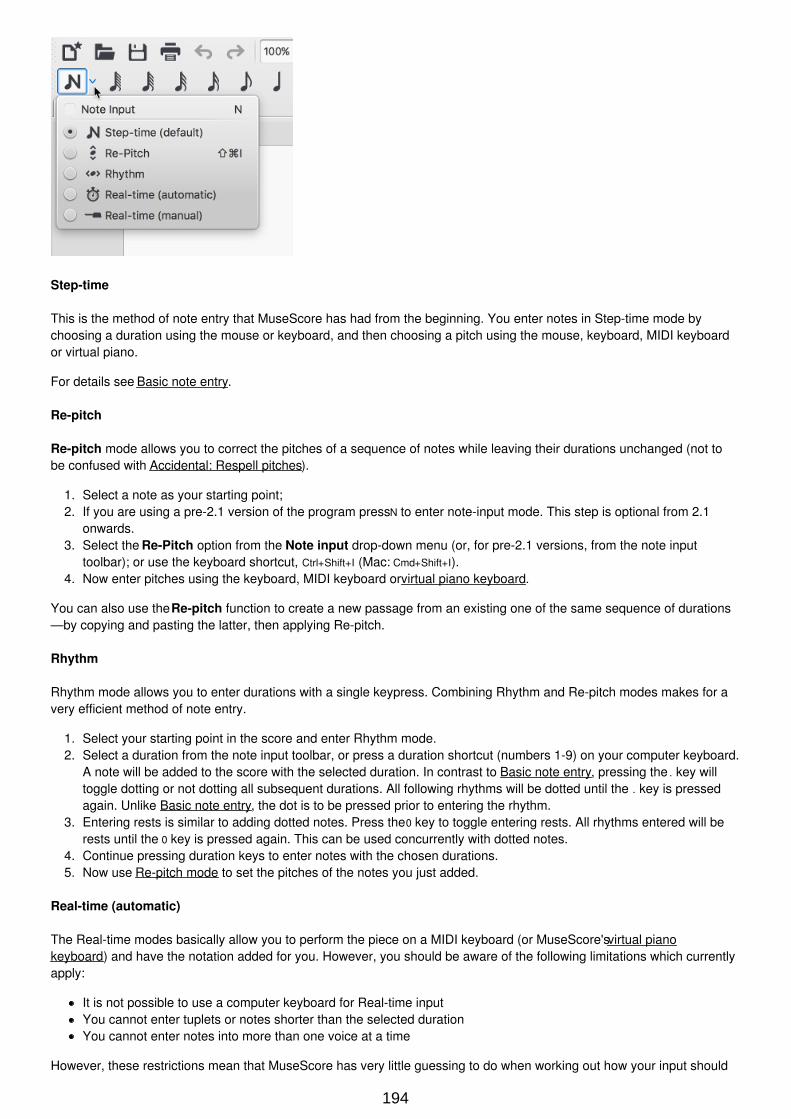
Step-time
This is the method of note entry that MuseScore has had from the beginning. You enter notes in Step-time mode bychoosing a duration using the mouse or keyboard, and then choosing a pitch using the mouse, keyboard, MIDI keyboardor virtual piano.
For details see Basic note entry.
Re-pitch
Re-pitch mode allows you to correct the pitches of a sequence of notes while leaving their durations unchanged (not tobe confused with Accidental: Respell pitches).
1. Select a note as your starting point;2. If you are using a pre-2.1 version of the program press N to enter note-input mode. This step is optional from 2.1
onwards.3. Select the Re-Pitch option from the Note input drop-down menu (or, for pre-2.1 versions, from the note input
toolbar); or use the keyboard shortcut, Ctrl+Shift+I (Mac: Cmd+Shift+I).4. Now enter pitches using the keyboard, MIDI keyboard or virtual piano keyboard.
You can also use the Re-pitch function to create a new passage from an existing one of the same sequence of durations—by copying and pasting the latter, then applying Re-pitch.
Rhythm
Rhythm mode allows you to enter durations with a single keypress. Combining Rhythm and Re-pitch modes makes for avery efficient method of note entry.
1. Select your starting point in the score and enter Rhythm mode.2. Select a duration from the note input toolbar, or press a duration shortcut (numbers 1-9) on your computer keyboard.
A note will be added to the score with the selected duration. In contrast to Basic note entry, pressing the . key willtoggle dotting or not dotting all subsequent durations. All following rhythms will be dotted until the . key is pressedagain. Unlike Basic note entry, the dot is to be pressed prior to entering the rhythm.
3. Entering rests is similar to adding dotted notes. Press the 0 key to toggle entering rests. All rhythms entered will berests until the 0 key is pressed again. This can be used concurrently with dotted notes.
4. Continue pressing duration keys to enter notes with the chosen durations.5. Now use Re-pitch mode to set the pitches of the notes you just added.
Real-time (automatic)
The Real-time modes basically allow you to perform the piece on a MIDI keyboard (or MuseScore's virtual pianokeyboard) and have the notation added for you. However, you should be aware of the following limitations which currentlyapply:
It is not possible to use a computer keyboard for Real-time inputYou cannot enter tuplets or notes shorter than the selected durationYou cannot enter notes into more than one voice at a time
However, these restrictions mean that MuseScore has very little guessing to do when working out how your input should
194
be notated, which helps to keep the Real-time modes accurate.
In the automatic version of Real-time input, you play at a fixed tempo indicated by a metronome click. You can adjust thetempo by changing the delay between clicks from the menu: Edit → Preferences... → Note Input (Mac: MuseScore → Preferences...
→ Note Input).
1. Select your starting position in the score and enter Real-time (automatic) mode.2. Select a duration from the note input toolbar.3. Press and hold a MIDI key or virtual piano key (a note will be added to the score).4. Listen for the metronome clicks. With each click the note grows by the selected duration.5. Release the key when the note has reached the desired length.
The score stops advancing as soon as you release the key. If you want the score to continue advancing (e.g. to allow youto enter rests) then you can use the Real-time Advance shortcut to start the metronome.
Real-time (manual)
In the manual version of Real-time input, you have to indicate your input tempo by tapping on a key or pedal, but you canplay at any speed you like and it doesn't have to be constant. The default key for setting the tempo (called "Real-timeAdvance") is Enter on the numeric keypad (Mac: fn+Return), but it is highly recommended that you change this to a MIDI keyor MIDI pedal (see below).
1. Select your starting position in the score and enter Real-time (manual) mode.2. Select a duration from the note input toolbar.3. Press and hold a MIDI key or virtual piano key (a note will be added to the score).4. Press the Real-time Advance key. With each press the note grows by the selected duration.5. Release the note when it has reached the desired length.
Real-time Advance shortcut
The Real-time Advance shortcut is used to tap beats in manual Real-time mode, or to start the metronome clicks inautomatic Real-time mode. It is called "Real-time Advance" because it causes the input position to more forward, or"advance", through the score.
The default key for Real-time Advance is Enter on the numeric keypad (Mac: fn+Return), but it is highly recommended thatyou assign this to a MIDI key or MIDI pedal via MuseScore's MIDI remote control. The MIDI remote control is availablefrom the menu: Edit → Preferences... → Note Input (Mac: MuseScore → Preferences... → Note Input).
Alternatively, if you have a USB footswitch or computer pedal which can simulate keyboard keys, you could set it tosimulate Enter on the numeric keypad.
See also
Note inputCopy and paste
External links
Video: Semi-Realtime MIDI Demo Part 1: New note entry modes (available as of MuseScore 2.1)Introduction to the new Repitch Mode (YouTube)
Noteheads
A range of alternative noteheads – in addition to the "normal" – can be found in the Note Heads palette of the Advancedworkspace and via the Inspector (see Change notehead group, below).
Note: The design of the notehead may vary depending on the music font selected (Emmentaler, Gonville or Bravura).Those in the palette are displayed as half notes in Bravura font.
Notehead groups
MuseScore supports a number of notehead styles:
Normal: A standard notehead.
195
Crosshead (Ghost note): Used in percussion notation to represent cymbals. It also indicates muted and/orpercussive effects in stringed instruments such as the guitar.Diamond: Used to indicate harmonic notes in instruments such as the guitar, violin etc.Slash: Used to notate rhythmic values.Triangle: Used in percussion notation.Shape notes: Do, Re, Mi, Fa, Sol, La, Ti.Circle cross: Used in percussion notation.Alternative Brevis: Used in early music notation.Brackets (Parentheses): When applied, these go around the existing note (or accidental).
Change notehead group
To change the shape of one or more noteheads in the score, use one of the following:
Select one or more notes and double click a notehead in a paletteDrag a notehead from a palette onto a note in the score.Select one or more notes and change the notehead in the Inspector, using the drop-down list under Note → Headgroup (not supported for drum staves).
Change notehead type
Occasionally you may need to change the apparent duration of a notehead—i.e. notehead type—without altering itsactual, underlying duration:
1. Select one or more notes.2. Chose one of the following options from the Inspector under Note → Head type:
Auto: Automatic, i.e, apparent duration = actual duration.Whole: Whole notehead, regardless of actual duration.Half: Half notehead, regardless of actual duration.Quarter: Quarter notehead, regardless of actual duration.Breve: Breve notehead, regardless of actual duration.
Shared noteheads
When two notes in different voices, but of the same written pitch, fall on the same beat, one of two things may happen:
The notes may share the same notehead.The notes may be offset: i.e. arranged side by side.
MuseScore follows standard music notation practice as follows:
Notes with stems in the same direction do not share noteheads.Dotted notes do not share noteheads with undotted notes.Black notes do not share noteheads with white notes.Whole notes never share noteheads.
Note: If two unison notes occur in the same voice they are always offset.
Change offset noteheads to shared
Offset noteheads can be turned into shared noteheads in one of two ways:
Make the smaller-value notehead invisible by selecting it and using the keyboard shortcut V (or unchecking the"Visible" option in the Inspector).Alter the notehead type of the shorter-duration note to match the longer one by switching "Head type" in the "Note"section of the Inspector.
Examples of notehead sharing
1. In the first example below, the notes of voices 1 and 2 share noteheads by default, because they are all black,undotted notes:
196
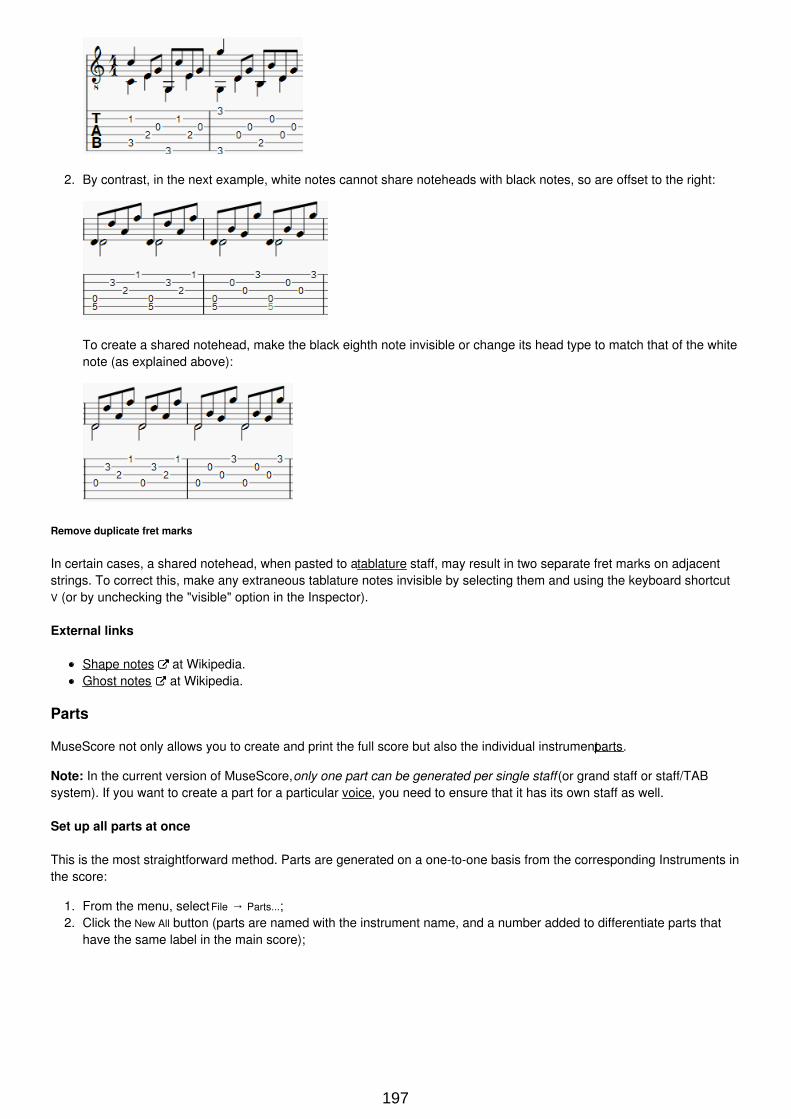
2. By contrast, in the next example, white notes cannot share noteheads with black notes, so are offset to the right:
To create a shared notehead, make the black eighth note invisible or change its head type to match that of the whitenote (as explained above):
Remove duplicate fret marks
In certain cases, a shared notehead, when pasted to a tablature staff, may result in two separate fret marks on adjacentstrings. To correct this, make any extraneous tablature notes invisible by selecting them and using the keyboard shortcutV (or by unchecking the "visible" option in the Inspector).
External links
Shape notes at Wikipedia.Ghost notes at Wikipedia.
Parts
MuseScore not only allows you to create and print the full score but also the individual instrument parts.
Note: In the current version of MuseScore, only one part can be generated per single staff (or grand staff or staff/TABsystem). If you want to create a part for a particular voice, you need to ensure that it has its own staff as well.
Set up all parts at once
This is the most straightforward method. Parts are generated on a one-to-one basis from the corresponding Instruments inthe score:
1. From the menu, select File → Parts...;2. Click the New All button (parts are named with the instrument name, and a number added to differentiate parts that
have the same label in the main score);
197

3. Click OK.
The parts can now be accessed by clicking on tabs above the document window.
Define specific parts
This method allows you to generate specific parts (rather than all-at-once), or to alter a previous parts set-up. It alsoallows you to specify multi-instrument parts, and define part names differently from the corresponding instruments, ifneeded.
The following instructions use a string quartet as an example, but the same principles apply for any other ensemble:
1. From the menu, select File → Parts...;
2. In the Parts window click New to create a "part definition;"
3. In the right pane, type the words you want to use for the "Part title" (this also serves for the corresponding part of thefilename when exporting);
4. Pick the instrument that you want to appear in your part by marking the relevant box in the right-hand pane. Usually,you only want one instrument per part, but sometimes you might need a part that includes more than one instrument(such as multiple percussion staves). MuseScore allows you to mark as many instruments per part as you need;
198
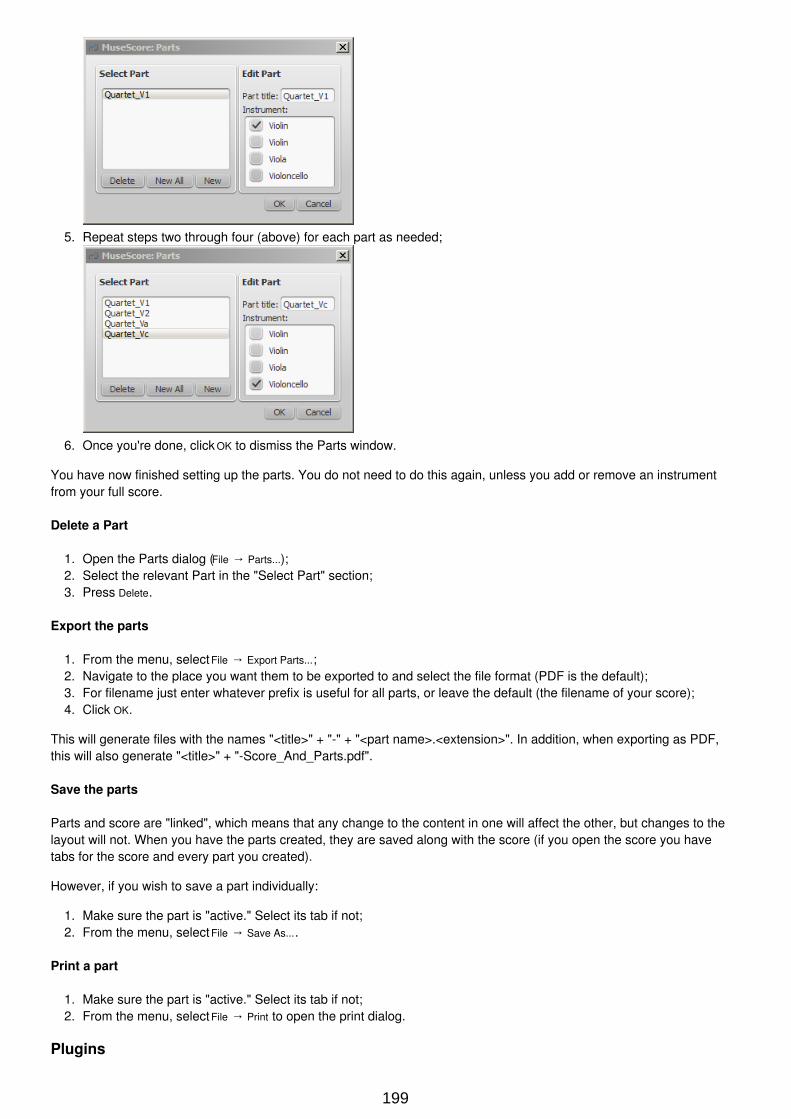
5. Repeat steps two through four (above) for each part as needed;
6. Once you're done, click OK to dismiss the Parts window.
You have now finished setting up the parts. You do not need to do this again, unless you add or remove an instrumentfrom your full score.
Delete a Part
1. Open the Parts dialog (File → Parts...);2. Select the relevant Part in the "Select Part" section;3. Press Delete.
Export the parts
1. From the menu, select File → Export Parts...;2. Navigate to the place you want them to be exported to and select the file format (PDF is the default);3. For filename just enter whatever prefix is useful for all parts, or leave the default (the filename of your score);4. Click OK.
This will generate files with the names "<title>" + "-" + "<part name>.<extension>". In addition, when exporting as PDF,this will also generate "<title>" + "-Score_And_Parts.pdf".
Save the parts
Parts and score are "linked", which means that any change to the content in one will affect the other, but changes to thelayout will not. When you have the parts created, they are saved along with the score (if you open the score you havetabs for the score and every part you created).
However, if you wish to save a part individually:
1. Make sure the part is "active." Select its tab if not;2. From the menu, select File → Save As....
Print a part
1. Make sure the part is "active." Select its tab if not;2. From the menu, select File → Print to open the print dialog.
Plugins
199
Overview
Plugins are small pieces of code that add a particular feature to MuseScore. By enabling a plugin, a new menu option willbe appended to the Plugins menu in MuseScore to accomplish a given action on the score or a part of it.
Some plugins come pre-installed with MuseScore—see →below. You can find many more plugins in the pluginrepository . Some plugins there work with MuseScore 2; others will only work with older versions of MuseScore, somework with either.To tell one from the other: for MuseScore 2.x the plugin code files have an extension of .qml, for older versions, it is .js.
Installation
Note that some plugins may require the installation of other components (fonts, e.g.) to work. Check the plugin'sdocumentation for more information.
Most plugins are provided as ZIP archives, so download the plugin's .zip file and uncompress it to one of the directoriesmentioned below. If a plugin is provided directly as an (unzipped) .qml file, simply download and place into one of thesedirectories.
Once a plugin is installed, it needs to be enabled in the Plugin Manager in order to use it—see →below.
Windows
MuseScore looks for pre-installed plugins in %ProgramFiles%\MuseScore 2\Plugins (or %ProgramFiles(x86)%\MuseScore 2\Plugins forthe 64-bit versions) and in %LOCALAPPDATA%\MuseScore\MuseScore 2\plugins on Vista, Seven and 10 or C:\Documents and
Settings\USERNAME\Local Settings\Application Data\MuseScore\MuseScore 2\plugins (adjusted to your language version) on XP.
To install new plugins, the above folders should not be used or modified. Instead you can add other plugins to%HOMEPATH%\Documents\MuseScore2\Plugins, or specify a different folder to look for plugins in MuseScore's Preferences.
macOS
On macOS, MuseScore looks for pre-installed plugins in the MuseScore bundle in /Applications/MuseScore
2.app/Contents/Resources/plugins (to reveal files in the app bundle, right click on MuseScore 2.app and choose "Show packagecontents") and in ~/Library/Application Support/MuseScore/MuseScore 2/plugins.
To install new plugins, the above folders should not be used or modified. Instead you can add other plugins to~/Documents/MuseScore2/Plugins, or specify a different folder to look for plugins in MuseScore's Preferences.
Linux
In Linux, MuseScore looks for plugins in /usr/share/mscore-2.0/plugins and in ~/.local/share/data/MuseScore/MuseScore 2/plugins.
To install new plugins, the above folders should not be used or modified. Instead you can add other plugins to~/Documents/MuseScore2/Plugins, or specify a different folder to look for plugins in MuseScore's Preferences.
Enable/disable plugins
To be able to access the installed plugins from the Plugins menu, they need to be enabled in the Plugin Manager:
200
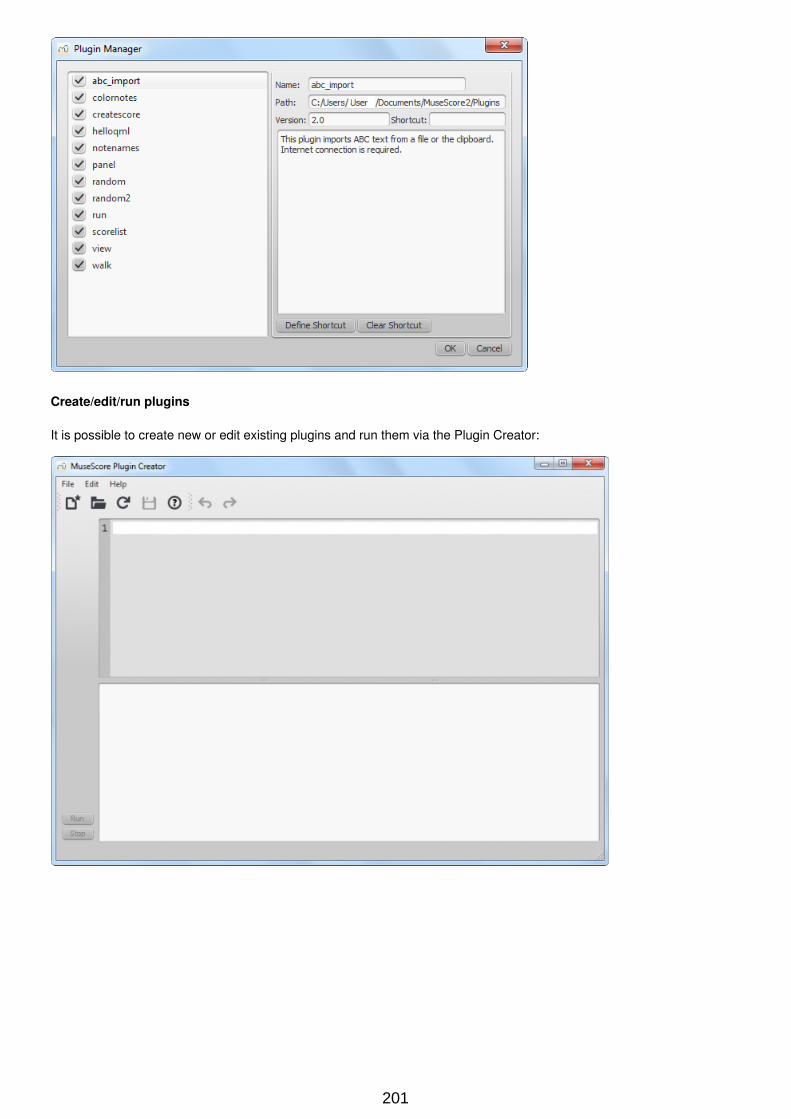
Create/edit/run plugins
It is possible to create new or edit existing plugins and run them via the Plugin Creator:
201
Here also the documentation of all available elements can be found
Plugins installed by default
Some plugins come pre-installed with MuseScore, but they are not enabled by default. See →above to enable plugins.
ABC Import
This plugin imports ABC text from a file or the clipboard. Internet connection is required, because it uses an externalweb-service for the conversion, which uses abc2xml and gets send the ABC data, returns MusicXML and importsthat into MuseScore.
Break Every X Measures
This plugin enters line breaks in the interval you select on the selected measures or, if no measures are selected, theentire score. It is no longer being distributed and has been replaced by Edit → Tools → Add/Remove Line Breaks. If you everused an early beta version of MuseScore 2, though, you may still see the plugin left over.
Notes → Color Notes
This demo plugin colors notes in the selected range (or the entire score), depending on their pitch. It colors the note headof all notes in all staves and voices according to the Boomwhackers convention. Each pitch has a different color. C and C♯have a different color. C♯ and D have the same color.To color all the notes in black, just run that plugin again (on the same selection). You could also use the 'Remove NotesColor' plugin for this.
Create Score
This demo plugin creates a new score. It creates a new piano score with 4 quarters C D E F. It's a good start to learn howto make a new score and add notes from a plugin.
helloQml
This demo plugin shows some basic tasks.
Notes → Note Names
202
This plugin names notes in the selected range or the entire score. It displays the names of the notes (as a staff text) asper MuseScore's language settings, for voices 1 and 3 above the staff, for voices 2 and 4 below the staff, and for chords ina comma separated list, starting with the top note.
Panel
This demo plugin creates a GUI panel.
random
Creates a random score.
random2
Creates a random score too
run
This demo plugin runs an external command. Probably this will only work on Linux.
scorelist
This test plugin iterates through the score list.
ScoreView
Demo plugin to demonstrate the use of a ScoreView
Walk
This test plugin walks through all elements in a score
See also
Tools
Preferences
You can customize many of MuseScore's default behaviors via the menu: Edit→Preferences... (Mac: MuseScore→Preferences...).
The Preferences dialog has multiple tabs:
Reset All Preferences to Default will reset all preferences to the ones MuseScore had when you installed it.
Cancel will close the dialog without applying changes.
General
203
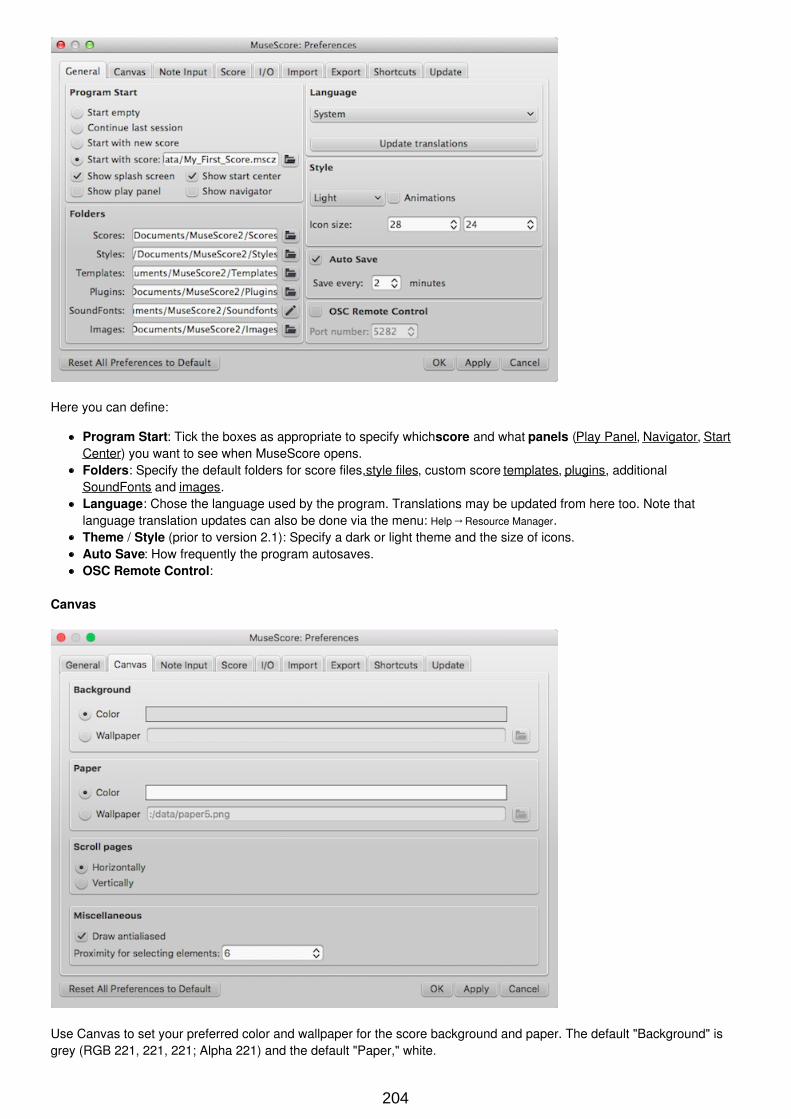
Here you can define:
Program Start: Tick the boxes as appropriate to specify which score and what panels (Play Panel, Navigator, StartCenter) you want to see when MuseScore opens.Folders: Specify the default folders for score files, style files, custom score templates, plugins, additionalSoundFonts and images.Language: Chose the language used by the program. Translations may be updated from here too. Note thatlanguage translation updates can also be done via the menu: Help→Resource Manager.Theme / Style (prior to version 2.1): Specify a dark or light theme and the size of icons.Auto Save: How frequently the program autosaves.OSC Remote Control:
Canvas
Use Canvas to set your preferred color and wallpaper for the score background and paper. The default "Background" isgrey (RGB 221, 221, 221; Alpha 221) and the default "Paper," white.
204
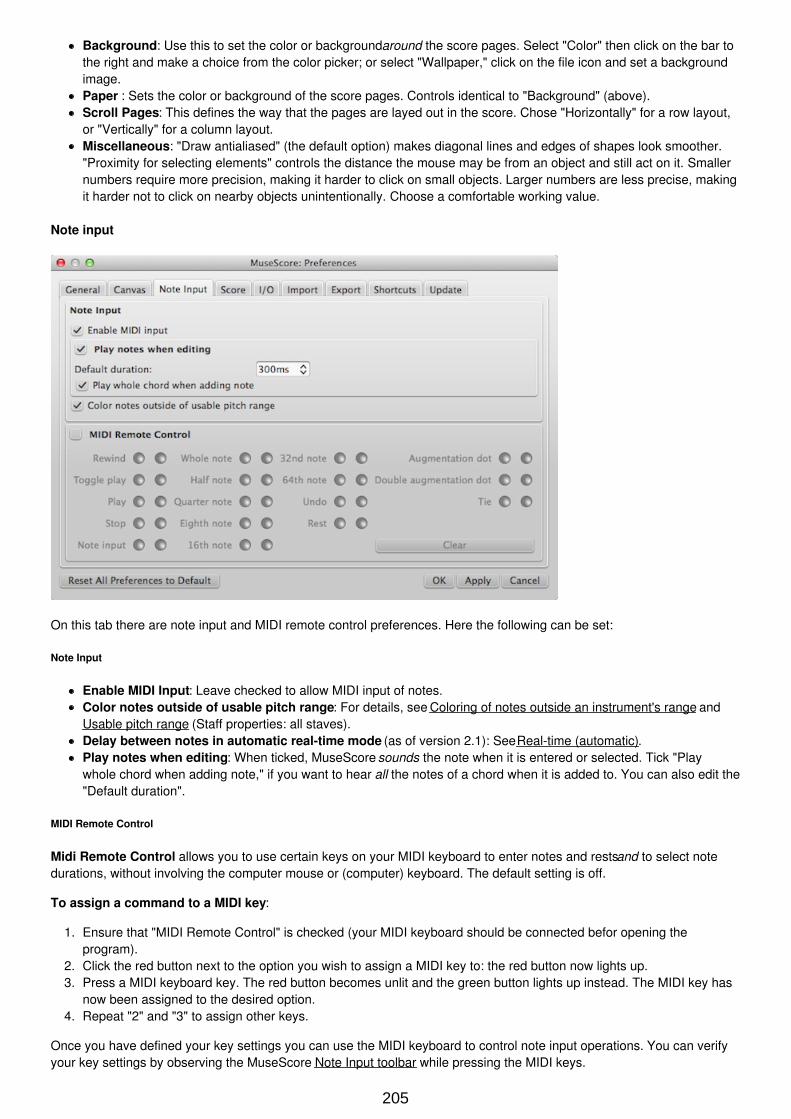
Background: Use this to set the color or background around the score pages. Select "Color" then click on the bar tothe right and make a choice from the color picker; or select "Wallpaper," click on the file icon and set a backgroundimage.Paper : Sets the color or background of the score pages. Controls identical to "Background" (above).Scroll Pages: This defines the way that the pages are layed out in the score. Chose "Horizontally" for a row layout,or "Vertically" for a column layout.Miscellaneous: "Draw antialiased" (the default option) makes diagonal lines and edges of shapes look smoother."Proximity for selecting elements" controls the distance the mouse may be from an object and still act on it. Smallernumbers require more precision, making it harder to click on small objects. Larger numbers are less precise, makingit harder not to click on nearby objects unintentionally. Choose a comfortable working value.
Note input
On this tab there are note input and MIDI remote control preferences. Here the following can be set:
Note Input
Enable MIDI Input: Leave checked to allow MIDI input of notes.Color notes outside of usable pitch range: For details, see Coloring of notes outside an instrument's range andUsable pitch range (Staff properties: all staves).Delay between notes in automatic real-time mode (as of version 2.1): See Real-time (automatic).Play notes when editing: When ticked, MuseScore sounds the note when it is entered or selected. Tick "Playwhole chord when adding note," if you want to hear all the notes of a chord when it is added to. You can also edit the"Default duration".
MIDI Remote Control
Midi Remote Control allows you to use certain keys on your MIDI keyboard to enter notes and rests and to select notedurations, without involving the computer mouse or (computer) keyboard. The default setting is off.
To assign a command to a MIDI key:
1. Ensure that "MIDI Remote Control" is checked (your MIDI keyboard should be connected befor opening theprogram).
2. Click the red button next to the option you wish to assign a MIDI key to: the red button now lights up.3. Press a MIDI keyboard key. The red button becomes unlit and the green button lights up instead. The MIDI key has
now been assigned to the desired option.4. Repeat "2" and "3" to assign other keys.
Once you have defined your key settings you can use the MIDI keyboard to control note input operations. You can verifyyour key settings by observing the MuseScore Note Input toolbar while pressing the MIDI keys.
205
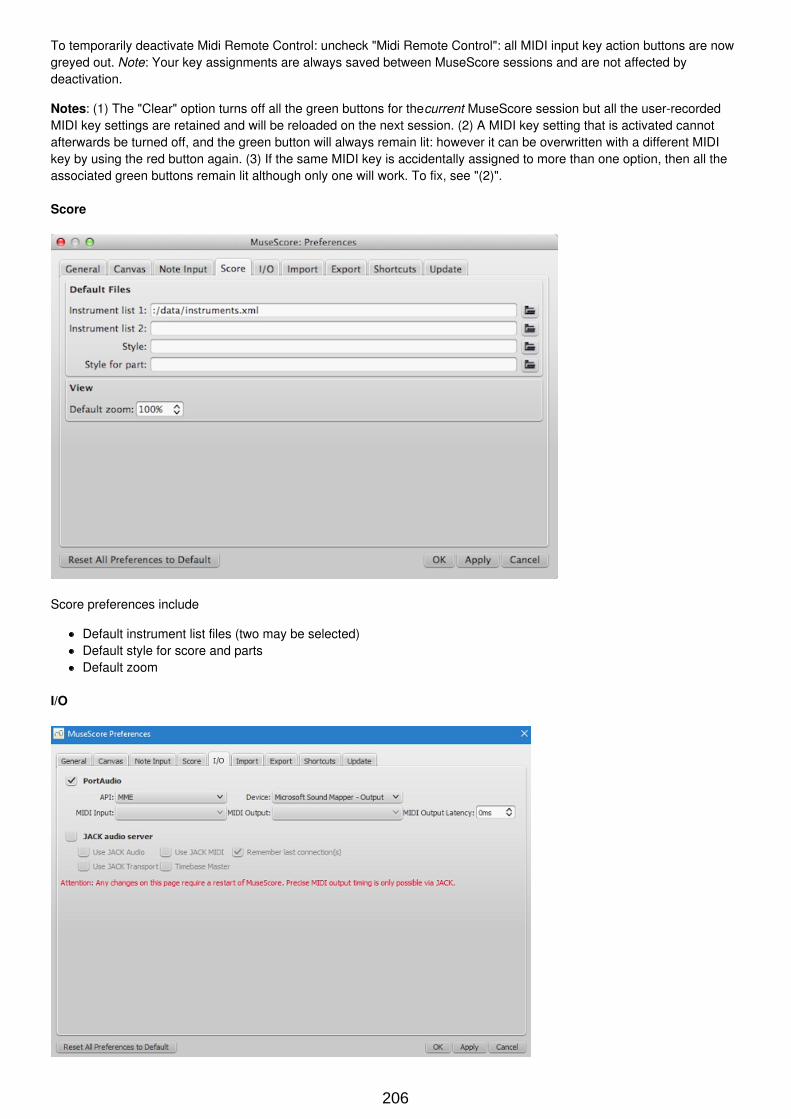
To temporarily deactivate Midi Remote Control: uncheck "Midi Remote Control": all MIDI input key action buttons are nowgreyed out. Note: Your key assignments are always saved between MuseScore sessions and are not affected bydeactivation.
Notes: (1) The "Clear" option turns off all the green buttons for the current MuseScore session but all the user-recordedMIDI key settings are retained and will be reloaded on the next session. (2) A MIDI key setting that is activated cannotafterwards be turned off, and the green button will always remain lit: however it can be overwritten with a different MIDIkey by using the red button again. (3) If the same MIDI key is accidentally assigned to more than one option, then all theassociated green buttons remain lit although only one will work. To fix, see "(2)".
Score
Score preferences include
Default instrument list files (two may be selected)Default style for score and partsDefault zoom
I/O
206

API / Device
This enables you to set the audio interface (API) and specify the device to be used for audio playback: e.g. built-inspeakers/headphones, USB headset, wireless, etc.
MIDI Input/Output/Output Latency
When an external MIDI input device is connected, its identifier appears in MIDI Input. As of MuseScore 2.2, when thedevice is connected for the first time, you also need to select the correct MIDI Output option in order to enable note inputand correct audio playback (e.g. in Windows, this might be "MMS<device name>"): then close and reopen the program toconfirm the changes.
Versions of MuseScore prior to 2.2 only have the "MIDI Input" option. The correct MIDI output is automatically specified aslong as the MIDI input device is connected correctly.
Jack Audio Server
Check these options as required if using the JACK Audio Connection Kit.
Import
These settings determine how files from other sources are imported:
Using either the built in MuseScore style or a style you chooseGuitar Pro and Overture character setsMusicXML layout optionsShortest note in MIDI files
Export
207
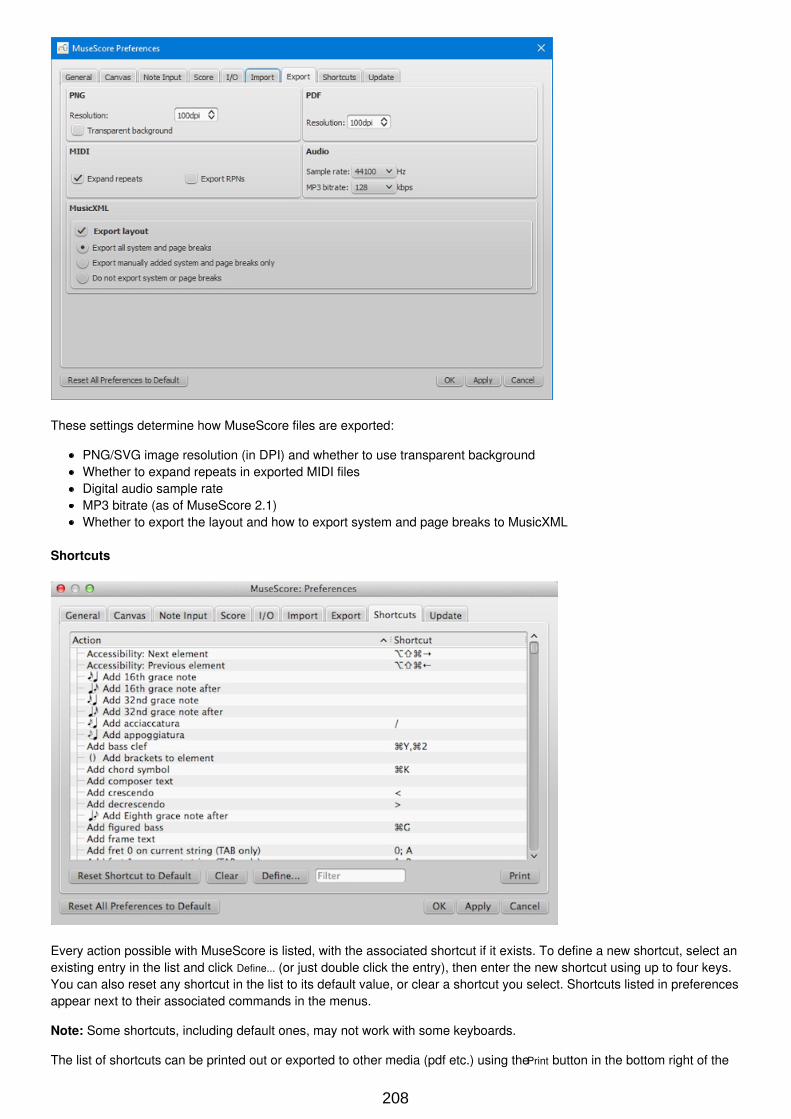
These settings determine how MuseScore files are exported:
PNG/SVG image resolution (in DPI) and whether to use transparent backgroundWhether to expand repeats in exported MIDI filesDigital audio sample rateMP3 bitrate (as of MuseScore 2.1)Whether to export the layout and how to export system and page breaks to MusicXML
Shortcuts
Every action possible with MuseScore is listed, with the associated shortcut if it exists. To define a new shortcut, select anexisting entry in the list and click Define... (or just double click the entry), then enter the new shortcut using up to four keys.You can also reset any shortcut in the list to its default value, or clear a shortcut you select. Shortcuts listed in preferencesappear next to their associated commands in the menus.
Note: Some shortcuts, including default ones, may not work with some keyboards.
The list of shortcuts can be printed out or exported to other media (pdf etc.) using the Print button in the bottom right of the
208
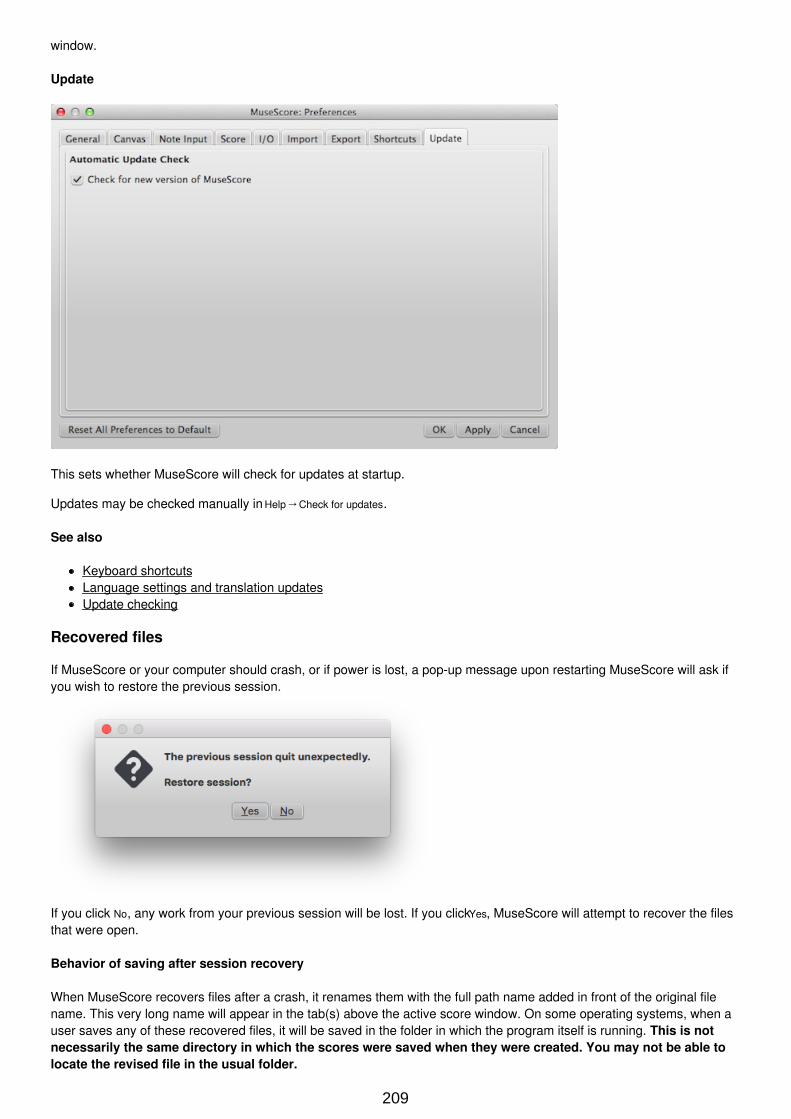
window.
Update
This sets whether MuseScore will check for updates at startup.
Updates may be checked manually in Help→Check for updates.
See also
Keyboard shortcutsLanguage settings and translation updatesUpdate checking
Recovered files
If MuseScore or your computer should crash, or if power is lost, a pop-up message upon restarting MuseScore will ask ifyou wish to restore the previous session.
If you click No, any work from your previous session will be lost. If you click Yes, MuseScore will attempt to recover the filesthat were open.
Behavior of saving after session recovery
When MuseScore recovers files after a crash, it renames them with the full path name added in front of the original filename. This very long name will appear in the tab(s) above the active score window. On some operating systems, when auser saves any of these recovered files, it will be saved in the folder in which the program itself is running. This is notnecessarily the same directory in which the scores were saved when they were created. You may not be able tolocate the revised file in the usual folder.
209
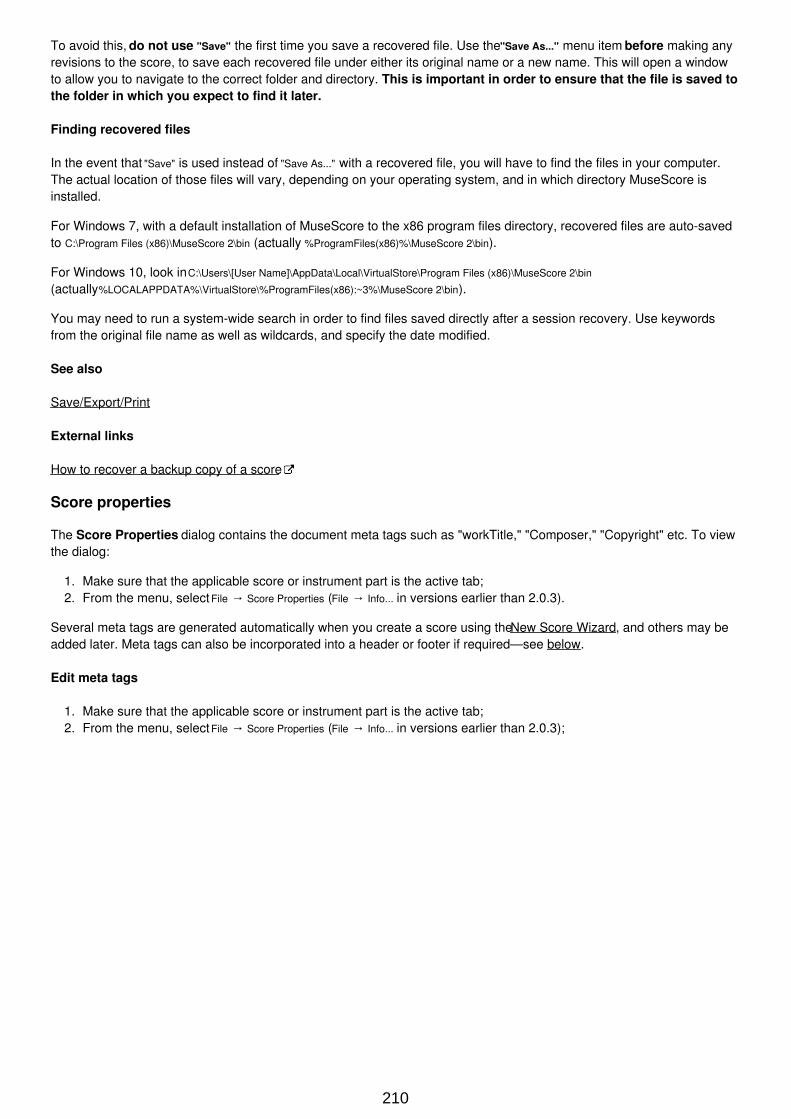
To avoid this, do not use "Save" the first time you save a recovered file. Use the "Save As..." menu item before making anyrevisions to the score, to save each recovered file under either its original name or a new name. This will open a windowto allow you to navigate to the correct folder and directory. This is important in order to ensure that the file is saved tothe folder in which you expect to find it later.
Finding recovered files
In the event that "Save" is used instead of "Save As..." with a recovered file, you will have to find the files in your computer.The actual location of those files will vary, depending on your operating system, and in which directory MuseScore isinstalled.
For Windows 7, with a default installation of MuseScore to the x86 program files directory, recovered files are auto-savedto C:\Program Files (x86)\MuseScore 2\bin (actually %ProgramFiles(x86)%\MuseScore 2\bin).
For Windows 10, look in C:\Users\[User Name]\AppData\Local\VirtualStore\Program Files (x86)\MuseScore 2\bin
(actually%LOCALAPPDATA%\VirtualStore\%ProgramFiles(x86):~3%\MuseScore 2\bin).
You may need to run a system-wide search in order to find files saved directly after a session recovery. Use keywordsfrom the original file name as well as wildcards, and specify the date modified.
See also
Save/Export/Print
External links
How to recover a backup copy of a score
Score properties
The Score Properties dialog contains the document meta tags such as "workTitle," "Composer," "Copyright" etc. To viewthe dialog:
1. Make sure that the applicable score or instrument part is the active tab;2. From the menu, select File → Score Properties (File → Info... in versions earlier than 2.0.3).
Several meta tags are generated automatically when you create a score using the New Score Wizard, and others may beadded later. Meta tags can also be incorporated into a header or footer if required—see below.
Edit meta tags
1. Make sure that the applicable score or instrument part is the active tab;2. From the menu, select File → Score Properties (File → Info... in versions earlier than 2.0.3);
210
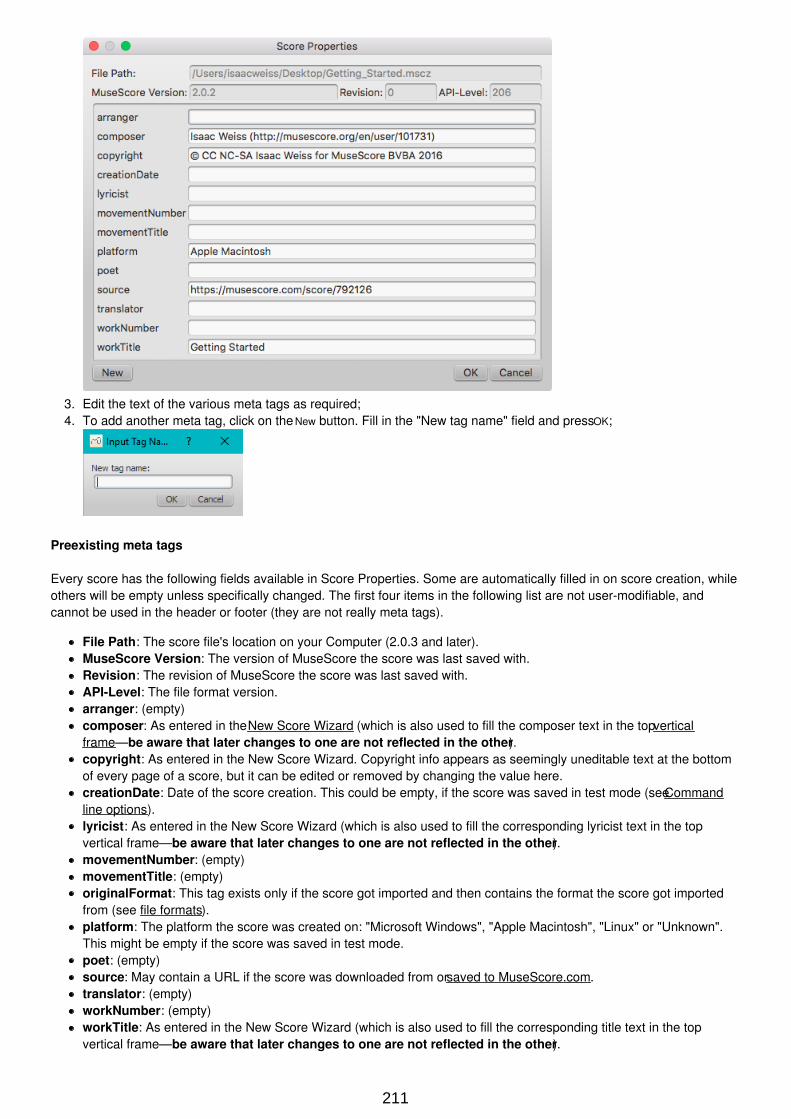
3. Edit the text of the various meta tags as required;4. To add another meta tag, click on the New button. Fill in the "New tag name" field and press OK;
Preexisting meta tags
Every score has the following fields available in Score Properties. Some are automatically filled in on score creation, whileothers will be empty unless specifically changed. The first four items in the following list are not user-modifiable, andcannot be used in the header or footer (they are not really meta tags).
File Path: The score file's location on your Computer (2.0.3 and later).MuseScore Version: The version of MuseScore the score was last saved with.Revision: The revision of MuseScore the score was last saved with.API-Level: The file format version.arranger: (empty)composer: As entered in the New Score Wizard (which is also used to fill the composer text in the top verticalframe—be aware that later changes to one are not reflected in the other).copyright: As entered in the New Score Wizard. Copyright info appears as seemingly uneditable text at the bottomof every page of a score, but it can be edited or removed by changing the value here.creationDate: Date of the score creation. This could be empty, if the score was saved in test mode (see Commandline options).lyricist: As entered in the New Score Wizard (which is also used to fill the corresponding lyricist text in the topvertical frame—be aware that later changes to one are not reflected in the other).movementNumber: (empty)movementTitle: (empty)originalFormat: This tag exists only if the score got imported and then contains the format the score got importedfrom (see file formats).platform: The platform the score was created on: "Microsoft Windows", "Apple Macintosh", "Linux" or "Unknown".This might be empty if the score was saved in test mode.poet: (empty)source: May contain a URL if the score was downloaded from or saved to MuseScore.com.translator: (empty)workNumber: (empty)workTitle: As entered in the New Score Wizard (which is also used to fill the corresponding title text in the topvertical frame—be aware that later changes to one are not reflected in the other).
211
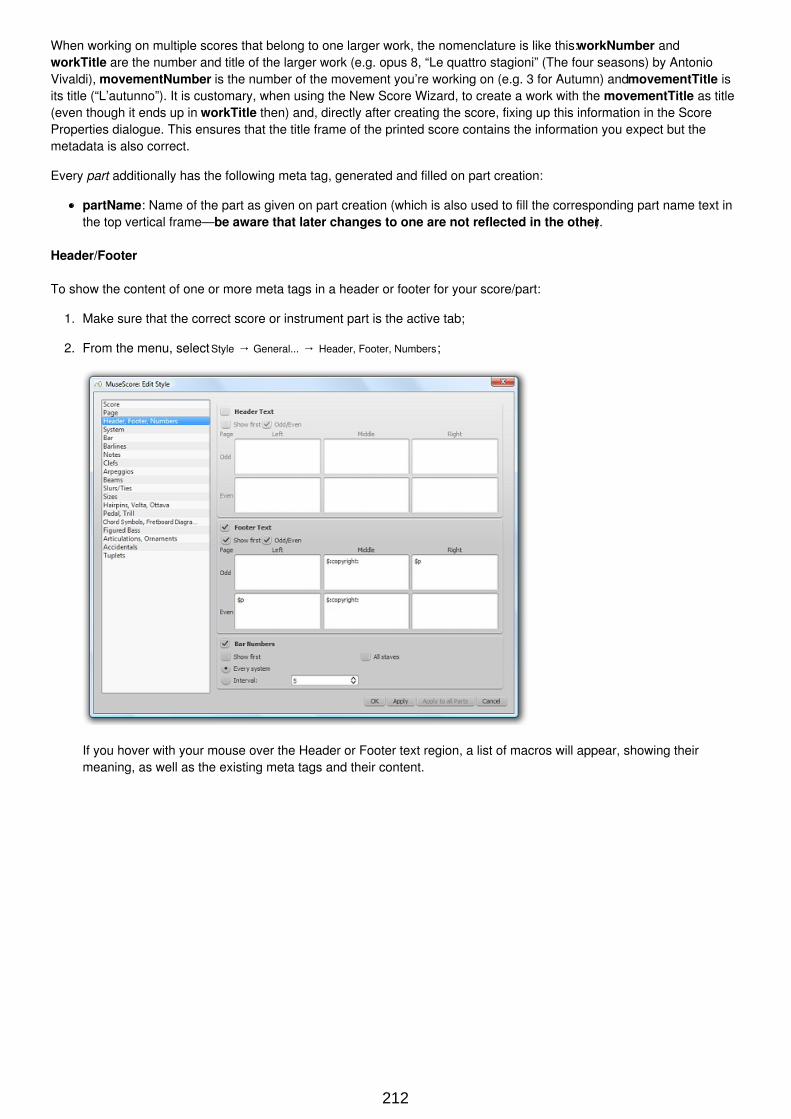
When working on multiple scores that belong to one larger work, the nomenclature is like this: workNumber andworkTitle are the number and title of the larger work (e.g. opus 8, “Le quattro stagioni” (The four seasons) by AntonioVivaldi), movementNumber is the number of the movement you’re working on (e.g. 3 for Autumn) and movementTitle isits title (“L’autunno”). It is customary, when using the New Score Wizard, to create a work with the movementTitle as title(even though it ends up in workTitle then) and, directly after creating the score, fixing up this information in the ScoreProperties dialogue. This ensures that the title frame of the printed score contains the information you expect but themetadata is also correct.
Every part additionally has the following meta tag, generated and filled on part creation:
partName: Name of the part as given on part creation (which is also used to fill the corresponding part name text inthe top vertical frame—be aware that later changes to one are not reflected in the other).
Header/Footer
To show the content of one or more meta tags in a header or footer for your score/part:
1. Make sure that the correct score or instrument part is the active tab;
2. From the menu, select Style → General... → Header, Footer, Numbers;
If you hover with your mouse over the Header or Footer text region, a list of macros will appear, showing theirmeaning, as well as the existing meta tags and their content.
212
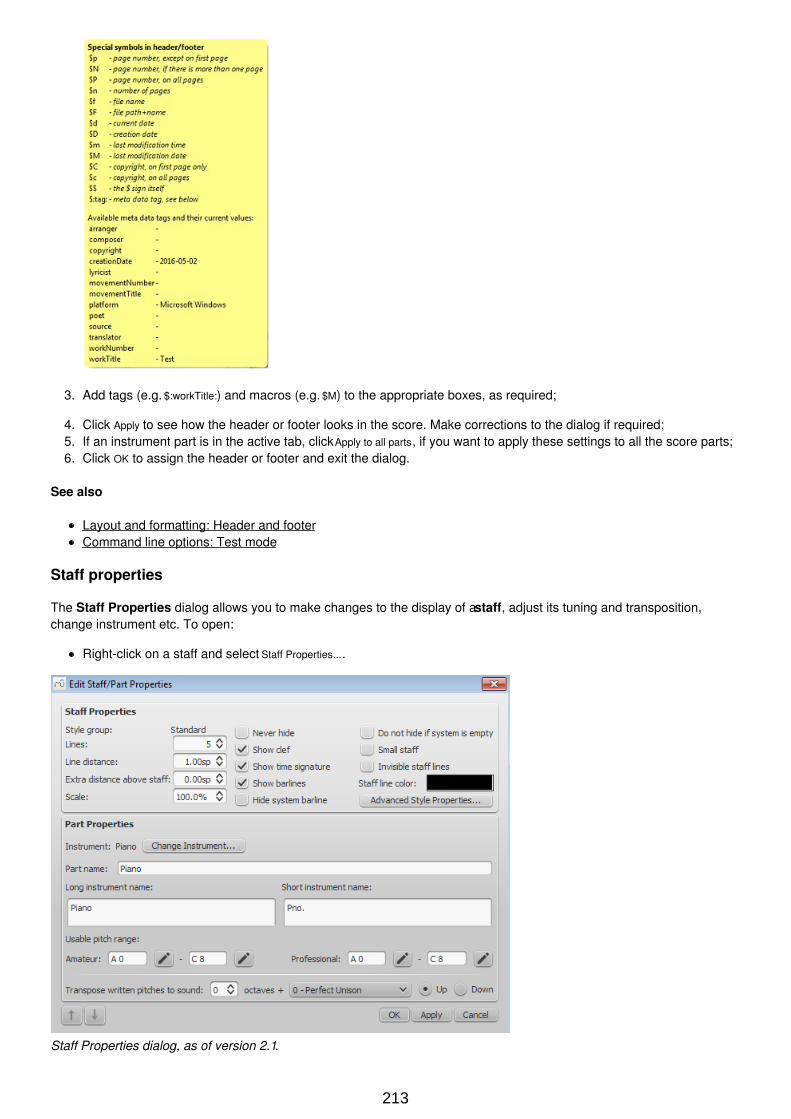
3. Add tags (e.g. $:workTitle:) and macros (e.g. $M) to the appropriate boxes, as required;
4. Click Apply to see how the header or footer looks in the score. Make corrections to the dialog if required;5. If an instrument part is in the active tab, click Apply to all parts, if you want to apply these settings to all the score parts;6. Click OK to assign the header or footer and exit the dialog.
See also
Layout and formatting: Header and footerCommand line options: Test mode
Staff properties
The Staff Properties dialog allows you to make changes to the display of a staff, adjust its tuning and transposition,change instrument etc. To open:
Right-click on a staff and select Staff Properties....
Staff Properties dialog, as of version 2.1.
213
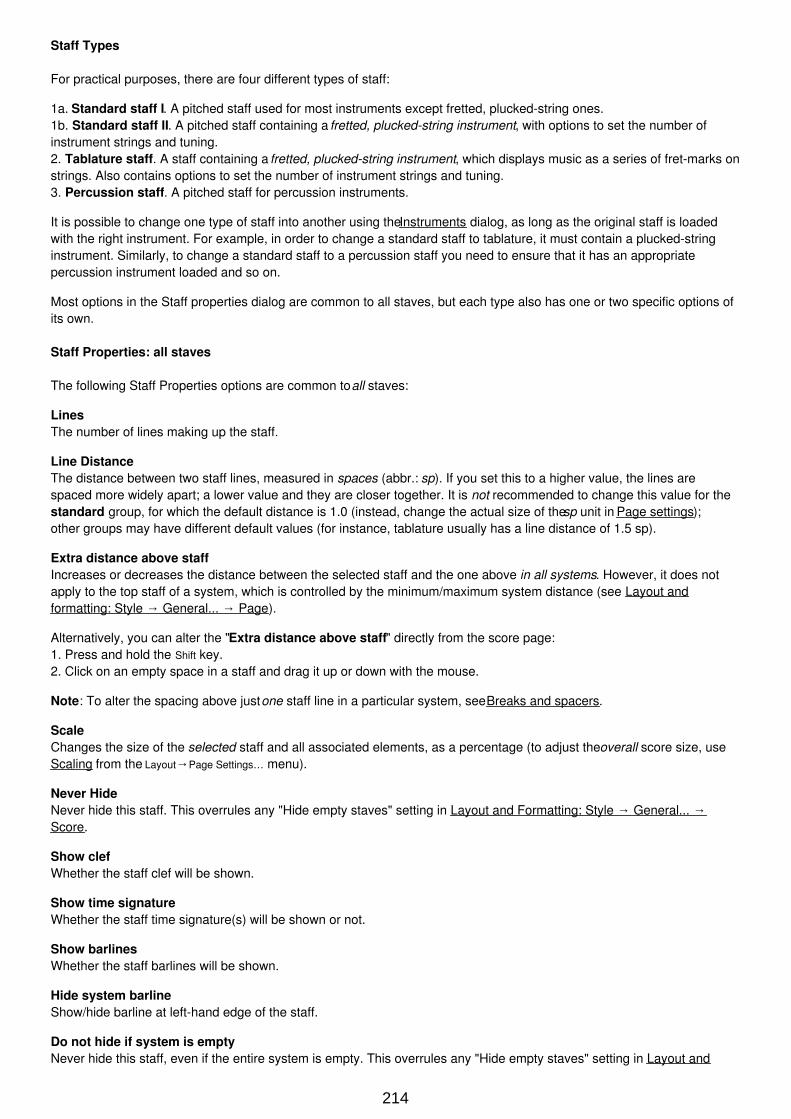
Staff Types
For practical purposes, there are four different types of staff:
1a. Standard staff I. A pitched staff used for most instruments except fretted, plucked-string ones.1b. Standard staff II. A pitched staff containing a fretted, plucked-string instrument, with options to set the number ofinstrument strings and tuning.2. Tablature staff. A staff containing a fretted, plucked-string instrument, which displays music as a series of fret-marks onstrings. Also contains options to set the number of instrument strings and tuning.3. Percussion staff. A pitched staff for percussion instruments.
It is possible to change one type of staff into another using the Instruments dialog, as long as the original staff is loadedwith the right instrument. For example, in order to change a standard staff to tablature, it must contain a plucked-stringinstrument. Similarly, to change a standard staff to a percussion staff you need to ensure that it has an appropriatepercussion instrument loaded and so on.
Most options in the Staff properties dialog are common to all staves, but each type also has one or two specific options ofits own.
Staff Properties: all staves
The following Staff Properties options are common to all staves:
LinesThe number of lines making up the staff.
Line DistanceThe distance between two staff lines, measured in spaces (abbr.: sp). If you set this to a higher value, the lines arespaced more widely apart; a lower value and they are closer together. It is not recommended to change this value for thestandard group, for which the default distance is 1.0 (instead, change the actual size of the sp unit in Page settings);other groups may have different default values (for instance, tablature usually has a line distance of 1.5 sp).
Extra distance above staffIncreases or decreases the distance between the selected staff and the one above in all systems. However, it does notapply to the top staff of a system, which is controlled by the minimum/maximum system distance (see Layout andformatting: Style → General... → Page).
Alternatively, you can alter the "Extra distance above staff" directly from the score page:1. Press and hold the Shift key.2. Click on an empty space in a staff and drag it up or down with the mouse.
Note: To alter the spacing above just one staff line in a particular system, see Breaks and spacers.
ScaleChanges the size of the selected staff and all associated elements, as a percentage (to adjust the overall score size, useScaling from the Layout→Page Settings… menu).
Never HideNever hide this staff. This overrules any "Hide empty staves" setting in Layout and Formatting: Style → General... →Score.
Show clefWhether the staff clef will be shown.
Show time signatureWhether the staff time signature(s) will be shown or not.
Show barlinesWhether the staff barlines will be shown.
Hide system barlineShow/hide barline at left-hand edge of the staff.
Do not hide if system is emptyNever hide this staff, even if the entire system is empty. This overrules any "Hide empty staves" setting in Layout and
214
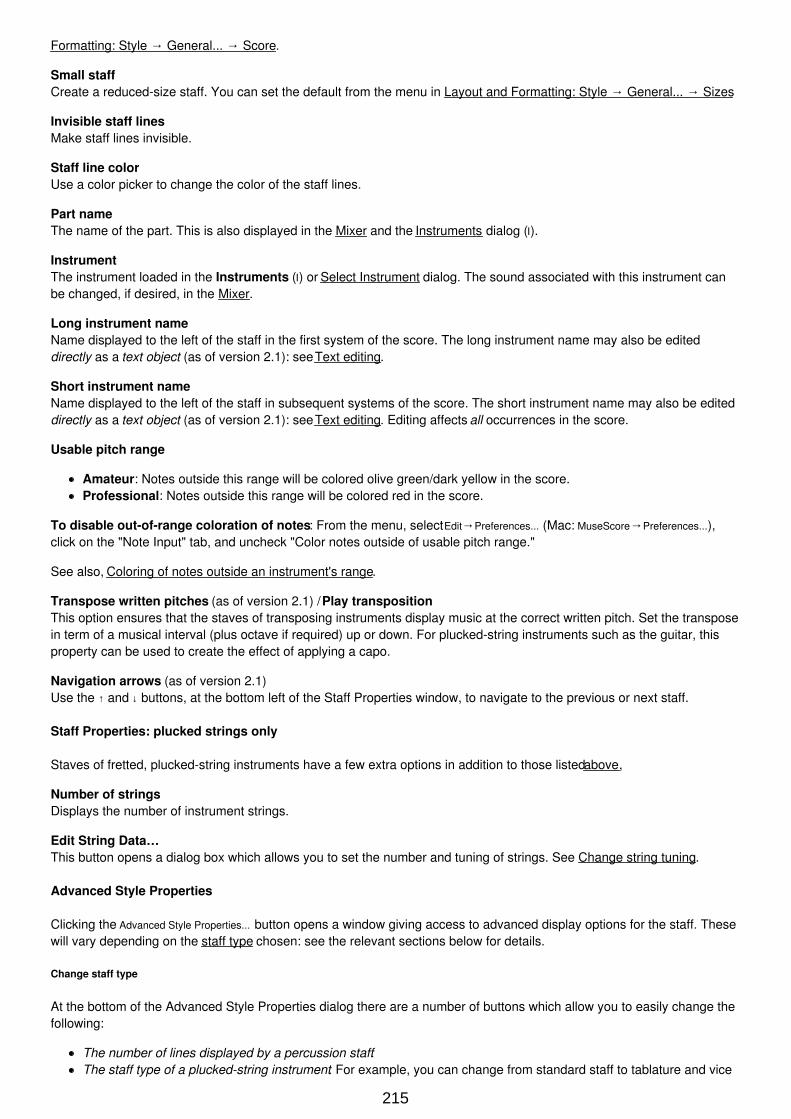
Formatting: Style → General... → Score.
Small staffCreate a reduced-size staff. You can set the default from the menu in Layout and Formatting: Style → General... → Sizes
Invisible staff linesMake staff lines invisible.
Staff line colorUse a color picker to change the color of the staff lines.
Part nameThe name of the part. This is also displayed in the Mixer and the Instruments dialog (I).
InstrumentThe instrument loaded in the Instruments (I) or Select Instrument dialog. The sound associated with this instrument canbe changed, if desired, in the Mixer.
Long instrument nameName displayed to the left of the staff in the first system of the score. The long instrument name may also be editeddirectly as a text object (as of version 2.1): see Text editing.
Short instrument nameName displayed to the left of the staff in subsequent systems of the score. The short instrument name may also be editeddirectly as a text object (as of version 2.1): see Text editing. Editing affects all occurrences in the score.
Usable pitch range
Amateur: Notes outside this range will be colored olive green/dark yellow in the score.Professional: Notes outside this range will be colored red in the score.
To disable out-of-range coloration of notes: From the menu, select Edit→Preferences... (Mac: MuseScore→Preferences...),click on the "Note Input" tab, and uncheck "Color notes outside of usable pitch range."
See also, Coloring of notes outside an instrument's range.
Transpose written pitches (as of version 2.1) / Play transpositionThis option ensures that the staves of transposing instruments display music at the correct written pitch. Set the transposein term of a musical interval (plus octave if required) up or down. For plucked-string instruments such as the guitar, thisproperty can be used to create the effect of applying a capo.
Navigation arrows (as of version 2.1)Use the ↑ and ↓ buttons, at the bottom left of the Staff Properties window, to navigate to the previous or next staff.
Staff Properties: plucked strings only
Staves of fretted, plucked-string instruments have a few extra options in addition to those listed above,
Number of stringsDisplays the number of instrument strings.
Edit String Data…This button opens a dialog box which allows you to set the number and tuning of strings. See Change string tuning.
Advanced Style Properties
Clicking the Advanced Style Properties... button opens a window giving access to advanced display options for the staff. Thesewill vary depending on the staff type chosen: see the relevant sections below for details.
Change staff type
At the bottom of the Advanced Style Properties dialog there are a number of buttons which allow you to easily change thefollowing:
The number of lines displayed by a percussion staff.The staff type of a plucked-string instrument. For example, you can change from standard staff to tablature and vice
215
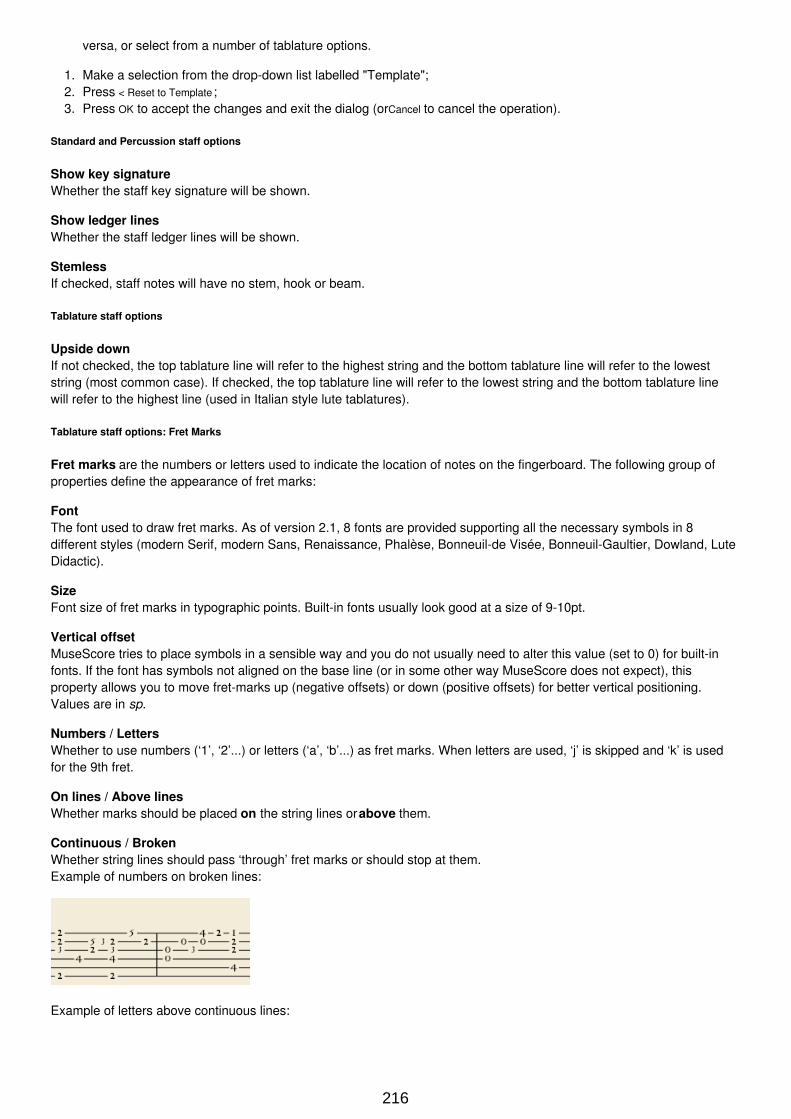
versa, or select from a number of tablature options.
1. Make a selection from the drop-down list labelled "Template";2. Press < Reset to Template ;3. Press OK to accept the changes and exit the dialog (or Cancel to cancel the operation).
Standard and Percussion staff options
Show key signatureWhether the staff key signature will be shown.
Show ledger linesWhether the staff ledger lines will be shown.
StemlessIf checked, staff notes will have no stem, hook or beam.
Tablature staff options
Upside downIf not checked, the top tablature line will refer to the highest string and the bottom tablature line will refer to the loweststring (most common case). If checked, the top tablature line will refer to the lowest string and the bottom tablature linewill refer to the highest line (used in Italian style lute tablatures).
Tablature staff options: Fret Marks
Fret marks are the numbers or letters used to indicate the location of notes on the fingerboard. The following group ofproperties define the appearance of fret marks:
FontThe font used to draw fret marks. As of version 2.1, 8 fonts are provided supporting all the necessary symbols in 8different styles (modern Serif, modern Sans, Renaissance, Phalèse, Bonneuil-de Visée, Bonneuil-Gaultier, Dowland, LuteDidactic).
SizeFont size of fret marks in typographic points. Built-in fonts usually look good at a size of 9-10pt.
Vertical offsetMuseScore tries to place symbols in a sensible way and you do not usually need to alter this value (set to 0) for built-infonts. If the font has symbols not aligned on the base line (or in some other way MuseScore does not expect), thisproperty allows you to move fret-marks up (negative offsets) or down (positive offsets) for better vertical positioning.Values are in sp.
Numbers / LettersWhether to use numbers (‘1’, ‘2’...) or letters (‘a’, ‘b’...) as fret marks. When letters are used, ‘j’ is skipped and ‘k’ is usedfor the 9th fret.
On lines / Above linesWhether marks should be placed on the string lines or above them.
Continuous / BrokenWhether string lines should pass ‘through’ fret marks or should stop at them.Example of numbers on broken lines:
Example of letters above continuous lines:
216
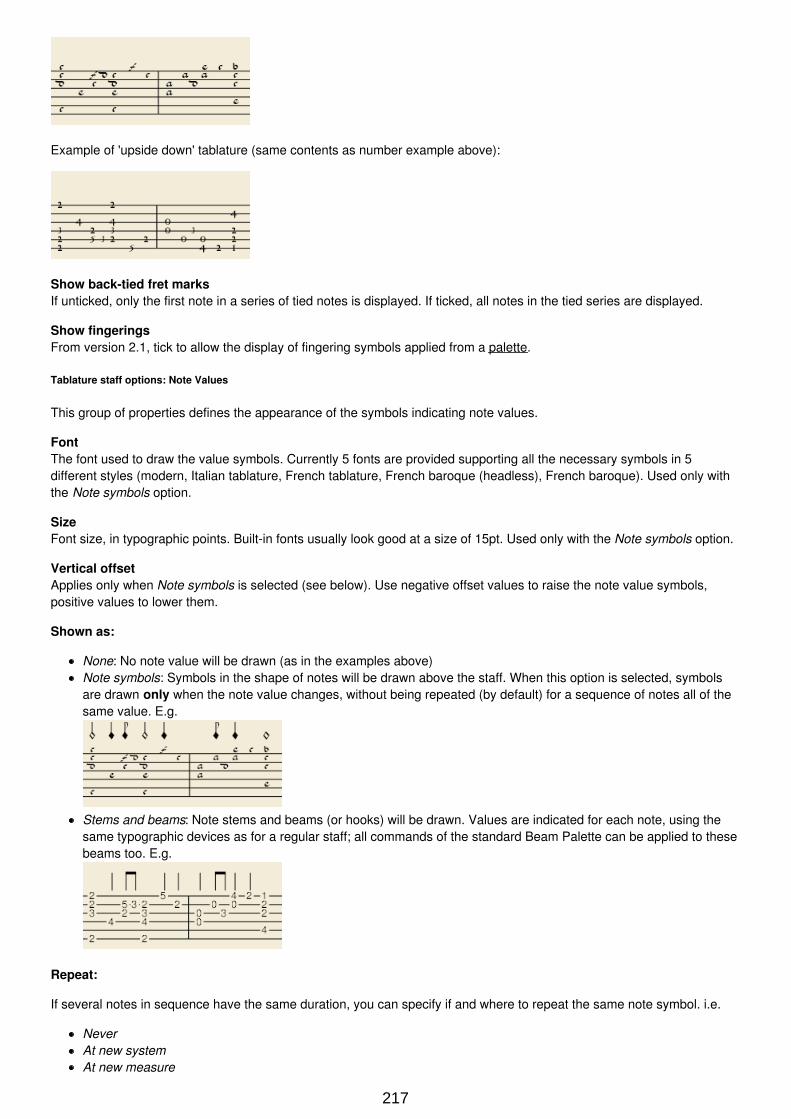
Example of 'upside down' tablature (same contents as number example above):
Show back-tied fret marksIf unticked, only the first note in a series of tied notes is displayed. If ticked, all notes in the tied series are displayed.
Show fingeringsFrom version 2.1, tick to allow the display of fingering symbols applied from a palette.
Tablature staff options: Note Values
This group of properties defines the appearance of the symbols indicating note values.
FontThe font used to draw the value symbols. Currently 5 fonts are provided supporting all the necessary symbols in 5different styles (modern, Italian tablature, French tablature, French baroque (headless), French baroque). Used only withthe Note symbols option.
SizeFont size, in typographic points. Built-in fonts usually look good at a size of 15pt. Used only with the Note symbols option.
Vertical offsetApplies only when Note symbols is selected (see below). Use negative offset values to raise the note value symbols,positive values to lower them.
Shown as:
None: No note value will be drawn (as in the examples above)Note symbols: Symbols in the shape of notes will be drawn above the staff. When this option is selected, symbolsare drawn only when the note value changes, without being repeated (by default) for a sequence of notes all of thesame value. E.g.
Stems and beams: Note stems and beams (or hooks) will be drawn. Values are indicated for each note, using thesame typographic devices as for a regular staff; all commands of the standard Beam Palette can be applied to thesebeams too. E.g.
Repeat:
If several notes in sequence have the same duration, you can specify if and where to repeat the same note symbol. i.e.
NeverAt new systemAt new measure
217
Always
Note: This option is only available if "Shown as: Note symbols" is selected (see above).
Stem style:
Beside staff: Stems are drawn as fixed height lines above/below the staff.Through staff: Stems run through the staff to reach the fret marks.
Note: This option is only available when "Shown as: Stems and Beams" is selected (see above).
Stem position:
Above: Stems and beams are drawn above the staff.Below: Stems and beams are drawn below the staff.
Note: This option is only available when "Shown as: Stems and Beams" and "Stem style: Beside staff" is selected (seeabove).
Half notes:
NoneAs short stemsAs slashed stems
Note: This option is only available when "Shown as: Stems and Beams and "Stem style: Beside staff" is selected (seeabove).
Show restsWhether note symbols should be used to indicate also the rests; when used for rests, note symbols are drawn at a slightlylower position. Used only with the Note symbols option.
Preview
Displays a short score in tablature format with all the current parameters applied.
Change instrument
You can change any instrument in a score to a different instrument at any time. The following method updates instrumentsound, staff name, and staff transposition all at once.
1. Right-click on an empty part of any measure OR on the instrument name and choose Staff Properties...;2. Click on Change Instrument... (under "Part Properties");3. Choose your new instrument and click OK to return to the Staff Properties dialog;4. Click OK again to return to the score.
Not to be confused with Mid-staff instrument change.
External links
How to turn a staff into an ossia .
Tools
A number of useful commands can be found in the Edit → Tools submenu.
Add / Remove system/line breaks
This tool adds or removes system breaks (Line breaks prior to version 2.2) over all or part of the score:
1. Select a range of measures: if no selection is made, the command is applied to the whole score.
2. Chose Edit→Tools→Add/Remove System (Line) Breaks…. The following dialog appears.
218
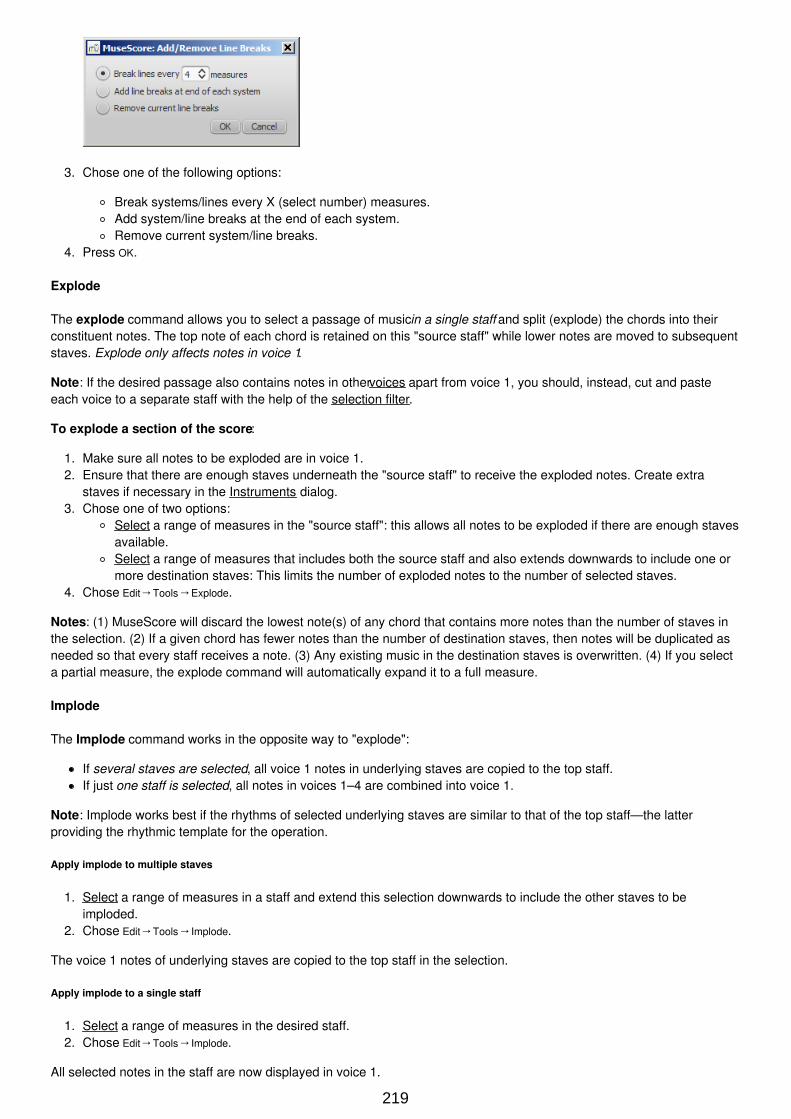
3. Chose one of the following options:
Break systems/lines every X (select number) measures.Add system/line breaks at the end of each system.Remove current system/line breaks.
4. Press OK.
Explode
The explode command allows you to select a passage of music in a single staff and split (explode) the chords into theirconstituent notes. The top note of each chord is retained on this "source staff" while lower notes are moved to subsequentstaves. Explode only affects notes in voice 1.
Note: If the desired passage also contains notes in other voices apart from voice 1, you should, instead, cut and pasteeach voice to a separate staff with the help of the selection filter.
To explode a section of the score:
1. Make sure all notes to be exploded are in voice 1.2. Ensure that there are enough staves underneath the "source staff" to receive the exploded notes. Create extra
staves if necessary in the Instruments dialog.3. Chose one of two options:
Select a range of measures in the "source staff": this allows all notes to be exploded if there are enough stavesavailable.Select a range of measures that includes both the source staff and also extends downwards to include one ormore destination staves: This limits the number of exploded notes to the number of selected staves.
4. Chose Edit→Tools→Explode.
Notes: (1) MuseScore will discard the lowest note(s) of any chord that contains more notes than the number of staves inthe selection. (2) If a given chord has fewer notes than the number of destination staves, then notes will be duplicated asneeded so that every staff receives a note. (3) Any existing music in the destination staves is overwritten. (4) If you selecta partial measure, the explode command will automatically expand it to a full measure.
Implode
The Implode command works in the opposite way to "explode":
If several staves are selected, all voice 1 notes in underlying staves are copied to the top staff.If just one staff is selected, all notes in voices 1–4 are combined into voice 1.
Note: Implode works best if the rhythms of selected underlying staves are similar to that of the top staff—the latterproviding the rhythmic template for the operation.
Apply implode to multiple staves
1. Select a range of measures in a staff and extend this selection downwards to include the other staves to beimploded.
2. Chose Edit→Tools→Implode.
The voice 1 notes of underlying staves are copied to the top staff in the selection.
Apply implode to a single staff
1. Select a range of measures in the desired staff.2. Chose Edit→Tools→Implode.
All selected notes in the staff are now displayed in voice 1.
219

Fill with slashes
This command fills the selection with slashes, one per beat:
1. Select one or more measures;2. From the menu, select Edit→Tools→Fill With Slashes.
If a measure is empty the slashes are added to voice 1, full-sized and centered on the middle line of the staff:
Notes: (1) If there are already notes in a measure in the selection, the command will put the slashes into the firstavailable empty voice. (2) Voice 2 slashes are full-sized and centered on the middle line of the staff; voices 3 slashesappear small and above the staff; voice 4 slashes are small and below the staff. (3) If a measure contains notes in all 4voices, voice 1 will be overwritten. (4) All slashes are set to not transpose or playback.
Toggle rhythmic slash notation
This command toggles selected notes between normal notes and rhythmic slash notation:
1. Select a range of notes or measures (Note: use the selection filter if you need to exclude certain voices);2. From the menu, select Edit→Tools→Toggle Rhythmic Slash Notation.
The selected noteheads are changed to slash noteheads which do not transpose or playback.
Slash-notehead notes in voices one or two are fixed to the middle staff line; those in voices three or four are small("accent" notation) and fixed above or below the staff:
In percussion staves, notes in voices 3 and 4 are not converted to small slashes but to small notes above or below thestaff.
Resequence rehearsal marks
The Resequence Rehearsal Marks command allows you to re-order the numbering/lettering of rehearsal marks if, forany reason, they have got out of sequence. For details see Automatically resequence rehearsal marks.
Copy lyrics to clipboard
This command, available in MuseScore 2.0.3 and above, copies all the lyrics of the score to the clipboard:
From the menu, select Edit→Tools→Copy Lyrics to Clipboard .
See also
Breaks and spacersRehearsal marks
220
New features in MuseScore 2
For an overview about the new features, see What's New in MuseScore 2 , Release notes for MuseScore 2.0 ,Release notes for MuseScore 2.0.1 , Release notes for MuseScore 2.0.2 , MuseScore 2.0.2 is released , Releasenotes for MuseScore 2.0.3 , MuseScore 2.0.3 is released , Release notes for MuseScore 2.1 , MuseScore 2.1 isreleased , Release notes for MuseScore 2.2 , MuseScore 2.2(.1) is released , Release notes for MuseScore2.2.1 , Release notes for MuseScore 2.3 , MuseScore 2.3(.1) is released , Release notes for MuseScore 2.3.1 ,MuseScore 2.3.2 is released , Release notes for MuseScore 2.3.2 and Changes for MuseScore 2.0 .Documentation of new features are available in the chapter they belong to logically (except the one that is referring toupgrading from 1.x) , but for users coming from 1.x here's a collection of links to be able to see at a glance what can bedone now...
See also
Album (→Advanced topics)View modes: Continuous view and Navigator (→Basics)Copy and paste: Selection filter (→Basics)Custom palettes (→Advanced topics)Early music features (→Advanced topics)Figured bass (→Advanced topics)Grid-based movement of symbols and staff text (→Text)Image capture (→Formatting)Inspector and object properties (→Advanced topics)Measure operations: Split and join (→Basics)MIDI import (→Sound and playback)Mid-staff instrument change (→Sound and playback)Part extraction (new options available) (→Advanced Topic)Rehearsal marks: Automatic next rehearsal mark and Search for a rehearsal mark (→Text)Save/Export (→Basics)Staff type properties (→Advanced topics)Swing (→Sound and playback)Tablature (→Advanced topics)Workspace (→Basics)Master palette (→Advanced topics)Layout and formatting (some options have changed, and there is a new "apply to all parts" feature) (→Formatting)Break and spacer: Section break (→Formatting)Selection modes: Select all similar new options (same subtype) (→Basics)Create a new score: start center (→Basics)Languages settings and translation updates (→Basics)Helping and improve translation (→Support)Accidentals: Respell pitches (→Notation)Re-pitch mode (→Advanced topics)Tools (→Advanced topics)Score Information (→Advanced topics)
Upgrade from MuseScore 1.x
How to upgrade MuseScore
Download and install the latest version from the download page as described at Installation. If you want to remove 1.x,check the installation page of the 1.x handbook.
Installing MuseScore 2 won't uninstall 1.x—both versions can coexist peacefully and can even be used in parallel. So thisisn't really an upgrade but an installation of a new and different program.
Opening 1.x scores in MuseScore 2
MuseScore 2 significantly improved the typesetting quality to make scores attractive and easier to read. Improvementscover many items such as beam slope, stem height, layout of accidentals in chords and general note spacing. However,this means that sheet music made with MuseScore 1.x looks slightly different from sheet music made with 2.x.
It also means that scores saved with 2.x won't open with 1.x.
221
To prevent you from accidentally overwriting your 1.x scores, 2.x treats them as an import, which means:
The score gets marked as being modified, even if you haven't change anythingOn exiting MuseScore you're asked to save the score (as a result from the above)MuseScore uses the "Save As" dialog to save it, not the "Save" dialogMuseScore uses the score's title to create a default filename rather than taking the old filename
Relayout
If you did not manually adjust the layout of a 1.x score, then MuseScore uses the 2.x typesetting engine to layout thescore. If you did touch the layout of the 1.x score, the individual adjustments you may have made should remain afteropening it in MuseScore 2.x, but due to slight changes in the surrounding layout they may still not appear correct incontext. If you wish to reset even manual adjustments to use the 2.x typesetting engine throughout, select the completescore with the shortcut Ctrl+A (Mac: Cmd+A) and reset the layout with Ctrl+R (Mac: Cmd+R).
Getting the sound from MuseScore 1.x
While the sound in 2.x has been much improved, you may still prefer the sound from MuseScore 1.x. In that case, you canget the 1.x sound in 2.x by downloading the 1.3 SoundFont and add it in 2.x. You can do this in two steps:
1. Download the 1.3 SoundFont named TimGM6mb2. Install and use the TimGM6mb SoundFont in 2.0
서포트서포트 (Support)
이 장에서는 MuseScore를 사용하여 도움을 받는 방법을 설명합니다 : 도움을 찾기에 가장 좋은 곳이며, 잘 모르겠을 때 포럼에서 질문을 하거나 버그를 보고하기에 가장 좋은 방법입니다.
번역본번역본 향상을향상을 위해위해 도움주는도움주는 방법방법
Development / Translating 에 언급된 바와 같이, 당신은 당신이 사용하는 언어로 MuseScore소프트웨어와 문서를 번역하는데 도움을 줄 수 있습니다.
소프트웨어소프트웨어 번역하는번역하는 법법
1. 번역 향상을 위한 포럼 에 물어 봐 주세요.2. Transifex/MuseScore http://translate.musescore.org 로 연락을 주세요. 연락을 받으면 당신에게 뒤에 있는 링크를통해 답장이 갈 것입니다.https://www.transifex.com/projects/p/musescore
3. 언어를 선택한 다음 도움이 필요한 섹션(musescore 또는 악기)를 선택합니다.4. "translate" 버튼을 눌러주세요. (버튼에 쓰여있는 텍스트는 사용자의 언어에 따라 다릅니다.)5. 의미있는 정보 중 번역하고 싶은 부분을 찾아주세요. (이미 번역된 부분을 필터링 할 수 있습니다.)
그에대한 기술적 설명: Continuous translation for MuseScore 2.0
웹사이트와웹사이트와 handbook 번역번역
Translation instructions 이곳을 봐주세요.
추가적인추가적인 내용내용
Language Settings and Update Translation, Update Translation
How to ask for support or file bug reports
Before submitting your support request in the forum , please:
Look for a solution in the Handbook (search the Handbook )Check the How Tos , FAQ and TutorialsSearch the forums of the website to see if someone has already encountered the same problem
If posting in either the issue tracker (for established reports), or forum (for inquiries/discussions):
Try to reproduce the issue with the latest nightly . You may also view and version history to check whether it
222
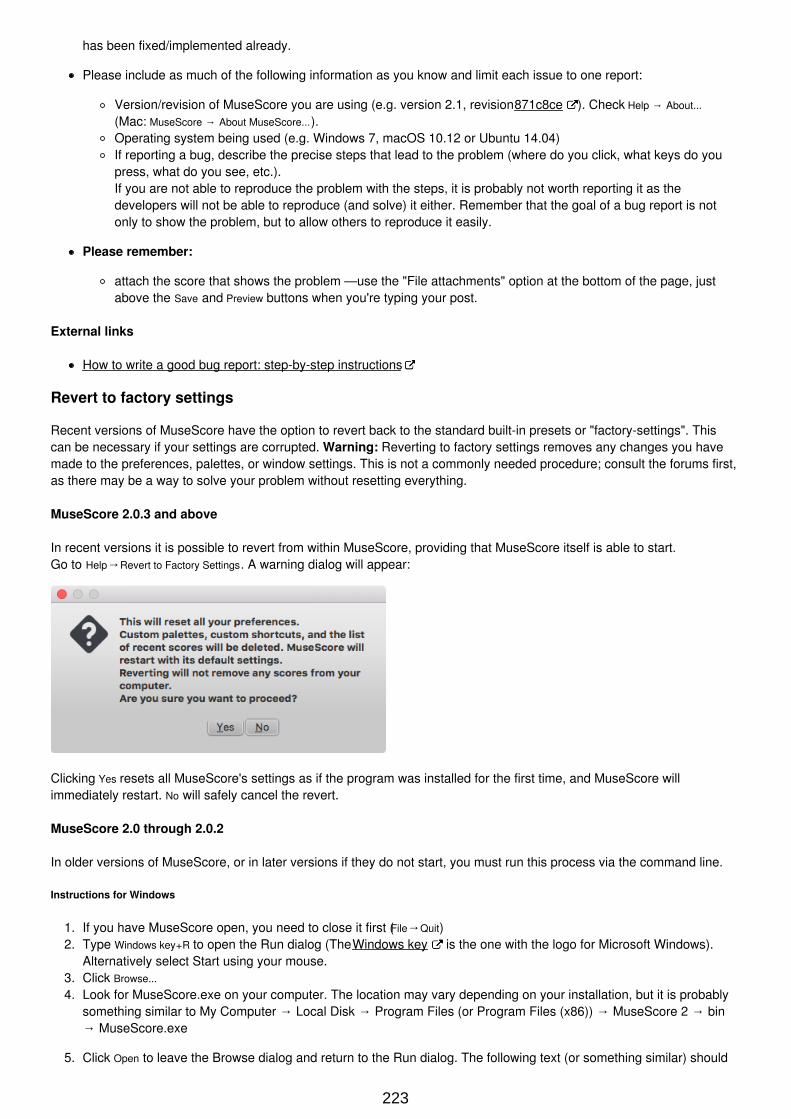
has been fixed/implemented already.
Please include as much of the following information as you know and limit each issue to one report:
Version/revision of MuseScore you are using (e.g. version 2.1, revision 871c8ce ). Check Help → About...
(Mac: MuseScore → About MuseScore...).Operating system being used (e.g. Windows 7, macOS 10.12 or Ubuntu 14.04)If reporting a bug, describe the precise steps that lead to the problem (where do you click, what keys do youpress, what do you see, etc.).If you are not able to reproduce the problem with the steps, it is probably not worth reporting it as thedevelopers will not be able to reproduce (and solve) it either. Remember that the goal of a bug report is notonly to show the problem, but to allow others to reproduce it easily.
Please remember:
attach the score that shows the problem —use the "File attachments" option at the bottom of the page, justabove the Save and Preview buttons when you're typing your post.
External links
How to write a good bug report: step-by-step instructions
Revert to factory settings
Recent versions of MuseScore have the option to revert back to the standard built-in presets or "factory-settings". Thiscan be necessary if your settings are corrupted. Warning: Reverting to factory settings removes any changes you havemade to the preferences, palettes, or window settings. This is not a commonly needed procedure; consult the forums first,as there may be a way to solve your problem without resetting everything.
MuseScore 2.0.3 and above
In recent versions it is possible to revert from within MuseScore, providing that MuseScore itself is able to start.Go to Help→Revert to Factory Settings. A warning dialog will appear:
Clicking Yes resets all MuseScore's settings as if the program was installed for the first time, and MuseScore willimmediately restart. No will safely cancel the revert.
MuseScore 2.0 through 2.0.2
In older versions of MuseScore, or in later versions if they do not start, you must run this process via the command line.
Instructions for Windows
1. If you have MuseScore open, you need to close it first (File→Quit)2. Type Windows key+R to open the Run dialog (The Windows key is the one with the logo for Microsoft Windows).
Alternatively select Start using your mouse.3. Click Browse...
4. Look for MuseScore.exe on your computer. The location may vary depending on your installation, but it is probablysomething similar to My Computer → Local Disk → Program Files (or Program Files (x86)) → MuseScore 2 → bin→ MuseScore.exe
5. Click Open to leave the Browse dialog and return to the Run dialog. The following text (or something similar) should
223
display in the Run dialog
C:\Program Files\MuseScore 2\bin\MuseScore.exe (actually %ProgramFiles%\MuseScore 2\bin\MuseScore.exe)
For 64-bit Windows, the location is
C:\Program Files (x86)\MuseScore 2\bin\MuseScore.exe (actually %ProgramFiles(x86)%\MuseScore 2\bin\MuseScore.exe)
For the Windows Store version (Windows 10), it is pretty well hidden, search for it via Windows Explorer
6. Click after the quote and add a space followed by a hyphen and a capital F: -F
7. Press OK
After a few seconds, MuseScore should start and all the settings reverted to "factory settings".
For advanced users, the main preference file is located at:
Windows Vista or later: C:\Users\<USERNAME>\AppData\Roaming\MuseScore\MuseScore2.ini
(actually %APPDATA%\MuseScore\MuseScore2.ini)
Windows XP or earlier: C:\Documents and Settings\<USERNAME>\Application Data\MuseScore\MuseScore2.ini
The other preferences (palettes, session, shortcuts, workspaces...) are in:
Windows Vista or later: C:\Users\<USERNAME>\AppData\Local\MuseScore\MuseScore2\
(actually %APPDATA%\MuseScore\MuseScore2\)
Windows XP or earlier: C:\Documents and Settings\<USERNAME>\Local Settings\Application Data\MuseScore\MuseScore2\
For the Windows Store version (Windows 10), these are pretty well hidden, search for them via Windows Explorer
Instructions for MacOS
1. If you have MuseScore open, you need to quit the application first (MuseScore→Quit)2. Open Terminal (in Applications/Utilities, or via Spotlight search) and a session window should appear
3. Type (or copy/paste) the following command into your terminal line (include the '/' at the front):
/Applications/MuseScore\ 2.app/Contents/MacOS/mscore -F
This resets all MuseScore preferences to factory settings and immediately launches the MuseScore application. Note thatyou cannot quit the Terminal without quitting MuseScore. You can safely quit MuseScore, quit the Terminal, and thenreopen MuseScore in the normal fashion, ready to continue using.
For advanced users, the main MuseScore preference file is located at ~/Library/Preferences/org.musescore.MuseScore2.plist.The other preferences (palettes, session, shortcuts, workspaces...) are in ~/Library/Application\ Support/MuseScore/MuseScore2/.
Instructions for Linux
The following is true for Ubuntu, and most likely all other Linux distributions and UNIX-style operating systems.
1. If you have MuseScore open, you need to quit the application first (File→Quit)2. From the Ubuntu main menu, choose Applications→Accessories→Terminal. A Terminal session window should appear
3. Type, (or copy/paste) the following command into your terminal line (Ctrl+Shift+V to paste in Terminal):
mscore -F
Or, if you are using the AppImage version, you must first use the cd command to change directory to wherever yousaved the AppImage. For example, if you saved it to your Desktop:
cd ~/Desktop./MuseScore*.AppImage -F
This resets all MuseScore preferences to factory settings and immediately launches the MuseScore application. You cannow quit Terminal, and continue using MuseScore.
For advanced users, the main MuseScore preference file is located at ~/.config/MuseScore/MuseScore2.ini.
224
The other preferences (palettes, session, shortcuts, workspaces...) are in ~/.local/share/data/MuseScore/MuseScore2/.
See also
Command line options
Known incompatibilities
Hardware incompatibilities
The following software is known to crash MuseScore on startup:
Samson USB Microphone, driver name "Samson ASIO Driver", samsonasiodriver.dll. More infoDigidesign MME Refresh Service. More infoWindows XP SP3 + Realtek Azalia Audio Driver. More infoWacom tablet. More info and QTBUG-6127
Software incompatibilities
Maple virtual cable is known to prevent MuseScore from closing properly.KDE (Linux) window settings can cause the whole window to move when dragging a note. Changing the windowsettings of the operating system avoids the problem.Nitro PDF Creator may prevent MuseScore 2 from starting on Windows 10, if being used as the default printer.Same for Amyumi/Quickbooks PDF Printer, see here and also some cloud printing services, see here .Creative Sound Blaster Z Series ASIO driver may prevent MuseScore 2 from starting on Windows 10.Untrusted Font Blocking policy prevents MuseScore 2 from starting (except in debug mode, i.e. using the -doption) on Windows 10. (Solution in the links provided here )
AVG Internet Security hangs MuseScore
MuseScore requires access to your internet connection with AVG. MuseScore doesn't need an internet connection tofunction, but if AVG blocks it, MuseScore hangs.
If AVG prompts you, Allow MuseScore and check "Save my answer as a permanent rule and do not ask me next time."
If it doesn't prompt you anymore,
1. Open the AVG user interface (right-click on the AVG icon, close to your clock -> Open AVG User Interface2. Click on Firewall3. Click Advanced Settings4. Click Applications5. Find MSCORE.EXE in the list and double click it6. Change Application Action to Allow for All
Font problem on macOS
MuseScore is known to display notes as square when some fonts are damaged on macOS.To troubleshoot this issue:
1. Go to Applications -> Font Book2. Select a font and press +A to select them all3. Go to File -> Validate Fonts4. If any font is reported as damaged or with minor problems, select it and delete it5. Restart MuseScore if necessary
In Bug in noteheads , a user believes to have found the font "Adobe Jenson Pro (ajenson)" to be the culprit, regardlessof not being reported as broken, or problematic as per the above validation, and solved the problem by deleting that font,so this is worth checking too.
Font problem on Linux
If the default desktop environment application font is set to bold, MuseScore will not display the notes properly.To troubleshoot this issue (gnome 2.*/MATE users):
225
1. Right-click on your desktop and select Change Desktop background2. Click on Fonts tab3. Set Regular style for Application font4. Restart MuseScore if necessary
For GNOME 3/SHELL users
1. Open the shell and open "Advanced Settings"2. Click on the Fonts option in the list3. Set the default font to something non-bold4. Restart MuseScore if necessary
Save As dialog empty on Linux
Some users reported that the Save As dialog is empty on Debian 6.0 and Lubuntu 10.10.To troubleshoot this issue:
1. Type the following in a terminal
which mscore
2. The command will answer with the path of mscore. Edit it with your preferred text editor and add the following line atthe beginning
export QT_NO_GLIB=1
Launch MuseScore and the problem should be solved.
Appendix
Keyboard shortcuts
Most keyboard shortcuts can be customized via the menu: select Edit→Preferences...→Shortcuts (Mac:MuseScore→Preferences...→Shortcuts). Below is a list of some of the initial shortcut settings.
Navigation
Beginning of score: Home (Mac: Fn+←)Last page of score: End (Mac: Fn+→)Find (measure number, rehearsal mark, or pXX when XX is a page number): Ctrl+F (Mac: Cmd+F)
Next score: Ctrl+Tab
Previous score: Shift+Ctrl+Tab
Zoom in: Ctrl++ (doesn't work on some systems) (Mac: Cmd++); or Ctrl (Mac: Cmd) + scroll upZoom out: Ctrl+- (Mac: Cmd+-); or Ctrl (Mac: Cmd) + scroll down
Next page: Pg Dn; or Shift + scroll down (Mac: Fn+↓)Previous page: Pg Up; or Shift + scroll up (Mac: Fn+↑)
Next measure: Ctrl+→ (Mac: Cmd+→)Previous measure: Ctrl+← (Mac: Cmd+←)
Next note: →Previous note: ←
Note below (within a chord or on lower staff): Alt+↓
Note above (within a chord or on higher staff): Alt+↑
Top note in chord: Ctrl+Alt+↑ (Ubuntu uses this shortcut for Workspaces instead)Bottom note in chord: Ctrl+Alt+↓ (Ubuntu uses this shortcut for Workspaces instead)
Note input
Begin note input mode: N
226
Leave note input mode: N or Esc
Duration
1 ... 9 selects a duration. See also Note input.
Half duration of previous note: QDouble duration of previous note: WDecrease duration by one dot: (as of version 2.1) Shift+Q (e.g. a dotted quarter note becomes a quarter note; a quarter notebecomes a dotted eighth note)Increase duration by one dot : (as of version 2.1) Shift+W (e.g. an eighth note becomes a dotted eighth note; a dottedeighth note becomes a quarter note)
Voices
To select a voice in note input mode.
Voice 1: Ctrl+Alt+1 (Mac: Cmd+Option+1)Voice 2: Ctrl+Alt+2 (Mac: Cmd+Option+2)Voice 3: Ctrl+Alt+3 (Mac: Cmd+Option+3)Voice 4: Ctrl+Alt+4 (Mac: Cmd+Option+4)
Pitch
Pitches can be entered by their letter name (A-G), or via MIDI keyboard. See Note input for full details.
Repeat previous note or chord: R (the repeat can be of a different note value by selecting duration beforehand)
Repeat selection: R (The selection will be repeated from the first note position after the end of the selection)
Raise pitch by octave: Ctrl+↑ (Mac: Cmd+↑)Lower pitch by octave: Ctrl+↓ (Mac: Cmd+↓)
Raise pitch by semi-tone (prefer sharp): ↑Lower pitch by semi-tone (prefer flat): ↓Raise pitch diatonically: Alt+Shift+↑
Lower pitch diatonically: Alt+Shift+↓
Change enharmonic spelling in both written and concert pitch views: JChange enharmonic spelling in current view only: Ctrl+J (Mac: Cmd+J)
Rest: 0 (zero)
Interval
Add interval above current note: Alt+[Number]
Layout
Flip direction (stem, slur, tie, tuplet bracket, etc.): XMirror note head: Shift+X
Increase stretch of measure(s): Decrease stretch of measure(s): Line break on selected barline: Return
Page break on selected barline: Ctrl+Return (Mac: Cmd+Return)Adjust space above a staff (except the top staff) for the whole score: Press Shift, click on the staff and drag
Articulations
Staccato: Shift+S
Tenuto: Shift+N
Sforzato (accent): Shift+V
Marcato: Shift+O
Grace note (acciaccatura): /
227
Crescendo: <Decrescendo: >
Text entry
Staff text: Ctrl+T (Mac:Cmd+T)System text: Ctrl+Shift+T (Mac: Cmd+Shift+T)Tempo text: Alt+T
Rehearsal Mark: Ctrl+M (Mac: Cmd+M)
Lyrics entry
Enter lyrics on a note: Ctrl+L (Mac: Cmd+L)Previous lyric syllable: Shift+Space
Next lyric syllable: if the current and the next syllables are separated by a '-': -, else Space
Move lyric syllable left by 0.1sp: ←Move lyric syllable right by 0.1sp: →Move lyric syllable left by 1sp: Ctrl+← (Mac: Cmd+←)Move lyric syllable right by 1sp: Ctrl+→ (Mac: Cmd+→)Move lyric syllable left by 0.01sp: Alt+←
Move lyric syllable right by 0.01sp: Alt+→
Up to previous stanza: Ctrl+↑ (Mac: Cmd+↑)Down to next stanza: Ctrl+↓ (Mac: Cmd+↓)
For more lyric shortcuts, see Lyrics.
Display
Navigator: F12 (Mac: fn+F12)Play Panel: F11 (Mac: fn+F11)Mixer: F10 (Mac: fn+F10)Palette: F9 (Mac: fn+F9)Inspector: F8 (Mac: fn+F8)Piano Keyboard: PSelection filter: F6
Display full screen: Ctrl+U
Miscellaneous
Toggle visibility on selected element(s): VShow Instruments dialog: IToggle multi-measure rests on or off: M
See also
Preferences: Shortcuts
Known limitations of MuseScore 2.x
While all members of the development team did their best to make the software easy to use and bug-free, there are someknown issues and limitations in MuseScore 2.x.
Local time signatures
The local time signature feature, which allows you to have different time signatures in different staves at the same time, isvery limited. You can only add a local time signature to measures that are empty, and only if there are no linked parts.When adding notes to measures with local time signatures, you can enter notes normally via note input mode, but copyand paste does not work correctly and may lead to corruption or even crashes. The join and split commands are disabledfor measures with local time signatures.
Regroup Rhythms
228
The Regroup Rhythms command found under the Layout menu may have unintended side effects, including changing thespelling of pitches and deleting some elements like articulations, glissandos, tremolos, grace notes and, esp. on undo,ties. Use this tool with caution on limited selections, so that you can tell if any unwanted changes are made.
Tablature staff linked with standard staff
When entering multiple-note chords on a standard staff in a linked staff/tablature system, the notes should be entered inorder from the top (first) string to the bottom string to ensure correct fret assignment.
This limitation does not apply if entering notes directly onto a tablature staff, or when using an unlinked staff/tablaturesystem.
Mixer
Changing settings in the mixer other than the sound doesn't mark the score 'dirty'. That means if you close a score youmay not get the warning "Save changes to the score before closing?". Changing mixer values are also not undoable.
Header & footer
There is no way to edit Header and Footer in a WYSIWYG manner. The fields in Style → General → Header, Footer,Numbers are plain text. They can contain "HTML like" syntax, but the text style, layout, etc. can't be edited with aWYSIWYG editor.
Command line options
You can launch MuseScore from the command line by typing
mscore [options] [ filename] (Mac and Linux)MuseScore.exe [options] [ filename] (Windows)
[options] and [filename] are optional. For this to work the MuseScore executable must be in %PATH% (Windows) resp. $PATH
(Mac and Linux). If it is not, see Revert to factory settings for detailed instructions on how and where to find and executethe MuseScore executable from the command line on the various supported platforms.
The following options are available
-?, -h, --help
Display help (doesn't work on Windows)-v, --version
Displays MuseScore's current version in the command line without starting the graphical interface (doesn't work onWindows)
--long-version
Displays MuseScore's current version and revision in the command line without starting the graphical interface(doesn't work on Windows)
-d, --debug
Starts MuseScore in debug mode-L, --layout-debug
Starts MuseScore in layout debug mode-s, --no-synthesizer
Disables the integrated software synthesizer-m, --no-midi
Disables MIDI input-a, --use-audio <driver>
Use audio driver: jack, alsa, pulse, portaudio-n, --new-score
Starts with the new score wizard regardless of preference setting for start mode-I, --dump-midi-in
Displays all MIDI input on the console-O, --dump-midi-out
Displays all MIDI output on the console-o, --export-to <filename>
Exports the currently opened file to the specified <filename>. The file type depends on the filename extension. Thisoption switches to the "converter" mode and avoids any graphical interface. You can also add a filename before the -
229
o if you want to import and export files from the command line. For example mscore -o "My Score.pdf" "My Score.mscz"
-r, --image-resolution <dpi>
Determines the output resolution for the output to PNG images in the converter mode. The default resolution istaken from Preferences, Export, PNG/SVG.
-T, --trim-image <margin>
Trims exported PNG and SVG images to remove surrounding whitespace around the score. The specified numberof pixels of whitespace will be added as a margin; use 0 for a tightly cropped image. For SVG, this option works onlywith single-page scores.
-x, --gui-scaling <factor>
Scales the score display and other GUI elements by the specified factor, for use with high resolution displays.-D, --monitor-resolution <dpi>
Specify monitor resolution, for use with high resolution displays (as of version 2.1).-S, --style <style>
Loads a style file; useful when you convert with the -o option-p, --plugin <name>
Execute the named plugin--template-mode
Save template mode, no page size-F, --factory-settings
Use only the standard built-in presets or "factory-settings" and delete preferences. For details, see Revert to factorysettings
-R, --revert-settings
Use only the standard built-in presets or "factory-settings", but do not delete preferences-i, --load-icons
Load icons from the file system. Useful if you want to edit the MuseScore icons and preview the changes-j, --job <filename>
Process a conversion job (as of version 2.1)-e, --experimental
Enable experimental features. See e.g. Layer (experimental)-c, --config-folder <pathname>
Set config path-t, --test-mode
Enable test mode-M, --midi-operations <filename>
Specify MIDI import operations file; See this example file: midi_import_options.xml-w, --no-webview
No web view in Start Center-P, --export-score-parts
Used with -o <filename>.pdf, export score and parts--no-fallback-font
Don't use Bravura as fallback musical font-f, --force
Used with -o, ignore warnings reg. score being corrupted or from wrong version (as of version 2.1)-b, --bitrate <bitrate>
Used with -o <filename>.mp3, sets bitrate in kbps (as of version 2.1)-E, --install-extension <extension file>
Install an extension, load soundfont as default unless if -e is passed too (as of version 2.3)
Qt Toolkit Options
-style= <style>
-style <style>
Determines the style of the GUI application. Possible values are "motif", "windows" and "platinum". Depending onthe platform other styles may be available
-stylesheet= <stylesheet>
-stylesheet <stylesheet>
Sets the application stylesheet. The value of "stylesheet" is a path to a file that contains the stylesheet-platform <platformname[:options]>
Specifies the Qt Platform Abstraction (QPA) plugin.Example: MuseScore.exe -platform windows:fontengine=freetype
See also
230
Revert to factory settings
External links
How to use the "conversion job" command-line optionLayer (experimental)http://doc.qt.io/qt-5/qapplication.html#QApplicationhttp://doc.qt.io/qt-5/qguiapplication.html#QGuiApplication
Glossary
The glossary is a work in progress—please help if you can. You can discuss this page in the documentation forum .
The list below is a glossary of frequently used terms in MuseScore as well as their meaning. The differences betweenAmerican English and British English are marked with "(AE)" and "(BE)", respectively.
Acciaccatura
A short →grace note which appears as a small note with a stroke through the stem. It is quickly executed andtechnically takes no value from its associated note.
AccidentalA sign appearing in front of a note that raises or lowers its pitch. The most common accidentals are →sharps, →flatsor →naturals, but double sharps and double flats are also used. Also →koron, and →sori and other quarter toneaccidentals. Accidentals affect all notes on the same →staff position only for the remainder of the measure in whichthey occur, but they can be canceled by another accidental. In notes tied across a →barline, the accidentalcontinues across the →barline to the tied note, but not to later untied notes on the same →staff position in thatmeasure.
AnacrusisSee →Pickup measure.
AnchorThe point of attachment to the score of objects such as Text and Lines: When the object is dragged, the anchorappears as small brown circle connected to the object by a dotted line. Depending on the object selected, its anchormay be attached to either (a) a note (e.g. fingering), (b) a staff line (e.g. staff text), or (c) a barline (e.g. repeats).
AppoggiaturaA long →grace note which takes value from its associated note. Its functions include: passing tone, anticipation,struck suspension, and escape tone.
Bar (BE)See →measure.
BarlineVertical line through a →staff, staves, or a full →system that separates →measures.
BeamNotes with a duration of an →eighth or shorter either carry a →flag or a beam. Beams are used for groupingnotes.
BPMBeats Per Minute is the unit for measuring tempo. See →metronome mark
BreveBrevis
A double whole note or breve is a note that has the duration of two whole notes.Cent
An interval equal to one hundredth of a semitone.Chord
A group of two or more notes sounding together. To select a chord in MuseScore, press Shift and click on a note. Inthe Inspector, however, the word "Chord" only covers notes in the same voice as the selected note(s).
ClefSign at the beginning of a →staff, used to tell which are the musical notes on the lines and between the lines.Clefs are very useful for →transposition.
Concert pitchEnables you to switch between concert pitch and transposing pitch (see Concert pitch and Transposition).
Crotchet (BE)See →Quarter note.
Demisemiquaver (BE)A thirty-second note.
Duplet
231
See →tuplet.Edit mode
The program mode from which you can edit various score elements.Eighth note
A note whose duration is an eighth of a whole note (semibreve). Same as a quaver (BE).Endings
See →volta.Enharmonic notes
Notes that sound the same pitch but are written differently. Example: G♯ and A are enharmonic notes.Flag
See →beam.Flat
Sign () that indicates that the pitch of a note has to be lowered one semitone.Grace note
Grace notes appear as small notes in front of a normal-sized main note. See →acciaccatura and →appoggiatura.Grand Staff (AE)Great Stave (BE)
A system of two or more staves, featuring treble and bass clefs, used to notate music for keyboard instruments andthe harp.
Half NoteA note whose duration is half of a whole note (semibreve). Same as a minim (BE).
Hemidemisemiquaver (BE)A sixty-fourth note.
IntervalThe difference in pitch between two notes, expressed in terms of the scale degree (e.g. major second, minor third,perfect fifth etc.). See Degree (Music) (Wikipedia).
JumpIn MuseScore, "jumps" are notations such as "D.S. al Coda", found in the "Repeats & Jumps" palette.
Key SignatureSet of →sharps or →flats at the beginning of the →staves. It gives an idea about the tonality and avoids repeatingthose signs all along the →staff.A key signature with B flat means F major or D minor tonality.
KoronAn Iranian →accidental which lowers the pitch of a note by a quarter tone (in comparison to the →flat which lowers anote by a semitone). It is possible to use this accidental in a →key signature.See also →sori.
LongaA longa is a quadruple whole note.
Ledger LineLine(s) that are added above or below the staff.
Measure (AE)A segment of time defined by a given number of beats. Dividing music into bars provides regular reference points topinpoint locations within a piece of music. Same as → bar (BE).
Metronome markMetronome marks are usually given by a note length equaling a certain playback speed in →BPM. In MuseScore,metronome marks are used in Tempo texts.
Minim (BE)See →Half note.
NaturalA natural () is a sign that cancels a previous alteration on notes of the same pitch.
Normal modeThe operating mode of MuseScore outside note input mode or edit mode: press Esc to enter it. In Normal mode youcan navigate through the score, select and move elements, adjust Inspector properties, and alter the pitches ofexisting notes.
Note input modeThe program mode used for entering music notation.
Operating SystemOS
Underlying set of programs which set up a computer, enabling additional programs (such as MuseScore). PopularOSes are Microsoft Windows, macOS, and GNU/Linux.Not to be confused with a sheet music →system.
Part
232
Music to be played or sung by one or a group of musicians using the same instrument. In a string quartet, 1st part =Violin 1, 2nd part = Violin 2, 3rd part = Viola, 4th part = Cello, in a choir there might be parts for soprano, alto, tenorand bass. A part has one or more →staves (e.g. Piano has 2 staves, Organ can have 2 or 3 staves).
Pickup Measure (also known as an Anacrusis or Upbeat)Incomplete first measure of a piece or a section of a piece of music. See Measure duration and Create new score:Pickup measure. Also Exclude from measure count.
QuadrupletSee →tuplet.
Quarter noteA note whose duration is a quarter of a whole note (semibreve). Same as a crotchet (BE).
Quaver (BE)See →eighth note.
QuintupletSee →tuplet.
Respell PitchesTries to guess the right accidentals for the whole score (see Accidentals).
RestInterval of silence of a specified duration.
Re-pitch modeAllows you to rewrite an existing passage of music by changing the note pitches without altering the rhythm.
Semibreve (BE)A whole note (AE). It lasts a whole measure in 4/4 time.
Semiquaver (BE)A sixteenth note.
Semihemidemisemiquaver (Quasihemidemisemiquaver) (BE)An hundred and twenty eighth note.
SextupletSee →tuplet.
SFZA virtual instrument format supported by MuseScore (along with →SoundFonts). An SFZ library consists of one ormore SFZ text files, each defining a particular instrument setup, and many audio sound samples.
SharpSign (♯) that indicates that the pitch of a note has to be raised one semitone.
SlurA curved line over or under two or more notes, meaning that the notes will be played smooth and connected(legato).See also →tie.
SoriAn Iranian →accidental which raises the pitch of a note by a quarter tone (in comparison to the sharp which raises itby a semitone). It is possible to use this accidental in a →key signature.See also →koron.
SoundFontA virtual instrument format supported by MuseScore (along with →SFZ). A SoundFont is a special type of file(extension .sf2, or .sf3 if compressed) containing sound samples of one or more musical instruments. In effect, avirtual synthesizer which acts as a sound source for MIDI files. MuseScore 2.2 comes with the SoundFont"MuseScore_General.sf3" pre-installed.
Spatium (plural: Spatia)SpaceStaff Spacesp (abbr./unit)
The distance between two lines of a normal 5-line staff. In MuseScore this unit influences most size settings. Seealso Page settings.
Staff (AE)Stave (BE)
Group of one to five horizontal lines used to lay on musical signs. In ancient music notation (before 11th century) thestaff/stave may have any number of lines (the plural of 'staff' is 'staves', in BE and AE).
Step-time inputMuseScore's default note input mode, allowing you to enter music notation one note (or rest) at a time.
SystemSet of staves to be read simultaneously in a score.See also →Operating System (OS).
Tie
233
A curved line between two or more notes on the same pitch to indicate a single note of combined duration:
Quarter note + Tie + Quarter note = Half noteQuarter note + Tie + Eighth note = Dotted Quarter noteQuarter note + Tie + Eighth note + Tie + 16th note = Double Dotted Quarter note
See also →slur.
Transposition
The act of moving the pitches of one or more notes up or down by a constant interval. There may be severalreasons for transposing a piece, for example:
1. The tune is too low or too high for a singer. In this case the whole orchestra will have to be transposed as well—easily done using MuseScore.
2. The part is written for a particular instrument but needs to be played by a different one.3. The score is written for an orchestra and you want to hear what the individual instruments sound like. This
requires changing the transposing instrument parts to concert pitch.4. A darker or a more brilliant sound is desired.
TripletSee →tuplet.
TupletA tuplet divides its next higher note value by a number of notes other than given by the time signature. For examplea →triplet divides the next higher note value into three parts, rather than two. Tuplets may be: →triplets, →duplets,→quintuplets, and other.
UpbeatSee →pickup measure.
VelocityThe velocity property of a note controls how loudly the note is played. This usage of the term comes from MIDIsynthesizers. On a keyboard instrument, it is the speed with which a key is pressed that controls its volume. Theusual scale for velocity is 0 (silent) to 127 (maximum).
VoicePolyphonic instruments like Keyboards, Violins, or Drums need to write notes or chords of different duration at thesame time on the same →staff. To write such things each horizontal succession of notes or chords has to be writtenon the staff independently. In MuseScore you can have up to 4 voices per staff. Not to be confused with vocalists,singing voices like soprano, alto, tenor and bass, which are better viewed as instruments.
VoltaIn a repeated section of music, it is common for the last few measures of the section to differ. Markings called voltasare used to indicate how the section is to be ended each time. These markings are often referred to simply as→endings.
External links
http://www.robertcarney.net/musical-terms-definitions.htmhttps://en.wikipedia.org/wiki/List_of_musical_symbols
Table of Contents
Getting started
InstallationCreate new scoreLanguage settings and translation updatesChecking for updates
기초기초
Create new score (→Getting started)Note inputConcert pitchCopy and pasteEdit mode
234
Measure operationsPalettePreferencesSave/Export/PrintSelection modesUndo and redoView modesFile formatShare scores online
Notation
Note input (→Basics)Palette (→Basics)AccidentalArpeggio and glissandoBar lineBeamBracketBreath and pauseClefDrum notationGrace noteHairpinKey signatureLinesMeasure restRepeatSlurTieTime signatureTranspositionTremoloTupletVoicesVolta (1st and 2nd time endings)
Sound and playback
MIDI importMid-staff instrument changePlay modeSoundfontSwingTempoDynamicsChange and adjust sound
Text
Grid-based movement of symbols and staff textRehearsal marksText editingText styleChord symbolsFingeringLyricsTempo (→Sound and playback)
Formatting
235
Layout and formatting (overview)Breaks and spacersFrameImageImage capture
Advanced topics
AccessibilityAlbumCross staff beamingCustom paletteEarly music featuresFigured bassFretboard diagramInspector and object propertiesMaster palettePart extractionPluginsReplace pitches without changing rhythmsScore informationStaff type propertiesTablatureToolsNonexistant node nid: 39841
New features in MuseScore 2.0
What's New in MuseScore 2MuseScore 2.0 Release Notes
Changes for MuseScore 2.0 .
Album (→Advanced topics)View modes: Continuous view and Navigator (→Basics)Copy and paste: Selection filter (→Basics)Custom palette (→Advanced topics)Early music features (→Advanced topics)Figured bass (→Advanced topics)Grid-based movement of symbols and staff text (→Text)Image capture (→Formatting)Inspector and object properties (→Advanced topics)Measure operations: Split and join (→Basics)MIDI import (→Sound and playback)Mid-staff instrument change (→Sound and playback)Part extraction (new options available) (→Advanced Topic)
Rehearsal marks: Automatic next rehearsal mark and Search for a rehearsal mark (→Text)Save/Export (→Basics) - Staff type properties (→Advanced topics)Swing (→Sound and playback)Tablature (→Advanced topics)Nonexistant node nid: 39841 (→Advanced topics)Master palette (→Advanced topics)Layout and formatting (some options have changed, and there is a new "apply to all parts" feature)(→Formatting)Breaks and spacers, section break (→Formatting)Selection modes, select all similar new options (same subtype) (→Basics)Create a new score, start center (→Basics)Languages settings and translation Updates (→Basics)Helping and improve translation (→Support)Accidentals, respell pitches (→Notation)Replace pitches without changing rhythms (→Advanced topics)Tools (→Advanced topics)
236
Meta tags (→Advanced topics)Upgrading from MuseScore 1.x
Support
Helping and improve translationHow to ask for support or file reportsRevert to factory settingsKnown incompatibilities
Appendix
Keyboard shortcutsKnown limitations of MuseScore 2.xCommand line optionsGlossaryHandbook for MuseScore 1.x
237
Related Documents