Multimode Spectrum Stabilized Laser Subsystem Installation and Operation Manual Document Number LASER-785-IP-02-1208 Office: Ocean Optics, Inc. World Headquarters 830 Douglas Ave., Dunedin, FL, USA 34698 Phone 727.733.2447 Fax 727.733.3962 8 a.m.– 8 p.m. (Mon-Thu), 8 a.m.– 6 p.m. (Fri) EST E-mail: [email protected] (General sales inquiries) [email protected] (Questions about orders) [email protected] (Technical support) WARNING Protective Eye Wear Should Be Worn When Using This Instrument - Intense Radiation Present See Important Safety Notices inside.

Welcome message from author
This document is posted to help you gain knowledge. Please leave a comment to let me know what you think about it! Share it to your friends and learn new things together.
Transcript

Multimode Spectrum Stabilized Laser Subsystem
Installation and Operation Manual Document Number LASER-785-IP-02-1208
Office: Ocean Optics, Inc. World Headquarters 830 Douglas Ave., Dunedin, FL, USA 34698 Phone 727.733.2447 Fax 727.733.3962 8 a.m.– 8 p.m. (Mon-Thu), 8 a.m.– 6 p.m. (Fri) EST
E-mail: [email protected] (General sales inquiries)
[email protected] (Questions about orders) [email protected] (Technical support)
WARNING
Protective Eye Wear Should Be Worn When Using This Instrument - Intense Radiation Present
See Important Safety Notices inside.

Additional Offices:
Ocean Optics Asia 666 Gubei Road, Kirin Tower, Suite 601B, Changning District, Shanghai, PRC. 200336 Phone 86.21.5206.8686 Fax 86.21.5206.8686 E-Mail [email protected]
Ocean Optics Europe Sales and Support Center Geograaf 24, 6921 EW DUIVEN, The Netherlands Phone 31-26-3190500 Fax 31-26-3190505 E-Mail [email protected]
Regional Headquarters Maybachstrasse 11 73760 Ostfildern Phone 49-711 34 16 96-0 Fax 49-711 34 16 96-85 E-Mail [email protected] Copyright © 2008 Ocean Optics, Inc. All rights reserved. No part of this publication may be reproduced, stored in a retrieval system, or transmitted, by any means, electronic, mechanical, photocopying, recording, or otherwise, without written permission from Ocean Optics, Inc. This manual is sold as part of an order and subject to the condition that it shall not, by way of trade or otherwise, be lent, re-sold, hired out or otherwise circulated without the prior consent of Ocean Optics, Inc. in any form of binding or cover other than that in which it is published. Trademarks Microsoft, Windows, Windows 95, Windows 98, Windows Me, Windows NT, Windows 2000, Windows XP and Excel are either registered trademarks or trademarks of Microsoft Corporation. Limit of Liability Every effort has been made to make this manual as complete and as accurate as possible, but no warranty or fitness is implied. The information provided is on an “as is” basis. Ocean Optics, Inc. shall have neither liability nor responsibility to any person or entity with respect to any loss or damages arising from the information contained in this manual.

Important Safety Notices The laser described here is safe to operate, provided the user pays attention to all safety warnings:
1. Post warnings in the area of the laser beam to alert those present.
2. Keep all unauthorized personnel out of the area where the laser is operated.
3. Whenever the laser is running and the beam is not in use, it is good operating practice to mechanically block the path.
4. Never look directly into the laser source or scattering laser light from any reflective surface. Never sight down the beam into the source.
5. Maintain experimental setup at low heights to prevent inadvertent beam-eye contact.
6. As a precaution against accidental exposures to the output beam or its reflection, operators should wear laser safety glasses attenuated to the wavelength being generated.
Sources for additional information and assistance on laser safety are the following:
Center for Device and Radiological Health Office of Compliance 2098 Gaither Rd. Rockville, MD 20850 Tel: 301 594 4654 Fax: 301 594 4672
Laser Institute of America 12424 Research Parkway, Suite 125 Orlando, FL 32826 Tel: 407 380 1553 Fax: 407 380 5588
Notice for OEM Laser Part: This laser module is designed for use as a component (or replacement) part and is thereby exempt from 21 CFR1040.10 and 1040.11 provisions.
INVISIBLE LASER RADIATION AVOID EYE OR SKIN EXPOSURE TO DIRECT OR SCATTERED RADIATION
EYE PROTECTION REQUIRED
CLASS IIIB
POWER GREATER THAN 350 mW
DANGER
LASER-785-IP -02-1208 A


Table of Contents
About This Manual .......................................................................................................... iii Document Purpose and Intended Audience.............................................................................. iii Document Summary.................................................................................................................. iii Product-Related Documentation ............................................................................................... iii
Upgrades......................................................................................................................... iii
Chapter 1: Introduction ......................................................................1
Overview ......................................................................................................................... 1 Features .......................................................................................................................... 2 Additional Equipment Required....................................................................................... 2
Chapter 2: Set-up and Operation.......................................................3
Overview ......................................................................................................................... 3 Set-up.............................................................................................................................. 4
Set-up for Manual Operation ..................................................................................................... 5 Set-up for Remote Operation .................................................................................................... 5
Operation......................................................................................................................... 5 Manual Operation ...................................................................................................................... 6 Remote Operation ..................................................................................................................... 6
Appendix A: Specifications................................................................7
Index.....................................................................................................9
LASER-785-IP -01-1208 i

Table of Contents
ii LASER-785-IP -01-1208

About This Manual
Document Purpose and Intended Audience This document provides you with information to get your laser set up and operating.
Document Summary Chapter Description
Chapter 1: Introduction Contains a list of product features and package contents.
Chapter 2: Set-up and Operation Provides instructions for setting up and operating the laser.
Appendix A: Specifications Provides a list of product specifications.
Product-Related Documentation You can access documentation for Ocean Optics products by visiting our website at http://www.oceanoptics.com. Select Technical → Operating Instructions, then choose the appropriate document from the available drop-down lists. Or, use the Search by Model Number field at the bottom of the web page.
You can also access operating instructions for Ocean Optics products on the Software and Technical Resources CD included with the system.
Engineering-level documentation is located on our website at Technical → Engineering Docs.
Upgrades Occasionally, you may find that you need Ocean Optics to make a change or an upgrade to your system. To facilitate these changes, you must first contact Customer Support and obtain a Return Merchandise Authorization (RMA) number. Please contact Ocean Optics for specific instructions when returning a product.
LASER-785-IP -01-1208 iii

About This Manual
iv LASER-785-IP -01-1208
Chapter 1
Introduction
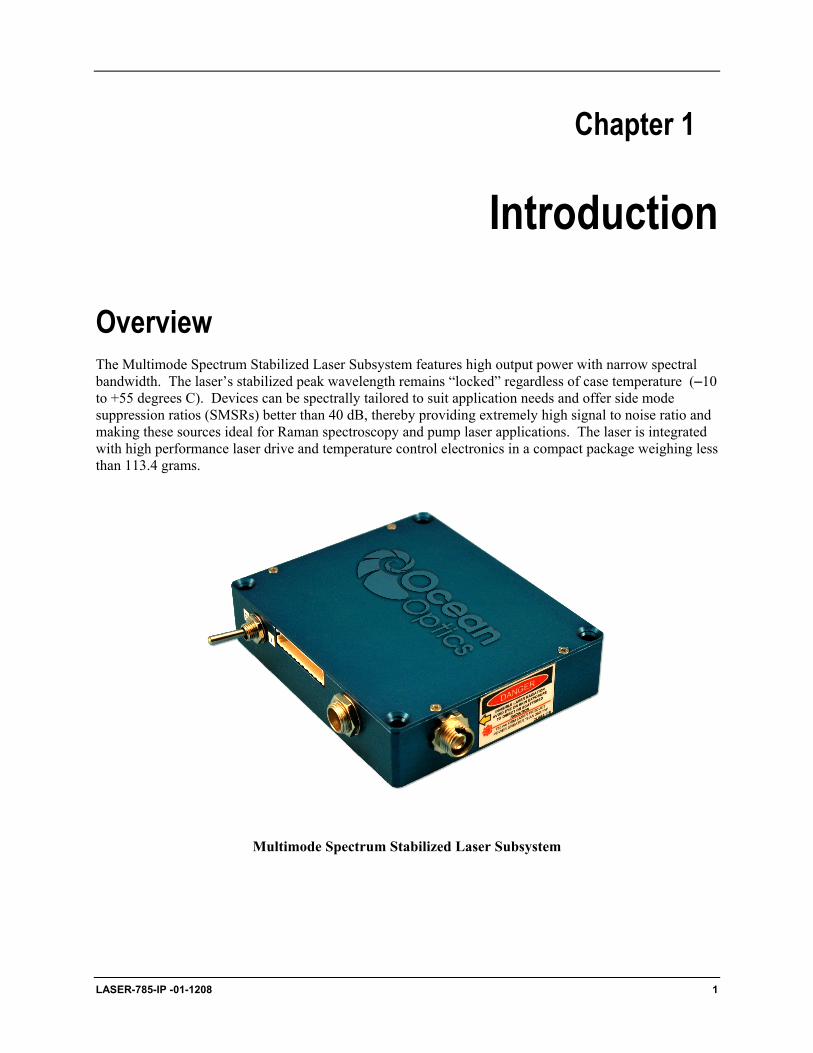
Overview The Multimode Spectrum Stabilized Laser Subsystem features high output power with narrow spectral bandwidth. The laser’s stabilized peak wavelength remains “locked” regardless of case temperature (–10 to +55 degrees C). Devices can be spectrally tailored to suit application needs and offer side mode suppression ratios (SMSRs) better than 40 dB, thereby providing extremely high signal to noise ratio and making these sources ideal for Raman spectroscopy and pump laser applications. The laser is integrated with high performance laser drive and temperature control electronics in a compact package weighing less than 113.4 grams.
Multimode Spectrum Stabilized Laser Subsystem
LASER-785-IP -01-1208 1

1: Introduction
Typical 785 nm Laser Spectrum (SMSR > 40 dB)
Features The laser provides the following features:
• Up to 400 mW Fiber Coupled Output Power
• Spectral Linewidth < 0.15 nm
• Temperature Stabilized Spectrum (< 0.007 nm/0C)
• Low Power consumption (< 5.5 W)
• 40 dB SMSR Typical
• 7.6 cm x 6.4 cm x 1.8 cm package weighing less than 113.4 g
Additional Equipment Required The following equipment, available from Ocean Optics, is also required to use your laser:
Safety goggles (R-2001-GL goggles from Ocean Optics are recommended)
2 LASER-785-IP -01-1208

Chapter 2
Set-up and Operation
Overview This section provides instructions for setting up and operating the laser. Read all instructions and warnings carefully before attempting to install and operate your laser.
Laser Rear View
LASER-785-IP -01-1208 3

2: Set-up and Operation
Set-up Refer to the following figure and table of pinouts while setting up your laser.
Laser Mechanical Drawing
Module Pinouts
Pin # Symbol Description
1 NC Not connected
2 V set ENABLE Enables “LD SET” on Pin 8 when connected to Ground. If left open or set to 3 – 5 Volt, output power defaults to internally preset value.
3 T SENS
4 T SENS 1000 Ohm RTD sensor (with reference to Ground) to monitor module case.
5 GND Ground
6 + 5V 4.9 to 5.1 Volt; 1 Ampere
7 ENABLE Tie to GND to disable laser output. Keep unconnected or apply 3 – 5 Volt to enable laser output.
8 LD SET Apply 0 to 1 Volt to control optical output power. Pin 2 must be grounded to enable this option.
9 PD+ Photodiode anode
10 PD- Photodiode cathode
4 LASER-785-IP -01-1208

2: Set-up and Operation
Set-up for Manual Operation
► Procedure
1. Mount laser module onto a suitable heat sink using corner mounting holes.
2. Ensure that external laser enable switch on sidewall of laser module is in the Off (O) position.
3. Plug 5 V DC power supply into wall outlet and then into 5 V DC power input jack on back of module.
Set-up for Remote Operation
► Procedure
1. Mount laser module onto a suitable heat sink using corner mounting holes.
2. Ensure that external laser enable switch on sidewall of laser module is in the Off (O) position.
3. Plug the prewired 10 pin Molex connector into the laser module.
4. Ensure that external 5 V DC power to the module is off (pin 6) and the Laser enable (Pin 7) is tied to ground.
Note
To use the remote modulation option on this module, connect Pin 2 to Ground and bias LD SET on Pin 8 between 0 and 1 V to adjust laser output power from 0 to max.
Operation
Read the following warning before attempting to use the laser:
WARNINGS
DO NOT LOOK DIRECTLY INTO THE LASER. LASER RADIATION IS HAZARDOUS TO THE EYES.
AVOID DIRECT EXPOSURE TO THE BEAM.
000-10000-080-02-0505 5

2: Set-up and Operation
Manual Operation To turn laser on: Flip the external laser toggle switch mounted on the module to the ON (I) position.
To turn laser off: Flip the external laser toggle switch mounted on the module to the Off (I) position.
Remote Operation
To Turn Laser ON
► Procedure
1. Toggle external laser enable switch mounted on side wall of module to the ON (I) position.
2. Apply power (5 V DC) to Pin 6.
3. Break connection to ground on Pin 7
To Turn Laser Off
► Procedure
4. Tie Pin 7 (Enable ) to Ground.
5. Turn off 5 V power supply to Pin 6.
To Adjust Power This allows you to smoothly adjust the laser's output power levels from 0 to max power by applying the appropriate voltage bias onto Pin 8.
► Procedure
1. Ground Pin 2.
2. Apply a 0 - 1 V DC voltage bias onto Pin 8.
6 LASER-785-IP -01-1208
Appendix A
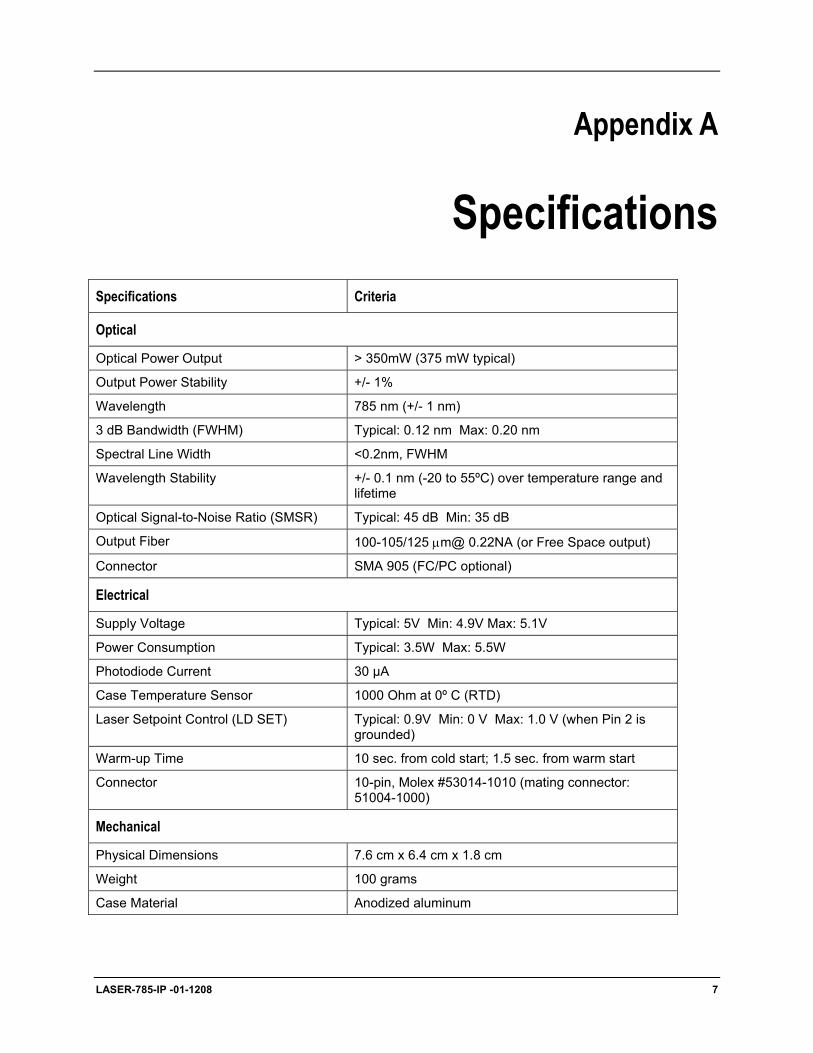
Specifications Specifications Criteria
Optical
Optical Power Output > 350mW (375 mW typical)
Output Power Stability +/- 1%
Wavelength 785 nm (+/- 1 nm)
3 dB Bandwidth (FWHM) Typical: 0.12 nm Max: 0.20 nm
Spectral Line Width <0.2nm, FWHM
Wavelength Stability +/- 0.1 nm (-20 to 55ºC) over temperature range and lifetime
Optical Signal-to-Noise Ratio (SMSR) Typical: 45 dB Min: 35 dB
Output Fiber 100-105/125 µm@ 0.22NA (or Free Space output)
Connector SMA 905 (FC/PC optional)
Electrical
Supply Voltage Typical: 5V Min: 4.9V Max: 5.1V
Power Consumption Typical: 3.5W Max: 5.5W
Photodiode Current 30 µA
Case Temperature Sensor 1000 Ohm at 0º C (RTD)
Laser Setpoint Control (LD SET) Typical: 0.9V Min: 0 V Max: 1.0 V (when Pin 2 is grounded)
Warm-up Time 10 sec. from cold start; 1.5 sec. from warm start
Connector 10-pin, Molex #53014-1010 (mating connector: 51004-1000)
Mechanical
Physical Dimensions 7.6 cm x 6.4 cm x 1.8 cm
Weight 100 grams
Case Material Anodized aluminum
LASER-785-IP -01-1208 7
A: Specifications
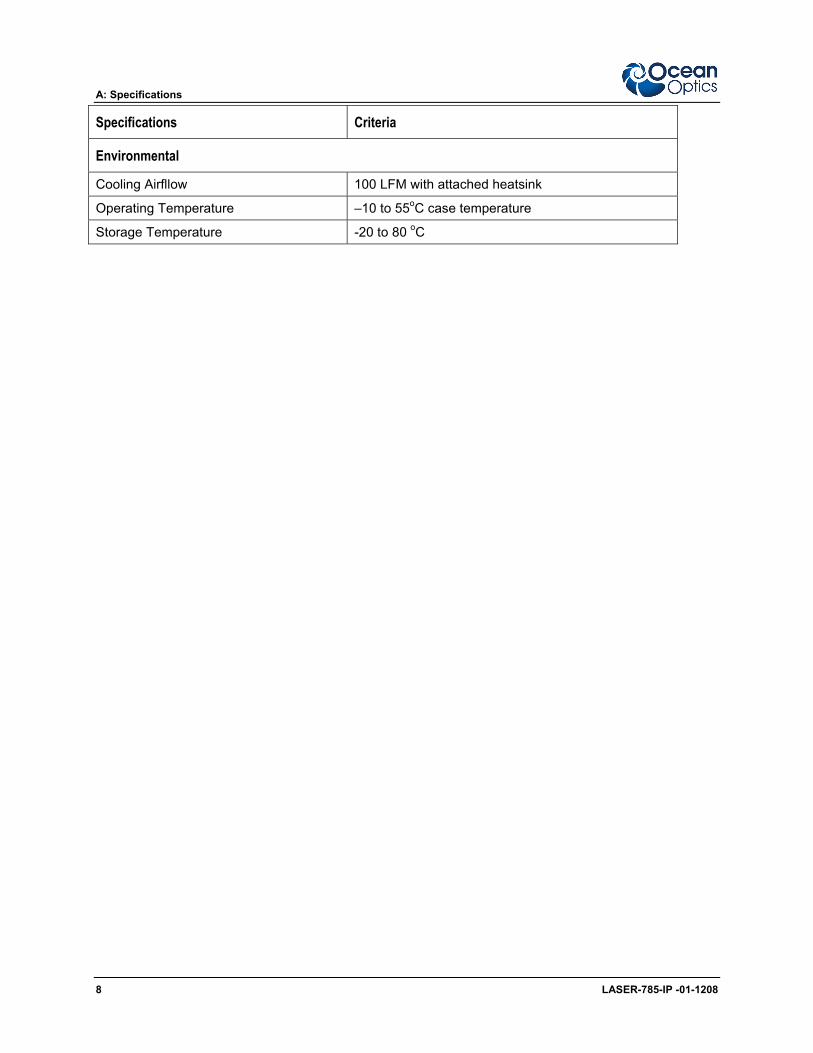
Specifications Criteria
Environmental
Cooling Airfllow 100 LFM with attached heatsink
Operating Temperature –10 to 55oC case temperature
Storage Temperature -20 to 80 oC
8 LASER-785-IP -01-1208

Index
D document
audience, iii purpose, iii summary, iii
E equipment
required, 2
F features, 2
I introduction, 1
L laser
turn off manual, 6 remote, 6
turn on manual, 6 remote, 6
laser power adjust in remote operation, 6
M manual operation, 6
set-up, 5 mechanical drawing, 4
O operation, 5
manual, 6 remote, 6
P pinouts, 4 power
adjust in remote operation, 6 product-related documentation, iii
R rear panel, 3 remote operation, 6
adjust laser power, 6 set-up, 5 turn laser off, 6 turn laser on, 6
required equipment, 2
S set-up, 4
manual operation, 5 remote operation, 5
specifications, 7 electrical, 7 environmental, 8 mechanical, 7 optical, 7
U upgrades, iii
LASER-785-IP -01-1208 9

Index
10 LASER-785-IP -01-1208
Related Documents


