M Mulesoft CMIS LAB Content Extract

Welcome message from author
This document is posted to help you gain knowledge. Please leave a comment to let me know what you think about it! Share it to your friends and learn new things together.
Transcript

M
Mulesoft CMIS LAB Content Extract

Overview
Welcome to the Mulesoft CMIS tutorial, in this lab guide I will show you step by step how to use the CMIS connector within your flow and extract content from specific site using Mulesoft Anypoint designer studio.
Important Note: This lab requires the use of your own CMIS instance (Alfresco or SharePoint). If you don’t have one, you can download community edition of Alfresco Enterprise Content Management. This lab uses Alfresco ECM (Community Edition), however feel free to try on any other CMIS like Liferay, Oracle ECM etc..

Setup Dependencies
1. Open Anypoint Studio and create a new Mule Project.
Click on File > New > Mule Project
2. In the New Mule Project dialog window, give your project a Project Name:
e.g. cmis-workshop
Under the Runtime section, select the most recent version of the Mule Server runtime.
Click on Finish

3. Open the Mule Project application property file “mule-app.properties”
under “src/main/app” and add the required properties.
Property cmis.username cmis.password cmis.url.atom
cmis.url.soap
download.dir
Value Notes
<CMIS Username> Username <CMIS Password> Password http://<server>:<port>/alfresco/a
pi/-default-/public/cmis/versions/
1.1/atom
http://<server>:<port>/alfresco/c
misws/cmis Source Site Document Library path
C:/temp Download directory for extraction and upload.
ATOM Url for CMIS access
cmis.source.site.path /Sites/source-site/documentLibra
ry

Configure Content Extract Flow
1. Open the mule flow file “cmis-workshop.xml” under “src/main/app” folder.
In the toolkit, search for HTTP Connector by typing in ‘HTTP’ in the Search bar.
Drag and drop the HTTP Connector onto the canvas.
This will set the HTTP Connector as an inbound endpoint.
2. In the Mule Properties view for the
HTTP Connector, click on the
icon next to the Connector Configuration field.

3. In the Global Element Properties window for HTTP Listener Configuration, leave the default values and click OK.

4. Back in the Mule Properties view for the HTTP Connector, type “/extract-content” for Path.
5. In the Mule Properties view for the flow, change the Flow Configuration Name as “cmis-extract-content-flow”

6. In the toolkit, search for CMIS Connector by typing in ‘CMIS’ in the Search bar.
Drag and drop the CMIS Connector onto the canvas within the process section.
This will allow the CMIS Connector to initiate once HTTP inbound end point is invoked.
7. When you add the connector, MuleSoft Studio will alert you to choose the version of the connector you want to add to the project. This warning will be prompted only if multiple versions of the connector are available.
Select “Use newest” to proceed.
8. In the Mule Properties view for the CMIS Connector, change the Display Name as “CMIS: Query Folders based on input folder path”

9. In the Mule Properties view for the
CMIS Connector, click on the
icon next to the Connector Configuration field.
10. In the Global Element Properties window for CMIS Connector
Configuration, enter the following property placeholders into the corresponding fields.
Field
Name Username Password Base Url
Value
CMIS_ATOM_Configuration ${cmis.username} ${cmis.password} ${cmis.url.atom}

Click “Test Connection” to test the connection details. Click OK to save.

11. In the Mule Properties view for the CMIS Connector, select “Get object
by path” for Operation and enter the value “${cmis.source.site.path}” for Path.
12. In the toolkit, search for Variable by typing in ‘Variable’ in the Search bar.
Drag and drop the Variable operations onto the canvas after the CMIS connector.
In the Mule Properties view for the Variable operation, enter values.
Field
Display Name Operation Name
Value
Set Folder Id Set Variable folderId

Value #[payload.id]
13. In the toolkit, search for Variable by typing in ‘Payload’ in the Search bar.
Drag and drop the Set Payload operations onto the canvas after the Set Folder Id operation.
In the Mule Properties view for the Variable operation, enter values.
Field
Display Name Value
Value
Clear Payload #[null]

14. In the toolkit, search for CMIS Connector by typing in ‘CMIS’ in the Search bar.
Drag and drop the CMIS Connector onto the canvas within the process section.
In the Mule Properties view for the CMIS connector, enter values.
Field
Display Name Connector Configuration Operation GET Folder Reference Folder Id Depth
Value
CMIS: Find all assets within the folder CMIS_ATOM_Configuration Folder DESCENDANTS #[payload] #[flowVars.folderId] 1

15. In the toolkit, search for For Each Operation by typing in ‘For Each’ in the Search bar.
Drag and drop the For Each Operation onto the canvas within the process section.
In the Mule Properties view for the For Each Operation, enter values.
Field
Display Name Collection
Value
For Each Asset #[payload]

16. In the toolkit, search for Variable by typing in ‘Variable’ in the Search bar.
Drag and drop the Variable operations onto the canvas after the within the For Each component as shown.
In the Mule Properties view for the Variable operation, enter values.
Field
Display Name Name Value
Value
Set Document Name documentName #[payload.item.name]
17. In the toolkit, search for Variable by typing in ‘Variable’ in the Search bar.
Drag and drop the Variable operations onto the canvas after the within the For Each component as shown.
In the Mule Properties view for the

Variable operation, enter values.
Field
Display Name Operation
Name Value
Value
Set Download Dir Set Variable
downloadDir ${download.dir}
18. In the toolkit, search for CMIS Connector by typing in ‘CMIS’ in the Search bar.
Drag and drop the CMIS Connector onto the canvas within the process section.
In the Mule Properties view for the CMIS connector, enter values.
Field
Display Name Connector Configuration Operation Cmis Object Reference Object Id
Value
CMIS: Get File Content CMIS_ATOM_Configuration Get content stream #[payload.item] #[payload.item.id]
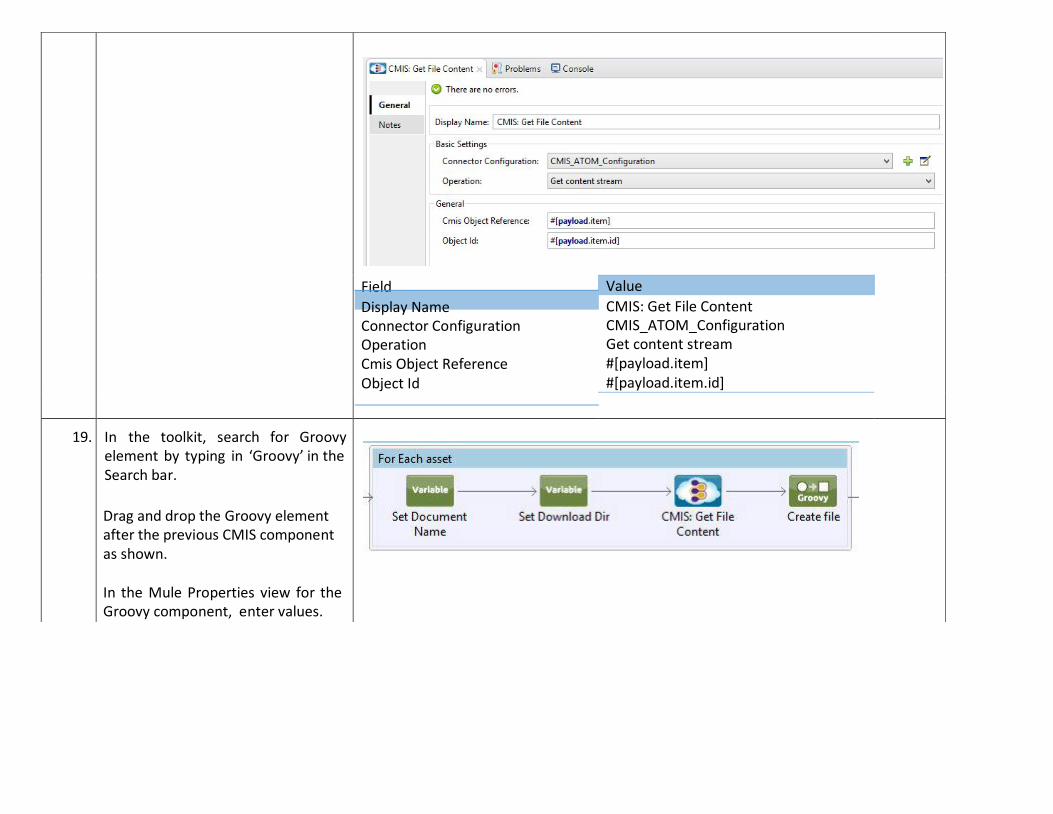
19. In the toolkit, search for Groovy element by typing in ‘Groovy’ in the Search bar.
Drag and drop the Groovy element after the previous CMIS component as shown.
In the Mule Properties view for the Groovy component, enter values.

Field Display Name Script Text
Value Create File import java.io.*;
FileOutputStream outStream = new FileOutputStream (flowVars['downloadDir'] + File.separatorChar + flowVars['documentName']);
InputStream inStream = payload['stream'];
byte[] buffer = new byte[1024]; int len; while ((len = inStream.read(buffer)) != -1) { outStream.write(buffer, 0, len);
}
inStream.close (); outStream.close ();

20. In the toolkit, search for Variable by typing in ‘Payload’ in the Search bar.
Drag and drop the Set Payload operations onto the canvas after the For Each operation.
In the Mule Properties view for the Variable operation, enter values.
Field Display Name Value
Value Set Response Payload #['Successfully extracted content.']
21. Save the project

Testing
1. Right Click and run the project as Mule application
Studio should deploy the application successfully.

2. Open a browser and invoke the URL: http://localhost:8081/extract-conten
t
Browser will respond with “Successfully extracted content.” message.
The mule flow will connect to Alfresco CMIS API and extract content from the source site and download it to the download directory specified in the mule application property file.

Summary
You have successfully completed Mulesoft CMIS Lab. Now you can get started to:
● Use CMIS Connector within your Mule flow ● Use CMIS Connector to connect to Alfresco ECM ● Use CMIS Connector APIs to extract content from specific sites
Related Documents