1 2 3 Discard all tape and orange lock Start Here USB cable users: To ensure that the software is installed correctly, do not connect the USB cable until you are asked to do so. Use this guide to set up the hardware and connect the HP All-in-One to either your computer or a working network. If you have problems during setup, see Troubleshooting later in the guide. Lift the print cartridge door. Remove and discard the orange shipping lock. Locate components Panduan Pemasangan HP Officejet 6300 All-in-One series HP Officejet 6300 All-in-One series Setup Guide Mulai dari Sini Pengguna kabel USB: Untuk memastikan perangkat lunak diinstal dengan benar, jangan hubungkan kabel USB sampai Anda diminta untuk melakukannya. Gunakan panduan ini untuk mengatur perangkat keras dan menghubungkan HP All-in-One ke komputer Anda atau ke jaringan. Jika Anda mengalami masalah selama pengaturan, lihat Pemecahan masalah dalam panduan ini. Angkat pintu kartrij cetak. Lepaskan dan buang pengaman paket oranye. Membersihkan semua isolasi dan pengaman oranye Memeriksa komponen USB Windows Mac

Welcome message from author
This document is posted to help you gain knowledge. Please leave a comment to let me know what you think about it! Share it to your friends and learn new things together.
Transcript

1
2
3
Discard all tape and orange lock
Start Here
USB cable users: To ensure that the software is installed correctly, do not connect the USB cable until you are asked to do so.
Use this guide to set up the hardware and connect the HP All-in-One to either your computer or a working network. If you have problems during setup, see Troubleshooting later in the guide.
Lift the print cartridge door. Remove and discard the orange shipping lock.
Locate components
Panduan Pemasangan HP Offi cejet 6300 All-in-One series HP Offi cejet 6300 All-in-One series Setup Guide
Mulai dari Sini Pengguna kabel USB: Untuk memastikan perangkat lunak diinstal dengan benar, jangan hubungkan kabel USB sampai Anda diminta untuk melakukannya.
Gunakan panduan ini untuk mengatur perangkat keras dan menghubungkan HP All-in-One ke komputer Anda atau ke jaringan. Jika Anda mengalami masalah selama pengaturan, lihat Pemecahan masalah dalam panduan ini.
Angkat pintu kartrij cetak. Lepaskan dan buang pengaman paket oranye.
Membersihkan semua isolasi dan pengaman oranye
Memeriksa komponen
USB
Windows
Mac

2 •
5
4 Attach the control panel faceplate (if not attached)
a Align the control panel faceplate with the device. b Press down fi rmly on all edges of the faceplate until it
snaps into place . Verify that the corners and the bottom edge are attached. Make sure the buttons are accessible.
IMPORTANT: The control panel faceplate must be attached for the HP All-in-One to work!
Attach paper trays and load paper
a Insert the bottom tray into the device. b Slide the paper adjuster over to the left. c Insert plain white paper. Move the paper adjuster to
the edge of the paper. d Attach the top (output) tray. Make sure you hook the
top edge of the tray into the light gray latches, and then lower.
e Pull out and fl ip over the tray extender.
• HP All-in-One
Memasang pelat muka panel kontrol (jika belum terpasang)
Memasang baki kertas dan memuatkan kertas
a Sejajarkan pelat muka panel kontrol dengan perangkat. b Tekan perlahan pada setiap sisi pelat muka sampai
terkunci pada tempatnya . Pastikan sudut-sudut dan sisi bawah melekat. Pastikan tombol-tombol dapat disentuh.
PENTING: Pelat muka panel kontrol harus dipasang agar HP All-in-One dapat bekerja!
a Masukkan baki paling bawah ke perangkat. b Geser pengatur kertas ke kiri. c Masukkan kertas putih biasa. Gerakkan pengatur
kertas ke ujung kertas. d Pasang baki atas (hasil cetak). Pastikan tepi atas
baki sudah terkunci ke dalam pengait abu-abu, kemudian turunkan.
e Tarik keluar dan ulur penyangga baki kertas.
a
b
a b c
d e
HP All-in-One •HP All-in-One • 3
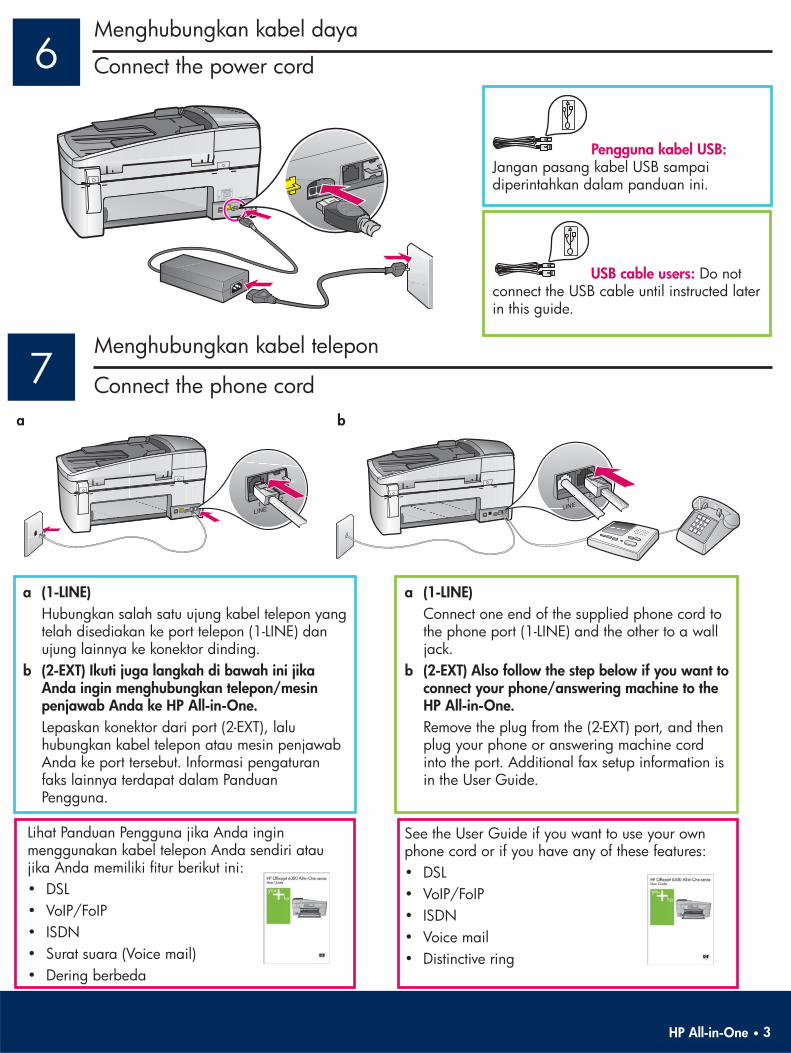
6
7
Connect the power cord
USB cable users: Do not connect the USB cable until instructed later in this guide.
Connect the phone cord
See the User Guide if you want to use your own phone cord or if you have any of these features: • DSL • VoIP/FoIP • ISDN • Voice mail • Distinctive ring
a (1-LINE) Connect one end of the supplied phone cord to
the phone port (1-LINE) and the other to a wall jack.
b (2-EXT) Also follow the step below if you want to connect your phone/answering machine to the HP All-in-One.
Remove the plug from the (2-EXT) port, and then plug your phone or answering machine cord into the port. Additional fax setup information is in the User Guide.
HP All-in-One •
Menghubungkan kabel daya
Pengguna kabel USB: Jangan pasang kabel USB sampai diperintahkan dalam panduan ini.
Menghubungkan kabel telepon
a (1-LINE) Hubungkan salah satu ujung kabel telepon yang
telah disediakan ke port telepon (1-LINE) dan ujung lainnya ke konektor dinding.
b (2-EXT) Ikuti juga langkah di bawah ini jika Anda ingin menghubungkan telepon/mesin penjawab Anda ke HP All-in-One.
Lepaskan konektor dari port (2-EXT), lalu hubungkan kabel telepon atau mesin penjawab Anda ke port tersebut. Informasi pengaturan faks lainnya terdapat dalam Panduan Pengguna.
Lihat Panduan Pengguna jika Anda ingin menggunakan kabel telepon Anda sendiri atau jika Anda memiliki fi tur berikut ini: • DSL • VoIP/FoIP • ISDN • Surat suara (Voice mail) • Dering berbeda
a b

4 •
8
9
10
Press the On button
Open the print cartridge door
Lift the print cartridge door until it stops. The print carriage moves to the right.
Remove tape from both cartridges
Remove the tape from both print cartridges. CAUTION: Do not touch the copper-colored contacts or re-tape the cartridges.
a After you press the On button, wait for the language prompt before continuing.
b To set the language for the display, use the arrow keys to select your language, press OK , and then confi rm. Use the arrow keys to select your country/region, press OK , and then confi rm.
• HP All-in-One
Membuka pintu kartrij cetak
Menekan tombol Hidup
Melepaskan pita perekat dari kedua kartrij
Angkat pintu kartrij cetak sampai berhenti. Tempat kartrij cetak bergerak ke kanan.
Lepaskan pita perekat dari kedua kartrij cetak. PERHATIAN: Jangan sentuh bidang kontak berwarna tembaga atau jangan pasang kembali pita perekat kartrij.
a Setelah Anda menekan tombol Hidup , tunggu sampai perintah bahasa sebelum melanjutkan.
b Untuk mengatur bahasa tampilan, gunakan tombol panah untuk memilih bahasa Anda, tekan OK , lalu konfi rmasikan. Gunakan tombol panah untuk memilih negara/kawasan Anda, tekan OK , lalu konfi rmasikan.

HP All-in-One •HP All-in-One • 5
11 Insert the tri-color print cartridge
The device must be On before you can insert the print cartridges. Make sure the print carriage is on the right side. a Hold the tri-color print cartridge with the
HP label facing up. b Place the tri-color print cartridge in front of
the left slot marked with the green label. c Push the cartridge fi rmly into the slot until it
snaps into place.
HP All-in-One •
Memasang kartrij cetak tiga warna
Perangkat harus dalam keadaan Hidup agar Anda dapat memasukkan kartrij cetak. Pastikan tempat kartrij cetak berada di sisi kanan. a Pegang kartrij cetak tiga warna dengan
label HP menghadap atas. b Tempatkan kartrij cetak tiga warna di
depan slot kiri yang ditandai dengan label hijau.
c Dorong kartrij perlahan sampai terkunci pada tempatnya.

6 •
12 Insert the black print cartridge
a Hold the black print cartridge with the HP label facing up.
b Place the black print cartridge in front of the right slot marked with the black and orange label.
c Push the cartridge fi rmly into the slot until it snaps into place.
d Close the print cartridge door.
• HP All-in-One
Memasukkan kartrij cetak hitam
a Pegang kartrij cetak hitam dengan label HP menghadap atas.
b Tempatkan kartrij cetak hitam di depan slot kanan yang ditandai dengan label hitam dan oranye.
c Dorong kartrij perlahan sampai terkunci pada tempatnya.
d Tutup pintu kartrij cetak.

HP All-in-One •HP All-in-One • 7
13
14
Align the print cartridges
Turn on your computer
After you close the print cartridge door, a message appears that the device is ready for alignment. a Make sure paper is loaded, and then press OK after each of the messages to start the process. b The alignment page is printed. Check the status on the display. Press OK to complete the process. If you have problems during alignment, make sure you loaded plain white paper. Alignment is complete when the page is printed.
a Turn on your computer, login if necessary, and then wait for the desktop to appear.
b Close any open programs.
HP All-in-One •
Meluruskan kartrij cetak
Menghidupkan komputer Anda
Setelah Anda menutup pintu kartrij cetak, sebuah pesan muncul menyatakan bahwa perangkat siap untuk pelurusan. a Pastikan kertas sudah dimasukkan, kemudian tekan OK setelah setiap pesan untuk memulai proses. b Halaman pelurusan dicetak. Periksa status pada layar. Tekan OK untuk menyelesaikan proses. Jika Anda mengalami masalah selama pelurusan, pastikan Anda telah memuatkan kertas putih biasa. Pelurusan selesai setelah halaman dicetak.
a Hidupkan komputer Anda, login bila perlu, lalu tunggu hingga desktop muncul.
b Tutup program yang terbuka.
a b
8 •
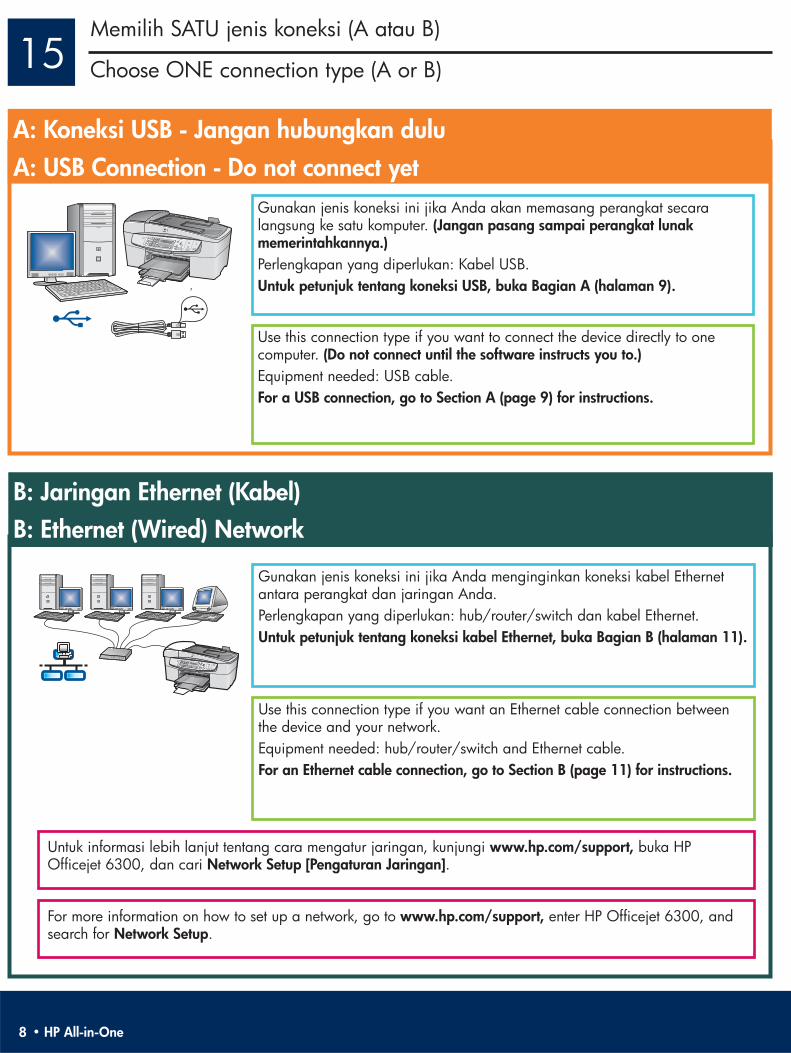
15 Choose ONE connection type (A or B)
Use this connection type if you want to connect the device directly to one computer. (Do not connect until the software instructs you to.) Equipment needed: USB cable. For a USB connection, go to Section A (page 9) for instructions.
A: USB Connection - Do not connect yet
Use this connection type if you want an Ethernet cable connection between the device and your network. Equipment needed: hub/router/switch and Ethernet cable. For an Ethernet cable connection, go to Section B (page 11) for instructions.
B: Ethernet (Wired) Network
For more information on how to set up a network, go to www.hp.com/support, enter HP Offi cejet 6300, and search for Network Setup .
• HP All-in-One
Memilih SATU jenis koneksi (A atau B)
Gunakan jenis koneksi ini jika Anda akan memasang perangkat secara langsung ke satu komputer. (Jangan pasang sampai perangkat lunak memerintahkannya.) Perlengkapan yang diperlukan: Kabel USB. Untuk petunjuk tentang koneksi USB, buka Bagian A (halaman 9).
A: Koneksi USB - Jangan hubungkan dulu
Gunakan jenis koneksi ini jika Anda menginginkan koneksi kabel Ethernet antara perangkat dan jaringan Anda. Perlengkapan yang diperlukan: hub/router/switch dan kabel Ethernet. Untuk petunjuk tentang koneksi kabel Ethernet, buka Bagian B (halaman 11).
B: Jaringan Ethernet (Kabel)
Untuk informasi lebih lanjut tentang cara mengatur jaringan, kunjungi www.hp.com/support, buka HP Offi cejet 6300, dan cari Network Setup [Pengaturan Jaringan] .

A1
HP All-in-One • HP All-in-One • 9
HP All-in-One •
Section A: USB Connection
Choose the correct CD
Windows Users:
a Insert the green HP All-in-One Windows CD. b Follow the onscreen instructions to install the
software. c On the Connection Type screen, make sure to
select directly to this computer . Continue to the next page.
NOTE: If the startup screen does not appear, double-click My Computer , double-click the CD-ROM icon, and then double-click setup.exe .
a Insert the gray HP All-in-One Mac CD. b Continue to the next page.
Mac Users:
Bagian A: Koneksi USB
Memilih CD yang benar
a Masukkan CD hijau HP All-in-One Windows. b Ikuti petunjuk di layar untuk menginstal perangkat
lunak. c Pada layar Connection Type [Jenis Koneksi] ,
pastikan untuk memilih directly to this computer [langsung ke komputer ini] . Lanjutkan ke halaman berikutnya.
CATATAN: Jika layar pembuka tidak muncul, klik ganda My Computer , klik ganda ikon CD-ROM , lalu klik ganda setup.exe .
a Masukkan CD abu-abu HP All-in-One Mac. b Lanjutkan ke halaman berikutnya.
Pengguna Windows: Pengguna Mac:

A2
A3
10
• HP All-in-One
Windows Users:
Mac Users:
a Follow the onscreen instructions until you see the prompt to connect the USB cable. (This may take several minutes.)
Once the prompt appears, connect the USB cable to the port on the back of the HP All-in-One, and then to any USB port on your computer.
b Follow the onscreen instructions. Complete the Fax Setup Wizard and Sign Up Now screens.
a Connect the USB cable from your computer to the USB port on the back of the device.
b Insert the HP All-in-One CD. Double-click the HP All-in-One Installer icon.
c Make sure you complete all screens, including the Setup Assistant.
Congratulations! See the last page to try out your HP All-in-One.
Menghubungkan kabel USB
Connect the USB cable
Pengguna Windows:
Pengguna Mac:
a Ikuti petunjuk di layar sampai Anda melihat perintah untuk menghubungkan kabel USB. (Ini akan berlangsung beberapa menit.)
Saat perintah tersebut muncul, hubungkan kabel USB ke port di bagian belakang HP All-in-One, lalu ke salah satu port USB di komputer Anda.
b Ikuti petunjuk di layar. Lengkapi layar Fax Setup Wizard [Wizard Pengaturan Faks] dan Sign Up Now [Daftarkan Sekarang] .
a Hubungkan kabel USB dari komputer ke port USB di bagian belakang perangkat.
b Masukkan CD HP All-in-One. Klik ganda ikon HP All-in-One Installer .
c Pastikan Anda telah melengkapi semua layar, termasuk Setup Assistant [Panduan Pengaturan].
Berhasil! Lihat halaman terakhir untuk mencoba menggunakan HP All-in-One.

B1
B2
HP All-in-One • HP All-in-One • 11
Section B: Ethernet (wired) network
a Remove the yellow plug from the back of the device. b Connect one end of the Ethernet cable to the Ethernet port on the back of the
device. c Connect the other end of the Ethernet cable to the hub/router/switch. If the cable
is not long enough, you can purchase a longer cable. IMPORTANT: Do not connect the Ethernet cable to a cable modem. You must have a working network. If you already connected the USB cable, do not connect the Ethernet cable.
Connect the Ethernet cable
Choose the correct CD
a Insert the gray HP All-in-One Mac CD.
a Insert the green HP All-in-One Windows CD.
Windows Users: Mac Users:
HP All-in-One •
a Lepaskan konektor kuning dari bagian belakang perangkat. b Hubungkan salah satu ujung kabel Ethernet ke port Ethernet di bagian belakang
perangkat. c Hubungkan ujung lain kabel Ethernet ke hub/router/switch. Jika kabel tidak
cukup panjang, Anda dapat membelinya yang lebih panjang. PENTING: Jangan hubungkan kabel Ethernet ke modem kabel. Anda harus memiliki jaringan yang aktif. Jika Anda telah menghubungkan kabel USB, jangan hubungkan kabel Ethernet.
Bagian B: Jaringan Ethernet (kabel)
Menghubungkan kabel Ethernet
Memilih CD yang benar
Pengguna Windows: Pengguna Mac: a Masukkan CD hijau HP
All-in-One Windows. a Masukkan CD abu-abu HP
All-in-One Mac.

B2
12 • HP All-in-One • HP All-in-One
• HP All-in-One
Anti-virus, Anti-Spamware, or fi rewall programs can block software installation. For details, go to www.hp.com/support , enter HP Offi cejet 6300 , and then search for Firewalls .
b Double-click the HP All-in-One Installer icon. c Make sure you complete all screens, including
the Setup Assistant. Continue to the next page.
b Follow the onscreen instructions to install the software.
c On the Connection Type screen, make sure to select through the network . Follow the onscreen instructions.
d You must choose unblock or accept on all fi rewall messages or setup will fail. Follow all onscreen instructions. Continue to the next page.
NOTE: If the startup screen does not appear, double-click My Computer , double-click the CD-ROM icon, and then double-click setup.exe .
Ethernet: Continued
Windows Users:
Mac Users: b Ikuti petunjuk di layar untuk menginstal perangkat
lunak. c Pada layar Connection Type [Jenis Koneksi] ,
pastikan untuk memilih through the network [melalui jaringan] . Ikuti petunjuk di layar.
d Anda harus memilih unblock [buka blokir] atau accept [terima] untuk semua pesan fi rewall, jika tidak pengaturan akan gagal. Ikuti semua petunjuk di layar. Lanjutkan ke halaman berikutnya.
CATATAN: Jika layar pembuka tidak muncul, klik ganda My Computer , klik ganda ikon CD-ROM , lalu klik ganda setup.exe .
Program Anti-virus, Anti-spyware, atau fi rewall dapat menghentikan penginstalan perangkat lunak. Untuk selengkapnya, kunjungi www.hp.com/support , buka HP Offi cejet 6300 , lalu cari Firewalls [Firewall] .
Pengguna Windows:
Pengguna Mac: b Klik ganda ikon HP All-in-One Installer . c Pastikan Anda melengkapi semua layar,
termasuk Setup Assistant [Panduan Pengaturan]. Lanjutkan ke halaman berikutnya.
Ethernet: Lanjutan

HP All-in-One •HP All-in-One • 13
B4
B3
Troubleshooting
Problem: A Carriage Jam message appears. Action: Open the print cartridge door. Make sure you have removed the orange plug. Remove any tape from inside the device. Turn the power off, and then wait one minute. Turn the power on again.
If you have additional computers on your network, install the HP All-in-One software on each computer. Choose the correct HP All-in-One CD for each installation. Follow the onscreen instructions. Make sure that you choose the connection type between the network and your HP All-in-One (not between your computer and the network).
Install software on additional computers
Congratulations! See the last page to try out your HP All-in-One.
HP All-in-One •
Pemecahan Masalah
Masalah: Pesan Tempat kartrij macet muncul. Tindakan: Buka pintu kartrij cetak. Pastikan Anda telah melepaskan pengaman oranye. Lepaskan pita perekat yang ada pada perangkat. Matikan perangkat, kemudian tunggu satu menit. Hidupkan kembali.
Jika Anda memiliki lebih dari satu komputer dalam jaringan, instal perangkat lunak HP All-in-One pada setiap komputer. Pilih CD HP All-in-One yang sesuai untuk masing-masing penginstalan. Ikuti semua petunjuk di layar. Pastikan Anda memilih jenis koneksi antara jaringan dan HP All-in-One Anda (bukan antara komputer Anda dan jaringan).
Menginstal perangkat lunak di komputer tambahan
Berhasil! Lihat halaman terakhir untuk mencoba menggunakan HP All-in-One Anda.
Troubleshooting
14 •
Troubleshooting
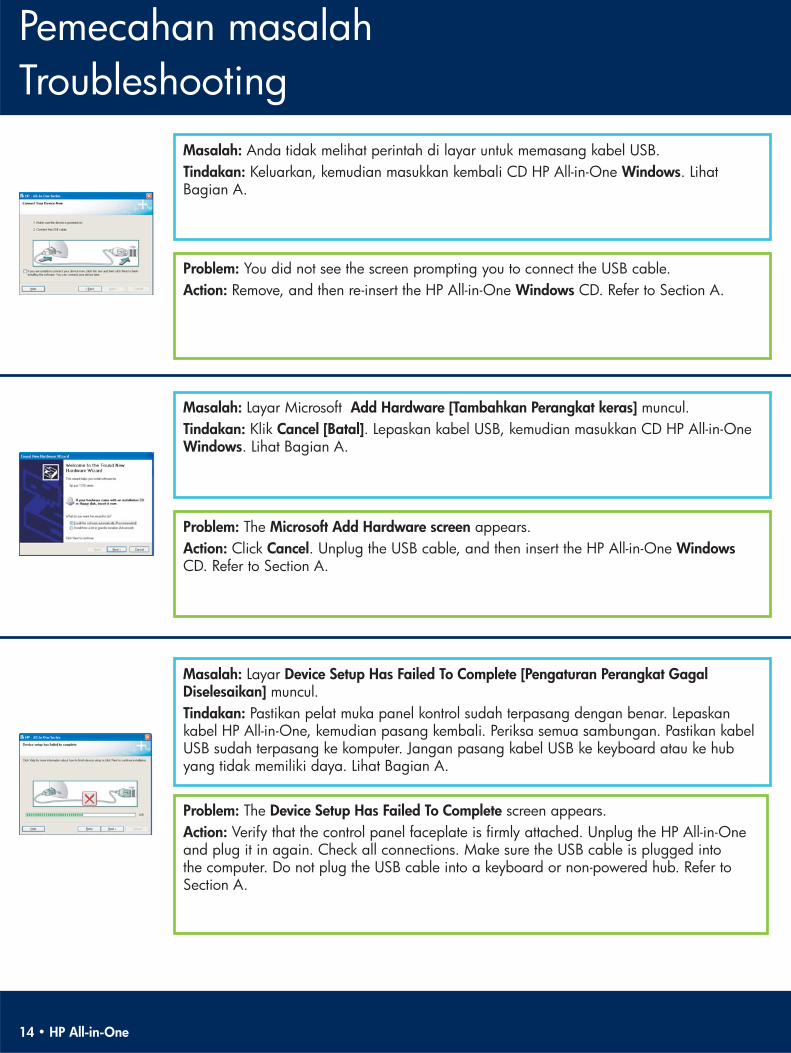
Problem: You did not see the screen prompting you to connect the USB cable. Action: Remove, and then re-insert the HP All-in-One Windows CD. Refer to Section A.
Problem: The Microsoft Add Hardware screen appears. Action: Click Cancel . Unplug the USB cable, and then insert the HP All-in-One Windows CD. Refer to Section A.
Problem: The Device Setup Has Failed To Complete screen appears. Action: Verify that the control panel faceplate is fi rmly attached. Unplug the HP All-in-One and plug it in again. Check all connections. Make sure the USB cable is plugged into the computer. Do not plug the USB cable into a keyboard or non-powered hub. Refer to Section A.
• HP All-in-One
Masalah: Anda tidak melihat perintah di layar untuk memasang kabel USB. Tindakan: Keluarkan, kemudian masukkan kembali CD HP All-in-One Windows . Lihat Bagian A.
Masalah: Layar Microsoft Add Hardware [Tambahkan Perangkat keras] muncul. Tindakan: Klik Cancel [Batal] . Lepaskan kabel USB, kemudian masukkan CD HP All-in-One Windows . Lihat Bagian A.
Masalah: Layar Device Setup Has Failed To Complete [Pengaturan Perangkat Gagal Diselesaikan] muncul. Tindakan: Pastikan pelat muka panel kontrol sudah terpasang dengan benar. Lepaskan kabel HP All-in-One, kemudian pasang kembali. Periksa semua sambungan. Pastikan kabel USB sudah terpasang ke komputer. Jangan pasang kabel USB ke keyboard atau ke hub yang tidak memiliki daya. Lihat Bagian A.
Pemecahan masalah
© Copyright 2006 Hewlett-Packard Development Company, L.P.
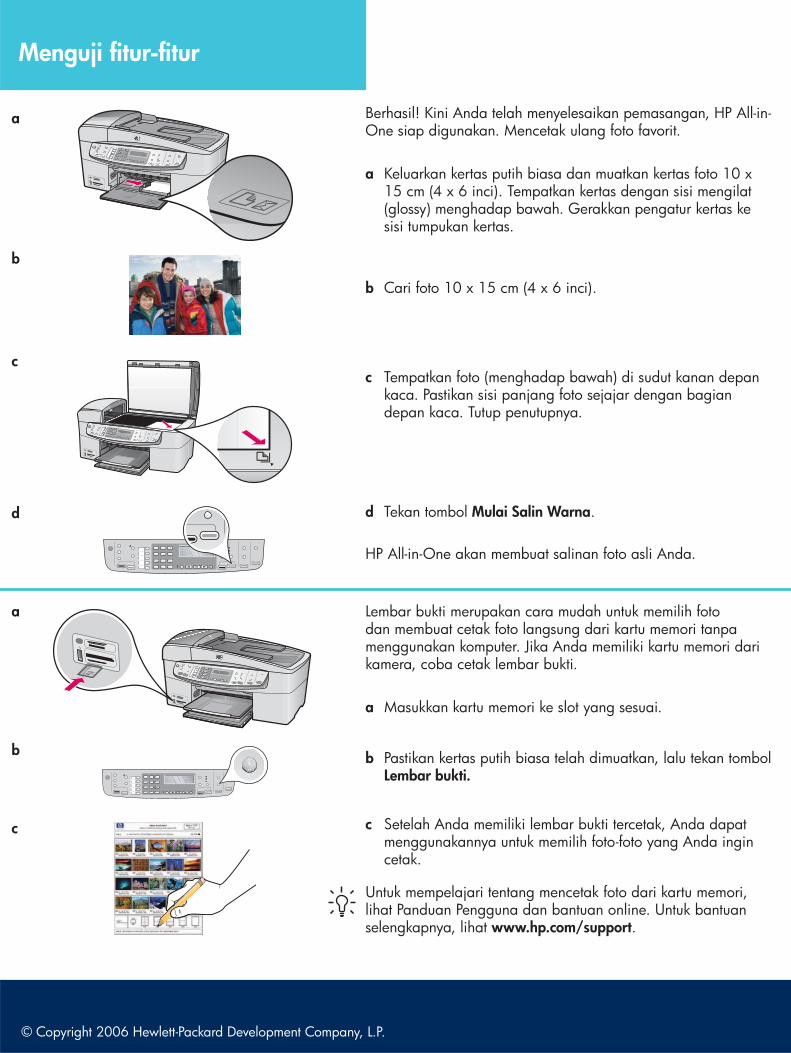
b Cari foto 10 x 15 cm (4 x 6 inci).
c Tempatkan foto (menghadap bawah) di sudut kanan depan kaca. Pastikan sisi panjang foto sejajar dengan bagian depan kaca. Tutup penutupnya.
d Tekan tombol Mulai Salin Warna .
HP All-in-One akan membuat salinan foto asli Anda.
Berhasil! Kini Anda telah menyelesaikan pemasangan, HP All-in-One siap digunakan. Mencetak ulang foto favorit. a Keluarkan kertas putih biasa dan muatkan kertas foto 10 x
15 cm (4 x 6 inci). Tempatkan kertas dengan sisi mengilat (glossy) menghadap bawah. Gerakkan pengatur kertas ke sisi tumpukan kertas.
Untuk mempelajari tentang mencetak foto dari kartu memori, lihat Panduan Pengguna dan bantuan online. Untuk bantuan selengkapnya, lihat www.hp.com/support .
b Pastikan kertas putih biasa telah dimuatkan, lalu tekan tombol Lembar bukti .
c Setelah Anda memiliki lembar bukti tercetak, Anda dapat menggunakannya untuk memilih foto-foto yang Anda ingin cetak.
Lembar bukti merupakan cara mudah untuk memilih foto dan membuat cetak foto langsung dari kartu memori tanpa menggunakan komputer. Jika Anda memiliki kartu memori dari kamera, coba cetak lembar bukti.
a Masukkan kartu memori ke slot yang sesuai.
Menguji fi tur-fi tur
a
c
b
d
a
b
c

*Q8061-90173*
Q8061-90173
*Q8061-90173*
© Copyright 2006 Hewlett-Packard Development Company, L.P.
Test the features
To learn about printing photos from memory cards, see the User Guide and online help.
For additional help, see www.hp.com/support .
b Find a 4 x 6 inch (10 x 15 cm) photo.
c Place the photo (face down) on the right front corner of the glass. Make sure the long edge of the photo is along the front of the glass. Close the lid.
d Press the Start Copy Color button.
The HP All-in-One makes a copy of your original photo.
Congratulations! Now that you have fi nished setup, it is time to use your HP All-in-One. Reprint a favorite photo. a Remove the plain white paper and load the 4 x 6 inch (10 x15
cm) photo paper. Place the paper glossy side down. Move the paper adjusters next to the stack of paper.
b Make sure plain white paper is loaded, and then press the Proofsheet button.
c After you have printed the proof sheet, you can use it to select the photos you want to print.
A proof sheet is a simple way to select photos and make prints directly from a memory card without using your computer. If you have a memory card from your camera, try printing a proofsheet. a Insert the memory card into the appropriate slot.
a
c
b
d
a
b
c
Related Documents