MSQ Plus Mass Detector Hardware Manual 60111-97046 Revision A September 2013

Welcome message from author
This document is posted to help you gain knowledge. Please leave a comment to let me know what you think about it! Share it to your friends and learn new things together.
Transcript

MSQ Plus Mass DetectorHardware Manual
60111-97046 Revision A September 2013

© 2013 Thermo Fisher Scientific Inc. All rights reserved.
Thermo Scientific, Accela, and Xcalibur are registered trademarks; and MSQ and MSQ Plus are trademarks of Thermo Fisher Scientific in the United States.
The following are registered trademarks in the United States and other countries: Agilent is a registered trademark of Agilent Technologies, Inc. Intel and Pentium are registered trademarks of Intel Corporation. Microsoft and Windows are registered trademarks of Microsoft Corporation.
The following are registered trademarks in the United States and possibly other countries: Swagelok is a registered trademark of Crawford Fitting Company. Teflon, Vespel, and Viton are registered trademarks of E.I. du Pont de Nemours & Co. Pfeiffer Vacuum is a registered trademark of Pfeiffer Vacuum GmbH Limited. Pozidriv is a registered trademark of the American Screw Company. Nitronic is a registered trademark of AK Steel Corporation. Rheodyne and Upchurch Scientific are registered trademarks of IDEX Health & Science, LLC.
PEEK is a trademark of Victrex plc. Edwards is a trademark of Edwards Limited.
All other trademarks are the property of Thermo Fisher Scientific Inc. and its subsidiaries.
Thermo Fisher Scientific Inc. provides this document to its customers with a product purchase to use in the product operation. This document is copyright protected and any reproduction of the whole or any part of this document is strictly prohibited, except with the written authorization of Thermo Fisher Scientific Inc.
The contents of this document are subject to change without notice. All technical information in this document is for reference purposes only. System configurations and specifications in this document supersede all previous information received by the purchaser.
Thermo Fisher Scientific Inc. makes no representations that this document is complete, accurate or error-free and assumes no responsibility and will not be liable for any errors, omissions, damage or loss that might result from any use of this document, even if the information in the document is followed properly.
This document is not part of any sales contract between Thermo Fisher Scientific Inc. and a purchaser. This document shall in no way govern or modify any Terms and Conditions of Sale, which Terms and Conditions of Sale shall govern all conflicting information between the two documents.
Release history: Revision A September 2013
Software version: (Thermo) MSQ Plus Mass Detector 2.0 or later; Xcalibur 2.2 SP1 or later; Foundation 2.0 SP1, 2.1, 3.0 or later
For Research Use Only. Not for use in diagnostic procedures.

Regulatory Compliance
Thermo Fisher Scientific performs complete testing and evaluation of its products to ensure full compliance with applicable domestic and international regulations. When the system is delivered to you, it meets all pertinent electromagnetic compatibility (EMC) and safety standards as described below.
EMC Directive 89/336/EEC as amended by 92/31/EEC and 93/68/EEC
EMC compliance has been evaluated by UNDERWRITERS LABORATORY, INC (UL).
Low-Voltage Safety Compliance
This device complies with the EU directive 73/23/EEC (equivalent to IEC 1010-1, 1990 plus Amendment 1, 1991 and Amendment 2, 1995) by meeting the following standard: EN 61010-1: 2001 with Corrigendum No. 1 and 2.
Changes that you make to your system may void compliance with one or more of these EMC and safety standards. Changes to your system include replacing a part or adding components, options, or peripherals not specifically authorized and qualified by Thermo Fisher Scientific. To ensure continued compliance with EMC and safety standards, replacement parts and additional components, options, and peripherals must be ordered from Thermo Fisher Scientific or one of its authorized representatives.
FCC Compliance Statement
EN 55011 (1998) EN 61000-4-3 (2002)
EN 61326-1 (1998) EN 61000-4-4 (2001)
EN 61000-3-2 1995 EN 61000-4-5 (2001)
EN 61000-3-3 1995 EN 61000-4-6 (2001)
EN 61000-4-2 (2001) EN 61000-4-11 (2001)
CFR 47 Part 15 Subpart B: 2004Code of Federal Regulations, Part 15, Subpart B, Radio Frequency Devices Unintentional Radiators Class A
THIS DEVICE COMPLIES WITH PART 15 OF THE FCC RULES. OPERATION IS SUBJECT TO THE FOLLOWING TWO CONDITIONS: (1) THIS DEVICE MAY NOT CAUSE HARMFUL INTERFERENCE, AND (2) THIS DEVICE MUST ACCEPT ANY INTERFERENCE RECEIVED, INCLUDING INTERFERENCE THAT MAY CAUSE UNDESIRED OPERATION.

Notice on Lifting and Handling ofThermo Fisher Scientific Instruments
For your safety, and in compliance with international regulations, the physical handling of this Thermo Fisher Scientific instrument requires a team effort to lift and/or move the instrument. This instrument is too heavy and/or bulky for one person alone to handle safely.
Notice on the Proper Use ofThermo Fisher Scientific Instruments
In compliance with international regulations: Use of this instrument in a manner not specified by Thermo Fisher Scientific could impair any protection provided by the instrument.
Notice on the Susceptibility to Electromagnetic Transmissions
Your instrument is designed to work in a controlled electromagnetic environment. Do not use radio frequency transmitters, such as mobile phones, in close proximity to the instrument.
For manufacturing location, see the label on the instrument.
CAUTION Read and understand the various precautionary notes, signs, and symbols contained inside this manual pertaining to the safe use and operation of this product before using the device.

WEEE Compliance
This product is required to comply with the European Union’s Waste Electrical & Electronic Equipment (WEEE) Directive 2002/96/EC. It is marked with the following symbol:
Thermo Fisher Scientific has contracted with one or more recycling or disposal companies in each European Union (EU) Member State, and these companies should dispose of or recycle this product. See www.thermoscientific.com/rohsweee for further information on Thermo Fisher Scientific’s compliance with these Directives and the recyclers in your country.
WEEE Konformität
Dieses Produkt muss die EU Waste Electrical & Electronic Equipment (WEEE) Richtlinie 2002/96/EC erfüllen. Das Produkt ist durch folgendes Symbol gekennzeichnet:
Thermo Fisher Scientific hat Vereinbarungen mit Verwertungs-/Entsorgungsfirmen in allen EU-Mitgliedsstaaten getroffen, damit dieses Produkt durch diese Firmen wiederverwertet oder entsorgt werden kann. Mehr Information über die Einhaltung dieser Anweisungen durch Thermo Fisher Scientific, über die Verwerter, und weitere Hinweise, die nützlich sind, um die Produkte zu identifizieren, die unter diese RoHS Anweisung fallen, finden sie unter www.thermoscientific.com/rohsweee.

Conformité DEEE
Ce produit doit être conforme à la directive européenne (2002/96/EC) des Déchets d'Equipements Electriques et Electroniques (DEEE). Il est marqué par le symbole suivant:
Thermo Fisher Scientific s'est associé avec une ou plusieurs compagnies de recyclage dans chaque état membre de l’union européenne et ce produit devrait être collecté ou recyclé par celles-ci. Davantage d'informations sur la conformité de Thermo Fisher Scientific à ces directives, les recycleurs dans votre pays et les informations sur les produits Thermo Fisher Scientific qui peuvent aider la détection des substances sujettes à la directive RoHS sont disponibles sur www.thermoscientific.com/rohsweee.

CAUTION Symbol CAUTION VORSICHT PRECAUCIÓN MISE EN GARDE
Risk electric shock: This instrument uses voltages that can cause electric shock and/or personal injury. Before servicing, shut down the instrument and disconnect it from line power. While operating the instrument, keep covers on. Do not remove the protective covers from the printed circuit board assemblies (PCBAs).
Stromschlaggefahr: Dieses Gerät arbeitet mit Spannungen, die Stromschläge und/oder Personenverletzungen verursachen können. Vor Wartungsarbeiten muss das Gerät abgeschaltet und vom Netz getrennt werden. Betreiben Sie das Gerät nicht mit abgenommenen Abdeckungen. Nehmen Sie die Schutzabdeckungen von Leiterplatten nicht ab.
Riesgo de descargas eléctricas: Este instrumento utiliza voltajes que pueden causar descargas eléctricas y/o lesiones personales. Antes de revisar o reparar el instrumento, apáguelo y desconéctelo de la red eléctrica. Mantenga colocadas las cubiertas mientras se utiliza el instrumento. No retire las cubiertas protectoras del circuito impreso completo (PCBA).
Risque de choc électrique : l’instrument utilise des tensions susceptibles de provoquer une électrocution et/ou des blessures corporelles. Il doit être arrêté et débranché de la source de courant avant toute intervention. Ne pas utiliser l’instrument sans ses couvercles. Ne pas enlever les capots de protection des cartes à circuit imprimé (PCBA).
Chemical hazard: Wear gloves and other protective equipment, as appropriate, when handling toxic, carcinogenic, mutagenic, corrosive, or irritant chemicals. Use approved containers and proper procedures to dispose of waste oil and when handling wetted parts of the instrument.
Gefahr durch Chemikalien: Tragen Sie beim Umgang mit toxischen, karzinogenen, mutagenen, ätzenden oder reizenden Chemikalien Schutzhandschuhe und weitere geeignete Schutzausrüstung. Verwenden Sie bei der Entsorgung von verbrauchtem Öl und beim Umgang mit medienberührenden Komponenten die vorgeschriebenen Behälter, und wenden Sie ordnungsgemäße Verfahren an.
Peligro por sustancias químicas: Cuando manipule sustancias químicas, tóxicas, carcinogénicas, mutágenas, corrosivas o irritantes, utilice guantes y otro equipo de protección. Utilice siempre recipientes homologados y siga los procedimientos adecuados cuando deseche aceite residual o manipule partes mojadas del instrumento.
Danger lié aux produits chimiques : porter des gants et d’autres équipements de protection appropriés pour manipuler les produits chimiques toxiques, cancérigènes, mutagènes, corrosifs ou irritants. Utiliser des récipients homologués et des procédures adéquates pour la mise au rebut des huiles usagées et lors de la manipulation des pièces de l’instrument en contact avec l’eau.
Hot surface: Before touching, allow any heated components to cool.
Heiße Oberflächen: Lassen Sie heiße Komponenten vor der Berührung abkühlen.
Superficies calientes: Antes de tocar los componentes calientes, espere a que se enfríen.
Surface chaude : laisser refroidir les composants chauffés avant toute manipulation.
Flammable substances hazard: Use care when operating the system in the presence of flammable substances.
Gefahr durch entzündbare Substanzen: Beachten Sie die einschlägigen Vorsichtsmaßnahmen, wenn Sie das System in Gegenwart von entzündbaren Substanzen betreiben.
Peligro por sustancias inflamables: Tenga mucho cuidado cuando utilice el sistema cerca de sustancias inflamables.
Danger lié aux substances inflammables : agir avec précaution lors de l’utilisation du système en présence de substances inflammables.
Risk of eye injury: Eye injury could occur from splattered chemicals, airborne particles, or sharp objects. (Sharp objects that customers might install in the instrument include fused-silica tubing, the autosampler needle, and so on.) Wear safety glasses when handling chemicals or servicing the instrument.
Augenverletzungsrisiko: Verspritzte Chemikalien, Schwebstoffpartikel oder scharfe Objekte können Augenverletzungen verursachen. (Scharfe Objekte, die Kunden möglicherweise im Gerät installieren, sind z. B. Quarzglas-Kapillaren, die Nadel des Autosamplers, usw.) Tragen Sie beim Umgang mit Chemikalien oder bei der Wartung des Gerätes eine Schutzbrille.
Riesgo de lesiones oculares: Las salpicaduras de sustancias químicas, las partículas flotantes en el aire y los objetos afilados pueden causar lesiones oculares. (Entre los objetos afilados que los clientes pueden instalar en el instrumento se encuentran tubos de sílice fundida, agujas del muestreador automático, etc.). Para manipular sustancias químicas o realizar tareas de mantenimiento, utilice gafas de seguridad.
Risque de lésion oculaire : les projections chimiques, les particules en suspension dans l’air et les objets tranchants peuvent entraîner des lésions oculaires. (Les objets tranchants pouvant être installés par les clients dans l’instrument comprennent les tubes en silice fondue, les aiguilles du passeur automatique, etc.). Porter des lunettes de protection lors de toute manipulation de produit chimique ou intervention sur l’instrument.
General hazard: A hazard is present that is not included in the other categories. This symbol also appears on the instrument. For details about the hazard, refer to the instrument manual.When the safety of a procedure is questionable, contact Technical Support for Thermo Scientific San Jose products.
Allgemeine Gefahr: Es besteht eine weitere Gefahr, die nicht in den vorstehenden Kategorien beschrieben ist. Dieses Symbol wird auch auf dem Gerät angebracht. Einzelheiten zu dieser Gefahr finden Sie in den Gerätehandbüchern.Wenn Sie sich über die Sicherheit eines Verfahrens im Unklaren sind, setzen Sie sich, bevor Sie fortfahren, mit dem technischen Support für Thermo Scientific San Jose Produkte in Verbindung.
Peligro general: Existen peligros que no se incluyen en las otras categorías. Este símbolo también aparece en el instrumento. Si desea obtener más información sobre estos peligros, consulte el manual del instrumento.En caso de duda sobre la seguridad de un procedimiento, póngase en contacto con el personal de servicio técnico de los productos Thermo Scientific San Jose.
Danger d’ordre général : indique la présence d’un risque n’appartenant pas aux catégories citées plus haut. Ce symbole figure également sur l’instrument. Pour plus de détails sur ce danger potentiel, se reporter au manuel de l’instrument.Si la sûreté d’une procédure est incertaine, contacter l’assistance technique pour les produits Thermo Scientific San Jose.
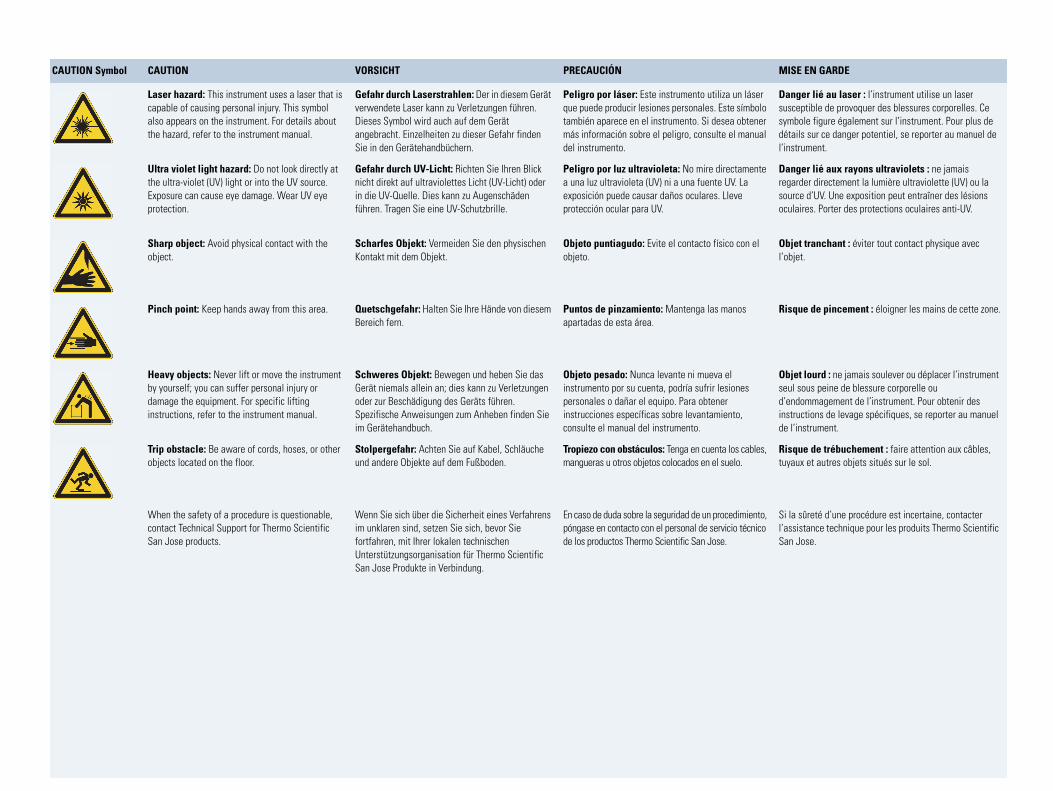
Laser hazard: This instrument uses a laser that is capable of causing personal injury. This symbol also appears on the instrument. For details about the hazard, refer to the instrument manual.
Gefahr durch Laserstrahlen: Der in diesem Gerät verwendete Laser kann zu Verletzungen führen. Dieses Symbol wird auch auf dem Gerät angebracht. Einzelheiten zu dieser Gefahr finden Sie in den Gerätehandbüchern.
Peligro por láser: Este instrumento utiliza un láser que puede producir lesiones personales. Este símbolo también aparece en el instrumento. Si desea obtener más información sobre el peligro, consulte el manual del instrumento.
Danger lié au laser : l’instrument utilise un laser susceptible de provoquer des blessures corporelles. Ce symbole figure également sur l’instrument. Pour plus de détails sur ce danger potentiel, se reporter au manuel de l’instrument.
Ultra violet light hazard: Do not look directly at the ultra-violet (UV) light or into the UV source. Exposure can cause eye damage. Wear UV eye protection.
Gefahr durch UV-Licht: Richten Sie Ihren Blick nicht direkt auf ultraviolettes Licht (UV-Licht) oder in die UV-Quelle. Dies kann zu Augenschäden führen. Tragen Sie eine UV-Schutzbrille.
Peligro por luz ultravioleta: No mire directamente a una luz ultravioleta (UV) ni a una fuente UV. La exposición puede causar daños oculares. Lleve protección ocular para UV.
Danger lié aux rayons ultraviolets : ne jamais regarder directement la lumière ultraviolette (UV) ou la source d’UV. Une exposition peut entraîner des lésions oculaires. Porter des protections oculaires anti-UV.
Sharp object: Avoid physical contact with the object.
Scharfes Objekt: Vermeiden Sie den physischen Kontakt mit dem Objekt.
Objeto puntiagudo: Evite el contacto físico con el objeto.
Objet tranchant : éviter tout contact physique avec l’objet.
Pinch point: Keep hands away from this area. Quetschgefahr: Halten Sie Ihre Hände von diesem Bereich fern.
Puntos de pinzamiento: Mantenga las manos apartadas de esta área.
Risque de pincement : éloigner les mains de cette zone.
Heavy objects: Never lift or move the instrument by yourself; you can suffer personal injury or damage the equipment. For specific lifting instructions, refer to the instrument manual.
Schweres Objekt: Bewegen und heben Sie das Gerät niemals allein an; dies kann zu Verletzungen oder zur Beschädigung des Geräts führen. Spezifische Anweisungen zum Anheben finden Sie im Gerätehandbuch.
Objeto pesado: Nunca levante ni mueva el instrumento por su cuenta, podría sufrir lesiones personales o dañar el equipo. Para obtener instrucciones específicas sobre levantamiento, consulte el manual del instrumento.
Objet lourd : ne jamais soulever ou déplacer l’instrument seul sous peine de blessure corporelle ou d’endommagement de l’instrument. Pour obtenir des instructions de levage spécifiques, se reporter au manuel de l’instrument.
Trip obstacle: Be aware of cords, hoses, or other objects located on the floor.
Stolpergefahr: Achten Sie auf Kabel, Schläuche und andere Objekte auf dem Fußboden.
Tropiezo con obstáculos: Tenga en cuenta los cables, mangueras u otros objetos colocados en el suelo.
Risque de trébuchement : faire attention aux câbles, tuyaux et autres objets situés sur le sol.
When the safety of a procedure is questionable, contact Technical Support for Thermo Scientific San Jose products.
Wenn Sie sich über die Sicherheit eines Verfahrens im unklaren sind, setzen Sie sich, bevor Sie fortfahren, mit Ihrer lokalen technischen Unterstützungsorganisation für Thermo Scientific San Jose Produkte in Verbindung.
En caso de duda sobre la seguridad de un procedimiento, póngase en contacto con el personal de servicio técnico de los productos Thermo Scientific San Jose.
Si la sûreté d’une procédure est incertaine, contacter l’assistance technique pour les produits Thermo Scientific San Jose.
CAUTION Symbol CAUTION VORSICHT PRECAUCIÓN MISE EN GARDE

CAUTION Symbol CAUTION 警告 危险警告
Risk electric shock: This instrument uses voltages that can cause electric shock and/or personal injury. Before servicing, shut down the instrument and disconnect it from line power. While operating the instrument, keep covers on. Do not remove the protective covers from the printed circuit board assemblies (PCBAs).
感電の危険性 : この機器では、感電および /または身体傷害を引き起こ
すおそれのある電圧を使用しています。整備点検の前には、機器の電
源を切り、電源コードを抜いてください。機器の作動中は、カバーを
付けたままにしてください。プリント基板アセンブリ (PCBA) から保護
カバーを取り外さないでください。
触电危险:本仪器所用电压可能导致电击或人身伤害。进行维修服务前,务必关闭仪器电源并断开其电源连接。操作此仪器时,不要卸下顶盖。勿卸下印刷电路板组件 (PCBA)的保护盖。
Chemical hazard: Wear gloves and other protective equipment, as appropriate, when handling toxic, carcinogenic, mutagenic, corrosive, or irritant chemicals. Use approved containers and proper procedures to dispose of waste oil and when handling wetted parts of the instrument.
化学的危険性 : 毒性、発癌性、変異原性、腐食性、または刺激性のある
化学薬品を取り扱うときは、必要に応じて手袋などの保護具を着用し
ます。廃油を処分したり、機器の接液部品を取り扱うときは、認可さ
れた容器を使用し、適切な手順に従います。
化学品危险:当处理毒性、致癌性、致突变性、腐蚀性或者刺激性化学品时,佩戴手套和其他保护性设备。当处理浸湿的仪器部件以及废油时,使用认可的容器和合适的步骤。
Hot surface: Before touching, allow any heated components to cool.
高温面 : 触れる前に、加熱した部品を冷ましてください。 热表面:待高温部件冷却之后再进行维修。
Flammable substances hazard: Use care when operating the system in the presence of flammable substances.
可燃性物質の危険性 :可燃性物質があるところでシステムを作動させる
場合は十分注意してください。
易燃物危险:在有易燃物质的场地操作该系统时,务必小心谨慎。
Risk of eye injury: Eye injury could occur from splattered chemicals, airborne particles, or sharp objects. (Sharp objects that customers might install in the instrument include fused-silica tubing, the autosampler needle, and so on.) Wear safety glasses when handling chemicals or servicing the instrument.
眼外傷の危険性 : 飛散した化学薬品、浮遊粒子、または鋭利な物体に
よって眼外傷を負うおそれがあります (機器に取り付けられる可能性が
ある鋭利な物体は、ヒューズドシリカ、オートサンプラーニードルな
どです )。化学薬品を取り扱ったり、機器を整備点検するときは、保護
メガネを着用します。
眼睛伤害风险:眼睛受伤可能源自飞溅的化学品、空气中的颗粒,或者锋利的物体。(安装在仪器内的锋利物体包括熔融石英管、自动进样器的进样针等。)处理化学品或对仪器进行维修服务时,务必戴上防护眼镜。
General hazard: A hazard is present that is not included in the other categories. This symbol also appears on the instrument. For details about the hazard, refer to the instrument manual.When the safety of a procedure is questionable, contact Technical Support for Thermo Scientific San Jose products.
一般的な危険性 :それぞれのカテゴリーに当てはまらない危険があります。この標識記号は機器にも表示されています。この危険の詳細については、機器のマニュアルを参照してください。手順の安全性にご不明な点がある場合は、Thermo Scientific San Jose 製品の
テクニカルサポートまでお問い合わせください。
普通危险:未归入其他类别的危险。此符号也会在仪器上出现。有关此危险的详细信息,参阅适当的仪器手册。若对任何步骤的安全事项有疑问,联系 Thermo Scientific San Jose 产品的技术支持中心。

Laser hazard: This instrument uses a laser that is capable of causing personal injury. This symbol also appears on the instrument. For details about the hazard, refer to the instrument manual.
レーザー光線の危険性 :この機器では、身体傷害を引き起こすおそれ
のあるレーザーを使用しています。この標識記号は機器にも表示され
ています。この危険の詳細については、機器のマニュアルを参照して
ください。
激光危险:本仪器所用激光会导致人身伤害。此符号也会在仪器上出现。有关此危险的详细信息,参阅适当的仪器手册。
Ultra violet light hazard: Do not look directly at the ultra-violet (UV) light or into the UV source. Exposure can cause eye damage. Wear UV eye protection.
紫外光の危険性 :紫外 (UV) 光または UV 光源を直接見ないでください。照射によって眼損傷を引き起こすおそれがあります。UV 保護メガネを着用します。
紫外光危险:不要直视紫外(UV)光或者紫外光源。直视可能导致眼睛伤害。佩戴紫外线防护眼镜。
Sharp object: Avoid physical contact with the object.
鋭利な物体 :物体との身体的接触を避けてください。 锋利物体:避免直接接触锋利的物体。
Pinch point: Keep hands away from this area.
ピンチポイント :この部分には手を挟まれないようにしてください。 夹点:勿将手放在此部位。
Heavy objects: Never lift or move the instrument by yourself; you can suffer personal injury or damage the equipment. For specific lifting instructions, refer to the instrument manual.
重量物 :1 人で機器を持ち上げたり移動しないでください。身体傷害を
負ったり、機器を損傷するおそれがあります。具体的な持ち上げ方法
については、機器のマニュアルを参照してください。
重物:切勿独自提起或移动本仪器;可能遭受人身伤害或损坏仪器。有关具体的提起说明,参阅仪器手册。
Trip obstacle: Be aware of cords, hoses, or other objects located on the floor.
作業の障害物 :床にあるコード、ホース、その他の物体に注意してく
ださい。
绊倒危险:注意地面上的线、管或其他物品。
When the safety of a procedure is questionable, contact Technical Support for Thermo Scientific San Jose products.
手順の安全性にご不明な点がある場合は、Thermo Scientific San Jose 製品の
テクニカルサポートまでお問い合わせください。
如对安全程序有疑问,联系 Thermo Scientific San Jose 产品的技术支持中心。
CAUTION Symbol CAUTION 警告 危险警告

Thermo Scientific MSQ Plus Mass Detector Hardware Manual xi
C
Preface . . . . . . . . . . . . . . . . . . . . . . . . . . . . . . . . . . . . . . . . . . . . . . . . . . . . . . . . . . . . . .xvRelated Documentation . . . . . . . . . . . . . . . . . . . . . . . . . . . . . . . . . . . . . . . . . . xvSafety and Special Notices . . . . . . . . . . . . . . . . . . . . . . . . . . . . . . . . . . . . . . . xviiSafety Precautions . . . . . . . . . . . . . . . . . . . . . . . . . . . . . . . . . . . . . . . . . . . . . . xviiSolvent and Gas Purity Requirements . . . . . . . . . . . . . . . . . . . . . . . . . . . . . . . .xixContacting Us . . . . . . . . . . . . . . . . . . . . . . . . . . . . . . . . . . . . . . . . . . . . . . . . .xix
Chapter 1 Introduction . . . . . . . . . . . . . . . . . . . . . . . . . . . . . . . . . . . . . . . . . . . . . . . . . . . . . . . . . . .1Overview . . . . . . . . . . . . . . . . . . . . . . . . . . . . . . . . . . . . . . . . . . . . . . . . . . . . . . . 2Ion Polarity Modes . . . . . . . . . . . . . . . . . . . . . . . . . . . . . . . . . . . . . . . . . . . . . . . 2Ionization Techniques . . . . . . . . . . . . . . . . . . . . . . . . . . . . . . . . . . . . . . . . . . . . . 3
Electrospray (ESI) . . . . . . . . . . . . . . . . . . . . . . . . . . . . . . . . . . . . . . . . . . . . . . 3Atmospheric Pressure Chemical Ionization (APCI) . . . . . . . . . . . . . . . . . . . . . 5
Scan Types . . . . . . . . . . . . . . . . . . . . . . . . . . . . . . . . . . . . . . . . . . . . . . . . . . . . . 7Full Scan . . . . . . . . . . . . . . . . . . . . . . . . . . . . . . . . . . . . . . . . . . . . . . . . . . . . . 7Selected Ion Monitoring (SIM) . . . . . . . . . . . . . . . . . . . . . . . . . . . . . . . . . . . . 7
Data Types . . . . . . . . . . . . . . . . . . . . . . . . . . . . . . . . . . . . . . . . . . . . . . . . . . . . . 8Profile Data Type . . . . . . . . . . . . . . . . . . . . . . . . . . . . . . . . . . . . . . . . . . . . . . 8Centroid Data Type . . . . . . . . . . . . . . . . . . . . . . . . . . . . . . . . . . . . . . . . . . . . 9MCA Data Type . . . . . . . . . . . . . . . . . . . . . . . . . . . . . . . . . . . . . . . . . . . . . . . 9
Chapter 2 Functional Description. . . . . . . . . . . . . . . . . . . . . . . . . . . . . . . . . . . . . . . . . . . . . . . . .11Liquid Chromatograph . . . . . . . . . . . . . . . . . . . . . . . . . . . . . . . . . . . . . . . . . . . 14Reference Inlet System . . . . . . . . . . . . . . . . . . . . . . . . . . . . . . . . . . . . . . . . . . . 15Mass Detector . . . . . . . . . . . . . . . . . . . . . . . . . . . . . . . . . . . . . . . . . . . . . . . . . . 18
Front Panel Status Indicator . . . . . . . . . . . . . . . . . . . . . . . . . . . . . . . . . . . . . 18Back Panel Controls and Connections. . . . . . . . . . . . . . . . . . . . . . . . . . . . . . 20Connection Between LC and Mass Detector . . . . . . . . . . . . . . . . . . . . . . . . . 22API Sources . . . . . . . . . . . . . . . . . . . . . . . . . . . . . . . . . . . . . . . . . . . . . . . . . . 22RF/dc Prefilter. . . . . . . . . . . . . . . . . . . . . . . . . . . . . . . . . . . . . . . . . . . . . . . . 25Mass Analyzer . . . . . . . . . . . . . . . . . . . . . . . . . . . . . . . . . . . . . . . . . . . . . . . . 26Ion Detection System . . . . . . . . . . . . . . . . . . . . . . . . . . . . . . . . . . . . . . . . . . 28Vacuum System. . . . . . . . . . . . . . . . . . . . . . . . . . . . . . . . . . . . . . . . . . . . . . . 30Inlet Gas Hardware . . . . . . . . . . . . . . . . . . . . . . . . . . . . . . . . . . . . . . . . . . . . 32
Cone Wash System . . . . . . . . . . . . . . . . . . . . . . . . . . . . . . . . . . . . . . . . . . . . . . 36
Contents
Contents
xii MSQ Plus Mass Detector Hardware Manual Thermo Scientific
Data System . . . . . . . . . . . . . . . . . . . . . . . . . . . . . . . . . . . . . . . . . . . . . . . . . . . 37Computer Hardware . . . . . . . . . . . . . . . . . . . . . . . . . . . . . . . . . . . . . . . . . . . 38Xcalibur Software . . . . . . . . . . . . . . . . . . . . . . . . . . . . . . . . . . . . . . . . . . . . . 38MSQ Plus Mass Detector Server . . . . . . . . . . . . . . . . . . . . . . . . . . . . . . . . . . 40Tune Window. . . . . . . . . . . . . . . . . . . . . . . . . . . . . . . . . . . . . . . . . . . . . . . . 41Printer . . . . . . . . . . . . . . . . . . . . . . . . . . . . . . . . . . . . . . . . . . . . . . . . . . . . . . 44
Chapter 3 Daily Operation . . . . . . . . . . . . . . . . . . . . . . . . . . . . . . . . . . . . . . . . . . . . . . . . . . . . . . .45Before Operating the Mass Detector . . . . . . . . . . . . . . . . . . . . . . . . . . . . . . . . . 45
Checking the Nitrogen Supply . . . . . . . . . . . . . . . . . . . . . . . . . . . . . . . . . . . 45Checking the Disk Space . . . . . . . . . . . . . . . . . . . . . . . . . . . . . . . . . . . . . . . . 45Checking the Oil Level in the Oil Mist Filter . . . . . . . . . . . . . . . . . . . . . . . . 46
After Operating the Mass Detector . . . . . . . . . . . . . . . . . . . . . . . . . . . . . . . . . . 47Flushing the API Probes . . . . . . . . . . . . . . . . . . . . . . . . . . . . . . . . . . . . . . . . 47Placing the System in the Off Mode . . . . . . . . . . . . . . . . . . . . . . . . . . . . . . . 48Draining the Oil Mist Filter and Purging the Pump Oil . . . . . . . . . . . . . . . . 48Emptying the Solvent Waste Bottles . . . . . . . . . . . . . . . . . . . . . . . . . . . . . . . 49
Chapter 4 Switching Probes . . . . . . . . . . . . . . . . . . . . . . . . . . . . . . . . . . . . . . . . . . . . . . . . . . . . .51Switching from ESI to APCI . . . . . . . . . . . . . . . . . . . . . . . . . . . . . . . . . . . . . . . 51Switching from APCI to ESI . . . . . . . . . . . . . . . . . . . . . . . . . . . . . . . . . . . . . . . 53
Chapter 5 Routine and Preventive Maintenance. . . . . . . . . . . . . . . . . . . . . . . . . . . . . . . . . . . .55Maintenance Schedule. . . . . . . . . . . . . . . . . . . . . . . . . . . . . . . . . . . . . . . . . . . . 55Maintaining the ESI Probe . . . . . . . . . . . . . . . . . . . . . . . . . . . . . . . . . . . . . . . . 56
Removing the ESI Probe . . . . . . . . . . . . . . . . . . . . . . . . . . . . . . . . . . . . . . . . 57Removing the ESI Capillary . . . . . . . . . . . . . . . . . . . . . . . . . . . . . . . . . . . . . 59Cleaning or Replacing the ESI Capillary . . . . . . . . . . . . . . . . . . . . . . . . . . . . 61Replacing the Ceramic Sleeve of the ESI Probe . . . . . . . . . . . . . . . . . . . . . . . 61Installing the ESI Capillary . . . . . . . . . . . . . . . . . . . . . . . . . . . . . . . . . . . . . . 63Installing the ESI Probe. . . . . . . . . . . . . . . . . . . . . . . . . . . . . . . . . . . . . . . . . 67
Maintaining the APCI Probe. . . . . . . . . . . . . . . . . . . . . . . . . . . . . . . . . . . . . . . 67Removing the APCI Probe . . . . . . . . . . . . . . . . . . . . . . . . . . . . . . . . . . . . . . 68Removing the APCI Capillary . . . . . . . . . . . . . . . . . . . . . . . . . . . . . . . . . . . . 69Installing the APCI Capillary. . . . . . . . . . . . . . . . . . . . . . . . . . . . . . . . . . . . . 71Installing the APCI Probe . . . . . . . . . . . . . . . . . . . . . . . . . . . . . . . . . . . . . . . 73
Maintaining the Probe Heater . . . . . . . . . . . . . . . . . . . . . . . . . . . . . . . . . . . . . . 74Removing the Probe Heater . . . . . . . . . . . . . . . . . . . . . . . . . . . . . . . . . . . . . 74Cleaning the Probe Heater . . . . . . . . . . . . . . . . . . . . . . . . . . . . . . . . . . . . . . 77Replacing the Detent Screw Insulator . . . . . . . . . . . . . . . . . . . . . . . . . . . . . . 77Installing the Probe Heater . . . . . . . . . . . . . . . . . . . . . . . . . . . . . . . . . . . . . . 78
Contents
Thermo Scientific MSQ Plus Mass Detector Hardware Manual xiii
Maintaining the Source Block Assembly . . . . . . . . . . . . . . . . . . . . . . . . . . . . . . 79Preparing the LC/MS System for Maintenance . . . . . . . . . . . . . . . . . . . . . . . 80Clearing Access to the Source Block Assembly. . . . . . . . . . . . . . . . . . . . . . . . 81Removing the Entrance Cone and the Cone Wash Nozzle . . . . . . . . . . . . . . 82Cleaning the Entrance Cone and the Cone Wash Nozzle . . . . . . . . . . . . . . . 83Removing the Source Block Assembly . . . . . . . . . . . . . . . . . . . . . . . . . . . . . . 86Cleaning the RF/dc Prefilter . . . . . . . . . . . . . . . . . . . . . . . . . . . . . . . . . . . . . 87Cleaning the Extraction Cone and the Source Block . . . . . . . . . . . . . . . . . . . 89Repairing the Entrance Cone. . . . . . . . . . . . . . . . . . . . . . . . . . . . . . . . . . . . . 91Assembling the Source Block Assembly . . . . . . . . . . . . . . . . . . . . . . . . . . . . . 92Installing the Source Block Assembly. . . . . . . . . . . . . . . . . . . . . . . . . . . . . . . 93
Maintaining the Forepump . . . . . . . . . . . . . . . . . . . . . . . . . . . . . . . . . . . . . . . . 95Maintaining the Turbomolecular Pump . . . . . . . . . . . . . . . . . . . . . . . . . . . . . . 96
Removing the Turbomolecular Pump Lubricant Reservoir . . . . . . . . . . . . . . 96Replacing the Turbomolecular Pump Lubricant Reservoir . . . . . . . . . . . . . . 98
Chapter 6 System Shutdown . . . . . . . . . . . . . . . . . . . . . . . . . . . . . . . . . . . . . . . . . . . . . . . . . . . . .99Shutting Down the System in an Emergency. . . . . . . . . . . . . . . . . . . . . . . . . . . 99Turning Off the Nitrogen Gas . . . . . . . . . . . . . . . . . . . . . . . . . . . . . . . . . . . . 100Placing the System in the Off Mode . . . . . . . . . . . . . . . . . . . . . . . . . . . . . . . . 101
Turning Off the Mass Detector from the Xcalibur Data System . . . . . . . . . 101Turning Off the Mass Detector from the Tune Window. . . . . . . . . . . . . . . 103
Shutting the System Down for Non-Routine Maintenance . . . . . . . . . . . . . . . 104Restarting the System Following a Complete Shutdown . . . . . . . . . . . . . . . . . 105
Checking the System Connections . . . . . . . . . . . . . . . . . . . . . . . . . . . . . . . 105Restarting the MSQ Plus Mass Detector . . . . . . . . . . . . . . . . . . . . . . . . . . . 106
Resetting the MSQ Plus Mass Detector. . . . . . . . . . . . . . . . . . . . . . . . . . . . . . 108
Chapter 7 Replaceable Parts. . . . . . . . . . . . . . . . . . . . . . . . . . . . . . . . . . . . . . . . . . . . . . . . . . . .111Consumables . . . . . . . . . . . . . . . . . . . . . . . . . . . . . . . . . . . . . . . . . . . . . . . . . . 111Spares . . . . . . . . . . . . . . . . . . . . . . . . . . . . . . . . . . . . . . . . . . . . . . . . . . . . . . . 116
Kits . . . . . . . . . . . . . . . . . . . . . . . . . . . . . . . . . . . . . . . . . . . . . . . . . . . . . . . 116Chemicals . . . . . . . . . . . . . . . . . . . . . . . . . . . . . . . . . . . . . . . . . . . . . . . . . . 117Source Block Assembly . . . . . . . . . . . . . . . . . . . . . . . . . . . . . . . . . . . . . . . . 117ESI Probe Assembly. . . . . . . . . . . . . . . . . . . . . . . . . . . . . . . . . . . . . . . . . . . 120APCI Probe Assembly . . . . . . . . . . . . . . . . . . . . . . . . . . . . . . . . . . . . . . . . . 121Probe Heater Assembly . . . . . . . . . . . . . . . . . . . . . . . . . . . . . . . . . . . . . . . . 123Vacuum Spares . . . . . . . . . . . . . . . . . . . . . . . . . . . . . . . . . . . . . . . . . . . . . . 124Gas Flow Spares and Nitrogen Generator . . . . . . . . . . . . . . . . . . . . . . . . . . 125Solvent Path and Calibrant Spares . . . . . . . . . . . . . . . . . . . . . . . . . . . . . . . . 125Electronic Spares . . . . . . . . . . . . . . . . . . . . . . . . . . . . . . . . . . . . . . . . . . . . . 126
Connection Kits . . . . . . . . . . . . . . . . . . . . . . . . . . . . . . . . . . . . . . . . . . . . . . . 126Manuals . . . . . . . . . . . . . . . . . . . . . . . . . . . . . . . . . . . . . . . . . . . . . . . . . . . . . 126

Contents
xiv MSQ Plus Mass Detector Hardware Manual Thermo Scientific
Appendix A Optimizing the LC Conditions . . . . . . . . . . . . . . . . . . . . . . . . . . . . . . . . . . . . . . . . . .127Flow Rates. . . . . . . . . . . . . . . . . . . . . . . . . . . . . . . . . . . . . . . . . . . . . . . . . . . . 127LC Solvents and Mobile Phase Additives. . . . . . . . . . . . . . . . . . . . . . . . . . . . . 128
LC Solvents . . . . . . . . . . . . . . . . . . . . . . . . . . . . . . . . . . . . . . . . . . . . . . . . . 128Mobile Phase Additives . . . . . . . . . . . . . . . . . . . . . . . . . . . . . . . . . . . . . . . . 128
Cone Wash System . . . . . . . . . . . . . . . . . . . . . . . . . . . . . . . . . . . . . . . . . . . . . 131Controlling the Cone Wash Pump Through Timed Events . . . . . . . . . . . . . . 133Flow Splitting . . . . . . . . . . . . . . . . . . . . . . . . . . . . . . . . . . . . . . . . . . . . . . . . . 134PEEK Tubing . . . . . . . . . . . . . . . . . . . . . . . . . . . . . . . . . . . . . . . . . . . . . . . . . 134Chemical Kit . . . . . . . . . . . . . . . . . . . . . . . . . . . . . . . . . . . . . . . . . . . . . . . . . . 135
Index . . . . . . . . . . . . . . . . . . . . . . . . . . . . . . . . . . . . . . . . . . . . . . . . . . . . . . . . . . . . . . .139
Thermo Scientific MSQ Plus Mass Detector Hardware Manual xv
P
Preface
This MSQ Plus Mass Detector Hardware Manual describes the operational modes and principal hardware components of the Thermo Scientific™ MSQ Plus™ Mass Detector. It also provides step-by-step instructions for cleaning and maintaining the mass detector.
This manual documents features of the MSQ Plus Mass Detector controlled by the Thermo MSQ 2.0 software. To view the instrument software version of the mass detector once you have configured it, choose Help > About Home Page from the Xcalibur™ Roadmap view.
To suggest changes to documentation or to Help
Complete a brief survey about this document by clicking the button below.Thank you in advance for your help.
Related DocumentationIn addition to this guide, Thermo Fisher Scientific provides the following documents for the MSQ Plus Mass Detector as PDF files:
• MSQ Plus Mass Detector Getting Started Guide
• MSQ Plus Mass Detector Getting Connected Guide
• MSQ Plus Mass Detector Preinstallation Guide
Contents
• Related Documentation
• Safety and Special Notices
• Safety Precautions
• Solvent and Gas Purity Requirements
• Contacting Us

PrefaceRelated Documentation
xvi MSQ Plus Mass Detector Hardware Manual Thermo Scientific
• MSQ Plus Mass Detector Calmix Kit Preparation Guide
• Dionex AXP/AXP-MS Metering Pump Operator’s Manual
• Dionex Chromelon/MSQ Plus Operator’s Guide
• Dionex MSQ Plus Facilities Preinstallation Requirements Guide
• Dionex MSQ Hardware Manual
• Dionex Installation and Commissioning Guide
• Dionex MSQ Preventive Maintenance
• Dionex MSQ10LA Nitrogen Generator for Mass Spectrometers
• Dionex MSQ18LA Nitrogen Generator for Mass Spectrometers
• Dionex N118LOA/N418LA Unpacking & Installation
• Dionex N*18KLA Nitrogen Generator User Manual
• Dionex MSQ Getting Started
• Safety and Regulatory Guide
You also receive a printed copy of the Safety and Regulatory Guide with your MSQ Plus Mass Detector. This guide contains important safety information about Thermo Scientific LC and MS systems. Make sure that all lab personnel have read and have access to this document.
The software also provides Help.
PrefaceSafety and Special Notices
Thermo Scientific MSQ Plus Mass Detector Hardware Manual xvii
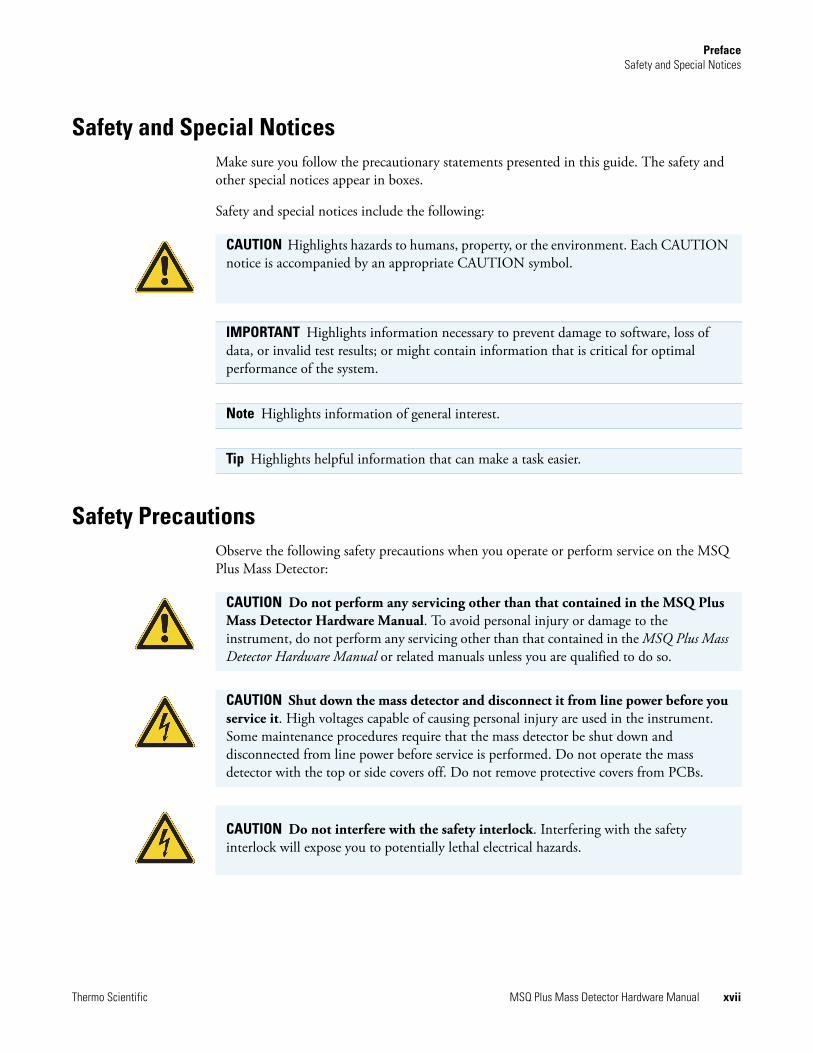
Safety and Special NoticesMake sure you follow the precautionary statements presented in this guide. The safety and other special notices appear in boxes.
Safety and special notices include the following:
Safety PrecautionsObserve the following safety precautions when you operate or perform service on the MSQ Plus Mass Detector:
CAUTION Highlights hazards to humans, property, or the environment. Each CAUTION notice is accompanied by an appropriate CAUTION symbol.
IMPORTANT Highlights information necessary to prevent damage to software, loss of data, or invalid test results; or might contain information that is critical for optimal performance of the system.
Note Highlights information of general interest.
Tip Highlights helpful information that can make a task easier.
CAUTION Do not perform any servicing other than that contained in the MSQ Plus Mass Detector Hardware Manual. To avoid personal injury or damage to the instrument, do not perform any servicing other than that contained in the MSQ Plus Mass Detector Hardware Manual or related manuals unless you are qualified to do so.
CAUTION Shut down the mass detector and disconnect it from line power before you service it. High voltages capable of causing personal injury are used in the instrument. Some maintenance procedures require that the mass detector be shut down and disconnected from line power before service is performed. Do not operate the mass detector with the top or side covers off. Do not remove protective covers from PCBs.
CAUTION Do not interfere with the safety interlock. Interfering with the safety interlock will expose you to potentially lethal electrical hazards.

PrefaceSafety Precautions
xviii MSQ Plus Mass Detector Hardware Manual Thermo Scientific
CAUTION Respect heated zones. Treat heated zones with respect. The ion transfer capillary and the APCI vaporizer might be very hot and might cause severe burns if touched. Allow heated components to cool before you service them.
CAUTION Place the mass detector in Standby (or Off ) mode before you open the atmospheric pressure ionization (API) source. The presence of atmospheric oxygen in the API source when the mass detector is on could be unsafe. The mass detector automatically goes into standby mode when you open the API source; however, take this added precaution for safety reasons.
CAUTION Take care when handling the corona pin. The corona pin is sharp and can cause personal injury. Take care when removing or installing the corona pin.
CAUTION Make sure you have sufficient nitrogen for your API source. Before you begin normal operation each day, make sure that you have sufficient nitrogen for your API source. The presence of atmospheric oxygen in the API source when the mass detector is on could be unsafe.
CAUTION Contain waste streams. Because the API source can accommodate high solvent flow rates, you must make provisions to collect the waste solvent.
CAUTION Provide adequate fume exhaust systems for the API source solvent waste container and the forepump. Your laboratory must be equipped with at least two fume exhaust systems: one to vent the waste container connected to the exhaust port (API solvent drain) on the back of the mass detector and the other to vent the forepump exhaust. As described in the MSQ Plus Mass Detector Getting Connected Guide, route the (blue) forepump exhaust hose to a dedicated fume exhaust system. Because the exhaust hose acts as a trap for exhaust fumes that would otherwise recondense in the forepump oil, the hose should travel at floor level for a minimum of two meters (78.5 in.) before it reaches the external exhaust system. Route tubing from the waste container connected to the exhaust port on the back of the mass detector to a second dedicated fume exhaust system. Consult local regulations for the proper method of exhausting the fumes from your system.
Do not vent the PVC drain tube (or any vent tubing connected to the waste container) to the same fume exhaust system that is connected to the forepump. The forepump exhaust contains pump oil, which can seriously contaminate the analyzer optics of the mass spectrometer.

PrefaceSolvent and Gas Purity Requirements
Thermo Scientific MSQ Plus Mass Detector Hardware Manual xix
Solvent and Gas Purity RequirementsBecause the MSQ Plus Mass Detector is extremely sensitive to solvent impurities, use the highest purity solvents available. Use liquid chromatography grade or higher solvents and buffers. Because deionized water contains chemicals that the MSQ Plus Mass Detector can detect, use distilled water.
The following table lists international sources that can supply high-quality solvents.
Contacting UsThere are several ways to contact Thermo Fisher Scientific for the information you need.
To contact Technical Support
Find software updates and utilities to download at mssupport.thermo.com.
To contact Customer Service for ordering information
To get local contact information for sales or service
Go to www.thermoscientific.com/wps/portal/ts/contactus.
Solvent source Telephone or fax number
Mallinckrodt/Baker, Inc. Tel: (800) 582-2537Fax: (908) 859-9370
Burdick & Jackson, Inc. Tel: (800) 368-0050Fax: (616) 725-6216
E. M. Science, Inc. Tel: (800) 222-0342Fax: (800) 336-4422
Phone 800-532-4752
Fax 561-688-8736
E-mail [email protected]
Knowledge base www.thermokb.com
Phone 800-532-4752
Fax 561-688-8731
E-mail [email protected]
Web site www.thermo.com/ms

To copy manuals from the Internet
Go to mssupport.thermo.com, agree to the Terms and Conditions, and then click Customer Manuals in the left margin of the window.
To suggest changes to documentation or to Help
• Fill out a reader survey online at www.surveymonkey.com/s/PQM6P62.
• Send an e-mail message to the Technical Publications Editor at [email protected].

Thermo Scientific MSQ Plus Mass Detector Hardware Manual 1
1
Introduction
The MSQ Plus Mass Detector is an advanced analytical instrument that includes a mass detector, forepump, data system, and an optional cone wash pump. Integrated with an LC system, the MSQ Plus Mass Detector provides the separation capability of an HPLC and the detection capability of a single-quadrupole mass detector. See Figure 1.
Figure 1. MSQ Plus Mass Detector and the Accela™ LC system
Contents
• Overview
• Ion Polarity Modes
• Ionization Techniques
• Scan Types
• Data Types
1 IntroductionOverview
2 MSQ Plus Mass Detector Hardware Manual Thermo Scientific
Overview In a typical LC/MS analysis, an analytical pump pushes solvent through an LC column under high pressure. An autosampler introduces a measured quantity of sample into this solvent stream. As the solvent stream passes through the LC column, the sample separates into its chemical components. The rate at which the components of the sample elute from the column depends on their relative affinities to the liquid mobile phase solvent and the solid particles that make up the column packing. As the separated chemical components exit the LC column they pass through a transfer line and enter the MSQ Plus Mass Detector.
The MSQ Plus Mass Detector consists of an atmospheric pressure ionization (API) source, a transfer lens, a mass analyzer, and an ion detection system. A vacuum manifold encloses part of the API source, the M-path, the transfer lens, the mass analyzer, and the ion detection system.
Mass detectors can detect only ionized molecules. The MSQ Plus Mass Detector provides two techniques: atmospheric pressure chemical ionization (APCI) and electrospray (ESI). In APCI mode, molecules ionize in the gaseous phase as they enter the API source. In ESI mode, molecules ionize in the liquid phase before they enter the ion source. For both ionization techniques, the mass detector can place either a positive or negative charge on the capillary of the API probe at any point in time. During a chromatographic run, the mass detector can switch the charge applied to the capillary. By repelling ions of like charge towards the entrance of the mass detector, the charged capillary acts as a charge filter.
The vacuum produced by the forepump draws both neutral molecules and ionized molecules through the entrance cone into the M-path region of the mass detector. The charge on the ionized molecules depends on the selected ion polarity mode. In the M-path region, the low vacuum of 1 torr produced by the forepump draws the neutral molecules out of the mass detector, enriching the ion stream. By the time the ion stream reaches the exit cone, the solvent flow has decreased by three orders of magnitude. The charge on the exit cone focuses and propels the ionized molecules into the intermediate vacuum region of the mass detector. As the ionized molecules pass through the exit cone, the transfer lens focuses them into a fine particle stream and transmits them to the mass analyzer. The mass analyzer transmits ions of a selected mass-to-charge ratio to the ion detection system, where they produce a signal. The system electronics amplify the signal, which is then transmitted through a USB connection to the MSQ Plus Mass Detector data system.
Ion Polarity ModesYou can operate the MSQ Plus Mass Detector in the following ion polarity modes: positive, negative, or positive-negative switching. The application controls the ion polarity by placing either a positive or negative charge on the capillary of the API probe.

1 IntroductionIonization Techniques
Thermo Scientific MSQ Plus Mass Detector Hardware Manual 3
The information obtained from a positive-ion mass spectrum is different from and complementary to that obtained from a negative-ion spectrum. Switching between positive and negative ionization modes in a single analytical run gives you the ability to identify more compounds in a single run.
Rapid ion polarity switching is a technique that is applied to several important areas of MS analysis, for example:
• Quantitation of different chemistries within the same run
In drug metabolism studies, certain compounds have functional groups that readily accept a proton (H+)—for example, compounds containing a primary amino group (R–NH2 + H+ --> R-NH3)—and respond best in the positive ion polarity mode. Other compounds have functional groups that readily lose a proton—for example, carboxylic acids (R-CO2H --> R-CO2
–)—and respond best in the negative ion polarity mode.
• Rapid screening of unknown analytes
Some compounds with functional groups, such as carboxylic acids, respond only in the negative mode. Some compounds with functional groups, such as amines, alcohols, and ketones, respond better or only in the positive mode. If you do not know the identity of your analyte, screen in both modes.
Ionization TechniquesYou can operate the MSQ Plus Mass Detector in both electrospray (ESI) and atmospheric pressure chemical ionization (APCI) modes.
Electrospray (ESI)
The electrospray (ESI) technique transfers ions in solution into the gas phase1.
Ion Desolvation Mechanism
To produce gas phase ions in ESI, the following sequence of events occurs:
1. The ESI capillary, to which a high voltage is applied, sprays sample solution into a fine mist of droplets that are electrically charged at their surface.
2. The electrical charge density at the surface of the droplets increases as solvent evaporates from the droplets until it reaches a critical point, known as the Rayleigh stability limit. At this critical point, the droplets divide into smaller droplets because the electrostatic
1 Refer to the following papers for more information on the electrospray process: Fenn, J. B.; Mann, M.; Meng, C. K.; Wong, S. F.; Whitehouse, C. M. Mass Spectrometry Reviews 1990, 9, 37; Smith, R. D.; Loo, J. A.; Edmonds, C. G.; Barinaga, C. J.; Udseth, H. R. Anal. Chem. 1990, 62, 882; Ikonomou, M. G.; Blades, A. T.; Kebarle, P. Anal. Chem. 1991, 63, 1989.

1 IntroductionIonization Techniques
4 MSQ Plus Mass Detector Hardware Manual Thermo Scientific
repulsion is greater than the surface tension. The process repeats itself, forming smaller and smaller droplets.
3. From the very small, highly charged droplets, the force of electrostatic repulsion ejects sample ions into the gas phase.
4. The charged ESI capillary attracts gas phase ions of opposite charge and repels gas phase ions of the same charge.
The low vacuum of 1 torr produced by the forepump draws both ionized molecules repelled by the charge on the capillary and neutral molecules in the gaseous phase into the mass detector through the entrance cone. Figure 2 shows the steps in the formation of gas phase ions from highly charged droplets.
Figure 2. Positive ion electrospray mechanism
Spectral Characteristics
In ESI mode, ionization takes place in the liquid phase. Polar compounds of low molecular weight (<1000 Da) typically form singly charged ions by the loss or gain of a proton. Basic compounds (for example, amines) can form a protonated molecule [M + H]+, which can be analyzed in the positive ion polarity mode to give a peak at an m/z value of M + 1, where M equals the mass of the original molecule. Acidic compounds (for example, sulphonic acids) can form a deprotonated molecule [M – H]-, which can be analyzed in the negative ion polarity mode to give a peak at an m/z value of M – 1. Because electrospray is a very soft ionization technique, there is usually little or no fragmentation, and the spectrum contains only the protonated or deprotonated molecule.
Preformed ions can also include adducts. Adduct ions are produced by the interaction reaction between a molecule and an ionic species to form an ion that contains all the constituent atoms of the original molecule, as well as one or more additional atoms. Common adducts are ammonium ions (NH4
+), yielding an m/z value of [M + 18]+, sodium ions (Na+), yielding an m/z value of [M + 23]+, and potassium ions (K+), yielding an m/z value of [M + 39]+.
+
++
+ ++
++
++
+ ++++
++++++
++ +
++
++ +
++
+
++
Negative ions attracted back to the capillary
Positive ions ejected from the surface
Ions moving towards the surface
Large dropletFine sprayPositively charged capillary +3 to +5 kV
Step 1 Step 2 Step 3 Step 4

1 IntroductionIonization Techniques
Thermo Scientific MSQ Plus Mass Detector Hardware Manual 5
Sample ions can carry a single charge or multiple charges. The number of charges carried by the sample ions depends on the structure of the analyte of interest and the carrier solvent. Because of multiple charging, you can use the ESI mode to analyze ions with molecular weights greater than 100000 Da. This makes ESI especially useful for the mass analysis of polar compounds, including biological polymers and industrial polymers. The mass spectra for these compounds typically consist of a series of peaks corresponding to a distribution of multiply charged analyte ions.
You can run ESI in three ion-polarity modes: positive, negative, or positive-negative switching. Because like charges repel each other, select the ion polarity mode that matches the polarity of your analytes:
• For acidic compounds, which form negative ions in solution, select the negative ion polarity mode.
• For basic compounds, which form positive ions in solution, select the positive ion polarity mode.
• For unknown mixtures, select the positive-negative switching mode.
Droplet size, surface charge, liquid surface tension, solvent volatility, and ion solvation strength affect the ESI process. Large droplets with high surface tension, low volatility, strong ion solvation, low surface charge, and high conductivity prevent good electrospray. The buffer type and buffer strength have a noticeable effect on sensitivity, making it important to choose these variables correctly.
Organic solvents such as methanol, acetonitrile, and isopropyl alcohol are superior to water for ESI. Volatile acids and bases can be used, but salt concentrations above 10 mM and strong acids and bases are extremely detrimental to the mass spectrometer.
The rules for a good electrospray are as follows:
• Keep salts out of the solvent system.
• Use organic or aqueous solvent systems and volatile acids and bases.
• Optimize the pH of the solvent system.
Atmospheric Pressure Chemical Ionization (APCI)
Atmospheric pressure chemical ionization (APCI) is a soft ionization technique that is used to analyze compounds of medium polarity that have some volatility.
Ion Generation Mechanism
The following sequence of events produces ions in APCI:
1. The APCI capillary sprays the sample solution into a fine mist of droplets.
2. A high-temperature tube (the heated nebulizer) vaporizes the droplets.

1 IntroductionIonization Techniques
6 MSQ Plus Mass Detector Hardware Manual Thermo Scientific
3. A high voltage applied to a needle located near the exit end of the tube creates a corona discharge. Energized electrons produced by the corona discharge ionize the nitrogen nebulizing gas. The nitrogen ions react with the solvent molecules to form solvent ions.
4. The solvent ions react with sample molecules to form sample ions.
Figure 3 shows these four steps in APCI.
Figure 3. Positive-ion APCI mechanism
APCI is a gas phase ionization technique in which the gas phase acidities and basicities of the analyte and solvent vapor play an important role.
In the positive-ion mode, sample ionization occurs in a series of reactions that start with the electron-initiated cation formation. Following are typical examples of primary, secondary, and adduct-ion formation.
Primary ion formation:
e– + N2 —> N2+• + 2e–
Secondary ion formation:
N2+• + H2O —> N2 + H2O+•
H2O+• + H2O —>H3O+ + HO•
Proton transfer:
H3O+ + M —>(M + H)+ + H2O
In negative-ion mode, (M – H)– is typically formed by the abstraction of a proton by OH–.
N2
N2
Heated nebulizerSample molecules
Solvent molecules
Corona pin produces a corona discharge
Ionized sample molecules
Step 1 Step 2 Step 3 Step 4
Liquid

1 IntroductionScan Types
Thermo Scientific MSQ Plus Mass Detector Hardware Manual 7
Because the APCI process produces only singly charged ions, its use is limited to small molecules with molecular weights up to about 2000 Da. Because the APCI process takes place in the gas phase, minor changes in most variables such as changes in buffer or buffer strength have no effect.
You can use APCI in the positive, negative, or positive-negative switching ion polarity mode. For most molecules, the positive-ion mode produces a stronger ion current, especially for molecules with one or more basic nitrogen (or other basic) atoms. Exceptions to the general rule are molecules with acidic sites such as carboxylic acids and acid alcohols, which produce more negative ions than positive ions. Although the negative ion polarity mode generates fewer ions, it also generates less chemical noise than does the positive mode, making it more selective.
Spectral Characteristics
Like electrospray, APCI is a soft ionization technique and forms singly charged ions, either the protonated, [M + H]+, or deprotonated, [M – H]–, molecule, depending on the selected ion polarity mode. Unlike electrospray, however, APCI does not produce multiply charged ions, so it is unsuitable for the analysis of high-molecular-weight compounds, such as proteins or peptides.
Because APCI uses a heated probe to aid the desolvation process, it is not suitable for thermally labile (unstable) compounds, which can fragment in the ion source.
Scan TypesThe MSQ Plus Mass Detector provides two scan types, full scan and selected ion monitoring (SIM).
Full Scan
A full scan provides a mass spectrum over a defined mass range. Because the mass detector has to monitor multiple m/z values during a chromatographic run, a full scan does not provide the sensitivity that SIM provides. The faster the chromatographic peaks elute, the lower the sensitivity.
Selected Ion Monitoring (SIM)
In selected ion monitoring (SIM), you specify the monitoring of a particular ion or set of ions. Because only a few ions are monitored during a chromatographic run, SIM can provide lower detection limits than a full-scan analysis. Use SIM if you need to detect small quantities of a target compound and you know the mass spectrum of your target compounds and the mass spectrum of the sample matrix.

1 IntroductionData Types
8 MSQ Plus Mass Detector Hardware Manual Thermo Scientific
SIM can improve the detection limit for quantitative analyses, but it can also reduce specificity. SIM monitors only specific ions. Therefore, any compound that produces those ions appears to be the target compound, resulting in false positives.
Data TypesThe MSQ Plus Mass Detector provides profile, centroid, and MCA data types.
From the Xcalibur data system, you can acquire and display mass spectral data (intensity versus mass-to-charge ratio) in the profile or centroid data types (peak formats). From the Tune window, you can acquire and display mass spectral data in all three data types.
Profile Data Type
In the profile data type, you can see the shape of the spectral peaks in the mass spectrum, as shown in Figure 4.
Figure 4. Spectrum of D-raffinose shown in profile peak format in full scan
Each atomic mass unit is divided into approximately 15 sampling intervals. The intensity of the ion current is determined at each of the sampling intervals. The intensity at each sampling interval is displayed with the intensities connected by a continuous line.
In general, the profile data type is used when you tune and calibrate the mass detector so that you can easily see and measure mass resolution.
275 300 325 350 375 400 425 450 475 500 525m/z 0
100
%
503
281
325 283 504

1 IntroductionData Types
Thermo Scientific MSQ Plus Mass Detector Hardware Manual 9
Centroid Data Type
In the centroid data type, the mass spectrum appears as a bar graph, as shown in Figure 5. In this data type, the Xcalibur data system sums the intensities for each 15-point sampling interval and displays the summed intensities versus the integral center of mass of the sampling interval. To increase the scan speed and reduce the disk space requirements, use the centroid data type for data acquisition. Data processing is also much faster for centroid data.
Figure 5. Spectrum of pentachlorophenol shown as centroid peak type in full scan
MCA Data Type
The third type of full scan acquisition is MCA, shown in Figure 6. Such data can be thought of as “summed profile,” with only one intensity-accumulated scan being written to disk for a given experiment. As the Xcalibur data system acquires each scan, it adds the intensity data to the accumulated summed data of previous scans.
120 140 160 180 200 220 240 260 280 m/z 0
100
%
265
263
267

1 IntroductionData Types
10 MSQ Plus Mass Detector Hardware Manual Thermo Scientific
Figure 6. Spectrum of horse heart myoglobin shown as MCA in full scan
An advantage of MCA is that although noise accumulates at the same rate as sample-related data, summing random noise over a number of scans reduces its effect, increasing the signal-to-noise ratio. A further advantage of MCA is that the Xcalibur data system writes data to disk only at the end of an experiment, significantly reducing disk space requirements.
Because an MCA raw file contains only one scan, you cannot use the MCA for time-resolved data such as LC/MS analyses. Generally, you use MCA to acquire data when you perform infusion or loop injection experiments on samples of fairly weak concentration to enhance the signal. You can view the real-time spectrum and stop the data acquisition when you obtain the required results. MCA is particularly useful for the acquisition of raw data from the infusion of proteins and peptides.
700 800 900 1000 1100 1200 1300 m/z 0
100
%
848
808
771
738
707 694
893
942
998
944
1060
999 1131
1212 1305

Thermo Scientific MSQ Plus Mass Detector Hardware Manual 11
2
Functional Description
This chapter describes the principal components of the MSQ Plus Mass Detector and their functions. See Figure 7.
Contents
• Liquid Chromatograph
• Reference Inlet System
• Mass Detector
• Cone Wash System
• Data System
2 Functional Description
12 MSQ Plus Mass Detector Hardware Manual Thermo Scientific
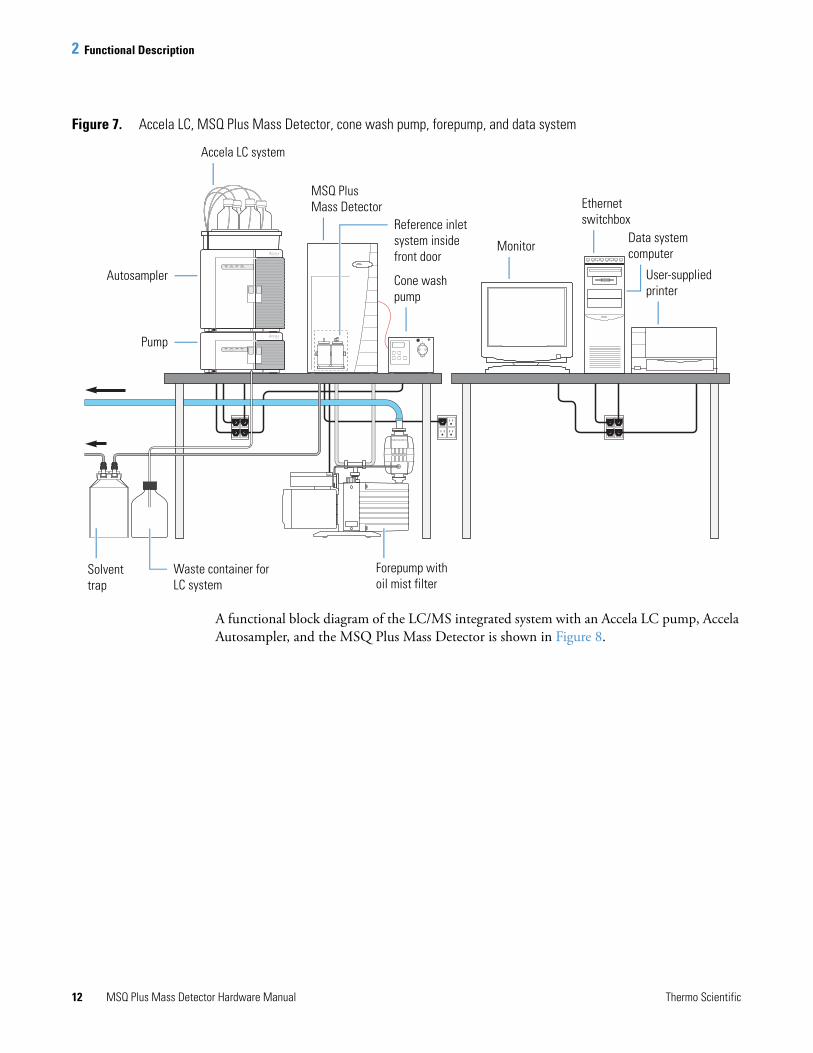
Figure 7. Accela LC, MSQ Plus Mass Detector, cone wash pump, forepump, and data system
A functional block diagram of the LC/MS integrated system with an Accela LC pump, Accela Autosampler, and the MSQ Plus Mass Detector is shown in Figure 8.
Oil Mist Filter EMF 20
Power Communication Run Degas
ACCELAPump
Power Communication Run Temperature
ACCELAAutosampler
MSQ Plus Mass Detector
Cone wash pump
Accela LC system
Monitor
Ethernet switchbox
User-supplied printer
Data system computer
Autosampler
Pump
Solvent trap
Forepump with oil mist filter
Waste container for LC system
Reference inlet system inside front door

2 Functional Description
Thermo Scientific MSQ Plus Mass Detector Hardware Manual 13
Figure 8. Functional block diagram of the LC/MS system
A sample transfer line connects the Accela LC to the MSQ Plus Mass Detector. The Accela LC system is usually installed to the left of the MSQ Plus Mass Detector to minimize the length of tubing required to connect the outlet from the LC to the inlet of the mass spectrometer. You can also integrate liquid chromatography systems supplied by other manufacturers with the MSQ Plus Mass Detector.
An autosampler injects samples into the mobile phase stream provided by the LC pump. As the stream passes through the LC column, the sample mixture divides between a solid stationary phase of large surface area and the liquid mobile phase. The molecular structure of each component of the mixture determines when each component elutes from the column.
The outlet of the LC column can be directly connected to a UV detector, the mass detector, or both with a split flow tee. For instructions on connecting a split flow tee, see “Optimizing the LC Conditions” on page 127. When preformed sample ions enter the API source of the mass detector, they are desolvated by electrospray (ESI), or sample molecules are desolvated and ionized by atmospheric pressure chemical ionization (APCI). The vacuum system draws the vaporized molecules and ions into the ion optics. The ion optics focus and accelerate the resulting sample ions into the mass analyzer, where they are analyzed according to their mass-to-charge ratios. As the mass analyzer ejects sample ions, an ion detection system detects them, producing an ion current signal. The system electronics receive the ion current signal, which is proportional to the number of ions in solution, and amplify it. Then they pass it on to the data system for further processing, storage, and display.
Autosampler
LC pump
API source
Ion optics
Mass analyzer
Ion detection system
Vacuum system
Instrument control
electronic assemblies
Reference inlet
system
Printer
Personal computer
Video monitor
Column
MSQ Plus Mass Detector Data system
Narrow, double-headed arrows represent electrical connections.
Broad, single-headed arrows represent the flow of sample molecules through the instrument.
2 Functional DescriptionLiquid Chromatograph
14 MSQ Plus Mass Detector Hardware Manual Thermo Scientific
Liquid ChromatographThe LC pump pumps the mobile phase through the LC column and into the API source. The autosampler introduces the sample into the mobile phase stream.
Contact closure provides autosampler start and stop signals to the MSQ Plus Mass Detector. Refer to the MSQ Plus Mass Detector Getting Connected Guide for information on connecting an autosampler to the MSQ Plus Mass Detector by contact closure.
Configure the Xcalibur data system for your LC devices with the Xcalibur Instrument Configuration application.
To open the Instrument Configuration application
• Double-click the Instrument Configuration icon, , on the Windows™ desktop.
–or–
• Choose Start > Programs >Thermo Foundation x.x > Instrument Configuration.
The Thermo Foundation Instrument Configuration window opens, as shown in Figure 9.
To minimize the number of devices displayed in the Devices box
Do one of the following:
• Select All in the Device Type box to display all the available devices controlled by the Xcalibur data system.
• Select LC in the Device Type box to display only LC pumps.
• Select AS in the Device Type box to display only autosamplers and devices that include an autosampler.
• Select Detector in the Device Type box to display only detectors.
• Select MS in the Device Type box to display only mass detectors.
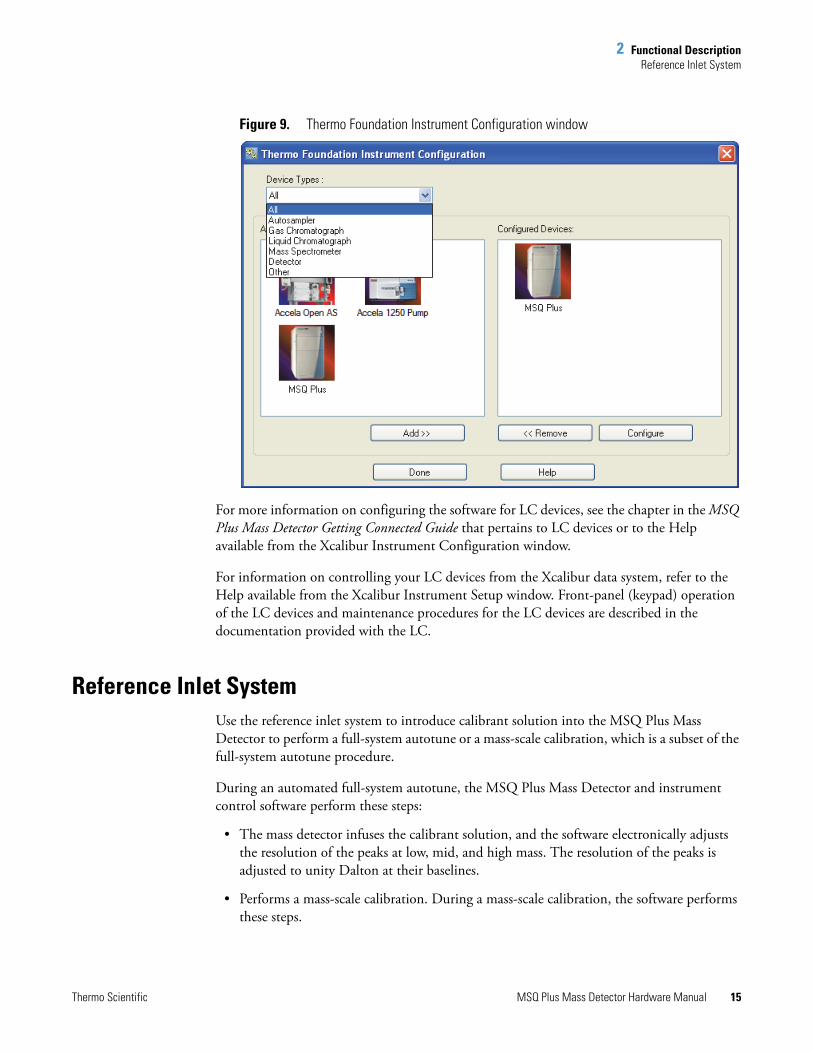
2 Functional DescriptionReference Inlet System
Thermo Scientific MSQ Plus Mass Detector Hardware Manual 15
Figure 9. Thermo Foundation Instrument Configuration window
For more information on configuring the software for LC devices, see the chapter in the MSQ Plus Mass Detector Getting Connected Guide that pertains to LC devices or to the Help available from the Xcalibur Instrument Configuration window.
For information on controlling your LC devices from the Xcalibur data system, refer to the Help available from the Xcalibur Instrument Setup window. Front-panel (keypad) operation of the LC devices and maintenance procedures for the LC devices are described in the documentation provided with the LC.
Reference Inlet SystemUse the reference inlet system to introduce calibrant solution into the MSQ Plus Mass Detector to perform a full-system autotune or a mass-scale calibration, which is a subset of the full-system autotune procedure.
During an automated full-system autotune, the MSQ Plus Mass Detector and instrument control software perform these steps:
• The mass detector infuses the calibrant solution, and the software electronically adjusts the resolution of the peaks at low, mid, and high mass. The resolution of the peaks is adjusted to unity Dalton at their baselines.
• Performs a mass-scale calibration. During a mass-scale calibration, the software performs these steps.

2 Functional DescriptionReference Inlet System
16 MSQ Plus Mass Detector Hardware Manual Thermo Scientific
– Compares the empirically determined masses of the factory-supplied calibrant solution to a reference file of the same compound that contains the correct mass for each peak.
– Adjusts the empirically determined masses in the acquired data file to match those in the reference file.
The software applies these adjustments to all subsequent acquisitions until you perform a new full-system autotune or mass-scale calibration.
After installing the MSQ Plus Mass Detector, a Thermo Fisher Scientific service engineer performs a full-system autotune. You must repeat the procedure if you move the MSQ Plus Mass Detector to a new location, install or update the Xcalibur data system, or change the laboratory environment. If you notice a drift in the mass accuracy of your analyses, you should perform a mass-scale calibration.
The reference inlet system consists of a reference inlet reservoir, a waste reservoir nitrogen pressurization line, a PEEK™ delivery tube, and a Rheodyne™ microinjection (switching) valve. One end of the PEEK tubing is inserted into the reference reservoir and the other end of the tubing is attached to port 5 of the Rheodyne microinjection valve.
Pressuring the reference reservoir with nitrogen gas and switching the valve to the load position forces the calibrant solution through the tubing into a 500 L sample loop, as shown in Figure 10. After the sample loop is filled, the valve switches to the inject position, allowing mobile phase to push the calibrant out of the sample loop and through the API probe, as shown in Figure 11.
Note Perform a mass-scale calibration by selecting either the Full System Autotune or the Mass Scale Calibration option from the Instrument Tuning and Calibration wizard.
CAUTION The union that connects the Rheodyne microinjection (switching) valve to the API probe is a grounding union. Do not connect port 3 of the Rheodyne microinjection directly to the inlet of the API probe. Bypassing the grounding union could lead to instrument damage and personal injury.
Note Thermo Fisher Scientific recommends that you avoid using the reference inlet for sample introduction. This inlet is used exclusively for autotune.

2 Functional DescriptionReference Inlet System
Thermo Scientific MSQ Plus Mass Detector Hardware Manual 17
Figure 10. Microinjection (switching) valve in the Load position
Figure 11. Microinjection (switching) valve in the Inject position
12
3
4 5
6
500 uL sample loop
To waste
Nitrogen line
Clip
Reference inlet reservoirWaste reservoir
Connection to LC
Grounding union
To API probe
12
3
4 5
6
500 uL sample loop
To waste
Nitrogen line
Clip
Reference inlet reservoirWaste reservoir
Connection to LC
Grounding union
To API probe

2 Functional DescriptionMass Detector
18 MSQ Plus Mass Detector Hardware Manual Thermo Scientific
Mass DetectorThe MSQ Plus Mass Detector provides sample ionization and mass analysis of samples injected with an autosampler or samples infused with the reference inlet system. The MSQ Plus Mass Detector uses a quadrupole mass analyzer with an API source external to the mass analyzer.
This section describes the following components of the MSQ Plus Mass Detector:
• Front Panel Status Indicator
• Back Panel Controls and Connections
• Connection Between LC and Mass Detector
• API Sources
• RF/dc Prefilter
• Mass Analyzer
• Ion Detection System
• Vacuum System
• Inlet Gas Hardware
Front Panel Status Indicator
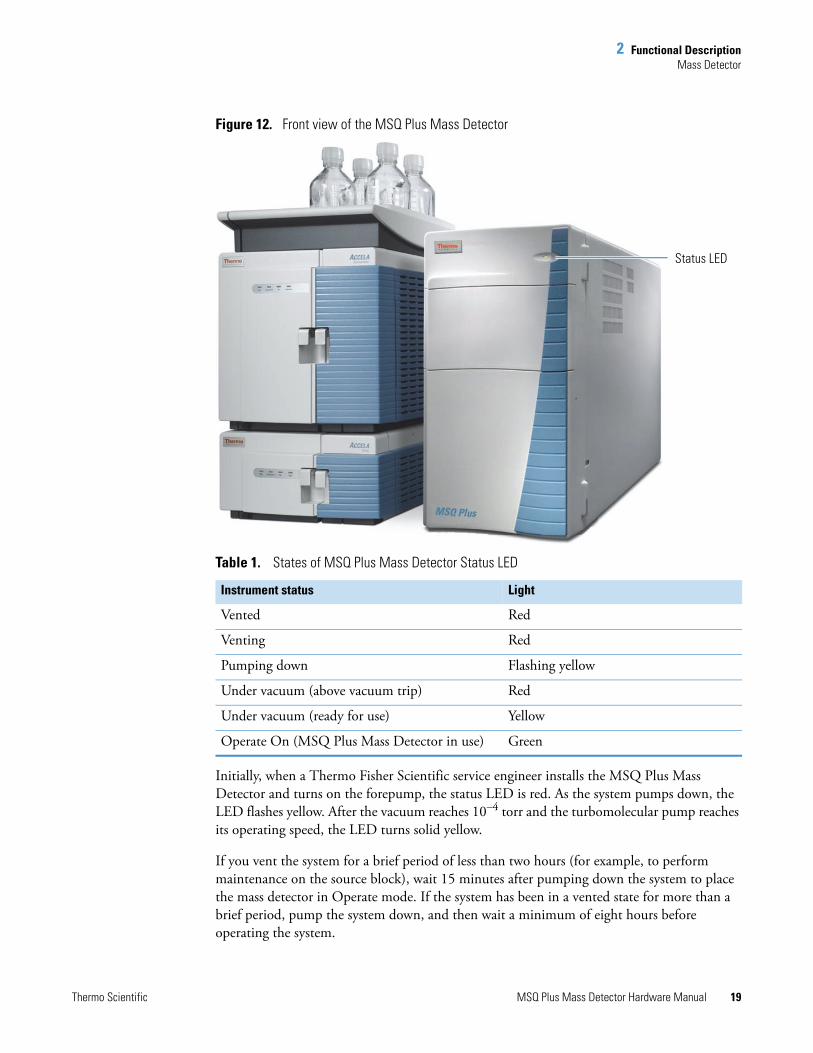
One light-emitting diode (LED) is located at the upper right corner of the front panel of the MSQ Plus Mass Detector, as shown in Figure 12. Table 1 lists the states of the status LED.
2 Functional DescriptionMass Detector
Thermo Scientific MSQ Plus Mass Detector Hardware Manual 19
Figure 12. Front view of the MSQ Plus Mass Detector
Initially, when a Thermo Fisher Scientific service engineer installs the MSQ Plus Mass Detector and turns on the forepump, the status LED is red. As the system pumps down, the LED flashes yellow. After the vacuum reaches 10–4 torr and the turbomolecular pump reaches its operating speed, the LED turns solid yellow.
If you vent the system for a brief period of less than two hours (for example, to perform maintenance on the source block), wait 15 minutes after pumping down the system to place the mass detector in Operate mode. If the system has been in a vented state for more than a brief period, pump the system down, and then wait a minimum of eight hours before operating the system.
Table 1. States of MSQ Plus Mass Detector Status LED
Instrument status Light
Vented Red
Venting Red
Pumping down Flashing yellow
Under vacuum (above vacuum trip) Red
Under vacuum (ready for use) Yellow
Operate On (MSQ Plus Mass Detector in use) Green
Status LED
2 Functional DescriptionMass Detector
20 MSQ Plus Mass Detector Hardware Manual Thermo Scientific
Back Panel Controls and Connections
The back panel of the MSQ Plus Mass Detector is shown in Figure 13. The back panel controls and connections include the following:
• MAINS ON/OFF
• PUMP OUT
• MAINS IN
• USB port
• User I/O panel
• Reset button
• Source line
• Backing line
• Exhaust line
• GAS IN

2 Functional DescriptionMass Detector
Thermo Scientific MSQ Plus Mass Detector Hardware Manual 21
Figure 13. Back panel of the MSQ Plus Mass Detector
The main power circuit breaker switch (labeled MAINS ON/OFF), the power source for the forepump (labeled PUMP OUT), and the connection to line power (labeled MAINS IN) are located in the lower-right corner of the back panel of the mass detector. In the Off (O) position, the circuit breaker removes all power to the mass detector, including the forepump (rotary vacuum pump). In the On (I) position, power is supplied to the mass detector and the forepump (rotary vacuum pump). In the standard operational mode, the circuit breaker is kept in the On (I) position.
The power supply requirements for the MSQ Plus Mass Detector are 230 Vac, regulated to ± 5% at 50 or 60 Hz. The application ships with power cords appropriate to its shipping destination.
PUMP OUT
MAINS IN
MAINS ON/OFF
RESET
USER I/O START IN +START IN -
USB
READY OUT +READY OUT -
GAS IN6 BARS MAX
SOURCE
BACKING
EXHAUST
USB connection to data system computer
Connector for contact closure
Reset button for downloading firmware
Power switch
Power supply for forepump
Connection to line power
Connected touser-supplied nitrogen source
Connected to forepump
Connected to forepump
Connected to solvent trap
2 Functional DescriptionMass Detector
22 MSQ Plus Mass Detector Hardware Manual Thermo Scientific
A USB port, an eight-terminal contact closure connector (labeled USER I/O), and a reset button are located in the upper-right corner of the back panel. A USB cable connects the MSQ Plus Mass Detector to the data system computer. Hardwiring terminals 1 and 2 on the User I/O panel to the autosampler provides contact closure. Pressing the Reset button downloads the software (firmware) for the MSQ Plus Mass Detector from the data system and restores communications.
Three manifolds are located on the left side of the back panel. The lines that exit the source and backing manifolds are connected to the forepump (also referred to as a backing pump, rotary vacuum pump, or roughing pump). The line that exits the exhaust manifold is connected to a solvent trap, which is connected to a user-supplied fume hood or industrial vent.
The connection to the user-supplied nitrogen source (labeled GAS IN) is located in the bottom-middle of the back panel. The MSQ Plus Mass Detector is connected to the user-supplied nitrogen source with 6 mm OD PTFE tubing.
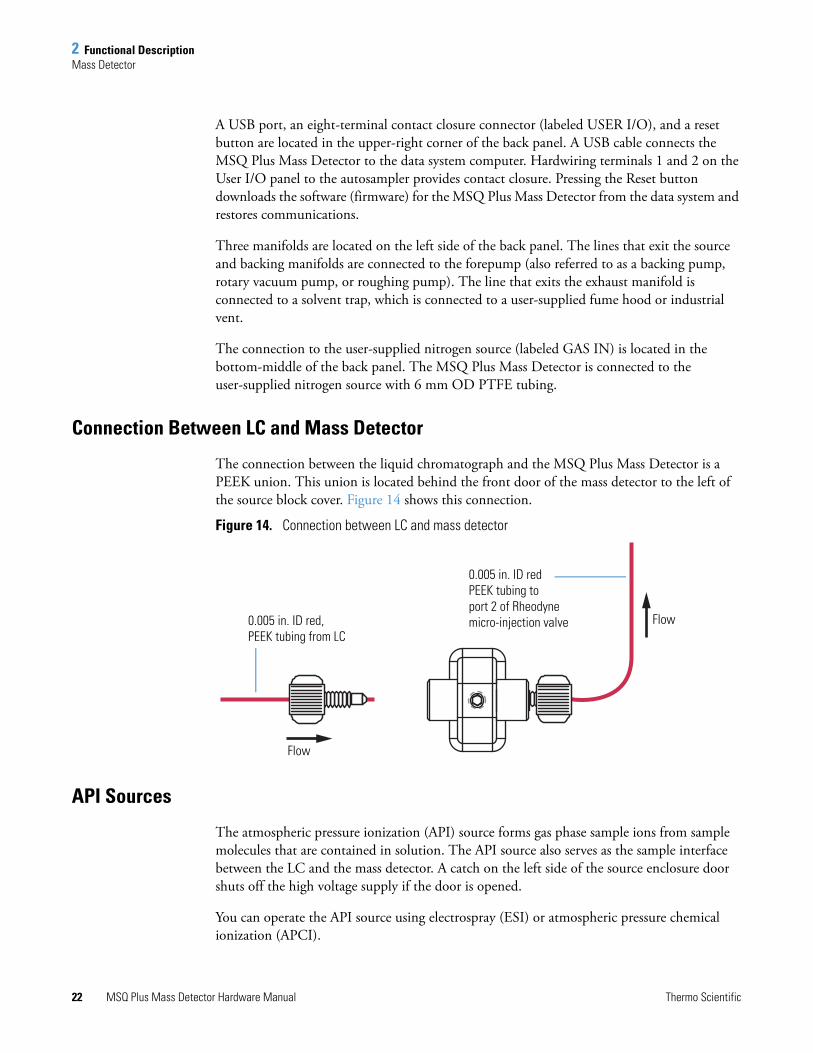
Connection Between LC and Mass Detector
The connection between the liquid chromatograph and the MSQ Plus Mass Detector is a PEEK union. This union is located behind the front door of the mass detector to the left of the source block cover. Figure 14 shows this connection.
Figure 14. Connection between LC and mass detector
API Sources
The atmospheric pressure ionization (API) source forms gas phase sample ions from sample molecules that are contained in solution. The API source also serves as the sample interface between the LC and the mass detector. A catch on the left side of the source enclosure door shuts off the high voltage supply if the door is opened.
You can operate the API source using electrospray (ESI) or atmospheric pressure chemical ionization (APCI).
0.005 in. ID red,PEEK tubing from LC
0.005 in. ID redPEEK tubing toport 2 of Rheodyne micro-injection valve Flow
Flow

2 Functional DescriptionMass Detector
Thermo Scientific MSQ Plus Mass Detector Hardware Manual 23
Electrospray (ESI)
The sample, consisting of preformed ions in solution, enters the source through a stainless steel insert capillary held at a voltage of ± 1 to 5 kV. The insert capillary is surrounded by a tube that directs a concentric flow of nitrogen nebulizing gas past the droplets of liquid forming at the tip of the probe. The action of the nebulizing gas and the high voltage produces an aerosol of liquid droplets containing sample ions and solvent ions. A second concentric flow of nitrogen gas, referred to as sheath gas, assists the ion evaporation process. This highly efficient desolvation process close to the entrance cone enables the routine use of high LC flow rates (up to 2 mL/min) with the ESI technique.
Drawn in by the low vacuum produced by the forepump, the desolvated ions enter the M-path region through the entrance cone. As the ions exit the focusing region, they pass into the RF/dc prefilter. Figure 15 shows the components used in electrospray.
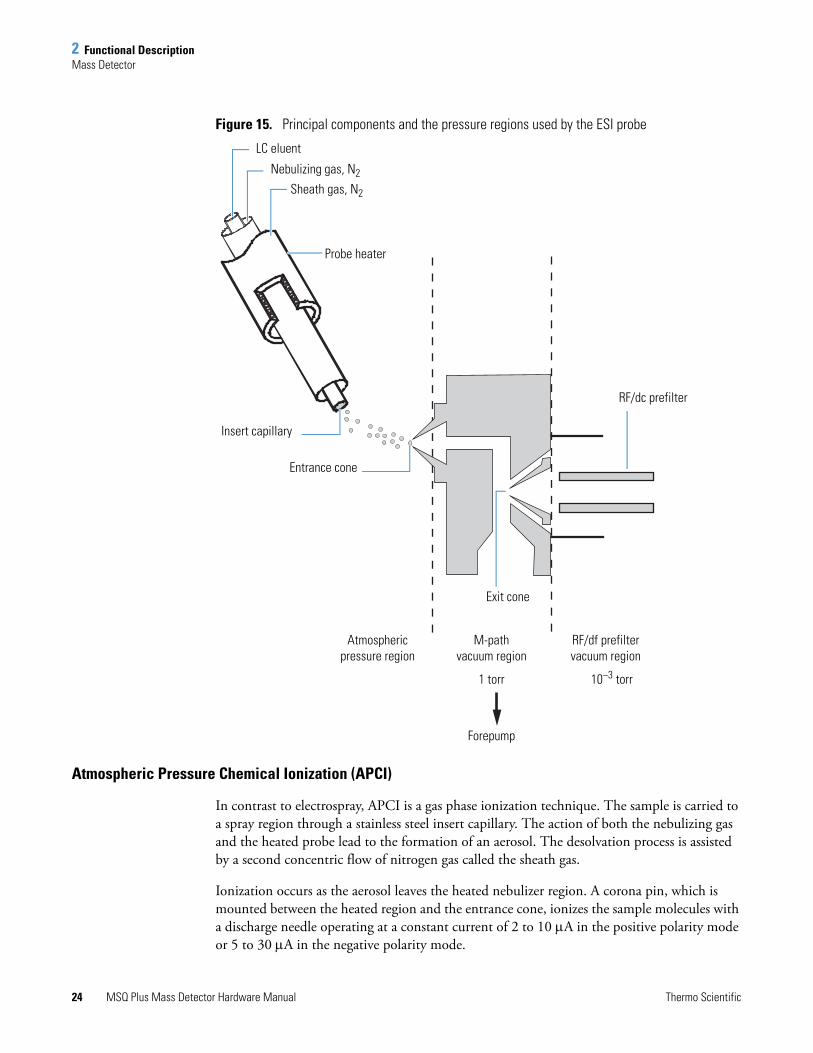
2 Functional DescriptionMass Detector
24 MSQ Plus Mass Detector Hardware Manual Thermo Scientific
Figure 15. Principal components and the pressure regions used by the ESI probe
Atmospheric Pressure Chemical Ionization (APCI)
In contrast to electrospray, APCI is a gas phase ionization technique. The sample is carried to a spray region through a stainless steel insert capillary. The action of both the nebulizing gas and the heated probe lead to the formation of an aerosol. The desolvation process is assisted by a second concentric flow of nitrogen gas called the sheath gas.
Ionization occurs as the aerosol leaves the heated nebulizer region. A corona pin, which is mounted between the heated region and the entrance cone, ionizes the sample molecules with a discharge needle operating at a constant current of 2 to 10 A in the positive polarity mode or 5 to 30 A in the negative polarity mode.
LC eluent
Nebulizing gas, N2
Sheath gas, N2
Probe heater
Insert capillary
Entrance cone
RF/dc prefilter
RF/df prefiltervacuum region
M-pathvacuum region
Atmosphericpressure region
1 torr 10–3 torr
Forepump
Exit cone

2 Functional DescriptionMass Detector
Thermo Scientific MSQ Plus Mass Detector Hardware Manual 25
The newly formed ions then enter the focusing region through the entrance cone and pass into the RF/dc prefilter region. See Figure 16.
Figure 16. Principal components and the pressure regions used by the APCI probe
RF/dc Prefilter
The RF/dc prefilter focuses the ions produced in the API source and transmits them to the mass analyzer. The RF/dc prefilter is a square array of square-profile rods that acts as an ion transmission device and as a wide band-pass mass filter, as shown in Figure 17.
During ion transmission, the offset voltage is positive for the positive ion polarity mode and negative for the negative ion polarity mode. Increasing the offset voltage increases the kinetic energy of the ions along the axis of the quadrupole through the differential aperture. Allowable values for the RF lens bias are –10 to +10 V. In the default tune file (default.tune), the RF lens bias is set to 1.0 V. The default RF lens bias for the autotune procedure is 0.5 V.
LC eluent
Nebulizing gas, N2
Sheath gas, N2
Probe heater
Insert capillary
Entrance cone
RF/dc prefilter
RF/df prefiltervacuum region
M-pathvacuum region
Atmosphericpressure region
1 torr 10–3 torr
Extraction cone
Corona pin
Forepump

2 Functional DescriptionMass Detector
26 MSQ Plus Mass Detector Hardware Manual Thermo Scientific
Figure 17. RF/dc prefilter, square array of square-profile rods
Mass Analyzer
The mass analyzer separates ions according to their mass-to-charge ratio and then passes them to the ion detection system. In the MSQ Plus Mass Detector, the mass analyzer is a single quadrupole rod assembly.
RF and DC Fields Applied to the Quadrupoles
In a quadrupole rod assembly, rods diagonally opposite each other in the array are connected electrically, so the four rods can be considered to be two pairs of two rods each. Ac and dc voltages are applied to the rods, and these voltages are ramped during the scan. Voltages of the same magnitude and sign are applied within the rods of each pair. Voltages equal in magnitude but opposite in sign (dc) and phase (RF) are applied to the different rod pairs. See Figure 18.
Figure 18. Polarity of the RF and dc voltages applied to the rods of the mass analyzer
The ac voltage applied to the quadrupole rods is of constant frequency. Because the frequency of this ac voltage is in the radio frequency range, it is referred to as RF voltage. The ratio of RF voltage to dc voltage determines the resolving power of the quadrupole and the ability of the mass detector to distinguish between ions of different mass-to-charge ratios.
+ RF voltage+ dc voltage
– RF voltage– dc voltage
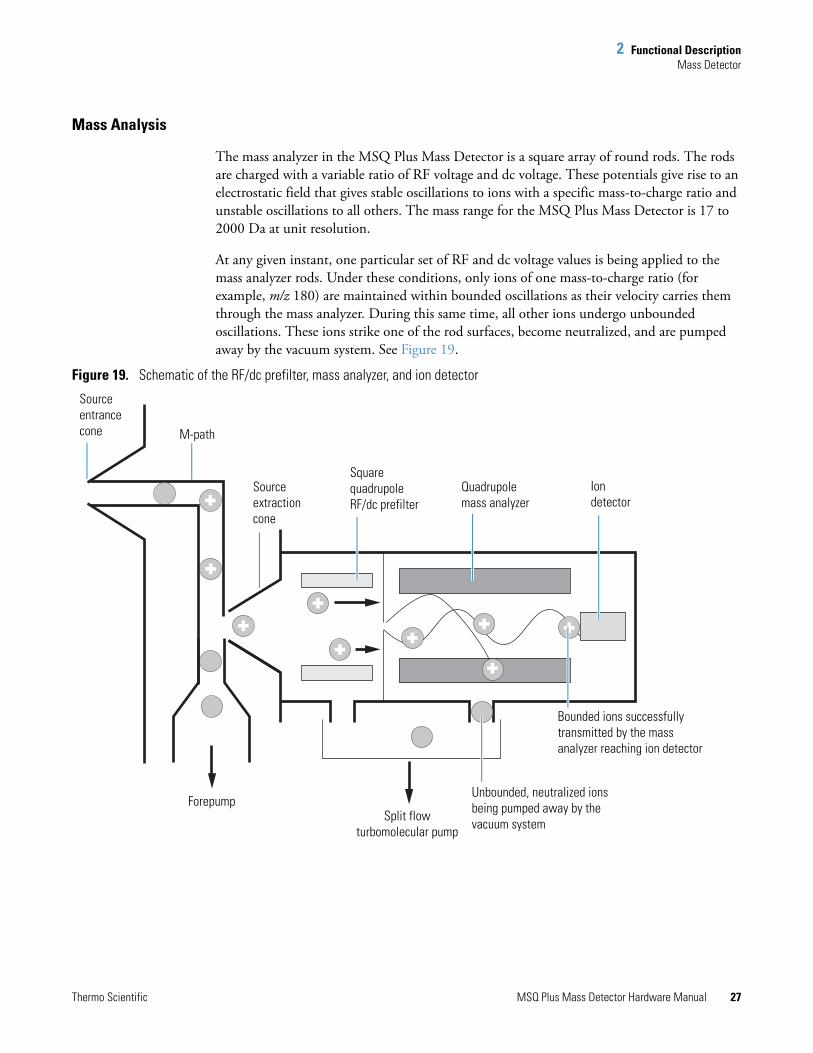
2 Functional DescriptionMass Detector
Thermo Scientific MSQ Plus Mass Detector Hardware Manual 27
Mass Analysis
The mass analyzer in the MSQ Plus Mass Detector is a square array of round rods. The rods are charged with a variable ratio of RF voltage and dc voltage. These potentials give rise to an electrostatic field that gives stable oscillations to ions with a specific mass-to-charge ratio and unstable oscillations to all others. The mass range for the MSQ Plus Mass Detector is 17 to 2000 Da at unit resolution.
At any given instant, one particular set of RF and dc voltage values is being applied to the mass analyzer rods. Under these conditions, only ions of one mass-to-charge ratio (for example, m/z 180) are maintained within bounded oscillations as their velocity carries them through the mass analyzer. During this same time, all other ions undergo unbounded oscillations. These ions strike one of the rod surfaces, become neutralized, and are pumped away by the vacuum system. See Figure 19.
Figure 19. Schematic of the RF/dc prefilter, mass analyzer, and ion detector
Sourceentrancecone M-path
Sourceextractioncone
SquarequadrupoleRF/dc prefilter
Quadrupolemass analyzer
Iondetector
ForepumpSplit flow
turbomolecular pump
Unbounded, neutralized ions being pumped away by the vacuum system
Bounded ions successfully transmitted by the mass analyzer reaching ion detector

2 Functional DescriptionMass Detector
28 MSQ Plus Mass Detector Hardware Manual Thermo Scientific
Then, at a later time, as the mass analyzer scans to a higher mass, both RF and dc voltages change, and ions of the next mass-to-charge ratio (for example, m/z 181) are allowed to pass, while all other ions (including m/z 180) become unstable and undergo unbounded oscillations. As the mass analyzer scans over the designated mass range, this process continues with ions of one mass-to-charge ratio after another being transmitted, as the RF and dc voltages change in value. At the end of the scan, the RF and dc voltages are discharged to zero, and the process is repeated.
The MSQ Plus Mass Detector can scan the RF and dc voltages over the full mass range of the system (for example, m/z 17 to 2000) in as short a time as 0.2 seconds. However, under the conditions usually employed in mass analysis, such a scan should normally be done in about 2 or more seconds to fall within the upper limit of the calibrated scan rate of 1000 Da/s.
Ion Detection System
The MSQ Plus Mass Detector is equipped with a high-sensitivity, off-axis ion detection system that produces a high signal-to-noise ratio and allows for voltage polarity switching between positive ion and negative ion modes of operation. The ion detection system includes a 10 kV conversion dynode and a channel electron multiplier. The ion detection system is located at the back of the vacuum manifold behind the mass analyzer. Figure 20 shows a cross-sectional view of the ion detection system.

2 Functional DescriptionMass Detector
Thermo Scientific MSQ Plus Mass Detector Hardware Manual 29
Figure 20. Cross-sectional view of the ion detection system, showing the electron multiplier and the conversion diode
The conversion dynode is a concave metal surface that is located at a right angle to the ion beam. A potential of +10 kV for negative ion detection or –10 kV for positive ion detection is applied to the conversion dynode. When an ion strikes the surface of the conversion dynode, one or more secondary particles are produced. These secondary particles can include positive ions, negative ions, electrons, and neutrals. When positive ions strike a negatively charged conversion dynode, the secondary particles of interest are negative ions and electrons. When negative ions strike a positively charged conversion dynode, the secondary particles of interest are positive ions. These secondary particles are focused by the curved surface of the conversion dynode and are accelerated by a voltage gradient into the electron multiplier. The conversion dynode shield, tube, and disk shield the vacuum manifold from the electric field produced by the conversion dynode.
Vacuum manifoldtop cover plate
Anode
High-voltage tube
High-voltage ring
Cathode
Electron multiplier
Secondary particles
Conversiondynode
Conversion dynodeshield tube
Massanalyzer
Ions
Conversion dynodefeedthrough electrode
2 Functional DescriptionMass Detector
30 MSQ Plus Mass Detector Hardware Manual Thermo Scientific
The electron multiplier is mounted on the top cover plate of the vacuum manifold next to the mass analyzer. The electron multiplier includes a cathode and an anode. The cathode of the electron multiplier is a lead oxide, funnel-like resistor. A potential of up to –2.5 kV is applied to the entrance of the cathode by the high-voltage ring. The exit end of the cathode (at the anode) is near ground potential.
The anode of the electron multiplier is a small cup located at the exit end of the cathode. The anode collects the electrons produced by the cathode. The anode screws into the anode feedthrough in the top cover plate.
Secondary particles from the conversion dynode strike the inner walls of the electron multiplier cathode with sufficient energy to eject electrons. The ejected electrons are accelerated farther into the cathode, drawn by the increasingly positive potential gradient. Because of the funnel shape of the cathode, the ejected electrons do not travel far before they again strike the inner surface of the cathode, thereby causing the emission of more electrons. A cascade of electrons is therefore created that finally results in a measurable current at the end of the cathode where the electrons are collected by the anode. The current collected by the anode is proportional to the number of secondary particles striking the cathode.
Typically, the electron multiplier is set to a gain of about 3 × 10⁵, which means that for each ion or electron that enters, 3 × 10⁵ electrons exit. The current that leaves the electron multiplier by way of the anode is converted to a voltage by the electrometer circuit and recorded by the data system.
The ion detection system of the MSQ Plus Mass Detector increases the signal while maintaining a low noise level. The high voltage applied to the conversion dynode results in a high conversion efficiency and increased signal. That is, for each ion striking the conversion dynode, many secondary particles are produced.
Because of the off-axis orientation of the ion detection system relative to the mass analyzer, neutral molecules from the mass analyzer tend not to strike the conversion dynode or electron multiplier. As a result, the noise from neutral molecules is greatly reduced.
Vacuum System
The vacuum system evacuates the region around the ion optics, mass analyzer, and ion detection system. The principal components of the vacuum system include the following:
• Vacuum Manifold
• Turbomolecular Pump
• Turbomolecular Pump
• Pirani Gauge
• Vent Valve
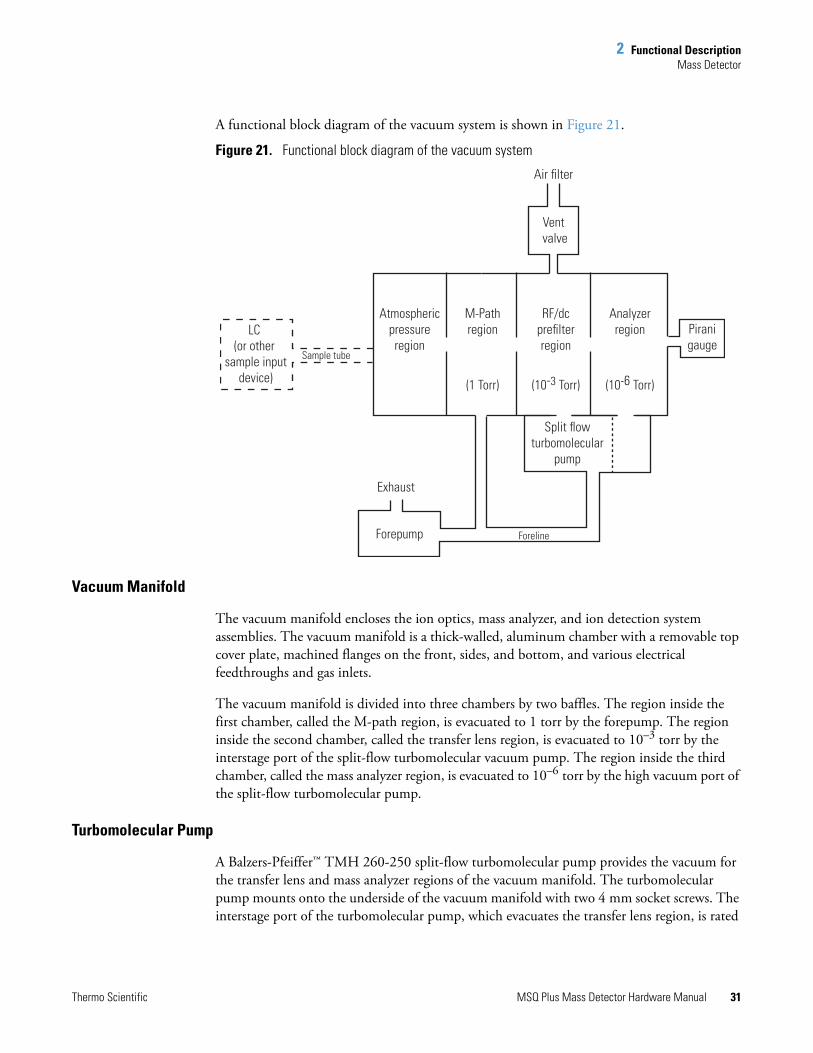
2 Functional DescriptionMass Detector
Thermo Scientific MSQ Plus Mass Detector Hardware Manual 31
A functional block diagram of the vacuum system is shown in Figure 21.
Figure 21. Functional block diagram of the vacuum system
Vacuum Manifold
The vacuum manifold encloses the ion optics, mass analyzer, and ion detection system assemblies. The vacuum manifold is a thick-walled, aluminum chamber with a removable top cover plate, machined flanges on the front, sides, and bottom, and various electrical feedthroughs and gas inlets.
The vacuum manifold is divided into three chambers by two baffles. The region inside the first chamber, called the M-path region, is evacuated to 1 torr by the forepump. The region inside the second chamber, called the transfer lens region, is evacuated to 10–3 torr by the interstage port of the split-flow turbomolecular vacuum pump. The region inside the third chamber, called the mass analyzer region, is evacuated to 10–6 torr by the high vacuum port of the split-flow turbomolecular pump.
Turbomolecular Pump
A Balzers-Pfeiffer™ TMH 260-250 split-flow turbomolecular pump provides the vacuum for the transfer lens and mass analyzer regions of the vacuum manifold. The turbomolecular pump mounts onto the underside of the vacuum manifold with two 4 mm socket screws. The interstage port of the turbomolecular pump, which evacuates the transfer lens region, is rated
Atmosphericpressureregion
M-Pathregion
RF/dcprefilterregion
Analyzerregion
(1 Torr) (10-3 Torr) (10-6 Torr)
Split flowturbomolecular
pump
Exhaust
ForelineForepump
Vent valve
Air filter
Sample tube
Piranigauge
LC (or other
sample inputdevice)

2 Functional DescriptionMass Detector
32 MSQ Plus Mass Detector Hardware Manual Thermo Scientific
at 125 L/s. The high vacuum port of the turbomolecular pump, which evacuates the mass analyzer region, is rated at 200 L/s. Under normal operating conditions, the pump provides a vacuum of approximately 10–3 torr in the transfer lens region, and 10–6 torr in the mass analyzer region.
The main power circuit breaker switch turns the power to the turbomolecular pump on or off. The turbomolecular pump controller regulates the power provided to the turbomolecular pump. A fan that draws air in from the underside of the instrument cools the turbomolecular pump.
Forepump
An Edwards™ forepump (also known as a roughing pump, backing pump, or rotary pump) establishes the vacuum necessary for the proper operation of the turbomolecular pump. The forepump also evacuates the M-path region of the vacuum manifold. The pump has a maximum displacement of 30 m3/h and maintains a minimum pressure of approximately 100 Pa (0.75 torr).
The forepump is connected to the turbomolecular pump by a section of 2.54 cm (1 in.) ID reinforced PVC tubing. The power cord of the forepump is plugged into the outlet labeled PUMP OUT on the back panel of the MSQ Plus Mass Detector. This outlet supplies power to the forepump and is controlled by the main power circuit breaker switch. The Edwards forepump has an On/Off switch that must be turned to the On position to operate the forepump.
Pirani Gauge
A Pirani gauge measures the pressure in the analyzer region of the vacuum manifold.
Vent Valve
The vent valve allows the vacuum manifold to be vented to air that has been filtered through a metal mesh. The vent valve is a solenoid-operated valve. The vent valve is closed when the solenoid is energized.
CAUTION Always plug the forepump power cord into the outlet labeled PUMP OUT on the back panel of the MSQ Plus Mass Detector. Never plug it into a wall outlet. Failure to follow these instructions could lead to instrument damage and personal injury.
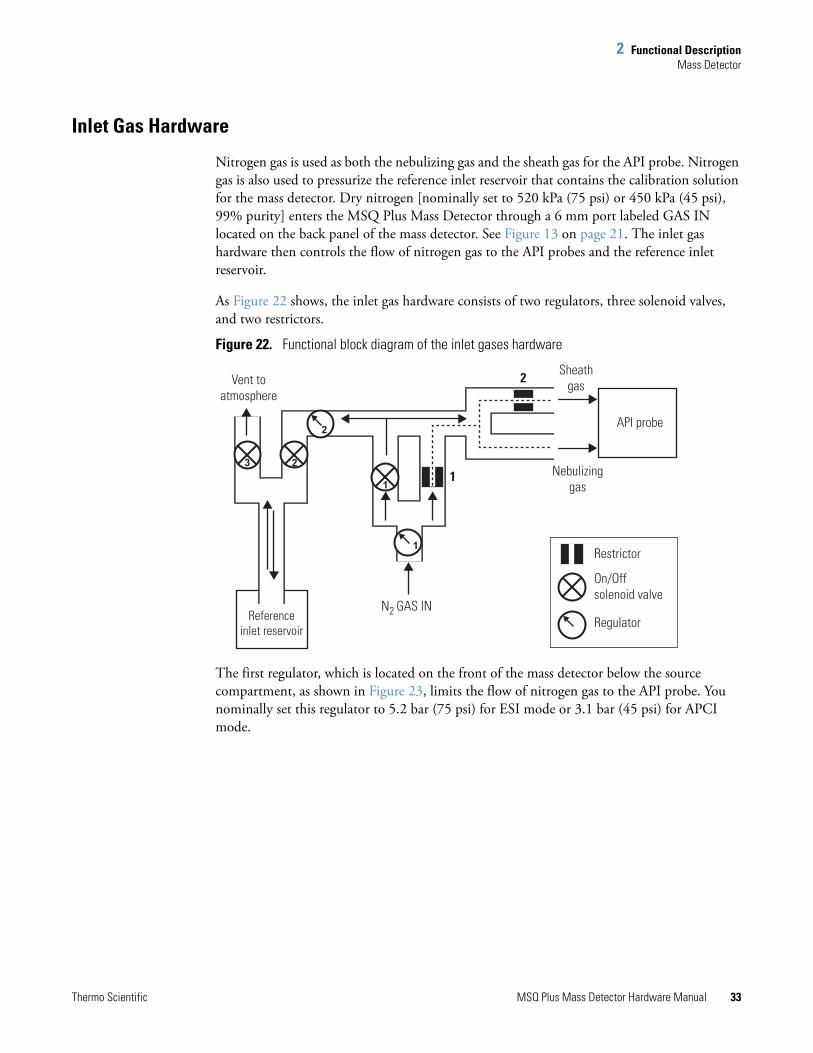
2 Functional DescriptionMass Detector
Thermo Scientific MSQ Plus Mass Detector Hardware Manual 33
Inlet Gas Hardware
Nitrogen gas is used as both the nebulizing gas and the sheath gas for the API probe. Nitrogen gas is also used to pressurize the reference inlet reservoir that contains the calibration solution for the mass detector. Dry nitrogen [nominally set to 520 kPa (75 psi) or 450 kPa (45 psi), 99% purity] enters the MSQ Plus Mass Detector through a 6 mm port labeled GAS IN located on the back panel of the mass detector. See Figure 13 on page 21. The inlet gas hardware then controls the flow of nitrogen gas to the API probes and the reference inlet reservoir.
As Figure 22 shows, the inlet gas hardware consists of two regulators, three solenoid valves, and two restrictors.
Figure 22. Functional block diagram of the inlet gases hardware
The first regulator, which is located on the front of the mass detector below the source compartment, as shown in Figure 23, limits the flow of nitrogen gas to the API probe. You nominally set this regulator to 5.2 bar (75 psi) for ESI mode or 3.1 bar (45 psi) for APCI mode.
N2 GAS IN
1
23Nebulizing
gas
Sheathgas
API probe
Referenceinlet reservoir
Restrictor
On/Off solenoid valve
Vent toatmosphere
Regulator
2
2
1
1

2 Functional DescriptionMass Detector
34 MSQ Plus Mass Detector Hardware Manual Thermo Scientific
Figure 23. User-controlled auxiliary nitrogen regulator
The second regulator limits the flow of nitrogen gas to the reference inlet reservoir. This regulator, which is inside the mass detector, is preset at the factory.
The first solenoid valve is the On/Off control for the flow of nitrogen gas into the MSQ Plus Mass Detector. To turn this valve on or off, click the Nitrogen Gas On/Off toggle button in the Per Method Parameters table of the Tune window, shown in Figure 24. After you turn on the nitrogen gas, you can hear the jet of nitrogen gas flowing into the API probe.
Note Call a Thermo Fisher Scientific service representative if you suspect that the nitrogen regulator inside the mass detector is malfunctioning.
Pressure gauge
Control dial
Nitrogen gas line
Reference inlet reservoir, containing calibrant
Reference waste reservoir

2 Functional DescriptionMass Detector
Thermo Scientific MSQ Plus Mass Detector Hardware Manual 35
Figure 24. Per Method Parameters table
The second solenoid valve is the On/Off control for the flow of nitrogen gas into the reference inlet reservoir. The third solenoid valve is the On/Off control for venting the reference inlet reservoir to the atmosphere. When the nitrogen gas flow is On, selecting either a full-system autotune or a mass-scale calibration causes the system to alternate between pressurizing and depressurizing the reference inlet reservoir.
Clicking the Inject From Ref. Inlet button in the Per Method Parameters table has a similar effect. When you click this toggle button, nitrogen gas pressurizes the reference inlet reservoir. Pressurizing the reference inlet reservoir pushes the calibrant out of the reference inlet reservoir bottle and into the 500 L sample loop attached to the microinjection valve of the mass detector. After the sample loop fills with calibrant, the microinjection valve switches to the inject position. With the valve in the inject position, the sample loop is open to the mobile phase stream from the LC pump. The stream pushes the calibrant out of the sample loop and through the API probe. After the microinjection valve switches to the inject position, the third solenoid valve switches to the On position, allowing the nitrogen gas to vent to the atmosphere and depressurizing the reference inlet reservoir.
The first restrictor allows a constant low flow of nitrogen gas to the API probe when the first solenoid valve is turned off. See dashed line shown in Figure 22 on page 33. The second restrictor shown in Figure 22 on page 33 limits the flow of sheath gas and acts as a split-flow regulator by forcing the majority of the gas flow to the API probe through the tubing for the nebulizing gas.
Toggle buttons

2 Functional DescriptionCone Wash System
36 MSQ Plus Mass Detector Hardware Manual Thermo Scientific
Cone Wash SystemThe API source on the MSQ Plus Mass Detector includes a self-cleaning solvent delivery system called the cone wash system. Figure 25 shows an example of this system. It makes the source robust and productive, greatly increasing the number of samples that can be analyzed before maintenance is required.
Figure 25. Front of the cone wash pump1
The self-cleaning API source delivers a constant low flow of solvent to the edge of the inlet orifice. See Figure 26. This low flow of wash solvent prevents the build-up of non-volatile components during LC/MS analysis that occurs with typical chromatographic buffers (for example, phosphates and ion pairing agents) and dramatically extends the length of time possible for analyses.
Note There is a constant low flow of nitrogen gas through the mass detector when it is not in use. This low flow of nitrogen gas maintains a positive pressure in the source compartment, preventing fumes from the solvent trap connected to the detector’s exhaust port from being drawn into the detector. Depending on the API mode and whether the instrument is in use, the nitrogen consumption is as follows:
• ESI mode consumes approximately 720 L/hr.
• APCI mode consumes approximately 480 L/hr.
• Standby mode consumes approximately 20 to 50 L/hr.
1 Image of the Scientific Systems, Inc. single-piston pump from the Series 1+ Pump Operator’s Manual 90-2518 Rev D by Scientific Systems, Inc.
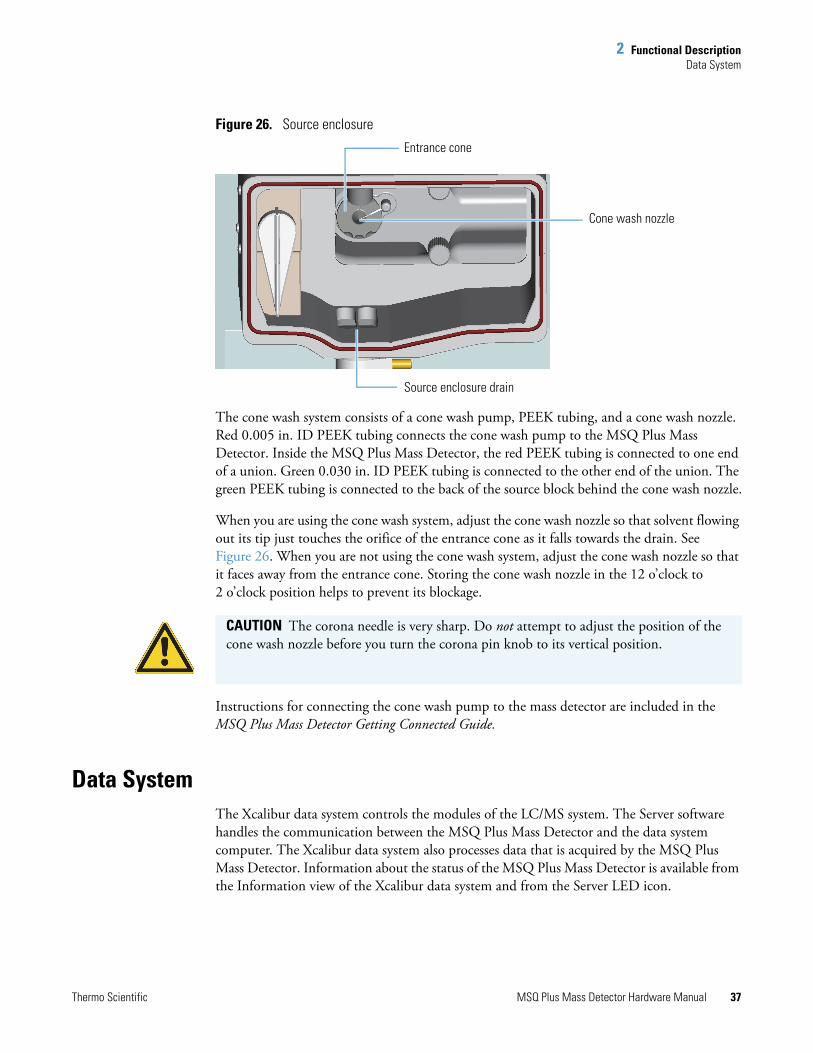
2 Functional DescriptionData System
Thermo Scientific MSQ Plus Mass Detector Hardware Manual 37
Figure 26. Source enclosure
The cone wash system consists of a cone wash pump, PEEK tubing, and a cone wash nozzle. Red 0.005 in. ID PEEK tubing connects the cone wash pump to the MSQ Plus Mass Detector. Inside the MSQ Plus Mass Detector, the red PEEK tubing is connected to one end of a union. Green 0.030 in. ID PEEK tubing is connected to the other end of the union. The green PEEK tubing is connected to the back of the source block behind the cone wash nozzle.
When you are using the cone wash system, adjust the cone wash nozzle so that solvent flowing out its tip just touches the orifice of the entrance cone as it falls towards the drain. See Figure 26. When you are not using the cone wash system, adjust the cone wash nozzle so that it faces away from the entrance cone. Storing the cone wash nozzle in the 12 o’clock to 2 o’clock position helps to prevent its blockage.
Instructions for connecting the cone wash pump to the mass detector are included in the MSQ Plus Mass Detector Getting Connected Guide.
Data SystemThe Xcalibur data system controls the modules of the LC/MS system. The Server software handles the communication between the MSQ Plus Mass Detector and the data system computer. The Xcalibur data system also processes data that is acquired by the MSQ Plus Mass Detector. Information about the status of the MSQ Plus Mass Detector is available from the Information view of the Xcalibur data system and from the Server LED icon.
Cone wash nozzle
Entrance cone
Source enclosure drain
CAUTION The corona needle is very sharp. Do not attempt to adjust the position of the cone wash nozzle before you turn the corona pin knob to its vertical position.
2 Functional DescriptionData System
38 MSQ Plus Mass Detector Hardware Manual Thermo Scientific
The data system for the MSQ Plus Mass Detector includes the following components:
• Computer Hardware
• Xcalibur Software
• MSQ Plus Mass Detector Server
• Tune Window
• Printer
Computer Hardware
The data system computer satisfies the following minimum system requirements:
• Intel™ Pentium™ 4 at 2.4 GHz processor
• 256 MB of random access memory (RAM)
• 40 GB HDD
• CD-ROM drive
• USB adapter (data system to mass detector)
• Ethernet adapter (data system to local area network)
• 1.44-MB, 3.5 in. disk drive
• Video Graphics card and monitor capable of 1024 × 768 resolution and 65536 colors (16-bit color quality).
For more information about the computer, refer to the manuals that come with it.
Xcalibur Software
Xcalibur software controls the MSQ Plus Mass Detector and a variety of liquid chromatography devices. The Xcalibur software package for the MSQ Plus Mass Detector includes the application programs listed in Table 2. Xcalibur Home Page version 2.2 SP1or later is required for the MSQ 2.0 version of the MSQ Plus Mass Detector software. The firmware versions of the LC devices controlled by the Xcalibur data system are listed in the MSQ Plus Mass Detector Getting Connected Guide.

2 Functional DescriptionData System
Thermo Scientific MSQ Plus Mass Detector Hardware Manual 39
When you start the Xcalibur data system from the Windows desktop by clicking its application icon, the Xcalibur Roadmap view, shown in Figure 27, opens to show a view of the data system. The icons shown on this view provide an easy way to access all the major modules of the data system. In addition, the Xcalibur data system runs the MSQ Plus Mass Detector server.
Table 2. Xcalibur software application programs
Desktop icon Program name File name
Xcalibur Homepage.exe
Instrument Configuration Xconfig.exe
Tune MSinst.exe
Signal to Noise Calculator SigNoise.exe
Note The Signal-to-Noise Calculator program (SigNoise.exe) is only installed for Xcalibur 2.0 data systems. It is not installed for Xcalibur 2.0.x data systems.
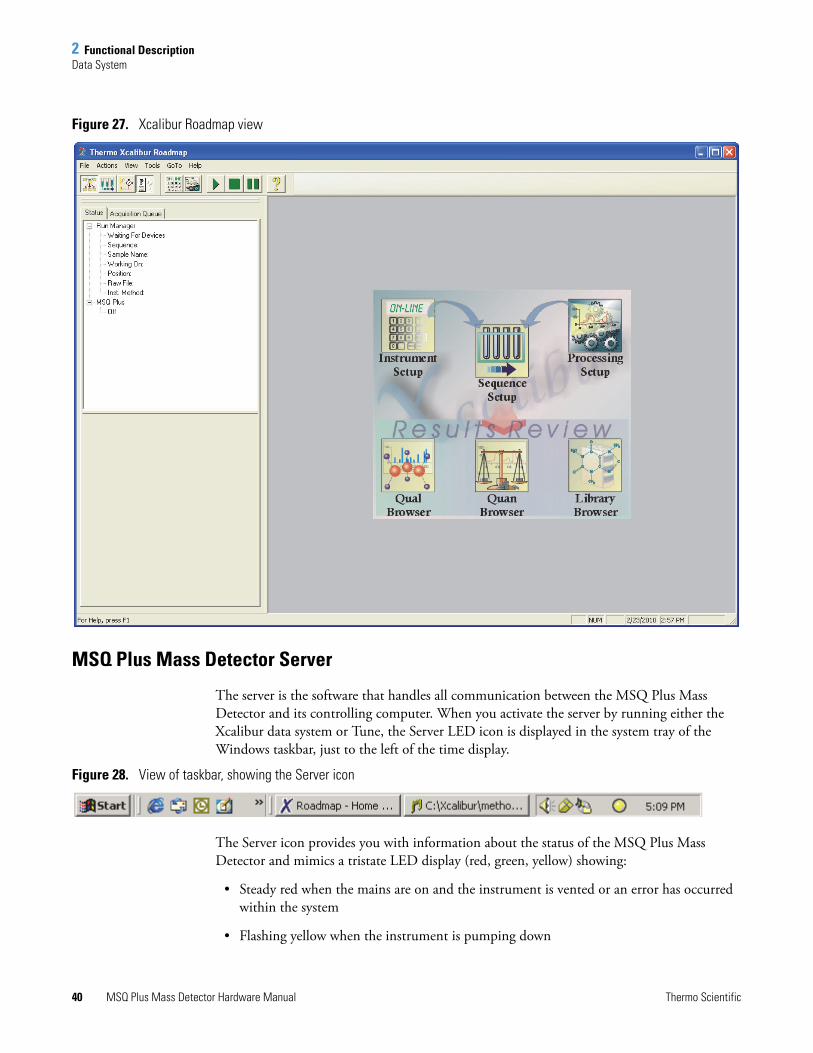
2 Functional DescriptionData System
40 MSQ Plus Mass Detector Hardware Manual Thermo Scientific
Figure 27. Xcalibur Roadmap view
MSQ Plus Mass Detector Server
The server is the software that handles all communication between the MSQ Plus Mass Detector and its controlling computer. When you activate the server by running either the Xcalibur data system or Tune, the Server LED icon is displayed in the system tray of the Windows taskbar, just to the left of the time display.
Figure 28. View of taskbar, showing the Server icon
The Server icon provides you with information about the status of the MSQ Plus Mass Detector and mimics a tristate LED display (red, green, yellow) showing:
• Steady red when the mains are on and the instrument is vented or an error has occurred within the system
• Flashing yellow when the instrument is pumping down
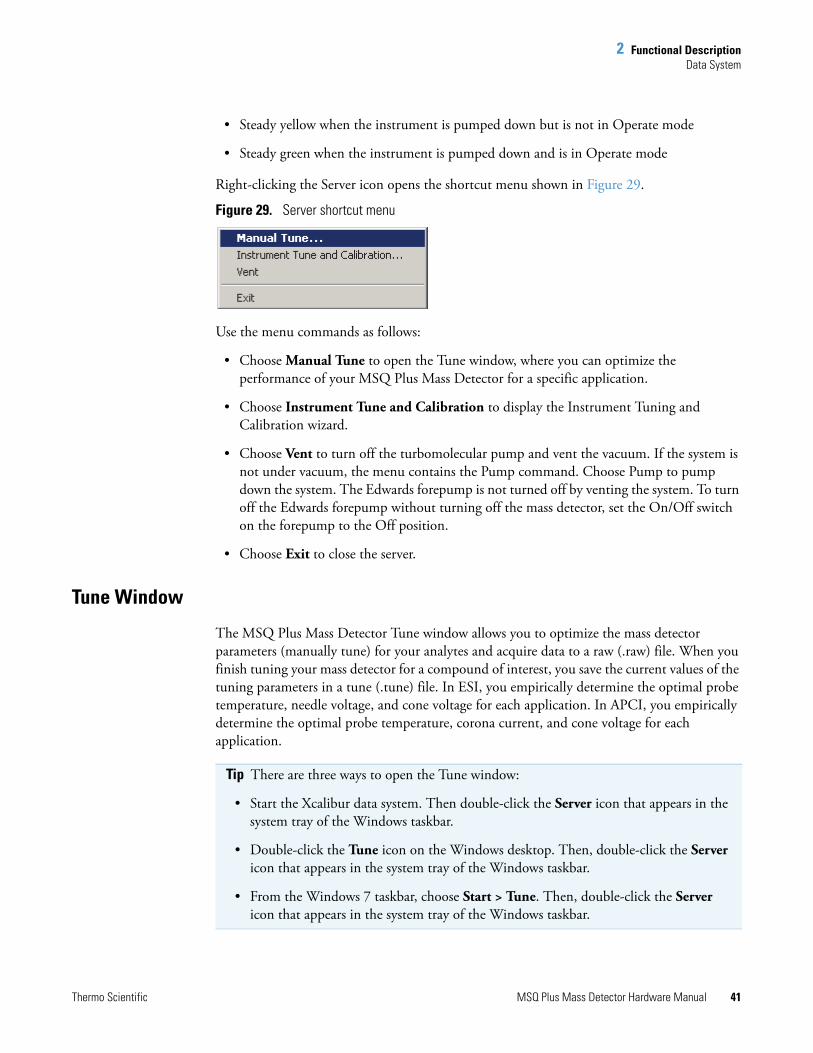
2 Functional DescriptionData System
Thermo Scientific MSQ Plus Mass Detector Hardware Manual 41
• Steady yellow when the instrument is pumped down but is not in Operate mode
• Steady green when the instrument is pumped down and is in Operate mode
Right-clicking the Server icon opens the shortcut menu shown in Figure 29.
Figure 29. Server shortcut menu
Use the menu commands as follows:
• Choose Manual Tune to open the Tune window, where you can optimize the performance of your MSQ Plus Mass Detector for a specific application.
• Choose Instrument Tune and Calibration to display the Instrument Tuning and Calibration wizard.
• Choose Vent to turn off the turbomolecular pump and vent the vacuum. If the system is not under vacuum, the menu contains the Pump command. Choose Pump to pump down the system. The Edwards forepump is not turned off by venting the system. To turn off the Edwards forepump without turning off the mass detector, set the On/Off switch on the forepump to the Off position.
• Choose Exit to close the server.
Tune Window
The MSQ Plus Mass Detector Tune window allows you to optimize the mass detector parameters (manually tune) for your analytes and acquire data to a raw (.raw) file. When you finish tuning your mass detector for a compound of interest, you save the current values of the tuning parameters in a tune (.tune) file. In ESI, you empirically determine the optimal probe temperature, needle voltage, and cone voltage for each application. In APCI, you empirically determine the optimal probe temperature, corona current, and cone voltage for each application.
Tip There are three ways to open the Tune window:
• Start the Xcalibur data system. Then double-click the Server icon that appears in the system tray of the Windows taskbar.
• Double-click the Tune icon on the Windows desktop. Then, double-click the Server icon that appears in the system tray of the Windows taskbar.
• From the Windows 7 taskbar, choose Start > Tune. Then, double-click the Server icon that appears in the system tray of the Windows taskbar.

2 Functional DescriptionData System
42 MSQ Plus Mass Detector Hardware Manual Thermo Scientific
Figure 30 shows the features of the Tune window.
Figure 30. Features of the Tune window
Title Bar
The title bar is the horizontal band at the very top of the window. It contains the file name of the currently active tune file. For example, default.tune is the name of the MSQ Plus Mass Detector default tuning file.
Menu Bar
The Tune window menu bar contains the File, View, and Help menus.
Note When you create an instrument method to control your LC/MS instrument during a sequence run, you import the tune file that contains the empirically determined optimal needle voltage or corona current for your analyte. You then manually enter all of the other MS parameters and the chromatography conditions for your analyte. You create instrument methods in the Instrument Setup window in the Xcalibur data system.
Menu bar
Toolbar
Per Method Parameters table Title bar
Peak Display
Scan Events table
Status bar
Comms Indicator
2 Functional DescriptionData System
Thermo Scientific MSQ Plus Mass Detector Hardware Manual 43
Toolbar
You can use the toolbar buttons to start and stop acquiring data and to print a tune report.
Comms Indicator
The Tune Comms Indicator, positioned to the right of the Tune toolbar, indicates whether there is proper communication between the Tune software and the MSQ Plus Mass Detector. The Comms Indicator is represented by an icon, depending on whether you are in Tune mode or Acquisition mode. The icon can be either stationary or spinning, depending on whether working communication is occurring.
The Tune icon, , appears when you are in Tune mode, that is, when you are in the Tune window and not acquiring data to a file. The icon spins continuously to show that communication between the MSQ Plus Mass Detector and the computer is established. For example, whenever the Tune software uploads or downloads a command, the icon spins to indicate that communication is working correctly.
The Acquisition icon, , appears when you are in Acquisition mode (that is, when you are acquiring data to file from the Tune window). A spinning icon indicates that communication is working correctly.
Scan Events Table
Use the Tune Scan Events table (or Peak Display controls) to define all the scan events that you want to acquire when performing a manual tune.
Per Method Parameters Table
Use the Tune Per Method Parameters table to enter values and define the settings for the “per method” tuning parameters. The table also provides individual tuning parameter readbacks. You can adjust the tuning of the MSQ Plus Mass Detector by altering the values of these tuning parameters. In ESI, you optimize the probe temperature and the needle voltage for your application. In APCI, you optimize the probe temperature and the corona current for your application.
Peak Display
The Tune Peak Display displays a real-time view of each tuning peak as defined by an enabled scan event (row) in the Tune Scan Events table. Use the Peak Display to monitor the tuning peaks for both peak form and intensity, particularly when optimizing the MSQ Plus Mass Detector during a manual tune. Using the parameters available in the Scan Events table, you can change the number of peaks displayed in the Peak Display and their appearance.
Status Bar
The status bar at the bottom of the Tune window displays information on the current status of the MSQ Plus Mass Detector.
2 Functional DescriptionData System
44 MSQ Plus Mass Detector Hardware Manual Thermo Scientific
Printer
Thermo Fisher Scientific does not ship a printer with the MSQ Plus Mass Detector. If you want to connect a printer that communicates through a USB cable, connect the cable to one of the USB ports on the front of the data system computer.
Set up the printer from the Print Setup dialog box. To open the Print Setup dialog box, choose File > Print Setup in any window.
Thermo Scientific MSQ Plus Mass Detector Hardware Manual 45
3
Daily Operation
To optimize the performance of your MSQ Plus Mass Detector, you must perform various routine operations both before and after you operate the system.
Before Operating the Mass DetectorThis section describes procedures that you might want to perform on a daily basis before you begin your analyses:
• Checking the Nitrogen Supply
• Checking the Disk Space
• Checking the Oil Level in the Oil Mist Filter
Checking the Nitrogen Supply
Check the nitrogen supply on the regulator of the nitrogen gas tank or liquid nitrogen boil-off tank. Make sure that you have sufficient gas for your analysis. Typical nitrogen consumption is 15800 liters per day (based on a 24 hr day). If necessary, replace the tank. Verify that the pressure of nitrogen reaching the mass spectrometer is between 520 ± 35 kPa (75 ± 5 psi). If necessary, adjust the pressure with the tank pressure regulator.
Checking the Disk Space
Periodically, verify that your hard disk drive has enough free space for data acquisition. The amount of available disk space is shown in the Disk Space dialog box.
To determine the amount of available disk space
1. From the Roadmap view (which is available by choosing Start > Thermo Xcalibur > Xcalibur from the Windows taskbar), choose Actions > Check Disk Space.
Contents
• Before Operating the Mass Detector
• After Operating the Mass Detector
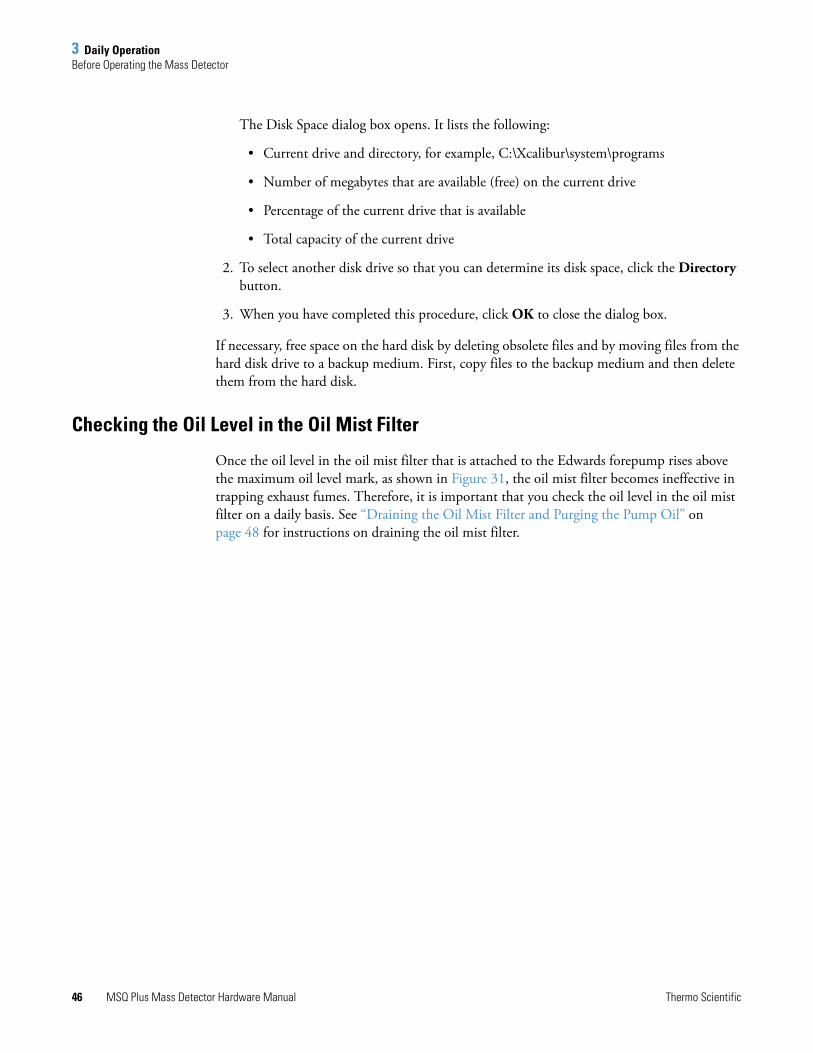
3 Daily OperationBefore Operating the Mass Detector
46 MSQ Plus Mass Detector Hardware Manual Thermo Scientific
The Disk Space dialog box opens. It lists the following:
• Current drive and directory, for example, C:\Xcalibur\system\programs
• Number of megabytes that are available (free) on the current drive
• Percentage of the current drive that is available
• Total capacity of the current drive
2. To select another disk drive so that you can determine its disk space, click the Directory button.
3. When you have completed this procedure, click OK to close the dialog box.
If necessary, free space on the hard disk by deleting obsolete files and by moving files from the hard disk drive to a backup medium. First, copy files to the backup medium and then delete them from the hard disk.
Checking the Oil Level in the Oil Mist Filter
Once the oil level in the oil mist filter that is attached to the Edwards forepump rises above the maximum oil level mark, as shown in Figure 31, the oil mist filter becomes ineffective in trapping exhaust fumes. Therefore, it is important that you check the oil level in the oil mist filter on a daily basis. See “Draining the Oil Mist Filter and Purging the Pump Oil” on page 48 for instructions on draining the oil mist filter.
3 Daily OperationAfter Operating the Mass Detector
Thermo Scientific MSQ Plus Mass Detector Hardware Manual 47
Figure 31. View of an Edwards forepump with oil mist filter, showing the maximum oil level mark
After Operating the Mass DetectorThis section describes procedures that you might want to perform after you complete your analyses:
• Flushing the API Probes
• Placing the System in the Off Mode
• Draining the Oil Mist Filter and Purging the Pump Oil
• Emptying the Solvent Waste Bottles
Flushing the API Probes
After running phosphate salts, ion pairing agents, acids, or other additives through the system, flush the probe with [50:50] acetonitrile/water or methanol/water to prevent blockage.
EDWARDS
30
Oil Mist Filter EMF 20
EDWARDS
To exhaust vent
Maximumoil level mark
Oil return tubing
Gas ballast knob
Note To prevent blockage, always flush the probes after using buffered solvents.

3 Daily OperationAfter Operating the Mass Detector
48 MSQ Plus Mass Detector Hardware Manual Thermo Scientific
To flush the capillary of the API probe
1. Attach the analytical pump outlet directly to the MSQ Plus Mass Detector. Because they might contain contaminants, bypass the injection valve of the autosampler and the LC column.
2. Pump a non-buffered solvent that is miscible with the buffered mobile phase through the probe at a flow rate of 2 mL/min for a few minutes.
3. Pump [50:50] acetonitrile/water or [50:50] methanol/water through the probe at a flow rate of 2 mL/min for 30 minutes.
Placing the System in the Off Mode
Place the MSQ Plus Mass Detector in the Off mode if you are not going to use it for a short period of time, such as overnight or over weekends. In the Off mode, the system is left under vacuum, but the nitrogen flow is reduced to a bleed through the API probe. The electron multiplier and conversion dynode are turned off, the power to the ion optics is turned off, and the power to the probe heater is turned off.
For instructions on turning the system to the Off mode, see “Placing the System in the Off Mode” on page 101.
Draining the Oil Mist Filter and Purging the Pump Oil
During normal operation, the oil in the forepump becomes contaminated with dissolved chemicals and water vapor. In addition, the oil mist filter fills with condensed oil. Over time, the rising water content of the oil can cause corrosion and decrease the lifetime of the forepump. And once the oil level in the oil mist filter rises above the maximum oil level mark, as shown in Figure 31 on page 47, the oil mist filter becomes ineffective in trapping exhaust fumes. Therefore, it is important that you drain the oil back into the forepump and purge the oil on a routine basis.
Operating the Edwards forepump with the gas ballast valve open allows the oil in the oil mist filter to drain back into the forepump by way of the oil return tubing. Operating the forepump with the gas ballast valve open also allows the removal of water and other volatile contaminants from the forepump oil.
A good time to drain the oil from the oil mist filter and to remove volatile contaminants from the oil in the forepump is at the end of the working day or after the LC/MS system completes a sequence run.
CAUTION Do not operate the forepump with the oil level in the oil mist filter above the maximum-level mark.

3 Daily OperationAfter Operating the Mass Detector
Thermo Scientific MSQ Plus Mass Detector Hardware Manual 49
To drain the oil mist filter and purge volatile contaminants from the oil in the forepump
1. Turn off the LC pump flow.
2. Turn the nitrogen gas, ion optics, and probe heater off by doing one of the following:
• From the Status page of the Information view in the Xcalibur data system, right-click the MSQ Plus listing and choose Turn Device Off from the shortcut menu.
–or–
• Open the Per Method Parameters table in the Tune window. Take the system out of Operate mode by clicking the Operate On/Off toggle button, and then turn off the nitrogen gas by clicking the Nitrogen Gas On/Off toggle button.
3. Open the gas ballast valve on the Edwards forepump by turning it six rotations counterclockwise.
4. Operate the Edwards forepump for approximately 15 minutes with the gas ballast valve open.
The oil in the oil mist filter returns to the forepump quickly. The prescribed time period of 15 minutes for ballasting is for the removal of volatile contaminants, such as water.
5. After ballasting the forepump for a period of approximately 15 minutes, close the gas ballast valve by turning the gas ballast knob clockwise until you feel resistance.
Emptying the Solvent Waste Bottles
Waste solvents are produced by both the MSQ Plus Mass Detector and the LC system. In the MSQ Plus Mass Detector, waste solvent flows from the drain port at the bottom of the source enclosure, out the back of the detector through the exhaust manifold, and into a solvent trap. Autosamplers, such as the Accela Autosampler, perform a flush operation after each injection. The flush solution drains to a solvent waste bottle. Dispose of the solvent waste in accordance with local and federal regulations.
Note Operating the forepump with the gas-ballast valve open increases the rate of oil loss from the pump. During normal operations, run the forepump with the gas ballast valve closed.


Thermo Scientific MSQ Plus Mass Detector Hardware Manual 51
4
Switching Probes
This chapter describes how to connect an atmospheric pressure ionization (API) probe to the MSQ Plus Mass Detector.
Switching from ESI to APCIFollow these steps to connect an APCI probe to the MSQ Plus Mass Detector.
To switch from ESI mode to APCI mode
1. Turn off the LC pump flow. If you are using the cone wash pump, turn it off.
2. Turn the nitrogen gas, ion optics, and probe heater off by doing one of the following:
• From the Status page in the Information view in the Xcalibur data system, right-click the MSQ Plus listing to display a shortcut menu, and choose Turn Device Off from the menu.
–or–
• Open the Per Method Parameters table in the Tune window. Take the system out of Operate mode by clicking the Operate On/Off toggle button, and then turn off the nitrogen gas by clicking the Nitrogen Gas On/Off toggle button.
3. Allow the probe heater to cool.
4. Unscrew and remove the PEEK fingertight fitting from the ESI probe.
Contents
• Switching from ESI to APCI
• Switching from APCI to ESI
CAUTION Allow the probe heater to cool before you remove the ESI probe.

4 Switching ProbesSwitching from ESI to APCI
52 MSQ Plus Mass Detector Hardware Manual Thermo Scientific
5. Turn the locking plate on the ESI probe clockwise to the open position. Then pull the ESI probe out of the probe heater.
6. Remove the APCI probe from the holder located in the door of the MSQ Plus Mass Detector and replace it with the ESI probe.
7. Turn the locking plate on the APCI probe clockwise to the open position. Insert the APCI probe into the probe heater, as shown in Figure 33. Then, turn the locking plate counterclockwise to the closed position.
Figure 32. MSQ Plus Mass Detector setup for the APCI mode
Figure 32 shows the MSQ Plus Mass Detector setup for the APCI mode. Figure 33 shows the corona pin in the operational position for the APCI mode.
CAUTION Take care not to damage the capillary of the probe as you insert the APCI probe into the probe heater.
Locking plate in locked position
Corona pin knob
Source housing
Probe mount
Probe heater

4 Switching ProbesSwitching from APCI to ESI
Thermo Scientific MSQ Plus Mass Detector Hardware Manual 53
Figure 33. View of the corona pin in the operational position for the APCI mode
8. Turn the corona pin knob 90 degrees to its horizontal position.
9. Insert the PEEK fingertight fitting into the APCI probe and screw in.
10. Adjust the nitrogen gas pressure to 310 kPa (45 psi).
Switching from APCI to ESIFollow these steps to connect an ESI probe to the MSQ Plus Mass Detector.
To switch from APCI mode to ESI mode
1. Turn off the LC pump flow. If you are using the cone wash pump, turn it off.
2. Turn the nitrogen gas, ion optics, and probe heater off by doing one of the following:
• From the Status page in the Information view in the Xcalibur data system, right-click the MSQ Plus listing to display a shortcut menu, and choose Turn Device Off from the menu.
–or–
• Open the Per Method Parameters table in the Tune window. Take the system out of Operate mode by clicking the Operate On/Off toggle button, and then turn off the nitrogen gas by clicking the Nitrogen Gas On/Off toggle button.
3. Allow the probe heater to cool.
4. Unscrew and remove the PEEK fingertight fitting from the APCI probe.
5. Turn the corona pin knob 90 degrees to its vertical position.
CAUTION Allow the probe heater to cool before you remove the APCI probe.
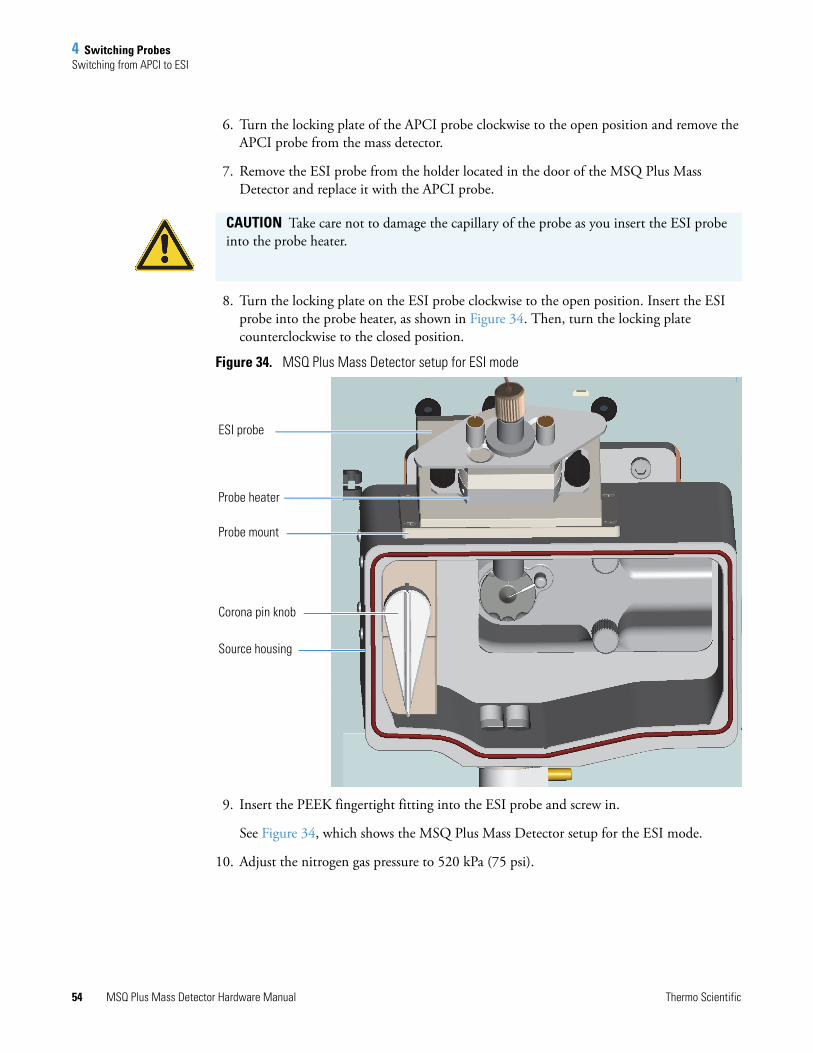
4 Switching ProbesSwitching from APCI to ESI
54 MSQ Plus Mass Detector Hardware Manual Thermo Scientific
6. Turn the locking plate of the APCI probe clockwise to the open position and remove the APCI probe from the mass detector.
7. Remove the ESI probe from the holder located in the door of the MSQ Plus Mass Detector and replace it with the APCI probe.
8. Turn the locking plate on the ESI probe clockwise to the open position. Insert the ESI probe into the probe heater, as shown in Figure 34. Then, turn the locking plate counterclockwise to the closed position.
Figure 34. MSQ Plus Mass Detector setup for ESI mode
9. Insert the PEEK fingertight fitting into the ESI probe and screw in.
See Figure 34, which shows the MSQ Plus Mass Detector setup for the ESI mode.
10. Adjust the nitrogen gas pressure to 520 kPa (75 psi).
CAUTION Take care not to damage the capillary of the probe as you insert the ESI probe into the probe heater.
ESI probe
Corona pin knob
Source housing
Probe mount
Probe heater
Thermo Scientific MSQ Plus Mass Detector Hardware Manual 55
5
Routine and Preventive Maintenance
This chapter contains a maintenance schedule and instructions for the maintenance tasks that you must perform to keep the MSQ Plus Mass Detector in optimal working condition.
The MSQ Plus Mass Detector is a low-maintenance instrument. Apart from fairly light periodic preventive maintenance, it requires only simple source cleaning and inspection on a “loss of performance” basis.
Maintenance ScheduleTable 3 contains a list of routine maintenance procedures that you must perform at the intervals specified.
The maintenance schedule provides only a rough guide to the maintenance tasks that you are responsible for. The appropriate frequency for these tasks depends on instrument usage and the level of system-induced contamination from samples and mobile phase solvents.
Contents
• Maintenance Schedule
• Maintaining the ESI Probe
• Maintaining the APCI Probe
• Maintaining the Probe Heater
• Maintaining the Source Block Assembly
• Maintaining the Forepump
• Maintaining the Turbomolecular Pump

5 Routine and Preventive MaintenanceMaintaining the ESI Probe
56 MSQ Plus Mass Detector Hardware Manual Thermo Scientific
Maintaining the ESI ProbeFlushing the probe on a regular basis helps to prevent contamination and blockage of its capillary. But even with the best preventive maintenance, occasionally the capillary can become blocked and the internal components can become contaminated.
A significant increase in LC pump backpressure (that is, up to 300 psi at a flow rate of 1 mL/min added to the total LC system backpressure) can be symptomatic of a blocked capillary. Instability in the MS signal can be symptomatic of a partially blocked capillary. Replace the capillary if it becomes blocked or partially blocked. The inner diameter of the ESI probe is 127 ± 30 uM, and the expected backpressure at 1 ml/mn is about 150 psi.
Table 3. Maintenance schedule
Frequency Action
As needed Clean the source if you see a drop in sensitivity during analyses.
Flush the capillaries after running an analysis that required buffered solvents. See “Flushing the API Probes” on page 47.
Replace the capillary if it becomes clogged. See “Maintaining the ESI Probe” on page 56 or “Maintaining the APCI Probe” on page 67.
Clean the probe if it becomes contaminated. See “Maintaining the ESI Probe” on page 56 or “Maintaining the APCI Probe” on page 67.
Drain the oil from the oil mist filter and purge the oil in the forepump as described in “Draining the Oil Mist Filter and Purging the Pump Oil” on page 48.
Monthly Clean the probe heater. See “Maintaining the Probe Heater” on page 74.
Check the oil level and color in the rotary pump and add oil if necessary. See “Maintaining the Forepump” on page 95. Refer to the manual that ships with the rotary pump for instructions on changing the oil.
3 to 6 months Replace the rotary pump oil after 3000 hours of operation. Refer to the manual that ships with the pump.
> 6 months Clean the RF/dc prefilter. See “Cleaning the RF/dc Prefilter” on page 87. Perform maintenance of the turbo pump every two years.
CAUTION Wait for the source block and the probe heater assembly to cool before you remove the ESI probe.
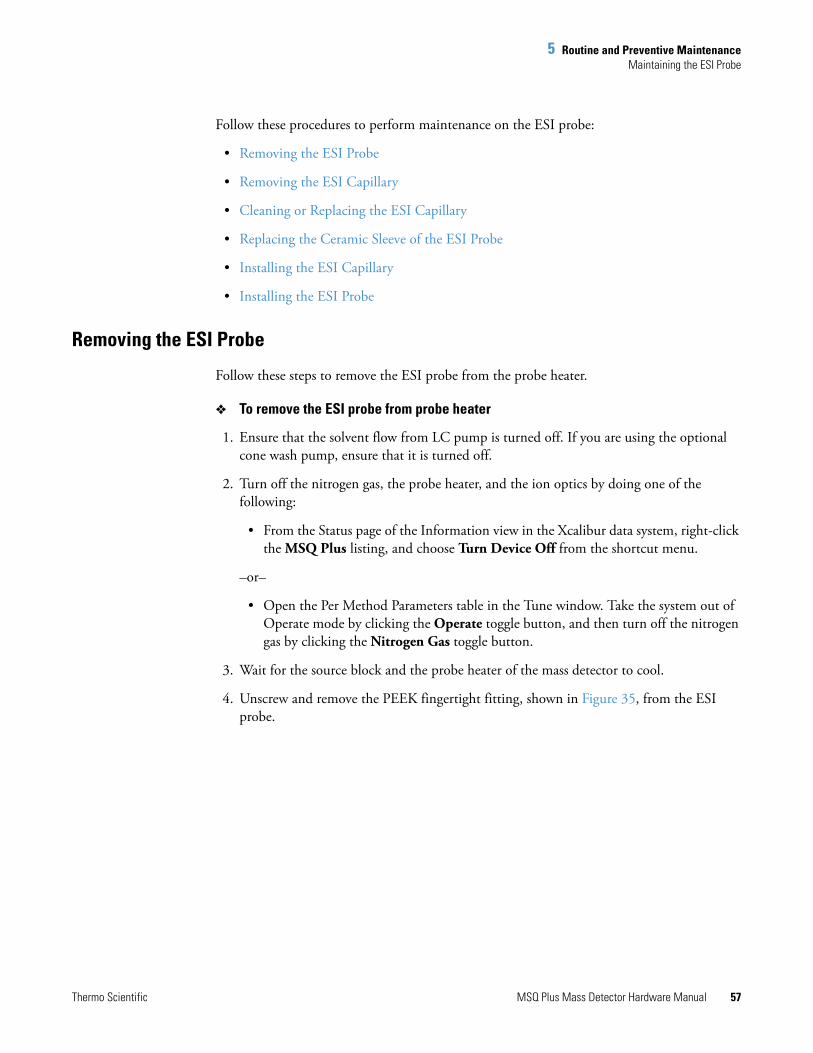
5 Routine and Preventive MaintenanceMaintaining the ESI Probe
Thermo Scientific MSQ Plus Mass Detector Hardware Manual 57
Follow these procedures to perform maintenance on the ESI probe:
• Removing the ESI Probe
• Removing the ESI Capillary
• Cleaning or Replacing the ESI Capillary
• Replacing the Ceramic Sleeve of the ESI Probe
• Installing the ESI Capillary
• Installing the ESI Probe
Removing the ESI Probe
Follow these steps to remove the ESI probe from the probe heater.
To remove the ESI probe from probe heater
1. Ensure that the solvent flow from LC pump is turned off. If you are using the optional cone wash pump, ensure that it is turned off.
2. Turn off the nitrogen gas, the probe heater, and the ion optics by doing one of the following:
• From the Status page of the Information view in the Xcalibur data system, right-click the MSQ Plus listing, and choose Turn Device Off from the shortcut menu.
–or–
• Open the Per Method Parameters table in the Tune window. Take the system out of Operate mode by clicking the Operate toggle button, and then turn off the nitrogen gas by clicking the Nitrogen Gas toggle button.
3. Wait for the source block and the probe heater of the mass detector to cool.
4. Unscrew and remove the PEEK fingertight fitting, shown in Figure 35, from the ESI probe.
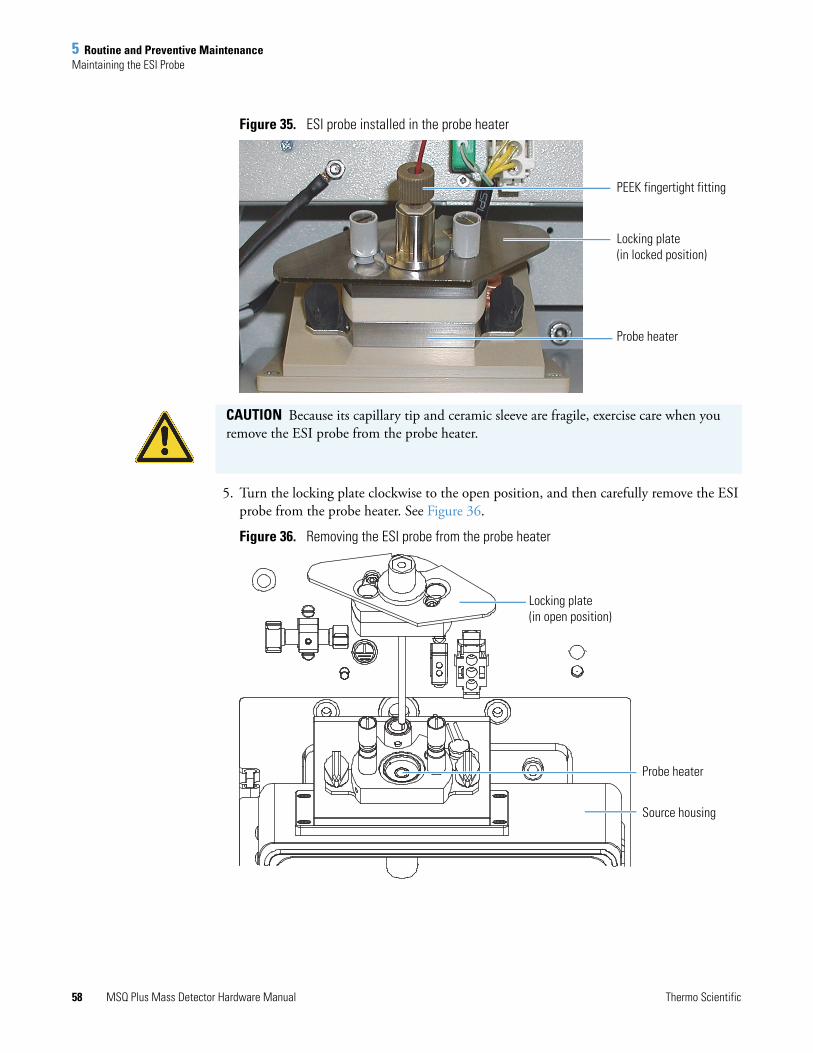
5 Routine and Preventive MaintenanceMaintaining the ESI Probe
58 MSQ Plus Mass Detector Hardware Manual Thermo Scientific
Figure 35. ESI probe installed in the probe heater
5. Turn the locking plate clockwise to the open position, and then carefully remove the ESI probe from the probe heater. See Figure 36.
Figure 36. Removing the ESI probe from the probe heater
PEEK fingertight fitting
Locking plate (in locked position)
Probe heater
CAUTION Because its capillary tip and ceramic sleeve are fragile, exercise care when you remove the ESI probe from the probe heater.
Locking plate(in open position)
Probe heater
Source housing
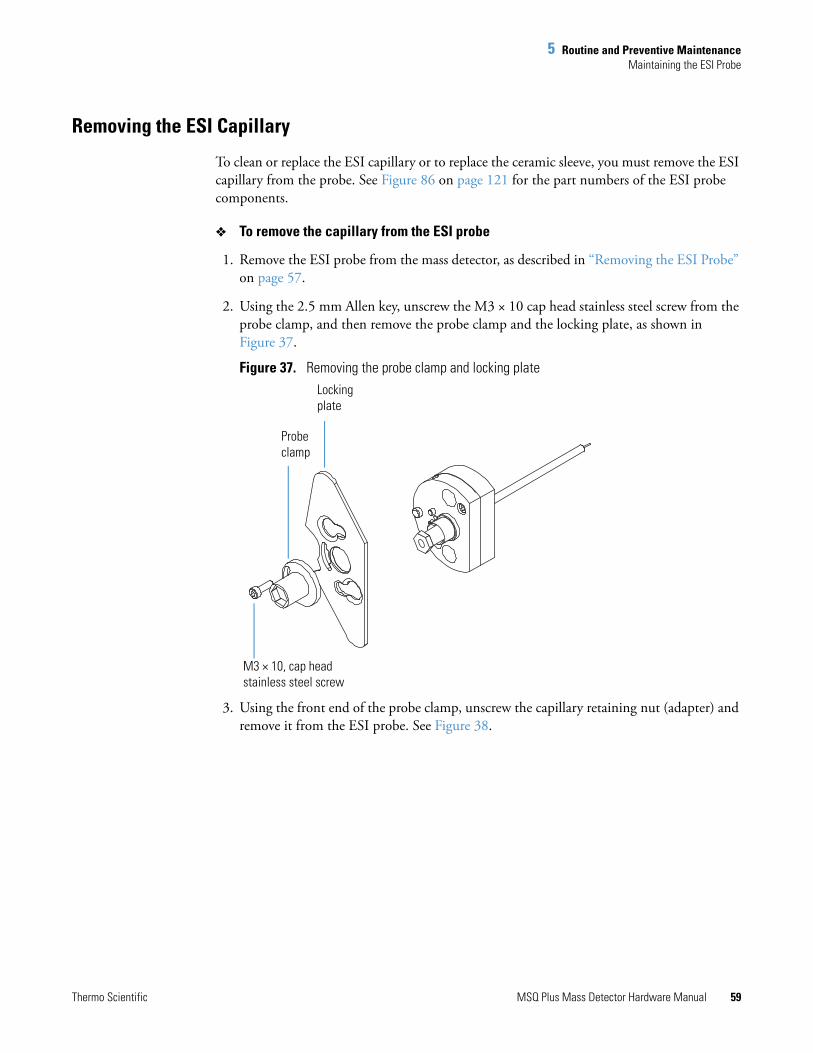
5 Routine and Preventive MaintenanceMaintaining the ESI Probe
Thermo Scientific MSQ Plus Mass Detector Hardware Manual 59
Removing the ESI Capillary
To clean or replace the ESI capillary or to replace the ceramic sleeve, you must remove the ESI capillary from the probe. See Figure 86 on page 121 for the part numbers of the ESI probe components.
To remove the capillary from the ESI probe
1. Remove the ESI probe from the mass detector, as described in “Removing the ESI Probe” on page 57.
2. Using the 2.5 mm Allen key, unscrew the M3 × 10 cap head stainless steel screw from the probe clamp, and then remove the probe clamp and the locking plate, as shown in Figure 37.
Figure 37. Removing the probe clamp and locking plate
3. Using the front end of the probe clamp, unscrew the capillary retaining nut (adapter) and remove it from the ESI probe. See Figure 38.
M3 × 10, cap headstainless steel screw
Probeclamp
Lockingplate

5 Routine and Preventive MaintenanceMaintaining the ESI Probe
60 MSQ Plus Mass Detector Hardware Manual Thermo Scientific
Figure 38. Removing the capillary retaining nut (adapter)
4. Place a lint-free cloth on the workbench, and then gently shake the ESI capillary (part number FM102598), graphite ferrule (part number 6070119), and PEEK tube insert (part number FM102591) assembly out of the ESI probe onto the cloth, as shown in Figure 39.
Figure 39. Removing the capillary, graphite ferrule, and PEEK insert assembly from the probe
5. Pull the ESI capillary out of the PEEK tube insert.
Probeclamp
Capillary retaining nut (adapter)
ESI capillary
Graphite ferrule
PEEK insert
CAUTION Because the ESI capillary is fragile and can be damaged easily, exercise care when handling it.
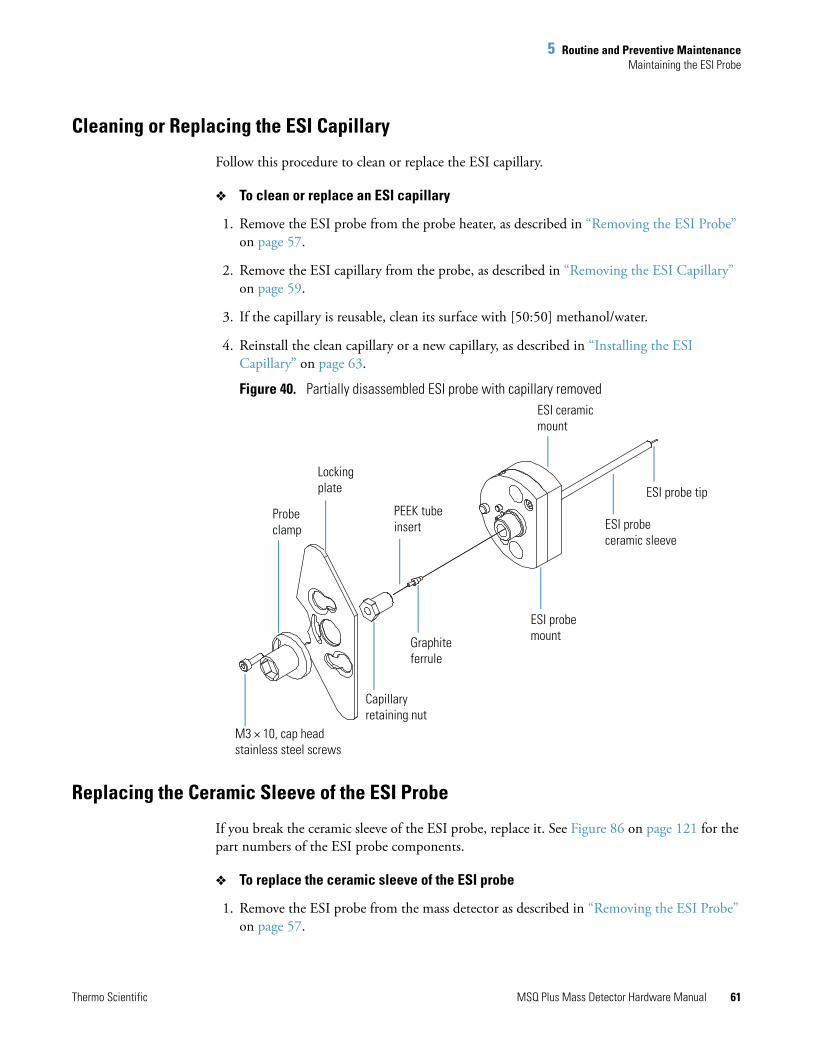
5 Routine and Preventive MaintenanceMaintaining the ESI Probe
Thermo Scientific MSQ Plus Mass Detector Hardware Manual 61
Cleaning or Replacing the ESI Capillary
Follow this procedure to clean or replace the ESI capillary.
To clean or replace an ESI capillary
1. Remove the ESI probe from the probe heater, as described in “Removing the ESI Probe” on page 57.
2. Remove the ESI capillary from the probe, as described in “Removing the ESI Capillary” on page 59.
3. If the capillary is reusable, clean its surface with [50:50] methanol/water.
4. Reinstall the clean capillary or a new capillary, as described in “Installing the ESI Capillary” on page 63.
Figure 40. Partially disassembled ESI probe with capillary removed
Replacing the Ceramic Sleeve of the ESI Probe
If you break the ceramic sleeve of the ESI probe, replace it. See Figure 86 on page 121 for the part numbers of the ESI probe components.
To replace the ceramic sleeve of the ESI probe
1. Remove the ESI probe from the mass detector as described in “Removing the ESI Probe” on page 57.
M3 × 10, cap headstainless steel screws
Probeclamp
Lockingplate
Capillaryretaining nut
PEEK tubeinsert
Graphiteferrule
ESI probemount
ESI ceramicmount
ESI probeceramic sleeve
ESI probe tip
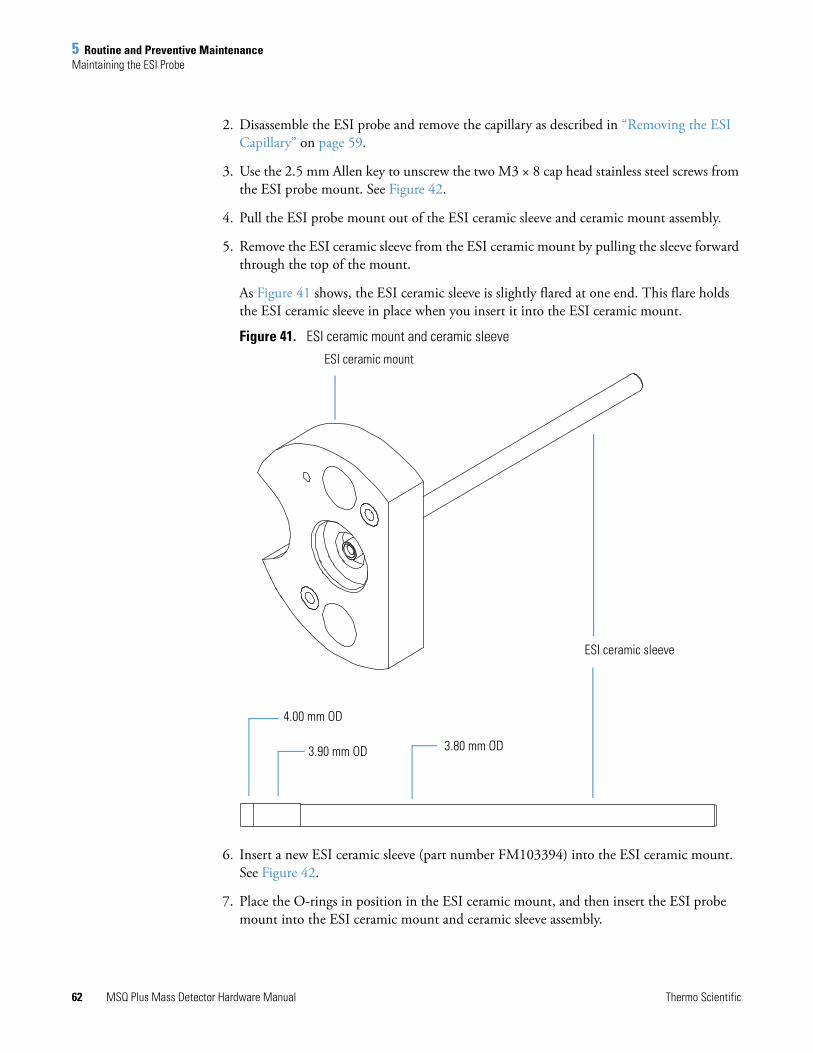
5 Routine and Preventive MaintenanceMaintaining the ESI Probe
62 MSQ Plus Mass Detector Hardware Manual Thermo Scientific
2. Disassemble the ESI probe and remove the capillary as described in “Removing the ESI Capillary” on page 59.
3. Use the 2.5 mm Allen key to unscrew the two M3 × 8 cap head stainless steel screws from the ESI probe mount. See Figure 42.
4. Pull the ESI probe mount out of the ESI ceramic sleeve and ceramic mount assembly.
5. Remove the ESI ceramic sleeve from the ESI ceramic mount by pulling the sleeve forward through the top of the mount.
As Figure 41 shows, the ESI ceramic sleeve is slightly flared at one end. This flare holds the ESI ceramic sleeve in place when you insert it into the ESI ceramic mount.
Figure 41. ESI ceramic mount and ceramic sleeve
6. Insert a new ESI ceramic sleeve (part number FM103394) into the ESI ceramic mount. See Figure 42.
7. Place the O-rings in position in the ESI ceramic mount, and then insert the ESI probe mount into the ESI ceramic mount and ceramic sleeve assembly.
4.00 mm OD
3.90 mm OD 3.80 mm OD
ESI ceramic mount
ESI ceramic sleeve
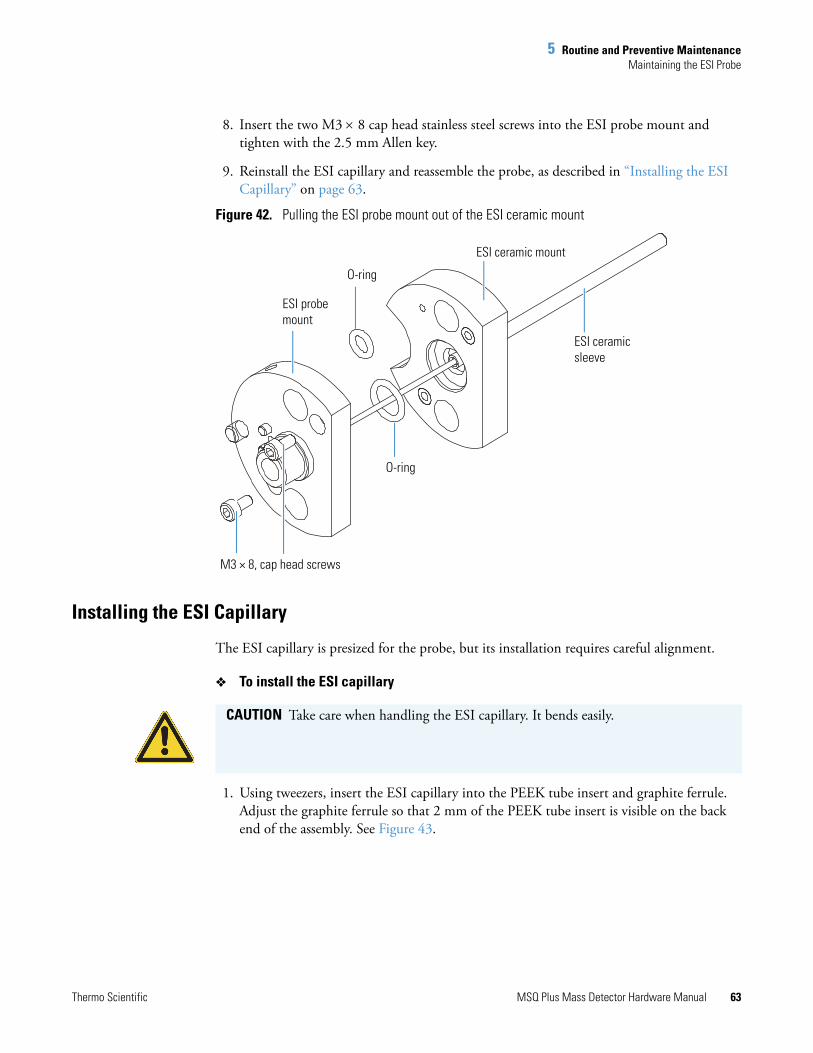
5 Routine and Preventive MaintenanceMaintaining the ESI Probe
Thermo Scientific MSQ Plus Mass Detector Hardware Manual 63
8. Insert the two M3 8 cap head stainless steel screws into the ESI probe mount and tighten with the 2.5 mm Allen key.
9. Reinstall the ESI capillary and reassemble the probe, as described in “Installing the ESI Capillary” on page 63.
Figure 42. Pulling the ESI probe mount out of the ESI ceramic mount
Installing the ESI Capillary
The ESI capillary is presized for the probe, but its installation requires careful alignment.
To install the ESI capillary
1. Using tweezers, insert the ESI capillary into the PEEK tube insert and graphite ferrule. Adjust the graphite ferrule so that 2 mm of the PEEK tube insert is visible on the back end of the assembly. See Figure 43.
ESI probe mount
O-ring
ESI ceramicsleeve
O-ring
ESI ceramic mount
M3 × 8, cap head screws
CAUTION Take care when handling the ESI capillary. It bends easily.
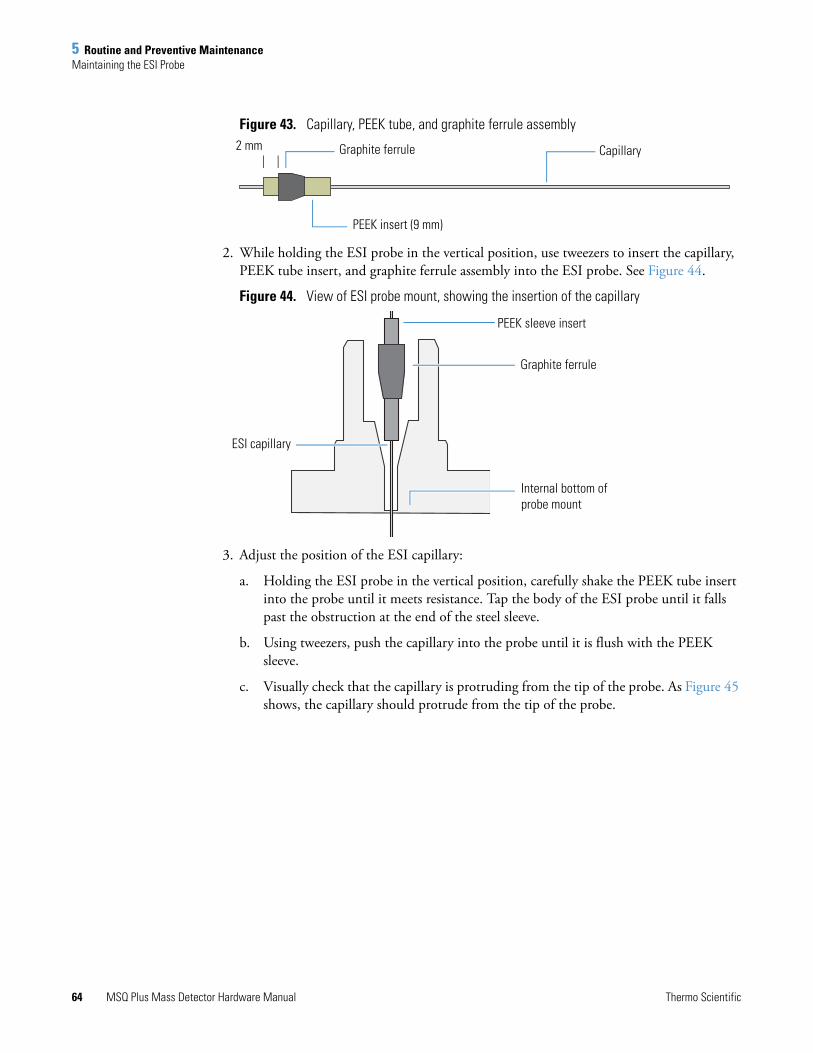
5 Routine and Preventive MaintenanceMaintaining the ESI Probe
64 MSQ Plus Mass Detector Hardware Manual Thermo Scientific
Figure 43. Capillary, PEEK tube, and graphite ferrule assembly
2. While holding the ESI probe in the vertical position, use tweezers to insert the capillary, PEEK tube insert, and graphite ferrule assembly into the ESI probe. See Figure 44.
Figure 44. View of ESI probe mount, showing the insertion of the capillary
3. Adjust the position of the ESI capillary:
a. Holding the ESI probe in the vertical position, carefully shake the PEEK tube insert into the probe until it meets resistance. Tap the body of the ESI probe until it falls past the obstruction at the end of the steel sleeve.
b. Using tweezers, push the capillary into the probe until it is flush with the PEEK sleeve.
c. Visually check that the capillary is protruding from the tip of the probe. As Figure 45 shows, the capillary should protrude from the tip of the probe.
2 mm Capillary
PEEK insert (9 mm)
Graphite ferrule
ESI capillary
Graphite ferrule
PEEK sleeve insert
Internal bottom of probe mount
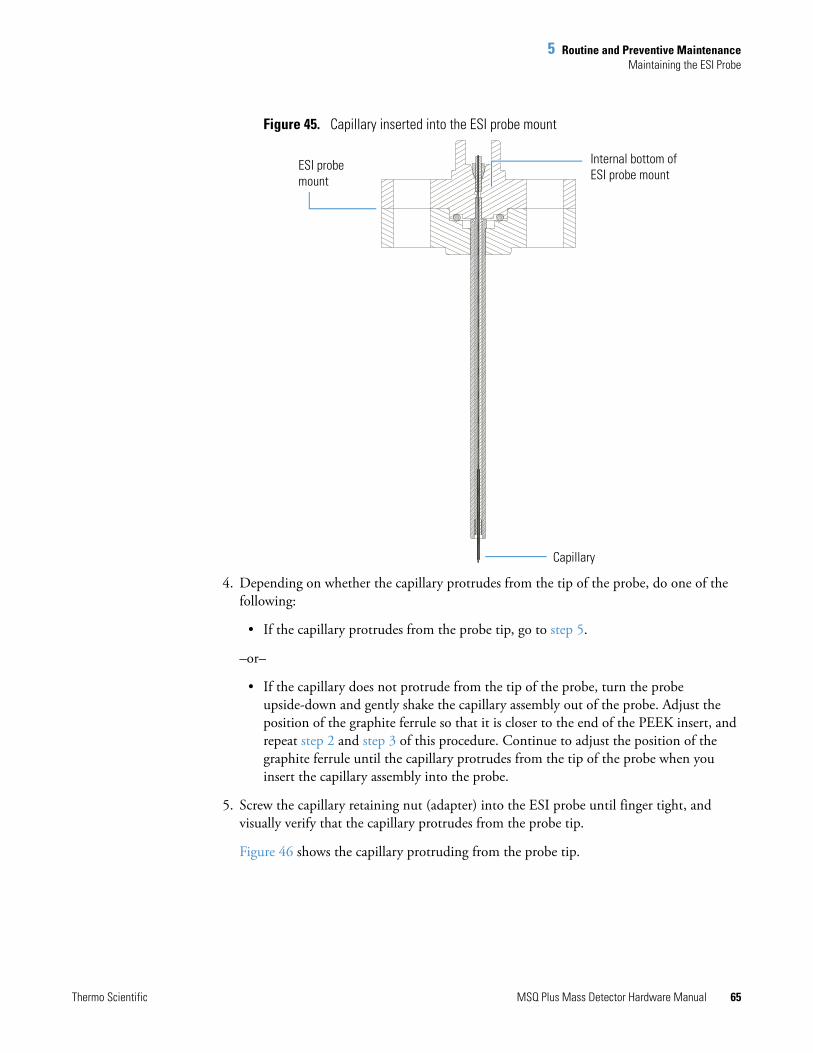
5 Routine and Preventive MaintenanceMaintaining the ESI Probe
Thermo Scientific MSQ Plus Mass Detector Hardware Manual 65
Figure 45. Capillary inserted into the ESI probe mount
4. Depending on whether the capillary protrudes from the tip of the probe, do one of the following:
• If the capillary protrudes from the probe tip, go to step 5.
–or–
• If the capillary does not protrude from the tip of the probe, turn the probe upside-down and gently shake the capillary assembly out of the probe. Adjust the position of the graphite ferrule so that it is closer to the end of the PEEK insert, and repeat step 2 and step 3 of this procedure. Continue to adjust the position of the graphite ferrule until the capillary protrudes from the tip of the probe when you insert the capillary assembly into the probe.
5. Screw the capillary retaining nut (adapter) into the ESI probe until finger tight, and visually verify that the capillary protrudes from the probe tip.
Figure 46 shows the capillary protruding from the probe tip.
ESI probe mount
Capillary
Internal bottom of ESI probe mount

5 Routine and Preventive MaintenanceMaintaining the ESI Probe
66 MSQ Plus Mass Detector Hardware Manual Thermo Scientific
Figure 46. ESI probe with the capillary retaining nut screwed in finger tight
6. Using the probe clamp, tighten the capillary retaining nut by one-half turn. Do not overtighten the nut. Overtightening the nut can cause solvent leakage, and it may collapse the ESI capillary.
7. Finish reassembling the ESI probe:
a. Place the locking plate and probe clamp in position.
b. Insert the M3 × 10 cap head stainless steel screw (part number FM103046) and tighten with the 2.5 mm Allen key.
c. The capillary must protrude from the probe tip. In addition to visually checking the protrusion depth of the capillary, you can use the ESI spacer plate. The ESI spacer plate is 0.64 mm thick. If you can see or feel the capillary protruding through the hole in the center of the plate, the capillary protrudes from the probe tip by more than 0.64 mm.
8. (Optional) Using the ESI spacer plate, confirm that the capillary protrudes from the tip of the probe.
Figure 47 shows the ESI spacer being used to check the protrusion depth of the capillary.
ESI probe mount
Capillary retaining nut
Capillary protruding from the ESI probe tip
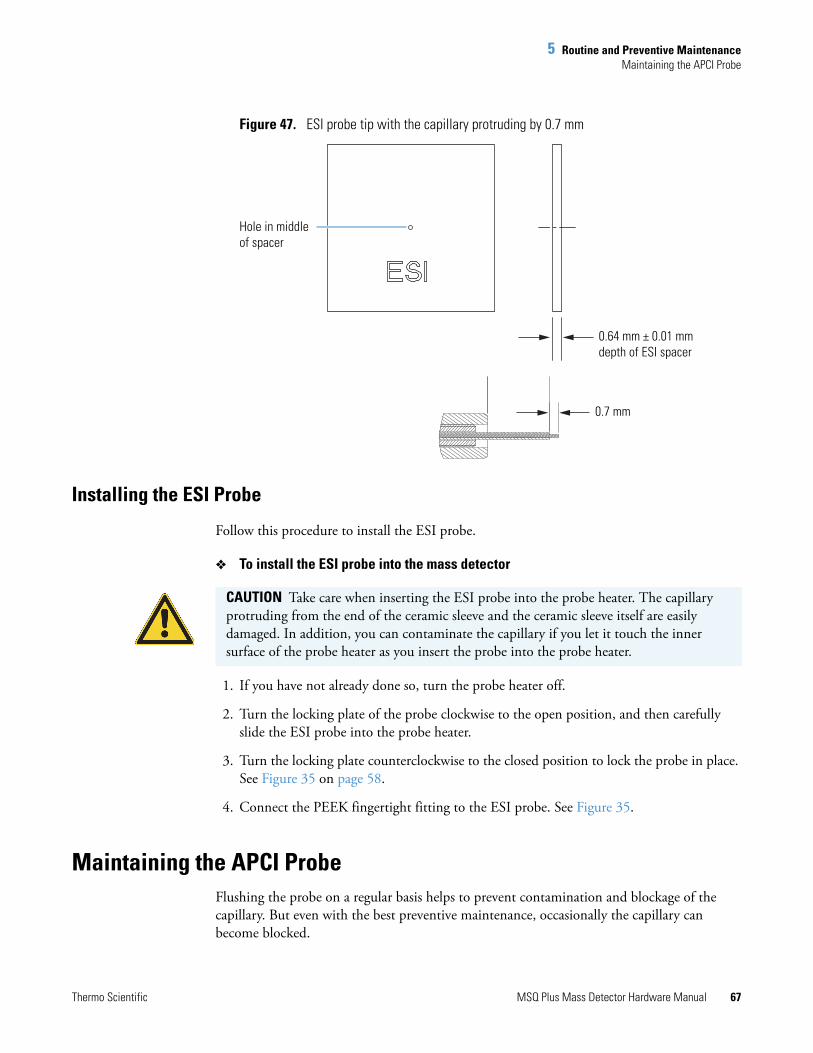
5 Routine and Preventive MaintenanceMaintaining the APCI Probe
Thermo Scientific MSQ Plus Mass Detector Hardware Manual 67
Figure 47. ESI probe tip with the capillary protruding by 0.7 mm
Installing the ESI Probe
Follow this procedure to install the ESI probe.
To install the ESI probe into the mass detector
1. If you have not already done so, turn the probe heater off.
2. Turn the locking plate of the probe clockwise to the open position, and then carefully slide the ESI probe into the probe heater.
3. Turn the locking plate counterclockwise to the closed position to lock the probe in place. See Figure 35 on page 58.
4. Connect the PEEK fingertight fitting to the ESI probe. See Figure 35.
Maintaining the APCI ProbeFlushing the probe on a regular basis helps to prevent contamination and blockage of the capillary. But even with the best preventive maintenance, occasionally the capillary can become blocked.
Hole in middle of spacer
0.7 mm
0.64 mm ± 0.01 mmdepth of ESI spacer
CAUTION Take care when inserting the ESI probe into the probe heater. The capillary protruding from the end of the ceramic sleeve and the ceramic sleeve itself are easily damaged. In addition, you can contaminate the capillary if you let it touch the inner surface of the probe heater as you insert the probe into the probe heater.

5 Routine and Preventive MaintenanceMaintaining the APCI Probe
68 MSQ Plus Mass Detector Hardware Manual Thermo Scientific
A significant increase in LC pump backpressure (that is, up to 300 psi at a flow rate of 1 mL/min added to the total LC system backpressure) or instability in the signal can be symptomatic of a blocked or partially blocked capillary. Replace the capillary if it has become blocked or partially blocked during operation. The APCI capillary (part number FM102594) is pre-sized for the probe, but its installation requires careful alignment.
Follow these maintenance procedures to replace a capillary or clean the APCI probe:
• Removing the APCI Probe
• Removing the APCI Capillary
• Installing the APCI Capillary
• Installing the APCI Probe
Removing the APCI Probe
Follow these steps to remove the APCI probe from the probe heater.
To remove the APCI probe from the probe heater
1. Ensure that the flow from the LC pump is turned off.
2. Turn off the nitrogen gas, the probe heater, and the ion optics by doing one of the following:
• In the Status page in the Information view of the Xcalibur data system, right-click the MSQ Plus listing, and choose Turn Device Off from the shortcut menu.
–or–
• Open the Per Method Parameters table in the Tune window. Take the system out of Operate mode by clicking the Operate toggle button, and turn off the nitrogen gas by clicking the Nitrogen Gas toggle button. See Figure 30 on page 42.
3. Wait for the source block and the probe heater to cool.
4. Unscrew and remove the PEEK fingertight fitting from the APCI probe. See Figure 48.
CAUTION Wait for the source block and probe heater assembly to cool before changing ionization modes.
CAUTION Because it is fragile and can be damaged easily, exercise care when handling the APCI capillary.

5 Routine and Preventive MaintenanceMaintaining the APCI Probe
Thermo Scientific MSQ Plus Mass Detector Hardware Manual 69
Figure 48. MSQ Plus Mass Detector set up for the APCI mode
5. Turn the locking plate clockwise to the open position and remove the APCI probe from the probe heater. See Figure 49.
Figure 49. Remove the APCI probe from the probe heater
Removing the APCI Capillary
Follow these steps to remove the capillary from the APCI probe.
To remove the capillary from the APCI probe
1. Using a 2.5 mm Allen key, unscrew the M3 10 cap head stainless steel screw (part number FM103046) from the probe clamp. See Figure 50.
PEEK fingertight fitting
Locking plate (in locked position)
Probe heater
Locking plate(in open position)
Probe heater

5 Routine and Preventive MaintenanceMaintaining the APCI Probe
70 MSQ Plus Mass Detector Hardware Manual Thermo Scientific
Figure 50. View of partially disassembled APCI probe with capillary removed
2. Remove the probe clamp and the locking plate.
3. Using the probe clamp, unscrew the capillary retaining nut.
4. Carefully shake the graphite Vespel™ ferrule (part number 6070119), PEEK tube insert (part number FM102591), and APCI probe capillary (part number FM102594) out of the probe.
5. Pull the APCI capillary out of the PEEK tube insert, and then do one of the following:
• If the capillary is partially blocked or blocked, dispose of it.
–or–
• If the capillary is reusable, clean its surface with [50:50] methanol/water.
Probe clamp
Locking plate
Graphite ferrule
APCI probe mount
M3 × 10, cap head stainless steel screws
Capillary retaining nut
PEEK tube insert
APCI capillary tube
CAUTION Exercise care when handling the APCI capillary because it is fragile and can be damaged easily.

5 Routine and Preventive MaintenanceMaintaining the APCI Probe
Thermo Scientific MSQ Plus Mass Detector Hardware Manual 71
Installing the APCI Capillary
This procedure describes how to install the APCI capillary in the APCI probe.
To install the APCI capillary in the APCI probe
1. Using tweezers, insert the APCI capillary into the PEEK tube insert and graphite Vespel ferrule assembly.
2. Using tweezers, insert the APCI capillary, PEEK tube insert, and graphite ferrule assembly into the probe. See Figure 51 and Figure 52.
Figure 51. Inserting the capillary, PEEK sleeve, and graphite ferrule into the APCI probe
Figure 52. APCI capillary, PEEK sleeve, and graphite ferrule inserted into probe
3. Adjust the position of the APCI capillary:
a. Holding the APCI probe in the vertical position, carefully shake the PEEK tube insert into the probe until it meets resistance. Tap the probe assembly.
b. Using tweezers, push the capillary into the probe until it is flush with the PEEK sleeve.
Bottom of the probe mount
Graphite Vespel ferrule
PEEK sleeve insert
PEEK sleeveGraphite Vespel ferrule
Capillary
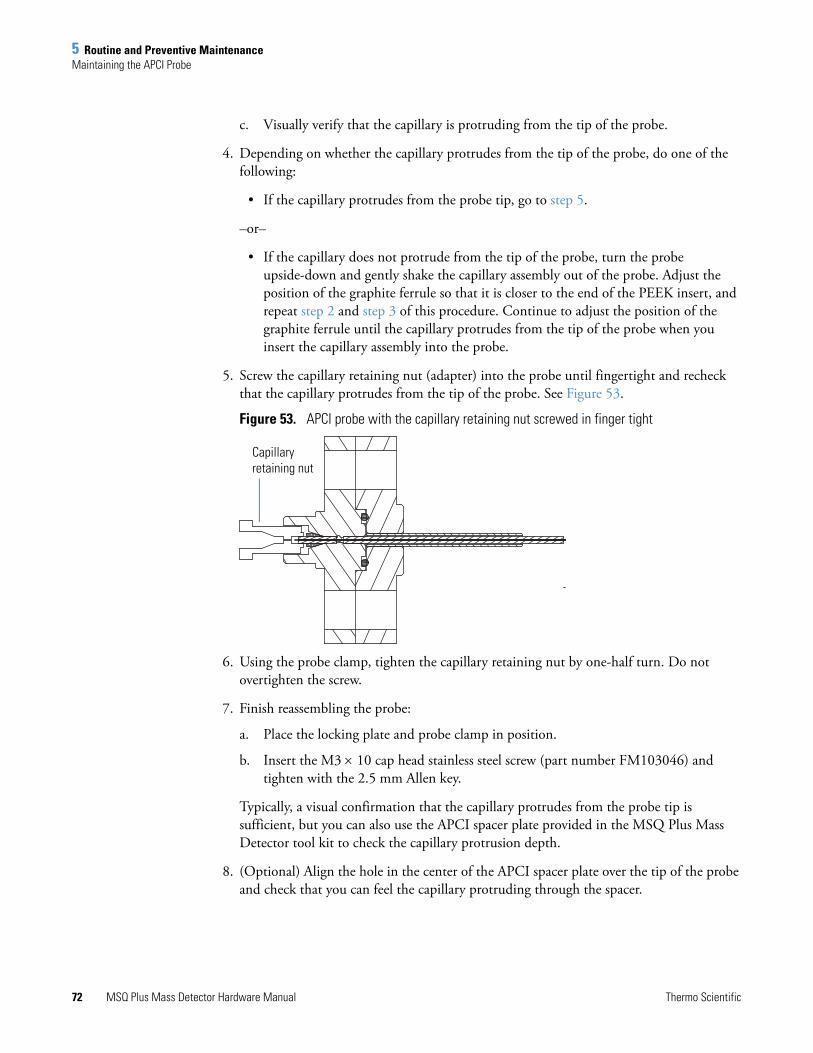
5 Routine and Preventive MaintenanceMaintaining the APCI Probe
72 MSQ Plus Mass Detector Hardware Manual Thermo Scientific
c. Visually verify that the capillary is protruding from the tip of the probe.
4. Depending on whether the capillary protrudes from the tip of the probe, do one of the following:
• If the capillary protrudes from the probe tip, go to step 5.
–or–
• If the capillary does not protrude from the tip of the probe, turn the probe upside-down and gently shake the capillary assembly out of the probe. Adjust the position of the graphite ferrule so that it is closer to the end of the PEEK insert, and repeat step 2 and step 3 of this procedure. Continue to adjust the position of the graphite ferrule until the capillary protrudes from the tip of the probe when you insert the capillary assembly into the probe.
5. Screw the capillary retaining nut (adapter) into the probe until fingertight and recheck that the capillary protrudes from the tip of the probe. See Figure 53.
Figure 53. APCI probe with the capillary retaining nut screwed in finger tight
6. Using the probe clamp, tighten the capillary retaining nut by one-half turn. Do not overtighten the screw.
7. Finish reassembling the probe:
a. Place the locking plate and probe clamp in position.
b. Insert the M3 10 cap head stainless steel screw (part number FM103046) and tighten with the 2.5 mm Allen key.
Typically, a visual confirmation that the capillary protrudes from the probe tip is sufficient, but you can also use the APCI spacer plate provided in the MSQ Plus Mass Detector tool kit to check the capillary protrusion depth.
8. (Optional) Align the hole in the center of the APCI spacer plate over the tip of the probe and check that you can feel the capillary protruding through the spacer.
Capillary retaining nut
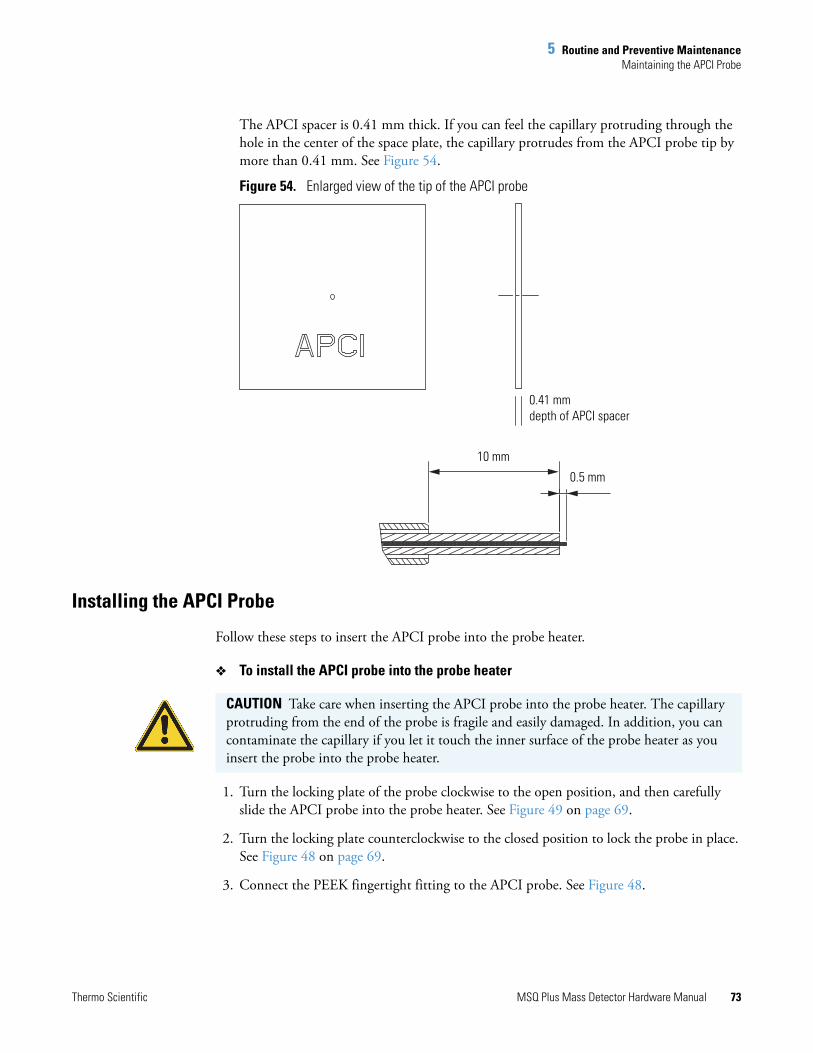
5 Routine and Preventive MaintenanceMaintaining the APCI Probe
Thermo Scientific MSQ Plus Mass Detector Hardware Manual 73
The APCI spacer is 0.41 mm thick. If you can feel the capillary protruding through the hole in the center of the space plate, the capillary protrudes from the APCI probe tip by more than 0.41 mm. See Figure 54.
Figure 54. Enlarged view of the tip of the APCI probe
Installing the APCI Probe
Follow these steps to insert the APCI probe into the probe heater.
To install the APCI probe into the probe heater
1. Turn the locking plate of the probe clockwise to the open position, and then carefully slide the APCI probe into the probe heater. See Figure 49 on page 69.
2. Turn the locking plate counterclockwise to the closed position to lock the probe in place. See Figure 48 on page 69.
3. Connect the PEEK fingertight fitting to the APCI probe. See Figure 48.
0.41 mmdepth of APCI spacer
0.5 mm
10 mm
CAUTION Take care when inserting the APCI probe into the probe heater. The capillary protruding from the end of the probe is fragile and easily damaged. In addition, you can contaminate the capillary if you let it touch the inner surface of the probe heater as you insert the probe into the probe heater.
5 Routine and Preventive MaintenanceMaintaining the Probe Heater
74 MSQ Plus Mass Detector Hardware Manual Thermo Scientific
Maintaining the Probe HeaterIf you use the instrument primarily in the ESI mode, you can clean the probe heater less frequently.
Occasionally, tension or sharp edges on the probe latching plate can cause breakage of the PEEK mounting pins. Use the parts supplied in the Probe Heater Repair Kit (part number 60111-62010) to repair the probe. Filing down the edges of the latching plate might compromise the ability of the plate to lock the probe down, so Thermo Fisher Scientific recommends that you avoid filing these edges unless pin breakage becomes a common problem.
To clean or repair the probe heater, follow these procedures:
• Removing the Probe Heater
• Cleaning the Probe Heater or Replacing the Detent Screw Insulator
• Installing the Probe Heater
Removing the Probe Heater
Follow these instructions to remove the probe heater from the probe mount.
To remove the probe heater from the probe mount
1. Remove the ESI or APCI probe. See “Removing the ESI Probe” on page 57 or “Removing the APCI Probe” on page 68.
2. Rotate the black knobs of the probe heater outwards 90 degrees, so that they face away from each other. See Figure 55 and Figure 56.
CAUTION Wait for the probe heater to cool before you remove it.

5 Routine and Preventive MaintenanceMaintaining the Probe Heater
Thermo Scientific MSQ Plus Mass Detector Hardware Manual 75
Figure 55. Probe heater and its connections to the front panel of the mass detector
Figure 56. Probe heater knobs in the removal position
Grounding cable
Green thermocouple connector
Probe mountProbe heater knobs in locked position
White power connector
Probe heater knobs in removal position
5 Routine and Preventive MaintenanceMaintaining the Probe Heater
76 MSQ Plus Mass Detector Hardware Manual Thermo Scientific
The black knobs are connected to locking cams. When the black knobs are facing away from each other, the cams are in the unlocked position and you can pull the probe heater out of the probe mount.
3. Pull the probe heater out of the probe mount, and then disconnect the green connector and the white connector from the mass detector. Be careful not to lose the O-rings. See Figure 57.
Figure 57. Power connector and thermocouple connector
The green connector connects the probe heater to the temperature sensor. The white connector connects the probe heater to its power source.
4. Store the probe heater in the holder to the left of the source compartment until you are ready to clean it. See Figure 58.
The probe heater is attached to the mass detector by the grounding strap, but it is not necessary to remove the grounding strap during the cleaning procedure. See Figure 58.
Figure 58. Probe heater with the operator detaching the grounding strap
White power connector
Green thermocouple connector
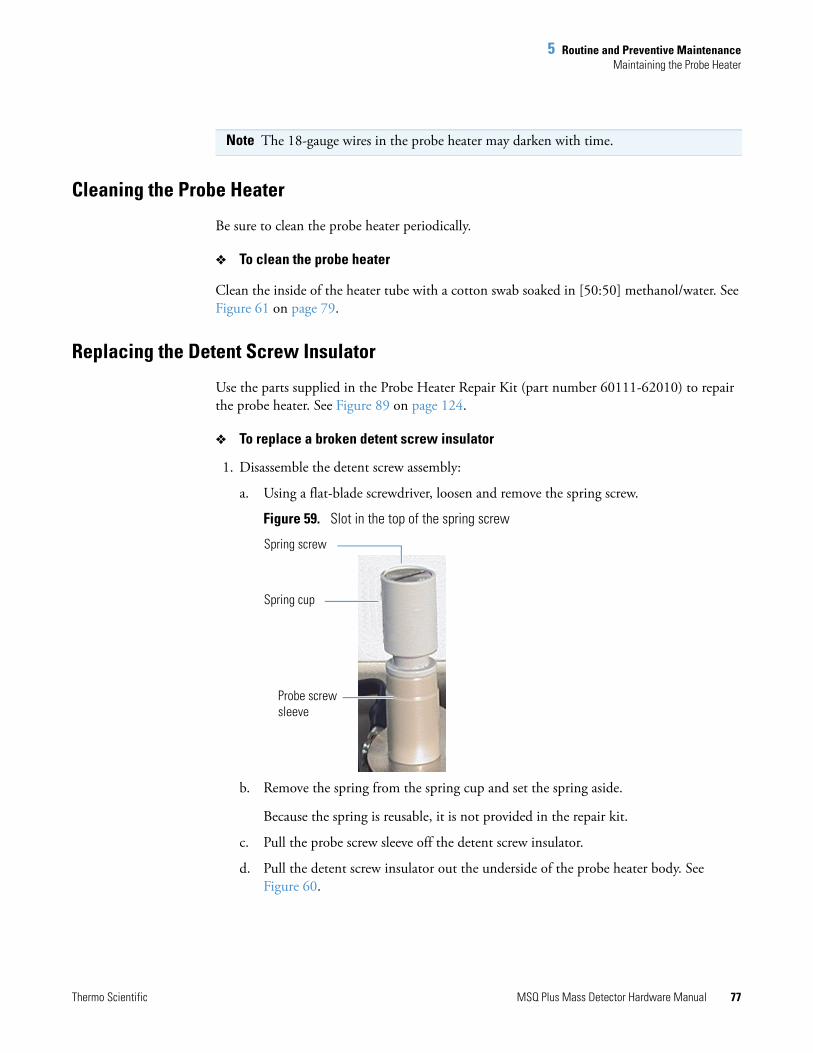
5 Routine and Preventive MaintenanceMaintaining the Probe Heater
Thermo Scientific MSQ Plus Mass Detector Hardware Manual 77
Cleaning the Probe Heater
Be sure to clean the probe heater periodically.
To clean the probe heater
Clean the inside of the heater tube with a cotton swab soaked in [50:50] methanol/water. See Figure 61 on page 79.
Replacing the Detent Screw Insulator
Use the parts supplied in the Probe Heater Repair Kit (part number 60111-62010) to repair the probe heater. See Figure 89 on page 124.
To replace a broken detent screw insulator
1. Disassemble the detent screw assembly:
a. Using a flat-blade screwdriver, loosen and remove the spring screw.
Figure 59. Slot in the top of the spring screw
b. Remove the spring from the spring cup and set the spring aside.
Because the spring is reusable, it is not provided in the repair kit.
c. Pull the probe screw sleeve off the detent screw insulator.
d. Pull the detent screw insulator out the underside of the probe heater body. See Figure 60.
Note The 18-gauge wires in the probe heater may darken with time.
Spring screw
Spring cup
Probe screw sleeve
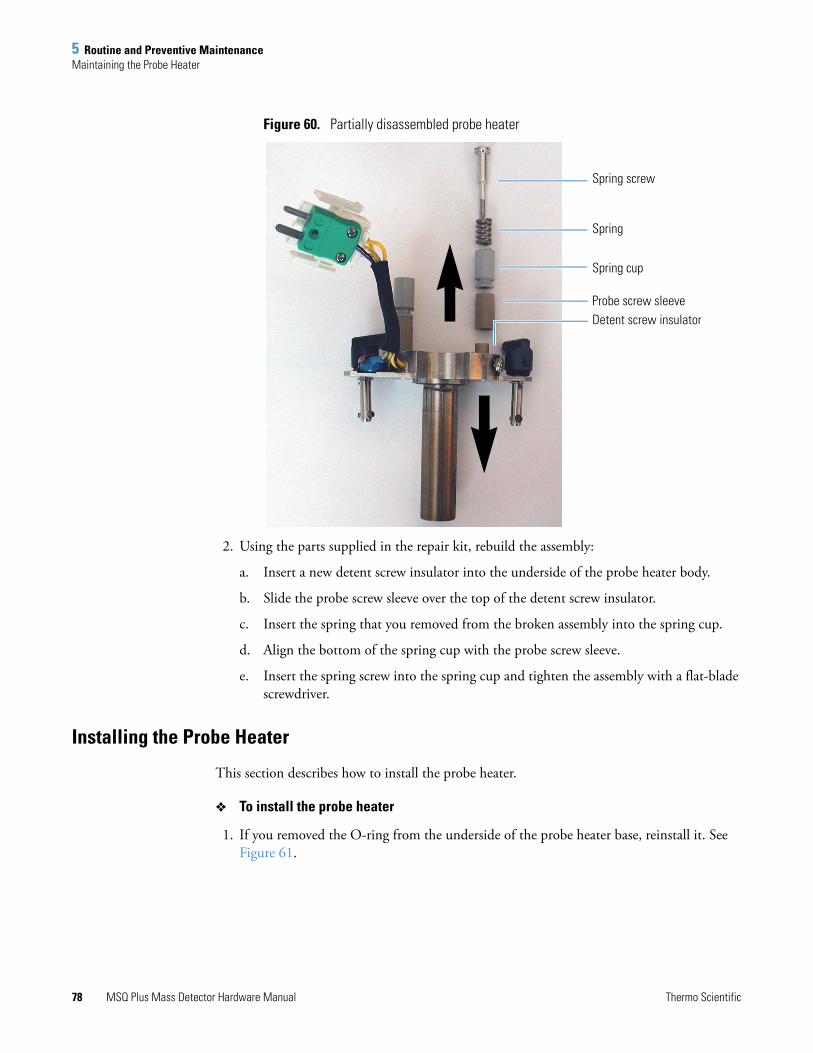
5 Routine and Preventive MaintenanceMaintaining the Probe Heater
78 MSQ Plus Mass Detector Hardware Manual Thermo Scientific
Figure 60. Partially disassembled probe heater
2. Using the parts supplied in the repair kit, rebuild the assembly:
a. Insert a new detent screw insulator into the underside of the probe heater body.
b. Slide the probe screw sleeve over the top of the detent screw insulator.
c. Insert the spring that you removed from the broken assembly into the spring cup.
d. Align the bottom of the spring cup with the probe screw sleeve.
e. Insert the spring screw into the spring cup and tighten the assembly with a flat-blade screwdriver.
Installing the Probe Heater
This section describes how to install the probe heater.
To install the probe heater
1. If you removed the O-ring from the underside of the probe heater base, reinstall it. See Figure 61.
Spring screw
Spring cup
Probe screw sleeveDetent screw insulator
Spring

5 Routine and Preventive MaintenanceMaintaining the Source Block Assembly
Thermo Scientific MSQ Plus Mass Detector Hardware Manual 79
Figure 61. View of O-ring installed in the underside of the probe heater base
2. If you disconnected the grounding strap from the probe heater, reconnect it to the probe heater. See Figure 58 on page 76.
3. Rotate the black knobs of the probe heater, so that they face away from each other. See Figure 56 on page 75.
4. Insert the tube portion of the probe heater into the probe mount.
5. Rotate the black knobs of the probe heater forward to their locking position. See Figure 55 on page 75.
6. Plug the green connector and the white connector into their respective receptacles located above the probe mount. See Figure 55.
Maintaining the Source Block AssemblyThe entrance cone is the only component of the source block assembly that requires frequent cleaning. The cone wash nozzle rarely requires cleaning because it is used to spray the entrance cone with cleaning solvent.
You do not need to disassemble the source block assembly to clean the entrance cone and the cone wash nozzle. To clean the RF/dc prefilter, the extraction cone, or the source block itself, you must remove the source block assembly from the mass detector and disassemble it.
Heater tube
O-ring, BS01818.77 mm ID × 1.78 mm THK
CAUTION Make sure that the grounding strap is connected to the probe heater before you insert the probe heater into the probe mount.
Note When it is not in use, ensure that the cone wash nozzle faces away from the entrance cone. See Figure 62 on page 82.

5 Routine and Preventive MaintenanceMaintaining the Source Block Assembly
80 MSQ Plus Mass Detector Hardware Manual Thermo Scientific
To clean any or all of the components of the source block assembly, follow these procedures:
• Preparing the LC/MS System for Maintenance
• Clearing Access to the Source Block Assembly
• Removing the Entrance Cone and the Cone Wash Nozzle
• Cleaning the Entrance Cone and the Cone Wash Nozzle
• Removing the Source Block Assembly
• Cleaning the RF/dc Prefilter
• Cleaning the Extraction Cone and the Source Block
• Repairing the Entrance Cone
• Assembling the Source Block Assembly
• Installing the Source Block Assembly
Preparing the LC/MS System for Maintenance
The first step in maintaining the source block assembly is to prepare the LC/MS system for maintenance.
To prepare your LC/MS system for maintenance
1. Turn off the flow from the LC pump.
2. If the cone wash is in use, turn it off.
3. Turn off the nitrogen gas, the ion optics, and the probe heater by doing one of the following:
• In the Per Method Parameters table of the Tune window, click the Nitrogen Gas On/Off toggle button to Off.
–or–
• Open the Status page of the Information view in the Xcalibur data system. Right-click the MSQ Plus listing to open a shortcut menu, and choose Turn Device Off from the shortcut menu.
4. If the MSQ Plus Mass Detector is under vacuum, vent it. Right-click the Server icon and choose Vent from the shortcut menu.
CAUTION Wait for the source block and probe heater assembly to cool before carrying out any maintenance.

5 Routine and Preventive MaintenanceMaintaining the Source Block Assembly
Thermo Scientific MSQ Plus Mass Detector Hardware Manual 81
Venting the MSQ Plus Mass Detector turns off the turbomolecular pump. It does not turn off the Edwards forepump.
5. Wait two or more minutes before proceeding so that the system has time to vent.
6. Turn off the Edwards forepump by doing one of the following:
• Turn off the power to the MSQ Plus Mass Detector by placing its MAINS ON/OFF switch to the Off position.
–or–
• Flip the power switch on the Edwards forepump to the Off position.
Clearing Access to the Source Block Assembly
It is important to clear access to the source block assembly to prevent damage to its parts.
To clear access to the source block assembly
1. To open the front door of the mass detector, depress the door latch on the left side of the detector as you pull the door forward.
2. Remove the API probe from the probe heater:
a. Remove the PEEK fingertight fitting from the probe.
b. Turn the locking plate clockwise to the open position, and then carefully pull the API probe out of the probe heater.
3. Rotate the black knobs of the probe heater so that they face away from each other, and then pull the probe heater out of the source mount. See Figure 56 on page 75.
4. Store the probe heater in the holder to the left of the source compartment.
5. If your MSQ Plus Mass Detector is set up in the APCI mode, rotate the corona pin knob downward to its vertical position.
CAUTION It takes approximately two minutes for the vacuum rotor to decelerate after you choose Vent. To avoid damaging the vacuum pump, allow time for this deceleration process before you turn off the power to the vacuum pump.
CAUTION Wait for the source block and probe heater to cool before performing any maintenance.
CAUTION Exercise care when handling the API probe. The ceramic sleeve of the ESI probe and the capillaries of both probes are fragile and can be damaged easily.

5 Routine and Preventive MaintenanceMaintaining the Source Block Assembly
82 MSQ Plus Mass Detector Hardware Manual Thermo Scientific
Removing the Entrance Cone and the Cone Wash Nozzle
Follow these steps to remove the entrance cone and the cone wash nozzle.
To remove the entrance cone and the cone wash nozzle
1. If you have not already done so, vent the mass detector, as described in “Preparing the LC/MS System for Maintenance” on page 80, and clear the access to the source block, as described in “Clearing Access to the Source Block Assembly” on page 81.
Figure 62. View of the front side of the source block with the cone wash nozzle turned away from the entrance cone
2. Being careful to handle the cone wash nozzle by its base, rotate the cone wash nozzle away from the entrance cone. See Figure 62.
3. Place a lint-free cloth over the drainage holes in the bottom of the source enclosure.
4. Turn the entrance cone clockwise and pull forward to remove it.
CAUTION The corona needle is very sharp. Do not attempt to remove the entrance cone or the cone wash nozzle before you turn the corona pin knob to its vertical position. See Figure 62.
Cone wash nozzle
Corona pin knob
Entrance cone
CAUTION The tip of the cone wash nozzle is very fragile, so take care to handle the cone wash nozzle by its base. See Figure 66 on page 85.
Tip It is easy to drop small objects such as the entrance cone and the cone wash nozzle into the drain at the bottom of the source enclosure. Temporarily blocking the drainage holes in the bottom of the source enclosure prevents small objects from falling into the drainage tubing.
Note The entrance cone assembly is reverse-threaded. Therefore, to remove it, turn it clockwise. To install it, turn it counterclockwise.

5 Routine and Preventive MaintenanceMaintaining the Source Block Assembly
Thermo Scientific MSQ Plus Mass Detector Hardware Manual 83
Figure 63. Entrance cone with cone facing upwards
5. Taking care to handle it by its base, carefully remove the cone wash nozzle from the source block.
6. Proceed to one of the following:
• For instructions on cleaning the entrance cone, go to the next procedure, “Removing the Entrance Cone and the Cone Wash Nozzle.”
• For instructions on cleaning the internal components of the source block assembly, go to “Removing the Source Block Assembly” on page 86.
Cleaning the Entrance Cone and the Cone Wash Nozzle
The cone wash nozzle requires cleaning only if it becomes blocked.
To clean the entrance cone and the cone wash nozzle
1. Use a 2.5 mm flat blade screwdriver to remove the O-ring on the back of the entrance cone. Figure 64 shows the location of the O-ring. For O-ring part numbers, see Figure 84 on page 115.
Figure 64. Back of the entrance cone, showing its O-ring (BS010)
CAUTION Take care when handling the entrance cone. Always store the entrance cone with its cone facing upwards, as shown in Figure 63.
Cone facing upwards
CAUTION Because its tip is fragile, take care when handling the cone wash nozzle.
O-ring, BS0106.07 mm ID × 1.78 mm THK

5 Routine and Preventive MaintenanceMaintaining the Source Block Assembly
84 MSQ Plus Mass Detector Hardware Manual Thermo Scientific
2. Sonicate the entrance cone in 100% methanol. If methanol does not remove the contamination, sonicate the cone in a 10% v/v aqueous solution of formic acid, rinse with distilled water, and then rinse with 100% methanol.
3. Using a microscope set to 30x magnification, inspect the inside of the cone to ensure cleanliness. Also inspect the outside of the cone to verify that the opening is circular and has a sharp edge. See “Repairing the Entrance Cone” on page 91 for information on temporarily repairing the cone. See Figure 65.
Figure 65. View of the inside back of the entrance cone
4. If the cone wash nozzle requires cleaning, remove its O-ring, and then sonicate the nozzle in 100% methanol. If methanol does not remove the contamination, sonicate the nozzle in a 10% v/v aqueous solution of formic acid, rinse with distilled water, and then rinse with 100% methanol.
Figure 66 shows the cone wash nozzle.
For O-ring part numbers, see Figure 84 on page 115.
Orifice in the center of the entrance cone
CAUTION Because solvent and acid can damage them, do not sonicate O-rings.
CAUTION Take care when handling the cone wash nozzle. Its tip is extremely fragile.
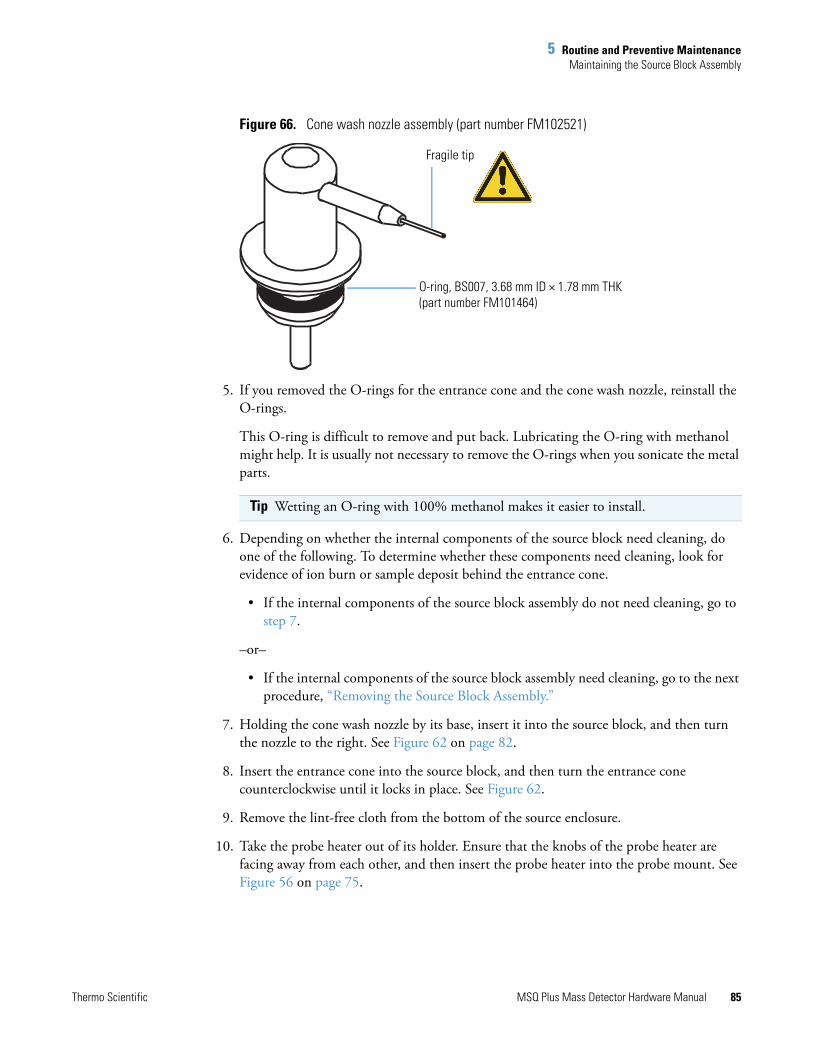
5 Routine and Preventive MaintenanceMaintaining the Source Block Assembly
Thermo Scientific MSQ Plus Mass Detector Hardware Manual 85
Figure 66. Cone wash nozzle assembly (part number FM102521)
5. If you removed the O-rings for the entrance cone and the cone wash nozzle, reinstall the O-rings.
This O-ring is difficult to remove and put back. Lubricating the O-ring with methanol might help. It is usually not necessary to remove the O-rings when you sonicate the metal parts.
6. Depending on whether the internal components of the source block need cleaning, do one of the following. To determine whether these components need cleaning, look for evidence of ion burn or sample deposit behind the entrance cone.
• If the internal components of the source block assembly do not need cleaning, go to step 7.
–or–
• If the internal components of the source block assembly need cleaning, go to the next procedure, “Removing the Source Block Assembly.”
7. Holding the cone wash nozzle by its base, insert it into the source block, and then turn the nozzle to the right. See Figure 62 on page 82.
8. Insert the entrance cone into the source block, and then turn the entrance cone counterclockwise until it locks in place. See Figure 62.
9. Remove the lint-free cloth from the bottom of the source enclosure.
10. Take the probe heater out of its holder. Ensure that the knobs of the probe heater are facing away from each other, and then insert the probe heater into the probe mount. See Figure 56 on page 75.
Tip Wetting an O-ring with 100% methanol makes it easier to install.
O-ring, BS007, 3.68 mm ID × 1.78 mm THK (part number FM101464)
Fragile tip

5 Routine and Preventive MaintenanceMaintaining the Source Block Assembly
86 MSQ Plus Mass Detector Hardware Manual Thermo Scientific
11. Lock the probe heater in place by turning its black knobs forward 90 degrees. See Figure 55 on page 75.
12. Reinsert the API probe into the probe heater and reattach the PEEK fingertight fitting to the probe. See Figure 35 on page 58.
Removing the Source Block Assembly
You must clean the entire source block assembly on a regular basis if you inject complex sample matrices or use highly buffered mobile phases. To clean the source block assembly, you must remove it from the instrument and disassemble it.
To remove the source block assembly from the mass detector
1. If you have not already done so, do the following:
• Prepare your LC/MS system for maintenance, as described in “Preparing the LC/MS System for Maintenance” on page 80.
• Remove the probe and the probe heater, as described in “Clearing Access to the Source Block Assembly” on page 81.
• Remove the entrance cone and the cone wash nozzle, as described in “Removing the Entrance Cone and the Cone Wash Nozzle” on page 82.
2. Loosen the thumbscrews on the source block and pull the source block assembly out of the mass detector. See Figure 67.
Figure 67. Source block assembly being removed from the mass detector
CAUTION Wait for the source block and probe heater assembly to cool before carrying out any maintenance.
Thumbscrews

5 Routine and Preventive MaintenanceMaintaining the Source Block Assembly
Thermo Scientific MSQ Plus Mass Detector Hardware Manual 87
Cleaning the RF/dc Prefilter
See Table 4 to determine the frequency at which you need to clean the RF/dc prefilter.
To clean the RF/dc prefilter
1. Support the quadrupole as you unscrew the hexapole screws at the base of the RF/dc prefilter to disconnect it from the source block. Tools are not required to remove the quadrupole. See Figure 68.
Figure 68. Source block assembly with the three screws connecting the RF/dc prefilter to the source block
2. Carefully slide the RF/dc prefilter into a 500 mL graduated glass cylinder containing 100% methanol. See Figure 69.
Table 4. Cleaning schedule for RF/dc prefilter
Sample/Solvent Type Cleaning Frequency
Pure samples and solvents 6 months
Standard samples 3 to 6 months
Complex matrices (for example, crude plasma and urine)
1 to 4 weeks with operation of cone wash
Non-volatile buffer Weekly with operation of cone wash
IMPORTANT You must wear non-powdered gloves to handle the quadrupole.
Three hexapole screws

5 Routine and Preventive MaintenanceMaintaining the Source Block Assembly
88 MSQ Plus Mass Detector Hardware Manual Thermo Scientific
Figure 69. Cleaning the RF/dc prefilter
3. Sonicate the cylinder for 15 minutes.
4. Carefully remove the RF/dc prefilter from the graduated cylinder. Then dry the prefilter with a gentle stream of nitrogen gas.
5. Reassemble the source block assembly and reinstall it into the mass detector. Pay careful attention to the orientation of the Teflon™ insulator, which has an indent on one side that should face up when assembling the transfer lens. Improper placement of this insulator interrupts the delivery of voltage to the entrance cone, leading to charging of the source block and a decrease in sensitivity.
6. Pump down the system and determine if the RF/dc prefilter is still dirty.
To make this determination, increase the voltage on the lens to see if beam intensity improves. If the prefilter is dirty, the default voltages result in lower-than-expected sensitivity, especially for ions below 200 m/z.
7. If the RF/dc prefilter is still dirty, perform a deep cleaning as described in the following procedure.
To perform a deep cleaning of the RF/dc prefilter
1. Immerse the RF/dc prefilter in a graduated cylinder containing 100% distilled water. Sonicate for 15 minutes.
2. Decant the water and fill the graduated cylinder with 100% methanol. Sonicate for 15 minutes.
Note Typically, sonicating the RF/dc prefilter in methanol is adequate to remove contamination. However, contamination from some compounds and some sample matrices can be more difficult to remove. If your RF/dc prefilter is still dirty after sonicating it in methanol, deep-clean it, as described in the following procedure.
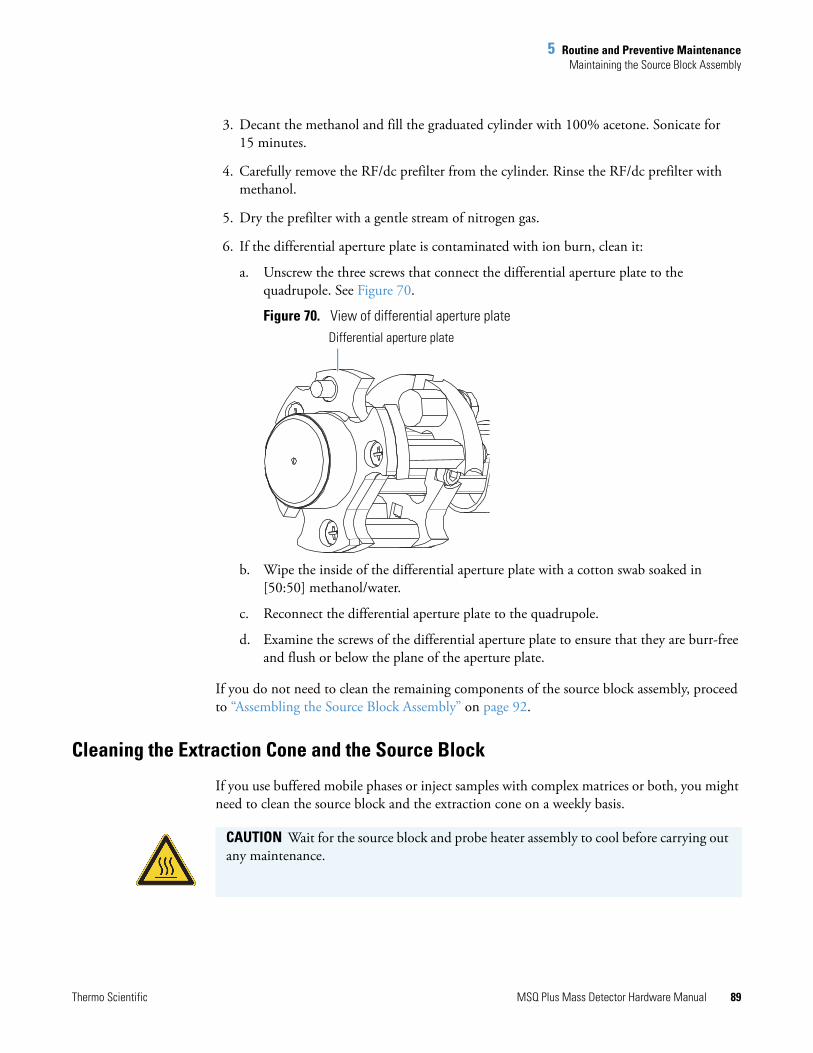
5 Routine and Preventive MaintenanceMaintaining the Source Block Assembly
Thermo Scientific MSQ Plus Mass Detector Hardware Manual 89
3. Decant the methanol and fill the graduated cylinder with 100% acetone. Sonicate for 15 minutes.
4. Carefully remove the RF/dc prefilter from the cylinder. Rinse the RF/dc prefilter with methanol.
5. Dry the prefilter with a gentle stream of nitrogen gas.
6. If the differential aperture plate is contaminated with ion burn, clean it:
a. Unscrew the three screws that connect the differential aperture plate to the quadrupole. See Figure 70.
Figure 70. View of differential aperture plate
b. Wipe the inside of the differential aperture plate with a cotton swab soaked in [50:50] methanol/water.
c. Reconnect the differential aperture plate to the quadrupole.
d. Examine the screws of the differential aperture plate to ensure that they are burr-free and flush or below the plane of the aperture plate.
If you do not need to clean the remaining components of the source block assembly, proceed to “Assembling the Source Block Assembly” on page 92.
Cleaning the Extraction Cone and the Source Block
If you use buffered mobile phases or inject samples with complex matrices or both, you might need to clean the source block and the extraction cone on a weekly basis.
Differential aperture plate
CAUTION Wait for the source block and probe heater assembly to cool before carrying out any maintenance.
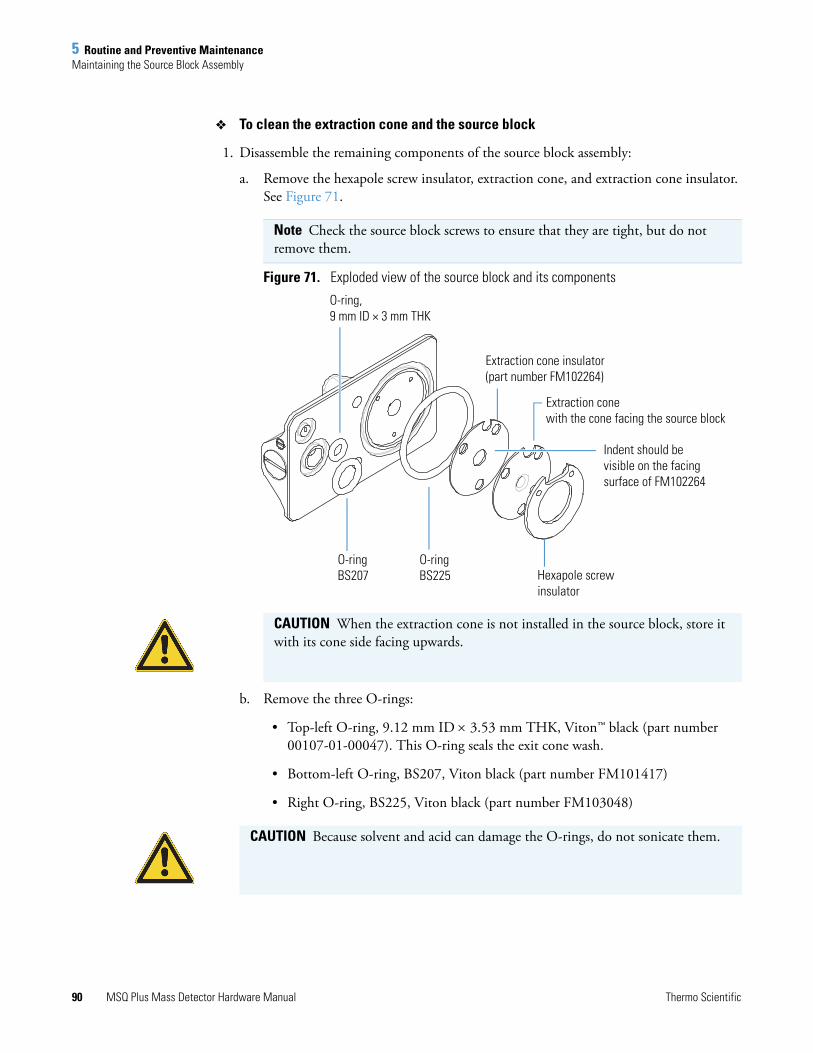
5 Routine and Preventive MaintenanceMaintaining the Source Block Assembly
90 MSQ Plus Mass Detector Hardware Manual Thermo Scientific
To clean the extraction cone and the source block
1. Disassemble the remaining components of the source block assembly:
a. Remove the hexapole screw insulator, extraction cone, and extraction cone insulator. See Figure 71.
Figure 71. Exploded view of the source block and its components
b. Remove the three O-rings:
• Top-left O-ring, 9.12 mm ID 3.53 mm THK, Viton™ black (part number 00107-01-00047). This O-ring seals the exit cone wash.
• Bottom-left O-ring, BS207, Viton black (part number FM101417)
• Right O-ring, BS225, Viton black (part number FM103048)
Note Check the source block screws to ensure that they are tight, but do not remove them.
O-ringBS207
O-ringBS225
Extraction cone insulator (part number FM102264)
O-ring,9 mm ID × 3 mm THK
Extraction conewith the cone facing the source block
Hexapole screw insulator
Indent should be visible on the facing surface of FM102264
CAUTION When the extraction cone is not installed in the source block, store it with its cone side facing upwards.
CAUTION Because solvent and acid can damage the O-rings, do not sonicate them.

5 Routine and Preventive MaintenanceMaintaining the Source Block Assembly
Thermo Scientific MSQ Plus Mass Detector Hardware Manual 91
2. To clean the source block, sequentially sonicate it in the following solvents:
a. 1% v/v solution of formic acid/distilled water
b. 100% distilled water
c. 100% methanol
3. Clean the extraction cone as follows:
a. Place the extraction cone, with the cone side facing upwards, into a beaker.
b. Fill the beaker with 10% v/v solution of formic acid, and then sonicate for approximately 15 minutes.
c. Decant the formic acid, fill the beaker with methanol, and then sonicate again for approximately 15 minutes.
d. Examine the entrance cone under magnification to be certain that the entrance is circular with sharp edges. If the entrance cone is damaged, you might be able to repair the damage, using the technique in “Repairing the Entrance Cone.”
Repairing the Entrance Cone
You can temporarily repair the MSQ Plus Mass Detector entrance cone (part number 60111-60049) pending replacement of the entrance cone.
To temporarily repair the entrance cone
1. Remove the entrance cone and clean according to standard procedures: sonicate in water and then methanol, and blow dry with compressed air or nitrogen.
2. Using a microscope set to 30x magnification, examine the cone.
The tip must be circular with a sharp edge. The inner diameter specification is 300 ± 10 M.
3. If the cone has been damaged and is no longer circular, you can use the corona pin needle (part number 70005-98033) by gently inserting the needle from the back of the cone until it makes contact. Slowly roll the needle back and forth, applying light pressure. Re-examine the cone under magnification.
The steel pin should be able to recircularize the titanium cone, but it might leave a ragged and somewhat larger opening. You can polish the ragged edge of the cone to a sharp circular rim by using 12 M grit sandpaper or similar abrasive.
CAUTION Exercise great care when handling the extraction cone. Use tweezers to handle the extraction cone and ensure that the cone side faces upwards when you place the extraction cone on a solid surface.

5 Routine and Preventive MaintenanceMaintaining the Source Block Assembly
92 MSQ Plus Mass Detector Hardware Manual Thermo Scientific
4. Clean the repaired entrance cone and attach it to the MSQ Plus Mass Detector system.
The cone inner diameter is likely to be somewhat larger than the specification.
5. Test the cone for sensitivity, using erythromycin or another test compound with known performance specifications.
Assembling the Source Block Assembly
After you clean and dry the components of the source block assembly, reassemble it.
To reassemble the source block assembly
1. Install the three O-rings (see Figure 71 on page 90):
• Top left O-ring, 9.12 mm ID 3.53 mm THK, Viton black (part number 00107-01-00047)
• Bottom left O-ring, BS207, Viton black (part number FM101417)
• Right O-ring, BS225, Viton black (part number FM103048)
2. Install the extraction cone insulator (part number FM102264).
3. Verify proper orientation by checking for the indent on the facing surface.
4. Install the extraction cone (part number FM102263) with the cone facing the source block.
5. Install the hexapole screw insulator (part number FM102248). Be certain that this part is free from contamination, particularly from metal filings that might result from the action of the hexapole screws on the source block. See Figure 71 on page 90.
6. Ensure that the semicircular cutouts in these three components line up, as shown in Figure 72.

5 Routine and Preventive MaintenanceMaintaining the Source Block Assembly
Thermo Scientific MSQ Plus Mass Detector Hardware Manual 93
Figure 72. Source block with the proper alignment of the extraction cone insulator, extraction cone, and hexapole insulator
7. Align the three spring screws at the base of the RF/dc prefilter to the three holes on the back of the source block. Support the quadrupole as you alternately screw the three spring screws at the base of the RF/dc prefilter into the source block. It might help to remove the thumbscrews from the source block, allowing the block to sit upright on a flat surface. See Figure 68 on page 87.
Installing the Source Block Assembly
You must reinstall the source block assembly before you prepare the system for operation.
Figure 73. Cone wash nozzle turned to the right in the source block
Properly aligned components
CAUTION The corona pin is very sharp. Do not attempt to install the entrance cone or the cone wash nozzle before you turn the corona pin knob to its vertical position. See Figure 73.
Cone wash nozzle
Corona pin knob
5 Routine and Preventive MaintenanceMaintaining the Source Block Assembly
94 MSQ Plus Mass Detector Hardware Manual Thermo Scientific
To install the source block assembly into the mass detector
1. Insert the source block assembly (part number 60111-60051) into the source block enclosure, and tighten the thumbscrews on the source block.
The source block is self-aligning when the thumbscrews are fully secure. Finger-tighten only. See Figure 67 on page 86.
2. Handling the cone wash nozzle by its base because the tip is fragile, insert the cone wash nozzle (part number FM102521) into the source block, and carefully rotate the nozzle tip to the right. Lubricating the O-ring with a little methanol helps the insertion process. See Figure 73.
3. Remove the lint-free cloth from the bottom of the source enclosure.
4. Insert the entrance cone into the source block, and turn it counterclockwise.
5. Install the probe heater:
a. Remove the probe heater from its holder, and rotate the black knobs of the probe heater so that they face away from each other. See Figure 56 on page 75.
b. Insert the tube portion of the probe heater into the probe mount. Be certain that the two small O-rings are still in place on the probe mount.
c. Rotate the black knobs of the probe heater forward to their locking position. See Figure 55 on page 75.
6. Install the API probe:
a. Turn the locking plate clockwise to the open position, and carefully insert the ESI probe (part number FM102595) (see Figure 36 on page 58) or the APCI probe (part number FM102587) (see Figure 49 on page 69) into the probe heater.
b. Turn the locking plate counterclockwise into the closed position.
c. Screw the PEEK fingertight fitting into the ESI probe assembly (part number FM102595) or APCI probe assembly (part number FM102587).
CAUTION The tip of the cone wash nozzle is very fragile.
Note The entrance cone assembly is reverse-threaded. Therefore, to remove it, turn it clockwise. To install it, turn it counterclockwise.
CAUTION Take care not to damage the tip of the API probe capillary. If you are installing the ESI probe, take care not to damage its ceramic sleeve.

5 Routine and Preventive MaintenanceMaintaining the Forepump
Thermo Scientific MSQ Plus Mass Detector Hardware Manual 95
7. Pump down the mass detector:
a. Right-click the Server icon, , in the system tray portion of the Windows taskbar to open the shortcut menu.
The Server icon is red because the system is vented.
b. Choose Pump from the shortcut menu.
c. Wait for the MSQ Plus Mass Detector to reach high vacuum.
The server light will change from flashing amber to solid amber. Reaching high vacuum takes approximately 10 minutes.
Maintaining the ForepumpThe vacuum system consists of two types of vacuum pumps, a turbomolecular pump and a forepump. The turbomolecular pump is housed within the MSQ Plus Mass Detector and requires a trained service engineer for servicing. The forepump (also referred to as a backing pump, a rotary pump, or a roughing pump) is external to the MSQ Plus Mass Detector and requires routine maintenance for optimal performance.
Check both the level and the color of the oil in the forepump at least once a month.
Check the oil by looking through the oil sight level window of the forepump. See Figure 74. The oil level should be between the upper and lower marks positioned next to the window. The oil color should be a clear straw color.
Figure 74. View of Edwards forepump that shows the oil sight level window
• If the oil level is near or below the lower mark, add more oil, as described in the manual that comes with the Edwards forepump.
Note You can find more information on operating and maintaining the rotary pump in the manual that is shipped with the pump.
EDWARDS
E32M30Oil sight level window
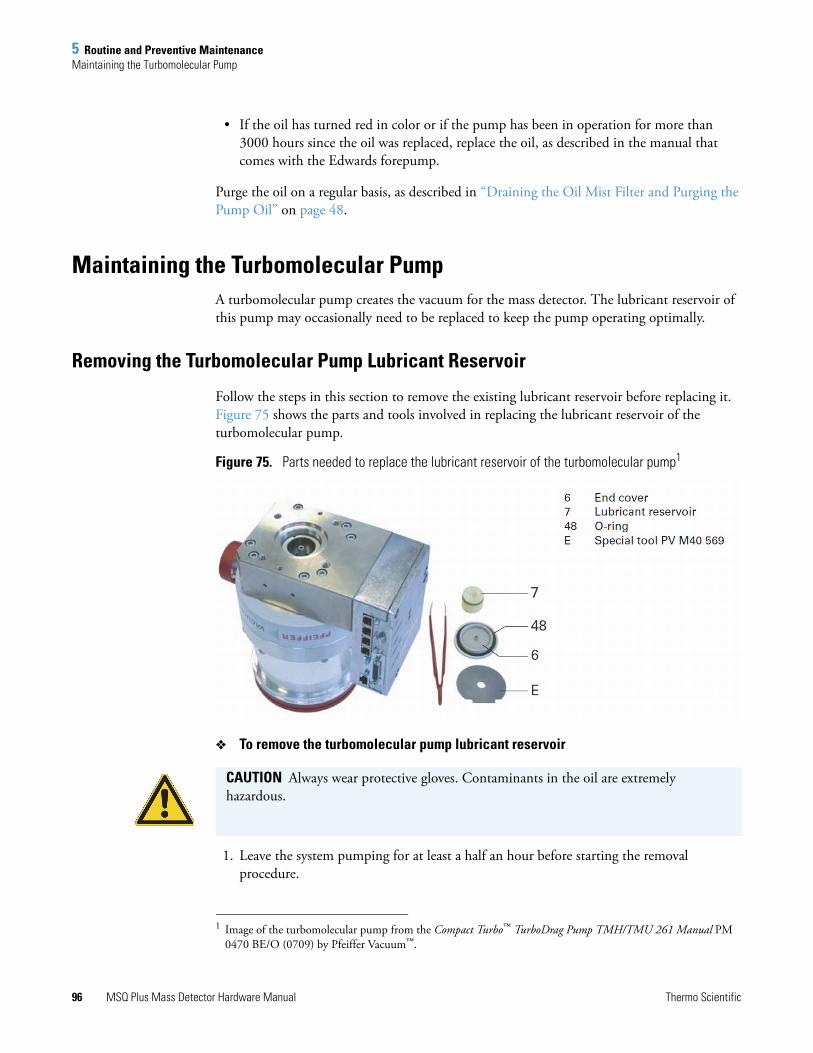
5 Routine and Preventive MaintenanceMaintaining the Turbomolecular Pump
96 MSQ Plus Mass Detector Hardware Manual Thermo Scientific
• If the oil has turned red in color or if the pump has been in operation for more than 3000 hours since the oil was replaced, replace the oil, as described in the manual that comes with the Edwards forepump.
Purge the oil on a regular basis, as described in “Draining the Oil Mist Filter and Purging the Pump Oil” on page 48.
Maintaining the Turbomolecular PumpA turbomolecular pump creates the vacuum for the mass detector. The lubricant reservoir of this pump may occasionally need to be replaced to keep the pump operating optimally.
Removing the Turbomolecular Pump Lubricant Reservoir
Follow the steps in this section to remove the existing lubricant reservoir before replacing it. Figure 75 shows the parts and tools involved in replacing the lubricant reservoir of the turbomolecular pump.
Figure 75. Parts needed to replace the lubricant reservoir of the turbomolecular pump1
To remove the turbomolecular pump lubricant reservoir
1. Leave the system pumping for at least a half an hour before starting the removal procedure.
1 Image of the turbomolecular pump from the Compact Turbo™ TurboDrag Pump TMH/TMU 261 Manual PM 0470 BE/O (0709) by Pfeiffer Vacuum™.
CAUTION Always wear protective gloves. Contaminants in the oil are extremely hazardous.

5 Routine and Preventive MaintenanceMaintaining the Turbomolecular Pump
Thermo Scientific MSQ Plus Mass Detector Hardware Manual 97
2. Vent the mass detector.
3. Using a No. 1 point Pozidriv™ screwdriver, remove the pump-access plate-securing screws.
4. Remove the access plate.
5. Using the supplied locking cap removal tool, shown in Figure 76, unscrew the locking cap by turning the tool and cap counterclockwise.
Figure 76. Removing the locking cap2
6. Remove the cap, including the O-ring, and wipe with a clean, lint-free cloth. Place in a secure location.
7. Using a small flat-blade screwdriver or tweezers, gently pry out the lubricant reservoir, including the O-ring, as shown in Figure 77.
2 Image of the turbomolecular pump from the Compact Turbo™ TurboDrag Pump TMH/TMU 261 Manual PM 0470 BE/O (0709) by Pfeiffer Vacuum.
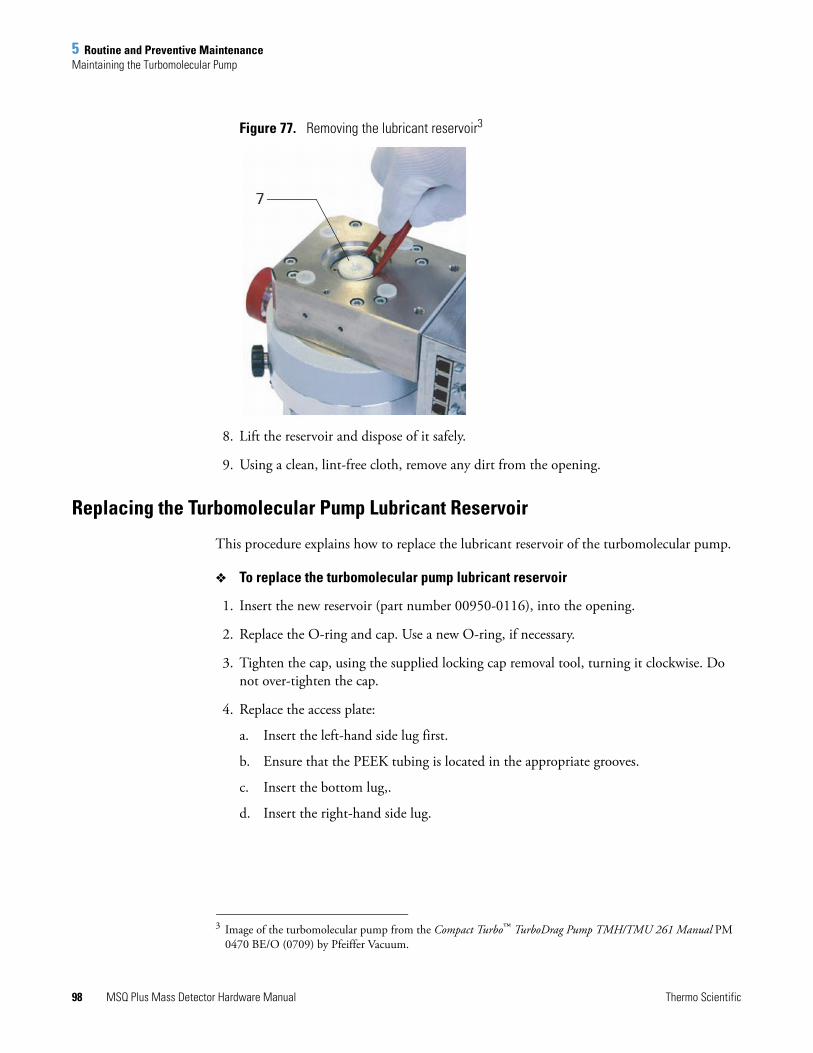
5 Routine and Preventive MaintenanceMaintaining the Turbomolecular Pump
98 MSQ Plus Mass Detector Hardware Manual Thermo Scientific
Figure 77. Removing the lubricant reservoir3
8. Lift the reservoir and dispose of it safely.
9. Using a clean, lint-free cloth, remove any dirt from the opening.
Replacing the Turbomolecular Pump Lubricant Reservoir
This procedure explains how to replace the lubricant reservoir of the turbomolecular pump.
To replace the turbomolecular pump lubricant reservoir
1. Insert the new reservoir (part number 00950-0116), into the opening.
2. Replace the O-ring and cap. Use a new O-ring, if necessary.
3. Tighten the cap, using the supplied locking cap removal tool, turning it clockwise. Do not over-tighten the cap.
4. Replace the access plate:
a. Insert the left-hand side lug first.
b. Ensure that the PEEK tubing is located in the appropriate grooves.
c. Insert the bottom lug,.
d. Insert the right-hand side lug.
3 Image of the turbomolecular pump from the Compact Turbo™ TurboDrag Pump TMH/TMU 261 Manual PM 0470 BE/O (0709) by Pfeiffer Vacuum.

Thermo Scientific MSQ Plus Mass Detector Hardware Manual 99
6
System Shutdown
When you are not performing analyses, you can temporarily turn off the nitrogen gas or set the MSQ Plus Mass Detector to the Off mode. Turning off the nitrogen gas between intermittent analyses conserves the nitrogen supply. Placing the system in the Off mode conserves the laboratory nitrogen supply and increases the life of the ion detection system.
Some of the maintenance procedures contained in Chapter 5, “Routine and Preventive Maintenance,” require that the system be completely shut down. To shut down the system, you must turn the vacuum system off.
Restarting the system after a complete shutdown requires building up the vacuum to a working level. If you are restarting the system after moving it to a new location, Thermo Fisher Scientific recommends that you perform a full-system autotune.
Shutting Down the System in an EmergencyIf you need to turn off the mass detector in an emergency, place the main power circuit breaker switch in the Off (O) position, as shown in Figure 78. The main power switch, which is labeled MAINS ON/OFF, is located on the back panel of the mass detector in the lower-right quadrant. Turning the main power switch to the Off position turns off all power to the mass detector, including the forepump. Although removing power abruptly does not harm any component within the system, it is not the recommended shutdown procedure to follow. See “Shutting the System Down for Non-Routine Maintenance” on page 104 for the recommended procedure.
Contents
• Shutting Down the System in an Emergency
• Turning Off the Nitrogen Gas
• Placing the System in the Off Mode
• Shutting the System Down for Non-Routine Maintenance
• Restarting the System Following a Complete Shutdown
• Resetting the MSQ Plus Mass Detector
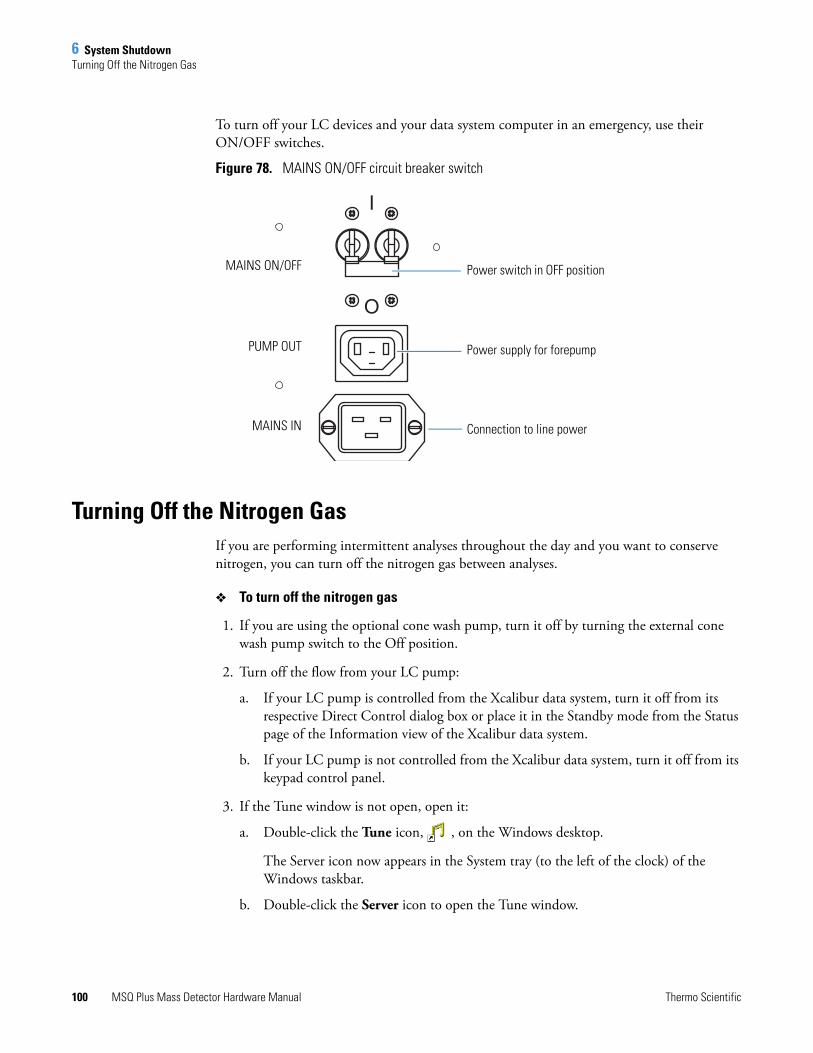
6 System ShutdownTurning Off the Nitrogen Gas
100 MSQ Plus Mass Detector Hardware Manual Thermo Scientific
To turn off your LC devices and your data system computer in an emergency, use their ON/OFF switches.
Figure 78. MAINS ON/OFF circuit breaker switch
Turning Off the Nitrogen GasIf you are performing intermittent analyses throughout the day and you want to conserve nitrogen, you can turn off the nitrogen gas between analyses.
To turn off the nitrogen gas
1. If you are using the optional cone wash pump, turn it off by turning the external cone wash pump switch to the Off position.
2. Turn off the flow from your LC pump:
a. If your LC pump is controlled from the Xcalibur data system, turn it off from its respective Direct Control dialog box or place it in the Standby mode from the Status page of the Information view of the Xcalibur data system.
b. If your LC pump is not controlled from the Xcalibur data system, turn it off from its keypad control panel.
3. If the Tune window is not open, open it:
a. Double-click the Tune icon, , on the Windows desktop.
The Server icon now appears in the System tray (to the left of the clock) of the Windows taskbar.
b. Double-click the Server icon to open the Tune window.
I
O
MAINS ON/OFF
PUMP OUT
MAINS IN
Power switch in OFF position
Power supply for forepump
Connection to line power

6 System ShutdownPlacing the System in the Off Mode
Thermo Scientific MSQ Plus Mass Detector Hardware Manual 101
4. If the Per Method Parameters table is not open, open it by clicking the Expand icon on the right side of the Tune window.
5. Turn off the nitrogen gas by clicking the Nitrogen Gas On/Off toggle button in the General Control group of the Per Method Parameters table.
The On/Off button turns from green to gray and the text to the left of the button changes from On to Off. Within a few seconds, you hear the nitrogen supply to the API source shut off. In the Nitrogen Gas Off mode, the system maintains a bleed of nitrogen gas to the probe to prevent gases from back-streaming from the waste solvent bottle.
Placing the System in the Off ModePlace the MSQ Plus Mass Detector in the Off mode if you are not going to use it for a short period of time, such as overnight or over weekends. In the Off mode, the system is left under vacuum, but the nitrogen flow is reduced to a bleed through the API probe. The electron multiplier and conversion dynode are turned off, the power to the ion optics is turned off, and the probe heater is turned off.
Therefore, placing the instrument in the Off mode allows you to conserve your laboratory nitrogen supply and increase the lifespan of the electron multiplier. In addition, you can restart and operate a MSQ Plus Mass Detector that has been left in the Off mode without waiting for the vacuum system to pump down to a working level.
Turn the mass detector off from the Status view in the Xcalibur data system or from the Tune window.
Turning Off the Mass Detector from the Xcalibur Data System
One way to turn off the MSQ Plus Mass Detector is to use the Status page of the Information view of the Xcalibur data system.
To turn off the MSQ Plus Mass Detector from the Xcalibur Status page
1. If you are using the optional cone wash pump, turn it off by turning its power switch to the Off position.
2. If the Xcalibur data system is not open, open it by double-clicking the Xcalibur icon, , on the Windows desktop.
Note
1. Leave the MSQ Plus Mass Detector under vacuum when you are switching the API probes. Do not vent the instrument unless you are performing a maintenance procedure that requires you to break the integrity of the vacuum.
2. Before you place the MSQ Plus Mass Detector in the Off mode, turn off the flow from the LC pump and the flow from the optional cone wash pump.

6 System ShutdownPlacing the System in the Off Mode
102 MSQ Plus Mass Detector Hardware Manual Thermo Scientific
3. If the Information view is not displayed, choose View > Info View to display it. Then click the Status tab to open the Status page.
4. To turn off the flow from the LC pump, do one of the following:
• If your LC pump is controlled from the Xcalibur data system, right-click the pump listing on the Status page and choose Turn Device Into Standby from the shortcut menu shown in Figure 79.
–or–
• If your LC pump is not controlled from the Xcalibur data system, turn it off from its control keypad.
Figure 79. Status of the Accela MS pump and its shortcut menu shown on the Status page of the Information view
5. Right-click the MSQ Plus listing on the Status page, and choose Turn Device Off from the shortcut menu to place the mass detector in the Off mode, as shown in Figure 80.
The status LED on the front of the MSQ Plus Mass Detector turns yellow.
Turning off the pump flow

6 System ShutdownPlacing the System in the Off Mode
Thermo Scientific MSQ Plus Mass Detector Hardware Manual 103
Figure 80. Shortcut menu for the MSQ Plus Mass Detector on the Status page of the Information view
Turning Off the Mass Detector from the Tune Window
Another way to turn off the MSQ Plus Mass Detector is to use the Tune window.
To turn off the MSQ Plus Mass Detector from the Tune window
1. If you are using the optional cone wash pump, turn it off by turning its power switch to the Off position.
2. Turn off the flow from the LC pump:
• If your LC pump is controlled from the Xcalibur data system, turn it off from its respective Direct Control dialog box, or place it in the Standby mode from the Status page of the Information view.
–or–
• If your LC pump is not controlled from the Xcalibur data system, turn it off from its keypad control panel.
3. If the Tune window is not open, open it:
a. Double-click the Tune icon, , on the Windows desktop.
The Server icon appears in the Windows taskbar.
b. Double-click the Server icon to open the Tune window.
4. If the Per Method Parameters table is not open, open it by clicking the Expand icon on the right side of the Tune window.
Turning off the mass detector

6 System ShutdownShutting the System Down for Non-Routine Maintenance
104 MSQ Plus Mass Detector Hardware Manual Thermo Scientific
5. Turn off the power to the ion optics by clicking the Operate On/Off toggle button.
The On/Off button turns from green to gray and the text to the left of the button changes from On to Off.
6. Turn off the nitrogen gas by clicking the Nitrogen Gas On/Off toggle button in the General Control group of the Per Method Parameters table.
The On/Off button turns from green to gray, and the text to the left of the button changes from On to Off. Within a few seconds, you hear the nitrogen supply to the API source shut off. In the Nitrogen Gas Off mode, the system maintains a bleed of nitrogen gas to the probe to prevent a rise in humidity within the source compartment.
7. When you plan to leave the MSQ Plus Mass Detector in the Off mode for a significant period of time, turn off the nitrogen supply to the system at the main regulator.
Shutting the System Down for Non-Routine MaintenanceYou might need to shut down the MSQ Plus Mass Detector for a non-routine maintenance procedure or to relocate the instrument.
To shut down the MSQ Plus Mass Detector
1. If you are using the optional cone wash pump, turn it off by turning its power switch to the Off position.
2. Open the Xcalibur data system by choosing Start > Programs > Thermo Xcalibur > Xcalibur from the Windows desktop.
3. If the Information view is not displayed, choose View > Info View to display it.
4. Turn off the flow from the LC pump as follows:
a. If your LC pump is controlled from the Xcalibur data system, turn it off from its respective Direct Control dialog box, or place it in the Standby mode from the Info View - Status page.
b. If your LC pump is not controlled from the Xcalibur data system, turn it off from its keypad control panel.
5. Right-click the MSQ Plus listing on the Status page, and choose Turn Device Off from the shortcut menu.

6 System ShutdownRestarting the System Following a Complete Shutdown
Thermo Scientific MSQ Plus Mass Detector Hardware Manual 105
6. Right-click the Server icon in the system tray of the Windows taskbar, and choose Vent from the shortcut menu to vent the system. Venting the system turns off the turbomolecular pump.
The Server is displayed as an icon in the Windows Taskbar just to the left of the time display, as shown in Figure 81.
Figure 81. View of taskbar showing the Server icon and the shortcut menu
7. Exit the Xcalibur data system, and close the server.
8. Wait for approximately two minutes, and turn off the MSQ Plus Mass Detector by setting the MAINS IN switch to the Off position.
Turning off the power to the MSQ Plus Mass Detector also turns off the power to the Edwards forepump, which gets its line power from the Pump Out receptacle on the back panel of the mass detector.
9. Close the nitrogen gas cylinder at the main regulator.
Restarting the System Following a Complete ShutdownFollowing a long-term shutdown, carry out the visual checks listed in the Pre-switch On checklist shown in Table 5, and then follow the system start-up procedure.
After you complete these procedures, the system is ready for a full-system autotune. Refer to the MSQ Plus Mass Detector Getting Started Guide for details.
Checking the System Connections
Before you switch on the system after an extended shutdown period, a major overhaul, or instrument relocation, perform the visual checks on the system listed in Table 5.
Table 5. Pre-switch On checklist (Sheet 1 of 2)
Items Check
Power Connections
The MSQ Plus Mass Detector and your LC devices are connected to line power.
The Edwards forepump is connected to the Pump Out receptacle on the back panel of the MSQ Plus Mass Detector.

6 System ShutdownRestarting the System Following a Complete Shutdown
106 MSQ Plus Mass Detector Hardware Manual Thermo Scientific
Restarting the MSQ Plus Mass Detector
Follow these steps to start the MSQ Plus Mass Detector.
To start the MSQ Plus Mass Detector
1. Turn on the power for your system:
a. Turn on the power to the MSQ Plus Mass Detector by turning the MAINS IN switch to the On position.
Communication Connections
MSQ Plus Mass Detector is connected to the data system computer with a USB cable.
The communication cables for the LC devices are appropriately connected to the data system computer.
Gas Connections
The GAS IN port on the back panel of the MSQ Plus Mass Detector is connected to a nitrogen supply, and the auxiliary regulator is set to 75 psi (5.2 bar).
Any gas connections required for the LC system have been made.
Vacuum Connections
The source manifold on the back panel of the MSQ Plus Mass Detector is connected to the forepump.
The backing manifold on the back panel of the MSQ Plus Mass Detector is connected to the forepump.
Exhaust Connections
The Exhaust manifold on the back panel of the MSQ Plus Mass Detector is connected to the solvent trap. The solvent trap is connected to a fume hood or an industrial vent.
The oil mist filter is connected to the exhaust port of the Edwards forepump. The blue hosing is used to connect the oil mist filter to a fume hood or an industrial vent.
LC Plumbing, Hardwire Connections, and Solvent Supply
The appropriate plumbing connections have been made for the LC system.
The appropriate contact closure connections have been made between the modules of the LC system and between the LC system and the MSQ Plus Mass Detector.
For the Accela LC, check the connections for the system synchronization harness.
The solvent reservoirs for the LC system are filled with the appropriate solvents.
The waste bottle for the LC system waste solvents is empty.
The solvent lines for the LC system are free of air.
Table 5. Pre-switch On checklist (Sheet 2 of 2)
Items Check
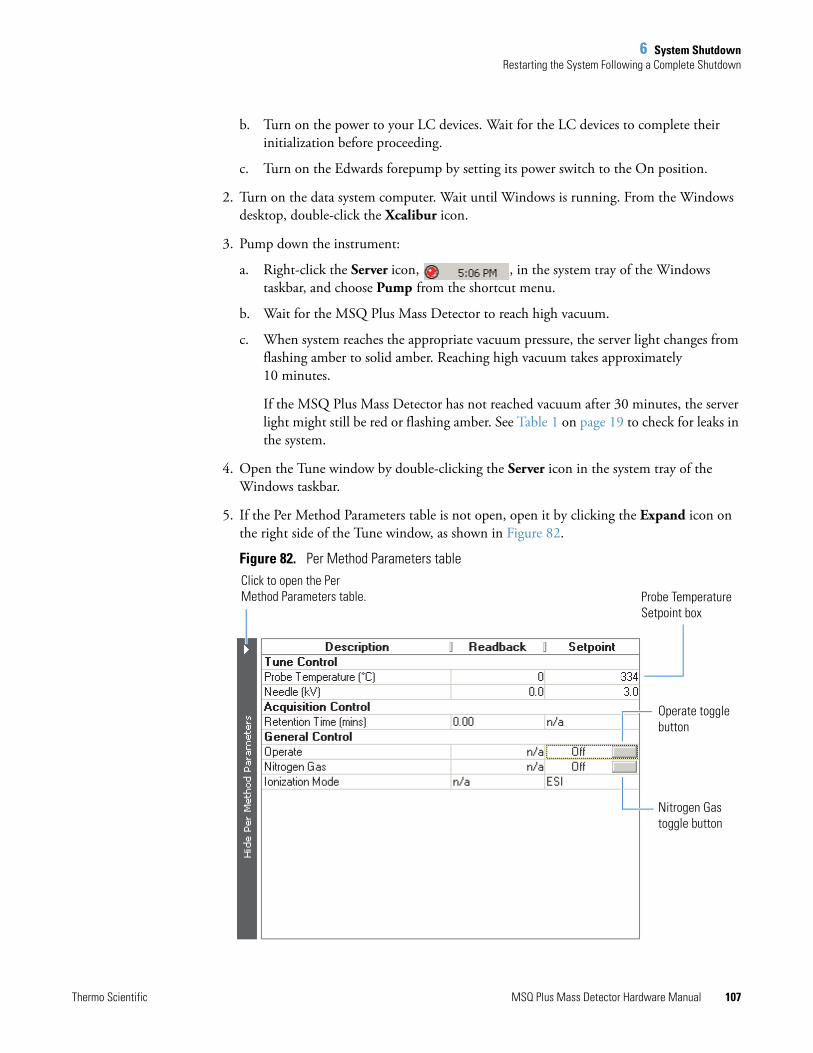
6 System ShutdownRestarting the System Following a Complete Shutdown
Thermo Scientific MSQ Plus Mass Detector Hardware Manual 107
b. Turn on the power to your LC devices. Wait for the LC devices to complete their initialization before proceeding.
c. Turn on the Edwards forepump by setting its power switch to the On position.
2. Turn on the data system computer. Wait until Windows is running. From the Windows desktop, double-click the Xcalibur icon.
3. Pump down the instrument:
a. Right-click the Server icon, , in the system tray of the Windows taskbar, and choose Pump from the shortcut menu.
b. Wait for the MSQ Plus Mass Detector to reach high vacuum.
c. When system reaches the appropriate vacuum pressure, the server light changes from flashing amber to solid amber. Reaching high vacuum takes approximately 10 minutes.
If the MSQ Plus Mass Detector has not reached vacuum after 30 minutes, the server light might still be red or flashing amber. See Table 1 on page 19 to check for leaks in the system.
4. Open the Tune window by double-clicking the Server icon in the system tray of the Windows taskbar.
5. If the Per Method Parameters table is not open, open it by clicking the Expand icon on the right side of the Tune window, as shown in Figure 82.
Figure 82. Per Method Parameters table
Probe Temperature Setpoint box
Operate toggle button
Nitrogen Gas toggle button
Click to open the Per Method Parameters table.

6 System ShutdownResetting the MSQ Plus Mass Detector
108 MSQ Plus Mass Detector Hardware Manual Thermo Scientific
6. Turn on the nitrogen gas by clicking the Nitrogen Gas On/Off toggle button in the General Control group of the Per Method Parameters table, shown in Figure 82.
The On/Off toggle button turns from gray to green, and the text to the left of the button changes from Off to On. Within a few seconds, you hear the nitrogen supply to the API source turn on.
7. Put the instrument into the Operate mode by clicking the Operate On/Off toggle button shown in Figure 82 on page 107.
The button turns from gray to green, and the text changes from Off to On.
8. To set the probe temperature, click the Probe Temperature Setpoint box shown in Figure 82, and type an appropriate value for your application.
The MSQ Plus Mass Detector is ready to use as soon as the probe temperature readback value approaches that in the setpoint box, although for most stable operation Thermo Fisher Scientific recommends that you wait approximately 10 minutes for the source to equilibrate. There is an allowable 2–5% tolerance on the readback.
9. Turn on the flow from the LC pump.
Resetting the MSQ Plus Mass DetectorIf communication between the mass detector and data system computer is lost, it might be necessary to reset the mass detector by using the Reset button on the power panel. Pressing the Reset button creates an interrupt on the CPU PCB of the embedded computer, causing the embedded computer to restart into a known (default) state. You might hear a high or low tone that confirms the reset when you open the Tune window.
The procedure given here assumes that the mass detector and data system computer are both powered on and operational. If the mass detector, data system computer, or both are off, See “Restarting the MSQ Plus Mass Detector” on page 106.
To reset the mass detector, press the Reset button located on the mass detector’s back panel, as shown in Figure 83.
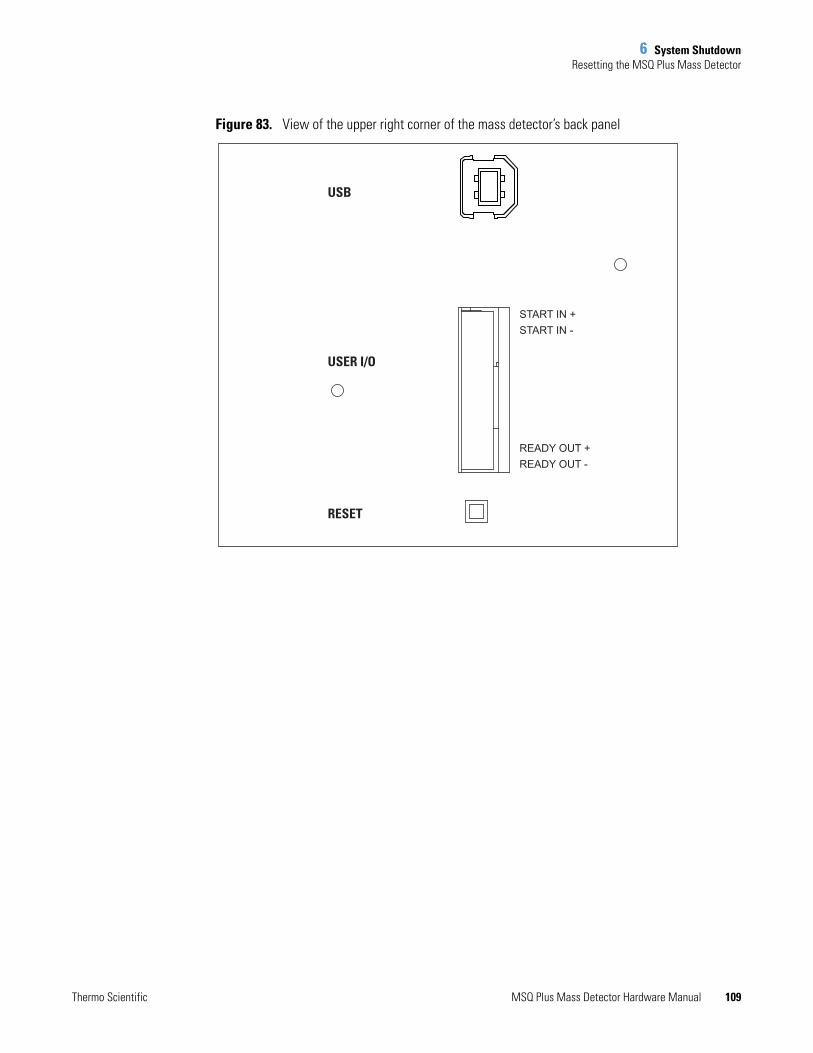
6 System ShutdownResetting the MSQ Plus Mass Detector
Thermo Scientific MSQ Plus Mass Detector Hardware Manual 109
Figure 83. View of the upper right corner of the mass detector’s back panel
START IN +START IN -
READY OUT +READY OUT -
USB
USER I/O
RESET

Thermo Scientific MSQ Plus Mass Detector Hardware Manual 111
7
Replaceable Parts
This chapter lists the parts most commonly used in the course of working with and maintaining your MSQ Plus Mass Detector.
The parts are categorized as follows:
• Consumables. Keep a stock of each of these parts, because you might need to replace them frequently.
• Spares. You can order these parts as required.
• Connection Kits. Use these interface kits to connect an LC system to your mass detector. You do not need an interface kit to connect an Accela LC to your MSQ Plus Mass Detector.
The manuals for the MSQ Plus Mass Detector are provided on the software DVD.
ConsumablesThe MSQ Plus Annual Maintenance kit (part number 60111-62014) contains all the consumables required for the upkeep of your MSQ Plus Mass Detector. The parts contained in this kit are listed in Table 6.
Contents
• Consumables
• Spares
• Connection Kits
• Manuals
Table 6. Parts in the MSQ Plus Annual Maintenance Kit (Sheet 1 of 3)
Item Part number
MSQ Plus Annual Maintenance kit 60111-62014
Adapter (capillary retainer nut) FM102590
APCI probe capillary (3 each) FM102594

7 Replaceable PartsConsumables
112 MSQ Plus Mass Detector Hardware Manual Thermo Scientific
Entrance skimmer assembly, titanium (1 each) 60111-60049
ESI probe capillary (3 each) FM102598
ESI ceramic sleeve (1 each) FM103394
Exit cone (extraction cone) (1 each) FM102263
Ferrule, SGE 1/16 graphite Vespel (10 per package)
6070119
Kit, hardware and O-ring, MSQ Plus 60111-62018
Oil reservoir 190/240/260 for turbomolecular pump
00950-01116
Turbomolecular pump oil change tool FM104442
Tube insert for API probe, PEEK (3 each) FM102591
Heater Repair Kit 60111-62010
Detent screw insulator FM102585
Screw sleeve FM102582
Spring screw FM102583
Spring cup FM102584
MSQ Plus Hardware and O-ring Kit 60111-62018
Sealing plug (2 each) FM102277
Ferrule, SGE 1/16 graphite Vespel (10 each) 6070119
Spring, E-type clip, stainless steel, MSQ only (3 each) (Not available as a separate item.)
FM102574
Spring, compression, 4.6 mm OD, 0.45 N/mm, 30 mm length
00111-01-00013
O-ring, 13.87 mm ID 3.53 mm THK, BS207a, BLK Viton (1 each)
FM101417
O-ring, 3.68 mm ID 1.78 mm THK, BS007, BLK Viton (2 each)
FM101464
O-ring, 3.0 mm ID 1.0 mm THK, BLK Viton (2 each)
5711933
O-ring, 9.25 mm ID 1.78 mm THK, BS012, Viton, for entrance cone (2 each)
FM100231
O-ring, 12.42 mm ID 1.78 mm THK, BS014, BLK Viton (1 each)
FM101522
Table 6. Parts in the MSQ Plus Annual Maintenance Kit (Sheet 2 of 3)
Item Part number

7 Replaceable PartsConsumables
Thermo Scientific MSQ Plus Mass Detector Hardware Manual 113
Table 7 shows where the O-rings are used, and lists them in order by size. Figure 84 on page 115 shows the location of the O-rings.
O-ring, 9.0 mm ID 3.0 mm THK, BLK Viton (1 each)
00107-01-00026
O-ring, 3.30 mm ID 2.4 mm THK, BLK Viton (2 each)
FM103016
O-ring, 47.22 mm ID 3.53 mm THK, BS225, BLK Viton (1 each)
FM103048
O-ring, 6.07 mm ID 1.78 mm THK, BS010, BLK Viton (2 each)
5711000
O-ring, 18.77 mm ID 1.78 mm THK, BS018, BLK Viton (2 each)
5711035
O-ring, 2.90 mm ID 1.78 mm THK, BS5006, BLK Viton (2 each)
TORN003
O-ring, 5.28 mm ID 1.78 mm THK, BS009, BLK Viton (2 each)
5711020
a British Standard
Table 7. O-ring locations (Sheet 1 of 2)
Part number Size Where used
ID (mm) THK (mm) ISO O-ring size
TORN003 2.9 1.78 BS006 Probe heater assembly
5711933 3.0 1.0 Source block assembly, small sealing plug
FM103016 3.3 2.40 Probe mount assembly
FM101464 3.68 1.78 BS007 Cone wash nozzle
5711020 5.28 1.78 BS009 API probe
5711000 6.07 1.78 BS010 Entrance cone
00107-01-00026 9.12 3.53 Source block assembly
FM100231 9.25 1.78 BS012 API probe
FM101522 12.42 1.78 BS014 Source block assembly, large sealing plug
FM101417 13.87 3.53 BS207 Source block assembly
Table 6. Parts in the MSQ Plus Annual Maintenance Kit (Sheet 3 of 3)
Item Part number

7 Replaceable PartsConsumables
114 MSQ Plus Mass Detector Hardware Manual Thermo Scientific
5711035 18.77 18.77 BS018 Probe heater assembly
FM103048 47.22 3.53 BS225 Source block assembly
Table 7. O-ring locations (Sheet 2 of 2)
Part number Size Where used
ID (mm) THK (mm) ISO O-ring size
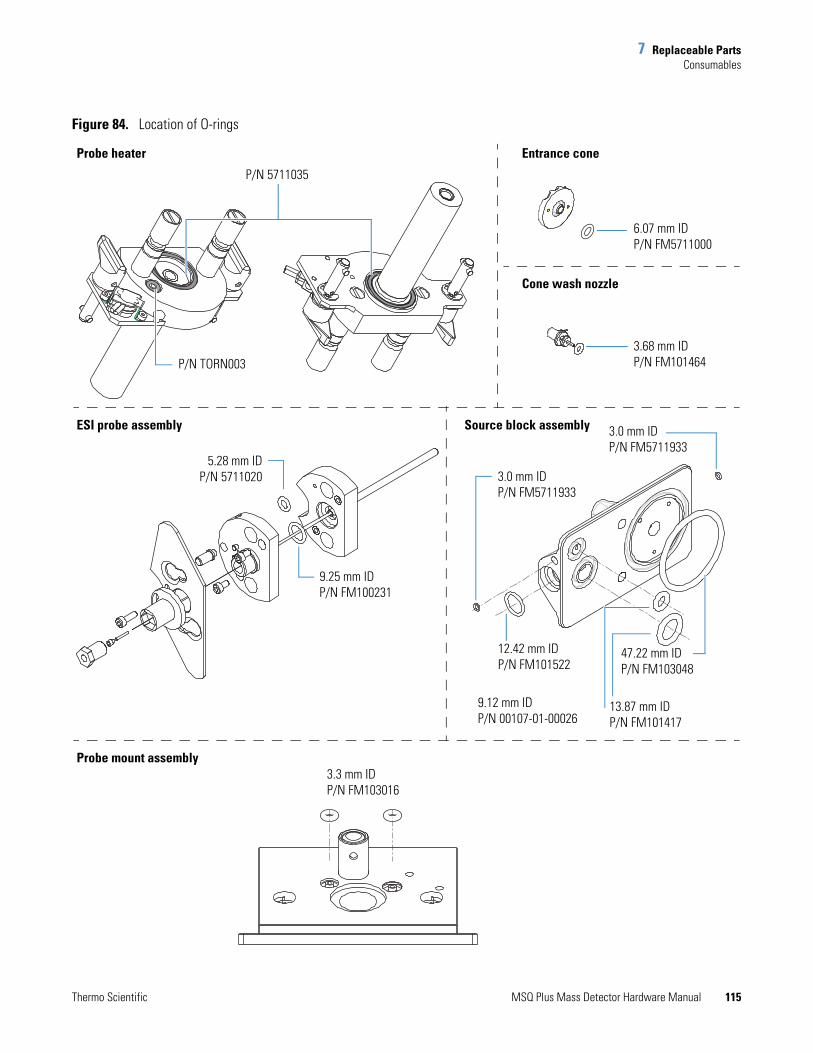
7 Replaceable PartsConsumables
Thermo Scientific MSQ Plus Mass Detector Hardware Manual 115
Figure 84. Location of O-rings
P/N TORN003
P/N 5711035
Probe heater
ESI probe assembly
5.28 mm IDP/N 5711020
9.25 mm IDP/N FM100231
Entrance cone
6.07 mm IDP/N FM5711000
Cone wash nozzle
3.68 mm IDP/N FM101464
Source block assembly 3.0 mm IDP/N FM5711933
3.0 mm IDP/N FM5711933
47.22 mm IDP/N FM103048
13.87 mm IDP/N FM101417
9.12 mm IDP/N 00107-01-00026
12.42 mm IDP/N FM101522
Probe mount assembly3.3 mm IDP/N FM103016
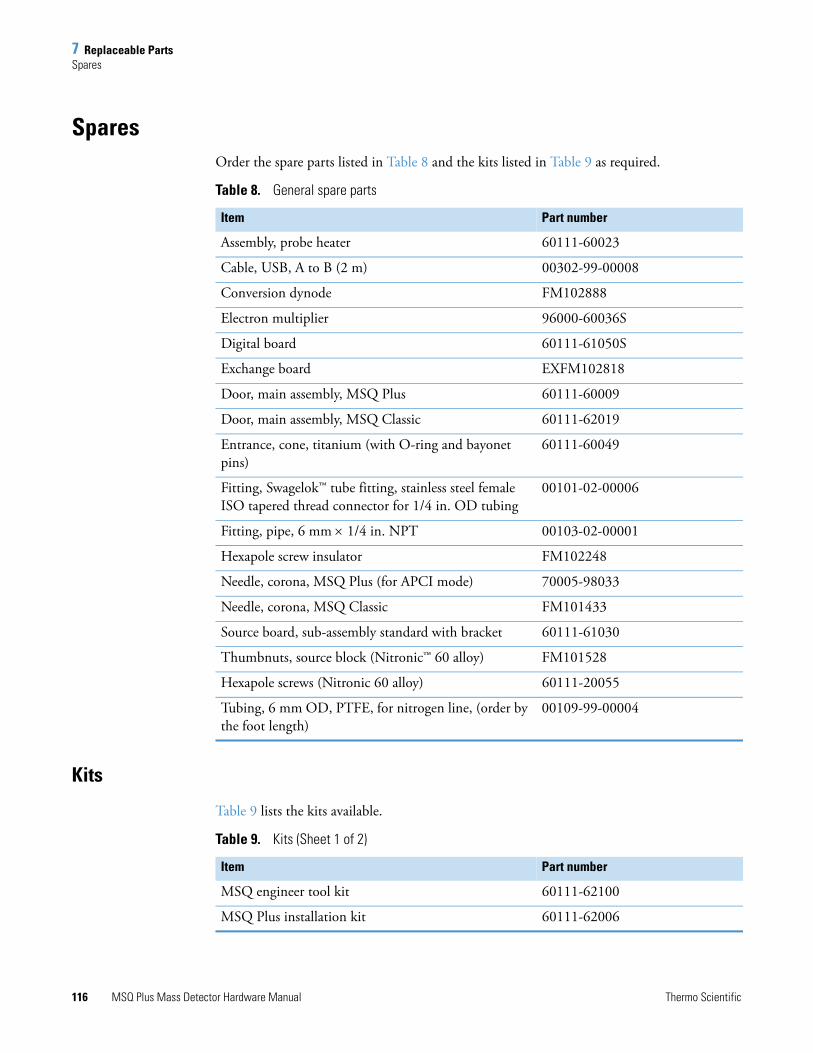
7 Replaceable PartsSpares
116 MSQ Plus Mass Detector Hardware Manual Thermo Scientific
SparesOrder the spare parts listed in Table 8 and the kits listed in Table 9 as required.
Kits
Table 9 lists the kits available.
Table 8. General spare parts
Item Part number
Assembly, probe heater 60111-60023
Cable, USB, A to B (2 m) 00302-99-00008
Conversion dynode FM102888
Electron multiplier 96000-60036S
Digital board 60111-61050S
Exchange board EXFM102818
Door, main assembly, MSQ Plus 60111-60009
Door, main assembly, MSQ Classic 60111-62019
Entrance, cone, titanium (with O-ring and bayonet pins)
60111-60049
Fitting, Swagelok™ tube fitting, stainless steel female ISO tapered thread connector for 1/4 in. OD tubing
00101-02-00006
Fitting, pipe, 6 mm 1/4 in. NPT 00103-02-00001
Hexapole screw insulator FM102248
Needle, corona, MSQ Plus (for APCI mode) 70005-98033
Needle, corona, MSQ Classic FM101433
Source board, sub-assembly standard with bracket 60111-61030
Thumbnuts, source block (Nitronic™ 60 alloy) FM101528
Hexapole screws (Nitronic 60 alloy) 60111-20055
Tubing, 6 mm OD, PTFE, for nitrogen line, (order by the foot length)
00109-99-00004
Table 9. Kits (Sheet 1 of 2)
Item Part number
MSQ engineer tool kit 60111-62100
MSQ Plus installation kit 60111-62006

7 Replaceable PartsSpares
Thermo Scientific MSQ Plus Mass Detector Hardware Manual 117
Chemicals
Table 10 lists the chemicals that are available.
Source Block Assembly
Table 11 lists the parts in the source block assembly.
Qualification kit OPTON-09015
Software DVD kit, MSQ Plus 60111-62005
Table 9. Kits (Sheet 2 of 2)
Item Part number
Table 10. Chemicals
Item Part number
4-nitrophenol FM101945
Erythromycin FM101946
Table 11. Source block assembly parts (Sheet 1 of 2)
Item Part number
Assembly, source block and transfer lens 60111-60051
Assembly, titanium entrance cone (with O-ring and bayonet pins)
60111-60049
Assembly, cone wash nozzle (includes O-ring) FM102521
CAP kit 60111-62012
CAP repair kit 60111-62017
Circlip, 2.5 mm, E-type (not available as a separate item)
FM102574
Exit cone (extraction skimmer) FM102263
Exit cone insulator (extraction cone insulator) FM102264
Hexapole screw insulator FM102248
O-ring, 6.07 mm ID 1.78 mm THK, BS010, BLK Viton (for entrance cone)
5711000
O-ring, 3.0 mm ID 1.0 mm THK, BLK Viton (for sealing plug)
5711933
O-ring, 13.87 mm ID 3.53 mm THK, BS207, BLK Viton
FM101417
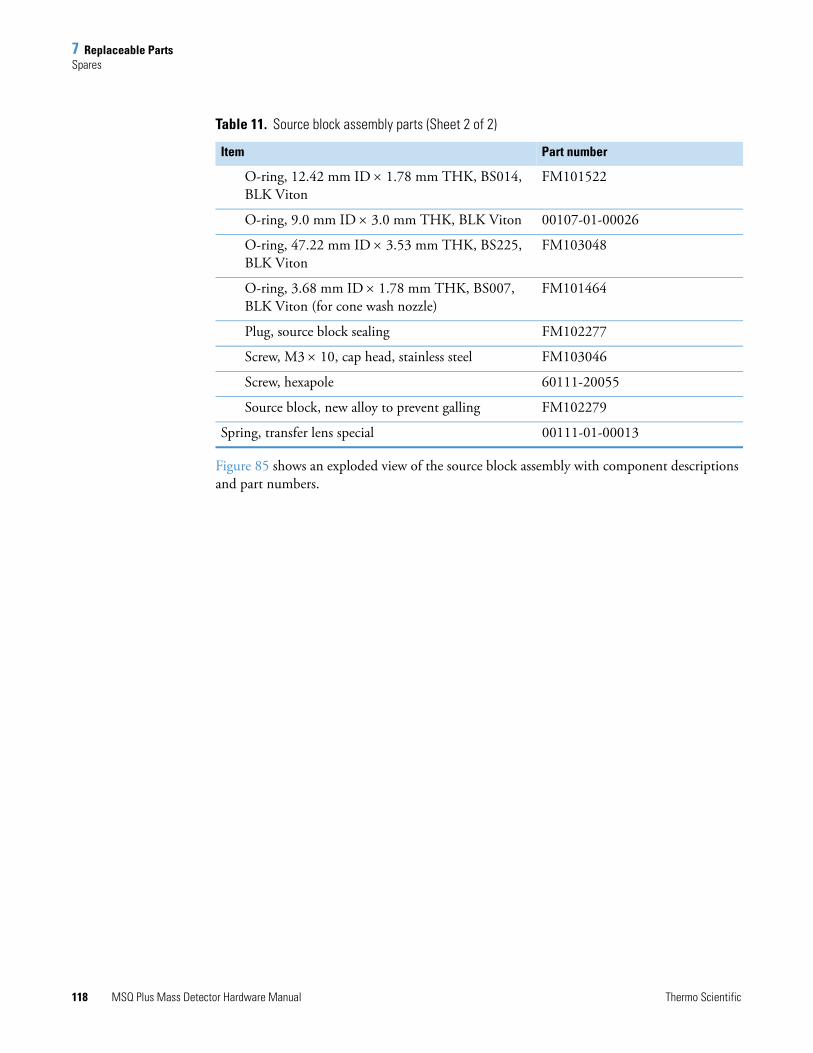
7 Replaceable PartsSpares
118 MSQ Plus Mass Detector Hardware Manual Thermo Scientific
Figure 85 shows an exploded view of the source block assembly with component descriptions and part numbers.
O-ring, 12.42 mm ID 1.78 mm THK, BS014, BLK Viton
FM101522
O-ring, 9.0 mm ID 3.0 mm THK, BLK Viton 00107-01-00026
O-ring, 47.22 mm ID 3.53 mm THK, BS225, BLK Viton
FM103048
O-ring, 3.68 mm ID 1.78 mm THK, BS007, BLK Viton (for cone wash nozzle)
FM101464
Plug, source block sealing FM102277
Screw, M3 10, cap head, stainless steel FM103046
Screw, hexapole 60111-20055
Source block, new alloy to prevent galling FM102279
Spring, transfer lens special 00111-01-00013
Table 11. Source block assembly parts (Sheet 2 of 2)
Item Part number

7 Replaceable PartsSpares
Thermo Scientific MSQ Plus Mass Detector Hardware Manual 119
Figure 85. Exploded view of the source block assembly
Entrance cone, titanium with O-ring and bayonet pins (P/N 60111-60049)
O-ring, BS010, 6.07 mm ID × 1.78 mm THK (P/N 5711000)
Bayonet pins (provided with entrance cone)
Cone wash nozzle(P/N FM102521)
O-ring, BS007, 3.68 mm ID × 1.78 mm THK (P/N FM101464)
Plug, sealing (P/N FM102277)
O-ring, 3.0 mm ID × 1.0 mm THK (P/N 5711933)
O-ring, BS225, 47.2 mm ID × 3.5 mm THK (P/N FM 103048)
Extraction cone insulator (P/N FM102264)
Exit cone (P/N FM102263)
Hexapole screw insulator(P/N FM102248)
O-ring, 9.0 mm ID × 3.0 mm THK(P/N 00107-01-0026)
O-ring, BS207,13.87 mm ID × 3.53 mm THK(P/N FM101417)
O-ring, BS014, 12.42 mm ID × 1.78 mm THK(P/N FM101522)
Plug source block sealing(P/N FM101460)
Spring (P/N 00111-01-00013)
Hexapole screw (P/N 60111-20055)
Circlip, provided in MSQ Plus Hardware and O-ring Kit (part number 60111-62018)
RF/dc prefilter
Thumbscrews(P/N FM101528) (Nitronic 60 alloy to prevent galling)

7 Replaceable PartsSpares
120 MSQ Plus Mass Detector Hardware Manual Thermo Scientific
ESI Probe Assembly
Table 12 lists the parts in the ESI probe assembly.
Figure 86 shows an exploded view of the ESI probe assembly.
Table 12. ESI probe assembly parts
Item Part number
Assembly, ESI probe FM102595
ESI probe capillary FM102598
ESI ceramic sleeve FM103394
Ferrule, GVF/16, graphite Vespel 6070119
O-ring, 9.25 mm ID 1.78 mm THK, BS012, BLK Viton
FM100231
O-ring, 5.28 mm ID 1.78 mm THK, BS009, BLK Viton
5711020
PEEK tube insert FM102591
Screw, M3 8, cap head, stainless steel N/A
Screw, M3 10, cap head, stainless steel FM103046
Capillary retaining nut FM102590
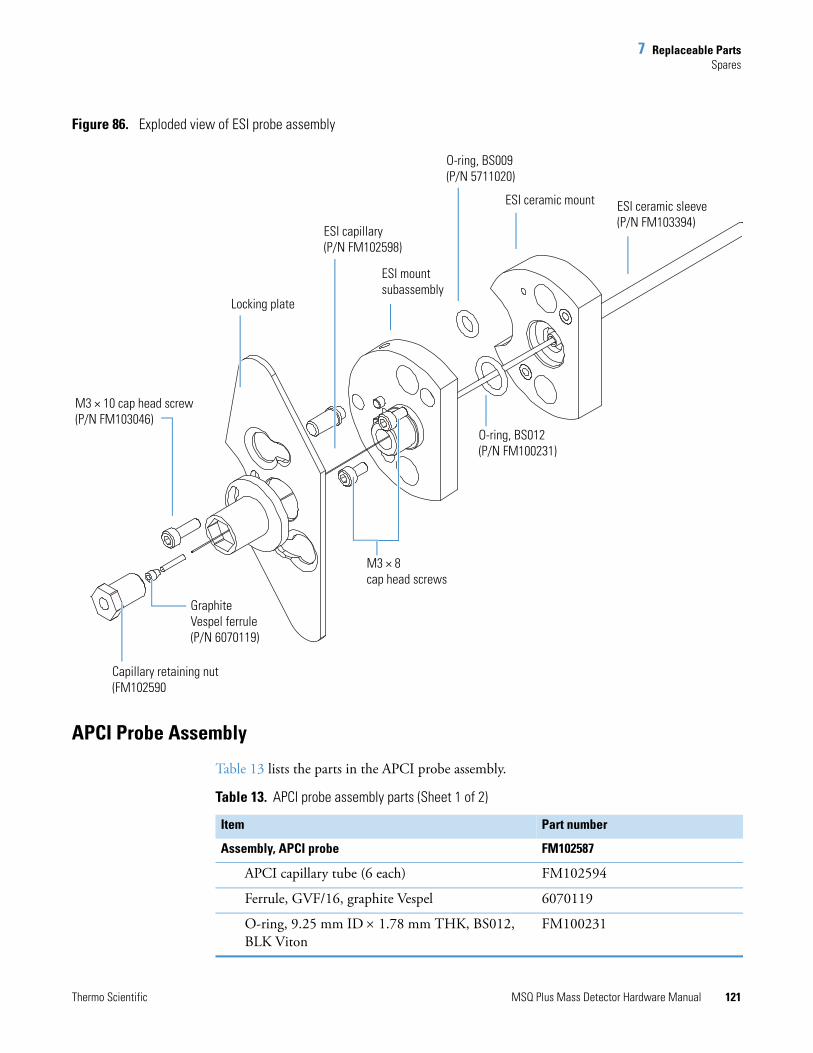
7 Replaceable PartsSpares
Thermo Scientific MSQ Plus Mass Detector Hardware Manual 121
Figure 86. Exploded view of ESI probe assembly
APCI Probe Assembly
Table 13 lists the parts in the APCI probe assembly.
Graphite Vespel ferrule (P/N 6070119)
M3 × 10 cap head screw(P/N FM103046)
Locking plate
ESI capillary (P/N FM102598)
ESI mountsubassembly
O-ring, BS009(P/N 5711020)
ESI ceramic mount ESI ceramic sleeve(P/N FM103394)
O-ring, BS012(P/N FM100231)
M3 × 8cap head screws
Capillary retaining nut(FM102590
Table 13. APCI probe assembly parts (Sheet 1 of 2)
Item Part number
Assembly, APCI probe FM102587
APCI capillary tube (6 each) FM102594
Ferrule, GVF/16, graphite Vespel 6070119
O-ring, 9.25 mm ID 1.78 mm THK, BS012, BLK Viton
FM100231
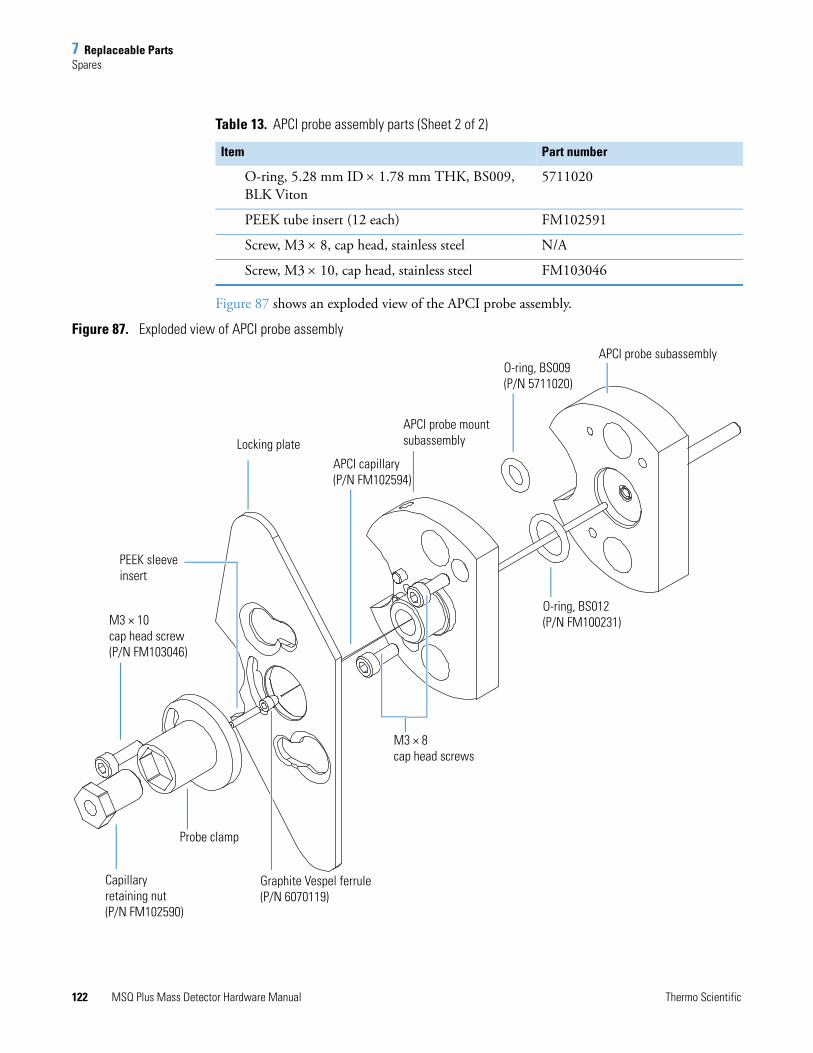
7 Replaceable PartsSpares
122 MSQ Plus Mass Detector Hardware Manual Thermo Scientific
Figure 87 shows an exploded view of the APCI probe assembly.
Figure 87. Exploded view of APCI probe assembly
O-ring, 5.28 mm ID 1.78 mm THK, BS009, BLK Viton
5711020
PEEK tube insert (12 each) FM102591
Screw, M3 8, cap head, stainless steel N/A
Screw, M3 10, cap head, stainless steel FM103046
Table 13. APCI probe assembly parts (Sheet 2 of 2)
Item Part number
Graphite Vespel ferrule(P/N 6070119)
M3 × 10cap head screw(P/N FM103046)
Probe clamp
APCI capillary (P/N FM102594)
APCI probe mountsubassemblyLocking plate
O-ring, BS012(P/N FM100231)
M3 × 8cap head screws
Capillary retaining nut(P/N FM102590)
O-ring, BS009 (P/N 5711020)
APCI probe subassembly
PEEK sleeve insert

7 Replaceable PartsSpares
Thermo Scientific MSQ Plus Mass Detector Hardware Manual 123
Probe Heater Assembly
Table 14 lists the parts in the probe heater assembly.
Figure 88 shows the probe heater assembly. Figure 89 shows the components of the Probe Heater Repair Kit (part number 60111-62010).
Figure 88. Probe heater assembly with a view of the O-rings
Table 14. Probe heater assembly parts
Item Part number
Probe heater assembly 60111-60023
Detent screw insulator FM102585
Spring screw FM102583
Spring cup FM102584
Probe screw sleeve FM102582
O-ring, 18.77 mm ID 1.78 mm THK, BS018, BLK Viton
5711035
O-ring, BS018, 18.77 mm ID × 1.78 mm THK (P/N 5711035)
Detent screw insulator (P/N FM102585)
O-ring, BS006, 2.9 mm ID × 1.78 THK(P/N TORN003)

7 Replaceable PartsSpares
124 MSQ Plus Mass Detector Hardware Manual Thermo Scientific
Figure 89. Components of the Probe Heater Repair Kit (part number 60111-62010)
Vacuum Spares
Table 15 lists the vacuum spare parts.
Spring screw (P/N FM102583)
Not provided in the kit
Spring cup (P/N FM102584)
Detent screw insulator (P/N FM102585)
Probe screw sleeve (P/N FM102582)
Table 15. Vacuum spare parts
Item Part number
Oil wick, Pfeiffer replacement FM104398
Oil, Edwards pump, 1-L bottle 00301-15102
Seal, vacuum housing FM101633
Tee, KF25 FM100203
Vent valve with 1 m cable assembly FM104308
Hose, blue exhaust, 1 in. ID (order by the foot length, 10 = 10 ft)
00301-08301
7 Replaceable PartsSpares
Thermo Scientific MSQ Plus Mass Detector Hardware Manual 125
Gas Flow Spares and Nitrogen Generator
Table 16 lists the gas flow spare parts and the nitrogen generator parts.
Solvent Path and Calibrant Spares
Table 17 lists the spare parts for the solvent path and the calibrant.
Table 16. Gas flow spare parts and nitrogen generator parts
Item Part number
Flow controller.
The flow controller is only available as part of a replacement nitrogen manifold assembly, part number 60111-60019S. This assembly comes with the flow controller preadjusted for the fixed sheath and nebulizer flows of the MSQ Plus Mass Detector and has a tamper-proof feature.
00110-01-00008
Tubing, 6 mm OD, PTFE, for nitrogen line (order by the foot length)
00109-99-00004
Nitrogen valve assembly. Order as an S part. The new style diverters are set in Manufacturing.
60111-60019S
PEAK nitrogen generator OPTON-97104
Table 17. Solvent path and calibrant spare parts
Item Part number
Assembly, waste bottle FM102770
Assembly, reference bottle FM102771
MSQ calibration solution kit (for MSQ software version 1.4 and later)
60111-62021
Nut, PEEK, 1-piece FM100513
7 Replaceable PartsConnection Kits
126 MSQ Plus Mass Detector Hardware Manual Thermo Scientific
Electronic Spares
Table 18 lists the electronic spare parts.
Connection KitsFor information on the connection kits available, refer to the manuals stored on the LC devices CD that is part of the media kit.
ManualsThe following manuals are available on the instrument software DVD:
• MSQ Plus Mass Detector Preinstallation Guide
• MSQ Plus Mass Detector Getting Connected Guide
• MSQ Plus Mass Detector Getting Started Guide
• MSQ Plus Mass Detector Hardware Manual
• MSQ Plus Mass Detector Calmix Kit Preparation Guide
Table 18. Electronic spare parts
Item Part number
Assembly, power supply, low-voltage, MSQ FM103098
PCB assembly, status 60111-61090
PCB, 2000 RF/Digital control 60111-61050S or EXFM102818
PCB, electrometer 60111-61020
PCB, source 60111-61030
PCB, RF generator 60111-61040
PCB, digital 60111-61050
PCB, RF/dc prefilter. Replacement requires “redipping” the transfer lens coil. Call Field Services.
60111-61080

Thermo Scientific MSQ Plus Mass Detector Hardware Manual 127
A
Optimizing the LC Conditions
This appendix includes information that you might find helpful for optimizing the LC system and the cone wash system.
Flow RatesIn general, the LC column employed determines the choice of flow rate. Each column has an optimum flow rate, as listed in Table 19.
Contents
• Flow Rates
• LC Solvents and Mobile Phase Additives
• Cone Wash System
• Flow Splitting
• PEEK Tubing
• Chemical Kit
Table 19. LC columns and flow rates
Column ID Flow rate
4.6 mm 1.0 mL/min
3.9 mm 0.5 mL/min
2.1 mm 0.2 mL/min
1.0 mm 40-50 L/min
Capillary <10 L/min

A Optimizing the LC ConditionsLC Solvents and Mobile Phase Additives
128 MSQ Plus Mass Detector Hardware Manual Thermo Scientific
The different ionization modes require different flow rates and column IDs. The following guidelines apply when using the MSQ Plus Mass Detector:
• Electrospray can operate at all the flow rates described in Table 19.
• APCI cannot operate at flow rates below 0.2 mL/min. Therefore, suitable column IDs are 2.1 mm, 3.9 mm, and 4.6 mm.
LC Solvents and Mobile Phase AdditivesThe choice of solvents for LC is dictated primarily by the separation requirements, but you must follow some guidelines when performing LC/MS analyses.
LC Solvents
Water, acetonitrile, and methanol are the solvents that are the most compatible with the MSQ Plus Mass Detector. These common reverse-phase LC solvents are ideal for LC/MS. When you use high percentages of water, you usually need to raise the probe temperature to aid desolvation.
Less commonly used solvents include normal-phase solvents; alcohols such as isopropanol, 2-methoxyethanol, and ethanol; and dimethyl sulfoxide (DMSO).
Normal-phase solvents such as dichloromethane, hexane, and toluene are most suitable for use in APCI. Alcohols have all been used with LC/MS, but their use tends to be application-specific. DMSO is commonly used by synthetic chemists for primary dilutions.
Mobile Phase Additives
Additives can be divided into three categories:
• Commonly Used Compatible Additives
• Less Commonly Used Additives
• Unsuitable Additives
Table 20 lists suitable additives.
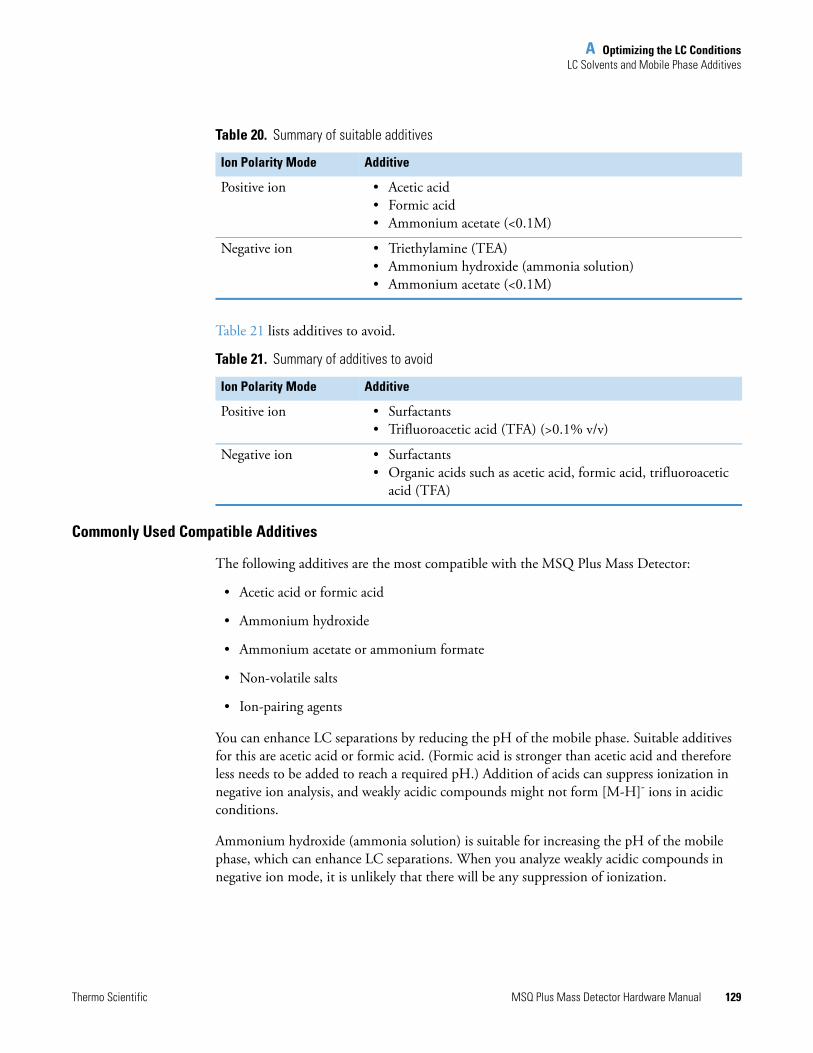
A Optimizing the LC ConditionsLC Solvents and Mobile Phase Additives
Thermo Scientific MSQ Plus Mass Detector Hardware Manual 129
Table 21 lists additives to avoid.
Commonly Used Compatible Additives
The following additives are the most compatible with the MSQ Plus Mass Detector:
• Acetic acid or formic acid
• Ammonium hydroxide
• Ammonium acetate or ammonium formate
• Non-volatile salts
• Ion-pairing agents
You can enhance LC separations by reducing the pH of the mobile phase. Suitable additives for this are acetic acid or formic acid. (Formic acid is stronger than acetic acid and therefore less needs to be added to reach a required pH.) Addition of acids can suppress ionization in negative ion analysis, and weakly acidic compounds might not form [M-H]- ions in acidic conditions.
Ammonium hydroxide (ammonia solution) is suitable for increasing the pH of the mobile phase, which can enhance LC separations. When you analyze weakly acidic compounds in negative ion mode, it is unlikely that there will be any suppression of ionization.
Table 20. Summary of suitable additives
Ion Polarity Mode Additive
Positive ion • Acetic acid• Formic acid• Ammonium acetate (<0.1M)
Negative ion • Triethylamine (TEA)• Ammonium hydroxide (ammonia solution)• Ammonium acetate (<0.1M)
Table 21. Summary of additives to avoid
Ion Polarity Mode Additive
Positive ion • Surfactants• Trifluoroacetic acid (TFA) (>0.1% v/v)
Negative ion • Surfactants• Organic acids such as acetic acid, formic acid, trifluoroacetic
acid (TFA)
A Optimizing the LC ConditionsLC Solvents and Mobile Phase Additives
130 MSQ Plus Mass Detector Hardware Manual Thermo Scientific
Volatile salts, such as ammonium acetate or ammonium formate, are often used to buffer mobile phases. Use as little ammonium acetate or ammonium formate as possible, keeping the concentration below 100 mM. Ensure that the cone wash is running when using high concentrations.
When using non-volatile salts, ensure that the cone wash is running, because they can crystallize in the source, block the entrance cone, and prevent the mass spectrometer from functioning. The most common non-volatile salts used are phosphates.
Ensure that the cone wash is running when using ion-pairing agents (for example, sodium octanesulfonic acid). Many ion-pairing agents suppress electrospray.
Less Commonly Used Additives
The following additives are less commonly used:
• Trifluoroacetic acid (TFA)
• Triethylamine (TEA)
• Tetrahydrofuran (THF)
• Inorganic acids
Trifluoroacetic acid (TFA) is frequently used for peptide and protein analysis. High levels greater than 0.1% v/v can cause suppression of sensitivity in positive-ion mode. TFA might completely suppress ionization in negative-ion mode.
Triethylamine (TEA) can suppress the ionization of less basic compounds in positive-ion mode (because it is also readily ionized to give a [M+H]+ ion at m/z 102). TEA enhances ionization of other compounds in negative-ion mode because it is basic. It is a particularly useful additive for the analysis of nucleic acids.
In ESI, using THF can reduce sensitivity. You can counteract this effect by the post-column addition of ammonium acetate. It has no effect in APCI.
Inorganic acids (for example, sulfuric acid or phosphoric acid) can be used. Check the suitability of the LC column to low pHs.
CAUTION Do not use a concentration of THF greater than 5% with PEEK tubing. THF causes swelling in the PEEK tubing and consequently presents a risk of the LC tubing bursting.
CAUTION After using phosphoric acid, thoroughly clean the source, source enclosure and hexapole RF lens to minimize the physical damage.

A Optimizing the LC ConditionsCone Wash System
Thermo Scientific MSQ Plus Mass Detector Hardware Manual 131
Unsuitable Additives
Unsuitable additives include surface-active agents and detergents. Surface-active agents and detergents can suppress the ionization of other compounds. Detergents by their very nature are concentrated at the surface of a liquid. They can cause problems with electrospray because the ionization relies on the evaporation of ions from the surface of a droplet. Therefore, the detergent suppresses the evaporation of other ions. Use surfactants only when they are being analyzed themselves, not as additives to HPLC mobile phases.
Cone Wash SystemHistorically, LC/MS has only been compatible with volatile buffer systems using modifiers, such as trifluoroacetic acid, formic acid, and acetic acid. Phosphate buffers, although extensively used in LC separations, were not suited to LC/MS because of the rapid blocking of the ion sampling region caused by the deposition of non-volatile phosphate salts. The self-cleaning API source provided by the cone wash system of the MSQ Plus Mass Detector allows routine LC/MS with chromatographic buffers, such as phosphates or ion-pairing agents and samples in dirty matrices.
The cone wash system consists of a cone wash nozzle, internal tubing, and a cone wash pump. Refer to the MSQ Plus Mass Detector Getting Connected Guide for instructions on connecting the cone wash pump to the MSQ Plus Mass Detector. The recommended flow rate for the cone wash solvent is 200 l/min, and the recommended cone wash solvent is [50:50] methanol/water (v/v).
Figure 90 shows the back of the cone wash pump, including the inputs.
Note Use the cone wash only for dirty matrices or with non-volatile buffers. Choose the cone wash solvent to give the most effective solubility for the expected contaminants. The cone wash can be used for a short duration at the beginning of the LC analysis and turned off after the void volume of the LC column is cleared.

A Optimizing the LC ConditionsCone Wash System
132 MSQ Plus Mass Detector Hardware Manual Thermo Scientific
Figure 90. Back of the cone wash pump
The pump’s inputs are on the 10-pin terminal board connector. Table 22 shows the pinouts of the cone wash pump.
To optimize the position of the cone wash nozzle
1. Turn the cone wash nozzle counterclockwise until the tip of the nozzle is just above the top of the entrance cone.
2. Turn the cone wash pump on by turning its On/Off switch to On.
Table 22. Pinout of the cone wash pump
Pin Function
10 VOLTAGE COM
9 VOLTAGE IN
8 FREQ IN
7 ENABLE IN
6 PUMP-RUN
5 PUMP-STOP
4 No connection
3 No connection
2 No connection
1 COM
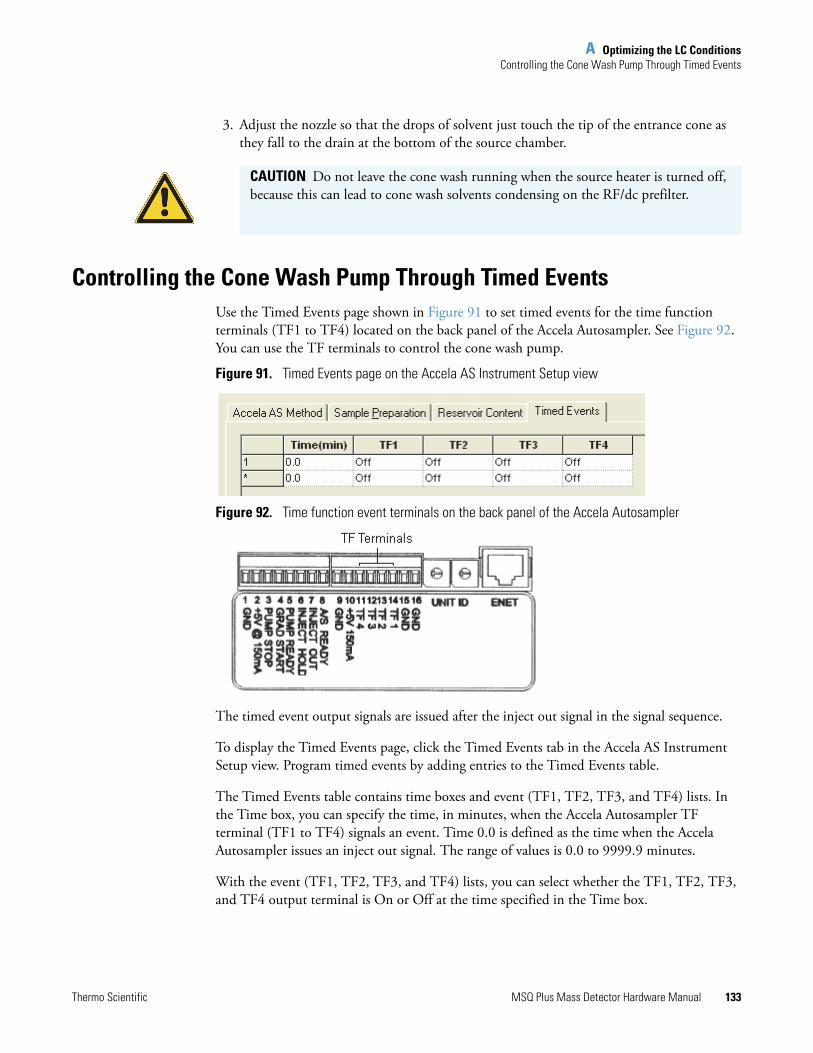
A Optimizing the LC ConditionsControlling the Cone Wash Pump Through Timed Events
Thermo Scientific MSQ Plus Mass Detector Hardware Manual 133
3. Adjust the nozzle so that the drops of solvent just touch the tip of the entrance cone as they fall to the drain at the bottom of the source chamber.
Controlling the Cone Wash Pump Through Timed EventsUse the Timed Events page shown in Figure 91 to set timed events for the time function terminals (TF1 to TF4) located on the back panel of the Accela Autosampler. See Figure 92. You can use the TF terminals to control the cone wash pump.
Figure 91. Timed Events page on the Accela AS Instrument Setup view
Figure 92. Time function event terminals on the back panel of the Accela Autosampler
The timed event output signals are issued after the inject out signal in the signal sequence.
To display the Timed Events page, click the Timed Events tab in the Accela AS Instrument Setup view. Program timed events by adding entries to the Timed Events table.
The Timed Events table contains time boxes and event (TF1, TF2, TF3, and TF4) lists. In the Time box, you can specify the time, in minutes, when the Accela Autosampler TF terminal (TF1 to TF4) signals an event. Time 0.0 is defined as the time when the Accela Autosampler issues an inject out signal. The range of values is 0.0 to 9999.9 minutes.
With the event (TF1, TF2, TF3, and TF4) lists, you can select whether the TF1, TF2, TF3, and TF4 output terminal is On or Off at the time specified in the Time box.
CAUTION Do not leave the cone wash running when the source heater is turned off, because this can lead to cone wash solvents condensing on the RF/dc prefilter.
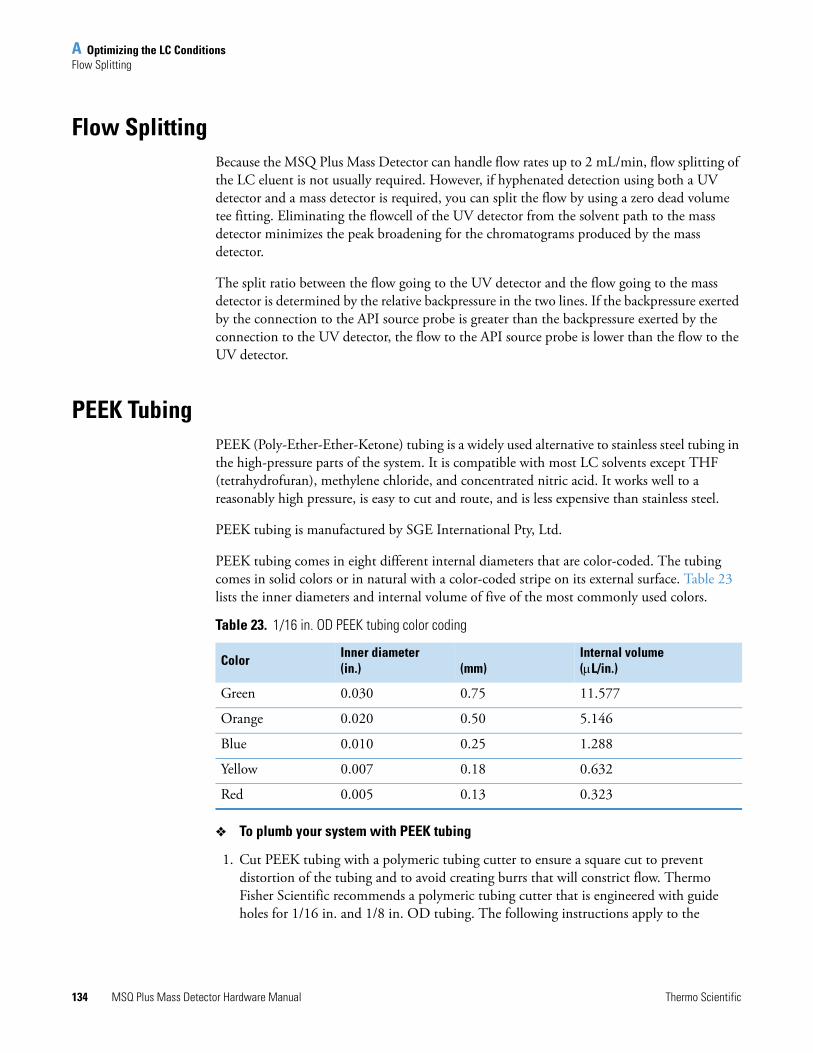
A Optimizing the LC ConditionsFlow Splitting
134 MSQ Plus Mass Detector Hardware Manual Thermo Scientific
Flow SplittingBecause the MSQ Plus Mass Detector can handle flow rates up to 2 mL/min, flow splitting of the LC eluent is not usually required. However, if hyphenated detection using both a UV detector and a mass detector is required, you can split the flow by using a zero dead volume tee fitting. Eliminating the flowcell of the UV detector from the solvent path to the mass detector minimizes the peak broadening for the chromatograms produced by the mass detector.
The split ratio between the flow going to the UV detector and the flow going to the mass detector is determined by the relative backpressure in the two lines. If the backpressure exerted by the connection to the API source probe is greater than the backpressure exerted by the connection to the UV detector, the flow to the API source probe is lower than the flow to the UV detector.
PEEK TubingPEEK (Poly-Ether-Ether-Ketone) tubing is a widely used alternative to stainless steel tubing in the high-pressure parts of the system. It is compatible with most LC solvents except THF (tetrahydrofuran), methylene chloride, and concentrated nitric acid. It works well to a reasonably high pressure, is easy to cut and route, and is less expensive than stainless steel.
PEEK tubing is manufactured by SGE International Pty, Ltd.
PEEK tubing comes in eight different internal diameters that are color-coded. The tubing comes in solid colors or in natural with a color-coded stripe on its external surface. Table 23 lists the inner diameters and internal volume of five of the most commonly used colors.
To plumb your system with PEEK tubing
1. Cut PEEK tubing with a polymeric tubing cutter to ensure a square cut to prevent distortion of the tubing and to avoid creating burrs that will constrict flow. Thermo Fisher Scientific recommends a polymeric tubing cutter that is engineered with guide holes for 1/16 in. and 1/8 in. OD tubing. The following instructions apply to the
Table 23. 1/16 in. OD PEEK tubing color coding
Color Inner diameter(in.) (mm)
Internal volume(L/in.)
Green 0.030 0.75 11.577
Orange 0.020 0.50 5.146
Blue 0.010 0.25 1.288
Yellow 0.007 0.18 0.632
Red 0.005 0.13 0.323

A Optimizing the LC ConditionsChemical Kit
Thermo Scientific MSQ Plus Mass Detector Hardware Manual 135
Upchurch Scientific™ Model A18 Polymeric Tubing Cutter and are provided courtesy of Upchurch Scientific:
a. Squeeze the tabs at the back of the cutter together to raise the blade.
b. Insert your tubing through the appropriate guide hole.
c. Release the tabs, allowing the blade of the cutter to rest on the tubing.
d. Holding the tubing, spin the cutter around the tubing to begin the cut. For PEEK tubing, spin the cutter two to three times, remove the tubing and snap the tubing at the cut.
2. Slip a fitting over the end of the tubing.
3. As you insert PEEK tubing into a port, ensure that the end of the tubing makes contact with the bottom of the port. Then tighten the fitting fingertight. See Figure 93.
Figure 93. Poor connections result if tubing is not bottomed in the port (A) or is not cut square (B)
Chemical KitTo prepare the MSQ Plus Mass Detector calibration solution for autotune and mass calibration, you can either prepare it yourself using the instructions in the “Calibrant Solution” section of the MSQ Plus Mass Detector Getting Started Guide, or you can use the MSQ Plus Mass Detector Chemical Kit (part number 60111-62023), shown in Figure 94. This kit contains calibration, qualification, and sensitivity chemicals for the MSQ Plus Mass Detector. Specifically, it contains the following:
Note
1. Tubing that is not properly seated can add dead volume to a chromatographic system.
2. Never over-tighten PEEK fittings, because this can cause leaks.
Courtesy of the Rheodyne Web site
(A) (B)
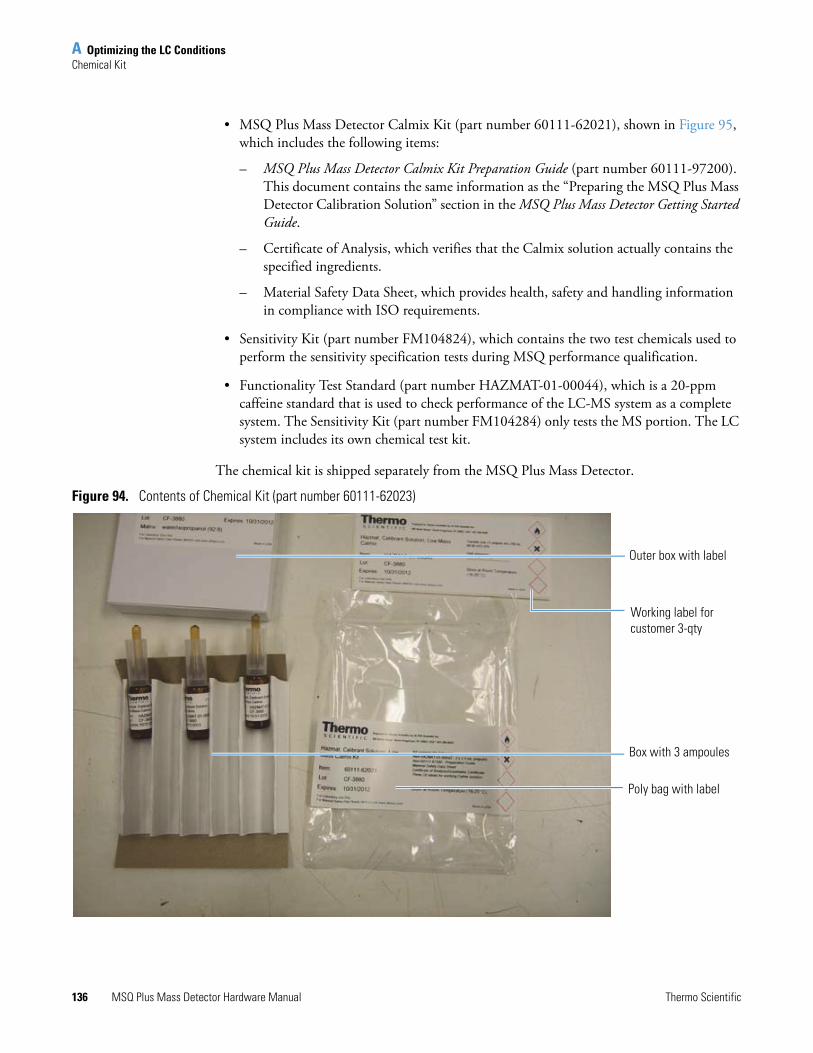
A Optimizing the LC ConditionsChemical Kit
136 MSQ Plus Mass Detector Hardware Manual Thermo Scientific
• MSQ Plus Mass Detector Calmix Kit (part number 60111-62021), shown in Figure 95, which includes the following items:
– MSQ Plus Mass Detector Calmix Kit Preparation Guide (part number 60111-97200). This document contains the same information as the “Preparing the MSQ Plus Mass Detector Calibration Solution” section in the MSQ Plus Mass Detector Getting Started Guide.
– Certificate of Analysis, which verifies that the Calmix solution actually contains the specified ingredients.
– Material Safety Data Sheet, which provides health, safety and handling information in compliance with ISO requirements.
• Sensitivity Kit (part number FM104824), which contains the two test chemicals used to perform the sensitivity specification tests during MSQ performance qualification.
• Functionality Test Standard (part number HAZMAT-01-00044), which is a 20-ppm caffeine standard that is used to check performance of the LC-MS system as a complete system. The Sensitivity Kit (part number FM104284) only tests the MS portion. The LC system includes its own chemical test kit.
The chemical kit is shipped separately from the MSQ Plus Mass Detector.
Figure 94. Contents of Chemical Kit (part number 60111-62023)
Outer box with label
Working label for customer 3-qty
Box with 3 ampoules
Poly bag with label

A Optimizing the LC ConditionsChemical Kit
Thermo Scientific MSQ Plus Mass Detector Hardware Manual 137
Figure 95. Contents of MSQ Plus Mass Detector CALMIX Kit (part number 60111-62021)
Material Safety Data Sheet Certificate of Analysis MSQ Plus Mass Detector Calmix Kit Preparation Guide


Thermo Scientific MSQ Plus Mass Detector Hardware Manual 139
I
Numerics2-methoxyethanol 128
AAccela Autosampler 12, 133Accela autosampler 133Accela LC pump 12acetic acid 129, 131acetonitrile 5, 128acid alcohols 7acidic compounds 4–5Acquisition icon 43adduct ions 4, 6ammonium acetate 129–130ammonium formate 129ammonium hydroxide 129APCI capillary
installing 71removing 69replacing 68
APCI probeinstalling 73installing the APCI capillary 71maintaining 67removing 68removing APCI capillary 69
APCI probe assembly 121APCI. See atmospheric pressure chemical ionizationAPI probe 32, 47–48, 94atmospheric pressure chemical ionization
adduct-ion formation 6API source 22, 24capillary 5definition of 5description 2flow rates 128ion generation 5ion polarity modes 7
molecular weights suited for 7molecule desolvation 13negative-ion mode 6nitrogen consumed 36positive-ion mode 6primary ion formation 6regulation of nitrogen gas 33secondary ion formation 6spectral characteristics 7switching to electrospray 53tuning parameters to set 41
atmospheric pressure ionization (API) source 22autosamplers
Accela 12contact closure 14purpose 2, 13
Bback panel of the MSQ Plus Mass Detector 20backing manifold 20, 22backpressure 56, 68basic compounds 4–5
Ccalibrant 35calibrant spare parts 125carboxylic acids 3, 7centroid data type 8chemicals 117compliance, WEEE vcone voltage 41cone wash nozzle
as part of cone wash system 37cleaning 83handling 84optimizing position of 132removing from source block assembly 82
cone wash pump 132–133
Index
140 MSQ Plus Mass Detector Hardware Manual Thermo Scientific
Index: D
cone wash systemcomponents of 37cone wash pump pinouts 132optimizing 127purpose 36
connection kits 126consumable parts 111contact closure 14contact closure connector 22contacting us xixconversion dynode 29–30corona current 41–42corona needle 82corona pin 24, 52
Ddata system computer
connecting to MSQ Plus Mass Detector 22requirements 38
dc voltage 26–28default.tune file 25deprotonated molecules 4, 7detent screw insulator 77dichloromethane 128dimethyl sulfoxide (DMSO) 128disassembling the RF/dc prefilter 89disk space 45Disk Space dialog box 46documentation survey xxdrug metabolism studies 3
EEdwards forepump 32EEK tube insert 71electron multiplier 30electronic spare parts 126electrospray
acidic compounds 4–5API source 22–23basic compounds 4–5definition of 3description 2flow rates 128fragmentation in 4ion desolvation in 3, 13molecular weights suited for 5nitrogen consumption 36polar compounds 5polarity modes available in 5recommended guidelines 5
regulation of nitrogen gas 33solvents used in 5spectral characteristics 4spectrum produced 4switching to atmospheric pressure chemical ionization 51tuning parameters to set 41
entrance conecleaning 83removing from source block assembly 82repairing 91
ESI capillarycleaning or replacing 61installing 63removing 59
ESI probeinstalling 67installing capillary 63maintaining 56removing 57removing capillary from 59replacing ceramic sleeve 61
ESI probe assembly 120ESI. See electrosprayethanol 128exhaust manifold 20, 22extraction cone 89
Fflow splitting 134forepump
checking oil level in oil mist filter 46connection to turbomolecular pump 32draining oil mist filter 48–49Edwards 32maintaining 95power source for 20–21turning off 41, 81vacuum produced by 2, 4
formic acid 84, 129, 131front panel of MSQ Plus Mass Detector 18front panel status indicator of the MSQ Plus MassDetector 18
full scan 7full-system autotune 15Functionality Test Standard 136
Ggas ballast valve 48gas flow spare parts 125GAS IN 20, 22, 32
Thermo Scientific MSQ Plus Mass Detector Hardware Manual 141
Index: H
graphite ferrule 60, 63, 70–71grounding union 16
Hhexane 128
IInformation view 37Inject From Ref. Inlet button 35inorganic acids 130Instrument Configuration application 14Instrument Configuration icon 14Instrument Setup view 42ion detection system 28ion optics 13, 31ion polarity modes 2ion-pairing agents 129isopropanol 128isopropyl alcohol 5
Kkits 116
LLC column 13LC column flow rates 127LC devices 15LC pump 14, 56, 68, 100, 104LC solvents 128LC system
Accela 1chemical test kit 136connecting to MSQ Plus Mass Detector 111optimizing 127waste solvents 49
LC/MS analysis 2light-emitting diode (LED) 18line power 21lubricant reservoir 96, 98
MMAINS IN connection to line power 20–21MAINS ON/OFF circuit breaker switch 20–21maintenance schedule 55manuals available 126mass analyzer
components of 27purpose 26
mass-scale calibrationhow to perform 16steps performed in 15when to perform 16
MCA data type 9menu bar of Tune window 42methanol 5, 84, 128methylene chloride 134mobile phase pH 129mobile phrase additives 128M-path region 31–32MSQ Plus Mass Detector
additives compatible with 129components of 1–2, 18connecting API probe 51connection to data system computer 22, 37connection to liquid chromatograph 22connection to nitrogen source 22data types provided by 8emergency shutdown 99integration with LC system 12ion detection system 28ion polarity modes 2maintenance schedule 55mass analyzer in 26mass range of 27parts in 111power supply requirements for 21procedures to perform after operation 47procedures to perform before operation 45resetting 108restarting after shutdown 105–106scan types in 7turning off 48, 99
from Tune window 103from Xcalibur data system 101non-routine maintenance 104
types of ionization performed 2MSQ Plus Mass Detector Calmix Kit 136MSQ Plus Mass Detector Chemical Kit 135multiply charged ions 7
Nneedle voltage 42negative ion polarity mode 2–5, 7, 25, 130nitric acid 134nitrogen gas 23, 32, 36, 100Nitrogen Gas On/Off toggle button 34nitrogen generator parts 125nitrogen source 22nitrogen supply 45
142 MSQ Plus Mass Detector Hardware Manual Thermo Scientific
Index: O
non-volatile salts 129normal-phase solvents 128
Ooil mist filter 46, 48–49O-rings 83–84, 113
PPeak Display 43PEEK delivery tube 16PEEK tube insert 60, 70PEEK tubing
color coding 134cone wash system 37connections for cone wash system 37description 134plumbing system with 134
PEEK union 22Per Method Parameters table 43phosphate buffers 131phosphoric acid 130Pirani gauge 32positive ion polarity mode 2–5, 7, 25, 130positive-negative ion polarity mode 2, 5, 7power circuit breaker switch 21power source for forepump 21power supply requirements for MSQ Plus Mass Detector 21Print Setup dialog box 44printer 44probe heater
cleaning 77installing 78, 94maintaining 74removing 74replacing detent screw insulator 77
probe heater assembly 123Probe Heater Repair Kit 74, 77probe temperature 41profile data type 8protonated molecules 4, 7PUMP OUT outlet 32PUMP OUT power source for forepump 20–21
Qquadrupole rod assembly 26
Rraw files
acquiring data to 41MCA 10
Rayleigh stability limit 3reference inlet reservoir 16, 32reference inlet system
components of 16purpose 15
Reset button 20, 22, 108reverse-phase LC solvents 128RF lens bias 25RF voltage 26–28RF/dc prefilter
cleaning 87deep-cleaning 88disassembly 89purpose 25
Rheodyne microinjection (switching) valve 16Roadmap view 39
Ssafety precautions xviiScan Events table 43selected ion monitoring (SIM) 7Sensitivity Kit 136Server icon 37, 40–41, 103, 105, 107Server icon shortcut menu 41, 105Server software 37sheath gas 23–24Signal-to-Noise Calculator program 39singly charged ions 4, 7solenoid valve 34solvent path spare parts 125source block 89source block assembly
assembling 92cleaning cone wash nozzle 83cleaning entrance cone 83clearing access to 81installing 93maintaining 79parts in 117preparing LC/MS system 80removing 86removing cone wash nozzle 82removing entrance cone 82repairing entrance cone 91
source manifold 20, 22spare parts 116
Thermo Scientific MSQ Plus Mass Detector Hardware Manual 143
Index: T
split flow tee 13status bar of Tune window 43sulfuric acid 130surfactants 129, 131survey link xx
Ttetrahydrofuran (THF) 130, 134TF terminals 133Thermo Foundation Instrument Configuration dialog box 14
Timed Events page 133title bar of Tune window 42toluene 128toolbar of Tune window 43triethylamine (TEA) 129–130trifluoroacetic acid (TFA) 129–131Tune Comms Indicator 43tune file
default 25displaying name in Tune window 42importing 42saving values of tuning parameters in 41
Tune icon 41, 43, 100, 103Tune window
Acquisition icon 43features of 42menu bar 42opening 41Peak Display 43Per Method Parameters table 43Scan Events table 43status bar 43title bar 42toolbar 43Tune Comms Indicator 43Tune icon 43turning off the mass detector from 103
turbomolecular pumplocation of 95maintaining 96operating speed 19purpose 31removing lubricant reservoir 96replacing lubricant reservoir 98turning off 41, 81
Uunsuitable additives 131USB cable 22USB port 20, 22USER I/O contact closure connector 20, 22UV detector 13
Vvacuum manifold 30–31vacuum spare parts 124vacuum system 30, 95vent valve 32
Wwaste reservoir nitrogen pressurization line 16waste solvent 49water 128WEEE compliance v
XXcalibur data system
configuring for LC devices 14controlling modules of LC/MS system 37Instrument Configuration application 14Instrument Setup view 42Roadmap view 37, 39software features 38
Xcalibur icon 101

Related Documents