MSD POWERSPORTS • WWW.MSDPOWERSPORTS.COM • (915) 858-3365 • FAX (915) 858-3496 MSD SB6 Programmable Ignition for the Hayabusa GSXR1000 PN 42271 WARNING: When installing the SB6, disconnect the battery cables. When disconnecting, always remove the negative cable first and re-install it last. Parts Included: 1 - Ignition 1 - Wiring Harness 1 - Parts Bag 1 - CD ROM Note: It is recommended to have the Service Manual available to verify correct panel removal and wiring since models can vary by year. It is recommended to contact the MSD Technical Help Desk for programming questions at 888-258-3835. The software is also available on the website at www.msdpowersports.com. These instructions detail the installation and wiring process of the ignition. Details in programming the SB6 Ignition are provided on the supplied CD in the Help menu or with the Programming Instructions. Figure 1 Remove bolts, lift seat. DISASSEMBLY 1. Remove seat by removing the bolts from both sides and lift (Figure 1). Figure 2 Remove tank cover panels. 2. Remove the lower side tank covers from each side. Pull the covers out and back to unhook them (Figure 2). SIDE TANK COVER

Welcome message from author
This document is posted to help you gain knowledge. Please leave a comment to let me know what you think about it! Share it to your friends and learn new things together.
Transcript

MSD POWERSPORTS • WWW.MSDPOWERSPORTS.COM • (915) 858-3365 • FAX (915) 858-3496
MSD SB6 Programmable Ignitionfor the Hayabusa GSXR1000
PN 42271
WARNING: When installing the SB6, disconnect the battery cables. When disconnecting, always remove the negative cable first and re-install it last.
Parts Included: 1 - Ignition 1 - Wiring Harness 1 - Parts Bag 1 - CD ROM
Note: It is recommended to have the Service Manual available to verify correct panel removal and wiring since models can vary by year. It is recommended to contact the MSD Technical Help Desk for programming questions at 888-258-3835. The software is also available on the website at www.msdpowersports.com.
These instructions detail the installation and wiring process of the ignition. Details in programming the SB6 Ignition are provided on the supplied CD in the Help menu or with the Programming Instructions.
Figure 1 Remove bolts, lift seat.
DISASSEMBLY1. Remove seat by removing the bolts from both
sides and lift (Figure 1).
Figure 2 Remove tank cover panels.
2. Remove the lower side tank covers from each side. Pull the covers out and back to unhook them (Figure 2).
SIDE TANK COVER

2 INSTALLATIONINSTRUCTIONS
MSD POWERSPORTS • WWW.MSDPOWERSPORTS.COM • (915) 858-3365 • FAX (915) 858-3496
Figure 3 Remove tank bolts.
Figure 4 Remove tank bolt and tank.
Figure 5 Remove air filter box.
3. Remove tank bolts and prop up the tank (Figure 3). Disconnect: • Fuel tank connector • Fuel tank breather hose • Fuel tank drain hose • Place a towel under the fuel feed hose and disconnect the fuel feed hose from the tank.
4. Remove Fuel Tank mounting bolt then remove the tank (Figure 4).
5. Disconnect: (Figure 5) • IAP connector • IAT connector • PVC hoses • Vacuum hoses • Air Filter box
Note: Some models will require removal of the top of the air cleaner to reach the bolts on the inside.
BOLTS
BOLT

INSTALLATIONINSTRUCTIONS 3
MSD POWERSPORTS • WWW.MSDPOWERSPORTS.COM • (915) 858-3365 • FAX (915) 858-3496
BLUE - TWO STEP (TO CLUTCH SWITCH)
ORANGE - SHIFT LIGHT OUTPUT
RED/BLACK - SPEED SENSOR
RED - SENSOR, 0-5V
BROWN - STEP RETARD
YELLOW/BLACK - SHIFT KILL
CRANKSENSOR
CONNECTORS
GROUND
VI BL/RE
YL BL/YL
WH BL/WH
BL/OR
GREEN
COIL 4 COIL 3 COIL 2
COIL 1
Figure 6 Wiring of the SB6 for the Hayabusa GSXR1000.
WIRING
Black 11 Connect to Ground.
Red/Black 16 Splice to the factory speed sensor Pink wire.
CrankSensorConnectors,2-pin
Green 1 Crankshaft Sensor reference.
Violet 14 Crankshaft Sensor signal.
CoilConnectors,Four2-PinConnectorsGreen 2 Coil 1 input.
White 7 Coil 2 input.
Yellow 4 Coil 3 input.
Violet 20 Coil 4 input.
RedJumper 12 volts.
Accessories
Blue 17 2-Step. Activates the MSD launch rpm setting when grounded. Connects to the clutch switch Yellow/Black wire.
Brown 15 Step Retard. When connected to 12 volts, the timing will retard.
Orange 3 Shift Light. Provides 12 volts to activate a shift light.
Yellow/Black 18 Shift Kill. When connected to ground the ignition output is momentarily disabled.
Red 5 0-5 Volt Sensor Input. Connect to the TPS or any other sensor that outputs a 0-5 volt signal.
OutputInput
PINLOCATION
Black/Orange 25 Coil 1 Trigger.
Black/White 26 Coil 2 Trigger.
Black/Yellow 13 Coil 3 Trigger.
Black/Red 9 Coil 4 Trigger.
4 INSTALLATIONINSTRUCTIONS
MSD POWERSPORTS • WWW.MSDPOWERSPORTS.COM • (915) 858-3365 • FAX (915) 858-3496
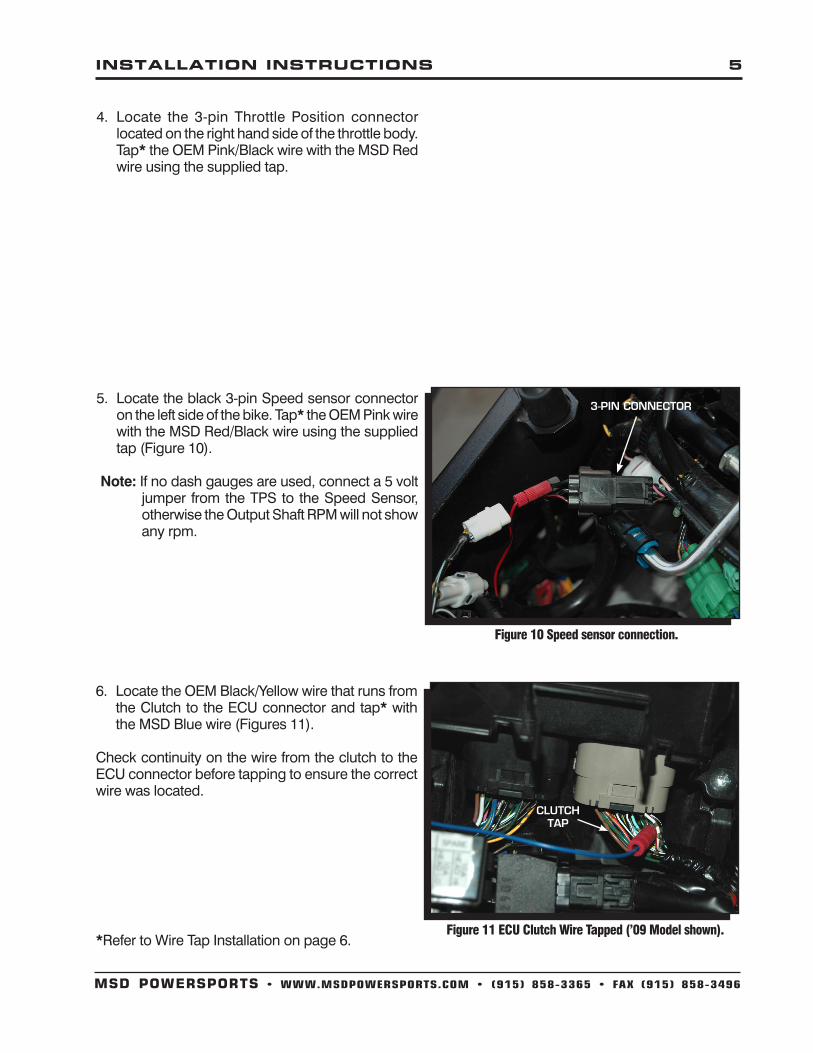
Figure 9 Crankshaft Sensor connection.
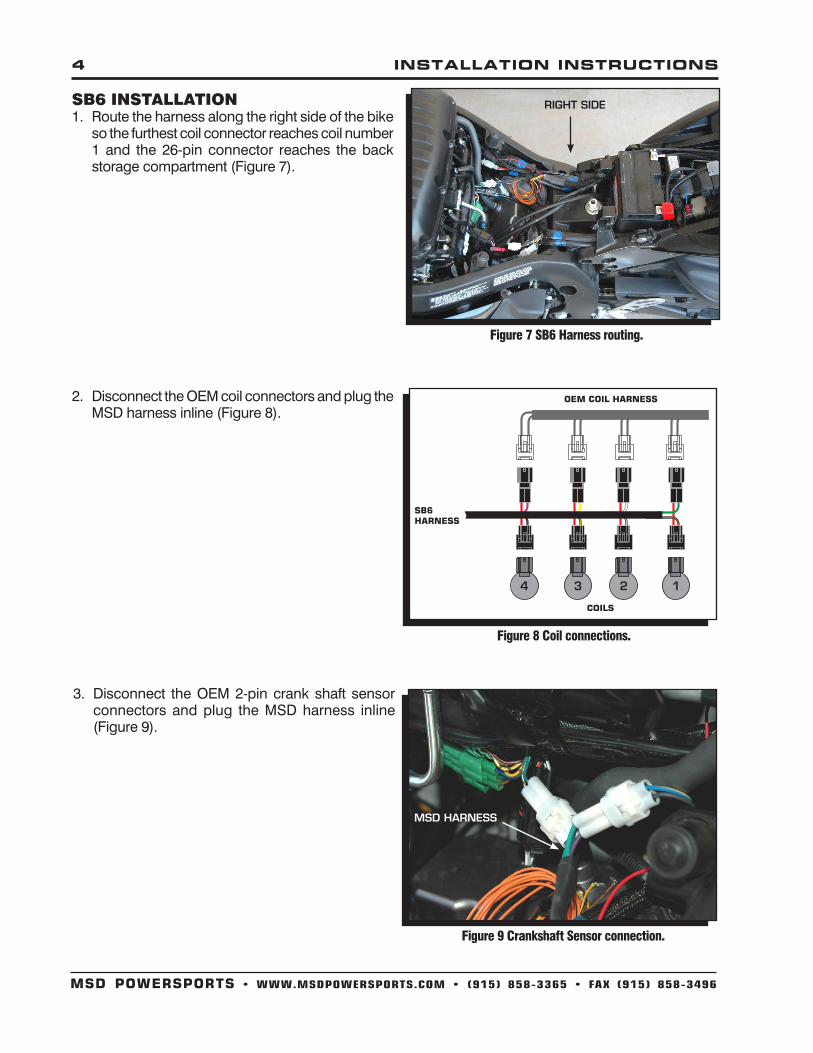
Figure 8 Coil connections.
SB6 INSTALLATION1. Route the harness along the right side of the bike
so the furthest coil connector reaches coil number 1 and the 26-pin connector reaches the back storage compartment (Figure 7).
Figure 7 SB6 Harness routing.
2. Disconnect the OEM coil connectors and plug the MSD harness inline (Figure 8).
3. Disconnect the OEM 2-pin crank shaft sensor connectors and plug the MSD harness inline (Figure 9).
COILS
OEM COIL HARNESS
SB6HARNESS
1234
RIGHT SIDE
MSD HARNESS
INSTALLATIONINSTRUCTIONS 5
MSD POWERSPORTS • WWW.MSDPOWERSPORTS.COM • (915) 858-3365 • FAX (915) 858-3496
Figure 10 Speed sensor connection.
Figure 11 ECU Clutch Wire Tapped (’09 Model shown).
5. Locate the black 3-pin Speed sensor connector on the left side of the bike. Tap* the OEM Pink wire with the MSD Red/Black wire using the supplied tap (Figure 10).
Note: If no dash gauges are used, connect a 5 volt jumper from the TPS to the Speed Sensor, otherwise the Output Shaft RPM will not show any rpm.
6. Locate the OEM Black/Yellow wire that runs from the Clutch to the ECU connector and tap* with the MSD Blue wire (Figures 11).
Check continuity on the wire from the clutch to the ECU connector before tapping to ensure the correct wire was located.
*Refer to Wire Tap Installation on page 6.
4. Locate the 3-pin Throttle Position connector located on the right hand side of the throttle body. Tap* the OEM Pink/Black wire with the MSD Red wire using the supplied tap.
3-PIN CONNECTOR
CLUTCHTAP

6 INSTALLATIONINSTRUCTIONS
MSD POWERSPORTS • WWW.MSDPOWERSPORTS.COM • (915) 858-3365 • FAX (915) 858-3496
WIRE TAP INSTALLATION1. Insert male end cup into wire to be spliced.3. Hand tighten barrel into male end cup.3. Strip wire approximately 3/8” (10mm).4. Insert wire into male end exposing only bare
wire.5. Hand tighten male end to barrel (Figure 13).
WIRE TO BESPLICED
MALEEND
MALEENDCUPBARREL
3/8”(10mm)
Figure 13 Wire Tap.
Figure 12 Grounding the SB6.
7. Install the MSD Black wire to the negative side of the battery terminal (Figure 12).
8. Install Software as outlined in the Programming Instructions included and verify wiring via Graph View.
9. Reassemble the panels and tank in reverse order.

INSTALLATIONINSTRUCTIONS 7
MSD POWERSPORTS • WWW.MSDPOWERSPORTS.COM • (915) 858-3365 • FAX (915) 858-3496
TECH NOTES_________________________________________________________________________________________________________________________
_________________________________________________________________________________________________________________________
_________________________________________________________________________________________________________________________
_________________________________________________________________________________________________________________________
_________________________________________________________________________________________________________________________
_________________________________________________________________________________________________________________________
_________________________________________________________________________________________________________________________
_________________________________________________________________________________________________________________________
_________________________________________________________________________________________________________________________
_________________________________________________________________________________________________________________________
_________________________________________________________________________________________________________________________
_________________________________________________________________________________________________________________________
_________________________________________________________________________________________________________________________
_________________________________________________________________________________________________________________________
_________________________________________________________________________________________________________________________
_________________________________________________________________________________________________________________________
_________________________________________________________________________________________________________________________
_________________________________________________________________________________________________________________________
_________________________________________________________________________________________________________________________
_________________________________________________________________________________________________________________________
_________________________________________________________________________________________________________________________
_________________________________________________________________________________________________________________________
_________________________________________________________________________________________________________________________
_________________________________________________________________________________________________________________________
_________________________________________________________________________________________________________________________
_________________________________________________________________________________________________________________________
_________________________________________________________________________________________________________________________
_________________________________________________________________________________________________________________________
_________________________________________________________________________________________________________________________
_________________________________________________________________________________________________________________________
_________________________________________________________________________________________________________________________
_________________________________________________________________________________________________________________________
_________________________________________________________________________________________________________________________
_________________________________________________________________________________________________________________________
_________________________________________________________________________________________________________________________
_________________________________________________________________________________________________________________________
_________________________________________________________________________________________________________________________

MSD POWERSPORTS • WWW.MSDPOWERSPORTS.COM • (915) 858-3365 • FAX (915) 858-3496© 2012 Autotronic Controls Corporation
FRM29649 Revised 02/12 Printed in U.S.A.
Limited Warranty MSD warrants this product to be free from defects in material and workmanship under its intended normal use*, when properly installed and purchased from an authorized MSD dealer, for a period of one year from the date of the original purchase. This warranty is void for any products purchased through auction websites. If found to be defective as mentioned above, it will be repaired or replaced at the option of MSD. Any item that is covered under this warranty will be returned free of charge using Ground shipping methods. This shall constitute the sole remedy of the purchaser and the sole liability of MSD. To the extent permitted by law, the foregoing is exclusive and in lieu of all other warranties or representation whether expressed or implied, including any implied warranty of merchantability or fitness. In no event shall MSD or its suppliers be liable for special or consequential damages. *Intended normal use means that this item is being used as was originally intended and for the original application as sold by MSD. Any modifications to this item or if it is used on an application other than what MSD markets the product, the warranty will be void. It is the sole responsibility of the customer to determine that this item will work for the application they are intending. MSD will accept no liability for custom applications.
Service In case of malfunction, this MSD component will be repaired free of charge according to the terms of the warranty. When returning MSD components for warranty service, ProofofPurchase must be supplied for verification. After the warranty period has expired, repair service is based on a minimum and maximum fee. All returns must have a Return Material Authorization (RMA) number issued to them before being returned. To obtain an RMA number please contact MSD Customer Service at 1 (888) MSD-7859 or visit our website at www.msdperformance.com/rma to automatically obtain a number and shipping information. When returning the unit for repair, leave all wires at the length in which you have them installed. Be sure to include a detailed account of any problems experienced, and what components and accessories are installed on the vehicle. The repaired unit will be returned as soon as possible using Ground shipping methods (ground shipping is covered by warranty). For more information, call MSD at (915) 855-7123. MSD technicians are available from 7:00 a.m. to 5:00 p.m. Monday - Friday (mountain time).
TECH NOTES_________________________________________________________________________________________________________________________
_________________________________________________________________________________________________________________________
_________________________________________________________________________________________________________________________
_________________________________________________________________________________________________________________________
_________________________________________________________________________________________________________________________
_________________________________________________________________________________________________________________________
_________________________________________________________________________________________________________________________
_________________________________________________________________________________________________________________________
_________________________________________________________________________________________________________________________
_________________________________________________________________________________________________________________________
_________________________________________________________________________________________________________________________
_________________________________________________________________________________________________________________________
_________________________________________________________________________________________________________________________
_________________________________________________________________________________________________________________________
_________________________________________________________________________________________________________________________
_________________________________________________________________________________________________________________________
_________________________________________________________________________________________________________________________
_________________________________________________________________________________________________________________________
Related Documents