Trouble Viewing? See the or view the HTML Version (https://fccid.io/TE7MS100/User-Manual/MS100-User-Manual-3450394.html) or PDF in frame (https://fccid.io/TE7MS100/User-Manual/MS100-User-Manual-3450394.iframe) MS100 Smart Motion Sensor User Manual MS100- TP-Link Technologies Co., Ltd. TP-Link Technologies Co., Ltd. Smart Motion Sensor FCC ID (https://fccid.io/) > TP-Link Technologies Co., Ltd. (https://fccid.io/TE7) > MS100 (https://fccid.io/TE7MS100) > MS100-User Manual (https://fccid.io/TE7MS100/User-Manual/MS100-User-Manual-3450394) FCC ID Filing: TE7MS100 (https://fccid.io/TE7MS100) Purchase on Amazon: Smart Motion Sensor (http://target.georiot.com/Proxy.ashx? tsid=17750&GR_URL=http%3A%2F%2Fwww.amazon.com%2Fgp%2Fsearch%3Fie%3DUTF8%26camp%3D1789%26creative%3D9325%26index%3De

Welcome message from author
This document is posted to help you gain knowledge. Please leave a comment to let me know what you think about it! Share it to your friends and learn new things together.
Transcript

Trouble Viewing? See the or view the HTML Version (https://fccid.io/TE7MS100/User-Manual/MS100-User-Manual-3450394.html) or PDF in frame(https://fccid.io/TE7MS100/User-Manual/MS100-User-Manual-3450394.iframe)
MS100 Smart Motion Sensor User Manual MS100- TP-LinkTechnologies Co., Ltd.TP-Link Technologies Co., Ltd. Smart Motion SensorFCC ID (https://fccid.io/) > TP-Link Technologies Co., Ltd. (https://fccid.io/TE7) > MS100 (https://fccid.io/TE7MS100) > MS100-User Manual(https://fccid.io/TE7MS100/User-Manual/MS100-User-Manual-3450394)
FCC ID Filing: TE7MS100 (https://fccid.io/TE7MS100)
Purchase on Amazon: Smart Motion Sensor (http://target.georiot.com/Proxy.ashx?tsid=17750&GR_URL=http%3A%2F%2Fwww.amazon.com%2Fgp%2Fsearch%3Fie%3DUTF8%26camp%3D1789%26creative%3D9325%26index%3De


User Guide Smart Motion Sensor 1910012158 REV1.0.0 Contents About This Guide····················································· 1 Introduction································································ 2 Appearance································································ 3 Set Up Your Motion Sensor································ 4 Main Pages·································································· 6 Authentication··························································· 7 About This Guide This guide provides a brief introduction to Motion Sensor and the Kasa app, as well as regulatory information. Please note that features of Motion Sensor may vary slightly depending on the model and software version you have, and on your loand internet service provider. All images, parameters and descriptions documented in this guide are used for demonstration only. Conventions In this guide, the following convention is used: Convention Teal Underline
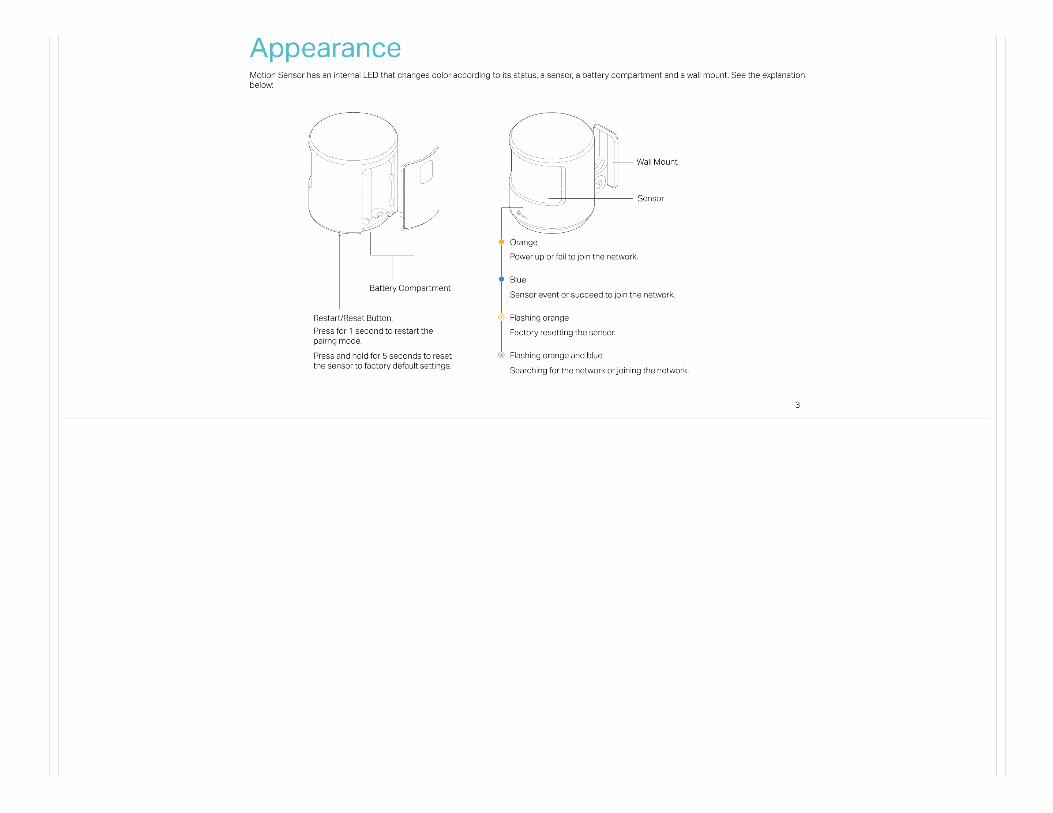
Description Key information appears in teal, including management page text such as menus, items, buttons and so on. Hyperlinks are in teal and underlined. You can click to redirect to a website. More Info • Specific product information can be found on the product page at http://www.tp-link.com. • • The latest firmware and management app are available from Download Center at http://www.tp-link.com/support. • A Technical Support Forum is provided for you to discuss our products at http://forum.tp-link.com. • Our Technical Support and troubleshooting information can be found at http://www.tp-link.com/support. Introduction With Motion Sensor connected to your Kasa Smart Home Router, your home can use motion sensing to become even smarter, and that masimpler. You can set your home in motion with Kasa app including: • Smart Lighting Control - Automatically turn smart lights on/off • Occupancy Sensing - Enhance security and save enrgy whenever you're away • Remote Notification - Be notified of activity at home no matter where you are • Simple Setup - Easily connects to your Kasa Smart Home Router Appearance Motion Sensor has an internal LED that changes color according to its status, a sensor, a battery compartment and a wall mount. Sbelow: Wall Mount Sensor Orange

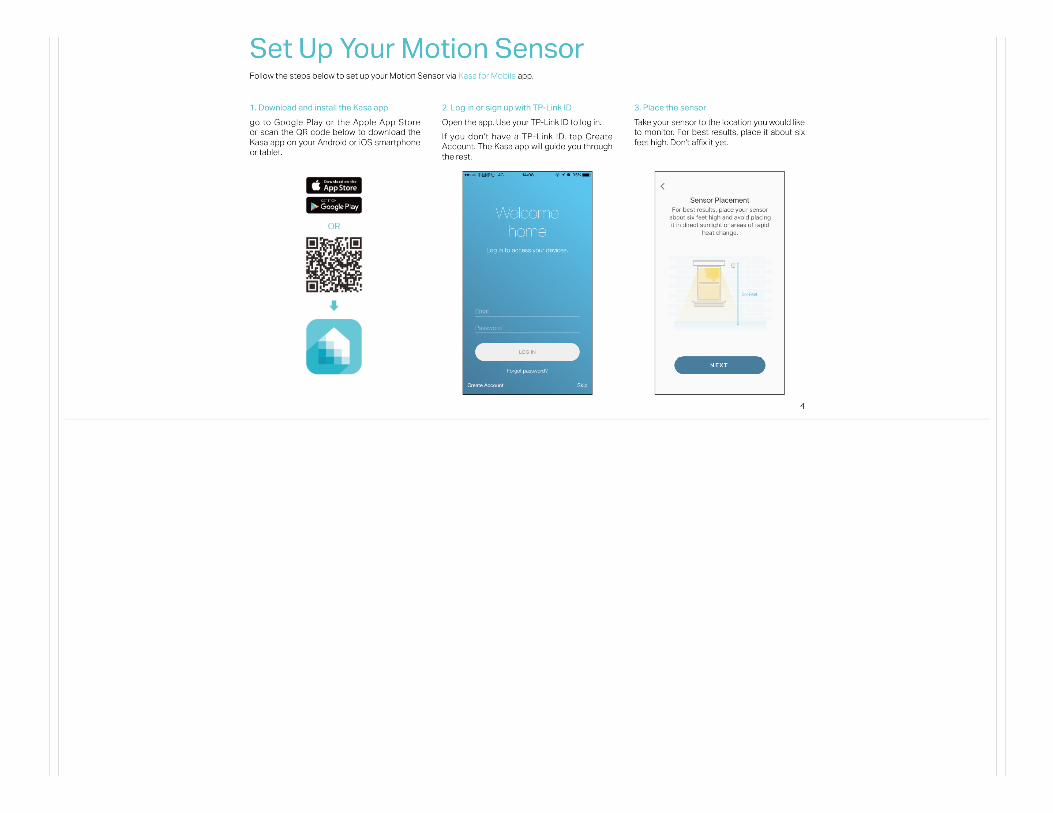
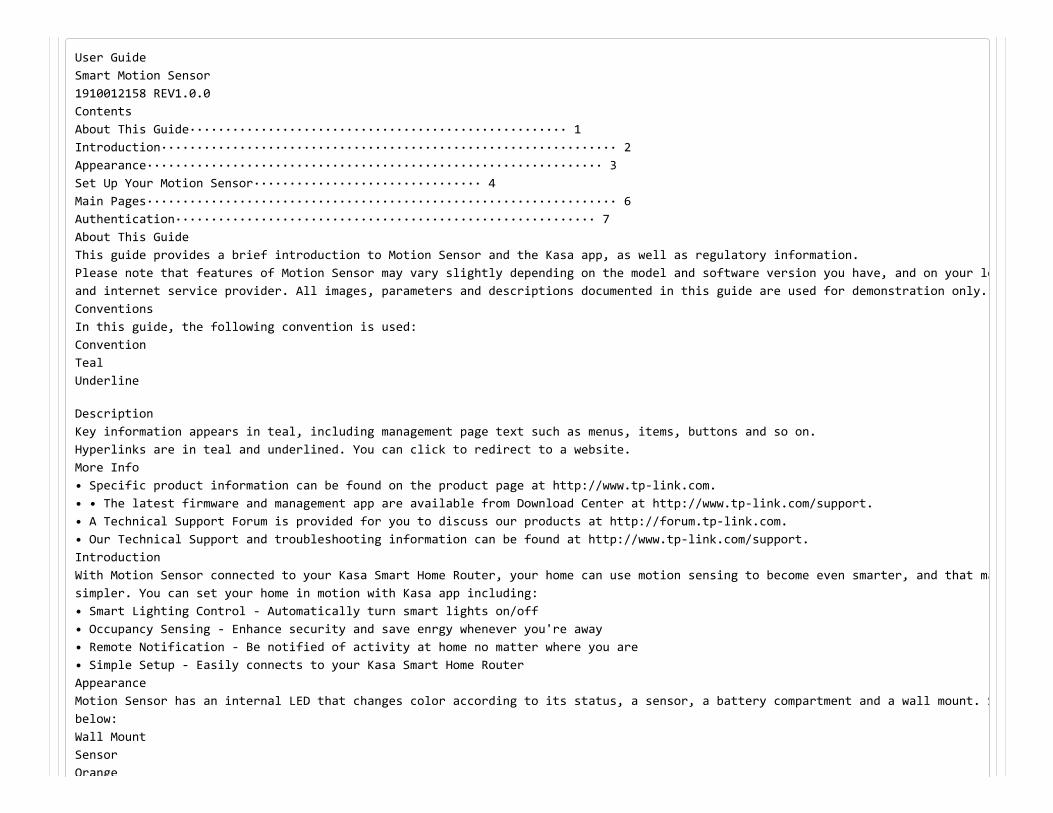
Orange Power up or fail to join the network. Battery Compartment Blue Sensor event or succeed to join the network. Restart/Reset Button: Flashing orange Press and hold for 5 seconds to reset the sensor to factory default settings. Flashing orange and blue Press for 1 second to restart the pairng mode. Factory resetting the sensor. Searching for the network or joining the network. Set Up Your Motion Sensor Follow the steps below to set up your Motion Sensor via Kasa for Mobile app. 1. Download and install the Kasa app go to Google Play or the Apple App Store or scan the QR code below to download the Kasa app on your Android or iOS smartphone or tablet. 2. Log in or sign up with TP-Link ID Open the app. Use your TP-Link ID to log in. If you don’t have a TP-Link ID, tap Create Account. The Kasa app will guide you through the rest. 3. Place the sensor Take your sensor to the location you would like to monitor. For best results, place it about six feet high. Don‘t affix it yet. Set Up Your Motion Sensor Follow the steps below to set up your Motion Sensor via Kasa for Mobile app. 4. Connect to Smart Home Router Remove the screw securing the wall mount and slide the cover down. Insert two batteries to enter pairing mode. 5. Install the sensor if needed It is all set up. You can install the sensor to the wall if needed. The Kasa app will guide you through the whole process of installation. Main Pages After you successfully set up your Motion Sensor, you will see the home page of the Kasa app. Here you can view the working statu

After you successfully set up your Motion Sensor, you will see the home page of the Kasa app. Here you can view the working statuyou've added to Kasa and manage them. Tap on a sensor to check the current status, time of last motion, the current battery levelon sensor status page to view your device settings. Home Page Sensor Status Device Settings Authentication COPYRIGHT & TRADEMARKS Specifications are subject to change without notice. is a registered trademark of TP-Link Technologies Co., Ltd. Other brands and product names are trademarks or registered trademarks of their respective holders. No part of the specifications may be reproduced in any form or by any means or used to make any derivative such as translation, tadaptation without permission from TP-Link Technologies Co., Ltd. Copyright © 2017 TP-Link Technologies Co., Ltd. All rights rese FCC STATEMENT This equipment has been tested and found to comply with the limits for a Class B digital device, pursuant to part 15 of the FCC Rdesigned to provide reasonable protection against harmful interference in a residential installation. This equipment generates, uradio frequency energy and, if not installed and used in accordance with the instructions, may cause harmful interference to radiHowever, there is no guarantee that interference will not occur in a particular installation. If this equipment does cause harmfuor television reception, which can be determined by turning the equipment off and on, the user is encouraged to try to correct thone or more of the following measures: • Increase the separation between the equipment and receiver. • Connect the equipment into an outlet on a circuit different from that to which the receiver is connected. • Consult the dealer or an experienced radio/ TV technician for help. This device complies with part 15 of the FCC Rules. Operation is subject to the following two conditions: 1. This device may not cause harmful interference. 2. This device must accept any interference received, including interference that may cause undesired operation. Any changes or modifications not expressly approved by the party responsible for compliance could void the user’s authority to opequipment. Note: The manufacturer is not responsible for any radio or TV interference caused by unauthorized modifications to this equipmentcould void the user’s authority to operate the equipment. FCC RF Radiation Exposure Statement This equipment complies with FCC RF radiation exposure limits set forth for an uncontrolled environment. This device and its anteco-located or operating in conjunction with any other antenna or transmitter. “To comply with FCC RF exposure compliance requirements, this grant is applicable to only Mobile Configurations. The antennas usetransmitter must be installed to provide a separation distance of at least 20 cm from all persons and must not be co-located or owith any other antenna or transmitter.” CE Mark Warning This is a class B product. In a domestic environment, this product may cause radio interference, in which case the user may be readequate measures. RF Exposure Information This device meets the EU requirements (2014/53/EU Article 3.1a) on the limitation of exposure of the general public to electromagof health protection.

of health protection. The device complies with RF specifications when the device used at 20 cm from your body. Canadian Compliance Statement This device complies with Industry Canada license-exempt RSS standard(s). Operation is subject to the following two conditions: 1. This device may not cause interference, and 2. This device must accept any interference, including interference that may cause undesired operation of the device. Le présent appareil est conforme aux CNR d’Industrie Canada applicables aux appareils radio exempts de licence. L’exploitation esdeux conditions suivantes : 1. l’appareil ne doit pas produire de brouillage; 2. l’utilisateur de l’appareil doit accepter tout brouillage radioélectrique subi, meme si le brouillage est susceptible d’en comRadiation Exposure Statement: This equipment complies with IC radiation exposure limits set forth for an uncontrolled environment. This equipment should be inswith minimum distance 20cm between the radiator & your body. Déclaration d’exposition aux radiations: Cet équipement est conforme aux limites d’exposition aux rayonnements IC établies pour un environnement non contrôlé. Cet équipeminstallé et utilisé avec un minimum de 20 cm de distance entre la source de rayonnement et votre corps. Industry Canada Statement CAN ICES-3 (B)/NMB-3(B) Korea Warning Statements: 당해 무선설비는 운용중 전파혼신 가능성이 있음. NCC Notice & BSMI Notice: 注意! 依據 低功率電波輻射性電機管理辦法 第十二條 經型式認證合格之低功率射頻電機,非經許可,公司、商號或使用者均不得擅自變更頻率、加大功率或變更原設計之特性或功能。 第十四條 低功率射頻電機之使用不得影響飛航安全及干擾合法通行;經發現有干擾現象時,應立即停用,並改善至無干擾時方得繼續使用。前項合法 通信,指依電信規定作業之無線電信。低功率射頻電機需忍受合法通信或工業、科學以及醫療用電波輻射性電機設備之干擾。 安全諮詢及注意事項 • 請使用原裝電源供應器或只能按照本產品注明的電源類型使用本產品。 • 清潔本產品之前請先拔掉電源線。請勿使用液體、噴霧清潔劑或濕布進行清潔。 • 注意防潮,請勿將水或其他液體潑灑到本產品上。 • 插槽與開口供通風使用,以確保本產品的操作可靠並防止過熱,請勿堵塞或覆蓋開口。 • 請勿將本產品置放於靠近熱源的地方。除非有正常的通風,否則不可放在密閉位置中。 • 請不要私自打開機殼,不要嘗試自行維修本產品,請由授權的專業人士進行此項工作。 Продукт сертифіковано згідно с правилами системи УкрСЕПРО на відповідність вимогам нормативних документів та вимогам, що передбачені чинними законодавчими актами України. 10 Safety Information • When product has power button, the power button is one of the ways to shut off the product; when there is no power button, the completely shut off power is to disconnect the product or the power adapter from the power source. • Don’t disassemble the product, or make repairs yourself. You run the risk of electric shock and voiding the limited warranty. Iplease contact us. • Avoid water and wet locations.

Download: (https://fccid.io/TE7MS100/User-Manual/MS100-User-Manual-3450394.pdf)
Mirror Download [FCC.gov] (https://fccid.io/TE7MS100/User-Manual/MS100-User-Manual-3450394/ViewExhibitReport.cfm)
Document ID 3450394
Application ID fCrdf9Ll74ongKS+dEarPQ==
Document Description MS100-User Manual
Short Term Confidential No
Permanent Confidential No
Supercede No
Document Type User Manual
Display Format Adobe Acrobat PDF - pdf
Filesize 201.95kB (2524432 bits)
Date Submitted 2017-07-05 00:00:00
Date Available 2017-07-10 00:00:00
Avoid water and wet locations. Explanation of the symbols on the product label Symbol DC voltage Explanation Indoor use only RECYCLING This product bears the selective sorting symbol for Waste electrical and electronic equipment (WEEE). This means that this producEuropean directive 2012/19/EU in order to be recycled or dismantled to minimize its impact on the environment. User has the choice to give his product to a competent recycling organization or to the retailer when he buys a new electrical or11

Creation Date 2017-05-10 09:07:56
Producing Software Adobe PDF Library 15.0
Document Lastmod 2017-05-10 16:17:40
Document Title MS100-User Manual
Document Creator Adobe InDesign CC 2015 (Windows)
Source Exif Data:

File Type : PDF File Type Extension : pdf MIME Type : application/pdf PDF Version : 1.7 Linearized : No XMP Toolkit : Adobe XMP Core 5.4-c005 78.147326, 2012/08/23-13:03:03 Create Date : 2017:05:10 09:07:56+08:00 Metadata Date : 2017:05:10 16:17:40+08:00 Modify Date : 2017:05:10 16:17:40+08:00 Creator Tool : Adobe InDesign CC 2015 (Windows) Instance ID : uuid:c4eb0fc1-0c3e-4fc2-925d-03d08b5ceabf Original Document ID : xmp.did:47d6471b-d755-024e-8a5d-5aea7e3f8867 Document ID : xmp.id:21da9cbd-aade-e948-aae8-81b6eedf71ae Rendition Class : proof:pdf History Action : converted History Parameters : from application/x-indesign to application/pdf History Software Agent : Adobe InDesign CC 2015 (Windows) History Changed : / History When : 2017:05:10 09:07:56+08:00 Derived From Instance ID : xmp.iid:d2dfdf91-0a3a-864c-a96c-961af3c93442 Derived From Document ID : xmp.did:47d6471b-d755-024e-8a5d-5aea7e3f8867 Derived From Original Document ID: xmp.did:47d6471b-d755-024e-8a5d-5aea7e3f8867 Derived From Rendition Class : default Format : application/pdf Producer : Adobe PDF Library 15.0 Trapped : False Page Mode : UseOutlines Page Count : 13 Creator : Adobe InDesign CC 2015 (Windows)
EXIF Metadata provided by EXIF.tools (https://exif.tools/)
(https://www.facebook.com/FCCID.io) (https://twitter.com/FCCIDio) (https://plus.google.com/+FccidNet-FCC-ID-Search)
(https://fccid.io/feed.rss) © FCCID.io 2018
Related Documents