Welcome message from author
This document is posted to help you gain knowledge. Please leave a comment to let me know what you think about it! Share it to your friends and learn new things together.
Transcript

15
6
8
9
10
7 4 3 1 2
5
14 13
3
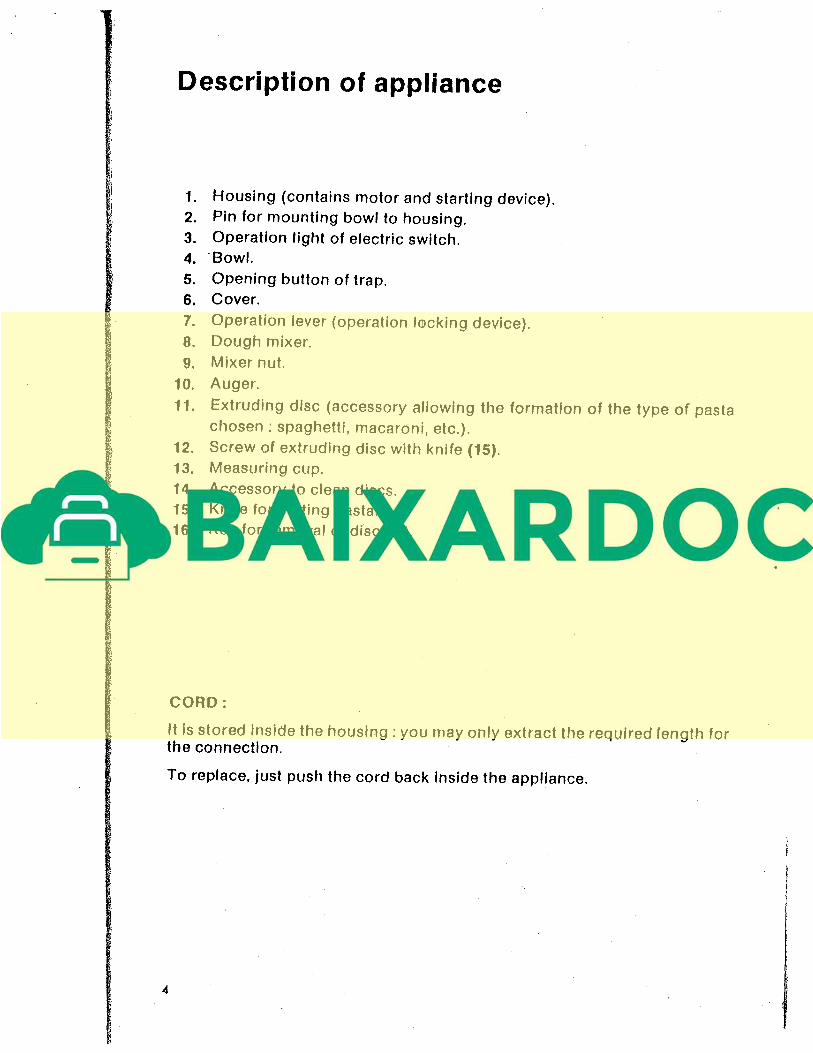
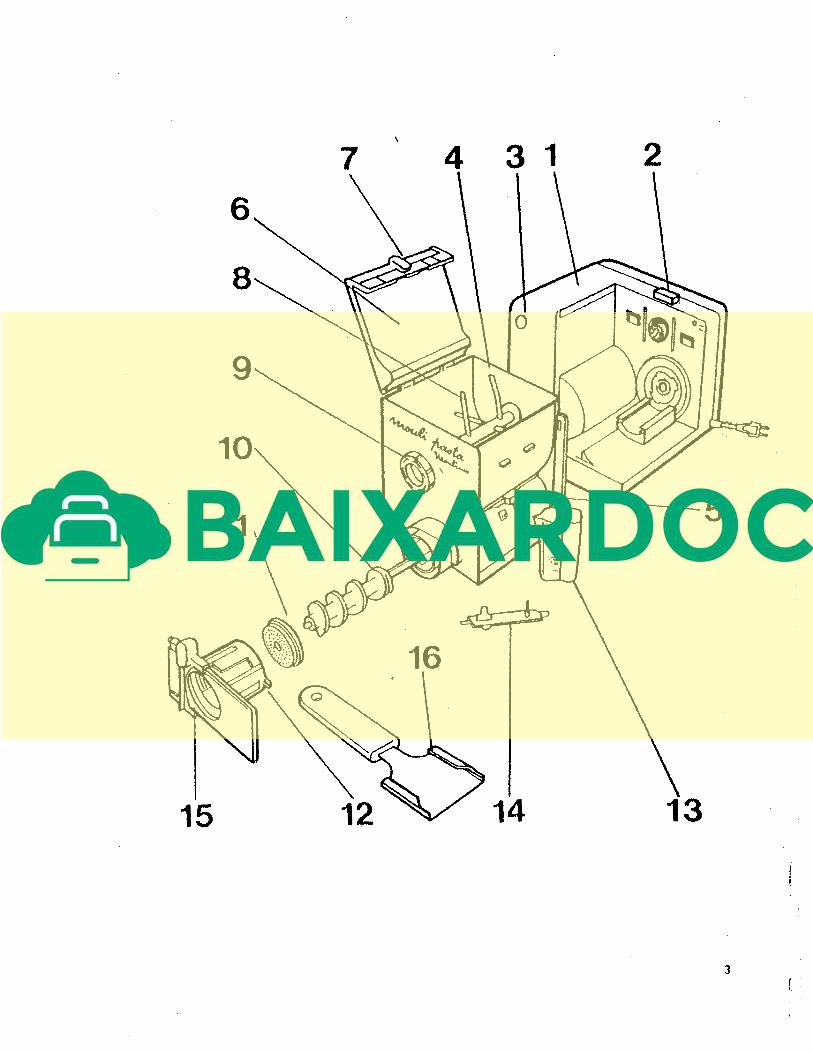
Description of appliance
1. Housing (contains motor and starting device).
2. Pin for mounting bowl to housing.
3. Operation light of electric switch.
4. 'Bowl.
5. Opening button of trap.
6. Cover.
7. Operation lever (operation locking device).
8. Dough mixer.
9. Mixer nut.
10. Auger.
11. Extruding disc (accessory allowing the formation of the type of pasta
chosen : spaghetti, macaroni, etc.).
12. Screw of extruding disc with knife (15).
13. Measuring cup.
14. Accessory to clean discs.
15. Knife for cutting pasta.
16. Key for removal of disc nut.
CORD:
It is stored inside the housing: you may only extract the required length for the connection.
To replace, just push the cord back inside the appliance.
4
...
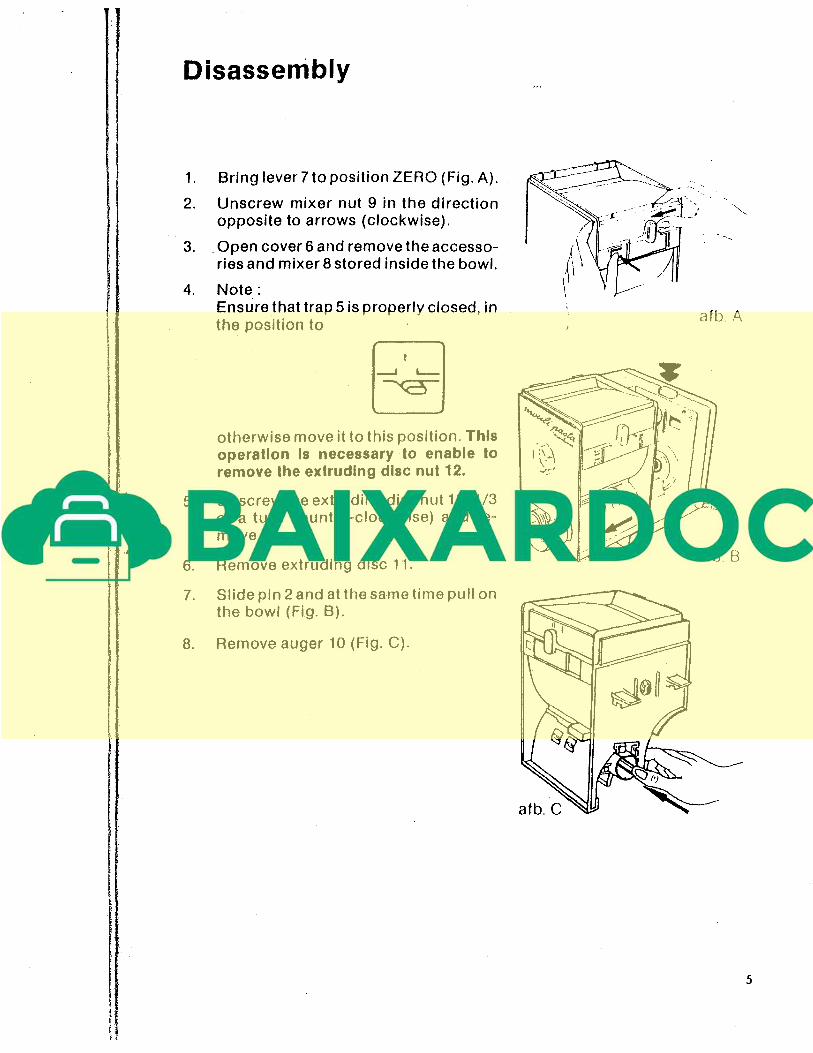
Disassembly
1. Bring lever 7 to position ZERO (Fig. A).
2. Unscrew mixer nut 9 in the direction opposite to arrows (clockwise).
3. _Open cover 6 and remove the accessories and mixer 8 stored inside the bowl.
4. Note: Ensure that trap 5 is properly closed, in the position to
otherwise move it to this position. This operation Is necessary to enable to remove the extruding disc nut 12 .
5. Unscrew the extruding disc nut 12 (113 of a turn counter-clockwise) and remove it.
6. Remove extruding disc 11.
7. Slide pin 2 and at the same time pull on the bowl (Fig. 8).
8. Remove auger 10 (Fig. C).
f
r\
~' \ I I I
\
atb A
atb. B
5
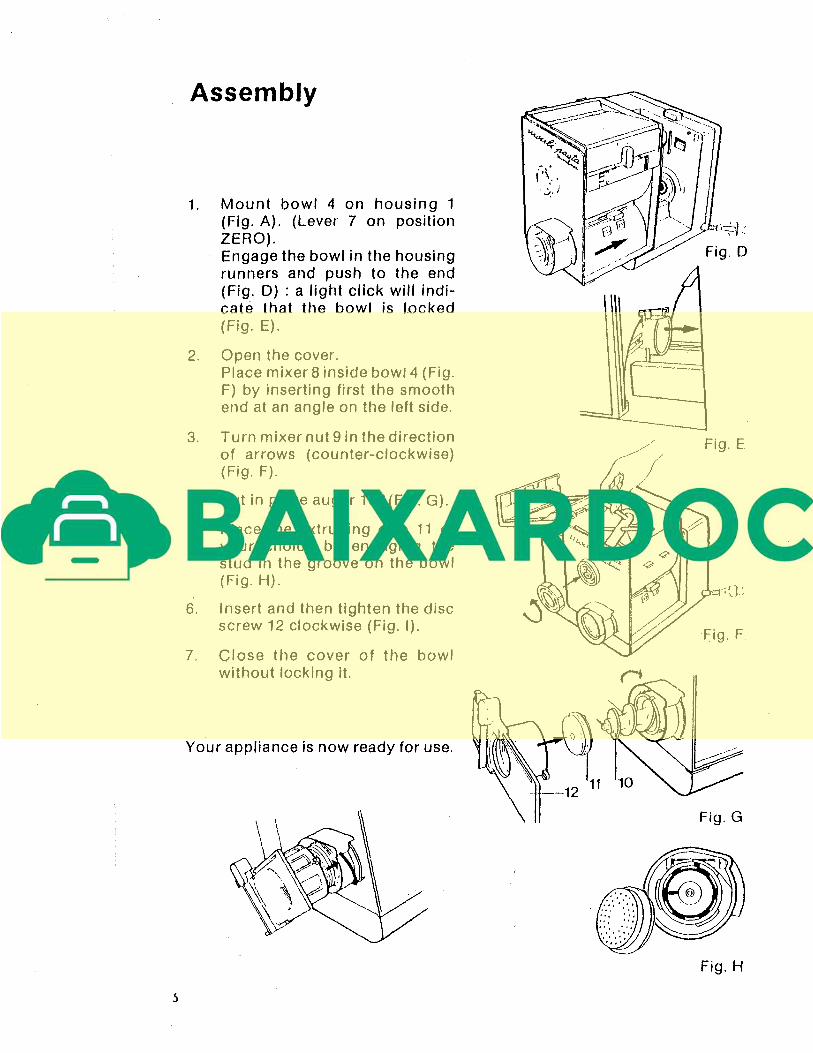
Assembly
1. Mount bowl 4 on housing 1 (Fig. A). (Lever 7 on position ZERO). Engage the bowl in the housing runners and push to the end (Fig. D) : a light click will indicate that the bowl is l.ocked (Fig. E).
2. Open the cover. Place mixer 8 inside bowl4 (Fig. F) by inserting first the smooth end at an angle on the left side.
3. Turn mixer nut 9 in the direction of arrows (counter-clockwise) (Fig. F).
4. Put in place auger 10 )(Fig. G).
5. Place the extruding disc 11 of your choice by engaging the stud in the groove on the bowl (Fig. H).
6. Insert and then tighten the disc screw 12 clockwise (Fig. 1).
7. Close tile cover of the bowl
without locking it.
Your appliance is now ready for use.
Fig. E
Fig. F.
Fig. G
Fig. H
) ;'
' r
•
BEFORE USE:
~ Check the voltage shown on the marking located under the appliance. ·
- Check on your meter the voltage used in your area.
- Make sure that these two voltages are identical.
As a security measure, all appliances are supplied at 110 V.
ANY ERROR IN THE CONNECTION VOIDS THE GUARANTEE.
To obtain fresh pasta
Follow very carefully the procedure described below and the instructions of the chart on p;;tges 12 - 13.
All these operations have been devised to allow you to obtain good pasta.
The percentage of humidity in the flour or wheat check and their quality are very important. It is for the purpose of keeping the mixture at the required consistency that we recommend, at point 10, to check this mixture after 3 to 5 minutes of kneading, and if necessary to add a little flour.
1) Weigh the .hard wheat middlings or the flour (a very fine hard wheat middling is recommended to obtain better quality). If needed, weigh the other ingredients.
2) Break the eggs in measuring cup 13 and if necessary add a small quantity of water to obtain the level indicated in the
7 recipe chosen. Beat the mixture well
with a fork to make it well fluid.
3) Plug in the appliance.
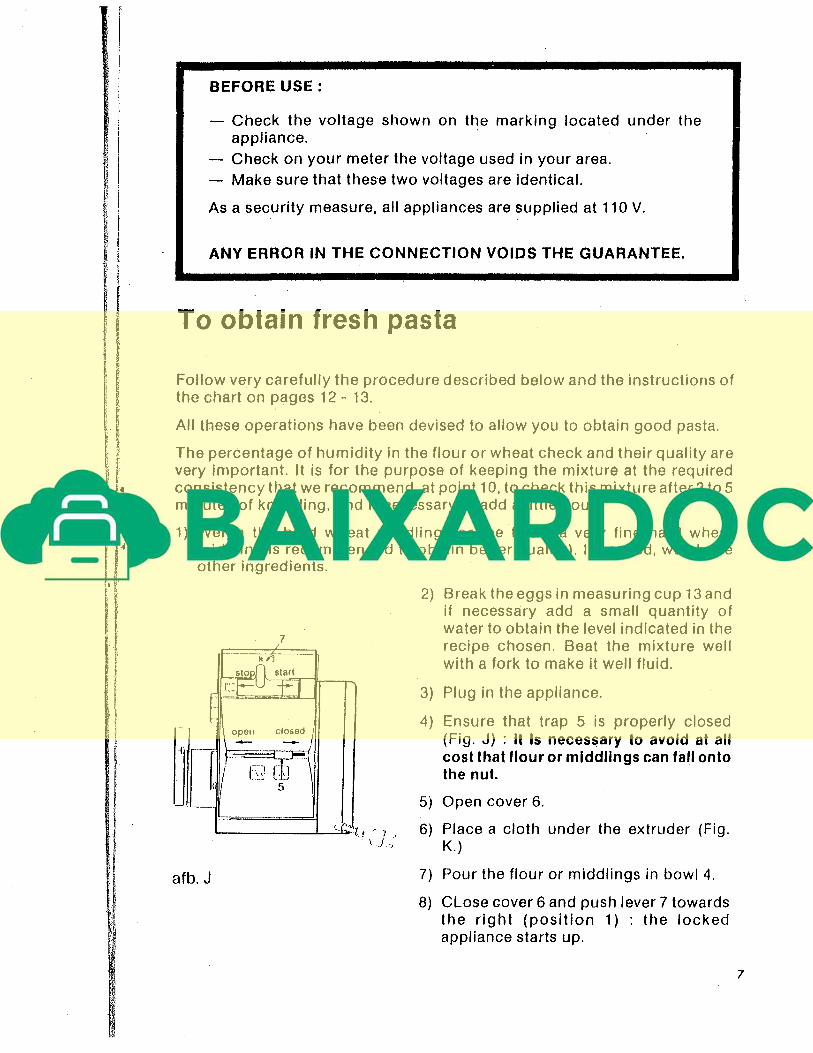
4) Ensure that trap 5 is properly closed
(Fig. J) : It Is necessary to avoid at all
cost that flour or middlings can fall onto the nut.
5) Open cover 6.
(_
{I ' ) - -' 6) Place a cloth under the extruder (Fig. \ j_, K.)
afb. J 7) Pour the flour or middlings in bowl 4.
8) Close cover 6 and push lever 7 towards the right (position 1) : the locked appliance starts up.
7

:•·.
8
afb. K
9) About 10 seconds later, pour the contents of the measuring cup through the cover slot, moving very slowly from left to right and from right to left until the cup is empty: this is done to obtain a proper spread· of these items.
1 0) Three minutes after the appliance started, stop it by pushing lever 7 towards the left (position 0). Open the cover: the mixture must have the appearance of coarse middlings.
1st case. The grains are the size of peas : this is because the mixture is a little too damp. Sprinkle it with a good tablespoon of flour or middlings. Close the cover again, start up and let it run for one minute.
2nd case. The mixture is too powdery: add a spoonful of water. Careful! Too much humidity will curl up the pasta and prevent it from passing through the trap.
11) Open then trap 5 by pushing towards the left (Fig. J). After about twenty seconds the pasta will start to come out of the openings of the extruder. With the knife of item 12 (screw of extruding disc) cut off the first centimeter of poorly mixed pasta and put it back in the bowl through the slot.
12) Still using the knife of item 12, cut the pasta with a sharp thrust at the desired length.
13) When the bowl is empty, let the appliance run for another few m.inutes to empty also the nut and make the disassembly easier.
14) Turn the appliance oft.

,,
ACTIVATION OF SAFETY SYSTEM
The appliance is equipped with a safety system which stops it in cases of abnormal operation.
Various cases :
- Error in dosage of ingredients, pasta is too dry.
- Extruder is plugged by dry pasta.
- Flour or middlings spilling into
the inside of the extruder.
3
When the safety device has opa
rated, the motor is stopped and
the warning light 3 Is lit (Fig. L). afb. L
Start-up is then impossible.
STEPS TO BE TAKEN WHEN OPERATION OF THE APPLIANCE IS STOPPED
Disconnect the appliance.
NEVER RECONNECT IT BEFORE HAVING ELIMINATED THE CAUSE OF THE ACTIVATION OF THE SAFETY SYSTEM.
Close trap 5.
Unscrew nut 12 with key 16 (Fig. M).
Take out the extruding disc and clean it thoroughly.
Disengage the bowl from the appliance and remove the nut : clean it. Empty
the ·bowl of its contents.
Place the bowl back on the runners.
Reconnect the appliance.
It is suggested that the appliance be tested by operating it empty.
afb. M
If your appliance does not start again, consult the approved MOULINEX maintenance center nearest to you.
If the appliance works, put back the nut, the extruding disc and the screw of the extruder, and check your recipe; start a new operation.
Check that trap 5 is closed and start mixing again, adding water if
necessary to obtain a smooth mixture.
Open trap 5 once a smooth mixture has been obtained.
9
10
Maintenance
The housing containing the motor must never be placed under a tap : the guarantee would be voided. Dry it very carefully with a cloth.
All other parts may be washed under the tap.
To make cleaning of bowl easier, the cover can be removed by detaching it from the hinges.
CLEANING OF EXTRUDING DISCS
Clean out the holes of the extruding disc using accessory 14; if possible, Jet this disc dry: it will then be very easy to remove the pasta by tapping the disc.
Once all parts have been cleaned, it is suggested to reassemble the unit.

Service
To obtain repairs to your appliance, follow the terms of the guarantee certificate.
You can obtain individual parts, as well as accessories and additional extruding discs, at your regular dealer or at the approved MOULIN EX SERVICE DEPOT nearest to you (see list contained on the certificate of guarantee).
Designation of Parts Reference No.
Mixer .............................................................................................................................................. ~.......... 3713G
Mixer nut ............................................................................................................................................ .
Auger ....................................................................................................................................................... .
Discs supplied spaghetti ........................................................................................... .
thin macaroni (bucatini) ........................................... ..
medium lasagne (tagliatelle) .............................. ..
large lasagne (pappardelle) .................................. .
striped macaroni (rigatoni) ................................... ..
pizza dough ................................................................................... .
small lasagne (linguine) ............................................ ..
gnocchi ............................................................................................... ..
Screw of extruding disc .......................................................... : ................................... .
Measuring cup ......................................................................................................................... ..
Key for removal of disc nut ................................................................................... ..
DISCS SUPPLIED
3716G
3719G
3704G
3705G
3702G
3701G
3706G
3707G
3703G
3708G
3717G
3700G
3709G
G(DO ~8® SPAGHETTI MEDIUM LARGE LARGE STRIPED THIN SMAll GNOCCHI PIZZA DOUGH
LASAGNE LASAGNE MACARONI MACARONI LASAGNE
TAGLIATEllE PAPPARDEllE RIGATONI BUCATINI LINGUINE
11
' 1,
Related Documents