
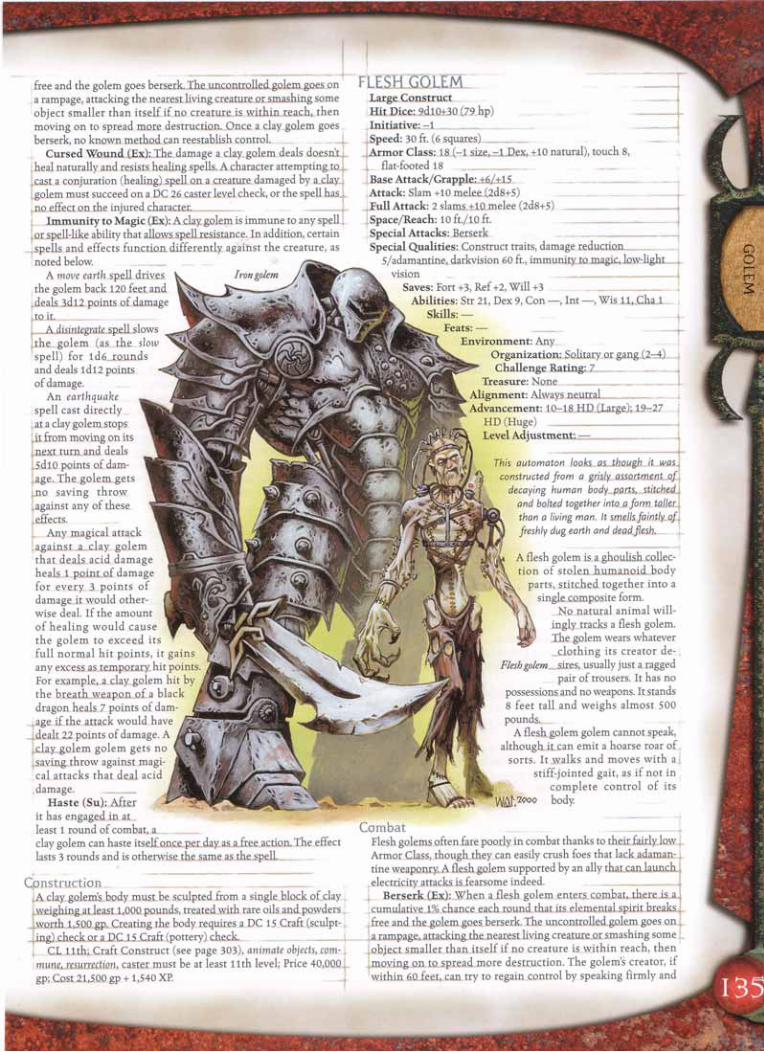
Welcome message from author
This document is posted to help you gain knowledge. Please leave a comment to let me know what you think about it! Share it to your friends and learn new things together.
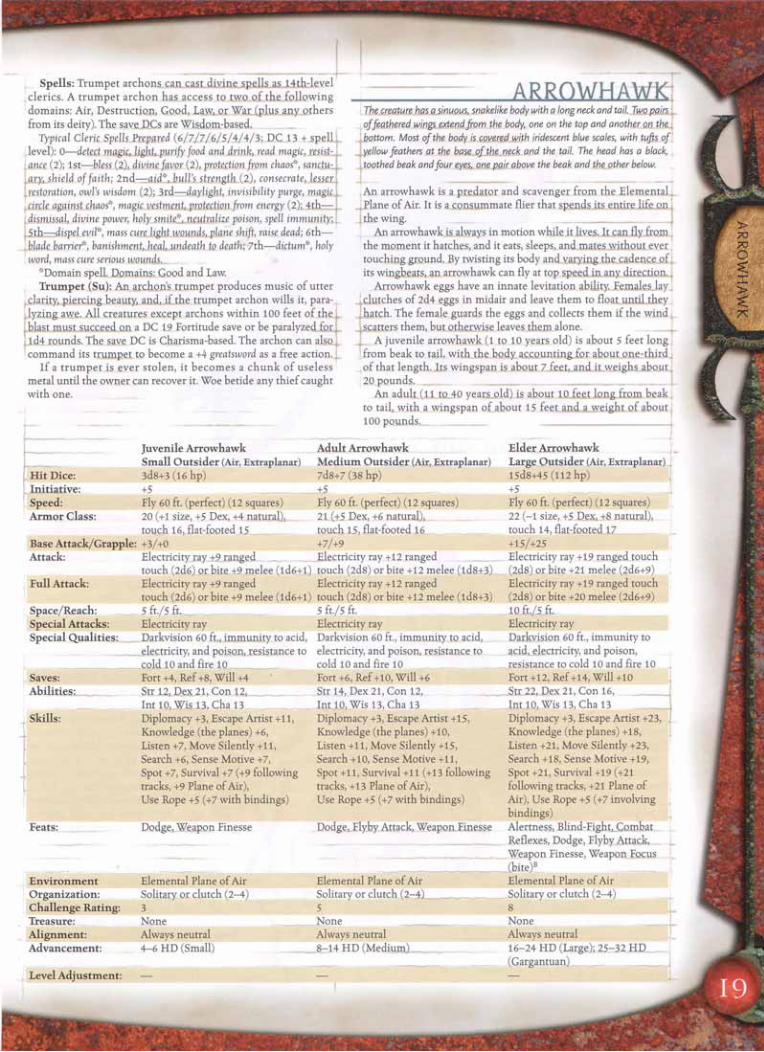
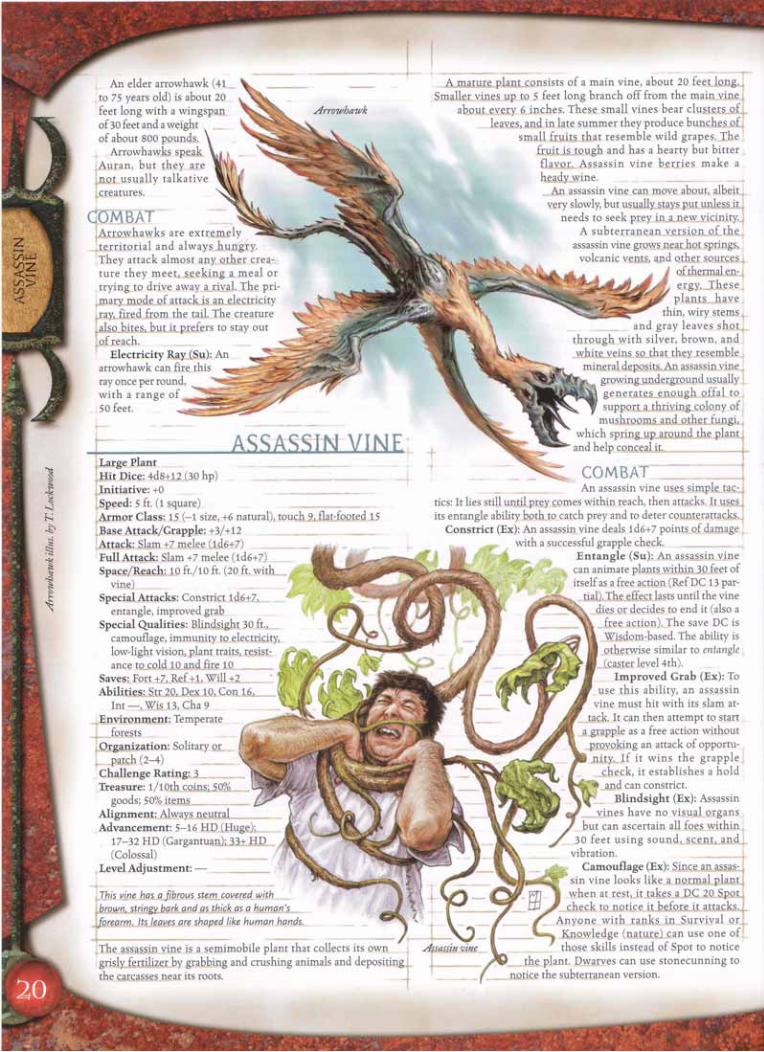
Transcript


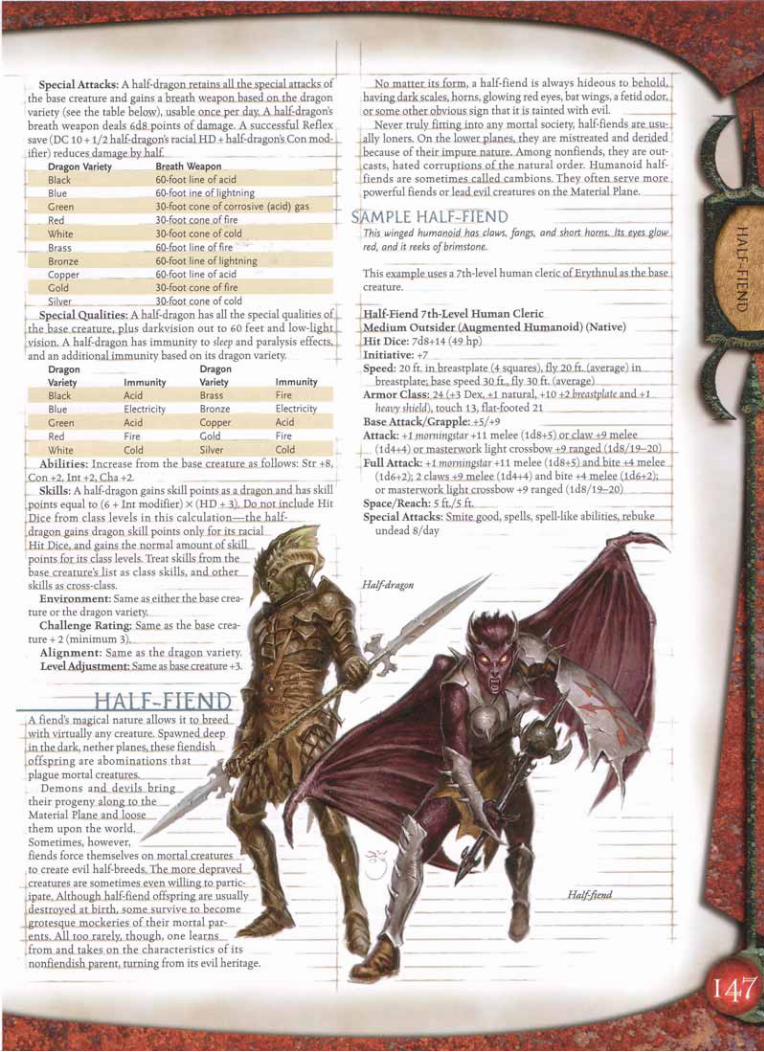


1
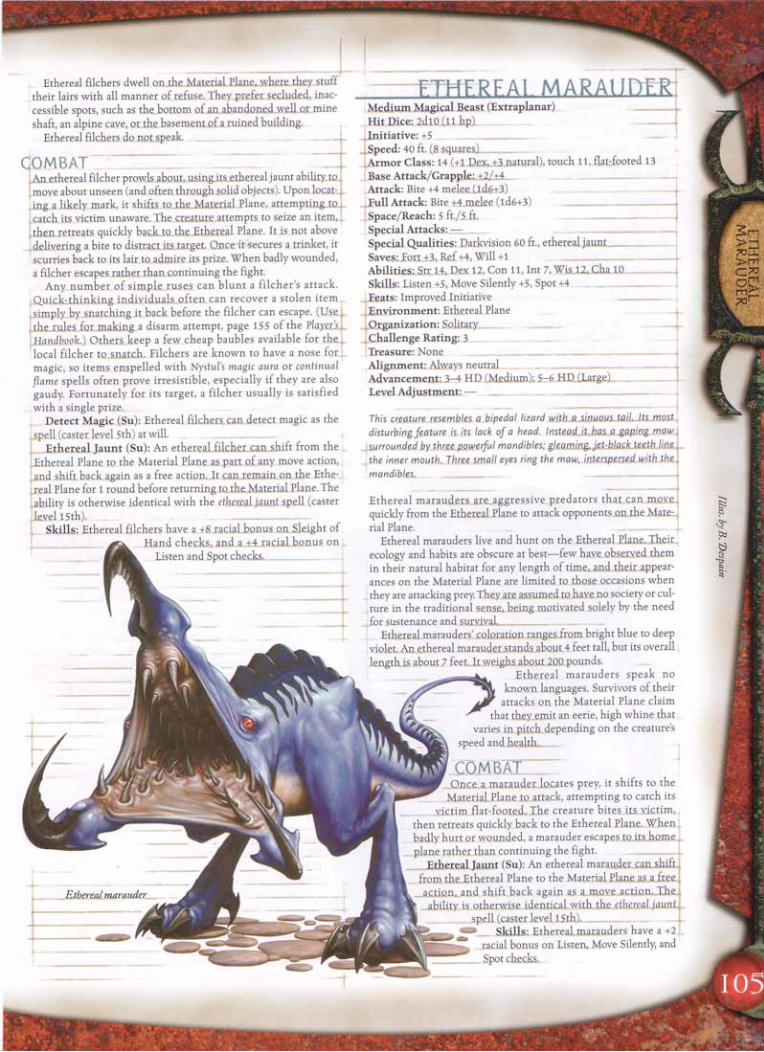
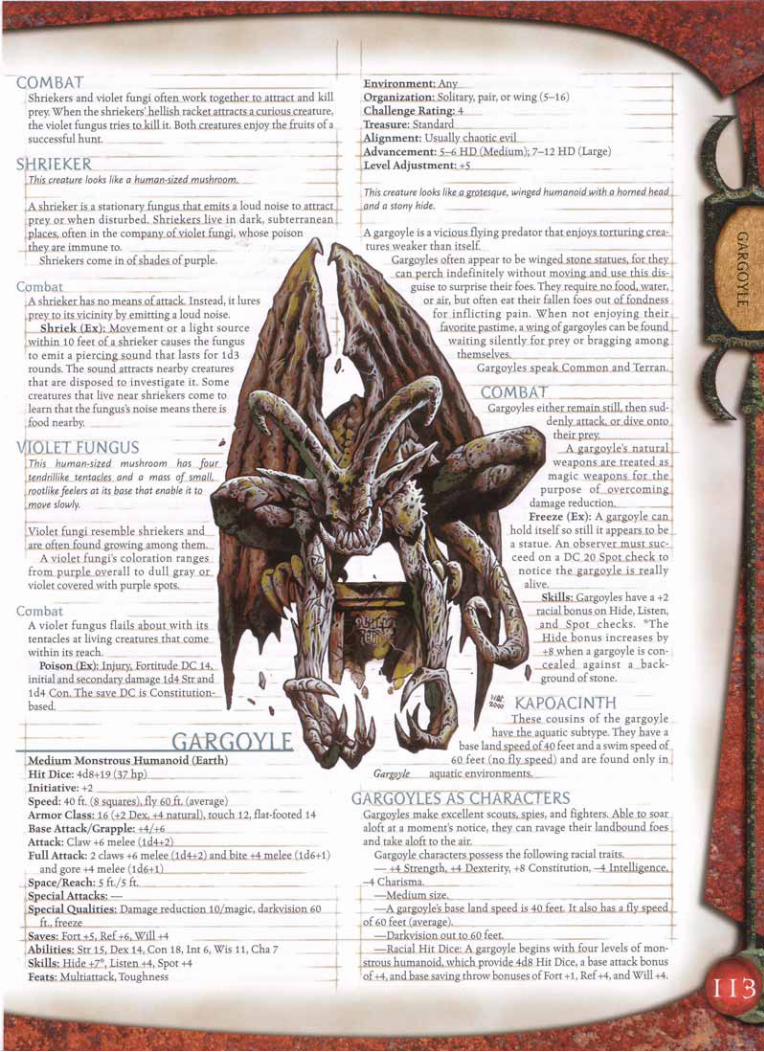
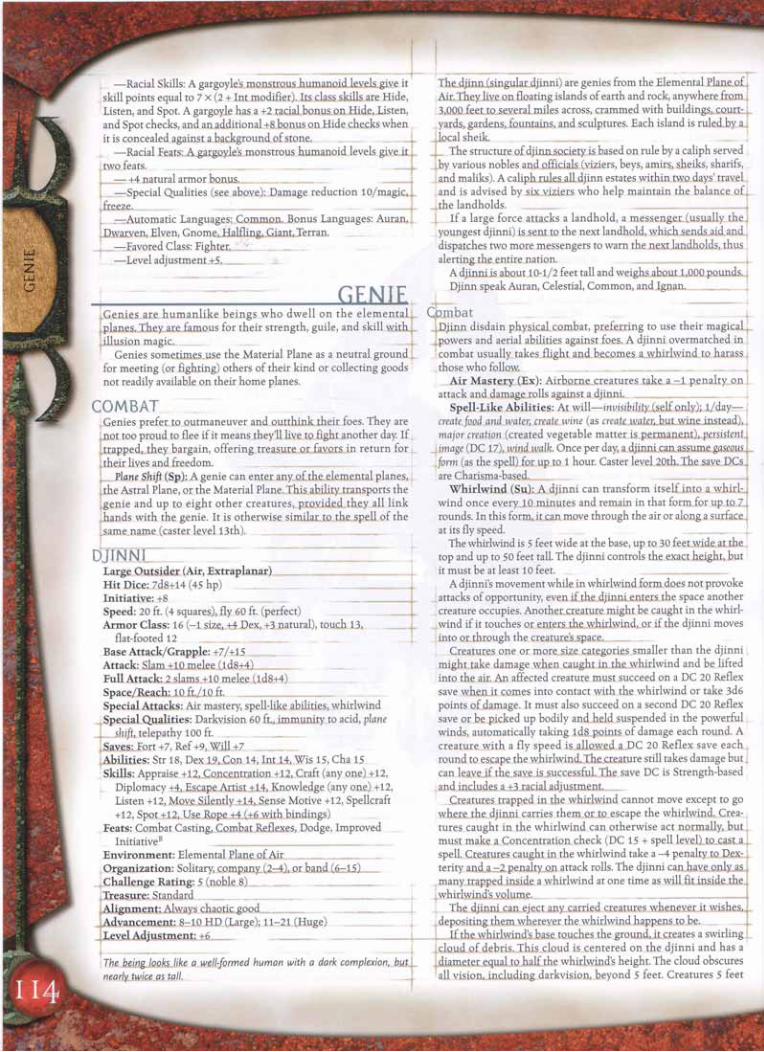
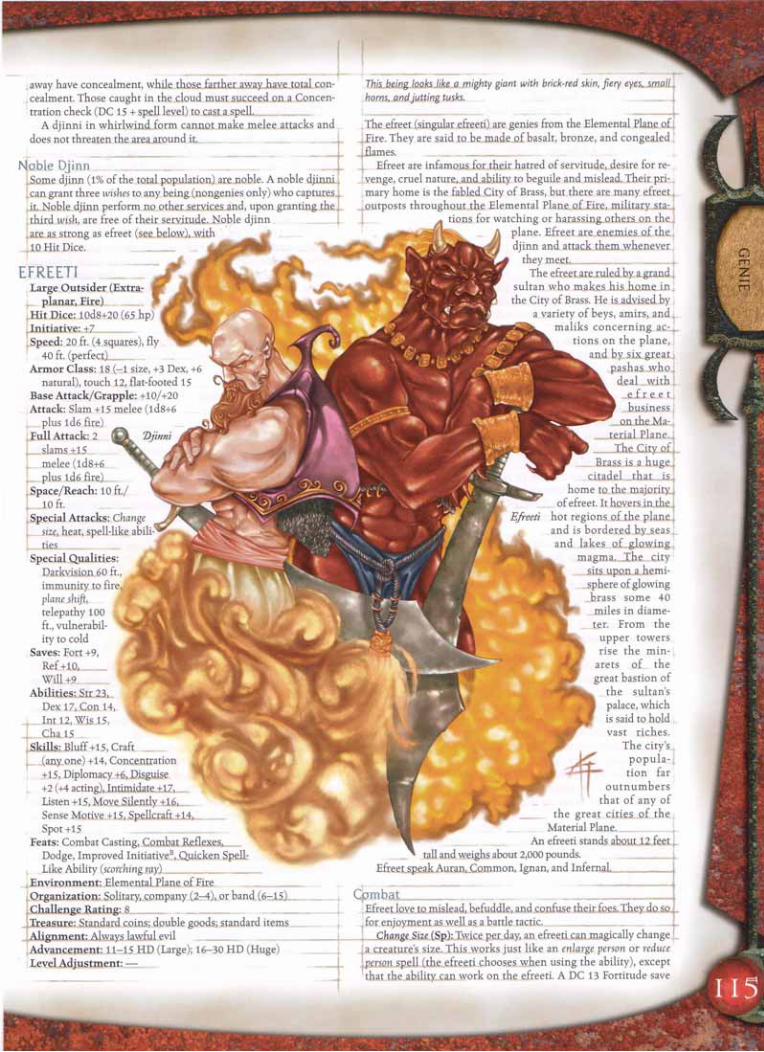
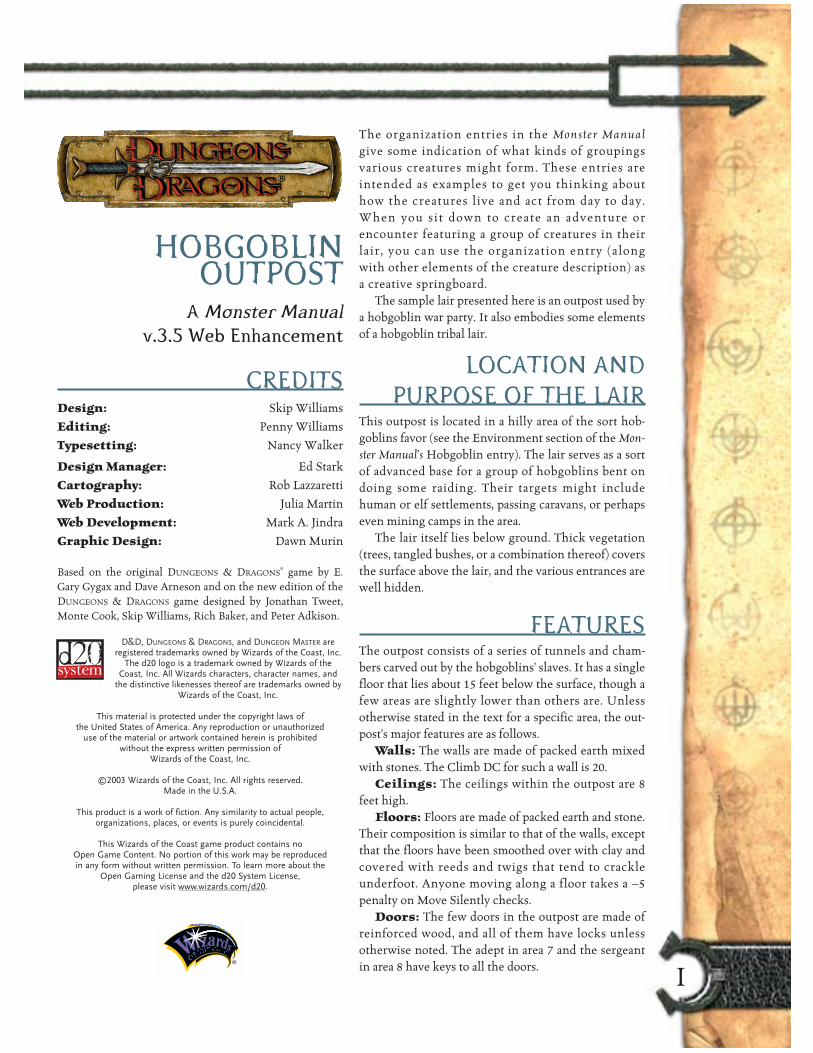
HOBGOBLINOUTPOST
A Monster Manualv.3.5 Web Enhancement
CREDITSDesign: Skip Williams
Editing: Penny Williams
Typesetting: Nancy Walker
Design Manager: Ed Stark
Cartography: Rob Lazzaretti
Web Production: Julia Martin
Web Development: Mark A. Jindra
Graphic Design: Dawn Murin
Based on the original DUNGEONS & DRAGONS® game by E.Gary Gygax and Dave Arneson and on the new edition of theDUNGEONS & DRAGONS game designed by Jonathan Tweet,Monte Cook, Skip Williams, Rich Baker, and Peter Adkison.
D&D, DUNGEONS & DRAGONS, and DUNGEON MASTER areregistered trademarks owned by Wizards of the Coast, Inc.
The d20 logo is a trademark owned by Wizards of theCoast, Inc. All Wizards characters, character names, and
the distinctive likenesses thereof are trademarks owned byWizards of the Coast, Inc.
This material is protected under the copyright laws of the United States of America. Any reproduction or unauthorized
use of the material or artwork contained herein is prohibited without the express written permission of
Wizards of the Coast, Inc.
©2003 Wizards of the Coast, Inc. All rights reserved. Made in the U.S.A.
This product is a work of fiction. Any similarity to actual people, organizations, places, or events is purely coincidental.
This Wizards of the Coast game product contains no Open Game Content. No portion of this work may be reproduced in any form without written permission. To learn more about the
Open Gaming License and the d20 System License, please visit www.wizards.com/d20.
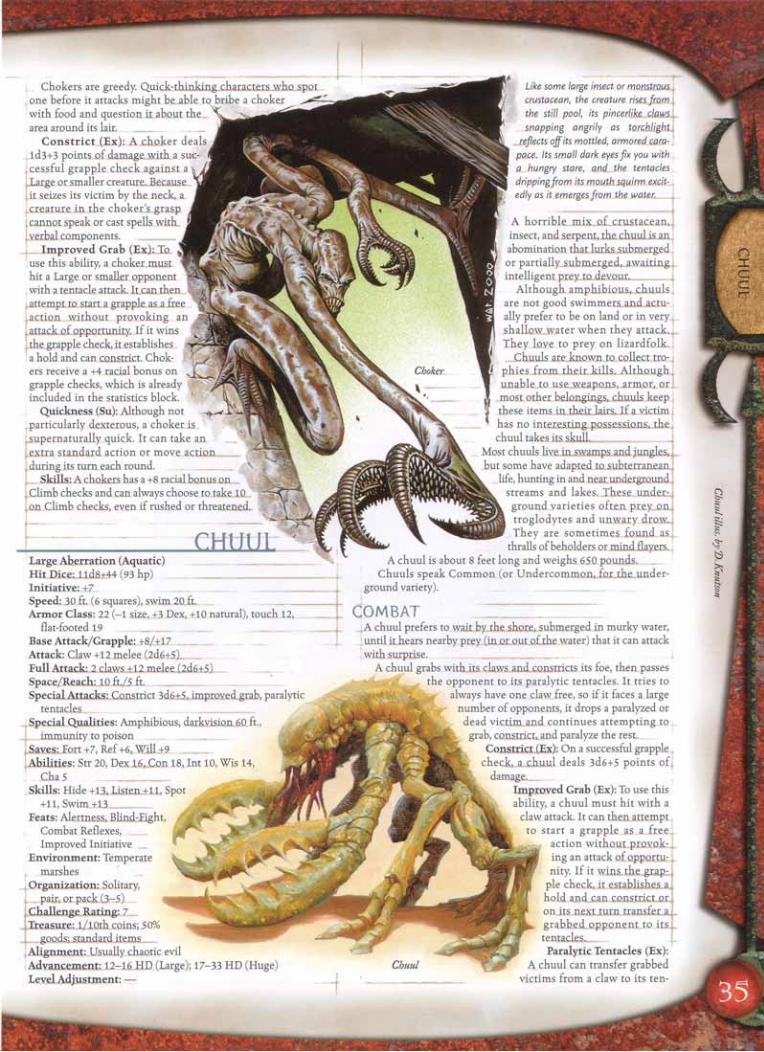
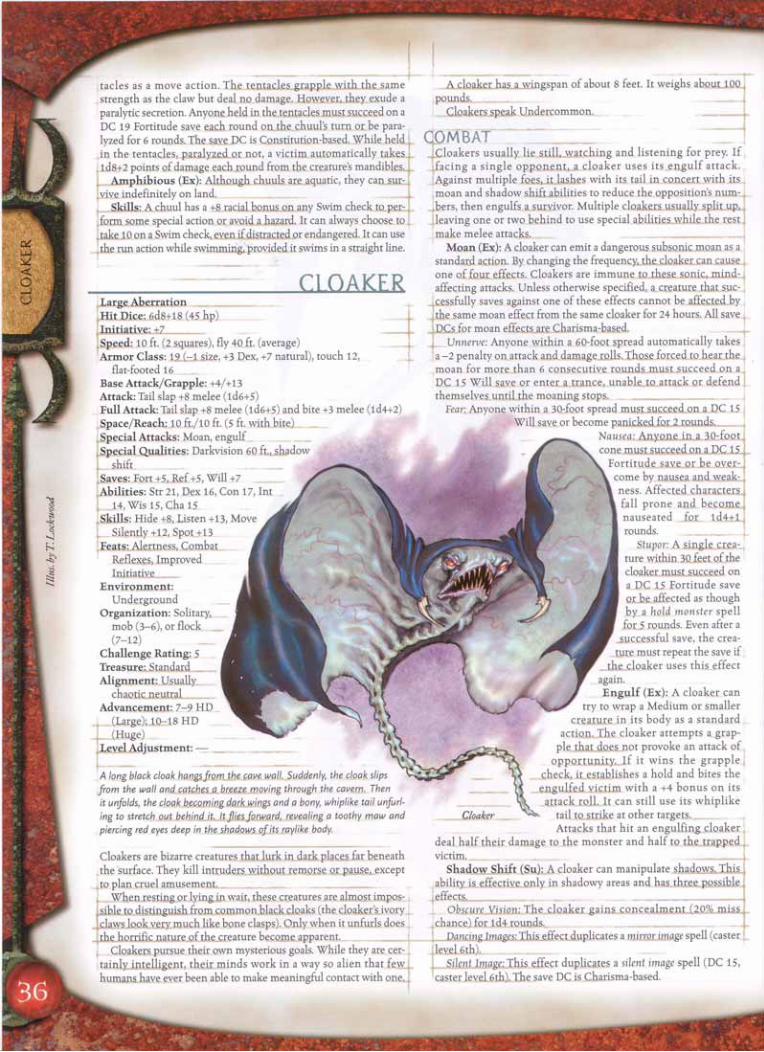
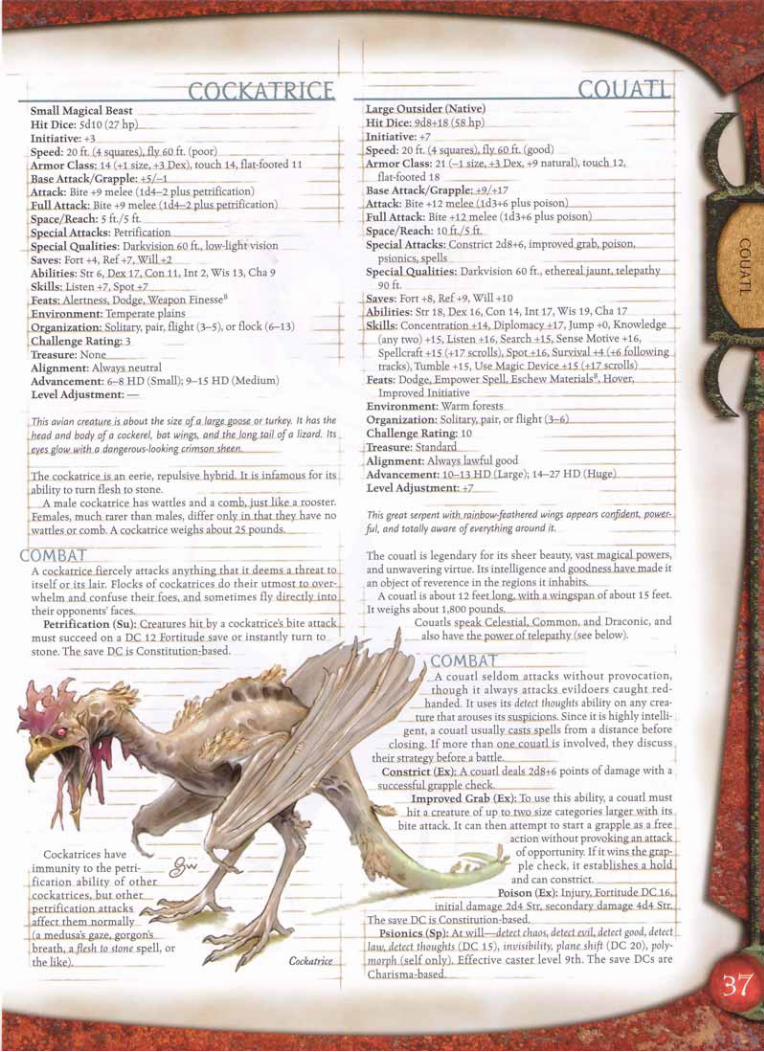
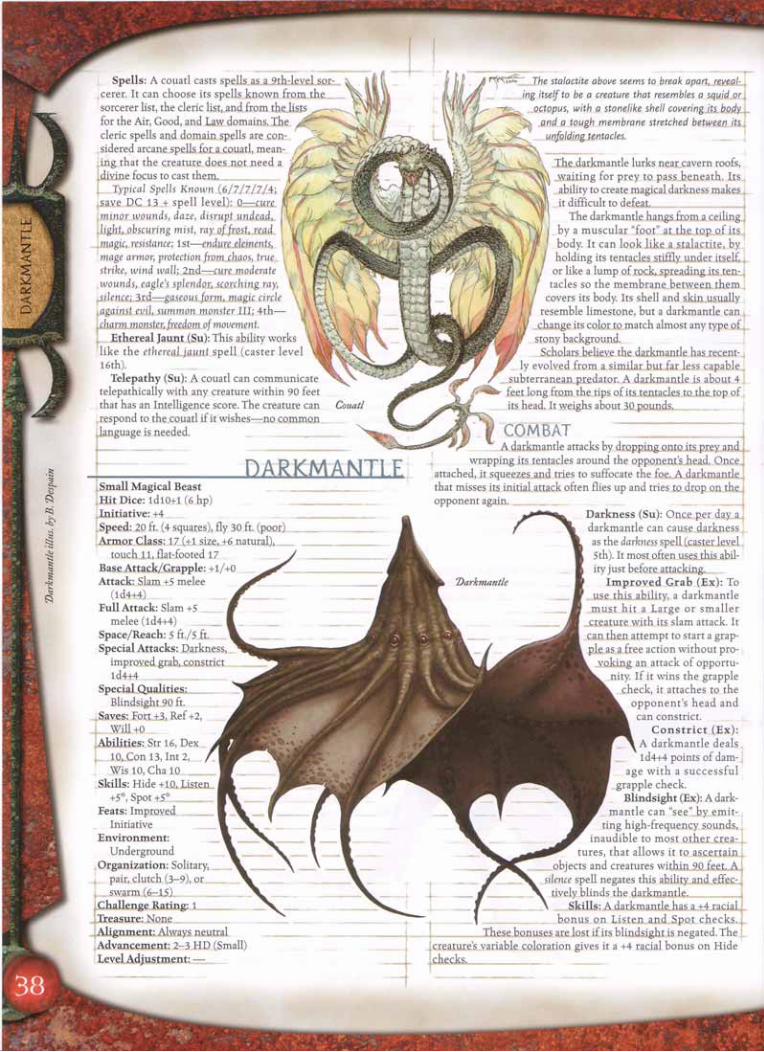
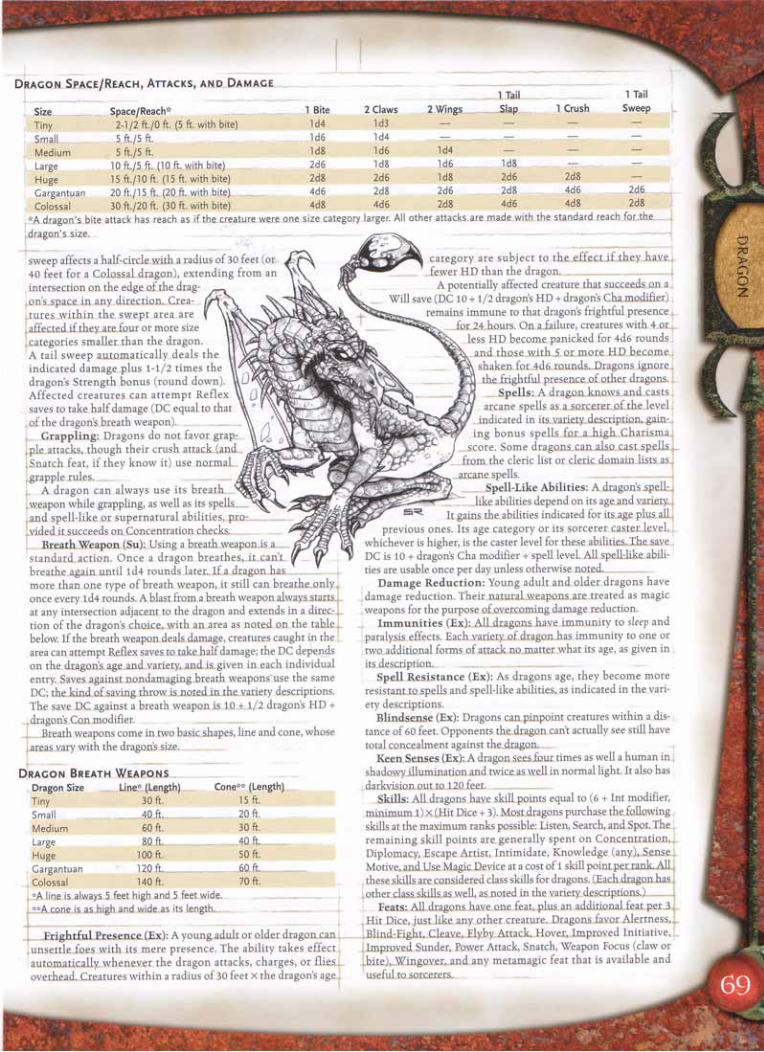
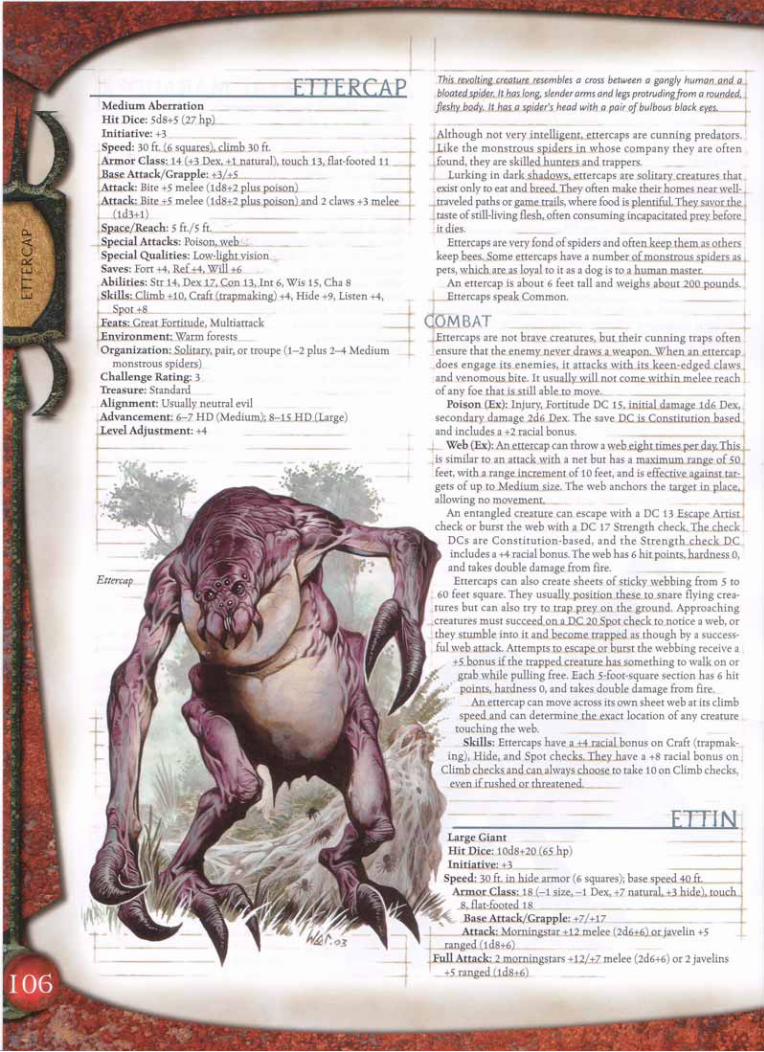
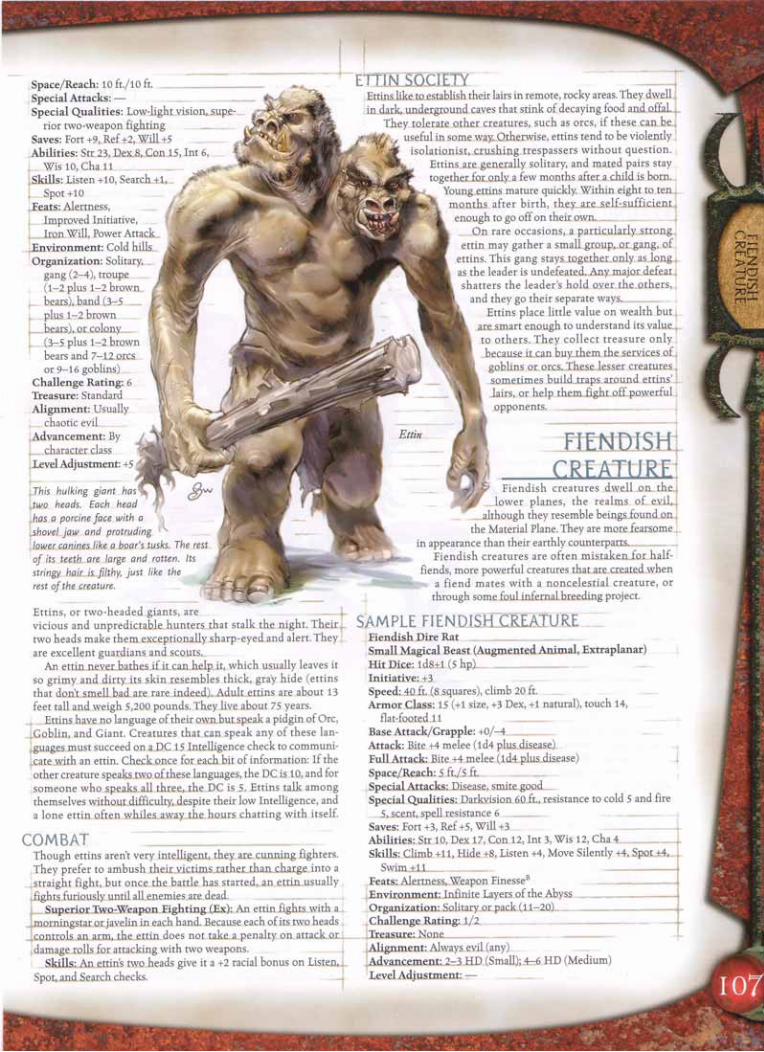
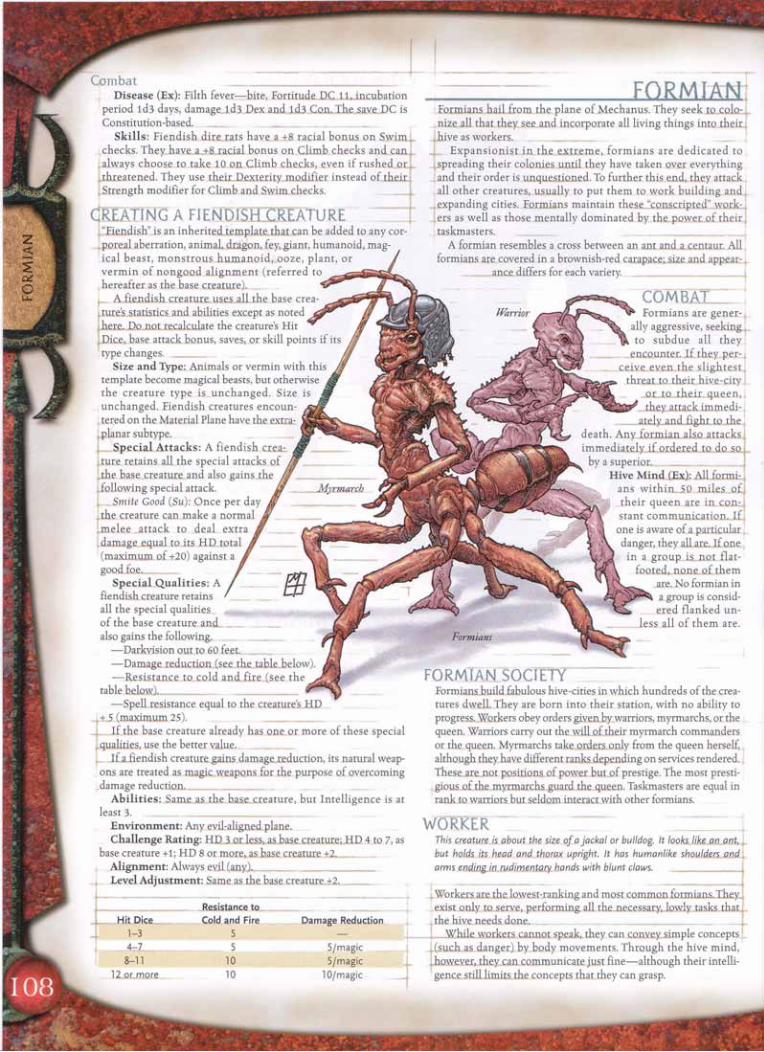
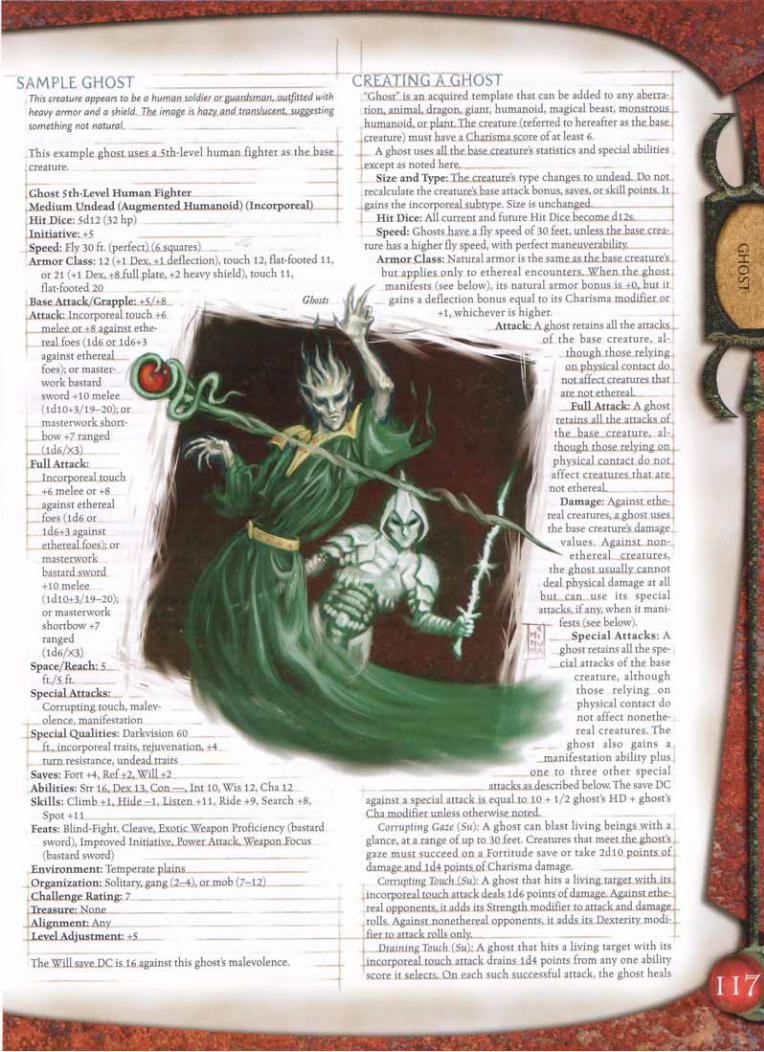
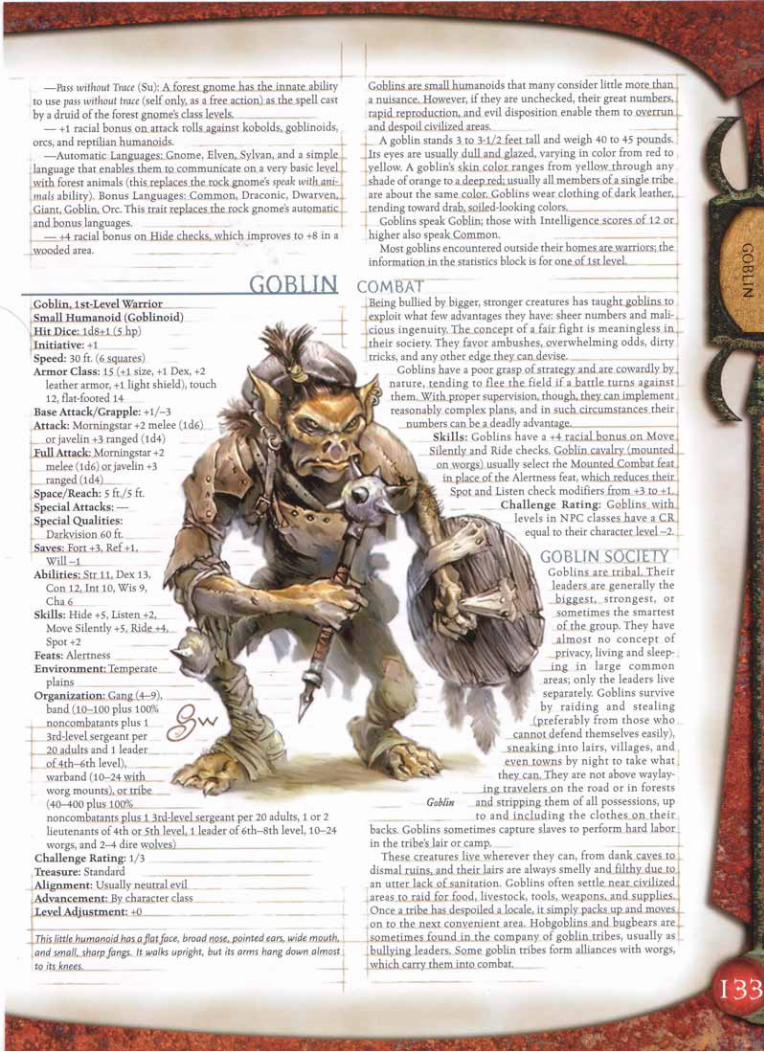
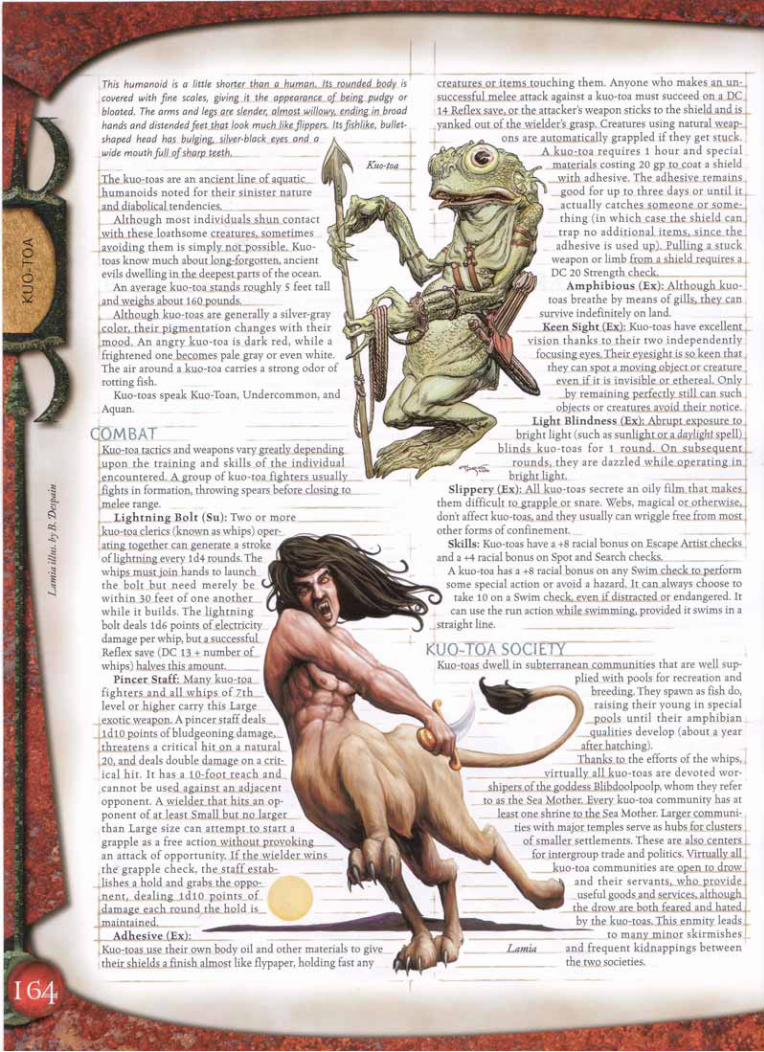
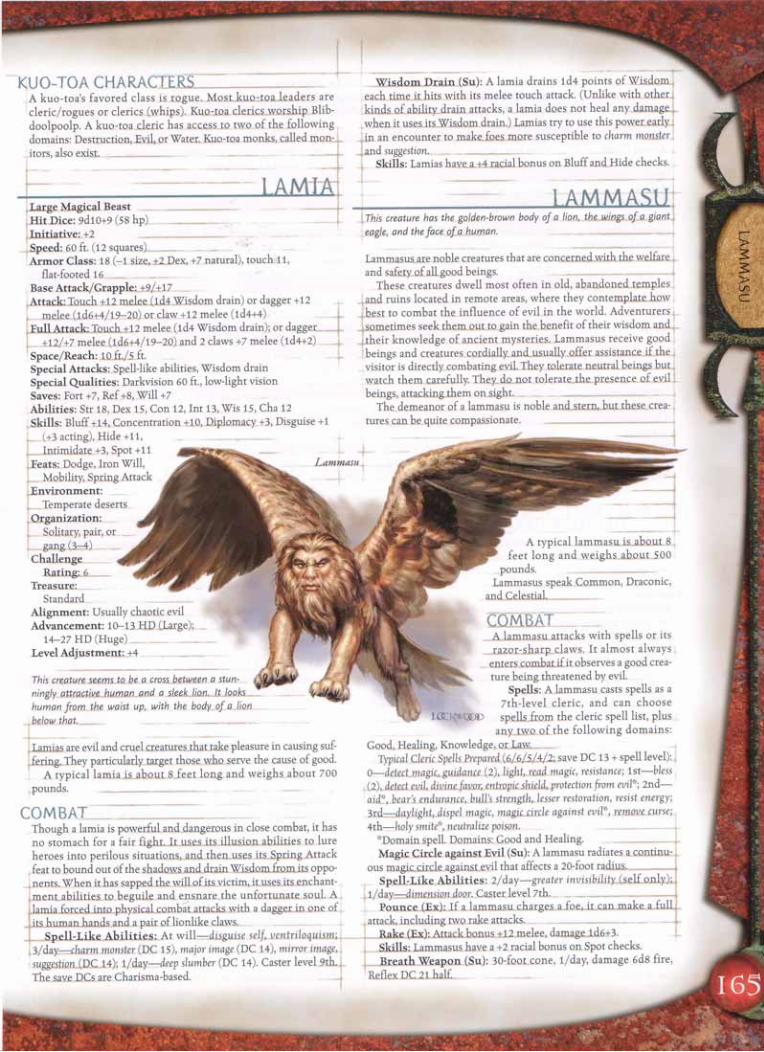
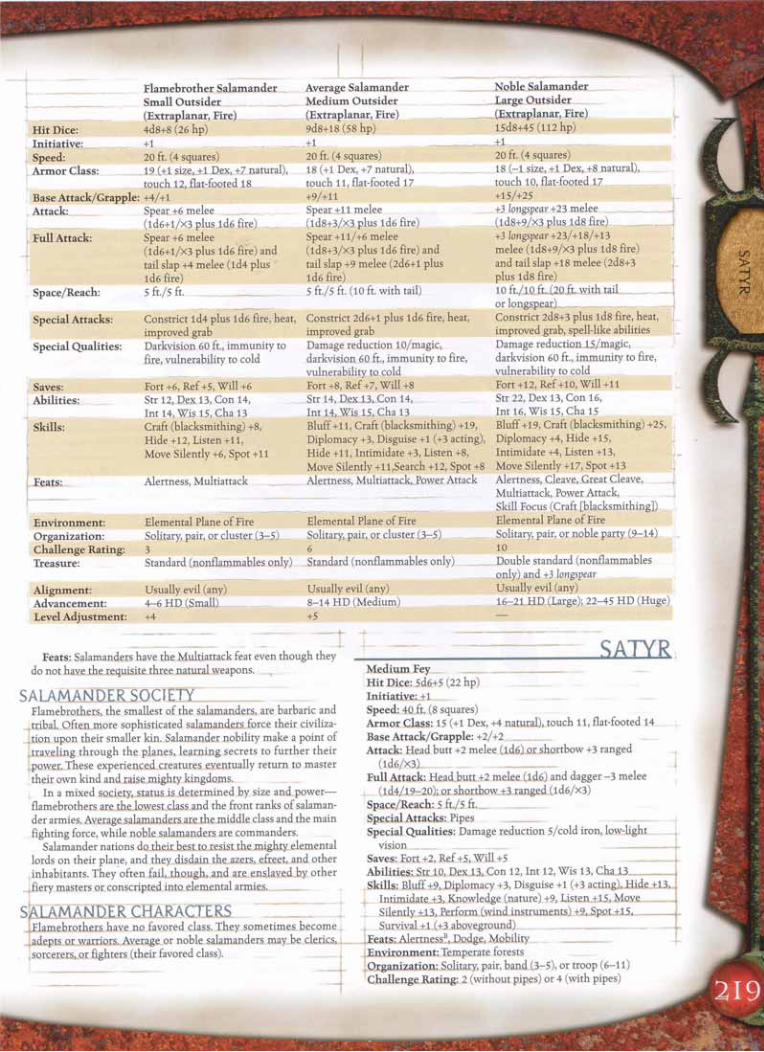
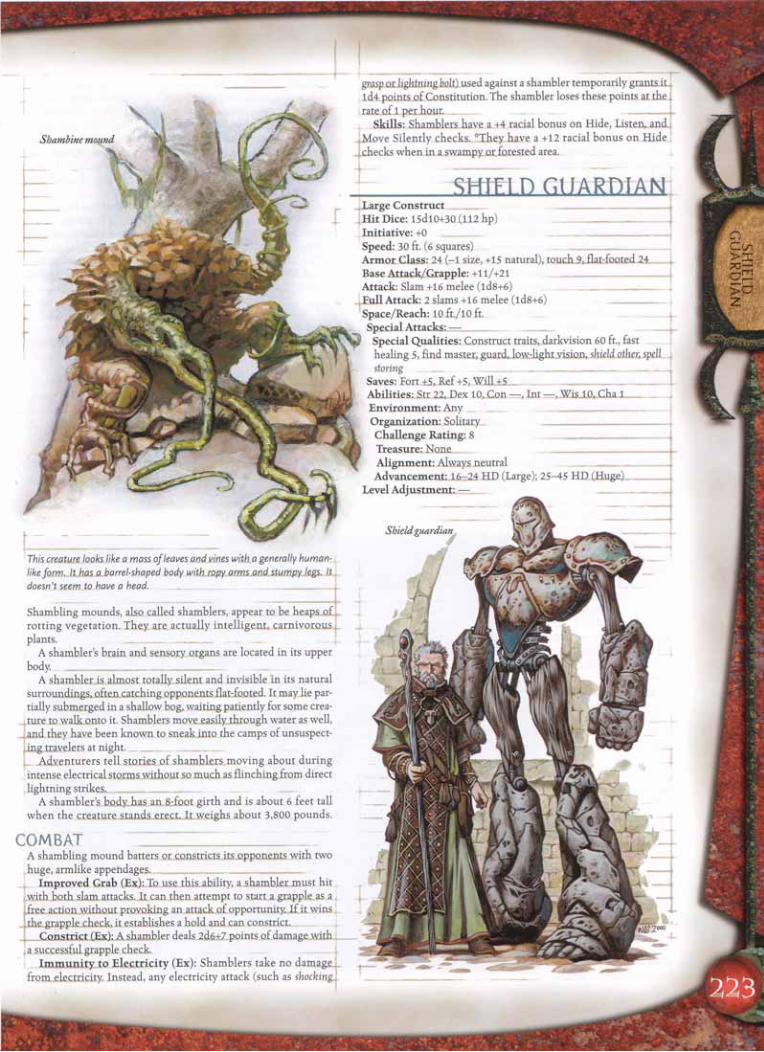
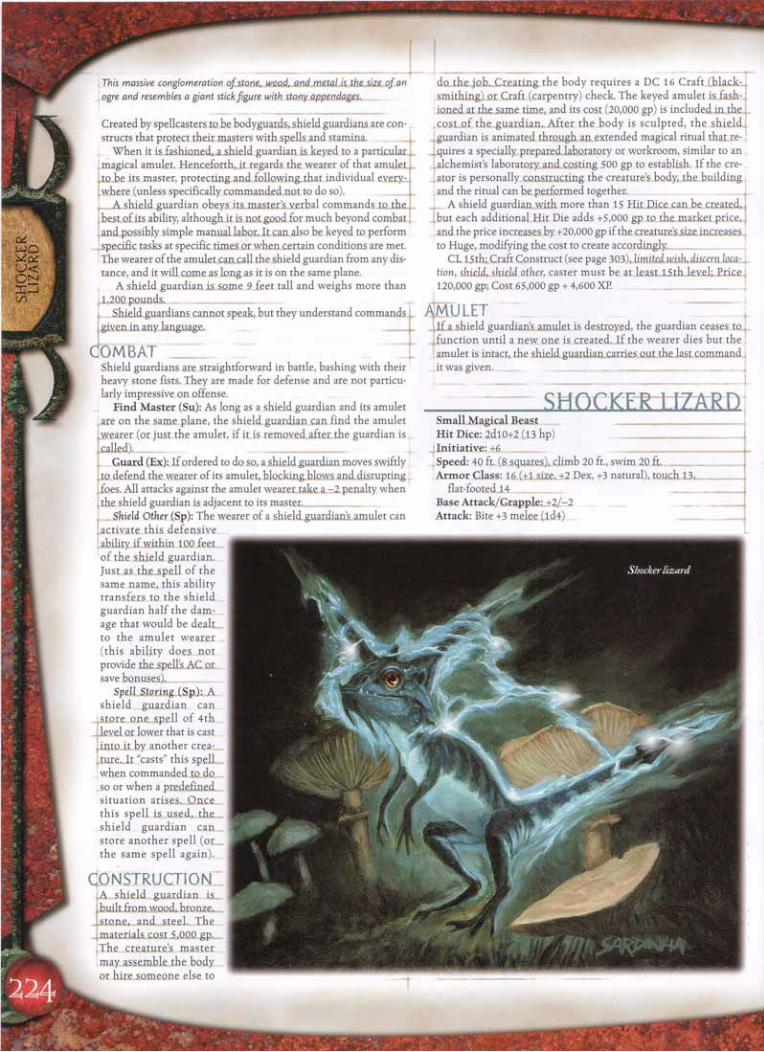
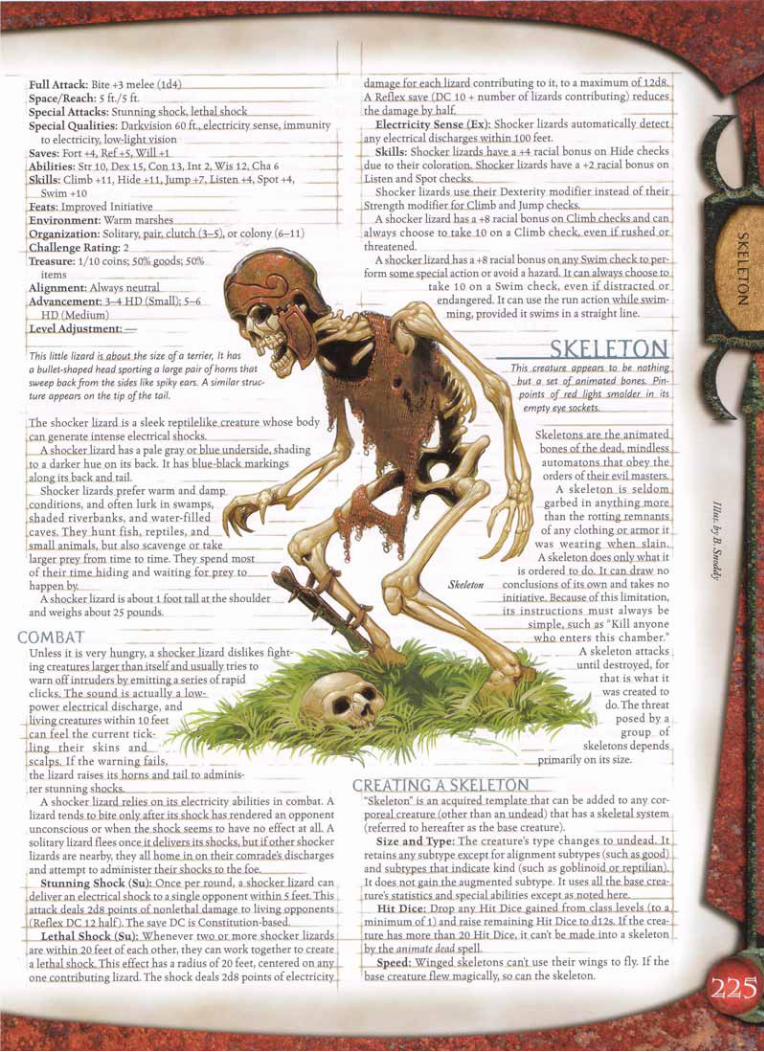
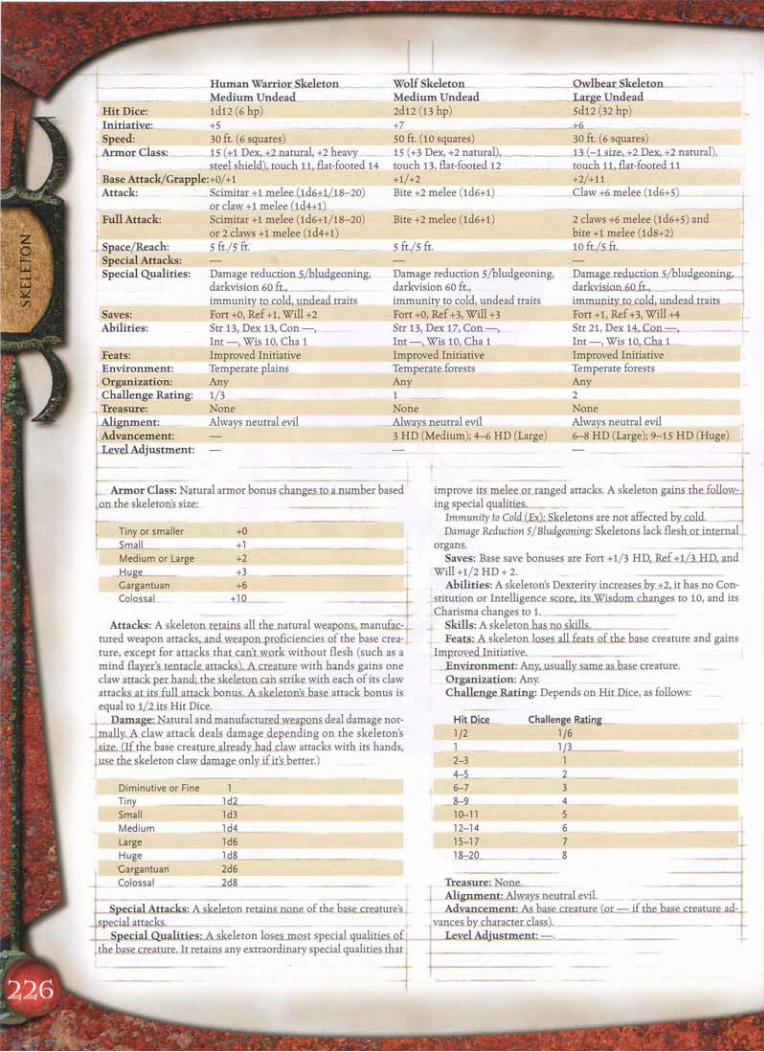
The organization entries in the Monster Manualgive some indication of what kinds of groupingsvarious creatures might form. These entries areintended as examples to get you thinking abouthow the creatures live and act from day to day.When you sit down to create an adventure orencounter featuring a group of creatures in theirlair, you can use the organization entry (alongwith other elements of the creature description) asa creative springboard.
The sample lair presented here is an outpost used bya hobgoblin war party. It also embodies some elementsof a hobgoblin tribal lair.
LOCATION ANDPURPOSE OF THE LAIR
This outpost is located in a hilly area of the sort hob-goblins favor (see the Environment section of the Mon-ster Manual’s Hobgoblin entry). The lair serves as a sortof advanced base for a group of hobgoblins bent ondoing some raiding. Their targets might includehuman or elf settlements, passing caravans, or perhapseven mining camps in the area.
The lair itself lies below ground. Thick vegetation(trees, tangled bushes, or a combination thereof) coversthe surface above the lair, and the various entrances arewell hidden.
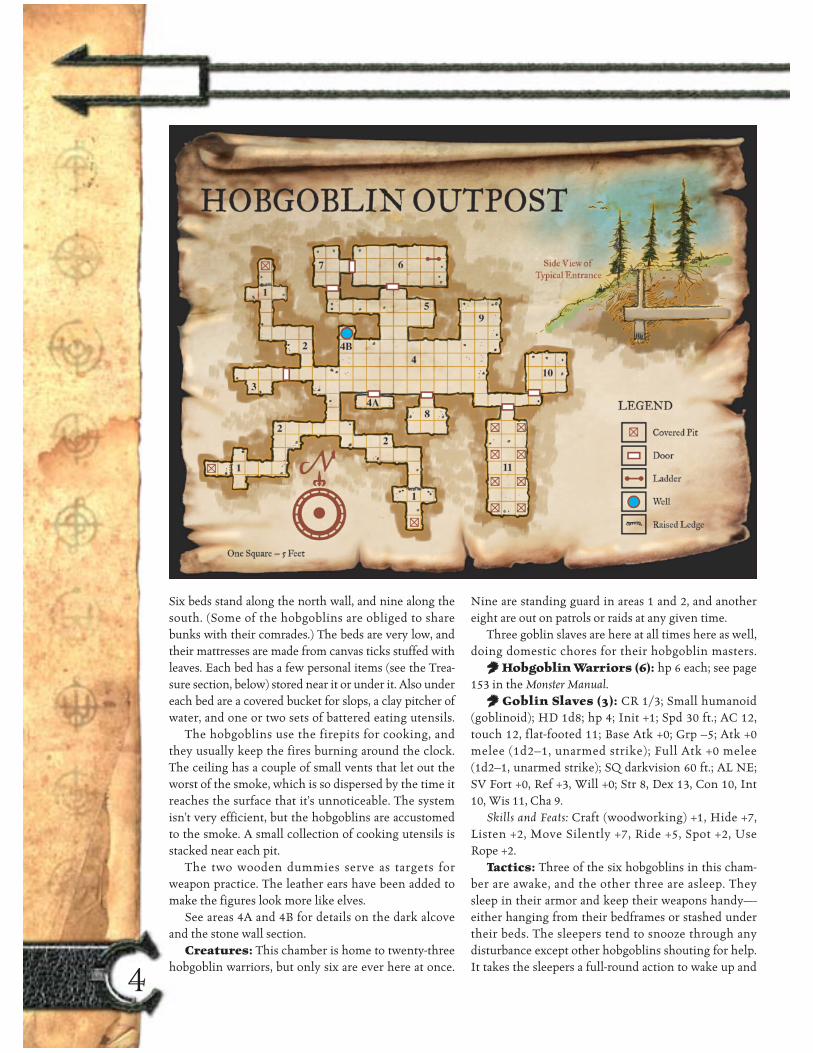
FEATURESThe outpost consists of a series of tunnels and cham-bers carved out by the hobgoblins’ slaves. It has a singlefloor that lies about 15 feet below the surface, though afew areas are slightly lower than others are. Unlessotherwise stated in the text for a specific area, the out-post’s major features are as follows.
Walls: The walls are made of packed earth mixedwith stones. The Climb DC for such a wall is 20.
Ceilings: The ceilings within the outpost are 8feet high.
Floors: Floors are made of packed earth and stone.Their composition is similar to that of the walls, exceptthat the floors have been smoothed over with clay andcovered with reeds and twigs that tend to crackleunderfoot. Anyone moving along a floor takes a –5penalty on Move Silently checks.
Doors: The few doors in the outpost are made ofreinforced wood, and all of them have locks unlessotherwise noted. The adept in area 7 and the sergeantin area 8 have keys to all the doors.
2
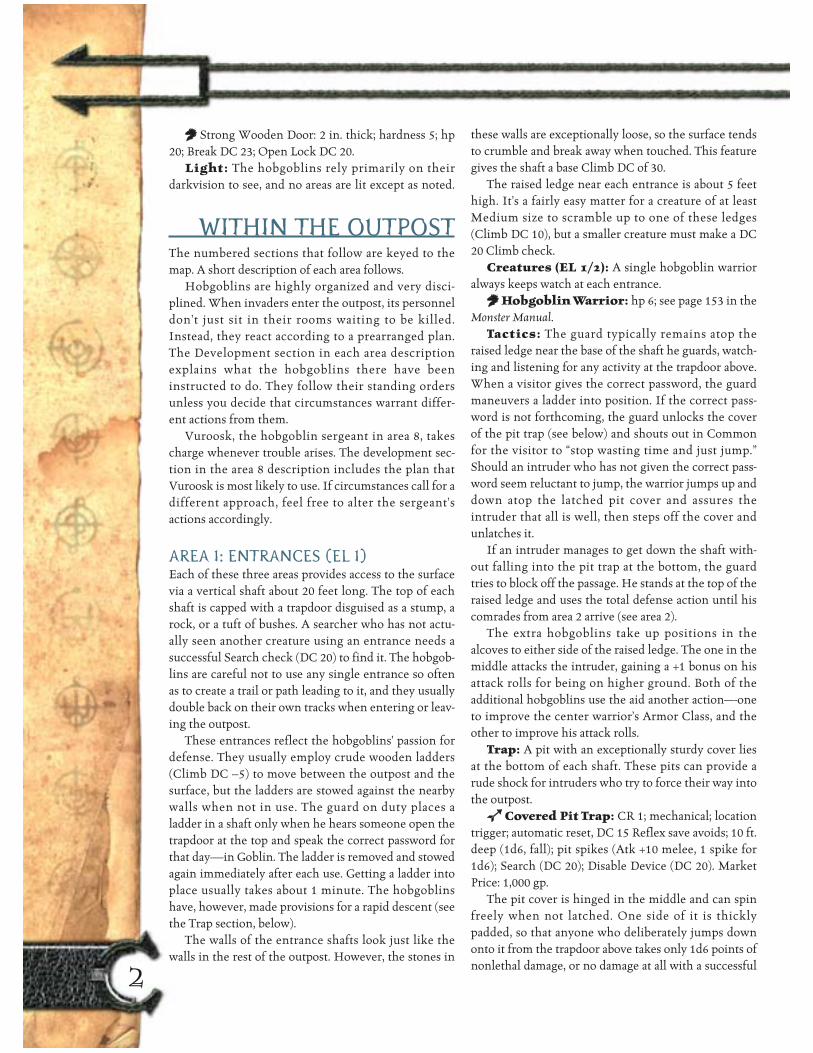
DD Strong Wooden Door: 2 in. thick; hardness 5; hp20; Break DC 23; Open Lock DC 20.
Light: The hobgoblins rely primarily on theirdarkvision to see, and no areas are lit except as noted.
WITHIN THE OUTPOSTThe numbered sections that follow are keyed to themap. A short description of each area follows.
Hobgoblins are highly organized and very disci-plined. When invaders enter the outpost, its personneldon’t just sit in their rooms waiting to be killed.Instead, they react according to a prearranged plan.The Development section in each area descriptionexplains what the hobgoblins there have beeninstructed to do. They follow their standing ordersunless you decide that circumstances warrant differ-ent actions from them.
Vuroosk, the hobgoblin sergeant in area 8, takescharge whenever trouble arises. The development sec-tion in the area 8 description includes the plan thatVuroosk is most likely to use. If circumstances call for adifferent approach, feel free to alter the sergeant’sactions accordingly.
AREA 1: ENTRANCES (EL 1)Each of these three areas provides access to the surfacevia a vertical shaft about 20 feet long. The top of eachshaft is capped with a trapdoor disguised as a stump, arock, or a tuft of bushes. A searcher who has not actu-ally seen another creature using an entrance needs asuccessful Search check (DC 20) to find it. The hobgob-lins are careful not to use any single entrance so oftenas to create a trail or path leading to it, and they usuallydouble back on their own tracks when entering or leav-ing the outpost.
These entrances reflect the hobgoblins’ passion fordefense. They usually employ crude wooden ladders(Climb DC –5) to move between the outpost and thesurface, but the ladders are stowed against the nearbywalls when not in use. The guard on duty places aladder in a shaft only when he hears someone open thetrapdoor at the top and speak the correct password forthat day—in Goblin. The ladder is removed and stowedagain immediately after each use. Getting a ladder intoplace usually takes about 1 minute. The hobgoblinshave, however, made provisions for a rapid descent (seethe Trap section, below).
The walls of the entrance shafts look just like thewalls in the rest of the outpost. However, the stones in
these walls are exceptionally loose, so the surface tendsto crumble and break away when touched. This featuregives the shaft a base Climb DC of 30.
The raised ledge near each entrance is about 5 feethigh. It’s a fairly easy matter for a creature of at leastMedium size to scramble up to one of these ledges(Climb DC 10), but a smaller creature must make a DC20 Climb check.
Creatures (EL 1/2): A single hobgoblin warrioralways keeps watch at each entrance.DDHobgoblin Warrior: hp 6; see page 153 in the
Monster Manual.Tactics: The guard typically remains atop the
raised ledge near the base of the shaft he guards, watch-ing and listening for any activity at the trapdoor above.When a visitor gives the correct password, the guardmaneuvers a ladder into position. If the correct pass-word is not forthcoming, the guard unlocks the coverof the pit trap (see below) and shouts out in Commonfor the visitor to “stop wasting time and just jump.”Should an intruder who has not given the correct pass-word seem reluctant to jump, the warrior jumps up anddown atop the latched pit cover and assures theintruder that all is well, then steps off the cover andunlatches it.
If an intruder manages to get down the shaft with-out falling into the pit trap at the bottom, the guardtries to block off the passage. He stands at the top of theraised ledge and uses the total defense action until hiscomrades from area 2 arrive (see area 2).
The extra hobgoblins take up positions in thealcoves to either side of the raised ledge. The one in themiddle attacks the intruder, gaining a +1 bonus on hisattack rolls for being on higher ground. Both of theadditional hobgoblins use the aid another action—oneto improve the center warrior’s Armor Class, and theother to improve his attack rolls.
Trap: A pit with an exceptionally sturdy cover liesat the bottom of each shaft. These pits can provide arude shock for intruders who try to force their way intothe outpost.aa Covered Pit Trap: CR 1; mechanical; location
trigger; automatic reset, DC 15 Reflex save avoids; 10 ft.deep (1d6, fall); pit spikes (Atk +10 melee, 1 spike for1d6); Search (DC 20); Disable Device (DC 20). MarketPrice: 1,000 gp.
The pit cover is hinged in the middle and can spinfreely when not latched. One side of it is thicklypadded, so that anyone who deliberately jumps downonto it from the trapdoor above takes only 1d6 points ofnonlethal damage, or no damage at all with a successful
3
Jump or Tumble check (DC 10). Normally, the damageand the check DC for such a jump would be greater,even for a landing on a soft surface, but the pit coversare specifically designed and built to cushion falls.
When the cover is unlatched, anyone jumping orfalling from the shaft takes damage from it as notedabove, but the pit cover also spins and dumps thevictim into the pit below. The pit is 10 feet deep, andthe bottom is lined with spikes. Together, the fall andthe spikes deal 2d6 points of damage. Anyone merelystepping on the unlatched pit cover can attempt aReflex save (DC 15) to avoid falling in.
Development: Any combat here is certain toattract the attention of additional guards at the nearestguardpost (area 2). Any prolonged negotiation or othernoise that doesn’t involve a fight eventually draws theattention of the sentries at the nearest guardpost (seethe Development section of area 2).
The entrance guards tend to stay at their posts nomatter what else happens in the outpost. If called awayby the warriors at area 2 (see the Development sectionthere), the guard here unlatches the pit cover beforeleaving.
AREA 2: GUARDPOSTS (EL 1)These areas serve as backup guardposts for theentrances. The guards here have a table, chairs, and afew provisions, so their duty is somewhat easier thanthat of the entrance guards.
Creatures: Two hobgoblin warriors are always onduty here. Each hour, one of them switches places witha guard at the nearest entrance. This arrangement helpskeep everyone rested and fairly alert.DDHobgoblin Warriors (2): hp 6 each; see page
153 in the Monster Manual.Tactics: These hobgoblins are charged with pre-
venting unauthorized entry to or exit from the outpost.These guards overhear most activity at the entrancenearest them, but they ignore anything short of apitched battle unless it continues for 1d4+1 rounds. Ifthey hear fighting at the entrance, however, one goesto help defend the warrior there, while the secondtakes 1 round to dash to area 4, raise the alarm, anddash back here. Once that task is completed, thesecond guard also joins the fight at the entrance.
Noise of combat inside the outpost alerts the guardshere after 1d4+1 rounds. They do not react immedi-ately because martial noises of various kinds occur fre-quently in the outpost. Off-duty hobgoblins hold spar-ring matches, gladiatorial fights between slaves andprisoners from areas 10 and 11 are staged from time to
time, and worship in area 9 can get noisy, too. Oncethey decide to investigate, however, one guard goes tothe scene of the disturbance, and the other carries awarning to area 4, then returns here to wait for hercomrade. If the absent sentry fails to return after 1d4+3rounds, the sentry here calls the guard at the entrance,and the two go off to join the fray themselves. The pairfirst goes to area 4 or 8 to get orders, but if no one ispresent in either area to instruct them, they seek outthe battle themselves.
Should any intruders get past the guard at theentrance without making a lot of noise, these guardstry to delay them as long as possible, using tactics simi-lar to those described for area 1.
Development: Should a fight develop in any ofthe guardposts, the hobgoblins from the rest of the out-post eventually converge there, as noted in the variousDevelopment sections.
AREA 3: TRASH DUMPThe door to this chamber is not locked, and it openseasily.
The hobgoblins pile all their refuse here. The placefeatures a great, smelly heap of used bedding and cook-ing scraps, plus several casks full of night soil. Whenthis chamber gets full, the hobgoblins force their slavesto haul the waste to the surface, where they dump it farfrom the outpost.
AREA 4: MAIN BARRACKS (EL 3)The hobgoblins eat, sleep, and relax here. Read or para-phrase the following when the characters enter this area.
Light from two charcoal firepits bathes this longhall in a feeble, ruddy glow. The air in here smellsstrongly of smoke, seared meat, and sweatybodies.
Low beds with log frames line the area’s northand south walls. Along the center of the room are acouple of tables and perhaps a dozen stools, alsomade of logs. Two deeply scarred wooden dum-mies, roughly humanoid in shape, stand againstthe short east wall. Someone has added big,pointed ears made of leather to both dummies,which makes them look pretty ridiculous.
At the west end of the north wall is a small,dark alcove. One wall section near the middle ofthe south wall appears to be made of fitted stone,not packed earth, like the walls in the rest of thiscomplex. Set in the center of that wall section is asturdy wooden door
Six beds stand along the north wall, and nine along thesouth. (Some of the hobgoblins are obliged to sharebunks with their comrades.) The beds are very low, andtheir mattresses are made from canvas ticks stuffed withleaves. Each bed has a few personal items (see the Trea-sure section, below) stored near it or under it. Also undereach bed are a covered bucket for slops, a clay pitcher ofwater, and one or two sets of battered eating utensils.
The hobgoblins use the firepits for cooking, andthey usually keep the fires burning around the clock.The ceiling has a couple of small vents that let out theworst of the smoke, which is so dispersed by the time itreaches the surface that it’s unnoticeable. The systemisn’t very efficient, but the hobgoblins are accustomedto the smoke. A small collection of cooking utensils isstacked near each pit.
The two wooden dummies serve as targets forweapon practice. The leather ears have been added tomake the figures look more like elves.
See areas 4A and 4B for details on the dark alcoveand the stone wall section.
Creatures: This chamber is home to twenty-threehobgoblin warriors, but only six are ever here at once.
Nine are standing guard in areas 1 and 2, and anothereight are out on patrols or raids at any given time.
Three goblin slaves are here at all times here as well,doing domestic chores for their hobgoblin masters.DDHobgoblin Warriors (6): hp 6 each; see page
153 in the Monster Manual.DD Goblin Slaves (3): CR 1/3; Small humanoid
(goblinoid); HD 1d8; hp 4; Init +1; Spd 30 ft.; AC 12,touch 12, flat-footed 11; Base Atk +0; Grp –5; Atk +0melee (1d2–1, unarmed strike); Full Atk +0 melee(1d2–1, unarmed strike); SQ darkvision 60 ft.; AL NE;SV Fort +0, Ref +3, Will +0; Str 8, Dex 13, Con 10, Int10, Wis 11, Cha 9.
Skills and Feats: Craft (woodworking) +1, Hide +7,Listen +2, Move Silently +7, Ride +5, Spot +2, UseRope +2.
Tactics: Three of the six hobgoblins in this cham-ber are awake, and the other three are asleep. Theysleep in their armor and keep their weapons handy—either hanging from their bedframes or stashed undertheir beds. The sleepers tend to snooze through anydisturbance except other hobgoblins shouting for help.It takes the sleepers a full-round action to wake up and4
5
get out of bed, and a move action to pick up their weap-ons. Once armed, the sleepers tend to use the tacticsdescribed below.
The three hobgoblins that are awake lose no timeresponding to an intruder in this area. They form abattle line, and one of them orders one slave to area 6,one to area 7, and the third to area 8 (a free action).Then the warriors hurl javelins at whichever targetsthey think they have they best chance of hitting. Theychoose foes without cover over foes with cover, andunarmored targets over armored ones. Against foeswithin melee reach, the warriors try to maneuver intoflanking positions if they can. Their general strategy isto eliminate weaker foes first. If they have difficultyhurting a foe, they either switch to easier targets or usethe aid another action to improve their attack bonuses.
The slaves obey their orders with alacrity becausethey know the price of disobedience only too well. Seethe Development sections of areas 6, 7, and 8 for details.
Development: The hobgoblins here react quicklyif one of their comrades brings a warning. They imme-diately wake their companions and send their slaves offto areas 6,7, and 8, as described in the Tactics section.As soon as all six hobgoblins are ready, they march offto the scene of the action, unless they receive orders tothe contrary (see the Development section of area 8).
Fighting in area 1 or 2 draws the attention of thehobgoblins here after 1d3 rounds. Once they noticesomething amiss, they react as noted above.
Any fighting in this area eventually draws guardsfrom areas 1 and 2, as noted in the Development sec-tions for those areas. It also brings the sergeant fromarea 8 and the adept from area 7, along with a pair ofdire apes from area 6 (see the Development sections inthose areas for details).
Treasure: A small bag or box of valuables isstowed near each bed in this room. The containereither lies underneath the bed or hangs from the frame.If the PCs search all the beds, they can collect the fol-lowing: 300 gp, 600 sp, 12 pieces of hematite (worth 10gp each), 8 pieces of malachite (worth 10 gp each), 10moss agates (worth 10 gp each), a set of eight of ivorydice with gold and amber pips (worth 8 gp each), 2silver cups (worth 12 gp each, 3 gold armbands (worth25 gp each), and a serpentine statuette of an erinyesdevil (worth 80 gp).
Area 4a: StoreroomThe walls, ceiling, and floor of this area are all made ofstone. The hobgoblins keep their food and drink here.Most of their provisions consist of game taken from thesurface, so several dressed carcasses hang from hooks
in the ceiling. A few barrels of hardtack, a crate of driedfruit, and several casks of ale and wine round out thefood stores.
Area 4b: WellThis area features a stone-lined shaft about 100 feetdeep. Very cold water fills the shaft to a height of 30feet. A big wooden bucket is attached to a ring on thewest wall with an 80-foot rope. The slaves use thisassembly to draw water from the well.
AREA 5: SMITHYThis alcove contains a crude forge built out of rockscollected from the surface. A pile of charcoal, a big, flatstone that serves as an anvil, and two stone troughs fullof dirty water give mute testimony to its purpose.Hooks on the walls hold a couple of bellows, plus somehammers and a few sets of tongs.
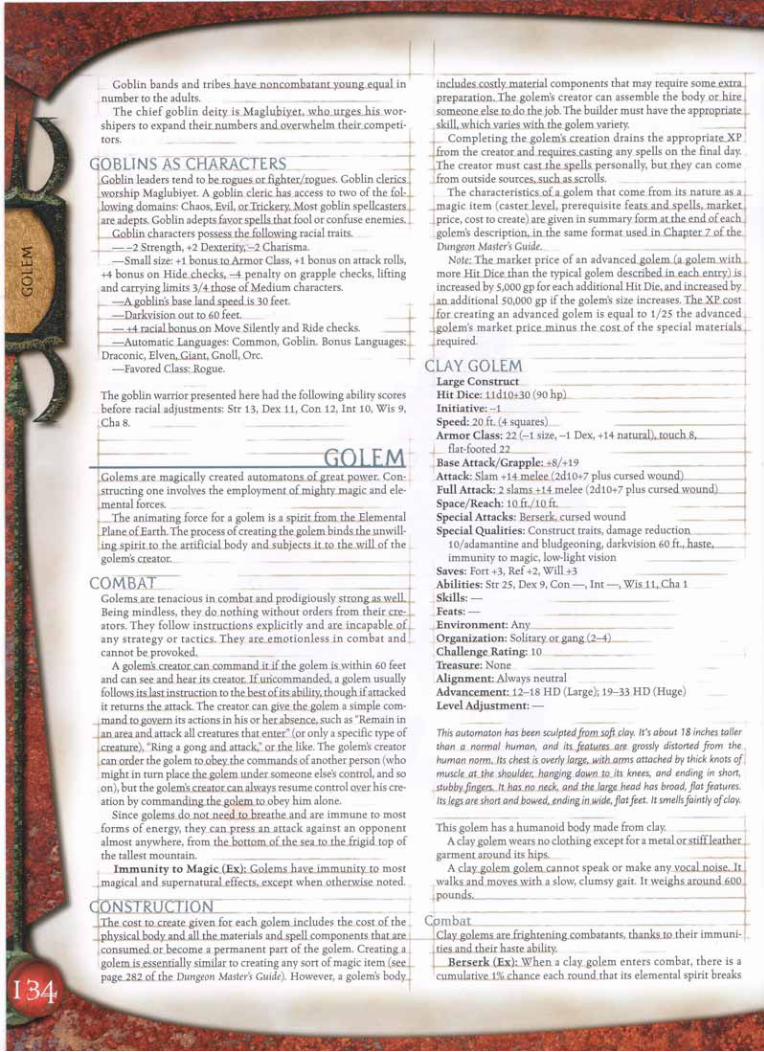
A barrel next to the forge holds miscellaneous bitsof steel and iron—mostly old horseshoes, nails, andpieces of chain, but also arrowheads, notched axeblades, bent daggers, broken swords, and smashed hel-mets. A successful Search check (DC 15) through allthis junk reveals a tarnished silver holy symbol of Pelor(taken from a cleric’s shield) with some of its rays bentor broken off. The symbol is worth 10 gp as is, or 25 gpif cleaned up and repaired.
The hobgoblin adept from area 7 occasionally plieshis metalworking craft here, but only when the hob-goblins are sure no enemies are nearby to see thesmoke from the forge. An airshaft about 6 inches wideleads from above the forge directly to the surface.
AREA 6: APE DEN (EL 5)The south door to this chamber is barred from thesouth side, but not locked.
The hobgoblins keep a pair of dire apes in this room.Read or paraphrase the following when the charactersenter.
The door opens to reveal a dingy chamber thatreeks of excrement and rotted flesh. By the lightof a single touch set in the north wall, two gaunt,feral apes, both well equipped with claws andteeth, are visible. In the northeast corner beyondthe apes stands a massive-looking wooden ladder.Its top is out of sight in a vertical shaft that iseasily wide enough to accommodate the apes.
The apes don’t seem too pleased with the intru-sion. They bare their bloodstained teeth andbellow out inhuman sounds that seem half growl,half scream.
6
The ladder in the northeast corner leads up about 12feet to a dead end. Three feet of packed earth separatethe end of the shaft from the surface. The hobgoblinscreated this feature to serve as an emergency exit forthe outpost. With about 1 minute of digging, a charac-ter working with a shovel or a sword can clear away thedirt and open a path to the surface.
The torch stuck in the north wall is an everburningtorch, set here to give the apes some light. It can easilybe removed.
Creatures: As noted above, this chamber serves asthe lair of two dire apes.DD Dire Apes (2): hp 35 each; see page 62 in the
Monster Manual.Tactics: The adept in area 7 has reared and trained
these apes to serve as fighting creatures. They attackany creature they see, except goblins or hobgoblins. If afoe should enter through the south door, both apesmove to attack. Should the foe come from the west,where there’s room for only one ape to fight, the closestone charges in while the other tries to burst throughthe south door and attack the foe through area 7. (Theapes aren’t very smart, but they know the outposts’layout and they’re eager to fight.)
Development: If the PCs get this far withoutalerting the hobgoblins to their presence, the screamsof the apes serve as an effective alarm. If Hoortchuc,the adept from area 7, is still alive, he is the first toarrive.
If a general alarm has been raised before the partygets this far, the hobgoblins in area 4 have already senta slave here (and one each to areas 7 and 8). Upon arriv-ing, the goblin goes to the south door and waits for theadept in area 7 to release the apes. If Hoortchuc doesnot appear within 3 rounds, the goblin lifts the bar tothe south door and releases the creatures himself.
Once out of their chamber, the apes first try to go toarea 7 to find the adept, if he is not present. IfHoortchuc is dead or absent, or if the apes can’t get intoarea 7, they go to area 4 and attack the first enemy theysee or scent. If the adept is not on hand to take chargeof the apes, the goblin slave picks up the everburningtorch from the north wall and follows the apes. If theadept does take over, the goblin follows along but slipsoff to area 10 at the first opportunity.
AREA 7: ADEPT’S CHAMBER (EL 4)This room contains a comfortable bed with an ironframe, a feather mattress, and pillows. A charcoal bra-zier provides heat, and a small writing desk in onecorner holds a pile of parchments, pens, an inkwell,
and a small water clock. About half the parchments areblank; the rest contain notes that form a sort of per-sonal journal (see the Creatures section, below, fordetails).
In a niche in the north wall is a pile of humanoidskulls (mostly human and elf). Set into the wall abovethem is a small, double-bitted axe made from a singlepiece of silver. An artful combination of black and redenamel makes the blades appear to be dripping blood.The axe is the symbol of the deity Maglubiyet, patronof goblins and hobgoblins. Though useless as a tool orweapon, it’s worth 75 gp.
Creature: The hobgoblin adept Hoortchuc callsthis chamber home. He spends most of his time hereconsidering plans for future raids, composing sermonsto deliver to the rest of the outpost, and scribbling inhis journal in Goblin.
The journal features a careful accounting of thepassing days, since Hoortchuc must give a sermonevery eight days. He also fills many pages with theolog-ical musings, and these notes form the basis of his ser-mons. In addition, the adept keeps notes on all the lootand slaves the warband has collected. His journal indi-cates that the band has captured far more slaves andtaken considerably more loot than the outpost actuallycontains at present. Most of the missing treasure andslaves have been passed on to the local tribal chieftain.The hobgoblins have spent the remaining cash andkilled the remaining slaves, either in gladiatorialmatches or as sacrifices to their god, Maglubiyet.
Hoortchuc also handles the feeding and ongoingtraining of the apes in area 6. He isn’t too concernedabout their hygiene, which accounts for the stench inthe apes’ den.DDHoortchuc: Male hobgoblin Expert 2/Adept 2;
CR 4; Medium humanoid (goblinoid); HD 2d6+2 plus2d6+2; hp 18; Init +1; Spd 30 ft.; AC 11, touch 11, flat-footed 10; Base Atk +2; Grp +1; Atk +1 (1d6–1, quarter-staff) or +3 ranged (1d8/19–20, light crossbow); FullAtk +1 (1d6–1, quarterstaff) or +3 ranged (1d8/19–20,light crossbow); AL LE; SV Fort +1, Ref +1, Will +10; Str8, Dex 12, Con 13, Int 15, Wis 14, Cha 12.
Skills and Feats: Appraise +9 (+11 for appraisals relat-ing to metalwork or traps), Concentration +6, Craft(metalworking) +7, Craft (trapmaking) +7, Diplomacy+3, Handle Animal +8, Heal +7, Intimidate +6, Knowl-edge (religion) +3, Ride +3, Sense Motive +7, Spot +7;Combat Casting, Iron Will.
Adept Spells Prepared: (3/2; save DC 12 + spelllevel): 0—cure minor wounds, light, mending; 1st—bless,command.
7
Possessions: Quarterstaff, light crossbow, case of10 bolts, scroll of dispel magic, scroll of cure criticalwounds, potion of cure moderate wounds, wand of burninghands (38 charges), wand of cure light wounds (22charges).
Tactics: If attacked in this chamber, Hoortchucflees to area 6, where his apes can help him. He uses hisbless spell as soon as he can, followed by his commandspell, which he aims at the foe that appears most physi-cally imposing. He uses his wand of cure light wounds onthe apes when necessary. Otherwise, he plies his wandof burning hands and his crossbow whenever suitabletargets present themselves.
Development: Any disturbance here brings theapes from area 6. Likewise, Hoortchuc goes to help hisapes if they’re attacked in their lair (see area 6).
Hoortchuc remains lost in his own musings andunaware of activity elsewhere in the outpost until amessenger (typically one of the goblin slaves from area4) comes to rouse him. When informed of trouble,Hoortchuc goes to area 6 and sends the apes to area 4,then takes down the everburning torch and follows them.Once the trio reaches area 4, all three attack any ene-mies they find, using the tactics described in theentries for areas 4 and 6. If there is no enemy in area 4,Hoortchuc and the apes either go where the sergeantsends them or follow the sounds of battle and press theattack as best they can.
If the alarm is raised, the goblin sent to summonHoortchuc to area 4 tags along behind when the adepttakes the apes to fight but slips away to area 10 as soonas possible. Should the goblin find Hoortchuc absentor dead, she immediately heads for area 10.
AREA 8: SERGEANT’S CHAMBER (EL 5)Vuroosk, the sergeant in charge of the outpost, liveshere. His chamber is similar to area 7, except that it hasno water clock or niche with skulls and holy symbol.
A neatly kept ledger on the writing desk details cap-tives and loot the hobgoblins have taken. The ser-geant’s notes are nearly identical to those kept by theadept in area 7, but easier to read. Vuroosk also keeps aroster of the outpost’s warriors, a pay ledger, andrecords of supplies both used and needed. A packet ofreports detailing the exploits of Vuroosk’s troops (alladdressed to the local hobgoblin chieftain, namedNygraag) lies at the bottom of the stack. All the recordshere are written in Goblin.
Creatures: Vuroosk spends most of his timelaying plans for future raids. He accepts suggestionsfrom the adept and from his troops, incorporating the
best of them into his schemes. He also spends a fairamount of time keeping records and writing reports forhis chieftain.DD Vuroosk: Male hobgoblin Fighter 2/Ranger 2;
CR 4; Medium humanoid (goblinoid); HD 2d10+2 plus2d8+2; hp 29; Init +4; Spd 30 ft.; AC 18, touch 14, flat-footed 14; Base Atk +4; Grp +6; Atk +6 melee(1d6+2/19–20, masterwork short sword) or +9 ranged1d8+2/[TS]3, masterwork composite longbow [+2 Strbonus]); Full Atk +6 melee (1d6+2/19–20, masterworkshort sword) and +6 melee (1d6+1/19–20, masterworkshort sword) or +9 ranged 1d8+2/[TS]3, masterworkcomposite longbow [+2 Str bonus]); SQ combat style(two-weapon fighting), favored enemy (elves +2), wildempathy +2; AL LE; SV Fort +7, Ref +7, Will +1; Str 14,Dex 18, Con 13, Int 10, Wis 12, Cha 10.
Skills and Feats: Climb +7, Hide +6, Jump +7, Spot+11, Survival +6; Dodge, Point Blank Shot, Precise Shot,Track, Weapon Focus (short sword).
Favored Enemy: Vuroosk has selected elves as afavored enemy. He gains a +2 bonus on his Bluff,Listen, Sense Motive, Spot, and Survival checks whenusing these skills against elves. He gets the same bonuson weapon damage rolls against elves.
Possessions: +1 studded leather armor, 2 master-work short swords, masterwork composite longbow (+2Str bonus), 3 potions of cure light wounds, eyes of the eagle.
Tactics: Vuroosk prefers to fight behind a wall ofhis own troops, using his bow to harass enemy spell-casters when possible or to help defeat fighter-typeswhen necessary. The sergeant is equally skilled inmelee combat. Like the warriors in area 4, Vurooskprefers to eliminate weaker opponents first, so as tostrip more powerful foes of their support.
If fighting alone, Vuroosk tries to stay out of meleerange as long as he can. If he can’t avoid melee, he triesto stand in a doorway or corner, where be can’t beflanked.
Treasure: Vuroosk keeps a locked strongboxunder his bed. He has the only key.ss Ironbound Strongbox: 2 in. thick; hardness
5; hp 35; Break DC 27; Open Lock DC 25.Inside the box are a leather bag containing 350 gp, a
leather pouch containing 28 pp, an unlocked woodenbox that holds three strings of pearls (worth 500 gpeach), eight packets of rare spices (worth 25 gp each),and a cloak of elvenkind. The gold coins representVuroosk’s pay chest; the other items are treasure thatthe hobgoblins wrested from their victims.
Development: When foes try to enter the out-post, word of the assault eventually reaches Vuroosk.
The sergeant tries to make a stand in area 4, where thereis space to bring the apes from area 6 into play. He sendsa few warriors off to delay the attackers but holds backat least half of his troops for the main battle in area 4.
When fighting in area 4, Vuroosk tries to draw thefoe to the east end of the chamber, so that any rein-forcements arriving from areas 1 and 2 can come upbehind the foe.
AREA 9: FANE OF MAGLUBIYETIn the center of this chamber is a large firepit (usuallycold). South of the firepit stand two rows of benchesmade of split logs, and north of it lies a big choppingblock with a great, black, double-bitted axe embedded init. Both axe and block are well spattered with bloodstains.
The block is just a piece of bloodstained wood withhollows and channels cut in it to facilitate beheadings.The axe is a masterwork greataxe with a head made ofblackened steel and a handle made of dark wood,stained black.
AREA 10: SLAVE QUARTERS (EL 1)The door leading to this room is barred from the out-side but is not locked.
Creatures: Seven goblin slaves (see area 4 for sta-tistics) live here in squalid conditions, but only four ofthem are here at any given time, and they are asleepunless the PCs have been very noisy. They don’t reallymind the filth.
Each goblin has a pile of straw and twigs for a bed.The slaves also have their own cooking pit and utensils,plus a small cache of supplies.
Tactics: If the PCs enter this chamber, the goblinspromptly hurl themselves at the characters’ feet andbeg them to have mercy on poor, abused slaves. Ifattacked, the goblins do their best to evade blows andescape from the outpost.
Development: Once the alarm is sounded, thegoblin slaves from area 4 carry out their assignmentsand then try to make their way here and release theirfellow goblins. If they manage to do so, all the goblinstry to slip away from the outpost, either through onethe entrances or via the emergency exit in area 6.
If the PCs try to question the goblins here, the levelof cooperation they get depends on what has happenedto the hobgoblins in the outpost thus far. If the goblinsbelieve (or know) that their hobgoblin masters havebeen defeated, they fawn on the PCs and truthfullyanswer any questions put to them. The goblins know
the outpost quite well, but if the PCs have alreadydefeated the hobgoblins, such information does themlittle good. The goblins know nothing about the hob-goblins’ plans for the surrounding area. They do knowthat the two chief hobgoblins, Vuroosk and Hoortchuc,answer to some “hobgoblin bigwig” in the area, butthey don’t know who. They’ve never heard of Nygraag(see the area 8 entry), and they have no idea where sucha person might be found.
The goblins are much less helpful if they believe thePCs have not defeated the hobgoblins in the outpost.They pretend to be utterly cowed, and they usuallyreply to questions by cringing and whining.
In any case, the goblins bide their time and try toescape from the PCs (and the hobgoblins) at the firstopportunity.
AREA 11: PRISONThis long, narrow chamber features two rows of cov-ered pits that the hobgoblins use as prison cells. Eachpit is 20 feet deep, and its walls are similar to those atthe entrances (Climb DC 20). The pit covers are pad-locked from the top; otherwise, they are just like thedoors in the rest of the outpost.
Four 1st-level elf warriors are presently incarceratedhere. (Use the statistics from page 102 in the MonsterManual, except that these elves have no equipment and2 hit points each.) They are starved nearly to death andin no shape to fight, but they are willing to give it a tryif the PCs insist.
If the PCs release these captives, the local elf lordoffers them each a reward of 75 gp.
ABOUT THE AUTHORSkip Williams has been active in the game industrysince 1974, when he took up wargaming and roleplay-ing while still in high school. He soon got an after-school job at TSR, Inc., the original publisher of theD&D game, and the rest (as they say) is history. Skip isa codesigner of the 3rd Edition D&D game (versions3.0 and 3.5) and the chief architect of the MonsterManual. He also coauthored the FORGOTTEN REALMS
Campaign Setting. Skip keeps busy with freelance proj-ects for several different game companies and hasbeen DRAGON Magazine’s Sage since 1986. When notdevising swift and cruel deaths for player characters,Skip putters in his kitchen or garden (his borscht getsrave reviews).
8
Related Documents


