MANUAL ON MONITORING Japan Internaonal Cooperaon Agency (JICA) Sustainable Natural Resource Management Project (SNRM) January 2020

Welcome message from author
This document is posted to help you gain knowledge. Please leave a comment to let me know what you think about it! Share it to your friends and learn new things together.
Transcript

MANUAL ON
MONITORING
Japan International Cooperation Agency (JICA)Sustainable Natural Resource Management Project (SNRM)
January 2020

This report was prepared as a part of the Sustainable Natural Resource Management Project (SNRM) funded by the Japan International Cooperation Agency (JICA) and executed by the Ministry of Agriculture and Rural Development of Viet Nam from 2015 to 2020.
The views expressed in this report are those of the authors and do not necessarily reflect the view of SNRM or JICA.
JICA/SNRM encourages reproduction and dissemination of material in this report. Non-commercial uses will be authorized free of charge upon request. Reproduction for commercial purposes, please contact JICA/SNRM for a prior and specific agreement.
All queries should be addressed to:
Officer in Charge of Forestry Projects/ProgrammesJICA Viet Nam Office11F CornerStone Building, 16 Phan Chu Trinh, Hoan Kiem, Ha Noi, Viet NamTel: +84-4-3831-5005Fax: + 84-4-3831-5009
Cover photo: Phantom 4 Pro V2.0 / dji.comDesign & Creative: AdmixStudio.com

Manual on Flycam Monitoring 1
Chapter 1: Introduction 3
Chapter 2: Scope of The Manual 5
2.1. Objective 6
2.2. Overall Structure of the Manual 6
Chapter 3: Basic Information of The Aircraft 7
3.1. Technical Specification 8
3.2. Name of Parts 9
Chapter 4: Flight Planning 11
4.1. Identification of the Surveyed Area and Operation Point 12
4.2. Flight Plan Preparation 13
4.2.1 Flight plan preparation on GIS application (Mapinfo) and export the data to Google Eath 14
4.2.2 Flight plan preparation on Litchi (web browse) 17
Chapter 5: Flight Operation 19
5.1. Checking weather conditions before the flight 20
5.2. Flycam Operation (Manual-Pilot) 22
5.2.1. Introduction on functions of DJI Go 4 21
5.2.2. Pre-survey calibrations 27
5.2.3. Manual Flycam Operations 28
5.3. Flycam Operation (Auto-Pilot) 31
5.4. Measures for Emergency Situations 33
Chapter 6: Data Processing 35
6.1. Pix4Dmapper 36
6.2. Data Processing 36
Chapter 7: Equipment Management and maintenance 41
7.1. Equipment Management 42
7.2. Equipment Maintenance 42
Annexes 43
Annex 1. Flycam Log Book 44
Annex 2. Flycam Check List 45
Annex 3. Battery Check List 47
Table of Contents

JICA/SNRM Project2
BNBNPMB Bidoup-Nuiba National Park Management Board
DNWPFMB Da Nhim Watershed Protection Forest Management Board
JICA Japan International Cooperation Agency
PFES Payment for Forest Environmental Service
RTH Return-to-Home
SNRM Sustainable Natural Resource Management Project
LB-BR Lang Biang World Biosphere Reserve
List of Abbreviations

Manual on Flycam Monitoring 3
1 INTRODUCTION
CHAPTER
Manual on Flycam Monitoring 3
JICA/SNRM Project4
The biodiversity component (Component 3) of the Sustainable Natural Resource Management Project (hereinafter referred to as “SNRM”) has been implemented by the JICA Project Team in collaboration with the relevant stakeholders in the Lam Dong Province, especially Bidoup Nuiba National Park Management Board (BNBNPMB) and Danhim Watershed Protection Forest Management Board (DNWPFMB), since August 2015. The main aim of the Project is to establish an integrated and collaborative ecosystem management mechanism in the Lang Biang World Biosphere Reserve (LB-BR) by i) introducing a multidisciplinary coordination and management framework for the LB-BR, ii) upgrading/developing the collaborative forest management mechanism based on the collaborative management agreement (CMA) in the buffer and core zones in the LB-BR and iii) use the results of forest and biodiversity monitoring for the management of the core and buffer zones of the LB-BR.
SNRM has supported on the improvement of current forest patrolling activities conducted by the group members which have engaged under forest protection contracts with forest owners (PFES groups). In this regard, flycam is a promising tool for manager of forest owners as it provides the latest and detailed aerial images for monitoring the forest status/condition timely and also, help each ranger station and PFES groups to conduct patrolling activities in more efficient and effective manner.
In order to secure the safe flycam operation, training of operators is essential, therefore SNRM has provided a series of trainings on drone operation and management to the staff of BNBNPMB and DNWPFMB during 2017-2018.
This is a comprehensive manual covering the wide topics relevant to operation and management of flycam in visualized manner for easy understanding of users. The manual is expected to be utilized for further capacity enhancement of the staff in charge of flycam operation and management for forest protection and conservation in the country.

5Manual on Flycam Monitoring
2 SCOPEOF THE MANUAL
CHAPTER
Manual on Flycam Monitoring 5
JICA/SNRM Project6
This manual provides a set of guidance on flycam operation and its management as well as data utilization and management for the officials in charge. Specifically, the manual aims to:
a. Provide basic information of flycam (DJI Phantom 4 Pro)
b. Provide guidance on how to design flight plan
c. Provide guidance on how to operate the flycam by manual-pilot and auto-pilot mode
d. Provide guidance on how to process the images of flycam and export data for its easy use
e. Provide guidance on proper management and maintenance of flycam relevant equipment
2.1. Objective
The manual is structured as indicated in Figure 2.1.
Please be noted that the information in the document is as of January 2020, and there is a possibility that the services referred in the manual might be changed/up-dated by each company. Please check the latest information as follows;
DJI: https://www.dji.com/
Pix4Dmapper: https://www.pix4d.com/product/pix4dmapper-photgrammetry-software
Litchi: https://flylitchi.com/
2.2. Overall Structure of the Manual
Basic InformationChapter 3
Data ProcessingChapter 6
Flight PlanningChapter 4
Equipment Maintenance and Management Chapter 7
Flight OperationChapter 5
Figure 2.1. Overall Structure of the Manual
7Manual on Flycam Monitoring
3 BASIC INFORMATION OF THE AIRCRAFT
CHAPTER
7Manual on Flycam Monitoring

JICA/SNRM Project8
SNRM has provided flycam (DJI Phantom 4 Pro) to BNBNPMB and DNWPFMB. Its technical specification and name of parts is provided as below;
Basic technical specification of DJI Phantom 4 Pro is indicated inTable 3.1 as below;
Table 3.1. Basic Specification of DJI Phantom 4 Pro
Name Phantom 4 Pro
Company DJI
Weight 1.4 kg v(propellers and batteries are included)
Max speed 72 km/h (max 54 km/h for Autopilot)
Flying time 27 mins (suggested at 15 mins including take off to landing)
Controlling rage 7 km (suggested 3km with auto-pilot and 4km with manual control)
Height 500 m
Resolution 20 megapixels
Battery Lithium-ion (LiPo) 5,870 mAh / 89.2 Wh
Charging 75 – 90 mins (up to batter capacity)v
Memory MicroUSB UHS Speed Class 3 (U3)
GPS GPS & GLONASS
3.1. Technical Specification

9Manual on Flycam Monitoring
3.2. Name of Parts
1
2 5
6
2
6
7
8
9
34
10
11
12
1 Gimbal/Camera
2 Sensor
3 Micro USB port
4 Memory Slot
5 Status Indicators/Linking button
6 Aircraft Status Indicators
7 Motor
8 Propeller
9 Antenna
10 Battery
11 Power button
12 Battery Led indicator

JICA/SNRM Project10
1 2
10 9
3
8 6
5
4
7
12 1113 13
19
18
17
14
15
16
1 Power button
2 Return to Home
3 Control sticks
4 Straps holder
5 Mobile device holder
6 Small device fastener
7 Extendable button
8 Antennas
9 Battery level LEDs
10 Led Indicator
11 Micro USB port
12 USB port
13 Functional button
14 Camera setting dials
15 Intelligent Flight Pause button
16 Shutter button
17 Flight mode switch
18 Record button
19 Gimbal Dial

4 FLIGHTPLANNING
CHAPTER
Manual on Flycam Monitoring 11

JICA/SNRM Project12
In order to have a safe and effective flight survey, flycam operators (and/or staff at the stations if qualified) shall identify 1) Area for the flight survey, and 2) Location of the operation point (standing point of the operator) mainly by the utilization of Google Earth Pro.
The followings are the points to be carefully considered when identify the surveyed area. Field checking might be required;
a. To ensure that the operation point is not too far from the surveyed area. The recommended distance from the operation point to the furthest survey point is within 3km
b. To ensure electricity is accessible at the operation point for continuous flight survey. If the point has no access to electricity, a back-up power plan should be considered (e.g. secure transportation to bring the battery to the charging point, procurement of back-up battery for charging (recommended: Anker PowerHouse 120,000mAh/ 400wh - A1701), etc.)
c. To ensure there is no obstacle for safe flight operation such as magnetic field, high-voltage line, etc.
Steps to identify the flight area by Google Earth Pro are as follows;
a. Create a folder for the data on surveyed area and operation point
b. Use Add Polygon tool to create an area to be surveyed in the folder
c. Use Add Placemark tool to create an operation point in the folder
d. Save the folder in the kml format
4.1. Identification of the Surveyed Area and Operation Point
Figure 4.1 Identify the Surveyed Area and Operation Point

Manual on Flycam Monitoring 13
In order to secure the safe flycam operation, SNRM recommends to apply auto-pilot mode with careful design of its flight planning, using an application called Litchi(1).
Two methods are proposed in this section; 1) Flight plan preparation on GIS application (Mapinfo) and export the data to Google Earth, and 2) Flight plan preparation on Litchi (web browser).
As a precondition, it should be noted that the images are required to overlap at least 70-80% each other to produce one integrated processed image by a software (Pix4D mapper). To determine the distance between two shutter points is calculated by below formula:
4.2. Flight Plan Preparation
Vertical projection of the flycam at the shooting point Horizontal projection of the ground surface captured by flycam
With the specifications provide by DJI, Phantom 4 Pro has shutter angle 840, height 500m (maximum), the coverage of 2 adjacent images is 80%. Therefore, image size and the distance between shutter points is calculated as follows:
R=tan(84/2)×500=450,2m
The area of the square inscribed in a circle (S)=(R×√2)2=(450,2×√2)2=40,535ha
To collect the largest image, the aspect ration of the image must be set 4:3, the 2 size lengths of the image are:
a=R×√2=450,2×√2=636,68m
b=3/4×a=3/4×636,68=477,51m
The distance between 2 shutter points is calculated:
Horizontal distance=a×(100-80)%=636,68×(100-80)%=127,34m
Vertical distance=b×(100-80)%=477,51×(100-80)%=95,5m(1) https://flylitchi.com/
JICA/SNRM Project14
4.2.1 Flight plan preparation on GIS application (Mapinfo) and export the data to Google Earth
Flight plan can be directly made on Litchi (tablet (iPad) or web browser). However, this manual recommends to make the flight plans in GIS application such as Mapin-fo or QGIS first, then export the data to Litchi to save time and secure the accura-cies of the plan. Mapinfo is applied in this manual as technical staff of BNBNPMB/DNWPFMB is familiar with the tool.
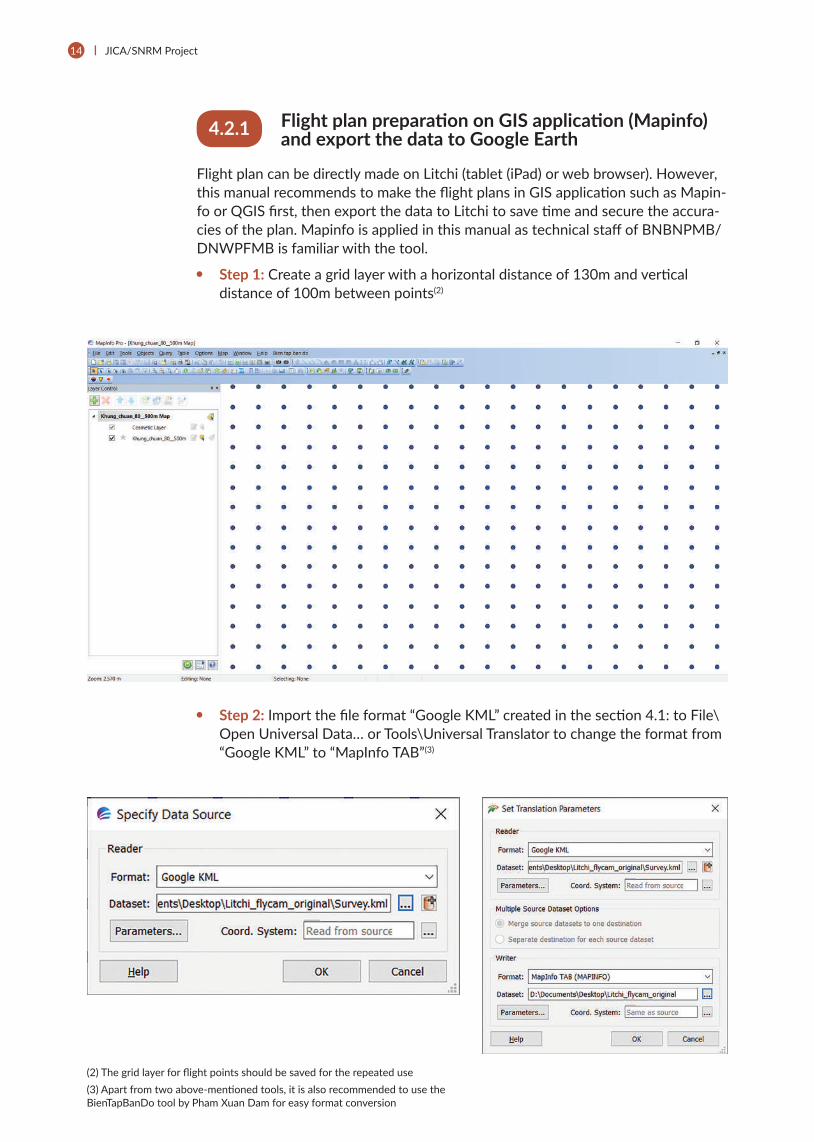
Step 1: Create a grid layer with a horizontal distance of 130m and vertical distance of 100m between points(2)
Step 2: Import the file format “Google KML” created in the section 4.1: to File\Open Universal Data… or Tools\Universal Translator to change the format from “Google KML” to “MapInfo TAB”(3)
(2) The grid layer for flight points should be saved for the repeated use(3) Apart from two above-mentioned tools, it is also recommended to use the BienTapBanDo tool by Pham Xuan Dam for easy format conversion

Manual on Flycam Monitoring 15
Step 3: Confirm the added layer on surveyed area and operation point, and remove unnecessary points outside the surveyed area.
Step 4: Use Polyline tool to draw flight routes. The recommended points of each flight are from 24 to 30 points with consideration of the starting point (red star)(4).
Step 5: Select all flight routes and use Export Map to Google Earth tool to export flight routes to kml format. Fill in 500 meters as Height Value
(4) Flight routes should be optimized (shortest flight distance, and the starting and ending points of the flight plan are nearest to the operation point).
JICA/SNRM Project16
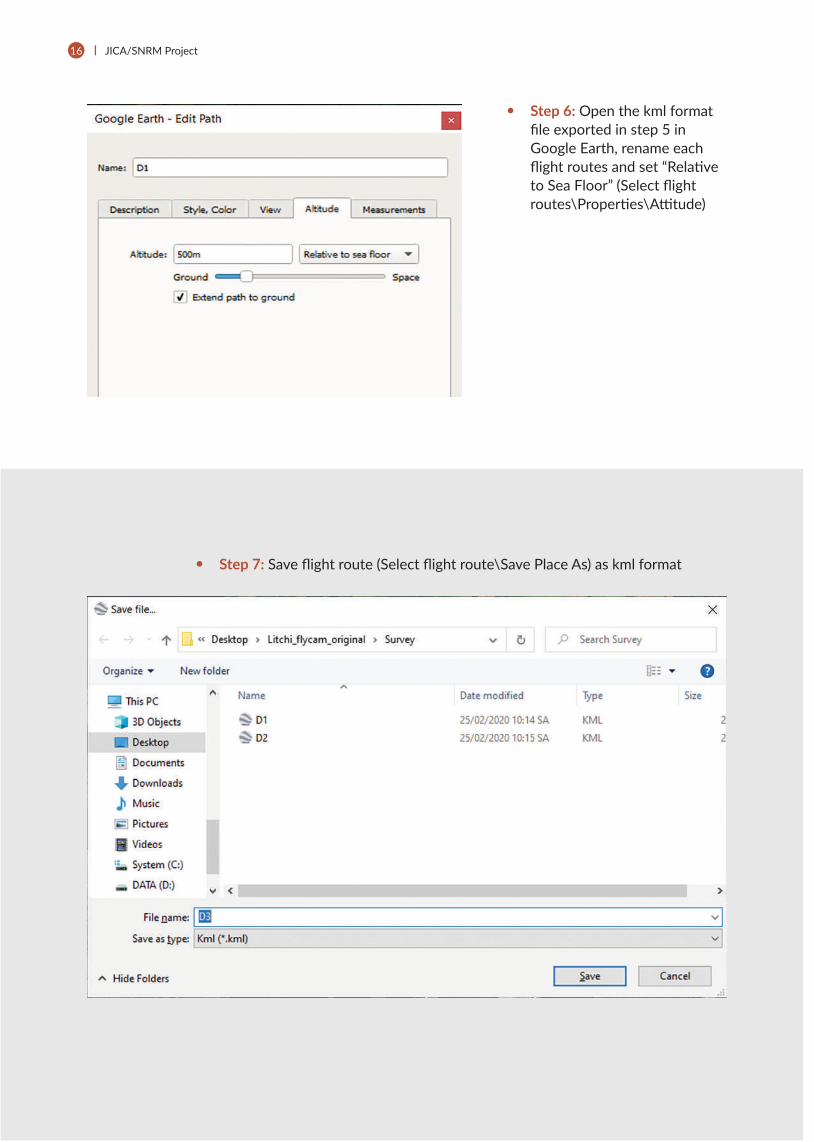
Step 6: Open the kml format file exported in step 5 in Google Earth, rename each flight routes and set “Relative to Sea Floor” (Select flight routes\Properties\Attitude)
Step 7: Save flight route (Select flight route\Save Place As) as kml format

Manual on Flycam Monitoring 17
(5) A free account can be created if you don’t have an account
4.2.2 Flight plan preparation on Litchi (web browse)
After the completion of the flight plan preparation in kml format as mentioned in the section 4.2.1, the flight plan shall be imported in Litchi on web browser (recommended to use Google Chrome) to set up the complete flights. These plans shall be stored in the database of Litchi and synchronized with tablets.
Step 1: Open Litchi on Web Browser using the link: https://flylitchi.com/hub
Step 2: Log in with the same account on tablet(5)

JICA/SNRM Project18
Step 3: Select Settings and set parameters as follows:
Aircraft: Mavic/Phantom 3-4/Inspire 1-2
Units: Metric
Heading Mode: Custom (WD)
Finish Action: RTH
Path Mode: Straight Lines
Cruising Speed: 54.0km/h
Max Flight Speed: 54.0km/h
Default Curve Size: 0%
Default Gimbal Pitch Mode: Disable
Step 4: Import flight plan created in the section 4.2.1 and check Add Take Photo Action
Step 5: Check the flight plan and save. When multiple flight plans are created, please be noted that consecutive saving would be failed as one plan requires a few minutes time for synchronizing between the server and Litchi account.

Manual on Flycam Monitoring 19
5 FLIGHT OPERATION
CHAPTER
Manual on Flycam Monitoring 19

JICA/SNRM Project20
Flycam operation is one of the most important topics in this manual in order to secure the safe flight for long term use and obtain the required data to monitor forest resources. In this chapter, the following sub-topics are covered;
5.1. Checking weather conditions before the flight
5.2. Flight operation (manual pilot)
5.3. Flight operation (auto pilot)
5.4. Measures for emergency situations
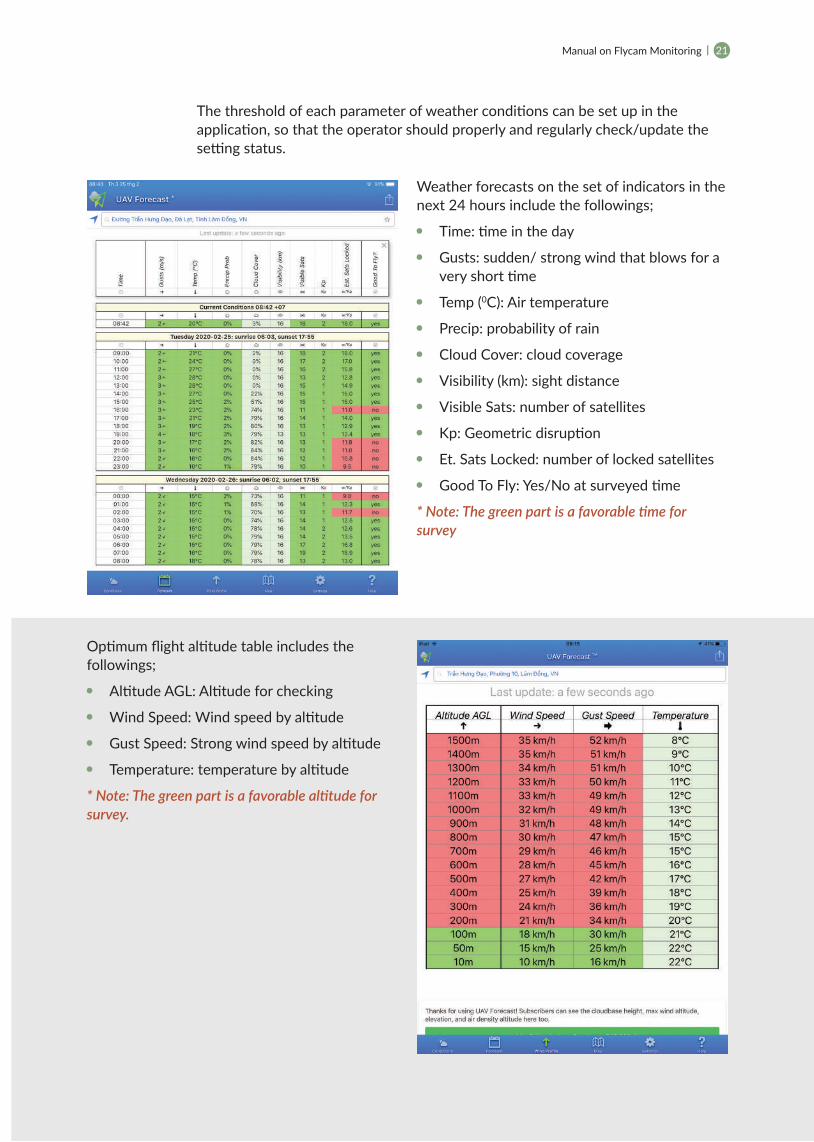
Weather factors such as wind, rain, temperature, fog, etc. will directly affect the flight safety as well as effectiveness of the survey. Therefore, the operator is required to check the weather conditions before conducting the flight. There are several applications to support the flycam operator to check the weather conditions timely, and this manual recommends to use an application “UAV Forecast” to check the above factors. UAV Forecast provides not only the weather information, but also information on “no-fly zones” (e.g. around airport, high population density area, etc.).
The above set of information provides whether it is possible to make a flight at the time of checking. And UAV forecast has functions to provide the additional information such as weather forecast on the above set of indicators by hour as well as weather conditions (wind speed, gust speed and temperature) by altitudes as indicated as below.
5.1. Checking weather conditions before the flight
Notifications on the screen include the followings;:
Good To Fly: possible to fly
Weather: current weather condition
Sun: sunrise and sunset time
Temperature: temperature at operation point
Wind: wind speed
Gusts: sudden/ strong wind that blows for a very short time
Wind Dir: wind direction
Prcip Prob: probability of rain
Cloud Cover
Visibility
Visible Sats: number of satellites
Kp: geomagnetic disruption
Sats Locked: number of locked satellites
21Manual on Flycam Monitoring
Weather forecasts on the set of indicators in the next 24 hours include the followings;
Time: time in the day
Gusts: sudden/ strong wind that blows for a very short time
Temp (0C): Air temperature
Precip: probability of rain
Cloud Cover: cloud coverage
Visibility (km): sight distance
Visible Sats: number of satellites
Kp: Geometric disruption
Et. Sats Locked: number of locked satellites
Good To Fly: Yes/No at surveyed time
* Note: The green part is a favorable time for survey
Optimum flight altitude table includes the followings;
Altitude AGL: Altitude for checking
Wind Speed: Wind speed by altitude
Gust Speed: Strong wind speed by altitude
Temperature: temperature by altitude
* Note: The green part is a favorable altitude for survey.
The threshold of each parameter of weather conditions can be set up in the application, so that the operator should properly and regularly check/update the setting status.
JICA/SNRM Project22
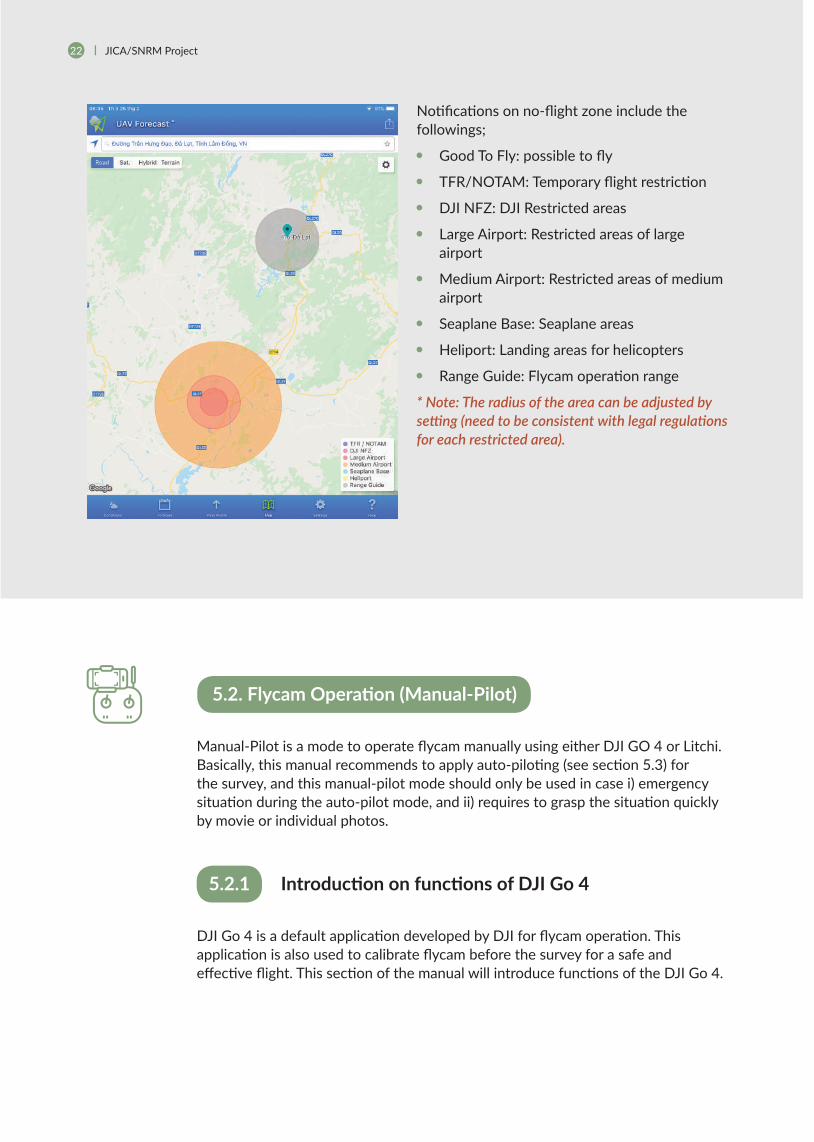
Notifications on no-flight zone include the followings;
Good To Fly: possible to fly
TFR/NOTAM: Temporary flight restriction
DJI NFZ: DJI Restricted areas
Large Airport: Restricted areas of large airport
Medium Airport: Restricted areas of medium airport
Seaplane Base: Seaplane areas
Heliport: Landing areas for helicopters
Range Guide: Flycam operation range
* Note: The radius of the area can be adjusted by setting (need to be consistent with legal regulations for each restricted area).
5.2. Flycam Operation (Manual-Pilot)
Manual-Pilot is a mode to operate flycam manually using either DJI GO 4 or Litchi. Basically, this manual recommends to apply auto-piloting (see section 5.3) for the survey, and this manual-pilot mode should only be used in case i) emergency situation during the auto-pilot mode, and ii) requires to grasp the situation quickly by movie or individual photos.
DJI Go 4 is a default application developed by DJI for flycam operation. This application is also used to calibrate flycam before the survey for a safe and effective flight. This section of the manual will introduce functions of the DJI Go 4.
5.2.1 Introduction on functions of DJI Go 4

23Manual on Flycam Monitoring
Select the device for the operation
Information interface of DJI Go 4
Device connection notification
Firmware update and restricted area
User information management
Manuals

JICA/SNRM Project24
3
1
2
9 10 8
1
4
5
11
6
7
1 Compass and map
2 Distance notification
3 Take-off and return buttons
4 Gimbal shooting angle control bar
5 Video recording and photo shooting switch
Main operation interface
6 Image parameter setting
7 Images preview
8 Technical parameter of image
9 Notification of favorable conditions
10 Signal and battery status notification
11 General setting
General setting
Unit setting
Map and flight route setting
Image sharing setting
Device status warning
Information about firmware

25Manual on Flycam Monitoring
Remote Controller Settings
Calibrate controller (if misaligned)
Control type: recommended mode 2 – default
Shortcut customization (function)
Connecting controller to Flycam (on the first use)
Visual Navigation Settings
Customized directions: this setting table is used for flycam to automatically avoid obstacles based on sensor (use the flight mode P in the main operator’s setting section)
Main Controller Settings
Flight mode setting: P/A/F
Return-to-Home Altitude (RTH): must be higher than surrounding obstacles
Flight height and distance setting
Advanced setting:
Operation lag
Sensitivity
Sensor and compass
CSC setting (emergency stop)

JICA/SNRM Project26
Image Transmission Settings
Frequency setting: to ensure the best connec-tion of the device to the controller, including 2 frequencies 2.4Ghz and 5.8Ghz. Recommend to switch to the frequency 5.8Ghz in interfer-ence-prone areas
Gimbal Settings
Information about battery status
Gimbal rotation mode
Calibrate Gimbal
Aircraft Battery
Information about battery status
Low battery warning
Smart Return-to-Home
Time to Discharge

27Manual on Flycam Monitoring
Image setting:
Calibrate iso, shutter, AV
Calibrate image scale, format,...
Memory card removal
In order to ensure a safe survey, the operator should calibrate the device via DJI Go 4 application. Calibrations are required for sensor, compass, controller, and gimbal.
Step 1: Put the aircraft on a flat, wide, airy surface far from metal and magnetic objects, and remove propellers from main aircraft
Step 2: Turn on the controller, aircraft and start DJI Go 4 on the tablet and wait for a stable connection between the devices
Step 3: Calibrate the functions in the following order;
Sensor: Select General Settings> Main Controller Settings> Advanced Settings> Sensors> IMU> Calibrate IMU. Rotate the aircraft as guided on the screen. After the completion, place the aircraft at the original position and press Restart.
Compass: Select General Settings> Main Controller Settings> Advanced Settings> Sensors> Compass> Calibrate Compass. Rotate the aircraft as guided at the height of 1.5m
Controller (recommend: do not operate Flycam in the same direction with the controller): Select General Settings> Remote Controller Settings> Remote Controller Calibration> Calibrate. Pull 2 control arms and Gimbal rotating rod to the directions respectively.
Gimbal (recommend: Conduct Gimbal to obtain misaligned images): General Settings> Gimbal Settings> Gimbal Auto Calibrate. Wait for the aircraft to auto-calibrate.
5.2.2 Pre-survey calibrations

JICA/SNRM Project28
5.2.3 Manual Flycam Operations
1. Connect with the controller using USB cable
1. Check battery status: press onceStart the controller: press twice and hold*Note: do the same steps for Flycam battery.
3. Set the table on mobile device holder
2. Roll up the cable neatly
2. If “Connected” is shown, it means Flycam is ready to operate
4. Check the connection with the tablet
Please follow the instruction as follows;
Step 1: Check the connection among controller, tablet and aircraft
Step 2: Check battery status and connection notification
29Manual on Flycam Monitoring
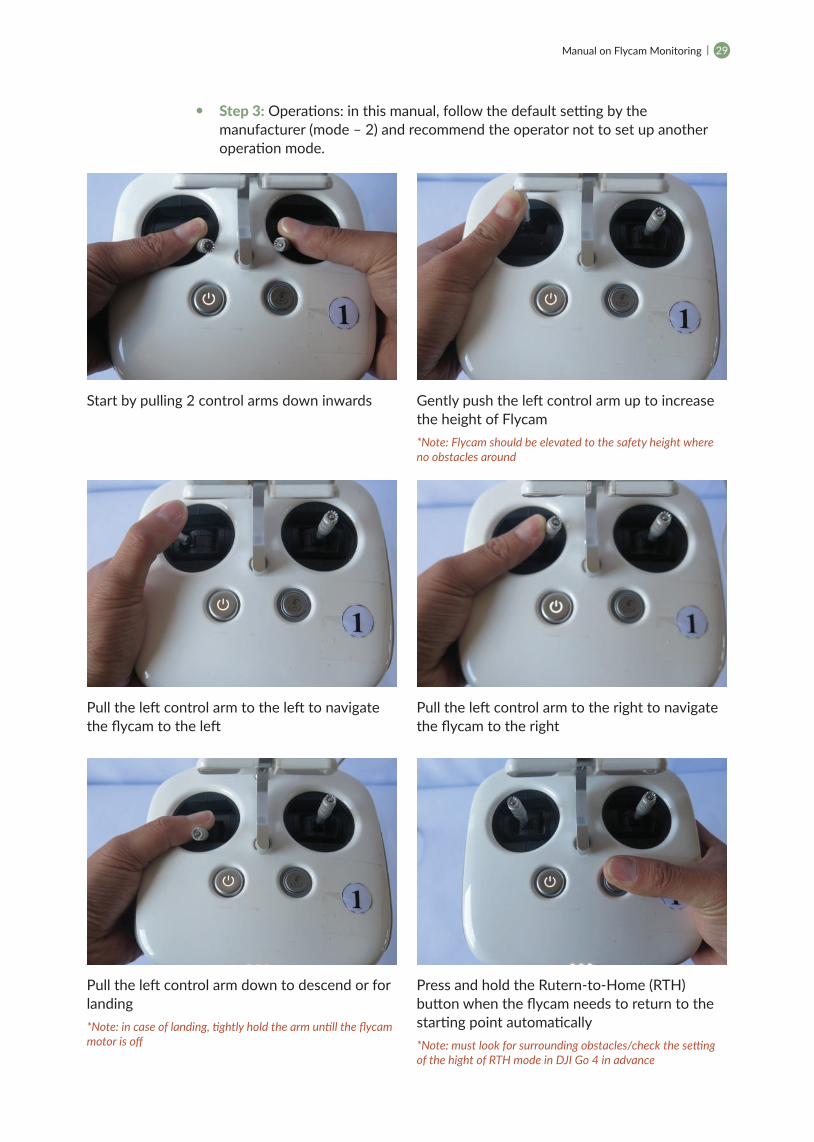
Start by pulling 2 control arms down inwards
Pull the left control arm to the left to navigate the flycam to the left
Pull the left control arm down to descend or for landing*Note: in case of landing, tightly hold the arm untill the flycam motor is off
Gently push the left control arm up to increase the height of Flycam*Note: Flycam should be elevated to the safety height where no obstacles around
Pull the left control arm to the right to navigate the flycam to the right
Press and hold the Rutern-to-Home (RTH) button when the flycam needs to return to the starting point automatically *Note: must look for surrounding obstacles/check the setting of the hight of RTH mode in DJI Go 4 in advance
Step 3: Operations: in this manual, follow the default setting by the manufacturer (mode – 2) and recommend the operator not to set up another operation mode.

JICA/SNRM Project30
Push the right control arm up so that the flycam moves forwards
Pull the left control arm to the left to navigate the flycam to the left
Turn the Gimbal control button to rotate Gimbal up or down
Press Record button to switch and record movie
Pull the right control arm down so that the flyc-am moves backwards
Pull the left control arm to the right to navigate the flycam to the right
Turn the camera setting to get the best data
Press Shutter button to take snapshot
* Notes on flycam movement operations: the controller’s direction need to be matched with the flycam’s direction (Gimbal direction) to avoid mis-control
31Manual on Flycam Monitoring
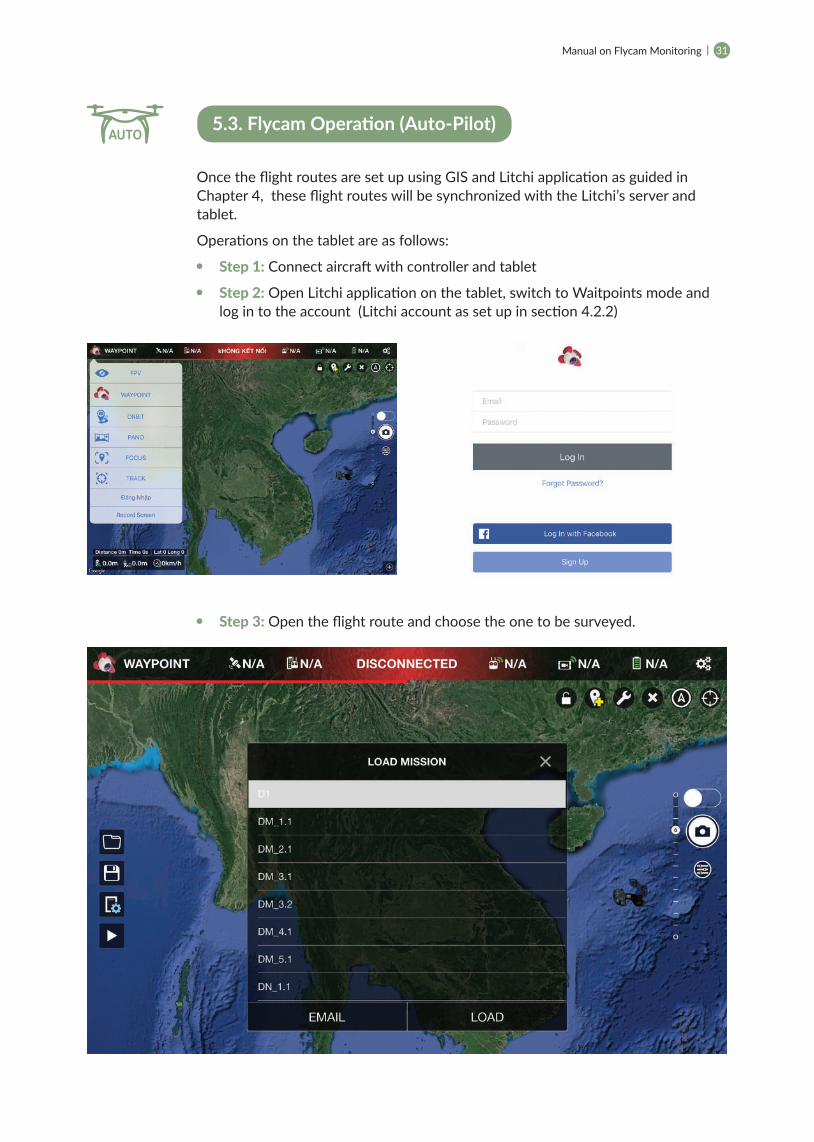
5.3. Flycam Operation (Auto-Pilot)
Once the flight routes are set up using GIS and Litchi application as guided in Chapter 4, these flight routes will be synchronized with the Litchi’s server and tablet.
Operations on the tablet are as follows:
Step 1: Connect aircraft with controller and tablet
Step 2: Open Litchi application on the tablet, switch to Waitpoints mode and log in to the account (Litchi account as set up in section 4.2.2)
Step 3: Open the flight route and choose the one to be surveyed.

JICA/SNRM Project32
Step 5: Select Play ( ) button to start the auto flight operation.
Notes:
Switch the video recording to image shooting mode (if needed)
Turn Gimbal down to the ground when the route is started.
Always check the controller’s screen for trouble shooting when needed.
During the flight, Flycam may miss the shooting point sometimes, in that case, the operator need to add the shooting point manually
Recommend to Format the memory card before survey (01 only before the first flight)
Recommend to use Clear Cache function (do not Format the card) of DJI Go 4 after the completion of each flight.
Step 4: Set up and check required technical parameters
Heading: Custom
Finish Action: RTH
Path Mode: Straight Lines
Cruising Speed: 54.0km/h
Max Flight Speed: 54.0km/h
Default Curve Size: 0%
Default Gimbal Pitch Mode: Disable
Rotations Direction: Managed
Attitude: 500m (check for each point)

33Manual on Flycam Monitoring
5.4. Measures for Emergency Situations
This section guides the readers on how to deal with emergency cases during the flycam operation in order to avoid or mitigate any severe damages, accidents, or low quality of collected data.
Emergency Situation Measures/ Required Actions
Rain/ Frog Phantom 4 pro is not waterproof product so when it starts rain or deep frog during flight operation, following measures should be taken;
Open DJI GO 4 and cancel the on-going flight (auto-pilot mode) and select “RTH (Return to Home)”. During the return, it is recommended to lower the height using the control arm to save time and avoid risks (Note: Keep checking on the screen to avoid unexpected crashes)
After landing, immediately check the flycam status; preliminary dry the device using the dehumidifying agent.
Dehydrate the device after the survey (using the anti-moisture box provided by SNRM project).
Magnetic field interference
Due to affection of the high-voltage power line/ other electronic devices which have strong magnetic field, flycam might be unable to take off and/ or control;
Check surrounding conditions to avoid the locations affected by the above-mentioned factors.
Reset the compass and sensor
Strong wind In case of strong wind, although Phantom 4 Pro is highly stable and less prone to accidents due to strong wind, following measures should be taken;
Before Flight
Not to operate when “UAV Forecast” shows that wind speed is more than 10m/s
Design and set up suitable routes (recommend: max. 30 survey points at the height of 500m and the distance to the furthest point of 3 km or less)
When there are the possibilities of sudden changes of weather conditions, it is highly recommended to reduce the number of survey points, dividing into smaller ones to ensure safety

JICA/SNRM Project34
Emergency Situation Measures/ Required Actions
Strong wind During Flight
When the flight is required to cancel due to the high wind speed, press RTH and lower the height. Keep watching the camera of flycam and in case not enough battery power is remaining for returning home, find a suitable place for flycam to land. Locate the landing position using maps and coordinates to search for flycam.
When operator did the sudden stop in the conditions of strong wind with high-speed of aircraft, there is a possibility of “turn-over” the aircraft which may result in turning off the motors and damage the aircraft. In this case, quickly conduct the overhead re-start (same as the take-off procedures). Note: this should be done quickly (within 2 seconds)
Weak signal Weak signal transmission is often caused by too long distance between controller and aircraft, interference, or the way of operation of the devise by users. Following measures should be taken;
Before Flight
Ensure two antennas of controller in parallel each other and direct the antennas to the aircraft
Design and set up suitable routes (recommend: max. 30 survey points at the height of 500m and the distance to the furthest point of 3 km or less)
Set RTH mode as finish action on Litchi before the survey
During Flight
Frequently check the monitor on the controller (even in auto-pilot mode) to take required action, i.e. cancel the auto-pilot mode and press RTH at early stage
Stuck to tree branches, obstacles
During the operation, the operator may mistakenly make flycam stuck to tree branches and obstacles, and motors burnt with loss of control. In this case, following measures/ actions are required;
Before Flight
Conduct the survey in suitable and obstacle-free areas.
Check the flight mode with sensor (P-mode)
After the accident
If the situation happens, quickly turn the motor off (CSC command) using the controller (Pull the control arm to the left and hold RTH button). Check and maintain the device (if needed)
Check the last coordinates sent by the flycam to the controller to locate the crash position

35Manual on Flycam Monitoring
6 DATAPROCESSING
CHAPTER
Manual on Flycam Monitoring 35

JICA/SNRM Project36
(7) https://pix4d.com/product/pix4dmapper-photogrammetry-software/
Pix4Dmapper(7) is a photogrammetry software for professional flycam-based mapping, using the photographs taken by flycam. It can produce various types of georeferenced 2D maps and 3D models, including digital surface and terrain models, orthomosaic maps, index maps (e.g. NDVI, NDRE), etc. With additional specialized camera such as multispectral or thermal camera, the range of data utilization can be significantly extended (e.g. monitoring growth of crops, forest fire, etc.).
SNRM project has procured one permanent license and two laptops, and handed over to BNBNPMB and DNWPFMB respectively.
Data requirements for processing of Pix4Dmapper are as follows;
Data from flycam: recommend to apply auto-pilot mode in order to secure the overlap rates among adjacent images are 70-80%
Computer for data processing: minimum specifications are CPU Intel core i5 6th generation, RAM: 8GB; separate SSD and VGA hard drives (Geforce or ATI)
Internet connection: broadband internet, stable during the processing of Pix4Dmapper
Step 1: Open Pix4D Desktop application, log in to the provided account, and select Pix4Dmapper Pro
6.1. Pix4Dmapper
6.2. Data Processing

37Manual on Flycam Monitoring
Step 2: In the main interface of the application, select “New Project” to process the set of new images
Step 3: In the New Project interface, enter the following information:
Name: enter the project name (recommend to name for easy identification of the area name and date of survey)
Create In: project saving location
Project Type: select “New Project” to create new project or select “Project Merged from Existing Projects” to merge/combine with the existing data.
After finishing the above steps, select “Next”

JICA/SNRM Project38
Step 4: In the next interface of “New Project”, select the images to be processed as following:
Add Image: select the images to be processed
Add Directories: select folder to store image
Remove Selected: to remove 1 or more selected images (if required)
Clear List: to remove all selected images (if required)
After completion of selecting the images, select “Next”

39Manual on Flycam Monitoring
Step 5: Use default parameters for image geolocation (image frame - do not change) as shown below and select “Next”

JICA/SNRM Project40
In the next interface (Select Output Coordinate System), use default parame-ters and select “Next”
Select “3D Maps”, check “Start Processing Now” and select “Finish”.

Manual on Flycam Monitoring 41
7 EQUIPMENT MANAGEMENT& MAINTENANCE
CHAPTER
Manual on Flycam Monitoring 41

JICA/SNRM Project42
* Saigon Hobby is the recommended service centers by DJI. The shop staff is officially trained by DJI and have the capability to repair DJI products. TLC Hobby is the distributing agent which SNRM purchased the flycam.
Proper management of the flycam relevant equipment is also another important topic to secure the safe flight operation for long term. Flycam Log Book (Annex 1) is recommended to keep record of the required flight log. The assigned officials shall keep records every flight and be responsible to report to the manager of the organization at least monthly basis.
Also, all the equipment shall be stored in an-ti-moisture box provided by SNRM. DJI recom-mends to keep the temperature between 22-28 degrees, and moisture level between 30-40% as indicated in the Flycam Check List (Annex 2).
The assigned officials are responsible for keep the equipment clean all the time and check the any damages or distortion to the equipment every flight as indicated in the flycam check list. DJI recommends taking regular inspections when flight times exceeds more than 200 times or accumulated duration of the flight is more than 50 hours. In Vietnam, there are some distributing agents which can provide the inspection/ maintenance services. The detail information of the agents are listed in Table 7.1.
Shop Name* Saigon Hobby Truong Thinh Branch (TLC Hobby)
Address 15 Ly Thai To, Ward 1, District 10 HCMC
49B Tu Xuong, Ward 7, District 3, HCMC
Contact 1900.5555.12 - Ext [email protected]
02862750638
7.1. Equipment Management
7.2. Equipment Maintenance
Table 7.1. List of Distributing Agents for Flycam Inspection/ Maintenance (as of Jan 2019)
All equipment should be stored in anti-moisture box
43Manual on Flycam Monitoring
ANNEXES
Manual on Flycam Monitoring 43

JICA/SNRM Project44
No
Dat
eO
pera
tor
Loca
tion
to
be u
sed
Flig
ht m
ode
Dep
artu
re a
nd
Arr
ival
poi
ntD
epar
ture
tim
eA
rriv
al ti
me
Flig
ht ti
me
Accu
mul
ated
fli
ght
Rem
ark
SốN
gày
Ngư
ời v
ận
hành
Địa
điể
m
sử d
ụng
Chế
độ b
ayĐ
iểm
đi v
à đế
nTh
ời g
ian
cất c
ánh
Thời
gia
n hạ
cá
nhTh
ời g
ian
bay
Thời
gia
n ba
y lu
ỹ tu
yến
Ghi
chú
1 8/
22/1
8Đ
inh
Văn
TýG
iang
Ly
stati
onTự
độn
gVă
n ph
òng
vườn
đế
n G
iang
Ly
10:4
716
:30
5:43
5:43
EXA
MPL
E
Ann
ex 1
. Fly
cam
Log
Boo
kFL
YCA
M L
OG
BO
OK
(PH
AN
TOM
4 P
RO N
O.1
)

45Manual on Flycam Monitoring
Annex 2. Fly Cam Check List
Regular Inspection
No damage/ distortion to the aircraft (including propellers)
No falling off of screw
Enough cash space in the tablet
Connection of remote controller and the tablet is no problem
Firmware for aircraft and remote controller, and applications (DJI GO 4/ Litchi) are updated as latest version
Weekly flight operation check on aircraft (without propellers), camera function, etc.
Keep clean on all equipment and store in anti-moisture box (Temparature: 22-28 degrees, Moisture: 30-40%)”
It is recommended to bring the aircraft to the distributing agent/ DJI support for regular inspection when its flight operation time is more than 200 times or exceed 50 hours as accumulated flight time
Adjustment When Firmware is Updated
Conduct firmware updates only when time for test flight can be secured
Confirm the firmware is updated on all the batteries
Conduct test flight to check the updates work well
(Optional) Conduct IMU calibration on flat ground*1
(Optional) Conduct remote controller calibration on flat ground*1
*1: When conduct any calibration, please turn off your mobilephone, take off your watch or rings if any
Just Before Flight
Never operate in severe weather conditions (heavy wind speeds (excedding 10 m/s), rain, snow, smog, hail, lightning, tornadoes or hurricanes) and before dawn/ after sunset
Never operate when the operator drunk any alcohol drinks
No damage/ distortion to the aircraft (including propellers/ motor)
Remote controller, aircraft batteries and tablet are fully charged (A battery which has not been used for a while require full-discharge to full-charge)

JICA/SNRM Project46
Memory card is inserted to the aircraft
Propellers are in good condition and securely tightened on the aircraft
Firmware for aircraft and remote controller, and applications (DJI GO 4/ Litchi) are latest version
Temperature of batteries are between 20-40 degrees
No battery error
Flight mode is set as [P-mode]
Set up the failsafe as [RTH] (Return-To-Home)
Set up the altitude of RTH
Set up the altitude limitation
Turn on the [Smart Go Home]
Turn on the [Obstacle detection function]
Check GPS signal (when no GPS signal or low signal (red colour); No operation) and compass status
Compass calibration (only when the DJI GO 4 app or the status indicator prompt to do)
Remember how to control the emergency stop
At Start of the Flight
Check the sound of motor/ propellers
Home point is updated properly
Check the obstacle around and sky
Control the aircraft to the height of your eyes to check whether the hovering is stable
Check the aircraft operation is normal
Check the wind speed on the screen all the time (less than 10m/s)
Check the status information all the time (On Screen Display (OSD) info, distance, altitude, GPS signal)
After Flight
No obstacles or risks in and around the landing course
Turn off the aircraft and remote-controller after confirming the motor is surely stopped
Confirm any damage or missing parts of aircraft
Clean when some dirty is confirmed
→ Back to regular inspection

47Manual on Flycam Monitoring
Battery Use
Do NOT allow the batteries to come into contact with any kind of liquid *1
Never use or charge swollen, leaky, or damaged batteries
Never install or remove the battery from the aircraft when it is turned on
Ensure the temperature of batteries are between 20 - 50 degrees*2
Clean battery terminals with a clean, dry cloth (NOT use any alcohol)
Make sure batteries are fully charged before each flight
*1: If the battery falls into water with the aircraft during flight, take it out immediately and put it in a safe and open area. Maintain a safe distance from battery until it is completely dry. Never use battery again, and dispose properly following the Vietnamese regulations regarding the disposal and recycling of batteries
*2: Otherwise, performance of the batteries would be significantly downgrade. Even when 100% charging is indicated on the screen, there are possibilities to suddenly fall down to 20% or so. When the tempature of batteries are less than 20 degrees, please make warm before use, or hovering in front of the controller
Battery Charging
Do NOT charge the battery near flammable materials or on flammable surfaces such as carpet or wood
Do NOT charge battery immediately after flight, because the battery tempature may be too high. Do NOT charge the battery until it cools down to near room tempeture (15-30 degrees)
Do NOT clean the charger with denatured alcohol or other flammable solvents
Never use a damaged charger
Keep monitoring the charging progress and disconnect the batteries when fully charged*3
Ensure the battery is turned off at all time during charging
Fully charge and discharge the battery at least once every 3 months to maintain battery health.
*3: The battery is designed to stop charging when it is full, but it is a good practice to monitor the charging progress
Annex 3. Battery Check List

JICA/SNRM Project48
Battery Storage
Store the battery in anti-moisture boxes provided by JICA SNRM project
Do NOT leave the battery near heat sources such as a furnace or heater
Do NOT leave the batteries inside of a vehicle on hot days. The ideal storage temperature is 22-28 degrees with 30-40% of moisture level
Keep the battery away from metal objects such as laptop, glasses, watches, hairpins, etc.
Never transport a damaged battery
Discharge the battery to 40-65% if it will NOT be used for 10 days or more. This can greatly extend the battery life*4
Remove batteries from the aircraft when stored for an extended period
Do NOT store the battery for an extended period after fully discharging it. Doing so may over-discharge the battery and cause irreparable batery cell damage
*4: The battery automatically discharges to below 65% when it is idle for more than 10 days to prevent it from swelling. Idle time threshold can be changed in the DJI GO 4 app. It taks approx 3 days to discharge the battery to 65% and moderate heat emitting is confirmed during the discharge process.
Battery Disposal
Dispose of the battery in specific recycling boxes only after a complete discharge. Do NOT place the battery in regular trash containers. Strictly follow Vietnamese regulations regarding the disposal and recycling of batteries


Related Documents