Molecular Plant-Microbe Interaction protocols Page 2 Introduction 3 Antibiotics and growth media 7 Plasmid DNA extraction 9 Cloning, competent cells and transformation 11 PCR, including arbitrary-prime PCR, ISomegonKm/hah and miniTn5 info 44 DNA sequencing protocols 48 Vacuum blotting and hybridisation 51 Dot blotting 52 Conjugation 53 Electroporation 54 Tn3 mutagenesis of cosmids 55 Gene expression (reporter gene) analysis 56 Cosmid library construction 62 Protein extraction and Western blot analysis 63 RNA isolation (TriZol) 64 Pulsed Filed Gel Electrophoresis 66 Whole Plasmid Analysis 67 Plasmid curing 68 In vivo expression technology (IVET) 73 Miscellaneous info and solutions 75 Plant pathogenicity tests 77 Apoplastic fluid extraction 80 Bacterial fitness tests (plant and in vitro)

Welcome message from author
This document is posted to help you gain knowledge. Please leave a comment to let me know what you think about it! Share it to your friends and learn new things together.
Transcript

Molecular Plant-Microbe Interaction protocols Page 2 Introduction 3 Antibiotics and growth media 7 Plasmid DNA extraction 9 Cloning, competent cells and transformation 11 PCR, including arbitrary-prime PCR, ISomegonKm/hah and miniTn5 info 44 DNA sequencing protocols 48 Vacuum blotting and hybridisation 51 Dot blotting 52 Conjugation 53 Electroporation 54 Tn3 mutagenesis of cosmids 55 Gene expression (reporter gene) analysis 56 Cosmid library construction 62 Protein extraction and Western blot analysis 63 RNA isolation (TriZol) 64 Pulsed Filed Gel Electrophoresis 66 Whole Plasmid Analysis 67 Plasmid curing 68 In vivo expression technology (IVET) 73 Miscellaneous info and solutions 75 Plant pathogenicity tests 77 Apoplastic fluid extraction 80 Bacterial fitness tests (plant and in vitro)

Molecular Microbiology and Molecular Plant-Microbe Interaction Experimental Protocols
This file is a collection of experimental protocols for molecular microbiology and molecular plant-microbe interactions. It is not exhaustive and as always there will be many variants of the methods used by others. The authors of the protocols in here are: Dr Dawn Arnold (Faculty of Applied Sciences, UWE, Bristol), Dr Christina Moon (AgResearch, Palmerston North, New Zealand), Dr Stephen Giddens and Dr Arantza Rico (Dept of Plant Sciences, University of Oxford), Prof Paul Rainey and Dr Xue-Xian Zhang (Massey University, New Zealand) and myself. Almost generic tips are as follows: Pseudomonas grows at 25-28oC and is killed at temperatures above 34oC – thus don’t incubate at 37oC. Escherichia coli grows at 37oC; it can be grown at lower temperatures if you want to slow its growth. Bacteria should be streaked out to produce single colonies – one colony represents a pure culture derived from one cell. Use single colonies for subculturing or inoculating broths. Wildtype bacteria mutate rapidly – do NOT use old cultures. Culture bacteria on agar and use immediately – do not use Pseudomonas cultures over 3-4 days old.

Antibiotics and Growth media
Antibiotics
Name Dilution Vol. in 10 ml Vol. in 20 ml Vol. in 400 ml Ampicillin 25 mg / ml in
H20 50 µl 100 µl
Tetracycline 10 mg / ml in 50% Ethanol in
H20
10 µl 20 µl 400 µl
Kanamycin 10 mg / ml in H20
25 µl 50 µl 1 ml
Rifamipicin 10 mg / ml in MeOH
100 µl 200 µl 4 ml
Chloramphenicol 3 mg / ml in 10 % Ethanol in
H20
500 µl 1 ml
Streptomycin 200 mg /ml in H20
50 µl 100 µl
Spectinomycin 60 mg / ml in H20
50 µl 100 µl
Naladixic acid 20 mg / ml in H20
10 µl 20 µl
Nitrofurantoin 100 mg/ml in DMSO/DMF
10 µl 20 µl 400 µl
XGal 20 mg/ml in DMSO/DMF
40 µl
IPTG 20 mg/ml in water
40 µl
Note that Rifampicin, Nitrofurantoin (NF) and XGal should always be added to agar either in the bottle or in the plate; if NF is added to a plate you will need to mix each plate individually immediately after addition due to the antibiotic precipitating out of solution. NF should ALWAYS be made fresh. Rif and Tet are light sensitive and are usually stored in a foil-covered universal at -20oC; most others are OK at -20oC or 4oC. Kings B medium 20 g /l Protese peptone 1.5 g/l K2HPO4
1.5 g/l MgSO4.7H2O 10 ml/l glycerol Deionised water. Agar 15 g / litre (6 g / 400 ml bottle)

Antibiotics and Growth media
LB medium 10 g/l Tryptone (Bacto Diffco) 5 g/l Yeast extract 10 g/l Sodium Chloride Distilled water. For solid media add 15 g/l agar (6 g / 400 ml bottle). Hrp-inducing minmal medium is from Mudgett et al. 1999 1l 500ml KPO4 pH 5.8* 50mM 4.25ml K2HPO4, 45.75ml KH2PO4 2.125ml K2HPO4, 22.875ml KH2PO4(NH4)2SO4 132.1 7.6mM 1g 0.5g MgCl2 203.3 1.7mM 0.35g 0.175g NaCl 58.44 1.7mM 0.1g 0.05g fructose 180.2 10mM 1.8g 0.9g mannitol 182.2 10mM 1.8g 0.9g Filtersterilize! MMP MEDIUM Robert-Gero M, Poiret M, Cohen GN. (1970) The aspartate kinase of Pseudomonas putida. Regulation of synthesis and activity. Biochim Biophys Acta. 206(1):17-30. Make up stock solutions (in one litre): A 73.4 g Na2HPO4 and 32.4 g KH2PO4, Autoclave [50X]
B 20.5 g MgSO4.7H2O, Autoclave [50X]
C 1 M MSG (mono-sodium L-glutamate), filter-sterilize [50X]
D 1.83 g FeSO4.7H2O, add 1 drop of concentrated H2SO4 [1000X]
To prepare MMP medium in 1 liter, mix: 20 ml A; 20 ml B; 20 ml C; 1 ml D and 939 ml H2O C can be replaced by other carbon and nitrogen sources (at 20 mM).
Antibiotics and Growth media
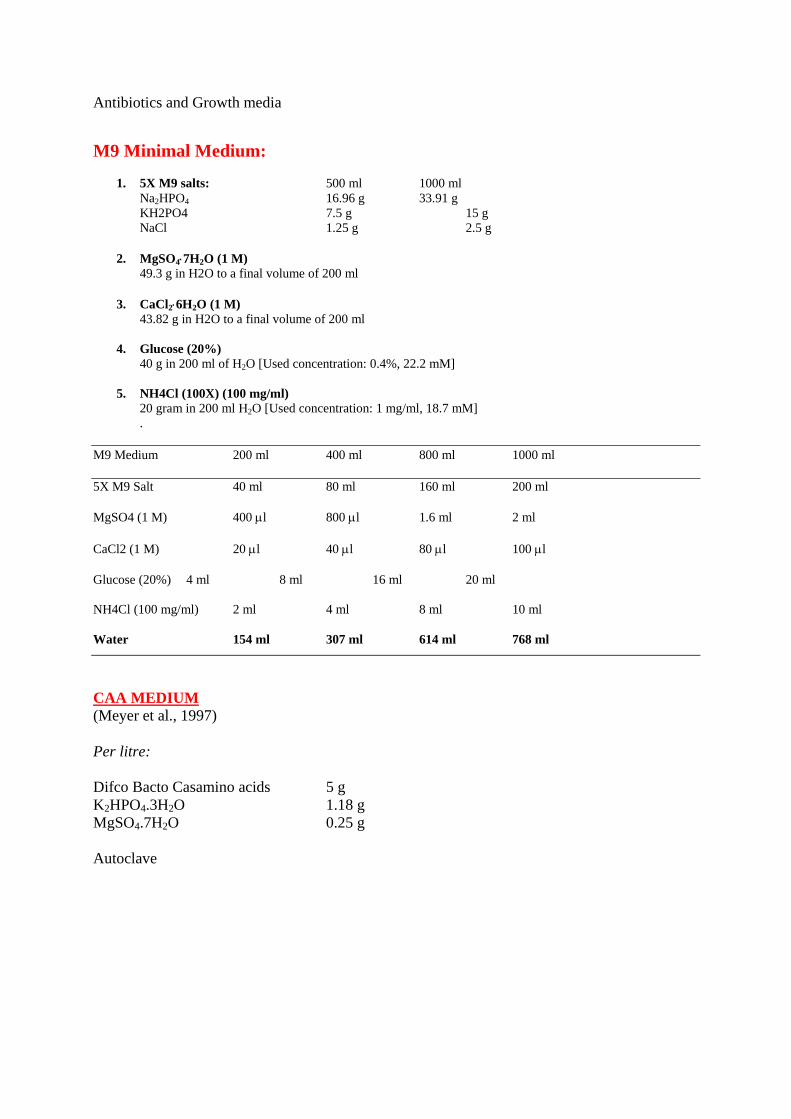
M9 Minimal Medium:
1. 5X M9 salts: 500 ml 1000 ml Na2HPO4 16.96 g 33.91 g KH2PO4 7.5 g 15 g NaCl 1.25 g 2.5 g
2. MgSO4⋅7H2O (1 M) 49.3 g in H2O to a final volume of 200 ml
3. CaCl2⋅6H2O (1 M) 43.82 g in H2O to a final volume of 200 ml
4. Glucose (20%)
40 g in 200 ml of H2O [Used concentration: 0.4%, 22.2 mM]
5. NH4Cl (100X) (100 mg/ml) 20 gram in 200 ml H2O [Used concentration: 1 mg/ml, 18.7 mM] .
M9 Medium 200 ml 400 ml 800 ml 1000 ml
5X M9 Salt 40 ml 80 ml 160 ml 200 ml
MgSO4 (1 M) 400 µl 800 µl 1.6 ml 2 ml
CaCl2 (1 M) 20 µl 40 µl 80 µl 100 µl
Glucose (20%) 4 ml 8 ml 16 ml 20 ml
NH4Cl (100 mg/ml) 2 ml 4 ml 8 ml 10 ml
Water 154 ml 307 ml 614 ml 768 ml
CAA MEDIUM (Meyer et al., 1997) Per litre: Difco Bacto Casamino acids 5 g K2HPO4.3H2O 1.18 g MgSO4.7H2O 0.25 g Autoclave
Antibiotics and Growth media
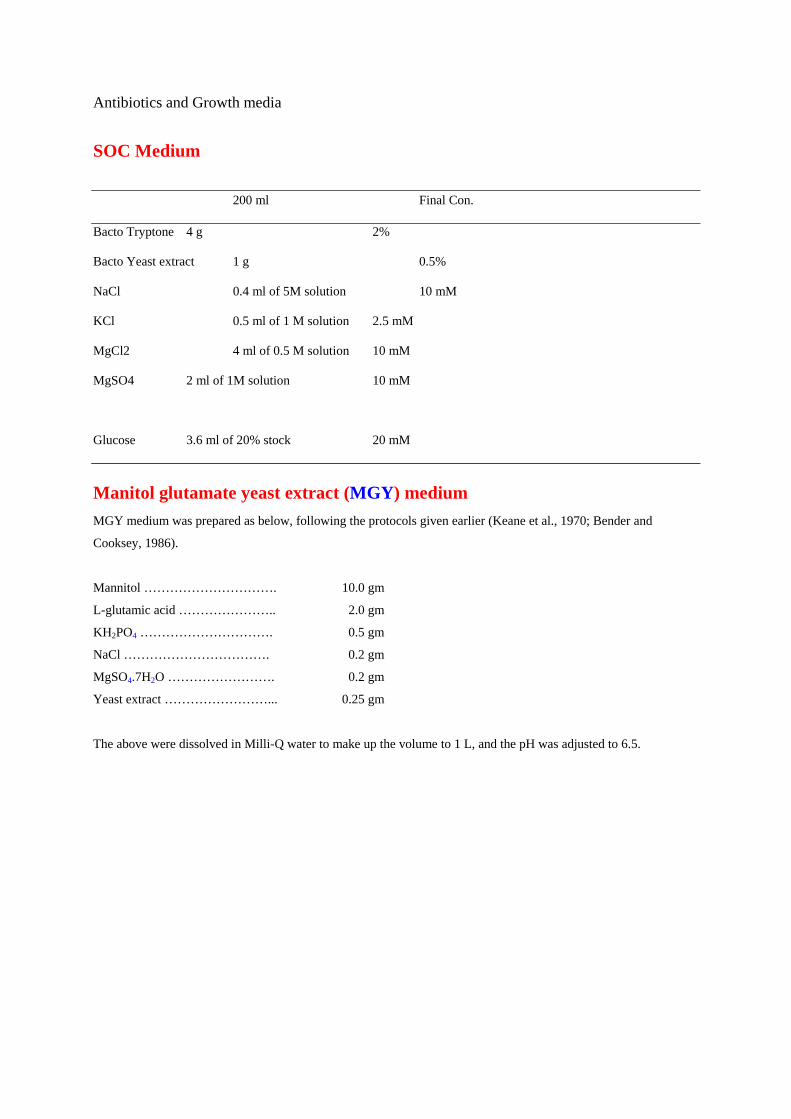
SOC Medium
200 ml Final Con.
Bacto Tryptone 4 g 2%
Bacto Yeast extract 1 g 0.5%
NaCl 0.4 ml of 5M solution 10 mM
KCl 0.5 ml of 1 M solution 2.5 mM
MgCl2 4 ml of 0.5 M solution 10 mM
MgSO4 2 ml of 1M solution 10 mM
Glucose 3.6 ml of 20% stock 20 mM
Manitol glutamate yeast extract (MGY) medium MGY medium was prepared as below, following the protocols given earlier (Keane et al., 1970; Bender and
Cooksey, 1986).
Mannitol …………………………. 10.0 gm
L-glutamic acid ………………….. 2.0 gm
KH2PO4 …………………………. 0.5 gm
NaCl ……………………………. 0.2 gm
MgSO4.7H2O ……………………. 0.2 gm
Yeast extract ……………………... 0.25 gm
The above were dissolved in Milli-Q water to make up the volume to 1 L, and the pH was adjusted to 6.5.

Extracting plasmid DNA from bacterial cells These days, kits such as QIAGEN QIAPREP miniprep kits are used to extract DNA. The
methods below are 2 variants that can be used. Total DNA is extracted by Puregene kit. Alkaline lysis mini prep method (with out phenol) This method is used to extract small amounts of plasmid DNA frrom bacterial cultures. 1. Inoculate 10 ml LB broth containing appropriate antibiotic with a single bacterial colony.
Incubate at appropriate temperature overnight. 2. Pour 1.5 ml of the culture into an Eppendorf and centrifuge for 1 min. 3. Remove the medium leaving the pellet as dry as possible. 4. Resuspend the pellet by vortexing in 100 µl of solution I (T.E.). 5. Add 200 µl of a freshly prepared solution II. Close tubes and mix by inverting the tube
rapidly two or three times. Do not vortex. Store the tube on ice for 5 min. 6. Add 150 µl of ice-cold solution III. Vortex gently in an inverted position for 10 sec. Store on
ice for 5 min. 7. Spin at full speed for 5 min. Transfer supernatant to a fresh tube. 8. Add 900 µl of absolute ethanol. Mix by vortexing. Stand at room temperature for 2 min. 9. Spin for 5 min. Remove supernatant. Add 1 ml of 70 % ethanol and vortex briefly and spin
for 1 min. 10. Remove supernatant and dry pellet. 11. Dissolve pellet in 50 µl of T.E. Digest 1-10 µl of DNA for a high copy number plasmid and 25 µl for a low copy number plasmid. Native plasmids for Pseudomonas strain; carry out two mini preps, resuspend in 20 µl, combine DNAs and digest all of it. Solutions All solutions must be sterile. Solution I (T.E.) 10 mM TrisHCl pH8.0 (for 200 ml use 2 ml of 1M) 1 mM EDTA pH8.0 (for 200 ml use 0.4 ml of 0.5 M)

Solution II 0.2 M NaOH (for 10 ml use 0.2 ml of 10 M) 1 % SDS (for 10 ml use 1 ml of 10 %) Make fresh from stocks each time, use sterile water and a sterile container. Solution III 5M Potassium acetate in 100 ml use 60 ml glacial acetic acid in 100 ml use 11.5 ml Water in 100 ml use 28.5 ml Alkaline lysis mini prep method This method is used to extract small amounts of plasmid DNA frrom bacterial cultures. 1. Inoculate 10 ml LB broth containing appropriate antibiotic with a single bacterial colony.
Incubate at appropriate temperature overnight. 2. Pour 1.5 ml of the culture into an Eppendorf and centrifuge for 1 min. 3. Remove the medium leaving the pellet as dry as possible. 4. Resuspend the pellet by vortexing in 100 µl of solution I (T.E.). 5. Add 200 µl of a freshly prepared solution II. Close tubes and mix by inverting the tube
rapidly two or three times. Do not vortex. Store the tube on ice for 5 min. 6. Add 150 µl of ice-cold solution III. Vortex gently in an inverted position for 10 sec. Store on
ice for 5 min. 7. Spin at full speed for 5 min. Transfer supernatant to a fresh tube. 8. Add 300 µl of phenol:chloroform (1:1). Mix by vortexing. Spin for 2 min. and transfer upper
aqueous phase to a fresh tube. 9. Add 1/10 volume 5 M sodium acetate and 900 µl of absolute ethanol. Mix by vortexing.
Stand at room temperature for 2 min. 10. Spin for 5 min. Remove supernatant. Add 1 ml of 70 % ethanol and vortex briefly and spin
for 1 min. 11. Remove supernatant and dry pellet. 12. Dissolve pellet in 50 µl of T.E. Digest 1-10 µl of DNA for a high copy number plasmid and 25 µl for a low copy number plasmid. Native plasmids for Pseudomonad strain; carry out two mini preps, resuspend in 20 µl, combine DNAs and digest all of it.

Cloning and transformation This section describes how to clone DNA into plasmids and then transform the cloned DNA into competent Escherichia coli cells. Note that gloves should be worn and care needs to be taken for obtaining efficient ligations (ie concentration of vector and insert DNA). Ligation Vector 1. Digest vector; pUC18 10 µl Enzyme 1 µl Buffer 2 µl Water 7 µl Incubate at 37 oC for 1.5 hr. 2. Add 2.5 µl CIAP (dil 1 in 10) and 2.5 µl Buffer. 3. Incubate at 37 oC for 15 min. 4. Add 2.5 µl CIAP (dil 1 in 10). 5. Incubate at 37 oC for 15 min. 6. Add 30 µl of phenol : chloroform (1 : 1). 7. Spin for 10 min. 8. Transfer supernatant to fresh tube add 60 µl ethanol and 3 µl Na acetate. 9. Spin for 10 min and wash pellet with 70 % ethanol. 10. Dry pellet and resuspend in 20 µl of T.E. Insert Cut as desired and treat as steps 6 to 10 above. Resuspend in 10 µl. Ligation DNA x µl Vector 2 µl Ligase 1 µl Buffer 1 µl Water x µl Total 10 µl incubate for 4-6 hr or overnight at 16 oC.
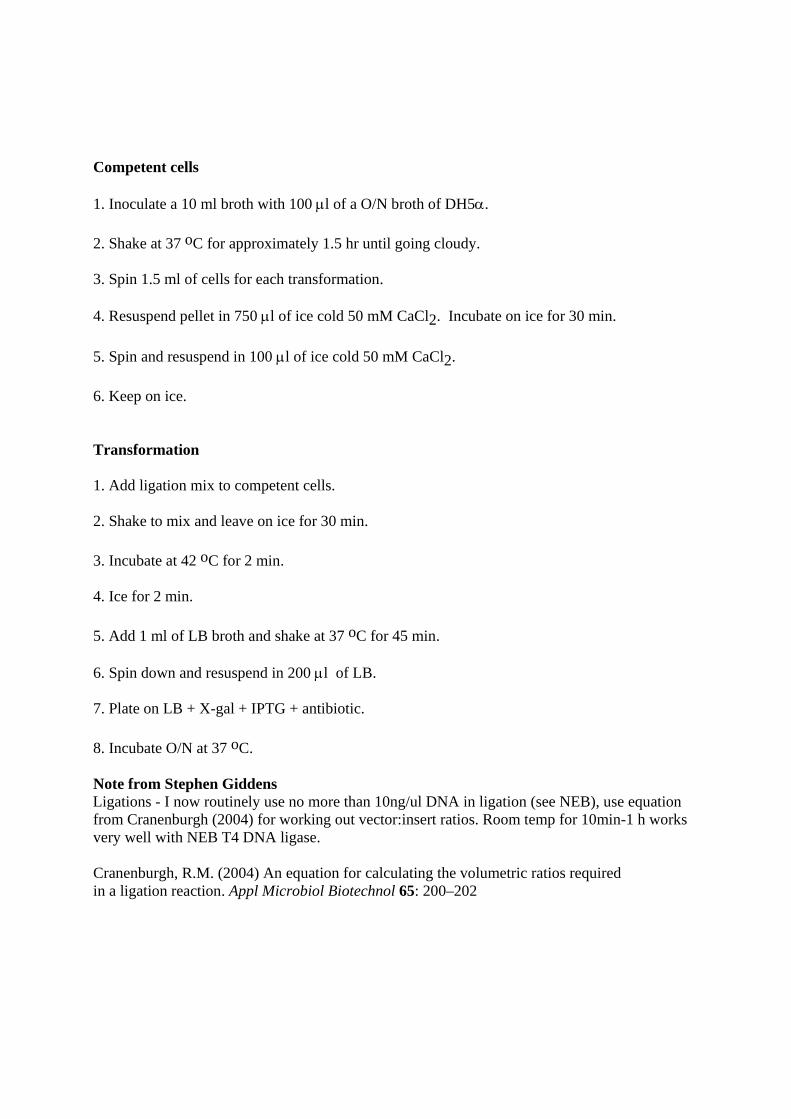
Competent cells 1. Inoculate a 10 ml broth with 100 µl of a O/N broth of DH5α. 2. Shake at 37 oC for approximately 1.5 hr until going cloudy. 3. Spin 1.5 ml of cells for each transformation. 4. Resuspend pellet in 750 µl of ice cold 50 mM CaCl2. Incubate on ice for 30 min. 5. Spin and resuspend in 100 µl of ice cold 50 mM CaCl2. 6. Keep on ice. Transformation 1. Add ligation mix to competent cells. 2. Shake to mix and leave on ice for 30 min. 3. Incubate at 42 oC for 2 min. 4. Ice for 2 min. 5. Add 1 ml of LB broth and shake at 37 oC for 45 min. 6. Spin down and resuspend in 200 µl of LB. 7. Plate on LB + X-gal + IPTG + antibiotic. 8. Incubate O/N at 37 oC. Note from Stephen Giddens Ligations - I now routinely use no more than 10ng/ul DNA in ligation (see NEB), use equation from Cranenburgh (2004) for working out vector:insert ratios. Room temp for 10min-1 h works very well with NEB T4 DNA ligase. Cranenburgh, R.M. (2004) An equation for calculating the volumetric ratios required in a ligation reaction. Appl Microbiol Biotechnol 65: 200–202

Polymerase chain reaction (PCR) PCR is used for amplification of DNA sequences and cam amplify minute amounts (picogram) to large amounts (microgram). There are also many variants of PCR. Rules for primer design (if designing by eye and not a program): avoid 2 primers that have runs of 3 or more complementary bases (eg 3 AAA in 1 primer and 3 TTT in 2nd primer); avoid runs of 3 or more complementary bases within one primer; make the 3’ terminal base a G or a C – this is a GC clamp and is more stable (G bonds to C via 3 hydrogen bonds whereas A+T is 2 H-bonds). Primers can be designed so that they anneal to DNA at different temperatures between 50-70oC. The annealing temperature is based on DNA base composition and primer length. To calculate the annealing temperature of a primer, design a primer between 17-25 nucleotides in length. Count the number of G+C in the primer and multiply that by 4; calculate the number of A+T in the primer and multiply that number by 2. Add the two numbers together and you have your annealing temperature. The annealing temperature of the primer can be increased or decreased by increasing or decreasing the length of the primer or choosing regions with more GC or AT. Personally I aim for primers of between 64-68oC as the higher temperature provides higher stringency in the amplification process (ie less chance of non-specific amplification). When primers are ordered, dissolve them in water to get a final concentration of 100 pmol per µl. This is frozen at -20oC and is the main stock. Working stocks are made by 1 in 10 dilution of this stock in water and use in a 25 µl reaction. Extension times during PCR are related to enzyme efficiency – rule of thumb is 500 bp takes 30 seconds. Eg for a 1 kb fragment you need to use a 1 min extension time. Generally, QIAGEN Taq mastermix is a pretty good general and easy to use enzyme with fairly good fidelity. It produces A overhangs on amplified fragments which can then be cloned into PCR cloning vectors with T overhangs. It works at 72oC. A typical mix for this Taq is: 12.5 µl mastermix, 1 µl of each primer and 9.5//10.5 µl water depending on whether using 1 µl DNA or cells as template. A typical program would be (1) 94oC (10 min, cells; 3 min, DNA), (2) 94 oC for 30s, annealing temp of primers (30s), (3) 72/68 oC extension temp (dependent on enzyme) for xx seconds/minutes (depending on size of fragment), (4) cycle back to (2) 29 more times, (5) 72 oC for 10 min (if using a non-proofreader), (6) 10 oC for infinity. High fidelity enzymes such as Pfx, Pfu, KOD etc are proofreading enzymes and they usually work at 68oC (check instructions). They usually create blunt-ended PCR fragments and thus need blunt end cloning vectors.

PRIMERS (5'-3') AND PCR PROGRAMS FOR LOCATING TRANSPOSON IN CHROMOSOME
CEKG 2A GGC CAC GCG TCG ACT AGT ACN NNN NNN NNN AGA GCEKG 2B GGC CAC GCG TCG ACT AGT ACN NNN NNN NNN ACG CCCEKG 2C GGC CAC GCG TCG ACT AGT ACN NNN NNN NNN GAT ATCEKG 4 GGC CAC GCG TCG ACT AGT AC
Tnpho A-II GTG CAG TAA TAT CGC CCT GAG CAhah-1 ATC CCC CTG GAT GGA AAA CGGhah-2 AAA CGG GAA AGG TTC CGT CCA
mTn5PCRF-1 CAT CGA CTG TGG CCG GCT GGmTn5PCRF-2 CTC CCG ATT CGC AGC GCA TCmTn5 OE end ACT TGT GTA TAA GAG TCA G
miniTn5-O2 GAA TTC GTC GAC AAG CTG CGGminiTn5-O3 ATT CGT CGA CAA GCT GCG GCC GCminiTn5-O4 T CGA CAA GCT GCG GCC GCC TAmTn5-F3 ATCGGGCCTTGATGTTACCGAGmTn5-F4 TACCCAGTCTGTGTGAGCAGG
FIRST ROUND AMPLIFICATION (PBR1mod)
94C, 10 min[94C, 30 sec; 42C, 30 sec; 72C, 3 min] repeat with annealing temp dropped by 1C per cycle untilannealing Temp is 37C[94C, 30 sec; 65C 30 sec; 72C, 3 min] x 20 cycles
Dilute these first round reactions 1/5 with MQ-H2O and use 1 uL as template in second round amplification
SECOND ROUND AMPLIFICATION (PBR2)
[94C, 30 sec; 65C, 30 sec; 72C, 3 min] x 30 cycles
First round PCRUse CEKG2A+2B+2C (1:1:1 at 20 pmol/ul)with 20 pmol/ul TnphoA-II (IS-Omegon-Km/hah and ISphoA transposons)or with 20 pmol/ul mTn5-F3 for miniTn5 transposons
Second round PCRUse CEKG4with hah-1 (IS-Omegon-Km/hah and ISphoA transposons)or with mTn5-F4 for miniTn5 transposons
Sequencinghah-1 can be used again, or hah-2 (IS-Omegon-Km/hah and ISphoA transposons)mTn5-F4 or -O2, -O3 OR -O4 for miniTn5 transposons
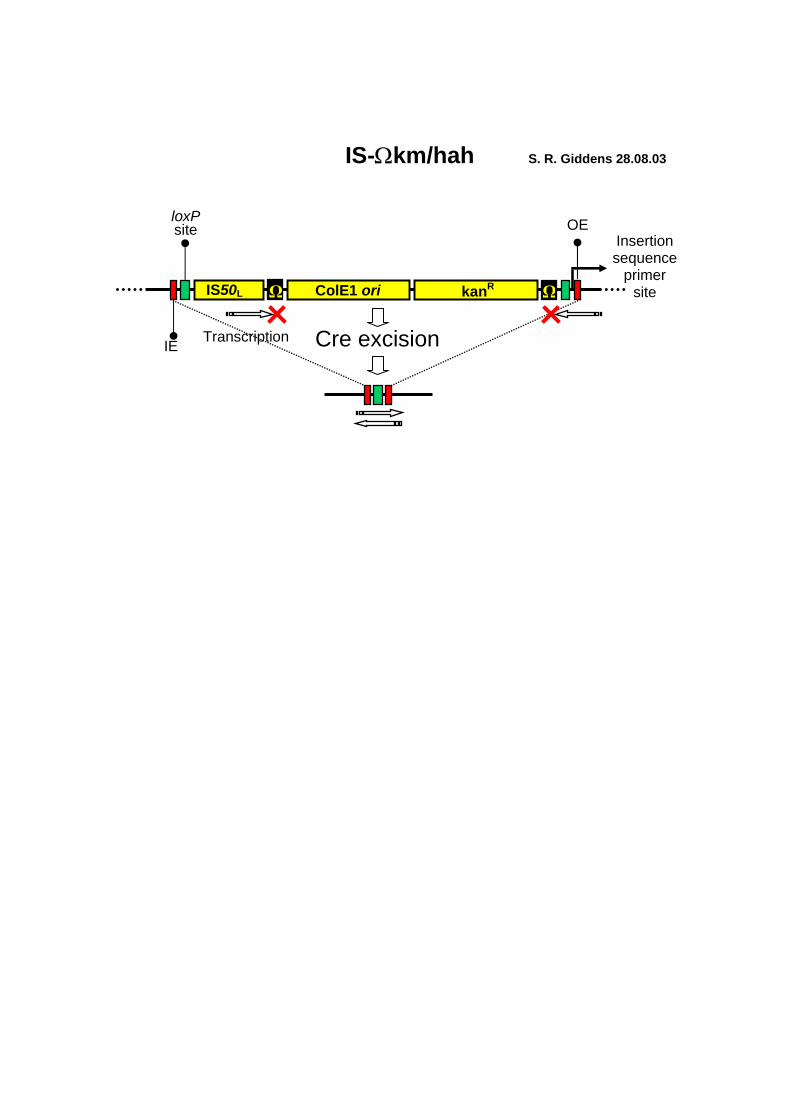
IS-Ωkm/hah S. R. Giddens 28.08.03
ColE1 ori IS50L
OE
Cre excision
loxP
site
kanR
Transcription
IE
Ω Ω
Insertion sequence
primer site

IS-omegon-km/hah sequence [pSCR001] 14 Dec 2004 (Updated 14 June 2007) Weblinks: GenBank: DQ059989 - http://www.ncbi.nlm.nih.gov/entrez/viewer.fcgi?db=nuccore&id=73476610 EBI: http://srs.ebi.ac.uk/srsbin/wgetz?%5Bembl-AccNumber:DQ059989%5D+-e Key plasmid features: Transposon 4745..10065 (5320 bp) IE 4763..4745 CTGTCTCTTGATCAGATCT OE 10047..10065 ACTTGTGTATAAGAGTCAG Influenza hemagglutinin epitope 4775..4818 CGTAGTCCGGCACGTCGTACGGGTAGTGATGGTGATGGTGATGC
Hexahistidine tag 4800..4818 LoxP sites 4859..4826 ATAACTTCGTATAGCATACATTATACGAAGTTAT 9967..10000 ATAACTTCGTATAGCATACATTATACGAAGTTAT Omegon replication ori 8939..8940 (ColE1 origin of replication) ac
PacI 4819
Ecl 136II
Transposon (4745..10065)
IS-Ω-km [pSCR001]
10571 bps
PmlI 451
Pvu
Xmn
Not I 4119 XhoI 4229
SacII 4260 SexAI 4308
MunI 4514XbaI 4739
BsiWI 4790
I 5698Sbf
III 6628Dra
II 7662 Rsr
I 9170Nde I 9412 Nru
10066 Acc 65I
Kpn I Eco RV
Sac I Sma I Xma I 10091
I 10299PsiBI 10508Sna
traK
bla (ApR)
tnp
IE
LoxP site
IS50L?
Omegon kmR
aphA (kmR)
pBR322 fragment
LoxP site
OE
Delivery vector[pUT]
2000
4000
6000
8000
10000
Bsu36I 5789
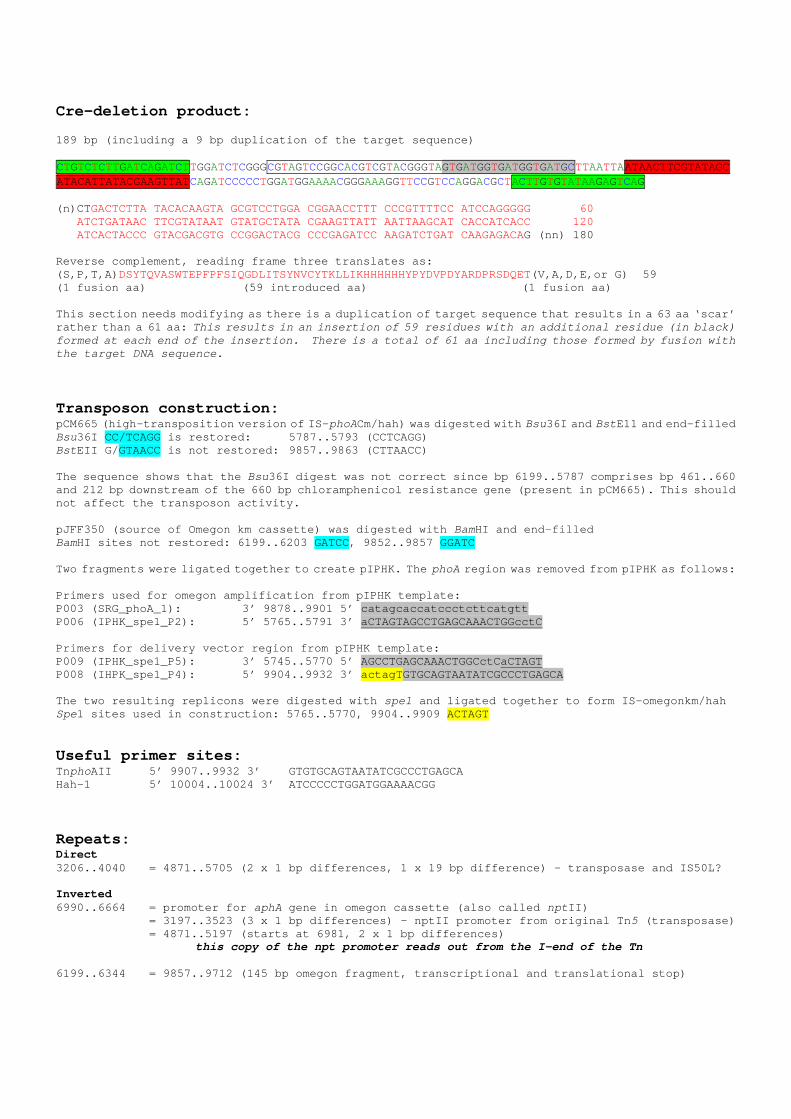
Cre-deletion product: 189 bp (including a 9 bp duplication of the target sequence) CTGTCTCTTGATCAGATCTTGGATCTCGGGCGTAGTCCGGCACGTCGTACGGGTAGTGATGGTGATGGTGATGCTTAATTAATAACTTCGTATAGCATACATTATACGAAGTTATCAGATCCCCCTGGATGGAAAACGGGAAAGGTTCCGTCCAGGACGCTACTTGTGTATAAGAGTCAG (n)CTGACTCTTA TACACAAGTA GCGTCCTGGA CGGAACCTTT CCCGTTTTCC ATCCAGGGGG 60 ATCTGATAAC TTCGTATAAT GTATGCTATA CGAAGTTATT AATTAAGCAT CACCATCACC 120 ATCACTACCC GTACGACGTG CCGGACTACG CCCGAGATCC AAGATCTGAT CAAGAGACAG (nn) 180 Reverse complement, reading frame three translates as: (S,P,T,A)DSYTQVASWTEPFPFSIQGDLITSYNVCYTKLLIKHHHHHHYPYDVPDYARDPRSDQET(V,A,D,E,or G) 59 (1 fusion aa) (59 introduced aa) (1 fusion aa) This section needs modifying as there is a duplication of target sequence that results in a 63 aa ‘scar’ rather than a 61 aa: This results in an insertion of 59 residues with an additional residue (in black) formed at each end of the insertion. There is a total of 61 aa including those formed by fusion with the target DNA sequence. Transposon construction: pCM665 (high-transposition version of IS-phoACm/hah) was digested with Bsu36I and BstE11 and end-filled Bsu36I CC/TCAGG is restored: 5787..5793 (CCTCAGG) BstEII G/GTAACC is not restored: 9857..9863 (CTTAACC) The sequence shows that the Bsu36I digest was not correct since bp 6199..5787 comprises bp 461..660 and 212 bp downstream of the 660 bp chloramphenicol resistance gene (present in pCM665). This should not affect the transposon activity. pJFF350 (source of Omegon km cassette) was digested with BamHI and end-filled BamHI sites not restored: 6199..6203 GATCC, 9852..9857 GGATC Two fragments were ligated together to create pIPHK. The phoA region was removed from pIPHK as follows: Primers used for omegon amplification from pIPHK template: P003 (SRG_phoA_1): 3’ 9878..9901 5’ catagcaccatccctcttcatgtt P006 (IPHK_spe1_P2): 5’ 5765..5791 3’ aCTAGTAGCCTGAGCAAACTGGcctC Primers for delivery vector region from pIPHK template: P009 (IPHK_spe1_P5): 3’ 5745..5770 5’ AGCCTGAGCAAACTGGCctCaCTAGT P008 (IHPK_spe1_P4): 5’ 9904..9932 3’ actagTGTGCAGTAATATCGCCCTGAGCA The two resulting replicons were digested with spe1 and ligated together to form IS-omegonkm/hah Spe1 sites used in construction: 5765..5770, 9904..9909 ACTAGT Useful primer sites: TnphoAII 5’ 9907..9932 3’ GTGTGCAGTAATATCGCCCTGAGCA Hah-1 5’ 10004..10024 3’ ATCCCCCTGGATGGAAAACGG Repeats: Direct 3206..4040 = 4871..5705 (2 x 1 bp differences, 1 x 19 bp difference) – transposase and IS50L? Inverted 6990..6664 = promoter for aphA gene in omegon cassette (also called nptII)
= 3197..3523 (3 x 1 bp differences) – nptII promoter from original Tn5 (transposase) = 4871..5197 (starts at 6981, 2 x 1 bp differences)
this copy of the npt promoter reads out from the I-end of the Tn 6199..6344 = 9857..9712 (145 bp omegon fragment, transcriptional and translational stop)
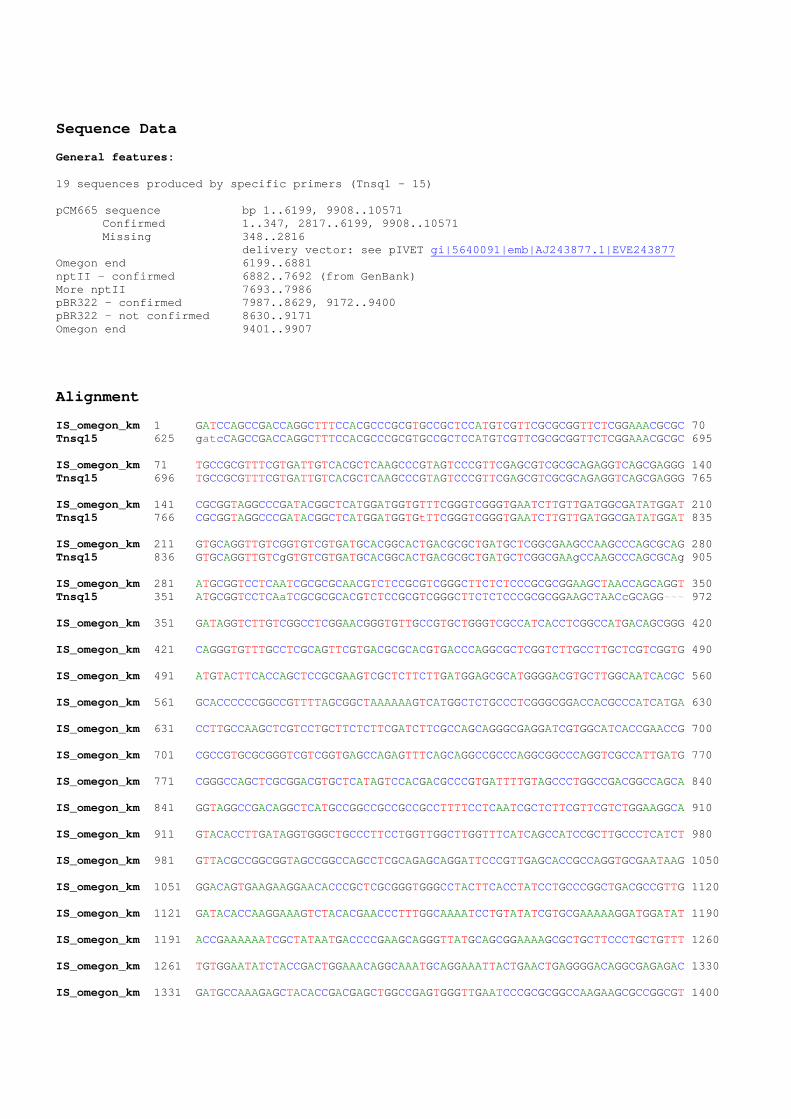
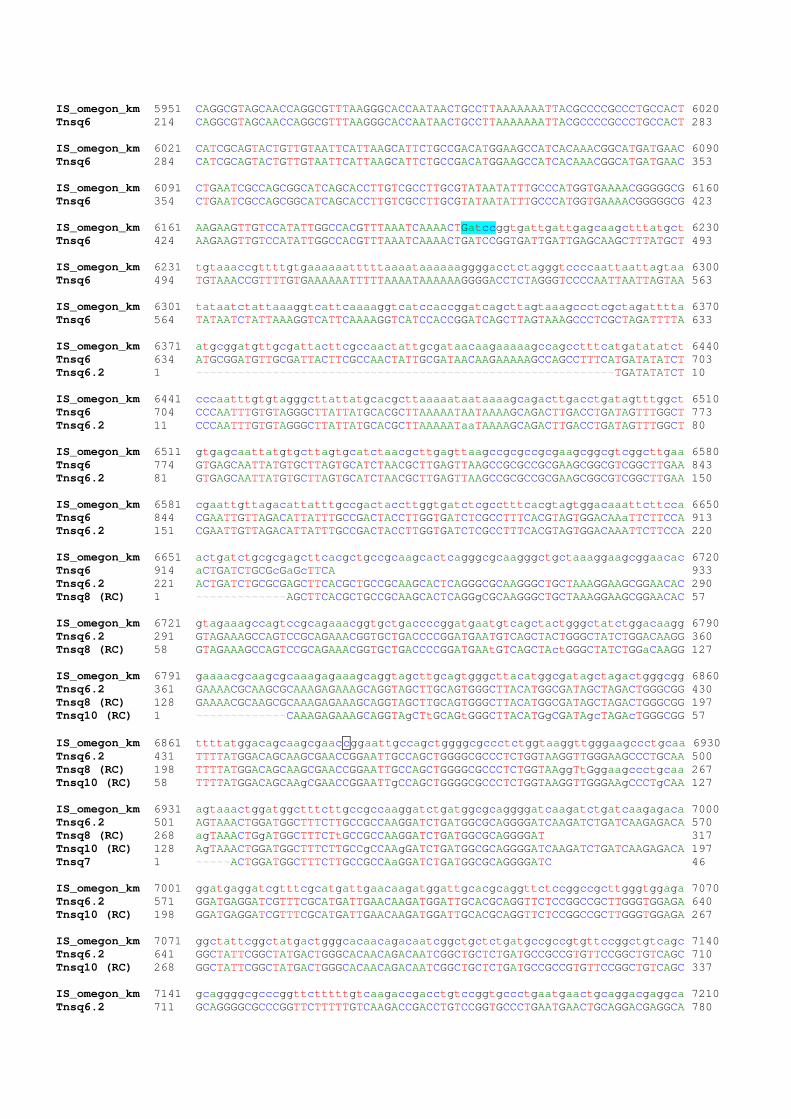
Sequence Data General features: 19 sequences produced by specific primers (Tnsq1 - 15) pCM665 sequence bp 1..6199, 9908..10571
Confirmed 1..347, 2817..6199, 9908..10571 Missing 348..2816
delivery vector: see pIVET gi|5640091|emb|AJ243877.1|EVE243877 Omegon end 6199..6881 nptII - confirmed 6882..7692 (from GenBank) More nptII 7693..7986 pBR322 – confirmed 7987..8629, 9172..9400 pBR322 – not confirmed 8630..9171 Omegon end 9401..9907 Alignment IS_omegon_km 1 GATCCAGCCGACCAGGCTTTCCACGCCCGCGTGCCGCTCCATGTCGTTCGCGCGGTTCTCGGAAACGCGC 70 Tnsq15 625 gatcCAGCCGACCAGGCTTTCCACGCCCGCGTGCCGCTCCATGTCGTTCGCGCGGTTCTCGGAAACGCGC 695 IS_omegon_km 71 TGCCGCGTTTCGTGATTGTCACGCTCAAGCCCGTAGTCCCGTTCGAGCGTCGCGCAGAGGTCAGCGAGGG 140 Tnsq15 696 TGCCGCGTTTCGTGATTGTCACGCTCAAGCCCGTAGTCCCGTTCGAGCGTCGCGCAGAGGTCAGCGAGGG 765 IS_omegon_km 141 CGCGGTAGGCCCGATACGGCTCATGGATGGTGTTTCGGGTCGGGTGAATCTTGTTGATGGCGATATGGAT 210 Tnsq15 766 CGCGGTAGGCCCGATACGGCTCATGGATGGTGtTTCGGGTCGGGTGAATCTTGTTGATGGCGATATGGAT 835 IS_omegon_km 211 GTGCAGGTTGTCGGTGTCGTGATGCACGGCACTGACGCGCTGATGCTCGGCGAAGCCAAGCCCAGCGCAG 280 Tnsq15 836 GTGCAGGTTGTCgGTGTCGTGATGCACGGCACTGACGCGCTGATGCTCGGCGAAgCCAAGCCCAGCGCAg 905 IS_omegon_km 281 ATGCGGTCCTCAATCGCGCGCAACGTCTCCGCGTCGGGCTTCTCTCCCGCGCGGAAGCTAACCAGCAGGT 350 Tnsq15 351 ATGCGGTCCTCAaTCGCGCGCACGTCTCCGCGTCGGGCTTCTCTCCCGCGCGGAAGCTAACcGCAGG~~~ 972 IS_omegon_km 351 GATAGGTCTTGTCGGCCTCGGAACGGGTGTTGCCGTGCTGGGTCGCCATCACCTCGGCCATGACAGCGGG 420 IS_omegon_km 421 CAGGGTGTTTGCCTCGCAGTTCGTGACGCGCACGTGACCCAGGCGCTCGGTCTTGCCTTGCTCGTCGGTG 490 IS_omegon_km 491 ATGTACTTCACCAGCTCCGCGAAGTCGCTCTTCTTGATGGAGCGCATGGGGACGTGCTTGGCAATCACGC 560 IS_omegon_km 561 GCACCCCCCGGCCGTTTTAGCGGCTAAAAAAGTCATGGCTCTGCCCTCGGGCGGACCACGCCCATCATGA 630 IS_omegon_km 631 CCTTGCCAAGCTCGTCCTGCTTCTCTTCGATCTTCGCCAGCAGGGCGAGGATCGTGGCATCACCGAACCG 700 IS_omegon_km 701 CGCCGTGCGCGGGTCGTCGGTGAGCCAGAGTTTCAGCAGGCCGCCCAGGCGGCCCAGGTCGCCATTGATG 770 IS_omegon_km 771 CGGGCCAGCTCGCGGACGTGCTCATAGTCCACGACGCCCGTGATTTTGTAGCCCTGGCCGACGGCCAGCA 840 IS_omegon_km 841 GGTAGGCCGACAGGCTCATGCCGGCCGCCGCCGCCTTTTCCTCAATCGCTCTTCGTTCGTCTGGAAGGCA 910 IS_omegon_km 911 GTACACCTTGATAGGTGGGCTGCCCTTCCTGGTTGGCTTGGTTTCATCAGCCATCCGCTTGCCCTCATCT 980 IS_omegon_km 981 GTTACGCCGGCGGTAGCCGGCCAGCCTCGCAGAGCAGGATTCCCGTTGAGCACCGCCAGGTGCGAATAAG 1050 IS_omegon_km 1051 GGACAGTGAAGAAGGAACACCCGCTCGCGGGTGGGCCTACTTCACCTATCCTGCCCGGCTGACGCCGTTG 1120 IS_omegon_km 1121 GATACACCAAGGAAAGTCTACACGAACCCTTTGGCAAAATCCTGTATATCGTGCGAAAAAGGATGGATAT 1190 IS_omegon_km 1191 ACCGAAAAAATCGCTATAATGACCCCGAAGCAGGGTTATGCAGCGGAAAAGCGCTGCTTCCCTGCTGTTT 1260 IS_omegon_km 1261 TGTGGAATATCTACCGACTGGAAACAGGCAAATGCAGGAAATTACTGAACTGAGGGGACAGGCGAGAGAC 1330 IS_omegon_km 1331 GATGCCAAAGAGCTACACCGACGAGCTGGCCGAGTGGGTTGAATCCCGCGCGGCCAAGAAGCGCCGGCGT 1400

IS_omegon_km 1401 GATGAGGCTGCGGTTGCGTTCCTGGCGGTGAGGGCGGATGTCGAGGCGGCGTTAGCGTCCGGCTATGCGC 1470 IS_omegon_km 1471 TCGTCACCATTTGGGAGCACATGCGGGAAACGGGGAAGGTCAAGTTCTCCTACGAGACGTTCCGCTCGCA 1540 IS_omegon_km 1541 CGCCAGGCGGCACATCAAGGCCAAGCCCGCCGATGTGCCCGCACCGCAGGCCAAGGCTGCGGAACCCGCG 1610 IS_omegon_km 1611 CCGGCACCCAAGACGCCGGAGCCACGGCGGCCGAAGCAGGGGGGCAAGGCTGAAAAGCCGGCCCCCGCTG 1680 IS_omegon_km 1681 CGGCCCCGACCGGCTTCACCTTCAACCCAACACCGGACAAAAAGGATCCTCTACGCCGGACGCATCGTGG 1750 IS_omegon_km 1751 CCGGCATCACCGGCGCCACAGGTGCGGTTGCTGGCGCCTATATCGCCGACATCACCGATGGGGAAGATCG 1820 IS_omegon_km 1821 GGCTCGCCACTTCGGGCTCATGAGCGCTTGTTTCGGCGTGGGTATGGTGGCAGGCCCCGTGGCCGGGGGA 1890 IS_omegon_km 1891 CTGTTGGGCGCCATCTCCTTGCTGCCTCGCGCGTTTCGGTGATGACGGTGAAAACCTCTGACACATGCAG 1960 IS_omegon_km 1961 CTCCCGGAGACGGTCACAGCTTGTCTGTAAGCGGATGCCGGGAGCAGACAAGCCCGTCAGGGCGCGTCAG 2030 IS_omegon_km 2031 CGGGTGTTGGCGGGTGTCGGGGCGCAGCCATGACCCAGTCACGTAGCGATAGCGGAGTGTATACTGGCTT 2100 IS_omegon_km 2101 AACTATGCGGCATCAGAGCAGATTGTACTGAGAGTGCACCATAAAATCAATCTAAAGTATATATGAGTAA 2170 IS_omegon_km 2171 ACTTGGTCTGACAGTTACCAATGCTTAATCAGTGAGGCACCTATCTCAGCGATCTGTCTATTTCGTTCAT 2240 IS_omegon_km 2241 CCATAGTTGCCTGACTCCCCGTCGTGTAGATAACTACGATACGGGAGGGCTTACCATCTGGCCCCAGTGC 2310 IS_omegon_km 2311 TGCAATGATACCGCGAGACCCACGCTCACCGGCTCCAGATTTATCAGCAATAAACCAGCCAGCCGGAAGG 2380 IS_omegon_km 2381 GCCGAGCGCAGAAGTGGTCCTGCAACTTTATCCGCCTCCATCCAGTCTATTAATTGTTGCCGGGAAGCTA 2450 IS_omegon_km 2451 GAGTAAGTAGTTCGCCAGTTAATAGTTTGCGCAACGTTGTTGCCATTGCTGCAGGCATCGTGGTGTCACG 2520 IS_omegon_km 2521 CTCGTCGTTTGGTATGGCTTCATTCAGCTCCGGTTCCCAACGATCAAGGCGAGTTACATGATCCCCCATG 2590 IS_omegon_km 2591 TTGTGCAAAAAAGCGGTTAGCTCCTTCGGTCCTCCGATCGTTGTCAGAAGTAAGTTGGCCGCAGTGTTAT 2660 IS_omegon_km 2661 CACTCATGGTTATGGCAGCACTGCATAATTCTCTTACTGTCATGCCATCCGTAAGATGCTTTTCTGTGAC 2730 IS_omegon_km 2731 TGGTGAGTACTCAACCAAGTCATTCTGAGAATAGTGTATGCGGCGACCGAGTTGCTCTTGCCCGGCGTCA 2800 IS_omegon_km 2801 ACACGGGATAATACCGCGCCACATAGCAGAACTTTAAAAGTGCTCATCATTGGAAAACGTTCTTCGGGGC 2870 IS_omegon_km 2871 GAAAACTCTCAAGGATCTTACCGCTGTTGAGATCCAGTTCGATGTAACCCACTCGTGCACCCAACTGATC 2940 Tnsq1 1 ~~~~~~~~~~~~~~~~~~~~~~~~~~~~~~~~~~~~~~~~~~~~~~ACCCACTCGTGCACCCAACTGATC 24 IS_omegon_km 2941 TTCAGCATCTTTTACTTTCACCAGCGTTTCTGGGTGAGCAAAAACAGGAAGGCAAAATGCCGCAAAAAAG 3010 Tnsq1 25 TTCAGCATCTTTTACTTTCACCAGcgTTTCTGGGTGAGCAAAAACAGGAAGGCAAAATGCCGCAAAAAAG 94 IS_omegon_km 3011 GGAATAAGGGCGACACGGAAATGTTGAATACTCATACTCTTCCTTTTTCAATATTATTGAAGCATTTATC 3080 Tnsq1 95 GGAATAAGGGCGACACGGAAATGTTGAATACTCATACTCTTCCTTTTTCAATATTATTGAAGCATTTATC 164 IS_omegon_km 3081 AGGGTTATTGTCTCATGAGCGGATACATATTTGAATGTATTTAGAAAAATAAACAAATAGGGGTTCCGCG 3150 Tnsq1 165 AGGGTTATTGTCTCATGAGCGGATACATATTTGAATGTATTTAGAAAAATAAACAAATAGGGGTTCCGCG 234 IS_omegon_km 3151 CACATTTCCCCGAAAAGTGCCACCTGcagatctgcaggtcgaccggTCAGATCTTGATCCCCTGCGCCAT 3220 Tnsq1 235 CACATTTCCCCGAAAAGTGCCACCTGCAGATCTGCAGGTCGACCGGTCAGATCTTGATCCCCTGCGCCAT 304 IS_omegon_km 3221 CAGATCCTTGGCGGCAAGAAAGCCATCCAGTTTACTTTGCAGGGCTTCCCAACCTTCCCAGAGGGCGCCC 3290 Tnsq1 305 CAGATCCTTGGCGGCAAGAAAGCCATCCAGTTTACTTTGCAGGGCTTCCCAACCTTCCCAGAGGGCGCCC 374 IS_omegon_km 3291 CAGCTGGCAATTCCGGTTCGCTTGCTGTCCATAAAACCGCCCAGTCTAGCTATCGCCATGTAAGCCCACT 3360 Tnsq1 375 CAGCTGGCAATTCCGGTTCGCTTGCTGTCCATAAAACCGCCCAGTCTAGCTATCGCCATGTAAGCCCACT 444 IS_omegon_km 3361 GCAAGCTACCTGCTTTCTCTTTGCGCTTGCGTTTTCCCTTGTCCAGATAGCCCAGTAGCTGACATTCATC 3430 Tnsq1 445 GCAAGCTACCTGCTTTCTCTTTGCGCTTGCGTTTTCCCTTGTCCAGATAGCCCAGTAGCTGACATTCATC 514 IS_omegon_km 3431 CGGGGTCAGCACCGTTTCTGCGGACTGGCTTTCTACGTGTTCCGCTTCCTTTAGCAGCCCTTGCGCCCTG 3500 Tnsq1 515 CGGGGTCAGCACCGTTTCTGCGGACTGGCTTTCTACGTGTTCCGCTTCCTTTAGCAGCCCTTGCGCCCTG 584

IS_omegon_km 3501 AGTGCTTGCGGCAGCGTGAAGCTTTCTCTGAGCTGTAACAGCCTGACCGCAACAAACGAGAGGATCGAGA 3570 Tnsq1 585 AGTGCTTGCGGCAGCGTGAAGCTTTCTCTGAGCTGTAACAGCCTGACCGCAACAAACGAGAGGATCGAGA 654 Tnsq2 1 ~~~GCTTGCGGCAGCGTGAAGCTTTCTCTGAgCTGTAACAGCCTGACCGCAACAAACGagaGGATCGAGA 67 IS_omegon_km 3571 CCATCCGCTCCAGATTATCCGGCTCCTCCATGCGTTGCCTCTCGGCTCCTGCTCCGGTTTTCCATGCCTT 3640 Tnsq1 655 CCATCCGCTCCAGATTATCCGGCTCCTCCATGCGTTGCCTCTCGGCTCCTGCTCCGGTTTTCCATGCCTT 724 Tnsq2 68 CCATCCGCTCCAGATTATCCGGCTCCTCCATGCGTTGCCTCTCGGCTCCTGCTCCGGTTTTCCATGCCTT 137 IS_omegon_km 3641 ATGGAACTCCTCGATCCGCCAGCGATGGGTATAAATGTCGATGACGCGCAAGGCTTGGGCTAGCGACTCG 3710 Tnsq1 725 ATGGAACTCCTCGATCCGCCAGCGATGGGTATAAATGTCGATGACGCGCAAGGCTTGGGCTAGCGACTCG 794 Tnsq2 138 ATGGAACTCCTCGATCCGCCAGCGATGGGtATAAATGTCGATGACgCGCAAGGcTTGGGCTAGCGACTCG 207 IS_omegon_km 3711 ACCGGTTCGCTGGTCAGCAACAACCATTTCAACGGGGTCTCACCCTTGGGCGGGTTAATCTCCTCGGCCA 3780 Tnsq1 795 ACCGGTTCGCTGGTCAGCAACAACCATTTCAACGGGGTCTCACCCTTGGGCGGGTTAATCTCCTCGGCCA 864 Tnsq2 208 ACCGGTTCGcTGGTCAGCAACAACCATTTCAACGGGGtCTCACCCTTGGGCGGGTTAATCTCCTCGGCCA 277 IS_omegon_km 3781 GCACCGCGTTGAGCGTGATATTCCCCTGTTTTAGCGTGATGCGCCCACTGCGCAGGCTCAAGCTCGCCTT 3850 Tnsq1 865 GCACCGCGTTGAGCGTGATATTCCCCTGTTTtAGCGTGATGCGCCCACTGCGCAGGCTCAAGCTCGCCT 933 Tnsq2 278 GCACCGCGTTGAGCGtGATATTCCCCTGTTTTAGCGTGATGCGCCCACTGcGCAgGCTCAAGCTcGCCTT 347 IS_omegon_km 3851 GCGGGCTGGTCGATTTTTACGTTTACCGCGTTTATCCACCACGCCCTTTTGCGGAATGCTGATCTGATAG 3920 Tnsq2 348 GcGgGcTGGTCGATTTTtACGTTTACCGCGTTTATCCACCACGCCCTTtTGcgGAATGCTGATCTGATAG 417 IS_omegon_km 3921 CCACCCAACTCCGGTTGGTTCTTCAGATGGTCGTACAGATACAACCCAGACTCTACGTCCTTGCGTGGGT 3990 Tnsq2 418 CCACCCAACTCCGGTTGGTTCTTCAGATGGTCGTACAGATACAACCCaGACTCTACGTCCTTGCGTGGGT 487 IS_omegon_km 3991 GCTTGGAGCGCACCACGAAGCGCTCGTTATGCGCCAGTTTGTCCTGCAGATAAGCATGAATATCGGCTTC 4060 Tnsq2 488 GCTTGGAGCGCACCACGAAGCGCTCGTTATGCGCCAGTTTGTCCTGCAGaTAagCaTGAATATcGGCTTc 557 IS_omegon_km 4061 GCGGTCACAGACCGCAATCACGTTGCTCATCATGCTGCCCATGCGTAACCGGCTAGTTGCGGCCGCTGCC 4130 Tnsq2 558 gcGgTcACaGACCGcAAtcACgTTGctCAtcATGctGCccATgcGtAACcGGcTAgtTgcgGcCGCTGCc 627 Tnsq3 1 ~~~~~~~~~~~~~~~~~~~~~~~~~~~~~~~~~~~~~~~~~~~~~~~~~~~~~~~~~~~~~~~CGCTGCC 7 IS_omegon_km 4131 AGCCATTTGCCACTCTCCTTTTCATCCGCATCGGCAGGGTCATCCGGGCGCATCCACCACTCCTGATGCA 4200 Tnsq2 628 agcc 631 Tnsq3 8 AGCCATTTGCCACTCTCCTTTTCATCCGCATCGGCAGGGTCATCcgggCGCATCCACCACTCCTGATGCA 77 IS_omegon_km 4201 GTAATCCTACGGTGCGGAATGTGGTGGCCTCGAGCAAGAGAACGGAGTGAACCCACCATCCGCGGGATTT 4270 Tnsq3 78 GTAATCCTACGGTGCGGAATGTGGTGGCCTCGAGCAAGAGAACGGAGTGAACCCACCATCCGCGGGATTT 147 IS_omegon_km 4271 ATCCTGAATAGAGCCCAGCTTGCCAAGCTCTTCGGCGACCTGGTGGCGATAACTCAAAGAGGTGGTGTCC 4340 Tnsq3 148 ATCCTGAATAGAGCCCAGCTTGCCAAGCTCTTCGGCGACCTGGTGGCGATAACTCAAAGAGGTGGTGTCC 217 IS_omegon_km 4341 TCAATGGCCAGCAGTTCGGGAAACTCCTGAGCCAACTTGACTGTTTGCATGGCGCCAGCCTTTCTGATCG 4410 Tnsq3 218 TCAATGGCCAGCAGTTCGGGAAACTCCTGAGCCAACTTGACTGTTTGCATGGCGCCAGCCTTTCTGATCG 287 IS_omegon_km 4411 CCTCGGCAGAAACGTTGGGATTGCGGATAAATCGGTAAGCGCCTTCCTGggcGGCTTCACTACCCTCTGA 4480 Tnsq3 288 CCTCGGCAGAAACGTTGGGATTGCGGATAAATCGGTAAGCGCCTTCCTGGGCGGCTTCACTACCCTCTGA 357 IS_omegon_km 4481 TGAGATGGgTATTGATTTACCAGAATATTTTGCCAATTGGGCGGCGACGTTAACCAAGCGGGCAGTACGG 4550 Tnsq3 358 TGAGATGGGTATTGATTTACCAGAATATTTTGCCAATTGGGCGGCGACGTTAACCAAGCGGGCAGTACGG 427 IS_omegon_km 4551 CGAGGATCACCCAGCGCCGCCGAAGAGAACACAGATTTAGCCCAGTCGGCCGCACGATGAAGAGCAGAAG 4620 Tnsq3 428 CGAGGATCACCCAGCGCCGCCGAAGAGAACACAGATTTAGCCCAGTCGGCCGCACGATGAAGAGCAGAAG 497 IS_omegon_km 4621 TTATCATGAACGTTACCATGTTAGGAGGTCACATGGAAGATCAGATCCTGGAAAACGGGAAAGGTTCCGT 4690 Tnsq3 498 TTATCATGAACGTTACCATGTTAGGAGGTCACATGGAAGATCAGATCCTGGAAAACGGGAAAGGTTCCGT 567 IS_omegon_km 4691 TCAGGACGCTACTTGTGTACGGGATCGGTCGACGGATCCCAAGCTTCTTCTAGACTGTCTCTTGATCAGA 4760 Tnsq3 568 TCAGGACGCTACTTGTGTACGGGATCGGTCGACGGATCCCAAGCTTCTTCTAGACTGTCTCTTGATCAGA 637 Tnsq4 1 ~~~~~~~~~~~~~~~~~~~~~~~~~~~~~~~~~~~~~~~~~~~~~~~~~~~~~~~~~~~~CTTGATCAGA 10 IS_omegon_km 4761 TCTTGGATCTCGGGCGTAGTCCGGCACGTCGTACGGGTAGTGATGGTGATGGTGATGCTTAATTAATAAC 4830 Tnsq3 638 TCTTGGATCTCGGGCGTAGTCCGGCACGTCGTACGGGTAGTGATGGTGATGGTGATGCTTAATTAATAAC 707 Tnsq4 11 TCTTGGATCTCGGGCGTAGTCCGGCACGTCGTACGGGTAGTGATGgtgATGGTGATGcttAATTAATAAC 80 IS_omegon_km 4831 TTCGTATAGCATACATTATACGAAGTTATGGTTAACgGGGGATCCCCTGCGCCATCAGATCCTTGGCGGC 4900
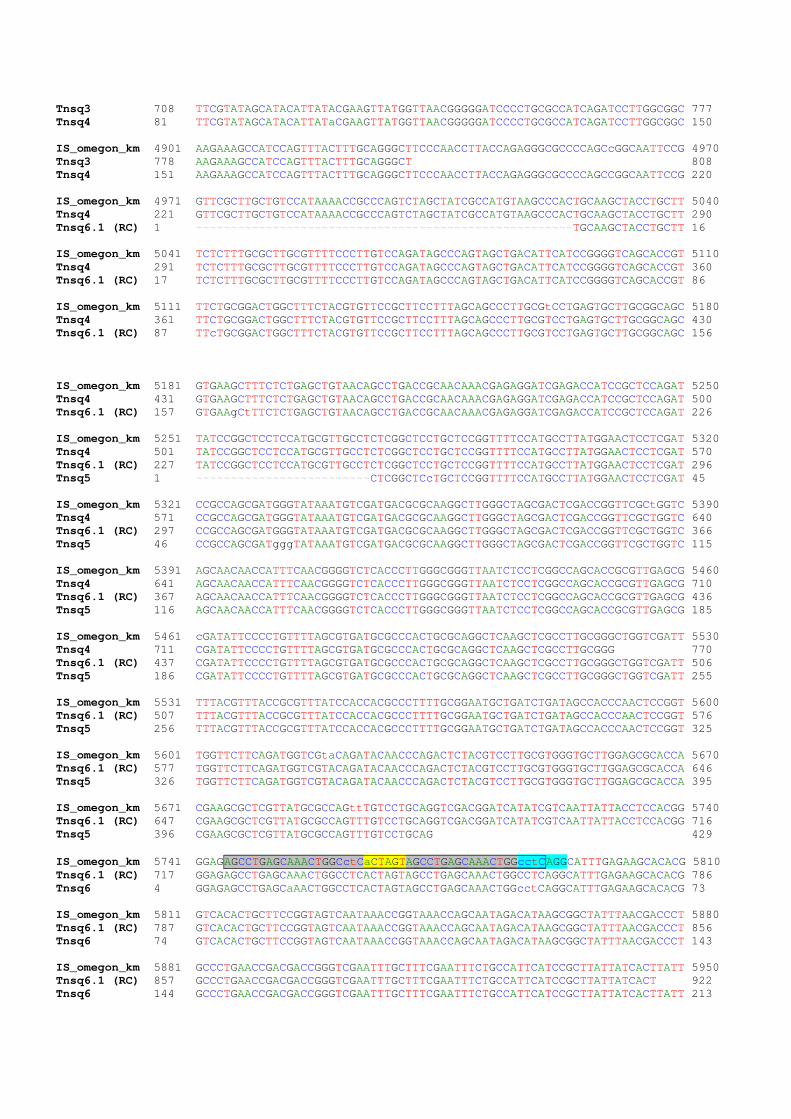
Tnsq3 708 TTCGTATAGCATACATTATACGAAGTTATGGTTAACGGGGGATCCCCTGCGCCATCAGATCCTTGGCGGC 777 Tnsq4 81 TTCGTATAGCATACATTATaCGAAGTTATGGTTAACGGGGGATCCCCTGCGCCATCAGATCCTTGGCGGC 150 IS_omegon_km 4901 AAGAAAGCCATCCAGTTTACTTTGCAGGGCTTCCCAACCTTACCAGAGGGCGCCCCAGCcGGCAATTCCG 4970 Tnsq3 778 AAGAAAGCCATCCAGTTTACTTTGCAGGGCT 808 Tnsq4 151 AAGAAAGCCATCCAGTTTACTTTGCAGGGCTTCCCAACCTTACCAGAGGGCGCCCCAGCCGGCAATTCCG 220 IS_omegon_km 4971 GTTCGCTTGCTGTCCATAAAACCGCCCAGTCTAGCTATCGCCATGTAAGCCCACTGCAAGCTACCTGCTT 5040 Tnsq4 221 GTTCGCTTGCTGTCCATAAAACCGCCCAGTCTAGCTATCGCCATGTAAGCCCACTGCAAGCTACCTGCTT 290 Tnsq6.1 (RC) 1 ~~~~~~~~~~~~~~~~~~~~~~~~~~~~~~~~~~~~~~~~~~~~~~~~~~~~~~TGCAAGCTACCTGCTT 16 IS_omegon_km 5041 TCTCTTTGCGCTTGCGTTTTCCCTTGTCCAGATAGCCCAGTAGCTGACATTCATCCGGGGTCAGCACCGT 5110 Tnsq4 291 TCTCTTTGCGCTTGCGTTTTCCCTTGTCCAGATAGCCCAGTAGCTGACATTCATCCGGGGTCAGCACCGT 360 Tnsq6.1 (RC) 17 TCTCTTTGCGCTTGCGTTTTCCCTTGTCCAGATAGCCCAGTAGCTGACATTCATCCGGGGTCAGCACCGT 86 IS_omegon_km 5111 TTCTGCGGACTGGCTTTCTACGTGTTCCGCTTCCTTTAGCAGCCCTTGCGtCCTGAGTGCTTGCGGCAGC 5180 Tnsq4 361 TTCTGCGGACTGGCTTTCTACGTGTTCCGCTTCCTTTAGCAGCCCTTGCGTCCTGAGTGCTTGCGGCAGC 430 Tnsq6.1 (RC) 87 TTcTGCGGACTGGCTTTCTACGTGTTCCGCTTCCTTTAGCAGCCCTTGCGTCCTGAGTGCTTGCGGCAGC 156 IS_omegon_km 5181 GTGAAGCTTTCTCTGAGCTGTAACAGCCTGACCGCAACAAACGAGAGGATCGAGACCATCCGCTCCAGAT 5250 Tnsq4 431 GTGAAGCTTTCTCTGAGCTGTAACAGCCTGACCGCAACAAACGAGAGGATCGAGACCATCCGCTCCAGAT 500 Tnsq6.1 (RC) 157 GTGAAgCtTTCTCTGAGCTGTAACAGCCTGACCGCAACAAACGAGAGGATCGAGACCATCCGCTCCAGAT 226 IS_omegon_km 5251 TATCCGGCTCCTCCATGCGTTGCCTCTCGGCTCCTGCTCCGGTTTTCCATGCCTTATGGAACTCCTCGAT 5320 Tnsq4 501 TATCCGGCTCCTCCATGCGTTGCCTCTCGGCTCCTGCTCCGGTTTTCCATGCCTTATGGAACTCCTCGAT 570 Tnsq6.1 (RC) 227 TATCCGGCTCCTCCATGCGTTGCCTCTCGGCTCCTGCTCCGGTTTTCCATGCCTTATGGAACTCCTCGAT 296 Tnsq5 1 ~~~~~~~~~~~~~~~~~~~~~~~~~CTCGGCTCcTGCTCCGGTTTTCCATGCCTTATGGAACTCCTCGAT 45 IS_omegon_km 5321 CCGCCAGCGATGGGTATAAATGTCGATGACGCGCAAGGCTTGGGCTAGCGACTCGACCGGTTCGCtGGTC 5390 Tnsq4 571 CCGCCAGCGATGGGTATAAATGTCGATGACGCGCAAGGCTTGGGCTAGCGACTCGACCGGTTCGCTGGTC 640 Tnsq6.1 (RC) 297 CCGCCAGCGATGGGTATAAATGTCGATGACGCGCAAGGCTTGGGCTAGCGACTCGACCGGTTCGCTGGTC 366 Tnsq5 46 CCGCCAGCGATgggTATAAATGTCGATGACGCGCAAGGCTTGGGCTAGCGACTCGACCGGTTCGCTGGTC 115 IS_omegon_km 5391 AGCAACAACCATTTCAACGGGGTCTCACCCTTGGGCGGGTTAATCTCCTCGGCCAGCACCGCGTTGAGCG 5460 Tnsq4 641 AGCAACAACCATTTCAACGGGGTCTCACCCTTGGGCGGGTTAATCTCCTCGGCCAGCACCGCGTTGAGCG 710 Tnsq6.1 (RC) 367 AGCAACAACCATTTCAACGGGGTCTCACCCTTGGGCGGGTTAATCTCCTCGGCCAGCACCGCGTTGAGCG 436 Tnsq5 116 AGCAACAACCATTTCAACGGGGTCTCACCCTTGGGCGGGTTAATCTCCTCGGCCAGCACCGCGTTGAGCG 185 IS_omegon_km 5461 cGATATTCCCCTGTTTTAGCGTGATGCGCCCACTGCGCAGGCTCAAGCTCGCCTTGCGGGCTGGTCGATT 5530 Tnsq4 711 CGATATTCCCCTGTTTTAGCGTGATGCGCCCACTGCGCAGGCTCAAGCTCGCCTTGCGGG 770 Tnsq6.1 (RC) 437 CGATATTCCCCTGTTTTAGCGTGATGCGCCCACTGCGCAGGCTCAAGCTCGCCTTGCGGGCTGGTCGATT 506 Tnsq5 186 CGATATTCCCCTGTTTTAGCGTGATGCGCCCACTGCGCAGGCTCAAGCTCGCCTTGCGGGCTGGTCGATT 255 IS_omegon_km 5531 TTTACGTTTACCGCGTTTATCCACCACGCCCTTTTGCGGAATGCTGATCTGATAGCCACCCAACTCCGGT 5600 Tnsq6.1 (RC) 507 TTTACGTTTACCGCGTTTATCCACCACGCCCTTTTGCGGAATGCTGATCTGATAGCCACCCAACTCCGGT 576 Tnsq5 256 TTTACGTTTACCGCGTTTATCCACCACGCCCTTTTGCGGAATGCTGATCTGATAGCCACCCAACTCCGGT 325 IS_omegon_km 5601 TGGTTCTTCAGATGGTCGtaCAGATACAACCCAGACTCTACGTCCTTGCGTGGGTGCTTGGAGCGCACCA 5670 Tnsq6.1 (RC) 577 TGGTTCTTCAGATGGTCGTACAGATACAACCCAGACTCTACGTCCTTGCGTGGGTGCTTGGAGCGCACCA 646 Tnsq5 326 TGGTTCTTCAGATGGTCGTACAGATACAACCCAGACTCTACGTCCTTGCGTGGGTGCTTGGAGCGCACCA 395 IS_omegon_km 5671 CGAAGCGCTCGTTATGCGCCAGttTGTCCTGCAGGTCGACGGATCATATCGTCAATTATTACCTCCACGG 5740 Tnsq6.1 (RC) 647 CGAAGCGCTCGTTATGCGCCAGTTTGTCCTGCAGGTCGACGGATCATATCGTCAATTATTACCTCCACGG 716 Tnsq5 396 CGAAGCGCTCGTTATGCGCCAGTTTGTCCTGCAG 429 IS_omegon_km 5741 GGAGAGCCTGAGCAAACTGGCctCaCTAGTAGCCTGAGCAAACTGGcctCAGGCATTTGAGAAGCACACG 5810 Tnsq6.1 (RC) 717 GGAGAGCCTGAGCAAACTGGCCTCACTAGTAGCCTGAGCAAACTGGCCTCAGGCATTTGAGAAGCACACG 786 Tnsq6 4 GGAGAGCCTGAGCaAACTGGCCTCACTAGTAGCCTGAGCAAACTGGcctCAGGCATTTGAGAAGCACACG 73 IS_omegon_km 5811 GTCACACTGCTTCCGGTAGTCAATAAACCGGTAAACCAGCAATAGACATAAGCGGCTATTTAACGACCCT 5880 Tnsq6.1 (RC) 787 GTCACACTGCTTCCGGTAGTCAATAAACCGGTAAACCAGCAATAGACATAAGCGGCTATTTAACGACCCT 856 Tnsq6 74 GTCACACTGCTTCCGGTAGTCAATAAACCGGTAAACCAGCAATAGACATAAGCGGCTATTTAACGACCCT 143 IS_omegon_km 5881 GCCCTGAACCGACGACCGGGTCGAATTTGCTTTCGAATTTCTGCCATTCATCCGCTTATTATCACTTATT 5950 Tnsq6.1 (RC) 857 GCCCTGAACCGACGACCGGGTCGAATTTGCTTTCGAATTTCTGCCATTCATCCGCTTATTATCACT 922 Tnsq6 144 GCCCTGAACCGACGACCGGGTCGAATTTGCTTTCGAATTTCTGCCATTCATCCGCTTATTATCACTTATT 213
IS_omegon_km 5951 CAGGCGTAGCAACCAGGCGTTTAAGGGCACCAATAACTGCCTTAAAAAAATTACGCCCCGCCCTGCCACT 6020 Tnsq6 214 CAGGCGTAGCAACCAGGCGTTTAAGGGCACCAATAACTGCCTTAAAAAAATTACGCCCCGCCCTGCCACT 283 IS_omegon_km 6021 CATCGCAGTACTGTTGTAATTCATTAAGCATTCTGCCGACATGGAAGCCATCACAAACGGCATGATGAAC 6090 Tnsq6 284 CATCGCAGTACTGTTGTAATTCATTAAGCATTCTGCCGACATGGAAGCCATCACAAACGGCATGATGAAC 353 IS_omegon_km 6091 CTGAATCGCCAGCGGCATCAGCACCTTGTCGCCTTGCGTATAATATTTGCCCATGGTGAAAACGGGGGCG 6160 Tnsq6 354 CTGAATCGCCAGCGGCATCAGCACCTTGTCGCCTTGCGTATAATATTTGCCCATGGTGAAAACGGGGGCG 423 IS_omegon_km 6161 AAGAAGTTGTCCATATTGGCCACGTTTAAATCAAAACTGatccggtgattgattgagcaagctttatgct 6230 Tnsq6 424 AAGAAGTTGTCCATATTGGCCACGTTTAAATCAAAACTGATCCGGTGATTGATTGAGCAAGCTTTATGCT 493 IS_omegon_km 6231 tgtaaaccgttttgtgaaaaaatttttaaaataaaaaaggggacctctagggtccccaattaattagtaa 6300 Tnsq6 494 TGTAAACCGTTTTGTGAAAAAATTTTTAAAATAAAAAAGGGGACCTCTAGGGTCCCCAATTAATTAGTAA 563 IS_omegon_km 6301 tataatctattaaaggtcattcaaaaggtcatccaccggatcagcttagtaaagccctcgctagatttta 6370 Tnsq6 564 TATAATCTATTAAAGGTCATTCAAAAGGTCATCCACCGGATCAGCTTAGTAAAGCCCTCGCTAGATTTTA 633 IS_omegon_km 6371 atgcggatgttgcgattacttcgccaactattgcgataacaagaaaaagccagcctttcatgatatatct 6440 Tnsq6 634 ATGCGGATGTTGCGATTACTTCGCCAACTATTGCGATAACAAGAAAAAGCCAGCCTTTCATGATATATCT 703 Tnsq6.2 1 ~~~~~~~~~~~~~~~~~~~~~~~~~~~~~~~~~~~~~~~~~~~~~~~~~~~~~~~~~~~~TGATATATCT 10 IS_omegon_km 6441 cccaatttgtgtagggcttattatgcacgcttaaaaataataaaagcagacttgacctgatagtttggct 6510 Tnsq6 704 CCCAATTTGTGTAGGGCTTATTATGCACGCTTAAAAATAATAAAAGCAGACTTGACCTGATAGTTTGGCT 773 Tnsq6.2 11 CCCAATTTGTGTAGGGCTTATTATGCACGCTTAAAAATaaTAAAAGCAGACTTGACCTGATAGTTTGGCT 80 IS_omegon_km 6511 gtgagcaattatgtgcttagtgcatctaacgcttgagttaagccgcgccgcgaagcggcgtcggcttgaa 6580 Tnsq6 774 GTGAGCAATTATGTGCTTAGTGCATCTAACGCTTGAGTTAAGCCGCGCCGCGAAGCGGCGTCGGCTTGAA 843 Tnsq6.2 81 GTGAGCAATTATGTGCTTAGTGCATCTAACGCTTGAGTTAAGCCGCGCCGCGAAGCGGCGTCGGCTTGAA 150 IS_omegon_km 6581 cgaattgttagacattatttgccgactaccttggtgatctcgcctttcacgtagtggacaaattcttcca 6650 Tnsq6 844 CGAATTGTTAGACATTATTTGCCGACTACCTTGGTGATCTCGCCTTTCACGTAGTGGACAAaTTCTTCCA 913 Tnsq6.2 151 CGAATTGTTAGACATTATTTGCCGACTACCTTGGTGATCTCGCCTTTCACGTAGTGGACAAATTCTTCCA 220 IS_omegon_km 6651 actgatctgcgcgagcttcacgctgccgcaagcactcagggcgcaagggctgctaaaggaagcggaacac 6720 Tnsq6 914 aCTGATCTGCGcGaGcTTCA 933 Tnsq6.2 221 ACTGATCTGCGCGAGCTTCACGCTGCCGCAAGCACTCAGGGCGCAAGGGCTGCTAAAGGAAGCGGAACAC 290 Tnsq8 (RC) 1 ~~~~~~~~~~~~~AGCTTCACGCTGCCGCAAGCACTCAGGgCGCAAGGGCTGCTAAAGGAAGCGGAACAC 57 IS_omegon_km 6721 gtagaaagccagtccgcagaaacggtgctgaccccggatgaatgtcagctactgggctatctggacaagg 6790 Tnsq6.2 291 GTAGAAAGCCAGTCCGCAGAAACGGTGCTGACCCCGGATGAATGTCAGCTACTGGGCTATCTGGACAAGG 360 Tnsq8 (RC) 58 GTAGAAAGCCAGTCCGCAGAAACGGTGCTGACCCCGGATGAAtGTCAGCTActGGGCTATCTGGaCAAGG 127 IS_omegon_km 6791 gaaaacgcaagcgcaaagagaaagcaggtagcttgcagtgggcttacatggcgatagctagactgggcgg 6860 Tnsq6.2 361 GAAAACGCAAGCGCAAAGAGAAAGCAGGTAGCTTGCAGTGGGCTTACATGGCGATAGCTAGACTGGGCGG 430 Tnsq8 (RC) 128 GAAAACGCAAGCGCAAAGAGAAAGCAGGTAGCTTGCAGTGGGCTTACATGGCGATAGCTAGACTGGGCGG 197 Tnsq10 (RC) 1 ~~~~~~~~~~~~~CAAAGAGAAAGCAGGTAgCTtGCAGtGGGCTTACATGgCGATAgcTAGAcTGGGCGG 57 IS_omegon_km 6861 ttttatggacagcaagcgaaccggaattgccagctggggcgccctctggtaaggttgggaagccctgcaa 6930 Tnsq6.2 431 TTTTATGGACAGCAAGCGAACCGGAATTGCCAGCTGGGGCGCCCTCTGGTAAGGTTGGGAAGCCCTGCAA 500 Tnsq8 (RC) 198 TTTTATGGACAGCAAGCGAACCGGAATTGCCAGCTGGGGCGCCCTCTGGTAAggTtGggaagccctgcaa 267 Tnsq10 (RC) 58 TTTTATGGACAGCAAgCGAACCGGAATTgCCAGCTGGGGCGCCCTCTGGTAAGGTTGGGAAgCCCTgCAA 127 IS_omegon_km 6931 agtaaactggatggctttcttgccgccaaggatctgatggcgcaggggatcaagatctgatcaagagaca 7000 Tnsq6.2 501 AGTAAACTGGATGGCTTTCTTGCCGCCAAGGATCTGATGGCGCAGGGGATCAAGATCTGATCAAGAGACA 570 Tnsq8 (RC) 268 agTAAACTGgATGGCTTTCTtGCCGCCAAGGATCTGATGGCGCAGGGGAT 317 Tnsq10 (RC) 128 AgTAAACTGGATGGCTTTCTTGCCgCCAAgGATCTGATGGCGCAGGGGATCAAGATCTGATCAAGAGACA 197 Tnsq7 1 ~~~~~ACTGGATGGCTTTCTTGCCGCCAaGGATCTGATGGCGCAGGGGATC 46 IS_omegon_km 7001 ggatgaggatcgtttcgcatgattgaacaagatggattgcacgcaggttctccggccgcttgggtggaga 7070 Tnsq6.2 571 GGATGAGGATCGTTTCGCATGATTGAACAAGATGGATTGCACGCAGGTTCTCCGGCCGCTTGGGTGGAGA 640 Tnsq10 (RC) 198 GGATGAGGATCGTTTCGCATGATTGAACAAGATGGATTGCACGCAGGTTCTCCGGCCGCTTGGGTGGAGA 267 IS_omegon_km 7071 ggctattcggctatgactgggcacaacagacaatcggctgctctgatgccgccgtgttccggctgtcagc 7140 Tnsq6.2 641 GGCTATTCGGCTATGACTGGGCACAACAGACAATCGGCTGCTCTGATGCCGCCGTGTTCCGGCTGTCAGC 710 Tnsq10 (RC) 268 GGCTATTCGGCTATGACTGGGCACAACAGACAATCGGCTGCTCTGATGCCGCCGTGTTCCGGCTGTCAGC 337 IS_omegon_km 7141 gcaggggcgcccggttctttttgtcaagaccgacctgtccggtgccctgaatgaactgcaggacgaggca 7210 Tnsq6.2 711 GCAGGGGCGCCCGGTTCTTTTTGTCAAGACCGACCTGTCCGGTGCCCTGAATGAACTGCAGGACGAGGCA 780

Tnsq10 (RC) 338 GCAGGGGCGCCCGGTTCTTTTTGTCAAGACCGACCTGTCCGGTGCCCTGAATGAACTGCAGGACGAGGCA 407 IS_omegon_km 7211 gcgcggctatcgtggctggccacgacgggcgttccttgcgcagctgtgctcgacgttgtcactgaagcgg 7280 Tnsq6.2 781 GCGCGGCTATCGTGGCTGGCCACGACGGGCGTTCCTTGCGCAGCTGTGCTCGACGTTGTCACTGAAGCGG 850 Tnsq10 (RC) 408 GCGCGGCTATCGTGGCTGGCCACGACGGGCGTTCCTTGCGCAGCTGTGCTCGACGTTGTCACTGAAGCGG 477 IS_omegon_km 7281 gaagggactggctgctattgggcgaagtgccggggcaggatctcctgtcatctcaccttgctcctgccga 7350 Tnsq6.2 851 GAAGGGACTGGCTGCTATTGGGCgAAgTGCCGGGGCAGGATCTCCTGTCATCTCACCTTGCTCCTGCCGA 920 Tnsq10 (RC) 478 GAAGGGACTGGCTGCTATTGGGCGAAGTGCCGGGGCAGGATCTCCTGTCATCTCACCTTGCTCCTGCCGA 547 IS_omegon_km 7351 gaaagtatccatcatggctgatgcaatgcggcggctgcatacgcttgatccggctacctgcccattcgac 7420 Tnsq6.2 921 gAAAGTATCCATCATGGCTGATGC 944 Tnsq10 (RC) 548 GAAAGTATCCATCATGGCTGATGCAATGCGGCGGCTGCATACGCTTGATCCGGCTACCTGCCCATTCGAC 617 Tnsq9.1 1 ~~~~~~~~~~~~~~~~~~~~~~~~~ATGCGGCGGCTGCATACGCTTGATCCGGCTACCTGCCCATTCGAC 45 IS_omegon_km 7421 caccaagcgaaacatcgcatcgagcgagcacgtactcggatggaagccggtcttgtcgatcaggatgatc 7490 Tnsq10 (RC) 618 CACCAAGCGAAACATCGCATCGAGCGAGCACGTACTCGGATGGAAGCCGGTCTTGTCGATCAGGATGATC 687 Tnsq9.1 46 CACCaagCGAAACATCGCATCGAGCGAGCACGTACTCGGATGGAAGCCGGTCTTGTCGATCAGGATGATC 115 IS_omegon_km 7491 tggacgaagagcatcaggggctcgcgccagccgaactgttcgccaggctcaaggcgcgcatgcccgacgg 7560 Tnsq10 (RC) 688 TGGACGAAGAGCATCAGGGGCTCGCGCCAGCCGAACTGTTCGCCAGGCTCAAGGCGCGCATGCCCGACGG 757 Tnsq9.1 116 TGGACGAAGAGCATCAGGGGCTCGCGCCAGCCGAACTGTTCGCCAGGCTCAAGGCGCGCATGCCCGACGG 185 IS_omegon_km 7561 cgaggatctcgtcgtgacccatggcgatgcctgcttgccgaatatcatggtggaaaatggccgcttttct 7630 Tnsq10 (RC) 758 cGAGGATCTCGTCGTGACCCATGGCGATgCCTGCTTGCCGaataTCATGGTGGAAAATGGCCGCTTTTCT 827 Tnsq9.1 186 CGAGGATCTCGTCGTGACCCATGGCGATGCCTGCTTGCCGAATATCATGGTGGAAAATGGCCGCTTTTCT 255 IS_omegon_km 7631 ggattcatcgactgtggccggctgggtgtggcggaccgctatcaggacatagcgttggctacccgtgata 7700 Tnsq10 (RC) 828 GGATTCATCGACTGTGGCCGGCTGGGTG 855 Tnsq9.1 256 GGATTCATCGACTGTGGCCGGCTGGGTGTGGCGGACCGCTATCAGGACATAGCGTTGGCTACCCGTGATA 325 Tnsq9 1 ~~~~~~~~~~~~~~~~~~~~~~~~~~~~tggcggaCcGCTATCAGGACATAGCGTTGGCTACCCGTGATA 42 IS_omegon_km 7701 ttgctgaagagcttggcggcgaatgggctgaccgcttcctcgtgctttacggtatcgccgctcccgattc 7770 Tnsq9.1 326 TTGCTGAAGAGCTTGGCGGCGAATGGGCTGACCGCTTCCTCGTGCTTTACGGTATCGCCGCTCCCGATTC 395 Tnsq9 43 TTGCTGAAGAGCTTGGCGGCGAATGGGCTGACCGCTTCCTCGTGCTTTACGGTATCGCCGCTCCCGATTC 112 IS_omegon_km 7771 gcagcgcatcgccttctatcgccttcttgacgagttcttctgagcgggactctggggttcgaaatgaccg 7840 Tnsq9.1 396 GCAGCGCATCGCCTTCTATCGCCTTCTTGACGAGTTCTTCTGAGCGGGACTCTGGGGTTCGAAATGACCG 465 Tnsq9 113 GCAGCGCATCGCCTTCTATCGCCTTCTTGACGAGTTCTTCTGAGCGGGACTCTGGGGTTCGAAATGACCG 182 IS_omegon_km 7841 accaagcgacgcccaacctgccatcacgagatttcgattccaccgccgccttctatgaaaggttgggctt 7910 Tnsq9.1 466 ACCAAGCGACGCCCAACCTGCCATCACGAGATTTCGATTCCACCGCCGCCTTCTATGAAAGGTTGGGCTT 535 Tnsq9 183 ACCAAGCGACGCCCAACCTGCCATCACGAGATTTCGATTCCACCGCCGCCTTCTATGAAAGGTTGGGCTT 252 IS_omegon_km 7911 cggaatcgttttccgggacgccggctggatgatcctccagcgcggggatctcatgctggagttcttcgcc 7980 Tnsq9.1 536 CGGAATCGTTTTCCGGGACGCCGGCTGGATGATCCTCCAGCGCGGGGATCTCATGCTGGAGTTCTTCGCC 605 Tnsq9 253 CGGAATCGTTTTCCGGGACGCCGGCTGGATGATCCTCCAGCGCGGGGATCTCATGCTGGAGTTCTTCGCC 322 IS_omegon_km 7981 cacccccggctggctggtttattgctgataaatctggagccggtgagcgtgggtctcgcggtatcattgc 8050 Tnsq9.1 606 CACCCCCGGCTGGCTGGTTTATTGCTGATAAATCTGGAGCCGGTGAGCGTGGGTCTCGCGGTATCATTGC 675 Tnsq9 323 CACCCCCGGCTGGCTGGTTTATTGCTGATAAATCTGGAGCCGGTGAGCGTGGGTCTCGCGGTATCATTGC 392 Tnsq13 (RC) 1 ~~~~~~~GGCTGGCTGGTTTATTGCTGATAAATCTGGAGCCggtGAGCGTGGGTCTCGCGGTATCATTGC 63 Tnsq14 1 ~~~~~~~~~~~~~~~~~~~~~~~~~~~~~~~~~~~~~~~~~~~~~~~~~~~~~~~~~~~~~~~TCATTGC 7 IS_omegon_km 8051 agcactggggccagatggtaagccctcccgtatcgtagttatctacacgacggggagtcaggcaactatg 8120 Tnsq9.1 676 AGCACTGGGGCCAGATGGTAAGCCCTCCCGTATCGTAGTTATCTACACGACGGGGAGTCAGGCAACTATG 745 Tnsq9 393 AGCACTGGGGCCAGATGGTAAGCCCTCCCGTATCGTAGTTATCTACACGACGGGGAGTCAGGCAACTATG 462 Tnsq13 (RC) 64 AGCACTGGGGCCAGATGgTAAGCCCTCCCG 93 Tnsq14 8 AGCACTGGGGCCAGATGGTAAGCCCTCCCGTATCGTAGTTATCTACACGACGGGGAGTCAGGCAACTATG 77 IS_omegon_km 8121 gatgaacgaaatagacagatcgctgagataggtgcctcactgattaagcattggtaactgtcagaccaag 8190 Tnsq9.1 746 GATGAACGAAATAGACAGATCGCTGAGATAGGTGCCTCACTGATTAAGCATTGGTAACTGTCAGACCAAG 815 Tnsq9 463 GATGAACGAAATAGACAGATCGCTGAGATAGGTGCCTCACTGATTAAGCATTGGTAACTGTCAGACCAAG 532 Tnsq14 78 GATGAACGAAATAGACAGATCGCtGAGATAGGTGCCTCACTGATTAAGCATTGGTAACTGTCAGACCAAG 147 IS_omegon_km 8191 tttactcatatatactttagattgatttaaaacttcatttttaatttaaaaggatctaggtgaagatcct 8260 Tnsq9.1 816 TTTACTCATATATACTTTAGATTGATTTAAAACTTCATTTTTAATTTAAAAGGATCTAGGTGAA 879

Tnsq9 533 TTTACTCATATATACTTTAGATTGATTTAAAACTTCATTTTTAATTTAAAAGGATCTAGGTGAAGATCCT 602 Tnsq14 148 TTTACTCATATATACTTTAGATTGATTTA 176 IS_omegon_km 8261 ttttgataatctcatgaccaaaatcccttaacgtgagttttcgttccactgagcgtcagaccccgtagaa 8330 Tnsq9 603 TTTTGATAATCTCATGACCAAAATCCCTTAACGTGAGTTTTCGTTCCACTGAGCGTCAGACCCCGTAGAA 672 IS_omegon_km 8331 aagatcaaaggatcttcttgagatcctttttttctgcgcgtaatctgctgcttgcaaacaaaaaaaccac 8400 Tnsq9 673 AAGATCAAAGGATCTTCTTGAGATCCTTTTTTTCTGCGCGTAATCTGCTGCTTGCAAACAAAAAAACCAC 742 IS_omegon_km 8401 cgctaccagcggtggtttgtttgccggatcaagagctaccaactctttttccgaaggtaactggcttcag 8470 Tnsq9 743 CGCTACCAGCGGTGGTTTGTTTGCCGGATCAAGAGCTACCAACTCTTTTTCCGAAGGTAACTGGCTTCAG 812 IS_omegon_km 8471 cagagcgcagataccaaatactgtccttctagtgtagccgtagttaggccaccacttcaagaactctgta 8540 Tnsq9 813 CAGAGCGCAGATACCAAATACTGTCCTTCTAGTGTAGCCGTAGTTAGGCCACCACTTCAAGAACTCTGTA 882 IS_omegon_km 8541 gcaccgcctacatacctcgctctgctaatcctgttaccagtggctgctgccagtggcgataagtcgtgtc 8610 Tnsq9 883 GCACCGCCTACATACCTCGCTCTGCTAATCCTGTTACCAGTGGCTGCTGCCAGTGGCGATAAGTCGTGTC 952 IS_omegon_km 8611 ttaccgggttggactcaagacgatagttaccggataaggcgcagcggtcgggctgaacggggggttcgtg 8680 Tnsq9 953 TTACCGGGTTGGACTCAAG 971 IS_omegon_km 8681 cacacagcccagcttggagcgaacgacctacaccgaactgagatacctacagcgtgagctatgagaaagc 8750 IS_omegon_km 8751 gccacgcttcccgaagggagaaaggcggacaggtatccggtaagcggcagggtcggaacaggagagcgca 8820 IS_omegon_km 8821 cgagggagcttccagggggaaacgcctggtatctttatagtcctgtcgggtttcgccacctctgacttga 8890 IS_omegon_km 8891 gcgtcgatttttgtgatgctcgtcaggggggcggagcctatggaaaaacgccagcaacgcggccttttta 8960 IS_omegon_km 8961 cggttcctggccttttgctggccttttgctcacatgttctttcctgcgttatcccctgattctgtggata 9030 IS_omegon_km 9031 accgtattaccgcctttgagtgagctgataccgctcgccgcagccgaacgaccgagcgcagcgagtcagt 9100 IS_omegon_km 9101 gagcgaggaagcggaagagcgcctgatgcggtattttctccttacgcatctgtgcggtatttcacaccgc 9170 IS_omegon_km 9171 atatggtgcactctcagtacaatctgctctgatgccgcatagttaagccagtatacactccgctatcgct 9240 Tnsq11 (RC) 1 ~TATGGTGCACTCTCAGTACAATCTGCTCTGATGCCGCATAGTTAAGCCAGTATACACTCCGCTATCGCT 69 Tnsq16 (RC) 1 ~~~~~~~~~~~~~~~~~~~~~~~~~~~~~~GATGCCGCATAGTTAAGCCAGTATaCACTCCGCTATCGcT 40 IS_omegon_km 9241 acgtgactgggtcatggctgcgccccgacacccgccaacacccgctgacgcgccctgacgggcttgtctg 9310 Tnsq11 (RC) 70 ACGTGACTGGGTCATGGCTGCGCCCCGACACCCGCCAACACCCGCTGACGCGCCCTGACGgGCTTGTCTG 139 Tnsq16 (RC) 41 ACGTGACTGGGTCATGGcTGCGCCCCGACACCCGCCAACACCCGcTGACGCGCCCTGACGGGCTTGTCTG 110 Tnsq12 2 GTGACTGGGTCATGGCTGCGCCCCGACACCCGCCAACACCCGCTGatgCGCCCTGACGGGCTTGTCTGCT 71 IS_omegon_km 9311 ctcccggcatccgcttacagacaagctgtgaccgtctccgggagctgcatgtgtcagaggttttcaccgt 9380 Tnsq11 (RC) 140 CTCCCGGCATCCGCTTACAGACAAGCTGTGACCGTCTCCGG 180 Tnsq16 (RC) 111 CTCCCGGCATCCGCTTACAGACAAGCTGTGACCGTCTCCGGGAGCTGCATGTGTCAGAGGTTTTCACCGT 180 Tnsq12 72 CCCGGCATCCGCTTACAGACAAGCTGTGACCGTCTCCGGGAGCTGCATGTGTCAGAGGTTTTCACCGTCA 141 IS_omegon_km 9381 catcaccgaaacgcgcgagggctcgatcccctcgcgagttggttcagctgctgcctgaggctggacgacc 9450 Tnsq16 (RC) 181 CATCACCGAAACGCGCGAGGGCTCGATCCCCTCGCGAGTTGGTTCAGCTGCTGCCTGAGGCTGGACGACC 250 Tnsq12 142 TCACCGAAACGCGCGAGG 159 IS_omegon_km 9451 tcgcggagttctaccggcagtgcaaatccgtcggcacccaggaaaccagcagcggctatccgcgcatcca 9520 Tnsq16 (RC) 251 TCGCGGAGTTCTACCGGCAGTGCAAATCCGTCGGCACCCAGGAAACCAGCAGCGGCTATCCGCGCATCCA 320 IS_omegon_km 9521 tgcccccgaactgcaggagtggggaggcacgatggccgctttggtcgacggatcagtgagggtttgcaac 9590 Tnsq16 (RC) 321 TGCCCCCGAACTGCAGGAGTGGGGAGGCACGATGGCCGCTTTGGTCGACGGATCAGTGAGGGTTTGCAAC 390 IS_omegon_km 9591 tgcgggtcaaggatctggatttcgatcacggcacgatcatcgtgcgggagggcaagggctccaaggatcg 9660 Tnsq16 (RC) 391 TGCGGGTCAAGGATCTGGATTTCGATCACGGCACGATCATCGTGCGGGAGGGCAAGGGCTCCAAGGATCG 460 IS_omegon_km 9661 ggccttgatgttacccgagagcttggcacccagcctgcgcgagcaggggaattgatccggtggatgacct 9730 Tnsq16 (RC) 461 GGCCTTGATGTTACCCGAGAGCTTGGCACCCAGCCTGCGCGAGCAGGGGAATTGATCCGGTGGATGACCT 530 IS_omegon_km 9731 tttgaatgacctttaatagattatattactaattaattggggaccctagaggtccccttttttattttaa 9800 Tnsq16 (RC) 531 TTTGAATGACCTTTAATAGATTATATTACTAATTAATTGGGGACCCTAGAGGTCCCCTTTTTTATTTTAA 600 IS_omegon_km 9801 aaattttttcacaaaacggtttacaagcataaagcttgctcaatcaatcaccggatcgtaaccagtaatg 9870
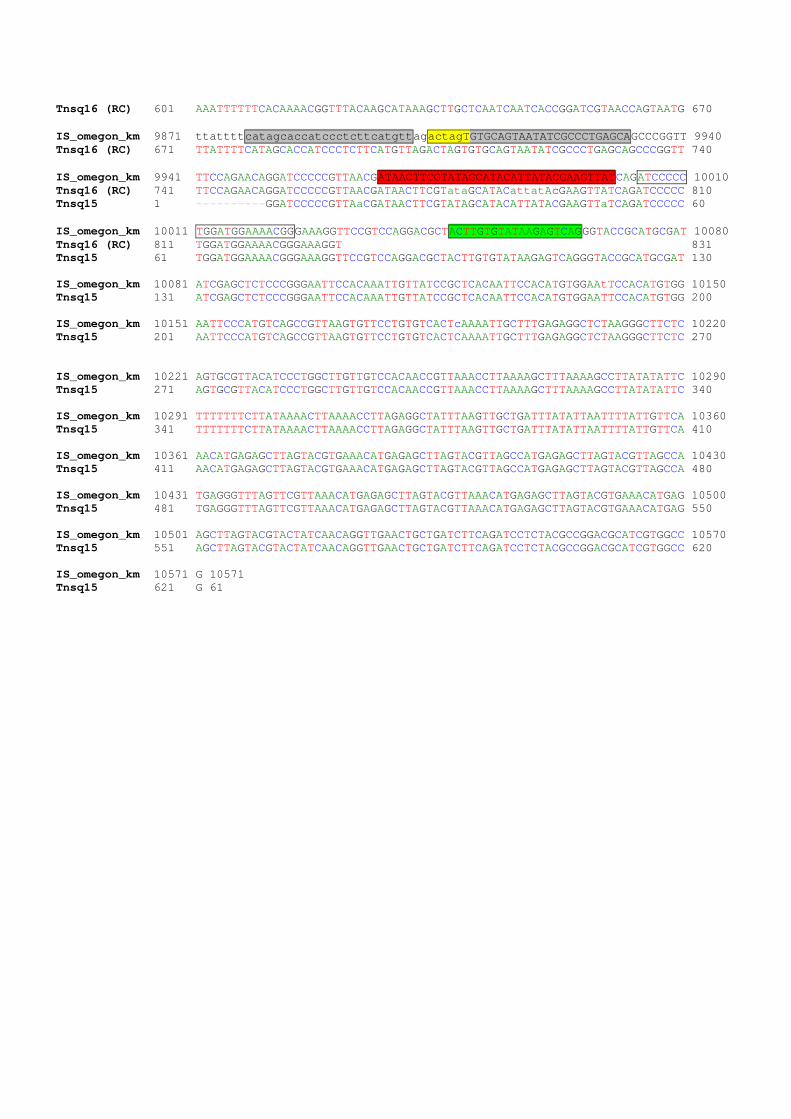
Tnsq16 (RC) 601 AAATTTTTTCACAAAACGGTTTACAAGCATAAAGCTTGCTCAATCAATCACCGGATCGTAACCAGTAATG 670 IS_omegon_km 9871 ttattttcatagcaccatccctcttcatgttagactagTGTGCAGTAATATCGCCCTGAGCAGCCCGGTT 9940 Tnsq16 (RC) 671 TTATTTTCATAGCACCATCCCTCTTCATGTTAGACTAGTGTGCAGTAATATCGCCCTGAGCAGCCCGGTT 740 IS_omegon_km 9941 TTCCAGAACAGGATCCCCCGTTAACGATAACTTCGTATAGCATACATTATACGAAGTTATCAGATCCCCC 10010 Tnsq16 (RC) 741 TTCCAGAACAGGATCCCCCGTTAACGATAACTTCGTataGCATACattatAcGAAGTTATCAGATCCCCC 810 Tnsq15 1 ~~~~~~~~~~GGATCCCCCGTTAaCGATAACTTCGTATAGCATACATTATACGAAGTTaTCAGATCCCCC 60 IS_omegon_km 10011 TGGATGGAAAACGGGAAAGGTTCCGTCCAGGACGCTACTTGTGTATAAGAGTCAGGGTACCGCATGCGAT 10080 Tnsq16 (RC) 811 TGGATGGAAAACGGGAAAGGT 831 Tnsq15 61 TGGATGGAAAACGGGAAAGGTTCCGTCCAGGACGCTACTTGTGTATAAGAGTCAGGGTACCGCATGCGAT 130 IS_omegon_km 10081 ATCGAGCTCTCCCGGGAATTCCACAAATTGTTATCCGCTCACAATTCCACATGTGGAAtTCCACATGTGG 10150 Tnsq15 131 ATCGAGCTCTCCCGGGAATTCCACAAATTGTTATCCGCTCACAATTCCACATGTGGAATTCCACATGTGG 200 IS_omegon_km 10151 AATTCCCATGTCAGCCGTTAAGTGTTCCTGTGTCACTcAAAATTGCTTTGAGAGGCTCTAAGGGCTTCTC 10220 Tnsq15 201 AATTCCCATGTCAGCCGTTAAGTGTTCCTGTGTCACTCAAAATTGCTTTGAGAGGCTCTAAGGGCTTCTC 270 IS_omegon_km 10221 AGTGCGTTACATCCCTGGCTTGTTGTCCACAACCGTTAAACCTTAAAAGCTTTAAAAGCCTTATATATTC 10290 Tnsq15 271 AGTGCGTTACATCCCTGGCTTGTTGTCCACAACCGTTAAACCTTAAAAGCTTTAAAAGCCTTATATATTC 340 IS_omegon_km 10291 TTTTTTTCTTATAAAACTTAAAACCTTAGAGGCTATTTAAGTTGCTGATTTATATTAATTTTATTGTTCA 10360 Tnsq15 341 TTTTTTTCTTATAAAACTTAAAACCTTAGAGGCTATTTAAGTTGCTGATTTATATTAATTTTATTGTTCA 410 IS_omegon_km 10361 AACATGAGAGCTTAGTACGTGAAACATGAGAGCTTAGTACGTTAGCCATGAGAGCTTAGTACGTTAGCCA 10430 Tnsq15 411 AACATGAGAGCTTAGTACGTGAAACATGAGAGCTTAGTACGTTAGCCATGAGAGCTTAGTACGTTAGCCA 480 IS_omegon_km 10431 TGAGGGTTTAGTTCGTTAAACATGAGAGCTTAGTACGTTAAACATGAGAGCTTAGTACGTGAAACATGAG 10500 Tnsq15 481 TGAGGGTTTAGTTCGTTAAACATGAGAGCTTAGTACGTTAAACATGAGAGCTTAGTACGTGAAACATGAG 550 IS_omegon_km 10501 AGCTTAGTACGTACTATCAACAGGTTGAACTGCTGATCTTCAGATCCTCTACGCCGGACGCATCGTGGCC 10570 Tnsq15 551 AGCTTAGTACGTACTATCAACAGGTTGAACTGCTGATCTTCAGATCCTCTACGCCGGACGCATCGTGGCC 620 IS_omegon_km 10571 G 10571 Tnsq15 621 G 61

IS omegon-km/hah 1 GATCCAGCCG ACCAGGCTTT CCACGCCCGC GTGCCGCTCC ATGTCGTTCG CGCGGTTCTC GGAAACGCGC 70 71 TGCCGCGTTT CGTGATTGTC ACGCTCAAGC CCGTAGTCCC GTTCGAGCGT CGCGCAGAGG TCAGCGAGGG 140 141 CGCGGTAGGC CCGATACGGC TCATGGATGG TGTTTCGGGT CGGGTGAATC TTGTTGATGG CGATATGGAT 210 211 GTGCAGGTTG TCGGTGTCGT GATGCACGGC ACTGACGCGC TGATGCTCGG CGAAGCCAAG CCCAGCGCAG 280 281 ATGCGGTCCT CAATCGCGCG CAACGTCTCC GCGTCGGGCT TCTCTCCCGC GCGGAAGCTA ACCAGCAGGT 350 351 GATAGGTCTT GTCGGCCTCG GAACGGGTGT TGCCGTGCTG GGTCGCCATC ACCTCGGCCA TGACAGCGGG 420 421 CAGGGTGTTT GCCTCGCAGT TCGTGACGCG CACGTGACCC AGGCGCTCGG TCTTGCCTTG CTCGTCGGTG 490 491 ATGTACTTCA CCAGCTCCGC GAAGTCGCTC TTCTTGATGG AGCGCATGGG GACGTGCTTG GCAATCACGC 560 561 GCACCCCCCG GCCGTTTTAG CGGCTAAAAA AGTCATGGCT CTGCCCTCGG GCGGACCACG CCCATCATGA 630 631 CCTTGCCAAG CTCGTCCTGC TTCTCTTCGA TCTTCGCCAG CAGGGCGAGG ATCGTGGCAT CACCGAACCG 700 701 CGCCGTGCGC GGGTCGTCGG TGAGCCAGAG TTTCAGCAGG CCGCCCAGGC GGCCCAGGTC GCCATTGATG 770 771 CGGGCCAGCT CGCGGACGTG CTCATAGTCC ACGACGCCCG TGATTTTGTA GCCCTGGCCG ACGGCCAGCA 840 841 GGTAGGCCGA CAGGCTCATG CCGGCCGCCG CCGCCTTTTC CTCAATCGCT CTTCGTTCGT CTGGAAGGCA 910 911 GTACACCTTG ATAGGTGGGC TGCCCTTCCT GGTTGGCTTG GTTTCATCAG CCATCCGCTT GCCCTCATCT 980 981 GTTACGCCGG CGGTAGCCGG CCAGCCTCGC AGAGCAGGAT TCCCGTTGAG CACCGCCAGG TGCGAATAAG 1050 1051 GGACAGTGAA GAAGGAACAC CCGCTCGCGG GTGGGCCTAC TTCACCTATC CTGCCCGGCT GACGCCGTTG 1120 1121 GATACACCAA GGAAAGTCTA CACGAACCCT TTGGCAAAAT CCTGTATATC GTGCGAAAAA GGATGGATAT 1190 1191 ACCGAAAAAA TCGCTATAAT GACCCCGAAG CAGGGTTATG CAGCGGAAAA GCGCTGCTTC CCTGCTGTTT 1260 1261 TGTGGAATAT CTACCGACTG GAAACAGGCA AATGCAGGAA ATTACTGAAC TGAGGGGACA GGCGAGAGAC 1330 1331 GATGCCAAAG AGCTACACCG ACGAGCTGGC CGAGTGGGTT GAATCCCGCG CGGCCAAGAA GCGCCGGCGT 1400 1401 GATGAGGCTG CGGTTGCGTT CCTGGCGGTG AGGGCGGATG TCGAGGCGGC GTTAGCGTCC GGCTATGCGC 1470 1471 TCGTCACCAT TTGGGAGCAC ATGCGGGAAA CGGGGAAGGT CAAGTTCTCC TACGAGACGT TCCGCTCGCA 1540 1541 CGCCAGGCGG CACATCAAGG CCAAGCCCGC CGATGTGCCC GCACCGCAGG CCAAGGCTGC GGAACCCGCG 1610 1611 CCGGCACCCA AGACGCCGGA GCCACGGCGG CCGAAGCAGG GGGGCAAGGC TGAAAAGCCG GCCCCCGCTG 1680 1681 CGGCCCCGAC CGGCTTCACC TTCAACCCAA CACCGGACAA AAAGGATCCT CTACGCCGGA CGCATCGTGG 1750 1751 CCGGCATCAC CGGCGCCACA GGTGCGGTTG CTGGCGCCTA TATCGCCGAC ATCACCGATG GGGAAGATCG 1820 1821 GGCTCGCCAC TTCGGGCTCA TGAGCGCTTG TTTCGGCGTG GGTATGGTGG CAGGCCCCGT GGCCGGGGGA 1890 1891 CTGTTGGGCG CCATCTCCTT GCTGCCTCGC GCGTTTCGGT GATGACGGTG AAAACCTCTG ACACATGCAG 1960 1961 CTCCCGGAGA CGGTCACAGC TTGTCTGTAA GCGGATGCCG GGAGCAGACA AGCCCGTCAG GGCGCGTCAG 2030 2031 CGGGTGTTGG CGGGTGTCGG GGCGCAGCCA TGACCCAGTC ACGTAGCGAT AGCGGAGTGT ATACTGGCTT 2100 2101 AACTATGCGG CATCAGAGCA GATTGTACTG AGAGTGCACC ATAAAATCAA TCTAAAGTAT ATATGAGTAA 2170 2171 ACTTGGTCTG ACAGTTACCA ATGCTTAATC AGTGAGGCAC CTATCTCAGC GATCTGTCTA TTTCGTTCAT 2240 2241 CCATAGTTGC CTGACTCCCC GTCGTGTAGA TAACTACGAT ACGGGAGGGC TTACCATCTG GCCCCAGTGC 2310
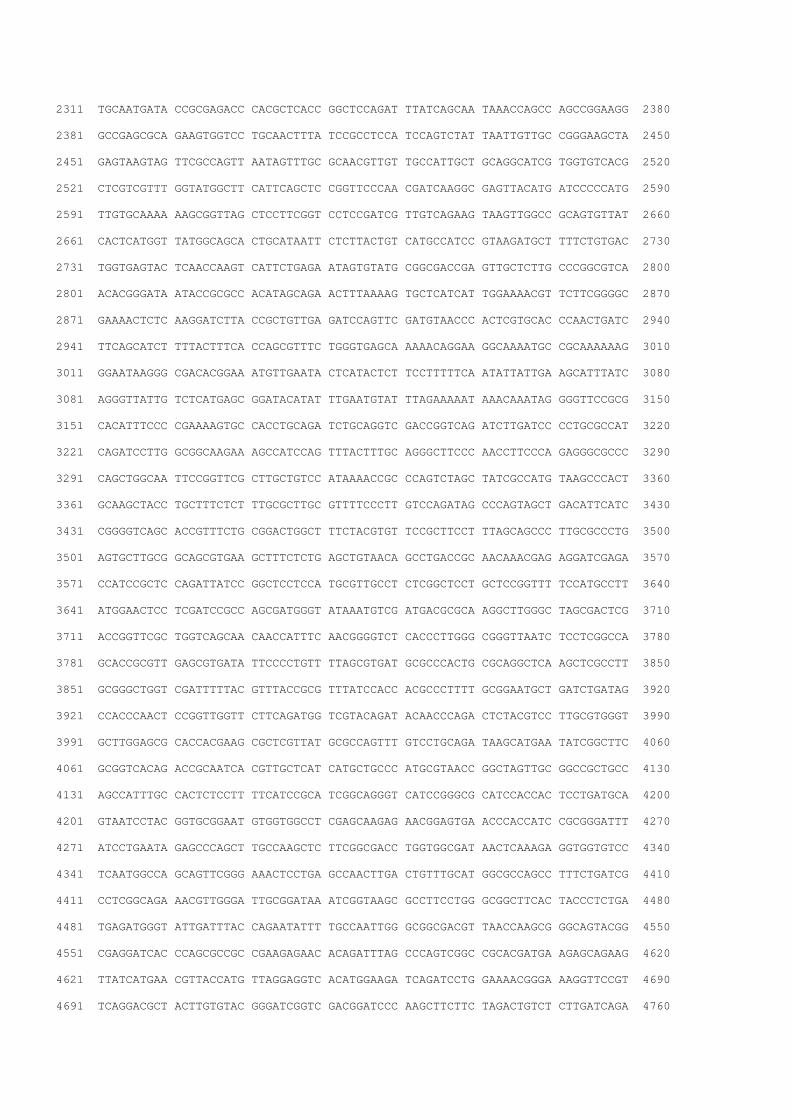
2311 TGCAATGATA CCGCGAGACC CACGCTCACC GGCTCCAGAT TTATCAGCAA TAAACCAGCC AGCCGGAAGG 2380 2381 GCCGAGCGCA GAAGTGGTCC TGCAACTTTA TCCGCCTCCA TCCAGTCTAT TAATTGTTGC CGGGAAGCTA 2450 2451 GAGTAAGTAG TTCGCCAGTT AATAGTTTGC GCAACGTTGT TGCCATTGCT GCAGGCATCG TGGTGTCACG 2520 2521 CTCGTCGTTT GGTATGGCTT CATTCAGCTC CGGTTCCCAA CGATCAAGGC GAGTTACATG ATCCCCCATG 2590 2591 TTGTGCAAAA AAGCGGTTAG CTCCTTCGGT CCTCCGATCG TTGTCAGAAG TAAGTTGGCC GCAGTGTTAT 2660 2661 CACTCATGGT TATGGCAGCA CTGCATAATT CTCTTACTGT CATGCCATCC GTAAGATGCT TTTCTGTGAC 2730 2731 TGGTGAGTAC TCAACCAAGT CATTCTGAGA ATAGTGTATG CGGCGACCGA GTTGCTCTTG CCCGGCGTCA 2800 2801 ACACGGGATA ATACCGCGCC ACATAGCAGA ACTTTAAAAG TGCTCATCAT TGGAAAACGT TCTTCGGGGC 2870 2871 GAAAACTCTC AAGGATCTTA CCGCTGTTGA GATCCAGTTC GATGTAACCC ACTCGTGCAC CCAACTGATC 2940 2941 TTCAGCATCT TTTACTTTCA CCAGCGTTTC TGGGTGAGCA AAAACAGGAA GGCAAAATGC CGCAAAAAAG 3010 3011 GGAATAAGGG CGACACGGAA ATGTTGAATA CTCATACTCT TCCTTTTTCA ATATTATTGA AGCATTTATC 3080 3081 AGGGTTATTG TCTCATGAGC GGATACATAT TTGAATGTAT TTAGAAAAAT AAACAAATAG GGGTTCCGCG 3150 3151 CACATTTCCC CGAAAAGTGC CACCTGCAGA TCTGCAGGTC GACCGGTCAG ATCTTGATCC CCTGCGCCAT 3220 3221 CAGATCCTTG GCGGCAAGAA AGCCATCCAG TTTACTTTGC AGGGCTTCCC AACCTTCCCA GAGGGCGCCC 3290 3291 CAGCTGGCAA TTCCGGTTCG CTTGCTGTCC ATAAAACCGC CCAGTCTAGC TATCGCCATG TAAGCCCACT 3360 3361 GCAAGCTACC TGCTTTCTCT TTGCGCTTGC GTTTTCCCTT GTCCAGATAG CCCAGTAGCT GACATTCATC 3430 3431 CGGGGTCAGC ACCGTTTCTG CGGACTGGCT TTCTACGTGT TCCGCTTCCT TTAGCAGCCC TTGCGCCCTG 3500 3501 AGTGCTTGCG GCAGCGTGAA GCTTTCTCTG AGCTGTAACA GCCTGACCGC AACAAACGAG AGGATCGAGA 3570 3571 CCATCCGCTC CAGATTATCC GGCTCCTCCA TGCGTTGCCT CTCGGCTCCT GCTCCGGTTT TCCATGCCTT 3640 3641 ATGGAACTCC TCGATCCGCC AGCGATGGGT ATAAATGTCG ATGACGCGCA AGGCTTGGGC TAGCGACTCG 3710 3711 ACCGGTTCGC TGGTCAGCAA CAACCATTTC AACGGGGTCT CACCCTTGGG CGGGTTAATC TCCTCGGCCA 3780 3781 GCACCGCGTT GAGCGTGATA TTCCCCTGTT TTAGCGTGAT GCGCCCACTG CGCAGGCTCA AGCTCGCCTT 3850 3851 GCGGGCTGGT CGATTTTTAC GTTTACCGCG TTTATCCACC ACGCCCTTTT GCGGAATGCT GATCTGATAG 3920 3921 CCACCCAACT CCGGTTGGTT CTTCAGATGG TCGTACAGAT ACAACCCAGA CTCTACGTCC TTGCGTGGGT 3990 3991 GCTTGGAGCG CACCACGAAG CGCTCGTTAT GCGCCAGTTT GTCCTGCAGA TAAGCATGAA TATCGGCTTC 4060 4061 GCGGTCACAG ACCGCAATCA CGTTGCTCAT CATGCTGCCC ATGCGTAACC GGCTAGTTGC GGCCGCTGCC 4130 4131 AGCCATTTGC CACTCTCCTT TTCATCCGCA TCGGCAGGGT CATCCGGGCG CATCCACCAC TCCTGATGCA 4200 4201 GTAATCCTAC GGTGCGGAAT GTGGTGGCCT CGAGCAAGAG AACGGAGTGA ACCCACCATC CGCGGGATTT 4270 4271 ATCCTGAATA GAGCCCAGCT TGCCAAGCTC TTCGGCGACC TGGTGGCGAT AACTCAAAGA GGTGGTGTCC 4340 4341 TCAATGGCCA GCAGTTCGGG AAACTCCTGA GCCAACTTGA CTGTTTGCAT GGCGCCAGCC TTTCTGATCG 4410 4411 CCTCGGCAGA AACGTTGGGA TTGCGGATAA ATCGGTAAGC GCCTTCCTGG GCGGCTTCAC TACCCTCTGA 4480 4481 TGAGATGGGT ATTGATTTAC CAGAATATTT TGCCAATTGG GCGGCGACGT TAACCAAGCG GGCAGTACGG 4550 4551 CGAGGATCAC CCAGCGCCGC CGAAGAGAAC ACAGATTTAG CCCAGTCGGC CGCACGATGA AGAGCAGAAG 4620 4621 TTATCATGAA CGTTACCATG TTAGGAGGTC ACATGGAAGA TCAGATCCTG GAAAACGGGA AAGGTTCCGT 4690 4691 TCAGGACGCT ACTTGTGTAC GGGATCGGTC GACGGATCCC AAGCTTCTTC TAGACTGTCT CTTGATCAGA 4760

4761 TCTTGGATCT CGGGCGTAGT CCGGCACGTC GTACGGGTAG TGATGGTGAT GGTGATGCTT AATTAATAAC 4830 4831 TTCGTATAGC ATACATTATA CGAAGTTATG GTTAACGGGG GATCCCCTGC GCCATCAGAT CCTTGGCGGC 4900 4901 AAGAAAGCCA TCCAGTTTAC TTTGCAGGGC TTCCCAACCT TACCAGAGGG CGCCCCAGCC GGCAATTCCG 4970 4971 GTTCGCTTGC TGTCCATAAA ACCGCCCAGT CTAGCTATCG CCATGTAAGC CCACTGCAAG CTACCTGCTT 5040 5041 TCTCTTTGCG CTTGCGTTTT CCCTTGTCCA GATAGCCCAG TAGCTGACAT TCATCCGGGG TCAGCACCGT 5110 5111 TTCTGCGGAC TGGCTTTCTA CGTGTTCCGC TTCCTTTAGC AGCCCTTGCG TCCTGAGTGC TTGCGGCAGC 5180 5181 GTGAAGCTTT CTCTGAGCTG TAACAGCCTG ACCGCAACAA ACGAGAGGAT CGAGACCATC CGCTCCAGAT 5250 5251 TATCCGGCTC CTCCATGCGT TGCCTCTCGG CTCCTGCTCC GGTTTTCCAT GCCTTATGGA ACTCCTCGAT 5320 5321 CCGCCAGCGA TGGGTATAAA TGTCGATGAC GCGCAAGGCT TGGGCTAGCG ACTCGACCGG TTCGCTGGTC 5390 5391 AGCAACAACC ATTTCAACGG GGTCTCACCC TTGGGCGGGT TAATCTCCTC GGCCAGCACC GCGTTGAGCG 5460 5461 CGATATTCCC CTGTTTTAGC GTGATGCGCC CACTGCGCAG GCTCAAGCTC GCCTTGCGGG CTGGTCGATT 5530 5531 TTTACGTTTA CCGCGTTTAT CCACCACGCC CTTTTGCGGA ATGCTGATCT GATAGCCACC CAACTCCGGT 5600 5601 TGGTTCTTCA GATGGTCGTA CAGATACAAC CCAGACTCTA CGTCCTTGCG TGGGTGCTTG GAGCGCACCA 5670 5671 CGAAGCGCTC GTTATGCGCC AGTTTGTCCT GCAGGTCGAC GGATCATATC GTCAATTATT ACCTCCACGG 5740 5741 GGAGAGCCTG AGCAAACTGG CCTCACTAGT AGCCTGAGCA AACTGGCCTC AGGCATTTGA GAAGCACACG 5810 5811 GTCACACTGC TTCCGGTAGT CAATAAACCG GTAAACCAGC AATAGACATA AGCGGCTATT TAACGACCCT 5880 5881 GCCCTGAACC GACGACCGGG TCGAATTTGC TTTCGAATTT CTGCCATTCA TCCGCTTATT ATCACTTATT 5950 5951 CAGGCGTAGC AACCAGGCGT TTAAGGGCAC CAATAACTGC CTTAAAAAAA TTACGCCCCG CCCTGCCACT 6020 6021 CATCGCAGTA CTGTTGTAAT TCATTAAGCA TTCTGCCGAC ATGGAAGCCA TCACAAACGG CATGATGAAC 6090 6091 CTGAATCGCC AGCGGCATCA GCACCTTGTC GCCTTGCGTA TAATATTTGC CCATGGTGAA AACGGGGGCG 6160 6161 AAGAAGTTGT CCATATTGGC CACGTTTAAA TCAAAACTGA TCCGGTGATT GATTGAGCAA GCTTTATGCT 6230 6231 TGTAAACCGT TTTGTGAAAA AATTTTTAAA ATAAAAAAGG GGACCTCTAG GGTCCCCAAT TAATTAGTAA 6300 6301 TATAATCTAT TAAAGGTCAT TCAAAAGGTC ATCCACCGGA TCAGCTTAGT AAAGCCCTCG CTAGATTTTA 6370 6371 ATGCGGATGT TGCGATTACT TCGCCAACTA TTGCGATAAC AAGAAAAAGC CAGCCTTTCA TGATATATCT 6440 6441 CCCAATTTGT GTAGGGCTTA TTATGCACGC TTAAAAATAA TAAAAGCAGA CTTGACCTGA TAGTTTGGCT 6510 6511 GTGAGCAATT ATGTGCTTAG TGCATCTAAC GCTTGAGTTA AGCCGCGCCG CGAAGCGGCG TCGGCTTGAA 6580 6581 CGAATTGTTA GACATTATTT GCCGACTACC TTGGTGATCT CGCCTTTCAC GTAGTGGACA AATTCTTCCA 6650 6651 ACTGATCTGC GCGAGCTTCA CGCTGCCGCA AGCACTCAGG GCGCAAGGGC TGCTAAAGGA AGCGGAACAC 6720 6721 GTAGAAAGCC AGTCCGCAGA AACGGTGCTG ACCCCGGATG AATGTCAGCT ACTGGGCTAT CTGGACAAGG 6790 6791 GAAAACGCAA GCGCAAAGAG AAAGCAGGTA GCTTGCAGTG GGCTTACATG GCGATAGCTA GACTGGGCGG 6860 6861 TTTTATGGAC AGCAAGCGAA CCGGAATTGC CAGCTGGGGC GCCCTCTGGT AAGGTTGGGA AGCCCTGCAA 6930 6931 AGTAAACTGG ATGGCTTTCT TGCCGCCAAG GATCTGATGG CGCAGGGGAT CAAGATCTGA TCAAGAGACA 7000 7001 GGATGAGGAT CGTTTCGCAT GATTGAACAA GATGGATTGC ACGCAGGTTC TCCGGCCGCT TGGGTGGAGA 7070 7071 GGCTATTCGG CTATGACTGG GCACAACAGA CAATCGGCTG CTCTGATGCC GCCGTGTTCC GGCTGTCAGC 7140
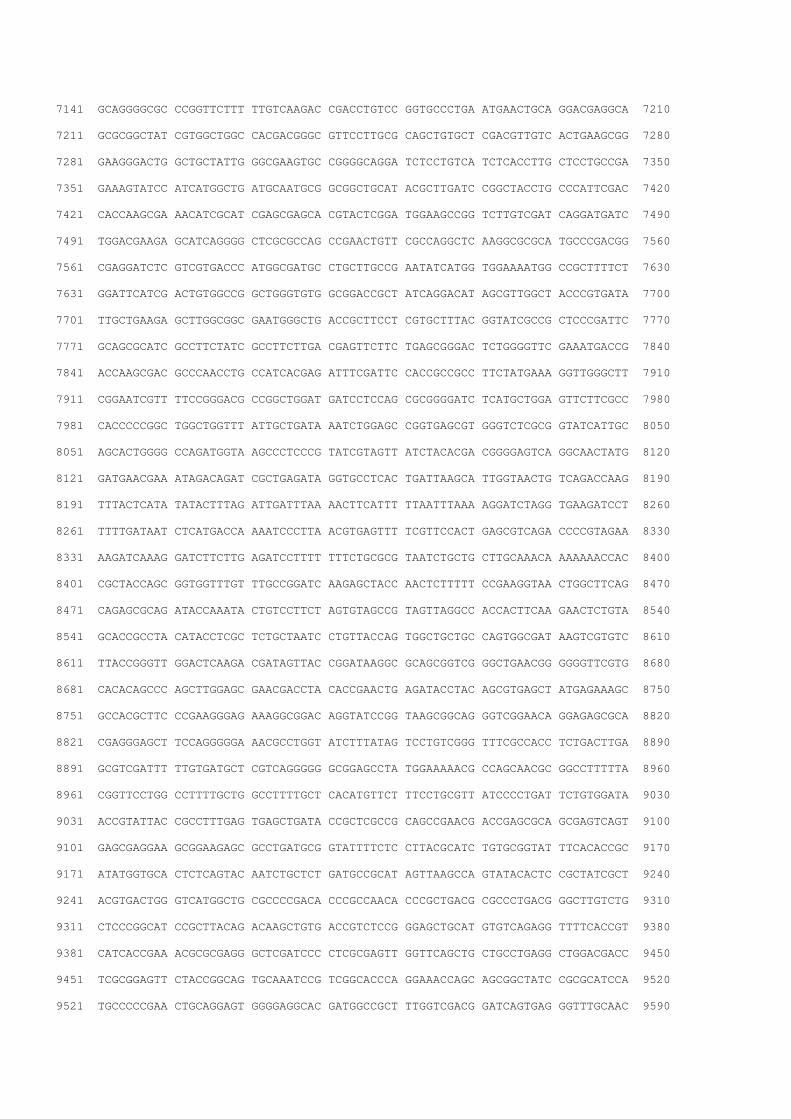
7141 GCAGGGGCGC CCGGTTCTTT TTGTCAAGAC CGACCTGTCC GGTGCCCTGA ATGAACTGCA GGACGAGGCA 7210 7211 GCGCGGCTAT CGTGGCTGGC CACGACGGGC GTTCCTTGCG CAGCTGTGCT CGACGTTGTC ACTGAAGCGG 7280 7281 GAAGGGACTG GCTGCTATTG GGCGAAGTGC CGGGGCAGGA TCTCCTGTCA TCTCACCTTG CTCCTGCCGA 7350 7351 GAAAGTATCC ATCATGGCTG ATGCAATGCG GCGGCTGCAT ACGCTTGATC CGGCTACCTG CCCATTCGAC 7420 7421 CACCAAGCGA AACATCGCAT CGAGCGAGCA CGTACTCGGA TGGAAGCCGG TCTTGTCGAT CAGGATGATC 7490 7491 TGGACGAAGA GCATCAGGGG CTCGCGCCAG CCGAACTGTT CGCCAGGCTC AAGGCGCGCA TGCCCGACGG 7560 7561 CGAGGATCTC GTCGTGACCC ATGGCGATGC CTGCTTGCCG AATATCATGG TGGAAAATGG CCGCTTTTCT 7630 7631 GGATTCATCG ACTGTGGCCG GCTGGGTGTG GCGGACCGCT ATCAGGACAT AGCGTTGGCT ACCCGTGATA 7700 7701 TTGCTGAAGA GCTTGGCGGC GAATGGGCTG ACCGCTTCCT CGTGCTTTAC GGTATCGCCG CTCCCGATTC 7770 7771 GCAGCGCATC GCCTTCTATC GCCTTCTTGA CGAGTTCTTC TGAGCGGGAC TCTGGGGTTC GAAATGACCG 7840 7841 ACCAAGCGAC GCCCAACCTG CCATCACGAG ATTTCGATTC CACCGCCGCC TTCTATGAAA GGTTGGGCTT 7910 7911 CGGAATCGTT TTCCGGGACG CCGGCTGGAT GATCCTCCAG CGCGGGGATC TCATGCTGGA GTTCTTCGCC 7980 7981 CACCCCCGGC TGGCTGGTTT ATTGCTGATA AATCTGGAGC CGGTGAGCGT GGGTCTCGCG GTATCATTGC 8050 8051 AGCACTGGGG CCAGATGGTA AGCCCTCCCG TATCGTAGTT ATCTACACGA CGGGGAGTCA GGCAACTATG 8120 8121 GATGAACGAA ATAGACAGAT CGCTGAGATA GGTGCCTCAC TGATTAAGCA TTGGTAACTG TCAGACCAAG 8190 8191 TTTACTCATA TATACTTTAG ATTGATTTAA AACTTCATTT TTAATTTAAA AGGATCTAGG TGAAGATCCT 8260 8261 TTTTGATAAT CTCATGACCA AAATCCCTTA ACGTGAGTTT TCGTTCCACT GAGCGTCAGA CCCCGTAGAA 8330 8331 AAGATCAAAG GATCTTCTTG AGATCCTTTT TTTCTGCGCG TAATCTGCTG CTTGCAAACA AAAAAACCAC 8400 8401 CGCTACCAGC GGTGGTTTGT TTGCCGGATC AAGAGCTACC AACTCTTTTT CCGAAGGTAA CTGGCTTCAG 8470 8471 CAGAGCGCAG ATACCAAATA CTGTCCTTCT AGTGTAGCCG TAGTTAGGCC ACCACTTCAA GAACTCTGTA 8540 8541 GCACCGCCTA CATACCTCGC TCTGCTAATC CTGTTACCAG TGGCTGCTGC CAGTGGCGAT AAGTCGTGTC 8610 8611 TTACCGGGTT GGACTCAAGA CGATAGTTAC CGGATAAGGC GCAGCGGTCG GGCTGAACGG GGGGTTCGTG 8680 8681 CACACAGCCC AGCTTGGAGC GAACGACCTA CACCGAACTG AGATACCTAC AGCGTGAGCT ATGAGAAAGC 8750 8751 GCCACGCTTC CCGAAGGGAG AAAGGCGGAC AGGTATCCGG TAAGCGGCAG GGTCGGAACA GGAGAGCGCA 8820 8821 CGAGGGAGCT TCCAGGGGGA AACGCCTGGT ATCTTTATAG TCCTGTCGGG TTTCGCCACC TCTGACTTGA 8890 8891 GCGTCGATTT TTGTGATGCT CGTCAGGGGG GCGGAGCCTA TGGAAAAACG CCAGCAACGC GGCCTTTTTA 8960 8961 CGGTTCCTGG CCTTTTGCTG GCCTTTTGCT CACATGTTCT TTCCTGCGTT ATCCCCTGAT TCTGTGGATA 9030 9031 ACCGTATTAC CGCCTTTGAG TGAGCTGATA CCGCTCGCCG CAGCCGAACG ACCGAGCGCA GCGAGTCAGT 9100 9101 GAGCGAGGAA GCGGAAGAGC GCCTGATGCG GTATTTTCTC CTTACGCATC TGTGCGGTAT TTCACACCGC 9170 9171 ATATGGTGCA CTCTCAGTAC AATCTGCTCT GATGCCGCAT AGTTAAGCCA GTATACACTC CGCTATCGCT 9240 9241 ACGTGACTGG GTCATGGCTG CGCCCCGACA CCCGCCAACA CCCGCTGACG CGCCCTGACG GGCTTGTCTG 9310 9311 CTCCCGGCAT CCGCTTACAG ACAAGCTGTG ACCGTCTCCG GGAGCTGCAT GTGTCAGAGG TTTTCACCGT 9380 9381 CATCACCGAA ACGCGCGAGG GCTCGATCCC CTCGCGAGTT GGTTCAGCTG CTGCCTGAGG CTGGACGACC 9450 9451 TCGCGGAGTT CTACCGGCAG TGCAAATCCG TCGGCACCCA GGAAACCAGC AGCGGCTATC CGCGCATCCA 9520 9521 TGCCCCCGAA CTGCAGGAGT GGGGAGGCAC GATGGCCGCT TTGGTCGACG GATCAGTGAG GGTTTGCAAC 9590

9591 TGCGGGTCAA GGATCTGGAT TTCGATCACG GCACGATCAT CGTGCGGGAG GGCAAGGGCT CCAAGGATCG 9660 9661 GGCCTTGATG TTACCCGAGA GCTTGGCACC CAGCCTGCGC GAGCAGGGGA ATTGATCCGG TGGATGACCT 9730 9731 TTTGAATGAC CTTTAATAGA TTATATTACT AATTAATTGG GGACCCTAGA GGTCCCCTTT TTTATTTTAA 9800 9801 AAATTTTTTC ACAAAACGGT TTACAAGCAT AAAGCTTGCT CAATCAATCA CCGGATCGTA ACCAGTAATG 9870 9871 TTATTTTCAT AGCACCATCC CTCTTCATGT TAGACTAGTG TGCAGTAATA TCGCCCTGAG CAGCCCGGTT 9940 9941 TTCCAGAACA GGATCCCCCG TTAACGATAA CTTCGTATAG CATACATTAT ACGAAGTTAT CAGATCCCCC 10010 10011 TGGATGGAAA ACGGGAAAGG TTCCGTCCAG GACGCTACTT GTGTATAAGA GTCAGGGTAC CGCATGCGAT 10080 10081 ATCGAGCTCT CCCGGGAATT CCACAAATTG TTATCCGCTC ACAATTCCAC ATGTGGAATT CCACATGTGG 10150 10151 AATTCCCATG TCAGCCGTTA AGTGTTCCTG TGTCACTCAA AATTGCTTTG AGAGGCTCTA AGGGCTTCTC 10220 10221 AGTGCGTTAC ATCCCTGGCT TGTTGTCCAC AACCGTTAAA CCTTAAAAGC TTTAAAAGCC TTATATATTC 10290 10291 TTTTTTTCTT ATAAAACTTA AAACCTTAGA GGCTATTTAA GTTGCTGATT TATATTAATT TTATTGTTCA 10360 10361 AACATGAGAG CTTAGTACGT GAAACATGAG AGCTTAGTAC GTTAGCCATG AGAGCTTAGT ACGTTAGCCA 10430 10431 TGAGGGTTTA GTTCGTTAAA CATGAGAGCT TAGTACGTTA AACATGAGAG CTTAGTACGT GAAACATGAG 10500 10501 AGCTTAGTAC GTACTATCAA CAGGTTGAAC TGCTGATCTT CAGATCCTCT ACGCCGGACG CATCGTGGCC 10570 10571 G 10571

>IS_omegon_km_hah GATCCAGCCGACCAGGCTTTCCACGCCCGCGTGCCGCTCCATGTCGTTCGCGCGGTTCTCGGAAACGCGCTGCCGCGTTTCGTGATTGTCACGCTCAAGCCCGTAGTCCCGTTCGAGCGTCGCGCAGAGGTCAGCGAGGGCGCGGTAGGCCCGATACGGCTCATGGATGGTGTTTCGGGTCGGGTGAATCTTGTTGATGGCGATATGGATGTGCAGGTTGTCGGTGTCGTGATGCACGGCACTGACGCGCTGATGCTCGGCGAAGCCAAGCCCAGCGCAGATGCGGTCCTCAATCGCGCGCAACGTCTCCGCGTCGGGCTTCTCTCCCGCGCGGAAGCTAACCAGCAGGTGATAGGTCTTGTCGGCCTCGGAACGGGTGTTGCCGTGCTGGGTCGCCATCACCTCGGCCATGACAGCGGGCAGGGTGTTTGCCTCGCAGTTCGTGACGCGCACGTGACCCAGGCGCTCGGTCTTGCCTTGCTCGTCGGTGATGTACTTCACCAGCTCCGCGAAGTCGCTCTTCTTGATGGAGCGCATGGGGACGTGCTTGGCAATCACGCGCACCCCCCGGCCGTTTTAGCGGCTAAAAAAGTCATGGCTCTGCCCTCGGGCGGACCACGCCCATCATGACCTTGCCAAGCTCGTCCTGCTTCTCTTCGATCTTCGCCAGCAGGGCGAGGATCGTGGCATCACCGAACCGCGCCGTGCGCGGGTCGTCGGTGAGCCAGAGTTTCAGCAGGCCGCCCAGGCGGCCCAGGTCGCCATTGATGCGGGCCAGCTCGCGGACGTGCTCATAGTCCACGACGCCCGTGATTTTGTAGCCCTGGCCGACGGCCAGCAGGTAGGCCGACAGGCTCATGCCGGCCGCCGCCGCCTTTTCCTCAATCGCTCTTCGTTCGTCTGGAAGGCAGTACACCTTGATAGGTGGGCTGCCCTTCCTGGTTGGCTTGGTTTCATCAGCCATCCGCTTGCCCTCATCTGTTACGCCGGCGGTAGCCGGCCAGCCTCGCAGAGCAGGATTCCCGTTGAGCACCGCCAGGTGCGAATAAGGGACAGTGAAGAAGGAACACCCGCTCGCGGGTGGGCCTACTTCACCTATCCTGCCCGGCTGACGCCGTTGGATACACCAAGGAAAGTCTACACGAACCCTTTGGCAAAATCCTGTATATCGTGCGAAAAAGGATGGATATACCGAAAAAATCGCTATAATGACCCCGAAGCAGGGTTATGCAGCGGAAAAGCGCTGCTTCCCTGCTGTTTTGTGGAATATCTACCGACTGGAAACAGGCAAATGCAGGAAATTACTGAACTGAGGGGACAGGCGAGAGACGATGCCAAAGAGCTACACCGACGAGCTGGCCGAGTGGGTTGAATCCCGCGCGGCCAAGAAGCGCCGGCGTGATGAGGCTGCGGTTGCGTTCCTGGCGGTGAGGGCGGATGTCGAGGCGGCGTTAGCGTCCGGCTATGCGCTCGTCACCATTTGGGAGCACATGCGGGAAACGGGGAAGGTCAAGTTCTCCTACGAGACGTTCCGCTCGCACGCCAGGCGGCACATCAAGGCCAAGCCCGCCGATGTGCCCGCACCGCAGGCCAAGGCTGCGGAACCCGCGCCGGCACCCAAGACGCCGGAGCCACGGCGGCCGAAGCAGGGGGGCAAGGCTGAAAAGCCGGCCCCCGCTGCGGCCCCGACCGGCTTCACCTTCAACCCAACACCGGACAAAAAGGATCCTCTACGCCGGACGCATCGTGGCCGGCATCACCGGCGCCACAGGTGCGGTTGCTGGCGCCTATATCGCCGACATCACCGATGGGGAAGATCGGGCTCGCCACTTCGGGCTCATGAGCGCTTGTTTCGGCGTGGGTATGGTGGCAGGCCCCGTGGCCGGGGGACTGTTGGGCGCCATCTCCTTGCTGCCTCGCGCGTTTCGGTGATGACGGTGAAAACCTCTGACACATGCAGCTCCCGGAGACGGTCACAGCTTGTCTGTAAGCGGATGCCGGGAGCAGACAAGCCCGTCAGGGCGCGTCAGCGGGTGTTGGCGGGTGTCGGGGCGCAGCCATGACCCAGTCACGTAGCGATAGCGGAGTGTATACTGGCTTAACTATGCGGCATCAGAGCAGATTGTACTGAGAGTGCACCATAAAATCAATCTAAAGTATATATGAGTAAACTTGGTCTGACAGTTACCAATGCTTAATCAGTGAGGCACCTATCTCAGCGATCTGTCTATTTCGTTCATCCATAGTTGCCTGACTCCCCGTCGTGTAGATAACTACGATACGGGAGGGCTTACCATCTGGCCCCAGTGCTGCAATGATACCGCGAGACCCACGCTCACCGGCTCCAGATTTATCAGCAATAAACCAGCCAGCCGGAAGGGCCGAGCGCAGAAGTGGTCCTGCAACTTTATCCGCCTCCATCCAGTCTATTAATTGTTGCCGGGAAGCTAGAGTAAGTAGTTCGCCAGTTAATAGTTTGCGCAACGTTGTTGCCATTGCTGCAGGCATCGTGGTGTCACGCTCGTCGTTTGGTATGGCTTCATTCAGCTCCGGTTCCCAACGATCAAGGCGAGTTACATGATCCCCCATGTTGTGCAAAAAAGCGGTTAGCTCCTTCGGTCCTCCGATCGTTGTCAGAAGTAAGTTGGCCGCAGTGTTATCACTCATGGTTATGGCAGCACTGCATAATTCTCTTACTGTCATGCCATCCGTAAGATGCTTTTCTGTGACTGGTGAGTACTCAACCAAGTCATTCTGAGAATAGTGTATGCGGCGACCGAGTTGCTCTTGCCCGGCGTCAACACGGGATAATACCGCGCCACATAGCAGAACTTTAAAAGTGCTCATCATTGGAAAACGTTCTTCGGGGCGAAAACTCTCAAGGATCTTACCGCTGTTGAGATCCAGTTCGATGTAACCCACTCGTGCACCCAACTGATCTTCAGCATCTTTTACTTTCACCAGCGTTTCTGGGTGAGCAAAAACAGGAAGGCAAAATGCCGCAAAAAAGGGAATAAGGGCGACACGGAAATGTTGAATACTCATACTCTTCCTTTTTCAATATTATTGAAGCATTTATCAGGGTTATTGTCTCATGAGCGGATACATATTTGAATGTATTTAGAAAAATAAACAAATAGGGGTTCCGCGCACATTTCCCCGAAAAGTGCCACCTGCAGATCTGCAGGTCGACCGGTCAGATCTTGATCCCCTGCGCCATCAGATCCTTGGCGGCAAGAAAGCCATCCAGTTTACTTTGCAGGGCTTCCCAACCTTCCCAGAGGGCGCCCCAGCTGGCAATTCCGGTTCGCTTGCTGTCCATAAAACCGCCCAGTCTAGCTATCGCCATGTAAGCCCACTGCAAGCTACCTGCTTTCTCTTTGCGCTTGCGTTTTCCCTTGTCCAGATAGCCCAGTAGCTGACATTCATCCGGGGTCAGCACCGTTTCTGCGGACTGGCTTTCTACGTGTTCCGCTTCCTTTAGCAGCCCTTGCGCCCTGAGTGCTTGCGGCAGCGTGAAGCTTTCTCTGAGCTGTAACAGCCTGACCGCAACAAACGAGAGGATCGAGACCATCCGCTCCAGATTATCCGGCTCCTCCATGCGTTGCCTCTCGGCTCCTGCTCCGGTTTTCCATGCCTTATGGAACTCCTCGATCCGCCAGCGATGGGTATAAATGTCGATGACGCGCAAGGCTTGGGCTAGCGACTCGACCGGTTCGCTGGTCAGCAACAACCATTTCAACGGGGTCTCACCCTTGGGCGGGTTAATCTCCTCGGCCAGCACCGCGTTGAGCGTGATATTCCCCTGTTTTAGCGTGATGCGCCCACTGCGCAGGCTCAAGCTCGCCTTGCGGGCTGGTCGATTTTTACGTTTACCGCGTTTATCCACCACGCCCTTTTGCGGAATGCTGATCTGATAGCCACCCAACTCCGGTTGGTTCTTCAGATGGTCGTACAGATACAACCCAGACTCTACGTCCTTGCGTGGGTGCTTGGAGCGCACCACGAAGCGCTCGTTATGCGCCAGTTTGTCCTGCAGATAAGCATGAATATCGGCTTCGCGGTCACAGACCGCAATCACGTTGCTCATCATGCTGCCCATGCGTAACCGGCTAGTTGCGGCCGCTGCCAGCCATTTGCCACTCTCCTTTTCATCCGCATCGGCAGGGTCATCCGGGCGCATCCACCACTCCTGATGCAGTAATCCTACGGTGCGGAATGTGGTGGCCTCGAGCAAGAGAACGGAGTGAACCCACCATCCGCGGGATTTATCCTGAATAGAGCCCAGCTTGCCAAGCTCTTCGGCGACCTGGTGGCGATAACTCAAAGAGGTGGTGTCCTCAATGGCCAGCAGTTCGGGAAACTCCTGAGCCAACTTGACTGTTTGCATGGCGCCAGCCTTTCTGATCGCCTCGGCAGAAACGTTGGGATTGCGGATAAATCGGTAAGCGCCTTCCTGGGCGGCTTCACTACCCTCTGATGAGATGGGTATTGATTTACCAGAATATTTTGCCAATTGGGCGGCGACGTTAACCAAGCGGGCAGTACGGCGAGGATCACCCAGCGCCGCCGAAGAGAACACAGATTTAGCCCAGTCGGCCGCACGATGAAGAGCAGAAGTTATCATGAACGTTACCATGTTAGGAGGTCACATGGAAGATCAGATCCTGGAAAACGGGAAAGGTTCCGTTCAGGACGCTACTTGTGTACGGGATCGGTCGACGGATCCCAAGCTTCTTCTAGACTGTCTCTTGATCAGATCTTGGATCTCGGGCGTAGTCCGGCACGTCGTACGGGTAGTGATGGTGATGGTGATGCTTAATTAATAACTTCGTATAGCATACATTATACGAAGTTATGGTTAACGGGGGATCCCCTGCGCCATCAGATCCTTGGCGGCAAGAAAGCCATCCAGTTTACTTTGCAGGGCTTCCCAACCTTACCAGAGGGCGCCCCAGCCGGCAATTCCGGTTCGCTTGCTGTCCATAAAACCGCCCAGTCTAGCTATCGCCATGTAAGCCCACTGCAAGCTACCTGCTTTCTCTTTGCGCTTGCGTTTTCCCTTGTCCAGATAGCCCAGTAGCTGACATTCATCCGGGGTCAGCACCGTTTCTGCGGACTGGCTTTCTACGTGTTCCGCTTCCTTTAGCAGCCCTTGCGTCCTGAGTGCTTGCGGCAGCGTGAAGCTTTCTCTGAGCTGTAACAGCCTGACCGCAACAAACGAGAGGATCGAGACCATCCGCTCCAGATTATCCGGCTCCTCCATGCGTTGCCTCTCGGCTCCTGCTCCGGTTTTCCATGCCTTATGGAACTCCTCGATCCGCCAGCGATGGGTATAAATGTCGATGACGCGCAAGGCTTGGGCTAGCGACTCGACCGGTTCGCTGGTCAGCAACAACCATTTCAACGGGGTCTCACCCTTGGGCGGGTTAATCTCCTCGGCCAGCACCGCGTTGAGCGCGATATTCCCCTGTTTTAGCGTGATGCGCCCACTGCGCAGGCTCAAGCTCGCCTTGCGGGCTGGTCGATTTTTACGTTTACCGCGTTTATCCACCACGCCCTTTTGCGGAATGCTGATCTGATAGCCACCCAACTCCGGTTGGTTCTTCAGATGGTCGTACAGATACAACCCAGACTCTACGTCCTTGCGTGGGTGCTTGGAGCGCACCACGAAGCGCTCGTTATGCGCCAGTTTGTCCTGCAGGTCGACGGATCATATCGTCAATTATTACCTCCACGGGGAGAGCCTGAGCAAACTGGCCTCACTAGTAGCCTGAGCAAACTGGCCTCAGGCATTTGAGAAGCACACGGTCACACTGCTTCCGGTAGTCAATAAACCGGTAAACCAGCAATAGACATAAGCGGCTATTTAACGACCCTGCCCTGAACCGACGACCGGGTCGAATTTGCTTTCGAATTTCTGCCATTCATCCGCTTATTATCACTTATTCAGGCGTAGCAACCAGGCGTTTAAGGGCACCAATAACTGCCTTAAAAAAATTACGCCCCGCCCTGCCACTCATCGCAGTACTGTTGTAATTCATTAAGCATTCTGCCGACATGGAAGCCATCACAAACGGCATGATGAACCTGAATCGCCAGCGGCATCAGCACCTTGTCGCCTTGCGTATAATATTTGCCCATGGTGAAAACGGGGGCGAAGAAGTTGTCCATATTGGCCACGTTTAAATCAAAACTGATCCGGTGATTGATTGAGCAAGCTTTATGCTTGTAAACCGTTTTGTGAAAAAATTTTTAAAATAAAAAAGGGGACCTCTAGGGTCCCCAATTAATTAGTAATATAATCTATTAAAGGTCATTCAAAAGGTCATCCACCGGATCAGCTTAGTAAAGCCCTCGCTAGATTTTAATGCGGATGTTGCGATTACTTCGCCAACTATTGCGATAACAAGAAAAAGCCAGCCTTTCATGATATATCTCCCAATTTGTGTAGGGCTTATTATGCACGCTTAAAAATAATAAAAGCAGACTTGACCTG

ATAGTTTGGCTGTGAGCAATTATGTGCTTAGTGCATCTAACGCTTGAGTTAAGCCGCGCCGCGAAGCGGCGTCGGCTTGAACGAATTGTTAGACATTATTTGCCGACTACCTTGGTGATCTCGCCTTTCACGTAGTGGACAAATTCTTCCAACTGATCTGCGCGAGCTTCACGCTGCCGCAAGCACTCAGGGCGCAAGGGCTGCTAAAGGAAGCGGAACACGTAGAAAGCCAGTCCGCAGAAACGGTGCTGACCCCGGATGAATGTCAGCTACTGGGCTATCTGGACAAGGGAAAACGCAAGCGCAAAGAGAAAGCAGGTAGCTTGCAGTGGGCTTACATGGCGATAGCTAGACTGGGCGGTTTTATGGACAGCAAGCGAACCGGAATTGCCAGCTGGGGCGCCCTCTGGTAAGGTTGGGAAGCCCTGCAAAGTAAACTGGATGGCTTTCTTGCCGCCAAGGATCTGATGGCGCAGGGGATCAAGATCTGATCAAGAGACAGGATGAGGATCGTTTCGCATGATTGAACAAGATGGATTGCACGCAGGTTCTCCGGCCGCTTGGGTGGAGAGGCTATTCGGCTATGACTGGGCACAACAGACAATCGGCTGCTCTGATGCCGCCGTGTTCCGGCTGTCAGCGCAGGGGCGCCCGGTTCTTTTTGTCAAGACCGACCTGTCCGGTGCCCTGAATGAACTGCAGGACGAGGCAGCGCGGCTATCGTGGCTGGCCACGACGGGCGTTCCTTGCGCAGCTGTGCTCGACGTTGTCACTGAAGCGGGAAGGGACTGGCTGCTATTGGGCGAAGTGCCGGGGCAGGATCTCCTGTCATCTCACCTTGCTCCTGCCGAGAAAGTATCCATCATGGCTGATGCAATGCGGCGGCTGCATACGCTTGATCCGGCTACCTGCCCATTCGACCACCAAGCGAAACATCGCATCGAGCGAGCACGTACTCGGATGGAAGCCGGTCTTGTCGATCAGGATGATCTGGACGAAGAGCATCAGGGGCTCGCGCCAGCCGAACTGTTCGCCAGGCTCAAGGCGCGCATGCCCGACGGCGAGGATCTCGTCGTGACCCATGGCGATGCCTGCTTGCCGAATATCATGGTGGAAAATGGCCGCTTTTCTGGATTCATCGACTGTGGCCGGCTGGGTGTGGCGGACCGCTATCAGGACATAGCGTTGGCTACCCGTGATATTGCTGAAGAGCTTGGCGGCGAATGGGCTGACCGCTTCCTCGTGCTTTACGGTATCGCCGCTCCCGATTCGCAGCGCATCGCCTTCTATCGCCTTCTTGACGAGTTCTTCTGAGCGGGACTCTGGGGTTCGAAATGACCGACCAAGCGACGCCCAACCTGCCATCACGAGATTTCGATTCCACCGCCGCCTTCTATGAAAGGTTGGGCTTCGGAATCGTTTTCCGGGACGCCGGCTGGATGATCCTCCAGCGCGGGGATCTCATGCTGGAGTTCTTCGCCCACCCCCGGCTGGCTGGTTTATTGCTGATAAATCTGGAGCCGGTGAGCGTGGGTCTCGCGGTATCATTGCAGCACTGGGGCCAGATGGTAAGCCCTCCCGTATCGTAGTTATCTACACGACGGGGAGTCAGGCAACTATGGATGAACGAAATAGACAGATCGCTGAGATAGGTGCCTCACTGATTAAGCATTGGTAACTGTCAGACCAAGTTTACTCATATATACTTTAGATTGATTTAAAACTTCATTTTTAATTTAAAAGGATCTAGGTGAAGATCCTTTTTGATAATCTCATGACCAAAATCCCTTAACGTGAGTTTTCGTTCCACTGAGCGTCAGACCCCGTAGAAAAGATCAAAGGATCTTCTTGAGATCCTTTTTTTCTGCGCGTAATCTGCTGCTTGCAAACAAAAAAACCACCGCTACCAGCGGTGGTTTGTTTGCCGGATCAAGAGCTACCAACTCTTTTTCCGAAGGTAACTGGCTTCAGCAGAGCGCAGATACCAAATACTGTCCTTCTAGTGTAGCCGTAGTTAGGCCACCACTTCAAGAACTCTGTAGCACCGCCTACATACCTCGCTCTGCTAATCCTGTTACCAGTGGCTGCTGCCAGTGGCGATAAGTCGTGTCTTACCGGGTTGGACTCAAGACGATAGTTACCGGATAAGGCGCAGCGGTCGGGCTGAACGGGGGGTTCGTGCACACAGCCCAGCTTGGAGCGAACGACCTACACCGAACTGAGATACCTACAGCGTGAGCTATGAGAAAGCGCCACGCTTCCCGAAGGGAGAAAGGCGGACAGGTATCCGGTAAGCGGCAGGGTCGGAACAGGAGAGCGCACGAGGGAGCTTCCAGGGGGAAACGCCTGGTATCTTTATAGTCCTGTCGGGTTTCGCCACCTCTGACTTGAGCGTCGATTTTTGTGATGCTCGTCAGGGGGGCGGAGCCTATGGAAAAACGCCAGCAACGCGGCCTTTTTACGGTTCCTGGCCTTTTGCTGGCCTTTTGCTCACATGTTCTTTCCTGCGTTATCCCCTGATTCTGTGGATAACCGTATTACCGCCTTTGAGTGAGCTGATACCGCTCGCCGCAGCCGAACGACCGAGCGCAGCGAGTCAGTGAGCGAGGAAGCGGAAGAGCGCCTGATGCGGTATTTTCTCCTTACGCATCTGTGCGGTATTTCACACCGCATATGGTGCACTCTCAGTACAATCTGCTCTGATGCCGCATAGTTAAGCCAGTATACACTCCGCTATCGCTACGTGACTGGGTCATGGCTGCGCCCCGACACCCGCCAACACCCGCTGACGCGCCCTGACGGGCTTGTCTGCTCCCGGCATCCGCTTACAGACAAGCTGTGACCGTCTCCGGGAGCTGCATGTGTCAGAGGTTTTCACCGTCATCACCGAAACGCGCGAGGGCTCGATCCCCTCGCGAGTTGGTTCAGCTGCTGCCTGAGGCTGGACGACCTCGCGGAGTTCTACCGGCAGTGCAAATCCGTCGGCACCCAGGAAACCAGCAGCGGCTATCCGCGCATCCATGCCCCCGAACTGCAGGAGTGGGGAGGCACGATGGCCGCTTTGGTCGACGGATCAGTGAGGGTTTGCAACTGCGGGTCAAGGATCTGGATTTCGATCACGGCACGATCATCGTGCGGGAGGGCAAGGGCTCCAAGGATCGGGCCTTGATGTTACCCGAGAGCTTGGCACCCAGCCTGCGCGAGCAGGGGAATTGATCCGGTGGATGACCTTTTGAATGACCTTTAATAGATTATATTACTAATTAATTGGGGACCCTAGAGGTCCCCTTTTTTATTTTAAAAATTTTTTCACAAAACGGTTTACAAGCATAAAGCTTGCTCAATCAATCACCGGATCGTAACCAGTAATGTTATTTTCATAGCACCATCCCTCTTCATGTTAGACTAGTGTGCAGTAATATCGCCCTGAGCAGCCCGGTTTTCCAGAACAGGATCCCCCGTTAACGATAACTTCGTATAGCATACATTATACGAAGTTATCAGATCCCCCTGGATGGAAAACGGGAAAGGTTCCGTCCAGGACGCTACTTGTGTATAAGAGTCAGGGTACCGCATGCGATATCGAGCTCTCCCGGGAATTCCACAAATTGTTATCCGCTCACAATTCCACATGTGGAATTCCACATGTGGAATTCCCATGTCAGCCGTTAAGTGTTCCTGTGTCACTCAAAATTGCTTTGAGAGGCTCTAAGGGCTTCTCAGTGCGTTACATCCCTGGCTTGTTGTCCACAACCGTTAAACCTTAAAAGCTTTAAAAGCCTTATATATTCTTTTTTTCTTATAAAACTTAAAACCTTAGAGGCTATTTAAGTTGCTGATTTATATTAATTTTATTGTTCAAACATGAGAGCTTAGTACGTGAAACATGAGAGCTTAGTACGTTAGCCATGAGAGCTTAGTACGTTAGCCATGAGGGTTTAGTTCGTTAAACATGAGAGCTTAGTACGTTAAACATGAGAGCTTAGTACGTGAAACATGAGAGCTTAGTACGTACTATCAACAGGTTGAACTGCTGATCTTCAGATCCTCTACGCCGGACGCATCGTGGCCG

pCM638: ISphoA/hah-Cm SRGiddens 08 01 2003 (last mod. 11.12.03) pUT vector: 1-476; 9549-10028 blast ISphoA/hah: 4751 – 9518 Larry Gallagher phoA: 5’ 9406 – 7928 3’ (blast): bp 1839-361 of 2715 bp complete phoA gene IE sequence: 3192-3220; 4751-4760 5’-CTGTCTCTTGATCAGATCT-3’ OE sequence: 9499-9518 3’-ACTTGTGTATAAGAGTCAG-5’ (complement) npt promoter: 5245-4919 Alignment with mini-Tn5 Km (ECU32991): bp 505-819bp. Promoter is in this region
which lies upstream of the KmR gene in mini-Tn5 (bp 857..1651). The npt promoter reads out across the IE end to drive expression of genes adjacent to the insertion point.
IS50R: 3192 – 4751 Most likely since the transposase was changed from the sequence given here
during the creation of CM638 (Gallagher, pers. comm.) this region of sequence will vary from that shown here. For instance, it was subsequently found that there is no sac1 site in this region as predicted for the IS50R transposase.
LoxP sites: 5’ 4865-4822 3’ and 5’ 4907-4873 3’; 5’ 9453-9420 3’ [site = 3’ ATAACTTCGTATAGCATACATTATACGAAGTTA 5’, inverted repeats
separated by spacer (bold) that provides orientation. See arrows in sequence. Two potential excision products]
The italicized sequence (5814-7927) differs from pCM639. CmR region for pCM638 (2114 bp) was replaced with a TcR region in pCM639 (2173 bp). Cut out using the single cutters Bsu36I and BstEII, end filled and ligated to a TcR cassette. Same procedure used to create pIPHK (kmR). Bsu36I site: 5801 CAAACTGGCC/TCAGGCATTT 5820 between 5811 and 5812 BstEII site: 7921 AGCAAG/GTAACCAGTAATGT 7941 between 7626 and 7927 pSRG07: bases 5812-9363 (external) A pCM638 derivative in which the CmR and phoA regions were replaced with omegon-Km. pSRG07 was created by amplification from bases 5812 (downstream) to 9363 and the addition of a spe1 site between these positions to create a 6483 bp plasmid into which markers etc can be introduced.
Tn section: bases 4751-5973 Spe1 site: bases 5812-5817
IS-omegonKm/hah: Sites missing (by physical mapping and elimination using known sequence): AvrI, ClaI, EcoRI, EcoRV, KpnI, NheI, NotI, SacI, SacII, SmaI, StuI, XbaI, XhoI, XmaI Sites present: AgeI, BamHI, BglII, HindIII, NcoI, NdeI, NgoMIV, PstI, PvuII, SalI, SpeI, SphI

10028 bases: 2216 a 2759 c 2594 g 2459 t ORIGIN 1 GATCCAGCCG ACCAGGCTTT CCACGCCCGC GTGCCGCTCC ATGTCGTTCG CGCGGTTCTC 61 GGAAACGCGC TGCCGCGTTT CGTGATTGTC ACGCTCAAGC CCGTAGTCCC GTTCGAGCGT 121 CGCGCAGAGG TCAGCGAGGG CGCGGTAGGC CCGATACGGC TCATGGATGG TGTTTCGGGT 181 CGGGTGAATC TTGTTGATGG CGATATGGAT GTGCAGGTTG TCGGTGTCGT GATGCACGGC 241 ACTGACGCGC TGATGCTCGG CGAAGCCAAG CCCAGCGCAG ATGCGGTCCT CAATCGCGCG 301 CAACGTCTCC GCGTCGGGCT TCTCTCCCGC GCGGAAGCTA ACCAGCAGGT GATAGGTCTT 361 GTCGGCCTCG GAACGGGTGT TGCCGTGCTG GGTCGCCATC ACCTCGGCCA TGACAGCGGG 421 CAGGGTGTTT GCCTCGCAGT TCGTGACGCG CACGTGACCC AGGCGCTCGG TCTTGCCTTG 481 CTCGTCGGTG ATGTACTTCA CCAGCTCCGC GAAGTCGCTC TTCTTGATGG AGCGCATGGG 541 GACGTGCTTG GCAATCACGC GCACCCCCCG GCCGTTTTAG CGGCTAAAAA AGTCATGGCT 601 CTGCCCTCGG GCGGACCACG CCCATCATGA CCTTGCCAAG CTCGTCCTGC TTCTCTTCGA 661 TCTTCGCCAG CAGGGCGAGG ATCGTGGCAT CACCGAACCG CGCCGTGCGC GGGTCGTCGG 721 TGAGCCAGAG TTTCAGCAGG CCGCCCAGGC GGCCCAGGTC GCCATTGATG CGGGCCAGCT 781 CGCGGACGTG CTCATAGTCC ACGACGCCCG TGATTTTGTA GCCCTGGCCG ACGGCCAGCA 841 GGTAGGCCGA CAGGCTCATG CCGGCCGCCG CCGCCTTTTC CTCAATCGCT CTTCGTTCGT 901 CTGGAAGGCA GTACACCTTG ATAGGTGGGC TGCCCTTCCT GGTTGGCTTG GTTTCATCAG 961 CCATCCGCTT GCCCTCATCT GTTACGCCGG CGGTAGCCGG CCAGCCTCGC AGAGCAGGAT 1021 TCCCGTTGAG CACCGCCAGG TGCGAATAAG GGACAGTGAA GAAGGAACAC CCGCTCGCGG 1081 GTGGGCCTAC TTCACCTATC CTGCCCGGCT GACGCCGTTG GATACACCAA GGAAAGTCTA 1141 CACGAACCCT TTGGCAAAAT CCTGTATATC GTGCGAAAAA GGATGGATAT ACCGAAAAAA 1201 TCGCTATAAT GACCCCGAAG CAGGGTTATG CAGCGGAAAA GCGCTGCTTC CCTGCTGTTT 1261 TGTGGAATAT CTACCGACTG GAAACAGGCA AATGCAGGAA ATTACTGAAC TGAGGGGACA 1321 GGCGAGAGAC GATGCCAAAG AGCTACACCG ACGAGCTGGC CGAGTGGGTT GAATCCCGCG 1381 CGGCCAAGAA GCGCCGGCGT GATGAGGCTG CGGTTGCGTT CCTGGCGGTG AGGGCGGATG 1441 TCGAGGCGGC GTTAGCGTCC GGCTATGCGC TCGTCACCAT TTGGGAGCAC ATGCGGGAAA 1501 CGGGGAAGGT CAAGTTCTCC TACGAGACGT TCCGCTCGCA CGCCAGGCGG CACATCAAGG 1561 CCAAGCCCGC CGATGTGCCC GCACCGCAGG CCAAGGCTGC GGAACCCGCG CCGGCACCCA 1621 AGACGCCGGA GCCACGGCGG CCGAAGCAGG GGGGCAAGGC TGAAAAGCCG GCCCCCGCTG 1681 CGGCCCCGAC CGGCTTCACC TTCAACCCAA CACCGGACAA AAAGGATCCT CTACGCCGGA 1741 CGCATCGTGG CCGGCATCAC CGGCGCCACA GGTGCGGTTG CTGGCGCCTA TATCGCCGAC 1801 ATCACCGATG GGGAAGATCG GGCTCGCCAC TTCGGGCTCA TGAGCGCTTG TTTCGGCGTG 1861 GGTATGGTGG CAGGCCCCGT GGCCGGGGGA CTGTTGGGCG CCATCTCCTT GCTGCCTCGC 1921 GCGTTTCGGT GATGACGGTG AAAACCTCTG ACACATGCAG CTCCCGGAGA CGGTCACAGC 1981 TTGTCTGTAA GCGGATGCCG GGAGCAGACA AGCCCGTCAG GGCGCGTCAG CGGGTGTTGG 2041 CGGGTGTCGG GGCGCAGCCA TGACCCAGTC ACGTAGCGAT AGCGGAGTGT ATACTGGCTT 2101 AACTATGCGG CATCAGAGCA GATTGTACTG AGAGTGCACC ATAAAATCAA TCTAAAGTAT 2161 ATATGAGTAA ACTTGGTCTG ACAGTTACCA ATGCTTAATC AGTGAGGCAC CTATCTCAGC 2221 GATCTGTCTA TTTCGTTCAT CCATAGTTGC CTGACTCCCC GTCGTGTAGA TAACTACGAT 2281 ACGGGAGGGC TTACCATCTG GCCCCAGTGC TGCAATGATA CCGCGAGACC CACGCTCACC 2341 GGCTCCAGAT TTATCAGCAA TAAACCAGCC AGCCGGAAGG GCCGAGCGCA GAAGTGGTCC 2401 TGCAACTTTA TCCGCCTCCA TCCAGTCTAT TAATTGTTGC CGGGAAGCTA GAGTAAGTAG 2461 TTCGCCAGTT AATAGTTTGC GCAACGTTGT TGCCATTGCT GCAGGCATCG TGGTGTCACG 2521 CTCGTCGTTT GGTATGGCTT CATTCAGCTC CGGTTCCCAA CGATCAAGGC GAGTTACATG 2581 ATCCCCCATG TTGTGCAAAA AAGCGGTTAG CTCCTTCGGT CCTCCGATCG TTGTCAGAAG 2641 TAAGTTGGCC GCAGTGTTAT CACTCATGGT TATGGCAGCA CTGCATAATT CTCTTACTGT 2701 CATGCCATCC GTAAGATGCT TTTCTGTGAC TGGTGAGTAC TCAACCAAGT CATTCTGAGA 2761 ATAGTGTATG CGGCGACCGA GTTGCTCTTG CCCGGCGTCA ACACGGGATA ATACCGCGCC 2821 ACATAGCAGA ACTTTAAAAG TGCTCATCAT TGGAAAACGT TCTTCGGGGC GAAAACTCTC 2881 AAGGATCTTA CCGCTGTTGA GATCCAGTTC GATGTAACCC ACTCGTGCAC CCAACTGATC 2941 TTCAGCATCT TTTACTTTCA CCAGCGTTTC TGGGTGAGCA AAAACAGGAA GGCAAAATGC 3001 CGCAAAAAAG GGAATAAGGG CGACACGGAA ATGTTGAATA CTCATACTCT TCCTTTTTCA 3061 ATATTATTGA AGCATTTATC AGGGTTATTG TCTCATGAGC GGATACATAT TTGAATGTAT 3121 TTAGAAAAAT AAACAAATAG GGGTTCCGCG CACATTTCCC CGAAAAGTGC CACCTGGATC 3181 TGCAGGTCGA CCTGTCTCTT GATCAGATCT TGATCCCCTG CGCCATCAGA TCCTTGGCGG 3241 CAAGAAAGCC ATCCAGTTTA CTTTGCAGGG CTTCCCAACC TTCCCAGAGG GCGCCCCAGC 3301 TGGCAATTCC GGTTCGCTTG CTGTCCATAA AACCGCCCAG TCTAGCTATC GCCATGTAAG 3361 CCCACTGCAA GCTACCTGCT TTCTCTTTGC GCTTGCGTTT TCCCTTGTCC AGATAGCCCA 3421 GTAGCTGACA TTCATCCGGG GTCAGCACCG TTTCTGCGGA CTGGCTTTCT ACGTGTTCCG 3481 CTTCCTTTAG CAGCCCTTGC GCCCTGAGTG CTTGCGGCAG CGTGAAGCTT TCTCTGAGCT 3541 GTAACAGCCT GACCGCAACA AACGAGAGGA TCGAGACCAT CCGCTCCAGA TTATCCGGCT 3601 CCTCCATGCG TTGCCTCTCG GCTCCTGCTC CGGTTTTCCA TGCCTTATGG AACTCCTCGA 3661 TCCGCCAGCG ATGGGTATAA ATGTCGATGA CGCGCAAGGC TTGGGCTAGC GACTCGACCG

3721 GTTCGCTGGT CAGCAACAAC CATTTCAACG GGGTCTCACC CTTGGGCGGG TTAATCTCCT 3781 CGGCCAGCAC CGCGTTGAGC GTGATATTCC CCTGTTTTAG CGTGATGCGC CCACTGCGCA 3841 GGCTCAAGCT CGCCTTGCGG GCTGGTCGAT TTTTACGTTT ACCGCGTTTA TCCACCACGC 3901 CCTTTTGCGG AATGCTGATC TGATAGCCAC CCAACTCCGG TTGGTTCTTC AGATGGTCGT 3961 ACAGATACAA CCCAGACTCT ACGTCCTTGC GTGGGTGCTT GGAGCGCACC ACGAAGCGCT 4021 CGTTATGCGC CAGTTTGTCC TGCAGATAAG CATGAATATC GGCTTCGCGG TCACAGACCG 4081 CAATCACGTT GCTCATCATG CTGCCCATGC GTAACCGGCT AGTTGCGGCC GCTGCCAGCC 4141 ATTTGCCACT CTCCTTTTCA TCCGCATCGG CAGGGTCATC CGGGCGCATC CACCACTCCT 4201 GATGCAGTAA TCCTACGGTG CGGAATGTGG TGGCCTCGAG CAAGAGAACG GAGTGAACCC 4261 ACCATCCGCG GGATTTATCC TGAATAGAGC CCAGCTTGCC AAGCTCTTCG GCGACCTGGT 4321 GGCGATAACT CAAAGAGGTG GTGTCCTCAA TGGCCAGCAG TTCGGGAAAC TCCTGAGCCA 4381 ACTTGACTGT TTGCATGGCG CCAGCCTTTC TGATCGCCTC GGCAGAAACG TTGGGATTGC 4441 GGATAAATCG GTAAGCGCCT TCCTGCATGG CTTCACTACC CTCTGATGAG ATGGTTATTG 4501 ATTTACCAGA ATATTTTGCC AATTGGGCGG CGACGTTAAC CAAGCGGGCA GTACGGCGAG 4561 GATCACCCAG CGCCGCCGAA GAGAACACAG ATTTAGCCCA GTCGGCCGCA CGATGAAGAG 4621 CAGAAGTTAT CATGAACGTT ACCATGTTAG GAGGTCACAT GGAAGATCAG ATCCTGGAAA 4681 ACGGGAAAGG TTCCGTTCAG GACGCTACTT GTGTACGGGA TCGGTCGACG GATCCCAAGC 4741 TTCTTCTAGA CTGTCTCTTG ATCAGATCTT GGATCTCGGG CGTAGTCCGG CACGTCGTAC 4801 GGGTAGTGAT GGTGATGGTG ATGCTTAATT AATAACTTCG TATAGCATAC ATTATACGAA 4861 GTTATCCAAT TGCATAACTT CGTATAGCAT ACATTATACG AAGTTATGGT TAACCGGGGA 4921 TCCCCTGCGC CATCAGATCC TTGGCGGCAA GAAAGCCATC CAGTTTACTT TGCAGGGCTT 4981 CCCAACCTTA CCAGAGGGCG CCCCAGCTGG CAATTCCGGT TCGCTTGCTG TCCATAAAAC 5041 CGCCCAGTCT AGCTATCGCC ATGTAAGCCC ACTGCAAGCT ACCTGCTTTC TCTTTGCGCT 5101 TGCGTTTTCC CTTGTCCAGA TAGCCCAGTA GCTGACATTC ATCCGGGGTC AGCACCGTTT 5161 CTGCGGACTG GCTTTCTACG TGTTCCGCTT CCTTTAGCAG CCCTTGCGCC CTGAGTGCTT 5221 GCGGCAGCGT GAAGCTTTCT CTGAGCTGTA ACAGCCTGAC CGCAACAAAC GAGAGGATCG 5281 AGACCATCCG CTCCAGATTA TCCGGCTCCT CCATGCGTTG CCTCTCGGCT CCTGCTCCGG 5341 TTTTCCATGC CTTATGGAAC TCCTCGATCC GCCAGCGATG GGTATAAATG TCGATGACGC 5401 GCAAGGCTTG GGCTAGCGAC TCGACCGGTT CGCCGGTCAG CAACAACCAT TTCAACGGGG 5461 TCTCACCCTT GGGCGGGTTA ATCTCCTCGG CCAGCACCGC GTTGAGCGTG ATATTCCCCT 5521 GTTTTAGCGT GATGCGCCCA CTGCGCAGGC TCAAGCTCGC CTTGCGGGCT GGTCGATTTT 5581 TACGTTTACC GCGTTTATCC ACCACGCCCT TTTGCGGAAT GCTGATCTGA TAGCCACCCA 5641 ACTCCGGTTG GTTCTTCAGA TGGTCGATCA GATACAACCC AGACTCTACG TCCTTGCGTG 5701 GGTGCTTGGA GCGCACCACG AAGCGCTCGT TATGCGCCAG CCTGTCCTGC AGGTCGACGG 5761 ATCATATCGT CAATTATTAC CTCCACGGGG AGAGCCTGAG CAAACTGGCC TCAGGCATTT 5821 GAGAAGCACA CGGTCACACT GCTTCCGGTA GTCAATAAAC CGGTAAACCA GCAATAGACA 5881 TAAGCGGCTA TTTAACGACC CTGCCCTGAA CCGACGACCG GGTCGAATTT GCTTTCGAAT 5941 TTCTGCCATT CATCCGCTTA TTATCACTTA TTCAGGCGTA GCACCAGGCG TTTAAGGGCA 6001 CCAATAACTG CCTTAAAAAA ATTACGCCCC GCCCTGCCAC TCATCGCAGT ACTGTTGTAA 6061 TTCATTAAGC ATTCTGCCGA CATGGAAGCC ATCACAGACG GCATGATGAA CCTGAATCGC 6121 CAGCGGCATC AGCACCTTGT CGCCTTGCGT ATAATATTTG CCCATGGTGA AAACGGGGGC 6181 GAAGAAGTTG TCCATATTGG CCACGTTTAA ATCAAAACTG GTGAAACTCA CCCAGGGATT 6241 GGCTGAGACG AAAAACATAT TCTCAATAAA CCCTTTAGGG AAATAGGCCA GGTTTTCACC 6301 GTAACACGCC ACATCTTGCG AATATATGTG TAGAAACTGC CGGAAATCGT CGTGGTATTC 6361 ACTCCAGAGC GATGAAAACG TTTCAGTTTG CTCATGGAAA ACGGTGTAAC AAGGGTGAAC 6421 ACTATCCCAT ATCACCAGCT CACCGTCTTT CATTGCCATA CGGAATTCCG GATGAGCATT 6481 CATCAGGCGG GCAAGAATGT GAATAAAGGC CGGATAAAAC TTGTGCTTAT TTTTCTTTAC 6541 GGTCTTTAAA AAGGCCGTAA TATCCAGCTG AACGGTCTGG TTATAGGTAC ATTGAGCAAC 6601 TGACTGAAAT GCCTCAAAAT GTTCTTTACG ATGCCATTGG GATATATCAA CGGTGGTATA 6661 TCCAGTGATT TTTTTCTCCA TTTTAGCTTC CTTAGCTCCT GAAAATCTCG ATAACTCAAA 6721 AAATACGCCC GGTAGTGATC TTATTTCATT ATGGTGAAAG TTGGAACCTC TTACGTGCCG 6781 ATCAACGTCT CATTTTCGCC AAAAGTTGGC CCAGGGCTTC CCGGTATCAA CAGGGACACC 6841 AGGATTTATT TATTCTGCGA AGTGATCTTC CGTCACAGGT ATTTATTCGG CGCAAAGTGC 6901 GTCGGGTGAT GCTGCCAACT TACTGATTTA GTGTATGATG GTGTTTTTGA GGTGCTCCAG 6961 TGGCTTCTGT TTCTATCAGC TGTCCCTCCT GTTCAGCTAC TGACGGGGTG GTGCGTAACG 7021 GCAAAAGCAC CGCCGGACAT CAGCGCTAGA GTCGAGGGTG ACAAGGCAGG AAACCACCAT 7081 CAACACCAGA CCCGCGACAA ACAGACGGGG GCCGCCTGCC CCCATCAAAT TCAGACACAT 7141 AATCATCAAC ATCGCGGTGG AAGGCAGCAC GTTTACGCCC ATTACGCCTA CCCACATTCC 7201 CGCTAATACT GCATCGGTTT TTAAGTTGTA AATTTCCCGG CTAAGCGGAT CGACGGCCCT 7261 GCTCGCTATC TGCCAGGCTA AATGCGGCCA GACGAACGCC CAGCCGACCA ACACCAGCCA 7321 CCACCAGCCC GGCGGCGGGT GTGAAACCAG CGTTGAAGCA ATCGGTAAGA ACATGCCAGC 7381 CAGGCCAACC GCACGGGGTA GTCTGACGCG ACGGGCGAAG CGCAGCCCGG ACCGCTGATG 7441 TTCGTTTTGA GGAGTTAAAG GAGGTTCCTC CCCGTGCGCC GCCGCTTTTT TGAAAAAGTT 7501 TTCATCATTC ATTATTTTTG GGAACATTCA GAAACAATTT TCCCAAATTA TAGAGACGGA 7561 GCTAAAGGCA GAAGTATGAT ATTTCGGGTG AGCCATTTTC GTAGCTCACC CGTTAGCACT 7621 ATCAGGTATC AGGCGGCTTT CTTGAGGCAG GCACTCATAA ACTTATTACG ATCATCACCT
Primer: IPHK_spe1_P5 (+ spe1 site at 5’ end for cloning)

7681 TTCAGAGATT GTTGTGTTGC TTGATTATTG CATTCGCGCA TCTTTTGCTG CTGTGGCGTC 7741 AAACTTTTTT CGCCAGGCGC AGACTTGCTG TTCTTCAGGC AATCACTCAT GTAGGTCTTA 7801 CGAGCATCCC CTTTCAACGC CTGCGCCGTC GCCTGCTGAT TACAGGAGGT CATACGCTGT 7861 TGTTGTGGGG TTAAAGTTCT CTCGGCAGCG CCGACGGTGG TTAAAAAAAC CAGACCGAAA 7921 AGCAAGGTAA CCAGTAATGT TATTTTCATA GCACCATCCC TCTTCATGTT TTAACCATGA 7981 GCGTATGCGC CCGTGATCTG CCATTAAGTC TGGTTGCTAA CAGCAAAAAA ACCACCCGGC 8041 AGCGAAAATT CACTGCCGGG CGCGGTTTTA TTTCAGCCCC AGAGCGGCTT TCATGGTGTA 8101 GAAGAGATCG GTCTGGTCGG TCAGTCCAAC AACATTGGCG GCATGCGGGC CATACGCCGC 8161 AATACGCAAC TGACTGCCGG TATGTTCTTG TGAATCCTCT TCGGAGTTCC CGTAACTCAT 8221 CACCATCACT GCGCCATCTT TGGTATTTAG CGCCTGGGTG AGGCCCGGAG CTTTGGTATC 8281 CGGCGCAACA ATCTGGCTGG CGTGGGCGTG ATCAGCGGTG ACTATGACCA GCGTGTTACC 8341 CTCCTTTTTA GCGAATTCCA GCGCCCGTTG TACGGCTTCA TCGAGATCGA CCGTCTCGCC 8401 AATTTGCCCA CAAGGATTCG CAGCATGATC CTGTTTATCG ATTGACGCAC CTTCAACTTG 8461 CAGGAAAAAG CCTTTCTCAT TTTTACTCAA CAATTCAATG GCTTTGTCGG TCATCTGCGC 8521 CAGGGTTGGT ACACTGTCAT TACGTTGCGG ATTTGGCGTA CAGGTGACTG CGGGCTTATC 8581 GATATTGCCA TGGTACGTTG CTTTCGGTCC TAGCCAGCGC ACTGGCATAT TGCCGTCAGC 8641 AAACAGGCCA AGCAGGGGTT TTTGCTGATT CGCTTCCGTC ACCGAATTCA GTGAGGCAGC 8701 ATCGCTCACC AACTGATAAC CACGCGCCTG TGCCTGTTCA CGCAGCGTTT TTCCCTGCCA 8761 TTCACCAGCG GTTGCCGTTT CAGCAAAGGT TTTTGCGCCG CCGCCAAGCG TAACGTCGGC 8821 ACGAGCGTTA AGCAGCTGTT CGGTAATCGA TCCTTTTCCG CCTTTTTCCA GAGCGTTACC 8881 CGGACATTTT TCACTGGTCG CGCTCGGACC GTAGCATTTG CGCGAGGTCA CATGTGCCAC 8941 CAGCGCAGCG GGCGTGGCAT CCTGCAACTC TGCGGTAGAA ACGTTACCGG TCGCCAGACC 9001 TGCGGCTTTT GCCATTTCCA GAATCGTTGG GTGATCTTTT TCGTGAATAT CGACGCCCAG 9061 CGCGCCGTTA TAGGTTTTGA CACCGGTTGA CCAGGCGGTT GCTGATGCAG CCGAGTCGGT 9121 GACGTAGTCC GGTTTGCCGG TTTTTTTATT CAGCGCATAG TGAGTGTATT GCCCGGTAAG 9181 CGGTAAGGCA TCTATACCTT TAAAAAAGCC GCCCGCACCT TCGGCATAAT TACGTGCGGC 9241 AGTAATTTCC GAGTCCCCCA TCCCATCGCC AATCAGCAAA ATAATATTTT TTGCAGGTTT 9301 ATCGCTAAGA GAATCACGCA GAGCGGCAGT CTGATCACCC GTTAAACGGC GAGCACCGCC 9361 GGGTGCAGTA ATATCGCCCT GAGCAGCCCG GTTTTCCAGA ACAGGATCCC CCGTTAACGA 9421 TAACTTCGTA TAGCATACAT TATACGAAGT TATCAGATCC CCCTGGATGG AAAACGGGAA 9481 AGGTTCCGTC CAGGACGCTA CTTGTGTATA AGAGTCAGGG TACCGCATGC GATATCGAGC 9541 TCTCCCGGGA ATTCCACAAA TTGTTATCCG CTCACAATTC CACATGTGGA ATCCACATGT 9601 GGAATTCCCA TGTCAGCCGT TAAGTGTTCC TGTGTCACTG AAAATTGCTT TGAGAGGCTC 9661 TAAGGGCTTC TCAGTGCGTT ACATCCCTGG CTTGTTGTCC ACAACCGTTA AACCTTAAAA 9721 GCTTTAAAAG CCTTATATAT TCTTTTTTTT CTTATAAAAC TTAAAACCTT AGAGGCTATT 9781 TAAGTTGCTG ATTTATATTA ATTTTATTGT TCAAACATGA GAGCTTAGTA CGTGAAACAT 9841 GAGAGCTTAG TACGTTAGCC ATGAGAGCTT AGTACGTTAG CCATGAGGGT TTAGTTCGTT 9901 AAACATGAGA GCTTAGTACG TTAAACATGA GAGCTTAGTA CGTGAAACAT GAGAGCTTAG 9961 TACGTACTAT CAACAGGTTG AACTGCTGAT CTTCAGATCC TCTACGCCGG ACGCATCGTG 10021 GCCGGATC
Primer 1 (TnphoA-II)
Sequencing primer ‘hah-2’
loxP site
OE sequence
Primer 2 ‘hah-1’
Sequencing primer ‘hah-2’

ISphoA sequence from pCM638 (bases 4751-9518). 1 CTGTCTCTTG ATCAGATCTT GGATCTCGGG CGTAGTCCGG CACGTCGTAC GGGTAGTGAT 61 GGTGATGGTG ATGCTTAATT AATAACTTCG TATAGCATAC ATTATACGAA GTTATCCAAT 121 TGCATAACTT CGTATAGCAT ACATTATACG AAGTTATGGT TAACCGGGGA TCCCCTGCGC 181 CATCAGATCC TTGGCGGCAA GAAAGCCATC CAGTTTACTT TGCAGGGCTT CCCAACCTTA 241 CCAGAGGGCG CCCCAGCTGG CAATTCCGGT TCGCTTGCTG TCCATAAAAC CGCCCAGTCT 301 AGCTATCGCC ATGTAAGCCC ACTGCAAGCT ACCTGCTTTC TCTTTGCGCT TGCGTTTTCC 361 CTTGTCCAGA TAGCCCAGTA GCTGACATTC ATCCGGGGTC AGCACCGTTT CTGCGGACTG 421 GCTTTCTACG TGTTCCGCTT CCTTTAGCAG CCCTTGCGCC CTGAGTGCTT GCGGCAGCGT 481 GAAGCTTTCT CTGAGCTGTA ACAGCCTGAC CGCAACAAAC GAGAGGATCG AGACCATCCG 541 CTCCAGATTA TCCGGCTCCT CCATGCGTTG CCTCTCGGCT CCTGCTCCGG TTTTCCATGC 601 CTTATGGAAC TCCTCGATCC GCCAGCGATG GGTATAAATG TCGATGACGC GCAAGGCTTG 661 GGCTAGCGAC TCGACCGGTT CGCCGGTCAG CAACAACCAT TTCAACGGGG TCTCACCCTT 721 GGGCGGGTTA ATCTCCTCGG CCAGCACCGC GTTGAGCGTG ATATTCCCCT GTTTTAGCGT 781 GATGCGCCCA CTGCGCAGGC TCAAGCTCGC CTTGCGGGCT GGTCGATTTT TACGTTTACC 841 GCGTTTATCC ACCACGCCCT TTTGCGGAAT GCTGATCTGA TAGCCACCCA ACTCCGGTTG 901 GTTCTTCAGA TGGTCGATCA GATACAACCC AGACTCTACG TCCTTGCGTG GGTGCTTGGA 961 GCGCACCACG AAGCGCTCGT TATGCGCCAG CCTGTCCTGC AGGTCGACGG ATCATATCGT 1021 CAATTATTAC CTCCACGGGG AGAGCCTGAG CAAACTGGCC TCAGGCATTT GAGAAGCACA 1081 CGGTCACACT GCTTCCGGTA GTCAATAAAC CGGTAAACCA GCAATAGACA TAAGCGGCTA 1141 TTTAACGACC CTGCCCTGAA CCGACGACCG GGTCGAATTT GCTTTCGAAT TTCTGCCATT 1201 CATCCGCTTA TTATCACTTA TTCAGGCGTA GCACCAGGCG TTTAAGGGCA CCAATAACTG 1261 CCTTAAAAAA ATTACGCCCC GCCCTGCCAC TCATCGCAGT ACTGTTGTAA TTCATTAAGC 1321 ATTCTGCCGA CATGGAAGCC ATCACAGACG GCATGATGAA CCTGAATCGC CAGCGGCATC 1381 AGCACCTTGT CGCCTTGCGT ATAATATTTG CCCATGGTGA AAACGGGGGC GAAGAAGTTG 1441 TCCATATTGG CCACGTTTAA ATCAAAACTG GTGAAACTCA CCCAGGGATT GGCTGAGACG 1501 AAAAACATAT TCTCAATAAA CCCTTTAGGG AAATAGGCCA GGTTTTCACC GTAACACGCC 1561 ACATCTTGCG AATATATGTG TAGAAACTGC CGGAAATCGT CGTGGTATTC ACTCCAGAGC 1621 GATGAAAACG TTTCAGTTTG CTCATGGAAA ACGGTGTAAC AAGGGTGAAC ACTATCCCAT 1681 ATCACCAGCT CACCGTCTTT CATTGCCATA CGGAATTCCG GATGAGCATT CATCAGGCGG 1741 GCAAGAATGT GAATAAAGGC CGGATAAAAC TTGTGCTTAT TTTTCTTTAC GGTCTTTAAA 1801 AAGGCCGTAA TATCCAGCTG AACGGTCTGG TTATAGGTAC ATTGAGCAAC TGACTGAAAT 1861 GCCTCAAAAT GTTCTTTACG ATGCCATTGG GATATATCAA CGGTGGTATA TCCAGTGATT 1921 TTTTTCTCCA TTTTAGCTTC CTTAGCTCCT GAAAATCTCG ATAACTCAAA AAATACGCCC 1981 GGTAGTGATC TTATTTCATT ATGGTGAAAG TTGGAACCTC TTACGTGCCG ATCAACGTCT 2041 CATTTTCGCC AAAAGTTGGC CCAGGGCTTC CCGGTATCAA CAGGGACACC AGGATTTATT 2101 TATTCTGCGA AGTGATCTTC CGTCACAGGT ATTTATTCGG CGCAAAGTGC GTCGGGTGAT 2161 GCTGCCAACT TACTGATTTA GTGTATGATG GTGTTTTTGA GGTGCTCCAG TGGCTTCTGT 2221 TTCTATCAGC TGTCCCTCCT GTTCAGCTAC TGACGGGGTG GTGCGTAACG GCAAAAGCAC 2281 CGCCGGACAT CAGCGCTAGA GTCGAGGGTG ACAAGGCAGG AAACCACCAT CAACACCAGA 2341 CCCGCGACAA ACAGACGGGG GCCGCCTGCC CCCATCAAAT TCAGACACAT AATCATCAAC 2401 ATCGCGGTGG AAGGCAGCAC GTTTACGCCC ATTACGCCTA CCCACATTCC CGCTAATACT 2461 GCATCGGTTT TTAAGTTGTA AATTTCCCGG CTAAGCGGAT CGACGGCCCT GCTCGCTATC 2521 TGCCAGGCTA AATGCGGCCA GACGAACGCC CAGCCGACCA ACACCAGCCA CCACCAGCCC 2581 GGCGGCGGGT GTGAAACCAG CGTTGAAGCA ATCGGTAAGA ACATGCCAGC CAGGCCAACC 2641 GCACGGGGTA GTCTGACGCG ACGGGCGAAG CGCAGCCCGG ACCGCTGATG TTCGTTTTGA 2701 GGAGTTAAAG GAGGTTCCTC CCCGTGCGCC GCCGCTTTTT TGAAAAAGTT TTCATCATTC 2761 ATTATTTTTG GGAACATTCA GAAACAATTT TCCCAAATTA TAGAGACGGA GCTAAAGGCA 2821 GAAGTATGAT ATTTCGGGTG AGCCATTTTC GTAGCTCACC CGTTAGCACT ATCAGGTATC 2881 AGGCGGCTTT CTTGAGGCAG GCACTCATAA ACTTATTACG ATCATCACCT TTCAGAGATT 2941 GTTGTGTTGC TTGATTATTG CATTCGCGCA TCTTTTGCTG CTGTGGCGTC AAACTTTTTT 3001 CGCCAGGCGC AGACTTGCTG TTCTTCAGGC AATCACTCAT GTAGGTCTTA CGAGCATCCC 3061 CTTTCAACGC CTGCGCCGTC GCCTGCTGAT TACAGGAGGT CATACGCTGT TGTTGTGGGG 3121 TTAAAGTTCT CTCGGCAGCG CCGACGGTGG TTAAAAAAAC CAGACCGAAA AGCAAGGTAA 3181 CCAGTAATGT TATTTTCATA GCACCATCCC TCTTCATGTT TTAACCATGA GCGTATGCGC 3241 CCGTGATCTG CCATTAAGTC TGGTTGCTAA CAGCAAAAAA ACCACCCGGC AGCGAAAATT 3301 CACTGCCGGG CGCGGTTTTA TTTCAGCCCC AGAGCGGCTT TCATGGTGTA GAAGAGATCG 3361 GTCTGGTCGG TCAGTCCAAC AACATTGGCG GCATGCGGGC CATACGCCGC AATACGCAAC 3421 TGACTGCCGG TATGTTCTTG TGAATCCTCT TCGGAGTTCC CGTAACTCAT CACCATCACT 3481 GCGCCATCTT TGGTATTTAG CGCCTGGGTG AGGCCCGGAG CTTTGGTATC CGGCGCAACA 3541 ATCTGGCTGG CGTGGGCGTG ATCAGCGGTG ACTATGACCA GCGTGTTACC CTCCTTTTTA 3601 GCGAATTCCA GCGCCCGTTG TACGGCTTCA TCGAGATCGA CCGTCTCGCC AATTTGCCCA 3661 CAAGGATTCG CAGCATGATC CTGTTTATCG ATTGACGCAC CTTCAACTTG CAGGAAAAAG 3721 CCTTTCTCAT TTTTACTCAA CAATTCAATG GCTTTGTCGG TCATCTGCGC CAGGGTTGGT 3781 ACACTGTCAT TACGTTGCGG ATTTGGCGTA CAGGTGACTG CGGGCTTATC GATATTGCCA
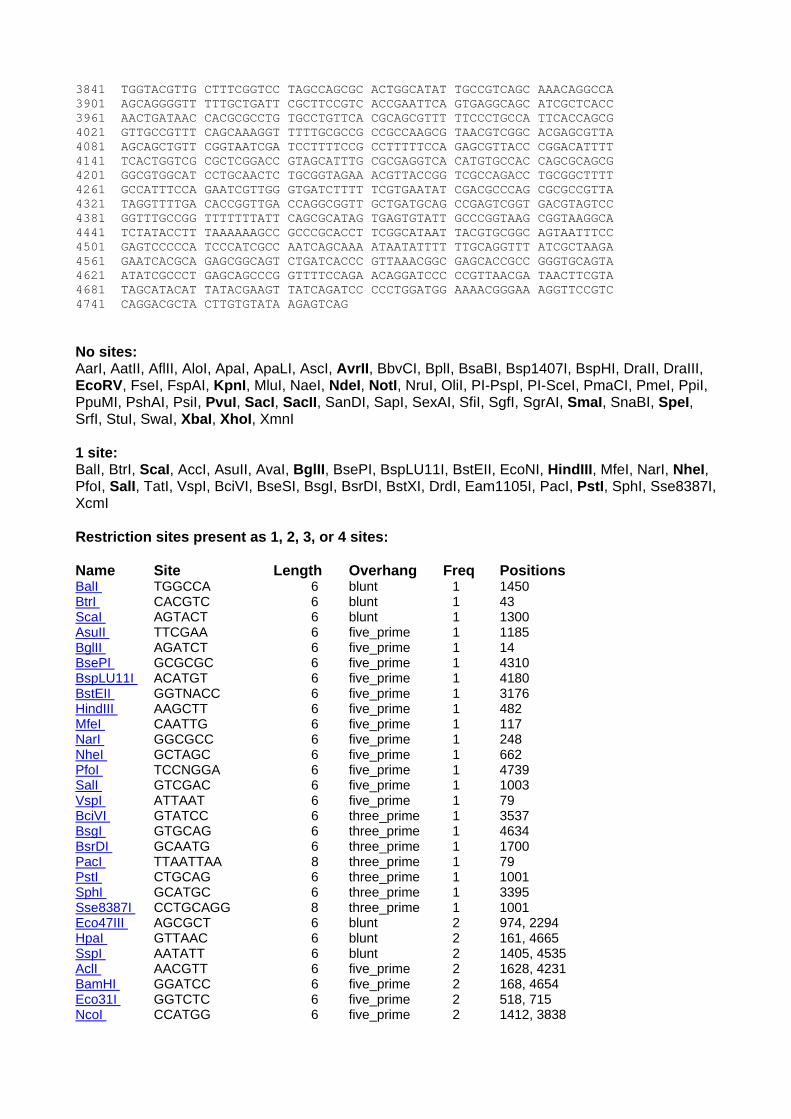
3841 TGGTACGTTG CTTTCGGTCC TAGCCAGCGC ACTGGCATAT TGCCGTCAGC AAACAGGCCA 3901 AGCAGGGGTT TTTGCTGATT CGCTTCCGTC ACCGAATTCA GTGAGGCAGC ATCGCTCACC 3961 AACTGATAAC CACGCGCCTG TGCCTGTTCA CGCAGCGTTT TTCCCTGCCA TTCACCAGCG 4021 GTTGCCGTTT CAGCAAAGGT TTTTGCGCCG CCGCCAAGCG TAACGTCGGC ACGAGCGTTA 4081 AGCAGCTGTT CGGTAATCGA TCCTTTTCCG CCTTTTTCCA GAGCGTTACC CGGACATTTT 4141 TCACTGGTCG CGCTCGGACC GTAGCATTTG CGCGAGGTCA CATGTGCCAC CAGCGCAGCG 4201 GGCGTGGCAT CCTGCAACTC TGCGGTAGAA ACGTTACCGG TCGCCAGACC TGCGGCTTTT 4261 GCCATTTCCA GAATCGTTGG GTGATCTTTT TCGTGAATAT CGACGCCCAG CGCGCCGTTA 4321 TAGGTTTTGA CACCGGTTGA CCAGGCGGTT GCTGATGCAG CCGAGTCGGT GACGTAGTCC 4381 GGTTTGCCGG TTTTTTTATT CAGCGCATAG TGAGTGTATT GCCCGGTAAG CGGTAAGGCA 4441 TCTATACCTT TAAAAAAGCC GCCCGCACCT TCGGCATAAT TACGTGCGGC AGTAATTTCC 4501 GAGTCCCCCA TCCCATCGCC AATCAGCAAA ATAATATTTT TTGCAGGTTT ATCGCTAAGA 4561 GAATCACGCA GAGCGGCAGT CTGATCACCC GTTAAACGGC GAGCACCGCC GGGTGCAGTA 4621 ATATCGCCCT GAGCAGCCCG GTTTTCCAGA ACAGGATCCC CCGTTAACGA TAACTTCGTA 4681 TAGCATACAT TATACGAAGT TATCAGATCC CCCTGGATGG AAAACGGGAA AGGTTCCGTC 4741 CAGGACGCTA CTTGTGTATA AGAGTCAG No sites: AarI, AatII, AflII, AloI, ApaI, ApaLI, AscI, AvrII, BbvCI, BplI, BsaBI, Bsp1407I, BspHI, DraII, DraIII, EcoRV, FseI, FspAI, KpnI, MluI, NaeI, NdeI, NotI, NruI, OliI, PI-PspI, PI-SceI, PmaCI, PmeI, PpiI, PpuMI, PshAI, PsiI, PvuI, SacI, SacII, SanDI, SapI, SexAI, SfiI, SgfI, SgrAI, SmaI, SnaBI, SpeI, SrfI, StuI, SwaI, XbaI, XhoI, XmnI 1 site: BalI, BtrI, ScaI, AccI, AsuII, AvaI, BglII, BsePI, BspLU11I, BstEII, EcoNI, HindIII, MfeI, NarI, NheI, PfoI, SalI, TatI, VspI, BciVI, BseSI, BsgI, BsrDI, BstXI, DrdI, Eam1105I, PacI, PstI, SphI, Sse8387I, XcmI Restriction sites present as 1, 2, 3, or 4 sites: Name Site Length Overhang Freq Positions BalI TGGCCA 6 blunt 1 1450 BtrI CACGTC 6 blunt 1 43 ScaI AGTACT 6 blunt 1 1300 AsuII TTCGAA 6 five_prime 1 1185 BglII AGATCT 6 five_prime 1 14 BsePI GCGCGC 6 five_prime 1 4310 BspLU11I ACATGT 6 five_prime 1 4180 BstEII GGTNACC 6 five_prime 1 3176 HindIII AAGCTT 6 five_prime 1 482 MfeI CAATTG 6 five_prime 1 117 NarI GGCGCC 6 five_prime 1 248 NheI GCTAGC 6 five_prime 1 662 PfoI TCCNGGA 6 five_prime 1 4739 SalI GTCGAC 6 five_prime 1 1003 VspI ATTAAT 6 five_prime 1 79 BciVI GTATCC 6 three_prime 1 3537 BsgI GTGCAG 6 three_prime 1 4634 BsrDI GCAATG 6 three_prime 1 1700 PacI TTAATTAA 8 three_prime 1 79 PstI CTGCAG 6 three_prime 1 1001 SphI GCATGC 6 three_prime 1 3395 Sse8387I CCTGCAGG 8 three_prime 1 1001 Eco47III AGCGCT 6 blunt 2 974, 2294 HpaI GTTAAC 6 blunt 2 161, 4665 SspI AATATT 6 blunt 2 1405, 4535 AclI AACGTT 6 five_prime 2 1628, 4231 BamHI GGATCC 6 five_prime 2 168, 4654 Eco31I GGTCTC 6 five_prime 2 518, 715 NcoI CCATGG 6 five_prime 2 1412, 3838
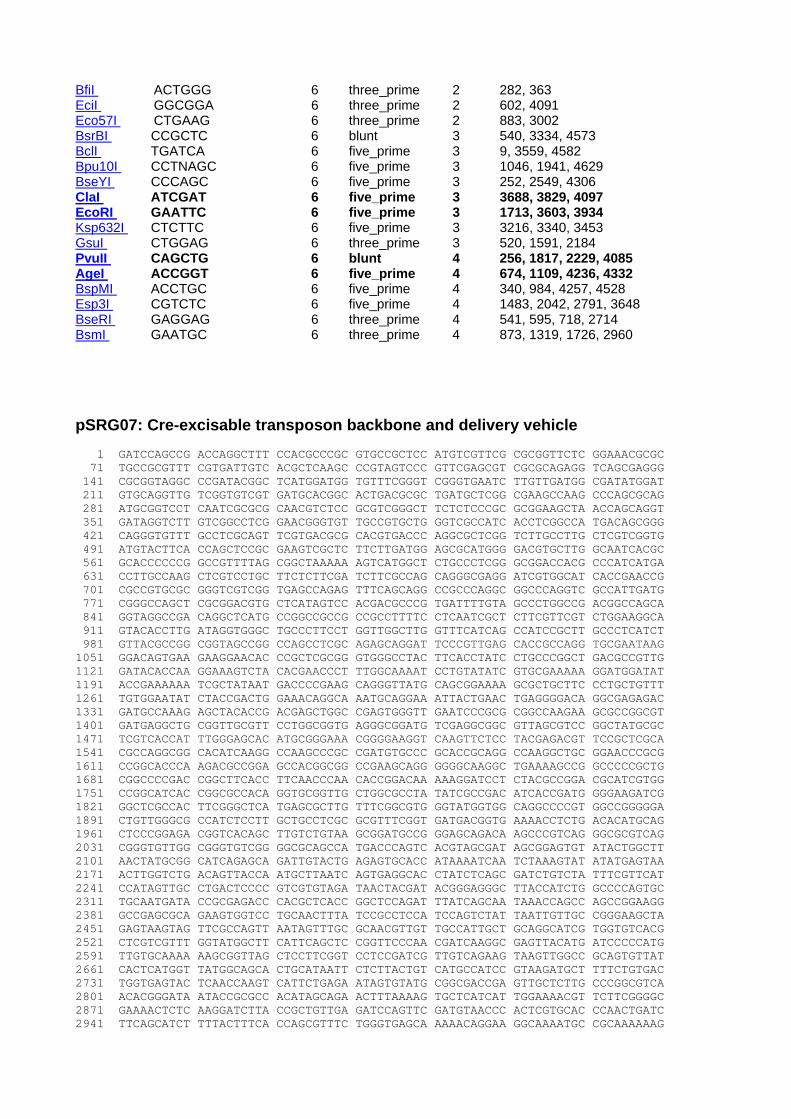
BfiI ACTGGG 6 three_prime 2 282, 363 EciI GGCGGA 6 three_prime 2 602, 4091 Eco57I CTGAAG 6 three_prime 2 883, 3002 BsrBI CCGCTC 6 blunt 3 540, 3334, 4573 BclI TGATCA 6 five_prime 3 9, 3559, 4582 Bpu10I CCTNAGC 6 five_prime 3 1046, 1941, 4629 BseYI CCCAGC 6 five_prime 3 252, 2549, 4306 ClaI ATCGAT 6 five_prime 3 3688, 3829, 4097 EcoRI GAATTC 6 five_prime 3 1713, 3603, 3934 Ksp632I CTCTTC 6 five_prime 3 3216, 3340, 3453 GsuI CTGGAG 6 three_prime 3 520, 1591, 2184 PvuII CAGCTG 6 blunt 4 256, 1817, 2229, 4085 AgeI ACCGGT 6 five_prime 4 674, 1109, 4236, 4332 BspMI ACCTGC 6 five_prime 4 340, 984, 4257, 4528 Esp3I CGTCTC 6 five_prime 4 1483, 2042, 2791, 3648 BseRI GAGGAG 6 three_prime 4 541, 595, 718, 2714 BsmI GAATGC 6 three_prime 4 873, 1319, 1726, 2960 pSRG07: Cre-excisable transposon backbone and delivery vehicle 1 GATCCAGCCG ACCAGGCTTT CCACGCCCGC GTGCCGCTCC ATGTCGTTCG CGCGGTTCTC GGAAACGCGC 71 TGCCGCGTTT CGTGATTGTC ACGCTCAAGC CCGTAGTCCC GTTCGAGCGT CGCGCAGAGG TCAGCGAGGG 141 CGCGGTAGGC CCGATACGGC TCATGGATGG TGTTTCGGGT CGGGTGAATC TTGTTGATGG CGATATGGAT 211 GTGCAGGTTG TCGGTGTCGT GATGCACGGC ACTGACGCGC TGATGCTCGG CGAAGCCAAG CCCAGCGCAG 281 ATGCGGTCCT CAATCGCGCG CAACGTCTCC GCGTCGGGCT TCTCTCCCGC GCGGAAGCTA ACCAGCAGGT 351 GATAGGTCTT GTCGGCCTCG GAACGGGTGT TGCCGTGCTG GGTCGCCATC ACCTCGGCCA TGACAGCGGG 421 CAGGGTGTTT GCCTCGCAGT TCGTGACGCG CACGTGACCC AGGCGCTCGG TCTTGCCTTG CTCGTCGGTG 491 ATGTACTTCA CCAGCTCCGC GAAGTCGCTC TTCTTGATGG AGCGCATGGG GACGTGCTTG GCAATCACGC 561 GCACCCCCCG GCCGTTTTAG CGGCTAAAAA AGTCATGGCT CTGCCCTCGG GCGGACCACG CCCATCATGA 631 CCTTGCCAAG CTCGTCCTGC TTCTCTTCGA TCTTCGCCAG CAGGGCGAGG ATCGTGGCAT CACCGAACCG 701 CGCCGTGCGC GGGTCGTCGG TGAGCCAGAG TTTCAGCAGG CCGCCCAGGC GGCCCAGGTC GCCATTGATG 771 CGGGCCAGCT CGCGGACGTG CTCATAGTCC ACGACGCCCG TGATTTTGTA GCCCTGGCCG ACGGCCAGCA 841 GGTAGGCCGA CAGGCTCATG CCGGCCGCCG CCGCCTTTTC CTCAATCGCT CTTCGTTCGT CTGGAAGGCA 911 GTACACCTTG ATAGGTGGGC TGCCCTTCCT GGTTGGCTTG GTTTCATCAG CCATCCGCTT GCCCTCATCT 981 GTTACGCCGG CGGTAGCCGG CCAGCCTCGC AGAGCAGGAT TCCCGTTGAG CACCGCCAGG TGCGAATAAG 1051 GGACAGTGAA GAAGGAACAC CCGCTCGCGG GTGGGCCTAC TTCACCTATC CTGCCCGGCT GACGCCGTTG 1121 GATACACCAA GGAAAGTCTA CACGAACCCT TTGGCAAAAT CCTGTATATC GTGCGAAAAA GGATGGATAT 1191 ACCGAAAAAA TCGCTATAAT GACCCCGAAG CAGGGTTATG CAGCGGAAAA GCGCTGCTTC CCTGCTGTTT 1261 TGTGGAATAT CTACCGACTG GAAACAGGCA AATGCAGGAA ATTACTGAAC TGAGGGGACA GGCGAGAGAC 1331 GATGCCAAAG AGCTACACCG ACGAGCTGGC CGAGTGGGTT GAATCCCGCG CGGCCAAGAA GCGCCGGCGT 1401 GATGAGGCTG CGGTTGCGTT CCTGGCGGTG AGGGCGGATG TCGAGGCGGC GTTAGCGTCC GGCTATGCGC 1471 TCGTCACCAT TTGGGAGCAC ATGCGGGAAA CGGGGAAGGT CAAGTTCTCC TACGAGACGT TCCGCTCGCA 1541 CGCCAGGCGG CACATCAAGG CCAAGCCCGC CGATGTGCCC GCACCGCAGG CCAAGGCTGC GGAACCCGCG 1611 CCGGCACCCA AGACGCCGGA GCCACGGCGG CCGAAGCAGG GGGGCAAGGC TGAAAAGCCG GCCCCCGCTG 1681 CGGCCCCGAC CGGCTTCACC TTCAACCCAA CACCGGACAA AAAGGATCCT CTACGCCGGA CGCATCGTGG 1751 CCGGCATCAC CGGCGCCACA GGTGCGGTTG CTGGCGCCTA TATCGCCGAC ATCACCGATG GGGAAGATCG 1821 GGCTCGCCAC TTCGGGCTCA TGAGCGCTTG TTTCGGCGTG GGTATGGTGG CAGGCCCCGT GGCCGGGGGA 1891 CTGTTGGGCG CCATCTCCTT GCTGCCTCGC GCGTTTCGGT GATGACGGTG AAAACCTCTG ACACATGCAG 1961 CTCCCGGAGA CGGTCACAGC TTGTCTGTAA GCGGATGCCG GGAGCAGACA AGCCCGTCAG GGCGCGTCAG 2031 CGGGTGTTGG CGGGTGTCGG GGCGCAGCCA TGACCCAGTC ACGTAGCGAT AGCGGAGTGT ATACTGGCTT 2101 AACTATGCGG CATCAGAGCA GATTGTACTG AGAGTGCACC ATAAAATCAA TCTAAAGTAT ATATGAGTAA 2171 ACTTGGTCTG ACAGTTACCA ATGCTTAATC AGTGAGGCAC CTATCTCAGC GATCTGTCTA TTTCGTTCAT 2241 CCATAGTTGC CTGACTCCCC GTCGTGTAGA TAACTACGAT ACGGGAGGGC TTACCATCTG GCCCCAGTGC 2311 TGCAATGATA CCGCGAGACC CACGCTCACC GGCTCCAGAT TTATCAGCAA TAAACCAGCC AGCCGGAAGG 2381 GCCGAGCGCA GAAGTGGTCC TGCAACTTTA TCCGCCTCCA TCCAGTCTAT TAATTGTTGC CGGGAAGCTA 2451 GAGTAAGTAG TTCGCCAGTT AATAGTTTGC GCAACGTTGT TGCCATTGCT GCAGGCATCG TGGTGTCACG 2521 CTCGTCGTTT GGTATGGCTT CATTCAGCTC CGGTTCCCAA CGATCAAGGC GAGTTACATG ATCCCCCATG 2591 TTGTGCAAAA AAGCGGTTAG CTCCTTCGGT CCTCCGATCG TTGTCAGAAG TAAGTTGGCC GCAGTGTTAT 2661 CACTCATGGT TATGGCAGCA CTGCATAATT CTCTTACTGT CATGCCATCC GTAAGATGCT TTTCTGTGAC 2731 TGGTGAGTAC TCAACCAAGT CATTCTGAGA ATAGTGTATG CGGCGACCGA GTTGCTCTTG CCCGGCGTCA 2801 ACACGGGATA ATACCGCGCC ACATAGCAGA ACTTTAAAAG TGCTCATCAT TGGAAAACGT TCTTCGGGGC 2871 GAAAACTCTC AAGGATCTTA CCGCTGTTGA GATCCAGTTC GATGTAACCC ACTCGTGCAC CCAACTGATC 2941 TTCAGCATCT TTTACTTTCA CCAGCGTTTC TGGGTGAGCA AAAACAGGAA GGCAAAATGC CGCAAAAAAG

3011 GGAATAAGGG CGACACGGAA ATGTTGAATA CTCATACTCT TCCTTTTTCA ATATTATTGA AGCATTTATC 3081 AGGGTTATTG TCTCATGAGC GGATACATAT TTGAATGTAT TTAGAAAAAT AAACAAATAG GGGTTCCGCG 3151 CACATTTCCC CGAAAAGTGC CACCTGGATC TGCAGGTCGA CCTGTCTCTT GATCAGATCT TGATCCCCTG 3221 CGCCATCAGA TCCTTGGCGG CAAGAAAGCC ATCCAGTTTA CTTTGCAGGG CTTCCCAACC TTCCCAGAGG 3291 GCGCCCCAGC TGGCAATTCC GGTTCGCTTG CTGTCCATAA AACCGCCCAG TCTAGCTATC GCCATGTAAG 3361 CCCACTGCAA GCTACCTGCT TTCTCTTTGC GCTTGCGTTT TCCCTTGTCC AGATAGCCCA GTAGCTGACA 3431 TTCATCCGGG GTCAGCACCG TTTCTGCGGA CTGGCTTTCT ACGTGTTCCG CTTCCTTTAG CAGCCCTTGC 3501 GCCCTGAGTG CTTGCGGCAG CGTGAAGCTT TCTCTGAGCT GTAACAGCCT GACCGCAACA AACGAGAGGA 3571 TCGAGACCAT CCGCTCCAGA TTATCCGGCT CCTCCATGCG TTGCCTCTCG GCTCCTGCTC CGGTTTTCCA 3641 TGCCTTATGG AACTCCTCGA TCCGCCAGCG ATGGGTATAA ATGTCGATGA CGCGCAAGGC TTGGGCTAGC 3711 GACTCGACCG GTTCGCTGGT CAGCAACAAC CATTTCAACG GGGTCTCACC CTTGGGCGGG TTAATCTCCT 3781 CGGCCAGCAC CGCGTTGAGC GTGATATTCC CCTGTTTTAG CGTGATGCGC CCACTGCGCA GGCTCAAGCT 3851 CGCCTTGCGG GCTGGTCGAT TTTTACGTTT ACCGCGTTTA TCCACCACGC CCTTTTGCGG AATGCTGATC 3921 TGATAGCCAC CCAACTCCGG TTGGTTCTTC AGATGGTCGT ACAGATACAA CCCAGACTCT ACGTCCTTGC 3991 GTGGGTGCTT GGAGCGCACC ACGAAGCGCT CGTTATGCGC CAGTTTGTCC TGCAGATAAG CATGAATATC 4061 GGCTTCGCGG TCACAGACCG CAATCACGTT GCTCATCATG CTGCCCATGC GTAACCGGCT AGTTGCGGCC 4131 GCTGCCAGCC ATTTGCCACT CTCCTTTTCA TCCGCATCGG CAGGGTCATC CGGGCGCATC CACCACTCCT 4201 GATGCAGTAA TCCTACGGTG CGGAATGTGG TGGCCTCGAG CAAGAGAACG GAGTGAACCC ACCATCCGCG 4271 GGATTTATCC TGAATAGAGC CCAGCTTGCC AAGCTCTTCG GCGACCTGGT GGCGATAACT CAAAGAGGTG 4341 GTGTCCTCAA TGGCCAGCAG TTCGGGAAAC TCCTGAGCCA ACTTGACTGT TTGCATGGCG CCAGCCTTTC 4411 TGATCGCCTC GGCAGAAACG TTGGGATTGC GGATAAATCG GTAAGCGCCT TCCTGCATGG CTTCACTACC 4481 CTCTGATGAG ATGGTTATTG ATTTACCAGA ATATTTTGCC AATTGGGCGG CGACGTTAAC CAAGCGGGCA 4551 GTACGGCGAG GATCACCCAG CGCCGCCGAA GAGAACACAG ATTTAGCCCA GTCGGCCGCA CGATGAAGAG 4621 CAGAAGTTAT CATGAACGTT ACCATGTTAG GAGGTCACAT GGAAGATCAG ATCCTGGAAA ACGGGAAAGG 4691 TTCCGTTCAG GACGCTACTT GTGTACGGGA TCGGTCGACG GATCCCAAGC TTCTTCTAGA CTGTCTCTTG 4761 ATCAGATCTT GGATCTCGGG CGTAGTCCGG CACGTCGTAC GGGTAGTGAT GGTGATGGTG ATGCTTAATT 4831 AATAACTTCG TATAGCATAC ATTATACGAA GTTATCCAAT TGCATAACTT CGTATAGCAT ACATTATACG 4901 AAGTTATGGT TAACCGGGGA TCCCCTGCGC CATCAGATCC TTGGCGGCAA GAAAGCCATC CAGTTTACTT 4971 TGCAGGGCTT CCCAACCTTA CCAGAGGGCG CCCCAGCTGG CAATTCCGGT TCGCTTGCTG TCCATAAAAC 5041 CGCCCAGTCT AGCTATCGCC ATGTAAGCCC ACTGCAAGCT ACCTGCTTTC TCTTTGCGCT TGCGTTTTCC 5111 CTTGTCCAGA TAGCCCAGTA GCTGACATTC ATCCGGGGTC AGCACCGTTT CTGCGGACTG GCTTTCTACG 5181 TGTTCCGCTT CCTTTAGCAG CCCTTGCGCC CTGAGTGCTT GCGGCAGCGT GAAGCTTTCT CTGAGCTGTA 5251 ACAGCCTGAC CGCAACAAAC GAGAGGATCG AGACCATCCG CTCCAGATTA TCCGGCTCCT CCATGCGTTG 5321 CCTCTCGGCT CCTGCTCCGG TTTTCCATGC CTTATGGAAC TCCTCGATCC GCCAGCGATG GGTATAAATG 5391 TCGATGACGC GCAAGGCTTG GGCTAGCGAC TCGACCGGTT CGCCGGTCAG CAACAACCAT TTCAACGGGG 5461 TCTCACCCTT GGGCGGGTTA ATCTCCTCGG CCAGCACCGC GTTGAGCGTG ATATTCCCCT GTTTTAGCGT 5531 GATGCGCCCA CTGCGCAGGC TCAAGCTCGC CTTGCGGGCT GGTCGATTTT TACGTTTACC GCGTTTATCC 5601 ACCACGCCCT TTTGCGGAAT GCTGATCTGA TAGCCACCCA ACTCCGGTTG GTTCTTCAGA TGGTCGATCA 5671 GATACAACCC AGACTCTACG TCCTTGCGTG GGTGCTTGGA GCGCACCACG AAGCGCTCGT TATGCGCCAG 5741 CCTGTCCTGC AGGTCGACGG ATCATATCGT CAATTATTAC CTCCACGGGG AGAGCCTGAG CAAACTGGCC 5811 TACTAGTGTG CAGTAATATC GCCCTGAGCA GCCCGGTTTT CCAGAACAGG ATCCCCCGTT AACGATAACT 5881 TCGTATAGCA TACATTATAC GAAGTTATCA GATCCCCCTG GATGGAAAAC GGGAAAGGTT CCGTCCAGGA 5951 CGCTACTTGT GTATAAGAGT CAGGGTACCG CATGCGATAT CGAGCTCTCC CGGGAATTCC ACAAATTGTT 6021 ATCCGCTCAC AATTCCACAT GTGGAATCCA CATGTGGAAT TCCCATGTCA GCCGTTAAGT GTTCCTGTGT 6091 CACTGAAAAT TGCTTTGAGA GGCTCTAAGG GCTTCTCAGT GCGTTACATC CCTGGCTTGT TGTCCACAAC 6161 CGTTAAACCT TAAAAGCTTT AAAAGCCTTA TATATTCTTT TTTTTCTTAT AAAACTTAAA ACCTTAGAGG 6231 CTATTTAAGT TGCTGATTTA TATTAATTTT ATTGTTCAAA CATGAGAGCT TAGTACGTGA AACATGAGAG 6301 CTTAGTACGT TAGCCATGAG AGCTTAGTAC GTTAGCCATG AGGGTTTAGT TCGTTAAACA TGAGAGCTTA 6371 GTACGTTAAA CATGAGAGCT TAGTACGTGA AACATGAGAG CTTAGTACGT ACTATCAACA GGTTGAACTG 6441 CTGATCTTCA GATCCTCTAC GCCGGACGCA TCGTGGCCGG ATC Restriction enzyme sites: Noncutters: AatII, AflII, ApaI, AscI, AsuII, AvrII, BbvCI, BplI, Bsp1407I, BstEII, BstXI, ClaI, DraIII, EcoNI, FseI, FspAI, MluI, NcoI, NdeI, NruI, OliI, PI-PspI, PI-SceI, PflMI, PmeI, PpuMI, PshAI, RsrII, SanDI, SfiI, SgfI, SrfI, StuI, SwaI One to four cutters: BalI TGGCCA 6 blunt 1 4353 EcoRV GATATC 6 blunt 1 5988 PmaCI CACGTG 6 blunt 1 453 PsiI TTATAA 6 blunt 1 6209 ScaI AGTACT 6 blunt 1 2738 SmaI CCCGGG 6 blunt 1 6001 SnaBI TACGTA 6 blunt 1 6418 AarI CACCTGC 7 five_prime 1 329

BsePI GCGCGC 6 five_prime 1 296 NotI GCGGCCGC 8 five_prime 1 4126 SpeI ACTAGT 6 five_prime 1 5812 XbaI TCTAGA 6 five_prime 1 4745 XhoI CTCGAG 6 five_prime 1 4235 KpnI GGTACC 6 three_prime 1 5978 PacI TTAATTAA 8 three_prime 1 4829 PvuI CGATCG 6 three_prime 1 2628 SacI GAGCTC 6 three_prime 1 5996 SacII CCGCGG 6 three_prime 1 4269 SphI GCATGC 6 three_prime 1 5984 Sse8387I CCTGCAGG 8 three_prime 1 5751 PvuII CAGCTG 6 blunt 2 3299, 5006 SspI AATATT 6 blunt 2 3062, 4512 AgeI ACCGGT 6 five_prime 2 3717, 5424 ApaLI GTGCAC 6 five_prime 2 2134, 2925 BclI TGATCA 6 five_prime 2 3200, 4759 BglII AGATCT 6 five_prime 2 3205, 4764 BspLU11I ACATGT 6 five_prime 2 6037, 6050 EcoRI GAATTC 6 five_prime 2 6004, 6057 MfeI CAATTG 6 five_prime 2 4520, 4867 NheI GCTAGC 6 five_prime 2 3705, 5412 BciVI GTATCC 6 three_prime 2 1108, 3089 BsgI GTGCAG 6 three_prime 2 232, 5839 BsmI GAATGC 6 three_prime 2 3916, 5623 BsrDI GCAATG 6 three_prime 2 2319, 2493 BtrI CACGTC 6 blunt 3 543, 787, 4793 HpaI GTTAAC 6 blunt 3 4537, 4911, 5870 SalI GTCGAC 6 five_prime 3 3186, 4724, 5753 VspI ATTAAT 6 five_prime 3 2430, 4829, 6253 GsuI CTGGAG 6 three_prime 3 2322, 3563, 5270 Eco47III AGCGCT 6 blunt 4 1242, 1845, 4017, 5724 AclI AACGTT 6 five_prime 4 2484, 2857, 4428, 4636 BamHI GGATCC 6 five_prime 4 1724, 4730, 4918, 5859 BspHI TCATGA 6 five_prime 4 625, 1838, 3093, 4630 Esp3I CGTCTC 6 five_prime 4 310, 1314, 1512, 1955 HindIII AAGCTT 6 five_prime 4 3525, 4737, 5232, 6174 SapI GCTCTTC 7 five_prime 4 524, 895, 4310, 4603 Eco57I CTGAAG 6 three_prime 4 2919, 3926, 5633, 6425 PstI CTGCAG 6 three_prime 4 2503, 3184, 4044, 5751 Tn section of pSRG07 (bases 4751-5973) 1 ctgtctcttg atcagatctt ggatctcggg cgtagtccgg cacgtcgtac gggtagtgat 61 ggtgatggtg atgcttaatt aataacttcg tatagcatac attatacgaa gttatccaat 121 tgcataactt cgtatagcat acattatacg aagttatggt taaccgggga tcccctgcgc 181 catcagatcc ttggcggcaa gaaagccatc cagtttactt tgcagggctt cccaacctta 241 ccagagggcg ccccagctgg caattccggt tcgcttgctg tccataaaac cgcccagtct 301 agctatcgcc atgtaagccc actgcaagct acctgctttc tctttgcgct tgcgttttcc 361 cttgtccaga tagcccagta gctgacattc atccggggtc agcaccgttt ctgcggactg 421 gctttctacg tgttccgctt cctttagcag cccttgcgcc ctgagtgctt gcggcagcgt 481 gaagctttct ctgagctgta acagcctgac cgcaacaaac gagaggatcg agaccatccg 541 ctccagatta tccggctcct ccatgcgttg cctctcggct cctgctccgg ttttccatgc 601 cttatggaac tcctcgatcc gccagcgatg ggtataaatg tcgatgacgc gcaaggcttg 661 ggctagcgac tcgaccggtt cgccggtcag caacaaccat ttcaacgggg tctcaccctt 721 gggcgggtta atctcctcgg ccagcaccgc gttgagcgtg atattcccct gttttagcgt 781 gatgcgccca ctgcgcaggc tcaagctcgc cttgcgggct ggtcgatttt tacgtttacc 841 gcgtttatcc accacgccct tttgcggaat gctgatctga tagccaccca actccggttg 901 gttcttcaga tggtcgatca gatacaaccc agactctacg tccttgcgtg ggtgcttgga 961 gcgcaccacg aagcgctcgt tatgcgccag cctgtcctgc aggtcgacgg atcatatcgt
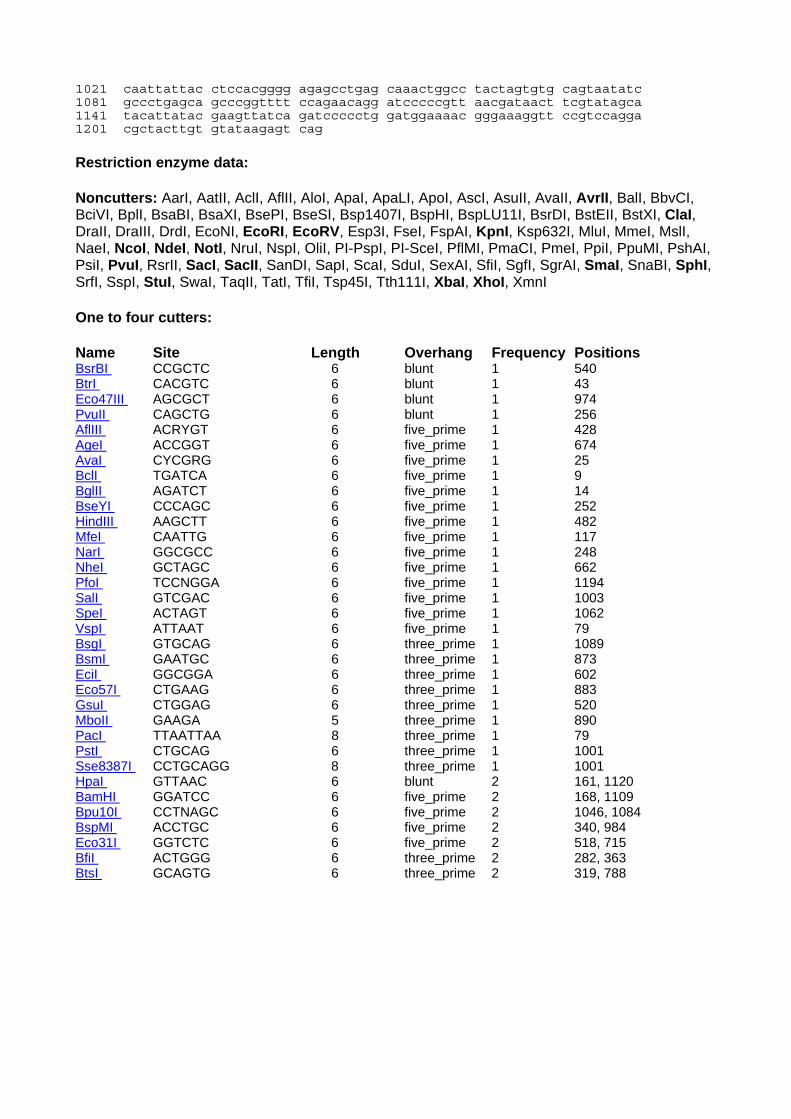
1021 caattattac ctccacgggg agagcctgag caaactggcc tactagtgtg cagtaatatc 1081 gccctgagca gcccggtttt ccagaacagg atcccccgtt aacgataact tcgtatagca 1141 tacattatac gaagttatca gatccccctg gatggaaaac gggaaaggtt ccgtccagga 1201 cgctacttgt gtataagagt cag Restriction enzyme data:
Noncutters: AarI, AatII, AclI, AflII, AloI, ApaI, ApaLI, ApoI, AscI, AsuII, AvaII, AvrII, BalI, BbvCI, BciVI, BplI, BsaBI, BsaXI, BsePI, BseSI, Bsp1407I, BspHI, BspLU11I, BsrDI, BstEII, BstXI, ClaI, DraII, DraIII, DrdI, EcoNI, EcoRI, EcoRV, Esp3I, FseI, FspAI, KpnI, Ksp632I, MluI, MmeI, MslI, NaeI, NcoI, NdeI, NotI, NruI, NspI, OliI, PI-PspI, PI-SceI, PflMI, PmaCI, PmeI, PpiI, PpuMI, PshAI, PsiI, PvuI, RsrII, SacI, SacII, SanDI, SapI, ScaI, SduI, SexAI, SfiI, SgfI, SgrAI, SmaI, SnaBI, SphI, SrfI, SspI, StuI, SwaI, TaqII, TatI, TfiI, Tsp45I, Tth111I, XbaI, XhoI, XmnI
One to four cutters: Name Site Length Overhang Frequency Positions BsrBI CCGCTC 6 blunt 1 540 BtrI CACGTC 6 blunt 1 43 Eco47III AGCGCT 6 blunt 1 974 PvuII CAGCTG 6 blunt 1 256 AflIII ACRYGT 6 five_prime 1 428 AgeI ACCGGT 6 five_prime 1 674 AvaI CYCGRG 6 five_prime 1 25 BclI TGATCA 6 five_prime 1 9 BglII AGATCT 6 five_prime 1 14 BseYI CCCAGC 6 five_prime 1 252 HindIII AAGCTT 6 five_prime 1 482 MfeI CAATTG 6 five_prime 1 117 NarI GGCGCC 6 five_prime 1 248 NheI GCTAGC 6 five_prime 1 662 PfoI TCCNGGA 6 five_prime 1 1194 SalI GTCGAC 6 five_prime 1 1003 SpeI ACTAGT 6 five_prime 1 1062 VspI ATTAAT 6 five_prime 1 79 BsgI GTGCAG 6 three_prime 1 1089 BsmI GAATGC 6 three_prime 1 873 EciI GGCGGA 6 three_prime 1 602 Eco57I CTGAAG 6 three_prime 1 883 GsuI CTGGAG 6 three_prime 1 520 MboII GAAGA 5 three_prime 1 890 PacI TTAATTAA 8 three_prime 1 79 PstI CTGCAG 6 three_prime 1 1001 Sse8387I CCTGCAGG 8 three_prime 1 1001 HpaI GTTAAC 6 blunt 2 161, 1120 BamHI GGATCC 6 five_prime 2 168, 1109 Bpu10I CCTNAGC 6 five_prime 2 1046, 1084 BspMI ACCTGC 6 five_prime 2 340, 984 Eco31I GGTCTC 6 five_prime 2 518, 715 BfiI ACTGGG 6 three_prime 2 282, 363 BtsI GCAGTG 6 three_prime 2 319, 788

MiniTn5 Primer Design – Note that primers F3 and F4 are best IE end CTGTCTCTTGATCAGATCTGGCCACCTAGGCCGAATTCCCGGGGATCCGGTGATTGATTGAGCAAGCTTTATGCTTGTAAACCGTTTTGTGAAAAAATTTTTAAAATAAAAAAGGGGACCTCTAGGGTCCCCAATTAATTAGTAATATAATCTATTAAAGGTCATTCAAAAGGTCATCCACCGGATCACCTTACCAAGCCCTCGCTAGATTGTTAATGCGGATGTTGCGATTACTTCGCCCAACTATTGCGATAACAAGAAAAGCGCCTTTCATGATATATCTCCCAATTTTGTGTAGGGCTTATTATGCACGCTTAAAAATAATAAAAGCGACTTGACCTGATAGTTTGGCTGTGAGCAATTATGTGCTTAGTGCATCTAACGCTTGAGTTAACCGCGCCGCGAAGCGGCGTCGGCTTGAACGAATTGTTAGACATTATTTGCCGACTACCTTGGTGATTCGCCTTTCACGTAGTGGACAAAATCAACCAACTGATCTGCGCGAGCTTCACGCTGCCGCAAGCATCAGGGCGCAAGGGCTGCTAAAGGAAGCGGAACACGTAGAAAGCCAGTCCGCAGAAACGGTGCTACCCCGGATGAATGTCAGCTACTGGGCTATCTGGACAAGGGAAAACGCAAGCGCAAAGAGAAAGAGGTAGCTTGCAGTGGGCTTACATGACGATAGCTAGACTGGGCGGTTTTATGGACAGCAAGCGAACCGGAATTGCCAGCTGGGGCGCCCTCTGGTAAGGTTGGGAAGCCCTGCAAAGTAAACTGGATGGCTTTCTTGCCGCCAAGGATCTGATGGCGCAGGGGATCAAGATCTGATCAAGAGACAGGATGAGGATCGTTTCGCATGATTGAACAAGATGGATTGCACGCAGGTTCTCCGGCCGCTTGGGTGGAGAGGCTATTCGGCTATGACTGGGCACAACAGACAATCGGCTGCTCTGATGCCGCCGTGTTCCGGCTGTCAGCGCAGGGGCGCCCGGTTCTTTTTGTCAAGACCGACCTGTCCGGTGCCCTGAATGAACTGCAGGACGAGGCAGCGCGGCTATCGTGGCTGGCCACGACGGGCGTTCCTTGCGCAGCTGTGCTCGACGTTGTCACTGAAGCGGGAAGGGACTGGCTGCTATTGGGCGAAGTGCCGGGGCAGGATCTCCTGTCATCTCACCTTGCTCCTGCCGAGAAAGTATCCATCATGGCTGATGCAATGCGGCGGCTGCATACGCTTGATCCGGCTACCTGCCCATTCGACCACCAAGCGAAACATCGCATCGAGCGAGCACGTACTCGGATGGAAGCCGGTCTTGTCGATCAGGATGATCTGGACGAAGAGCATCAGGGGCTCGCGCCAGCCGAACTGTTCGCCAGGCTCAAGGCGCGCATGCCCGACGGCGAGGATCTCGTCGTGACCCATGGCGATGCCTGCTTGCCGAATATCATGGTGGAAAATGGCCGCTTTTCTGGATTCATCGACTGTGGCCGGCTGGGTGTGGCGGACCGCTATCAGGACATAGCGTTGGCTACCCGTGATATTGCTGAAGAGCTTGGCGGCGAATGGGCTGACCGCTTCCTCGTGCTTTACGGTATCGCCGCTCCCGATTCGCAGCGCATCGCCTTCTATCGCCTTCTTGACGAGTTCTTCTGAGCGGGACTCTGGGGTTCGAAATGACCGACCAAGCGACGCCCAACCTGCCATCACGAGATTTCGATTCCACCGCCGCCTTCTATGAAAGGTTGGGCTTCGGAATCGTTTTCCGGGACGCCGGCTGGATGATCCTCCAGCGCGGGGATCTCATGCTGGAGTTCTTCGCCCACCCCGGGCTCGATCCCCTCGCGAGTTGGTTCAGCTGCTGCCTGAGGCTGGACGACCTCGCGGAGTTCTACCGGCAGTGCAAATCCGTCGGCATCCAGGAAACCAGCAGCGGCTATCCGCGCATCCATGCCCCCGAACTGCAGGAGTGGGGAGGCACGATGGCCGCTTTGGTCGACCCGGACGGGACGGATCAGTGAGGGTTTGCAACTGTGGGTCAAGGATCTGGATTTCGATCACGGCACGATCATCGTCGGGAGGGCAAGGGCTCCAAGGATCGGGCCTTGATGTTACCGAGAGCTTGGTACCCAGTCTGTGTGAGCAGGGGAATTGATCCGGTGGATGACCTTTTGAATGACCTTTAATAGATTATATTACTAATTAATTGGGGACCCTAGAGGTCCCCTTTTTTATTTTAAAAATTTTTTCACAAAACGGTTTACAAGCATAAAGCTTGCTCAATCAATCACCGGAT
CCCCGGGAATTCGTCGACAAGCTGCGGCCGCCTAGGCCGTGGCCGAACTTGTGTATAAGAGTCAG OE end
miniTn5-O2 miniTn5-O3 miniTn5-O4 T = first unique base. The region upstream of this T to the GATC site highlighted in italics is duplicated (in reverse complement) at the other end (5’) of the transposon. Name 5’ to 3’ sequence Bp from
Tn end Length %GC Tm (oC)
mTn5-OE ACTTGTGTATAAGAGTCAG 0 19 36.8 46.7 mTn5-O2 GAATTCGTCGACAAGCTGCGG 38 21 57.1 59.9 mTn5-O3 ATTCGTCGACAAGCTGCGGCCGC 34 23 65.2 68.0 mTn5-O4 TCGACAAGCTGCGGCCGCCTA 31 21 66.7 67.2 TnphoAII 23 52.2 60.7 Hah-1 21 57.1 60.6 mTn5PCR-F1 CATCGACTGTGGCCGGCTGG 863 20 70.0 63.9 mTn5PCR-F2 CTCCCGATTCGCAGCGCATC 738 20 65.0 62.0 mTn5-F3 ATCGGGCCTTGATGTTACCGAG 242 22 54.5 61.4 mTn5-F4 TACCCAGTCTGTGTGAGCAGG 214 21 57.1 60.4
mTn5PCRF-1
mTn5PCRF-2
mTn5-F3 mTn5-F4

LOCUS ECU32991 2356 bp DNA linear BCT 23-JAN-1996 DEFINITION Escherichia coli mini-Tn5 kanamycin transposon. ACCESSION U32991 VERSION U32991.1 GI:1163175 KEYWORDS . SOURCE Escherichia coli ORGANISM Escherichia coli Bacteria; Proteobacteria; Gammaproteobacteria; Enterobacteriales; Enterobacteriaceae; Escherichia. REFERENCE 1 (bases 1 to 2356) AUTHORS de Lorenzo,V., Herrero,M., Jakubzik,U. and Timmis,K.N. TITLE Mini-Tn5 transposon derivatives for insertion mutagenesis, promoter probing, and chromosomal insertion of cloned DNA in gram-negative eubacteria JOURNAL J. Bacteriol. 172 (11), 6568-6572 (1990) MEDLINE 91035272 PUBMED 2172217 REFERENCE 2 (bases 1 to 2356) AUTHORS Pinyon,R.A. and Thomas,C.J. TITLE DNA sequence of a mini-Tn5 transposon (mini-Tn5 Km) JOURNAL Unpublished REFERENCE 3 (sites) AUTHORS Herrero,M., de Lorenzo,V. and Timmis,K.N. TITLE Transposon vectors containing non-antibiotic resistance selection markers for cloning and stable chromosomal insertion of foreign genes in gram-negative bacteria JOURNAL J. Bacteriol. 172 (11), 6557-6567 (1990) MEDLINE 91035271 PUBMED 2172216 REFERENCE 4 (sites) AUTHORS Prentki,P. and Krisch,H.M. TITLE In vitro insertional mutagenesis with a selectable DNA fragment JOURNAL Gene 29 (3), 303-313 (1984) MEDLINE 85028451 PUBMED 6237955 REFERENCE 5 (sites) AUTHORS Beck,E., Ludwig,G., Auerswald,E.A., Reiss,B. and Schaller,H. TITLE Nucleotide sequence and exact localization of the neomycin phosphotransferase gene from transposon Tn5 JOURNAL Gene 19 (3), 327-336 (1982) MEDLINE 83106478 PUBMED 6295884 REFERENCE 6 (bases 1 to 2356) AUTHORS Pinyon,R.A. TITLE Direct Submission JOURNAL Submitted (02-AUG-1995) Rebecca A. Pinyon, Department of Microbiology and Immunology, University of Adelaide, Frome Road, Adelaide, S.A. 5001, Australia COMMENT On Jan 23, 1996 this sequence version replaced gi:1000122. FEATURES Location/Qualifiers source 1..2356 /organism="Escherichia coli" /mol_type="genomic DNA" /strain="SM10(lambda pir)" /db_xref="taxon:562" /plasmid="mini-Tn5 Km" /transposon="mini-Tn5 Km" repeat_region 1..19 /note="Tn5 I end functional in transposition" /citation=[4] /rpt_type=inverted CDS 857..1651 /function="neomycin and kanamycin resistance"

/codon_start=1 /transl_table=11 /product="neomycin phosphotransferase" /protein_id="AAA85506.1" /db_xref="GI:1000123" /translation="MIEQDGLHAGSPAAWVERLFGYDWAQQTIGCSDAAVFRLSAQGR PVLFVKTDLSGALNELQDEAARLSWLATTGVPCAAVLDVVTEAGRDWLLLGEVPGQDL LSSHLAPAEKVSIMADAMRRLHTLDPATCPFDHQAKHRIERARTRMEAGLVDQDDLDE EHQGLAPAELFARLKARMPDGEDLVVTHGDACLPNIMVENGRFSGFIDCGRLGVADRY QDIALATRDIAEELGGEWADRFLVLYGIAAPDSQRIAFYRLLDEFF" repeat_region 2338..2356 /note="Tn5 O end functional in transposition" /citation=[4] /rpt_type=inverted ORIGIN 1 ctgtctcttg atcagatctg gccacctagg ccgaattccc ggggatccgg tgattgattg 61 agcaagcttt atgcttgtaa accgttttgt gaaaaaattt ttaaaataaa aaaggggacc 121 tctagggtcc ccaattaatt agtaatataa tctattaaag gtcattcaaa aggtcatcca 181 ccggatcacc ttaccaagcc ctcgctagat tgttaatgcg gatgttgcga ttacttcgcc 241 caactattgc gataacaaga aaagcgcctt tcatgatata tctcccaatt ttgtgtaggg 301 cttattatgc acgcttaaaa ataataaaag cgacttgacc tgatagtttg gctgtgagca 361 attatgtgct tagtgcatct aacgcttgag ttaaccgcgc cgcgaagcgg cgtcggcttg 421 aacgaattgt tagacattat ttgccgacta ccttggtgat tcgcctttca cgtagtggac 481 aaaatcaacc aactgatctg cgcgagcttc acgctgccgc aagcatcagg gcgcaagggc 541 tgctaaagga agcggaacac gtagaaagcc agtccgcaga aacggtgcta ccccggatga 601 atgtcagcta ctgggctatc tggacaaggg aaaacgcaag cgcaaagaga aagaggtagc 661 ttgcagtggg cttacatgac gatagctaga ctgggcggtt ttatggacag caagcgaacc 721 ggaattgcca gctggggcgc cctctggtaa ggttgggaag ccctgcaaag taaactggat 781 ggctttcttg ccgccaagga tctgatggcg caggggatca agatctgatc aagagacagg 841 atgaggatcg tttcgcatga ttgaacaaga tggattgcac gcaggttctc cggccgcttg 901 ggtggagagg ctattcggct atgactgggc acaacagaca atcggctgct ctgatgccgc 961 cgtgttccgg ctgtcagcgc aggggcgccc ggttcttttt gtcaagaccg acctgtccgg 1021 tgccctgaat gaactgcagg acgaggcagc gcggctatcg tggctggcca cgacgggcgt 1081 tccttgcgca gctgtgctcg acgttgtcac tgaagcggga agggactggc tgctattggg 1141 cgaagtgccg gggcaggatc tcctgtcatc tcaccttgct cctgccgaga aagtatccat 1201 catggctgat gcaatgcggc ggctgcatac gcttgatccg gctacctgcc cattcgacca 1261 ccaagcgaaa catcgcatcg agcgagcacg tactcggatg gaagccggtc ttgtcgatca 1321 ggatgatctg gacgaagagc atcaggggct cgcgccagcc gaactgttcg ccaggctcaa 1381 ggcgcgcatg cccgacggcg aggatctcgt cgtgacccat ggcgatgcct gcttgccgaa 1441 tatcatggtg gaaaatggcc gcttttctgg attcatcgac tgtggccggc tgggtgtggc 1501 ggaccgctat caggacatag cgttggctac ccgtgatatt gctgaagagc ttggcggcga 1561 atgggctgac cgcttcctcg tgctttacgg tatcgccgct cccgattcgc agcgcatcgc 1621 cttctatcgc cttcttgacg agttcttctg agcgggactc tggggttcga aatgaccgac 1681 caagcgacgc ccaacctgcc atcacgagat ttcgattcca ccgccgcctt ctatgaaagg 1741 ttgggcttcg gaatcgtttt ccgggacgcc ggctggatga tcctccagcg cggggatctc 1801 atgctggagt tcttcgccca ccccgggctc gatcccctcg cgagttggtt cagctgctgc 1861 ctgaggctgg acgacctcgc ggagttctac cggcagtgca aatccgtcgg catccaggaa 1921 accagcagcg gctatccgcg catccatgcc cccgaactgc aggagtgggg aggcacgatg 1981 gccgctttgg tcgacccgga cgggacggat cagtgagggt ttgcaactgt gggtcaagga 2041 tctggatttc gatcacggca cgatcatcgt cgggagggca agggctccaa ggatcgggcc 2101 ttgatgttac cgagagcttg gtacccagtc tgtgtgagca ggggaattga tccggtggat 2161 gaccttttga atgaccttta atagattata ttactaatta attggggacc ctagaggtcc 2221 ccttttttat tttaaaaatt ttttcacaaa acggtttaca agcataaagc ttgctcaatc 2281 aatcaccgga tccccgggaa ttcgtcgaca agctgcggcc gcctaggccg tggccgaact 2341 tgtgtataag agtcag
000816 BigDye Method.doc
ECONOMY BIGDYE SEQUENCING PROTOCOL This protocol uses as little as 1/20th of the recommended volume of BigDye ready reaction mixture in a 7 µl volume. We find that this gives excellent signal (usually >400 bases readable sequence), whilst drastically economizing on reagents. Reagents: Filter sterile MQ-H2O BigDye Terminator Ready Reaction Mix (ABI Prism) 5× reaction buffer (400 mM Tris-HCl, pH 9.0; 10 mM MgCl2; store at -20C) Sequencing primers (5 µM concentration) PCR template (purified with Qiagen kit) Methodology: 1. In 0.2 ml microamp tubes on ice, add 5-15 pmol of sequencing primer, and usual
amount (mass) of template and water to a volume of 5 µl.
2. Make a mastermix on ice (use n+1 volumes of reagents for n samples) containing the following quantities per sample:
BigDye ready reaction mix 0.4 µl 5× reaction buffer 1.6 µl
Total 2.0 µl
3. Mix well and add 3 µl of mastermix to each tube. Mix sample and spin down briefly.
4. Thermal cycle samples using the following program with rapid thermal ramping:
95°C for 5 min, then
95°C for 10 sec 50°C for 5 sec 60°C for 4 min Perform 45-50 cycles then cool to 4°C.
5. Bring volume of sample to 20 µl by addition of 13 µl MQ-H2O, and clean up by ethanol precipitation in the usual manner.
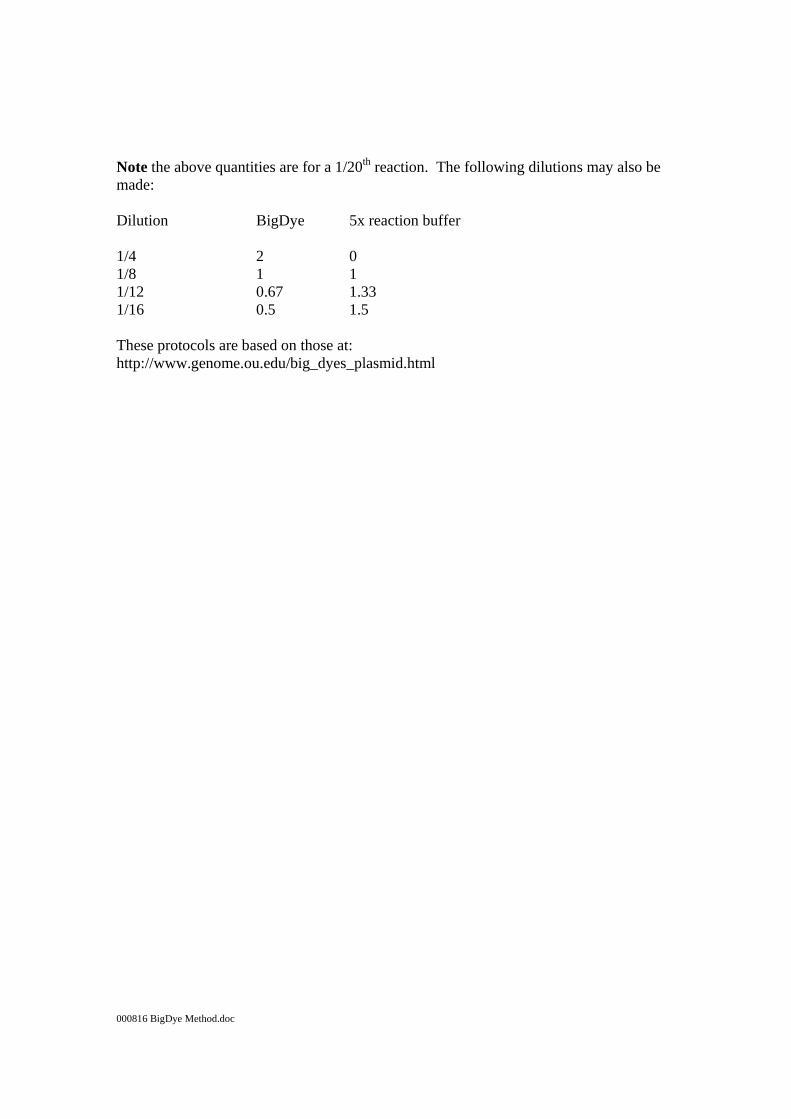
000816 BigDye Method.doc
Note the above quantities are for a 1/20th reaction. The following dilutions may also be made: Dilution BigDye 5x reaction buffer 1/4 2 0 1/8 1 1 1/12 0.67 1.33 1/16 0.5 1.5 These protocols are based on those at: http://www.genome.ou.edu/big_dyes_plasmid.html
Protocol for sequencing on the Perkin Elmer ABI For pUC/LITMUS/pBS
1. Use 3-5 pmol primer (M13FOR and M13REV for pUC), 100-200 ng clone DNA, 4 µl BigDye and make up to 10 µl.
2. Carry out PCR program for sequencing. 3. Add 10 µl dH2O, 50 µl 95% EtOH and 2 µl NaOAc. 4. Incubate at room temp for 10 min. 5. Spin 10 min. 6. Wash with 70% EtOH. 7. Air dry and add sequencing solution according to instructions.
For cosmids
1. Use at least 500 ng DNA with 10 pmol primer and heat at 95 oC for 5 min.
2. Cool and add 8 µl BigDye and make up volume to 20 µl. 3. PCR, precipitate and sequence.
For Tn3 sequencing, primers are Tn3L (60 oC) and Tn3R (56 oC). Tn3L works best. Standard PCR program for BigDye is: 25 cycles of: 96 oC 10 s 50 oC 5 s 60 oC 4 min and then 4 oC for infinity.
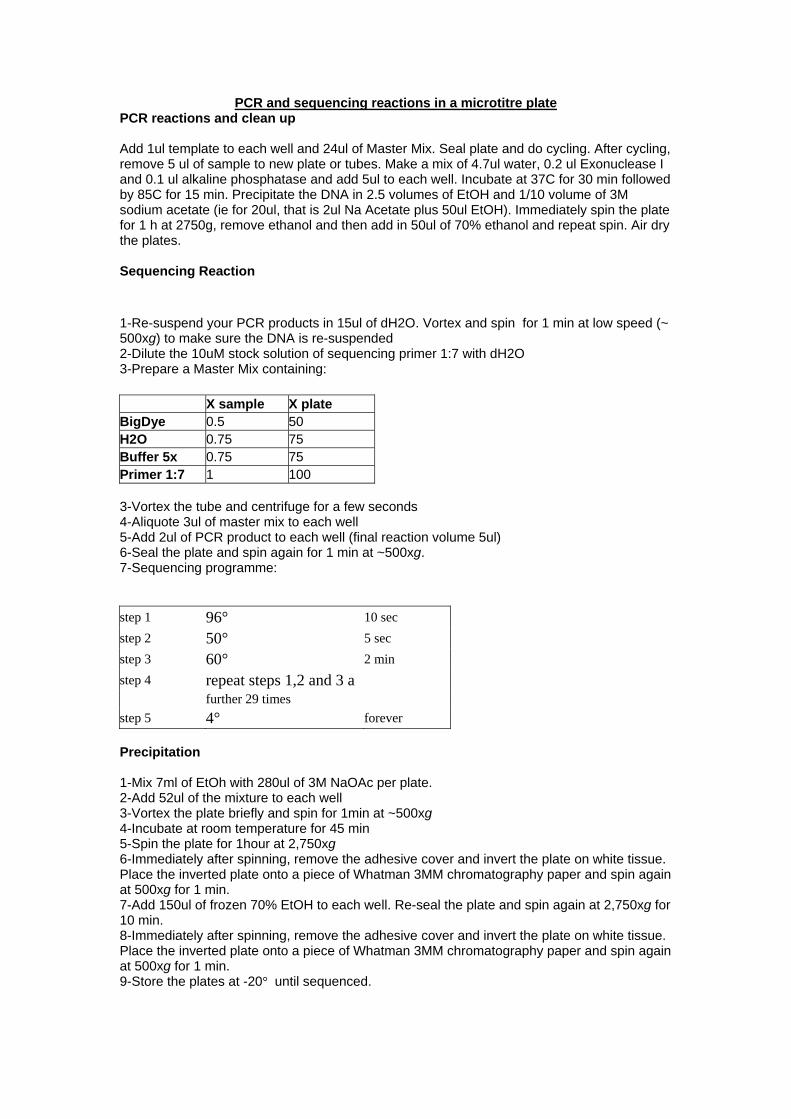
PCR and sequencing reactions in a microtitre plate PCR reactions and clean up Add 1ul template to each well and 24ul of Master Mix. Seal plate and do cycling. After cycling, remove 5 ul of sample to new plate or tubes. Make a mix of 4.7ul water, 0.2 ul Exonuclease I and 0.1 ul alkaline phosphatase and add 5ul to each well. Incubate at 37C for 30 min followed by 85C for 15 min. Precipitate the DNA in 2.5 volumes of EtOH and 1/10 volume of 3M sodium acetate (ie for 20ul, that is 2ul Na Acetate plus 50ul EtOH). Immediately spin the plate for 1 h at 2750g, remove ethanol and then add in 50ul of 70% ethanol and repeat spin. Air dry the plates. Sequencing Reaction 1-Re-suspend your PCR products in 15ul of dH2O. Vortex and spin for 1 min at low speed (~ 500xg) to make sure the DNA is re-suspended 2-Dilute the 10uM stock solution of sequencing primer 1:7 with dH2O 3-Prepare a Master Mix containing: X sample X plate BigDye 0.5 50 H2O 0.75 75 Buffer 5x 0.75 75 Primer 1:7 1 100 3-Vortex the tube and centrifuge for a few seconds 4-Aliquote 3ul of master mix to each well 5-Add 2ul of PCR product to each well (final reaction volume 5ul) 6-Seal the plate and spin again for 1 min at ~500xg. 7-Sequencing programme: step 1 96° 10 sec step 2 50° 5 sec step 3 60° 2 min step 4 repeat steps 1,2 and 3 a further 29 times step 5 4° forever Precipitation 1-Mix 7ml of EtOh with 280ul of 3M NaOAc per plate. 2-Add 52ul of the mixture to each well 3-Vortex the plate briefly and spin for 1min at ~500xg 4-Incubate at room temperature for 45 min 5-Spin the plate for 1hour at 2,750xg 6-Immediately after spinning, remove the adhesive cover and invert the plate on white tissue. Place the inverted plate onto a piece of Whatman 3MM chromatography paper and spin again at 500xg for 1 min. 7-Add 150ul of frozen 70% EtOH to each well. Re-seal the plate and spin again at 2,750xg for 10 min. 8-Immediately after spinning, remove the adhesive cover and invert the plate on white tissue. Place the inverted plate onto a piece of Whatman 3MM chromatography paper and spin again at 500xg for 1 min. 9-Store the plates at -20° until sequenced.

Protocol for vacuum bloting, radiolabelling DNA with α-[32P]-dCTP and
doing hybridisation
Vacuum blotting
This is the protocol for transferring DNA from an agarose gel onto a membrane for hybridization
analysis.
Vacuum blotting was performed according to the following method (as described by ICN). After
DNA was separated by agarose gel electrophoresis (see 2.7), the DNA was treated to make it
single stranded. The gel was immersed in 0.025 M HCl (20 min or until the colour of the
loading dye changed from blue to yellow/green). The HCl was discarded and replaced by fresh
HCl (10 min); removal of the HCl was followed by immersion of the gel in denaturing solution
(1.5 M NaCl, 0.5 M NaOH; 20 min or until the loading dye returned to its original blue colour).
Removal of the denaturing solution was followed by a final immersion in neutralising solution
(1.5 M NaCl, 0.5 M Tris, 0.001 M EDTA; 10 min). In the meantime a vacuum blotter
(Appligene) was prepared for transferring DNA from the gel onto Hybond N+ nylon membrane.
A section of membrane was cut to the size of the gel (containing DNA) and placed on a similarly
sized piece of filter paper. The two materials were placed into the center of the vacuum blotter,
membrane side up, and dampened with 2 x SSC. A gasket was chosen to fit around the
membrane, but was smaller than the gel by 5 mm on each edge. The gasket was clamped into
place and the treated gel was placed onto the membrane so that all the edges of the gasket were
ovelapped by the gel. After switching the unit on, the vacuum created underneath the gel was
adjusted so that a suction pressure of 50 mbar was achieved. The gel was maintained like this
for 60 min, constantly being soaked with 2 x SSC to avoid the gel drying out. The gel was then
discarded and the membrane air-dried; the DNA was fixed to the membrane as described above
(see 2.8).
Radiolabelling of probe
Gloves must be disposed in the designated bins. All other radioactive waste should be discarded
in the other designated bins.
1. In the morning, DNA blots should be incubated with pre-hybridization solution (in the nuclear
suite). You must wear a lab coat and a set of gloves. Switch on the hybridization oven and set
the temperature to 65 oC. Wet each blot with 2 x SSC and roll the blot into a cigar shape. Insert
the blot into an appropriately sized hybridization tube and carefully unroll the blot on the tube
wall taking care to avoid bubbles between the wall and the blot. Depending on the blot size add
10-30 ml of pre-hybridization solution to the tube, seal with the lid (check that there is a white
O-ring in the lid) and clamp the tube into the hybridization oven. Ensure a balance tube is also
used. Switch on the motor so that the tubes rotate and the blots are fully covered by the pre-
hybridization solution.
2. In the nuclear suite, switch on a hot block (in a fume cupboard) set to 37 oC.
3. After 3-5 h of incubation in the oven, the probe must be prepared. The DNA sample to be
radiolabelled must first be single stranded to allow the enzyme complex access to the DNA
bases. In the laboratory, add up to 15 µl of DNA (or less plus water) to a screw-capped 1.5 ml
Eppendorf tube. Incubate the sealed tube in a boiling water bath for 5 min and then transfer to
ice. Add 4 µl of High Prime solution (also kept on ice) to the DNA and store on ice. Go to the
nuclear suite.
4.Researchers should first put on 2 layers of latex gloves, placing a finger badge between the
layers on the middle finger of the predominant hand. A lab coat and a pair of goggles should be
worn.
5. The radiolabel stock must be requested from the Chief Radiobiology Technician who will
place the vial into a shielded fume cupboard. A suitable Geiger-Muller tube should be used to
check that the fume cupboard is not contaminated. The counter should be left in the fume
cupboard for monitoring during the aliquoting of the radiolabel. A P10 Gilson pipette should be
used for aliquoting the radiolabel using contamination-guard tips. A shielded discard pot should
also be present.
6. Transfer the screw-capped Eppendorf to a shielded Eppendorf carrier. If the stock is
previously unopened, undo the lead lid followed by the plastic vial lid and firmly insert a yellow

pipette tip into the top of the vial. This will jam the tip into splashguard which should be
carefully removed from the vial and discarded with the tip into the discard pot. Transfer 370
kBq (ca. 1 µl of fresh stock or 2-3 µl of 14+ d old stock) of α-[32P]-dCTP to the DNA taking
care to avoid placing hands or arms over the stock solution. Close the stock pot and the
Eppendorf tube.
7. Transfer the Eppendorf to the hot block and incubate at 37 oC for 10 min (up to 1 h). A
shield should be placed in front of the hot block at this period.
8. Prepare a water bath and heat until boiling. Place a shield in front of the water bath and after
the ten minutes have elapsed transfer the labelled DNA to the water bath, using a polystyrene
float. Incubate the DNA for 5 min and then transfer the tube to a shielded Eppendorf carrier.
Remove the hybridization tube from the oven and remove the lid. Carefully transfer the labelled
DNA into the hybridization tube, if possible avoiding touching the blot. Replace the lid and
place the tube back into the oven. Incubate the blot, with rotation, overnight.
9. The radioactive hybridization solution should be discarded down the sink (wear labcoat,
gloves (plus fingerbadge) and goggles) behind a shield. Non-specific binding and non-
incorporated radiolabel must be removed by washing the membrane twice with 2 x SSC (15 min
each). The wash solution should be disacrded between washes. The washes should be followed
by a wash with 2 x SSC, 0.1 % SDS (30 min) and, for high stringency washes, a wash with 0.1 x
SSC, 0.1 % SDS (30 min).
10. After the final wash, discard the wash solution and remove the blots onto a bed of tissue
paper. Carefully wrap the blots in Saran-wrap and measure the level of radioactivity with a
Geiger counter. Place the wrapped blots into an X-ray cassette with intensifying filters and, in a
darkroom, place a sheet of X-ray film (Kodak X-OMAT AR) over the blots. Close the cassette
and place in a - 80 oC freezer for 30 min -72 h depending on the level of radioactivity detected
on the blot. Remove the cassette and allow to defrost for 10 min, then develop the film, always
taking care to keep exposure to the blots to a minimum.

Dot Blotting 1. DNA or bacterial cells added to 200 µl of 0.4 M NaOH - 10 mM EDTA in wells of a
microtitre plate. 2. Seal plate with autoclave tape and incubate at 60 oC for 15 min.. 3. Chill on ice for 5 min. 4. Wet membrane with 2 X SSC. 5. Assemble BioRad dot blot apparatus. 6. Transfer samples onto a membrane. 7. Wash membrane briefly in 2 X SSC and air dry. 8. Wrap membrane in saron wrap and expose to UV light for 2 min. stock 200 ml 20 ml 0.4 M NaOH 10M 8 ml 0.8 ml 10 mM EDTA 500 mM 4 ml 0.4 ml

Transferring plasmids into bacterial cells This section describes the procedures used to transfer plasmids into bacterial cells, usually naked
DNA or plasmids maintained in E. coli, into Pseudomonas. Eppendorf mating 1. Grow up O/N broth's of : a) E. coli donor b) Pseudomonas recipient
c) if E. coli donor is not S17-1λpir, then you need E. coli containing pRK2013
2. Spin for 1 min 0.5 ml of a + c and 1 ml of b in separate eppendorfs. 3. Resuspend pellets in 0.5 ml of 1/4 strength Ringers solution. 4. Repeat steps 2 and 3. 5. Mix all three together. 6. Spin for 1 min. 7. Discard supernatant and draw up pellet in gilson tip. Place on the middle of a KB plate.
Incubate 24-48 hr 30 oC. 8. Streak out on selective media. Plate mating 1. Grow up library plates O/N, 37 oC. 2. Grow up overnight broth's of E. coli containing pRK2013 (37 oC) (if necessary, see above)
and Pseudomonas recipient (25 oC). 3. Spin down 1 ml of recipient and 0.5 ml of pRK2013 in an eppendorf. Resuspend pellet in
0.75 ml of 1/4 strength Ringers solution. 4. Spread 0.1 ml onto KB plate and leave to dry. 5. Replica plate library onto lawn using sterile hedgehog or velvet. Incubate at 30 oC O/N. 6. Replica plate onto KB + selection.
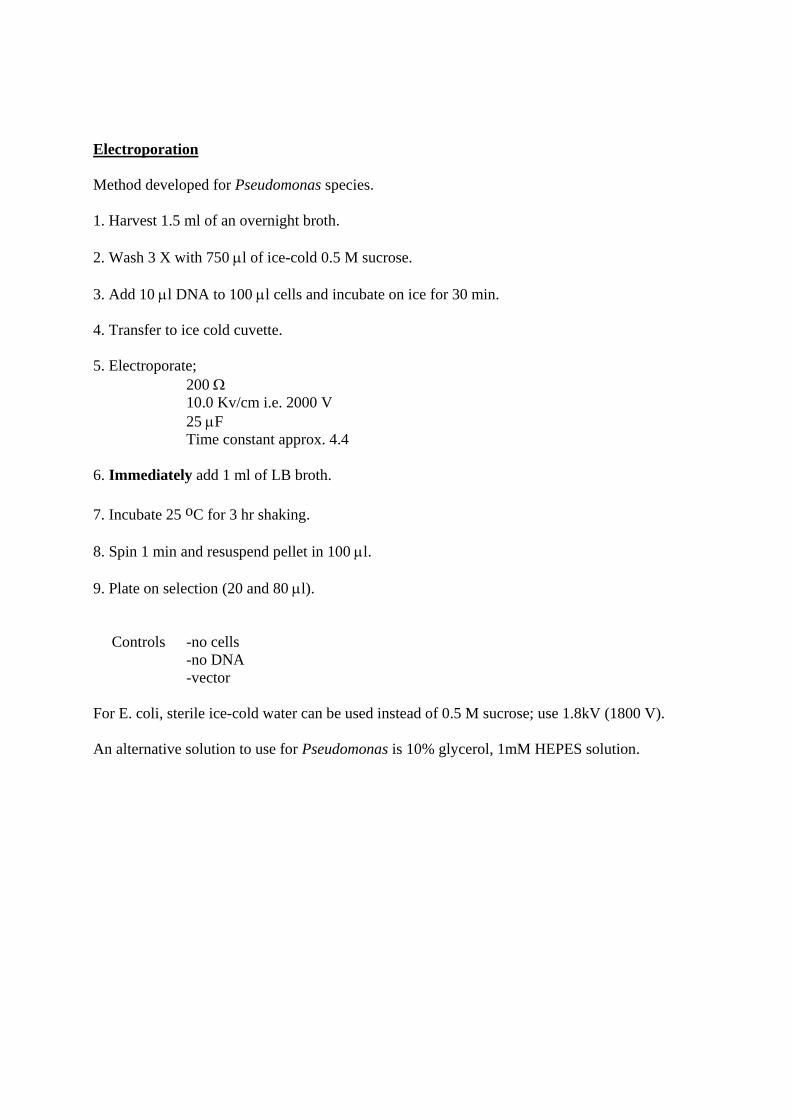
Electroporation Method developed for Pseudomonas species. 1. Harvest 1.5 ml of an overnight broth. 2. Wash 3 X with 750 µl of ice-cold 0.5 M sucrose. 3. Add 10 µl DNA to 100 µl cells and incubate on ice for 30 min. 4. Transfer to ice cold cuvette. 5. Electroporate; 200 Ω 10.0 Kv/cm i.e. 2000 V 25 µF Time constant approx. 4.4 6. Immediately add 1 ml of LB broth. 7. Incubate 25 oC for 3 hr shaking. 8. Spin 1 min and resuspend pellet in 100 µl. 9. Plate on selection (20 and 80 µl). Controls -no cells -no DNA -vector For E. coli, sterile ice-cold water can be used instead of 0.5 M sucrose; use 1.8kV (1800 V). An alternative solution to use for Pseudomonas is 10% glycerol, 1mM HEPES solution.

Mutagenesis of cloned DNA by Tn3-gus
This method can be used to introduce a transposon into DNA cloned with cosmid vectors. The
transposon preferentially inserts into the plasmid, so it is possible to generate knockouts in the
cosmid and screen for loss of function. These can then also be used for marker exchange to
knockout the original gene in the Pseudomonas chromosome.
1. QIAGEN midi prep. cosmid DNA. Redissolve in 200 µl of TE.
2. Overnight broth of E. coli HB101 (pHoKmGus; pSShe), LB+ap+cm
3. Transform 10 µl of cosmid DNA into 100 µl competent HB101 (pHoKmGus; pSShe) cells.
Select on LB+ap+km+tet+cm, overnight 37 oC.
4. Pick 10 colonies into one 10 ml broth (LB+ap+km+tet+cm), grown overnight at 37 oC.
Overnight broths of C2110 (LB+nal) and HB101 (pRK2013) (LB+kan), 37 oC.
5. Sub all three broths, 100 µl into 10 ml with no antibiotics, grow for 3 hrs.
6. Harvest 1 ml of each, resuspend in 0.5 ml 1 /4 Ringers solution, combine, spin down and
resuspend pellet in a small volume of 1 /4 Ringers solution. Place pellet on a LB plate and
incubate at 37 oC overnight.
7. Resuspend pellet in 1.2 ml and spread 200 µl onto each of 6 LB+nal+tet+ kan plates.
Incubate at 37 oC overnight.
8. Resuspend the lawn from all 6 plates in 20 ml of LB broth and directly midi prep using
Quigen kit. Resuspend in 100 µl.
9. Prepare competent DH5α cells (see ligation/transformation section) from an overnight broth
and transform 100 µl of cells with 10µl of midiprepped DNA from step 8. Select on
LB+tet+kan.
10. Pick colonies onto plates. Grow overnight boths of a selection of clones, mini prep the
plasmid DNA. Digest the DNA with EcoRI and HindIII to check for the presence of the
transposon in the cosmid.
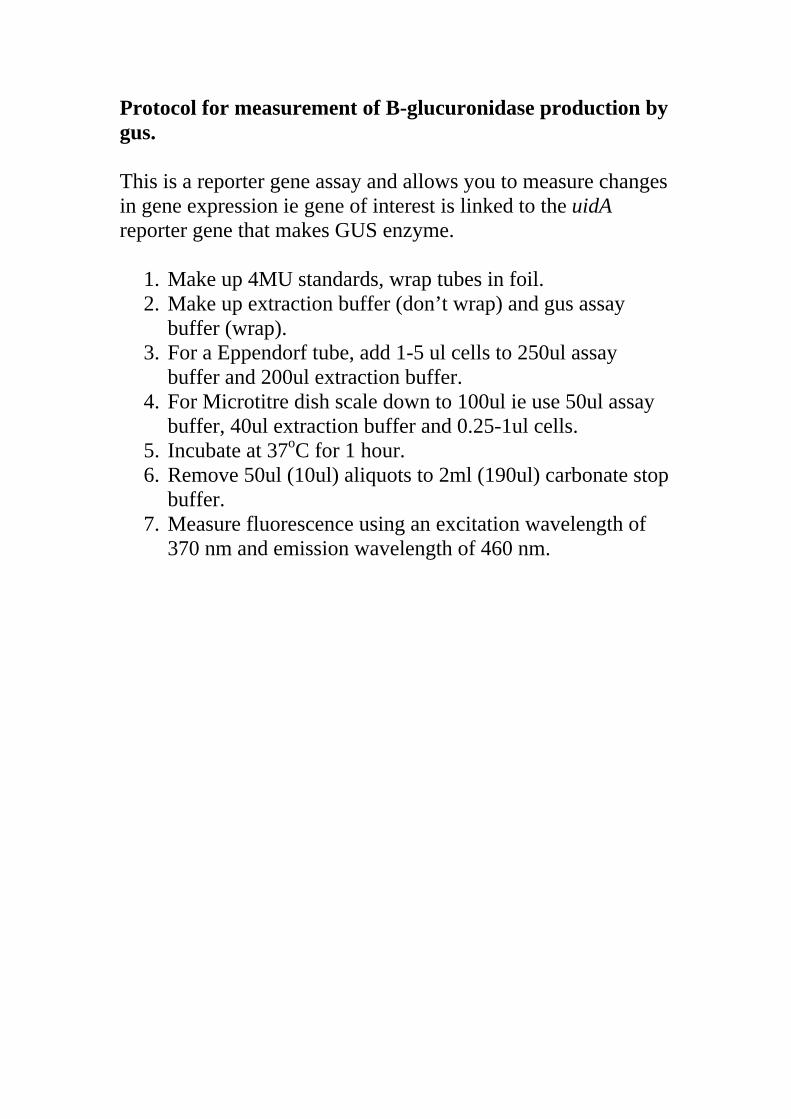
Protocol for measurement of B-glucuronidase production by gus. This is a reporter gene assay and allows you to measure changes in gene expression ie gene of interest is linked to the uidA reporter gene that makes GUS enzyme.
1. Make up 4MU standards, wrap tubes in foil. 2. Make up extraction buffer (don’t wrap) and gus assay
buffer (wrap). 3. For a Eppendorf tube, add 1-5 ul cells to 250ul assay
buffer and 200ul extraction buffer. 4. For Microtitre dish scale down to 100ul ie use 50ul assay
buffer, 40ul extraction buffer and 0.25-1ul cells. 5. Incubate at 37oC for 1 hour. 6. Remove 50ul (10ul) aliquots to 2ml (190ul) carbonate stop
buffer. 7. Measure fluorescence using an excitation wavelength of
370 nm and emission wavelength of 460 nm.

1
MAKING A COSMID LIBRARY This protocol describes how to make a cosmid library ie to chop a bacterial genome into 20-
30kb sized chunks and clone into a cosmid vector. This is a technically challenging protocol, particularly vector preparation, partial digests (TIMING IS CRITICAL) and sucrose gradients. It is imperative that gloves are worn during the construction – I know of one instance when someone was losing their genomic DNA due to hand DNase contamination. Do not forget to deactivate Sau3AI after digests.
Preparation of vector DNA
1. Grow 2 x 100 ml overnight broths of pLAFR3 in LA + Tet.
2. Extract DNA using 2 QIAGEN midi prep columns (Tip 100), resuspend each prep in 50 µl
of TE and combine together when dissolved.
3. Digest 3 µl of pLAFR3 DNA with 1 µl BamHI in a final volume of 20 µl, run on a 0.7 %
agarose gel with 500, 200 & 100 ng λ DNA. This is to show that the p LAFR3 DNA is
being cut by BamHI and to estimate the concentration.
4. Digest all the remaining DNA (approx. 20 µg), except 2 µl, with 5 µl of BamHI in a final
volume of 200 µl for 1 hour at 37 oC; place on ice. Run 3 µl of cut DNA and the 2 µl of
uncut DNA on a 0.8 % gel to see if digestion is complete. If digestion is not complete
further enzyme can be added and incubate for extra time.
5. Remove 20 µl of digested DNA and phenol/chloroform extract (see appendix I). Redissolve
in 10µl of TE. This is the digested but not dephosphorylated vector DNA.
6. To the remaining 180 µl add 10 U of CIAP (e.g. dil CIAP 1 in 20 and add 10 µl) and 20 µl
buffer, incubate 37 oC, 30 min. followed by 75 oC, 10 min. Phenol/chloroform extract.
Redissolve in 50 µl of TE.
7. Run 1 µl on a 0.8 % gel with 500, 200 & 100 ng λ DNA. The final vector concentration
should be adjusted to 500 ng / µl if necessary.
Test ligations
1. Set up the following ligations;
A. 500 ng of dephosphorylated BamHI digested pLAFR3 DNA
B. 500 ng of dephosphorylated BamHI digested pLAFR3 DNA
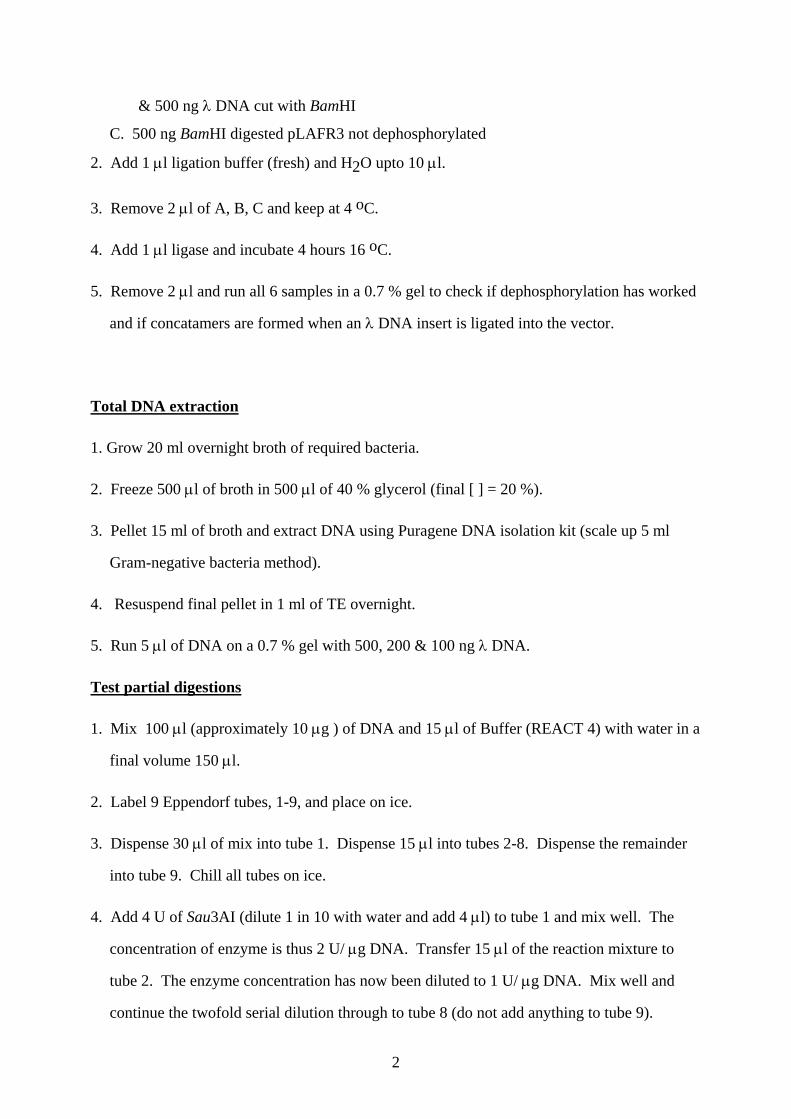
2
& 500 ng λ DNA cut with BamHI
C. 500 ng BamHI digested pLAFR3 not dephosphorylated
2. Add 1 µl ligation buffer (fresh) and H2O upto 10 µl.
3. Remove 2 µl of A, B, C and keep at 4 oC.
4. Add 1 µl ligase and incubate 4 hours 16 oC.
5. Remove 2 µl and run all 6 samples in a 0.7 % gel to check if dephosphorylation has worked
and if concatamers are formed when an λ DNA insert is ligated into the vector.
Total DNA extraction
1. Grow 20 ml overnight broth of required bacteria.
2. Freeze 500 µl of broth in 500 µl of 40 % glycerol (final [ ] = 20 %).
3. Pellet 15 ml of broth and extract DNA using Puragene DNA isolation kit (scale up 5 ml
Gram-negative bacteria method).
4. Resuspend final pellet in 1 ml of TE overnight.
5. Run 5 µl of DNA on a 0.7 % gel with 500, 200 & 100 ng λ DNA.
Test partial digestions
1. Mix 100 µl (approximately 10 µg ) of DNA and 15 µl of Buffer (REACT 4) with water in a
final volume 150 µl.
2. Label 9 Eppendorf tubes, 1-9, and place on ice.
3. Dispense 30 µl of mix into tube 1. Dispense 15 µl into tubes 2-8. Dispense the remainder
into tube 9. Chill all tubes on ice.
4. Add 4 U of Sau3AI (dilute 1 in 10 with water and add 4 µl) to tube 1 and mix well. The
concentration of enzyme is thus 2 U/ µg DNA. Transfer 15 µl of the reaction mixture to
tube 2. The enzyme concentration has now been diluted to 1 U/ µg DNA. Mix well and
continue the twofold serial dilution through to tube 8 (do not add anything to tube 9).
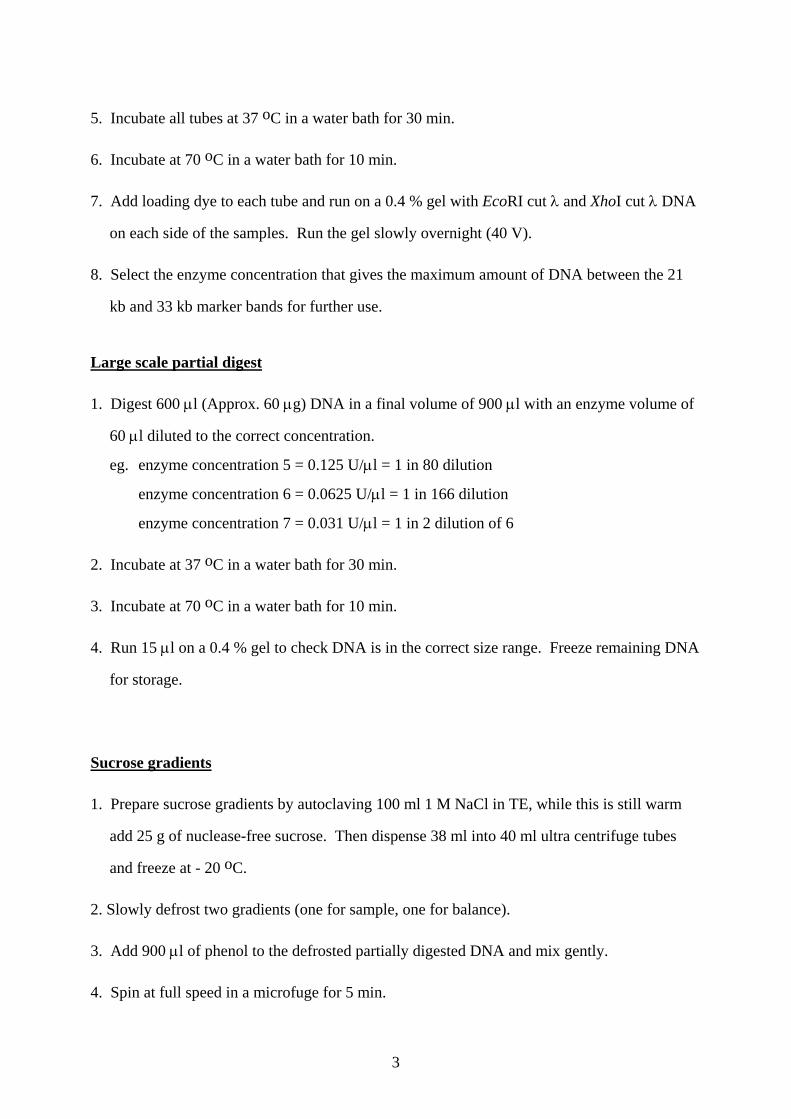
3
5. Incubate all tubes at 37 oC in a water bath for 30 min.
6. Incubate at 70 oC in a water bath for 10 min.
7. Add loading dye to each tube and run on a 0.4 % gel with EcoRI cut λ and XhoI cut λ DNA
on each side of the samples. Run the gel slowly overnight (40 V).
8. Select the enzyme concentration that gives the maximum amount of DNA between the 21
kb and 33 kb marker bands for further use.
Large scale partial digest
1. Digest 600 µl (Approx. 60 µg) DNA in a final volume of 900 µl with an enzyme volume of
60 µl diluted to the correct concentration.
eg. enzyme concentration 5 = 0.125 U/µl = 1 in 80 dilution
enzyme concentration 6 = 0.0625 U/µl = 1 in 166 dilution
enzyme concentration 7 = 0.031 U/µl = 1 in 2 dilution of 6
2. Incubate at 37 oC in a water bath for 30 min.
3. Incubate at 70 oC in a water bath for 10 min.
4. Run 15 µl on a 0.4 % gel to check DNA is in the correct size range. Freeze remaining DNA
for storage.
Sucrose gradients
1. Prepare sucrose gradients by autoclaving 100 ml 1 M NaCl in TE, while this is still warm
add 25 g of nuclease-free sucrose. Then dispense 38 ml into 40 ml ultra centrifuge tubes
and freeze at - 20 oC.
2. Slowly defrost two gradients (one for sample, one for balance).
3. Add 900 µl of phenol to the defrosted partially digested DNA and mix gently.
4. Spin at full speed in a microfuge for 5 min.
4
5. Carefully remove upper layer and place on top of sucrose gradient using a wide bore
pipette.
6. Balance tubes +/- 50 µg. Spin gradients in SW-28-Ti rotor at 25K rpm for 24 hrs with slow
acceleration (number 7). When rotor slows down to 1000 rpm, switch the brake off.
7. Carefully remove 1 ml fractions from the gradient by placing a tip just in the meniscus and
drawing up slowly.
8. Run 40 µl of every 3rd fraction (making sure to run the last fraction) on a 0.3 % gel slowly
overnight with EcoRI cut λ and XhoI cut λ DNA, in 25 % sucrose, on each side of the
samples.
9. Pool together the fractions that are in the correct size range and precipitate using 2 vol. of
absolute ethanol and 1/10 vol. of 3 M Na acetate, pH 5.5. Spin for 30 min., wash pellet in
70 % ethanol and resuspend in a final volume of 200 µl.
10. Run 10 µl on a 0.3 % gel with EcoRI cut λ and XhoI cut λ DNA and 500, 200 & 100 ng λ
DNA. Check the fraction is of the correct size and estimate concentration.
Ligation
1. Precipitate insert DNA and resuspend to give a final concentration of 500 ng / µl.
2. Set up the following ligation reaction:
Phosphotase-treated vector DNA 3 µg (6 µl)
Insert DNA 3 µg (6 µl)
10 X ligation buffer 2 µl
Water make up to 20 µl
3. Remove 1 µl aliquot and store at 4 oC.
4. Add 1 µl ligase and incubate overnight at 12 oC.
5. Remove 1 µl and run on a 0.3 % gel with the other aliquot taken in step 3, with 500, 200 &
100 ng λ DNA. Ligation has occured if the second aliquot size has increased significantly.
5
Packaging
1. Ethanol precipitate the ligation mixture and resuspend so that there is 500 ng DNA in 4 µl
TE (optimum for packaging).
2. Use Amersham λ in vitro packaging kit (code N 3342)
3. Thaw blue and yellow tubes on ice.
4. When JUST thawed, add 4 µl of ligated DNA to the blue tube, followed immediately by 15
µl from the yellow tube. Mix gently with a pipette tip, microfuge for 10 sec to obtain all
liquid in the bottom of the tube.
5. Incubate at 20 oC for 2 hr.
6. Add 71 µl of ψ dilution buffer (see appendix II). Mix gently, use immediately.
Transduction
1. E. coli 803 grown overnight with 0.2 % (w/v) maltose and 10 mM MgCl2 in LB (10 ml).
2. Harvest cells in 1.5 ml aliquots (1.5 ml is sufficient for 5 packaging reactions).
3. Resuspend cells in 500 µl of 10 mM MgCl2. Aerate by shaking at 37 oC for 1 hr.
4. Add 100 µl packaged DNA to 100 µl competent cells. Incubate at 37 oC for 30 min without
shaking.
5. Add 800 µl of pre-warmed (37 0C) LB.
6. Incubate at 37 oC for 45 mins.
7. Harvest cells and resuspend in 1 ml 1/4 Ringers solution.
8. Spread one plate each of 100 µl of a serial dilution down to 10 -3 i.e. four plates in total, on
LA plus Tet. Incubate at 37 oC overnight. Keep the rest of the solutions at 4 0C.
9. Select 10 colonies and grow overnight broths , alkaline lysis mini-prep, digest with EcoRI

6
and run on a 0.7 % gel to confirm presence of inserts.
Storage of library
1. Spead as many plates of diluted cells that allow 40 library plates (48 colonies on each) to be
picked, grow these at 37 oC overnight.
2. Dipense 60 µl of LB plus Tet into 20 multiwell plates and transfer colonies to them with a
multiwell inoculator as described in appendix III. Grow overnight at 37 oC.
3. Add 60 µl of 40 % glycerol solution to each well of the plates and freeze at - 80 oC.
Appendix I: Phenol / Choloform extraction
1. Add an equal volume of Phenol/Choloform, spin for 10 min.
2. Transfer upper phase to clean tube.
3. Add 2 volumes of absolute ethanol and 1/5 volume of 3 M Na acetate, pH 5.5, spin 10 min.
4. Wash pellet with 70% ethanol, spin 1 min.
5. Dry pellet and redissovle in required volume.
Appendix II: Ψ dilution buffer 1 ml 1 M Tris HCl pH 7.4. 99 ml H20 0.24 g Mg SO4 0.01 g gelatine Autoclave and store at room temperature.
Library plates
1
P etri dish 1 P etri dish 2
Colony num ber 2 3 4 5 6
7
7
48

Buffers and protocol for protein extraction and Western blot Proteins can be extracted by sonication using the buffers below or direct from cells for Western blot (crude method).
Sonication buffers Preston et al. 1995 for E. coli and P. syringae 50mM Tris-HCl pH7.4, 1mM EDTA, 100mM NaCl pH8, 1mM PMSF Bernhard Haubold thesis 0.1mg/ml NADP, 14mM B-mercaptoethanol Grow cells in 20ml LB and centrifuge 15ml. Resuspend in 1.5ml disruption solution. Use a 10ml glass test tube, sonicate for 4 min at amplitude of 5microns. Keep on ice.
Method for Western analysis of GAL4 containing fusions Grow overnight cultures in LB. (If using E. coli and induction required, then inoculate fresh cultures with 100µl of o/n broth and grow for 4-6 hours with IPTG). Measure OD600 and adjust to 0.5. Spin down 1ml cell suspension and remove supernatant. Resuspend cells in 200µl extraction buffer and heat at 100oC for 2 min. Freeze aliquots of 20µl. Spin aliquots, heat at 100oC for 3min and load onto gel. Use 3µl anti-GAL4 Ab on blot. Extraction buffer 625 µl Tris-HCl, pH 6.8 2 ml 50% glycerol 2 ml 10% SDS 0.5 ml b-mercaptoethanol 4.875 ml SDW

RNA Isolation by using the TRIzol reagent from Invitrogen This method can be used to isolate total RNA from bacterial cells for use in RT-PCR and Northern blotting. 1. Transfer 1.5 ml of Pseudomonas overnight culture in M9 to a pre-chilled
microcentrifuge tube. 2. Centrifuge the tube at 6000 x g for 5 minutes at 4oC in a microcentrifuge. 3. During centrifugation, preheat 200 ul Max Bacterial Enhancement Reagent to
95oC. 4. After centrifugation, decant the supernatant and resuspend the cell pellet in
preheated 200 ul Bacterial Enhancement Reagent from the previous step. Mix well by pipetting up and down.
5. Incubate at 95oC for 4 minutes.
6. Add 1 ml TRIzol Reagent to the lysate and mix well. 7. Incubate the sample for 5 minutes at room temperature (15 to 30oC). 8. Add 0.2 ml of cold chloroform and mix by shaking the tubes vigorously by hand
for 15 seconds.
Incubate at room temperature for 2 to 3 minutes. Centrifuge the samples at no more than 12000 x g for 15 minutes at 4oC. 9. Transfer the colorless, upper aqueous phase (~400 ul) to a fresh tube. Add 0.5 ml cold isopropyl alcohol (isopropanol) and mix by inverting the tube. Incubate at room temperature for 10 minutes. Centrifuge at 15000 x g for 10 minutes at 4oC. 10. Remove the supernatant carefully without disturbing the RNA pellet (a gel-like
pellet formed at the side and bottom of the tube) Add 1 ml of 75% ethanol and mix the sample by vortexing. Centrifuge at 7,500 x g for 5 minutes 4oC. 11. Air-dry the RNA pellet for 5-10 minutes Dissolve the RNA pellet in 50 ul RNase-free water and incubate at 60oC for 10
minutes, if needed.

Pulsed-field gel electrophoresis This is a method used to analyse the genomic DNA of bacteria and unlike normal agarose gels it is used for analysing very large DNA molecules (up to 1000 Kb). The method is good for genomic fingerprinting and is adapted from Rainey et al., 1994. Microbiology, 140:2315-2331. See paper for running conditions of gels. Important: do not use anything metal to manipulate the blocks up until the stage they are loaded in the gel.
Preparation of agarose blocks 1. Grow cells overnight in LB.
2. Harvest cells from 0.5 ml overnight culture, wash twice in NET-100 buffer and resuspend cells in 0.5 ml NET-100.
3. Prepare 0.9 % Biorad chromosomal grade agarose in NET-100 and after melting keep
agarose at 50 C. 4. Take 0.5 ml molten agarose and add to 0.5 ml washed cells, mix briefly and dispense
into perspex mould on ice. 5. Remove blocks from mould, place in 1 ml of lysis solution and incubate at 37 C for
24 hr. 6. Replace lysis solution with 1 ml ESP solution and incubate at 50 C for 48 hr. 7. Store in ESP at 4 C.
Digestion of blocks Pre-digestion 1. Treat blocks in screw capped Eppendorfs with 1 ml TE containing 1 mM PMSF (0.1
M PMSF stock - 17.5 mg PMSF in 1 ml isopropanol) for 2 hr on a rotating platform. **PMSF can be substituted with the safer AEBSF/ABSS – use same dilution procedure**.
2. Repeat step one. 3. Wash blocks three times in 1 ml TE for 20 min each wash. Use rotating platform. 4. Store blocks in TE at 4 C.
Digestion 1. Cut (using glass cover slip) a thin (0.5 – 1 mm) sliver from a block and place in a 1.5
ml tube on ice. Add 200 ul KGB buffer and incubate on ice for 15 min. 2. Replace buffer with 150 ul fresh KGB, add 6 – 8 U enzyme and incubate on ice for a
further 15 min. 3. Incubate for 5 -18 hr at appropriate temperature. 4. Replace with 200 ul ES and heat at 55 C for 10 min. 5. Replace with 1.5 ml TE for 15 min before loading into gel. To load gel place on digested sliver of block into well and seal well with the same concentration of agrose as the gel (Biorad Molecular Biology Grade). Solutions ALL solutions (except KGB buffer) must be autoclaved. NET-100 in 100 ml 0.1 M NaCl (5 M = 29.2 g/100 ml) 2 ml 0.1M EDTA, pH 8 (0.5 M = 18.61 g/100ml) 20 ml 0.01 M Tris-HCL, pH8 (1 M = 12.11 g/100ml) 1ml Lysis solution in 10 ml 6 mM Tris-HCL, pH7.6 (1M = 12.11 g/100 ml) 60 ul 1 M NaCl (5 M = 29.22 g/100 ml) 2 ml 100 mM EDTA, pH8 (0.5 M = 17.11 g/100 ml) 2 ml 0.5 % Sarkosyl (10 % = 10 g/100 ml) 0.5 ml 1 mg/ml lysozyme 10 mg N.B. Sarkosyl = N-laurylsarcosine. ESP in 10 ml 0.5 M EDTA, pH 9 (1 M = 37.2 g/100 ml) 5 ml 1 % Sarkosyl (10 % = 10 g/100ml) 1 ml 1.5 mg/ml proteinase K 15 mg ES in 10 ml 0.5 M EDTA, pH 9 (1 M = 37.2 g/100 ml) 5 ml 1 % Sarkosyl (10 % = 10 g/100ml) 1 ml

KGB Buffer (2x) !!Store at 4 C!! (make from sterile stocks) in 10 ml 200 mM Potassium Glutamate (1 M = 18.52 g/100ml) 2 ml (L-Glutamic acid) 50 mM Tris Acetate, pH7.6 (1 M = 18.12 g/100ml) 0.5 ml 20 mM Magnesium Acetate (1 M = 21.45 g/100ml) 0.2 ml 100 ug/ml Bovine Serum Albumin (Mol. Biol. Grade) 1 mg 1 mM B-mercaptoethanol (14.4 M Stock) 0.7 ul Sterile distilled water 7.3 ml
Whole plasmid analysis This method can be used to analyse the whole native plasmids of bacteria including E. coli and Pseudomonas. Gels can also be blotted for probing. Make 0.5% agarose gel without EtBr. Make 0.2% SDS, 0.2M NaOH solution fresh (960ul H2O, 20ul 10% SDS, 20ul NaOH). Harvest 175ul E. coli cells, 350ul Pseudomonas cells. Add 20ul TE onto cell pellet without mixing. Aspirate 15ul SDS/NaOH solution into yellow tip, but do not dispense. Vigorously mix the TE with the cells and then dispense the SDS/NaOH and gently stir and pipette up and down. Leave on bench for 3 min. Add 35ul phenol:chloroform:isoamylalcohol, flick tube a few times to mix and then centrifuge for 10 min. Load top phase into gel well. Do for all samples. Add in some loading dye to each well and allow gel to sit for 10 min. Run gel initially at 70V then increase as appropriate. Do not stop the gel to look at. Stain gel with ETHIDIUM BROMIDE and view.

Plasmid curing These are 2 methods that can be used to cure plasmids from Pseudomonas bacteria – the first one is most suited to native plasmids, the second one to plasmids with an antibiotic marker. By incompatibility Plasmid pPPY51, which harbours a rep region of a Pph native plasmid, was used to cause cure native Pph plasmids by incompatibility. DNA of pPPY51 was prepared by midiprep (see 2.2.2) and 1 mg of DNA was electroporated into electrocompetent cells (see 2.20). Electroporants were selected on KB+AMP agar plates and single colonies were subcultured to LB+AMP broths and grown (40 h; 25 oC). Growth in broth was usually much slower than the wild type strain, so 700 ml of broth was harvested for analysis of the plasmid profiles (see 2.2.3; 2.7). By cold shock Plasmids were cured from Pseudomonas cells by inoculating a 10 ml LB broth, without antibiotics, with the appropriate strain(s) (Malik et al., 1985). The broth was incubated, without shaking, at 4 oC (7 d). Cells were harvested from a 1.5 ml aliquot of broth, resuspended in 1 ml of 1/4 strength Ringers solution, serially diluted and 100 ml spread on KB agar plates. After 2 days at 25 oC, the plates were replica plated, using sterile velvets (see 2.18), to KB plates with and without antibiotic selection. Colonies that had become antibiotic-sensitive were streaked for single colonies and the replica plating procedure to KB (+/- antibiotic-selection) was repeated at least twice to obtain a plasmid cured derivative.
Screening Pseudomonas pIVETD libraries using dapB-based system
This protocol describes how to make and screen an IVET library. A 70,000 clone
Pseudomonas library has been constructed in pIVETD and is maintained in E. coli S17-1
(λ pir) in pools of ~500 clones (all stored at -80 C).
1. Mobilisation of the library and integration into Pseudomonas ∆dapB
A. Inoculate a loop of cells from a single -80C pool (scrape a match head sized loop and
don’t let the vial thaw) into 5 ml LB and grow overnight (shaking) in LB containing 12.5
µg ml-1 tet (37 C). In addition, grow a single 5 ml culture of Pseudomonas ∆dapB in LB
supplemented with 800 µg ml-1 DAP (stock: 200 mg ml-1 in water - autoclaved) and 80 µg
ml-1 lysine (stock: 80 mg ml-1 in water – autoclaved). This should be grown with shaking
at 28 C.
B. Next morning, heat a water bath to 45 C. Remove the Pseudomonas ∆dapB culture
and heat shock this for 20 mins before setting up the conjugation. At the same time
place the E. coli culture in a static 37 C incubator.
C. For the conjugation take a single fresh LB plate containing DAP and Lys (same
concentration as in broth) and pre-warm to 28 C. Mix 300 ul donor (E. coli) with 700 ul
recipient (Pseudomonas ∆dapB) in an epp’f, spin briefly to pellet, discard s’natant and
add 50 ul fresh pre-warmed LB. Gently spot mixture onto the surface of the LB plate.
Incubate overnight at 28 C.
D. Next morning harvest cells, re-suspend in 3 ml LB and plate 100 ul aliquots onto LB
supplemented with DAP, Lys, Tet (12.5 µg ml-1) and NF (20 µg ml-1: Nitrofurantoin –
stock 100 mg ml-1 in DMSO, but make fresh stock each time you need it (you can also
use Nx at 10 µg ml-1 to counter select E. coli). Incubate 48 h 28 C. Each plate should
contain between 200 and 500 transconjugants. Pool ~2000 of these colonies by

washing plates with 2 ml LB and store at -80C (in 20% glycerol). You can proceed
directly to seed inoculation at this stage without having to re-grow the library if you are
organised (this is preferable as it avoids re-amplification of the library).
2. Inoculation of seeds
If you have to proceed from the frozen stock then scrape a match head size of inoculum
and grow overnight in LB (DAP, Lys, Tet (6.25 µg ml-1) at 28 C with shaking. Next
morning harvest 1 ml and wash twice in dH20. Alternatively, take the library from the “LB
washed plates” directly (as mentioned above). Dilute this solution in a 1 ml cuvette (in
dH20) to an absorbance (A600) of 0.05. Take 100 ul of this dilute suspension and add to
5 ml dH20 contain in a Petri dish. Add 20 coated sugar beet seeds (Amethyst or
Roberta) to this solution and leave for 1 min before removing seeds (“hooked” tweezers
are useful). Blot briefly on a towel and plant in non-sterile vermiculite / soil mix (~70%
vermiculite and 30% loam) in 5 ml scintillation vials. Cover with the soil mix so the seeds
are about 5 mm down, try to make sure that the seed is centred and not against the side
which can mean they dry out. Water (but not too much) and place in a growth chamber,
20 C, 16 light cycle (but lab windowsill will do!). Using double-sided sticky tape, vials
can be attached inside plastic Tupperware boxes. The seedlings are most susceptible
to drying out early on, but they are also susceptible to over-watering. Water the soil until
you just see the soil pores at the base of the vial begin to fill. Pour a little water into the
bottom of the Tupperware box and cover loosely with clingfilm (don’t seal) until the
seeds germinate (3-5 days); you won’t have to water them again until you remove the
clingfilm . Once the seeds are beginning to germinate remove the clingfilm and water
every second day or so – you just have to keep an eye on things and avoid having them
either too dry or too wet.

3. Library screening
This is the easy bit. You do nothing – just don’t let the plants die.
4. Harvesting fusions
After 3 weeks growth harvest plants. Prepare three Sterlin pots for each seedling by
adding 5 ml dH20 and ~10 glass beads to two pots and 3 ml dH20 and ~10 glass beads
to the third. Label one of the two “5 ml pots” “soil” and the other (rhizosphere). Label
the “3ml pot” “leaf”. “Tap” the contents of the vial (seedling + soil) over the “soil pot”, but
hold onto the leaves! When it comes free (the roots will hold the soil together) dip it
three times into the 5 ml dH20 “soil pot”. The free soil will come away. Next hold the
seedling plus rhizosphere over the “rhizosphere pot” and with scissors cut the stem just
above the roots, letting this drop into the “rhizosphere pot”. The leaf parts go into the
“leaf pot”. Whirli-mix each for 60 s and then prepare a dilution series (count on ~5 x 10⁷
cells in the rhizosphere and ~5 x 10³ cells on the leaves). Plate appropriate dilutions
onto M9 (glucose) + ½ strength CFC, + tet (12.5 µg ml-1), + DAP + Lys, + X-gal and
incubate at 28 C.
5. Checking fusions
Colonies will take a few days to come through, but the selection is pretty clean.
Carefully examine the plates. You should have a range of colonies that range in colour
from dark blue to very pale blue (truly white colonies are likely to be either contaminants,
or Pseudomonas that has suffered loss of the plasmid / part of the plasmid, so leave
these). If the appropriate pool size has been used (remember we are guesstimating
this), then you should find that not all plants yield the desired very pale blue colonies.
From those plates that do have very pale blue colonies, take just two (they are likely to

be siblings). Check that neither grows on M9 without DAP or Lys. Take a little inoculum
with a loop and suspend in ~250 ul dH20, then streak ont0 M9. Incubate plates for 48 h
and check for growth (use Pseudomonas as a control first time). Be rigorous about this.
If there is obvious growth within 48 h then discard the colonies. Provided they show no,
or extremely poor growth at 48 h they go forward to the next phase.
6. Recovering fusions from the chromosome (conjugative cloning)
Grow fusion strain overnight in LB tet (6.25 µg ml -1); also grow helper pRK2013 and
recipient strain (DH5αλpir) in LB. Next morning mix 300 µl of each strain and spin briefly
to sediment. Pour off supernatant, resuspend cells in the ~50µl that remain and spread
the contents directly onto LB agar plates containing tet (12.5 µg ml-1). Incubate these
plates at 37 C (check that the incubator is really at 37 – or if it does no harm then turn
the incubator up to 39 C – Pseudomonas will not grow at 37 C– it just grows (eventually)
at 35-36 C). Check these plates daily for transconjugants. Selection is very clean, but
something odd happens with respect to the “time of conjugation”. Some fusions will
recover after 24 h (i.e. you will see colonies). Others will take up to 5 days. In addition,
the frequency of recovery varies from one or two colonies to 100’s. Nevertheless, it is
very rare to find a colony growing on these selective plates that is not DH5αλpir carrying
the recovered fusion.
7. Sequence analysis of fusions
Purify pIVETD + insert from DH5αλpir using a Qaiprep (mini-prep) spin column (harvest
1.5 ml of cells). Resuspend DNA in 100 µl. If you wish (and a good idea to begin with)
cut 8.5 ul with BamH1 and EcoR1 (in a volume of 10 µl) to see a diagnostic band pattern
and this will also liberate the insert. The remaining DNA is available for sequencing. We

sequence each fusion using both a reverse (out from dapB) and forward primer (in from
bla):
dap primer 5’-CCGCCTCTACCAGCGTCTTGCC
bla primer 5’- CAGGGTTATTGTCTCATGAGCG
8. Strain and data handling
It is important that each Pseudomonas ∆dapB fusion strain is given an appropriate
number and stored at -80C. It is also important to store each DH5αλpir (pIVETD + insert)
fusion plasmid. These E. coli strains should be labelled to indicate their relationship to
the Pseudomonas ∆dapB fusion strain from which the plasmid was recovered by
replacing Pf with Ec: so Ec001 correspond to Ps001PBR. The DNA sequence from
each reaction should be checked for quality (ideally we need a good 200 nt from each
end). From here it is possible to check the results of regularly up-dated blast searches
and generally mine the data.
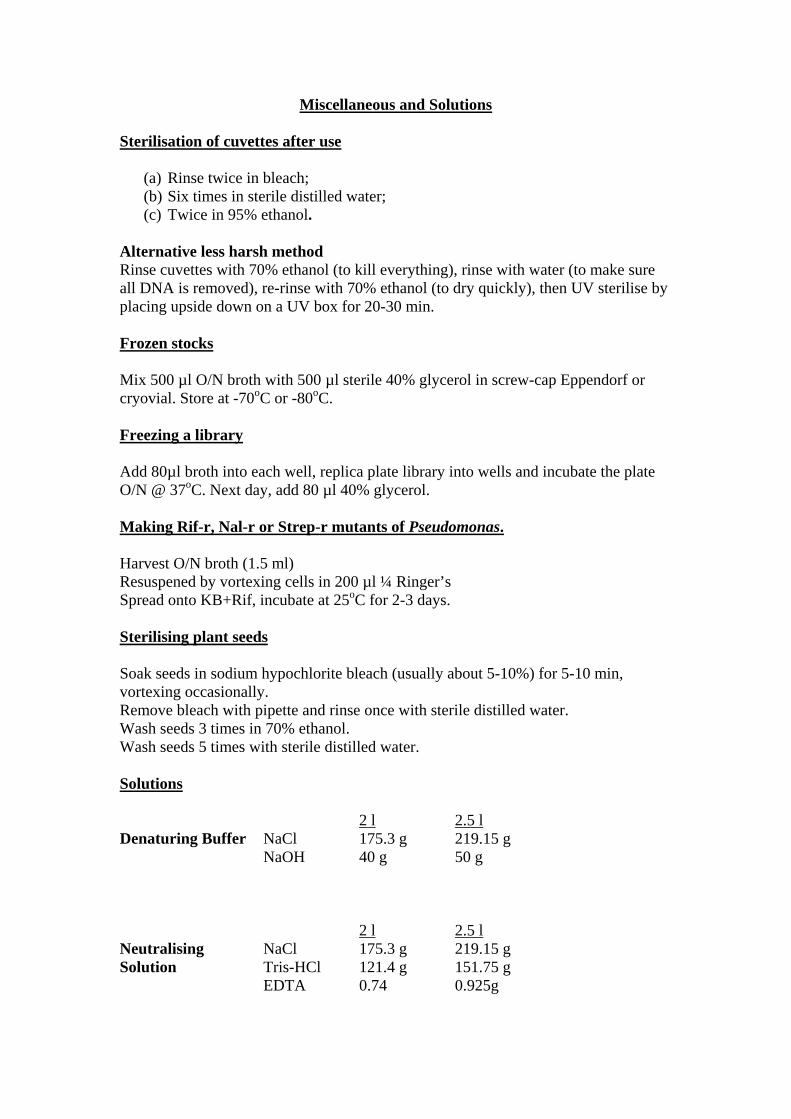
Miscellaneous and Solutions Sterilisation of cuvettes after use
(a) Rinse twice in bleach; (b) Six times in sterile distilled water; (c) Twice in 95% ethanol.
Alternative less harsh method Rinse cuvettes with 70% ethanol (to kill everything), rinse with water (to make sure all DNA is removed), re-rinse with 70% ethanol (to dry quickly), then UV sterilise by placing upside down on a UV box for 20-30 min. Frozen stocks
Mix 500 µl O/N broth with 500 µl sterile 40% glycerol in screw-cap Eppendorf or cryovial. Store at -70oC or -80oC. Freezing a library Add 80µl broth into each well, replica plate library into wells and incubate the plate O/N @ 37oC. Next day, add 80 µl 40% glycerol. Making Rif-r, Nal-r or Strep-r mutants of Pseudomonas. Harvest O/N broth (1.5 ml) Resuspened by vortexing cells in 200 µl ¼ Ringer’s Spread onto KB+Rif, incubate at 25oC for 2-3 days. Sterilising plant seeds Soak seeds in sodium hypochlorite bleach (usually about 5-10%) for 5-10 min, vortexing occasionally. Remove bleach with pipette and rinse once with sterile distilled water. Wash seeds 3 times in 70% ethanol. Wash seeds 5 times with sterile distilled water. Solutions 2 l 2.5 l Denaturing Buffer NaCl 175.3 g 219.15 g NaOH 40 g 50 g 2 l 2.5 l Neutralising NaCl 175.3 g 219.15 g Solution Tris-HCl 121.4 g 151.75 g EDTA 0.74 0.925g

2 l 2.5 l 20 X SSC NaCl 364 g 455 g NaCitrate 180 g 225 g 1 l 20 X TE Tris 24.22 g EDTA 7.444 g 1 l 2.5 l 10 X TBE Tris 108.99 g 272 g Boric acid 55.62 g 139 g EDTA 8.41 g 21 g

Pathogenicity testing in plants These are methods used to observe and score symptoms for Pseudomonas syringae and for assessing bacterial growth in planta. Note that a new method of assessment (Macho et al. (2007) Molecular Plant Pathology 8, 437-450) using Competitive Index has been proposed. Pod tests (P. vulgaris) Strains of Pph were tested for virulence and avirulence on Phaseolus vulgaris (French Dwarf bean) by recovering a mass of cells on the tip of a sterile cocktail stick and stabbing the cells into a bean pod of the appropriate cultivar (Harper et al. 1987). The pods were incubated in a plastic sandwich box lined with moist tissue paper, at 22oC with a 16:8 h light:dark photoperiod for 4-5 d and the symptoms recorded. Disease was observed as watersoaking around the inoculation site, whereas resistance was observed as tissue browning, sometimes with tissue sinking or slight differences in the colour, depending on the avr/R interactions taking place. Leaf tests in P. vulgaris Pathogenic phenotypes were also tested in planta. A 10 ml overnight broth of a Pph strain was grown and the cells harvested. The cells were resuspended in 10 mM MgCl2 to achieve a cell density of 5 x 10⁸ cells ml-1, equivalent to an optical density (OD) of 0.60 at 600 nm. The cells were injected on the underside of the leaf, next to a large vein, with a 1 ml syringe until an area of leaf tissue had been infiltrated. Inoculations were made into the leaves of two plants. Plants were incubated at 22 oC with a 16:8 h light:dark photoperiod for 6 d and symptoms recorded. (Harper et al., 1987). Disease symptoms in the leaf were scored as follows: Grade 1, partial tissue glazing at the inoculation point; 2, 100 % tissue glazing; 3, <50 % tissue collapse; 4, 50-100 % tissue collapse; 5, 100 % tissue collapse; 6, 100 % tissue collapse plus browning (necrosis). Symptom development caused by different strains was compared by calculating the mean tissue symptom score and graphically presenting the data against time. Since the resistant reaction always resulted in tissue browning (necrosis) but was not always observed to cause 100 % tissue collapse, the resistant reaction was distinguished on graphs with a solid line whereas the susceptible reaction was illustrated with a dotted line. Leaf tests#2 This is an alternative method of inoculation. In planta leaf tests can be performed using an atomiser (DeVilbiss Healthcare Inc., Somerset, USA) for inoculation. An agar culture of the test bacterium was grown (25 oC; 3 d) to obtain dense cell growth. The entire culture was harvested from the plate by flooding with sterile distilled water (10 ml) and the cells were resuspended using a sterile pastette. The cells were passed through sterile muslin, to remove large cell clumps, into a sterile universal. The universal was attached to the atomiser which was attached to a pump. A small 1-2 cm2 area in the middle of the leaf underside was infiltrated with a high cell density by applying the end of the atomiser against the leaf surface and allowing the high pressure to force cells into the intercellular spaces. The rest of the leaf was then sprayed with the cell suspension. The plants were incubated in a growth chamber, at 18 oC with 100 % humidity and 16:8 h light:dark photoperiod, for 70 h before transfer to a glass-house maintained at 18-20 oC for 4 d. Symptoms were scored as either a HR (HR), intermediate (+/-) or disease (susceptible) reaction (S).

Stem inoculation tests in Pisum sativum (pea) Ppi strains were tested for virulence and avirulence by inoculation into Pisum sativum (pea) cultivars based on the method of Malik et al. (1987), as described by Moulton et al. (1993). Two-week-old pea plants were used for inoculations. A mass of cells on the tip of a sterile pin was inoculated into the plant by vertically stabbing the pin into the youngest two nodes at the stem-stipule junction. The plants were incubated in a glass-house at 18-20 oC and scored after 5-7 d. Disease was observed as watersoaking and stunted growth of the stipule at the inoculation point, whereas a resistant reaction was observed as a brown necrotic area restricted to the inoculation point. In planta population studies The in planta growth of populations was monitored by infiltration of a 5 x 10⁸ cells ml-1 bacterial suspension into leaf tissue (see 2.27.2) and re-isolation from the tissue over 4 d. Each strain was inoculated four times for time periods 0, 24, 48 and 96 h and three replicates for each strain were made. The plants were maintained as described in 2.27.2 and the bacteria were extracted from the inoculated tissue with a sterilised 0.8 cm diameter borer. Bacterial cells were recovered from the tissue by grinding in 10 mM MgCl2 (100 ml) and the volume made up to 1 ml. Serial dilutions 10-8 cells ml-1 were spread (200 ml) on appropriately supplemented KB. Bacterial numbers were assessed after incubation (25 oC; 2 d) and the means used to plot bacterial growth in the leaf tissue over time.

Protocol for apoplast extraction from tomato or Arabidopsis plants
This protocol can be used both for apoplast extraction of healthy tissue or diseased
tissue after the inoculation of bacteria at different time points.
1. Select leaves from six week-old tomato plants from different heights. It's better not to
take the leaves in the highest position which are more curly. 1 g of leaves can lead
approximately to 200 ul of apoplast extract.
2. Record the weigh
3. Introduce the leaves in a 60 ml syringae with the tip sealed and fill in with 30 ml
approx. of disttilled water/sorbitol 0.24 M. Insert the plunger into the syringae and
move it up and down or place the base of the plunger on the bench and move the
syringae up and down. Apply pressures of 6 to 10 s. followed by vacuum, 6 to 10
times, until you can see that the leaves are infiltrated. They get darker and sink into
the bottom of the syringae. Alternatively, use 500 ml flask connected to a pum and fill
it with 50 to 100 ml of distilled water and place 10 to 20 leaves. Apply cycles of
vacuum for 20-60 sec followed by atmospheric pressure for 5 to 10 times.
(In tobacco plants, infiltrate water with 1 ml syringe into the leaves. Then blot dry)
4. Remove the leaves from the syringae and let them dry on tissue paper for 5-10'.
Then record the weigh.
5. Carefullly place the leaves into a 5 ml tip. Use as many tips as necessary. Insert an
eppendorf tube on the bottom of the tip, and place this assembly into a 50 ml conical
tube.
6. Centrifuge at 2000 g during 5'. (raw or primary sample)
7. Recover the apoplast extracts from the eppendorf tubes and store it at -80 ºC.
Record the obtained volume.
8. Centrifuge at 3000 rmp at 4 ºC during 10 min. (secondary sample)
9. The extracts can be filtered using Millipore centrifugal columne devices (cat no. UFC8
005 24) which are originally designed to concentrate protein samples, but that can be
also useful to separate big molecular weight compounds such as proteins, bacterial
and plant cell debris, from low molecular weight compounds. Centrifuge at 3750-4000
rpm, for 20' at RT. (filtered or tertiary sample)
10.Check the presence of cytoplasm contamination in the apoplast samples (see
citoplasmic contamination enzyme assay). Record the percentage.

CYTOPLASMIC CONTAMINATION ASSAYS ON APOPLAST EXTRACTS
1- Preparation of plant extraction buffer This buffer is used to extract whole plant tissue as a control of the assay.
Dissolve the following chemicals in 50 ml H2O and once autoclaved add DTT to 1mM and add one protease
inhibitor tablet
[stock] vol [final]
1 M Tris-HCl pH7.6 2.5 ml 50 mM
50% glycerol 10 ml 10%
0.5 M EDTA 0.1 ml 1 mM
100X Triton X-100 0.25 ml 0.5%
DTT 7.7 mg
H2O 37.15 ml
Total volume 50 ml
Extract tissue at 1:2 weight plant tissue:vol extraction buffer (eg. 2g plant tissue in 4 ml).
Weigh tissue and freeze with liquid N2 in a mortar and grind thoroughly. (It can be stored at -80C).
Add the extraction buffer and grind.
Recover the liquid and place it in a centrifuge tube.
Spin at maximum speed for 1 min. Recover supernatant and keep on ice during the enzymatic assay.
2. Malate dehydrogenase (MDH) assay Prepare:
-fresh MOPS dissolved in ddH2O (0.5 M)
-fresh NADH dissolved in ddH2O (10 mM)
-fresh oxaloacetic acid in ddH2O (10 mM)
Enzyme activity is assayed spectrophotometrically at 340 nm at 25C in 1 ml of reaction mixture. The
enzymatic activity is based on the reduction of oxaloacetic acid and oxidation of NADH to NAD+, which
decreases the absorbance
[stock] vol [final]
0.5 M MOPS 200 µl 0.1 M
10 mM NADH 50 µl
Extract 10 µl
H2O 540 µl
Blank the reaction with MOPS, NADH and H2O. Then add extract and measure base rate for 5 min.
Add 200 µl oxaloacetic acid and measure decrease of absorbance over 5, 10 and 15 min. Calculate ∆A340
(Rate of reduction of absorbance/min). Use the following formula to calculate the change of concentration of

NADH. ∆C= ∆A340 Σ-1, where Σ is the molar extinction coefficient for NADH=6.22 M-1 cm-1. Compare ∆C
values between whole plant extracts and apoplast extracts.
3. Alcohol dehydrogenase (ADH)
Prepare fresh NAD dissolved in ddH2O (10 mM)
Enzyme activity is assayed spectrophotometrically at 340 nm at 25C in 1 ml of reaction mixture. The
enzymatic activity is based on the oxidation of ethanol and reduction of NAD to NADH, which increases the
absorbance.
[stock] Vol [final]
1M Tris pH 8.9 100 µl 100 mM
10 mM NAD 20 µl 0.2 mM
Extract 20 µl
H2O 850 µl
Blank the reaction with Tris, NAD and H2O. Then add extract and measure base rate for 5 min.
Add 10 µl ethanol and measure increase of absorbance over 5, 10 and 15 min. Calculate ∆A340 (Rate of
reduction of absorbance/min).
Use the following formula to calculate the change of concentration of NAD
∆C= ∆A340 Σ-1, where Σ is the molar extinction coefficient for NAD=6.22 M-1 cm-1. Compare ∆C values
between whole plant extracts and apoplast extracts.
4. Glucose-6-phosphate dehydrogenase (G-6PDH)
Prepare 0.2 M Glycine-NaOH pH 9.5. Add 10 M NaOH to reach pH
Prepare fresh NADP+ dissolved in ddH2O (4 mM)
Dissolve Glucose-6-P glycine-NaOH to 30 mM
Enzyme activity is assayed spectrophotometrically at 334 nm at 25C in 1 ml of reaction mixture. The
enzymatic activity is based on the oxidation of glucose-6-P and reduction of NADP+ to NADPH, which
increases the absorbance.
[stock] Vol
0.2 M Glycine-NaOH 500 µl
4 mM NADP+ 200 µl
Extract 50 µl
H2O 220 µl
Blank the reaction with Glycine-NaOH, NADP+ and H2O. Then add extract and measure base rate for 5 min.
Add 10 µl Glucose-6-P and measure increase of absorbance over 5, 10 and 15 min. Calculate ∆A340 (Rate
of reduction of absorbance/min).
Use the following formula to calculate the change of concentration of NADP+
∆C= ∆A340 Σ-1, where Σ is the molar extinction coefficient for NAD=6.18 M-1 cm-1. Compare ∆C values
between whole plant extracts and apoplast extracts.

Fitness test of P. fluorescens SBW25 mutants in plant environment
Day 1, Inoculate mutants from freezer into 5 ml LB broth. Set up eight
independent cultures for each mutant. At the same time inoculate from freezer
the competitor strain SBW25-lacZ into 8 tubes of 5 ml LB broth.
Day 2, Transfer 5ul into 5 ml fresh LB broth
Day 3, Mix 0.3 ml of mutant and the competitor and then spin down the cells.
After removing the supernatant the cells are re-suspended into 1 ml sterile water.
Count start ratio: make a serial dilution until 10-5 and inoculate 100 ul of the 10-
5 dilution onto a “LB + X-gal” plate. After two days incubation at 28oC, count the
number of white (mutant) and blue (competitor) colonies.
Plant inoculation: take 100 ul of this suspension and add to 5 ml dH20
contained in a Petri dish (8 totally). Add 4-5 coated sugar beet seeds to this
solution and leave for 5 min before removing seeds (“hooked” tweezers are
useful). Blot briefly on a towel and plant in non-sterile vermiculite in 15 ml plastic
tube. Cover with vermiculite so the seeds are about 5 mm down, try to make sure
that the seed is centred and not against the side which can mean they dry out.
Water (but not too much) and place in a growth chamber, 20oC, 16 hrs light cycle
(but lab windowsill will do!). The seedlings are most susceptible to drying out
early on, but they are also susceptible to over-watering. Water the vermiculite
until the water level to ~ 8 ml marker. Then cover the tubes in a rack with cling
film. The seeds will take 3 -5 days to germinate. Once the seeds are beginning to
germinate remove the clingfilm and water every second day or so – you just have
to keep an eye on things and avoid having them either too dry or too wet.
Two or three weeks after plant sowing, the plants can be harvested. We
should prepare enough agar plates of “M9 + ½ CFC + X-gal”. At least five plates

are needed if we want count bacteria from both shoot and rhizosphere of a plant.
For each plant prepare two plastic tubes (20 ml) and add about 20-30 glass
beads into each tube. Use a sterile scissor and tweezers to cut the shoot first
(part above the vermiculite) and put the shoot into one tube. Then pour the whole
contents of the plant-growing tube into a Petri dish and put rhizosphere (roots
with attached vermiculite) into anther plastic tube with glass beads.
Add 5 ml sterile water into the tube with rhizosphere, and 3 ml for the tube with
shoot. Vortex vigorously for 1 min. Dilute the rhizosphere solution until 10-3 and
inoculate 100 ul of 10-2 and 10-3 dilutions into two “M9 + ½ CFC + X-Gal” plates.
Dilute the shoot solution (100) until 10-2 and inoculate 100 ul of 100, 10-1, and 10-2
into three “M9 + ½ CFC + X-Gal”. The plates are incubated at 28oC.
Two days late check the results. Count white colonies (the tested mutant) and
blue colonies (the competitor, wild type).

10x
SBW25∆Ding (mutant) SBW25-lacZ (wt)
-80oC Freezer
5 ml LB Broth
10x
10x 10x5 ml M9 Broth
50 ul
10 X
Mix 500 ul of the mutant and the competitor, spin down and resuspend into 1 ml sterile water
Inoculate 5 ul into 5 ml
Count starting ratio
Inoculate 5 ul into 5 ml
Count the end ratio
Fitness test of bacteria in laboratory medium
Related Documents