Module Three: POINT-OF-SALE ACCOUNTING Introduction: In this module, you will learn to understand accounting (Cash vs. Accrual Accounting Methods), accounts payable (Purchase Orders & Commission), accounts receivable (Invoices), how to use the payment wizard, how to apply multiple payments to a single invoice or purchase order, and how to void payments or charges and issue credits. TABLE OF CONTENTS: Section 1: UNDERSTANDING ACCOUNT BASIS (CASH VS. ACCRUAL ACCOUNTING METHODS) Section 2: ACCOUNTS PAYABLE (PURCHASE ORDERS & COMMISSION) Section 3: ACCOUNT RECEIVABLES (INVOICES) Section 4: APPLYING MULTIPLE PAYMENTS TO A SINGLE INVOICE OR PURCHASE ORDER Section 5a: VOIDING PAYMENTS OR CHARGES ON INVOICES ISSUING CREDITS Section 5b: VOIDING PAYMENTS OR CHARGES ON PURCHASE ORDERS Module 3: Point-of-Sale Accounting © TicketNetwork Direct, 137 Bolton Road, Vernon, Connecticut 06066 36

Welcome message from author
This document is posted to help you gain knowledge. Please leave a comment to let me know what you think about it! Share it to your friends and learn new things together.
Transcript

Module Three:
POINT-OF-SALE ACCOUNTING Introduction: In this module, you will learn to understand accounting (Cash vs. Accrual Accounting Methods), accounts payable (Purchase Orders & Commission), accounts receivable (Invoices), how to use the payment wizard, how to apply multiple payments to a single invoice or purchase order, and how to void payments or charges and issue credits. TABLE OF CONTENTS: Section 1: UNDERSTANDING ACCOUNT BASIS (CASH VS. ACCRUAL ACCOUNTING METHODS) Section 2: ACCOUNTS PAYABLE (PURCHASE ORDERS & COMMISSION) Section 3: ACCOUNT RECEIVABLES (INVOICES) Section 4: APPLYING MULTIPLE PAYMENTS TO A SINGLE INVOICE OR PURCHASE ORDER Section 5a: VOIDING PAYMENTS OR CHARGES ON INVOICES ISSUING CREDITS Section 5b: VOIDING PAYMENTS OR CHARGES ON PURCHASE ORDERS Module 3: Point-of-Sale Accounting © TicketNetwork Direct, 137 Bolton Road, Vernon, Connecticut 06066 36

Section 1: UNDERSTANDING ACCOUNT BASIS (Cash vs. Accrual Accounting Methods) What is cash basis accounting? Most small businesses use the cash basis method of accounting, which is based on real-time cash flow. In cash method, you report an expense when it is paid and record income when it is received. So, the day you receive a check, it becomes a cash receipt. And you record your expenses when you pay your bills, not when the bill is received. By the way, the word "cash" is not meant literally - it also covers payments by check, credit card, barter, etc. What is the accrual method of accounting? With accrual accounting, you record income when it is earned, not when it is paid. Similarly, you record your expenses when the obligation arises, not when you pay it. The tax code refers to this as recording income and expenses when they are "fixed" - when all the necessary events have occurred to receive the income or expense the liability. It is not necessary for cash to change hands. Here's how accrual would work. Say, for example, you're a consultant and you complete a job on December 15, but you haven't been paid for it. You recognize all expenses in relation to that contract when they were incurred, regardless of whether you've been paid yet or not. Both the income and expenses are recorded for the current tax year, even if payment is received and bills are paid the following February. Module 3: Point-of-Sale Accounting © TicketNetwork Direct, 137 Bolton Road, Vernon, Connecticut 06066 37

Section 2: ACCOUNTS PAYABLE (Purchases Orders and Commission)
NOTE: All Purchase Orders are separated into 3 types: � Outstanding, where you owe money. � Paid, where you don’t owe money. � Voided, where Purchase Orders have been voided.
1. To view all of your Purchase Orders:
a. Click on Accounting. b. Click on Purchase Orders.
Module 3: Point-of-Sale Accounting © TicketNetwork Direct, 137 Bolton Road, Vernon, Connecticut 06066 38

2. Purchase Orders will default to the last 30 days. To view a purchase order greater than 30 days: Click the check box in the upper right hand corner of the screen to the left of “ONLY SHOW LAST 30 DAYS!”
3. To perform any action on a Purchase Order: a. Right-click on the P O. There will be different actions depending whether or not the PO is outstanding, paid, or voided. 4. To pay a purchase order: a. Right-click on the PO and select “Pay PO.” Payment Wizard screen appears. Refer to Appendix for instructions on how to use this. “Payment History” will show all payments that have been made or voided on a particular P.O. 5. To see the Purchase Order: a. Select “View Copy of PO.” The Purchase Order will appear. Follow prompts to email or print it out. Refer to Selling Tickets Module ** for instructions 6. To see what notes are on the PO:
a. View / Modify PO Notes will allow you to see and edit them. To edit or add notes:
Click in the white box “PO Note (Internal).”
To edit or add a “PO Note (External).” Click below the white box.
Module 3: Point-of-Sale Accounting © TicketNetwork Direct, 137 Bolton Road, Vernon, Connecticut 06066 39

To edit “On Hand” note: Click inside the white box below “Tickets On-Hand Note.” Make your changes if desired:
Click on Save or Close. 7. To pay multiple POs with one payment: a. Select “View Customer Details / Advanced Payments” in the Payment Wizard. 8. To view any FedEx label for Invoices attached to that PO:
a. Select “Related Shipping Labels.” 9. To view details for the broker associated for that purchase order:
a. Select “View Customer Details.” 10. To modify on-hand status: a. Click on “Action – Modify Ticket ON-HAND / NOT ON-HAND.”
i. If the tickets are on hand: a. Check box to the left of the ticket group will be checked.
If they are not on hand: b. The check box will not be checked.
ii. To mark a ticket on hand: a. Click the check box. b. Click on “Mark On-Hand” in the lower right hand corner.
iii. To mark a ticket not on hand: a. Click to uncheck the check box. b. Click to “Mark Not On-Hand.” c. Click on “Close” in the lower right hand corner to complete this action. 11. To email the Purchase Order:
a. Select “Action – Email Copy of PO.” 12. To print the Purchase Order:
a. Select “Action – Print PO.” 13. To change the contact on the Purchase Order when the wrong contact has been recorded: a. Select “Action – Reassign Contact” b. Click on name of person on the list who should be the contact. 14. To void the purchase order: See Appendix for greater detail.
a. Select “VOID PO.” Module 3: Point-of-Sale Accounting © TicketNetwork Direct, 137 Bolton Road, Vernon, Connecticut 06066 40

b. Click Yes. NOTE: You will be able to void the purchase as long as there are no Invoices tied to it. If there are, you need to void the Invoices first:
c. Void Invoices. d. See confirmation that PO has been voided. e. Click on OK.
IF there was a payment on the PO, you will be asked: i. Do you wish to give the broker a Credit? ii. Click on Yes or No. 15. Scenario:
You need to pay commission on an invoice: a. Click on the Accounting tab on the left side of the POS. b. Click on “Commission Management.” This will bring up all UnPaid Invoices that you have. c. Click on “Pay Commission” to pay. This will open up the Commission Payment Wizard. d. Click the Check Box to the left of the employee to be paid. e. To change the amount that you will pay, if necessary: i. Click in the box below “AMT $.” ii. Type in the amount you will pay. iii. Type any note you require:
a. Click in the box below NOTES and enter your note. iv. Select the payment type:
a. Click down arrow under “Payment Type.” b. Click to show you will pay the commission. c. Click in box below “CHECK/CC#”if you are paying by Check or CC#. d. Type in the number. e. Click on “Pay Out All Checked.” f. Click on OK. Module 3: Point-of-Sale Accounting © TicketNetwork Direct, 137 Bolton Road, Vernon, Connecticut 06066 41

Section 3: ACCOUNT RECEIVABLES (Invoices) NOTE: Invoices are separated into 3 types: � Outstanding, where the customer owes money on the invoice. � Paid, where the customer does not owe money. � Voided, which are invoices that have been voided. 1. To view all of your Invoices: a. Click on Accounting. b. Click on Invoices.
2. Invoices will default to the last 30 days. To view an invoice that is greater than 30 days: a. Click the check box in the upper right hand corner to the left of “ONLY SHOW LAST 30 DAYS!” 3. To perform any actions on an invoice: a. Right-click on the invoice. Depending on the type of invoice you will have different options. 4. To collect on an invoice a. Right-click on the invoice. b. Select “PAY INVOICE.” Module 3: Point-of-Sale Accounting © TicketNetwork Direct, 137 Bolton Road, Vernon, Connecticut 06066 42

This will bring you to the Payment Wizard screen. See Appendix for more information. 5. To see all payments that have been made or voided on a particular invoice:
a. See “View Payment History.” 6. To see the invoice and e-mail or print it:
a. Select “View Copy of PO.” 7. To see and edit notes that are on the invoice as well as corporate info:
a. Select “View / Modify PO Notes + Corp info.” b. Click in the white box below “Invoice Note (INTERNAL)” to add an internal note. c. Click in the white box below “Invoice Note (EXTERNAL/ DISPLAYED)” for an external note. d. Click inside the white bar below EXTERNAL PO# to edit the External PO#. e. Click on “Corp Info” in the upper left hand corner to edit the Corp Info:
i. Click in the white bar to the right of the area that you would like to edit. ii. Type in the new information. iii. To save changes, click on Save. iv. To discard any changes, click on Close.
8. To Email the Invoice to your customer:
a. Select Email – Invoice to Customer.
9. To Email the “Will Call” authorization: a. Select Email – Will Call Confirmation to Customer.
10. To Email the Credit Card Authorization to a customer if the event has not taken place:
a. Select Email – Credit Card Authorization. 11. To change the CSR on an outstanding Invoice:
a. Select Edit Invoice CSR. b. Click on the drop down box. c. Click on the CSR to which you wish to change. d. Click on Select.
12. To edit shipping information:
a. Select “Edit Shipping Information” on Invoice. b. Select if the package has shipped or not:
i. Click on either Shipped or Shipment Pending. Module 3: Point-of-Sale Accounting © TicketNetwork Direct, 137 Bolton Road, Vernon, Connecticut 06066 44

13. To add/change/delete the tracking number: a. Click inside the white box to the right of the Tracking #. b. Click on the down arrow to change the “Actual Ship Date” and “Est. Ship Date” associated with either date. c. Click inside the “Edit the customer address,” inside the box associated with the part of the address you want to change. d. Click on “Shipping Account” to change the shipping method. e. Click on the appropriate method. f. To update the amount you are charging on an outstanding invoice:
i. Click the check box to the left of Override on the left side of the screen. ii. Enter a new amount. On a Paid Invoice: Click on Update at the bottom of the screen. You will be asked if you want to give the customer their money back, give them a credit, or cancel the change.
g. To give a customer a credit, view available credit that a customer has to pay the invoice, or use the Payment Wizard to pay this or multiple invoices:
i. Select “Edit Customer Totals / Issue Credit / Payment Wizard.” ii. Select “Issue Credit.” iii. Type in amount you wish to credit. iv. Click on Save. v. Click on “Credit/Gift” to view a credit available to that client. vi. Click on “Pay Wizard” to get into the Payment Wizard.
h. To print the invoice: i. Select PRINT Invoice.
Module 3: Point-of-Sale Accounting © TicketNetwork Direct, 137 Bolton Road, Vernon, Connecticut 06066 44

Section 4: APPLYING MULTIPLE PAYMENTS TO A SINGLE INVOICE OR PURCHASE ORDER 1. There will be times when you have a customer who wants to use multiple payments for one invoice. To record multiple payments:
a. Sell out the tickets and make sure that the invoice does not have “Pay in Full” selected. b. Go back into the Invoices tab. c. Click on the + to bring you to the Payment Wizard. d. Click on the payment type the customer is going to use. e. If the customer wants to pay with multiple credit cards, make sure that the first one is selected.
2. Click in the white bar in the center of the screen: a. Type in the amount that you wish to charge for the first payment. b. Click on apply. c. The amount in the center of the screen will update showing how much is left to be paid after the payment is applied.
Module 3: Point-of-Sale Accounting © TicketNetwork Direct, 137 Bolton Road, Vernon, Connecticut 06066 45

3. Click on the next payment type that you will apply: a. If you are going to use a second credit card:
i. Click on that credit card number in the lower left hand corner. ii. Click in the white bar in the center. iii. Type in the amount you will charge. iv. Click on apply. Keep repeating the process until you are done. When you have paid off the invoice completely, the Payment Wizard will disappear.
Module 3: Point-of-Sale Accounting © TicketNetwork Direct, 137 Bolton Road, Vernon, Connecticut 06066 46

Section 5a: VOIDING PAYMENTS OR CHARGES ON INVOICES Issuing a credit from the Invoice tab: 1. Right-click and choose “View Payment History” to view all payments.
Payment History screen appears.
2. Right-click the payment to be voided and select “Void Payment.”
a. Dialog box asks: “Are you sure you want to void out of payment # __?” b. Confirm you want to Void the payment: Select Yes or No “Issue Credit” window appears
The payment is voided. Voided payments can be saved as store credits to be applied against future purchases by the same customer. 3. The Invoice now moves to the “Outstanding” status: Voiding any type of payment other than credit card is the same as with a PO:
a. Right-click on the invoice. b. Select “View Payment History.” Pop-up window appears, “Void Payment.” c. Select Yes
Module 3: Point-of-Sale Accounting © TicketNetwork Direct, 137 Bolton Road, Vernon, Connecticut 06066 47

Pop-up window appears confirming Void, “Credit Issued.” d. Click on OK.
4. Pop-up window appears, “Issue Credit?” asking if you wish to issue a “store credit” for the amount under consideration.
e. Select Yes or No. Pop-up window appears confirming Credit, “Credit Issued.” f. Click on OK. The Invoice now moves to the “Outstanding” tab. You may wish to issue a store credit to the customer’s account. This cash payment can be registered to the customer’s account for a future purchase.
ISSUING REFUNDS: NOTE: A Credit Card payment processed through IPCharge cannot be done in this manner. You first must Void or Credit the credit card in IP Charge through your WebAdmin Account:
To void a transaction: Voiding is only possible if the transaction occurred today and has not been batched or settled yet.
a. Click on the “VOID” tab b. Fill in the customer detail (full cardholder name, full cc# & exp)
Since PCI Compliance guidelines prohibit storing CVV2 codes, merchant banks can no longer require them as a transaction qualifier Module 3: Point-of-Sale Accounting © TicketNetwork Direct, 137 Bolton Road, Vernon, Connecticut 06066 48

c. Click on “Void” if payment was made today. The customer’s credit card payment is now voided. 1. To Credit a customer either the full amount or a partial amount:
a. Click on the “Credit” tab b. Fill in the customer detail (full cardholder name, full cc# & exp) Since PCI Compliance guidelines prohibit storing CVV2 codes, merchant banks can no longer require them as a transaction qualifier c. Click on “Credit.” d. If you are only crediting back a part of the total amount type the refund amount in the “Amount” box
* You would Void if the transaction was run on the same day or Credit if the transaction were run on a previous day. In IP CHARGE Credit=Refund In POS Credit=Store Credit In POS Refund=Refund Module 3: Point-of-Sale Accounting © TicketNetwork Direct, 137 Bolton Road, Vernon, Connecticut 06066 49
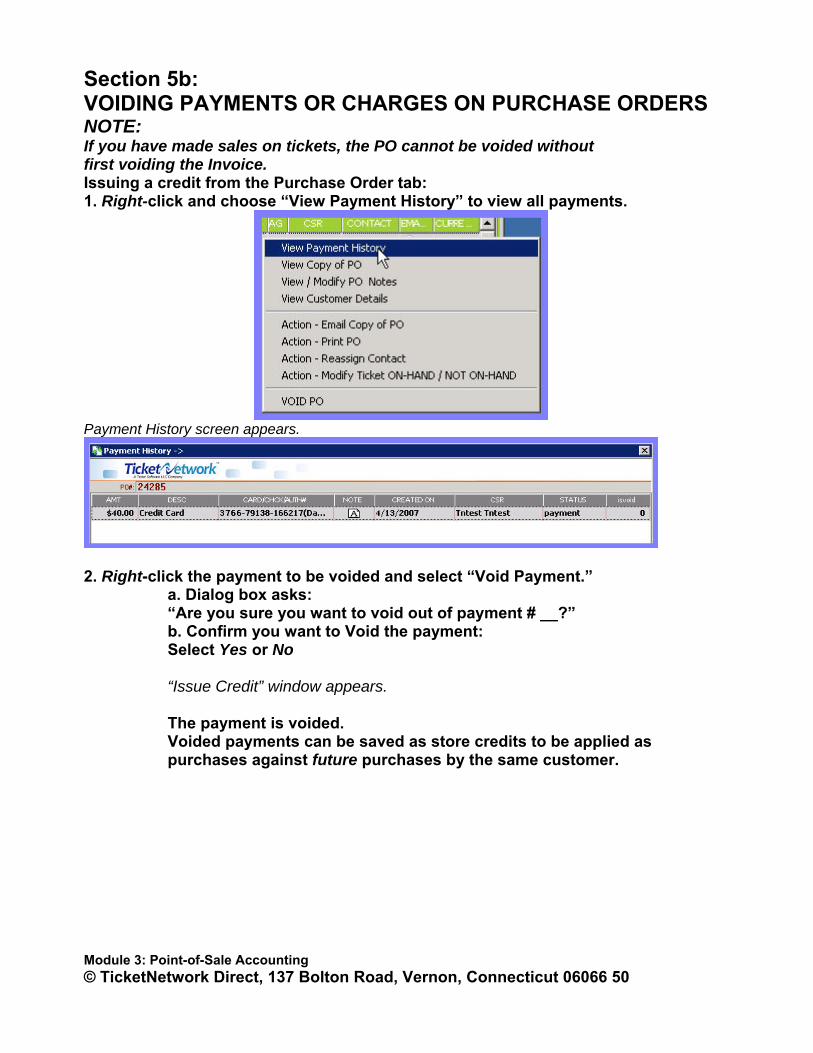
Section 5b: VOIDING PAYMENTS OR CHARGES ON PURCHASE ORDERS NOTE: If you have made sales on tickets, the PO cannot be voided without first voiding the Invoice. Issuing a credit from the Purchase Order tab: 1. Right-click and choose “View Payment History” to view all payments.
Payment History screen appears.
2. Right-click the payment to be voided and select “Void Payment.”
a. Dialog box asks: “Are you sure you want to void out of payment # __?” b. Confirm you want to Void the payment: Select Yes or No “Issue Credit” window appears. The payment is voided. Voided payments can be saved as store credits to be applied as purchases against future purchases by the same customer.
Module 3: Point-of-Sale Accounting © TicketNetwork Direct, 137 Bolton Road, Vernon, Connecticut 06066 50

3. The Purchase Order now moves to the “Outstanding” status: Voiding any type of payment other than credit card is the same as with an Invoice:
g. Right-click on the Purchase Order. h. Select “View Payment History.” Pop-up window appears, “Void Payment.” i. Select Yes Pop-up window appears confirming Void, “Credit Issued.” j. Click on OK.
4. Pop-up window appears, “Issue Credit?” asking if you wish to issue a “store credit” for the amount under consideration. Select Yes or No.
Pop-up window appears confirming Credit, “Credit Issued.” k. Click on OK. The Purchase Order now moves to the “Outstanding” tab. You may wish to issue a store credit to the customer’s account. This cash payment can be registered to the customer’s account for a future purchase.
Module 3: Point-of-Sale Accounting © TicketNetwork Direct, 137 Bolton Road, Vernon, Connecticut 06066 51
Related Documents


