i Model 2030 TABLE OF CONTENTS SECTION . . . . . . . . . . . . . . . . . . . . . . . . . . . . . . . . . . . . . . . . . . . . . . . . Page 1. QUICK REFERENCE ......................................................................... 1 2. INTRODUCTION ................................................................................ 4 2.1 Recycling ..................................................................................... 5 2.2 Energy Star SM ............................................................................... 5 2.3 Year 2000 Compliance ................................................................ 6 3. BEFORE OPERATION ...................................................................... 7 3.1 Name of Parts ............................................................................. 7 3.2 Operator Panel .......................................................................... 10 3.3 Main Unit and Accessories ........................................................ 16 3.3.1 Installing the Accessories ............................................. 17 3.4 Telephone Handset ................................................................... 18 3.5 Imaging Cartridge ...................................................................... 19 3.5.1 Low Toner and No Toner Receiving ............................. 19 3.6 Loading Paper ........................................................................... 22 3.7 Memory Features ...................................................................... 24 3.7.1 Standard “Flash” Document Memory ........................... 24 3.7.2 Optional “Flash” Document Memory Card.................... 25 3.7.3 Optional “Dynamic” Memory Card ................................ 25 3.8 Documents ................................................................................ 26 3.8.1 Acceptable Size and Thickness.................................... 26 3.8.2 Acceptable Number of Documents............................... 26 3.8.3 Image Quality................................................................ 26 3.8.4 Contrast ....................................................................... 27 3.8.5 Working with a Photo ................................................... 27 3.8.6 Automatic Reduction .................................................... 27 3.8.7 Effective Printing Area .................................................. 28 3.8.8 Copying a Document .................................................... 28 4. BASIC OPERATION.......................................................................... 29 4.1 Turning on the Power ................................................................ 29 4.2 Terminology............................................................................... 30 4.2.1 “Help” Key ..................................................................... 30 4.2.2 “Priority” Feature ........................................................... 30 4.2.3 Automatic Daylight Time Shift ...................................... 30 4.2.4 Multiple Selectable Transmit IDs .................................. 30 4.2.5 Remote Retrieval .......................................................... 31 4.3 System Set-Up .......................................................................... 31

Welcome message from author
This document is posted to help you gain knowledge. Please leave a comment to let me know what you think about it! Share it to your friends and learn new things together.
Transcript

i
Model 2030 TABLE OF CONTENTS SECTION . . . . . . . . . . . . . . . . . . . . . . . . . . . . . . . . . . . . . . . . . . . . . . . . Page 1. QUICK REFERENCE ......................................................................... 1 2. INTRODUCTION ................................................................................ 4 2.1 Recycling ..................................................................................... 5 2.2 Energy StarSM............................................................................... 5 2.3 Year 2000 Compliance................................................................ 6 3. BEFORE OPERATION ...................................................................... 7 3.1 Name of Parts ............................................................................. 7 3.2 Operator Panel .......................................................................... 10 3.3 Main Unit and Accessories........................................................ 16 3.3.1 Installing the Accessories ............................................. 17 3.4 Telephone Handset ................................................................... 18 3.5 Imaging Cartridge...................................................................... 19 3.5.1 Low Toner and No Toner Receiving............................. 19 3.6 Loading Paper ........................................................................... 22 3.7 Memory Features ...................................................................... 24 3.7.1 Standard “Flash” Document Memory ........................... 24 3.7.2 Optional “Flash” Document Memory Card.................... 25 3.7.3 Optional “Dynamic” Memory Card ................................ 25 3.8 Documents ................................................................................ 26 3.8.1 Acceptable Size and Thickness.................................... 26 3.8.2 Acceptable Number of Documents............................... 26 3.8.3 Image Quality................................................................ 26 3.8.4 Contrast ....................................................................... 27 3.8.5 Working with a Photo ................................................... 27 3.8.6 Automatic Reduction .................................................... 27 3.8.7 Effective Printing Area .................................................. 28 3.8.8 Copying a Document .................................................... 28 4. BASIC OPERATION.......................................................................... 29 4.1 Turning on the Power ................................................................ 29 4.2 Terminology............................................................................... 30 4.2.1 “Help” Key..................................................................... 30 4.2.2 “Priority” Feature........................................................... 30 4.2.3 Automatic Daylight Time Shift ...................................... 30 4.2.4 Multiple Selectable Transmit IDs .................................. 30 4.2.5 Remote Retrieval.......................................................... 31 4.3 System Set-Up .......................................................................... 31
ii
TABLE OF CONTENTS SECTION .................................................................................................... PAGE 4.4 Sending a Document..................................................................... 32 4.4.1 Scan to Memory ............................................................... 32 4.4.2 Automatic Redialing (Retries)........................................... 32 4.4.3 Dialing through the Numeric Keypad................................ 33 4.4.4 Dialing with a Speed Dial Number.................................... 34 4.4.5 Dialing with a One-Touch Key .......................................... 35 4.4.6 Dialing with P-Keys........................................................... 36 4.4.7 Dialing by Pressing the DELAYED SEND Key ................. 36 4.4.8 Dialing by Programming an AutoDial Job......................... 37 4.4.9 Dialing Manually from the Telephone Handset................. 39 4.4.10 Voice Request Dialing .................................................... 40 4.5 Receiving a Document .................................................................. 41 4.5.1 Receiving to Memory........................................................ 42 4.5.2 Out of Paper Receive ....................................................... 43 4.5.3 Receiving Manually........................................................... 44 4.6 Polling............................................................................................ 45 4.6.1 Preparing a Document to be Polled (Simple Poll) ............ 46 4.6.2 Editing “To Be Polled” Jobs .............................................. 47 4.6.3 Polling Another Machine (Simple Polling)......................... 48 4.6.4 Bulletin Board/Unlimited Polling........................................ 49 4.6.5 Sequential Polling ............................................................. 49 4.6.6 Turnaround Polling ........................................................... 51 4.6.7 Polling a Mailbox............................................................... 51 5. FEATURES SELECTIONS................................................................... 53 5.1 Storing Speed Dial Numbers......................................................... 56 5.1.1 Creating or Adding a Speed Dial Number ........................ 57 5.1.2 Changing or Deleting a Speed Dial Number, Telephone Number or Name......................................... 58 5.2 One-Touch Keys ........................................................................... 60 5.2.1 Programming a One-Touch Key....................................... 60 5.2.2 Deleting a Speed Dial Number from a One-Touch Key ... 61 5.3 Programming AutoDial Jobs ......................................................... 63 5.3.1 Sending a Document with Programmable AutoDial Jobs. 64 5.3.2 Polling with Programmable AutoDial Jobs........................ 65 5.3.3 Entering a Relay Programmable AutoDial Jobs ............... 66 5.3.4 Sending/Receiving with Programmable AutoDial Jobs .... 68 5.3.5 Sending to a Mailbox with Programmable AutoDial Jobs. 69 5.4 Editing AutoDial Jobs .................................................................... 71 5.4.1 Adding Pages ................................................................... 72 5.4.2 Editing Destinations.......................................................... 72

iii
TABLE OF CONTENTS SECTION .................................................................................................... PAGE 5.4.3 Deleting a Job................................................................... 74 5.4.4 Repeating a Job ............................................................... 74 5.4.5 Changing a Time .............................................................. 75 5.4.6 Print Document................................................................. 76 5.5 Programming P-Keys (One Touch Programmable Keys) ............. 77 5.5.1 Storing P-Keys.................................................................. 77 5.5.2 Editing or Deleting the Program from a P-Key ................. 78 5.6 Printing Reports and Forms .......................................................... 80 5.6.1 Printing a Report On Demand .......................................... 80 5.6.2 On Demand Reports ........................................................ 81 1. Jobs Report .................................................................. 81 2. Speed Dial Directory ..................................................... 81 3. One-Touch Directory .................................................... 81 4. One-Touch Overlay Sheet ............................................ 82 5 Program Key (P-Key) Directory .................................... 82 6. System Set-Up Report .................................................. 82 7. Cartridge Order Form ................................................... 83 5.6.3 Journal Report .................................................................. 83 5.6.4 Verification Reports .......................................................... 84 1. Job Status Report ......................................................... 84 2. Job Confirmation Report............................................... 84 3. Mailbox Directory .......................................................... 84 4. Mailbox Confirmation .................................................... 84 5. Mailbox Delivery Report................................................ 85 6. Relay Confirmation Report ........................................... 85 5.7 Setting Up The System .................................................................. 86 5.7.1 Changing or Programming the Set-Up Definitions ........... 87 5.7.2 Machine Settings .............................................................. 87 5.7.3 Machine ID Settings ......................................................... 90 5.7.4 Report Settings................................................................. 91 5.7.5 Job Settings...................................................................... 95 5.7.6 Telephone Line Settings................................................... 97 5.7.7 Option Settings ................................................................. 99 5.7.8 Receive Settings............................................................... 101 5.7.9 PC Options ....................................................................... 105 6. SPECIAL FEATURES AND FUNCTIONS ............................................ 106 6.1 PBX Access Codes ....................................................................... 106 6.1.1 PBX Access Codes ON.................................................... 107 6.1.2 Programming AutoDial Jobs - PBX Access Codes ON .................................................... 107
iv
TABLE OF CONTENTS SECTION.................................................................................................... PAGE 6.2 Mailbox Functions ......................................................................... 108 6.2.1 Setting up Mailboxes ........................................................ 109 6.2.2 Printing the Mailbox Directory........................................... 110 6.2.3 Printing Mail Stored in a Mailbox ...................................... 111 6.2.4 Storing Mail in Your Model 2030 Mailbox ......................... 112 6.2.5 Sending a Document to a Mailbox ................................... 114 6.2.6 Polling Your Mailbox From Remote Locations ................. 115 6.3 Relay Functions............................................................................. 116 6.3.1 Single and Dual Node Relay............................................. 117 6.3.2 How Speed Dial Numbers and One-Touch Keys are Used in the Relay Process................................................ 118 6.3.3 Single Node Relays From Your Unit................................. 118 6.3.4 Dual Node Relays From Your Unit ................................... 120 6.3.5 Performing Relays Using DTMF (Touch-Tone)................ 122 6.3.6 Relay Reports................................................................... 123 6.4 Programmable Power Saver ......................................................... 123 6.4.1 Programmable Power Saver Feature (Heater Timer) ...... 123 6.5 Modem Start Speed ...................................................................... 124 6.6 Sub-Addressing............................................................................. 125 6.6.1 General Description.......................................................... 125 6.6.2 Programming a Sub-address ........................................... 126 7. TROUBLESHOOTING AND MAINTENANCE....................................... 127 7.1 Symptom and Probable Cause ..................................................... 127 7.2 Display Messages ......................................................................... 128 7.3 Clearing a Paper Jam.................................................................... 129 7.4 Clearing a Misfed Original ............................................................. 132 7.5 Cleaning the Scanner Surface ...................................................... 133 7.6 Installing/Replacing the Imaging Cartridge.................................... 134 7.6.1 Cleaning the Printer.......................................................... 136 7.7 Safety and Ozone Emissions Information ..................................... 137 7.7.1 Safety Information ............................................................ 137 7.7.2 Ozone Information............................................................ 137
7.7.3 Toner Safety and Care ..................................................... 138 8. NOTICE TO USA USERS .................................................................... 139 9. NOTICE TO CANADIAN USERS ........................................................ 141 10. INFORMATION FOR U.K. USERS...................................................... 143
10.1 BABT Information for Model 2030............................................... 143

v
TABLE OF CONTENTS SECTION .................................................................................................... PAGE 11. MODEL 2030 SYSTEM SPECIFICATIONS........................................ 147 11.1 ITU-T Test Document #1 ............................................................ 150 12. SERVICE INFORMATION .................................................................. 151 13. MODEL 2030 OPTIONS AND SUPPLIES.......................................... 152 INDEX......................................................................................................... 154
1
1. QUICK REFERENCE A. GETTING STARTED Your Model 2030 can be used as soon as it’s unboxed, plugged into a power outlet, and connected to an analog telephone line. A Pitney Bowes Customer Service Representative should have already done this for you, as well as set basic system parameters (e.g., the time and date that appear in the display, etc.). If your machine has already been installed, you can begin transmissions as soon as you turn on the power. See Section 4 for instructions on “Basic Operation” and Section 4.4 for “Sending a Document.” If you need to move the system, or in the unlikely event that a Customer Service Representative is unavailable, you can begin to use the system by following these steps:
1. Plug the power cord into the wall outlet.
2. Insert paper in the Paper Cassette. See “Loading Paper,” Section 3.6.
3. Connection to telephone equipment:
(U.S. Version) a. Connect the Telephone Line Cord that came with the machine. One
end goes into the RJ-11C telephone jack on the wall. The other end goes into the back of the Model 2030 jack labeled LINE. (See NOTE 1 below. There is no need to provide any other telephone.)
b. To install the Telephone Handset: • Plug one end of the coiled Telephone Handset Cord into the
Telephone Handset. • Plug the other end of the coiled Telephone Handset cord into the
jack on the Telephone Handset Base.
(U.K. Version) a. Connect the Telephone Handset Cord to wall socket. b. Plug Telephone Handset into rear socket marked TEL.
4. Install Imaging Cartridge. See Section 7.6, “Installing/Replacing the
Imaging Cartridge.”
5. Turn on the power and begin a transmission. See Section 4.4, “Sending a Document.”
NOTES: 1. BEFORE PLUGGING THE MODEL 2030 INTO THE TELEPHONE LINE,
CHECK WITH YOUR PHONE COMPANY OR SUPPLIER TO BE SURE THAT NO DAMAGE MAY RESULT TO THE PHONE SYSTEM. INFORM THEM THAT YOU ARE INSTALLING A GROUP 3 FACSIMILE MACHINE.
2
THE MODEL 2030 REQUIRES AN ANALOG TELEPHONE LINE. THE FCC REGISTRATION NUMBER AND RINGER EQUIVALENCE NUMBERS ARE ALL ON A DATA PLATE ON THE REAR OF THE MODEL 2030.
2. See Section 3.1 for illustration of the back of the Model 2030 for assistance
with Steps 3a and 3b (outlined above). 3. Please follow the procedures in Section 5.7 “Setting Up the System.” B. FEATURE SELECTION PROCESS The feature categories and the selections possible under each are briefly described below for your convenience. For a more detailed description, refer to Section 5, “Feature Selections,” or to the specific Sections mentioned for each feature below. There are nine main Features in your Model 2030. Features can be selected by either:
• repeatedly pressing the FEATURES key until you reach the desired feature, then press YES or…
• pressing the FEATURES key + the CURSOR (δχ) key until you reach the desired feature, then press YES or…
• pressing the FEATURES key + the desired feature number + YES (twice).
Many of the Features relate to storing phone numbers and programming AutoDial Jobs. Before you store phone numbers and begin to program AutoDial Jobs, you should consider your communication needs and create a list of phone numbers and groups of phone numbers you want to store. The MAILBOX FUNCTIONS are described in the Special Features and Functions Section of this Guide (see Section 6). The CLEAN PRINTER Feature is described in the Troubleshooting and Maintenance Section (see Section 7.6.1).

3
The Feature categories are described below. For specific selections under each, please refer to Section 5, “Feature Selections.” #1 AUTO DIAL (See Section 5.3)
To store Jobs to send or receive single or multiple documents at a specific time to specific locations.
#2 PRINT REPORTS (See Section 5.6) To print administrative reports and forms. #3 MAILBOX ACCESS (See Section 6.2) To define and use various Mailbox feature selections. #4 EDIT JOBS (See Section 5.4) To change or delete AutoDial Jobs. #5 SET SPEED DIAL (See Section 5.1)
To store a frequently dialed number as a three-digit code. A Speed Dial number is an abbreviated way of entering and dialing a phone number.
#6 SET ONE TOUCH (See Section 5.2)
One-Touch keys allow you to send a document to one or several locations by pressing only one key.
#7 SET PROGRAM KEYS (See Section 5.5)
For permanent storage of frequently used AutoDial Jobs. #8 SET UP SYSTEM (See Section 5.7) Defines system settings.
#12 CLEAN PRINTER (See Section 7.6.1) To clean the Model 2030 each time a new Imaging Cartridge is installed.
4
2. INTRODUCTION
Congratulations on your selection of the Pitney Bowes Model 2030 facsimile system. The Model 2030 will help you keep communications costs down while giving you sophisticated transmission capabilities with one of the fastest transmission speeds in the industry. This Operator’s Guide will help you learn your Model 2030 quickly and easily. The Quick Reference Chart, Table of Contents and Index will serve to make information on every feature available instantly. Since the Model 2030 performs many different functions, not everyone will need to learn every feature. You may wish to read only the Sections that contain the feature(s) you are interested in. This Guide describes the Model 2030 and explains how to set up and use the system. The Guide is divided into eight other sections: • Quick Reference Chart lists all of the features selectable from the Model
2030 Main Level Menu. The feature categories and each of the selections possible under them are briefly described in this chart.
• Before Operations describes the Model 2030 Operator’s Guide and
explains how to use it. • Basic Operation describes the basic use of the system for those who will
use the system for occasional transmissions. • Feature Selections describes the features that allow you to store fax
numbers, create and edit AutoDial Jobs, set up the system, and print reports. These features are the ones that allow you to customize the system.
• Special Features and Functions describes high level facsimile
capabilities, such as PBX Access Codes, Mailbox and Relay functions, Sub-addressing, etc. These are powerful standard features that save time and provide real cost savings and a high degree of system and network security.
• Troubleshooting and Maintenance describes the routine procedures
you’ll need to replace consumables (Imaging Cartridge), clear misfeeds, clean the scanner, etc.
• Notices for USA, Canadian and U.K. Users – contains information
pertinent to use of the Model 2030 in the respective country. • Service, Supplies and Options – Contains important contact and
supply/accessory/option ordering information.
5
2.1 Recycling Pitney Bowes is concerned about issues that affect our environment. Properly handled, all parts from our Imaging Cartridges can be recycled in some way rather than taking up additional space in our country’s landfills. To make this easier, Pitney Bowes has set up a program to provide trouble free recycling for the Model 2030’s Imaging Cartridges in the U.S. Enclosed with each Imaging Cartridge is a prepaid postage return label and a strip of adhesive tape. Simply pack the used Cartridge in the same box that contained its replacement. Seal the box with the tape, apply the return label and mail back to us with your regular mail. You may want to keep a copy of the label in the event you misplace the original. As long as it is a clear copy, the Post Office will honor the copied label. A recycling program is currently under review in the U.K. In Canada, cartridge returns are handled by Purolator Courier. To return, please follow the instructions provided on the Purolator material enclosed with each cartridge.
2.2 Energy StarSM Pitney Bowes’ desire to advise customers about the energy efficiency of our equipment not only includes the bottom line savings but also evaluating our equipment’s impact on the environment. Office equipment is the fastest growing electricity load in the world. The U.S. Environmental Protection Agency (EPA) promotes energy efficiency because electricity generation contributes to air pollution, including 35 percent of all U.S. emissions of carbon dioxide. It also accounts for 75 percent and 38 percent of all U.S. emissions of sulfur dioxides and nitrogen oxides, respectively. By using more energy-efficient equipment like the new Pitney Bowes Model 2030 facsimile, we can reduce this pollution, while saving money. Printers and fax machines are typically left on 24 hours a day, but are active only a small percent of the time. This means conventional printers and fax units can waste a lot of energy and money but the Pitney Bowes Model 2030 automatically powers down to save energy when not being used. This SLEEP MODE feature can cut the unit’s annual electricity use by over 65 percent. As an ENERGY STARSM partner, Pitney Bowes Inc. has determined that the Model 2030 meets the ENERGY STARSM guidelines for energy efficiency.

6
Look for the ENERGY STARSM logo (like the one on your Model 2030) when considering products for your office.
2.3 Year 2000 Compliance The Model 2030 is Year 2000 compliant. Please visit our web site at www.pitneybowes.com for more information.

7
3. BEFORE OPERATION
3.1 Names of Parts
The Model 2030 has the following main components. 1. Automatic Document Feeder (ADF) Set the documents you want to
transmit face down on the Automatic Document Feeder. You can have up to 50 pages in the ADF at one time.
2. Document Guides You can adjust the Document Guides to allow you to
position different size documents in the feeder. Standard size indications (A4, 8-1/2”, B4 and 11”) are printed between the Document Guides.
3. Telephone Handset Can be used for placing outbound calls or answering incoming calls. See Section 3.4 for more information on the Telephone Handset.
4. Operator Control Panel (Top Cover) The Operator Control Panel keys
and display allow you to rapidly program the Model 2030 with a high degree of logic and ease.
3 1
2
4

8
5. Original Document Return Tray Once an original document moves through the Document Feeder, it is stacked on this top tray. Received documents stack on the Paper Receive Tray below.
6. Receive Document Tray Received documents are presented to the
operator here after the printing process has been completed. 7. Main Front Loading Paper Cassette Holds approximately 500 sheets of
paper and is located under the machine. You can remove this cassette by pulling it towards you. Located under the Main Paper Cassette, two more paper trays can be added which will hold approximately 250 or 500 sheets of paper each. Maximum paper capacity: 1,250 sheets.
8. Printer Cover Release Button Press this release button on the right side
of the unit to open the Printer Cover for Imaging Cartridge and paper path access.
5
6
7
8

9
9. AC 120V Power Cord for attachment to the Model 2030 AC Power Socket. The Power Cord must be plugged into a wall outlet to power the system. (Note for U.K.: This is 240VAC.)
10. ON/OFF Switch This powers the unit ON ( | ) or OFF ( 0 ). Switch is
located at the lower right rear of the unit (when viewed from the rear). 11. RJ-11C Telephone Line A Telephone line cord connects this jack to a
similar wall jack for attachment to a phone line. (Not applicable in U.K.) 12. RJ-11C Extension Telephone Line Used if attachment of a customer
provided extension telephone is required. (Not applicable in U.K.) 13. Optional IEEE 1284 Parallel Port This port is used to connect cables if
the Printer Driver and/or HydraFax options are installed. (Call your local Pitney Bowes Office for additional information.)
14. Ringer Volume Switch The three-position Ringer Volume Switch allows
you to adjust the volume (loudness) of the rings generated from your unit when someone calls it. Moving the Switch increases and decreases the volume. (Not applicable in U.K.)
9
10
11
1220
13
14

10
3.2 Operator Panel

11
1) Display Area
The two-line display has space for up to 20 characters per line. Messages that appear in the display confirm the date and time, or the current operation. When POWER is on, the display will indicate the system status. If the display is blank, check power switch and power plug. If δδ or χχ are shown in the display. Pressing the δδ or χχ key will shift back and forth between the previous and next screens.
2) On Line Light
Indicates that communications are occurring. The display will remain in the “System Ready” mode (see Communication Status key).
3) Out of Toner Light
The OUT OF TONER indicator will illuminate when low or out of toner. 4) Reports Key
Press the REPORTS key* to print the following reports, directories and forms:
• Journal Report (view and/or print) • Jobs Report • Speed Dial Directory • One-Touch Directory • P-Key Directory • System Set Up Directory • (Toner) Cartridge Order Form • One-Touch Sheet (control panel overlay)
*Also used as the left CURSOR ( β ) key.
5) Communication Status Key
a. The display can be switched by pressing and releasing the COMMUNICATION STATUS key* once for the Transmission Speed, Remote ID or twice for Job # and Page #, to allow for monitoring of the transmission in progress (on line). Even if the document is being received while copying is in progress, the state of reception can be verified. The display will revert to “System Ready” after 5 seconds.
b. The COMMUNICATION STATUS key and then the STOP key can be pressed in order to cancel a transmission from memory.
c. After pressing the VOICE key, press the COMMUNICATION STATUS key to lower or increase the volume of the Monitor (Speaker).
*Also used as the right CURSOR ( α ) Key.

12
6) Directory Search Key
DIRECTORY SEARCH key allows you to look up any one of the 200 Speed Dial numbers with a minimum of effort. Use of this feature employs three keys: the DIRECTORY SEARCH key, and the two Search (or scrolling) keys, which on the Model 2030 are the EDIT JOBS (δ) and HELP (χ) keys.
1. Press DIRECTORY SEARCH to access this feature.
2. After pressing the Alphabetical One-Touch keys to specify the
alphabetical group desired, pressing the EDIT JOBS key δ or the HELP key χ will cursor to the location ID. You can enter as many letters as you want to help define the name and reduce the amount of scrolling with the δ or χ keys.
3. Once the proper location is displayed, pressing the SEND/RECEIVE
key will initiate communication. 7) Edit Jobs Key The EDIT JOBS key* is used to gain direct access to the EDIT JOBS feature.
When pressed, the following selections appear on the display: 1=Add Pg, 2=Edit Dest. 3=Delete, 4=Repeat, then press δ to view 5=Change Time, 6=Print Document. These functions are used to view or modify a stored AutoDial Job.
*Also used as a CURSOR (δ) key.
8) Help Key
Press the HELP key* to print a brief explanation of any key or feature you need help with. *Also used as a CURSOR ( χ ) key.
9) Original Key (Normal, Light, Dark)
Press the ORIGINAL key when you want to adjust for the contrast of the original document. If a document is present in the Automatic Document Feeder, each time you press the button, the display will indicate the selection.
10) Mode (Resolution) Key
Press the MODE key when you need to adjust the transmission for a higher than normal resolution. If a document is present in the Automatic Document Feeder, each press of this button advances the display that will indicate the selection. You can also press MODE when you are programming an ID to insert symbols.
13
11) Photos Key
Press the PHOTOS key when you want to send a document that contains a halftone image (photo). An indicator will illuminate on the Control Panel.
12) Delayed Send Key Press the DELAYED SEND key to set up transmission jobs for delayed or
immediate transmissions, to single or multiple destinations. Up to 30 jobs can be stored in the Model 2030.
13) Document To Memory Key The DOCUMENT TO MEMORY key determines if documents are to be
stored to memory before dialing. Documents will be stored into memory before transmission when the green LED is on. When the LED is off, documents will be sent directly from the ADF.
14) One-Touch Keys (01-30)
Press any of the 30 ONE-TOUCH keys to:
•• send a document to one or more locations stored in that key, •• poll from one or more locations stored in that key, • to record characters (A-Z, space and hyphen) when programming the
Name field within the Machine ID, Speed Dial, One-Touch and P-Key settings.
15) Programmable One-Touch Keys (P-Keys)
You can use the last five ONE-TOUCH keys (P1, P2, P3, P4, P5) to:
• program a permanent AutoDial job that you can use frequently (without the need for reprogramming).
16) Yes Key
Press YES to:
• answer “Yes” to a prompt while you are programming, • confirm a program selection you want to enter into memory, • select a Speed Dial number for communications, • confirm any function that requires the YES key to complete the activity.
14
17) No Key
Press NO to: • answer “No” to a prompt while you are programming, • backspace and erase an incorrect character or number while you are programming.
18) Redial Key
Press the REDIAL key to immediately redial the last number called or to override an existing redial wait period. The Model 2030 will remember the last telephone number dialed, either through the Numeric Keypad or automatically (e.g., via a Speed Dial number or One-Touch key).
19) Voice Key
The VOICE key is used for On-Hook Voice Mode. This allows you to call a random non-fax telephone number or non-fax Speed Dial number or non-fax telephone number stored as a One-Touch Program key. The VOICE key also is used to adjust the 2030’s speaker volume (monitor).
20) Pause Key
Press PAUSE to: • insert a 1- to 10- second delay (indicated by a “,” in the display) in a
dialing sequence while you are programming or dialing a telephone number. A 5-second hesitation per pause entry is the factory default. The length of each pause can be changed by calling the Pitney Bowes Diagnostic Center listed in the back of this Guide. This feature can be changed over the phone and does not require a service call.
21) Numeric Keypad
The numeric keypad serves two functions: 1. In fax mode, press the numeric keys to dial a fax or voice call. 2. In program mode, is used for entry of the numeric portion of program-
med telephone/fax numbers.
22) Features Key
Press FEATURES to access different programmable operations from the Main Menu: Auto Dial, Print Reports, Mailbox Access, Edit Jobs, Set Speed Dial, Set One-Touch keys, Set Program keys, Set Up System and Clean Printer. These features are explained in detail in Sections 5, 6 and 7. You can also refer to the Quick Reference in Section 1.
15
23) Stop Key
Press STOP to: • Cancel an ADF transmit in progress • Halt printing of reports or copies • Stop an audible alarm
24) Copy Key
Press the COPY key, enter the number of copies (up to 99) and then press the YES key to make copies or to verify the quality of an original.
25) Send/Receive Key
Press the SEND/RECEIVE key when you are ready to begin a transmission/ reception.

16
3.3 Main Unit and Accessories The Model 2030 has the following components:
• Imaging Cartridge • Quick Reference Guide • Document Return Tray • Supply & Paper Cassette Labels • Receive Document Tray • Telephone Handset* • Telephone Line Cord • Telephone Handset Curly Cord* • Power Cord • Operator’s Guide
• Document Carrier • Speed Dial Directory
*Note: Not available in the U.K.

17
3.3.1 Installing the Accessories 1. Telephone Handset and Curly Cord: Connect cable to handset and plug
other end into the cradle. Place handset in cradle. (Not available in U.K.) 2. Original Document Return Tray: Hook the projections into the square
holes at the top left side of the machine.
3. Received Document Tray: Hook the projections into the square holes at the bottom left side of the machine.
See Section 13 for additional Model 2030 options and supplies.

18
3.4 Telephone Handset (not available in the U.K.) Your Model 2030 is equipped with a built-in Telephone Handset that enables the unit to be used as a combination facsimile machine and telephone. The Model 2030 is designed to be used on its own telephone line or it can be attached to your normal voice line and used as a desk telephone as well as an Auto Receive fax. This means that you can actually (in most cases) eliminate your existing desktop single line telephone set and replace it with the Model 2030. If you intend to use the Model 2030 as your primary telephone, you may or may not want the machine set up for automatic receiving. It can be set up either way depending upon your needs. If you always want the Model 2030 to answer, the number of Rings Before Answer (ring count) should be set at 1. This is the default setting when your 2030 was shipped. When set to 1 ring, the Model 2030 will answer immediately after the first ring. If you would like to be able to answer an incoming call before the Model 2030 answers, you can configure your system for delayed answer. This allows you to determine how quickly the fax unit will answer after the phone begins to ring. The Rings Before Answer setting determines the delay (number of rings) before the Model 2030 answers. The number of Rings Before Answer should have been set at the time that your system was installed. If not, or if you wish to change it, it can be changed in the SET UP SYSTEM feature (see Section 5.7, “Setting up the System”).
You may always want to answer incoming calls and never have the Model 2030 answer automatically. In this case, you can configure your system for Manual Receive Mode. This is also changed in the SET UP SYSTEM feature (see Section 5.7, “Setting up the System”). The display will indicate Manual Receive, if configured this way. All incoming calls must then be answered by picking up the Telephone Handset. If the incoming call is a fax transmission, simply press the SEND/RECEIVE key on the Operator Control Panel.
19
3.5 Imaging Cartridge The printing system employed by the Model 2030 drastically reduces operator involvement and service calls. Except for paper, the Imaging Cartridge is the only other supply you’ll ever need. The imaging technology is extremely reliable. Each time you replace the Imaging Cartridge, you actually are replacing the major components that control the imaging process. There is no chance for system wear or deterioration. A. The transmission settings of the sending machine:
• Mode (Resolution) = Normal/Fine/Extra Fine/Ultra Fine
• Original (Contrast) = Normal/Dark/Light
• Photos (Halftone) = On/Off
The transmission settings are actually determined by the sending machine. For example, if the document is sent in the Normal Mode, it will be received in Normal Mode on your 2030, and so on. If documents are sent to you in the Fine or Extra Fine Modes, the resolution will be higher. Likewise, if the sending machine is set for a Normal Original, your unit will receive in the same manner. If the sender changes the Original setting of the transmission, your received copies may be darker. When a sending machine transmits pictures or graphics to you in the Photos Mode, your Model 2030 may use more toner. B. The type of document(s) being transmitted to you The Imaging Cartridge yield of approximately 15,000 copies (based on the ITU-T Test Document #1, see sample, Section 11.1) may actually vary according to the print density of the documents being received. Pages that contain more data or black coverage will result in fewer pages per Imaging Cartridge. 3.5.1 Low Toner and No Toner Receiving This feature allows the Model 2030 to guard against lost pages or documents if toner runs low. In most cases, this guarantees that all pages sent to your machine will be either printed or saved in memory for printing at a later time. The machine actually senses low toner well in advance of complete toner depletion and the unit will let you know when toner is needed in two ways:

20
1) A form is automatically printed when toner becomes low. Fill out the form and either fax or call the number listed in Section 12. This form may also be printed by following directions in Section 5.6.1, “Printing a Report on Demand.” (Not available in U.K.)
2) Additionally, as soon as a low toner condition is detected, the Toner Indicator
near the display on the Operator Control Panel will begin blinking. Enough toner still remains in the Imaging Cartridge to print approximately 250 pages. A special sensor automatically sends incoming pages to memory when the toner out condition is detected. Conveniently, in the U.S. and Canada, the Pitney Bowes toll free supply line telephone number is displayed when the toner becomes depleted. In the U.K. a number to call is listed. The following messages will appear in the display:
The Toner Indicator light will continue to blink. After the Model 2030 prints another 250 copies (approximate), the Toner Indicator will remain steadily lit. If the Model 2030 detects this secondary low toner situation while printing a page from memory, the rest of the document will either remain in memory or continue to be received into memory. Likewise, all subsequent documents will be received into memory. All documents in memory will be automatically printed when the Imaging Cartridge is replaced. If the Toner Indicator remains steadily lit, it means the unit is completely out of toner and the following messages will appear in the display:
Do This
This Happens
1. Replace the Imaging Cartridge with a new one (see
Section 7.6 for instructions).
If additional pages or documents are still in the Model 2030’s memory, they will be automatically printed when the Imaging Cartridge is replaced. While printing these pages or documents, the display will read:
After replacing the Imaging Cartridge, the display will read:
TONER ALMOST EMPTY XXX PRINTS REMAIN
FOR REPLACEMENT CALL (SUPPLY NUMBER)
AUG 10 2001 10:00 SYSTEM READY
FOR REPLACEMENT CALL (SUPPLY NUMBER)
AUG 10 2001 10:00 SYSTEM READY
TONER EMPTY PRINTER NOT USEABLE
PLEASE WAIT!
PRINTING NOW PAGE.7

21
NOTES: 1. If the secondary low toner situation occurs and the remaining pages and
future documents are then received into memory, there may not be enough available memory to receive the entire transmission. The Model 2030 will receive until memory becomes full and then the telephone connection will automatically disconnect. The Model 2030 will then not be able to receive until the Imaging Cartridge is replaced. If this occurs frequently, you should consider upgrading to one of the other Memory Options or paper cassettes available from Pitney Bowes (see Section 13). Should you feel that it is necessary to upgrade the Memory of your Model 2030, please call your Pitney Bowes Sales Representative to place an order for the appropriate option.

22
3.6 Loading Paper Anyone can add paper to the front loading, easy to access paper cassette(s) of the Model 2030 with minimal effort. Installation of one or two different sizes and/or quantities of paper is a simple procedure. If receiving volumes increase over time, add another cassette. (To order additional cassettes, see Section 13, “Model 2030 Options and Supplies.”) Your Model 2030 will print on letter-, legal- or A4-size paper, in weights ranging from 16 to 24 lbs. In general, most papers designed for photocopiers and laser printers will produce excellent results. In its standard configuration, you can load up to 500 sheets of standard weight paper (20 lb. or 75 g/m2) in the 2030’s cassette(s). One or two additional cassettes, 250-sheets and/or 500-sheets can be added, for a maximum paper supply of 1,250 sheets. With possibly three cassettes present, there is no receiving guesswork. Once the machine is set up and the paper is installed in the cassettes, the Model 2030 decides whether reduction is necessary to fit onto any letter-size paper. Or, if legal paper is installed, in the second or third cassette, the unit may decide that a received image might be best suited to print on legal size, if too big for letter-size.
To load paper, proceed as follows: 1. Pull the cassette completely out from
underneath the front of the 2030. • Select a supply of approximately 500
sheets of paper (maximum) to install in the main paper cassette. Then, while holding the stack loosely, tap the edge of the stack against a flat surface to align the edges.
2. To load paper,
• Push Pressure Plates down into locked position.
• Load the paper. Caution: Make sure that the paper is set under the clips of the paper cassette. Remember, you can load about 500 sheets of standard weight paper (20 lb.). 3. Slide the paper cassette into the machine
until completely closed. 4. Lastly, affix the proper paper size label
(shipped with unit) on front of cassette.

23
To adjust the cassette paper size (LTR, LGL or A4), proceed as follows: 1
2
3
4
1. First, remove the cassette…
• Pull straight out until it stops. • Grasp each end of the cassette
and lift up slightly, while pulling, as shown by the arrow.
2. Adjust the Paper Length Guide
(green) to the paper length. For LGL size paper, remove the Paper Length Guide and store it in the provided slot in the front left side of the paper cassette. Note: See illustration inside of cassette.
3. Reposition the Paper Size Selector
(green) at the rear of the cassette. This Selector will tell the 2030 which paper size is loaded in the cassette. • Release the clip and remove the
Paper Size Selector. • Rotate the Paper Size Selector
until the appropriate setting marked on the Selector is facing upward and the wording is upright, e.g., LGL.
• Reinstall the Paper Size Selector. 4. If changing paper from LTR/LGL to
A4 width, (or vice versa) adjust the Paper Width Guide and Clip to the new paper size. The factory default for the Width Guide and Clip are in the LTR/LGL position.

24
5
5. Reinstall the paper cassette by angling it slightly as it first enters the unit. Level off, while pushing in, as shown by the arrow.
3.7 Memory Features 3.7.1 Standard “Flash” Document Memory The 2030’s one megabyte (1 MB) “Flash” Document Memory can store up to 60 pages* (see next Section for Memory Card Options). The 2030 uses this memory to store pages for such capabilities as Delayed Send, Batching, Mailbox, Broadcasting to multiple locations, and receiving documents into memory. “Flash” Memory enables the unit to retain documents stored in memory (e.g., for a delayed transmission or due to a paper-out condition) even if power to the unit is interrupted. The 2030 uses its document memory in a very unique and efficient manner, in that it frees-up memory as each page of a document is transmitted. This method of memory usage reduces the chance for a “Memory Full” situation which not only improves productivity, it reduces costs by sending the entire document during one (versus multiple) phone calls. The 2030’s powerful memory also supports the following functions, each of which will be covered in subsequent chapters:
• Receive-to-Memory • Out-of-Paper/Out-of-Toner Reception (also called Substitute Reception) • Transmission from Memory (to single or multiple locations) • Multitasking • Automatic Reduction of Received Documents • Delayed Transmission • Making Multiple Copies • Mailboxes • Automatic Page Retransmission (from point of error)
25
3.7.2 Optional “Flash” Document Memory Card Additional “Flash” Document Memory Card options are available for your 2030. The 2-MB, 4-MB and 8-MB options each offer the same features as the standard "Flash” Document Memory (see above), only with increased page capacity for added application versatility. Your unit may have been ordered with one of these Document Memory options. To determine the size of installed memory options, if any, print the System Setup Report (refer to Section 5.6.2 for instructions.)
Additional “Flash” Memory Card Size
Additional Number of Pages*
Total Number of Pages*
2 megabyte 160 220 4 megabyte 320 380 8 megabyte 640 700
3.7.3 Optional “Dynamic” Memory Card Your 2030 can also be upgraded with additional “Dynamic” memory, adding either a 2-MB, 4-MB or 8-MB card. “Dynamic” memory provides enhanced multitasking capabilities, such as simultaneous printing and scanning at 300 dpi and 400 dpi. PC printing resolution is also enhanced to 600 dpi. NOTES: 1. Feature performance is dependent on the amount of available memory.
Actual page capacity may vary according to document density. Number of pages is based upon ITU-T Test Document #1 (see sample, Section 11.1).
2. The machine Date/Time is protected by battery backup and will be retained if
power to the 2030 is interrupted. Documents stored in memory, machine settings and programming are in non-volatile memory which is unaffected by power loss.
3. Multitasking lets the Model 2030 answer the telephone even while the unit is
printing from memory. Incoming documents can be temporarily received into memory for printing as soon as printing of the current document is complete.

26
3.8 Documents 3.8.1 Acceptable Size and Thickness
Maximum Width/Length:
11" x 78.7" (280 mm x 2 m)
Minimum Width/Length:
5.8" x 5" (148 mm x 128 mm)
Thickness:
Single Page: 12 to 30 lbs. 0.0024" to 0.006" (0.06 mm to 0.015 mm) Multiple Pages: 12 lbs. to 20 lbs. 0.0024" to 0.0048" (0.06 mm to 0.012 mm)
Effective Scanning Area Effective Printing Width:
9.92" (252 mm) 8.20" (208 mm) (A4: 202 mm)
3.8.2 Acceptable Number of Documents A maximum of 50 documents can be set on the Automatic Document Feeder at one time. Adjust the Document Guide to make sure the document is centered in the ADF. NOTES: 1. Transmission time is increased on documents with pictures or large dark
areas. 2. Make sure that correction fluid has dried before transmitting or copying. 3. If using “Post It” notes or the like, make sure the glued edge is being fed into
the fax unit first. 4. Printing that is outside the prescribed range may not be transmitted
successfully. 5. Do not use paper that is pressure sensitive, glossy, wrinkled, curled or folded
too thin (onionskin, airmail), too thick, smaller than 5”x5” (128mm x 128mm), cloth or metal. Make a photocopy first and then send the copy or place original in a Document Carrier. Document Carriers should be fed one at a time. See Section 13 for information on Document Carriers.
3.8.3 Image Quality Pressing the MODE key on the Operator Control Panel sets the mode or image resolution. Most documents can be sent in NORMAL mode. You can select FINE or EXTRA FINE Mode (by pressing the MODE key) before you send a document in order to improve the appearance of the transmitted page.
27
• NORMAL (98 x 203 dpi): For documents with standard size characters. • FINE (198 x 203 dpi): For documents with relatively small characters or
thin lines.
• EXTRA FINE (396 x 203 dpi): For documents with detailed lines and characters. The receiving party must possess Extra Fine capabilities (Pitney Bowes proprietary and/or ITU-T standard) in order to benefit from this mode’s feature. If not, the reception will be accomplished in the Fine Mode. If it is necessary to receive in ITU-T Extra Fine, call the Diagnostic Center listed in the back of this Guide to have this feature turned on. Installation of 2-MB, 4-MB or 8-MB is necessary. The standard 1MB Memory is not sufficient.
• ULTRA FINE (396 x 406 dpi): Only required when documents are of
extremely fine detail. All the rules regarding ITU and memory installation outlined under “Extra Fine” apply.
3.8.4 Contrast (ORIGINAL Key) When transmitting dark documents, selecting DARK will allow the received copy to be printed lighter than the original. When transmitting light documents, selecting LIGHT will allow the received copy to be printed darker than the original. Place the document in the Automatic Document Feeder face down then press the ORIGINAL key. The indicator corresponding to the selected level of contrast will illuminate. 3.8.5 Working with a Photo The Model 2030 has a 64-shade gray scale scanning capability, providing high quality photo reproduction. It is not necessary for the receiving machine to have a photo capability. You can send or copy a document that contains a photograph by pressing the PHOTOS key on the Operator Panel. When the PHOTOS key is selected, the Mode indicator will automatically advance to FINE. To enhance image quality, you may press the MODE key if you desire higher or lower image resolution. 3.8.6 Automatic Reduction The Model 2030 was shipped with a 500-sheet universal paper cassette adjustable for letter, legal or A4 paper and the Print Auto Reduction feature ON. Each page of a received document is first stored in memory. Based on the document length the Model 2030 will then automatically calculate the suitable Reduction Ratio to enable the entire document to print on a single page. It will reduce only the amount necessary for everything to print. If you turn the Auto Reduction OFF, all documents will be received at their full size and no reduction will occur. As a result, two sheets may print. If you wish to turn Auto Reduction OFF, contact the Pitney Bowes Diagnostic Center listed in the back of this Guide. This feature can be disabled over the phone and does not require a service call.

28
3.8.7 Effective Printing Area The Model 2030, like all plain paper imaging products (copiers, laser printers, laser fax units, and ink jet printers), contains certain borders or print margins where no printing can occur. The Effective Printing Area is therefore somewhat smaller than the actual size of the Recording Paper loaded in the Model 2030. 3.8.8 Copying a Document You can use the Model 2030 to make convenience copies of a document. You should also make a copy of a document that is of questionable quality to verify what the reception quality will be before you send it. To copy a document: Do This
This Happens
1. Insert the document face down in the Document Feeder.
2. Press COPY.
3. Enter the number of copies you want from 1 to 99. Then press YES to begin copying.
NOTES: 1. If you wish to bypass memory and copy directly from the scanner, for
example, page content exceeds the 2030’s internal document memory, you may do so by pressing COPY or YES in Step #3 above. One copy of the document will be made.
2. If you are making several copies of a multi-page document, the display will inform you of the copying status. The page being printed and the document number being copied will be displayed.
3. Making multiple copies is dependent upon available memory.
AUG 10 2001 10:00 MEMORY AVAILABLE 100%
HOW MANY COPIES? MAX (99)
COPY PAGE 1

29
4. BASIC OPERATION This Section describes the basic operating instructions of the system. It also describes the procedures an occasional Model 2030 user needs to send, receive or poll documents.
4.1 Turning on the Power Once the Model 2030 has been set up, you should check the display on the Operator Control Panel to be sure SYSTEM READY is displayed. If it is not, press the ON/OFF switch at the lower right rear of the system. You should keep the power ON at all times. When the system is waiting to be used, you’ll see the current date and time in the display. This is called the System Ready Mode.
System Ready Mode Or, if your 2030 remains idle for 5 minutes* (factory setting), the display will read as follows: This indicates that the unit is conserving energy while not in use. This programmable Power Saver feature greatly reduces electric bills. If an incoming document arrives, the unit will reactivate the heater timer as it temporarily receives the document into memory. Once the element has reached operating temperature, the document is completely printed. When you load a page in the Automatic Document Feeder, you’ll see an indication of the amount of memory that is available: *Note: The Power Saver Timer is user-selectable (1 to 255 minutes). See Section 5.7.2 for instructions on adjusting this setting.
AUG 10 2001 10:00 SYSTEM READY
SLEEP MODE PRESS KEY TO WAKEUP
AUG 10 2001 10:00 MEMORY AVAILABLE 100%
30
4.2 Terminology 4.2.1 “Help” Key The Model 2030 has a convenient HELP key that is located below the display on the Operator Control Panel. Whenever this key is pressed, the user will be prompted by a display message to press the key or enter the feature they need assistance with. After pressing the desired key or reaching the desired feature, the Model 2030 will print an explanation of the key or feature in question. The printed material contains descriptive information as well as important programming guidelines. 4.2.2 “Priority” Feature If enabled, the Priority feature allows you to place an important document at the top of the transmission queue. The display prompts, “SHALL THIS JOB BE A PRIORITY?” whenever programming an AutoDial Job. Respond with “Yes” and the priority document is sent next. When finished, the 2030 automatically resumes dialing/transmission to the remaining destination(s). To turn this feature ON, please contact the Pitney Bowes Diagnostic Center listed in the back of this Guide. 4.2.3 Automatic Daylight Time Shift (not available in UK) The Daylight Time Shift feature automatically adjusts the 2030’s internal clock to occur on the first Sunday of April (one hour ahead) and the last Sunday of October (one hour back). This means you will not have to be concerned with changing the time on your fax. The yearly time shifts will be consistent at least through the year 2005. This feature can be disabled by your Service Representative or the Pitney Bowes Diagnostic Center for areas that do not require this feature. 4.2.4 Multiple Selectable Transmit IDs If enabled, the 2030 allows you to set up to 25 different Transmit IDs. A user’s personal ID can be chosen while setting up a document transmission. The machine’s default ID is used if one is not selected. The ID is used in the traditional “FROM” section of the identification banner at the top of each transmitted page. It is also used in the “FROM” box on the Automatic Cover Sheet (if this feature is activated). Multiple IDs provides a personal touch to the Model 2030 if it is shared by numerous users in an office or department. To turn this feature ON, please contact the Pitney Bowes Diagnostic Center listed in the back of this Guide.
31
4.2.5 Remote Retrieval This feature allows you to retrieve documents received into the 2030’s memory (except Mailboxes and pending Jobs) from a remote fax. If turned on, all documents will be received into memory. To retrieve them, you must know the 2030’s Remote Retrieval passcode The passcode is used for securing the Remote Retrieval feature. All documents in the 2030’s memory will be erased after being received by the remote fax. See Section 5.7.8 for more information on Remote Retrieval.
4.3 System Set-Up Since a Pitney Bowes Customer Service Representative probably unboxed and installed your Model 2030, your basic System Set-Up Definitions should have already been programmed for you. If your machine has already been installed, you can begin transmissions as soon as you turn on the power. See Section 4.4 for instructions on “Sending a Document.” If the Pitney Bowes Customer Service Representative has not programmed these Set-Up Definitions for you, you may want to program them before sending a document (see Section 5.7, “Setting up the System”). This is not necessary to begin a transmission, but if it is done prior to any sending and receiving, the Model 2030 can help you keep records of all documents from the very beginning. For example, the built-in clock keeps the exact Date and Time, and your Transmit ID (TTI) and Fax Telephone Number help identify you when you send or receive documents. Important: The Telephone Consumer Protection Act of 1991 makes it unlawful for any person or entity to transmit a fax without identifying a Transmit ID, i.e., name, fax number, date and time of transmission. The features that can be programmed in the SET UP SYSTEM feature are:
• MACHINE SETTINGS - DATE & TIME - BEEP VOLUME - DOCUMENT SEPARATOR
- PRINT INDEX MARK - SEPARATOR PAGE
- POWER SAVER - POWER SAVER TIMER
• MACHINE ID SETTINGS - TRANSMIT ID NAME - THIS FAX NUMBER
• REPORT SETTINGS - JOURNAL FORMAT - JOURNAL DISPLAY - JOURNAL ID FIELD
- JOURNAL PRINT - JOURNAL SEND - JOB STATUS • JOB SETTINGS
- SAVE INCOMPLETE JOBS - SAVE STOPPED JOBS
- SCAN TO MEMORY…
- SEND COVER SHEET - ONE TOUCH START DELAY - CONFIRM JOBS REPORT • TELEPHONE LINE SETTINGS
- ANSWER RING PATTERN - RINGS BEFORE ANSWER - AUTO RECEIVE - RETRY COUNT - RETRY INTERVAL
• OPTIONS SETTINGS - MEMORY SIZE - ACCESS CONTROL CODE
- OK STAMP - POLLING PASSCODE • RECEIVE SETTINGS
- REMOTE RETRIEVAL - RECEIVE TO MEMORY
• PC OPTIONS (only selectable after the Parallel Port option has been installed. Please refer to the appropriate option User’s Guide.)

32
Take a few moments to refer to Section 5.7, “Setting Up the System,” to configure the above definitions if they have not been configured already.
4.4 Sending a Document The Model 2030 provides you with nine different methods of sending a document. For transmissions, you can:
• dial through the Numeric Keypad, also referred to as on-hook dialing • enter a Speed Dial number through the Numeric Keypad • press a One-Touch key • dial with a Programmable One-Touch key (P-Key) • press the Delayed Send key • program an AutoDial Job • dial manually from an extension telephone (off-hook dialing) • dial manually from the Model 2030 Telephone Handset (off-hook
dialing) • Voice Request Dialing
4.4.1 Scan to Memory When sending a document by any of the above methods (with the exception of sending by Dialing Manually and Voice Request Dialing), all pages are automatically sent to memory before being transmitted, i.e., Scan to Memory defaults to ON. The Scan to Memory Feature can be deactivated by you. See Section 5.7.5, “Job Settings.” Note that if Scan to Memory is turned OFF and multiple destinations are programmed in a One-Touch, the document will store to memory. When documents are scanned into memory, automatic redialing will occur when needed. 4.4.2 Automatic Redialing (Retries) If the line is busy or if there is no answer, the Model 2030 will automatically redial. The unit is set at 3 retries at 3-minute intervals. If you want to change the number of retries (0-15 attempts) or the interval between retry attempts (0-10 minutes), see Section 5.7.6, “Telephone Line Settings.” If no connection is made after all retry attempts, a Job Status Report automatically prints. Redialing occurs when dialing correct or incorrectly entered numbers, so use caution when programming destination numbers. IMPORTANT: The Federal Communications Commission (FCC) has placed a restriction on dialing retries to protect the public from receiving a large number of accidental calls, in case a machine is dialing an incorrect number. This ruling restricts dialing to a location no more than two times if, after dialing, it does not detect a busy signal (from the telephone system) or answer tones from another

33
facsimile machine. Absence of these two conditions indicates that the number dialed is not a facsimile unit. If the machine does detect a busy signal or another facsimile, it may dial up to 14 times. If multiple destinations are programmed in a One-Touch or AutoDial job, the Model 2030 will begin dialing the first Speed Dial number on the list. If there are additional destinations programmed, the Model 2030 will dial the next telephone number on the list, even if the first destination number was busy. After all numbers have been called all incomplete stations will be redialed. 4.4.3 Dialing through the Numeric Keypad (also referred to as on-hook
dialing) To dial through the Model 2030 Numeric Keypad:
Do This
This Happens
1. Insert the document face down in the Automatic
Document Feeder.
2. Enter the phone number via the Numeric Keypad.
Example: Enter 5551234.
NOTE: If your phone system requires a pause for an access number, to reach an outside line, enter it first followed by a pause, represented by “,” in the phone number. To enter a pause, press the Pause key. Example: 9,5551234.
The numbers appear in the display.
3. Press SEND/RECEIVE.
The document(s) is scan-ned to memory and auto-matically sent. Display returns to System Ready mode:
ENTER DESTINATION(S)
5551234
JOB #001 TO MEMORY PAGE.1
AUG 10 2001 10:00 SYSTEM READY
34
Note: If the line is busy or the remote machine is not available, the Model 2030 will automatically redial the destination. If no connection is made after all redial attempts, the following message will appear briefly in the display:
Then, the following alterna-ting messages will appear:
Or
4.4.4 Dialing with a Speed Dial Number A Speed Dial number is an abbreviated way of entering a phone number. If you frequently send documents to the same location, you can store the number as a three-digit Speed Dial number, and simply enter the Speed Dial number from the Numeric Keypad. Each number you store can be up to 36 digits including pauses. A total of 200 Speed Dial numbers may be programmed. See Section 5.1 for procedures on “Storing Speed Dial Numbers.” To dial using a previously stored Speed Dial number through the Keypad:
Do This
This Happens
1. Insert the document face down in the Automatic
Document Feeder.
2. Enter the one, two or three-digit Speed Dial number
from the Numeric Keypad. If a mistake is made, press NO to backspace and erase incorrect digits or use the cursor keys to move the cursor to the incorrect digit and simply enter the correct digit.
JOB STATUS REPORT PRINTING NOW
ENTER DESTINATION(S)
12
INCOMPLETE JOB CHECK JOBS REPORT
AUG 10 2001 10:00 LINE BUSY
AUG 10 2001 10:00 COMMUNICATION ERROR
35
3. Press YES.
The system will automatically begin sending after a 5-second pause. This pause can be eliminated by pressing SEND/RECEIVE key immediately after pressing YES.
The document(s) is scanned to memory and automatically sent. Display returns to System Ready mode:
You will hear the dialing sequence and answer tone through the Monitor Speaker. When the remote fax is detected, the Monitor will turn off and the document will be sent to the Speed Dial location. 4.4.5 Dialing with a One-Touch Key The 35 One-Touch keys on the Operator Panel allow you to store and use any combination of Speed Dial numbers that you need to use on a regular basis. You can store multiple Speed Dial numbers (or just one number) in each One- Touch key. One-Touch keys allow you to send a document to numerous locations by pressing only one key. See Section 5.2 for the procedures to store a One-Touch key. To dial using a previously stored One-Touch key: Do This
This Happens
1. Insert the document face down in the Automatic
Document Feeder.
2. Press the desired One-Touch key containing the
destination(s) you want to send the document to.
The system will automatically begin sending after a 5-second pause. This pause can be eliminated by pressing the SEND/RECEIVE key immediately.
The document(s) is scanned to memory and automatically sent. Display returns to System Ready mode:
ENTER DESTINATION(S)
JOB #001 TO MEMORY PAGE.1
AUG 10 2001 10:00 SYSTEM READY
#01: MARKETING
JOB #001 TO MEMORY PAGE.1
AUG 10 2001 10:00 SYSTEM READY

36
4.4.6 Dialing with P-Keys The five P-Keys (P1, P2, P3, P4 and P5) on the Model 2030 control panel allow you to store a frequently used AutoDial Job. Once programmed, you can enter the Job by pressing the P-Key. P-Keys can be reprogrammed with new sets of Jobs any time and can perform other functions as well as sending to one or several locations. See Section 5.5 for procedures on “Programming P-Keys”). To dial with a previously programmed P-Key: Do This
This Happens
1. Insert the document face down in the Automatic
Document Feeder.
2. Press the appropriate P-Key, Example: Press P3.
The system will automatically begin sending after a 5-second pause. This pause can be eliminated by pressing the SEND/RECEIVE key immediately.
The document(s) is scanned to memory and automatically sent. Display returns to System Ready mode:
4.4.7 Dialing by Pressing the DELAYED SEND Key (Quick AutoDial) The Model 2030 has a DELAYED SEND key for setting up delayed or immediate; single or multiple transmission jobs. On the Model 2030, up to 30 jobs can be entered through the DELAYED SEND key. You can program delayed jobs by any one of the following methods:
• random phone number entered from Numeric Keypad • previously stored Speed Dial number entered from Numeric Keypad • previously programmed One-Touch key
ENTER DESTINATION(S)
PK3: REGIONS
JOB#001 TO MEMORY PAGE.1
AUG 10 2001 10:00 SYSTEM READY
37
To program a job using the DELAYED SEND key: Do This
This Happens
1. Insert the document face down in the Automatic
Document Feeder.
2. Press the DELAYED SEND key.
3. Enter the destination(s) in one of the following
ways: - a phone number from the Numeric Keypad, - a previously stored Speed Dial number, - a previously programmed One-Touch key.
If a mistake is made, press NO to backspace and erase incorrect digits or use the cursor keys to move the cursor to the incorrect digit and simply enter the correct digit.
4. Press YES (press YES a second time if you entered
a Speed Dial destination).
5. Press YES to enter additional destinations or press
NO to proceed.
6. Enter the time to send the document by pressing the
appropriate Numeric Keypad numbers, using the 24- hour time clock, and then press YES.
The document(s) is scanned to memory and automatically sent at the designated time. Display returns to System Ready mode:
4.4.8 Dialing by Programming an AutoDial Job A programmable AutoDial job is a transmission (or polling) instruction you enter from the Operator Control Panel. Although this dialing method can be used for single facsimile transmissions, it is typically used for more complex jobs to transmit (or poll) a document to one or more locations at any specified time within a 24-hour period.
ENTER DESTINATION(S)
ENTER DESTINATION#
ANOTHER NUMBER? ENTER YES OR NO
ENTER TIME _ _:_ _
ENTER TIME 10:45
JOB # 001 TO MEMORY PAGE.1
AUG 10 2001 10:00 SYSTEM READY
#01: MARKETING

38
Up to 30 jobs can be entered by the AutoDial method. See Section 5.3 for the procedures to enter other types of Programmable AutoDial Jobs. Do This
This Happens
1. Insert the document face down in the Automatic
Document Feeder. Then press FEATURES twice.
2. Press YES.
3. Press 1, then press YES.
4. Enter the destination(s) in one of the following
ways: - a phone number from the Numeric Keypad, - a previously stored Speed Dial number, - a previously programmed One-Touch key.
If a mistake is made, press NO to backspace and erase incorrect digits or use the cursor keys to move the cursor to the incorrect digit and simply enter the correct digit.
5. Press YES after checking that your entry is correct
(if you entered a Speed Dial number, press YES a second time).
6. Press NO to proceed or press YES and enter
another number by one of the methods mentioned in Step #4 above. Repeat until all numbers are entered.
7. Enter the number corresponding to the correct
resolution and then press YES. Or just press YES for Normal resolution mode.
8. Enter the time* to send the document and then
press YES or just press YES to begin sending now. *Note: Enter using “Military” format, e.g., 11:00 PM is entered as 23:00.
AUTO DIAL? ENTER YES, NO OR ttss
1=SND, 2=RCV, 3=RELAY 4=SND/RCV, 5=MAILBOX δδ
ENTER DESTINATION# z
ANOTHER NUMBER? ENTER YES OR NO
1=NORM 2=FINE 3=EXTRA FINE 4=U-FINE
ENTER TIME _ _:_ _
#01: MARKETING
39
The document(s) is scanned to memory and automatically sent, either immediately or at the designated time. Display returns to System Ready mode:
NOTES: 1. See Section 5.4 for procedures on “Editing AutoDial Jobs.” 4.4.9 Dialing Manually from the Model 2030 Handset (off-hook dialing) You can use the Model 2030 Telephone Handset to dial manually according to the following instructions: Do This
This Happens
1. Insert the document face down in the Automatic
Document Feeder.
2. Lift the Telephone Handset.
3. Enter the phone number by pressing the Numeric
Keypad keys. Example: 5551234.
The telephone number ap-pears in the display as it is entered. Dialing will take place exactly like a regular phone (there is a slight delay before the dialing sequence and tones are heard).
4. When you hear the answer tone, press
SEND/RECEIVE and then hang up the Telephone Handset.
The document is sent to the destination shown in the display. Display returns to System Ready mode:
JOB #001 TO MEMORY PAGE.1
ENTER DESTINATION(S)
AUG 10 2001 10:00 PHONE OFF HOOK
5551234
AUG 10 2001 10:00 SYSTEM READY
AUG 10 2001 10:00 SYSTEM READY
40
4.4.10 Voice Request Dialing Although these optional dialing methods can be used for facsimile transmission, they are typically used for placing Voice calls. A. For Dialing with the Model 2030 Telephone Handset OFF-HOOK. Do This
This Happens
1. Pick up the Model 2030 Telephone Handset.
You hear a dial tone.
2. Dial the telephone number from the Model 2030
Numeric Keypad.
The telephone number ap-pears in the display as it is entered. Dialing will take place exactly like a regular phone (there is a slight delay before the dialing sequence and tones are heard).
3. After the conversation, hang up the Telephone
Handset, or begin a fax communication by pressing SEND/ RECEIVE and hanging up.
After pressing SEND/RECEIVE, if pages are set in the Document Feeder, the Model 2030 will begin sending when the remote fax machine’s Ready Tone is detected. If there are no pages in the feeder, the Model 2030 will attempt to poll (receive).
B. For Voice Communication with the Telephone Handset ON-HOOK. Do This
This Happens
1. Press the VOICE key.
2. Enter the destination by either entering a phone
number from the Numeric Keypad or entering a previously stored Speed Dial number; or pressing a previously programmed One-Touch key. Press SEND/RECEIVE key.
When dialing begins, you hear the dialing sequence through the Monitor Speaker
The number appears.
VOICE MODE ENTER TEL #
DIALING NOW 5553495

41
3. When you hear the party answer, lift the Model 2030
Telephone Handset and begin talking. If facsimile communication is desired after the conversation, press the SEND/RECEIVE key, when you hear the remote fax machine’s Ready Tone, then hang up.
If the remote handset is not picked up within 5 minutes, the Model 2030 will automa-tically disconnect the line.
NOTES: 1. If an error is made in entering telephone numbers (when using on-hook
dialing), corrections can be made by pressing NO to backspace and delete, or by using the cursor keys to move the cursor to the incorrect digit. When the cursor is in the position at the point of error, simply enter the correct digit(s) and press SEND/RECEIVE.
2. In the U.K., the telephone can be used for dialing as well as the numeric keypad on the facsimile machine.
4.5 Receiving a Document Receiving a document on your Model 2030 is a simple procedure. Different steps may have to be followed depending upon your unit’s receive configuration. The following configuration choices are available to you. 1. Auto Receive Mode (this is the way your Model 2030 was configured when it
was shipped to you):
• Auto Receive: ON (user-selectable ON/OFF) • Rings Before Answer: 1 (user-selectable 1-9)
If you have a phone line dedicated to the fax and you keep the unit on Automatic Receive Mode, your unit will automatically answer all incoming calls after the first ring. It will act as though all incoming calls are fax calls. All documents will automatically be received to memory before printing. Additionally, if the paper supply runs out, the remainder of any document being received will automatically be received into memory for printing at a later time. Subsequent documents will also be received into memory until memory becomes full or until the paper supply is replenished. 2. Rings Before Answer:
• Auto Receive: ON • Rings Before Answer: Up to 9
If you would like to be able to answer an incoming call before the Model 2030 answers, you can change the RINGS BEFORE ANSWER feature and thus configure the Model 2030 for delayed answering. The number of rings can be

42
set from 1 through 9. Setting it at a higher number than 1 will instruct the Model 2030 as to how many rings it will wait before answering incoming calls. The default Rings Before Answer setting on your Model 2030 should be set at 1, which means that it will answer after the first ring. See Section 5.7.6 for procedures to change this feature. If you answer the call before the Model 2030 answers, you can speak to the person if it is a voice call. If it is an incoming fax call and you hear a fax sending tone on the line when you pick it up, you can still receive a fax by first removing any pages from the Automatic Document Feeder and then pressing the SEND/RECEIVE key. If you do not answer the call by the number of rings you select in the Ring Before Answer selection, the Model 2030 will answer the call and assume that it is an inbound fax call. Just as with the original settings, all documents will be received into memory first and Out of Paper Receive and Out of Toner will still work. 3. Manual Receive Mode:
• Auto Receive: OFF You may want to answer all incoming calls and never have the Model 2030 answer automatically. In this case, you can configure your system for Manual Receive by turning the AUTO RECEIVE feature OFF (or changing it from YES to NO). The display will indicate Manual Receive. See Section 5.7.6 for procedures to change this setting. See Section 4.5.3 for Manual Receive procedures. 4.5.1 Receiving to Memory The Model 2030 normally receives all documents into memory briefly before printing. This allows your machine to determine the length of each incoming page so it can be reduced to fit onto a single page whenever possible. You may want to configure your Model 2030 to automatically receive all documents into memory to print at a later time or for the Remote Retrieval feature. Printing may also be secured by Passcode. This is a simple operation that is done by selecting the SET UP SYSTEM Feature. See Section 5.7.8 for information on Receiving to Memory.

43
If you configure your Model 2030 to always Receive to Memory, the following occurs: Do This
This Happens
1. All documents received are stored in memory and will
only be printed when you wish.
If documents have been received into memory, this prompt will appear in the display.
2. To print the documents stored in memory, press
COPY and your documents will print.
Note: If “Secure” Receive to Memory is enabled, the display at right will appear. Enter required Passcode and press YES in order to print documents.
4.5.2 Out of Paper Receive The Model 2030 normally receives to paper after temporarily receiving to memory. If the 2030’s paper supply runs out while receiving, the remainder of the current document being received will automatically be received into memory for printing at a later time. Subsequent documents will also be received into memory until memory becomes full or until the paper supply is replenished. Do This
This Happens
The Model 2030 automatically detects when the paper supply becomes depleted. If the Model 2030 paper supply runs out, while receiving, an alarm will sound and the display will read: The next page, and all remaining pages of the document, will be received into memory for printing at a later time.
Replenish paper and the display will read:
NOTES: 1. If Memory becomes “FULL” while printing pages or documents from memory,
the Model 2030 will not be able to answer the telephone. Incoming calls will usually receive a busy signal (“UNABLE TO RX”) until the 2030 has finished printing all pages.
PRINTING NOW PAGE.3/7
AUG 10 2001 10:00 PAPER EMPTY
MESSAGE IN MEMORY PRESS COPY TO PRINT
ENTER PASSCODE __ __ __ __
PRINTING NOW PAGE.1/1
44
2. If there is not enough available memory to receive the entire transmission, the Model 2030 will receive until memory becomes full and then the telephone connection will automatically disconnect. The Model 2030 will then not be able to receive until the paper supply is replenished. If this occurs frequently, you should consider upgrading Memory or paper cassette options available from Pitney Bowes (see Section 3.7.2 for more information on available Document Memory Card options). Should you feel that it is necessary to upgrade the Memory of your Model 2030, please call your Pitney Bowes Sales Representative to place an order for the appropriate option.
4.5.3 Receiving Manually If you wish to configure the Model 2030 in the Manual Receive Mode, this can be done by selecting the SET UP SYSTEM Feature. This means that you will have to answer all incoming calls because the Model 2030 will not be able to automatically receive. Refer to Section 5.7.6 for the procedures to change Auto Receive from ON (YES) to OFF (NO). If you configure the Model 2030 to receive manually, this is how you would receive a document: Do This
This Happens
1. A phone call has come in to the Model 2030. Lift the
Telephone Handset.
If you hear another person, it is a voice call and you can continue your conversation as you would on a normal telephone. Or, it may be a voice call after which the caller wants to send you a fax. If the call is from a facsimile unit, you will hear a Send Tone.
Whether the call is a voice or fax call, while the Telephone Handset is off hook, the display will read:
2. If you hear a Send Tone when you lift the Telephone
Handset or you wish to receive a fax after a con- versation, remove any document currently in the Automatic Document Feeder and press the SEND/ RECEIVE key*. This will send a Ready Tone to the other fax/phone. Then hang up the Telephone Handset.
*Note: While printing pages or documents from memory, you will not be able to press the SEND/RECEIVE key until the Model 2030 has finished printing all pages.
Voice connection is broken. The other fax machine begins sending the document and your 2030 will begin to receive. The following message ap-pears in the display (if from another 33,600 bps unit):
AUG 10 2001 10:00 PHONE OFF HOOK
RCV ULTRA FAST 33,600 (IDENTIFICATION)
45
4.6 Polling The Polling feature allows you to call another Pitney Bowes facsimile machine and receive a document, or allows another machine to call and receive documents from your machine. You may want to establish an extra level of security if you have sensitive documents that will be polled from your Model 2030. The Model 2030 lets you establish a four digit polling Passcode through the SET-UP SYSTEM Feature. (Refer to Section 5.7.7 for procedures to enter this four-digit code). If you enter a polling Passcode, only Pitney Bowes machines with a matching Passcode will be able to poll your machine. Similarly, if you will be polling other Pitney Bowes facsimile machines, you must make sure that your Passcode matches the others. If the polled machines have Passcodes, this is the only way you can successfully poll and receive documents from them. NOTES: 1. If none of the Pitney Bowes fax units you communicate with have polling
Passcodes and you do not wish to perform secure polling, non-secure polling can take place. (The polling Passcode for non-secure polling is “0000.”)
2. There is no universal polling standard. Attempts to poll non-Pitney Bowes
machines may not work. There are several Polling methods available on the Model 2030. • Simple Polling - another fax can poll your Model 2030 and receive
documents from your unit; or you can poll another fax unit and receive documents from that remote unit.
• Bulletin Board Polling - this feature allows you to place a document in
memory to be polled by more than one machine a specified number of times before being deleted. The Model 2030 allows for infinite polling.
• Sequential Polling - you can poll a group or list of numbers by using One-
Touch keys, Programmable One-Touch keys (P-Keys) or programmed AutoDial Jobs.
• Turnaround Polling - used to send to a location and then receive a fax from
the same location during the same phone call. • Polling a Mailbox - this procedure allows you to poll and receive a
document from a compatible Mailbox of a Pitney Bowes fax machine. You must use a “DTMF” (touch-tone) phone.

46
• Remote Fax Retrieval (a form of Polling) - allows you to retrieve documents received into the 2030 memory from a remote facsimile.
4.6.1 Preparing a Document to be Polled (Simple Polling) To prepare a document for polling: Do This
This Happens
1. If you want to establish a polling Passcode, refer to
Section 5.7.7 for instructions.
2. Insert the document face down in the Automatic
Document Feeder.
3. Use the MODE and ORIGINAL keys, if necessary, to
change the Mode and Contrast.
4. Press FEATURES twice.
5. Press YES.
6. Press 6.
7. Press YES.
8. Enter number of times (up to 99) then press YES.
Once the document is in memory the display indi-cates: When the remote system dials your Model 2030, the docu-ment will be sent.
ENTER DESTINATION(S)
AUTO DIAL? ENTER YES, NO OR ttss
1=SND, 2=RCV, 3=RELAY 4=SND/RCV, 5=MAILBOX tt
6=POLL ss
HOW MANY TIMES? _ _
JOB #010 TO MEMORY PAGE.1
AUG 10 2001 10:00 WAITING TO BE POLLED

47
4.6.2 Editing “To Be Polled” Jobs (Overwrite, Delete and Append) The Model 2030 allows you to edit an existing “To Be Polled” Job waiting in memory. You can overwrite the page(s) of the Job with new pages, you can delete the existing Job, or you can add pages to the existing Job. To Overwrite Existing Pages, the documents to be stored must be placed in the document feeder: Do This
This Happens
1. Press FEATURES key twice.
2. Press YES.
3. Press 6.
4. Press YES.
5. Press 1.
6. Press YES.
To Delete a “To Be Polled” Job: Do This
This Happens
1. Press FEATURES key twice.
2. Press YES.
3. Press 6.
4. Press YES.
AUTO DIAL? ENTER YES, NO OR ttss
1=SND, 2=RCV, 3=RELAY 4=SND/RCV, 5=MAILBOX tt
6=POLL ss
1=OVERWRITE 2=DELETE3=ADD PAGE
AUTO DIAL? ENTER YES, NO OR ttss
1=SND, 2=RCV, 3=RELAY 4=SND/RCV, 5=MAILBOX tt
1=OVERWRITE 2=DELETE3=ADD PAGE
6=POLL s
JOB #011 TO MEMORY PAGE.1

48
5. Press 2.
6. Press YES.
The polled Job is now erased from memory.
To Add Pages (Append) to a “To Be Polled” Job (documents to be added must be placed in the document feeder): Do This
This Happens
1. Press FEATURES key twice.
2. Press YES.
3. Press 6.
4. Press YES.
5. Press 3.
6. Press YES.
The page(s) are added to the existing pages.
4.6.3 Polling Another Machine (Simple Polling) To poll a document from another fax unit: Do This
This Happens
1. If you need to establish a polling Passcode, refer to
Section 5.7.7 for instructions.
AUTO DIAL? ENTER YES, NO OR ttss
1=SND, 2=RCV, 3=RELAY 4=SND/RCV, 5=MAILBOX tt
6=POLL s
1=OVERWRITE 2=DELETE3=ADD PAGE
POLLED JOB DELETE
JOB #012 TO MEMORY PAGE.2
49
2. With no documents inserted in the Model 2030
Automatic Document Feeder, dial the remote system by either entering a phone number from the Numeric Keypad, selecting a Speed Dial Number, pressing a One-Touch key, or pressing a P-Key.
The number appears in the display.
3. Press SEND/RECEIVE.
4. Press YES.
5. Enter the Passcode, if required by the fax unit you
are polling. Then, press YES or press NO if a Passcode is not required.
NOTES: 1. To use an AutoDial Job or P-Key to poll after hours, see Section 5.3.2,
“Polling with Programmable AutoDial Jobs,” for the procedures to poll using these methods.
2. If you attempt to poll with pages loaded in the Feeder, the machine will
switch into the Send Mode. Pages should only be loaded in the Feeder if you intend to Turnaround Poll or Send. Refer to Section 4.6.6, “Turnaround Polling,” for instructions on performing this function.
3. If there is not enough memory to Poll an entire document into memory before
printing, the Model 2030 will automatically Poll directly to paper. 4.6.4 Bulletin Board/Unlimited Polling 1. Your Model 2030 is equipped with a Bulletin Board feature. This allows a
document to be placed in memory and then polled a specified number of times before being automatically erased. When you store a document to be polled, this prompt will appear: “HOW MANY TIMES?”. You can enter up to 99 or “00” for unlimited poll times and then press YES (or just press YES to poll once).
2. The system will erase a polling Job after the specified number of pollings. 4.6.5 Sequential Polling The Model 2030 allows you to poll a group or list of numbers, one at a time. You can sequentially poll a group of numbers using previously stored Speed Dial numbers or random telephone numbers. This can be done with a programmable
DO YOU WISH TO POLL?
ENTER PASSCODE IF NEEDED_ _ _ _

50
AutoDial Job (up to 30). See Section 5.3.2, “Polling with Programmable AutoDial Jobs” for the procedures to poll using this method. To create a list for sequential polling: Do This
This Happens
1. With no documents inserted in the Model 2030
Automatic Document Feeder, press the appropriate One- Touch key(s) that contain the group or list to poll. Example: One-Touch keys #01, #02, #06, #10, #22…
After each One-Touch key is pressed, the associated num-ber and name will appear in the display.
2. Press SEND/RECEIVE.
3. Press YES.
4. Enter the Passcode, if required by the fax unit you
are polling, then press YES or press NO if a Passcode is not required.
NOTES: 1. All remote fax units on the created list to be polled must have the same
Passcodes or require no Passcode at all. 2. If one of the dialed numbers in the Sequential Polling List is busy or does not
answer, that number will move to the “bottom” of the polling list. And the next number on the list will be dialed. The busy or “no answer” numbers will be retried until the “retry count” is exhausted.
3. To use an AutoDial Job or a P-Key to poll after hours, see Section 5.3.2,
“Polling with Programmable AutoDial Jobs” for the procedures to poll using these methods.
4. If you attempt to poll with pages loaded in the feeder, the machine will switch
into the Send Mode. Pages should only be loaded in the feeder if you intend to Turnaround Poll or Send. Refer to Section 4.6.6, “Turnaround Polling” for instructions on performing this Function.
5. There is no universal polling standard. It may not be possible for your Model
2030 to poll certain non-Pitney Bowes machines.
DO YOU WISH TO POLL?
ENTER PASSCODE IF NEEDED _ _ _ _
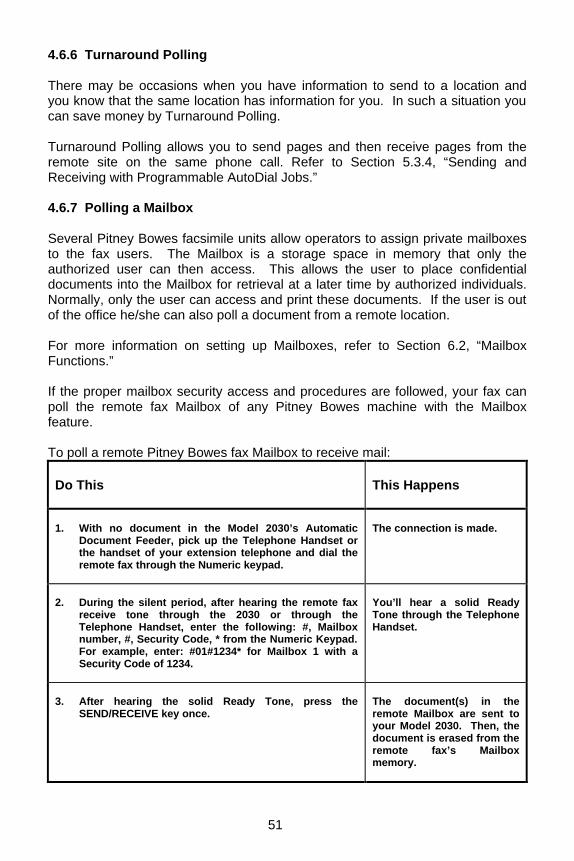
51
4.6.6 Turnaround Polling There may be occasions when you have information to send to a location and you know that the same location has information for you. In such a situation you can save money by Turnaround Polling. Turnaround Polling allows you to send pages and then receive pages from the remote site on the same phone call. Refer to Section 5.3.4, “Sending and Receiving with Programmable AutoDial Jobs.” 4.6.7 Polling a Mailbox Several Pitney Bowes facsimile units allow operators to assign private mailboxes to the fax users. The Mailbox is a storage space in memory that only the authorized user can then access. This allows the user to place confidential documents into the Mailbox for retrieval at a later time by authorized individuals. Normally, only the user can access and print these documents. If the user is out of the office he/she can also poll a document from a remote location. For more information on setting up Mailboxes, refer to Section 6.2, “Mailbox Functions.” If the proper mailbox security access and procedures are followed, your fax can poll the remote fax Mailbox of any Pitney Bowes machine with the Mailbox feature. To poll a remote Pitney Bowes fax Mailbox to receive mail: Do This
This Happens
1. With no document in the Model 2030’s Automatic
Document Feeder, pick up the Telephone Handset or the handset of your extension telephone and dial the remote fax through the Numeric keypad.
The connection is made.
2. During the silent period, after hearing the remote fax
receive tone through the 2030 or through the Telephone Handset, enter the following: #, Mailbox number, #, Security Code, * from the Numeric Keypad. For example, enter: #01#1234* for Mailbox 1 with a Security Code of 1234.
You’ll hear a solid Ready Tone through the Telephone Handset.
3. After hearing the solid Ready Tone, press the
SEND/RECEIVE key once.
The document(s) in the remote Mailbox are sent to your Model 2030. Then, the document is erased from the remote fax’s Mailbox memory.

52
NOTES: 1. If you hear a broken NOT READY tone or a high pitched fluttering tone, there
either is no mail in the remote fax Mailbox or the Security Code for the mailbox was incorrect. Try again, at the next silent period or hang up and try again, if necessary.
2. The Mailbox Security Code takes priority over the Polling Passcode when
you are polling a Mailbox.

53
5. FEATURE SELECTIONS
This Section describes all of the features selectable from the Model 2030 Main Level Menu. There are nine main Features on the Model 2030. Features are selected in one of three ways:
• repeatedly pressing the FEATURES key until you reach the desired feature, then press YES or…
• pressing the FEATURES key + the CURSOR (δχ) key until you reach the desired feature, then press YES or…
• pressing the FEATURES key + the desired feature number + YES (twice).
Many of the Features relate to storing phone numbers and programming AutoDial Jobs. Before you store phone numbers and begin to program AutoDial Jobs, you should consider your communications needs and create a list of phone numbers and groups of phone numbers you want to store. The MAILBOX FUNCTIONS are described in the Special Features and Functions Section of this Guide (see Section 6). The CLEAN PRINTER feature is described in the Troubleshooting and Maintenance Section of this Guide (See Section 7.6.1). The Feature categories and the selections possible under each are briefly described below for your convenience. #1 AUTO DIAL (See Section 5.3)
To store Jobs to send or receive single or multiple documents at a specific time to specific locations.
• 1=SND (send) • 2=RCV (receive or polling) • 3=RELAY • 4=SND/RCV (turnaround polling) • 5=MAILBOX • 6=POLL
#2 PRINT REPORTS (See Section 5.6) To print administrative reports and forms.
• JOURNAL • JOBS REPORT • SPEED DIAL DIRECTORY • ONE TOUCH DIRECTORY • P-KEY DIRECTORY • SYSTEM SET UP • CARTRIDGE ORDER FORM • ONE TOUCH SHEET
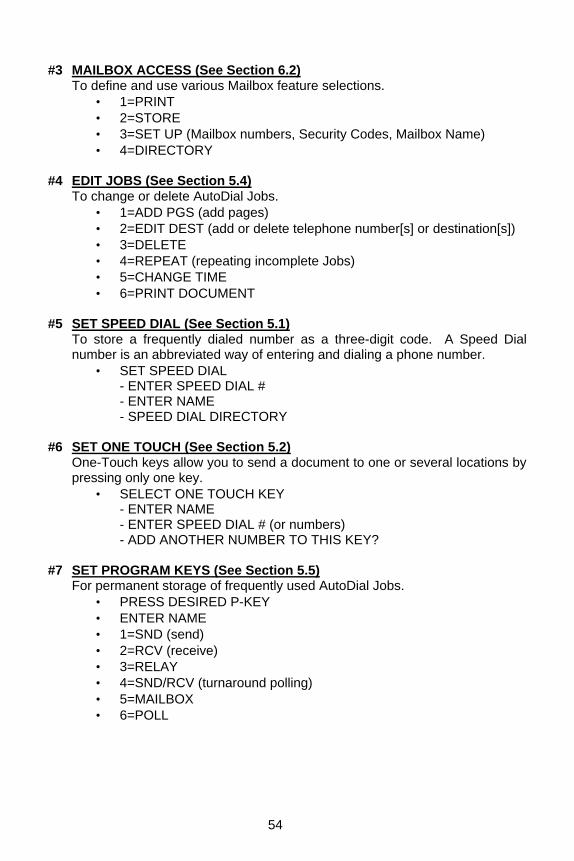
54
#3 MAILBOX ACCESS (See Section 6.2) To define and use various Mailbox feature selections.
• 1=PRINT • 2=STORE • 3=SET UP (Mailbox numbers, Security Codes, Mailbox Name) • 4=DIRECTORY
#4 EDIT JOBS (See Section 5.4) To change or delete AutoDial Jobs.
• 1=ADD PGS (add pages) • 2=EDIT DEST (add or delete telephone number[s] or destination[s]) • 3=DELETE • 4=REPEAT (repeating incomplete Jobs) • 5=CHANGE TIME • 6=PRINT DOCUMENT
#5 SET SPEED DIAL (See Section 5.1)
To store a frequently dialed number as a three-digit code. A Speed Dial number is an abbreviated way of entering and dialing a phone number.
• SET SPEED DIAL - ENTER SPEED DIAL # - ENTER NAME - SPEED DIAL DIRECTORY
#6 SET ONE TOUCH (See Section 5.2)
One-Touch keys allow you to send a document to one or several locations by pressing only one key.
• SELECT ONE TOUCH KEY - ENTER NAME - ENTER SPEED DIAL # (or numbers) - ADD ANOTHER NUMBER TO THIS KEY?
#7 SET PROGRAM KEYS (See Section 5.5)
For permanent storage of frequently used AutoDial Jobs. • PRESS DESIRED P-KEY • ENTER NAME • 1=SND (send) • 2=RCV (receive) • 3=RELAY • 4=SND/RCV (turnaround polling) • 5=MAILBOX • 6=POLL
55
#8 SET UP SYSTEM (See Section 5.7) Defines system settings.
• MACHINE SETTINGS 01 DATE/TIME 02 BEEP VOLUME 03 DOCUMENT SEPARATOR - PRINT INDEX MARK 04 POWER SAVER 05 POWER SAVER TIMER
• MACHINE ID SETTINGS 01 TRANSMIT ID NAME 02 THIS FAX NUMBER
• REPORT SETTINGS 01 JNL FORMAT 02 JNL DISPLAY 03 JNL ID FIELD 04 JNL PRINT 05 JNL SEND 06 JOB STATUS
• JOB SETTINGS 01 SAVE INCOMPLETE JOBS 02 SAVE STOPPED JOBS 03 SCAN TO MEMORY 04 SEND COVER SHEET 05 ONE TOUCH START DELAY 06 CONFIRM JOBS REPORT
• TELEPHONE LINE SETTINGS 01 ANSWER RING PATTERN 02 RINGS BEFORE ANSWER 03 AUTO RECEIVE 04 RETRY COUNT 05 RETRY INTERVAL
• OPTION SETTINGS 01 MEMORY SIZE 02 ACCESS CONTROL CODE - ANY OPERATION - SET UP - EDIT JOBS 03 OK STAMP - TX FROM FEEDER - SCAN TO MEMORY 04 POLLING PASSCODE
• RECEIVE SETTINGS - REMOTE RETRIEVAL - RECEIVE TO MEMORY
• PC OPTIONS

56
#12 CLEAN PRINTER (See Section 7.6.1) To clean the Model 2030 each time a new Imaging Cartridge is installed.
• CLEANING CHARTS PRINTING NOW • LOAD CHARTS FACE UP…IN UPPER CASSETTE AND THEN
PRESS YES • CLEANING PRINTER
5.1 Storing Speed Dial Numbers A Speed Dial number is an abbreviated way of entering a phone number. If you frequently send documents to the same location, there’s no need to enter the complete number; you can store the number as a three-digit Speed Dial number and then simply enter the Speed Dial number from the Numeric Keypad whenever you need it. Each number you store can be up to 36 digits, including pauses (a delay in the dialing sequence). On the Model 2030, you can store up to 200 phone numbers as Speed Dial numbers 001-200. When programming Speed Dial numbers, the Model 2030 prompts you to specify the Speed Dial number, telephone number and Speed Dial Name: • SET SPEED DIAL ? • ENTER SPEED DIAL # • ENTER TEL NUMBER • ENTER NAME • RELAY STATION? (Only if selected in Service Mode) NOTES: 1. Dialing pauses are entered by pressing the PAUSE key on the Operator
Control Panel. Entering a pause (,) at the appropriate place within a phone number compensates for any phone line access delay and automates the dialing process for you.
You may want to include one or more pauses at the end of international telephone numbers to allow for the longer connect time that usually occurs during these calls. You may also place pauses before a telephone number if there is normally a delay in getting a dial tone from your telephone system.
The Model 2030 is configured with a pause length of 5 seconds. Each pause (,) in a phone number causes a 5-second delay before dialing continues. You may enter multiple pauses to increase the pause time, which will be in multiples of 5 seconds, e.g., two pauses will provide ten seconds of pause time. The pause is adjustable. If you would like to change the length of each pause, please contact the Pitney Bowes Diagnostic Center listed in the back of this Guide. This feature can be changed over the phone and does not require a service call.
Prompts

57
5.1.1 Creating or Adding a Speed Dial Number To store a telephone number as a Speed Dial number, or to add a Speed Dial number: Do This
This Happens
1. Press FEATURES.
2. Press 5 and then YES.
3. Press YES.
4. Use the Numeric Keypad to enter the Speed Dial
number you want from 001 to 200.
Enter the number, up to 36 characters (including pauses). Use the Cursor Keys to move left or right if corrections are necessary, or press NO to backspace and erase incorrect digits.
NOTES: • To enter a pause, press the Pause key. A comma
“,” will appear in the number. Example: 9,5551234. • You can enter a space between area code and
number to make it easier to read in the display (e.g., 9,555 1234) by pressing Space on the One-Touch keypad.
The number appears in the display.
5. Press YES.
6. Enter a name for the Speed Dial number, (up to 16
characters total). If you don’t want to name the Speed Dial number, press NO and to go Step #8 below. The Speed Dial name can be either alphabetical, numerical, or special symbol characters, or a combination of all three. Use the alphabetical One-Touch keys to enter A-Z characters. Use the Numeric Keypad to enter numerical characters. Example: ATLANTA
Press the MODE key if you want to insert symbols. Use the cursor keys to place the cursor over the desired symbol, then press YES. To return to alphabetical and numerical characters, press MODE once again.
NOTE: A “NAME” could be a company name, a department name or an individual’s name. When you program a name, it will appear at the top of all transmitted pages.This allows you to send a personalized TO/FROM header with all transmissions.
FEATURE SELECTIONS PRESS YES, NO OR ttss
SET SPEED DIAL? PRESS YES, NO OR ttss
ENTER SPEED DIAL # zz =
ENTER TEL NUMBER 001=9,555 1234
ENTER TEL NUMBER 001=
ENTER NAME 001=
ENTER NAME 001=ATLANTA
+=<>!@*^&(),:-/#? 001=ATLANTA

58
7. Press YES when the “NAME” is complete.
The display only appears if the Speed Dial number is resident in one or more One-Touch keys (List). If not, skip to Step #9.
8. Press YES if you want the system to update this
Speed Dial entry in a One-Touch key or P-Key. If not, press NO. (See Section 5.2 to set One-Touch keys).
NOTE: If NO is pressed, the number will be deleted from any One-Touch key in which it was previously stored.
9. Enter another Speed Dial number and repeat from
Step #1 to change or delete another Speed Dial number, etc. Or, press NO to print a Speed Dial Directory when finished. You can also press STOP to return to SYSTEM READY without printing a Speed Dial Directory.
10. Press 1 to have Directory printed in numerical order
or 2 to have it printed alphabetically, then press YES.
5.1.2 Changing or Deleting A Speed Dial Number, Telephone Number, Or Name Do This
This Happens
1. Press FEATURES.
2. Press 5 and then YES.
3. Press YES.
4. Enter the Speed Dial number you wish to change
using the Numeric Keypad.
UPDATE ONE TOUCH? ENTER YES OR NO
ENTER SPEED DIAL # zz =
FEATURE SELECTIONS PRESS YES, NO OR ttss
SET SPEED DIAL? PRESS YES, NO OR ttss
ENTER SPEED DIAL # zz =
ENTER TEL NUMBER 001=555 1010
SPEED DIAL DIRECTORY 1=NUMERIC 2=ALPHA
SPEED DIAL DIRECTORY PRINTING NOW
59
5. There are 3 options at this point:
• Enter the new number over the old one (or press NO to delete it) or the cursor keys to move to the digit you need to change.
• Press NO twice if you wish to completely delete the old TEL # and NAME. Then press STOP to return to System Ready.
• Press NO three times and unit returns to System Ready and prints a new Speed Dial Directory.
6. Press YES when the new number has been correctly
entered.
7. Press YES to keep the existing name or press NO to
delete it, then enter the new name (e.g., ALBANY) or use the cursor keys to move to the characters/digits you need to change.
8. Press YES after entering the new name.
This display only appears if the Speed Dial number is resident in one or more One-Touch keys (Lists). If not, skip to Step #9.
9. If you want the system to update the Speed Dial
entries stored in a One-Touch key or P-Key, press YES. If not, press NO. See Section 5.2 to set One- Touch keys.
NOTE: If NO is pressed, the number will be deleted from any One-Touch key in which it was previously stored.
10. Repeat from Step #4 to change or delete another
Speed Dial number, etc. Or, if finished, press STOP to return to SYSTEM READY or NO in order to print a Speed Dial Directory.
11. Press 1 to have Directory printed in numerical order
or 2 to have it printed alphabetically, then press YES.
ENTER TEL NUMBER 001=555 7484
ENTER NAME 001=ATLANTA’S FAX
ENTER NAME 001=ALBANY
ENTER SPEED DIAL # zz =
UPDATE ONE TOUCH? ENTER YES OR NO
SPEED DIAL DIRECTORY 1=NUMERIC 2=ALPHA
SPEED DIAL DIRECTORY PRINTING NOW

60
5.2 One-Touch Keys The One-Touch keys (#01-30), on the Operator Panel, allow you to store and use any combination of Speed Dial numbers that you need to use on a regular basis. You can store multiple Speed Dial numbers (or just one) in each One-Touch key. When One-Touch keys have been programmed, they can be thought of as Lists (or Groups) of Speed Dial numbers. One-Touch keys allow you to send a document to these lists by pressing only one key, or you may wish to use One- Touch keys for the single destinations that you communicate with most frequently. When you have stored all of the One-Touch keys, a One-Touch Overlay Sheet will print automatically. You can place the Overlay Sheet under the One-Touch panel. 1. Cut along the dotted line and place under the plastic overlay covering the
One-Touch Label sheet (in the middle of the Model 2030 Operator Panel). 2. To manually print a One-Touch Overlay Sheet, press the REPORTS key and
press cursor down (t) until display reads: “ONE TOUCH SHEET.” Then press YES.
5.2.1 Programming a One-Touch Key To store Speed Dial numbers in a One-Touch key: Do This
This Happens
1. Press FEATURES.
2. Press 6 and then YES.
3. Press YES.
4. Press the One-Touch key you want to work with.
Example: Press 06.
FEATURE SELECTIONS PRESS YES, NO OR ttss
SET ONE TOUCH? PRESS YES, NO OR ttss
SELECT ONE TOUCH KEY
ENTER NAME #06:

61
5. Enter the One-Touch key or the List name as you
would a Speed Dial name (See Section 5.1.1, Step #6). The One-Touch key name can be either alphabetical, numerical or special symbol characters or a combination of all three. Enter up to 16 characters total. If you do not want to name the One-Touch key, press NO and go to Step #7 below.
NOTE: If you are only storing a single Speed Dial number in a One-Touch key, the Speed Dial number’s name will automatically be assigned to the One-Touch key.
6. When you finish entering the List name, press YES.
7. Enter the 3-digit Speed Dial number you want in the
list, then press YES.
8. Press YES if you want to enter another Speed Dial
number in this List. Or, if finished, press NO, then skip to Step #10.
9. Repeat Steps #7 and #8 until all Speed Dial numbers
you want in the list have been entered, then press NO.
10. Select another One-Touch key to work with and
follow from Step #4. Or, if finished, press NO. A One-Touch Overlay Sheet will print automatically or press Stop to return to System Ready without printing a One-Touch Overlay Sheet.
5.2.2 Deleting a Speed Dial Number from a One-Touch Key If you want to delete the Speed Dial numbers stored in a One-Touch key: Do This
This Happens
1. Press FEATURES.
2. Press 6 and then YES.
ENTER NAME #06:WESTERN REGION
ENTER SPEED DIAL # zz
ADD ANOTHER NUMBER TO THIS KEY?
ENTER SPEED DIAL # 001:ATLANTA
ENTER SPEED DIAL # zz
SELECT ONE TOUCH KEY
FEATURE SELECTIONS PRESS YES, NO OR ttss
SET ONE TOUCH? PRESS YES, NO OR ttss
ONE TOUCH SHEET PRINTING NOW
AUG 10 2001 10:00
SYSTEM READY

62
3. Press YES.
4. Press the One-Touch key you want to delete Speed
Dial numbers from. Example: 08.
5. Press NO.
NOTE: Be careful. If you press YES at this point, all Speed Dial numbers stored under this One-Touch key will be deleted.
6. Press YES and scroll using the tt key (EDIT JOBS
key) to specify the Speed Dial number you wish to delete from this One-Touch key. Example: 001
7. Press YES.
8. Press YES to delete this number.
The number is deleted.
9. If you wish to delete another number, press YES. If
not, press NO, then skip to Step #12.
10. Repeat Steps #6-9 to delete other Speed Dial
numbers. After you have answered YES or NO to all Speed Dial numbers in the list, this prompt appears:
11. You can enter a new Speed Dial number to store in
this One-Touch key. Remember to press YES to confirm the number after you enter it.
12. Select another One-Touch key to work with and
follow from Step #4. Or, if finished, press NO. A One-Touch Overlay Sheet will print automatically or press Stop to return to System Ready without printing a One-Touch Overlay Sheet.
SELECT ONE TOUCH KEY
DELETE? #08:SOUTHERN REGION
ENTER NAME #08:SOUTHERN REGION
ENTER SPEED DIAL # 001:NEW ORLEANS
DELETE? 001:NEW ORLEANS
ADD ANOTHER NUMBER TO THIS KEY?
ENTER SPEED DIAL # zz
AUG 10 2001 10:00 SYSTEM READY
ONE TOUCH SHEET PRINTING NOW

63
5.3 Programmable AutoDial Jobs The single transmission procedures described earlier in Section 4.4 are only a small part of the Model 2030 transmission capabilities. The additional transmission power is from the programmable AutoDial Jobs. Programmable AutoDial Jobs are entered through the AutoDial Feature. You can program up to 30 AutoDial Jobs using the AutoDial Feature on the Model 2030. Since all pages associated with an AutoDial Job are sent to memory, remember that your Model 2030 can store approximately 60 pages, with standard memory. A programmable AutoDial Job is a transmission instruction you enter from the Operator Control Panel. Examples of when you would use programmable AutoDial Jobs include:
• Sending a document after hours to multiple destinations • Polling after hours (simple, sequential, etc.) • Serial broadcasting (sending to multiple locations) • Sending to a Relay Station • Sending to a private Mailbox • Instructing the remote machine to print multiple copies • Turnaround polling
You can program the following selections from the AutoDial Feature Menu:
• 1=SND Sending • 2=RCV Receiving or polling • 3=RELAY For Relaying • 4=SND/RCV Turnaround Polling • 5=MAILBOX To send to Mailboxes of a remote machine • 6=POLL Allows other machines to call and receive documents in your
unit’s memory The Model 2030 really provides two types of Delayed communications Jobs, the AutoDial Jobs (reviewed in this Section) and those stored in Programmable One- Touch keys (P-Keys are reviewed in Section 5.5). The difference between these two types of Delayed Job Communications features is as follows:
• With a programmable AutoDial Job, once it has been completed it does not exist in memory any longer.
• With a programmable One-Touch key (P-Key), you can store a Delayed (or immediate) Communication Job permanently. The Job programmed in the P-Key will be repeated every time you press that P-Key. If you call the same location on a regular basis, you may want to store the Jobs permanently in a One-Touch Program Key. The Model 2030 has 5 dedicated programmable One-Touch keys (P1, P2, P3, P4, P5). Refer to Section 5.5 for information on Program Keys.
64
Because of the variety of ways you can use the AutoDial Feature, each procedure is described below. 5.3.1 Sending a Document with Programmable AutoDial Jobs To send a document with a Programmable AutoDial Job: Do This
This Happens
1. Insert the document face down in the Automatic
Document Feeder. Use the ORIGINAL key, if necessary, to change the contrast. You can either change the Mode at this time or wait until the AutoDial Job asks you to change it later (see Step #8 below). Then press FEATURES twice.
2. Press YES.
3. Press 1, then press YES. Or just press YES.
4. Enter a destination in one of the following ways:
- a random fax number from the Numeric Keypad, - a previously stored Speed Dial number, - a previously programmed One-Touch key.
If a mistake is made, press NO to backspace and erase incorrect digits or use the cursor keys to move the cursor to the incorrect digit and simply enter the correct digit.
The number appears in the display.
5. Press YES after checking that your entry is correct.
(If you entered a Speed Dial number, press YES a second time).
6. To enter additional destinations, press YES and
enter another number by one of the methods mentioned in Step #4 above. Repeat until all numbers are entered or press NO to continue.
NOTE: Up to 32 random phone numbers can be entered from the 2030 Numeric Keypad.
AUTO DIAL ? PRESS YES, NO OR ttss
6=POLL ss
1=SND, 2=RCV, 3=RELAY 4=SEND/RCV,5 =MAILBOX tt
ENTER DESTINATION# z
ANOTHER NUMBER ? ENTER YES OR NO
ENTER DESTINATION# z
1=NORMAL 2=FINE 3=EX-FINE 4=U-FINE
65
7. Enter the number corresponding to the correct
MODE and then press YES. Or just press YES for selected mode.
8. Enter the time to send the document and then press
YES. Or just press YES to begin sending now.
The document(s) is scanned to memory and is automatically sent at the time(s) specified (or immediately if no time was specified).
5.3.2 Polling with Programmable AutoDial Jobs To Poll (Receive) with a Programmable AutoDial Job: Do This
This Happens
1. With no documents inserted in the Automatic
Document Feeder, press FEATURES twice.
2. Press YES.
3. Since there are no pages in the Automatic
Document Feeder, the cursor will already be at #2, and you can just press YES.
4. Enter a destination in one of the following ways:
- a random fax number from the Numeric Keypad, - a previously stored Speed Dial number, - a previously programmed One-Touch key.
If a mistake is made, press NO to backspace and erase incorrect digits or use the cursor keys to move the cursor to the incorrect digit and simply enter the correct digit.
The number appears in the display.
5. Press YES after entering the number (if you entered
a Speed Dial number, press YES a second time).
ENTER TIME _ _:_ _
AUTO DIAL ? ENTER YES, NO OR ts
1=SND, 2=RCV, 3=RELAY 4=SND/RCV,5=MAILBOX tt
ENTER DESTINATION# z
ANOTHER NUMBER? ENTER YES OR NO
JOB #014 TO MEMORY PAGE.1
AUG 10 2001 10:00 SYSTEM READY

66
6. If you’re polling several locations, press YES and
enter another number. (NOTE: 32 random phone numbers can be entered from the 2030 Numeric Keypad). Repeat Steps #5-7 until all numbers are entered. Then press NO to continue.
7. If the remote location requires a Passcode, enter the
correct four-digit Passcode, then press YES or you will not be able to receive from the other unit. Press NO if a Passcode is not required.
8. Enter the time to dial the remote station, and then
press YES. Or just press YES to begin polling now.
NOTES: 1. If you are polling several locations during one AutoDial Job, all remote fax
units to be polled during that Job must have the same Passcodes or require no Passcode at all.
2. There is no universal polling standard. It may not be possible for your Model
2030 to poll certain non-Pitney Bowes machines. 5.3.3 Entering a Relay Programmable AutoDial Job The Model 2030 allows you to set up a Single Node Relay AutoDial Job (through one remote machine or group of remote machines – the “Broadcast Relay”) to one or several final destinations. Or you can relay a document via a Dual Node Relay (first through one machine – or group of machines – then through another machine or group of machines) to the final destination. (NOTE: Remote machines are referred to as Relay Stations.) As with more sophisticated features like Mailboxes, it is recommended that a Key Operator or System Administrator set up the Relay capabilities with other Key Operators. Careful assignment of Speed Dial Numbers and One-Touch Program keys is essential for accurate faxing using Relay jobs. Coordination with remote sites is required to keep lists and report generation accurate. See Section 6.3, “Relay Functions” for more information on the Model 2030’s Relay feature. To enter a Relay Programmable AutoDial Job: Do This
This Happens
1. Insert the document face down in the Automatic
Document Feeder and press FEATURES twice.
ENTER PASSCODE IF NEEDED _ _ _ _
ENTER TIME _ _:_ _
AUG 10 2001 10:00 SYSTEM READY
AUTO DIAL ? PRESS YES, NO OR ts
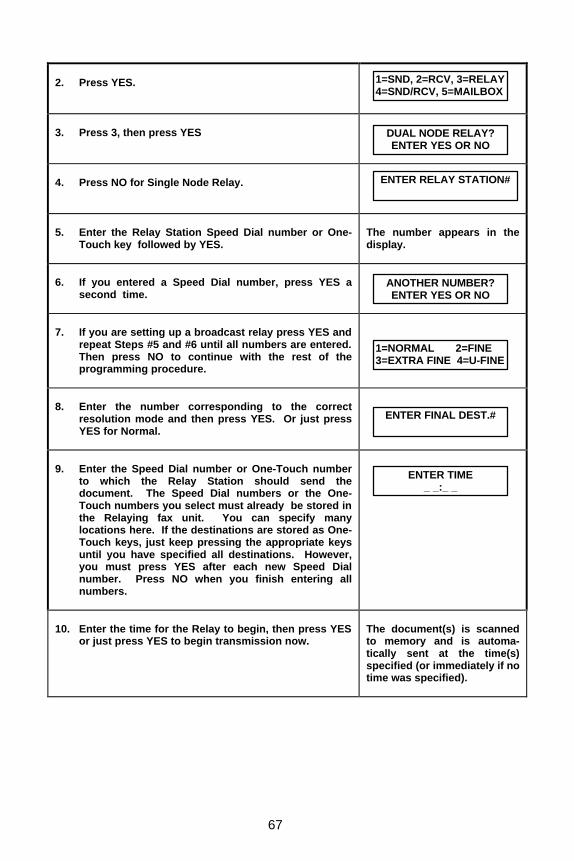
67
2. Press YES.
3. Press 3, then press YES
4. Press NO for Single Node Relay.
5. Enter the Relay Station Speed Dial number or One-
Touch key followed by YES.
The number appears in the display.
6. If you entered a Speed Dial number, press YES a
second time.
7. If you are setting up a broadcast relay press YES and
repeat Steps #5 and #6 until all numbers are entered. Then press NO to continue with the rest of the programming procedure.
8. Enter the number corresponding to the correct
resolution mode and then press YES. Or just press YES for Normal.
9. Enter the Speed Dial number or One-Touch number
to which the Relay Station should send the document. The Speed Dial numbers or the One-Touch numbers you select must already be stored in the Relaying fax unit. You can specify many locations here. If the destinations are stored as One-Touch keys, just keep pressing the appropriate keys until you have specified all destinations. However, you must press YES after each new Speed Dial number. Press NO when you finish entering all numbers.
10. Enter the time for the Relay to begin, then press YES
or just press YES to begin transmission now.
The document(s) is scanned to memory and is automa-tically sent at the time(s) specified (or immediately if no time was specified).
1=SND, 2=RCV, 3=RELAY 4=SND/RCV, 5=MAILBOX
DUAL NODE RELAY? ENTER YES OR NO
ENTER RELAY STATION# z
ANOTHER NUMBER? ENTER YES OR NO
1=NORMAL 2=FINE 3=EXTRA FINE 4=U-FINE
ENTER FINAL DEST.#
ENTER TIME _ _:_ _

68
5.3.4 Sending and Receiving with Programmable AutoDial Jobs To send and receive with a Programmable AutoDial Job (Turnaround Polling): Do This
This Happens
1. If you need to set a polling Passcode, refer to
Section 5.7.7 for instructions.
2. Load pages you wish to send into the Document
Feeder face down, then press FEATURES twice.
3. Press YES.
4. Press 4, then press YES.
5. Enter one of the following: a phone number from
the Numeric Keypad; a Speed Dial number; or a One-Touch key.
The number will appear in the display.
6. Press YES after entering the number (if you entered
a Speed Dial number, press YES a second time).
7. Press YES to enter another number by one of the
methods mentioned in Step #5 above. Repeat Steps #5-#7 until all numbers are entered. Then press NO to continue.
NOTE: Up to 32 random numbers can be entered from the Numerical Keypad.
8. Enter the number corresponding to the correct
resolution mode and then press YES. Or just press YES for NORMAL.
9. If the remote location requires a Passcode, enter the
correct four-digit Passcode, then press YES. Press NO if a Passcode is not required.
AUTO DIAL ? PRESS YES, NO, ts
1=SND, 2=RCV, 3=RELAY 4=SND/RCV, 5=MAILBOX
ENTER DESTINATION# z
ANOTHER NUMBER? ENTER YES OR NO
1=NORMAL 2=FINE 3=EXTRA FINE 4=U-FINE
ENTER PASSCODE IF NEEDED _ _ _ _
ENTER TIME __ __:__ __
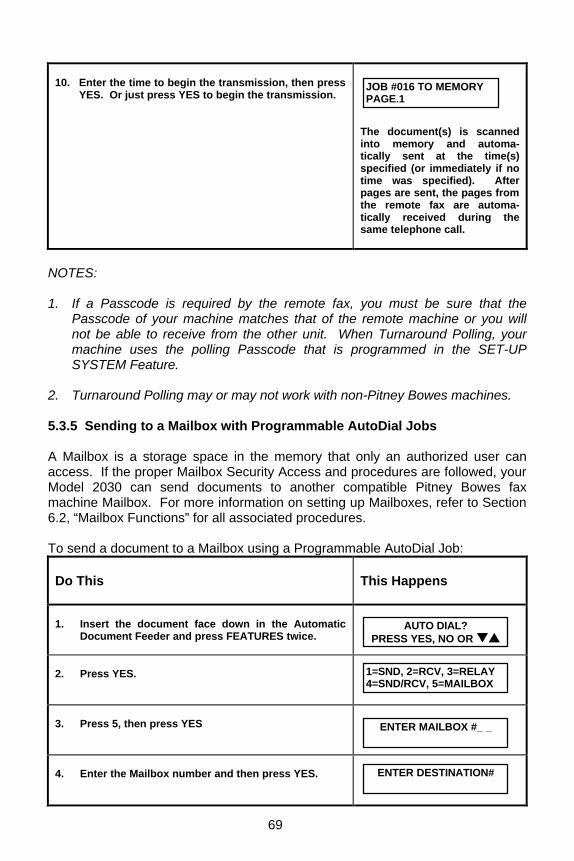
69
10. Enter the time to begin the transmission, then press
YES. Or just press YES to begin the transmission.
The document(s) is scanned into memory and automa-tically sent at the time(s) specified (or immediately if no time was specified). After pages are sent, the pages from the remote fax are automa-tically received during the same telephone call.
NOTES: 1. If a Passcode is required by the remote fax, you must be sure that the
Passcode of your machine matches that of the remote machine or you will not be able to receive from the other unit. When Turnaround Polling, your machine uses the polling Passcode that is programmed in the SET-UP SYSTEM Feature.
2. Turnaround Polling may or may not work with non-Pitney Bowes machines. 5.3.5 Sending to a Mailbox with Programmable AutoDial Jobs A Mailbox is a storage space in the memory that only an authorized user can access. If the proper Mailbox Security Access and procedures are followed, your Model 2030 can send documents to another compatible Pitney Bowes fax machine Mailbox. For more information on setting up Mailboxes, refer to Section 6.2, “Mailbox Functions” for all associated procedures. To send a document to a Mailbox using a Programmable AutoDial Job: Do This
This Happens
1. Insert the document face down in the Automatic
Document Feeder and press FEATURES twice.
2. Press YES.
3. Press 5, then press YES
4. Enter the Mailbox number and then press YES.
AUTO DIAL? PRESS YES, NO OR ts
1=SND, 2=RCV, 3=RELAY 4=SND/RCV, 5=MAILBOX
ENTER MAILBOX #_ _
ENTER DESTINATION# z
JOB #016 TO MEMORY PAGE.1

70
5. Enter one of the following:
- a random fax number from the Numeric Keypad, - a previously stored Speed Dial number, - a previously programmed One-Touch key. Then press YES. (If you entered a Speed Dial number, press YES a second time).
The number will appear in the display.
6. The Model 2030 lets you request that a Mailbox
Delivery Report be faxed to a third location from the unit to which you are sending mail. Press NO if you do not want a third fax unit to receive a Send Delivery Report. Press YES if you want a Mailbox Delivery Report to be faxed to a third location. See Note 1 below. See Section 6.2, “Mailbox Functions,” for complete information on Mailboxes. Example: Press NO.
7. Enter the number corresponding to the correct
resolution and then press YES. Or just press YES for Normal.
8. Enter the time to send the document and then press
YES. Or just press YES to begin transmission immediately.
The document is scanned into memory and automatically sent at the time specified (or immediately if no time was specified).
NOTES: 1. If you answer YES in Step #6 (Delivery Report) above, the system will ask for
the destination(s). They must be either Speed Dial numbers or One-Touch keys that are already stored in the fax machine to which you are sending mail. See Section 6.2 for more information on Mailboxes.
2. You can program a P-Key to send to a Mailbox if you regularly send
materials to the same location’s Mailbox. Refer to Section 5.5 for more information on programming a One-Touch Program Key.
3. If multiple destinations (Speed Dial numbers) are programmed in the
AutoDial Job, the Model 2030 will begin dialing the first Speed Dial number on the list. If there are additional destinations programmed, the 2030 will dial the next telephone number on the list, even if the first destination number was busy. After all numbers have been called all incomplete stations will be redialed.
SEND DELIVERY REPORT? ENTER YES OR NO
ENTER TIME _ _:_ _
JOB #129 TO MEMORY PAGE.1
1=NORMAL 2=FINE 3=EX-FINE 4=U-FINE

71
5.4 Editing AutoDial Jobs All AutoDial Jobs are stored in the Model 2030 memory until transmission is complete. At times, you may need to modify an AutoDial Job while the Job is still in memory (not in progress). The quickest way is to press the “Edit Jobs” key on the Operator Panel. You may also use the EDIT JOBS Feature #4 Menu to:
1=ADD PGS – add pages to an existing Job 2=EDIT DEST – add, delete or change telephone number[s]
(destination[s]) to a pending Job 3=DELETE – delete Jobs 4=REPEAT – repeat incomplete Job[s] 5=CHANGE TIME – of a pending Job 6=PRINT DOCUMENT – pages of Job
To edit an AutoDial Job: Do This
This Happens
1. Print a copy of the Jobs Report (Press REPORTS, δδ,
YES) to determine the Job number you want to edit.
The Jobs Report prints.
2. Press EDIT JOBS key. (If pressed twice, options 5
and 6 appear.)
3. Enter the number of the action you want:
#1 to add page(s), #2 to edit the destinations (or add fax numbers) #3 to delete a Job, #4 to repeat a Job, #5 to change time,
#6 to print document.
Now, follow the appropriate Steps in the next sections for whatever selection you wish to make (1-6).
5=CHANGE TIME ss 6=PRINT DOCUMENT
1=ADD PGS 2=EDIT DEST 3=DELETE 4=REPEAT tt
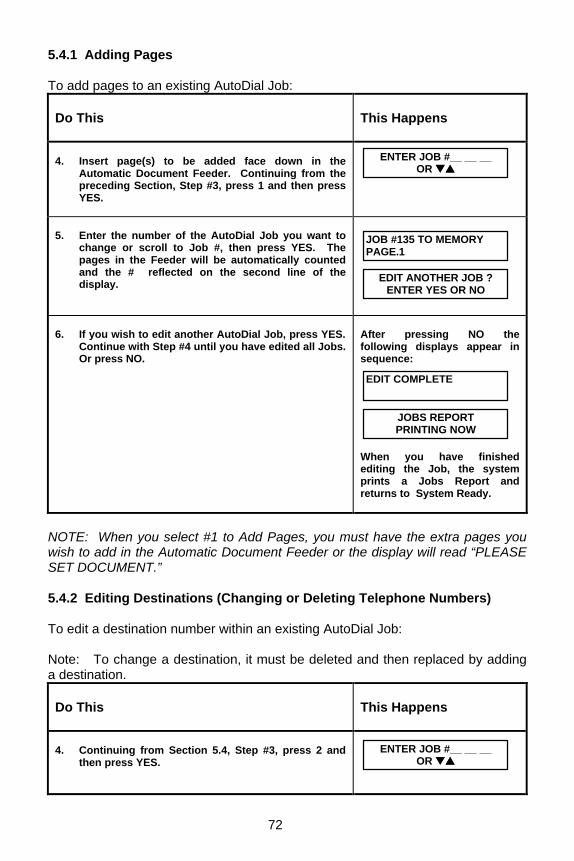
72
5.4.1 Adding Pages To add pages to an existing AutoDial Job: Do This
This Happens
4. Insert page(s) to be added face down in the
Automatic Document Feeder. Continuing from the preceding Section, Step #3, press 1 and then press YES.
5. Enter the number of the AutoDial Job you want to
change or scroll to Job #, then press YES. The pages in the Feeder will be automatically counted and the # reflected on the second line of the display.
6. If you wish to edit another AutoDial Job, press YES.
Continue with Step #4 until you have edited all Jobs. Or press NO.
After pressing NO the following displays appear in sequence: When you have finished editing the Job, the system prints a Jobs Report and returns to System Ready.
NOTE: When you select #1 to Add Pages, you must have the extra pages you wish to add in the Automatic Document Feeder or the display will read “PLEASE SET DOCUMENT.” 5.4.2 Editing Destinations (Changing or Deleting Telephone Numbers) To edit a destination number within an existing AutoDial Job: Note: To change a destination, it must be deleted and then replaced by adding a destination. Do This
This Happens
4. Continuing from Section 5.4, Step #3, press 2 and
then press YES.
ENTER JOB #__ __ __ OR ttss
EDIT ANOTHER JOB ? ENTER YES OR NO
JOB #135 TO MEMORY PAGE.1
JOBS REPORT PRINTING NOW
EDIT COMPLETE
ENTER JOB #__ __ __ OR ttss
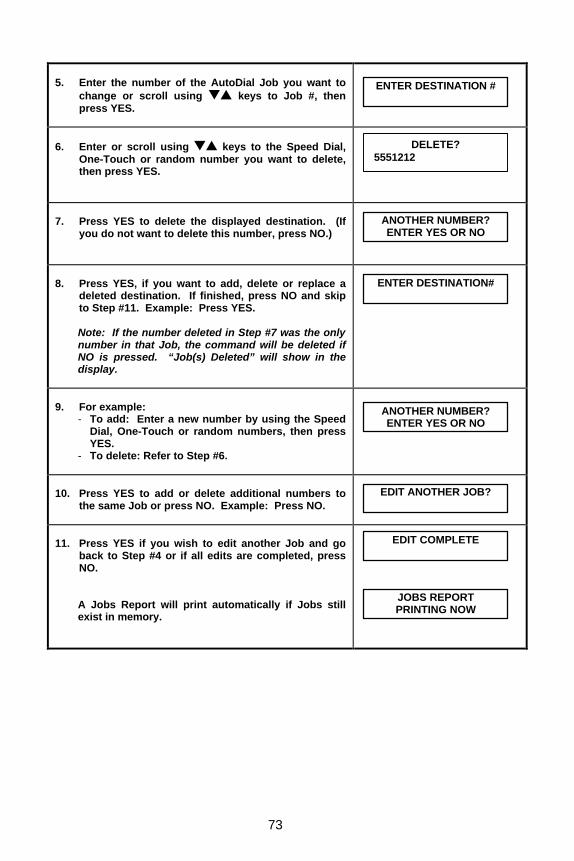
73
5. Enter the number of the AutoDial Job you want to
change or scroll using ts keys to Job #, then press YES.
6. Enter or scroll using ts keys to the Speed Dial,
One-Touch or random number you want to delete, then press YES.
7. Press YES to delete the displayed destination. (If
you do not want to delete this number, press NO.)
8. Press YES, if you want to add, delete or replace a
deleted destination. If finished, press NO and skip to Step #11. Example: Press YES.
Note: If the number deleted in Step #7 was the only number in that Job, the command will be deleted if NO is pressed. “Job(s) Deleted” will show in the display.
9. For example:
- To add: Enter a new number by using the Speed Dial, One-Touch or random numbers, then press YES.
- To delete: Refer to Step #6.
10. Press YES to add or delete additional numbers to
the same Job or press NO. Example: Press NO.
11. Press YES if you wish to edit another Job and go
back to Step #4 or if all edits are completed, press NO.
A Jobs Report will print automatically if Jobs still exist in memory.
ENTER DESTINATION # z
ANOTHER NUMBER? ENTER YES OR NO
ANOTHER NUMBER? ENTER YES OR NO
JOBS REPORT PRINTING NOW
EDIT COMPLETE
DELETE? 5551212
ENTER DESTINATION# z
EDIT ANOTHER JOB?

74
5.4.3 Deleting a Job To delete an existing AutoDial Job: Do This
This Happens
4. Continuing from Section 5.4, Step #3, press 3 and
then press YES.
5. Enter the number of the AutoDial Job you want to
delete or scroll using ts keys to Job #, then press YES.
6. Press YES to delete the Job.
7. If there are other existing AutoDial Jobs in memory,
the following display will appear. Press YES to edit another Job and repeat from Step #4 or, if finished, press NO.
If there are no other existing AutoDial Jobs in memory, the system returns to System Ready without printing a Jobs Report.
5.4.4 Repeating a Job The Model 2030 is equipped with a Memory Save feature. (The default setting is OFF. To turn this feature ON, contact the Pitney Bowes Diagnostic Center listed in the back of this guide). Whenever a transmission is incomplete because the Job was interrupted or the remote location did not answer (e.g., was busy or encountered a communication error), the Job (and document) is saved in memory. The system will print a Job Status Report Inc. that identifies the Job number and verifies that the document is still in memory. In addition, this message will appear in the display:
ENTER JOB #__ __ __ OR ttss
DELETE JOB #119?
INCOMPLETE JOB CHECK JOBS REPORT
#119 SND 22:00 P00219085551212
EDIT ANOTHER JOB?
JOB(S) DELETED
EDIT COMPLETE
JOBS REPORT PRINTING NOW

75
You can either delete the Job (See preceding Section 5.4.3) or instruct the system to repeat the incomplete part of the Job. To repeat the incomplete part of an AutoDial Job: Do This
This Happens
4. Continuing from Section 5.4, Step #3, press 4 and
then press YES.
5. Enter the Job number you want to repeat or scroll
using ts keys to Job #, then press YES.
6. Enter the time you want the Job repeated. Then
press YES. Or, just press YES to repeat the Job now.
7. If you wish to edit another Job, press YES.
Continue with Step #4 until you have edited all necessary Jobs. Or, if finished, press NO.
After pressing NO, the following displays appear in the sequence: When you have finished editing the Job, the system prints the Jobs Report. If the Job should be repeated now, the transmis-sion begins. If not, the system returns to System Ready.
5.4.5 Changing a Time To change a communication time of an existing AutoDial Job: Do This
This Happens
4. Continuing from Section 5.4, Step #3, press 5 and
then press YES.
EDIT ANOTHER JOB? ENTER YES OR NO
EDIT COMPLETE
JOBS REPORT PRINTING NOW
ENTER JOB #__ __ __ OR ttss
ENTER TIME _ _:_ _
#130 SND 10:30 P007 19087251212
ENTER JOB #__ __ __ OR ttss
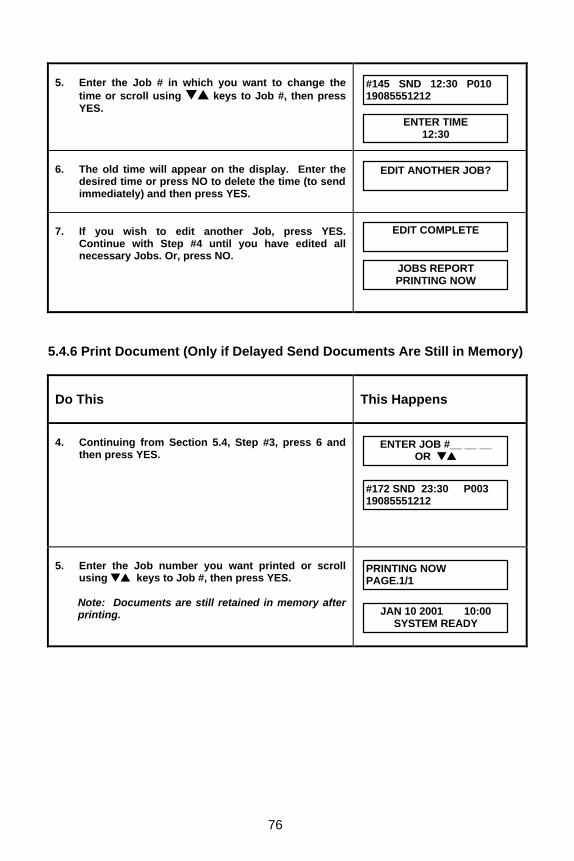
76
5. Enter the Job # in which you want to change the
time or scroll using ts keys to Job #, then press YES.
6. The old time will appear on the display. Enter the
desired time or press NO to delete the time (to send immediately) and then press YES.
7. If you wish to edit another Job, press YES.
Continue with Step #4 until you have edited all necessary Jobs. Or, press NO.
5.4.6 Print Document (Only if Delayed Send Documents Are Still in Memory) Do This
This Happens
4. Continuing from Section 5.4, Step #3, press 6 and
then press YES.
5. Enter the Job number you want printed or scroll
using ttss keys to Job #, then press YES.
Note: Documents are still retained in memory after printing.
ENTER TIME 12:30
EDIT ANOTHER JOB?
JOBS REPORT PRINTING NOW
ENTER JOB #__ __ __ OR ttss
JAN 10 2001 10:00 SYSTEM READY
PRINTING NOW PAGE.1/1
#145 SND 12:30 P010 19085551212
EDIT COMPLETE
#172 SND 23:30 P003 19085551212

77
5.5 Programming P-Keys (One-Touch Programmable Keys)
On the Model 2030, the last five numbers (P1 - P5) are dedicated as P-Keys. Once programmed, you can enter a Job by pressing the One-Touch Program Key. If you were to use an AutoDial Job instead of a programmed P-Key, once an AutoDial Job has been completed it does not exist in memory any longer. A new Job would have to be entered the next time you wish to communicate with the same locations. One-Touch Program keys save the time of re-entering an AutoDial Job each time you need to transmit to the same locations. Programmable One-Touch keys can be reprogrammed with a new Job at any time. 5.5.1 Storing P-Keys To store an AutoDial Job in a One-Touch Program (P-Key): Do This
This Happens
1. Press FEATURES.
2. Press 7 and then YES.
3. Press YES.
4. Press one of the last 5 One-Touch keys (31-35).
Example: Press “P1”.
5. Enter a name for the P-Key as you would a Speed
Dial name, then press YES. (See Section 5.1.1, Step #6). Example: Enter “BRANCHES”, then YES. The P-Key name can be either alphabetical, numerical or special symbol characters, or a combination of all three. Enter up to 16 characters total. If you do not want to name the P-Key, press NO.
FEATURE SELECTIONS PRESS YES, NO OR δδχχ
SET PROGRAM KEYS? ENTER YES, NO OR δδχχ
ENTER NAME PK1: zz
6=POLL χχ
1=SND, 2=RCV, 3=RELAY 4=SND/RCV, 5=MAILBOXδδ
PRESS DESIRED P-KEY
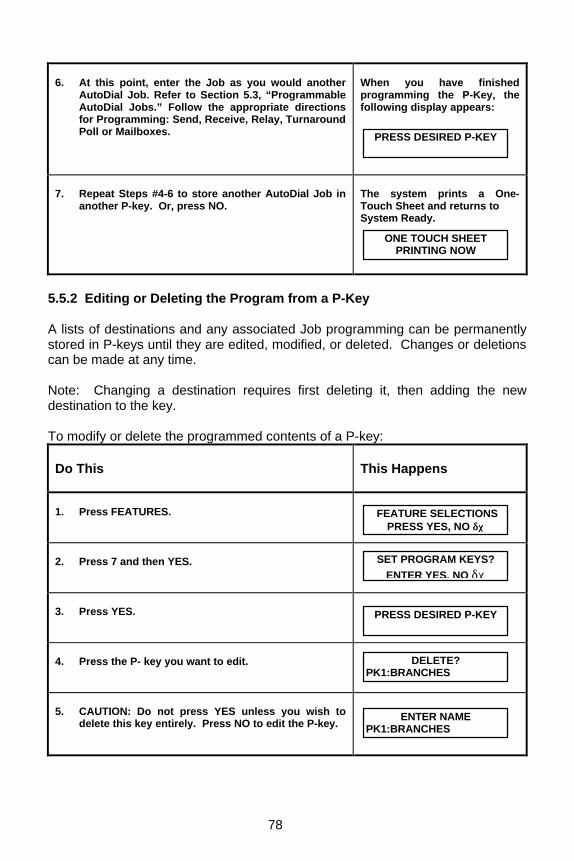
78
6. At this point, enter the Job as you would another
AutoDial Job. Refer to Section 5.3, “Programmable AutoDial Jobs.” Follow the appropriate directions for Programming: Send, Receive, Relay, Turnaround Poll or Mailboxes.
When you have finished programming the P-Key, the following display appears:
7. Repeat Steps #4-6 to store another AutoDial Job in
another P-key. Or, press NO.
The system prints a One- Touch Sheet and returns to System Ready.
5.5.2 Editing or Deleting the Program from a P-Key A lists of destinations and any associated Job programming can be permanently stored in P-keys until they are edited, modified, or deleted. Changes or deletions can be made at any time. Note: Changing a destination requires first deleting it, then adding the new destination to the key. To modify or delete the programmed contents of a P-key: Do This
This Happens
1. Press FEATURES.
2. Press 7 and then YES.
3. Press YES.
4. Press the P- key you want to edit.
5. CAUTION: Do not press YES unless you wish to
delete this key entirely. Press NO to edit the P-key.
PRESS DESIRED P-KEY
FEATURE SELECTIONS PRESS YES, NO δδχχ
SET PROGRAM KEYS?
ENTER YES, NO δχ
PRESS DESIRED P-KEY
DELETE? PK1:BRANCHES
ENTER NAME PK1:BRANCHES
ONE TOUCH SHEET PRINTING NOW
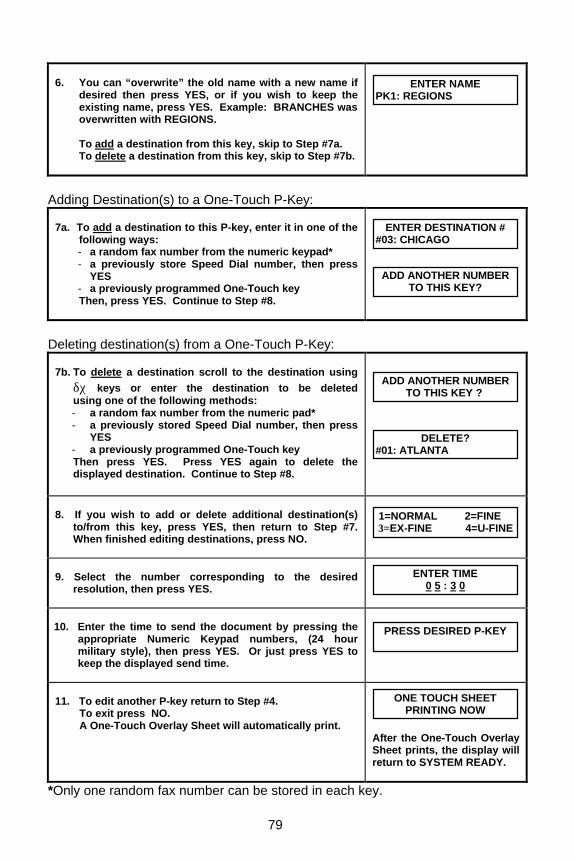
79
6. You can “overwrite” the old name with a new name if
desired then press YES, or if you wish to keep the existing name, press YES. Example: BRANCHES was overwritten with REGIONS. To add a destination from this key, skip to Step #7a. To delete a destination from this key, skip to Step #7b.
Adding Destination(s) to a One-Touch P-Key:
7a. To add a destination to this P-key, enter it in one of the
following ways: - a random fax number from the numeric keypad* - a previously store Speed Dial number, then press
YES - a previously programmed One-Touch key Then, press YES. Continue to Step #8.
Deleting destination(s) from a One-Touch P-Key:
7b. To delete a destination scroll to the destination using
δχ keys or enter the destination to be deleted using one of the following methods:
- a random fax number from the numeric pad* - a previously stored Speed Dial number, then press
YES - a previously programmed One-Touch key Then press YES. Press YES again to delete the displayed destination. Continue to Step #8.
8. If you wish to add or delete additional destination(s)
to/from this key, press YES, then return to Step #7. When finished editing destinations, press NO.
9. Select the number corresponding to the desired
resolution, then press YES.
10. Enter the time to send the document by pressing the
appropriate Numeric Keypad numbers, (24 hour military style), then press YES. Or just press YES to keep the displayed send time.
11. To edit another P-key return to Step #4. To exit press NO. A One-Touch Overlay Sheet will automatically print.
After the One-Touch Overlay Sheet prints, the display will return to SYSTEM READY.
*Only one random fax number can be stored in each key.
ENTER NAME PK1: REGIONS
ADD ANOTHER NUMBER TO THIS KEY?
ENTER DESTINATION # #03: CHICAGO
ONE TOUCH SHEET PRINTING NOW PRINTING NOW
1=NORMAL 2=FINE 3=EX-FINE 4=U-FINE
PRESS DESIRED P-KEY
ENTER TIME 0 5 : 3 0
ADD ANOTHER NUMBER TO THIS KEY ?
DELETE? #01: ATLANTA

80
5.6 Printing Reports and Forms With the Model 2030, you can print a variety of reports, many of the reports can be printed on demand or programmed to print automatically. The following reports are accessed through the Print Reports feature described in Section 5.6.1.
• Jobs Report • Speed Dial Directory • One-Touch Directory • One-Touch Overlay Sheet • Program Key (P-Key) Directory • System Set-Up Report • Cartridge Order Form
Methods for accessing the following reports are discussed in Section 5.6.4.
• Job Status Report (Communications Report) • Job Confirmation Report • Mail Box Directory • Mail Box Confirmation • Relay Confirmation Report
5.6.1 Printing a Report on Demand You may want to print one of the reports, forms or directories accessible through the Print Report Feature to:
• verify pending AutoDial Jobs (Jobs Report) • check what Speed Dial numbers are available (Speed Dial Directory) • check what One-Touch keys are available (One-Touch Directory) • verify the organization of the system e.g., to check how it was programmed (System Set-Up Report) • order cartridges • revise One-Touch destinations
To print any one of the above reports on demand: Do This
This Happens
1. Press REPORTS.
PRINT REPORTS JOURNAL?

81
2. Use tt and ss keys to scroll to the desired report
name. Or press NO until the report name you want to print appears in the display: Speed Dial Directory, One- Touch Directory, P-Key Directory, System Set-Up Report, Cartridge Order Form or One-Touch Sheet.
3. When the report name you want appears, press
YES.
The system will automatically return to SYSTEM READY.
5.6.2 On Demand Reports (1) Jobs Report The Jobs Report contains information on the amount of memory available in your system. It also lists the number of pages in the Send Memory, the Receive Memory as well as those pages stored in Mailbox(es). Additionally, all pending AutoDial Jobs, including Job Time and Date, are itemized for your review. You can print the Jobs Report on demand, but it also prints each time you edit an AutoDial Job (see Section 5.4, “Editing AutoDial Jobs”), unless there are no other Jobs pending. (2) Speed Dial Directory The Speed Dial Directory itemizes the telephone numbers and names that you have programmed as three-digit Speed Dial numbers. It may be printed in Numeric telephone order or alphabetically. It also indicates which locations you have programmed as Relay Stations (see Section 6.3 for information on the Relay Functions). There are a total of 200 possible Speed Dial numbers on the Model 2030. You can print the Speed Dial Directory on demand, but it also prints each time you enter or change any Speed Dial number or name. See Section 5.1 for instructions on programming Speed Dial numbers. (3) One-Touch Directory The One-Touch Directory identifies the One-Touch key (List #) and name associated with it along with the Speed Dial number(s), telephone number(s) and name(s) that are stored in that One-Touch key. See Section 5.2 for procedures to program One-Touch keys.
PRINT REPORTS JOBS REPORT?
(REPORT NAME) PRINTING NOW
82
(4) One-Touch Overlay Sheet After programming a One-Touch key, the One-Touch Overlay Sheet, which includes the first 12 characters of each destination name, prints automatically when you have made changes to the name of the One-Touch key or P-key. Cut along the dotted line and place it over the One-Touch keys under the Directory Sheet Cover. To print out an Overlay Sheet, press the REPORTS key and press cursor down (t) until display reads: “ONE TOUCH SHEET.” Then press YES. (5) Program Key (P-Key) Directory This report describes the contents of the Programmable One-Touch key (P-Keys) by printing a Program Key Directory. A One-Touch Overlay Sheet is automatically printed each time you program or change the name of a P-Key. See Section 5.5 for procedures to Program a P-Key. (6) System Set-Up Report This report has seven sections that contain various programmable settings for machine operation and communication. • Machine Settings: The current date and time, beep volume, document
separator, power save settings and the power save timer are listed here. • Machine ID Settings: Your Model 2030 transmit ID(s) and fax phone
number are displayed in this section. • Reports Settings: In this area, the Journal specifications are listed, such as:
JNL Format, JNL Display (what will show when the Journal is viewed on the 2030 display), JNL ID Field (what is listed on the To/From column of the Journal Report and Job Status Report), JNL Send (whether the machine will transmit a copy of the journal to another location). The Job Status selection is also displayed here (On, Off, Inc, On-demand).
• Jobs Settings: This section describes whether the following features are
activated: Save Incomplete Jobs, Save Stopped Jobs, Scan to Memory, Send Cover Sheet, Confirm Jobs Report. The One-Touch Start Delay is also listed under this section.
• Telephone Line Settings; The selections for what Ring Pattern the Model
2030 answers, how many Rings Before Answer, whether the machine is in Auto Receive or Manual Receive mode, how many Retries the machine will dial if no answer or busy signal, and how long the machine will wait between Retries is listed in this area.

83
IMPORTANT: The Federal Communications Commission (FCC) has placed a restriction on dialing retries to protect the public from receiving a large number of accidental calls, in case a machine is dialing an incorrect number. This ruling restricts dialing to a location no more than two times if, after dialing, it does not detect a busy signal (from the telephone system) or answer tones from another facsimile machine. Absence of these two conditions indicates that the number dialed is not a facsimile unit. If the machine does detect a busy signal or another facsimile, it may dial up to 14 times.
• Option Settings: Here you can see how much memory is in the machine,
the access code requirements, whether the OK stamp is active from memory or from the feeder, and what the polling passcode is set for.
• Receive Settings: Under this section, you can see whether the Remote
Retrieval and Receive to Memory features are on or off. 7) Cartridge Order Form You can print a form to be used in ordering toner cartridges for your 2030. This form can be telephoned or faxed to the numbers listed on the form. To print this form, press REPORTS key and press cursor down (t) until display reads: “CARTRIDGE ORDER FORM.” Then press YES. This form will also print automatically when the machine senses low toner. 5.6.3 Journal Report The Model 2030 Journal gives details of all transmissions and receptions. You can print out the Journal anytime you need one. Simply press the REPORTS key, then press YES on the Control Panel. After it is chosen, two numbered selections appear on the display (1=PRINT, 2=VIEW). Press 1, then YES, to obtain a printed Journal Report. Press 2, then YES, to view each transaction on the display. Use the ts keys to scroll through the list of transactions. The communications you want to see on the display may be selected on the Journal setup of Set Up System feature (See Section 5.7). You may choose 1=Originated Call Only or 2=All. The Model 2030 Journal stores up to 32 transmit or receive transactions before becoming full. If you wish, you can program the Model 2030 to automatically print a Journal once a day, at the same time everyday, only when full or not to print automatically. Refer to Set Up System feature (Section 5.7.4) for instructions on how to program your system to print a Journal everyday. When the Journal is printed automatically, the information is erased from memory and a new Journal is started.
84
5.6.4 Verification Reports Your Model 2030 is capable of printing various Verification Reports. Most of these are generated automatically and some can be turned ON or OFF. Collectively, these reports provide immediate feedback about transmissions, receptions, Jobs, Mailboxes, Relays and other important functions. 1. Job Status Report This report prints immediately following each transmission, even after your unit has been polled by another machine. The information is identical to a line item on the Journal Report. See Section 5.6.3 for more information. You may choose to have the 2030 automatically print out the Job Status Report after each transmission or you may choose:
1=Off 2=On 3=Inc (default) – a report will print only if transmission is unsuccessful 4=On Demand – you can choose to print a report while setting up a
transmission. See Report Settings (Section 5.7.4) for details on setting up this feature. 2. Job Confirmation Report This type of report prints automatically each time you enter or edit a programmable AutoDial Job. See Section 5.3 for more information on AutoDial Jobs. The Job Confirmation Report was OFF when your Model 2030 was installed. If you wish, you can turn it ON by accessing the System Setup, Job Settings feature (see Section 5.7.5 for further details). 3. Mailbox Directory You can program the Model 2030 with 10 private Mailboxes. A Mailbox is a storage space in memory that can only be accessed with a special code. The Mailbox Directory prints automatically after Mailboxes are set up or each time you change a Mailbox name or access code. Only an authorized Key Operator or System Administrator can print a copy of the Directory whenever it is needed. Refer to Section 6.2 for information on working with Mailboxes and printing the Mailbox Directory. 4. Mailbox Confirmation Notice of Private Mail Delivery This report is automatically sent back to the sending machine from the system that has the Mailbox to confirm that mail was received. The same report also prints on the fax unit with the Mailbox.

85
5. Mailbox Delivery Report A report similar to the Mailbox Confirmation is automatically sent to a third machine if specified. The unit sending to another machine’s Mailbox can request that the Mailbox unit send a Mailbox Delivery Report to a third fax unit. NOTE: If your machine receives mail and the unit sending mail to you requested that your unit fax a Mailbox Delivery Report to a third machine, your machine will not be able to forward this report if you have PBX Access Codes ON. There is no way for the machine sending you mail to specify a PBX Code for your unit. See Section 6.1, “PBX Access Codes” and Section 6.2, “Mailbox Functions.” 6. Relay Confirmation Report During a Relay, this report is printed at the Relay Station. It can also be sent back to the Originators to confirm that the Relay Station has executed a Relay Job that was initiated by the Originator. Refer to Section 6.3 for more detailed information on the Relay Function.

86
5.7 Setting Up the System When the Model 2030 was installed, System Set Up definitions should have been programmed. If you wish to change one or more of them (e.g., the date/time, machine ID, retry count, etc.), refer to the procedures in the appropriate Section(s) as shown below:
1. MACHINE SETTINGS (Section 5.7.2) - DATE/TIME - BEEP VOLUME - DOCUMENT SEPARATOR
- PRINT INDEX MARK - SEPARATOR PAGE
- POWER SAVER - POWER SAVER TIMER
2. MACHINE ID SETTINGS (Section 5.7.3) - TRANSMIT ID NAME - THIS FAX NUMBER
3. REPORT SETTINGS (Section 5.7.4) - JOURNAL FORMAT - JOURNAL DISPLAY - JOURNAL ID FIELD - JOURNAL PRINT - JOURNAL SEND - JOB STATUS REPORT
4. JOB SETTINGS (Section 5.7.5) - SAVE INCOMPLETE JOBS - SAVE STOPPED JOBS - SCAN TO MEMORY - SEND COVER SHEET - ONE TOUCH START DELAY - CONFIRM JOBS REPORT
5. TELEPHONE LINE SETTINGS (Section 5.7.6) - ANSWER RING PATTERN - RINGS BEFORE ANSWER - AUTO RECEIVE - RETRY COUNT - RETRY INTERVAL
6. OPTION SETTINGS (Section 5.7.7) - MEMORY SIZE - ACCESS CONTROL CODE
- ANY OPERATION - SET UP - EDIT JOBS - OK STAMP - TX FROM FEEDER - SCAN TO MEMORY
- POLLING PASSCODE
87
7. RECEIVE SETTINGS (Section 5.7.8) - REMOTE RETRIEVAL - RECEIVE TO MEMORY
8. PC OPTIONS (Section 5.7.9) 5.7.1 Changing or Programming the Set-Up Definitions If you wish to change one or several Set-Up Definitions, there is no need to answer all of the following prompts and questions. Instead, you can press NO or tt ss (EDIT JOBS/HELP keys) to scroll to the one you want to change or review. When finished, simply press STOP to return to the System Ready Mode. In this case, the system will not automatically print a System Set Up Report. You may print one anytime through the Reports key (see Section 5.6.1). 5.7.2 Machine Settings
The Machine Settings are as follows: •Date/Time: The programmed Date/Time appears in the 2030’s display
and prints at the top of each transmitted page as part of the “header” on all received faxes.
• Beep Volume: Audible signal indicating key presses and alarm tones. Settings include low, medium and high volume.
• Document Separator: If your 2030 has a single paper cassette, turning the Document Separator feature ON will instruct the system to place an “Index Mark” (approximately .25” x .5” in size) on the upper right corner of the first page of a received fax. This will help distinguish receptions if they are allowed to accumulate in the reception tray. If your 2030 has been equipped with two or more cassettes, turning the “Separator Page” feature ON will tell the unit to print the first page of the incoming fax from the second optional cassette and the rest of the reception on paper from the other cassette(s). By installing unique paper (e.g., colored) you will easily be able to identify and separate fax receptions that accumulate in the reception tray. This feature may be used in conjunction with the Index Mark.
• Power Saver: The 2030 was shipped with the Power Saver feature turned ON and therefore does not require adjustment. It is set to automatically power down and thus save energy when the system is not being used. You can, however, make custom adjustments if necessary.
• Power Saver Timer: The power will be reduced after the time interval indicated here. The default setting is 5 minutes. The setting can be changed from 1 to 255 minutes.

88
To view or adjust Machine Settings, proceed as follows: Do This
This Happens
1. Press FEATURES.
2. Press 8 and then YES.
3. Press YES.
4. The Model 2030 has been defaulted to SECURE
MACHINE SETTINGS. This feature can be turned off by calling the Diagnostic Center. Enter your ACCESS CODE, if required and press YES. The default ACCESS CODE is 2030.
5. Press YES to select MACHINE SETTINGS. Press YES
again to program or change the Date or Time (or tt to move to the next item).
6. Program or change the date and/or time in month/
day/year/ hours/minutes order. For example, for JAN. 10, 2001, 4:28 p.m., you would enter: 011020011628.
If you want to change an existing date: Individual corrections can be made using the uu and tt arrow cursor keys to move the item you wish to change remember to enter the time in military fashion. Enter numbers for the months you want: 01=Jan, 02=Feb, 03=Mar, etc.
There is no need to set the time ahead or back to accommodate daylight savings. The Automatic daylight/standard time shift feature will take place on the first Sunday of April (one hour ahead) and the last Sunday in October (one hour back). (Note: This feature can be turned off for areas that do not use DST.)
The new Date and Time appear in the display as you enter them.
7. Press YES when the date and time are complete.
8. Press YES to change the Beep Volume (or tt to move
to the next item).
ENTER DATE/TIME JAN 10 2001 16:28
BEEP VOLUME ? PRESS YES, NO OR ttss
DATE/TIME ? PRESS YES, NO OR ttss
BEEP VOLUME OFF tt --*-- uu HI
FEATURE SELECTIONS PRESS YES, NO OR ttss
SET UP SYSTEM ? PRESS YES, NO OR ttss
ENTER ACCESS CODE _ _ _ _
MACHINE SETTINGS? PRESS YES, NO OR ttss
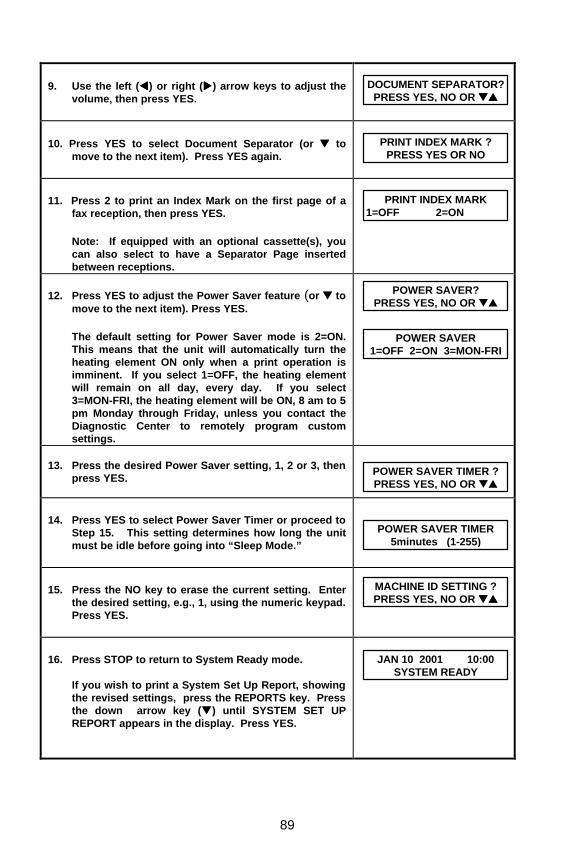
89
9. Use the left (tt) or right (uu) arrow keys to adjust the
volume, then press YES.
10. Press YES to select Document Separator (or tt to
move to the next item). Press YES again.
11. Press 2 to print an Index Mark on the first page of a
fax reception, then press YES.
Note: If equipped with an optional cassette(s), you can also select to have a Separator Page inserted between receptions.
12. Press YES to adjust the Power Saver feature (or tt to
move to the next item). Press YES.
The default setting for Power Saver mode is 2=ON. This means that the unit will automatically turn the heating element ON only when a print operation is imminent. If you select 1=OFF, the heating element will remain on all day, every day. If you select 3=MON-FRI, the heating element will be ON, 8 am to 5 pm Monday through Friday, unless you contact the Diagnostic Center to remotely program custom settings.
13. Press the desired Power Saver setting, 1, 2 or 3, then
press YES.
14. Press YES to select Power Saver Timer or proceed to
Step 15. This setting determines how long the unit must be idle before going into “Sleep Mode.”
15. Press the NO key to erase the current setting. Enter
the desired setting, e.g., 1, using the numeric keypad. Press YES.
16. Press STOP to return to System Ready mode.
If you wish to print a System Set Up Report, showing the revised settings, press the REPORTS key. Press the down arrow key (qq) until SYSTEM SET UP REPORT appears in the display. Press YES.
DOCUMENT SEPARATOR? PRESS YES, NO OR ttss
PRINT INDEX MARK ? PRESS YES OR NO
PRINT INDEX MARK 1=OFF 2=ON
POWER SAVER? PRESS YES, NO OR ts
POWER SAVER 1=OFF 2=ON 3=MON-FRI
POWER SAVER TIMER ? PRESS YES, NO OR ts
POWER SAVER TIMER 5minutes (1-255)
JAN 10 2001 10:00 SYSTEM READY
MACHINE ID SETTING ? PRESS YES, NO OR ttss

90
5.7.3 Machine ID Settings
The Machine ID Settings are as follows: • Transmit ID Name – Along with the programmed Date/Time, the
programmed name (e.g., company name) prints at the top of each transmitted page as part of the “header” on all received faxes, as well as remote reports, thus identifying the sender/unit.
• This Fax Number – The programmed fax number also prints at the top of each transmitted page (see above).
To view or adjust Machine ID Settings, proceed as follows: Do This
This Happens
1. Press FEATURES.
2. Press 8 and then YES.
3. Press YES.
4. The Model 2030 has been defaulted to SECURE
MACHINE SETTINGS. This feature can be turned off by calling the Diagnostic Center. Enter your ACCESS CODE, if required and press YES. The default ACCESS CODE is 2030.
5. Press NO or t (Edit Jobs key) to bypass MACHINE
SETTINGS.
6. Press YES to select MACHINE ID SETTINGS.
7. Press YES to enter/edit the ID Name (or press tt to
move to the next item).
8. Enter the desired Name (up to 21 characters) via the
alphabetic (One-Touch keys) and numeric keys. (A space or hyphen can also be entered via the One-Touch keys.)
Note: To delete characters, press NO. To overstrike characters, use the cursor keys to move left (tt) or right (uu) and enter correct information.
MACHINE ID SETTING? PRESS YES, NO OR ts
TRANSMIT ID NAME? PRESS YES, NO OR ttss
ENTER TRANSMIT ID z
TRANSMIT ID NAME XYZ COMPANY
FEATURE SELECTIONS PRESS YES, NO OR ttss
SET UP SYSTEM ? PRESS YES, NO OR ttss
ENTER ACCESS CODE _ _ _ _
MACHINE SETTINGS? PRESS YES, NO OR ttss
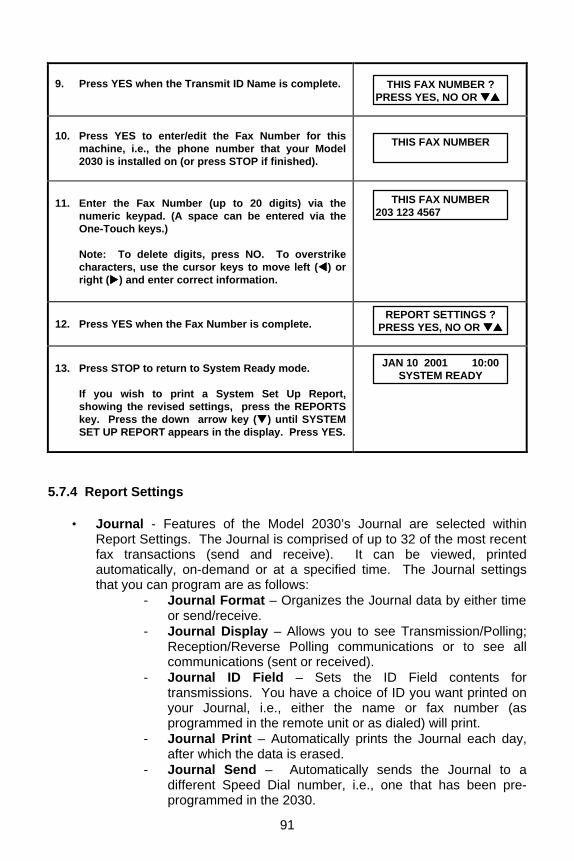
91
9. Press YES when the Transmit ID Name is complete.
10. Press YES to enter/edit the Fax Number for this
machine, i.e., the phone number that your Model 2030 is installed on (or press STOP if finished).
11. Enter the Fax Number (up to 20 digits) via the
numeric keypad. (A space can be entered via the One-Touch keys.)
Note: To delete digits, press NO. To overstrike characters, use the cursor keys to move left (tt) or right (uu) and enter correct information.
12. Press YES when the Fax Number is complete.
13. Press STOP to return to System Ready mode.
If you wish to print a System Set Up Report, showing the revised settings, press the REPORTS key. Press the down arrow key (qq) until SYSTEM SET UP REPORT appears in the display. Press YES.
5.7.4 Report Settings
• Journal - Features of the Model 2030’s Journal are selected within Report Settings. The Journal is comprised of up to 32 of the most recent fax transactions (send and receive). It can be viewed, printed automatically, on-demand or at a specified time. The Journal settings that you can program are as follows:
- Journal Format – Organizes the Journal data by either time or send/receive.
- Journal Display – Allows you to see Transmission/Polling; Reception/Reverse Polling communications or to see all communications (sent or received).
- Journal ID Field – Sets the ID Field contents for transmissions. You have a choice of ID you want printed on your Journal, i.e., either the name or fax number (as programmed in the remote unit or as dialed) will print.
- Journal Print – Automatically prints the Journal each day, after which the data is erased.
- Journal Send – Automatically sends the Journal to a different Speed Dial number, i.e., one that has been pre-programmed in the 2030.
JAN 10 2001 10:00 SYSTEM READY
THIS FAX NUMBER ? PRESS YES, NO OR ttss
THIS FAX NUMBER z
REPORT SETTINGS ? PRESS YES, NO OR ttss
THIS FAX NUMBER 203 123 4567

92
• Job Status Report – The Job Status Report confirms whether or not a
Job was successfully completed. The settings include: - OFF – The report will not print. - ALL – Prints after every Job. - INC. – Prints only when Jobs are incomplete. This is the default. - ON DEMAND – When transmitting, the display will prompt you as to
whether or not you wish to print a Job Status Report. To view or adjust Journal Settings, proceed as follows: Do This
This Happens
1. Press FEATURES.
2. Press 8 and then YES.
3. Press YES.
4. The Model 2030 has been defaulted to SECURE
MACHINE SETTINGS. This feature can be turned off by calling the Pitney Bowes Diagnostic Center. Enter your ACCESS CODE, if required and press YES. The default ACCESS CODE is 2030.
5. Press NO or tt (Edit Jobs key) twice.
6. Press YES to select REPORT SETTINGS.
7. Press YES to select Journal Format (or press tt to
move to the next item).
8. Press 1 if you want the Journal formatted by time or
Press 2 to group by send and receive transactions. Press YES to continue.
9. Press YES to select Journal Display (or press tt to
move to the next item).
REPORT SETTING? PRESS YES, NO OR ttss
JNL FORMAT? PRESS YES, NO OR ttss
JNL FORMAT 1=TIME 2=SND/RCV
JNL DISPLAY? PRESS YES, NO OR ttss
JNL DISPLAY 1=ORIGINATED 2=ALL
FEATURE SELECTIONS PRESS YES, NO OR ttss
SET UP SYSTEM ? PRESS YES, NO OR ttss
ENTER ACCESS CODE _ _ _ _
MACHINE SETTINGS? PRESS YES, NO OR ttss

93
10. Press 1 if you want to see only calls dialed by this
machine or press 2 if you want to see all communications (sent and received). Press YES to continue.
11. Press YES to select what will print in the Journal ID
Field (or press tt to move to the next item).
Press: • 1=Remote ID Name • 2=Remote Telephone Number • 3=Dialed Name (as programmed in your 2030) • 4=Dialed Telephone Number
Press YES to continue.
12. Press YES to select the Journal Print (or press tt to
move to the next item).
13. Press 1 to turn the Journal OFF or press 2 to print
the Journal only when full (default setting) or press 3 to enter a time at which the report should print every day. For example, press 3 and then YES.
14. Enter the time at which the Journal is to print, e.g.,
5:00 pm = 17:00. Press YES to continue.
15. Press YES to select Journal Send (or press tt to
move to the next item).
16. Enter the 3-digit Speed Dial number to which you
want the Journal automatically sent, e.g., 001.
To change a previously selected Speed Dial number, press NO to erase the old Speed Dial number/name and enter new Speed Dial number.
17. Press YES.
18. Press STOP to return to System Ready mode.
If you wish to print a System Set Up Report, showing the revised settings, press the REPORTS key. Press the down arrow key (qq) until SYSTEM SET UP REPORT appears in the display. Press YES.
JNL ID FIELD? PRESS YES, NO OR ttss
JNL ID FIELD REMOTE:1=NAME 2=TEL qq
PRESS JNL ID FIELD
DIALED:3=NAME 4=TEL pp
PRESS
JNL PRINT? PRESS YES, NO OR ttss
JNL PRINT? 1=OFF 2=FULL 3=TIME
ENTER PRINT TIME 17:00
JNL SEND? PRESS YES, NO OR ttss
ENTER SPEED DIAL # z
SEND JOURNAL TO 001: MAIN OFFICE
JOB STATUS? PRESS YES, NO OR ttss
JAN 10 2001 10:00 SYSTEM READY
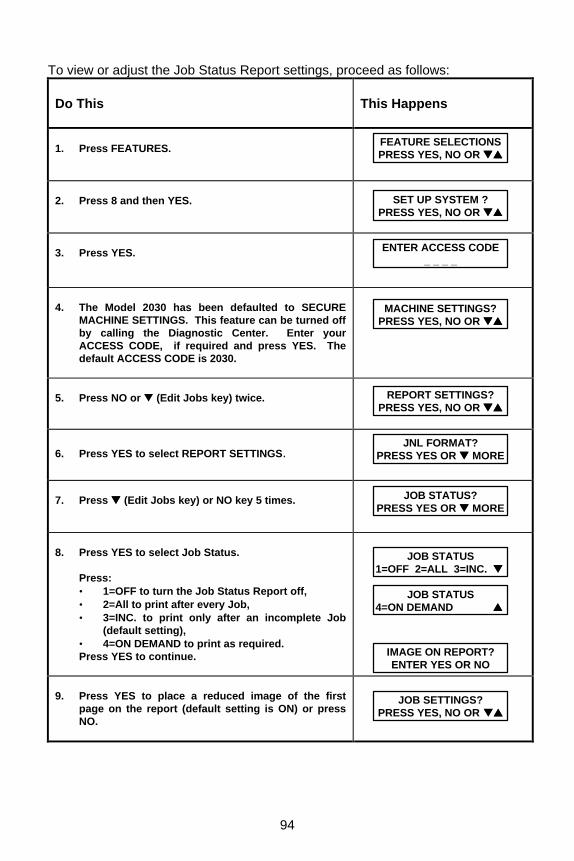
94
To view or adjust the Job Status Report settings, proceed as follows: Do This
This Happens
1. Press FEATURES.
2. Press 8 and then YES.
3. Press YES.
4. The Model 2030 has been defaulted to SECURE
MACHINE SETTINGS. This feature can be turned off by calling the Diagnostic Center. Enter your ACCESS CODE, if required and press YES. The default ACCESS CODE is 2030.
5. Press NO or t (Edit Jobs key) twice.
6. Press YES to select REPORT SETTINGS.
7. Press tt (Edit Jobs key) or NO key 5 times.
8. Press YES to select Job Status.
Press: • 1=OFF to turn the Job Status Report off, • 2=All to print after every Job, • 3=INC. to print only after an incomplete Job
(default setting), • 4=ON DEMAND to print as required. Press YES to continue.
9. Press YES to place a reduced image of the first
page on the report (default setting is ON) or press NO.
REPORT SETTINGS? PRESS YES, NO OR ttss
JOB STATUS? PRESS YES OR tt MORE
JOB STATUS 1=OFF 2=ALL 3=INC. tt
JOB STATUS 4=ON DEMAND pp
IMAGE ON REPORT? ENTER YES OR NO
JOB SETTINGS? PRESS YES, NO OR ttss
FEATURE SELECTIONS PRESS YES, NO OR ttss
SET UP SYSTEM ? PRESS YES, NO OR ttss
ENTER ACCESS CODE _ _ _ _
MACHINE SETTINGS? PRESS YES, NO OR ttss
JNL FORMAT? PRESS YES OR tt MORE

95
10. Press STOP to return to System Ready mode.
If you wish to print a System Set Up Report, showing the revised settings, press the REPORTS key. Press the down arrow key (qq) until SYSTEM SET UP REPORT appears in the display. Press YES.
5.7.5 Job Settings
The Job Settings are as follows: • Save Incomplete Jobs – If selected, the unit will automatically retain
incomplete Jobs in memory. • Save Stopped Jobs – If selected, the unit will retain Jobs that have
been stopped (by pressing the Stop key on the control panel) in memory.
• Scan to Memory – Scan to memory is ON by default, thus all fax documents are scanned into memory prior to transmission. If turned OFF, documents are transmitted directly from the document feeder.
• Send Cover Sheet – If selected, each outgoing fax can include (as its first page) a Cover Sheet that includes the date/time, destination fax number, Machine ID (your company’s name) and number of pages.
• One Touch Start Delay – This is a pause that occurs after pressing a One-Touch Program key. The pause allows time to correct key presses and/or allow additional programming/destinations to be selected. The default setting of 5 seconds is adjustable from 0 to 15 seconds.
• Confirm Jobs Report – If selected, this report allows you to verify Job settings (e.g., time, destination[s], etc.). While intended to provide confirmation of Job settings before dialing or when performing a delayed transmission, it can also be used for immediate transmission. Note, however, that by default the unit will dial the destination as the report is being printed.
To view or adjust the Job Settings, proceed as follows: Do This
This Happens
1. Press FEATURES.
2. Press 8 and then YES.
JAN 10 2001 10:00 SYSTEM READY
FEATURE SELECTIONS PRESS YES, NO OR ttss
SET UP SYSTEM ? PRESS YES, NO OR ttss
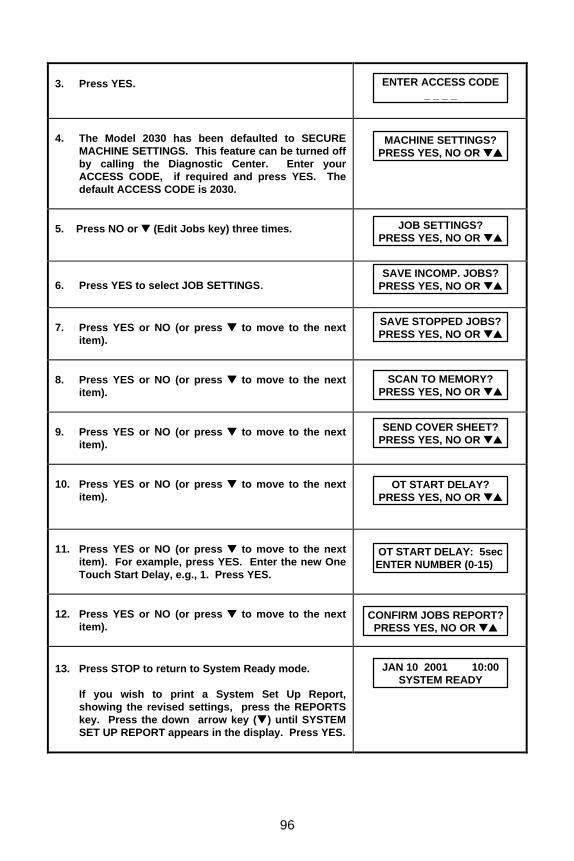
96
3. Press YES.
4. The Model 2030 has been defaulted to SECURE
MACHINE SETTINGS. This feature can be turned off by calling the Diagnostic Center. Enter your ACCESS CODE, if required and press YES. The default ACCESS CODE is 2030.
5. Press NO or t (Edit Jobs key) three times.
6. Press YES to select JOB SETTINGS.
7. Press YES or NO (or press tt to move to the next
item).
8. Press YES or NO (or press tt to move to the next
item).
9. Press YES or NO (or press tt to move to the next
item).
10. Press YES or NO (or press tt to move to the next
item).
11. Press YES or NO (or press tt to move to the next
item). For example, press YES. Enter the new One Touch Start Delay, e.g., 1. Press YES.
12. Press YES or NO (or press tt to move to the next
item).
13. Press STOP to return to System Ready mode.
If you wish to print a System Set Up Report, showing the revised settings, press the REPORTS key. Press the down arrow key (qq) until SYSTEM SET UP REPORT appears in the display. Press YES.
JOB SETTINGS? PRESS YES, NO OR ts
SAVE INCOMP. JOBS? PRESS YES, NO OR ts
SAVE STOPPED JOBS? PRESS YES, NO OR ts
SEND COVER SHEET? PRESS YES, NO OR ts
OT START DELAY? PRESS YES, NO OR ts
OT START DELAY: 5sec ENTER NUMBER (0-15)
CONFIRM JOBS REPORT? PRESS YES, NO OR ts
JAN 10 2001 10:00 SYSTEM READY
SCAN TO MEMORY? PRESS YES, NO OR ts
ENTER ACCESS CODE _ _ _ _
MACHINE SETTINGS? PRESS YES, NO OR ttss
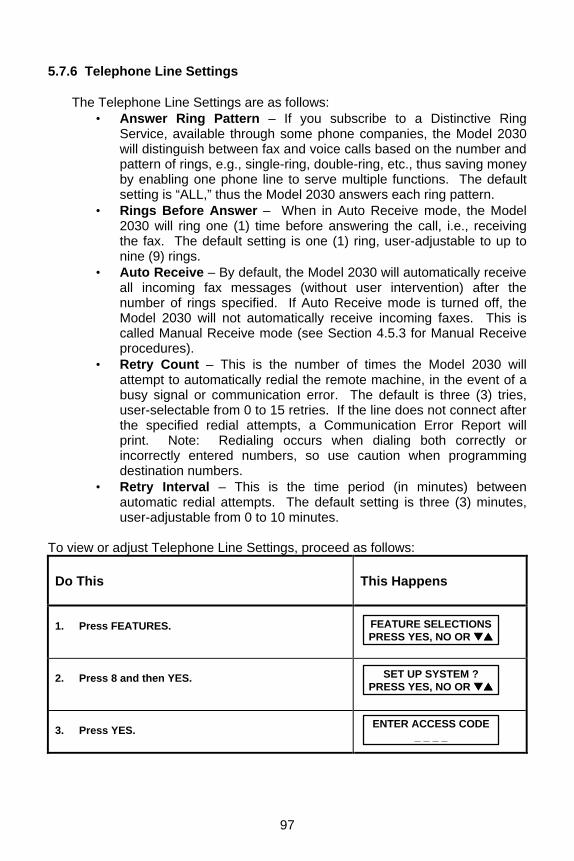
97
5.7.6 Telephone Line Settings
The Telephone Line Settings are as follows: • Answer Ring Pattern – If you subscribe to a Distinctive Ring
Service, available through some phone companies, the Model 2030 will distinguish between fax and voice calls based on the number and pattern of rings, e.g., single-ring, double-ring, etc., thus saving money by enabling one phone line to serve multiple functions. The default setting is “ALL,” thus the Model 2030 answers each ring pattern.
• Rings Before Answer – When in Auto Receive mode, the Model 2030 will ring one (1) time before answering the call, i.e., receiving the fax. The default setting is one (1) ring, user-adjustable to up to nine (9) rings.
• Auto Receive – By default, the Model 2030 will automatically receive all incoming fax messages (without user intervention) after the number of rings specified. If Auto Receive mode is turned off, the Model 2030 will not automatically receive incoming faxes. This is called Manual Receive mode (see Section 4.5.3 for Manual Receive procedures).
• Retry Count – This is the number of times the Model 2030 will attempt to automatically redial the remote machine, in the event of a busy signal or communication error. The default is three (3) tries, user-selectable from 0 to 15 retries. If the line does not connect after the specified redial attempts, a Communication Error Report will print. Note: Redialing occurs when dialing both correctly or incorrectly entered numbers, so use caution when programming destination numbers.
• Retry Interval – This is the time period (in minutes) between automatic redial attempts. The default setting is three (3) minutes, user-adjustable from 0 to 10 minutes.
To view or adjust Telephone Line Settings, proceed as follows: Do This
This Happens
1. Press FEATURES.
2. Press 8 and then YES.
3. Press YES.
FEATURE SELECTIONS PRESS YES, NO OR ttss
SET UP SYSTEM ? PRESS YES, NO OR ttss
ENTER ACCESS CODE _ _ _ _

98
4. The Model 2030 has been defaulted to SECURE
MACHINE SETTINGS. This feature can be turned off by calling the Pitney Bowes Diagnostic Center. Enter your ACCESS CODE, if required and press YES. The default ACCESS CODE is 2030.
5. Press NO or t (Edit Jobs key) four times.
6. Press YES to select TEL LINE SETTINGS.
7. Press YES to select Answer Ring Pattern (or press
tt to move to the next item).
Press: • 1=All (default) ring patterns, • 2=Single ring pattern, • 3=Double ring pattern, • 4=Triple-1 ring (short, short, long) pattern, • 5=Triple-2 ring (short, long, short) pattern.
Press YES to continue.
8. Press YES to select Rings Before Answer (or press
tt to move to the next item). If desired, enter a new number (1-9). Press YES.
9. Press YES.
10. Press 1 to turn Auto Receive OFF or press 2 to turn
Auto Receive ON. The default setting is 2=ON. Press YES.
11. Press Yes to select Retry Count (or press tt to move
to next item).
12. If desired, enter a new number (0-15). Press YES.
Note: Please refer to Section 5.6.2 for FCC regulations regarding redials.
TEL LINE SETTINGS? PRESS YES, NO OR ts
ANSWER RING PATTERN? PRESS YES, NO OR ttss
ANSWER RING PATTERN 3=DOUBLE ttpp
ANSWER RING PATTERN 1=ALL 2=SINGLE tt
ANSWER RING PATTERN 4=TRIPLE-1 ttpp
ANSWER RING PATTERN 5=TRIPLE-2 pp
RINGS BEFORE ANSWER? PRESS YES, NO OR ts
RINGS BEFORE ANS. : 1 ENTER NUMBER (1-9)
AUTO RECEIVE? PRESS YES, NO OR ttss
AUTO RECEIVE 1=OFF 2=ON
RETRY COUNT? PRESS YES, NO OR ts
RETRY COUNT : 3 ENTER NUMBER (0-15)
MACHINE SETTINGS? PRESS YES, NO OR ttss

99
13. Press YES to select Retry Interval (or press tt to
move to the next item). Press YES.
14. If desired, enter a new number (0-15). Press YES.
15. Press STOP to return to System Ready mode.
If you wish to print a System Set Up Report, showing the revised settings, press the REPORTS key. Press the down arrow key (qq) until SYSTEM SET UP REPORT appears in the display. Press YES.
5.7.7 Option Settings
The Option Settings are as follows: • Memory Size – Displays the current memory capacity of the unit. • Access Control Code – A four-digit Access Code can be used to
secure your 2030, that is, protect all or certain areas of machine operation and/or programming.
• OK Stamp – The 2030’s OK Stamp allows you to choose printing of an “OK” (red ink impression) stamp on the front trail edge of pages that have been successfully scanned or transmitted.
• Polling Passcode – If a Polling Passcode is programmed, only compatible Pitney Bowes fax machines with matching Polling Passcodes will be able to poll your machine.
To view or adjust Option Settings, proceed as follows: Do This
This Happens
1. Press FEATURES.
2. Press 8 and then YES.
3. Press YES.
4. The Model 2030 has been defaulted to SECURE
MACHINE SETTINGS. This feature can be turned off by calling the Diagnostic Center. Enter your ACCESS CODE, if required and press YES. The default ACCESS CODE is 2030.
RETRY INTERVAL? PRESS YES, NO OR ts
RETRY INTERVAL : 3min ENTER NUMBER (0-15)
JAN 10 2001 10:00 SYSTEM READY
FEATURE SELECTIONS PRESS YES, NO OR ttss
SET UP SYSTEM ? PRESS YES, NO OR ttss
ENTER ACCESS CODE _ _ _ _
MACHINE SETTINGS? PRESS YES, NO OR ttss

100
5. Press NO or tt five times.
6. Press YES. Press YES again to display the 2030’s
memory capacity or NO (or tt) to skip to Step #7.
If you pressed YES to display the memory size (as shown), press YES to continue.
7. Press YES to program a Secure Access Code or
press NO (or tt) to skip to Step #11. If you pressed YES to program a Secure Access Code, enter the default four-digit Access Code, “2030” (or enter current Access Code), then press YES. The current Access Code is displayed. Press YES again to continue. Note: To delete an existing Access Code, press NO to erase the entry. Enter the new four-digit Access Code and press YES to continue.
8. Press YES to secure Any Operation. An Access
Code will be required to use any 2030 feature, e.g., send a fax, make a copy, etc. When this setting is turned ON, each time you press a key on the control panel, the display will read: “ENTER ACCESS CODE.” (Note: Automatic receiving is always possible.) Skip to Step #11.
If you wish to bypass this option, press NO and continue.
9. Press YES to secure System Settings (default
setting). An Access Code will be required to make any System Setup changes. Programming Speed Dials and One-Touch keys is not restricted.
If you wish to bypass this option, press NO and continue.
10. Press YES to secure Edit(ing) a Job. An Access
Code will be required to make changes to a pending Job, e.g., delete a Job, alter a delayed send time, add pages to a Job, print a stored document, etc.
If you wish to bypass this option, press NO and continue.
MEMORY SIZE ? PRESS YES, NO OR ttss
MEMORY SIZE 1MB
ACCESS CONTROL CODE? PRESS YES, NO OR ttss
ANY OPERATION ? ENTER YES OR NO
CHANGE SYSTEM SET? ENTER YES OR NO
EDIT A JOB? ENTER YES OR NO
OPTION SETTINGS ? PRESS YES, NO OR ttss
ACCESS CONTROL CODE 2030
ENTER ACCESS CODE _ _ _ _
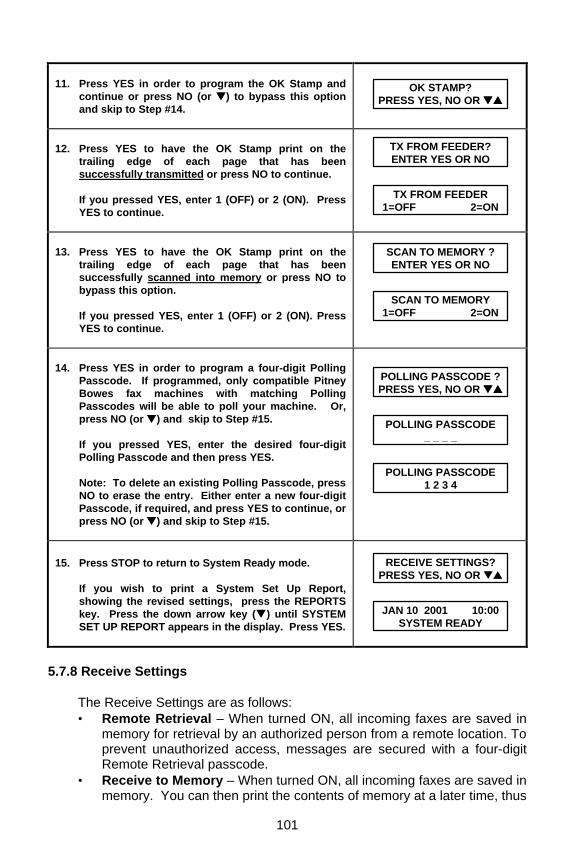
101
11. Press YES in order to program the OK Stamp and
continue or press NO (or tt) to bypass this option and skip to Step #14.
12. Press YES to have the OK Stamp print on the
trailing edge of each page that has been successfully transmitted or press NO to continue.
If you pressed YES, enter 1 (OFF) or 2 (ON). Press YES to continue.
13. Press YES to have the OK Stamp print on the
trailing edge of each page that has been successfully scanned into memory or press NO to bypass this option.
If you pressed YES, enter 1 (OFF) or 2 (ON). Press YES to continue.
14. Press YES in order to program a four-digit Polling
Passcode. If programmed, only compatible Pitney Bowes fax machines with matching Polling Passcodes will be able to poll your machine. Or, press NO (or tt) and skip to Step #15.
If you pressed YES, enter the desired four-digit Polling Passcode and then press YES. Note: To delete an existing Polling Passcode, press NO to erase the entry. Either enter a new four-digit Passcode, if required, and press YES to continue, or press NO (or tt) and skip to Step #15.
15. Press STOP to return to System Ready mode.
If you wish to print a System Set Up Report, showing the revised settings, press the REPORTS key. Press the down arrow key (qq) until SYSTEM SET UP REPORT appears in the display. Press YES.
5.7.8 Receive Settings
The Receive Settings are as follows: • Remote Retrieval – When turned ON, all incoming faxes are saved in
memory for retrieval by an authorized person from a remote location. To prevent unauthorized access, messages are secured with a four-digit Remote Retrieval passcode.
• Receive to Memory – When turned ON, all incoming faxes are saved in memory. You can then print the contents of memory at a later time, thus
OK STAMP? PRESS YES, NO OR ttss
TX FROM FEEDER? ENTER YES OR NO
SCAN TO MEMORY ? ENTER YES OR NO
SCAN TO MEMORY 1=OFF 2=ON
POLLING PASSCODE ? PRESS YES, NO OR ttss
POLLING PASSCODE _ _ _ _
JAN 10 2001 10:00 SYSTEM READY
TX FROM FEEDER 1=OFF 2=ON
POLLING PASSCODE 1 2 3 4
RECEIVE SETTINGS? PRESS YES, NO OR ts
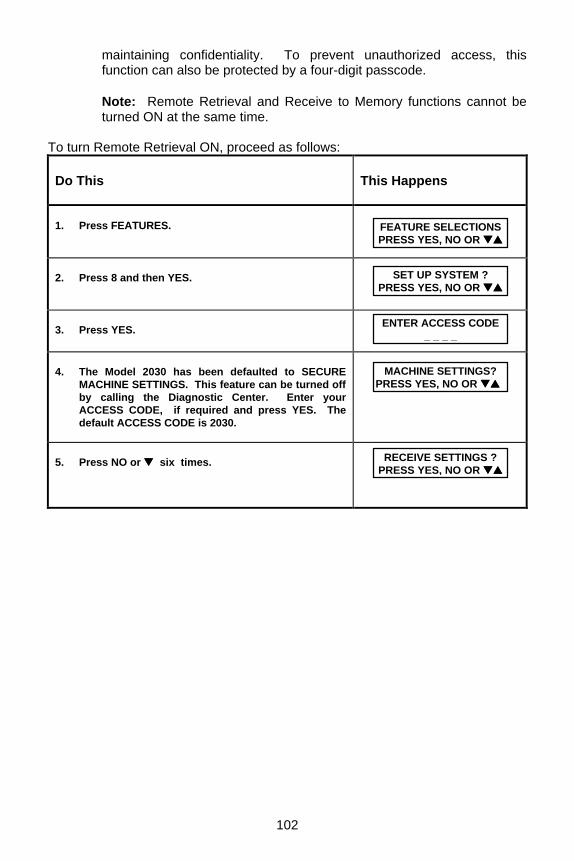
102
maintaining confidentiality. To prevent unauthorized access, this function can also be protected by a four-digit passcode.
Note: Remote Retrieval and Receive to Memory functions cannot be turned ON at the same time.
To turn Remote Retrieval ON, proceed as follows: Do This
This Happens
1. Press FEATURES.
2. Press 8 and then YES.
3. Press YES.
4. The Model 2030 has been defaulted to SECURE
MACHINE SETTINGS. This feature can be turned off by calling the Diagnostic Center. Enter your ACCESS CODE, if required and press YES. The default ACCESS CODE is 2030.
5. Press NO or tt six times.
FEATURE SELECTIONS PRESS YES, NO OR ttss
SET UP SYSTEM ? PRESS YES, NO OR ttss
ENTER ACCESS CODE _ _ _ _
MACHINE SETTINGS? PRESS YES, NO OR ttss
RECEIVE SETTINGS ? PRESS YES, NO OR ttss
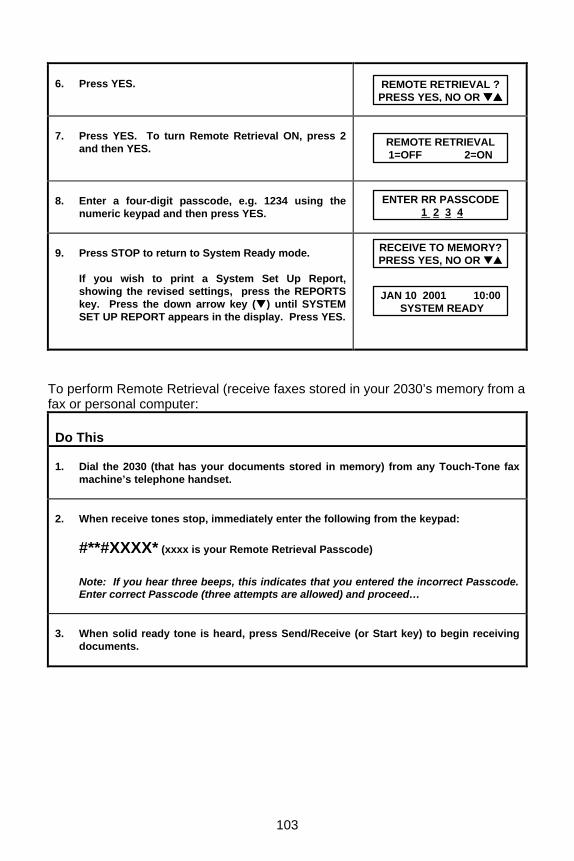
103
6. Press YES.
7. Press YES. To turn Remote Retrieval ON, press 2
and then YES.
8. Enter a four-digit passcode, e.g. 1234 using the
numeric keypad and then press YES.
9. Press STOP to return to System Ready mode.
If you wish to print a System Set Up Report, showing the revised settings, press the REPORTS key. Press the down arrow key (qq) until SYSTEM SET UP REPORT appears in the display. Press YES.
To perform Remote Retrieval (receive faxes stored in your 2030’s memory from a fax or personal computer: Do This 1. Dial the 2030 (that has your documents stored in memory) from any Touch-Tone fax
machine’s telephone handset. 2. When receive tones stop, immediately enter the following from the keypad:
#**#XXXX* (xxxx is your Remote Retrieval Passcode)
Note: If you hear three beeps, this indicates that you entered the incorrect Passcode. Enter correct Passcode (three attempts are allowed) and proceed…
3. When solid ready tone is heard, press Send/Receive (or Start key) to begin receiving
documents.
REMOTE RETRIEVAL ? PRESS YES, NO OR ttss
ENTER RR PASSCODE 1 2 3 4
RECEIVE TO MEMORY? PRESS YES, NO OR ts
REMOTE RETRIEVAL 1=OFF 2=ON
JAN 10 2001 10:00 SYSTEM READY

104
To perform Remote Retrieval from a personal computer (PC): You can also retrieve documents to your PC if it is equipped to send and receive faxes and your fax software allows “manual” answering. This is a handy feature for people that bring along their PC while traveling. Do This 1. To receive to your PC, you will need a Touch-Tone capable telephone connected in
parallel with your PC modem. An easy way to accomplish this is by inserting a “Y” adapter into the “line” port on your PC’s modem, then plug the telephone cord and the telephone line cord (from the telephone outlet) into the “Y” adapter.
2. With your PC faxing software running (and set to manual answer), use the telephone
to dial the 2030 that is storing your faxes for Remote Retrieval. When the 2030 answers, enter your Remote Retrieval Passcode.
3. When you hear the solid ready tone, direct your PC fax software to answer. At that
point, you can hang up the telephone and your documents will be received into our PC.
To turn Receive to Memory ON, proceed as follows: Do This
This Happens
1. Press FEATURES.
2. Press 8 and then YES.
3. Press YES.
4. The Model 2030 has been defaulted to SECURE
MACHINE SETTINGS. This feature can be turned off by calling the Diagnostic Center. Enter your ACCESS CODE, if required and press YES. The default ACCESS CODE is 2030.
5. Press NO or tt six times.
FEATURE SELECTIONS PRESS YES, NO OR ttss
SET UP SYSTEM ? PRESS YES, NO OR ttss
ENTER ACCESS CODE _ _ _ _
MACHINE SETTINGS? PRESS YES, NO OR ttss
RECEIVE SETTINGS ? PRESS YES, NO OR ttss

105
6. Press YES.
7. Press NO or tt.
8. Press YES. To turn Receive to Memory ON, press 2
and then YES.
9. Press YES if you wish to restrict the printing of
documents with a passcode. If YES is selected, the polling passcode established in Section 5.7.7 will be required in order to print stored fax messages. Press NO for unrestricted printing.
The “MESSAGE IN MEMORY, PRESS COPY TO PRINT” message will appear in the display each time a document is received. See Section 4.5.1 for instructions on printing messages received into memory.
10. Press STOP to return to System Ready mode.
If you wish to print a System Set Up Report, showing the revised settings, press the REPORTS key. Press the down arrow key (qq) until SYSTEM SET UP REPORT appears in the display. Press YES.
5.7.9 PC Options This setting is only selectable after the Parallel Port has been installed. Please refer to the User’s Guide. For information regarding available options, see Section 13, “Model 2030 Options and Supplies.”
RECEIVE TO MEMORY? 1=OFF 2=ON
PASSCODE TO PRINT? ENTER YES OR NO
PC OPTIONS? PRESS YES, NO OR ttss
JAN 10 2001 10:00 SYSTEM READY
REMOTE RETRIEVAL ? PRESS YES, NO OR ttss
RECEIVE TO MEMORY? PRESS YES, NO OR ts
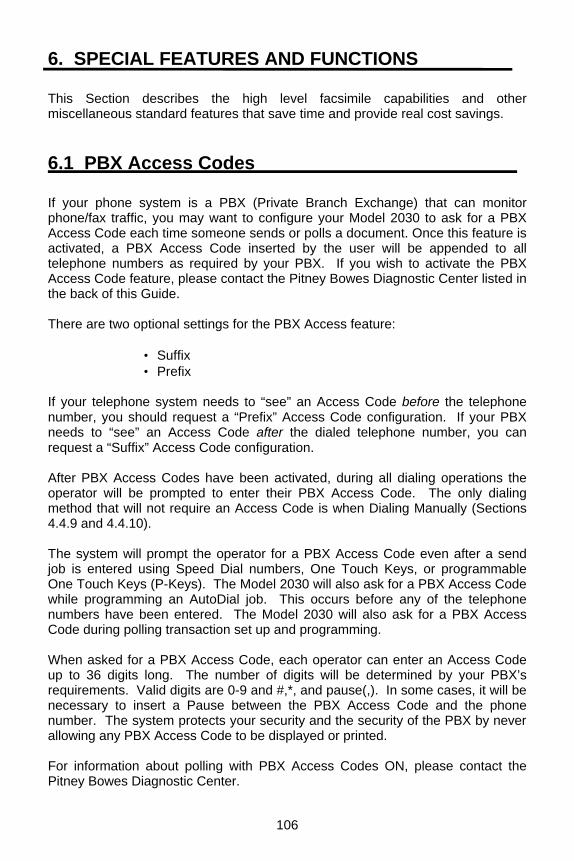
106
6. SPECIAL FEATURES AND FUNCTIONS
This Section describes the high level facsimile capabilities and other miscellaneous standard features that save time and provide real cost savings.
6.1 PBX Access Codes If your phone system is a PBX (Private Branch Exchange) that can monitor phone/fax traffic, you may want to configure your Model 2030 to ask for a PBX Access Code each time someone sends or polls a document. Once this feature is activated, a PBX Access Code inserted by the user will be appended to all telephone numbers as required by your PBX. If you wish to activate the PBX Access Code feature, please contact the Pitney Bowes Diagnostic Center listed in the back of this Guide. There are two optional settings for the PBX Access feature: • Suffix • Prefix If your telephone system needs to “see” an Access Code before the telephone number, you should request a “Prefix” Access Code configuration. If your PBX needs to “see” an Access Code after the dialed telephone number, you can request a “Suffix” Access Code configuration. After PBX Access Codes have been activated, during all dialing operations the operator will be prompted to enter their PBX Access Code. The only dialing method that will not require an Access Code is when Dialing Manually (Sections 4.4.9 and 4.4.10). The system will prompt the operator for a PBX Access Code even after a send job is entered using Speed Dial numbers, One Touch Keys, or programmable One Touch Keys (P-Keys). The Model 2030 will also ask for a PBX Access Code while programming an AutoDial job. This occurs before any of the telephone numbers have been entered. The Model 2030 will also ask for a PBX Access Code during polling transaction set up and programming. When asked for a PBX Access Code, each operator can enter an Access Code up to 36 digits long. The number of digits will be determined by your PBX’s requirements. Valid digits are 0-9 and #,*, and pause(,). In some cases, it will be necessary to insert a Pause between the PBX Access Code and the phone number. The system protects your security and the security of the PBX by never allowing any PBX Access Code to be displayed or printed. For information about polling with PBX Access Codes ON, please contact the Pitney Bowes Diagnostic Center.

107
6.1.1 PBX Access Codes ON To send a document when PBX Access Codes are ON: Do This
This Happens
1. Insert the document face down in the Automatic
Document Feeder.
2. Enter one of the following: a phone number from the
Numeric Keypad; a Speed Dial number; a One Touch Key; or a programmable One Touch Key (P-Key).
The appropriate telephone number, Speed Dial number, One Touch Key number or P-Key number appears in the display.
3. Press SEND/RECEIVE (or press YES, then
SEND/RECEIVE if you entered a Speed Dial number in Step #2).
4. Enter your personal PBX Access Code for all phone
calls going through your PBX.
NOTE: Your PBX may not require an Access Code to dial all destinations (i.e. other locations within your building). In this case, and certain other cases, press NO, and the document will be sent to memory as in Step #5 before being transmitted.
The cursor moves with each entry. No numbers appear in the display.
5. Press YES.
The document is sent to memory first. The document(s) is sent at the time(s) specified (or imme-diately if no time was specified).
6.1.2 Programming AutoDial Jobs PBX Access Codes ON To program an AutoDial job when PBX Codes are ON: Do This
This Happens
1. Insert the document face down in the Document
Feeder. Press the FEATURES Key twice.
ENTER DESTINATION(S)
ENTER PBX CODE
TO MEMORY PAGE. 1
AUTO DIAL? ENTER YES OR NO
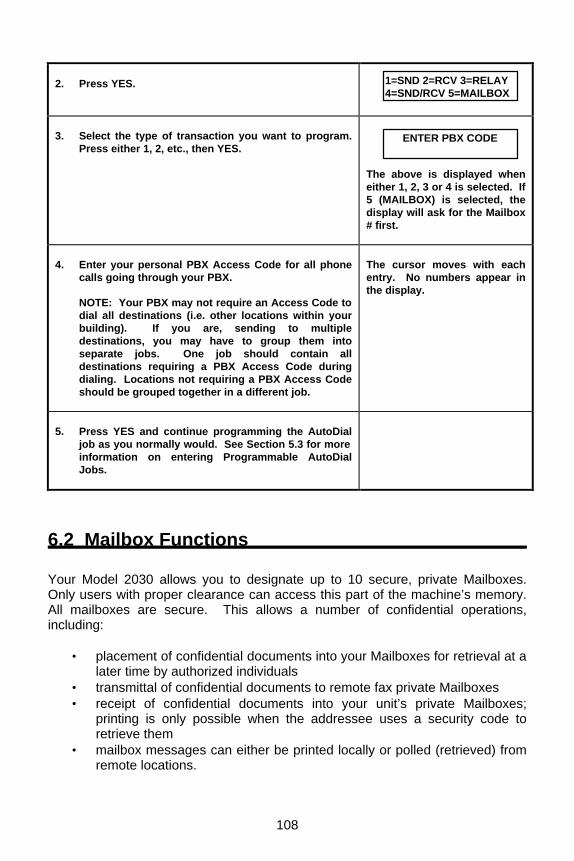
108
2. Press YES.
3. Select the type of transaction you want to program.
Press either 1, 2, etc., then YES.
The above is displayed when either 1, 2, 3 or 4 is selected. If 5 (MAILBOX) is selected, the display will ask for the Mailbox # first.
4. Enter your personal PBX Access Code for all phone
calls going through your PBX.
NOTE: Your PBX may not require an Access Code to dial all destinations (i.e. other locations within your building). If you are, sending to multiple destinations, you may have to group them into separate jobs. One job should contain all destinations requiring a PBX Access Code during dialing. Locations not requiring a PBX Access Code should be grouped together in a different job.
The cursor moves with each entry. No numbers appear in the display.
5. Press YES and continue programming the AutoDial
job as you normally would. See Section 5.3 for more information on entering Programmable AutoDial Jobs.
6.2 Mailbox Functions Your Model 2030 allows you to designate up to 10 secure, private Mailboxes. Only users with proper clearance can access this part of the machine’s memory. All mailboxes are secure. This allows a number of confidential operations, including:
• placement of confidential documents into your Mailboxes for retrieval at a later time by authorized individuals
• transmittal of confidential documents to remote fax private Mailboxes • receipt of confidential documents into your unit’s private Mailboxes;
printing is only possible when the addressee uses a security code to retrieve them
• mailbox messages can either be printed locally or polled (retrieved) from remote locations.
1=SND 2=RCV 3=RELAY 4=SND/RCV 5=MAILBOX
ENTER PBX CODE
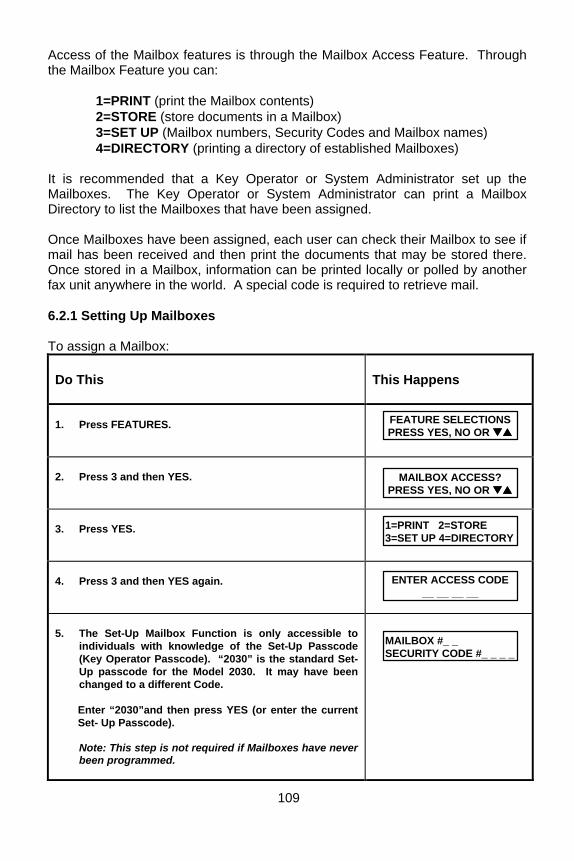
Access of the Mailbox features is through the Mailbox Access Feature. Through the Mailbox Feature you can:
1=PRINT (print the Mailbox contents) 2=STORE (store documents in a Mailbox) 3=SET UP (Mailbox numbers, Security Codes and Mailbox names) 4=DIRECTORY (printing a directory of established Mailboxes)
It is recommended that a Key Operator or System Administrator set up the Mailboxes. The Key Operator or System Administrator can print a Mailbox Directory to list the Mailboxes that have been assigned. Once Mailboxes have been assigned, each user can check their Mailbox to see if mail has been received and then print the documents that may be stored there. Once stored in a Mailbox, information can be printed locally or polled by another fax unit anywhere in the world. A special code is required to retrieve mail. 6.2.1 Setting Up Mailboxes To assign a Mailbox: Do This
This Happens
1. Press FEATURES.
2. Press 3 and then YES.
3. Press YES.
4. Press 3 and then YES again.
5. The Set-Up Mailbox Function is only accessible to
individuals with knowledge of the Set-Up Passcode (Key Operator Passcode). “2030” is the standard Set-Up passcode for the Model 2030. It may have been changed to a different Code. Enter “2030”and then press YES (or enter the current Set- Up Passcode).
Note: This step is not required if Mailboxes have never been programmed.
FEATURE SELECTIONS PRESS YES, NO OR ttss
MAILBOX ACCESS? PRESS YES, NO OR ttss
1=PRINT 2=STORE 3=SET UP 4=DIRECTORY
ENTER ACCESS CODE __ __ __ __
MAILBOX #_ _ SECURITY CODE #_ _ _ _
109

110
6. Enter a two-digit Mailbox number (00-09).
Then enter the four-digit Security Code you wish to assign. Any number is valid, including 0000 to 9999.
NOTE: After you enter the two-digit Mailbox number, the system will display “0000” for the Security Code. If you want something different, type over this with the correct numbers.
The numbers are displayed as they are entered.
7. Press YES when the numbers appear correctly.
8. Enter a name for the Mailbox as you would a Speed
Dial name (see Section 5.1.1, Step #6). The Mailbox name can be either alphabetical, numerical, or special symbol characters, or a combination of all three. Enter up to 10 characters total.
The name is displayed as it is entered.
9. Press YES when the name is correct.
10. Press YES to assign another Mailbox, then repeat
Steps #6 through #9 until all Mailboxes are assigned. Then press NO. Or, press NO if you don’t want to assign another Mailbox.
A Mailbox Directory will print automatically. This Directory contains the Mailbox numbers, Security Codes and names that have been set up for all users. Care should be taken to store it in a secure place. If you do not wish to have a Mailbox Directory print, press STOP after programming the last Mailbox instead of pressing YES or NO here.
After pressing NO, the following display appears:
6.2.2 Printing the Mailbox Directory The Mailbox Directory prints automatically after Mailboxes are set up or each time you change any Mailbox Access Code or name. You can print a copy of the directory whenever you need one.
ENTER NAME #XX:
ANOTHER MAILBOX?
MAILBOX DIRECTORY PRINTING NOW

111
To print the Mailbox Directory: Do This
This Happens
1. Press FEATURES.
2. Press 3 and then YES.
3. Press YES.
4. Press 4 and then YES again.
5. Enter “2030” and then press YES (or enter the current
Set-Up Passcode).
NOTE: Only individuals with knowledge of the Set-Up Passcode (Key Operator Passcode) can print a Mailbox Directory.
A Mailbox Directory will print automatically. This Directory contains the Mailbox numbers, Security Codes and names that have been set up for all users. Care should be taken to store it in a secure place.
6.2.3 Printing Mail Stored in a Mailbox After a document is received into a Mailbox (or stored there by an operator), the display will indicate that one or more Mailboxes have mail: This display indicates that mail has been received in three of the Model 2030 Mailboxes. A Notice of Private Mail Delivery (Mailbox Confirmation) will also automatically be printed on the Model 2030 each time mail is received. This report lists the date, time, Mailbox #, addressee (the Mailbox name), the name of the sender and the number of pages received. If the Notice of Private Mail Delivery (Mailbox Confirmation) is lost or thrown away, the Key Operator or System Administrator can print a copy of the Jobs Report which shows the same information as the Mailbox Confirmation. Refer to Section 5.6.1 for instructions to print a Jobs Report. Once the Key Operator
MAILBOX ACCESS? PRESS YES, NO OR ttss
1=PRINT 2=STORE 3=SET UP 4=DIRECTORY
ENTER ACCESS CODE __ __ __ __
MAILBOX DIRECTORY PRINTING NOW
MAIL IS IN 03 BOX(ES) CHECK JOBS REPORT
FEATURE SELECTIONS PRESS YES, NO OR ttss

112
reviews the Jobs Report, he/she can then notify the appropriate people that mail is waiting for them. If you were advised that you have mail in your Mailbox, or if you know that a document was recently sent to your Mailbox, you should go to the Model 2030 and print the contents of your Mailbox. To do so, proceed as follow: Do This
This Happens
1. Press FEATURES.
2. Press 3 or tt three times and then YES.
3. Press YES.
4. Press 1 and then YES.
5. Enter the two-digit number for the Mailbox you wish
to access. Then enter the four-digit Security Code.
The Mailbox number appears as it is entered. The Security Code number does not appear, but the cursor will move forward with each number entered.
6. Press YES after entering the Security Code.
If the Security Code is correct, all pages in Mailboxes will be printed. The display will return to System Ready Mode and pages are automatically erased from Memory.
6.2.4 Storing Mail Locally in Your Model 2030 Mailbox A person may want to store mail locally in your unit’s Mailbox. This mail could be retrieved at a later time by either local or remote operators with proper authorization.
MAILBOX ACCESS? PRESS YES, NO OR ttss
1=PRINT 2=STORE 3=SET UP 4=DIRECTORY
MAILBOX # _ _ SECURITY CODE #_ _ _ _
PRINTING NOW PAGE. 1/2
FEATURE SELECTIONS PRESS YES, NO OR ttss
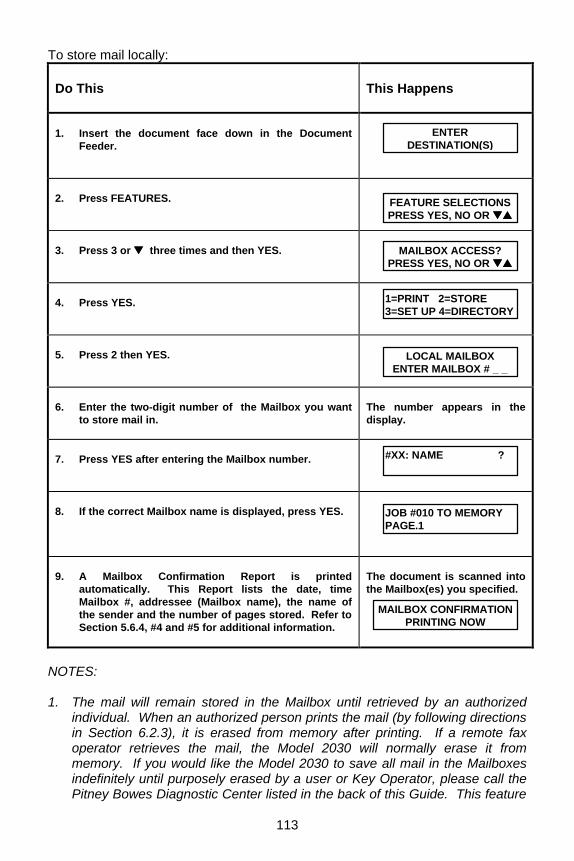
113
To store mail locally: Do This
This Happens
1. Insert the document face down in the Document
Feeder.
2. Press FEATURES.
3. Press 3 or tt three times and then YES.
4. Press YES.
5. Press 2 then YES.
6. Enter the two-digit number of the Mailbox you want
to store mail in.
The number appears in the display.
7. Press YES after entering the Mailbox number.
8. If the correct Mailbox name is displayed, press YES.
9. A Mailbox Confirmation Report is printed
automatically. This Report lists the date, time Mailbox #, addressee (Mailbox name), the name of the sender and the number of pages stored. Refer to Section 5.6.4, #4 and #5 for additional information.
The document is scanned into the Mailbox(es) you specified.
NOTES: 1. The mail will remain stored in the Mailbox until retrieved by an authorized
individual. When an authorized person prints the mail (by following directions in Section 6.2.3), it is erased from memory after printing. If a remote fax operator retrieves the mail, the Model 2030 will normally erase it from memory. If you would like the Model 2030 to save all mail in the Mailboxes indefinitely until purposely erased by a user or Key Operator, please call the Pitney Bowes Diagnostic Center listed in the back of this Guide. This feature
ENTER DESTINATION(S)
FEATURE SELECTIONS PRESS YES, NO OR ttss
MAILBOX ACCESS? PRESS YES, NO OR ttss
1=PRINT 2=STORE 3=SET UP 4=DIRECTORY
LOCAL MAILBOX ENTER MAILBOX # _ _
#XX: NAME ?
JOB #010 TO MEMORY PAGE.1
MAILBOX CONFIRMATION PRINTING NOW

114
can be changed over the phone and does not require a service call. Turning the Mail Save feature ON would keep mail in the Mailboxes for numerous retrievals by different remote fax units.
2. Your Model 2030 was configured in the PRIVATE Mailbox Mode during
installation. This means that only remote Pitney Bowes units can retrieve mail from your Mailbox(es). If you would like any Group 3 facsimile unit to have the ability to poll your Mailbox(es), you can request that your unit be configured in the PUBLIC Mailbox Mode. Call the Pitney Bowes Diagnostic Center listed in the back of this Guide.
6.2.5 Sending a Document to a Mailbox To send mail to a Pitney Bowes Facsimile Mailbox (must have compatible Mailbox feature):
• Enter a Mailbox Programmable AutoDial Job. Refer to Section 5.3.5 for complete procedures to send to a Mailbox or,
• Press a One Touch Program Key (P1 - P5) in which a “Send to” Mailbox program has already been stored. Refer to Sections 5.3.5 and 5.5 for more information on using One Touch Program Keys or,
• Use the Numeric Keypad on your Model 2030 to enter a random telephone number. Sending mail to a remote facsimile Mailbox also requires you to know the Mailbox number.
To send mail to a Pitney Bowes Mailbox using the Numeric Keypad method (only required when sending from a non-Pitney Bowes fax machine or a Pitney Bowes machine that doesn’t support this feature): Note: This procedure is also used if you (or another party) are at a remote location and wish to send mail to a mailbox in your 2030. Do This
This Happens
1. Prepare the document for transmission as usual,
then dial the remote fax with the Telephone Handset off-hook so you can listen to the tones generated by the remote fax when it answers.
The phone call is made to the remote fax unit.
2. After connection is made, listen until the receive
tone stops. As soon as the tone stops, enter the following: #, Mailbox number, * from the Keypad on the phone. For example, enter #25* to send to a Mailbox 25.
Listen carefully through the Telephone Handset. If the Mailbox is ready, you’ll hear a SOLID READY TONE. If the Mailbox is not ready, you’ll hear a BROKEN NOT READY TONE. See NOTE 1 at end of Section.
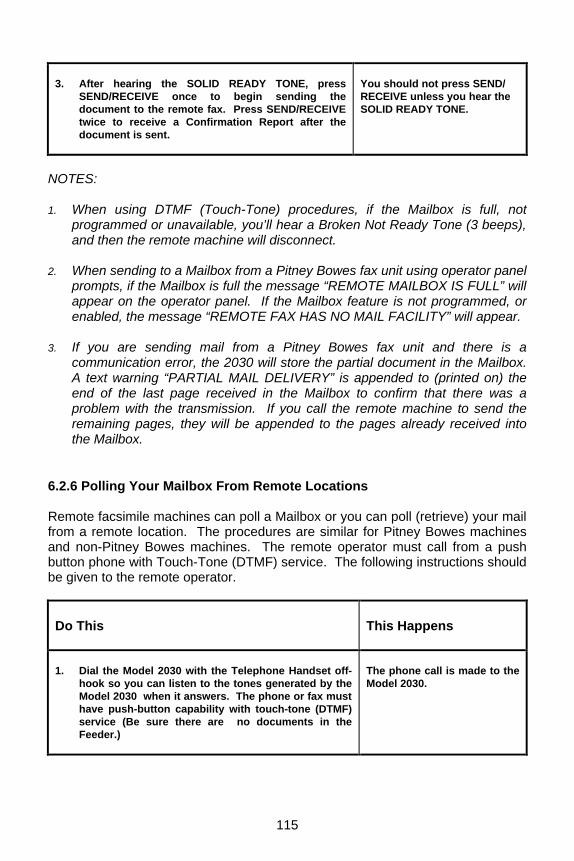
115
3. After hearing the SOLID READY TONE, press
SEND/RECEIVE once to begin sending the document to the remote fax. Press SEND/RECEIVE twice to receive a Confirmation Report after the document is sent.
You should not press SEND/ RECEIVE unless you hear the SOLID READY TONE.
NOTES: 1. When using DTMF (Touch-Tone) procedures, if the Mailbox is full, not
programmed or unavailable, you’ll hear a Broken Not Ready Tone (3 beeps), and then the remote machine will disconnect.
2. When sending to a Mailbox from a Pitney Bowes fax unit using operator panel
prompts, if the Mailbox is full the message “REMOTE MAILBOX IS FULL” will appear on the operator panel. If the Mailbox feature is not programmed, or enabled, the message “REMOTE FAX HAS NO MAIL FACILITY” will appear.
3. If you are sending mail from a Pitney Bowes fax unit and there is a
communication error, the 2030 will store the partial document in the Mailbox. A text warning “PARTIAL MAIL DELIVERY” is appended to (printed on) the end of the last page received in the Mailbox to confirm that there was a problem with the transmission. If you call the remote machine to send the remaining pages, they will be appended to the pages already received into the Mailbox.
6.2.6 Polling Your Mailbox From Remote Locations Remote facsimile machines can poll a Mailbox or you can poll (retrieve) your mail from a remote location. The procedures are similar for Pitney Bowes machines and non-Pitney Bowes machines. The remote operator must call from a push button phone with Touch-Tone (DTMF) service. The following instructions should be given to the remote operator. Do This
This Happens
1. Dial the Model 2030 with the Telephone Handset off-
hook so you can listen to the tones generated by the Model 2030 when it answers. The phone or fax must have push-button capability with touch-tone (DTMF) service (Be sure there are no documents in the Feeder.)
The phone call is made to the Model 2030.

116
2. After the connection is made, listen until the receive
tone stops. As soon as the tone stops, enter the following: #, Mailbox number, #, Security Code, * from the Keypad on the phone. For example, enter: #25#1234* for Mailbox 25 with a Security Code of 1234.
Listen carefully through the Telephone Handset. If the Model 2030 is ready, you’ll hear a SOLID READY TONE. If the Model 2030 is not ready, you’ll hear a BROKEN NOT READY TONE. See NOTE 1.
3. Press SEND/RECEIVE once.
You should not press SEND/ RECEIVE unless you hear the SOLID READY TONE. The documents in the Model 2030 Mailbox are sent to your unit.
NOTES: 1. If you hear a BROKEN NOT READY TONE, there either is no mail or the
Security Code for the Mailbox was incorrect 2. If there is a communication error during the transmission, repeat Steps #1-3. 3. The Mailbox Security Code takes priority over a Polling Passcode when a
Mailbox is polled.
6.3 Relay Functions
Your 2030 has the ability to request a Relay*, that is, to ask the recipient fax unit to forward your document to another fax unit. The Relay feature allows you to perform a number of powerful communication links, such as:
• Request a Simple (or Single Node) Relay from your unit (the Requestor), through a Relay Station (Node), and on to a third fax unit (or final Destination).
• Request a Dual Node (or Two Step) Relay from your unit (the
Requestor), through a second fax machine (Node 1), then through a third unit (Node 2) and on to a fourth fax machine (final Destination).
As with more sophisticated features like Mailboxes, it is recommended that a Key Operator or System Administrator set up the Relay capabilities with other fax Key Operators. Careful assignment of Speed Dial Numbers and One-Touch Program keys are essential for accurate faxing using Relay jobs. Coordination with remote sites is required to keep lists and report generation accurate.

117
*Important: The Relay feature must be turned ON by the Pitney Bowes Diagnostics Center before Speed Dial numbers can be programmed as Relay Stations. 6.3.1 Single Node Relay (Simple Relay) and Dual Node Relay (Two Step
Relay) Concept The 2030 allows you to request or act as a Relay Station in two kinds of Relays-the Single Node Relay (Simple Relay) and Dual Node Relay (Two Step Relay). For the purposes of this Guide, a Node is defined as another fax machine at a remote location, with Relay Station capabilities. Think of a Node as a “step” along your communications route. A Single Node Relay permits a Requesting fax unit to send a document through a Relay Station (Node). Then the document continues on its transmission route to destinations programmed in the Speed Dial numbers or One-Touch keys of the Relaying machine. The final Destination could be many units. A Dual Node Relay permits the same communications as a Single Node Relay, but it allows one additional step. The Requesting fax unit can send a document through a Relay Station (First Node). The document then continues through a Second Node (second Relay Station) and then on to one or more final Destinations. The diagram below illustrates a Single Node Relay. The document is sent from the Requestor, through one Relay Station (or Node), and then on to one final Destination:
REQUESTING RELAY STATION DESTINATION UNIT (NODE) The diagram below illustrates a Dual Node (or Two Step) Relay. The document in this example travels from the Requestor in Rochester through the Albany Relay Station (Node 1). The document is then sent to the Sacramento Relay Station (Node 2) where it is forwarded to the final Destination in Stockton: REQUESTING FIRST SECOND DESTINATION UNIT RELAY STATION RELAY STATION (NODE 1) (NODE 2)
Tacoma New York Seattle
Rochester Albany Sacramento
Stockton

118
6.3.2 How Speed Dial numbers and One-Touch Program Keys are Used in the Relay Process
Please remember the following rules when inputting destination fax numbers (Speed Dial and One-Touch keys) while setting up a Relay Request Job:
• As a Relay Requestor, to access a Relay Station, you will always be using/dialing a fax number that is programmed locally into your Speed Dial and/or One-Touch key directory. This is because it is the only call in the Relay process that your machine actually dials.
• Relay Station(s) will make all of the subsequent calls placed during the
Relay process. Therefore, they will dial numbers that are programmed into their own Speed Dial and/or One-Touch key directories, NOT the Speed Dial or One-Touch key fax numbers that are programmed in the requesting unit. This is why it is imperative that the operator at the requesting unit has current information on the Speed Dial and One-Touch key directories of the participating hub units.
• The Requesting unit passes the destination information to a Relay Station
in the form of Speed Dial numbers and/or One-Touch keys. For example, while setting up a Relay job, you select One-Touch key #16 as the “Destination.” The Relay Station will relay (send) the document to the fax number(s) as programmed in its One-Touch key #16. So, even though you press One-Touch key #16 on the requesting machine, that key press will only be used as destination instructions to be sent to the Relay Station.
6.3.3 Single Node Relays From Your Unit You can relay a document through a Pitney Bowes model with a compatible Relay feature to final destinations by one of the following methods: A. Enter a Relay programmable AutoDial job (see instructions below). B. Program a P-Key for a Relay routine. Once you have selected the appropriate
P-Key you wish to program, follow the same procedures as outlined below. This establishes a regular Relay job that can be easily repeated by placing a document in the Feeder and pressing the appropriate P-Key. Refer to Section 5.5 for more information on storing programmable One Touch Keys (P-Keys).
C. Follow DTMF dialing procedures. This is commonly referred to as Touch-
Tone™ dialing and can be accomplished using the Numeric Keypad. Normally, you would only use this procedure if originating the Relay from a non-Pitney Bowes fax machine or a Pitney Bowes fax machine that does not support the Relay feature.

119
To enter a Single Node Relay programmable AutoDial job: Do This
This Happens
1. Insert the document face down in the Document
Feeder and press FEATURES twice.
2. Press YES.
3. Press 3, and then press YES.
4. Press NO for Single Node Relay.
5. Enter the Relay Station Speed Dial number or One-
Touch Key followed by the YES.
The appropriate Speed Dial or One Touch Key number and name appears in the ddisplay.
6. If you entered a Speed Dial number, press YES a
second time.
7. Press YES and enter another number by one of the
methods mentioned in Step #5 above. Repeat Steps #5 and #6 until all numbers are entered correct. Then press NO to continue.
8. Enter the number corresponding to the correct Mode
and then press YES. Or, just press YES for Normal Mode.
9. Enter the Speed Dial number or One Touch number
to which the Relay Station should send the document. The Speed Dial numbers or the One Touch numbers you select must already be stored in the Relaying fax unit. You can specify many locations here. If the destinations are stored as One Touch Keys, just keep pressing the appropriate Keys until you have specified all destinations. However, you must press YES after each new Speed Dial number. Press NO when you finish entering all numbers.
AUTO DIAL? PRESS YES, NO OR ttss
1:SND 2:RCV 3:RELAY 4:SND/RCV 5:MAILBOX
DUAL NODE RELAY? PRESS YES OR NO
ENTER RELAY STATION#
ANOTHER NUMBER?
1:NORMAL 2:FINE 3:EXTRA FINE 4:U-FINE
ENTER FINAL DEST. #
ENTER TIME _ _ : _ _
ANOTHER NUMBER? ENTER YES OR NO

120
10. Enter the time for the Relay to begin, then press YES.
Or, just press YES to begin transmission now. Press NO to return to Ready Mode.
The document(s) is scanned to memory and is automatically sent at the time(s) specified (or immediately if no time was specified).
NOTES: 1. The time you enter is when your machine will start the Relay sequence.
Once the document is received completely at the Relay Station, it is Relayed immediately. You cannot specify the Relay time to a final destination.
2. All Speed Dial numbers and One Touch Keys specified in Step #5 must have
been pre-programmed as Relay Stations when storing Speed Dial numbers. If a Speed Dial number or One Touch Key is entered in Step #5, and it has not been pre-designated as a Relay Station, the display will read “#XXX: NOT A RELAY STATION.”
3. If you make a mistake while entering any number from the Keypad, press NO
to backspace and erase incorrect digits or use the Cursor Direction Keys to move the cursor to the incorrect digit. When the cursor is at the point of error, simply enter the correct digit.
6.3.4 Dual Node Relays From Your Unit You can perform a Dual Node Relay through a Pitney Bowes model with a compatible Relay feature to final destinations by one of the following methods: A. Enter a Dual Node Relay programmable AutoDial job. B. Program a P-Key for a Dual Node Relay routine. Once you have
selected the appropriate P-Key to be programmed, follow the same procedures as outlined for entering a Dual Node Relay programmable AutoDial job below. This establishes a regular Relay job that can be easily repeated by placing a document in the Feeder and pressing the appropriate P-Key.
C. Follow DTMF dialing procedures. This is commonly referred to as a
Touch Tone and can be accomplished using the Numeric Keypad on your 2030 Series. Normally, you would only use this procedure if originating the Relay from a non-Pitney Bowes fax machine or a Pitney Bowes fax machine that does not support the Relay feature.

121
To enter a Dual Node Relay programmable AutoDial job: Do This
This Happens
1. Insert the document face down in the Document
Feeder and press FEATURES twice.
2. Press YES.
3. Press 3, and then press YES.
4. Press YES for Dual Node Relay. The 2030 cannot
be used as a Relay Station.
5. Enter the NODE 1 Speed Dial number or One Touch
Key followed by YES.
The number appears in the display.
6. If you entered a Speed Dial number, press YES a
second time.
7. Press YES and enter another number by one of the
methods mentioned in Step #5 above. Repeat Steps #5 and #6 until all numbers are entered. Then press NO to continue.
8. Enter the NODE 2 Speed Dial number or One Touch
Key followed by YES. The Speed Dial numbers or the One Touch Key numbers you select must already be stored as Relay Stations or the display will read “#XXX not a Relay Station”. Remember: the 2030 cannot be used as a Relay Station.
The number appears in the display.
9. If you entered a Speed Dial number, press YES a
second time.
10. Press YES and enter another number by one of the
methods mentioned in Step #8 above. Repeat Steps #8 and #9 until all numbers are entered. Then press NO to continue.
11. Enter the number corresponding to the correct
Mode and then press YES. Or, just press YES for Normal Mode.
AUTO DIAL? PRESS YES, NO OR ttss
1:SND 2:RCV 3:RELAY 4:SND/RCV 5:MAILBOX
DUAL NODE RELAY? PRESS YES OR NO
ENTER NODE 1 STATION #
ANOTHER NUMBER?
ENTER NODE 2 STATION #
ANOTHER NUMBER?
1:NORMAL 2:FINE 3:EXTRA FINE 4:U-FINE
ENTER FINAL DEST.#

122
12. Enter the Speed Dial number or One Touch number
to which the Relay Station should send the document. The Speed Dial numbers or the One Touch numbers you select must already be stored in the Relaying fax unit. You can specify many locations here. If the destinations are stored as One Touch Keys, just keep pressing the appropriate Keys until you have specified all destinations. However, you must press YES after each new Speed Dial number. Press NO when you finish entering all numbers.
13. Enter the time for the Relay to begin, then press
YES. Or, just press YES to begin transmission now.
The document(s) is scanned to memory and is automatically sent at the time(s) specified (or immediately if no time was specified).
NOTES: 1. The time you enter is when your machine will start the Relay sequence.
Once the document is received completely at the Relay Station, it is Relayed immediately. You cannot specify the Relay time for the Node 1 or Node 2 Relay Stations.
2. Relay Station 1’s operator must have Node 2 Relay Station(s) designated as
a Relay Station. If not, relaying from Node 1 to Node 2 will fail. If this error occurs, the Requesting unit will indicate: “REMOTE FAX HAS NO RELAY FACILITY.”
3. If you make a mistake while entering any number from the keypad, press NO
to backspace and erase incorrect digits or use the Cursor Direction Keys to move the cursor to the incorrect digit. When the cursor is at the point of error, simply enter the correct digit.
6.3.5 Performing Relays Using DTMF (Touch-Tone) Single and Dual Node Relays can be requested (initiated) from non-Pitney Bowes fax machines using DTMF (Dual Tone Multi-Frequency) dialing procedures. This is commonly referred to as Touch-Tone dialing and can be accomplished by dialing from that unit’s attached Touch-Tone capable telephone handset. When using this procedure, your Pitney Bowes 2030 will act as a Relay Station (Hub), forwarding the document to another Relay Station (in the case of Dual Node Relay) or to the final destination(s), as a Single Node Relay. Should you wish to do so, please contact the Pitney Bowes Diagnostic Center listed in the back of this guide for additional information and/or documentation.
ENTER TIME _ _ : _ _

123
6.3.6 Relay Reports During Single Node Relays (Simple Relay) and Dual Node Relays (Two Step Relay), many reports can be generated to confirm the status of the Relay at each “step” along the programmed Relay communication route. If each location operator follows certain procedures, Relay Confirmation Reports can be sent to and printed at the Originating locations, First Relay Station(s) and Second Relay Station(s). Relay Confirmation Reports can inform all locations involved in a Relay command that the Relay was successful. SPECIAL CONDITIONS MUST BE MET FOR RELAY CONFIRMATION REPORTS TO REACH THE ORIGINATOR. This is why it is recommended that a Key Operator or System Administrator set up the Relay capabilities with other fax Key Operators. If you want to receive more information and/or documentation on how to program the Requesting unit and Relay Station(s) to receive a Relay Confirmation Report, please call the Pitney Bowes Diagnostic Center listed in the back of this Guide.
6.4 Programmable Power Saver The Programmable Power Saver feature available on Model 2030 conserves energy and greatly reduces electric bills while ensuring that documents will still be received and printed. 6.4.1 Programmable Power Saver Feature (Heater Timer) Your 2030 was shipped with the Power Saver feature ON and therefore does not require adjustment. It is set to automatically power down and thus save energy when the system is not being used. This programmable Power Saver feature conserves energy and greatly reduces electric bills while ensuring that the documents will still be received and printed. In the event that an incoming document arrives when the Power Saver mode is on (and the heating element’s temperature is low), the unit will reactivate the heater timer while temporarily receiving the document into memory. Once the element reaches operating temperature, the document is completely printed. The heater element automatically shuts off until the next designated “on period,” or when another document is received, whichever comes first. Depending upon your needs, the Power Saver can be ON, OFF or CUSTOMIZED. These choices are available under the “Setting System Options,” (See Section 5.7.2). If “ON” is selected, the heater will be powered only when a print operation is imminent. When “OFF” is selected, the Model 2030’s heater will always receive full power. Selecting the “CUSTOM” setting will maintain full power to the heating element from 8:00 am - 5:00 pm, Monday through Friday. The printer heater will be off during the remaining times. Different customized routines can also be remotely programmed by the Diagnostic Center or a Pitney Bowes technician. Once programmed with the “CUSTOM” setting selected, the 2030 will automatically turn

124
the heating element on at the designated time each day and off again at a designated later time.
6.5 Modem Start Speed Your Model 2030 is capable of communicating with other units at the speed of 33,600 bits per second (bps). The amount of time each transaction takes depends upon the type of document being transmitted and whether the sending machine is set for either Normal, Fine, or Extra Fine Modes (resolution). The transmission speed is always determined by the capability of the receiving fax and quality of the phone line. If you are sending from the Model 2030 and it detects inferior telephone quality, it will automatically adjust its speed downward (from 33,600 down to 2,400 bps, in 2,400 bps increments). When sending to certain destinations, particularly overseas, it may not be possible to send at the top speed. If this is known in advance, you can save time and money if the Modem is preset to start at a lower speed. This will reduce the protocol or “hand-shake” time between pages, thereby reducing telephone costs. If you notice that your machine is consistently sending to certain locations at slower than normal speeds, the Modem Start Speed feature can be activated on your unit. Please call the Pitney Bowes Diagnostic Center listed in the back of this Guide. This feature can be changed over the phone and does not require a service call. The Modem Start Speed feature allows you to set a specific speed for each Speed Dial number. You will see the following extra prompt displayed when programming new Speed Dial numbers or changing existing ones: Do This
This Happens
1. Following the procedures in Section 5.1.1, press
FEATURES, 5, then YES; press YES again, enter the Speed Dial number; enter the telephone number and name; press YES.
2. Press YES if you want to select a start speed or NO
if you do not. Example: press YES.
3. Press the Communication Status or Help Key to
display the desired start speed. Then press YES to select. Or, do not specify a start speed by pressing NO.
SET START SPEED? ENTER YES, NO OR tt ss
START SPEED: 33.6 PRESS tt ss TO SELECT
ENTER SPEED DIAL # * =

125
4. Press YES to continue programming Speed Dial
Numbers (or NO to return to the Ready Mode).
Important: For each step down you select, you will increase the transmission time. This feature should not be used unless you consistently cannot communicate at top speed to specific speed dial destinations.
6.6 Sub-addressing 6.6.1 General Description A Pitney Bowes 2030 can transmit a document with a Sub-address simply by entering the Sub-address from the fax control panel. The Sub-Addressing function allows you to further route, forward or relay documents to a specific workstation on a computer or telephone network. Only systems using fax hardware/software that are capable of sending and receiving Sub-address codes can utilize this feature. If you would like to use the Sub-address feature, please contact the Pitney Bowes Diagnostic Center listed in the back of this Guide so it can be enabled. Sending with a Sub-address to a workstation on a Computer Network: Sending faxes to a recipient using a fax system that supports Sub-addressing is as simple as sending an ordinary fax.
PB 2030 (send toSub-address #4)
PB Unit withHydraFax
1
2
3
4
LAN
Workstations
Documentrecieved
here

126
6.6.2 Programming a Sub-address While programming a fax number into a Speed Dial number (see Section 5.1.1 on programming Speed Dial numbers, if necessary), or entering a fax number via the numeric keypad, press the COPY key (a lower case “s” is displayed), enter the Sub-address code.
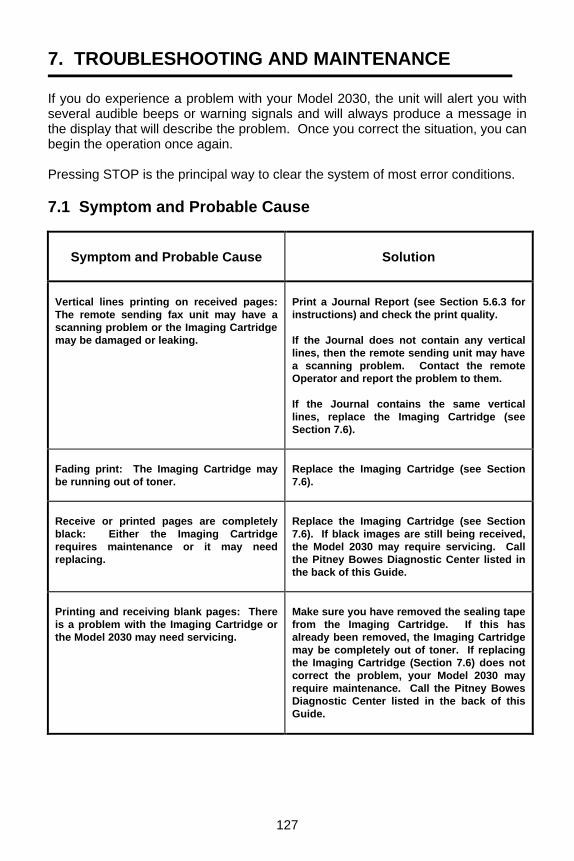
127
7. TROUBLESHOOTING AND MAINTENANCE
If you do experience a problem with your Model 2030, the unit will alert you with several audible beeps or warning signals and will always produce a message in the display that will describe the problem. Once you correct the situation, you can begin the operation once again. Pressing STOP is the principal way to clear the system of most error conditions. 7.1 Symptom and Probable Cause
Symptom and Probable Cause
Solution
Vertical lines printing on received pages: The remote sending fax unit may have a scanning problem or the Imaging Cartridge may be damaged or leaking.
Print a Journal Report (see Section 5.6.3 for instructions) and check the print quality. If the Journal does not contain any vertical lines, then the remote sending unit may have a scanning problem. Contact the remote Operator and report the problem to them. If the Journal contains the same vertical lines, replace the Imaging Cartridge (see Section 7.6).
Fading print: The Imaging Cartridge may be running out of toner.
Replace the Imaging Cartridge (see Section 7.6).
Receive or printed pages are completely black: Either the Imaging Cartridge requires maintenance or it may need replacing.
Replace the Imaging Cartridge (see Section 7.6). If black images are still being received, the Model 2030 may require servicing. Call the Pitney Bowes Diagnostic Center listed in the back of this Guide.
Printing and receiving blank pages: There is a problem with the Imaging Cartridge or the Model 2030 may need servicing.
Make sure you have removed the sealing tape from the Imaging Cartridge. If this has already been removed, the Imaging Cartridge may be completely out of toner. If replacing the Imaging Cartridge (Section 7.6) does not correct the problem, your Model 2030 may require maintenance. Call the Pitney Bowes Diagnostic Center listed in the back of this Guide.
128
Printer Jam: Verify that the paper tray is loaded properly. Try reducing the amount of paper loaded in the unit. Verify that the unit is on a level surface. Change the plain paper to one designed for laser printers.
First, insure that the Model 2030 is on a level surface. Your paper may be too thin or too thick. Never place more than 500 sheets into the paper cassette. It is best to keep more than a few pages of paper in the Main Cassette. Refer to Section 3.6 for instructions on properly installing paper. If none of these measures corrects the problem, remove the paper, fan it, turn it upside down, and place the paper back into the cassette.
Scanner Jam: The condition and/or type of pages may not be appropriate for automatic feeding or the original may not be in the ADF properly.
Refer to Section 3.8.1 and 3.8.2 for all document specifications and limitations. Originals should not contain staples, paper clips or dust or grease. Use a Document Carrier for pressure sensitive materials, carbon paper or extra thin or glossy paper. Never place more than 50 pages in the Automatic Document Feeder at same time. Make sure the Document Guides are adjusted properly.
When you send, the receiving Operator notices vertical lines on the received pages: The remote receiving fax unit may have a printing problem or the scanner on your machine many need cleaning
If you make a copy on your machine and the copy quality is fine, it is a problem with the receiving machine. If the copy you made displays lines, clean the scanner located under the Operator Panel. See Section 7.5 for details.
7.2 Display Messages
Display Message
Meaning and Solution
JOB #XX CANNOT EDIT
You have attempted to edit a programmed job that the Model 2030 is currently executing, i.e., the unit is on line (dialing, or transmitting). A job cannot be edited while it is in progress. You can only edit a job if the control panel “On Line” LED is off. However, it is possible to edit this job if the Model 2030 is on-line executing an unrelated job.

129
COMMUNICATIONS ERROR
An unsuccessful transmission resulted from an unspecified telephone problem. Press STOP and try again. Or press STOP, contact the remote operator, and try the transmission once again or repeat the Job via the Edit Job Key or Feature #4 (See Section 5.4).
DIALER FULL
The AutoDial Memory cannot accept any more programmable AutoDial jobs, or Delayed Send jobs until an existing job has been completed or deleted. The 2030 can store a maximum of 30 jobs.
ENTER ACCESS CODE __ __ __ __
The Secure Access feature is ON. You must enter the Access Code to perform any machine function. See your Key Operator or System Administrator for assistance.
ENTER PBX CODE
The PBX Access Code feature is ON. You must enter a valid PBX Access Code if dialing through your PBX. See your Key Operator or System Administrator for assistance.
INCOMPLETE JOB CHECK JOBS REPORT
This message is displayed if no connection was made after all redial attempts. The unit should have also printed an Incomplete Dial Message. Press STOP and print a Jobs Report if necessary (see Section 5.6.1). Repeat the transmission or contact the remote operator to resolve the situation.
LOWER CASSETTE EMPTY
If only one additional cassette has been added, this message will appear.
2ND CASSETTE EMPTY
This message indicates that one of the two additional cassettes (middle cassette) is empty.
7.3 Clearing a Paper Jam Although it is an extremely rare occurrence, the Paper may become jammed in your 2030, if proper loading procedures are not followed. See Section 3.6 for procedures on loading paper. Some of the more common causes of paper jams and the best ways to avoid them are listed below: 1. The best way to prevent frequent jams is to make sure that the 2030 is
placed on a level, hard, flat, stable surface.

130
2. The vast majority of plain paper will work well in your 2030. If the paper is not
compatible with the unit, however, using it could promote frequent jams.
• Avoid very smooth or coarse paper. • If your machine is feeding two or more pages at once, you may be
using a type of paper that is difficult to separate. Remove the paper from the cassette(s) and fan the edges to separate the pages.
3. You may be using your paper incorrectly.
• Store your Recording Paper in a stable environment, avoiding extremes in temperature and humidity.
• Load paper into the paper supply areas carefully. If a page is folded or wrinkled, remove it.
• Print on the correct side of the paper. Some paper manufacturers place an arrow on the end of the paper ream wrap to specify which side of the page is correct side for printing. If you are having problems, remove the paper stack from the tray, rotate it 180°, turn it over, and then place it back in the tray.
4. Clean the printer every time the Imaging Cartridge is replaced to prevent
toner build-up inside the paper path. See Section 7.6.1 for details. 5. Very frequent jamming may indicate that you should have your 2030
serviced. Please call the Pitney Bowes Diagnostic Center listed in the back of this Guide.
If the paper can’t feed properly and a paper jam is detected, the display will flash “Printer Jam.” You must clear the misfed paper before continuing. The 2030 will automatically return to the System Ready screen after the paper has been cleared. It is possible for more than one sheet of paper to be caught in the unit during a printer jam, so check for more than one page. Jams occur most often in the paper pick-up area and fuser roller area of the unit. To clear a printer jam, follow the instructions and illustrations below:
• Remove all jammed paper very carefully. Avoid tearing the page to ensure you remove it all.
• Keep your fingers away from the hot fuser roller. • If the page tears as you remove it, check inside the unit for small
pieces of paper and make sure you remove all of them before proceeding.
1. Open Cassette(s) to be sure the paper is loaded properly. Pull the cassette(s)
completely out and check inside the unit. Paper may have started to feed

131
through and become jammed. Make sure paper is set under the clips and does not exceed over the full indication line on Paper Width Guide on right side. Replace the cassette(s).
2. Push the release button on right side (near the front) to open the printer door.
As soon as you open the cover, you will hear an alarm. The alarm will stop in approximately 10 seconds, or you can press STOP to turn the alarm off immediately.
3. Remove any Recording Paper that may be caught in figures 1 and/or 2. 4. Gently but firmly close the Printer Door.
132
WARNING: The fuser area is HOT. Do not touch the fuser rollers or injury may result. CAUTION: Remove the paper jam carefully. Toner from the jammed paper can stain your clothes. If your clothes get toner on them, wipe the toner off with a dry cloth, and wash the clothes in cold water. Hot water sets toner into fabric.
7.4 Clearing a Misfed Original In the unlikely event that an original document does not feed properly, the display will flash “Scanner Misfeed.” You must press “Stop” to erase the message and then clear the misfed original before continuing. Follow the instructions and illustrations below: 1. To open the Document Feeder Door lift up on Operator Panel. 2. Remove the misfed document.
Note: § The 2030 will automatically return to the System Ready screen after the
paper jam(s) have been cleared. § If the message in the display still reads “PRINTER JAM” or if the paper
continues to jam, call the Pitney Bowes Diagnostic Center listed in the back of this Guide.
Note: Try to send the document again. If documents jam frequently, make sure your documents comply with recommendations reviewed in Section 3.8.

133
7.5 Cleaning the Scanner Surface To ensure transmission of quality images, i.e., those void of lines or other marks, periodic cleaning of the scanner glass in recommended. To do so, proceed as follows:
1. Open the Operator Panel. Grasp the right side of the panel, as you would to release documents from the feeder, and lift up. Locate the long narrow vertical strip of glass located between the paper feed rollers.
2. Using a soft clean, moistened* cloth, wipe the glass surface.
3. Also clean the white plastic strip located in the upper half of the Operator
Panel. 4. Close the Operator Panel.
*Note: Do not use abrasives or caustic substances to clean the scanner glass. Isopropyl alcohol is recommended.

134
7.6 Installing/Replacing the Imaging Cartridge Follow the steps outlined below to install or replace the 2030’s Imaging Cartridge. If replacing the cartridge, it is recommended that you perform the “Clean Printer Procedure” after replacement. See next Section for details.
• Remove the new Imaging Cartridge from the carton.
• Pull the tear strip on the aluminum
colored (anti-static) bag and remove the new Imaging Cartridge. See CAUTION to follow.
1. Gently rock the cartridge from end to
end five or six times to redistribute the toner.
2. Remove the protective seal.
Note: Pull the seal slowly and straight out.
3. Push the button on the right side of
the unit to open the Printer Cover. Note: As soon as you open the panel, you will hear an audible alarm. This will stop in approximately 10 seconds. To turn it off immediately, press Stop. Display flashes “Printer Door Open.”
CAUTION: To prevent damage or poor image quality, do not touch the drum surface (gray cylinder underneath protective cover) or expose the Imaging Cartridge to direct sunlight or room light for more than a few minutes. The cartridge uses a developing process similar to that used for film in a camera. Light can cause the developing roller inside the cartridge to be damaged.

135
§ If replacing a cartridge, remove the old cartridge from the unit, being sure to grasp the middle of the cartridge firmly. Do not touch the heater roller in the unit, it may be very hot. To recycle the old cartridge return it in the box the new cartridge came in. See Section 2.1 for details.
4. Install the new Imaging Cartridge by
aligning the arrow and the projection on both sides as shown and insert the cartridge all the way in.
5. Close the Printer Cover firmly.
CAUTION: If your clothes get toner on them, wipe the toner off with a dry cloth, and wash the clothes in cold water. Hot water sets toner into fabric. CAUTION: Because the Model 2030 uses a unique Cartridge, it is recommended that the Imaging Cartridge be ordered from Pitney Bowes Facsimile Systems. Exclusive sensors and keying systems will not allow you to install any other type of Imaging Cartridge. Damage to the machine may result. WHEN THE IMAGING CARTRIDGE IS REPLACED, BE SURE TO SELECT FEATURE 12 FROM THE OPERATOR PANEL FOR CLEANING THE PRINTER (see next Section).
136
7.6.1 Cleaning the Printer For continued reliability and image quality, you should perform the Printer Cleaning procedure each time a new Imaging Cartridge is installed, or if the 2030 is experiencing paper misfeeds. Failure to do so can cause jams and/or damage to the unit. The Printer Cleaning Procedure generates 3 sheets of Cleaning Paper that are then used to clean the fuser rollers in the Model 2030 paper path. Do This
This Happens
1. Press FEATURES.
2. Press 12 and then YES.
After a few moments, the Model 2030 will automatically print 3 test charts with a diagonal black pattern that will be delivered, face up, into the Paper Exit Tray.
Then the display will read:
The following message will appear in the display:
3. When the test charts have been printed, remove them
from the Paper Exit Tray and place them, face up, in the Upper Cassette. Close the Cassette. Press YES.
The display will immediately read: The test charts will automa-tically feed into the Model 2030. The fuser rollers in the 2030 should now be clean. The display will return to the System Ready Mode.
FEATURE SELECTIONS PRESS YES, NO OR ts
CLEANING CHARTS PRINTING NOW
CLEANING PRINTER
LOAD CHARTS FACE UP…
IN CASSETTE THEN PRESS YES.

137
7.7 Safety And Ozone Emissions Information The information contained in the following Section is presented to insure that you are familiar with all Model 2030 operational aspects and safety issues. 7.7.1 Safety Information The Model 2030 is UL listed, CSA certified, and GS licensed. 1. Laser Safety
The laser component of the Model 2030 is certified as a Class 1 laser product under the U.S. Department of Health and Human Services (DHHS) Radiation Performance Standard according to the “Radiation Control for Health and Safety Act” of 1968. This means that the unit is completely confined within protective housings and external covers, the laser beam cannot escape from the machine during any phase of user operation.
2. CDRH Regulations
The Center of Device and Radiological Health (CDRH) of the U.S. Food and Drug Administration implemented regulations for laser products on August 2, 1976. These regulations apply to laser products manufactured from August 1, 1976. Compliance is mandatory for products marketed in the United States. This unit complied with DHHS Rules 21 CFR Chapter 1, Subchapter J. at the date of manufacture.
CAUTION: Use of controls and adjustments of performance of procedures
other than those specified in this manual may result in hazardous radiation exposure.
7.7.2 Ozone Information The high voltage supplies found in laser engines and photocopies generate ozone gas (03) as a by-product of the electrophotographic process. Ozone is only generated while the fax unit is printing. 1. UL Standards for Ozone
The only existing standard for ozone emissions has been established by Underwriters Laboratory (UL). The 2030’s ozone emissions are less than specified by this standard.
Because ozone can be an irritant, various regulatory agencies have established limits to the amount of ozone to which employees may be exposed. The work place specifications are:
• A person may not be exposed to an average concentration of greater than 0.1 part per million (PPM) of ozone for a period of eight hours.
138
• At this time, the ACGIH has proposed a ceiling limit of 0.1 PPM for ozone. 2. Model 2030 Ozone Emissions The Model 2030 produces an extremely low amount of ozone, below 0.02
mg/m3. 3. Employer Responsibilities The employer is responsible for providing a work environment that meets the standards discussed in section 1 above. Almost all ozone concerns arise from abnormal site or operating conditions. The following conditions may generate an ozone complaint: • multiple laser print engines in a very confined area • extremely low relative humidity • poor room ventilation • the facsimile ventilation slots directed toward the face of personnel • long, continuous receiving, copying, or printing with any of the above conditions Inspect your work environment for the operating conditions listed above if you believe ozone emissions are a problem in your area. Some people may be extra-sensitive to ozone odor. If this situation is encountered, it is advisable to position the fax unit away from the sensitive operator. 7.7.3 Toner Safety and Care Toner is a non-toxic substance composed of plastic, iron, and a small amount of pigment. If toner comes in contact with skin or clothing, remove as much toner as possible with a vacuum or dry tissue wipes, and then wash with cold water. Hot water causes toner to be more difficult to remove. Because toner tends to degrade vinyl materials, contact with any vinyl should be avoided.
139
8. NOTICE FOR U.S.A. USERS The telephone Consumer Protection Act of 1991 makes it unlawful for any person to use a computer or other electronic device to send any message via telephone facsimile units unless the message clearly contains, in a margin at the top or bottom of each transmitted page or on the first page of transmission, the following information:
1. Date and Time of transmission and 2. Identification of either business, business entity or individual sending the
message and 3. Telephone number of either the sending machine, business, business
entity or individual. In order to program this information into your 2030, you should refer to Section 5.7 to complete the steps. FCC REQUIREMENTS 1. This equipment complies with Part 68 of the FCC rules. On the rear side of
the facsimile is a label that contains, among other information, the FCC registration number and ringer equivalence number (REN) for this unit.
If requested, this information must be provided to the telephone company. 2. This equipment connects to the network via USOC RJ11C. 3. The REN is used to determine the quantity of devices which may be
connected to the telephone line. Excessive REN’s on the telephone line may result in the devices not ringing in response to an incoming call. In most, but not all areas, the sum of the REN’s should not exceed five (5.0). To be certain of the number of devices that may be connected to the line, as determined by the total REN’s, contact the telephone company to determine the maximum REN for the calling area.
4. If the terminal equipment causes harm to the telephone network, the telephone company will notify you in advance. But if advance notice isn’t practical, the telephone company will notify the customer as soon as possible. Also, you will be advised of your right to file a complaint with the FCC if you believe it is necessary.
5. The telephone company may make changes in its facilities, equipment, operations, or procedures that could affect the operation of the equipment. If this happens, the telephone company will provide advance notice in order for you to make the necessary modifications in order to maintain uninterrupted service.
6. If trouble is experienced with this equipment, please call the following 800 number for repair and/or warranty information: 800-243-5556. If the trouble is causing harm to the telephone network, the telephone company may request you remove the equipment from the network until the problem is resolved.
7. This equipment cannot be used on public coin service provided by the telephone company. Connection to Party Line Service is subject to state
140
tariffs. (Contact the state public utility commission, public service commission or corporation commission for information.)
8. The telephone consumer Protection Act of 1991 makes it unlawful for any person to use a computer or other electronic device to send any message via telephone fax machine unless such message clearly contains, in a margin at the top or bottom of each transmitted page or on the first page of the transmission, the date and time it is sent and an identification of the business or other entity, or other individual sending the message and the telephone number of the sending machine or such business, other entity, or individual. (In order to program this information into your fax machine and insure that it will be transmitted, refer to Section 5.7.2).
9. This equipment is Hearing-Aid Compatible.
FCC WARNING
This equipment generates, uses, and can radiate radio frequency energy and, if not installed and used in accordance with the Operating Guide, may cause interference to radio communications. It has been tested and found to comply with the limits for a Class B Computing Device pursuant to Sub-part J of part 15 of FCC Rules, which are designed to provide reasonable protection against such interference when operated in a residential installation. However, there is no guarantee that interference will not occur in a particular installation. If this equipment does cause interference to radio or television reception, which can be determined by turning the equipment off and on, you are encouraged to try to correct the interference by one or more of the following measures:
(1) Reorient the receiving antenna. (2) Relocate your fax machine with respect to the receiver. (3) Move your fax machine away from the receiver. (4) Plug your fax machine into a different outlet so that the fax machine
and receiver are on different electrical circuits.

141
9. NOTICE TO CANADIAN USERS The Canadian Department of Communications Label identifies certified equipment. This certification means that the equipment meets certain telecommunications network protective, operational and safety requirements. The Department does not guarantee the equipment will operate to the user’s satisfaction. Before installing this equipment, users should ensure that it is permissible to be connected to the facilities of the local telecommunications company. The equipment must also be installed using an acceptable method of connection. In some cases, the company’s inside wiring associated with a single line individual service may be extended by means of a certified connector assembly (telephone extension cord). The customer should be aware that compliance with the above conditions may not prevent degradation of service in some situations. Repairs to certified equipment should be made by an authorized Canadian maintenance facility designated by supplier. Any repairs or alteration made by the user to this equipment, or equipment malfunctions, may give the telecommunications company cause to request the user to disconnect the equipment. User should ensure for their own protection that the electrical ground connections of the power utility, telephone lines and internal metallic water pipe system, if present, are connected together. This precaution may be particularly important in rural areas. CAUTION: User should not attempt to make such connections themselves, but should contact the appropriate electric inspection authority, or electrician, as appropriate. The Load Number (LN) assigned to each device denotes the percentage of the total load to be connected to a telephone loop which is used by the device, to prevent overloading. The termination on a loop may consist of any combination of devices subject only to the requirement that total of the Load Numbers of all the devices does not exceed 100. The Load Number of this device is 16. L'étiquette du ministère des Communications du Canada identifie le matériel homologué. Cette étiquette certifie que le matériel est conforme à certaines normes de protection, d'exploitation et de sécurité des réseaux de télécommunications. Le Ministère n'assure toutefois pas que le matériel fonctionnera à la satisfaction de l'utilisateur. Avant d'installer ce matériel, l'utilisateur doit s'assurer qu'il est permis de le raccorder aux installations de l'entreprise locale de télécommunication. Le matériel doit également être installé en suivant une méthode acceptée de raccordement. Dans certains cas, les fils intérieurs de l'entreprise utilisês pour un service individuel à ligne unique peuvent être prolongês au moyen d'un

142
dispositif homologué de raccordement (cordon prolongateur téléphonique interne). L'abonné ne doit pas oublier qu'il est possible que la conformité aux conditions énoncées ci-dessus n'empêchent pas la dégradation du service dans certaines situations. Les réparations de matériel homologué doivent être effectuées pas un centre d'entretien canadien autorisé désigné par le fournisseur. Toute réparation ou modification effectuée par l'utilisateur de cet équipement ou tout mauvais fonctionnement de l'équipement peut obliger la compagnie de télécommuni-cations à demander à l'utilisateur de débrancher l'équipement. Pour sa propre protection, l'utilisateur doit s'assurer que tous les fils de mise à la terre de source d'énergie électrique, des lignes téléphoniques et des canalisations d'eau métalliques, s'il y en a, sont raccordés ensemble. Cette précaution est particulièrement importante dans les régions rurales. ADVERTISSEMENT L'utilitsateur ne doit pas tenter de faire ces raccordements lui-même; il doit avoir recours â un service d'inspection des installations électriques ou â un électricien, selon le cas. L'indice de charge (IC) assigné à chaque dispositif indique, pour éviter toute surcharge, le pourcentage de la charge totale qui peut étre raccordée à un circuit téléphonique bouclé utilisé par ce dispositif. Le raccordement du circuit bouclé peut être constitué de n'importe quelle combinaison de dispositifs, pourvu que la somme des indices de charge de l'ensemble des dispositifs ne dépasse pas 100. L'indice de charge de ce produit est 16.

143
10. INFORMATION FOR U.K. USERS 10.1 BABT Information for Model 2030 1. WARNING • Equipment connected to the rear ports should be such that the facsimile
continues to comply with the requirements of Section 4.2 (TNV) and Section 2.3 (SELV) circuits of EN 41003 after the circuit connections are made.
• The connection to the telecommunications systems is to be disconnected before the main plug is removed. The connection to the telecommunication systems is not to be hard wired.
• The voltages of the port marked “TEL” are Telecommunication Network Voltage (TNV) for the PSTN line connection and series connection.
• To prevent fire or shock hazard, do not expose this apparatus to rain or any type of moisture.
• Interconnection circuits for connection to the RJ11 and BS 6312 sockets should be such that the equipment continues to comply with the requirements of section 4.2 of EN 41003 for TNV circuits. All other interconnection circuits shall comply with the requirements of section of EN 60950 for SELV circuits.
• This equipment must be earthed. This is normally via the earth pin of the 13 A plug.
2. POINTS PERTINENT TO PSTN CONNECTION • This apparatus is approved for connection telecommunication systems
specified in the instructions for use, subject to the conditions set out in them. • BABT Certification number not available at time of printing. • This apparatus is not suitable as an extension to a payphone. • R.E.N.= 3
R.E.N. means Ringer Equivalence Number. The REN relates to the performance of the facsimile machine when used in combination with other items of apparatus. The REN is a customer guide indicating approximately the maximum number of items of apparatus that should be connected simultaneously to the line. This maximum number is obtained by summing the REN by summing the REN value of each of the individual items. The total REN should not exceed 4. The REN value of the facsimile machine is 3 and the REN value of a telephone is typically 1. Therefore only one telephone and facsimile machines should be connected to the line.
• This apparatus should only be used on exclusive exchange lines with loop disconnect or multi-frequency signaling.
• Approval to shared service line or a line connected to a 1+a carrier system. • The voltage drop introduced between the PSTN line cord and the telephone
socket has been measured a 2.OV at a current of 40mA. Therefore, no additional series equipment may be connected.
The introduction of this voltage drop may occasionally cause difficulties in making calls from the associated telephone or problems in telephone
144
conversation being experienced by both parties to the call. In the unlikely event of such problems occurring, the user should contact the supplier or maintainer of the apparatus, rather than the network operator. While operation may be possible initially, changes to or modernization of the network taking place in the normal course of events may result in the apparatus being connected to a network service with which it was not designed to be compatible. Failure of the apparatus to work under these circumstances may not be the responsibility of the network operator.
• Some difficulties may be experienced when making calls from other
apparatus connected to the PSTN via the series apparatus. Such difficulties may include:
- Difficulties in making calls - Problems in the telephone conversation being experienced by both parties to the call. • In the event of any such difficulties in the first instance, contact Pitney Bowes,
rather than the network operator. • The facsimile should not be used in conjunction with other series connected
apparatus such that the aggregate declared voltage drops of all this apparatus, together with the voltage drop introduced at 40mA by any separate wiring that is used to link items of apparatus, exceeds 2.OV.
• For the definition of a RBS (Relevant Branch System) for PSTN lines, please
refer to BS6789 Part 6.1, section 2.4 of BS6789. • This apparatus has been approved for the use of the following facilities.
1. Storage of telephone numbers for retrieval by a predetermined code 2. Automatic call initiation 3. Operation in the absence of Proceed Indication 4. Automatic dialling 5. Automatic storage of last number dialled 6. Multiple repeat attempt 7. Autoclear from the call originating end 8. Modem 9. Multi-frequency signaling 10. Loop disconnect signaling 11. Series connection 12. Call progress monitor
Any other usage will invalidate the approval of the apparatus if as a result, it then ceases to conform to the standards against which approval was gained. • The apparatus is only approved for compatible PBX’s and Pitney Bowes
should be consulted for an up to date list of PBX’s with which this apparatus is compatible.

145
• It cannot be guaranteed that the apparatus will operate correctly under all possible conditions of connection to compatible PBX’s. In case of difficulty, please refer in the first instance to Pitney Bowes.
• WARNING. No more than two pauses should be inserted between the PSTN
access digit and the PSTN number when programming the machine. Failure to observe this may cause incorrect working.
• Ensure that manually entered telephone numbers are correctly stored in the
apparatus and that all Speed Dial locations are correctly programmed. • The apparatus is suitable for connection to a PBX that returns secondary
proceed indication. 3. INSTALLATION OF ASSOCIATED TELEPHONE (Optional) At the rear of the unit is the telephone connector. The associated telephone is plugged into the socket marked TEL. 4. POINTS ON PITNEY BOWES HS1 HANDSET (Optional) • The dialing code “999“ can be dialed on the associated telephone for the
purposes of making calls to the British Telecom Emergency (999) Service. • The Redial facility of the handset must not be used when the apparatus is
connected to a PABX which returns secondary proceed indication. Failure to comply with this requirement may result in unsatisfactory
• operation. • Before installation please ensure that the TONE/PULSE DIALLING selector
switch is set to the correct position.

146
TO THE USER
Before connecting this equipment to a British Telecom line, the lower portion of this form should be sent to your local Telephone Area Office. This form is to:
1. Advise of your connection 2. Where necessary, request the installation of a suitable BT connection
socket. _ _ _ _ _ _ _ _ _ _ _ _ _ _ _ _ _ _ _ _ _ _ _ _ _ _ _ _ _ _ _ _ _ _ _ _ _ _ _ _ _ _ _ To: THE TELEPHONE MANAGER At:___________________________ I/We___________________ have purchased a Pitney Bowes 2030 facsimile machine (BABT Approval number not available at time of printing). I/We/do/do not require the installation of a BT wall socket for this equipment (for PSTN connection). __________________________ (Signed) NAME: __________________________________________ ADDRESS: ______________________________________ ________________________________________________ ________________________________________________ ________________________________________________
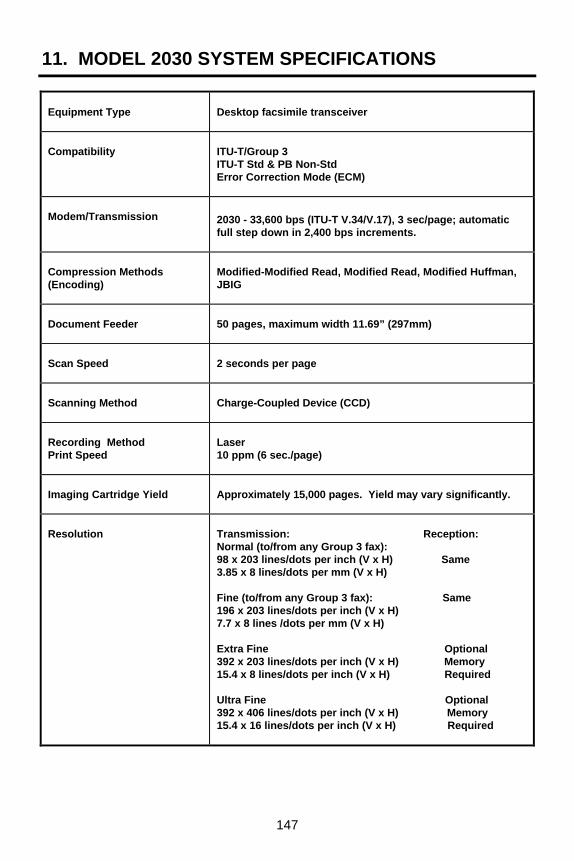
147
11. MODEL 2030 SYSTEM SPECIFICATIONS
Equipment Type
Desktop facsimile transceiver
Compatibility
ITU-T/Group 3 ITU-T Std & PB Non-Std Error Correction Mode (ECM)
Modem/Transmission
2030 - 33,600 bps (ITU-T V.34/V.17), 3 sec/page; automatic full step down in 2,400 bps increments.
Compression Methods (Encoding)
Modified-Modified Read, Modified Read, Modified Huffman, JBIG
Document Feeder
50 pages, maximum width 11.69” (297mm)
Scan Speed
2 seconds per page
Scanning Method
Charge-Coupled Device (CCD)
Recording Method Print Speed
Laser 10 ppm (6 sec./page)
Imaging Cartridge Yield
Approximately 15,000 pages. Yield may vary significantly.
Resolution
Transmission: Reception: Normal (to/from any Group 3 fax): 98 x 203 lines/dots per inch (V x H) Same 3.85 x 8 lines/dots per mm (V x H) Fine (to/from any Group 3 fax): Same 196 x 203 lines/dots per inch (V x H) 7.7 x 8 lines /dots per mm (V x H) Extra Fine Optional 392 x 203 lines/dots per inch (V x H) Memory 15.4 x 8 lines/dots per inch (V x H) Required Ultra Fine Optional 392 x 406 lines/dots per inch (V x H) Memory 15.4 x 16 lines/dots per inch (V x H) Required

148
Recording Paper
Cut sheet letter, legal, A4 500 sheet universal Cassette Optional 250 – letter, legal, A4 Optional 500 – letter, legal, A4
Edge Deletion
All four sides: 0.156” (4mm)
Original Document Size
Width: 5.8” 11” (148 - 280mm) Length: 5.0” 78.7” (2 m) or unlimited* *Note: one page at a time; requires operator intervention Page Thickness (weight): Single Page: 16 to 28 lbs. (0.0024” to 0.006” or 0.06 - 0.15mm) Multiple Pages: 16 to 20 lbs. (0.0024” to 0.0048” or 0.06mm - 0.12mm)
Max. Effective Scan Width
9.92” (252mm)
Operating Conditions Power Requirements Temperature Humidity
99-138VAC , 47-63HZ 120V +/-. 10% (in U.K., 220-240 VAC) 50-950 F (10-350C)
15-70%RH
Dimensions (WxDxH)
17.2” (436mm) x 20.4” (519mm) x 13.4” (340mm) (excluding trays)
Weight
33 lbs (15.5kg) (excluding Toner Cartridge and Trays)
Telephone Interface
- Public Switched Network - FCC registered internal coupler with modular connector - FCC Number and Ringer Equivalency Number * - DOC Approval Number * - BABT Approved * * see plate on back of machine
Standard Document Memory
1 MB - 60 pages
Options
- Internal Memory Card (2 MB, 4 MB, 8 MB) - 250- and 500-sheet Optional Cassettes - Printer Driver (enables up to 600 dpi Windows 95, 98, NT 4.0 printing) - Bidirectional Parallel Port (enables PC-fax/scan/print) - HydraFax Lite (Windows-compatible PC-fax/scan/print software)

149
Printer Warm-Up Time
40 seconds
Safety Approval
UL I.T.E. 8B22 CSA 40447 CANADIAN: 188 9514A
Collation Stack: Print Scan
Face Up Face Down
FCC Registration Number Ringer Equivalence
CHSJPN-27462-FA-E 2.1B
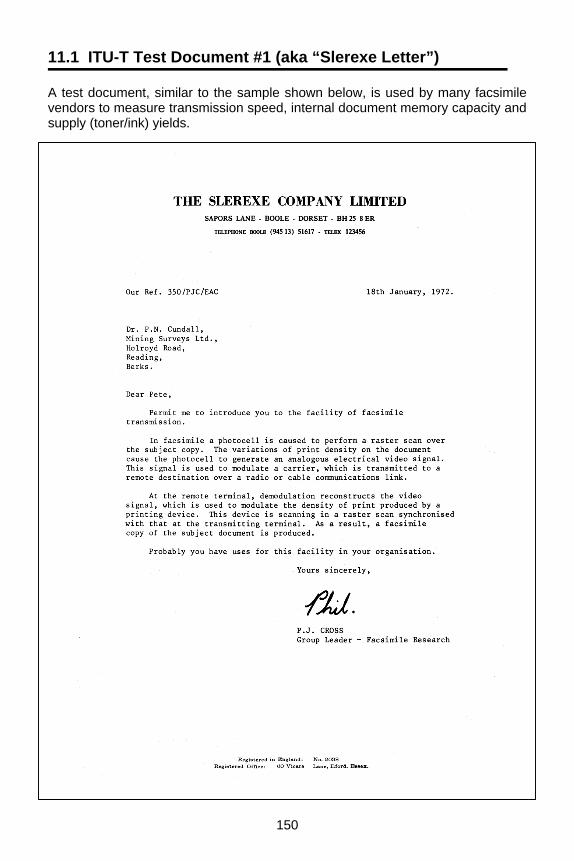
150
11.1 ITU-T Test Document #1 (aka “Slerexe Letter”) A test document, similar to the sample shown below, is used by many facsimile vendors to measure transmission speed, internal document memory capacity and supply (toner/ink) yields.

151
12. SERVICE INFORMATION Service and supplies on Pitney Bowes office products is available throughout the United States, Canada, U.K. and Australia. Please refer to the next page for information regarding available 2030 options and supplies.
Diagnostic Center Phone Number
Supply Phone
Number
Supply Fax Number
United States 800 243-5556* 800 462-6797 800 832-1869
Canada (English)
800 668-9194 800 263-4660 800 441-9823
(French) 800 387-0185 800 263-4660 800 441-9823
United
Kingdom
01279-443431 01279-456519 01279-456510
Australia Call your local office
* In the U.S., you can fax questions to the Pitney Bowes Diagnostic Center at 800 824-4417. Note: Please be sure to include your phone, fax, model and serial numbers.
When calling for service or supplies please be prepared to provide your:
Model number: Serial number: Customer account number: Company name: Machine phone number: Postcode (U.K.):

152
13. MODEL 2030 OPTIONS AND SUPPLIES There are a number of supply, accessory and optional items you can order for your 2030. They can be ordered from either the Pitney Bowes Supply line or from your local Pitney Bowes Sales office (see previous page for phone/fax numbers). When placing an order, be sure to have your model number, serial number and customer account number ready. Reorder Item Number Description n Imaging Cartridge 815-7 One (1) cartridge (yield: approx. 15,000 pages) n Cassettes: 250-sheet 6429678* Universal cassette with feeder 500-sheet 6429679* Universal cassette with feeder 250-sheet 812-5 Replacement cassette 500-sheet 812-6 Replacement cassette n Document Trays 815-5 Original document return tray 812-4 Paper receive tray n Document Carrier 802-8 Transparent folder for transmission of non-conforming originals n Handset 6432147* Telephone handset (in U.K.: HS-1) n Handset Cord 6436089* Telephone handset cord n Internal Memory Cards 6429704* 2 MB (160 pages)
6429705* 4 MB (320 pages) 6429702* 8 MB (640 pages)
n Recording Paper: Letter-size Plain Paper 471-1 8.5” x 11” (case: 10 reams) Legal-size Plain Paper 462-1 8.5” x 14” (case: 6 reams) n Connectivity: Bidirectional Parallel Port 6429713* Enables PC-fax/scan/print PCL 5e/6 6429712* Enhanced printing capabilities (requires Parallel Port option) Printer Driver 6429682* Enables up to 600-dpi Windows- Compatible printing Software: HydraFax Lite*** 6429681* Enables PC-fax/scan/print HydraFax Gold*** 6429703* Network Version LaserFax (U.K. only) SV90211 Enables PC-fax/scan/print n Documentation:
Operator’s Guide FX30053** Manual Quick Reference Guide FX15194** Abbreviated Operator’s Guide
* Order through your local Pitney Bowes Sales Branch. ** May also be ordered through the Pitney Bowes Diagnostic Center (USA
Only). *** Not available in the United Kingdom.

153
NOTES: 1. Imaging Cartridges – Each Model 2030 Imaging Cartridge contains all the
necessary imaging materials in a single piece. The toner contained in the Imaging Cartridge is specially formulated to provide you with archive-quality received documents and management reports.
The Model 2030 uses a unique Cartridge that must be ordered from Pitney Bowes Facsimile Systems. Exclusive sensors and keying systems will not allow you to install any other type of Imaging Cartridge. The Imaging Cartridge is specifically designed to be replaced after a single use. Refilling a used Imaging Cartridge is not recommended. The electrophotographic drum degrades during prolonged use and exposure to light, and damage to the Model 2030 may occur if an improperly refilled Cartridge is used.
2. Paper Supply – In general, most bond (or “Correspondence Quality”) paper
will produce excellent results. Most photocopy paper will also work very well. There are many “name” and “generic” brands of paper available. You may want to test various papers until you obtain the results you are looking for.
3. Document Carriers – A transparent folder, referred to as a Document
Carrier can be used with your machine. This is useful if your original documents are either pressure sensitive materials, carbon paper, extra thin or glossy paper. Document Carriers should always be used when sending small originals. Each page of these types of documents must be placed in a Document Carrier. This protects the original and the Model 2030.
Document Carriers should be sent one at a time. Trying to feed multiple Carriers may cause a misfeed. Place the closed end of the Carrier into the ADF first.

154
Index
A. Accessories, 16, 152 Access Control Code, 86, 99 Adding Speed Dial Numbers, 57 Answer, Delayed, 18, 41, 97 AutoDial Job, 3, 37, 63 Adding Pages, 71, 72 Changing a Time, 71, 75 Deleting a Job, 71, 74 Dialing by Delayed Send Key, 36 Editing, 71 Editing Destinations, 71, 72 Incomplete Dialing, 70 Mailbox, 63, 69 Polling with Programmable AutoDial, 65 Print Document, 71, 76 Programmable, 37, 63 Relay, 66 Programmable (PBX Access Codes ON), 107 Repeating a Job, 71, 74 Sending by Programmable AutoDial, 64 Turnaround Polling with Programmable AutoDial, 68 Auto Document Separation, 86, 87 Automatic Cover Sheet, 86, 95 Automatic Daylight Time Shift, 30 Automatic Document Feeder, 7, 147 Acceptable Documents, 26 Automatic Page Retransmission, 24 Automatic Redialing (Retries), 18, 32, 97 Automatic Receive to Memory, 41, 42, 101, 104 Automatic Reduction, 24, 27 Automatic Shut Off, 5, 87, 123 B. BABT Information (U.K.), 143 Basic Operation, 29 Beep Volume, 87 British Telecom, 146 Broadcasting, 60, 63 (see “AutoDial Job”) Bulletin Board/Unlimited Polling, 45, 49
155
C. Canadian Users, Notice to, 141 Cancel a Transmission from Memory, 11 Cartridge Order Form, 19, 20, 80, 83 On Demand, 80, 83, Cassettes, 8, 152 Optional, 152 Single Installed, 8, 22, 23 Standard, 8, 22, 23 Changing Speed Dial Number, 58 System Set Up, 86 Cleaning the Printer, 2, 135, 136 Cleaning the Scanner Surface, 133 Clearing Paper Jam, 129 Misfed Original, 132 Collation Stack, 149 Communication Status Key, 10, 11 Confirm Jobs Report, 95 Contrast, 12, 19, 27 Copy, 28 Copy Key, 10, 15, 28 Cover Sheet (Automatic), 95 Cover Release Button, 8 Creating Speed Dial Number, 56 D. Date, Set, 87 Date/Time, 25, 31 (see “Date” and “Time”) Daylight Time Shift, Automatic, 30 Delayed Answer Mode, 18, 41, 97 Delayed Send, 24, 36, 63, 75 Delayed Send Key, 10, 13, 36, 63 Deleting Job, 74 P-Key, 78 Speed Dial Number, 58 Speed Dial Number from One-Touch Key, 61 Diagnostic Centers, 151 Dialing Delayed Send Key, 36 Manually, 39 Numeric Keypad, 39, 40, 64 One-Touch Key, 35 P-Key, 36
156
Programming an AutoDial Job, 37, 63 Speed Dial Number, 34 Voice Request, 40 Directory Search Key, 10, 12 Directory, One-Touch, 80, 81 Directory, Speed Dial, 80, 81 Directory Sheet, Speed Dial, 16 Display Area, 10, 11 Display Messages, 128 Document Carriers, 16, 26, 152, 153 Document Guides, 7 Document Return Tray, 8, 16, 152 Document to Memory Key, 10, 13 Document Tray, 8, 16, 152 Documents Image Quality, 26 Number of, 26 Size and Thickness, 26 Dual Node Relays, 116, 117, 120 Dynamic Memory Card, 25, 152 E. Edit Jobs Key, 10, 12, 71 Editing AutoDial Jobs, 71 P-Key, 78 Effective Print Area, 26, 28 Energy StarSM, 5 EPA, 5 Extra Fine Mode, 19, 26, 27, 147 F. FCC Retry (Redial) Restrictions, 32 FCC Requirements, 83, 139 FCC Warning, 140 Features Key, 2, 10, 14 Feature Selections, 2, 53 Fine Mode, 19, 26, 27, 147 Flash Document Memory, 24, 25, 152 Forms, Printing, 80 G. Group Dial (Broadcast), 60, 63
157
H. Handset, 1, 16, 17, 18, 41, 143 (U.K.) Cord, 16, 17, 152 Help Key, 10, 12, 30 HydraFax Lite, 152 I. Imaging Cartridge, 19 Maintenance, 134 Order Form, 80, 83 Ordering, 151, 152 Problems, 127 Replacing, 134 Image Quality, 26 Incomplete Job, 74, 82, 95 Installing the Accessories, 17 Internal Document Memory, 24 ITU-T Test Document #1, 25, 150 J. Jam, Paper, 129 Job Confirmation Report, 84, 95 Job Status Report, 84, 92 Image On Report, 94 Journal Report, 83, 91 L. Loading Paper, 22 Low Toner Order Form, 19, 83 Low Toner and No Toner Receiving, 19 M. Machine ID Settings, 90 Machine Settings, 87 Mailbox Communication Access Codes, 108 Polling, 51, 115

158
Printing Directory, 84, 110 Mail, 111 Programmable AutoDial Job, 63, 69 Remote, 115 Sending Mail To, 114 From, 115 Setting Up, 109 Storing, 112 Mailbox Confirmation Report, 84 Mailbox Delivery Report, 85 Mailbox Directory, 84 Mailbox Functions, 116 Main Paper Cassette, 8 Manual Dialing, 39 Memory Document to Memory Key, 10, 13 Features, 24, 25 Full, 24, 43, 44 Optional, 25, 152 Receive to, 41, 42, 101, 104 Scan to, 32, 95 Size, 24, 99 Standard, 24, 148 Misfed Original, 132 Mode Key, 10, 12, 19, 26, 27 Modem Start Speed, 124 Monitor Volume, 11 Multitasking, 24, 25 N. No Key, 10, 14 No Toner, 19 Normal Mode, 12, 19, 26, 27, 147 Numeric Keypad Dialing, 39 Numeric Keys, 10, 14 O. Off-Hook Dialing, 40 OK Stamp, 99

159
On-Hook Dialing, 40 On Line Light (Display), 10, 11 On/Off Switch, 9, 29 One-Touch Deleting Speed Dial Number from, 61 Dialing, 35 Directory, On Demand, 80, 81 Keys, 10, 13 Overlay Sheet, 60, 80, 82 Programmable Keys (P-Keys), 10, 13, 77 Adding Destination(s), 79 Deleting Destination(s), 79 Programming, 60 Start Delay, 95 Operator Control Panel, 10 Optional Cassette(s), 152 Optional Memory, 25, 152 Options and Supplies, 152 Option Settings, 99 Ordering Supplies, 151 Original Document Return Tray, 8, 152 Original Key, 10, 12 Original Mode, 19, 27 Out of Paper Receive, 43 Out of Toner Display, 20 Out of Toner Light, 10, 11 Overlay Sheet, One-Touch, 60, 82 Ozone Emissions Information, 137 P. PBX Access Codes, 106 AutoDial Jobs, 107 ON, 107 P-Key, 10, 13 Dialing with, 36 Deleting, 78 Editing, 78 Programming, 77 Storing, 77 Paper Capacity, 22, 148 Cassette, 8 Jam, 129
160
Loading, 22 Problems, 127, 128 Receive Tray, 8, 16 Types, 153 Weight, 22, 26 Parallel Port, 9, 152 Parts, 7, 16, 152 Passcode Set-Up, 99 PC Options, 105 Pause Key, 10, 14, 56 Photos Key, 10, 13 Mode, 19, 27 Pitney Bowes Diagnostic Centers, 151 Polling, 45 Bulletin Board, 45, 49 Cancel, 47 Editing, 47 Mailbox, 51 Passcode, 99 PBX Access Codes, 106 Prepare Document, 46 Programmable AutoDial Job, 68 Sequential, 49, 65 Simple (to be Polled), 45, 46 Turnaround, 45, 51 Unlimited, 49 Power, 29 Cord, 1, 9, 16, 152 Power Saver, 5, 29, 87, 123 Print Auto Reduction, 27 Print Method, 147 Print Reports, 80 Jobs, 81 Job Confirmation Report, 84 Job Status Report, 84 Journal, 83 Mailbox Confirmation, 84 Mailbox Delivery, 85 Mailbox Directory, 84 One-Touch Overlay Sheet, 82 Relay Confirmation, 85 System Set Up, 82 Verification Reports, 84

161
On Demand, 81 Cartridge Order Form, 83 One-Touch Directory, 81 Program (P-Key) Directory, 82 Speed Dial Directory, 81 System Set-Up Directory, 82 Printer Cleaning, 136 Printer Cover Release Button, 8 Printer Driver, 152 Printing Area, 26, 28 Printing Mailbox, 111 Priority Feature, 30 Programmable AutoDial Jobs, 37, 63 Mailbox, 69 PBX Codes, 106 Polling, 65 Relay, 66, 119, 121 Sending/Receiving, 68 Programmable One-Touch Keys, 77 (see “P-Key” and “One-Touch”) Programmable Power Saver, 29, 87, 123 Programming AutoDial Job, 37, 63 One-Touch Key, 60 P-Key, 77 P-Key Directory, 80, 82 Set Up System, 31, 86 PSTN, 143, 148 Q. Quick Reference, Getting Started, 1 Quick Reference Guide, 16, 152 R. RJ-11C Telephone Line Jack, 1, 9 Receive Auto Set Up, 18, 41, 97 Receive Settings, 101 Receive to Memory, 41, 42, 101, 104 Receive Paper Tray, 8, 16, 17 Receiving a Document, 41 Receiving to Memory, 42, 101, 104 Low Toner & No Toner, 19 Manually, 42, 44 Out of Paper, 43 Receive to Memory, 42, 101, 104

162
Recycling, 5 Redial (Retry) Count, 18, 32, 97 Redial Key, 10, 14 Reduction, Automatic Print, 27 Relay Confirmation Report, 85, 123 Relay Functions, 116 Relay Programmable AutoDial Job, 66 Remote Fax Retrieval, 31, 46, 101 Turn Remote Retrieval ON, 102 Perform Remote Retrieval from a PC, 103 Reports Cartridge Order Form, 80, 83 Job Confirmation, 80, 84 Job Status, 80, 84 Jobs, 80, 81 Journal, 83 Key, 10, 11, 80 Mailbox Confirmation, 80, 84 Mailbox Delivery, 85 Mailbox Directory, 80, 84 On Demand, 80 One-Touch, 80, 81 P-Key Directory, 80, 82 Printing, 80 Relay, 80, 85 Speed Dial, 80, 81 System Set Up, 80, 82 Verification Reports, 84 Report Settings, 91 Resolution, 26, 27 Retry (Redial) Count, 18, 32, 97 Retry (Redial) Interval, 97 Retry (Redial) Restrictions, FCC, 32 Rings Before Answer, 18, 97 Ring Pattern, 97 Ringer Volume Switch, 9, 18 S. Safety, 137 Save Incomplete Jobs, 95 Save Stopped Jobs, 95 Scan to Memory, 32, 95 Scanner Surface, Cleaning, 133 Secure Access, 99

163
Send Cover Sheet, 95 Send from ADF, 13 Sending a Document, 32 Separator, Document, 87 Sequential Polling, 45, 49 Service, 151 Set Up Job Settings, 95 Machine ID Settings, 90 Machine Settings, 87 Mailbox, 109 One Touch, 60 Option Settings, 99 Passcode, 99 Program Keys, 77 Report Settings, 91 Speed Dial, 56 System, 86 Telephone Line Settings, 97 Single Node Relay, 116 Sleep Mode, 29 Specifications, 147 Speed Dial Changing/Deleting, 58 Creating/Adding, 57 Deleting from One-Touch Key, 61 Dialing, 34 Directory, On Demand, 80, 81 Set, 56 Storing, 56 Standard Memory, 24 Stop Key, 10, 15 Storing Mail in Mailbox, 112 One-Touch Keys, 60 P-Keys, 77 Speed Dial Numbers, 56 Sub-Addressing, 125 Supplies, 152 Document Carriers, 152, 153 Imaging Cartridges, 152, 153 Paper Cassettes, 152 Trays, 16, 152 Symptom and Probable Cause, 127

164
System Ready Mode, 29 System Set Up, 31, 86 Directory, On Demand, 80, 82 System Specifications, 147 T. Telephone Handset, 7, 17, 18 Line Cord, 1, 9 Line Settings, 97 Ringer Volume Switch, 9, 18 Telephone Consumer Protection Act, 31, 139 Terminology, 30 Time, Set, 87 This Fax Number, 90 Toner Cartridge, 5, 16, 19, 134, 152, 153 Toner Safety, 138 Transmit from ADF, 13 Transmit ID Name, 90 Transmit IDs, Multiple Selectable, 30 Turnaround Polling, 45, 51 U. U.K. User Information, 143 U.S.A. Users, Notice For, 139 Ultra-Fine Resolution, 27, 147 V. Verification Reports, 84 Voice Request Dialing, 40 Volume, Beep, 87 Monitor, 11 Y. Yes Key, 10, 13
Related Documents