MANUAL DE INSTRUCCIONES INSTRUCTION MANUAL MOD. KGV3000D Limpiadora de vapor y aspiración con función detergente o enjuage con agua caliente Steam and vacuum cleaner with detergent or idroject function

Welcome message from author
This document is posted to help you gain knowledge. Please leave a comment to let me know what you think about it! Share it to your friends and learn new things together.
Transcript

MANUAL DE INSTRUCCIONES INSTRUCTION MANUAL
MOD. KGV3000DLimpiadora de vapor y aspiración con funcióndetergente o enjuage con agua caliente
Steam and vacuum cleaner with detergent or idroject function

NOTAS / NOTES
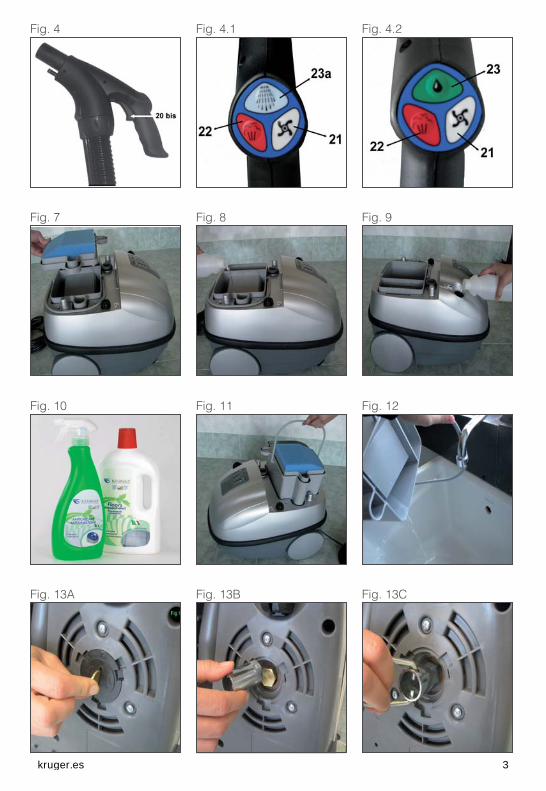
Fig. 4
Fig. 7
Fig. 10
Fig. 13A
Fig. 8
Fig. 11
Fig. 13B
Fig. 9
Fig. 12
Fig. 13C
Fig. 4.1 Fig. 4.2
kruger.es 3
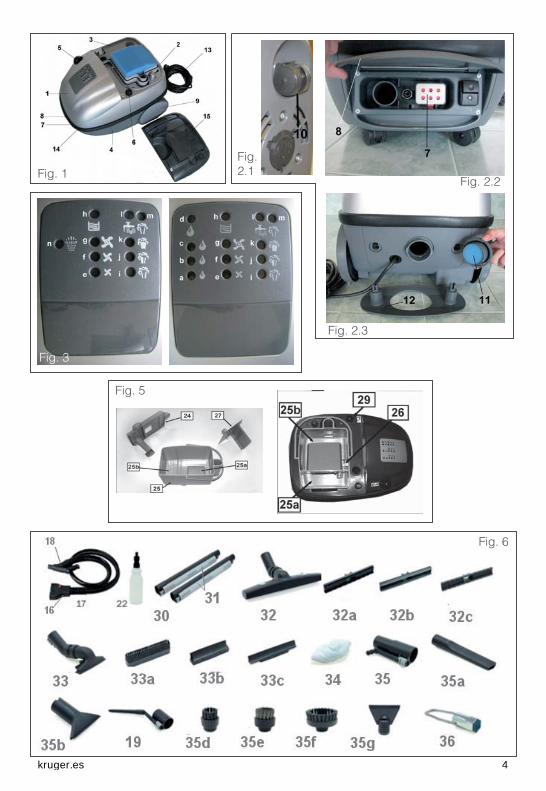
Fig. 1Fig.2.1
Fig. 2.2
Fig. 2.3
Fig. 3
Fig. 5
Fig. 6
kruger.es 4

MOD. KGV3000DMANUAL DE INSTRUCCIONES APARATO PARA LIMPIAR CON VAPOR, ASPIRADOR Y DETERGENTE /ENJUAGÜE CON AGUA CALIENTE
kruger.es 5
SUMARIO
1. ADVERTENCIAS PARA EL USO
2. EMPUÑADURA DE MANDO ASPIRACIÓN / VAPOR/ DETERGENTE / ENJUAGUE CON AGUA CALIENTE
3. MONTAJE ACCESORIOS
4. OPERACIONES PRELIMINARES4.1 FUNCIÓN ASPIRACIÓN4.2 FUNCIÓN VAPOR4.3 DEPÓSITO DETERGENTE4.4 ENCENDIDO4.5 PROGRAMACIÓN FUNCIÓN
5. ASPIRACIÓN EN SECO Y DE LÍQUIDOS5.1 ASPIRACIÓN EN SECO5.2 ASPIRACIÓN LÍQUIDOS5.3 ELIMINACIÓN DEL POLVO EN EL AGUA
6. LIMPIEZA CON VAPOR
7. LIMPIEZA CON VAPOR Y DETERGENTE ( SOLO MDO. 3000D)
8. LIMPIEZA CON VAPOR, Y ENJUAGUE CON AGUACALIENTE (SOLO MOD. 3000ID)
9. LIMPIEZA CON VAPOR Y ASPIRACIÓN
10. FUNCIÓN DSL (BLOQUE DIGITAL DEL VAPOR)
11. OPERACIONES FINALES
12. MANUTENCIÓN CALDERA
13. MANUTENCIÓN EXTRAORDINARIO
14. COMO USAR LOS ACCESORIOS12.1 EMPUÑADURA DE MANDO12.2 CEPILLO GRANDE CON FUNCIÓN VAPOR-ASPIRACIÓN12.3 CEPILLO PEQUEÑO CON FUNCIÓN VAPOR- ASPIRACIÓN12.4 BOQUILLA MULTIUSO12.5 LIMPIA-CRISTALES
15. LIMPIEZA DE LAS HABITACIONES
16. GARANTÍA
PÁG. 8PÁG. 8
PÁG. 8PÁG. 8
PÁG. 10
PÁG. 11PÁG. 11PÁG. 12
PÁG. 12PÁG. 12PÁG. 12PÁG. 13PÁG. 13PÁG. 13
PÁG. 14PÁG. 18
kruger.es 6

DESCRIPCIÓN DEL APARATO (1 y 2)
1. Casquete superior2. Faja de protección de goma parachoques3. Contratapa4. Casquete inferior5. Tapón del depósito del agua para la
alimentación de la caldera vapor6. Tapón detergente (Mod. 3000D)7. Toma de conexión (para tubo fl exible
vapor/aspiración)8. Tapa de protección toma de conexión9. Ruedas posteriores10. Ruedas anteriores giratorias11. Tapa soplado12. Enrolla-cable13. Cable de alimentación con enchufe14. Interruptor general on/off con piloto
luminoso15. Tapa cesto de recuperación extraíble
VISUALIZACIÓN FUNCIONES DEL APARATO (3)
a. Cantidad mínima detergente (Mod. 3000D)b. Cantidad media detergente (Mod. 3000D)c. Cantidad máxima detergente (Mod. 3000D)d. Alarma fi n detergente (también con esta
alarma el aparato puede funcionar sólocon vapor y aspiración)
e. Potencia mínima de aspiraciónf. Potencia media de aspiracióng. Potencia máxima de aspiraciónh. Alarma nivel mín./máx. cesto recuperación
(con esta alarma se deshabilitan todaslas funciones)
i. Cantidad mínima vaporj. Cantidad media vapork. Cantidad máxima vaporl. Alarma falta de agua en el depósito que
alimenta la caldera (con esta alarma sedeshabilitan todas las funciones)
m. Aparato listo para la erogación de vapor
SISTEMA FILTRO DE AGUA (5)
24. Elemento estanco para cobertura cesto25. Cesto extraíble con manilla subdividido en
dos zonas25a. Recogida suciedad pesada25b. Depósito de agua para eliminación polvo y recogida suciedad ligera26. Flotador de nivel27. Elemento separador con guía obligada
extraíble29. Tapón depósito de detergente
ACCESORIOS ESTÁNDAR (6)
17. Tubo fl exible19. Boquilla universal con extensión22. Botella30. Pareja tubos extensión termo-aislados31. Anillo de bloqueo, presente en los tubos de
extensión y en todos los accesorios32. Cepillo grande de 300 mm. con:32a. Accesorio con doble hilera de cerdas (para aspiración en seco)32b. Accesorio con doble hilera de goma (para función lava / seca)32c. Accesorio con doble espátula tubular rígida (para función lava/seca alfombras)33. Cepillo pequeño de 150 mm. para función
aspiración líquidos y sólidos con:33a. Accesorio con doble hilera de cerdas (para función limpieza y aspiración en seco)33b. Accesorio con doble hilera de goma (para función lava / seca) 150 mm33c. Accesorio para cristales 250 mm34. Funda de esponja con elástico 250 mm35. Boquilla multiuso con soporte con:35a. Boquilla vertical para aspiración en seco35b. Boquilla trapezoidal para aspiración líquidos35d. Cepillo pequeño con cerdas de poliéster35e. Cepillo pequeño con cerdas de acero35f. Cepillo Ø 60mm con cerdas de poliéster35g. Espátula36. Llave a tubo para drenaje caldera
LEYENDA
kruger.es 7

1. ADVERTENCIAS PARA EL USO• Antes de utilizar el aparato, leer ATENTAMENTE y TOTALMENTE las presentes instrucciones deuso.
• Antes de enchufar el aparato, asegurarse de que latensión eléctrica corresponda con la indicadaen losdatos del aparato, y que la toma de alimentación tenga una puesta a tierra.
• Quitar el enchufe tirando sólo del cuerpo del mismo y no del cable. Proteger el cable de alimentación de fuentes de calor, vapor y aceites.
• No tocar el aparato con las manos o con los pies mojados cuando el enchufe esté puesto.
• No dejar nunca el aparato sin vigilancia cuando esté conectado a la red eléctrica. Si el aparato nosetuviese que utilizar, se recomienda quitar el enchufe de alimentación de la red eléctrica.
• Para limpiar hornos, frigorífi cos, lámparas, etc.; se recomienda quitar siempre el cable dealimentación de la red poniendo a dichos aparatos fuera de tensión.
• No inmergir nunca el aparato en el agua o en otros líquidos.
• No permitir que el aparato sea utilizado por niños o por personas que no conozcan sufuncionamiento.
• No introducir detergentes, perfumes u otras sustancias químicas en el depósito del agua quealimenta la caldera.
• Usar exclusivamente agua potable, no utilizar agua destilada.
• No tocar nunca de cerca el chorro de vapor con las manos. ¡Peligro de quemadura!
• No dirigir el chorro de vapor de cerca sobre personas o animales. ¡Peligro de quemadura!
• No dirigir el vapor hacia aparatos que contengan componentes eléctricos
• No ejercer presión sobre las extensiones ni sobrelos accesorios durante el uso. Es inútil y dañino.Dehecho, la limpieza a fondo se obtiene de la potencia del vapor, de la aspiración o de la combinación del vapor más el detergente.El aparato se puede utilizar en muchísimas aplicaciones también gracias a la posibilidad de que sepuede disponer de diferentes regulaciones de erogación del vapor.
• EI vapor no se deberá usar (o se deberá utilizar con mucho cuidado) en los siguientes casos:- objetos o decoraciones revestidas de piel, tejidoalcántara, terciopelos sintéticos o tejidosmuydelicados;- suelos encerados o barnizados, ya que el vaporpodría quitar la cera o el barniz;- cristales serigrafi ados o pintados;- superfi cies de madera brillante;- en contacto directo con colas o siliconas (la fuerza del vapor y la alta temperatura podrían eliminarya sea las colas que las siliconas).En estos casos se aconseja consultar las instrucciones del fabricante del producto que hay quelimpiaro, si no las hay, realizar pruebas, rápidamente y con poco vapor, sobre partes ocultas o sobremuestras análogas a los productos que hay que tratar.Además, especialmente durante los períodos invernales, acordarse de “precalentar” el cristal conuna vaporización con vapor medio/bajo erogado con la pistola a una distancia de 30/40 centímetros del cristal. Después del “precalentamiento”, éste se podrá lavar siguiendo las instrucciones.
kruger.es 8
• No utilizar nunca el chorro de vapor para limpiar aparatos eléctricos o electrónicos (ordenadores,televisores, lámparas, teléfonos, etc.) aunque éstos no estén conectados a la red eléctrica
• Sólo en el aparato 3000D con detergente será posible añadir a la potencia del vapor un productodetergente que no produzca espuma. Las cantidades de detergente que hay que añadir al vaporsepodrán seleccionar desde el mango con tres cantidades diferentes (véase panel mandos Fig. 3).
• Se garantiza un funcionamiento correcto de la máquina solo empleando el detergente KS Group.
• La combinación de vapor con detergente deberá usarse exclusivamente para la limpieza deartículos que no se deterioren en contacto con estas sustancias.
2. EMPUÑADURA DE MANDO ASPIRACIÓN/VAPOR (Fig. 4, 4.1 y 4.2)
16 Enchufe de conexión del tubo fl exible17 Tubo fl exible con doble conducto (erogación vapor / aspiración sólidos y líquidos)18 Empuñadura de mando vapor / aspiración20bis Botón de mando vapor21 Botón aspiración (color blanco) 22 Botón vapor (color rojo)23 Botón detergente (color verde) 23a Botón enjuague con agua caliente (color azul)
3. MONTAJE ACCESORIOS
Para conectar todos los accesorios (18-30-31) al mango y/o a las extensiones, basta con poner uno dentro del otro y luego girar el anillo de bloqueo para fi jarlos (Fig. 5).
4. OPERACIONES PRELIMINARES
4.1 FUNCIÓN ASPIRACIÓN
Levantar la tapa (15) (Fig. 7) y el elemento de retención para cobertura cesto (24) y echar aguadel grifo en el compartimiento (25b) (Fig. 8) con la medida de: 500 cc. aproximadamente Cerrar colocando el elemento de retención (24) y la tapa (15) en su sitio. Atención: Un sistema electrónico con señalación acústica impedirá la activación de la función aspiración sifalta el agua en el compartimiento (25b) del cesto (25) (Fig. 6) o si ésta no es sufi ciente. El fl otador (26) (Fig. 7) dentro del cesto (25) señalará el nivel. En caso de que haya demasiada agua, vaciar elcesto (25). ATENCIÓN: Es muy importante la utilización de productos anti-espuma recomendado por el fabricante para evitar la formación de la misma en el cesto de aspiración. El fabricante no asume ninguna responsabilidad por daños derivados del incumplimiento de este requisito y / o uso de productos distintos de los recomendados.ATENCIÓN: Es muy importante mantener limpio el cesto y sus componentes, en particularel fl otador y su sede. Asegúrese de que está libre para deslizarse y no obstruido en modoalguno, este puede causar el mal funcionamiento de la detección del nivel del agua sucia enel cesto de aspiración y puede causar daños a la máquina. El fabricante no asume ningunaresponsabilidad por daños derivados del incumplimiento de este requisito.
4.2 FUNCIÓN VAPOR
Quitar el tapón del depósito (5) (Fig. 1) y llenarlo sólo con agua del grifo. Está absolutamente prohibido echar en el depósito que alimenta la caldera, detergentes, perfumes u otras sustancias
kruger.es 9

químicas. Enroscar el tapón (5) (Fig. 1) sin apretar demasiado.
4.3 DEPÓSITO DETERGENTE
Desenroscar el tapón del depósito (6) y llenar con detergente diluido en agua.ATENCIÓN: utilizar sólo el detergente aconsejado por el productor. Está terminantemente prohibido echar en el depósito detergentes con espuma o detergentes que en contacto con el calor puedan desarrollar gases tóxicos o sustancias irritantes. Si se utilizan productos incompatibles, el limpiador podría sufrir daños irreparables (Fig. 10).
4.4 ENCENDIDO
Poner el enchufe del cable de alimentación (13) (Fig. 1) en una toma eléctrica idónea como indica la etiqueta de datos técnicos. Pulsar la parte inferior del interruptor principal (14) (Fig. 1); se iluminará el piloto (13) naranja que se encuentra en el interruptor.
4.5 PROGRAMACIÓN FUNCIÓN
Se puede programar la cantidad de vapor que hay queechar o la potencia de aspiración por medio delmango. De hecho, el aparato posee circuitos electrónicos que permiten el máximo provecho de su funcionamiento en relación con las exigencias efectivas delusuario.
5. ASPIRACIÓN SÓLIDOS Y LÍQUIDOS
5.1 ASPIRACIÓN EN SECO
- Realizar las operaciones indicadas en el punto 4.- Poner en la toma (7) (Fig. 2) el enchufe del tubo fl exible (16) (Fig. 6) y asegurarse de que esté bienpuesto dando ligeros tirones.- Montar el accesorio adecuado para la aspiración deseada:- tubo extensión- cepillo grande 300 mm.- cepillo pequeño 150 mm.- boquilla multiuso- limpia-cristales- La aspiración se activará pulsando el botón blancodel mango. Teniendo continuamente presionado elbotón se podrá seleccionar la potencia de aspiraciónen tres niveles diferentes; una vez seleccionado el nivel de aspiración deseado bastará con soltar elbotón y la máquina seguirá aspirando.Para apagar la aspiración, pulsar el botón blanco. Durante las operaciones de aspiración, si se pone lapalanca mecánica en bloqueo botón vapor, se podráevitar que éste se pulse accidentalmente.
5.2 ASPIRACIÓN LÍQUIDOS
- Montar el accesorio deseado y realizar las operaciones de aspiración descritas en el punto 5.1.- La suciedad seca y el líquido aspirado se recogeránen el cesto (25) (Fig. 5).- La cantidad de líquido recogida hará salir el fl otador (26) (Fig. 5) que bloqueará la aspiraciónquitando la corriente al motor antes de que el agua sobrepase el nivel máximo. En este caso seencenderá el LED rojo y saltará una señal acústica.En presencia de esta señal se habrá superado el nivel máximo, por lo tanto habrá que restablecerla cantidad de agua prevista.
5.3 ELIMINACIÓN DEL POLVO EN EL AGUA
El combinado mod. 3000/3000D/3000ID utiliza un sistema patentado de eliminación en húmedo de la suciedad recogida en el cesto (25) (Fig. 5), donde se crea unremolino de agua que captura la suciedad seca más fi na, mientras que las partículas de mayor tamaño son retenidas por el fi ltro de red de acero. Por lo tanto, el sistema garantiza la salida de aire limpio impidiendo que el polvo, el
kruger.es 10

polen y los ácaros aspirados puedan volver al ambiente, porque se eliminan cuando se vacía y se limpia el cesto (25) (Fig. 5).
6. LIMPIEZA CON VAPOR
- Realizar las operaciones preliminares indicadas en el punto 4- Poner en la toma (7) (Fig. 2) el enchufe de conexión del fl exible (16) (Fig. 6) y asegurarse de queesté bien puesto dando ligeros tirones.- Montar el accesorio indicado para el vapor deseado (directamente sobre el fl exible y/o sobre lostubos de extensión):- tubo extensión- cepillo pequeño 150 mm.- cepillo pequeño 150 mm.- boquilla multiuso- limpia-cristales En el aparato se encenderá el led (i) “vapor mínimo”. Controlar que después de4 minutos aproximadamente también se encienda el led verde “presión alcanzada” (m). Signifi caráque el aparato está listo para erogar vapor.Para mandar la erogación vapor, presionar el botón negro (20bis) (Fig. 4) que se halla en la parteinferior del mango y mantenerlo pulsado. Si se suelta, la erogación se interrumpirá. Para aumentar la cantidad de vapor, presionar el botón rojo (22) (Fig. 4) que se halla a la izquierda del mango mandos y soltarlo; también se encenderá el led que indica la regulación “vapor medio” (j). Si se pulsa de nuevo se encenderá el led que indica la regulación “vapor máximo” (k). Si se mantiene pulsado el botónrojo (22) (Fig. 4) la regulación pasará por orden de MÍNIMO a MEDIO, a MÁXIMO, a MÍNIMO, etc.La falta de agua en el depósito es indicada por el led (l) y al mismo tiempo por la señal acústica; laerogación vapor se bloqueará con la alarma activa.- Para llenar el depósito, actuar como se indica en el punto 4.2.
7. LIMPIEZA CON VAPOR Y DETERGENTE (sólo MOD. 3000D)
- ¡La erogación del detergente sólo se puede realizar al mismo tiempo que la erogación vapor!- La activación del detergente se puede producir sólo en el caso de que se active cualquier electro-válvula de salida vapor (¡no se puede erogar el detergente solo sin vapor!).- La erogación del detergente se activará o se desactivará pulsando el botón detergente (23) enel mango; si se mantiene presionado el botón detergente (23) se podrá seleccionar la cantidad dedetergente en tres diferentes niveles; para la erogación del detergente habrá que pulsar el botón demando vapor (20bis) que se encuentra en la parte inferior del mango.- La primera vez que se presione el botón detergente (23), se activará la cantidad mínima dedetergente y se encenderá el led amarillo (a) en el cuadro mandos, en este caso la bomba serádirigida con los siguientes tiempos: 0,3 seg. ON y 4 seg. OFF.- Si se mantiene pulsado el botón detergente (23) se pasará a la cantidad media de detergente y seencenderá el segundo led amarillo (b) en el cuadro mandos; en este caso la bomba será dirigida con los siguientes tiempos: 0,3 seg ON y 2 seg. OFF.- Si se mantiene pulsado el botón detergente (23), se encenderá el tercer led amarillo (c) en el cuadro mandos, en este caso la bomba será dirigida con los siguientes tiempos: 0,3 seg ON y 1seg OFF.- En caso de que el detergente falte, un sensor con lengüeta (como el que hay en el depósito delagua fría) activará el led rojo (d) y la alarma. La señal acústica será activada solamente 5 segundos,luego la intermitencia del piloto rojo será la que recuerde que el detergente se ha terminado, sinmolestar al usuario con un ruido continuo. En esta situación el aparato sólo funciona con la funciónvapor y aspiración.
kruger.es 11

8. LIMPIEZA CON VAPOR Y ENJUAGUE CON AGUA CALIENTE(sólo Mod. 3000ID)
El modelo 3000-ID tiene las mismas características que el modelo 3000, con la función adicional de enjuague con agua caliente, que sale de la manguera fl exible. ATENCIÓN: cuando la función de enjuague con agua caliente está activada, agua caliente y vapor salen de la manguera fl exible al mismo tiempo, la presión crece con rapidez. Tenga cuidado de no tocar el yecto de vapor procedente de los accesorios. La función de enjuague con agua caliente está controlada por el botón azul (23a). Para habilitar esta función debería presionar el botón 23a y la luz correspondiente en el panel de control de la máquina se enciende. El botón (20bis) de la empuñadura activa la función y deja que el agua, mezclada con el vapor, salga. Atención: la función de enjuague con agua caliente sólo puede utilizarse cuando también la función del vapor está activada. Para desactivar la función de enjuague con agua caliente, sólo se debe presionar otra vez el botón azul 23a (las funciones vapor y aspiración no serán cambiado).
9. LIMPIEZA CON VAPOR Y ASPIRACIÓN
Se pueden efectuar al mismo tiempo las operacionesde limpieza a vapor y de aspiración seco/líquido. Endicho caso seguir las instrucciones indicadas en losanteriores puntos 5 y 6.
10. FUNCIÓN DSL (bloque digital del vapor)
La función DSL (bloque digital del vapor) utiliza el mismo método de la aspiración y del enjuage con agua caliente para deshabilitar la activación del vapor. Cuando se enciende la máquina, el vapor es activo y regulado a la primera posición, las tres posiciones del vapor se cambian presionando el botón (22). Para seleccionar la función DSL tiene que presionar rapidamente el botón (22), así el vapor es deshabilitado. Todas las luces LED de vapor en el panel de control se apagan y el botón no funciona más (no activa la salida de vapor). Para deshabilitar la función DSL, sólo es necesario repetir la presión del botón (22) y el vapor estará disponible de nuevo.
DSL es de extrema utilidad si es necesario, por ejemplo, utilizar la función de aspiración sin activar accidentalmente las funcioned de enjuage con agua caliente o el vapor (muy importante si usted necesita limpiar objetos frágiles o componentes electrónicos donde el vapor y el agua podría dañar o ser peligroso).
11. OPERACIONES FINALES
La limpieza de los accesorios al fi nal del uso del aparato es una operación indispensable y obligatoria para conservar la máquina en buen estado y para evitar incrustaciones en el fl exible, en los tubos de extensión y en el cesto que, además de serun fenómeno antigiénico, puede provocar malos olores.
Para esto, proceder del siguiente modo: - Quitar la tapa (15) (Fig. 1) y sacar el cesto con sus elementos (24 + 25) (Fig. 5) (Fig. 11)- Vaciar el agua sucia (Fig. 12)- Desmontar todos los elementos en el depósito delagua sucia y limpiarlos- Volver a montar todos los elementos en el depósitodel agua sucia.- Echar agua limpia en el compartimiento (25b) (Fig. 5) con la medida de 500cc aproximadamente
kruger.es 12

- Aspirar medio litro de agua limpia aproximadamente para lavar los diferentes conductos- Repetir dos veces la operación
Para esterilizar todo, vaporizar rápidamente la tapa (15) (Fig. 1) y el cesto (25) (Fig. 5). Con sus elementos, y eventualmente los tubos de extensión y los demás accesorios usados - Aclarar y volver a colocar todo en el aparato.- Enrollar el cable de alimentación (13) (Fig. 1) en el enrolla-cable (12) (Fig. 2)- Como ya se ha indicado en las advertencias de uso, se recomienda insistentemente NO AÑADIRPERFUMES U OTRAS SUSTANCIAS EN EL DEPÓSITO DEL AGUA QUE ALIMENTA LACALDERA, Y USAR EXCLUSIVAMENTE AGUA POTABLE, NO AGUA DESTILADA.
12. MANTENIMIENTO CALDERA
(El aparato deberá desconectarse de la red eléctrica antes de realizar las operaciones de mantenimiento). Con el objeto de reducir al mínimo los efectos negativos de la cal presente en el agua, se recomiendainsistentemente vaciar completamente la caldera cada 2/3 meses.
Para esto, proceder del siguiente modo:
1 – asegurarse de que la máquina esté totalmente fría 2 – con una moneda desenroscar la tapa de plástico que cubre la tuerca de drenaje (Fig. 13A) 3 – con la llave a tubo hexagonal (36) (Fig. 6) que se ha entregado con el aparato, desenroscar la tuerca de drenaje (Fig. 13B-C) 4 - agitar ligeramente la máquina y dejar fl uir el agua y la cal presentes en la caldera 5 – volver a enroscar la tuerca de drenaje y la tapa de plástico
13. MANTENIMIENTO EXTRAORDINARIO
- En caso de avería y/o de mal funcionamiento ponerse en contacto con el centro de asistencia máspróximo o con el productor. Cualquier operación noautorizada hará vencer la garantía y podrá serfuente de peligro.
- No abrir nunca el aparato.- No intentar desmontar el aparato nunca. Acudir al Centro de Asistencia o a la Sede Central. -Asegurarse siempre de que el cable de alimentación y el enchufe no estén dañados. En caso de que fuese necesaria su sustitución, se recomienda acudir al centro de asistencia más próximo.
14. COMO USAR LOS ACCESORIOS
Los accesorios tienen que montarse con una ligera presión y se tienen que bloquear girando el anillo defi jación.
14.1 EMPUÑADURA DE MANDO
El mango de mando se puede utilizar como pistola vaporizadora, regulando la presión de salida del vaporsobre el mango. A él se pueden adaptar todos los accesorios.
14.2 CEPILLO GRANDE CON FUNCIÓN VAPOR-ASPIRACIÓN
El cepillo grande (32) (Fig. 6) sirve ya sea para la limpieza con vapor, que para la aspiración. Para la
kruger.es 13

limpieza de suelos rígidos, montar el accesorio indicado (32b) (Fig. 6) (doble hilera de goma – función lava/seca). Para la limpieza de moquetas y de alfombras, montar el accesorio apropiado (32c) (Fig. 6) (doble espátula tubular rígida – función lava/seca). Para aspirar en seco, montar el accesorioindicado (32a) (Fig. 6) (doble hilera con cerdas)..
14.3 CEPILLO PEQUEÑO CON FUNCIÓN VAPOR- ASPIRACIÓN
El cepillo pequeño (33) (Fig. 6) sirve para la limpieza a vapor o para la aspiración de superfi cies a las que se llega con difi cultad con el cepillo grande. Para la función vapor se aconseja montar el accesorio (33b) (Fig. 6) (doble hilera de goma-función lava/seca). Por el contrario, si se monta el accesorio (33a) (Fig. 6) (doble hilera de cerdas) será posible aspirar en seco o limpiar con vapor, con la ayuda, si es necesario, de la funda de esponja (34) (Fig. 6).
14.4 BOQUILLA MULTIUSO
La boquilla multiuso (35) (Fig. 6) y sus accesorios se pueden empalmar directamente al mango mando, o a uno o a dos tubos de extensión, y consienten ya sea la función vapor, que la aspiración.
VaporLos accesorios que consienten aprovechar lo mejor posible la función vapor son:- extensión tubo (19) para llegar con el chorro de vapor a los puntos más ocultos;- ideal para: radiadores, sanitarios, WC, lavabos, cocinas, frigorífi cos, congeladores, persianas, etc.; - cepillo pequeño poliéster (35d) y cepillo medio diámetro 60 (35f), para suciedad normal;- cepillo pequeño acero (35e) para suciedad resistente o incrustaciones:- espátula (35g)
AspiraciónLos accesorios que consienten la aspiración son: - boquilla trapezoidal (35b) (para aspiración líquidos);- boquilla vertical (35a) (para aspiración seco); se recomienda sobre todo, hacer adherir bien lasboquillas a la superfi cie que hay que aspirar.
12.5 LIMPIA-CRISTALES
El limpia-cristales permite limpiar y desengrasar los cristales con facilidad. En invierno se aconseja precalentar los cristales a una distancia de 30 ó 40 cm. antes de limpiar. Se puede limpiar el cristal accionando al mismo tiempo las dos funciones vapor/aspiración. Inclinando ligeramente el limpia-cristales, deslizarlo por el cristal desde arriba hacia abajo con la función vapor. Si hay zonas empañadas, volver a pasar sólo con la función aspiración.
15. LIMPIEZA DE LAS HABITACIONES
A. COCINA
Fregaderos de acero, de cerámica o esmaltados, griferías
• Utilizar la boquilla multiuso sola, con la boquilla a punta o con los cepillos dependiendo de lasuciedad que haya que quitar. Regular con vapor máximo.• Actuar sin hacer fuerza, dirigiendo el chorro del vapor hacia los puntos que haya que limpiar.• Donde la suciedad sea más resistente, usar los cepillos.• Secar enseguida con un trapo de algodón seco y limpio. Si la superfi cie lo consiente, se podráutilizar la aspiración con la boquilla.
kruger.es 14

Fuegos de cocinas
• Seguir los pasos explicados en el punto “Fregaderos-griferías”.
Horno
• Utilizar la boquilla multiuso con el cepillo de cerdas de poliéster. Utilizar el de cerdas de acero sólopara la rejilla.• Regular con vapor al máximo y actuar como se indica en el punto “Fregaderos - Griferías”.• Después del secado, el horno estará perfectamente desengrasado.
Frigorífi cos y congeladores
• Acordarse de quitar el enchufe de alimentación o de apagar el electrodoméstico y de vaciarlo.• Para limpiar y perfumar rápidamente, vaporizar las paredes con la boquilla multiuso regulando elvapor en la posición b.• Secar enseguida con un trapo de algodón seco y limpio• Para descongelar, utilizar la espátula de descon-gelación.
B. SUELOS Y REVESTIMIENTOS
Suelos y revestimientos de mármol, de linóleo y de cerámica (no barnizados ni encerados)
• Utilizar, donde sea necesario, con las extensiones, el cepillo grande o pequeño dependiendo deltamaño de la superfi cie que haya que limpiar, regulando el vapor que se desee.• En el cepillo grande (32) se deberá utilizar el accesorio apropiado (32b) para secar, accionando laaspiración a la velocidad deseada.
Limpieza de alfombras y de moquetas
• Montar el cepillo grande vapor/aspiración (32) o pequeño vapor/aspiración (32) dependiendo deltamaño de la superfi cie que haya que limpiar• En el cepillo grande (32) se deberá montar el accesorio extraíble (32c), mientras que en el cepillopequeño (33) se deberá montar el accesorio (33b).• Regular el vapor en la posición mínimo o medio dependiendo de la delicadeza del tejido, y vaporizar. • Para secar, accionar la aspiración a la velocidad deseada.
Atención: para alfombras de valor, especialmente si son antiguas, se aconseja consultar al vendedor de las mismas para estar seguros de que el color no se pierda. Por precaución, usar sólo vapor al mínimo y hacer pruebas en las esquinas ocultas para asegurarse de que la alfombra no pierda color y no se estropee.
Juntas de los azulejos
• Utilizar la boquilla multiuso con los cepillos pequeños.• Regular el vapor deseado.• Orientar el vapor a lo largo de la línea de la junta del azulejo pasando hacia adelante y hacia atrássin presionar.• Aspirar con la boquilla trapezoidal.• Las dos operaciones se pueden efectuar al mismo tiempo.
Manchas sobre moquetas y alfombras
• Utilizar la boquilla multiuso con punta regulando el vapor en la posición media.• Inclinar la boquilla multiuso hacia la mancha a una distancia muy próxima.
kruger.es 15

• Luego realizar una limpieza estándar de alfombras y moquetas• Accionar la aspiración a la velocidad deseada, montando la boquilla o el cepillo pequeño.
Parquet
Atención: al tratarse de una superfi cie de madera barnizada, hay que prestar mucha atención. • Antes de empezar, realizar unas pruebas en las esquinas ocultas para asegurarse de que el barnizno se elimine o no se dañe la superfi cie.• Utilizar el cepillo grande vapor/aspiración (32) con el accesorio (32c) o el cepillo pequeño vapor/aspiración (33) con el accesorio (33b) dependiendo del tamaño de la superfi cie que haya que limpiar. • Regular el vapor en la posición mínima y pasar rápidamente sobre la superfi cie que haya que tratar. Accionar al mismo tiempo la función expiación en la posición máxima. .
Revestimientos de papel, tela etc. Asegurarse de que el revestimiento esté bien pegado; sino, prestar mucha atención a las uniones para evitar que el vapor empeore el estado de eventuales zonas despegadas. Utilizar el cepillo grande vapor / aspiración (32) con el accesorio (32b) o el cepillo pequeño vapor/aspiración (33) con el accesorio (33b) dependiendo del tamaño de la superfi cie que haya que limpiar. Regular el vapor en la posición mínima y pasar rápidamente sobre la superfi cie que haya que tratar. Revestimientos de metal o laminados Véase el punto anterior “Revestimientos de papel”.
C. BAÑOS
Griferías, sanitarios, azulejos y accesorios de baño.
• Utilizar la boquilla multiuso con vapor regulado al máximo, dependiendo de las modalidades yaindicadas en el punto “Fregaderos – Griferías”
Cabinas de ducha
• En las esquinas y en los intersticios utilizar el accesorio multiuso solo o con los cepillos, evitandoactuar en los puntos sellados con resinas de silicona.• Para las paredes de cristal en relieve, utilizar el cepillo pequeño vapor/aspiración (33) (Fig. 8) conel accesorio (33b) (Fig. 8) regulando el vapor en la posición media.• Para secar, accionar la aspiración a la velocidad deseada.
D. CRISTALES Y ESPEJOS
Atención: no usar el aparato para cristales serigrafi ados o pintados
Cristales brillantes • En lo que se refi ere a los cristales de las ventanas se recuerda la exigencia de precalentar duranteel período invernal, como se indica en el apartado “Precauciones de uso”.• Utilizar el limpia-cristales (33) (Fig. 6).• Regular el vapor en la posición mínima.• Actuar con rapidez prestando atención a hacer adherir bien la goma del cepillo limpia-cristalessobre la parte de cristal.• Accionar al mismo tiempo la función erogación del vapor con función aspiración a la velocidaddeseada (para evitar goteos).
Cristales en relieve, rugosos, irregulares y opacos
• Utilizar el cepillo pequeño regulando el vapor al mínimo y actuando rápidamente sobre la superfi cieque haya que limpiar.
kruger.es 16

• Accionar al mismo tiempo la función erogación del vapor con función aspiración a la velocidadmáxima (para evitar goteos”).
E. MUEBLES Y OBJETOS DE DECORACIÓN
Limpieza muebles
• El aparato se puede usar sin contraindicaciones en todos los muebles revestidos de laminadosplásticos regulando a vapor medio.• Hay que prestar especial atención a los muebles abrillantados o barnizados.• En este caso antes de usar el aparato, hacer pruebas en las esquinas ocultas o en las muestras.• Si no hay inconvenientes, utilizar el cepillo pequeño (33) (Fig. 6) con el accesorio (33b) (Fig. 6),regular el vapor al mínimo y pasar con rapidez sobre los muebles accionando al mismo tiempo lafunción erogación aspiración a la máxima velocidad.
Quitar el polvo a los muebles
• Para quitar el polvo y desengrasar los muebles, utilizar la pistola vaporizadora regulando el vaporal mínimo.• Vaporizar teniendo la pistola a una distancia de 30 cm. aproximadamente del mueble y pasarenseguida un trapo limpio y seco.
Sillones y butacas
Atención: no usar el aparato sobre sillones de piel, tejido alcántara y tejidos delicados.
• En los demás casos, después de haber probado sobre partes ocultas, usar el cepillo pequeño.• Regular el vapor al mínimo y accionar al mismo tiempo la función aspiración pasando con rapidezsobre las superfi cies que interesan.
F. RADIADORES Y CALEFACTORES
• Utilizar la boquilla multiuso con el cepillo de poliéster.• Utilizar el vapor medio.• Pasar con la boquilla pequeña bajo el radiador con la función aspiración para recoger la suciedad.
G. PUNTOS DE DIFÍCIL ACCESO
• Para limpiar escaleras, carpinterías, parteluces, puertas, laminados de aluminio, persianas etc.utilizar, con la ayuda de las extensiones, la boquilla multiuso con la punta o con el cepillo másadecuado.
• Vaporizar con vapor medio y accionar la función aspiración
H. VAPORIZACIÓN PLANTAS DE APARTAMENTO
• Para quitar el polvo y humidifi car las plantas deapartamento utilizar la pistola vaporizadoraregulandoel vapor al mínimo.• Vaporizar a una distancia de 40/50 cm.
I. AUTOMÓVIL
Limpieza muebles
• Utilizar el cepillo como se indica en el precedente punto “Sillones y butacas”.
kruger.es 17

Espacio motor y llantas ruedas
• Usar la pistola de mando con vapor al máximo montando la boquilla multiuso con la punta.
• Actuar en todo el espacio motor o en las llantas delas ruedas a una distancia de aproximadamente 20 cm.
Parabrisas
• Actuar siguiendo las precauciones y las modalidadesindicadas en el precedente punto “Cristalesbrillantes”.
16."GARANTÍA
El aparato combinado MOD. 3000/3000D/3000ID tiene una garantía de 1 año desde la fecha de compra contra los defectos de fabricación y las taras de los materiales. La garantía es válida si a ésta le acompaña el recibo fiscal o el sello del revendedor con la fecha de compra. Por garantía se entiende la sustitución o reparación gratuita de las partes que componen el aparato que son defectuosas desde el inicio por defectos de fabricación. La garantía tampoco es válida en todos los casos en los que se haga un uso inadecuado del aparato y especialmente en caso de uso no doméstico. En caso de avería o de mal funcionamiento, ponerse inmediatamente en contacto con el centro de asistencia autorizado más próximo. Eventuales manipulaciones en el aparato por parte de personal no autorizado harán vencer automáticamente la garantía.
LA EMPRESA declina todas las responsabilidades en caso de accidentes que deriven de un uso del MOD.3000/3000D/3000ID que no respete las presentes instrucciones de uso, en caso de daños que deriven directa o indirectamente sobre personas, cosas o animales.
CONSERVAR EL EMBALAJE ORIGINAL Y EN CASO DE NECESIDAD ENVIAR EL APARATO AL CENTRO DE ASISTENCIA EXCLUSIVAMENTE EN SU PROPIO EMBALAJE. SI ÉSTE YA NO SE HALLA DISPONIBLE, SERUEGA LLAMAR AL CENTRO DE ASISTENCIA PARA QUE LE SEA ENVIADO OTRO EMBALAJE (SE REQUIERE PAGAMIENTO).
Este símbolo que aparece en elproducto o sobre su embalaje, indica que el mismo no debe ser eliminado junto con los demás desechos domésticos. Los usuarios deben proceder a la eliminación de los aparatos a desguazar llevándolos al centro de recojo indicado, para el sucesivo reciclaje de los aparatos eléctricos y electrónicos. El recojo diferenciado y el reciclaje de los aparatos a desguazar favorecen la conservación de los recursos naturales y garantiza que tales aparatosson desguazados en el respeto del medio ambiente
y salvaguarda de la salud. Para mayores informes sobre los puntos de recojo de los aparatos a desguazar, contactar el propio Ayuntamiento de residencia, el servicio local de eliminación de desechos o la tienda en la que el producto ha sido adquirido.
kruger.es 18

MOD. KGV3000DINSTRUCTION MANUALSTEAM AND VACUUM CLEANER WITH DETERGENT/IDROJECT FUNCTION
kruger.es 19

SUMMARY
1 SAFETY WARNINGS
2 CONTROL HANDLE FOR VACUUM / STEAM /DETERGENT/IDROJECT FUNCTIONS
3 ASSEMBLING OF ACCESSORIES
4 PRELIMINARY OPERATIONS4.1 VACUUM FUNCTION4.2 STEAM FUNCTION4.3 DETERGENT TANK4.4 SWITCHING ON4.5 FUNCTION PROGRAMMING
5 WET AND DRY VACUUM5.1 DRY VACUUM5.2 LIQUID VACUUM5.3 DUST RETENTION IN WATER
6 STEAM CLEANING
7 STEAM AND DETERGENT CLEANING (Mod. 3000D only)
8 STEAM AND IDROJECT CLEANING (Mod. 3000ID only)
9 STEAM AND VACUUM CLEANING
10 DSL FUNCTION (DIGITAL STEAM LOCK)
11 FINAL OPERATIONS
12 BOILER MAINTENANCE
13 SPECIAL MAINTENANCE
14 HOW TO USE THE ACCESSORIES 14.1 CONTROL HANDLE 14.2 LARGE BRUSH WITH STEAM/VACUUM FUNCTION 14.3 SMALL BRUSH WITH STEAM/VACUUM FUNCTION 14.4 MULTI-USE NOZZLE 14.5 WINDOW SQUEEGEE
15 CLEANING SUGGESTIONS
16 WARRANTY
PAG. 22PAG. 23
PAG. 23PAG. 23
PAG. 25
PAG. 25 PAG. 25PAG. 26PAG. 26PAG. 26PAG. 26PAG. 27PAG. 27PAG. 27
PAG. 28PAG. 32
kruger.es 20

LEGEND
PRODUCTDESCRIPTION (1, 2)
1. Upper housing2. Shockproof rubber ring3. Countecover4. Lower housing5. Steam boiler feed water tank cap6. Detergent cap (Mod. 3000D)7. Socket (for steam/vacuum fl exible hose)8. Socket safety cap9. Rear wheels10. Pirouetting front wheels11. Blowhole cap12. Cable winder13. Electrical cable and plug14. Main switch (on/off) with led15. Waste tank removable cover
APPLIANCE FUNCTIONSVIEW (3)
a. Minimum detergent quantity (Mod. 3000D)b. Middle detergent quantity (Mod. 3000D)c. Maximum detergent quantity (Mod. 3000D)d. No detergent warning light (even when this
light is on, the device can still operate withthe steam and vacuum functions)
e. Minimum vacuuming powerf. Middle vacuuming powerg. Maximum vacuuming powerh. Recovery tank min/max level warning light
(when this light is illuminated all functionsare disabled)
i. Minimum steam quantityjl. Middle steam quantityk. Maximum steam quantityl. No water in boiler feed tank warning light
(when this light is illuminated all functionsare disabled)
m. The unit is ready to release steamn. Idroject
WATER FILTER SYSTEM (5)
24. Sealing element to cover tank25. Removable tank with handle divided into
two compartments 25a. Heavy dirt collection 25b. Water tank for dust suppression and light
dirt collection 26. Level fl oat gauge27. Removable dividing element with guiding
bar29. Detergent tank cap
STANDARD ACCESSORIES (6)
17. Steam hose19. Nozzle extension22. Bottle30. Double thermoisolated extension pipe31. Locking ferrule32. Large brush 300 mm equipped with:32a. Double profi le bristled frame (for dry vacuuming) 32b. Double profi le rubber frame (wash / dry function) 32c. Frame with double stiff frame 33. Small brush (150 mm) for liquids and
solid matter vacuuming equipped with:33a. Double profi le bristled frame (for washing
and dry vacuuming) 33b. Double profi le rubber frame (for wash / dry function) 33c. Frame for windows mm 250 34. Sponge covering for small brush35. Universal mouth35a. Vertical mouth35b. Horizontal mouth35d. Small polyester brush35e. Small stainless steel brush35f. Small polyester brush Ø 60 mm35g. Small spatula36. Box spanner for boiler draining
kruger.es 21

1. SAFETY WARNINGS
• Before using the appliance for the fi rst time CAREFULLY READ the operating instructions.
• Before plugging in the device, make surethat the supply voltage corresponds to that indicated onthe specifi cations of the device and that the electrical outlet is grounded.
• Do not disconnect the plug by pulling the power cord. Keep the power cord away fromheat, steamand oil.
• Do not touch the device with wet hands or feet when plugged in.
• Never leave the device unattended when plugged in. Unplug the device when not in use.
• Before cleaning ovens, refrigerators, lamps,etc., unplug the appliances.
• Do not immerse the device into water or other liquids.
• The device is not to be used by children or persons who do not know how to operate it.
• Never fi ll the boiler’s water tank with detergents, perfumes or other chemicals.
• Only use drink water, and never distilled water.
• Keep away from the steam release. Danger of scalding!
• Never point direct steam in the direction of people or animals. Danger of scalding!
• Never point direct steam in the direction of electrical appliances.
• Do not put any stress on the hoses or the accessories while in use. It’s useless and harmful. Thecleaning effi ciency is generated by the steam or the vacuum power, or by the combination of steamand detergent. The appliance can be implemented in a number of ways, also thanks to the varietyof steam delivery settings.
• Steam should not be applied (or should be used with great care) in the following cases:-items or pieces of furniture covered in leather, synthetic velvet or very delicate fabric;-waxed or painted fl oors as steam can remove wax or paint;-silk printed or painted glass;-polished wooden surfaces;-in direct contact with glue or silicone sealings (the steam power and the high temperature mightremove both glue and silicone).In these cases the instruction leafl ets relating to the product to be cleaned should be referred to; ifthese are not available, short tests should be carried out, applying low steam power, onunobtrusiveareas or samples of the products to be cleaned.More over, especially during winter, glass should be “preheat” by spraying middle/lowsteam powerwith the nozzle, which should beheld 30/40 cm away from the glass. After this procedure, cleaningcan be carried out according to the instructions.
• Never use the steam cleaner to clean electrical or electronic equipment (computer, TVs,lamps,telephones, etc.) even when these areunplugged from electrical outlets.
• Applies only to 3000D with detergent: it’s possible to add a non foaming detergent to the steam
kruger.es 22

power. Three different regulations of detergent to be added to steam release can be selected on the control handle (see control panel, Fig. 3).
• The right functioning of the machine is guaranteed only with the KS Group detergent
• The combined cleaning system with steamand detergent should only be used on itemswhich donot deteriorate if they come intocontact with such substances.
2. CONTROL HANDLE FOR VACUUM/STEAM/DETERGENT/IDROJECT FUNCTIONS (Fig. 4, 4.1 and 4.2)
16 Flexible hose socket 17 Double function fl exible hose (steam release / dry and liquid vacuuming) 18 Steam / vacuuming / detergent / idroject handle 20bis Steam control button 21 Vacuum enabling switch (white) 22 Steam enabling switch (red) 23 Detergent switch (green)23a Idroject switch (light blue)
3. ASSEMBLING OF ACCESSORIES
All accessories (18-30-31) can be connected to the handle and/or to the extensions by simply inserting the end of a component into them and by rotating the locking ring.
4. PRELIMINARY MEASURES
4.1 VACUUM FUNCTION
Lift the cover (15) (Fig. 7) and the sealing element to cover tank (24) (Fig. 6) and pour drink water in the tank (25b) (Fig. 8): -about 500 cc. Put the sealing element (24) and the cover (15) back in place.
Warning: An electronic system with warning signal prevents the vacuuming function from activating if there is no or unsuffi cient water in the compartment (25b) of the tank (25) (Fig.6). The level fl oat gauge (26) (Fig. 7) inside the tank (25) indicates the water level. In case there is too much water in the tank (25), empty it.
CAUTION:It is very important to use the anti-foam product recommended by the manufaturer in order to prevent the formation of foam in the dirty water basket. The manufacturer assumes no responsibility for damages resulting from failure to comply with this requirement and / or use of products other than those recommended.
CAUTION:It is very important to keep clean the dirty water basket clean and its components, especially the fl oat element. Make sure it is free to slide in and not obstructed in any way, this may cause malfunction of the level detection in the dirty water basket and can cause damage to the machine. The manufacturer assumes no responsibility for damages resulting from failure to comply with this requirement.
kruger.es 23
4.2 STEAM FUNCTION
Unscrew the tank cap (5) (Fig. 1) and fi ll it exclusively with drink water (Fig. 9). It’s strictly forbidden to fi ll the boiler’s water tank with detergents, perfumes or other chemicals. Screw the cap (5) Fig. 1) back on, thought not too tight.
4.3 DETERGENT TANK
Unscrew the tank cap (6) and pour detergent thinned with water (Fig. 9).
WARNING: Use only the detergent recommended bythe manufacturer. It’s strictly forbidden to pour foaming detergents in the tank, or detergents which may develop toxic gases or irritating substances when they come into contact with heat. If incompatible products are used, the cleaner may be subject to irreparable damage (FIG. 10).
4.4 SWITCHING ON
Plug the power supply cable (13) (Fig. 1) into a suitable socket, as stated on the technical specifi cations label. Push the lower part of the main switch (14) (Fig.1). The orange light (m) on the switch will illuminate.
4.5 FUNCTIONS PROGRAMMING
By operating the control handle, both the amount of steam to be released and the vacuum power can be programmed. The device is supplied with electronic circuits which allow to optimize the performance, inline with the specifi c needs of the user.
5. WET AND DRY VACUUM
5.1 DRY VACUUM
- Perform the operations described in par. 4- Insert the fl exible hose’s plug (16) (Fig. 6) in the socket (7) (Fig. 2) and make sure it’s properlyfi ttedby pulling slightly at it.- Fit the desired vacuum accessory:- extension hose -large brush mm 300- small brush mm 150- multi-use nozzle- window squeegee- Vacuuming is activated by pushing the white button on the handle. By holding in this button,the vacuum power can be selected on three different levels. By releasing the button, after havingselected the desired vacuum level, the device will continue vacuuming. By pushing the white button, vacuuming will stop.
5.2 LIQUIDS VACUUM
- Fit the desired accessory and start vacuuming following the instructions given in par. 5.1- Both dry dirt and vacuumed liquid are stored in therecovery tank (25) (Fig. 5).- The amount of liquid which has been collected willcause the level fl oat gauge to rise (26)(Fig. 5). This will stop the vacuuming, as motor’s power supply will be cut off before water exceedsthe maximum level. The red LED will now illuminate and a warning signal will sound. When this lightilluminates, it means that the maximum water level has been reached; take out exceeding water.
kruger.es 24

5.3 DUST RETENTION IN WATER
The Combined Mod. 3000/3000D/3000ID makes use of apatented wet retention system of dirt which has been collected in the recovery tank (25) (Fig. 5). In the tank a water whirlpool captures the fi nest dry particles, while the larger ones are retained by a stainless steel mesh fi lter. This system allows fresh air to be released, withholding the vacuumed dust, pollen and mites, which are later eliminated by simply emptying and cleaning the recovery tank (25) (Fig. 5).
6. STEAM CLEANING
- Perform the preparatory operations described in par. 4- Insert the fl exible hose’s plug (16) (Fig. 6) in the socket (7) (Fig. 2) and make sure it’s properly fi ttedby pulling slightly at it.- Fit the desired steam cleaning accessory (directly to the fl exible hose and/or to the extensionhoses):- extension hose- large brush mm 300- small brush mm 150- multi-use nozzle- window squeegee. The ‘minimum steam’ led (i) will illuminate. After about 4 minutes, check thatthe green led- ‘pressure achieved’ (m)- also has illuminated. This means that the device is ready to release steam. To control the steamrelease, push the black button (20 bis) (Fig. 4), to be found on the lower side of the handle, andhold it in. Releasing the button will stop the steam release. To increase the amount of steam, pushand release the red button (20bis) (Fig. 4), to be found on the left side of the control handle; the ledindicating the ‘middle steam’ setting will also illuminate (j). By pushing it again, the led indicating the‘maximum steam’ setting (k) will illuminate. By holding in the red button (22) (Fig. 4), the setting willautomatically pass MINIMUM-MIDDLE-MAXIMUM-MINIMUM and so forth.- The led (l) and a warning signal indicate the lack of water in the tank; when the alarm is on, thesteam release will stop.- To fi ll the tank, perform the operations as described in par. 4.2
7. STEAM AND DETERGENT CLEANING (Mod. 3000D only)
- Detergent can only be released together with steam release! (Fig. 4)- Detergent release can only be activated if any steam release electro valve has been activated(detergent cannot be released without steam!)- The detergent release can be turned on or off by pushing the detergent button (23) on the handle;by holding in this button (23) the amount of detergent can be set on three different levels; to releasedetergent, the steam control button (20bis) on the lower side of the handle needs to be pressed.- By pushing the detergent button (23) once, the minimum amount of detergent will be selected, andthe yellow led (a) on the control panel will illuminate; the timing of the pump will then be as follows:0.3 sec ON and 4 sec OFF.- By holding in the detergent button (23), the middle amount of detergent will be selected, and thesecond yellow led (b) on the control panel will illuminate; the timing of the pump will then be asfollows: 0.3 sec ON and 2 sec OFF.- By holding in the detergent button (23), the third yellow led (c) on the control panel will illuminate;the timing of the pump will then be as follows: 0.3 sec ON and 1 sec OFF.- In case the detergent runs out, a reed sensor (as the one fi tted in the cold water tank) activates thered led (d) and the alert signal. The signal will only sound for 5 seconds, then only the pulsing red led
kruger.es 25

will remind of the detergent having run out, to avoid the inconvenience of a constant sound. In this condition, only the steam and vacuum functions of the device will operate.
8. STEAM AND IDROJECT CLEANING (Mod. 3000ID only)
Model 3000-ID has the same features than 3000, with the additional hot water injection function (called “Idroject”), that comes out from the fl exible hose.ATTENTION: when the idroject function is activated, hot water and steam come out from the fl exible hose; at the same time pressure quickly grows up. Take care not to touch the steam ject coming from the accessories.Hot water injection is controlled from light blue button (23a)To enable this function you should quick push the button and the corresponding light on the signalling board upon the machine will turns on.The trigger (20bis) of the pistol grip activates the function and let the water, mixed with steam, comes out. Pay attention, hot water injection could be used only mixed with steam, so ensure that both steam and idrojects function are enabled.To disable the idroject function, you should only repeat the short pression of light blue button (23a) (steam & vac functions will not be changed).
9. STEAM AND VACUUM CLEANING
It’s possible to combine the steam cleaning and thedry/wet vacuum functions. Follow the instructions given in par. 5 and 6.
10. DSL FUNCTION (Digital Steam Lock)
In this model, you’ll fi nd also the DSL feature (Digital Steam Lock): with the same method used for vacuum and hydroject, also for steam there’s the possibility to disable the activation of this feature.Immediately after the machine start-up, steam regulation is enabled and placed on the 1st position, if you want to change the regulation you should keep pressed the red (22) button; to enable DSL, you could anytime shortly push red (22) button and this will disable the steam activation. All steam led lights on the signalling board will be turned off and the trigger (20bis), doesn’t work (activates no steam exit).To disable DSL, it only necessary repeat the short pressure of red (22) button, and Steam features will be available again.DSL is extreme useful if you need, for example, to use vacuum without have the possibility to activate accidentally steam or hot water injection (very important if you need to clean fragile objects or electronics components where steam and water can damage or be dangerous).
11. FINAL OPERATIONS
Cleaning the accessories after using the device isan essential procedure; this safeguards the effi ciency of the appliance and prevents deposits in thefl exible hose, the extension hoses and in the recovery tank, which besides being unhealthy may cause them to smell bad. Act as follows: - Lift the cover (15) (Fig. 1) and remove the recovery tank and its components (24 + 25) (Fig. 5) (Fig. 11) - Dispose of waste water (Fig. 12)- Unmount all the internal parts of the waste tank andwash it all- Put the washed parts in the right position inside thewaste tank- Pour clean water in the compartment (25b) (Fig. 5),approx. 500 cc.
kruger.es 26
- Aspirate about half liter clean water to rinse theducts.- Perform it twiceTo sterilize it altogether, briefl y steam the cover (15) (Fig. 1) and the tank (25) (Fig. 5) including itscomponents and all extension hoses and accessories whichmay have been used.- Rinse and replace on the appliance.- Rewind the power supply cable (13) (Fig. 1) on the appropriate cable winder (12) (Fig. 2).-As has already been stated in the Safety warnings, NOR PERFUMES OR OTHER SUBSTANCESSHOULD BE POURED IN THE BOILER’S WATER TANK, AND ONLY DRINK WATER AND NEVERDISTILLED WATER SHOULD BE USED.
12. BOILER’S MAINTENANCE
(Before performing any maintenance operation, unplug the appliance from the electrical outlet).In order to minimize the negative effects of limes calein water, the boiler should be fully drained every 2/3 months. Act as follows:1 – make sure that the appliance has cooled down2 – using a coin, unscrew the plastic cap covering thedraining nut (Fig. 13A)3 – using the enclosed box spanner (36) (Fig. 6), unscrew the draining nut (Fig. 13B-C)4 – carefully shake the appliance and allow the waterand the limescale in the boiler to run out5 – screw the draining nut and the plastic cap back on
13. SPECIAL MAINTENANCE
- Always contact the nearest Service Centre or the manufacturer, in case of failure and/or malfunction.Any unauthorized alteration will void the warranty and may cause danger.- Never open the device.- Never try to dismantle the device. Always refer to the Service Centre or the Main Offi ce.- Always make sure that the plug and cable are not damaged. In case they need to be replaced,contact the nearest Service Centre.
14. HOW TO USE THE ACCESSORIES
The accessories are to be carefully pushed into place, and fastened by rotating the locking ring.
14.1 CONTROL HANDLE
The control handle can be used as steam gun, by setting the steam release pressure on it. All accessories can be connected to the steam gun.
14.2 LARGE BRUSH WITH STEAM - VACUUM FUNCTION
The large brush (32) (Fig. 6) can be used for both steam cleaning and vacuuming.
14.3 SMALL BRUSH WITH STEAM VACUUM FUNCTION
The small brush (33) (Fig. 6) is suitable both for steam cleaning and for the vacuuming of areas which would be diffi cult to reach with the large brush. For the steam function, it’s advisable to fi t the frame (33b) (Fig. 6) (double profi le rubber frame – wash&dry function). The frame (33a) (Fig. 6) (double profi le bristled frame) is suitable for dry vacuuming or steam cleaning, with the aid of the sponge with elasticized cover, if necessary (34) (Fig. 6).
kruger.es 27
14.4 MULTI-USE NOZZLE
The multi-use nozzle (35) (Fig. 6) and its accessories can be directly connected to the control handle, or to one or two extension pipes, and are suitable for both the steam and the vacuum functions.
Steam
The accessories which are best suitable for the steam function are:- nozzle extension (19) allows to reach otherwise inaccessible locations with jet of steam;- ideal for: radiators, sanitary ware, toilet bowls, wash-basins, cooktops, refrigerators, freezers,shutters, etc.;- small polyester brush (35d) and middle brush Ø 60 (35f), for normal dirt;- small stainless steel brush (35e) for resistant stains or deposits;- small spatula (35g)
Vacuum
The accessories which are suitable for vacuuming are: - trapezoid union (35b) (for liquids vacuuming); vertical union (35a) (for dry vacuuming);It’s particularly advisable to keep the unions in close contact with the surfaces to be vacuumed.
14.5 WINDOW SQUEEGEE
The window squeegee allows to easily clean and remove the greasy fi lm on windows. During winter it’s advisable to pre-heat window panes (from a distance of 30/40 cm) prior to the actual cleaning. Windows can be cleaned by activating both the steam and the vacuum functions at the same time. Slightly tilt the window squeegee and pull the blade straight down the window surface from top to bottom, applying the steam. Should rims be visible, apply only the vacuum function.
15. CLEANING SUGGESTIONS
A. KITCHEN
Stainless steel, ceramic or enamelled sinks, taps • Use the multi-use nozzle alone, or together with the ferrule or the small brushes, depending on thestains to be removed. Set on maximum steam power.
• Do not apply any pressure, and only point the jet of steam towards the surfaces to be cleaned.
• In case of diffi cult spots, use the brushes.
• Dry immediately afterwards with a dry and clean cotton cloth. Eventually vacuum with the nozzle,if it’s compatible with the surface.
Cooktops
• Follow the instructions given for “Sinks and taps”.
Oven • Use the multi-use nozzle with the small polyester brush. Use the small stainless steel brush onlyon the grate.
• Set on maximum steam power and follow the instructions given for “Sinks and taps”.
kruger.es 28

• After drying, the oven will be perfectly clean and free of grease.
Refrigerators and freezers • Unplug or turn off the appliance and empty it.
• For rapid cleaning and deodorizing, apply steam on the walls with the multi-use nozzle, setting thesteam power on position b.
• Dry immediately afterwards with a dry and clean cotton cloth.
• To defrost the appliance, use the appropriate defrost spatula.
B. FLOORS AND SURFACES
Marble, linoleum and ceramic fl oors and surfaces (not painted nor waxed) • Use the large or the small brush, with extension pipe if needed, according to the size of the surface to be cleaned, and set the preferred steam power.
• On the large brush (32) should the appropriate frame be fi tted (32b); select the desired vacuumpower to dry the surface.
Carpets and fi tted carpets cleaning • Fit the large steam/vacuum brush (32) or the small steam/vacuum brush (32) according to the sizeof the surface to be cleaned.
• On the large brush (32) should the removable frame be fi tted (32c) whereas frame (33b) should befi tted on the small brush (33).
• Set the steam to minimum or middle, according to how fragile the fabric is, and apply steam.
• Vacuum at the desired power to dry.Warning: When cleaning valuable carpets, especially if antique, it’s advisable to refer to thecarpet’s supplier, so as to make sure of colour stability. Apply, as a precaution, only steam atminimum power, and always do a test on a non visible part of the item, to prevent the coloursfrom fading or the carpet from being damaged.
Tiles edges • Use the multi-use nozzle with the small brushes.
• Set the preferred steam power.
• Direct the steam along the tiles edges, running the nozzle back and forth, without applying anypressure.
• Vacuum using the trapezoid union.
• The two procedures can be carried out at the same time.
Stains on carpets and fi tted carpets • Use the multi-use nozzle with the ferrule, setting steam power to middle.
• Tilt the multi-use nozzle towards the stain, from a very close distance.
• Proceed to clean the carpet or the fi tted carpet follo•wing standard instructions.
kruger.es 29

• Activate the vacuum function at the desired power, fi tting the nozzle or the small brush.
Hard wood fl oors Warning: Great care should be taken when cleaning varnished wood surfaces.
• Always do a test on a non visible part of the fl oor, to check whether the paint peels off or the surface is damaged.
• Fit either the large steam/vacuum brush (32) with the frame (32c) or the small steam/vacuum brush(33) with the frame (33b) according to the size of the surface to be cleaned.
• Set steam power to mimimum and apply for a brief period. Set vacuum power to maximum at thesame time.
Paper, cloth covered surfaces, etc. Make sure that the covering sticks perfectly to the item; otherwise take great care, as the steam may further loosen the covering. Fit either the large steam/vacuum brush (32) with the frame (32b) or the small steam/vacuum brush (33) with the frame (33b) according to the size of the surface to be cleaned. Set steam power to mimimum and apply for a brief period. Beaded or laminated covers Refer to “Paper covered surfaces”.
C. BATHROOM
Taps, sills, tiles and accessories.
• Use the multi-use nozzle with maximum steam power, and follow the instructions given for “Sinksand taps”.
Shower cab • In diffi cult corners or interstices use the nozzle alone or together with the small brushes; try not tovaporise on silicone sealings.
• For embossed glass surfaces, use the small steam/vacuum brush (33) (Fig. 8) with the frame (33b)(Fig. 8), setting steam power to middle.
• Vacuum at the desired power to dry.
D. WINDOWS AND MIRRORS
Warning: The appliance should not be used on silk printed or painted glass
Clear panes • When cleaning window panes, remember to pre-heat them during winter, following the instructions given in par. “Safety warnings”.
• Use the window squeegee (33) (Fig. 6).
• Set the steam power to minimum.
• Run the tool rapidly across the window, holding the rubber insert in close contact with the pane.
• Activate both the steam and the vacuum functions at the same time and at the desired speed (toavoid water drops).
kruger.es 30
Embossed, rough, repoussé and pale glass • Use the small brush, setting the steam power to minimum and vaporizing briefl y.
• Activate both the steam and the vacuum functions (the latest at the maximum speed) at the sametime (to avoid water drops).
E. FURNITURE
Cleaning of furniture • The appliance can be used with no side effects on all plastic laminated furniture, applying steamat middle power.
• Particular care should be taken for polished or varnished furniture.
• Always do a test on a non visible part of the item or on a sample, prior to using the appliance.
• In case no side effects are found, use the small brush (33) (Fig. 6) with the frame (33b) (Fig. 6), setthe steam power to minimum and run briefl y across the piece of furniture, activating the vacuumfunction at the maximum speed at the same time.
Dusting of furniture • To dust furniture and remove the greasy fi lm on it, use the steam gun, setting power to minimum.
• Vaporize using the gun from about 30 cm distance from the surface, and wipe with a dry and cleancloth immediately afterwards.
Couches and armchairs Warning: The appliance should not be used on couches made in leather, alcantara, or other delicate fabrics.
• In all other cases, after having done a test on a non visible part of the item, use the small brush.• Set steam power to minimum and activate the vacuum function at the same time, running thedevice briefl y across the surface.
F. RADIATORS
• Use the multi-use nozzle with the small polyester brush.
• Set steam power to middle.
• To collect dirt, run the small nozzle under the radiator with the vacuum function on.
G. HARD TO REACH CORNERS
• To clean stairs, window sills, door jambs, aluminium profi les, rolling shutters, connect an extensionpipe to the multi-use nozzle, equipped with the ferrule or the most suitable brush.
• Apply steam at middle power and activate the vacuum function as well.
H. STEAM ON HOUSEPLANTS
• To dust and humidify houseplants, use the steam gun, setting steam power to minimum.
kruger.es 31
• Steam from a 40/50 cm distance.
I. CAR
Cleaning of seats
• Use the brush, following the instructions given in “Couches and armchairs”.Engine bonnet and tyre rims
• Use the steam gun with multi-use nozzle and ferrule, setting steam power to maximum.
• Apply steam on the engine bonnet or the tyre rims from about 20 cm distance.
Windscreen
• Follow the instructions given in “Clear panes”.
16. WARRANTY
The combined appliance MOD. 3000/3000D/3000ID has a one year warranty from the day of purchase against manufacture defect and faults of the materials. In order to be valid, the warranty needs to be accompanied either by the sales receipt or by the seller’s stamp indicating the date of purchase. The warranty covers the replacement or the repair free of charge of the components of the appliance, in case of defective material due to a faulty manufacturing. The warranty does not cover damage caused by improper use of the appliance, in particular if the appliance was used outside the household. In case of failure or malfunction, contact the nearest Service Centre immediately. Any unauthorized modification to the appliance will automatically void the warranty.
The MANUFACTURER declines any responsibility in case of accidents caused by any use of MOD. 3000/3000D/3000ID which is not in line with the present operating instructions, in case of direct or indirect damage to persons, things or animals.
KEEP THE ORIGINAL PACKAGING AND, IF REQUIRED, RETURN THE APPLIANCE TO THE SERVICE CENTRE IN ITS ORIGINAL PACKAGING. IN CASE THIS WAS NO LONGER AVAILABLE, PLEASE CONTACT THE SERVICE CENTRE TO REQUEST ANOTHER PACKAGING (UPON PAYMENT OF FEE).
This symbol that appears on products or packages indicates thatthe product must not be disposedof together with domestic waste.The users must provide for the disposal of the equipment to be scrapped by bringing it to the indicatedcollection centre for the successive recycling of theelectric and electronic equipment. Separated collectionand recycling of equipment to be scrapped helps to conserve natural resources and guarantees that the equipment is scrapped while respecting the environment andsafeguarding health.
For further information about collection points for equipment to be scrapped, contactyour local city hall, the local waste disposal service orthe shop where the product was purchased.
kruger.es 32

DECLARACIÓN DE CONFORMIDAD “CE”
KRÜGER TECHNOLOGY, S.L.
CON DOMICILIO EN: POLÍGONO AGUSTINOS CALLE G – PARCELA B2 31.013 PAMPLONA (NAVARRA)
Declara bajo su propia y exclusiva responsabilidad que el producto:
GENERADOR DE VAPOR
MODELO
NÚMERO DE SERIE
AÑO DE FABRICACIÓN
Al cual se refiere esta declaración, es conforme a las siguientes directivas:
2006/42/CE 2006/95/CE 2004/108/CE
Y, ha sido fabricada en conformidad a las normas armonizadas:
EN 60335-1:2002 EN 60335 –2 –2:2010 EN ISO 12100: 2010 EN ISO 13849-1:2009 EN 60204-1:2010 EN 60947-1:2011, EN ISO 11200:2009 EN 842:2008 EN 61310-1:2008, EN 60445:2010 EN 60719:1993
Carlos Krüger DIRECTOR GERENTE Pamplona, a 21 de enero de 2014.

KRUGER TECHNOLOGY S.L.Pol. Agustinos C/G Parcela B2
31013 Pamplona (Navarra) ESPAÑATel. 948 343 393 - Fax 948 318 453
www.kruger.es - [email protected]
Related Documents