i MobileView 3208 User Manual XXXXX • REV 01.00 • ISS JAN 2018

Welcome message from author
This document is posted to help you gain knowledge. Please leave a comment to let me know what you think about it! Share it to your friends and learn new things together.
Transcript

i
MobileView 3208 User Manual
XXXXX • REV 01.00 • ISS JAN 2018

MobileView 3208 User Manual ii
MobileView 3208 User Manual
© 2018 MobileView. All rights reserved. All trademarks are the property of their respective owners.
Microsoft, Internet Explorer, and Windows are registered trademarks of Microsoft Corporation in the United States and/or other countries. Apple, iPad, iPhone, and iTunes are registered trademarks of Apple Inc. Android is a trademark of Google, Inc. Other trade names used in this document may be trademarks or registered trademarks of the manufacturers or vendors of the respective products.
This document applies to MobileView 3208 Recorder
N0000
http://www.mobileviewvideo.com
Contact Technical Support: Monday–Friday 6 am – 7 pm EST Phone: 1.844.899.7366 Email: [email protected]

MobileView 3208 User Manual iii
Table of Contents
MOBILEVIEW 3208 USER MANUAL .................................................................................... I
CHAPTER 1 INTRODUCTION .............................................................................................. 1
PREREQUISITE .................................................................................................................. 1
SAFETY ............................................................................................................................ 1
PRODUCT OVERVIEW ....................................................................................................... 1
3208 ........................................................................................................................................ 2
PRODUCT CONTENTS ................................................................................................................... 3
FRONT AND REAR PANELS ................................................................................................ 3
3208 FRONT PANEL .................................................................................................................... 3
3208 REAR PANEL ...................................................................................................................... 5
REVIEWING STORED IMAGES ......................................................................................................... 5
CHAPTER 2 INSTALLATION AND WIRING ........................................................................... 7
NETWORK VIDEO RECORDING SYSTEM ............................................................................. 7
LOCATING THE RECORDER ............................................................................................................ 7
MOUNTING THE RECORDER .......................................................................................................... 8
TOOLS AND MATERIALS ............................................................................................................... 8
ATTACHING RECORDER HARDWARE ................................................................................. 9
HARNESS CONNECTIONS ............................................................................................................... 9
CONNECTOR REMOVAL .............................................................................................................. 10
CONNECTIONS ................................................................................................................ 10
P1 AND P1A HARNESS CONNECTIONS .......................................................................................... 10
Power input connections ................................................................................................................. 10
Connecting the Power ..................................................................................................................... 11
Battery disconnect systems .............................................................................................................. 11
P2A HARNESS CONNECTION ....................................................................................................... 11
P3A HARNESS CONNECTIONS ...................................................................................................... 12
Serial power connections ................................................................................................................ 12
P4 HARNESS CONNECTIONS ........................................................................................................ 12
Power connections .......................................................................................................................... 13
Video out connection ....................................................................................................................... 13
Audio out connection ....................................................................................................................... 13
P6 AND P7 HARNESS CONNECTIONS ............................................................................................ 13
Power connections .......................................................................................................................... 14
Relay output..................................................................................................................................... 14
Analog input .................................................................................................................................... 14
CADDY SWAP ........................................................................................................................... 15

MobileView 3208 User Manual iv
CHAPTER 3 CONFIGURATION ........................................................................................... 16
SERVICE LAPTOP REQUIREMENTS .................................................................................... 16
CONNECTING THE RECORDER SOFTWARE ........................................................................ 16
OPENING A BROWSER CONNECTION ............................................................................................. 17
GENERAL BROWSER PAGES ......................................................................................................... 17
Login ............................................................................................................................................... 17
Landing Page .................................................................................................................................. 18
WEB PAGE WINDOW LAYOUT ..................................................................................................... 18
CONFIGURATION PAGES ................................................................................................. 19
VIDEO PAGES............................................................................................................................ 19
LIVE ........................................................................................................................................ 19
OVERLAY SETTINGS ................................................................................................................... 19
CAMERA SETTINGS .......................................................................................................... 20
MANAGE DEVICES ..................................................................................................................... 20
IP BASIC SETTINGS .................................................................................................................... 21
IP ADVANCED SETTINGS ............................................................................................................. 21
EVENTS PAGES ................................................................................................................ 22
Display Event Summary .................................................................................................................. 22
CONFIGURING AN EVENT ............................................................................................................ 23
Special Concepts ............................................................................................................................. 24
NOTIFICATION PAGES ..................................................................................................... 24
SYSTEM ALARMS ....................................................................................................................... 24
Configuring Alarm Triggered Record ............................................................................................ 25
G SENSOR ................................................................................................................................ 25
Setting up G Sensor Alarm ............................................................................................................. 26
Setting up Install Orientation ......................................................................................................... 26
ALARM SETTINGS ............................................................................................................ 26
ALARM INPUTS ......................................................................................................................... 26
ALARM OUTPUTS ...................................................................................................................... 27
ACCELEROMETER ...................................................................................................................... 28
J1939 MESSAGE TYPE ............................................................................................................... 28
J1939 TYPE ASSIGNMENT .......................................................................................................... 28
NETWORK SETTINGS ....................................................................................................... 29
AUTO DISCOVERY ..................................................................................................................... 29
ETHERNET ................................................................................................................................ 30
Assign Ethernet Ports ..................................................................................................................... 30
WIRELESS SETTINGS .................................................................................................................. 30
WPA Security Modes ...................................................................................................................... 30
Client Settings ................................................................................................................................. 30

MobileView 3208 User Manual v
Wireless Survey ............................................................................................................................... 31
TRANSMIT LIMITS ..................................................................................................................... 31
SYSTEM SETTINGS ........................................................................................................... 31
GENERAL SYSTEM SETTINGS........................................................................................................ 32
DATA MANAGEMENT ................................................................................................................ 32
DATE AND TIME ........................................................................................................................ 32
MEDIA SETUP........................................................................................................................... 32
MUX ...................................................................................................................................... 33
AUDIO SETUP ........................................................................................................................... 33
SERIAL PORTS ........................................................................................................................... 33
EXTENSIONS ............................................................................................................................. 34
ADMINISTRATION ........................................................................................................... 34
USER ACCOUNTS ...................................................................................................................... 34
LOGGING ................................................................................................................................. 34
CONFIGURATION ....................................................................................................................... 35
FIRMWARE .............................................................................................................................. 36
SYSTEM EXTENSIONS ...................................................................................................... 36
J1939 EXTENSION .................................................................................................................... 36
DIAGNOSTIC TRANSMISSION ....................................................................................................... 36
SUPPORTED MESSAGES .............................................................................................................. 37
SUPPORTED QUERIES ................................................................................................................. 37
SUPPORTED CONTROLS .............................................................................................................. 37
CONFIGURATION PORTS AND MODE ............................................................................................ 37
CONFIGURATION INPUT MESSAGES .............................................................................................. 38
Configuration Message Database ................................................................................................... 39
CHAPTER 4 RECORDER NAVIGATION................................................................................ 40
NAVIGATING MOBILEVIEW LIVE ...................................................................................... 40
MAIN MENU ................................................................................................................... 40
EXCEPTION MENU ........................................................................................................... 40
LIST INTERACTION ..................................................................................................................... 40
ACKNOWLEDGE AND SILENCE AN EXCEPTION ................................................................................. 41
STATUS MENU ................................................................................................................ 41
OPEN STATUS MENU ................................................................................................................. 41
VIDEO STATUS .......................................................................................................................... 41
Opening the Video Status Menu ...................................................................................................... 41
WIRELESS MENU ...................................................................................................................... 41
Opening the Wireless Menu............................................................................................................. 42
MEDIA MENU .......................................................................................................................... 42
Opening the Media menu ................................................................................................................ 42
G Sensor Menu ................................................................................................................................ 42

MobileView 3208 User Manual vi
Opening the G Sensor Menu ........................................................................................................... 43
ALARM MENU .......................................................................................................................... 43
Opening the Alarm Menu ................................................................................................................ 43
OTHER MENU .......................................................................................................................... 43
Opening the Other Menu ................................................................................................................ 43
MAINTAIN MENU ............................................................................................................ 43
OPENING MAINTAIN MENU........................................................................................................ 44
EXPORT CFG MENU .................................................................................................................. 44
IMPORT CFG MENU .................................................................................................................. 44
EXPORT LOG MENU .................................................................................................................. 44
MEDIA MENU .......................................................................................................................... 44
UPGRADE MENU ...................................................................................................................... 45
SHUTDOWN ............................................................................................................................. 45
INFO MENU .................................................................................................................... 45
CHAPTER 5 HARDWARE ................................................................................................... 46
HARDWARE SPECIFICATIONS ........................................................................................... 46
VIDEO SURVEILLANCE ................................................................................................................ 46
DIGITAL INPUT RECORDING ........................................................................................................ 46
NETWORK AND INTERFACE ......................................................................................................... 46
PHYSICAL ................................................................................................................................. 47
ENVIRONMENTAL ...................................................................................................................... 47
ELECTRICAL .............................................................................................................................. 47
SYSTEM MAINTENANCE .................................................................................................. 47
CHAPTER 6 USE CASES ..................................................................................................... 48
SCREEN SNAPS ................................................................................................................ 48
CAMERA DEVICE LIST ...................................................................................................... 48
DECIDING VIDEO STREAM ............................................................................................... 48
INSTALL A WIRELESS CARD .............................................................................................. 48
GLOSSARY ...................................................................................................................... 49


0

MobileView 3208 User Manual 1
Chapter 1 Introduction
This manual provides an overview of the product and detailed instructions for the
MobileView 3208 eight-channel recorder.
Read these instructions and all related documentation before installing or operating this
product. The most current versions of this and related documentation are available from
technical support. Contact technical support for questions or concerns.
Note: Only qualified service personnel, complying with all applicable codes, should
perform hardware installation.
Prerequisite
Before using this document, have a basic knowledge of the following:
• CCTV systems and components
• Electrical wiring
• Windows operating system
• TCP/IP networking
• Standard web browser use
Safety
Ensure the recorder is stable and fastened in place when in use
Do not operate if wires are exposed
The recorder should be located in a ventilated area
Product Overview
The MobileView 3208 recorder with up to eight (8) audio/visual inputs, and optional
equipment such as a status/tag indicator, GPS antenna, and wireless networking devices.
The 3208 NVR supports a minimum of 5Mbps for each IP channel up to eight (8) and
optimizes front and rear ports and connectors to improve installation time and eliminate
redundancy.

MobileView 3208 User Manual 2
The central component of the MobileView system is a high-quality recorder. It records
time-stamped data of one millisecond for up to 8 IP cameras at 6Mpx with 30 frames per
second. The amount of surveillance information the recorder can store is determined by
storage capacity of the main media caddy, the resolution and the frame rate settings of the
cameras, and the total operational hours in a day. The recorder captures video and audio
within 90 seconds of receiving the vehicle ignition signal. The recorder continues to capture
data while the signal is present and for a defined period of time after the vehicle ignition
signal ends. Surveillance and event-based video data is stored on a removable media caddy.
When storage capacity is full, the recorder automatically overwrites the oldest data with the
new data in a FIFO (first-in, first-out) order.
Recorders use MobileView Navigator to review surveillance and event-based video stored
on the removable media caddy. Wi-Fi allows for automatic video transfer and downloads
using the Depot Manager software. Recorders include a built-in web server to configure
operating parameters.
A MobileView system consists of the recording device, cameras, and any optional
equipment.
3208
Typical MobileView System Layout
1. IP Camera, 8 IP cameras (max)
2. Ethernet (CAT5) cable
3. GPS antenna
4. NVR assembly
5. (Optional) External wireless
6. Wireless antenna
7. Antenna connection cable
8. Status indicator/panic button

MobileView 3208 User Manual 3
Product Contents
The MobileView 3208 recorders include:
• Recorder main assembly and key
• Removable media caddy and key
• Wiring harnessing
• Internal wireless (optional)
MobileView 3208 recorder supports these accessories:
• 8 IP input channels
• Status/tag button
• GPS antenna
• External wireless
• MobileView Live running on iPhone or Tablet
Inspect the package and contents for visible damage. If any components are damaged or
missing, do not use the unit and contact the supplier immediately. When returning the
product, use the original shipping box.
Front and Rear Panels
The recorder front panel is the primary user interface for interacting with the device and
checking heath status. The rear panel contains all harness connection points.
3208 Front Panel
MobileView Recorder Front Panel

MobileView 3208 User Manual 4
Description of front panel
No. Name Function Description
1 SD Card cover Cover is locked in place when the caddy is mounted
2 Status Indicator PWR Red/Green Power/Ignition
REC Green Recording
ERR Red Fault or maintenance
required
MC Red Media Caddy
SD Red SD Card
GPS Green GPS satellite lock
3 Caddy door lock Rotate right to lock, left to unlock. Covers network and USB interfaces
4 Thumbscrews Tighten to ensure caddy does not fall out when key lock is unlocked
Power Indicator
Red Solid = Main Power OK (Standby Mode)
Red Flash (1Hz) = Pending Startup (Heater or Startup Delay)
Green Solid = Power OK & Ignition ON
Green Flash (1Hz) = Power OK, Ignition OFF (Unit in Delayed Shutdown Mode)
OFF = No Power or Abnormal Voltage (Over/Under Volt condition)
Recording Indicator
Green Solid = Recoding (at least one IP stream is being recorded)
OFF = No streams are being recorded
Error Indicator
Red Solid = System Fault Exists (general fault or as programmed)
OFF = System Faults Not Exist
Media Caddy Indicator
OFF = Media Caddy OK
Red Solid = Media fault (Storage Error)
Red Flash = Caddy detected but not locked
GPS Indicator
Green Solid = GPS Signal Lock
OFF = GPS Signal No Lock

MobileView 3208 User Manual 5
3208 Rear Panel
MobileView Recorder Rear Panel
Description of rear panel
ID Name Description
1 POWER 6-pin aviation plug for power supply
2 RS485 Connector for RS-485 devices
3 USB Connector for USB devices
4 AV OUT 4-pin aviation plug for audio and video output
5 RS232 Connector for RS-232
6 WIFI WI-FI antenna interface (2x)
7 GPS GPS antenna interface
8 PORTS Eight (8) rear mounted analog video audio ports
9 REAR Network interface
10 ALARM Alarm input/output interface
Aviation connectors implement a screw-down knurl and relies on a high friction
coefficient to remain locked in place.
Molex connectors are from the Micro-Fit family and employ a positive latching
ramp mechanism to lock the connector in place.
Reviewing Stored Images
The 3208 recorder converts information from IP inputs into digital format and stores it on
the removable media caddy. This data is exported or reviewed by a Video Review Station
running the MobileView Depot Manager software. The recorder connects to the Video
Review Station through a network connection. The Video Review station is generally a
laptop or desktop computer running a compatible Windows operating system. When
connected to the recorder, users can view and export live and recorded surveillance data,
check logs, and retrieve device health diagnostics. Most of these functions are available
when connected to the recorder media caddy.
Refer to the help system in Depot Manager for video station requirements, a list of
compatible software, and more information on how to retrieve and view images from the
recorder and media caddy.

MobileView 3208 User Manual 6

MobileView 3208 User Manual 7
Chapter 2 Installation and Wiring
Network Video Recording System
The MobileView 3208 recorder is designed for installation on public transit vehicles, school
busses and fleet vehicles.
Components of the recorder assembly
1. Recorder main housing
2. Recorder storage caddy
Locating the Recorder
Recorders are normally mounted in the vehicle’s electronics enclosure. These enclosures
vary in size and location, depending on the vehicle make and model and provide enough
space for the recorder. For most vehicles, this is located behind the driver, and is typically
lockable and climate controlled. When deciding the location of the recorder, ensure space is
protected against liquid and foreign material intrusion, and provides enough ventilation to
maintain an optimum operating temperature range. For HDD models, the device must
maintain 0-40°C, for SSD models, 0 to 55°C. For lower temperature down to -20°C the
device implements an integrated heater used to bring the temperature of the device to an
operating range within 20 minutes.

MobileView 3208 User Manual 8
Mounting the Recorder
The MobileView 3208 recorder is designed to resist shock and vibration forces commonly
observed on a transit vehicle. Resistance to specific levels are only obtained when the
recorder is secured to a stationary (with respect to the vehicle), vibration-resistant,
horizontal surface. Mounting the recorder in a way that does not meet these requirements
may result in undesired performance.
To mount the recorder:
1. On a flat, stationary, and vibration-resistant surface, use the recorder base as a template
to mark and drill four mounting holes.
2. Using bolts, locking washers, and nuts, mount the recorder base plate to the vehicle
surface.
Mounting the recorder
1. Mounting bolts
2. Main housing
To resist vibration, use nuts with a thread locking compound or a self-locking nylon insert.
Failure to use such devices may result in insecure mounting and damage to the unit.
Tools and Materials
The list of tools and materials below is recommended for installation. This list is not
complete and the installation may require different or specialty items.
BNC crimper
Cat 5 ethernet crossover cable
Cat 5 ethernet patch cable
Drill and bits, up to 5/8 in.
Electrical connections (ends, lugs,
etc.)
Electrical tape
Electrical voltmeter
Extension cords
General tools
Heat shrink
Hole saws, up to 1–1/8 in.
Laptop/viewing station
Thread-locking compound
Molex pin crimper
Phillips and flathead screwdrivers

MobileView 3208 User Manual 9
Riv-nut gun
Socket set, up to 5/8 in.
Solder gun with solder
Spare BNCs
Wrenches, up to 5/8 in.
Spare Molex pins
Spare terminal blocks
Tie wraps (8 in.)
Torx bit, secured #10
Wire snake
Wire strippers
Attaching Recorder Hardware
Use the following information to attach field wires directly to connectors. Harnesses provide an easy
way to connect and disconnect the recorder from the vehicle for service, maintenance, or repair.
Connectors must be fully seated and each screw down tightly to ensure the connector remains in place
during normal operation.
WARNING: The installer is responsible to power off the recorder before connections are made.
Check all power connections for shorts and grounds before applying power. Failure to follow this
recommendation may result in damage to the vehicle or the recorder, including injury to the
installation personnel.
Harness connections
Harness connections to the recorder are made on the rear panel.
NVR Harness Connections
Harness connections
P1A 3208 Power input connector (12A input)
P2A 3208 RS485 connector
P3A-2 Multi-IO connector part 2
P3A-3 Multi-IO connector part 1
P4 AV Out
P7 I/O connector
MobileView 3208 User Manual 10
Connector Removal
The recorders P6 and P connections employ a locking mechanism to ensure connection to the recorder
during operation. Connectors are logistically difficult to remove. To remove a connector, fully
disengage the locking mechanism and gently rock the connector side to side while pulling the
connector away from the recorder chassis. The connector eventually pulls free.
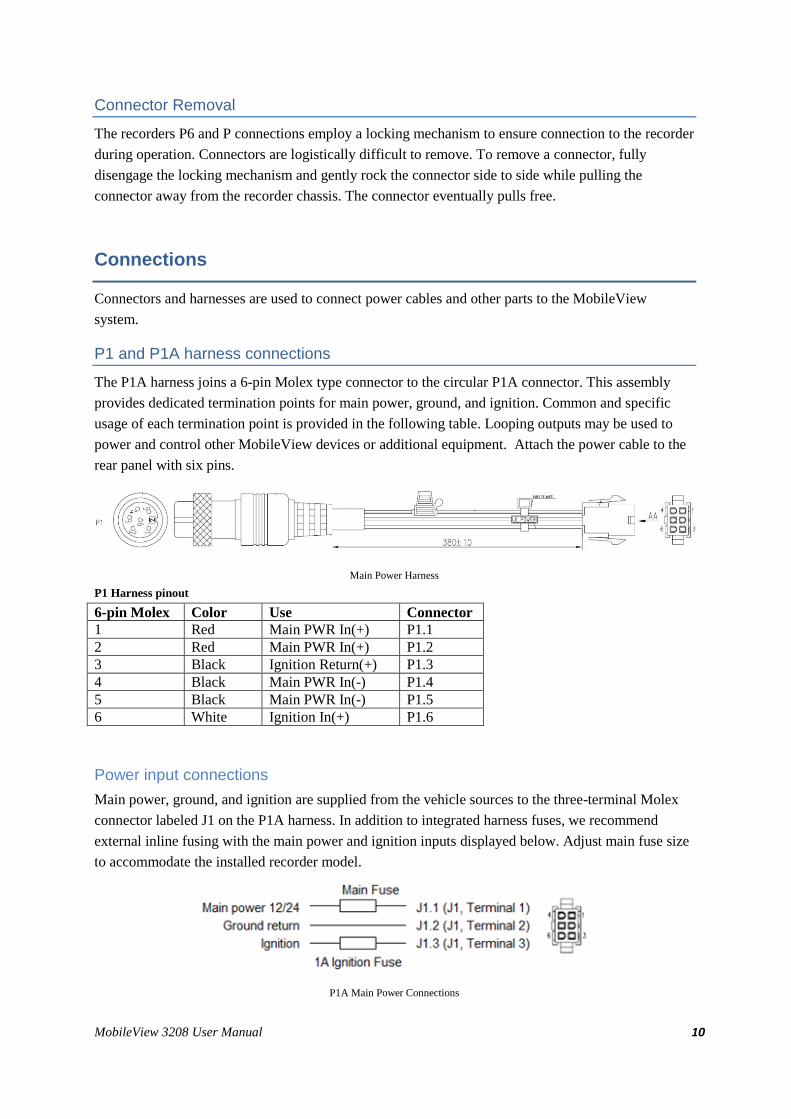
Connections
Connectors and harnesses are used to connect power cables and other parts to the MobileView
system.
P1 and P1A harness connections
The P1A harness joins a 6-pin Molex type connector to the circular P1A connector. This assembly
provides dedicated termination points for main power, ground, and ignition. Common and specific
usage of each termination point is provided in the following table. Looping outputs may be used to
power and control other MobileView devices or additional equipment. Attach the power cable to the
rear panel with six pins.
Main Power Harness
P1 Harness pinout
6-pin Molex Color Use Connector
1 Red Main PWR In(+) P1.1
2 Red Main PWR In(+) P1.2
3 Black Ignition Return(+) P1.3
4 Black Main PWR In(-) P1.4
5 Black Main PWR In(-) P1.5
6 White Ignition In(+) P1.6
Power input connections
Main power, ground, and ignition are supplied from the vehicle sources to the three-terminal Molex
connector labeled J1 on the P1A harness. In addition to integrated harness fuses, we recommend
external inline fusing with the main power and ignition inputs displayed below. Adjust main fuse size
to accommodate the installed recorder model.
P1A Main Power Connections

MobileView 3208 User Manual 11
Connecting the Power
1. Run a three-conductor 8 AWG cord from the vehicle power, electrical ground, and ignition
source locations to the recorder.
Note: Adding inline, fast-blow fuses to the main power and ignition inputs is recommended.
2. With the vehicle power off, connect to the vehicle power and ignition sources.
Contact the vehicle manufacturer for information on connecting to the vehicle power source.
3. At the recorder, remove the P1A connector.
4. Terminate power, ignition, and ground wires to the proper terminal of a mating Molex
connector.
5. Connect the mating Molex connector to the J1 connector on the P1A harness.
6. Before reattaching the P1A connector to the recorder, turn on the vehicle power and use a
voltmeter to check each Molex terminal for proper voltage and polarity.
Main power and ignition voltages should be nominal 12 or 24 VDC.
7. After confirming voltages and polarities are correct, remove vehicle power, plug the P1A
connector into the recorder, and tighten the retaining ring.
8. Check all connections before starting vehicle power.
Battery disconnect systems
Many vehicles incorporate a source disconnect device, also called a battery disconnect or knife
switch. The device removes power to noncritical systems during routine maintenance or to stop long-
term battery drain. When the recorder is connected to a device, it is subject to immediate and
uncontrolled loss of power. Uncontrolled power loss can negatively affect expected system
performance. The recorder avoids this by implementing an internal UPS, designed to keep the system
operational for 3-7 seconds after all power is lost. This allows the device plenty of time to stop any
open processes and close files in preparation for power loss.
P2A harness connection
Harness P2A provides connection to the device connector P2A. Connector is a multi-pin aviation
connector for RS485, 12V out.
P2A Harness pinout
Pin Color 6-pin Molex Jumper Use
P2A.1 White 1 3 TX485 (+)
P2A.2 Green 2 4 TX485 (-)
P2A.5 Orange 3 1 RX485 (+)
P2A.6 Yellow 4 2 RX485 (-)
5
6
P2A.3 Red 7 12VDC (+)
P2A.4 Black 8 GND (Return)

MobileView 3208 User Manual 12
P3A harness connections
The P3A harness connects 5-pin Molex type connectors to a circular P3A connector. This provides
dedicated termination points for serial devices. Common and specific usage of each termination point
is provided in the following table.
P3A Serial Harness
P3 Harness pinout
5-pin Molex Color Use Connector
1 Green RXD (Receive) P3.1
2 White TXD (Transmit) P3.2
3 Yellow 12V + P3.3
4 Black GND P3.4
5 Red 5V+ P3.5
Serial power connections
The recorder implements 5 VDC and 12 VDC outputs on the P3A harness to power small serial
devices. Current is limited to 1A for these devices.
P4 harness connections
The P4 harness connects BNC and 2-pin Molex type connectors to the circular P4 connector. This
setup has dedicated termination points for video and output to an AV monitor with limited power for
the device. Common and specific usage of each termination point is provided in the following table.
P4 AV Output Harness
P4 Harness pinout
Connector Color Use Connector
CN2.Pin Orange Video out P4.1
CN2.Shell Black Ground (Return) P4.4
CN3.Pin Brown Audio out P4.2
CN3.Shell Black Ground (Return) P4.4
CN4.1 Red 12V (+) out P4.3
CN4.2 Black Ground (Return) P4.4
MobileView 3208 User Manual 13
Power connections
The recorder implements 12 VDC output on the P4 harness to power an external monitor. Set the
current to limited and fused to 1A for this device.
Video out connection
The video output displays images configured by the system MUX settings.
Audio out connection
The audio output plays audio defined by the system audio settings.
P6 and P7 Harness Connections
The P7 harness connects several multi-pin Molex type connectors (J2, J3, and J5) to the two multi-pin
Molex connectors labeled P7. This setup provides dedicated termination points for digital and analog
inputs, relay outputs, and status outputs along with limited power. Common and specific usage of
each termination point is provided in the following tables. Each table represents the connector J2, J3,
or J5.
P7 Multi-Output Harness
P7 harness pinout (J3)
Molex Color Use Connector
J3-1.1 Yellow Digital input 1 P7.8
J3-1.2 Red Digital input 2 P7.7
J3-1.3 White Digital input 3 P7.6
J3-1.4 Blue Digital input 4 P7.5
J3-1.5 Brown Digital input 5 P7.16
J3-1.6 Orange Digital input 6 P7.15
J3-1.7 Purple Digital input 7 P7.14

MobileView 3208 User Manual 14
J3-1.8 Grey Digital input 8 P7.13
J3-1.9 Black GND P7.4
J3-1.10 Green 12v (Digital 1) P7.12
J3-1.11 Green 12v (Digital 2) P7.12
J3-1.12 Green 12v (Digital 3) P7.12
J3-1.13 Green 12v (Digital 4) P7.12
J3-1.14 Green 12v (Digital 5) P7.12
J3-1.15 Green 12v (Digital 6) P7.12
J3-1.16 Green 12v (Digital 7) P7.12
J3-1.17 Green 12v (Digital 8) P7.12
J3-1.18 Black GND P7.4
P7 harness pinout (J5)
10-pin Molex Color Use Connector
J5.1
J5.2
J5.3 White Relay 1 NC P7.1
J5.4 Blue Relay 1 NO P7.3
J5.5 Brown Relay 1 common P7.2
J5.6 Black GND P6.3
J5.7 Black GND P6.3
J5.8 Orange Relay 2 NC P7.9
J5.9 Purple Relay 2 NO P7.11
J5.10 Grey Relay 2 common P7.10
Power connections
The recorder implements 12 VDC output on the P6 harness as part of digital, analog, and status
circuits. The current for these connections is limited to 1A.
Relay output
Relay contacts are shown in their de-energized state and are rated for 200 mA maximum current
draw.
Analog input
The recorder provides two analog inputs. These inputs convert continuous voltage detected at the
terminal into a separate numeric representation of the direct value. The system can be configured to
trigger a response when the number rises above or below a set point. Analog input can be used to
track temperature fluctuations on key vehicle systems.
Not all monitored vehicles provide a voltage output. When one is not available, use a conversion
device with corresponding voltage output.
The analog to digital converter on the recorder is a 12-bit device supporting up to 4096 separate set
points. Set points range from 0 to 4096 and correspond to an input voltage range of 0 to 30 VDC. If
the full-scale input voltage is less than 30 VDC, only a corresponding range of the 4096 set points are
available.
If the full-scale input is greater than 30 VDC, the input voltage must be reduced to a point within the
supported range. Use a voltage divider network to reduce voltage.

MobileView 3208 User Manual 15
Voltage divider, analog input
In the previous figure, a certain amount of the input voltage (Vin) is used across resistor R1. The
remaining voltage (Vout) is routed and monitored by the analog input. The installer is responsible for
determining the proper values of R1 and R2 based on specified voltage input variables.
The value of VOUT is determined by the following formula.
Vout = (R2 * Vin) / (R1 + R2)
Since recorder analog inputs support a maximum voltage input of 30 VDC, VOUT is always 30 VDC.
For most applications, R2 is set to 10 kΩ and the value of Vin is the full scale value of the voltage
input to be measured. Solving the previous equation for variable R1 allows simple calculation of its
required value.
R1 = (R2 * Vin / Vout) - R2
In the previous example, to monitor a 40 VDC variable input using a recorder analog input would
require an R1 of 3.3 kΩ with an R2 of 10 kΩ.
R1 = (R2 * Vin / Vout) - R2
R1 = (10 kΩ * 40 VDC / 30 VDC) -- 10 kΩ
R1 = 3.3 kΩ
Caddy Swap
Swapping a caddy between models in a product family does not change normal storage operations.
This includes:
Previously recorded data will not be lost (except FIFO)
Mass storage for new surveillance information.

MobileView 3208 User Manual 16
Chapter 3 Configuration
MobileView 3208 recorder implements a built-in web server to provide system configuration using a
web browser interface. Only Internet Explorer 11 running on Windows 7 or Windows 10 is
supported.
Service laptop requirements
The service laptop must meet minimum requirements to function correctly. The minimum
requirements are:
Windows 7 or Windows 10 having all current updates applied
Intel I5 processor
4 GB RAM
120 GB hard disk space
Compatible Web Browser (Internet Explorer 11)
Wired network interface card (NIC)
Ethernet cable
Note: A dedicated graphics card is not required.
Connecting the Recorder Software
1. Plug an Ethernet cable into the recorder front RJ-45 port (for locking door).
2. Connect the other end of the cable to the computer.
3. Set the computer IP to 192.168.0.99 / 255.255.255.0.
4. Open a web browser. Use either Chrome 34 or higher, or Internet Explorer 10 or 11.
5. Enter 192.168.0.100 into the URL.
The recorder uses a self-signed certificate as untrusted.
Although the browser does not recommend continuing, follow the prompts to continue to the
web page.
6. The login page displays.
7. Enter the username and password.
8. The landing page displays.
9. From the landing page, click the desired page containing the item to review or configure. Once
the recorder has been installed, it is configured using a connected service laptop.
MobileView 3208 User Manual 17
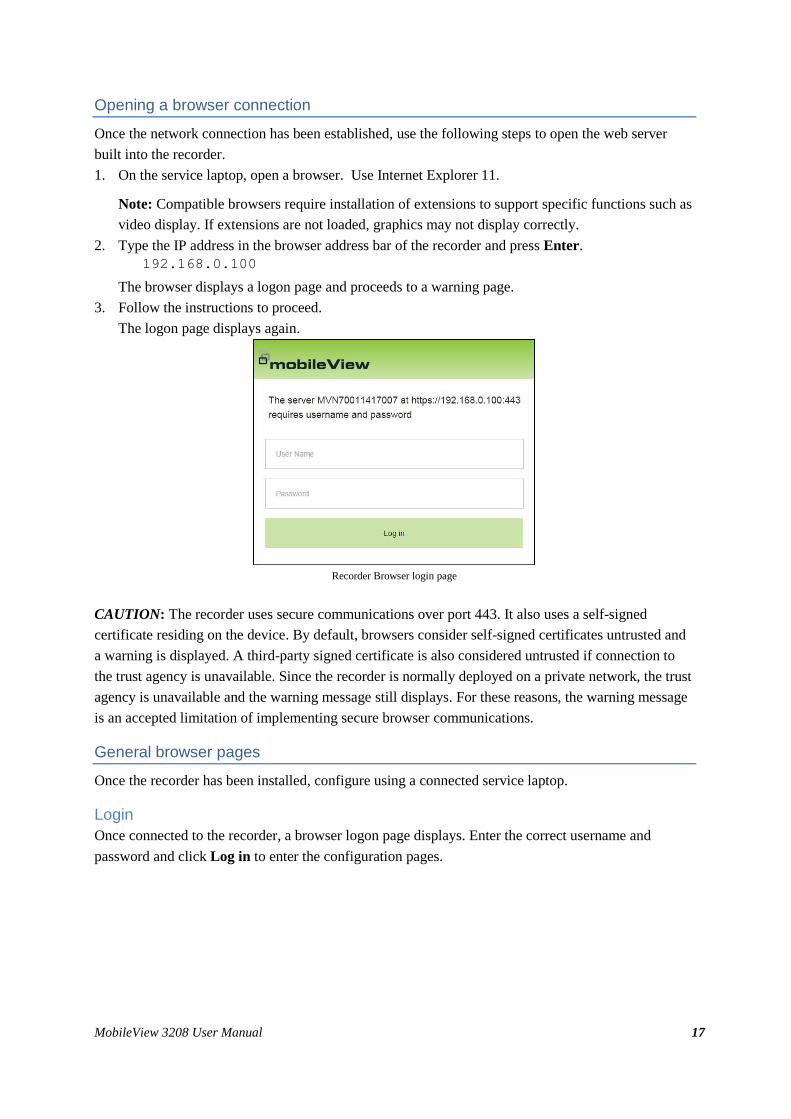
Opening a browser connection
Once the network connection has been established, use the following steps to open the web server
built into the recorder.
1. On the service laptop, open a browser. Use Internet Explorer 11.
Note: Compatible browsers require installation of extensions to support specific functions such as
video display. If extensions are not loaded, graphics may not display correctly.
2. Type the IP address in the browser address bar of the recorder and press Enter.
192.168.0.100
The browser displays a logon page and proceeds to a warning page.
3. Follow the instructions to proceed.
The logon page displays again.
Recorder Browser login page
CAUTION: The recorder uses secure communications over port 443. It also uses a self-signed
certificate residing on the device. By default, browsers consider self-signed certificates untrusted and
a warning is displayed. A third-party signed certificate is also considered untrusted if connection to
the trust agency is unavailable. Since the recorder is normally deployed on a private network, the trust
agency is unavailable and the warning message still displays. For these reasons, the warning message
is an accepted limitation of implementing secure browser communications.
General browser pages
Once the recorder has been installed, configure using a connected service laptop.
Login
Once connected to the recorder, a browser logon page displays. Enter the correct username and
password and click Log in to enter the configuration pages.

MobileView 3208 User Manual 18
401 Unauthorized
Upon entering incorrect credentials three times, the login rejection (401 pages) displays.
User lockout
If a user enters incorrect credentials more than the allowed incorrect entries, the account locks for a
period of time.
Landing Page
Upon entering valid credentials the user is presented with a landing page containing basic information
about the device.
Web Page Window Layout
Upon logging in, MobileView web page layouts conform to the following example.
Web Page Window Layout
Main window legend
ID Name Description
1 Navigation Click main and sub tab to open a configuration page
2 Quick Stats Summary overview of device status
3 Help Sidebar Short description of available configuration items
4 Extended Help Click icon to see more information about configuration items
5 Configuration Items available for user configuration
6 Save Options Click to save edits made to configuration page

MobileView 3208 User Manual 19
Configuration pages
For detailed information when using configuration pages, refer to the help side bar and extended help
information when connected to the specific page. The help information is located in the same
window as the configuration page.
Video pages
Video configuration settings are related to viewing video on the recorder web browser only. Settings
applied to these pages have no effect on surveillance information stored on the recorder.
Live
Live video and audio is displayed in a standard tiled layout. The layout may be adjusted to display
one or more video tiles.
1. Click Video.
2. Click Live.
Live page
Overlay Settings
Overlay settings provides live page overlay setting options. Choose to display IP or analog channel
name, video status, and geo-location on live video or within the individual video tiles when overlay is
enabled.
1. Click Video.
2. Click Overlay Settings.
3. Toggle each setting on or off. A check mark displays when the option is on.
4. Click Apply.

MobileView 3208 User Manual 20
When a camera name is checked, a colored video status indicator is on the live video page.
Black: Input not enabled or configured
Green: Normal Video
Blue: Video Loss
Red: Alarm/Event video
Overlay Settings page
Camera Settings
Camera configuration settings refer to setting up IP channels and devices from the recorder. Live
video and audio support both analog and IP. The default source for each channel is IP.
Manage Devices
The page defines the IP and analog channels available on the recorder along with the current network
address and protocol assignments for IP device. IP addresses may be changed or deleted to suit an
individual installation or device type. MobileView recommends leaving settings at their default
values.
CAUTION: Ensure IP addresses are in the same subnet as the camera network. The camera
network is configured under Network tab on the Ethernet page.

MobileView 3208 User Manual 21
Manage IP Devices
IP Basic Settings
IP basic settings provide an overview of common device settings for each configured IP channel and
most settings can be modified. For detailed changes, navigate to the IP Advanced Settings page.
1. Click Camera.
2. Click IP Basic Settings.
3. A summary of the available camera channels displays. Use this window to:
Change the camera name.
Enable or disable the camera.
Adjust the resolution per stream.
Select the frame rate for each stream.
Copy settings to other cameras. Source and target cameras must be of the same type.
4. Click Apply.
IP Advanced Settings
Configure detailed camera channel and device parameters on the IP Advanced Settings page. The
most common parameters are duplicated on the IP Basic Settings page but important video
transmission, video adjustment, and video overlay parameters are reserved only for this advanced
page.

MobileView 3208 User Manual 22
IP Advanced Settings
Events pages
Events allow monitored input to trigger programmed responses. Responses include recording at
higher resolution, frame-rate, activating outputs including alarm buzzers or warning lamps.
Display Event Summary
Events summary displays information for currently programmed events. The event settings cannot be
changed. New events are added with default parameters selected.
1. Click Events.
2. Click Event Summary.
Configuring an event is performed using Configure Event.

MobileView 3208 User Manual 23
Events Summary
Configuring an Event
Once an event has been created from the Event Summary page, fully configured it on the Configure
Event page.
1. Click Events.
2. Click Configure Event adds a new event with default configuration settings.
3. Use the Event Identification section to define how a trigger activates the event.
4. Use the Event Trigger section to set the event trigger input.
5. Use the Output Action section to define system reactions when the event has been triggered.
6. Click Apply.

MobileView 3208 User Manual 24
Special Concepts
Modify an event to trigger an alarm in the following ways.
Disable if active at startup: When selected, the device ignores an input if it is active during
system boot. This helps eliminate undesired event activations if an input is wired or
configured incorrectly. If the input changes to inactive, the input is no longer ignored.
Trigger Mask Duration: Once an input triggers an event, subsequent activation of the same
input can be ignored for the duration defined by the Trigger Mask Time. This feature ensures
only one occurrence of the event occurs during the specified time.
Trigger Delay Duration: This value requires the input remain active for the specified period
before the event can trigger. This feature monitors inputs normally fluctuating between active
and inactive state over a short duty cycle but lock into active state when in fully active.
Notification Pages
Notification configuration settings provide an alert for conditions requiring attention.
System Alarms
Configure system alarms and alert parameters using System Alarms. Active system alarms are
displayed in MobileView Live of the Exception menu and transmitted using the J1939 interface
extension when enabled. System alarms are ignored unless the Report check box is selected.

MobileView 3208 User Manual 25
Configuring Alarm Triggered Record
To configure alarm triggered recording:
1. Click Notifications.
2. Click System Alarms.
3. Select System Reactions for each alarm
4. Click Apply to save the settings and click OK to exit.
After configuring alarm input, open the Record Settings interface to set an alarm triggered record.
G Sensor
The G Sensor option configures device reaction for excessive accelerations. It also defines how the
device is mounted in a vehicle.
G-Sensor Actions: Configure how the device reacts when acceleration forces detected by the
onboard G-Sensor exceed values considered safe for rotating storage media (HDD). The goal
is to alert the operator that a high acceleration event was sensed and prevent data loss by
disabling drives. Results are not guaranteed.
Install Orientation: Define device mounting orientation on the vehicle. Establishing
orientation is required for proper performance of direction based acceleration alarms
G Sensor

MobileView 3208 User Manual 26
Setting up G Sensor Alarm
To configure how the system will react when the G sensor parameters are exceeded, perform the
following.
1. Click Notifications.
2. Click G Sensor.
3. Click Enable.
4. Identify alarm output.
5. Click Apply.
Setting up Install Orientation
To define how the recorder is installed on the vehicle, perform the following:
1. Click Notifications.
2. Click G Sensor.
3. Click an option in the G-Sensor Install Orientation. Choose the option that best describes the
orientation of the recorder. The arrows point towards the front of the vehicle.
4. Click Apply.
Alarm Settings
The Alarms option includes configuration settings related to inputs and outputs monitored by the
device. These include digital inputs (alarm inputs), relay outputs (alarm outputs), acceleration alarms,
and J1939 message alarms.
Alarm Inputs
Use the Alarm Inputs option to configure when digital (discrete) and analog (variable) inputs are
considered active. The active state of an input is used to trigger events. The page also automatically
updates the current activation state of each input according to the configuration setting.
Digital Inputs: Digital inputs are relays or switches having a defined normal state of open
(OFF) or closed (ON). Digital inputs monitor for the presence (closed) or absence (open) of a
voltage. Voltage range and values are shown below.
o 0VDC – 5V = Open (Off)
o 5VDC – 6V = No state guarantee
o 6VDC – 36V = Closed (ON)
o 40V = Max voltage before damage

MobileView 3208 User Manual 27
Analog Inputs: Analog inputs are sensors without a single defined ON or OFF state such as
pressure, lever position, and fuel level sensors. These devices have a set value triggering an
action. Analog inputs activate when the current value is higher or lower than the set value.
Alarm Inputs
Alarm Outputs
Use the Alarm Outputs option to enter a descriptive name for each relay output. The current state of
the output is also displayed and dynamically updated.

MobileView 3208 User Manual 28
Alarm Outputs
Accelerometer
The Accelerometer option configures how acceleration alarms are processed. Acceleration alarms are
also called Driver Behavior alarms since they are generally activated based on how an operator drives.
Each alarm represents a fixed acceleration profile. Hard Turn for example represents a lateral
(sideways) acceleration over a long period of time while Swerve represents the same lateral
acceleration over a short period of time. Hard brake uses a front to rear acceleration profile. Click the
check box to trigger an event or turn on the recorder fault LED.
CAUTION: Because acceleration alarms are dependent upon motion in defined directions,
device mounting orientation must be considered and configured. The Notifications G Sensor
section has additional information.
J1939 Message Type
J1939 messages can be grouped into types. Assign a 16 character descriptive name to each message
type. Message types can be used as a trigger for an event. The descriptive name entered here is used
wherever message type is referenced. Click Apply when completed.
Note: Only J1939 messages representing digital values (On/Off) can be used to trigger an event.
J1939 Type Assignment
Categorize J1939 messages into types. Up to 4 message types are allowed as shown in the drop-down
list next to each message. Messages of the same type can be used to trigger an event. Assign a type to
each message. Click Apply when completed.

MobileView 3208 User Manual 29
Note: J1939 messages representing digital values (On/Off) are preceded with (D). Although
digital and non-digital messages can be assigned to the same type, only digital messages can be
used to trigger an event.
Network Settings
The network configuration settings are correlate to networking and remote devices accessed over
networks.
Auto Discovery
Auto Discovery sets the network destination for device discovery messages. Discovery messages
contain limited information about the recorder and location on the network. This information is used
by MobileView software to establish periodic and ongoing communications with the device.
LAN Discovery Server: Discovery messages are sent to network destinations connected to
the rear or wireless networks. The discovery message destination is defined by the server
configuration. LAN discovery supports IP or hostname addressing methods for the server.
Cellular Discovery Server: When transmitting discovery messages over a cellular network
the information is sent to the public IP address of the discovery server and returned to the
public IP address of the recorder.
Auto Discovery
1. Click Network.
2. Click Auto-Discovery.
3. Enter the LAN and Cellular discovery server information.
4. Click Apply.

MobileView 3208 User Manual 30
Ethernet
The device contains two physical network interface cards (NIC) named Front NIC and Rear NIC. The
Front NIC is dedicated for service and maintenance support and has a fixed IP address (192.168.0.100
/ 255.255.255.0) that cannot be changed. The Rear NIC supports two networks, each have thei own IP
addresses. Use the Ethernet option to configure Rear NIC addressing.
Assign Ethernet Ports
The Front NIC displays and cannot be changed. The Rear NIC information displays in a separate
chart, some items can be edited.
1. Click Network.
2. Click Ethernet.
Camera Network: This network is designated for connection to IP cameras.
Rear Network: This network is designated for connection to user specified backend
networking devices. These may include high end wireless equipment or other systems on
the vehicle.
3. Make any necessary changes to the network including changing the IP address of the interface,
subnet mask of the interface, gateway of the interface, and the HTTP port for the interface.
4. Click Apply.
Wireless Settings
The device supports a radio frequency (RF) option module. When installed, the RF option card
enables wireless communications in client mode. Supported transmit options and security modes
depend upon the specific wireless card included with the RF option module. These are automatically
set when the card is detected during system boot.
WPA Security Modes
The system supports WPA1 and WPA2 personal security modes. To enable advanced, enterprise-level
wireless security, Third party specialty wireless equipment must be added to the system and
connected to the rear network.
Client Settings
Use the wireless client settings to set the configuration settings for wireless client basic settings,
security settings, and network settings.
1. Click Network.
2. Click Wireless Client.
3. Make necessary changes in the Client Settings group.
Wireless Network Mode: Select the wireless network mode for the AP. Choose from
Disabled, Auto, Mixed (2.4GHz Only), and Mixed (5GHz Only).
Wireless SSID: Enter the wireless SSID for the AP.
Wireless Channel: Select the wireless transmission channel for the AP.
Channel Width: Select the wireless transmission channel bandwidth for the AP.
Security Mode: Select the wireless security mode for the AP.
WPA Algorithms: Select the encryption method to use with the selected security mode on
the AP.

MobileView 3208 User Manual 31
Shared Key: Enter the security key to use with selected security mode.
Unmask Key: Check the box to see the shared key. Uncheck the box to replace characters
with *.
Network Type: Select the wireless network mode.
Survey: Click Survey to open a new browser window containing a wireless survey.
4. Click Apply.
Wireless Survey
When equipped with a wireless card, the device supports basic wireless survey capabilities. Pressing
the Survey button opens a dialog displaying information about nearby access points. Highlight the
desired row and press Select to automatically populate client wireless settings.
Wireless Survey
Transmit Limits
Use Transmit limits to identify limits on RTSP connections. The limits include restricting allowed
video streams types, IP channels, and number of concurrent connections.
System Settings
The system miscellaneous setting pages are used to configure a wide range of basic system
parameters.

MobileView 3208 User Manual 32
General System Settings
General system settings display recorder information including network name of the device, language
and video mode, power settings, and LCD option settings.
Data Management
The Data Management option defines data retention and record settings.
Date and Time
Configure date and time settings for the device. Since the recorder is the master time clock, time
settings are pushed to connected surveillance devices such as IP cameras.
To set recorder time, click the Set Time button under the Time Settings. This will open a dialog box
to set the time on the recorder. Time is only updated using this dialog; time is not updated when the
apply button is pressed on the main Date and Time page.
Set Time
Media Setup
Media Setup is used to configure and manage the media used on the recorder. This includes media
inside the media caddy, SD media, and currently attached USB media.
NOTE: Media can only be mounted after the caddy key is in the lock position.
Media Caddy Format: Media format function initializes and prepares media for use in the
recorder. The format operation erases all data on the disk.
Mirror Mode: Mirror mode configures duplicate recordings to both disks in the media caddy.
This results in half the recording storage space but provides redundancy if a drive inside the
media pack fails. If a single drive failure occurs, data remains available on the working drive.
Once important data has been collected, the media caddy should be replaced.
SSD Mode: Solid state drives (SSD) have higher operating temperatures than hard disk drives
(HDD). Select the check box to use the SSD temperature profile instead of HDD temperature
profile.
o SSD Temperature Profile: 0°C to 55°C External Ambient
o HDD Temperature Profile: 0°C to 40°C External Ambient
SD Missing as Storage Error: The SD card is normally installed and contains the recorder
log file. Check the box to trigger a storage error when the card is missing.

MobileView 3208 User Manual 33
Media Setup
MUX
The MUX option provides configuration and management of the multiplexed video output. The MUX
output is used to display available IP video channels. Setting the MUX determines what is normally
displayed on the output. These settings can be temporarily overridden by events.
When setting the tile assignments, only one IP channel can be assigned per available video tile and
tile assignments are individually configured for each tile layout.
1. Click System.
2. Click MUX.
3. In the MUX Setup section, define the video layout for the system and the amount of pause time
when switching cameras.
4. Assign a channel for each tile.
5. Click Apply.
Audio Setup
The Audio Setup option provides access to IP audio output configurations. The settings that display
can be adjusted and saved, but only apply if the associated IP device (camera) is present, enabled, and
supports the audio function.
Serial Ports
The Serial option provides configuration for available serial ports on the recorder. Serial ports are
used to connect additional peripheral devices. Currently the only supported serial device is the J1939
converter. The converter attaches to serial port COM2 using default settings.
CAUTION: Console mode is a special mode is used by MobileView support personnel to
perform advanced diagnostic functions and should not be enabled during normal system
operation. When enabled, the system may function erratically.

MobileView 3208 User Manual 34
Extensions
The Extensions option enables or disables extensions and provides access to detailed extension
configuration parameters. Extensions may have unique configuration layouts.
Note: Refer to System Extensions for more detailed information about available extensions.
Administration
Use the Administration options to administer access and configuration of the device.
User Accounts
The device uses controlled access with user accounts. When logged in using the Supervisor account,
the page provides management of those accounts. Primary functions include add, edit, and delete user
accounts. Also provided are settings to display access denied messages and user lockouts when
incorrect credentials are entered. There are three levels of user accounts; Supervisor, Admin, and
Operator. Each type of user account can be created, edited, and deleted.
1. Click Administration.
2. Click User. Previously created user accounts display.
3. Click Edit to add, delete, or modify a user.
User Levels: Access rights to functions while logged into the device are controlled by user
levels. Access rights assigned to user levels are fixed and cannot be edited. See the Device
Web help page for the latest information about user levels and rights.
Supervisor Account: The supervisor account is a special account reserved specifically for the
management of user accounts.
Logging
The device supports system and user account activity logging in two locations. The main device log
(NVR Log) is written to the SD card located behind the front access door. The card must be present
for the log to exist. A second log is stored on the media caddy (HDD Log). The Logging page
provides access to download the logs.
NVR Log: Contains historical device activity.
HDD Log: Contains historical activity from when the media caddy is installed in a particular
device. When the media caddy is moved to a different device, the existing log is appended
with activity from the new device as it occurs.
Note: Logs have a limited size and the oldest data is overwritten with new data when the log
space size is full.

MobileView 3208 User Manual 35
Logging
Configuration
The device provides flexible configuration management. The Config window provides access to
loading, saving, and resetting configuration to defaults. For remote users, an option to reboot the
device is provided on this page.
Config

MobileView 3208 User Manual 36
Firmware
Update firmware manually on the live device, manually using remote access, or set up an automated
process. Use the Firmware option to update the device to a new version. Upon completion of a
firmware update, the device reboots. Supported configuration settings remain intact. Any unsupported
configuration settings no longer exist and new configuration items are set to their default values.
System Extensions
The following information details configuration parameters for system extensions. Extensions enable
additive functionality on the device beyond generic recording surveillance information.
J1939 Extension
J1939 is a standardized communications network used for transmission of real-time diagnostic and
control information on heavy-duty vehicles. The standard is managed by the Society of Automotive
Engineers (SAE) and supports several thousand public and private message types. The recorder
supports continuous transmission of heath diagnostic information and reception of a limited set of pre-
defined messages, queries, and controls. Select the J1939 Config button on the Extensions page to
open the J1939 configuration page.
Diagnostic Transmission
The device constantly transmits health diagnostics. The following are supported J1939 diagnostics:
DVR General Fault
DVR Temperature Below Operating Range
DVR Temperature Above Operating Range
DVR HDD Temperature Above Operation Range
DVR PCB(s) Temperature Above Normal Operational Range
DVR HDD Caddy Fault or Missing
DVR Network 1 Erratic, Intermittent or Incorrect
DVR Wireless, Erratic, Intermittent or Incorrect
Video Channel 1 Erratic, Intermittent or Incorrect
Video Channel 2 Erratic, Intermittent or Incorrect
Video Channel 3 Erratic, Intermittent or Incorrect
Video Channel 4 Erratic, Intermittent or Incorrect
Video Channel 5 Erratic, Intermittent or Incorrect
Video Channel 6 Erratic, Intermittent or Incorrect
Video Channel 7 Erratic, Intermittent or Incorrect
Video Channel 8 Erratic, Intermittent or Incorrect
Video Channel 9 Erratic, Intermittent or Incorrect
Video Channel 10 Erratic, Intermittent or Incorrect
Video Channel 11 Erratic, Intermittent or Incorrect
Video Channel 12 Erratic, Intermittent or Incorrect
Video Channel 13 Erratic, Intermittent or Incorrect

MobileView 3208 User Manual 37
Video Channel 14 Erratic, Intermittent or Incorrect
Video Channel 15 Erratic, Intermittent or Incorrect
Video Channel 16 Erratic, Intermittent or Incorrect
DVR Input Voltage Above Operation Range
DVR Input Voltage Below Operation Range
Device Fuse Fault or Missing
Device Expansion Module Fault or Missing
POE Module Erratic, Intermittent or Incorrect
HDD Caddy Fan Erratic, Intermittent or Incorrect
Accelerometer Erratic, Intermittent or Incorrect
Device 5VDC Output Below Operation Range
Device 12VDC Output Below Operation Range
Event Saved
Note: DVR, NVR, and Device all refer to the recorder.
Supported Messages
The device supports monitoring of the J1939 network for specific message types listed on the Input
Messages configuration tab. The list of supported messages may be updated using the Message
Database tab.
Supported Queries
The device responds to a fixed set of directed queries from the J1939 network. The following are
supported J1939 queries:
Device Firmware ID by Request
Device Make, Model, and Serial Number Request
Device Date-Time by Request
Device GPS Data by Request
Supported Controls
The device reacts to a single control from the J1939 network. The following are supported J1939
controls:
Set device time to value
Configuration Ports and Mode
The Ports and Mode option sets the J1939 network transmit mode.
Listen Mode: Device monitors the J1939 network but does not transmit any data onto the
network.
Active Mode: Device proactively transmits health status to the J1939 network and respond to
queries from the network,

MobileView 3208 User Manual 38
Configuration Port and Mode
Configuration Input Messages
The Input Messages option allows the user to select messages to monitor on the J1939 network.
Available List: This is a listing of all messages the device is capable of monitoring.
Selected List: This is a listing of messages the device actively monitors.
Message Selection: Select message and use the arrow to move messages between lists.
Note: Messages must be enabled on the network by a source device. For example, to capture
a front door open message, a device must exist on the network that transmits the front door
open message.
Input Messages

MobileView 3208 User Manual 39
Configuration Message Database
The Message Database option allows updates to the list of available messages. This may be required
from time to time to support custom or new message formats. These files must be created by the
MobileView engineering team. Once provided, upload the file by selecting browse and selecting the
file. Select Target USB if the file exists on a memory device connected to the front USB port.
Note: The file name must be named “3208_J1939.MVB”.
Message Database

MobileView 3208 User Manual 40
Chapter 4 Recorder Navigation
The MobileView 3208 recorder uses MobileView Live to navigate recorder operations.
Navigating MobileView Live
Use the home button on your iPhone or tablet to navigate recorder selections.
Main Menu
The top level menu displays a list of choices including Exception, Status, Maintain, and Info.
Some selections have submenus with a list of additional items while others display information or
selectable actions. Continue to touch a selection or press the Home button cancel the current activity.
Exception Menu
The exception menu lists monitored internal and external abnormal recorder conditions. Internal
conditions are displayed on the notifications section of the System Alarms web configuration page.
External conditions display when an alarm buzzer is selected to activate for an event. Active and
unacknowledged conditions are listed on the exception display. All of the available options listed
update automatically each time this menu is selected.
List Interaction
Exceptions are displayed in a list with a selector caret preceding each item. Unacknowledged
exceptions display an asterisk “*” character. If an exception description is too long, pausing on the
item allows the full text description to scroll across the display. If the number of items exceed the
display range, the word “More” displays on the last line. Select the next button on the last item to
display the next screen. Press next on the last item to return to the first screen. Press the back button to
return to the previous screen.

MobileView 3208 User Manual 41
Acknowledge and Silence an Exception
To acknowledge an active exception, navigate to the desired item in the list of items, press the enter
key, the asterisk deletes. If the exception condition is no longer active, it is removed from the
exception list. Continue to acknowledge each item separately.
If the buzzer is active for any of the exceptions, it silences for all exceptions when any active item is
acknowledged. Previously acknowledged exceptions do not cause the buzzer to reactivate until the
system reboots. If a new exception adds, the alarm buzzer reactivates.
1. Press Exception.
2. If an item is already acknowledged, it is not selectable. Choices containing an asterisk (*)
identify exceptions that are not acknowledged.
3. Press on an item to acknowledge an exception.
4. A message of “Success” displays.
5. Press Back to return to the main menu.
Status Menu
Use the status menu to view the status of various conditions the recorder monitors.
Open Status Menu
1. Press Status.
2. Status choices display.
Video Status
The video status menu displays active and receiving video channels.
IPC-ACT: This is a list of active IP and Analog camera channels. These channels match the
device access list displayed on the cameras section of the Manage IP Devices web
configuration page.
IPC-RCV: This is a list of IP and Analog camera channels where the device is receiving
data. This matches the online column from the device access list shown on the Cameras
section of the Manage IP Devices web configuration page.
A or I: The upper case "A" or "I" indicates the video channel is Analog or IP and is active or
received.
x: The lower case “x” indicates the IP channel is not active or not receiving.
Opening the Video Status Menu
1. After opening Status, press Video to open video status.
2. The video status displays and cannot be changed.
Wireless Menu
The wireless status menu displays information related to wireless devices and functions of the device.
GPS: Provides current state of GPS signal.
o No Module: GPS module not detected (failure condition)
o Sat Lock: Positional information being received

MobileView 3208 User Manual 42
o No Service: Positional information not being received
WIFI: Provides current state of Wi-Fi signal.
o No Module: Wireless module not detected
o Not Enable: Wireless module not enabled
o Failed: Wireless module not working properly
o Scanning: Wireless client scanning for access point
o Connected: Wireless client connected to access point
Mode: Provides current operational mode of Wi-Fi module.
o Not Enable: Wireless module not enabled
o Client Mode: Wireless module in client mode
Opening the Wireless Menu
1. Press Status.
2. Press Wireless to view the wireless status.
3. The status displays, automatically updates and cannot be changed.
Media Menu
The media status menu displays information related to surveillance and user storage media connected
to the device internally and externally. Available storage devices are listed using a shortened name.
Both SD and USB have standardized meanings.
The following information displays.
SD (Secure Digital): Represents media inserted into SD slot on front of device
USB (Universal Serial Bus): Represents media inserted into USB slot on front of device
EHD (External Hard Drive): Represents media connected to eSATA slot on front of device
MC1 (Media Caddy 1): Represents caddy inserted into main device media bay
Each status condition displays next to the media type:
None: Storage device is not installed
Error: Storage device is working and has a problem
OK: Storage device is working and can be used
Fail: Storage device is not functioning
Opening the Media menu
1. Press Status.
2. Press Media to open the storage status.
2. Scroll to a media option in the list and select to display extended information about the media.
G Sensor Menu
The G-Sensor status menu displays the current access values of the built-in accelerometer (gravity
sensor). The values are represented using the axis.
X: This is defined as side to side on the device (0G is normal)
Y: This is defined as front to back on the device (0G is normal)
Z: This is defined as top to bottom on the device (+1G is normal)

MobileView 3208 User Manual 43
Opening the G Sensor Menu
1. Press Status.
2. Press G Sensor to open the G sensor status.
3. The status displays, automatically updates, and cannot be changed.
Alarm Menu
The alarm status menu dynamically displays the current state of digital and analog inputs monitored
by the device.
Digital: Monitored input is physically inactive/OFF (L) or active/ON (H)
Analog: Current voltage level of monitored input (range = 0VDC – 30VDC)
CAUTION: Digital and analog inputs use a voltage range input. Each has expected operational
values and maximum allowed values as shown.
Digital Input
o Inactive/OFF State: 0VDC – 5VDC
o No State Guarantee: 5VDC – 6VDC
o Active/ON State: 6VDC – 36VDC
o Max allowed voltage = 40VDC
Analog Input
o Voltage Range: 0VDC – 36VDC
o Max allowed voltage = 40VDC
Opening the Alarm Menu
1. Press Status.
2. Press Alarm to open the alarm status.
3. Alarm status displays and cannot be changed. The status automatically updates.
Other Menu
The other status menu dynamically displays general information monitored by the device.
• PWR: Main input voltage level
• IGN: State of the ignition input
• Caddy: State of media caddy lock
o None: Media caddy does not exist
o Lock: Caddy lock is locked
o Unlock: Caddy lock is unlocked
Opening the Other Menu
1. Press Status.
2. Press Other.
Maintain Menu
Use the maintain menu to perform maintenance related tasks without logging in.

MobileView 3208 User Manual 44
WARNING: Although limited, maintain actions can result in partial or complete data loss if applied
incorrectly. Ensure the recorder is housed in a locked enclosure or other area accessible to authorized
personnel. If this is not possible, deselect the check box on the System: General Web Configuration
page under MobileView Live Setting and actions will not display.
Opening Maintain Menu
1. Press Maintain.
2. Press a selection.
Export CFG Menu
The exportCFG action is used to save a copy of the current system configuration. It is saved to the
root directory of the memory device attached to the front USB port. The file name is set to
“DeviceName_DeviceModel_mm-dd-yyyy.cfg” An error message displays if a device is not attached.
If the media is not compatible with the device, it should be formatted using the Media action.
Note: The keys lock and do not respond to any operation during the exporting process.
Import CFG Menu
Connect a removable USB device containing a compatible configuration to the devices USB port. The
importCFG action is used to load and apply a new configuration to the device from the root directory
of the memory device attach to the front USB port. Press ImportCFG menu to replace the current
local configuration file. Select a file from the list of available configuration files.
Note: The keys lock and do not respond to any operation during the importing process.
Export Log Menu
Connect a removable USB device to the USB port. The export log action is used to save a copy of the
device log to the root directory of the USB device in comma separated variable (CSV) format. Press
ExportLog menu to save the device log to the removable media. Open this file in Notepad or Excel.
The saved file name format is fixed as “DeviceName_DeviceModel_mm-dd-yyyy.csv.” If no device
is attached, an error message displays. If the media is not compatible with the device, it may be
formatted using the Media action.
Media Menu
The media action is used to formats and displays the current status of storage devices attached to the
device. Displayed status types are defined in the status menu section under media. To format a media,
press on the desired media type.
Select one of the following to format that device.
SDF: SD memory device
USB: USB memory device
EHD: eSATA expansion memory device
MC1: Media Caddy 1
A confirmation displays before format operations complete.

MobileView 3208 User Manual 45
WARNING: Format deletes all data on the target device. Once started, the operation cannot be halted
and the operation cannot be undone.
Upgrade Menu
Connect a removable USB device containing a compatible configuration to the device USB port. The
upgrade action causes the device to load and apply a new operational firmware to the device. Select
the file to load from the connected USB drive. Press Upgrade to replace the current local
configuration file with the new upgrade. The upgrade file must be located in the root directory of the
media file. Browse to locate the file and press the name of the file.
Shutdown
Use the shutdown option to immediately close all activity and initiate an orderly shutdown. The
function is used to bypass the timed shutdown sequence during maintenance operation.. If startup
conditions are present, the device restarts.
Info Menu
Use the Info option to display limited information about low level system firmware.
The topics are:
SN: Displays device serial number of the recorder
FW: Displays device embedded recorder firmware version
BD: Embedded firmware build date
MV: Displays firmware build date
IR: Displays IR control ID

MobileView 3208 User Manual 46
Chapter 5 Hardware
Hardware Specifications
The following specifications are detailed in this section:
Video surveillance
Digital input recording
Network and interfaces
Physical
Environmental
Electrical
Video Surveillance
Camera Channels 8 Channels Maximum Limit
Frame Rate IP: Camera Dependent
Recording Resolution IP: Camera Dependent
Incoming Bandwidth 40Mbps (5Mbps each IP camera)
Video Output 1CH CVBS Output, Mirroring, Aviation
Connector, 1.0 Vp-p, 75 Ω;
PAL 704*576 , NTSC 704*480
1x VGA with configurable resolutions
Audio 1 mono out
Storage Solution Caddy supporting single or dual 2.5" media
(HDD/SSD)
HDD Insertion Removable
Caddy Interchangeable, drive caddy with USB port
Geolocation and Positioning GPS based tracking
Clock sync methods Via GPS or network timeserver
Download Options Manual or automated via wireless
Field Upgradable Software and Firmware update via USB memory
device
Digital Input Recording
Alarm Input 8 Digital inputs
Network and Interface
NIC 2

MobileView 3208 User Manual 47
Standard Protocols DHCP, NTP, DNS
Wireless Integrated 802.11 AC, AN, BGN Wireless Client
Antenna
2 Wi-Fi SMA on pluggable module
1 GPS SMA on NVR
USB/eSATA 1 USB3.0, 1 eSATA
Serial Port 1 RS232, 1 RS422, Aviation Connector
Physical
Dimensions 8" W x 4" H x 11.42" D
Weight ~ 15 lbs.
Environmental
Temperature -20ºC – 55ºC (-4°F - 131°F)
Humidity 10% – 95%
Electrical
Power Input: DC +9V~ +36V;
Output: DC +12V/1A, +5V/2A
Power Consumption 25W Typical (Recorder with IP cameras)
System Maintenance
To keep the system working properly, it is recommended to routinely check the following:
Voltage
Temperature
Unobstructed access
Rear panel connectors tight and secure
Access to door
Clean with damp cloth

MobileView 3208 User Manual 48
Chapter 6 Use Cases
The following scenarios may be useful in a work environment.
Screen Snaps
Screen snaps of each video tile are available from the Video Live page. A screen snap records the
visible items displayed at a given time. These are especially useful when setting up cameras with a
customer and deciding on the angle of the camera. Once the camera is set in place, take a screen snap
of the image display. Give the customer a print out of the snap and verify this is what the customer
expects to view from the camera before completing the setup process.
Camera Device List
Click Camera and Manage IP Devices. All of the cameras expected to be found should display in
the list. If any new cameras are set to defaults, they can be easily found and added to the list by using
the finder utility. Click Finder. On the Device/Finder window, click Refresh. Any new cameras
display in the list. If a camera is already in the list, it does not display in the finder.
Deciding Video Stream
When choosing a type of video stream to select, we recommended using Alternate. If the customer
prefers still shots, alternates are sufficient. If they are requesting video, select Primary or Alarm
stream.
Install a Wireless Card
A wireless card comes with a plate. Using a screwdriver, remove the plate and install the wireless
card.

MobileView 3208 User Manual 49
Glossary
DHCP: DHCP is the acronym of Dynamic Host Configuration Protocol, and it is one of the
TCP/IP protocol stacks. It assigns the dynamic IP address to the host on the network.
Dual Stream: Dual stream is a technology recording high resolution video locally while
transmitting a lower resolution stream over the network.
eSATA: eSATA is the acronym for External Serial Advanced Technology Attachment and is an
extension to the Serial ATA standard that enables SATA drives to be attached externally.
GNSS: A satellite navigation system is a system of satellites providing autonomous geo-spatial
positioning with global coverage. It allows small electronic receivers to determine their location
(longitude, latitude, and altitude) to high precision (within a few meters) using time signals
transmitted along a line of sight by radio from satellites. The signals allow the electronic receivers
to calculate the current local time to high precision, and time synchronization. A satellite
navigation system with global coverage may be termed GNSS (Global Navigation Satellite
System).
GPS: GPS (Global Positioning System) is a space-based global navigation satellite system
providing location and time information in all weather and anywhere on or near the earth, having
an unobstructed line of sight of 4 or more GPS satellite.
G-Sensor: (Gravity-sensor) can sense the change of the accelerated force, shaking, free falling
and lifting. Those changes of the accelerated force are sensed by the G-sensor by means of
electrical signals, and link certain action according to the changes of the electrical signals. When
applied in the hard disk protection, G-Sensor can check the current status of the hard disk in case
of the affection of the R/W function by the sudden change of the accelerated force.
NTP: NTP is Network Time Protocol, and it is a protocol synchronizing the computer time.
NVR: Network video recorder.
USB: Acronym for Universal Serial Bus. USB is a plug-and-play serial bus standard to interface
devices to a host computer.
Wi-Fi: Wi-Fi is a mechanism of the wireless connecting electronic devices. A device enabled
with Wi-Fi including PC, video game console, can connect to the internet using a wireless
network access point.

MobileView 3208 User Manual 50

Related Documents