1 Mobile Dyno How To DirectLink Kit will provide the tuner with the tools and necessary data to maximize the potential of the installed upgrades. The system is designed for Harley-Davidson® and Buell® Fuel Injection equipped motorbikes. This Guide is intended to answer basic Mobile Dyno questions and to act as a Quick Start Guide. It is not intended to be encyclopedic on the tuning process - only to answer basic questions about this function. This Guide assumes that you already have experience with the DirectLink software and tuning process.

Welcome message from author
This document is posted to help you gain knowledge. Please leave a comment to let me know what you think about it! Share it to your friends and learn new things together.
Transcript

1
Mobile Dyno How To
DirectLink Kit will provide the tuner with the tools and necessary data to maximize the potential of the installed upgrades. The system is designed for Harley-Davidson® and Buell® Fuel Injection equipped motorbikes.
This Guide is intended to answer basic Mobile Dyno questions and to act as a Quick Start Guide. It is not intended to be encyclopedic on the tuning process - only to answer basic questions about this function. This Guide assumes that you already have experience with the DirectLink software and tuning process.

2
This Guide assumes that you already have experience with the DirectLink software and tuning process
IF YOU ARE NOT FAMILIAR WITH THE PROCESS, PLEASE
READ THE DIRECTLINK MANUAL LOCATED ON OUR WEBPAGE UNDER THE DIRECTLINK DOWNLOAD
REMEMBER, YOUR TUNE IS GOING TO BE AS GOOD AS THE
INFORMATION PROCESSED

3
Connect the DirectLink Hardware Connect the DirectLink Hardware to your motorcycle: Connect the DirectLink (Flash Tuner) and the motorcycle's data link connector using the Data link connector cable (4 pin or 6 pin) in the kit. Location of Data link connector:
Touring models: Underneath the right side cover. (2008-2012 Underneath the left side cover)
Softail models: Underneath the seat. Dyna models: Underneath the left side cover. Sportster models: Underneath the left side cover. VRSC: Underneath the front side neck cover.
TO AVOID DAMAGING THE CABLES, KEEP THEM CLEAR OF THE EXHAUST
Starting your DirectLink (Flash-Tuner) software
Connect the DirectLink hardware to the computer using the USB cable in the kit.
Insert the USB Hardware Key into your computer’s second USB port to use the DirectLink software.

4
Starting your DirectLink (Flash-Tuner) software: Run the program by clicking "DirectLink Race Performance" icon on the desktop.
Click "Accept". Select your language of preference.
Click on ECU Info

5
Save Original Map.
Name this file with your customer’s name

6
Configure VCM for Mobile Dyno Select the “Config VCM” button
Click “YES”

7
Click “OK”

8
Load the starter map File > Open Calibration → Modified Select the correct model → Select the map that more closely resembles the
modifications on the motorcycle Load this map and name it “_START”

9
After the status bar has reached 100, check for the green PASS to ensure that all operations have concluded successfully.
Follow all on-screen instructions
If the process fails, you will get a “FAIL”. Repeat the process and if it FAILS again, PLEASE refer to the DirectLink manual on what to do. Do not disconnect the USB Hardware Key. This could damage the key.
Unplug the USB cable from the VCM

10
Your VCM is now ready to log data while you ride. The engine should already be warmed up before you go for the data logging ride. It can hold a maximum of 15 minutes of data. NOTE: If the engine is not warmed up, during the warm up stage
disconnect the VCM from the motorcycle’s Deutz connector. You don’t want this data to be logged.
Once the engine has been warmed up, connect the VCM to the
motorcycle’s Deutz connector and go for your data logging ride. The memory will record 15 minutes of data.
After you’ve completed your ride, connect the VCM to the computer. Open the “EDIT-TABLE” tab and select the Air-Fuel table

11
Select the “Closed Loop” operation area highlighted
Set it at a value lower than “14.0”, click “Apply”, then click “OK”

12
Select Strip Chart Go to View > Strip Chart or just click Strip Chart icon. Go to Options > Mobile Dyno or click on the “Mobile Dyno” button
Open front and rear tables. We recommend to setting it up like this:

13
Save the log. NOTE: you cannot change the logged data’s name
You can now go back to the strip chart and run the logged data. Remember to select if you used the “Motorcycle O2” sensors or “ External O2” sensors

14
At this stage, NO changes are being made to the starter map loaded earlier. It is only
showing you where it made changes (light blue cells)
APPLY these changes to the starter map by clicking APPLY on both the Front and Rear tables
15
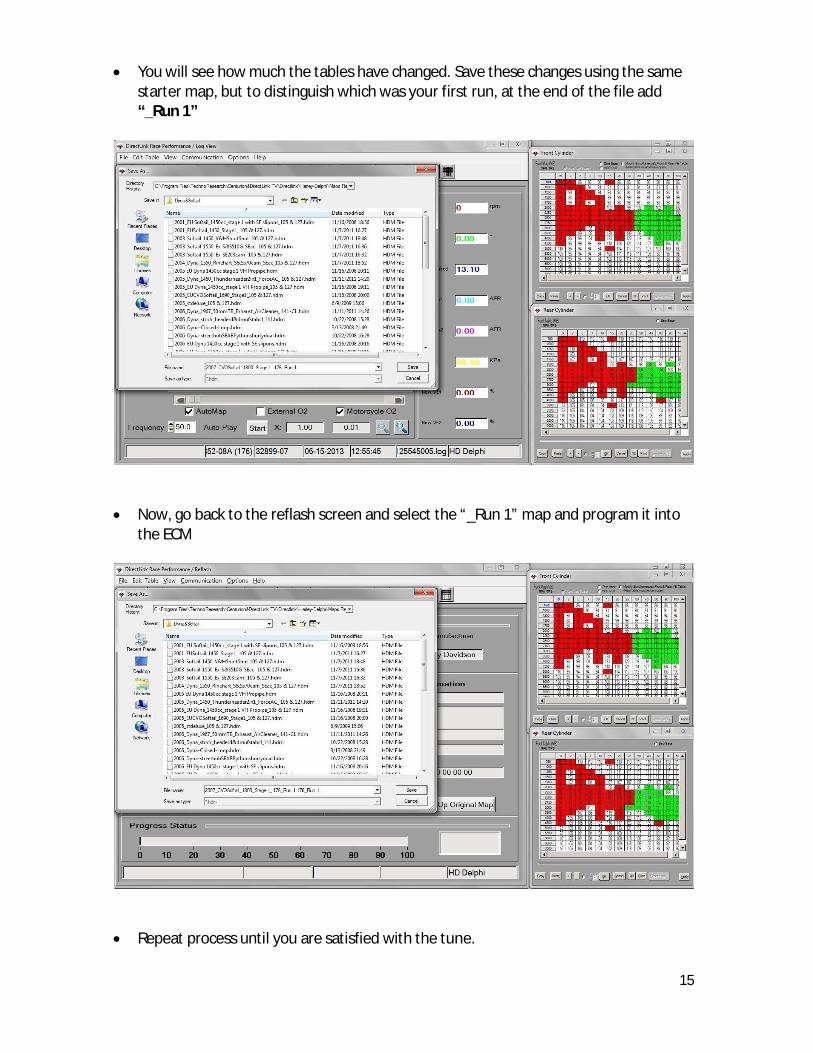
You will see how much the tables have changed. Save these changes using the same
starter map, but to distinguish which was your first run, at the end of the file add “_Run 1”
Now, go back to the reflash screen and select the “_Run 1” map and program it into the ECM
Repeat process until you are satisfied with the tune.
16
This Guide assumes that you already have experience with the DirectLink software and tuning process
IF YOU ARE NOT FAMILIAR WITH THE PROCESS, PLEASE
READ THE DIRECTLINK MANUAL LOCATED ON OUR WEBPAGE UNDER THE DIRECTLINK DOWNLOAD
REMEMBER, YOUR TUNE IS GOING TO BE AS GOOD AS THE
INFORMATION PROCESSED
Related Documents