1 Mobile Application You can remotely monitor all channels of the DVR through your mobile device. The required mobile application is from the DVR manufacturer and it supports mobile OS for both Windows mobile 5.0 above and Symbian. Please confirm that the network function of the DVR has been activated before mobile connection: Main menu Network Setup HTTP Setup Check the “Enable HTTP Server”. 1 Mobile Application, Installation and Operation for Symbian System Mobile Device : Nokia, Sony Ericsson…etc. System requirement : GPRS/ 3G must be provided from your telecom service. Mobile device that supports GPRS/ 3G protocol and Java cldc1.0/midp 2.0 environment. 1.1 Mobile Application Installation Please follow the steps shown below to perform the mobile device surveillance function. Step 1: You need to install the mobile application called “DVRH264.jar” into your mobile device. The application can be downloaded from the CD that packed with DVR through Bluetooth or USB cable. Step 2: Install the application software “DVRH264.jar” in your mobile device. It might be installed automatically after downloading; otherwise, select it from the downloading file for installation.

Welcome message from author
This document is posted to help you gain knowledge. Please leave a comment to let me know what you think about it! Share it to your friends and learn new things together.
Transcript

1
Mobile Application You can remotely monitor all channels of the DVR through your mobile
device. The required mobile application is from the DVR manufacturer and
it supports mobile OS for both Windows mobile 5.0 above and Symbian.
Please confirm that the network function of the DVR has been activated
before mobile connection: Main menu Network Setup HTTP Setup
Check the “Enable HTTP Server”.
1 Mobile Application, Installation and Operation for Symbian System
Mobile Device: Nokia, Sony Ericsson…etc.
System requirement:
GPRS/ 3G must be provided from your telecom service.
Mobile device that supports GPRS/ 3G protocol and Java cldc1.0/midp 2.0
environment.
1.1 Mobile Application Installation
Please follow the steps shown below to perform the mobile device surveillance function.
Step 1: You need to install the mobile application called “DVRH264.jar” into
your mobile device. The application can be downloaded from the CD that
packed with DVR through Bluetooth or USB cable.
Step 2: Install the application software “DVRH264.jar” in your mobile
device. It might be installed automatically after downloading; otherwise,
select it from the downloading file for installation.

2
1.2 Mobile Application Operation
After the installation, enter Program Files menu in your mobile device to run a file called “H264 MIDlet”. Select “Menu” at the right lower corner of your mobile screen, 4 commands, Login Add Modify and Delete, will show up.
1.2.1 Add New Login DVR
To log into the DVR, you need to enter the logging-in DVR information. Find
“Add” under the “Menu” then enter logging-in DVR’s IP address, Port
number, account name and password. Press “Add” to save this information
after entering.

3
1.2.2 Logging onto the DVR
Use the Login command to log onto a DVR and monitor live images. If
multiple DVRs have been added to the mobile application, they will be
listed by name, you can select one to log onto.
A confirmation message might show up for a network charge before
connection. The fee rate will depend on the telecom company and package
fee that you go with.
Network connectivity will take some time. It will be affected by networking
environment and bandwidth flow. Live image will show up after a
successful connection.

4
1.2.3 Modify the Login Information of the DVR
You can use “Modify” command to change the login information of the DVR.
The dialogue is identical to that of “Add” command.
PS. Live images can not be displayed in your mobile when the recoding is set to off on
local DVR.

5
1.2.4 Delete the Login Information of the DVR
“Delete” command can be used to remove the DVR information when it is
no longer useful. Select the DVR on the name list, then choose “Delete”.
1.3 Live Monitoring Operation
This paragraph describes some operation under the LIVE monitoring mode
in your mobile device.
1.3.1 Scroll the Image
You can use the keypad on your mobile device to scroll the image when it is
oversized.
Key Action
2 Scroll Up
4 Scroll Left
6 Scroll Right
8 Scroll Down
1.3.2 Image Quality Setup
Select “Quality” under the “Menu”. There will be 5 levels for you to choose:
Low, Normal, Middle, High and Highest.

6

7
1.3.3 Channel Display
Select “Single” under the “Menu”, all channels will be listed for you to choose from.
1.3.4 Size of Image
PS. Live images can not be displayed in your mobile when the recoding is set to off in
local DVR.

8
The screen size of different mobile device can be different. You can select
“Size” under the “Menu” to choose from “Original” or “Fit Screen” to resize
the display image.
Item Description
Original The image will be shown in original size.
Fit Screen The image will be shown to fit the screen.

9
1.3.5 Rotate the image
Live image can be displayed by normal image or rotate to 90 degrees.
Select “Rotate” under the “Menu” for this operation.
1.3.6 Alarm

10
This application will not only allow user to remotely monitor through mobile
device but receive the alarm that has been triggered by events such as
Motion Detected, Sensor Triggered and Vloss.
Select the “Alarm” under the “Menu” to switch this function on or off.
Item Description
Motion detected
Sensor triggered
Video loss

11
2 Mobile Application Installation and Operation for Windows Mobile System
There are two kinds of applications for Window Mobile OS: JPEG compression and H.264 compression. The one for H.264 compression can transfer both audio and video signal to your mobile device.
System Requirement:
Mobile device OS Windows mobile system 5.0 and above.
Mobile device need to support internet: GPRS 3G Wifi… etc.
2.1 Mobile Application Installation
Please follow the steps shown below to perform the mobile device surveillance function on your mobile device (mobile phone, PDA ...etc). Step 1: The mobile application called “Jrviewer.CAB” and “H264Pocket.CAB” need to be installed in your mobile device. The application can be downloaded directly from the manufacturer’s website to your mobile or; alternatively, it can be transferred to your mobile device from the CD that is packed with DVR through Bluetooth or USB cable. Step 2: Install the application software “Jrviewer.CAB” and “H264Pocket.CAB” in your mobile device, two folders named ”Jrviewer” and “H264Pocket” will be created. It might be installed automatically after downloading; otherwise, select it from the downloading file for installation.

12
2.2 Mobile Application Operation
After the installation, enter the Program Files menu in your mobile device to
run files named “Jrviewer” and “H264Pocket”.
This application allows you to remotely logon and monitor the DVR. Press
“OK” to bring up the operation menu; see chart the below for further
information.
Item Function Description
Add Add login DVR Enter DVR’s name, IP address, Port, Account user,
Password then press “OK”
Login Logon DVR
Choose the DVR that you’d like to logon , then press
“OK”
PS. Live image can not be displayed in your mobile
when the recoding is off.
PS. Network connectivity will be affected by
networking environment and bandwidth
flow. The fee rate will depend on the telecom
company and package fee you go with.
Modify Modify Login DVR Choose DVR, press “Modify”, and press”OK” to save
change.
Delete Delete Login DVR Choose DVR and press”Delete” to delete the DVR info.

13
The operation of Jrviewer The operation of H264Pocket
2.3 Operation under the LIVE monitoring
After successful logon to the DVR, press “View” to bring up operation menu. You can choose the channel, resize the image, choose the quality, and turn On/ Off the status bar, alarm, full screen display….etc
2.3.1 jrviewer Operation under the LIVE monitoring
14
Item Function Description
Channel 1~16
Display for CH 1~16
Choose from CH1~16 to display
Screen Size of image
Original image size as original
Stretch stretch the size as full screen
Fit: resize the image to fit the screen
Quality Quality Change the quality of image. Please note the better quality, the slower data transfer rate.
Status Bar Status Bar
Graphical icons indicated below will be shown on the status bar if there is event such as motion detected, sensor triggered and video loss to be detected on any channel. You can also uncheck the “Status Bar” to inactivate this function.
Icon Description
Motion Detect
Sensor Trigger
V-Loss
Alarm Alarm Alarm through your mobile device can be triggered if there is event to be detected. You can also uncheck the “Alarm” under the “View” to inactivate this function.
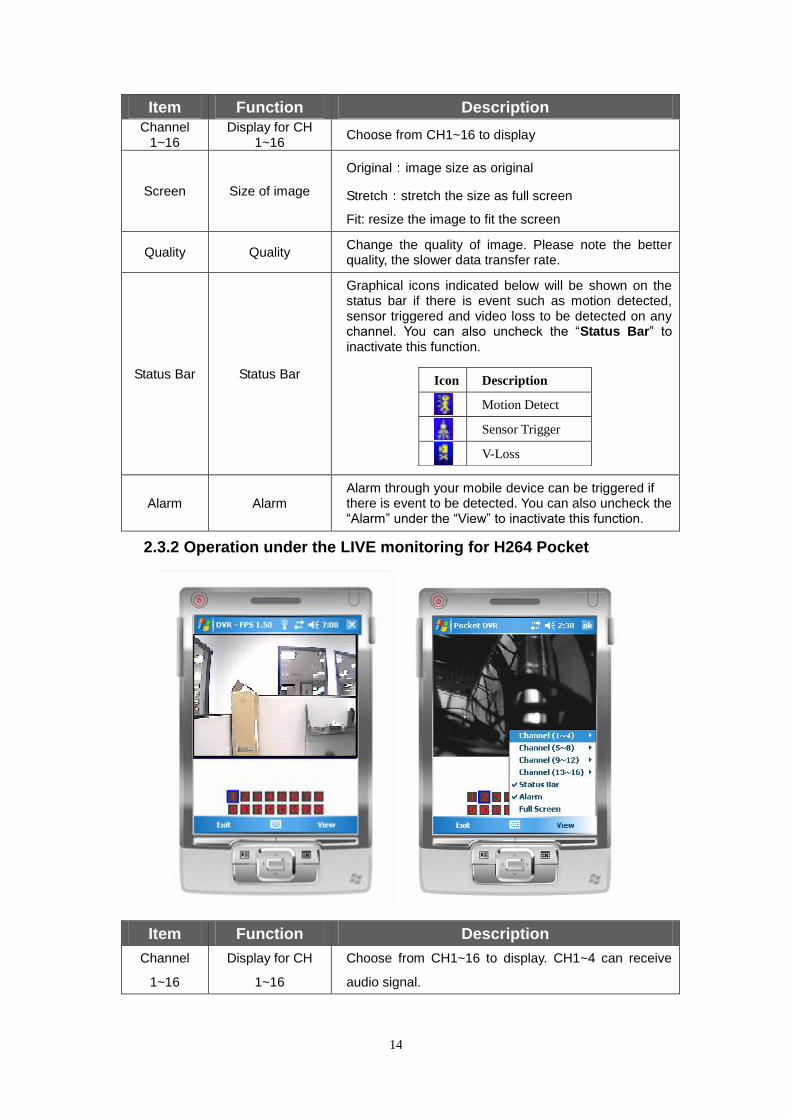
2.3.2 Operation under the LIVE monitoring for H264 Pocket
Item Function Description
Channel
1~16
Display for CH
1~16
Choose from CH1~16 to display. CH1~4 can receive
audio signal.
15
Status Bar Status Bar
Graphical icons indicated below will be shown on the
status bar if there is event such as motion detected,
sensor triggered and video loss to be detected on any
channel. You can also uncheck the “Status Bar” to
inactivate this function.
Icon Description
Motion Detect
Sensor Trigger
V-Loss
Alarm Alarm
Alarm through your mobile device can be triggered if
there is event to be detected. You can also uncheck
the “Alarm” under the “View” to inactivate this function.
Full Screen Full screen
display
Check this function to choose one channel to display
in full screen.
Related Documents