EMAIL: [email protected] WEB: corsair.com BLOG: corsair.com/blog FORUM: forum.corsair.com FACEBOOK: facebook.com/Corsair TWITTER: twitter.com/Corsair YOUTUBE: youtube.com/Corsair USA and CANADA: (888) 222-4346 | INTERNATIONAL: (510) 657-8747 | FAX: (510) 657-8748 corsair.com ML120 PRO RGB ML120 PRO RGB 47100 Bayside Parkway • Fremont • California • 94538 • USA MAGNETIC LEVITATION FANS WITH CUSTOMIZABLE LIGHTING MODES AND COLORS © 2017 CORSAIR COMPONENTS, Inc. All Rights Reserved. The CORSAIR logo is a registered trademark, The CORSAIR logo is a registered trademark of CORSAIR in the United States and/or other countries. All other names and products are trademarks and property of their respective owners. Printed in China. 49-001633 AA

Welcome message from author
This document is posted to help you gain knowledge. Please leave a comment to let me know what you think about it! Share it to your friends and learn new things together.
Transcript

EMAIL: [email protected]
WEB: corsair.com
BLOG: corsair.com/blog
FORUM: forum.corsair.com
FACEBOOK: facebook.com/Corsair
TWITTER: twitter.com/Corsair
YOUTUBE: youtube.com/Corsair
USA and CANADA: (888) 222-4346 | INTERNATIONAL: (510) 657-8747 | FAX: (510) 657-8748
corsair.com
ML120 PRO RGB
ML120 PRO RGB
47100 Bayside Parkway • Fremont • California • 94538 • USAMAGNETIC LEVITATION FANS WITH CUSTOMIZABLE LIGHTING MODES AND COLORS© 2017 CORSAIR COMPONENTS, Inc. All Rights Reserved. The CORSAIR logo is a registered trademark, The CORSAIR
logo is a registered trademark of CORSAIR in the United States and/or other countries. All other names and products are trademarks and property of their respective owners. Printed in China. 49-001633 AA

English .............................................. 1 – 6
Français ..........................................7 – 12
Deutsch ........................................ 13 – 18
Español ........................................ 19 – 24
Россию ........................................... 25 – 30
中文 ................................................ 31 – 36

2
ML120 PRO RGB FANTable Of Contents
1
Congratulations
The CORSAIR ML120 PRO RGB PWM fan combines the performance of a magnetic levitation bearing with vibrant RGB lighting. Four hub-mounted RGB LEDs output a vivid blast of light and color, making it easy to match your system’s style, and with a 400 RPM to 1,600 RPM control range, it’s easy to make sure your PC is seen, but not heard.
ML PRO RGB Kit Contents
Three Fan Kit
Fans 3Fan Hub 1CORSAIR Lighting Node PRO 1Mounting Screws 12Mounting Strips 2
Single FanFan 1Mounting Screws 4
Congratulations ......................................................................................................................................2
ML PRO RGB Kit Contents ..................................................................................................................2
Installation ................................................................................................................................................3
Lighting Node PRO Installation .......................................................................................................4
LED Hub Installation .............................................................................................................................5
Download CORSAIR LINK ..................................................................................................................6
4
ML120 PRO RGB FANML120 PRO RGB FAN
3
Installation Lighting Node PRO Installation
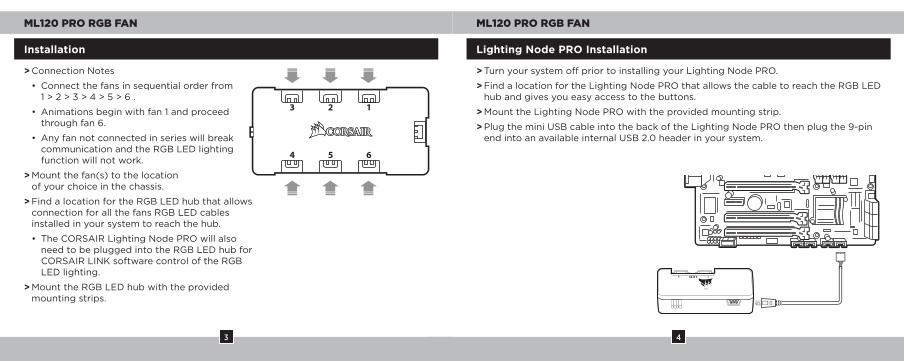
> Connection Notes
• Connect the fans in sequential order from 1 > 2 > 3 > 4 > 5 > 6 .
• Animations begin with fan 1 and proceed through fan 6.
• Any fan not connected in series will break communication and the RGB LED lighting function will not work.
> Mount the fan(s) to the location of your choice in the chassis.
> Find a location for the RGB LED hub that allows connection for all the fans RGB LED cables installed in your system to reach the hub.
• The CORSAIR Lighting Node PRO will also need to be plugged into the RGB LED hub for CORSAIR LINK software control of the RGB LED lighting.
> Mount the RGB LED hub with the provided mounting strips.
> Turn your system off prior to installing your Lighting Node PRO.
> Find a location for the Lighting Node PRO that allows the cable to reach the RGB LED hub and gives you easy access to the buttons.
> Mount the Lighting Node PRO with the provided mounting strip.
> Plug the mini USB cable into the back of the Lighting Node PRO then plug the 9-pin end into an available internal USB 2.0 header in your system.
6
ML120 PRO RGB FANML120 PRO RGB FAN
5
Download CORSAIR LINKLED Hub Installation
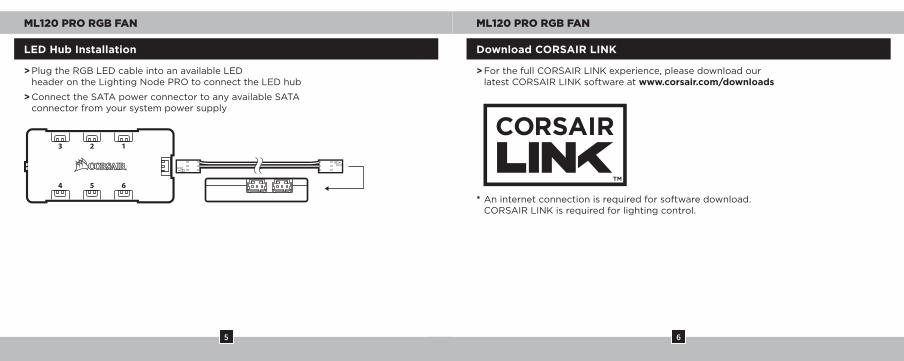
> Plug the RGB LED cable into an available LED header on the Lighting Node PRO to connect the LED hub
> Connect the SATA power connector to any available SATA connector from your system power supply
> For the full CORSAIR LINK experience, please download our latest CORSAIR LINK software at www.corsair.com/downloads
* An internet connection is required for software download. CORSAIR LINK is required for lighting control.
8
ML120 PRO RGB FAN
7
Table Des Matières
Félicitations ..............................................................................................................................................8
Contenu du kit ML PRO RGB .............................................................................................................8
Installation ................................................................................................................................................9
Installation du Lighting Node PRO ............................................................................................. 10
Installation du hub LED .................................................................................................................... 11
Télécharger CORSAIR LINK ............................................................................................................ 12
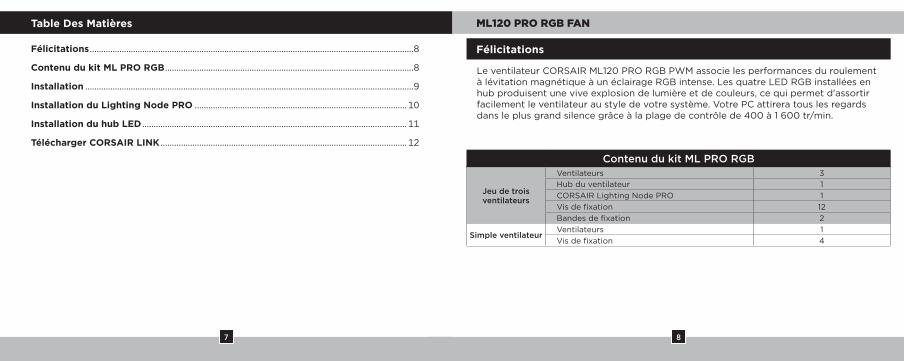
Félicitations
Le ventilateur CORSAIR ML120 PRO RGB PWM associe les performances du roulement à lévitation magnétique à un éclairage RGB intense. Les quatre LED RGB installées en hub produisent une vive explosion de lumière et de couleurs, ce qui permet d'assortir facilement le ventilateur au style de votre système. Votre PC attirera tous les regards dans le plus grand silence grâce à la plage de contrôle de 400 à 1 600 tr/min.
Contenu du kit ML PRO RGB
Jeu de trois ventilateurs
Ventilateurs 3Hub du ventilateur 1CORSAIR Lighting Node PRO 1Vis de fixation 12Bandes de fixation 2
Simple ventilateurVentilateurs 1Vis de fixation 4

10
ML120 PRO RGB FANML120 PRO RGB FAN
9
Installation Installation du Lighting Node PRO
> Remarques sur la connectique
• Connectez les ventilateurs dans l'ordre séquentiel : 1 > 2 > 3 > 4 > 5 > 6.
• Les animations commencent par le ventilateur n°1 et continuent jusqu'au ventilateur n°6.
• Un ventilateur non connecté en série entraînera l'arrêt de la communication et de la fonction d'éclairage LED RGB.
> Montez les ventilateurs à l'emplacement de votre choix dans le châssis.
> Trouvez pour le hub RGB LED un emplacement suffisamment spacieux pour connecter tous les câbles des LED RGB des ventilateurs installés dans votre système.
• Le CORSAIR Lighting Node PRO devra également être branché au hub RGB LED pour que le logiciel CORSAIR LINK puisse contrôler l'éclairage RGB LED.
> Installez le hub RGB LED à l'aide des bandes de fixation fournies.
> Éteignez votre système avant d'installer le Lighting Node PRO.
> Trouvez un emplacement pour le Lighting Node PRO. Il doit être suffisamment spacieux pour que le câble atteigne le hub RGB LED et pour que vous ayez un accès facile aux boutons.
> Installez le Lighting Node PRO à l'aide de la bande de fixation fournie.
> Branchez le câble mini-USB sur l'arrière du Lighting Node PRO, puis branchez l'extrémité à 9 broches sur un cavalier USB 2.0 interne disponible de votre système.

12
ML120 PRO RGB FANML120 PRO RGB FAN
11
Télécharger CORSAIR LINKInstallation du hub LED
> Branchez le câble RGB LED sur un cavalier LED disponible sur le Lighting Node PRO pour connecter le hub LED
> Connectez la fiche SATA sur une prise SATA disponible de l'alimentation de votre système
> Pour profiter de tout le potentiel de CORSAIR LINK, téléchargez la dernière version à l'adresse www.corsair.com/downloads
* Une connexion Internet est nécessaire pour télécharger le logiciel. CORSAIR LINK est indispensable pour contrôler l'éclairage.

14
ML120 PRO RGB FAN
13
Inhaltsverzeichnis
Herzlichen Glückwunsch .................................................................................................................. 14
ML PRO RGB Kit-Komponenten................................................................................................... 14
Installation ............................................................................................................................................. 15
Installation des Lighting Node PRO ........................................................................................... 16
Installation der LED-Nabe ............................................................................................................... 17
CORSAIR LINK herunterladen ....................................................................................................... 18
Herzlichen Glückwunsch
Der CORSAIR ML120 PRO RGB PWM-Lüfter vereint die Performance eines Magnetschwebelagers und eine lebendige RGB-Beleuchtung. Vier RGB-LEDs auf der Rotornabe sorgen für eine lebendige Beleuchtung und Farbe und erleichtern die Anpassung an den Stil Ihres Systems. Dank des Regelbereichs von 400 bis 1.600 Umdrehungen pro Minute können Sie ganz einfach sicherstellen, dass Ihr PC nur optisch auffällt, nicht akustisch.
ML PRO RGB Kit-Komponenten
Kit mit drei Lüftern
Lüfter 3Lüfternabe 1CORSAIR Lighting Node PRO 1Befestigungsschrauben 12Montageleisten 2
Einzelner LüfterLüfter 1Befestigungsschrauben 4

16
ML120 PRO RGB FANML120 PRO RGB FAN
15
Installation Installation des Lighting Node PRO
> Anschlusshinweise
• Schließen Sie die Lüfter in folgender sequenzieller Reihenfolge an: 1>2>3>4>5>6.
• Die Animationen beginnen mit Lüfter 1 und fahren anschließend bis Lüfter 6 fort.
• Jeder Lüfter, der nicht in der richtigen Reihenfolge angeschlossen ist, unterbricht die Kommunikation und damit das Funktionieren der RGB-LED-Beleuchtungsfunktion.
> Montieren Sie den/die Lüfter an der gewünschten Stelle im Gehäuse.
> Suchen Sie eine geeignete Position für die RGB-LED-Nabe, sodass alle RGB-LED-Kabel der in Ihrem System installierten Lüfter bis zur Nabe reichen.
• Der CORSAIR Lighting Node PRO muss zur Steuerung der RGB-LED-Beleuchtung durch die CORSAIR LINK-Software ebenfalls an der RGB-LED-Nabe angeschlossen werden.
> Montieren Sie die RGB-LED-Nabe mithilfe der mitgelieferten Montageleisten.
> Schalten Sie Ihren Computer aus, bevor Sie den Lighting Node PRO installieren.
> Finden Sie eine Position für den Lighting Node PRO, von der aus die Kabel zu der RGB-LED-Nabe geführt werden können und an der Sie einfachen Zugang zu den Tasten haben.
> Montieren Sie den Lighting Node PRO mithilfe der mitgelieferten Montageleisten.
> Schließen Sie das Mini-USB-Kabel auf der Rückseite des Lighting Node PRO an und verbinden Sie das neunpolige Ende mit einem freien internen USB-2.0-Anschluss in Ihrem Computer.

18
ML120 PRO RGB FANML120 PRO RGB FAN
17
CORSAIR LINK herunterladenInstallation der LED-Nabe
> Schließen Sie das RGB-LED-Kabel an einem verfügbaren LED-Anschluss des Lighting Node PRO an, um es mit der LED-Nabe zu verbinden.
> Schließen Sie das SATA-Netzkabel an einem freien SATA-Anschluss am Netzteil Ihres Computers an.
> Laden Sie für ein umfassendes CORSAIR LINK-Erlebnis die aktuelle Version unserer CORSAIR LINK-Software unter www.corsair.com/downloads herunter.
* Für den Download der Software ist eine Internetverbindung erforderlich CORSAIR LINK ist für die Beleuchtungssteuerung erforderlich.
20
ML120 PRO RGB FAN
19
Índice
Enhorabuena ......................................................................................................................................... 20
Contenido del kit ML PRO RGB .................................................................................................... 20
Instalación .............................................................................................................................................. 21
Instalación de Lighting Node PRO .............................................................................................. 22
Instalación de concentrador LED ................................................................................................. 23
Descargar CORSAIR LINK ............................................................................................................... 24
Enhorabuena
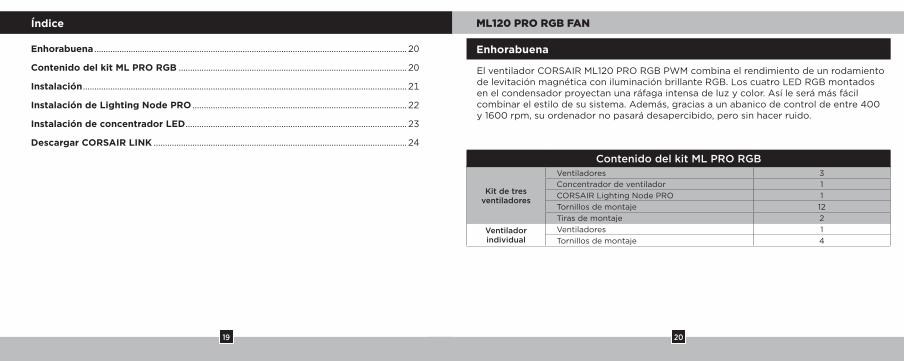
El ventilador CORSAIR ML120 PRO RGB PWM combina el rendimiento de un rodamiento de levitación magnética con iluminación brillante RGB. Los cuatro LED RGB montados en el condensador proyectan una ráfaga intensa de luz y color. Así le será más fácil combinar el estilo de su sistema. Además, gracias a un abanico de control de entre 400 y 1600 rpm, su ordenador no pasará desapercibido, pero sin hacer ruido.
Contenido del kit ML PRO RGB
Kit de tres ventiladores
Ventiladores 3Concentrador de ventilador 1CORSAIR Lighting Node PRO 1Tornillos de montaje 12Tiras de montaje 2
Ventilador individual
Ventiladores 1Tornillos de montaje 4

22
ML120 PRO RGB FANML120 PRO RGB FAN
21
Instalación Instalación de Lighting Node PRO
> Notas sobre conexiones
• Conecte los ventiladores en orden secuencial desde 1 > 2 > 3 > 4 > 5 > 6.
• Las animaciones comienzan con el ventilador 1 y continúan hasta el ventilador 6.
• Si un ventilador no está conectado en serie, interrumpirá la comunicación y la función de iluminación LED RGB no funcionará.
> Monte los ventiladores en la ubicación elegida del chasis.
> Encuentre una ubicación para el concentrador LED RGB que permita la conexión de todos los cables LED RGB de los ventiladores instalados en su sistema.
• CORSAIR Lighting Node PRO también deberá enchufarse al concentrador LED RGB para poder controlar la iluminación LED RGB mediante el software CORSAIR LINK.
> Monte el concentrador LED RGB con las tiras de montaje proporcionadas.
> Apague el sistema antes de instalar el Lighting Node PRO.
> Encuentre una ubicación para el Lighting Node PRO que permita que el cable llegue al concentrador LED RGB y le ofrezca un acceso sencillo a los botones.
> Monte el Lighting Node PRO con la tira de montaje proporcionada.
> Enchufe el cable mini USB en la parte trasera del Lighting Node PRO y luego enchufe el extremo de 9 clavijas en un cabezal USB 2.0 interno disponible del sistema.
24
ML120 PRO RGB FANML120 PRO RGB FAN
23
Descargar CORSAIR LINKInstalación de concentrador LED
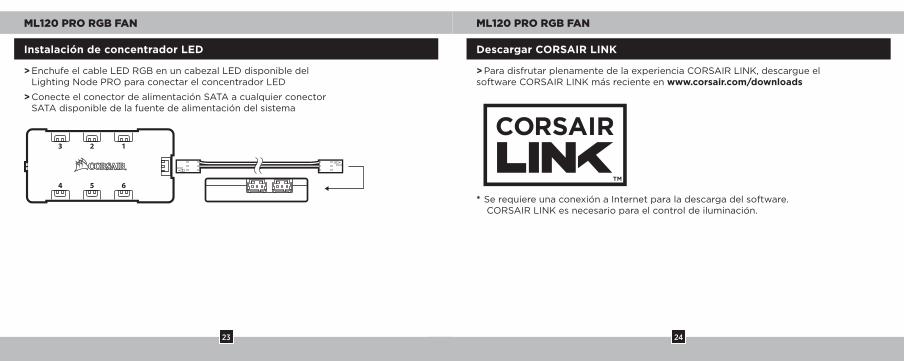
> Enchufe el cable LED RGB en un cabezal LED disponible del Lighting Node PRO para conectar el concentrador LED
> Conecte el conector de alimentación SATA a cualquier conector SATA disponible de la fuente de alimentación del sistema
> Para disfrutar plenamente de la experiencia CORSAIR LINK, descargue el software CORSAIR LINK más reciente en www.corsair.com/downloads
* Se requiere una conexión a Internet para la descarga del software. CORSAIR LINK es necesario para el control de iluminación.

26
ML120 PRO RGB FAN
25
Оглавление
Поздравляем .......................................................................................................................................... 26
Содержимое комплекта ML PRO RGB .......................................................................................... 26
Установка ................................................................................................................................................. 27
Установка Lighting Node PRO ........................................................................................................ 28
Установка концентратора светодиодной подсветки ................................................................... 29
Скачивание CORSAIR LINK .............................................................................................................. 30
Поздравляем
ШИМ-вентилятор CORSAIR ML120 PRO RGB сочетает в себе производительность магнитного подшипника и яркую RGB-подсветку. Четыре встроенных в каркас RGB-светодиода излучают яркий цветной свет, благодаря чему вы сможете с легкостью обеспечить его соответствие стилю вашей системы, а благодаря диапазону регулировки от 400 до 1600 об/мин можно быть уверенным в том, что ваш компьютер виден, но не слышен.
Содержимое комплекта ML PRO RGB
Комплект из трех вентиляторов
Вентиляторы 3Концентратор вентилятора 1CORSAIR Lighting Node PRO 1Крепежные винты 12Монтажные планки 2
Один вентиляторВентиляторы 1Крепежные винты 4
28
ML120 PRO RGB FANML120 PRO RGB FAN
27
Установка Установка Lighting Node PRO
> Примечания по подключению
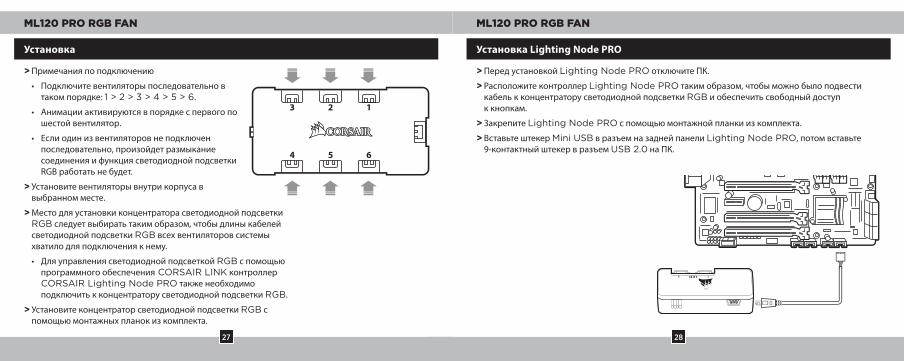
• Подключите вентиляторы последовательно в таком порядке: 1 > 2 > 3 > 4 > 5 > 6.
• Анимации активируются в порядке с первого по шестой вентилятор.
• Если один из вентиляторов не подключен последовательно, произойдет размыкание соединения и функция светодиодной подсветки RGB работать не будет.
> Установите вентиляторы внутри корпуса в выбранном месте.
> Место для установки концентратора светодиодной подсветки RGB следует выбирать таким образом, чтобы длины кабелей светодиодной подсветки RGB всех вентиляторов системы хватило для подключения к нему.
• Для управления светодиодной подсветкой RGB с помощью программного обеспечения CORSAIR LINK контроллер CORSAIR Lighting Node PRO также необходимо подключить к концентратору светодиодной подсветки RGB.
> Установите концентратор светодиодной подсветки RGB с помощью монтажных планок из комплекта.
> Перед установкой Lighting Node PRO отключите ПК.
> Расположите контроллер Lighting Node PRO таким образом, чтобы можно было подвести кабель к концентратору светодиодной подсветки RGB и обеспечить свободный доступ к кнопкам.
> Закрепите Lighting Node PRO с помощью монтажной планки из комплекта.
> Вставьте штекер Mini USB в разъем на задней панели Lighting Node PRO, потом вставьте 9-контактный штекер в разъем USB 2.0 на ПК.
30
ML120 PRO RGB FANML120 PRO RGB FAN
29
Скачивание CORSAIR LINKУстановка концентратора светодиодной подсветки
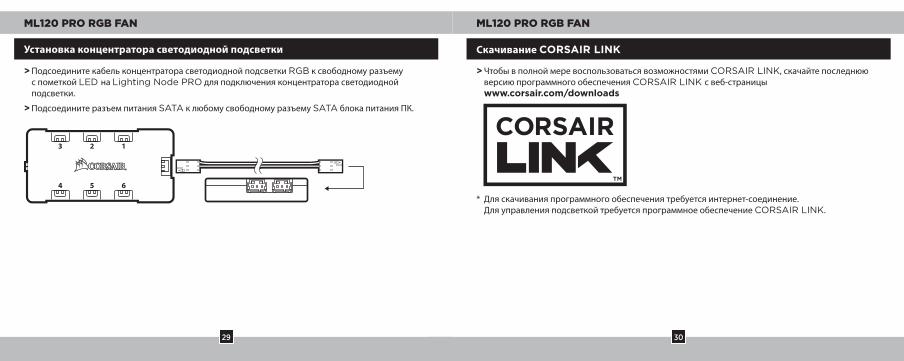
> Подсоедините кабель концентратора светодиодной подсветки RGB к свободному разъему с пометкой LED на Lighting Node PRO для подключения концентратора светодиодной подсветки.
> Подсоедините разъем питания SATA к любому свободному разъему SATA блока питания ПК.
> Чтобы в полной мере воспользоваться возможностями CORSAIR LINK, скачайте последнюю версию программного обеспечения CORSAIR LINK с веб-страницы www.corsair.com/downloads
* Для скачивания программного обеспечения требуется интернет-соединение. Для управления подсветкой требуется программное обеспечение CORSAIR LINK.
32
ML120 PRO RGB FAN
31
目录
恭喜 ............................................................................................................................................................ 32
ML PRO RGB 配套内容 ....................................................................................................................... 32
安装 ............................................................................................................................................................ 33
Lighting Node PRO 安装 ................................................................................................................... 34
LED 集线器安装 ...................................................................................................................................... 35
下载 CORSAIR LINK ............................................................................................................................ 36
恭喜
美商海盗船 ML120 PRO RGB PWM 风扇既有磁悬浮轴承的高性能,也有 RGB 灯光的生动色彩。四个安装在集线器上的 RGB LED 灯散发出富有冲击力的生动光线和色彩,更能轻松匹配您的系统风格。400 RPM 到 1,600 RPM 的转速控制范围,让您可以看到 PC 发出的光线而噪音全无。
ML PRO RGB 配套内容
三个风扇组
风扇 3风扇集线器 1CORSAIR Lighting Node PRO 1安装螺丝 12安装条 2
单个风扇 风扇 1安装螺丝 4
34
ML120 PRO RGB FANML120 PRO RGB FAN
33
安装 Lighting Node PRO 安装
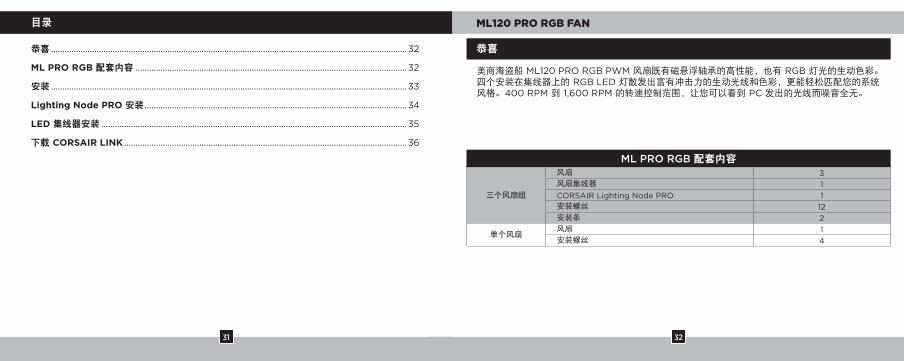
> 连接注意事项
•风扇连接顺序为 1 > 2 > 3 > 4 > 5 > 6。
•动画会以风扇 1 开始并继续进行到风扇 6。
• 未依序连接的风扇会中断通信, 而 RGB LED 照明功能将无法作用。
> 将风扇安装到您在机箱中选择的位置。
> 找出一个可让 RGB LED 集线器连接安装在系统中的所有风扇 RGB LED 电缆且容易触及集线器的位置。
• CORSAIR Lighting Node PRO 也需要插入RGB LED 集线器,让 CORSAIR LINK 软件 控制 RGB LED 照明。
> 使用随附的安装条安装 RGB LED 集线器。
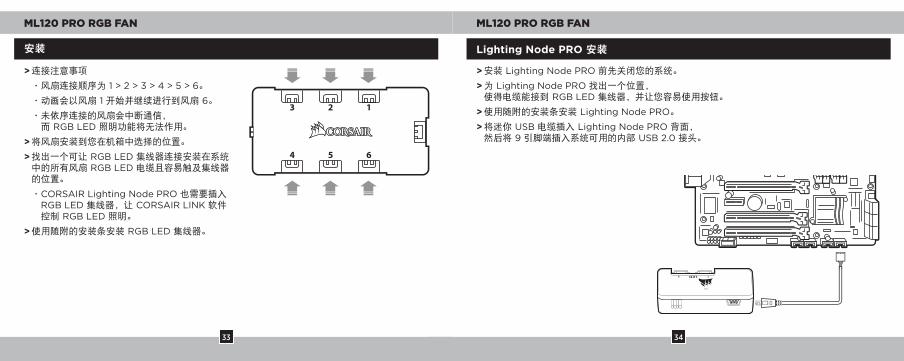
> 安装 Lighting Node PRO 前先关闭您的系统。
> 为 Lighting Node PRO 找出一个位置, 使得电缆能接到 RGB LED 集线器,并让您容易使用按钮。
> 使用随附的安装条安装 Lighting Node PRO。
> 将迷你 USB 电缆插入 Lighting Node PRO 背面, 然后将 9 引脚端插入系统可用的内部 USB 2.0 接头。
36
ML120 PRO RGB FANML120 PRO RGB FAN
35
下载 CORSAIR LINKLED 集线器安装
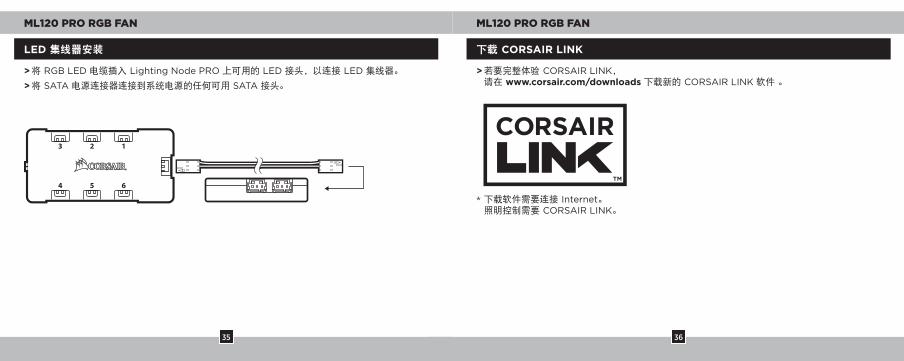
> 将 RGB LED 电缆插入 Lighting Node PRO 上可用的 LED 接头,以连接 LED 集线器。
> 将 SATA 电源连接器连接到系统电源的任何可用 SATA 接头。
> 若要完整体验 CORSAIR LINK, 请在 www.corsair.com/downloads 下载新的 CORSAIR LINK 软件 。
* 下载软件需要连接 Internet。 照明控制需要 CORSAIR LINK。
Related Documents