1 Mille Miglia Navigation and Timing Notes Prepared By Steve McKelvie March 2016 These notes were prepared in order to help make the Mille Miglia event more understandable for first time competitors. It is prepared on the assumption that the competitor’s car will not be fitted with an adjustable, calibratable odometer. Know the event schedule and its implications!

Welcome message from author
This document is posted to help you gain knowledge. Please leave a comment to let me know what you think about it! Share it to your friends and learn new things together.
Transcript

1
Mille Miglia Navigation and Timing Notes
Prepared By
Steve McKelvie
March 2016
These notes were prepared in order to help make the Mille Miglia event more understandable for
first time competitors. It is prepared on the assumption that the competitor’s car will not be
fitted with an adjustable, calibratable odometer.
Know the event schedule and its implications!

2
I recommend getting the car scrutineered as soon as possible as you will get the Road Book
sooner. That will give you more time to become familiar with the Road Book. Also gives you
more time to ask questions if there are things that you do not understand.
From the Provisional Starting List, you might see that your car number will be #395. This means
that, in theory, you will be starting 395 minutes (6 hours 35 minutes) behind the first car. This
means that your rally will run much later than the cars at the front. For example on the First
Day, Car #1 (or the first car) will start at 18:00. You official start time will be (18:00 + 6:35)
24:35 or 00:35. The end of the First Day for you will be (23:00 + 6:35) 29:35 or 05:35 early the
next morning! Your First Day evening meal will be at about 06:00! If you are running on time,
then your whole Mille Miglia rally will be on such a time shift.
A couple of notes about the schedule based on the above starting position:
1. On Thursday, Friday, and Saturday your rally will extend well into the night. Make sure
that your lights work well. Also I recommend a headlamp for the navigator as it will be
dark inside the car and you will need a light to read the route book. Check the car to see
how bright the instrument lights are. It will be necessary for the navigator to read the trip
odometer using the instrument’s lights.
2. You will spend many hours of this rally driving at night. A good set of lights and
additional rally lights will make the drive much easier, safer, and would make it much
easier to read street signs to help to minimize the possibilities of getting lost.
3. As much of the rally could be driven at night, the temperature will be cool especially in
an open car or in a closed car with poor heating.
4. Window defogging effectiveness can be an issue.
5. Be sure to check the suitability of the windshield wipers. Take some Rainex.
6. Note how intense the schedule is! At the end of each day after completing the day’s
rallying, the competitors have 8 hours to fuel the car, have dinner, shoot the breeze with
other competitors, sleep, have breakfast, get ready for another day rallying, and get to the
day’s start line.
7. Consider bringing some of those 5-Hour Energy Drinks.
The regulations note that they will be starting three cars at the same time. This will probably
happen at the start of the First Day and perhaps when starting from other major locations. This
can lead to confusion if you are not prepared for this. All three cars will be timed to a different
minute, but you will be initially traveling very close to each other. From the car numbers you
will know where you fit in with the other two cars. You will have to play this as you best you
can. You don’t want to get held up by other cars, but perhaps you don’t want to be out front
“breaking trail”. It might be best to lay back for a few kilometers and see how you feel about the
other cars. The two cars ahead of you might have both Italian crews, so perhaps they know the
roads well.
Caution: Do not trust the car in front of you. If they make a mistake, so will you! You can use
the car ahead of you as a guide or as a suggestion of the action that is needed, but not as the
absolute authority on what should be done. Also don’t let another car ruin your rally. If another
car is getting in your way or holding you up don’t hesitate to pass them.

3
Synchronizing Your Clocks
It is important that you have the correct time of day. There should be an official clock at the
rally headquarters, although more and more rallies seem to say to use GPS time. This is a little
scary, as I was in a store in Germany with many “radio-controlled” clocks for sale, but only one
agreed with our GPS time which we felt comfortable with. Be sure to take the time to get your
watches/clocks synchronized with the official clocks. You might have to walk up the Start Line
and synchronize with their official time there. It is important to get the clock as synchronized as
possible with the official clocks.
It is a good idea to have three independent sources of time in the car in case there is a problem
with one timepiece.
Many of the top teams at Mille Miglia utilize a specialized clock developed by Blizz Timing that
was designed for events such as the Mille Miglia. The picture below shows my Blizz Timing
clock.
Blizz Timing Clock

4
Other manufacturers, such as GaugePilot have been developing products that are custom
designed for the Mille Miglia.
GaugePilot Screens For Mille Miglia
Official Notice Board
At the rally headquarters there will be an Official Notice Board. Also note that the location of
this Official Notice Board will move daily as the rally moves along. Check this board at every
opportunity as it is updated with information that competitors should be aware of. Perhaps some
instructions are corrected or some new instructions might be provided, if for example, road
construction requires a route change.
Odometer Calibration
A key to following the Road Book instructions is to know where the instructions are to take
place. This is where you will have to rely on three things:
Matching the tulip diagram with the action location

5
Noting the additional information, such as signs and sign location
Odometer reading
In order to know your location, you will have to be able convert your odometer reading into
reading in the Road Book.
As in this case it is being assumed that you do not have a special adjustable and calibratable rally
odometer, you will have to rely on the standard odometer that you have in the car. For these
purposes it is assumed that your car is fitted with two odometer readings:
Total distance display (miles or kilometers, reading to whole units)
Resettable trip display (miles or kilometers, reading to the 1/10 unit)
An odometer factor can be established that will allow you to convert official distances to your
trip display. The overall equation that you will use to do this is as follows:
Odometer Factor X Official Distance = Trip Odometer Display
In order to establish the Odometer Factor, use the following equation:
Odometer Factor = Trip Odometer Reading
Official Distance
The accuracy of the Odometer Factor can be greatly increased if you can read the trip odometer
increased precision. The sketch on the following page provides some guidelines about how read
a 1/10 rolling odometer digit.

6
Interpolating The 1/10 Rolling Odometer Digit
Let’s look at two theoretical examples about how to establish the Odometer Factor.
Example 1
After resetting your trip odometer to 0.0, you drive for an official distance of 3.26 kilometers, but
your trip odometer reading is 3.42 kilometers. (take the time to carefully look at the 1/10
rotating dial to interpolate the 1/00 value – it will greatly increase your trip reading accuracy
during the rally). As a result, your Odometer Factor can be calculated as follows:
Odometer Factor = 3.42 = 1.049
3.26

7
Example 2
After resetting your trip odometer to 0.0, you drive for an official distance of 3.26 kilometers, but
your trip odometer reading is 2.08 miles. Again look carefully at the 1/10 rotating dial to
interpolate the 1/100 value. As a result, your Odometer Factor can be calculated as follows:
Odometer Factor = 2.08 = 0.638
3.26
There very good possibility that the organizers will provide a measured distance for all
competitors to drive before the event starts, so that everyone will be able to calibrate their
odometer. Note that for a good factor the longer the measured length then the more tolerance
there is in the trip odometer reading.
When traveling over an official measured distance for the purposes of calibrating your odometer,
always follow the usual traveled route. For example, don’t cut or apex the corners – follow the
path that a normal car would have traveled when setting out the measured distance.
When you start a section, be sure to zero your trip odometer. Then if the Road Book notes a
right turn at 23.74 kilometers then by using the Odometer Factor as follows you can determine
the trip odometer reading at the location of the right turn:
Odometer Factor X Official Distance = Odometer Reading
0.638 X 23.74 = 15.15
Therefore expect the right turn to happen when the trip odometer says 15.15.
If you get lost or miss a turn then your trip odometer will be off. When that happens, then you
will have to rely on the Incremental Distances. For example, say your trip odometer is reading
21.56 (or so) at a known location, but you know that it is off because you have driven extra
distance because of an off-course error. From the instructions in the Road Book, you know that
the incremental distance to the next instruction, say a left turn, is 6.32 kilometers. Therefore the
incremental distance on the odometer would be (0.638 X 6.32) 4.03. Therefore the trip odometer
reading should be about (21.56 + 4.03) 25.59 when you get to the left turn. You will have to
continue this approach until the next opportunity to re-zero the trip odometer. You could also
reset your trip odometer to zero once you regain the proper route and add the incremental values
from that baseline of zero.
It might be difficult to read the trip odometer from the passenger’s seat, but it will have to be
done especially at critical times. The driver might be able to help read the odometer, but in most
cases, the driver is too busy steering the car to read the odometer.

8
Road Book
The Road Book describes the route in detail (using symbols as well). You absolutely must not
lose the road book or any of the time cards! If it is not in your personal possession they should
be placed in a secure place.
After looking through it and getting some rally miles under you, you will learn how to find and
use the many pieces of information contained in the Road Book. In the first few pages of the
Book, there will be a legend explaining the symbols that are used in the Road Book.
Tulip Instructions
For tulip diagrams remember that you enter the instruction at the “ball” and leave in the direction
of the “arrow.” The following is a legend of the tulip lines and symbols, and their definitions:
Tulip, Line type Meaning
Basics of a "tulip". Dot at bottom signifies where you are coming from. Arrowhead shows which way you are to go. This will typically be given with a distance in kilometers.
Go straight.
"X" Indicates a quoted sign or landmark. The sign will be usually be defined in the adjoining column.
Go straight, perform indicated action, if any, at "sign".
A dotted line, like the one at the top, usually indicates a non-road. A non-road may be a driveway, or a road that is marked "no entry", "dead end", "not a thru road", "one way", or "no outlet". It is not an option as a way to go at that intersection.
Turn left at an intersection with a non-road across the way and the matching sign as shown and stated in the adjoining column.
This tulip shows an intersection with an island. All sides of the island are legal, conventionally, you would take the first opportunity to make the right.
Turn right before the island at an intersection with the quoted sign indicated by "X".

9
Another intersection with an island. This time, the dotted line shows a non-road, which means you cannot go straight ahead. Follow the path of solid line road through this intersection.
If you are at the proper intersection for this tulip, turn right before the island, then left.
A squared circle over an intersection, indicates an intersection with a traffic light. This may be a flashing light, or a full stop light.
Go straight at a 4-way intersection with traffic light, and a quoted sign as indicated by the "X".
A four way intersection with 3 paved roads shown by solid lines, and one non-road, straight ahead, shown by the dotted lines.
Turn right at a signaled intersection with a non-road across the way and the matching sign as shown and stated in the adjoining column.
The boxes, or rectangles represent stores, shops, or buildings, or mentioned in the information column.
The boxes help to identify which buildings you are looking for.
The symbol to the right that looks like brackets lying down represents a bridge.
Turn right at a 4-way intersection to cross a bridge. The sign must match what is stated in the adjoining column.

10
Other typical rally tulips are shown below:
Each rally will have its own style and you will be provided with a legend for the tulips at the
front of the Road Book.
A sample page from the Mille Miglia Road Book is shown on the following page.

11
Sample Of A Mille Miglia Road Book Page

12
Overview of the Control Types
There are several different types of controls that you will encounter in the Mille Miglia. These
controls are outlines as follows:
Time Controls (CO)
Basically, Time Controls place the competitors in a certain order and keeps the event moving
along. Participants will be given a start time to begin the event or to start a day. The competitors
are expected to show up at that time ready to start the first sector. For example, if your start time
is 7:50:00, then you should be at the Starting Line at 7:50:00. Sometimes there might be a delay
for some reason and they might assign you a slightly different start time for the sector while you
are at or near the start line.
Once you start the sector, the time to go through the next Time Control (your in-time) is the
required travel time (which is written on the schedule or Time Card) added to the real departure
time or start time from the last Time Control. For example, if your out-time or start time from
the last Time Control was 7:50:00 and the required travel time is 1:03:00, then your in-time to
the next Time Control (CO) is (7:50:00 + 1:03:00) 8:53:00.
Controls in Transit (CT)
Controls in transit or Passage Controls are used to ascertain that the pre-established route is
being followed. Each team will be assigned a time limit, or a period of time, in which they must
show the time card to the officials. Teams should try to keep no more than 20 minutes early.
Control in Transit (CT) or Passage Control

13
Passage Control Card
Stamping Of The Passage Control Card

14
Regularity Stages (PC)
Regularity Stages or time trials will be held en route. In order to participate in these trials,
participants must do the time trails in the times indicated on their schedules. The Regularity
Stages or time trials consist of a series of closely spaced timing lines. These Regularity Stages or
time trials might be at the end of a section or might be at the beginning of a section. There is no
standard location. Contrary to the Time Controls, the start of the Regularity Stages or time trials
is not regulated. Each participant will decide when to do them and place themselves at the
starting marshal’s disposal. The time for these Regularity Stages or time trials begins when the
car activates the starting line air pressure hose. Time (in hundredths of a second) will be
measured through “pressure switches” or rubber tubes connected to a printing chronometer,
which reads the impulse taken from when the front wheels go over the tube. Those who cross
too early or too late will be penalized.
Average Speed Controls
This year the Mille Miglia will be having average speed stages for the first time in about 10
years. The details as to how these stages will be run, but we know that they will be having 6
timed stages. At this time it is not known how these stages will be run, so the information
provided herein is based on a potential scenario. We do know that the timing controls will be
“hidden”. “Hidden” can have at least two meanings. One is that simply the controls are not
known beforehand, but that the controls are very visible when you pass by the controls. The
other meaning of “hidden” is that the controls truly are hidden and you do not know when you
drive by them. This last meaning seems somewhat inconsistent with the Mille Miglia timing and
scoring methods. The organizers seem to like using air hose timing lines and I think that they
would want the teams to know when they drove by a control so that the teams can time
themselves in order to verify the scores at the end of the day.
The style of the Mille Miglia has been to have consecutive similar scoring stations, so one
possible layout is to have two groups of three hidden average speed controls. Each group would
be positioned in one sector.

15
How These Controls Fit Together
The time card presented on the following page shows how these control types fit together in the
Mille Miglia. These are shown on the left side of the time card. This time card shows the
controls in Section 1 of the Mille Miglia. Section 1 runs between Time Controls CO 1 and CO 2.
Sample Time Card From The Mille Miglia
During the route from CO 1 to CO 2, the competitors will pass through four (4) passage controls:
CT 1, CT 2, CT 3, and CT 4. The location of each of these passage controls is shown on the time
card. For example, CT 1 will be located 34.13 kilometres after CO 1 and CT 4 will be located
80.85 kilometres after CO 1.
Note that columns under the word “Distanze” provide competitors with the incremental and total
distances in kilometers from the starting CO, CO 1, in Brescia.
In the far right column, titled “Orario 1a Vett.” are the times for the first car. The first car on the
road is scheduled to leave CO 1 at 14:30 and arrive at 19:15 or 4 hours and 45 minutes later.
This duration of 4 hours 45 minutes is also provided at the bottom of the column titled “Tempi
Imposti”/”Settore”. Others cars will have to add 4 hours and 45 minutes to their start time at CO
1 to determine their in-time at CO 2. In the next column to the left under “Settore”, competitors
are advised that in order to get from CO 1 to CO 2 in the proper time, then will have to average a
speed of 38.53 kilomtres per hour.

16
In this section of the Mille Miglia there will be fifteen (15) regularity stages with PC controls.
Notice how these regularity stages are clustered together with incremental distances often as
close as 200 metres. For example, PC 13 is only 0.24 kilometres (240 metres) past PC 12. In
this example, there are three clusters of 4, 3, and 8 regularity stages.
The time for the competitors to reach the next PC control is presented in column titled “Tempi
Imposti”/”Parziali”. The required average speed to get to the next PC is presented in the column
titled “Media”/”Parziali”. Note that the times that are provided are the times from one PC to the
next PC. The end at one PC is the start of the next PC section. For example, no matter what
time you cross the timing line at PC 9, the competitors have to cross the timing line at PC 10 36
seconds later.
Penalties And Other Disciplinary Proceedings
It is very important that you know what they penalize you for. The following are the time
penalties that can be assigned due to timing during the Mille Miglia rally.
Time Controls (CO)
For each minute or fraction of a minute early arrival: 100 negative penalty points
For each minute or fraction of minute of late arrival: 100 negative penalty points
For any delay beyond maximum time allowed: 12,000 negative penalty points
Regularity Stages (PC)
For every 1/100 of a second early arrival or delay: 1 negative penalty points (with a
maximum of 300)
Tests At An Imposed Average Speed
For each minute or fraction of a minute early arrival: 1 negative penalty points
For each minute or fraction of a minute late arrival: 1 negative penalty points
Secret Passage Checks
Up to 20 minutes early arrival: 320 negative penalty points
More than 20 minutes early arrival: 12,000 negative penalty points
More than 20 minutes early arrival (second time): expulsion
Some further penalties are as follows:
Time Card
Modifications, changes or corrections not officially approved by the Race Marshals:
expulsion from the race
Missing annotation at a Time Control: 12,000 negative penalty points
Missing stamp at a Passage Control: 12,000 negative penalty points
Time card not turned in at finish line: expulsion from the race

17
Additional Penalties
Failure to start at the scheduled time and order: 100 negative penalty points
Stopping the car in a control zone (stopped car): 100 negative penalty points
Crew’s unauthorized access to a control zone (unless otherwise directed): 300 negative
penalty points
Missing passage or time annotation at any Checkpoint (CO or PC): 12,000 negative
penalty points
Unauthorized stopping in a control zone: 12,000 negative penalty points
Blocking the passage of and/or harming other crews: expulsion from the race
Unsportsmanlike behavior: from a reprimand to expulsion
Passing checkpoint in the wrong or other direction: expulsion from the race
Infringement of Italian traffic laws: up to expulsion
Irregularities in documents at the administrative checks: refused entry into event
Late arrival regarding the checks schedule: up to refused entry into event
Not departing from the starting line of the first or second leg: expulsion from the race
Having people other than the official driver or navigator drive the car in the event:
expulsion from race
Lack of an event number or event license plate: fine
Lack of two or all event numbers on the car: expulsion from the race
Lack of a notice of withdrawal to the Clerk of the Course: fine
Not following procedure regarding synchronization of chronometers: expulsion from the
race
Imprudent behavior on the part of the driver, navigator or support or accompanying crew
member: up to expulsion
Leaning out of a moving car: up to expulsion
Not respecting the orders of the Race Marshals: up to expulsion
Failure to respect publicity regulations for entered cars: 12,000 negative penalty points
A crew will be considered beyond the maximum time limit:
If they pass a Time Control (CO) more than 30 minutes after their expected passage time.
If they transit various controls late and accumulate more than 60 minutes of late passage
time.
Only at the Time Controls at the beginning of each leg (which means in Brescia, Rimini, Rome
and Parma), will crews will be considered to have exceeded the time limit if they arrive at the
these starting lines more than 15 minutes late.
The opening and closing times of the Regularity Stages (PC) and of the Passage Controls (CT)
will be those indicated on the timetable.
In addition to the rules of the Mille Miglia rally throughout the entire event, the driver must be
prudent and alert, scrupulously respecting the Italian traffic laws and the rules put in place by the
Clerk of the Course and Race Marshals. If a driver should not abide by the aforementioned rules
and/or laws, the following penalties will apply:

18
First infraction: 300 negative penalty points
Second infraction: 12,000 negative penalty points
Third infraction: expulsion from the race.
Check Point Procedures
The following control signs will be used to depict controls and the location of other features
along the rally route.
Yellow Clock sign Determines the beginning of
the Time Control
Red Clock sign Location of Time Control
Drooping Flag with Yellow
Background
Warning of Regularity
Timing Line, placed 25
meters before the Regularity
Timing Line

19
Drooping Flag With Red
Background
Location of Regularity
Timing Line
Beige sign with black stripes Limit of Control Zone
Checkered Flag with red
background
Located at the end of a series
of Regularity Timing Lines
Image of Old Time Stamp on
a Yellow Background
Warning of Approaching
Passage Control

20
Image of Old Time Stamp on
a Red Background
Location of Passage Control
Gasoline Pump on Blue
Background
Beginning of Re-Fueling
Area
Three stripes through a
gasoline pump on a Blue
Background
End of Re-Fueling Area
Electrical Bolt on Blue
Background
Location of Radio Control

21
Cross on Blue Background Location of Medical Services
In 2015 the overall route was about 1,761 kilometers long broken down into sectors. Along the
route there were 16 Time Controls (CO), 76 Regularity Stages (PC), 17 Passage Controls (CT),
and 8 Regularity Tests At An Imposed Average Speed.
The event was divided into sectors, with the word “sector” indicating a part included between
two time controls. The target time for each sector is listed in the Time and Distance Table and
the Time Card, which will be handed out to drivers at each starting point of each leg.
Cars must transit the sector at their given time. The required sector in-time is obtained by adding
the actual start time at the previous CO to the target transit time allowed for that sector (listed on
the time table). The actual transit time will be measured by pneumatic tube pressure switches as
the cars cross the timing line at the next control. The line will be marked by a red sign showing a
clock.
A Car Crossing The Timing Line Hose
22
If, for some reason, the pressure switch is not working, the transit time of the vehicles will be
measured manually by the official timekeepers when the front wheel hub crosses the check line.
Vehicles are not allowed to stop inside control zones, which are stretches about 50 meters long,
marked with a yellow sign at the beginning and a beige one with black stripes one at the end.
To avoid picking up penalty points at check points, competitors have one minute from their
required in-time in which to drive over the pressure sensors. For example, for the 14:45:00 sector
finishing time, passing over the air hose pressure sensor timing line between 14:45:00 and
14:45:59 will not incur in penalization.
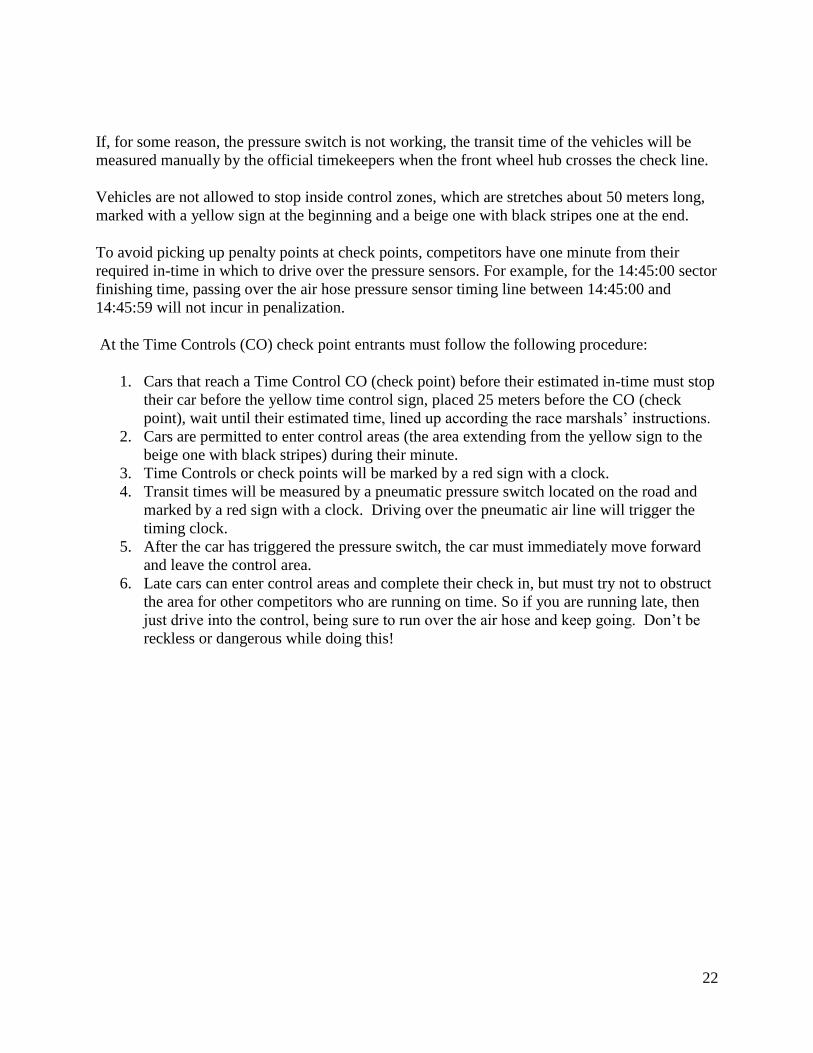
At the Time Controls (CO) check point entrants must follow the following procedure:
1. Cars that reach a Time Control CO (check point) before their estimated in-time must stop
their car before the yellow time control sign, placed 25 meters before the CO (check
point), wait until their estimated time, lined up according the race marshals’ instructions.
2. Cars are permitted to enter control areas (the area extending from the yellow sign to the
beige one with black stripes) during their minute.
3. Time Controls or check points will be marked by a red sign with a clock.
4. Transit times will be measured by a pneumatic pressure switch located on the road and
marked by a red sign with a clock. Driving over the pneumatic air line will trigger the
timing clock.
5. After the car has triggered the pressure switch, the car must immediately move forward
and leave the control area.
6. Late cars can enter control areas and complete their check in, but must try not to obstruct
the area for other competitors who are running on time. So if you are running late, then
just drive into the control, being sure to run over the air hose and keep going. Don’t be
reckless or dangerous while doing this!
23
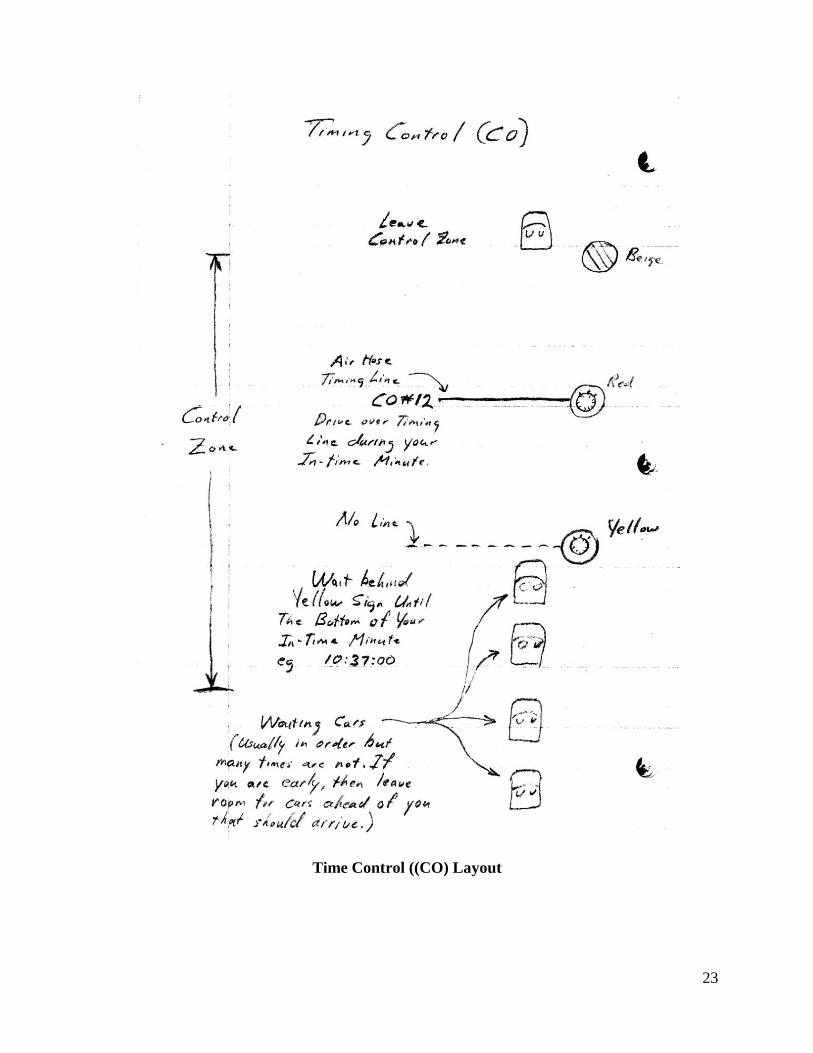
Time Control ((CO) Layout

24
Regularity Stages
A number of Regularity Stages are present in each sector. The length of each Regularity Stage
and the given target time are listed on the Time and Distance Table and on the Time Card.
The regularity stages in each group are “interlinked”; meaning the end of one is the beginning of
the next. Measuring lines, marked on the ground, have a pneumatic tube pressure switch
connected to a printing chronometer. Time will be measured in hundredths of a second. To the
right of the sensor will be a red sign showing a drooping flag and to the left, a rubber traffic
cone. Twenty-five (25) meters before the measuring line you will see a yellow sign with a
drooping flag, and 25 meters after the line there will be a beige sign with three black diagonal
stripes. The measuring line at the end of the last stage of a group of Regularity Stages will be
marked with signs showing a checkered flag. Vehicles are not permitted to stop between the
yellow sign and the beige sign. For regularity stages shorter than 300 meters there is no yellow
warning sign placed 25 meters from the timing line.
For a Regularity Stage, the following procedures are followed:
1. Vehicles are to line up before the yellow sign, in rough order of their competition
numbers;
2. Cars are to gather at the yellow sign, which marks the beginning of the first stage of a
group of Regularity Stages. They then must follow the instructions of the road marshal or
timekeeper. Nothing will be written on their time card at this point;
3. Within five seconds of the “VIA” (“GO”) called by a marshal or timekeeper, cars will
start, passing over the first pressure tube switch. This establishes the initial time of the
first regularity stage. The car is then to proceed in carrying out the rest of the series of
stages, trying to keep to the target times that have been given. Anyone who is forced to
stop - for whatever reason - is kindly asked to avoid blocking the passage of other
competitors and to follow the directions given by marshals;
4. Having finished the series of Regularity Stages, crews are to continue on without any
more stops for time entries or for anything else.
Note that the times given are the times on the Mille Miglia timing sheet from Checkpoint to
Checkpoint. For example refer to the illustration below, if the crew took 9 seconds instead of 8
to go from CH10 to CP21 the crew would still have to cross the CP22 timing line 12 seconds
after crossing the CP21 timing line. The times through the controls are not cumulative.
In The Regulatory Controls The Times Are From Control To Control

25
Example Of A Cluster Of Regularity (PC) Controls Layout

26
In the photo below a car crossing the timing line at a PC control while if you look in the
background, you can see other cars waiting behind the yellow control sign for their in-time.
A Car At A Regularity Control
Passage Controls (CT)
Along the route there will be Passage Controls (CT) to ascertain that the pre-established itinerary
is being followed.
The approach to the checkpoint is indicated first by a yellow sign on the right hand side of the
road, showing the symbol of an old-fashioned ink stamp, located 25 meters before arrival. The
Passage Control (CT) check point itself is marked with a red sign with the same symbol, and is
then followed by a beige sign with three black diagonal stripes 25 meters past it.
At a Passage Control (CT) check point drivers must not get out of their cars. A marshal will
stamp your time card. Passage Control check points will remain open one hour after the
estimated transit time of the last competitor.
Failure to have a time card stamped at a CT will result in the penalization.

27
Passage Control Layout

28
Average Speed Controls
Potential Layout Of Average Speed Controls
Presumably the target average speed will be provided. The average speed might be given in an
integer number (say 35 km/hr) which would allow you to use speed/distance/time tables, or they
might be given as a decimal number (say 38.26 km/hr) which will require special preparation.

29
Pacing Example
Let’s assume that the average speeds are provided in decimal numbers and that you want to be
able to provide pacing timing at every 0.5 interval on the odometer. From a previous example,
let’s assume that the Odometer Factor is 0.638. By re-arranging the equation for the Odometer
Factor the following equation is provided:
Official Distance = Odometer Reading
Odometer Factor
Set Odometer Reading Interval = 0.5
Odometer Factor = 0.638
Therefore the Official Distance traveled for every 0.5 increment on the odometer:
Official Distance = 0.5 = 0.7837 kilometers
0.638
The Speed-Time-Distance relationship is as follows;
Time = Distance
Speed
We know the required average speed is 38.26 km/hr, therefore for every 0.5 increment on the
odometer (actual distance traveled = 0.7837 km) the time can be calculated as follows:
Time = 0.7837 km = 0.02048 hours
38.26 km/hr
More convenient time units can be calculated as follows:
0.02048 hours = 0.02048 hr X 60 minutes = 1.229 minutes
hr
1.229 minutes = 1.229 minutes X 60 seconds = 73.74 seconds = 1 minute 13.74 seconds
minute
Therefore every 0.5 on the odometer the time increment should be increased by 1 minute 13.4
seconds in order to keep the car on a 38.26 km/hr pace. Therefore when the odometer says 0.5
then the time should be 1 minute 13.74 seconds after the start time. When the odometer says 1.0
then the time should be 2 minutes 27.48 seconds after the start time. When the odometer says
1.5 then the time should be 3 minutes 41.22 seconds after the start time and so on and so on until
the average speed portion is complete.

30
Points
The Mille Miglia is won by the car with the highest number of points. At each control cars are
assigned a time penalty as discussed previously. These time penalties are then assigned points
based on the following chart. The chart is read by looking up the number of penalties that you
got at a control. For example, let’s assume that you were 78 hundreds of a second late at a
control line. Looking at the points chart shown below, you can see that you would be assigned
122 points.
MILLE MIGLIA 2009 - POINTS CHART
cent/sec
penalties points
0 420
1 395
2 370
3 350
4 330
5 310
6 291
7 272
8 254
9 236
10 226
11 217
12 212
13 207
14 203
15 200
16 198
17 196
18 194
19 192
20 190
21 188
22 186
23 184
cent/sec
penalties points
38 162
39 161
40 160
41 159
42 158
43 157
44 156
45 155
46 154
47 153
48 152
49 151
50 150
51 149
52 148
53 147
54 146
55 145
56 144
57 143
58 142
59 141
60 140
61 139
cent/sec
penalties points
76 124
77 123
78 122
79 121
80 120
81 119
82 118
83 117
84 116
85 115
86 114
87 113
88 112
89 111
90 110
91 109
92 108
93 107
94 106
95 105
96 104
97 103
98 102
99 101
cent/sec
penalties points
114 86
115 85
116 84
117 83
118 82
119 81
120 80
121 79
122 78
123 77
124 76
125 75
126 74
127 73
128 72
129 71
130 70
131 69
132 68
133 67
134 66
135 65
136 64
137 63

31
24 182
25 180
26 178
27 176
28 174
29 172
30 170
31 169
32 168
33 167
34 166
35 165
36 164
37 163
62 138
63 137
64 136
65 135
66 134
67 133
68 132
69 131
70 130
71 129
72 128
73 127
74 126
75 125
100 100
101 99
102 98
103 97
104 96
105 95
106 94
107 93
108 92
109 91
110 90
111 89
112 88
113 87
138 62
139 61
140 60
141 59
142 58
143 57
144 56
145 55
146 54
147 53
148 52
149 51
150 50
151 49
cent/sec
penalties points
152 48
153 47
154 46
155 45
156 44
157 43
158 42
159 41
160 40
161 39
162 38
163 37
164 36
165 35
166 34
167 33
168 32
169 31
170 30
171 29
cent/sec
penalties points
189 11
190 10
191 9
192 8
193 7
194 6
195 5
196 4
197 3
198 2
199 1
200 0
201 0
202 0
203 0
204 0
205 0
206 0
207 0
208 0
cent/sec
penalties points
226 0
227 0
228 0
229 0
230 0
231 0
232 0
233 0
234 0
235 0
236 0
237 0
238 0
239 0
240 0
241 0
242 0
243 0
244 0
245 0
cent/sec
penalties points
263 0
264 0
265 0
266 0
267 0
268 0
269 0
270 0
271 0
272 0
273 0
274 0
275 0
276 0
277 0
278 0
279 0
280 0
281 0
282 0

32
172 28
173 27
174 26
175 25
176 24
177 23
178 22
179 21
180 20
181 19
182 18
183 17
184 16
185 15
186 14
187 13
188 12
209 0
210 0
211 0
212 0
213 0
214 0
215 0
216 0
217 0
218 0
219 0
220 0
221 0
222 0
223 0
224 0
225 0
246 0
247 0
248 0
249 0
250 0
251 0
252 0
253 0
254 0
255 0
256 0
257 0
258 0
259 0
260 0
261 0
262 0
283 0
284 0
285 0
286 0
287 0
288 0
289 0
290 0
291 0
292 0
293 0
294 0
295 0
296 0
297 0
298 0
299 0
300 0
Points are multiplied by the coefficient assigned
In the above chart you can see that in 2009, once you are assigned a penalty 200 or more then
you will receive zero points.
For the final standings in the Mille Miglia the overall points assigned to each car is determined
by multiplying the vehicle’s score by a coefficient assigned to that car. The car models that can
enter the Mille Miglia are those of which at least one of that car model took part in one of the
speed editions (1927-1957), or completed the registration formalities for one of these editions.
Each car accepted is allocated a coefficient which will then be multiplied by the points obtained
by its drivers during the competition.
The coefficient assigned to a car is based on its age and characteristics. For example the older
cars generally have less horsepower and likely have brakes that are not as good as the cars of the
mid-1950s that might have disk brakes. Cars with lower performance characteristics have higher
coefficients.
The coefficients are calculated and assigned considering the year of design and the technical,
sporting and historical features of the models, the partial coefficients related to period,
class and category. Competitors are advised to consult the rules in order to understand the
coefficient assigned to their car. This can be done before arriving at the start of the Mille Miglia.

33
The graph shown on the following page shows how the points fall off very quickly with small
errors. As a result it can be seen that you score will improve significantly if you can get your
error down to less than 0.10 seconds.
Relationship Between Time Penalties And Points Scored
In order to finish near the top of the field in the Mille Miglia, then you have to get the average
time penalty at each control to a value below 0.10 seconds - much lower if you want to win.
Having the driver practice this car control before the event is time well spent.
General Advice
Know what you can and can’t do, and the penalty (if any) for doing it.
Keep all your paperwork in order and accessible. Have your “office” tidy and organized.
Keep your driver focused.
Keep calm.
Ensure you know when the next fuel stop is – and have enough in the car to get there!
Ensure that you, your driver and the car are ready, at the appropriate time, at wherever
you are supposed to be.
Keep a note of your times and penalties.

34
Make sure that no other times and penalties are applied on any results (interim or final).
Ensure that marshals write the correct times on the timecard.
Be friendly with the marshals.
Note all entries on the timecard and ensure that all signatures are obtained before leaving
the control. Control marshals can make mistakes.
Know the cars that are ahead and behind of you, so you will know where to slot in at
controls and at starts. This may (will) change during the rally but be aware of what is
happening around you.
Run your own rally! Do not always assume that the car (or cars) ahead of you know what
they are doing. As you go through the rally, you will begin to get a feeling or the
knowledge of who knows what they are doing and who might be suspect.
Be Careful!
Related Documents