AVAYA Military Unique Deployment Guide for Avaya IX Messaging ® 10.8 Document Version 1.7 | January 2020

Welcome message from author
This document is posted to help you gain knowledge. Please leave a comment to let me know what you think about it! Share it to your friends and learn new things together.
Transcript

AVAYA
Military Unique Deployment Guide for
Avaya IX Messaging® 10.8
Document Version 1.7 | January 2020
January 2020, Document ver. 1.7 ©2020 Avaya Inc. Page 2 Avaya proprietary – use pursuant to company instructions
IX Messaging is a feature rich application which offers a solution for virtually any organization or situation. The
productivity enhancing nature of IX Messaging derives from the dynamic environment of all the feature which can be fully customized and mixed-and-matched to meet the specific needs of an organization.
The High Security installation for Avaya IX Messaging is certified JITC compliant. Corporations that deal with the various branches of the U.S. government may be required to have their software JITC certified to maintain the highest levels of interoperability, safety and security. JITC certified software has additional layers to help protect the client than non- certified software products.
Avaya IX Messaging can be purchased in a JITC certified format which encrypts the database files using Windows EFS. Communications use encrypted TLS (Transport Layer Security) protocols. This keeps all of your data and communications secure. Please contact your reseller for details.

January 2020, Document ver. 1.7 ©2020 Avaya Inc. Page 3 Avaya proprietary – use pursuant to company instructions
Table of Contents 4 INTRODUCTION
5 INSTALLATION PREPARATION
Pre-requisites
Deployment Configuration Considerations
Antivirus Applications
Required Server Components
6 SERVER ROLES AND FEATURES
16 INSTALLING MICROSOFT .NET FRAMEWORK 4.6
17 CERTIFICATES
Installing Certificates for Encrypted File System (EFS) Self-Signed Certificate
CA Signed Certificate
IIS Certificate Bindings
27 DISABLING USER ACCOUNT CONTROL NOTIFICATION
30 INSTALLING IX MESSAGING WITH HIGH SECURITY ON A SINGLE SERVER
38 INSTALLING IX MESSAGING WITH HIGH SECURITY WITH HIGH AVAILABILITY
Master Voice Server
Consolidated Server
Secondary Voice Servers
63 JITC PASSWORDS
64 CREATING PUBLIC AND PRIVATE KEYS
65 CERTIFICATES FOR MOBILINK CONNECTION
66 FILE ENCRYPTION AND DATA TRANSFERS
Configuring TLS with IX Messaging for SIP
January 2020, Document ver. 1.7 ©2020 Avaya Inc. Page 4 Avaya proprietary – use pursuant to company instructions
Introduction Conditions of Fielding
For the complete list of Conditions of Fielding for this tracking number, please reference and follow the
Conditions of Fielding as listed in the Cybersecurity Assessment Report (CAR).
Additional Information The High Security installation for Avaya IX Messaging is certified JITC compliant.
The Joint Interoperability Test Command (JITC) is a certifying agency for I.T. products for the U.S. Department of Defense. Corporations that deal with the various branches of the U.S. government may be required to have their software JITC certified to maintain the highest levels of interoperability, safety and security. JITC certified software has additional layers to help protect the client than non-certified software products.
Avaya IX Messaging can be purchased in a JITC certified format which encrypts the database files using FIPS approved encryption. Other security sensitive files and folders within IX Messaging are encrypted using Windows EFS. Communications use encrypted TLS (Transport Layer Security) protocols. This keeps all of your data and communications secure. Please contact your reseller for details.
When installing Avaya IX Messaging version 10.5+, almost all choices regarding program configuration are asked at the beginning so that the many components can be installed without interruption. The only variation that occurs after the initial selection is the PBX and integration type, which will be unique to most sites.
Requirements
Requirements Details
License A High Security License for 10.5+.
Software For details on IX Messaging 10.5+ Hardware and Software requirements please consult the Technical Operating Guidelines.
Note: The steps in this chapter only apply to sites who have purchased the high security edition of Avaya IX Messaging. If your site will not use high security, this chapter can be safely omitted.
Warning: The instructions found in this guide cannot be guaranteed to work for all installations since each site is unique. Some problems may arise even if you follow these instructions precisely. Therefore, use this document as a reference for your own configuration, making the changes appropriate to your site's specific requirements.
Note: Avaya IX Messaging has only been validated on Windows in English and in French. Other varieties of Windows may not work as intended.
Note: Avaya IX Messaging should only be installed on a dedicated server specifically intended for the purpose. Sharing system resources with other applications may prevent IX Messaging from functioning properly.
Caution: It is strongly recommended that the operating system drive has a minimum of 100GB reserved exclusively for the O/S. This is in addition to any amount required for the IX Messaging voice server installation.

January 2020, Document ver. 1.7 ©2020 Avaya Inc. Page 5 Avaya proprietary – use pursuant to company instructions
Installation Preparation
Pre-requisites
• A high security license for Avaya IX Messaging must be purchased.
• High security installations are only supported on Windows Server 2012 R2 and Windows Server 2016.
All other system requirements are the same as for any other IX Messaging installation.
Pre-installation STIG requirements for Secure Boot • In order to meet the Windows Server 2016 STIG requirement for STIG items WN-16-00-000470
and WN-16-00-000480 you must configure UEFI to be enabled in the server’s firmware
prior to installation. Once Windows is installed, this setting cannot be changed, therefore it
must be set prior to installation of the Windows OS. Please see the server’s operating
documentation for information on how to access the server’s firmware and make this setting.
Deployment Configuration Considerations
• An Avaya IX Messaging server may be installed on the root drive (the same drive where Windows is installed). This
must be a local drive. iSCSI targets are not supported.
• An IX Messaging server may be installed on a secondary drive (on a different drive from where Windows is installed).
This must be a local drive. iSCSI targets are not supported.
• The drives may each be a physical drive (for best performance), or a single drive with partitions.
• The folders \uc\logs, \uc\DB, and \uc\messages may be mounted to a local drive. Network or mapped drives are not
supported.
• In an ESX(i)/VMWare environment, SAN/iSCSI is supported, but only at the ESX(i) level. The iSCSI target must be
mounted and managed by the ESX(i) host. If a virtual machine is to have a C drive and a D drive, they must be
added as a virtual hard disk using the VMWare client.
• The rules for drive types and options are the same for virtual machine environments. The storage must be local,
Direct Attached Storage or SAN.
Antivirus Applications
It is suggested that any antivirus applications currently active on the server computer be disabled during installation. Any other resource intensive applications or monitoring tools which may cause a conflict with the installation should also be disabled during the installation process.
Required Server Components
For Microsoft Windows Server 2012 and 2016, you must ensure that all the necessary server roles and features are installed on the system before proceeding with IX Messaging installation.
Warning: These configurations have been tested and approved by Avaya for use with IX Messaging. While other configurations may be possible, Avaya cannot provide support in these areas.

January 2020, Document ver. 1.7 ©2020 Avaya Inc. Page 6 Avaya proprietary – use pursuant to company instructions
Server Roles and Features
1. From the Server Manager Dashboard, click Add roles and features.
If this screen is hidden, go to View and select Show Welcome Tile.
2. Click Next.

January 2020, Document ver. 1.7 ©2020 Avaya Inc. Page 7 Avaya proprietary – use pursuant to company instructions
3. Leave the default settings as they are. Click Next.
4. Leave the default settings as they are. Click Next.
January 2020, Document ver. 1.7 ©2020 Avaya Inc. Page 8 Avaya proprietary – use pursuant to company instructions
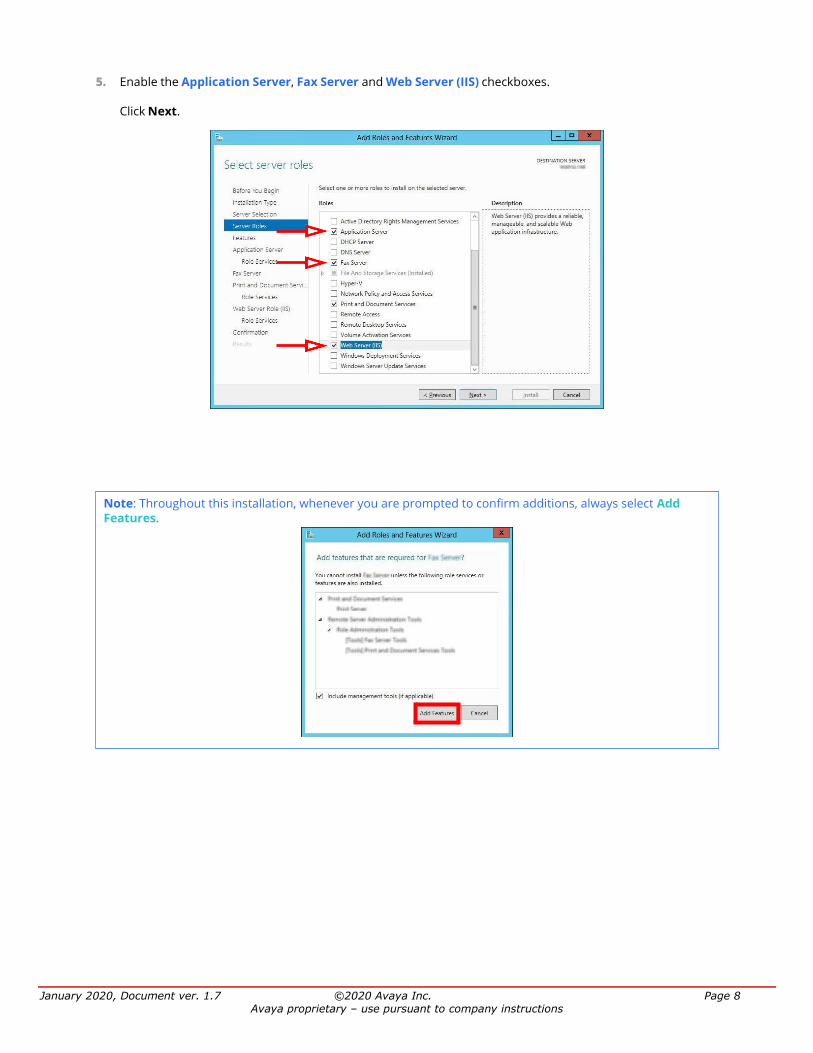
5. Enable the Application Server, Fax Server and Web Server (IIS) checkboxes.
Click Next.
Note: Throughout this installation, whenever you are prompted to confirm additions, always select Add Features.

January 2020, Document ver. 1.7 ©2020 Avaya Inc. Page 11 Avaya proprietary – use pursuant to company instructions
6. Enable the .NET Framework 3.5 Features checkbox. Click Next.
7. Review the information, then click Next.

January 2020, Document ver. 1.7 ©2020 Avaya Inc. Page 12 Avaya proprietary – use pursuant to company instructions
8. Ensure that HTTP Activation, under Windows Process Activation Service Support is enabled. Click Next.
9. On the Fax Server screen, click Next.

January 2020, Document ver. 1.7 ©2020 Avaya Inc. Page 13 Avaya proprietary – use pursuant to company instructions
10. On the Print and Document Services screen, click Next.
11. No changes are required here. Click Next.
January 2020, Document ver. 1.7 ©2020 Avaya Inc. Page 14 Avaya proprietary – use pursuant to company instructions
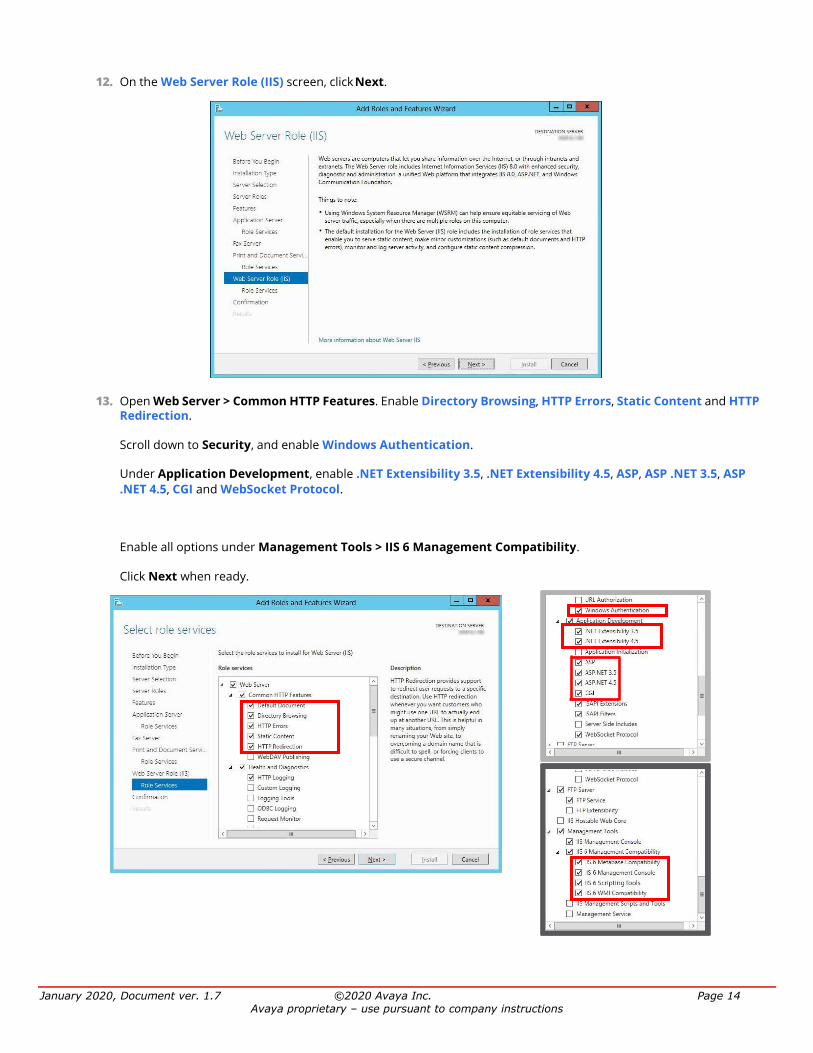
12. On the Web Server Role (IIS) screen, click Next.
13. Open Web Server > Common HTTP Features. Enable Directory Browsing, HTTP Errors, Static Content and HTTP Redirection.
Scroll down to Security, and enable Windows Authentication.
Under Application Development, enable .NET Extensibility 3.5, .NET Extensibility 4.5, ASP, ASP .NET 3.5, ASP
.NET 4.5, CGI and WebSocket Protocol.
Enable all options under Management Tools > IIS 6 Management Compatibility.
Click Next when ready.

January 2020, Document ver. 1.7 ©2020 Avaya Inc. Page 15 Avaya proprietary – use pursuant to company instructions
14. Review the selections here. When ready to proceed, click Install.
15. If prompted to provide the Windows disk to load the files, click Specify an alternate source path and direct it to the appropriate drive.
Hint: This is particularly important for virtual machine installations where there may not be a drive configured locally.

January 2020, Document ver. 1.7 ©2020 Avaya Inc. Page 16 Avaya proprietary – use pursuant to company instructions
16. Windows will now start the installation process for the chosen items. This process may take a while.
17. Once all changes are complete, Restart the server.
Installing Microsoft .NET Framework 4.6
The Microsoft .NET Framework 4.6 is a required Windows component but it cannot be installed as part of the program package. It must be added by the administrator.
The installer can be downloaded from the Microsoft site here:
https://www.microsoft.com/en-ca/download/details.aspx?id=48130
Follow the instructions provided to install .NET Framework 4.6 onto the server.
Note: This window can be closed without interrupting the installation procedure

January 2020, Document ver. 1.7 ©2020 Avaya Inc. Page 17 Avaya proprietary – use pursuant to company instructions
Certificates
Installing Certificates for Encrypted File System (EFS)
Avaya IX Messaging requires that signed certificates be installed on the all servers before attempting an installation. If there is no certificate installed, the installer will automatically create a self-signed certificate.
Certificates are used to encrypt security sensitive files on the server.
Digital certificates can be purchased from any trusted Certificate Authority (CA), such as GoDaddy™ and Symantec™. It is also possible to create a self-signed certificate for use with the program.
Install either:
• Self-Signed Certificate
• CA Signed Certificate
Self-Signed Certificate
Self-signed certificates are generated by the server itself.
1. Open the Windows Control Panel and select User Accounts.
2. Click Manage your file encryption certificates.

January 2020, Document ver. 1.7 ©2020 Avaya Inc. Page 18 Avaya proprietary – use pursuant to company instructions
3. Click Next.
Enable Create New Certificate then click Next.
4. Select A self-signed certificate stored on my computer. Click Next.

January 2020, Document ver. 1.7 ©2020 Avaya Inc. Page 19 Avaya proprietary – use pursuant to company instructions
5. Enable Backup the certificate and key now, fill in the path to where the backup file will be saved, and give it a password. Click Next.
6. Enable All Logical Drives, then click Next.

January 2020, Document ver. 1.7 ©2020 Avaya Inc. Page 20 Avaya proprietary – use pursuant to company instructions
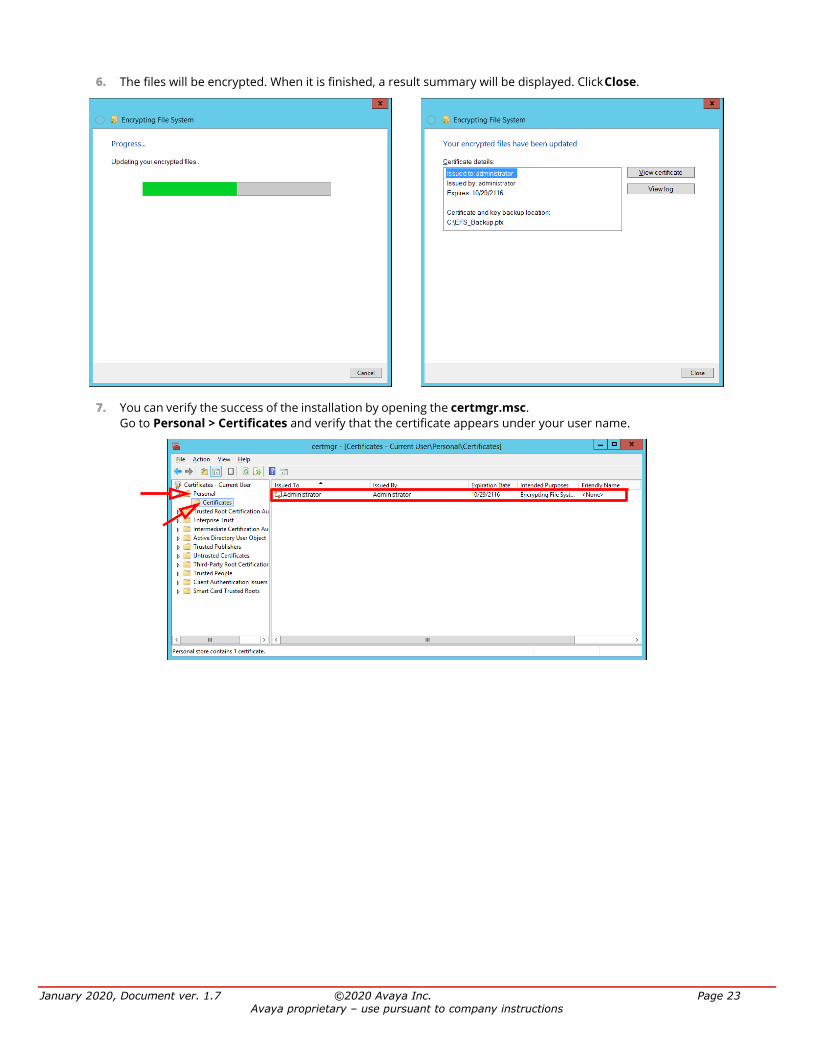
7. The files will be encrypted. When it is finished, a result summary will be displayed. Click Close.
8. You can verify the success of the installation by opening the certmgr.msc.
Go to Personal > Certificates and verify that the certificate appears under your user name.
January 2020, Document ver. 1.7 ©2020 Avaya Inc. Page 21 Avaya proprietary – use pursuant to company instructions
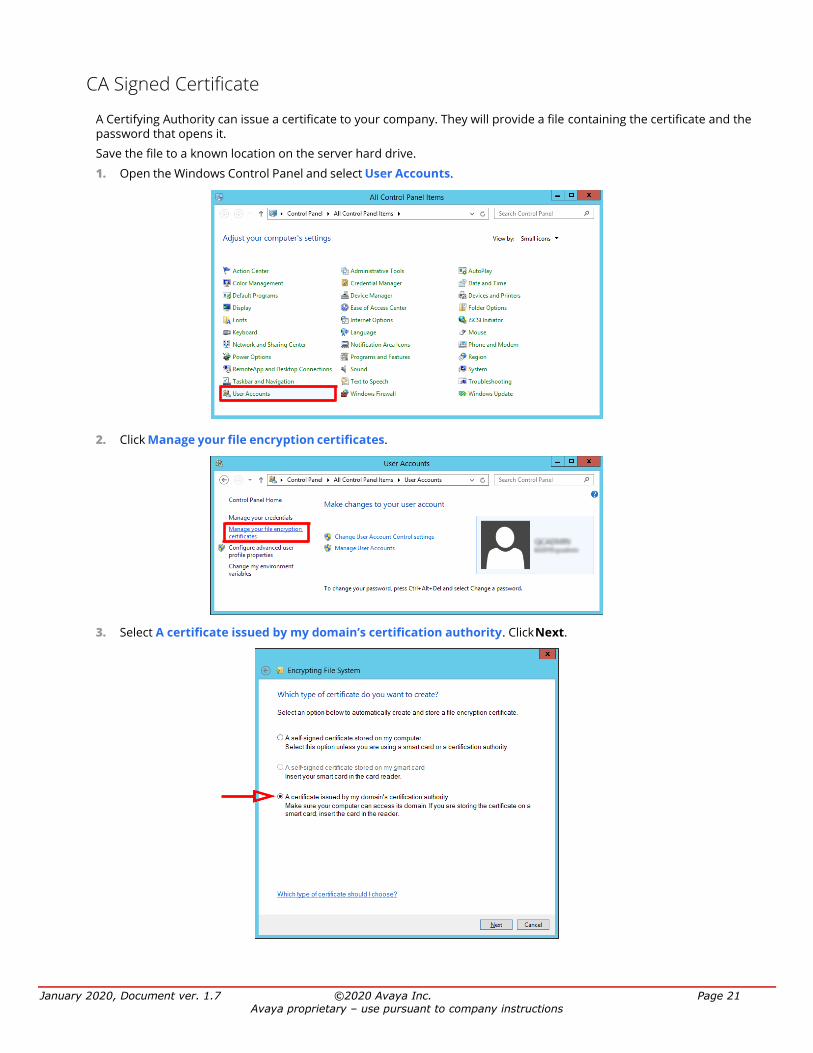
CA Signed Certificate
A Certifying Authority can issue a certificate to your company. They will provide a file containing the certificate and the password that opens it.
Save the file to a known location on the server hard drive.
1. Open the Windows Control Panel and select User Accounts.
2. Click Manage your file encryption certificates.
3. Select A certificate issued by my domain’s certification authority. Click Next.

January 2020, Document ver. 1.7 ©2020 Avaya Inc. Page 22 Avaya proprietary – use pursuant to company instructions
4. Enable Backup the certificate and key now, fill in the path to where the backup file will be saved, and give it a password. Click Next.
5. Enable All Logical Drives, then click Next.
January 2020, Document ver. 1.7 ©2020 Avaya Inc. Page 23 Avaya proprietary – use pursuant to company instructions
6. The files will be encrypted. When it is finished, a result summary will be displayed. Click Close.
7. You can verify the success of the installation by opening the certmgr.msc.
Go to Personal > Certificates and verify that the certificate appears under your user name.
January 2020, Document ver. 1.7 ©2020 Avaya Inc. Page 24 Avaya proprietary – use pursuant to company instructions
IIS Certificate Bindings
To enable an HTTPS connection, another certificate has to be installed in IIS. This certificate must be acquired from a certifying authority.
The HTTPS protocol must be enabled, and HTTP disabled.
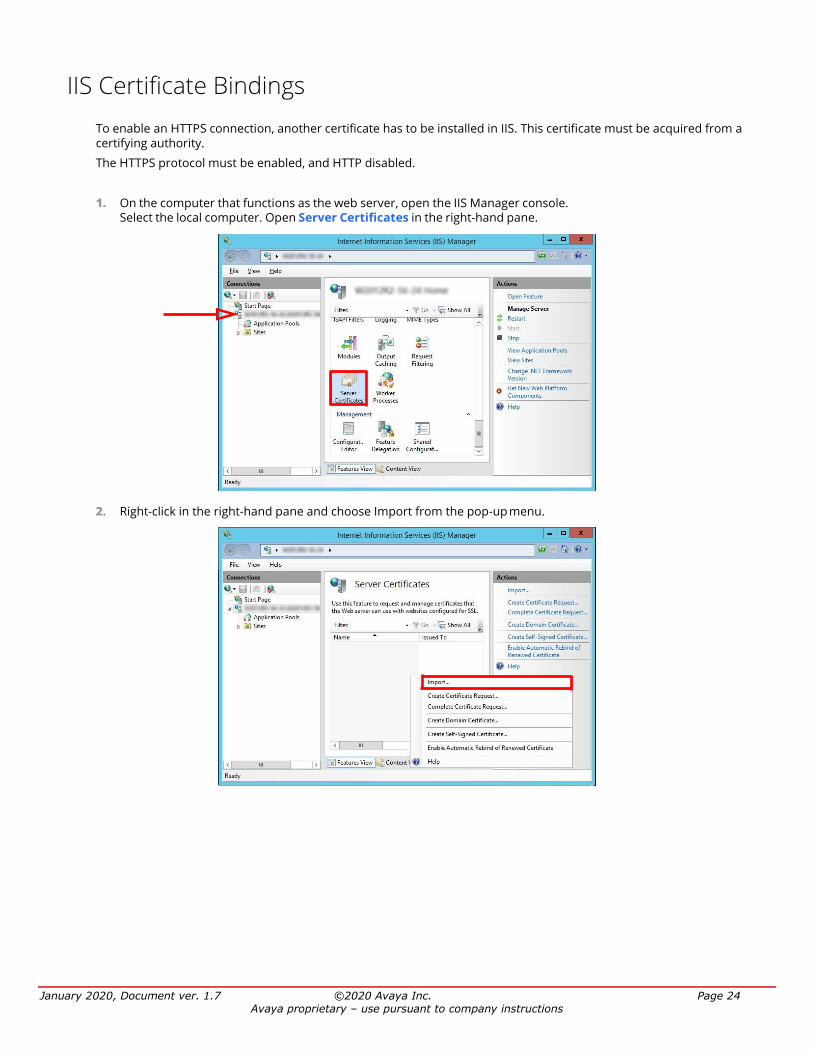
1. On the computer that functions as the web server, open the IIS Manager console.
Select the local computer. Open Server Certificates in the right-hand pane.
2. Right-click in the right-hand pane and choose Import from the pop-up menu.

January 2020, Document ver. 1.7 ©2020 Avaya Inc. Page 25 Avaya proprietary – use pursuant to company instructions
3. Enter the path to the certificate file and the password. Select Personal as the Certificate Store. Click OK.
4. Go to Sites > Default Web Site. Click Bindings....
5. Add the HTTPS binding type. Set the IP Address to All Unassigned. Leave Port at its default. Change SSL Certificate to the certificate name installed above. Click OK.
January 2020, Document ver. 1.7 ©2020 Avaya Inc. Page 26 Avaya proprietary – use pursuant to company instructions
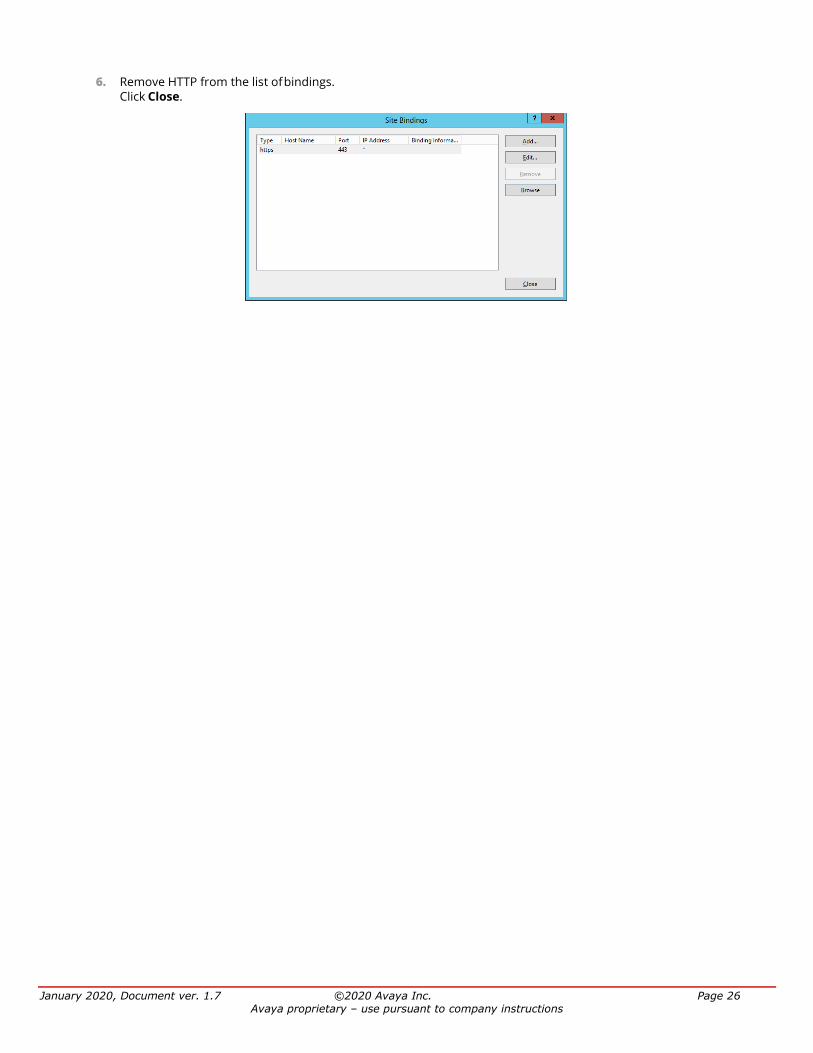
6. Remove HTTP from the list of bindings. Click Close.
January 2020, Document ver. 1.7 ©2020 Avaya Inc. Page 27 Avaya proprietary – use pursuant to company instructions
Disabling User Account Control Notification
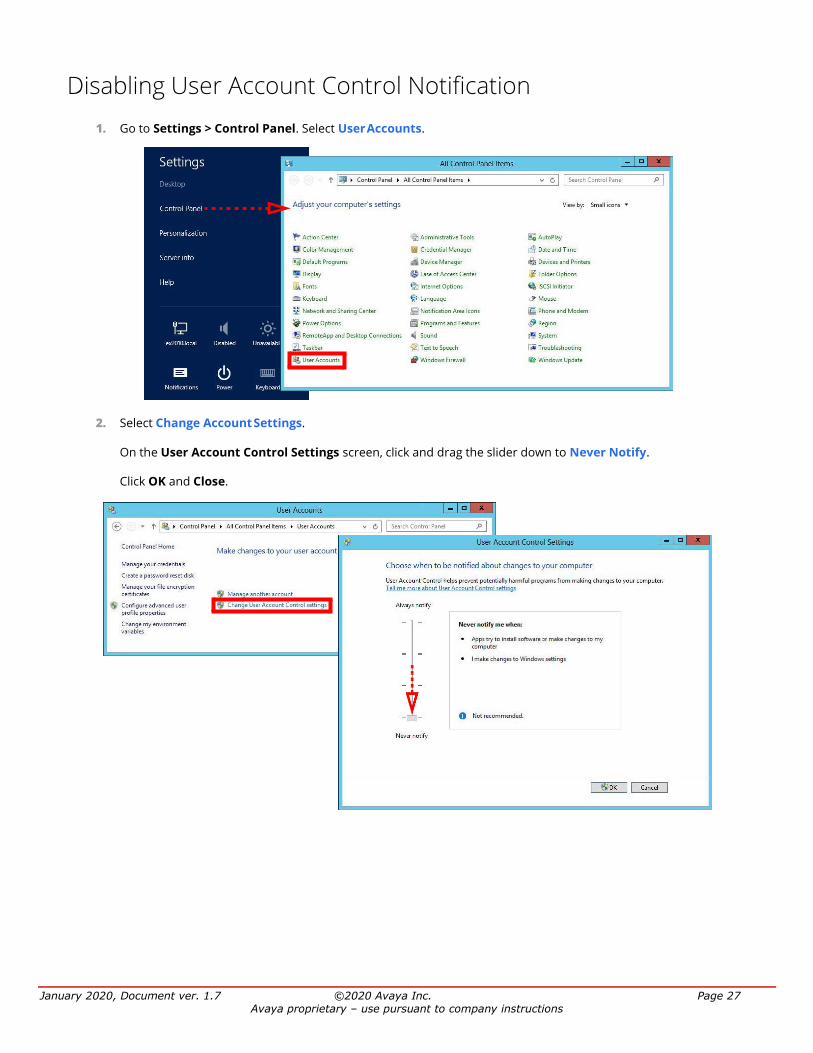
1. Go to Settings > Control Panel. Select User Accounts.
2. Select Change Account Settings.
On the User Account Control Settings screen, click and drag the slider down to Never Notify.
Click OK and Close.
January 2020, Document ver. 1.7 ©2020 Avaya Inc. Page 28 Avaya proprietary – use pursuant to company instructions
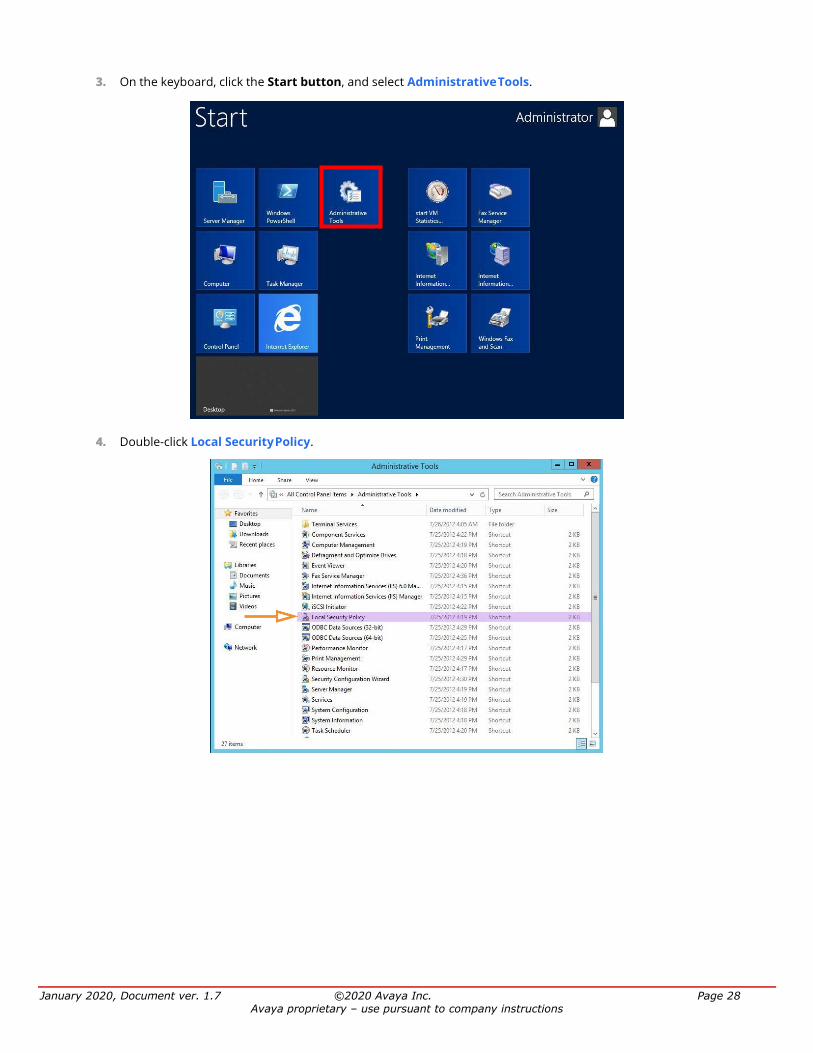
3. On the keyboard, click the Start button, and select Administrative Tools.
4. Double-click Local Security Policy.

January 2020, Document ver. 1.7 ©2020 Avaya Inc. Page 29 Avaya proprietary – use pursuant to company instructions
5. Under Security Settings > Local Policies > Security Options, double-click
User Account Control: Run all administrators in Admin Approval Mode.
6. Select Disabled. Click OK.
7. Reboot the server.

January 2020, Document ver. 1.7 ©2020 Avaya Inc. Page 30 Avaya proprietary – use pursuant to company instructions
Installing IX Messaging with High Security on a Single Server
This section covers installing IX Messaging in Single Server configuration. If you are planning a High Availability installation, jump to page 38.
Continue with the Avaya IX Messaging installation. The presence of a high security license will be noted during installation and the appropriate files will be loaded. Encryption will be enabled at that time.
1. Run the UCServices.iso you received when you purchased the program.
2. Once the Windows components have been verified, the following
screen will appear.
Click Next to begin the installation procedure.
Note: Make sure that all of the necessary Services for your operating system have been installed before proceeding with the installation. Refer to the appropriate section of the Server Installation Guide for further details. Also make sure that Windows Firewall is disabled, and that Windows Automatic Update is turned off.
Note: If you have Autorun disabled on your system, please browse into the DVD and double-click the
Setup.exe file to begin the installation process.
Note: The installer will automatically install the necessary packages at the beginning of the installation if they do not already exist on the system. These packages may include Sentinel Protection, Microsoft Visual C++ Redistributable and Microsoft .Net Framework 4.5. This process may take a while depending on the required components.
Note: Clicking on the Documentation button will provide you with the default set of PDF documents which comprehensively cover most aspects of IX Messaging. They can also be downloaded from https://support.avaya.com

January 2020, Document ver. 1.7 ©2020 Avaya Inc. Page 31 Avaya proprietary – use pursuant to company instructions
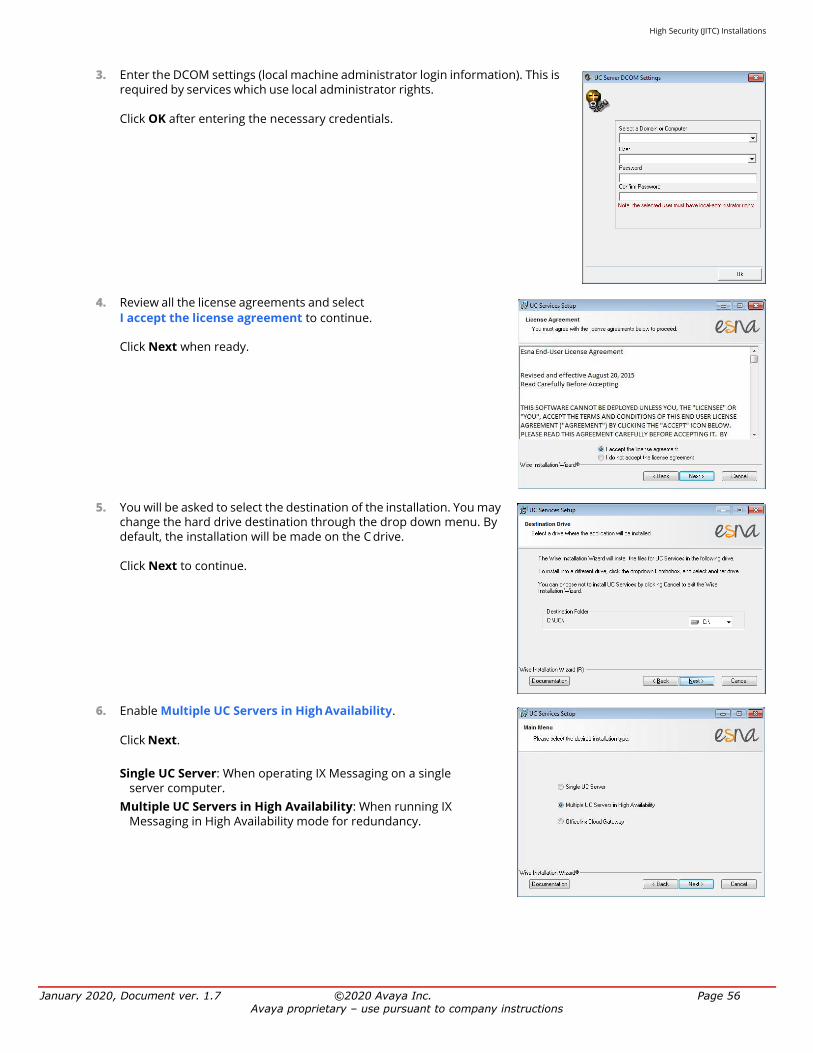
3. Enter the DCOM settings (local machine administrator login information). This is required by services which use local administrator rights.
Click OK after entering the necessary credentials.
4. Review all the license agreements and select
I accept the license agreement to continue.
Click Next when ready.
5. You will be asked to select the destination of the installation. You may change the hard drive destination through the drop down menu. By default, the installation will be made on the C drive.
Click Next to continue.
6. Enable Single UC Server.
Click Next.
Single UC Server: When operating IX Messaging on a single server computer.
Multiple UC Servers in High Availability: When running IX Messaging in High Availability mode for redundancy.

January 2020, Document ver. 1.7 ©2020 Avaya Inc. Page 32 Avaya proprietary – use pursuant to company instructions
7. When prompted, click Run to confirm the installation. The necessary files will be installed.
8. Once the process is complete the licensing screen will appear. It is recommended that you use Online Activation whenever possible. To do so, simply enter the Serial Number and Site ID which has been provided to you.
Click Request Online Activation when finished.
9. Most of the fields in the Customer Site Registration window should already be filled in based upon the license and site numbers entered. Complete the form where necessary (all fields are required).
Note: This screen may not appear, depending upon your Windows operating system and settings.
Warning: It is essential that the system/PC clock be properly set before activating the license. Any subsequent changes to the clock can adversely affect or terminate the license.

January 2020, Document ver. 1.7 ©2020 Avaya Inc. Page 33 Avaya proprietary – use pursuant to company instructions
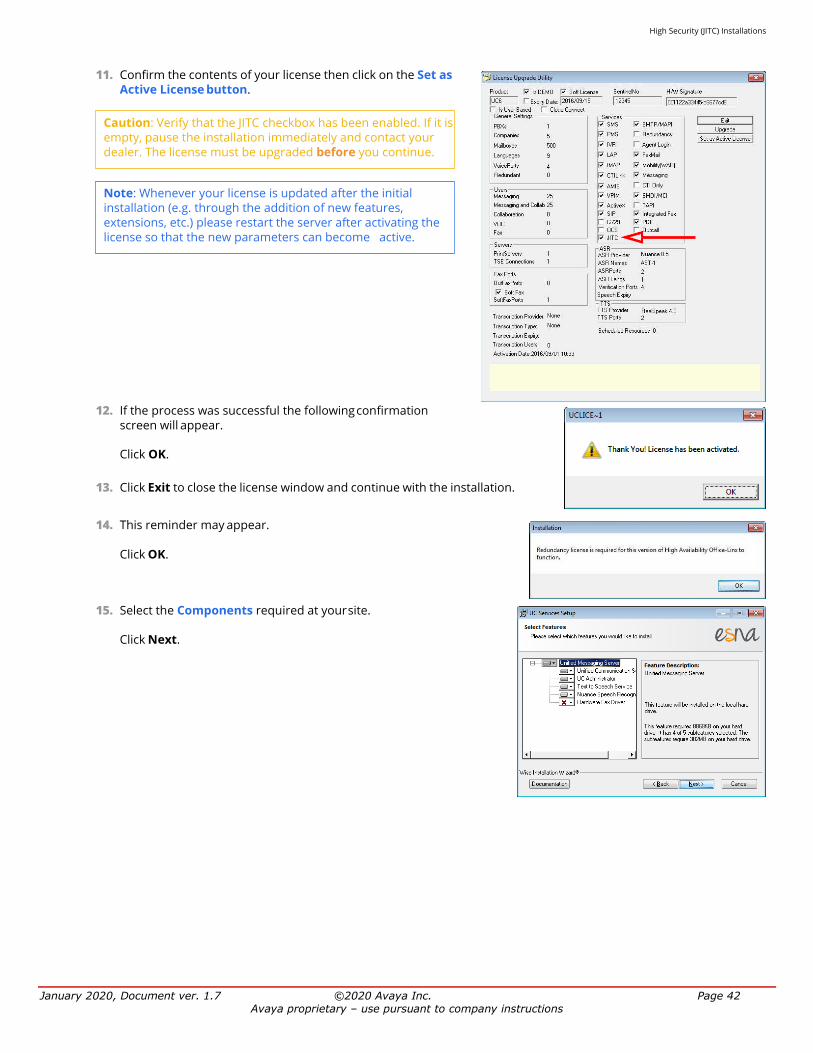
10. Confirm the contents of your license then click on the Set as Active License button.
11. If the process was successful the following confirmation
screen will appear.
Click OK.
12. Click Exit to close the license window and continue with the installation.
13. Select the Components required at your site. Disable any
components that are not needed.
Click Next.
14. This screen shows all of the Windows components that IX Messaging requires to operate properly.
For all items that are not checked, return to Windows and add any missing components to the operating system.
Click Next when finished.
Note: Whenever your license is updated after initial installation (e.g. through the addition of new features, extensions, etc.) please restart the server after activating the license so that the new parameters can become active.
Important: Caution: Verify that the JITC checkbox has been enabled. If it is empty, pause the installation immediately and contact your dealer. The license must be upgraded before you continue.
Note: This screen will only appear if one or more required components are not installed on the computer.
Note: The installation will not continue until all of the required components have been added to Windows. This screen does not refresh until you click Next.

January 2020, Document ver. 1.7 ©2020 Avaya Inc. Page 34 Avaya proprietary – use pursuant to company instructions
15. This screen shows IIS settings that IX Messaging requires to operate properly.
For all items that are not checked, return to the IIS Manager in Windows and set these options as required.
Click Next when finished.
16. Select your PBX Brand then click Next.
17. Select your PBX model from the dropdown menu.
Click Next.
18. Enter the primary location from which most telephone calls will be
placed. This will normally be where the corporate office is situated. Additional dialing locations and rules may be defined after the installation is complete.
Select the country from the dropdown menu, and enter the area code in the space provided.
Click Next to continue.
Note: This screen will only appear if one or more of the required settings has not been made on the computer.
Note: The installation will not continue until all of the required IIS settings have been made.
This screen does not refresh until you click Next.
Note: If the Phone and Modem Settings under Windows Control Panel have already been configured, this step will not appear. The values entered there will be used automatically.

High Security (JITC) Installations
January 2020, Document ver. 1.7 ©2020 Avaya Inc. Page 35 Avaya proprietary – use pursuant to company instructions
19. Enter a password to provide administrator only access to the system. This account password is used to configure the many elements of the system.
20. Enter the database encryption password. The database files will be
encrypted with this password using the FIPS 140-2 certified security algorithms.
This password must meet the requirements outlined here.
21. The installation will create a new user account on the local computer. Type and confirm a password for the new account.
Click Next to continue.
22. The preliminary information required for installation is now complete.
Click Next.
Hint: The password cannot be left blank. It must contain both letters, numbers and characters, and must be at least 15 characters long. See page 63 for a complete list of password requirements.
IMPORTANT ! : Record this password and keep it in a safe location.
The loss of this password will lead to the complete and unrecoverable loss of data.
High Security (JITC) Installations
January 2020, Document ver. 1.7 ©2020 Avaya Inc. Page 36 Avaya proprietary – use pursuant to company instructions
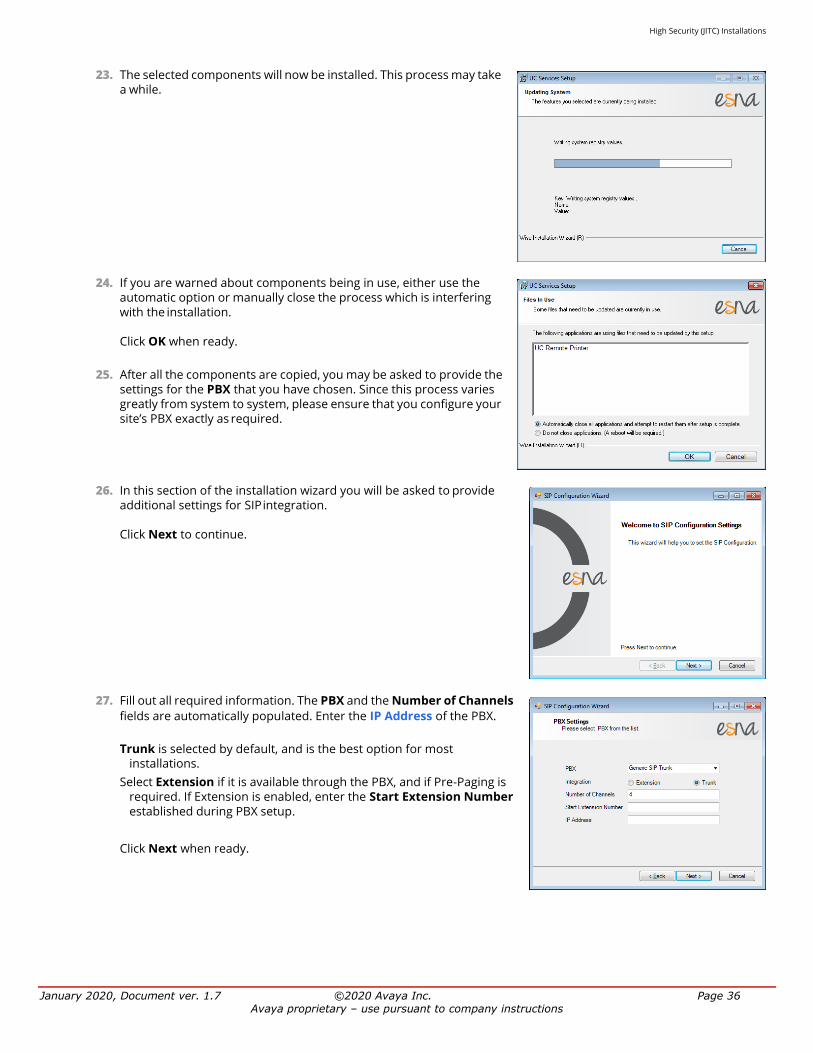
23. The selected components will now be installed. This process may take a while.
24. If you are warned about components being in use, either use the
automatic option or manually close the process which is interfering with the installation.
Click OK when ready.
25. After all the components are copied, you may be asked to provide the
settings for the PBX that you have chosen. Since this process varies greatly from system to system, please ensure that you configure your site’s PBX exactly as required.
26. In this section of the installation wizard you will be asked to provide additional settings for SIP integration.
Click Next to continue.
27. Fill out all required information. The PBX and the Number of Channels
fields are automatically populated. Enter the IP Address of the PBX.
Trunk is selected by default, and is the best option for most
installations.
Select Extension if it is available through the PBX, and if Pre-Paging is required. If Extension is enabled, enter the Start Extension Number established during PBX setup.
Click Next when ready.

High Security (JITC) Installations
January 2020, Document ver. 1.7 ©2020 Avaya Inc. Page 37 Avaya proprietary – use pursuant to company instructions
28. Confirm the information then click Finish.
29. Click Finish to restart the server.
If you wish to restart your computer at a later time, disable the Restart
check box then click Finish.
Note: Depending on the type of SIP integration you’ll be using, you may have to fine tune the settings from the SIP Configuration Tool in order for the system to function properly. The SIP Configuration Tool can be found in the IX Messaging programs folder after installation.
High Security (JITC) Installations
January 2020, Document ver. 1.7 ©2020 Avaya Inc. Page 38 Avaya proprietary – use pursuant to company instructions
Installing IX Messaging with High Security with High
Availability
This section covers installing IX Messaging in a High Availability (HA) configuration. If you are planning a Single Server installation, jump to page 30.
An HA installation involves up to 20 servers: 1 Master voice server, 1 Consolidated server, and up to 19 Secondary servers. The program must be installed and configured on all 3 types of server. If any of the servers fail, the remaining servers take over with no interruption in service. The multiple server configuration also spreads large traffic loads across many machines to improve performance.
Continue with the Avaya IX Messaging installation. The presence of a high security license will be noted during installation and the appropriate files will be loaded. Encryption will be enabled at that time.
The installation process for each type of server is slightly different and each will be covered separately here:
• Master Voice Server
• Consolidated Server
• Secondary Voice Servers
Warning: It is important to login to the servers (Master, Consolidated and all Secondaries) using a domain account that has full administrative rights on the local machine.
High Security (JITC) Installations
January 2020, Document ver. 1.7 ©2020 Avaya Inc. Page 39 Avaya proprietary – use pursuant to company instructions
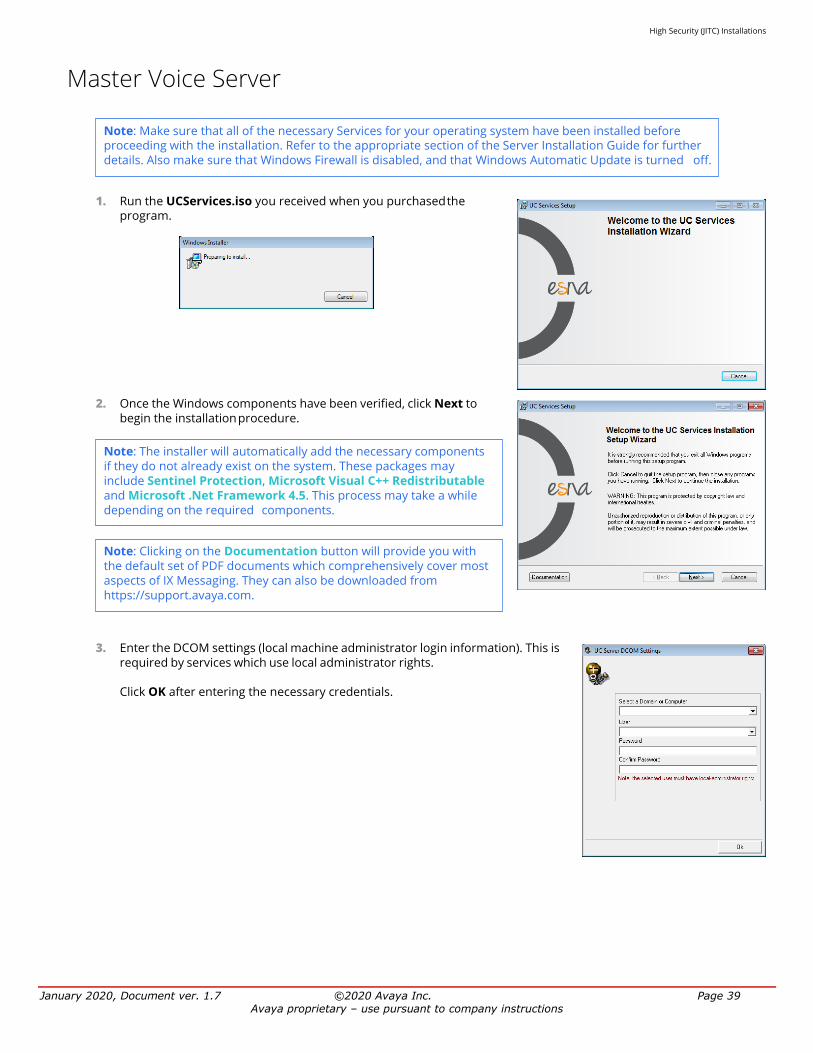
Master Voice Server
1. Run the UCServices.iso you received when you purchased the program.
2. Once the Windows components have been verified, click Next to
begin the installation procedure.
3. Enter the DCOM settings (local machine administrator login information). This is
required by services which use local administrator rights.
Click OK after entering the necessary credentials.
Note: Make sure that all of the necessary Services for your operating system have been installed before proceeding with the installation. Refer to the appropriate section of the Server Installation Guide for further details. Also make sure that Windows Firewall is disabled, and that Windows Automatic Update is turned off.
Note: The installer will automatically add the necessary components if they do not already exist on the system. These packages may include Sentinel Protection, Microsoft Visual C++ Redistributable and Microsoft .Net Framework 4.5. This process may take a while depending on the required components.
Note: Clicking on the Documentation button will provide you with the default set of PDF documents which comprehensively cover most aspects of IX Messaging. They can also be downloaded from https://support.avaya.com.

High Security (JITC) Installations
January 2020, Document ver. 1.7 ©2020 Avaya Inc. Page 40 Avaya proprietary – use pursuant to company instructions
4. Review the license agreement and select
I accept the license agreement.
Click Next when ready.
5. You will be asked to select the destination of the installation. You may change the hard drive destination through the drop down menu. By default, the installation will be made on the C drive.
Click Next to continue.
6. Enable Multiple UC Servers in High Availability.
Click Next.
Single UC Server: When operating IX Messaging on a single server computer.
Multiple UC Servers in High Availability: When running IX Messaging in High Availability mode for redundancy.
7. Select Master Voice Server.
Click Next.
High Security (JITC) Installations
January 2020, Document ver. 1.7 ©2020 Avaya Inc. Page 41 Avaya proprietary – use pursuant to company instructions
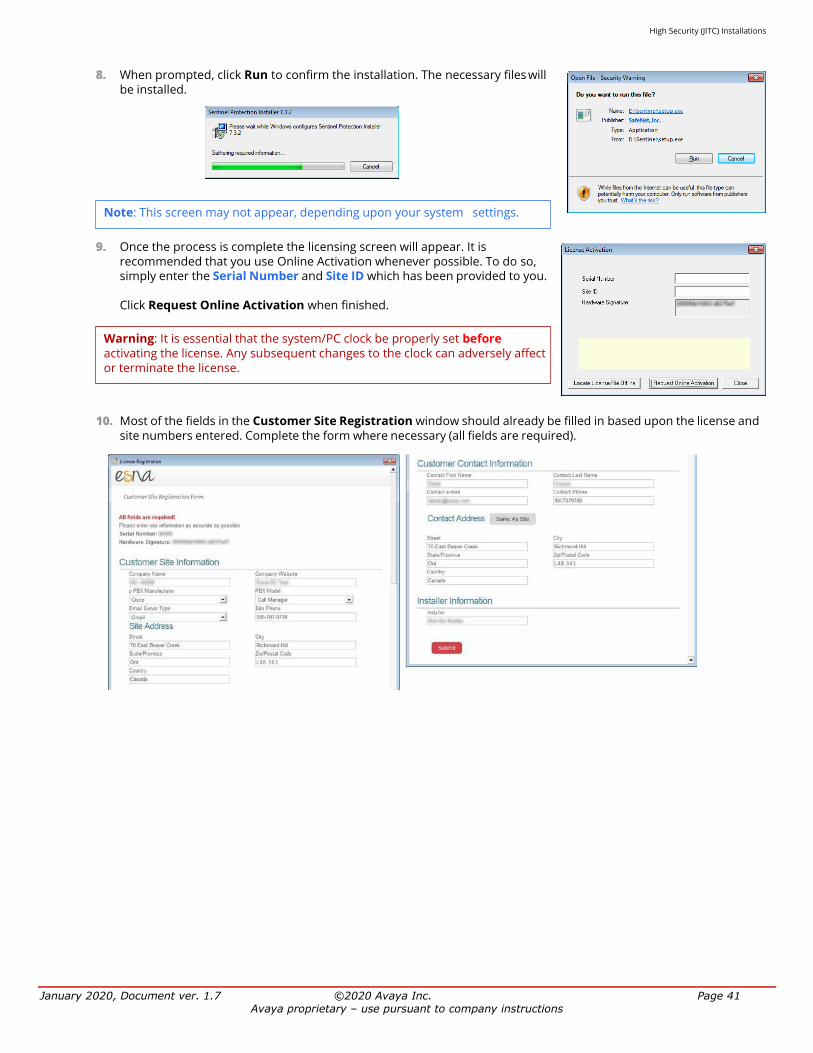
8. When prompted, click Run to confirm the installation. The necessary files will be installed.
9. Once the process is complete the licensing screen will appear. It is recommended that you use Online Activation whenever possible. To do so, simply enter the Serial Number and Site ID which has been provided to you.
Click Request Online Activation when finished.
10. Most of the fields in the Customer Site Registration window should already be filled in based upon the license and site numbers entered. Complete the form where necessary (all fields are required).
Note: This screen may not appear, depending upon your system settings.
Warning: It is essential that the system/PC clock be properly set before activating the license. Any subsequent changes to the clock can adversely affect or terminate the license.
High Security (JITC) Installations
January 2020, Document ver. 1.7 ©2020 Avaya Inc. Page 42 Avaya proprietary – use pursuant to company instructions
11. Confirm the contents of your license then click on the Set as Active License button.
12. If the process was successful the following confirmation screen will appear.
Click OK.
13. Click Exit to close the license window and continue with the installation.
14. This reminder may appear.
Click OK.
15. Select the Components required at your site.
Click Next.
Caution: Verify that the JITC checkbox has been enabled. If it is empty, pause the installation immediately and contact your dealer. The license must be upgraded before you continue.
Note: Whenever your license is updated after the initial installation (e.g. through the addition of new features, extensions, etc.) please restart the server after activating the license so that the new parameters can become active.
High Security (JITC) Installations
January 2020, Document ver. 1.7 ©2020 Avaya Inc. Page 43 Avaya proprietary – use pursuant to company instructions
16. This screen shows all of the Windows components that IX Messaging requires to operate properly.
For all items that are not checked, return to Windows and add any missing components to the operating system.
Click Next when finished.
17. This screen shows IIS settings that IX Messaging requires to operate properly.
For all items not checked, refer to IIS Certificate Bindings for configuration details.
Click Next when finished.
18. Select your PBX Brand then click Next.
19. Select your PBX model from the dropdown menu.
Click Next.
Note: This screen will only appear if one or more required components are not installed on the computer.
Note: The installation will not continue until all of the required components have been added to Windows.
This screen does not refresh until you click Next.
Note: This screen will only appear if one or more of the required settings has not been made on the computer.
Note: The installation will not continue until all of the required IIS settings have been made. This screen does not refresh until you click Next.
High Security (JITC) Installations
January 2020, Document ver. 1.7 ©2020 Avaya Inc. Page 44 Avaya proprietary – use pursuant to company instructions
20. Enter the IP Address for the Consolidated Server.
Click Next.
21. Enter the number of ports your system will use.
Click Next.
22. Enter the primary location from which most telephone calls will be placed. This will normally be where the corporate office is situated. Additional dialing locations and rules may be defined after the installation is complete.
Select the country from the dropdown menu, and enter the area code in the space provided.
Click Next to continue.
23. Enter the database encryption password. The database files will be encrypted with this password using the FIPS 140-2 certified security algorithms. This password must meet the requirements outlined here.
Note: If the Phone and Modem Settings under Windows Control Panel have already been configured, this step will not appear. The values entered there will be used automatically.
IMPORTANT ! : Record this password and keep it in a safe location.
The loss of this password will lead to the complete and unrecoverable loss of data.

High Security (JITC) Installations
January 2020, Document ver. 1.7 ©2020 Avaya Inc. Page 45 Avaya proprietary – use pursuant to company instructions
24. Enter the values in the spaces provided. These are provided with the certificate (either self-signed or a CA signed).
These values are used when configuring the certificates on page 65.
25. The preliminary information required for installation is now complete.
Click Next.
26. The selected components will now be installed. This process may take a while.
27. If you are warned about components being in use, either use the
automatic option or manually close the process which is interfering with the installation.
Click OK when ready.
28. After all the components are copied, you may be asked to provide the
settings for the PBX that you have chosen. Since this process varies greatly from system to system, please ensure that you configure your site’s PBX exactly as required.

High Security (JITC) Installations
January 2020, Document ver. 1.7 ©2020 Avaya Inc. Page 46 Avaya proprietary – use pursuant to company instructions
29. In this section of the installation wizard you will be asked to provide additional settings for SIP integration.
Click Next to continue.
30. Fill out all required information. The PBX and the Number of Channels
fields are automatically populated. Enter the IP Address of the PBX.
Trunk is selected by default, and is the best option for most
installations.
Select Extension if it is available through the PBX, and if Pre-Paging is required. If Extension is enabled, enter the Start Extension Number established during PBX setup.
Click Next when ready.
31. Confirm the information then click Finish.
32. Click Finish to restart the server.
If you wish to restart your computer at a later time, disable the
Restart check box then click Finish.
Note: Depending on the type of SIP integration you’ll be using, you may have to fine tune the settings from the SIP Configuration Tool in order for the system to function properly. The SIP Configuration Tool can be found in the IX Messaging programs folder after installation.

High Security (JITC) Installations
January 2020, Document ver. 1.7 ©2020 Avaya Inc. Page 47 Avaya proprietary – use pursuant to company instructions
33. This alert is to remind you to properly share the UC installation folder.
Click OK to restart the computer.
Important: The installation folder MUST be shared before proceeding with the Consolidated and Secondary server installations.

High Security (JITC) Installations
January 2020, Document ver. 1.7 ©2020 Avaya Inc. Page 48 Avaya proprietary – use pursuant to company instructions
Consolidated Server
1. Run the UCServices.iso you received when you purchased the program.
2. Once the Windows components have been verified, the following
screen will appear. Click Next to begin the installation procedure.
3. Enter the DCOM settings (local machine administrator login information). This is
required by services which use local administrator rights.
Click OK after entering the necessary credentials.
Note: Make sure that all of the necessary Services for your operating system have been installed before proceeding with the installation. Refer to the appropriate section of the Server Installation Guide for further details. Also make sure that Windows Firewall is disabled, and that Windows Automatic Update is turned off.
Note: If you have Autorun disabled on your system, please browse into the DVD and double-click the
Setup.exe file to begin the installation process.
Note: The installer will automatically install the necessary packages at the beginning of the installation if they do not already exist on the system. These packages may include Sentinel Protection, Microsoft Visual C++ Redistributable and Microsoft .Net Framework 4.5. This process may take a while depending on the required components.
Note: Clicking on the Documentation button will provide you with the default set of PDF documents which comprehensively cover most aspects of IX Messaging. They can also be downloaded from https://support.avaya.com.

High Security (JITC) Installations
January 2020, Document ver. 1.7 ©2020 Avaya Inc. Page 49 Avaya proprietary – use pursuant to company instructions
4. Review all the license agreements and select
I accept the license agreement to continue.
Click Next when ready.
5. You will be asked to select the destination of the installation. You may change the hard drive destination through the drop down menu. By default, the installation will be made on the C drive.
Click Next to continue.
6. Enable Multiple UC Servers in High Availability.
Click Next.
Single UC Server: When operating IX Messaging on a single server computer.
Multiple UC Servers in High Availability: When running IX Messaging in High Availability mode for redundancy.
7. Select Consolidated Database/File Server.
Click Next.

High Security (JITC) Installations
January 2020, Document ver. 1.7 ©2020 Avaya Inc. Page 50 Avaya proprietary – use pursuant to company instructions
8. Enter the IP address for the Master voice server.
Click Next.
9. On the C drive, open the Logs folder.
Open the file named icense using any text editor (e.g. Notepad).
Verify Highsecurity=1. If it does not, verify that the same file (OL Installation drive:\UC) on the Master voice server does have this setting. If the setting is valid on the Master, there is a connection or a sharing problem between the two machines. If the Master is not correctly set, contact your reseller for an updated license.
Once any connection or sharing problems have been fixed, return to step 8 and check again for this file.
Caution: Do not continue the installation until this file has the Highsecurity setting equal to 1.

High Security (JITC) Installations
January 2020, Document ver. 1.7 ©2020 Avaya Inc. Page 51 Avaya proprietary – use pursuant to company instructions
10. Select the Components required at your site.
Click Next.
11. This screen shows all of the Windows components that the
Consolidated server requires to operate properly.
For all items that are not checked, return to Windows and install any missing components into the operating system.
Click Next when finished.
12. Select your PBX Brand then click Next.
13. Select your PBX model from the dropdown menu.
Click Next.
Note: This screen will only appear if one or more required components are not installed on the server.
Note: The installation will not continue until all of the required components have been added to the server. The screen does not refresh until you click Next.

High Security (JITC) Installations
14. Unless the Master Server has been upgraded, enable No.
Click Next.
January 2020, Document ver. 1.7 ©2020 Avaya Inc. Page 52 Avaya proprietary – use pursuant to company instructions
15. Enter a password to provide administrator only access to the system. This account password is used to configure the many elements of the system.
16. Enter the database encryption password. The database files will be
encrypted with this password using the FIPS 140-2 certified security algorithms. This password must meet the requirements outlined here.
17. Enter an encryption password to protect Mobilink communications.
Hint: Passwords cannot be left blank. In a high-security installation, all passwords must contain letters, numbers and characters, and must be at least 15 characters long. See page 63 for a complete list of password requirements.
IMPORTANT ! : Record this password and keep it in a safe location.
The loss of this password will lead to the complete and unrecoverable loss of data.

High Security (JITC) Installations
January 2020, Document ver. 1.7 ©2020 Avaya Inc. Page 53 Avaya proprietary – use pursuant to company instructions
18. Enter a password for the Mobilink identity file.
Click Next.
19. The installation will create a new user account on the local computer.
Type and confirm a password for the new account.
Click Next to continue.
20. The preliminary information required for installation is now complete.
Click Next.
21. The selected components will now be installed. This process may take
a while.

High Security (JITC) Installations
January 2020, Document ver. 1.7 ©2020 Avaya Inc. Page 54 Avaya proprietary – use pursuant to company instructions
22. If you are warned about components being in use, either use the automatic option or manually close the process which is interfering with the installation.
Click OK when ready.
23. After all the components are copied, you may be asked to provide the
settings for the PBX that you have chosen. Since this process varies greatly from system to system, please ensure that you configure your site’s PBX exactly as required.
24. Click Finish to restart the server.
If you wish to restart your computer at a later time, disable the
Restart check box then click Finish.
25. This alert is to remind you to properly share the UC installation folder.
Click OK to restart the computer.

High Security (JITC) Installations
January 2020, Document ver. 1.7 ©2020 Avaya Inc. Page 55 Avaya proprietary – use pursuant to company instructions
Secondary Voice Servers
Up to 19 Secondary servers can be added to a High Availability environment. Each must be given its own, unique identification number (e.g. 2-20) which is assigned during installation.
1. Run the UCServices.iso you received when you purchased the program.
2. Once the Windows components have been verified, the following
screen will appear. Click Next to begin the installation procedure.
Note: Make sure that all of the necessary Services for your operating system have been installed before proceeding with the installation. Refer to the appropriate section of the Server Installation Guide for further details. Also make sure that Windows Firewall is disabled, and that Windows Automatic Update is turned off.
Note: If you have Autorun disabled on your system, please browse into the DVD and double-click the
Setup.exe file to begin the installation process.
Note: The installer will automatically install the necessary packages at the beginning of the installation if they do not already exist on the system. These packages may include Sentinel Protection, Microsoft Visual C++ Redistributable and Microsoft .Net Framework 4.5. This process may take a while depending on the required components.
Note: Clicking on the Documentation button will provide you with the default set of PDF documents which comprehensively cover most aspects of IX Messaging. They can also be downloaded from https://support.avaya.com.
High Security (JITC) Installations
January 2020, Document ver. 1.7 ©2020 Avaya Inc. Page 56 Avaya proprietary – use pursuant to company instructions
3. Enter the DCOM settings (local machine administrator login information). This is required by services which use local administrator rights.
Click OK after entering the necessary credentials.
4. Review all the license agreements and select
I accept the license agreement to continue.
Click Next when ready.
5. You will be asked to select the destination of the installation. You may change the hard drive destination through the drop down menu. By default, the installation will be made on the C drive.
Click Next to continue.
6. Enable Multiple UC Servers in High Availability.
Click Next.
Single UC Server: When operating IX Messaging on a single server computer.
Multiple UC Servers in High Availability: When running IX Messaging in High Availability mode for redundancy.

High Security (JITC) Installations
January 2020, Document ver. 1.7 ©2020 Avaya Inc. Page 57 Avaya proprietary – use pursuant to company instructions
7. Select Voice Server.
Click Next.
8. Select the IP Address of the Master Voice Server.
Click Next.
High Security (JITC) Installations
January 2020, Document ver. 1.7 ©2020 Avaya Inc. Page 58 Avaya proprietary – use pursuant to company instructions
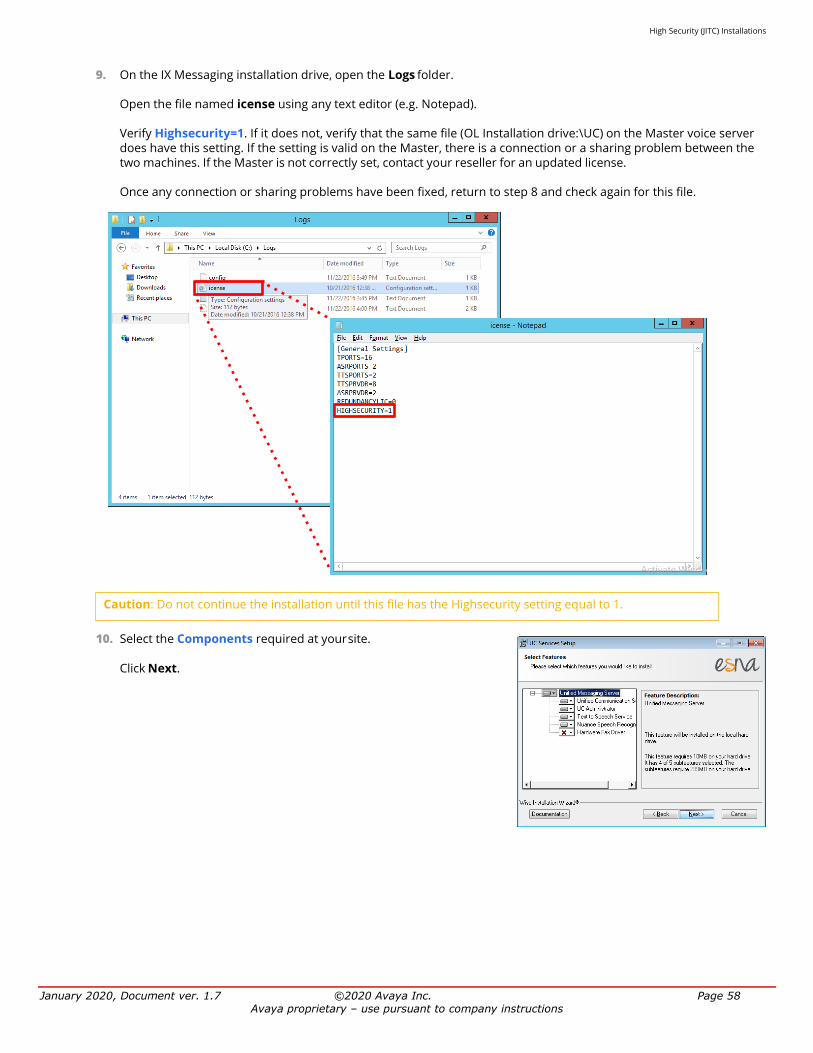
9. On the IX Messaging installation drive, open the Logs folder.
Open the file named icense using any text editor (e.g. Notepad).
Verify Highsecurity=1. If it does not, verify that the same file (OL Installation drive:\UC) on the Master voice server does have this setting. If the setting is valid on the Master, there is a connection or a sharing problem between the two machines. If the Master is not correctly set, contact your reseller for an updated license.
Once any connection or sharing problems have been fixed, return to step 8 and check again for this file.
10. Select the Components required at your site.
Click Next.
Caution: Do not continue the installation until this file has the Highsecurity setting equal to 1.

High Security (JITC) Installations
January 2020, Document ver. 1.7 ©2020 Avaya Inc. Page 59 Avaya proprietary – use pursuant to company instructions
11. Select your PBX Brand then click Next.
12. Select your PBX model from the dropdown menu.
Click Next.
13. Unless the Master Server has been upgraded, enable No.
Click Next.
14. Enter the number for this Secondary Server. Each Secondary must have a unique number assigned between 2 and 20.
Click Next.
High Security (JITC) Installations
January 2020, Document ver. 1.7 ©2020 Avaya Inc. Page 60 Avaya proprietary – use pursuant to company instructions
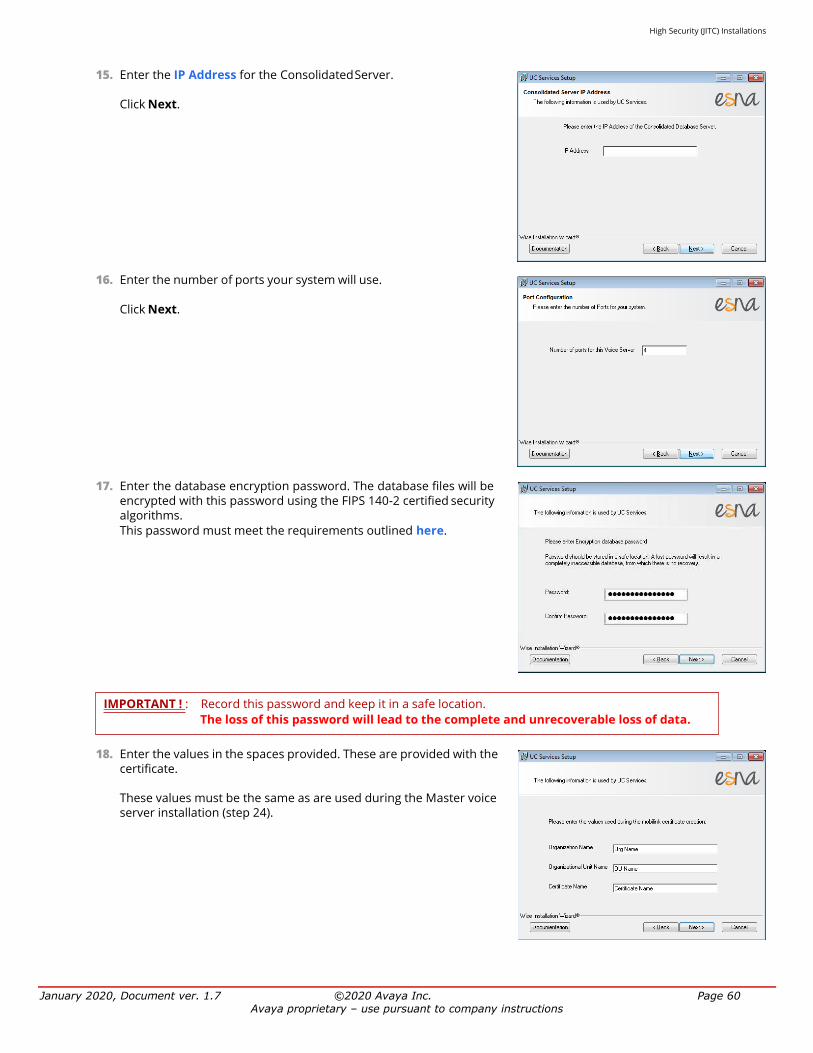
15. Enter the IP Address for the Consolidated Server.
Click Next.
16. Enter the number of ports your system will use.
Click Next.
17. Enter the database encryption password. The database files will be encrypted with this password using the FIPS 140-2 certified security algorithms.
This password must meet the requirements outlined here.
18. Enter the values in the spaces provided. These are provided with the certificate.
These values must be the same as are used during the Master voice server installation (step 24).
IMPORTANT ! : Record this password and keep it in a safe location.
The loss of this password will lead to the complete and unrecoverable loss of data.

High Security (JITC) Installations
January 2020, Document ver. 1.7 ©2020 Avaya Inc. Page 61 Avaya proprietary – use pursuant to company instructions
19. The preliminary information required for installation is now complete.
Click Next.
20. The selected components will now be installed. This process may take
a while.
21. If you are warned about components being in use, either use the
automatic option or manually close the process which is interfering with the installation.
Click OK when ready.
22. After all the components are copied, you may be asked to provide the
settings for the PBX that you have chosen. Since this process varies greatly from system to system, please ensure that you configure your site’s PBX exactly as required.
23. In this section of the installation wizard you will be asked to provide additional settings for SIP integration.
Click Next to continue.

High Security (JITC) Installations
January 2020, Document ver. 1.7 ©2020 Avaya Inc. Page 62 Avaya proprietary – use pursuant to company instructions
24. Fill out all required information. The PBX and the Number of Channels
fields are automatically populated. Enter the IP Address of the PBX.
Trunk is selected by default, and is the best option for most
installations.
Select Extension if it is available through the PBX, and if Pre-Paging is required. If Extension is enabled, enter the Start Extension Number established during PBX setup.
Click Next when ready.
25. Confirm the information then click Finish.
26. Click Finish to restart the server.
If you wish to restart your computer at a later time, disable the
Restart check box then click Finish.
27. This alert is to remind you to properly share the UC installation folder.
Click OK to restart the computer.
Note: Depending on the type of SIP integration you will be using, you may have to fine tune the settings from the SIP Configuration Tool in order for the system to function properly. The SIP Configuration Tool can be found in the IX Messaging programs folder after installation.

High Security (JITC) Installations
January 2020, Document ver. 1.7 ©2020 Avaya Inc. Page 63 Avaya proprietary – use pursuant to company instructions
JITC Passwords
More stringent rules for user passwords are also mandated when using a high security, JITC certified installation. These include:
• Must be at least 15 characters long.
• Include at least one uppercase character (A-Z).
• Include at least one lowercase character (a-z).
• Include at least one non-alphabetic character (0-9, !@#$% etc.).
• Passwords must be changed every 60 days.
• No new password can be the same as a previous password extending back 10 iterations.
• The administrator can change the password at any time.
• The client can change their password only once within a 24 hour period.
• A client password can only be changed by the client or the administrator.
• A password cannot contain any personal information, such as names, telephone numbers, birthdates, etc.
These rules are enabled by default when installing the high security edition of Avaya IX Messaging. They can also be enabled through the OL Admin MMC under Configuration > Advanced.

High Security (JITC) Installations
January 2020, Document ver. 1.7 ©2020 Avaya Inc. Page 64 Avaya proprietary – use pursuant to company instructions
Creating Public and Private Keys
Use the included utility to generate the required public and private keys required for the high-security installation.
1. On the Master computer, open the drive where Avaya IX Messaging has been
installed. Open the Sybase\SQL Anywhere 17\BIN64 folder and run the createkey
program.
2. At the prompt, enter 2048, then press Enter.
3. Key in the location where you want the public key to be stored. Include the name of the key. The name MUST be e2ee_PublicKey2048.pem . Press Enter.
4. Key in the location where you want the private key to be stored. Include the name of the key. The name MUST be e2ee_PrivateKey2048.pem . Press Enter.
5. Enter a password for Mobilink end-to-end encryption and press Enter. The password is the same as the one entered during the Consolidated server installation step 17.
6. Copy the file generated for the public key to the Master voice server, and to all Secondary servers. Paste the file into the UC\Certificates folder on the drive where Avaya IX Messaging was installed.
Copy the file generated for the private key to the same folder on the Consolidated server.

High Security (JITC) Installations
January 2020, Document ver. 1.7 ©2020 Avaya Inc. Page 65 Avaya proprietary – use pursuant to company instructions
Certificates for Mobilink Connection
1. If you are using a self-signed certificate, run the following script from the command prompt to generate the public and private key files.
Change the highlighted sections so that they apply to your installation. Enter the same values as were used during the installation of the Master voice server (step 24).
Enter the password you chose for the Consolidated server during installation.
createcert -t rsa -b 2048 -sc CA -sst ON -sl Toronto -so "Test Org" -sou "Test OU" -scn "Test Cert" -x -m 0 -v 5 -ca 0 -u 1,3,4,5,6 -co c:\MobilinkPublicCertificate.crt -ko c:\ConsPrivateKey.pem -io c:\ConsolidatedIdentity.pem -kp Abc123def456gh!
2. Copy the ConsolidatedIdentity.pem certificate file to the UC\Certificates folder on the Consolidated server to the drive where Avaya IX Messaging was installed. For a certificate provided by a CA, rename the private key file and copy here. The self-signed certificate created in step will already have this name.
3. Copy the MobilinkPublicCertificate.crt certificate file to the UC\Certificates folder on the Master and all Secondary servers to the drive where Avaya IX Messaging was installed. For a certificate provided by a CA, rename the public key file and copy here. The self-signed certificate created in step will already have this name.
High Security (JITC) Installations
January 2020, Document ver. 1.7 ©2020 Avaya Inc. Page 66 Avaya proprietary – use pursuant to company instructions
File Encryption and Data Transfers
When Avaya IX Messaging is installed with the high security license, some sensitive files and folders are encrypted using Windows EFS. The voice server database files employ FIPS 140-2 compliant encryption.
Data transfers and other communications are encrypted using the Transport Layer Security (TLS) protocol.
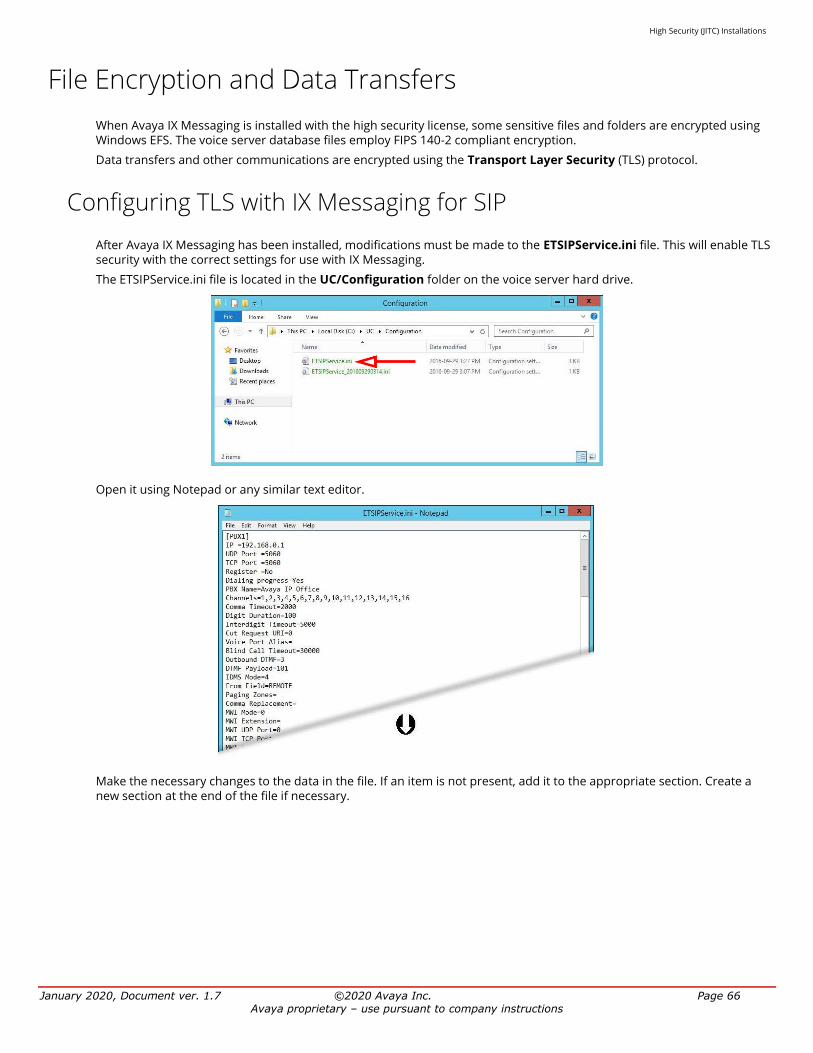
Configuring TLS with IX Messaging for SIP
After Avaya IX Messaging has been installed, modifications must be made to the ETSIPService.ini file. This will enable TLS security with the correct settings for use with IX Messaging.
The ETSIPService.ini file is located in the UC/Configuration folder on the voice server hard drive.
Open it using Notepad or any similar text editor.
Make the necessary changes to the data in the file. If an item is not present, add it to the appropriate section. Create a new section at the end of the file if necessary.
High Security (JITC) Installations
January 2020, Document ver. 1.7 ©2020 Avaya Inc. Page 67 Avaya proprietary – use pursuant to company instructions
This is an example of additions and changes that can be made to the file. Make the changes required for your site.
[PBX1]
Transport protocol=3
[SIP settings]
Ignore Local Addresses=Yes
TCP Enabled = Yes
TLS IP = 192.168.0.91:5061
[TLS Manager]
FIPS=0
[TLS Server]
Private [email protected]
Certificate Depth=5
[TLS Client]
Intermediate [email protected]
Certificate Depth=5

High Security (JITC) Installations
January 2020, Document ver. 1.7 ©2020 Avaya Inc. Page 68 Avaya proprietary – use pursuant to company instructions
Change History
Issue Date Reason
1.0 September 2016 Initial release
1.1 November 2016 Added Document control history and Conditions of fielding
1.2 December 2016 Document formatting
1.3 January 2017 Document formatting
1.4 March 2018 Updated for 10.6 SP1
1.5 August 2018 Updated for 10.7 and branding change from ESNA to Avaya
1.6 November 2019 Not material changes, only updated for DTR#3 for 3 year APL Extension
1.7 January 2020 Updated for DTR#4: Branding change to Avaya IX Messaging, update software version to 10.8, addition of Remote Consolidated Server
For comments or change recommendations, please contact:
Avaya Government Solutions
Related Documents