MIIS 2003 Walkthrough: Implementing Global Address List Synchronization Microsoft Corporation Published: March, 2005 Author: Dave Kreitler Editor: Justin Hall Abstract This walkthrough demonstrates an implementation of the Microsoft Identity Integration Server (MIIS) 2003 global address list synchronization solution between two forests. You create the two Active Directory forests, install Microsoft Exchange Server 2003, create a global address list (GAL) for each forest, and then use MIIS 2003 to create a GAL synchronization infrastructure to synchronize the global address lists between the two forests.

MIIS 2003 GAL Synchronization Step by Step
Nov 28, 2014
Welcome message from author
This document is posted to help you gain knowledge. Please leave a comment to let me know what you think about it! Share it to your friends and learn new things together.
Transcript

MIIS 2003 Walkthrough: Implementing Global Address List Synchronization
Microsoft Corporation
Published: March, 2005
Author: Dave Kreitler
Editor: Justin Hall
Abstract
This walkthrough demonstrates an implementation of the Microsoft Identity Integration
Server (MIIS) 2003 global address list synchronization solution between two forests. You
create the two Active Directory forests, install Microsoft Exchange Server 2003, create a
global address list (GAL) for each forest, and then use MIIS 2003 to create a GAL
synchronization infrastructure to synchronize the global address lists between the two
forests.

The information contained in this document represents the current view of Microsoft
Corporation on the issues discussed as of the date of publication. Because Microsoft
must respond to changing market conditions, it should not be interpreted to be a
commitment on the part of Microsoft, and Microsoft cannot guarantee the accuracy of any
information presented after the date of publication.
This White Paper is for informational purposes only. MICROSOFT MAKES NO
WARRANTIES, EXPRESS, IMPLIED OR STATUTORY, AS TO THE INFORMATION IN
THIS DOCUMENT.
Complying with all applicable copyright laws is the responsibility of the user. Without
limiting the rights under copyright, no part of this document may be reproduced, stored in
or introduced into a retrieval system, or transmitted in any form or by any means
(electronic, mechanical, photocopying, recording, or otherwise), or for any purpose,
without the express written permission of Microsoft Corporation.
Microsoft may have patents, patent applications, trademarks, copyrights, or other
intellectual property rights covering subject matter in this document. Except as expressly
provided in any written license agreement from Microsoft, the furnishing of this document
does not give you any license to these patents, trademarks, copyrights, or other
intellectual property.
Unless otherwise noted, the example companies, organizations, products, domain
names, e-mail addresses, logos, people, places and events depicted herein are fictitious,
and no association with any real company, organization, product, domain name, e-mail
address, logo, person, place or event is intended or should be inferred.
© 2005 Microsoft Corporation. All rights reserved.
Active Directory, Microsoft, MS-DOS, Visual Studio, Windows, and Windows NT are
either registered trademarks or trademarks of Microsoft Corporation in the United States
and/or other countries.
The names of actual companies and products mentioned herein may be the trademarks
of their respective owners.

Contents
MIIS 2003 Walkthrough: Implementing Global Address List Synchronization....................5
What This Walkthrough Covers......................................................................................6
Prerequisite Knowledge..............................................................................................6
Audience..................................................................................................................6
Time Requirements..................................................................................................7
Additional Resources...............................................................................................7
Walkthrough Scenario Description..............................................................................7
The Testing Environment.........................................................................................7
Hardware................................................................................................................. 8
Software................................................................................................................... 8
Setup Files...............................................................................................................9
Sample Data...............................................................................................................9
Active Directory Organizational Unit Structure.......................................................10
Metaverse Schema Extensions..............................................................................13
Walkthrough Steps....................................................................................................14
Implementing the Walkthrough.....................................................................................15
Creating the Management Agents.............................................................................15
Creating the Contoso GALMA................................................................................15
Creating the Fabrikam GALMA..............................................................................20
Running the Management Agents.............................................................................22
Using Management Agent Run Profiles.................................................................22
Running the Run Profiles and Enabling Provisioning.............................................25
Verifying the Results..............................................................................................28
Administering the GAL Synchronization Infrastructure..............................................29
Hide a Mailbox from the Exchange Address Book.................................................29
Display a Hidden Mailbox in the Exchange Address Book.....................................31
Delete a User Account...........................................................................................32
Delete a Synchronized Contact in the Target Forest..............................................32
Delete a Mailbox in the Source Forest...................................................................33
Optional: Configure GALSync for Live Communications Server...................................34
Configuration Requirements......................................................................................35
Implementing the LCS Configuration............................................................................35
Select the Central Forest...........................................................................................36
Extend Metaverse Schema.......................................................................................36
Configure a One-way trust from the Central Forest...................................................38

Configure the Management Agent for the Central Forest..........................................40
Configure Management Agent for the Non-Central Forests......................................42
Synchronize the Live Communications Attributes......................................................44
Verifying Successful Synchronization........................................................................45
Summary...................................................................................................................... 46
See Also....................................................................................................................... 46
Appendix A: GAL Sync Lab Setup and Requirements.....................................................46
Hardware Requirements...............................................................................................47
Set Up the Contoso Forest Computer...........................................................................48
Configure the DNS Server............................................................................................48
Set Up the Fabrikam Forest Computer.........................................................................48
Create the Scenario Folder...........................................................................................49
Populating and Configuring Active Directory Objects...................................................49
Configure the E-mail Environment................................................................................53
Configure the Mail Addresses in Exchange Server 2003..........................................53
Create Exchange Mailboxes for the Active Directory User Accounts.........................54

MIIS 2003 Walkthrough: Implementing Global Address List Synchronization
This walkthrough demonstrates an implementation of the Microsoft Identity Integration
Server (MIIS) 2003 global address list synchronization solution between two forests. You
create the two Active Directory forests, install Microsoft Exchange Server 2003, create a
global address list (GAL) for each forest, and then use MIIS 2003 to create a GAL
synchronization infrastructure to synchronize the global address lists between the two
forests.
Specifically, you perform the following tasks to implement the MIIS 2003 GAL
synchronization solution for this walkthrough:
Review the Active Directory® directory service forest design.
Set up the lab environment, where you install and configure Active Directory and
Exchange Server 2003.
Create two instances of the management agent for Active Directory global address
list (GAL). The metaverse schema is extended when you create the first
management agent.
Run the management agents.
Administer the GAL synchronization infrastructure.
The goal of a GAL synchronization solution is to synchronize users, groups, and contacts
from one forest with contact objects in another forest. This walkthrough provides step-by-
step procedures to demonstrate a GAL synchronization solution between two fictitious
organizations.
Before you set up a GAL synchronization solution in your own environment, read
Microsoft Identity Integration Server 2003 Global Address List (GAL) Synchronization.
That document outlines the design of the GAL synchronization solution, including the
rules and preconfigured values of the management agent for Active Directory global
address list (GAL), and the deployment and extension of a GAL synchronization
infrastructure.
5

What This Walkthrough CoversThis document is intended to discuss the basic steps required to synchronize global
address list data between two forests by using MIIS 2003. The goal is to present a
rudimentary scenario to help new users get acquainted with how the GAL data flows
through MIIS.
The following topics are not discussed in this document:
Precedence
Deprovisioning and Object Deletion
Prerequisite Knowledge
Following are some suggestions regarding the intended audience and time required to
complete this walkthrough.
Audience
This walkthrough is intended for administrators who are familiar with the use of a global
address list and are familiar with using MIIS 2003 to synchronize multiple data sources. A
working knowledge of installing and configuring management agents in MIIS 2003 is
helpful but not required because the necessary procedures are included in this
walkthrough.
The user who sets up and performs the procedures in this walkthrough must be able to
install, configure, and perform basic administrative tasks for:
Microsoft® Windows Server 2003, Enterprise Edition
Microsoft® Exchange Server 2003
Active Directory
Microsoft SQL Server™ 2000
Microsoft Identity Integration Server 2003
GAL synchronization can be performed by using either Microsoft Identity Integration
Server 2003 or Identity Integration Feature Pack (IIFP) for Microsoft Windows Server
Active Directory.
6

Time Requirements
After the initial lab setup, the procedures in this walkthrough can be completed in
approximately two hours.
Additional Resources
For more information about designing and planning a GAL Synchronization solution using
MIIS 2003, see Microsoft Identity Integration Server 2003 Global Address List
Synchronization (http://go.microsoft.com/fwlink/?LinkId=41449).
Complete documentation is available for MIIS 2003 at the MIIS Technical Resources Web
site (http://go.microsoft.com/fwlink/?LinkId=36734).
Technical Reference information describing how MIIS 2003 works can be found in the
Microsoft Identity and Access Management Series (http://go.microsoft.com/fwlink/?
LinkId=36735).
Design and planning information can be found in the MIIS 2003 Design and Planning
Collection at the MIIS 2003 Planning, Deploying, and Administering Web site
(http://go.microsoft.com/fwlink/?LinkId=36736).
Additional walkthroughs can be found at the Microsoft Download Center Web site
(http://go.microsoft.com/fwlink/?LinkID=36850).
Walkthrough Scenario Description
In this walkthrough, you implement an MIIS 2003 solution to synchronize global address
lists between two organizations so they each have contact objects in their respective
global address lists to represent the users, groups, and contacts from the other
organization. The two organizations, Fabrikam and Contoso, each maintain their own e-
mail environments by using Microsoft Exchange Server 2003. Each organization
maintains its own Active Directory forest, which is used to host the GAL for that
organization’s e-mail. To synchronize their global address lists, the users, groups, and
contacts in the Contoso forest need to have corresponding contact objects added to the
GAL in the Fabrikam forest. The users, groups, and contacts in the Fabrikam forest need
to be added to the Contoso GAL. In this walkthrough, you use the management agent for
Active Directory global address list (GAL) to implement this solution.
The Testing Environment
This walkthrough uses two servers. Each server hosts one Active Directory forest and
acts as an Exchange server for that forest. One of the servers also hosts MIIS 2003 and
7

acts as the DNS server for both forests. The servers are connected to a network and
DNS is configured so the servers can locate each other.
Note:
To avoid the possibility of interfering with your identity management environment,
the procedures in this walkthrough should not be performed on an MIIS 2003
server that is currently acting as part of the identity management infrastructure in
your production environment.
For complete instructions about how to build and configure the test environment for this
walkthrough, see Appendix A: GAL Sync Lab Setup and Requirements.
The lab environment for this walkthrough requires the following hardware and software:
Hardware
To complete this walkthrough, you must configure two server computers. Use hardware
that meets or exceeds the following specifications:
Pentium II 500
256 MB of RAM
8-GB hard disk
512-KB L2 cache
Network adapter
4-MB video adapter
SVGA monitor (17 inch)
Microsoft Mouse or compatible pointing device
All hardware must be on the Microsoft Windows Server 2003, Enterprise Edition,
Windows Catalog, available on the Microsoft web site
(http://www.microsoft.com/windows/catalog/server/).
Software
Ensure that you have the installation media for the following software available before
you begin this scenario:
Microsoft Windows Server 2003, Enterprise Edition.
Microsoft Exchange Server 2003, Standard Edition; or Microsoft Exchange Server
2003, Enterprise Edition.
8

Microsoft Identity Integration Server 2003, Enterprise Edition with Service Pack 1.
Note:
The Identity Integration Feature Pack (IIFP) 1a for Microsoft Windows Server
Active Directory can also be used for this walkthrough if Microsoft Identity
Integration Server 2003, Enterprise Edition is not available.
Microsoft SQL Server 2000, Enterprise Edition with Service Pack 3a.
If you are configuring a new server, then Microsoft SQL Server 2000 Standard Edition
(with Service Pack 3a) can be used, but a new installation of MIIS 2003 with Service
Pack 1 or IIFP 1a must also be used. You cannot use a prior version of MIIS 2003
with SQL Server 2000 Standard Edition and then apply the MIIS 2003 SP1 update.
Microsoft SQL Server 2000 Enterprise Edition is required for versions of MIIS 2003
earlier than Service Pack 1.
Optionally, if you intend to complete the Live Communications Server procedures at
the end of this walkthrough, you also need Live Communications Server 2005 SP1
Standard or Enterprise Edition.
Setup Files
In addition to the installation media mentioned above, this walkthrough also uses a
number of support files to help streamline the setup of the lab environment. The Windows
Installer package that contains this walkthrough also includes the required support files.
The Windows Installer package can be downloaded from the Microsoft Download Center.
Copy these support files into a folder named C:\MIIS\GALSynchronization on the server
running MIIS 2003, as described in the following section.
Sample Data
To support this MIIS 2003 GAL synchronization walkthrough, command line scripts are
provided to create user accounts and organizational units in each of the Active Directory
forests. Instructions for the use of these scripts are included in Appendix A: GAL Sync
Lab Setup and Requirements.
Before using these scripts to create these organizational units, understand the
organizational unit structure common to all MIIS 2003 GAL synchronization
implementations and the specific implementation for this scenario. In addition, become
familiar with metaverse schema extensions that are used to support this MIIS 2003 GAL
synchronization scenario.
9

Active Directory Organizational Unit Structure
GAL synchronization between Active Directory forests involves a source forest and a
target forest. Each forest uses organizational units created specifically for GAL
synchronization. In the source forest are organizational units for Users, Groups, and
Contacts that MIIS 2003 uses to populate a specific Contacts organizational unit in the
target forest. All Active Directory objects used to support GAL synchronization are stored
in these organizational units.
The following table lists the organizational units required by each Active Directory forest
used in this walkthrough.
Description Contoso Organizational Units Fabrikam Organizational
Units
Domain controller name CONNOA-DC-01 FABNOA-DC-01
Synchronization
organizational unit
GALSynchronization GALSynchronization
Local (source) domain Contoso Fabrikam
User Users Users
Group Groups Groups
Contacts Contacts Contacts
Remote (target) domain Fabrikam Contoso
Organizational unit for
remote contacts
Contacts Contacts
Important:
If you build this scenario by using a different organizational unit structure, the
example will vary; however, the label of the lowest OU in the OU structure
(Contacts) for each forest must be named Contacts when you deploy the
Microsoft Identity Integration Server 2003 GAL synchronization solution.
The following figure shows the correct organizational unit structure for the Connoa forest
as viewed in the Active Directory Users and Computers snap-in.
10

The connoa and fabnoa forests have an organizational unit with the name of the local
domain controller (CONNOA-DC-01 or FABNOA-DC-01) under which a GAL
synchronization organizational unit (GALSynchronization) exists. The
GALSynchronization OU contains additional organizational units for contacts, groups,
and users. Also under the organizational unit named after the domain controller is an
organizational unit named after the remote forest (Contoso or Fabrikam), which contains
an organizational unit named Contacts where the synchronized contact objects are
stored. In the connoa domain, the OU that accommodates the Fabrikam contacts is
named Fabrikam. In the fabnoa domain, the OU is named Contoso.
Note:
If the scripts included with the support files for this walkthrough are used to setup
the lab environment, the proper organizational unit structure will be created on
each lab server. Instructions for the use of these scripts are included in Appendix
A: GAL Sync Lab Setup and Requirements.
Using the computer name of the Active Directory domain controller in the OU structure is
uncommon in an Active Directory forest; however, by including the computer name,
variations on the scenario within this document can use the same Active Directory
forests.
11

You can use any hierarchical OU structure you want when implementing GAL
synchronization. To use the scripts included with this walkthrough, however, you must use
the structure described here. To use a different OU structure, create your own users,
groups, and contacts for testing because the scripts cannot populate the customized OU
structure.
Also remember that if you build this scenario by using a different OU structure, the label
of the lowest OU in the OU structure (Contacts) for each forest must be named Contacts
when you deploy the Microsoft Identity Integration Server 2003 GAL synchronization
solution.
For example, the Lightweight Directory Access Protocol (LDAP) string for the Contacts
organizational unit in the Connoa forest is:
ou=Contacts,ou=Fabrikam,ou=GALSynchronization,ou=CONNOA-DC-01,DC=connoa,DC=concorp,DC=contoso,DC=com
The computer name parameter (ou=CONNOA-DC-01) is replaced by the computer name
of the domain controller.
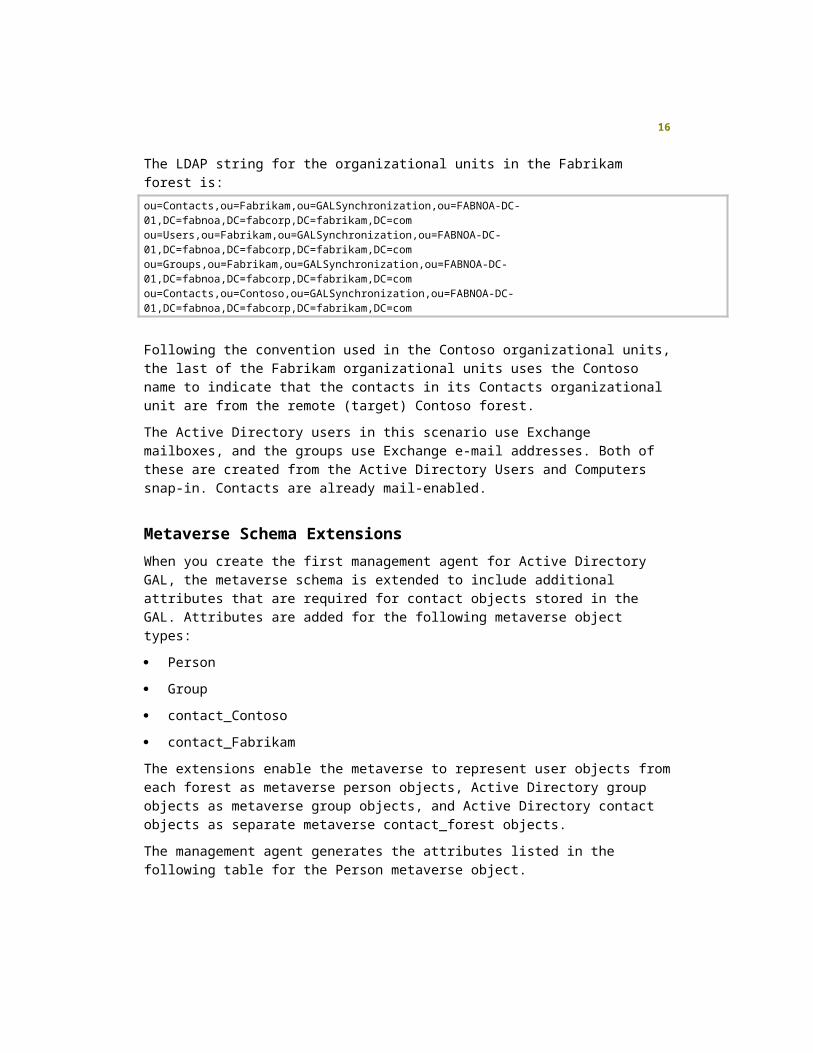
The LDAP string for the organizational units in the Connoa forest is:
ou=Contacts,ou=Contoso,ou=GALSynchronization,ou=CONNOA-DC-01,DC=connoa,DC=concorp,DC=contoso,DC=comou=Users,ou=Contoso,ou=GALSynchronization,ou=CONNOA-DC-01,DC=connoa,DC=concorp,DC=contoso,DC=comou=Groups,ou=Contoso,ou=GALSynchronization,ou=CONNOA-DC-01,DC=connoa,DC=concorp,DC=contoso,DC=comou=Contacts,ou=Fabrikam,ou=GALSynchronization,ou=CONNOA-DC-01,DC=connoa,DC=concorp,DC=contoso,DC=com
As stated earlier, the last parent organizational unit is named Fabrikam to indicate that
the contacts in its Contacts organizational unit are from the remote (target) Fabrikam
forest.
The LDAP string for the organizational units in the Fabrikam forest is:
ou=Contacts,ou=Fabrikam,ou=GALSynchronization,ou=FABNOA-DC-01,DC=fabnoa,DC=fabcorp,DC=fabrikam,DC=comou=Users,ou=Fabrikam,ou=GALSynchronization,ou=FABNOA-DC-01,DC=fabnoa,DC=fabcorp,DC=fabrikam,DC=comou=Groups,ou=Fabrikam,ou=GALSynchronization,ou=FABNOA-DC-01,DC=fabnoa,DC=fabcorp,DC=fabrikam,DC=comou=Contacts,ou=Contoso,ou=GALSynchronization,ou=FABNOA-DC-01,DC=fabnoa,DC=fabcorp,DC=fabrikam,DC=com
12

Following the convention used in the Contoso organizational units, the last of the
Fabrikam organizational units uses the Contoso name to indicate that the contacts in its
Contacts organizational unit are from the remote (target) Contoso forest.
The Active Directory users in this scenario use Exchange mailboxes, and the groups use
Exchange e-mail addresses. Both of these are created from the Active Directory Users
and Computers snap-in. Contacts are already mail-enabled.
Metaverse Schema Extensions
When you create the first management agent for Active Directory GAL, the metaverse
schema is extended to include additional attributes that are required for contact objects
stored in the GAL. Attributes are added for the following metaverse object types:
Person
Group
contact_Contoso
contact_Fabrikam
The extensions enable the metaverse to represent user objects from each forest as
metaverse person objects, Active Directory group objects as metaverse group objects,
and Active Directory contact objects as separate metaverse contact_forest objects.
The management agent generates the attributes listed in the following table for the
Person metaverse object.
Attribute Type
hideFromAddressLists (hideDLMembership) Boolean
legacyExchangeDN Indexable String
Name Indexable String
proxyAddresses Indexable String
targetAddress Indexable String
userAccountControl Number
The management agent generates the attributes listed in the following table for the Group
metaverse object.
13

Attribute Type Multivalued
hideFromAddressLists Boolean No
legacyExchangeDN Indexable String No
proxyAddresses Indexable String Yes
TargetAddress Indexable String No
The management agent adds two new object types, contact_fabrikam_galma and
contact_contoso_galma, to the metaverse schema and generates the attributes listed in
the following table for those objects.
Attribute Type Multi-valued
cn Indexable String No
company Indexable String No
displayName Indexable String No
employeeID Indexable String No
givenName Indexable String No
hideFromAddressLists Boolean No
L Indexable String No
legacyExchangeDN Indexable String No
mail Indexable String No
mailNickname Indexable String No
sn Indexable String No
proxyAddresses Indexable String Yes
targetAddress Indexable String No
Walkthrough Steps
During this walkthrough, you perform the following tasks:
Create management agents.
14
Run the Management Agents
Administer the GAL.
Implementing the WalkthroughTo implement this walkthrough, set up a server by using the procedures outlined in
Appendix A: GAL Sync Lab Setup and Requirements.
Note:
This walkthrough assumes the design and planning process has been completed
based on the information presented earlier and the worksheets are complete.
The walkthrough is designed to step the reader through the implementation of
the proposed design. For complete information on designing and planning an
MIIS 2003 deployment, see the MIIS 2003 Design and Planning Collection.
Creating the Management Agents
To run this GAL synchronization walkthrough and synchronize data between the two
forests, you need to create two management agents for Active Directory GAL. These
management agents are named Contoso GALMA and Fabrikam GALMA.
The rules required for GAL synchronization are built into the management agents and do
not require that you configure each page in Management Agent Designer. The following
options are preconfigured:
Select object types
Select attributes
Configure connector filters
Configure join an projection rules
Configure attribute flow
Configure deprovisioning
Configure extensions
Creating the Contoso GALMA
Create the Contoso GALMA first and then create the Fabrikam GALMA.
15

To create the Contoso GALMA
1. On the domain controller for the connoa Active Directory domain, open Identity
Manager.
2. From the Tools menu, click Management Agents.
3. From the Actions menu, click Create.
4. In Management Agent Designer, in the Management agent for drop-down list,
click Active Directory global address list (GAL).
5. In Name, type Contoso GALMA and click Next.
When configuring the management agent for Active Directory global address
lists, the first step is to provide the name of the forest that the management agent
connects to during import and export operations. If you use the example provided
in this walkthrough, this management agent connects to the Contoso forest.
6. On the Connect to an Active Directory Forest page, type the values for forest
name (connoa.concorp.contoso.com), user name, password, and domain.
Note:
If you used different domain names than those suggested for this
walkthrough, enter that information on this page.
7. Click Next.
Next, specify the directory partition and organizational units (OUs) the
management agent uses for GAL synchronization. If you used the scripts
accompanying this walkthrough to configure your test environment, then the
necessary OU structure has been created in the Contoso forest inside the
CONNOA-DC-01 OU.
8. On the Configure Directory Partitions page, in Select directory partitions,
select the only partition listed
(DC=connoa,DC=concorp,DC=contoso,DC=com).
9. Clear the Sign and encrypt LDAP traffic check box.
10. Click Containers.
11. Clear the check box next to the directory partition to clear all organizational units
under it.
12. Expand the directory partition if necessary, and then expand the domain
controller name.
13. Select the GALSynchronization organizational unit. The organizational units
16

beneath it, Fabrikam and Contoso, will also be selected.
14. Click OK, and then click Next.
The next step is to identify the container that will be used to store the contacts
from other forests. Based on the sample data provided with this walkthrough,
GAL synchronization will take place between the Contoso and Fabrikam forests.
If the scripts accompanying this walkthrough are used, a Fabrikam container is
created in the OU structure. Inside the Fabrikam container, an additional
container named Contacts is created to act as the storage location for contacts
imported from the Fabrikam forest.
15. On the Configure GAL page, under GAL container information, click Target.
16. In Target Container, in Select a partition, select the
DC=connoa,DC=concorp,DC=contoso,DC=com target organizational unit.
17. Click Container.
18. In Select Containers, expand CONNOA-DC-01, expand the GAL
Synchronization container, expand the Fabrikam container, and then select
only the Contacts container beneath it.
19. Click OK to close Select Containers, and then click OK again to close Target
Container.
Next, you need to identify the container used to store the contacts from the local
forest, in this case Contoso, which contains the contact information that is to be
sent to the other forest.
20. Click Source….
21. Make sure DC=connoa,DC=concorp,DC=contoso,DC=com is selected in the
Select a partition drop-down list.
22. Click Add Containers….
23. Expand CONNOA-DC-01, expand the GAL Synchronizationcontainer, expand
the Contoso container, and then select only the Contacts container beneath the
Contoso container.
24. Click OK to close Select Containers, and then click OK again to close Source
Container.
25. On the same Configure GAL page, under Exchange configuration, click
Edit….
26. Enter the e-mail suffix @Contoso.com and click Add. Click OK.
17

Note:
On the Configure GAL page, do not select the check boxes for routing
mail to contacts or specifying an administrative group.
27. Click Next.
The management agent for Active Directory GAL is preconfigured to select
specific objects and specific attributes of those objects so MIIS 2003 can
synchronize the information necessary to create valid contact objects in the other
forest.
28. On the Select Object Types page, verify that the object types required for GAL
synchronization are selected. Any object types that are already selected should
remain selected. If they are not selected by default, ensure the following object
types are selected: contact, container, domainDNS, group,
organizationalUnit, and user.
29. Click Next.
30. On the Select Attributes page, select Show All. Any attributes that are already
can remain selected. In addition, verify that the following attributes required for
GAL synchronization are selected:
cn
company
displayName
employeeID
givenName
hideDLMembership
l
legacyExchangeDN
mailNickname
Name
proxyAddresses
sn
targetAddress
18

userAccountControl
31. Click Next.
32. The management agent for Active Directory GAL is preconfigured to use rules
extensions. On the Configure Connector Filter page, ensure that contact,
group, and user are configured to use a rules extension as their filter type. Click
Next.
Join and Projection, Attribute Flow, and Deprovisioning rules are all
preconfigured and require no changes.
33. On the Configure Join and Projection Rules page, you can see that four join
and one projection rules for GAL synchronization are specified.
Note:
You can expand the join and projection rules to see data source attribute,
mapping type, and metaverse attribute for each rule.
34. Click Next.
35. In Configure Attribute Flow, you can see that five preconfigured attribute flow
mappings for GAL synchronization are specified.
Note:
You can expand the attribute flows to see data source attribute, flow
type, and metaverse attribute for each attribute flow mapping.
36. Click Next.
37. On the Configure Deprovisioning page, in Deprovisioning Options, verify that
the Determine with a rules extension option is selected.
38. Click Next.
39. On the Configure Extensions page, in Rules extension name, verify that the
GALSync.dll file is specified.
Note:
The Contoso GALMA looks for this file in the following location: C:\
Program Files\Microsoft Identity Integration Server\Extensions.
40. Click Finish.
19

Creating the Fabrikam GALMA
The Fabrikam GALMA is similar to the Contoso GALMA, except for the management
agent name and forest information.
To create the Fabrikam GALMA
1. On the domain controller for the connoa Active Directory domain, open Identity
Manager.
2. From the Tools menu, click Management Agents.
3. From the Actions menu, click Create.
4. In Management Agent Designer, in Management agent for, click Active
Directory global address list (GAL).
5. In Name, type Fabrikam GALMA, and then click Next.
Identify the forest and partition that the management agent needs to connect to.
6. On the Connect to an Active Directory forest page, type the values for forest
name (fabnoa.fabcorp.fabrikam.com), user name, password and domain.
Note:
If you used different domain names than those suggested for this
walkthrough, enter that information on this page.
7. Click Next.
8. On the Configure Directory Partitions page, in Select directory partitions,
select the only partition listed
(DC=fabnoa,DC=fabcorp,DC=fabrikam,DC=com).
9. Clear the Sign and encrypt LDAP traffic check box.
Identify the containers that are to be used for synchronizing the GALs.
10. Click Containers….
11. Clear the check box next to the directory partition to clear all organizational units
under the directory partition.
12. Expand the directory partition if necessary, and then expand the domain
controller name, FABNOA-DC-01.
13. Select the GALSynchronization organizational unit. Note that this also selects
the Fabrikam and Contoso organizational units.
14. Click OK, and then click Next.
20

Identify the target container for contact information received from the other forest
and the container from this forest that will be used to send contact information to
the other forest.
15. On the Configure GAL page, under GAL container configuration, click Target.
16. In Target Container, in Select a partition, select the
DC=fabnoa,DC=fabcorp,DC=fabrikam,DC=com target organizational unit.
17. Click Container….
18. In Select Containers, expand the directory partition
(DC=fabnoa,DC=fabcorp,DC=fabrikam,DC=com), expand the node with name
of the fabnoa domain controller (FABNOA-DC-01), expand
GALSynchronization, expand Contoso, and then check Contacts.
19. Click OK to close Select Containers, and then click OK again to close Target
Container.
20. Click Source….
21. Click Add Containers….
22. Expand the FABNOA-DC-01 branch of the tree until you see the Contacts
container under Fabrikam. Make sure that Contacts container is selected.
23. Click OK to close Select Containers, and then click OK again to close Source
Container.
24. On the Configure GAL page, configure the settings under Exchange
configuration. Click Edit….
25. Enter @Fabrikam.com and click Add. Click OK.
Note:
On the Configure GAL page, do not select the check boxes for routing
mail to contacts or specifying an administrative group.
26. Click Next.
27. On the Select Object Types page, verify that the object types required for GAL
synchronization are selected. Any object types that are already selected should
remain selected. If they are not selected by default, ensure the following object
types are selected: contact, container, domainDNS, group,
organizationalUnit, and user.
28. Click Next.
29. On the Select Attributes page, select Show All. Any attributes that are already
21

selected should remain selected. In addition, verify that the attributes required for
GAL synchronization are selected (use the same list provided for the Contoso
GALMA earlier).
30. Click Next.
31. Connector Filters, Join and Projection Rules, Attribute Flow, and Deprovisioning
are all preconfigured for the management agent and require no changes. Click
Next to proceed through each screen until you see the Configure Extensions
screen.
32. On the Configure Extensions page, in Assembly name, verify that the
GALSync.dll file is specified.
Note:
The Fabrikam GALMA looks for this file in the following location: C:\
Program Files\ Microsoft Identity Integration Server\Extensions.
33. Click Finish.
Running the Management Agents
By running the Contoso GALMA and Fabrikam GALMA, you populate the MIIS 2003
metaverse and create contacts in both Active Directory forests.
Using Management Agent Run Profiles
Run profiles are created when you create the Contoso GALMA and Fabrikam GALMA.
The following table lists and describes the eight run profiles that are created
automatically.
Run Profile Description
Delta Import All changed data flows from the Active
Directory data source to the MIIS 2003
connector space and metaverse.
Delta Import (Stage Only) All changed data flows from the Active
Directory data source to the MIIS 2003
connector space and is staged for inbound
synchronization with the metaverse.
22

Delta Synchronization After changed data source data is staged,
changed data flows from the MIIS 2003
connector space to the metaverse during
inbound synchronization and from the
metaverse to the connector space during
outbound synchronization.
Export All data staged for export flows from the
MIIS 2003 connector space to the Active
Directory data source.
Full Import All specified data flows from the Active
Directory data source to the MIIS 2003
connector space and metaverse.
Full Import (Stage Only) All specified data flows from the Active
Directory data source to the MIIS 2003
connector space and is staged for inbound
synchronization with the metaverse.
Full Import and Full Synchronization All specified data flows from the Active
Directory data source to the MIIS 2003
connector space. Then, all specified data
flows from the MIIS 2003 connector space
to the metaverse during inbound
synchronization and from the metaverse to
the connector space during outbound
synchronization.
Full Synchronization Any staged data flows from the MIIS 2003
connector space to the metaverse during
inbound synchronization and from the
metaverse to the connector space during
outbound synchronization.
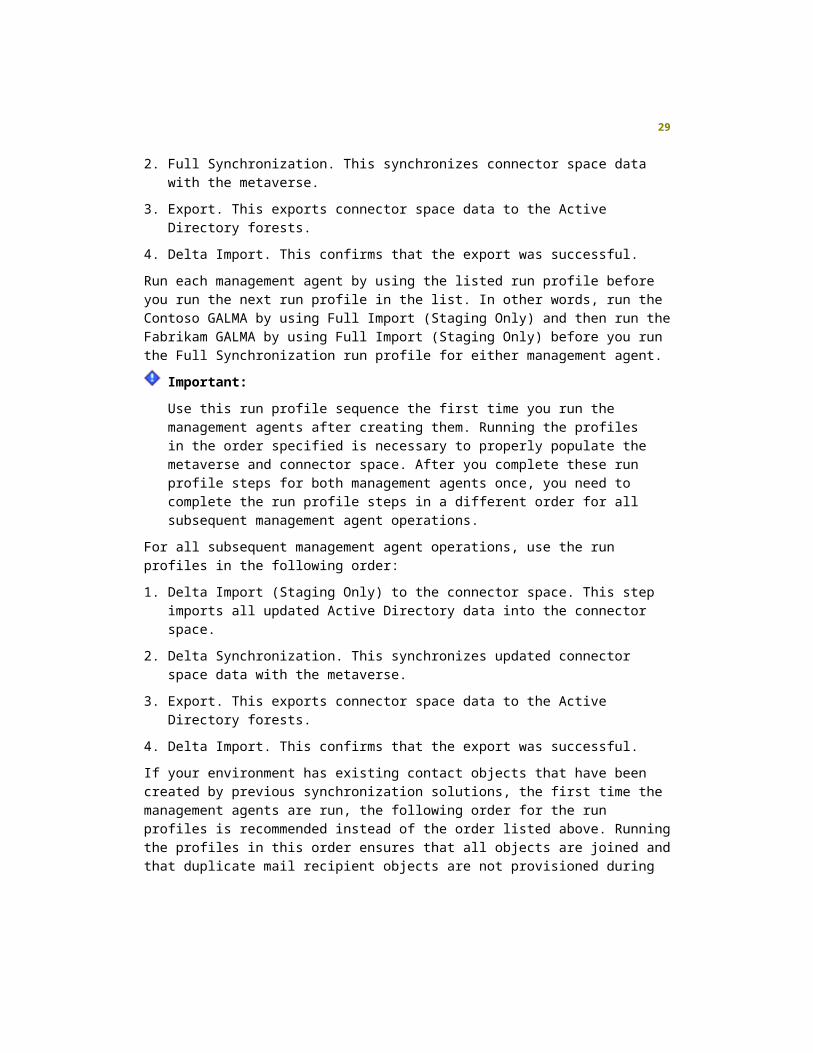
Enable provisioning, and then run both management agents by using the run profiles in
the following order:
1. Full Import (Staging Only) to the connector space. This step imports all specified
Active Directory data into the connector space.
2. Full Synchronization. This synchronizes connector space data with the metaverse.
3. Export. This exports connector space data to the Active Directory forests.
23

4. Delta Import. This confirms that the export was successful.
Run each management agent by using the listed run profile before you run the next run
profile in the list. In other words, run the Contoso GALMA by using Full Import (Staging
Only) and then run the Fabrikam GALMA by using Full Import (Staging Only) before you
run the Full Synchronization run profile for either management agent.
Important:
Use this run profile sequence the first time you run the management agents after
creating them. Running the profiles in the order specified is necessary to properly
populate the metaverse and connector space. After you complete these run
profile steps for both management agents once, you need to complete the run
profile steps in a different order for all subsequent management agent
operations.
For all subsequent management agent operations, use the run profiles in the following
order:
1. Delta Import (Staging Only) to the connector space. This step imports all updated
Active Directory data into the connector space.
2. Delta Synchronization. This synchronizes updated connector space data with the
metaverse.
3. Export. This exports connector space data to the Active Directory forests.
4. Delta Import. This confirms that the export was successful.
If your environment has existing contact objects that have been created by previous
synchronization solutions, the first time the management agents are run, the following
order for the run profiles is recommended instead of the order listed above. Running the
profiles in this order ensures that all objects are joined and that duplicate mail recipient
objects are not provisioned during the initial setup of GAL synchronization. The
recommended order is:
1. Full Import with staging to the connector space on all management agents
2. Delta Synchronization on all management agents
3. Repeat Delta Synchronization on all management agents
4. Export on all management agents
24

Running the Run Profiles and Enabling Provisioning
In order for the GAL Synchronization management agent to function properly,
provisioning must be enabled. Verify that provisioning is enabled before you begin to
stage data.
To verify that provisioning is enabled
1. On the domain controller for the connoa Active Directory domain, open Identity
Manager.
2. From the Tools menu, click Options.
3. In Metaverse Rules Extensions, ensure that the Enable metaverse rules
extensions check box is selected.
4. Ensure that the Enable Provisioning Rules Extension check box is selected.
5. Click OK.
After you verify that provisioning is enabled, stage the Contoso data by using the
Contoso GALMA. This step creates all the Contoso objects in the connector space.
To run the Full Import (Staging Only) run profile for the Contoso GALMA
1. In Identity Manager, in Management Agents view, click the Contoso GALMA.
2. From the Actions menu, click Run.
3. In Run Management Agent, in Run Profiles, click Full Import (Stage Only),
and then click OK.
The Synchronization Statistics should show 34 Adds. This represents the nine OUs
(forest, DC, GALSynchronization, Contoso, Contoso Contacts, Fabrikam, Fabrikam
Contacts, Users and Groups) and the 25 user, group, and contact objects.
Next, you stage the data for the Fabrikam GALMA. This step creates all the Fabrikam
objects in the connector space.
To run the Full Import (Staging Only) run profile for the Fabrikam GALMA
1. In Identity Manager, in Management Agents view, click the Fabrikam GALMA.
2. From the Actions menu, click Run.
3. In Run Management Agent, in Run Profiles, click Full Import (Staging Only),
and then click OK.
Again you should see 34 Adds listed in the Synchronization Statistics.
25

Next, you perform a full synchronization for each of the management agents. This causes
the join and projection rules to be processed. All objects will be created in the metaverse
and linked to their corresponding connector space objects. Export attribute flow rules will
also prepare any objects that are to be exported. The contact information from the
Contoso GAL will be flagged for export to the Fabrikam GAL. The Fabrikam contact
information will be flagged for export to the Contoso GAL.
To run full synchronization for the Contoso GALMA
1. In Identity Manager, in Management Agents view, click the Contoso GALMA.
2. From the Actions menu, click Run.
3. In Run Management Agent, in Run Profiles, click Full Synchronization, and
then click OK.
The Synchronization Statistics should show a total of 25 projections. These are the new
objects created in the metaverse for storing the user, group, and contact information for
the objects in the Contoso forest.
To run full synchronization for the Fabrikam GALMA
1. In Identity Manager, in Management Agents view, click the Fabrikam GALMA.
2. From the Actions menu, click Run.
3. In Run Management Agent, in Run Profiles, click Full Synchronization, and
then click OK.
Again you should see 25 projections. These are the new metaverse objects used to store
the Fabrikam object data.
Next, you export the data to each Active Directory forest. During this step, any objects
staged for export will be exported from the connector space to the connected data
source. The Contoso contact objects, staged during the previous synchronization, will be
exported to the Fabrikam directory. The staged Fabrikam contact objects will be exported
to the Contoso directory.
To run the export run profile for the Contoso GALMA
1. In Identity Manager, in Management Agents view, click the Contoso GALMA.
2. From the Actions menu, click Run.
3. In Run Management Agent, in Run Profiles, click Export, and then click OK.
26

In the Synchronization Statistics, you should see 25 Adds, indicating that the 25 objects
from the Fabrikam forest have been exported to the Contoso forest.
To run the export run profile for the Fabrikam GALMA
1. In Identity Manager, in Management Agents view, click the Fabrikam GALMA.
2. From the Actions menu, click Run.
3. In Run Management Agent, in Run Profiles, click Export, and then click OK.
Again you will see 25 Adds, indicating that the 25 objects from the Contoso forest have
been exported to the Fabrikam forest.
Note:
When you perform an export, MIIS 2003 cannot be certain that the export
completed successfully. To confirm the export, MIIS 2003 stores the exported
changes for an object in the connector space. During the next import, MIIS 2003
compares the imported data with the exported changes.
Now you must perform an import so that MIIS 2003 can confirm that the export was
successful.
To run a delta import for the Contoso GALMA
1. In Identity Manager, in Management Agents view, click the Contoso GALMA.
2. From the Actions menu, click Run.
3. In Run Management Agent, in Run Profiles, click Delta Import, and then click
OK.
Verify that 25 Adds and 25 Updates are reported back from Active Directory to MIIS 2003
as a result of the Delta Import run profile.
To run a delta import for the Fabrikam GALMA
1. In Identity Manager, in Management Agents view, click the Fabrikam GALMA.
2. From the Actions menu, click Run.
3. In Run Management Agent, in Run Profiles, click Delta Import, and then click
OK.
Verify that 25 Adds and 25 Updates are reported back from Active Directory to MIIS 2003
as a result of the Delta Import run profile.
27
The GAL Synchronization management agent synchronizes the mail-enabled contacts
from one forest to another. All the users, groups, and contacts created by the scripts for
this walkthrough are mail-enabled. You can test the behavior of the management agent
for Active Directory GAL by creating a user who does not have a mailbox and witnessing
what happens to the account during synchronization.
To verify synchronization behavior for accounts that are not mail-enabled
1. On the domain controller for Connoa, use Active Directory Users and
Computers to create a new user account. Create the new user in the Users OU
located in the Contoso OU under the CONNOA-DC-01 OU. Use the following
options when you create the account:
First Name: Contoso
Last Name: NoMailUser
User Logon Name: NoMailUser
Make sure you clear the Create an Exchange mailbox check box when given
the choice.
Accept the defaults for all other settings.
2. Once the user account is created, synchronize the contact data between the two
forests. Use the Contoso GALMA and perform a Delta Import.
Upon completion of the Delta Import, you can see one filtered disconnector object listed
in the Synchronization Statistics. If you open the object details for the disconnector
object, you can see that it is the new user account you created with no e-mail. Because
the account is not mail-enabled, it is filtered during synchronization and is not added to
the metaverse.
Verifying the Results
You can examine the results of the GAL synchronization process by using the Active
Directory Users and Computers console on each of the domain controllers to view the
Contacts imported from the other forest.
To verify the synchronized contacts in the Connoa domain
1. On the domain controller for the connoa Active Directory domain, click Start, click
Control Panel, double-click Administrative Tools, and then double-click Active
Directory Users and Computers.
2. Expand the organizational unit named after the domain controller, and then
28

expand GALSynchronization.
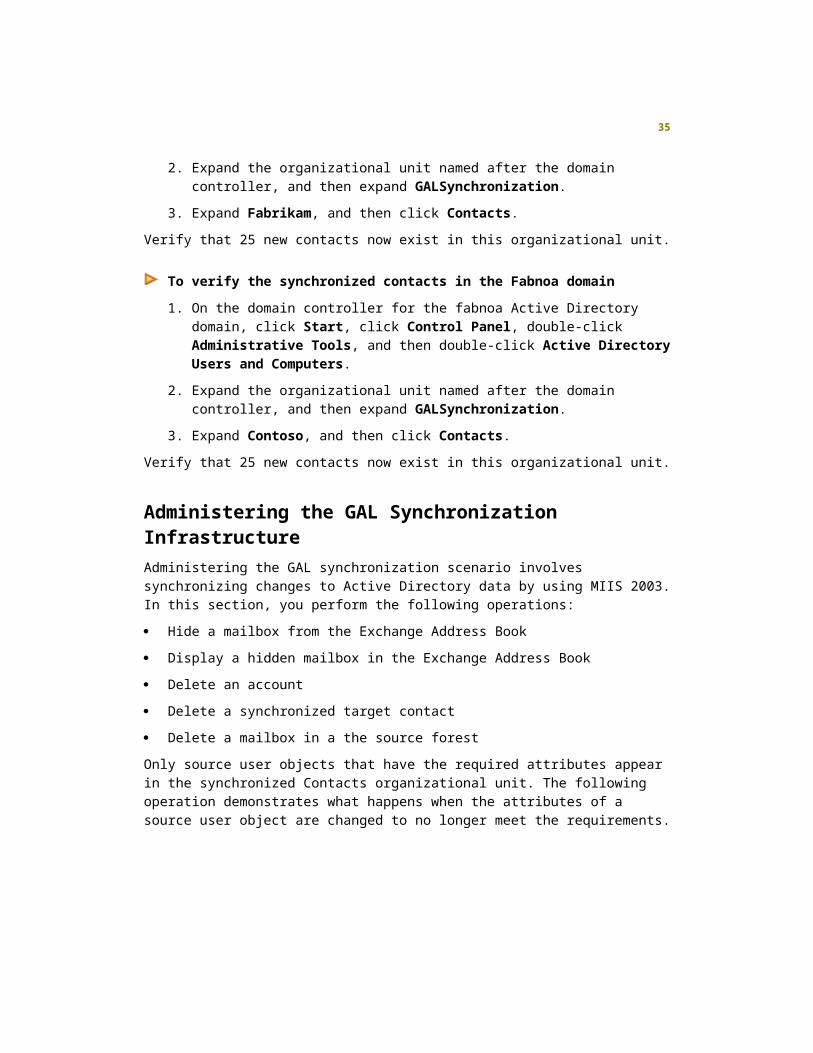
3. Expand Fabrikam, and then click Contacts.
Verify that 25 new contacts now exist in this organizational unit.
To verify the synchronized contacts in the Fabnoa domain
1. On the domain controller for the fabnoa Active Directory domain, click Start, click
Control Panel, double-click Administrative Tools, and then double-click Active
Directory Users and Computers.
2. Expand the organizational unit named after the domain controller, and then
expand GALSynchronization.
3. Expand Contoso, and then click Contacts.
Verify that 25 new contacts now exist in this organizational unit.
Administering the GAL Synchronization Infrastructure
Administering the GAL synchronization scenario involves synchronizing changes to
Active Directory data by using MIIS 2003. In this section, you perform the following
operations:
Hide a mailbox from the Exchange Address Book
Display a hidden mailbox in the Exchange Address Book
Delete an account
Delete a synchronized target contact
Delete a mailbox in a the source forest
Only source user objects that have the required attributes appear in the synchronized
Contacts organizational unit. The following operation demonstrates what happens when
the attributes of a source user object are changed to no longer meet the requirements.
Hide a Mailbox from the Exchange Address Book
At this stage in the walkthrough, all source accounts have been successfully
synchronized and appear as contacts in the target domain because the original source
accounts were mail-enabled. To demonstrate a source user account modification, hide a
mailbox from the Exchange Address Book. This sets the msExchHideFromAddressList
attribute to true, which causes the deletion of the corresponding contact in the target
domain during the next GAL synchronization cycle.
29

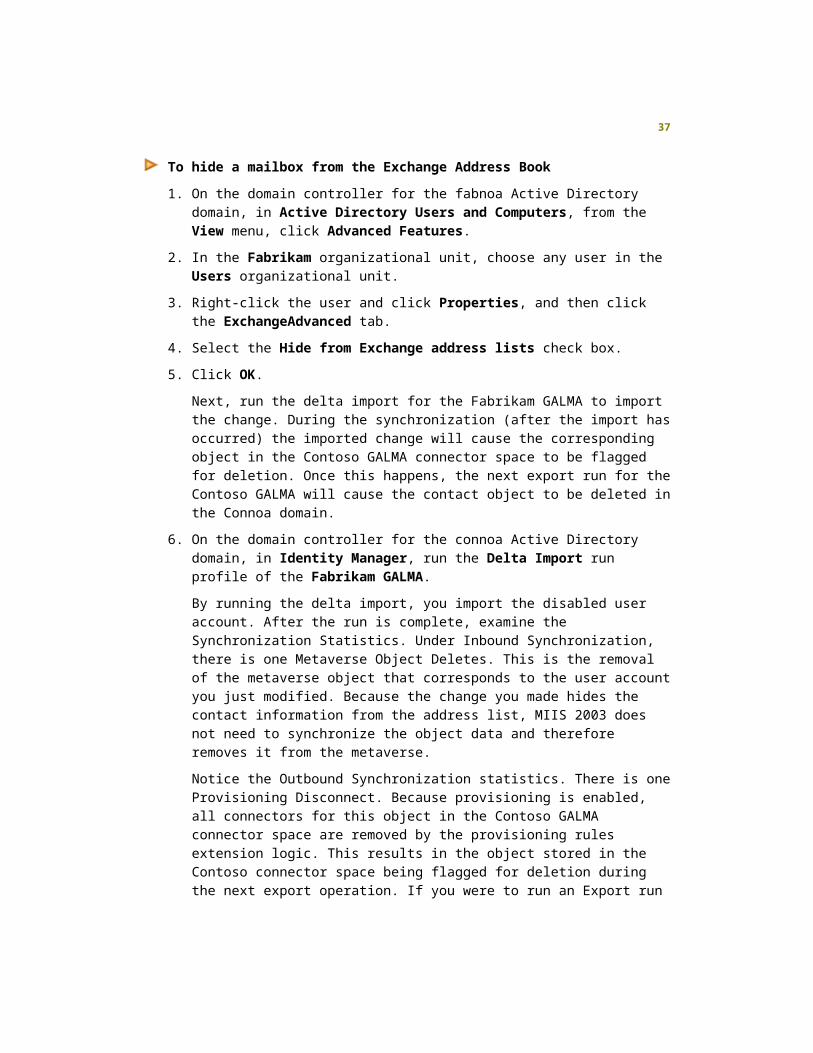
To hide a mailbox from the Exchange Address Book
1. On the domain controller for the fabnoa Active Directory domain, in Active
Directory Users and Computers, from the View menu, click Advanced
Features.
2. In the Fabrikam organizational unit, choose any user in the Users organizational
unit.
3. Right-click the user and click Properties, and then click the ExchangeAdvanced
tab.
4. Select the Hide from Exchange address lists check box.
5. Click OK.
Next, run the delta import for the Fabrikam GALMA to import the change. During
the synchronization (after the import has occurred) the imported change will
cause the corresponding object in the Contoso GALMA connector space to be
flagged for deletion. Once this happens, the next export run for the Contoso
GALMA will cause the contact object to be deleted in the Connoa domain.
6. On the domain controller for the connoa Active Directory domain, in Identity
Manager, run the Delta Import run profile of the Fabrikam GALMA.
By running the delta import, you import the disabled user account. After the run is
complete, examine the Synchronization Statistics. Under Inbound
Synchronization, there is one Metaverse Object Deletes. This is the removal of
the metaverse object that corresponds to the user account you just modified.
Because the change you made hides the contact information from the address
list, MIIS 2003 does not need to synchronize the object data and therefore
removes it from the metaverse.
Notice the Outbound Synchronization statistics. There is one Provisioning
Disconnect. Because provisioning is enabled, all connectors for this object in the
Contoso GALMA connector space are removed by the provisioning rules
extension logic. This results in the object stored in the Contoso connector space
being flagged for deletion during the next export operation. If you were to run an
Export run profile on the Contoso GALMA to push out the deletion, one delete
operation would be reported in the export statistics. Then, if you were to run a
Delta Import on the Contoso GALMA, the delete operation would be imported
into MIIS 2003 again and confirmed. Perform an export and a delta import by
using the Contoso GALMA.
7. On the domain controller for the connoa Active Directory domain, in Identity
Manager, run the Export run profile on the Contoso GALMA.
30

8. On the domain controller for the connoa Active Directory domain, in Active
Directory Users and Computers, verify the content of the synchronized contact
in the Contacts organizational unit in the Fabrikam organizational unit.
Note:
The corresponding contact for the user you modified should be deleted in
the Fabrikam organizational unit.
9. On the domain controller for the connoa Active Directory domain, in Identity
Manager, run a Delta Import on the Contoso GALMA. This imports the delete
operation into MIIS 2003 again.
Display a Hidden Mailbox in the Exchange Address Book
Now that you synchronized the hidden mailbox in the Exchange Address Book, you will
reverse this setting and synchronize the change.
To display a hidden mailbox in the Exchange address book
1. On the domain controller for the fabnoa Active Directory domain, in Active
Directory Users and Computers, right-click the user whose mailbox was hidden
in the previous procedure.
2. Click Properties and then click the Exchange Advanced tab.
3. Clear the Hide from Exchange Address lists check box.
4. Click OK.
5. On the domain controller for the connoa Active Directory domain, in Identity
Manager, run the Delta Import run profile of the of the Fabrikam GALMA.
6. On the domain controller for the connoa Active Directory domain, in Identity
Manager, run the Export run profile on the Contoso GALMA.
7. On the domain controller for the fabnoa Active Directory domain, in Active
Directory Users and Computers, verify the content of the synchronized contact
in the Contacts organizational unit in the Fabrikam organizational unit. The
corresponding contact should be re-created in the Connoa domain.
8. As a last step, run a Delta Import on the Contoso GALMA. This will re-import the
add operation into MIIS 2003.
If the source object is hidden or displayed in the Exchange Address Book, a direct import
and export attribute flow rule sequence also hides or displays the synchronized contact.
31

Delete a User Account
To demonstrate the two-way synchronization of the GAL synchronization scenario, the
following operation shows how a contact in the target Active Directory data source is
deleted when the associated object in the source Active Directory data source is deleted.
In this example, a user account from the Fabrikam forest is deleted and MIIS 2003
removes the corresponding contact in the Contoso forest.
To demonstrate the results of a target source account deletion
1. On the domain controller for the fabnoa Active Directory domain, in Active
Directory Users and Computers, select the user account for fabuser01.
2. Right-click the user account and then click Delete. Allow Active Directory to
delete the mailbox also.
3. On the domain controller for the connoa Active Directory domain, in Identity
Manager, run a Delta Import run profile on the Fabrikam GALMA.
4. Next, run the Export run profile on the Contoso GALMA.
The export statistics should report one delete operation and the contact should
be deleted in the connoa domain. Verify the removal of the contact from the
Fabrikam organizational unit in the Connoa domain.
5. Run a Delta Import on the Contoso GALMA. This imports the delete operation
into MIIS 2003 again.
Delete a Synchronized Contact in the Target Forest
When a synchronized Contact is deleted in the target forest organizational unit, MIIS
2003 synchronization creates it again. To demonstrate this event, you delete a contact in
the Contoso organizational unit of the fabnoa domain, and then synchronize the GAL
synchronization infrastructure to create the object again.
To demonstrate a synchronized contact deletion and recreation
1. On the domain controller for the fabnoa Active Directory domain, in Active
Directory Users and Computers, delete the contact conuser02 from the
synchronized Contacts organizational unit in the Contoso organizational unit.
2. On the domain controller for the connoa Active Directory domain, in Identity
Manager, run the Delta Import run profile on the Fabrikam GALMA. Verify that
one delete appears in the import statistics. If you examine the object details, you
see that it is the user contact, conuser02, which you just deleted.
32

3. On the domain controller for the connoa Active Directory domain, in Identity
Manager, run the Full Synchronization run profile on the Fabrikam GALMA.
Examine the Outbound Synchronization statistics. Verify that export attribute flow
and provisioning are occurring for the conuser02 object.
4. On the domain controller for the connoa Active Directory domain, in Identity
Manager, run the Export run profile on the Fabrikam GALMA. Examine the
Outbound Synchronization statistics. Verify that one add takes place for the
conuser02 object.
5. On the domain controller for the fabnoa Active Directory domain, in Active
Directory Users and Computers, verify that the conuser02 contact has been
created again in the Contoso organizational unit.
6. On the domain controller for the connoa Active Directory domain, in Identity
Manager, run the Delta Import run profile on the Fabrikam GALMA.
This imports the add operation into MIIS 2003 so it can confirm the export was
successful.
Delete a Mailbox in the Source Forest
When a mailbox in the source forest is deleted and synchronization is run, the
corresponding contact in the target forest is deleted.
To delete a mailbox in a source forest
1. On the domain controller for the fabnoa Active Directory domain, in Active
Directory Users and Computers, select fabuser04 from the Users
organizational unit in the Fabrikam organizational unit.
2. Right-click the user and click Exchange Tasks.
3. Click Delete the Mailbox and confirm the deletion (Click Next, click Next again
to confirm deletion and then click Finish).
4. On the domain controller for the connoa Active Directory domain, in Identity
Manager, run the Delta Import run profile on the Fabrikam GALMA. Verify that
there is one update.
5. On the domain controller for the connoa Active Directory domain, in Identity
Manager, run the Export run profile on the Contoso GALMA. Confirm that there
is one delete.
6. On the domain controller for the connoa Active Directory domain, in Active
Directory Users and Computers, verify the contact for fabuser04 has been
33
removed from the Contacts organizational unit in the Fabrikam organizational
unit in the connoa domain. You may need to refresh the view to see the update.
7. On the domain controller for the connoa Active Directory domain, in Identity
Manager, run a Delta Import on the Contoso GALMA.
Optional: Configure GALSync for Live Communications ServerThis optional section is intended for customers who want to deploy Live Communications
Server 2005 with Service Pack 1 (SP1) in a multiforest environment with Exchange
deployed in a cross-forest or hybrid topology using MIIS GALSync. For a multiforest
environment, Live Communications Server 2005 with SP1 is required to be deployed in a
central forest topology. This means you need to select one of the forests to act as the
central forest of your Live Communications Server 2005 with SP1 environment. For more
information about this topology, refer to the Live Communications Server 2005
Deployment Resources.
In order for Live Communications Server 2005 with SP1 to function in a multiforest
environment, users in one forest must be able to see the contact information for users in
the other forests. This means that every user in a non-central forest must have their
contact information created as a contact object in the central forest and those contact
objects must be added to the GAL in the central forest.
In an Active Directory environment where Exchange is deployed, MIIS 2003 can be used
to perform GAL synchronization between the forests to synchronize the contact
information. This makes the contact information from one forest available to the users in
the other forests.
The MIIS GAL synchronization solution was originally designed to synchronize contact
information for use by Exchange and its clients. However, the same contact information is
also used by Live Communications Server 2005 with SP1, so GAL synchronization can
also be used as a solution for synchronizing contact information for Live Communications
Server 2005 with SP1.
To use the MIIS 2003 management agent for Active Directory GAL to synchronize the
contact information for Live Communications Server 2005 with SP1, you must be running
Microsoft Identity Integration Server 2003 Enterprise Edition with Service Pack 1 or the
Identity Integration Feature Pack (IIFP) 1a. This is because the management agent for
Active Directory GAL in MIIS 2003 SP1 and IIFP 1a has been updated to synchronize the
additional attributes needed by Live Communications Server 2005 with SP1. In addition
to the new attributes synchronized by GAL synchronization in MIIS 2003 SP1, five
34

additional Active Directory attributes require manual configuration for use by Live
Communications Server 2005 with SP1.
Configuration Requirements
To implement the optional Live Communications Server 2005 with SP1 configuration
presented in this section, you need to add support for Live Communications Server 2005
with SP1 to your testing environment. In addition to the setup procedures covered in
Appendix A: Gal Sync Lab Setup and Requirements, the following additional
configuration must be made before continuing with the procedures in this section:
Set up a server running Live Communications Server 2005 with SP1 and two clients
in the Contoso forest. Instructions can be found in "Lab Scenario 1: Deploying a Live
Communications Server and Enabling Client Access" in the Live Communications
Server 2005 Standard Edition Lab Quick Start found at the Live Communications
Server 2005 Deployment Resources Web site.
You also have the option of using Live Communications Server 2005 with SP1 Enterprise
Edition for this exercise. If you choose to use the Enterprise Edition instead of the
Standard Edition, make sure you use the Live Communications Server 2005 Enterprise
Edition Lab Quick Start, found at the same location, for the additional configuration
instructions.
Important:
The GAL synchronization procedures presented earlier in this walkthrough must
be completed before proceeding with the optional Live Communications Server
2005 with SP1 section. The procedures in the Live Communications Server 2005
with SP1 section assume the GAL synchronization procedures are complete.
Implementing the LCS ConfigurationTo add support for Live Communications Server 2005 with SP1to the GAL
synchronization deployment you already have in place, perform the following steps:
Select which forest will act as the central forest for Live Communications Server 2005
with SP1.
Extend the Active Directory schema in the central forest.
Configure one-way, outgoing trusts from the central forest to every other forest.
Configure the management agent for the central forest.
Configure the management agents for the non-central forests.
35
Synchronize the Live Communications Attributes.
Select the Central Forest
In a Live Communications Server 2005 with SP1 deployment, one forest must be
selected to act as the central forest. The central forest requires some additional
configuration and is the forest that hosts the server running Live Communications Server
2005 with SP1. The configuration requirements listed earlier state that the server running
Live Communications Server 2005 with SP1 should be installed in the Contoso forest.
Therefore, the Contoso forest will act as the central forest for the purposes of this
walkthrough. If you have elected to use your own forest design instead of the example
provided in this walkthrough (Contoso and Fabrikam), you need to choose the forest that
will act as your central forest and install the server running Live Communications Server
2005 with SP1 in that forest before you continue. For information about installing and
configuring Live Communication Server, see the Live Communications Server 2005
Deployment Resources Web site.
Extend Metaverse Schema
Live Communications Server 2005 with SP1 uses the same contact information stored in
the global address list that is used by Exchange and its clients. In addition to this
information, Live Communications Server 2005 with SP1 requires the data stored in five
additional attributes:
OtherMobile
OtherPager
IpPhone
msRTCSIP-OriginatorSid
msRTCSIP-PrimaryUserAddress
The MIIS 2003 metaverse schema must be extended to add support for these attributes.
To extend the metaverse schema
1. Click Metaverse Designer.
2. Click person in the Object types pane.
3. Click Add Attribute in the Actions pane.
4. Click New Attribute button.
36

5. Enter msRTCSIP-OriginatorSid in the Attribute name: field.
6. Select Binary (indexable) in the Attribute type: drop-down field.
7. Verify the Multi-valued and Indexed check boxes are not selected.
8. Click OK.
9. Click Add Attribute.
10. Click the New Attribute button.
11. Enter msRTCSIP-PrimaryUserAddress in the Attribute name: field.
12. Select String (indexable) in the Attribute type: drop-down field.
13. Verify the Multi-valued and Indexed check boxes are not selected.
14. Click OK.
15. Click Add Attribute.
16. Click the New Attribute button.
17. Enter ipPhone in the Attribute name: field.
18. Select String (indexable) in the Attribute type: drop-down field.
19. Verify the Multi-valued and Indexed check boxes are not selected.
20. Click New Attribute.
21. Click the New Attribute button.
22. Enter otherMobile in the Attribute name: field.
23. Select String (indexable) in the Attribute type: drop-down field.
24. Verify the Multi-valued and Indexed check boxes are not selected.
25. Click New Attribute.
26. Click the New Attribute button.
27. Enter otherPager in the Attribute name: field.
28. Select String (indexable) in the Attribute type: drop-down field.
29. Verify the Multi-valued and Indexed check boxes are not selected.
30. Click OK.
31. Click OK.
37

After extending the metaverse schema, you must refresh the central forest’s metaverse
schema:
To refresh the metaverse schema of the central forest
1. Right-click the central forest management agent (Contoso).
2. Click Refresh Schema…
3. Click OK.
4. Enter Enterprise Admin credentials for the central forest.
5. Click OK.
6. Click Close once the schema has refreshed.
Configure a One-way trust from the Central Forest
Live Communications Server 2005 with SP1 requires a one-way, incoming trust between
the central forest and any other forest whose users will be connecting to the server
running Live Communications Server 2005 with SP1. This is necessary so the server
running Live Communications Server 2005 with SP1 can validate user credentials when
the user attempts to connect to the server regardless of which forest the user is
connecting from. The trust needs to be one-way from the central forest to the other forest.
Note:
MIIS does not require any trusts to synchronize information across different
forests. This trust is only required if Live Communications Server 2005 with SP1
is being deployed for users across multiple forests.
To establish a one-way trust from the central forest
1. Logon to CONNOA-DC-01 as a member of the Enterprise Admins group in the
Contoso forest.
2. Open Active Directory Domains and Trusts.
3. Right-click connoa.concorp.contoso.com and choose Properties.
4. Click the Trusts tab and click New Trust….
5. The New Trust wizard opens. Click Next.
6. Enter fabnoa.fabcorp.fabrikam.com as the Trust Name. Click Next.
7. Select One-way outgoing as the Direction of Trust. Click Next.
38

8. On the Sides of Trust page, select This domain only. Click Next.
9. On the Outgoing Trust Authentication Level page, select Domain-wide
authentication. Click Next.
10. Enter a strong password for the Trust Password. Confirm the password by
entering it a second time. Click Next.
11. Review the summary information to make sure the options are correct and click
Next.
12. Click Next to create the trust.
13. When asked to confirm the outgoing trust select No, do not confirm the
outgoing trust. Click Next.
14. Click Finish. Click OK to close the SID Filtering dialog box if it appears.
15. Click OK to close the Properties dialog.
16. Logon to FABNOA-DC-01 as a member of the Enterprise Admins group in the
Fabrikam forest.
17. Open Active Directory Domains and Trusts.
18. Right-click fabnoa.fabcorp.fabrikam.com and choose Properties.
19. Click the Trusts tab and click New Trust….
20. The New Trust wizard opens. Click Next.
21. Enter connoa.concorp.contoso.com as the Trust Name. Click Next.
22. Select One-way incoming as the Direction of Trust. Click Next.
23. On the Sides of Trust page, select This domain only. Click Next.
24. On the Outgoing Trust Authentication Level page, select Domain-wide
authentication. Click Next.
25. Enter a strong password for the Trust Password. Use the same password that
you entered in step 10 above. Confirm the password by entering it a second time.
Click Next.
26. Click Next to create the trust.
27. When asked to confirm the incoming trust, select Yes, confirm the incoming
trust. Enter the user name and password of the administrator account from the
Contoso forest that was used for steps 1-15. Click Next.
28. Click Finish.
39

29. Click OK to close the Properties dialog.
Configure the Management Agent for the Central Forest
Some changes need to be made to the configuration of the central forest's management
agent so it can use the two new attributes you added to the schema.
To configure the management agent for the central forest
1. Click Management Agents.
2. Select the management agent for the central forest (Contoso).
3. Select Properties in the Actions pane.
4. Click Select Attributes in the Management Agent Designer list.
5. Click Show All.
6. Find and select msRTCSIP-OriginatorSid.
7. Find and select msRTCSIP-PrimaryUserAddress.
8. Find and select ipPhone.
9. Find and select otherMobile.
10. Find and select otherPager.
11. Click Configure Attribute Flow in the Management Agent Designer list.
12. Expand the node that has Object Type: contact in the Data Source Attribute
column and Object Type: person in the Metaverse Attribute column of the
Configure Attribute Flow table.
13. Under Build Attribute Flow, select msRTCSIP-OriginatorSid in the Data
sourceattribute.
14. Select the Export option button in the Flow Direction section.
15. Select the option to Allow Nulls.
16. Select the Direct option button in the Mapping Type section.
17. Select msRTCSIP-OriginatorSid in the Metaverse attribute: list.
18. Click New.
19. Select msRTCSIP-PrimaryUserAddress in the Data source attribute: list of
the Build Attribute Flow section.
40

20. Select the Import option button in the Flow Direction section.
21. Select the Direct option button in the Mapping Type section.
22. Select msRTCSIP-PrimaryUserAddress in the Metaverse attribute: list.
23. Click New.
24. Expand the node that has Object Type: contact in the Data Source Attribute
column and Object Type: person in the Metaverse Attribute column of the
Configure Attribute Flow table.
25. Under Build Attribute Flow, select ipPhone in the Data sourceattribute.
26. Select the Export option button in the Flow Direction section.
27. Select the option to Allow Nulls.
28. Select the Direct option button in the Mapping Type section.
29. Select ipPhone in the Metaverse attribute: list.
30. Click New.
31. Expand the node that has Object Type: contact in the Data Source Attribute
column and Object Type: person in the Metaverse Attribute column of the
Configure Attribute Flow table.
32. Under Build Attribute Flow, select otherMobile in the Data sourceattribute.
33. Select the Export option button in the Flow Direction section.
34. Select the option to Allow Nulls.
35. Select the Direct option button in the Mapping Type section.
36. Select otherMobile in the Metaverse attribute: list.
37. Click New.
38. Expand the node that has Object Type: contact in the Data Source Attribute
column and Object Type: person in the Metaverse Attribute column of the
Configure Attribute Flow table.
39. Under Build Attribute Flow, select otherPager in the Data sourceattribute.
40. Select the Export option button in the Flow Direction section.
41. Select the option to Allow Nulls.
42. Select the Direct option button in the Mapping Type section.
43. Select otherPager in the Metaverse attribute: list.
41
44. Click New.
45. Click OK.
Configure Management Agent for the Non-Central Forests
The management agents for any other forests that are included in the Live
Communications Server 2005 with SP1 deployment need to be updated also. Perform
the following steps for the other forest management agents:
To configure the management agents for the non-central forests
1. Click Management Agents.
2. Select the management agent for a non-central forest.
3. Select Properties in the Actions pane.
4. Click Select Attributes in the Management Agent Designer list.
5. Click Show All.
6. Find and select objectSid.
7. Find and select ipPhone.
8. Find and select otherMobile.
9. Find and select otherPager.
10. Click Configure Attribute Flow in the Management Agent Designer list.
11. Expand the node that has Object Type: user in the Data Source Attribute
column and Object Type: person in the Metaverse Attribute column of the
Configure Attribute Flow table.
12. Under Build Attribute Flow, select objectSid in the Data source attribute: list.
13. Select the Import option button in the Flow Direction section.
14. Select Direct in the Mapping Type section.
15. Select msRTCSIP-OriginatorSid in the Metaverse attribute list.
16. Click New.
17. In the Configure Attribute Flow table, make sure the node that has Object
Type: user in the Data Source Attribute column and Object Type: person in
the Metaverse Attribute column is selected.
18. Click the row that shows proxyAddresses selected in the Data source
42

attribute: column and legacyExchangeDN selected in the Metaverse attribute:
column.
19. Verify Flow Direction is set to Export.
20. Under Build Attribute Flow, while holding the CTRL key, click msRTCSIP-
PrimaryUserAddress attribute in the Metaverse attribute list in order to
multiselect.
21. Click Edit.
22. Replace the string ProxyAddressesMappingBackwards with
LcsProxyAddressesMappingBackwards in the Flow rule name: field.
23. Click OK.
24. In the Configure Attribute Flow table, expand the node that has Object Type:
contact in the Data Source Attribute column and Object Type: person in the
Metaverse Attribute column of the Configure Attribute Flow table.
25. Click the row that shows proxyAddresses selected in the Data Source
Attribute column, legacyExchangeDN and proxyAddresses selected in the
Metaverse attribute: column
26. Under Build Attribute Flow, while holding the CTRL key, click msRTCSIP-
PrimaryUserAddress attribute in the Metaverse attribute list in order to
multiselect.
27. Click Edit
28. Replace the string ProxyAddressesMappingForwards with
LcsProxyAddressesMappingForwards in the Flow rule name: field.
29. Click OK.
30. Expand the node that has Object Type: user in the Data Source Attribute
column and Object Type: person in the Metaverse Attribute column of the
Configure Attribute Flow table.
31. Under Build Attribute Flow, select ipPhone in the Data source attribute: list.
32. Select the Import option button in the Flow Direction section.
33. Select Direct in the Mapping Type section.
34. Select ipPhone in the Metaverse attribute list.
35. Click New.
36. Expand the node that has Object Type: user in the Data Source Attribute
43
column and Object Type: person in the Metaverse Attribute column of the
Configure Attribute Flow table.
37. Under Build Attribute Flow, select otherMobile in the Data source attribute:
list.
38. Select the Import option button in the Flow Direction section.
39. Select Direct in the Mapping Type section.
40. Select otherMobile in the Metaverse attribute list.
41. Click New.
42. Expand the node that has Object Type: user in the Data Source Attribute
column and Object Type: person in the Metaverse Attribute column of the
Configure Attribute Flow table.
43. Under Build Attribute Flow, select otherPager in the Data source attribute:
list.
44. Select the Import option button in the Flow Direction section.
45. Select Direct in the Mapping Type section.
46. Select otherPager in the Metaverse attribute list.
47. Click New.
48. Click OK.
49. Repeat all steps for each non-central forest management agent.
Synchronize the Live Communications Attributes
Once the above management agent configurations are completed, import run profiles
must be run on all management agents to import the Active Directory data of all forests
into their respective connector space. Synchronization then imports the new information
into the metaverse and provisions the updates to the connector space so the new data
can be exported to the central forest. Finally, the export run profile is run to export the
provisioned contact objects representing users from the different non-central forests to
the central forest.
To import and synchronize the new contact data
1. Select the forest management agent under Management Agents.
2. Right-click the management agent and select Run…
44

3. Select Full Import (Stage Only).
4. Click OK.
After you have performed the import on each forest, the next step is
synchronization. Once again, these steps need to be performed on each forest.
5. Select the forest management agent under Management Agents.
6. Right-click the management agent.
7. Select Run…
8. Select Full Synchronization.
9. Click OK.
To export the contact information to the central forest
1. Select the central forest management agent under Management Agents
2. Right-click the management agent
3. Select Run…
4. Select Export
5. Click OK
Verifying Successful Synchronization
To test whether or not the necessary contact information was successfully synchronized
between the two forests, sign on to a Windows Messenger 5.1 client in the Contoso
forest on CONNOA-DC-01 by using a user account from the Contoso forest. Then, sign
on to a Windows Messenger 5.1 client on FABNOA-DC-01 by using a user account from
the Fabrikam forest.
If the contact information was successfully synchronized across the forests, each user
should be able to add the other user's contact information to their contact list in Windows
Messenger. By clicking on the contact's name, they can establish a messaging sessions
and should be able to chat back and forth.
All the information you need to set up a server running Live Communications Server 2005
with SP1 and the Windows Messaging clients for this test can be found in the Live
Communications Server 2005 Standard Edition Lab Quick Start (or the Live
Communications Server 2005 Enterprise Edition Lab Quick Start if you only have access
to the Enterprise Edition) located at the Live Communications Server 2005 Deployment
Resources Web site.
45

To test that synchronization has worked correctly without configuring Live
Communications Server 2005 with SP1 and using Windows Messenger, a tool such as
ADSIEDIT or LDP can also be used to lookup and confirm the extra attributes have been
added to the contact objects in the central forest.
SummaryYou have just completed a rudimentary implementation of GAL synchronization by using
MIIS 2003. You started with two forests each hosting their own Exchange GAL and you
used the management agent for Active Directory global address list (GAL) to synchronize
the global address lists between the two forests. After the initial synchronization, you
performed some rudimentary administrative tasks and then observed how MIIS 2003
synchronized the changes you made. You hid a mailbox on one forest and then observed
how the contact information for that mailbox was removed from the GAL in the other
forest. You deleted a user in one forest and saw the contact object for that user removed
from the contact list in the other forest. You also attempted to remove a contact from the
remote forest’s contact list and observed how synchronization caused the contact to be
replaced.
You also had the option of configuring five additional attributes needed for use by LCS
2005 SP1. These attributes make it possible for users in one forest to see the contact
information for users in another forest. This exercise demonstrated how to use the
GALSync management agent to synchronize this contact information for use by LCS
2005 SP1.
See AlsoMIIS 2003 Design and Planning Collection | Microsoft Identity Integration Server 2003
Global Address List Synchronization | Live Communications Server 2005 Deployment
Resources
Appendix A: GAL Sync Lab Setup and Requirements
Complete the following procedures to set up the lab environment for this walkthrough.
These procedures describe the software installation requirements and the specific
options that must be configured to demonstrate an implementation of GAL
synchronization.
46
To set up the lab environment:
Set up the Contoso forest computer
Configure the DNS Server
Set up the Fabrikam forest computer
Create the scenario folders on the scenario computers
Populate and configure Active Directory objects, including OUs and users.
Configure the e-mail environment
The following diagram represents the test environment used for this walkthrough.
Hardware RequirementsThe recommended test environment for this walkthrough is two servers on an isolated
network, each hosting one forest. The following software must be installed:
Microsoft® Windows Server™ 2003, Enterprise Edition, which contains the required
Internet Information Services (IIS) service and ASP.NET components
Microsoft Exchange Server 2003, Standard Edition Server
Microsoft SQL Server™ 2000 with Service Pack 3a
Microsoft Identity Integration Server 2003 with Service Pack 1
Hardware requirements must meet the minimum requirements outlined for each of the
software packages listed above. The minimum hardware requirements can be found in
the product documentation for each of the listed products or at http://www.microsoft.com.
47
Set Up the Contoso Forest ComputerThe first computer will host the Contoso forest. Name the server connoa-dc-01 and install
the following software:
Windows Server 2003, Enterprise Edition
DNS Server
Active Directory
Internet Information Services (IIS) service
ASP.NET
Exchange Server 2003
Microsoft SQL Server 2000 Service Pack 3a
Microsoft Identity Integration Server 2003 with Service Pack 1
Note:
Exchange Server 2003 requires that the Internet Information Services (IIS)
service components are installed and running on the server computer where
Exchange Server 2003 is installed.
Configure the DNS ServerThe DNS server will host two zones, one for the Contoso forest and one for the Fabrikam
forest. Create two primary Active Directory-integrated zones:
Connoa.concorp.contoso.com
Fabnoa.fabcorp.fabrikam.com
Make sure you enable dynamic updates so the DNS zones can be properly updated
during the installation of Active Directory.
Set Up the Fabrikam Forest ComputerThe second computer will host the Fabrikam forest. Name the computer fabnoa-dc-01
and install the following software:
Windows Server 2003, Enterprise Edition
Active Directory
Internet Information Services (IIS) service
48

Exchange Server 2003
Configure it to use connoa-dc-01 as its DNS server prior to installing Active Directory.
Note:
Exchange Server 2003 requires that the Internet Information Services (IIS)
service components are installed and running on the server computer where
Exchange Server 2003 is installed.
Create the Scenario FolderAll of the files necessary for the configuration of this scenario are included in the
GALSynchronization folder provided with this document. These files must be copied to a
file directory on the each of the servers used in this scenario.
To create the folder for this scenario
1. On each of the servers used in this scenario, create the following folder:
C:\Scenarios\GALSynchronization
2. Copy all of the contents of the GALSynchronization folder, provided with this
document, into the new folder on each server.
Populating and Configuring Active Directory ObjectsPopulating Active Directory consists of creating the organizational unit structure and
creating users, groups and contacts within each corresponding organizational unit.
Two command line scripts are used to populate the separate Active Directory forests:
contoso-buildad.cmd - populates the Contoso Active Directory forest.
fabrikam-buildad.cmd - populates the Fabrikam Active Directory forest.
If you want to recreate the Active Directory environment after you have completed this
scenario, you must delete the organizational unit and object structure initially created by
these scripts, and then run these scripts again. If you do not delete the existing GAL
Synchronization scenario organizational unit and object structure, the scripts will not
work.
49

After populating Active Directory, configure the Active Directory objects by configuring the
mail addresses in Exchange Server 2003 and by creating Exchange mailboxes for the
user accounts.
To populate the Active Directory in the connoa domain:
1. Log on to the server running Microsoft Identity Integration Server 2003 using the
Administrator account
2. Locate the file contoso-buildad.cmd in the C:\Scenarios\GALSynchronization folder
and open it by using Notepad. You should see the following statements:
@echo off
rem
rem Copyright (c) Microsoft Corporation. All rights reserved.
rem
rem TODO: Enter the right information for the server, user credentials
rem and AD Domain if different from the scenario documentation
rem ==========================================
set servername=CONNOA-DC-01
set username=administrator
set domainname=connoa
set password=*
rem ==========================================
set addomain=DC=connoa,DC=concorp,DC=contoso,DC=com
rem ==========================================
ldifde -k -v -i -f contoso-ous.ldif -c "OU=COMPUTERNAME,ADDOMAIN" "OU=
%COMPUTERNAME%,%addomain%" -s %servername% -b %username% %domainname%
%password%
ldifde -k -v -i -f contoso-contacts.ldif -c "OU=COMPUTERNAME,ADDOMAIN" "OU=
%COMPUTERNAME%,%addomain%" -s %servername% -b %username% %domainname%
%password%
ldifde -k -v -i -f contoso-users.ldif -c "OU=COMPUTERNAME,ADDOMAIN" "OU=
%COMPUTERNAME%,%addomain%" -s %servername% -b %username% %domainname%
%password%
50

ldifde -k -v -i -f contoso-groups.ldif -c "OU=COMPUTERNAME,ADDOMAIN" "OU=
%COMPUTERNAME%,%addomain%" -s %servername% -b %username% %domainname%
%password%
3. Edit the cmd file and change the variables listed in the following table to reflect your
scenario. These values are found in the cmd file in the lines that begin with "set."
Variable Value
Servername Name of the domain controller for the
connoa Active Directory domain.
Username Name of an administrative account that is
allowed to create objects in Active
Directory, (for example, Administrator).
Domainname NetBIOS name of the Active Directory
domain, (for example, CONNOA).
Password Password of the administrative account
that you specified earlier.
If you use a domain name other than connoa.concorp.contoso.com, then you need to
follow these instructions:
1. While editing the contoso-buildad.cmd file change the
addomain=dc=connoa,dc=concorp,dc=contoso,dc=com” to match the name of your
domain in LDAP notation.
2. Prior to running contoso-buildad.cmd file, edit the contoso-contacts.ldif file. Replace
all @contoso.com strings with the Exchange mail domain of your scenario.
3. Save the changes to contoso-buildad.cmd and close Notepad.
4. At the command prompt, run contoso-buildad.cmd.
The contoso-buildad.cmd file creates eight organizational units (OUs) in Active Directory.
One OU is named after the computer running Microsoft Identity Integration Server 2003,
such as CONNOA-DC-01. Under this OU, another OU named GALSynchronization is
created. Under this OU, the Contoso and Fabrikam OUs are created.
The Contoso OU is populated with three other OUs: Users, Groups and Contacts, Each
of these OUs will be populated with users, groups, and contacts respectively. The
Fabrikam OU is populated with an empty Contacts OU.
51

After the contoso-buildad.cmd file is finished running, the following objects are within the
organizational units:
13 new users in the Users organizational unit.
7 new groups in the Groups organizational unit.
5 new contacts in the Contacts organizational unit.
Next, you must populate the directory for the fabnoa domain.
To populate the Active Directory in the fabnoa domain:
1. Log on as Administrator to the domain controller hosting the fabnoa domain.
2. Locate the file fabrikam-buildad.cmd, and then open it by using Notepad. Change the
variables listed in following table to reflect your scenario.
Variable Value
Servername Name of the domain controller for the
fabnoa Active Directory domain.
Username Name of an administrative account that is
allowed to create objects in Active
Directory (for example, Administrator).
Domainname NetBIOS name of the Active Directory
domain (for example, FABNOA).
Password Password for the administrator account.
If you use a domain name other than fabnoa.fabcorp.fabrikam.com, then you need to
follow these instructions:
1. While editing the fabrikam-buildad.cmd file, change the LDAP string
addomain=dc=fabnoa,dc=fabcorp,dc=fabrikam,dc=com” to match the name of your
domain.
2. Prior to running fabrikam-buildad.cmd, edit the fabrikam-contacts.ldif file. Replace all
@fabrikam.com strings with the Exchange mail domain of your scenario.
3. Save the changes to fabrikam-buildad.cmd and close Notepad.
4. At the command prompt, run fabrikam-buildad.cmd.
The fabrikam-buildad.cmd script creates five organizational unit (OU) objects in Active
Directory. One OU is named after the server running Microsoft Identity Integration Server
52

2003, FABNOA-DC-01. Under this OU, another OU is created and named
GALSynchronization. Under the GALSynchronization OU, two OUs are created: Contoso
OU and Fabrikam OU. The Fabrikam OU is populated with three other OUs: Users,
Groups, and Contacts, each of which is populated with users, groups, and contacts
respectively. The Contoso OU is populated with an empty Contacts OU.
The import assumes an empty Active Directory, except for the default Active Directory
and Exchange objects and the default configurations that have only the initial Active
Directory objects. If you are setting up this scenario for a second time, you need to delete
the existing Active Directory users, groups, and contacts before running the scripts to
populate this Active Directory domain.
Configure the E-mail EnvironmentConfiguring the e-mail environment consists of configuring mail address creation on
Exchange Server 2003 and then creating mailboxes for the user accounts.
Configure the Mail Addresses in Exchange Server 2003
This scenario requires that the following attributes are set for the newly created objects:
proxyAddresses
targetAddress
legacyExchangeDN
You must set the SMTP mail domain correctly for both Active Directory forests in this
walkthrough. This configuration is performed by adjusting the Exchange Default Recipient
Policies.
To adjust the Exchange Default Recipient Policies for both forests
1. On the domain controller hosting the connoa domain, start the Exchange Server
2003 System Manager.
2. Expand Recipients, and then click Recipient Policies.
3. Right-click Default Policy and select Properties.
4. Click the E-Mail Addresses (Policy) tab.
5. In Generation rules, in Type, click SMTP, and then click Edit.
6. In SMTP Address Properties, in Address, type @contoso.com for the connoa
domain in the Contoso Active Directory forest.
53

7. Click OK.
8. Click OK.
9. If asked to apply the changes to all recipients now, click Yes.
10. On the domain controller hosting the fabnoa domain, start the Exchange Server
2003 System Manager.
11. Expand Recipients, and then click Recipient Policies.
12. Right-click Default Policy and select Properties.
13. Click the E-Mail Addresses (Policy) tab.
14. In Generation rules, in Type, click SMTP, and then click Edit.
15. In SMTP Address Properties, in Address, type @fabrikam.com for the fabnoa
domain in the Fabrikam Active Directory forest.
16. Click OK.
17. Click OK.
18. If asked to apply the changes to all recipients now, click Yes.
Create Exchange Mailboxes for the Active Directory User Accounts
The newly created Active Directory objects have to be enabled for Exchange Server
2003. Create mailboxes for each user account and establish e-mail addresses for the
group and contact objects. The operations must be performed within both Active Directory
forests.
Important:
You must create mailboxes for each user account and establish e-mail addresses
for the group objects in both forests.
To create mail boxes for the newly created objects in the connoa domain
1. On the domain controller for the connoa Active Directory domain, start Active
Directory Users and Computers.
2. Click the organizational unit named after the domain controller (CONNOA-DC-
01), click GALSynchronization, click Contoso, and then click Users.
3. Press CTRL+A to select all users within the organizational unit.
54

4. Right-click the selected users, and then click Exchange Tasks.
5. On the Exchange Task Wizard Welcome page, click Next.
6. From the list of available tasks, ensure that Create Mailbox is highlighted and
then click Next.
7. For the Create Mailbox page, use the default values and click Next.
8. Click Finish.
To establish e-mail addresses for the newly created groups in the connoa domain
1. On the domain controller for the connoa Active Directory domain, in Active
Directory Users and Computers, under the Contoso organizational unit, click
Groups.
2. Press CTRL+A to select all groups within the organizational unit.
3. Right-click the selected groups and click Exchange Tasks.
4. In the Exchange Task Wizard Welcome page, click Next.
5. From the list of available tasks, select Establish E-mail Address on Groups.
Click Next.
6. For the Establish E-Mail Address on Groups page, use the default values and
click Next.
7. Click Finish.
To create mail boxes for the newly created objects in the fabnoa domain
1. On the domain controller for the Fabnoa Active Directory domain, start Active
Directory Users and Computers.
2. Click the organizational unit named after the domain controller (FABNOA-DC-01),
click GALSynchronization, click Fabrikam, and then click Users.
3. Select all users within the organizational unit.
4. Right-click the selected users and click Exchange Tasks.
5. On the Exchange Task Wizard Welcome page, click Next.
6. From the list of available tasks, ensure that Create Mailbox is highlighted and
then click Next.
7. For the Create Mailbox page, use the default values and click Next.
55

8. Click Finish.
To establish e-mail addresses for the newly created groups in the Fabnoa domain
1. On the domain controller for the fabnoa Active Directory domain, in Active
Directory Users and Computers, under the Contoso organizational unit, click
Groups.
2. Select all groups within the organizational unit.
3. Right-click the selected groups and click Exchange Tasks.
4. In the Exchange Task Wizard Welcome page, click Next.
5. From the list of available tasks, select Establish E-mail Address on Groups
and click Next
6. For the Establish E-Mail Address on Groups page, use the default values and
click Next.
7. Click Finish.
At this point your servers should be setup and configured properly for this walkthrough.
You are ready to begin.
56
Related Documents


