Migrating Data to the Parcel Fabric Christine Leslie Amir Bar-Maor

Welcome message from author
This document is posted to help you gain knowledge. Please leave a comment to let me know what you think about it! Share it to your friends and learn new things together.
Transcript

Migrating Data to the Parcel FabricChristine Leslie
Amir Bar-Maor

What is a parcel fabric?
• Dataset of related feature classes and tables
- Polygons, lines, points, plans, etc.
- Predefined system attributes
• Connected parcel groups
- Forms a parcel boundary network
• Explicit topology
- Defined by common parcel corner points
• Parcel Editor toolbar
Parcel fabric data model
Plans
Control Line Points
Points Lines
Parcels
1-M
0-M
2-1
1
1-M
0-1
1
1
0-1

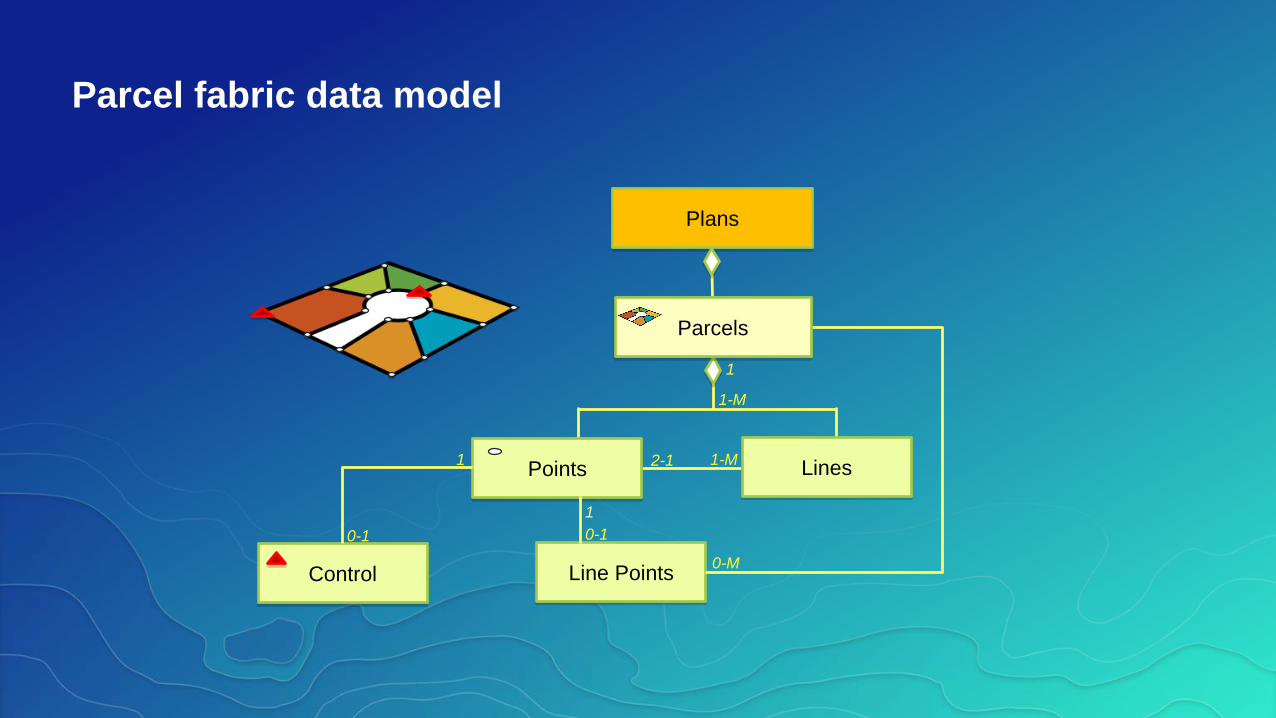
Parcel fabric data model
• Plans
- Represent the legal document
- Store record information
• Parcels
- Polygon defined by a sequence of lines (traverse)
• Lines
- Store the recorded dimensions
- Have a To and a From point
• Points
- Have X Y Z coordinates
- Can have a control point

Line pointsParcel fabric data model
• Ensure topology between parcels
• Preserve recorded dimensions

Overlapping parcelsParcel fabric data model
• Subdivisions, Lots, Tax Parcels, Historic parcels share common points

Amir Bar-Maor
Demo

Parcel fabric data model
• Data model can be optimized for your organization
• In the USA, the Local Government Information Model is used

Local Government Information Model (LGIM)
• A collection of maps and apps used to manage land records in the USA:
- Tax parcel editing
- Survey framework maintenance
- Tax map book production
• Related apps such as Community Parcels,
Tax parcel viewer, Address Management

Parcel fabric and the LGIM
• Parcel fabric can be enabled with the LGIM
- Optimized for parcel editing in the USA
• Provides a configured layer for streamlined editing
• Provides automated parcel editing workflows

Migrating data to the Parcel Fabric
• Setup the data model
- Extend your parcel fabric model
- Or use the Local Government Information Model
• Setup a staging environment
• Format and prepare data
• Use the Load a Topology to a Parcel Fabric geoprocessing tool
• Import control points

StepsMigrating data to the parcel fabric
• Recommendation: Test the workflow against a small pilot area of parcels
1. Create a parcel
fabric
2. Setup staging &
create attributes
3. Prepare
geometries
4. Load data
5. Configure the
map
6. Import control
points
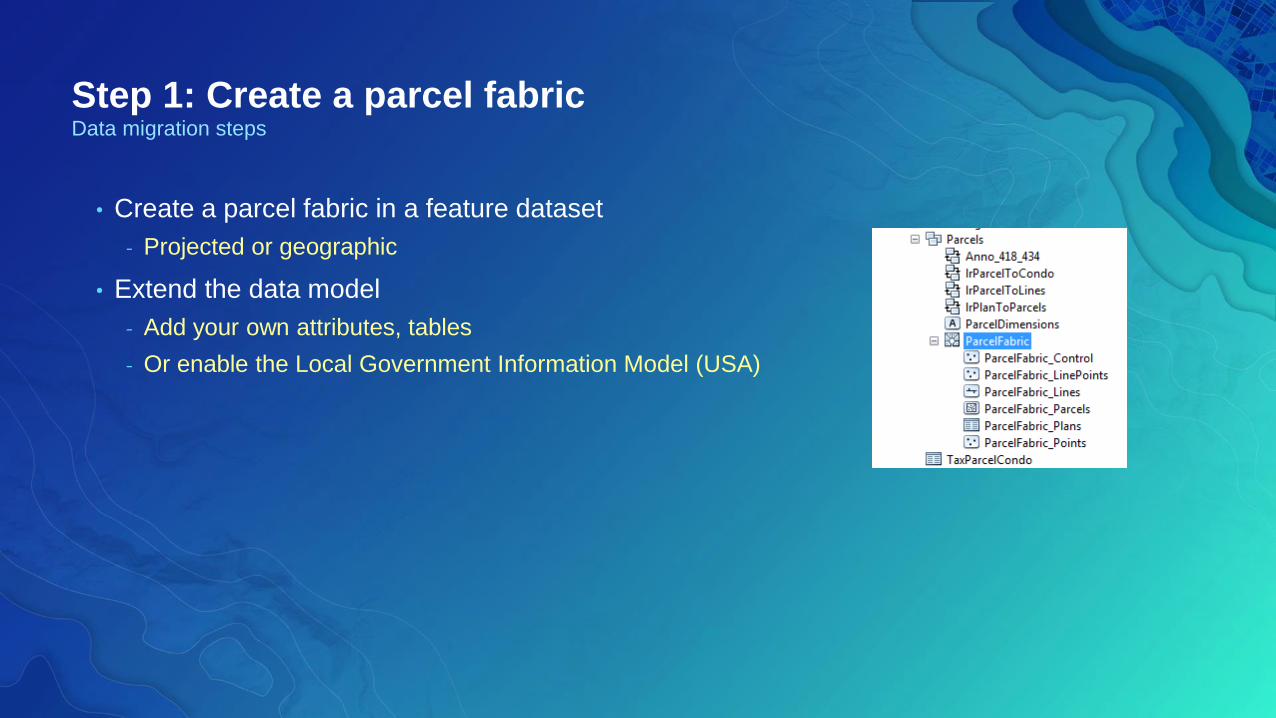
Step 1: Create a parcel fabricData migration steps
• Create a parcel fabric in a feature dataset
- Projected or geographic
• Extend the data model
- Add your own attributes, tables
- Or enable the Local Government Information Model (USA)

Amir Bar-Maor
Demo : Step 1

Step 2: Setup staging & create attributesData migration steps
• Review source data
- Inventory of polygons
• Create an empty polygon feature class for each parcel type
- In a separate feature dataset
• Add attribute fields
- Fields must match fields in parcel fabric tables (both system and additional)
• Calculate/format attributes in source polygons
- Prepare source attributes for loading into staging feature classes
- For example, Types, Historic parcels
• Check alignments between overlapping polygon types
- Use the Integrate geoprocessing tool

Step 2 continued… StagingData migration steps
• Load source polygons into staging feature classes
- Use the Simple Data Loader
• If using the LGIM
- Staging feature classes are setup for you
- Download and unpack the staging layer package
- Use the Simple Data Loader

Amir Bar-Maor
Demo : Step 2

Step 3: Prepare geometriesData migration steps
• For each parcel type:
1. Check and repair any polygon geometries (GP Tool)
2. Convert polygons to lines (GP Tool)
3. Clean up curves (Curves and Lines Add-in)
4. Rebuild polygons from lines (GP Tool)
5. Check polygon inventories

Amir Bar-Maor
Demo : Step 3

Data migration stepsRecap
1. Create a parcel
fabric
2. Setup staging &
create attributes
3. Prepare
geometries
4. Load data
5. Configure the
map
6. Import control
points

Step 4: Load dataData migration steps
• Load a Topology to a Parcel Fabric geoprocessing Tool
• Individual topologies for each parcel type
• Topology validated against a required set of rules

Amir Bar-Maor
Demo : Step 4

Steps 1 to 4: Summary of stagingData migration steps
• Polygon feature class
for each type
• Separate feature
datasets
• Add/map fields that
match fabric fields• Load source polygons into staging using Simple
Data Loader
• Create lines
• Format lines
• Rebuild polygons from
lines
• Create/validate
topologies
• Load topologies

Step 5: Configure your mapData migration steps
• If using the LGIM:
- Drag LGIM-enabled parcel fabric into the map
• If using your own model
- Query parcels and save layer files

Amir Bar-Maor
Demo : Step 5

Step 6: Import control pointsData migration steps
• Why have control?
- Accuracy for new parcels
- Deed references control points
- Least-Squares adjustment
• Use Import Control Points wizard
• Use XYZ coordinates
• Can be loaded multiple times for new updates to coordinates

Amir Bar-Maor
Demo : Step 6

Additional considerations
• Iterate tool for large datasets
- Divide into zones
• Overlapping parcels of the same type
- Planarize your lines
- Merge courses after loading
• Starting with lines instead of polygons
- Format lines, type lines, build polygons

Resources
• Documentation
- http://desktop.arcgis.com/en/arcmap/latest/manage-data/editing-parcels/dm-setupdatamodel.htm
• LGIM
- Download the Maintain Tax Parcel Inventory app to get staging layer package
http://solutions.arcgis.com/local-government/land-records/manage-property/
- Enable parcel fabric with the LGIM in Catalog
• Land Records Meetup
• http://www.meetup.com/Esri-Land-Records-Meet-Up/
• Esri supported parcel fabric Add ins
- http://www.arcgis.com/home/item.html?id=7f35ed8034a942b98bf3290f7adcbf13

Please Take Our Survey on the Esri Events App!
Select the session you attended
Scroll down to find the survey
Complete Answersand Select “Submit”
Download the Esri Events app and find
your event

Related Documents