MIDDLE SCHOOL SCIENCE PROJECTS by Kayla Fay www.middle-school-science-projects.com Copyright 2012/2013 A. L. Dash & Sons LLC 1

Welcome message from author
This document is posted to help you gain knowledge. Please leave a comment to let me know what you think about it! Share it to your friends and learn new things together.
Transcript

MIDDLE SCHOOL SCIENCE PROJECTS
by Kayla Faywww.middle-school-science-projects.com
Copyright 2012/2013 A. L. Dash & Sons LLC 1

MIDDLE SCHOOL SCIENCE PROJECTS
Table of Contents:
Introduction – Page 3
Project 1: Testing the Strength of Hair – Page 5
Project 2: Finding the Best Conditions for Growing Yeast - Page 12
Project 3: Making a Solar Heater - Page 17
Project 4: Exploring Soil - Page 24
Project 5: Testing Vitamin C - Page 32
Note. Within this document there are 'hyperlinks', which are underlined words that you can click on and be taken to another spot. You may have to hold down the Control key before the link works. The Control keys are located in the bottom left and right of your keyboard; they have CTRL written on them. Hold down the Control key, then click with your mouse.
SCIENCE SAFETY:Make sure you supervise your child during these experiments! Use extreme caution when working with hot liquids. Safety goggles are recommended for projects with liquids and balloons.
This product is copyrighted, and all rights are reserved. Pages and tools included in Middle School Science Projects may be printed by the original purchaser only. This does not mean that our projects cannot be used by teachers in the classroom, only that It is illegal to provide multiple copies of this product.
DISCLAIMER: Although the experiments in this web-site are regarded as low hazard, author and publisher expressly disclaim all liability for any occurrence, including, but not limited to, damage, injury or death which might arise as consequences of the use of any experiment(s) listed or described here. Therefore, you assume all the liability and use these experiments at your own risk.
A note about your purchase: Thank you for your purchase of Middle School Science Projects. Please note that your billing statement will show a charge from Clk*Bank.com. Any questions about this product should be directed to [email protected].
Copyright 2012/2013 A. L. Dash & Sons LLC 2

MIDDLE SCHOOL SCIENCE PROJECTS Introduction
Included in this document are five different science project guides. Each guide will address the following elements of a science project:
Purpose: This is the question that will be answered by the experiment.
Hypothesis: You should make up your own hypothesis, based on what you know about what you are studying. If you don't know anything yet, do a bit of research to find out what to expect. Each project includes a reference section to help give you basic information about the subject matter. We are sometimes asked why we do not offer our hypothesis. That is because the hypothesis is your educated guess. There is no right or wrong hypothesis!
Materials: Supplies should be gathered before the experiment. Make sure you get an adult to supervise you during these experiments! Use extreme caution when working with hot liquids. Safety goggles are recommended for projects with liquids and balloons.
Procedure: Step by step details are given to make the experiment go as smoothly as possible.
Data and chart: We provide a sample chart and graph. Note that we use imaginary data to discourage you from taking our results as your own. (Trust us – if you use our data, your teacher will know.) Important! Each project has a link to an Excel spreadsheet that has pre-formatted charts and graphs. All you need to do is plug in the data, and you'll see the graph change. When it is time to do make the project board, simply copy and paste the chart and graph onto your paper, and size it as necessary.
Conclusion: The conclusion answers the question posed in the Purpose, using data and observations from the experiment. Your child must arrive at his or her own conclusion. The data in the examples given will not lead your child to the correct conclusion.
Application: How can the results of your experiment be used? Consider scientific, medical, and consumer uses. Will the results of the experiment change behavior in your family? Does it dispel any myths or urban legends?
References: Books and internet sites are listed to help with research. Hyperlinks within your guide will take you to the internet
Copyright 2012/2013 A. L. Dash & Sons LLC 3

for your resources. Please note that, while all care has been taken to ensure that these sites are not offensive or hazardous, we have no control over external material. As always, use the internet with adult supervision.
Other Science Project Elements: You may also need a science project proposal, an abstract, science logs, research papers or reports. This guide will give you plenty of information that you can use to create these.
Sometimes teachers also want you to list variables. When doing a science experiment, there are things that you, as the scientist, control to make sure your test results are dependable:
● Independent Variable – The independent variable is the thing that you change in the experiment. All the other things in your experiment should stay the same.
● Dependent Variable – The dependent variable is the thing that changes because of the independent variable.● Control – The control is the group in which nothing changes at all.
Options: Each guide gives instructions for a specific science project, but begins with ideas to change or expand the projects and make it uniquely yours. We also give you ideas for project titles.
Measurements: We have used mainly English measurements, since most American homes have mainly English measuring utensils. If your science teacher requires metric measures, go to Google, and type in “convert ______ to _______”. Put the English measurement in the first space, and the metric measure in the second. Google will convert it for you. If you're having trouble figuring out the metric words, go to Thinkquest.com.
☼ Our projects can also be done in 24 hours! Information about each 24 hour option is noted in the individual project descriptions. Look for the special sun ☼ symbol!
Note: When you finish your project, we'd love to hear about it – and see it! Please go to our blog, and post about your project! We'd love to see your pictures, and find out what worked, what didn't, and how much fun you had!
Copyright 2012/2013 A. L. Dash & Sons LLC 4

MIDDLE SCHOOL SCIENCE PROJECTSTesting the Strength of Hair
Purpose: To find out how various hair treatments change the strength of hair.
Description: This experiment tests the strength of hair using paper clips and washers. It will show the strength of hair before (using the control) and after being treated with various hair products and/or treatments. You can choose to test everyday hair products – like shampoo and conditioner, mousse and hair gel. You can compare brands, or types of products. You could also test the effects of more permanent hair treatments such as color, highlights, straighteners or 'permanents'.
A terrific project would also be to enlist the help of a hair salon, and get them to give you strands of hair from before, during, and after they give a hair treatment. For example, get samples of hair from the same person before they apply chemical straightener, immediately afterwards, and then after applying the special hair strengthening shampoo. Other ideas – test peroxide, lemon juice, egg whites, mayonnaise, and other household products that are sometimes used on hair.
We used an untreated hair as the control. For some tests, water itself would be an appropriate control.
☼This is a 24 Hour Science Project! If you do the project as we did it, you should be able to complete it in one day!
Note that because of the fragility of hair, you should do more trials than the three usually required. We recommend at least five trials per type of treatment.
Safety note: Use protective goggles and gloves when using chemicals! Always work under the supervision of an adult.
Suggested Titles: Splitting Hairs, Hair Today, Gone Tomorrow, Does My Hair Look Big In This?, The Effect of Hair Care Products on Tensile Strength of Hair, Does Your Shampoo Weaken Your Hair?, Hair Care 101, Break a Hair!, Let Your Hair Down, and The Buck Stops Hair.
Hypothesis: Use the reference helps below to formulate an hypothesis.
Our experiment tests conditioner, hair spray, mousse, and water. It uses untreated hair as the control.
Copyright 2012/2013 A. L. Dash & Sons LLC 5

Materials: ● Strands of untreated hair 8 inches or longer. Hair should be from the same person. (Further instructions are below.)● Scissors.● 1 zip close bag.● One 50 meter roll of 2” wide clear packing tape.● Large (we used 3”) paper clips. ● Horizontal rod to tape samples of hair. You could use your shower curtain or a towel rack, a dowel stick or a curtain rod.
We used an old curtain rod suspended between two chairs.● 50 heavy washers. We used 3/16” X 1-1/4” zinc plated fender washers.● 12 inch ruler. ● Water.● Samples of hair products. We used conditioner, hair spray, and mousse, and plain water. We had mousse, borrowed the
hair spray and used a hotel sample for the conditioner. (Can you tell we have all boys?) ● One shallow, wide bowl for each type of treatment.● Cotton swabs.● Permanent marker.● Timer or clock.● Safety goggles (if you are using chemical treatments).
Procedure: Note: This procedure tests four variables – plain water, conditioner, mousse, and hair spray – and one control. These are the independent variables that you can change.
1. Find a volunteer with untreated hair longer than 8 inches. Snip a lock of hair so that you have about fifty strands. If you cut on the underside next to the neck, it won't be noticeable. If your volunteer is under age 18, you must get her (or his!) parents' permission. (Hint – A signed permission form from your volunteer adds a great scientific touch.) Place the hair in a zip close bag.
2. Cut packing tape into 4" strips. You'll need four strips per strand of hair – so for our five trials of five pieces of hair, we needed 100 pieces of tape. Mark the strips every 2" as shown. HINT: We found it easiest to lay the tape sticky side up and stick the side of the ruler on the tape. The ruler held the tape flat, and the tape held the ruler in place. A permanent marker will write on the sticky side.
Copyright 2012/2013 A. L. Dash & Sons LLC 6

3. Cut the hair into strands approximately 8" long. 4. Take two pieces of tape, and place them sticky side up at the very edge of each
end of your ruler. (See Figure 1) Make sure that the tape is barely touching the edge. There should be exactly four inches in between each piece of tape.
5. Using the 2" marks as guides, position the hair so that it is centered over the four inch gap. The hair should reach to the middle of each piece of tape, so that 2" is on each piece of tape. There must be exactly 4” of hair in the middle.(Figure 1)
6. Each piece of tape should have hair on half of it. Fold the pieces of tape in half, so the hair is at the fold. It doesn't matter if the tape is wrinkled, as long as the hair reaches up to the fold.
7. Use the marker to label each sample of hair with one of your hair product types. Don't forget to add one for water and one for the control. (Figure 2)
8. For each sample, open a paper clip on at the middle 'turn', so that there is a hook at the top and the bottom. Attach the small end of the paper clip to the unlabeled piece of tape as shown. Make sure the clip reaches to the top of the tape, and that the tape is fastened securely. (Figures 3 and 4)
Copyright 2012/2013 A. L. Dash & Sons LLC 7
Figure 1
Figure 3 Figure 4Figure 2

9. Place a sample of each hair product into bowls, and add the corresponding strand of hair. Try to make sure that the tape does not get into the product. Use a cotton swab to thoroughly coat the strand with product. Let the hair soak in the product for five minutes.
10.After five minutes, take the hair samples out of the product, and use the final piece of tape to attach the labeled piece of tape to the rod. Place each sample at least four inches apart so they won't swing into each other.
11. Add two washers to each hook. Wait five minutes, and add two more. Wait five more minutes, and add one more. For each five minute interval thereafter, add one more washer to each hook.
12.At some point, the strands of hair will begin to break. When this happens, note how many washers were on the hook.
13.Repeat the process FIVE times. These are your five trials.
Copyright 2012/2013 A. L. Dash & Sons LLC 8
Figure 2
Figure 1

Data and chart:
Click here to access the Excel spreadsheet and charts.
Conclusion: Use your data to answer the question stated in your purpose. Remember that the data I use is imaginary, and if you use it, your teacher will know that you copied my work.
Application: How can your results be used in real life? Will it change your hair care habits? Will you tell your friends about your results? Will it make you change the products you use, or the treatments you may or may not get? What surprising things did you find?
References: NOTE: The first place you should do research is in the encyclopedia and a elementary or middle school science book. These materials are designed to give basic, concise information.
Copyright 2012/2013 A. L. Dash & Sons LLC 9

BOOKS
● Books about basic hair care: Hair Trix for Cool Chix: The Real Girl's Guide to Great Hair and Kids Talk Hair: An Instruction Book for Grown-Ups & Kids
● It's True! Your Hair Is Dead “Tease your friends with tangled tales and hair raising facts." A comprehensive guide to hair, including facts about baldness, friziness, hairballs, and beards.
● The Natural Beauty Book Get some great ideas about natrual hair treaments in this fun to read book by the fun people at Klutz publishing.
● Girl in a Fix: Quick Beauty Solutions (and Why They Work) The "why they work" parts in this book explain the chemistry behind some hair treatments.
● The Science of Hair Care It's said that this book is, "The most comprehensive source on the subject." A very good book that will answer any specific question you may have. It goes into detail about the structure of hair.
● Hair Structure and Chemistry A textbook. Explains hair composition and what chemical changes take place in the hair for coloring and perming. You'll learn what chemicals make up each product and how they work with the hair.
WEBSITES
● L'Oréal invites you to discover for yourself the human hair inner structure by taking over the controls of three-dimensional models of the hair follicle. A fantastic source of information! The player for this 3D demonstration has to be installed on your computer, but I encourage you to get permission from an adult, then take the time to download and view this cool interactive resource.
● How Stuff Works explains how hair coloring works, with text, pictures and videos.● Webmd offers lots of information on hair. The article is directed to those suffering from hair loss, but the basic hair
information is very helpful.● Hair Color Chemistry - Bleaching & Dyeing offers more good basics to help you understand the chemistry behind hair.● Salonweb will give you basic information about conditioners and other hair products, as well as some ideas for different
variables for your experiment.
NOTE: If any of the links above are “broken”, please let me know by emailing [email protected]. If you report one or more broken links, I'll give you a free copy of Waking Up from the Homework Nightmare.
Questions or comments about MIDDLE SCHOOL SCIENCE PROJECTS should be directed to [email protected] .
Copyright 2012/2013 A. L. Dash & Sons LLC 10

DISCLAIMER: Although the experiments in this web-site are regarded as low hazard, author and publisher expressly disclaims all liability for any occurrence, including, but not limited to, damage, injury or death which might arise as consequences of the use of any experiment(s) listed or described here. Therefore, you assume all the liability and use these experiments at your own risk.
Copyright 2012/2013 A. L. Dash & Sons LLC 11

MIDDLE SCHOOL SCIENCE PROJECTSFinding the Best Conditions for Growing Yeast
Purpose: To find out the best conditions for growing yeast.
Description: Yeast is a fungus which is commonly used to leaven bread and ferment alcoholic beverages. Yeast is present in a wide variety of places. It's in the air and in the human body. It will grow anywhere there is a carbohydrate for it to eat. When yeast feeds, it gives off carbon dioxide gas. The bubbles in bread and in beer are caused by yeast releasing gas.
This experiment finds out the best conditions for the growth of yeast by measuring the amount of gas the yeast produces. To do that, yeast is placed in small bottles with various ingredients under various conditions. As a control, one bottle is left with only yeast. A balloon is placed over the mouth of each bottle to trap the gas. The size of the balloon will show how well the yeast is growing.
We've chosen a very simple test for our example; we're testing the growth of yeast in warm water with no sugar, ½ teaspoon of sugar, and with 1 tablespoon of sugar. Here are some ideas for variations:
● Use different temperatures of water.● Try various liquids – milk, water, soft drink, orange juice, Gatorade, oil.● Feed the yeast different 'foods' – artificial sweetener, salt, flour, cornstarch, protein powder, baking soda, cookie crumbs● Take a bread making recipe, and use each of the ingredients to feed your yeast. ● Do a combo approach. Test: warm water and sugar, warm water and no sugar, cold water and sugar, cold water and no
sugar, hot water and sugar, hot water and no sugar. Get approval from your teacher for this one, as it has more than one independent variable.
● Don't use water, and put moist meat, fruit, vegetable, or other food into the bottle.● Try to 'catch' raw yeast and experiment with it! (See the references.)
Remember to use a control with each experiment.
☼This is a 24 Hour Science Project! You should be able to complete this project in one day!
Suggested Titles: Care and Feeding of Pet Yeast, Yeast - It's Alive!, Yeast – the Beast Within, Yeast – On the Menu – On Its Menu, The Rise and Fall of Bread and Beer, Kitchen Chemistry, Blowing Bubbles, Yeast- Rising to the Occasion
Copyright 2012/2013 A. L. Dash & Sons LLC 12

Our experiment tests warm water with no sugar, ½ teaspoon of sugar, and with 1 tablespoon of sugar. It uses yeast with no water or sugar as the control.
Hypothesis: Use the reference helps below to formulate an hypothesis.
Materials: ● Twelve empty 8 ounce water bottles. ● Permanent marker.● Measuring cup.● 1 jar active yeast. ● Sugar.● About 15 balloons. (In case of breakage.) We got the best results with 3 inch round balloons. ● Warm water. ● Funnel.● Tablespoon measure.● Teaspoon measure.● Ruler.● Timer or Clock
Procedure: 1. Line up the bottles and remove the tops. Do not remove the labels; the balloon could adhere to
the sticky residue and skew the results of your experiment. You may want to cover the water label with paper, and use the paper for labeling in the next step.
2. Stretch the balloons, blow them up, and let the air out.3. Label the bottles: 3 with NO SUGAR, 3 with ½ TEASPOON SUGAR, 3 with 1 TABLESPOON
SUGAR, and 3 with NO WATER OR SUGAR (Control).4. Add 1 tablespoon of yeast to each bottle. 5. Add the sugar according to the way you have labeled your bottles.
You are now going to test the bottles in three sets, each with one bottle from each condition group. The first group, for example, will have 1 bottle with no sugar, 1 with ½ teaspoon sugar, 1 with 1 tablespoon sugar, and one control.
Copyright 2012/2013 A. L. Dash & Sons LLC 13

6. Use the funnel to add 1/2 cup very warm water to the first bottle. Note – WARM is defined as 100°F to 115°F. If you don't have a thermometer, you can add 1/2 cup boiling water to a jug, then add 1 cup tap water – enough for one trial. As you learn to cook (and we hope you will!), you'll learn to judge the temperature just by touching. If it burns your finger, it's too hot.
7. VERY quickly place the balloon over the entire mouth of the bottle, as shown in the picture. Make sure the entire top of the bottle is covered - all the way down over the threads.
8. Repeat – adding water and then the balloon for next two bottles, and then just the balloon for the control.
9. After a couple of minutes you will see the balloons with 'well fed' yeast begin to rise, then actually blow up from the carbon dioxide released.
10.Let the balloons rise for about 30 minutes, then measure the height of the balloons in centimeters.
11. Record the measurements. 12.Repeat steps 5 – 10 for the other two sets of bottles.13.Average the heights for each condition group. You can use our spreadsheet
to make it easy.
NOTE: If a balloon breaks before the 30 minutes is up, you'll need to repeat the procedure for that bottle.
Copyright 2012/2013 A. L. Dash & Sons LLC 14

Data and Chart:
Click here to access the Excel spreadsheet and charts.
Conclusion: Use your data to answer the question stated in your purpose. Remember that the data I use is imaginary, and if you use it, your teacher will know that you copied my work.
Application: How can you use what you have learned? It will certainly help you as you cook. What other places will your knowledge about yeast be helpful?
References:
NOTE: The first place you should do research is in the encyclopedia and a elementary or middle school science book. These materials are designed to give basic, concise information.
BOOKS
● The Tale of John Barleycorn: Or from Barley to Beer - Tells the fascinating story of how John Barleycorn turns from barley into ale.
● Science Experiments You Can Eat - Cooking is great science, and this book give you the best of both worlds.● The Science Chef - Features 100 Fun Food Experiments and Recipes for Kids● English Bread and Yeast Cookery - This fascinating book starts with a history of bread making in the British Isles - before
baking powder and store bought yeast. It's collection of recipes just makes it better.● Slime Molds and Fungi (Nature Close-Up) - The terrific photographs in this book give a positive introduction to molds and
fungi.
Copyright 2012/2013 A. L. Dash & Sons LLC 15

● The Fungus That Ate My School - An hysterical, slap stick book to make a literature connection.● Fungi and Molds - Part of a series of books that explore germs and diseases. ● What Is a Fungus - Great explanations and photos explain how a fungus lives, what it eats, and how it reproduces.
WEBSITES
● TLC Cooking gives instructions on how to catch wild yeast and make sourdough bread! ● Fun Facts About Fungi explores all different kinds of fungi, including yeast. This page gives an introduction to fungi,
explaining how a fungus is classified, its composition, life cycle, and the way fungi are necessary to our lives.● Scientists at The University of Purdue have an idea about how yeast can help make an alternative source of fuel.● The Bread World Canada by Fleischmann’s Yeast gives the history of yeast and tells how yeast makes bread rise. ● Watch dough rise once, then twice with videos on Epicurious.com.● Yeast grows normally in our bodies, but too much is a problem. Read about this in MedicineNet.com.● Dr. Greene.com talks about a natural way to combat yeast infections in the body.● Louis Pasteur (of pasteurization fame) discovered something very important about yeast. Find out about it here.
NOTE: If any of the links above are “broken”, please let me know by emailing [email protected]. If you report one or more broken links, I'll give you a free copy of Waking Up from the Homework Nightmare.
Questions or comments about MIDDLE SCHOOL SCIENCE PROJECTS should be directed to [email protected] .
DISCLAIMER: Although the experiments in this web-site are regarded as low hazard, author and publisher expressly disclaims all liability for any occurrence, including, but not limited to, damage, injury or death which might arise as consequences of the use of any experiment(s) listed or described here. Therefore, you assume all the liability and use these experiments at your own risk.
We'd love to hear how your project went! Tell us about it at:http://www.middle-school-science-projects.com
Copyright 2012/2013 A. L. Dash & Sons LLC 16

MIDDLE SCHOOL SCIENCE PROJECTSMaking a Solar Heater
Purpose: To build a working solar heater.
Description: This project uses easy to find, inexpensive materials to build a heater that uses the sun's energy. It is not written to be an experiment, although it can be turned into one. A couple of construction options are given. To do this project, you'll need a saw (or a hardware store that will cut wood for you) and other basic carpentry tools.
Although we've only created a working model that demonstrates how a solar heater works, you could vary the type of materials used, then test the efficiency by measuring the temperature of the air as it comes out of the oven. You could also find a way to turn your oven into a water heater!
☼This is a 24 Hour Science Project! If you do the project as we did it, you should be able to complete it in one day!
Safety note: Use protective gear when using power tools and paint! Always work under the supervision of an adult.
Suggested Titles: Canned Heat, Free Heat, Cheap Heats, Catching Rays, Sunshine.
Hypothesis: If you do this as an experiment, use the reference section below to formulate your hypothesis. The hypothesis will answer the question posed in the Purpose.
Our project gives two alternatives for building a a water heater. We bought the material for one, and scavenged for things to build the other.
Model One – Uses purchased materials.Materials:
● 24 empty soda cans.● Black spray paint.● Pointed tool – screwdriver/needle nosed pliers, utility scissors, awl.● Duct tape and scissors.● One 18” x 24” sheet of plexiglass.
Copyright 2012/2013 A. L. Dash & Sons LLC 17

● One 18” x 24” sheet of ¼ inch plywood.● One 8 foot 1 x 4 pine board.● Insulation – pink or polyshield. ● Wood glue.● About 10 2” wood screws.● About 22 ½” pan phillips screws.● About 12 1 x 18 wire nails.● 1 ½” drill bit and drill. (See if your hardware store will drill for you. You'll probably need to supply the bit.)● Hammer.● Saw. ● Measuring tape.● Thermometers to measure temperature inside the box and outdoors.
Procedure: 1. Remove the tabs from the soda cans, and spray the cans black. Let them dry.2. Use the sharp instrument to punch a hole in the bottom of each can. The hole should be about the same size as the one
on the top. 3. Cut the 8' board into five pieces. You'll need 2 pieces 18” long, 2 pieces 24” long, and one leftover. The leftover piece
should be cut in half lengthwise. 4. Make a rectangular frame from the 18” and 24” pieces and the 2” screws. Pre-drill the holes before you attach the
screws. (See the schematic.)5. Use the 1 1/2” bit to drill holes 2” up on each of the longer frame sides.6. Use the drill to make another hole in the center of one of the shorter frame sides. This will now be the top of the heater.
Copyright 2012/2013 A. L. Dash & Sons LLC 18
Punch holes in cans. Drill holes in side and top.Predrill holes. Attach plexiglass.

7. Position one of the remaining pieces of the 1 x 4 board to center of the edge of the the bottom of the frame and attach it with 2” screws. Where this support board meets the frame edge is now the front of your heater.
8. Use the ½” screws to attach the plexiglass to front of the frame. (It will rest on the piece of support board attached in step 7.)
9. Make a row of six cans that rest on the support board, and then stack cans on top of the row. It will be four cans high, and will rest on the plexiglass. Tape the cans together.
10.Put the insulation on the plywood. If you're using pink insulation, it will stay in place because of the bulk; if you use insulation board, use wood glue.
11. Nail the plywood to the back of the frame.12.Use the duct tape to seal the tiny gap between the plexiglass and the frame. You may also need to do this for the frame
back.13.Set the heater with the plexiglass side facing the sun. 14.Measure the temperature inside the oven with your room thermometer, and use the outdoor thermometer to record the
outside temperature. Repeat your measurements once every four hours. 15. If the day is sunny, it won't be long until you feel heat coming out the top!
Model Two – Uses recycled/scavenged materials. NOTE: Because your frame will be different from ours, we don't give exact numbers/amounts of materials.
● Empty soda cans.● Black spray paint.● Pointed tool – screwdriver/needle nosed pliers, utility scissors, awl.
Copyright 2012/2013 A. L. Dash & Sons LLC 19
Stack the cans. Tape together. Add insulation. Seal the edges with duct tape.
The finished heater. See the streamers blowing out the top!

● Duct tape.● Scissors.● One picture frame with glass intact. We used one with real glass, as it conducts heat better. Look for a large, plain frame
with flat edges.● One 8 foot 1 x 4 pine board.● Polyshield insulation - enough to cover the area of the frame twice.● About 20 2” wood screws.● 1 ½” drill bit.● Drill. (See if your hardware store will drill for you. You'll probably need to supply the bit.)● Hammer.● Saw.
Procedure: 1. Remove the tabs from the soda cans, and spray the frames black. Let them dry.2. Use the sharp instrument to punch a hole in the bottom of
each can. The hole should be about the same size as the one on the top.
3. Measure the picture frame. Cut the 8' board to fit around the frame - two pieces the same length as the vertical measurements, and two the length of the horizontal. We cut one more piece about 2/3 the length of the horizontal, and then cut it in half lengthwise, but you can use leftover insulation for this part. This is a support board.
4. Make a rectangular frame from your four pieces of wood. Pre-drill the holes before you attach the screws.
5. Use the 1 1/2” bit to drill holes 2” up on each of the longer frame sides.
6. Use the drill to make another hole in the center of one of the shorter frame sides. This will now be the top of the heater.
7. Screw the picture frame to the rectangular frame you just made, and reinforce it with duct tape.
8. Put your support board to the center edge of the the bottom of the frame and attach it with 2” screws. Where this support board meets the frame edge is now the front of your heater.
Copyright 2012/2013 A. L. Dash & Sons LLC 20
Heater made from picture frame.

9. Make a row of cans that rest on the support board, and then stack cans on top of the row. Make sure there is at least a three inch gap at the top of the heater. Tape the cans together.
10.Measure the inside edge of the frame, and use the measurements to cut a piece of insulation.11. Cut a second piece of insulation the same size as the picture frame. This will be the back of your heater.12.Place the smaller piece of insulation inside the frame. It should fit securely. 13.Place the larger piece of insulation on the back of the frame. Use the duct tape to secure it.14.Set the heater with the glass side facing the sun. 15.Measure the temperature inside the oven with your room thermometer, and use the outdoor thermometer to record the
outside temperature. Repeat your measurements once every four hours. 16. If the day is sunny, it won't be long until you feel heat coming out the top!
Note: When presenting your heater at a science fair, you can use a desk lamp to heat it up. If you'd like, tape pieces of crepe paper streamers to the top, to demonstrate that there really is hot air escaping!
Data and Chart:Click here to access the Excel spreadsheet and charts.
Copyright 2012/2013 A. L. Dash & Sons LLC 21
Reinforce with duct tape. Stack the cans. Tape them together.
Push the insulation inside the frame.
Use the last piece of insulation as the back.

Conclusion: Use your data to answer the question stated in your purpose. Remember that the data I use is imaginary, and if you use it, your teacher will know that you copied my work.
Application: What can you use your heater to do? Could you really heat a room? A garage? Could you harness the heat and heat water for an outdoor shower at the pool? What about using it to warm plant seedlings? If you compared different variables, what did you learn?
References:
NOTE: The first place you should do research is in the encyclopedia and a elementary or middle school science book. These materials are designed to give basic, concise information.
BOOKS
● How to Harness Solar Power for Your Home (Tell Your Parents) - The author of this book became interested in solar heat as a child. She shares her experiences and her vast knowledge in this cool book.
● Producing Your Own Power: How to Make Nature's Energy Sources Work for You - This book explains how to use solar energy to help grow food.
● Solar Power - A very basic and simple guide to solar energy and the principles behind it.● Solar Energy Projects for the Evil Genius - A great book with expansion ideas for this project. It includes helpful
information and facts.● Going Solar: Understanding And Using The Warmth In Sunlight ● Make Your Own Solar Panels and Save $$$$ - A guide that promises to teach you how to generate power and reduce
your energy bills. ● Solar Power Your Home For Dummies
WEBSITES
● Energy Kids - A comprehensive resource on energy, directed at students. Starting with the basics of energy, learn the forms that it comes in and the difference between renewable and nonrenewable sources. It includes a special section on solar energy. This may be the only resource you need!
● Solar Energy International - Among other things, this site explains the difference between "solar energy" and "photovoltaics".
● How Stuff Works explains how a solar cell works.
Copyright 2012/2013 A. L. Dash & Sons LLC 22

● This Squidoo lens has pictures of another solar heater similar to ours.● The National Renewable Energy Laboratory (NREL) is the nation's primary laboratory for renewable energy and energy
efficiency research and development (R&D). Its mission and strategy are focused on advancing the U.S. Department of Energy's and our nation's energy goals.
● The American Council on Renewable Energy gives an overview of the U.S. renewable energy field in 2009.
NOTE: If any of the links above are “broken”, please let me know by emailing [email protected]. If you report one or more broken links, I'll give you a free copy of Waking Up from the Homework Nightmare.
Questions or comments about MIDDLE SCHOOL SCIENCE PROJECTS should be directed to [email protected] .
DISCLAIMER: Although the experiments in this web-site are regarded as low hazard, author and publisher expressly disclaims all liability for any occurrence, including, but not limited to, damage, injury or death which might arise as consequences of the use of any experiment(s) listed or described here. Therefore, you assume all the liability and use these experiments at your own risk.
We'd love to hear how your project went! Share your pictures and ideas at: http://www.middle-school-science-projects.com
Copyright 2012/2013 A. L. Dash & Sons LLC 23

MIDDLE SCHOOL SCIENCE PROJECTSExploring Soil
Purpose: To find out if soil texture affect its water carrying capacity.
Description: All soil is made up of three sizes of particles: sand, silt (sometimes called loam), and clay. Soil can be described by its 'texture', which basically is the way it feels. Sand is the largest particle, and it feels gritty. Smaller than sand is silt, which feels smooth and silky. The smallest particles are clay, which feels slippery.
If you mix a cup of soil with water and let it settle, it will form layers of sand, silt, and clay. The relative percentage of each of the layers determines soil type. For example, if a soil is made up of 57% sand, 29% silt, and 14% clay, the soil is classified as 'sandy loam'. After doing the settle test on soil, scientists use a 'soil triangle' to plot the type of soil.
How quickly water will flow through soil is its water carrying capacity. If you think about sand in the desert, you'll realize that soil that water flows through too quickly isn't good for growing things. Imagine a mud puddle near your home, and you'll see that plants also don't grow well in soil that water doesn't flow through quickly enough. The water carrying capacity of soil has far reaching effects, including soil erosion, building construction, animal populations, and even weather.
This experiment has two parts. Part one analyzes types of soil, and part two is an experiment that compares how quickly water will flow through the various types. You'll collect soil samples from your yard or neighborhood. You might be surprised to find that you have several types of soil in your yard! The soil type analysis of this project could be done as a stand alone demonstration project. The experiment that compares water carrying capacity can also be done as a stand alone project.
☼This is a 24 Hour Science Project! Settling soil takes about 24 hours, but after a few hours you'll have a rough idea of what type of soil you have. If you do the project as we did it except you shorten the settle time, you should be able to complete it in one day!
NOTE: Although this experiment explains how to analyze soil by 'settling' it, there is an easy way you can get a general idea of soil texture. Simply take a handful of soil, moisten it slightly and squeeze. If it doesn’t really stick together at all, it's sand. If it makes a loose clump that you can still break apart, it's silt. If it forms a firm ball, its clay.
Suggested Titles: Playing in the Dirt, Soil - Getting Down to the Nitty/Gritty, Filthy Rich Soil, The Dirt on Dirt, Let's Settle This
Copyright 2012/2013 A. L. Dash & Sons LLC 24

Hypothesis: If you do this as an experiment, use the reference section below to formulate your hypothesis. The hypothesis will answer the question posed in the purpose.
Materials: ● Three or more 2 quart samples of soils of different types. Choose one soil near a beach, a construction site, or a
sandbox. Choose another soil from a farm, a grassy area, a garden, or the woods. Dig down a bit so you'll be past any mulch or leaves. Choose another soil from a hard path, the bottom of a mud puddle, or a hard canal bank. We live in the city, and were able to get all of our samples from our yard. Potting soil does not work well, as there is so much organic matter in it. You'll need large containers and digging utensils to get your soil samples.
● Large piece of cardboard or an old baking pan.● Piece of cardstock.● Potato masher or wooden spoon.● Labeling materials.
For the soil texture analysis:● Clear quart jars with lids – one for each sample. Canning jars are great for this. If jars aren't available, you can
also use tall clear cylinder vases and two quart plastic containers with lids.● Measuring cup.● Long handled wooden spoon.● Water.● Ruler that measures centimeters.
For the carrying capacity experiment:● One quart sized bowl.● One tin can that will hold at least 26 ounces, with both ends removed.● Several sheer to toe panty hose legs. These can be rinsed between trials and reused.● Scissors.● Measuring cup.● Two cups water per sample.● Timer.
NOTE: The dollar store store and thrift stores are great (cheap!) places to get materials for this project.
Copyright 2012/2013 A. L. Dash & Sons LLC 25

Procedure:
1. Dump your first soil sample onto the cardboard or baking pan. Remove any rocks and leaves or other organic material.
2. Use the potato masher or wooden spoon to break up any clumps of soil. (From the information above, what kind of soil do you have to break up?!)
3. Measure four samples of soil – one cup for soil texture analysis, and three cups for the carrying capacity experiment.
4. Label your samples.5. Repeat steps one through four for each soil
sample.
Part One – Soil Texture Analysis:
1. Place one cup of soil in the jar. Add two cups of water to the container. Shake the sample for two minutes. Set the jar aside and allow the particles to settle. (If you do not have a jar, put the soil into your other container that has a lid, shake it up, then pour it into your tall jar for settling.)
2. After a couple of minutes, check the soil that has settled. If you see an uneven layer of sand at the bottom, use the handle end of your wooden spoon to give it a gentle swirl.
3. After 24 hours, examine your soil. You'll see that it has settled into layers. The bottom layer – with larger grains – is sand. The middle layer is silt, and the top layer is clay. Anything floating on top is organic. (Or trash – our garden sample had little styrofoam beads in it!)
4. Measure the height of the soil – do NOT disturb your sample. Then measure each layer of soil. Divide the measure of the bottom layer by the total soil height to get the percentage of sand. Divide the middle layer by total soil height to get the percentage of silt. And divide the top layer by total height to get the percentage of clay. Your three percentages should add up to 100%. (If you enter your data into our chart, this is calculated for you automatically!) Note that we used paper to mark the levels, and then measured the paper.
5. Use your percentages to classify your soil. Scientists do this on the texture triangle – the cool device on the next page. Directions to use the soil triangle are here. You can also take a shortcut and enter your data into this online calculator.
Copyright 2012/2013 A. L. Dash & Sons LLC 26
Remove rocks and organic matter. Break up clumps.

Data and Charts for Soil Texture Analysis:
Click here to access the Excel spreadsheet and charts.
Copyright 2012/2013 A. L. Dash & Sons LLC 27

Part Two - Soil Carrying Capacity Experiment:
1. Cut the legs off the pantyhose.2. Place one 'leg' over one end of the jar.3. Carefully add two cups of soil to the can, and pack the soil with the potato masher..4. Hold the dirt filled can over the bowl, and slowly pour in one cup of water. Hold the hose tightly, or your dirt will stretch
them and fall out of the can. This may require two people.5. Let the water go through the soil for 2 minutes. Depending on the soil, the water may drip, seep, or flow.6. Remove the soil sample. There may still be water on top of the soil.7. Use the measuring cup to record the amount of water that has come through the soil into the bowl.8. Repeat the procedure for each of your soil samples. 9. Do three trials for each soil sample.
Copyright 2012/2013 A. L. Dash & Sons LLC 28
Pack soil into can. Let water drip through soil for 2 minutes.Place the can – hose side down – into the bowl.
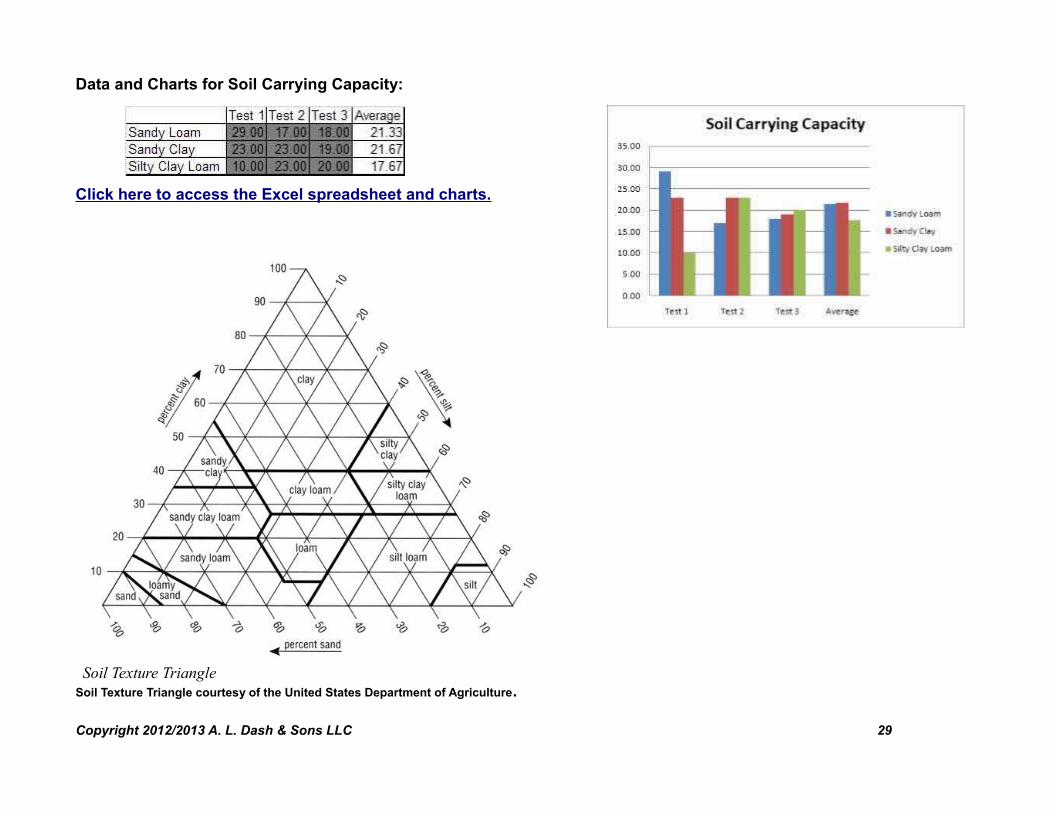
Data and Charts for Soil Carrying Capacity:
Click here to access the Excel spreadsheet and charts.
Soil Texture Triangle courtesy of the United States Department of Agriculture.
Copyright 2012/2013 A. L. Dash & Sons LLC 29
Soil Texture Triangle

Conclusion: Use your data to answer the question stated in your purpose. Remember that the data I use is imaginary, and if you use it, your teacher will know that you copied my work.
Application: How can you use your newfound knowledge about soil? Think about your yard and a garden you might plant. What about erosion? How does this relate to 'perking' a lot? What can you do to change unfavorable soil conditions?
References:
NOTE: The first place you should do research is in the encyclopedia and a elementary or middle school science book. These materials are designed to give basic, concise information.
BOOKS
● Building Soils for Better Crops applies the science of dirt to agriculture. A great book for practical application ideas.● The Chemistry of Soil Analysis takes soil analysis a bit further – beyond its texture into its chemical makeup.● Soil: Digging into Earth's Vital Resource gives an overview of what makes up soil and how it is formed. It also gives
explanations about some of the different soil types. ● Landslides: Mass Wasting, Soil, and Mineral Hazards explains what happens when soil doesn't cooperate with humans.● Secrets to Great Soil describes loam as “lovely”! This book has good, practical knowledge about soil.● Why Buildings Fall Down: How Structures Fail teaches how soil is affected in an earthquake.
WEBSITES
● NASA provides the best place to launch your study of soil. Great, basic, easy to understand information. This page gives tons more, including links about gardening, the importance of soil, even how good soil smells good.
● Oklahoma State share a lesson plan on soil analysis. You'll feel like the teacher is guiding you through the lesson! ● West Texas A & M has ideas for your science project display! Make a physical model of soil using balls, or use sponges
to illustrate carrying capacity.● DH Water Management offers easy instructions on http://www.dhwatermgmt.com/free-articles/dhwm_soil_triangle.pdf
how to use the soil triangle.● Get another visual on the relationship between soil particle size at NEsoil.com. Work your way through the slide show for
more.● Find out even more about how to test soil's texture.
Copyright 2012/2013 A. L. Dash & Sons LLC 30

NOTE: If any of the links above are “broken”, please let me know by emailing [email protected]. If you report one or more broken links, I'll give you a free copy of Waking Up from the Homework Nightmare.
DISCLAIMER: Although the experiments in this web-site are regarded as low hazard, author and publisher expressly disclaims all liability for any occurrence, including, but not limited to, damage, injury or death which might arise as consequences of the use of any experiment(s) listed or described here. Therefore, you assume all the liability and use these experiments at your own risk.
Copyright 2012/2013 A. L. Dash & Sons LLC 31

MIDDLE SCHOOL SCIENCE PROJECTSTesting Vitamin C
Purpose: To find out if the amount of vitamin C in juice diminishes over time.
Hypothesis: Use the reference section below to formulate your hypothesis. The hypothesis will answer the question posed in the purpose.
Description: Ascorbic acid is one of the most familiar of all vitamins. You know it as vitamin C. Vitamin C is essential to your body for many reasons. It helps the body produce collagen, speeds up the absorption of iron, protects fat soluble vitamins, and prevents disease. Although the orange is the most popular source of vitamin C, is is found in many fruits and vegetables.
This experiment is designed to test what happens to vitamin C over time. Does the amount stay the same, or does it decrease. To test this, you will test the relative amount of vitamin using starch and an iodine indicator. Starch is mixed with the liquid, then drops of iodine are added. You can compare how much vitamin C is in the liquid by the number of drops that it takes for the liquid to turn a dark inky blue.
Here's how that works: Iodine likes starch, and when you put them in the same container, they will combine. When iodine combines with starch, it turns blue. Iodine and vitamin C also like each other, and they will also combine if they are in the same container. In fact, iodine 'likes' Vitamin C much more than it 'likes' cornstarch, and will leave the starch when Vitamin C is around. Iodine and Vitamin C don't make a blue color.
When you add the iodine to the juice and the starch mixture, as long as there is still vitamin C that has not been combined with the iodine, the color will stay the color of the juice, but after you reach the equivalence point- when you have added as much iodine as there is vitamin C – then the iodine starts combining with the cornstarch.
The more iodine it takes, the more vitamin C there is. That means that the more blue the mixture, the less Vitamin C there is - because there wasn't so much Vitamin C for the iodine to hang out with.
So, back to your experiment. Each day of your experiment, you'll count how many drops of iodine it takes to turn your juice/starch mixture blue. Over a period of a week, you'll be able to see if the amount of Vitamin C goes down.
As it's written, this experiment takes a week to perform. You can, however, make it ☼a 24 Hour Science Project by testing
Copyright 2012/2013 A. L. Dash & Sons LLC 32

other variables all in one day. Get a pack of single serving juices and see if each has the same amount of vitamin C. Compare different types of fruit. If it's available, compare fresh picked fruit to the same type of fruit purchased at a store. Test different types of vitamin drinks. Compare the same juice at different temperatures - cold, room temperature, and heated. If you have a weekend, see if there's a difference between the amount of vitamin C stored in the refrigerator and at room temperature. Use clear and opaque containers, and measure the effect of light. There a many, many variations to this project!
Suggested Titles: To C or Not to C, C-More or C-Less, King Vitamin, C 'ya Later, Time to C, I Can “C” Clearly Now
Materials: ● 2 cup samples of different juices/drinks known to contain vitamin C. You can use fresh squeezed juice. ● Plastic containers with lids to store juice.● 2 % to 10 % Iodine, sometimes called Povidone- Iodine solution. You will probably need at least 4 ounces of iodine.
NOTE: Make sure you do NOT buy the decolorized kind. You are looking for tincture of iodine. It's the kind you buy for cuts from the pharmacy. It's UPC number 0068113173197 at Wal-Mart. A few pharmacies keep iodine behind the counter. If you still have trouble finding iodine, ask a physician or a veterinarian if you can purchase some from them. Iodine is also available from CVS.com.
● Water.● One baby food jar for each sample of juice, plus one for the control. You can also use juice glasses.● Eyedropper.● Three tablespoons cornstarch per day of your trial.● Stove and pot.● Teaspoon, tablespoon and measuring cup.
Procedure: 1. Measure out two cups of each of your juice/liquid samples. You may need several pieces of fresh fruit to squeeze out two
cups. Remove any seeds. Label the containers that will store the juice.2. Put 3 tablespoons of cornstarch into a measuring cup, and make a paste by adding drops of water. The amount of water
isn’t that important, but if you add too much at a time the cornstarch will clump just like it does in gravy. 3. Slowly add more water to the paste until you have 1 cup. Mix well. 4. Pour the cornstarch/water mixture into a pot. Add two more cups of water and stir.5. Over medium heat, bring the cornstarch mixture to a boil. Boil five minutes, stirring occasionally. After five minutes,
remove from heat and let cool for fifteen minutes. This is your cornstarch solution.6. While the cornstarch solution is cooling, prepare your samples for testing. Label your jar for each sample, and label one
'control'. (You can write on the glass with a Sharpie, or just put paper labels in front of each sample.)
Copyright 2012/2013 A. L. Dash & Sons LLC 33

7. Add one tablespoon of each juice/liquid sample to the appropriate jar. You'll have one left over for the control.8. Add four teaspoons of water to each jar.9. After 15 minutes, add 1 teaspoon (about 5 ml) of cornstarch solution to each jar. Swirl the jar until mixed with the
juice/water mixture. 10.You are now going to count how many drops of iodine it takes to turn the juice mixture to a deep purple-blue
color. This will indicate the relative amount of vitamin C in each juice. Use an eyedropper and add one drop of iodine to your first juice mixture. Swirl the jar. The mixture may turn blue for an instant, then lose the color.
After 2 or 3 seconds, observe the juice mixture to see if it has turned a dark, inky, purple-blue color. (See pictures.) If not, add another drop. Swirl, wait a couple more seconds, observe the color. Repeat the procedure counting the number of drops you add until the mixture turns the dark purple-blue color. When it does, it means the 'equivalency point' has been reached - the amount of vitamin C is equal to the amount of iodine. Make a note of how many drops were added before the 'equivalency point' was reached. NOTE: Some juices will need 30 or more drops added until there is a color change. This means they have a lot of vitamin C! Your control will turn blue almost immediately; it has no vitamin C.
11. Repeat the procedure for the remaining jars of juice. 12.Perform the experiment three times, washing all your equipment between each trial. Average your results. 13.Store the remaining juice samples in the refrigerator.14.For the next week, repeat steps 2 through 14, and note if the amount of vitamin C has decreased.
Copyright 2012/2013 A. L. Dash & Sons LLC 34
This juice isn't yet the dark, inky blue.
These juices are the correct color.

Data and Chart:
Click here to access the Excel spreadsheet and charts.
Conclusion: Use your data to answer the question stated in your purpose. Remember that the data I use is imaginary, and if you use it, your teacher will know that you copied my work.
Application: What does this experiment teach you about vitamin C? How should it be stored? Where – and when – should it be purchased? What surprised you about your results?
References: NOTE: The first place you should do research is in the encyclopedia and a elementary or middle school science book. These materials are designed to give basic, concise information.
BOOKS
● Linus Pauling and the Chemistry of Life – A biography about Linus Pauling, who is the vitamin C scientist.● Vitamin C and the Common Cold – written by Linus Pauling himself. A fantastic resource.● Vitamin C: The Real Story, the Remarkable and Controversial Healing Factor explores many conventional and
alternative uses of vitamin C.● The History of Scurvy and Vitamin C - This is a survey of the long and fascinating history of the various ideas and
theories about the cause of scurvy. The fascinating story in the history of science and medicine will be of interest to the historian, scientist and the general reader.
● Vitamin C: Its Chemistry answers all those 'why' questions you are sure to have.
Copyright 2012/2013 A. L. Dash & Sons LLC 35

● The Complete Idiot's Guide to Vitamins and Minerals has tons of information about how we need, use, get, and can even counteract vitamins and minerals.
● Squeezed: What You Don't Know About Orange Juice reveals the history of the orange juice industry.● Fresh: A Perishable History explores how the refrigerator has changed our concept of what 'fresh' means.
SCHOLARLY ARTICLES
● Pediatric News reveals which type of orange juice has the most Vitamin C.● This article has a similar study about organic fruit.
WEBSITES
● The Vitamin C foundation has up to the minute news, information, and commentary on Vitamin C.● To find out why the iodine turns the juice blue, head here. ● How Stuff Works explains how the body uses this important vitamin. ● Kidshealth explains the difference between water soluble and fat soluble vitamins. ● Results of this experiment will vary depending on the samples of juices used! To find out some of the surprising reasons
why, read this study.● Ohio State University explains the relationship between vitamin C and iron.● Check out this interactive 3D model of a molecule of vitamin C!● Read a biography of Linus Pauling from the Nobel Foundation.
NOTE: If any of the links above are “broken”, please let me know by emailing [email protected]. If you report one or more broken links, I'll give you a free copy of Waking Up from the Homework Nightmare.
Questions or comments about MIDDLE SCHOOL SCIENCE PROJECTS should be directed to [email protected] .
DISCLAIMER: Although the experiments in this web-site are regarded as low hazard, author and publisher expressly disclaims all liability for any occurrence, including, but not limited to, damage, injury or death which might arise as consequences of the use of any experiment(s) listed or described here. Therefore, you assume all the liability and use these experiments at your own risk.
Copyright 2012/2013 A. L. Dash & Sons LLC 36

We'd love to hear how your project went! Tell us about it at:http://www.middle-school-science-projects.com
We'd also like to invite you to check out our other educational products:
Waking Up from the Homework Nightmare – a parent's guide to surviving a night of homework.
Focus Pocus – 100 Ways to help your child pay attention.
The PAC-kit – a Planner/Agenda/Calendar designed especially for ADHD children.
Copyright 2012/2013 A. L. Dash & Sons LLC 37
Related Documents


