May 2006 Part No: 58485 BMC® Remedy® Action Request System® 7.0 Installing and Administering BMC Remedy Mid Tier

Welcome message from author
This document is posted to help you gain knowledge. Please leave a comment to let me know what you think about it! Share it to your friends and learn new things together.
Transcript

BMC® Remedy® Action Request System® 7.0
Installing and Administering BMC Remedy Mid Tier
May 2006
Part No: 58485

Copyright 1991–2006 BMC Software, Inc. All rights reserved.
BMC, the BMC logo, all other BMC product or service names, BMC Software, the BMC Software logos, and all other BMC Software product or service names, are registered trademarks or trademarks of BMC Software, Inc. All other trademarks belong to their respective companies.
BMC Software, Inc., considers information included in this documentation to be proprietary and confidential. Your use of this information is subject to the terms and conditions of the applicable end user license agreement or nondisclosure agreement for the product and the proprietary and restricted rights notices included in this documentation.
For license information about the OpenSource files used in the licensed program, please read OpenSourceLicenses.pdf. This file is in the \Doc folder of the distribution CD-ROM and in the documentation download portion of the product download page.
Restricted Rights LegendU.S. Government Restricted Rights to Computer Software. UNPUBLISHED -- RIGHTS RESERVED UNDER THE COPYRIGHT LAWS OF THE UNITED STATES. Use, duplication, or disclosure of any data and computer software by the U.S. Government is subject to restrictions, as applicable, set forth in FAR Section 52.227-14, DFARS 252.227-7013, DFARS 252.227-7014, DFARS 252.227-7015, and DFARS 252.227-7025, as amended from time to time. Contractor/Manufacturer is BMC Software, Inc., 2101 CityWest Blvd., Houston, TX 77042-2827, USA. Any contract notices should be sent to this address.
Contacting Us
If you need technical support for this product, contact Customer Support by email at [email protected]. If you have comments or suggestions about this documentation, contact Information Development by email at [email protected].
This edition applies to version 7.0 of the licensed program.
BMC Software, Inc.www.bmc.com
Contents
Preface . . . . . . . . . . . . . . . . . . . . . . . . . . . . . . . . . . . . . 9
Audience . . . . . . . . . . . . . . . . . . . . . . . . . . . . . . . . 9
AR System documents . . . . . . . . . . . . . . . . . . . . . . . . . 10
Learn about the AR System Developer Community . . . . . . . . . . . . 12
Why should you participate in the Developer Community? . . . . . . . . 12
How do you access the Developer Community? . . . . . . . . . . . . . 12
Chapter 1 Preparing to install BMC Remedy Mid Tier . . . . . . . . . . . . . 13
Overview . . . . . . . . . . . . . . . . . . . . . . . . . . . . . . . 14
Types of mid tier configurations. . . . . . . . . . . . . . . . . . . . 14
What the installer does . . . . . . . . . . . . . . . . . . . . . . . 15
BMC Remedy Mid Tier file locations. . . . . . . . . . . . . . . . . . 15
Important documentation to review . . . . . . . . . . . . . . . . . . . 16
Before you install . . . . . . . . . . . . . . . . . . . . . . . . . . . 16
Installing components and patches for the mid tier . . . . . . . . . . . . 17
Preparing servers that will use the bundled ServletExec . . . . . . . . . . 19
UNIX—Filling in the worksheet for installing the mid tier . . . . . . . . . 26
Windows—Filling in the worksheet for installing the mid tier. . . . . . . . 30
Chapter 2 UNIX—Installing BMC Remedy Mid Tier . . . . . . . . . . . . . . 33
Accessing the software . . . . . . . . . . . . . . . . . . . . . . . . . 34
UNIX—Installing the BMC Remedy Mid Tier . . . . . . . . . . . . . . 35
Contents � 3

BMC Remedy Action Request System 7.0
Chapter 3 Windows—Installing the BMC Remedy Mid Tier . . . . . . . . . . 41
Accessing the BMC Remedy Mid Tier software . . . . . . . . . . . . . . 42
Windows—Installing BMC Remedy Mid Tier and ServletExec . . . . . . . 43
Installing the mid tier . . . . . . . . . . . . . . . . . . . . . . . . 43
Installing ServletExec . . . . . . . . . . . . . . . . . . . . . . . . 53
Completing the installation . . . . . . . . . . . . . . . . . . . . . . . 55
Installing ARWebReportViewer separately . . . . . . . . . . . . . . . . 55
Chapter 4 After the installation . . . . . . . . . . . . . . . . . . . . . . . 57
Postinstallation tasks . . . . . . . . . . . . . . . . . . . . . . . . . 58
Changing the mid tier configuration password . . . . . . . . . . . . . 58
Changing the ServletExec port number . . . . . . . . . . . . . . . . . 58
Changing permissions for an Apache web server . . . . . . . . . . . . . 59
Uninstalling the mid tier and ServletExec. . . . . . . . . . . . . . . . . 60
Checking the mid tier uninstall on UNIX . . . . . . . . . . . . . . . . 62
Starting and stopping ServletExec/AS manually . . . . . . . . . . . . . . 62
Troubleshooting the mid tier installation. . . . . . . . . . . . . . . . . 64
Troubleshooting the ServletExec installation . . . . . . . . . . . . . . 64
Recovering a failed installation of ServletExec on UNIX. . . . . . . . . . 65
Installing the mid tier into a separate directory . . . . . . . . . . . . . 66
Troubleshooting Java SDK . . . . . . . . . . . . . . . . . . . . . . 66
Linux—Changing the group ID value . . . . . . . . . . . . . . . . . 66
Chapter 5 Configuring the mid tier . . . . . . . . . . . . . . . . . . . . . 67
Configuring the BMC Remedy Mid Tier through a firewall . . . . . . . . . 68
Accessing the Mid Tier Configuration Tool . . . . . . . . . . . . . . . . 70
Using the Mid Tier Configuration Tool with a load balancer. . . . . . . . 71
MIME (Multipurpose Internet Mail Extensions) types . . . . . . . . . . 71
Overview of configuration settings. . . . . . . . . . . . . . . . . . . . 71
General settings . . . . . . . . . . . . . . . . . . . . . . . . . . . . 74
General . . . . . . . . . . . . . . . . . . . . . . . . . . . . . . 75
Server connection pool . . . . . . . . . . . . . . . . . . . . . . . 80
AR Server settings . . . . . . . . . . . . . . . . . . . . . . . . . . . 80
Cache settings . . . . . . . . . . . . . . . . . . . . . . . . . . . 84
Cache table . . . . . . . . . . . . . . . . . . . . . . . . . . . . 86
Report settings . . . . . . . . . . . . . . . . . . . . . . . . . . . . 87
4 �Contents

Installing and Administering BMC Remedy Mid Tier
Web service settings . . . . . . . . . . . . . . . . . . . . . . . . . . 91
Log settings . . . . . . . . . . . . . . . . . . . . . . . . . . . . . . 93
Logging . . . . . . . . . . . . . . . . . . . . . . . . . . . . . . 94
Mid-Tier Profiler . . . . . . . . . . . . . . . . . . . . . . . . . . 96
View logs . . . . . . . . . . . . . . . . . . . . . . . . . . . . . 96
Change password . . . . . . . . . . . . . . . . . . . . . . . . . . . 97
Browser settings . . . . . . . . . . . . . . . . . . . . . . . . . . . . 98
Configuring Flashboards data points. . . . . . . . . . . . . . . . . . . 98
Chapter 6 Setting user preferences . . . . . . . . . . . . . . . . . . . . . 99
User preferences for web clients . . . . . . . . . . . . . . . . . . . . . 100
Setting centralized preferences on web clients . . . . . . . . . . . . . . . 100
Common fields . . . . . . . . . . . . . . . . . . . . . . . . . . 101
Form tab . . . . . . . . . . . . . . . . . . . . . . . . . . . . 101
Logging tab . . . . . . . . . . . . . . . . . . . . . . . . . . . . . . 105
Locale tab . . . . . . . . . . . . . . . . . . . . . . . . . . . . 106
Advanced tab . . . . . . . . . . . . . . . . . . . . . . . . . . 109
Chapter 7 Working with AR System forms and applications on the Web . . 113
What users see in a form in a browser . . . . . . . . . . . . . . . . . . 114
Working with View options. . . . . . . . . . . . . . . . . . . . . . . 116
Showing or hiding the web toolbar . . . . . . . . . . . . . . . . . 118
Editing web header and footer content . . . . . . . . . . . . . . . . 119
Working with form action fields for the web . . . . . . . . . . . . . . . 122
Browser settings for scripting and ActiveX controls . . . . . . . . . . . . 125
Configuring page properties . . . . . . . . . . . . . . . . . . . . . . 126
Managing resource files . . . . . . . . . . . . . . . . . . . . . . . . 126
Accessing forms and applications with URLs . . . . . . . . . . . . . . . 128
Opening forms and applications from a Home Page . . . . . . . . . . 128
URLs for opening forms and applications. . . . . . . . . . . . . . . 128
Accessing support files . . . . . . . . . . . . . . . . . . . . . . . 130
Specifying parameters in URLs for direct access . . . . . . . . . . . . 131
Passing data to a field in a URL . . . . . . . . . . . . . . . . . . . 136
Creating URLs for login and logout . . . . . . . . . . . . . . . . . 137
Working with the Mid Tier Object List . . . . . . . . . . . . . . . . 140
Creating customized login pages . . . . . . . . . . . . . . . . . . . . 142
Contents � 5

BMC Remedy Action Request System 7.0
How a view is selected . . . . . . . . . . . . . . . . . . . . . . . . . 143
How locale is established . . . . . . . . . . . . . . . . . . . . . . . . 144
Session timeouts . . . . . . . . . . . . . . . . . . . . . . . . . . . 144
Creating help for web applications. . . . . . . . . . . . . . . . . . . . 145
Saving a web application to another location . . . . . . . . . . . . . . . 146
Making your web-based applications accessible to users with disabilities . . . 146
Browsers and third-party assistive devices. . . . . . . . . . . . . . . 146
Configuring JAWS . . . . . . . . . . . . . . . . . . . . . . . . 147
Configuring Windows-Eyes . . . . . . . . . . . . . . . . . . . . 147
Cursor types and form modes. . . . . . . . . . . . . . . . . . . . 148
User preferences for accessibility . . . . . . . . . . . . . . . . . . 148
Accessibility features . . . . . . . . . . . . . . . . . . . . . . . 150
Keyboard shortcuts . . . . . . . . . . . . . . . . . . . . . . . . 151
Chapter 8 Customizing AR System style sheets . . . . . . . . . . . . . . 153
Cascading style sheets in AR System . . . . . . . . . . . . . . . . . . . 154
Overview of CSS rules . . . . . . . . . . . . . . . . . . . . . . . . . 154
CSS rule syntax . . . . . . . . . . . . . . . . . . . . . . . . . . 154
Specificity . . . . . . . . . . . . . . . . . . . . . . . . . . . . 154
Order of precedence. . . . . . . . . . . . . . . . . . . . . . . . 155
Default style sheets provided with AR System . . . . . . . . . . . . . . . 156
Customizing style sheets in AR System . . . . . . . . . . . . . . . . . . 158
Using style sheets with web applications . . . . . . . . . . . . . . . . . 158
Applying styles to AR System fields and other objects . . . . . . . . . . . 162
CSS selectors and field types . . . . . . . . . . . . . . . . . . . . 162
Customizing styles in BMC Remedy Administrator . . . . . . . . . . 169
Changing font styles . . . . . . . . . . . . . . . . . . . . . . . . . . 172
Chapter 9 Saving and running searches on the web . . . . . . . . . . . . 175
Overview . . . . . . . . . . . . . . . . . . . . . . . . . . . . . . . 176
Creating and saving searches . . . . . . . . . . . . . . . . . . . . . . 177
Running a search . . . . . . . . . . . . . . . . . . . . . . . . . . . 178
Loading a search. . . . . . . . . . . . . . . . . . . . . . . . . . . . 179
Managing saved searches . . . . . . . . . . . . . . . . . . . . . . . . 179
6 �Contents

Installing and Administering BMC Remedy Mid Tier
Including parameters in saved or defined searches . . . . . . . . . . . . . 180
Defining a search with parameters . . . . . . . . . . . . . . . . . . 180
Saving a search with parameters . . . . . . . . . . . . . . . . . . . 182
Running a defined or saved search with parameters . . . . . . . . . . 183
Chapter 10 Configuring the mid tier to run reports on the Web . . . . . . . 185
Reporting on AR System data . . . . . . . . . . . . . . . . . . . . . . 186
Web reporting components. . . . . . . . . . . . . . . . . . . . . . . 186
Steps required to enable web reporting . . . . . . . . . . . . . . . . . . 187
Overview of the Crystal Reports and BusinessObjects software . . . . . . . 189
Understanding the ARWebReportViewer. . . . . . . . . . . . . . . . . 190
Configuring web server settings for Crystal reports . . . . . . . . . . . . 191
Crystal Enterprise 10 . . . . . . . . . . . . . . . . . . . . . . . 191
BusinessObjects Enterprise XI (Managed) . . . . . . . . . . . . . . 198
Crystal Reports Server XI (Unmanaged) . . . . . . . . . . . . . . . 199
Configuring the mid tier for Crystal reports . . . . . . . . . . . . . . . 200
Chapter 11 Creating reports for the Web . . . . . . . . . . . . . . . . . . 207
Using the ReportType form. . . . . . . . . . . . . . . . . . . . . . . 208
Creating report definition files . . . . . . . . . . . . . . . . . . . . . 213
AR System reports . . . . . . . . . . . . . . . . . . . . . . . . 213
Crystal reports . . . . . . . . . . . . . . . . . . . . . . . . . . 213
Using the ReportCreator form . . . . . . . . . . . . . . . . . . . . . 214
Creating a report definition file . . . . . . . . . . . . . . . . . . . 216
Saving report definition files . . . . . . . . . . . . . . . . . . . . 222
Editing report definition files . . . . . . . . . . . . . . . . . . . . 222
Using the Report form . . . . . . . . . . . . . . . . . . . . . . . . . 222
Report form entries . . . . . . . . . . . . . . . . . . . . . . . . 223
Deleting report definition files . . . . . . . . . . . . . . . . . . . 223
Running a report on the Web . . . . . . . . . . . . . . . . . . . . . . 224
Accessing the ReportSelection form directly through a browser . . . . . 224
Reporting using table fields and results list fields . . . . . . . . . . . . 228
Running a report through an Open Window active link. . . . . . . . . 231
Exporting AR System data to a file . . . . . . . . . . . . . . . . . . 233
Printing a report from the web . . . . . . . . . . . . . . . . . . . 238
Contents � 7

BMC Remedy Action Request System 7.0
Backward compatibility . . . . . . . . . . . . . . . . . . . . . . . . 239
Macro conversion procedure . . . . . . . . . . . . . . . . . . . . 239
Localized reports created using macros . . . . . . . . . . . . . . . . 239
Crystal Reports tips for the Web. . . . . . . . . . . . . . . . . . . . . 240
Establishing a system data source name (DSN) for Crystal reports . . . . 240
ODBC driver configuration for Crystal reports . . . . . . . . . . . . 241
Restricting the number of records retrieved . . . . . . . . . . . . . . 244
Optimal formatting for all environments . . . . . . . . . . . . . . . 245
Saving a Crystal report. . . . . . . . . . . . . . . . . . . . . . . 246
Appendix A Installing and configuring Crystal Web Connector on UNIX platforms 247
Overview of the process . . . . . . . . . . . . . . . . . . . . . . . . 248
Installing Crystal Reports Server 10 . . . . . . . . . . . . . . . . . . . 248
Installing the BMC Remedy Mid Tier . . . . . . . . . . . . . . . . . . 248
Installing and configuring Crystal Web Connector . . . . . . . . . . . . 249
Installing Samba network file sharing software . . . . . . . . . . . . . . 251
Configuring Crystal Reports . . . . . . . . . . . . . . . . . . . . . . 255
Index . . . . . . . . . . . . . . . . . . . . . . . . . . . . . . . . . . . 259
8 �Contents

Preface
Important: The compatibility information listed in the product documentation is subject to change. See the compatibility matrix at http://supportweb.remedy.com for the latest, most complete information about what is officially supported.
Carefully read the system requirements for your particular operating system, especially the necessary patch requirements.
Audience
This guide is written for administrators who are responsible for setting up and maintaining web services, web reporting, and web applications built on the BMC® Remedy® Action Request System®® (AR System®). It is intended to aid new and current administrators of AR System. If you are a current AR System administrator, this guide enhances the ease of use and performance of your AR System environment. If you are a new AR System administrator, this guide helps you create an effective and efficient AR System environment.
You must know how to use AR System, including BMC Remedy Administrator, BMC Remedy User, and BMC Remedy Import.
Preface � 9

BMC Remedy Action Request System 7.0
AR System documents
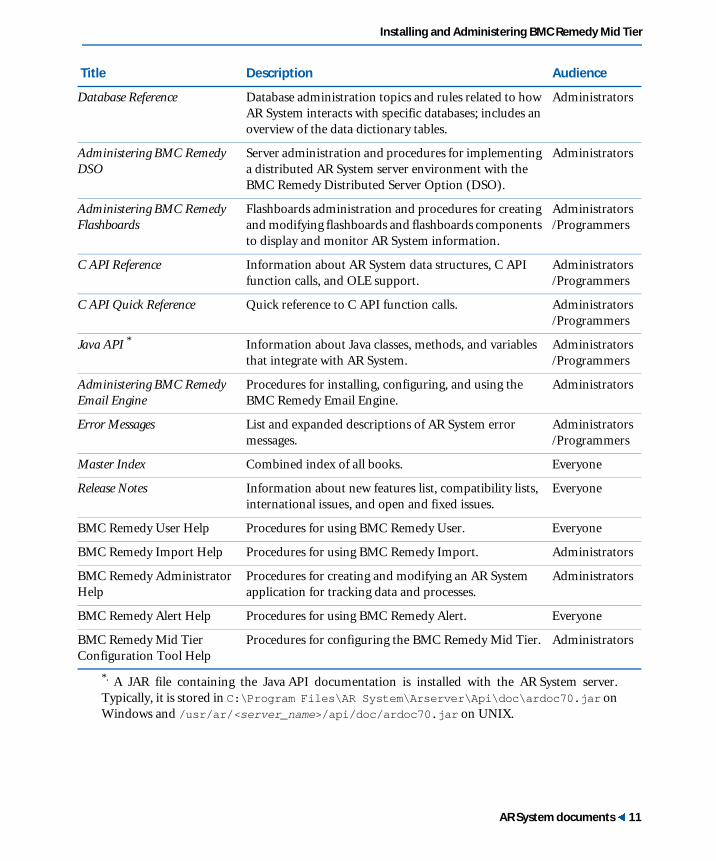
The following table lists documentation available for AR System products.
Unless otherwise noted, online documentation in Adobe Acrobat (PDF) format is available on AR System product installation CDs, on the Customer Support site (supportweb.remedy.com), or both.
You can access product Help through each product’s Help menu or by clicking on Help links.
Title Description Audience
Concepts Overview of AR System architecture and features with in-depth examples; includes information about other AR System products as well as a comprehensive glossary for the entire AR System documentation set.
Everyone
Installing Procedures for installing AR System. Administrators
Getting Started Introduces topics that are usually only learned when first starting to use the system, including logging in, searching for objects, and so on.
Everyone
Form and Application Objects Describes components necessary to build applications in AR System, including applications, fields, forms, and views.
Developers
Workflow Objects Contains all of the workflow information. Developers
Configuring Contains information about configuring AR System servers and clients, localizing, importing and exporting data, and archiving data.
Administrators
Installing and Administering BMC Remedy Mid Tier
Contains information about the mid tier, including mid tier installation and configuration, and web server configuration.
Administrators
Integrating with Plug-ins and Third-Party Products
Discusses integrating AR System with external systems using plug-ins and other products, including LDAP, OLE, and ARDBC.
Administrators/Developers
Optimizing and Troubleshooting
Server administration topics and technical essays related to monitoring and maintaining AR System for the purpose of optimizing performance and troubleshooting problems.
Administrators
10 �Preface
Installing and Administering BMC Remedy Mid Tier
Database Reference Database administration topics and rules related to how AR System interacts with specific databases; includes an overview of the data dictionary tables.
Administrators
Administering BMC Remedy DSO
Server administration and procedures for implementing a distributed AR System server environment with the BMC Remedy Distributed Server Option (DSO).
Administrators
Administering BMC Remedy Flashboards
Flashboards administration and procedures for creating and modifying flashboards and flashboards components to display and monitor AR System information.
Administrators/Programmers
C API Reference Information about AR System data structures, C API function calls, and OLE support.
Administrators /Programmers
C API Quick Reference Quick reference to C API function calls. Administrators /Programmers
Java API * Information about Java classes, methods, and variables that integrate with AR System.
Administrators /Programmers
Administering BMC Remedy Email Engine
Procedures for installing, configuring, and using the BMC Remedy Email Engine.
Administrators
Error Messages List and expanded descriptions of AR System error messages.
Administrators /Programmers
Master Index Combined index of all books. Everyone
Release Notes Information about new features list, compatibility lists, international issues, and open and fixed issues.
Everyone
BMC Remedy User Help Procedures for using BMC Remedy User. Everyone
BMC Remedy Import Help Procedures for using BMC Remedy Import. Administrators
BMC Remedy Administrator Help
Procedures for creating and modifying an AR System application for tracking data and processes.
Administrators
BMC Remedy Alert Help Procedures for using BMC Remedy Alert. Everyone
BMC Remedy Mid Tier Configuration Tool Help
Procedures for configuring the BMC Remedy Mid Tier. Administrators
*. A JAR file containing the Java API documentation is installed with the AR System server.Typically, it is stored in C:\Program Files\AR System\Arserver\Api\doc\ardoc70.jar onWindows and /usr/ar/<server_name>/api/doc/ardoc70.jar on UNIX.
Title Description Audience
AR System documents � 11

BMC Remedy Action Request System 7.0
Learn about the AR System Developer Community
If you are interested in learning more about AR System, looking for an opportunity to collaborate with fellow AR System developers, and searching for additional resources that can benefit your AR System solution, then this online global community sponsored by BMC Remedy is for you.
In the Developer Community, you will find collaboration tools, product information, resource links, user group information, and be able to provide BMC Remedy with feedback.
The Developer Community offers the following tools and information:
� Community message board
� Community Downloads
� AR System Tips & Tricks
� Community recommended resources
� Product information
� User Experience Design tips
Why should you participate in the Developer Community?
You can benefit from participating in the Developer Community for the following reasons:
� The community is a direct result of AR System developer feedback.
� BMC Remedy provides unsupported applications and utilities by way of Community Downloads, an AR System application.
� BMC Remedy posts the latest AR System product information in the Developer Community to keep you up to date.
� It is an opportunity to directly impact product direction through online and email surveys.
� It’s free!
How do you access the Developer Community?
Go to supportweb.remedy.com, and click the Developer Community link.
12 �Preface

Chapter
1
Preparing to install BMC Remedy Mid TierBefore you install BMC Remedy Mid Tier, you should read the Release Notes, and then you must complete basic preinstallation steps.
The following topics are provided:
� Overview (page 14)
� Important documentation to review (page 16)
� Before you install (page 16)
� Installing components and patches for the mid tier (page 17)
� UNIX—Filling in the worksheet for installing the mid tier (page 26)
� Windows—Filling in the worksheet for installing the mid tier (page 30)
Preparing to install BMC Remedy Mid Tier � 13

BMC Remedy Action Request System 7.0
Overview
BMC Remedy Mid Tier enables users to access AR System forms and applications through browsers.
The mid tier resides on the system running the JSP (servlet) engine. Depending on your configuration, you might install multiple mid tiers for additional scalability.
Using the BMC Remedy Mid Tier Configuration Tool, you can configure the mid tier and the AR System servers that communicate with the mid tier. This tool is installed with the mid tier.
Types of mid tier configurations
You can install the mid tier on UNIX or Windows using either of the following methods:
� Install the mid tier and ServletExec, which is bundled with the mid tier. (Most common method)
The instructions for this type of installation are provided in:
� Chapter 2, “UNIX—Installing BMC Remedy Mid Tier”
� Chapter 3, “Windows—Installing the BMC Remedy Mid Tier”
� Install the mid tier only and use your own JSP engine.
If you choose to not to use the bundled ServletExec and want use your own JSP engine, see the appropriate white paper at http://supportweb.remedy.com. The white papers include instructions installing the mid tier on other supported JSP engine and application servers.
White papers include information about configuring IBM WebSphere, configuring combinations such as running a Apache web server with a Tomcat JSP engine, and others.
For a complete list of supported configurations, see the compatibility matrix at http://supportweb.remedy.com.
14 �Chapter 1—Preparing to install BMC Remedy Mid Tier

Installing and Administering BMC Remedy Mid Tier
What the installer does
The BMC Remedy Mid Tier installer performs the following tasks:
1 Creates the installation directory, if required.
2 Places mid tier files and directories in the correct locations.
3 Installs and registers ServletExec 5.0. (Optional)
4 On Windows, installs the required BMC Remedy ODBC DLLs and sets up the driver for Crystal Reports. (You must have Crystal Enterprise 10 or BusinessObjects Enterprise XI to run Crystal reports.)
The mid tier requires the following amounts of free space:
� 120000 KB during installation
� 40000 KB after installation
5 On Windows, installs the ARWebReportViewer application if you have BusinessObjects Enterprise XI installed. (Optional)
BMC Remedy Mid Tier file locations
By default, mid tier is installed in /usr/ar/mid-tier on UNIX and C:\Program Files\AR System\Mid-Tier on windows. The following files are created or modified when you install BMC Remedy Mid Tier.
File Location
Executables <mt_install_dir>
Configuration file <mt_install_dir>/WEB-INF/classes/config.properties
JSP files <mt_install_dir>\shared
.gif file <mt_install_dir>\shared\images
Javascript <mt_install_dir>\resources
Web application <mt_install_dir>\WEB-INF
Java class files <mt_install_dir>\WEB-INF\classes
Shared libraries <mt_install_dir>\WEB-INF\lib
Overview � 15

BMC Remedy Action Request System 7.0
Important documentation to review
Before you complete any pre-installation tasks, review the following documentation:
� Release Notes to learn about version 7.0-specific information about open issues, localization, and other AR System information
� Product compatibility matrix (see http://supportweb.remedy.com)
� Configuring guide to learn about postinstallation configuration information
Use this information to decide whether to configure components during installation.
You can find this documentation at http://supportweb.remedy.com.
Before you install
Before you install the BMC Remedy Mid Tier, you must complete the following procedures:
� For all configurations, install the appropriate components and patches. (See page 17.)
Go to http://supportweb.remedy.com and search for AR System for the latest patch.
� For configurations that use the ServletExec that is bundled with the mid tier, prepare your web server as needed. See the procedure for your environment:
� “UNIX—Preparing a Sun One web server with bundled ServletExec” on page 19
� “UNIX—Preparing an Apache server” on page 21
� “Windows—Preparing a Sun One web server” on page 21
� “Disabling the Sun One web server and internal Java” on page 22
� If you are not installing ServletExec, which is packaged with the BMC Remedy Mid Tier, see the appropriate white paper for your configuration at http://supportweb.remedy.com.
� Complete the installation worksheet for your environment:
16 �Chapter 1—Preparing to install BMC Remedy Mid Tier
Installing and Administering BMC Remedy Mid Tier
� “UNIX—Filling in the worksheet for installing the mid tier” on page 26
� “Windows—Filling in the worksheet for installing the mid tier” on page 30
Installing components and patches for the mid tier
Before you install the mid tier, install the following components. (See the preinstallation considerations [if any] for these components in the sections that follow.)
� Java Software Developer’s Kit (SDK), which is available from the appropriate third-party vendor’s site.
Install the Java SDK before you install the web server.
Tip: On UNIX, install the SDK into the /usr/java directory. If you install the SDK into another directory, and then you install ServletExec, you might need to make manual changes to your ServletExec configuration after the installation.
� Web server
� Browser
� AR System server
The AR System server can be installed locally, but the mid tier is typically installed on a separate computer with network access to the server.
� One of the following reporting tools (if you will be running Crystal reports on the Web):
� BusinessObjects Enterprise XI (recommended)
� Crystal Reports Server XI
� Crystal Enterprise 10 and the Crystal Web Component Server
Crystal Web Component Server (which requires advance configuration) is available from http://www.businessobjects.com/.
If this server is installed remotely, you will need to share the mid tier installation directory with the remote Crystal server, specifying the full path to this directory. Make a note of this directory path if you will access Crystal Web Component Server over a network.
Installing components and patches for the mid tier � 17
BMC Remedy Action Request System 7.0
For more information, see Chapter 10, “Configuring the mid tier to run reports on the Web.”
Note: You must install Crystal Reports on Windows to run reports using the AR System ODBC driver. For UNIX platforms, see Appendix A, “Installing and configuring Crystal Web Connector on UNIX platforms.”
� Home Page server (Optional)
The home page form displays entry points on a given server or server group. The home-page server can be configured as a home-page server and must be an AR System server.
For more information about home pages, see the Form and Application Objects guide.
� Preference server (Optional)
The preference server must be an AR System server, must be configured to be a preference server, and must be entered in the list of AR System servers. For more information, see the Configuring guide.
� Java Server Pages (JSP) engine (Optional)
If you are not using ServletExec 5.0, which is bundled with the mid tier installation, you must install and enable your supported JSP engine before you install the mid tier. For a list of supported JSP engines, see the compatibility matrix at http://supportweb.remedy.com.
� ANSI C compiler (for Apache with ServletExec only)
GNU version 2.8.1 or higher is required. Vendor-specific C compilers are not supported.
� PERL 5.003 (or later) software (for Apache with ServletExec only)
� The appropriate patches for your configuration. For more information, see the Release Notes.
18 �Chapter 1—Preparing to install BMC Remedy Mid Tier

Installing and Administering BMC Remedy Mid Tier
Preparing servers that will use the bundled ServletExec
If you are using the ServletExec that is bundled with BMC Remedy Mid Tier, complete the appropriate preinstallation steps for your web server:
� “UNIX—Preparing a Sun One web server with bundled ServletExec” on page 19
� “UNIX—Preparing an Apache server” on page 21
� “Windows—Preparing a Sun One web server” on page 21
� “Disabling the Sun One web server and internal Java” on page 22
� “Windows 2003 Server x64” on page 24
� “32-bit Java requirement” on page 25
UNIX—Preparing a Sun One web server with bundled ServletExec
If you are using a Sun One web server with ServletExec that is bundled with the mid tier, complete the following tasks before you install the mid tier. (Skip this procedure if you are using your own JSP engine.)
� To prepare a Sun One web server with ServletExec before installing the mid tier
1 Install the Sun One web server (if it is not installed).
When you install the Sun One web server:
� Choose the typical installation option.
� Include umask 077 in the web server start sequence to minimize security exposure.
� ServletExec/AS: Choose a port number other than 8888 for the Sun web administrative server.
ServletExec and the Sun One web server administrative server both use port 8888 by default, and this cannot be changed during the ServletExec installation. Changing the port when you install the web server prevents conflicts.
For more information, see “Changing the ServletExec port number” on page 58.
Installing components and patches for the mid tier � 19

BMC Remedy Action Request System 7.0
2 If the Sun One web server is already installed, change the Sun administrative server and web server ports:
a Stop the Sun One web server admin server.
b Change the default Administrative server port number on the Port line from 8888 to another number in the <sun_web_server_install_dir>/https-adminserv/config/server.xml file.
c Refresh the Web Server Administration Server page after you make changes, and if you are prompted to load configurations, do so.
d Restart the Sun One web server.
If you do not follow these guidelines, your web server might become corrupted.
3 Obtain write privileges to the Sun One obj.conf configuration file.
The installer needs write privileges to:
� Configure the reports and attachments features.
� Install the JSP engine as a plug-in.
For information about the obj.conf file, see the ServletExec User Guide, installed with ServletExec (<ServletExec_install_dir>/Documentation by default), or from the ServletExec website at http://www.servletexec.com.
4 Obtain root permissions to your computer.
5 Obtain the Sun One web server user name, password, and administration server port number
The user name, password, and port number are necessary to access the Sun administration web server. These parameters are established when the Sun One web server is installed.
6 If you have an existing ServletExec 5.0 directory, remove it before installing ServletExec 5.0.
Alternatively, you can rename your existing directory and install ServletExec 5.0 into another directory.
7 Disable Java for the Sun One web server and deactivate the Sun One web server servlet engine.
See “Disabling the Sun One web server and internal Java” on page 22 for instructions.
20 �Chapter 1—Preparing to install BMC Remedy Mid Tier

Installing and Administering BMC Remedy Mid Tier
UNIX—Preparing an Apache server
If you are using an Apache web server, complete the following tasks before you install the mid tier.
� To prepare an Apache server before installing the mid tier
1 Place the ANSI C compiler and PERL software in your path environment.
2 Make sure you have root permissions to the Apache web server that allow you to write to all relevant files and directories. For example, make sure you have access to the /usr/conf/httpd.conf file.
3 If you are upgrading and the existing mid tier was installed with a Group ID value of #-1 (the default), modify the <apache_install>/conf/httpd.conf file.
Use your editor such as vi and look for the Group identifier. If you see Group #-1, change it to the valid group, and save the file.
4 Enter or verify that the compiler and link-editor specified by $CFG_CC and $CFG_LD_SHLIB in the apxs script are in the PATH environment variable.
5 Install Apache. (During installation, enable the DSO option.)
You can verify that DSO is enabled by running <apache install>/bin/httpd -l to see the list of modules after Apache has been installed. If you see mod_so.c in the list, then DSO has been enabled.
6 To minimize security exposure, include umask 077 in the web server start sequence.
Using umask 077 makes sure that files created by the web server processes will be owned and only usable by the user who runs that web server.
Windows—Preparing a Sun One web server
If you are using a Sun One web server in a Windows environment, complete the following tasks before you install the mid tier.
� To prepare a Sun One web server before installing the mid tier
1 Obtain local Windows Administrator account privileges for the Web server computer. You must be able to change registry entries. Otherwise, the Mid Tier Configuration Tool that is installed with the mid tier will not save changes.
Installing components and patches for the mid tier � 21
BMC Remedy Action Request System 7.0
2 Install the Sun One web server (if it is not installed).
When you install the Sun One web server:
� Choose the typical installation option.
� ServletExec/AS: Choose a port number other than 8888 for the Administrative server.
ServletExec and the Sun administrator web server both use port 8888 by default, and this cannot be changed during the ServletExec installation. Changing the port when you install the web server prevents conflicts.
3 If the Sun One web server is already installed, change the Sun administrative server and web server ports:
a Stop the Sun One web server admin server.
b Change the default Administrative server port number on the Port line from 8888 to another number in the <sun_web_server_install_ dir>\https-adminserv\config\server.xml file.
c Refresh the Web Server Administration Server page after you make changes, and if you are prompted to load configurations, do so.
d Restart the Sun One web server.
If you do not follow these guidelines, your web server might become corrupted.
4 Disable Java for the Sun One web server and deactivate the Sun One web server servlet engine.
See “Disabling the Sun One web server and internal Java” on page 22 for instructions.
Disabling the Sun One web server and internal Java
If you are installing the ServletExec that is supplied with the mid tier, complete the following two procedures. You will disable the Sun JSP web server and deactivate the Sun One web server servlet engine on UNIX and Windows. Then you will disable internal Java.
If you are using the built-in Sun JSP web server, you can skip these procedures.
22 �Chapter 1—Preparing to install BMC Remedy Mid Tier
Installing and Administering BMC Remedy Mid Tier
WARNING: Stop the Sun One web server before you make any changes to the configuration. In addition, after you make changes, refresh the Web Server Administration Server page, and if you are prompted to load configurations, do so. If you do not follow these guidelines, your web server could become corrupted.
� To disable the Sun One web server JSP and Servlet engine
1 If it is not installed, install the Sun One web server using the typical option.
2 Open the administration page at http://<host_name>:<port_number>.
For example, go to http://myserver.mydomain.com:8050.
The Manager Servers screen appears. Your server should be listed in the Select a Server field.
3 If you have two or more web servers, choose the target web server in the list.
4 Click Manage.
If you are prompted to load configurations, do so.
The Server On/Off screen appears.
5 If the server is on, click Server Off.
A message appears, stating that the server has been shut down.
6 Click OK to dismiss the message.
� To disable the Sun One web server internal Java
1 Use your browser to log in to the Sun One web server administrative server interface.
2 Choose the Servers tab.
3 Click the Manage Servers Link.
4 Select the web server instance that will have ServletExec installed, and click Manage.
5 Click the Java tab.
6 Clear the Enable Java Globally check box.
7 Clear the Enable Java for class check box.
8 Click Apply Link, and then click Apply Changes.
Installing components and patches for the mid tier � 23

BMC Remedy Action Request System 7.0
Windows 2003 Server x64
The installer that is bundled with the mid tier does not install properly on the x64 version of Windows. Complete the following instructions to run ServletExec ion this platform.
� To run ServletExec on Windows 2003 Server x64
1 Install the mid tier, and chooseServletExec as the JSP engine.
2 Stop the IIS Admin Service service.
3 Switch the ServletExec DLL to the 32-bit version.
a Navigate to the C:\Inetpub\Scripts directory.
b Rename the ServletExec_ISAPI.dll file to ServletExec_ISAPI.dll.Itanium.
c Rename the ServletExec_ISAPI32.dll file to ServletExec_ISAPI.dll.
4 Manually add ServletExec as a filter to IIS.
a Open the Internet Information Services (IIS) Manager. (A shortcut is in Control Panel >Administrative Tools.)
b Browse to Internet Information Services > <Local Computer> >Web Sites.
c Right-click on Default Web Site, and select Properties.
d Click on the ISAPI Filters tab.
e If ServletExec is already there, select it and click Remove.
f Click Add.
g For the Filter name, enter ServletExec.
h For the Executable, click the Browse button, and select the file C:\Inetpub\Scripts\ServletExec_ISAPI.dll.
i Click OK.
5 Start the IIS Admin Service service.
6 In the IIS Manager, make sure that the Default Web Site and the DefaultAppPool is started.
24 �Chapter 1—Preparing to install BMC Remedy Mid Tier

Installing and Administering BMC Remedy Mid Tier
7 Configure 64-bit IIS to run 32-bit processes.
a In a command window, change directories to C:\Inetpub\AdminScripts.
b Run the following command:
cscript.exe adsutil.vbs set W3SVC/AppPools/Enable32BitAppOnWin64 "TRUE"
8 Verify that ServletExec is running by opening its Administration page by choosing Start > Programs > New Atlanta >ServletExec 5.0 ISAPI > ServletExec Admin.
9 From the Administration page, choose General > License to enter the license number.
32-bit Java requirement
The Web Services plug-in, Email Engine, Flashboards Server, and Mid Tier require the 32-bit version of the JDK/JRE. These products will not work with 64-bit Java on Windows 2003 x64.
Installing components and patches for the mid tier � 25

BMC Remedy Action Request System 7.0
UNIX—Filling in the worksheet for installing the mid tier
This section contains the information that will help you prepare to install the mid tier on UNIX or Linux.
Enter in your values on the following blank lines, and use the values in conjunction with the installation prompts.
Product directory: _______________________________________
Path to the directory where the mid tier CD-ROM is mounted and where the mt_install file is located.
The location must have adequate disk space and be accessible to at least one AR System server locally or through a network. Clients must have web access to this location.
If you are installing on the same computer as an AR System server, choose a separate directory for the mid tier.
The default directory is:
/usr/ar/mid-tier
Web server installation directory: __________________________
Path to the directory where the web server is installed.
JSP engine installation directory: ___________________________
Path to the directory where the JSP engine is installed.
Mid-tier installation directory: _____________________________
Path to the directory where the mid tier will be installed.
Note: You must install the mid tier into its own top-level directory and not in a subdirectory of another AR System component. For example, do not install the mid tier into the same directory as BMC Remedy Administrator. Both the mid tier directory and the BMC Remedy Administrator directory should be installed in the top-level AR System directory.
26 �Chapter 1—Preparing to install BMC Remedy Mid Tier

Installing and Administering BMC Remedy Mid Tier
ServletExec information
If you plan to install ServletExec 5.0, fill in your values on the following blank lines, and use your values with the installation instructions.
Base SDK directory: ______________________________________
Path to the SDK directory (usually /usr/java).
Base ServletExec directory: ________________________________
Path to the ServletExec installation directory.
Web server type: ________________________________________
Type of web server.
Web server installation directory: __________________________
Installation directory for the web server.
Unique instance name: ___________________________________
Unique name for the ServletExec instance you are installing. You designate the name during the installation.
Instance port number: ____________________________________
Port number for the ServletExec instance.
User name: _____________________________________________
ServletExec administrator user name. You designate the name during the installation.
User password: __________________________________________
Password that corresponds to the ServletExec user name. You designate the password during the installation.
UNIX—Filling in the worksheet for installing the mid tier � 27

BMC Remedy Action Request System 7.0
Server informationAR System serverServer #1: ____________________ Server #2: ____________________ (Optional)
Name of the AR System server to which the mid tier will connect (required).
You must specify at least one AR System server. You can make further changes after you install.
AR System server port (Optional)Server #1 port: ____________________ Server #2 port: ____________________
TCP port number for the AR System server that the mid tier connects to.
If your AR System server is not configured to run on a specific port, leave these fields empty.
RPC Port Number (Optional)Server #1 port: ____________________ Server #2 port: ____________________
RPC port number for the AR System server that the mid tier connects to.
If you elect to run your server on a private RPC socket, enter a value. (You must configure the AR System server to run on a private server first to allow this.) For more information about private servers, see the Configuring guide.
Preference server: _______________________________________
(Optional) Name of the preference server (if any) that you designated during the AR System server installation. The preference server must be an AR System server. For more information about preference servers, see the Configuring guide.
If you did not specify a preference server during the server installation, you can do so after the mid tier installation in the Mid Tier Configuration tool.
28 �Chapter 1—Preparing to install BMC Remedy Mid Tier

Installing and Administering BMC Remedy Mid Tier
If you identify two or more preference servers, separate each entry with a comma but no space, for example: server1,server2,server3. . .
Home page server: _______________________________________
Name of the home page server (if any) that you designated during the AR System server installation (optional). The home page server must be an AR System server.
If you identify two or more home page servers, separate each entry with a comma but no space, for example: server1,server2,server3. . .
If you did not specify a home-page server during the server installation, you can do so after the mid tier installation in the Configuration tool.
Data visualization module server: __________________________
Name of the data visualization module server (if any). For more information, see the Integrating with Plug-ins and Third-Party Products guide.
UNIX—Filling in the worksheet for installing the mid tier � 29

BMC Remedy Action Request System 7.0
Windows—Filling in the worksheet for installing the mid tier
This section contains the information that will help you prepare to install the mid tier on Windows.
For each mid tier you install, enter your values on the following blank lines, and use the values in conjunction with the installation instructions.
Web server: _____________________________________________
Name of the web server. You must have a supported web server to install the mid tier.
JSP engine: _____________________________________________
Path to the location of the JSP engine.
AR System server: ________________________________________
Name of the AR System server to which the mid tier will connect (required). You must specify at least one AR System server. You can make further changes after you install.
Port: ___________________________________________________
TCP port number for the AR System server that the mid tier connects to.
If your AR System server is not configured to run on a specific port, leave this field empty.
If your server is running on a specific port, you can still have the server registered with portmapper. For more information about portmappers, see the Installing guide.
30 �Chapter 1—Preparing to install BMC Remedy Mid Tier

Installing and Administering BMC Remedy Mid Tier
RPC port number: ________________________________________
RPC port number for the AR System server that the mid tier connects to.
If you elect to run your server on a private RPC socket, enter a value. (You must configure the AR System server to run on a private server first to allow this.) For more information about private servers, see the Configuring guide.
Preference server: _______________________________________
Name of the preference server (if any) that you designated during the AR System server installation (optional). The preference server must be an AR System server.
If you did not specify a preference server during the server installation, you can do so after the mid tier installation in the Configuration tool.
Home page server: _______________________________________
Name of the home-page server (if any) that you designated during the AR System server installation (optional). The home-page server must be an AR System server.
If you did not specify a home-page server during the server installation, you can do so after the mid tier installation in the Configuration tool.
Crystal Reports server: ____________________________________
Name of the Crystal Reports server (if any).
Destination folder: _______________________________________
Path to the directory where the mid tier will be installed.
Note: You must install the mid tier into its own top-level directory.
If you plan to install ServletExec 5.0 after you install the mid tier, fill in your values on the following blank lines, and use your values with the installation instructions.
Windows—Filling in the worksheet for installing the mid tier � 31

BMC Remedy Action Request System 7.0
Destination location: _____________________________________
Path to the installation directory for ServletExec.
User name: _____________________________________________
User name for the administrator who has privileges to connect to the ServletExec web administrator. You designate this user name during the installation.
Password: ______________________________________________
Password corresponding to the user name. You designate this password during installation.
Anonymous user: ________________________________________
User account for anonymous users (users who connect through the internet).
Use the following syntax:
IUSR_<AR_System_server_name>
32 �Chapter 1—Preparing to install BMC Remedy Mid Tier
Chapter
2
UNIX—Installing BMC Remedy Mid TierInstalling BMC Remedy Mid Tier on UNIX requires specific steps, which are different from Windows installations. The following topics are provided:
� Accessing the software (page 34)
� UNIX—Installing the BMC Remedy Mid Tier (page 35)
After you install the mid tier, see Chapter 4, “After the installation,” and Chapter 5, “Configuring the mid tier,” to complete the installation and configuration process.
Note: Read the Release Notes before you perform the steps in this section.
UNIX—Installing BMC Remedy Mid Tier � 33
BMC Remedy Action Request System 7.0
Accessing the software
This section contains two procedures that describe how to:
� Access the software from a CD.
� Access and prepare the AR System software (which includes BMC Remedy Mid Tier) obtained by HTTP download.
� To access the mid tier installation files from a CD
1 Mount the CD either locally or remotely. For instructions, see the Installing guide.
2 Change to the directory containing the BMC Remedy Mid Tier installation script as follows:
# cd <cd_mount_point>/arsystem
The default mount point is /cdrom.
Proceed to the next section, “UNIX—Installing the BMC Remedy Mid Tier.”
� To access mid tier installation files from the downloaded software
1 Log in as the root user.
2 Copy the downloaded directory (midtier_unix) and its contents to the location where you will install BMC Remedy Mid Tier.
3 Change to the directory containing the copy of the downloaded files.
4 Change to the directory containing the install program:
# cd midtier_unix
5 Uncompress the file midtier_web.tar.gz, which contains the UNIX installation files for BMC Remedy Mid Tier.
Use the gunzip utility to uncompress the file by entering the following command:
# gunzip midtier_<unixType>.tar.gz
Where <unixType> is the type (flavor) of UNIX, such as AIX or HP-UX.
If you do not have the gunzip utility, you can download it from the gzip home page: http://www.gzip.org.
34 �Chapter 2—UNIX—Installing BMC Remedy Mid Tier

Installing and Administering BMC Remedy Mid Tier
6 Extract the installation program file by entering the following command:
# tar -xvf midtier_<unixType>.tar
Where <unixType> is the type of UNIX, such as AIX or HP-UX.
The midtier_web.tar tar file contains the directory arsystem, which contains the installation program (mt_install).
7 Note the directory into which the tar files were extracted. Enter the path to that directory when prompted for the product directory name during installation.
8 Change to the directory containing the installation program:
# cd arsystem
Proceed to the next section, “UNIX—Installing the BMC Remedy Mid Tier.”
UNIX—Installing the BMC Remedy Mid Tier
You must have write access to the mid tier, web server, and JSP files and directories to install the mid tier; therefore, you should install as root.
The procedures in this section explain how to perform an upgrade or new install of the mid tier. Differences for upgrades are noted in the procedures.
By default, mid tier is installed in /usr/ar/mid-tier.
Tip: If you have a specific configuration to install (such as Apache 2.x and Tomcat 5.x using JK Connectors), see the 7.0 white papers on the Support website for specific installation steps.
� To install the BMC Remedy Mid Tier on UNIX
1 Prepare your system as discussed in Chapter 1, “Preparing to install BMC Remedy Mid Tier.”
The mid tier will not install or function correctly if you do not prepare your system.
2 Make sure you have the latest Mid Tier patch, which includes a full version installation.
You can find the patch at http://supportweb.remedy.com.
UNIX—Installing the BMC Remedy Mid Tier � 35

BMC Remedy Action Request System 7.0
3 Complete the installation worksheet in “UNIX—Filling in the worksheet for installing the mid tier” on page 26.
4 Run the mid tier installation script:
# ./mt_install
5 At the prompt asking to install the mid tier, press ENTER to continue with the installation.
A record of the installation is preserved in /usr/tmp/mt_install.log.
6 At the product directory prompt, enter the name of the directory where the CD is mounted and where the midtier.tar file is located, or press ENTER to accept the default.
7 At the licensing prompt, complete one of the following steps:
� Press ENTER to view the entire licensing agreement.
� Enter 1 to accept the licensing agreement, 2 to reject the agreement, or 3 to re-read the agreement.
The script displays:
� Disk space information and requirements
� AR System product and copyright information
� Your UNIX version information
� Space requirements for mid tier installation
Note: Make sure you have the correct space requirements on your system.
8 At the preinstallation tasks prompt, press ENTER to proceed with the installation.
9 At the prompt for a compatible JDK, complete one of the following steps:
� Enter Y to continue with the installation if you have a compatible JDK installed.
� Exit the installation and install a compatible JDK from the Sun Java products website (http://java.sun.com/j2se/). Or, you can also install the IBM or HP java products.
10 Enter the Java JDK install directory.
36 �Chapter 2—UNIX—Installing BMC Remedy Mid Tier

Installing and Administering BMC Remedy Mid Tier
11 At the web server prompts:
a Type the letter corresponding to your web server:
� A for Apache
� J for Sun One
� O for other
A supported web server is required to install the mid tier. If you do not have a supported web server installed, terminate the installation and install one.
b Enter the web server installation directory, for example:
/usr/local/<web_server>
12 At the JSP engine prompt, perform one of the following set of steps:
To install the JSP engine (ServletExec) provided with the mid tier:
a Enter N if you do not have a JSP engine installed.
The installer prompts you to install ServletExec.
b Enter Y to install ServletExec. Go to step 13.
Note: When you are installing ServletExec with the UNIX mid tier on the Sun One web server, the ServletExec installer lists options for web servers that the BMC Remedy Mid Tier does not support. This is a non-BMC issue. See the product compatibility matrix on the BMC Remedy support site for supported Sun One web servers.
To use your own JSP engine:
� Enter Y if you have a JSP engine installed and type the letter corresponding to your engine:
� S for New Atlanta ServletExec 5.0
Enter the installation directory for ServletExec 5.0.
� J for JBoss
Enter the full paths to the JBOSS deployment directory and startup script. The installer starts the JBOSS service if it is not running.
� O for another JSP engine
� Q to exit the installation
UNIX—Installing the BMC Remedy Mid Tier � 37

BMC Remedy Action Request System 7.0
13 At the mid tier installation directory prompt, enter and confirm the path to the mid tier installation directory.
Note: You must install the mid tier in a separate directory under the top-level AR System directory and not in a subdirectory of another AR System component. For example, do not install the mid tier into the same directory as the AR System server. If you install the mid tier into the same directory as another component, the web server might access the wrong .jar files.
After you enter the mid tier install directory, mid tier files are installed. For information about where the files are located, see “BMC Remedy Mid Tier file locations” on page 15 The following lines are an example from the display:
Extracting files, please wait.x ./images, 0 bytes, 0 tape blocksx ./images/bkgdImage.gif, 16751 bytes, 33 tape blocksx ./images/blackdot.gif, 35 bytes, 1 tape blocksx ./images/diaryExpand.gif, 188 bytes, 1 tape blocks. . .
This step might take a few minutes.
14 If you did not choose to install ServletExec 5.0, go to step 17 on page 39.
15 If you chose to install ServletExec 5.0, enter the following information at the corresponding prompts:
a Directory information:
� Base SDK directory—Path to the SDK directory.
� Base ServletExec directory—Path to the ServletExec installation directory.
b License information
Accept the license conditions.
c ServletExec/AS instance installation—Choose 1 to install ServletExec and the web server adaptor.
d Enter the following related information:
� Web server type
� Web server installation directory
38 �Chapter 2—UNIX—Installing BMC Remedy Mid Tier
Installing and Administering BMC Remedy Mid Tier
� Unique name—Unique name to give to the ServletExec instance you are installing. You designate this unique name during this installation.
� ServletExec instance port number (The default is 8888.)
� Password—Password that corresponds to the user name. You designate this password during this installation.
e Existing web server: If you have an existing web server, the ServletExec installation prompts you to update the existing configuration files. Enter Y to update the files or N to skip this step.
If you choose N, you must configure your web server after installation, if applicable. See “Postinstallation tasks” on page 58.
16 Web-server adaptor—Do not choose this option.
17 For upgrades only: If you have existing mid tier configurations (for example, if you have already designated port numbers, preference servers, or AR System servers), perform one of the following actions at the upgrade configuration prompt:
a Enter Y to keep the existing configurations. If you select this option, you will still be able to add AR System servers and preference servers.
b Enter N to reconfigure your current setup.
Go to the next step.
18 At the AR System server prompt, enter the name of the AR System server to which the mid tier will connect (required).
The mid tier requires at least one AR System server to connect users to AR System. You can enter or modify servers in the BMC Remedy Mid Tier Configuration Tool after installation.
19 At the AR System server port prompts:
a Enter the port number (TCP port) for the AR System server you chose in step 18 if you designated a port number during the server installation (optional).
If you did not assign a port number, press ENTER to accept the default port.
b Enter the RPC port number for the AR System server you chose in step 18 if you designated an RPC port number during the server installation.
c Enter the names and port numbers for other AR System servers (optional) or type N to go to the next step.
UNIX—Installing the BMC Remedy Mid Tier � 39

BMC Remedy Action Request System 7.0
20 Enter Mid Tier Administrator Password for the AR System server on which you are installing the mid tier.
This password must match the password set in the Server Information dialog box in BMC Remedy Administrator. If you are running AR System 7.0, this password is required.
The following message appears:
AR Servers are: <your entries>
21 (Optional) At the preference server selection prompt, enter and confirm the number that corresponds to the preference server you chose during the AR System server installation.
Preference servers must be AR System servers. You do not have to specify a preference server now. You can specify preference servers after installation using the Mid Tier Configuration Tool.
Enter N to skip this step.
22 (Optional) At the home page server prompt, enter and confirm the number that corresponds to the home page server you chose during the AR System server installation.
Enter N to skip this step.
The installation is complete.
23 Restart the web server. If you are upgrading your mid tier installation, stop and restart ServletExec.
24 Complete the steps described in “Postinstallation tasks” on page 58.
40 �Chapter 2—UNIX—Installing BMC Remedy Mid Tier
Chapter
3
Windows—Installing the BMC Remedy Mid TierInstalling BMC Remedy Mid Tier on Windows requires specific steps. The following topics are provided:
� Accessing the BMC Remedy Mid Tier software (page 42)
� Windows—Installing BMC Remedy Mid Tier and ServletExec (page 43)
� Completing the installation (page 55)
� Installing ARWebReportViewer separately (page 55)
After you install the mid tier, see Chapter 4, “After the installation,” and Chapter 5, “Configuring the mid tier,” to complete the installation and configuration process.
Note: Read the Release Notes before you perform the steps in this section.
Windows—Installing the BMC Remedy Mid Tier � 41

BMC Remedy Action Request System 7.0
Accessing the BMC Remedy Mid Tier software
If your computer is part of a Windows domain, you must log in to the domain as a Windows Domain Administrator to install BMC Remedy Mid Tier. If your computer is not part of a Windows domain, you must log in as an administrator for the local system.
Note: The BMC Remedy Mid Tier software is included in the AR System CD or HTTP download.
� To access the software from the CD
1 Log in to Windows as an administrator and insert the CD into the drive.
If autorun is enabled, the CD browser opens.
2 Click AR System Server.
If the CD browser does not start, run the file midtier.exe.
Proceed to the next section, “Windows—Installing BMC Remedy Mid Tier and ServletExec.”
� To access the software from HTTP download
1 If you downloaded AR System to a location where you will not install AR System, copy the downloaded directory and its contents to the computer where you will install AR System.
2 From the download directory, run the file midtier.exe.
When you run this file, the installation files are unpacked into a temporary directory and the Setup program starts.
Proceed to the next section, “Windows—Installing BMC Remedy Mid Tier and ServletExec.”
42 �Chapter 3—Windows—Installing the BMC Remedy Mid Tier

Installing and Administering BMC Remedy Mid Tier
Windows—Installing BMC Remedy Mid Tier and ServletExec
Use the procedures in this section to install the BMC Remedy Mid Tier and ServletExec 5.0 (optional) on Windows.
These procedures explain how to perform an upgrade or new install of the mid tier with either a Sun One web server or IIS. Differences for upgrades are noted in the procedures.
By default, mid tier is installed in c:\Program Files\AR System\Mid-Tier.
Tip: If you have a specific configuration to install (such as Apache 2.x and Tomcat 5.x using JK Connectors), see the 7.0 white papers on the Support website for specific installation steps.
Installing the mid tier
This section describes how to install the mid tier.
� To install the BMC Remedy Mid Tier on Windows
1 Prepare your system as discussed in Chapter 1, “Preparing to install BMC Remedy Mid Tier.”
The mid tier will not install or function correctly if you do not prepare your system.
2 Make sure that you must have administrative privileges on the computer where the mid tier will be installed.
3 Make sure you have the latest Mid Tier patch, which includes a full version installation.
You can find the patch at http://supportweb.remedy.com.
4 Complete the installation worksheet in “Windows—Filling in the worksheet for installing the mid tier” on page 30.
5 If you have ServletExec 4.2 installed, uninstall it before you begin the mid tier installation.
The 7.0 mid tier installs the correct version of ServletExec if you choose that option.
Windows—Installing BMC Remedy Mid Tier and ServletExec � 43

BMC Remedy Action Request System 7.0
If you want to use another JSP engine, see the compatibility matrix at http://supportweb.remedy.com.
6 Start the installer as described in “Accessing the BMC Remedy Mid Tier software” on page 42.
7 If you are performing a new installation, in the Choose Setup Language dialog box, choose a language for the installation, and click OK.
If you are reinstalling, click Yes in the dialog box to reinstall the mid tier.
The Welcome screen appears.
Note: If you do not have a compatible SDK or a supported web server installed, a warning message appears. Click OK to continue with the installation, and install the SDK and web server after you complete the mid tier install. You must install these items for the mid tier to work correctly.
8 Click Next.
The licensing screen appears.
9 Read the agreement, choose I Agree, and click Next.
The Select Features screen appears.
Figure 3-1: Select Features screen
44 �Chapter 3—Windows—Installing the BMC Remedy Mid Tier
Installing and Administering BMC Remedy Mid Tier
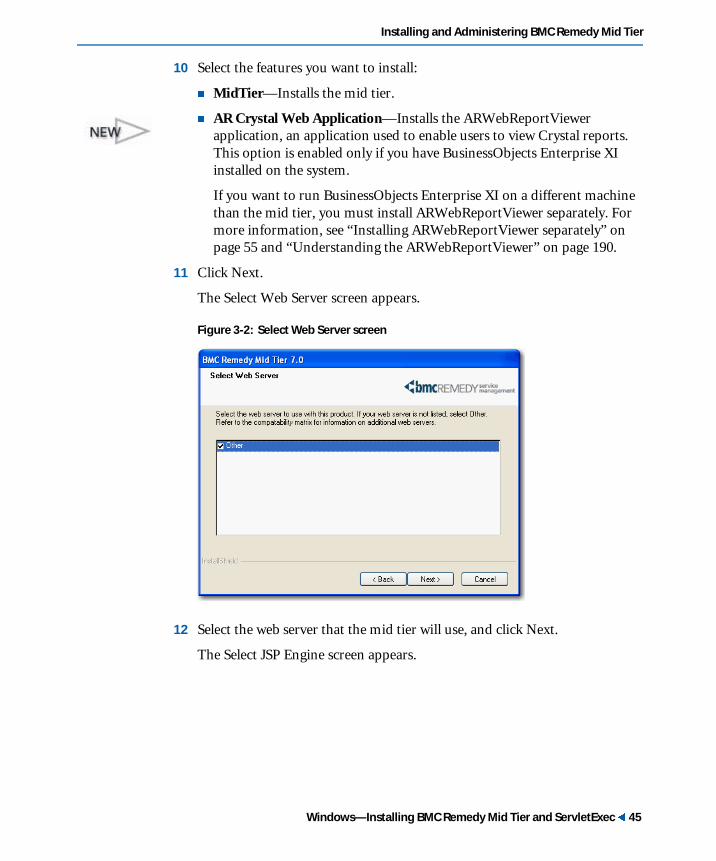
10 Select the features you want to install:
� MidTier—Installs the mid tier.
� AR Crystal Web Application—Installs the ARWebReportViewer application, an application used to enable users to view Crystal reports. This option is enabled only if you have BusinessObjects Enterprise XI installed on the system.
If you want to run BusinessObjects Enterprise XI on a different machine than the mid tier, you must install ARWebReportViewer separately. For more information, see “Installing ARWebReportViewer separately” on page 55 and “Understanding the ARWebReportViewer” on page 190.
11 Click Next.
The Select Web Server screen appears.
Figure 3-2: Select Web Server screen
12 Select the web server that the mid tier will use, and click Next.
The Select JSP Engine screen appears.
Windows—Installing BMC Remedy Mid Tier and ServletExec � 45

BMC Remedy Action Request System 7.0
Figure 3-3: Select JSP Engine screen
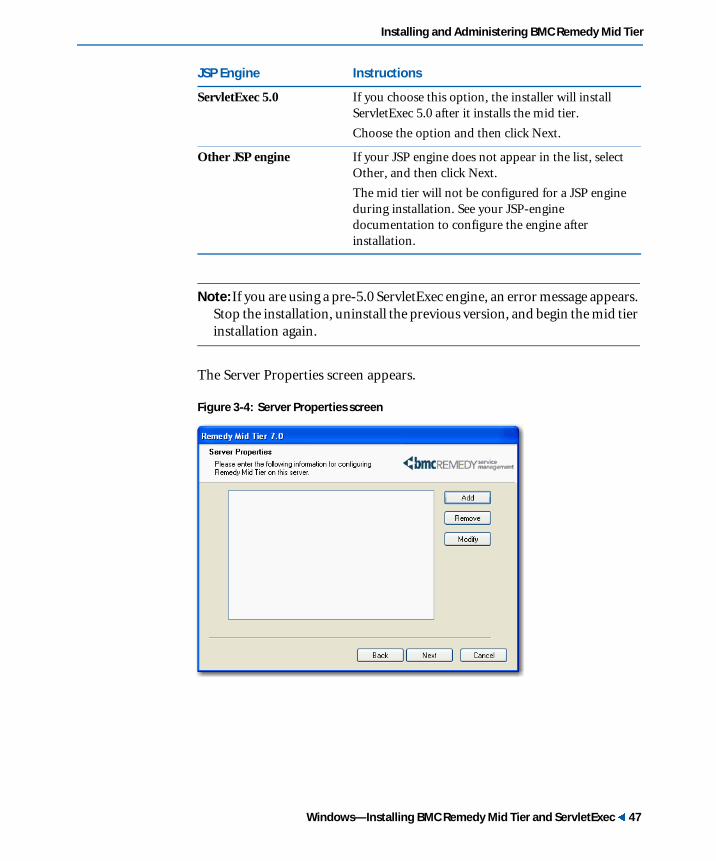
13 Select your JSP engine.
JSP Engine Instructions
JBOSS The JBOSS Deployment Directory screen appears.
Enter the JBOSS deployment directory and click OK. For example, enter:
C:\jboss-3.2.3\server\all\deploy
46 �Chapter 3—Windows—Installing the BMC Remedy Mid Tier
Installing and Administering BMC Remedy Mid Tier
Note: If you are using a pre-5.0 ServletExec engine, an error message appears. Stop the installation, uninstall the previous version, and begin the mid tier installation again.
The Server Properties screen appears.
Figure 3-4: Server Properties screen
ServletExec 5.0 If you choose this option, the installer will install ServletExec 5.0 after it installs the mid tier.
Choose the option and then click Next.
Other JSP engine If your JSP engine does not appear in the list, select Other, and then click Next.
The mid tier will not be configured for a JSP engine during installation. See your JSP-engine documentation to configure the engine after installation.
JSP Engine Instructions
Windows—Installing BMC Remedy Mid Tier and ServletExec � 47
BMC Remedy Action Request System 7.0
14 To select an AR System server that the mid tier will connect to, choose one of the following options:
� Select an existing server from the list and click Next.
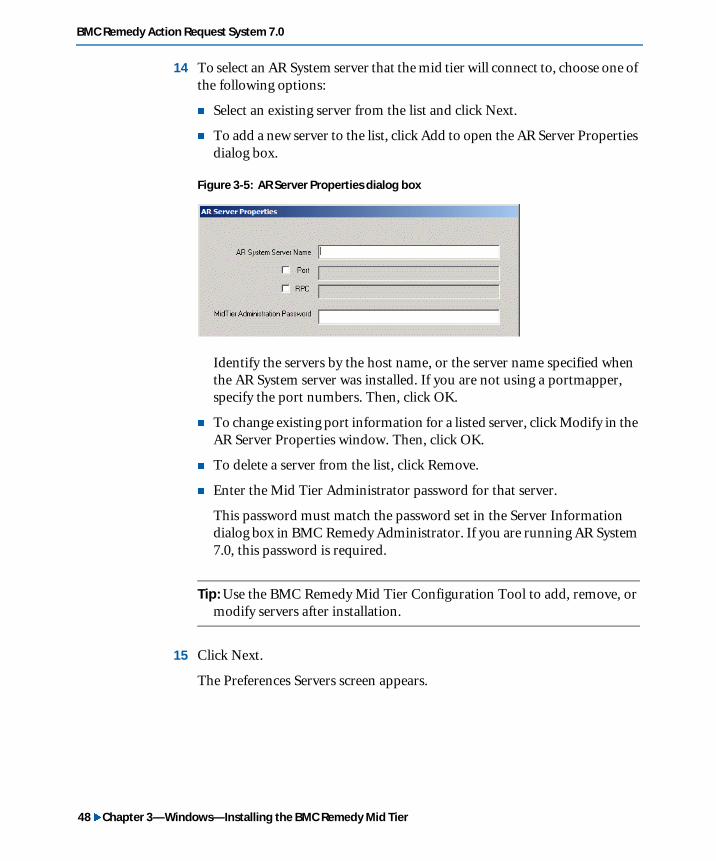
� To add a new server to the list, click Add to open the AR Server Properties dialog box.
Figure 3-5: AR Server Properties dialog box
Identify the servers by the host name, or the server name specified when the AR System server was installed. If you are not using a portmapper, specify the port numbers. Then, click OK.
� To change existing port information for a listed server, click Modify in the AR Server Properties window. Then, click OK.
� To delete a server from the list, click Remove.
� Enter the Mid Tier Administrator password for that server.
This password must match the password set in the Server Information dialog box in BMC Remedy Administrator. If you are running AR System 7.0, this password is required.
Tip: Use the BMC Remedy Mid Tier Configuration Tool to add, remove, or modify servers after installation.
15 Click Next.
The Preferences Servers screen appears.
48 �Chapter 3—Windows—Installing the BMC Remedy Mid Tier

Installing and Administering BMC Remedy Mid Tier
Figure 3-6: Preferences Servers screen
16 Enter or select the specific types of servers that the mid tier will connect to.
� If you have previously configured preference, home page, or data visualization module servers, enter the names of each server in the appropriate field. Servers entered here will appear in the Mid Tier Configuration Tool, and will be available to the mid tier. If you have not configured servers for these purposes, leave the fields blank.
If you specify servers during the mid tier installation, you do not need to set up these server connections in the Mid Tier Configuration Tool after installation. If you do not specify these servers during the mid tier installation, you can use the Mid Tier Configuration Tool to do so after installation.
To identify multiple preference servers, enter the server names separated by commas. For example, enter: server1,server2,server3.
� If you enter an AR System server here, that server must also be entered in the Server Properties screen.
� If the local computer is not a preference, home page, or report server, remove the local computer name from the fields.
17 Click Next.
If you have Crystal Enterprise 10, Crystal Reports Server XI, or BusinessObjects Enterprise XI installed, go to step 18.
Windows—Installing BMC Remedy Mid Tier and ServletExec � 49

BMC Remedy Action Request System 7.0
If you do not have Crystal Reports installed, click Next and go to step 21.
18 Enter the Crystal Enterprise 10 Location, or enter the BusinessObjects Enterprise XI (or Crystal Reports Server XI) Location (http://<server>:<port>) in the Crystal Reports Information screen, and click Next.
Figure 3-7: Crystal Reports Information screen
Note: If you will be using BusinessObjects Enterprise XI only, leave the Crystal Enterprise 10 Location empty, and enter the correct location in the BusinessObjects XI Location field.
If you are using both versions, enter the correct location in each field, but the Crystal Enterprise 10 Location field will take precedence.
If you selected the AR Crystal Web Application option at the beginning of the installation, the Crystal Management Server screen appears.
50 �Chapter 3—Windows—Installing the BMC Remedy Mid Tier

Installing and Administering BMC Remedy Mid Tier
Figure 3-8: Crystal Management Server screen
19 Select the appropriate BusinessObjects Report version:
� Business Objects Enterprise XI (Managed)
� Crystal Reports Server XI (Unmanaged)
If you selected the BusinessObjects Enterprise XI version, enter information for the following fields:
� AR System ODBC Data Source Name—Name of the system DSN. If the field is blank, “AR System ODBC Data Source” (the default) is used. The ODBC driver is installed by BMC Remedy User, the mid tier, or ARWebReportViewer.
� CMS Folder Name—Name of the folder where the Crystal reports are published.
� CMS User Name and CMS Password—The user name and password of CMS. The mid tier uses this user information to log in to the CMS and publish the reports.
If you selected the Crystal Reports Server XI version, enter information for the following field:
� AR System ODBC Data Source Name—Name of the system DSN. If the field is blank, “AR System ODBC Data Source” (the default) is used. The ODBC driver is installed by BMC Remedy User, the mid tier, or ARWebReportViewer.
Windows—Installing BMC Remedy Mid Tier and ServletExec � 51

BMC Remedy Action Request System 7.0
20 Click Next.
The Choose Destination Folder screen appears.
Figure 3-9: Choose Destination Folder screen
21 To accept the default installation directory on the Choose Destination Folder screen, click Next.
If you want to select another directory:
a Complete one of the following steps:
� Reinstallation: Click Browse, and from the Existing Folders list, select AR System mid tier.
� New installation or installation into another directory: Click Browse and select the new directory name.
b Click Next.
Note: Install the mid tier into its own separate, top-level directory. For example, do not install the mid tier into the AR System directory. One mid tier can service multiple AR System servers.
52 �Chapter 3—Windows—Installing the BMC Remedy Mid Tier
Installing and Administering BMC Remedy Mid Tier
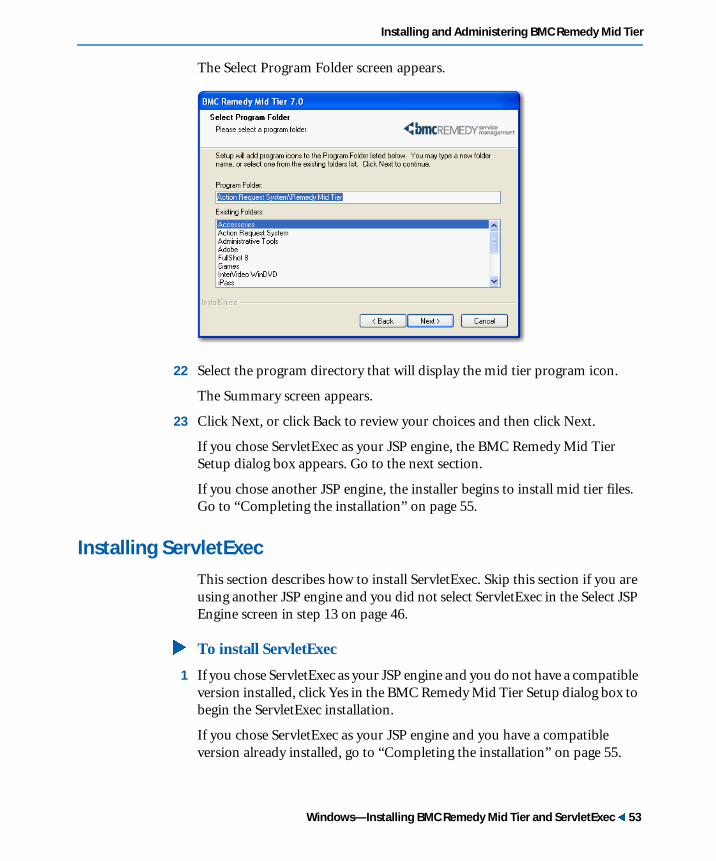
The Select Program Folder screen appears.
22 Select the program directory that will display the mid tier program icon.
The Summary screen appears.
23 Click Next, or click Back to review your choices and then click Next.
If you chose ServletExec as your JSP engine, the BMC Remedy Mid Tier Setup dialog box appears. Go to the next section.
If you chose another JSP engine, the installer begins to install mid tier files. Go to “Completing the installation” on page 55.
Installing ServletExec
This section describes how to install ServletExec. Skip this section if you are using another JSP engine and you did not select ServletExec in the Select JSP Engine screen in step 13 on page 46.
� To install ServletExec
1 If you chose ServletExec as your JSP engine and you do not have a compatible version installed, click Yes in the BMC Remedy Mid Tier Setup dialog box to begin the ServletExec installation.
If you chose ServletExec as your JSP engine and you have a compatible version already installed, go to “Completing the installation” on page 55.
Windows—Installing BMC Remedy Mid Tier and ServletExec � 53
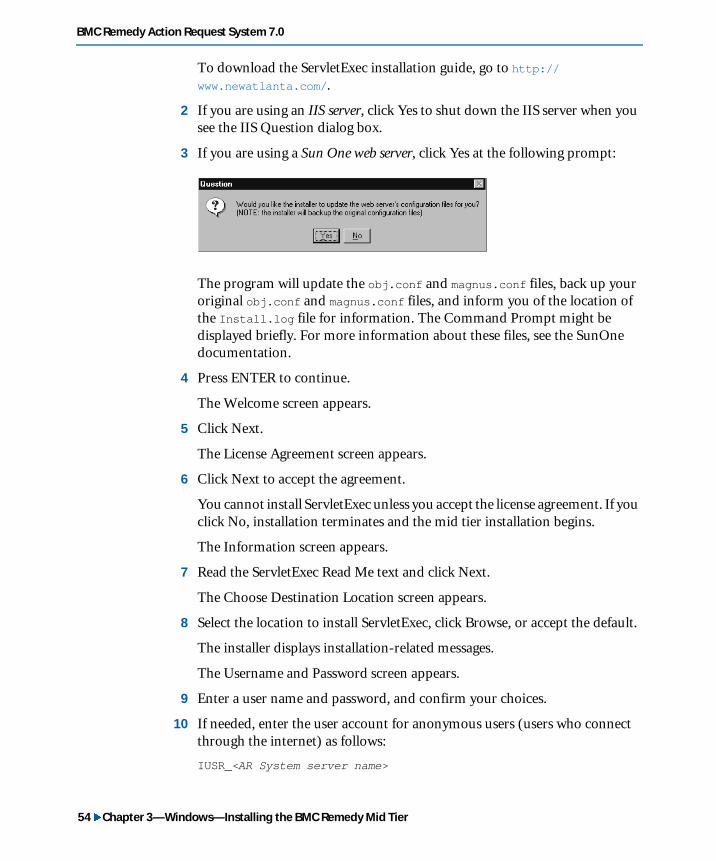
BMC Remedy Action Request System 7.0
To download the ServletExec installation guide, go to http://www.newatlanta.com/.
2 If you are using an IIS server, click Yes to shut down the IIS server when you see the IIS Question dialog box.
3 If you are using a Sun One web server, click Yes at the following prompt:
The program will update the obj.conf and magnus.conf files, back up your original obj.conf and magnus.conf files, and inform you of the location of the Install.log file for information. The Command Prompt might be displayed briefly. For more information about these files, see the SunOne documentation.
4 Press ENTER to continue.
The Welcome screen appears.
5 Click Next.
The License Agreement screen appears.
6 Click Next to accept the agreement.
You cannot install ServletExec unless you accept the license agreement. If you click No, installation terminates and the mid tier installation begins.
The Information screen appears.
7 Read the ServletExec Read Me text and click Next.
The Choose Destination Location screen appears.
8 Select the location to install ServletExec, click Browse, or accept the default.
The installer displays installation-related messages.
The Username and Password screen appears.
9 Enter a user name and password, and confirm your choices.
10 If needed, enter the user account for anonymous users (users who connect through the internet) as follows:
IUSR_<AR System server name>
54 �Chapter 3—Windows—Installing the BMC Remedy Mid Tier

Installing and Administering BMC Remedy Mid Tier
11 Click Next.
The InstallShield Wizard Complete screen appears.
12 Click Finish to complete the ServletExec installation.
The ServletExec Read Me information is displayed in a text file.
13 Read the text and close the file.
The installer displays installation-related messages.
Note: If you are performing a new install, go to “Completing the installation.”
The Maintenance Complete screen appears.
14 Click Finish to complete the installation.
Completing the installation
Skip this section if the installer has installed Servlet 5.0 (see “Installing ServletExec” on page 53).
Follow the steps in this section to complete the installation.
� To complete the installation
1 In the BMC Remedy Mid Tier 7.0 screen that appears, select Yes to restart your computer.
Choose No to restart your computer later.
2 Click Finish to complete the installation.
Installing ARWebReportViewer separately
If you are using BusinessObjects Enterprise XI, you can install the ARWebReportViewer (a web application that enables users to view Crystal reports) with the mid tier.
If you want to run the mid tier and Crystal reports on separate machines, complete the following steps.
Completing the installation � 55

BMC Remedy Action Request System 7.0
� To install the mid tier and ARWebReportViewer on separate machines
1 On the first machine, run the mid tier installer as described in “Installing the mid tier” on page 43, but select only MidTier on the Select Features screen, and complete the installation.
2 On the second machine (where the Crystal Management server is located), run the mid tier installer, but select only AR Crystal Web Application on the Select Features screen, and complete the installation.
Figure 3-10: Select Features screen
For the remainder of the installation, you will see most of the screens are the same as those outlined in “Installing the mid tier” on page 43.
56 �Chapter 3—Windows—Installing the BMC Remedy Mid Tier

Chapter
4
After the installationAfter you install the mid tier, you can finish the process by changing the password. You might also need to change the port number or update permissions.
The following topics are provided:
� Postinstallation tasks (page 58)
� Uninstalling the mid tier and ServletExec (page 60)
� Starting and stopping ServletExec/AS manually (page 62)
� Troubleshooting the mid tier installation (page 64)
After the installation � 57
BMC Remedy Action Request System 7.0
Postinstallation tasks
This section describes tasks you should complete after you install the mid tier:
� “Changing the mid tier configuration password” on page 58
� “Changing the ServletExec port number” on page 58
� “Changing permissions for an Apache web server” on page 59
Changing the mid tier configuration password
Consider changing the mid tier configuration password after you complete the installation.
� To change the mid tier configuration password
1 Start the Mid Tier Configuration Tool in a browser.
The URL is http://<web_server>:<port>/arsys/shared/config/config.jsp.
2 In the login screen, enter the default password (arsystem).
3 Click Change Password in the left panel.
4 Enter your new password.
Changing the ServletExec port number
Complete this section if all of the following conditions apply to your configuration:
� You are using ServletExec/AS.
� You installed both ServletExec and a Sun One web server on port 8888.
� You did not change the Sun One web server port number.
� To change the ServletExec port number
1 Stop ServletExec.
2 Change the port in the startServerExec, stopServerExec, and web server obj.conf files.
58 �Chapter 4—After the installation

Installing and Administering BMC Remedy Mid Tier
On Windows, use the Web Server Administration Server to change the port number.
3 Restart ServletExec.
On HP-UX, AIX, or Linux, start ServletExec/AS manually, as described in “Starting and stopping ServletExec/AS manually” on page 62.
4 Refresh the Sun One web server.
You must refresh the web server after you install the mid tier so that updates to the configuration file will take effect.
For information about refreshing the Sun One web server, see your Sun documentation.
Changing permissions for an Apache web server
When you install ServletExec separately (that is, if you do not choose to install ServletExec as part of the mid tier installation), the ownership and group name for ServletExec installation directories is root. To run correctly, the group name for the StartServletExec script must be the same as those for the mid tier and web server.
The download of Apache installs with root directory ownership. To run a secure website, the directory and file group permissions for the web server, the runapache script, and the mid tier should all be set to the same web group ID.
� To change permissions in the ServletExec directory
1 Change to the ServletExec installation directory:
# cd <ServletExec_install_dir>
2 Change the ownership of the ServletExec directory, all subdirectories, and files to root by using the recursive option:
# chown -R root <ServletExec_install_dir>
3 Change the group name of the ServletExec directory, all subdirectories, and files to root by using the recursive option:
# chgrp -R <Web_Server_Group> <ServletExec_install_dir>
For more information, see the ServletExec documentation installed with the product: <ServletExec_install_dir>/ServletExecAS/Documentation.
Postinstallation tasks � 59

BMC Remedy Action Request System 7.0
Uninstalling the mid tier and ServletExec
The following procedures describe how to uninstall the mid tier and ServletExec on UNIX and Windows.
The uninstallation procedures included here describe only ServletExec. If you installed the mid tier with another JSP engine, see that product’s documentation for information.
� To uninstall the mid tier on UNIX
1 Navigate to the parent directory of the mid tier installation directory.
2 Delete the installation directory.
For example:
rm /etc/arinstall/conf/midtier.conf
WARNING: Use the rm command with caution. You cannot retrieve what you remove with that command.
� To uninstall the mid tier (and ServletExec) on Windows
1 Stop ServletExec.
2 Stop the web server.
3 Choose Start > Settings > Control Panel.
4 Double-click the Add/Remove Programs icon.
The Add/Remove Programs screen appears.
5 Select Action Request System Mid Tier from the list of applications.
6 Click Add/Remove.
The uninstallation screen appears.
7 Click OK to confirm your selection.
WARNING: Applications that do not use the registry might use a shared file. Do not remove a file if you are not sure if it is shared. If you do not remove shared files, you can remove them manually.
60 �Chapter 4—After the installation
Installing and Administering BMC Remedy Mid Tier
Note: If you choose not to remove all DLLs, some mid tier files will remain on the system. You can inspect the uninstall log file and remove files manually. Applications are not uninstalled by the mid tier uninstallation program.
� To uninstall the ServletExec/ISAPI or ServletExec/NSAPI
1 Stop the Sun One web server.
2 Delete the ServletExec installation directory.
3 Remove lines from the obj.conf file.
For more information, see “Checking the mid tier uninstall on UNIX” on page 62
� To uninstall ServletExec/AS
1 If you are using a copy of ServletExec that was installed separately from the mid tier, stop the ServletExec process. You can stop ServletExec by issuing the ./StopServletExec command in the following directory:
<ServletExec_install_dir>/ServletExecAS/se-<instance_name>
You can run this command while logged in as root. You do not need to assume the web user ID.
2 Stop the web server.
3 Uninstall ServletExec installer.
a Run the ServletExec installer.
b At the prompt for the installation directory, choose the existing ServletExec installation directory.
You will be prompted to remove ServletExec or install a new instance.
c Choose the option to remove ServletExec.
4 Remove the mid tier directory.
Uninstalling the mid tier and ServletExec � 61

BMC Remedy Action Request System 7.0
Checking the mid tier uninstall on UNIX
When you uninstall, you must make sure that you removed all components.
For Solaris with Sun One web server
Remove the following lines from the obj.conf file:
Init fn="load-modules" shlib=" /opt/SUNWwbsvr/ServletExecNSAPI/bin/ServletExecNSAPI.so"funcs="ServletExecInit,ServletExecFilter,ServletExecService"Init fn="ServletExecInit"Service method="(GET|HEAD|POST)" type="magnus-internal/nac" fn="ServletExecService"
For Sun One web server and Apache
For information about removing the web server configuration file entries, see your Sun One and Apache documentation.
Starting and stopping ServletExec/AS manually
If you installed the mid tier and the version of ServletExec that is bundled with it in the following configurations, use the procedure in this section to start ServletExec manually after you install the mid tier:
� Apache web server on Solaris, HP-UX, AIX, or Red Hat Linux
� Sun One web server on HP-UX or AIX
The procedure assumes that ServletExec/AS has been installed.
Note: If you choose to install the mid tier with ServletExec/AS in any other configuration, manual configuration of the web server and JSP engine is required. These configurations will not be supported.
� To start ServletExec/AS manually
1 Navigate to the following directory:
cd <servexec_5.0_as_install_dir>/ServletExecAS/se-<hostname_instance>
2 Assume the UNIX web user ID.
su <webuserid>
62 �Chapter 4—After the installation

Installing and Administering BMC Remedy Mid Tier
The web user ID (UID) is generally nobody, except on HP-UX.
For HP-UX, another UID must be created for the web user account (for example, UID = web, GID = web).
3 Start ServletExec.
./StartServletExec &
This command starts ServletExec/AS in the background.
4 Issue the exit command to assume your previous user ID (root).
5 Verify that ServletExec/AS is licensed and functioning.
a Open http://<host_name>:<port_number>/servletexec/admin in your browser.
b Use the BMC Remedy Mid Tier Configuration Tool to perform a few basic operations.
� To stop ServletExec/AS manually
� Issue the ./StopServletExec command in the following directory:
<ServletExec_install_dir>/ServletExecAS/se-<hostname_instance>
You can run this command while logged in as root. You do not need to assume the web user ID.
Starting and stopping ServletExec/AS manually � 63

BMC Remedy Action Request System 7.0
Troubleshooting the mid tier installation
This section describes procedures to troubleshoot problems with the mid tier installation.
Troubleshooting the ServletExec installation
If you encounter problems with ServletExec, make sure that the product installed successfully. To do so, verify the registration, and then verify the virtual settings, as described in the following procedures.
� To verify the ServletExec registration and settings
1 Open a browser and go to http://<web_server>/servletexec/admin.
This URL requires a user name and password (the same user name a password required during the install). The default user is admin, and the default password is NULL (blank).
On Windows, you can also open this page in either of the following ways:
� For IIS, on your Windows desktop, choose Start > Programs > New Atlanta ServletExec 5.0 ISAPI > ServletExec Admin.
� For Sun One, on your Windows desktop, choose Start > Programs > New Atlanta ServletExec 5.0 NSAPI > ServletExec Admin.
2 Open your ServletExec Admin page.
3 Verify that a license key appears in the License Key field.
If no key appears, contact Customer Support.
4 Click classpath under Virtual Machine in the left panel.
5 Verify that the tools.jar file appears in the classpath list.
6 Click Manage under the Web Applications in the left panel.
7 Verify that the web application ARSYSTEM appears in the list.
� To verify virtual options
1 Choose Web Application > Manage on the left panel.
2 Choose ARSYSTEM under the Configure column.
64 �Chapter 4—After the installation

Installing and Administering BMC Remedy Mid Tier
3 Fill in the following information:
� Application Name: ARSYSTEM
� URL Context Path: /arsys/
� Location: <File system path for the mid tier install directory>
Note: To configure the mid tier, access the configuration tool at: http://<host>/<contextpath>/shared/config/config.jspwhere <host> is the name of the web server and <contextpath> is the path representing the location of the mid tier (arsys by default). Use arsystem as the default login password.
For information about mid tier settings, see Chapter 5, “Configuring the mid tier.”
Recovering a failed installation of ServletExec on UNIX
If ServletExec fails during installation on UNIX, you can manually install it.
� To manually install ServletExec on UNIX
1 Obtain the adaptor source from the NewAtlanta ftp site.
The source comes as part of the hotfix package, which can be found at ftp://ftp.newatlanta.com/public/servletexec/5_0/hotfix. Open the most recent folder at that site, and download the appropriate zip file.
2 Execute the following command:
/usr/local/apache2.0.49/bin/apxs -i -a -c -n servletexec mod_servletexec2.c
3 Modify the /usr/local/apache2.0.49/conf/http.conf file to reflect the following information:
ServletExecAdapterConfigFile"/usr/local/NewAtlanta/ServletExecAS/config/webadapter.properties"
Note: Remember where you will install ServletExec AS because you will need to provide this path during the ServletExec installation.
Troubleshooting the mid tier installation � 65

BMC Remedy Action Request System 7.0
Installing the mid tier into a separate directory
If you install the mid tier in the same directory as other AR System components, you will see the following error message:
Error. The server encountered an unexpected condition which prevented it from fulfilling the request.
If you see this message, uninstall the mid tier and reinstall it into its own separate directory.
Troubleshooting Java SDK
If you have a valid Java SDK installed, but the mid tier installer warns you that the SDK is not found or is not valid, the registry information for Java SDK might be corrupt. To fix the problem, simply uninstall and reinstall the Java SDK. Then, run the mid tier installer again.
Note: Some web environments such as WebSphere, Sun One, or Oracle AS might install their own Java SDK which is not registered globally, thus mid tier installer might report that no Java SDK was found. If this is the case, you can ignore the error message and continue installing mid tier.
Linux—Changing the group ID value
You might receive the following security-related error message when you install the mid tier on Linux with Apache:
chgrp: invalid group name '#-1'Error running the following commandchgrp -R #-1 /usr/ar/mid-tierYou will need to manually run this command after theinstallation has completed. See the install log/use/tmp/mt_install.log for details
If you see this error, enter the correct web server group ID in the Group line of the httpd.conf file, located in the Apache installation directory. If you do not make this change, you will be unable to save changes you make to the Mid Tier Configuration Tool settings. Obtain the correct group ID from your web server administrator.
66 �Chapter 4—After the installation

Chapter
5
Configuring the mid tierTo configure the BMC Remedy Mid Tier, you will use the BMC Remedy Mid Tier Configuration Tool. The following topics are provided:
� Configuring the BMC Remedy Mid Tier through a firewall (page 68)
� Accessing the Mid Tier Configuration Tool (page 70)
� Overview of configuration settings (page 71)
� General settings (page 74)
� AR Server settings (page 80)
� Report settings (page 87)
� Web service settings (page 91)
� Log settings (page 93)
� Change password (page 97)
� Browser settings (page 98)
� Configuring Flashboards data points (page 98)
Configuring the mid tier � 67
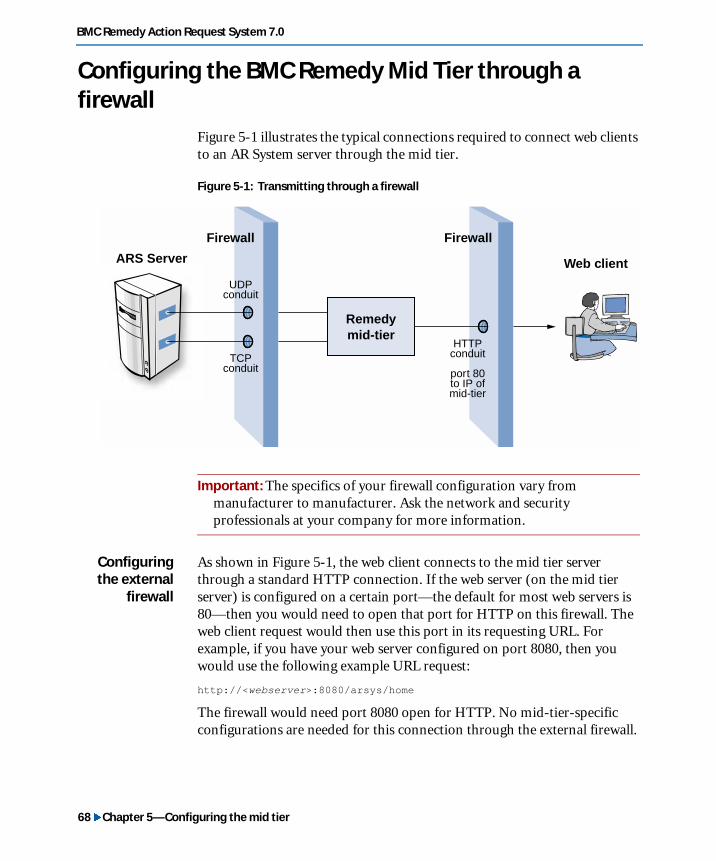
BMC Remedy Action Request System 7.0
Configuring the BMC Remedy Mid Tier through a firewall
Figure 5-1 illustrates the typical connections required to connect web clients to an AR System server through the mid tier.
Figure 5-1: Transmitting through a firewall
Important: The specifics of your firewall configuration vary from manufacturer to manufacturer. Ask the network and security professionals at your company for more information.
Configuringthe external
firewall
As shown in Figure 5-1, the web client connects to the mid tier server through a standard HTTP connection. If the web server (on the mid tier server) is configured on a certain port—the default for most web servers is 80—then you would need to open that port for HTTP on this firewall. The web client request would then use this port in its requesting URL. For example, if you have your web server configured on port 8080, then you would use the following example URL request:
http://<webserver>:8080/arsys/home
The firewall would need port 8080 open for HTTP. No mid-tier-specific configurations are needed for this connection through the external firewall.
ARS Server
Firewall
Remedymid-tier
Firewall
Web client
HTTPconduit
port 80to IP ofmid-tier
TCPconduit
UDPconduit
68 �Chapter 5—Configuring the mid tier
Installing and Administering BMC Remedy Mid Tier
Configuringthe internal
firewall
The mid tier server connects to the AR System server using a TCP connection. If there is a firewall between the mid tier and the AR System server, you must allow traffic through the firewall on the TCP port on which AR System listens.
To enable these connections through the firewall, the AR System server and the mid tier must be configured to communicate on the proper ports. To configure the mid tier to connect to the AR System server, perform the following steps:
Step 1 Set the AR System server to use a specific TCP port in BMC Remedy Administrator.
Because you are configuring the mid tier to use a specific port, registering the server with portmapper is optional.
Step 2 Ask your network administrator to open the port on which the AR System server is listening on the internal firewall for TCP.
For more information about assigning a specific port number in the Server TCP/IP Port box, see the Configuring guide.
Step 3 In the Mid Tier Configuration Tool, select AR Server Settings, and then set the Port# field to the AR System configuration.
These settings allow the mid tier to connect to the AR System server using the port specified.
For information about the Mid Tier Configuration Tool, see “Accessing the Mid Tier Configuration Tool” on page 70.
Configuring the BMC Remedy Mid Tier through a firewall � 69

BMC Remedy Action Request System 7.0
Accessing the Mid Tier Configuration Tool
The Mid Tier Configuration Tool enables you to configure a variety of mid tier settings from a browser. For example, you can add or modify AR System server information; add, delete, or change the configuration password; update cache policy information; and specify user authentication for web services.
You can access the Mid Tier Configuration Tool in one of three ways:
� Open a browser and enter the following URL:
http://<host_name>:<port>/<contextpath>/shared/config/config.jsp
where:
<host_name> is the name of the host machine for the mid tier.
<port> is an optional port number; it is required if the web server is not using the default port (port 80).
<contextpath> is the path representing the location of the mid tier in the JSP engine (arsys by default).
� If the mid tier is installed on the local computer in the default directory, enter the following URL in your browser:
http://localhost/arsys/shared/config/config.jsp
For this the URL to work, localhost must be correctly entered in the hosts file.
� On a Windows computer where the mid tier is installed on the local computer, choose Start > Programs > Action Request System > BMC Remedy Mid Tier > Configure ARSYSTEM on Localhost.
When the Login page appears, enter the login password, and click Login. If you have not changed the password yet, the default password is arsystem.
After you log in, the Mid Tier Configuration Tool Overview page appears. It provides a read-only display of the current settings for your installation. Use the navigation pane at the left to select configuration tasks.
70 �Chapter 5—Configuring the mid tier

Installing and Administering BMC Remedy Mid Tier
Using the Mid Tier Configuration Tool with a load balancer
If you are using the Mid Tier Configuration Tool with a load balancer, you must use the web server’s real IP address, not a virtual IP address, to open the Mid Tier Configuration Tool. Explicitly configure each mid tier instance directly, not through the load balancer’s virtual IP. The Mid Tier Configuration Tool will not function as expected if you use a virtual server to open it.
Each web server will have its own mid tier. You must configure each mid tier individually, and you must configure each mid tier identically.
Also, it is important to configure the load balancer for session affinity—sometimes called the “sticky” setting on some load balancers—so that all activity for one session is associated with the same web server. A persistent session allows login content to be maintained. Session migration between JSP engine instances is not supported.
MIME (Multipurpose Internet Mail Extensions) types
If you have an application that requires mapping to another application to view it, you can set MIME types in the servlet engine configuration, typically using the graphical user interface. You can also set MIME types manually by adding them to the web.xml file.
Overview of configuration settings
This section explains the configuration settings for the mid tier that you can specify and update using the Mid Tier Configuration Tool. To access the pages for these settings, click the appropriate links in the navigation pane. Step-by-step instructions for configuring these settings are also provided in Mid Tier Configuration Tool help.
The Overview read-only page displays the following information about mid tier system settings.
Overview of configuration settings � 71

BMC Remedy Action Request System 7.0
Figure 5-2: Mid Tier Configuration Tool—Overview page
Setting Value
Mid tier system information
Mid Tier Version The version of the mid tier that is installed.
Installation Directory The directory path being used for your BMC Remedy Mid Tier installation.
Web Server Information The product name of the web server being used with this installation of AR System (for example, Microsoft IIS) and the product name of the Java servlet engine being used with this installation of AR System (for example, ServletExec 5.0).
Operating System Name The operating system used on your computer (for example, Windows 2003).
Java Version The version of the Java Software Development Kit (SDK) that is installed on your computer (for example, 1.4.2).
72 �Chapter 5—Configuring the mid tier
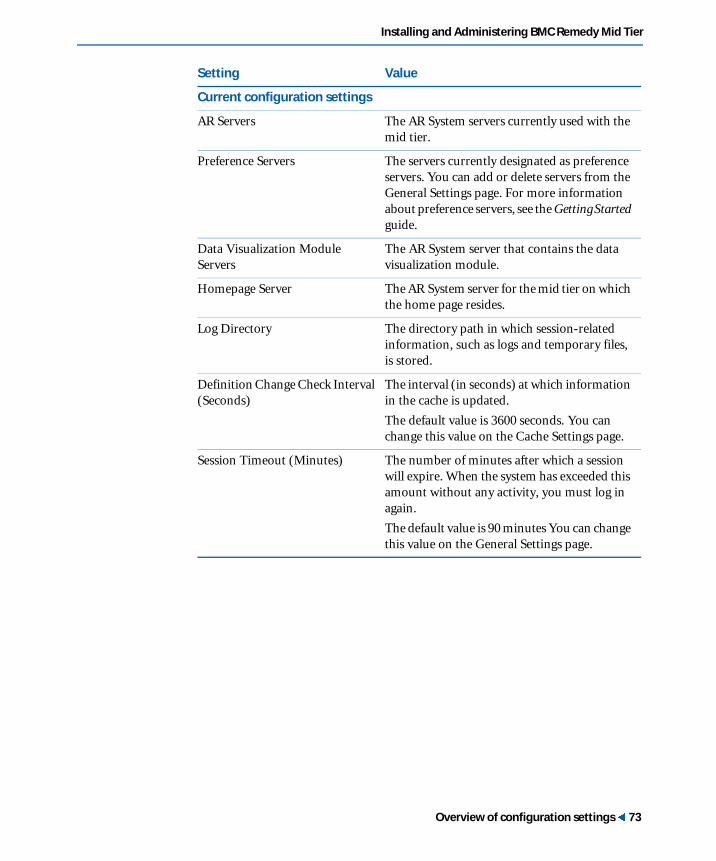
Installing and Administering BMC Remedy Mid Tier
Current configuration settings
AR Servers The AR System servers currently used with the mid tier.
Preference Servers The servers currently designated as preference servers. You can add or delete servers from the General Settings page. For more information about preference servers, see the Getting Started guide.
Data Visualization ModuleServers
The AR System server that contains the data visualization module.
Homepage Server The AR System server for the mid tier on which the home page resides.
Log Directory The directory path in which session-related information, such as logs and temporary files, is stored.
Definition Change Check Interval (Seconds)
The interval (in seconds) at which information in the cache is updated.
The default value is 3600 seconds. You can change this value on the Cache Settings page.
Session Timeout (Minutes) The number of minutes after which a session will expire. When the system has exceeded this amount without any activity, you must log in again.
The default value is 90 minutes You can change this value on the General Settings page.
Setting Value
Overview of configuration settings � 73

BMC Remedy Action Request System 7.0
General settings
Click the General Settings link in the navigation pane to access the General Settings page. Use this page to update configuration settings, such as session timeout intervals, preference servers, Home page server, and reporting information. A bold label with an asterisk indicates a required field.
Figure 5-3: Mid Tier Configuration Tool—General Settings page
74 �Chapter 5—Configuring the mid tier

Installing and Administering BMC Remedy Mid Tier
General
Setting Description
Session Timeout (Minutes)
The number of minutes after which the current session will expire. When the system has exceeded this amount without any activity, you must log in again.
If you are entering data in a form, that data might be lost if the session times out before you submit the data. To prevent possible data loss after a timeout, open a new instance of the browser window with the same login, and copy and paste the data to a new form.
If users are experiencing frequent timeouts, increase the session timeout. The default value is 90 minutes; there is no upper or lower limit.
The entry in the Session Timeout in Minutes field of the AR System User Preferences form (Advanced tab in the web view, Web tab in the standard view) will override this setting for a specific user.
Preference Servers The name of the AR System server designated as a preference server. You can specify more than one server if you need multiple preference servers to support different departments or business units. If you enter more than one preference server, the system searches the list until it finds the first preference server that matches the user name and uses that server as the preference server.
To add or update preference servers, enter the name of each server you want to designate as a preference server. If you are adding more than one server, separate each name with a comma (for example, mars,jupiter,saturn).
A fully qualified server name is not valid in this field.
Note: All servers designed as preference servers must be included in the AR System Server list on the AR Server Settings page.
Data Visualization Module Servers
The name of the AR System server designated as a data visualization module server. You can specify more than one server if you need to copy the modules to another server to serve as a backup in case the first module server goes down.
To add or update module servers, enter the name of each server you want to designate as a module server. If you are adding more than one server, separate each name with a comma (for example, mars, jupiter, saturn).
A fully qualified server name is not valid in this field.
Note: All servers designed as module servers must be included in the AR System Server list on the AR Server Settings page.
For information about data visualization fields, see the Integrating with Plug-ins and Third-Party Products guide.
General settings � 75

BMC Remedy Action Request System 7.0
Homepage Server Select the server that contains the Home page you want to open in the browser when the user logs in.
The Home page URL:
http://<mid_tier_server>/<context_path>/home
The Home page server must already be added to the list of mid tier servers on the AR Server Settings page. For information about how to add a server, see “To add a new server” on page 82.
The mid tier will search this server for the designated or default Home page. This server will be used globally if you have not selected a Home page server in the AR System User Preference form. A Home page server specified in the AR System User Preferences form will take precedence over the server set here.
The form used for the Home page has the following precedence on a specific server:
1 A form designated in the AR System User Preference form.
2 A default Home page designated in the Server Information dialog box in BMC Remedy Administrator.
3 The default Home page installed with AR System.
For more information about specifying a server and a Home page, see the Form and Application Objects guide.
Authentication Server
Select the server that the mid tier uses to authenticate the user. If you specify an authentication server, the mid tier will authenticate with the specified server only. The authentication server must already be added to the list of mid tier servers on the AR Server Settings page.
Prefer standard/windows views
One of the settings evaluated when the system is progressing through the view selection algorithm; it indicates whether you want a standard view or a web view to be the default for the view type selection.
If the check box is:
� Selected—If no view is specified, the browser displays the standard view of the form.
� Cleared (the default)—If no view is specified, the browser displays the web view of the form, if one is available. If no web view is available, the standard view is displayed.
See “How a view is selected” on page 143 and the Form and Application Objects guide for more information about how a view is selected for the user.
Setting Description
76 �Chapter 5—Configuring the mid tier
Installing and Administering BMC Remedy Mid Tier
Enable object list Indicates whether you want to enable the AR System Mid Tier Object List that displays all the forms and applications that can be accessed by the mid tier.
The object list is displayed automatically when the system cannot determine the specific form to load because an incomplete URL is entered into the browser or an application does not define a primary form.
To enable the AR System Mid Tier Object List, you must:
1 Add your Home page server to the list of mid tier servers on the AR Server Settings page of the Mid Tier Configuration Tool.
2 Set the Home page server on the General Settings page of the Mid Tier Configuration Tool.
3 Import the definition files to your Home page server.
4 Select the Enable object list check box on the General Settings page of the Mid Tier Configuration Tool.
Importing the definition files
Import the definition files into your Home page server. Definition files of different locales are installed with the mid tier; the default installation is:
C:\\Program Files\AR System\Mid-Tier\samples\ARSystemMidTierObjectList*.def
Import the ARSystemMidTierObjectList.def file to your Home page server by using Tools > Import Definitions > From Definition File in BMC Remedy Administrator. This will provide the default view and the related workflow in English. If you require only the English view of the form, you need to import only this file.
For a localized view, you must import the appropriate localized .def file in addition to using Tools > Import Definitions > From View Definition File in BMC Remedy Administrator. Browse to the samples directory, and select the .def file for the locale you require. The naming convention is as follows:
� ARSystemMidTierObjectList_fgis.def—Contains French, German, Italian and Spanish views.
� ARSystemMidTierObjectList_ja.def—Contains the Japanese view.
� ARSystemMidTierObjectList_ko.def—Contains the Korean view.
� ARSystemMidTierObjectList_zh_CN.def—Contains the Simplified Chinese view.
Setting Description
General settings � 77
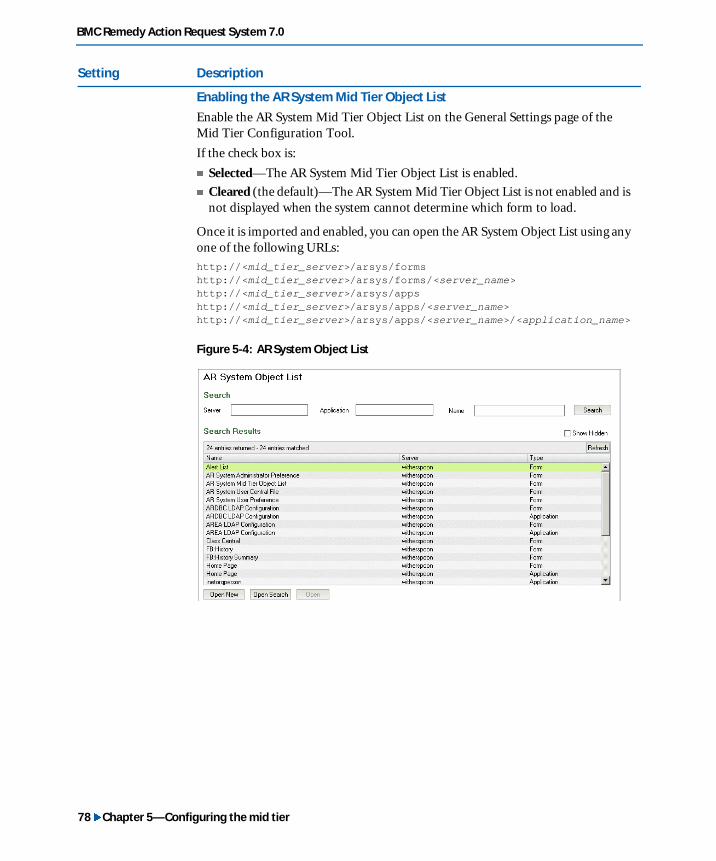
BMC Remedy Action Request System 7.0
Enabling the AR System Mid Tier Object List
Enable the AR System Mid Tier Object List on the General Settings page of the Mid Tier Configuration Tool.
If the check box is:
� Selected—The AR System Mid Tier Object List is enabled.
� Cleared (the default)—The AR System Mid Tier Object List is not enabled and is not displayed when the system cannot determine which form to load.
Once it is imported and enabled, you can open the AR System Object List using any one of the following URLs:
http://<mid_tier_server>/arsys/formshttp://<mid_tier_server>/arsys/forms/<server_name>http://<mid_tier_server>/arsys/appshttp://<mid_tier_server>/arsys/apps/<server_name>http://<mid_tier_server>/arsys/apps/<server_name>/<application_name>
Figure 5-4: AR System Object List
Setting Description
78 �Chapter 5—Configuring the mid tier
Installing and Administering BMC Remedy Mid Tier
Opening forms and applications with the AR System Object List
� To open a form, select it and click the appropriate buttons to open in New or Search mode.
� To open an application, select the application and click the Open button.
Searching
� To search for an application by name, enter the name of the application in the Application field and click Find. This field is case sensitive.
� To search for an application or form by keyword, enter a word or a phrase from the name in the Search field and click Find. The search is conducted only on the Name column. Use the following criteria:
� The name of a form or any sequence of letters contained in the form or application name. For example, if the form name is Purchase Requisition and you enter requ, the form is found.
� Multiple, non-sequential words or search operators are not valid as keywords.
Choosing how forms and applications are displayed
All the forms and applications on all servers configured by the mid tier are listed in the table by default. To restrict the list to a specific server, enter the server name in the Server field, and click Find.
You can arrange the list of forms and applications by Name, Server, or Type by clicking on the appropriate column heading.
The Show Hidden check box displays hidden objects and is only available to administrators.
Setting Description
General settings � 79

BMC Remedy Action Request System 7.0
Server connection pool
The server connection pool represents a list of servers that share available connections. A number of connections can be reserved for a server, thus constituting a “pool” for that server.
When a connection is requested for a server, the system searches for a free connection in the server’s pool and if one is available, it is used for the request. When the request is completed, the connection is returned to the pool. If there is no available connection in the server’s pool, a new connection is allocated, subject to the constraints set here. When the request is completed, the connection is added to the server’s pool.
You must restart the mid tier for changes to the server connection pool setting to take effect.
AR Server settings
From the AR Server Settings page, you can add, delete, or modify information about servers used by the mid tier. A bold label with an asterisk indicates a required field.
The fields on this page are read-only except for the Delete/Edit field.
Setting Description
Maximum connections per server
Enter a value to set a limit for the total number of connections for any server. If the number of connections for the requested server does not exceed the value entered here, a connection is allocated to that server.
The default is 80 connections per server.
80 �Chapter 5—Configuring the mid tier
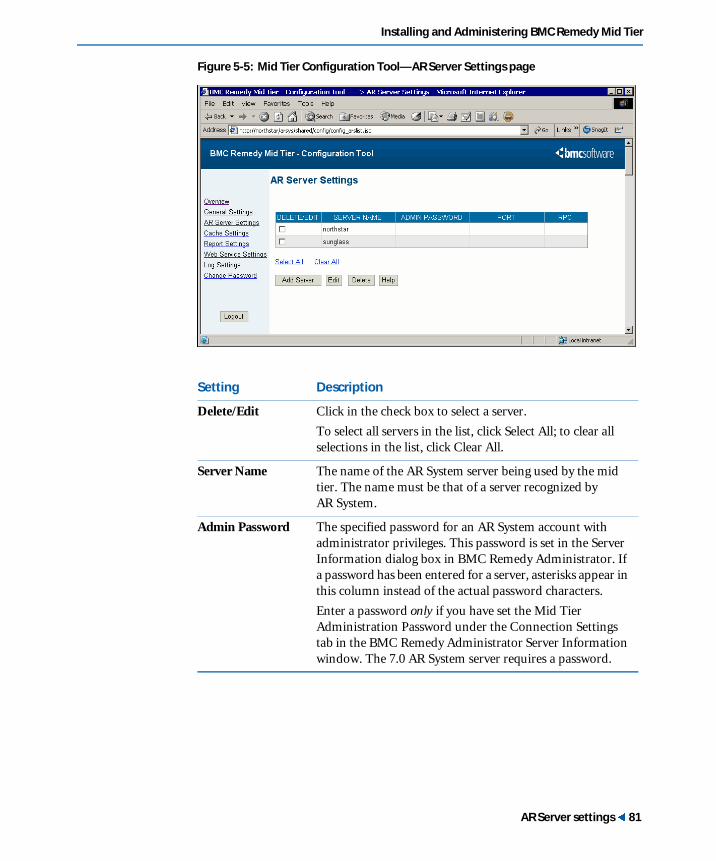
Installing and Administering BMC Remedy Mid Tier
Figure 5-5: Mid Tier Configuration Tool—AR Server Settings page
Setting Description
Delete/Edit Click in the check box to select a server.
To select all servers in the list, click Select All; to clear all selections in the list, click Clear All.
Server Name The name of the AR System server being used by the mid tier. The name must be that of a server recognized by AR System.
Admin Password The specified password for an AR System account with administrator privileges. This password is set in the Server Information dialog box in BMC Remedy Administrator. If a password has been entered for a server, asterisks appear in this column instead of the actual password characters.
Enter a password only if you have set the Mid Tier Administration Password under the Connection Settings tab in the BMC Remedy Administrator Server Information window. The 7.0 AR System server requires a password.
AR Server settings � 81
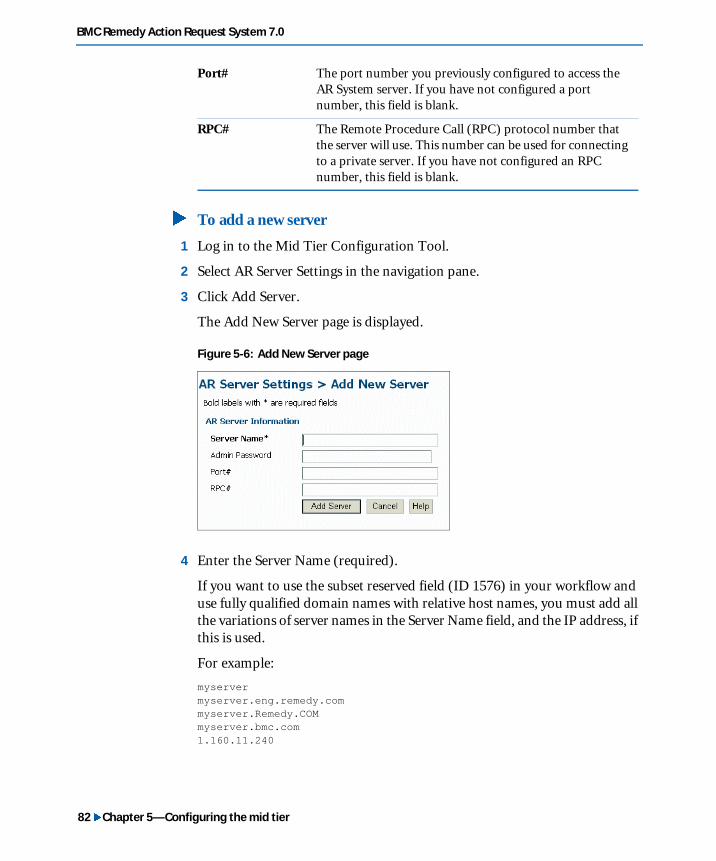
BMC Remedy Action Request System 7.0
� To add a new server
1 Log in to the Mid Tier Configuration Tool.
2 Select AR Server Settings in the navigation pane.
3 Click Add Server.
The Add New Server page is displayed.
Figure 5-6: Add New Server page
4 Enter the Server Name (required).
If you want to use the subset reserved field (ID 1576) in your workflow and use fully qualified domain names with relative host names, you must add all the variations of server names in the Server Name field, and the IP address, if this is used.
For example:
myservermyserver.eng.remedy.commyserver.Remedy.COMmyserver.bmc.com1.160.11.240
Port# The port number you previously configured to access the AR System server. If you have not configured a port number, this field is blank.
RPC# The Remote Procedure Call (RPC) protocol number that the server will use. This number can be used for connecting to a private server. If you have not configured an RPC number, this field is blank.
82 �Chapter 5—Configuring the mid tier

Installing and Administering BMC Remedy Mid Tier
For more information about reserved fields and their use, see the Form and Application Objects guide.
5 Enter an Admin Password, Port#, and RPC# for the new server.
6 Click Add Server.
After you add a server, the AR Server Settings page is redisplayed with the new server listed.
� To edit server properties
1 Log in to the Mid Tier Configuration Tool.
2 Select AR Server Settings in the navigation pane.
3 In the Delete/Edit column of the AR Server Settings page, select the check box next to the server whose properties you want to edit.
Note: You cannot edit the server name. If you need to change the name of a server, you must delete the server and add it again with the new name.
4 Click Edit.
The Edit AR Server page is displayed.
Figure 5-7: Edit AR Server page
5 In the Admin Password, Port#, or RPC# fields, make the appropriate changes.
6 Click Save AR Server to save the updates, or click Cancel to discard the updates and return to the AR Server Settings page.
AR Server settings � 83

BMC Remedy Action Request System 7.0
� To delete one or more servers
1 Log in to the Mid Tier Configuration Tool.
2 Select AR Server Settings in the navigation pane.
3 In the Edit/Delete column of the AR Server Settings page, select the check boxes next to the servers you want to delete.
To select all servers, click the Select All link.
4 Click Delete. The selected servers are deleted.
Note: If a server you have selected for deletion is being used as a preference server or a Home Page server, you must delete it from the General Settings page before you can delete it from this list.
Cache settings
Click the Cache Settings link in the left navigation pane to open the Cache Settings page.
84 �Chapter 5—Configuring the mid tier

Installing and Administering BMC Remedy Mid Tier
Figure 5-8: Mid Tier Configuration Tool—Cache Settings page
Setting Description
Definition change check interval (seconds)
The interval (in seconds) at which cache information will be automatically updated. The default value is 3600 seconds.
To change the interval, enter the new number of seconds in this field; the value must be greater than 0. If you do not want the cache to be updated, clear the Perform check box.
Perform check Indicates whether you want the cache to be updated automatically. You can still update the cache manually by clicking the Flush cache button.
If the check box is:
� Selected: The cache will be updated automatically at the interval you specify in the Definition change check interval field.
� Cleared: The cache will not be updated automatically. If the system is in the process of flushing the cache when you clear the check box, the current cache flush will continue until that session is completed.
Update Flashboard Definition Interval (Seconds)
The interval (in seconds) at which the server updates the Flashboards cache information. Set this value to 0 to disable caching.
The default value is 0.
For more information about Flashboards, see the Administering Flashboards guide.
AR Server settings � 85

BMC Remedy Action Request System 7.0
Save your changes, or click Restore Defaults before you save to restore the previous settings.
Cache table
The cache table shows information about different cached objects and how they change. It displays the following items:
� Object name—The type of object in the cache.
� Object count—The number of objects in the cache.
� Hit count—The number of times an object is found in the cache.
� Miss count—The number of times an object is not found in the cache.
� Last flush—The time that particular type of object was last flushed from the cache and the reason for the flush.
This table is useful for monitoring your application’s performance. If objects are being flushed due to server definition changes, this will cause serious performance degradation.
Resource Check Interval (seconds)
The time limit (in seconds) for which resources (such as images, .css files, and JavaScript files) can be used. The default is 300 seconds.
If a user closes a form and opens it again within the specified expiry time, the image is cached and is not downloaded again. This helps increase the mid tier’s performance.
Flush Cache Click Flush cache to update the objects already in the cache with the latest versions on the AR System server.
86 �Chapter 5—Configuring the mid tier

Installing and Administering BMC Remedy Mid Tier
Report settings
The Report Settings page enables you to specify folder locations so that users can run Crystal reports.
Figure 5-9: Mid Tier Configuration Tool—Report Settings page
Setting Description
Crystal/BO Report Engine Deployment
Specify how you are deploying your report engine. The options are:
� No Report Engine (You are using AR System reports only.)
� Crystal Enterprise 10
� BOXI/Crystal Report Server 11 on a different machine without a mid tier
� BOXI/Crystal Report Server 11 on a different machine with a mid tier
Reporting Working Directory
The default directory in which reports will be stored.
Enter the complete (absolute) path for this directory, for example:
c:\Program Files\AR System\Mid-Tier\reports
Report settings � 87

BMC Remedy Action Request System 7.0
To view reports on BusinessObjects Enterprise XI, the mid tier uses a web application called ARWebReportViewer. This application can be installed with the mid tier on the same machine as the Crystal Management Server is located, or it can be installed separately from the mid tier. If ARWebReportViewer is installed on the same machine as the mid tier, then you will see the following Report Settings page in the Mid Tier Configuration Tool.
Crystal Enterprise 10 Location
Enter the appropriate information as discussed in the following bullets. Leave this field empty if you are not using Crystal Enterprise 10.
� For IIS web servers serving Crystal Web, specify the <host_name> of the web server machine.
http://<host_name>
If you need to specify a port number other than the default, you must include it in the string as follows:
http://<host_name>:<port_number>
� For SunONE 6.1 or Apache web servers serving Crystal Web, specify the CGI path to the Crystal Web component server as:
http://<host_name>/cgi-bin/wcscgi.exe
where <host_name> is the name of the web server machine. If you need to specify a port number other than the default, you must include it in the string as follows:
http://<host_name>:port/cgi-bin/wcscgi.exe
BOXI/Crystal Reports Server 11 Location
Enter the path to BusinessObjects Enterprise XI or Crystal Reports Server XI. Leave this field empty if you are not using either of these versions.
Specify the <host_name> of the web server machine.
http://<host_name>
If you need to specify a port number other than the default, you must include it in the string as follows:
http://<host_name>:<port_number>
88 �Chapter 5—Configuring the mid tier
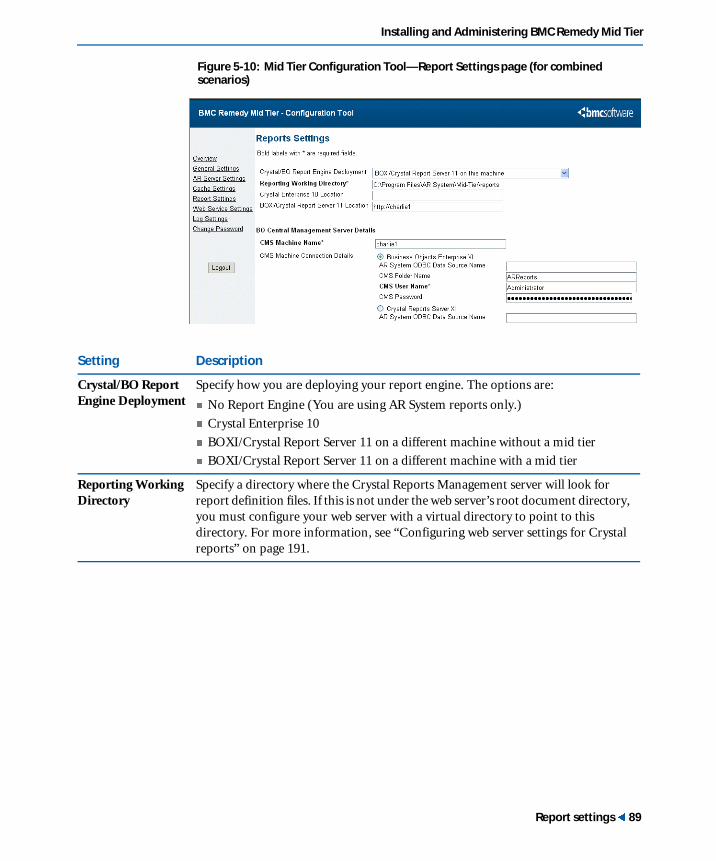
Installing and Administering BMC Remedy Mid Tier
Figure 5-10: Mid Tier Configuration Tool—Report Settings page (for combined scenarios)
Setting Description
Crystal/BO Report Engine Deployment
Specify how you are deploying your report engine. The options are:
� No Report Engine (You are using AR System reports only.)
� Crystal Enterprise 10
� BOXI/Crystal Report Server 11 on a different machine without a mid tier
� BOXI/Crystal Report Server 11 on a different machine with a mid tier
Reporting Working Directory
Specify a directory where the Crystal Reports Management server will look for report definition files. If this is not under the web server’s root document directory, you must configure your web server with a virtual directory to point to this directory. For more information, see “Configuring web server settings for Crystal reports” on page 191.
Report settings � 89
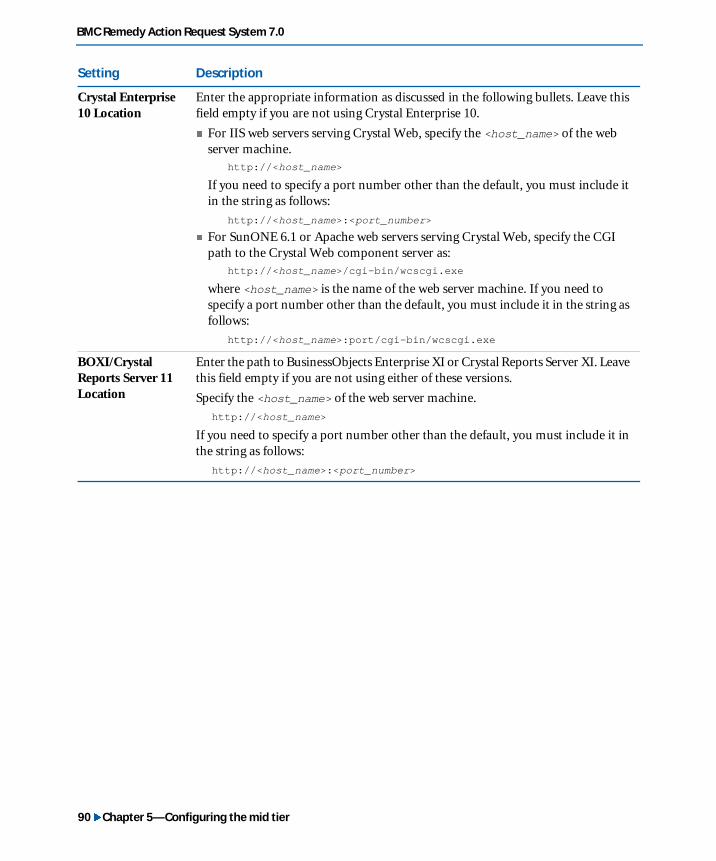
BMC Remedy Action Request System 7.0
Crystal Enterprise 10 Location
Enter the appropriate information as discussed in the following bullets. Leave this field empty if you are not using Crystal Enterprise 10.
� For IIS web servers serving Crystal Web, specify the <host_name> of the web server machine.
http://<host_name>
If you need to specify a port number other than the default, you must include it in the string as follows:
http://<host_name>:<port_number>
� For SunONE 6.1 or Apache web servers serving Crystal Web, specify the CGI path to the Crystal Web component server as:
http://<host_name>/cgi-bin/wcscgi.exe
where <host_name> is the name of the web server machine. If you need to specify a port number other than the default, you must include it in the string as follows:
http://<host_name>:port/cgi-bin/wcscgi.exe
BOXI/Crystal Reports Server 11 Location
Enter the path to BusinessObjects Enterprise XI or Crystal Reports Server XI. Leave this field empty if you are not using either of these versions.
Specify the <host_name> of the web server machine.
http://<host_name>
If you need to specify a port number other than the default, you must include it in the string as follows:
http://<host_name>:<port_number>
Setting Description
90 �Chapter 5—Configuring the mid tier

Installing and Administering BMC Remedy Mid Tier
Web service settings
The Web Service Settings page provides text fields in which to enter a user name and password for authentication when accessing web services.
For published web services used by AR System, user information such as user name, password, and domain name are passed to the service through Simple Object Access Protocol (SOAP) headers. If a user name and password cannot be found in the SOAP headers, the name and password specified in these fields are used to connect to the server where the needed web service resides. There is no default value for these fields.
CMS Machine Name
Host name of the machine where the local Crystal Reports Management server resides. Do not include the port number.
BusinessObjects Report Version
Select the report version you are using:
� BusinessObjects Enterprise XI (Managed)
� Crystal Reports Server XI (Unmanaged)
If you selected the BusinessObjects Enterprise XI version, enter information for the following fields:
� AR System ODBC Data Source Name—Name of the system DSN. If the field is blank, “AR System ODBC Data Source” (the default) is used. The ODBC driver is installed by BMC Remedy User, the mid tier, or ARWebReportViewer.
� CMS Folder Name—Name of the folder where the Crystal reports are published.
� CMS User Name and CMS Password—The user name and password of CMS. The mid tier uses this user information to log in to the CMS and publish the reports.
If you selected the Crystal Reports Server XI version, enter information for the following field:
� AR System ODBC Data Source Name—Name of the system DSN. If the field is blank, “AR System ODBC Data Source” (the default) is used. The ODBC driver is installed by BMC Remedy User, the mid tier, or ARWebReportViewer.
Setting Description
Web service settings � 91
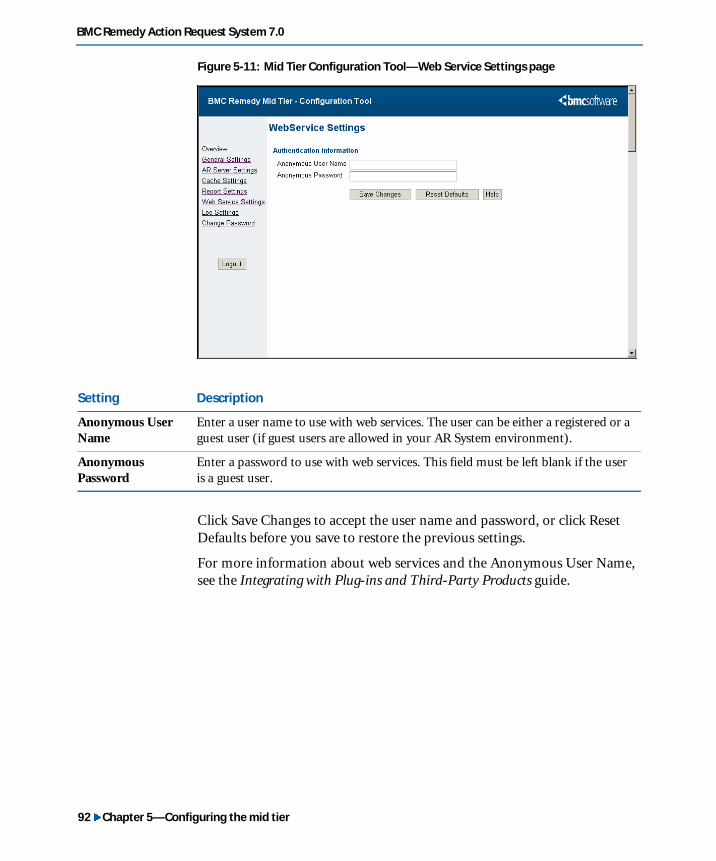
BMC Remedy Action Request System 7.0
Figure 5-11: Mid Tier Configuration Tool—Web Service Settings page
Click Save Changes to accept the user name and password, or click Reset Defaults before you save to restore the previous settings.
For more information about web services and the Anonymous User Name, see the Integrating with Plug-ins and Third-Party Products guide.
Setting Description
Anonymous User Name
Enter a user name to use with web services. The user can be either a registered or a guest user (if guest users are allowed in your AR System environment).
Anonymous Password
Enter a password to use with web services. This field must be left blank if the user is a guest user.
92 �Chapter 5—Configuring the mid tier
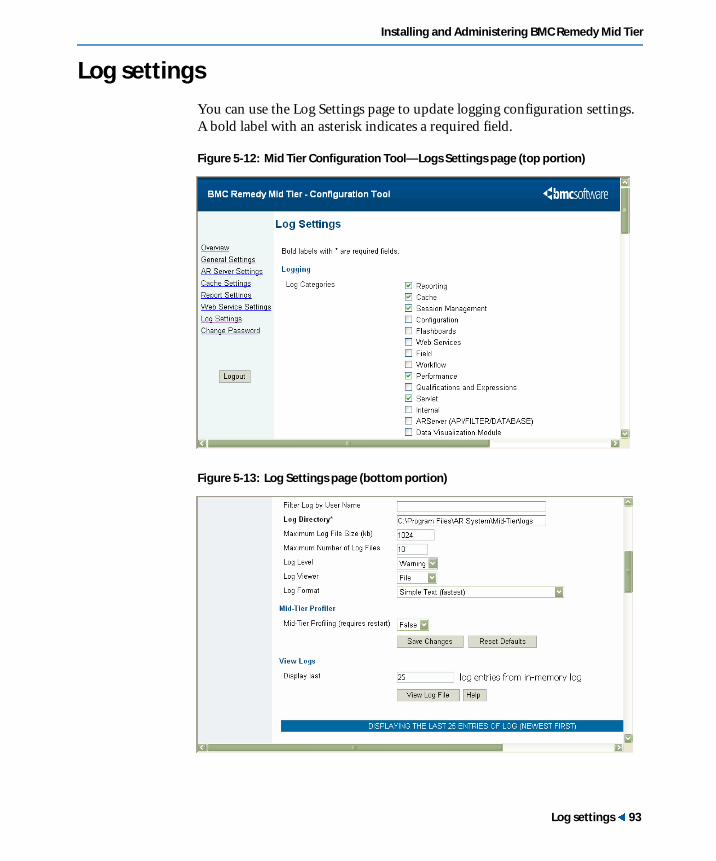
Installing and Administering BMC Remedy Mid Tier
Log settings
You can use the Log Settings page to update logging configuration settings. A bold label with an asterisk indicates a required field.
Figure 5-12: Mid Tier Configuration Tool—Logs Settings page (top portion)
Figure 5-13: Log Settings page (bottom portion)
Log settings � 93

BMC Remedy Action Request System 7.0
Logging
Setting Description
Log Categories The type of information to be stored in the log file.
To specify a category, select the check box next to the information to be stored.
� Reporting—Messages related to reporting.
� Cache—Messages related to definitions, such as forms and active links in the cache.
� Session Management—Messages related to user session construction and expiration, such as login, logout or timeout.
� Configuration—Messages related to the config.properties file, such as when it is loaded and changed.
� Flashboards—Messages related to Flashboards.
� Web Services—Messages related to web services.
� Workflow—Messages related to compilation of workflow (primarily active link actions), such as invalid active links.
� Performance—Messages related to performance, including duration of operations.
� Qualifications and Expressions— Messages related to parsing and compilation of expressions, for example, in active links.
� Servlet—Messages related to servlet handling of http requests, primarily for reporting results of back-channel requests.
� Internal—Internal logging messages.
� ARServer (API/Filter/Database)—Messages related to APIs, filters, and databases.
� Data Visualization Module—Messages related to the data visualization module.
Categories selected by default are: Reporting, Cache, Session Management, Performance, and Servlet.
Filter Log by User Name
The statements relating to the user who is logged in with this user name only are recorded. After you enter the user name and save changes, a new log file is started.
For log messages displayed on the screen, the filter will only be applied to new entries. Older entries that existed before the user name was changed will still be displayed on screen, up to the limit set in the View Logs setting.
If the field is left blank, all logs related to the current session are stored, regardless of who is logged in.
You can enter only enter one name in this field.
94 �Chapter 5—Configuring the mid tier

Installing and Administering BMC Remedy Mid Tier
Log Directory The directory in which log files are stored, for example, C:\Program Files\AR System\Mid-Tier\logs.
To change the log directory, enter the absolute (complete) path for the new directory. You cannot change the log file name.
Maximum Log File Size (kb)
The maximum size (in kilobytes) a file reaches before a backup copy is automatically made. The default size is 1024 KB. When the log file reaches this limit, a backup copy is made with the same file name (the default is armidtier.log) and an incremental number (for example, armidtier<n>.log).
Maximum Number of Log Files
The maximum number of backup files that the system will generate when the log file size exceeds the limit specified in the Maximum Log File Size.
The default is 10 backups.
Log Level The level of detail for logging information. The options are:
� Fine—Provides the highest level of detail.
� Warning—Provides a moderate level of detail. Warnings plus those errors included in the Severe level are logged.
� Severe—Provides the lowest level of detail; only server start time and error messages are logged.
The default value is Warning.
Log Viewer The method by which you want to view log files. The options are:
� Console—The log entries will be directed to the stderr (System.err) of your servlet engine.
� File—Data is saved to a file in the specified log directory.
The default value is File.
Note: If you are using ServletExec as your servlet engine, you can also view Servlet log data from your browser. To do so, enter http://<host_name>/servletexec/admin in the browser address field, then click the View Logs link in the navigation bar.
Log Format The log output is generated using the standard Java 1.4 logging API, including Simple and XML formatting. The options are:
� Simple Text—A basic text file for faster performance. It does not include stack trace information except in the case of Severe log messages.
� Detailed Text—A text file containing details such as Java class names and methods.
� XML—A file in XML format.
The default value is Simple Text.
Log settings � 95

BMC Remedy Action Request System 7.0
Mid-Tier Profiler
You can turn on the Mid-Tier Profiling feature to gather performance information.
View logs
You can view the log files that record the activity of the mid tier. If you have no log files generated, it might be because the Log Viewer setting is set to Console. Change this setting to Files to generate mid tier log files.
Setting Description
Mid-Tier Profiling A tool for profiling the client side (JavaScript) code on the mid tier. The profiler will show how much time was spent on a particular method (such as a table refresh). Changing this value requires that you restart the mid-tier server.
When the profiler is turned on, Show Profile and Clear Profile buttons appear in the mid-tier toolbar (if enabled) when forms are viewed in the browser. If you click Show Profile, a new window will display all the profiled data up to that point. If you click Clear Profile, all profiled data will be cleared from memory.
The Mid-Tier Profiling option is normally used during development of an application because when you turn on the profiler, all users will have access to the profile.
Setting Description
Display Last The number of lines you want to view from the most recent entries in the log. The default is 25.
View Log File Click to view the log file.
96 �Chapter 5—Configuring the mid tier

Installing and Administering BMC Remedy Mid Tier
Change password
You can change the password used to access the Mid Tier Configuration Tool. A bold label with an asterisk indicates a required field.
Figure 5-14: Mid Tier Configuration Tool—Change Password page
Click Change Password to accept the new configuration password, or click Clear to keep your original password.
To verify that the new configuration password is in effect, log out of the Mid Tier Configuration Tool and log in again.
Setting Description
Old Password The current configuration password.
New Password The new configuration password. The password must contain more than 5 and less than 20 characters; do not include double-byte characters. As you type, asterisks are displayed instead of the actual password characters.
Confirm New Password
The new configuration password. Re-enter the new configuration password exactly as you entered it in the New Password field.
Change password � 97

BMC Remedy Action Request System 7.0
Browser settings
For the mid tier to work properly, the browser settings for the XMLHTTP protocol between the browsers and mid tier must be set correctly.
Typically, if you simply use all the default scripting settings in MS IE and Mozilla, you should not see any problems with the mid tier. See “Browser settings for scripting and ActiveX controls” on page 125 for more information.
For the mid tier to open windows properly, users must configure their browser or pop-up window-blocking software to allow pop-up windows originating from the web server’s address.
Configuring Flashboards data points
If the number of data points plotted on a flashboard exceeds the configurable limit of 3000 set by Microsoft, you will see the error message: Cannot display a graph that contains more than {0} data points. To increase this limit, add the following to the config.properties file:
flashboards.maxDataPoints=<number of points>
For example:
flashboards.maxDataPoints=4000
The config.properties file is installed in the following directory:
<mid_tier_installation_directory>\Mid-Tier\WEB-INF\classes\config.properties
By default, <mid_tier_installation_directory> is C:\\Program Files\AR System.
98 �Chapter 5—Configuring the mid tier

Chapter
6
Setting user preferencesYou can set user and administrator preferences both locally and on the server (centralized). The following topics are provided:
� User preferences for web clients (page 100)
� Setting centralized preferences on web clients (page 100)
� Logging tab (page 105)
Setting user preferences � 99

BMC Remedy Action Request System 7.0
User preferences for web clients
Users can set individual preferences for the behavior and display characteristics of each client. These preferences can be stored locally (on the client machine) or centrally (on a designated preference server).
Users who log in to BMC Remedy User can choose to use local or centralized preferences. Centralized preferences help users who want to have the same settings and customizations available when they use multiple machines. Local preferences are used when no preference server is designated or available. Regardless of whether centralized or local preferences are used, multiple users can use the same client machine with individual preferences and customizations. For more information about user preferences for BMC Remedy User, see the Configuring guide.
Users logging in to web clients must use centralized preferences to store preferences, and these changes take effect immediately. The following section describes how to set these preferences.
Setting centralized preferences on web clients
Web client users can set preferences by opening the AR System User Preference form and submitting changes.
You can open this form in the browser by entering the following case-sensitive URL in the address field:
http://<mid_tier_server>/arsys/forms/<ar_server>/AR System User Preference
100 �Chapter 6—Setting user preferences

Installing and Administering BMC Remedy Mid Tier
Common fields
These fields reside in the non-page field portion of the AR System User Preference form.
Figure 6-1: Common area of AR System User Preference form for web settings
Form tab
Figure 6-2: Form tab of AR System User Preference form for web settings
Field Name Description
Login Name Allows the administrator to create and modify preferences for a specific user by entering the user’s login name in this field. Users can search for and modify their own preference records. The default setting is $USER$.
Short Description Allows the administrator to create and modify preferences for a specific user based upon a value in this field. Users can search for and modify their own preference records. The default setting is Preference entry for $USER$.
Setting centralized preferences on web clients � 101
BMC Remedy Action Request System 7.0
Group Name Field Name Description
On New Defines the action that a form opened in New mode takes when accessed multiple times. The options are:
� Clear All Fields—Designates that all fields on new forms are cleared when a new form is opened or when a form is reset after a request is submitted.
� Set Fields to Default Values —(Default) Designates that fields on new forms are filled with default values when a new form is opened or when a form is reset after a request is submitted.
� Keep Previous Field Values—Designates that fields on new forms are filled with the previously used values when the form is reset after a request is submitted.
� Clear—Designates that when no option is selected, the Set Fields to Default Values default is used.
102 �Chapter 6—Setting user preferences

Installing and Administering BMC Remedy Mid Tier
On Search Defines the action a form opened in Search mode takes when accessed multiple times. The options are:
� Clear All Fields—(Default) Designates that all fields on search forms are clear after you perform a search, display the records in modify or display mode, and then return to the search form without closing the form.
� Set Fields to Default Values—Designates that fields on search forms are filled with default values after you perform a search, display the records in modify or display mode, and then return to the search form without closing the form.
� Keep Previous Field Values—Designates that fields on search forms are filled with previously used values after you perform a search, display the records in modify or display mode, and then return to the search form without closing the form.
� Clear—Designates that when no option is selected, the Clear All Fields default is used.
On Search—Limit Number of Items Returned
Defines whether the number of search results returned is limited. The options are:
� No—(Default) All results are returned.
� Yes—The number specified on the User Preference form is returned.
If you choose Yes, you can specify the number of search results returned. (If you choose No, this field is disabled.)
The default value is 1000. This preference can be overridden by the server setting Max Entries Returned by GetList in the Configuration tab of the Server Information window. AR System uses the lesser of the two values.
On Open Show Advanced Search Bar
Defines whether to show the advanced search bar when a new Search window is opened.
Confirm After Creating New Request
Defines whether a confirmation dialog box appears after a new request is submitted to verify the submitted entry and the entry ID.
Group Name Field Name Description
Setting centralized preferences on web clients � 103

BMC Remedy Action Request System 7.0
Diary Field Show Most Recent First
Defines the order in which entries appear in the diary field of a form. The options are:
� Yes—Diary entries are listed in descending order by date, starting with the most recent entry.
� No—(Default) Diary entries are listed in ascending order by date, starting with the earliest entry.
� Default—See No.
View Default Form View Defines the view to be used as the default for all forms. Ask your AR System administrator for the name you should enter here, or leave this field blank.
Note: If you enter a view name that does not exist, AR System determines which view best fits. This might not be the default view.
For more information about how a view is selected for a user, see the Form and Application Objects guide.
Open Window View Extension
Defines the suffix to be used as the default for all forms that are opened from other forms. Ask your administrator for the name you should enter, or leave this field blank.
Note: If you enter a suffix that does not exist, AR System determines which view best fits. This might not be the default view.
Hidden Display Hidden Forms (Admin)
Defines which forms are available. The options are:
� No—Only those forms that have been designated as visible are available.
� Yes—All forms are available, whether designated as hidden or visible.
Note: This option is available only if you are logged in as an administrator or subadministrator to an active server.
Group Name Field Name Description
104 �Chapter 6—Setting user preferences
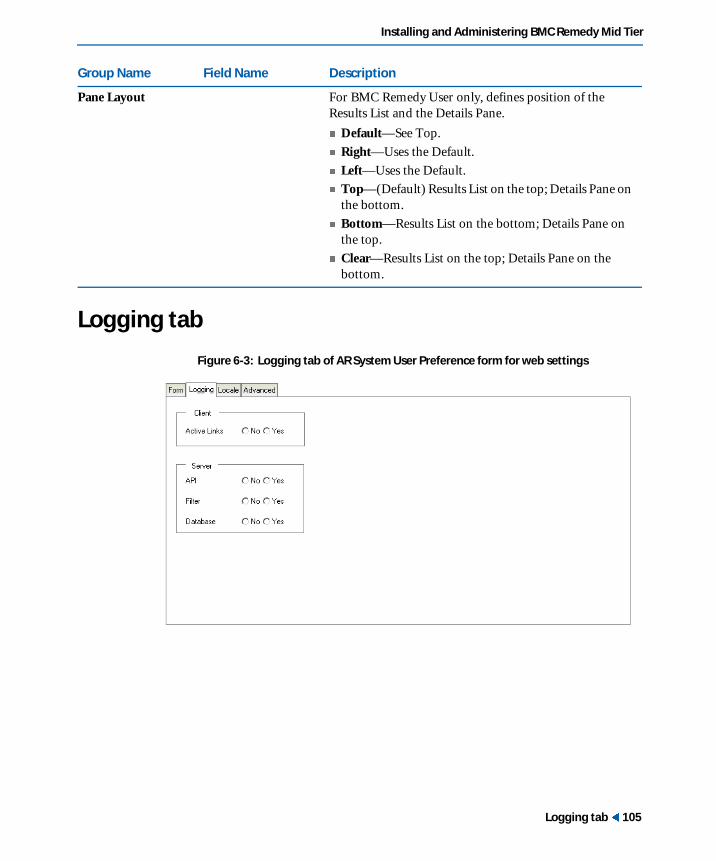
Installing and Administering BMC Remedy Mid Tier
Logging tab
Figure 6-3: Logging tab of AR System User Preference form for web settings
Pane Layout For BMC Remedy User only, defines position of the Results List and the Details Pane.
� Default—See Top.
� Right—Uses the Default.
� Left—Uses the Default.
� Top—(Default) Results List on the top; Details Pane on the bottom.
� Bottom—Results List on the bottom; Details Pane on the top.
� Clear—Results List on the top; Details Pane on the bottom.
Group Name Field Name Description
Logging tab � 105

BMC Remedy Action Request System 7.0
Locale tab
Figure 6-4: Locale tab of AR System User Preference form for web settings
Group Name Field Name Description
Client Active Links Designates whether use of active links on the client is logged in a browser window.
Server API Designates whether use of APIs on the server is logged.
Filter Designates whether use of filters on the server is logged.
Database Designates whether activity on the database is logged.
106 �Chapter 6—Setting user preferences
Installing and Administering BMC Remedy Mid Tier
Section name Field Name Description
Locale User Locale Designates the language displayed on the user’s system, in the format <language_Country>, where language is the language code (such as fr for French or en for English), and Country is the two-letter country code (such as FR for France or US for United States). Some sample entries are:
� en_US—English (United States)
� fr_BE—French (Belgium)
� fr_CA—French (Canada)
� zh_HK—Chinese (Hong Kong)
� zh_CN—Simplified Chinese
� ja_JP—Japanese (Japan)
This field is clear by default.
If the locale is not set here, the browser’s language flag is used.
Time Zone Defines the time zone displayed on the user’s system. Select a time zone from the menu, for example, Asia/Tokyo, America/New York, or Europe/Paris.
Any ICU (International Component for Unicode) format is accepted. This field is clear by default.
Currency The type of currency to be applied for this locale (for example, USD for United States dollars).
If currency is specified here, it overrides the administrator-defined Initial Currency Type in the field properties dialog box of BMC Remedy Administrator. If there is a default value for this field, it overrides the User Preference and the Initial Currency Type.
Logging tab � 107

BMC Remedy Action Request System 7.0
Date/Time Display Display Date/Time Style
Defines the format in which the date and time appear. According to ICU (International Component for Unicode) format, the options are:
� Short
� Long
� Custom
This setting is platform-independent and will not automatically be the same as preferences set in BMC Remedy User, or as any preferences set in the Windows Control Panel. Use a predefined ICU format or customize an ICU format to set web view Date/Time appearances.
The default is Short.
Custom Date Format
Defines the format of date strings to be displayed in your browser. This field is active only when Custom is selected from the Display Date/Time Style menu list.
Select the format of date strings. You can add a forward slash (/), dash (-) or a period (.) as separators. This field is clear by default.
For more information about date formats, see the Configuring guide.
Custom Time Format
Defines the format of time strings to be displayed in your browser. This field is active when Custom is selected from the Display Date/Time Style menu list.
Select the format of time strings. You can add a semicolon (:), dash (-), or a period (.) as separators. This field is clear by default.
For more information about time formats, see the Configuring guide.
Section name Field Name Description
108 �Chapter 6—Setting user preferences

Installing and Administering BMC Remedy Mid Tier
Advanced tab
Figure 6-5: Advanced tab of the AR System User Preference form for web settings
Group Name Field Name Description
Table Fields Refresh Content on Display
Defines whether the data in a table field is refreshed automatically every time a form is displayed.
Note: You can refresh the table manually by clicking on it when you want to check for changes.
Alert Refresh Interval Defines the interval, in minutes, that passes between queries to the Alert Events form. The default value is 0.
The alert list displays the user’s alerts by querying the Alert Events form that contains the user’s alerts.
Alert Servers Defines which servers contribute alerts to a web-based alert list. The administrator can enter the server names to retrieve alerts from this field. The server names must be separated by the comma ( , ) delimiter.
This field is clear by default.
Logging tab � 109
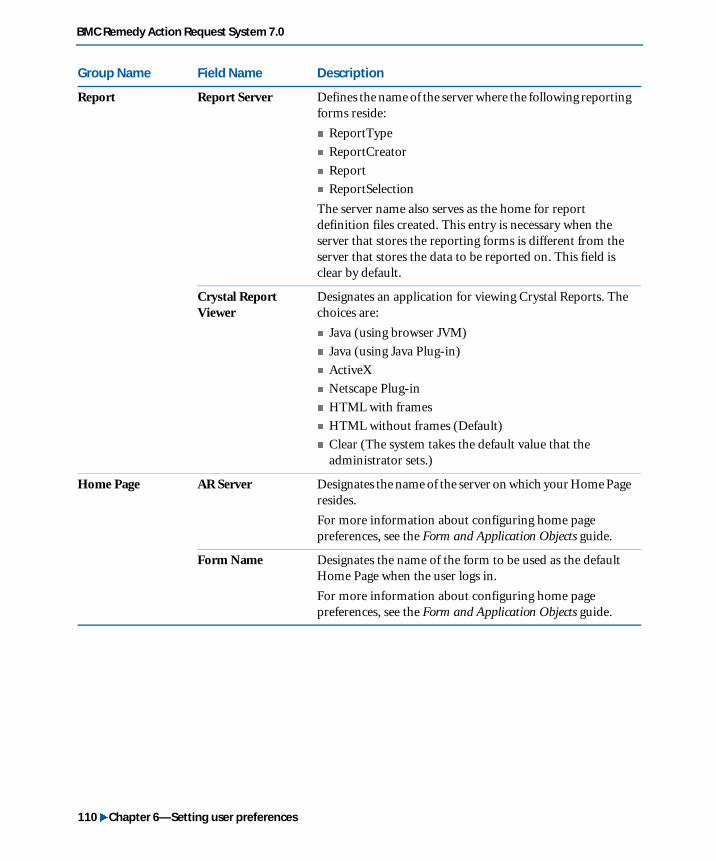
BMC Remedy Action Request System 7.0
Report Report Server Defines the name of the server where the following reporting forms reside:
� ReportType
� ReportCreator
� Report
� ReportSelection
The server name also serves as the home for report definition files created. This entry is necessary when the server that stores the reporting forms is different from the server that stores the data to be reported on. This field is clear by default.
Crystal Report Viewer
Designates an application for viewing Crystal Reports. The choices are:
� Java (using browser JVM)
� Java (using Java Plug-in)
� ActiveX
� Netscape Plug-in
� HTML with frames
� HTML without frames (Default)
� Clear (The system takes the default value that the administrator sets.)
Home Page AR Server Designates the name of the server on which your Home Page resides.
For more information about configuring home page preferences, see the Form and Application Objects guide.
Form Name Designates the name of the form to be used as the default Home Page when the user logs in.
For more information about configuring home page preferences, see the Form and Application Objects guide.
Group Name Field Name Description
110 �Chapter 6—Setting user preferences

Installing and Administering BMC Remedy Mid Tier
Accessibility Accessible Mode Designates whether an accessible mode applies to this view and if so, which mode. The options are:
� Default—No accessible mode used.
� Screen Magnifier/Low Vision—View is accessed with a screen magnification device.
� Screen Reader/No Vision—View is accessed using screen reader software.
This field is clear by default.
Accessible Message Designates the type of nonvisual feedback that applies to workflow. The options are:
� No Action—No messages are shown for accessibility. Active link message actions of the type Accessible are ignored.
� Message Action—Displays accessibility messages defined by active link message action of type Accessible.
� All Actions—Displays accessibility messages to reflect visual changes on the page as well as accessible messages defined by an active link message action of the type Accessible.
Note: These options are not used in the mid tier for AR System versions 6.3 and later.
Session Session Timeout in Minutes
Designates the number of minutes after which a session times out. The default is 90 minutes.
You can set the session timeout for longer than 90 minutes for a specific user, and this setting will override the session timeout in the General Settings page of BMC Remedy Mid Tier Configuration Tool.
Group Name Field Name Description
Logging tab � 111

BMC Remedy Action Request System 7.0
112 �Chapter 6—Setting user preferences

Chapter
7
Working with AR System forms and applications on the WebWorking with AR System applications for the Web involves a few more steps than working with forms in BMC Remedy User. The following topics are provided:
� What users see in a form in a browser (page 114)
� Working with View options (page 116)
� Working with form action fields for the web (page 122)
� Browser settings for scripting and ActiveX controls (page 125)
� Configuring page properties (page 126)
� Managing resource files (page 126)
� Accessing forms and applications with URLs (page 128)
� Creating customized login pages (page 142)
� How a view is selected (page 143)
� How locale is established (page 144)
� Session timeouts (page 144)
� Creating help for web applications (page 145)
� Saving a web application to another location (page 146)
� Making your web-based applications accessible to users with disabilities (page 146)
Before reading this section, you should be familiar with the information about defining applications and creating forms and views in the Form and Application Objects guide:
Working with AR System forms and applications on the Web � 113

BMC Remedy Action Request System 7.0
What users see in a form in a browser
Users can view any AR System form or application in a browser simply by entering URLs that you supply.
In most respects, the appearance and functionality of forms and applications on the Web is essentially the same as that in BMC Remedy User. (Note that BMC Remedy Administrator allows you to design a form based on non-standard font sizes, but the mid tier does not always support those sizes.) The following figures show a form as seen first in BMC Remedy User, then in a browser.
Figure 7-1: AR System form in BMC Remedy User
In a browser, toolbar buttons along the top of the form provide the equivalent functionality of menus and toolbars in the Standard (Windows) view. You can hide the entire toolbar by clicking the down arrow icon just above the first toolbar button. You can also configure the form to hide the toolbar when the form is viewed in a browser, and control individual button access using Menu Access view properties.
114 �Chapter 7—Working with AR System forms and applications on the Web
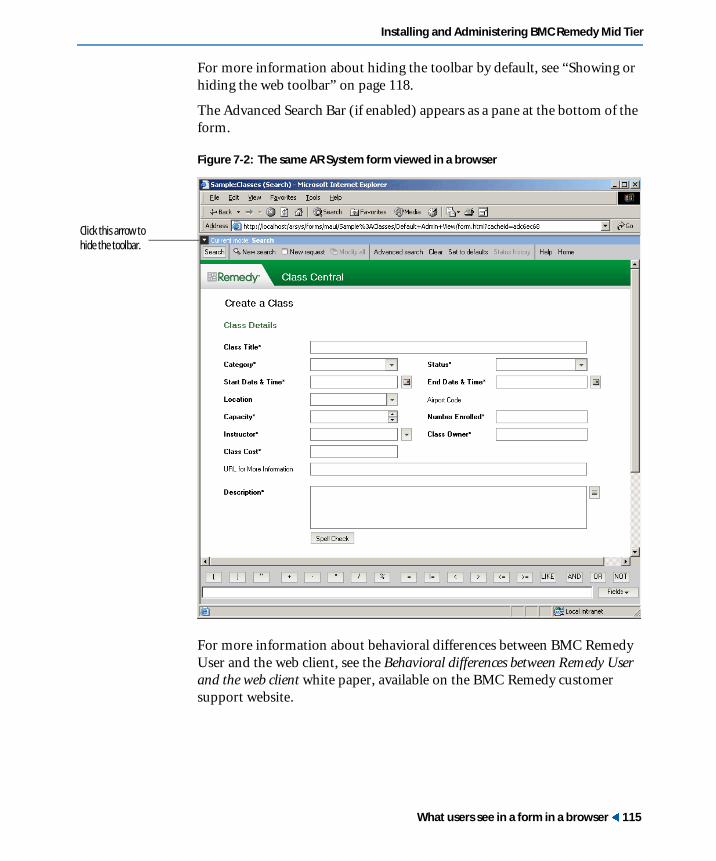
Installing and Administering BMC Remedy Mid Tier
For more information about hiding the toolbar by default, see “Showing or hiding the web toolbar” on page 118.
The Advanced Search Bar (if enabled) appears as a pane at the bottom of the form.
Figure 7-2: The same AR System form viewed in a browser
For more information about behavioral differences between BMC Remedy User and the web client, see the Behavioral differences between Remedy User and the web client white paper, available on the BMC Remedy customer support website.
Click this arrow to hide the toolbar.
What users see in a form in a browser � 115

BMC Remedy Action Request System 7.0
Working with View options
When you create forms, you can create views by selecting either a standard (Windows) view or a Web-Alternate (fixed) view. For most forms, you can use the standard view, which can be displayed both in BMC Remedy User and in a browser.
Note: If you are creating a new view of the same form (for example, if you are creating both a Standard view and a separate web view), use a different label for the second view, so that the view name will be unique in the URL for the form. For more information about creating views, see the Form and Application Objects guide.
� To customize a standard or web view
1 Open the form for which you want to customize a view.
2 Choose Form > Manage Views.
The Manage Views dialog box appears.
Figure 7-3: Manage Views dialog box
3 Select the view you want to customize.
4 Click Properties.
The View Properties dialog box appears.
116 �Chapter 7—Working with AR System forms and applications on the Web

Installing and Administering BMC Remedy Mid Tier
Figure 7-4: View Properties dialog box
Note: The Dynamic Web Views tab appears only in Standard views in AR System 6.3 and later.
From the Appearances tab of this dialog box, you can specify the visibility of the details pane, results pane, and toolbar when forms are viewed in a browser. You also can edit web header and footer content of any view. For more information, see the following resources:
� For information about selecting menu access, list color, advanced results, list, dynamic views, aliases and labels, and defined searches, see the Form and Application Objects guide.
� For information about pane banner visibility on the web, see “Showing or hiding the web toolbar.”
� For information about editing web header and footer content, see “Editing web header and footer content” on page 119.
Working with View options � 117

BMC Remedy Action Request System 7.0
Showing or hiding the web toolbar
You can specify whether the toolbar should be visible or hidden by default when a form is viewed in a browser.
� To show or hide the web toolbar
1 Open the form for which you want to specify toolbar visibility.
2 Choose Form > Manage Views.
3 Select a view.
4 Click Properties.
5 In the View Properties dialog box, click the Appearances tab.
Figure 7-5: Appearances tab
6 In the Pane Banner Visibility region, choose Visible or Hidden in the Web Toolbar field.
7 Click OK.
Choose Visible or Hidden for the web toolbar in this view.
118 �Chapter 7—Working with AR System forms and applications on the Web

Installing and Administering BMC Remedy Mid Tier
Editing web header and footer content
You can customize any view to add web-specific header and footer content. If you have existing Web-Alternate (Fixed) web views, you can edit the headers and footers from the Form Properties dialog box in BMC Remedy Administrator instead of modifying the markup above and below the AR System fields.
To be sure that header and footer text appears properly in your form, follow these guidelines:
� Allow enough room at the top of your form for the header text, especially if you will be using a banner graphic or if your header text will use a large type size. You might need to move some fields down on the form.
� Enclose all header or footer text within <div> tags. Then, use the desired HTML tags and styles to format the text.
� Use absolute positioning so that the header and footer content is not hidden behind the fields in the form.
Use the following procedure to add new header or footer text or to edit existing text.
� To add or edit web headers and footers
1 Open the form for which you want to include web header or footer text.
2 Choose Form > Manage Views.
3 Select the view for which you want to add or edit headers or footers.
4 Click Properties.
5 In the View Properties dialog box, click the Appearances tab.
Working with View options � 119

BMC Remedy Action Request System 7.0
Figure 7-6: Appearances tab
6 In the Web Header and Footer region, select either the Edit Web Header Content or Edit Web Footer Content button.
The Web Header Content dialog box appears.
Figure 7-7: Web Header Content dialog box
7 Add the content you want to include in the header or footer.
Enclose all text within <div> tags, and specify the position for the header and footer text, as shown in the following example:
Click either of these buttons to edit web header and footer content.
120 �Chapter 7—Working with AR System forms and applications on the Web

Installing and Administering BMC Remedy Mid Tier
<div style="position: absolute; top: 50px; left: 30px; width=640px; height: 45px;"><h1 style="color: #ffffff;background-color: 003366; font-size: 24pt; font-style: italic; border-top: 2px solid #ffffff; border-bottom: 2px solid #ffffff; padding-top: 6px; padding-bottom: 6px;">ABC Enterprise Solutions</h1></div>
In this example, the header is positioned 50 pixels from the top of the form, and 30 pixels from the left edge, with a height of 45 pixels. An <H1> tag is used, with styles specified for the color, background color, font size and style, border, and padding around the text.
Note: Make sure that the CSS z-index of the header and footer is higher than that of the other elements on the page that overlap it. For example, if you add content to the top of the page, make sure that its z-index is higher than that of the FormContainer element (for instance, greater than 29999).
Figure 7-8: Example header in a web view of a form
8 Click OK to return to the View Properties dialog box.
9 Click OK to close the dialog box.
Header text
Working with View options � 121
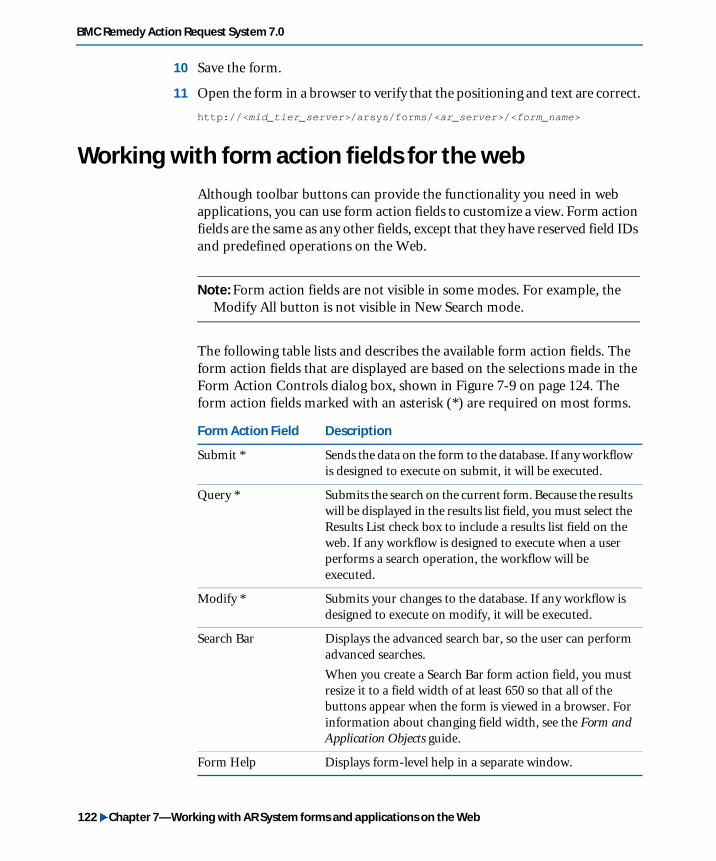
BMC Remedy Action Request System 7.0
10 Save the form.
11 Open the form in a browser to verify that the positioning and text are correct.
http://<mid_tier_server>/arsys/forms/<ar_server>/<form_name>
Working with form action fields for the web
Although toolbar buttons can provide the functionality you need in web applications, you can use form action fields to customize a view. Form action fields are the same as any other fields, except that they have reserved field IDs and predefined operations on the Web.
Note: Form action fields are not visible in some modes. For example, the Modify All button is not visible in New Search mode.
The following table lists and describes the available form action fields. The form action fields that are displayed are based on the selections made in the Form Action Controls dialog box, shown in Figure 7-9 on page 124. The form action fields marked with an asterisk (*) are required on most forms.
Form Action Field Description
Submit * Sends the data on the form to the database. If any workflow is designed to execute on submit, it will be executed.
Query * Submits the search on the current form. Because the results will be displayed in the results list field, you must select the Results List check box to include a results list field on the web. If any workflow is designed to execute when a user performs a search operation, the workflow will be executed.
Modify * Submits your changes to the database. If any workflow is designed to execute on modify, it will be executed.
Search Bar Displays the advanced search bar, so the user can perform advanced searches.
When you create a Search Bar form action field, you must resize it to a field width of at least 650 so that all of the buttons appear when the form is viewed in a browser. For information about changing field width, see the Form and Application Objects guide.
Form Help Displays form-level help in a separate window.
122 �Chapter 7—Working with AR System forms and applications on the Web
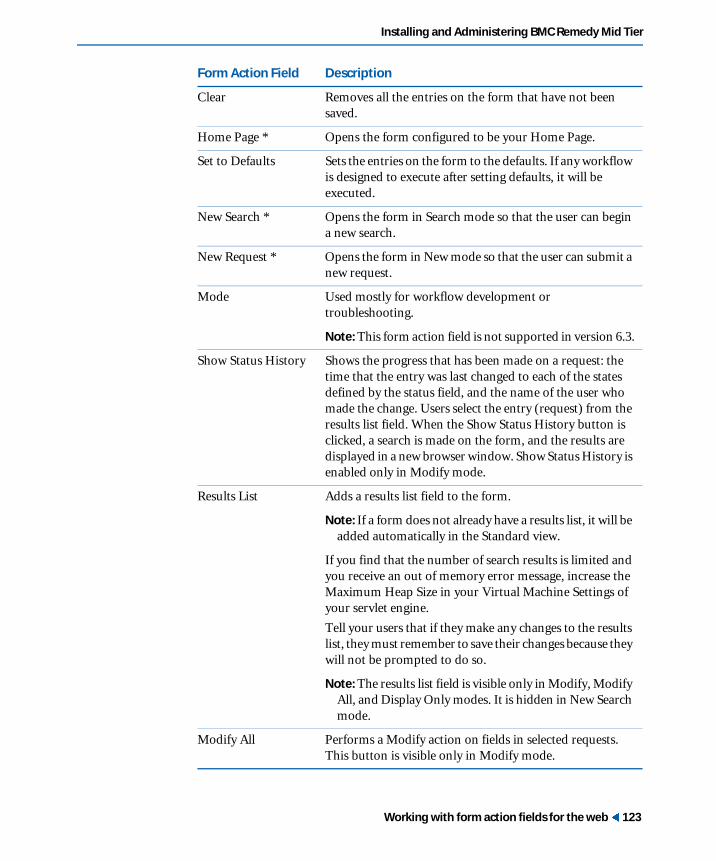
Installing and Administering BMC Remedy Mid Tier
Clear Removes all the entries on the form that have not been saved.
Home Page * Opens the form configured to be your Home Page.
Set to Defaults Sets the entries on the form to the defaults. If any workflow is designed to execute after setting defaults, it will be executed.
New Search * Opens the form in Search mode so that the user can begin a new search.
New Request * Opens the form in New mode so that the user can submit a new request.
Mode Used mostly for workflow development or troubleshooting.
Note: This form action field is not supported in version 6.3.
Show Status History Shows the progress that has been made on a request: the time that the entry was last changed to each of the states defined by the status field, and the name of the user who made the change. Users select the entry (request) from the results list field. When the Show Status History button is clicked, a search is made on the form, and the results are displayed in a new browser window. Show Status History is enabled only in Modify mode.
Results List Adds a results list field to the form.
Note: If a form does not already have a results list, it will be added automatically in the Standard view.
If you find that the number of search results is limited and you receive an out of memory error message, increase the Maximum Heap Size in your Virtual Machine Settings of your servlet engine.
Tell your users that if they make any changes to the results list, they must remember to save their changes because they will not be prompted to do so.
Note: The results list field is visible only in Modify, Modify All, and Display Only modes. It is hidden in New Search mode.
Modify All Performs a Modify action on fields in selected requests. This button is visible only in Modify mode.
Form Action Field Description
Working with form action fields for the web � 123

BMC Remedy Action Request System 7.0
You can set a preference for which form action fields are automatically included. In BMC Remedy Administrator, choose File > Preferences, and click the Web View tab. For more information, see the Getting Started guide.
Use the following procedure to add form action fields manually to a view.
� To add form action fields manually to a view
1 Open a form view.
2 Place the cursor where you want to insert the form action field.
3 Choose Form > Form Action Fields.
The Form Action Controls dialog box appears.
Figure 7-9: Form Action Controls dialog box
4 Select the actions that you want included the view, and clear the check boxes for the actions that you do not want included in the view.
5 In the Add to Views field, select the views that should include the selected form action fields.
6 Click OK to close the Form Action Controls dialog box and add your new fields.
7 Save your changes.
124 �Chapter 7—Working with AR System forms and applications on the Web

Installing and Administering BMC Remedy Mid Tier
Browser settings for scripting and ActiveX controls
For the mid tier (version 6.3 and later) to work properly, the ActiveX settings for the XMLHTTP protocol between the browsers and mid tier must be set correctly.
Typically, if you simply use all the default scripting settings in MS IE and Mozilla, you should not see any problems with the mid tier.
Otherwise, use the following ActiveX settings for your browser.
For IE browsers, enable the following options:
� Under the ActiveX Control and Plug-ins heading,
� Run ActiveX Control and Plug-ins
� Script ActiveX controls Marked Safe for Scripting
� Under the Scripting section
� Active Scripting
� Under the Downloads section
� Automatic prompting for file downloads
� File download
� Under the Miscellaneous section
� Submit nonencrypted form data (This option is not required if SSL is used.)
To access these options in IE, choose Tools > Internet Options. Click the Security tab, then click the Custom Level button.
For Mozilla browsers, enable the following option:
� The Enable JavaScript for Navigator option must be enabled.
To access this option in Mozilla, choose Edit > Preferences > Advanced > Scripts & Plug-ins.
Browser settings for scripting and ActiveX controls � 125

BMC Remedy Action Request System 7.0
Configuring page properties
The appearance of AR System fields in a browser is determined by a default cascading style sheet (.css) file that is provided with the mid tier. You can add your own .css file to override these default values. For detailed information about how to customize style sheets, see Chapter 8, “Customizing AR System style sheets.”
Managing resource files
Resource files include files such as images or custom cascading style sheets. You must use the Support Files tab in Application Properties to add any resource files to the web application.
Figure 7-10: Application Properties window—Support Files tab
If you create or open forms within the Application window, resources added to form views are automatically added to the application’s Support Files properties. At the time the resource is added, the reference to that resource matches its location in Support Files. However, AR System does not maintain these references (for example, if you change the directory structure for resources in Support Files).
The Resources Directory Structure level represents the directory for your application in the mid tier. You can add support files directly under this level, or to other directories that you create. You cannot delete or change the name of the Resources Directory Structure level.
You can add or delete directories and files, or rename existing directories. You can also save the directory structure to an external disk.
Use the following procedures to specify support files for web applications.
Support Files tab with resource files and directories listed
126 �Chapter 7—Working with AR System forms and applications on the Web
Installing and Administering BMC Remedy Mid Tier
� To create directories for support files
1 Open the application object with which you want to work.
2 Click the Support Files tab.
The Resources Directory Structure appears, including the Resources directory.
3 Select the directory under which you want to create a new directory.
4 Click the Create Dir button.
A new directory appears under the directory you selected in step 3.
5 Enter a new name for the directory, and press ENTER.
6 Add support files (such as images) to the new directory, as described in the following procedure.
If you do not add support files to the directory you created, it will be removed from the directory structure the next time you open the application object.
7 Save the application.
� To add files to support file directories
1 Open the application with which you want to work.
2 Click the Support Files tab.
The Resources Directory Structure appears.
3 Select the directory under which you want to add support files.
4 Click the Add File(s) button.
The Open dialog box appears.
5 Select the file you want to add to the directory, and click the Open button.
The file is added to the directory selected in step 3.
6 Repeat steps 3, 4, and 5 for every file that you want to add to the directory.
Note: If you have added support files for your application, you can access them through a URL. For more information, see “Accessing support files” on page 130.
Managing resource files � 127
BMC Remedy Action Request System 7.0
Accessing forms and applications with URLs
Users can access forms on the web through links on a Home Page or through URLs that you supply. This section provides the following information about providing URLs:
� “Opening forms and applications from a Home Page” on page 128
� “URLs for opening forms and applications” on page 128
� “Accessing support files” on page 130
� “Specifying parameters in URLs for direct access” on page 131
� “Passing data to a field in a URL” on page 136
� “How a view is selected” on page 143
� “How locale is established” on page 144
� “Creating URLs for login and logout” on page 137
� “Working with the Mid Tier Object List” on page 140
Opening forms and applications from a Home Page
The simplest way to enable user access to your applications is to use a Home Page. The Home Page is a single point of access that includes all forms and guides that have been configured as entry points, and to which the user has access permissions. The AR System generates all the entry points from all the servers in the AR Server Settings window in the BMC Remedy Mid Tier Configuration Tool, and displays them in the home page’s application list field.
The Home Page appears automatically when web clients access the Home Page URL (http://<mid_tier_server>/arsys/home). For more information about configuring entry points and Home Pages, see the Form and Application Objects guide.
URLs for opening forms and applications
If you do not use a Home Page form to display the entry points of your web applications, you must supply URLs for your users so that they can access applications and forms in a browser.
128 �Chapter 7—Working with AR System forms and applications on the Web

Installing and Administering BMC Remedy Mid Tier
In AR System 6.3 and later, names of applications, forms, and views referenced in URLs use the actual database name of the object instead of the web aliases required by previous releases.
As a form loads in the browser, the system appends a hexidecimal cache ID to the URL, such as ?cacheID=acbec68. This number represents parameters such as the user name, locale, view, application, and workflow logging. The purpose of the cache ID is to make the URL unique in the browser cache and to make sure that the correct view is displayed.
Note: The mid tier also provides an Object List that displays a list of forms and applications available on the mid tier. This list appears if the system cannot determine which form to load because of an incorrect or incomplete URL, or if the application does not have a primary form. The Object List must be enabled in the General Settings window of the Mid Tier Configuration Tool. For more information, see “Working with the Mid Tier Object List” on page 140.
The following sections provide the URL formats to use for opening forms and applications in a browser. In the following examples, arsys is used as the default context path.
Opening a form
� To open a form, enter:
http://<mid_tier_server>/arsys/forms/<ar_server>/<form_name>
� To open a specific view of a form, enter:
http://<mid_tier_server>/arsys/forms/<ar_server>/<form_name>/<view_name>
The view name is optional.
Opening an application’s primary form
To open an application and display its primary form, enter:
http://<mid_tier_server>/arsys/apps/<ar_server>/<app_name>
Accessing forms and applications with URLs � 129

BMC Remedy Action Request System 7.0
Opening any form in an application
To open any form in an application, enter:
http://<mid_tier_server>/arsys/apps/<ar_server>/<app_name>/<form_name>/<view_name>
You can add URLs to form views to provide users access to web pages, HTML documents, and images. You can also build URL links on web pages, view fields, and text trim fields that open forms.
You can also use the $HOMEURL$ keyword in workflow to reference the context path displayed in a browser. For more information, see the Workflow Objects guide.
Using the Back button
The Back button might not behave as users might expect. If they are viewing a form in a browser (in either New or Search mode) and they go to another web page and then click the Back button, the browser will display the form in Search mode, and the form will be empty. Field properties, selections, and other values will not be saved.
Accessing support files
If you have added support files for your application, you can access them through a URL. If you have placed support files at the top level of the Resources Directory Structure, enter:
http://<mid_tier_server>/arsys/apps/<ar_server><application_name>/resources/<file_name>
Note: Lowercase the word resources at this level.
If you have placed support files under any subdirectories (including the Resources directory that BMC Remedy Administrator creates dynamically), those must be added to the URL, as in the following examples. Notice that the Resources subdirectory name is uppercase and lowercase (title case).
� To access a file under the Resources directory, enter:
http://<mid_tier_server>/arsys/apps/<ar_server>/<application_name>/resources/Resources/<file_name>
130 �Chapter 7—Working with AR System forms and applications on the Web

Installing and Administering BMC Remedy Mid Tier
� If you have created an additional directory under Resources, enter:
http://<mid_tier_server>/arsys/apps/<ar_server>/<application_name>/resources/Resources/<directory_name>/<file_name>
Note: To access application support files, a valid AR System login is required.
Specifying parameters in URLs for direct access
You can use the ViewFormServlet to open a specific form and pass parameters such as a user name or a qualification.
Note: When a user enters a URL from a previous version of AR System (a legacy URL), the system will redirect the user to the proper form if the URL uses ViewFormServlet. If the URL does not use ViewFormServlet, users must enter the new URL.
At a minimum, you must supply the server name and form name. If more than one view of a form is available, the system selects a view based on certain criteria, as described in “How a view is selected” on page 143.
Values in URLs are case-sensitive. For example, ViewFormServlet and viewformservlet are not the same.
Supported parameters in AR System
A list of available views for the user is generated based on parameters specified in the URL. At a minimum, you must specify values for form and server. Include additional parameters as necessary, depending on the number of views available for the form and the requirements of the user.
The following table lists supported parameters, their descriptions, and possible values. All parameters and values are case sensitive.
Accessing forms and applications with URLs � 131
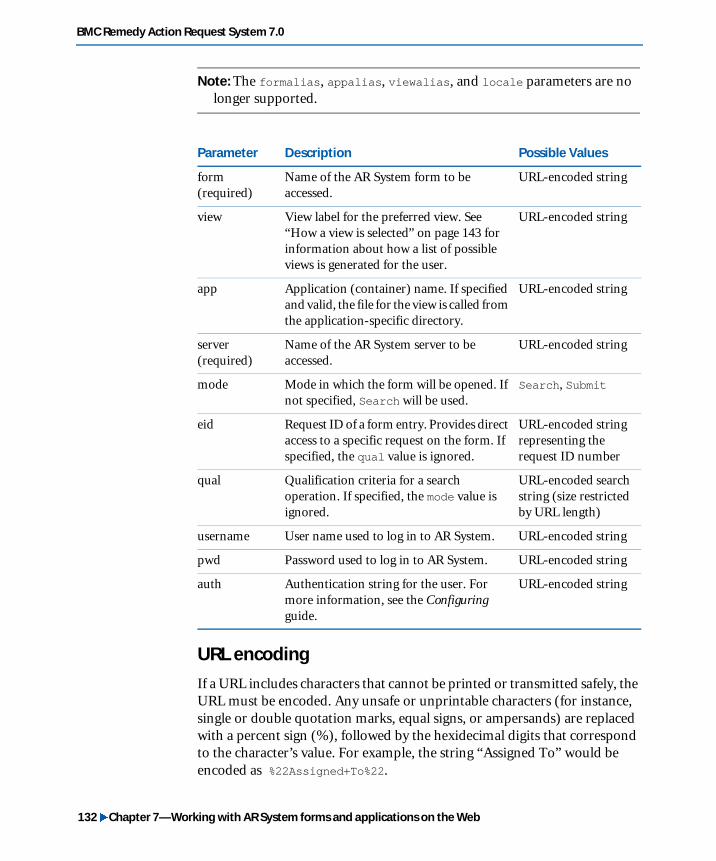
BMC Remedy Action Request System 7.0
Note: The formalias, appalias, viewalias, and locale parameters are no longer supported.
URL encoding
If a URL includes characters that cannot be printed or transmitted safely, the URL must be encoded. Any unsafe or unprintable characters (for instance, single or double quotation marks, equal signs, or ampersands) are replaced with a percent sign (%), followed by the hexidecimal digits that correspond to the character’s value. For example, the string “Assigned To” would be encoded as %22Assigned+To%22.
Parameter Description Possible Values
form(required)
Name of the AR System form to be accessed.
URL-encoded string
view View label for the preferred view. See “How a view is selected” on page 143 for information about how a list of possible views is generated for the user.
URL-encoded string
app Application (container) name. If specified and valid, the file for the view is called from the application-specific directory.
URL-encoded string
server(required)
Name of the AR System server to be accessed.
URL-encoded string
mode Mode in which the form will be opened. If not specified, Search will be used.
Search, Submit
eid Request ID of a form entry. Provides direct access to a specific request on the form. If specified, the qual value is ignored.
URL-encoded string representing the request ID number
qual Qualification criteria for a search operation. If specified, the mode value is ignored.
URL-encoded search string (size restricted by URL length)
username User name used to log in to AR System. URL-encoded string
pwd Password used to log in to AR System. URL-encoded string
auth Authentication string for the user. For more information, see the Configuring guide.
URL-encoded string
132 �Chapter 7—Working with AR System forms and applications on the Web

Installing and Administering BMC Remedy Mid Tier
The following table lists commonly encoded characters.
URL encoder utility
The AR System mid tier provides a URL encoder utility that enables you to convert non-alphanumeric characters to UTF-8 encoded values.
Character Encoding value
<space> + (plus sign) or %20
“ (double quotation mark) %22
# (hash mark) %23
$ (dollar sign) %24
% (percent) %25
& (ampersand) %26
+ (plus sign) %2B
, (comma) %2C
< (less than sign) %3C
= (equal sign) %3D
> (greater-than sign) %3E
/ (forward slash) %2F
: (colon) %3A
? (question mark) %3F
Accessing forms and applications with URLs � 133
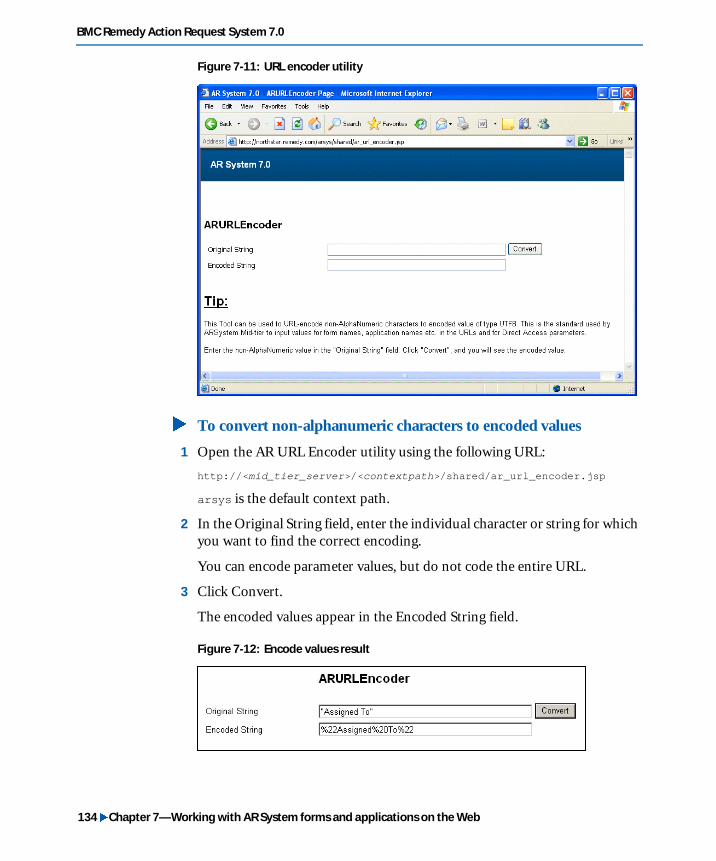
BMC Remedy Action Request System 7.0
Figure 7-11: URL encoder utility
� To convert non-alphanumeric characters to encoded values
1 Open the AR URL Encoder utility using the following URL:
http://<mid_tier_server>/<contextpath>/shared/ar_url_encoder.jsp
arsys is the default context path.
2 In the Original String field, enter the individual character or string for which you want to find the correct encoding.
You can encode parameter values, but do not code the entire URL.
3 Click Convert.
The encoded values appear in the Encoded String field.
Figure 7-12: Encode values result
134 �Chapter 7—Working with AR System forms and applications on the Web
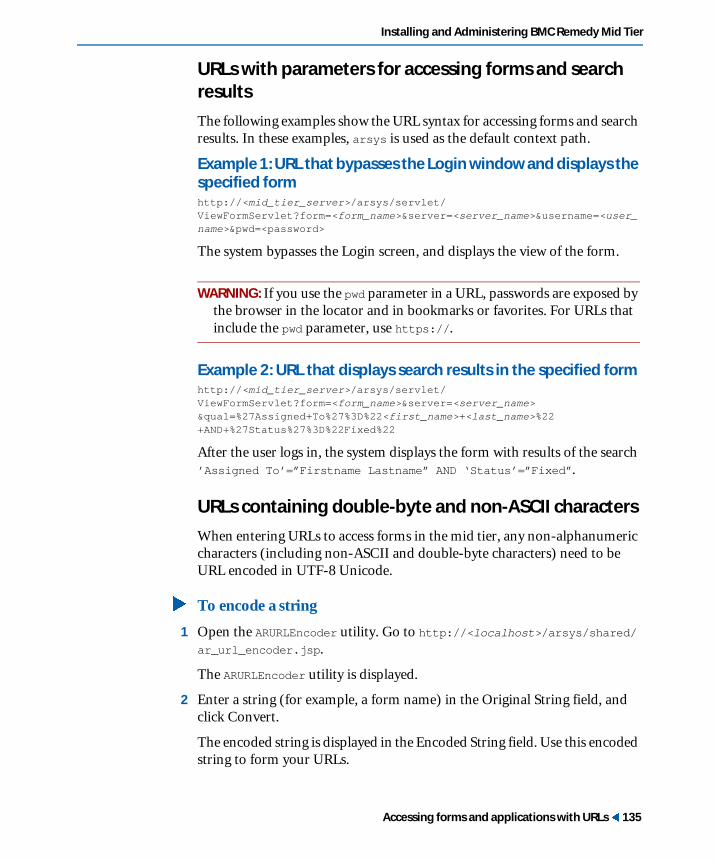
Installing and Administering BMC Remedy Mid Tier
URLs with parameters for accessing forms and search results
The following examples show the URL syntax for accessing forms and search results. In these examples, arsys is used as the default context path.
Example 1: URL that bypasses the Login window and displays the specified formhttp://<mid_tier_server>/arsys/servlet/ViewFormServlet?form=<form_name>&server=<server_name>&username=<user_name>&pwd=<password>
The system bypasses the Login screen, and displays the view of the form.
WARNING: If you use the pwd parameter in a URL, passwords are exposed by the browser in the locator and in bookmarks or favorites. For URLs that include the pwd parameter, use https://.
Example 2: URL that displays search results in the specified formhttp://<mid_tier_server>/arsys/servlet/ViewFormServlet?form=<form_name>&server=<server_name>&qual=%27Assigned+To%27%3D%22<first_name>+<last_name>%22+AND+%27Status%27%3D%22Fixed%22
After the user logs in, the system displays the form with results of the search ’Assigned To’=”Firstname Lastname” AND ‘Status’=”Fixed”.
URLs containing double-byte and non-ASCII characters
When entering URLs to access forms in the mid tier, any non-alphanumeric characters (including non-ASCII and double-byte characters) need to be URL encoded in UTF-8 Unicode.
� To encode a string
1 Open the ARURLEncoder utility. Go to http://<localhost>/arsys/shared/ar_url_encoder.jsp.
The ARURLEncoder utility is displayed.
2 Enter a string (for example, a form name) in the Original String field, and click Convert.
The encoded string is displayed in the Encoded String field. Use this encoded string to form your URLs.
Accessing forms and applications with URLs � 135
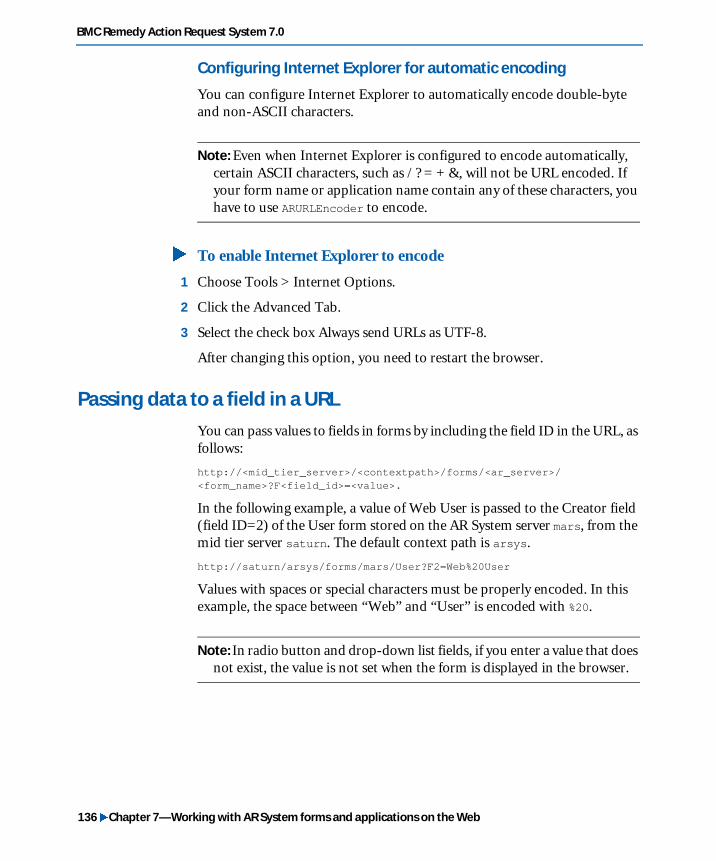
BMC Remedy Action Request System 7.0
Configuring Internet Explorer for automatic encoding
You can configure Internet Explorer to automatically encode double-byte and non-ASCII characters.
Note: Even when Internet Explorer is configured to encode automatically, certain ASCII characters, such as / ? = + &, will not be URL encoded. If your form name or application name contain any of these characters, you have to use ARURLEncoder to encode.
� To enable Internet Explorer to encode
1 Choose Tools > Internet Options.
2 Click the Advanced Tab.
3 Select the check box Always send URLs as UTF-8.
After changing this option, you need to restart the browser.
Passing data to a field in a URL
You can pass values to fields in forms by including the field ID in the URL, as follows:
http://<mid_tier_server>/<contextpath>/forms/<ar_server>/<form_name>?F<field_id>=<value>.
In the following example, a value of Web User is passed to the Creator field (field ID=2) of the User form stored on the AR System server mars, from the mid tier server saturn. The default context path is arsys.
http://saturn/arsys/forms/mars/User?F2=Web%20User
Values with spaces or special characters must be properly encoded. In this example, the space between “Web” and “User” is encoded with %20.
Note: In radio button and drop-down list fields, if you enter a value that does not exist, the value is not set when the form is displayed in the browser.
136 �Chapter 7—Working with AR System forms and applications on the Web

Installing and Administering BMC Remedy Mid Tier
Creating URLs for login and logout
You can use URLs to susers directly to a login or logout page. When you susers directly to a login page, you must specify a URL to which the user will go after logging in. You might also want users to access an alternate URL after logging out.
Parameters for login and logout
The following table shows the URL parameters that apply to login and logout. All parameters and values are case sensitive.
The goto parameter redirects users to an alternate URL after login or logout. The enc parameter specifies the type of character encoding, such as UTF-8 or Shift_JIS, used in other parameters.
Following are a few login and logout guidelines:
� To have users log in manually, specify login.jsp.
� To susers to the logout page only, specify logout.jsp or specify LogoutServlet without the goto parameter.
� To have users go directly to an alternate URL, specify LoginServlet or LogoutServlet and the goto parameter.
The following examples show how to use URLs for login and logout. In these examples, <mid_tier_server> is the name of the web server, arsys is the default context path, and <URL> is a valid URL. When creating login and logout URLs, do not include quotation marks around parameter values.
Parameter login.jsp LoginServlet logout.jsp LogoutServlet
goto Required Required Not applicable Optional
server Required Required Not applicable Not applicable
username Not applicable Required Not applicable Not applicable
pwd Not applicable Required Not applicable Not applicable
auth Not applicable Optional Not applicable Not applicable
Accessing forms and applications with URLs � 137
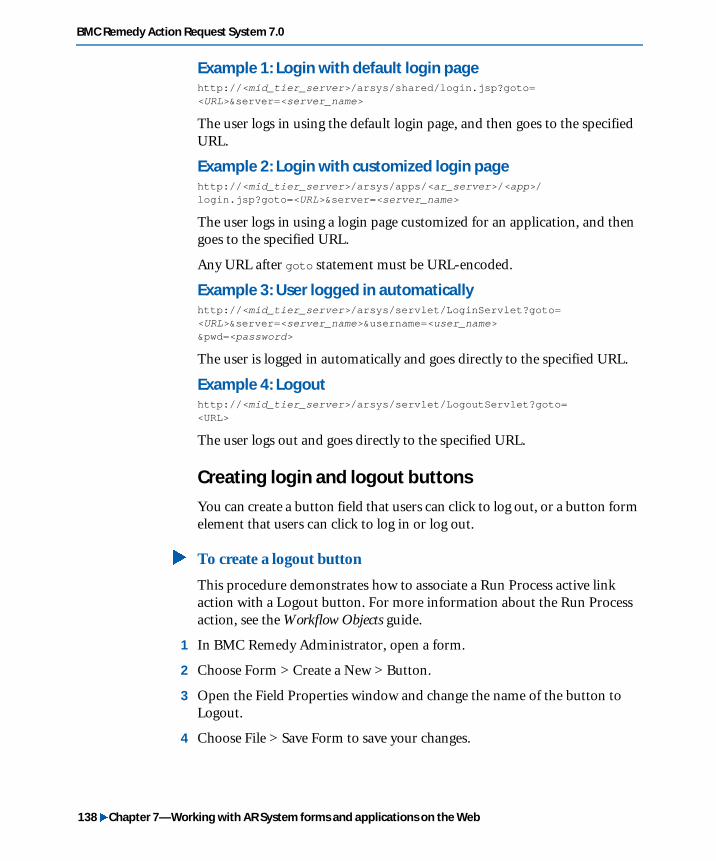
BMC Remedy Action Request System 7.0
Example 1: Login with default login pagehttp://<mid_tier_server>/arsys/shared/login.jsp?goto=<URL>&server=<server_name>
The user logs in using the default login page, and then goes to the specified URL.
Example 2: Login with customized login pagehttp://<mid_tier_server>/arsys/apps/<ar_server>/<app>/login.jsp?goto=<URL>&server=<server_name>
The user logs in using a login page customized for an application, and then goes to the specified URL.
Any URL after goto statement must be URL-encoded.
Example 3: User logged in automaticallyhttp://<mid_tier_server>/arsys/servlet/LoginServlet?goto=<URL>&server=<server_name>&username=<user_name>&pwd=<password>
The user is logged in automatically and goes directly to the specified URL.
Example 4: Logouthttp://<mid_tier_server>/arsys/servlet/LogoutServlet?goto=<URL>
The user logs out and goes directly to the specified URL.
Creating login and logout buttons
You can create a button field that users can click to log out, or a button form element that users can click to log in or log out.
� To create a logout button
This procedure demonstrates how to associate a Run Process active link action with a Logout button. For more information about the Run Process action, see the Workflow Objects guide.
1 In BMC Remedy Administrator, open a form.
2 Choose Form > Create a New > Button.
3 Open the Field Properties window and change the name of the button to Logout.
4 Choose File > Save Form to save your changes.
138 �Chapter 7—Working with AR System forms and applications on the Web

Installing and Administering BMC Remedy Mid Tier
5 Create an active link with the following properties:
6 Choose File > Save Active Link to save your changes.
The following procedure demonstrates how to create a Login or Logout submit button on a web page. arsys is used as the default context path.
� To create a login or logout form element button
1 Open the web page in a text editor.
2 To create login and logout functionality, insert HTML code as shown in the following examples.
� For login functionality, modify the HTML code as follows:
<form name=”loginForm” method=”post” action=”http://<mid_tier_server>/arsys/shared/login.jsp?goto=<URL>”&server=<server_name><p><INPUT type=”submit” value=”Login” name=”login”></p></form>
where arsys represents the default context path, <URL> is the URL the user will go to after logging in, and <server_name> is the name of the server to which the user needs to log in.
� For Logout functionality, modify the HTML code as follows:
<form name=”logoutForm”method=”post” action=”http://<mid_tier_server>/arsys/servlet/LogoutServlet?goto=<URL>”><p><INPUT type=”submit” value=”Logout” name=”logout”></p></form>
where arsys represents the default context path, and <URL> is the URL the user will go to after logging out.
3 Save your changes.
Note: For more information about customizing login and logout pages, see the Release Notes.
Execute On condition Button/menu item
Execute On field Logout
If Action Run Process
Command Line PERFORM-ACTION-EXIT-APP
Accessing forms and applications with URLs � 139

BMC Remedy Action Request System 7.0
Working with the Mid Tier Object List
Another way to access forms and applications on the web is through the Mid Tier Object List, which lists all forms and applications available through your installed mid tier.
Enabling the Mid Tier Object List
To use the Mid Tier Object List, you must first enable it. To do so, complete the following steps, which are summarized here and explained in greater detail in “Enable object list” on page 77.
� To enable the Mid Tier Object List
1 In the AR Servers page of the Configuration Tool, verify that your Home Page server is included in the server list. If it is not, add it.
2 In the General Settings page of the Mid Tier Configuration Tool (http://<mid_tier_server>/shared/config/config.jsp), verify that you have set a Home Page server.
3 In BMC Remedy Administrator, import the Mid Tier Object List definition file to your Home Page server. This file provides the default view and related workflow in English. The default location is:
c:\Program Files\AR System\Mid-Tier\samples\AR SystemMidTierObjectList.def
To import the file, choose Tools > Import Definitions > From Definition File.
4 If you need additional localized views, import the appropriate .def files. To do so, choose Tools > Import Definitions > From View Definition Files, and select the .def files you need. If you do not need localized views, skip this step.
5 In the General Settings page of the Mid Tier Configuration Tool, select the Enable Object List check box. (By default, this box is not selected.)
Displaying the Object List
Once enabled, the Object List appears automatically in your browser if the system cannot determine which form to load because of an incomplete or incorrect URL, or if your URL specifies an application that does not have a primary form. (For more information about specifying a primary form in an application, see the Form and Application Objects guide.)
140 �Chapter 7—Working with AR System forms and applications on the Web

Installing and Administering BMC Remedy Mid Tier
You can also display the Object List using any of the following URLs.
� http://<mid_tier_server>/arsys/forms
� http://<mid_tier_server>/arsys/forms/<server_name>
� http://<mid_tier_server>/arsys/apps
� http://<mid_tier_server>/arsys/apps/<server_name>
� http://<mid_tier_server>/arsys/apps/<server_name>/<application_name>
Figure 7-13: Object List example
Searching for forms or applications in the Object List
By default, the Object List displays all available forms and applications for your mid tier. You can restrict the display to specific forms, applications, and servers using any of the following methods:
� To find objects in a specific server, enter all or part of the server name in the Server field and click Search.
� To find an application, enter all or part of the application name in the Application field, and click Search.
� To find a form, enter all or part of the form name in the Name field and click Search.
Accessing forms and applications with URLs � 141

BMC Remedy Action Request System 7.0
� To restore the full list of forms and applications, clear the Server, Application, and Name fields, and click Search.
You can also arrange items in the list by name, server, or type by clicking the appropriate column headings.
Opening forms and applications from the Object List
To open a form, select the form name and click Open New or Open Search.
To open an application, select the application and click Open.
Note: The Show Hidden check box is viewable by administrators only.
Creating customized login pages
You can customize the login page of an application by creating a separate HTML file. When this file is properly configured, the mid tier will append it to the login.jsp file as an <iframe>.
Note: On Internet Explorer browsers, the auto complete feature does not function properly. To work around this issue, you must remove the Authentication field and make sure that the password is not scrambled in the JSP engine.
� To create a customized login page
1 Create a new HTML page with the text you want to include in your customization.
2 Save this page as login.html. Do not use any other name, and be sure that the extension is html instead of htm.
3 In BMC Remedy Administrator, open the application for which you want the customized login page.
4 Choose Application > Properties.
5 Click the Support Files tab.
6 Under the Resources Directory Structure level, create a new directory called public (lowercase p).
142 �Chapter 7—Working with AR System forms and applications on the Web

Installing and Administering BMC Remedy Mid Tier
7 Select this directory.
8 Click Add File(s).
9 Browse to the login.html file you created in step 1.
10 Add the file to the public directory.
Figure 7-14: public directory on support Files tab
11 Save your application.
12 Log in to your application to verify that the customized text appears. It will be displayed in an iframe just below the login fields.
How a view is selected
Normally, when choosing a view for a user, the system offers a Web-Alternate (Fixed) view in preference to a Standard view. An option in the Configuration Tool allows you to reverse this default setting. For more information, see Chapter 5, “Configuring the mid tier,” and the Configuring guide.
The AR System tries to provide the user with the best possible view of a form. The choice of view is based on the user’s application environment, language, and preference settings.
A view is selected as follows:
1 The system selects the view category that has been requested by the user or by way of workflow. If no view category is requested, or if the requested category does not exist, the default category will be used.
How a view is selected � 143

BMC Remedy Action Request System 7.0
2 The system selects a view that is appropriate for the client that the user is running. If the client is on the Web, the system selects a view according to the Prefer Standard/Windows View option in the Mid Tier Configuration Tool. For more information, see Chapter 5, “Configuring the mid tier,” and the Configuring guide.
3 The system selects a view that is appropriate for the user’s locale. If there is not an exact match, a fallback mechanism finds the closest possible locale to the one requested. The resulting view is then displayed for use.
How locale is established
As of AR System 6.3, URLs do not contain locale information. The system determines the correct locale in one of two ways, depending on whether the user is logged in:
� If the user is not logged in, the system takes the preferred locale list from the browser, and uses it in prioritized order to try to match the closest locale. This how the W3C recommends choosing a locale for a web page.
� If the user is logged in, the system takes the locale set in the user’s preferences as the locale of choice. If no locale is set in the user preferences, then the system uses the browser-supplied list.
Session timeouts
When a user logs in to the mid tier, the length of the user’s session is determined by the timeout setting in the Mid Tier Configuration Tool. When the session exceeds this time, the session times out and the user must log in again. The default session timeout is 90 minutes.
If a user is entering data in a form, that data might be lost if the session times out before the user submits (saves) the data. To prevent data loss if a timeout occurs, the user should log in from a new window, copy and paste the data to the new window, and submit the data from the new window.
If users are experiencing frequent timeouts, you might want to increase the session timeout setting in the Mid Tier Configuration Tool. For more information, see Chapter 5, “Configuring the mid tier,” and the Configuring guide.
144 �Chapter 7—Working with AR System forms and applications on the Web

Installing and Administering BMC Remedy Mid Tier
Creating help for web applications
If you created help for your applications in BMC Remedy Administrator, users can view that help in a browser window by clicking the Help link in the form’s toolbar.
Figure 7-15: Help in a browser window
You can also provide access to help on the web by using a Form Action field.
� To create help for a form on the web using a Form Action field
1 Create help for the form and for each field as described in the Getting Started guide.
Note: For field-level help, the Hide This Help Text in Web Views check box at the bottom of the tab is ignored in version 6.3 and later. Using previous versions, you can select the check box if you do not want help text for a field to appear in a form viewed on the web.
2 Create a Form Help field on the form.
a In the form window, choose Form > Form Action Fields.
b Select the Form Help check box, and click OK.
c Set field properties for the Help button that appears. See the Form and Application Objects guide for more information.
Toolbar help link
Form help text
Field help text
Creating help for web applications � 145

BMC Remedy Action Request System 7.0
Saving a web application to another location
You might want to save your web application to another location on your computer or file server. This enables you to verify the contents of your application before making it available to users.
� To save an application to disk
1 Open an existing application in BMC Remedy Administrator.
2 Choose Application > Properties.
3 Choose File > Save Application To Disk.
4 Enter the full path name in the dialog box that appears.
5 Click OK.
Making your web-based applications accessible to users with disabilities
You can configure your AR System web-based applications to work with assistive technology like JAWS (Job Access with Speech). This makes them accessible to people with disabilities, in accordance with Section 508 of the Rehabilitation Act of 1973. Configuration includes setting user preferences for accessibility and defining certain properties within your applications.
Note: You must make sure that all custom HTML and client script code is in compliance with Section 508 standards. This includes HTML snippets in view fields and any modifications you make to JSP pages.
Complete Section 508 standards can be found at http://www.section508.gov.
Browsers and third-party assistive devices
AR System accessibility features can be used with the following browsers and assistive devices:
� Microsoft Internet Explorer 5.5 (Service Pack 1 or later) or later
� JAWS Screen Reader for No Vision users (Windows only).
146 �Chapter 7—Working with AR System forms and applications on the Web

Installing and Administering BMC Remedy Mid Tier
Note: The BMC Remedy Mid Tier does not provide explicit support for Low Vision users. Low Vision users should use a third-party tool to enlarge the screen.
Configuring JAWS
On the mid tier, optimal readout will occur if you set JAWS as outlined in the following procedure. This is not a default JAWS setting.
� To configure JAWS for optimal readout
1 Open JAWS.
2 Choose Utilities > Configuration Manager.
3 In the window that appears, choose Set Options >HTML Options.
4 In the Test Link Options region of the Links tab, select the Use Title option (instead of the Use Screen Text option).
If you use other products, you might have to reset these settings. See the documentation for each product you are using.
Configuring Windows-Eyes
You can configure Windows-Eyes to read link title attributes instead of link text.
� Configuring Windows-Eyes to read link title attributes
1 Open Windows-Eyes.
2 Open the application you want to configure.
3 Verify that the MSAA mode is active by pressing CTRL+SHIFT+A.
4 Press INSERT+V to open the MSAA Verbosity dialog box.
5 Select Object.
6 Make sure that the Expose Alternative Text option is checked.
7 Click OK.
If you use other products, you might have to reset these settings. See the documentation for each product you are using.
Making your web-based applications accessible to users with disabilities � 147

BMC Remedy Action Request System 7.0
Cursor types and form modes
JAWS provides three cursor types to enable users to access HTML pages.
� PC cursor—The main focus of the active program. Press NUM PAD + to restore the PC cursor.
� JAWS cursor—Corresponds directly with the mouse pointer. Press NUM PAD - to restore the JAWS cursor.
� Virtual PC cursor—Use INSERT+Z to toggle Virtual PC cursor on or off. When this option is turned off, you are put in Forms mode.
Most interactions on the web use Forms mode or Non-Forms mode. By default, forms open in Non-Forms mode (PC cursor). In Non-Forms mode, the entire page is read when the form is initially displayed so the user will get an idea of the page layout. The user tabs to the fields (or use INSERT-F7 to show a list of links). To type into an edit field, the user first presses Enter, which puts the user into Forms mode. Data can then be entered into the field. The user can continue to tab to fields to type in data. Use NUM PAD+ to exit Forms mode.
INSERT+Z toggles the Virtual PC cursor on or off permanently. When Virtual PC cursor is off, every form you display is automatically in Forms mode.
As users traverse the fields in a form by using the Tab key, JAWS reads the field label and information about the field.
To interact with a menu, you must be in Forms mode. To enter this mode, press ENTER in an edit field, or press INSERT+Z. (After you press INSERT+Z, your focus is set to the first field in the form or the first field in the web toolbar if it is visible.)
Saved searches in the web toolbar appear in a menu. To interact with this menu, you must be in Forms mode.
User preferences for accessibility
The AR System User Preference form contains the following web accessibility preferences. To access these preferences, click the Web tab.
If no user preferences are set, no Section 508 enhancements will be made to the form. For each user, Section 508 enhancements are added dynamically when the HTML for the form is read.
148 �Chapter 7—Working with AR System forms and applications on the Web

Installing and Administering BMC Remedy Mid Tier
Figure 7-16: Web tab on AR System User Preference form
Preference Description
Accessible Mode Generates the HTML page so it is optimized as follows:
� Default—No optimization.
� Screen Magnifier/Low Vision—Accessed with a screen magnification device.
� Screen Reader/No Vision—Accessed using screen reader software.
Accessible Mode is enabled when it is set to Screen Reader/No Vision.
Note: When adding image buttons to a form, you must add a label for the button image so that screen readers can read the ALT tag for the image. When the No Vision option is set in user preferences, the screen reader will use the label text to read the ALT tag.
Accessible Message Designates the level of nonvisual feedback that applies to workflow. The options are:
� No Action—No messages are shown for accessibility. Active link message actions of type Accessible are ignored.
� Message Action—Displays accessibility messages defined by an active link message action of type Accessible.
� All Actions—Displays accessibility messages to reflect visual changes on the page, as well as accessibility messages defined by an active link message action of type Accessible.
Note: These options are not used in the BMC Remedy Mid Tier for versions 6.3 and later.
Session Timeout in Minutes
Specifies the number of minutes for the login session to time out. If no value is defined, the default value defined in the BMC Remedy Configuration Tool will be used. This value should be increased for No Vision users, because they might need more time to traverse forms.
Making your web-based applications accessible to users with disabilities � 149

BMC Remedy Action Request System 7.0
Accessibility features
AR System provides many accessibility features when the Accessible Mode user preference is enabled. In certain cases, you might need to configure the system to meet accessibility requirements.
Because of a JavaScript href reference for the A element tags that make up the buttons, JAWS assumes that all buttons have been visited.
Note: JAWS will not automatically read the contents of a read-only field.
Accessibility feature AR System functionality Administrator tasks
Text equivalent for images
For images on buttons, the field label can be interpreted by a screen reader.
Field accessibility � Field labels and field states (such as Read Only and Disabled) can be interpreted by a screen reader.
� AR System supplies default text for menu and expand box icons that appear next to fields.
You must distinguish Required fields. For example, you can add an asterisk, a plus sign, or other character to the field label.
Table field row and column identification
Table titles, column headers, and row headers can be interpreted by a screen reader.
Note: If a table or results list has only one column, screen readers will not recognize the table as a data table, and will not read it out.
Keyboard shortcuts The web client supports keyboard shortcuts.
For more information, see “Keyboard shortcuts” on page 151.
150 �Chapter 7—Working with AR System forms and applications on the Web

Installing and Administering BMC Remedy Mid Tier
Keyboard shortcuts
The following table lists keyboard shortcuts used in AR System. The term focus refers to keyboard focus, not to virtual cursor positions defined by certain assistive technologies.
General shortcut keys
Page field shortcut keys
Character field menu shortcut keys
You must be in Forms mode to access the character menu.
Key Description
DELETE
CTRL+X, +C, +V, +A
PAGE UP, PAGE DOWN
HOME, END
Arrow keys
Standard window editing and viewing shortcut keys.
TAB Tabs through all page elements that receive focus.
Key Description
LEFT ARROW
RIGHT ARROW
If the focus is on a tab selector (an anchor link), sets focus to the next or previous tab selector without displaying it. Press ENTER to display the selector.
ENTER If the focus is on a tab selector, displays the page.
Key Description
UP, DOWN, or ARROW Moves focus through the menu items. Press ENTER to fill the field with the menu selection.
RIGHT ARROW If the selected item is a submenu, opens and sets focus to the submenu.
Making your web-based applications accessible to users with disabilities � 151

BMC Remedy Action Request System 7.0
Form Action shortcut keys
These keys work only when the corresponding form action button is visible and enabled.
LEFT ARROW Dismisses the submenu and sets focus to the upper level menu. There is no action if the focus is at the top level.
<letter> Enter a letter to select the first item in the menu that begin with that letter. Press ENTER to fill the field with the menu selection.
Key Description
CTRL+ALT+F2 Switches to New Request mode
CTRL+ALT+F3 Switches to New Search mode.
CTRL+ALT+ENTER In New or Modify mode, saves the changes. In Search mode, performs the search.
CTRL+ALT+E Clears all field values.
CTRL+ALT+U Sets default field values.
CTRL+ALT+H Show status history values.
CTRL+ALT+Q Sets focus to the Advanced Search Bar input field.
Key Description
152 �Chapter 7—Working with AR System forms and applications on the Web

Chapter
8
Customizing AR System style sheetsYou can customize AR System forms and applications using customized cascading style sheets (CSS). The following topics are provided:
� Cascading style sheets in AR System (page 154)
� Overview of CSS rules (page 154)
� Default style sheets provided with AR System (page 156)
� Customizing style sheets in AR System (page 158)
� Using style sheets with web applications (page 158)
� Applying styles to AR System fields and other objects (page 162)
� Changing font styles (page 172)
Note: Because of color limitations in the printed documentation, the following examples are best viewed in the PDF version of this guide.
Customizing AR System style sheets � 153
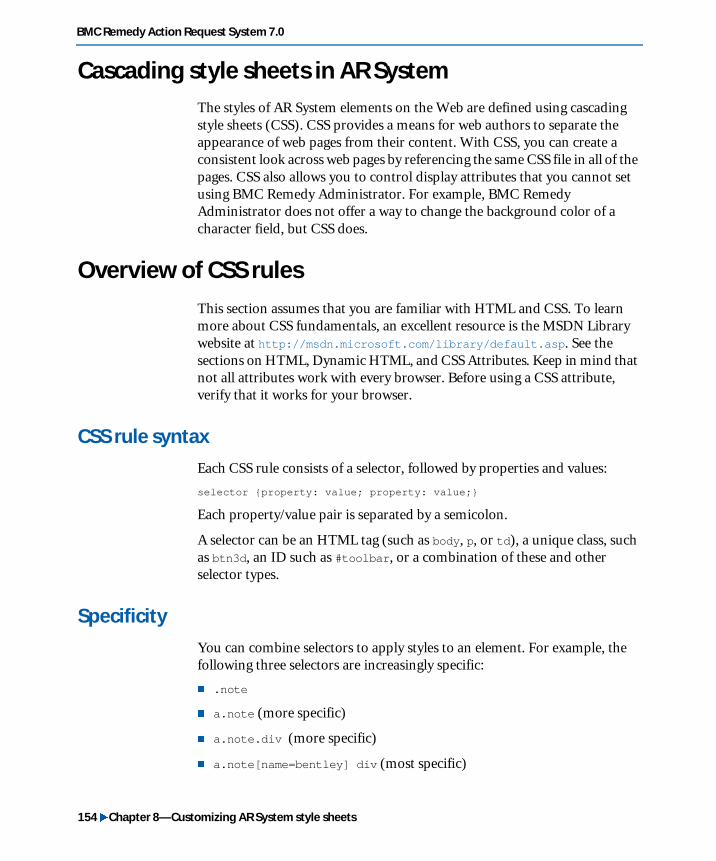
BMC Remedy Action Request System 7.0
Cascading style sheets in AR System
The styles of AR System elements on the Web are defined using cascading style sheets (CSS). CSS provides a means for web authors to separate the appearance of web pages from their content. With CSS, you can create a consistent look across web pages by referencing the same CSS file in all of the pages. CSS also allows you to control display attributes that you cannot set using BMC Remedy Administrator. For example, BMC Remedy Administrator does not offer a way to change the background color of a character field, but CSS does.
Overview of CSS rules
This section assumes that you are familiar with HTML and CSS. To learn more about CSS fundamentals, an excellent resource is the MSDN Library website at http://msdn.microsoft.com/library/default.asp. See the sections on HTML, Dynamic HTML, and CSS Attributes. Keep in mind that not all attributes work with every browser. Before using a CSS attribute, verify that it works for your browser.
CSS rule syntax
Each CSS rule consists of a selector, followed by properties and values:
selector {property: value; property: value;}
Each property/value pair is separated by a semicolon.
A selector can be an HTML tag (such as body, p, or td), a unique class, such as btn3d, an ID such as #toolbar, or a combination of these and other selector types.
Specificity
You can combine selectors to apply styles to an element. For example, the following three selectors are increasingly specific:
� .note
� a.note (more specific)
� a.note.div (more specific)
� a.note[name=bentley] div (most specific)
154 �Chapter 8—Customizing AR System style sheets

Installing and Administering BMC Remedy Mid Tier
In AR System, each element’s style is controlled by CSS rules, which are defined in one or more CSS files. The system CSS files are located under the Resources directory of the BMC Remedy Mid Tier.
Order of precedence
The style that you ultimately see for an element is created dynamically by the mid tier and the browser, based on a hierarchy of multiple style sheets, plus any inline styles.
The following diagram outlines the order of precedence for applying styles.
Styles are applied in downward order from the top of the diagram. Inline styles always override other CSS rules, and application-specific styles override system styles. The standard style sheet usually contains rules for all elements with properties that work for all browsers. The other style sheets might repeat or add a rule with different or unique properties specific to a browser client, application, locale, or user.
In addition, properties that are not redeclared in succeeding style sheets are applied from the previous declarations. For example, suppose you have a style rule called input.text that is declared in the first four source files:
� System style sheet: input.text {background-color: red; color: black;}
� System, browser-specific style sheet: input.text {border: 1px solid green}
� Application, standard style sheet: input.text {font-family: Arial, sans-serif; color: blue;}
� Application, browser-specific style sheet: input.text {font-size: 8px; border: 2px;}
Order of precedence
Overview of CSS rules � 155

BMC Remedy Action Request System 7.0
The resulting rule is:
input.text {background-color: red;color: blue;border: 2px solid green;font-family: Arial, sans-serif;font-size: 8px;}
In this example, the style declarations from the application style sheets take precedence over those from the system style sheets. For instance, the color: blue declaration from the standard application style “wins” over the color: black declaration from the system style sheet.
The mid tier might assign multiple CSS rules to an HTML element; for example:
<textarea class=”text sr f9 dat”>
Style rules take precedence in right-to-left order. Rules to the right take precedence over rules to the left. Properties that are not declared are carried over and reapplied to succeeding style sheets.
Default style sheets provided with AR System
The following table lists the CSS files available and their directory locations.
Style sheet name Description Default directory
config.css Styles for the BMC Remedy Mid Tier Configuration Tool.
Selectors from version 6.0.1 are still used. You cannot specify browser or application-specific versions of this style sheet.
C:\Program Files\AR System\Mid-Tier\shared\config\
rwebhelp.css Styles for BMC Remedy Mid Tier Configuration Tool help.
Selectors from version 6.0.1 are still used. You cannot specify browser or application-specific versions of this style sheet.
C:\Program Files\AR System\MidTier\shared\doc\config\<locale>
flashboards.css Styles specific to BMC Remedy Flashboards user customization controls.
Selectors from version 6.0.1 are still used. You cannot specify browser or application-specific versions of this style sheet.
C:\Program Files\AR System\Mid-Tier\resources\standard\stylesheets\
156 �Chapter 8—Customizing AR System style sheets

Installing and Administering BMC Remedy Mid Tier
ARSystemHelp.css Styles for dynamically generated help created for forms and fields.
A style sheet for help was not used in previous releases. You cannot specify browser or application-specific versions of this style sheet.
C:\Program Files\AR System\Mid-Tier\resources\standard\stylesheets\
ARSystemAppList.css
Styles for application list fields in AR System forms.
In previous releases, the main style sheet was used to apply styles for application list fields.
C:\Program Files\AR System\Mid-Tier\resources\standard\stylesheets\
ARSystem.css(generic)
Styles for AR System forms that are properly interpreted or ignored by all browsers.
C:\Program Files\AR System\Mid-Tier\resources\standard\stylesheets\
ARSystem.css (IE)
Styles that are needed specifically for Internet Explorer browsers.
C:\Program Files\AR System\Mid-Tier\resources\ie\stylesheets\
ARSystem.css(Mozilla)
Styles that are needed specifically for Mozilla browsers.
C:\Program Files\AR System\Mid-Tier\resources\moz\stylesheets\
ARSystem_ja.css Japanese-specific styles. C:\Program Files\AR System\Mid-Tier\resources\standard\stylesheets\
ARSystem_ko.css Korean-specific styles. C:\Program Files\AR System\Mid-Tier\resources\standard\stylesheets\
ARSystem_zh.css Simplified Chinese styles. C:\Program Files\AR System\Mid-Tier\resources\standard\stylesheets\
Style sheet name Description Default directory
Default style sheets provided with AR System � 157
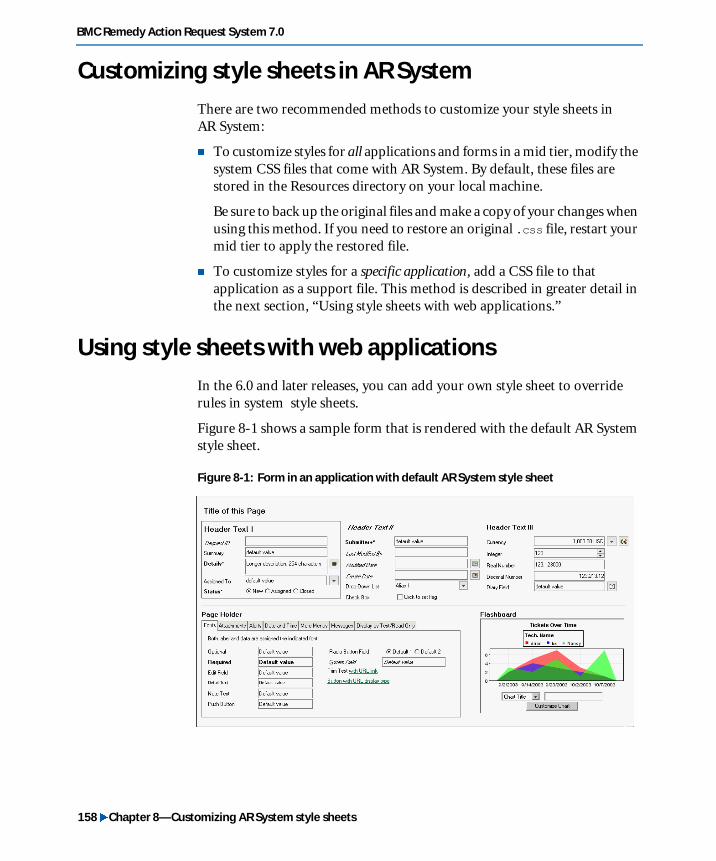
BMC Remedy Action Request System 7.0
Customizing style sheets in AR System
There are two recommended methods to customize your style sheets in AR System:
� To customize styles for all applications and forms in a mid tier, modify the system CSS files that come with AR System. By default, these files are stored in the Resources directory on your local machine.
Be sure to back up the original files and make a copy of your changes when using this method. If you need to restore an original .css file, restart your mid tier to apply the restored file.
� To customize styles for a specific application, add a CSS file to that application as a support file. This method is described in greater detail in the next section, “Using style sheets with web applications.”
Using style sheets with web applications
In the 6.0 and later releases, you can add your own style sheet to override rules in system style sheets.
Figure 8-1 shows a sample form that is rendered with the default AR System style sheet.
Figure 8-1: Form in an application with default AR System style sheet
158 �Chapter 8—Customizing AR System style sheets

Installing and Administering BMC Remedy Mid Tier
If you want the application to include your corporate standard for colors and fonts, you can use a customized style sheet to reflect your corporate styles.
The following procedure outlines how to add a customized style sheet to a web application.
� To apply a customized style sheet to a web application
1 In BMC Remedy Administrator, open the window for the application you want to work with.
2 Open the Application Properties window.
3 Click the Support Files tab.
The Resources Directory Structure appears.
Figure 8-2: Resources directory in application window
4 Select the top Resources Directory Structure directory.
5 Click the Create Dir button to create a set of directories using the structure shown in the following figure. This structure mirrors the structure in the mid tier directory for system resources.
Using style sheets with web applications � 159

BMC Remedy Action Request System 7.0
Figure 8-3: Directory structure for customized style sheets
The standard directory is for stylesheets and other resources that work across all browsers. The ie and moz directories are for stylesheets that contain CSS rules specific to each browser and that should be applied only to that browser.
Keep in mind that a CSS rule property is sometimes applied only by the browsers that support it, and is safely ignored by all other browsers. Such properties do not need to be limited to a browser-specific style sheet, which means that you might be able to reduce the number of style sheets you need to create.
6 Select a directory, and click Add Files.
The Open dialog box appears.
7 Select your custom CSS file and click Open.
The file is added to the directory selected in step 6.
8 Click the Rename button to rename this file to ARSystem.css if it does not already have this name.
160 �Chapter 8—Customizing AR System style sheets
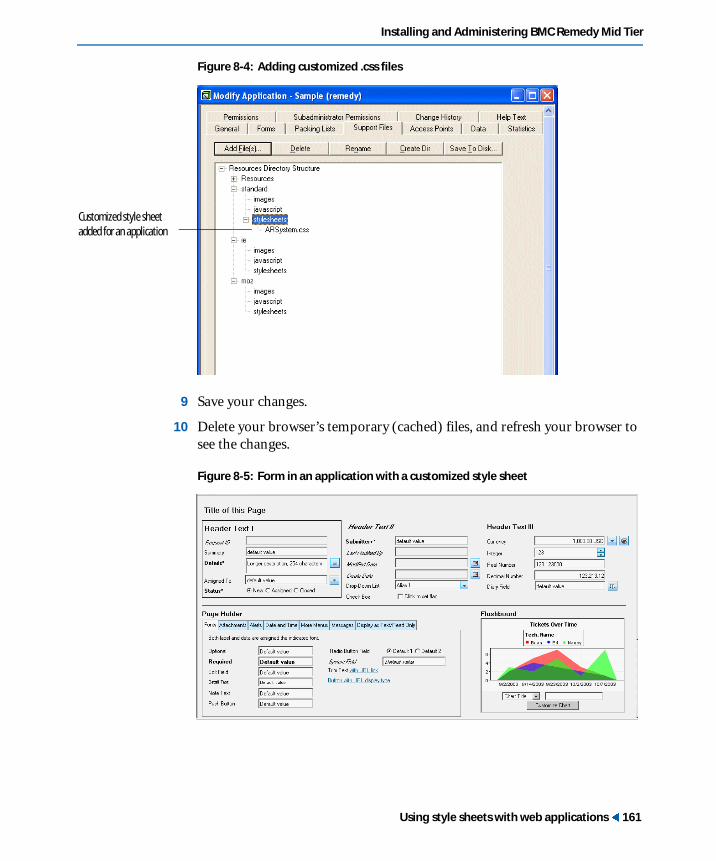
Installing and Administering BMC Remedy Mid Tier
Figure 8-4: Adding customized .css files
9 Save your changes.
10 Delete your browser’s temporary (cached) files, and refresh your browser to see the changes.
Figure 8-5: Form in an application with a customized style sheet
Customized style sheet added for an application
Using style sheets with web applications � 161

BMC Remedy Action Request System 7.0
As you can see, this customized style sheet changes the appearance of the application in the browser, including fonts, labels, colors, menu styles, button styles, trim lines, and more.
11 Repeat steps 6 through 10 for each directory to which you want to customize your .css files. In each directory, click the Rename button to rename each customized CSS file to ARSystem.css.
12 If you need to edit a .css file later, delete the current file and add the edited one. Delete the temporary (cached) files in your browser, and refresh the page to see the changes.
Applying styles to AR System fields and other objects
All AR System field types have associated CSS rules. You can use CSS to customize AR System field types, and apply styles to specific fields in a form.
CSS selectors and field types
The following table shows the mapping between the parts of AR System field types and CSS selectors. The numbered items in the field type illustrations correspond to the available selectors.
Before customizing any style sheets, examine the system style sheets for the default property directions.
WARNING: System forms are laid out with absolute positioning, which means that elements do not automatically shift and resize if the window or element size changes. To prevent unwanted text clipping or other layout changes, avoid editing or adding geometric properties such as width, height, positioning, padding, font size, or font family. In addition, avoid adding properties such as overflow or z-index to elements. Limit your customizations to visual properties such as color, background color, and border color.
162 �Chapter 8—Customizing AR System style sheets

Installing and Administering BMC Remedy Mid Tier
AR System field type CSS selector
Character 1. fieldset
2. textarea.text, textarea.sr
For the “display as text” option:
textarea.dat
For the read-only option:
fieldset.dfro input.textfieldset.dfro textarea.text
fieldset.dfro.button.menu
fieldset.dfro div.radiofieldset.dfro labelfieldset.dfro span
3. label.label, . * , f0-f10
Character, 2 or more rows Same as the previous row, except:
2. textarea.text only
4. See Button, field_text.gif mid tier resource, and Diary and Text Editor pop-up.
Selection, drop-down Same as Character properties, except:
2. div.selection input
input.text
4. See Button and field_menu.gif mid tier resource.
Selection, radio button Same as Character properties, except:
2. div.radio
4. div.radio.input
Selection, check box Same as Selection, radio button properties.
Currency Same as Character properties, except:
2. input.currency
4, 5. See Button and field_menu.gif and field_currency.gif mid tier resources.
Applying styles to AR System fields and other objects � 163

BMC Remedy Action Request System 7.0
Currency, functional currency pop-up 1. div.DIVPopup (border only) table.DIVPopupTitleBar
2. table.CurTable
3. td.CurSym
4. td.CurVal
Date/Time, Date, Time Same as Character properties, except:
2. input.text
4. See Button and field_calendar.gif or field_time.gif mid tier resources.
DateTime, Date, Time pop-ups 1. div.DivPopup (border only)
2. td.DIVPopupBody
3. td.DivPopupButtons. See also Button.
4. input.text
5. tr.daysofweek
6. td.calendaron
7. td.weekday
8. td.weekend
9. See Button. spinner_down.gif and spinner_up.gif are mid tier resources.
Integer Same as Character properties, except:
2. input.text
div.integer input
3. See Button. spinner_down.gif and spinner_up.gif are mid tier resources.
Real Number Same as Character properties, except:
2. input.text only
Decimal Same as Character properties, except:
input.decimal
AR System field type CSS selector
164 �Chapter 8—Customizing AR System style sheets
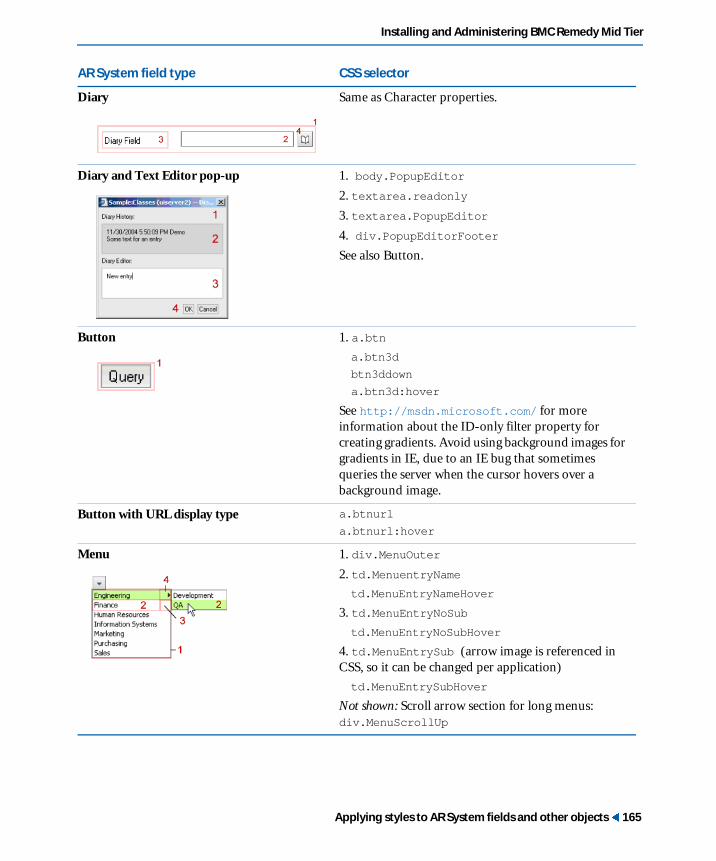
Installing and Administering BMC Remedy Mid Tier
Diary Same as Character properties.
Diary and Text Editor pop-up 1. body.PopupEditor
2. textarea.readonly
3. textarea.PopupEditor
4. div.PopupEditorFooter
See also Button.
Button 1. a.btn
a.btn3dbtn3ddown a.btn3d:hover
See http://msdn.microsoft.com/ for more information about the ID-only filter property for creating gradients. Avoid using background images for gradients in IE, due to an IE bug that sometimes queries the server when the cursor hovers over a background image.
Button with URL display type a.btnurla.btnurl:hover
Menu 1. div.MenuOuter
2. td.MenuentryName
td.MenuEntryNameHover
3. td.MenuEntryNoSub
td.MenuEntryNoSubHover
4. td.MenuEntrySub (arrow image is referenced in CSS, so it can be changed per application)
td.MenuEntrySubHover
Not shown: Scroll arrow section for long menus: div.MenuScrollUp
AR System field type CSS selector
Applying styles to AR System fields and other objects � 165

BMC Remedy Action Request System 7.0
Trim text *
f0-f10
If a URL is included:
a.TrimLinktd.LinkCella.TrimLink:hover
Table, List View
AR System field type CSS selector
1. *
divTableHdr
2. See Button. Arrow images are mid tier resources. The space around “page” is to accommodate all languages.
3. divTable Inner (Only the border is affected).
4. div.BaseTableHeader
div.BaseTableHeaderDragLdiv.BaseTableHeaderDragR
5. td.BaseTableCellOdd and td.BaseTableCell affect alternating rows. tr.SelPrimary td and tr.SelSecondry td affect primary and secondary + row selections.
6. div.BaseTableBar div (column divider)
7. Internet Explorer only:div.TableInner (scrollbar-rdlight-color: #ebebeb; scrollbar-arrow-color...}
See http://msdn.microsoft.com for more information about CSS attributes.
8. div.Table.Ftr
166 �Chapter 8—Customizing AR System style sheets

Installing and Administering BMC Remedy Mid Tier
Table, Tree View 1. div.tree (Background and border of the tree)
2. div.treetitle (Specifies the font and color for nodes)
3. div.treeroot (Specifies additional styling for the root node)
4. div.treetitleselectedfocused (Specifies the styling for a selected node)
5. div.tree img (Specifies the width and height of the expand and collapse icons)
Horizontal Navigation
AR System field type CSS selector
12
3
4
5
1
2 3 4 6
7
5
8 9 10
1 .HNavBar2 .HNavItem.leftrnd3 .HNavItem.center4 .HNavItem.left5 .HNavItem.right6 .HNavItem.rightrnd7 .HNavSep8 .HNavSelected9 .HNavHover10 .HNavDisabled
Applying styles to AR System fields and other objects � 167

BMC Remedy Action Request System 7.0
Vertical Navigation 1 div.VNavBar2 div.VNavLevel13 div.VNavParent4 div.VNavLevel25 div.VNavLeaf6 div.VNavSelected7 div.VNavHover8 div.VNavSep9 div.VNavDisabled
Page Field 1 .OuterOuterTab
2 .OuterTab, .OuterTabSelected3 .Tab
Other settings include:
.TabLeft
.TabRight
.TabLeftRounded
.TabRightRounded
Toolbar 1. a.TBTopBarBox
2. div.TBTopBarStatus
3. div.TBTopBarStatus span
4. div.TBTopBarStatusMode1-6
5. See Button and a.searchsavechanges
6. td.TBGroup0
7. a.tbbtn.a.ttbbtn:hover
8-9. td.TBGroup1-3
10. div#ToolBar
AR System field type CSS selector
12, 34, 5
67
8
9
3
1 2 3 4
5 6 7 8 910
168 �Chapter 8—Customizing AR System style sheets

Installing and Administering BMC Remedy Mid Tier
Customizing styles in BMC Remedy Administrator
You can specify styles to fields and other objects in a form by creating a style for that field in the appropriate style sheet, and naming the style for the field in BMC Remedy Administrator. To use the same style for several fields, apply the same name to the properties of each field in BMC Remedy Administrator.
� To apply a custom style
1 In the style sheet to which you want to apply the style, add the style using the following syntax:
<styleName> {<property>: <value>;}
For example:
myRaisedBox {border-bottom-color; #e9967a;border-right-color: #e9967a;}
2 In BMC Remedy Administrator, open the form whose field you want to apply the customized style.
3 Select the field and open the Field Properties window.
Advanced Search Bar 1. div.AdvancedSearchBar
2. See Button.
3. See Button and Menus.
Message boxes 1.body.PopupMsg (The image is a mid tier resource.)
2. div.PopupMsgBox (It is difficult to hide this border; the box needs to be scrollable if the text is long).
3. div.PopupMsgFooter. See also Button.
AR System field type CSS selector
Applying styles to AR System fields and other objects � 169

BMC Remedy Action Request System 7.0
4 In the Custom CSS field, enter the name of the style from your style sheet.
Figure 8-6: Custom CSS in Field Properties dialog box
5 Save the form.
6 Open your browser and clear any temporary (cached) files.
7 Display the form to verify that the style has been applied to the object.
The following examples show customized styles applied to boxes and buttons.
Customized style
170 �Chapter 8—Customizing AR System style sheets
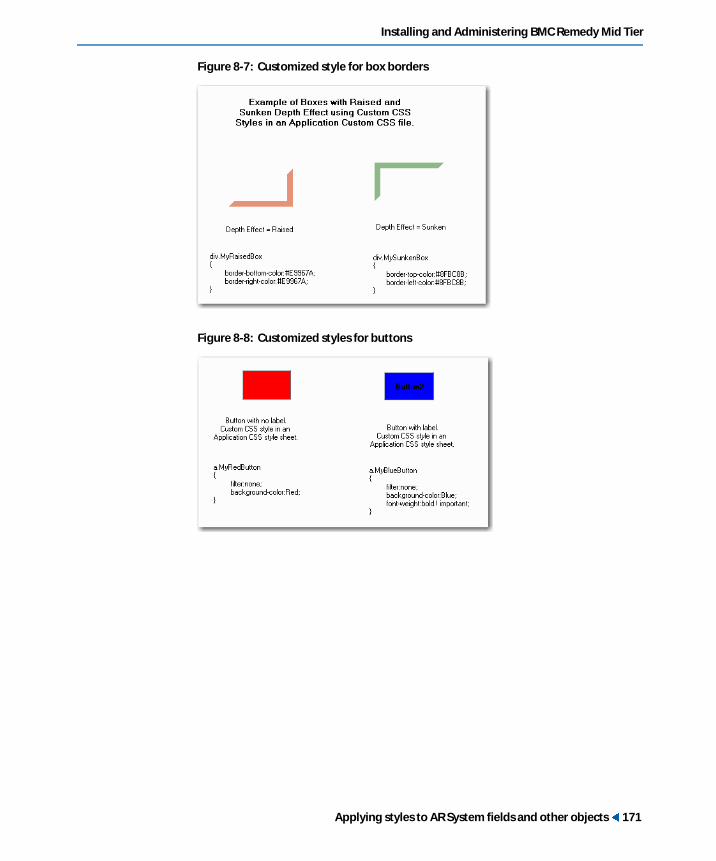
Installing and Administering BMC Remedy Mid Tier
Figure 8-7: Customized style for box borders
Figure 8-8: Customized styles for buttons
Applying styles to AR System fields and other objects � 171

BMC Remedy Action Request System 7.0
Changing font styles
The AR System uses fonts that are styled for the web using CSS class rules. These rules are applied automatically to the data or label portion of a field.
The following table outlines the style rules used for AR System fonts.
These classes include the specifications of such CSS properties as background color and font (which includes font family, weight, style, and size.). These properties cannot be edited in BMC Remedy Administrator. For more information about these fonts, see the Getting Started guide.
The default class for a field’s label and text is based on its entry mode (specified in the Database tab). If a field’s entry mode is Required, its default label class will be f9, in addition to label.label. In the HTML, the label tag contains class=”label f9”). Otherwise, it will be f6 (optional). For system-level fields such as Request ID, the default class is f10.
Font name in BMC Remedy Administrator
CSS selector
n.a. * (asterisk)—A special rule that applies to all HTML elements, and that AR System uses to define basic font properties.
Header (I) f2
Header (II) f3
Header (III) f4
Optional Field f6
Required f9
System field f10
Edit field f1
Push Button f7
Radio Button f8
Note Text f5
Detail Text f0
172 �Chapter 8—Customizing AR System style sheets

Installing and Administering BMC Remedy Mid Tier
You can override the default class for the label/text of a field in BMC Remedy Administrator by making selections in the Color/Font tab of the Field Properties dialog box.
You can override the default color (usually black) of the label/text of a field if you clear the Default Label/Text Color check box and choose a color. Doing so adds inline styles to the field’s HTML code. These inline styles take precedence over the CSS rules in any linked style sheets.
WARNING: Do not increase the font size unless you also increase the size of the field’s bounding box in BMC Remedy Administrator. The scaling factor is tied to font sizes, so you might end up with overlapping fields if you increase font sizes without increasing the bounding box size for the field.
Changing font styles � 173

BMC Remedy Action Request System 7.0
174 �Chapter 8—Customizing AR System style sheets
Chapter
9
Saving and running searches on the webThis section describes how to save and run searches on the web. The following topics are provided:
� Overview (page 176)
� Creating and saving searches (page 177)
� Running a search (page 178)
� Loading a search (page 179)
� Managing saved searches (page 179)
� Including parameters in saved or defined searches (page 180)
Saving and running searches on the web � 175

BMC Remedy Action Request System 7.0
Overview
You can now save searches on the web, and run them at any time by selecting searches from a toolbar menu in a form. In addition, the recent searches and defined searches currently available in BMC Remedy User are now available in a browser. You can load each type of search criteria into a form, and update the search criteria before you execute a search. All searches can be run across multiple sessions.
The Searches button is enabled only if you have specified a preference server and have the AR System Searches Preference form installed.
Figure 9-1: Searches menu in toolbar of a form displayed in a browser
Three types of searches are available on the web:
� Saved searches—Searches that users can create and save for a form. These searches are saved to a system form called AR System Searches Preference. Each search is an entry in this form. You must have this form installed in your preference server to save searches on the web. If you do not have this form installed, import it using BMC Remedy Administrator.
� Recent searches—A list of searches that a user has executed recently. The number of recent searches is configured in the AR System User Preference form. When a user executes a new search, it is added to the list of recent searches. If the maximum number of recent searches has been reached, the oldest of the recent searches is replaced by the newest search. These searches are also saved in the Ar System Searches Preference form.
Note: Parameterized searches are not saved in the list of recent searches.
� Defined searches—Searches defined by the administrator. Each defined search is associated with a specific form view, and is stored as part of the properties for that view.
Saved and defined searches can include parameters. For more information, see “Including parameters in saved or defined searches” on page 180.
176 �Chapter 9—Saving and running searches on the web

Installing and Administering BMC Remedy Mid Tier
Note: Searches saved on the web cannot be accessed from BMC Remedy User, and searches saved in BMC Remedy User cannot be accessed on the web.
Creating and saving searches
The following procedures detail how to save and run searches from a form viewed in a browser.
Note: You must execute a search before you can save it.
� To save a search you have created
1 Open a form in Search mode.
2 Enter the search criteria in the form fields, in the advanced search bar, or a combination of both.
3 Click Search.
The system executes the search and displays a results list.
4 From the toolbar, choose Searches > Save Search.
The Save or Redefine Search dialog box appears.
Figure 9-2: Save or Redefine Search dialog box
5 In the Search Name field, enter a name for the search, or select one from the list of existing saved searches.
This is the name that will appear in the saved search list. If the name you enter already exists, the search criteria under the existing name will be overwritten.
Creating and saving searches � 177

BMC Remedy Action Request System 7.0
6 Click OK.
The new search will now be available in the list of saved searches.
Running a search
� To run a saved, recent, or defined search
1 From the toolbar, choose Searches > Run My Searches, Run Recent, or Run Defined.
Figure 9-3: Searches menu
2 From the list of searches, choose a search to run.
The system executes the search and displays a results list.
Figure 9-4: Search results
178 �Chapter 9—Saving and running searches on the web

Installing and Administering BMC Remedy Mid Tier
Loading a search
You can load search criteria from saved, recent, or defined searches into a form without executing the search. You can then modify the search criteria, or execute the search as it is.
� To load search criteria into a form
1 Open a form in Search mode.
2 From the toolbar, choose Searches > Load My Searches, Load Recent, or Load Defined.
3 From the list of searches, choose the search you want to load into the form.
The search criteria is loaded into the form. You can execute the search by choosing Search from the toolbar, or you can modify the search criteria.
Managing saved searches
You can enable, disable, or delete existing saved searches. Disabling a search removes it from the list of searches, but keeps the search data.
� To enable or disable a search
1 From the toolbar, choose Searches > Manage My Searches.
The Manage Search dialog box appears.
Figure 9-5: Manage Search dialog box
The label for this button changes depending on the currently selected search.
Use the Delete button to delete a search.
Loading a search � 179

BMC Remedy Action Request System 7.0
2 Select the search you want to enable or disable, and click the Enable/Disable button.
If a search is not yet selected in the Manage Search dialog box, the default button label of Disable is displayed.
The state of the search changes to either Enabled or Disabled, depending on your action. If the search is disabled, it no longer appears in the search menu on the toolbar, but the search data is still stored in the AR System Searches Preference form.
3 Click Save to save your changes.
� To delete a search
1 Select the search you want to delete.
2 Click Delete.
3 Click Save.
The search is deleted from the list in the Manage Searches dialog box, from the search menu, and from the AR System Searches Preference form. To restore a deleted search, you must recreate and save it.
Including parameters in saved or defined searches
You can include parameters in a saved or defined search by specifying a value in the format $<parameter>$. When a user runs a parameterized search, a dialog box opens and prompts the user to enter a specific value for the parameter.
Parameterized searches are not saved in recent search menus.
Defining a search with parameters
Use the following procedure to define a search with parameters on the web.
Note: Parameterized searches cannot be executed in BMC Remedy User.
180 �Chapter 9—Saving and running searches on the web

Installing and Administering BMC Remedy Mid Tier
� To define a search with parameters
1 Open a form in BMC Remedy Administrator.
2 Choose Form > Manage Views.
3 Select a view, and click Properties.
4 Click the Defined Searches tab.
5 Enter the appropriate information in the following fields:
� Name—The administrator-defined name for the search.
� Description—A short description of what the search does; for example, “Search for tickets by submitter.” This description is displayed to the user in both BMC Remedy User and in a browser for an administrator-defined search. If a description does not exist for a search, the name will be used instead.
� Qualification—The criteria to be used for the search. To specify a parameter, use the following syntax:
‘<field>’ <operator> “$<parameter>$”
where
� <field> is the field on which to search.
� <operator> is the operator type.
� <parameter> is the label for the search parameter. The label can be any string that is not a keyword.
For example, the search ‘Submitter’ = “$Enter Submitter$” will prompt the user to enter a submitter name.
Figure 9-6: Parameters in a defined search
6 Click OK.
7 Close the Manage Views dialog box.
8 Save the form.
Including parameters in saved or defined searches � 181

BMC Remedy Action Request System 7.0
Saving a search with parameters
� To save a search with parameters
1 In a browser, open a form in Search mode.
2 Enter parameters either in the fields, or by using the advanced search bar.
If the advanced search bar is not displayed, show it by choosing Advanced Searches from the toolbar.
Figure 9-7: Entering parameters in the advanced search bar
3 Click Search.
A dialog box appears, requesting values for the search parameters.
4 Enter the values for which you want to search, and click OK.
The system executes the search and displays the results.
5 To save the search, follow the instructions from step 4 in “To save a search you have created” on page 177.
Search parameters
182 �Chapter 9—Saving and running searches on the web

Installing and Administering BMC Remedy Mid Tier
Running a defined or saved search with parameters
� To run a defined or saved search with parameters
1 Select Searches > Run Defined or Run My Searches, and select a search from the list.
2 A dialog box appears, requesting values for the search parameters.
Figure 9-8: Search parameters
3 Enter the values on which you want to search, and click OK.
The system executes the search and displays the results.
Including parameters in saved or defined searches � 183

BMC Remedy Action Request System 7.0
184 �Chapter 9—Saving and running searches on the web
Chapter
10
Configuring the mid tier to run reports on the WebThis section outlines the procedures for configuring the mid tier to run reports on the web. The following topics are provided:
� Reporting on AR System data (page 186)
� Web reporting components (page 186)
� Steps required to enable web reporting (page 187)
� Overview of the Crystal Reports and BusinessObjects software (page 189)
� Understanding the ARWebReportViewer (page 190)
� Configuring web server settings for Crystal reports (page 191)
� Configuring the mid tier for Crystal reports (page 200)
Note: To display Crystal reports on the Web, Crystal Enterprise is required. For more information, see the compatibility matrix at http://supportweb.remedy.com.
Configuring the mid tier to run reports on the Web � 185

BMC Remedy Action Request System 7.0
Reporting on AR System data
AR System reporting tools enable users to create reports based on requests that meet search criteria specified by a user. Once a list of requests is generated, users can run a report using those requests as input.
The layout and content of data in a report is determined by a report definition file, which can be created using tools in native or web AR System clients, or by using the Crystal Report Designer application.
For information about how to use reporting features in BMC Remedy User, see BMC Remedy User help. The following sections describe AR System reporting using a browser, and the steps that an administrator must complete to enable web reporting.
Web reporting components
The following components work together in AR System to enable web reporting.
� Configuration settings
� AR System Preferences (only if you are using Crystal Enterprise 10)
� BMC Remedy Mid Tier Configuration Tool
� ARWebReportViewer settings (for BusinessObjects Enterprise XI or Crystal Reports Server XI only)
For more information about the ARWebReportViewer, see “Understanding the ARWebReportViewer” on page 190.
� Reporting forms—Forms that are loaded automatically during AR System installation and whose entries work to define web reporting. If these forms do not appear in the Object List dialog box of BMC Remedy User after installation, they can be imported using the reportforms definition file, found in the default AR System directory (C:\Program Files\AR System\Arserver\Samples\<language>). You must also import the data in the ReportType.arx file (also found in the same directory).
186 �Chapter 10—Configuring the mid tier to run reports on the Web
Installing and Administering BMC Remedy Mid Tier
The four reporting forms are:
� ReportType—Defines the environment that supports creating, editing, and running reports on the Web
� ReportCreator—Used to create or edit AR System report definition files
� Report—Associates an existing report definition file with a particular form
� ReportSelection—Enables users to select the report they want to view
� Report definition files—Files that define the layout and content of data in a report. These files are created and edited using the following tools:
� BMC Remedy User reporting tools
� The ReportCreator form
� The Crystal Report Designer application
� A form containing a table or results list field—Table and results list fields hold the data that serves as input to a report.
� The Open Window active link—A workflow object that opens a browser window for any form. For reporting, the Open Window active link is set up to open the ReportSelection form in a browser window.
Steps required to enable web reporting
The following steps outline the tasks that must be completed to enable web reporting.
Note: If you are not using Crystal reports, begin with step 4.
Step 1 To enable your users to view Crystal reports, install the AR System ODBC driver (arodbc70.dll) on the machine you are using. The driver can be installed in any of the following ways:
� The BMC Remedy User install program includes an option to install the AR System ODBC data source as a User DSN (data source name). For more information, see the Installing guide.
� The BMC Remedy Mid Tier install program “silently” installs the AR System ODBC data source as a System DSN.
Steps required to enable web reporting � 187
BMC Remedy Action Request System 7.0
� The BMC Remedy ARWebReportViewer “silently” installs the AR System ODBC data source as a System DSN.
Step 2 For AR System on UNIX using Crystal Enterprise 10: Use the UNIX Web Connector component that comes with Crystal Enterprise 10 to connect to the UNIX mid tier. For more information, see Appendix A, “Installing and configuring Crystal Web Connector on UNIX platforms,” on page 247.
Step 3 If you are using BusinessObjects Enterprise XI, Crystal Reports Server XI, or Crystal Enterprise 10, configure the following options and settings:
� Web server settings (See page 191.)
� Configuration options (See page 200.)
� BMC Remedy User preferences—for Crystal Enterprise 10 only (See BMC Remedy User Help.)
For information about configuration, see “Configuring the mid tier for Crystal reports” on page 200.
Step 4 Define the environment you are using to create, edit, and run reports on the Web with entries to the ReportType form. (See “Using the ReportType form” on page 208.)
Step 5 Make the ReportCreator and ReportSelection forms available to users on the Web.
Views of these forms are automatically saved with the locale of en_US. If you need a view of the form in another locale, open the view of the form on a machine set to the locale you require, and save it.
Step 6 Create a report definition file using BMC Remedy User reporting tools, the ReportCreator form, or the Crystal Report Designer application, and make the report available for selection on the Web.
� For information about creating or editing a report using BMC Remedy User reporting tools, see BMC Remedy User help.
� For information about creating or editing a report using the ReportCreator form, see “Using the ReportCreator form” on page 214.
� For information about Report form entries, see “Report form entries” on page 223.
188 �Chapter 10—Configuring the mid tier to run reports on the Web

Installing and Administering BMC Remedy Mid Tier
Step 7 Define a table or results list field on a form to hold the data that serves as input for a report. See “Reporting using table fields and results list fields” on page 228.
Step 8 Generate an AR System or Crystal report through a browser. (See “Running a report on the Web” on page 224.)
The remaining topics in this section pertain specifically to Crystal reports. If you are not using Crystal reports, see the section“Creating reports for the Web” for information about creating, displaying, and exporting reports.
Overview of the Crystal Reports and BusinessObjects software
To run reports on the web, you can use any of the following products:
� Crystal Enterprise 10
� BusinessObjects Enterprise XI, which is managed
� Crystal Reports Server XI, which is unmanaged
A “managed” version caches reports on the Crystal Reports Management server (not the local disk), enabling you to have more control over reporting. It also enables you to schedule reports. With an “unmanaged” version, you can view reports on the ARWebReportViewer machine.
Crystal Enterprise 10 is URL-based, and BusinessObjects Enterprise XI and Crystal Reports Server XI are Java-based. (For BusinessObjects Enterprise XI and Crystal Reports Server XI, Java APIs are used [it is not a pure Java based solution.]) Because of these differences, one version might require different configuration or setup steps. These differences are noted throughout this chapter.
Overview of the Crystal Reports and BusinessObjects software � 189

BMC Remedy Action Request System 7.0
Understanding the ARWebReportViewer
If you are running BusinessObjects Enterprise XI or Crystal Reports Server XI separately from the mid tier, you must use the ARWebReportViewer to enable users to view Crystal reports with the mid tier. For more information, see “To configure the ARWebReportViewer separately” on page 202.
When you install the mid tier on a Windows machine, you are given the option to install the ARWebReportViewer with the mid tier. Or, you can install it separately. For more information, see “Windows—Installing BMC Remedy Mid Tier and ServletExec” on page 43 and “Installing ARWebReportViewer separately” on page 55.
After the ARWebReportViewer is installed, you can access it at http://<ARWebReportViewer_host>/arreports/shared/config/configreport.jsp.
Figure 10-1: Report Settings page
ARWebReportViewer is similar to the Mid Tier Configuration Tool, but ARWebReportViewer has three links:
� Report Settings, which is discussed in “To configure the ARWebReportViewer separately” on page 202.
� Log Settings, which is discussed in “Log settings” on page 93.
� Change Password, which is discussed in “Change password” on page 97.
190 �Chapter 10—Configuring the mid tier to run reports on the Web

Installing and Administering BMC Remedy Mid Tier
Configuring web server settings for Crystal reports
Web server settings for Crystal reports are configured differently depending on the version you are using:
� “Crystal Enterprise 10” on page 191
� “BusinessObjects Enterprise XI (Managed)” on page 198
� “Crystal Reports Server XI (Unmanaged)” on page 199
Crystal Enterprise 10
Web server settings are required if a user wants to view reports created with the Crystal Report Designer application on the Web.
To run Crystal Enterprise 10 with AR System you must configure a virtual directory, arreports, that points to the report directory on your mid tier. The following procedures describe how to do this for IIS (page 191) and SunONE (page 195).
To set up a remote mid tier that communicates with Crystal Enterprise 10, see “Setting up a remote mid tier for Crystal Enterprise 10” on page 197.
� To configure a virtual directory for an IIS web server
1 Go to the Windows Control Panel, open Administrative tools, and double-click Internet Services Manager.
The Internet Information Services window appears.
Configuring web server settings for Crystal reports � 191

BMC Remedy Action Request System 7.0
Figure 10-2: Internet Information Services window
2 In the Internet Information Services window, select Default Web Site from the hierarchy.
3 From the Action menu, choose New > Virtual Directory to start the Virtual Directory Creation Wizard.
Figure 10-3: Starting the Virtual Directory Creation Wizard
192 �Chapter 10—Configuring the mid tier to run reports on the Web
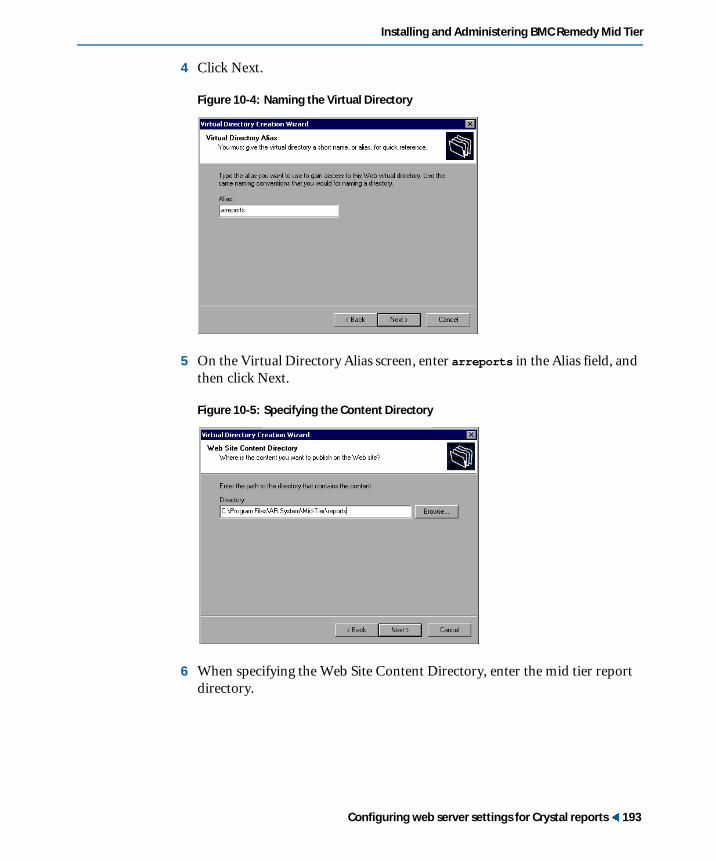
Installing and Administering BMC Remedy Mid Tier
4 Click Next.
Figure 10-4: Naming the Virtual Directory
5 On the Virtual Directory Alias screen, enter arreports in the Alias field, and then click Next.
Figure 10-5: Specifying the Content Directory
6 When specifying the Web Site Content Directory, enter the mid tier report directory.
Configuring web server settings for Crystal reports � 193
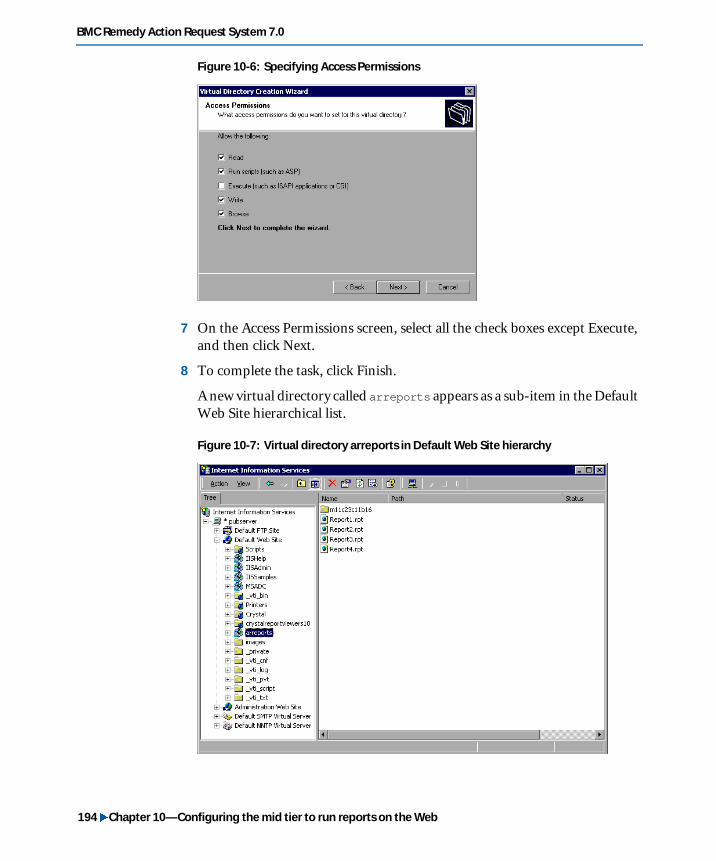
BMC Remedy Action Request System 7.0
Figure 10-6: Specifying Access Permissions
7 On the Access Permissions screen, select all the check boxes except Execute, and then click Next.
8 To complete the task, click Finish.
A new virtual directory called arreports appears as a sub-item in the Default Web Site hierarchical list.
Figure 10-7: Virtual directory arreports in Default Web Site hierarchy
194 �Chapter 10—Configuring the mid tier to run reports on the Web

Installing and Administering BMC Remedy Mid Tier
� To configure a virtual directory on a Sun ONE web server
1 Create the directory cgi-bin under the web server’s document root:
C:\SunONE\Servers\docs\cgi-bin
2 Configure the web server to enable CGI for this cgi-bin directory.
See your web server documentation for instructions.
3 Copy the wcscgi.exe file from the Crystal Enterprise installation directory (C:\Program Files\Crystal Decisions\win32_x86\wcscgi.exe) to the cgi-bin directory.
4 Test the configuration by trying to view the sample web reports that are installed with Crystal Enterprise. These samples are accessed from the Windows Start menu option for Crystal Enterprise.
5 Open the SunONE web server settings in a browser.
6 Click the Java tab on the settings page.
7 On the Java web page, click the Default Class List link, and then click the Programs tab.
8 On the Programs tab, click the CGI File Type link.
The CGI as a File Type page appears.
Figure 10-8: CGI File Type
9 Select Yes to activate CGI as a file type.
Configuring web server settings for Crystal reports � 195

BMC Remedy Action Request System 7.0
10 Click the CGI Directory link.
The CGI Directory – Add Another CGI Directory page appears.
Figure 10-9: CGI Directory
11 In the URL prefix field, enter cgi-bin.
12 In the CGI directory field, enter <web server root>\cgi-bin. For example, for a web server located at C:\SunONE, the value of the CGI directory field would be C:\SunONE\Servers\docs\cgi-bin.
13 Click the Content Mgmt tab, and then click the Additional Document Directories link.
The Additional Document Directories – Add Another Directory page appears.
196 �Chapter 10—Configuring the mid tier to run reports on the Web

Installing and Administering BMC Remedy Mid Tier
Figure 10-10: Content Management tab
14 In the URL prefix field, enter arreports.
15 In the Map To Directory field, specify the path to the mid tier report directory.
16 Click OK.
Setting up a remote mid tier for Crystal Enterprise 10
If you want to set up a remote mid tier that communications with Crystal Enterprise 10, complete the following steps after you set up a virtual directory.
� To set up a remote mid tier for Crystal Enterprise 10
1 Install Crystal Enterprise 10 on a machine (Machine A).
2 For IIS only, add the arreports property to the IIS default website and set the local path (in Properties window of arreports) to read similar to C:\crystalTest\reports.
3 Share the crystalTest directory, and give full control to everyone.
In the Properties window, click the Sharing tab. Then, click the Permissions button, and select Everyone (Full Control).
Configuring web server settings for Crystal reports � 197

BMC Remedy Action Request System 7.0
On IIS, if you are running the IIS server on a local account, IIS has its own security, which might prevent you from creating folders in the shared directory. To work around this issue, you must run the service as a user who has permission to create folders in the shared directory.
4 Install the mid tier on another machine (Machine B), and map a drive to Machine A’s crystalTest folder.
5 Using the Mid Tier Configuration Tool, set the following Report Settings:
� Crystal Enterprise 10 Location—http://<Machine B’s host name>: <port>
� Reporting Working Directory—Specify the mapped directory (for example, Y:\reports).
6 Run the report.
BusinessObjects Enterprise XI (Managed)
To configure Crystal web settings for BusinessObjects Enterprise XI (Managed), simply complete the following steps:
� Make sure all services are running and enabled in the BusinessObjects Central Configuration Manager.
� If you have already run reports through the mid tier, verify the reports are published properly. To view a list of the published reports, open the ARReports folder in the Central Management Console.
The Central Management Console is at http://<host_server>/businessobjects/enterprise11/admin/<locale>/admin.cwr.
Note: If you are using BusinessObjects Enterprise XI, make sure that the C:/WINNT/Temp folder has the permissions for the user that the web server runs as because reports are copied to this folder before they are published to the CMS.
198 �Chapter 10—Configuring the mid tier to run reports on the Web

Installing and Administering BMC Remedy Mid Tier
Crystal Reports Server XI (Unmanaged)
To configure Crystal web settings for Crystal Reports Server XI (Unmanaged), simply complete the following steps:
� Make sure all services are running and enabled in the BusinessObjects Central Configuration Manager.
� Configure the Report Application Server service as described in the following procedure.
Note: If you are using Crystal Reports Server XI, make sure that the C:/WINNT/Temp folder has the permissions for the user that the web server runs as because reports are copied to this folder before they are published to the CMS.
� To configure the Report Application Server service
1 Stop the Report Application Server service.
2 Open the Properties dialog box for the service.
3 Click the Parameters tab.
4 Choose Server from the Option Type menu list.
5 In the Report Directory field, enter the complete path to the directory where the reports reside (in the mid tier installation directory or in the ARWebReportViewer installation directory).
6 Click OK.
7 Start the Report Application Server service.
Configuring web server settings for Crystal reports � 199

BMC Remedy Action Request System 7.0
Configuring the mid tier for Crystal reports
To run reports, you have several options in the BMC Remedy Mid Tier Configuration Tool:
� No report engine (Run only AR System native reports and not Crystal reports)
If you choose this option, you do not need to modify the Report Settings page of the BMC Remedy Mid Tier Configuration Tool, as described in the following procedures, which are used for the other Reporting options.
� Run reports using Crystal 10 Enterprise.
See “To configure the mid tier separately” on page 201.
� Run reports using Business Objects Enterprise XI or Crystal Reports Server XI on the same machine as the mid tier.
See “To configure the mid tier and ARWebReportViewer as one application on the same machine” on page 204.
� Run reports using Business Objects Enterprise XI or Crystal Reports Server XI on a different machine that does not have a mid tier.
See “To configure the mid tier separately” on page 201 and “To configure the ARWebReportViewer separately” on page 202.
If you choose this option, you must have ARWebReportViewer installed on the machine where the CMS is installed.
To install ARWebReportViewer separately, see “Installing ARWebReportViewer separately” on page 55.
� Run reports using Business Objects Enterprise XI or Crystal Reports Server XI on a different machine that has a mid tier.
Make sure that the “different” machine has followed the steps for a combined installation. See “To configure the mid tier and ARWebReportViewer as one application on the same machine” on page 204.
For the current mid tier, point the Business Objects Enterprise XI or Crystal Reports Server XI location to the “different” machine’s web server. See “To configure the mid tier separately” on page 201.
Following are the instructions to configure these combinations.
200 �Chapter 10—Configuring the mid tier to run reports on the Web

Installing and Administering BMC Remedy Mid Tier
� To configure the mid tier separately
1 Log in to the Mid Tier Configuration Tool (http://<midtier_host>/arsys/shared/config/config.jsp).
2 Click the Report Settings link.
Figure 10-11: Report Settings page
3 Enter values in the following fields:
� Crystal/BO Report Engine Deployment—Specify how you are deploying your report engine. The options are:
� No Report Engine (You are using AR System reports only.)
� Crystal Enterprise 10
� BOXI/Crystal Reports Server XI on a different machine without a mid tier
� BOXI/Crystal Reports Server XI on a different machine with a mid tier
� Reporting Working Directory—Specify a directory where the Crystal Reports Management server will look for report definition files. If this is not under the web server’s root document directory, you must configure your web server with a virtual directory to point to this directory. For more information, see “Configuring web server settings for Crystal reports” on page 191.
� Crystal Enterprise 10 Location—Enter the appropriate information as discussed in the following bullets. Leave this field empty is you are not using Crystal Enterprise 10.
Configuring the mid tier for Crystal reports � 201
BMC Remedy Action Request System 7.0
� For IIS web servers serving Crystal Web is IIS, specify the <host_name> of the Crystal Reports server.
http://<host_name>
If you need to specify a port number other than the default, you must include it in the string as follows:
http://<host_name>:<port_number>
� For SunONE 6.1 web servers serving Crystal Web, specify the CGI path to the Crystal Web component server as:
http://<host_name>/cgi-bin/wcscgi.exe
where <host_name> is the name of the web server machine. If you need to specify a port number other than the default, you must include it in the string as follows:
http://<host_name>:port/cgi-bin/wcscgi.exe
� BOXI/Crystal Reports Server XI Location—Enter the <host_name> of BusinessObjects Enterprise XI or Crystal Reports Server XI. Leave this field empty if you are not using either of these versions.
Specify the <host_name> of the web server machine where BusinessObjects Enterprise XI or Crystal Reports Server XI is installed.
http://<host_name>
If you need to specify a port number other than the default, you must include it in the string as follows:
http://<host_name>:<port_number>
� To configure the ARWebReportViewer separately
1 Log in to the ARWebReportViewer Configuration Tool (http://<ARWebReportViewer_host>/arreports/shared/config/configreport.jsp).
2 Click the Report Settings link.
202 �Chapter 10—Configuring the mid tier to run reports on the Web

Installing and Administering BMC Remedy Mid Tier
Figure 10-12: Report Settings page
3 In the Reporting Working Directory field, specify a directory where the Crystal Reports Management server will look for report definition files.
If this is not under the web server’s root document directory, you must configure your web server with a virtual directory to point to this directory. For more information, see “Configuring web server settings for Crystal reports” on page 191.
4 In the BO Central Management Server Details section, complete the following fields:
� CMS Machine Name—Enter the host name of the machine where the local Crystal Reports Management server resides. Do not include the port number.
� CMS Machine Connection Details—Select one of the following options:
� BusinessObjects Enterprise XI (Managed)
� Crystal Reports Server XI (Unmanaged).
5 If you selected BusinessObjects Enterprise XI, enter information for the following fields:
� AR System ODBC Data Source Name—Name of the system DSN. If the field is blank, “AR System ODBC Data Source” (the default) is used. The ODBC driver is installed by BMC Remedy User, the mid tier, or ARWebReportViewer.
Configuring the mid tier for Crystal reports � 203

BMC Remedy Action Request System 7.0
� CMS Folder Name—Name of the folder where the Crystal reports are published.
� CMS User Name and CMS Password—The user name and password of CMS. The mid tier uses this user information to log in to the CMS and publish the reports.
6 If you selected Crystal Reports Server XI, enter information for the following field:
� AR System ODBC Data Source Name—Name of the system DSN. If the field is blank, “AR System ODBC Data Source” (the default) is used. The ODBC driver is installed by BMC Remedy User, the mid tier, or ARWebReportViewer.
� To configure the mid tier and ARWebReportViewer as one application on the same machine
1 Log in to the Mid Tier Configuration Tool (http://<midtier_host>/arsys/shared/config/config.jsp).
2 Click the Report Settings link.
Figure 10-13: Report Settings page
204 �Chapter 10—Configuring the mid tier to run reports on the Web

Installing and Administering BMC Remedy Mid Tier
3 Enter values in the following fields:
� Crystal/BO Report Engine Deployment—Select one of the following options:
� No Report Engine (You are using AR System reports only.)
� Crystal Enterprise 10
� BOXI/Crystal Reports Server XI on this machine
� BOXI/Crystal Reports Server XI on a different machine w/o a Midtier
� BOXI/Crystal Reports Server XI on a different machine with Midtier
� Reporting Working Directory—Specify a directory where the Crystal Reports Management server will look for report definition files. If this is not under the web server’s root document directory, you must configure your web server with a virtual directory to point to this directory. For more information, see “Configuring web server settings for Crystal reports” on page 191.
� Crystal Enterprise 10 Location—Enter the appropriate information as discussed in the following bullets. Leave this field empty is you are not using Crystal Enterprise 10.
� For IIS web servers serving Crystal Web is IIS, specify the <host_name> of the Crystal Reports server.
http://<host_name>
If you need to specify a port number other than the default, you must include it in the string as follows:
http://<host_name>:<port_number>
� For SunONE 6.1 or Apache web servers serving Crystal Web, specify the CGI path to the Crystal Web component server as:
http://<host_name>/cgi-bin/wcscgi.exe
where <host_name> is the name of the web server machine. If you need to specify a port number other than the default, you must include it in the string as follows:
http://<host_name>:port/cgi-bin/wcscgi.exe
Configuring the mid tier for Crystal reports � 205

BMC Remedy Action Request System 7.0
� BOXI/Crystal Reports Server XI Location—Enter the <host_name> of BusinessObjects Enterprise XI or Crystal Reports Server XI. Leave this field empty if you are not using either of these versions.
Specify the <host_name> of the Crystal Reports Management server.
http://<host_name>
If you need to specify a port number other than the default, you must include it in the string as follows:
http://<host_name>:<port_number>
4 In the BO Central Management Server Details section, complete the following fields:
� CMS Machine Name—Enter the host name of the machine where the local Crystal Reports Management server resides. Do not include the port number.
� CMS Machine Connection Details—Select one of the following options:
� BusinessObjects Enterprise XI (Managed)
� Crystal Reports Server XI (Unmanaged).
5 If you selected BusinessObjects Enterprise XI, enter information for the following fields:
� AR System ODBC Data Source Name—Name of the system DSN. If the field is blank, “AR System ODBC Data Source” (the default) is used. The ODBC driver is installed by BMC Remedy User, the mid tier, or ARWebReportViewer.
� CMS Folder Name—Name of the folder where the Crystal reports are published.
� CMS User Name and CMS Password—The user name and password of CMS. The mid tier uses this user information to log in to the CMS and publish the reports.
6 If you selected Crystal Reports Server XI, enter information for the following field:
� AR System ODBC Data Source Name—Name of the system DSN. If the field is blank, “AR System ODBC Data Source” (the default) is used. The ODBC driver is installed by BMC Remedy User, the mid tier, or ARWebReportViewer.
206 �Chapter 10—Configuring the mid tier to run reports on the Web

Chapter
11
Creating reports for the WebReporting features in AR System enable users to create, edit, and produce professional reporting documents. The following topics are provided:
� Using the ReportType form (page 208)
� Creating report definition files (page 213)
� Using the ReportCreator form (page 214)
� Using the Report form (page 222)
� Running a report on the Web (page 224)
� Backward compatibility (page 239)
� Crystal Reports tips for the Web (page 240)
Note: To display Crystal reports on the Web, Crystal Enterprise is required. For more information, see the compatibility matrix at http://supportweb.remedy.com.
Creating reports for the Web � 207

BMC Remedy Action Request System 7.0
Using the ReportType form
The ReportType form defines the environment that supports creating, editing, and running reports on the Web.
Report types are defined in the ReportType form. Four types of reports are available:
� AR System
� Crystal
You can create your own report type entries, but they should follow the syntax described in Table 11-1 on page 210. Only administrators can submit or modify entries to the ReportType form.
Note: The recommended entries for AR System and Crystal report types are loaded automatically during AR System installation. Open the ReportType form in BMC Remedy User in Search mode to see these entries. Use the following procedure to define a new report type.
� To define a report type
1 Open the ReportType form in New mode.
http://<host>/<contextpath>/forms/<servername>/ReportType
Figure 11-1: ReportType form
208 �Chapter 11—Creating reports for the Web

Installing and Administering BMC Remedy Mid Tier
2 In the Report Type field, enter a name for the supporting report engine.
You cannot use the following names as names for your report types:
� AR System
� Crystal
These names are already used by the AR System and would violate a unique index that has already been defined.
3 In the Query Converter Class field, enter the name of the Java class that converts an AR System query string into a query string format recognized in the web reporting interface.
AR System uses the com.remedy.arsys.reporting.CrystalQueryConverter to implement the ReportQueryConverter interface that converts queries to the Crystal report engine. You must also use this interface when writing your own query converter for other web-based report engines. You can find the CrystalQueryConverter and queryConverter_ReadMe.txt file in the <mid_tier_install_dir>\samples directory. The queryConverter_ReadMe.txt file provides a guide for creating your own query converter class.
4 In the Query Override Capability field, select Yes or No.
Selecting Yes gives this report type permission to override a query stored in a report. A No selection denies this permission.
This field also is displayed on the ReportSelection form, with the selected value.
5 For the Run Command, Edit Command, and Create Command fields, enter the URLs that are used to connect a report to the report engine.
� The Run command begins processing of the selected report.
� The Edit and Create commands enable modifying and creating of reports on the web.
The keyword portion of the URL corresponds to parameters that are passed to the web reporting environment.
The following table lists allowable URL keywords that can be used to build the Run, Edit, and Create commands. These keywords listed are for reporting purposes only. They are not AR System keywords.
Using the ReportType form � 209
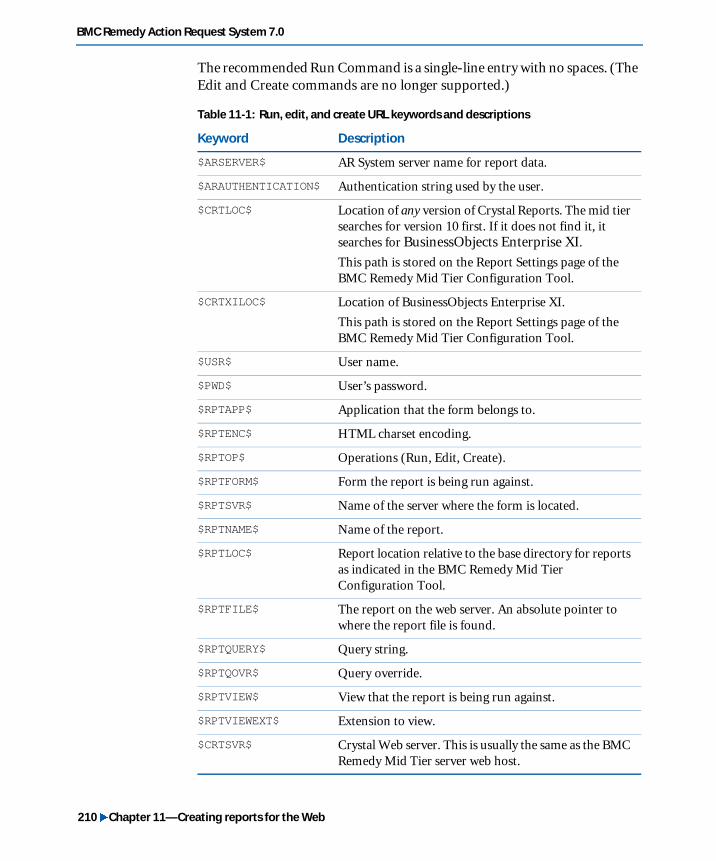
BMC Remedy Action Request System 7.0
The recommended Run Command is a single-line entry with no spaces. (The Edit and Create commands are no longer supported.)
Table 11-1: Run, edit, and create URL keywords and descriptions
Keyword Description
$ARSERVER$ AR System server name for report data.
$ARAUTHENTICATION$ Authentication string used by the user.
$CRTLOC$ Location of any version of Crystal Reports. The mid tier searches for version 10 first. If it does not find it, it searches for BusinessObjects Enterprise XI.
This path is stored on the Report Settings page of the BMC Remedy Mid Tier Configuration Tool.
$CRTXILOC$ Location of BusinessObjects Enterprise XI.
This path is stored on the Report Settings page of the BMC Remedy Mid Tier Configuration Tool.
$USR$ User name.
$PWD$ User’s password.
$RPTAPP$ Application that the form belongs to.
$RPTENC$ HTML charset encoding.
$RPTOP$ Operations (Run, Edit, Create).
$RPTFORM$ Form the report is being run against.
$RPTSVR$ Name of the server where the form is located.
$RPTNAME$ Name of the report.
$RPTLOC$ Report location relative to the base directory for reports as indicated in the BMC Remedy Mid Tier Configuration Tool.
$RPTFILE$ The report on the web server. An absolute pointer to where the report file is found.
$RPTQUERY$ Query string.
$RPTQOVR$ Query override.
$RPTVIEW$ View that the report is being run against.
$RPTVIEWEXT$ Extension to view.
$CRTSVR$ Crystal Web server. This is usually the same as the BMC Remedy Mid Tier server web host.
210 �Chapter 11—Creating reports for the Web
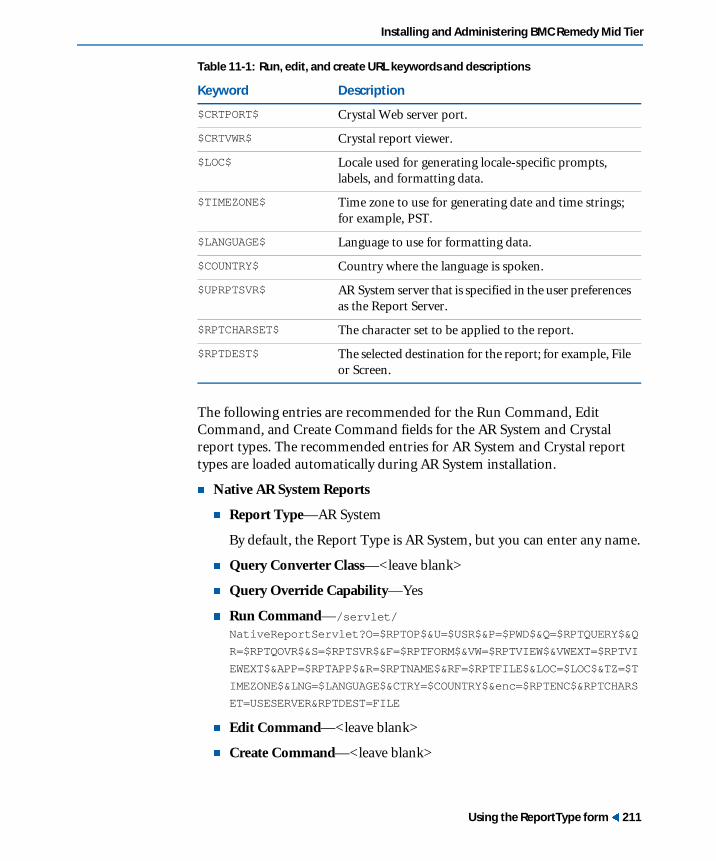
Installing and Administering BMC Remedy Mid Tier
The following entries are recommended for the Run Command, Edit Command, and Create Command fields for the AR System and Crystal report types. The recommended entries for AR System and Crystal report types are loaded automatically during AR System installation.
� Native AR System Reports
� Report Type—AR System
By default, the Report Type is AR System, but you can enter any name.
� Query Converter Class—<leave blank>
� Query Override Capability—Yes
� Run Command—/servlet/NativeReportServlet?O=$RPTOP$&U=$USR$&P=$PWD$&Q=$RPTQUERY$&QR=$RPTQOVR$&S=$RPTSVR$&F=$RPTFORM$&VW=$RPTVIEW$&VWEXT=$RPTVIEWEXT$&APP=$RPTAPP$&R=$RPTNAME$&RF=$RPTFILE$&LOC=$LOC$&TZ=$TIMEZONE$&LNG=$LANGUAGE$&CTRY=$COUNTRY$&enc=$RPTENC$&RPTCHARSET=USESERVER&RPTDEST=FILE
� Edit Command—<leave blank>
� Create Command—<leave blank>
$CRTPORT$ Crystal Web server port.
$CRTVWR$ Crystal report viewer.
$LOC$ Locale used for generating locale-specific prompts, labels, and formatting data.
$TIMEZONE$ Time zone to use for generating date and time strings; for example, PST.
$LANGUAGE$ Language to use for formatting data.
$COUNTRY$ Country where the language is spoken.
$UPRPTSVR$ AR System server that is specified in the user preferences as the Report Server.
$RPTCHARSET$ The character set to be applied to the report.
$RPTDEST$ The selected destination for the report; for example, File or Screen.
Table 11-1: Run, edit, and create URL keywords and descriptions
Keyword Description
Using the ReportType form � 211

BMC Remedy Action Request System 7.0
� Crystal Reports
� Report Type—Crystal
By default, the Report Type is Crystal, but you can enter any name.
� Query Converter Class—com.remedy.arsys.reporting.CrystalQueryConverter
� Query Override Capability—No
� Run Command—Crystal10URL=$CRTLOC$/arreports/$RPTLOC$?init=$CRTVWR$&User0=$USR$;ARServer=$ARSERVER$;ARAuthentication=$ARAUTHENTICATION$;ARReportLocale=$LOC$;ARVUIType=1&Password0=$PWD$&SF=$RPTQUERY$
BORemoteAPPURL=$CRTXILOC$/arreports/$RPTLOC$?init=$CRTVWR$&User0=$USR$;ARServer=$ARSERVER$;ARAuthentication=$ARAUTHENTICATION$;ARReportLocale=$LOC$;ARVUIType=1&Password0=$PWD$&SF=$RPTQUERY$
BOCurrentMidtierURL=$CRTXILOC$/arsys/$RPTLOC$?init=$CRTVWR$&User0=$USR$;ARServer=$ARSERVER$;ARAuthentication=$ARAUTHENTICATION$;ARReportLocale=$LOC$;ARVUIType=1&Password0=$PWD$&SF=$RPTQUERY$
BORemoteMidtierURL=$CRTXILOC$/arsys/$RPTLOC$?init=$CRTVWR$&User0=$USR$;ARServer=$ARSERVER$;ARAuthentication=$ARAUTHENTICATION$;ARReportLocale=$LOC$;ARVUIType=1&Password0=$PWD$&SF=$RPTQUERY$
The $RPTLOC$ parameter refers to a report file location relative to the directory specified as the Reporting Working Directory in the Mid Tier Configuration Tool. See “Configuring the mid tier for Crystal reports” on page 200 for information about configuration tool options. If the directory specified in the Mid Tier Configuration Tool is not the web server’s document root, you must include the web server’s path to the configured directory before the $RPTLOC$. In this example, arreports is a virtual directory configured on the web server to point to the parent of $RPTLOC$.
� Edit Command—<leave blank>
� Create Command—<leave blank>
212 �Chapter 11—Creating reports for the Web

Installing and Administering BMC Remedy Mid Tier
Creating report definition files
Report definition files define the layout and content of data on a report. You create them using the following design tools:
� BMC Remedy User reporting tools
� ReportCreator form on the Web
� Crystal Report Designer application
For information about creating a report definition file in BMC Remedy User, see BMC Remedy User help.
AR System reports
You can create AR System reports on the Web using the ReportCreator form. Reports created using the ReportCeator form automatically create an entry to the Report form when submitted.
For information about creating and editing AR System reports using BMC Remedy User reporting tools, see BMC Remedy User help.
Crystal reports
Crystal reports are created using the Crystal Report Designer application, which is a Windows application that BusinessObjects sells separately. Report definition files created using the Crystal Report Designer application are saved with the file extension .rpt. Once saved, the definition files can then be made available for web reporting with an entry to the Report form. Additional Crystal Web-related settings that might need to be configured depending on the web server installed. See “Configuring web server settings for Crystal reports” on page 191 for more information.
Creating report definition files � 213

BMC Remedy Action Request System 7.0
Important: To prevent user names and passwords from being embedded in data from Crystal Reports 10, modify your System DSNs to remove the user name and password. For more information, see “Establishing a system data source name (DSN) for Crystal reports” on page 240 and “ODBC driver configuration for Crystal reports” on page 241.
Additionally, when saving, select the Save Without Data option and deselect the Report Refresh on Open option to prevent the original data from being displayed each time a report is displayed.
Note: If you run a report from the Web that contains a subreport, Crystal Enterprise 10 prompts you for user credentials for the subreport.
If form fields are modified, especially fields on which a Crystal report is reporting, then you must update the Crystal report; otherwise, you will receive the following error message: “Error detected by database DLL. [On Report Server: <server_name>].”
� To update a Crystal report
1 Open the report in Crystal Designer.
2 Choose Database > Verify Database.
If the report is up-to-date, a message appears to notify you. If it is not up-to-date, a message appears stating, “The database file <file_name> has changed. Proceed to fix up the report?”
3 Click Yes.
4 Map your report fields to the updated report.
5 Save the report and reattach it to the corresponding entry in the Report form.
Using the ReportCreator form
When you create a report definition file from the Web, a Report form entry is automatically created when a user clicks the Save button on the ReportCreator form, making the report available on the Web.
214 �Chapter 11—Creating reports for the Web

Installing and Administering BMC Remedy Mid Tier
When users open the ReportCreator form to create or edit reports, the Form Name field is filled automatically only if no aliases are specified for the form that opens the Report Selection window. The data dictionary menu attached to the Form Name field displays Plural request aliases of forms (or form names if there are no aliases). As workflow has no access to the Plural request alias, the Form Name field cannot be populated.
The following figure displays the ReportCreator form with sample entries for creating a report definition file for a report called Sample: ClassList.
Figure 11-2: ReportCreator form
Using the ReportCreator form � 215

BMC Remedy Action Request System 7.0
Creating a report definition file
Users can create reports on the Web using the ReportCreator form. This form can be accessed in either of two ways:
� From the ReportSelection form, by selecting a report type from the Create Type menu, then clicking the Create button. For information about accessing the ReportSelection form directly from a browser, see “Accessing the ReportSelection form directly through a browser” on page 224.
� By accessing the ReportCreator form directly with a URL.
Note: To be sure that reports can be saved, the permissions for the ReportCreator form must be Visible for the Public group (the default).
� To create report definition files using the ReportCreator form
1 Do either of the following actions:
� In the Create Report section of the ReportSelection form, select AR System from the Create Type list, and then click Create.
� Enter the following URL:
http://<host_name>/arsys/forms/<server_name>/ReportCreator
The arsys within the URL assumes that you used the installer-supplied Web Application context path of /arsys/ in ServletExec JSP Engine. If you used a different context path, change arsys to the name you specified.
The ReportCreator form opens in New mode.
2 In the Report Name field, enter a unique, locale-specific name for the report; for example, MyReport-en.
3 From the Report Format drop-down list, select one of the following choices for the format of the report:
� Record—Displays each field of the request on a separate line.
� Column—Displays each field as a column heading, and displays information from each request in a separate row.
� Compressed—Compresses the information with commas, white space, or any other specified character between the columns. On the Web, the compressed format is viewed in a column format.
216 �Chapter 11—Creating reports for the Web

Installing and Administering BMC Remedy Mid Tier
4 In the Server name field, enter the name of the server where the form being reported on is located.
5 In the Locale field, enter the locale of the report in the following format:
<language_country>
For a list of standard choices for this field, open the Manage Views dialog box in BMC Remedy Administrator. Only the language portion should be entered, allowing for all country variations of a language. For example, an entry of fr would include all country variations of French.
6 In the Form Name field, click the menu button to select the form from which data is being reported on.
7 In the Report Set field, enter a locale-independent description for the report.
The Report Set field is used to identify locale variants of the same report. The combination of Report Set and Locale must be unique.
8 Update each of the ReportCreator form tabs as described in the following sections. Entries that are specific to Windows reports are identified in each of the tabs. Those settings are ignored for Web reports.
Fields tab
In the Fields tab, define the fields on the form from which data is being reported to be included in the report.
� To specify fields to be included in a report
1 In the Field field, click the menu button to select which fields on the specified form will be displayed on the report.
2 In the Label field, enter the field name as you want it displayed on the report.
3 In the Field to Add Before/After field, select a field to use as a reference when clicking the Add After or Add Before buttons.
4 Click Add Before or Add After to set the positioning of fields in a report, with reference to the Field to Add Before/After field.
5 Click Modify to update the selected field label or width specification.
6 Click Remove to remove a selected field.
7 Click Remove All to remove all selections from the field list.
Using the ReportCreator form � 217
BMC Remedy Action Request System 7.0
Sorting tab
In the Sorting tab, select fields to sort on and set the sort order and grouping for each field for the report. You can select up to five fields for sorting.
� To specify sorting criteria
1 From the first Field Name list, select the field on which you want to sort.
2 Select Ascending or Descending Sort Order for the selected field.
3 To group by a field, select the Group check box for the selected field.
4 Repeat steps 1 through 3 for the other fields on which you want to sort.
Statistics tab
In the Statistics tab, define expressions that will calculate statistics for the requests contained in the report. Use the Statistics tab to specify what type of statistics to include.
� To include statistics in a report
1 From the Operation field, select the appropriate operation:
� Count—Tallies the number of requests.
� Sum—Adds up specified fields or the arithmetic relationship among fields.
� Average—Calculates the average of specified fields.
� Minimum—Calculates the minimum value for a specified field.
� Maximum—Calculates the maximum value for a specified field.
Except for Count, these operations can be applied only to numeric and date/time fields. Each operation can apply to the whole report, or to a group of requests in a report. Groups are defined in the Sorting tab.
2 From the Expression field, select a field from the menu list to include as part of a statistic.
An expression is required for all statistical operations except Count. Whether you include an expression for a Count operation depends on how you want rows with null values to be counted.
218 �Chapter 11—Creating reports for the Web

Installing and Administering BMC Remedy Mid Tier
If you are defining a Count operation that includes an expression, only rows with a value that is not null for the specified expression are counted when the report is run. If you are defining a Count operation that does not include an expression, all rows returned are counted, including those with null values.
The menu list displays all numeric or date fields in the form. Expressions can include any of the following values:
� Numeric fields
� Date fields
� Status history fields
� Keywords
The most commonly used keywords are $DATE$, $NULL$, $TIME$, $TIMESTAMP$, $USER$, and $WEEKDAY$. Keywords are case-sensitive and must be entered in all capital letters. For a complete list of AR System keywords, see the Workflow Objects guide.
Note: For reports to run properly on the Web, you must add a backslash to the keyword in the Expression field, for example, $\TIMESTAMP$.
� Numbers
You can type numbers directly into the Expression field, for example, 5.25, 33, and so on.
� Arithmetic operators (+, -, *, /, and %)
You can type arithmetic operators directly into the Expression field, similar to the way they are entered in the advanced search bar.
3 In the Label field, type the label to identify a statistic on the report.
You can use text, keywords, or field values, and enter as many as 128 characters. To use keywords for the Label field, click the menu list and select the appropriate keyword. Include one of the following results formats:
%* % Default format
%#% Numerical format (total number of seconds)
%:% Time format (hh:mm:ss; hours, minutes, and seconds)
Using the ReportCreator form � 219

BMC Remedy Action Request System 7.0
4 On the report, the statistic will appear inside the label. For example, a label created as Statistical result is %#% days will appear on the report as Statistical result is 123 days.
You can also include any of the following control characters in a label field:
5 From the Compute On field, select the scope of a statistic.
You can determine whether a statistic is calculated for the entire report, or for defined groups within the report by selecting the appropriate setting in the Compute On field.
� Report—Calculates the statistic for all entries in the report. The statistic appears at the end of the report.
� <Group level>—Calculates a statistic for groups defined in the Sorting tab. The statistic appears below each group.
6 In the Layout field, for the Windows platform only, specify how you want the results to be displayed in the report by choosing one of the following options:
� Single—Displays all the statistical results on one line.
� Multiple—Displays each statistical result on its own line.
� Column—Displays the result for each value at the bottom of the column of the field specified in the Expression field. Column is valid only for a column-formatted report.
The Layout field setting works with the Compute On setting to determine where a statistic appears on a report.
Page Setup tab
In the Page Setup tab, specify the page configuration information. Sections indicated by (windows) can be ignored.
In the General section:
1 Enter the name of the report in the Title field. The report title appears at the top of the report.
\b Backspace
\n Return
\t Tab
\\ Backslash
\<nnn> ASCII character
220 �Chapter 11—Creating reports for the Web

Installing and Administering BMC Remedy Mid Tier
2 Enter text in the Header field. The header appears at the top of every page.
3 Enter text in the Footer field. The footer appears at the bottom of every page.
To use keywords for the Title, Header, and Footer fields, click the menu list and select the appropriate keyword. The data in the Title, Header, and Footer fields must be a single line. Embedded carriage returns are not allowed.
Qualification tab
In the Qualification tab, specify which records to include in a report. If a report is run from a results list, any qualifications defined in this tab are ignored. For information about building qualifications, see the Workflow Objects guide.
Description tab
In the Description tab, enter a description of the report. This field provides a helpful summary to your users.
Permissions tab
In the Permissions tab, use the Assignee Groups field to define who has access to a report.
If the server is configured to allow multiple groups in the Assignee Group field, then this field will allow multiple groups to be specified, separating each group with a single space. If the server is not configured to allow multiple groups, then only one group can be specified in this field.
Leaving the Assignee Groups field blank allows only the submitter to view the report. Specifying Public allows anyone to view the report.
Administration tab
In the Administration tab of the Report Creator form, enter the user name of the person who is creating the report, and define the status of the report. The fields on this tab are required.
1 In the Submitter field, enter the name of the user creating the report.
2 In the Status field, select one of the following options:
� Active—Makes the report available for selection in the ReportSelection form.
Using the ReportCreator form � 221

BMC Remedy Action Request System 7.0
� Inactive—Indicates a submission that is no longer active.
� Pending—Indicates a submission that is being reviewed.
If Inactive or Pending is selected, the report will not appear for selection in the ReportSelection form, unless the current user is the submitter of the report.
Saving report definition files
To save a report definition file, click the Save button in the ReportCreator form toolbar. This action automatically creates an entry for the new report definition file in the Report form, and makes it available for selection in the ReportSelection form.
Editing report definition files
To edit an AR System report using the ReportCreator form, perform one of the following steps:
� Select a report in the ReportSelection form, and click Edit.
� Use the New Search and Search buttons on the ReportCreator form toolbar to search for ReportCreator form entries. Results of the search are appear in the results list. A user can then select an entry to edit from the results list.
Using the Report form
The Report form associates an existing report definition file with a particular form. Attaching a report definition file to a Report form entry makes a report available for web reporting in the ReportSelection form. The Report form also provides the mechanism by which permissions to run a report are granted to specified groups.
Important: If your server is a Unicode server, you cannot create a record in the Report form by attaching an .arr file created in BMC Remedy User.
Any file created in BMC Remedy User will be incompatible because it does not support Unicode. Instead, use the ReportCreator form to create reports on a Unicode server.
222 �Chapter 11—Creating reports for the Web

Installing and Administering BMC Remedy Mid Tier
Report form entries
Report definition files that are created using the ReportCreator form automatically have entries created in the Report form for them. Report definition files created using BMC Remedy User reporting tools, or the Crystal Report Designer application, need their own entries in the Report form to make them available for web reporting. For information about creating an entry in the Report form in BMC Remedy User, see BMC Remedy User Help.
Figure 11-3 shows the Report form with a sample entry for a report called Sample:ClassList.
Figure 11-3: Report form
Deleting report definition files
Use the following procedures to delete report definition files on the Web. For instructions on removing report definition files in BMC Remedy User, see BMC Remedy User Help.
� To delete a report definition file
1 Open the Report form on the Web.
2 Run a search to list all Report form entries.
Using the Report form � 223
BMC Remedy Action Request System 7.0
3 Select the entry you want to delete from the results list.
4 Click Delete.
Note: To make a report unavailable without deleting it, select Inactive in the Status field on the Report form for the report entry. You can make the report available again later by changing the status back to Active.
Running a report on the Web
Users can open the ReportSelection form on the Web using any of the following methods:
� Accessing the ReportSelection form directly through a browser
� Clicking the Report button at the bottom portion of a table or results list field, and opening the ReportSelection form
� Creating an Open Window active link, and attaching it to a workflow trigger, such as a button field
These methods are discussed in the following sections.
Accessing the ReportSelection form directly through a browser
The ReportSelection form must be made available to users on the Web to enable web reporting.
If the default directory was selected during installation of the mid tier, then the following URL can be used to access the ReportSelection form:
http://<host_name>/arsys/forms/<server_name>/ReportSelection
Note: The arsys within the URL assumes that you used the installer-supplied Web Application context path of /arsys/ in ServletExec . If you used a different context path, change arsys to the name you specified.
224 �Chapter 11—Creating reports for the Web

Installing and Administering BMC Remedy Mid Tier
When accessing the ReportSelection form directly with a URL, an additional field called Form Server appears on the ReportSelection form. The Form Server field indicates the server on which the data form is located for the selected report. A user can enter the server name manually into the Form Server field. If the field is left empty, the server where the ReportSelecion form resides will be used to locate the selected data form.
Figure 11-4 on page 225 displays the ReportSelection Form with two reports listed, and the Sample:ClassRoster report highlighted for selection.
Figure 11-4: ReportSelection form
Running a report on the Web � 225

BMC Remedy Action Request System 7.0
The following table describes the buttons and options on the ReportSelection form and their functions in web reporting.
Buttons and Options
Function
Preferences A menu that enables you to modify the column settings in the table field. Options include the following:
� Add Column: Displays a list of available columns that can be added to the table. The list includes only those columns made visible by the administrator, and which have a width of zero (previously hidden by the user).
Note: If a table is set to AutoFit Columns, the width of all columns will be adjusted so that they will fit into the table. As a result, when a column that was previously removed is added back to the table, its width might not be the same as the administrator-defined width.
� Remove Column: Displays a list of columns that the user can remove from the table. This list includes only columns that the administrator has made visible, and whose width is greater than zero.
� Reset: Restores the column width, column order, visibility, and sort order to their administrator-defined default values.
� Save: Saves the settings to the user’s preference server, making them available from a centralized location for future logins. If the user is not logged into a preference server, this option is disabled.
Refresh Updates the list of available reports in the report selection table.
The table displays only reports that the user who is currently logged in has permission to use.
If the user arrives at the ReportSelection form from a table or results list field, then only the reports associated with the form from which the table or results list field is displaying data will be available for selection. A user’s access permission determines which reports they see.
If the user arrives at the ReportSelection form directly by way of a URL, then all reports available on the server, and that the user has permission to access, are displayed.
Edit Opens the ReportCreator form, allowing the user to edit the selected AR System report definition file.
226 �Chapter 11—Creating reports for the Web

Installing and Administering BMC Remedy Mid Tier
Form Server Indicates where the form is located for the selected report. This field only appears when accessing the ReportSelection form directly from a URL. For more information, see “Accessing the ReportSelection form directly through a browser” on page 224.
Create Type The report engine that supports creating reports on the Web. AR System is the only option available for Web reporting.
Create Opens the ReportCreator form, from which a new report definition file can be created.
Destination The output format for the report. Options are Screen (for displaying the report on the screen), File (for exporting the report as a file), or Printer (for printing the report).
Override Query in Report?
Whether to grant permission to override the query stored in a report with a query from a table or results list. Options are Yes (grant permission) or No (denies permission).
Note: By default, the Query Override Capability field is hidden on the ReportSelection form and appears only when you select a report whose type has Query Override Capability set to Yes. By default, the AR System and Crystal report types set this field to No, since these report types do not implement this feature. The Query Override Capability field should be set to Yes only for user-defined report types.
Report Format The format in which you want to run the report. Options are AR Report, CSV, ARX, and XML. When you select a report, this field is filled in with the value from the report definition file.
Character Encoding
The character set to be used when creating this report. Character encoding is especially useful when exporting data to external programs that support Unicode, such as Microsoft Excel. You can choose a character set from the menu, or choose Use Server to apply the character encoding used by the server.
Character encoding is supported on the Web for .csv, .arx, and .xml report formats only.
Run Runs the selected report by displaying it on the screen or saving it to a file.
Close Closes the window in which the ReportSelection form is displayed.
Buttons and Options
Function
Running a report on the Web � 227

BMC Remedy Action Request System 7.0
Reporting using table fields and results list fields
Table fields and results list fields provide a way to capture and display data from one or more requests. Either field type can be selected for reporting purposes. You can create a table or results list field on a form using BMC Remedy Administrator, and choose to have reporting features associated with the table or results list field.
Options in the Table Labels tab in the Field Properties dialog box for table and results list fields allow an administrator to define which hyperlinks and buttons are positioned at the base of a table or results list for reporting. For information about setting table and results lists properties, see the Form and Application Objects guide.
The following table describes the buttons at the top and bottom of the table field displayed in Figure 11-5 on page 230 and their functions as they relate to web reporting.
You cannot have more than one results list field on a single form, but you can have multiple table fields on a single form. Figure 11-5 on page 230 shows a form containing a table field defined to hold data from another form.
Buttons Function
Refresh Updates the table with the most recent AR System data.
Report Opens a new browser window for the ReportSelection form.
Select All Selects all entries in the table to be included in a report.
Selective reporting is also possible using the following keystrokes:
� SHIFT key—To report on a range of entries, click an entry and hold down the SHIFT key. Click another entry above or below the original selection, and then release the SHIFT key.
This action includes all entries between those selected in a report.
� CTRL key—To report on multiple entries, click an entry and then hold down the CTRL key. Continue to click the entries you want to include in a report, still holding down the CTRL key. When you have finished selecting table entries, release the CTRL key.
This action includes selected entries in a report.
Deselect All Clears all selections in the table. If no entries in the table are selected, the report will show all entries that match the table search. If a table search has not been defined, then all entries are printed.
228 �Chapter 11—Creating reports for the Web

Installing and Administering BMC Remedy Mid Tier
� To run reports using table and results list fields
1 In a browser, open a form that holds a table or results list field defined to report on data from a specified form.
2 Click Refresh to refresh the table or results list field.
3 Select the entries that you want to include in a report.
4 Click Report at the bottom of the table or results list field.
The ReportSelection form opens in a new browser window, and lists the available reports.
5 Select a report.
6 In the Run Report section, select the following options:
� Destination—Select Screen to display the report on the screen, or File to export the report data to a file.
� Query Override—Accept the default selection of Yes, or select No to deny permission to override the query stored with the report.
� Report Format—Select the report format. For more information, see “File types” on page 233.
� Character Encoding (.arx, .xml, and .csv formats only)—Select the character encoding to use for this report, or select useserver to apply the character encoding used by the server.
7 Click Run.
If you selected Screen as the destination, the report is displayed in a separate browser window in the selected format.
Running a report on the Web � 229

BMC Remedy Action Request System 7.0
Figure 11-5: Report in .arx format displayed in a browser window
Note: Reports in Record, Compressed, and Column format are displayed in HTML format.
If you selected File, you will be prompted for a file name and destination.
230 �Chapter 11—Creating reports for the Web
Installing and Administering BMC Remedy Mid Tier
Running a report through an Open Window active link
The Open Window active link method of running a report is useful when you want to run a report with the same query each time. Within the definition of the active link, you direct the report to a specific form, and also define which requests to include in the report. After the active link is defined, it can be attached to a workflow trigger, such as a button field. When the user clicks the workflow trigger where the active link is attached, a new browser window opens to display the report.
The following procedure outlines the steps for creating an Open Window active link for web reporting. For general information about creating active links and related properties, see the Workflow Objects guide.
� To create an Open Window active link for web reporting
1 In the Create Active Link window, make the following entries in the Basic tab:
a In the Name field, enter a name for the active link you are creating.
b In the Form Name box, check the form being reported on.
2 Make the following entries in the If Action tab:
a From the New Action list, select Open Window.
b From the Window Type list, select Report.
c From the Target Location menu, select New.
This causes a new window to open for each report generated. Select Current to use the existing open window from where the active link is initiated.
d From the Server Name list, select a server.
This is the name of the AR System server on which the form being reported on is located.
e From the Form Name list, select a form.
This is the name of the form being reported on.
f From the Form View list, select a view.
Running a report on the Web � 231

BMC Remedy Action Request System 7.0
3 Create the following entries in the Qualification tab:
a Enter a query string determining which entries from the form to include in the report.
If you want to get this string from a local field, you must use the EXTERNAL keyword, for example, EXTERNAL($QueryStringField$). If this string and the Entry IDs string are both left empty, all entries in the form being reported on are included in the report.
b In the If No Requests Match box, select Do Not Show Any Message.
4 Create the following entries in the Report Information tab:
a In the Report Type field, select a report type from the menu.
The menu’s data is read from the ReportType form on the AR System server being used for the Open Window action.
b In the Name field, enter the name of the report as stored in the Report form.
This is the report name in the Report form, not the file name of the attachment.
c For the Destination field, select Screen or File from the menu.
d For the Operation field, select one of the following menu items:
� Create—Used to create a new report definition file.
� Edit—Used to edit an existing report definition file.
� Run—Used to run a report.
Note: If you select Crystal Report in the Report Type field, then Edit and Create are not valid options for the Operation field.
e In the Location field, select Reporting Form from the menu.
f In the Entry ID field, enter a comma-separated list of entry IDs from the form being reported on.
Only these entries are displayed in the report. If this string is filled and contains fewer than 256 entry IDs, it overrides the Qualification String. Otherwise, the Qualification String takes precedence. If both are left empty, all entries in the form are included in the report.
232 �Chapter 11—Creating reports for the Web

Installing and Administering BMC Remedy Mid Tier
g For the Query Override field menu, select Yes or No from the menu.
Some report engines allow the Qualification String (or Entry IDs) to override a query that might be stored as part of the report definition. This value specifies whether the report engine should do so.
h In the Character Encoding field, select the character set to be used for the report, or select Use Server to apply the same character set encoding used by the server.
5 Click Add Action.
6 Save the active link and close the window.
Note: Check the Advanced check box at the bottom of the active link window to select local field values from a menu for each attribute. For more information about how to create an active link, see the Workflow Objects guide.
� To attach an Open Window active link to a form with a button field
1 In BMC Remedy Administrator, select a view of a form and create a new button field where you want to attach the Open Window active link created in the preceding procedure.
For more information about active links and attaching them to button fields, see the Workflow Objects guide.
2 Choose File > Save.
3 Open the form in a browser, and click the button field that contains the Open Window active link.
Exporting AR System data to a file
You can save or export AR System data to use in different AR System forms, in a spreadsheet, or other applications. You can also save or export non-AR System data from another application to use in an AR System form.
File types
The file type you choose for exporting will depend on the original data source and how you will use the data. File types are explained in the following sections.
Running a report on the Web � 233

BMC Remedy Action Request System 7.0
AR Export
AR Export (.arx) is the default file type, and yields the cleanest results when data is exported and imported within AR System. The AR Export format is designed to properly format data that you will import into an AR System form using BMC Remedy Import.
Note: When an attachment is exported in AR Export format from the Web, a .zip file is created that includes the .arx file and the attachments.
In BMC Remedy User, an attachment directory is created in the same directory as the *.arx file, and named with the file name and an integer time stamp (for example, <filename>_917732184). The *.arx file contains the directory name and the names of the attachment files in it. If duplicate names exist, characters are added to the attachment names to create unique file names.
AR System XML
AR XML (.xml) is a BMC Remedy XML standard derived from the W3C XForm standard, and it contains several elements that are required for AR System use. If you plan to import XML data into an AR System form using BMC Remedy Import, your data must conform to the AR XML data specification. Data exported to the AR XML file type conforms to this specification. You can also convert XML data obtained outside AR System to the AR XML standard.
Conversely, you can export AR XML data, parse it with any tool that parses documents that conform to the XForm specification, and use the data outside AR System. For information about XForms, see the W3C website.
Attachments are handled in the same manner as in the .arx file type.
234 �Chapter 11—Creating reports for the Web

Installing and Administering BMC Remedy Mid Tier
Note: When you export AR System data from Crystal Reports to HTML 3.2, HTML 4.0, or XML, your default export directory depends on whether your computer is connected to a network. If your computer is connected to a network, and your login profile has a temporary directory setting under Windows, your default export directory will be %USERPROFILE%\LocalSettings\Temp. If your computer is not connected to a network your export will default to whatever temporary directory is set in your Windows environment settings, for example, C:\Temp or C:\Windows\Temp.
Comma-separated values
You can use the comma-separated values (.csv) format if you plan to use the report data in other applications, such as Crystal Enterprise or in spreadsheets. For example, if you want to use the report data in a Microsoft Excel spreadsheet, export it as a .csv file, open Excel, and import the data into the Excel file.
Note: You cannot export the content of an attachment with a .csv file. If you export a .csv file with an attachment, only the file name of the attachment is exported.
Record, column, compressed
These formats are used with BMC Remedy User. When you select one of these formats in the ReportSelection form on the Web, the report is saved as an HTML file (for example, report.rep.html).
Note: The Compressed format is not supported on the Web. When you select Compressed as the report format, your report will be displayed in Column format instead.
� To export data from the web to a file
1 In a browser, open the ReportSelection form. See “Accessing the ReportSelection form directly through a browser” on page 224.
2 Select a report.
3 In the Destination field, select File.
Running a report on the Web � 235

BMC Remedy Action Request System 7.0
4 In the Report Format field, select the format in which you want to export the report. For more information, see “File types” on page 233.
5 Click Run.
A dialog box appears with the default file name Report.<file_type>, where <file_type> is the extension for the file type you selected in step 4.
Figure 11-6: Selecting a report file name
6 In the Report File Name field, replace the default name Report with a file name under which you want to export the report; for example, MyDocuments. The file name will then be (for example) MyDocuments.csv.If you want to use a different file format for this report, change the extension also. For example, to export as an .arx file instead of a .csv file, change the extension from .csv to .arx.
Note: In BMC Remedy User, you must enter a fully qualified path name that includes the name you want for the report; for example, c:\temp\MyReport.csv.
7 Click OK.
The File Download dialog box appears.
8 Select a location for the file (for example, c:\temp).
9 Click Save.
236 �Chapter 11—Creating reports for the Web

Installing and Administering BMC Remedy Mid Tier
Using exported data with BMC Remedy Import
If you plan to import data into an AR System form using BMC Remedy Import, you must export the data in one of the file formats listed in the following table.
Data Format Extension
AR Export .arx
AR XML .xml
Comma-Separated Value (CSV) .csv
ASCII .asc
Running a report on the Web � 237
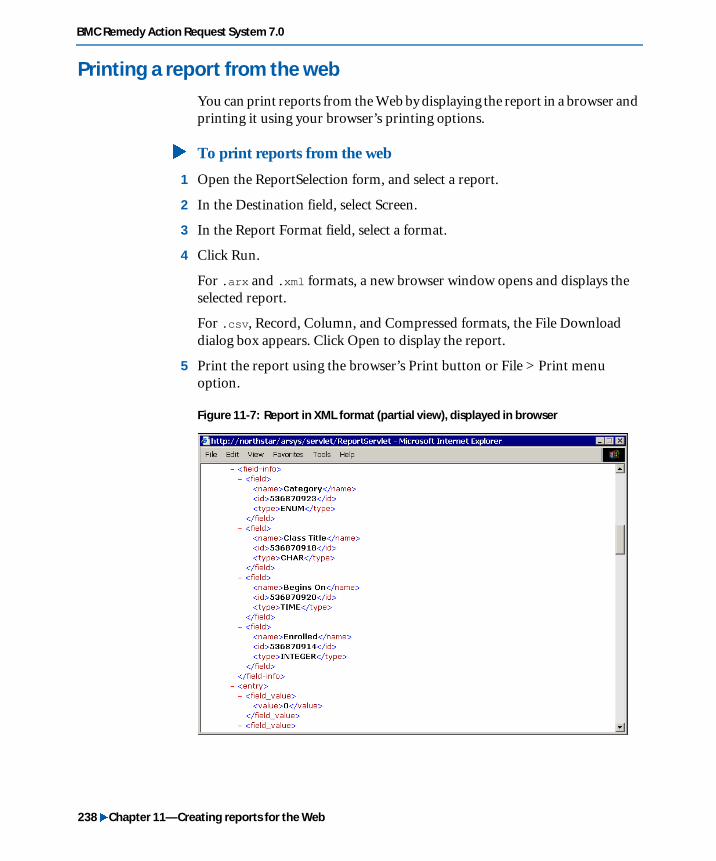
BMC Remedy Action Request System 7.0
Printing a report from the web
You can print reports from the Web by displaying the report in a browser and printing it using your browser’s printing options.
� To print reports from the web
1 Open the ReportSelection form, and select a report.
2 In the Destination field, select Screen.
3 In the Report Format field, select a format.
4 Click Run.
For .arx and .xml formats, a new browser window opens and displays the selected report.
For .csv, Record, Column, and Compressed formats, the File Download dialog box appears. Click Open to display the report.
5 Print the report using the browser’s Print button or File > Print menu option.
Figure 11-7: Report in XML format (partial view), displayed in browser
238 �Chapter 11—Creating reports for the Web

Installing and Administering BMC Remedy Mid Tier
Backward compatibility
Macros stopped being supported in the AR System 5.x release. You can view reports created using run macro report actions with releases prior to AR System 5.x in BMC Remedy User, or on the Web, by converting them to an equivalent active link.
Macro conversion procedure
Running the conversion procedure for a run macro report action creates an equivalent active link, which you will be prompted to name. The report content and layout (definition) become automatically embedded within the active link during the conversion, and no additional entries are required. Once the active link is created, it can then be attached to a workflow trigger, such as a button field, and placed on a form.
For details about the macro conversion procedure, see the Workflow Objects guide.
For instructions on attaching active links to a workflow trigger, such as a button field, see “To attach an Open Window active link to a form with a button field” on page 233.
For information about backwards compatibility related to localization, see the Form and Application Objects guide.
Localized reports created using macros
If you have language-specific reports created using Run Macro report actions with releases prior to AR System 5.x, perform the following steps to make them available to users:
1 Convert the run macro report action to an equivalent active link.
2 Attach the active link to a workflow trigger, such as a button field, and place it on a form.
3 Create an entry in the AR System Message Catalog.
See “Printing a report from the web” for details on converting run macro report actions to equivalent active links, and attaching them to a workflow trigger.
Backward compatibility � 239
BMC Remedy Action Request System 7.0
For details on the AR System Message Catalog entry required for localized reports embedded in an active link, see the Form and Application Objects guide.
Crystal Reports tips for the Web
There are several aspects of creating a Crystal Report that you need to be aware of so that reports will work properly. See the following topics for more information:
� “Establishing a system data source name (DSN) for Crystal reports” on page 240
� “ODBC driver configuration for Crystal reports” on page 241
� “Restricting the number of records retrieved” on page 244
� “Optimal formatting for all environments” on page 245
� “Saving a Crystal report” on page 246
Establishing a system data source name (DSN) for Crystal reports
Every AR System server that a report references will need a System DSN (data source name). The recommended format of this name is <server_name>_DSN. For more information, see the Integrating with Plug-ins and Third-Party Products guide.
If the Crystal Report Designer application is installed on a different system from the Crystal Web Component server, then the administrator must make sure that the System DSN has the same name. For example, if an application developer who is developing on Machine A has created a system DSN called myServer_DSN, and the Crystal Web Component server is on Machine B, then Machine B will also need to have a system DSN named myServer_DSN.
240 �Chapter 11—Creating reports for the Web

Installing and Administering BMC Remedy Mid Tier
Important: Crystal Designer and Crystal Reports use the user name and password in the System DSN to log in to AR System. When you create reports in Crystal Designer, you use a System DSN complete with a user name and a password. If Crystal Designer requests user information, do not provide it. The information in the System DSN should be sufficient. If not, provide the required information in the System DSN, not in Crystal Designer. Do not use a User DSN when you create or run Crystal Reports. Before you run any reports, however, modify your System DSN to remove the user name and password. This causes Crystal Reports to use the user name and password of the user currently logged in. Failure to remove the user name and password from the System DSN might give you unexpected results when you run your report.
ODBC driver configuration for Crystal reportsBefore creating a Crystal report, configure the ODBC settings on the machine you are using to create the report. These settings will prevent the user name, server name, and password from being embedded in the report.
� To configure ODBC settings for Crystal reports
1 Go to the Windows Control Panel, and select Administrative Tools.
2 Double-click Data Sources (ODBC).
The ODBC Data Sources Administrator dialog box opens.
3 Click the System DSN tab.
Important: Be sure to click the System DSN tab, not the User DSN tab. Never use the User registered version of the ODBC driver to create reports.
Crystal Reports tips for the Web � 241
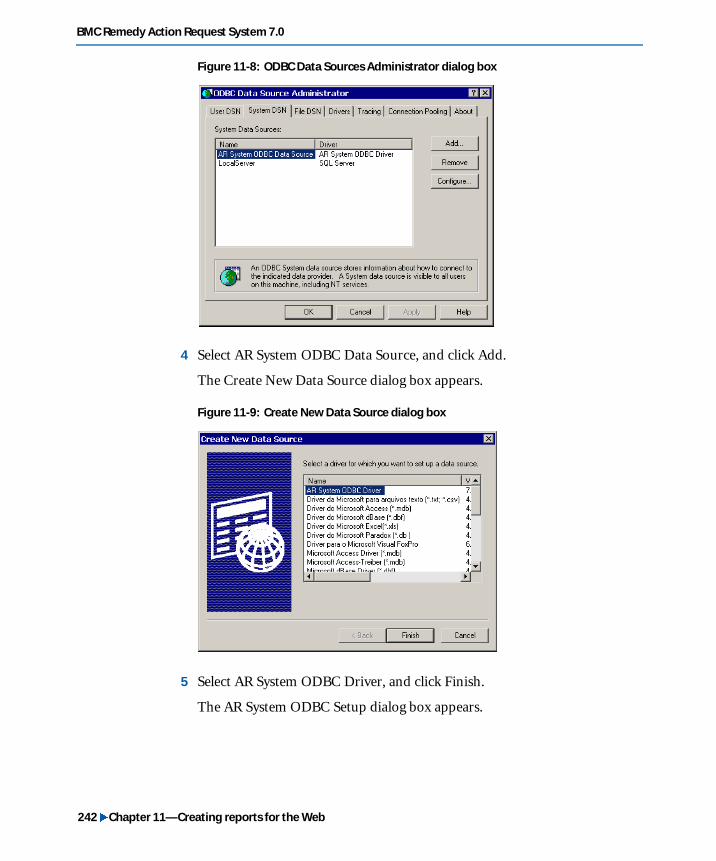
BMC Remedy Action Request System 7.0
Figure 11-8: ODBC Data Sources Administrator dialog box
4 Select AR System ODBC Data Source, and click Add.
The Create New Data Source dialog box appears.
Figure 11-9: Create New Data Source dialog box
5 Select AR System ODBC Driver, and click Finish.
The AR System ODBC Setup dialog box appears.
242 �Chapter 11—Creating reports for the Web
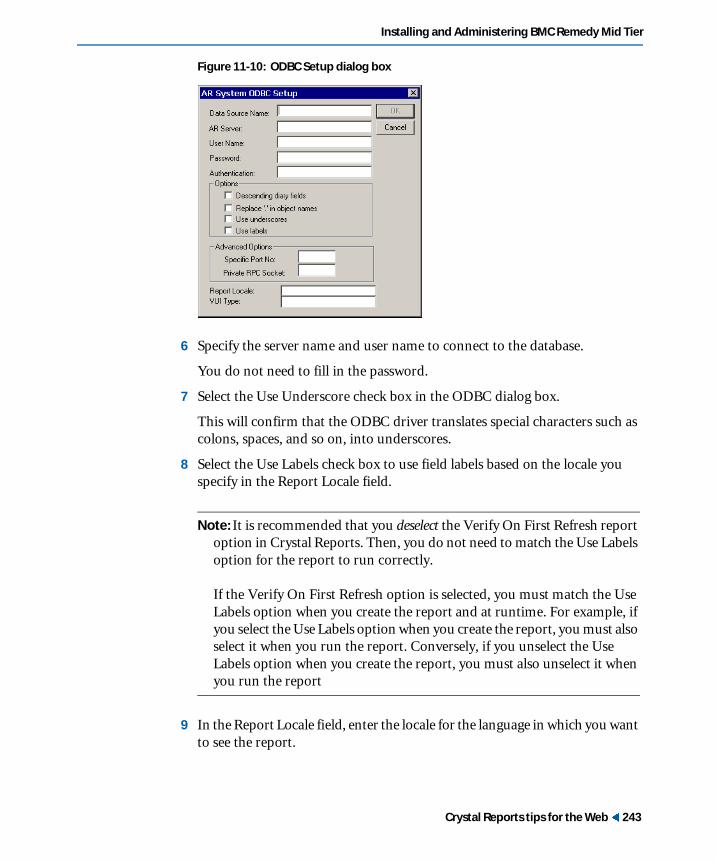
Installing and Administering BMC Remedy Mid Tier
Figure 11-10: ODBC Setup dialog box
6 Specify the server name and user name to connect to the database.
You do not need to fill in the password.
7 Select the Use Underscore check box in the ODBC dialog box.
This will confirm that the ODBC driver translates special characters such as colons, spaces, and so on, into underscores.
8 Select the Use Labels check box to use field labels based on the locale you specify in the Report Locale field.
Note: It is recommended that you deselect the Verify On First Refresh report option in Crystal Reports. Then, you do not need to match the Use Labels option for the report to run correctly.
If the Verify On First Refresh option is selected, you must match the Use Labels option when you create the report and at runtime. For example, if you select the Use Labels option when you create the report, you must also select it when you run the report. Conversely, if you unselect the Use Labels option when you create the report, you must also unselect it when you run the report
9 In the Report Locale field, enter the locale for the language in which you want to see the report.
Crystal Reports tips for the Web � 243

BMC Remedy Action Request System 7.0
Note: If you have installed two localized views (for example, German and French), and you are using the German localized view and the report locale setting is set to the French locale, the data returned will be in French, though the static report text will be in German.
For reports displayed by BMC Remedy User, you do not need to specify a value in the Report Locale field. BMC Remedy User supplies the correct value.
10 Click OK to save the settings.
Restricting the number of records retrievedTo restrict the number of records retrieved from the database when a report is run, Crystal Reports enables you to use a Selection Formula. A Selection Formula can be added in a Crystal report by choosing Report > Edit Selection Formula. When the report is run from BMC Remedy User, however, these qualifications are not used. Use the qualification bar available in the Open Window Active Link action. The data can be filled in via the data stored in a form or hard coded. When the report is run, this qualification will be used to select data from the AR System forms specified in the report.
244 �Chapter 11—Creating reports for the Web

Installing and Administering BMC Remedy Mid Tier
Figure 11-11: Qualification bar in Open Window active link
Optimal formatting for all environmentsWhen you create a report and align the fields in the designer, and then view it in the Crystal Designer and BMC Remedy User, it might appear to be well aligned, but when you view it on the Web, the fields might not be aligned. To address this issue, use horizontal and vertical “guidelines” in reports to align fields.
� To set up optimal formatting for all environments
1 Right-click inside the designer and make sure the Snap to Grid option is not selected.
2 Select Show guidelines in design and Show guidelines in preview options from this menu.
Crystal Reports tips for the Web � 245

BMC Remedy Action Request System 7.0
3 Click on the top and left page margins to make vertical or horizontal lines appear in the designer.
4 Move the fields next to the guidelines to attach them to the guidelines. This way the column headings and the column content can be left aligned as well as top aligned.
Note: Guidelines are displayed only in the design mode and not when the report is actually viewed.
Figure 11-12: Guidelines in Crystal Reports Designer
Saving a Crystal reportWhen saving a Crystal report, do not save the report with data. You will see this as one of the options in the Crystal Designer under the menu File > Save Data with Report, but do not select it.
246 �Chapter 11—Creating reports for the Web
Appendix
A
Installing and configuring Crystal Web Connector on UNIX platformsAR System does not fully support Crystal Reports Server 10 on UNIX. However, with the UNIX Web Connector component that comes with Crystal Reports Server 10, you can connect the UNIX mid tier with Crystal Reports Server 10 running on Windows.
The following topics are provided:
� Overview of the process (page 248)
� Installing Crystal Reports Server 10 (page 248)
� Installing the BMC Remedy Mid Tier (page 248)
� Installing and configuring Crystal Web Connector (page 249)
� Installing Samba network file sharing software (page 251)
� Configuring Crystal Reports (page 255)
Note: AR System 7.0 fully supports BusinessObjects Enterprise XI and Crystal Reports Server XI on UNIX.
Installing and configuring Crystal Web Connector on UNIX platforms � 247

BMC Remedy Action Request System 7.0
Overview of the process
This section describes how to install and configure Crystal Web Connector on UNIX. This discussion is based on Solaris, which differs slightly from other UNIX platforms, for example, HP-UX. You should have some knowledge of basic UNIX commands before using this information to create files, shared directories, and so on.
To run Crystal Reports from the BMC Remedy Mid Tier with Crystal Web Connector (on UNIX) and Crystal Reports Server 10 (on Windows), use the following sequence:
Step 1 Install Crystal Reports Server 10 on the Windows system using the MS IIS web server. (page 248)
Step 2 Install the mid tier on UNIX with iPlanet/ServletExec. (page 248)
Step 3 Install and configure Crystal Web Connector on the same system where the mid tier is installed. (page 249)
Step 4 Install Samba (or similar network file sharing software) on the same system where the mid tier is installed. (page 251)
Step 5 Configure Crystal Reports. (page 255)
Installing Crystal Reports Server 10
� To install Crystal Reports Server 10
1 Install Crystal Reports Server 10 on the Windows machine as you normally would.
2 Remember where you installed the Web Content and the crystalreportviewers directories. You will need this information later when you create the magnus.conf file for the Crystal Web Connector (see page 249).
Installing the BMC Remedy Mid Tier
Install the BMC Remedy Mid Tier on your UNIX system using iPlanet web server/ServletExec. For more information, see Chapter 2, “UNIX—Installing BMC Remedy Mid Tier.”
248 �Appendix A—Installing and configuring Crystal Web Connector on UNIX platforms

Installing and Administering BMC Remedy Mid Tier
Installing and configuring Crystal Web Connector
� To install and configure Crystal Web Connector on UNIX
1 Copy the following files from the Crystal CD to your local system and rename them as follows:
a Rename webconn~1.sh to webcon_install.sh.
b Rename licens~1 to licensetext.
c Rename webconn~1.gz to webconn_install.tar.gz.
2 Run the webcon_install.sh Web Connector install script.
You will now configure Crystal Web Connector on your system.
3 Navigate to the <connecter_installed>/crystal/enterprise/solaris_sparc/wcs/conf directory.
You will now copy parts of the following files to related files under the <iPlanet_installation>/config directory:
� Mime.type.conf to mime.types (step 4)
� obj.conf to magnus.conf (step 5)
� obj.conf to obj.conf (step 6)
4 Copy the contents of the Mime.type.conf file to the mime.types file (located under the <iPlanet_installation>/config directory):
type=magnus-internal/rpt exts=rpttype=magnus-internal/csp exts=csptype=magnus-internal/cri exts=critype=magnus-internal/cwr exts=cwr
5 For initialization, copy the following two lines from the obj.conf file to the magnus.conf file:
Init fn="load-modules" funcs=req_handler,req_initshlib="<connecter_install_directory>/crystal/enterprise/solaris_sparc/wcs/lib/libnsapi.so"Init fn="req_init" WCSHosts="<hostname>.<your_domain>.COM"ClientPool="5" ConnectorTimeou t="600000" WCSPathMap="/crystal;.rpt;<Crystal_Enterprise_install_directory>/Web Content/,/crystal;.cwr;<Crystal_Enterprise_install_directory>/Web Content/,/crystal;.csp;<Crystal_Enterprise_install_directory>/Web Content/,/crystal;.cri;<Crystal_Enterprise_install_directory>/Web Content/,/crystalreportviewers;.csp; <Crystalreportviewer_install_directory>/2.0/crystalreportviewers/"
Installing and configuring Crystal Web Connector � 249
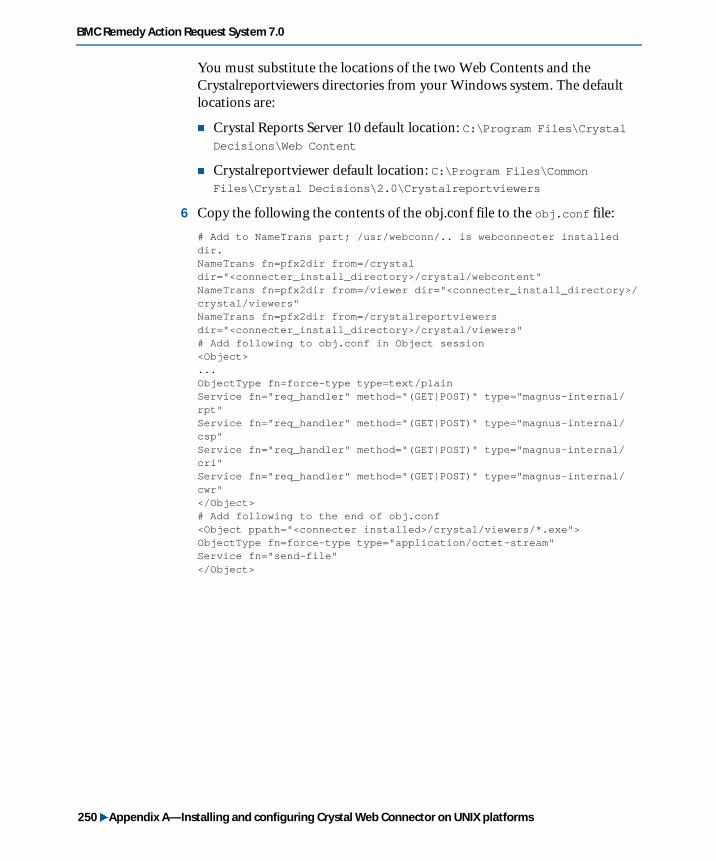
BMC Remedy Action Request System 7.0
You must substitute the locations of the two Web Contents and the Crystalreportviewers directories from your Windows system. The default locations are:
� Crystal Reports Server 10 default location: C:\Program Files\Crystal Decisions\Web Content
� Crystalreportviewer default location: C:\Program Files\Common Files\Crystal Decisions\2.0\Crystalreportviewers
6 Copy the following the contents of the obj.conf file to the obj.conf file:
# Add to NameTrans part; /usr/webconn/.. is webconnecter installeddir.NameTrans fn=pfx2dir from=/crystaldir="<connecter_install_directory>/crystal/webcontent"NameTrans fn=pfx2dir from=/viewer dir="<connecter_install_directory>/crystal/viewers"NameTrans fn=pfx2dir from=/crystalreportviewersdir="<connecter_install_directory>/crystal/viewers"# Add following to obj.conf in Object session<Object>...ObjectType fn=force-type type=text/plainService fn="req_handler" method="(GET|POST)" type="magnus-internal/rpt"Service fn="req_handler" method="(GET|POST)" type="magnus-internal/csp"Service fn="req_handler" method="(GET|POST)" type="magnus-internal/cri"Service fn="req_handler" method="(GET|POST)" type="magnus-internal/cwr"</Object># Add following to the end of obj.conf<Object ppath="<connecter installed>/crystal/viewers/*.exe">ObjectType fn=force-type type="application/octet-stream"Service fn="send-file"</Object>
250 �Appendix A—Installing and configuring Crystal Web Connector on UNIX platforms

Installing and Administering BMC Remedy Mid Tier
Installing Samba network file sharing software
To run Crystal Web Connector, you must install Samba (or a similar network file sharing software) on UNIX.
� To install Samba software
1 Download Samba source code from http://www.samba.org.
2 Install the Samba software:
a Use the gunzip command to extract the download tar file, for example, samba-3.0.0.tar.
b Change directories to the ../source directory.
c Enter the configure command:
./configure --prefix=<path_where_you_want_to_install>
For example:
./configure --prefix=/usr/samba
d Enter the make command:
make
e Enter the make install command:
make install
3 Create an smb.conf file under the <samba_install_directory>/lib directory.
The smb.conf file should contain the following information:
# Global parametersworkgroup = WORKGROUPserver string = Samba 3.0security = share[root]path = /comment = Solaris rootguest ok = Noread only = Yes[share]path = /sharecomment = Solaris shareguest ok = Yesread only = Noencrypt passwords = yessmb passwd file = /usr/samba30/bin/smbpasswd
Installing Samba network file sharing software � 251
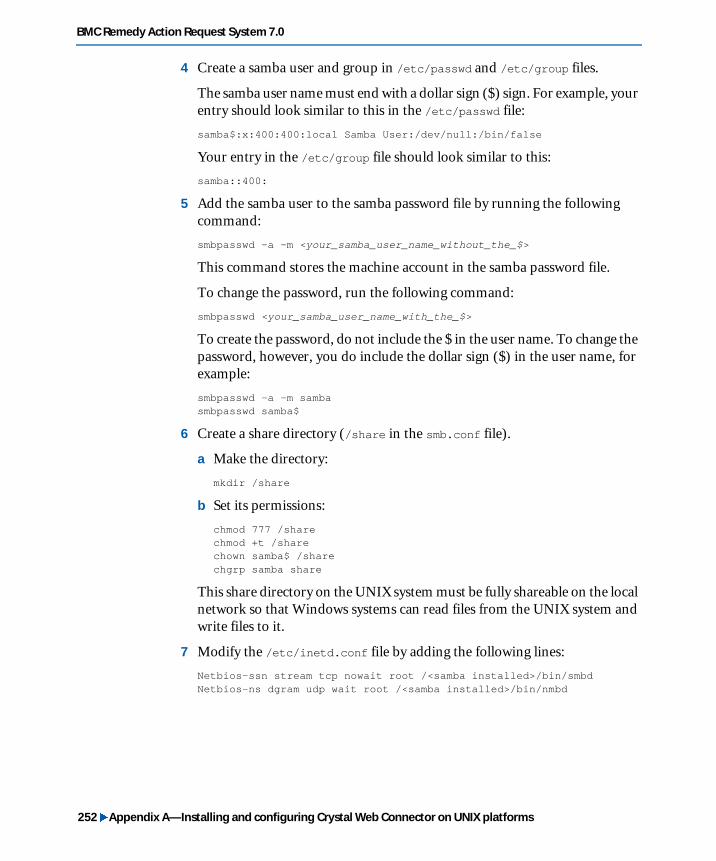
BMC Remedy Action Request System 7.0
4 Create a samba user and group in /etc/passwd and /etc/group files.
The samba user name must end with a dollar sign ($) sign. For example, your entry should look similar to this in the /etc/passwd file:
samba$:x:400:400:local Samba User:/dev/null:/bin/false
Your entry in the /etc/group file should look similar to this:
samba::400:
5 Add the samba user to the samba password file by running the following command:
smbpasswd -a -m <your_samba_user_name_without_the_$>
This command stores the machine account in the samba password file.
To change the password, run the following command:
smbpasswd <your_samba_user_name_with_the_$>
To create the password, do not include the $ in the user name. To change the password, however, you do include the dollar sign ($) in the user name, for example:
smbpasswd -a -m sambasmbpasswd samba$
6 Create a share directory (/share in the smb.conf file).
a Make the directory:
mkdir /share
b Set its permissions:
chmod 777 /sharechmod +t /sharechown samba$ /sharechgrp samba share
This share directory on the UNIX system must be fully shareable on the local network so that Windows systems can read files from the UNIX system and write files to it.
7 Modify the /etc/inetd.conf file by adding the following lines:
Netbios-ssn stream tcp nowait root /<samba installed>/bin/smbdNetbios-ns dgram udp wait root /<samba installed>/bin/nmbd
252 �Appendix A—Installing and configuring Crystal Web Connector on UNIX platforms

Installing and Administering BMC Remedy Mid Tier
8 Create an /etc/xinetd.d directory, then add two files to it: netbios-ssn and netbios-ns.
a Add the following information to the netbios-ssn file:
service netbios-ssn{socket_type = streamprotocol = tcpwait = nouser = rootserver = /usr/local/samba/bin/smbddisable = no}
b Add the following information to the netbios-ns file:
service netbios-ns{socket_type = dgramprotocol = udpwait = yesuser = rootserver = /usr/local/samba/bin/nmbddisable = no}
9 Create the start script under /etc/init.d directory, for example, naming it RunSamba.
10 Edit the directories in this start script to reflect your installation. The script can then be used to manually start, stop, or restart Samba. You can also return the status of Samba.
A sample start script might look like the this:
#!/bin/sh## description: Starts and stops the Samba smbd and nmbd daemons \# used to provide SMB network services.
# Samba root directoryROOT=/usr/local/sambaexport ROOT
# Where to find the Samba configuration file (smb.conf)SMBCONF=$ROOT/lib/smb.confexport SMBCONF
# Where goes the PID file (normally the lock directory)LOCK=$ROOT/var/locksexport LOCK
# Needed to kill all the instances of smbd and nmbd
Installing Samba network file sharing software � 253

BMC Remedy Action Request System 7.0
termall() {pid=`/bin/ps ax | /bin/grep -w $1 | /bin/sed -e 's/^ *//' -e 's/.*//'`echo -n "Stopping $1 now : "for PID in $pid; do[ "$PID" != "" ] && kill -0 $PID 2> /tmp/pid >&2 && kill -15$PIDecho -n "$PID "doneechorm -f /tmp/pid}
running() {listpid=`/bin/ps ax | /bin/grep -w $1 | /bin/sed -e 's/^ *//' -e's/ .*//'`if [ "$listpid" != "" ]; thenecho -n "$1 is running with PID = "for pid in $listpid; dokill -0 $pid > /tmp/pid 2>&1 && echo -n "$pid "doneelseecho -n "$1 not running"firm -f /tmp/pidecho}
# Check that smb.conf exists.[ -f $SMBCONF ] || exit 0
# See how we were called.case "$1" instart)echo -n "Starting SMB services: "if [ -f $LOCK/smbd.pid ]; thenrm $LOCK/smbd.pidfiif [ -f $LOCK/nmbd.pid ]; thenrm $LOCK/nmbd.pidfi# the deamons must be in the bin directory (needed by swat)$ROOT/bin/smbd -D && echo -n "smbd "$ROOT/bin/nmbd -D && echo -n "nmbd "echo# Only needed on a Linux (RedHat ?) system# touch /var/lock/subsys/smb;;stop)echo -n "Shutting down SMB services: "termall smbdtermall nmbd# Needed for a Linux system# rm -f /var/lock/subsys/smb
254 �Appendix A—Installing and configuring Crystal Web Connector on UNIX platforms

Installing and Administering BMC Remedy Mid Tier
echo "";;status)running smbdrunning nmbd$ROOT/bin/smbstatus;;restart)
Configuring Crystal Reports ! 11Crystal Web Connector installation and configurationecho -n "Restarting SMB services: "$0 stop$0 startecho "done.";;*)echo "Usage: smb {start|stop|restart|status}"exit 1esac
11 Start Samba from the start script:
RunSamba start
You can also stop Samba from the start script:
RunSamba stop
If the stop command does not work, you can kill the two processes for Samba.
Configuring Crystal Reports
Now, you must configure the Crystal Report Location and the Report Working Directory in the General Settings of the mid tier.
� To configure Crystal Reports in the mid tier
1 Open the BMC Remedy Mid Tier Configuration Tool.
2 Configure the Crystal Report Location and Report Working Directory in the General Settings of the mid tier.
The Crystal Report Location should be the web server on Windows, for example, http://<web server>:<port>). The Reporting Working Directory is the shared directory, for example, /share.
3 Map the UNIX shared directory to the Windows system where MS IIS/Crystal Reports Server 10 is installed, for example, /share.
Configuring Crystal Reports � 255
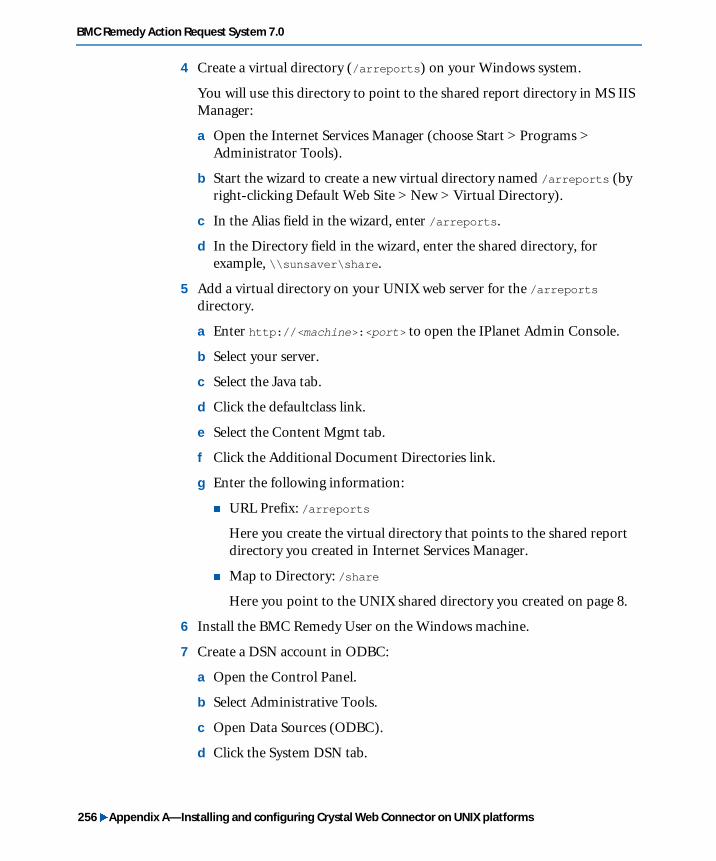
BMC Remedy Action Request System 7.0
4 Create a virtual directory (/arreports) on your Windows system.
You will use this directory to point to the shared report directory in MS IIS Manager:
a Open the Internet Services Manager (choose Start > Programs > Administrator Tools).
b Start the wizard to create a new virtual directory named /arreports (by right-clicking Default Web Site > New > Virtual Directory).
c In the Alias field in the wizard, enter /arreports.
d In the Directory field in the wizard, enter the shared directory, for example, \\sunsaver\share.
5 Add a virtual directory on your UNIX web server for the /arreports directory.
a Enter http://<machine>:<port> to open the IPlanet Admin Console.
b Select your server.
c Select the Java tab.
d Click the defaultclass link.
e Select the Content Mgmt tab.
f Click the Additional Document Directories link.
g Enter the following information:
� URL Prefix: /arreports
Here you create the virtual directory that points to the shared report directory you created in Internet Services Manager.
� Map to Directory: /share
Here you point to the UNIX shared directory you created on page 8.
6 Install the BMC Remedy User on the Windows machine.
7 Create a DSN account in ODBC:
a Open the Control Panel.
b Select Administrative Tools.
c Open Data Sources (ODBC).
d Click the System DSN tab.
256 �Appendix A—Installing and configuring Crystal Web Connector on UNIX platforms
Installing and Administering BMC Remedy Mid Tier
e Click Add.
f Select AR System ODBC Driver from the list and click Finish.
g Enter the data source name.
� If the name is AR System ODBC Data Source, delete the User DSN entry with this name to avoid conflict. (Crystal will pick the User DSN over the System DSN if they have the same name. The web requires the System DSN.)
� Preferably, use a name other than AR System ODBC Data Source to avoid conflict with the User DSN entry that is created upon BMC Remedy User installation.
h Enter the name of the AR System server in the AR Server field.
i Select the Replace '.' in object names option.
j Select the Use Underscores option.
k Select the Use Labels check box to use field labels based on the locale you specify in the Report Locale field.
Note: It is recommended that you deselect the Verify On First Refresh report option in Crystal Reports. Then, you do not need to match the Use Labels option for the report to run correctly.
If the Verify On First Refresh option is selected, you must match the Use Labels option when you create the report and at runtime. For example, if you select the Use Labels option when you create the report, you must also select it when you run the report. Conversely, if you deselect the Use Labels option when you create the report, you must also deselect it when you run the report
l In the Report Locale field, enter the locale for the language in which you want to see the report.
Note: If you have installed two localized views (for example, German and French), and you are using the German localized view and the report locale setting is set to the French locale, the data returned will be in French, though the static report text will be in German.
Configuring Crystal Reports � 257

BMC Remedy Action Request System 7.0
For reports displayed by BMC Remedy User, you do not need to specify a value in the Report Locale field. BMC Remedy User supplies the correct value.
m Click OK.
8 Verify that Crystal Web Connector works for the Crystal examples.
You can find this information in the Crystal Web Connector documentation.
9 Run a Crystal report using the AR System.
258 �Appendix A—Installing and configuring Crystal Web Connector on UNIX platforms
Index
AAccessibility (Section 508)
cursor types and form modes 148accessibility (Section 508)
accessible mode 149features 150images 150preferences 148requirements for applications 146
accessingdownloaded UNIX software 34downloaded Windows software 42
active link actions, Open Window 187, 231ActiveX controls, in browser settings 125adding servers to mid tier 82Apache web server
postinstallation tasks 59preinstallation steps 21
applicationsaccessibility 146cascading style sheets, using with 158saving to disk 146support files 126users with disabilities and 146
AR Export format 234, 237AR System Mid Tier Object List
definition file 77description 77display 79enabling 78
AR System Mid Tier Object List (continued)localized views 77opening forms and applications 79searching 79
AR System Server settings, mid tier 80AR System User Preference form
common fields 101setting preferences for the web 100
ARWebReportViewer 55, 186, 190ASCII format, obtaining data 237attachments, importing and exporting 234authentication server 76
BBack button 130backward compatibility and macros 239browser settings for scripting and ActiveX 98, 125BusinessObjects Enterprise XI versus Crystal
Enterprise 189BusinessObjects location 88, 90buttons
Back 130login and logout 138Open Window action and 233
Ccache table, Mid Tier Configuration Tool 86cache, mid tier settings 84cascading style sheets
adding to applications 158anatomy of rule syntax 154
Index � 259
BMC Remedy Action Request System 7.0
cascading style sheets (continued)application list fields, using with 157AR System and 154browser limitations 154customizing 158default file locations 156example of style sheets applied 155field types 162files in mid tier directory 158font styles, changing 172help, using with 157hierarchy of elements 155order of precedence 155web applications, using with 158
changing the group ID, Linux 66comma-separated value (.csv) format 237compatibility, backward with macros 239components required by mid tier 17Configuration Tool. See Mid Tier Configuration
Toolconfiguring
changing password 58mid tier 71web reports and 200
Crystal Enterprise versus BusinessObjects Enterprise XI 189
Crystal ReportsCrystalQueryConverter Java interface 209Designer 213DSN 240location 88, 90ODBC driver configuration 241optimal formatting 245queries, converting 209ReportQueryConverter Java interface 209restricting number of records retrieved 244setting up configuration 200tips for the Web 240web reporting 191
Crystal Web Connector, installing 247Crystal Web, component server 17CSV, formats for exporting 235currency types and locale 107cursor types and form modes 148customized login page 142
customizingdata field types with styles sheets 162font styles with style sheets 172style sheets 158user environment 100
Ddata
DSN (reporting) 240exporting to file 233passing to a field 136reporting overview 186styles, applying to field types 162
defined searches 176definition change check interval 85definition files
AR System Mid Tier Object List 77deleting 223editing 222reports and 213, 214saving 222
deleting definitions files 223deployable applications
See also applicationsdeploying, web applications 128deployment
.css style sheets 158support files, modifying 126
differences in Crystal products 189direct access URLs and web views 131double-byte characters in URLs 135DSN (data source name) 240
Eencoded characters 133encoder utility for URLs 133encoding URLs 132entries, Report form 223environment
customizing 100web reporting 208
exampleslogin and logout URLs 137style sheets applied 155
260 �Index

Installing and Administering BMC Remedy Mid Tier
exportingattachments 234data from web to file 235data to file 233
external files and .css style sheets 158EXTERNAL keyword 232
Ffield types, reporting 228fields
CSS classes 162form action 122passing data in URL 136
file locations, mid tier 15files
See also log files.css style sheets 158definition 222definition, saving 222exporting data to 233report 187style sheet location 156
Flashboardsdata points 98definition interval 85
flush cache 86font styles, changing with style sheets 172footer content, editing 119form action fields 122formats
AR Export 234, 237ASCII 237comma-separated values 237CSV, reports 235XML 234, 237
formatting web pages 126forms
AR System Mid Tier Object List 77Home Pages, opening from 128Report 222ReportCreator 214reporting 186ReportType 208
Hheader content, editing 119help for web applications 145hierarchy of elements in style sheets 155home pages
form action fields 123forms, opening 128opening forms from 128server 76, 110URL 128
IIIS web server and virtual directory 191importing attachments 234installation
components and patches 17overview 14troubleshooting 64UNIX 35UNIX worksheet 26Windows 43Windows worksheet 30
internal Java, disabling 22
JJava SDK, troubleshooting 66Java, disabling internal 22JAWS, configuring 147
Kkeyboard shortcuts 151keywords
EXTERNAL 232reports and 219URL, to connect reports to engine 209
Llegacy URLs 131limitations for browser and CSS 154Linux, changing the group ID value 66load balancer, Mid Tier Configuration Tool 71loading a search 179locale
configuring 107determining 144
Index � 261

BMC Remedy Action Request System 7.0
localizingreport definition files in ReportCreator
form 217run macro actions (5.x) and reports 239
log categories 94log directory 95log files
backup 95format 95level 95log directory 95log level 95log viewer 95mid tier 93mid tier profiling 96size 95viewing 95, 96
log filter 94logging in, web clients 137, 138logging out, web clients 137, 138login page, customized 142login URLs 137login.jsp 137LoginServlet 137, 139logout URLs 137logout.jsp 137LogoutServlet 137, 139
Mmacros and backward compatibility 239managing saved searches 179maximum connections per server in server pool 80Mid Tier Configuration Tool
accessing 70AR Server settings 80cache settings 84cache table 86change password 97filter log by user name 94flush cache 86general settings 74Home page server 76log categories 94preference server 75report settings 87
Mid Tier Configuration Tool (continued)reporting working directory 87, 89settings 71using with a load balancer 71view logs 93web service settings 91
mid tier object list 140
Nnon-ASCII characters in URLs 135
OObject List, mid tier 140object list. See AR System Mid Tier Object ListODBC driver configuration for Crystal
Reports 241Open Window action, reporting 187, 231order of precedence for styles 155
Ppages, formatting for web 126parameters
accessing forms and search results 135including in saved searches 180login and logout 137running a search with 183saving in a search 182specifying in URLs 131supported in AR System 131
passwordchanging in Mid Tier Configuration Tool 97changing mid tier configuration password 58configuring 58
patches for mid tier 17permissions, changing in ServletExec directory 59pool, server connection 80postinstallation tasks 58predefined searches 178preferences
accessibility 148DSN name (reporting) 240server 75user 100views for the web 76web clients 100
262 �Index

Installing and Administering BMC Remedy Mid Tier
preinstallationApache web server 21ServletExec 19Sun One web server 19, 21
Qqualifications, reporting 221query converter class 209
Rrecent searches 176remote mid tier 197Report form entries 223report forms, overview 186ReportCreator form 213, 214, 216
deleting definition files 223keywords, using with web 219localization 217report definition files 222
reportingARWebReportViewer 190backward compatibility 239definition file, creating 216definition files 213, 214deleting definition files 223files 187keywords and 219localization in ReportCreator form 217localized with run macro actions (5.x) 239macros 239optimal formatting 245overview 186process 187qualifications 221running on web 224statistics 220table and results list fields 228web components 186
reporting working directory 87, 89ReportQueryConverter Java interface for Crystal
Reports 209reports, configuring for mid tier 87ReportSelection form 224, 226
accessing through web clients 224URL 224
ReportType form 208required components 17resource files 126restricting number of records retrieved 244results list fields and reporting 228rules, CSS syntax 154
Ssaved searches 176saving applications to disk 146scripting, browser controls for 125searches, saving
creating a search 177defining a search with parameters 180deleting a search 180loading a search 179managing searches 179running a saved search 178running a search with parameters 183search types 176
Section 508 compliance 146selecting views 143server connection pool
max connections per server 80overview 80
serversadding to mid tier 82deleting from mid tier 84plugin 75preference 75properties for mid tier 83report server 110
ServletExecchanging permissions 59changing the port number 58installing 43, 53registration, verifying 64starting and stopping manually 62Sun One, UNIX 19troubleshooting installation 64
servletsLoginServlet 137, 139LogoutServlet 137, 139
session timeouts 75, 144
Index � 263

BMC Remedy Action Request System 7.0
settingsCrystal Reports for web 191
shortcuts, keyboard 151software
accessing UNIX software 34accessing Windows software 42
standard view, preference 76statistics in reports 220style sheets. See cascading style sheetsSun One web server
disabling internal Java 22preinstallation 19, 21virtual directory 195
support file URLs 130support files, modifying 126
Ttimeouts, session 75, 144toolbars, web 118troubleshooting
installation 64Java SDK 66
Uuninstalling
on UNIX 60on Windows 60ServletExec, UNIX 61
UNIXCrystal Web Connector 247file locations 15installation worksheet 26uninstall, checking 62uninstalling 60
URLsaccessing forms and search results 135direct access 131directly accessing report form 224double-byte and non-ASCII characters 135encoder utility 133encoding 132for support files 130Home Pages 128keywords to connect reports to engine 209legacy URLs 131
URLs (continued)login and logout 137Mid Tier Configuration Tool 70passing data to a field 136ReportCreator form 216reports and direct access 224ReportSelection form 224
User Preference form. See AR System User Preference form
userscustomizing preferences 100web 100with disabilities 146
Vview preference, web or standard 76ViewFormServlet 131views
options 116selection process 143web 131
virtual directory, IIS 191virtual directory, Sun ONE 195virtual options, verifying 64
Wwarnings
font size, not increasing unless bounding box increased 173
webcentralized preferences 100logging in 137, 138logging out 137, 138saving application to disk 146
web applications.css style sheets 158deploying 128help 145Home Page URL 128home pages and 128logging in 137, 138logging out 137, 138opening in a browser 128
264 �Index

Installing and Administering BMC Remedy Mid Tier
web clientsorder of precedence for CSS 155ReportSelection form, accessing 224
web header and footer content, editing 119web reporting
ARWebReportViewer 190BOXI settings 198components 186Crystal Report Designer, using 213Crystal Web settings 191keywords, using 219running reports 224setting up configuration 200steps 187
web servicesconfiguring for mid tier 91
web toolbar 118web views
Crystal web settings 191direct access URL 131external files and 126page properties 126preference 76
Web-Alternate view 116Windows
file locations 15installation worksheet 30uninstalling 60
worksheetUNIX installation 26Windows installation 30
XXML
formats for exporting 234, 237
Zz-index 121
Index � 265

BMC Remedy Action Request System 7.0
266 �Index


*58485**58485**58485**58485*
*58485*
Related Documents


