Welcome message from author
This document is posted to help you gain knowledge. Please leave a comment to let me know what you think about it! Share it to your friends and learn new things together.
Transcript


Microsoft®
Word 2010 Plain & Simple
Katherine Murray

copyright © 2010 by Katherine Murray.
complying with all applicable copyright laws is the responsibility of the user. all rights reserved. without limiting the rights under copyright,no part of this document may be reproduced, stored in or introduced into a retrieval system, or transmitted in any form or by any means(electronic, mechanical, photocopying, recording, or otherwise), or for any purpose, without express written permission of o’reilly Media, inc.
isbn: 978-0-7356-2731-4
Printed and bound in canada.
2 3 4 5 6 7 8 9 10 ti 7 6 5 4 3 2
Microsoft Press titles may be purchased for educational, business, or sales promotional use. online editions are also available for most titles (http://my.safaribooksonline.com). for more information, contact our corporate/institutional sales department: (800) 998-9938 or [email protected]. Visit our website at microsoftpress.oreilly.com. send comments to [email protected].
Microsoft, Microsoft Press, activeX, excel, frontPage, internet explorer, PowerPoint, sharePoint, webdings, windows, and windows 7 are either registered trademarks or trademarks of Microsoft corporation in the united states and/or other countries. other product and company names mentioned herein may be the trademarks of their respective owners.
unless otherwise noted, the example companies, organizations, products, domain names, e-mail addresses, logos, people, places, and events depicted herein are fictitious. no association with any real company, organization, product, domain name, e-mail address, logo, person, place, or event is intended or should be inferred.
this book expresses the author’s views and opinions. the information contained in this book is provided without any express, statutory, or
Acquisitions and Developmental Editor: Kenyon brownProduction Editor: adam zarembaCopy Editor: nancy sixsmithEditorial Production: octal Publishing, inc.Technical Reviewer: Kristen todCompositor: ron bilodeauIllustrator: robert romanoIndexer: ron strauss
[2012-03-30]
implied warranties. neither the author, Microsoft corporation, nor their respective resellers or distributors will be held liable for any damages caused or alleged to be caused either directly or indirectly by such information.

To the creative spirit in all of us


v
ContentsAcknowledgments . . . . . . . . . . . . . . . . . . . . . . . . . . . . . . . . . . . . . . . . . . . . . . . . . . . . . . . . . xi
About This Book 1
No Computerspeak! . . . . . . . . . . . . . . . . . . . . . . . . . . . . . . . . . . . . . . . . . . . . . . . . . . . . . . . 2A Quick Overview . . . . . . . . . . . . . . . . . . . . . . . . . . . . . . . . . . . . . . . . . . . . . . . . . . . . . . . . . 2What’s New in Word 2010? . . . . . . . . . . . . . . . . . . . . . . . . . . . . . . . . . . . . . . . . . . . . . . . . . 4A Few Assumptions . . . . . . . . . . . . . . . . . . . . . . . . . . . . . . . . . . . . . . . . . . . . . . . . . . . . . . . . 5A Final Word (or Two) . . . . . . . . . . . . . . . . . . . . . . . . . . . . . . . . . . . . . . . . . . . . . . . . . . . . . . 6
Getting Started with Word 2010 7
Creating a New Document . . . . . . . . . . . . . . . . . . . . . . . . . . . . . . . . . . . . . . . . . . . . . . . . . 12Starting with a Template . . . . . . . . . . . . . . . . . . . . . . . . . . . . . . . . . . . . . . . . . . . . . . . . . . . 15Working with an Existing Document . . . . . . . . . . . . . . . . . . . . . . . . . . . . . . . . . . . . . . . . 17Introducing Backstage View . . . . . . . . . . . . . . . . . . . . . . . . . . . . . . . . . . . . . . . . . . . . . . . . 18Adding Content . . . . . . . . . . . . . . . . . . . . . . . . . . . . . . . . . . . . . . . . . . . . . . . . . . . . . . . . . . 20Adding Hyperlinks . . . . . . . . . . . . . . . . . . . . . . . . . . . . . . . . . . . . . . . . . . . . . . . . . . . . . . . . 23Printing a Document . . . . . . . . . . . . . . . . . . . . . . . . . . . . . . . . . . . . . . . . . . . . . . . . . . . . . . 25Getting Help . . . . . . . . . . . . . . . . . . . . . . . . . . . . . . . . . . . . . . . . . . . . . . . . . . . . . . . . . . . . . 27
1
2
vi Contents
Editing Your Content 29
Editing Basics . . . . . . . . . . . . . . . . . . . . . . . . . . . . . . . . . . . . . . . . . . . . . . . . . . . . . . . . . . . . 30Changing Your View . . . . . . . . . . . . . . . . . . . . . . . . . . . . . . . . . . . . . . . . . . . . . . . . . . . . . . 33Navigating Through the Document . . . . . . . . . . . . . . . . . . . . . . . . . . . . . . . . . . . . . . . . . 36Converting Old Documents . . . . . . . . . . . . . . . . . . . . . . . . . . . . . . . . . . . . . . . . . . . . . . . . 40Reading a Document . . . . . . . . . . . . . . . . . . . . . . . . . . . . . . . . . . . . . . . . . . . . . . . . . . . . . . 42Moving and Copying Text . . . . . . . . . . . . . . . . . . . . . . . . . . . . . . . . . . . . . . . . . . . . . . . . . 44Replacing Text . . . . . . . . . . . . . . . . . . . . . . . . . . . . . . . . . . . . . . . . . . . . . . . . . . . . . . . . . . . 47Inserting Building Blocks . . . . . . . . . . . . . . . . . . . . . . . . . . . . . . . . . . . . . . . . . . . . . . . . . . 48Correcting Your Spelling and Grammar . . . . . . . . . . . . . . . . . . . . . . . . . . . . . . . . . . . . . . 50Correcting Text Automatically . . . . . . . . . . . . . . . . . . . . . . . . . . . . . . . . . . . . . . . . . . . . . . 52Researching a Subject . . . . . . . . . . . . . . . . . . . . . . . . . . . . . . . . . . . . . . . . . . . . . . . . . . . . . 55Translating Your Text . . . . . . . . . . . . . . . . . . . . . . . . . . . . . . . . . . . . . . . . . . . . . . . . . . . . . . 56
Formatting Documents 59
Choosing and Changing Themes . . . . . . . . . . . . . . . . . . . . . . . . . . . . . . . . . . . . . . . . . . . 63Applying and Saving Styles . . . . . . . . . . . . . . . . . . . . . . . . . . . . . . . . . . . . . . . . . . . . . . . . 66Changing Style Sets . . . . . . . . . . . . . . . . . . . . . . . . . . . . . . . . . . . . . . . . . . . . . . . . . . . . . . . 68Formatting Text . . . . . . . . . . . . . . . . . . . . . . . . . . . . . . . . . . . . . . . . . . . . . . . . . . . . . . . . . . 69Creating a Bulleted or Numbered List . . . . . . . . . . . . . . . . . . . . . . . . . . . . . . . . . . . . . . . 71Customizing a Bulleted or Numbered List . . . . . . . . . . . . . . . . . . . . . . . . . . . . . . . . . . . . 73Creating a Multilevel List . . . . . . . . . . . . . . . . . . . . . . . . . . . . . . . . . . . . . . . . . . . . . . . . . . 75Customizing a Multilevel List . . . . . . . . . . . . . . . . . . . . . . . . . . . . . . . . . . . . . . . . . . . . . . . 77Changing Character Font and Size . . . . . . . . . . . . . . . . . . . . . . . . . . . . . . . . . . . . . . . . . . 78Adjusting Paragraph Line Spacing . . . . . . . . . . . . . . . . . . . . . . . . . . . . . . . . . . . . . . . . . . 80Adjusting the Spacing Between Characters . . . . . . . . . . . . . . . . . . . . . . . . . . . . . . . . . . . 82Setting Paragraph Alignment . . . . . . . . . . . . . . . . . . . . . . . . . . . . . . . . . . . . . . . . . . . . . . 83Indenting a Paragraph . . . . . . . . . . . . . . . . . . . . . . . . . . . . . . . . . . . . . . . . . . . . . . . . . . . . 84
3
4

Contents vii
Formatting with Tabs . . . . . . . . . . . . . . . . . . . . . . . . . . . . . . . . . . . . . . . . . . . . . . . . . . . . . . 85Adding Text Boxes . . . . . . . . . . . . . . . . . . . . . . . . . . . . . . . . . . . . . . . . . . . . . . . . . . . . . . . . 87Creating a Dropped Capital Letter . . . . . . . . . . . . . . . . . . . . . . . . . . . . . . . . . . . . . . . . . . 90Copying Your Formatting . . . . . . . . . . . . . . . . . . . . . . . . . . . . . . . . . . . . . . . . . . . . . . . . . . 91Placing a Line Border Around a Page . . . . . . . . . . . . . . . . . . . . . . . . . . . . . . . . . . . . . . . . 92Placing an Art Border Around a Page . . . . . . . . . . . . . . . . . . . . . . . . . . . . . . . . . . . . . . . . 93Adding a Decorative Horizontal Line . . . . . . . . . . . . . . . . . . . . . . . . . . . . . . . . . . . . . . . . 94Adding a Border or Shading to a Paragraph . . . . . . . . . . . . . . . . . . . . . . . . . . . . . . . . . . 95
Designing Great Layouts 97
Customizing a Template . . . . . . . . . . . . . . . . . . . . . . . . . . . . . . . . . . . . . . . . . . . . . . . . . . . 98Designing a Template . . . . . . . . . . . . . . . . . . . . . . . . . . . . . . . . . . . . . . . . . . . . . . . . . . . . 100Laying Out the Page . . . . . . . . . . . . . . . . . . . . . . . . . . . . . . . . . . . . . . . . . . . . . . . . . . . . . 102Changing Page Orientation . . . . . . . . . . . . . . . . . . . . . . . . . . . . . . . . . . . . . . . . . . . . . . . 104Changing Margins in a Document . . . . . . . . . . . . . . . . . . . . . . . . . . . . . . . . . . . . . . . . . 105Fine-Tuning Your Layout . . . . . . . . . . . . . . . . . . . . . . . . . . . . . . . . . . . . . . . . . . . . . . . . . . 106Creating Sections . . . . . . . . . . . . . . . . . . . . . . . . . . . . . . . . . . . . . . . . . . . . . . . . . . . . . . . . 108Adding Columns . . . . . . . . . . . . . . . . . . . . . . . . . . . . . . . . . . . . . . . . . . . . . . . . . . . . . . . . 110Creating a Table from Scratch . . . . . . . . . . . . . . . . . . . . . . . . . . . . . . . . . . . . . . . . . . . . . 111Using a Predesigned Table . . . . . . . . . . . . . . . . . . . . . . . . . . . . . . . . . . . . . . . . . . . . . . . . 113Creating a Table from Text . . . . . . . . . . . . . . . . . . . . . . . . . . . . . . . . . . . . . . . . . . . . . . . . 114Adding or Deleting Rows and Columns in a Table . . . . . . . . . . . . . . . . . . . . . . . . . . . . 115Positioning Elements in a Table . . . . . . . . . . . . . . . . . . . . . . . . . . . . . . . . . . . . . . . . . . . . 117Customizing a Table Layout . . . . . . . . . . . . . . . . . . . . . . . . . . . . . . . . . . . . . . . . . . . . . . . 119Aligning a Table . . . . . . . . . . . . . . . . . . . . . . . . . . . . . . . . . . . . . . . . . . . . . . . . . . . . . . . . . 122Moving a Table . . . . . . . . . . . . . . . . . . . . . . . . . . . . . . . . . . . . . . . . . . . . . . . . . . . . . . . . . . 123Formatting a Table . . . . . . . . . . . . . . . . . . . . . . . . . . . . . . . . . . . . . . . . . . . . . . . . . . . . . . . 124Creating a Table Style . . . . . . . . . . . . . . . . . . . . . . . . . . . . . . . . . . . . . . . . . . . . . . . . . . . . 125
5

viii Contents
Adding Graphics to Your Documents 127
Inserting a Picture . . . . . . . . . . . . . . . . . . . . . . . . . . . . . . . . . . . . . . . . . . . . . . . . . . . . . . . 130Changing the Size of a Picture . . . . . . . . . . . . . . . . . . . . . . . . . . . . . . . . . . . . . . . . . . . . . 132Adding Clip Art . . . . . . . . . . . . . . . . . . . . . . . . . . . . . . . . . . . . . . . . . . . . . . . . . . . . . . . . . 134Adding Shapes . . . . . . . . . . . . . . . . . . . . . . . . . . . . . . . . . . . . . . . . . . . . . . . . . . . . . . . . . . 135Editing and Formatting a Picture . . . . . . . . . . . . . . . . . . . . . . . . . . . . . . . . . . . . . . . . . . 137Getting Artistic with Pictures . . . . . . . . . . . . . . . . . . . . . . . . . . . . . . . . . . . . . . . . . . . . . . 139Removing Picture Backgrounds . . . . . . . . . . . . . . . . . . . . . . . . . . . . . . . . . . . . . . . . . . . . 141Wrapping Text Around a Graphic . . . . . . . . . . . . . . . . . . . . . . . . . . . . . . . . . . . . . . . . . . 142Arranging Multiple Graphics . . . . . . . . . . . . . . . . . . . . . . . . . . . . . . . . . . . . . . . . . . . . . . 144Positioning Graphics on the Page . . . . . . . . . . . . . . . . . . . . . . . . . . . . . . . . . . . . . . . . . . 146Creating Artistic Text . . . . . . . . . . . . . . . . . . . . . . . . . . . . . . . . . . . . . . . . . . . . . . . . . . . . . 148Inserting a Relational Diagram . . . . . . . . . . . . . . . . . . . . . . . . . . . . . . . . . . . . . . . . . . . . 149Creating a Chart . . . . . . . . . . . . . . . . . . . . . . . . . . . . . . . . . . . . . . . . . . . . . . . . . . . . . . . . . 152
Word 2010 for Blogging, Mailing, and More 155
Creating an Online Document . . . . . . . . . . . . . . . . . . . . . . . . . . . . . . . . . . . . . . . . . . . . . 160Including a File Within a File . . . . . . . . . . . . . . . . . . . . . . . . . . . . . . . . . . . . . . . . . . . . . . 162Writing and Publishing a Blog . . . . . . . . . . . . . . . . . . . . . . . . . . . . . . . . . . . . . . . . . . . . . 164Printing an Envelope . . . . . . . . . . . . . . . . . . . . . . . . . . . . . . . . . . . . . . . . . . . . . . . . . . . . . 167Printing a Mailing Label . . . . . . . . . . . . . . . . . . . . . . . . . . . . . . . . . . . . . . . . . . . . . . . . . . 168Creating a Form Letter . . . . . . . . . . . . . . . . . . . . . . . . . . . . . . . . . . . . . . . . . . . . . . . . . . . 170Personalizing a Form Letter . . . . . . . . . . . . . . . . . . . . . . . . . . . . . . . . . . . . . . . . . . . . . . . 172
6
7

Contents ix
Adding Special Features for Long Documents 175
Creating Headers and Footers . . . . . . . . . . . . . . . . . . . . . . . . . . . . . . . . . . . . . . . . . . . . . 176Creating Variable Headers and Footers . . . . . . . . . . . . . . . . . . . . . . . . . . . . . . . . . . . . . 178Organizing Your Information . . . . . . . . . . . . . . . . . . . . . . . . . . . . . . . . . . . . . . . . . . . . . . 181Reorganizing a Document . . . . . . . . . . . . . . . . . . . . . . . . . . . . . . . . . . . . . . . . . . . . . . . . 183Creating a Master Document . . . . . . . . . . . . . . . . . . . . . . . . . . . . . . . . . . . . . . . . . . . . . . 186Inserting a Cover Page . . . . . . . . . . . . . . . . . . . . . . . . . . . . . . . . . . . . . . . . . . . . . . . . . . . 187Creating Footnotes and Endnotes . . . . . . . . . . . . . . . . . . . . . . . . . . . . . . . . . . . . . . . . . . 188Creating a Table of Contents . . . . . . . . . . . . . . . . . . . . . . . . . . . . . . . . . . . . . . . . . . . . . . 190Creating an Index . . . . . . . . . . . . . . . . . . . . . . . . . . . . . . . . . . . . . . . . . . . . . . . . . . . . . . . . 192
Sharing, Co-Authoring, and Finalizing Your Document 195
Using the Word 2010 Web App . . . . . . . . . . . . . . . . . . . . . . . . . . . . . . . . . . . . . . . . . . . . 198Co-Authoring a Document . . . . . . . . . . . . . . . . . . . . . . . . . . . . . . . . . . . . . . . . . . . . . . . . 200Contacting Co-Authors . . . . . . . . . . . . . . . . . . . . . . . . . . . . . . . . . . . . . . . . . . . . . . . . . . . 203Reviewing Shared File Information . . . . . . . . . . . . . . . . . . . . . . . . . . . . . . . . . . . . . . . . . 204Working with Revision Marks . . . . . . . . . . . . . . . . . . . . . . . . . . . . . . . . . . . . . . . . . . . . . . 206Comparing Changes in a Document . . . . . . . . . . . . . . . . . . . . . . . . . . . . . . . . . . . . . . . . 208Combining Reviews . . . . . . . . . . . . . . . . . . . . . . . . . . . . . . . . . . . . . . . . . . . . . . . . . . . . . . 210Viewing Documents Side by Side . . . . . . . . . . . . . . . . . . . . . . . . . . . . . . . . . . . . . . . . . . 211Finalizing Your Document . . . . . . . . . . . . . . . . . . . . . . . . . . . . . . . . . . . . . . . . . . . . . . . . 212
8
9
x Contents
Customizing and Securing Word 215
Customizing the Ribbon . . . . . . . . . . . . . . . . . . . . . . . . . . . . . . . . . . . . . . . . . . . . . . . . . . 216Customizing the Quick Access Toolbar . . . . . . . . . . . . . . . . . . . . . . . . . . . . . . . . . . . . . . 220Customizing the Work Area . . . . . . . . . . . . . . . . . . . . . . . . . . . . . . . . . . . . . . . . . . . . . . . 222Changing the Location and Type of Saved Files . . . . . . . . . . . . . . . . . . . . . . . . . . . . . . 224Customizing Your Spelling Dictionaries . . . . . . . . . . . . . . . . . . . . . . . . . . . . . . . . . . . . . 225Creating a Macro . . . . . . . . . . . . . . . . . . . . . . . . . . . . . . . . . . . . . . . . . . . . . . . . . . . . . . . . 226Changing File Validation . . . . . . . . . . . . . . . . . . . . . . . . . . . . . . . . . . . . . . . . . . . . . . . . . . 229Choosing What’s Displayed in Protected View . . . . . . . . . . . . . . . . . . . . . . . . . . . . . . . 230Password Protecting a File . . . . . . . . . . . . . . . . . . . . . . . . . . . . . . . . . . . . . . . . . . . . . . . . 231Limiting File Changes . . . . . . . . . . . . . . . . . . . . . . . . . . . . . . . . . . . . . . . . . . . . . . . . . . . . 232Recovering Unsaved Versions . . . . . . . . . . . . . . . . . . . . . . . . . . . . . . . . . . . . . . . . . . . . . 234
Index . . . . . . . . . . . . . . . . . . . . . . . . . . . . . . . . . . . . . . . . . . . . . . . . . . . . . . . . . . . . . . . . . . . . . . .235
10

xi
Acknowledgments
Each book is a collaborative process that requires the time, talent, and energy of a number of dif-ferent people . Thanks to all who contributed to the writing, editing, and layout of this book! Most notably, thanks go out to:
■■ Marianne Moon and Jerry Joyce, for providing the great starting point for this revision
■■ Juliana Aldous, at Microsoft Press, for giving me the great opportunity to work on this project
■■ Claudette Moore, of Moore Literary Agency, for her always-wise counsel and project companionship
■■ Kenyon Brown, at O’Reilly Media, for his effective management of the many pieces of this book as it went through editorial and production
■■ Nancy Sixsmith, for an excellent copyedit completed in nearly record time (and with a smile)
■■ Ron Bilodeau, Rob Romano, Adam Zaremba, and crew, for producing the great layout of the book you now hold in your hands

In this section:
127
In this section:
Adding Graphics to Your Documents
The images you add to your documents—whether you’re cre-ating a business report, a newsletter for your garden club,
invitations for your son’s graduation party, or a flyer for a new product—invite people in for a closer look . Images bring color, energy, and life to the words on the page . Whether you’re show-ing pictures of happy people, capturing a beautiful landscape, spotlighting a product, or creating a piece of abstract art, the images in your document can inspire and uplift people, while encouraging them to stick around and read what you’ve written .
Microsoft Word 2010 includes a number of picture tools that help you fine-tune your pictures and add professional, artistic touches that can really make your work stand out . New features in Word 2010 enable you to add artistic effects—including all kinds of special filters—to the images you add . And the enhanced cropping tool makes it simple for you to display just the aspect of your image that is sure to get the most attention .
6■■ A Quick Look at Word 2010
Illustrations
■■ Inserting a Picture
■■ Changing the Size of a Picture
■■ Adding Clip Art and Shapes
■■ Editing and Formatting a Picture
■■ Getting Artistic with Pictures
■■ Removing Picture Backgrounds
■■ Wrapping Text Around a Graphic
■■ Arranging Multiple Graphics
■■ Positioning Graphics on the Page
■■ Creating Artistic Text
■■ Inserting a Relational Diagram
■■ Creating a Chart

A Quick Look at Word 2010 IllustrationsYears ago, adding a photo or a diagram to a document was a pretty big deal . Today it’s very easy to do and what’s more, you can apply all sorts of professional effects to make the images look great on the page . In the Illustrations group of the Insert tab, Word 2010 gives you the tools to add several different types of illustrations to your document so that you can inspire your readers with photographs, drawings, charts, diagrams, screenshots, and more .
PicturesChances are that you’ll use the Picture tool quite a bit . Using this tool, you can add photos or other artwork you’ve already saved in folders on your computer . Once you put the picture in place, you can use Word’s picture editing tools to fine-tune its appearance .
Clip ArtWord 2010 offers a large collection of clip art—with more being posted all the time—and connects directly to Office .com so you can always access the great number of downloadable art available for free online . And clip art isn’t just cartoons—you’ll also find photos and sound and video clips available through the Clip Art tool .
ShapesIf you want to create your own illustrations in your document, Word 2010 offers a large collection of ready-made shapes you can add directly to your page . You can create a drawing canvas and add the custom illustration there or simply click the shape you want and draw right on the page .
128 A Quick Look at Word 2010 Illustrations

SmartArtSmartArt graphics give you a simple way to create professional-looking diagrams, helping you illustrate key ideas in the documents you create . SmartArt offers a number of different diagram styles, and you can customize all the diagrams you create within each style type .
ChartsYou can create and insert a variety of chart types directly into your Word documents using the Chart tool in the Illus-trations group . A datasheet enables you to add and modify chart values; you can customize the chart to add titles, labels, values, formatting, and more .
ScreenshotsA new feature in Word 2010 enables you to capture and insert screenshots in your Word documents . You might do this, for example, when you want to show a picture of your business Web site or when you are illustrating a book like this one .
Adding Graphics to Your Documents
A Quick Look at Word 2010 Illustrations 129

Inserting a PictureAdding pictures to your document livens things up and gives your readers something colorful to capture their interest . If you’re creating a dry report, you can include a photo of key staff members to personalize the document . If you’re writing Web copy, you can add images of your building, the surround-ing landscape, your products, or happy customers to paint a
positive image of what you do . Inserting a picture is a simple task in Word, and Word accepts images in a number of different file formats, as you can see in the following table . This means you can use pictures from a wide variety of sources—nothing goes to waste!
Picture Format Name File Format
Windows Enhanced Metafile .emf
Windows Metafile .wmf
JPEG File Interchange Format .jpg, .jpeg, .jfif, .jpe
Portable Network Graphics .png
Windows Bitmap .bmp, .dib, .rle
Graphics Interchange Format .gif, .gfa
Compressed Windows Enhanced Metafile .emz
Compressed Windows Metafile .wmz
Compressed Macintosh PICT .pcz
Tag Image File Format .tif, .tiff
WordPerfect Graphics .wpg
Computer Graphics Metafile .cgm
Encapsulated PostScript .eps
Macintosh PICT .pct, .pict
“Adding Clip Art” on page 134 for information about inserting pictures that you’ve cataloged using the Clip Organizer .
See Also
Most of us today have lots of digital pictures, and Office 2010 comes with a valuable tool that can help you manage your media effec-tively . The Microsoft Office Picture Manager is available in Microsoft Office Tools . Simply click Start, click All Programs, click Microsoft Office, and choose Microsoft Office Tools . Click Microsoft Office Picture Manager to open the software and begin working with your photos .
Try This!
130 Inserting a Picture

Insert a Picture
1 Click in your document where you want to insert the picture .
2 On the Insert tab, click the Picture button in the Illustrations group to display the Insert Picture window .
3 Navigate to the folder that contains the picture you want and click the picture file .
4 Click the down arrow next to the Insert button and click one of the following:
• Insert to copy the picture and store it in the Word document .
• Link To File to connect to the pic-ture file without increasing the file size of your Word document . (The source picture file must be available for the picture to be displayed .)
• Insert And Link to copy the picture, store it in the Word document, and update the picture automatically whenever the source picture file changes .
1
3 4
2
“Editing and Formatting a Picture” on page 137 for information about modifying a picture or its placement .
See Also
Inserting a Picture 131
Adding Graphics to Your Documents
1 2
3
4
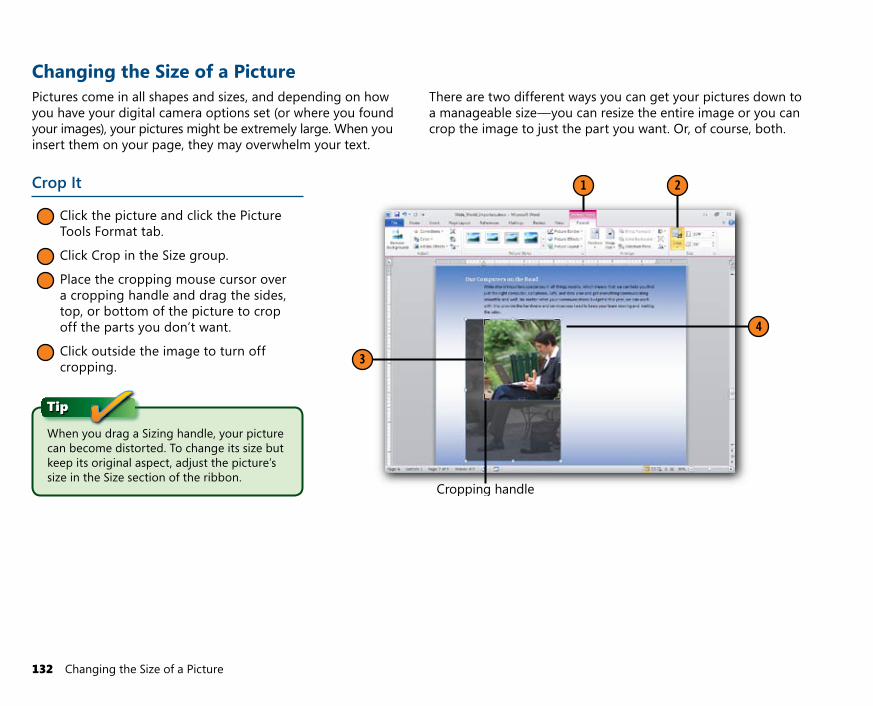
Cropping handle
Changing the Size of a PicturePictures come in all shapes and sizes, and depending on how you have your digital camera options set (or where you found your images), your pictures might be extremely large . When you insert them on your page, they may overwhelm your text .
There are two different ways you can get your pictures down to a manageable size—you can resize the entire image or you can crop the image to just the part you want . Or, of course, both .
Crop It
1 Click the picture and click the Picture Tools Format tab .
2 Click Crop in the Size group .
3 Place the cropping mouse cursor over a cropping handle and drag the sides, top, or bottom of the picture to crop off the parts you don’t want .
4 Click outside the image to turn off cropping .
When you drag a Sizing handle, your picture can become distorted . To change its size but keep its original aspect, adjust the picture’s size in the Size section of the ribbon .
Tip
132 Changing the Size of a Picture

1
2
3
Sizing handle
Size It
1 Click to select the picture if it isn’t already selected .
2 Drag a Sizing handle on the picture to modify the size of the picture .
3 Click outside the image to complete the process .
Now in Word 2010 you can crop a photo to a shape to add special touches to your files . Add a photo to your page by clicking Insert, Picture, and choosing the photo you want to add . Click Insert to paste the photo at the cursor position . Now click the photo and click the Picture Tools Format tab . In the Size group, click the Crop arrow, and point to Crop To Shape . Click the shape you want to apply to the photo and watch what happens on your page! The photo is cropped to the shape you selected . You won’t want to use this often in your publications and worksheets, but once in a while it’s a fun feature .
Try This!
If you want to crop your photo to a specific shape, you can set the aspect ratio before you crop . To do this, click the Picture Tools Format tab and click the Crop arrow in the Size group . Point to Aspect Ratio and click the ratio you want to apply to the image .
Tip
Changing the Size of a Picture 133
Adding Graphics to Your Documents
2 3
1
6
5
7
4
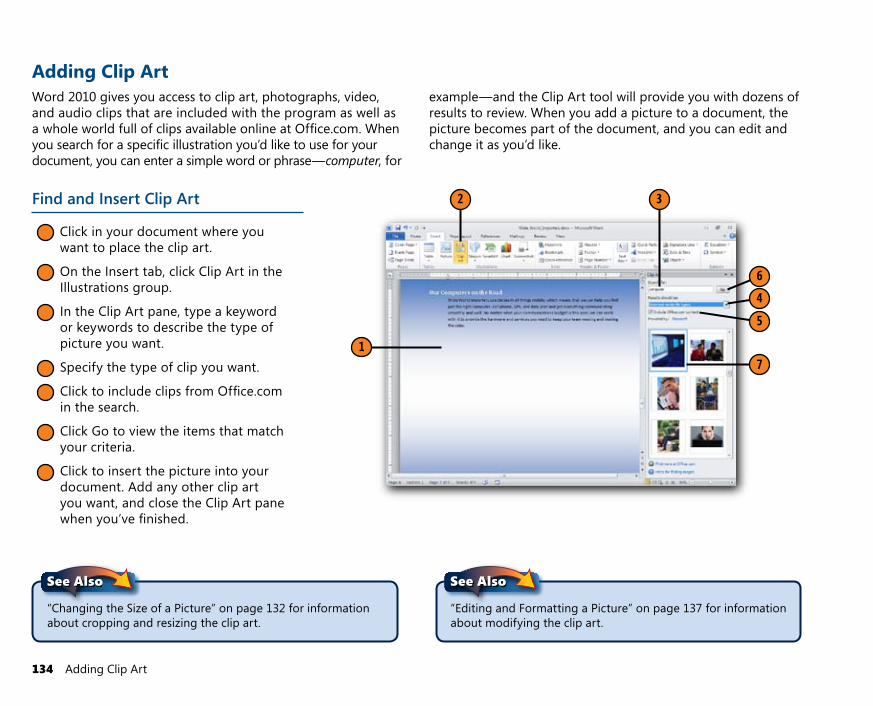
Adding Clip ArtWord 2010 gives you access to clip art, photographs, video, and audio clips that are included with the program as well as a whole world full of clips available online at Office .com . When you search for a specific illustration you’d like to use for your document, you can enter a simple word or phrase—computer, for
example—and the Clip Art tool will provide you with dozens of results to review . When you add a picture to a document, the picture becomes part of the document, and you can edit and change it as you’d like .
Find and Insert Clip Art
1 Click in your document where you want to place the clip art .
2 On the Insert tab, click Clip Art in the Illustrations group .
3 In the Clip Art pane, type a keyword or keywords to describe the type of picture you want .
4 Specify the type of clip you want .
5 Click to include clips from Office .com in the search .
6 Click Go to view the items that match your criteria .
7 Click to insert the picture into your document . Add any other clip art you want, and close the Clip Art pane when you’ve finished .
“Changing the Size of a Picture” on page 132 for information about cropping and resizing the clip art .
See Also
“Editing and Formatting a Picture” on page 137 for information about modifying the clip art .
See Also
134 Adding Clip Art

1 3
2
Adding ShapesFor some documents you may want to draw things yourself . Word 2010 includes a palette of shapes you can use to create all sorts of images—buttons, boxes, and much more—on your page . You can use shapes as containers for text and create pull
quotes, sidebars, coupons—almost anything you can envision you can create . Once you’ve drawn the shape, you can add 3-D effects, shadows, or special formatting touches to make the shape stand out .
Draw a Shape
1 Click in your document where you want to insert the shape .
2 On the Insert tab, click Shapes in the Illustrations group, and choose the shape you want from the gallery that appears .
3 Hold down the left mouse button, and drag out the shape .
(continued on next page)
Adding Shapes 135
Adding Graphics to Your Documents

56
4
Sizinghandle
Rotationhandle
4 Adjust the shape by dragging the
• Sizing handles to change the size of the drawing .
• Adjustment handle to reshape the drawing .
• Rotation handle to rotate the drawing .
5 Change the shape fill and outline color .
6 Use Shape Effects to apply special effects—including shadow, glow, and more—to the shape .
“Adding Shapes” on page 135 for information about modifying the appearance of a shape .
See Also
“Arranging Multiple Graphics” on page 144 for information about combining multiple shapes for special effects .
See Also
“Creating Artistic Text” on page 148 and “Adding Text Boxes” on pages 87–89 for infor-mation about customizing the text and text layout in a text box .
See Also
Draw a Shape (continued)
136 Adding Shapes

12
3
Editing and Formatting a PictureWord 2010 includes some great picture editing tools that enable you to fine-tune your images, adjusting brightness, contrast, and color . In addition to picture editing tools, you can apply special artistic effects to give your pictures a professional
appearance, displaying them, for example, as watercolor prints, ink drawings, or even images through glass . Using these types of special picture enhancements help you create a document your readers will remember .
Change Its Appearance
1 Click the picture and click the Picture Tools Format tab .
2 Click Corrections .
3 Click the setting you want to apply to the image .
When you edit a picture, you’re editing only the copy of it that you’ve inserted into your Word document . If you want to change the original picture file, you’ll need to edit it in a separate program—for example, in Windows Paint or Microsoft Office Picture Manager .
Tip
Editing and Formatting a Picture 137
Adding Graphics to Your Documents
2 4 5
3
1
Formatshape
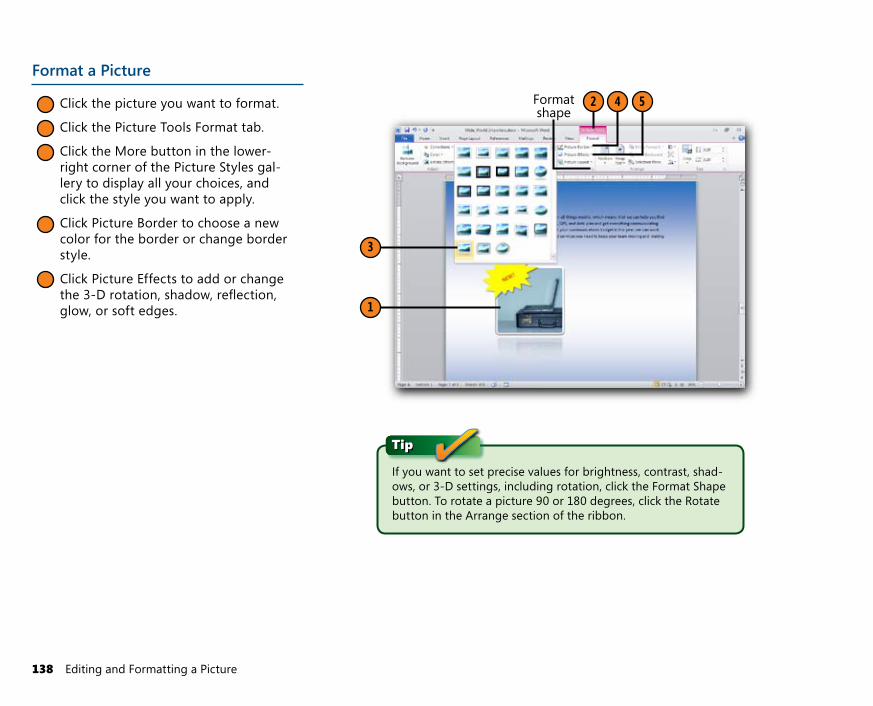
Format a Picture
1 Click the picture you want to format .
2 Click the Picture Tools Format tab .
3 Click the More button in the lower-right corner of the Picture Styles gal-lery to display all your choices, and click the style you want to apply .
4 Click Picture Border to choose a new color for the border or change border style .
5 Click Picture Effects to add or change the 3-D rotation, shadow, reflection, glow, or soft edges .
If you want to set precise values for brightness, contrast, shad-ows, or 3-D settings, including rotation, click the Format Shape button . To rotate a picture 90 or 180 degrees, click the Rotate button in the Arrange section of the ribbon .
Tip
138 Editing and Formatting a Picture
3 2
4
1
Reset picture
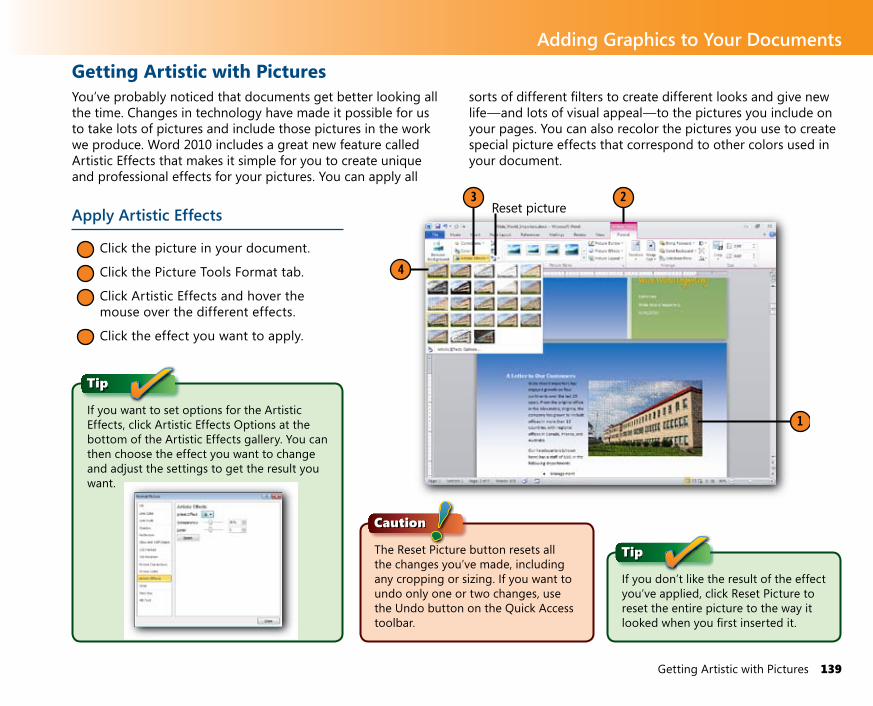
Getting Artistic with PicturesYou’ve probably noticed that documents get better looking all the time . Changes in technology have made it possible for us to take lots of pictures and include those pictures in the work we produce . Word 2010 includes a great new feature called Artistic Effects that makes it simple for you to create unique and professional effects for your pictures . You can apply all
sorts of different filters to create different looks and give new life—and lots of visual appeal—to the pictures you include on your pages . You can also recolor the pictures you use to create special picture effects that correspond to other colors used in your document .
Apply Artistic Effects
1 Click the picture in your document .
2 Click the Picture Tools Format tab .
3 Click Artistic Effects and hover the mouse over the different effects .
4 Click the effect you want to apply .
If you don’t like the result of the effect you’ve applied, click Reset Picture to reset the entire picture to the way it looked when you first inserted it .
TipThe Reset Picture button resets all the changes you’ve made, including any cropping or sizing . If you want to undo only one or two changes, use the Undo button on the Quick Access toolbar .
Caution
If you want to set options for the Artistic Effects, click Artistic Effects Options at the bottom of the Artistic Effects gallery . You can then choose the effect you want to change and adjust the settings to get the result you want .
Tip
Getting Artistic with Pictures 139
Adding Graphics to Your Documents
3 2
4 1
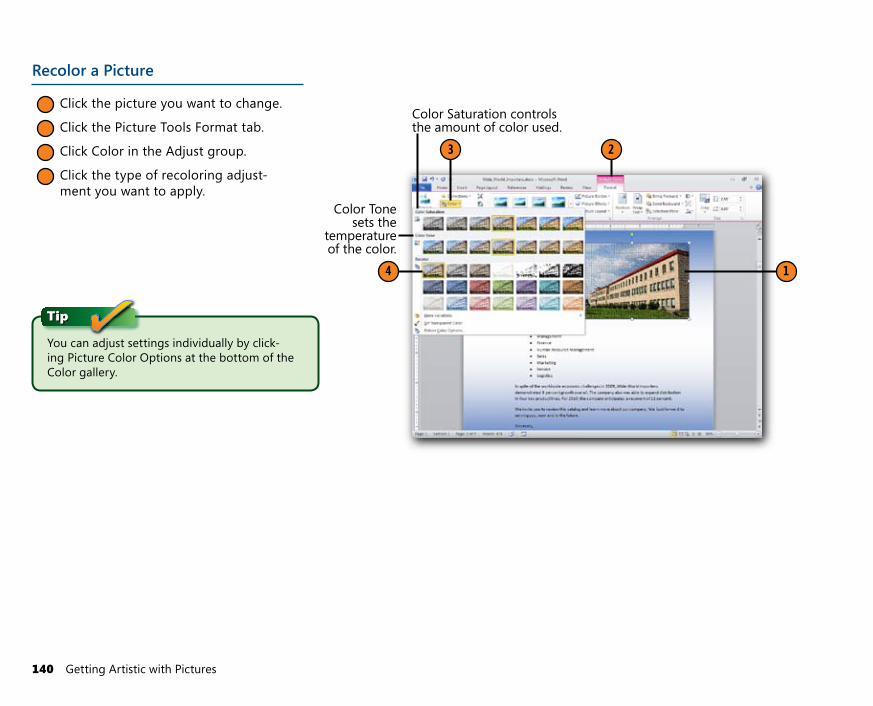
Color Saturation controlsthe amount of color used.
Color Tonesets the
temperatureof the color.
Recolor a Picture
1 Click the picture you want to change .
2 Click the Picture Tools Format tab .
3 Click Color in the Adjust group .
4 Click the type of recoloring adjust-ment you want to apply .
You can adjust settings individually by click-ing Picture Color Options at the bottom of the Color gallery .
Tip
140 Getting Artistic with Pictures
3 2
1
64 5
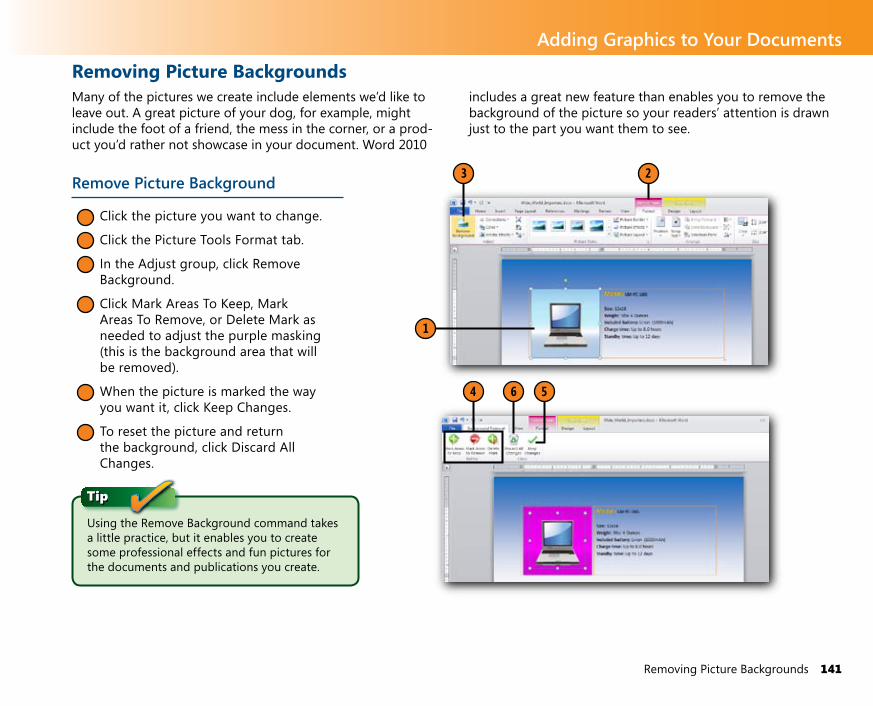
Removing Picture BackgroundsMany of the pictures we create include elements we’d like to leave out . A great picture of your dog, for example, might include the foot of a friend, the mess in the corner, or a prod-uct you’d rather not showcase in your document . Word 2010
includes a great new feature than enables you to remove the background of the picture so your readers’ attention is drawn just to the part you want them to see .
Remove Picture Background
1 Click the picture you want to change .
2 Click the Picture Tools Format tab .
3 In the Adjust group, click Remove Background .
4 Click Mark Areas To Keep, Mark Areas To Remove, or Delete Mark as needed to adjust the purple masking (this is the background area that will be removed) .
5 When the picture is marked the way you want it, click Keep Changes .
6 To reset the picture and return the background, click Discard All Changes .
Using the Remove Background command takes a little practice, but it enables you to create some professional effects and fun pictures for the documents and publications you create .
Tip
Removing Picture Backgrounds 141
Adding Graphics to Your Documents

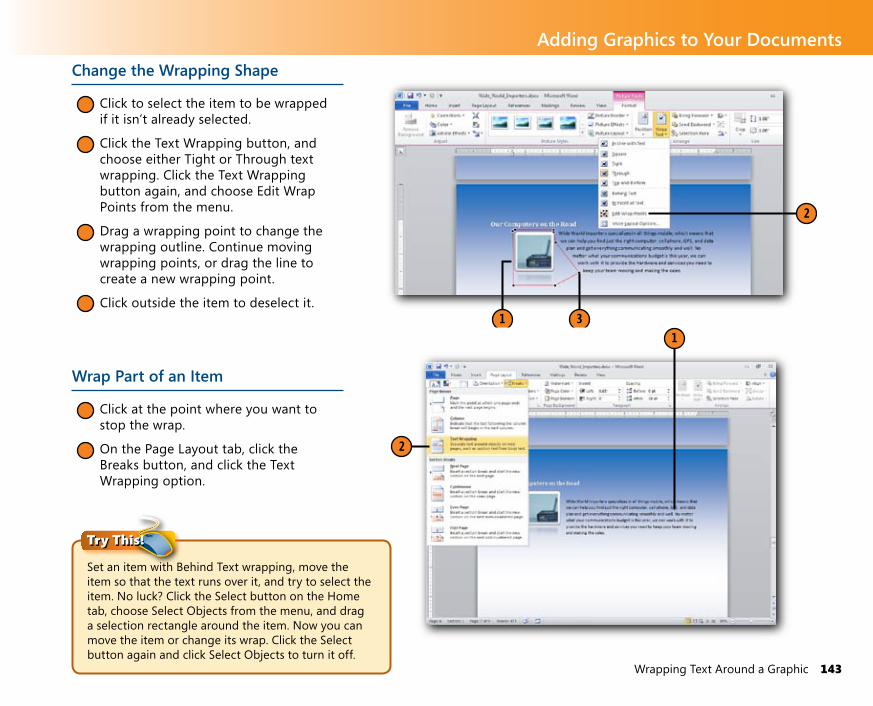
Wrapping Text Around a GraphicWhen you place images, shapes, pictures, and diagrams in your document, you need to be able to adjust the text to make room for those items . Wrapping text around an item adds another level of polish to your document . However, using one
of the standard text-wrapping configurations doesn’t always produce the desired effect . As you might expect, you can cus-tomize the way Word wraps the text .
Set the Text Wrapping
1 Click the picture .
2 Click the Picture Tools Format tab and click the Wrap Text in the Arrange group . Click the text-wrapping option you want .
3 Drag the picture to set its position in the paragraph . The text wraps around it .
4 If the text wrapping still doesn’t look the way you want, click the Text Wrapping button again, choose More Layout Options from the menu, and make your custom layout settings in the Advanced Layout dialog box . Click OK when you’ve finished .
2
1 3
4
In Linewith Text
Tight
Square
When you’re using the drawing canvas, set the text wrapping for the drawing canvas itself, not for the individual items on the canvas .
Tip
142 Wrapping Text Around a Graphic
31
2
1
2
Change the Wrapping Shape
1 Click to select the item to be wrapped if it isn’t already selected .
2 Click the Text Wrapping button, and choose either Tight or Through text wrapping . Click the Text Wrapping button again, and choose Edit Wrap Points from the menu .
3 Drag a wrapping point to change the wrapping outline . Continue moving wrapping points, or drag the line to create a new wrapping point .
4 Click outside the item to deselect it .
Wrap Part of an Item
1 Click at the point where you want to stop the wrap .
2 On the Page Layout tab, click the Breaks button, and click the Text Wrapping option .
Set an item with Behind Text wrapping, move the item so that the text runs over it, and try to select the item . No luck? Click the Select button on the Home tab, choose Select Objects from the menu, and drag a selection rectangle around the item . Now you can move the item or change its wrap . Click the Select button again and click Select Objects to turn it off .
Try This!
Wrapping Text Around a Graphic 143
Adding Graphics to Your Documents

Arranging Multiple GraphicsWhen you have more than one graphic (or type of graphic) in your document—for example, pictures, clip art, and/or shapes that are meant to appear together—you can arrange them in whatever configuration you want . You may want to overlap
the graphics so that one appears in front of another or group several items into one group so that you can move, resize, and copy and paste them together .
Arrange the Graphics
1 Click a graphic and click the Picture Tools Format tab .
2 Click Bring Forward or Send Back-ward in the Arrange group to arrange the image .
3 Repeat for other graphics on the page .
(continued on next page)
2
1 3
144 Arranging Multiple Graphics

5
4
Arrange the Graphics (continued)
4 Select multiple shapes by pressing Ctrl and clicking each item .
5 Click Group in the Arrange group to combine the shapes into a single object .
You can ungroup items you’ve put together by clicking the group, clicking the Picture Tools Format or Drawing Tools Format contextual tab, clicking the Group tool, and choosing Ungroup .
Tip
Arranging Multiple Graphics 145
Adding Graphics to Your Documents
1
5
4
3
2
The Align button
Gridlines display a nonprintinglayout grid on the page.
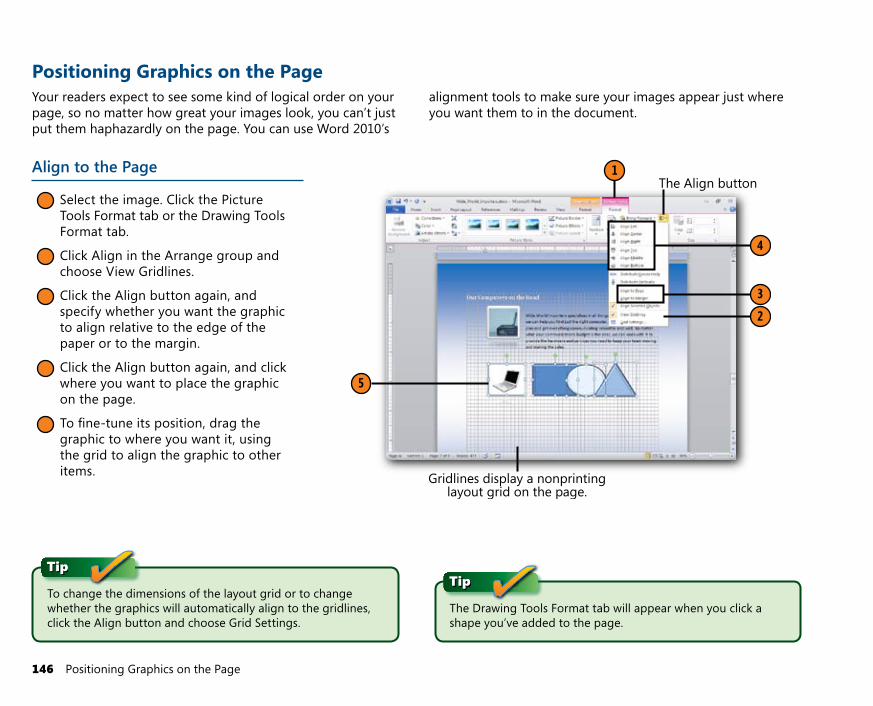
Positioning Graphics on the PageYour readers expect to see some kind of logical order on your page, so no matter how great your images look, you can’t just put them haphazardly on the page . You can use Word 2010’s
alignment tools to make sure your images appear just where you want them to in the document .
Align to the Page
1 Select the image . Click the Picture Tools Format tab or the Drawing Tools Format tab .
2 Click Align in the Arrange group and choose View Gridlines .
3 Click the Align button again, and specify whether you want the graphic to align relative to the edge of the paper or to the margin .
4 Click the Align button again, and click where you want to place the graphic on the page .
5 To fine-tune its position, drag the graphic to where you want it, using the grid to align the graphic to other items .
The Drawing Tools Format tab will appear when you click a shape you’ve added to the page .
TipTo change the dimensions of the layout grid or to change whether the graphics will automatically align to the gridlines, click the Align button and choose Grid Settings .
Tip
146 Positioning Graphics on the Page
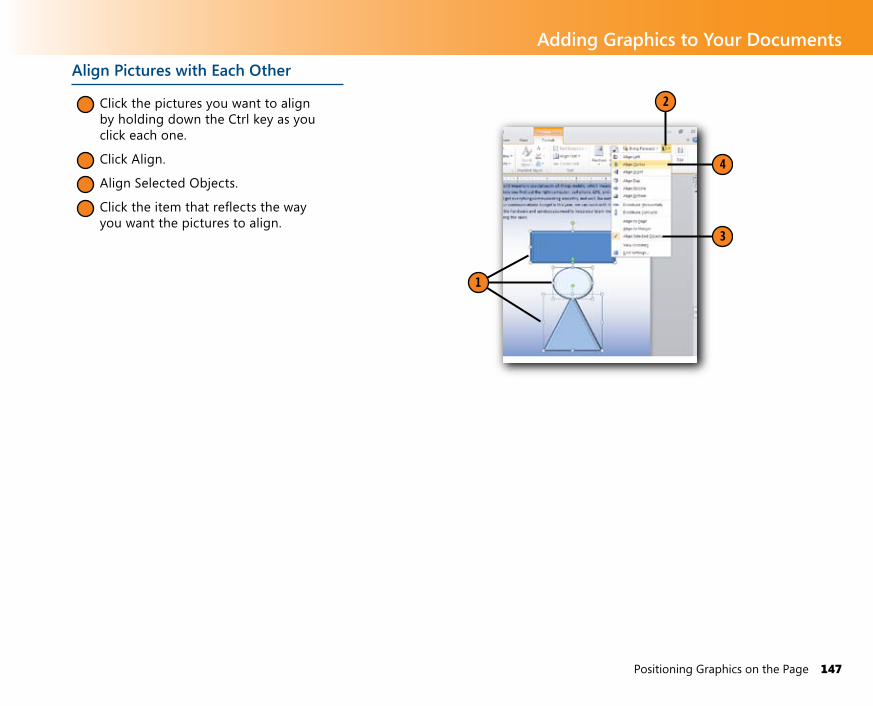
Align Pictures with Each Other
1 Click the pictures you want to align by holding down the Ctrl key as you click each one .
2 Click Align .
3 Align Selected Objects .
4 Click the item that reflects the way you want the pictures to align .
2
1
4
3
Positioning Graphics on the Page 147
Adding Graphics to Your Documents

Creating Artistic TextWord 2010 includes features that help you stylize your text in new ways . WordArt is a tool that has been around for a while, but it is more closely integrated into the workings of Word
now . You can add all kinds of effects, curving your text words and phrases, creating interesting angles, shadows, and more .
Add WordArt Elements
1 On the Insert tab, click WordArt in the Text group to display the Word-Art gallery .
2 Click the WordArt style you want .
3 A text box appears on your page with the format you selected . Click in the box .
4 Type your text .
5 Click outside the text box .
1
5 4 2
3
You can turn regular text into WordArt by selecting the text before you click the WordArt tool .
Tip
Create some WordArt, select it, and then use the tools on the WordArt Tools Format tab to change the shape, charac-ter spacing and height, and text alignment . Use the WordArt Styles gallery to apply a three-dimensional effect . Use the 3-D Effects tools to change the color, depth, direction, lighting, surface type, and 3-D angle . Amazing, isn’t it? And so much fun!
Try This!You may notice that the styles available in the Text Effects gallery (in the Font group of the Home tab) and the styles available in WordArt look similar . You’re right—they do . But WordArt creates a text box with the phrase “Your text here,” and in order to edit and format the object you use the Draw-ing Tools Format contextual tab . Text effects add and format the text on your document page, so the result is that the actual text is given the format you choose from Text Effects .
Tip
148 Creating Artistic Text

1
3
2
Inserting a Relational DiagramSmartArt is the diagramming tool in Word 2010 that makes it easy for you to show relationships—including comparisons, processes, and more—in your documents . SmartArt offers a number of different categories with different styles of diagrams
you can adapt to fit what you want to show . You can also use pictures as part of the diagram (this is a new feature in Word 2010) and continue to add to the diagram as your needs change .
Create a Diagram
1 Click the Insert tab and click SmartArt in the Illustrations group .
2 Select the type of diagram you want .
3 Click a diagram design, review the information about that diagram, and click OK to create the diagram .
(continued on next page)
You can’t create SmartArt graphics in a Word 97–2003 format document . When you save a document that contains SmartArt in the Word 97–2003 format, the SmartArt is converted into a picture that you can’t modify .
Tip
Inserting a Relational Diagram 149
Adding Graphics to Your Documents
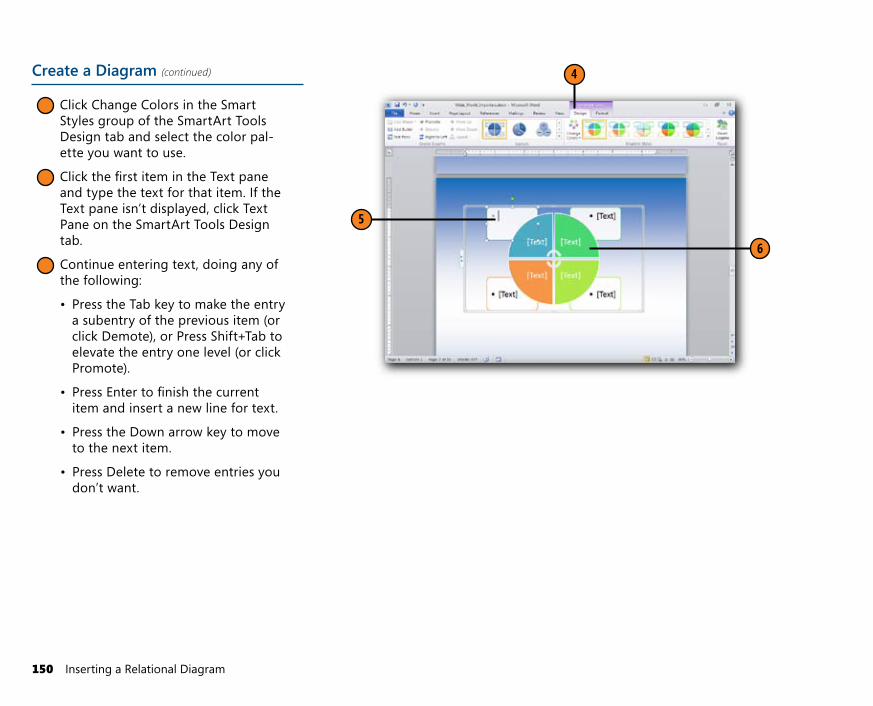
4 Click Change Colors in the Smart Styles group of the SmartArt Tools Design tab and select the color pal-ette you want to use .
5 Click the first item in the Text pane and type the text for that item . If the Text pane isn’t displayed, click Text Pane on the SmartArt Tools Design tab .
6 Continue entering text, doing any of the following:
• Press the Tab key to make the entry a subentry of the previous item (or click Demote), or Press Shift+Tab to elevate the entry one level (or click Promote) .
• Press Enter to finish the current item and insert a new line for text .
• Press the Down arrow key to move to the next item .
• Press Delete to remove entries you don’t want .
4
5
6
Create a Diagram (continued)
150 Inserting a Relational Diagram
23
1
4
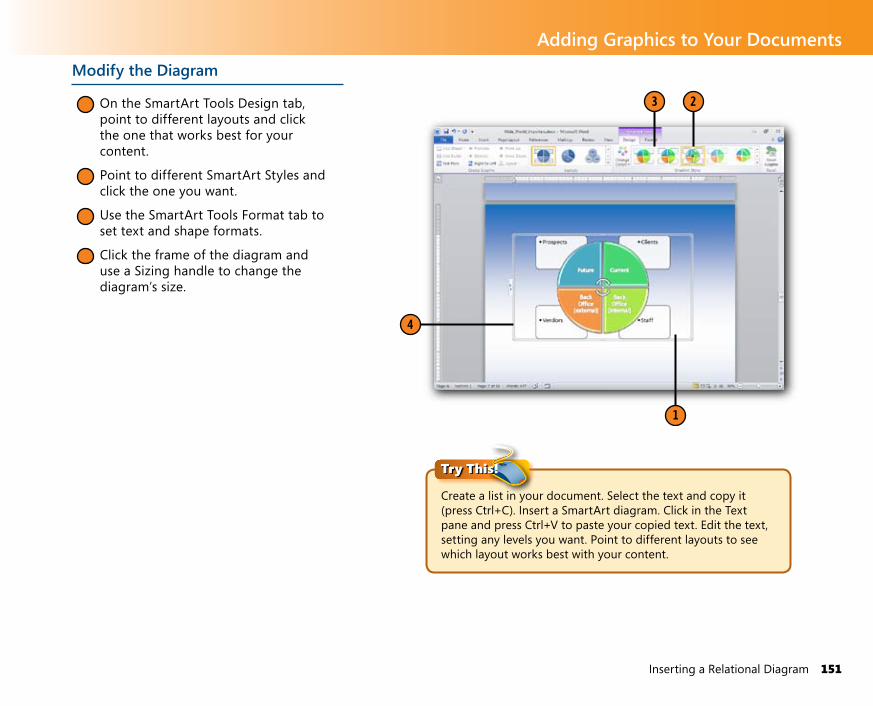
Modify the Diagram
1 On the SmartArt Tools Design tab, point to different layouts and click the one that works best for your content .
2 Point to different SmartArt Styles and click the one you want .
3 Use the SmartArt Tools Format tab to set text and shape formats .
4 Click the frame of the diagram and use a Sizing handle to change the diagram’s size .
Create a list in your document . Select the text and copy it (press Ctrl+C) . Insert a SmartArt diagram . Click in the Text pane and press Ctrl+V to paste your copied text . Edit the text, setting any levels you want . Point to different layouts to see which layout works best with your content .
Try This!
Inserting a Relational Diagram 151
Adding Graphics to Your Documents

1
3
2
Creating a ChartOne of the beautiful things about the various programs in Office 2010 is that it is so easy to use the programs together . When you’re working with data that you’d like to present in a
chart, you can easily add a chart within Word that draws from the powerful features of Excel . The process is simple, and the chart will look great with just a few clicks of the mouse .
Create a Chart
1 Click the Insert tab and click Chart in the Illustrations group .
2 Select a chart type .
3 Click the chart design you want and click OK .
(continued on next page)
If you don’t have Excel installed on your com-puter, Microsoft Graph will start when you click the Chart button on the Insert tab . Microsoft Graph works much like Excel, although it has fewer features .
Tip
152 Creating a Chart

5 4 6
Create a Chart (continued)
4 In the Excel worksheet that appears, edit the sample data so that only your data is shown .
5 The result of your data entry appears in the chart .
6 Close the worksheet when you’ve finished .
Creating a Chart 153
Adding Graphics to Your Documents
6 2 3 4 5
1
Format the Chart
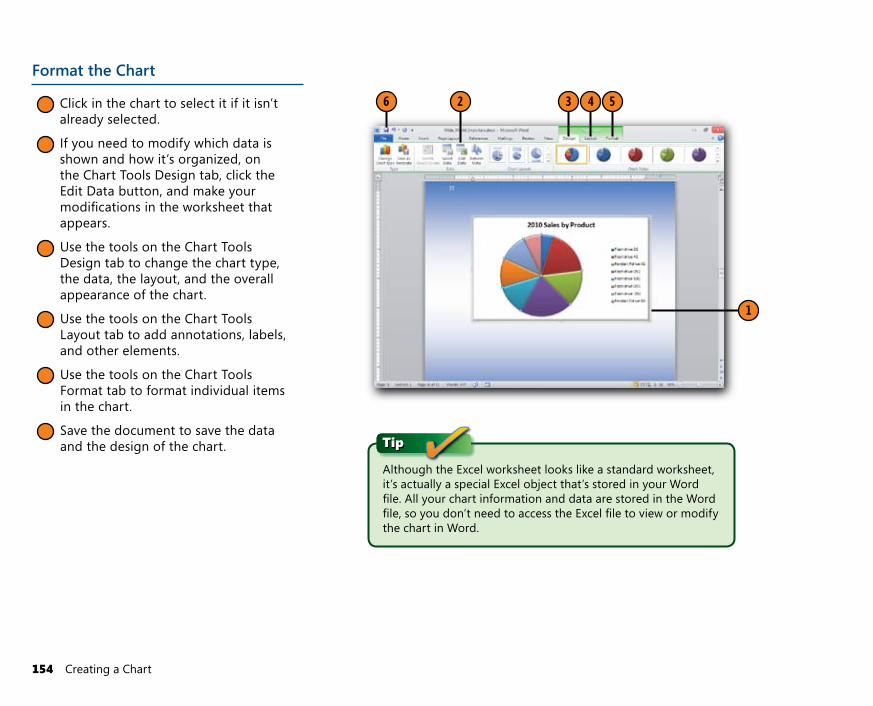
1 Click in the chart to select it if it isn’t already selected .
2 If you need to modify which data is shown and how it’s organized, on the Chart Tools Design tab, click the Edit Data button, and make your modifications in the worksheet that appears .
3 Use the tools on the Chart Tools Design tab to change the chart type, the data, the layout, and the overall appearance of the chart .
4 Use the tools on the Chart Tools Layout tab to add annotations, labels, and other elements .
5 Use the tools on the Chart Tools Format tab to format individual items in the chart .
6 Save the document to save the data and the design of the chart .
Although the Excel worksheet looks like a standard worksheet, it’s actually a special Excel object that’s stored in your Word file . All your chart information and data are stored in the Word file, so you don’t need to access the Excel file to view or modify the chart in Word .
Tip
154 Creating a Chart

In this section:
215
In this section:
Customizing and Securing Word
One of the great things about Microsoft Word 2010 is that not only does it pack a lot of power into the various features
and tools at your fingertips, but it also allows you to customize those tools so you have just what you want nearby when you want it . You can easily customize the ribbon by adding tabs, tab groups, and tools; you can customize the Quick Access Toolbar by changing the tools it displays and changing where in the document window it appears . What’s more, you can change other preferences, such as the way the screen looks, the way your files are saved, and much more .
Another important story in Word 2010 is the enhanced security that occurs largely without your even noticing it . Behind the scenes, Word 2010 is working to ensure that the files you receive and open have been checked—thoroughly—for any possible risk . You can set the types of files you want to be blocked in your version of Word and tell the program when you want Protected View to intervene and safeguard your files and when it’s okay to open them directly . These security features—and more—are the topic of this section .
10■■ Customizing the Ribbon
■■ Customizing the Quick Access Toolbar
■■ Customizing the Work Area
■■ Creating Macros
■■ Safeguarding a Document
■■ Recovering Unsaved Versions of a File
■■ Restricting Access and Changes to a Document
■■ Digitally Signing a Document
■■ Protecting a Document with a Password

Customizing the RibbonYou probably remember all the excitement around the intro-duction of the ribbon, which was offered for the first time with Office 2007 . Some people were thrilled, others were dismayed, and most Word users simply figured out how to master the interface and gradually grew to like it . Word 2010 includes
a new feature that is huge to Word users who want to have within clicking distance the tools they use most often . Now you can customize the ribbon to include tabs you create . And you can add your own groups and tools to those tabs in whatever order makes sense to you .
Create and Rename a New Tab
1 Click the File tab to display Backstage view .
2 Click Options .
(continued on next page)
1
2By default a new group is created when you add a new tab . You can add additional groups to the tab by clicking New Group at the bottom of the Customize The Ribbon list .
Tip
216 Customizing the Ribbon

4
3
7
5
6
You can move the group you create up or down through the tabs shown by clicking the Move Down or Move Up buttons .
Tip
Create and Rename a New Tab (continued)
3 Click Customize Ribbon .
4 Click New Tab .
5 Click the new tab .
6 Click Rename .
7 Type a new name for the tab and click OK .
Customizing the Ribbon 217
Customizing and Securing Word
Rename and Add Tools to the Group
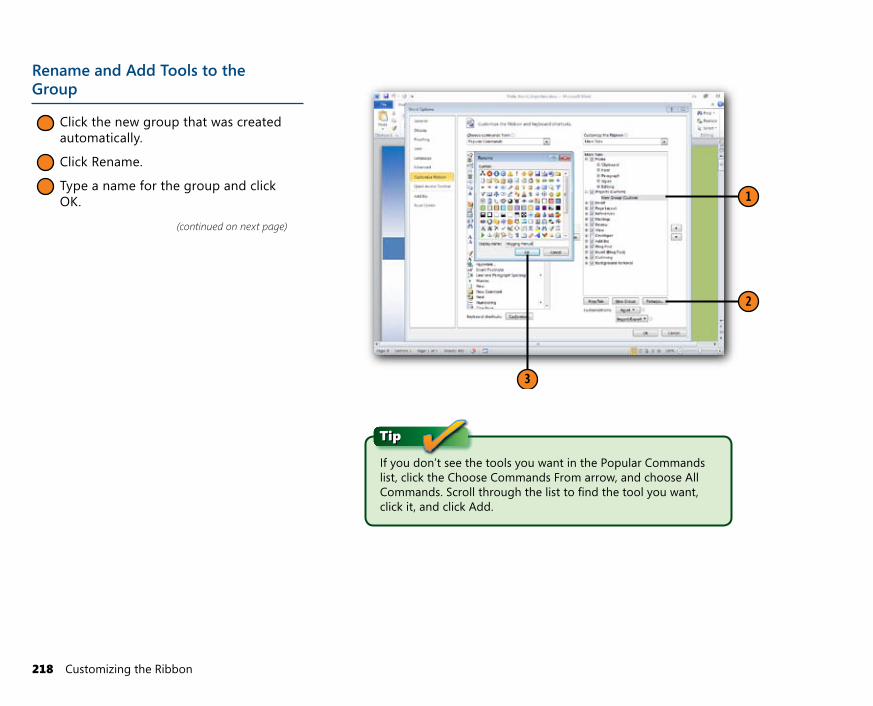
1 Click the new group that was created automatically .
2 Click Rename .
3 Type a name for the group and click OK .
(continued on next page)
3
1
2
If you don’t see the tools you want in the Popular Commands list, click the Choose Commands From arrow, and choose All Commands . Scroll through the list to find the tool you want, click it, and click Add .
Tip
218 Customizing the Ribbon

5
7
4
Rename and Add Tools to the Group (continued)
4 In the Choose Commands From list, click the tool you want to add to the group .
5 Click Add .
6 Repeat Steps 4 and 5 as needed until you have added all the tools you want .
7 Click OK .
In addition to selecting the tool and clicking Add, you can add a new tool to the group by simply dragging it from one list to another .
Tip
If you use more than one computer and want to use your customized ribbon on another machine, click the Import/Export button in the lower-right corner of the Customize Ribbon dialog box . Choose Export All Customizations to create a file you can add to other computers . When you move the file to the new computer, use Import Customization File to import your changed ribbon settings .
Tip
Customizing the Ribbon 219
Customizing and Securing Word

Customizing the Quick Access ToolbarThe Quick Access Toolbar makes it easy for you to have the tools you want to access quickly nearby no matter which Word tabs you may be using . If you put so many items on the Quick
Access Toolbar that it becomes too big to fit on the title bar, you can move it to its own line .
Add or Remove Items Common to the Quick Access Toolbar
1 Click the down arrow at the right of the Quick Access Toolbar .
2 On the Customize Quick Access Tool-bar menu, click any checked items that you want to remove from the toolbar .
3 Click any unchecked items that you want to add to the toolbar .
4 Right-click any item anywhere on the ribbon that you want to add to the toolbar, and choose Add To Quick Access Toolbar from the shortcut menu .
5 If the toolbar becomes too large to fit on the title bar or if you want to change the location of the bar, click the down arrow at the right of the toolbar and click Show Below The Ribbon on the menu .
1
3
2
5
4
The Quick Access toolbaron its own line below
the ribbon
You can return the Quick Access Toolbar to its spot above the ribbon by clicking the Quick Access Toolbar arrow and choos-ing Show Above The Ribbon .
Tip
220 Customizing the Quick Access Toolbar
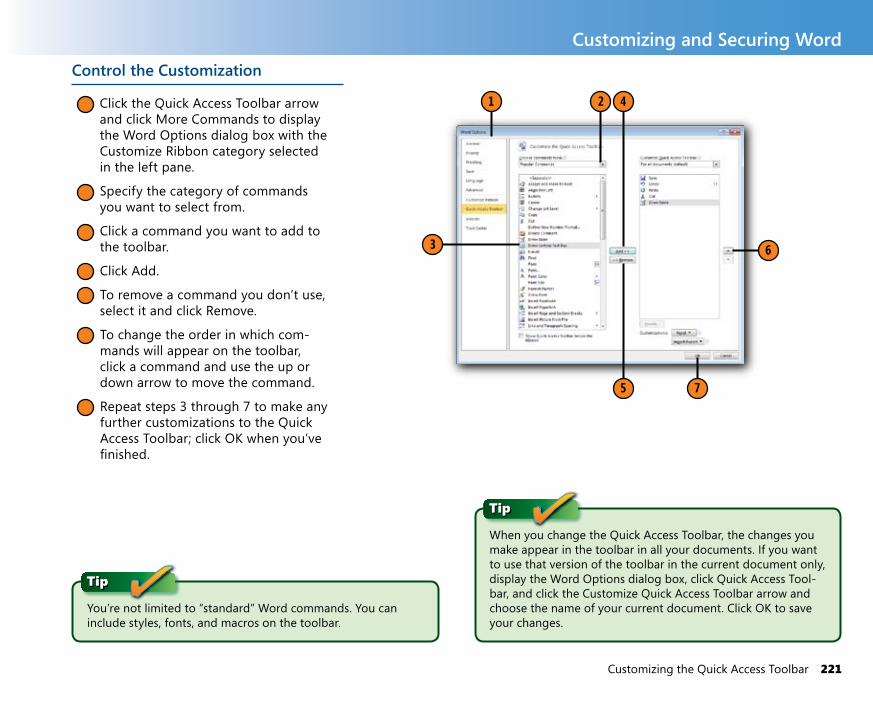
Control the Customization
1 Click the Quick Access Toolbar arrow and click More Commands to display the Word Options dialog box with the Customize Ribbon category selected in the left pane .
2 Specify the category of commands you want to select from .
3 Click a command you want to add to the toolbar .
4 Click Add .
5 To remove a command you don’t use, select it and click Remove .
6 To change the order in which com-mands will appear on the toolbar, click a command and use the up or down arrow to move the command .
7 Repeat steps 3 through 7 to make any further customizations to the Quick Access Toolbar; click OK when you’ve finished .
1 2 4
5 7
3 6
You’re not limited to “standard” Word commands . You can include styles, fonts, and macros on the toolbar .
Tip
When you change the Quick Access Toolbar, the changes you make appear in the toolbar in all your documents . If you want to use that version of the toolbar in the current document only, display the Word Options dialog box, click Quick Access Tool-bar, and click the Customize Quick Access Toolbar arrow and choose the name of your current document . Click OK to save your changes .
Tip
Customizing the Quick Access Toolbar 221
Customizing and Securing Word

Customizing the Work AreaThe work area is where you create, edit, format, and fine-tune the documents you create in Word 2010, so you may want to customize it to fit your own preferences . You can show or hide
items on the status bar, set the ribbon to appear only when you need to use it, change the overall color scheme for the window, and so on .
Show or Hide Items on the Status Bar
1 Right-click anywhere on the status bar .
2 Review the information on the Customize Status Bar menu .
3 To show an item that isn’t currently displayed on the status bar, click the item .
4 To hide an item that’s currently dis-played, click the item .
2
1
4
3
1 2
3
Change the Color Scheme
1 Click the File tab and click Options to display the Word Options dialog box .
2 In the General tab, click Color Scheme and click the color you want .
3 Click OK .
222 Customizing the Work Area

1
2 3
Show or Minimize the Ribbon
1 Click the Minimize The ribbon button at the top right of the ribbon .
2 Display the ribbon by clicking the tab you want . Click a tab when you want to display the ribbon and choose the tool you want . The ribbon is then hidden again .
3 To redisplay the ribbon, click Maxi-mize The Ribbon .
With the ribbon displayed, double-click the active tab to minimize the ribbon, and then click any tab to display the ribbon temporarily . Click in your document to minimize the ribbon again . Double-click the active tab to redisplay the ribbon . Press Ctrl+F1 to hide the ribbon, and press Ctrl+F1 again to always display the ribbon .
Try This!
Customizing the Work Area 223
Customizing and Securing Word

Changing the Location and Type of Saved FilesIf you want to save your documents in specific folders, you can have Word change the places your files are saved by default . You set file locations and formats using the Word Options dialog box . What’s more, you can choose to save your Word files in a previous version if you like, in case you work with
peers and friends who are using a previous version of Word . (Note, however, that if you work in a version of Word prior to 2007, many of the new features—including artistic effects, collaborative tools, and more—won’t be available in the earlier format .)
Change the File Locations and Formats
1 Click the File tab, click Options and click Advanced . Scroll down to the General area and click the File Loca-tions button to display the File Locations dialog box .
2 Click the item whose location you want to change .
3 Click Modify, and, in the Modify Location dialog box, locate and select the folder that you’re designating as the new location; click OK .
4 Specify the location for any other file types and click OK when you’ve finished .
5 Click the Save category .
6 Select the default format in which you want to save your documents .
7 Click OK to close the Word Options dialog box .
1
4
2
3
7
5 6
If you consistently save your files in a format other than the Word 2010 for-mat, you should modify the Compat-ibility settings on the Advanced tab of the Word Options dialog box so that your documents have the correct lay-out for the format in which you save them .
Tip
224 Changing the Location and Type of Saved Files

Customizing Your Spelling DictionariesWord 2010 enables you to use one or more dictionaries to check your spelling . When there’s a word in your document that’s correct but that Word doesn’t recognize—a name, an address, or an unfamiliar technical or scientific term, for example—you can tell Word to add that word to your custom dictionary . If you already have a custom dictionary that
includes many of the words you want Word to recognize as correct, you can add that dictionary to the list of dictionaries that Word is using . Now in Word 2010 you can also choose a dictionary in another language if you are translating or editing in a language other than English .
Add a Dictionary
1 Click the File tab and click Options to display the Word Options dialog box .
2 Click Proofing .
3 Click the Custom Dictionaries button to display the Custom Dictionaries dialog box .
4 If you have an existing dictionary that you want to use, click Add; in the Add Custom Dictionary dialog box that appears, locate the dictionary file . Click Open .
5 To create a dictionary by adding entries, click New, use the Create Custom Dictionary dialog box to name the dictionary file, and click Save .
6 To add or delete words in a dictionary, select the dictionary, and click Edit Word List .
7 Click Add and type a word, or select a word you want to remove and click Delete .
8 Click OK .
9 Verify that the dictionaries you want to use are checked and those you don’t want to use aren’t checked .
10 Click OK .
1
2
3
10
9 5
4
6
8
7
Customizing Your Spelling Dictionaries 225
Customizing and Securing Word

Creating a MacroYou can automate procedures you follow often by creating a macro to record the keystrokes and menu selections and then playing them back by pressing a single key combination . For example, you could create a macro by recording the replacement
of a phrase and/or a style using the Replace command . Then you can run that macro to modify other documents . Regardless of the complexity of your macro, you can run it as though it were a single Word command .
Create a Macro
1 Click the View tab, click the Macros arrow in the Macros group, and choose Record Macro to display the Record Macro dialog box .
2 Type a name for the macro . (The name must begin with a letter and can’t contain any spaces or symbols .)
3 Choose whether you want to assign the macro to a button or the keyboard .
4 Specify where you want to store the macro and type a description .
5 Click OK .
6 Execute the series of actions you want to record as a macro, using your keyboard to select text and to move the insertion point . (Note that other than when you click a com-mand, most mouse actions aren’t recorded .)
7 When you’ve completed the series of actions, click the Macros arrow again and choose Stop Recording .
8 Click Macros to display the Macros dialog box, select the macro you just recorded and click Run to make sure the macro performs correctly .
1
2
5
3
4 7
For the greatest control in creating and modifying macros, add the Developer tab to the ribbon by clicking the File tab, clicking Options, clicking Customize Ribbon, and clicking the Developer tab check box in the list on the right . Click OK to save your changes .
Tip
226 Creating a Macro

Understanding Security in Office 2010Today you just can’t be too careful about the files you accept and download from the Internet . Every computer user needs some sort of antivirus program that scans incoming files for potential threats and keeps your computer safe from attack . Word 2010 includes improved security features that evaluate files before you open them and then prompting you if some-thing unrecognized is found .
One area developers found vulnerable to attack occurs when you open a file saved in a previous version of Word . To safeguard this process, Word now includes a security check that goes on behind the scenes when you open a new
document . The file must pass a series of checks—called a file validation process—before it is considered a safe file . If Word 2010 finds anything suspicious, the document is displayed in Protected View .
Word 2010 shows you that a file is in Protected View by displaying a message bar across the top of the work area . If you know the sender of the file or are certain the file is safe, you can click Enable Editing to remove the protection and edit the file normally . You can change which files Word 2010 flags for protection by changing the settings in the Trust Center .
Customizing and Securing Word
Understanding Security in Office 2010 227
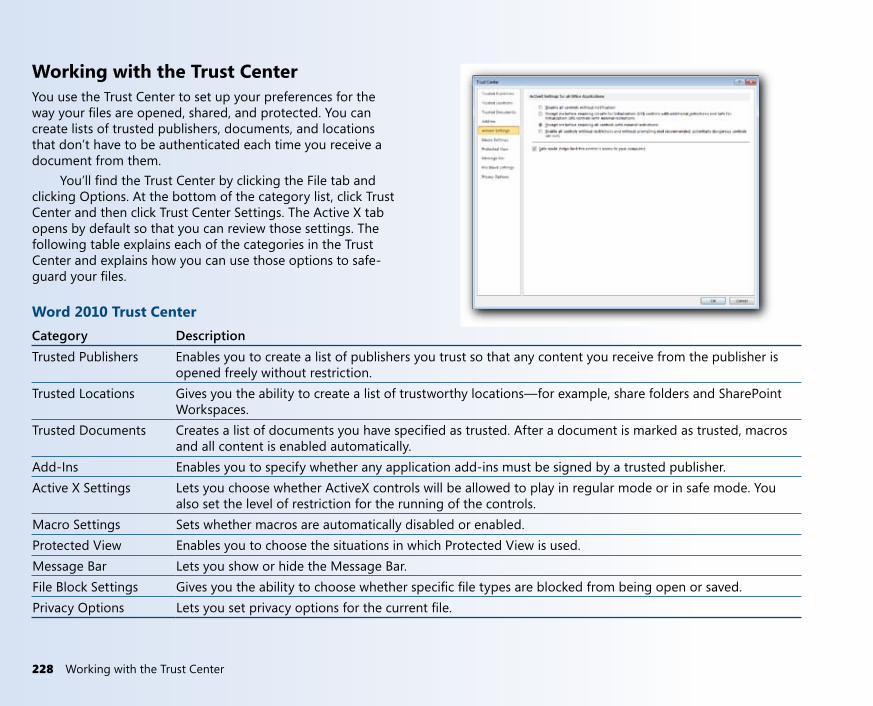
Working with the Trust CenterYou use the Trust Center to set up your preferences for the way your files are opened, shared, and protected . You can create lists of trusted publishers, documents, and locations that don’t have to be authenticated each time you receive a document from them .
You’ll find the Trust Center by clicking the File tab and clicking Options . At the bottom of the category list, click Trust Center and then click Trust Center Settings . The Active X tab opens by default so that you can review those settings . The following table explains each of the categories in the Trust Center and explains how you can use those options to safe-guard your files .
Word 2010 Trust Center
Category Description
Trusted Publishers Enables you to create a list of publishers you trust so that any content you receive from the publisher is opened freely without restriction .
Trusted Locations Gives you the ability to create a list of trustworthy locations—for example, share folders and SharePoint Workspaces .
Trusted Documents Creates a list of documents you have specified as trusted . After a document is marked as trusted, macros and all content is enabled automatically .
Add-Ins Enables you to specify whether any application add-ins must be signed by a trusted publisher .
Active X Settings Lets you choose whether ActiveX controls will be allowed to play in regular mode or in safe mode . You also set the level of restriction for the running of the controls .
Macro Settings Sets whether macros are automatically disabled or enabled .
Protected View Enables you to choose the situations in which Protected View is used .
Message Bar Lets you show or hide the Message Bar .
File Block Settings Gives you the ability to choose whether specific file types are blocked from being open or saved .
Privacy Options Lets you set privacy options for the current file .
228 Working with the Trust Center

Changing File ValidationYou can tell Word 2010 which file types you want to validate before opening the files . This controls when Protected View is used to safeguard files that you are opening . You can choose
that files be checked when you open a file, save a file, or both . The following table introduces the different settings you can choose for file validation .
Set File Types
1 Click the File tab and click Options to display the Word Options dialog box .
2 Click Trust Center .
3 Click the Trust Center Settings button .
4 Click the File Block Settings category .
5 Click to clear the check mark in any file type you don’t want to check .
6 Click to add a check mark in the Open and Save columns for those file types you do want to check .
7 Click OK .
File Block Behaviors
Setting Description
Do Not Open Selected File Types
The selected files are blocked and will not be opened .
Open Selected File Types In Protected View
Opens the selected file in a safe mode that is protected from other files and processes .
Open Selected File Types In Protected View And Allow Editing
Opens the selected file type in safe mode but allows the user to edit normally .
1
2
3
7
45
6
Changing File Validation 229
Customizing and Securing Word

Choosing What’s Displayed in Protected ViewThe Protected View message bar appears when you have tried to open a file that has either been blocked or has been deter-mined to be in a file format flagged for blocking . If you want to see the contents of the file or know the person or company who sent it, you can open the file in Protected View . Protected View is a safe mode that enables you to view the file without it
potentially affecting your other files . When you know the file is okay, you can click Enable Editing to open the file normally .
Word 2010 enables you to choose when Protected View is used for your files . You’ll find the settings for Protected View in the Protected View category in the Trust Center .
Set Protected View Settings
1 Click the File tab and click Options to display the Word Options dialog box .
2 Click Trust Center and click Trust Center Settings .
3 Select Protected View .
4 Click to remove the check mark of any setting you do not want to keep .
5 Click OK .
You can modify the settings at any time . If you later want to restore a protection you removed, simply display the Protected View category again and click the check mark to return the check .
Tip
1
2
5
3
4
230 Choosing What’s Displayed in Protected View

Password Protecting a FileOffice 2010, like its predecessors, makes it easy for you add passwords to your Word, Excel, and PowerPoint files . Now
in Office 2010, you can add encryption to your password to ensure that your file is as secure as possible .
Add a Password
1 Click the File tab .
2 In the Info tab, click Protect Docu-ment in the Permissions area .
3 Click Encrypt with a Password .
4 Enter a password and click OK .
1 2
3
4
Note that when you set an encrypted password for your Word file, the password cannot be recovered if you forget the pass-word later . For this reason, you should keep a copy of your passwords in a safe place you can access easily .
CautionYou can also set the password during the Save As process by clicking (in the Save As dialog box) the Tools arrow, choosing General Options, and entering the password required to open the file . If you plan to share the file with others, you can enter a separate password that you share with co-authors to enable modification and file sharing .
Tip
Password Protecting a File 231
Customizing and Securing Word
Limiting File ChangesNot only do you need to make sure that the files you open are safe, but you also need to be able to protect the files you create so that people can change only what you want them to change in the file . You can set protection levels on individual
files that make it possible for you to limit editing in a docu-ment, for example, or protect sections or the structure of a worksheet, so that others’ ability to change the content of the file is limited .
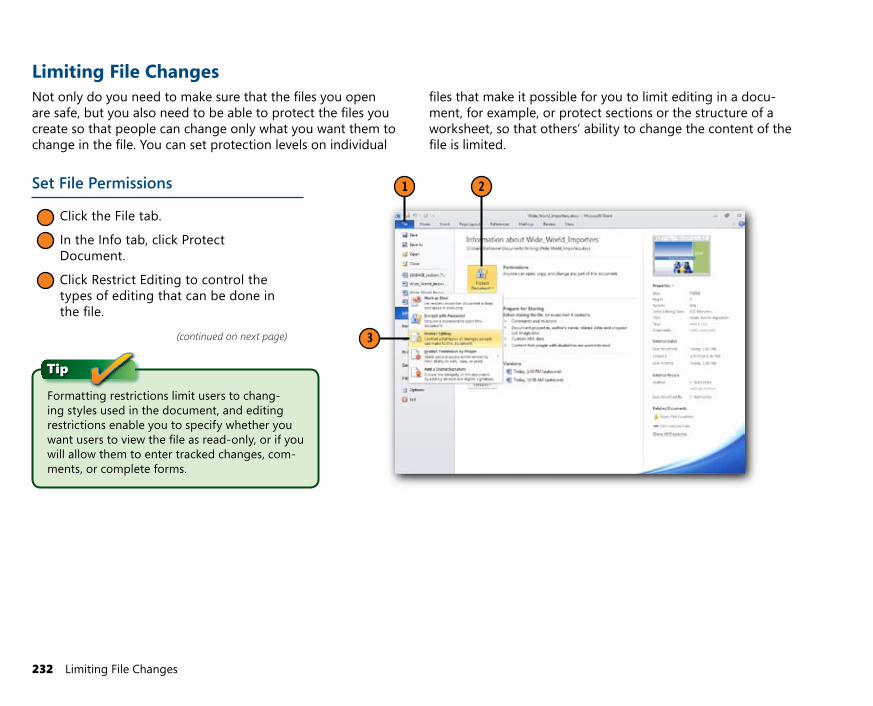
Set File Permissions
1 Click the File tab .
2 In the Info tab, click Protect Document .
3 Click Restrict Editing to control the types of editing that can be done in the file .
(continued on next page)
1 2
3
Formatting restrictions limit users to chang-ing styles used in the document, and editing restrictions enable you to specify whether you want users to view the file as read-only, or if you will allow them to enter tracked changes, com-ments, or complete forms .
Tip
232 Limiting File Changes

7
6
4
5
Word gives you the option of adding a digital signature to your document to verify a document’s integrity . The digital signa-ture feature in each of these applications requires a signature service from a third-party vendor . You can begin the process by clicking Add A Digital Signature in the Protect Document selection of the Info tab, and a prompt will offer you the option of finding a signature service on Office Marketplace . Note that Protect Document is not available if you are using Compatibil-ity Mode—you must first save the document as a Word 2010 file before Protect Document becomes available .
Tip
You can also limit the access others have to your files by restricting the permissions they have based on their role . The Restrict Permission By People option in the Protect Docu-ment settings in the Info tab (in Backstage view) enable you to choose the group of people who you want to give access to your document .
Tip
Set File Permissions (continued)
4 Click the Allow Only This Type Of Editing In The Document check box .
5 Click the type of change you want to allow .
6 Indicate who these changes apply to .
7 Click Yes, Start Enforcing Protection .
Limiting File Changes 233
Customizing and Securing Word

1
3
2
Recovering Unsaved VersionsHave you ever made great changes to a document and then accidentally closed the file without saving? One of the great new safety-net features in Word 2010 is your file is saved for you in case you forget . Because the program stores your
unsaved files automatically, you can return to a previous ver-sion if you need to find information you accidentally deleted or items you revised in error .
Recover Unsaved Files
1 Click the File tab .
2 Click Manage Versions .
3 Click Recover Unsaved Versions .
4 Select the file you want and click Open .
You can also display unsaved documents from the Recent category . Scroll to the bottom of the Recent Documents list and click Recover Unsaved Documents . Double-click the file you want to view in the Open dialog box .
Tip
If you open an autosaved document that is not the most current version available, Word 2010 lets you know about the status of the file . Click whether you’d like to compare the autosaved version with your current document or restore the autosaved file to full editing capabilities .
Tip
234 Recovering Unsaved Versions

contacting co-authors 235
Index
contacting co-authors 235
Index
Symbols97-2003 Word Document format, 159–16097-2003 Word Template Document
format, 1592003 XML Document format, 159? wildcard, 39* wildcard, 39
AAbout This Sentence (grammar), 51Add Text tool, 190Adjustment handle (shapes), 136alignment
of graphics to pages, 146–147of paragraphs, 83of pictures, 146–147of tables, 122of text in tables, 117
Allow Typing option, 42Apply Styles window, 66Arrange All function, 211art borders around pages, 93Artistic Effects (pictures), 139–140artistic text, creating, 148Aspect Ratio, setting, 133At Least option (paragraph formatting), 80attachments to e-mails, displaying, 42AutoCorrect feature, 52–55AutoCorrect Options button, 72automatically inserted hyperlinks, 23automatic text correction, 52–54autosaved documents, 234
Bbackgrounds, removing picture, 141Backstage view, 15, 18–20, 27Behind Text wrapping, 143blogs, writing/publishing, 164–166blue squiggles, 51borders
adding to paragraphs, 95around pages, 92art borders around pages, 93Borders And Shading dialog box, 96Borders tool, 124
bound documents, setting up, 103breaking manually, defined, 106Browse For Themes option, 63browser icon, 9Browse tools, 24building blocks, creating/inserting, 48–49bulleted/numbered lists
creating, 71customizing, 73–74list styles and, 61
business documents, styles and, 68
Ccells, dividing (tables), 121center alignment of text, 83Change Styles tool, 68character formatting
applying, 69copying, 91
charactersadjusting space between, 82styling, 61wildcard, 39
chartsChart tool, 129Chart Tools Design tab, 154creating, 152–154
Check For Updates function, 27Clear All option (Clipboard), 46Clear Formatting tool, 79clip art, 128, 134Clipboards, Windows & Office, 34, 44–46Clip Organizer, 130co-authoring documents, 4, 200–203Collapse Subdocument function, 186colors
Color gallery, 140Color Scheme, changing, 222
columns, adding to documents, 110columns and rows (tables)
adding/deleting, 115–116sizing, 120
command tabs, 8comparing changes in documents,
208–209compatibility
Compatibility Checker, 40Compatibility Mode, 40, 233settings, 224
compiling indexes, 193conditional content
form letters and, 173setting (mail merge), 169
contacting co-authors, 203

236 content
contentadding to documents, 20–22conditional (form letters), 173content controls (fields), 101setting conditional (mail merge), 169
Contextual tab, 9converting
documents between Word versions, 40–41
table text to regular text, 114copying/cutting/pasting text, 34–35,
44–46copying paragraph formatting, 91cover pages, 187cropping pictures, 132–133cross-references (indexes), 193Ctrl key for hyperlinks, 24customizing
bulleted/numbered lists, 73–74charts, 129Customize Ribbon dialog box, 219Custom Margins option, 103multilevel lists, 77Quick Access Toolbar, 220–221ribbon, 216–219table layouts, 119templates, 98–99Word 2010, 4work area, 222–223
DDate And Time tool, 101Decimal tab stop, 117decorative horizontal lines, 94deleting rows/columns, 116designing templates, 100–101Developer tab, adding to ribbon, 226
diagramsrelational, 149–151SmartArt, 151
dictionaries, spelling, 225digital signatures, 233direct formatting
defined, 62vs . styles, 83
discontinuous numbered lists, 72Distribute Rows function (tables), 119documents . See also files
adding content to, 20–22adding content with ink function, 22adding hyperlinks to, 23–24autosaved, 234co-authoring, 200–203composing different types of, 156–157converting old, 40–41cover pages, 187creating new, 12–14creating/posting online, 160–163creating with templates, 15–16dividing into sections, 108Document Inspector dialog box, 213Document tab, 37finalizing, 212–213formatting with themes/styles/fonts,
60–62indexes, creating, 192–193inserting files in, 162inserting pictures in, 130–131inserting text files in, 21linking, 24master documents, 186navigating, 36–38, 43opening as copy, 17opening existing, 17opening existing as templates, 15opening in Windows Live SkyDrive, 199
opening recently used, 18Outline view, 183–185page setup for electronic viewing, 156previewing, 25printing, 25–26reading through, 42reorganizing, 183–185reviewing . See reviewing documentssaving, 14saving to shared spaces, 198setting margins, 102table of contents, 190–191viewing side by side, 211
Draft view, 8, 11, 188, 206drag and drop text function, 20drawing
content (ink function), 22drawing canvas, 142Drawing Tools Format contextual tab,
145Drawing Tools Format tab, 146Draw Table tool, 121shapes, 135–136text boxes, 87
drop caps, creating, 90
Eediting
Edit Header function, 109Editing group (Home tab), 38Edit Recipient List (form letters), 171headers and footers, 177pictures, 137, 137–138restrictions on, 232summary of methods for, 34–35text, 30–32
Effects, Theme, 65electronic postage, 167

gutters 237
e-mail addresses/links, adding, 160Enable Live Preview check box, 67encrypted passwords, 231endnotes . See footnotes and endnotesenvelopes, printing, 167Eraser tool, 121Esc key, 31even-page headers and footers, 179Exactly option (paragraph formatting), 80Excel 2010
dragging/dropping content from, 20inserting charts from, 152–154
Expand Subdocuments function, 186Export All Customizations function
(ribbon), 219
Ffields, template, 101file formats
for pictures, 130Word 2010, 158–159
files . See also documentsadding content to, 20–22adding hyperlinks to, 23–24changing location/formats of saved, 224changing validation of, 229converting old, 40–41creating within files (online), 162–163designing templates based on existing,
100File Block behaviors, 229File tab, 13, 17, 25, 26and folders, pinning, 18formatting with themes/styles/fonts,
60–62limiting changes to, 232–233naming, 14navigating through, 36–38
opening, 17opening as copy, 17opening recently used, 18password protecting, 231permissions, setting, 232–233printing, 25–26reading, 42–43recovering unsaved, 234reviewing shared file information, 204saving, 14shared (co-authoring), 204–205
finalizing documents, 212–213Find And Replace dialog box, 39Find tool, 38First Line Indent marker, 84fonts
Font dialog box, 82formatting, 78–79Theme Fonts, 65
footers . See headers and footersfootnotes and endnotes, 188–189Format Horizontal Line dialog box, 94Format Painter tool, 62, 91formats, file . See file formatsformatting
characters, 69charts, 154copying formatting, 91direct formatting, 62documents with themes/styles/fonts,
60–62fonts, 78–79Format Shape button, 138pictures, 137–138restrictions on, 232tables, 124with tabs, 85–86text, 69–70
form letters, 170–174Full Screen Reading view, 8, 10, 33, 42
GGabriola font, 82gallery example (illustration), 9General tab, 222Go To Footer tool, 109grammar
correcting, 51Grammar checker, 50
graphicsarranging multiple, 144–145Artistic Effects, 139–140charts, 152–154Chart tool, 129clip art, 128, 134picture backgrounds, removing, 141pictures, changing size of, 132–133pictures, editing/formatting, 137–138pictures, inserting, 130–131Picture tool, 128positioning on pages, 146–147relational diagrams, 149–151screenshots, 129shapes, 128–129, 135–136SmartArt, 129WordArt, 148wrapping text around, 142–143
green squiggles, 51gridlines, 33, 121, 146Grid Setting (Align button), 146groups (custom tabs), 218–219Group tool, 145Grow Font tool, 79gutters, 102–103

238 headers and footers
Hheaders and footers
changing running heads, 109creating, 176editing, 177Header & Footer Tools Design tab, 109linking and unlinking, 180variable, 178–179
headings, navigating documents by, 36Help
Help dialog box, 27icon (illustration), 9
Hide Folders function, 14Highlight tool, 207Home Page button (Blogs), 166Home tab, 8, 13, 38, 47horizontal lines, decorative, 94hyperlinks, adding to documents, 23–24hyphenation, adjusting, 107
Iillustrations
art borders around pages, 93artistic text, creating, 148automatic text correction, 52Backstage view, 18–19borders/shading, adding to paragraphs,
95–96building blocks, inserting, 48–49bulleted and numbered lists, 71–72character fonts/sizes, changing, 78–79character formatting, copying, 91charts, creating, 152–153co-authoring documents, 200–203columns, adding to documents, 110columns/rows, sizing, 120
composing types of documents, 156–157
content, adding with Ink function, 22converting old documents, 41copying/moving text, 44copying/pasting multiple items, 46cover pages, inserting, 187customizing bulleted/numbered lists, 73customizing multilevel lists, 77decorative horizontal lines, 94direct formatting, 62discontinuous numbered lists, 72dividing table cells, 121documents, comparing changes in,
208–209documents, creating new, 12–13document sections, 108documents, finalizing, 212documents, opening, 17documents, opening in Live SkyDrive,
199documents, reorganizing, 183–185documents, saving, 14documents, saving to shared spaces,
198documents, viewing side by side, 211drag and drop text, 20drop caps, 90File Block settings, 229file locations/formats, changing, 224file permissions, setting, 232–233finding/inserting Clip Art, 134footnotes and endnotes, 188–189formatting text, 69formatting with tabs, 85form letters, 170–173grammar, correcting, 51graphics, positioning on pages, 146headers and footers, 176–180
hyperlinks, adding to documents, 23hyphenation, adjusting, 107indenting paragraphs, 84indexes, creating/compiling, 192–193laying out pages, 102–103line borders around pages, 92linking documents, 24linking text box text, 89list numbering schemes, changing, 74macros, creating, 226margins in documents, changing,
105–106master documents, creating, 186Mini Translator, 57multilevel lists, 75–76multiple graphics, arranging, 144–145navigating through documents, 36online documents, creating, 160–161page orientation, changing, 104paragraph alignment, 83paragraph line spacing, adjusting,
80–81password protecting files, 231pasting text, 45picture backgrounds, removing, 141pictures, applying Artistic Effects to, 139pictures, changing size of, 132–133pictures, editing/formatting, 137–138pictures, inserting in documents, 131predesigned tables, 113predesigned text boxes, 87printing documents, 25printing envelopes, 167Protected View settings, 230Quick Access Toolbar, customizing,
220–221reading documents, 42relational diagrams, inserting, 149–150researching subjects, 55

letters 239
revision marks, 206ribbon, customizing, 216–219running heads, 109shapes, drawing, 135–136spacing between characters, 82spelling dictionaries, customizing, 225spelling errors, correcting, 50styles, applying/saving, 66–67style sets, changing, 68styles, types of, 61table of contents, creating, 190–191table rows/columns, adding/deleting,
115–116tables, aligning, 122tables and lists, sorting, 181tables, creating, 111tables, creating from text, 114tables, formatting, 124tables, moving, 123tables, positioning elements in, 117–118tables, sizing, 119table styles, creating, 125tab stops, modifying, 86templates, choosing, 15–16templates, customizing, 98–99templates, designing, 100–101text boxes, 87text files, inserting, 21text flow, adjusting, 106text, replacing, 47text, searching/finding, 38text, selecting/modifying, 30text, translating, 56text, wrapping, 142–143themes, formatting documents with, 60themes, previewing/choosing, 63thumbnails, viewing, 37unsaved files, recovering, 234views, setting, 33
Word 2010 views, 10–11Word 2010 window, 8Word Help, 27work area, customizing, 222–223writing/publishing blogs, 164–166
Illustrations group, 128Include Content From Office Online check
box, 73Increase Text Size option, 42indenting paragraphs, 84indent markers, 8indents, adjusting list, 76indexes, creating, 192–193information, organizing with tables/lists,
181–182Info tab, 18–19, 41ink function, 22inserting
building blocks, 48–49charts from Excel, 152–154Clip Art, 134cover pages, 187files in documents, 162Insert Category button (Blogs), 166Insert Hyperlink dialog box, 24Insert Merge Field dialog box (mail
merge), 172Insert tab, 128, 131pictures in documents, 131predesigned text boxes, 87–88relational diagrams, 149–150tabs in table cells, 111text files, 21
JJoyce, Jerry, 5justifying paragraphs, 83
KKeep On Top button, 27Keep Source Formatting (pasting), 45Keep Text Only (pasting), 45kerning characters, 82keyboard shortcuts
copying/moving text, 35editing text, 31–32Find And Replace dialog box, 39formatting text, 70hiding/displaying ribbon, 223Hyperlinks, 160Insert Hyperlink dialog box, 24inserting tabs in table cells, 111line spacing, 80moving between list levels, 75moving between table cells, 111moving to top of documents, 178Research task pane, 55saving files, 14selecting text, 34selecting text in linked text boxes, 89
KeyTips, 31
LLabels tab (mailing), 168Landscape Orientation, 102, 104languages, translation, 56layouts, page . See page layoutsleaders for tab stops, 86Left Indent marker, 84legal blacklining, 208letters, form . See form letters

240 lines
linesdecorative horizontal, 94Line And Page Breaks tab, 106line borders around pages, 92Line Spacing tool, 81line status bar, 8spacing between paragraphs, 81spacing within paragraphs, 80
linkingdocuments, 24headers and footers, 180linked styles, 61Link To File function, 131Link To Previous tool, 180text box text, 89
listsbulleted/numbered, 71, 73–74discontinuous numbered, 72list styles, 61multilevel . See multilevel listssorting, 182
Live Preview feature, 67
Mmacros
creating, 226Macro-Enabled Document format, 158Macro-Enabled Template Word
Document format, 158magnifying text with Zoom control, 12mailing labels, printing, 168Mailings tab, 167, 169, 171Mail Merge, 169–172Manage Accounts button (Blogs), 166Manage Versions (Backstage view), 19manual breaking, defined, 106manual column breaks, 110manual page breaks, 107
marginschanging in documents, 105markers, 8setting in documents, 102
marked up inserted text (illustration), 9Mark Entry tool (indexes), 192Mark Index Entry dialog box, 193markup area (illustration), 9master documents, creating, 186Match Destination Formatting (pasting),
45Merge Formatting (pasting), 45merging . See also Mail Merge
cells (tables), 121documents (reviewing), 210
Microsoft Graph, 152Microsoft Office 2010 Upload Center, 197Microsoft Office Picture Manager, 130Microsoft SharePoint Workspace 2010,
196–197Microsoft Windows 7 Plain & Simple, 5Microsoft Works database, 169Mini toolbar (selected text), 78Mini Translator, 57Mirror Indents option, 84modifying
Modify Location dialog box, 224templates, 99themes, 65
Moon, Marianne, 5Move pointer, 120moving
paragraphs, 184sections (text), 185
multilevel listscreating, 75customizing, 77styles, choosing, 76
multiple graphics, arranging, 144–145
Multiple Pages settings, 103Multiply option (paragraph formatting),
80My Templates icon, 15
Nnaming files, 14navigating documents, 36–38, 43Navigation pane, 33nesting tables, 122numbered/bulleted lists
creating, 71customizing, 73–74list styles and, 61
Numbering gallery (lists), 74
OObject tool (Text group), 162odd-page headers and footers, 179odd-page section breaks, 109Office 2010
Clipboard, 44Compatibility pack, 41security in, 227
Office Clipboard, 34Office .com, 15, 73Office Marketplace, 233OneNote notebooks, 25, 26online documents
creating, 160–163including files within files, 162–163
openingdocuments in Live SkyDrive, 199existing documents, 17recently used files, 18templates, 98
Quick Tables 241
OpenType settings, 82orientation of pages, 104Orientation option (pages setup), 102orphans, defined (text), 106outline of this book, 3–4Outline view, 8, 11, 183–185, 188, 190Outlining tab, 186Outlook Contacts list (form letters), 170Overtype mode (text), 30
Ppage layouts
bound documents, 103changing page orientation, 104columns, adding, 110hyphenation, 107margins, 105Page Layout view, 206page orientation, 104running heads, 109sections, creating, 108standard page setup, 102tables . See tablestemplates . See templatestext flow, adjusting, 106two-sided document setup, 103
page numbers (illustration), 9pages
art borders around, 93line borders around, 92page borders, creating, 92page breaks, manual, 107Page Setup dialog box, 25, 86, 102positioning graphics on, 146
paragraphsadding borders to, 95adding shading to, 96copying paragraph formatting, 91
indenting, 84moving in Outline view, 184Paragraph dialog box, 86paragraph marks, 9, 157paragraph styles, 61setting alignment of, 83setting line spacing between, 81setting line spacing within, 80
password protecting files, 231pasting
multiple items, 46Paste with Live Preview function, 44text, 45–46
permissionssetting, 18setting co-author, 200setting for files, 232–233
personalizing form letters, 172–173pictures
aligning, 146–147Artistic Effects, 139–140changing size of, 132–133editing/formatting, 137–138inserting in documents, 130–131Picture Bullet dialog box, 73picture file formats, 130Picture Manager, Microsoft Office, 130Picture Options dialog box, 165Picture tool, 128Picture Tools contextual tab, 9Picture Tools Format tab, 132, 133, 137recoloring, 140removing backgrounds from, 141Reset Picture button, 139
pinning files/folders, 18Plain Text Document format, 159Play feature (translations), 57points, defined (fonts), 80Popular Commands list, 218
Portrait Orientation, 102, 104positioning graphics on pages, 146–147predesigned tables, 113predesigned text boxes, 87–88previewing
documents, 25Preview Results button (form letters),
172themes, 63
printingdocuments, 25–26envelopes, 167mailing labels, 168Print Layout view, 8, 10, 123, 176, 187,
191Print Preview, 25
Proofing Errors icon, 51Proofing option (Word Options dialog), 53Protect Document function, 212Protect Document settings, 233Protected View, 227, 229–230publishing blogs, 164pull quotes, 87
QQuick Access Toolbar
customizing, 220–221Save button, 14
Quick Parts feature, 48–49Quick Styles
for consistent font formatting, 78feature, 3gallery, 66
Quick Tables, 113

242 reading documents
Rreading documents, 42read-only files, 17, 232Recent Documents list, 234Recent tab, 18Recent Templates icon, 15Recheck Document button, 51recoloring pictures, 140Recover Draft Versions function, 19recovering unsaved files, 234References tab, 189, 191, 193relational diagrams, 149–151Remove Background command (pictures),
141Remove Space After Paragraph option, 81Remove Space Before Paragraph option,
81renaming new tabs (ribbon), 216–217reorganizing documents, 183–185Replace Text As You Type check box, 53replacing text, 47researching subjects, 55Research tool, 55Reset Picture function, 139resizing . See sizingRestrict Permission by People option, 233reviewing documents
basics, 206combining reviews, 210comparing changes in document,
208–209reviewer comment (illustration), 9reviewing shared file information, 204Review tab, 22, 55, 202, 206with Tracked Changes, 207
revision marks (Tracked Changes), 206–207
ribboncustomizing, 216–219illustration, 8showing/minimizing, 223Size section, 132tools (illustration), 33
Rich Text Format (RTF), 159Right Indent marker, 84Rotate button, 138Rotation handle (shapes), 136rows and columns, adding/deleting,
115–116rulers
illustrations, 8, 33Ruler check box, 85setting indents with, 84showing distance between cell
boundaries with, 119Rules tool, 169running heads, 109
SSample Templates icon, 15saving
documents, 14documents as Web pages, 161documents to shared spaces, 198recovering unsaved files, 234Save As command, 41Save As dialog box, 14, 231styles, 66text boxes as default, 88
Scale box (character spacing), 82scaling documents for printing, 26screenshots, 129ScreenTip button (hyperlinks), 23ScreenTip dialog box, 24searching text, 38–39
sections (text)dividing documents into, 108moving, 185
securityFile Block behaviors, 229file validation, 229limiting changes to files, 232–233in Office 2010, 227password protecting files, 231Protected View settings, 230Trust Center, 228
selectingtext, 34–35text boxes, 88
Select Recipients button (form letters), 170Set As Default Text Box option, 88sets, style, 68shading
adding to paragraphs, 96for cell grouping, 124
shapes, 128–129, 135–136shared files (co-authoring), 204–205SharePoint Workspaces 2010, 4Show Comments And Changes option, 42Show Document option (master
documents), 186Show/Hide function (Paragraph group),
105Show/Hide tool, 13, 104showing/minimizing ribbon, 223Show One/Two Page(s) options, 42Show Printed Page option, 42Shrink Font tool, 79sidebars, 87Single File Web Page Document format,
159sizing
fonts, 79pictures, 132
text 243
Sizing handle (shapes), 136table rows/columns, 120tables, 119
SmartArt, 41, 129, 149–151sorting
lists, 182Sort Text dialog box, 182tables, 181
space between characters, 82space mark (illustration), 9spacing lines within/between paragraphs,
80–81spelling and grammar
customizing spelling dictionaries, 225Spelling and Grammar checker, 50–51status icon (illustration), 9
splitting cells (tables), 121squiggles, 51status bar, 222styles
applying and saving, 66applying from styles palette, 67applying to tables, 125choosing from gallery, 66of fonts, 78for multilevel lists, 76style sets, changing, 68Styles gallery, themes and, 63Styles Pane Options dialog box, 67types of, 61vs . direct formatting, 83
subdocuments, opening from master document, 186
subjects, researching, 55Symbol dialog box, 73Synchronous Scrolling, 211
Ttable of contents, 190–191tables
aligning, 122for aligning text in columns, 85anatomy of, 112applying styles to, 125cells, dividing, 121creating from text, 114customizing layout of, 119formatting, 124moving, 123nesting, 122positioning elements in, 117–118rows and columns, adding/deleting,
115–116rows/columns, sizing, 120sorting, 181styles, 61vs . tab stops, 85Table Tools Design tab, 121, 124Table Tools Layout tab, 121, 122–123using predesigned, 113
tabsAutoCorrect, 54Chart Tools Design, 154command tabs, 8Contextual, 9creating/renaming new, 216–217Developer, 226Document, 37Drawing Tools Format, 146Drawing Tools Format contextual, 145File, 13, 17, 25, 26General, 222Header & Footer Tools Design, 109Home, 8, 13, 38Info, 18
Insert, 128, 131Labels, 168Line And Page Breaks, 106Mailings, 171Outlining, 183, 186Page Layout, 64, 65, 92, 94, 104, 108Picture Tools Format, 132, 133, 137Recent, 18References, 193Review, 22, 55Table Tools Design, 124View, 33, 36
tabs, textDecimal tab stop, 117formatting with, 85–86setting, 85Tab key, 75tab stops, 8
templatescreating documents with, 15–16creating from scratch, 101customizing, 98–99designing from existing files, 100for form letters, 172Template Document format, 158
textadjusting flow of, 106aligning in tables, 117automatic correction of, 52–54converting table text to regular text,
114copying/moving, 35, 44–46correcting automatically, 52–54creating artistic, 148creating tables from, 114cutting/copying, 44drag and drop function, 20editing basics, 30–32entering sample, 12

244 text (continued)
text (continued)files, inserting in documents, 21formatting, 69–70keyboard shortcuts for editing, 31–32methods for editing, 34–35pasting, 45–46replacing, 47searching, 38–39selecting/modifying, 30Text Direction tool, 118Text Effects gallery, 148Text Wrapping section, 122translating, 56using as hyperlinks, 23–24wrapping, 123wrapping around graphics, 142–143
text boxesdrawing, 87inserting predesigned, 87–88linking text between, 89saving, 88Text Box gallery, 87
themeschoosing and changing, 63–64defined, 60modifying, 65
thumbnails, viewing, 37Time And Date tool, 101tools
renaming and adding to groups, 218–219
Tools menu, 43Track Changes function, 206–207translating text, 56–57Trust Center, 228two-sided documents, 103
UUndo button, 30Undo tool, 79, 181ungroup items, 145unlinking headers and footers, 180unsaved files, recovering, 234updating
shared files, 205Table of Contents, 191Update Services (translations), 57Update Table tool, 191
Vvalidation of files, 229variable headers and footers, 178–179viewing
documents side by side, 211thumbnails, 37View options menu, 42View tab, 33, 36, 211
viewsBackstage, 15, 18Draft, 8, 11, 188Full Screen Reading, 8, 10, 33Outline, 8, 11, 188Print Layout, 8, 10, 176setting, 33View Gridlines function, 121View Options menu, 42Web Layout, 8, 10, 188
WWeb Layout view, 8, 10, 188Web Page Document format, 159Web pages, saving documents as, 161
widows, defined (text), 106wildcard characters, 39Windows Clipboard, 44Windows Live, 4Windows Live Sign-In Assistant, 199Windows Live SkyDrive
opening documents in, 199overview, 4, 197
Windows Split bar, 211Windows Vista Plain & Simple, 5windows, Word 2010, 8Word 2010
customizing, 4file formats, 158–159launching, 12location of tools in window, 8–9Macro-Enabled Document format, 158Macro-Enabled Template Document
format, 158new features in, 4–5overview of this book, 2–4Template Document format, 158Trust Center, 228views summary, 10–11visual appearance of, 5Word Document format, 158Word Help dialog box, 27Word Options dialog box, 24, 101, 221Word Template Save As type, 100XML Document format, 158
Word 2010 Web Appoverview, 196saving documents to shared spaces, 198
WordArt, 148word count (illustration), 9work area, customizing, 222–223Works 6 .0-9 .0 Document format, 159wrapping text, 123, 142–143writing/publishing blogs, 164–166
Zoom tool 245
XXML Word Document format, 158
ZZoom control, 8, 12, 33, 104, 179Zoom tool, 25


About the AuthorKatherine Murray is the author or co-author of 40+ computer books, including First Look Microsoft® Office 2010, Microsoft® Word 2003 Inside Out, and First Look 2007 Microsoft® Office System . She is also a columnist on the Microsoft® Office Community site at Microsoft .com .
Related Documents