For additional Microsoft Office handouts, visit http://www.calstatela.edu/its/docs/office.php. For video tutorials, visit http://www.youtube.com/mycsula. CALIFORNIA STATE UNIVERSITY, LOS ANGELES INFORMATION TECHNOLOGY SERVICES Microsoft Word 2010 Part 1: Introduction to Word Summer 2011, Version 1.0 Table of Contents Introduction ....................................................................................................................................3 Starting the Program .....................................................................................................................3 Exploring the User Interface.........................................................................................................3 Customizing the Quick Access Toolbar......................................................................................4 Exploring the Ribbon ..................................................................................................................5 Using Dialog Box Launchers .................................................................................................5 Minimizing and Expanding the Ribbon .................................................................................5 Exploring the Backstage View ....................................................................................................6 Creating, Saving, and Closing a Document .................................................................................6 Using Save As .............................................................................................................................8 Closing a Document and Exiting Word ......................................................................................8 Opening an Existing Document ....................................................................................................9 Editing a Document .......................................................................................................................9 Selecting Text............................................................................................................................10 Deleting Text.............................................................................................................................10 Copying and Moving Text ........................................................................................................10 Using Undo and Redo ...............................................................................................................11 Formatting a Document ..............................................................................................................11 Live Preview .............................................................................................................................11 Mini Toolbar .............................................................................................................................11 Formatting Characters ...............................................................................................................12 Changing the Font ................................................................................................................12 Changing the Font Size ........................................................................................................13 Changing the Font Style .......................................................................................................13 Changing the Font Color and Highlighting Text .................................................................13 Copying Character Formatting .............................................................................................14 Clearing Formats ..................................................................................................................14 Formatting Paragraphs ..............................................................................................................14 Aligning Paragraphs .............................................................................................................15 Modifying Line and Paragraph Spacing...............................................................................15 Indenting Paragraphs ............................................................................................................16

Welcome message from author
This document is posted to help you gain knowledge. Please leave a comment to let me know what you think about it! Share it to your friends and learn new things together.
Transcript

For additional Microsoft Office handouts, visit http://www.calstatela.edu/its/docs/office.php. For video tutorials, visit http://www.youtube.com/mycsula.
CALIFORNIA STATE UNIVERSITY, LOS ANGELES INFORMATION TECHNOLOGY SERVICES
Microsoft Word 2010 Part 1: Introduction to Word
Summer 2011, Version 1.0
Table of Contents Introduction ....................................................................................................................................3 Starting the Program .....................................................................................................................3 Exploring the User Interface .........................................................................................................3
Customizing the Quick Access Toolbar ......................................................................................4 Exploring the Ribbon ..................................................................................................................5
Using Dialog Box Launchers .................................................................................................5 Minimizing and Expanding the Ribbon .................................................................................5
Exploring the Backstage View ....................................................................................................6 Creating, Saving, and Closing a Document .................................................................................6
Using Save As .............................................................................................................................8 Closing a Document and Exiting Word ......................................................................................8
Opening an Existing Document ....................................................................................................9 Editing a Document .......................................................................................................................9
Selecting Text............................................................................................................................10 Deleting Text .............................................................................................................................10 Copying and Moving Text ........................................................................................................10 Using Undo and Redo ...............................................................................................................11
Formatting a Document ..............................................................................................................11 Live Preview .............................................................................................................................11 Mini Toolbar .............................................................................................................................11 Formatting Characters ...............................................................................................................12
Changing the Font ................................................................................................................12 Changing the Font Size ........................................................................................................13 Changing the Font Style .......................................................................................................13 Changing the Font Color and Highlighting Text .................................................................13 Copying Character Formatting .............................................................................................14 Clearing Formats ..................................................................................................................14
Formatting Paragraphs ..............................................................................................................14 Aligning Paragraphs .............................................................................................................15 Modifying Line and Paragraph Spacing ...............................................................................15 Indenting Paragraphs ............................................................................................................16

Microsoft Word 2010 Part 1: Introduction to Word 2
Creating Bulleted and Numbered Lists .....................................................................................16 Applying Styles .........................................................................................................................18
Viewing a Document in Different Ways.....................................................................................19 Changing Document Magnification ..........................................................................................20
Previewing and Printing a Document ........................................................................................21 Previewing a Document ............................................................................................................21 Printing a Document .................................................................................................................22
Getting Help .................................................................................................................................23

Microsoft Word 2010 Part 1: Introduction to Word 3
Introduction Microsoft Word 2010 is a word-processing program that can be used to create professional-looking documents such as reports, resumes, letters, memos, and newsletters. Word 2010 includes many powerful tools that can be used to easily format and edit documents as well as collaborate with others. In addition, Word 2010 includes many desktop publishing features that can be used to enhance the appearance of documents so that they are visually appealing and easy to read. This handout provides an overview of the Word 2010 user interface and covers how to perform basic tasks such as creating a new document, saving, editing, formatting, printing, and getting help.
Starting the Program The following steps are for starting Word 2010 using the computers in the ITS Training Program computer labs. The steps for starting the program on other computers may vary. To start Word 2010:
1. Click the Start button, click All Programs, click Microsoft Office, and select Microsoft Word 2010. The program window opens with a new blank document.
Exploring the User Interface The Word 2010 program window is easy to navigate and simple to use (see Figure 1 and Table 1 for the main elements of the program window). It is designed to help you quickly find the commands that you need to complete a task.
Figure 1 – Word 2010 Program Window

Microsoft Word 2010 Part 1: Introduction to Word 4
Table 1 – Word 2010 Program Window Elements
Element Description Title bar Displays the name of the document and the program. Minimize, Restore Down/Maximize, and Close buttons
Used to control the program window. Use the Minimize button to hide the window. Use the Restore Down/Maximize button to adjust the size of the window. Use the Close button to close the document or exit Word.
Quick Access toolbar
Contains frequently used commands that are independent of the tab displayed on the Ribbon.
Ribbon Contains all the commands related to managing documents and working with document content.
Document window Displays the contents of the document. Insertion point Indicates where text or graphics will be inserted. Navigation pane Enables you to search for specific text, move through the document by
clicking headings, reorganize the content by dragging headings, or view thumbnail images of the document pages.
Scroll bars Used to scroll through the document. Status bar Displays useful information about the document (e.g., number of pages,
number of words) and provides access to certain program functions. View Shortcuts toolbar
Used to display the document in a variety of views, each suited to a specific purpose.
Zoom Level button and Zoom slider
Used to change the magnification of the document.
Customizing the Quick Access Toolbar By default, the Quick Access toolbar is located at the left end of the Title bar and displays the Save, Undo, and Redo buttons (see Figure 1). You can change the location of the Quick Access toolbar and customize it to include commands that you use frequently. To add a command to the Quick Access toolbar:
1. On the Ribbon, click the appropriate tab or group to display the command that you want to add.
2. Right-click the command and select Add to Quick Access Toolbar from the shortcut menu.
To remove a command from the Quick Access toolbar:
1. On the Quick Access toolbar, right-click the command that you want to remove and select Remove from Quick Access Toolbar from the shortcut menu.
Figure 2 – Customize Quick Access Toolbar Menu
NOTE: Clicking the Customize Quick Access Toolbar arrow on the Quick Access toolbar displays a list of additional commands and options that can be used to customize the toolbar (see Figure 2).

Microsoft Word 2010 Part 1: Introduction to Word 5
Exploring the Ribbon The Ribbon is located below the Title bar. Across the top of the Ribbon is a set of task-specific tabs (see Figure 1 and Table 2). Some tabs, known as contextual tabs, appear only when you create or select certain types of objects (e.g., pictures, tables, charts). Clicking a tab displays an associated set of commands that are organized into logical groups. Commands generally take the form of buttons and lists. Some commands appear in galleries. The appearance of the buttons and groups on the Ribbon changes depending on the width of the program window. A button representing a command that cannot be performed on the selected element is inactive (gray). NOTE: Pointing to a button on the Ribbon displays information about the button in a ScreenTip. Table 2 – Ribbon Tabs
Tab Description File tab Displays the Backstage view which contains commands related to managing
documents. The File tab replaces the Microsoft Office button and File menu used in earlier releases of Microsoft Office.
Home tab Contains commands related to working with document content. The Home tab is active by default.
Insert tab Contains commands related to all the items you can insert into a document. Page Layout tab Contains commands related to the appearance of a document. References tab Contains commands related to items you can add to a document. Mailings tab Contains commands related to creating mass mailings. Review tab Contains commands related to proofreading a document, working in other
languages, adding comments, tracking and resolving document changes, and protecting a document.
View tab Contains commands related to changing the view and other aspects of the display.
Using Dialog Box Launchers Some groups on the Ribbon have related dialog boxes or task panes that contain additional commands. These commands can be accessed by clicking the dialog box launcher located in the lower-right corner of the group (see Figure 1).
Minimizing and Expanding the Ribbon You can minimize the Ribbon to make more space available on the screen. When the Ribbon is minimized, only the tab names are visible. To minimize the Ribbon:
1. Click the Minimize the Ribbon button located at the right end of the Ribbon. Or, press Ctrl+F1.
To expand the Ribbon:
1. Click the Expand the Ribbon button located at the right end of the Ribbon. Or, press Ctrl+F1.

Microsoft Word 2010 Part 1: Introduction to Word 6
Exploring the Backstage View The Backstage view contains all the commands related to managing documents and customizing the program (see Figure 3). It provides an easy way to create, open, save, print, share, and close files; find recently used files; view and update document properties; set permissions; set program options; get help; and exit the program. To display the Backstage view:
1. Click the File tab on the Ribbon (see Figure 3).
Figure 3 – Info Tab of Backstage View
To exit the Backstage view: 1. Click any tab on the Ribbon. Or, press the Esc key.
Creating, Saving, and Closing a Document When you start Word 2010 without opening a specific document, a new blank document is displayed, ready for you to enter your content. You can also create a new document while Word 2010 is running. The insertion point, a blinking vertical line in the upper-left corner of the page, shows where the next character you type will appear. When the insertion point reaches the right margin, the word you are typing automatically moves to the next line. Pressing the Enter key starts a new paragraph. Each document you create is temporary unless you save it as a file with a unique name or location. To create a new blank document:
1. Click the File tab on the Ribbon. The Backstage view displays. 2. Click New in the left pane. The New tab displays (see Figure 4).

Microsoft Word 2010 Part 1: Introduction to Word 7
3. Under Available Templates, select Blank document. 4. Click the Create button in the right pane. A new blank document opens in a new
window.
Figure 4 – New Tab of Backstage View
To save a document for the first time: 1. Click the Save button on the Quick Access toolbar. The Save As dialog box opens
(see Figure 5). 2. In the Navigation pane, select a location to save the file or leave the default location.
NOTE: By default, files are saved in the Documents folder.
3. In the File name box, enter a name for the document. NOTE: File names can have up to 250 characters and can include any combination of alphanumeric characters, spaces, and special characters, with the exception of the forward slash (/), backslash (\), greater than sign (>), less than sign (<), asterisk (*), question mark (?), quotation mark (“), pipe symbol (|), and colon (:).
4. Click the Save button. NOTE: After a document has been saved, subsequent saves will not open the Save As dialog box. You can save changes by clicking the Save button on the Quick Access toolbar or by pressing Ctrl+S. The new version of the document will overwrite the previous version.
NOTE: By default, Word 2010 documents are saved in the Word Document format which has the .docx file extension. Documents created in versions of Word prior to Word 2007 have the .doc file extension. You can use Word 2010 to save a document in the Word 97-2003 Document format to make it compatible with earlier versions of Word. You can also use Word 2010 to open documents created with earlier versions of Word, but the new features of Word 2010 will not be available until the document is converted to the .docx format.

Microsoft Word 2010 Part 1: Introduction to Word 8
Figure 5 – Save As Dialog Box
Using Save As The Save As command can be used to save a document in a different location, with a different file name, or in a different file format. To use the Save As command:
1. Click the File tab on the Ribbon, and then click Save As. The Save As dialog box opens. 2. To save the document in a different location, select the desired location in the Navigation
pane. 3. To save the document with a different file name, enter the desired name in the File name
box. 4. To save the document in a different file format, click the Save as type arrow and select
the desired file format from the list. 5. Click the Save button.
Closing a Document and Exiting Word When you finish working on a document, you can close it and exit the Word program. If the document contains any unsaved changes, you will be prompted to save the document before closing it. To close a document without exiting Word:
1. Click the File tab on the Ribbon, and then click Close.

Microsoft Word 2010 Part 1: Introduction to Word 9
To close a document and exit Word: 1. Click the Close button located at the right end of the Title bar. Or, click the File
tab on the Ribbon, and then click Exit.
Opening an Existing Document When you save a document, it is saved as a file on your computer. You can open the document at a later time to view it, modify it, or print it. To open an existing document:
1. Click the File tab on the Ribbon, and then click Open. The Open dialog box opens (see Figure 6).
2. Locate and select the file you want to open. NOTE: If the file you want to open is not in the default folder, use the Navigation pane in the Open dialog box to select the appropriate drive or folder.
3. Click the Open button.
Figure 6 – Open Dialog Box
Editing a Document Most documents require some editing. After creating a document, you may want to add or remove text, or move text from one place to another. This section provides information about some of the common tasks you will perform in Word 2010 such as selecting, deleting, copying, and moving text; and undoing and redoing changes.

Microsoft Word 2010 Part 1: Introduction to Word 10
Selecting Text In order to perform tasks such as copying or moving text, you must first select the text. You can use the mouse, the keyboard, or the selection area (an invisible area in the document’s left margin) to make a selection (see Table 3). Selected text appears highlighted on the screen. Table 3 – Text Selection Methods
Action Method To select a word Double-click anywhere in the word. To select a sentence Hold down the Ctrl key and click anywhere in the sentence. To select a line Click in the selection area to the left of the line. To select a paragraph Triple-click anywhere in the paragraph. Or, double-click in the
selection area to the left of the paragraph. To select the entire document Triple-click in the selection area. Or, press Ctrl+A. To select adjacent words, lines, or paragraphs
Drag the mouse pointer over the text. Or, click at the beginning of the text, and then hold down the Shift key and click at the end of the text.
To select non-adjacent words, lines, or paragraphs
Make the first selection, and then hold down the Ctrl key and make the second selection.
NOTE: To deselect selected text, click anywhere in the document.
Deleting Text There may be times when you need to remove text from a document. You can use the Backspace key or the Delete key to delete one character at a time. The Backspace key removes the character to the left of the insertion point, and the Delete key removes the character to the right of the insertion point. You can also select and delete a word, sentence, paragraph, or block of text. To delete text:
1. Select the text you want to delete. 2. Press the Delete key.
Copying and Moving Text When editing a document, you may want to move or copy text within the same document or between documents. If you want to duplicate text in another location, you can copy the text rather than retype it. When you move text, the text is deleted from its original location and placed into the new location. Cut or copied text is placed on the Clipboard where it is saved until you paste it to a new location. To copy text:
1. Select the text you want to copy. 2. On the Home tab, in the Clipboard group, click the Copy button (see Figure 7). Or,
press Ctrl+C. 3. Position the insertion point where you want to paste the text. 4. On the Home tab, in the Clipboard group, click the Paste button . Or, press Ctrl+V.

Microsoft Word 2010 Part 1: Introduction to Word 11
To move text: 1. Select the text you want to move. 2. On the Home tab, in the Clipboard group, click the Cut button (see Figure 7). Or,
press Ctrl+X. 3. Position the insertion point where you want to paste the text. 4. On the Home tab, in the Clipboard group, click the Paste button . Or, press Ctrl+V.
Figure 7 – Clipboard Group on the Home Tab
Using Undo and Redo The Undo command allows you to reverse the results of the previous command or action. Once the Undo command is used, the Redo command becomes available. The Redo command allows you to restore the results of the command or action you reversed with the Undo command. To undo the previous command or action:
1. Click the Undo button on the Quick Access toolbar. Or, press Ctrl+Z. To redo the undone command or action:
1. Click the Redo button on the Quick Access toolbar. Or, press Ctrl+Y.
Formatting a Document Word 2010 includes a number of features that can be used to easily format a document. Formatting enhances the appearance of the document and makes it look professional.
Live Preview The Live Preview feature allows you to try out different styles, effects, and colors to visualize their effects before applying them. As you move the mouse pointer over the thumbnail images or list items in the galleries, the formatting displayed in the body of the document temporarily changes. When you finish previewing the styles, click to select your preferred option.
Mini Toolbar The Mini toolbar contains frequently used formatting commands and appears in a semi-transparent mode whenever text is selected. Moving the mouse pointer over the toolbar activates it and makes the options available for use (see Figure 8). Most of the formatting options on the Mini toolbar are discussed in the following sections.
Figure 8 – Mini Toolbar

Microsoft Word 2010 Part 1: Introduction to Word 12
Formatting Characters Character formatting enhances the appearance of text, and includes font, font size, font color, and font styles. Character formatting can be applied using the commands in the Font group on the Home tab (see Figure 9 and Table 4).
Figure 9 – Font Group on the Home Tab
Table 4 – Commands in the Font Group
Name Description
Font list Changes the font.
Font Size list Changes the size of the text.
Grow Font button Increases the text size.
Shrink Font button Decreases the text size.
Change Case button Changes all the selected text to uppercase, lowercase, or other common capitalizations.
Clear Formatting button Clears all formatting for the selected text, leaving only the plain text.
Bold button Makes the selected text bold.
Italic button Italicizes the selected text.
Underline button Draws a line under the selected text. Click the arrow to select the type of underline.
Strikethrough button Draws a line through the middle of the selected text.
Subscript button Creates subscript characters.
Superscript button Creates superscript characters.
Text Effects button Applies a visual effect such as shadow, glow, or reflection to the selected text.
Text Highlight Color button Makes text look like it was marked with a highlighter pen. Click the arrow to select a different color.
Font Color button Changes the text color. Click the arrow to select a different color.
Changing the Font A font is defined as a group of characters sharing similar type attributes. Fonts can be applied to existing text, or you can select a font prior to typing text. By default, the font used for text in a new Word 2010 document is Calibri.

Microsoft Word 2010 Part 1: Introduction to Word 13
To change the font: 1. Select the text for which you want to change the font. 2. On the Home tab, in the Font group, click the Font arrow , and select the
desired font from the list of available fonts.
Changing the Font Size Font size is measured in points. The larger the font size, the larger the text. A font size can be applied to existing text, or you can select a font size prior to typing text. The default font size for new Word 2010 documents is 11 points. To change the font size:
1. Select the text for which you want to change the font size. 2. On the Home tab, in the Font group, click the Font Size arrow , and select the
desired font size from the list. NOTE: Font sizes are not listed in increments of one point. If a desired font size is not listed in the Font Size list, click in the Font Size box and enter the desired font size.
Changing the Font Style Font style refers to type enhancements such as bold and italic. To change the font style:
1. Select the text for which you want to change the font style. 2. On the Home tab, in the Font group, click the button for the desired font style (see Table
4).
Changing the Font Color and Highlighting Text You can change the color of text as well as highlight important text in a document. To change the font color:
1. Select the text for which you want to change the font color. 2. On the Home tab, in the Font group, click the Font Color button .
NOTE: To select a different color, click the Font Color arrow and select the desired color from the color palette (see Figure 10).
To highlight text:
1. Select the text you want to highlight. 2. On the Home tab, in the Font group, click the Text Highlight Color button .
NOTE: To select a different color, click the Text Highlight Color arrow and select the desired color from the color palette (see Figure 11).

Microsoft Word 2010 Part 1: Introduction to Word 14
Figure 10 – Font Color Palette
Figure 11 – Text Highlight Color Palette
Copying Character Formatting You can use the Format Painter command to copy the character format of specific text and apply it to other text. This feature saves time when multiple formats have been applied to text and you want to format additional text with all the same formats. To copy character formatting:
1. Position the insertion point in the text containing the formats you want to copy. 2. On the Home tab, in the Clipboard group, click the Format Painter button . The
mouse pointer changes into an I-beam with a paintbrush to its left. 3. Select the text you want to format.
Clearing Formats You can use the Clear Formatting command to remove formatting and styles from selected text or the entire document. To clear formats:
1. Select the text that contains the formatting you want to clear. 2. On the Home tab, in the Font group, click the Clear Formatting button .
Formatting Paragraphs Paragraph formatting refers to the layout of a paragraph on the page. You can change a paragraph’s indentation, alignment, and line spacing, as well as the space before and after it. Paragraph formatting can be applied using the commands in the Paragraph group on the Home tab (see Figure 12).
Figure 12 – Paragraph Group on the Home Tab
Microsoft Word 2010 Part 1: Introduction to Word 15
NOTE: To display or hide formatting marks such as spaces, tabs, and paragraph marks, click the
Show/Hide button in the Paragraph group on the Home tab.
Aligning Paragraphs Paragraph alignment refers to the position of each line of text in a paragraph between the left and right margins. The Paragraph group on the Home tab contains four alignment commands that can be used to quickly change the alignment of a paragraph (see Table 5). Table 5 – Alignment Commands
Name Description
Align Text Left button Aligns each line of the paragraph at the left margin, with a ragged right edge. Align Text Left is the default alignment.
Center button Aligns the center of each line in the paragraph between the left and right margins, with ragged left and right edges.
Align Text Right button Aligns each line of the paragraph at the right margin, with a ragged left edge.
Justify button Aligns each line of the paragraph between the left and right margins, creating even left and right edges.
To align a paragraph:
1. Select the paragraph you want to align. 2. On the Home tab, in the Paragraph group, click the desired alignment button.
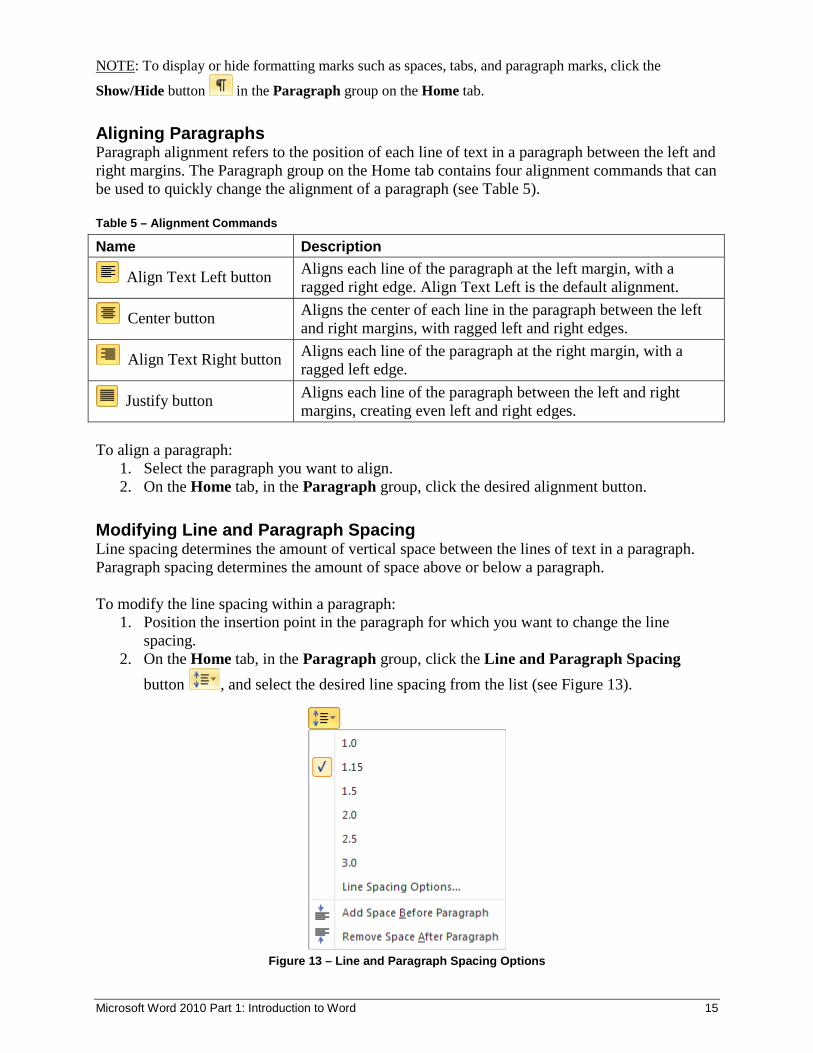
Modifying Line and Paragraph Spacing Line spacing determines the amount of vertical space between the lines of text in a paragraph. Paragraph spacing determines the amount of space above or below a paragraph. To modify the line spacing within a paragraph:
1. Position the insertion point in the paragraph for which you want to change the line spacing.
2. On the Home tab, in the Paragraph group, click the Line and Paragraph Spacing button , and select the desired line spacing from the list (see Figure 13).
Figure 13 – Line and Paragraph Spacing Options

Microsoft Word 2010 Part 1: Introduction to Word 16
To modify the spacing before or after a paragraph: 1. Position the insertion point in the paragraph for which you want to change the spacing. 2. On the Home tab, in the Paragraph group, click the Line and Paragraph Spacing
button , and select Add Space Before Paragraph or Add Space After Paragraph from the list (see Figure 13).
NOTE: If you want to customize the spacing, click the dialog box launcher in the Paragraph group to open the Paragraph dialog box, and then modify the spacing in the Spacing section on the Indents and Spacing tab.
Indenting Paragraphs Indenting a paragraph refers to moving it away from the left, the right, or both margins. The Paragraph group on the Home tab contains two commands that can be used to increase or decrease the left indent of a paragraph in half-inch increments. To change the left indent of a paragraph:
1. Position the insertion point in the paragraph you want to indent. 2. On the Home tab, in the Paragraph group, do one of the following:
Click the Increase Indent button to indent the paragraph to the right. Click the Decrease Indent button to decrease the indent of the paragraph.
NOTE: If you want to indent a different amount, click the dialog box launcher in the Paragraph group to open the Paragraph dialog box, and then specify the desired values in the Indentation section on the Indents and Spacing tab.
Creating Bulleted and Numbered Lists You can quickly add bullets or numbers to existing lines of text, or Word can automatically create bulleted and numbered lists as you type. When you want to emphasize items in a list in no particular order, create a bulleted list. When you want to present a sequence of information or list items by order of importance, create a numbered list. You can also create a list that has multiple levels. To create a bulleted list:
1. Position the insertion point where you want to begin the list.
2. On the Home tab, in the Paragraph group, click the Bullets button .
3. Type the text for the first list item. 4. Press the Enter key to add the next
list item. 5. To end the list, press the Enter key
twice. NOTE: You can change the bullet symbol by clicking the Bullets arrow and making a selection from the Bullets gallery (see Figure 14).
Figure 14 – Bullets Gallery

Microsoft Word 2010 Part 1: Introduction to Word 17
To create a numbered list:
1. Position the insertion point where you want to begin the list.
2. On the Home tab, in the Paragraph group, click the Numbering button
. 3. Type the text for the first list item. 4. Press the Enter key to add the next
list item. 5. To end the list, press the Enter key
twice. NOTE: You can change the number style by clicking the Numbering arrow and making a selection from the Numbering gallery (see Figure 15).
NOTE: If you move an item within a numbered list, Word will renumber the list to keep the items in the correct order.
Figure 15 – Numbering Gallery
To create a multilevel list:
1. Position the insertion point where you want to begin the list.
2. On the Home tab, in the Paragraph group, click the Multilevel List button , and select the desired style from the Multilevel List gallery (see Figure 16).
3. Type the text for the first list item. 4. Press the Enter key to add the next
list item. 5. Continue creating the list of items
that are all at the same level. 6. To change the list level, do one of
the following: Press the Tab key to demote the
list level. Press Shift+Tab to promote the
list level. 7. To end the list, position the insertion
point at the end of the last list item, press the Enter key, and then press the Delete key.
Figure 16 – Multilevel List Gallery

Microsoft Word 2010 Part 1: Introduction to Word 18
To add bullets or numbers to existing text: 1. Select the text that you want to add bullets or numbers to. 2. On the Home tab, in the Paragraph group, do one of the following:
Click the Bullets button to add bullets. Click the Numbering button to add numbers.
NOTE: If the numbering sequence is incorrect, right-click the list item, and then select Restart at 1 or Continue Numbering from the shortcut menu.
Applying Styles Word 2010 has several types of predefined Quick Styles that you can use to easily format a document. Quick Styles apply a combination of character formatting (such as font, font size, and font color) and paragraph formatting (such as line spacing). The Quick Styles gallery, located in the Styles group on the Home tab, provides a quick way of previewing and applying styles to selected text (see Figure 17). You can also apply styles using the Styles pane (see Figure 19).
Figure 17 – Styles Group on the Home Tab
To apply a style using the Quick Styles gallery: 1. Select the text that you want to apply a style to. 2. On the Home tab, in the Styles group, select the desired style from the Quick Styles
gallery (see Figure 17).
NOTE: To see the entire Quick Styles gallery, click the More button in the lower-right corner of the gallery to expand it (see Figure 18).
Figure 18 – Quick Styles Gallery
To apply a style using the Styles pane: 1. On the Home tab, click the dialog box launcher in the Styles group. The Styles pane
opens (see Figure 19). 2. Select the text that you want to apply a style to. 3. Select the desired style in the Styles pane.

Microsoft Word 2010 Part 1: Introduction to Word 19
Figure 19 – Styles Pane
Viewing a Document in Different Ways In Word 2010, you can display a document in a variety of views, each suited to a specific purpose (see Table 6). By default, documents are displayed in Print Layout view. Table 6 – Document View Commands
Name Description
Print Layout button Displays the document as it will appear when printed.
Full Screen Reading button
Displays as much of the content of the document as will fit on the screen.
Web Layout button Displays the document the way it will look when viewed in a web browser.
Outline button Displays the structure of the document as nested levels of headings and body text, and provides tools for viewing and changing its hierarchy.
Draft button Displays the content of the document with a simplified layout so that you can type and edit quickly. Layout elements such as headers and footers are not displayed.
To change the document view:
1. Click the desired button on the View Shortcuts toolbar located at the right end of the Status bar (see Figure 20). Or, click the desired button in the Document Views group on the View tab (see Figure 21).
Figure 20 – View Shortcuts Toolbar, Zoom Level Button, and Zoom Slider

Microsoft Word 2010 Part 1: Introduction to Word 20
Figure 21 – Document Views Group on the View Tab
Changing Document Magnification You can magnify a document to make the text easier to read, or you can reduce the magnification to see more of the document. Changing the magnification does not change the document; it only changes how the document appears on the screen. To change the magnification of a document:
1. Click the Zoom Level button located at the right end of the Status bar (see Figure 20). Or, click the Zoom button in the Zoom group on the View tab (see Figure 22). The Zoom dialog box opens (see Figure 23).
Figure 22 – Zoom Group on the View Tab
Figure 23 – Zoom Dialog Box
2. Under Zoom to, select the desired magnification level. A preview appears in the Preview box.
3. Click the OK button. NOTE: You can also adjust the magnification of a document by using the Zoom slider located at the right end of the Status bar (see Figure 20). You can drag the Zoom slider to the left or right, or click the Zoom Out or Zoom In button on either side of the slider to change the percentage incrementally.

Microsoft Word 2010 Part 1: Introduction to Word 21
Previewing and Printing a Document Previewing and printing have become much easier in Word 2010. The Print tab in the Backstage view allows you to preview a document, set print options, and print the file, all in one location (see Figure 24).
Figure 24 – Print Tab of Backstage View
Previewing a Document Before printing a document, you can preview it to see how each page will look when printed. Print preview automatically displays on the Print tab in the Backstage view (see Figure 24). Whenever you make a change to a print-related setting, the preview is automatically updated. To preview a document:
1. Click the File tab on the Ribbon, and then click Print. Or, press Ctrl+P. The Print tab displays, with print settings in the center pane and a preview of the document in the right pane (see Figure 24).
2. To view each page, click the Next Page or Previous Page arrow in the lower-left corner of the Preview pane.
3. To adjust the magnification, drag the Zoom slider in the lower-right corner of the Preview pane.
4. When finished, click any tab on the Ribbon to exit the Backstage view.

Microsoft Word 2010 Part 1: Introduction to Word 22
Printing a Document When you are ready to print a document, you can quickly print one copy of the entire document using the current printer, or you can change the default print settings before you print the document. To print a document:
1. Click the File tab on the Ribbon, and then click Print. Or, press Ctrl+P. The Print tab displays, with print settings in the center pane and a preview of the document in the right pane (see Figure 24). NOTE: You can skip step 2 if you do not want to change any of the print settings.
2. To change the print settings, do one or more of the following: To change the printer, under Printer, click the button displaying the name of the
default printer, and select the desired printer from the list. To print multiple copies, click in the Copies box and enter the number of copies you
want to print. To print part of the document (e.g., the selected content, the current page, a range of
pages), under Settings, click the Print All Pages button, and select the part of the document you want to print from the list (see Figure 25). NOTE: Use commas for individual pages and hyphens for a range of pages (e.g., the page range 1,3,5-7 prints page 1, page 3, and pages 5, 6, and 7.
3. Click the Print button.
Figure 25 – Print What List

Microsoft Word 2010 Part 1: Introduction to Word 23
Getting Help You can use the Word Help system to get assistance on any Word topic or task. This system is a combination of tools and files that were stored on your computer when Word 2010 was installed. If your computer is connected to the Internet, you can also access resources from Office.com. To get help:
1. Click the Microsoft Word Help button located at the right end of the Ribbon. Or, press the F1 key. The Word Help window opens displaying a list of general help topics (see Figure 26).
NOTE: You can also click the Help button in the upper-right corner of an open dialog box to display topics related to the functions of that dialog box in the Word Help window.
2. Click any topic to display the corresponding information.
Figure 26 – Word Help Window
3. To find help on a specific topic, type a word or phrase related to the topic in the Search box, and then press the Enter key. The search results display in the window.
4. To access online help, click the Offline button in the lower-right corner of the window, and select Show content from Office.com from the menu (see Figure 27).

Microsoft Word 2010 Part 1: Introduction to Word 24
Figure 27 – Connection Status Menu
5. To close the Word Help window, click the Close button in the upper-right corner of the window.
Related Documents