Microsoft ® PowerPoint ® 2010 Master Slides SPOTLIGHT GUIDE T ABLE O F C ONTENTS Master Slides are an effective set of PowerPoint tools that are helpful in creating well-organized presentations. The Slide Master enables you to apply custom fonts, backgrounds, color schemes, and formatting to a template page, which PowerPoint can use to automatically update other slides in your presentation. This is especially useful for design consistency, or when you need a recurring element such as a company logo on each slide. The Notes Master feature allows you to make notes about each slide that can be used as presentation aids, or given to an audience as extra content. The Handout Master quickly sets up handouts for your presentation, summarizing your slide show for reference or later review. Note: Since some basic knowledge of PowerPoint is assumed, those in need of a starter guide are referred to the PowerPoint 2010 Quick Reference Guide by Nevada Learning Series. www.nlearnseries.com 2 Customizing & Adding Graphics to Slide Masters Sorting a Day or Month Column Applying Color & Conditional Formatting Sorting with Color & Conditional Formatting Sorting by Column Sorting by Rows 3 Working with Slide Masters Managing Slide Master Layouts Restoring Placeholders Using Multiple Slide Masters Saving a Slide Master as a Template Applying a Slide Master 4 Notes & Handout Masters Using the Notes Master Customizing the Notes Master Adding Pictures to the Notes Master Using the Handout Master Customizing the Handout Master Using the Slide Master The Slide Master consolidates all of your design choices into one slide, which PowerPoint will use as a template for other slides. This is a good way to maintain consistency throughout a presentation, or to quickly apply a single design element change to multiple slides. If your organization uses a specific font or color scheme, you can add these features to the Slide Master as well. Displaying Slide Masters To display the Slide Master(s): on the tab, click Slide Master in the Master Views group. Note: Slide Masters appear in the layout pane on the left side of the screen, along with smaller thumbnails that show the layout of slides linked to the Slide Master. Note that Slide Master thumbnails are numbered; it is possible for a presentation to have more than one Slide Master. To close the Slide Master view: on the tab, click Close Master View. Current view Click to close the Slide Master view. Font theme. See To apply colors, fonts, and effects to a Slide Master, page 2. Slide Master theme options. See Customizing Slide Masters, page 2. The Ribbon The Slide Master. See Using the Slide Master, below. The Slide Master layout pane Slide Master name The Ribbon with the Slide Master tab selected. Click Slide Master. Slide Master footer. See To restore a default title or footer placeholder, page 3. Click to return to Normal view. Add your company logo to a Slide Master. See Adding Shapes or Pictures to a Slide Master, page 2.

Welcome message from author
This document is posted to help you gain knowledge. Please leave a comment to let me know what you think about it! Share it to your friends and learn new things together.
Transcript
Microsoft® PowerPoint® 2010
Master Slides
S P O T L I G H T G U I D E
T A B L E O F C O N T E N T S
Master Slides are an effective set of PowerPoint tools that are helpful in creating well-organized presentations. The Slide Master enables you to apply custom fonts, backgrounds, color schemes, and formatting to a template page, which PowerPoint can use to automatically update other slides in your presentation. This is especially useful for design consistency, or when you need a recurring element such as a company logo on each slide. The Notes Master feature allows you to make notes about each slide that can be used as presentation aids, or given to an audience
as extra content. The Handout Master quickly sets up handouts for your presentation, summarizing your slide show for reference or later review.Note: Since some basic knowledge of PowerPoint is assumed, those in need of a starter guide are referred to the PowerPoint 2010 Quick Reference Guide by Nevada Learning Series.
www.nlearnseries.com
2 Customizing & Adding Graphics to Slide MastersSorting a Day or Month ColumnApplying Color & Conditional FormattingSorting with Color & Conditional FormattingSorting by ColumnSorting by Rows
3 Working with Slide MastersManaging Slide Master LayoutsRestoring PlaceholdersUsing Multiple Slide MastersSaving a Slide Master as a TemplateApplying a Slide Master
4 Notes & Handout MastersUsing the Notes MasterCustomizing the Notes MasterAdding Pictures to the Notes MasterUsing the Handout MasterCustomizing the Handout Master
Using the Slide MasterThe Slide Master consolidates all of your design choices into one slide, which PowerPoint will use as a template for other slides. This is a good way to maintain consistency throughout a presentation, or to quickly apply a single design element change to multiple slides. If your organization uses a specific font or color scheme, you can add these features to the Slide Master as well.
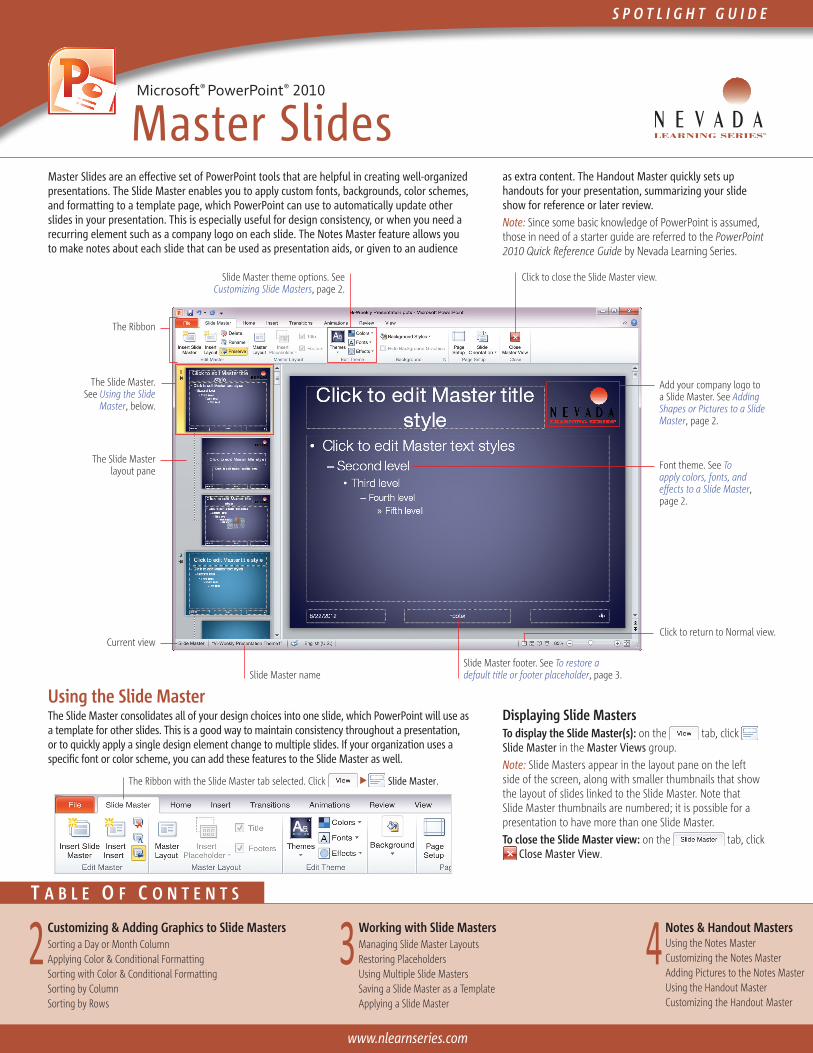
Displaying Slide MastersTo display the Slide Master(s): on the tab, click Slide Master in the Master Views group.Note: Slide Masters appear in the layout pane on the left side of the screen, along with smaller thumbnails that show the layout of slides linked to the Slide Master. Note that Slide Master thumbnails are numbered; it is possible for a presentation to have more than one Slide Master.To close the Slide Master view: on the tab, click
Close Master View.
Current view
Click to close the Slide Master view.
Font theme. See To apply colors, fonts, and effects to a Slide Master, page 2.
Slide Master theme options. See Customizing Slide Masters, page 2.
The Ribbon
The Slide Master. See Using the Slide
Master, below.
The Slide Master layout pane
Slide Master name
The Ribbon with the Slide Master tab selected. Click Slide Master.
Slide Master footer. See To restore a default title or footer placeholder, page 3.
Click to return to Normal view.
Add your company logo to a Slide Master. See Adding Shapes or Pictures to a Slide Master, page 2.
2Customizing Slide MastersThe default Slide Master has eleven slide layouts associated with it. When you make changes to the Slide Master, it applies those changes to all of the associated layouts. For example, if you add a company logo to the Slide Master, the logo will appear on each of the layouts in the same location.Click Slide Master in the Master Views group on the tab to display the tab.To apply a theme to a Slide Master:1. Click to select the Slide Master that you want to apply a theme to.2. On the tab, click Themes.3. Choose an option from the gallery to select and apply the theme.To add a background to a Slide Master:1. With the Slide Master selected, on the tab, click Background
Styles.2. Click an option in the gallery to select and apply the background.To customize the background of a Slide Master: 1. On the tab, click Background Styles and choose Format
Background.
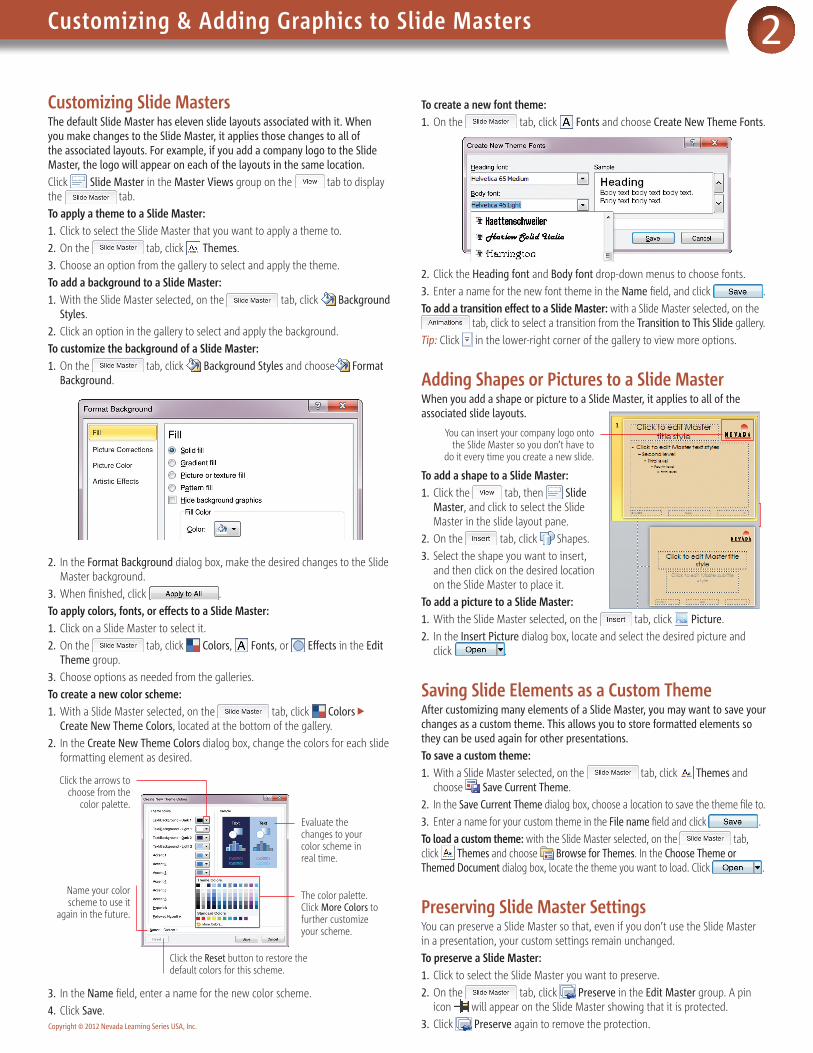
2. In the Format Background dialog box, make the desired changes to the Slide Master background.
3. When finished, click .To apply colors, fonts, or effects to a Slide Master:1. Click on a Slide Master to select it.2. On the tab, click Colors, Fonts, or Effects in the Edit
Theme group.3. Choose options as needed from the galleries.To create a new color scheme:1. With a Slide Master selected, on the tab, click Colors
Create New Theme Colors, located at the bottom of the gallery.2. In the Create New Theme Colors dialog box, change the colors for each slide
formatting element as desired.
3. In the Name field, enter a name for the new color scheme.4. Click Save.
To create a new font theme:1. On the tab, click Fonts and choose Create New Theme Fonts.
2. Click the Heading font and Body font drop-down menus to choose fonts.3. Enter a name for the new font theme in the Name field, and click .To add a transition effect to a Slide Master: with a Slide Master selected, on the
tab, click to select a transition from the Transition to This Slide gallery.Tip: Click in the lower-right corner of the gallery to view more options.
Adding Shapes or Pictures to a Slide MasterWhen you add a shape or picture to a Slide Master, it applies to all of the associated slide layouts.
To add a shape to a Slide Master:1. Click the tab, then Slide
Master, and click to select the Slide Master in the slide layout pane.
2. On the tab, click Shapes.3. Select the shape you want to insert,
and then click on the desired location on the Slide Master to place it.
To add a picture to a Slide Master:1. With the Slide Master selected, on the tab, click Picture.2. In the Insert Picture dialog box, locate and select the desired picture and
click .
Saving Slide Elements as a Custom ThemeAfter customizing many elements of a Slide Master, you may want to save your changes as a custom theme. This allows you to store formatted elements so they can be used again for other presentations.To save a custom theme:1. With a Slide Master selected, on the tab, click Themes and
choose Save Current Theme.2. In the Save Current Theme dialog box, choose a location to save the theme file to.3. Enter a name for your custom theme in the File name field and click .To load a custom theme: with the Slide Master selected, on the tab, click Themes and choose Browse for Themes. In the Choose Theme or Themed Document dialog box, locate the theme you want to load. Click .
Preserving Slide Master SettingsYou can preserve a Slide Master so that, even if you don’t use the Slide Master in a presentation, your custom settings remain unchanged.To preserve a Slide Master:1. Click to select the Slide Master you want to preserve.2. On the tab, click Preserve in the Edit Master group. A pin
icon will appear on the Slide Master showing that it is protected.3. Click Preserve again to remove the protection.
Customizing & Adding Graphics to Slide Masters
Copyright © 2012 Nevada Learning Series USA, Inc.
Evaluate the changes to your color scheme in real time.
Click the arrows to choose from the
color palette.
The color palette. Click More Colors to further customize your scheme.
Click the Reset button to restore the default colors for this scheme.
Name your color scheme to use it
again in the future.
You can insert your company logo onto the Slide Master so you don’t have to
do it every time you create a new slide.
Copyright © 2012 Nevada Learning Series USA, Inc.
3Working with Slide Masters
Renaming a Slide MasterRenaming a Slide Master is an effective way of keeping track of your Slide Masters, and which type of presentations they should be used for.1. Click to select the Slide Master you want to rename.2. On the tab, click Rename in the Edit Master group.
Alternatively, right-click the Slide Master and choose Rename Master.3. In the Rename Layout dialog box, type in a name that clearly identifies the
Slide Master (e.g., Sales Presentation) and click . The Slide Master name will be updated in the bottom-left corner of the screen.
Note: You can also rename individual slide layouts in a similar fashion.
Managing Slide Master LayoutsThe default Slide Master has eleven slide layouts associated with it. You can add to, customize, or delete these layouts to suit your needs.To add additional slide layouts to a Slide Master: click on the Slide Master or any of its associated slide layouts and, on the tab, click Insert Layout in the Edit Master group.Note: If you select the Slide Master before inserting a new slide layout, the new layout will be added after the last slide associated with that Slide Master. If you select a slide layout, the new layout will be inserted directly after that slide.To customize a slide layout:1. Click to select the slide layout you want to customize. On the
tab, click Insert Placeholder and choose a placeholder option.2. Click on the desired area of the slide to insert the placeholder. You can resize
and reposition the placeholder, in addition to any placeholders that are already present on the slide.
Note: Because these elements are only placeholders, you cannot add actual slide content from this view. Close the master view (click Close Master View on the tab) and then add specific content to your slides.To rename or delete a slide layout: click to select the slide layout. On the
tab, click Delete in the Edit Master group to delete the layout, or Rename to open a dialog box where you can enter a name for the layout.
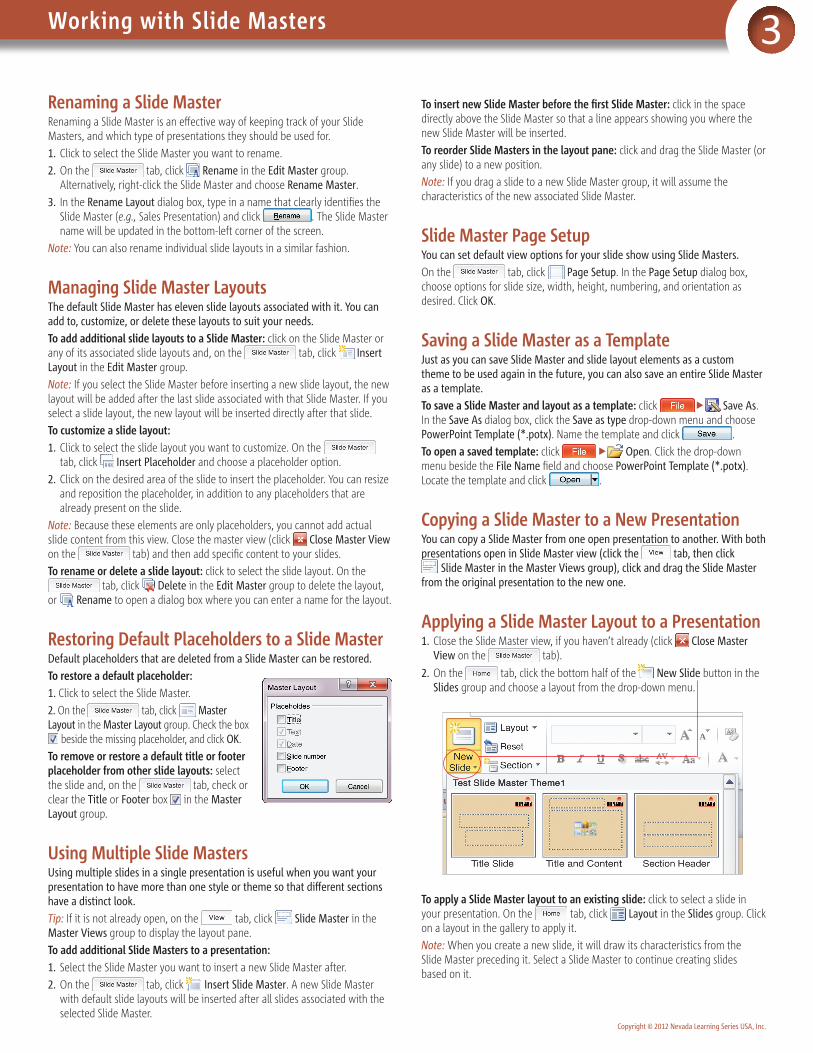
Restoring Default Placeholders to a Slide MasterDefault placeholders that are deleted from a Slide Master can be restored.To restore a default placeholder:1. Click to select the Slide Master.2. On the tab, click Master Layout in the Master Layout group. Check the box
beside the missing placeholder, and click OK.To remove or restore a default title or footer placeholder from other slide layouts: select the slide and, on the tab, check or clear the Title or Footer box in the Master Layout group.
Using Multiple Slide MastersUsing multiple slides in a single presentation is useful when you want your presentation to have more than one style or theme so that different sections have a distinct look.Tip: If it is not already open, on the tab, click Slide Master in the Master Views group to display the layout pane.To add additional Slide Masters to a presentation:1. Select the Slide Master you want to insert a new Slide Master after.2. On the tab, click Insert Slide Master. A new Slide Master
with default slide layouts will be inserted after all slides associated with the selected Slide Master.
To insert new Slide Master before the first Slide Master: click in the space directly above the Slide Master so that a line appears showing you where the new Slide Master will be inserted.To reorder Slide Masters in the layout pane: click and drag the Slide Master (or any slide) to a new position.Note: If you drag a slide to a new Slide Master group, it will assume the characteristics of the new associated Slide Master.
Slide Master Page SetupYou can set default view options for your slide show using Slide Masters.On the tab, click Page Setup. In the Page Setup dialog box, choose options for slide size, width, height, numbering, and orientation as desired. Click OK.
Saving a Slide Master as a TemplateJust as you can save Slide Master and slide layout elements as a custom theme to be used again in the future, you can also save an entire Slide Master as a template.To save a Slide Master and layout as a template: click Save As. In the Save As dialog box, click the Save as type drop-down menu and choose PowerPoint Template (*.potx). Name the template and click .To open a saved template: click Open. Click the drop-down menu beside the File Name field and choose PowerPoint Template (*.potx). Locate the template and click .
Copying a Slide Master to a New PresentationYou can copy a Slide Master from one open presentation to another. With both presentations open in Slide Master view (click the tab, then click
Slide Master in the Master Views group), click and drag the Slide Master from the original presentation to the new one.
Applying a Slide Master Layout to a Presentation1. Close the Slide Master view, if you haven’t already (click Close Master
View on the tab).2. On the tab, click the bottom half of the New Slide button in the
Slides group and choose a layout from the drop-down menu.
To apply a Slide Master layout to an existing slide: click to select a slide in your presentation. On the tab, click Layout in the Slides group. Click on a layout in the gallery to apply it.Note: When you create a new slide, it will draw its characteristics from the Slide Master preceding it. Select a Slide Master to continue creating slides based on it.
For information on customization, visit our website at www.nlearnseries.com/customTo order other guides in our series, please contact us by email ([email protected]) or by fax (416-487-3121).Microsoft® PowerPoint® 2010: Master Slides Spotlight Guide copyright ©2012 Nevada Learning Series USA, Inc. We assume no responsibility for errors or omissions in this guide. PowerPoint® is a registered trademark of Microsoft®.
ISBN: 978-1-55374-342-2 Printed in the USA
4The Notes & Handout Masters
Using the Notes MasterThe Notes Master enables you to set up and format a template for creating notes for personal reference during presentations, or to hand out as supplementary material to your audience. You can edit placeholders, choose or create font themes, and more.
Displaying the Notes MasterTo display the Notes Master: on the tab, click Notes Master in the Master Views group.To close Notes Master view: on the tab, click Close Master View.
Customizing the Notes MasterThe Notes Master has six default placeholders, each of which is adjustable and removable. Like the Slide Master, you can customize many aspects of how notes appear visually.To add or remove a placeholder: on the tab, check or clear the boxes in the Placeholders group.To edit a placeholder: click to select the placeholder you want to edit. Click and drag the placeholder to move it to a new location, or click and drag the edges or corners of the placeholder to re-size it.To add a background to the Notes Master: on the tab, click
Background Styles. Click an option in the gallery to select and apply the background.Tip: You may not want to add a background to your notes if they will be printed as handouts for your audience, especially if you are printing in black and white. Too much visual information can be distracting or look unprofessional.To apply a color or font theme to the Notes Master: on the tab, click Colors or Fonts. Choose an option from the gallery to apply it to the Notes Master.To create a new font theme: on the tab, click Fonts and choose Create New Theme Fonts. Choose a new Heading font and Body font as needed. Enter a name for the new font theme and click .
Notes Master Page SetupYou can set the default orientation for how your notes appear and print. On the tab, click Notes Page Orientation in the Page Setup group. Choose either Portrait or Landscape from the drop-down menu.
Adding Pictures to the Notes MasterWhen you add a picture to a Notes Master, it applies to all of the notes pages in your presentation.To add a picture to the Notes Master: 1. Display the Notes Master (click Notes Master).2. On the tab, click Picture.3. In the Insert Picture dialog box, locate and select the desired picture and
click . Use the picture’s handles to move and re-size it as needed.
Viewing and Printing Presentation NotesChanges you make to the Notes Master apply automatically to all notes in your presentation.To view and edit notes for presentation slides: on the tab, click
Notes Page to open the Notes Page view. Add or edit content in the placeholder sections as desired. Alternatively, choose Normal to select the normal view, and add notes using the notes pane at the bottom of the screen.To print presentation notes: click Print. On the Print screen, click the second drop-down menu in the Settings section and, under Print Layout, choose
Notes Pages. Choose additional print settings as desired and click Print.
Using the Handout MasterPowerPoint 2010 provides tools for turning a slide show presentation into a set of handouts that summarize the presentation for an audience. The Handout Master allows you to customize these handouts, adding lines for audience note-taking, changing the visual layout, and more.
Displaying the Handout MasterTo display the Handout Master: on the tab, click Handout Master in the Presentation Views group.To close the Notes Master view: on the tab, click
Close Master View.
Customizing the Handout MasterThe Handout Master displays thumbnails of your presentation slides, along with other information such as headers, footers, and the date. You can customize how the handout sheets will appear.To add or remove a placeholder: on the tab, check or clear the boxes in the Placeholders group.To change the orientation of handout pages: on the tab, click
Handout Orientation in the Page Setup group and choose an option.To change the Handout Master layout: on the tab, click
Slides Per Page. From the drop-down menu, choose a layout option.Tip: The 3 Slides layout leaves blank space on the handout page, which may be useful for audience members who wish to make notes during a presentation.To add a background to the Handout Master: on the tab, click
Background Styles. Click an option in the gallery to apply it.
Adding Slide Elements to the Handout MasterYou can add slide elements such as text boxes, images, and shapes to your Handout Master. These objects will appear on all handout sheets.To add a text box to the Handout Master: display the Handout Master (click
Handout Master). Under the tab, click Text Box in the Text group. Click and drag to draw a text box onto the desired area of the Handout Master page. Move or re-size the text box as needed, and type content inside.Note: Many other slide elements can be added to the Handout Master in the same way. Remember that these elements will appear on every page, so keep your Handout Master design simple!
Viewing and Printing HandoutsWhen you print handouts, PowerPoint will automatically fill the placeholders with thumbnails of slides from your presentation. Each handout page will look like the Handout Master, and include elements such as images or text boxes that you may have added.To preview presentation handouts:1. Display the Handout Master (click Handout Master).2. Click Print. On the Print screen, click the second drop-down menu
in the Settings section and, under Handouts, choose a layout option.
Tip: Use the page buttons ( ) below the Handout preview to view how each page will appear.To print handouts: click Print. Choose print settings as needed on the Print screen and, when finished, click Print.
Related Documents