1 Training & Technology Solutions Queens College ~ Office of Information Technology ~ Training & Technology Solutions 718-997-4875 ~ [email protected] ~ I-Bldg 214 Microsoft Office Publisher 2010 Microsoft Publisher is a desktop publishing application which allows you to create artistic documents as brochures, flyers, and newsletters. To open Microsoft Office Publisher: 1. Click on the Start Menu/Window Orb. 2. Select All Programs. 3. Select Microsoft Office. 4. Select Microsoft Office Publisher 2010. When the program opens, you will see Available Templates, from where you can select the type of publication you want to create. You can choose to open one of Publisher’s many predesigned publications and replace the text and graphics with your own information, or you can use a blank publication to create a publication from scratch. To create a publication from scratch, select More Blank Page Sizes.

Welcome message from author
This document is posted to help you gain knowledge. Please leave a comment to let me know what you think about it! Share it to your friends and learn new things together.
Transcript

1 Training & Technology Solutions
Queens College ~ Office of Information Technology ~ Training & Technology Solutions
718-997-4875 ~ [email protected] ~ I-Bldg 214
Microsoft Office Publisher 2010
Microsoft Publisher is a desktop publishing application which allows you to create artistic
documents as brochures, flyers, and newsletters.
To open Microsoft Office Publisher:
1. Click on the Start Menu/Window Orb.
2. Select All Programs.
3. Select Microsoft Office.
4. Select Microsoft Office Publisher 2010.
When the program opens, you will see Available Templates, from where you can select the type
of publication you want to create. You can choose to open one of Publisher’s many predesigned
publications and replace the text and graphics with your own information, or you can use a blank
publication to create a publication from scratch.
To create a publication from scratch, select More Blank Page Sizes.

2 Training & Technology Solutions
Queens College ~ Office of Information Technology ~ Training & Technology Solutions
718-997-4875 ~ [email protected] ~ I-Bldg 214
On the new page, select the page size you want your publication to have. For this publication
we’ll choose: Letter (Portrait) 8.5x11”
Everything in Publisher document is an individual element, whether it is a block of text, a
graphic, or a table. These elements are inserted into a publication using the Ribbon.
The Ribbon
The Ribbon is the white bar on top of the window. Through the ribbon, you can customize your
Word document to your liking through the use of the 7 tabs.

3 Training & Technology Solutions
Queens College ~ Office of Information Technology ~ Training & Technology Solutions
718-997-4875 ~ [email protected] ~ I-Bldg 214
Text Boxes
To Create a Text Box:
1. Select the Draw Text Box icon located on the Home or Insert Tab on the Ribbon.
2. Drag your mouse over the desired area on the screen you want your text box to take up.
3. When the mouse is released, the text box will then be inserted, surrounded by re-sizing
handles.
4. In the newly created text box type “Welcome to the MS Publisher Training”
If the text box is not large enough to fit all the texts, a Text in Overflow indicator (pictured
below) will display when the box is selected.

4 Training & Technology Solutions
Queens College ~ Office of Information Technology ~ Training & Technology Solutions
718-997-4875 ~ [email protected] ~ I-Bldg 214
To Resize Objects:
1. To fix the Text in Overflow, rest the mouse over one of the text box handles, and when a
double-headed resize arrow appears, click and drag to enlarge the box.
2. Once the text box can accommodate all the text the Text in Overflow indicator will
disappear.
3. Create a new text box that states “A simple way to learn Publisher” and resize the text
box to the appropriate size.
To Move Objects:
1. To reposition an object, click on the
object to select it then move the
mouse slowly towards the border of
the object.
2. When the mouse changes into a four-
headed arrow, hold down the left
mouse and drag the whole object to
the desired position.

5 Training & Technology Solutions
Queens College ~ Office of Information Technology ~ Training & Technology Solutions
718-997-4875 ~ [email protected] ~ I-Bldg 214
To Delete an Object:
1. Select the object by click on it with the mouse.
2. Right click on that object.
3. A shortcut menu will open, select Delete Object.
6 Training & Technology Solutions
Queens College ~ Office of Information Technology ~ Training & Technology Solutions
718-997-4875 ~ [email protected] ~ I-Bldg 214
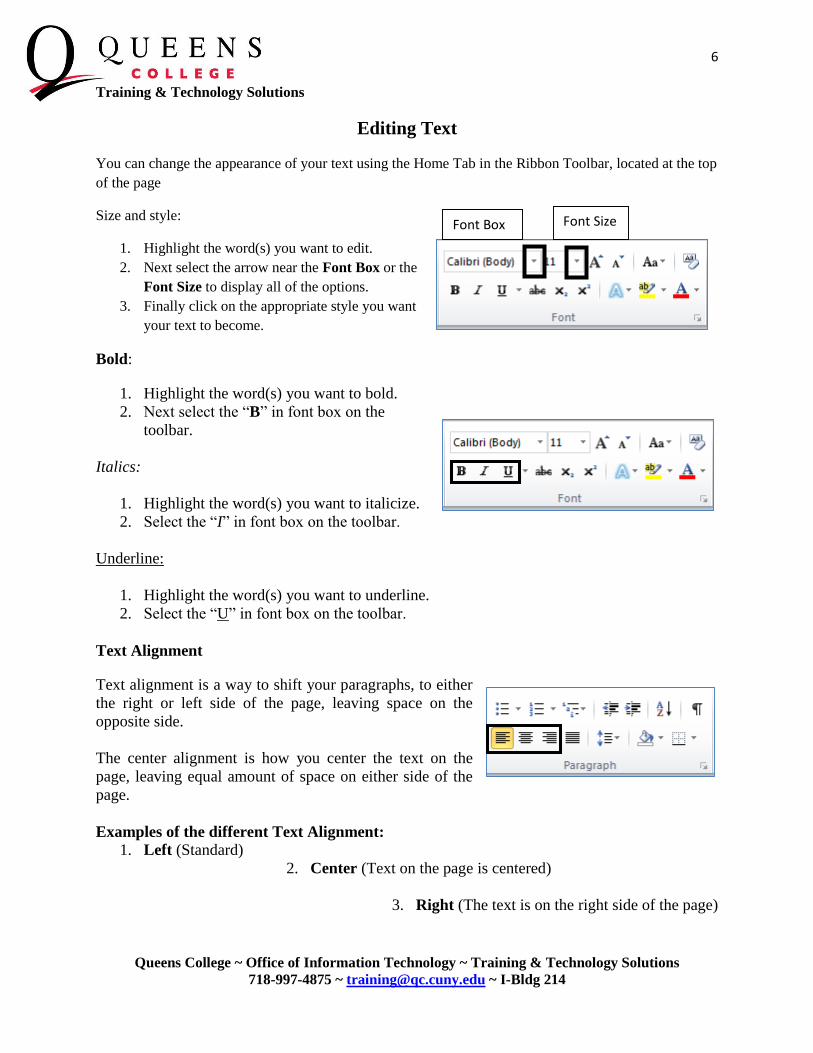
Editing Text
You can change the appearance of your text using the Home Tab in the Ribbon Toolbar, located at the top
of the page
Size and style:
1. Highlight the word(s) you want to edit.
2. Next select the arrow near the Font Box or the
Font Size to display all of the options.
3. Finally click on the appropriate style you want
your text to become.
Bold:
1. Highlight the word(s) you want to bold.
2. Next select the “B” in font box on the
toolbar.
Italics:
1. Highlight the word(s) you want to italicize.
2. Select the “I” in font box on the toolbar.
Underline:
1. Highlight the word(s) you want to underline.
2. Select the “U” in font box on the toolbar.
Text Alignment
Text alignment is a way to shift your paragraphs, to either
the right or left side of the page, leaving space on the
opposite side.
The center alignment is how you center the text on the
page, leaving equal amount of space on either side of the
page.
Examples of the different Text Alignment:
1. Left (Standard)
2. Center (Text on the page is centered)
3. Right (The text is on the right side of the page)
Font Box Font Size
7 Training & Technology Solutions
Queens College ~ Office of Information Technology ~ Training & Technology Solutions
718-997-4875 ~ [email protected] ~ I-Bldg 214
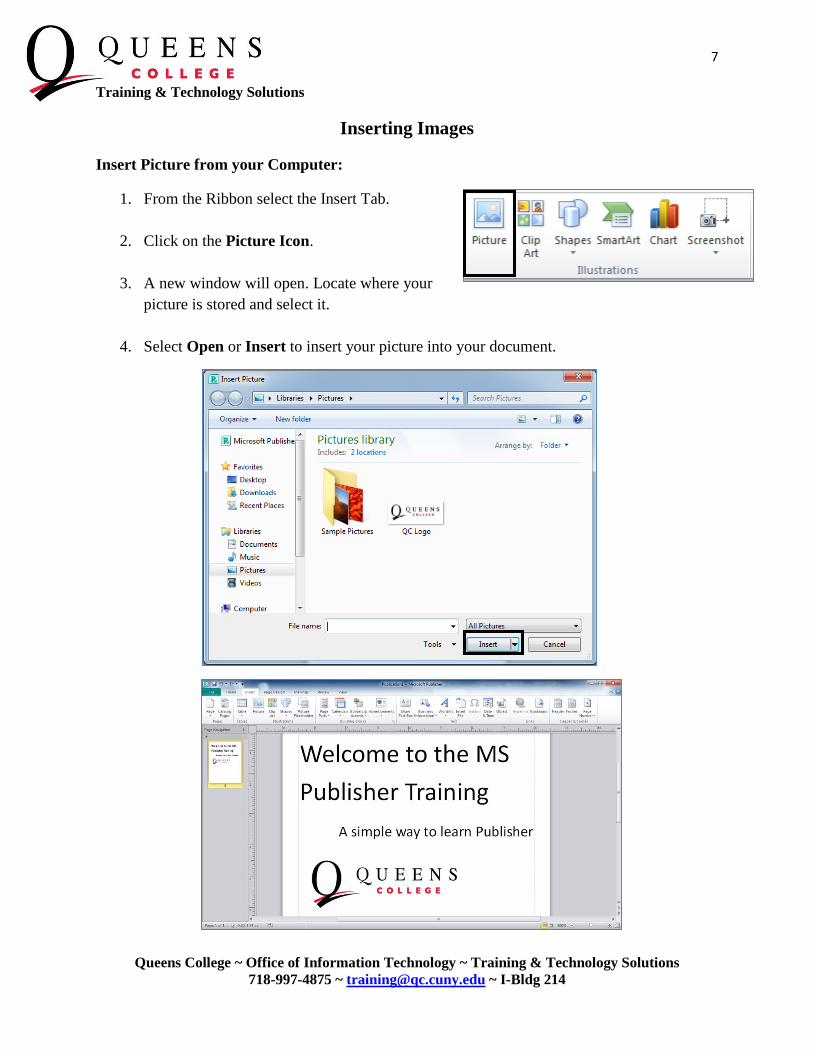
Inserting Images
Insert Picture from your Computer:
1. From the Ribbon select the Insert Tab.
2. Click on the Picture Icon.
3. A new window will open. Locate where your
picture is stored and select it.
4. Select Open or Insert to insert your picture into your document.

8 Training & Technology Solutions
Queens College ~ Office of Information Technology ~ Training & Technology Solutions
718-997-4875 ~ [email protected] ~ I-Bldg 214
Insert Picture from Clip Art:
1. From the Ribbon select the Insert Tab.
2. Click on the Clip Art Icon. The Clip Art Menu
should appear on the right side of the screen.
3. In the Search for: box enter a word or phrase.
4. Select Go.
5. Click once on any picture from the clip art search result to
add it to your presentation.
6. Closed the Clip Art menu when done by selecting the X.

9 Training & Technology Solutions
Queens College ~ Office of Information Technology ~ Training & Technology Solutions
718-997-4875 ~ [email protected] ~ I-Bldg 214
Adding Borders and Colors
To Add a Border to an Object:
1. Select the object you want to add a border to.
2. Right-click on the object and choose the Format Text/Format Picture option from the
shortcut menu.
3. Select the Colors and Lines tab.
4. Under the Fill section, select the dropdown
menu near the Color section. This will allow you to
add a background color to an object. If the color you
want does not appear, select “More Colors...” to see
more colors.
5. Under the Line section, select the dropdown
menu near Color section. This will allow you to add a
border color to an object. If the color you want does
not appear, select “More Colors...” to see more
colors.

10 Training & Technology Solutions
Queens College ~ Office of Information Technology ~ Training & Technology Solutions
718-997-4875 ~ [email protected] ~ I-Bldg 214
Saving
Saving Your Work:
1. Select File Tab, located at the top left of the screen.
2. Select Save.
3. Using the menu of the left hand side locate a place to save
your publication.
4. In the File Name box, name your publication.
5. Select the Save button.

11 Training & Technology Solutions
Queens College ~ Office of Information Technology ~ Training & Technology Solutions
718-997-4875 ~ [email protected] ~ I-Bldg 214
Pre-Designed Publication
Instead of creating a publication from scratch, you can open one of Publisher’s pre-designed
publications and modify them to your own requirements.
1. After opening Publisher, select one of the many categories from the Available Template
Menu.
2. Double click on the type of design/template from the middle section of the screen, or
choose from one of the blank designs.
The text and pictures can now be replaced with your own information. You can also
automatically change the color, font, and design of the publication.

12 Training & Technology Solutions
Queens College ~ Office of Information Technology ~ Training & Technology Solutions
718-997-4875 ~ [email protected] ~ I-Bldg 214
Color and Font Schemes
Changing the Color Scheme:
1. Click on the Page Design Tab, located on the Ribbon.
2. In the Scheme section, click on the various options to see the color scheme applied to the
publication.
Changing the Font Scheme:
1. In the Page Design Tab, select the Font icon.
2. In the Font drop-down menu, click on the various options to see the font scheme applied
to the publication.
Related Documents