WWW.ANSELL.COM The simple solution for attaching chemical gloves to coveralls • Innovative design utilising the latest polymer technology • Creates a liquid tight seal between glove and cuff • Consistent and reliable alternative to taping • Quick and easy fit - improves productivity • Works with a wide variety of chemical glove thicknesses • Ribbed cone and collar for secure attachment • AlphaTec® - Advanced Chemical Protection Industries • Agriculture • Chemical • Construction • Food Manufacturing • Life Sciences • Oil and Petrochemical • Waste Disposal Applications • Caustic clean downs • Chemical handling/ transportation • Industrial tank cleaning • Paint spraying • Sewage purification inspections • Solvent degreasing and parts cleaning Providing an integrated chemical protection solution Glove Connector Tested in accordance with ISO 17491-3:2008 - Determination of resistance to penetration by a jet of liquid (jet test) Coverall Ansell Glove Brand & Material Technology MICROGARD® 2300 PLUS MICROFLEX® 93-260 0.198mm Neoprene & Nitrile AlphaTec® 58-530 0.33mm Nitrile MICROCHEM® 3000 ChemTek TM 38-612 0.3mm Butyl/Viton Neotop TM 29-500 0.7mm Neoprene MICROCHEM® 5000 Scorpio® 09-924 1.5mm Neoprene

Welcome message from author
This document is posted to help you gain knowledge. Please leave a comment to let me know what you think about it! Share it to your friends and learn new things together.
Transcript

WWW.ANSELL.COM
The simple solution for attaching chemical gloves to coveralls
• Innovative design utilising the latest polymer technology
• Creates a liquid tight seal between glove and cuff
• Consistent and reliable alternative to taping
• Quick and easy fi t - improves productivity
• Works with a wide variety of chemical glove thicknesses
• Ribbed cone and collar for secure attachment
• AlphaTec® - Advanced Chemical Protection
Industries• Agriculture
• Chemical
• Construction
• Food Manufacturing
• Life Sciences
• Oil and Petrochemical
• Waste Disposal
MICROGARD®
Applications• Caustic clean downs
• Chemical handling/ transportation
• Industrial tank cleaning
• Paint spraying
• Sewage purifi cation inspections
• Solvent degreasing and parts cleaning
Providing an integrated chemical protection solution
Glove Connector
Tested in accordance with ISO 17491-3:2008 - Determination of resistance to penetration by a jet of liquid (jet test)
Coverall Ansell Glove Brand & Material Technology
MICROGARD® 2300 PLUS
MICROFLEX® 93-260 0.198mm Neoprene & Nitrile
AlphaTec® 58-530 0.33mm Nitrile
MICROCHEM® 3000ChemTekTM 38-612 0.3mm Butyl/Viton
NeotopTM 29-500 0.7mm Neoprene
MICROCHEM® 5000 Scorpio® 09-924 1.5mm Neoprene
WWW.ANSELL.COM
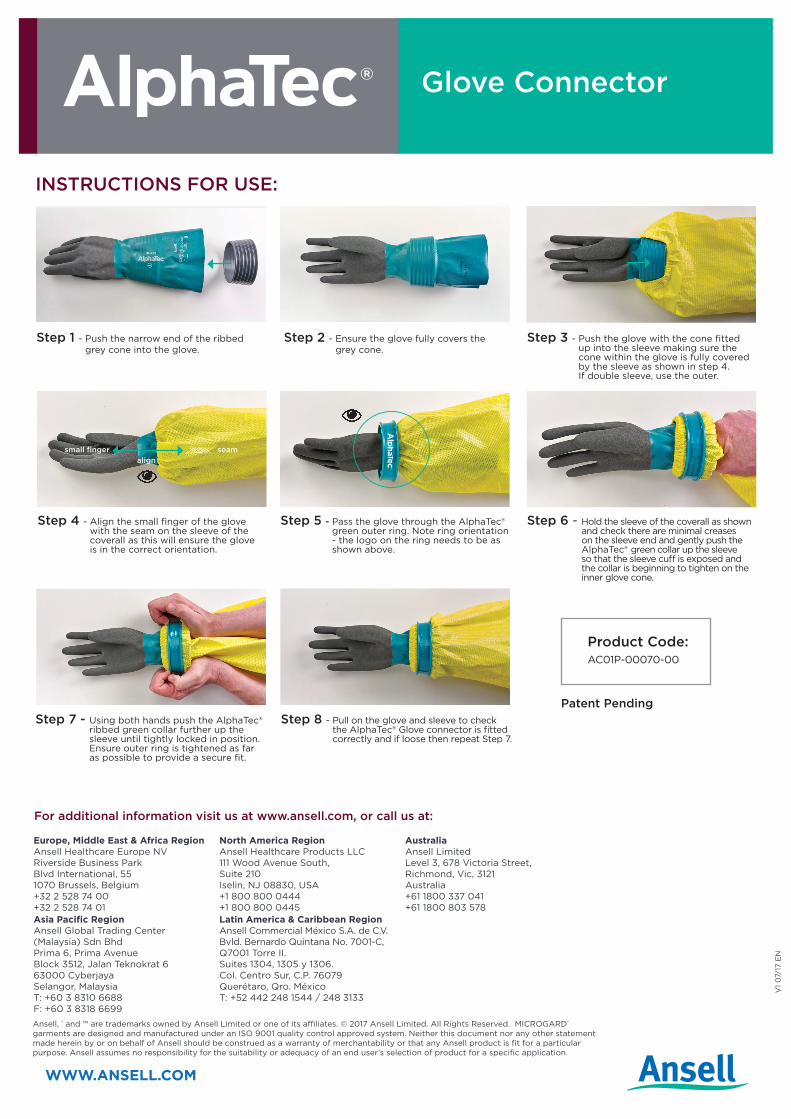
INSTRUCTIONS FOR USE:
Ansell, ® and ™ are trademarks owned by Ansell Limited or one of its affiliates. © 2017 Ansell Limited. All Rights Reserved. MICROGARD® garments are designed and manufactured under an ISO 9001 quality control approved system. Neither this document nor any other statement made herein by or on behalf of Ansell should be construed as a warranty of merchantability or that any Ansell product is fit for a particular purpose. Ansell assumes no responsibility for the suitability or adequacy of an end user’s selection of product for a specific application.
V1
07/
17 E
N
For additional information visit us at www.ansell.com, or call us at:
Europe, Middle East & Africa RegionAnsell Healthcare Europe NVRiverside Business ParkBlvd International, 551070 Brussels, Belgium+32 2 528 74 00+32 2 528 74 01
North America RegionAnsell Healthcare Products LLC111 Wood Avenue South, Suite 210Iselin, NJ 08830, USA+1 800 800 0444+1 800 800 0445
AustraliaAnsell LimitedLevel 3, 678 Victoria Street,Richmond, Vic, 3121Australia+61 1800 337 041+61 1800 803 578
Latin America & Caribbean RegionAnsell Commercial México S.A. de C.V.Bvld. Bernardo Quintana No. 7001-C, Q7001 Torre II.Suites 1304, 1305 y 1306. Col. Centro Sur, C.P. 76079Querétaro, Qro. MéxicoT: +52 442 248 1544 / 248 3133
Asia Pacific RegionAnsell Global Trading Center (Malaysia) Sdn BhdPrima 6, Prima AvenueBlock 3512, Jalan Teknokrat 663000 CyberjayaSelangor, MalaysiaT: +60 3 8310 6688F: +60 3 8318 6699
MICROGARD® Glove Connector
Step 1 - Push the narrow end of the ribbed grey cone into the glove.
Step 3 - Push the glove with the cone fitted up into the sleeve making sure the cone within the glove is fully covered by the sleeve as shown in step 4. If double sleeve, use the outer.
Step 5 - Pass the glove through the AlphaTec® green outer ring. Note ring orientation - the logo on the ring needs to be as shown above.
Step 7 - Using both hands push the AlphaTec® ribbed green collar further up the sleeve until tightly locked in position. Ensure outer ring is tightened as far as possible to provide a secure fit.
Step 2 - Ensure the glove fully covers the grey cone.
Step 4 - Align the small finger of the glove with the seam on the sleeve of the coverall as this will ensure the glove is in the correct orientation.
Step 6 - Hold the sleeve of the coverall as shown and check there are minimal creases on the sleeve end and gently push the AlphaTec® green collar up the sleeve so that the sleeve cuff is exposed and the collar is beginning to tighten on the inner glove cone.
Step 8 - Pull on the glove and sleeve to check the AlphaTec® Glove connector is fitted correctly and if loose then repeat Step 7.
seamsmall fingeralign
Product Code:AC01P-00070-00
Patent Pending
Related Documents