Metalogix ® Archive Manager for Exchange 8.3 PST Importer Administration Guide

Welcome message from author
This document is posted to help you gain knowledge. Please leave a comment to let me know what you think about it! Share it to your friends and learn new things together.
Transcript
Metalogix® Archive Manager for Exchange 8.3
PST Importer Administration Guide
© 2020 Quest Software Inc. ALL RIGHTS RESERVED.
This guide contains proprietary information protected by copyright. The software described in this guide isfurnished under a software license or nondisclosure agreement. This software may be used or copied only inaccordance with the terms of the applicable agreement. No part of this guide may be reproduced or transmitted inany form or by any means, electronic or mechanical, including photocopying and recording for any purpose otherthan the purchaser’s personal use without the written permission of Quest Software Inc.
The information in this document is provided in connection with Quest Software products. No license, express orimplied, by estoppel or otherwise, to any intellectual property right is granted by this document or in connectionwith the sale of Quest Software products. EXCEPT AS SET FORTH IN THE TERMS AND CONDITIONS AS SPECIFIED INTHE LICENSE AGREEMENT FOR THIS PRODUCT, QUEST SOFTWARE ASSUMES NO LIABILITY WHATSOEVER ANDDISCLAIMS ANY EXPRESS, IMPLIED OR STATUTORY WARRANTY RELATING TO ITS PRODUCTS INCLUDING, BUT NOTLIMITED TO, THE IMPLIED WARRANTY OF MERCHANTABILITY, FITNESS FOR A PARTICULAR PURPOSE, OR NON-INFRINGEMENT. IN NO EVENT SHALL QUEST SOFTWARE BE LIABLE FOR ANY DIRECT, INDIRECT, CONSEQUENTIAL,PUNITIVE, SPECIAL OR INCIDENTAL DAMAGES (INCLUDING, WITHOUT LIMITATION, DAMAGES FOR LOSS OF PROFITS,BUSINESS INTERRUPTION OR LOSS OF INFORMATION) ARISING OUT OF THE USE OR INABILITY TO USE THISDOCUMENT, EVEN IF QUEST SOFTWARE HAS BEEN ADVISED OF THE POSSIBILITY OF SUCH DAMAGES. QuestSoftware makes no representations or warranties with respect to the accuracy or completeness of the contents ofthis document and reserves the right to make changes to specifications and product descriptions at any timewithout notice. Quest Software does not make any commitment to update the information contained in thisdocument.
If you have any questions regarding your potential use of this material, contact:
Quest Software Inc.Attn: LEGAL Dept.4 Polaris WayAliso Viejo, CA 92656
Refer to our Web site (https://www.quest.com) for regional and international office information.
Patents
Quest Software is proud of our advanced technology. Patents and pending patents may apply to this product. Forthe most current information about applicable patents for this product, please visit our website athttps://www.quest.com/legal.
Trademarks
Quest, the Quest logo, and Metalogix are trademarks and registered trademarks of Quest Software Inc. and itsaffiliates. For a complete list of Quest marks, visit https://www.quest.com/legal/trademark-information.aspx. Allother trademarks and registered trademarks are property of their respective owners.
Legend
CAUTION: A caution icon indicates potential damage to hardware or loss of data if instructions arenot followed.
IMPORTANT, NOTE, TIP, MOBILE OR VIDEO: An information icon indicates supporting information.
Metalogix® Archive Manager for Exchange
Updated November 2020
Version 8.3
Metalogix Archive Manager for Exchange PST Importer Adminis tration Guide 3
Contents
About the documentation ........................................................................................................... 4
Basic requirements and preparation .......................................................................................... 5
PST Importer .............................................................................................................................. 7
Manual importing of .pst files .................................................................................................. 7
Configuring the settings for manual importing .................................................................................................8
Folders tab ....................................................................................................................................................8
Analyse tab .................................................................................................................................................10
Default tab ...................................................................................................................................................11
Archive tab ...................................................................................................................................................14
How to proceed at manual importing of .pst files ..........................................................................................15
Loading a .pst file .................................................................................................................................................16
How to set a specific owner/ specific folder ....................................................................................................17
Importing a .pst file ...............................................................................................................................................20
Analyze function ....................................................................................................................................................21
How to get summary information about a .pst file .........................................................................................24
Log files ..................................................................................................................................................................26
Automated importing of .pst files ........................................................................................... 28
Installing the Gatherer service on client computers ......................................................................................29
How to enable the Gatherer service on a firewalled Windows 7 and 10 ........................................33
How does the process work ..............................................................................................................................35
Configuring settings for automated importing ................................................................................................36
Ownership tab ............................................................................................................................................37
Search tab ...................................................................................................................................................40
Upload tab ..................................................................................................................................................42
How to modify the settings for a client computer ...........................................................................................43
Managing client computers ................................................................................................................................45
Manual adding of a new client computer ..............................................................................................45
Automatic registration of new client computers ..................................................................................46
Importing of new client computers .........................................................................................................48
Removing a client computer ...................................................................................................................50
Disabling a client computer ....................................................................................................................50
How to start searching immediately for .pst files ...........................................................................................52
How to start uploading .pst files immediately .................................................................................................53
How to import and archive uploaded .pst files ...............................................................................................55
How to disable uploading of a .pst file .............................................................................................................57
How to set properties for a .pst file ...................................................................................................................58
Addendum ................................................................................................................................ 61
About Us ................................................................................................................................... 63
Contacting Quest ................................................................................................................. 63
Technical Support Resources ............................................................................................... 63
4About the documentation
Metalogix Archive Manager for Exchange PST Importer Adminis tration Guide
About the documentation
1
Introduction
PST Importer is an Archive Manager for Exchange application that is used for retrieving and
archiving Microsoft Outlook items from .pst files. This manual describes all procedures necessary
for configuring and using PST Importer, and explains how to use it for importing Microsoft
Outlook data files.
How to use this manual
For better understanding it is recommended to read this manual before using PST Importer.
Moreover, the default settings need to be specified first.
Prerequisite knowledge
Working knowledge of MS Exchange Server 2019/2016/2013 and of MS Outlook is a must.
5Bas ic requirements and preparation
Metalogix Archive Manager for Exchange PST Importer Adminis tration Guide
Basic requirements and preparation
2
Software Requirements
On the computer where the PST Importer should run, you need to have installed:
· Windows Server 2012 / 2016 / 2019
· .NET Framework 2.0 SP2 or higher
· Outlook 2013 (32bit) /2016 (32 bit) / 2019 (32 bit)
o In case of Exchange 2013, Outlook 2013 is needed.
o In case of Exchange 2016, Outlook 2013/2016 is needed.
o In case of Exchange 2019, Outlook 2019 is needed.
NOTE: All versions of Outlook specified above require the latest Office service pack and
public updates..
Since Microsoft Outlook data files (.pst files) are handled exclusively by Microsoft Outlook
Extended MAPI, it is necessary to have it configured properly on the computer where importing
of .pst files takes place. PST Importer works with two types of .pst files:
· ANSI data files
· UNICODE data files
Configuring Extended MAPI
The Extended MAPI (the messaging API used by Microsoft Outlook) cannot handle Microsoft
Outlook data files, unless its configuration file (MAPISVC.INF) contains messaging services to
handle them. Therefore all messaging services installed on the computer must be added to the
MAPISVC.INF file.
· When no Microsoft Outlook is installed, then the MAPISVC.INF file is located in the Windows
system folder (C:\Windows\system32), and the Extended MAPI configuration is read from this
file.
· When Microsoft Outlook is installed, then a MAPISVC.INF file is created in the C:\Program
Files\Common Files\System\MSMAPI\1003 folder, with all messaging services having been
added to Microsoft Outlook included.
Configuration file located under C:\Windows\system32\ MAPISVC.INF must be updated
with the one located under C:\Program Files\Common Files\ System\ MSMAPI\
1003\ MAPISVC.INF before running PST Importer.
6Bas ic requirements and preparation
Metalogix Archive Manager for Exchange PST Importer Adminis tration Guide
To update Extended MAPI configuration file (MAPISVC.INF), follow these steps:
1. Locate the MAPISVC.INF in the Windows system folder (C:\Windows\system32).
2. Locate the MAPISVC.INF in the Common Files\System folder (C:\Program
Files\Common Files\System\MSMAPI\1003\).
3. Make a backup copy of both files.
4. Overwrite the MAPISVC.INF file in the Windows system folder (in C:
\Windows\system32) with the one located in the Common Files\System folder (C:
\Program Files\Common Files\ System\ MSMAPI\1003\). This will
ensure that Extended MAPI will be using the proper configuration file.
In order to work with Microsoft Outlook data files (.pst files), it is crucial to have the
MAPISVC.INF file configured correctly. If messaging services are missing in the
MAPISVC.INF file, no importing of Microsoft Outlook data files (.pst files) will take place. Note
that some of the values are different on different computers.
For more information see the Addendum section.
When modifications are done, close all applications which are using Extended MAPI to force the
reload of MAPISVC.INF.
When you are done with the Extended MAPI configuration file, proceed further.
61
7PST Importer
Meta logix Archive Manager for Exchange PST Importer Adminis tration Guide
PST Importer
3
PST Importer can be used for manual as well as automated importing of Microsoft Outlook data
files and subsequent archiving of their items. We will describe both types of importing in detail.
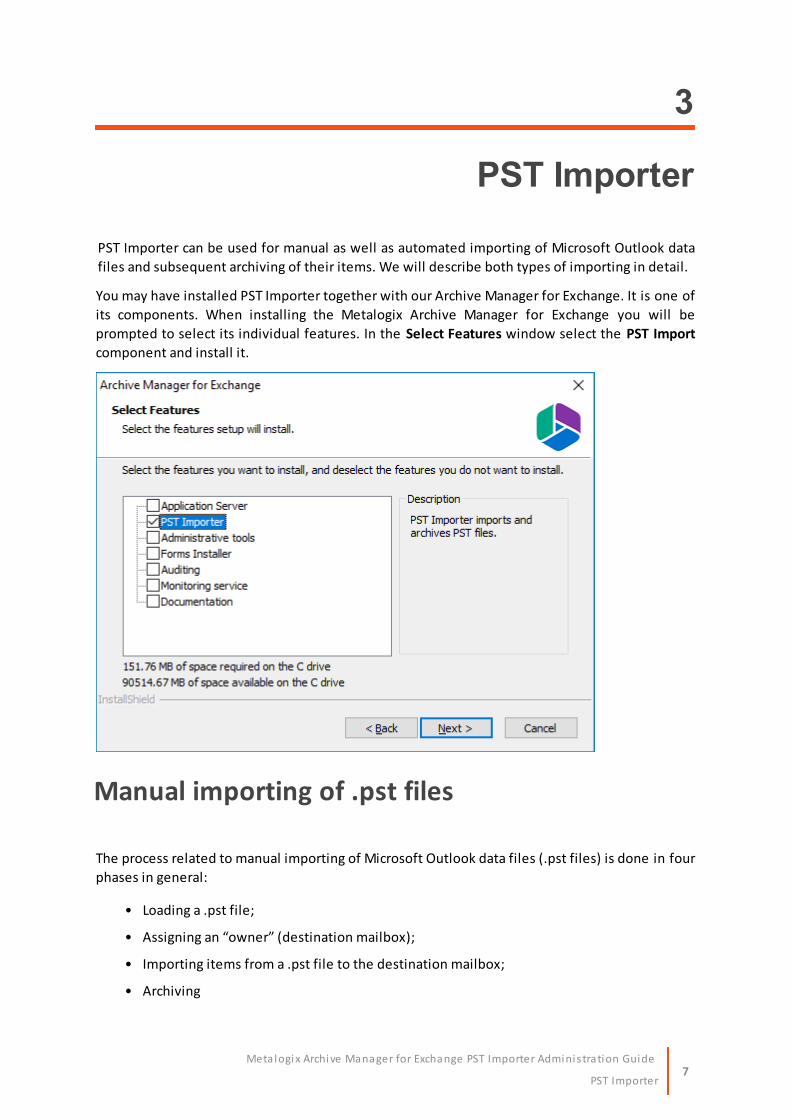
You may have installed PST Importer together with our Archive Manager for Exchange. It is one of
its components. When installing the Metalogix Archive Manager for Exchange you will be
prompted to select its individual features. In the Select Features window select the PST Import
component and install it.
Manual importing of .pst files
The process related to manual importing of Microsoft Outlook data files (.pst files) is done in four
phases in general:
• Loading a .pst file;
• Assigning an “owner” (destination mailbox);
• Importing items from a .pst file to the destination mailbox;
• Archiving
8PST Importer
Meta logix Archive Manager for Exchange PST Importer Adminis tration Guide
Before using PST Importer, you need to specify the configuration settings, i.e. the location of four
folders that will be used by the program (Import, BadProcessed, Processed, and Log). It is also
necessary to specify a default “owner” and a default “destination folder”. By an “owner” we
mean a “destination mailbox” where the items from a .pst file will be imported to. By a
“destination folder” we mean an Outlook folder in the owner’s mailbox which will be the root
folder for the whole .pst tree structure, if specified.
Configuring the settings for manual importing
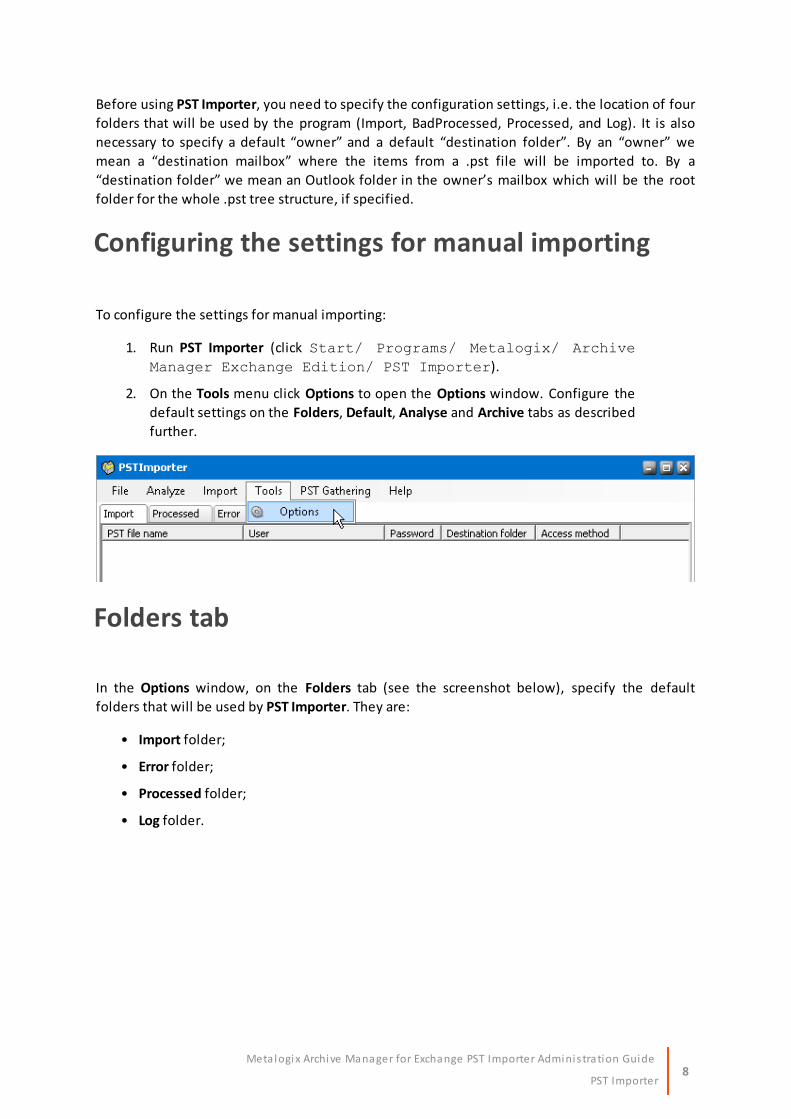
To configure the settings for manual importing:
1. Run PST Importer (click Start/ Programs/ Metalogix/ Archive
Manager Exchange Edition/ PST Importer).
2. On the Tools menu click Options to open the Options window. Configure the
default settings on the Folders, Default, Analyse and Archive tabs as described
further.
Folders tab
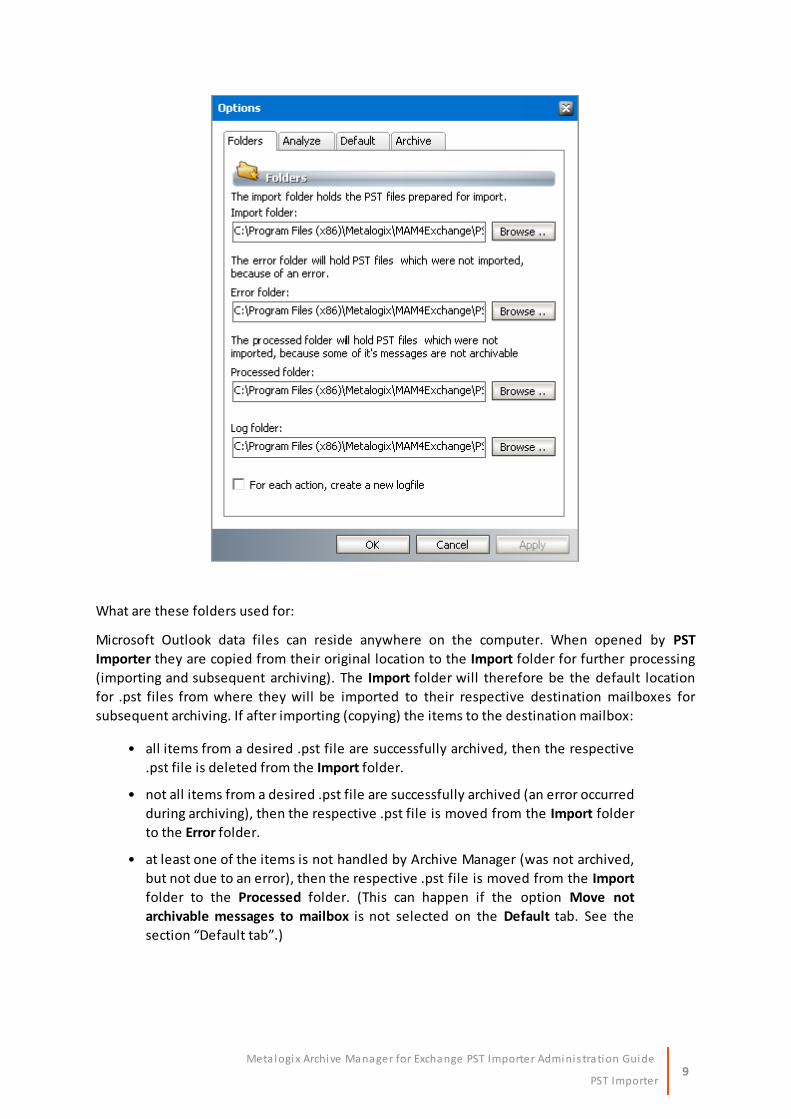
In the Options window, on the Folders tab (see the screenshot below), specify the default
folders that will be used by PST Importer. They are:
• Import folder;
• Error folder;
• Processed folder;
• Log folder.
9PST Importer
Meta logix Archive Manager for Exchange PST Importer Adminis tration Guide
What are these folders used for:
Microsoft Outlook data files can reside anywhere on the computer. When opened by PST
Importer they are copied from their original location to the Import folder for further processing
(importing and subsequent archiving). The Import folder will therefore be the default location
for .pst files from where they will be imported to their respective destination mailboxes for
subsequent archiving. If after importing (copying) the items to the destination mailbox:
• all items from a desired .pst file are successfully archived, then the respective
.pst file is deleted from the Import folder.
• not all items from a desired .pst file are successfully archived (an error occurred
during archiving), then the respective .pst file is moved from the Import folder
to the Error folder.
• at least one of the items is not handled by Archive Manager (was not archived,
but not due to an error), then the respective .pst file is moved from the Import
folder to the Processed folder. (This can happen if the option Move not
archivable messages to mailbox is not selected on the Default tab. See the
section “Default tab”.)
10PST Importer
Meta logix Archive Manager for Exchange PST Importer Adminis tration Guide
The Log folder stores the log files generated by PST Importer. Log files are used for recording all
the activities taken on .pst files (e.g. analyze, report).
All the above mentioned folders (Import, Error, Processed, and Log) are created by default under
C:\Program Files (x86)\ Metalogix\ MAM4Exchange\ PST. You may, however,
select another location while using the Browse button.
On this tab you may specify how log files will be created. Should you select the For each action,
create a new logfile check box, then a separate log file will be created for every action (analyze,
report). By default, all logs are written into one log file.
When you are done, click Apply.
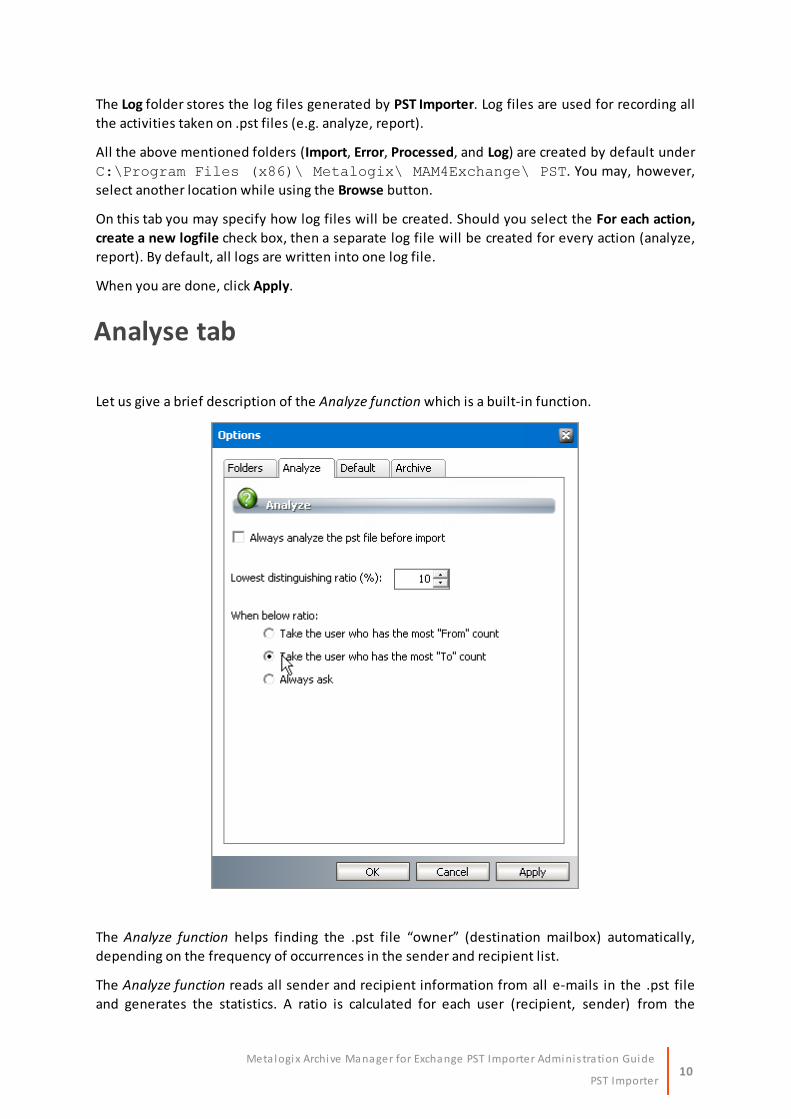
Analyse tab
Let us give a brief description of the Analyze function which is a built-in function.
The Analyze function helps finding the .pst file “owner” (destination mailbox) automatically,
depending on the frequency of occurrences in the sender and recipient list.
The Analyze function reads all sender and recipient information from all e-mails in the .pst file
and generates the statistics. A ratio is calculated for each user (recipient, sender) from the
11PST Importer
Meta logix Archive Manager for Exchange PST Importer Adminis tration Guide
respective .pst file. This means that a list of all users is created and the number of messages
where the respective user is a sender (From) and the number of messages where the respective
user is a recipient (To, Cc, Bcc) is calculated. Then a ratio is produced. The ratio is calculated for
each user as follows: the total sum of occurrences in the recipient list and in the sender list
divided by the total sum of recipients and senders, as a percentage.
The biggest ratio indicates the highest probability; therefore the user with the highest ratio
should be the “owner”, and would be assigned by the Analyze function automatically. In some
cases there might be several users whose ratios differ only slightly, and in such cases we want
the administrator to choose whom to select as the “owner”.
For that purpose you may specify the Lowest distinguishing ratio (%).
• If the difference between the two highest ratios is higher than the specified
lowest distinguishing ratio, then the “owner” (destination mailbox) is
assigned automatically;
• If the difference between the two highest ratios is lower than the specified
lowest distinguishing ratio then:
i) you will be either prompted to assign the owner manually, if the Always
ask option is selected; or
ii) the owner will be assigned by the Analyze function depending on which
of the other two options are selected (Take the user who has the most
“From” count, or Take the user who has the most “To” count).
IMPORTANT NOTE: THIS HAPPENS IN THE CASE THAT SUCH A USER (MAILBOX) EXISTS ON THE MS
EXCHANGE SERVER AND HAS BEEN SYNCHRONIZED WITH ARCHIVE MANAGER; OTHERWISE ITEMS
ARE IMPORTED INTO THE DEFAULT OWNER’S MAILBOX!!!
For example, let’s say the Lowest distinguishing ratio (%) is set to 5. If, after running the Analyze
function, two users are generated with their ratios differing by 4 or less, then you would be:
• prompted to select the owner, if the Always ask option is selected; or
• the owner will be assigned automatically if any of the two other options are
selected (Take the user who has the most “From” count, or Take the user
who has the most “To” count).
If you want to control the results of the analysis manually, select the Always ask option;
otherwise select one of the two other options and the owner will be assigned automatically.
Select the Always analyze the pst file before import check box to make the analyze process
automatic for every manually loaded .pst file.
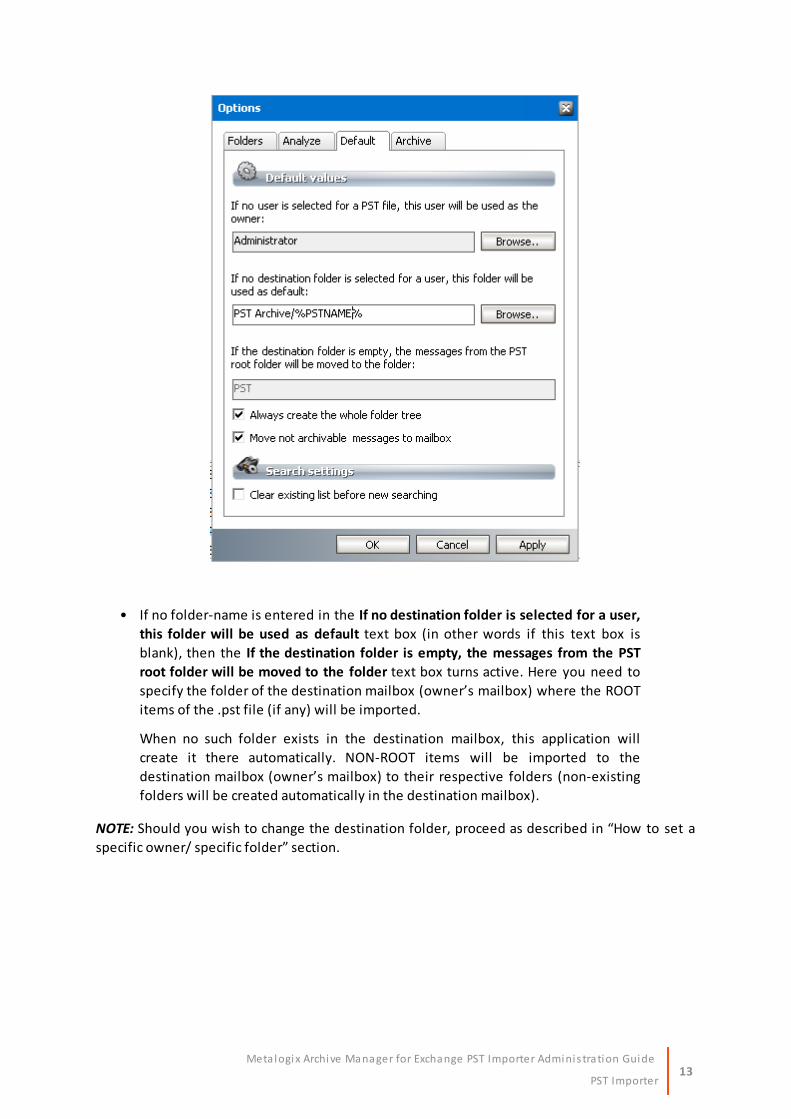
Default tab
On the Default tab please set a default destination mailbox (“owner”) and a default destination
folder. These default values will be assigned to all manually loaded .pst files. However, it is still
12PST Importer
Meta logix Archive Manager for Exchange PST Importer Adminis tration Guide
possible to assign another destination mailbox/destination folder to a specific .pst file (see the
section “How to set a specific owner/specific folder”).
The .pst file will be imported to the destination mailbox (“owner”), if no other user is selected.
To specify the default owner, use the Browse button.
The default destination folder for a .pst file will be chosen as follows:
• If a folder-name is entered in the If no destination folder is selected for a user,
this folder will be used as default text box then that folder will be the root folder
for the imported .pst file.
NOTE: Even when no such folder exists in the destination mailbox, this
application will create it there automatically.
IMPORTANT NOTE: It is possible to create a unique folder for every imported .pst file. This is
advantageous since items of more .pst files will not be mixed in one folder and user defined
sorting will be preserved.
To create this unique folder for every .pst file, enter one of the following tags:
%PSTNAME% - it will be replaced by the display name of the .pst file
%PSTFILENAME% - it will be replaced by the file name (without extension) of
the .pst file
Example: PST Archive/%PSTNAME%
13PST Importer
Meta logix Archive Manager for Exchange PST Importer Adminis tration Guide
• If no folder-name is entered in the If no destination folder is selected for a user,
this folder will be used as default text box (in other words if this text box is
blank), then the If the destination folder is empty, the messages from the PST
root folder will be moved to the folder text box turns active. Here you need to
specify the folder of the destination mailbox (owner’s mailbox) where the ROOT
items of the .pst file (if any) will be imported.
When no such folder exists in the destination mailbox, this application will
create it there automatically. NON-ROOT items will be imported to the
destination mailbox (owner’s mailbox) to their respective folders (non-existing
folders will be created automatically in the destination mailbox).
NOTE: Should you wish to change the destination folder, proceed as described in “How to set a
specific owner/ specific folder” section.
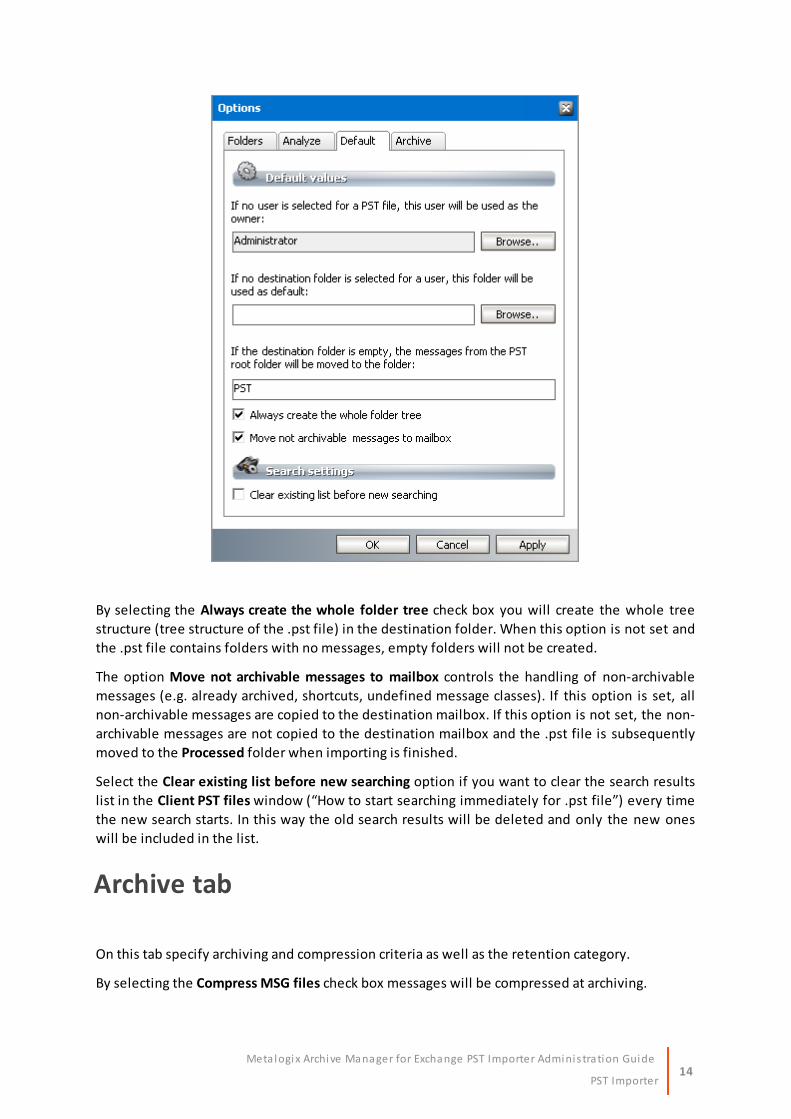
14PST Importer
Meta logix Archive Manager for Exchange PST Importer Adminis tration Guide
By selecting the Always create the whole folder tree check box you will create the whole tree
structure (tree structure of the .pst file) in the destination folder. When this option is not set and
the .pst file contains folders with no messages, empty folders will not be created.
The option Move not archivable messages to mailbox controls the handling of non-archivable
messages (e.g. already archived, shortcuts, undefined message classes). If this option is set, all
non-archivable messages are copied to the destination mailbox. If this option is not set, the non-
archivable messages are not copied to the destination mailbox and the .pst file is subsequently
moved to the Processed folder when importing is finished.
Select the Clear existing list before new searching option if you want to clear the search results
list in the Client PST files window (“How to start searching immediately for .pst file”) every time
the new search starts. In this way the old search results will be deleted and only the new ones
will be included in the list.
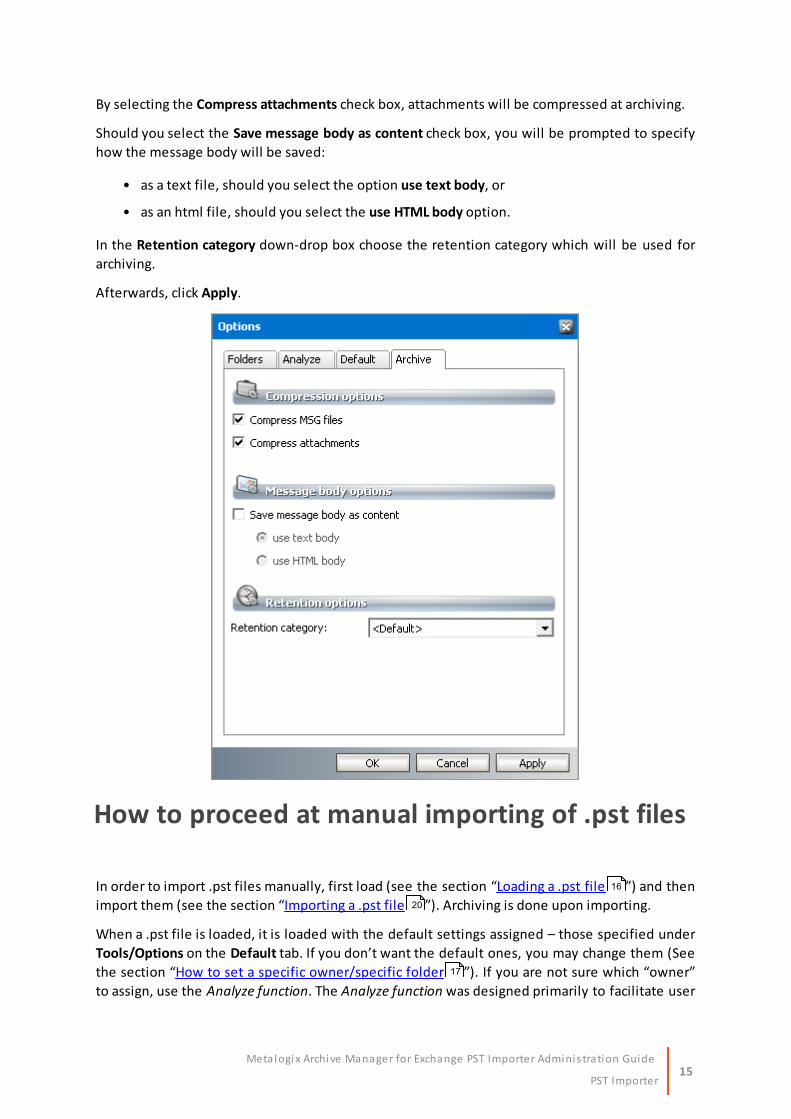
Archive tab
On this tab specify archiving and compression criteria as well as the retention category.
By selecting the Compress MSG files check box messages will be compressed at archiving.
15PST Importer
Meta logix Archive Manager for Exchange PST Importer Adminis tration Guide
By selecting the Compress attachments check box, attachments will be compressed at archiving.
Should you select the Save message body as content check box, you will be prompted to specify
how the message body will be saved:
• as a text file, should you select the option use text body, or
• as an html file, should you select the use HTML body option.
In the Retention category down-drop box choose the retention category which will be used for
archiving.
Afterwards, click Apply.
How to proceed at manual importing of .pst files
In order to import .pst files manually, first load (see the section “Loading a .pst file ”) and then
import them (see the section “Importing a .pst file ”). Archiving is done upon importing.
When a .pst file is loaded, it is loaded with the default settings assigned – those specified under
Tools/Options on the Default tab. If you don’t want the default ones, you may change them (See
the section “How to set a specific owner/specific folder ”). If you are not sure which “owner”
to assign, use the Analyze function. The Analyze function was designed primarily to facilitate user
16
20
17
16PST Importer
Meta logix Archive Manager for Exchange PST Importer Adminis tration Guide
assignment (see the section “Specifying the owner using the Analyze function” or the section
“Analyse tab ”).
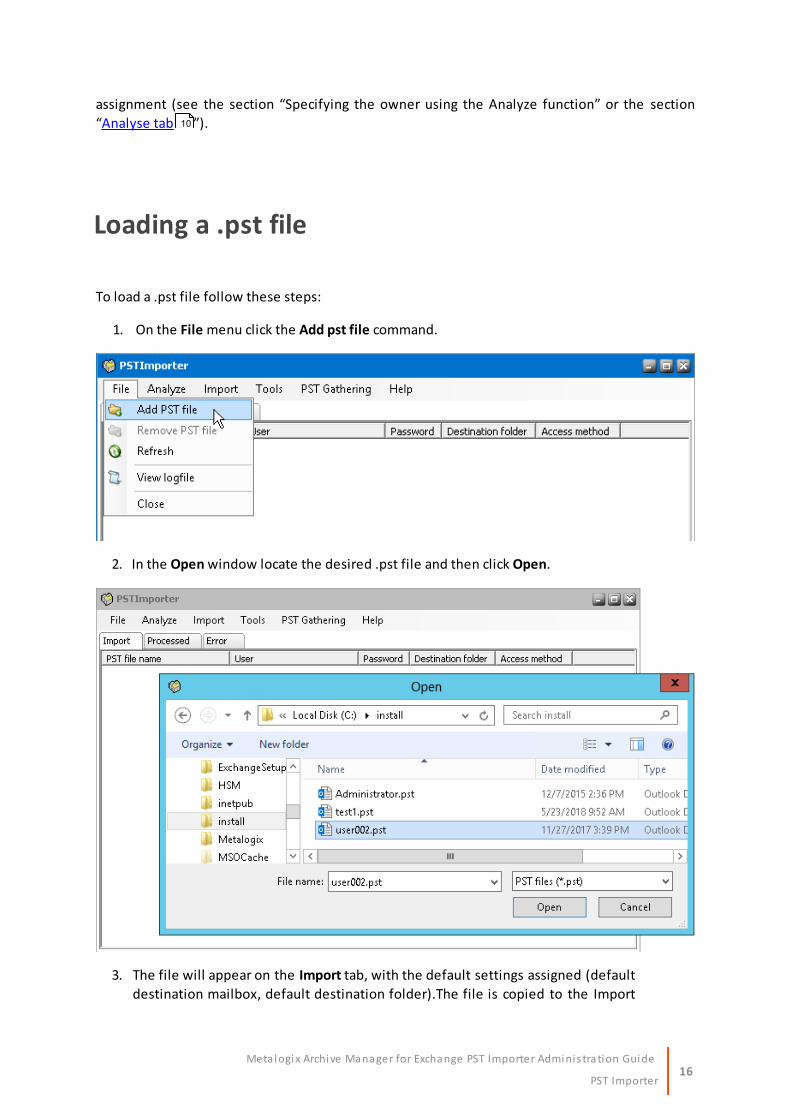
Loading a .pst file
To load a .pst file follow these steps:
1. On the File menu click the Add pst file command.
2. In the Open window locate the desired .pst file and then click Open.
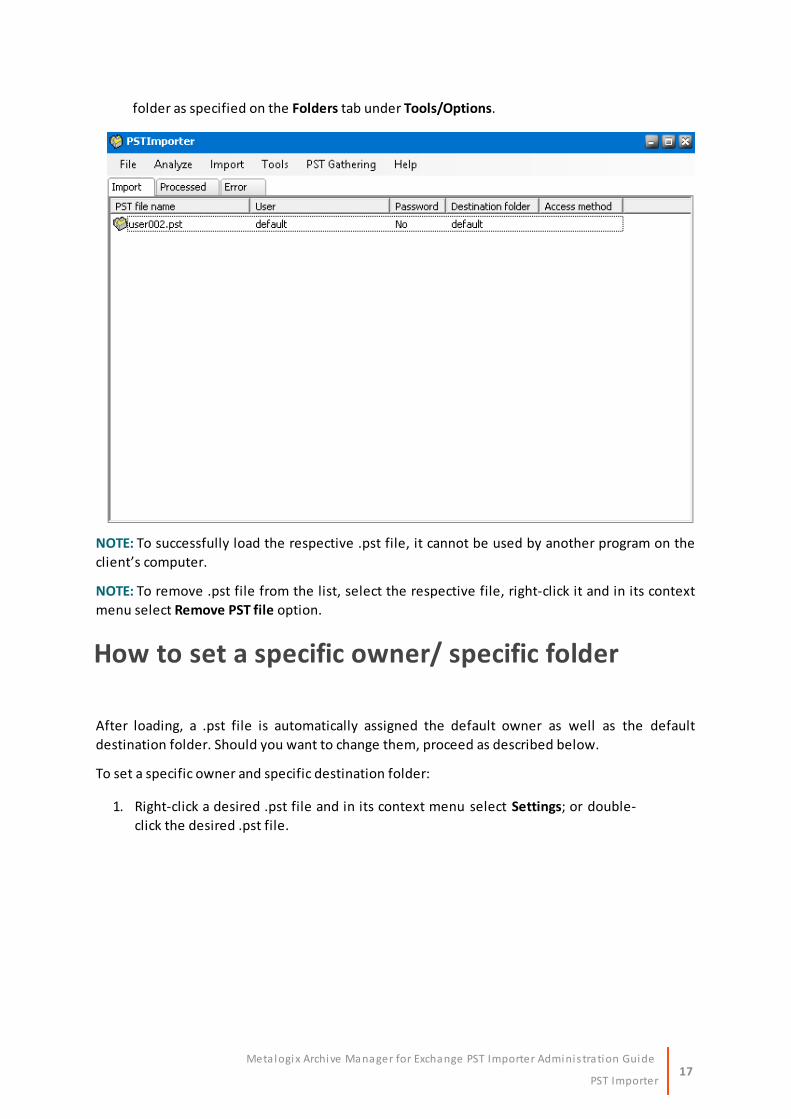
3. The file will appear on the Import tab, with the default settings assigned (default
destination mailbox, default destination folder).The file is copied to the Import
10
17PST Importer
Meta logix Archive Manager for Exchange PST Importer Adminis tration Guide
folder as specified on the Folders tab under Tools/Options.
NOTE: To successfully load the respective .pst file, it cannot be used by another program on the
client’s computer.
NOTE: To remove .pst file from the list, select the respective file, right-click it and in its context
menu select Remove PST file option.
How to set a specific owner/ specific folder
After loading, a .pst file is automatically assigned the default owner as well as the default
destination folder. Should you want to change them, proceed as described below.
To set a specific owner and specific destination folder:
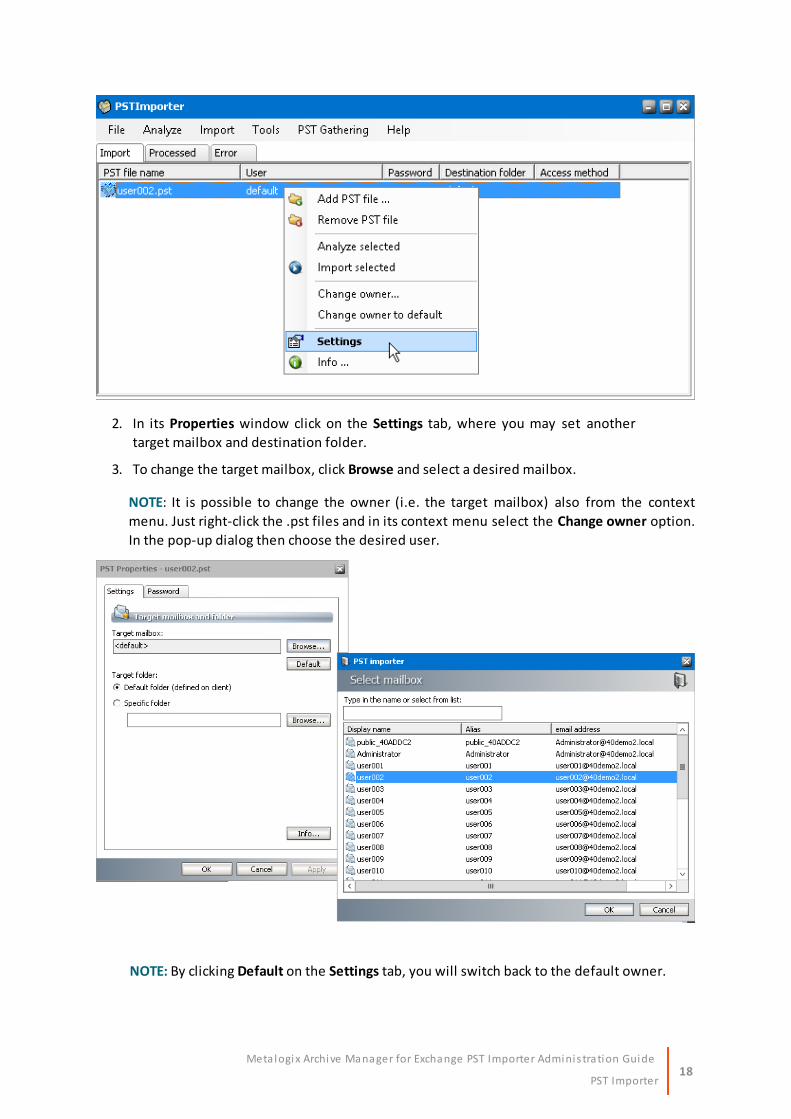
1. Right-click a desired .pst file and in its context menu select Settings; or double-
click the desired .pst file.
18PST Importer
Meta logix Archive Manager for Exchange PST Importer Adminis tration Guide
2. In its Properties window click on the Settings tab, where you may set another
target mailbox and destination folder.
3. To change the target mailbox, click Browse and select a desired mailbox.
NOTE: It is possible to change the owner (i.e. the target mailbox) also from the context
menu. Just right-click the .pst files and in its context menu select the Change owner option.
In the pop-up dialog then choose the desired user.
NOTE: By clicking Default on the Settings tab, you will switch back to the default owner.
19PST Importer
Meta logix Archive Manager for Exchange PST Importer Adminis tration Guide
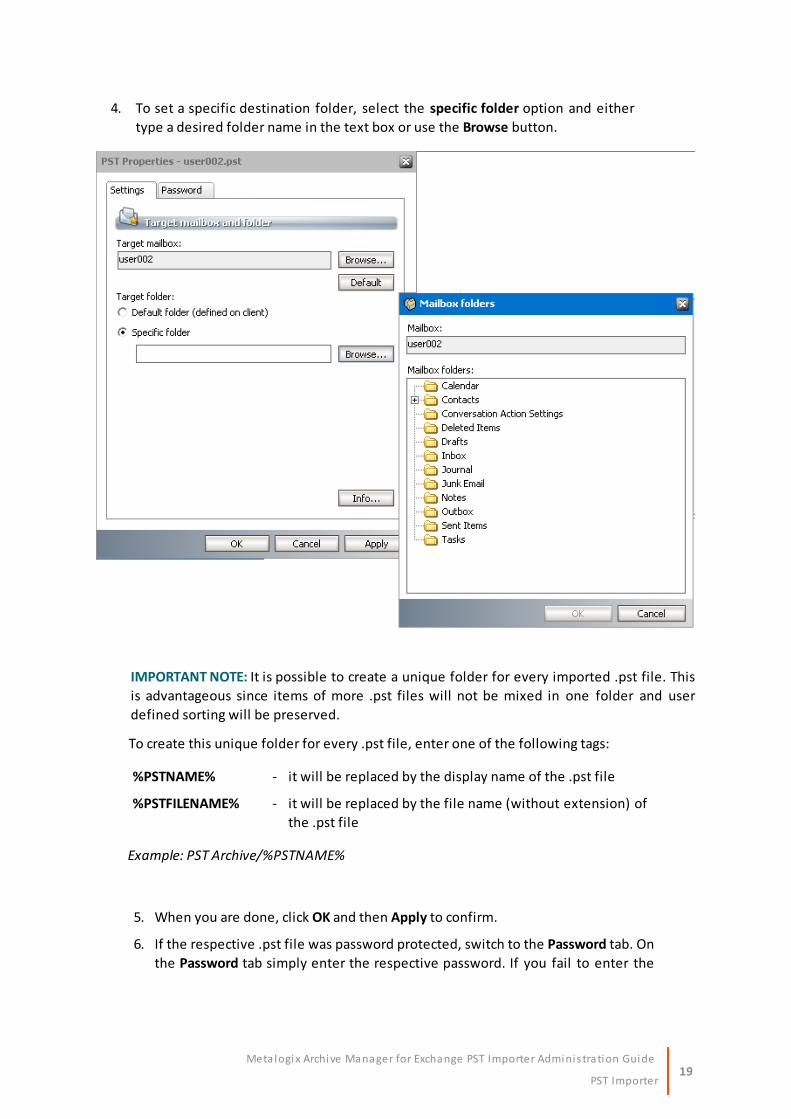
4. To set a specific destination folder, select the specific folder option and either
type a desired folder name in the text box or use the Browse button.
IMPORTANT NOTE: It is possible to create a unique folder for every imported .pst file. This
is advantageous since items of more .pst files will not be mixed in one folder and user
defined sorting will be preserved.
To create this unique folder for every .pst file, enter one of the following tags:
%PSTNAME% - it will be replaced by the display name of the .pst file
%PSTFILENAME% - it will be replaced by the file name (without extension) of
the .pst file
Example: PST Archive/%PSTNAME%
5. When you are done, click OK and then Apply to confirm.
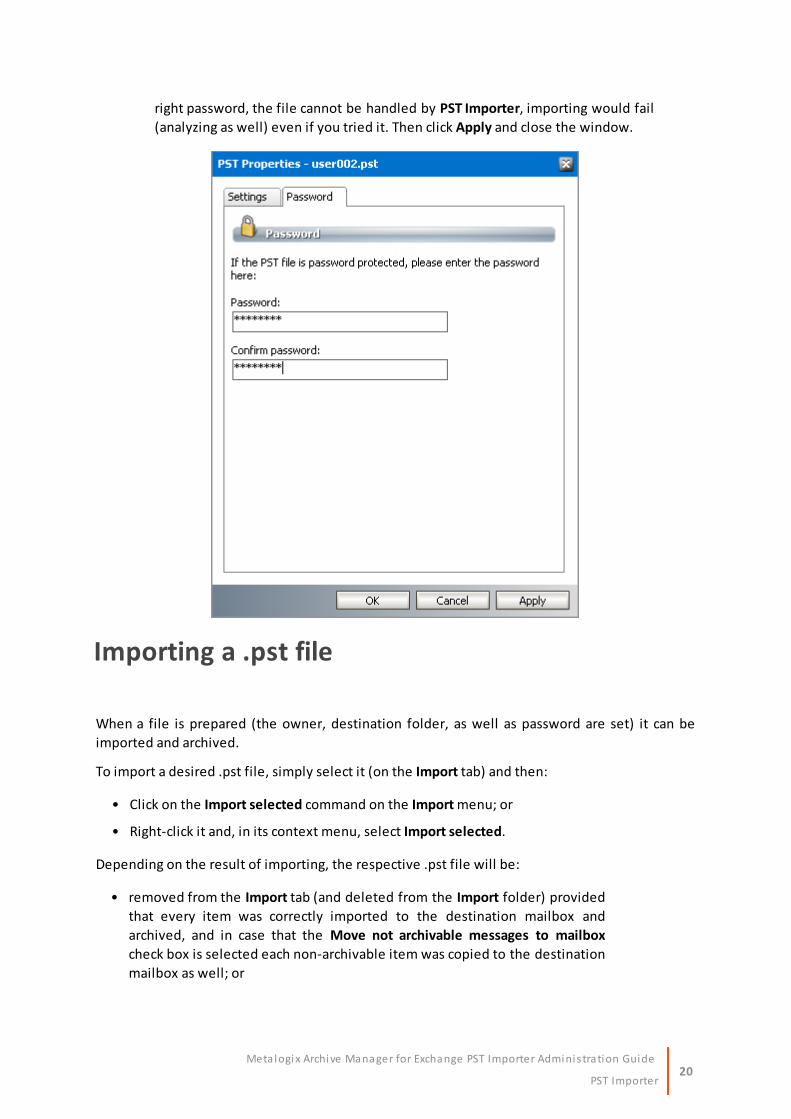
6. If the respective .pst file was password protected, switch to the Password tab. On
the Password tab simply enter the respective password. If you fail to enter the
20PST Importer
Meta logix Archive Manager for Exchange PST Importer Adminis tration Guide
right password, the file cannot be handled by PST Importer, importing would fail
(analyzing as well) even if you tried it. Then click Apply and close the window.
Importing a .pst file
When a file is prepared (the owner, destination folder, as well as password are set) it can be
imported and archived.
To import a desired .pst file, simply select it (on the Import tab) and then:
• Click on the Import selected command on the Import menu; or
• Right-click it and, in its context menu, select Import selected.
Depending on the result of importing, the respective .pst file will be:
• removed from the Import tab (and deleted from the Import folder) provided
that every item was correctly imported to the destination mailbox and
archived, and in case that the Move not archivable messages to mailbox
check box is selected each non-archivable item was copied to the destination
mailbox as well; or
21PST Importer
Meta logix Archive Manager for Exchange PST Importer Adminis tration Guide
• moved to the Processed tab (and moved from the Import folder to the
Processed folder) if no 100% importing took place, i.e at least one non-
archivable item was found in that .pst file and the Move not archivable
messages to mailbox check box was not selected; or
• moved to the Error tab (and moved from the Import folder to the Error folder)
if no 100% archiving took place, i.e. at least one item was not archived due to
an error.
It is recommended to check a log file after import (click File/ View logfile, select the log and click
Show).
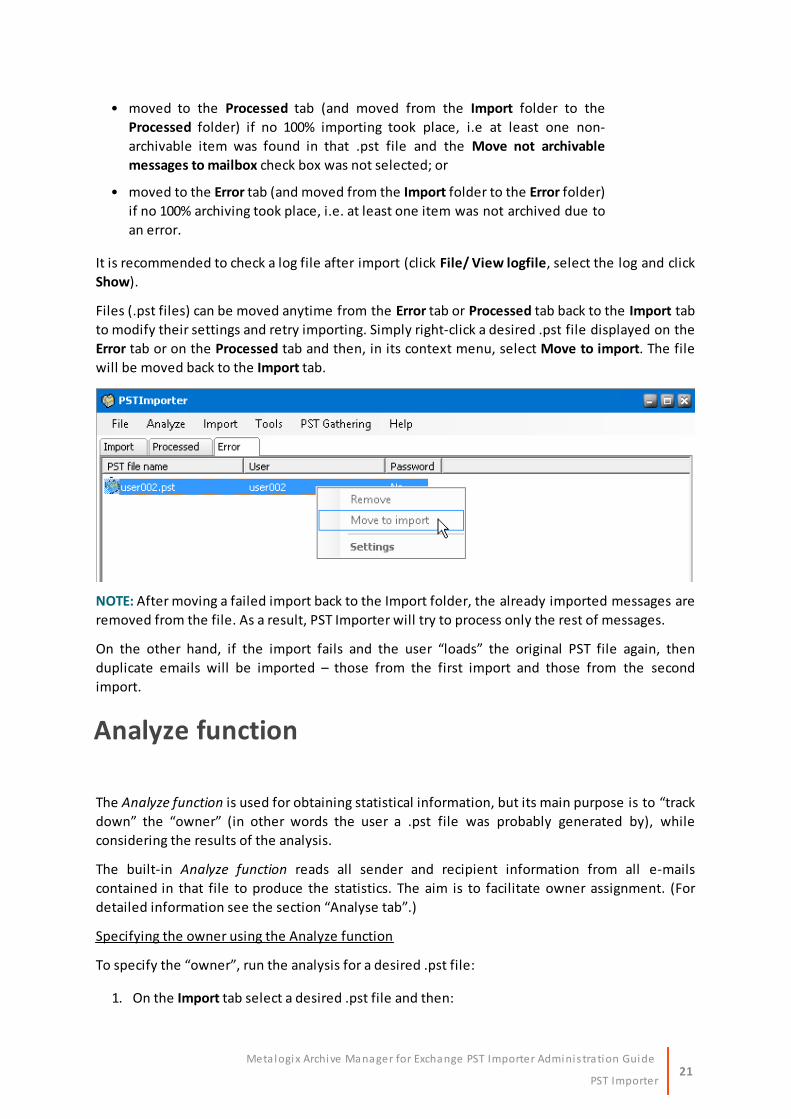
Files (.pst files) can be moved anytime from the Error tab or Processed tab back to the Import tab
to modify their settings and retry importing. Simply right-click a desired .pst file displayed on the
Error tab or on the Processed tab and then, in its context menu, select Move to import. The file
will be moved back to the Import tab.
NOTE: After moving a failed import back to the Import folder, the already imported messages are
removed from the file. As a result, PST Importer will try to process only the rest of messages.
On the other hand, if the import fails and the user “loads” the original PST file again, then
duplicate emails will be imported – those from the first import and those from the second
import.
Analyze function
The Analyze function is used for obtaining statistical information, but its main purpose is to “track
down” the “owner” (in other words the user a .pst file was probably generated by), while
considering the results of the analysis.
The built-in Analyze function reads all sender and recipient information from all e-mails
contained in that file to produce the statistics. The aim is to facilitate owner assignment. (For
detailed information see the section “Analyse tab”.)
Specifying the owner using the Analyze function
To specify the “owner”, run the analysis for a desired .pst file:
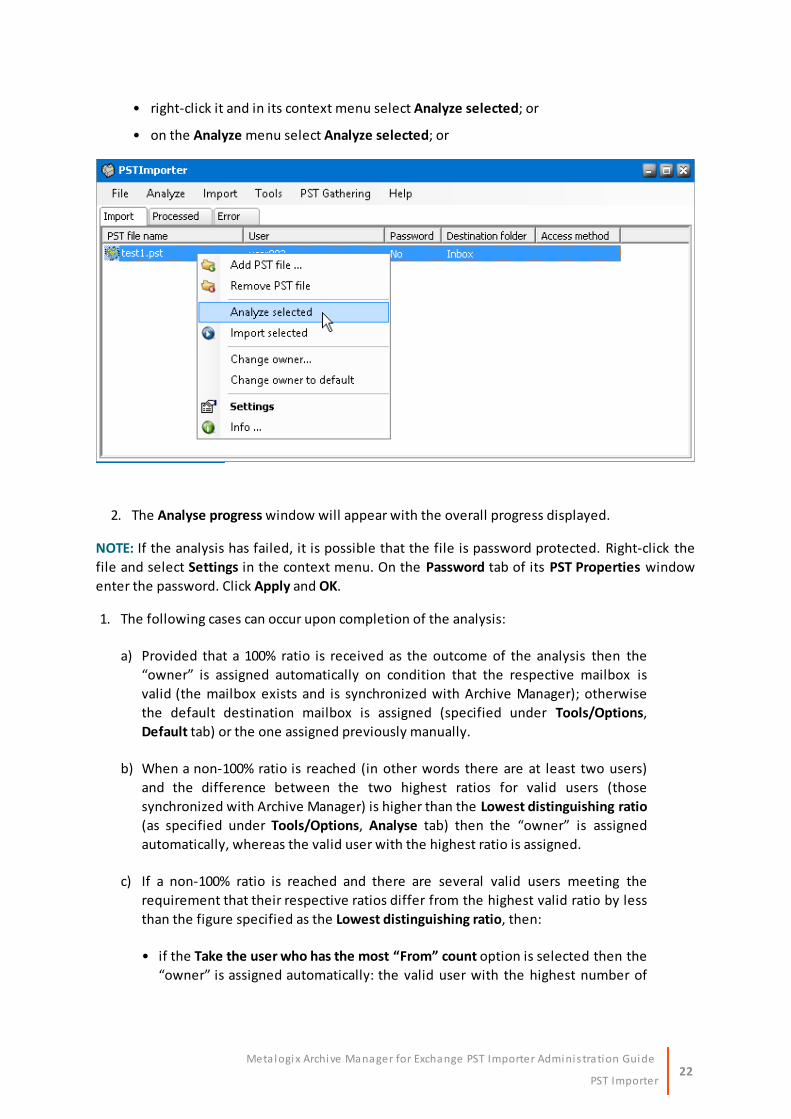
1. On the Import tab select a desired .pst file and then:
22PST Importer
Meta logix Archive Manager for Exchange PST Importer Adminis tration Guide
• right-click it and in its context menu select Analyze selected; or
• on the Analyze menu select Analyze selected; or
2. The Analyse progress window will appear with the overall progress displayed.
NOTE: If the analysis has failed, it is possible that the file is password protected. Right-click the
file and select Settings in the context menu. On the Password tab of its PST Properties window
enter the password. Click Apply and OK.
1. The following cases can occur upon completion of the analysis:
a) Provided that a 100% ratio is received as the outcome of the analysis then the
“owner” is assigned automatically on condition that the respective mailbox is
valid (the mailbox exists and is synchronized with Archive Manager); otherwise
the default destination mailbox is assigned (specified under Tools/Options,
Default tab) or the one assigned previously manually.
b) When a non-100% ratio is reached (in other words there are at least two users)
and the difference between the two highest ratios for valid users (those
synchronized with Archive Manager) is higher than the Lowest distinguishing ratio
(as specified under Tools/Options, Analyse tab) then the “owner” is assigned
automatically, whereas the valid user with the highest ratio is assigned.
c) If a non-100% ratio is reached and there are several valid users meeting the
requirement that their respective ratios differ from the highest valid ratio by less
than the figure specified as the Lowest distinguishing ratio, then:
• if the Take the user who has the most “From” count option is selected then the
“owner” is assigned automatically: the valid user with the highest number of
23PST Importer
Meta logix Archive Manager for Exchange PST Importer Adminis tration Guide
From count is assigned. Provided that this figure (From count) is identical for
several valid users then the one with the highest ratio is assigned.
• if the Take the user who has the most “To” count option is selected then the
“owner” is assigned automatically: the valid user with the highest number of To
count is assigned. Provided that this figure (To count) is identical for several
valid users then the one with the highest ratio is assigned.
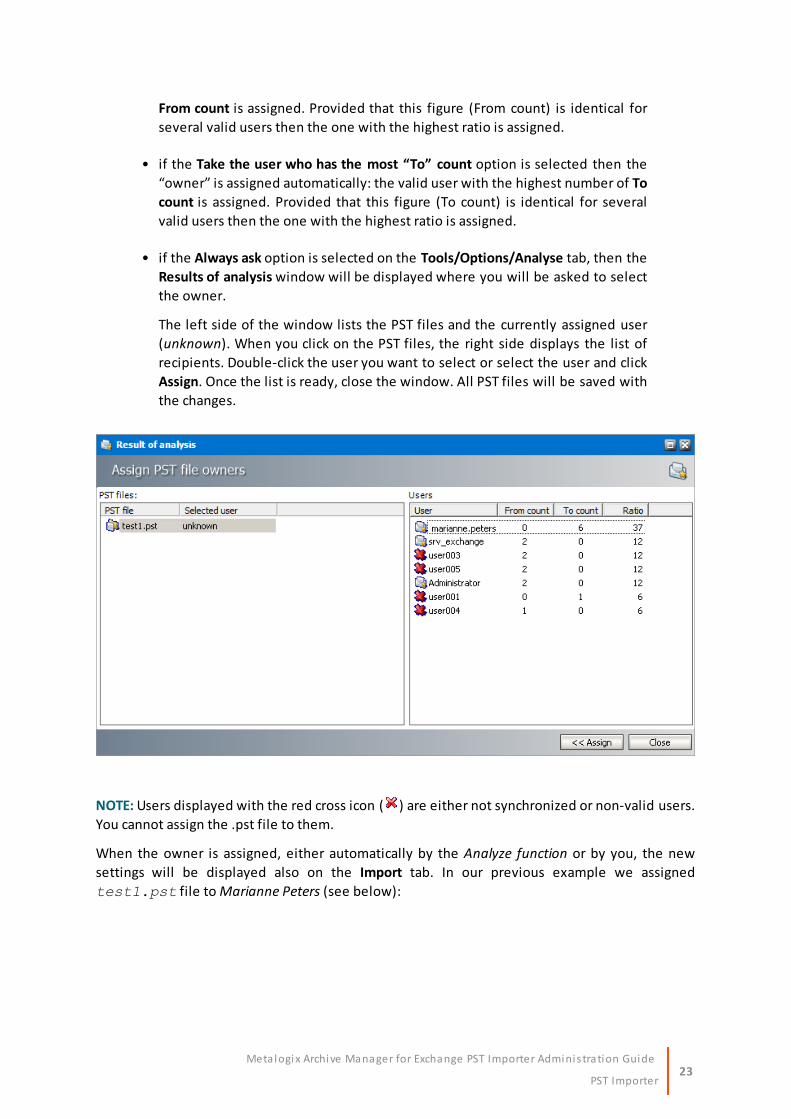
• if the Always ask option is selected on the Tools/Options/Analyse tab, then the
Results of analysis window will be displayed where you will be asked to select
the owner.
The left side of the window lists the PST files and the currently assigned user
(unknown). When you click on the PST files, the right side displays the list of
recipients. Double-click the user you want to select or select the user and click
Assign. Once the list is ready, close the window. All PST files will be saved with
the changes.
NOTE: Users displayed with the red cross icon ( ) are either not synchronized or non-valid users.
You cannot assign the .pst file to them.
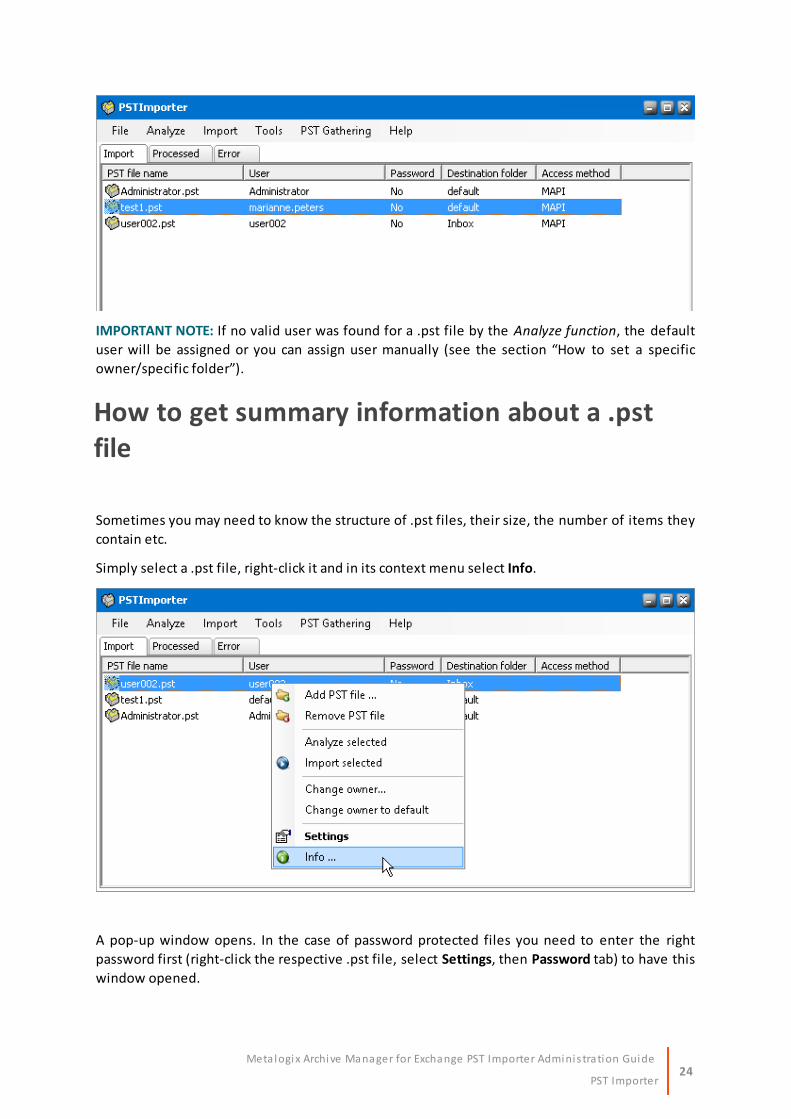
When the owner is assigned, either automatically by the Analyze function or by you, the new
settings will be displayed also on the Import tab. In our previous example we assigned
test1.pst file to Marianne Peters (see below):
24PST Importer
Meta logix Archive Manager for Exchange PST Importer Adminis tration Guide
IMPORTANT NOTE: If no valid user was found for a .pst file by the Analyze function, the default
user will be assigned or you can assign user manually (see the section “How to set a specific
owner/specific folder”).
How to get summary information about a .pstfile
Sometimes you may need to know the structure of .pst files, their size, the number of items they
contain etc.
Simply select a .pst file, right-click it and in its context menu select Info.
A pop-up window opens. In the case of password protected files you need to enter the right
password first (right-click the respective .pst file, select Settings, then Password tab) to have this
window opened.

25PST Importer
Meta logix Archive Manager for Exchange PST Importer Adminis tration Guide
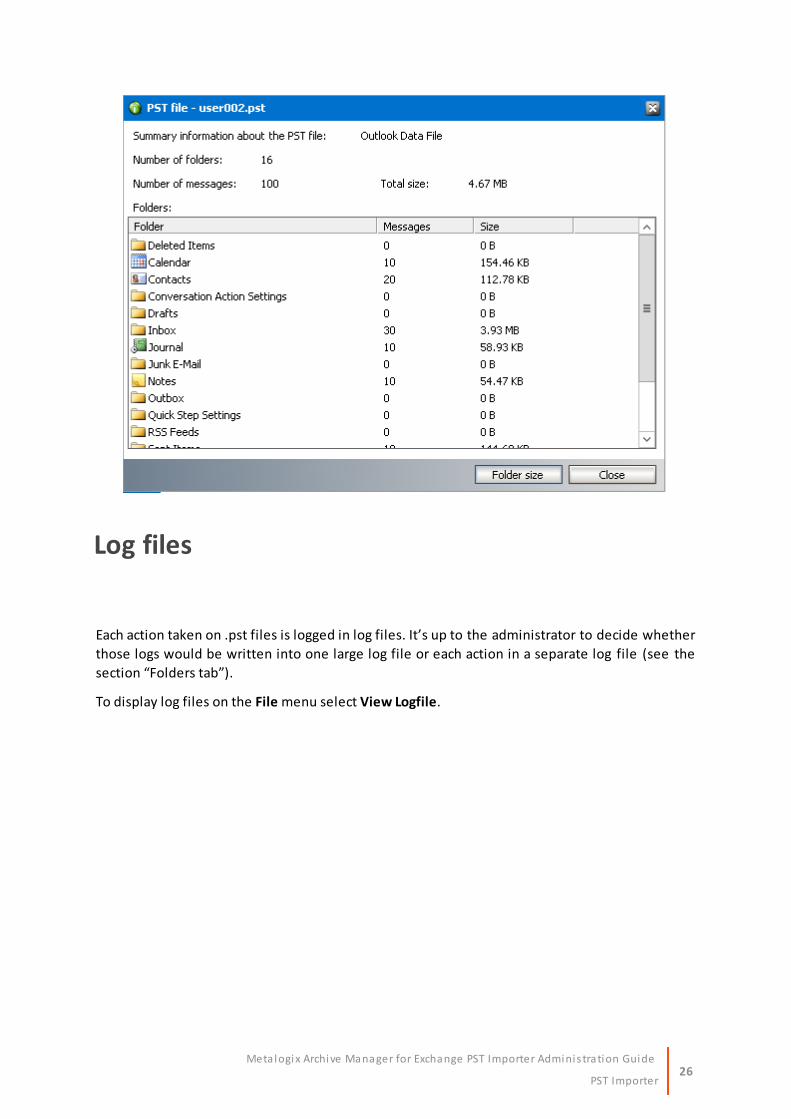
Summary info includes the size and structure of the respective .pst file. Initially only the folder
structure and number of messages are displayed, as shown below.
After clicking on the Folder size button, their respective sizes are displayed with the total size as
well.
26PST Importer
Meta logix Archive Manager for Exchange PST Importer Adminis tration Guide
Log files
Each action taken on .pst files is logged in log files. It’s up to the administrator to decide whether
those logs would be written into one large log file or each action in a separate log file (see the
section “Folders tab”).
To display log files on the File menu select View Logfile.

27PST Importer
Meta logix Archive Manager for Exchange PST Importer Adminis tration Guide
A list of log files (the content of the Log folder) will be displayed. This list can be sorted by name,
date, or size – simply by clicking on the respective column.
Either double-click a desired log file or select it and click on the Show button.
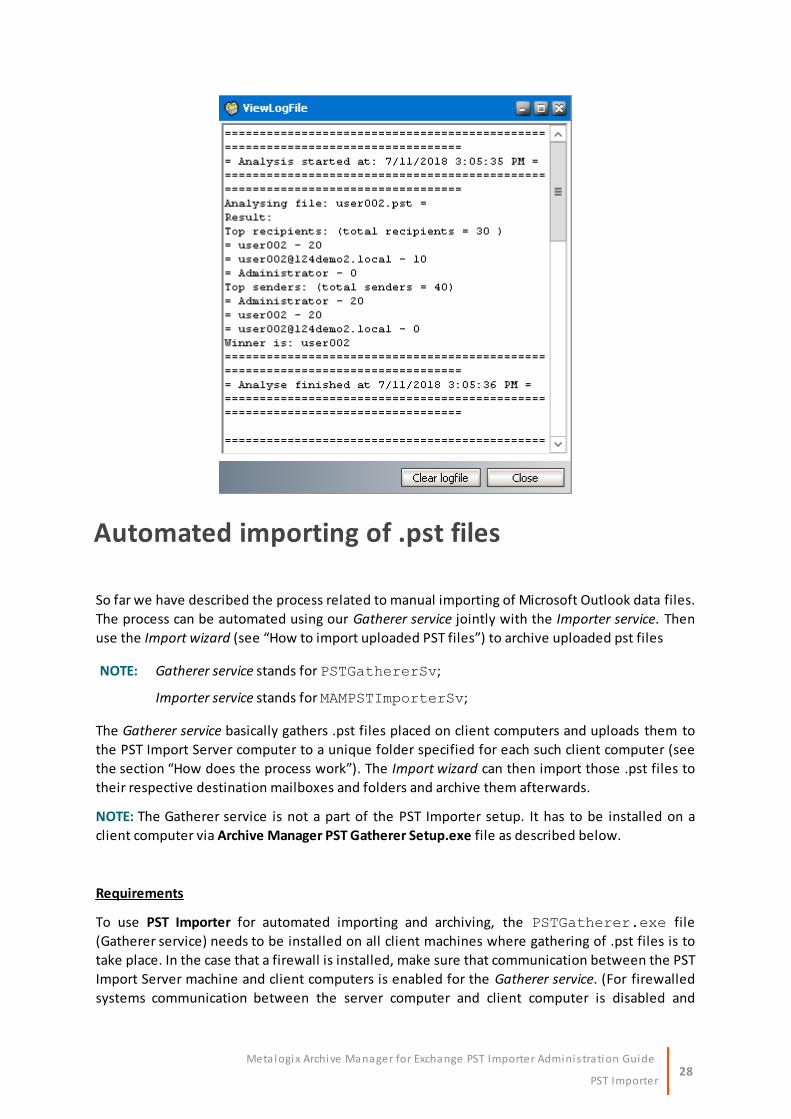
Its content will be displayed in the ViewLogFile window.
28PST Importer
Meta logix Archive Manager for Exchange PST Importer Adminis tration Guide
Automated importing of .pst files
So far we have described the process related to manual importing of Microsoft Outlook data files.
The process can be automated using our Gatherer service jointly with the Importer service. Then
use the Import wizard (see “How to import uploaded PST files”) to archive uploaded pst files
NOTE: Gatherer service stands for PSTGathererSv;
Importer service stands for MAMPSTImporterSv;
The Gatherer service basically gathers .pst files placed on client computers and uploads them to
the PST Import Server computer to a unique folder specified for each such client computer (see
the section “How does the process work”). The Import wizard can then import those .pst files to
their respective destination mailboxes and folders and archive them afterwards.
NOTE: The Gatherer service is not a part of the PST Importer setup. It has to be installed on a
client computer via Archive Manager PST Gatherer Setup.exe file as described below.
Requirements
To use PST Importer for automated importing and archiving, the PSTGatherer.exe file
(Gatherer service) needs to be installed on all client machines where gathering of .pst files is to
take place. In the case that a firewall is installed, make sure that communication between the PST
Import Server machine and client computers is enabled for the Gatherer service. (For firewalled
systems communication between the server computer and client computer is disabled and
29PST Importer
Meta logix Archive Manager for Exchange PST Importer Adminis tration Guide
therefore communication between the Gatherer service and the Importer service running on the
server computer is blocked). See How to enable the Gatherer service on a firewalled Windows 7
and 10 for an example about enabling communication with the Gatherer service. If you are
using other systems, please make sure to enable this communication.
After installing the Gatherer service on client computers, and enabling it for firewalled systems,
make sure it is started (simply click Start /Programs /Administrative tools /Services to check the
status of PSTGathererSv). Also make sure that the Importer service is started on the PST
Import Server computer (simply click Start /Programs /Administrative tools /Services to check the
status of MAMPSTImporterSv).
Installing the Gatherer service on clientcomputers
In the following lines we describe installation using Archive Manager PST Gatherer Setup.exe
setup – standard step-by-step installation.
The Gatherer is usually needed on multiple workstations. It is possible to install it using Group
Policy or other tools designed for software installation on multiple clients from a central location.
The setup file can be started with parameters defining the configuration values and run in "silent
mode", without the need of going through the wizard steps. For more information on
parameterized installation, please refer to “Installing PST Gatherer” manual.
To install the Gatherer service:
1. Double-click Archive Manager PST Gatherer Setup.exe
2. On the Welcome page click Next. Read the License Agreement. If you agree,
select I accept… and click Next.
3. In the next dialog you can choose the installation folder. As the default the
product installs in C:\Program Files (x86) \ Metalogix \ MAM4Exchange \
PSTGatherer. The installation folder can be changed by using the Change button.
Click Next.
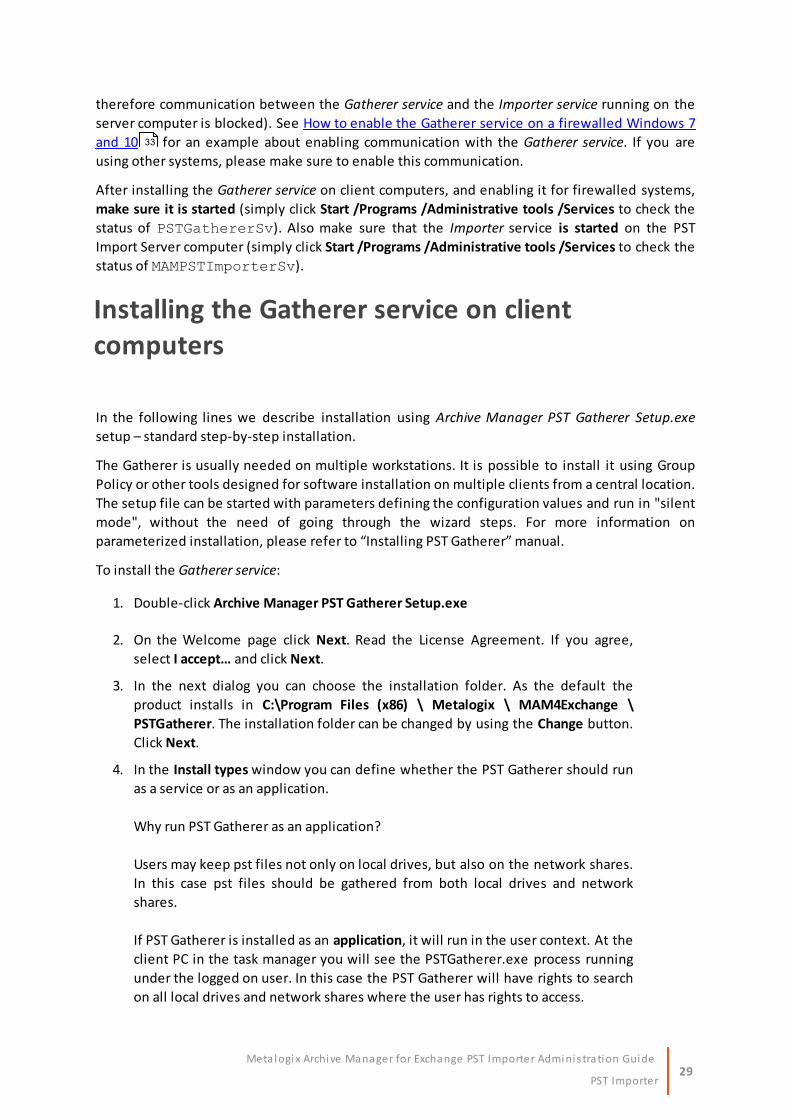
4. In the Install types window you can define whether the PST Gatherer should run
as a service or as an application.
Why run PST Gatherer as an application?
Users may keep pst files not only on local drives, but also on the network shares.
In this case pst files should be gathered from both local drives and network
shares.
If PST Gatherer is installed as an application, it will run in the user context. At the
client PC in the task manager you will see the PSTGatherer.exe process running
under the logged on user. In this case the PST Gatherer will have rights to search
on all local drives and network shares where the user has rights to access.
33
30PST Importer
Meta logix Archive Manager for Exchange PST Importer Adminis tration Guide
If PST Gatherer is installed as a service, it will be running as LOCAL SYSTEM which
has rights only locally on the local drives. Thus PST Gatherer will be limited to
search files only on the local drives.
When Application is selected, there are two more choices available:
Autostart – when checked, PST Gatherer application will start whenever the user
specified on the previous page logs on.
Show in tray – when checked, a tray icon of this application will be displayed
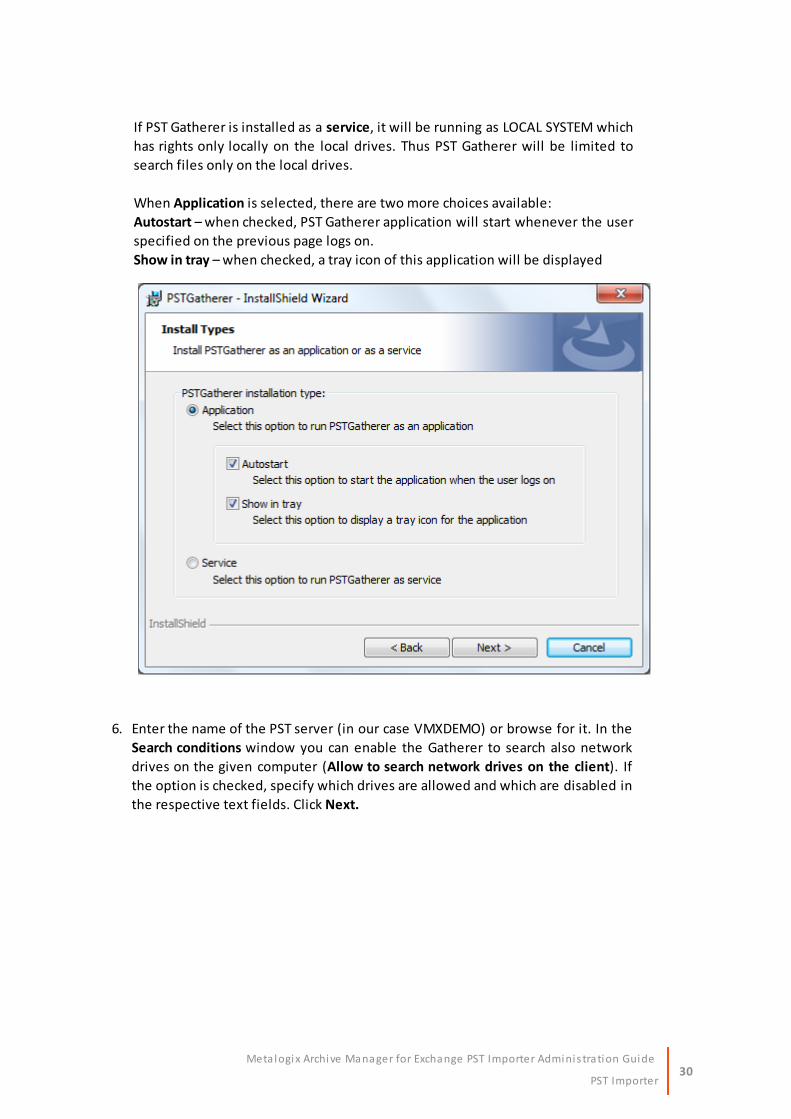
6. Enter the name of the PST server (in our case VMXDEMO) or browse for it. In the
Search conditions window you can enable the Gatherer to search also network
drives on the given computer (Allow to search network drives on the client). If
the option is checked, specify which drives are allowed and which are disabled in
the respective text fields. Click Next.
31PST Importer
Meta logix Archive Manager for Exchange PST Importer Adminis tration Guide
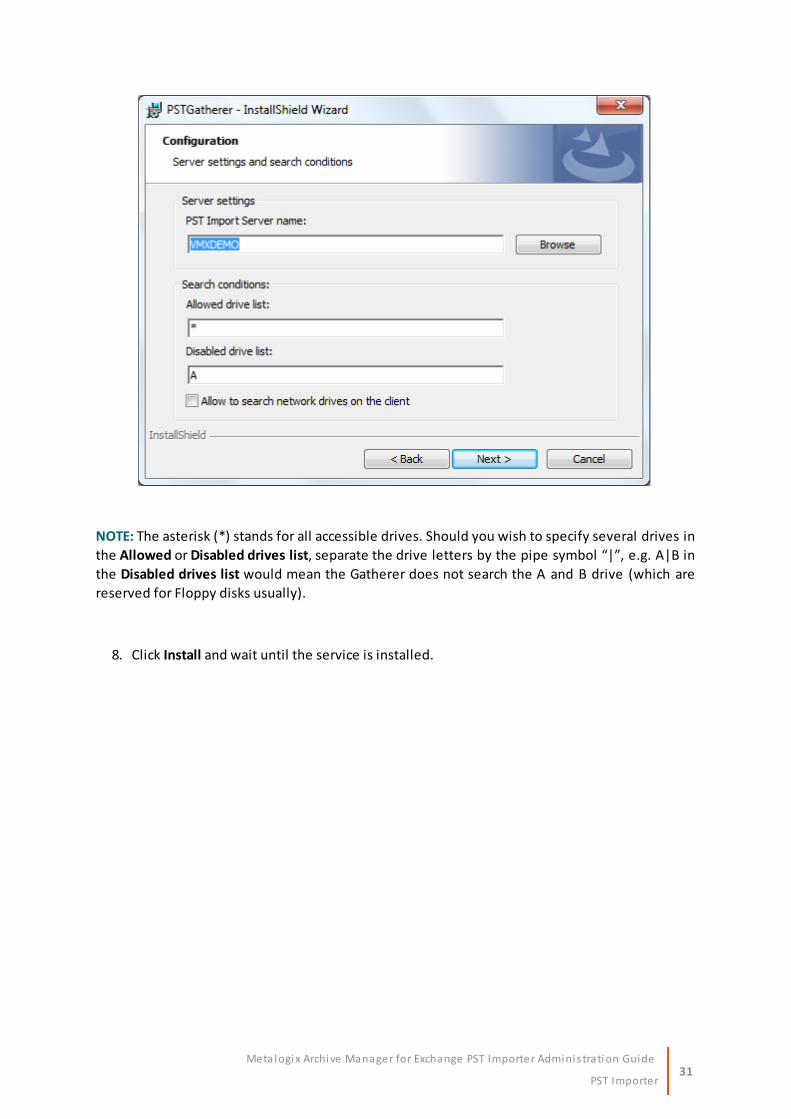
NOTE: The asterisk (*) stands for all accessible drives. Should you wish to specify several drives in
the Allowed or Disabled drives list, separate the drive letters by the pipe symbol “|”, e.g. A|B in
the Disabled drives list would mean the Gatherer does not search the A and B drive (which are
reserved for Floppy disks usually).
8. Click Install and wait until the service is installed.
32PST Importer
Meta logix Archive Manager for Exchange PST Importer Adminis tration Guide
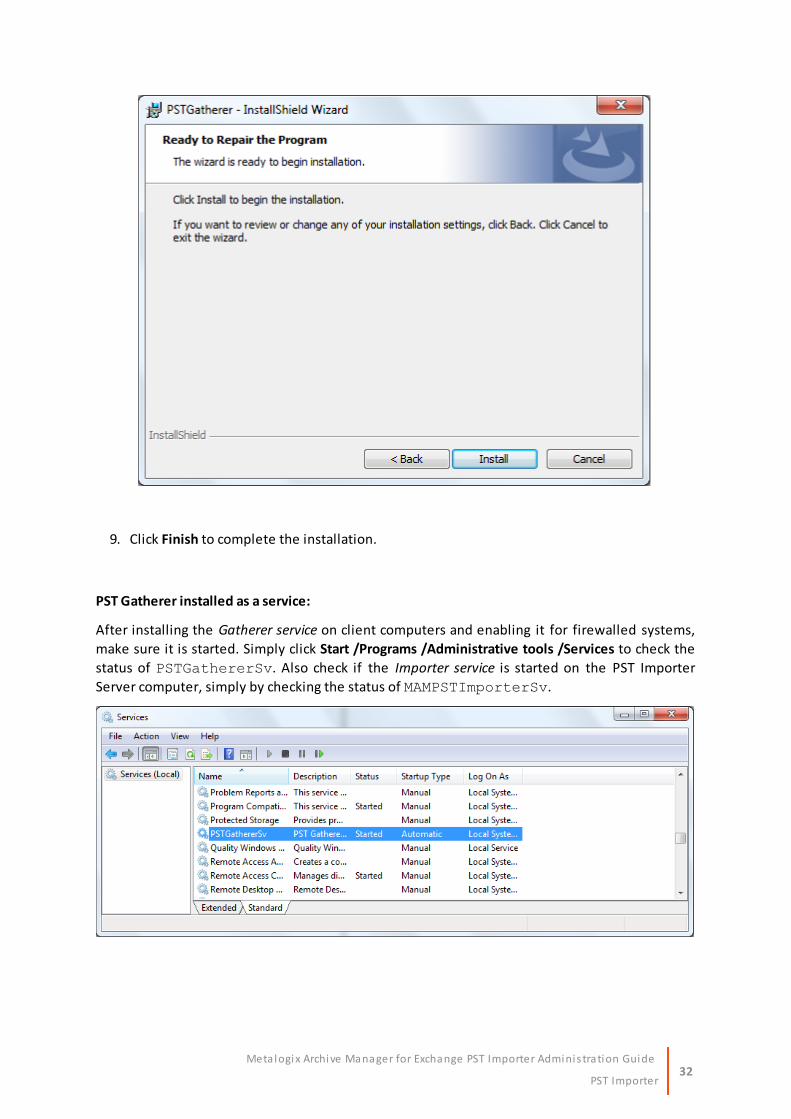
9. Click Finish to complete the installation.
PST Gatherer installed as a service:
After installing the Gatherer service on client computers and enabling it for firewalled systems,
make sure it is started. Simply click Start /Programs /Administrative tools /Services to check the
status of PSTGathererSv. Also check if the Importer service is started on the PST Importer
Server computer, simply by checking the status of MAMPSTImporterSv.
33PST Importer
Meta logix Archive Manager for Exchange PST Importer Adminis tration Guide
IMPORTANT NOTE: Make sure to re-start the Gatherer service whenever it is updated/modified.
To do so, simply select PSTGathererSv and then click on the Restart Service button on the
toolbar.
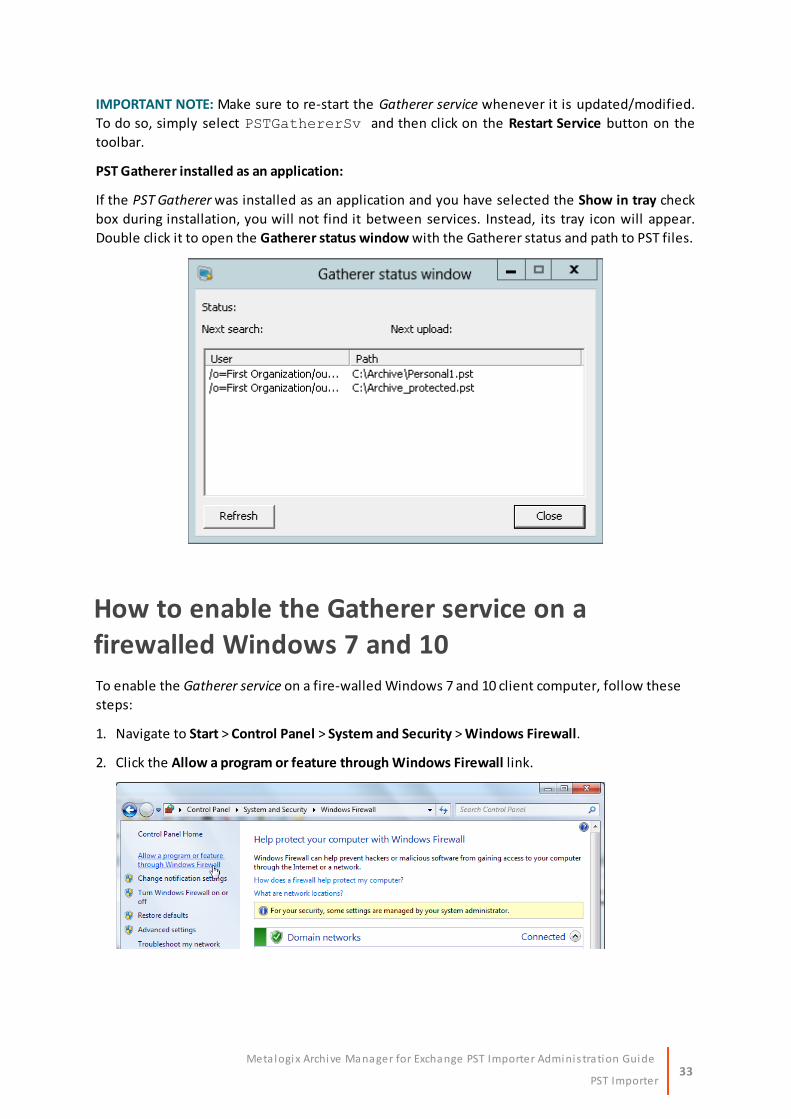
PST Gatherer installed as an application:
If the PST Gatherer was installed as an application and you have selected the Show in tray check
box during installation, you will not find it between services. Instead, its tray icon will appear.
Double click it to open the Gatherer status window with the Gatherer status and path to PST files.
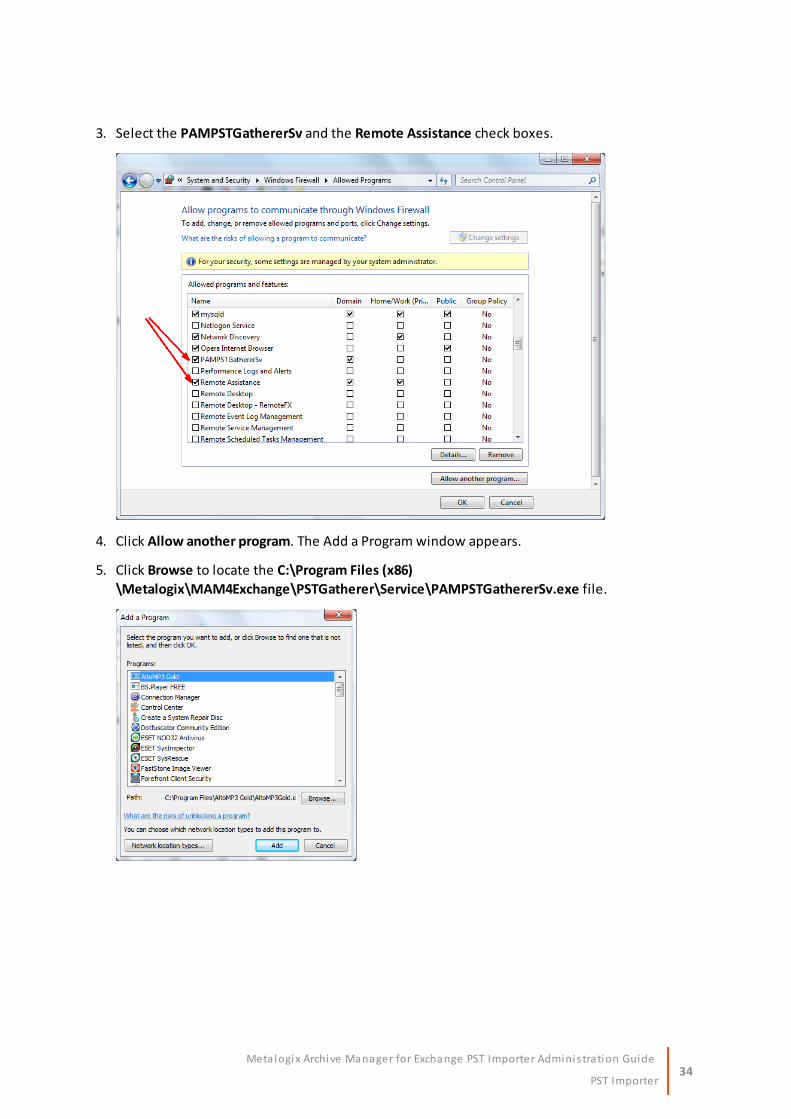
How to enable the Gatherer service on afirewalled Windows 7 and 10
To enable the Gatherer service on a fire-walled Windows 7 and 10 client computer, follow these
steps:
1. Navigate to Start > Control Panel > System and Security > Windows Firewall.
2. Click the Allow a program or feature through Windows Firewall link.
34PST Importer
Meta logix Archive Manager for Exchange PST Importer Adminis tration Guide
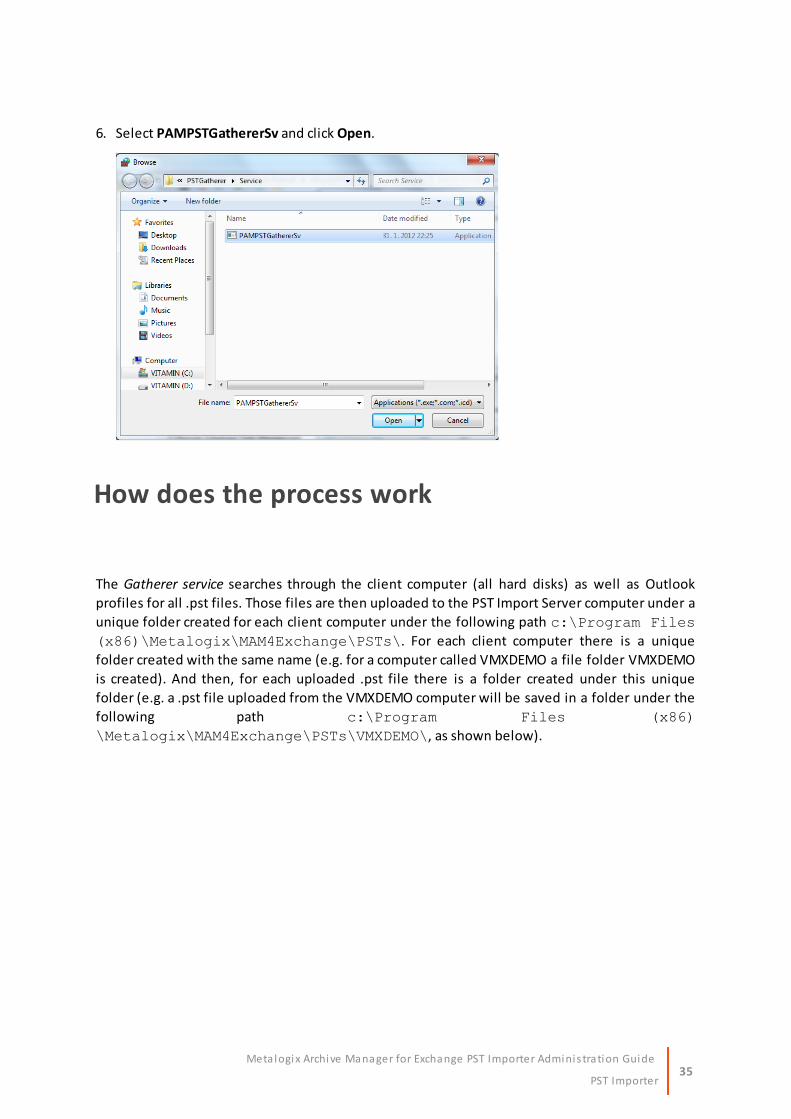
3. Select the PAMPSTGathererSv and the Remote Assistance check boxes.
4. Click Allow another program. The Add a Program window appears.
5. Click Browse to locate the C:\Program Files (x86)
\Metalogix\MAM4Exchange\PSTGatherer\Service\PAMPSTGathererSv.exe file.
35PST Importer
Meta logix Archive Manager for Exchange PST Importer Adminis tration Guide
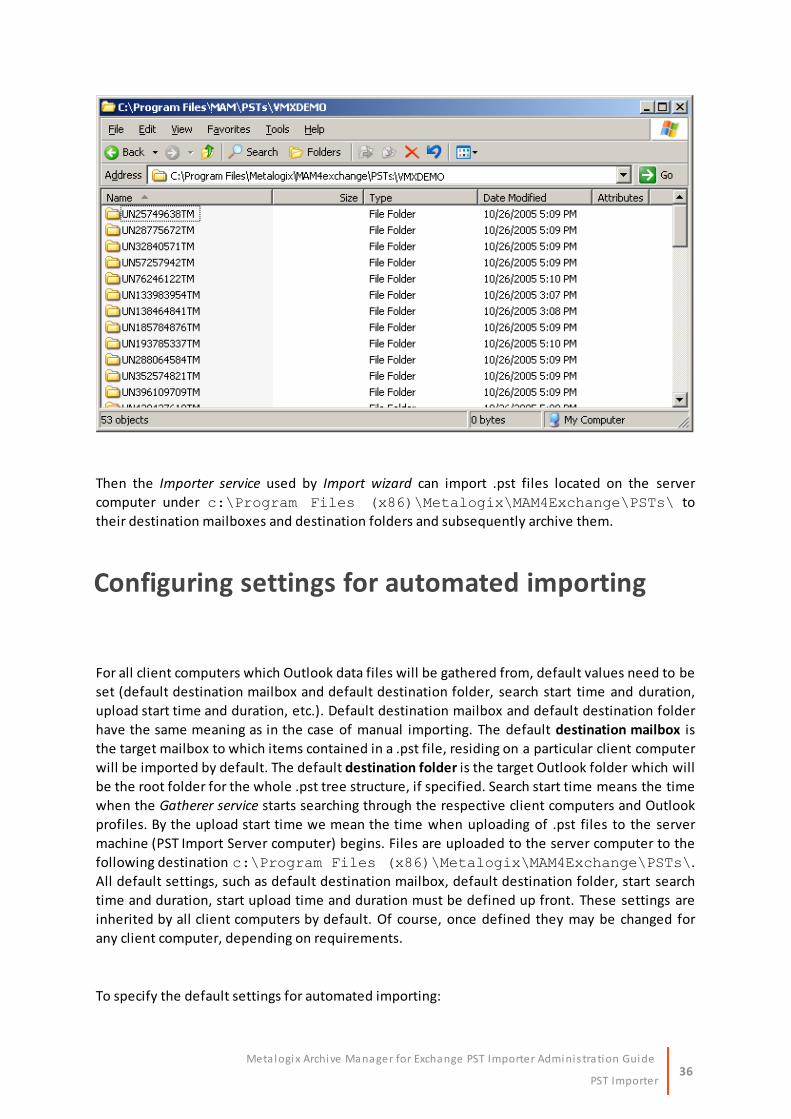
6. Select PAMPSTGathererSv and click Open.
How does the process work
The Gatherer service searches through the client computer (all hard disks) as well as Outlook
profiles for all .pst files. Those files are then uploaded to the PST Import Server computer under a
unique folder created for each client computer under the following path c:\Program Files
(x86)\Metalogix\MAM4Exchange\PSTs\. For each client computer there is a unique
folder created with the same name (e.g. for a computer called VMXDEMO a file folder VMXDEMO
is created). And then, for each uploaded .pst file there is a folder created under this unique
folder (e.g. a .pst file uploaded from the VMXDEMO computer will be saved in a folder under the
following path c:\Program Files (x86)
\Metalogix\MAM4Exchange\PSTs\VMXDEMO\, as shown below).
36PST Importer
Meta logix Archive Manager for Exchange PST Importer Adminis tration Guide
Then the Importer service used by Import wizard can import .pst files located on the server
computer under c:\Program Files (x86)\Metalogix\MAM4Exchange\PSTs\ to
their destination mailboxes and destination folders and subsequently archive them.
Configuring settings for automated importing
For all client computers which Outlook data files will be gathered from, default values need to be
set (default destination mailbox and default destination folder, search start time and duration,
upload start time and duration, etc.). Default destination mailbox and default destination folder
have the same meaning as in the case of manual importing. The default destination mailbox is
the target mailbox to which items contained in a .pst file, residing on a particular client computer
will be imported by default. The default destination folder is the target Outlook folder which will
be the root folder for the whole .pst tree structure, if specified. Search start time means the time
when the Gatherer service starts searching through the respective client computers and Outlook
profiles. By the upload start time we mean the time when uploading of .pst files to the server
machine (PST Import Server computer) begins. Files are uploaded to the server computer to the
following destination c:\Program Files (x86)\Metalogix\MAM4Exchange\PSTs\.
All default settings, such as default destination mailbox, default destination folder, start search
time and duration, start upload time and duration must be defined up front. These settings are
inherited by all client computers by default. Of course, once defined they may be changed for
any client computer, depending on requirements.
To specify the default settings for automated importing:
37PST Importer
Meta logix Archive Manager for Exchange PST Importer Adminis tration Guide
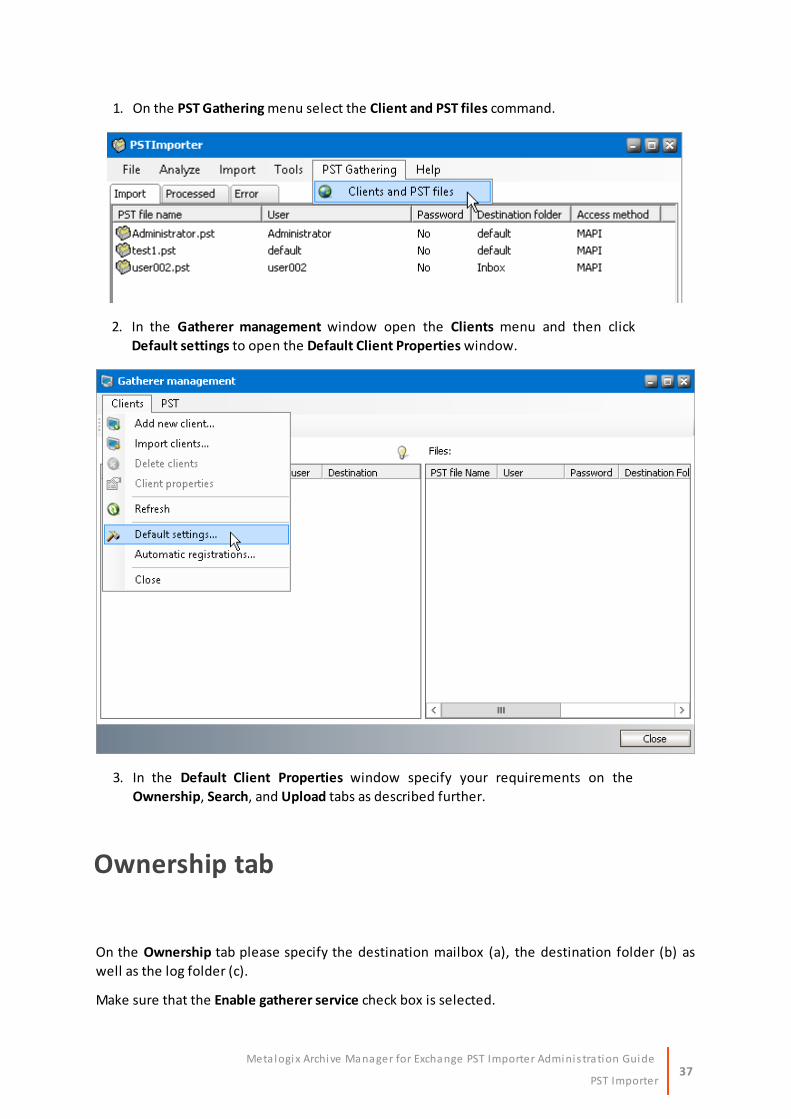
1. On the PST Gathering menu select the Client and PST files command.
2. In the Gatherer management window open the Clients menu and then click
Default settings to open the Default Client Properties window.
3. In the Default Client Properties window specify your requirements on the
Ownership, Search, and Upload tabs as described further.
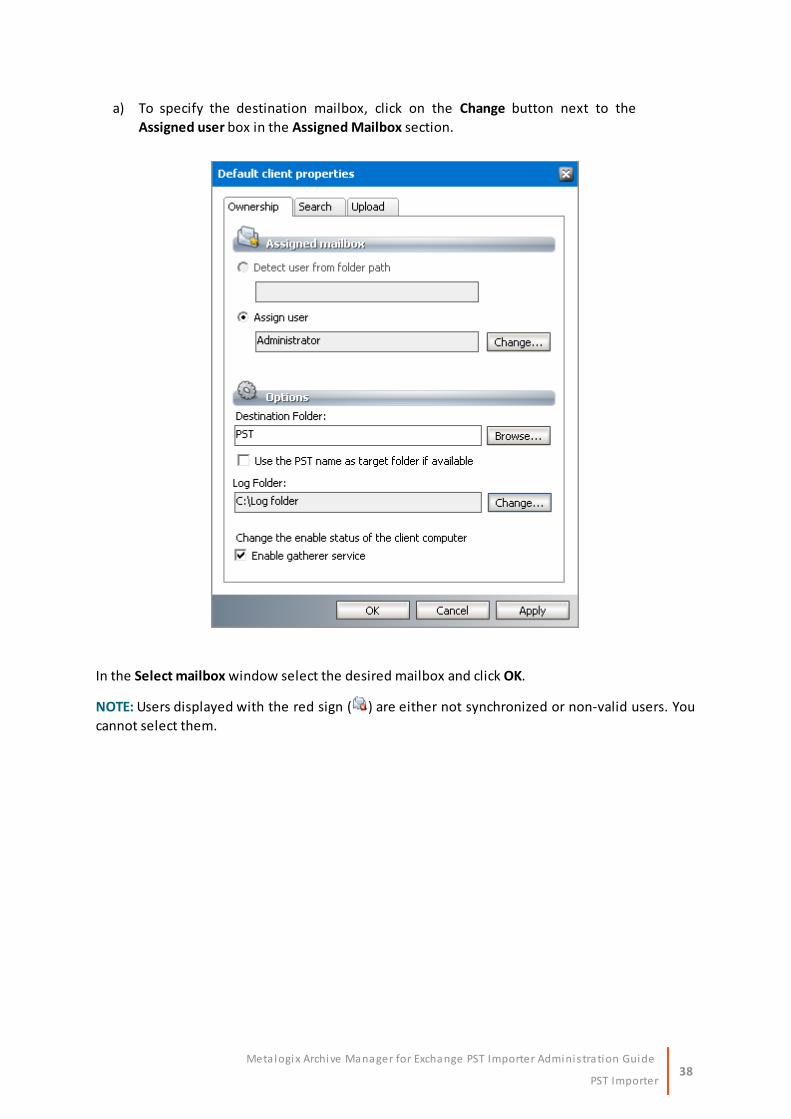
Ownership tab
On the Ownership tab please specify the destination mailbox (a), the destination folder (b) as
well as the log folder (c).
Make sure that the Enable gatherer service check box is selected.
38PST Importer
Meta logix Archive Manager for Exchange PST Importer Adminis tration Guide
a) To specify the destination mailbox, click on the Change button next to the
Assigned user box in the Assigned Mailbox section.
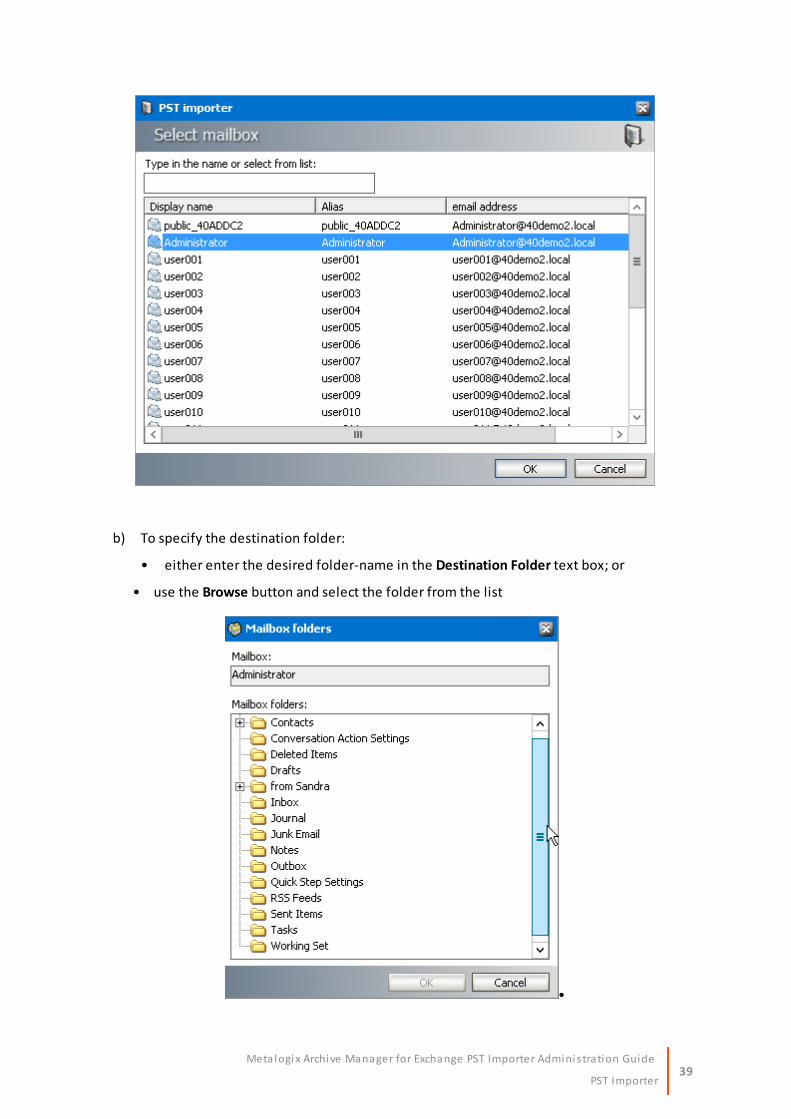
In the Select mailbox window select the desired mailbox and click OK.
NOTE: Users displayed with the red sign ( ) are either not synchronized or non-valid users. You
cannot select them.
39PST Importer
Meta logix Archive Manager for Exchange PST Importer Adminis tration Guide
b) To specify the destination folder:
• either enter the desired folder-name in the Destination Folder text box; or
• use the Browse button and select the folder from the list
•
40PST Importer
Meta logix Archive Manager for Exchange PST Importer Adminis tration Guide
IMPORTANT NOTE: It is possible to create a unique folder for every imported .pst file. This is
advantageous since items of more .pst files will not be mixed in one folder and user defined
sorting will be preserved.
To create this unique folder for every .pst file, enter one of the following tags:
%PSTNAME% - it will be replaced by the display name of the .pst file
%PSTFILENAME% - it will be replaced by the file name (without extension) of
the .pst file
Example: PST Archive/%PSTNAME%
c) To specify the Log Folder, use the Change button next to the Log Folder text box. In
the Browse For Folder window:
• either locate the desired one and then click OK; or
• create a new one by clicking the Make New Folder button and then click OK
All log files created by the Gatherer service will be saved in this folder.
All default settings specified under points a), b), and c) will be displayed on the Ownership tab.
Click Apply.
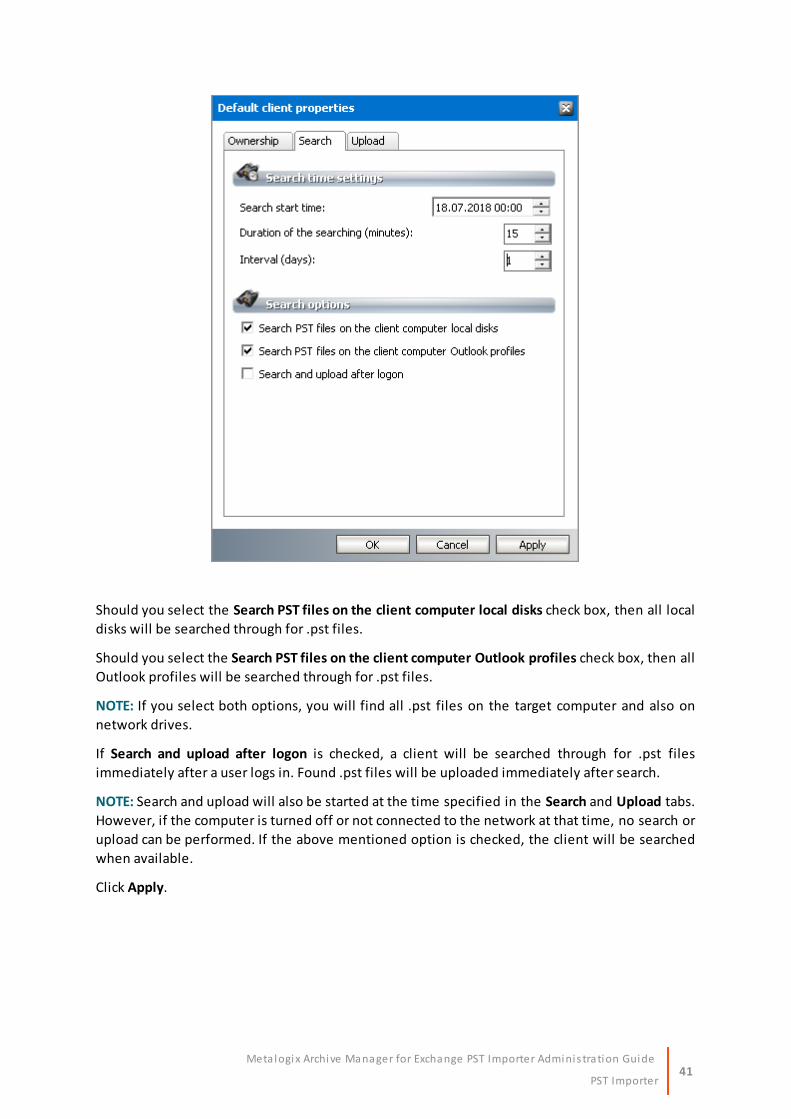
Search tab
On this tab specify when searching for .pst files begins, the duration of searching as well as
frequency and other search options.
In the Search start time combo box enter the date and time when the Gatherer service should
start searching for .pst files.
In the Duration of the searching (minutes) combo box enter the desired period. Pay due
attention to this period especially for those client computers where many .pst files may reside,
as it may take time.
In the Interval (days) combo-box enter frequency of the searching.
41PST Importer
Meta logix Archive Manager for Exchange PST Importer Adminis tration Guide
Should you select the Search PST files on the client computer local disks check box, then all local
disks will be searched through for .pst files.
Should you select the Search PST files on the client computer Outlook profiles check box, then all
Outlook profiles will be searched through for .pst files.
NOTE: If you select both options, you will find all .pst files on the target computer and also on
network drives.
If Search and upload after logon is checked, a client will be searched through for .pst files
immediately after a user logs in. Found .pst files will be uploaded immediately after search.
NOTE: Search and upload will also be started at the time specified in the Search and Upload tabs.
However, if the computer is turned off or not connected to the network at that time, no search or
upload can be performed. If the above mentioned option is checked, the client will be searched
when available.
Click Apply.

42PST Importer
Meta logix Archive Manager for Exchange PST Importer Adminis tration Guide
Upload tab
On this tab you may specify when to upload .pst files, the duration of uploading as well as
frequency of uploading and other upload options.
In the Upload start time combo box enter the date and time when the uploading of .pst files to
the PST Import server should begin.
In the Duration of upload (minutes) combo box enter the desired period. Pay due attention to
this period especially for those client computers from which many .pst files may be uploaded.
In the Interval (days) combo box enter frequency of the uploading.
NOTE: In those cases when uploading starts before searching begins, .pst files gathered in the
previous cycle are uploaded.
Further you may specify what to do with .pst files after they are uploaded (copied) to the PST
Import server:
43PST Importer
Meta logix Archive Manager for Exchange PST Importer Adminis tration Guide
Should you select the Delete PST file from client computer after it is uploaded to the server check
box then all .pst files will be deleted on the client computer after having been uploaded to the
PST Import server.
NOTE: This feature ensures that no .pst files will be imported twice. No pst files will be lost
because they will be moved to PST Importer server and if the importing process is not completed,
the file is not removed from the PST Importer server either.
Should you select the Remove the PST file from the Outlook profile after it is uploaded to the
server check box, then .pst files will be removed from Outlook profile after being uploaded to
the PST Import server.
Should you select the Disable PST file usage on the client computer check box, then no other
applications will be using .pst files during their uploading.
If you select the Completely disable PST file usage on the client computer check box, the
MAPISVC.INF file and registry file on the client’s computer will be modified, preventing the user
form creating and using PST files.
IMPORTANT NOTE: AFTER SELECTING THIS OPTION AND CLICKING APPLY IT IS NOT POSSIBLE TO
TURN IT BACK. USER WILL NOT BE ABLE TO CREATE OR USE PST FILES IN OUTLOOK ANY MORE.
Finally click Apply, then OK.
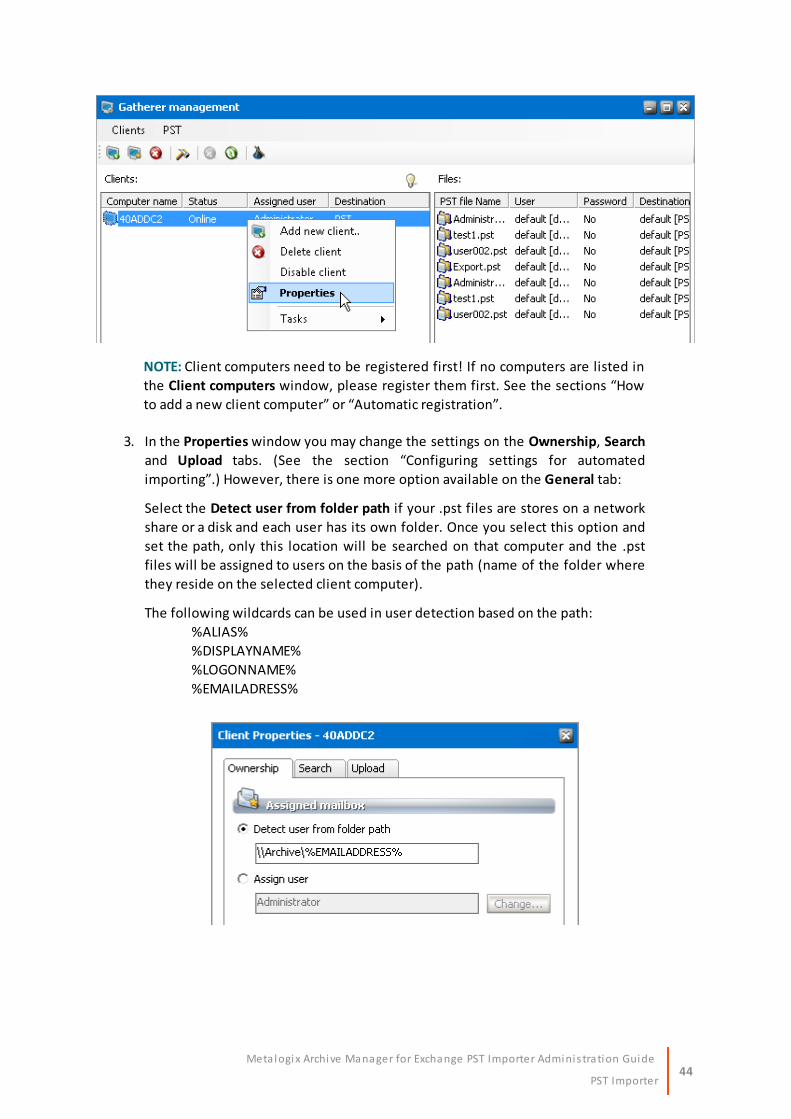
How to modify the settings for a client computer
To modify the default settings for a desired client computer:
1. On the PST Gathering menu select Clients and PST files to open the Gatherer
management window.
2. In the Clients list select the desired client computer. Right-click it and in its context
menu select Properties to open its Properties window.
NOTE: Or select a desired client computer in the list and then on the Clients menu
select Client Properties; or double-click the desired client computer in the Client
computers window.
44PST Importer
Meta logix Archive Manager for Exchange PST Importer Adminis tration Guide
NOTE: Client computers need to be registered first! If no computers are listed in
the Client computers window, please register them first. See the sections “How
to add a new client computer” or “Automatic registration”.
3. In the Properties window you may change the settings on the Ownership, Search
and Upload tabs. (See the section “Configuring settings for automated
importing”.) However, there is one more option available on the General tab:
Select the Detect user from folder path if your .pst files are stores on a network
share or a disk and each user has its own folder. Once you select this option and
set the path, only this location will be searched on that computer and the .pst
files will be assigned to users on the basis of the path (name of the folder where
they reside on the selected client computer).
The following wildcards can be used in user detection based on the path:
%ALIAS%
%DISPLAYNAME%
%LOGONNAME%
%EMAILADRESS%
45PST Importer
Meta logix Archive Manager for Exchange PST Importer Adminis tration Guide
Managing client computers
All computers where the gathering of .pst files is to take place:
Øneed the gatherer (either Archive Manager PST Gatherer Setup.exe is installed and enabled
(see the section “Installing the Gatherer service on client computers”) or PST Import server
installed)
Ømust be added to the Clients list
Client computers can be added to the Clients list in three different ways:
· manually one-by-one
· by automatic registration
· by importing (from a comma separated file)
In the following lines we will describe all three possibilities.
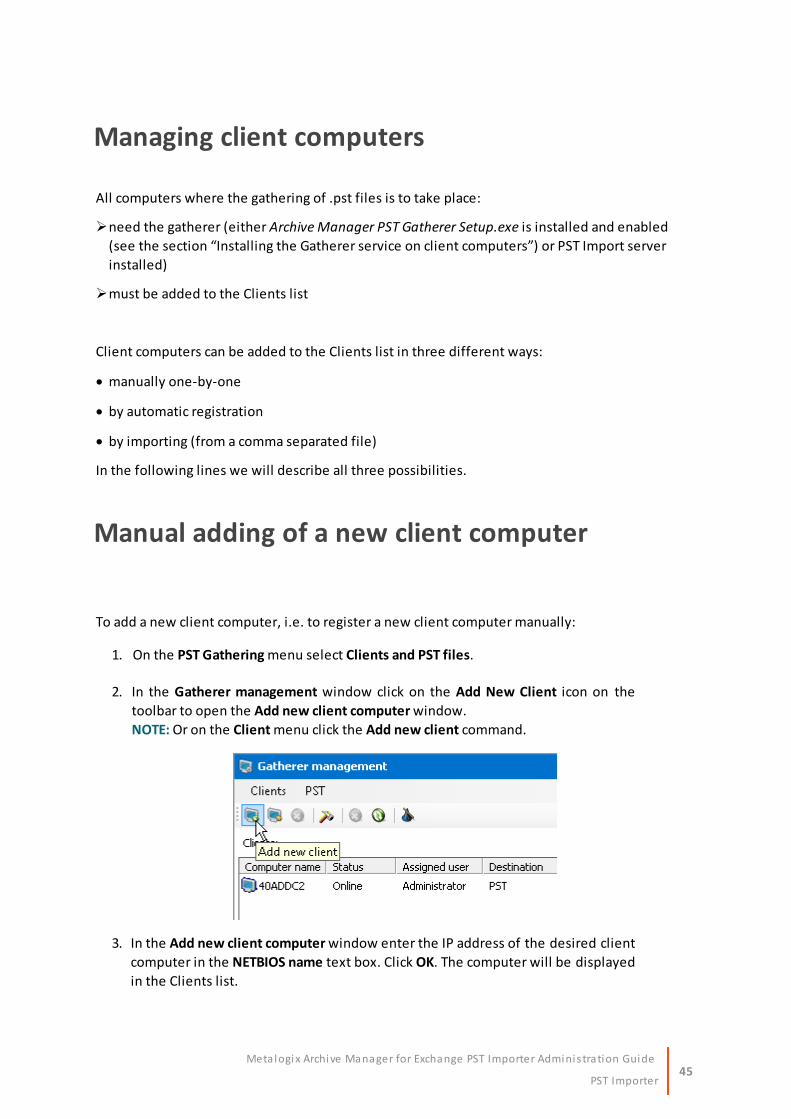
Manual adding of a new client computer
To add a new client computer, i.e. to register a new client computer manually:
1. On the PST Gathering menu select Clients and PST files.
2. In the Gatherer management window click on the Add New Client icon on the
toolbar to open the Add new client computer window.
NOTE: Or on the Client menu click the Add new client command.
3. In the Add new client computer window enter the IP address of the desired client
computer in the NETBIOS name text box. Click OK. The computer will be displayed
in the Clients list.
46PST Importer
Meta logix Archive Manager for Exchange PST Importer Adminis tration Guide
NOTE: In case that an incorrect IP address is entered Error is displayed under the
Status column in the Client computers window. Error is displayed also in case
that the Gatherer service is stopped, or when the client computer is not available
for some reason (e.g. turned off). In such cases please check to find out the
reason.
You can start the Gatherer service on the respective computer from C:\Program
Files (x86) \ Metalogix \ MAM4Exchange \ Tools \ Start .
Automatic registration of new client computers
Instead of registering client computers one-by-one, you may want to register them automatically
by using the automatic registration feature.
All clients with Gatherer installed, connect to the PST Server. Administrator can check these
clients via automatic registration and register selected ones. They will be displayed in the Clients
list then.
For automatic registration:
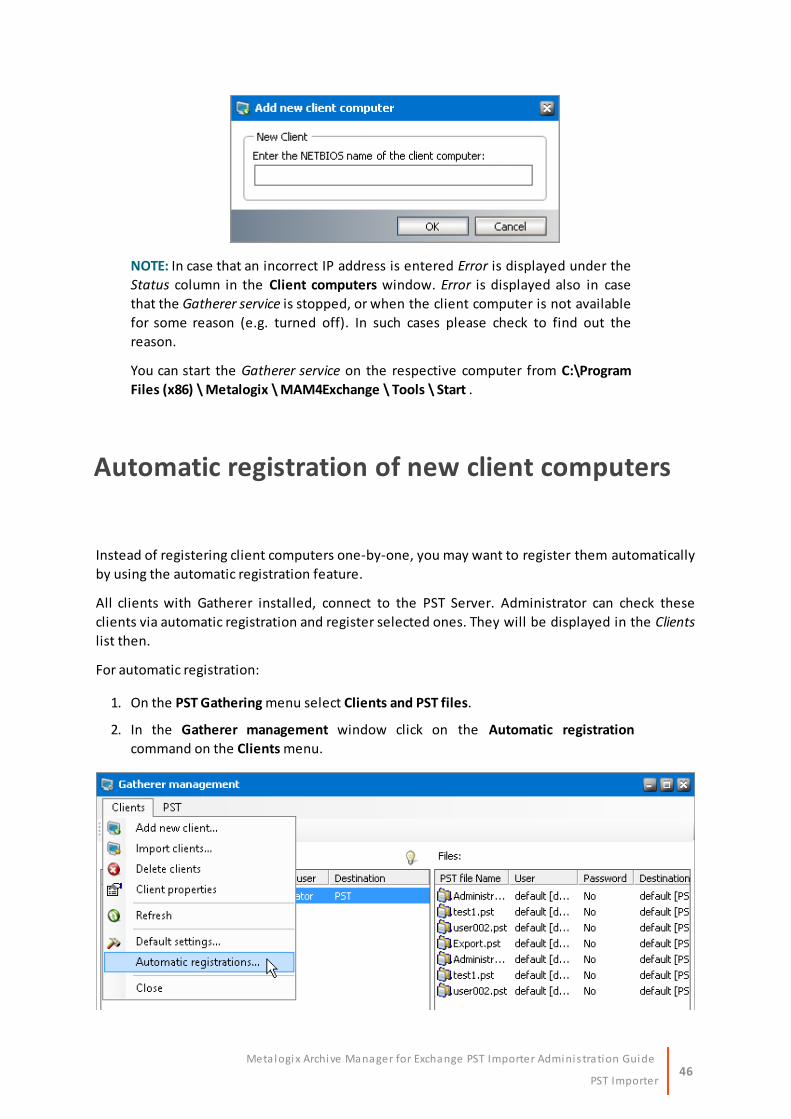
1. On the PST Gathering menu select Clients and PST files.
2. In the Gatherer management window click on the Automatic registration
command on the Clients menu.
47PST Importer
Meta logix Archive Manager for Exchange PST Importer Adminis tration Guide
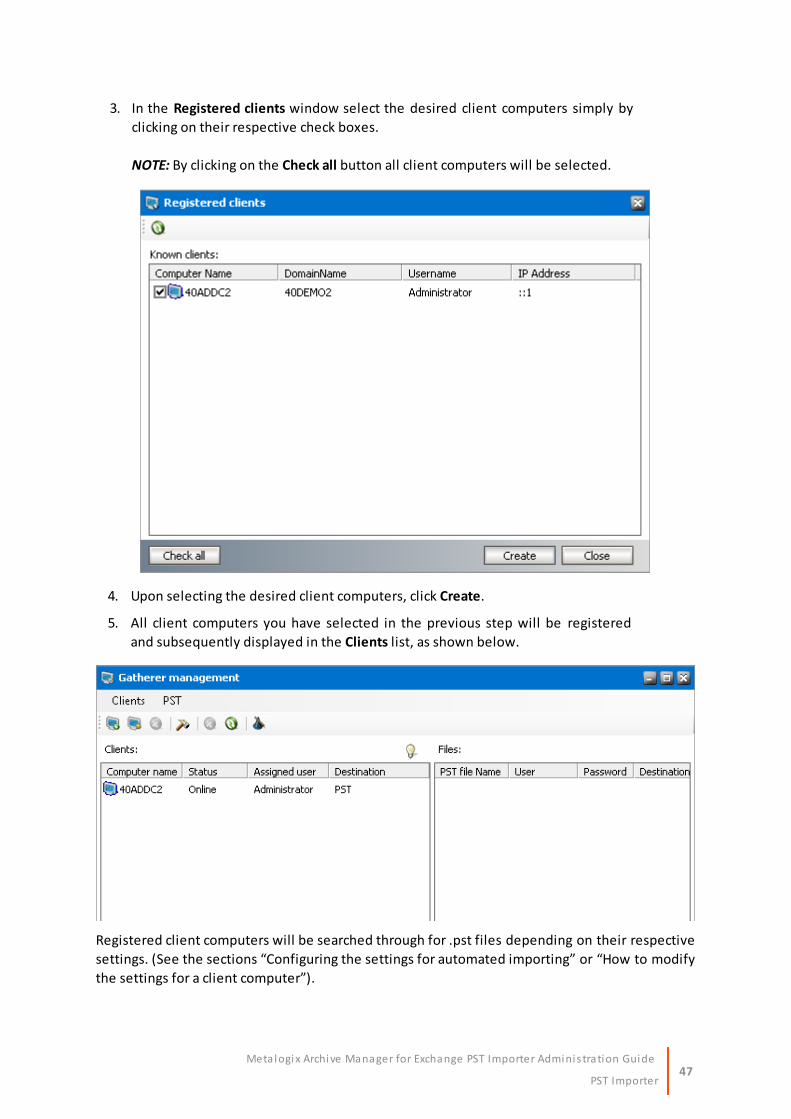
3. In the Registered clients window select the desired client computers simply by
clicking on their respective check boxes.
NOTE: By clicking on the Check all button all client computers will be selected.
4. Upon selecting the desired client computers, click Create.
5. All client computers you have selected in the previous step will be registered
and subsequently displayed in the Clients list, as shown below.
Registered client computers will be searched through for .pst files depending on their respective
settings. (See the sections “Configuring the settings for automated importing” or “How to modify
the settings for a client computer”).
48PST Importer
Meta logix Archive Manager for Exchange PST Importer Adminis tration Guide
Importing of new client computers
Client computer registration can be based also on the import file. Administrator specifies all
necessary data in this import file. Then the clients are imported with the defined settings.
First we explain how to create the import file, then the importing is described.
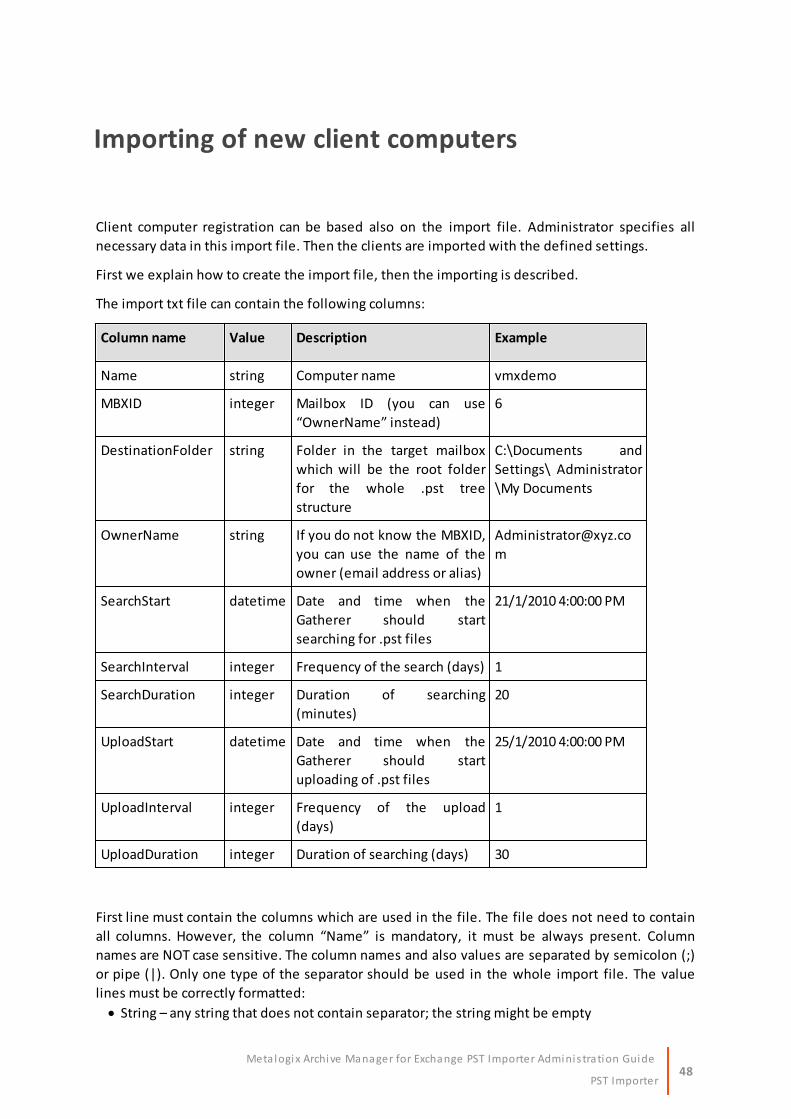
The import txt file can contain the following columns:
Column name Value Description Example
Name string Computer name vmxdemo
MBXID integer Mailbox ID (you can use
“OwnerName” instead)
6
DestinationFolder string Folder in the target mailbox
which will be the root folder
for the whole .pst tree
structure
C:\Documents and
Settings\ Administrator
\My Documents
OwnerName string If you do not know the MBXID,
you can use the name of the
owner (email address or alias)
m
SearchStart datetime Date and time when the
Gatherer should start
searching for .pst files
21/1/2010 4:00:00 PM
SearchInterval integer Frequency of the search (days) 1
SearchDuration integer Duration of searching
(minutes)
20
UploadStart datetime Date and time when the
Gatherer should start
uploading of .pst files
25/1/2010 4:00:00 PM
UploadInterval integer Frequency of the upload
(days)
1
UploadDuration integer Duration of searching (days) 30
First line must contain the columns which are used in the file. The file does not need to contain
all columns. However, the column “Name” is mandatory, it must be always present. Column
names are NOT case sensitive. The column names and also values are separated by semicolon (;)
or pipe (|). Only one type of the separator should be used in the whole import file. The value
lines must be correctly formatted:
· String – any string that does not contain separator; the string might be empty
49PST Importer
Meta logix Archive Manager for Exchange PST Importer Adminis tration Guide
· Integer – only numeric value
· DateTime – the format of the date depends on the regional settings of the computer where
the application is running
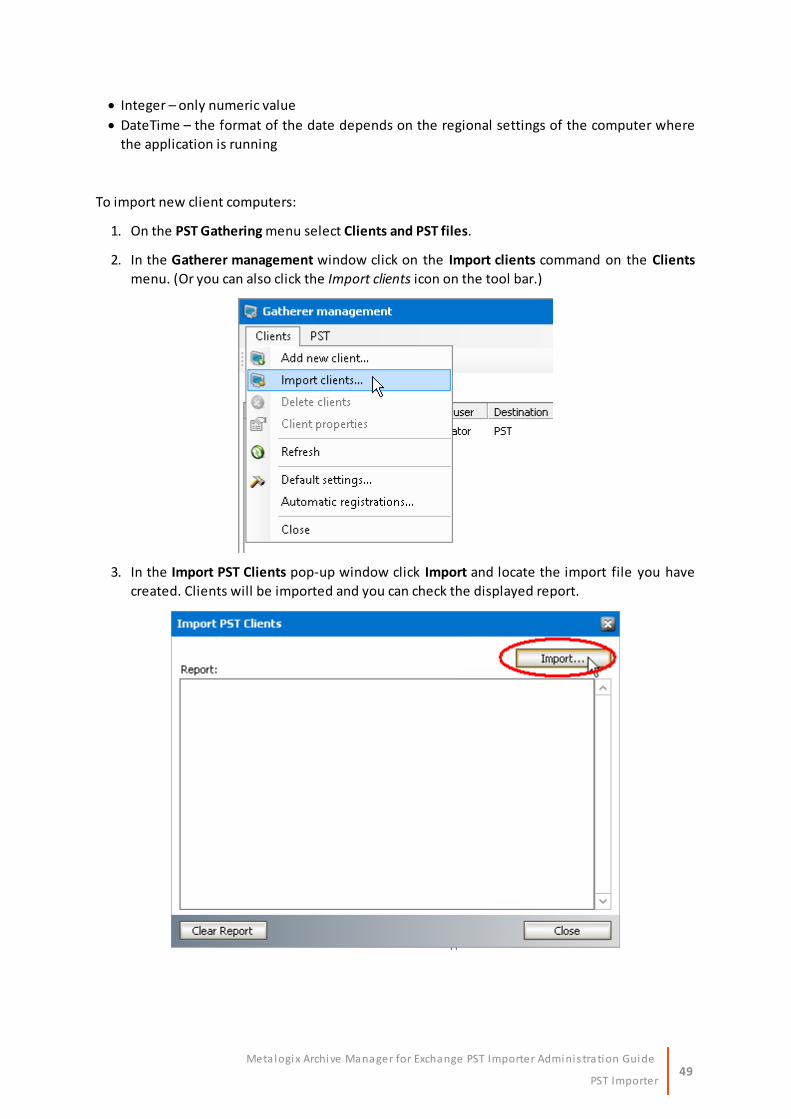
To import new client computers:
1. On the PST Gathering menu select Clients and PST files.
2. In the Gatherer management window click on the Import clients command on the Clients
menu. (Or you can also click the Import clients icon on the tool bar.)
3. In the Import PST Clients pop-up window click Import and locate the import file you have
created. Clients will be imported and you can check the displayed report.
50PST Importer
Meta logix Archive Manager for Exchange PST Importer Adminis tration Guide
Removing a client computer
A client computer can be removed from the Gatherer management. When removed, no
uploading of .pst files from that client computer can be performed.
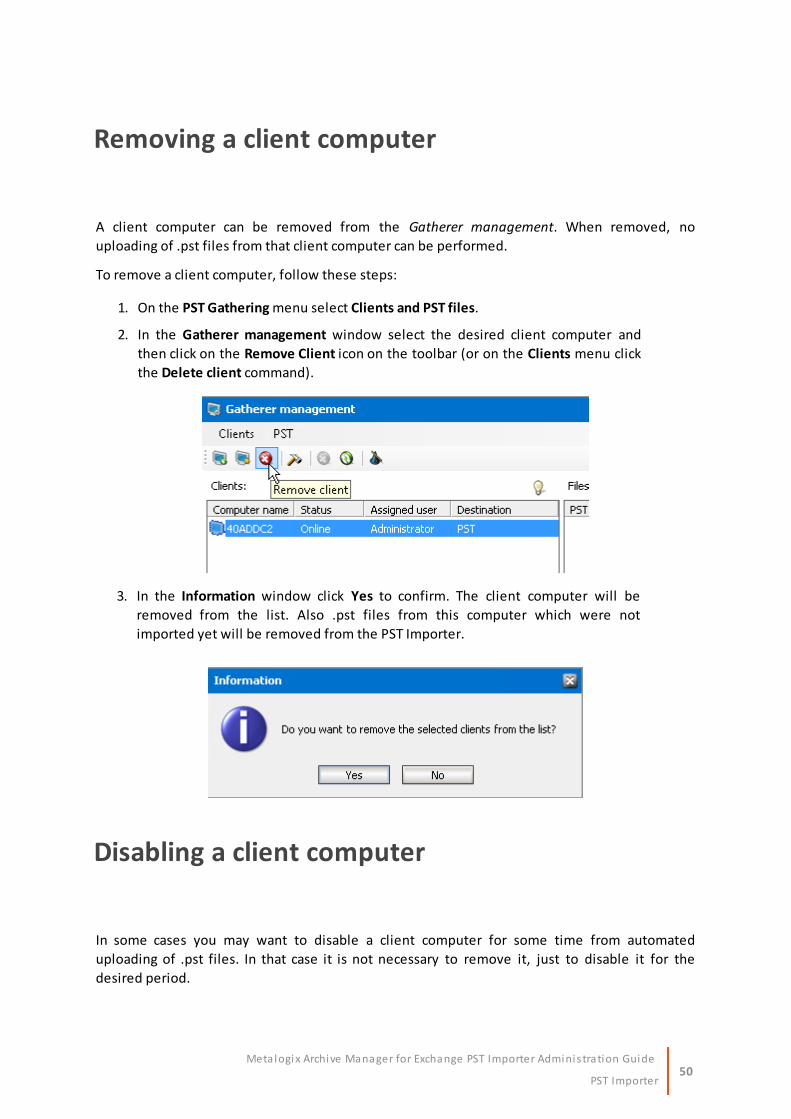
To remove a client computer, follow these steps:
1. On the PST Gathering menu select Clients and PST files.
2. In the Gatherer management window select the desired client computer and
then click on the Remove Client icon on the toolbar (or on the Clients menu click
the Delete client command).
3. In the Information window click Yes to confirm. The client computer will be
removed from the list. Also .pst files from this computer which were not
imported yet will be removed from the PST Importer.
Disabling a client computer
In some cases you may want to disable a client computer for some time from automated
uploading of .pst files. In that case it is not necessary to remove it, just to disable it for the
desired period.
51PST Importer
Meta logix Archive Manager for Exchange PST Importer Adminis tration Guide
IMPORTANT NOTE: If a client computer is disabled for automated uploading, manual uploading
and subsequent importing of .pst files can be performed. Manual uploading is an independent
process from automated uploading.
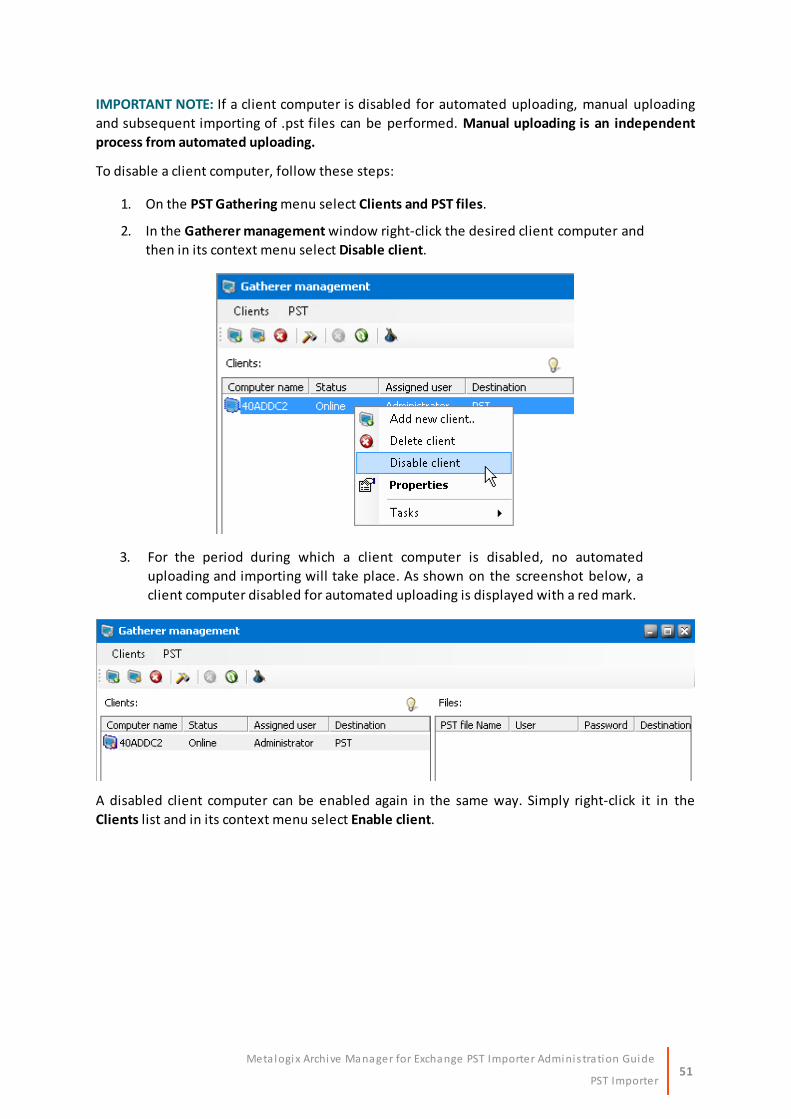
To disable a client computer, follow these steps:
1. On the PST Gathering menu select Clients and PST files.
2. In the Gatherer management window right-click the desired client computer and
then in its context menu select Disable client.
3. For the period during which a client computer is disabled, no automated
uploading and importing will take place. As shown on the screenshot below, a
client computer disabled for automated uploading is displayed with a red mark.
A disabled client computer can be enabled again in the same way. Simply right-click it in the
Clients list and in its context menu select Enable client.
52PST Importer
Meta logix Archive Manager for Exchange PST Importer Adminis tration Guide
How to start searching immediately for .pst files
Searching for .pst files on a specific client computer starts depending on the search start time
specified for that specific computer. You may, however, start searching even immediately, if
necessary.
To start searching immediately through a desired client computer for .pst files:
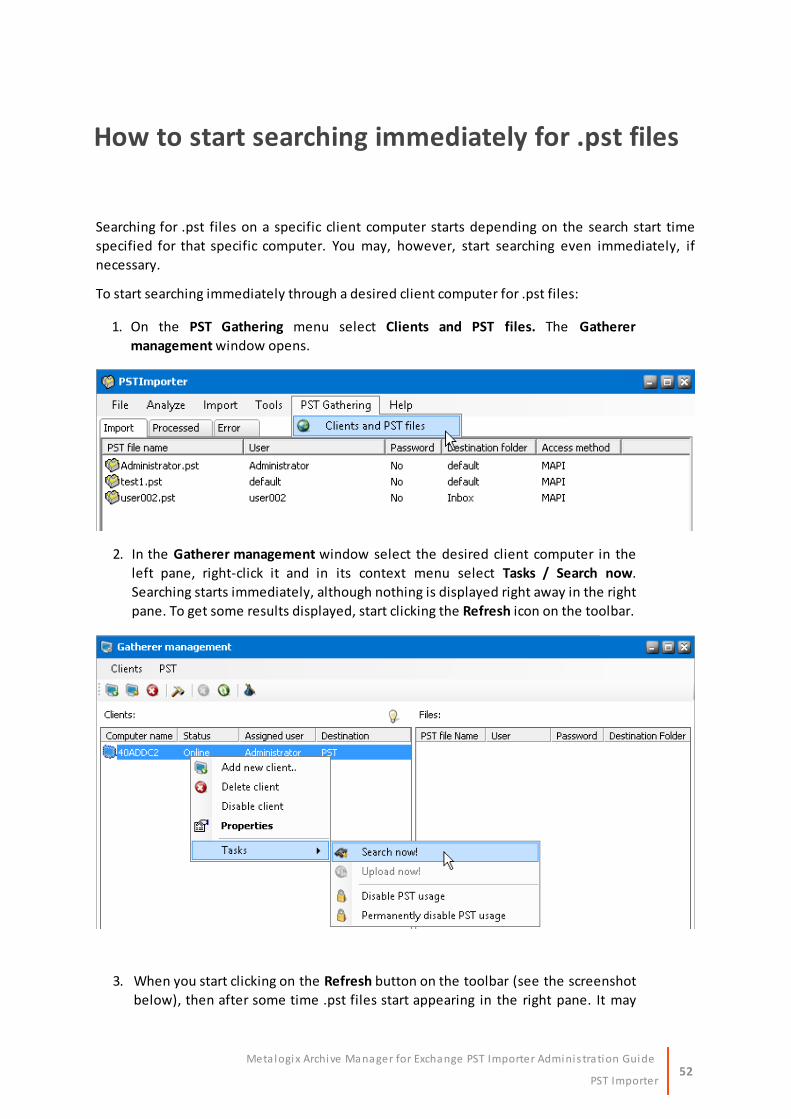
1. On the PST Gathering menu select Clients and PST files. The Gatherer
management window opens.
2. In the Gatherer management window select the desired client computer in the
left pane, right-click it and in its context menu select Tasks / Search now.
Searching starts immediately, although nothing is displayed right away in the right
pane. To get some results displayed, start clicking the Refresh icon on the toolbar.
3. When you start clicking on the Refresh button on the toolbar (see the screenshot
below), then after some time .pst files start appearing in the right pane. It may
53PST Importer
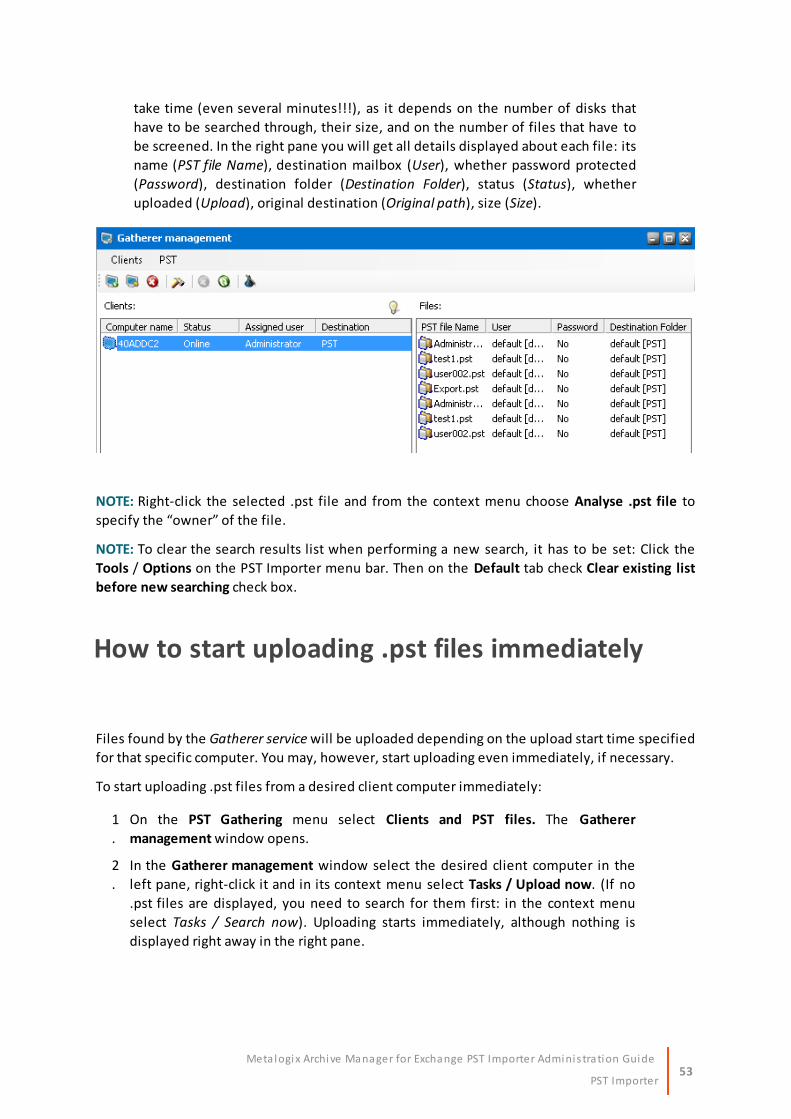
Meta logix Archive Manager for Exchange PST Importer Adminis tration Guide
take time (even several minutes!!!), as it depends on the number of disks that
have to be searched through, their size, and on the number of files that have to
be screened. In the right pane you will get all details displayed about each file: its
name (PST file Name), destination mailbox (User), whether password protected
(Password), destination folder (Destination Folder), status (Status), whether
uploaded (Upload), original destination (Original path), size (Size).
NOTE: Right-click the selected .pst file and from the context menu choose Analyse .pst file to
specify the “owner” of the file.
NOTE: To clear the search results list when performing a new search, it has to be set: Click the
Tools / Options on the PST Importer menu bar. Then on the Default tab check Clear existing list
before new searching check box.
How to start uploading .pst files immediately
Files found by the Gatherer service will be uploaded depending on the upload start time specified
for that specific computer. You may, however, start uploading even immediately, if necessary.
To start uploading .pst files from a desired client computer immediately:
1
.
On the PST Gathering menu select Clients and PST files. The Gatherer
management window opens.
2
.
In the Gatherer management window select the desired client computer in the
left pane, right-click it and in its context menu select Tasks / Upload now. (If no
.pst files are displayed, you need to search for them first: in the context menu
select Tasks / Search now). Uploading starts immediately, although nothing is
displayed right away in the right pane.

54PST Importer
Meta logix Archive Manager for Exchange PST Importer Adminis tration Guide
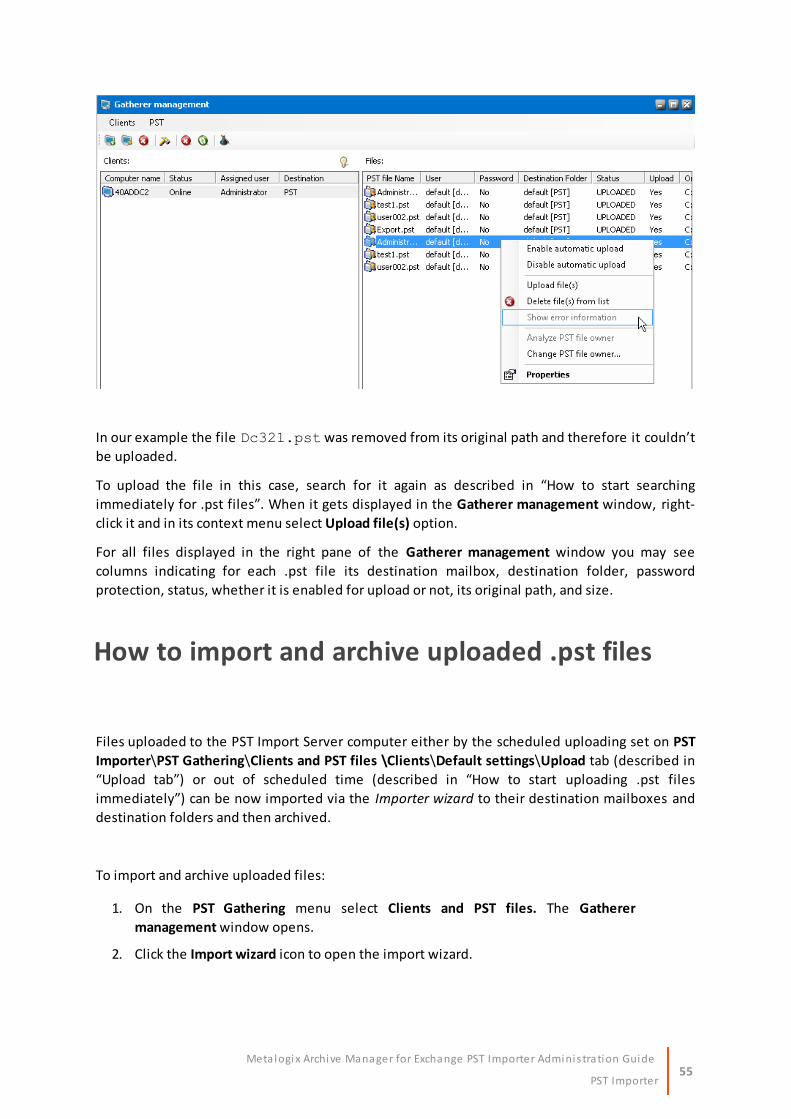
3. When you start clicking on the Refresh button on the toolbar (see the screenshot
below), then the Status in the right pane changes gradually as files are uploaded.
You may see there UPLOADED, ERROR, and even UPLOADING – indicating that at
the time the respective file is being uploaded.
ERROR indicates that the respective .pst file couldn’t be uploaded because even though it was
found by the Search function and displayed in the right pane, before uploading took place it had
been for instance deleted from the disk. To find out what kind of error occurred, right-click the
respective .pst file and in its context menu select Show error information.
55PST Importer
Meta logix Archive Manager for Exchange PST Importer Adminis tration Guide
In our example the file Dc321.pst was removed from its original path and therefore it couldn’t
be uploaded.
To upload the file in this case, search for it again as described in “How to start searching
immediately for .pst files”. When it gets displayed in the Gatherer management window, right-
click it and in its context menu select Upload file(s) option.
For all files displayed in the right pane of the Gatherer management window you may see
columns indicating for each .pst file its destination mailbox, destination folder, password
protection, status, whether it is enabled for upload or not, its original path, and size.
How to import and archive uploaded .pst files
Files uploaded to the PST Import Server computer either by the scheduled uploading set on PST
Importer\PST Gathering\Clients and PST files \Clients\Default settings\Upload tab (described in
“Upload tab”) or out of scheduled time (described in “How to start uploading .pst files
immediately”) can be now imported via the Importer wizard to their destination mailboxes and
destination folders and then archived.
To import and archive uploaded files:
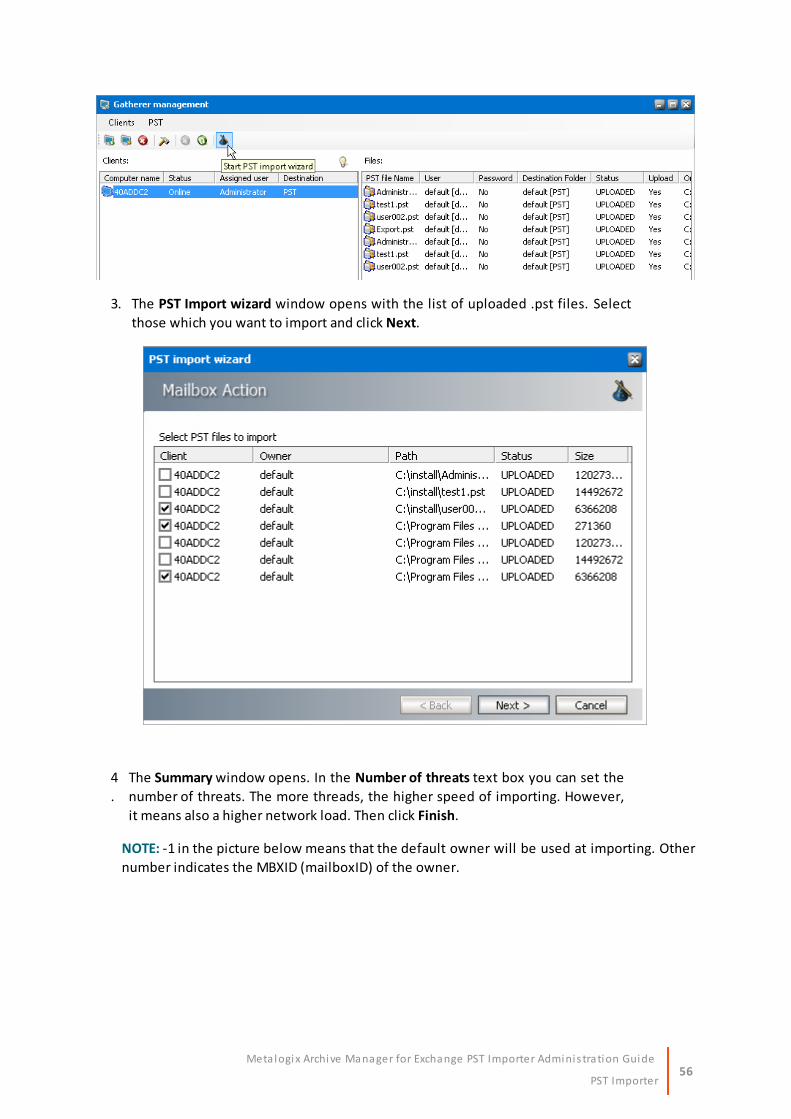
1. On the PST Gathering menu select Clients and PST files. The Gatherer
management window opens.
2. Click the Import wizard icon to open the import wizard.
56PST Importer
Meta logix Archive Manager for Exchange PST Importer Adminis tration Guide
3. The PST Import wizard window opens with the list of uploaded .pst files. Select
those which you want to import and click Next.
4
.
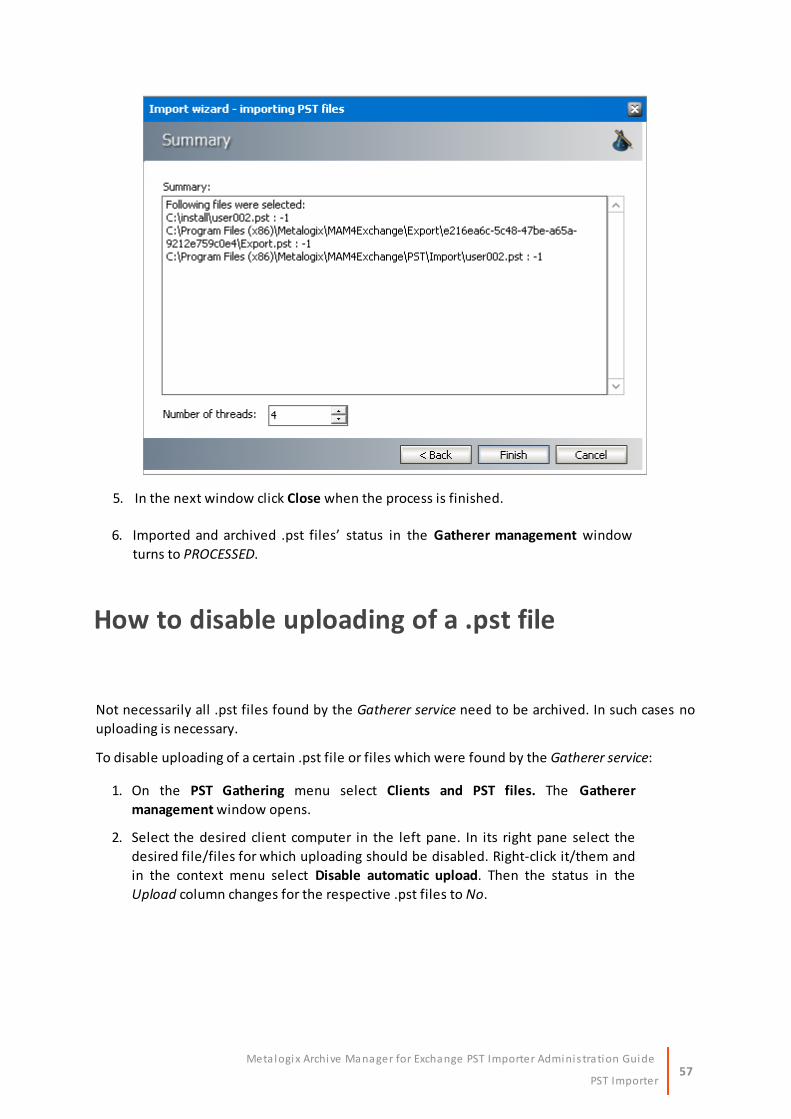
The Summary window opens. In the Number of threats text box you can set the
number of threats. The more threads, the higher speed of importing. However,
it means also a higher network load. Then click Finish.
NOTE: -1 in the picture below means that the default owner will be used at importing. Other
number indicates the MBXID (mailboxID) of the owner.
57PST Importer
Meta logix Archive Manager for Exchange PST Importer Adminis tration Guide
5. In the next window click Close when the process is finished.
6. Imported and archived .pst files’ status in the Gatherer management window
turns to PROCESSED.
How to disable uploading of a .pst file
Not necessarily all .pst files found by the Gatherer service need to be archived. In such cases no
uploading is necessary.
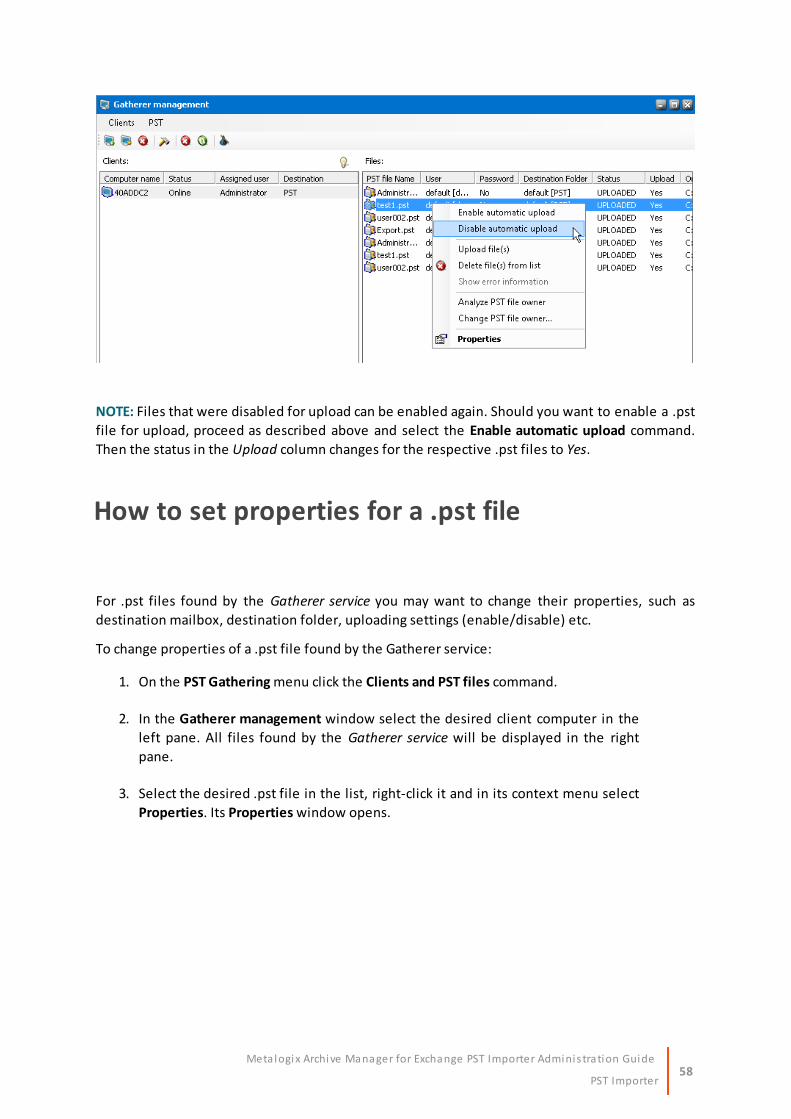
To disable uploading of a certain .pst file or files which were found by the Gatherer service:
1. On the PST Gathering menu select Clients and PST files. The Gatherer
management window opens.
2. Select the desired client computer in the left pane. In its right pane select the
desired file/files for which uploading should be disabled. Right-click it/them and
in the context menu select Disable automatic upload. Then the status in the
Upload column changes for the respective .pst files to No.
58PST Importer
Meta logix Archive Manager for Exchange PST Importer Adminis tration Guide
NOTE: Files that were disabled for upload can be enabled again. Should you want to enable a .pst
file for upload, proceed as described above and select the Enable automatic upload command.
Then the status in the Upload column changes for the respective .pst files to Yes.
How to set properties for a .pst file
For .pst files found by the Gatherer service you may want to change their properties, such as
destination mailbox, destination folder, uploading settings (enable/disable) etc.
To change properties of a .pst file found by the Gatherer service:
1. On the PST Gathering menu click the Clients and PST files command.
2. In the Gatherer management window select the desired client computer in the
left pane. All files found by the Gatherer service will be displayed in the right
pane.
3. Select the desired .pst file in the list, right-click it and in its context menu select
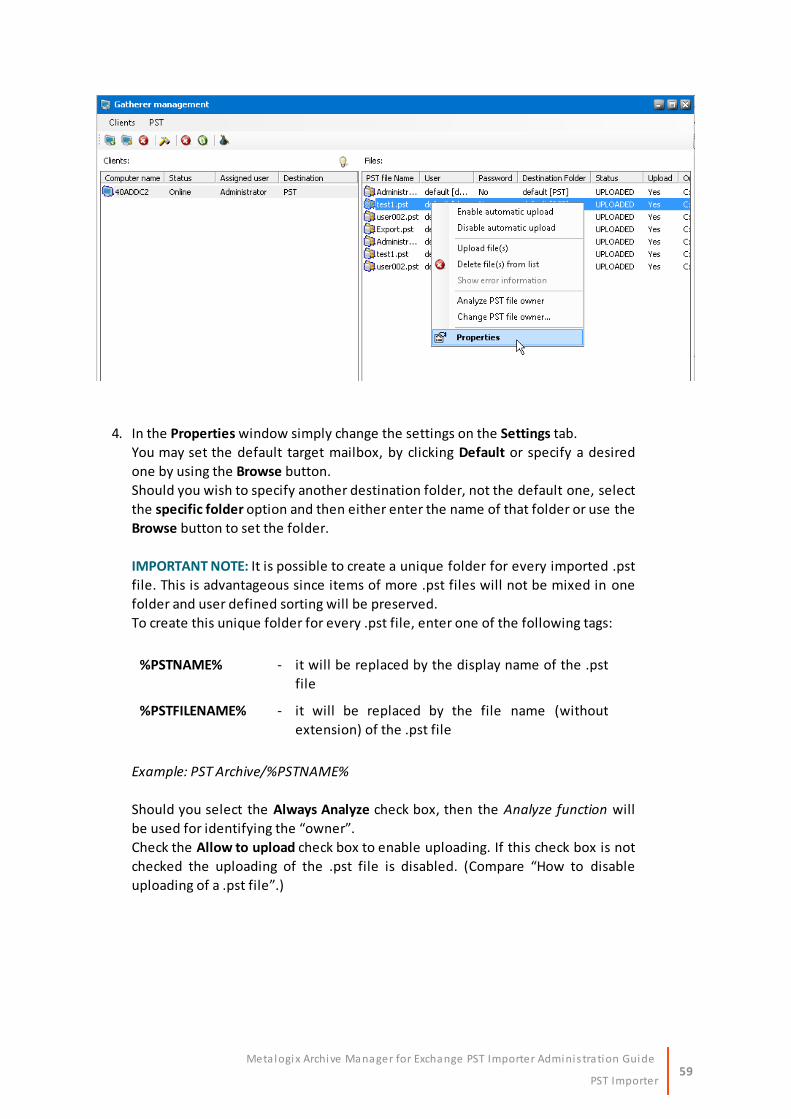
Properties. Its Properties window opens.
59PST Importer
Meta logix Archive Manager for Exchange PST Importer Adminis tration Guide
4. In the Properties window simply change the settings on the Settings tab.
You may set the default target mailbox, by clicking Default or specify a desired
one by using the Browse button.
Should you wish to specify another destination folder, not the default one, select
the specific folder option and then either enter the name of that folder or use the
Browse button to set the folder.
IMPORTANT NOTE: It is possible to create a unique folder for every imported .pst
file. This is advantageous since items of more .pst files will not be mixed in one
folder and user defined sorting will be preserved.
To create this unique folder for every .pst file, enter one of the following tags:
%PSTNAME% - it will be replaced by the display name of the .pst
file
%PSTFILENAME% - it will be replaced by the file name (without
extension) of the .pst file
Example: PST Archive/%PSTNAME%
Should you select the Always Analyze check box, then the Analyze function will
be used for identifying the “owner”.
Check the Allow to upload check box to enable uploading. If this check box is not
checked the uploading of the .pst file is disabled. (Compare “How to disable
uploading of a .pst file”.)

60PST Importer
Meta logix Archive Manager for Exchange PST Importer Adminis tration Guide
5. On the Details tab you can enter a password if the file is password protected and
you can check also other properties as Status, Size, Path on the server and also
summary information on the structure of the .pst file when you click the Info
button.
61Addendum
Metalogix Archive Manager for Exchange PST Importer Adminis tration Guide
Addendum
4
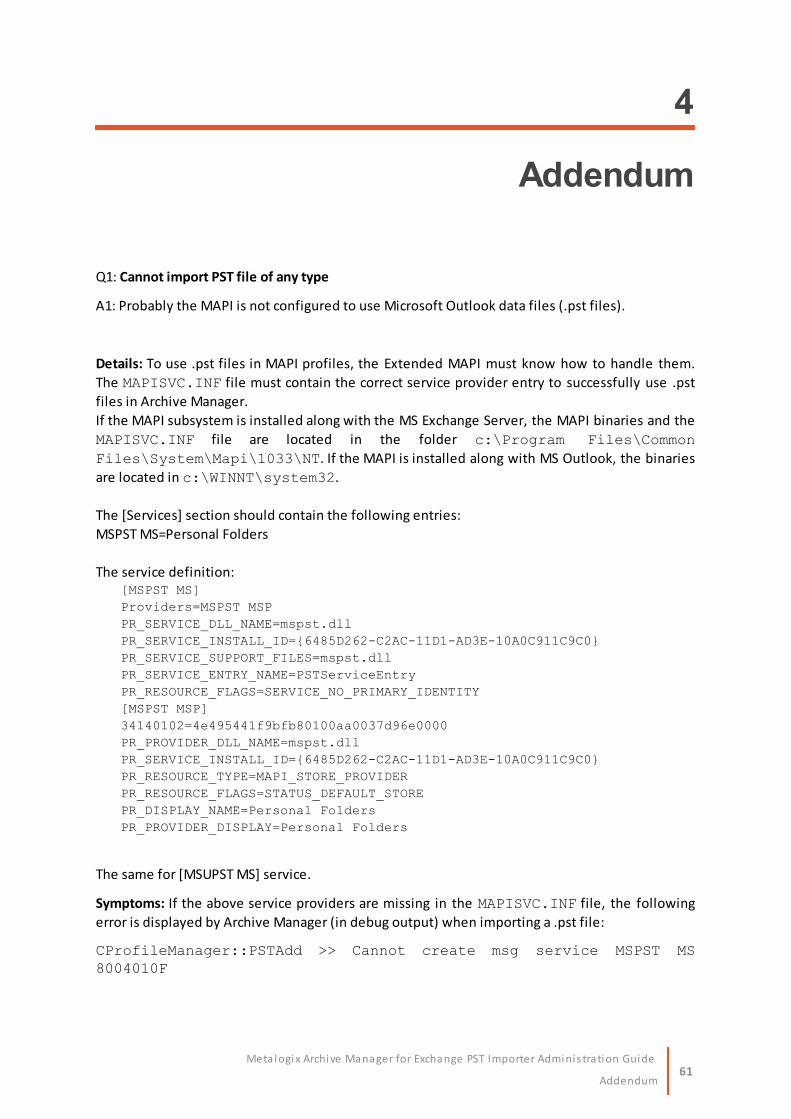
Q1: Cannot import PST file of any type
A1: Probably the MAPI is not configured to use Microsoft Outlook data files (.pst files).
Details: To use .pst files in MAPI profiles, the Extended MAPI must know how to handle them.
The MAPISVC.INF file must contain the correct service provider entry to successfully use .pst
files in Archive Manager.
If the MAPI subsystem is installed along with the MS Exchange Server, the MAPI binaries and the
MAPISVC.INF file are located in the folder c:\Program Files\Common
Files\System\Mapi\1033\NT. If the MAPI is installed along with MS Outlook, the binaries
are located in c:\WINNT\system32.
The [Services] section should contain the following entries:
MSPST MS=Personal Folders
The service definition:[MSPST MS]
Providers=MSPST MSP
PR_SERVICE_DLL_NAME=mspst.dll
PR_SERVICE_INSTALL_ID={6485D262-C2AC-11D1-AD3E-10A0C911C9C0}
PR_SERVICE_SUPPORT_FILES=mspst.dll
PR_SERVICE_ENTRY_NAME=PSTServiceEntry
PR_RESOURCE_FLAGS=SERVICE_NO_PRIMARY_IDENTITY
[MSPST MSP]
34140102=4e495441f9bfb80100aa0037d96e0000
PR_PROVIDER_DLL_NAME=mspst.dll
PR_SERVICE_INSTALL_ID={6485D262-C2AC-11D1-AD3E-10A0C911C9C0}
PR_RESOURCE_TYPE=MAPI_STORE_PROVIDER
PR_RESOURCE_FLAGS=STATUS_DEFAULT_STORE
PR_DISPLAY_NAME=Personal Folders
PR_PROVIDER_DISPLAY=Personal Folders
The same for [MSUPST MS] service.
Symptoms: If the above service providers are missing in the MAPISVC.INF file, the following
error is displayed by Archive Manager (in debug output) when importing a .pst file:
CProfileManager::PSTAdd >> Cannot create msg service MSPST MS8004010F

62Addendum
Metalogix Archive Manager for Exchange PST Importer Adminis tration Guide
CProfileManager::PSTAdd >> Exception 8004010FCProfileManager::PSTAdd >> Cannot create msg service MSPST/MSUPSTMS %08XCProfileManager::PSTAdd >> Cannot create msg service MSUPST MS8004010FCProfileManager::PSTAdd >> Exception 8004010FCProfileManager::PSTAdd >> Cannot create msg service MSPST/MSUPSTMS %08X
Remark: The error code 8004010F stands for MAPI_E_NOT_FOUND and indicates that the
required data was not found on the object. (e.g. the MSPST MS service provider was not found)
Q2: Cannot import Unicode PST files
A2: Probably the MAPI is not configured to use Unicode .pst files or no Outlook was installed on
the PST Import Server.
Details: The service provider MSUPST MS must be included in the MAPISVC.INF file. For
detailed description of the MAPISVC.INF file see question Q1.
Symptoms: The following lines can appear in the debug output:
CProfileManager::PSTAdd >> Cannot create msg service MSUPST MS8004010FCProfileManager::PSTAdd >> Exception 8004010FCProfileManager::PSTAdd >> Cannot create msg service MSPST/MSUPSTMS %08X
Remark: The error code 8004010F stands for MAPI_E_NOT_FOUND and indicates that the
required data was not found on the object. (e.g. the MSPST MS service provider was not found)
63About Us
Metalogix Archive Manager for Exchange PST Importer Adminis tration Guide
About Us
5
Quest creates software solutions that make the benefits of new technology real in an
increasingly complex IT landscape. From database and systems management, to Active Directory
and Office 365 management, and cyber security resilience, Quest helps customers solve their
next IT challenge now. Around the globe, more than 130,000 companies and 95% of the Fortune
500 count on Quest to deliver proactive management and monitoring for the next enterprise
initiative, find the next solution for complex Microsoft challenges and stay ahead of the next
threat. Quest Software. Where next meets now. For more information, visit www.quest.com.
Contacting QuestFor sales or other inquiries, visit www.quest.com/contact.
Technical Support ResourcesTechnical support is available to Quest customers with a valid maintenance contract and
customers who have trial versions. You can access the Quest Support Portal at
https://support.quest.com
The Support Portal provides self-help tools you can use to solve problems quickly and
independently, 24 hours a day, 365 days a year. The Support Portal enables you to:
· Submit and manage a Service Request
· View Knowledge Base articles
· Sign up for product notifications
· Download software and technical documentation
· View how-to-videos
· Engage in community discussions
· Chat with support engineers online
· View services to assist you with your product
Related Documents