875-0049-12 RevB Mercury API Programmer’s Guide For: Mercury API v1.27.3 and later Supported Hardware: M6 and Astra-EX (firmware v4.19.3 and later) M6e, M6e-A, M6e-PRC (firmware v1.19.0 and later) Micro, Micro-LTE, USBPro (firmware v1.7.3 and later) Nano (firmware v1.5.0 and later) M5e, M5e-C, USB Plus+ and Vega (fw v1.7.2 and later)

Welcome message from author
This document is posted to help you gain knowledge. Please leave a comment to let me know what you think about it! Share it to your friends and learn new things together.
Transcript

875-0049-12 RevB
Mercury APIProgrammer’s Guide
For: Mercury API v1.27.3 and laterSupported Hardware: M6 and Astra-EX (firmware v4.19.3 and later)
M6e, M6e-A, M6e-PRC (firmware v1.19.0 and later)Micro, Micro-LTE, USBPro (firmware v1.7.3 and later)Nano (firmware v1.5.0 and later)M5e, M5e-C, USB Plus+ and Vega (fw v1.7.2 and later)

Government Limited Rights Notice: All documentation and manualswere developed at private expense and no part of it was developed usingGovernment funds.
The U.S. Governmentʼs rights to use, modify, reproduce, release, perform,display, or disclose the technical data contained herein are restricted byparagraph (b)(3) of the Rights in Technical Data — Noncommercial Itemsclause (DFARS 252.227-7013(b)(3)), as amended from time-to-time. Anyreproduction of technical data or portions thereof marked with this legendmust also reproduce the markings. Any person, other than the U.S.Government, who has been provided access to such data must promptlynotify Trimble.
ThingMagic, Mercury, Reads Any Tag, and the ThingMagic logo aretrademarks or registered trademarks of Trimble.
Other product names mentioned herein may be trademarks or registeredtrademarks of Trimble or other companies.
©2014 ThingMagic – a division of Trimble Navigation Limited. ThingMagic and The Engine in RFID are registered trademarks of Trimble Navigation Limited. Other marks may be protected by their respective owners. All Rights Reserved.
ThingMagic, A Division of Trimble
4 Cambridge Center, 12th floor
Cambridge, MA 02142
12 Revision BFeb 2016
Revision Table
Date Version Description
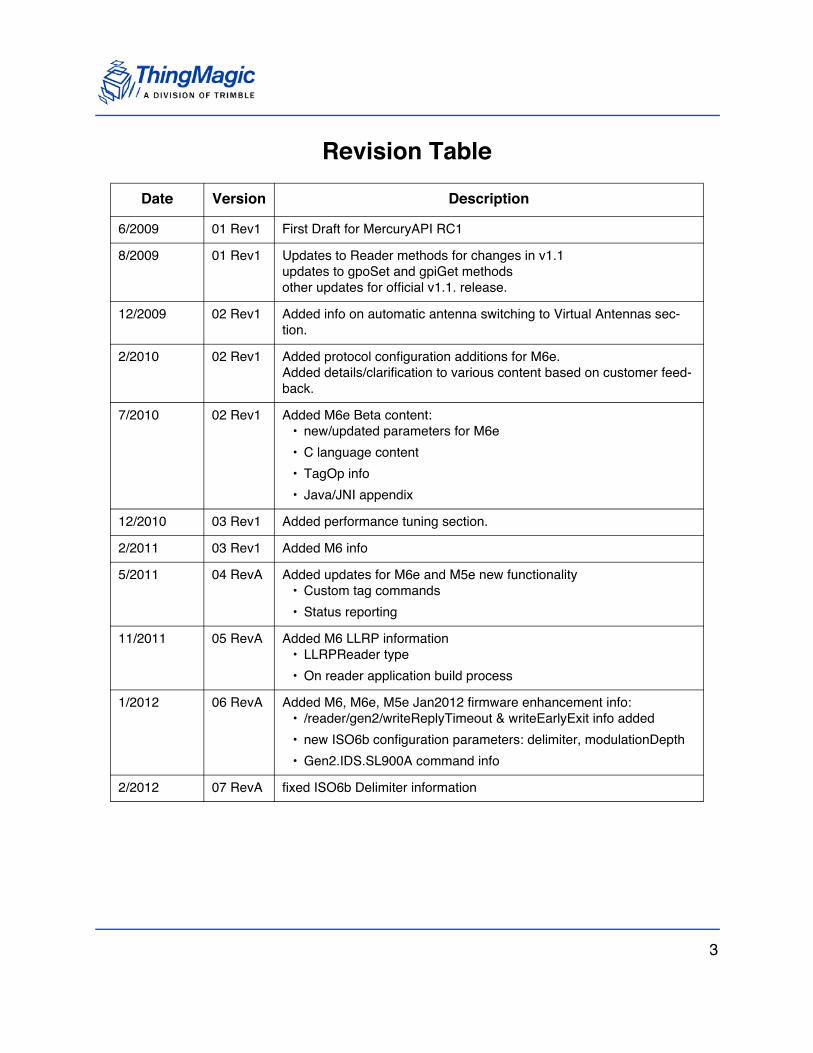
6/2009 01 Rev1 First Draft for MercuryAPI RC1
8/2009 01 Rev1 Updates to Reader methods for changes in v1.1updates to gpoSet and gpiGet methodsother updates for official v1.1. release.
12/2009 02 Rev1 Added info on automatic antenna switching to Virtual Antennas sec-tion.
2/2010 02 Rev1 Added protocol configuration additions for M6e.Added details/clarification to various content based on customer feed-back.
7/2010 02 Rev1 Added M6e Beta content:• new/updated parameters for M6e
• C language content
• TagOp info
• Java/JNI appendix
12/2010 03 Rev1 Added performance tuning section.
2/2011 03 Rev1 Added M6 info
5/2011 04 RevA Added updates for M6e and M5e new functionality• Custom tag commands
• Status reporting
11/2011 05 RevA Added M6 LLRP information• LLRPReader type
• On reader application build process
1/2012 06 RevA Added M6, M6e, M5e Jan2012 firmware enhancement info:• /reader/gen2/writeReplyTimeout & writeEarlyExit info added
• new ISO6b configuration parameters: delimiter, modulationDepth
• Gen2.IDS.SL900A command info
2/2012 07 RevA fixed ISO6b Delimiter information
3
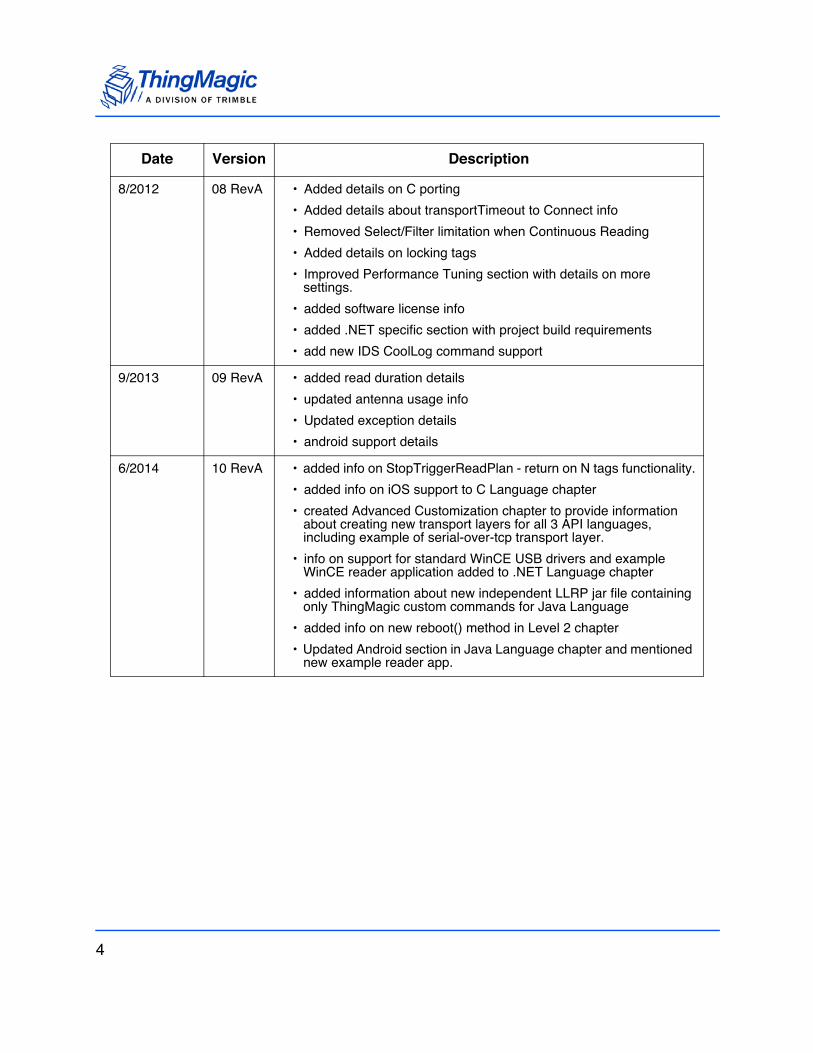
8/2012 08 RevA • Added details on C porting
• Added details about transportTimeout to Connect info
• Removed Select/Filter limitation when Continuous Reading
• Added details on locking tags
• Improved Performance Tuning section with details on more settings.
• added software license info
• added .NET specific section with project build requirements
• add new IDS CoolLog command support
9/2013 09 RevA • added read duration details
• updated antenna usage info
• Updated exception details
• android support details
6/2014 10 RevA • added info on StopTriggerReadPlan - return on N tags functionality.
• added info on iOS support to C Language chapter
• created Advanced Customization chapter to provide information about creating new transport layers for all 3 API languages, including example of serial-over-tcp transport layer.
• info on support for standard WinCE USB drivers and example WinCE reader application added to .NET Language chapter
• added information about new independent LLRP jar file containing only ThingMagic custom commands for Java Language
• added info on new reboot() method in Level 2 chapter
• Updated Android section in Java Language chapter and mentioned new example reader app.
Date Version Description
4
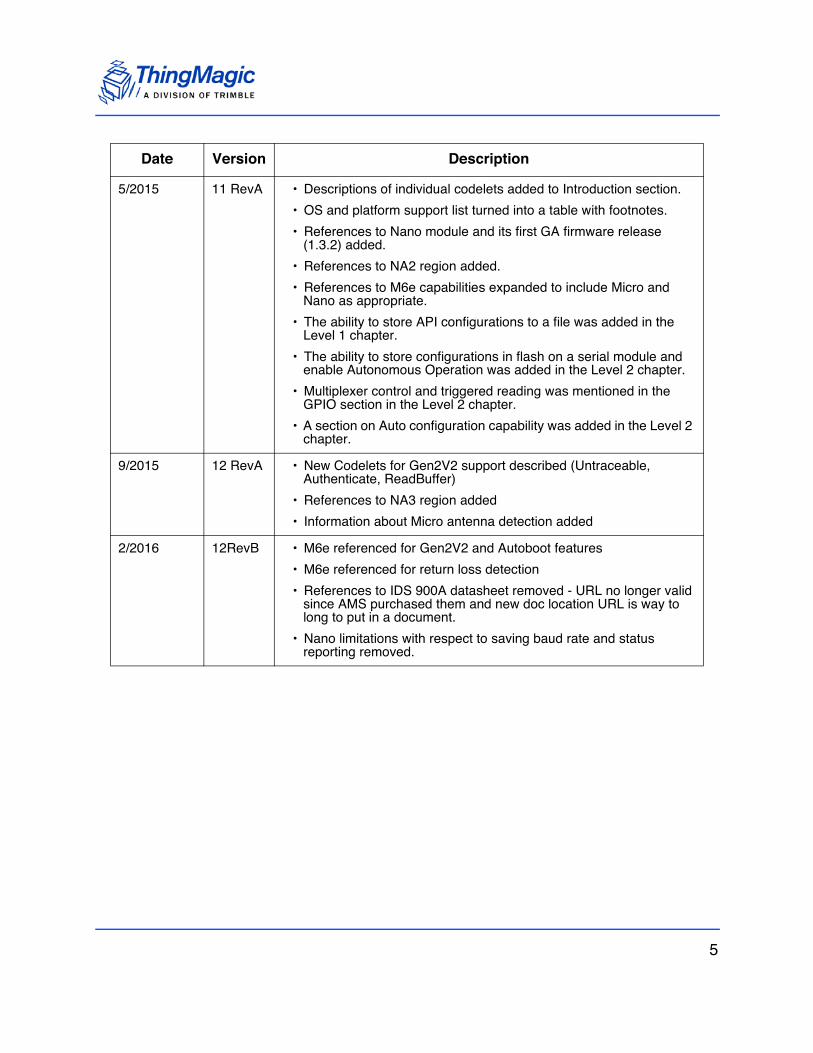
5/2015 11 RevA • Descriptions of individual codelets added to Introduction section.
• OS and platform support list turned into a table with footnotes.
• References to Nano module and its first GA firmware release (1.3.2) added.
• References to NA2 region added.
• References to M6e capabilities expanded to include Micro and Nano as appropriate.
• The ability to store API configurations to a file was added in the Level 1 chapter.
• The ability to store configurations in flash on a serial module and enable Autonomous Operation was added in the Level 2 chapter.
• Multiplexer control and triggered reading was mentioned in the GPIO section in the Level 2 chapter.
• A section on Auto configuration capability was added in the Level 2 chapter.
9/2015 12 RevA • New Codelets for Gen2V2 support described (Untraceable, Authenticate, ReadBuffer)
• References to NA3 region added
• Information about Micro antenna detection added
2/2016 12RevB • M6e referenced for Gen2V2 and Autoboot features
• M6e referenced for return loss detection
• References to IDS 900A datasheet removed - URL no longer valid since AMS purchased them and new doc location URL is way to long to put in a document.
• Nano limitations with respect to saving baud rate and status reporting removed.
Date Version Description
5

6
Contents
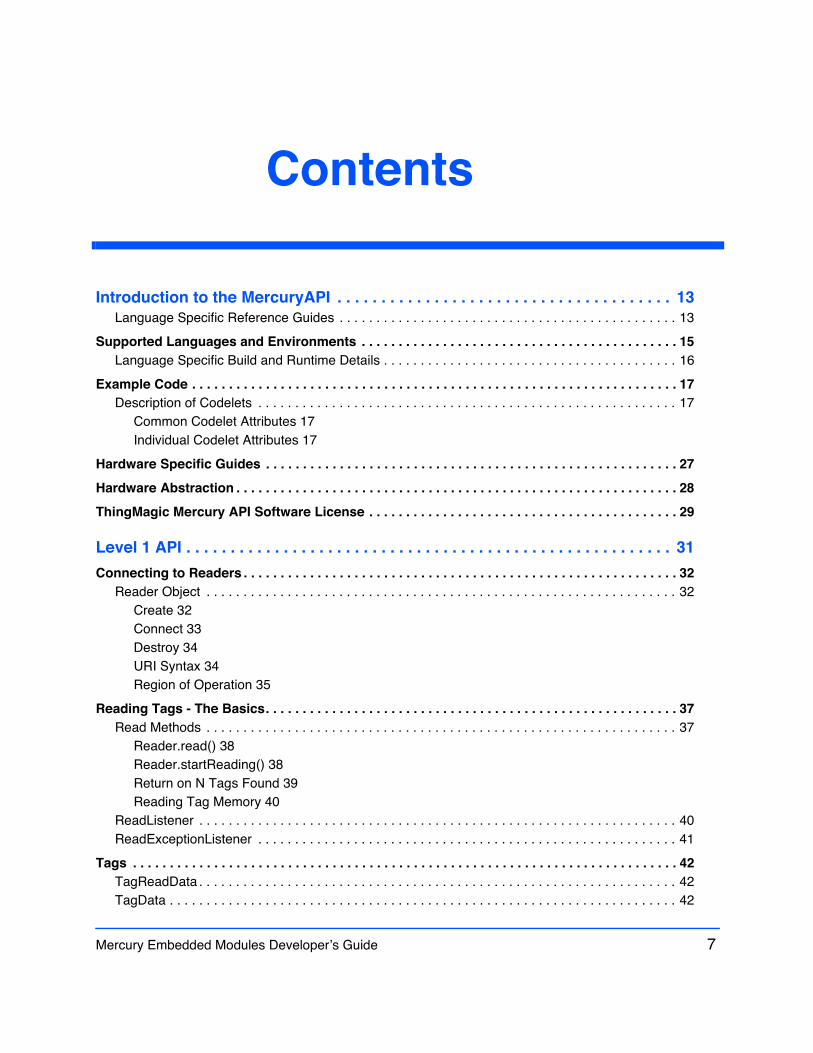
Introduction to the MercuryAPI . . . . . . . . . . . . . . . . . . . . . . . . . . . . . . . . . . . . . . 13Language Specific Reference Guides . . . . . . . . . . . . . . . . . . . . . . . . . . . . . . . . . . . . . . . . . . . . . . 13
Supported Languages and Environments . . . . . . . . . . . . . . . . . . . . . . . . . . . . . . . . . . . . . . . . . . . 15
Language Specific Build and Runtime Details . . . . . . . . . . . . . . . . . . . . . . . . . . . . . . . . . . . . . . . . 16
Example Code . . . . . . . . . . . . . . . . . . . . . . . . . . . . . . . . . . . . . . . . . . . . . . . . . . . . . . . . . . . . . . . . . . 17
Description of Codelets . . . . . . . . . . . . . . . . . . . . . . . . . . . . . . . . . . . . . . . . . . . . . . . . . . . . . . . . . 17
Common Codelet Attributes 17
Individual Codelet Attributes 17
Hardware Specific Guides . . . . . . . . . . . . . . . . . . . . . . . . . . . . . . . . . . . . . . . . . . . . . . . . . . . . . . . . 27
Hardware Abstraction . . . . . . . . . . . . . . . . . . . . . . . . . . . . . . . . . . . . . . . . . . . . . . . . . . . . . . . . . . . . 28
ThingMagic Mercury API Software License . . . . . . . . . . . . . . . . . . . . . . . . . . . . . . . . . . . . . . . . . . 29
Level 1 API . . . . . . . . . . . . . . . . . . . . . . . . . . . . . . . . . . . . . . . . . . . . . . . . . . . . . . . 31
Connecting to Readers . . . . . . . . . . . . . . . . . . . . . . . . . . . . . . . . . . . . . . . . . . . . . . . . . . . . . . . . . . . 32
Reader Object . . . . . . . . . . . . . . . . . . . . . . . . . . . . . . . . . . . . . . . . . . . . . . . . . . . . . . . . . . . . . . . . 32
Create 32
Connect 33
Destroy 34
URI Syntax 34
Region of Operation 35
Reading Tags - The Basics. . . . . . . . . . . . . . . . . . . . . . . . . . . . . . . . . . . . . . . . . . . . . . . . . . . . . . . . 37
Read Methods . . . . . . . . . . . . . . . . . . . . . . . . . . . . . . . . . . . . . . . . . . . . . . . . . . . . . . . . . . . . . . . . 37
Reader.read() 38
Reader.startReading() 38
Return on N Tags Found 39
Reading Tag Memory 40
ReadListener . . . . . . . . . . . . . . . . . . . . . . . . . . . . . . . . . . . . . . . . . . . . . . . . . . . . . . . . . . . . . . . . . 40
ReadExceptionListener . . . . . . . . . . . . . . . . . . . . . . . . . . . . . . . . . . . . . . . . . . . . . . . . . . . . . . . . . 41
Tags . . . . . . . . . . . . . . . . . . . . . . . . . . . . . . . . . . . . . . . . . . . . . . . . . . . . . . . . . . . . . . . . . . . . . . . . . . 42
TagReadData . . . . . . . . . . . . . . . . . . . . . . . . . . . . . . . . . . . . . . . . . . . . . . . . . . . . . . . . . . . . . . . . . 42
TagData . . . . . . . . . . . . . . . . . . . . . . . . . . . . . . . . . . . . . . . . . . . . . . . . . . . . . . . . . . . . . . . . . . . . . 42
Mercury Embedded Modules Developerʼs Guide 7
Writing To Tags . . . . . . . . . . . . . . . . . . . . . . . . . . . . . . . . . . . . . . . . . . . . . . . . . . . . . . . . . . . . . . . . . 43
Status Reporting . . . . . . . . . . . . . . . . . . . . . . . . . . . . . . . . . . . . . . . . . . . . . . . . . . . . . . . . . . . . . . . . 44
StatusListener . . . . . . . . . . . . . . . . . . . . . . . . . . . . . . . . . . . . . . . . . . . . . . . . . . . . . . . . . . . . . . . . 44
Saving Configurations to a File . . . . . . . . . . . . . . . . . . . . . . . . . . . . . . . . . . . . . . . . . . . . . . . . . . . . 45
Exceptions . . . . . . . . . . . . . . . . . . . . . . . . . . . . . . . . . . . . . . . . . . . . . . . . . . . . . . . . . . . . . . . . . . . . . 46
ReaderCommException . . . . . . . . . . . . . . . . . . . . . . . . . . . . . . . . . . . . . . . . . . . . . . . . . . . . . . . . . 46
ReaderCodeException . . . . . . . . . . . . . . . . . . . . . . . . . . . . . . . . . . . . . . . . . . . . . . . . . . . . . . . . . . 46
ReaderParseException . . . . . . . . . . . . . . . . . . . . . . . . . . . . . . . . . . . . . . . . . . . . . . . . . . . . . . . . . 46
ReaderFatalException . . . . . . . . . . . . . . . . . . . . . . . . . . . . . . . . . . . . . . . . . . . . . . . . . . . . . . . . . . 46
FeatureNotSupportedException . . . . . . . . . . . . . . . . . . . . . . . . . . . . . . . . . . . . . . . . . . . . . . . . . . . 47
Level 2 API . . . . . . . . . . . . . . . . . . . . . . . . . . . . . . . . . . . . . . . . . . . . . . . . . . . . . . . 49
Advanced Reading . . . . . . . . . . . . . . . . . . . . . . . . . . . . . . . . . . . . . . . . . . . . . . . . . . . . . . . . . . . . . . 50
ReadPlan . . . . . . . . . . . . . . . . . . . . . . . . . . . . . . . . . . . . . . . . . . . . . . . . . . . . . . . . . . . . . . . . . . . . 50
SimpleReadPlan 50
StopTriggerReadPlan 51
MultiReadPlan 51
In-Module Multi-Protocol Read. . . . . . . . . . . . . . . . . . . . . . . . . . . . . . . . . . . . . . . . . . . . . . . . . . . . 52
Selecting Specific Tags . . . . . . . . . . . . . . . . . . . . . . . . . . . . . . . . . . . . . . . . . . . . . . . . . . . . . . . . . . 53
TagFilter Interface . . . . . . . . . . . . . . . . . . . . . . . . . . . . . . . . . . . . . . . . . . . . . . . . . . . . . . . . . . . . . 53
MultiFilter 54
Gen2.Select 54
ISO180006B.Select 54
Tag Protocol . . . . . . . . . . . . . . . . . . . . . . . . . . . . . . . . . . . . . . . . . . . . . . . . . . . . . . . . . . . . . . . . . . 55
Advanced Tag Operations . . . . . . . . . . . . . . . . . . . . . . . . . . . . . . . . . . . . . . . . . . . . . . . . . . . . . . . . 56
TagOp Invocation . . . . . . . . . . . . . . . . . . . . . . . . . . . . . . . . . . . . . . . . . . . . . . . . . . . . . . . . . . . . . . 56
Direct Invocation 56
Embedded TagOp Invocation 57
Gen2 Standard TagOps . . . . . . . . . . . . . . . . . . . . . . . . . . . . . . . . . . . . . . . . . . . . . . . . . . . . . . . . . 58
Gen2.WriteTag 58
Gen2.ReadData 58
Gen2.WriteData 59
Gen2.Lock 59
Gen2.Kill 61
Gen2 Optional TagOps . . . . . . . . . . . . . . . . . . . . . . . . . . . . . . . . . . . . . . . . . . . . . . . . . . . . . . . . . 62
Gen2.BlockWrite 62
Gen2.BlockPermaLock 62
Gen2 Tag Specific TagOps - Alien Higgs. . . . . . . . . . . . . . . . . . . . . . . . . . . . . . . . . . . . . . . . . . . . 62
Gen2.Alien.Higgs2.PartialLoadImage 62
8 Mercury Embedded Modules Developerʼs Guide
Gen2.Alien.Higgs2.FullLoadImage 63
Gen2.Alien.Higgs3.FastLoadImage 63
Gen2.Alien.Higgs3.LoadImage 63
Gen2.Alien.Higgs3.BlockReadLock 63
Gen2 Tag Specific TagOps - NXP G2* . . . . . . . . . . . . . . . . . . . . . . . . . . . . . . . . . . . . . . . . . . . . . 63
Gen2.NXP.G2I.SetReadProtect and Gen2.NXP.G2X.SetReadProtect 63
Gen2.NXP.G2I.ResetReadProtect and Gen2.NXP.G2X.ResetReadProtect 64
Gen2.NXP.G2I.ChangeEas and Gen2.NXP.G2X.ChangeEas 64
Gen2.NXP.G2I.EasAlarm and Gen2.NXP.G2X.EasAlarm 64
Gen2.NXP.G2I.Calibrate and Gen2.NXP.G2X.Calibrate 64
Gen2.NXP.G2I.ChangeConfig 65
Gen2 Tag Specific TagOps - NXP UCODE DNA. . . . . . . . . . . . . . . . . . . . . . . . . . . . . . . . . . . . . . 65
Gen2.NXP.AES.Tam1Authentication 65
Gen2.NXP.AES.Tam2Authentication 65
Gen2.NXP.AES.Untraceable 65
Gen2.NXP.AES.ReadBuffer 65
Gen2.NXP.AES.Authenticate 65
Gen2 Tag Specific TagOps - Impinj Monza4 . . . . . . . . . . . . . . . . . . . . . . . . . . . . . . . . . . . . . . . . . 66
Gen2.Impinj.Monza4.QTReadWrite 66
Gen2 Tag Specific TagOps - IDS SL900A . . . . . . . . . . . . . . . . . . . . . . . . . . . . . . . . . . . . . . . . . . . 66
Gen2.IDS.SL900A.AccessFifo 66
Gen2.IDS.SL900A.GetBatteryLevel 66
Gen2.IDS.SL900A.GetCalibrationData 66
Gen2.IDS.SL900A.GetLogState 67
Gen2.IDS.SL900A.GetMeasurementSetup 67
Gen2.IDS.SL900A.GetSensorValue 67
Gen2.IDS.SL900A.EndLog 67
Gen2.IDS.SL900A.Initialize 67
Gen2.IDS.SL900A.SetCalibrationData 67
Gen2.IDS.SL900A.SetLogLimit 67
Gen2.IDS.SL900A.SetLogMode 68
Gen2.IDS.SL900A.SetPassword 68
Gen2.IDS.SL900A.SetShelfLife 68
Gen2.IDS.SL900A.SetSFEParameters 68
Gen2.IDS.SL900A.StartLog 68
ISO18000-6B TagOps . . . . . . . . . . . . . . . . . . . . . . . . . . . . . . . . . . . . . . . . . . . . . . . . . . . . . . . . . . 68
Iso180006b.ReadData 68
Iso180006b.WriteData 69
Iso180006b.Lock 69
Advanced Tag Operations [Deprecated]. . . . . . . . . . . . . . . . . . . . . . . . . . . . . . . . . . . . . . . . . . . . . 70
Killing Tags. . . . . . . . . . . . . . . . . . . . . . . . . . . . . . . . . . . . . . . . . . . . . . . . . . . . . . . . . . . . . . . . . . . 70
Mercury Embedded Modules Developerʼs Guide 9
killTag() 70
Locking Tags . . . . . . . . . . . . . . . . . . . . . . . . . . . . . . . . . . . . . . . . . . . . . . . . . . . . . . . . . . . . . . . . . 70
lockTag() 70
Tag Memory Access . . . . . . . . . . . . . . . . . . . . . . . . . . . . . . . . . . . . . . . . . . . . . . . . . . . . . . . . . . . 70
readTagMemBytes() 70
readTagMemWords() 71
writeTagMemBytes() 71
writeTagMemWord() 71
Antenna Usage . . . . . . . . . . . . . . . . . . . . . . . . . . . . . . . . . . . . . . . . . . . . . . . . . . . . . . . . . . . . . . . . . 72
Automatic Antenna Switching. . . . . . . . . . . . . . . . . . . . . . . . . . . . . . . . . . . . . . . . . . . . . . . . . . . . . 72
Virtual Antenna Settings. . . . . . . . . . . . . . . . . . . . . . . . . . . . . . . . . . . . . . . . . . . . . . . . . . . . . . . . . 72
GPIO Support. . . . . . . . . . . . . . . . . . . . . . . . . . . . . . . . . . . . . . . . . . . . . . . . . . . . . . . . . . . . . . . . . . . 74
Get/Set Value . . . . . . . . . . . . . . . . . . . . . . . . . . . . . . . . . . . . . . . . . . . . . . . . . . . . . . . . . . . . . . . . . 74
GPIO Direction . . . . . . . . . . . . . . . . . . . . . . . . . . . . . . . . . . . . . . . . . . . . . . . . . . . . . . . . . . . . . . . . 74
GPO Multiplexer Control . . . . . . . . . . . . . . . . . . . . . . . . . . . . . . . . . . . . . . . . . . . . . . . . . . . . . . . . 74
GPI Reading Control . . . . . . . . . . . . . . . . . . . . . . . . . . . . . . . . . . . . . . . . . . . . . . . . . . . . . . . . . . . 75
Firmware Updates . . . . . . . . . . . . . . . . . . . . . . . . . . . . . . . . . . . . . . . . . . . . . . . . . . . . . . . . . . . . . . . 76
Rebooting Readers . . . . . . . . . . . . . . . . . . . . . . . . . . . . . . . . . . . . . . . . . . . . . . . . . . . . . . . . . . . . . . 77
Protocol License Keys . . . . . . . . . . . . . . . . . . . . . . . . . . . . . . . . . . . . . . . . . . . . . . . . . . . . . . . . . . . 78
Deprecated API . . . . . . . . . . . . . . . . . . . . . . . . . . . . . . . . . . . . . . . . . . . . . . . . . . . . . . . . . . . . . . . 78
Debug Logging . . . . . . . . . . . . . . . . . . . . . . . . . . . . . . . . . . . . . . . . . . . . . . . . . . . . . . . . . . . . . . . . . 79
TransportListener Interface . . . . . . . . . . . . . . . . . . . . . . . . . . . . . . . . . . . . . . . . . . . . . . . . . . . . . . 79
Configuring Readers . . . . . . . . . . . . . . . . . . . . . . . . . . . . . . . . . . . . . . . . . . . . . . . . . . . . . . . . . . . . . 80
Reader Configuration Methods . . . . . . . . . . . . . . . . . . . . . . . . . . . . . . . . . . . . . . . . . . . . . . . . . . . 80
paramGet() 80
paramSet() 80
paramList() 80
Save and Restore Configuration in Module . . . . . . . . . . . . . . . . . . . . . . . . . . . . . . . . . . . . . . . . . . 80
Reader Configuration Parameters . . . . . . . . . . . . . . . . . . . . . . . . . . . . . . . . . . . . . . . . . . . . . . . . . 81
/reader 82
/reader/antenna 85
/reader/gen2 87
/reader/gpio 92
/reader/iso18000-6b 93
/reader/radio 94
/reader/read 97
/reader/region 98
/reader/status 99
/reader/tagReadData 100
10 Mercury Embedded Modules Developerʼs Guide
/reader/tagop 102
/reader/version 103
Serial Reader Autonomous Operation . . . . . . . . . . . . . . . . . . . . . . . . . . . . . . . . . . . . . . . . . . . . . 105
Level 3 API . . . . . . . . . . . . . . . . . . . . . . . . . . . . . . . . . . . . . . . . . . . . . . . . . . . . . . 107
.NET Language Interface . . . . . . . . . . . . . . . . . . . . . . . . . . . . . . . . . . . . . . . . . . 109.NET Development Requirements . . . . . . . . . . . . . . . . . . . . . . . . . . . . . . . . . . . . . . . . . . . . . . . . 109
Mercury API Library (desktop): 109
Mercury API CE Library (embedded Compact Framework) 109
RFID Searchlight: 109
Universal Reader Assistant 1.0 110
Universal Reader Assistant 2.0 110
USB Drivers . . . . . . . . . . . . . . . . . . . . . . . . . . . . . . . . . . . . . . . . . . . . . . . . . . . . . . . . . . . . . . . . . 110
WinCE Driver Installation Procedure 110
WinCE Sample Application Installation Procedure 110
C Language Interface . . . . . . . . . . . . . . . . . . . . . . . . . . . . . . . . . . . . . . . . . . . . . 113
C Language Features . . . . . . . . . . . . . . . . . . . . . . . . . . . . . . . . . . . . . . . . . . . . . . . . . . . . . . . . . . . 114
C Read Iterator. . . . . . . . . . . . . . . . . . . . . . . . . . . . . . . . . . . . . . . . . . . . . . . . . . . . . . . . . . . . . . . 114
Build Considerations . . . . . . . . . . . . . . . . . . . . . . . . . . . . . . . . . . . . . . . . . . . . . . . . . . . . . . . . . . . 115
API Changes Required for Different Hardware Platforms . . . . . . . . . . . . . . . . . . . . . . . . . . . . . . 115
C Conditional Compilation . . . . . . . . . . . . . . . . . . . . . . . . . . . . . . . . . . . . . . . . . . . . . . . . . . . . . . 115
Protocol-Specific C Compilation Options 116
IOS Support . . . . . . . . . . . . . . . . . . . . . . . . . . . . . . . . . . . . . . . . . . . . . . . . . . . . . . . . . . . . . . . . . . . 117
Development Environment . . . . . . . . . . . . . . . . . . . . . . . . . . . . . . . . . . . . . . . . . . . . . . . . . . . . . . 117
Supported IOS Versions. . . . . . . . . . . . . . . . . . . . . . . . . . . . . . . . . . . . . . . . . . . . . . . . . . . . . . . . 117
Testing Environment . . . . . . . . . . . . . . . . . . . . . . . . . . . . . . . . . . . . . . . . . . . . . . . . . . . . . . . . . . 117
README File . . . . . . . . . . . . . . . . . . . . . . . . . . . . . . . . . . . . . . . . . . . . . . . . . . . . . . . . . . . . . . . . 117
Java Language Interface. . . . . . . . . . . . . . . . . . . . . . . . . . . . . . . . . . . . . . . . . . . 119
JNI Library . . . . . . . . . . . . . . . . . . . . . . . . . . . . . . . . . . . . . . . . . . . . . . . . . . . . . . . . . . . . . . . . . . . . 119
LLRP ToolKit (LTK) Support. . . . . . . . . . . . . . . . . . . . . . . . . . . . . . . . . . . . . . . . . . . . . . . . . . . . . . 120
Usage 120
Required Windows Runtime Libraries . . . . . . . . . . . . . . . . . . . . . . . . . . . . . . . . . . . . . . . . . . . . . 121
Android Support . . . . . . . . . . . . . . . . . . . . . . . . . . . . . . . . . . . . . . . . . . . . . . . . . . . . . . . . . . . . . . . 122
Development Environment . . . . . . . . . . . . . . . . . . . . . . . . . . . . . . . . . . . . . . . . . . . . . . . . . . . . . . 122
Testing Environment . . . . . . . . . . . . . . . . . . . . . . . . . . . . . . . . . . . . . . . . . . . . . . . . . . . . . . . . . . 122
Tested Android Versions . . . . . . . . . . . . . . . . . . . . . . . . . . . . . . . . . . . . . . . . . . . . . . . . . . . . . . . 122
Mercury Embedded Modules Developerʼs Guide 11
Advanced Customization . . . . . . . . . . . . . . . . . . . . . . . . . . . . . . . . . . . . . . . . . . 123
Custom Serial Transport Naming . . . . . . . . . . . . . . . . . . . . . . . . . . . . . . . . . . . . . . . . . . . . . . . . . 123
Implementation. . . . . . . . . . . . . . . . . . . . . . . . . . . . . . . . . . . . . . . . . . . . . . . . . . . . . . . . . . . . . . . 123
Changes Required for C#/.NET . . . . . . . . . . . . . . . . . . . . . . . . . . . . . . . . . . . . . . . . . . . . . . . . . . 125
Example 126
Changes Required for C. . . . . . . . . . . . . . . . . . . . . . . . . . . . . . . . . . . . . . . . . . . . . . . . . . . . . . . . 127
Example: 128
Changes Required for Java . . . . . . . . . . . . . . . . . . . . . . . . . . . . . . . . . . . . . . . . . . . . . . . . . . . . . 129
Example 130
On Reader Applications . . . . . . . . . . . . . . . . . . . . . . . . . . . . . . . . . . . . . . . . . . . 131
Building On-Reader Applications . . . . . . . . . . . . . . . . . . . . . . . . . . . . . . . . . . . . . . . . . . . . . . . . . 132
Requirements . . . . . . . . . . . . . . . . . . . . . . . . . . . . . . . . . . . . . . . . . . . . . . . . . . . . . . . . . . . . . . . . 132
Instructions . . . . . . . . . . . . . . . . . . . . . . . . . . . . . . . . . . . . . . . . . . . . . . . . . . . . . . . . . . . . . . . . . . 132
Installing the Cross Compiler Environment . . . . . . . . . . . . . . . . . . . . . . . . . . . . . . . . . . . . . . . . . 133
Compiling an Application . . . . . . . . . . . . . . . . . . . . . . . . . . . . . . . . . . . . . . . . . . . . . . . . . . . . . . . 133
Troubleshooting 134
Installing the Application on the M6 . . . . . . . . . . . . . . . . . . . . . . . . . . . . . . . . . . . . . . . . . . . . . . . 134
Via NFS Mount 134
Via wget 134
Running an On-Reader Application . . . . . . . . . . . . . . . . . . . . . . . . . . . . . . . . . . . . . . . . . . . . . . . 135
Connecting the M6 to an NFS Mount . . . . . . . . . . . . . . . . . . . . . . . . . . . . . . . . . . . . . . . . . . . . . . 136
Exporting an NFS Mount Point 136
Mount the NFS Share on the M6 136
Telnet to the Reader. . . . . . . . . . . . . . . . . . . . . . . . . . . . . . . . . . . . . . . . . . . . . . . . . . . . . . . . . . . 136
Saving the Program to the JFFS2 File System . . . . . . . . . . . . . . . . . . . . . . . . . . . . . . . . . . . . . . 137
Performance Tuning . . . . . . . . . . . . . . . . . . . . . . . . . . . . . . . . . . . . . . . . . . . . . . 139
How UHF RFID Works (Gen2). . . . . . . . . . . . . . . . . . . . . . . . . . . . . . . . . . . . . . . . . . . . . . . . . . . . . 140
Transmit Power . . . . . . . . . . . . . . . . . . . . . . . . . . . . . . . . . . . . . . . . . . . . . . . . . . . . . . . . . . . . . . 141
Reader-to-Tag Settings . . . . . . . . . . . . . . . . . . . . . . . . . . . . . . . . . . . . . . . . . . . . . . . . . . . . . . . . 141
Tag-to-Reader Settings . . . . . . . . . . . . . . . . . . . . . . . . . . . . . . . . . . . . . . . . . . . . . . . . . . . . . . . . 142
Tag Contention Settings. . . . . . . . . . . . . . . . . . . . . . . . . . . . . . . . . . . . . . . . . . . . . . . . . . . . . . . . 142
Optimizing Gen2 settings . . . . . . . . . . . . . . . . . . . . . . . . . . . . . . . . . . . . . . . . . . . . . . . . . . . . . . . . 145
12 Mercury Embedded Modules Developerʼs Guide
Introduction to the MercuryAPI
The MercuryAPI is intended to provide a common programming interface to all ThingMagic products. This MercuryAPI Programmer’s Guide provides detailed information about the programming interface and how to use it to connect, configure and control ThingMagic products.
This version of the MercuryAPI Guide is intended for use with the following hardware firmware versions:
M6 and Astra-EX (firmware v4.19.3 and later)
M6e family (firmware v1.19.0 and later)
M5e, M5e-C, USB Plus+ and Vega (firmware v1.7.3 and later)
Micro, Micro-LTE, USBPro (firmware v1.7.3 and later)
Nano (firmware v1.5.0 and later)
Language Specific Reference Guides
For language specific command reference see the corresponding language (Java, C#, C) reference Guides included in the API source and libraries package under their respective subdirectories:
Introduction to the MercuryAPI 13

Java - [SDK Install Dir]/java/doc/index.html
C#/.NET - [SDK Install Dir]/cs/MercuryAPIHelp/index.html
C - [SDK Install Dir]/c/doc/index.html
Note
All code examples in this document will be written in Java, unless otherwise noted.
14 Introduction to the MercuryAPI
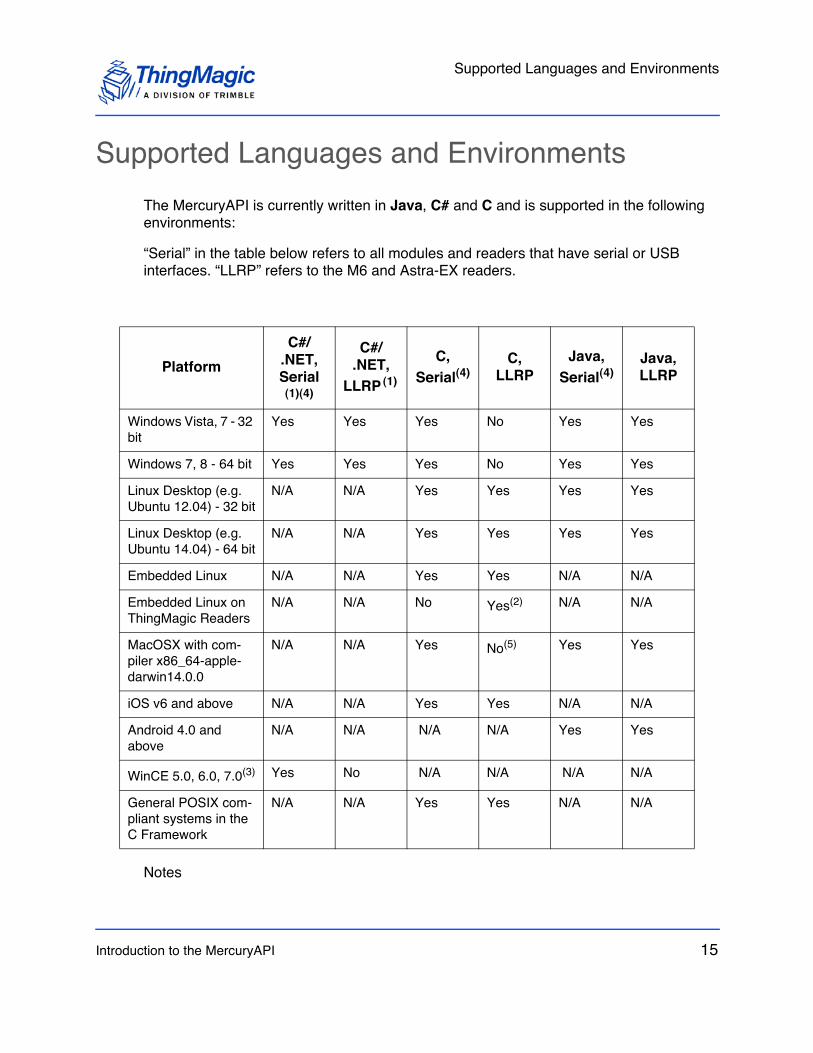
Supported Languages and Environments
Supported Languages and Environments
The MercuryAPI is currently written in Java, C# and C and is supported in the following environments:
“Serial” in the table below refers to all modules and readers that have serial or USB interfaces. “LLRP” refers to the M6 and Astra-EX readers.
Notes
Platform
C#/.NET, Serial (1)(4)
C#/.NET,
LLRP (1)
C,
Serial(4)C,
LLRP
Java,
Serial(4)Java, LLRP
Windows Vista, 7 - 32 bit
Yes Yes Yes No Yes Yes
Windows 7, 8 - 64 bit Yes Yes Yes No Yes Yes
Linux Desktop (e.g. Ubuntu 12.04) - 32 bit
N/A N/A Yes Yes Yes Yes
Linux Desktop (e.g. Ubuntu 14.04) - 64 bit
N/A N/A Yes Yes Yes Yes
Embedded Linux N/A N/A Yes Yes N/A N/A
Embedded Linux on ThingMagic Readers
N/A N/A No Yes(2) N/A N/A
MacOSX with com-piler x86_64-apple-darwin14.0.0
N/A N/A Yes No(5) Yes Yes
iOS v6 and above N/A N/A Yes Yes N/A N/A
Android 4.0 and above
N/A N/A N/A N/A Yes Yes
WinCE 5.0, 6.0, 7.0(3) Yes No N/A N/A N/A N/A
General POSIX com-pliant systems in the C Framework
N/A N/A Yes Yes N/A N/A
Introduction to the MercuryAPI 15
Supported Languages and Environments
1. Managed code in the .NET Compact Framework v2.0 SP2, callable from .NET applications written in any language on any Windows platform supporting the Compact Framework v2.0.
2. Requires the cross-compiler toolchain from ThingMagic
3. Should work with any device that uses Intel x86, ARM, MIPS or Hitachi SH processors
4. Serial interfaces that encapsulate the data in to another protocol (such as serial-ver-Ethernet) can be accommodated using a Custom Serial Transport layer.
5. Would not compile using C-API v1.25.0. Likely to be supported in a future release.
Language Specific Build and Runtime Details
The document also contains information on unique characteristics, build and runtime requirements relevant to specific languages and platforms in the following sections:
.NET Language Interface - Provides requirements for the development environment and instructions for creating WinCE USB drivers and installing the WinCE sample app.
C Language Interface - Describes some of the unique characteristics of the C interface in addition to help with building for embedded platforms. and the iOS environment.
Java Language Interface - Provides details on support for the low level JNI Serial Interface library required to communicate with SerialReaders along with details on how to build the library for other platforms, including Android devices.
Advanced Customization - Provides instructions for creating a custom serial transport layer and for using the tcp serial transport layer included in the MercuryAPI SDK.
On Reader Applications - Describes how to build and install C language applications on LLRPReaders.
Performance Tuning - Describe how to tailor the readerʼs settings to fit your unique RFID environment.
16 Introduction to the MercuryAPI
Example Code
Example Code
In addition to using this guide, there are several example application and code samples that should be helpful in getting started writing applications with the MercuryAPI.
Please see the following directories in the MercuryAPI zip package for example code:
/cs/samples - Contains C# code samples in the ./Codelets directory and several example applications with source code. All samples include Visual Studio project files.
/java/samples_nb - Contains Java code samples and associated NetBeans project
/java/samples - Contains Java code samples for Android Operating System
/c/src/samples - Contains C code samples, including a Makefile (in .../api) for building the samples.
/c/ios/Samples - Contains C code samples for the IOS Operating System
Description of Codelets
Here is a list of the codelets, the functionality they are intended to demonstrate, and the API commands they demonstrate. These descriptions are based on the C-sharp codelets, but apply to the codelets for the “C” and “Java” languages as well.
Common Codelet Attributes
1. All the codelets expect at least one input argument, the reader URI. A second input argument is optional for most readers but mandatory for Micro and Nano readers: an antenna list.
2. Transport listener can be enabled for all codelets, so the raw communication with the reader can be observed for troubleshooting purposes.
Individual Codelet Attributes
AntennaList
Creates a simple read plan with an antenna list passed as argument. Shows the use of:
• SimpleReadPlan with antennaList field
Introduction to the MercuryAPI 17
Example Code
Authenticate
Illustrates how to authenticate an NXP UCODE DNA tag using a preconfigured key, with or without obtaining memory data as well. Shows use of:
Gen2.NXP.AES.Tam1Authentication
Gen2.NXP.AES.Tam2Authentication
Gen2.NXP.AES.Authenticate
AutonomousMode
Illustrates how to create an autonomous read plan. Shows use of:
SerialReader.UserConfigOp
Reader.enableAutonomousRead
Reader.ReceiveAutonomousReading
Reader.ReadTrigger
BAP
Created to demonstrate settings designed to optimize read performance for EM Micro BAP tags, such as the EM4324 and EM4325. Shows use of:
• “Gen2.BAPParameters” with “bap.POWERUPDELAY” (Extends pre-inventory on-time to give BAP tag a chance to wake up when it is in power-saving mode.
• “Gen2.BAPParameters” with “bap.FREQUENCYHOPOFFTIME” (Extends reader off time so BAP tag will detect it and correctly start Gen2 S0, S2, and S3 session timers.)
BlockPermaLock
Demonstrates Gen2 Block Permalock functionality as a standalone TagOp. Shows the use of:
• “Gen2.Password”
• “Gen2.BlockPermaLock”
18 Introduction to the MercuryAPI

Example Code
BlockWrite
Demonstrates Gen2 Block Write functionality as a TagOp or embedded TagOp commands. Shows use of:
• “Gen2.BlockWrite” using “ExecuteTagOp”
• “SimpleReadPlan” with “Gen2.BlockWrite” embedded command
DenatranIAVCustomTagOperations
For ThingMagic internal testing only (uses non-standard readers and tags).
EmbeddedReadTID
A sample program that includes values in tag memory to tag metadata prints the results. Optionally specifying a length value of “0” for a memory read returns all data in that memory area. Shows use of:
• “SimpleReadPlan” with “Gen2.ReadData” embedded command
FastId
Illustrates how to use custom commands supported by Impinj Monza 4 and 5 tags, including selecting public or private profiles for added security and “Fast ID” (concatenation of EPC and TID fields as if they were a long EPC field). Shows use of:
• “Gen2.Impinj.Monza4.QTReadWrite” with access password, payload, and control byte parameters
• “Gen2.Impinj.Monza4.QTPayload”, specifically “payload.QTMEM” and “payload.QTSR”
• “Gen2.Impinj.Monza4.QTControlByte”, specifically “controlByte.QTReadWrite” and “controlByte.Persistence”
• Filtering on Monza 4 tags (looking for tags with a TID that starts with “E2801105”)
• Setting a special Select filter in a “SimpleReadPlan” to activate the Fast ID function (requires a Select filter on specific TID bits).
Introduction to the MercuryAPI 19
Example Code
Filter
Sample program that demonstrates the usage of different types of filters, including Gen2 Select on memory fields, inverted Gen2 Select, and filtering of tags after they have been read. Shows use of:
• ParamGet to obtain value of "/reader/gen2/session"
• ParamSet to configure "/reader/gen2/session"
• Filtering for EPC value among “TagReadData” results
• SimpleReadPlan with a Select filter on TID memory field
• “SimpleReadPlan” with a Select filter for all tags that do not have a given TID value
• Filtering for new tags among “TagReadData” results
Firmware
Program to update firmware on serial and LLRP readers. Shows use of:
• Processing common firmware error messages, such as “FAULT_BL_INVALID_IMAGE_CRC_Exception” and “FAULT_BL_INVALID_APP_END_ADDR_Exception”
• Use of “FileStream” with” FirmwareLoadOptions” and “LlrpFirmwareLoadOptions” for LLRP readers
• Use of “FileStream” with “FileMode” and “FileAccess” for serial readers
• Obtaining software version using “ParamGet” with "/reader/version/software"
Gen2ReadAll MemoryBanks
Illustrates how to perform embedded and stand-alone tag operations to read one or more memory banks. Shows use of:
• Use of “Gen2.Bank” enumeration, specifically “Gen2.Bank.USER” and sequential reads using “Gen2.Bank.GEN2BANKUSERENABLED”, “Gen2.Bank.GEN2BANKRESERVEDENABLED”, “Gen2.Bank.GEN2BANKEPCENABLED”, and Gen2.Bank.GEN2BANKTIDENABLED”
20 Introduction to the MercuryAPI
Example Code
GpioCommands
Sample program supporting arguments for obtaining GPI values (“get-gpi”), for setting GPI values ("set-gpo [[1,1],[2,1]]") and for reporting the direction of GPIO lines ("testgpiodirection"). Shows use of:
• “GpiGet” method
• “GpiSet” method
• “ParamGet” for "/reader/gpio/outputList"
• “ParamGet” for "/reader/gpio/inputList"
LicenseKey
Sample program to set the license key on a reader. This program has a dummy license key hard-coded within. The actual license key would be supplied by ThingMagic under special agreement.
Shows use of:
• “ParamSet” method with "/reader/licensekey" value.
LoadSaveConfiguration
Sample program for saving and loading of reader configuration files by the API to/ from the file system of the host on which it is running. Shows use of:
• “SaveConfig” method
• “LoadConfig” method
LockTag
Sample program to lock and unlock a tag via a stand-alone TagOp. Does not use Access Password as in previous versions. Shows use of:
• ExecuteTagOp method
• “Gen2.LockAction” for “Gen2.LockAction.EPC_LOCK” and “Gen2.LockAction.EPC_UNLOCK”
Introduction to the MercuryAPI 21
Example Code
MultiProtocolRead
Illustrates obtaining a protocol list from the reader and adding these protocols to a MultiReadPlan. Shows use of:
• “ParamGet” method for "/reader/version/supportedProtocols"
• Creating a “SimpleReadPlan” for each supported protocol and combining them into a single “MultiReadPlan”
MultireadAsync
Shows asynchronous stopping and starting of reading (rather than the single timed reads used in most of the other examples). Shows use of:
• Creating a “SimpleReadPlan” and using “ParamSet” to define a "/reader/read/plan"
• “StartReading”, “StopReading”, and “Destroy” methods
Read
A sample program that reads tags for a fixed amount of time and prints the tags found. Shows use of:
• Defining a “SimpleReadPlan”
• “ParamSet” of "/reader/read/plan"
• Timed read using “Read” method
Readasync
Shows asynchronous stopping and starting of reading (rather than the single timed reads used in most of the other examples). Shows use of:
• Creating a “SimpleReadPlan” and using “ParamSet” to define a "/reader/read/plan"
• “StartReading” and “StopReading methods
22 Introduction to the MercuryAPI
Example Code
ReadasyncFilter
Shows asynchronous stopping and starting of reading (rather than the single timed reads used in most of the other examples). Identifies which tags have an EPC that starts with “E2”. Shows use of:
• Creating a “SimpleReadPlan” and using “ParamSet” to define a "/reader/read/plan"
• “StartReading” and “StopReading methods
• Working with read results using “TagReadData.Tag.EpcBytes”
ReadAsyncFilter-ISO18k-6b
Demonstrates how to set ISO 18000-6B parameters, create a filter, and read tags with this protocol. Shows use of:
• “ParamSet” to set "/reader/iso180006b/delimiter"
• “Iso180006b.Select” with all fields including “Iso180006b.SelectOp.NOTEQUALS”
• “StartReading” and “StopReading methods
ReadasyncTrack
Sample program that reads tags in the background and track tags that have been seen; only print the tags that have not been seen before. Shows use of:
• Creation of “SimpleReadPlan”
• “StartReading” and “StopReading methods
ReadBuffer
Illustrates how to authenticate NXP UCODE DNA tags and optionally obtain and decrypt memory data by obtaining the encrypted string from a special tag buffer. Shows use of:
Gen2.NXP.AES.ReadBuffer
Gen2.NXP.AES.Tam1Authentication
Gen2.NXP.AES.Tam2Authentication
ReadCustomTransport
This example adds the custom transport scheme before calling Create(). This can be done by using C# API helper function “SetSerialTransport()”. It accepts two arguments: “scheme” and “serial transport factory function”. In this example, “scheme” is defined as
Introduction to the MercuryAPI 23
Example Code
“tcp” and “serial transport factory function” is defined as “SerialTransportTCP.CreateSerialReader”. Examples are given for both synchronous (timed) reads and asynchronous reads (start, stop). Shows use of:
• “SetSerialTransport” using “SerialTransportTCP.CreateSerialReader”
• “Read”, “StartReading” and “StopReading” methods.
ReaderInformation
Creates a reader information object, consisting of labels and values for the following attributes: hardware version, serial number, model, software version, reader URI, product ID, product group ID, product group, and reader description. Shows use of:
• “readInfo.Get” method
ReaderStats
Creates a SimpleReadPlan and requests all reader statistics. Shows use of:
• Defining “SimpleReadPlan”, setting it via “ParamSet” using "/reader/read/plan"
• Defining status reporting via “ParamSet” using "/reader/stats/enable" with “Reader.Stat.StatsFlag.ALL”
• Obtaining status via “ParamGet” using "/reader/stats/enable"
ReadStopTrigger
Provides an example of the use of a “StopTriggerReadPlan” to cease reading after a given number of tags are read (in this case, 1). The Genb2 “q” value is set to “1”, so it expects very few tags in the field (1 or two). It reads on all antennas provided as an argument to the call. Shows the use of:
• Configuring a “StopTriggerReadPlan” and loading it via “ParamSet” method using “/reader/read/plan"
RebootReader
Connects to a reader, reboots it, then repeatedly attempts to connect to it again until successful. Shows use of:
• “Connect”, “Reboot”, and “Destroy” methods.
24 Introduction to the MercuryAPI
Example Code
SavedConfig
This example works only for the Micro module at this time, but may be supported for the M6e and Nano modules in the future. Gives examples for Save, Restore, Verify, and clear of protocol setting. Then does a clear of the values and verifies that the protocol is now “none” (its default value). Shows use of:
• “ParamSet” of "/reader/userConfig".
• “SerialReader.UserConfigOperation” for “CLEAR, SAVE, RESTORE, and VERIFY operations
SavedReadPlanConfig
Sets up and stores read plan that enables reading triggered by GPI pin 1. Options include reverting the module to factory defaults, including reader statistics, and enabling embedded reading with a filter. Shows use of:
• “ParamSet”, including “SerialReader.UserConfigOperation.CLEAR” (commented out by default)
• “ParamSet”, including “Reader.Stat.StatsFlag.TEMPERATURE (commented out by default)
• “ParamSet” of "/reader/read/trigger/gpi"
• Enable of “GpiPinTrigger”
• “ParamSet” of "/reader/userConfig" including “SerialReader.UserConfigOperation.SAVEWITHREADPLAN”
• “ParamSet” of "/reader/userConfig" including “SerialReader.UserConfigOperation.RESTORE”
• “ReceiveAutonomousReading” method
SecureReadData
For ThingMagic internal testing only (uses non-standard readers and tags).
Serialtime
Sample program that reads tags for a fixed period of time (500ms) and prints the tags found, while logging the serial message with timestamps. Shows use of:
• “Transport” event
Introduction to the MercuryAPI 25
Example Code
SL900A
Illustrates use of IDS (now AMS) SL900A sensor tag custom commands. Shows use of:
• Creating the “Get Calibration Data tag” operation (“Gen2.IDS.SL900A.GetCalibrationData”)
• Using the Get Calibration Data and SFE Parameters (“Gen2.IDS.SL900A.CalSfe”)
• Saving the current Cal to restore it to the tag after the test (“Gen2.IDS.SL900A.CalibrationData”)
• Displaying the Calibration and SFE Parameters Data (“Console.WriteLine”)
• Setting the Calibration Data (“Gen2.IDS.SL900A.CalibrationData”)
• Executing the Set Calibration Data command with test_cal to change its value (“Gen2.IDS.SL900A.SetCalibrationData”) as a stand-alone TagOps.
• Verifying and restoring the Calibration Data using similar commands as above.
Untraceable
Illustrates how to configure NXP UCODE DNA tags to withhold some or all of their EPC, TID or User memory fields from unauthorized readers. Shows use of:
Gen2.NXP.AES.Untraceable
Gen2.NXP.AES.Tam1Authentication
Gen2.NXP.AES.Tam2Authentication
WriteTag
Sample program to write EPC of a tag which is first found in the field. Shows use of:
• “Gen2.WriteTag(epc)” as stand-alone TagOps
26 Introduction to the MercuryAPI
Hardware Specific Guides
Hardware Specific Guides
The MercuryAPI is intended to allow cross-product development. However, due to differences in product features and functionality, 100% compatibility is not possible and specific feature differences are not all clearly described in this Guide. It is important to read the product specific hardware guide to fully understand the features and functionality available for each product. Product hardware guides are available on the ThingMagic website rfid.thingmagic.com/devkit.
Introduction to the MercuryAPI 27

Hardware Abstraction
Hardware Abstraction
The MercuryAPI is intended to allow cross-product development. The same application can be used to connect, configure and control any ThingMagic product. However, due to differences in product features and functionality, 100% compatibility would not be possible without limiting the capabilities of the API. To allow for application requiring maximum compatibility and provide full access to all products functionality the MercuryAPI is conceptually divided into four layers:
Level 1 API - contains basic reader operations and is hardware and implementation independent.
Level 2 API - contains a more complete set of reader operations, including more complex variations of items in Level 1.
Level 3 API - contains the set of all operations specific to the different hardware platforms. Levels 1 and 2 are built using these interfaces. Level 3 is hardware dependent.
Level 4 API - provides raw access to the underlying reader protocol for each specific hardware platform. Level 3 is built on these interfaces. This level is not public and not supported for user applications.
Note
This is not a technical division, all four layers are available at all times. For maximum cross-product compatibility the user must be aware of specific reader capabilities if using classes/interfaces below Level 2.
C A U T I O N !! !
Every level implicitly provides support for multiple tag protocols,including Gen2/ISO18000-6c and ISO18000-6b, even though not all prod-ucts support them. For maximum cross-product compatibility the usermust be careful when “switching” from high level, protocol independenttag operations (basic reads and writes) to protocol specific operations,as defined by the protocol specific subclasses of the TagData class.
28 Introduction to the MercuryAPI
ThingMagic Mercury API Software License
ThingMagic Mercury API Software License
Copyright (c) 2009 - 2014 Trimble Navigation Limited
Permission is hereby granted, free of charge, to any person obtaining a copy of this software and associated documentation files (the "Software"), to deal in the Software without restriction, including without limitation the rights to use, copy, modify, merge, publish, distribute, sublicense, and/or sell copies of the Software, and to permit persons to whom the Software is furnished to do so, subject to the following conditions:
The above copyright notice and this permission notice shall be included in all copies or substantial portions of the Software.
THE SOFTWARE IS PROVIDED "AS IS", WITHOUT WARRANTY OF ANY KIND, EXPRESS OR IMPLIED, INCLUDING BUT NOT LIMITED TO THE WARRANTIES OF MERCHANTABILITY, FITNESS FOR A PARTICULAR PURPOSE AND NONINFRINGEMENT. IN NO EVENT SHALL THE AUTHORS OR COPYRIGHT HOLDERS BE LIABLE FOR ANY CLAIM, DAMAGES OR OTHER LIABILITY, WHETHER IN AN ACTION OF CONTRACT, TORT OR OTHERWISE, ARISING FROM,
OUT OF OR IN CONNECTION WITH THE SOFTWARE OR THE USE OR OTHER DEALINGS IN THE SOFTWARE.
Introduction to the MercuryAPI 29

ThingMagic Mercury API Software License
30 Introduction to the MercuryAPI
Level 1 API
The objects and methods described in this section provide basic reader operations and are hardware and implementation independent.
Level 1 API 31
Connecting to Readers
Connecting to Readers
Reader Object
Create
The operations of the MercuryAPI are centered around a single object that represents the state of the reader. This object is called “Reader”. Except when otherwise specified, all functions described in this document are of the Reader class.
The user obtains a Reader object by calling a static factory method:
Reader create(String uriString);
The create() method return an instance of a Reader class that is associated with a RFID reader on the communication channel specified by the URI Syntax of the uriString parameter. There are currently two subclasses of Reader:
SerialReader
The SerialReader class provides access to commands and configuration specific to devices which communicate over and use the embedded modules serial command protocol. These devices include:
– Mercury5e Series (including the M5e, M5e-Compact, M5e-EU, and M5e-PRC)
– USB Reader (M5e-based)
– Vega Reader (M5e-Based)
– Mercury6e Series (including the M6e, M6e-A, and M6e-PRC)
– Micro Series (including the Micro and Micro-LTE)
– Nano Series
RqlReader
The RQLReader class provides access to commands and configuration specific to devices which can use the RQL command protocol. These devices include:
– Astra (Not Astra-EX) (v4.1.24 firmware)
LLRPReader
The LLRPReader class provides access to commands and configuration specific to devices which can use the LLRP communication protocol. These devices include:
32 Level 1 API
Connecting to Readers
– Mercury 6 (v4.9.2 firmware and later)
– Astra-EX
Connect
The communication channel is not established until the connect() method is called. Calling:
void connect()
will establish a connection and initialize the device with any pre-configured settings. Calling connect() on an already connected device has no effect.
Note
SerialReaders require the Region of Operation, /reader/region/id, to be set using Level 2 paramSet(), after the connect(), in order for any RF operations to succeed.
When attempting to open a connection the API will wait for /reader/transportTimeout for the reader to respond. If a response isnʼt received in that period of time an exception will be thrown. Certain transport layers, such as Bluetooth, may require a longer transportTimeout, especially during initial connect.
For RQLReader connections this opens a TCP connection to port 8080 (or another port if specified in the URI). For the SerialReaders when the specified serial device is opened the baud rate is “auto-detected”. Once connected the serial device is set to the preferred baud rate (115200 by default, for maximum compatibility with host serial devices). The baud rate can also be manually set, prior to calling Connect(), using the Reader Configuration Parameters /reader/baudRate, this can avoid attempts using the wrong baud rate during “auto-detect” for certain types of serial readers.
The connected reader is then queried for information that affects further communication, such as the device model. After the connect() succeeds the Region of Operation should be set (unless the hardware only supports one) and is checked for validity, and the default protocol is set to Gen2.
Existing configuration on the device is not otherwise altered.
Note
It is the userʼs responsibility to handle device restarts. If a device is restarted it is recommended that the previously existing Reader object be destroyed, and a new Reader object created.
Level 1 API 33
Connecting to Readers
Destroy
When the user is done with the Reader, Reader.destroy() should be called to release resources that the API has acquired, particularly the serial device or network connection:
void destroy()
In languages that support finalization, this routine should be called automatically; however, since languages that support finalization do not generally guarantee when or whether they will be invoked, explicitly calling the destroy() method to guarantee release is highly recommended.
Multiple Reader objects may be obtained for different readers. The behavior of create() called repeatedly with the same URI without an intervening destroy() is not defined.
URI Syntax
The URI argument follows a subset of the standard RFC 3986 syntax:
scheme://authority/path
The scheme defines the protocol that will be used to communicate with the reader. the supported “schemes” for ThingMagic devices are:
tmr - (ThingMagic Reader) indicates the API should attempt to determine the protocol and connect accordingly. The API will select among eapi, rql, and llrp, but any custom serial protocols, such as tcp will have to be explicitly specified.
eapi - indicates a connection to a SerialReader type device via a COM port (or a USB interface acting as a virtual COM port).
rql - indicates a connection to an RqlReader type device.
llrp - indicates a connection to an LLRPReader type device.
The authority specifies an Internet address and optional port number for protocols with network transport (currently only rql), or is left blank to specify the local system.
The path is currently unused for rql and is used to specify the serial communications device to which the reader is attached for eapi. The tmr scheme assumes that the protocol is rql if there is a non-blank authority and a blank path, and the serial protocol if the authority is blank and the path is non-blank. tmr is the preferred scheme.
The C#.NET API allows users to add custom transport interfaces for readers. The samples include the URI “tcp”, which indicates a connection to an SerialReader type device via a TCP bridge.
34 Level 1 API
Connecting to Readers
URI Examples
Please note the specific format of the URI path will depend on the OS and drivers being used. The following are some common examples but it is not an exhaustive list.
tmr:///com2 - typical format to connect to a serial based module on Windows COM2.
tmr:///dev/cu.usbserial - common format for the USB interface on MacOSX.
tmr:///dev/ACM0 or tmr:///dev/USB0 - common format for Linux depending on the USB driver being used.
tmr://192.168.1.101/ - typical format to connect to a fixed reader connected on a network at address “192.168.1.101”. This will try first to connect to an LLRPReader on port 5084, if no response then it will try to connect to an RqlReader on port 8080.
eapi:///com1 - typical format to connect to a serial based module on Windows COM1
eapi:///dev/ttyUSB0 - typical format to connect to a USB device named ttyUSB0 on a Unix system.
rql://reader.example.com/ - typical format to connect to a fixed reader connected on a network at address “reader.example.com” on the default RQL port of 8080
rql://reader.example.com:2500/ - typical format to connect to a fixed reader connected on a network at address “reader.example.com” on the non-default RQL port of 2500
llrp://reader.example.com/ - typical format to connect to a fixed reader connected on a network at address “reader.example.com” on the default, standard LLRP port of 5084
llrp://reader.example.com:2500/ - typical format to connect to a fixed reader connected on a network at address “reader.example.com” on the non-default LLRP port of 2500
Sample files within the MercuryAPI SDK may be used implement an additional URI (which is not “discovered” by the “tmr” URI):
tcp://reader.example.com/ - custom format to connect to a fixed reader connected on a network at address “reader.example.com” on the default port of the tcp bridge.
tcp://reader.example.com:2500/ - custom format to connect to a fixed reader connected on a network at address “reader.example.com” on the non-default tcp port of 2500
Region of Operation
The Region enumeration represents the different regulatory regions that the device may operate in (see reader specific Hardware Guide for supported regions). Supported Region enumeration values are:
Level 1 API 35

Connecting to Readers
Reader.Region.NA (North America/FCC, 26 MHz band)
Reader.Region.NA2 (North America, 10 MHz wide band)
Reader.Region.NA3 (North America, FCC, 5 MHz wide band)
Reader.Region.EU3 (European Union/ETSI Revised EN 302 208)
Reader.Region.KR2 (Korea KCC)
Reader.Region.PRC (China)
Reader.Region.IN (India)
Reader.Region.JP (Japan)
Reader.Region.AU (Australia/AIDA LIPD Variation 2011)
Reader.Region.NZ (New Zealand)
Reader.Region.OPEN (No region restrictions enforced)
Reader.Region.NONE (No region Specified)
Note
The available, supported regions are specific to each hardware platform. The supported regions for the connected device are available as a Reader Configuration Parameters under /reader/region/supportedRegions. Please refer to the specific deviceʼs User Guide for more information on supported regions.
36 Level 1 API
Reading Tags - The Basics
Reading Tags - The Basics
Read Methods
Reader Object provides multiple ways of reading/inventorying tags. The tag reading methods:
Reader.read()
Reader.startReading()
issue one or more search commands to the device to satisfy the userʼs request for searches of a particular duration, duty cycle, antennas, and protocols.
The result of a read operation is a collection of TagReadData objects, which provides access to the information about the tag and the metadata associated with each tag read.
The default read behavior is to search for all tags on all detected antennas using all supported protocols. Level 2 API can be used for advanced control over read behavior, such as setting antennas (see Antenna Usage for more details), protocols and filtering criteria used for the search. These are controlled by the ReadPlan object assigned to the /reader/read/plan parameter of the Reader Configuration Parameters.
Note
Not all readers can detect antennas. The Nano reader does not currently have that ability and require explicit setting in the ReadPlan.
Note
Not all antennas are detectable by the readers that can detect antennas. For M5e, Compact, and M6e modules, the antenna needs to have some DC resistance (0 to 10 kOhms) if it is to be discovered by the antenna detection circuit. The Micro module (with firmware version 1.7.1 and above) uses a return loss measurement to determine if an antenna is present. Ports with return losses of 0 through 9 dB are assumed to be un-terminated. Ports with return losses greater than 10 dB are assumed to be connected to an antenna. Although the Micro supports antenna detection, it must be explicitly called, and then the antenna list in the read plan adjusted to only include detected antennas.
If, when using the Level 1 read functionality, reads are not occurring it is possible the antennas are not detectable and require explicit setting in the ReadPlan.
Level 1 API 37

Reading Tags - The Basics
Reader.read()
The read() method takes a single parameter:
TagReadData[] Reader.read(long duration)
duration - The number of milliseconds to read for. In general, especially with readers of type SerialReader, the duration should be kept short (a few seconds) to avoid filling up the tag buffer. Maximum value is 65535 (65 seconds).
It performs the operation synchronously, and then returns an array of TagReadData objects resulting from the search. If no tags were found then the array will be empty; this is not an error condition.
When performing a synchronous read() operation the tags being read are buffered on the reader and stored in the readerʼs Tag Buffer. During a single read() operation tag de-duplication will occur on the reader so re-reads of the same tag will result in the tagʼs ReadCount metadata field to be incremented, a new TagReadData instance will not be created for each. The reader specific hardware guide should be referenced for information on the size of the Tag Buffer.
Note
The C-API read() implementation takes 3 arguments, reader pointer, duration in milliseconds and the reference to the tag count. The third parameter is an output parameter which gets filled by the read() method. Upon successful completion of read() the method returns TMR_SUCCESS status with the number of tags found. The C Read Iterator methods need to be used to retrieve the tags.
Reader.startReading()
The startReading() method is an asynchronous reading method. It does not take a parameter.
void Reader.startReading()
It returns immediately to the calling thread and begins a sequence of reads or a continuous read, depending on the reader, in a separate thread. The reading behavior is controlled by the Reader Configuration Parameters:
/reader/read/asyncOnTime - sets duration of those reads,
/reader/read/asyncOffTime - sets the delay between the reads.
The results of each read is passed to the application via the ReadListener interface; each listener registered with the addReadListener() method is called with a TagReadData object for each read that has occurred. In the event of an error during these reads, the ReadExceptionListener interface is used, and each listener registered with the
38 Level 1 API
Reading Tags - The Basics
addReadExceptionListener() method is called with a ReaderException argument.
The reads are repeated until the stopReading() method is called.
Note
The C# version of this API uses the native delegate/event mechanism with delegates called TagReadHandler and ReadExceptionHandler and events named TagRead and ReadException, rather than the Java-style listener mechanism.
Pseudo-Asynchronous Reading
In pseudo-asynchronous reading a synchronous search is looped over and over again running indefinitely in a separate thread. Tags are off-loaded once every synchronous search is completed. i.e., read listeners will be called once for every “/reader/read/asyncOnTime” milliseconds. On all readers except the M6, M6e and Micro pseudo-asynchronous reading is the only implementation used for background reading operations.
Continuous Reading
The M6, M6e and Micro also support true continuous reading which allows for 100% read duty cycle - with the exception of brief pauses during RF frequency hops. Continuous reading is enabled when /reader/read/asyncOffTime is set to zero. In this mode tags are streamed to the host processor as they are read.
Note
In continuous mode there is currently no on-reader de-duplication, every tag read will result in a tagread event being raised. This can result in a lot of communication and tag handling overhead which the host processor must be able to handle it. Consider the details on setting Gen2 Session and Target values, as described in How UHF RFID Works (Gen2), to decrease the frequency of tag replies to inventory operations as a way to decrease traffic.
Return on N Tags Found
In addition to reading for the specified timeout or asyncOnTime period and returning all the tags found during that period, it is also possible to return immediately (more
Level 1 API 39
Reading Tags - The Basics
specifically, the time granularity is one Gen2 inventory round) upon reading a specified number of tags.
The behavior is invoked by creating a StopTriggerReadPlan with the desired number of tags and setting it as the active /reader/read/plan.
For optimum performance it is recommended to use a StaticQ setting for /reader/gen2/q appropriate for the specified value of N, where:
N <= 2Q
For example, if return on N tags is 3, then optimal Q is 2, but there is a chance that module may find and report 4 tags.
See sample codelets in the SDK.
Note
Not currently supported with Continuous Reading.
Reading Tag Memory
Additional methods for reading individual tags are available in the Level 2 API.
ReadListener
Classes that implement the ReadListener interface may be used as listeners (callbacks) for background reads. The interface has one method:
void tagRead(Reader r, TagReadData t)
This method is called for each tag read in the background after Reader.startReading() has been invoked.
See the example applications, i.e. readasync.java, for typical implementations.
40 Level 1 API
Reading Tags - The Basics
C A U T I O N !! !
When performing asynchronous read operations the reader is operatingin a continuous or pseudo-continuous read mode. During this mode per-forming other tag or reader operations, including GPIO operations, arenot supported. As such, other tag and reader operations MUST NOT beperformed within the tagRead() ReadListener method. Doing so canhave unexpected results. Use Embedded TagOp Invocation in order to perform an operation on every tagfound, or perform Reader.read() and iterate through the tags found, perform-ing the desired tag operations on each.
ReadExceptionListener
Classes that implement the ReadExceptionListener interface may be used as listeners (callbacks) for background reads. The interface has one method:
void tagReadException(Reader r, ReaderException re)
This method is called for any Exceptions that occurs during a background tag read after Reader.startReading() has been invoked.
See the example applications for typical implementations.
Level 1 API 41
Tags
Tags
TagReadData
An object of the TagReadData class contains the metadata (see the Hardware Specific Guides for details on available tag read metadata for each product) about the tag read as well as the TagData object representing the particular tag.
TagReadData (or arrays of) objects are the primary results of Read Methods, one for each tag found.
The actual EPC ID for a Tag can be found by calling the getTag() method which returns a TagData object.
See the methods available for getting TagData and metadata (including, RSSI, Frequency, Phase, etc. - see Hardware specific user guide for available metadata) from TagReadData in the language specific API Reference.
TagData
An object of the TagData class contains information that represents a particular tag. The methods and constructors of TagData allow access to and creation of TagData (tagʼs EPC IDs) using byte and hexidecimal string formats.
TagData objects are used to represent the information on a tag which has been read (contained in the TagReadData object) and for representing data to be written to tag(s) in the field using Gen2.WriteTag. In addition, the TagData class implements the TagFilter Interface so TagData objects may be used as such to perform operations, which use TagFilters, on a tag with a particular EPC.
Subclasses of TagData, such as Gen2.TagData, may contain additional information specific to a particular protocol.
See the methods available for getting TagData and metadata from TagReadData in the language specific API Reference.
42 Level 1 API

Writing To Tags
Writing To Tags
Write operations should be performed using the functionality described in the Advanced Tag Operations section. Specifically, for writing to Gen2 tags, the Gen2.WriteTag, for writing the EPC ID of tags, and Gen2.WriteData, for writing to specific locations in individual memory banks, should be used.
Level 1 API 43
Status Reporting
Status Reporting
Status information about the reader and the environment the reader is operating in is available both while the reader is idle and during active background reading.
Note
Status reporting is only available for SerialReader type readers which support Continuous Reading. Currently, only the M6e and Micro module families support this status reporting. The Nano module does not support status reporting in firmware version 1.3.2, but may in a future release.
StatusListener
During Continuous Reading operations it is possible to get status reports at every frequency hop by the reader. A StatusReport object is sent to each Status listener upon receiving the status response. A status report can contain the following information:
Temperature - The current temperature of the reader as detected on the RF board.
Frequency - The frequency the reader just completed using. This is the frequency the noise floor is reported on.
Tx and Rx port - The antenna port that the reader just completed an operation on, which the status is associated with.
Protocol - The protocol that the reader is currently using.
RF On time - The cumulative time this port has been actively transmitting since the reader was rebooted or this statistic was reset. (This information can be used with total time to calculate the average transmit duty cycle since reset.)
Noise Floor- The noise floor at the current frequency with TX on. (This information can be used to measure changes in the amount of reflected power in the RF environment.)
The specific status report fields returned are defined by the Reader Configuration Parameters under /reader/status.
The desired status report fields must be explicitly selected. All default to off (false) to minimize communications overhead.
44 Level 1 API
Saving Configurations to a File
Saving Configurations to a File
The API has the ability to store configurations to a local file and retrieve them. This is accomplished using the reader.saveConfig and reader.loadConfig methods. Both methods take a single argument - the filePath where the configuration is to be saved as a text file with a “.urac” extension.
A code sample, LoadSaveConfiguration, is provided to demonstrate this function.
Level 1 API 45
Exceptions
Exceptions
In the event of an error, methods of this interface may throw a ReaderException, which will contain a string describing the error. Several subtypes exist:
ReaderCommException
This exception is used in the event of a detected failure of the underlying communication mechanism (timeout, network fault, CRC error, etc). This class includes a method:
byte[] getReaderMessage()
that returns the message where the failure was detected.
ReaderCodeException
This exception is used for errors reported from the reader device. The class includes a method:
int getCode()
that returns the numeric error code reported by the device. This code can be very useful to ThingMagic Support when debugging a problem.
See the reader specific Hardware Guide for details on the error codes returned.
ReaderParseException
This exception is used when a message was successfully received from the device, but the format could not be understood by the API.
ReaderFatalException
This exception is used in the event of an error in the device or API that cannot be recovered from. All device operations will fail after reception of this exception. This exception indicates a potentially damaging situation has occurred, or the reader is damaged, and the reader has reset.
In the event of receiving a ReaderFatalException error from a reader device, the message returned with the exception will be included in the exception string, in ASCII
46 Level 1 API

Exceptions
form and should be provided immediately to ThingMagic Support along with the code which caused the ReaderFatalException.
FeatureNotSupportedException
The method being invoked or parameter being passed is not supported by the connected reader. Please see the reader specific Hardware Guide and Reader Configuration Parameters for more details on reader supported features.
Level 1 API 47

Exceptions
48 Level 1 API
Level 2 API
The objects and methods described in this section provide a more complete set of reader operations, including more complex variations of items in Level 1. The Level 2 API is intended to be hardware and implementation independent.
Level 2 API 49
Advanced Reading
Advanced Reading
ReadPlan
An object of class ReadPlan specifies the antennas, protocol and filters to use for a search (Read Methods). The ReadPlan used by a search is specified by setting /reader/read/plan in Reader Configuration Parameters. The three current subclasses are:
SimpleReadPlan
StopTriggerReadPlan
MultiReadPlan
Each ReadPlan object contains a numeric weight parameter that controls the fraction of the search used by that plan when combined in a MultiReadPlan.
SimpleReadPlan
A SimpleReadPlan constructor accepts the following parameters:
Tag Protocol - defines the protocol to search on. The default is Gen2. To search on multiple protocols a MultiReadPlan should be used.
int[] of antennas - defines which antennas (or virtual antenna numbers) to use in the search. The default value is a zero-length list.
– When the list of antennas is zero-length the reader will run antenna detection on each port in /reader/antenna/portList and use all detected antennas. This is not currently supported in the Nano module due to firmware limitations nor on the Micro because of the time required to do the antenna detection using the return loss method.
– When the list of antennas is not zero-length, all the specified antennas will be used, unless /reader/antenna/checkPort is enabled in which case the list can only include detectable antennas. CheckPort is not currently supported in the Nano module. In the Micro case, this is due to the time it takes to detect antennas using the return loss method. In the Nano case, it is due to hardware limitations.
See Antenna Usage for more information on antenna configuration and usage.
NoteNot all antennas are detectable by the readers. The antenna needs to have some DC resistance if it is to be discovered by our antenna detection circuit. If, when using the zero-length array method requiring antenna detect, reads are not occurring it is possible the antennas are not detectable and require explicit setting.
50 Level 2 API
Advanced Reading
TagFilter Interface - defines a subset of tags to search for.
TagOp Invocation - defines a tag operation (ReadData, WriteData, Lock, Kill, etc.) to be performed on each tag found, as its found. When read operations are performed the data read will be stored in the resulting TagReadData Data field.
int weight - default value is 1000. See MultiReadPlan for how weights are used.
boolean useFastSearch - optimizes performance for small tag populations moving through the RF field at high speeds.
Constructors exist to create SimpleReadPlan objects with various combinations of antennas, TagFilter Interface and weights. See the language specific reference guide for the list of all constructors.
StopTriggerReadPlan
This sub-class of SimpleReadPlan accepts the following additional parameter and, when set as the active /reader/read/plan, will cause the Read Methods operation to Return on N Tags Found instead of waiting for the full timeout or /reader/read/asyncOnTime to expire:
StopOnTagCount - This class contains an integer field N which specifies the number of tags read required to trigger the end of the read operation. See Return on N Tags Found for suggestions on optimizing configuration for a particular N value.
NoteNot currently supported with Continuous Reading.
MultiReadPlan
A MultiReadPlan object contains an array of other ReadPlan objects. The relative weight of each of the included sub-ReadPlans is used to determine what fraction of the total read time is allotted to that sub-plan.
For example, if the first plan has a weight of 20 and the second has a weight of 10, the first 2/3 of any read will use the first plan, and the remaining 1/3 will use the second plan).
MultiReadPlan can be used, for example, to search for tags of different protocols on different antennas and search on each for a different amount of time.
C A U T I O N !! !
The M6e, Micro, and Nano do not currently support MultiReadPlans whenoperating in Continuous Reading mode. If a MultiReadPlan is being used onone of these modules with the Reader.StartReading() method then /reader/read/asyncOffTime must be greater than zero.
Level 2 API 51
Advanced Reading
In-Module Multi-Protocol Read
The M6e and Micro modules support reader-scheduled, multi-protocol reads This allows you to specify a set of protocols and the M6e schedules on its own, reading on all protocols and return the results without repeated communications with the client application to switch protocols.
To allow a module to use multi-protocol search, create a MultiReadPlan where all child ReadPlans have weight=0. This signals the API to defer to the module for read plan scheduling.
See the MultiProtocolRead Example Code for language specific code samples.
NoteYour M6e or Micro must have Protocol License Keys installed for multiple protocols in order to support multi-protocol reads.
52 Level 2 API

Selecting Specific Tags
Selecting Specific Tags
TagFilter Interface
TagFilter is an interface type that represents tag read filtering operation. Currently classes which implement the TagFilter Interface provide two ways to filter tags:
Air Protocol Filtering
1. When specifying a TagFilter as parameter for Advanced Reading or Advanced Tag Operations [Deprecated], the filter will be applied at the air protocol level, i.e. to tags “in the field”. That is, only tags matching the TagFilter criteria will be returned in an inventory operation or operated (write, lock, etc.) on.
Post Inventory Filtering
2. Objects of type TagFilter provide a match() method that can be used to check whether a TagData object matches the TagFilter criteria. This filtering is not applied to tags “in the field” - non-matching objects are discarded later using post-inventory filtering.
NoteCurrently, post inventory filtering with match() can only be used to filter against a TagData EPC value.
The TagData class implements the TagFilter interface and TagData objects may be used as such to match a tag with a specific EPC. The protocol specific classes: Gen2.Select and ISO180006B.Select, among others, represent the protocol selection capabilities of their respective protocols and can be used to perform the protocol-specific filtering operations. Applying a filter of one protocol to an operation of another protocol will result in an error.
In a future release, MultiFilter objects will be able to be used to create more elaborate filters from a list of simpler filters. MultiFilters are not currently supported by any readers.
Any TagFilter may match more than one tag in an operation; they do not guarantee uniqueness.
NoteAstra readers currently only support TagData filters. They do not support [Protocol].Select type TagFilters.
Level 2 API 53
Selecting Specific Tags
MultiFilter
Contains an array of objects that implement the TagFilter Interface. When used as a TagFilter the array of TagFilters in the MultiFilter object will be applied for tag selection.
NoteCurrently, the sequence in which the TagFilters are applied is not guaranteed.
Gen2.Select
The Gen2.Select class represents selection operations specific to the Gen2 protocol. This class provides the capability to select Gen2 tags based on the value in any Gen2 tag memory bank, except RESERVED. The tag selection criteria can be specified using the Gen2.Select constructor:
Gen2.Select(boolean invert, Gen2.Bank bank, int bitPointer, int bitLength, byte[] mask)
invert = Whether to invert the selection (deselect tags that match the filter criteria and return/operate on the ones which donʼt)
bank = The Gen2.Bank enumeration constant (EPC, TID, USER) indicating the memory bank to be matched.
bitPointer = The memory bank offset, in bits (zero-based 16 bit multiples), at which to begin comparing the mask value.
bitLength = The length, in bits (16 bit multiples), of the mask.
mask = The value to compare with the data in the specified memory bank (bank) at the specified address offset (bitPointer), MSB first.
ISO180006B.Select
The ISO180006B.Select class represents a selection operation in the ISO18000-6b protocol. This class provides the capability to select ISO18000-6B tags based on the value of data stored on the tag. The tag selection criteria can be specified using the ISO180006B.Select constructor:
ISO180006B.Select(boolean invert, ISO180006b.SelectOp op, int address, byte mask, byte[] data)
invert = Whether to invert the selection (deselect tags that match the filter criteria and return/operate on the ones which donʼt)
op = The type of The operation to use to compare the tag data to the provided data. See the ISO180006b.SelectOp class info.
54 Level 2 API
Selecting Specific Tags
address = The address of the tag memory to compare to the provided data.
mask = Bitmask of which of the eight provided data bytes to compare to the tag memory. Each bit=ʻ1ʼ indicates the corresponding byte will be compared. If bit[0]=1 then byte[0] value will be compared with found tags.
data = The data to compare. Exactly eight bytes.
Tag Protocol
The TagProtocol enumeration represents RFID protocols. It is used in many places where a protocol is selected or reported. Some possible values are:
TagProtocol.GEN2
TagProtocol.ISO180006B
TagProtocol.IPX64 (64kbps link rate)
TagProtocol.IPX256 (256kbps link rate)
Each protocol may have several configuration parameters associated with it. These parameters can be found in the Reader Configuration Parameters section under /reader/[protocol name].
NoteNot all devices support all protocols and for those that do, a license key may need to be applied to activate them. A list of supported protocols for a connected device may be obtained using the Reader Configuration Parameters:/reader/version/supportedProtocols parameter. See the specific hardwareʼs User Guide or product data sheet for more details on its supported protocols.
Level 2 API 55
Advanced Tag Operations
Advanced Tag Operations
NoteThese new TagOp data structures replace the older individual Advanced Tag Operations [Deprecated] and Level 3 API.
TagOp Invocation
A TagOp is a data structure which encapsulates all the arguments of a particular, protocol-specific command. The following groups of TagOps are supported:
Gen2 Standard TagOps
Gen2 Optional TagOps
Gen2 Tag Specific TagOps - Alien Higgs
Gen2 Tag Specific TagOps - NXP G2*
Gen2 Tag Specific TagOps - Impinj Monza4
ISO18000-6B TagOps
Using TagOp provides a scalable architecture for extending supported tag operations than an ever-increasing number of individual API methods. TagOps have the added benefit of being embeddable in larger structures; e.g., SimpleReadPlan with a TagOp allowing for operations to be automatically performed on every tag found during an Advanced Reading operation.
Specific tagop structures depend on the structure of the protocol commands. See the Language Specific Reference Guides TagOp subclasses for detailed information.
Direct Invocation
The Reader.ExecuteTagOp() method provides direct execution of TagOp commands. Using ExecuteTagOp() results in the following behavior:
The reader operates on the first tag found, with applicable tag filtering as specified by the TagFilter Interface object passed in ExecuteTagOp().
The command will be attempted for the timeout value specified in the /reader/commandTimeout.
The reader stops and the call returns immediately after finding one tag and operating on it, unless the timeout expires first.
The operation is performed on the antenna specified in /reader/tagop/antenna
56 Level 2 API
Advanced Tag Operations
The /reader/tagop/protocol parameter selects the RFID Tag Protocol to use and can affect the semantics of the command, as some commands are not supported by some protocols.
Embedded TagOp Invocation
TagOps may also be executed as a side effect of an Advanced Reading operation. When a SimpleReadPlan is created with a TagOp specified in the tagOp parameter the following behavior results:
The specified operation will be executed on each tag as each tag is found during the Advanced Reading operation.
The specified operation will be performed on the same antenna the tag was read on during the overall read operation.
The rules of the Advanced Reading operation and specified ReadPlan apply.
NoteEmbedded TagOps are only supported with Gen2 (ISO18000-6C) protocol tags and when connected to readers of type SerialReader and RQLReader type M6.
NoteIn previous versions of the API this functionality required the use of Level 3 API operations. Those operations should no longer be used.
Embedded TagOp Success/Failure Reporting
Current reader functionality does not provide a means to report the success or failure of an embedded tagop for each invocation, except for ReadData operations where the presence or absence of the data is an implicit indicator. Summary success/failure information is available through the following /reader/tagReadData parameters:
/reader/tagReadData/tagopSuccess
/reader/tagReadData/tagopFailures
NoteEmbedded TagOps operate on all tags that respond and do not differentiate between tags that have never responded and those that have been acted upon already. Depending on the Gen2 Tag Contention Settings used the operations Succeeded/Failed counts can be misleading since in Session 0, for example, tags may respond many times during an inventory round and the command may be attempted many times. This would result in counts
Level 2 API 57
Advanced Tag Operations
higher than the actual number of unique tags the operation succeeded or failed on.
These counters are reset to zero at the beginning of each Reading operation and behave as follows:.
Reader.read() -Counters resets to 0 at beginning of call and accumulates values until call completes.
Reader.startReading() -Counters reset to 0 when Reader.StartReading is called and accumulate values until StartReading() is called again. Counter values can be retrieved while the read is still active. Reader.StopReading has no effect on counters.
Gen2 Standard TagOps
The following tag operations are supported by ALL Gen2 tags and all Reader Types.
Gen2.WriteTag
Writes the specified EPC ID value to the tag. It is preferred over using Gen2.WriteData because WriteTag will automatically lengthen or shorten the EPC ID, by modifying the PC bits, according to the Tag EPC specified. If WriteData is used, the specified data will be modified but the EPC ID length will not be modified.
NoteGen2.WriteTag is optimized for single tags in the field (or filtering that induces only a single tag to respond) and will always use /reader/gen2/q=0 if set to Gen2.DynamicQ. For bulk writing applications, a StaticQ appropriate for the population size should be used to avoid collisions. See the Performance Tuning chapter for information on selecting this value.
Gen2.ReadData
Reads the specified number of memory words (1 word = 2 bytes) of tag memory from the specified Memory Bank and location.
NoteCurrently limited to returning 123 words of data per standalone ReadData invocation or 32 words when performed as an Embedded TagOp Invocation.
When used as an Embedded TagOp Invocation the data read can be used an a unique identifier of the tag by setting /reader/tagReadData/uniqueByData = true. This allows tags
58 Level 2 API
Advanced Tag Operations
with the same EPC ID but different values in the specified Gen2.ReadData memory location to be treated as unique tags during inventories.
NoteSpecifying 0 (zero) as the data size to read will result in the entire contents of the specified memory bank (up to the maximums specified above) being returned.
Gen2.WriteData
Writes the specified data to the tag memory location specified by the Memory Bank and location parameters.
NoteCurrently limited to writing 123 words of data per WriteData invocation.
By default this method will perform a word by word write but it can be made to attempt a Gen2.BlockWrite by setting /reader/gen2/writeMode = Gen2.WriteMode.BLOCK_ONLY or BLOCK_FALLBACK.
Gen2.Lock
Sends a command to a tag to lock and/or unlock segments of tag memory. The lock operation to perform is represented as an instance of the Gen2.LockAction Class.
In order to lock Gen2 Memory the desired password must first be written to Reserved Memory. Once the Access password has been written the desired memory can be locked using the AccessPassword. This can be done by either:
Set /reader/gen2/accessPassword to the correct value and specify 0 in the Gen2.Lock instanceʼs password field
Set the password parameter of the Gen2.Lock instance to the correct password.
Level 2 API 59
Advanced Tag Operations
Gen2.LockAction Class
Instances of this class represent a set of lock and unlock actions on a Gen2 tag. It is based on the LLRP syntax for C1G2Lock.
There are 5 lockable fields within the tag memory (LLRP calls these “DataFields”): EPC, TID, User, Kill Password and Access Password. Each field may be assigned one of 4 possible lock states (LLRP calls these “Privileges”):
Lock: Writes not allowed. If the field is a password, then reads arenʼt allowed, either.
Unlock: Reads and Writes allowed.
Permalock: Permanently locked – attempts to Unlock will now fail.
Permaunlock: Permanently unlocked – attempts to Lock will now fail.
Gen2.LockAction encapsulates a field and a lock state. Predefined constants are provided for every possible combination of field and lock state.
Gen2.LockAction.KILL_LOCK
Gen2.LockAction.KILL_UNLOCK
Gen2.LockAction.KILL_PERMALOCK
Gen2.LockAction.KILL_PERMAUNLOCK
Gen2.LockAction.ACCESS_LOCK
Gen2.LockAction.ACCESS_UNLOCK
Gen2.LockAction.ACCESS_PERMALOCK
Gen2.LockAction.ACCESS_PERMAUNLOCK
Gen2.LockAction.EPC_LOCK
Gen2.LockAction.EPC_UNLOCK
Gen2.LockAction.EPC_PERMALOCK
Gen2.LockAction.EPC_PERMAUNLOCK
Gen2.LockAction.TID_LOCK
Gen2.LockAction.TID_UNLOCK
Gen2.LockAction.TID_PERMALOCK
Gen2.LockAction.TID_PERMAUNLOCK
Gen2.LockAction.USER_LOCK
Gen2.LockAction.USER_UNLOCK
Gen2.LockAction.USER_PERMALOCK
60 Level 2 API
Advanced Tag Operations
Gen2.LockAction.USER_PERMAUNLOCK
To lock a single field, provide one of these predefined constants to lockTag().
Gen2 tags allow more than one field to be locked at a time. To lock multiple fields, a Gen2.LockAction constructor is provided to combine multiple Gen2.LockActions with each other.
Example:
new Gen2.LockAction(Gen2.LockAction.EPC_LOCK, Gen2.LockAction.ACCESS_LOCK, Gen2LockAction.KILL_LOCK)
A Gen2.LockAction constructor is also provided which allows explicit setting of mask and action fields. These 10-bit values are as specified in the Gen2 Protocol Specification. Use the constructor:
Gen2.LockAction(int mask, int action)
to create a Gen2.LockAction object with the specified mask and action.
The following symbolic constants are provided for convenience in handling Gen2 lock mask and action bitmasks. Perform a binary OR on these to pass multiple lock/unlock settings.
Gen2.LockBits.ACCESS
Gen2.LockBits.ACCESS_PERM
Gen2.LockBits.KILL
Gen2.LockBits.KILL_PERM
Gen2.LockBits.EPC
Gen2.LockBits.EPC_PERM
Gen2.LockBits.TID
Gen2.LockBits.TID_PERM
Gen2.LockBits.USER
Gen2.LockBits.USER_PERM
Gen2.Kill
Sends a kill command to a tag to permanently disable the tag. The tagʼs Reserved memory Kill Password must be non-zero for the kill to succeed.
Level 2 API 61
Advanced Tag Operations
Gen2 Optional TagOps
The following tag operations are optional features of the Gen2 tag specification and are supported by many but not all Gen2 tags. These operations are supported by readers of type SerialReader and the M6/Astra-EX.
Gen2.BlockWrite
On tags which support this command, it provides faster writing of data to a tag by writing more than one word at a time over the air, compared to Gen2.WriteData which sends data to write over the air to the tag word by word.
Calls to BlockWrite can only specify data of the maximum length which the tag supports in its BlockWrite implementation. For example, Impinj Monza tags only support 2-word BlockWrites. This means that in order to write more than 2 words multiple calls must be made.
Gen2.BlockWrite can also be made the default behavior of Gen2.WriteData by setting /reader/gen2/writeMode = Gen2.WriteMode.BLOCK_ONLY or BLOCK_FALLBACK
Gen2.BlockPermaLock
On tags which support this command, it allows User Memory to be selectively, permanently write-locked in individual sub-portions. Compare BlockPermaLock with standard Gen2.Lock which only allows locking entire memory banks. The block-size is tag- specific. For example, Alien Higgs3 tags support 4 word blocks.
Gen2 Tag Specific TagOps - Alien Higgs
The following tag operations are custom tag commands supported only on tags using Alien Higgs2 and Higgs3 chips, as implied by the TagOp name. These operations are supported by readers of type SerialReader and the M6/Astra-EX, but not the Nano module as of firmware version 1.3.2.
Gen2.Alien.Higgs2.PartialLoadImage
This command writes an EPC with a length of up to 96-bits, plus the Kill and Access passwords without locking in a single command.
NoteDoes not support the use of a TagFilter Interface.
62 Level 2 API
Advanced Tag Operations
Gen2.Alien.Higgs2.FullLoadImage
This command writes an EPC with a length of up to 96-bits, plus the Kill and Access passwords and will also modify the Lock bits (locking the tag according to the Alien Higgs Lock Bits) and the PC Bits.
NoteDoes not support the use of a TagFilter Interface.
Gen2.Alien.Higgs3.FastLoadImage
This command writes an EPC with a length of up to 96-bits, the Kill and Access passwords to Higgs3 tags in a single command, thereby reducing the tag programming time compared to the use of LoadImage or multiple Gen2.WriteData commands.
Gen2.Alien.Higgs3.LoadImage
This command writes Reserved, EPC and User Memory to the Higgs3 tags in a single command, thereby reducing the tag programming time compared to the use of multiple Gen2.WriteData commands.
Gen2.Alien.Higgs3.BlockReadLock
This command allows four-word blocks of User Memory to be read locked. Once read locked the correct Access Password will be required to read the contents of the locked blocks with Gen2.ReadData.
Gen2 Tag Specific TagOps - NXP G2*
The following tag operations are custom tag commands supported only on tags using NXP G2xL, G2iL and/or G2iM chips. The commands are supported on all chip types as their names imply. These operations are currently only supported by readers of type SerialReader and the M6/Astra-EX, but not the Nano module as of firmware version 1.3.2.
Gen2.NXP.G2I.SetReadProtect and Gen2.NXP.G2X.SetReadProtect
Causes all tag access command, all Gen2 TagOps and Gen2.NxpSetReadProtect, Gen2.NxpChangeEAS, Gen2.NxpEASAlarm and Gen2.NxpCalibrate to be disabled until a Gen2.NXP.G2I.ResetReadProtect and Gen2.NXP.G2X.ResetReadProtect is sent.
Level 2 API 63
Advanced Tag Operations
Gen2.NXP.G2I.ResetReadProtect and Gen2.NXP.G2X.ResetReadProtect
Restores normal operation to a tag which is in ReadProtect mode due to receiving Gen2.NXP.G2I.SetReadProtect and Gen2.NXP.G2X.SetReadProtect.
NoteGen2.NXP.G2X.ResetReadProtect cannot be used through Embedded TagOp Invocation, only via Direct Invocation. However the G2I version can and can be used with G2x tags.
Gen2.NXP.G2I.ChangeEas and Gen2.NXP.G2X.ChangeEas
Sets or resets the EAS system bit. When set, the tag will return an alarm code if an “EAS Alarm” command is received.
Gen2.NXP.G2I.EasAlarm and Gen2.NXP.G2X.EasAlarm
sets or resets the EAS system bit. When set, the tag will return an alarm code if an “EAS Alarm” command is received.
The response to the EAS Alarm command contains 8 bytes of EAS Alarm Data
NoteCannot be used through Embedded TagOp Invocation, only via Direct Invocation and it does not support TagFilter Interface usage.
Gen2.NXP.G2I.Calibrate and Gen2.NXP.G2X.Calibrate
Calibrate causes the tag to return a random data pattern that is useful in some frequency spectrum measurements.
NoteCalibrate can only be sent when the tag is in the Secured state, when the access password is non-zero.
64 Level 2 API
Advanced Tag Operations
Gen2.NXP.G2I.ChangeConfig
Used to toggle the bits of the G2i* tagʼs Gen2.ConfigWord. Specify ʻtrueʼ for each field of the Gen2.NXP.G2I.ConfigWord to toggle that setting.
Different version of the G2i* tags support different features. See tag data sheet for specific bits supported.
The Gen2.NXP.G2I.ChangeConfig command can ONLY be sent in the Secured state, i.e. requires a non- zero password. Caution should be used when using this through an Embedded TagOp Invocation. Since this command toggles the specified fields, if the tag responds twice (or an even number of times) during an inventory round the end result will be no change.
Gen2 Tag Specific TagOps - NXP UCODE DNA
Gen2.NXP.AES.Tam1Authentication
Used to define fields when authenticating NXP UCODE DNA tag.
Gen2.NXP.AES.Tam2Authentication
Used to define fields to authenticate and optionally obtain encrypted memory data from an NXP UCODE DNA tag.
Gen2.NXP.AES.Untraceable
Used to configure an NXP UCODE DNA tag to hide some or all of its EPC, TID and User memory fields.
Gen2.NXP.AES.ReadBuffer
Used to obtain authentication and, optionally, encrypted memory data from the buffer of an NXP UCODE DNA tag. This is an alternative to having the tag backscatter the information and must be done after authentication is requested, but before power is dropped to the tag.
Gen2.NXP.AES.Authenticate
Used to define an authentication tagops to be used with NXP UCODE DNA tags.
Level 2 API 65
Advanced Tag Operations
Gen2 Tag Specific TagOps - Impinj Monza4
The following tag operations are custom tag commands supported only on tags using Impinj Monza4 and Monza5 chips. These operations are supported by readers of type SerialReader and the M6/Astra-EX, but not the Nano module as of firmware version 1.3.2.
Gen2.Impinj.Monza4.QTReadWrite
Controls the switching of Monza 4QT between the Private and Public profiles. The tag MUST be in the Secured state, i.e. non-zero Access Password, to succeed. The specific settings provide protection of data through public and private data profiles and the use of short range reading options. See the Impinj Monza 4 data sheet (IPJ_Monza4Datasheet_20101101.pdf), available from Impinj, for more details.
Gen2 Tag Specific TagOps - IDS SL900A
The following tag operations are custom tag commands supported only on tags using IDS (now AMS) SL900A chips. These operations are supported by readers of type SerialReader and LLRPReader, but not the Nano module as of firmware version 1.3.2. Further details about the IDS/AMS SL900A tag silicon and the supported custom commands can be found on the AMS website (http://www.ams.com/) and the SL900A specification (SL900A_Datasheet_EN_v5.pdf).
Sample codelets using the SL900A custom commands can be found in the C# /Samples/Codelets/SL900A directory of the MercuryAPI SDK, v1.11.2 or later.
The current set of supported IDS SL900A custom commands are as follows:
Gen2.IDS.SL900A.AccessFifo
The ACCESS FIFO command can read and write data from the FIFO and can also read the FIFO status register.
Gen2.IDS.SL900A.GetBatteryLevel
The GET BATTERY LEVEL command starts the AD conversion on the battery voltage and returns the voltage level with the battery type (1.5V or 3V).
Gen2.IDS.SL900A.GetCalibrationData
The GET CALIBRATION DATA command reads the calibration data field and the SFE parameters field.
66 Level 2 API
Advanced Tag Operations
Gen2.IDS.SL900A.GetLogState
The GET LOG STATE command reads the status of the logging process. The command can be used to quickly determine the current state of the product, together with the Shelf life and the Limit counter.
Gen2.IDS.SL900A.GetMeasurementSetup
The GET MEASUREMENT SETUP command will read the current system setup of the chip.
Gen2.IDS.SL900A.GetSensorValue
The GET SENSOR VALUE command starts the AD conversion on the specified sensor and returns the value.
Gen2.IDS.SL900A.EndLog
The END LOG command stops the logging procedure and turns off the real time clock. It also clears the Active flag that is store in the “System status” field in the EEPROM.
Gen2.IDS.SL900A.Initialize
The INITIALIZE command clears the System status field, the Limit counters and sets the Delay time field and the Application data field. The Initialize command is needed before the START LOG command as it will clear the pointers and counters. If the application needs to run the logging process from the previous point on, the Initialize command ca be left out.
Gen2.IDS.SL900A.SetCalibrationData
The SET CALIBRATION DATA write to the calibration block in the EEPROM memory. The calibration data is preset during manufacturing, but can also be changed in the application if needed. The SET CALIBRATION DATA will write only to the EEPROM, but it will not update the calibration values in the calibration registers. The calibration registers are automatically updated with each START LOG command.
Gen2.IDS.SL900A.SetLogLimit
The SET LOG LIMIT command writes the 4 limits that are used in the logging process. All 4 limits are 10 bits long.
Level 2 API 67
Advanced Tag Operations
Gen2.IDS.SL900A.SetLogMode
The SET LOG MODE command sets the logging form, storage rule, enables sensors that are used in the logging process and sets the logging interval (in 1 second steps).
Gen2.IDS.SL900A.SetPassword
The SET PASSWORD command writes a 32-bit password to the EEPROM. The password protection for the specified area is automatically enabled if the password is any other value except 0.
Gen2.IDS.SL900A.SetShelfLife
The SET SHELF LIFE command programs parameters for the dynamic shelf life algorithm.
Gen2.IDS.SL900A.SetSFEParameters
The SET SFE PARAMETERS command writes the Sensor Front End parameters to the memory. Those parameters include the range preset values for the external sensor inputs, external sensor types and the also the sensor that will be used for limits comparison.
Gen2.IDS.SL900A.StartLog
The START LOG command starts the logging process. It refreshes the data in the calibration registers, enables the RTC, writes the Start time and sets the Active bit in the “System status” field in the EEPROM.
ISO18000-6B TagOps
NoteCannot be used through Embedded TagOp Invocation, only via Direct Invocation and must be invoked with an Iso180006b.TagData TagFilter Interface.
Iso180006b.ReadData
Read the specified number of data bytes starting at the specified byte-offset memory location.
68 Level 2 API

Advanced Tag Operations
Iso180006b.WriteData
Write the specified data starting at the specified byte-offset memory location.
Iso180006b.Lock
Sends a command to a tag to lock segments of tag memory. The lock operation to perform is represented as an instance of the ISO180006B.LockAction class.
ISO180006B.LockAction class
Instances of this class represent the single lock action of locking a particular byte of tag memory on ISO18000-6b tags. Use the constructor.
ISO180006B.LockAction(int address)
to construct a ISO180006B.LockAction object for the specified address.
Level 2 API 69
Advanced Tag Operations [Deprecated]
Advanced Tag Operations [Deprecated]
C A U T I O N !! !
The following individual tag operation methods are being deprecated infavor of the new TagOp Invocation class and its subclasses. All new develop-ment should use these data structures instead of the older individual tagoperations.
The Level 2 API methods that operate on individual tags use the reader-level /reader/tagop/antenna parameter to select the antenna on which the command is issued. The /reader/tagop/protocol parameter selects the RFID Tag Protocol to use and can affect the semantics of the command, as some commands are not supported by some protocols.
All of the following methods will use the timeout value specified in the /reader/commandTimeout.
Killing Tags
killTag()
void killTag(TagFilter target, TagAuthentication auth)
Locking Tags
lockTag()
void lockTag(TagFilter target, TagLockAction lock)
Tag Memory Access
readTagMemBytes()
byte[] readTagMemBytes(TagFilter filter, int bank, int address, int length)
70 Level 2 API
Advanced Tag Operations [Deprecated]
readTagMemWords()
short[] readTagMemWords(TagFilter filter, int bank, int address, int length)
writeTagMemBytes()
void writeTagMemBytes(TagFilter filter, int bank, int address, byte[] data)
writeTagMemWord()
void writeTagMemWord(TagFilter filter, int bank, int address, short[] data)
Level 2 API 71
Antenna Usage
Antenna Usage
Automatic Antenna Switching
Only one antenna can be active at a time, when multiple antennas are specified they are switched on, one at a time, in the order specified. It stops when the search timeout expires or stopReading() is issued, as appropriate.
The exact method of switching depends on your code. There are two main methods you can use for switching antennas:
1. Setup the list of antennas in a single ReadPlan and let the reader handle the switching. The search cycles through the antennas, moving to the next antenna when no more tags are found on the current antenna.
Note: The cycle resets and restarts on the first antenna each time Reader.read()is re-issued or, in the case of Reader.startReading(), after each /reader/read/asyncOnTime period.
In this case the amount of time spent reading on each antenna is non-deterministic and there is no guarantee all antennas will be used in any specific time period. It will stay on an antenna as long as there are still tags being read.
2. Create a SimpleReadPlan for each antenna and combine them into a MultiReadPlan giving each a relative weight based on the desired percentage of time spent on it and use that MultiReadPlan as your /reader/read/plan setting.
Virtual Antenna Settings
The M6e, Micro, Nano and M5e-Family of reader devices have built-in support for using Multiplexers, supporting the ability to expand the number of physical ports by a factor of 4. M5e modules can accomplish this for monostatic or bistatic antenna operation. For more information on how the Multiplexer support works at the module level please see the hardware guide that is appropriate for your module.
In the MercuryAPI the configuration of multiple antennas and bistatic/monostatic operation on M5e-Family products is done using the /reader/antenna/txRxMap and /reader/antenna/portSwitchGpos configuration parameters.
Auto Configuration
When using the most recent version of reader firmware and the MercuryAPI the readers will self-identify their configuration and the ports settings will be automatically configured. The type of reader will be provided in the parameter /reader/version/productGroup. For
72 Level 2 API

Antenna Usage
example, if the reader is identified as a Vega, the settings define in Vega Reader Example which previously had to be manually configured will be automatically set.
Manual Configuration
The portSwitchGpos parameter defines which GPOutput lines will be used for antenna switching and, consequently how many ports are supported.
The txRxMap parameter defines the mapping of virtual port numbers to physical TX and RX ports. Once configured the virtual antenna number for each antenna configuration setting will be used in place of the physical port number in API calls, such as in SimpleReadPlan.
The map between virtual antenna numbers and physical antenna ports specified in /reader/antenna/txRxMap will be used to filter the detected antennas - antenna ports that are detected but have no corresponding virtual antenna in the map will not be used. The map will also be used to translate from specified antenna numbers to antenna ports.
Vega Reader Example
In order to map the virtual port numbers to correspond to the antenna port labels on the Vega reader you must set the portSwitchGpos to use one GPOutput line to control the 1 to 2 multiplexer used by Vega (as noted in the Vega User Guide) and setup the txRxmap:
r.paramSet("/reader/antenna/portSwitchGpos", new int[]{1});
r.paramSet("/reader/antenna/txRxMap", new int[][]{new int[]{1,2,2}, new int[]{2,5,5}, new int[]{3,1,1}});
Level 2 API 73
GPIO Support
GPIO Support
Get/Set Value
Reader.GpioPin[] gpiGet()
void gpoSet(Reader.GpioPin[] state)
If the reader device supports GPIO pins, the gpiGet() and gpoSet() methods can be used to manipulate them. The pin numbers supported as inputs by the reader are provided in the /reader/gpio/inputList parameter. The pin numbers supported as outputs by the reader are provided in the /reader/gpio/outputList parameter.
The gpiGet() and gpoSet() methods use an array Reader.GpioPin objects which contain pin ids and values.
NoteThe gpoSet() method is not guaranteed to set all output pins simultaneously.
NoteThe gpiGet() method returns the state for all GPI pins.
NoteSee specific devices User Guide for pin number to physical pin mapping.
GPIO Direction
NoteThe direction (input or output) of the GPIO pins on the M6e, Micro, and Nano are configurable. The configuration of the pins can be configured by setting the /reader/gpio/inputList and the /reader/gpio/outputList parameters.
GPO Multiplexer Control
One or two GPO lines can be used to control an external multiplexer, expanding the number of antenna ports on a serial reader by a factor of 4. This is controlled by setting the /reader/antenna/portSwitchGpos parameter. See Virtual Antenna Settings.
74 Level 2 API

GPIO Support
GPI Reading Control
Under autonomous operation, reading can be activated using GPI lines. Raising the line high activates reading, lowering it ceases reading. See the Serial Reader Autonomous Operation section for information on defining and enabling this functionality.
Level 2 API 75

Firmware Updates
Firmware Updates
void firmwareLoad(java.io.InputStream firmware)
The firmwareLoad() method attempts to install firmware on the reader. The argument is a language specific data structure or pointer (see Language Specific Reference Guides for details) connected to a firmware image. It is the userʼs responsibility to have an appropriate firmware file. No password is required.
76 Level 2 API
Rebooting Readers
Rebooting Readers
void reboot()
The reboot() method reboots the reader or module.
NoteThe Reboot method is not supported over the RQLReader interface and cannot be used to reboot Mercury4/5 and Astra readers.
Level 2 API 77
Protocol License Keys
Protocol License Keys
NoteThe M6e and Micro have the ability to support multiple protocols. The basic module supports Gen2 (ISO18000-6C) only. To enable additional protocols a license key must be purchased (contact [email protected] for details). Once a license key is obtained it is installed by setting the Reader Configuration Parameters /reader/licenseKey to the provided license key.
Once set the key is stored persistently in flash and does not need to be repeatedly set.
NoteSee LicenseKey for language specific examples of how to set the key.
Deprecated API
SerialReader method:
public byte[] cmdSetProtocolLicenseKey(byte[] key) throws ReaderException
Parameters:
key - license key
Returns:
Supported protocol bit mask
78 Level 2 API
Debug Logging
Debug Logging
TransportListener Interface
The TransportListener interface provides a method of snooping on raw, transport-layer packets sent to and received from any device. The class that is interested in observing raw message packets implements this interface, and the object created with that class is registered with:
void addTransportListener(TransportListener listener)
Once registered data transmitted or receive will cause the message() method to be invoked.
void message(boolean tx, byte[] data, int timeout)
When data is sent to the device, message() is invoked with tx set to true.
When data is received from the device, message() is invoked with tx set to false. The timeout originally specified by the caller is also returned.
The data field includes every byte that is sent over the connection, including framing bytes and CRCs.
To remove a TransportListener from an object so that it no longer is notified of message packets call removeTransportListener():
void removeTransportListener(Reader.TransportListener listener)
NoteFor most users raw, transport layer packet information will not be very useful but can be a critical tool for ThingMagic Support to debug a problem. To facilitate debugging it is recommended that TransportListener logging be available in all applications.
Level 2 API 79
Configuring Readers
Configuring Readers
Reader Configuration Methods
Each Reader Object has a set of named parameters which provide device metadata and/or provide configuration settings. The names of parameters are strings; case insensitive. Related parameters are grouped together in a filesystem-style layout, for example, the parameters under /reader/antenna provide information about and allow configuration of the devices antennas.
paramGet()
The paramGet() method retrieves the value of a particular named parameter. The returned type is generic (Object) and must be cast to the appropriate type.
paramSet()
The paramSet() method sets a new value for a parameter. The type of the value that is passed must be appropriate for the parameter. Not all parameters can be set.
paramList()
The function String[] paramList() returns a list of the parameters supported by the Reader instance. Readers of different types (serial, RQL, etc.) support different configuration parameters.
Save and Restore Configuration in Module
NoteThe M6e, Nano, and Micro support configuration settings to be saved in flash providing configuration persistence across reboot. The number of parameters has increased significantly for the Micro module as of firmware version 1.5.0.22, for the M6e as of firmware version 1.19.0, and for the Nano as of firmware version 1.5.0. Save and restore is not supported in the M5e family of modules, nor the Vega and USB Plus+ readers.
The M6e, Micro, and Nano modules support:
/reader/baudRate
/reader/region/id
80 Level 2 API

Configuring Readers
/reader/tagop/protocol
/reader/baudRate
/reader/gen2/BLF
/reader/gen2/session
/reader/gen2/tagEncoding
/reader/gen2/target
/reader/radio/portReadPowerList
/reader/radio/portWritePowerList
/reader/radio/readPower
/reader/radio/writePower
/reader/read/trigger/gpi
/reader/region/id
/reader/tagop/protocol
To operate on a configuration, set the parameters as desired then set the /reader/userConfig parameter to a SerialReader.UserConfigOp with the appropriate parameter.
Save - Save the configuration into Flash
Restore - Restore the saved configuration
Verify - Verify the saved configuration against the current configuration.
Clear - Reset saved configuration to factory defaults
See the code sample named SavedConfig for an example of saving and restoring configurations on the M6e, Nano, and Micro.
Reader Configuration Parameters
The following are all the available parameters broken down by grouping:
Level 2 API 81
Configuring Readers
/reader
/reader/baudRate
Type: integer
Default value: 115200
Writable: yes
Products: M5e (and derived products), M6e, Micro, Nano
This parameter (present on serial readers only) controls the speed that the API uses to communicate with the reader once communication has been established. When a Reader.Connect() occurs the serial baud rate is “auto-detected” by attempting supported baud rates in the following order:
1. value of /reader/baudRate (default is 115200 for M6e, Micro and Nano; 9600 for M5e)
2. 9600, 115200, 921600, 19200, 38400, 57600, 230400, 460800
Once connected if the connection baud rate is not the same as the value of /reader/baudRate the moduleʼs baudrate will be changed to /reader/baudRate.
M5e Family Notes - The module always boots into 9600 baud resulting in a connection delay due to the first attempt of connecting at the default /reader/baudRate of 115200. This delay can be avoided by setting /reader/baudRate to 9600 before calling Reader.Connect() then setting it again to the desired faster rate after the connect.
M6e, Micron NanoNotes- The moduleʼs boot baud rate can be modified. If the module boot baud rate is changed it is recommended to set /reader/baudRate to the saved boot baud rate prior to Reader.Connect() to avoid the penalty of trying incorrect rates during auto-detect.
/reader/commandTimeout
Type: int
Default value: 1000
Writable: yes
Products: all
Sets the timeout, in milliseconds, used by Advanced Tag Operations. This timeout specifies how long the reader will continue to attempt a tag Operation before giving up. If it succeeds before the specified timeout the operation completes and returns. If it hasn't
82 Level 2 API
Configuring Readers
succeeded after repeatedly trying for the timeout period, it gives up and returns an exception.
/reader/licenseKey
Type: Array of bytes
Default value: From reader
Writable: yes (not readable)
Products: M6e and Micro
Used to install licensed features, such as additional protocols
/reader/powerMode
Type: SerialReader.PowerMode
Default value: From reader
Writable: yes
Products: M5e (and derived products), M6e, Micro, Nano
Controls the power-consumption mode of the reader as a whole.
NoteM6e and Micro - Certain power modes require a special character string in order to “wake up” the module before the beginning of the first command. /reader/powerMode should be called prior to connecting to the reader. This allows the Connect() sequence to issue the appropriate signals, speeding up the connect.
/reader/transportTimeout
Type: int
Default value: 1000
Writable: yes
Products: all
The number of milliseconds to allow for transport of the data over level 4 transport layer. Certain transport layers, such as Bluetooth, may require longer timeouts.
Level 2 API 83
Configuring Readers
/reader/userMode
Type: SerialReader.UserMode
Default value: From reader
Writable: yes
Products: M5e (and derived products)
Sets a number of protocol specific parameters for particular usecases.
/reader/uri
Type: String
Default value: From reader
Writable: no
Products: all
Gets the URI string used to connect to the reader from the Reader Object.
/reader/userConfig
Type: SerialReader.UserConfigOp
Default value: null
Writable: yes
Products: M6e and Micro
Enables module configuration Saving and Restoring. See Save and Restore Configuration in Module.
84 Level 2 API
Configuring Readers
/reader/antenna
/reader/antenna/checkPort
Type: boolean
Default value: From reader
Writable: yes
Products: M5e (and derived products), M6e, M6, Astra-EX. Not Micro or Nano at this time.
Controls whether the reader checks each antenna port for a connected antenna before using it for transmission. Make sure all connected antennas are detectable before turning this on.
On the M6 this is enabled by default and also turns antenna detection on at boot time. This results in the Web Interface | Status page reflecting which antennas are connected, detectable and available for usage. If disabled then antennas to transmit on must always be explicitly specified.
In the Micro and Nano, it turns on antenna detection, but does not permit automatic checking each time the reader transmits. This limitation is imposed because it takes significantly more time to do antenna detection based on return loss (the Micro and Nano method) than by testing the DC resistance of the antenna (The M6e and M5e method).
/reader/antenna/connectedPortList
Type: Array of integers
Writable: no
Products: M5e, M6e, M6, Astra-EX. Not Micro and Nano at this time.
Contains the numbers of the antenna ports where the reader has detected antennas. Changing the /reader/antenna/portSwitchGpos parameter may change the value this parameter.
Level 2 API 85
Configuring Readers
/reader/antenna/portList
Type: Array of integers
Writable: no
Products: all
Contains the number of the antenna ports supported by the device. These numbers may not be consecutive or ordered. Changing the /reader/antenna/portSwitchGpos parameter may change this parameter.
/reader/antenna/portSwitchGpos
Type: Array of integers
Writable: yes
Products: M5e (and derived products), M6e, Micro, Nano
Controls which of the readerʼs GPO pins are used for antenna port switching. The elements of the array are the numbers of the GPO pins, as reported in /reader/gpoList.
/reader/antenna/returnloss
Type: Array of 2-element arrays interpreted as (tx port, return loss)
Writable: no
Products: Micro, M6e
Returns the return loss of each port based on multiple measurements at multiple channels within the defined region..
/reader/antenna/settlingTimeList
Type: array of array of integers
Default value: From reader
Writable: yes
Products: M5e (and derived products), M6e, Micro, Nano
A list of per transmit port settling time values. Each list element is a length-two array; the first element is the Antenna Usage number as defined by /reader/antenna/txRxMap (NOTE: the settlingTime is associated with the TX port, the paired RX port is not
86 Level 2 API
Configuring Readers
relevant), and the second element is the settling time in microseconds. Ports not listed are assigned a settling time of zero.
/reader/antenna/txRxMap
Type: array of array of 3 integers
Default value: all the antennas in /reader/antenna/portList in monostatic mode. i.e. for the M5e = [[1,1,1],[2,2,2]]
Writable: yes
Products: M5e (and derived products), M6e, Micro, Nano
A configurable list that associates transmit ports with receive ports (and thus selects monostatic mode or bistatic mode for each configuration) and assigns a Antenna Usage number to each. Each list element is a length three array, [ [ A, B, C], ...], where:
A is the virtual antenna number
B is the transmit (TX) physical port number
C is the receive (RX) physical port number.
The reader will restrict which combinations are valid.
Example: Using an M5e configured for both monostatic and bistatic operation, with the bistatic configuration (TX=1, RX=2) assigned virtual port 1 and the monostatic configuration (TX=1, RX=1) assigned virtual port 2:
r.paramSet("/reader/antenna/txRxMap", new int[][]{new int[]{1,1,2}, new int[]{2,1,1}});
/reader/gen2
See the Performance Tuning sections: How UHF RFID Works (Gen2) and Optimizing Gen2 settings for details on how the following settings related to reader performance and how to select the best settings for your usecase.
Level 2 API 87
Configuring Readers
/reader/gen2/accessPassword
Type: Gen2.Password
Default value: 0
Writable: yes
Products: all
The Gen2 access password that is used for all tag operations. If set to a non-zero value it must match the value stored in the tagʼs Reserved Memory | Access Password or tag operations on that tag will fail, even if the memory operated on is not locked.
/reader/gen2/writeMode
Type: Enum
Default value: Gen2.WriteMode.WORD_ONLY
Writable: yes
Products: M6e, Micro, Nano, M6, Astra-EX
Controls whether write operations will use the optional Gen2 BlockWrite command instead of writing block (word) by block until all the data is written. Using BlockWrite can result in significantly faster write operations, however, not all Gen2 tags support BlockWrite.Three modes are supported:
WORD_ONLY - Use single-word Gen2 Write only. Guaranteed to work with all Gen2 tags.
BLOCK_ONLY - Use multi-word Gen2 BlockWrite only. Not all tags support BlockWrite. If a write is attempted in this mode on a non-supporting tag it will fail and an exception will be thrown.
BLOCK_FALLBACK - Try BlockWrite first then, if it fails, retry a standard Write.
88 Level 2 API
Configuring Readers
/reader/gen2/BLF
Type: Integer
Default value: 250
Writable: yes
Products: M6e, Micro, M6, Astra-EX. M5e family and Nano support the default only.
Sets the Gen2 backscatter link frequency, in kHz. See the M6e Hardware Guide for full configuration options and supported BLF values.
See Tag-to-Reader Settings for details.
NoteIt is important that the /reader/baudRate is greater than /reader/gen2/BLF, in equivalent frequency units. If its not then the reader could be reading data faster than the transport can handle and send and the readerʼs buffer might fill up.
/reader/gen2/q
Type: Gen2.Q
Default value: Gen2.DynamicQ
Writable: yes
Products: all
Controls whether the reader uses a dynamic, reader controlled, Q algorithm or uses a static, user defined value, and that static value. The value of Q only makes a difference if it is considerably too high or considerably too low. If it is considerably too low, all slots will contain collisions and no tags will be read. If it is considerably too high, then many slots will pass with no tag attempting to communicate in that slot. The number of slots is 2^Q, so for 7 tags, a Q of 4 should be ideal. Each slot takes approximately 1 microsecond, so the overall affect of empty slots is not significant to the overall performance unless the Q is extremely high.
The Q value will not affect the write success rate.
See Tag Contention Settings for details.
Level 2 API 89
Configuring Readers
/reader/gen2/millerm [Deprecated]
Type:Gen2.MillerM
Default value: Gen2.MillerM.M4
Writable: yes
Products: M5e (and derived products)
Controls the Gen2 Miller M value used for communications with the tag. Replaced by /reader/gen2/tagEncoding.
/reader/gen2/tagEncoding
Type:Gen2.TagEncoding
Default value: Gen2.TagEncoding.M4
Writable: yes
Products: M5e (and derived products), M6e, Micro, Nano, M6, Astra-EX
Controls the tag encoding method (Miller options or FM0) used for communications with Gen2 tags. See the [product] Hardware Guide for full configuration options. See Tag-to-Reader Settings for details.
/reader/gen2/session
Type: Gen2.Session
Default value: Gen2.Session.S0
Writable: yes
Products: all
Controls the session that tag read operations are conducted in. See Tag Contention Settings for details.
90 Level 2 API

Configuring Readers
/reader/gen2/target
Type: Gen2.Target
Default value: Gen2.Target.A
Writable: yes
Products: all
Controls the target algorithm used for read operations. See Tag Contention Settings for details.
/reader/gen2/Tari
Type:Gen2.Tari
Default value: From reader
Writable: yes
Products: M6e, Micro, M6, Astra-EX. M5e and Nano only support a default value of 25 usec at this time.
Controls the Tari value used for communications with Gen2 tags. See the appropriate hardware guide for full configuration options.
See Reader-to-Tag Settings for details.
/reader/gen2/writeReplyTimeout
Type: Integer
Default value: 20000
Writable: yes
Products: M5e, M6e, Micro, Nano
Controls the time, in microseconds, each word write operation (a Gen2.WriteTag and Gen2.WriteData consists of multiple word write operations) will wait for a tag response before moving to next word write. Great caution must be taken when changing this parameter. Not all tags take the same amount of time to complete each word write. If the time is shortened to less than the time a tag takes to perform each word write, the write operation will fail. The Gen2 specification dictates that all tags must complete and respond to a word write in 20ms or less. Some tags take less than 3ms, some close to 20ms
Level 2 API 91
Configuring Readers
– Max. timeout = 21000us
– Min. timeout = 1000us.
/reader/gen2/writeEarlyExit
Type: Boolean
Default value: True
Writable: yes
Products: M5e, M6e, Micro, Nano
True = Early Exit - If the tagʼs response to a word write is detected it moves onto the next word write, otherwise waits for timeout value: /reader/gen2/writeReplyTimeout.
False = Fixed Wait Time - Always waits the specified /reader/gen2/writeReplyTimeout per word write.
Using Fixed Wait Time results in a consistent time for each write operation. With Early Exit the time it takes to write a tag can vary since in some cases the word response will be detected and the write operation will immediately move onto the next word write and in other cases the response is missed and the full time-out must expire before moving to the next word.
/reader/gpio
/reader/gpio/inputList
Type: Array of integer
Writable: Yes for the M6e, Micro, and Nano
Products: all
Contains the numbers of the GPIO pins available as input pins on the device.
M6e and Nano - Set to an array of ints (1 through 4) to configure GPIO lines as inputs.
Micro - Set to an array of ints (1 or 2) to configure GPIO lines as inputs.
92 Level 2 API
Configuring Readers
/reader/gpio/outputList
Type: Array of integer
Writable: no (yes for the M6e)
Products: all
Contains the numbers of the GPIO pins available as output pins on the device.
M6e and Nano - Set to an array of ints (1 through 4) to configure GPIO lines as outputs.
Micro - Set to an array of ints (1 or 2) to configure GPIO lines as outputs.
/reader/iso18000-6b
/reader/iso18000-6b/BLF
Type: Iso18000-6b.LinkFrequency
Default value: ISO18000-6b.LinkFrequency.LINK160KHZ
Writable: yes
Products: M6e, Micro, M6, Astra-EX
This sets the backscatter (return) link frequency used by the ISO18000-6b protocol. See the appropriate hardware guide for full configuration options.
/reader/iso18000-6b/modulationDepth
Type: Iso18000-6b.ModulationDepth
Default value: MODULATION99PERCENT
Writable: yes
Products: M6e, Micro, M6, Astra-EX
In some cases using the smaller modulation depth of 11% will result in improved read range and read reliability as it allows more power to be transmitted to the tag. However, the smaller modulation depth can also result in a greater reduction in performance when interference is present.
Level 2 API 93
Configuring Readers
/reader/iso18000-6b/delimiter
Type: Iso18000-6b.Delimiter
Default value: DELIMITER4
Writable: yes
Products: M6e, Micro, M6, Astra-EX
ISO18000-6B tags support two delimiter settings on the transmitter. Not all tags support both delimiters and some tags require the delimiter be set to DELIMITER1.
Ceratin tags, in addition to setting the delimiter to 1, also require a TagFilter be specified of the class ISO180006B.Select, specifically, one of the following:
– GROUP_SELECT_EQ
– GROUP_SELECT_NE
– GROUP_SELECT_GT
– GROUP_SELECT_LT
– GROUP_UNSELECT_EQ
– GROUP_UNSELECT_NE
– GROUP_UNSELECT_GT
– GROUP_UNSELECT_LT
/reader/radio
/reader/radio/enablePowerSave
Type: boolean
Default value: False
Writable: yes
Products: M6e
Controls the M6e Transmit Mode. When enabled the M6e power consumption is reduced during RF operations but is no longer 100% compliant with the Gen2 DRM spectral mask. See the M6e Hardware Guide for more details on Transmit Modes.
94 Level 2 API
Configuring Readers
/reader/radio/powerMax
Type: integer
Writable: no
Products: all
Maximum value that the reader accepts for transmit power.
/reader/radio/powerMin
Type: integer
Writable: no
Products: all
Minimum value that the reader accepts for transmit power.
/reader/radio/portReadPowerList
Type: array of array of integers
Default value: From reader
Writable: yes
Products: all
List of per-port transmit power values for read operations. Each list element is a length-two array. The first element is the port number, and the second element is the power level in centi-dBm. Ports not listed are assigned a per-port power level of 0 (which indicates it will use the global read power level: /reader/radio/readPower)
/reader/radio/portWritePowerList
Type: array of array of integers
Default value: From reader
Writable: yes
Products: all
List of per-port transmit power values for write operations. Each list element is a length-two array. The first element is the port number, and the second element is the power level in centi-dBm. Ports not listed are assigned a per-port power level of 0 (which indicates it
Level 2 API 95

Configuring Readers
will use the global write power level: /reader/radio/writePower)
/reader/radio/readPower
Type: integer
Default value: From reader
Writable: yes
Products: all
The global transmit power setting, in centi-dBm, for read operations (except where overridden by /reader/radio/portReadPowerList).
/reader/radio/writePower
Type: integer
Default value: From reader
Writable: yes
Products: all
The global transmit power setting, in centi-dBm, for write operations (except where overridden by /reader/radio/portWritePowerList).
/reader/radio/temperature
Type: integer
Writable: no
Products: M5e (and derived products), M6e, Micro, Nano
Contains the temperature of the reader radio, in degrees C.
96 Level 2 API

Configuring Readers
/reader/read
/reader/read/asyncOffTime
Type: integer
Default value: 0
Writable: yes
Products: all
The duration, in milliseconds, for the reader to be quiet while querying, RF Off time, on the reader during background, asynchronous read operations invoked via Reader.startReading(). This parameter and /reader/read/asyncOnTime together set the frequency and duty cycle of the background operation.
/reader/read/asyncOnTime
Type: integer
Default value: 250
Writable: yes
Products: all
Sets the duration, in milliseconds, for the reader to be actively querying, RF On time, on the reader during background, asynchronous read operations invoked via Reader.startReading().
/reader/read/plan
Type: ReadPlan
Default value: SimpleReadPlan (default protocol, automatic set of antennas)
Writable: yes
Products: all
Controls the antennas, protocols, embedded tagOps and filters used for Read Methods (different than /reader/tagop/antenna and /reader/tagop/protocol which sets the antenna and protocol for single tag operations).
Level 2 API 97
Configuring Readers
/reader/read/trigger/gpi
Type: array of integer
Writable: yes
Products: M6e, Micro, Nano
Defines GPI pins that trigger reading under Autonomous Operation
/reader/region
/reader/region/id
Type: Reader.Region
Default value: Specified in Reader Object create() method.
Writable: yes
Products: all
Controls the Region of Operation for the device. It may not be settable on all device types.
/reader/region/supportedRegions
Type: Reader.Region[]
Writable: no
Products: all
List of supported regions for the connected device.
/reader/region/hopTable
Type: Array of integer
Default value: From reader
Writable: yes
Products: M5e/M5e-C (and derivative products), M6e, Micro, Nano
Controls the frequencies used by the reader. The entries are frequencies for the reader to use, in kHz. Allowed frequencies will be limited by the device in use and the /reader/region/id setting.
98 Level 2 API
Configuring Readers
/reader/region/hopTime
Type: integer
Default value: From reader
Writable: yes
Products: M5e (and derived products), M6e, Micro, Nano
Controls the frequency hop time, in milliseconds, used by the reader.
/reader/region/lbt/enable
Type: boolean
Writable: yes
Default value: based on the Region chosen
Products: M5e (and derived products). M6e, Micro, Nano.
Enables/disables LBT in the region specified.
Note: Not all regions support LBT. For the M6e, Micro, and Nano modules, only the JP (Japan) region supports LBT.
/reader/status
/reader/status/antennaEnable
Type: boolean
Writable: yes
Default value: false
Products: M6e, Micro, and Nano.
Enables/disables the antenna field in StatusListener reports.
Level 2 API 99
Configuring Readers
/reader/status/frequencyEnable
Type: boolean
Writable: yes
Default value: false
Products: M6e, Micro, and Nano.
Enables/disables the frequency field in StatusListener reports.
/reader/status/temperatureEnable
Type: boolean
Writable: yes
Default value: false
Products: M6e, Micro, and Nano..
Enables/disables the temperature field in StatusListener reports.
/reader/tagReadData
/reader/tagReadData/recordHighestRssi
Type: boolean
Default value: From reader
Writable: yes
Products: all
Controls whether to discard previous, lower Return Signal Strength (RSSI) values of a tag read when multiple reads of the same tag occur during a read operation. If enabled and a read occurs with a higher RSSI value all TagReadData metadata will be updated.
100 Level 2 API
Configuring Readers
/reader/tagReadData/reportRssiInDbm
Type: boolean
Default value: From reader
Writable: yes
Products: M5e
This is the setting that controls the units for the RSSI metadata. If false, the RSSI is represented by an uncalibrated number between 0 and 128.
/reader/tagReadData/uniqueByAntenna
Type: boolean
Default value: From reader
Writable: yes
Products: all
Controls whether reads on different antennas are reported separately.
/reader/tagReadData/uniqueByData
Type: boolean
Default value: From reader
Writable: yes
Products: all
Controls whether reads with different data memory values are reported separately when reading tag data.
Level 2 API 101
Configuring Readers
/reader/tagReadData/tagopSuccess
Type: integer
Default value: none
Writable: no
Products: all
Number of Embedded TagOp Invocation operations which succeeded.
/reader/tagReadData/tagopFailures
Type: integer
Default value: none
Writable: no
Products: all
Number of Embedded TagOp Invocation operations which failed.
/reader/tagop
/reader/tagop/antenna
Type: integer
Default: First element of /reader/antenna/connectedPortList
Writable: yes
Products: all
Specifies the antenna used for tag operations other than reads (reads use /reader/read/plan). Its value must be one of the antenna numbers reported in the /reader/antenna/portList parameter.
102 Level 2 API

Configuring Readers
/reader/tagop/protocol
Type: TagProtocol
Writable: yes
Products: all
Specifies the protocol used for Advanced Tag Operations [Deprecated]. Does not affect the protocols used for Read Methods.
/reader/version
/reader/version/hardware
Type: String
Writable: no
Products: all
Contains a version identifier for the reader hardware.
/reader/version/model
Type: String
Writable: no
Products: all
Contains a model identifier for the reader hardware.
/reader/version/productGroup
Type: String
Writable: no
Products: all
Contains the Product group type (“Module”, “Ruggedized Reader”, “USB Reader”) that helps define the physical port settings, allowing Auto Configuration.
Level 2 API 103
Configuring Readers
/reader/version/serial
Type: String
Writable: no
Products: all
Contains a serial number of the reader, the same number printed on the barcode label.
/reader/version/software
Type: String
Writable: no
Products: all
Contains a version identifier for the readerʼs software.
/reader/version/supportedProtocols
Type: array of TagProtocol
Writable: no
Products: all
Contains the protocols that the connected device supports.
104 Level 2 API
Serial Reader Autonomous Operation
Serial Reader Autonomous Operation
Serial readers can be configured to save their settings to flash memory and execute a simple read plan whenever they are powered up. Reading can begin immediately upon boot-up or be triggered by a GPI pin.
NoteThe M6e, Micro and Nano modules support this functionality at this time for continuous reading. There is currently no duty cycle control, so if the module or reader get too hot, the only recourse is to lower the RF output level.
There are three steps to configuring a module for autonomous operation. The first step is to create a SimpleReadPlan with the following attributes and constraints:
Enable continuous reading by setting /reader/read/asyncOffTime to zero
Define the protocol as Gen2 (the default)
Create an antenna list
If a tag filter is desired, use only Air Protocol Filtering
If desired, add an embedded TagOp to read a data field, as described in Gen2.ReadData. No other embedded TagOp is supported for autonomous operation.
Set the boolean useFastSearch to true if you wish to optimize performance for small tag populations moving through the RF field at high speeds.
Leave the weight at its default value. It does not have meaning in this context because MultiReadPlan is not supported.
Enable autonomous reading by setting the read planʼs boolean object enableAutonomousRead to true.
The second step is to define the parameters that will be used by the module when reading. See Save and Restore Configuration in Module for a list of settings that are supported. If a setting is not listed, its value will return to default if the module is rebooted.
To configure the module to trigger when a GPI line is raised (as opposed to reading whenever the module is powered), you must define the GPI line that will be used, then activate GPI reading in the Read Plan.
The /reader/read/trigger/gpi parameter selects the GPI line to be used as the trigger. Enable GPI triggering in the read plan by setting the read planʼs object gpiPinTrigger to true.
The third step is to store the settings and the read plan in flash memory on the module. To accomplish this, define the parameters as desired then set the /reader/userConfig
Level 2 API 105
Serial Reader Autonomous Operation
parameter to SerialReader.UserConfigOp containing the Opcode that corresponds to “Save With Read Plan”.
To disable autonomous mode, disconnect and reconnect to the reader via the API. This will automatically call the reader.stopReading() method to stop continuous reading. Continuous reading will start again if the module is rebooted unless a new read plan is stored with the read planʼs object enableAutonomousRead set to false.
The Autonomous Operation functionality can be demonstrated using the Autonomous Configuration Tool application, distributed separately. The source code for this application is in the Java SDK in the “.../java/samples/ConfigurationTool” directory). Also distributed with the Autonomous Configuration Tool application are code samples written in C, C#/.NET, and Java to receive and interpret the streaming data messages coming from the serial reader, without use of the API.
See the Autonomous Configuration Tool User Guide for more details on the operation and behavior of autonomous mode.
106 Level 2 API
Level 3 API
The Level 3 API provides per-command access to the individual elements of the underlying device control protocol. Level 3 is not portable across hardware types.
Level 3 commands are not dependant on the state of the device or of the reader configuration; the same command with the same parameters will always send the same message to the reader.
Level 3 commands validate their inputs to the extent necessary for communication with the reader device (for example, limiting values to the number of bits permitted in the protocol) but otherwise leave error checking to the device. Unless otherwise specified, errors returned by the device are reported via instances of ReaderCodeException. All Level 3 methods begin with “cmd”.
If any Level 3 methods seem to be required to achieve the desired functionality we recommend you contact [email protected] to discuss before using.
C A U T I O N !! !
Making use of any commands in Level 3 or below guarantees cross-prod-uct compatibility will be broken. These methods should only be usedwhen equivalent functionality is not available in Level 1 or Level 2. Level3 APIs are not guaranteed to be the same on different versions of theMercuryAPI.
W A R N I N G !
Level 3 functionality does not support the asynchronous operations in Level 1 and Level 2. Level 3 operations are strictly synchronous, blocking method calls and cannot be performed in parallel with other threads interacting with SerialReader devices.
Level 3 API 107

108 Level 3 API
.NET Language Interface
The .NET interface provides an API supporting the primary Windows development platform. Depending on the specific version of Windows being developed for there are limitations on the development tools that can be used.
Whenever possible the MercuryAPI SDK libraries and applications make use of free, standard Visual Studio and .NET Frameworks. However, in some cases, Windows Mobile application development, for example, development requires the use of the Professional version of Visual Studio.
The following section describes some of the platform and version constraints for the various sample applications included in the MercuryAPI SDK.
.NET Development Requirements
Mercury API Library (desktop):
Visual Studio 2005 Express or better
.NET 2.0 or newer
Mercury API CE Library (embedded Compact Framework)
Visual Studio 2008 Pro No newer versions - VS2010 no longer supports Windows CE 5 / Mobile 6
.NET 2.0 Compact Framework or newer
RFID Searchlight:
Visual Studio 2008 Pro No newer versions - VS2010 no longer supports Windows CE 5 / Mobile 6
.NET 3.5 Compact Framework or newer
.NET Language Interface 109
Windows Mobile 6 Professional SDK
Universal Reader Assistant 1.0
Visual Studio 2008 Express or better
.NET 2.0 or newer
Universal Reader Assistant 2.0
Visual Studio 2010 Express or better
Optional - install free WiX add-on to build installer - http://wix.codeplex.com/
.NET 4.0 or newer
USB Drivers
Starting with release 1.23.0 of the MercuryAPI SDK, there is support for the USB CDC/ACM drivers for WinCE 5.0, 6.0, and 7.0. This feature also includes a sample application developed on WinCE to demonstrate the native USB driver functionality.
WinCE Driver Installation Procedure
1. The drivers for WinCE are included under the “...\cs\Drivers” directory.
2. In the Drivers directory, there are separate sub-directories for each version of WinCE: WinCE-5.0, WinCE-6.0 and WinCE-7.0. Under these directories, you will find usb\installer. Within this directory will be a “.sln” solution file:
USBSerCabInstaller.sln for WinCE-5.0
USBSer6.sln for WinCE-6.0
USBSer7.sln for WinCE-7.0
3. Build the solution in Visual Studio 2008 Pro. It will generate a “.CAB” of the same name in the “Debug” directory.
4. Copy the CAB file to your WinCE device and double click on it, it will install USB serial driver for your WinCE device.
WinCE Sample Application Installation Procedure
1. WinCE-ReadApp application is included in the following path “...\cs\Samples\exe”
110 .NET Language Interface

2. Locate the WinceReadApp.CAB file.
3. Copy this CAB file into your WinCE device. By double clicking it, you will install the winceReadApp application in the WInCE device and it will create a shortcut in the windows “Start/Programs” folder.
Note
This application is intended for demonstration purposes only and has not been fully tested by ThingMagic nor qualified on a wide variety of platforms
.NET Language Interface 111

112 .NET Language Interface
C Language Interface
The C language interface is designed primarily to provide support for embedded systems. The structure of the interface is designed to provide a pseudo object-oriented programming model that mimics the Java and .NET interfaces as much as possible. The C API will work similarly as the other languages, as described in the previous sections of the Guide, with mostly language syntax and semantics differences. It uses similarly named API calls (e.g. substitute TMR_* for Reader.*) in C for all the operations outlined in the API Guide, and they will be used in the same manner.
In order to best support embedded systems it avoids large memory buffers and dynamic memory allocation (where possible, interfaces are created so that if dynamic allocation is available, the user can take advantage of it without difficulty and), has several memory-saving features including the ability to build only a subset of the API (strip out unused protocols, advanced features, etc.).
The following section will provide details to help understand the unique aspects of the C interface as compared to Java and .NET, and how to build C API applications for embedded systems.
Note
Currently the C API does not support the RQLReader interface and cannot be used to control Mercury4/5 and Astra readers, only SerialReaders (M5e and M5e-C, M6e, USB, Vega) and Astra-EX/M6 v4.9.2 and later.
Note
Requires GCC v4.4.2 or newer
Note
The C API is not supported on Windows for the M6 and Astra-EX.
C Language Interface 113
C Language Features
C Language Features
For clarity of definition, C99 datatypes (bool, uintN_t) are used. If these types are not defined on the target platform, a substitute typedef for bool can be define, but a custom stdint.h must be created to define specific integer sizes in terms of the target environment.
Types with multiple fields to set, such as TMR_ReadPlan or TMR_Filter, have constructor macros, such as TMR_RP_init_simple() to set the fields of the structure compactly and conveniently
C Read Iterator
To avoid dynamically allocating large buffers, the TMR_read function doesn't automatically create a list of TMR_TagReadData. Instead, you must repeatedly call TMR_hasMoreTags(reader) and TMR_getNextTag(reader, &tagread) to extract tag reads from the module.
TMR_Status err = TMR_read(reader, timeout, &tagCount);
if (TMR_SUCCESS != err) { FAIL(err); }
while (TMR_SUCCESS == TMR_hasMoreTags(reader))
{TMR_TagReadData trd;
err = TMR_getNextTag(reader, &trd);
if (TMR_SUCCESS != err) { FAIL(err); }
}
If dynamic memory allocation can be used, a convenience method is provided called TMR_readIntoArray()
TMR_TagReadData* tagReads;
TMR_Status err = TMR_read(reader, timeout, &tagCount;
if (TMR_SUCCESS != err) { FAIL(err); }
TMR_readIntoArray(reader, timeout, &tagCount, &tagReads)
while (TMR_SUCCESS == TMR_hasMoreTags(reader))
{TMR_TagReadData trd;
err = TMR_getNextTag(reader, &trd);
if (TMR_SUCCESS != err) { FAIL(err); }
}
114 C Language Interface
Build Considerations
Build Considerations
The full source code of the C API is provided. The API source code includes sample build processes for desktop and embedded environments (Makefile and Visual Studio project). It is recommend these be used as starting points for building custom applications.
Client code only needs to include a single header file, tm_reader.h to use the API.
API Changes Required for Different Hardware Platforms
The API has a couple layers of encapsulation. The important layer for porting purposes, when dealing with serial communications based modules, is the transport layer which handles the host/controller and reader communications. This involves sending commands to and listening for/receiving responses from the module. This layer is platform specific and is contained in the serial_transport_[posix|win32|dummy].c file.
To make the API work for your hardware architecture, you need to take the empty version of these functions in serial_transport_dummy.c and write your own Serial/UART commands (modeled after one of the prototypes provided for Windows or Posix systems) to make sure the specified arguments are passed and provide the correct returns/exceptions.
The higher levels of encapsulation take care of encoding/decoding the reader commands. There is no need to worry about header, length, checksum, etc., simply send that array out over the serial interface and listen for the response.
For more details on building and porting the C API on different platforms, particularly Win32, see the two README files in [SDK install dir]/c, README.PORTING and README.WIN32.
C Conditional Compilation
For very storage-constrained systems, the C implementation provides compilation conditionals to selectively remove parts of the system. Edit tm_config.h to comment out the #defines of features you do not want.
For descriptions, see Mercury C API Language Specific Reference Guides for tm_config.h
#define TMR_ENABLE_SERIAL_READER
#define TMR_ENABLE_SERIAL_TRANSPORT_NATIVE
#define TMR_MAX_SERIAL_DEVICE_NAME_LENGTH 64
C Language Interface 115
Build Considerations
#define TMR_ENABLE_SERIAL_TRANSPORT_LLRP //not currently supported
#define TMR_ENABLE_ISO180006B
#define TMR_ENABLE_BACKGROUND_READS //not supported on Windows
#define TMR_ENABLE_ERROR_STRINGS
#define TMR_ENABLE_PARAM_STRINGS
#define TMR_SR_MAX_ANTENNA_PORTS
The minimum #defines that must currently be specified are:
TMR_ENABLE_SERIAL_READER - enables support for the ThingMagic serial command protocol, but does not specify how that reader is connected. This is factored out into a "serial transport" layer to allow for future alternatives to the *_NATIVE interface.
TMR_ENABLE_SERIAL_TRANSPORT_NATIVE - supports standard serial ports (both UART-based and USB - anything that goes through the OS native serial driver.)
Protocol-Specific C Compilation Options
Gen2 and iPX protocol support are included in all builds and cannot be excluded but ISO18000-6B protocol may be disabled (TMR_ENABLE_ISO180006B) when building the C API.
116 C Language Interface
IOS Support
IOS Support
The MercuryAPI C API includes a sample IOS application that can connect to serial readers through a serial cable such as the Redpark C2-DB9V. The full source and project files are in SDKROOT\c\ios. The tools used for this sample are as follows:
Development Environment
Xcode IDE
Supported IOS Versions
Version 6 and above
Testing Environment
iPad, IOS version 7.1.4
iPad Mini, IOS version 7.1
iPhone
iPod
README File
Under the C directory, there is a text file named README.IOS. It provides information about:
IOS code organization in the MercuryAPI distribution
How to build the Mercury API for IOS
How to build and run the sample appl.ication on an IOS device
How to generate “.ipa” file and install it in IOS devices
Device Provisioning / Profile Creation
Creating a CSR Certificate
Generating a provision profile
How to obtain the UDID
C Language Interface 117

IOS Support
Creating an APP ID
118 C Language Interface
Java Language Interface
JNI Library
The java interface, when connecting to readers of type SerialReader, requires the use of a JNI Serial Driver library to handle the low level serial port communications. The mercuryapi.jar includes libraries supporting the following environments:
Linux on x86
Linux on AMD64
Windows on x86 (see Required Windows Runtime Libraries)
MacOSX
For other platforms the library will have to be custom built. The source and example makefiles/projects for building the library is in [SDKInstall]/c/[proj/src]/jni.
Java Language Interface 119
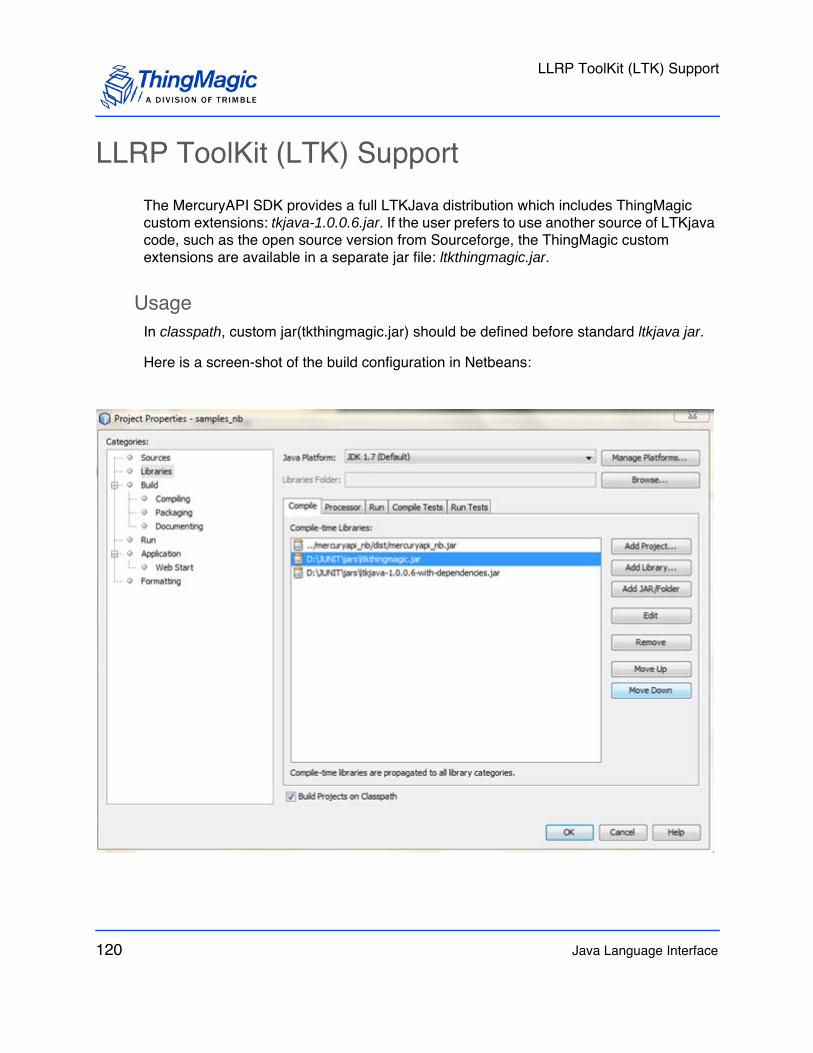
LLRP ToolKit (LTK) Support
LLRP ToolKit (LTK) Support
The MercuryAPI SDK provides a full LTKJava distribution which includes ThingMagic custom extensions: tkjava-1.0.0.6.jar. If the user prefers to use another source of LTKjava code, such as the open source version from Sourceforge, the ThingMagic custom extensions are available in a separate jar file: ltkthingmagic.jar.
Usage
In classpath, custom jar(tkthingmagic.jar) should be defined before standard ltkjava jar.
Here is a screen-shot of the build configuration in Netbeans:
120 Java Language Interface
Required Windows Runtime Libraries
Required Windows Runtime Libraries
In order to run the Java APIs, more specifically the JNI Serial Driver, on Windows the latest C runtime libraries must be installed. These can be downloaded and installed from Microsofts website here:
http://www.microsoft.com/downloads/details.aspx?familyid=766A6AF7-EC73-40FF-B072-9112BAB119C2&displaylang=en
Select the correct architecture (IA64,x64 or x86), download and install.
Java Language Interface 121
Android Support
Android Support
The MercuryAPI SDK includes a sample Android application that can connect to serial readers over bluetooth, USB, and networked readers. The full source and project files are in SDKROOT\java\samples\android.
Note
This application is intended for demonstration purposes only and has not been fully tested by ThingMagic nor qualified on a wide variety of platforms
Development Environment
The tools used for this sample are as follows:
Eclipse + Android Development Tools (ADT) plugin
Android SDK
Android Platform-tools (these let you manage the state of an emulator instance)
Testing Environment
Android Emulator
Mobile device emulator in built in Android SDK
Tested Android Versions
4.4.2 (API 23)
4.2 (API 17)
4.1.2 (API 16)
4.0.3 (API 15)
122 Java Language Interface
Advanced Customization
Custom Serial Transport Naming
Starting with version 1.23.0 of the MercuryAPI SDK, users can write their own custom serial transport layer to handle different types of serial connections, and create a unique URI name for it. The SDK provides an example of this for serial connections over TCP networks, for each of the supported OSʼs.
Two devices have been tested with this implementation. (Each has their own Windows-based configuration tool)
WIZnet WIZ110SR Serial-to-Ethernet Gateway
Tibbo Technology DS1101 BASIC-programmable Serial Controller
Implementation
The SDK now contains a table-based dispatcher and a common API for calling the different constructors.
Before calling Reader.Create(), the user application should set up the URI dispatch table (a mapping from string to factory function). Examples for each OS are provided below.
Users can add new entries with their own choice of strings and factory functions.
When Reader.Create is called, it will:
Parse the reader URI to get the URI scheme (e.g., eapi:///COM1 -> “eapi”)
Look up the URI scheme in the URI dispatch table to get a pointer to a factory function (e.g., “eapi” -> CreateSerialReader)
Advanced Customization 123
Custom Serial Transport Naming
Call the factory function with the already-parsed URI (e.g., Reader rdr = CreateSerialReader(uri))
For new functions, the user needs to modify the code in two places:
Create one new file to implement the serial transport. (We already have files encapsulating the implementations of SerialReader and LlrpReader.)
Initialize the dispatch table in your application code before calling Reader.Create().
Note
Currently Mercury API supports the addition of custom transport schemes only for serial readers. The user will not be able to use this scheme addition for LLRP readers. TMR_setSerialReader() will pop up an “UNSUPPORTED” message if it is attempted.
Note
Thingmagic universal Reader (“tmr”) scheme does not support user-generated transport schemes, including the tcp example we provide in the API SDK.
124 Advanced Customization
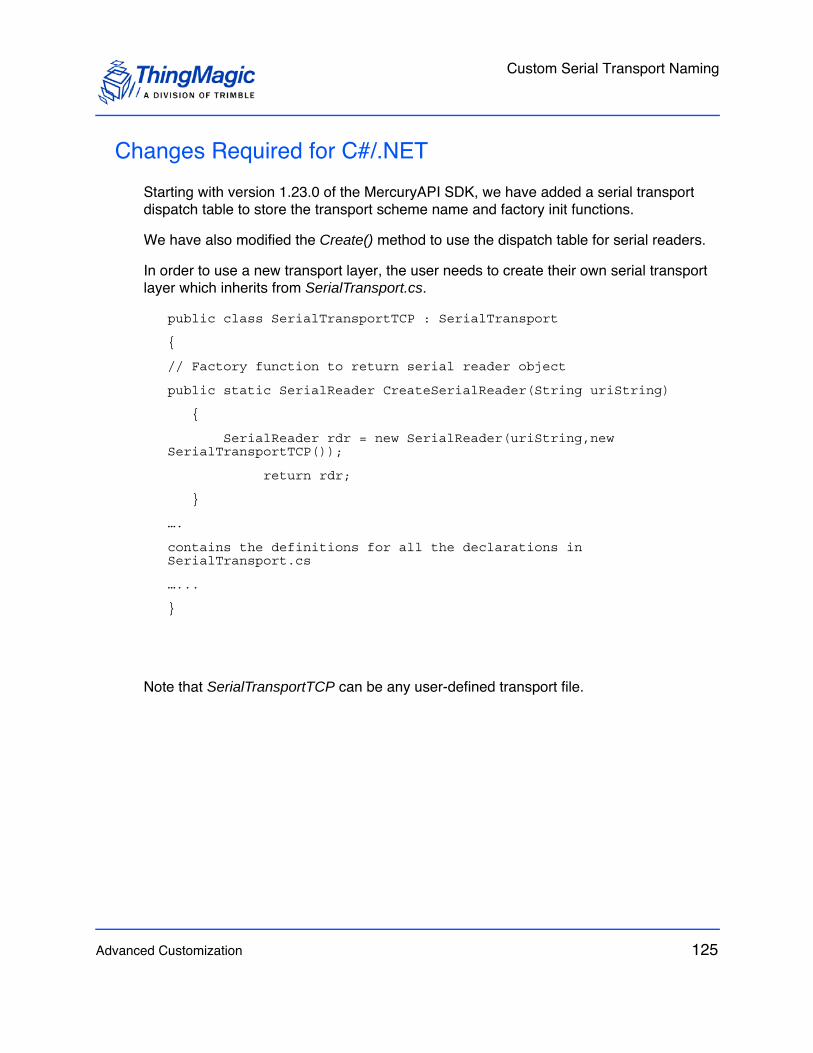
Custom Serial Transport Naming
Changes Required for C#/.NET
Starting with version 1.23.0 of the MercuryAPI SDK, we have added a serial transport dispatch table to store the transport scheme name and factory init functions.
We have also modified the Create() method to use the dispatch table for serial readers.
In order to use a new transport layer, the user needs to create their own serial transport layer which inherits from SerialTransport.cs.
public class SerialTransportTCP : SerialTransport
{
// Factory function to return serial reader object
public static SerialReader CreateSerialReader(String uriString)
{
SerialReader rdr = new SerialReader(uriString,new SerialTransportTCP());
return rdr;
}
….
contains the definitions for all the declarations in SerialTransport.cs
…...
}
Note that SerialTransportTCP can be any user-defined transport file.
Advanced Customization 125
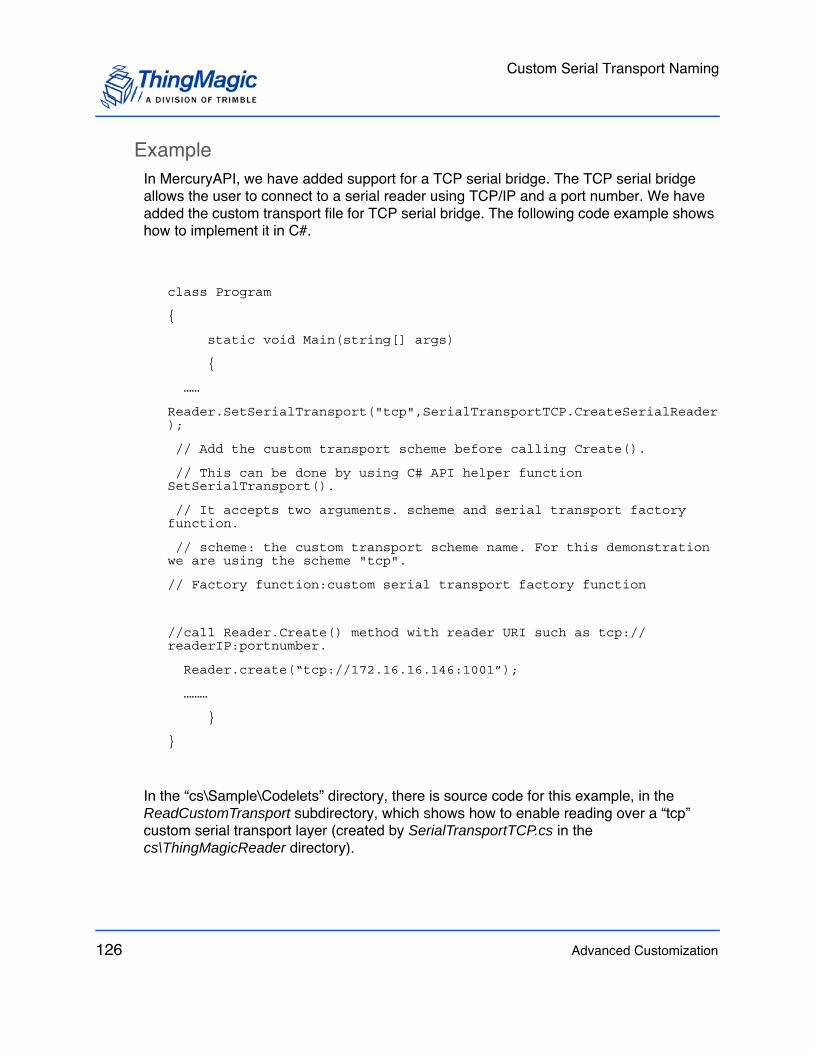
Custom Serial Transport Naming
Example
In MercuryAPI, we have added support for a TCP serial bridge. The TCP serial bridge allows the user to connect to a serial reader using TCP/IP and a port number. We have added the custom transport file for TCP serial bridge. The following code example shows how to implement it in C#.
class Program
{
static void Main(string[] args)
{
……
Reader.SetSerialTransport("tcp",SerialTransportTCP.CreateSerialReader);
// Add the custom transport scheme before calling Create().
// This can be done by using C# API helper function SetSerialTransport().
// It accepts two arguments. scheme and serial transport factory function.
// scheme: the custom transport scheme name. For this demonstration we are using the scheme "tcp".
// Factory function:custom serial transport factory function
//call Reader.Create() method with reader URI such as tcp://readerIP:portnumber.
Reader.create(“tcp://172.16.16.146:1001”);
………
}
}
In the “cs\Sample\Codelets” directory, there is source code for this example, in the ReadCustomTransport subdirectory, which shows how to enable reading over a “tcp” custom serial transport layer (created by SerialTransportTCP.cs in the cs\ThingMagicReader directory).
126 Advanced Customization
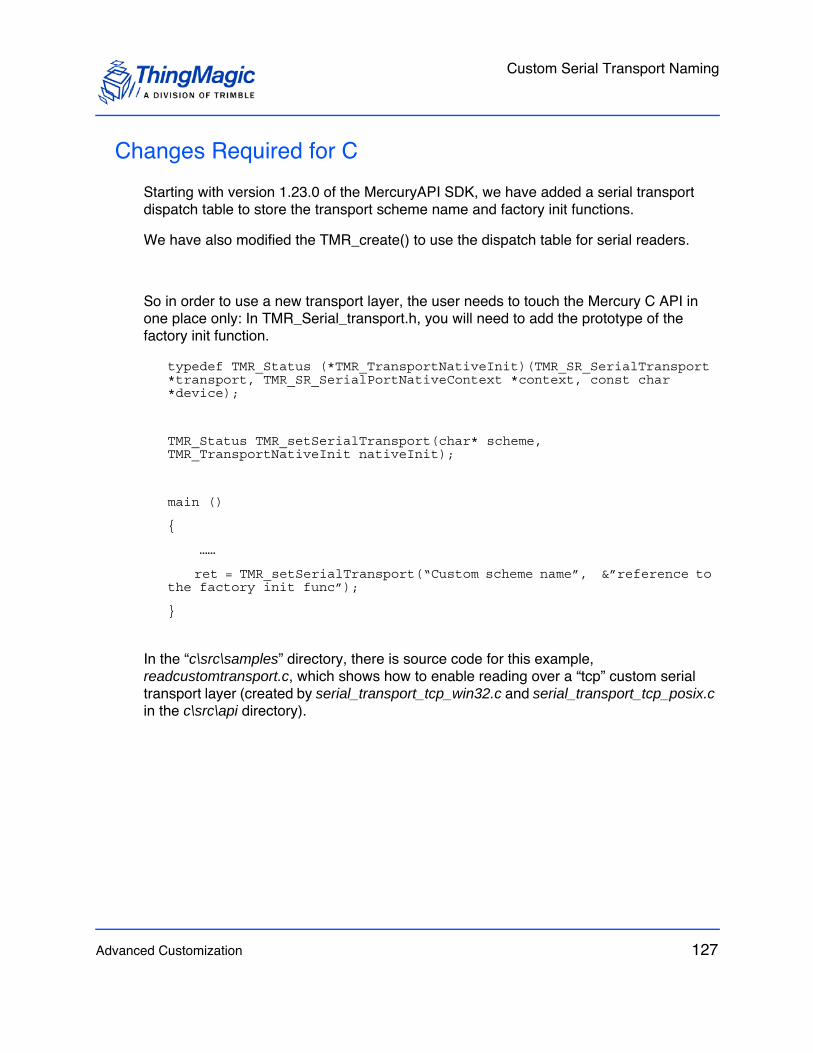
Custom Serial Transport Naming
Changes Required for C
Starting with version 1.23.0 of the MercuryAPI SDK, we have added a serial transport dispatch table to store the transport scheme name and factory init functions.
We have also modified the TMR_create() to use the dispatch table for serial readers.
So in order to use a new transport layer, the user needs to touch the Mercury C API in one place only: In TMR_Serial_transport.h, you will need to add the prototype of the factory init function.
typedef TMR_Status (*TMR_TransportNativeInit)(TMR_SR_SerialTransport *transport, TMR_SR_SerialPortNativeContext *context, const char *device);
TMR_Status TMR_setSerialTransport(char* scheme, TMR_TransportNativeInit nativeInit);
main ()
{
……
ret = TMR_setSerialTransport(“Custom scheme name”, &”reference to the factory init func”);
}
In the “c\src\samples” directory, there is source code for this example, readcustomtransport.c, which shows how to enable reading over a “tcp” custom serial transport layer (created by serial_transport_tcp_win32.c and serial_transport_tcp_posix.c in the c\src\api directory).
Advanced Customization 127
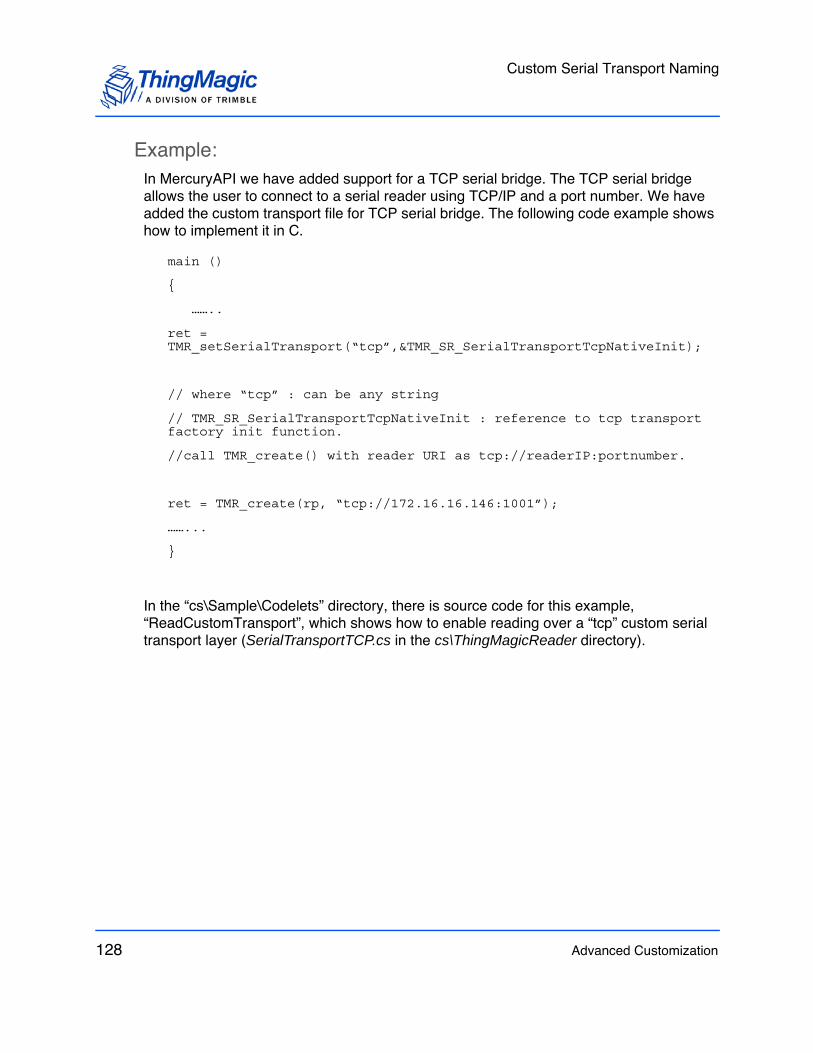
Custom Serial Transport Naming
Example:
In MercuryAPI we have added support for a TCP serial bridge. The TCP serial bridge allows the user to connect to a serial reader using TCP/IP and a port number. We have added the custom transport file for TCP serial bridge. The following code example shows how to implement it in C.
main ()
{
……..
ret = TMR_setSerialTransport(“tcp”,&TMR_SR_SerialTransportTcpNativeInit);
// where “tcp” : can be any string
// TMR_SR_SerialTransportTcpNativeInit : reference to tcp transport factory init function.
//call TMR_create() with reader URI as tcp://readerIP:portnumber.
ret = TMR_create(rp, “tcp://172.16.16.146:1001”);
……...
}
In the “cs\Sample\Codelets” directory, there is source code for this example, “ReadCustomTransport”, which shows how to enable reading over a “tcp” custom serial transport layer (SerialTransportTCP.cs in the cs\ThingMagicReader directory).
128 Advanced Customization
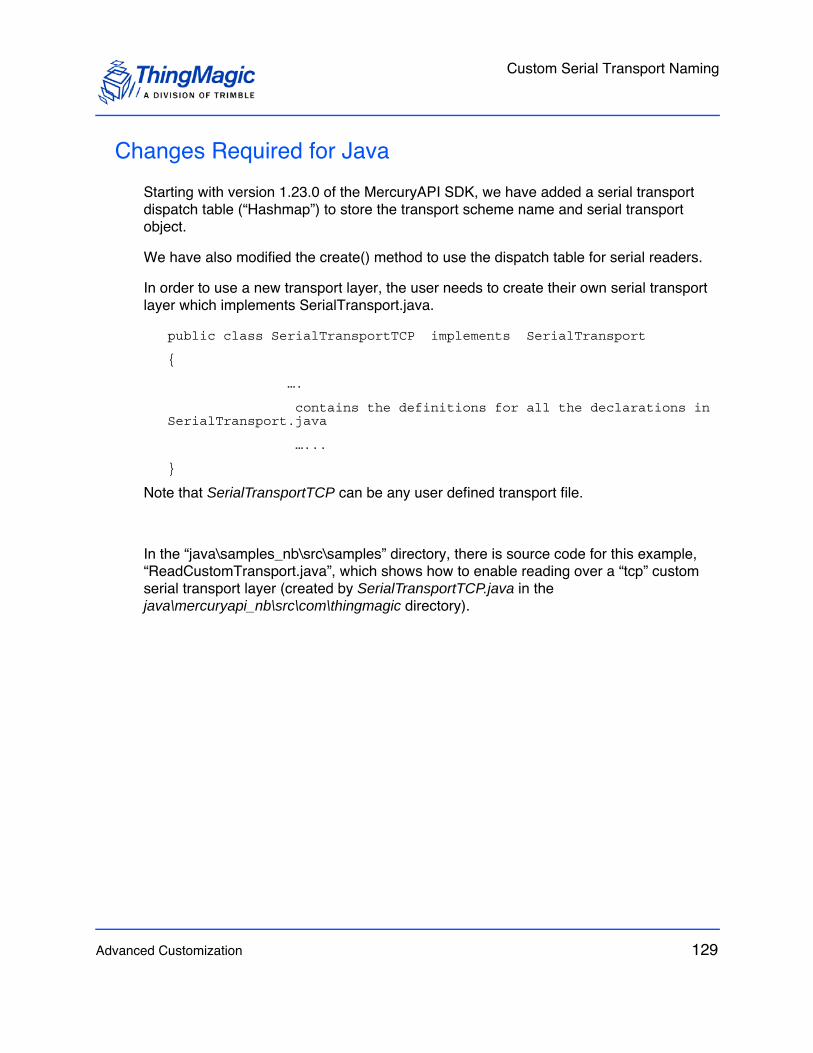
Custom Serial Transport Naming
Changes Required for Java
Starting with version 1.23.0 of the MercuryAPI SDK, we have added a serial transport dispatch table (“Hashmap”) to store the transport scheme name and serial transport object.
We have also modified the create() method to use the dispatch table for serial readers.
In order to use a new transport layer, the user needs to create their own serial transport layer which implements SerialTransport.java.
public class SerialTransportTCP implements SerialTransport
{
….
contains the definitions for all the declarations in SerialTransport.java
…...
}
Note that SerialTransportTCP can be any user defined transport file.
In the “java\samples_nb\src\samples” directory, there is source code for this example, “ReadCustomTransport.java”, which shows how to enable reading over a “tcp” custom serial transport layer (created by SerialTransportTCP.java in the java\mercuryapi_nb\src\com\thingmagic directory).
Advanced Customization 129
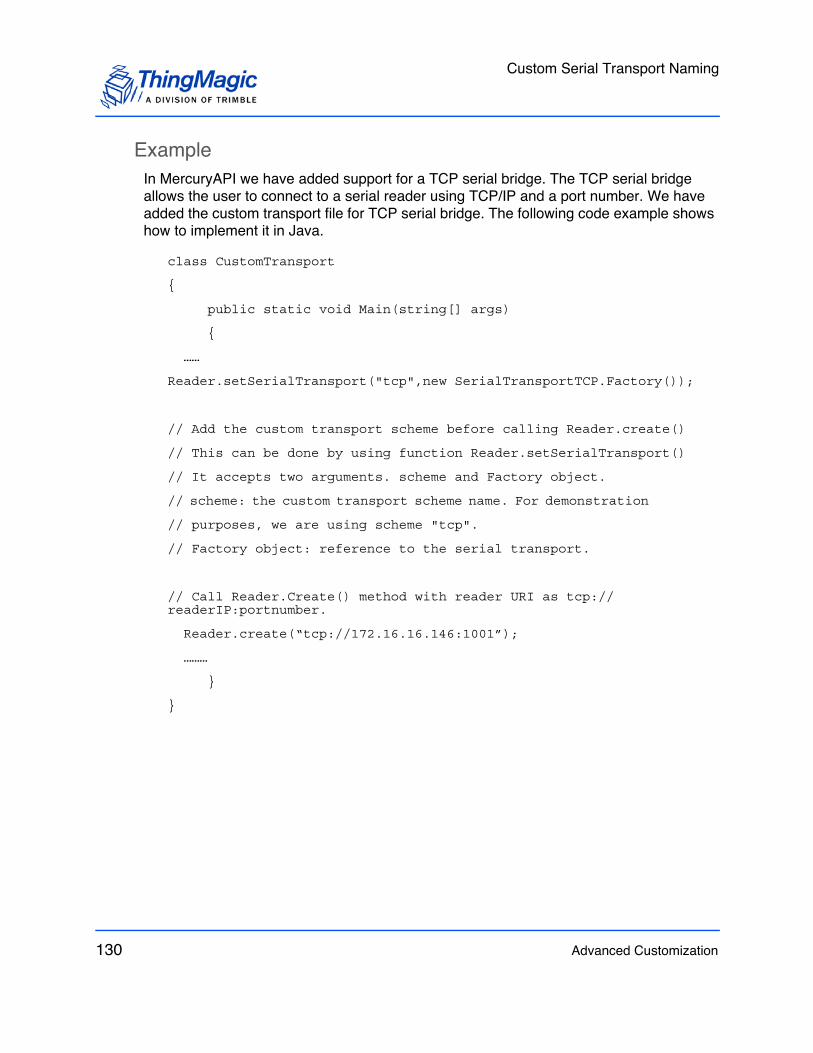
Custom Serial Transport Naming
Example
In MercuryAPI we have added support for a TCP serial bridge. The TCP serial bridge allows the user to connect to a serial reader using TCP/IP and a port number. We have added the custom transport file for TCP serial bridge. The following code example shows how to implement it in Java.
class CustomTransport
{
public static void Main(string[] args)
{
……
Reader.setSerialTransport("tcp",new SerialTransportTCP.Factory());
// Add the custom transport scheme before calling Reader.create()
// This can be done by using function Reader.setSerialTransport()
// It accepts two arguments. scheme and Factory object.
// scheme: the custom transport scheme name. For demonstration
// purposes, we are using scheme "tcp".
// Factory object: reference to the serial transport.
// Call Reader.Create() method with reader URI as tcp:// readerIP:portnumber.
Reader.create(“tcp://172.16.16.146:1001”);
………
}
}
130 Advanced Customization
On Reader Applications
The M6 Reader, starting with firmware v4.9.2 and MercuryAPI v1.11.1, and the Astra-EX reader support running custom applications on the reader, built using the MercuryAPI C Language interface. Most programs written using the C API can be compiled to run as a client application or run on the reader.
The instructions in this chapter refer to the M6, but apply equally to the Astra-EX reader.
On Reader Applications 131
Building On-Reader Applications
Building On-Reader Applications
Requirements
The following items are needed to run APIs on the reader.
The MercuryAPI SDK v1.11 or later. (available on rfid.thingmagic.com/devkit)
The M6 On-Reader cross-compiler environment (available on rfid.thingmagic.com/devkit)
A host PC running a modern Linux distribution.
– Tested with Ubuntu 12.04 LTS
An M6 or Astra-EX Reader.
GCC version 4.4.3 or 4.5.2. GCC v4.6 fails to build LTK library.
A method of getting the compiled application onto the M6:
– A directory on the PC exported via the Network File System (NFS) that the reader can mount remotely and install Via NFS Mount. This allows you to share files between the two devices. In our example, we will assume the /tmp directory is shared OR
– An FTP or HTTP server to serve the compiled binary so you can fetch the files Via wget utility on the M6.
Instructions
Use the following procedure to set up the reader to run API applications.
To run code on the reader:
1. Install the cross compiler and other binary utilities for the PC. See Installing the Cross Compiler Environment.
2. Develop and test your code on the PC as you would with any MercuryAPI C client application.
3. Cross-compile the code on the PC for the target system i.e., the reader. See Compiling an Application.
4. Install and run your code on the reader. See Installing the Application on the M6 and Running an On-Reader Application
132 On Reader Applications
Building On-Reader Applications
Installing the Cross Compiler Environment
Precompiled Linux binaries for the cross compiler are available on the ThingMagic website. The easiest way to setup the environment and build applications is to download the cross-compiler environment (available on rfid.thingmagic.com/devkit) and extract it into the root directory (/). This installs the necessary files and libraries into /usr/local. Our Makefiles are coded to expect them there so no Makefile modification will be necessary. If they are extracted into a different location modifications to the Makefile will be required, specifically to the referenced ../arch/ARM/ixp42x/module.mk.
Copy the file arm-linux-tools-20030927.tar.gz to your local file system and extract the files using the following commands:
Your-Linux-PC-Prompt> sudo tar -xvf arm-linux-tools-20030927.tar.gz -C /usr/local/include/g++-3/floatio.h
usr/local/include/g++-3/sstream
usr/local/include/g++-3/editbuf.h
usr/local/include/g++-3/builtinbuf.h
usr/local/include/g++-3/PlotFile.h
...
Compiling an Application
The MercuryAPI SDK contains several sample C language application in [SDKInstall]\c\src\samples. The Makefile for building these samples is in [SDKInstall]\c\src\api. These sample can be compiled for both client usage and as on-reader applications. To build all the samples as on-reader applications follow these steps:
1. Navigate to the C sample apps makefile directory in the MercuryAPI SDK:
Your-Linux-PC-Prompt> cd SDK_INSTALL_DIR/c/src/api
2. Clean up from any previous builds
Your-Linux-PC-Prompt> make clean
3. Build to the M6 target platform:
Your-Linux-PC-Prompt> make PLATFORM=EMBEDDED
All the sample codelet binaries for use on the M6 are now available in the current directory.
On Reader Applications 133
Building On-Reader Applications
Troubleshooting
The build process for on-reader applications requires some Linux utilities that arenʼt installed as part of many default Linux distributions. If errors reporting missing executables occur during the build you can use the Linux apt-get install utility to install the necessary binaries. For example, the error:
SDKROOT/c/src/api/lib/install_LTKC.sh: 37: patch: not found
indicates the patch binaries are missing. These can be installed by running:
Your-Linux-PC-Prompt> sudo apt-get install patch
Another utility used that is not installed by default in most Linux distributions is xsltproc. It can be installed by running:
Your-Linux-PC-Prompt> sudo apt-get install xsltproc
Installing the Application on the M6
Via NFS Mount
If you have successfully completed Connecting the M6 to an NFS Mount the binary executable can simply be copied to the shared directory (see Saving the Program to the JFFS2 File System).
Via wget
If using an FTP or HTTP server then copy the file to the server , Telnet to the Reader, from the M6 console interface:
1. Navigate to /tm/bin
2. run the following to get the file:
[root@m6-21071f] $ wget [URL to binary]
3. change permissions on the saved binary executable so its executable
[root@m6-21071f] $ chmod 777 [filename]
134 On Reader Applications
Building On-Reader Applications
Running an On-Reader Application
Once the binary is installed on the Reader it can be executed as you would from a Linux host or the binary or a shell script invoking the binary can be configured to run at boot time.
To start the application at boot you can place it in the readerʼs /tm/etc/inittab file. If you do this, the operating system starts that program when the system boots and restarts it in the event of a crash.
Default inittab
demonb:unknown:/bin/demonb
rendezvous:unknown:/bin/run_mdnsd.sh
telnetd:unknown:/bin/run_telnetd.sh
portmap:unknown:/bin/portmap -d
tmmpd:unknown:/tm/bin/tmmpd
ntp:unknown:/bin/run_ntp.sh
wtp:unknown:/tm/bin/run_wtp.sh
webserver:unknown:/bin/run_webserver.sh
sshd:unknown:/bin/run_sshd.sh
getty:unknown:/sbin/getty 115200 /dev/ttyS1
snmpd:unknown:/bin/run_snmp.sh
update_passwd:unknown:/usr/sbin/update_passwd.sh
Modified inittab
demonb:unknown:/bin/demonb
rendezvous:unknown:/bin/run_mdnsd.sh
telnetd:unknown:/bin/run_telnetd.sh
portmap:unknown:/bin/portmap -d
tmmpd:unknown:/tm/bin/tmmpd
ntp:unknown:/bin/run_ntp.sh
wtp:unknown:/tm/bin/run_wtp.sh
webserver:unknown:/bin/run_webserver.sh
sshd:unknown:/bin/run_sshd.sh
On Reader Applications 135
Building On-Reader Applications
getty:unknown:/sbin/getty 115200 /dev/ttyS1
snmpd:unknown:/bin/run_snmp.sh
update_passwd:unknown:/usr/sbin/update_passwd.sh
userprogram:unknown:/tm/bin/userprogram
Connecting the M6 to an NFS Mount
Exporting an NFS Mount Point
To export an nfs mount point from your host Linux PC, add this line to the /etc/exportfs file:
/tmp *(rw,insecure,no_root_squash,sync)
Mount the NFS Share on the M6
Mount the PC's NFS share by issuing the following command on the M6:
mount -o nolock,vers=2 pc_ip_address:/tmp /mnt.
Now your PC's /tmp directory is visible on the reader as /mnt
Telnet to the Reader
In order to gain access to the M6 console interface you can telnet into the M6 as follows:
Your-Linux-PC-Prompt> telnet reader_ip_address.
The default username is root and the password is secure. You will see a Linux prompt. You are now logged into the reader.
C A U T I O N !! !
Do not delete any lines from this file. Thereader may not work properly if all the pro-grams do not start.
136 On Reader Applications
Building On-Reader Applications
Saving the Program to the JFFS2 File System
The root MercuryOS filesystem runs out of a ramdisk that is loaded from the flash memory device on boot. This filesystem is read/write while the reader is running, however any changes made to the filesystem are gone when you reboot the reader.
The JFFS2 filesystem mounted at /tm is different. Any files you place in the /tm directory or any of its subdirectories are saved to flash and restored when the system is restarted.
ThingMagic binaries are stored in the /tm/bin directory. You can use this directory or create another directory to permanently store your programs. You can copy them to any directory in the /tm filesystem where they are loaded from the flash, the next time the reader is rebooted.
On Reader Applications 137

Building On-Reader Applications
138 On Reader Applications
Performance Tuning
The following sections describe how to enhance or tailor the readerʼs settings to fit your unique RFID environment.
How UHF RFID Works (Gen2)
Optimizing Gen2 settings
Performance Tuning 139
How UHF RFID Works (Gen2)
How UHF RFID Works (Gen2)
At its most basic level, the reader powers up the tag at the same time it is communicating with it. A good analogy for this kind of system would be if two people are trying to send messages from one mountaintop to another at night, where one has only a flashlight (representing the reader) and the other has a mirror (representing the tag). The person with the flashlight can send messages by turning the flashlight on and off, but when he wants a response, he must keep the flashlight on so his partner can signal back with the mirror. Layer on top of that the possibility that there may be many people on other mountaintops, also with mirrors, ready to send messages back to the “reader”, and you have an idea of the communication challenge the Gen2 protocol was designed to handle.
The settings which govern the tagʼs behavior are all controlled by the reader via messages it sends when it communicates with one or more tags. These settings do not remain in effect long. Some last for a single exchange with the reader, some until all tags present have responded, some until the tag powers down, and some for a fixed period of time. After a few minutes, however, the Gen2 protocol expects all tags to fall back into their default state so a second reader would automatically know what initial state the tags are in when it encounters them.
There are quite a few Gen2 settings, but they can be grouped into 3 categories:
1. Settings that control how the reader communicates to the tags
2. Settings that control how the tag communicates back to the reader
3. Settings that control when tags respond relative to each other to avoid communication collisions
Also, as you learn more about the Gen2 options, keep in mind which aspects of RFID performance you are looking to optimize for your application. Typical choices are:
1. Maximum read distance
2. Minimum time to read every tag in the field at least once
3. Minimum time to read a single tag traveling through the field
4. Maximum number of responses from any tag in the shortest amount of time
The last case, 4, is rarely required in practical applications, but it is mentioned along with the others because it is often the first thing users try to do when they test a reader in a lab environment. Your goals may also include minimizing negative influences on performance, such as reducing reader-to- reader interference when many readers are located in close proximity. Gen2 settings can help there, too.
140 Performance Tuning
How UHF RFID Works (Gen2)
Transmit Power
/reader/radio/readPower/reader/radio/writePower
Although not directly related to Gen2 settings, the role of transmit power is so central to successful RFID applications, a few words must be said about it. In order to have successful communications between a reader and a tag, the tag must be able to be powered-up by the readerʼs signal. No communication at all occurs if the tag remains dormant and does not respond to the reader. To achieve maximum performance, always configure the reader to transmit at the highest permitted power into an antenna of highest permitted gain, allowed by local regulations. (In regions governed by the FCC regulations, this would be a +30 dBm power level into an antenna with a maximum gain of 9 dBiC, if circularly polarized, and 6dBiL if linearly polarized.)
Reader-to-Tag Settings
/reader/gen2/Tari
There are two primary Gen2 settings that control reader-to-tag communications, “Tari” and “link rate”. In our flashlight and mirror analogy, if the communication “protocol” was Morse code, the “Tari” would control the length of a dot (or dash) and the link rate would control how quickly the dots and dashes are sent. Just as with Morse code, the maximum speed at which words can be sent is limited by the length of the dots and dashes. ThingMagic adjusts both of these Gen2 settings together, so as the user selects a smaller Tari, the link rate is automatically increased. Tari values offered are 6.25 usec, 12.5 usec, and 25 usec, which are automatically paired with link rates of 40 kbps, 80 kbps and 160 kbps by the ThingMagic reader.
Factors to consider when selecting the Tari value (and therefore the link rate) are:
1. Will I be writing data to the tag often? The Gen2 protocol is designed to minimize communication from the reader to the tag (during an inventory round, the messages sent are very short.) If obtaining the EPC of the tag is essentially all that is required, then the Tari/link- rate can be optimized for other factors – they wonʼt affect performance that much. If tags are being written to, then decreasing the Tari (to increase the link rate) could have noticeable benefits.
2. Are there many other readers in the area? Without going into too much explanation, faster communication on a channel can cause interference with adjacent channels if the channels are closely spaced. If there are other readers in the area and performance of the first reader seems to degrade as more readers are turned on, then the system might be experiencing adjacent channel interference between readers. This is rarely seen when readers are operated in the North American (FCC) region as it contains 50 well-spaced
Performance Tuning 141
How UHF RFID Works (Gen2)
channels, but in the EU region where there are only 4 channels, this could become an issue. In this case, you would want to try increasing the Tari to decrease the link rate and see if the performance of the first reader improves.
Tag-to-Reader Settings
/reader/gen2/BLF/reader/gen2/tagEncoding
The tag uses a slightly different signaling method to communicate back to the reader than the reader uses to communicate with the tag. There are two settings that you can use to control the tag-to-reader communication method, the link frequency (called “Backscatter Link Frequency” to clearly distinguish it from the readerʼs link rate) and “M” value. Both the Backscatter Link Frequency (often abbreviated “BLF”) and “M” value modify the way the tag communicates back to the reader. The BLF is the raw signaling rate. Data rates supported by ThingMagic readers are 250 kHz and 640 kHz. The M value essentially controls how many times a symbol is repeated. An M of 2 means that each symbol is repeated twice. M values of 1 (FM0), 2, 4, and 8 are supported by ThingMagic readers. When there is no repetition (M=1) this mode is referred to as “FM0” because of other slight distinctions not relevant to this discussion. The Gen2 protocol provides this option to repeat symbols to maximize the chances that the reader can decode a very weak signal from the tag. Just as it is easier to understand someone who is whispering in a noisy room if they repeat everything they say several times, so too, the RFID reader will decode a weak signal more reliably if “M” is 2 or greater.
ThingMagic readers currently support a BLF of 640 kHz together with an “M” value of FM0 to achieve the highest tag-to-reader data rate, around 400 tags per second. Alternatively, a BLF of 250 kHz can be combined with “M” options of FM0, 2, 4, or 8. At BLF=250 kHz and M=8 the tag read rate drops to around 100 tags per second, but the increased sensitivity could nearly double the read distance compared to settings of 640 kHz/FM0 for sensitive battery-assisted tags. There is one additional trade-off to consider when selecting theses values. Just as higher data rates from reader-to-tag communication increased the likelihood of reader-to-reader interference when many readers are present, so too can higher rates from tag-to-reader cause unwanted adjacent channel interference. How to balance these concerns will be addressed in the section on optimization.
Tag Contention Settings
/reader/gen2/q/reader/gen2/session
142 Performance Tuning
How UHF RFID Works (Gen2)
/reader/gen2/target
The remaining Gen2 settings control how soon, and how often, a tag responds to a reader. If all tags in the field responded immediately to the reader, their responses would collide and the reader would rarely be able to decode responses from any tags. To avoid this, the Gen2 protocol provides a variable number of time slots in which tags can respond. The reader announces to the tag population the number of response opportunities it will give to them (calculated from a value it sends, called “Q”). Each tag randomly picks a number within this range and the reader starts announcing response slots. Essentially the reader announces the start of a round and then repeatedly shouts “next”. Each tag keeps count of how many “nexts” there has been and responds when their selected slot comes around. The “Q” value that is announced is a number from 0 to 15. The number of slots is 2^Q power. The number of slots increases rapidly with the “Q” value: 1, 2, 4, 8, 16, etc.
If “Q” is too large, many response opportunities will go unanswered and the inventory round will take longer than it should. If “Q” is too small, one or more tags will be more likely to respond in the same time slot, resulting in several inventory rounds having to be run before all tags respond. In the extreme case, where there are many more tags in the field than slots available, response collisions will always occur and the inventory round will never complete successfully. The ideal number of slots has been determined to be around 1.5 times the number of tags in the field. If the tag population will be variable, the user can set the ThingMagic reader to automatically determine the Q based on the results of successive rounds (it increases the “Q” if there are many collisions, and decreases the “Q” if there are too many unanswered response slots.)
There are two additional Gen2 settings which control whether, and how often, a tag participates in an inventory round. When initially setting up the response queue, the reader also sends two other pieces of information to all tags:
1. How long they should delay until they re-respond (called the “session” value) and
2. What state (“A” or “B”) they should be in to participate in the inventory round. The “A” state indicates that the tag has not yet responded to an inventory round. The “B” state indicates that it has. The session setting determines how long the tags wait in the “B” state before returning to the “A” state so they can participate again.
When you call one of the Read Methods a query is initiated and the reader performs one or more inventory rounds depending on the time-out period (longer time-outs result in more inventory rounds being executed). During an inventory round, the reader attempts to read all tags within the field. The reader operates in only one session for the duration of an inventory round.
The “Session” setting, which controls how often tags respond to inventory rounds, has 4 options, but two behave identically.
Performance Tuning 143
How UHF RFID Works (Gen2)
Session “0”: Prepare to respond again as soon as RF power drops
Session “1”: Prepare to respond again between 0.5 and 5 seconds after first response
Session “2” or “3”: Do not respond again for at least 2 seconds
Selection of the session setting is nearly always based on the expected number of tags in the field. You usually want all tags in the field to have had a chance to respond once before the first tags start responding again. For ThingMagicʼs default settings, the tag read rate is around 200 tags per second. With these settings, you would want to use session 0 up to around 100 tags in the field, and session 1 up to around 400 tags, and session “2” (or “3”) for more than 400 tags.
The ThingMagic “target” setting is only important if you want to force tags to re-respond more often than they otherwise would. There are two relevant choices, “A” and “A then B”. “A” means that the reader always looks for tags that are in the “A” state. Tags held in their “B” state by their session timer are ignored. “A then B” tells the reader to read all the tags in the “A” state, then read all the tags in the “B” state, and keep repeating this process. Tags in their “B” state will respond to a “B” query and return immediately to their “A” state, regardless if there was time left on their session timer. This accelerated read rate is only useful in two cases:
1. The application needs to read the same tag multiple times in order to determine more than the tagʼs identity, for example, if an attempt is being made to determine whether the tag is moving toward or away from the antenna by monitoring the tagʼs returning signal level.
2. The user is attempting to estimate the readerʼs performance in the presence of many tags by reading fewer tags over and over.
144 Performance Tuning
Optimizing Gen2 settings
Optimizing Gen2 settings
If the previous information on Gen2 settings is new to you, the task of optimizing all these settings together will likely appear daunting to you at this point. Fortunately, we have created a step-by-step procedure for achieving the desired results.
1. Set the reader up to achieve the maximum read distance possible (Tari=6.25 usec, BLF=250kHz, M=8) at the anticipated transmit level (usually the highest allowed by regulations unless the read-field size must be limited). Place tags at the maximum read distance required for your application and ensure that all tags are read reliably.
2. Setup your “Q” and session value for the expected tag population (2^Q should be greater than 1.5 times the number of tags). If the number of tags will vary widely, use the ThingMagic “automatic” setting.
3. Set the session value. The maximum-distance BLF and M settings will read around 100 tags per second, so the session should be set to “0” if you anticipate up to 50 tags, “1” for up to 200 tags, and “2” (or “3”) if you anticipate there being more tags in the field.
4. Now determine if these settings meet your requirements for tag read rate (or the ability to read a tag moving through the field). If the read rate (or single-tag read time) is too slow, start decreasing the “M” value (keeping the BLF at 250 kHz) until the desired read rate is achieved. (If FM0 and 250 kHz is insufficient, try FM0 and 640 kHz.) Now check your system performance at the required distance again to make sure your tags can still be read reliably. If it is still OK, keep these settings. If not, you will have to decide on the best compromise values for M and BLF that balance read-distance with read-rate.
5. If the application calls for it, add more readers with the same settings. Check the performance of the first reader while the other readers are operating. If it has not changed, leave its settings alone. If its performance has decreased, then reader-to-reader interference is probably occurring. First increase the Tari on all readers to see if that helps (this change will impact the other performance factors least.) If that does not work, try decreasing the BLF and increasing the M value to see if that eliminates the problem. If so, you must select the BLF and M values which give you an acceptable level of reduced reader-to-reader interference, read rate, and read distance.
6. If your application requires a few tags to respond repeatedly, use session=”0” and leave the target=”A” setting alone. If there are enough tags in the field to require using session “1” or “2”, but you need the tags to re-respond more rapidly than the session timers allow, use the target=”A then B” setting.
At this point, your Gen2 settings will be optimized and your system will be operating at peak performance. If you are still experiencing difficulties, additional resources are available from ThingMagic.
Performance Tuning 145

Optimizing Gen2 settings
146 Performance Tuning
Related Documents