Merchandising 4.2 Inventory Management User Guide

Welcome message from author
This document is posted to help you gain knowledge. Please leave a comment to let me know what you think about it! Share it to your friends and learn new things together.
Transcript

Merchandising 4.2 Inventory Management
User Guide
Copyright 2007‐2010 NSB Retail Solutions Inc., NSB Retail Solutions Ltd.
Connected Retailer, NSB logo and certain other marks are trademarks or service marks of NSB Retail Solutions Ltd. and NSB Retail Solutions Inc. or another NSB Group company. All other trademarks and registered trademarks are owned by their respective companies.
The contents of this manual and the software it describes are the property of NSB Retail Solutions Inc. and are copyrighted. Any reproduction in whole or in part, except as authorized by NSB Retails Solutions Inc., is strictly prohibited.
NSB Retail Solutions Inc.2800 Trans‐Canada HighwayPointe‐Claire, Quebec, CanadaH9R 1B1Tel.: (514) 426‐0822Fax: (514) 426‐0824E‐mail: [email protected]
Merchandising 4.2 Inventory ManagementFebruary, 2010

Preface ............................................................................1
What is Inventory Management? ........................................3
Interactive Non‐Sale (INS) / Store Inventory Tracking (SIT) ..........................................................................................5
Inventory Management flow ...............................................6
INS/SIT Option .......................................................................7
About this manual .................................................................8
A few terms .............................................................................8
Getting Started ......................................................................10
The Basics ..............................................................................11
Starting Merchandising .......................................................11
The Navigation Bar ..............................................................11
The Toolbar ...........................................................................12
The Menu Bar .......................................................................12
Changing modules within Merchandising ......................13
Calendar ................................................................................13
Query .....................................................................................14
Worklists ...............................................................................14
Entering information ...........................................................15
Printing ..................................................................................15
Getting help ..........................................................................15
Exiting Merchandising ........................................................15
Working with Merchandising ............................................16
Toolbar buttons ....................................................................17
Using the keyboard instead of the mouse ........................17
Configuring a worklist or lookup window view ............18
Using help .............................................................................19To find information through the Contents ............................ 19
Finding information through your own search ................... 19
Electronic manuals ...............................................................19
Retrieving information from your database ....................21To retrieve all information ....................................................... 21
To retrieve specific information .............................................. 21
Specify Using ........................................................................23
Table of Contents

ii Table of Contents
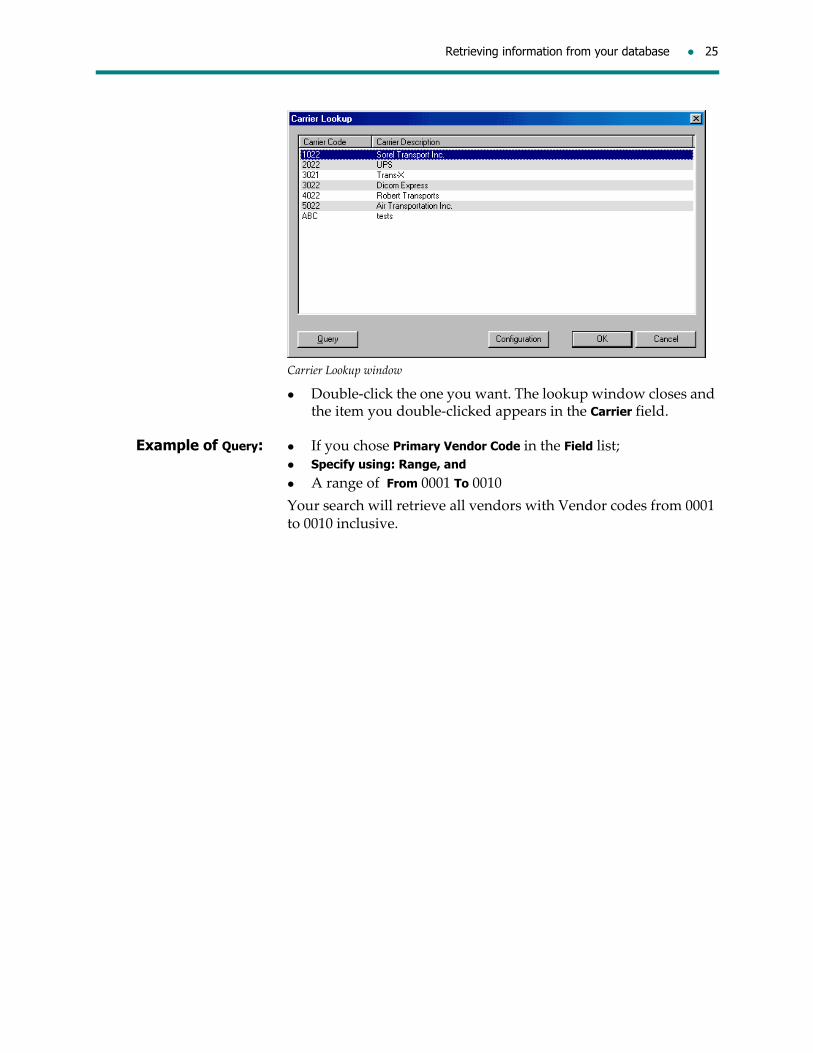
Search examples ...................................................................24Example of Lookup: ................................................................... 24Example of Query: ..................................................................... 25
Printing ..................................................................................26
Printing a document ............................................................26
Print previewing a document ............................................27
Vendor and Warehouse Receipts .............................29
PO Receipts flow ..................................................................31
PO Receipts ...........................................................................32
PO Receipt header ................................................................32To create a PO Receipt header ................................................ 43
PO Receipt details ................................................................44
1. Entering receipts by SKU ................................................48To enter PO Receipts by SKU .................................................. 48
2. Entering receipts by UPC ................................................49To enter SKU Receipts by UPC ............................................... 49
3. Entering receipts by Size Grid ........................................49To enter PO Receipts by Size Grid ......................................... 51
4. Entering receipts as Ordered ..........................................51To enter PO Receipts as Ordered ............................................ 52
Entering bin locations ..........................................................52To enter bin locations ............................................................... 52
Printing a PO Receipt ..........................................................53To print a PO Receipt ............................................................... 53
Modifying a PO Receipt .....................................................54To modify a PO Receipt ........................................................... 56
Receiving a PO Receipt .......................................................56To receive a PO Receipt ........................................................... 57
Canceling and Reinstating a PO Receipt ..........................57To cancel a PO Receipt ............................................................. 57
To reinstate a PO Receipt ......................................................... 57
Releasing a PO Receipt to a Third Party Invoice Matching system ....................................................................................58To release a PO Receipt to a third party Invoice Matching sys‐tem ............................................................................................... 58
PO Receipts not Released to Invoice Matching greater than ‘X’ Days after Receipt ..........................................................58
System delete of PO Receipts .............................................59
Deleting a PO Receipt manually ........................................59
PO Receipts vs. Ordered Report ........................................59
ASN Receipts flow: into the store or warehouse .............61
(Auto‐generate PO Receipt parameter set to YES) ..........61
ASN Receipts flow: into the store/warehouse .................62

Table of Contents iii
(Auto‐generate PO Receipt parameter set to NO) ..........62
Advance Shipping Notice Receipts ...................................63
ASN header ...........................................................................63
View PO Receipts for an ASN ............................................66
ASN details ...........................................................................66
Entering receipts against an ASN if the parameter Auto‐Generate PO Receipt is set to Yes ......................................68
1 ‐ By accessing the ASN .....................................................69To enter receipts against an ASN by accessing the ASN .... 69
2 ‐ By accessing the PO Receipt ..........................................69To enter receipts against an ASN by accessing the PO Receipt 70
Entering receipts against an ASN if the parameter Auto‐Generate PO Receipt is set to No .......................................70
1 ‐ Generating a PO Receipt as Shipped via the ASN menu (1‐step process) .....................................................................70To generate a PO Receipt As Shipped via the ASN menu (1 step process) .............................................................................. 70
2 ‐ Generating a PO Receipt and receiving as shipped via the ASN menu (2‐step process) ..........................................71To generate a PO Receipt and receive as shipped via the ASN menu (2‐step process) ............................................................... 71
3 ‐ Generating a PO Receipt and entering receipts via the PO Receipts menu ................................................................71To generate a PO Receipt and enter receipts via the PO Re‐ceipts menu ................................................................................ 72
Printing a PO Receipt based on an ASN ...........................72
Modifying quantities received against an ASN ..............72
Canceling and Reinstating a PO Receipt based on ASN quantities ...............................................................................72
Releasing a PO Receipt based on an ASN to Invoice Match‐ing ...........................................................................................72
System delete of ASNs .......................................................73
Deleting ASNs manually ....................................................73
System delete of PO Receipts based on an ASN .............73
Deleting a PO Receipt based on an ASN manually ........73
Store Shipments flow ...........................................................74
Store Shipment Receipts .....................................................75
Entering receipts for a Store Shipment .............................78
1. Entering receipts for a Store Shipment by SKU ...........78To enter Store Shipment Receipts by SKU ............................ 78
2. Entering receipts for a Store Shipment by UPC ..........79To enter Store Shipment Receipts by UPC ............................ 79
3. Entering receipts for a Store Shipment as sent ............79
iv Table of Contents
To enter Store Shipment Receipts as sent .............................. 79
Printing a Store Shipment receipt ......................................79To print a Store Shipment Receipt .......................................... 80
Modifying Store Shipment receipt information ..............80To modify a Store Shipment Receipt ...................................... 81
Receiving a Store Shipment ................................................81
Discrepancy Report .............................................................81
Store Shipments Not Received within ‘X’ Days of Ship‐ment .......................................................................................82
System delete of Store Shipment receipts .........................82
Deleting a Store Shipment receipt manually ...................82
Receive by Carton flow .......................................................83
Receiving by Carton ............................................................84
Entering receipts by carton .................................................84
1. Entering receipt units by carton by detail ....................85To enter receipt units by carton by detail .............................. 85
2. Entering receipts by carton by UPC ..............................86To enter receipts by carton by UPC ........................................ 86
3. Entering receipt units by carton as sent ........................86To enter receipt units by carton as sent ................................. 86
Modifying receipts done via Receive by Carton functional‐ity ............................................................................................86
Deleting Cartons ..................................................................87
Batch Import flow ................................................................88
Batch Import .........................................................................89
Unsolicited Receipts flow ...................................................90
Unsolicited Receipts ............................................................91
Unsolicited Receipts Header ..............................................91To add a new Unsolicited Receipt header ............................. 97
Unsolicited Receipts details ................................................97
Entering Unsolicited Receipt details .................................99
1. Entering units received by UPC ..................................100To enter Unsolicited Receipt units by UPC ......................... 100
2. Entering units received by size grid ............................100To enter Unsolicited Receipt units by size grid .................. 100
Entering bin locations ........................................................101To enter bin locations ............................................................. 101
Printing an Unsolicited Receipt .......................................101To print an Unsolicited Receipt ............................................ 101
Modifying an Unsolicited Receipt ...................................101To modify an Unsolicited Receipt ........................................ 103
Receiving an Unsolicited Receipt ....................................103To receive an Unsolicited Receipt ........................................ 104

Table of Contents v
Releasing an Unsolicited Receipt to a third party Invoice Matching system ................................................................104To release an Unsolicited Receipt ......................................... 104
Canceling and Reinstating an Unsolicited Receipt .......104To cancel an Unsolicited Receipt .......................................... 105
To reinstate an Unsolicited Receipt ...................................... 105
System delete of Unsolicited Receipts ............................105
Deleting an Unsolicited Receipt manually .....................105
Creating IMRDs at Head Office .............................107
Inventory Movement Request Document flow originating from head office .......................................................................108
IMRD RTVs .........................................................................109
IMRD RTV header .............................................................109
IMRD RTV details ..............................................................113
Entering IMRD RTV details ..............................................115
1. Entering IMRD RTV units by UPC ..............................115To enter IMRD RTV units by UPC ....................................... 115
2. Entering IMRD RTV units by style/color/size ...........116To enter IMRD RTV units by style/color/size ..................... 116
Modifying an IMRD RTV .................................................117To modify an IMRD RTV ....................................................... 118
Submitting an IMRD RTV ................................................118To submit an IMRD RTV ....................................................... 118
Canceling and Reinstating an IMRD RTV ......................118To cancel an IMRD RTV ......................................................... 119
To reinstate an IMRD RTV .................................................... 119
Creating an RTV from an IMRD RTV .............................119
IMRD Transfers ..................................................................120
IMRD Transfer header ......................................................120
IMRD Transfer details .......................................................124
Entering IMRD Transfer details .......................................125
1. Entering IMRD Transfer units by UPC .......................126To enter IMRD Transfer units by UPC ................................ 126
2. Entering units by style/color/size ................................127To enter IMRD Transfer units by style/color/size .............. 127
Modifying an IMRD Transfer ..........................................127To modify an IMRD Transfer ................................................ 128
Submitting an IMRD Transfer ..........................................129To submit an IMRD Transfer ................................................ 129
Canceling and Reinstating an IMRD Transfer ...............129To cancel an IMRD Transfer .................................................. 129
To reinstate an IMRD Transfer ............................................. 130
Creating an Outbound Transfer from an IMRD Transfer ..
vi Table of Contents
130
Creating a Transfer or IMRD Transfer through Merchan‐dising Analytics ..................................................................130
Merging multiple IMRD Transfers ..................................130To merge multiple IMRD Transfers ..................................... 131
System Delete of IMRD Documents ................................134
Deleting IMRD Documents Manually ............................135To delete IMRD documents ................................................... 135
Printing an IMRD ...............................................................136To print an IMRD document ................................................. 137
Transfers ....................................................................139
Pseudo styles ......................................................................139
Outbound Transfer flow ...................................................140
Outbound Transfers ..........................................................141
Pseudo styles ......................................................................141
Outbound Transfer header ...............................................141To add a new Outbound Transfer header ........................... 151
Outbound Transfer details ...............................................151
1. Entering sent units by size grid ...................................151
Enter Units by Size Grid dialog box ................................152To enter Outbound Transfer sent units by size grid .......... 153
2. Entering sent units by UPC ..........................................153To enter Outbound Transfer sent units by UPC ................ 153
Modifying an Outbound Transfer ...................................153To modify an Outbound Transfer ........................................ 157
Printing an Outbound Transfer document ....................158To print an Outbound Transfer ............................................ 158
Printing an Outbound Transfer carton label ..................158To print an Outbound Transfer carton label ....................... 159
Setting an Outbound Transfer’s status to Ready to Send ..159
Sending the Outbound Transfer .....................................160To send the Outbound Transfer ........................................... 160
Transfers Sent but not Received over ‘X’ Days Ago .....160
Inbound Transfers flow .....................................................161
Inbound Transfers ..............................................................162
Inbound Transfer header ..................................................162To complete an Inbound Transfer header ........................... 170
Inbound Transfer details ...................................................171
1. Entering receipt units by SKU ......................................171To enter Inbound Transfer receipt units by SKU ............... 171
2. Entering receipt units by UPC .....................................172To enter Inbound Transfer receipt units by UPC ............... 172

Table of Contents vii
3. Entering receipt units as sent .......................................172To enter Inbound Transfer Receipt units as sent ................ 172
Modifying an Inbound Transfer ......................................172To modify an Inbound Transfer ........................................... 173
Receiving an Inbound Transfer ........................................173To receive an Inbound Transfer ............................................ 173
Discrepancy Report ...........................................................174
Canceling and reinstating transfers .................................174To cancel a transfer ................................................................. 175
To reinstate a transfer ............................................................. 175
System delete of transfers .................................................175
Deleting a transfer manually ............................................175
Returns to Vendor ....................................................177
Returns to Vendor flow: 1‐step process ..........................178
1‐Step RTVs .........................................................................179
1‐Step RTV header .............................................................179To add a 1‐Step RTV header .................................................. 185
1‐Step RTV details ..............................................................186
1. Entering units returned by UPC ..................................186To enter 1‐Step RTV units by UPC ....................................... 186
2. Entering units returned by Size Grid ..........................187To enter 1‐Step RTV units returned by Size Grid .............. 187
Returning a 1‐step RTV .....................................................188
Returns to Vendor flow: 2‐step process ..........................189
2‐Step RTVs .........................................................................190
2‐Step RTV header .............................................................190To add a 2‐Step RTV Header ................................................. 197
2‐Step RTV details ..............................................................197
1. Entering units requested by UPC ................................197To enter 2‐Step RTV units requested by UPC .................... 198
2. Entering units requested by Size Grid ........................198To enter 2‐Step RTV units requested by Size Grid ............ 198
Initiating an RTV Document Request within a 2‐step pro‐cess .......................................................................................199To initiate a 2‐Step RTV document request ........................ 199
Returning a “Requested” RTV Document within a 2‐step process .................................................................................200To return a “Requested” 2‐Step RTV document ................ 200
Consolidation flow: 2‐step process ..................................201
Consolidation: 2‐step process ...........................................203
Releasing an RTV Document to Warehouse Management 204
Printing an RTV Carton Label ..........................................205

viii Table of Contents
Printing an RTV document ...............................................206To print an RTV document .................................................... 206
Modifying an RTV Document ..........................................207To modify an RTV document ................................................ 208
Releasing an RTV Document to Invoice Matching .......209To release an RTV document to Invoice Matching ............ 209
Canceling and Reinstating an RTV Document ..............210To cancel an RTV document .................................................. 210
To reinstate an RTV document ............................................. 210
System Delete of RTV Documents ...................................211
Deleting an RTV Document Manually ...........................212
Responding to an IMRD ..........................................213
Inventory Movement Request Document flow originating from head office .......................................................................214
Printing an IMRD ...............................................................215To print an IMRD .................................................................... 216
IMRD Transfers ..................................................................217
IMRD Transfer header ......................................................217
IMRD Transfer details .......................................................221
Creating an Outbound Transfer from an IMRD Transfer ..223To create an Outbound Transfer from an IMRD Transfer 223
IMRD RTVs .........................................................................224
IMRD RTV Header ............................................................224
IMRD RTV details ..............................................................228
Creating an RTV from an IMRD RTV .............................230To create an RTV from an IMRD RTV ................................. 230
Modifying an IMRD ..........................................................232To modify an IMRD ................................................................ 233
Submitting an IMRD .........................................................234To submit an IMRD ................................................................ 234
Canceling and Reinstating an IMRD ...............................235To cancel an IMRD .................................................................. 235
To reinstate an IMRD ............................................................. 235
System Delete of IMRD Documents ................................236
Deleting IMRD Documents Manually ............................237
The Print Worklist ....................................................239
Retrieving worklist details ................................................239
Printed status ......................................................................240
Adjustments ..............................................................241
Stock Status Adjustments flow ........................................242
Stock Status Adjustments .................................................243

Table of Contents ix
Stock Status Adjustment Header .....................................244
Messages ..............................................................................245To add a Stock Status Adjustment header .......................... 246
Stock Status Adjustment details ......................................246
1. Entering units by UPC ..................................................246To enter SSA units by UPC .................................................... 246
2. Entering units by Size Grid ..........................................247To enter SSA units by Size Grid ............................................ 247
Submitting an SSA document ..........................................247To submit an SSA document ................................................. 248
Printing an SSA document ...............................................248To print an SSA document .................................................... 249
Modifying an SSA document ...........................................249
Canceling and reinstating an SSA document ................249To cancel an SSA document .................................................. 250
To reinstate an SSA document .............................................. 250
System delete of an SSA document .................................250
Deleting an SSA document manually .............................250
Shrinkage Adjustments flow ............................................251
Shrinkage Adjustments (SAs) ..........................................252
Shrinkage Adjustment header .........................................252
Messages ..............................................................................253To add a Shrink Adjustment header .................................... 254
Shrink Adjustment details ................................................254
1. Entering units by UPC ..................................................255To enter SA units by UPC ...................................................... 255
2. Entering units by Size Grid ..........................................255To enter SA units by Size Grid .............................................. 255
Submitting an SA document ............................................256To submit an SA document ................................................... 256
Printing an SA document ..................................................256To print an SA document ....................................................... 257
Modifying an SA document .............................................257
Canceling and reinstating an SA document ...................257To cancel an SA document .................................................... 258
To reinstate an SA document ................................................ 258
System delete of an SA document ...................................258
Deleting an SA document manually ...............................258
User‐Defined Adjustments flow ......................................259
User‐Defined Adjustments (UDAs) ................................260
Pseudo styles ......................................................................260
User‐Defined Adjustment header ...................................261
Messages ..............................................................................263
x Table of Contents
User‐Defined Adjustment details ....................................263
Enter Cost Only adjustments ...........................................264
1. Entering cost adjustments by UPC ..............................264To enter cost UDAs by UPC .................................................. 264
2. Entering cost adjustments by Size Grid ......................264To enter cost UDAs by Size Grid .......................................... 264
Submitting a UDA document affecting cost only .........265To submit a UDA document affecting cost only ................ 265
Enter Unit Only adjustments ............................................265
1. Entering unit adjustments by UPC ..............................266To enter unit only adjustments by UPC .............................. 266
2. Entering unit only UDAs by Size Grid .......................266To enter unit only UDAs by size grid .................................. 266
Submitting a UDA document affecting units only .......267To submit a UDA document affecting units only .............. 267
Enter both Cost and Units adjustments ..........................267
1. Entering cost and unit adjustments by UPC ..............268To enter cost and unit UDAs by UPC .................................. 268
2. Entering cost and unit adjustments by Size Grid ......268To enter cost and unit UDAs by size grid ........................... 268
3. Entering adjustments using the Enter Adjustment for a Pseudo Style option ...........................................................269To enter a cost and units adjustment using the Enter Adjust‐ment for a Pseudo Style ........................................................ 269
Submitting a UDA document affecting cost and units 271To submit a UDA affecting cost and units .......................... 271
Printing a UDA document ................................................271To print a UDA document ..................................................... 272
Modifying a UDA document ...........................................272
Canceling and Reinstating a UDA document ................273To cancel a UDA document ................................................... 273
To reinstate a UDA ................................................................. 273
System Delete of a UDA document .................................273
Deleting a UDA document manually .............................273
Average Cost Adjustments flow .....................................275
Average Cost Adjustments (ACAs) ................................276
Pseudo styles ......................................................................276
Average Cost Adjustment header ...................................276
Messages ..............................................................................278To add an ACA header .......................................................... 278
Average Cost Adjustment details ....................................278To enter ACA details .............................................................. 278
Submitting an ACA document ........................................279To submit an ACA document ............................................... 279

Table of Contents xi
Printing an ACA document ..............................................279To print an ACA document ................................................... 280
Modifying an ACA document .........................................280
System delete of an ACA document ...............................280
Deleting an ACA document manually ...........................280
Physical Inventory ....................................................281
Physical Inventory Flow ...................................................283
Setting up for Physical Inventory ....................................284
Inventory Control Documents (ICDs) .............................284
Inventory Control Document (ICD) Header ..................284
Inventory Count details ....................................................291
Importing Physical Inventory Counts ............................296
Count import definition ....................................................296
1. Fixed format ....................................................................296To set up a fixed file format ................................................... 298
2. Delimited format ............................................................298To set up a delimited file format .......................................... 300
Count Import ......................................................................300
When a line is rejected .......................................................302To import a count .................................................................... 302
Rejections from Count Import ..........................................303
Recalculating Count Values .............................................304To recalculate count values ................................................... 304
Modifying Inventory Counts ...........................................305
Preliminary Shrink Reports ..............................................305
Modifying the ICD Header ...............................................314To modify the ICD header ..................................................... 315
Modifying Inventory Counts ...........................................316To modify inventory counts .................................................. 316
Modifying an incorrect system on hand .........................317
Canceling and reinstating an ICD ...................................317
Posting Inventory Counts .................................................318
Final Shrinkage Reports ....................................................318
Inventory and Shrinkage Updates ..................................326
Physical Inventory Interface from Warehouse Manage‐ment ...........................................................................................328
Sales ............................................................................331
Sales Flow ............................................................................331
Sales ......................................................................................332
How sales are updated within Merchandising .............332
Possible reason codes ........................................................334

xii Table of Contents
Reports .......................................................................335
Transfers Sent but not Received over ‘X’ Days Ago .....336
Store Shipments Not Received Within ‘X’ Days of Ship‐ment ...........................................................................................337
Discrepancy Report ...........................................................338
PO Receipts Not Released to Invoice Matching Greater than ‘X’ Days After Receipt ....................................................339
Interactive Non‐Sale (INS) / Store Inventory Track‐ing (SIT) .....................................................................341
INS / SIT Information flow ...............................................342
Triggers for sending and re‐sending documents ..........343
IMRD Transfers ..................................................................343
Transfers ..............................................................................343
Store Shipments ..................................................................344
IMRD RTVs (SIT only) ......................................................344
PO and/or PO‐ASN ............................................................344
Introduction to using Sales Audit ...................................345
Guided Audit tab ...............................................................345Accessing the Guided Audit tab ........................................... 345
Introduction to Interface Rejects ......................................349
Adding an interface rejection reason ..............................350Accessing the Interface Rejects window .............................. 350
Correcting Interface Rejects ..............................................352
Navigating the Transaction Details window .................353Transaction attachments ........................................................ 353
Object‐actions .......................................................................... 353
Revalidating UPCs .................................................................. 354
I/F Reject reason: Stock Control Validation Failed ........355To correct a Stock Control Validation Failed I/F reject reason 355
I/F Reject reason: Stock Control Issue Detected ............356To correct a Stock Control Issue Detected I/F reject reason ....356
I/F Reject reason: External system process error ...........356To correct an External system process error I/F reject reason 357
I/F Reject reason: Stock Control pre‐validation failed ..357To correct a Stock Control pre‐validation failed I/F reject rea‐son ............................................................................................. 358
I/F Reject reason: Stock control validation failed selectively 358To correct a stock control validation failed selectively I/F re‐ject reason ................................................................................. 359

Table of Contents xiii
Overriding an I/F Reject ....................................................360To override an I/F reject ......................................................... 360
Deferring an I/F reject ........................................................362To defer an I/F reject ............................................................... 362
Viewing a deferred I/F reject ............................................363To view a deferred I/F reject .................................................. 363
To undefer a current deferred I/F reject ............................... 363
Verifying an archived deferred I/F reject .......................363To verify an archived deferred I/F reject ............................. 364
Inventory Management Document Processing – Import‐ing Data from POS ...................................................................365
Outbound Documents .......................................................365Store Acts On An IMRD (of type “Transfer”) ..................... 365
INS ONLY: Store Acts On A Transfer (of Status “Ready to Send”) ....................................................................................... 368
SIT ONLY: Store Acts On An IMRD (of type “RTV”) ....... 370
Transfer (Outbound) Created At POS ................................. 372
RTV Created At POS .............................................................. 373
Inbound Documents ..........................................................375Inbound Transfer .................................................................... 375
Example .................................................................................... 377
WMS Initiated Store Shipment ............................................. 379
Example .................................................................................... 380
Example .................................................................................... 381
PO Receipt ................................................................................ 382
Physical Inventory Counts From POS ............................383
User‐Defined Adjustments ...............................................384
Ticket Printing ..........................................................387
Ticket Printing Preferences ...............................................388
Changing locations ............................................................389
Get next dataset button .....................................................389
Generating and Printing Tickets by Location ................390
Generating tickets by location ..........................................390
Generate Tickets by Purchase Order ...............................392
Generate Tickets by Unsolicited Receipts ......................393
Generate Tickets by Style ..................................................394
Generate Tickets by Pack ..................................................395
Generate Tickets by Purchase Order ...............................397
Generate Tickets by Unsolicited Receipt ........................398
Generate Tickets by Style ..................................................401
Generate Tickets by Pack ..................................................403To generate tickets by Location by Unsolicited Receipt .... 405
Printing tickets by location ...............................................405

xiv Table of Contents
Selecting to print tickets already generated ...................405
Printing Tickets by Purchase Order ................................407
Printing Tickets by Advance Shipment Notice .............408
Printing Tickets by PO Receipt ........................................409
Printing Tickets by Unsolicited Receipt ..........................411
Printing Tickets by Price Change ....................................412
Printing Tickets by Style ...................................................413
Printing Tickets by Pack ....................................................414
Printing Tickets by Purchase Order ................................416
Printing Tickets by Unsolicited Receipt ..........................418
Printing Tickets by Price Change ....................................419
Print Tickets by Style .........................................................421
Print Tickets by Pack .........................................................422To print tickets by Location by Style .................................... 424
Generating and Printing Tickets for All Locations .......426
Generating tickets for all locations ..................................426
Generating tickets manually for all locations by style .427To generate tickets for all Locations by Style ...................... 432
Printing tickets for all locations .......................................432
Printing Tickets by Purchase Order ................................434
Printing Tickets by Price Change ....................................435
Printing Tickets by Style ...................................................436To print tickets for all Locations by Purchase Order ......... 438
Merchandise Locator ...............................................439
Identifying a UPC ..............................................................440
Merchandise levels and groups .......................................440Sample merchandise structure .............................................. 440
Merchandise Locator drill‐down process .......................441
Selecting a Search Method ................................................443
Searching by Merchandise Level/Group ........................444To perform a search by merchandise level/group ............. 444
Searching by UPC ..............................................................449To perform a search by UPC ................................................. 449
Searching by Vendor Style ................................................452To perform a search by vendor style ................................... 452
Searching by Vendor .........................................................455To perform a search by vendor ............................................. 455
Searching by Style ..............................................................458
Style attributes and values ................................................458To perform a search by style ................................................. 458
Searching by Alternate Code ............................................462To perform a search by alternate code ................................. 462

Table of Contents xv
Viewing inventory information for your location ........467To view inventory information for your location .............. 467
Viewing price history for your location ..........................468To view price history for your location ............................... 468
Style view ............................................................................469
UPC details .........................................................................470
Finding a UPC in another location ..................................471To create a transfer request ................................................... 472
Viewing price history for another location ....................474
Viewing inventory information for another location ...475
Modification Tables .................................................477
Vendor and Warehouse Receipts Modifications ...........478
PO Receipts .........................................................................478
ASNs ....................................................................................480
Store Shipments ..................................................................481
Unsolicited Receipts ..........................................................481
Creating IMRDs at Head Office Modifications .............483
IMRD RTVs .........................................................................483
IMRD Transfers ..................................................................484
Transfer Modifications ......................................................485
Outbound Transfers ..........................................................485
Inbound Transfers ..............................................................487
Return to Vendor (RTV) Modifications ..........................489
Responding to Inventory Movement Request Document (IMRD) Modifications .............................................................491
Adjustments Modifications ..............................................492
Modifying an SSA document ...........................................492
Modifying an SA document .............................................492
Modifying a UDA document ...........................................492
Modifying an ACA document .........................................493
Physical Inventory Modifications ....................................494
ICD Header .........................................................................494
Parameters ................................................................497
Inventory Management Parameters ................................498
Inbound: PO Receipt Parameters .....................................498
Unsolicited Receipts Parameters .....................................499
ASN Parameters .................................................................499
Store Shipment Parameters ..............................................501
Outbound: RTV Parameters .............................................502
Transfer Parameters ...........................................................503
IMRD Parameters ...............................................................504

xvi Table of Contents
Shrink Adjustment Parameters ........................................505
Stock Status Adjustment Parameters ..............................506
User‐Defined Adjustment Parameters ............................507
Average Cost Adjustment Parameters ............................507
General Parameters ............................................................508
Physical Inventory Parameters ........................................509
Infobase Parameters ...........................................................510
Ticket Printing System Parameters .................................512
Index ...........................................................................517

Connected Retailer® Merchandising Solution for retail enterprises streamlines the key processes of business. With the integration of key components including pricing, inventory and margin management, the retailer is equipped with accurate, up‐to‐the‐minute information that facilitates powerful management and analysis of merchandise.
The Merchandising Solution includes the following:
Allocation & Replenishment (A&R) satisfies the changing merchandise needs of your stores, including a seamless communication with the Purchasing module. By enabling you to balance inventories and distributions, its powerful module components serve to increase turns, reduce markdowns, improve gross margins, and optimize merchandise performance, to maximize your sales, profits and ROI.
Enterprise Data offers a single point of entry for all information that defines a retail enterprise, such as locations, vendors, hierarchies, currencies, etc. It feeds common information to all Merchandising modules, thereby ensuring that all modules get the same information at the same time.
Foundation enables the integration of all functions across your organization, streamlining information flow and simplifying internal processes. It facilitates data transfer across all areas while maintaining security setup.
Inventory supports all inventory movement transactions including Receipts, RTVs, transfers, ASNs, adjustments and physical inventory. Common receiving procedures provide consistency at the warehouse and the stores. Real‐time updates and user‐defined inventory statuses offer retailers in‐depth and timely information for analysis.
Invoice Matching, a component of Inventory, provides your accounts payable system with complete details for matching and reconciling invoices from your vendors.
Merchandise Planning enables you to create and manage your merchandise plans at chain level, store level or both. Flexible and unlimited merchandise and location hierarchies streamline the planning of multiple channels, allowing you to develop plans that truly meet the demands at a micro‐level.
Preface
2 Preface
Merchandising Analytics (MA) provides decision support for analyzing all retail activities, including sales, orders, receipts, distributions, price changes, inventory adjustments, and returns to vendors.
Pricing and Price Look Up (PLU) provide complete support for simulating and executing temporary and permanent price changes (including deal documents, which are a special type of temporary price change) and sending this information to your stores. Pricing allows you to manage prices by any combination of style, style/color, and style/color/location, increasing your return on inventory.
Product Management (Prod Mgt) allows you to maintain a comprehensive list of the merchandise your company sells that can be used across all selling channels, including the Web, in kiosks, and in catalogs.
Purchasing provides options for managing your entire purchase ordering process, including seamless communication with the Allocation & Replenishment module. Purchasing lets you monitor the progress of buys and their delivery dates, while maintaining strict financial and open‐to‐buy control, as well as providing a user‐defined approval process and in‐depth reporting capabilities.
Stock Ledger, a component of Inventory, allows you to define the components and calculations that interface to your general ledger system in the way that best meets your business needs.
Warehouse Management streamlines receiving, processing, and distribution, and enables you to accurately monitor items as they move from supplier to store or individual customer. It supports multiple channels and gives you the ability to efficiently manage all warehousing functions.
What is Inventory Management? 3
What is Inventory Management?
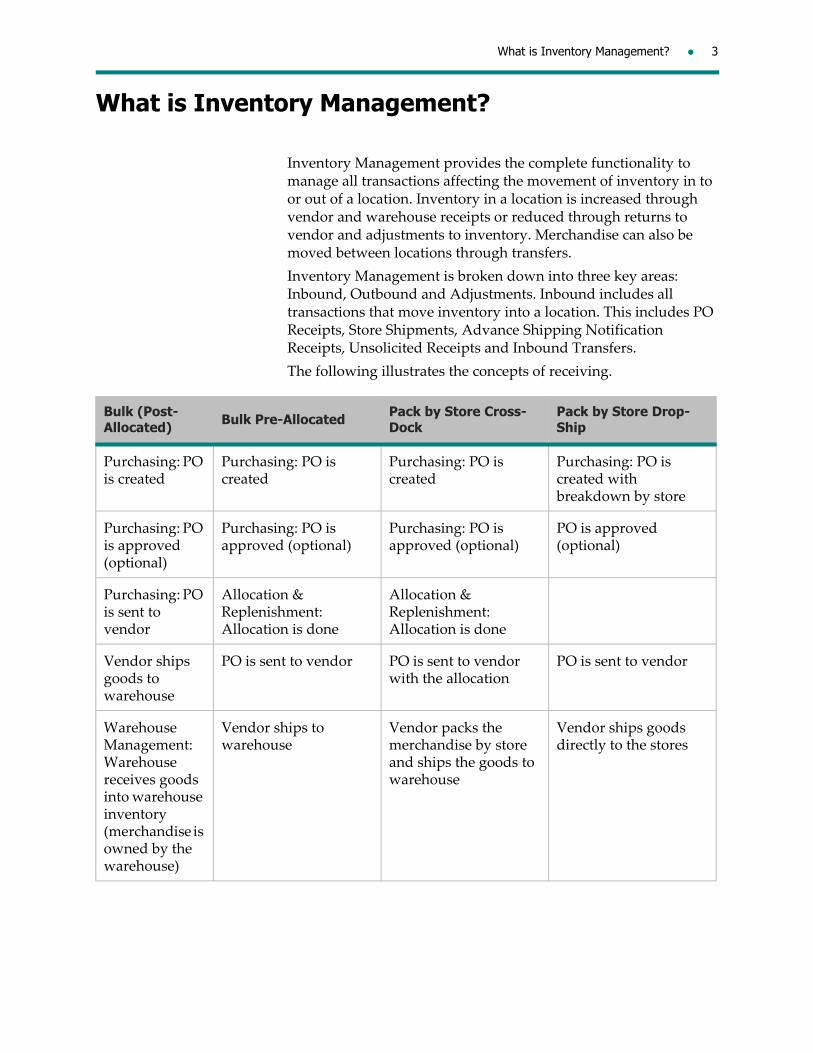
Inventory Management provides the complete functionality to manage all transactions affecting the movement of inventory in to or out of a location. Inventory in a location is increased through vendor and warehouse receipts or reduced through returns to vendor and adjustments to inventory. Merchandise can also be moved between locations through transfers.
Inventory Management is broken down into three key areas: Inbound, Outbound and Adjustments. Inbound includes all transactions that move inventory into a location. This includes PO Receipts, Store Shipments, Advance Shipping Notification Receipts, Unsolicited Receipts and Inbound Transfers.
The following illustrates the concepts of receiving.
Bulk (Post-Allocated) Bulk Pre-Allocated Pack by Store Cross-
DockPack by Store Drop-Ship
Purchasing: PO is created
Purchasing: PO is created
Purchasing: PO is created
Purchasing: PO is created with breakdown by store
Purchasing: PO is approved (optional)
Purchasing: PO is approved (optional)
Purchasing: PO is approved (optional)
PO is approved (optional)
Purchasing: PO is sent to vendor
Allocation & Replenishment: Allocation is done
Allocation & Replenishment: Allocation is done
Vendor ships goods to warehouse
PO is sent to vendor PO is sent to vendor with the allocation
PO is sent to vendor
Warehouse Management: Warehouse receives goods into warehouse inventory (merchandise is owned by the warehouse)
Vendor ships to warehouse
Vendor packs the merchandise by store and ships the goods to warehouse
Vendor ships goods directly to the stores
4 Preface
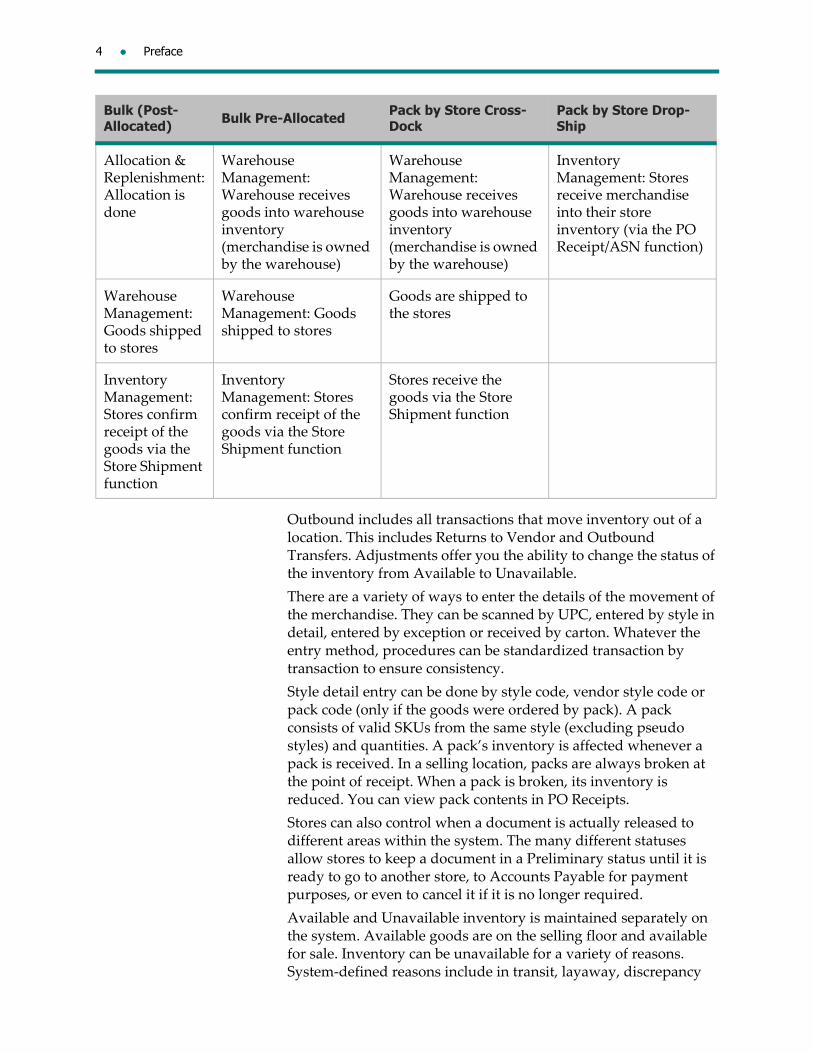
Outbound includes all transactions that move inventory out of a location. This includes Returns to Vendor and Outbound Transfers. Adjustments offer you the ability to change the status of the inventory from Available to Unavailable.
There are a variety of ways to enter the details of the movement of the merchandise. They can be scanned by UPC, entered by style in detail, entered by exception or received by carton. Whatever the entry method, procedures can be standardized transaction by transaction to ensure consistency.
Style detail entry can be done by style code, vendor style code or pack code (only if the goods were ordered by pack). A pack consists of valid SKUs from the same style (excluding pseudo styles) and quantities. A pack’s inventory is affected whenever a pack is received. In a selling location, packs are always broken at the point of receipt. When a pack is broken, its inventory is reduced. You can view pack contents in PO Receipts.
Stores can also control when a document is actually released to different areas within the system. The many different statuses allow stores to keep a document in a Preliminary status until it is ready to go to another store, to Accounts Payable for payment purposes, or even to cancel it if it is no longer required.
Available and Unavailable inventory is maintained separately on the system. Available goods are on the selling floor and available for sale. Inventory can be unavailable for a variety of reasons. System‐defined reasons include in transit, layaway, discrepancy
Allocation & Replenishment: Allocation is done
Warehouse Management: Warehouse receives goods into warehouse inventory (merchandise is owned by the warehouse)
Warehouse Management: Warehouse receives goods into warehouse inventory (merchandise is owned by the warehouse)
Inventory Management: Stores receive merchandise into their store inventory (via the PO Receipt/ASN function)
Warehouse Management: Goods shipped to stores
Warehouse Management: Goods shipped to stores
Goods are shipped to the stores
Inventory Management: Stores confirm receipt of the goods via the Store Shipment function
Inventory Management: Stores confirm receipt of the goods via the Store Shipment function
Stores receive the goods via the Store Shipment function
Bulk (Post-Allocated) Bulk Pre-Allocated Pack by Store Cross-
DockPack by Store Drop-Ship
What is Inventory Management? 5
and so on. User‐defined reasons may include held in stockroom, or shows and samples. Since available and unavailable inventory are maintained separately, it is very simple to obtain reporting that shows sales as a function of available inventory for a more focused evaluation of sales to stock.
Interactive Non-Sale (INS) / Store Inventory Tracking (SIT)The INS and SIT modules allow clients to perform non‐sale transactions at the store and have them feed to the Merchandising Inventory Management host module as scheduled (typically nightly). Stores with a constant network connection will use Inventory Management to perform non‐sale type transactions (such as returns to vendor, inter‐store transfers, etc.) while stores without this connection can use one of the following NSB solutions:
either the NSB POS Store Inventory Tracking module (known as “SIT”), or
the NSB Storeworks Interactive Non‐Sale (known as “INS”) module
The Sales Audit system is used by Head Office Inventory Control personnel to make corrections to Inventory Management transactions with audit concerns (for example, invalid statuses on particular documents, incorrect receiving or sending locations, etc.). In Sales Audit, these are known as Interface Rejects. Sales Audit provides you with the tools to isolate these transactions and then make the required changes so that the transactions can be revalidated in Sales Audit.
See “Interactive Non‐Sale (INS) / Store Inventory Tracking (SIT)” on page 341 for more information.

6 Preface
Inventory Management flow

INS/SIT Option 7
INS/SIT Option
8 Preface
About this manual
This manual is designed as a reference user guide for Inventory Management.
A few termsFollowing are some terms used in this manual that may be unfamiliar.
Alphanumeric – code or description made up of numbers or letters, or a combination of both.
Default – information that appears automatically, without your having to enter it each time. Defaults can usually be changed.
Dialog box – a small window that opens as you work and gathers additional information from you before you can continue working.
Entity – a record or transaction.
Flag – an option or parameter that acts as a “signal” to the system.
Mandatory – required.
Module – any of the applications within Merchandising (Enterprise Data, Pricing, Purchasing, Inventory Management, etc.).
Operators – sometimes also referred to as “logical operators”, these are mathematical symbols used in searching databases.
User input – data you must enter in a field. Generally, you can type the information. Sometimes you also have a drop‐down list of choices or you can double‐click within the field to open a lookup—in either of these cases, the data you select is automatically entered in the field, without the need to type it.
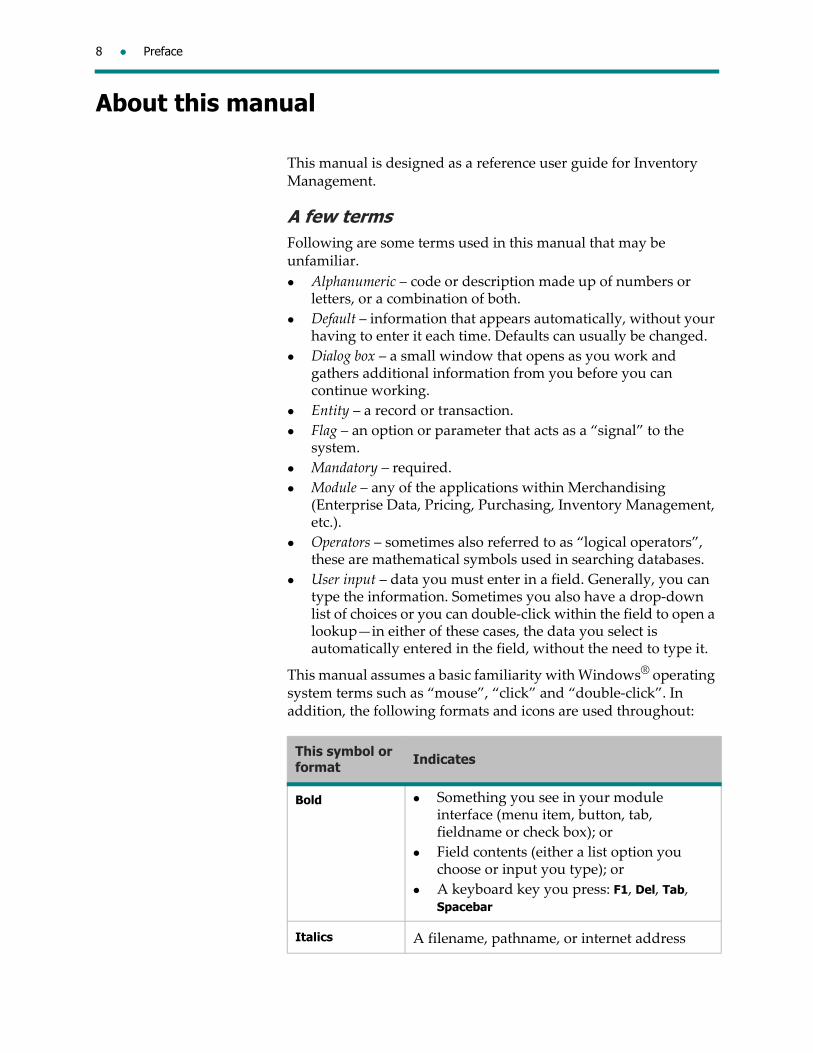
This manual assumes a basic familiarity with Windows® operating system terms such as “mouse”, “click” and “double‐click”. In addition, the following formats and icons are used throughout:
This symbol or format Indicates
Bold Something you see in your module interface (menu item, button, tab, fieldname or check box); or
Field contents (either a list option you choose or input you type); or
A keyboard key you press: F1, Del, Tab, Spacebar
Italics A filename, pathname, or internet address
About this manual 9
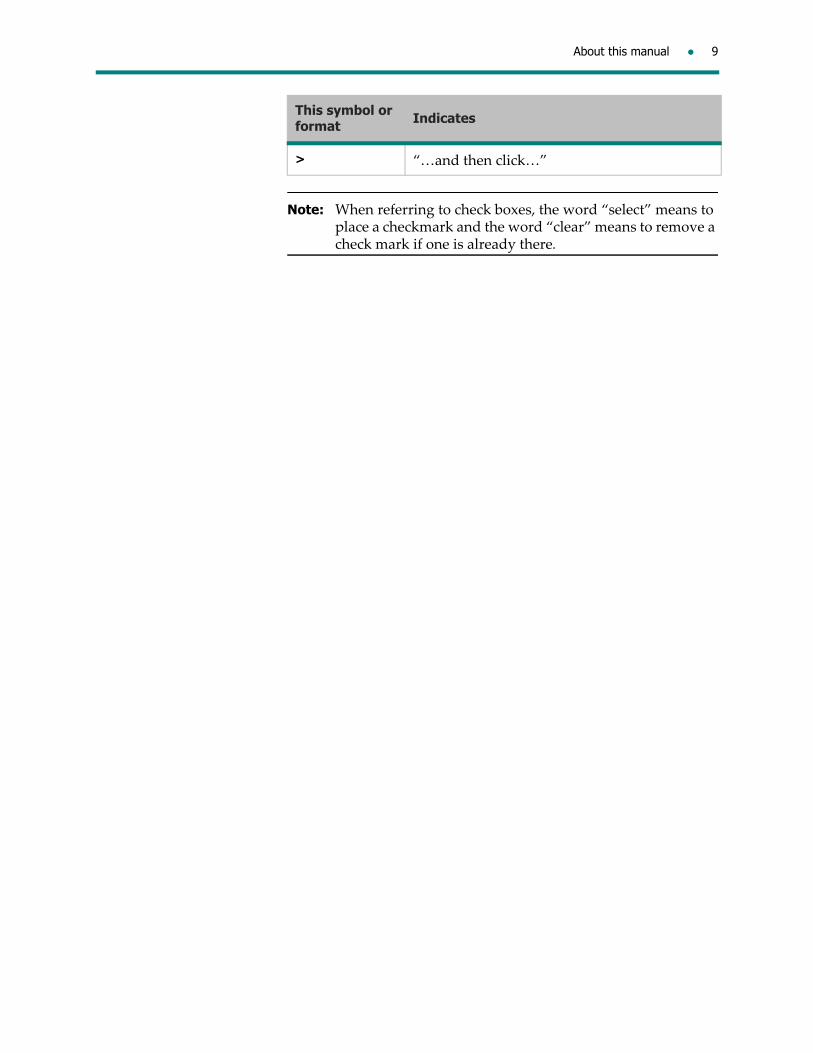
Note: When referring to check boxes, the word “select” means to place a checkmark and the word “clear” means to remove a check mark if one is already there.
> “…and then click…”
This symbol or format Indicates

10 Preface
Getting Started
Thie following pages describes the basic skills needed to work with Inventory Management. Even if you have used Microsoft® Windows before, you should read this chapter to become familiar with the Inventory Management working environment.

The Basics 11
The Basics
Inventory Management is a Windows‐based module and
therefore uses the standard Windows navigation tools and techniques.
Starting Merchandising Double‐click the Merchandising icon, located on the
Windows desktop. When the Merchandising Solution opens, select the Inventory tab on the Module Bar to open Inventory Management main window:
The Navigation BarYou can display or hide the Navigation Bar by selecting or clearing the Navigation Bar check box on the View menu.
When the Navigation Bar is displayed, you can navigate Inventory Management by selecting from the Navigation Bar on the left side of the screen.

12 Preface
When the Navigation Bar is hidden, you can navigate Inventory Management by selecting from the Navigate menu.
Note: If you prefer to use a keyboard instead of a mouse, see “Using the keyboard instead of the mouse” on page 17.
The ToolbarThe Toolbar contains buttons that help you perform various actions. Here is a typical Toolbar:
Inbound PO Receipt Header toolbar
You can display or hide the Toolbar by selecting or clearing the Toolbar check box on the View menu.
The Menu BarWhen the Toolbar is hidden, the toolbar buttons are no longer available. To perform actions in the various screens, select from menus on the Menu Bar. These include such items as File, Edit, Data and Actions. Note that the menu items available on the menu bar

The Basics 13
may differ from window to window. Following is a typical menu bar:
Although you can hide the Navigation Bar and the ToolbBar, the Menu Bar is always visible.
Changing modules within MerchandisingIt isn’t necessary to exit and restart Merchandising to switch to a different Merchandising module.
On the Module Bar, select the name of the module you want to change to.
If you don’t see all modules on the Module Bar, click the down arrow at the end of it to display other modules:
Note: Only one of the Merchandising modules can be open at a time. For example, if you open Inventory and then open Enterprise Data, Inventory closes and Enterprise Data opens. (The exceptions to this are Allocation & Replenishment and Purchasing, which can be open at the same time, along with any one of the other five Merchandising modules.)
CalendarIn any screen with a date field requiring user input (for example, the Effective From date), you can click the down arrow to open the Calendar.
The Calendar opens at the current month, with the current date circled in red and also noted at the bottom.
Click the directional buttons at the top of the Calendar to move forward or backward by month.
Click any date to enter it automatically in the current field.

14 Preface
QueryThe Query box allows you to define specific search criteria when retrieving information. After you define the search criteria, the system returns all information that meets the criteria.
For more information about queries, see “Retrieving information from your database” on page 21.
WorklistsWorklists are used in tables that have numerous fields to maintain. In Inventory Management, there are worklists for Inbound, Outbound, Adjustments and Physical Inventory documents.
The worklist displays one row of information for each record. You can use the query function to select the records that you want to view. (See “Retrieving information from your database” on page 21 for more information about defining your query criteria.) For example, if you want to view all Preliminary PO receipts, you can define your query criteria to include PO Receipts, Status = Preliminary. The worklist will display only those PO receipts that meet the criteria.
To re‐sequence the order in which columns appear in a worklist, from the View menu in a worklist, click Layout. There, you can also choose the information you want the worklist to display. All column headings in the worklist are user‐defined, and are based on your preferences as to which fields to display. The column headings provide descriptive information that helps you zero in on the record that you are looking for. You can save worklist layouts for re‐use. To save a layout, click Save as, enter a name and then click OK. To use that layout at a future time, simply access Layout on the View menu and select the layout you want to use from the Configuration List and then click OK. To return to your company’s default setting, access Layout on the View menu, select Reset > Yes.
To sort a worklist in ascending or descending order, simply click the column heading.

The Basics 15
To change the width of a column in a worklist, position your cursor on the line separating it and the column beside it. Then click and drag the column separator to the appropriate width.
To view, add or modify information contained in a record, double‐click it in the worklist.
You can update a document’s status from a worklist. Select the document and from the Actions menu, select the new status.
In addition, there is a Print Worklist accessible from the Main Menu that can be used to select more than one document at a time for printing or print previewing. See “Printing” on page 26 for more information.
Entering informationAs you enter, retrieve and change information in the various Inventory Management screens, remember that when a field is gray, it cannot be edited. Gray areas usually indicate values that have been defined elsewhere, often in Enterprise Data.
PrintingInventory Management documents can be printed using the Print option. For details about printing, see “Printing” on page 26.
Getting helpHelp provides you with:
step‐by‐step instructions on how to accomplish tasks.
field definitions and key terms.
To access help, click F1 while in Inventory Management (or select the Help menu). For more information on using help, see “Using help” on page 19.
Exiting MerchandisingTo exit Merchandising, click X in the top right corner of the window that you’re working in.

16 Preface
Working with Merchandising
The following pages provides you with topics to familiarize yourself with the Merchandising workplace. You’ll also find methods to customize your Merchandising system to suit your requirements.
Topics include the following:
Toolbar buttons
Using the keyboard instead of the mouse
Customizing the Merchandising look
Configuring a worklist and lookup window
Using help
Retrieving information from the database
Printing and print previewing a document

Toolbar buttons 17
Toolbar buttons
The buttons you see on a toolbar depend on the menu item and window you are working in.
Some buttons are multi‐purpose and are used for different functions depending on which window is active. Toolbar buttons that are unique to a specific window are displayed in that window only. Move your mouse over a toolbar button to view a description of the button.
Using the keyboard instead of the mouseYou may prefer to use a keyboard instead of a mouse. Standard Windows keyboard shortcuts usually work in Merchandising. Some of the most common shortcuts are:
Keyboard shortcut Action
Alt + shortcut letter (The shortcut letter is underlined.)
Opens a window, changes modules, activates a menu item or tab, may move to a different field.
Shortcut letter Selects the highlighted choice on a list.
Tab Moves through screens, field by field, skipping any field that canʹt be edited.
Back Space + Tab
May move to previous field. (If not, use cursor keys.)
Cursor keys Move from field to field, both backward and forward.
Space bar Selects and clears check boxes. Also cycles through choices in some lists.
Cursor keys or Tab
Selects buttons.
Cursor Cycles through choices in lists.
Enter key Selects the highlighted choice on a submenu, list, button or tab.
Esc Escapes current shortcut selection.

18 Preface
Configuring a worklist or lookup window viewYou can change the columns that display in a worklist or lookup window, the order in which they display and their size.
1. Do one of the following:
In a worklist, click View > Layout.
In a lookup window, click Configuration.
The worklist/lookup configuration window opens and you can customize the view in whatever way you prefer.
Select column headings you want the worklist to display.
Clear column headings you donʹt want the worklist to display.
To arrange the order of the column headings in the worklist, click the Up and Down Order buttons.
2. If you want to save this configuration for future use, click Save as and type a name for it in Configuration List > OK.
Using help 19
Using help
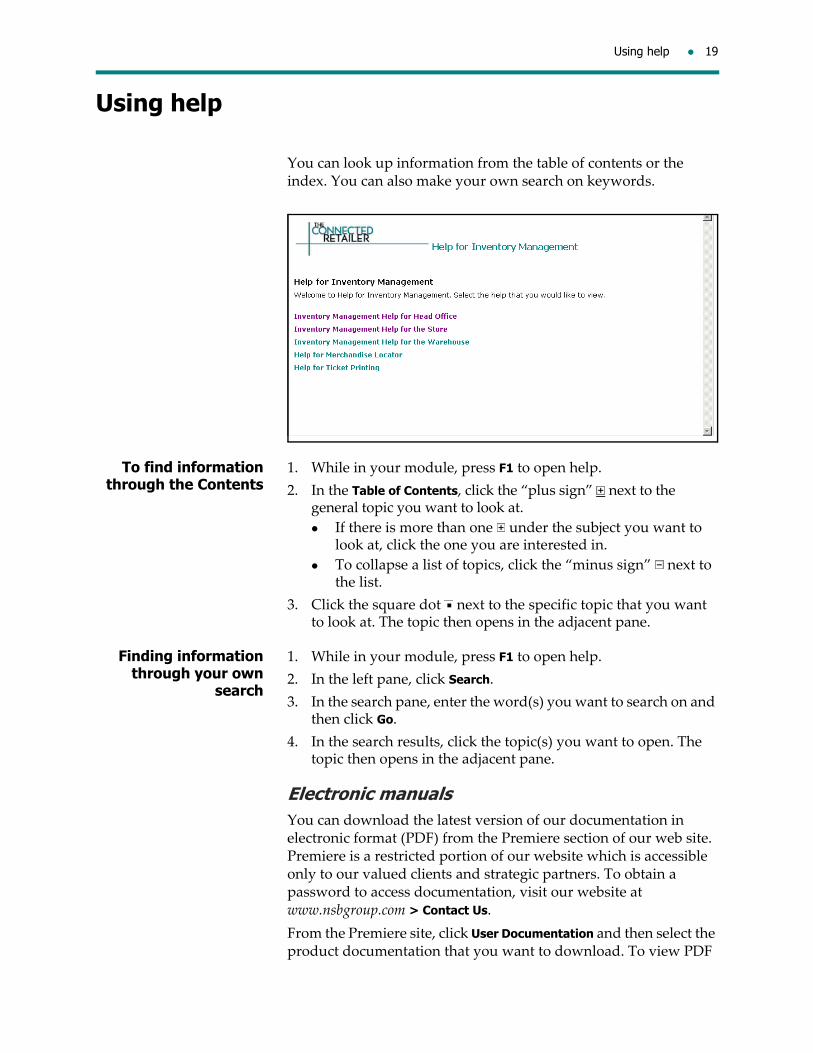
You can look up information from the table of contents or the index. You can also make your own search on keywords.
To find information through the Contents
1. While in your module, press F1 to open help.
2. In the Table of Contents, click the “plus sign” next to the general topic you want to look at.
If there is more than one under the subject you want to look at, click the one you are interested in.
To collapse a list of topics, click the “minus sign” next to the list.
3. Click the square dot next to the specific topic that you want to look at. The topic then opens in the adjacent pane.
Finding information through your own
search
1. While in your module, press F1 to open help.
2. In the left pane, click Search.
3. In the search pane, enter the word(s) you want to search on and then click Go.
4. In the search results, click the topic(s) you want to open. The topic then opens in the adjacent pane.
Electronic manualsYou can download the latest version of our documentation in electronic format (PDF) from the Premiere section of our web site. Premiere is a restricted portion of our website which is accessible only to our valued clients and strategic partners. To obtain a password to access documentation, visit our website at www.nsbgroup.com > Contact Us.
From the Premiere site, click User Documentation and then select the product documentation that you want to download. To view PDF

20 Preface
documents youʹll need Acrobat Reader, which can also be downloaded free from the Premiere site.
Electronic documents can be read on your screen or printed. Should you decide to look at a document on your screen, you can search for a topic in the table of contents, and jump to it.
Electronic documentation is also available on CD‐ROM. The CD‐ROM contains the Acrobat Reader and instructions for its installation.

Retrieving information from your database 21
Retrieving information from your database
Whether you want to look at one item, a group consisting of several items, or all items, you must retrieve this information from the database.
To retrieve all information
On the Data menu in each worklist, you can select Retrieve All to retrieve all documents. (This may not always be practical, since for example, you may have hundreds or even thousands of inbound documents.)
To retrieve specific information
Usually, you retrieve specific information, whether a single item or a range of items. The Merchandising Solution uses two information‐retrieval tools: the Lookup window and the Query search window.
While in your module, click in the field where you want to enter information, then press F3. (You can also click … if the field contains it, or press F8 to open the Query dialog box.)
If a Lookup window opens, double‐click the item you want to select. (See “Search examples” on page 24, Example of Lookup.)
If the Query window opens, complete steps 1–3 to define specific criteria to narrow your search:
Step 1: In the Field box, click the down arrow and select an information type for your search.
Step 2: Under Specify using, select your search method. (see “Specify Using” on page 23 for more information.)
Step 3: Under Values, enter your choices and click OK.

22 Preface
Note: When a Lookup button is available, you can click it to open a lookup window from which you can choose one or more items to add to the List box.
Note: Sometimes the Query dialog box opens with default values displayed in the List area. To clear them, select the Clear button. To clear all values displayed in the Criteria section, select the Clear All button.
Retrieving information from your database 23
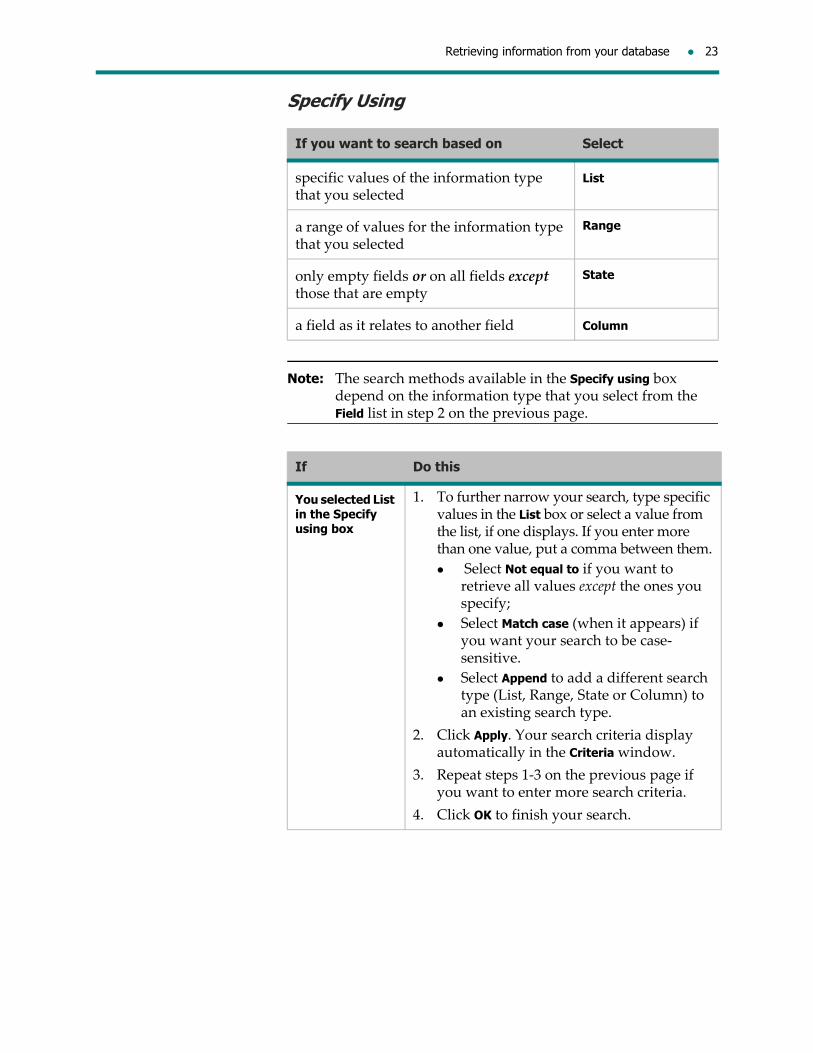
Specify Using
Note: The search methods available in the Specify using box depend on the information type that you select from the Field list in step 2 on the previous page.
If you want to search based on Select
specific values of the information type that you selected
List
a range of values for the information type that you selected
Range
only empty fields or on all fields except those that are empty
State
a field as it relates to another field Column
If Do this
You selected List in the Specify using box
1. To further narrow your search, type specific values in the List box or select a value from the list, if one displays. If you enter more than one value, put a comma between them.
Select Not equal to if you want to retrieve all values except the ones you specify;
Select Match case (when it appears) if you want your search to be case‐sensitive.
Select Append to add a different search type (List, Range, State or Column) to an existing search type.
2. Click Apply. Your search criteria display automatically in the Criteria window.
3. Repeat steps 1‐3 on the previous page if you want to enter more search criteria.
4. Click OK to finish your search.

24 Preface
Search examples
Example of Lookup: You want to change the carrier on an Unsolicited Receipt Header. You press F3 in the Carrier field. The Carrier Lookup window opens, showing a list of carriers to choose from.
You selected Range in the Specify using box
1. In the From field, type the first value in the range.
2. In the To field, type the second value in the range.
Select Not equal to if you want to retrieve all values except the ones you specify;
Select Match case (when it appears) if you want your search to be case‐sensitive.
Select Append if you want to add a different search type (List, Range, State or Column) to an existing search type.
3. Click Apply. Your search criteria display automatically in the Criteria window.
4. Repeat steps 1‐3 on the previous page if you want to enter more search criteria.
5. Click OK to finish your search.
You selected State in the Specify using box
Choose Empty if you want the search to find only records that contain no information in the field you selected.
Choose Not Empty if you want the search to find only records that do contain information in the field you selected.
You selected Column in the Specify using box
1. Select an operator to compare the field you choose in the Field box with the field you choose in the To field. Choices of operators are:
= (equal to);
<= (equal to or less than);
<> (less than or more);
< (less than);
>= (equal to or more than); or
> (more than).
2. Click OK to finish you search. (See example below.)
If Do this
Retrieving information from your database 25
Carrier Lookup window
Double‐click the one you want. The lookup window closes and the item you double‐clicked appears in the Carrier field.
Example of Query: If you chose Primary Vendor Code in the Field list; Specify using: Range, and
A range of From 0001 To 0010
Your search will retrieve all vendors with Vendor codes from 0001 to 0010 inclusive.

26 Preface
Printing
You can print or view a printed version (referred to as Print Preview) of most Inventory Management documents.
The following Inventory Management documents can be printed or viewed in Print Preview format. Note that if you choose to print while in Print Preview mode, no print flags will be set. It is instead, recommended that you print from the Print Worklist; see “The Print Worklist” on page 239 for more information.
PO Receipts
Store Shipment Receipts
Unsolicited Receipts
Inbound Transfers
Outbound Transfers
Outbound Transfer Labels
RTVs
Stock Status Adjustments
IMRDs
In the case of PO Receipts, the information printed depends on the point at which the document is being printed. For example, if a PO Receipt header has been created and saved, then only the header information will be printed. No details will appear.
Once the details of a PO Receipt have been created, the printed PO Receipt will have more information.
The format of a printed PO receipt is dependent on a parameter. The format can be either SKU or grid format. The parameter can also be set to prompt for a format whenever a report is requested.
Printing a documentDocuments can be printed either from the worklist (highlight the document in the worklist and then click Print) or while you have a document open (simply click Print).

Printing 27
In the Print dialog box, select the appropriate PRINTER, the PAGES and the NUMBER OF COPIES to print and then click OK.
Print previewing a documentDocuments can be print previewed either from the worklist (highlight the document in the worklist and then click Print Preview) or while you have a document open (simply click Print Preview). It is recommended that you do not print while you are in Print Preview mode to prevent print flags from being set incorrectly. Instead, print from the Print Worklist; see “The Print Worklist” on page 239 for more information.
1. Once the document is displayed on the screen, use the toolbar arrow buttons (first page, previous page, next page or last page) to navigate your document.
2. To increase or reduce the size of the document displayed on the Print Preview screen, click Zoom, select the size to zoom and then click OK.

28 Preface

This chapter describes how to receive merchandise from a vendor or from a warehouse into your location, modify the quantities received as well as delete documents.
All inbound documents are shown on the Inbound Worklist where summary information about the document is available (for example; document type, number, status, from and to location, create and receive date, vendor code and name, reason, received by name, cartons arrived (those with an “Arrived” status) and total cartons). When one carton is received in Inventory Management, the entire document is flagged as Received.
The different types of receipts that can be done through Inventory Management are:
PO Receipts
ASN Receipts
Store Shipment Receipts
Unsolicited Receipts
A Purchase Order Receipt is a receipt made against a purchase order. Receipt detail input can be done by style or pack code. Pseudo style codes for items such as greeting cards or cosmetics that reference a diverse group of merchandise can be used in place of style codes. When pseudo styles codes are used, entry is made by total retail values.
For bulk orders, after the receipt is done in Warehouse Management or a third party warehouse system, the information is sent to Inventory Management for viewing and follow‐up only. For drop‐shipments (orders sent directly to the stores), the receipt is entered directly in Inventory Management. Invoice Matching will be updated whenever a PO Receipt is created, modified or deleted.
An ASN Receipt is a receipt against an Advance Shipping Notice ‐ an electronic notice sent from the vendor specifying items and quantities shipped to the store.
A Store Shipment Receipt allows stores to confirm receipt of a merchandise shipment from their warehouse. Store Shipments are used for orders that are shipped centrally to a warehouse and are received there before being shipped out to stores.
Receipts in any of the above cases can be entered in detail (by style or by UPC), or by exception. For ASN shipments, Store Shipments
1 Vendor and Warehouse Receipts
30 Vendor and Warehouse Receipts
and Inbound Transfers, you can also Receive by Carton. This function allows you to receive merchandise into your location by scanning a carton label. Inventory Management supports the standard UCC128 label.
An Unsolicited Receipt allows you to receive merchandise onto the system without a purchase order. Unsolicited Receipts might be used in the case of a vendor fill where the merchandise is replenished by the vendor at store level (for example, candles, panty hose, socks, greeting cards, etc.). An Unsolicited Receipt into the system will order and update the inventory for your location in a 1‐step process, instead of having the buyer create a PO and then the location creating a PO Receipt. Invoice Matching will be updated whenever a PO Receipt is created, modified or deleted.
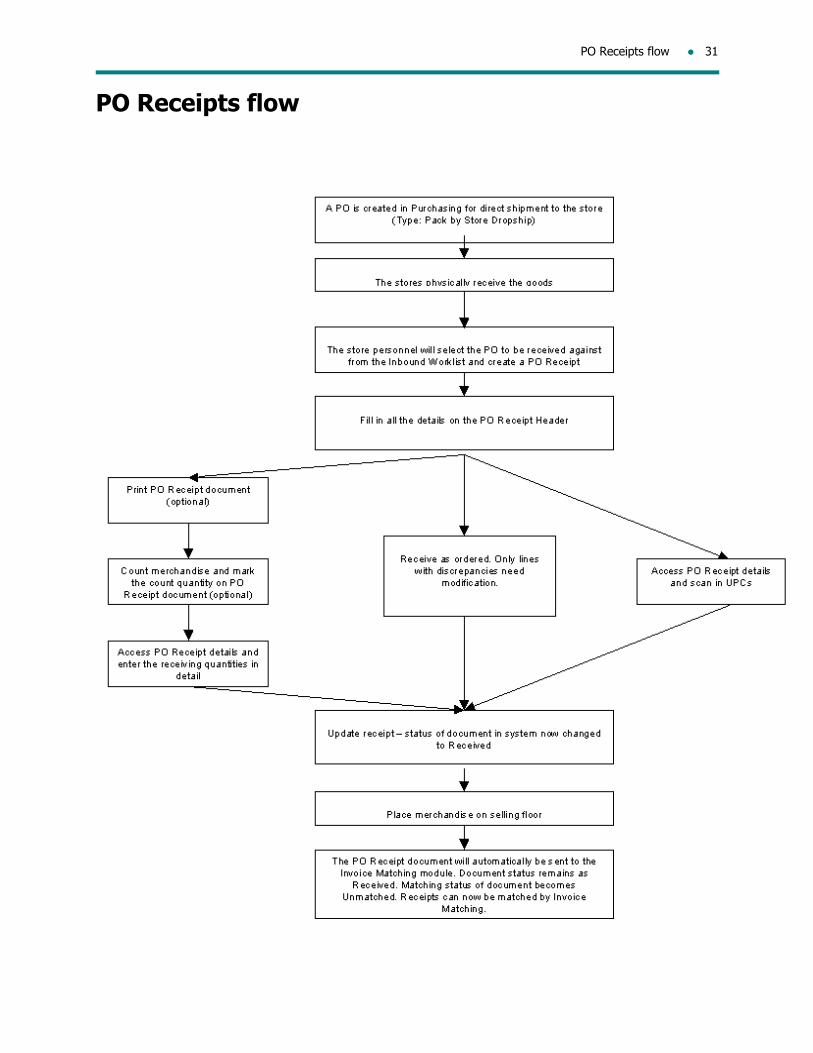
PO Receipts flow 31
PO Receipts flow

32 Vendor and Warehouse Receipts
PO Receipts
PO Receipts are used to receive regular and pseudo styles against a PO that are being shipped directly to your location. All merchandise from the PO that have a balance on order show up on the receipt that is created. You then input the unit quantities actually received. Subsequent receipts will only bring up the balance of styles remaining on order.
If the Distributions with no WMS system option is set, you can assign bin locations to the items received on a PO Receipt. This option is defined at installation time and is not visible to the user.
PO Receipt documents are made up of a header which contains general information pertinent to the entire receipt, and details which are the individual items being received.
Entry of the details of the receipt can be done in a number of ways. The receipt can be scanned using a scanner, can be manually entered into the system or can be automatically set by the system to be equal to what was ordered.
A new PO Receipt is created from the Inbound menu.
Inbound Worklist
PO Receipt headerThe PO Receipt header contains all the general information that applies to the entire shipment, such as the purchase order number, the date received, the carrier, who received it, etc.

PO Receipts 33
PO Receipt Header
PO Receipt no. Assigned when the PO Receipt header is first saved. The number is automatically generated from the range of numbers specified in the system parameters.
Date created The date the PO Receipt document was created.
Last activity date
The date the PO Receipt was last accessed (either the date it was created or the date it was last modified).
PO no. The number of the purchase order you are receiving against. This number is automatically picked up when you select the PO number from the Inbound Worklist to receive against.
Description A description of the PO Receipt of up to 60 alphanumeric characters. This field can be used to make a query on PO Receipts. For example, you can group all of your PO Receipts that had boxes missing by typing in a description of “Missing Boxes”. Then, if you wanted to see all PO Receipts that had boxes missing, you could make a query on the description “Missing Boxes” and all those PO Receipts would be displayed in the Inbound Worklist for your review.

34 Vendor and Warehouse Receipts
Status The status of the PO Receipt document based on certain activity such as whether the document is newly created, received, etc.
Preliminary ‐ new document or work in progress not yet updated by the user to a status of Received.
Received ‐ the on hand in Infobase has been updated to reflect the receipts on the document.
Canceled ‐ the receipt on the system was canceled by the user.
Source Shows where the document was originally created; will be Merchandising unless the document is interfaced from another system: in that case, the name of the source will be other. “In‐Store” will appear for documents created at POS.
Vendor The number and name of the vendor that the goods were ordered from.
Location The number of the location receiving the merchandise; usually your location number. The name of the location will display once the location number is entered.
Ticket Status The status of the tickets; either Required, Not Required, Not Applicable, Pending Print, Printed or Pending Reprint.
Match Status The status of the document in relation to Invoice Matching. Possible values are:
Preliminary – Invoice Matching has not been notified of the receipt.
Unmatched – Invoice Matching has referenced the receipt for Invoice Matching purposes, but has not matched any invoices to the receipt.
Partially Matched – Invoice Matching has matched at least one invoice credit memo to the receipt, but has not completely matched the value of the receipt.
Fully Matched – Invoice Matching has completely matched the value of the receipt with the invoices from the vendor.
PO Receipt Header

PO Receipts 35
Ticket Source Where the tickets will be generated from. Either None, PO, PO Receipt, ASN or Allocation.
PO Receipt Header, General tab
Date received Mandatory. The date the merchandise is physically received. Defaults to the current date but can be overridden.
Weight How much the shipment weighed when received. If a number is entered, a measurement (pounds, tons, etc.) must be selected from the list next to this field. Required input if Payment method is Collect.
No. of containers How many containers the shipment was sent in. If a number is entered, a container type must be selected from the list next to this field.
PO Receipt Header
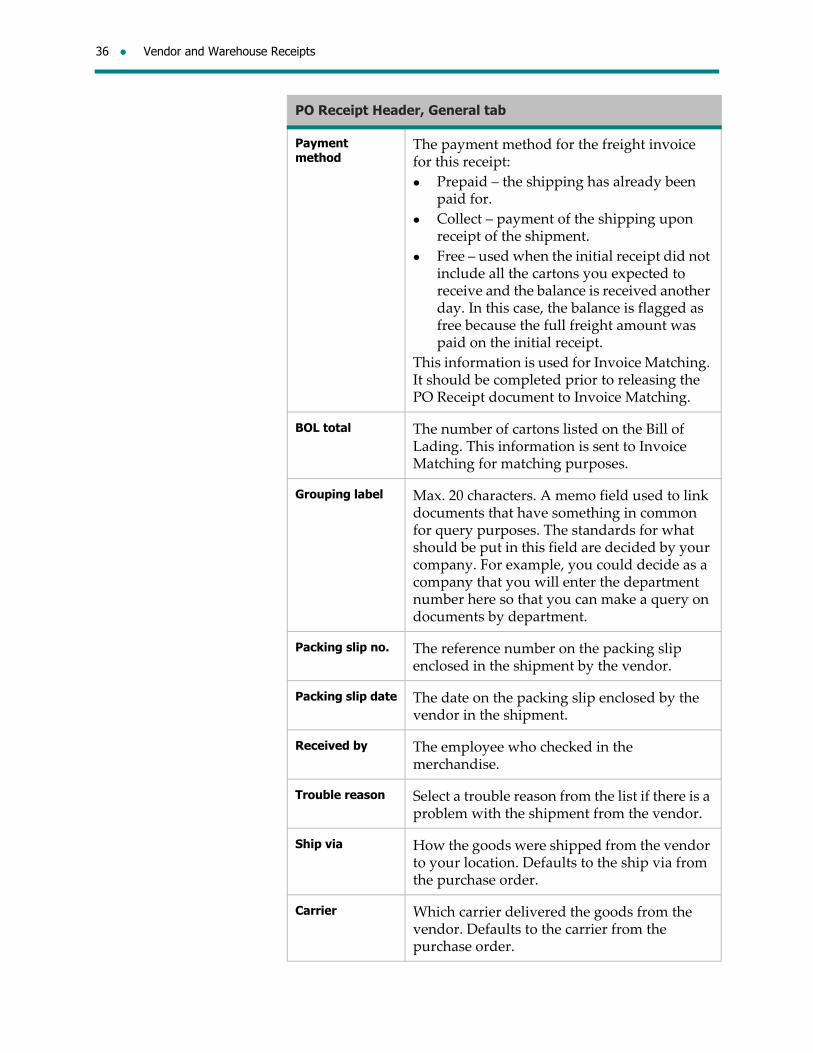
36 Vendor and Warehouse Receipts
Payment method
The payment method for the freight invoice for this receipt:
Prepaid – the shipping has already been paid for.
Collect – payment of the shipping upon receipt of the shipment.
Free – used when the initial receipt did not include all the cartons you expected to receive and the balance is received another day. In this case, the balance is flagged as free because the full freight amount was paid on the initial receipt.
This information is used for Invoice Matching. It should be completed prior to releasing the PO Receipt document to Invoice Matching.
BOL total The number of cartons listed on the Bill of Lading. This information is sent to Invoice Matching for matching purposes.
Grouping label Max. 20 characters. A memo field used to link documents that have something in common for query purposes. The standards for what should be put in this field are decided by your company. For example, you could decide as a company that you will enter the department number here so that you can make a query on documents by department.
Packing slip no. The reference number on the packing slip enclosed in the shipment by the vendor.
Packing slip date The date on the packing slip enclosed by the vendor in the shipment.
Received by The employee who checked in the merchandise.
Trouble reason Select a trouble reason from the list if there is a problem with the shipment from the vendor.
Ship via How the goods were shipped from the vendor to your location. Defaults to the ship via from the purchase order.
Carrier Which carrier delivered the goods from the vendor. Defaults to the carrier from the purchase order.
PO Receipt Header, General tab
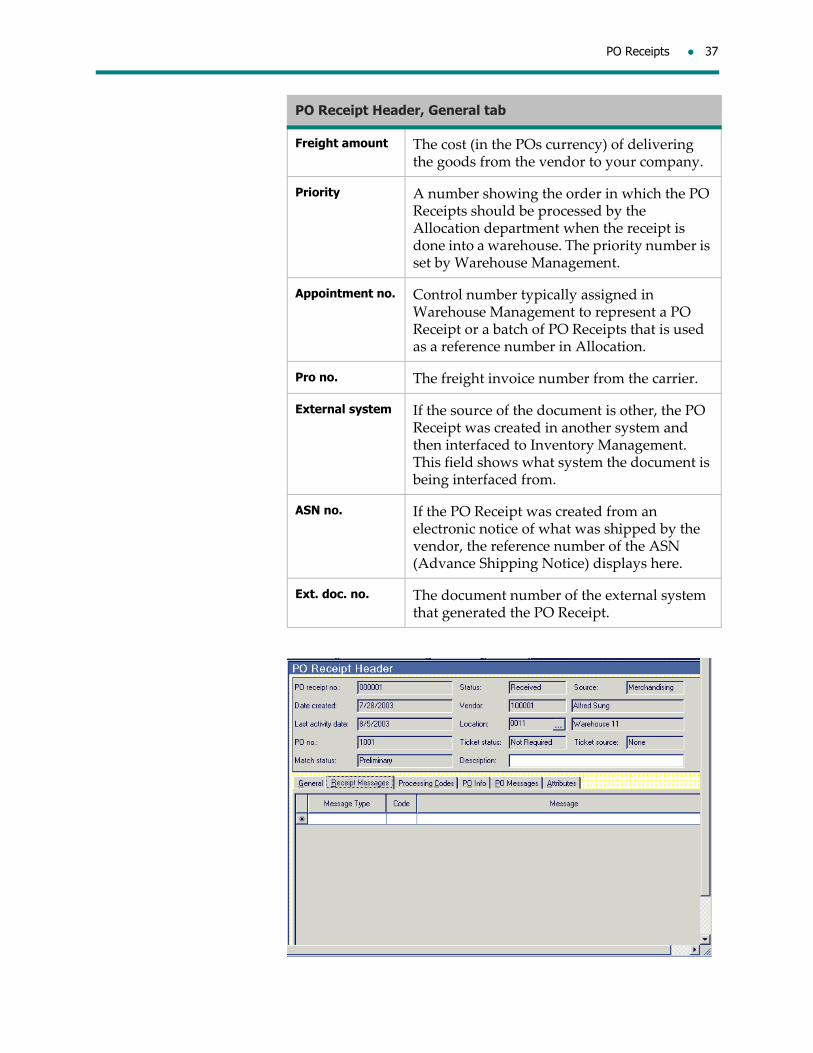
PO Receipts 37
Freight amount The cost (in the POs currency) of delivering the goods from the vendor to your company.
Priority A number showing the order in which the PO Receipts should be processed by the Allocation department when the receipt is done into a warehouse. The priority number is set by Warehouse Management.
Appointment no. Control number typically assigned in Warehouse Management to represent a PO Receipt or a batch of PO Receipts that is used as a reference number in Allocation.
Pro no. The freight invoice number from the carrier.
External system If the source of the document is other, the PO Receipt was created in another system and then interfaced to Inventory Management. This field shows what system the document is being interfaced from.
ASN no. If the PO Receipt was created from an electronic notice of what was shipped by the vendor, the reference number of the ASN (Advance Shipping Notice) displays here.
Ext. doc. no. The document number of the external system that generated the PO Receipt.
PO Receipt Header, General tab

38 Vendor and Warehouse Receipts
You can assign messages to a PO Receipt header to communicate information about the PO Receipt for other users’ reference, such as Accounts Payable and/or Head Office personnel. For example, a message in the header may indicate to Invoice Matching that this is a partial shipment that is to be paid only when the balance arrives.
Messages can be predefined in Enterprise Data in advance of PO Receipt creation and can be assigned to a PO Receipt using the Receipt Messages tab. You can also add your own free‐form messages to the document.
PO Receipt Header, Receipt Messages tab
Message Type Select the appropriate message type from the list.
Code To choose a predefined message, select it by choosing its associated code. If you are entering a free‐form message, then this field is left blank.
Message If you choose a predefined message, it displays here after you select a code. You can also enter your own free‐form message here.

PO Receipts 39
Processing codes are optional instructions to the supplier, warehouse or store about how to process the order (for example, how to ship the order or how it should be received).
When you create a PO Receipt header, the processing codes from the purchase order header will be automatically added as processing codes for the PO Receipt Header. Processing codes set up in the PO at the header level will display here.
Processing codes can also be added in the location when the PO Receipt is created if the person who creates the PO Receipt wants to give specific instructions to the person who will actually receive the goods.
PO Receipt Header, Processing Codes tab
Processing Code The processing code is linked to a set of instructions regarding the receipt. Once the code is selected, the instructions will automatically display. Typically, this will come from the purchase order and will show instructions about how to process this shipment, but it can also be attached in Inventory Management if someone is reviewing the receipts to be done prior to doing them.
Description Alphanumeric description of the processing code (maximum 30 characters).
Type A one‐character processing code type. Valid options include:
Q: Quantity: to enter a unit quantity for the processing code. For example, hangers ‐ quantity 100.
R: Regular: no additional information is required.
I: Information: displays information.
Qty. Mandatory if Processing Code Type Quantity was selected.

40 Vendor and Warehouse Receipts
PO Receipt Header, PO Info tab
Order date The date the contract was made with the vendor. Defaults to the date the PO was created.
Expected receipt The date the order is expected to be delivered. Defaults to a date determined by parameters in the system.
Cancel date Date after which the system will automatically cancel the PO. Determined by parameters defined in the system.
Predistribution Determines how the vendor is to pack the goods and if the merchandise is to be shipped to one or multiple locations. Four types: Bulk, Bulk Pre‐Allocated, Pack by Store Crossdock or Pack by Store Dropship.
Blanket PO no. The PO number of the Blanket PO being drawn against by a Release PO.
Reference Po no. A memo field that refers to another PO number. For example, if a purchase order was created in reference to another in order to increase the quantities initially ordered, the original PO number can be entered as the Reference PO# so that it is easy to find it.

PO Receipts 41
External system A system‐maintained field used if a PO is fed from another system such as a replenishment system. The name of the external system is displayed here.
External doc. no. When a PO is fed from another system, like a replenishment system, the document number used by the other system is displayed here.
Terms The payment terms as agreed between the buyer and the vendor.
Buyer The code and name of the buyer who created this purchase order.
Source System‐maintained field that identifies where the PO was created.
New store Indicates whether the order is for a new store; especially for a warehouse receiving merchandise for a store that’s not yet open.
Import order Indicates whether the order is a foreign order.
Replenishment If this system‐maintained check box is selected, order quantities have been imported from a replenishment system and the PO is a Replenishment PO.
Special order If selected, this check box identifies the order as a special customer order.
EDI order If selected, the check box indicates the order as an order that was sent electronically to the vendor
PO Receipt Header, PO Info tab

42 Vendor and Warehouse Receipts
Messages that were attached to the PO are displayed here.
PO Receipt Header, PO Messages tab
Message Type Category of messages being attached to the PO. Categories include Accounting, Allocation and Vendor messages. Contains up to 20 alphanumeric characters.
Code The code corresponds to a predefined message which it attaches to the PO at the PO Header level.
Message A message attached to the PO at the PO Header level.

PO Receipts 43
PO Receipt Header window, Attributes tab
Inventory Management documents can be grouped together based on common characteristics that are defined as attributes. The values of the characteristics would be defined as attribute sets for that attribute. For example, you can create “Department” as an attribute and then create an attribute set for each department number. This provides for a linking of documents by department.
Attributes and attribute sets are set up in advance in Enterprise Data.
To create a PO Receipt header
1. From the Main Menu, select Inbound.
2. From the Inbound Worklist, select PO Receipt.
3. In the dialog box, select New, enter the PO number you are creating a receipt against and click OK.
PO Receipt Header, Attributes tab
Attribute Code Alphanumeric reference defining the attribute code to attach to a PO receipt.
Attribute Label The name of the attribute code displays automatically after the attribute code is selected.
Attribute Set Code
Alphanumeric reference to the attribute set label. It must be unique within the attribute set labels.
Attribute Set Label
The name of the attribute set code automatically displays after the attribute set code is selected.

44 Vendor and Warehouse Receipts
4. In the PO Receipt Header, enter the Date received and complete any other fields on the General tab as appropriate.
5. Enter receipt messages on the Receipt Messages tab, if required.
6. If necessary, select the Processing Codes tab and enter processing details for this receipt. Be sure to enter a quantity if Processing Code Type Quantity was selected.
7. To assign a PO Receipt number to the newly created PO Receipt Header, click Save. This receipt is assigned a status of Preliminary.
8. To acknowledge the save, click OK.
PO Receipt detailsThe PO Receipt Details screen allows you to enter the quantities actually being received for each of the styles.
You can also attach processing codes at the detail level. PO Receipt SKU processing codes are instructions to the supplier about how to ship the specific item or how the receiving store or warehouse should store the specific items once they are received (for example, on hangers, in boxes, etc.).
Processing codes set up in the PO at the SKU level will display here as PO Receipt SKU processing codes.
If you receive items that are damaged, use the detail entry by SKU method to enter receipt quantities. Remember to enter the quantity you received damaged in the Damaged Units column, not in the Received Units column.
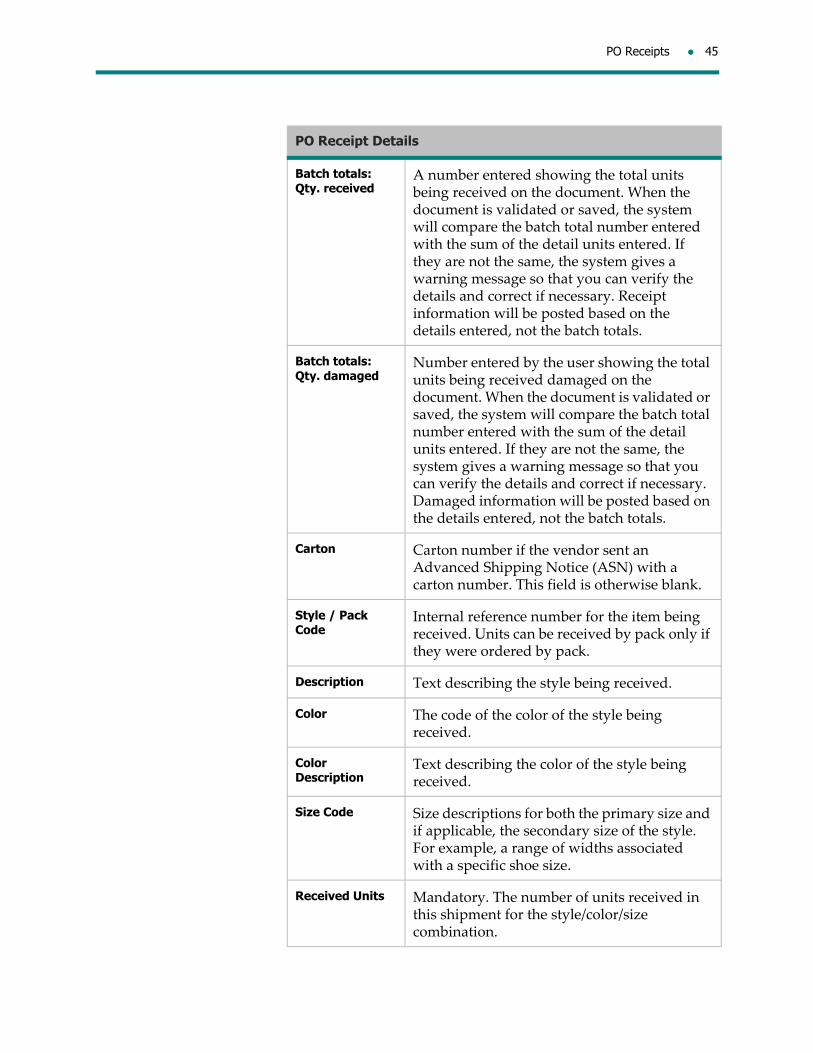
PO Receipts 45
PO Receipt Details
Batch totals: Qty. received
A number entered showing the total units being received on the document. When the document is validated or saved, the system will compare the batch total number entered with the sum of the detail units entered. If they are not the same, the system gives a warning message so that you can verify the details and correct if necessary. Receipt information will be posted based on the details entered, not the batch totals.
Batch totals: Qty. damaged
Number entered by the user showing the total units being received damaged on the document. When the document is validated or saved, the system will compare the batch total number entered with the sum of the detail units entered. If they are not the same, the system gives a warning message so that you can verify the details and correct if necessary. Damaged information will be posted based on the details entered, not the batch totals.
Carton Carton number if the vendor sent an Advanced Shipping Notice (ASN) with a carton number. This field is otherwise blank.
Style / Pack Code
Internal reference number for the item being received. Units can be received by pack only if they were ordered by pack.
Description Text describing the style being received.
Color The code of the color of the style being received.
Color Description
Text describing the color of the style being received.
Size Code Size descriptions for both the primary size and if applicable, the secondary size of the style. For example, a range of widths associated with a specific shoe size.
Received Units Mandatory. The number of units received in this shipment for the style/color/size combination.
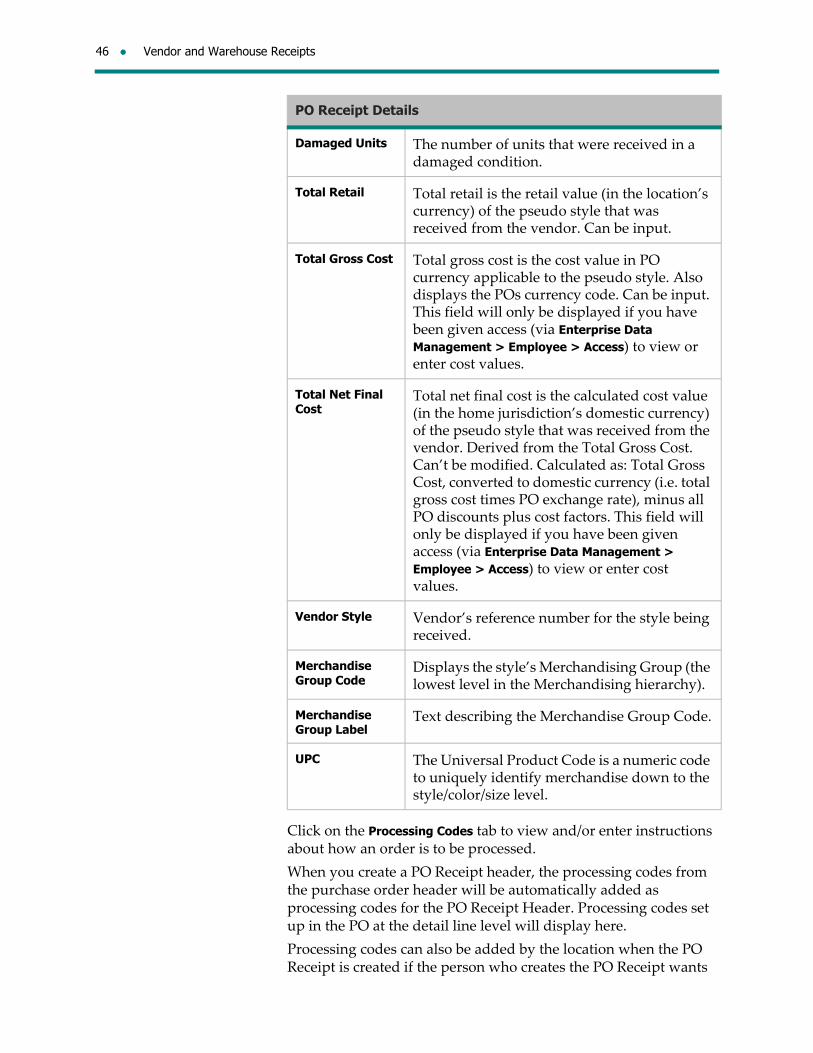
46 Vendor and Warehouse Receipts
Click on the Processing Codes tab to view and/or enter instructions about how an order is to be processed.
When you create a PO Receipt header, the processing codes from the purchase order header will be automatically added as processing codes for the PO Receipt Header. Processing codes set up in the PO at the detail line level will display here.
Processing codes can also be added by the location when the PO Receipt is created if the person who creates the PO Receipt wants
Damaged Units The number of units that were received in a damaged condition.
Total Retail Total retail is the retail value (in the location’s currency) of the pseudo style that was received from the vendor. Can be input.
Total Gross Cost Total gross cost is the cost value in PO currency applicable to the pseudo style. Also displays the POs currency code. Can be input. This field will only be displayed if you have been given access (via Enterprise Data Management > Employee > Access) to view or enter cost values.
Total Net Final Cost
Total net final cost is the calculated cost value (in the home jurisdiction’s domestic currency) of the pseudo style that was received from the vendor. Derived from the Total Gross Cost. Can’t be modified. Calculated as: Total Gross Cost, converted to domestic currency (i.e. total gross cost times PO exchange rate), minus all PO discounts plus cost factors. This field will only be displayed if you have been given access (via Enterprise Data Management > Employee > Access) to view or enter cost values.
Vendor Style Vendor’s reference number for the style being received.
Merchandise Group Code
Displays the style’s Merchandising Group (the lowest level in the Merchandising hierarchy).
Merchandise Group Label
Text describing the Merchandise Group Code.
UPC The Universal Product Code is a numeric code to uniquely identify merchandise down to the style/color/size level.
PO Receipt Details

PO Receipts 47
to give specific instructions to the person who will actually receive the goods.
PO Receipt Details, Processing Codes tab
Processing Code The processing code is linked to a set of instructions regarding the receipt. Click … to look up valid processing codes. Once the code is selected, the instructions will automatically display. Typically, this will come from the purchase order and will show instructions about how to process this shipment, but it can also be attached in Inventory Management if someone is reviewing the receipts to be done prior to doing them.
Description Alphanumeric description of the processing code (maximum 30 characters).
Type A one‐character processing code type. Valid options include: Q: Quantity: to enter a unit quantity for the processing code. For example, hangers ‐ quantity 100. R: Regular: no additional information is required. I: Information: displays information.
Qty. Mandatory if Processing Code Type Quantity was selected.
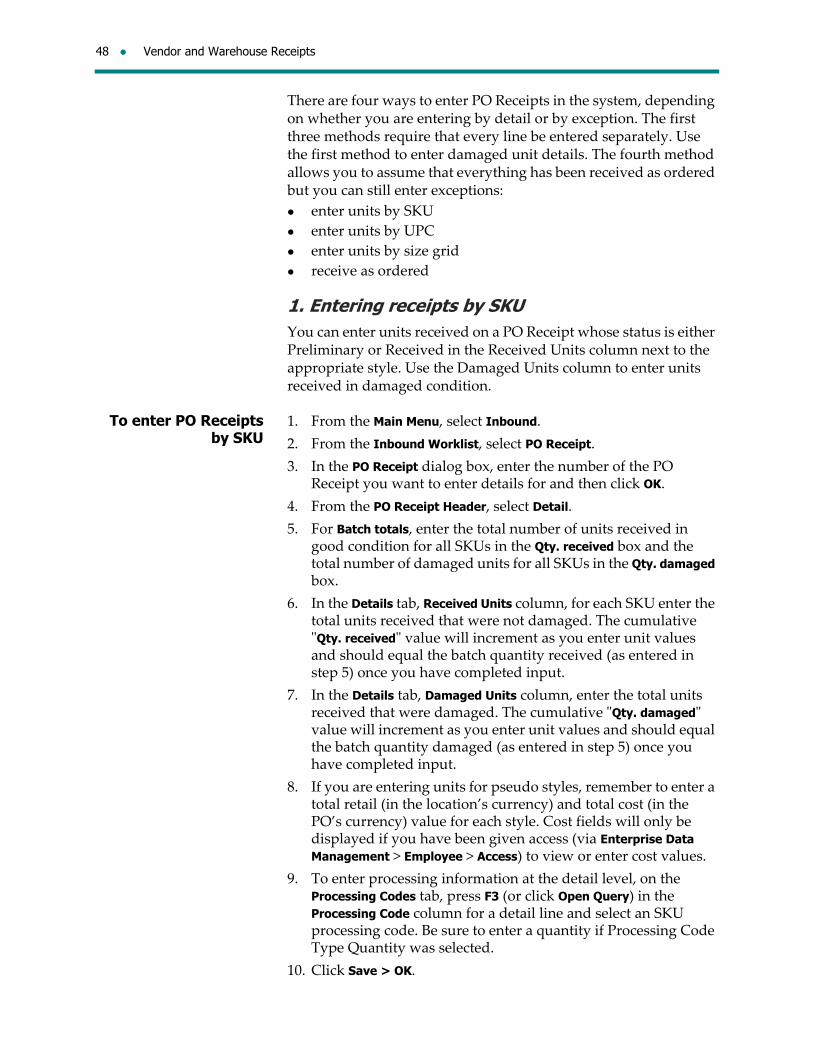
48 Vendor and Warehouse Receipts
There are four ways to enter PO Receipts in the system, depending on whether you are entering by detail or by exception. The first three methods require that every line be entered separately. Use the first method to enter damaged unit details. The fourth method allows you to assume that everything has been received as ordered but you can still enter exceptions:
enter units by SKU
enter units by UPC
enter units by size grid
receive as ordered
1. Entering receipts by SKUYou can enter units received on a PO Receipt whose status is either Preliminary or Received in the Received Units column next to the appropriate style. Use the Damaged Units column to enter units received in damaged condition.
To enter PO Receipts by SKU
1. From the Main Menu, select Inbound.
2. From the Inbound Worklist, select PO Receipt.
3. In the PO Receipt dialog box, enter the number of the PO Receipt you want to enter details for and then click OK.
4. From the PO Receipt Header, select Detail.
5. For Batch totals, enter the total number of units received in good condition for all SKUs in the Qty. received box and the total number of damaged units for all SKUs in the Qty. damaged box.
6. In the Details tab, Received Units column, for each SKU enter the total units received that were not damaged. The cumulative ʺQty. receivedʺ value will increment as you enter unit values and should equal the batch quantity received (as entered in step 5) once you have completed input.
7. In the Details tab, Damaged Units column, enter the total units received that were damaged. The cumulative ʺQty. damagedʺ value will increment as you enter unit values and should equal the batch quantity damaged (as entered in step 5) once you have completed input.
8. If you are entering units for pseudo styles, remember to enter a total retail (in the location’s currency) and total cost (in the PO’s currency) value for each style. Cost fields will only be displayed if you have been given access (via Enterprise Data Management > Employee > Access) to view or enter cost values.
9. To enter processing information at the detail level, on the Processing Codes tab, press F3 (or click Open Query) in the Processing Code column for a detail line and select an SKU processing code. Be sure to enter a quantity if Processing Code Type Quantity was selected.
10. Click Save > OK.
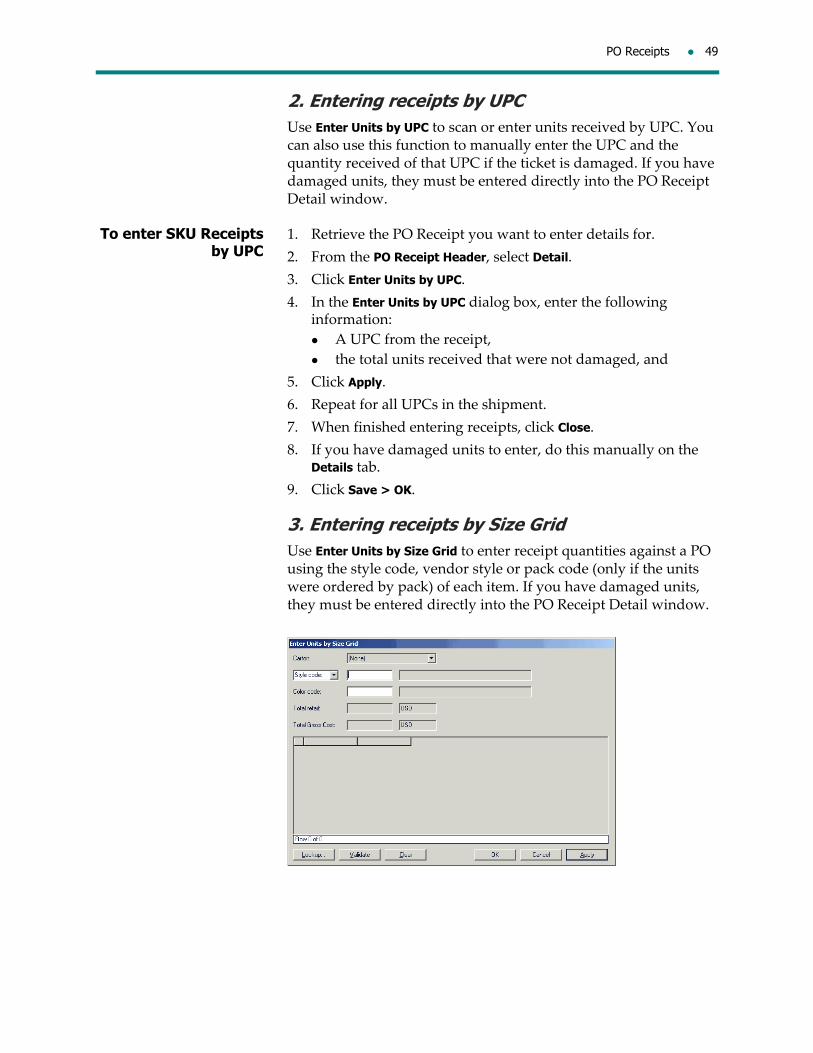
PO Receipts 49
2. Entering receipts by UPCUse Enter Units by UPC to scan or enter units received by UPC. You can also use this function to manually enter the UPC and the quantity received of that UPC if the ticket is damaged. If you have damaged units, they must be entered directly into the PO Receipt Detail window.
To enter SKU Receipts by UPC
1. Retrieve the PO Receipt you want to enter details for.
2. From the PO Receipt Header, select Detail.
3. Click Enter Units by UPC.
4. In the Enter Units by UPC dialog box, enter the following information:
A UPC from the receipt,
the total units received that were not damaged, and
5. Click Apply.
6. Repeat for all UPCs in the shipment.
7. When finished entering receipts, click Close.
8. If you have damaged units to enter, do this manually on the Details tab.
9. Click Save > OK.
3. Entering receipts by Size GridUse Enter Units by Size Grid to enter receipt quantities against a PO using the style code, vendor style or pack code (only if the units were ordered by pack) of each item. If you have damaged units, they must be entered directly into the PO Receipt Detail window.
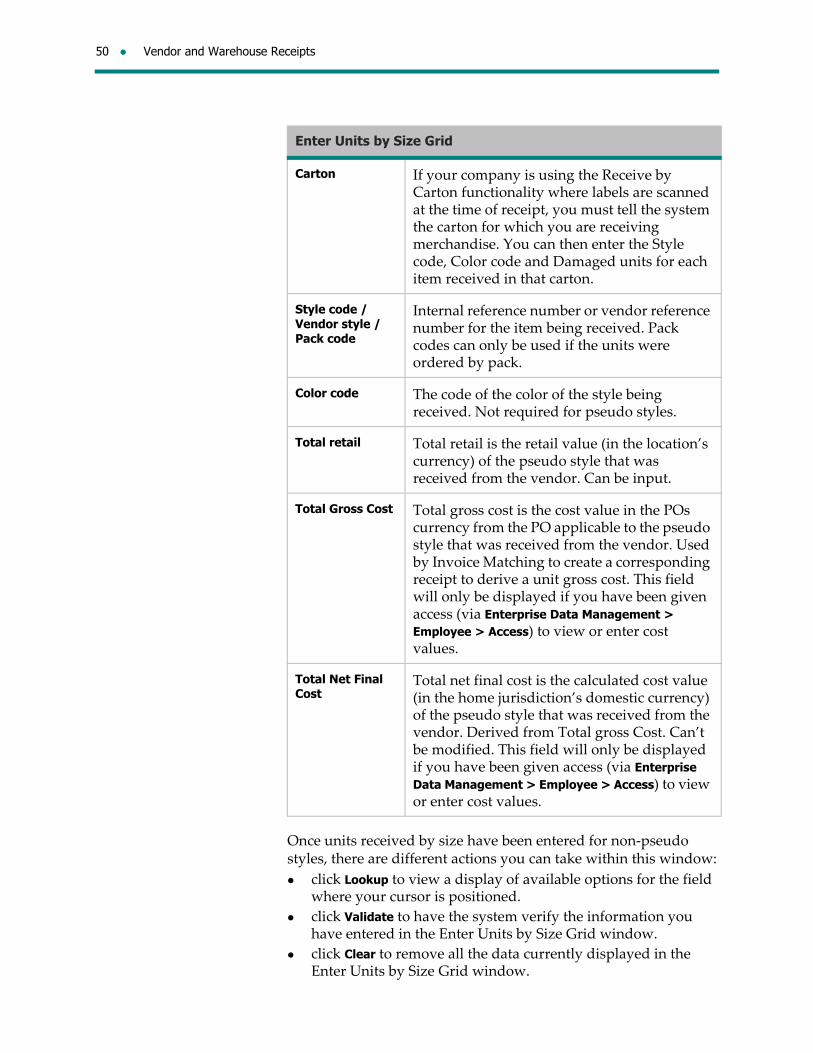
50 Vendor and Warehouse Receipts
Once units received by size have been entered for non‐pseudo styles, there are different actions you can take within this window:
click Lookup to view a display of available options for the field where your cursor is positioned.
click Validate to have the system verify the information you have entered in the Enter Units by Size Grid window.
click Clear to remove all the data currently displayed in the Enter Units by Size Grid window.
Enter Units by Size Grid
Carton If your company is using the Receive by Carton functionality where labels are scanned at the time of receipt, you must tell the system the carton for which you are receiving merchandise. You can then enter the Style code, Color code and Damaged units for each item received in that carton.
Style code / Vendor style / Pack code
Internal reference number or vendor reference number for the item being received. Pack codes can only be used if the units were ordered by pack.
Color code The code of the color of the style being received. Not required for pseudo styles.
Total retail Total retail is the retail value (in the location’s currency) of the pseudo style that was received from the vendor. Can be input.
Total Gross Cost Total gross cost is the cost value in the POs currency from the PO applicable to the pseudo style that was received from the vendor. Used by Invoice Matching to create a corresponding receipt to derive a unit gross cost. This field will only be displayed if you have been given access (via Enterprise Data Management > Employee > Access) to view or enter cost values.
Total Net Final Cost
Total net final cost is the calculated cost value (in the home jurisdiction’s domestic currency) of the pseudo style that was received from the vendor. Derived from Total gross Cost. Can’t be modified. This field will only be displayed if you have been given access (via Enterprise Data Management > Employee > Access) to view or enter cost values.
PO Receipts 51
click OK to enter the information selected into the PO Receipt details and close the Enter Units by Size Grid window.
click Cancel to close the Enter Units by Size Grid window without entering the information selected into the PO Receipt details.
click Apply to enter the selected information into the PO Receipt details, and then select another item.
To enter PO Receipts by Size Grid
1. Retrieve the PO Receipt you want to enter details for.
2. From the PO Receipt Header, select Detail.
3. For Batch totals Qty. received and Qty. damaged, enter the total units received in good condition and the total damaged units received.
4. Click Enter Units by Size Grid.
5. In the Enter Units by Size Grid dialog box, enter the following SKU details for each item received: Carton Style code / Vendor style / Pack code: enter the code of a style
on the PO
Color code: enter a color for this style (not applicable for pseudo styles)
If you are entering units for pseudo styles, remember to enter a Total Retail (in the location’s currency) and Total Gross Cost (in the POs currency) value for each style. Cost fields will only be displayed if you have been given access (via Enterprise Data Management > Employee > Access) to view or enter cost values.
In the size grid boxes, enter units received (non‐pseudo styles only). The total of the units entered here for all SKUs must equal the Batch Totals: Qty. received entered in step 5. For pseudo styles, enter total units received.
6. Click Apply.
7. When finished, click OK.
8. If you are entering damaged units, enter them directly on the Details tab.
9. On the Processing Codes tab, press F3 in the Processing Code column for the first detail and select an SKU processing code. Be sure to enter a quantity if Processing Code Type Quantity was selected.
10. Click Save > OK.
4. Entering receipts as OrderedUse Receive as Ordered only for PO receipts with a Preliminary status, to enter quantities received of all items as they were ordered on the PO. If there are any detail lines with differences in received quantities versus ordered quantities only those lines need to be modified (see “Modifying a PO Receipt ” on page 54).

52 Vendor and Warehouse Receipts
When this option is selected for a PO receipt with pseudo styles:
Total units will be set by the system based on the total units ordered on the PO but can be overridden.
Total retail will be set by the system based on the total ordered on the PO but can be overridden. This value will be in the location’s currency.
Total gross cost is set by the system based on total ordered gross cost on the PO but can be overridden. This value will be in the POs currency. If this field is modified, the system recalculates the total net final cost.
Total net final cost will be set by the system in the home jurisdiction’s domestic currency based on total ordered net final cost on the PO. This field cannot be overridden.
To enter PO Receipts as Ordered
1. Retrieve the PO Receipt you want to enter details for.
2. On the General tab, enter a date in the Date Received field.
3. From the PO Receipt Header, click Detail.
4. To receive merchandise as ordered, click Receive as Ordered.
5. To confirm that you want to set all received units equal to on‐order units, click Yes. The Batch totals: Qty. received field and the Received Units column for each detail SKU are updated with a value equal to the ordered units.
6. If you are entering damaged units, enter them directly on the Details tab.
7. Add an SKU processing code, if required. Be sure to enter a quantity if Processing Code Type Quantity was selected.
8. Save and acknowledge your work.
Entering bin locationsOnce a PO Receipt has been saved and items appearing on the document have been placed in a bin, you can specify the bin number for each item. Bin locations can be entered by SKU or pack.
Note: This feature is only available if the Distributions with no WMS system option is set. This option is defined at installation time and is not visible to the user.
To enter bin locations 1. Retrieve the PO Receipt.
2. From the Navigate menu, select Bin Locations. The Bin Locations screen from Product Management will display for this receipt. All SKUs and packs that were received on the receipt will appear.
3. In the Bin Location column, enter the location for each pack and/or SKU.
4. Click Save when finished.
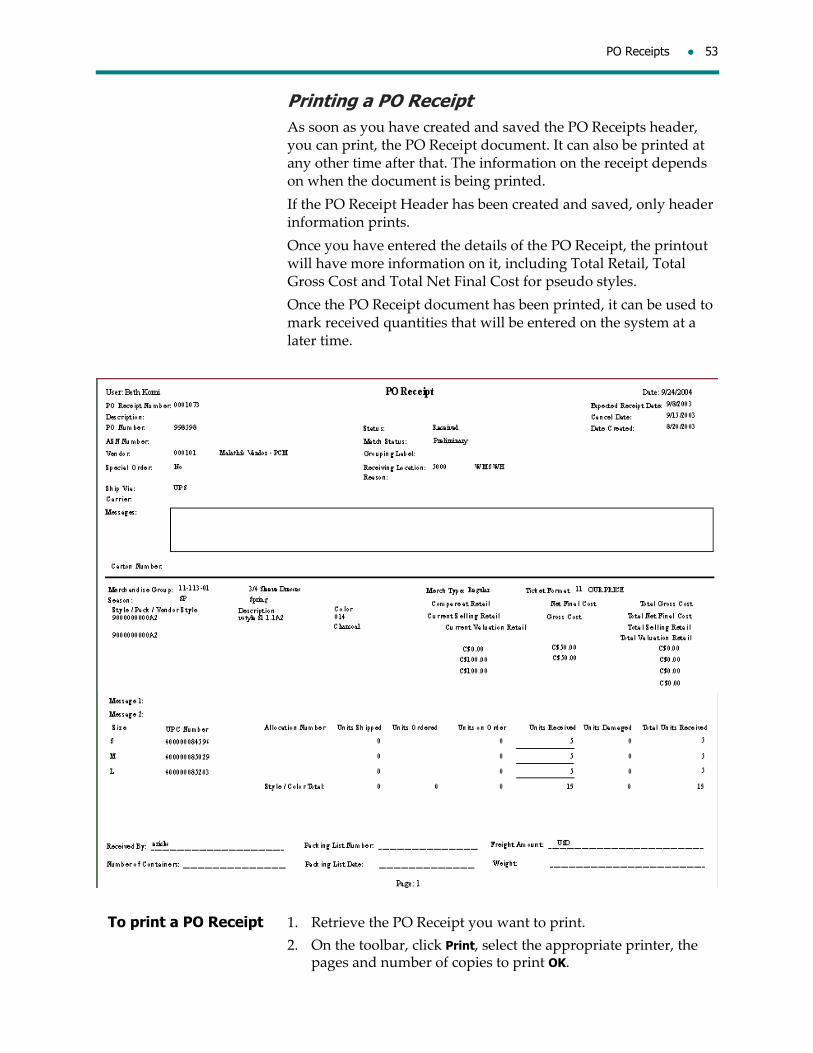
PO Receipts 53
Printing a PO ReceiptAs soon as you have created and saved the PO Receipts header, you can print, the PO Receipt document. It can also be printed at any other time after that. The information on the receipt depends on when the document is being printed.
If the PO Receipt Header has been created and saved, only header information prints.
Once you have entered the details of the PO Receipt, the printout will have more information on it, including Total Retail, Total Gross Cost and Total Net Final Cost for pseudo styles.
Once the PO Receipt document has been printed, it can be used to mark received quantities that will be entered on the system at a later time.
To print a PO Receipt 1. Retrieve the PO Receipt you want to print.
2. On the toolbar, click Print, select the appropriate printer, the pages and number of copies to print OK.

54 Vendor and Warehouse Receipts
Modifying a PO Receipt You can modify both the PO Receipt Header and the PO Receipt Details if information was entered incorrectly or forgotten. For example, after you have entered the receipt, you find two more boxes containing styles for the PO Receipt you just entered. SKU level processing codes can also be modified as long as the PO has a status of Approved or Reapproved and the PO Receipt has not yet been fully matched within Invoice Matching. A SKU level processing code can also be deleted if you find that it does not apply (for example, hangers for shoes).
Different PO Receipt fields can be modified depending on the status of the document as shown in the following table.
Note: Cost fields will only be displayed if you have been given access (via Enterprise Data Management > Employee > Access) to view or modify cost values.
Status Description What has been updated What can be modified
Preliminary The PO Receipt document has been created but the status of the document has not been changed to Received.
The document is still a work‐in‐progress, nothing has been updated at this point.
Description
Date received
Weight
Number of containers
Payment Method
BOL total cartons
Grouping label
Packing list number
Packing list date
Received by
Trouble reason
Ship via
Carrier
Freight amount
Priority
Appointment number
Pro no
Receipt messages
Header processing codes
Received units
Damaged units
SKU processing codes
Total Retail
Total Cost
Attributes
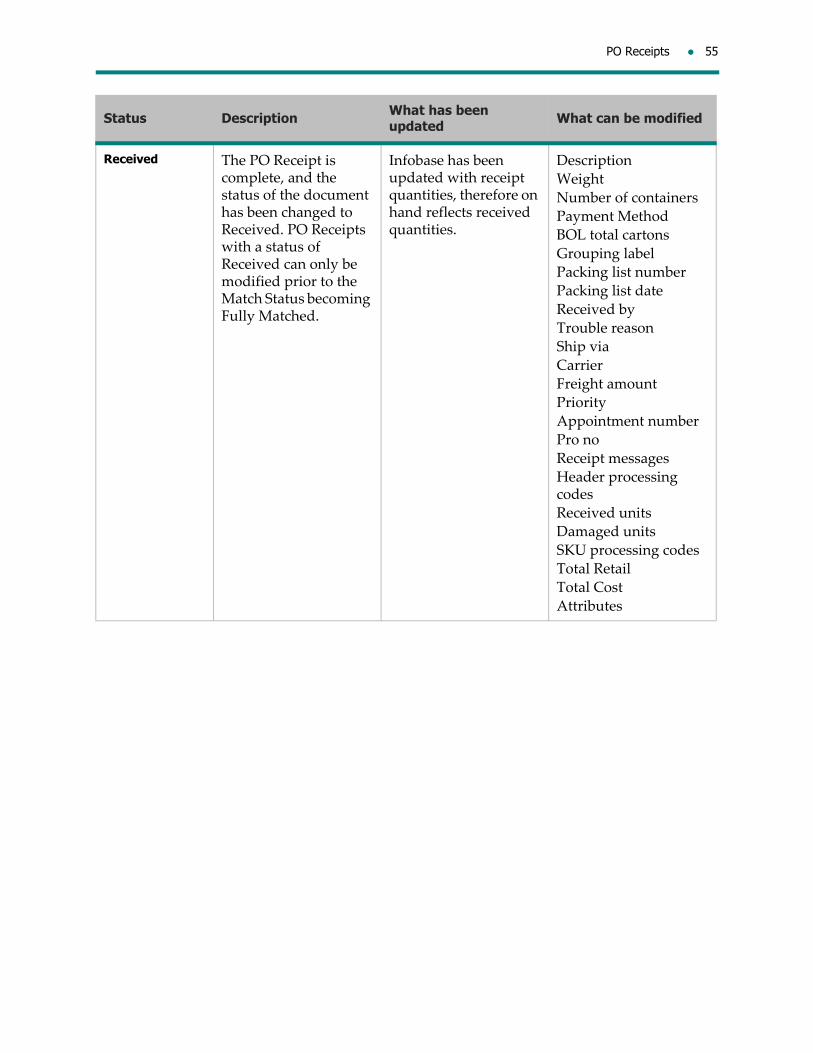
PO Receipts 55
Received The PO Receipt is complete, and the status of the document has been changed to Received. PO Receipts with a status of Received can only be modified prior to the Match Status becoming Fully Matched.
Infobase has been updated with receipt quantities, therefore on hand reflects received quantities.
Description
Weight
Number of containers
Payment Method
BOL total cartons
Grouping label
Packing list number
Packing list date
Received by
Trouble reason
Ship via
Carrier
Freight amount
Priority
Appointment number
Pro no
Receipt messages
Header processing codes
Received units
Damaged units
SKU processing codes
Total Retail
Total Cost
Attributes
Status Description What has been updated What can be modified

56 Vendor and Warehouse Receipts
To modify a PO Receipt
1. Retrieve the PO Receipt you want to modify.
2. Make the necessary changes. See “PO Receipt header” on page 32 and “PO Receipt details” on page 44 for field definitions.
3. Save and acknowledge your input.
Receiving a PO ReceiptOnce you have entered PO details you can either just save the PO Receipt, or you can save the receipt and change the status of the document to Received. The status can be changed from either within the document or from the Inbound Worklist. Use the save option only if you start a receipt today but don’t have time to complete it. When you save, the document will be saved where you left off and on hand for your location will not be updated. When you receive the rest of the shipment, you should save the receipt and change the status of the document to Received to update the on hand for your location.
Canceled The PO Receipt has been canceled.
If a Preliminary PO Receipt has been canceled, nothing has been updated. If a Received PO Receipt has been canceled, the received units from the document are reversed in Infobase.
Description
Date received
Weight
Number of containers
Payment Method
BOL total cartons
Grouping label
Packing list number
Packing list date
Received by
Trouble reason
Ship via
Carrier
Freight amount
Priority
Appointment number
Pro no
Receipt messages
Header processing codes
Received units
Damaged units
SKU processing codes
Total Retail
Total Cost
Attributes
Status Description What has been updated What can be modified

PO Receipts 57
For clients using Merchandisingʹs Invoice Matching, whenever the status of a PO Receipt is changed to Received, Invoice Matching is automatically updated, the PO Receipt’s Match Status will be set to Unmatched and Invoice Matching will update the match status from this point on. Modifications to a PO Receipt are still allowed until the Match Status is Fully Matched and will be fed to Invoice Matching.
To receive a PO Receipt
1. Retrieve the PO Receipt you want to receive.
2. Click Receive. The status is now Received.
3. To acknowledge the status change, click OK.
Canceling and Reinstating a PO ReceiptA PO Receipt with a status of either Preliminary or Received can be canceled. This might be necessary if the receipt was accidentally made against the wrong PO. If the document that was canceled had a status of Preliminary, the status of the document changes to Canceled. If the document that was canceled had a status of Received, the location’s on hand will be decreased by the number of units on the receipt document at the time of canceling, and the status of the document changes to Canceled.
If you canceled a PO Receipt by mistake, you can reinstate it to a status of Preliminary. You will need to reinput the Date Received in the header. Only PO Receipts with a status of Canceled may be reinstated.
To cancel or reinstate a PO receipt, you can either:
highlight the document on the Inbound Worklist and select the Cancel or Reinstate action on the Actions menu, or
open the document and select the Cancel or Reinstate action on the Actions menu.
To cancel a PO Receipt Note: Instead of following the procedure below to cancel a PO Receipt document, you can also highlight the document on the Inbound Worklist and select the Cancel action on the Actions menu.
1. Retrieve the PO Receipt you want to cancel.
2. From the Actions menu, select Cancel.
3. To acknowledge the status change, click OK. The status of this PO Receipt is now Canceled.
To reinstate a PO Receipt
Instead of following the procedure below to reinstate a PO Receipt document, you can also open the document and select the Reinstate action on the Actions menu.
1. On the Inbound Worklist, highlight the PO Receipt you want to reinstate.
2. From the Actions menu, select Reinstate.
58 Vendor and Warehouse Receipts
3. To acknowledge the status change, click OK. The status of this PO Receipt is now Preliminary.
Releasing a PO Receipt to a Third Party Invoice Matching system
Note: If your company is using a third party Invoice Matching system, you will need to release PO receipts to this system using the functionality described below.
When you have finished entering all the receipt information for the shipment, release the document to a third party Invoice Matching system so that the vendor will be paid for the goods. Only PO Receipts with a Received status (or Preliminary with the mandatory header fields completed and at least one detail) can be released to Invoice Matching. Once the receipt has been released to a third party Invoice Matching system, its match status will change from Preliminary to Fully Matched, and the document can no longer be modified.
Once the third party Invoice Matching module has fully matched the PO Receipt with invoice(s), it will update the PO Receipt document’s status to Matched.
If you are using the Warehouse Management system (WMS), when a Received PO Receipt has been verified and completed in WMS, its Match status is set to Unmatched and the PO receipt is sent to the queue for Inventory Management. This received unmatched PO Receipt can then be released to a third part invoice invoice matching system
To release a PO Receipt to a third
party Invoice Matching system
1. Retrieve the PO Receipt you want to release.
2. Select a payment method if the field is blank.
3. From the Actions menu, select Release to Invoice Matching. The status of this PO Receipt header is now Unmatched.
4. To acknowledge the status change, click OK.
PO Receipts not Released to Invoice Matching greater than ‘X’ Days after ReceiptThe Receipts not Released to Invoice Matching greater than ‘X’ Days after Receipt report can be generated from the Reports menu in Inventory Management. Highlight the report name and then click Print.
This report shows PO Receipts not yet released to Invoice Matching and can be useful in ensuring vendors are paid for their merchandise.

PO Receipts 59
System delete of PO ReceiptsPO Receipts will be automatically deleted by the system for you if the status is:
Canceled, or
Fully Matched, and
a predefined number of weeks have passed since the status was changed to Received.
Note: A PO Receipt will not be deleted if it is linked to a distribution document.
Deleting a PO Receipt manuallyIf you need to clean up PO Receipt documents that are no longer required, you can delete any that have a status of either Preliminary or Canceled, or have a matching status of Fully Matched.
Note: A PO Receipt cannot be deleted if it is linked to a distribution document.
To delete a PO Receipt from the Inbound Worklist, highlight the appropriate PO Receipt document to be deleted and then click Delete.
PO Receipts vs. Ordered ReportThe PO Receipts vs. Ordered Report can be generated from the Reports menu in Inventory Management. Simply highlight the report name and then click Print. This report will show the ordered quantities and the received quantities for all the items on a PO Receipt document. The PO Receipt documents that can be included on the report are any with a status other than Preliminary. Total Retail, Total Gross Cost and Total Net Final Cost are shown for pseudo styles.
This report can be useful for following up with vendors that are not supposed to ship incomplete, or for canceling balances on order that will never be received.
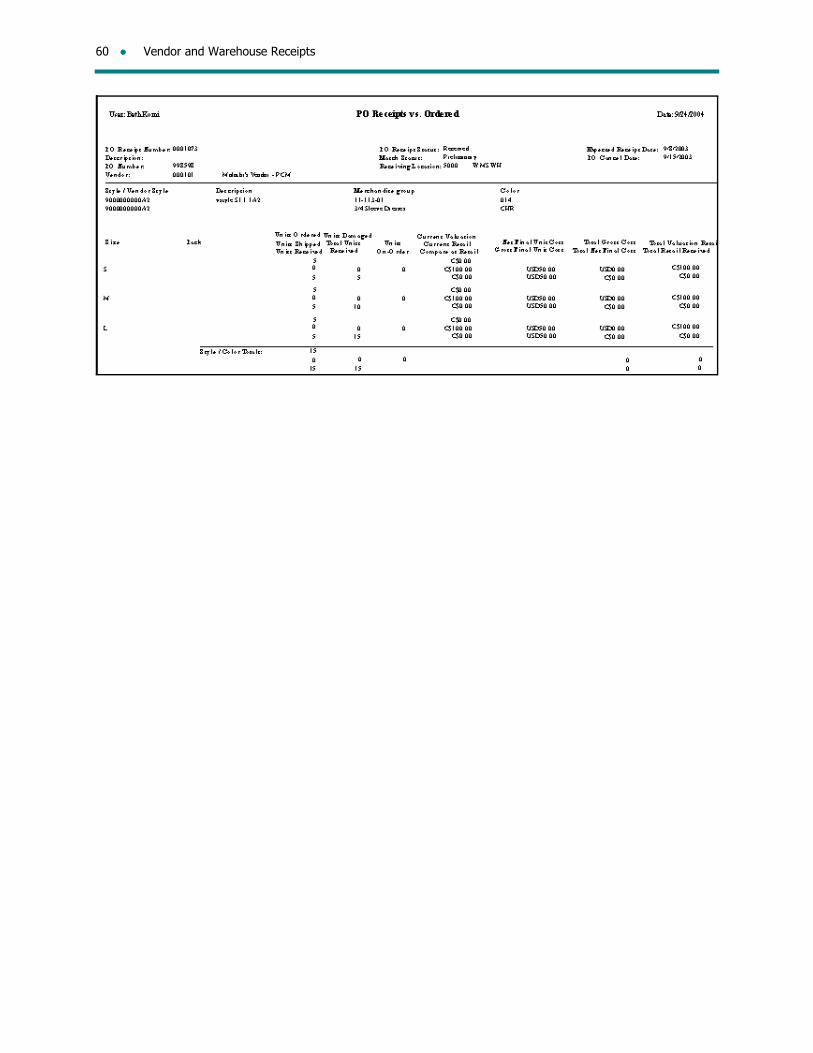
60 Vendor and Warehouse Receipts
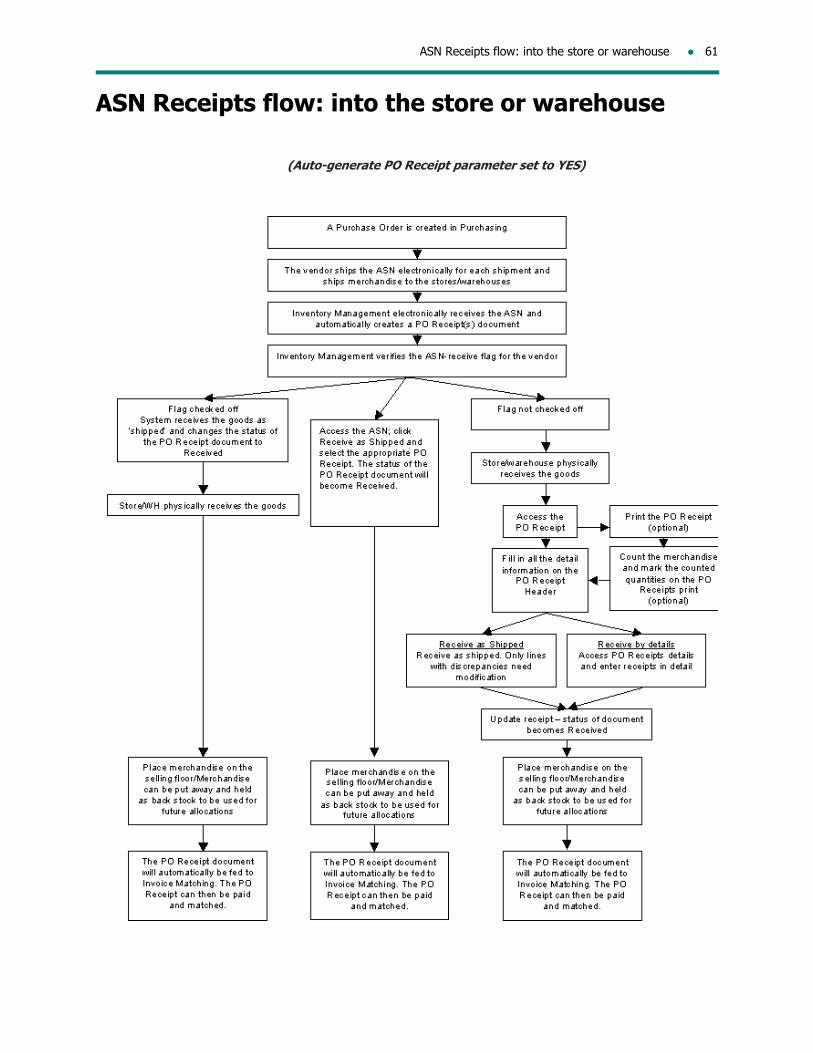
ASN Receipts flow: into the store or warehouse 61
ASN Receipts flow: into the store or warehouse
(Auto-generate PO Receipt parameter set to YES)

62 Vendor and Warehouse Receipts
ASN Receipts flow: into the store/warehouse
(Auto-generate PO Receipt parameter set to NO)
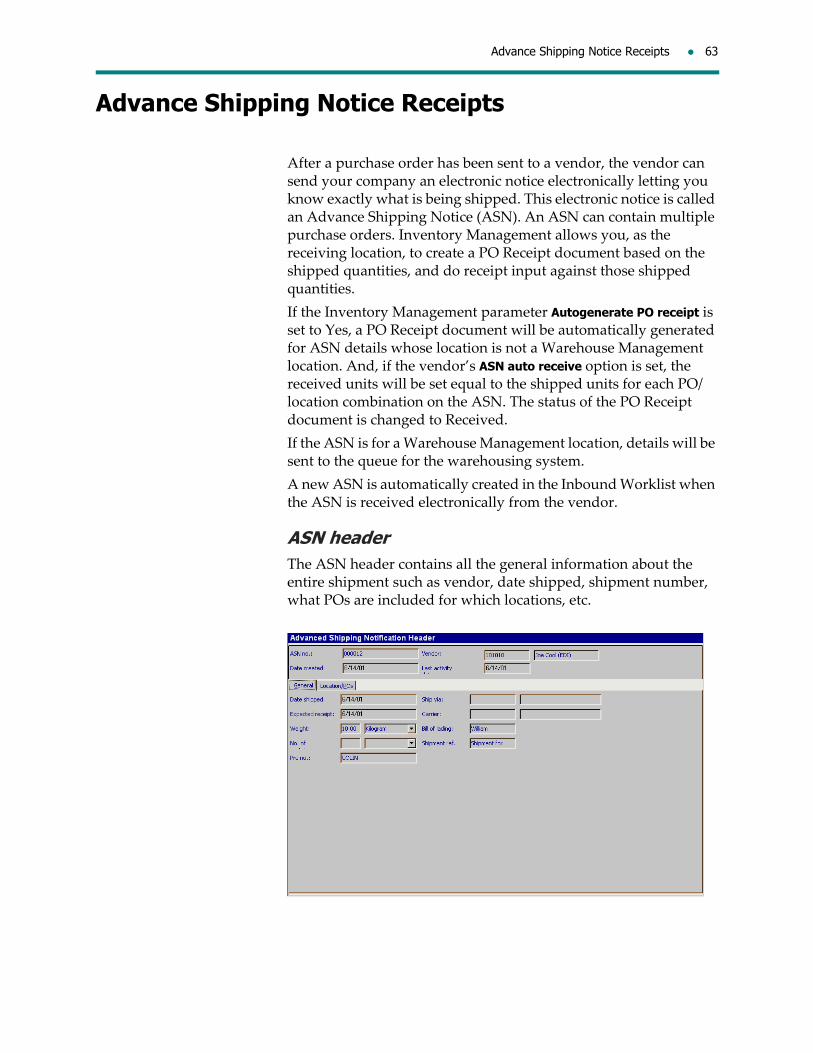
Advance Shipping Notice Receipts 63
Advance Shipping Notice Receipts
After a purchase order has been sent to a vendor, the vendor can send your company an electronic notice electronically letting you know exactly what is being shipped. This electronic notice is called an Advance Shipping Notice (ASN). An ASN can contain multiple purchase orders. Inventory Management allows you, as the receiving location, to create a PO Receipt document based on the shipped quantities, and do receipt input against those shipped quantities.
If the Inventory Management parameter Autogenerate PO receipt is set to Yes, a PO Receipt document will be automatically generated for ASN details whose location is not a Warehouse Management location. And, if the vendor’s ASN auto receive option is set, the received units will be set equal to the shipped units for each PO/location combination on the ASN. The status of the PO Receipt document is changed to Received.
If the ASN is for a Warehouse Management location, details will be sent to the queue for the warehousing system.
A new ASN is automatically created in the Inbound Worklist when the ASN is received electronically from the vendor.
ASN headerThe ASN header contains all the general information about the entire shipment such as vendor, date shipped, shipment number, what POs are included for which locations, etc.
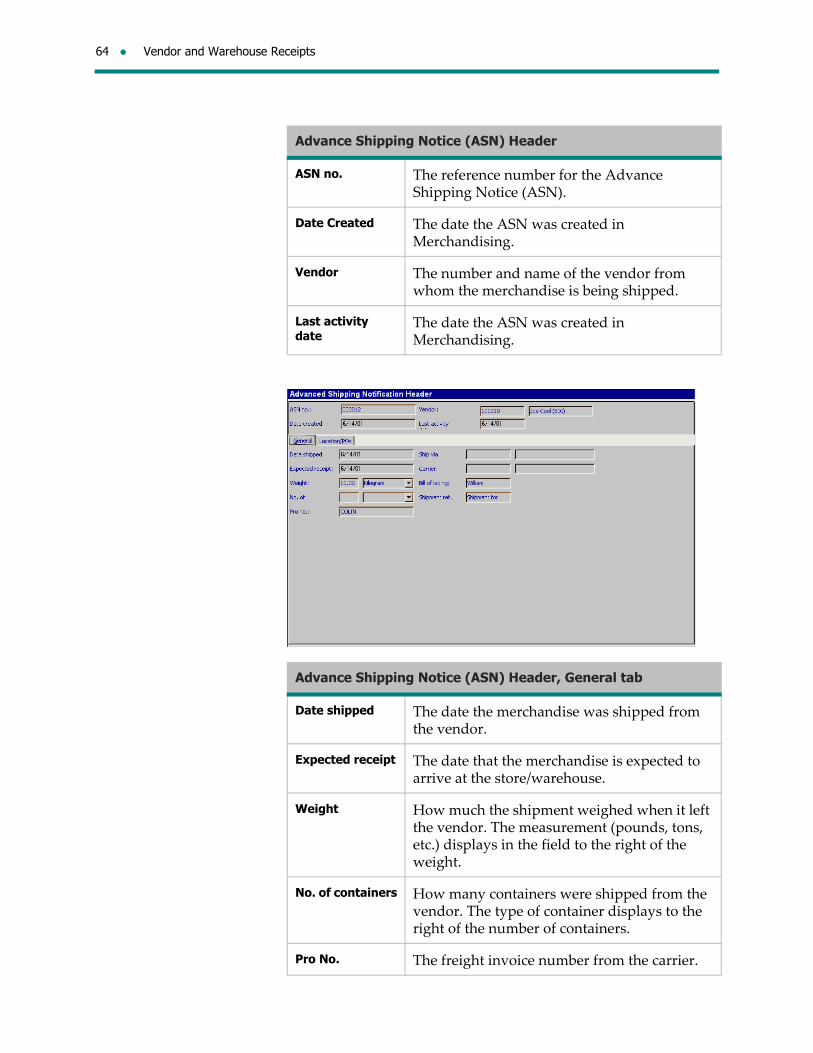
64 Vendor and Warehouse Receipts
Advance Shipping Notice (ASN) Header
ASN no. The reference number for the Advance Shipping Notice (ASN).
Date Created The date the ASN was created in Merchandising.
Vendor The number and name of the vendor from whom the merchandise is being shipped.
Last activity date
The date the ASN was created in Merchandising.
Advance Shipping Notice (ASN) Header, General tab
Date shipped The date the merchandise was shipped from the vendor.
Expected receipt The date that the merchandise is expected to arrive at the store/warehouse.
Weight How much the shipment weighed when it left the vendor. The measurement (pounds, tons, etc.) displays in the field to the right of the weight.
No. of containers How many containers were shipped from the vendor. The type of container displays to the right of the number of containers.
Pro No. The freight invoice number from the carrier.

Advance Shipping Notice Receipts 65
Ship via The method by which the merchandise was shipped.
Carrier The carrier that shipped the merchandise.
Bill of lading The carrier’s reference number for the shipment.
Shipment ref. No.
Mandatory; the vendor’s reference number for the shipment.
Advance Shipping Notice (ASN) Header, Location/POs tab
Location No. The location that the merchandise has been shipped to and will be received in.
Location Name The description of the location the merchandise was shipped to.
PO No. The number of the purchase order on which the merchandise was ordered.
Blanket PO No. The blanket purchase order number if the merchandise was ordered on a blanket PO.
Release No. The release number for the blanket purchase order if the merchandise was ordered on a blanket PO.
Advance Shipping Notice (ASN) Header, General tab

66 Vendor and Warehouse Receipts
View PO Receipts for an ASNFrom either the ASN Header or ASN Detail screen, you can display a list of all PO receipts (regardless of status) created for an ASN.
On the Actions menu, select Show All PO Receipts.
ASN detailsThe ASN details show the styles and the total units shipped by the vendor for each style by purchase order number/location.
Ticket Source Where the tickets will be generated from. Either None, PO, PO Receipt, ASN or Allocation.
Ticket Status The status of the tickets; either Required, Not Required, Not Applicable, Pending Print, Printed or Pending Reprint.
Advance Shipping Notice (ASN) Header, Location/POs tab

Advance Shipping Notice Receipts 67

68 Vendor and Warehouse Receipts
Entering receipts against an ASN if the parameter
Auto-Generate PO Receipt is set to YesIf the parameter Auto‐Generate PO Receipt is set to Yes, there are two ways to enter receipts against an ASN:
Advance Shipping Notice (ASN) Details
Location No. The location that the merchandise has been shipped to and will be received in.
Location name The description of the location the merchandise was shipped to.
PO No. The number of the purchase order on which the merchandise was ordered.
Carton If merchandise is being shipped in cartons, the carton identification number appears here.
Style Code Internal reference number for the item that was shipped.
Style Description
Text describing the item that was shipped.
Color The code of the color of the item that was shipped.
Color Description
Text describing the color of the item that was shipped.
Size Code Size descriptions for both the primary size and if applicable, the secondary size of the style. For example, a range of widths associated with a specific shoe size.
Shipped Units The number of units of the style/color/size the vendor shipped.
Vendor Style Vendor’s reference number for the style that was shipped.
Merchandise Group Code
Displays the style’s Merchandising Group (the lowest level in the merchandising hierarchy).
Merchandise Group Label
Description of the Merchandising Group the style belongs to.
UPC The Universal Product Code is a numeric code uniquely identifying merchandise down to the style/color/size level.

Advance Shipping Notice Receipts 69
1. by accessing the ASN
2. by accessing the PO receipt
A third option, where nothing needs to be done by the user, sets the ASN Auto‐receive option to Yes. If this is set up, as soon as the ASN is created on the system and the PO Receipt document is auto‐created, the system will set received units equal to shipped units and change the status of the document to Received.
1 - By accessing the ASN1. Access the ASN. (Typically, do this by scoping on the vendor’s
ship reference number.)
2. Click Receive as Shipped.
3. Select the appropriate PO Receipt document to receive as shipped.
Doing this causes the system to set received quantities equal to shipped quantities. It also changes the status of the PO Receipt document to Received, and updates the system so that the on hand will reflect that the styles have been received in the store/warehouse.
To enter receipts against an ASN by accessing the ASN
1. From the Main Menu, select Inbound.
2. From the Inbound Worklist, select ASN.
3. Enter an ASN number from your database and then click OK. (Typically, the ASN number is auto generated by the system and is therefore unknown to the user. Scope on the shipment reference number to find the ASN document in the Inbound Worklist.)
4. Click Receive as Shipped.
5. Select the PO Receipt to receive as shipped and then click OK.
6. To acknowledge the receipt, click OK.
2 - By accessing the PO Receipt1. Access the PO Receipt that was auto‐generated by the system
via the PO Receipts menu.
2. Enter receipts as shipped or in detail (by SKU, by UPC, or by size grid).
To receive as shipped, select Receive as Shipped from the Actions menu. This will set the received units equal to the shipped units.
To receive in detail (by SKU, by UPC, or by size grid), see “PO Receipt details” on page 44.
To then receive the PO Receipt document so that the location’s on hand is updated and the status of the document is changed to Received, select Receive from the Actions menu.

70 Vendor and Warehouse Receipts
To enter receipts against an ASN by
accessing the PO Receipt
1. From the Main Menu, select Inbound.
2. From the Inbound Worklist, select PO Receipt.
3. In the PO Receipt dialog box, select PO Receipt no., enter the receipt number that was auto‐generated by the system and then click OK.
4. From the PO Receipt Header, select Detail.
5. For Batch totals, enter a value for both Qty. received and Qty. damaged.
6. On the Details tab, in the Received Units and Damaged Units columns, enter unit values.
7. On the Actions menu, select Receive as Ordered.
8. Click OK.
Entering receipts against an ASN if the parameter Auto-Generate PO Receipt is set to NoIf the parameter Auto‐Generate PO Receipt is set to No, there are three ways to enter receipts against an ASN:
1. Generate a PO Receipt ‐ as shipped via the ASN menu (1‐step process)
2. Generate a PO Receipt and receive as shipped via the ASN menu (2‐step process)
3. Generate a PO Receipt and enter receipts via PO Receipts menu
1 - Generating a PO Receipt as Shipped via the ASN menu (1-step process)1. Access the ASN.
2. Select Generate PO Receipts as Shipped on the Actions menu.
Doing this causes the system to create a PO Receipt, set received units equal to shipped units, change the status of the PO Receipt document to Received, and update the on hand of the store or warehouse with the receipt quantities.
If any of the SKUs were not received as shipped, the quantities received can then be modified via the PO Receipts menu (See “Modifying a PO Receipt ” on page 54 for details).
To generate a PO Receipt As Shipped via the ASN menu (1 step
process)
1. Retrieve the ASN you want to generate a receipt for.
2. From the Actions menu, select Generate PO Receipts as Shipped.
3. Click OK in response to the prompt All the listed Location/POs will be used.
4. To acknowledge that the PO Receipt was successfully generated, click OK.

Advance Shipping Notice Receipts 71
2 - Generating a PO Receipt and receiving as shipped via the ASN menu (2-step process)1. Access the ASN.
2. Create a PO Receipt with a Preliminary status.
3. Select Receive as Shipped from the Actions menu.
Doing this creates a PO Receipt document for you to receive against, and then you will be able to select Receive as Shipped from the Actions menu. This will allow you to select the appropriate PO Receipt for the PO number and location. Once you have selected the appropriate PO Receipt, and have clicked OK, the system will set the received quantities equal to the shipped quantities, change the status of the document to “Received”, and update the on hand of the store or warehouse with the receipt quantities.
To generate a PO Receipt and receive as
shipped via the ASN menu (2-step process)
1. Retrieve the ASN you want to generate a PO Receipt for.
2. To generate the PO Receipt(s), from the Actions menu select Generate PO Receipt(s) – Preliminary status.
3. To generate receipts for all the listed location/POs, click OK.
4. To acknowledge that the PO Receipt(s) were successfully generated, click OK.
5. To receive as shipped, from the Actions menu select Receive as Shipped, select the receipts to be received and then click OK.
3 - Generating a PO Receipt and entering receipts via the PO Receipts menu1. Access the ASN.
2. Create a PO Receipt with a Preliminary status.
3. Access the new PO Receipt via the PO Receipts menu.
4. Enter receipts as shipped or in detail (by SKU, by UPC, or by size grid).
Doing this creates a PO Receipt document for you to receive against. Then you can access the PO Receipt document via the PO Receipts menu.
To receive as shipped, select Receive as Shipped from the Actions menu. This will set received units equal to shipped units.
To enter receipts in detail (by SKU, by UPC, or by size grid), see “PO Receipt details” on page 44 in this manual for more information.
To then receive the PO Receipt document so that the location’s on hand is updated to reflect the received units and the status of the PO Receipt document is changed to Received, select Receive from the Actions menu.

72 Vendor and Warehouse Receipts
To generate a PO Receipt and enter
receipts via the PO Receipts menu
1. Retrieve the ASN you want to generate a PO Receipt(s) for.
2. Click Generate PO Receipt - Preliminary Status > OK to use all the listed location/POs.
3. To acknowledge that the generation of the PO Receipt(s) was successful, click OK.
4. Access the PO Receipts menu, retrieve the PO Receipt(s), enter receipt information and change the status of the PO Receipt document(s).
Printing a PO Receipt based on an ASNSee “Printing a PO Receipt” on page 53 for more details.
Modifying quantities received against an ASN See “Modifying a PO Receipt ” on page 54 for details.
Canceling and Reinstating a PO Receipt based on ASN quantitiesSee “Canceling and Reinstating a PO Receipt” on page 57 for more details.
Releasing a PO Receipt based on an ASN to Invoice Matching
Note: If you are using Invoice Matching, this step is not necessary.
When you have finished entering all the receipts for the ASN shipment, you should release the PO Receipt documents to Invoice Matching so that the invoice from the vendor gets paid. See “Releasing a PO Receipt to a Third Party Invoice Matching system” on page 58 for details.
Advance Shipping Notice Receipts 73
System delete of ASNs The system will automatically delete ASNs a certain number of weeks after the date received. The number of weeks is defined in the parameters.
Note: An ASN will not be deleted if it is linked to a distribution document with a status of either Open, Frozen or Released. Only ASNs linked to distribution documents with a status of either Preliminary, Complete or Canceled will be deleted.
Deleting ASNs manuallyYou can delete an ASN manually, perhaps because the shipment was stolen while in transit and will not be received.
Note: An ASN will not be deleted if it is linked to a distribution document with a status of either Open, Frozen or Released. Only ASNs linked to distribution documents with a status of either Preliminary, Complete or Canceled will be deleted.
Access the Inbound Worklist, highlight the ASN you want to delete and from the File menu, click Delete.
A notice of the delete will be sent to the queue for Warehouse Management for a Warehouse Management or Distribution Center location whose Warehousing system option (in Enterprise Data > Location Maintenance) is enabled.
System delete of PO Receipts based on an ASNSee “System delete of PO Receipts” on page 59 for details.
Deleting a PO Receipt based on an ASN manuallySee “Deleting a PO Receipt manually” on page 59 for details.

74 Vendor and Warehouse Receipts
Store Shipments flow

Store Shipment Receipts 75
Store Shipment Receipts
Store Shipment Receipts at the store are used to confirm receipt of merchandise at the store from the warehouse. One Store Shipment can contain units from many different distributions.
Store Shipments are created in Warehouse Management or an external distribution system. Once a shipment is sent, the Store Shipment information from the distribution system is added to Inventory Management Store Shipments and will have a Sent status.
There is an Enterprise Data, Inventory Management system parameter called Auto-receive store shipments. If this parameter is set to Yes, then for all locations, Inventory Management will automatically set the received units equal to the shipped units, change the status of the document to Received, and update the status of the items on the shipment to Available for the receiving location.
If this system parameter is set to No, then the document retains its Sent status, and the units on the shipment are considered Unavailable ‐ In Transit. Once the Store Shipment Receipts have been entered and the document status has been changed to Received at the store, the units on the Store Shipment are considered Available.
Each location also has an Auto-receive store shipments parameter so that store shipments can be automatically received on a location‐by‐location basis. If the Inventory Management system parameter is set, all locations will be auto‐receive. If the system parameter is not set, the system uses each locationʹs Auto-receive store shipments parameter value.
Note: When you need to move pseudo style inventory between two locations within your system a 2‐sided UDA function

76 Vendor and Warehouse Receipts
has been designed. Use it to adjust total units, total retail and total cost dollars for pseudo styles. See “Enter both Cost and Units adjustments” on page 267 for more information.
Store Shipment window
Store Shipment no.
Assigned to the shipment in the distribution system (for example, Warehouse Management).
Status The status of the Store Shipment document based on certain activity:
Sent ‐ the shipment has been sent from the warehouse but is not yet received by the store.
Received ‐ the shipment has been received by the store.
Date created The date the Store Shipment was first added in Inventory Management.
Last activity date
The date the Store Shipment document was last modified.
Date shipped The date the warehouse shipped the items to the store.
Exp. Receipt date
The expected receipt date is the approximate date the store will receive the shipment. It is equal to the date shipped plus the number of expected in transit days set up in Warehouse Management by store.
Date received The date the merchandise is physically received by the store; defaults to the current date.
From location The number and name of the warehouse that is sending the shipment.
To location The number and name of the store the shipment is being sent to.
External system Where the shipment was created; typically Warehouse Management .
Received by The employee who checked in the shipment.
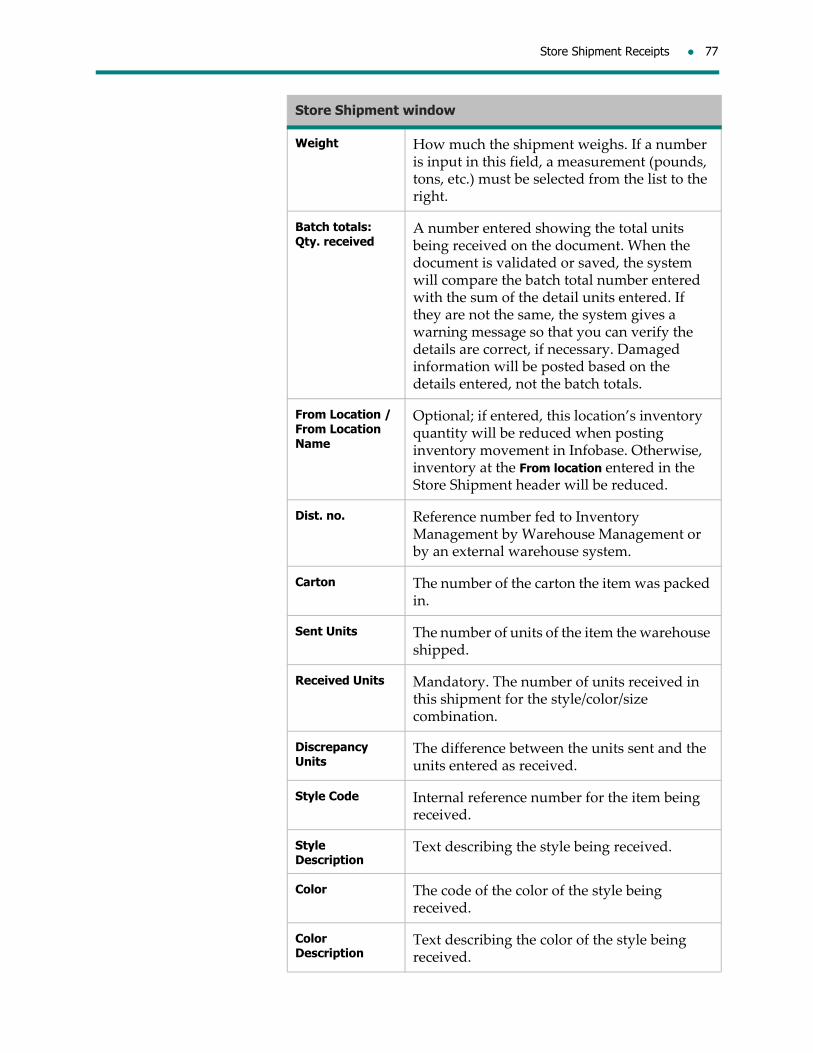
Store Shipment Receipts 77
Weight How much the shipment weighs. If a number is input in this field, a measurement (pounds, tons, etc.) must be selected from the list to the right.
Batch totals: Qty. received
A number entered showing the total units being received on the document. When the document is validated or saved, the system will compare the batch total number entered with the sum of the detail units entered. If they are not the same, the system gives a warning message so that you can verify the details are correct, if necessary. Damaged information will be posted based on the details entered, not the batch totals.
From Location / From Location Name
Optional; if entered, this location’s inventory quantity will be reduced when posting inventory movement in Infobase. Otherwise, inventory at the From location entered in the Store Shipment header will be reduced.
Dist. no. Reference number fed to Inventory Management by Warehouse Management or by an external warehouse system.
Carton The number of the carton the item was packed in.
Sent Units The number of units of the item the warehouse shipped.
Received Units Mandatory. The number of units received in this shipment for the style/color/size combination.
Discrepancy Units
The difference between the units sent and the units entered as received.
Style Code Internal reference number for the item being received.
Style Description
Text describing the style being received.
Color The code of the color of the style being received.
Color Description
Text describing the color of the style being received.
Store Shipment window

78 Vendor and Warehouse Receipts
Entering receipts for a Store ShipmentIf the shipment is not auto‐received into the store, then the receipts must be entered by the store.
Receipts can be entered in three ways:
1. in detail: by SKU,
2. in detail: by UPC, or
3. by exception: receive as sent.
1. Entering receipts for a Store Shipment by SKUIf you are manually keying the receipt, you will enter the received units line by line.
To enter Store Shipment Receipts by
SKU
1. From the Main Menu, select Inbound.
2. From the Inbound Worklist, select Store Shipment.
3. Enter the Store Shipment number for which you want to enter receipts and then click OK.
4. Enter the pertinent receipt information.
5. For Batch totals: Qty. received, enter total units received.
6. Enter the From Location if it is different to the From location in the Store Shipment header.
Size Code Size descriptions for both the primary size and if applicable, the secondary size of the style. For example, a range of widths associated with a specific shoe size.
Vendor Code The number of the vendor from whom the item was received.
Vendor The name of the vendor from whom the item was received.
Vendor Style Vendor’s reference number for the style being received.
Merchandise Group Code
Displays the style’s Merchandising Group (the lowest level in the merchandising hierarchy).
Merchandise Group Label
Description of the Merchandising Group the style belongs to.
UPC The Universal Product Code is a numeric code uniquely identifying the merchandise down to the style/color/size level.
Store Shipment window
Store Shipment Receipts 79
7. Enter the received units. If the units you are entering do not equal the units shown in the Sent Units column, the difference will be displayed in the Discrepancy units column. (Since the warehouse claims to have sent a specific quantity and the store claims to have received a different quantity, the missing or extra units fall in the discrepancy field for reporting and investigative purposes.)
8. Save and acknowledge your input.
2. Entering receipts for a Store Shipment by UPCUse this option if you are scanning in the units for each detail line on the shipment. You can also use this function to manually type in the UPC and the quantity received of that UPC if the ticket is damaged.
To enter Store Shipment Receipts by
UPC
1. Retrieve the Store Shipment for which you are entering receipts.
2. Enter the pertinent receipt information.
3. For Batch totals: Qty. received, enter total units received.
4. Click Enter Units by UPC.
5. For each detail line, enter the From Location if it is different to the From location in the Store Shipment header, the carton number, the UPC number and the quantity received (if different from the default value) and then click Apply.
6. Repeat for each item being received. When finished, click Close.
7. Save and acknowledge your input
3. Entering receipts for a Store Shipment as sentReceive as sent if you have received most of the goods as shipped. You can change the units on the lines that are different.
To enter Store Shipment Receipts as
sent
1. Retrieve the Store Shipment you want to receive as sent.
2. Enter the pertinent receipt information.
3. Click Receive as Sent. Any modifications can be made later.
4. To confirm that you want to set all received units equal to sent units, click Yes. The Batch totals: Qty. received and Received Units column for each detail SKU are updated with a value equal to the ordered units.
5. Save and acknowledge your input.
Printing a Store Shipment receiptDocuments for Store Shipments sent to your store can be printed so that received units can be written on the document for entry in the system at a later time.
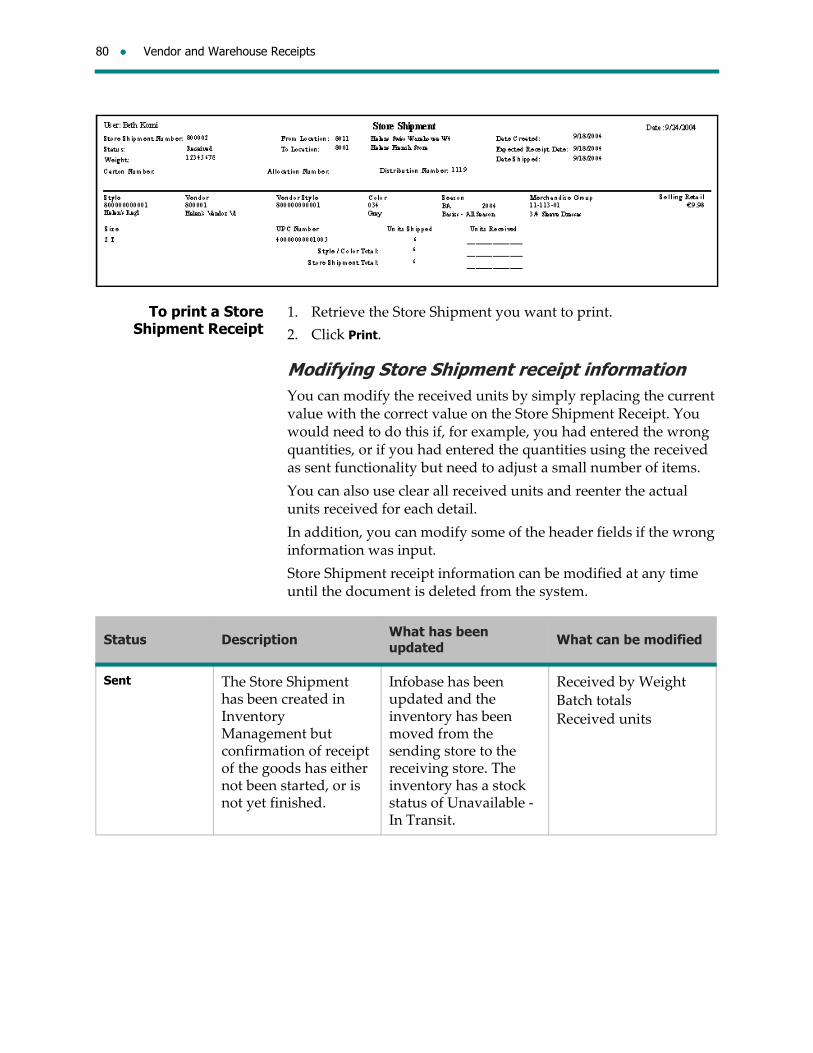
80 Vendor and Warehouse Receipts
To print a Store Shipment Receipt
1. Retrieve the Store Shipment you want to print.
2. Click Print.
Modifying Store Shipment receipt informationYou can modify the received units by simply replacing the current value with the correct value on the Store Shipment Receipt. You would need to do this if, for example, you had entered the wrong quantities, or if you had entered the quantities using the received as sent functionality but need to adjust a small number of items.
You can also use clear all received units and reenter the actual units received for each detail.
In addition, you can modify some of the header fields if the wrong information was input.
Store Shipment receipt information can be modified at any time until the document is deleted from the system.
Status Description What has been updated What can be modified
Sent The Store Shipment has been created in Inventory Management but confirmation of receipt of the goods has either not been started, or is not yet finished.
Infobase has been updated and the inventory has been moved from the sending store to the receiving store. The inventory has a stock status of Unavailable ‐ In Transit.
Received by Weight
Batch totals
Received units

Store Shipment Receipts 81
To modify a Store Shipment Receipt
1. Retrieve the Store Shipment you want to modify.
2. Make the necessary changes. See “Store Shipment Receipts” on page 75 for field definitions.
3. Save and acknowledge your input.
Receiving a Store ShipmentOnce all receipts have been entered, the status of the Store Shipment document should be updated to Received so that the units are no longer considered in transit. To receive the Store Shipment, click Receive. The status of the Store Shipment document changes from Sent to Received. If you are using the Warehouse Management System (WMS), when a store shipment is received, the details will be sent to the queue for WMS.
Discrepancy ReportThe Discrepancy report can be generated from the Reports menu in Inventory Management. Highlight the report name and then click Print. Use this report to monitor discrepancies between units sent and units received for completed store shipments and follow up on the store shipments listed.
Received Sent quantities have been confirmed as received.
Infobase is updated. Status of units received change from Unavailable ‐ In Transit to Available. Status of units not received (discrepancy) change from Unavailable ‐ In Transit to Unavailable ‐ Discrepancy.
Received by
Weight
Batch totals
Received units
Status Description What has been updated What can be modified

82 Vendor and Warehouse Receipts
Store Shipments Not Received within ‘X’ Days of ShipmentThe Store Shipments Not Received within ‘X’ Days of Shipment can be generated from the Reports menu in Inventory Management. Highlight the report name and then click Print. This report shows the progress of a store shipment. It lists store shipments with a status of “Sent” in Inventory Management that have not been received by the receiving store.
This report can be used to follow up on store shipments listed.
System delete of Store Shipment receiptsStore Shipment receipts will be automatically deleted by the system for you if the Store Shipment has had a status of Received for a user‐defined number of weeks.
Deleting a Store Shipment receipt manuallyIf you need to remove some of the Store Shipment documents from your system, you can delete any that have a status of Received.
To delete a Store Shipment receipt, select the appropriate Store Shipment receipt document from the Inbound Worklist and then click Delete.
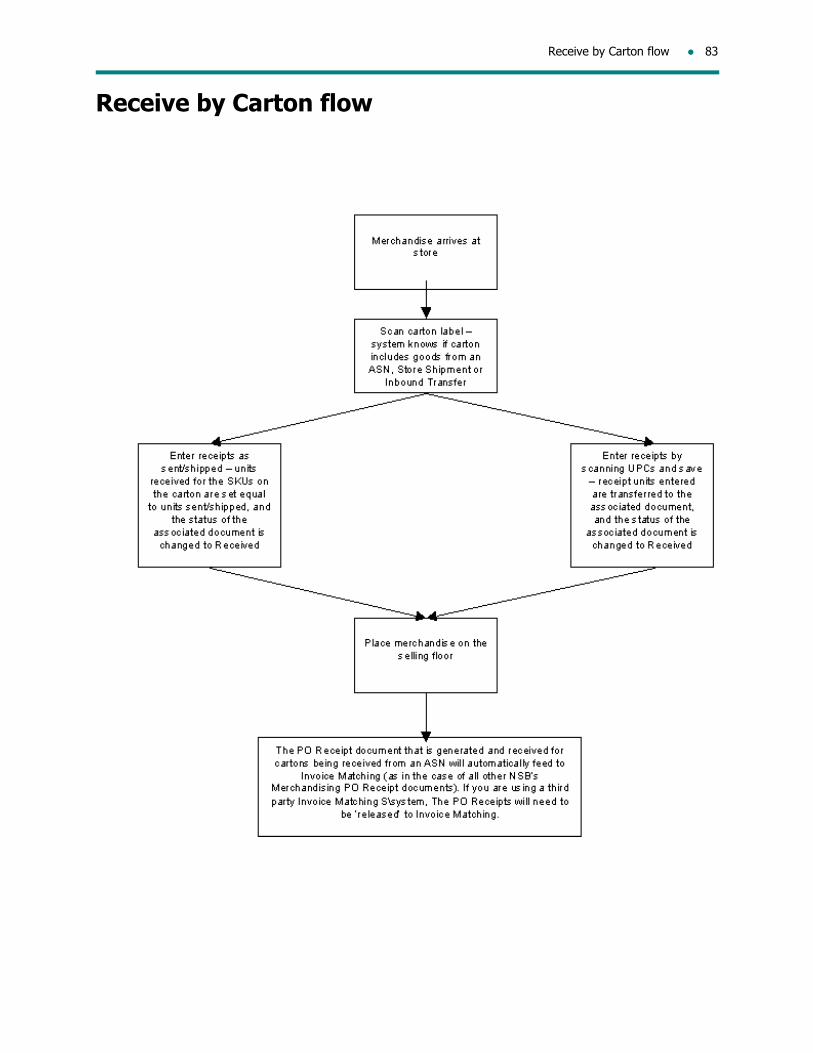
Receive by Carton flow 83
Receive by Carton flow
84 Vendor and Warehouse Receipts
Receiving by Carton
The “Receive by Carton” function allows you to receive merchandise into the system by scanning or manually entering carton labels. Use it to receive ASN shipments, Inbound Transfers and Store Shipments. If the carton number is attached to more than one document type (for example, if the vendor uses carton #123 on an ASN, and Inventory Management assigns Carton #123 for an Inbound Transfer), then the system will prompt you for the document type you are receiving against.
Entering receipts by cartonYou can receive the carton as shipped or in detail.
Note: The option to receive a carton “as sent” is only available to users who have been given permission to enter carton receipts as sent (via Enterprise Data Management > Employee > Access).
If you receive the carton as shipped, the units received for the SKUs on the carton are set equal to the units that were shipped to you, and the status of the associated document is changed to Received.
If you receive the carton in detail, you access the Carton document.
Receive by Carton
Document No. The reference number for the document associated with the style/color/size.
Style Code Internal reference number for the item being received.
Style Description
Text describing the style being received.
Color The code of the color of the style being received.
Color Description
Text describing the color of the style being received.
Size Code Size descriptions for both the primary size and if applicable, the secondary size of the style. For example, a range of widths associated with a specific shoe size.
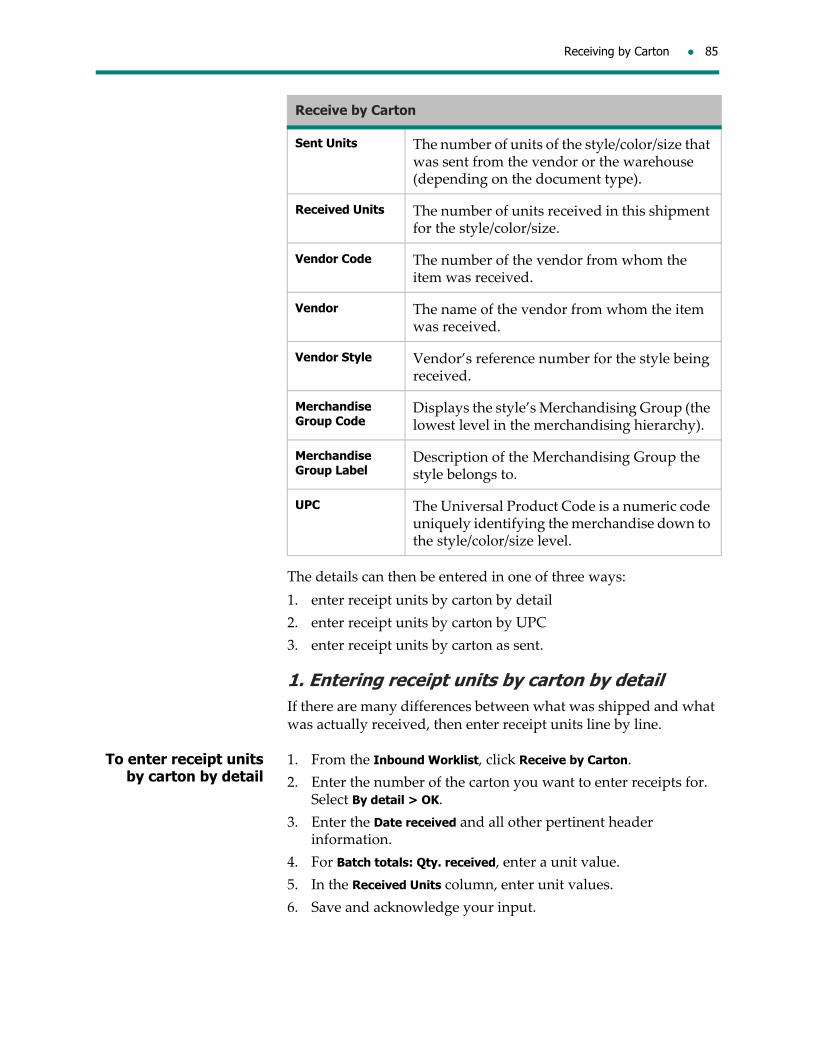
Receiving by Carton 85
The details can then be entered in one of three ways:
1. enter receipt units by carton by detail
2. enter receipt units by carton by UPC
3. enter receipt units by carton as sent.
1. Entering receipt units by carton by detailIf there are many differences between what was shipped and what was actually received, then enter receipt units line by line.
To enter receipt units by carton by detail
1. From the Inbound Worklist, click Receive by Carton.
2. Enter the number of the carton you want to enter receipts for. Select By detail > OK.
3. Enter the Date received and all other pertinent header information.
4. For Batch totals: Qty. received, enter a unit value.
5. In the Received Units column, enter unit values.
6. Save and acknowledge your input.
Sent Units The number of units of the style/color/size that was sent from the vendor or the warehouse (depending on the document type).
Received Units The number of units received in this shipment for the style/color/size.
Vendor Code The number of the vendor from whom the item was received.
Vendor The name of the vendor from whom the item was received.
Vendor Style Vendor’s reference number for the style being received.
Merchandise Group Code
Displays the style’s Merchandising Group (the lowest level in the merchandising hierarchy).
Merchandise Group Label
Description of the Merchandising Group the style belongs to.
UPC The Universal Product Code is a numeric code uniquely identifying the merchandise down to the style/color/size level.
Receive by Carton

86 Vendor and Warehouse Receipts
2. Entering receipts by carton by UPCIf you have the UPCs for the goods being received, enter receipt units by UPC. Use this method if you will be scanning the items. If the ticket is damaged, you can also manually enter the UPC and quantity received.
To enter receipts by carton by UPC
1. From the Inbound Worklist, click Receive by Carton.
2. Enter the number of the carton you want to enter receipts for. Select By detail > OK.
3. Enter the Date received.
4. For Batch totals: Qty. received, enter a unit value.
5. Enter all other header information as required.
6. Click Enter Units by UPC.
7. Enter a UPC and Quantity Received, if different from the default value. Click Apply.
8. Repeat for each UPC received. When you are finished, click Close.
9. Save and acknowledge your input.
3. Entering receipt units by carton as sentIf you received almost exactly what was sent, enter receipts as sent. Lines that were not received as sent can then be modified.
Note: The option to receive a carton “as sent” is only available to users who have been given permission to enter carton receipts as sent (via Enterprise Data Management > Employee > Access).
To enter receipt units by carton as sent
1. From the Inbound Worklist, click Receive by Carton.
2. Enter the number of the carton you want to enter receipts for and select As sent.
3. Click OK. Received Units are now updated for this carton.
4. Click Cancel to return to the Inbound Worklist. To review the receipt, select the appropriate receipt type and display the details.
Modifying receipts done via Receive by Carton functionalityIf a document has been received on the system using Receive by Carton functionality, it can be modified in one of two ways:
1. by accessing the Carton document via Inbound Worklist, by carton. Replace the incorrect receipt quantity with the correct receipt quantity in the Carton Details.

Receiving by Carton 87
2. by accessing the associated document (i.e. Inbound Transfer, Store Shipment, PO Receipt) itself. This involves accessing the document via the menu where the document was created, and following modification procedures based on the menu. For example, if you have received Store Shipment #2468 via the receive by carton functionality, and you need to modify one of the fields on the Store Shipment document, you would go into Inbound Worklist, select Store Shipment from the Navigate menu and then enter the Store Shipment number. This brings you into the Store Shipment document. Modify it following the guidelines described in Modify Store Shipment receipt information in this manual
Similarly, to modify a PO Receipt created from an ASN, access the Inbound Worklist, then PO Receipts and enter the PO Receipt number. To modify an Inbound Transfer, access the Inbound Worklist, select Inbound Transfer Header and then enter the Transfer number.
See “Entering receipts by carton” on page 84 for field definitions.
Deleting CartonsCartons cannot be deleted manually. They will be cleared off the system as the documents they are associated with are cleared off the system.

88 Vendor and Warehouse Receipts
Batch Import flow

Batch Import 89
Batch Import
Batch import functionality allows you to scan in the carton labels of your receipts into a handheld device, load the file onto the system and import the file into Inventory Management.
All the cartons in the file will have the received units set to the shipped or sent values, and the status of the documents associated with the cartons will be set to Received.
If a carton from the file is rejected (for example, if the carton number does not exist in Inventory Management or if the carton belongs to more than one type of document), then the carton number and a brief explanation of why the carton number rejected will display on the screen. This screen should then be printed. Rejected carton numbers should be followed up on to determine why they were rejected, and receipt processes should be used to receive the carton, if possible.
Note: The Batch Import function is not used on conjunction with the offline Inventory Management solutions (that is, INS or SIT).

90 Vendor and Warehouse Receipts
Unsolicited Receipts flow

Unsolicited Receipts 91
Unsolicited Receipts
Unsolicited Receipts are receipts which have no purchase orders on the system for the locations to receive against. This situation could occur when:
the vendor does a count and fills the racks based on certain preset inventory level requirements (vendor fill situations)
a buyer ordered merchandise at market, but has not yet input the order on the system
the vendor sends merchandise not originally ordered, but the buyer decides to keep it
In order to receive merchandise on an Unsolicited Receipt document, the style must already exist in the system. This means that the buyer must be notified to create the style if it does not already exist.
Unsolicited receipts can be created for regular and pseudo styles.
If the Distributions with no WMS system option is set, you can assign bin locations to the items received on an Unsolicited Receipt. This option is defined at installation time and is not visible to the user.
Unsolicited Receipts HeaderThe Unsolicited Receipt Header contains information that applies to the entire shipment such as date received, who the shipment was received by, number of containers, etc.

92 Vendor and Warehouse Receipts
Unsolicited Receipts Header
Uns. receipt no. A system‐generated number identifying an Unsolicited Receipt document; assigned when the Unsolicited Receipt Header is first saved.
Date created The date the Unsolicited Receipt document was first saved.
Last activity date
The date the Unsolicited Receipt was last referenced for creation or modification.
Match status The status of the document in relation to Invoice Matching. Possible values are:
Preliminary – Invoice Matching has not been notified of the receipt.
Unmatched – Invoice Matching has referenced the receipt for Invoice Matching purposes, but has not matched any invoices to the receipt.
Partially Matched – Invoice Matching has matched at least one invoice to the receipt, but has not completely matched the value of the receipt.
Fully Matched – Invoice Matching has completely matched the value of the receipt with the invoices from the vendor.
Description Allows you to enter a description of the Unsolicited Receipt of up to 60 alphanumeric characters.
This field can be used to make a query on Unsolicited Receipts documents. For example, you can group together all of your Unsolicited Receipts that were vendor fills by typing in a description of “vendor fill”. Then if you want to see all of your vendor fill receipts, you could make a query on the description “vendor fill” and those Unsolicited Receipt documents would display.
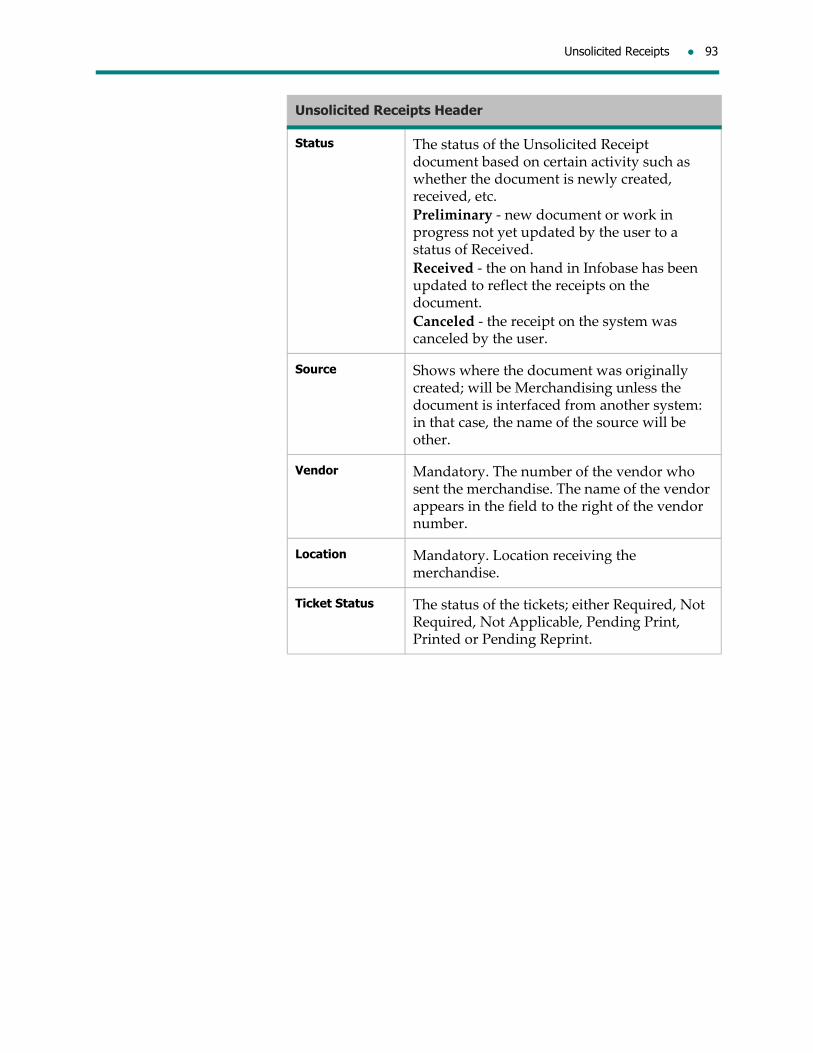
Unsolicited Receipts 93
Status The status of the Unsolicited Receipt document based on certain activity such as whether the document is newly created, received, etc.
Preliminary ‐ new document or work in progress not yet updated by the user to a status of Received.
Received ‐ the on hand in Infobase has been updated to reflect the receipts on the document.
Canceled ‐ the receipt on the system was canceled by the user.
Source Shows where the document was originally created; will be Merchandising unless the document is interfaced from another system: in that case, the name of the source will be other.
Vendor Mandatory. The number of the vendor who sent the merchandise. The name of the vendor appears in the field to the right of the vendor number.
Location Mandatory. Location receiving the merchandise.
Ticket Status The status of the tickets; either Required, Not Required, Not Applicable, Pending Print, Printed or Pending Reprint.
Unsolicited Receipts Header

94 Vendor and Warehouse Receipts
Unsolicited Receipts Header, General tab
Date received The date the merchandise is physically received. Defaults to the current date but can be overridden.
Weight How much the shipment weighed when received. If a number is entered, a measurement (pounds, tons, etc.) must be selected from the list in the field next to this field.
No. of containers How many containers were included in this Unsolicited Receipt. If a number is entered, a container type must be selected from the list in the field next to this field.
Terms Select the payment terms as agreed upon between the buyer and the vendor.
FOB Freight on board is the point where the ownership of the goods passes from the vendor to the location.

Unsolicited Receipts 95
Grouping label Max. 20 characters. A memo field used to link documents that have something in common for query purposes. The standards for what should be put in this field are decided by your company. For example, you could decide as a company that you will enter the department number here so that you can make a query on documents by department.
Received by The person checking in the receipt.
Reason Must be an Unsolicited Receipt reason code. It explains why the merchandise is being received using Unsolicited Receipts (e.g. vendor fills).
Ship via How the goods were shipped from the vendor to your location.
Carrier Which carrier delivered the goods from the vendor.
External system If the source of the document is other, the Unsolicited Receipt document was created in another system and then interfaced to Inventory Management. This field shows what system the document is being interfaced from.
External doc. no. The document number of the external system that generated the Unsolicited Receipt.
Unsolicited Receipts Header, General tab
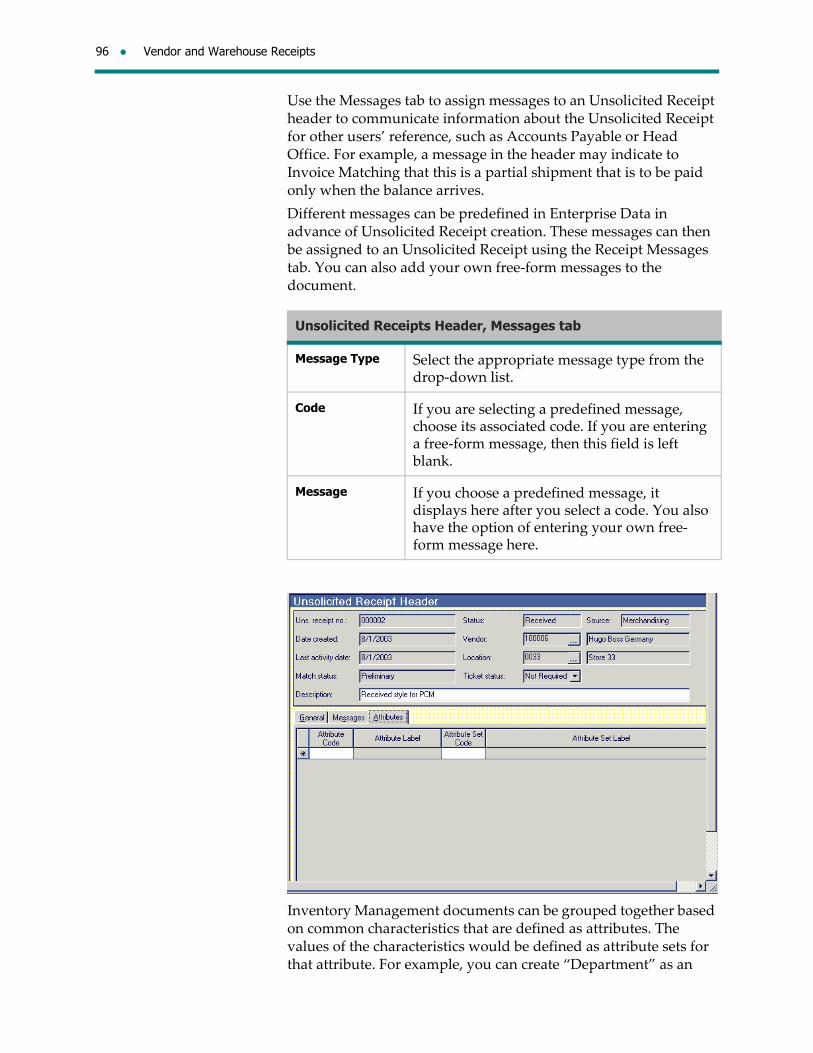
96 Vendor and Warehouse Receipts
Use the Messages tab to assign messages to an Unsolicited Receipt header to communicate information about the Unsolicited Receipt for other users’ reference, such as Accounts Payable or Head Office. For example, a message in the header may indicate to Invoice Matching that this is a partial shipment that is to be paid only when the balance arrives.
Different messages can be predefined in Enterprise Data in advance of Unsolicited Receipt creation. These messages can then be assigned to an Unsolicited Receipt using the Receipt Messages tab. You can also add your own free‐form messages to the document.
Inventory Management documents can be grouped together based on common characteristics that are defined as attributes. The values of the characteristics would be defined as attribute sets for that attribute. For example, you can create “Department” as an
Unsolicited Receipts Header, Messages tab
Message Type Select the appropriate message type from the drop‐down list.
Code If you are selecting a predefined message, choose its associated code. If you are entering a free‐form message, then this field is left blank.
Message If you choose a predefined message, it displays here after you select a code. You also have the option of entering your own free‐form message here.
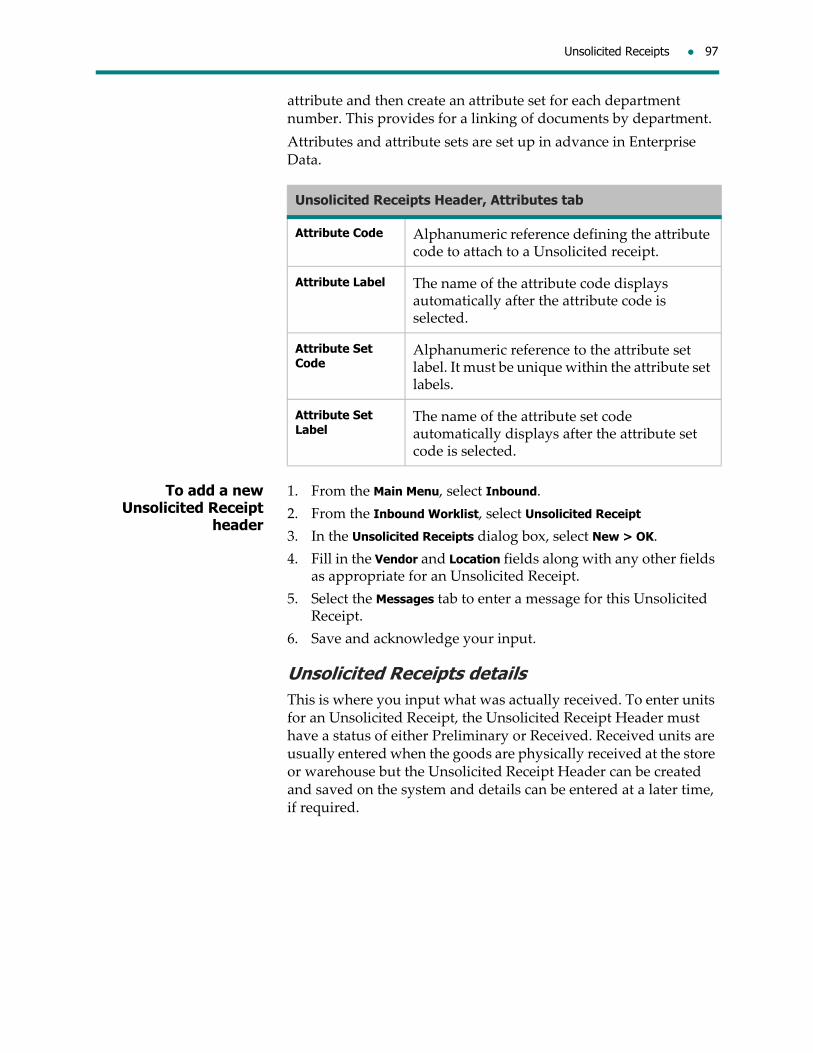
Unsolicited Receipts 97
attribute and then create an attribute set for each department number. This provides for a linking of documents by department.
Attributes and attribute sets are set up in advance in Enterprise Data.
To add a new Unsolicited Receipt
header
1. From the Main Menu, select Inbound.
2. From the Inbound Worklist, select Unsolicited Receipt
3. In the Unsolicited Receipts dialog box, select New > OK.
4. Fill in the Vendor and Location fields along with any other fields as appropriate for an Unsolicited Receipt.
5. Select the Messages tab to enter a message for this Unsolicited Receipt.
6. Save and acknowledge your input.
Unsolicited Receipts detailsThis is where you input what was actually received. To enter units for an Unsolicited Receipt, the Unsolicited Receipt Header must have a status of either Preliminary or Received. Received units are usually entered when the goods are physically received at the store or warehouse but the Unsolicited Receipt Header can be created and saved on the system and details can be entered at a later time, if required.
Unsolicited Receipts Header, Attributes tab
Attribute Code Alphanumeric reference defining the attribute code to attach to a Unsolicited receipt.
Attribute Label The name of the attribute code displays automatically after the attribute code is selected.
Attribute Set Code
Alphanumeric reference to the attribute set label. It must be unique within the attribute set labels.
Attribute Set Label
The name of the attribute set code automatically displays after the attribute set code is selected.

98 Vendor and Warehouse Receipts
Unsolicited Receipts Detail
Batch totals: Qty received
A number entered showing the total units being received on the document. When the document is validated or saved, the system will compare the batch total number entered with the sum of the detail units entered. If they are not the same, the system gives a warning message so that you can verify the details and correct if necessary. Receipt information will be posted based on the details entered, not the batch totals.
Style Code / Vendor Style
Internal reference number or vendor reference number for the item being received.
Style Description
Text describing the style being received.
Color The code of the color of the style being received.
Color Description
Text describing the color of the style being received.
Size Code Size descriptions for both the primary size and if applicable, the secondary size of the style. For example, a range of widths associated with a specific shoe size.
Received Units The number of units received in this shipment for the style/color/size combination.

Unsolicited Receipts 99
Entering Unsolicited Receipt detailsWhen you add details, you are entering the received units into your system.
You can add details to an Unsolicited Receipt in two ways:
by UPC, or
by size grid.
Unit Cost How much your company will be paying (shown in the home jurisdiction’s currency) for the style/color/size being received. Defaults to the cost defined in a parameter in Product Management. Not applicable if the style is a pseudo style. This field will only be displayed if you have been given access (via Enterprise Data Management > Employee > Access) to view or enter cost values.
Total Retail For pseudo styles only; the total retail received value, in the domestic currency of the location’s jurisdiction. Can be modified.
Total Cost For pseudo styles only; the final net cost, in the home jurisdiction’s domestic currency. Since discounts and cost factors aren’t applied to unsolicited receipts, this value is both a gross and net final cost. It is used by Invoice Matching to derive its gross unit cost. Can be modified. This field will only be displayed if you have been given access (via Enterprise Data Management > Employee > Access) to view or enter cost values.
Vendor Style Vendor’s reference number for the style being received.
Merchandise Group Code
Displays the style’s Merchandising Group (the lowest level in the merchandising hierarchy).
Merchandise Group Label
Text describing the Merchandise Group Code.
UPC The Universal Product Code is a numeric code to uniquely identify merchandise down to the style/color/size level.
Unsolicited Receipts Detail

100 Vendor and Warehouse Receipts
1. Entering units received by UPCThis method is used when you are scanning the UPCs of the items received. You can also enter the UPC and the quantities received manually if the ticket is damaged.
To enter Unsolicited Receipt units by UPC
1. Retrieve the Unsolicited Receipt for which you want to enter received units.
2. From the Unsolicited Receipt Header, select Detail.
3. In the Batch totals: Qty. received, enter a unit value.
4. Click Enter Units by UPC.
5. Enter the UPC number and units received (if different from the default value of 1) and then click Apply.
6. When finished entering UPCs, click Close.
7. Save and acknowledge your input.
2. Entering units received by size gridIf you have the style information about the goods you are receiving, you should enter receipts by size grid. Received units can be entered using either the style code or vendor style.
To enter Unsolicited Receipt units by size
grid
1. Retrieve the Unsolicited Receipt for which you want to enter units received.
2. From the Unsolicited Receipt Header, select Detail.
3. In the Batch totals: Qty. received, enter a unit value.
4. Click Enter Units by Size Grid.
5. In the Enter Units by Size Grid window, enter the following information:
Style code/Vendor style: a style or vendor style from your database
Color code: a color for this style (not applicable for pseudo styles)
Unit Cost: a unit cost in the home jurisdiction’s currency for this style (not applicable for pseudo styles). This field will only be displayed if you have been given access (via Enterprise Data Management > Employee > Access) to view or enter cost values.
Total Retail: pseudo styles only; enter the value in the currency of the locationʹs jurisdiction.
Total Cost: pseudo styles only. Used by Invoice matching when creating a corresponding receipt to derive unit gross cost. Enter the value in the home jurisdiction currency. This field will only be displayed if you have been given access (via Enterprise Data Management > Employee > Access) to view or enter cost values.
In the size grid, enter units received.

Unsolicited Receipts 101
Click Apply.
6. Repeat step 5 for all styles you are receiving.
7. Click OK.
8. Save and acknowledge your input.
Entering bin locationsOnce an Unsolicited Receipt has been saved and items appearing on the document have been placed in a bin, you can specify the bin number for each item. Bin locations can be entered by SKU or pack.
Note: This feature is only available if the Distributions with no WMS system option is set. This option is defined at installation time and is not visible to the user.
To enter bin locations 1. Retrieve the Unsolicited Receipt.
2. From the Navigate menu, select Bin Locations. The Bin Locations screen from Product Management will display for this receipt. All SKUs and packs that were received on the receipt will appear.
3. In the Bin Location column, enter the location for each pack and/or SKU.
4. Click Save when finished.
Printing an Unsolicited ReceiptAs soon as you have created and saved the Unsolicited Receipts header, you can print, the Unsolicited Receipt document. It can also be printed at any other time after that. The information on the receipt depends on when the document is being printed.
If the Unsolicited Receipt Header has been created and saved, only header information prints.
Once you have entered the details of the Unsolicited Receipt, the printout will have more information on it, including Total Retail Received and Total Cost Received for pseudo styles.
Once the Unsolicited Receipt document has been printed, it can be used to mark received quantities that will be entered on the system at a later time.
To print an Unsolicited Receipt
1. Retrieve the Unsolicited Receipt you want to print.
2. On the toolbar, click Print, select the appropriate printer, the pages and number of copies to print > OK.
Modifying an Unsolicited ReceiptIf you entered the wrong information, some Unsolicited Receipt fields can be modified depending on the status of the document. For example, if you entered the wrong quantity received, or if you

102 Vendor and Warehouse Receipts
find a box that was missing from the shipment, you can modify the number of units received. You can also add styles that were missed from the shipment, using the same methods as for creating the details.
The following chart lists the fields that can be modified based on the status of the document.
Note: Cost fields will only be displayed if you have been given access (via Enterprise Data Management > Employee > Access) to view or modify cost values.
Status Description What has been updated What can be modified
Preliminary The Unsolicited Receipt document has been created but the status of the document has not been changed to Received.
The document is still a work‐in‐progress, nothing has been updated at this point.
Vendor
Location
Description
Date received
Weight
No of containers
Terms
FOB
Grouping label
Received by Reason
Ship via Carrier
Messages
Received units
Cost Attributes
Received The Unsolicited Receipt has been completed and can only be modified prior to the Match Status being changed to Fully Matched.
Infobase is updated with the receipt quantities.
Description
Weight
No of containers
Terms
FOB
Grouping label
Received by Reason
Ship via Carrier
Messages
Received units
Cost
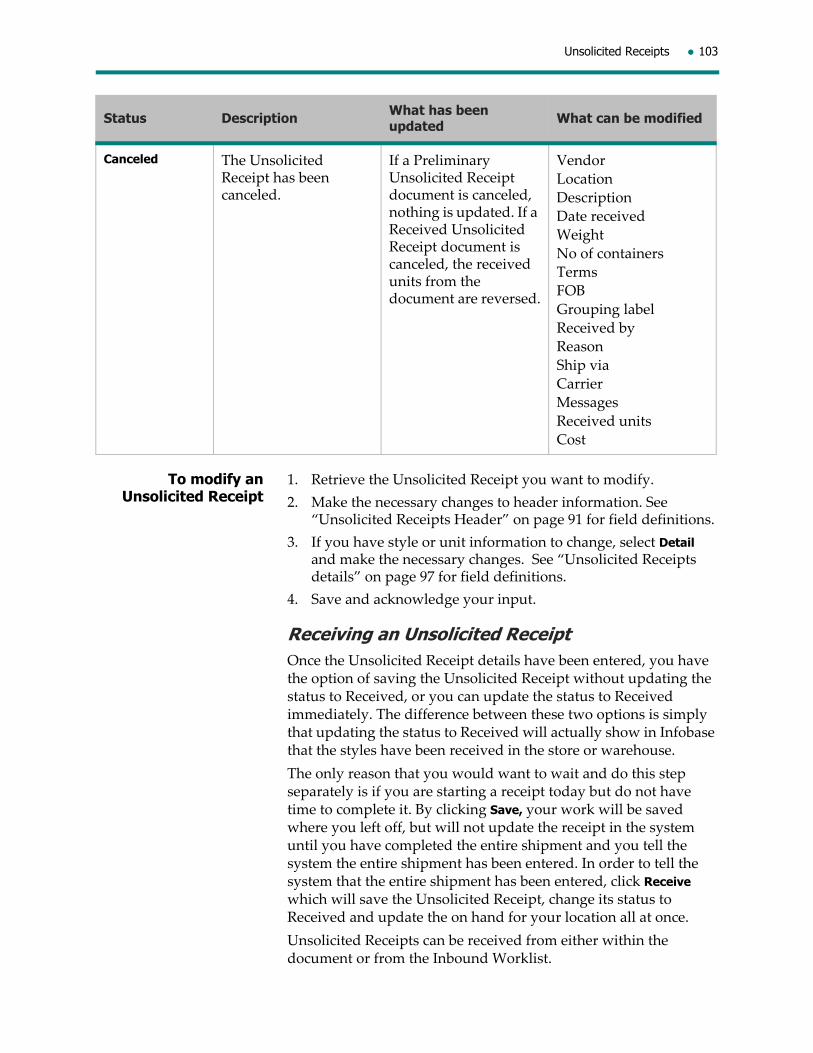
Unsolicited Receipts 103
To modify an Unsolicited Receipt
1. Retrieve the Unsolicited Receipt you want to modify.
2. Make the necessary changes to header information. See “Unsolicited Receipts Header” on page 91 for field definitions.
3. If you have style or unit information to change, select Detail and make the necessary changes. See “Unsolicited Receipts details” on page 97 for field definitions.
4. Save and acknowledge your input.
Receiving an Unsolicited ReceiptOnce the Unsolicited Receipt details have been entered, you have the option of saving the Unsolicited Receipt without updating the status to Received, or you can update the status to Received immediately. The difference between these two options is simply that updating the status to Received will actually show in Infobase that the styles have been received in the store or warehouse.
The only reason that you would want to wait and do this step separately is if you are starting a receipt today but do not have time to complete it. By clicking Save, your work will be saved where you left off, but will not update the receipt in the system until you have completed the entire shipment and you tell the system the entire shipment has been entered. In order to tell the system that the entire shipment has been entered, click Receive which will save the Unsolicited Receipt, change its status to Received and update the on hand for your location all at once.
Unsolicited Receipts can be received from either within the document or from the Inbound Worklist.
Canceled The Unsolicited Receipt has been canceled.
If a Preliminary Unsolicited Receipt document is canceled, nothing is updated. If a Received Unsolicited Receipt document is canceled, the received units from the document are reversed.
Vendor
Location
Description
Date received
Weight
No of containers
Terms
FOB
Grouping label
Received by
Reason
Ship via
Carrier
Messages
Received units
Cost
Status Description What has been updated What can be modified
104 Vendor and Warehouse Receipts
For clients using Merchandisingʹs Invoice Matching, whenever the status of an Unsolicited Receipt is changed to Received, Invoice Matching is automatically updated, the Unsolicited Receipt’s Match Status will be set to Unmatched and Invoice Matching will update the match status from this point on. Modifications to a Unsolicited Receipt are still allowed until the Match Status is Fully Matched and will be fed to Invoice Matching.
To receive an Unsolicited Receipt
1. Retrieve the Unsolicited Receipt you want to receive.
2. Click Receive. The Status is now Received.
3. To acknowledge the status change, click OK.
Releasing an Unsolicited Receipt to a third party Invoice Matching system
Note: If your company is using a third party Invoice Matching system, you will need to release Unsolicited receipts to this system using the functionality described below.
When you have finished entering all the receipts for the shipment, you must release the document to Invoice Matching so that the invoice from the vendor gets paid. Only an Unsolicited Receipt with a Received status (or a Preliminary status with the mandatory fields in the header filled in and at least one detail) can be released to Invoice Matching.
The information will be sent via a Pipeline segment to the interface for the third party Invoice Matching system. At this point, the match status becomes Fully Matched and the document can no longer be modified.
Unsolicited Receipts can be released to Invoice Matching from either within the document or from the Inbound Worklist.
To release an Unsolicited Receipt
1. Retrieve the Unsolicited Receipt you want to release to Invoice Matching.
2. From the File menu, select Release to Invoice Matching.
3. To acknowledge the status change, click OK. The status of the Unsolicited Receipt header is now Unmatched.
Canceling and Reinstating an Unsolicited ReceiptUnsolicited Receipts may be canceled only if their status is Preliminary or Received. If you find the purchase order number that the shipment was supposed to be linked to, you might want to cancel the Unsolicited Receipt and then do the receipt through PO Receipts so that the purchase order cycle will be completed. If you cancel an Unsolicited Receipt with a status of Received, the received units on the document will be reversed from Infobase.

Unsolicited Receipts 105
If you canceled an Unsolicited Receipt by mistake, you can reinstate it to a status of Preliminary. Only Unsolicited Receipts with a status of Canceled may be reinstated.
To cancel or reinstate an Unsolicited Receipt, you can either:
highlight the document on the Inbound Worklist and select the Cancel or Reinstate action on the Actions menu, or
open the document and select the Cancel or Reinstate action on the Actions menu.
To cancel an Unsolicited Receipt
Note: Instead of following the procedure below to cancel an Unsolicited Receipt document, you can also highlight the document on the Inbound Worklist and select the Cancel action on the Actions menu.
1. Retrieve the Unsolicited Receipt you want to cancel.
2. From the Actions menu, select Cancel.
3. To acknowledge the status change, click OK.
To reinstate an Unsolicited Receipt
Note: Instead of following the procedure below to reinstate an Unsolicited Receipt document, you can also open the document and select the Reinstate action on the Actions menu.
1. On the Inbound Worklist, highlight the Unsolicited Receipt you want to reinstate.
2. From the Actions menu, select Reinstate.
3. To acknowledge the status change, click OK.
System delete of Unsolicited ReceiptsThe system will automatically clean up Unsolicited Receipts if the Unsolicited Receipt has:
a status of Canceled, or
a status of Fully Matched, and
the date received meets conditions set up behind the scenes
Unsolicited receipt documents with a status of Received, Unmatched or Partially Matched will not be deleted automatically by the system.
Deleting an Unsolicited Receipt manuallyIf you need to clean up Unsolicited Receipt documents that are no longer required, you can manually delete an Unsolicited Receipt.
Highlight the Unsolicited Receipt document in the Inbound Worklist and then click Delete.
Unsolicited Receipts with a status of either Preliminary or Fully Matched may be deleted.

106 Vendor and Warehouse Receipts

An IMRD (Inventory Movement Request Document) is a directive sent from head office requesting locations to move inventory. These directives can be used for RTVs and transfers.
As a buyer, you can use an IMRD to request a transfer to balance out stock, consolidate merchandise to a specific location or recall merchandise back to the warehouse. For RTVs, you may want to notify your locations of merchandise that should be returned directly to the vendor. This can be used in instances where a general quality problem is found.
The stores can use your IMRDs to create documents such as transfers and RTVs keeping in mind that all documents created from an IMRD must be for the same styles requested on the IMRD and stores cannot add styles to the document. This ensures that your stores only move the items listed on the IMRD.
As mentioned above, an IMRD can be for one of the following transaction types:
Transfers
Returns to Vendor
Each of the documents will contain different header and detail information even though they are created via an IMRD.
2 Creating IMRDs at Head Office

108 Creating IMRDs at Head Office
Inventory Movement Request Document flow originating from head office

IMRD RTVs 109
IMRD RTVs
An IMRD RTV is used to instruct locations to create a Return to Vendor document with specific information, styles, and quantities by size and color. The RTV document will be created off of the IMRD RTV by the location.
IMRD RTV headerThe IMRD header shows all general information relevant to the request from head office such as the return authorization number, which locations are to return the merchandise, reason codes and associated PO information.
Inventory Movement Request RTV Document Header
IMRD no. Automatically generated from the range of numbers specified in the system parameters (maximum: 20 numeric).
Dated created The date the IMRD document is first saved.
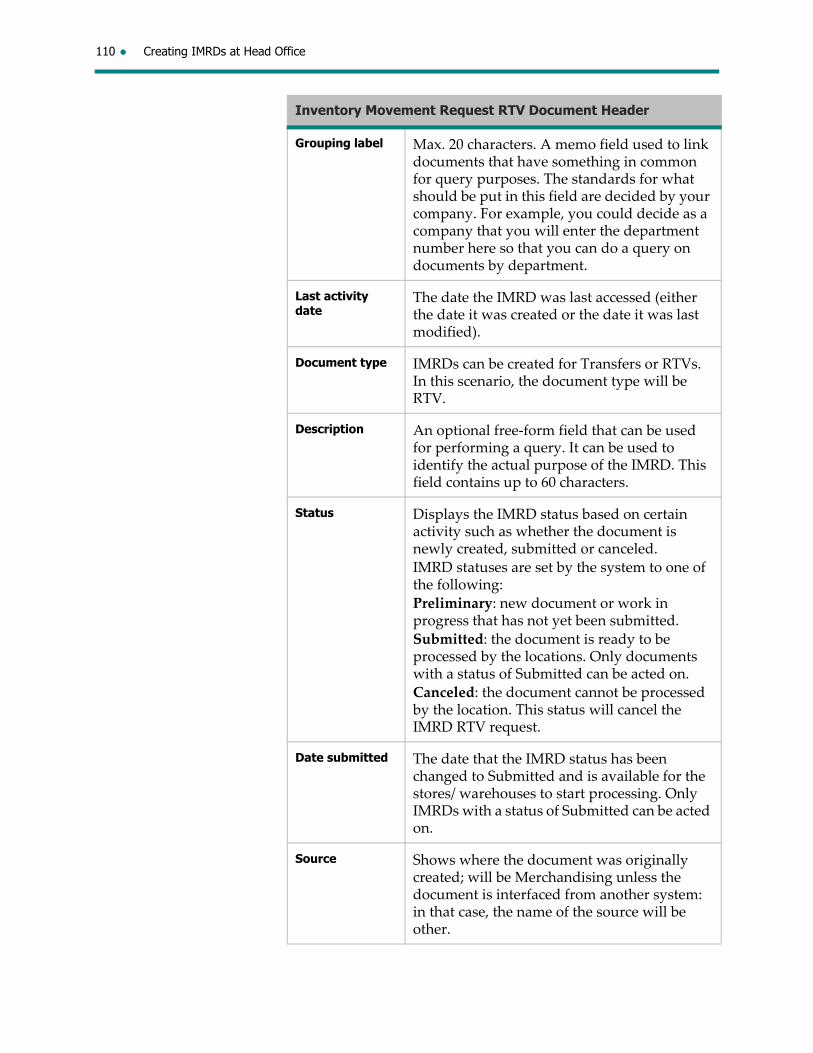
110 Creating IMRDs at Head Office
Grouping label Max. 20 characters. A memo field used to link documents that have something in common for query purposes. The standards for what should be put in this field are decided by your company. For example, you could decide as a company that you will enter the department number here so that you can do a query on documents by department.
Last activity date
The date the IMRD was last accessed (either the date it was created or the date it was last modified).
Document type IMRDs can be created for Transfers or RTVs. In this scenario, the document type will be RTV.
Description An optional free‐form field that can be used for performing a query. It can be used to identify the actual purpose of the IMRD. This field contains up to 60 characters.
Status Displays the IMRD status based on certain activity such as whether the document is newly created, submitted or canceled.
IMRD statuses are set by the system to one of the following:
Preliminary: new document or work in progress that has not yet been submitted.
Submitted: the document is ready to be processed by the locations. Only documents with a status of Submitted can be acted on.
Canceled: the document cannot be processed by the location. This status will cancel the IMRD RTV request.
Date submitted The date that the IMRD status has been changed to Submitted and is available for the stores/ warehouses to start processing. Only IMRDs with a status of Submitted can be acted on.
Source Shows where the document was originally created; will be Merchandising unless the document is interfaced from another system: in that case, the name of the source will be other.
Inventory Movement Request RTV Document Header
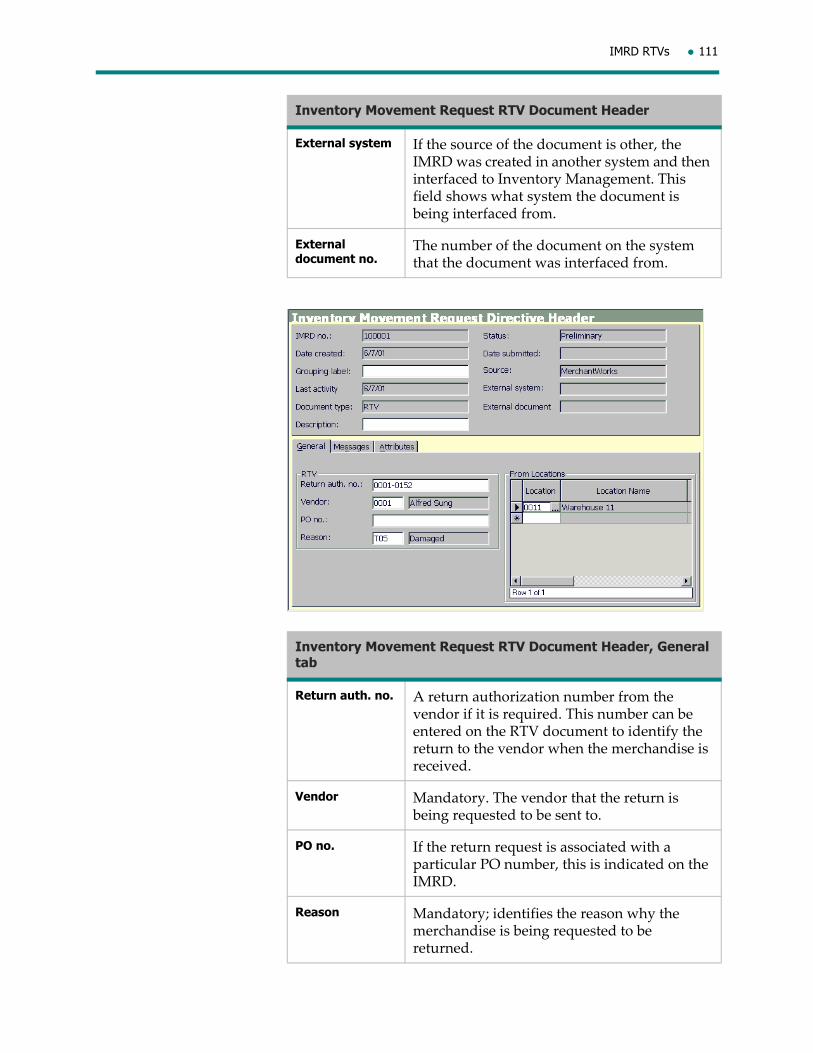
IMRD RTVs 111
External system If the source of the document is other, the IMRD was created in another system and then interfaced to Inventory Management. This field shows what system the document is being interfaced from.
External document no.
The number of the document on the system that the document was interfaced from.
Inventory Movement Request RTV Document Header, General tab
Return auth. no. A return authorization number from the vendor if it is required. This number can be entered on the RTV document to identify the return to the vendor when the merchandise is received.
Vendor Mandatory. The vendor that the return is being requested to be sent to.
PO no. If the return request is associated with a particular PO number, this is indicated on the IMRD.
Reason Mandatory; identifies the reason why the merchandise is being requested to be returned.
Inventory Movement Request RTV Document Header

112 Creating IMRDs at Head Office
The Messages tab contains messages assigned to an IMRD RTV to communicate information to the stores/warehouses. For example, there may be special processing instructions such as the type of transportation to be used for the RTV or specific packing instructions.
From locations Identifies which locations are to return the style(s) indicated.
Inventory Movement Request RTV Document Header, General tab

IMRD RTVs 113
Inventory Management documents can be grouped together based on common characteristics that are defined as attributes. The values of the characteristics would be defined as attribute sets for that attribute. For example, you can create “Department” as an attribute and then create an attribute set for each department number. This provides for a linking of documents by department.
Attributes and attribute sets are set up in advance in Enterprise Data.
IMRD RTV detailsThe IMRD details screen displays the items and quantities by size and color that you want returned to the specified vendor or to a common location (such as a warehouse).
Inventory Movement Request RTV Document Header, Attributes tab
Attribute Code Alphanumeric reference defining the attribute code to attach to an IMRD RTV.
Attribute Label The name of the attribute code displays automatically after the attribute code is selected.
Attribute Set Code
Alphanumeric reference to the attribute set label. It must be unique within the attribute set labels.
Attribute Set Label
The name of the attribute set code automatically displays after the attribute set code is selected.

114 Creating IMRDs at Head Office
Inventory Movement Request RTV Document Details
Units Requested The number of units by style/color/size that are to be returned. This field works in conjunction with the ‘Compare’ field.
Compare This field works in conjunction with the ‘Units requested’ field. Valid options include:
<=: the units returned by the location must be less than or equal to the units requested.
>=: the units returned by the location must be greater than or equal to the units requested.
=: the units returned by the location must be exactly the same as the units requested.
ALL: if this option was selected, the units requested will be grayed out. This means that the location is to return all units in stock.
Style Code A unique internal code identifying the style within the system.
Style Description
Description of the style on the document.
Color A three digit alphanumeric code identifying the color for the style.
Color Description
Description of the color for the style.

IMRD RTVs 115
Entering IMRD RTV detailsEnter the items and quantities being requested to be returned on the IMRD RTV Details screen. There are two ways to input the IMRD RTV details:
1. enter units by UPC, or
2. enter units by style/color/size
1. Entering IMRD RTV units by UPCIf you are scanning the tickets of the items for which you are requesting to be returned, use Enter Units by UPC.
To enter IMRD RTV units by UPC
1. From the Main Menu, select Outbound.
2. From the Outbound Worklist, select IMRD, then select New and Document type RTV. Click OK.
3. Enter the header information for the IMRD RTV.
4. On the General tab, enter the authorization number given by the vendor for Return auth. no., enter the Vendor code, the PO number for this RTV (if applicable) and the Reason for the return.
5. For From Locations, enter a list of the locations that are to return the merchandise.
6. If required, on the Messages tab either select a message type from the drop‐down list or enter a message code and enter the message details.
Size Code Size descriptions for both the primary size and if applicable, the secondary size of the style (for example, a range of widths associated with a specific shoe size).
Vendor Style Usually supplied by the vendor and must be unique within the vendor. It is an alphanumeric reference to the style.
Merchandise Group Code
The code assigned to the group in the merchandise hierarchy that the style is assigned to.
Merchandise Group Label
The label assigned to the group in the merchandise hierarchy that the style is assigned to.
UPC The Universal Product Code is a numeric code to uniquely identify merchandise down to the color and size level.
Inventory Movement Request RTV Document Details

116 Creating IMRDs at Head Office
7. From the Inventory Movement Request Document Header, click IMRD Detail then from the Edit menu, select Enter Units by UPC. .
8. In the Enter Units by UPC dialog box:
scan the UPC barcode or enter the UPC of the item to be returned.
the quantity automatically defaults to 1. If there are multiple items of the same SKU (style, color, size), enter the number of the items to be returned.
at the Comparison Operator field, select the operator corresponding to the number of units the stores are to return and then click Apply.
9. Repeat step 8 for each item to be returned and then click Close.
10. The IMRD RTV Detail screen reappears so that you can review the items and quantities on this particular IMRD RTV document.
11. Once you are satisfied that all details entered are accurate, click Save > OK.
2. Entering IMRD RTV units by style/color/sizeIf you are entering the quantities being requested using the style code, use Enter Units by Style/Color/Size.
To enter IMRD RTV units by style/color/
size
1. From the Main Menu, select Outbound.
2. From the Outbound Worklist, select IMRD, then select New and Document type RTV. Click OK.
3. Enter the header information for the IMRD RTV.
4. On the General tab, enter the authorization number given by the vendor for Return auth no., enter the Vendor code, the PO number for this RTV (if applicable) and the Reason for the return.
5. In the From Locations, enter a list of the locations that are to return the merchandise.
6. If required, on the Messages tab either select a message type from the drop‐down list or enter a message code and enter the message details, if applicable.
7. From the Inventory Movement Request Document Header, select IMRD Detailthen from the Edit menu, select Enter Units byStyle/Color/Size.
8. In the Enter Units by Style/Color/Size dialog box:
enter a valid style code
enter a color code
enter a size code
select the comparison operator for the quantity to be returned
enter the units requested.
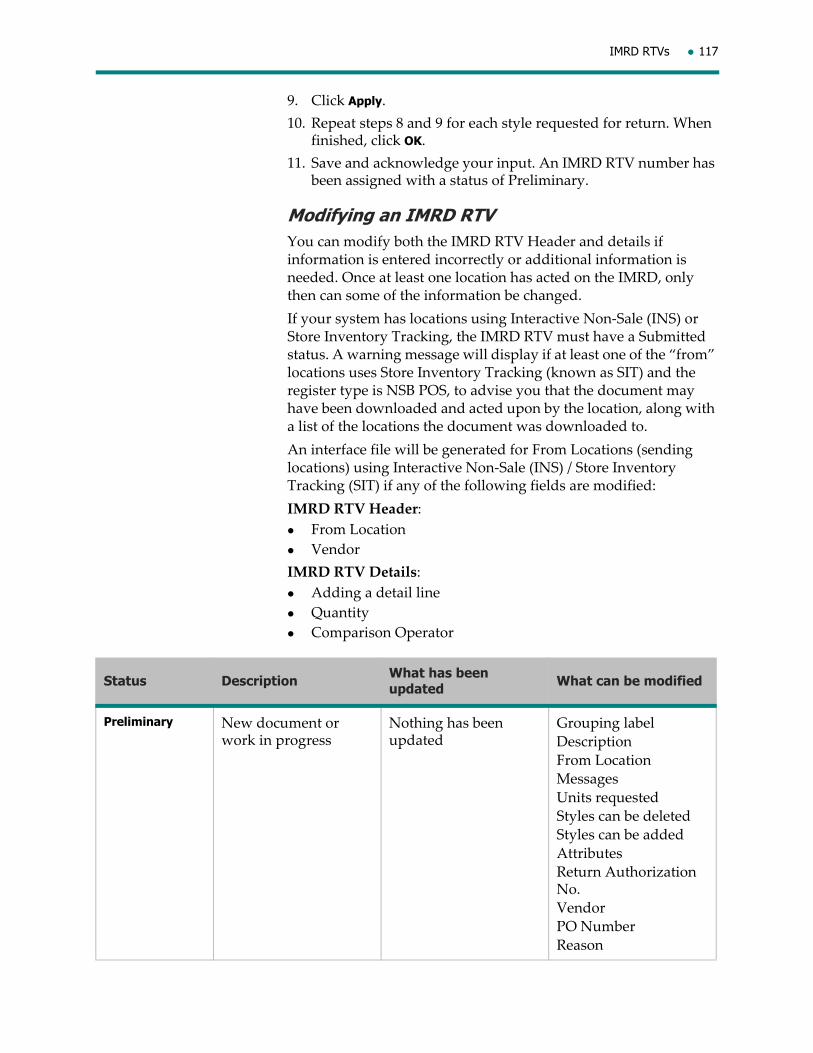
IMRD RTVs 117
9. Click Apply.
10. Repeat steps 8 and 9 for each style requested for return. When finished, click OK.
11. Save and acknowledge your input. An IMRD RTV number has been assigned with a status of Preliminary.
Modifying an IMRD RTVYou can modify both the IMRD RTV Header and details if information is entered incorrectly or additional information is needed. Once at least one location has acted on the IMRD, only then can some of the information be changed.
If your system has locations using Interactive Non‐Sale (INS) or Store Inventory Tracking, the IMRD RTV must have a Submitted status. A warning message will display if at least one of the “from” locations uses Store Inventory Tracking (known as SIT) and the register type is NSB POS, to advise you that the document may have been downloaded and acted upon by the location, along with a list of the locations the document was downloaded to.
An interface file will be generated for From Locations (sending locations) using Interactive Non‐Sale (INS) / Store Inventory Tracking (SIT) if any of the following fields are modified:
IMRD RTV Header:
From Location
Vendor
IMRD RTV Details:
Adding a detail line
Quantity
Comparison Operator
Status Description What has been updated What can be modified
Preliminary New document or work in progress
Nothing has been updated
Grouping label
Description
From Location
Messages
Units requested
Styles can be deleted
Styles can be added
Attributes
Return Authorization No.
Vendor
PO Number
Reason
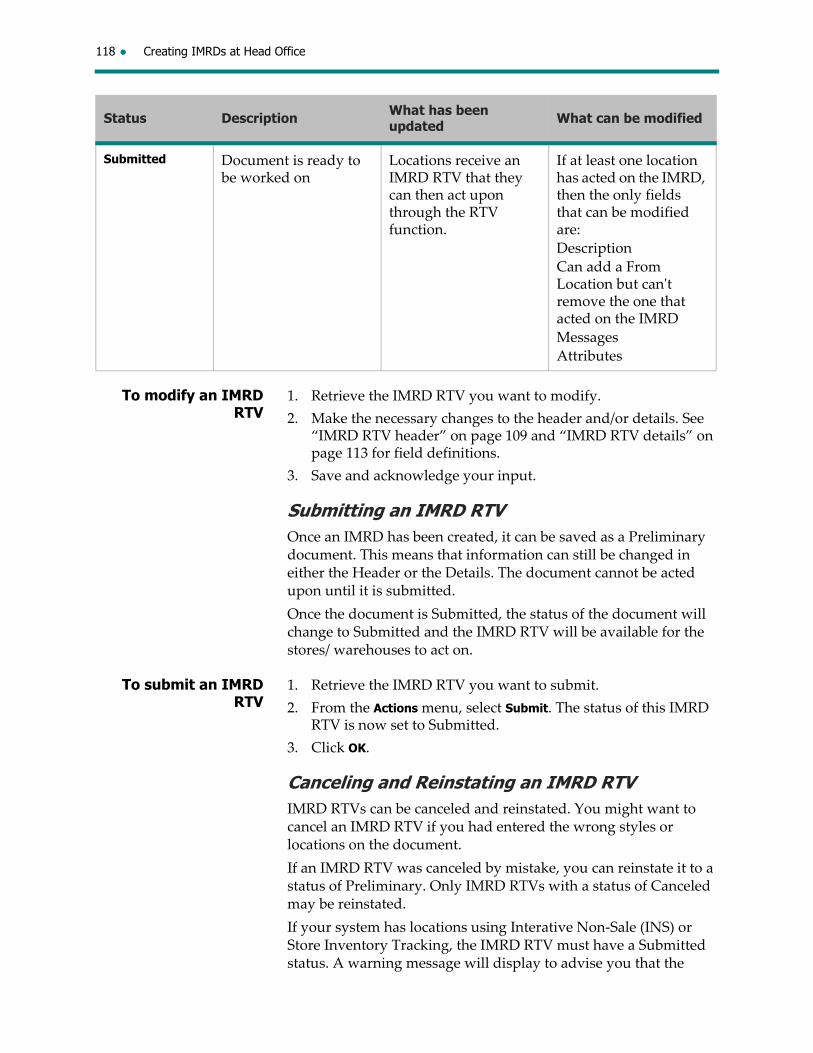
118 Creating IMRDs at Head Office
To modify an IMRD RTV
1. Retrieve the IMRD RTV you want to modify.
2. Make the necessary changes to the header and/or details. See “IMRD RTV header” on page 109 and “IMRD RTV details” on page 113 for field definitions.
3. Save and acknowledge your input.
Submitting an IMRD RTVOnce an IMRD has been created, it can be saved as a Preliminary document. This means that information can still be changed in either the Header or the Details. The document cannot be acted upon until it is submitted.
Once the document is Submitted, the status of the document will change to Submitted and the IMRD RTV will be available for the stores/ warehouses to act on.
To submit an IMRD RTV
1. Retrieve the IMRD RTV you want to submit.
2. From the Actions menu, select Submit. The status of this IMRD RTV is now set to Submitted.
3. Click OK.
Canceling and Reinstating an IMRD RTVIMRD RTVs can be canceled and reinstated. You might want to cancel an IMRD RTV if you had entered the wrong styles or locations on the document.
If an IMRD RTV was canceled by mistake, you can reinstate it to a status of Preliminary. Only IMRD RTVs with a status of Canceled may be reinstated.
If your system has locations using Interative Non‐Sale (INS) or Store Inventory Tracking, the IMRD RTV must have a Submitted status. A warning message will display to advise you that the
Submitted Document is ready to be worked on
Locations receive an IMRD RTV that they can then act upon through the RTV function.
If at least one location has acted on the IMRD, then the only fields that can be modified are:
Description
Can add a From Location but canʹt remove the one that acted on the IMRD
Messages
Attributes
Status Description What has been updated What can be modified

IMRD RTVs 119
document may have been downloaded and acted upon by the location, along with a list of the locations the document was downloaded to.
To cancel or reinstate an IMRD RTV, you can either:
highlight the document on the Outbound Worklist and select the Cancel or Reinstate action on the Actions menu, or
open the document and select the Cancel or Reinstate action on the Actions menu.
To cancel an IMRD RTV
Note: Instead of following the procedure below to cancel an IMRD RTV document, you can also highlight the document on the Outbound Worklist and select the Cancel action on the Actions menu.
1. Retrieve the IMRD RTV you want to cancel.
2. From the Actions menu, select Cancel. The status of this IMRD RTV is now set to Canceled.
3. To acknowledge the status change, click OK.
To reinstate an IMRD RTV
Note: Instead of following the procedure below to reinstate an IMRD RTV document, you can also open the document and select the Reinstate action from the Actions menu.
1. On the Outbound Worklist, highlight the IMRD RTV you want to reinstate.
2. From the Actions menu, select Reinstate.
3. To acknowledge the status change, click OK.
Creating an RTV from an IMRD RTVThe User Preferences in the Enterprise Data module determine whether RTVs can be created from IMRD RTVs. If the user preference IMRD for RTV is set to Must use or This input is optional, an RTV can be created in one of two ways:
either select an IMRD RTV with a status of Submitted from the Outbound Worklist, or
select to add a new RTV by creating it from an IMRD RTV and then enter the IMRD RTV number.
When you have an IMRD RTV that needs to be acted upon, the locations should physically gather the goods and then access the Outbound Worklist to create an RTV document using the IMRD RTV document as the reference. The rest of the RTV flow occurs as described in Returns to Vendor (RTVs) in this manual.
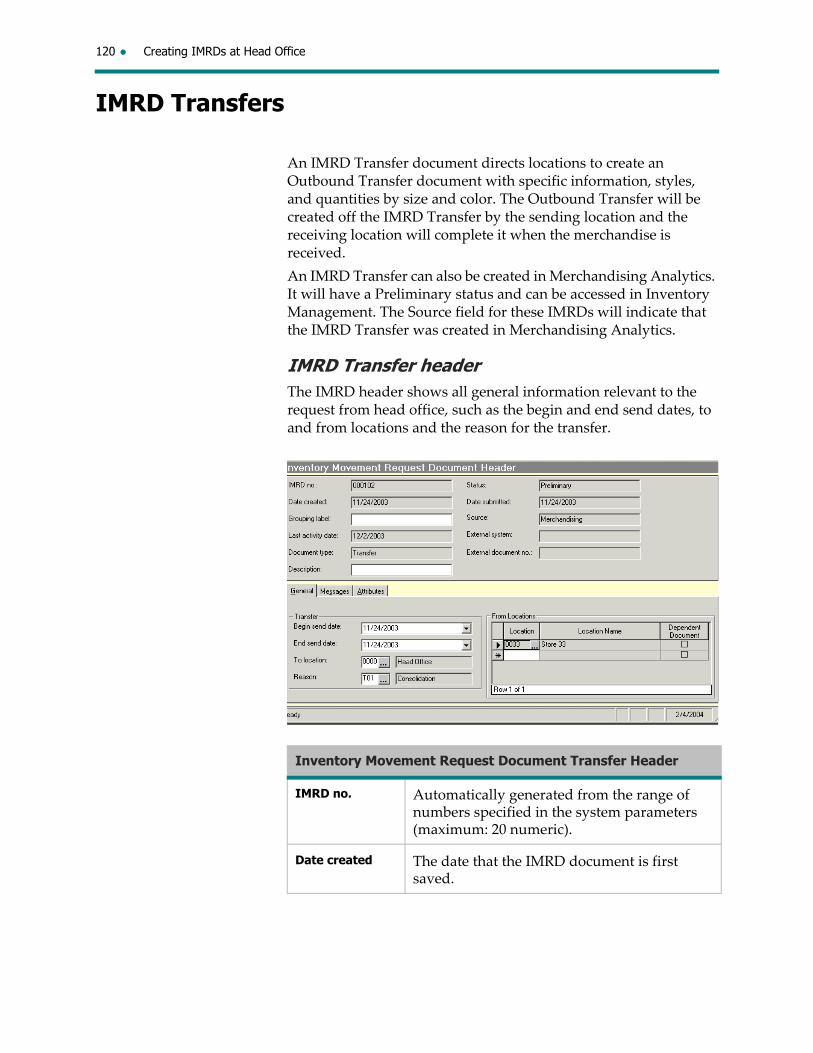
120 Creating IMRDs at Head Office
IMRD Transfers
An IMRD Transfer document directs locations to create an Outbound Transfer document with specific information, styles, and quantities by size and color. The Outbound Transfer will be created off the IMRD Transfer by the sending location and the receiving location will complete it when the merchandise is received.
An IMRD Transfer can also be created in Merchandising Analytics. It will have a Preliminary status and can be accessed in Inventory Management. The Source field for these IMRDs will indicate that the IMRD Transfer was created in Merchandising Analytics.
IMRD Transfer headerThe IMRD header shows all general information relevant to the request from head office, such as the begin and end send dates, to and from locations and the reason for the transfer.
Inventory Movement Request Document Transfer Header
IMRD no. Automatically generated from the range of numbers specified in the system parameters (maximum: 20 numeric).
Date created The date that the IMRD document is first saved.

IMRD Transfers 121
Grouping label Max. 20 characters. A memo field used to link documents that have something in common for query purposes. The standards for what should be put in this field are decided by your company. For example, you could decide as a company that you will enter the department number here so that you can do a query on documents by department.
Last activity date
The date the IMRD was last accessed (either the date it was created or the date it was last modified).
Document type IMRDs can be created for Transfers or RTVs. In this scenario, the document type will be Transfer.
Description An optional free‐form field that can be used for performing a query. It can be used to identify the actual purpose of the IMRD. This field contains up to 60 characters.
Status Displays the IMRD status based on certain activity such as whether the document is newly created, submitted or canceled. An IMRD’s status may be one of the following:
Preliminary: a new document or work in progress that has not yet been submitted by Head Office.
Submitted: the document is ready to be processed by the locations. Only documents with a status of Submitted can be acted on.
Canceled: the document cannot be processed by the location. This status will cancel the IMRD Transfer request.
Date submitted The date that the IMRD status was changed to Submitted, making the IMRD available for stores/ warehouses to start processing.
Source Shows where the document was originally created; will be Merchandising unless the document is interfaced from another system: in that case, the name of the source will be other.
Inventory Movement Request Document Transfer Header

122 Creating IMRDs at Head Office
External system If the source of the document is other, the IMRD was created in another system and then interfaced to Inventory Management. This field shows what system the document is being interfaced from.
External document no.
The number of the document on the system that the document was interfaced from.
IMRD Transfer Header, General tab
Begin send date Merchandise cannot be sent before this date.
End send date Merchandise cannot sent after this date.
To location Mandatory. Indicates where the transfer items are to be sent.
Reason Mandatory. Indicates the reason for the transfer.
From Locations Indicates the locations that are directed to transfer styles. If the From Location code is grayed out, this means that location has created a transfer referencing the IMRD. If the From Location code is not grayed out, then that location has not yet acted on the request.
Inventory Movement Request Document Transfer Header
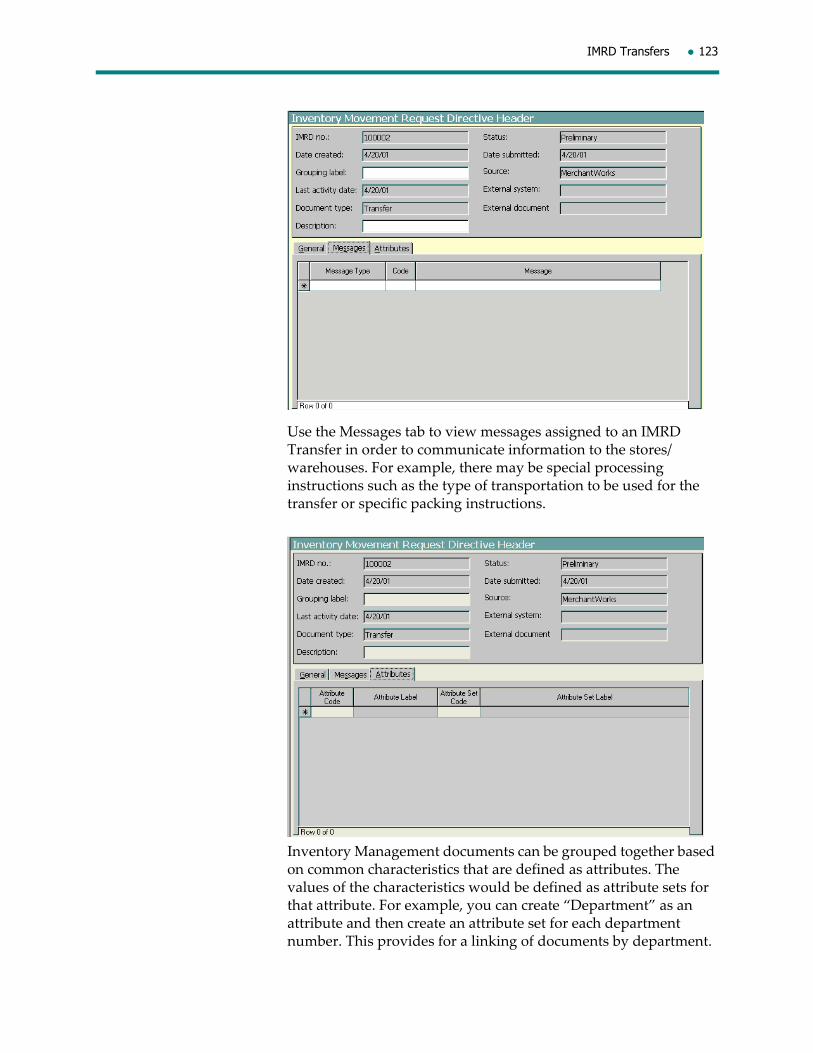
IMRD Transfers 123
Use the Messages tab to view messages assigned to an IMRD Transfer in order to communicate information to the stores/warehouses. For example, there may be special processing instructions such as the type of transportation to be used for the transfer or specific packing instructions.
Inventory Management documents can be grouped together based on common characteristics that are defined as attributes. The values of the characteristics would be defined as attribute sets for that attribute. For example, you can create “Department” as an attribute and then create an attribute set for each department number. This provides for a linking of documents by department.
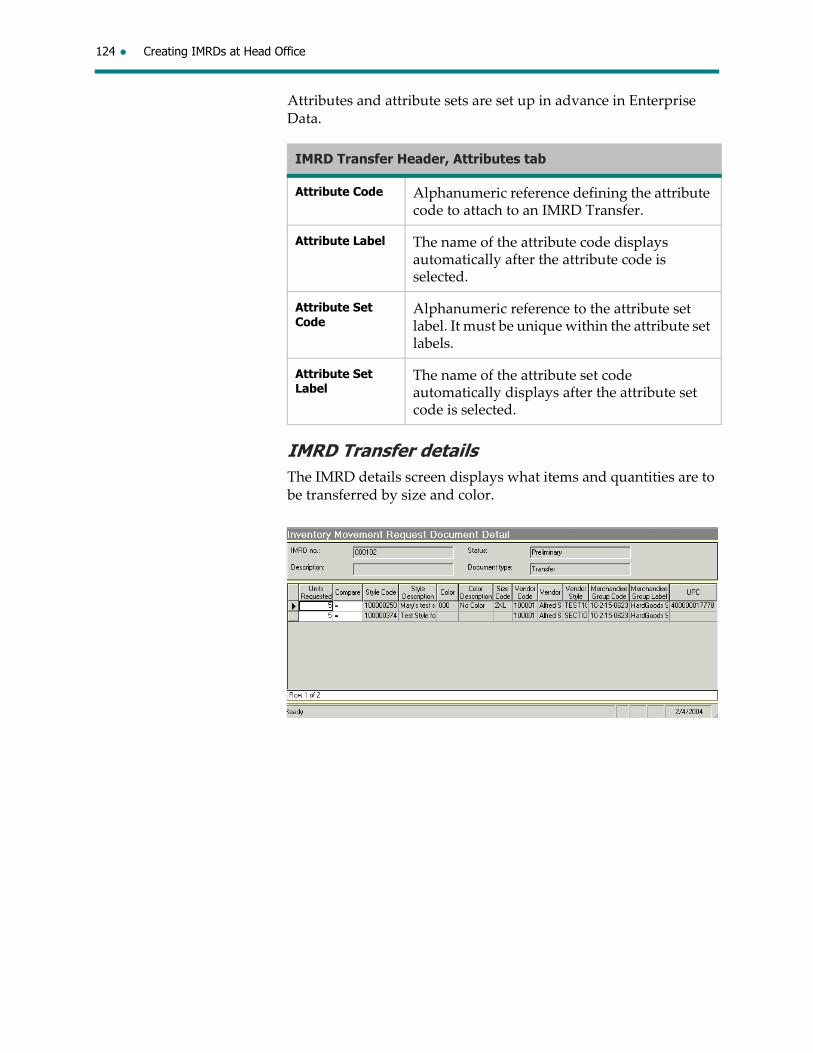
124 Creating IMRDs at Head Office
Attributes and attribute sets are set up in advance in Enterprise Data.
IMRD Transfer detailsThe IMRD details screen displays what items and quantities are to be transferred by size and color.
IMRD Transfer Header, Attributes tab
Attribute Code Alphanumeric reference defining the attribute code to attach to an IMRD Transfer.
Attribute Label The name of the attribute code displays automatically after the attribute code is selected.
Attribute Set Code
Alphanumeric reference to the attribute set label. It must be unique within the attribute set labels.
Attribute Set Label
The name of the attribute set code automatically displays after the attribute set code is selected.
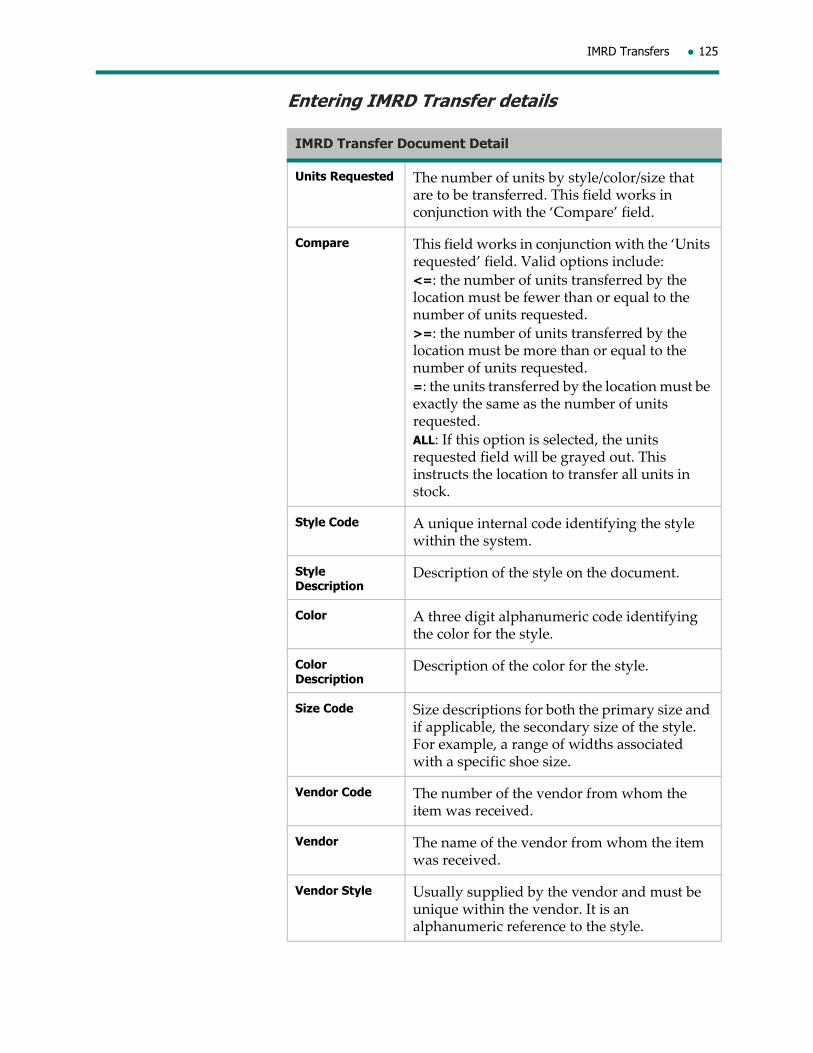
IMRD Transfers 125
Entering IMRD Transfer details
IMRD Transfer Document Detail
Units Requested The number of units by style/color/size that are to be transferred. This field works in conjunction with the ‘Compare’ field.
Compare This field works in conjunction with the ‘Units requested’ field. Valid options include:
<=: the number of units transferred by the location must be fewer than or equal to the number of units requested.
>=: the number of units transferred by the location must be more than or equal to the number of units requested.
=: the units transferred by the location must be exactly the same as the number of units requested.
ALL: If this option is selected, the units requested field will be grayed out. This instructs the location to transfer all units in stock.
Style Code A unique internal code identifying the style within the system.
Style Description
Description of the style on the document.
Color A three digit alphanumeric code identifying the color for the style.
Color Description
Description of the color for the style.
Size Code Size descriptions for both the primary size and if applicable, the secondary size of the style. For example, a range of widths associated with a specific shoe size.
Vendor Code The number of the vendor from whom the item was received.
Vendor The name of the vendor from whom the item was received.
Vendor Style Usually supplied by the vendor and must be unique within the vendor. It is an alphanumeric reference to the style.

126 Creating IMRDs at Head Office
Enter the items and quantities being requested to be transferred on the IMRD Transfer Details screen. There are two ways to input the IMRD Transfer details:
1. enter units by UPC, or
2. enter units by style/color/size
1. Entering IMRD Transfer units by UPCIf you are scanning the tickets of the items for which you are requesting to be transferred, use Enter Units by UPC.
To enter IMRD Transfer units by UPC
1. From the Main Menu, select Outbound.
2. From the Outbound Worklist, select IMRD, then select New and Document type Transfer. Click OK.
3. Enter the header information for the IMRD Transfer.
4. On the General tab, enter the To Location code where the merchandise should be transferred and the Reason for the transfer.
5. In the From Location, enter a list of the locations that are to transfer the merchandise.
6. If required, on the Messages tabs either select a message type from the drop‐down list or enter a message code and enter the message details.
7. From the Inventory Movement Request Document Header, select IMRD Detail then from the Edit menu, select Enter Units by UPC.
8. Scan the UPC barcode or enter the UPC of the item to be transferred.
9. The quantity automatically defaults to 1. If there are multiple items of the same SKU (style, color, size), enter the number of the items to be transferred.
10. At the Comparison Operator field, select the operator corresponding to the number of units the stores are to transfer and then click Apply.
Merchandise Group Code
The code assigned to the group in the merchandise hierarchy that the style is assigned to.
Merchandise Group Label
The label assigned to the group in the merchandise hierarchy that the style is assigned to.
UPC The Universal Product Code is a numeric code to uniquely identify merchandise down to the color and size level.
IMRD Transfer Document Detail

IMRD Transfers 127
11. Repeat steps 8 ‐ 10 for each item to be transferred and then click Close.
12. The IMRD Transfer Detail screen reappears so that you can review the items and quantities on this particular IMRD Transfer document.
13. Once you are satisfied that all details entered are accurate, click Save > OK.
2. Entering units by style/color/sizeIf you are entering the quantities being transferred using the style code, use Enter Units by Style/Color/Size.
To enter IMRD Transfer units by style/color/size
1. From the Main Menu, select Outbound.
2. From the Outbound Worklist, select IMRD, then select New and Document type Transfer. Click OK.
3. Enter the header information for the IMRD Transfer.
4. On the General tab, enter the To location code where the merchandise should be transferred and the Reason for the transfer.
5. In the From Locations, enter a list of the locations that are to transfer the merchandise.
6. If required, on the Messages tab either select a message type from the drop‐down list or enter a message code and enter the message details.
7. From the Inventory Movement Request Document Header, select IMRD Detail. Then on the Edit menu, select Enter Units by Style/Color/Size.
8. In the Enter Units by Style/Color/Size dialog box, enter a valid style code, color code and size code and select the comparison operator for the quantity to be transferred and enter the units requested.
9. Click Apply.
10. Repeat steps 8‐9 for each style requested for transfer. When finished, click OK.
11. Save and acknowledge your input. An IMRD Transfer number is assigned with a status of Preliminary.
Modifying an IMRD TransferYou can modify both the IMRD Transfer Header and details if information is entered incorrectly or additional information is needed. Once at least one location has acted on the IMRD, only then can some of the information be changed.
If your system has locations using Interactive Non‐Sale (INS) or Store Inventory Tracking, the IMRD Transfer must have a Submitted status. A warning message will display to advise you
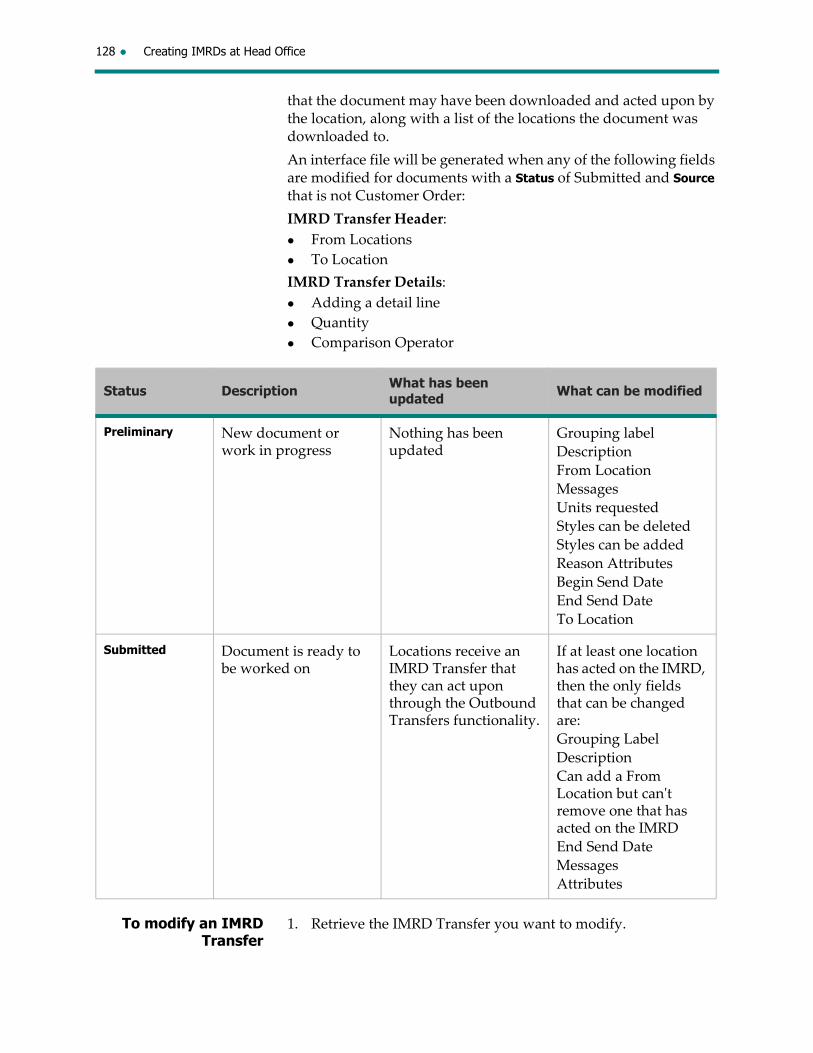
128 Creating IMRDs at Head Office
that the document may have been downloaded and acted upon by the location, along with a list of the locations the document was downloaded to.
An interface file will be generated when any of the following fields are modified for documents with a Status of Submitted and Source that is not Customer Order:
IMRD Transfer Header:
From Locations
To Location
IMRD Transfer Details:
Adding a detail line
Quantity
Comparison Operator
To modify an IMRD Transfer
1. Retrieve the IMRD Transfer you want to modify.
Status Description What has been updated What can be modified
Preliminary New document or work in progress
Nothing has been updated
Grouping label
Description
From Location
Messages
Units requested
Styles can be deleted
Styles can be added
Reason Attributes
Begin Send Date
End Send Date
To Location
Submitted Document is ready to be worked on
Locations receive an IMRD Transfer that they can act upon through the Outbound Transfers functionality.
If at least one location has acted on the IMRD, then the only fields that can be changed are:
Grouping Label
Description
Can add a From Location but canʹt remove one that has acted on the IMRD
End Send Date
Messages
Attributes

IMRD Transfers 129
2. Make the necessary changes to the header and/or details. See “IMRD Transfer header” on page 120 and “IMRD Transfer details” on page 124 for field definitions.
3. Save and acknowledge your input.
Submitting an IMRD TransferOnce an IMRD has been created, it can be saved as a Preliminary document. This means that information can still be changed in either the Header or the Details. The document cannot be acted upon by the locations until it is submitted.
Once the document is Submitted, the status of the document will change to Submitted and the IMRD Transfer will be available for the locations to act on.
To submit an IMRD Transfer
1. Retrieve the IMRD Transfer you want to submit.
2. From the Actions menu, select Submit. The status of this IMRD Transfer is now set to Submitted.
3. Click OK.
Canceling and Reinstating an IMRD TransferIMRD Transfers can be canceled and reinstated. If an IMRD Transfer was canceled by mistake, you can reinstate it to a status of Preliminary. Only IMRD Transfers with a status of Canceled may be reinstated.
If your system has locations using Interactive Non‐Sale (INS) or Store Inventory Tracking, the IMRD Transfer must have a Status of Submitted and a document Source that is not Customer Order. A warning message will display to advise you that the document may have been downloaded and acted upon by the location, along with a list of the locations the document was downloaded to.
To cancel or reinstate an IMRD Transfer, you can either:
highlight the document on the Outbound Worklist and select the Cancel or Reinstate action on the Actions menu, or
open the document and select the Cancel or Reinstate action on the Actions menu.
To cancel an IMRD Transfer
Note: Instead of following the procedure below to cancel an IMRD Transfer, you can also highlight the document on the Outbound Worklist and select the Cancel action on the Actions menu.
1. Retrieve the IMRD Transfer you want to cancel.
2. From the Actions menu, select Cancel. The status of this IMRD Transfer is now set to Canceled.
3. To acknowledge the status change, click OK.

IMRD Transfers 130
To reinstate an IMRD Transfer
Note: Instead of following the procedure below to reinstate an IMRD Transfer, you can also open the document and select the Reinstate action on the Actions menu.
1. On the Outbound Worklist, highlight the IMRD Transfer you want to reinstate.
2. From the Actions menu, select Reinstate.
3. To acknowledge the status change, click OK.
Creating an Outbound Transfer from an IMRD TransferThe User Preferences in the Enterprise Data module determine whether transfers can be created from IMRD Transfers. If the user preference IMRD for Transfer is set to Must use or This input is optional, a transfer can be created in one of two ways:
either select an IMRD Transfer with a status of Submitted from the Outbound Worklist, or
select to add a new transfer by creating it from an IMRD Transfer and then enter the IMRD Transfer number.
When you have an IMRD Transfer that needs to be acted upon, be sure to verify the begin send date and end send date. An IMRD Transfer can only be acted upon within that range of dates. If the current date is within this range, physically gather the goods requested on the IMRD Transfer document, access the Outbound Worklist and create an Outbound Transfer document using the IMRD Transfer document as the reference. The rest of the transfer flow occurs as described in the Transfers chapter in this manual.
Creating a Transfer or IMRD Transfer through Merchandising AnalyticsYou can create a transfer or IMRD transfer using Merchandising Analytics. (See the Merchandising Analytics User Guide for the two procedures.) Once the transfer or IMRD transfer has been created in Merchandising Analytics, it can be accessed in Inventory Management by accessing Transfers, Outbound Worklist and performing a query on Document type and Document number. Once the transfer details are displayed, sent units will need to be entered if ʺAllʺ was entered for the units to transfer in Merchandising Analytics. Otherwise, units entered in Merchandising Analytics can be overridden. When this transfer is saved in Inventory Management, its status changes from Preliminary to Ready to Send.
Merging multiple IMRD TransfersYou can merge styles from multiple IMRD transfers with a Preliminary status onto one IMRD Transfer document.
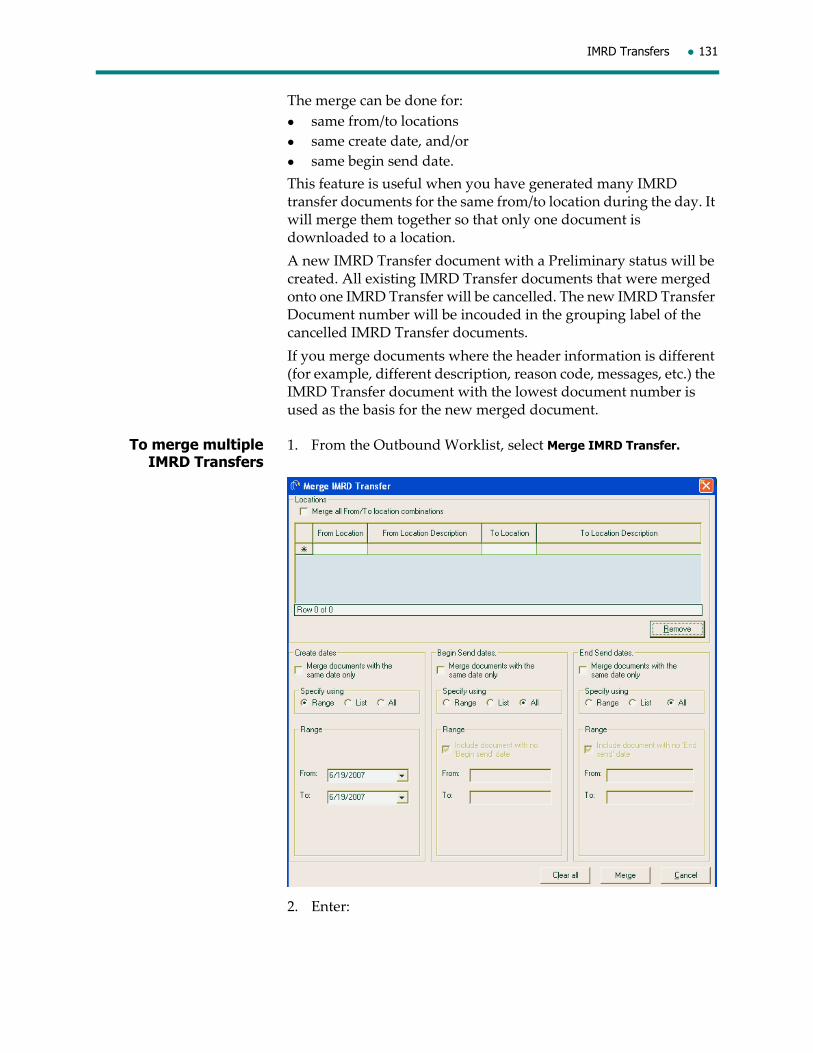
IMRD Transfers 131
The merge can be done for:
same from/to locations
same create date, and/or
same begin send date.
This feature is useful when you have generated many IMRD transfer documents for the same from/to location during the day. It will merge them together so that only one document is downloaded to a location.
A new IMRD Transfer document with a Preliminary status will be created. All existing IMRD Transfer documents that were merged onto one IMRD Transfer will be cancelled. The new IMRD Transfer Document number will be incouded in the grouping label of the cancelled IMRD Transfer documents.
If you merge documents where the header information is different (for example, different description, reason code, messages, etc.) the IMRD Transfer document with the lowest document number is used as the basis for the new merged document.
To merge multiple IMRD Transfers
1. From the Outbound Worklist, select Merge IMRD Transfer.
2. Enter:
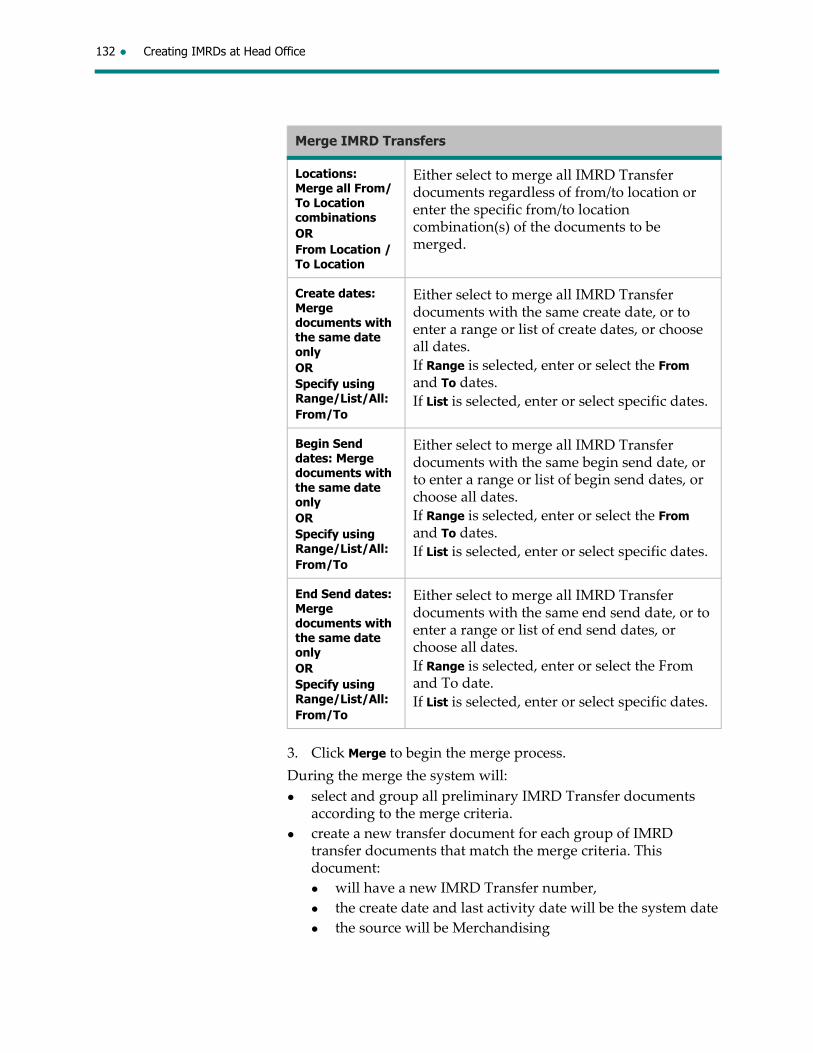
132 Creating IMRDs at Head Office
3. Click Merge to begin the merge process.
During the merge the system will:
select and group all preliminary IMRD Transfer documents according to the merge criteria.
create a new transfer document for each group of IMRD transfer documents that match the merge criteria. This document:
will have a new IMRD Transfer number,
the create date and last activity date will be the system date
the source will be Merchandising
Merge IMRD Transfers
Locations: Merge all From/To Location combinationsORFrom Location / To Location
Either select to merge all IMRD Transfer documents regardless of from/to location or enter the specific from/to location combination(s) of the documents to be merged.
Create dates: Merge documents with the same date onlyORSpecify using Range/List/All:From/To
Either select to merge all IMRD Transfer documents with the same create date, or to enter a range or list of create dates, or choose all dates.
If Range is selected, enter or select the From and To dates.If List is selected, enter or select specific dates.
Begin Send dates: Merge documents with the same date onlyORSpecify using Range/List/All:From/To
Either select to merge all IMRD Transfer documents with the same begin send date, or to enter a range or list of begin send dates, or choose all dates.
If Range is selected, enter or select the From and To dates.If List is selected, enter or select specific dates.
End Send dates: Merge documents with the same date onlyORSpecify using Range/List/All:From/To
Either select to merge all IMRD Transfer documents with the same end send date, or to enter a range or list of end send dates, or choose all dates.
If Range is selected, enter or select the From and To date.
If List is selected, enter or select specific dates.

IMRD Transfers 133
the external system and external document number will be set to null (if the documents selected for merge had a non‐null value).
If the documents selected for merge have different begin or end send dates, these dates will be set to the lowest begin send date and highest end send date respectively.
If the documents selected for merge have different grouping labels descriptions, or reason codes, the new IMRD Transfer document will reflect the grouping label, description and reason code from the source document with the lowest IMRD Transfer number.
If the documents selected for merge have different attributes, all attributes will be added to the new IMRD Transfer document.
If the documents to be merged have the same attribute codes but different attribute sets, the attribute code/set from the source document with the lowest IMRD Transfer document number will be used.
If the documents selected for merge have different messages, all messages will be added to the new IMRD Transfer document.
If the documents to be merged have the same message type but different message code, the meesage type/code from the source document with the lowest IMRD Transfer document number will be used.
In the IMRD Details, each detail line from the source documents that matches the merge criteria will be added to the new document. If the documents being merged have identical SKUs are but different quantities, the highest quantity will be used.
All merged IMRD Transfer documents will be cancelled and the grouping label on each will be set to the new IMRD Transfer Document number.

134 Creating IMRDs at Head Office
System Delete of IMRD Documents
IMRDs will be automatically deleted by the system if the IMRD has:
a status of Canceled, or
a status of Submitted, and
a certain user‐defined number of weeks has elapsed since these documents were updated with these statuses.

Deleting IMRD Documents Manually 135
Deleting IMRD Documents Manually
IMRD documents with a status of Submitted or Canceled may be deleted from the system manually as required.
If your system has locations using Interactive Non‐Sale (INS) or Store Inventory Tracking, a warning message will display for IMRD Transfers and RTVs to advise you that the document may have been downloaded and acted upon by the location, along with a list of the locations the document was downloaded to if deleting an IMRD with a status of Submitted.
To delete IMRD documents
To delete an IMRD document, highlight the appropriate IMRD document on the Outbound Worklist, from the File menu, click Delete > Yes to confirm your request to delete.

136 Creating IMRDs at Head Office
Printing an IMRD
An IMRD can be printed from the Outbound Worklist or while you are in the document itself.
The printed IMRD contains the following header information:
User
Date
IMRD number
Description
Status
Grouping label
Date created
Message
For IMRD Transfers, the following additional information is printed:
To location
Reason
Begin send date
End send date
IMRD Transfer document
For IMRD RTVs, the following additional information is printed:
Vendor
PO number
Return authorization number
Reason
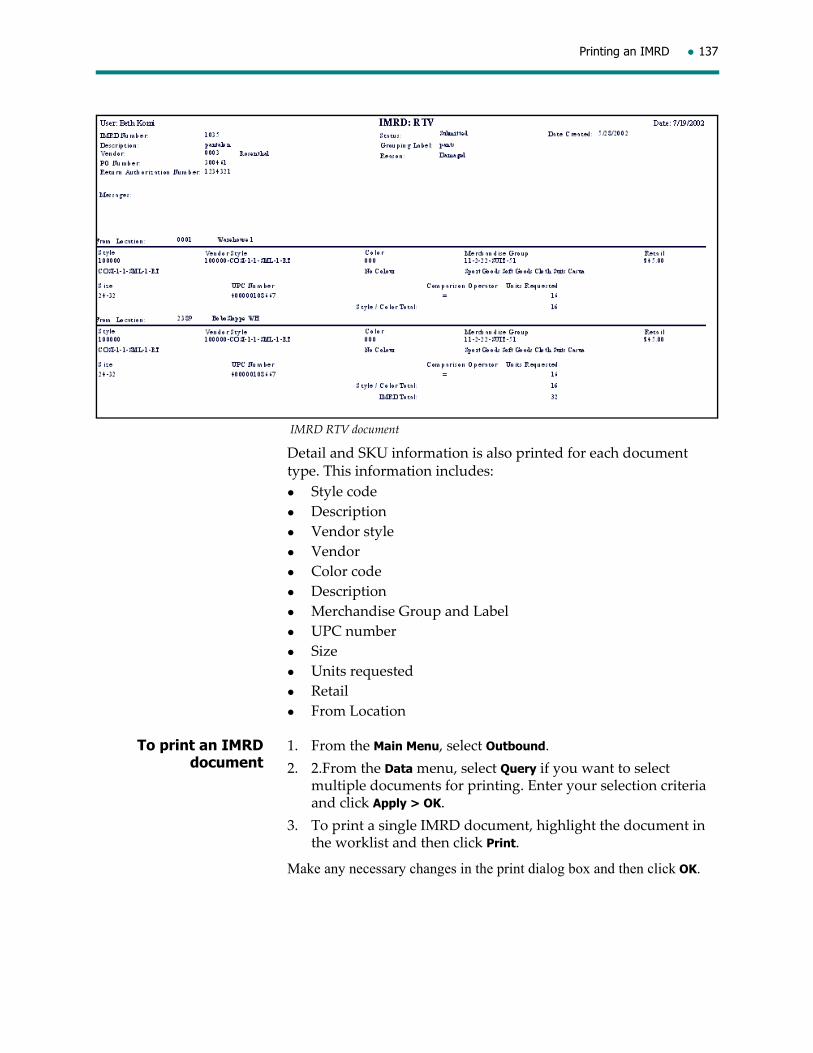
Printing an IMRD 137
IMRD RTV document
Detail and SKU information is also printed for each document type. This information includes:
Style code
Description
Vendor style
Vendor
Color code
Description
Merchandise Group and Label
UPC number
Size
Units requested
Retail
From Location
To print an IMRD document
1. From the Main Menu, select Outbound.
2. 2.From the Data menu, select Query if you want to select multiple documents for printing. Enter your selection criteria and click Apply > OK.
3. To print a single IMRD document, highlight the document in the worklist and then click Print.
Make any necessary changes in the print dialog box and then click OK.

138 Creating IMRDs at Head Office
In this section you will learn how to send merchandise to a store or warehouse, modify the quantities sent, print a transfer document, print carton labels, receive shipments from a store, modify the quantities received and delete a Transfer document.
An Outbound Transfer is used to initiate the transfer of goods from your store to the destination location. Once the transfer send flow is complete, the units are booked into the receiving store’s inventory and are given a status of Unavailable ‐ In Transit in Infobase.
An Inbound Transfer is used to acknowledge the receipt into your store of transferred merchandise being sent from another location. Once the transfer receipt flow is complete, the status of Unavailable ‐ In Transit attached to the items is released and the inventory is considered Available in the store.
If there are any discrepancies between the units sent and the units received within the transfer process, the system will automatically flag these discrepancy units as unavailable ‐ discrepancy. This inventory is booked to either the sending store or the receiving store based on system parameter settings.
Inventory Management provides the ability to create carton labels for each carton on a given Outbound Transfer. This allows the receiving location to scan the carton labels upon receipt of the shipment, and to use the Receive by Carton functionality described in the Vendor and Warehouse Receipts section of this manual.
Pseudo stylesWhen you need to make adjustments to both the sending and receiving location’s total units, total retail and total cost for a pseudo style, use a two‐sided (affecting sending and receiving locations) user‐defined cost and units adjustment instead of a transfer. See “3. Entering adjustments using the Enter Adjustment for a Pseudo Style option” on page 269 for more information.
3 Transfers

140 Transfers
Outbound Transfer flow

Outbound Transfers 141
Outbound Transfers
In order to let the system know what items you are sending to a store or warehouse, you must create an Outbound Transfer document on the system. The Outbound Transfer is made up of a header that contains general information about the transfer, and details that specify the individual items being sent.
Head Office may have also created an Outbound Transfer from Merchandising Analytics. You can now enter in the actual units you are sending based on the message from Head Office advising you of the number of units you should send.
The User Preferences in the Enterprise Data module determine whether Outbound Transfers can be created from IMRD Transfers.
If the user preference IMRD for Transfer is set to Must use, the transfer must be created from an IMRD Transfer.
If the user preference IMRD for Transfer is set to This input is optional, a transfer may be created from an IMRD Transfer.
If the user preference IMRD for Transfer is set to Mustn't use, a transfer cannot be created from an IMRD Transfer.
Pseudo stylesWhen you need to make adjustments to both the sending and receiving location’s total units, total retail and total cost for a pseudo style, use a two‐sided (affecting sending and receiving locations) user‐defined cost and units adjustment instead of an outbound transfer. See “3. Entering adjustments using the Enter Adjustment for a Pseudo Style option” on page 269 for more information.
Outbound Transfer headerUse the Outbound Transfer Header to input general information about the shipment, such as where, why and how you are sending it.
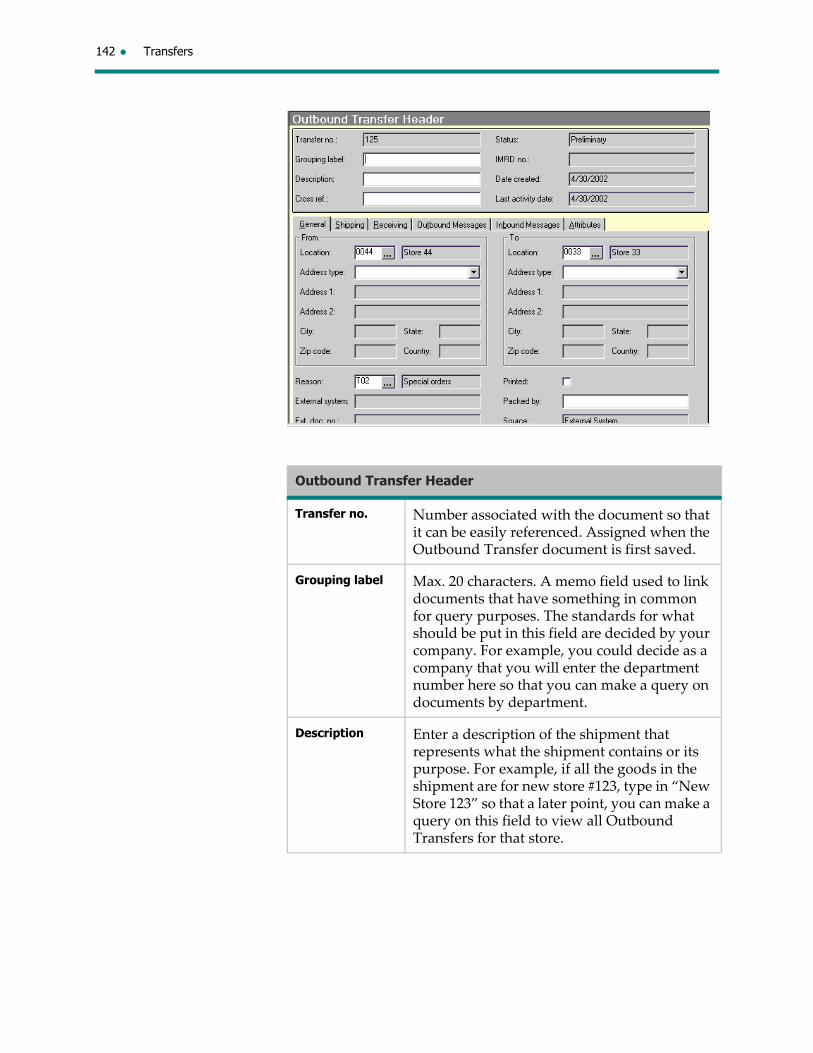
142 Transfers
Outbound Transfer Header
Transfer no. Number associated with the document so that it can be easily referenced. Assigned when the Outbound Transfer document is first saved.
Grouping label Max. 20 characters. A memo field used to link documents that have something in common for query purposes. The standards for what should be put in this field are decided by your company. For example, you could decide as a company that you will enter the department number here so that you can make a query on documents by department.
Description Enter a description of the shipment that represents what the shipment contains or its purpose. For example, if all the goods in the shipment are for new store #123, type in “New Store 123” so that a later point, you can make a query on this field to view all Outbound Transfers for that store.

Outbound Transfers 143
Cross ref. The cross‐reference field is a memo field where you can enter a number that references another document. For example, you are sending an item to another store to fulfill a customer request. The receiving store has printed customer information on a numbered form. You can enter the number of that form in the Cross ref. field to help the receiving store match the goods with the customer request.
Status This field shows at what stage of the transfer flow the document is located.
Preliminary: the Outbound Transfer document has been created, but is not considered Ready to send, perhaps because not all details have been entered.
Ready to send: the Outbound Transfer document has all the pertinent information, but the goods in the shipment have not yet been physically sent.
Sent: the Outbound Transfer document has all the pertinent information and the shipment has been physically sent.
IMRD no. A reference to an Inventory Movement Request document, which is a request initiated from Head Office to move merchandise. This will be covered in more detail in the section Responding to an MRD in this manual.
Last activity date
The date the document was created or last modified.
Outbound Transfer Header

144 Transfers
Outbound Transfer Header, General tab
From: Location Mandatory. Where the merchandise is being sent from; your store number. Once the number is entered, the name of the location will display in the field to the right.
Address type Select a valid address type from the drop‐down list.
Address 1 Predefined alphanumeric field, max. 50 characters. Generally used to describe the street name and number. Displays once the address type is selected.
Address 2 Predefined alphanumeric field, max. 50 characters. Used if an additional address line is required, usually for floor numbers, suite numbers etc. Displays once the address type is selected.
City Predefined alphanumeric field, max. 20 characters. Displays once the address type is selected.
State Predefined alphanumeric field, 2 characters. Displays once the address type is selected.

Outbound Transfers 145
Zip Code Predefined alphanumeric field, max. 15 characters. Displays once the address type is selected.
Country Predefined alphanumeric field; max. 2 or 3 characters. Displays once the address type is selected.
To: Location Mandatory. The number of the location you are sending the merchandise to. Once the number of the location is entered, the name of the location will display in the field to the right.
Address type Select a valid address type from the drop‐down list.
Address 1 Predefined alphanumeric field, max. 50 characters. Generally used to describe the street name and number. Displays once the address type is selected.
Address 2 Predefined alphanumeric field, max. 50 characters. Used if an additional address line is required, usually for floor numbers, suite numbers etc. Displays once the address type is selected.
City Predefined alphanumeric field, max. 20 characters. Displays once the address type is selected.
State Predefined alphanumeric field, 2 characters. Displays once the address type is selected.
Zip Code Predefined alphanumeric field, max. 15 characters. Displays once the address type is selected.
Country Predefined alphanumeric field; max. 2 or 3 characters. Displays once the address type is selected.
Reason Mandatory. Why the goods are being transferred to another location.
Date created The date the Outbound Transfer document was first saved.
Outbound Transfer Header, General tab

146 Transfers
External system If the source of the document is other, the Outbound Transfer was created in another system and then interfaced to Inventory Management. This field shows what system the document is being interfaced from.
External document no.
If the Outbound Transfer document was created outside of Merchandising, the number of the document in the other system displays here.
Packed by The name of the employee packing the merchandise being sent.
Printed check box
Indicates if the transfer has been printed by Head Office.
Source Shows where the document was originally created; will be Merchandising unless the document is interfaced from another system. For example, if the transfer was created in Merchandising Analytics, the source will be Merchandising Analytics. “In‐Store” will appear for documents created at POS.
Outbound Transfer Header, General tab

Outbound Transfers 147
Outbound Transfer Header, Shipping tab
Begin send date If the transfer from your store was initiated as a result of a head office request (IMRD – Inventory Movement Request Document; for more details, see“Responding to an IMRD” on page 213) then this field displays the first date the sending store was told it could ship the goods. Defaults to the current date.
End send date If the transfer from your store was initiated as a result of a head office request (IMRD – Inventory Movement Request Document; for more information, see “IMRD Transfers” on page 217) then this field displays the last date the sending store was told it could ship the goods. Defaults to the current date.
Date shipped The date the transfer was sent from your store.
Warehouse The warehouse number where the transfer is being routed through (if applicable).
Ship via The means by which the transfer is being sent.
Carrier The transport company used to ship the transfer.
Bill of lading A number assigned by the carrier to reference the shipment.
Weight How much the shipment being sent weighs. If a number is entered in this field, a measurement (pounds, tons, etc.) must be selected from the field to the right.
No. of containers The number of containers used to pack the shipment.
Routed through Warehouse
If the transfer is going to a warehouse before going to the receiving location, this field is selected.
Received by Warehouse
This is information fed to Inventory Management from Warehouse Management or from an external distribution system. It indicates whether or not a transfer that was routed through a warehouse has been received at the warehouse.
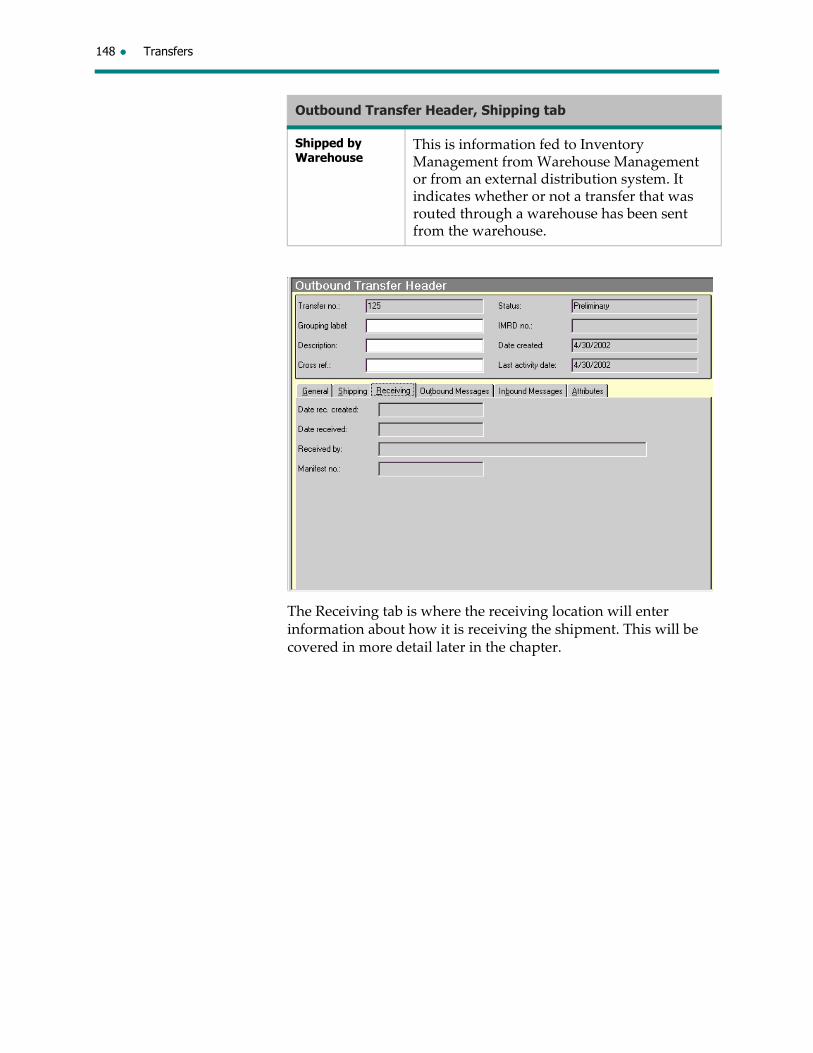
148 Transfers
The Receiving tab is where the receiving location will enter information about how it is receiving the shipment. This will be covered in more detail later in the chapter.
Shipped by Warehouse
This is information fed to Inventory Management from Warehouse Management or from an external distribution system. It indicates whether or not a transfer that was routed through a warehouse has been sent from the warehouse.
Outbound Transfer Header, Shipping tab

Outbound Transfers 149
You can assign predefined or free‐form messages in the Outbound Messages tab. You might use these messages to indicate to the receiving store or warehouse that some of the goods still need to be ticketed.
Outbound Transfer Header, Outbound Messages tab
Message Type Select the appropriate message type from the drop‐down list.
Code A code that references a predefined message; left blank if a free‐form text message is being entered.
Message Either a free‐form message or the text of the predefined message code entered above.

150 Transfers
The Inbound Messages tab is where the receiving location will enter messages for other users’ reference. This will be covered in more detail later in this chapter.
Inventory Management documents can be grouped together based on common characteristics that are defined as attributes. The values of the characteristics would be defined as attribute sets for that attribute. For example, you can create “Department” as an attribute and then create an attribute set for each department number. This provides for a linking of documents by department.

Outbound Transfers 151
Attributes and attribute sets are set up in advance in the Enterprise Data module.
To add a new Outbound Transfer
header
1. From the Main Menu, select Outbound.
2. From the Outbound Worklist, select Transfer.
3. In the Transfer dialog box, select New > OK.
4. Enter the required transfer header information.
5. In the General tab, To location field, enter a valid location number and in the Reason field, enter a valid transfer reason code.
6. In the Shipping tab, enter the End send date and any other information as required.
7. Select the Outbound Messages tab to enter a message.
8. Save and acknowledge your input. The transfer number and Preliminary status have been assigned.
Outbound Transfer detailsThe Outbound Transfer Detail screen allows you to enter the items and quantities of those items actually being sent. There are two ways to enter the units being sent out on the transfer:
1. enter sent units by size grid, or
2. enter units by UPC.
1. Entering sent units by size grid1. To enter details using the style code, from the Edit menu, select
Enter Units by Size Grid.
Outbound Transfer Header, Attributes tab
Attribute Code Alphanumeric reference defining the attribute code to attach to an Outbound Transfer.
Attribute Label The name of the attribute code displays automatically after the attribute code is selected.
Attribute Set Code
Alphanumeric reference to the attribute set label. It must be unique within the attribute set labels.
Attribute Set Label
The name of the attribute set code automatically displays after the attribute set code is selected.

152 Transfers
If your company is using the Receive by Carton functionality where labels are scanned at the time of receipt, you must tell the system what items are going in which box.
Therefore, when you start a new carton, click New Carton. The system will display a new carton number in the Carton field. You can then enter the Style code, Color code and Reason code for each item being packed in that carton. If you are adding items to an already opened carton, click More. From the list of carton numbers that are “open” on the system, select the carton number you wish to continue packing merchandise into and then click OK.
Enter Units by Size Grid dialog boxStyle codeInternal reference number for the item being sent.
Color codeThe code of the color of the style being sent.
Reason codeWhy the particular item is being transferred to another location. Only fill out this field if the reason is different from the reason specified in the Outbound Transfer Header. The field will default to the reason code from the header.
There are different actions you can take within this window:
click Lookup to view a display of available options for the field where your cursor is positioned.
click Validate to have the system verify the information you have entered in the Select SKUs for Transfer Send window.
click Clear to remove all the data currently displayed on the screen.
click Apply to enter the information selected into the Outbound Transfer details and then select another item.
click OK to enter the information selected into the Outbound Transfer details and close the Select SKUs for Transfer Send window.
click Cancel to close the Select SKUs for Transfer Send window without entering the information selected into the Outbound Transfer details.
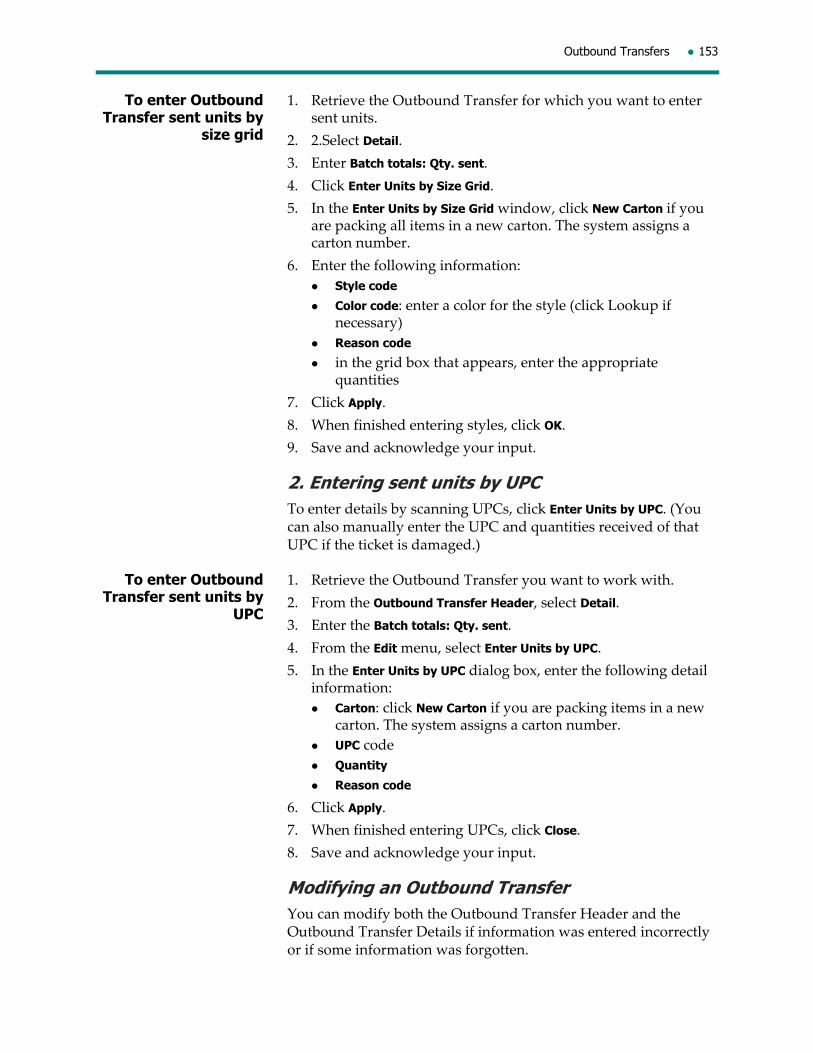
Outbound Transfers 153
To enter Outbound Transfer sent units by
size grid
1. Retrieve the Outbound Transfer for which you want to enter sent units.
2. 2.Select Detail.
3. Enter Batch totals: Qty. sent.
4. Click Enter Units by Size Grid.
5. In the Enter Units by Size Grid window, click New Carton if you are packing all items in a new carton. The system assigns a carton number.
6. Enter the following information:
Style code
Color code: enter a color for the style (click Lookup if necessary)
Reason code
in the grid box that appears, enter the appropriate quantities
7. Click Apply.
8. When finished entering styles, click OK.
9. Save and acknowledge your input.
2. Entering sent units by UPCTo enter details by scanning UPCs, click Enter Units by UPC. (You can also manually enter the UPC and quantities received of that UPC if the ticket is damaged.)
To enter Outbound Transfer sent units by
UPC
1. Retrieve the Outbound Transfer you want to work with.
2. From the Outbound Transfer Header, select Detail.
3. Enter the Batch totals: Qty. sent.
4. From the Edit menu, select Enter Units by UPC.
5. In the Enter Units by UPC dialog box, enter the following detail information:
Carton: click New Carton if you are packing items in a new carton. The system assigns a carton number.
UPC code
Quantity
Reason code
6. Click Apply.
7. When finished entering UPCs, click Close.
8. Save and acknowledge your input.
Modifying an Outbound TransferYou can modify both the Outbound Transfer Header and the Outbound Transfer Details if information was entered incorrectly or if some information was forgotten.
154 Transfers
If you are using the Warehouse Management System (WMS) and the Warehousing System field for the To Location on the transfer document is enabled, information will be sent to the queue for WMS when an Outbound Transfer has been modified.
If your system has locations using Interactive Non‐Sale (INS) or Store Inventory Tracking (SIT), the transfers that have a status of Ready to send receive a warning message. The message will display to advise you that the document may have been downloaded and acted upon by the location, along with a list of the locations the document was downloaded to.
An interface file will be generated if any of the following fields are modified:
Outbound Transfer Header:
From Location
To Location
Outbound Transfer Details:
Units (on a detail line)
Detail line is added or deleted
Depending on the document status, you can modify different Outbound Transfer Header and Detail fields. The table below lists the fields that can be modified based on the status of the document.

Outbound Transfers 155
In addition, you can add a carton number to one or multiple detail lines.
Status Description What has been updated What can be modified
Preliminary The Outbound Transfer has been created, but is not yet completed
Nothing has been updated.
Grouping label
Description
Cross Reference
From location
From location address type
To location
To location address type
Header reason code
Packed by
Begin send date
End send date
Date shipped
Ship via
Carrier
Bill of lading
Weight
No. of containers
Routed through warehouse
Outbound messages
Sent units
SKU reason code
Attributes
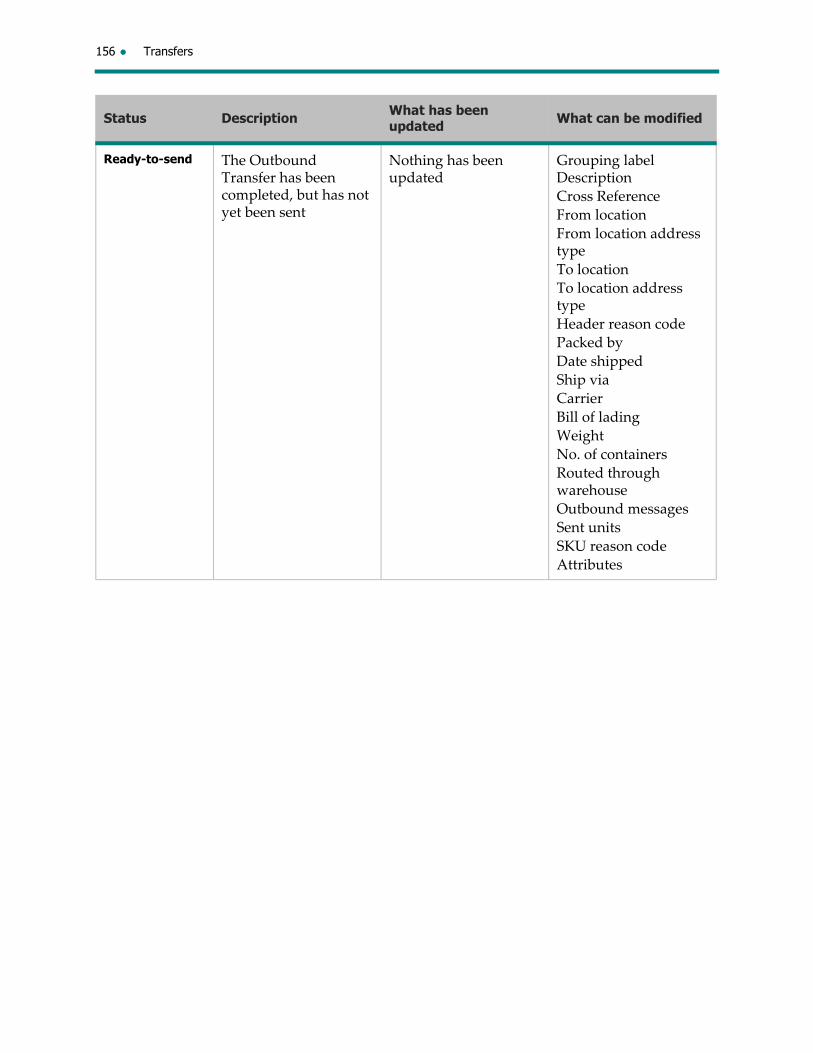
156 Transfers
Ready-to-send The Outbound Transfer has been completed, but has not yet been sent
Nothing has been updated
Grouping label Description
Cross Reference
From location
From location address type
To location
To location address type
Header reason code
Packed by
Date shipped
Ship via
Carrier
Bill of lading
Weight
No. of containers
Routed through warehouse
Outbound messages
Sent units
SKU reason code
Attributes
Status Description What has been updated What can be modified

Outbound Transfers 157
To modify an Outbound Transfer
1. Retrieve the outbound transfer you want to modify.
2. Make all the necessary changes to the header and details. For field definitions, see “Outbound Transfer header” on page 141 and “Outbound Transfer details” on page 151.
3. Save and acknowledge your input.
Canceled The Outbound Transfer has been canceled
If a Preliminary or Ready to Send Outbound Transfer document is canceled, nothing is updated. If a Sent Outbound Transfer document is canceled, the send units from the document are moved back to the sending location’s inventory.
Grouping label Description
Cross Reference
From location
From location address type
To location
To location address type
Header reason code
Packed by
Date shipped
Ship via
Carrier
Bill of lading
Weight
No. of containers
Routed through warehouse
Outbound messages
Sent units
SKU reason code
Attributes
Sent The transfer has been sent to the receiving store, but the receiving store has not yet received the goods on the system
Infobase has been updated and the inventory has moved from the sending store to the receiving store (the inventory now has a status of Unavailable ‐ In Transit)
Grouping label
Description
Cross Reference
Header reason code
Packed by
Ship via
Carrier
Bill of lading
Weight
No. of containers
Outbound messages
Sent units
SKU reason code
Attributes
Status Description What has been updated What can be modified
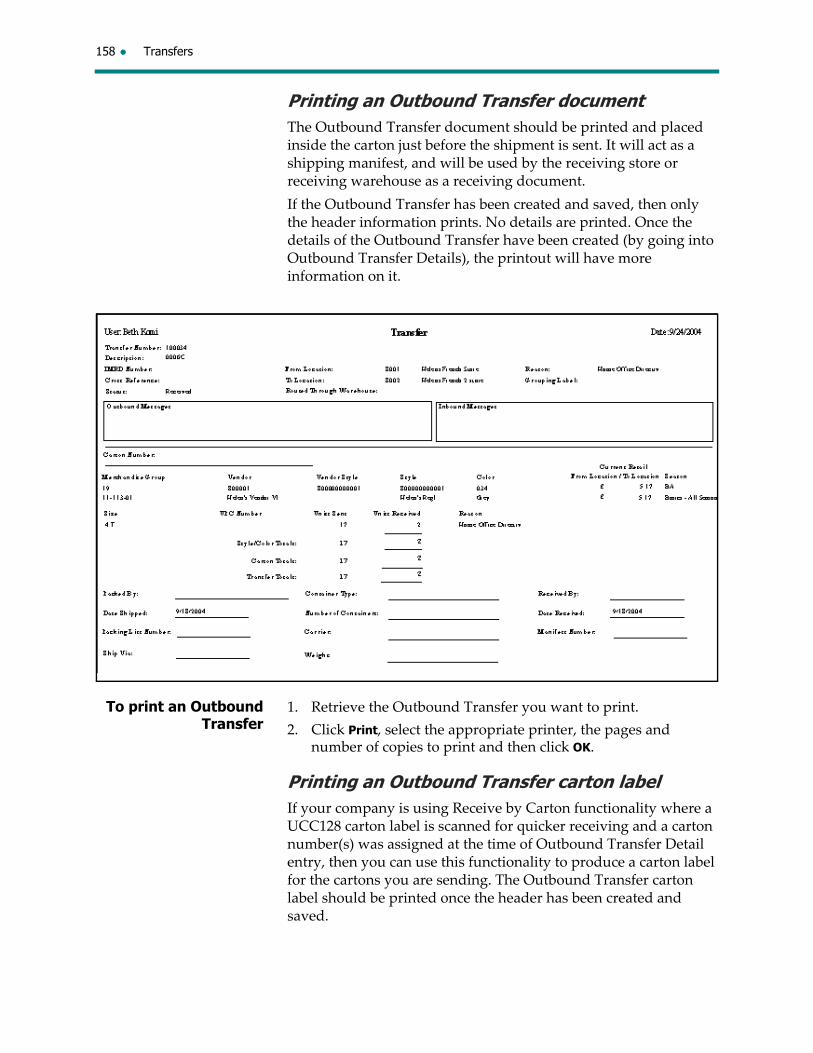
158 Transfers
Printing an Outbound Transfer documentThe Outbound Transfer document should be printed and placed inside the carton just before the shipment is sent. It will act as a shipping manifest, and will be used by the receiving store or receiving warehouse as a receiving document.
If the Outbound Transfer has been created and saved, then only the header information prints. No details are printed. Once the details of the Outbound Transfer have been created (by going into Outbound Transfer Details), the printout will have more information on it.
To print an Outbound Transfer
1. Retrieve the Outbound Transfer you want to print.
2. Click Print, select the appropriate printer, the pages and number of copies to print and then click OK.
Printing an Outbound Transfer carton labelIf your company is using Receive by Carton functionality where a UCC128 carton label is scanned for quicker receiving and a carton number(s) was assigned at the time of Outbound Transfer Detail entry, then you can use this functionality to produce a carton label for the cartons you are sending. The Outbound Transfer carton label should be printed once the header has been created and saved.

Outbound Transfers 159
To print an Outbound Transfer carton label
1. Retrieve the Outbound Transfer for which you want to print a carton label.
2. Click Print Carton label.
3. Select the appropriate printer, the pages and number of copies to print and then click OK.
Setting an Outbound Transfer’s status to Ready to SendYou can change the status of your Outbound Transfer document to Ready to Send if your transfer is ready to be shipped to a store or warehouse, but has not actually left your location. This step is optional. Inventory will not be booked to the receiving store or warehouse as a result of this action.
In order to change the status of your Outbound Transfer document to Ready to Send, either:
access the Outbound Transfer header, and then from the Actions menu, select Mark as Ready to Send, or
highlight the Outbound Transfer on the Outbound Worklist and from the Actions menu, select Mark as Ready to Send.
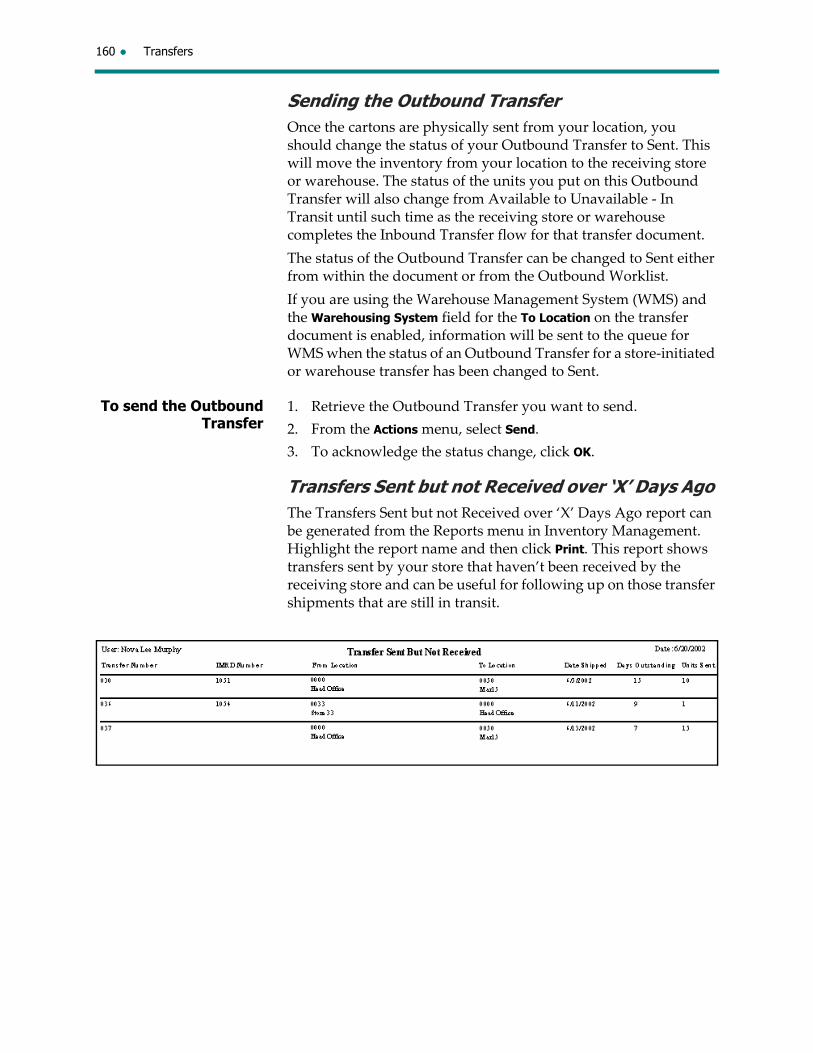
160 Transfers
Sending the Outbound Transfer Once the cartons are physically sent from your location, you should change the status of your Outbound Transfer to Sent. This will move the inventory from your location to the receiving store or warehouse. The status of the units you put on this Outbound Transfer will also change from Available to Unavailable ‐ In Transit until such time as the receiving store or warehouse completes the Inbound Transfer flow for that transfer document.
The status of the Outbound Transfer can be changed to Sent either from within the document or from the Outbound Worklist.
If you are using the Warehouse Management System (WMS) and the Warehousing System field for the To Location on the transfer document is enabled, information will be sent to the queue for WMS when the status of an Outbound Transfer for a store‐initiated or warehouse transfer has been changed to Sent.
To send the Outbound Transfer
1. Retrieve the Outbound Transfer you want to send.
2. From the Actions menu, select Send.
3. To acknowledge the status change, click OK.
Transfers Sent but not Received over ‘X’ Days Ago The Transfers Sent but not Received over ‘X’ Days Ago report can be generated from the Reports menu in Inventory Management. Highlight the report name and then click Print. This report shows transfers sent by your store that haven’t been received by the receiving store and can be useful for following up on those transfer shipments that are still in transit.
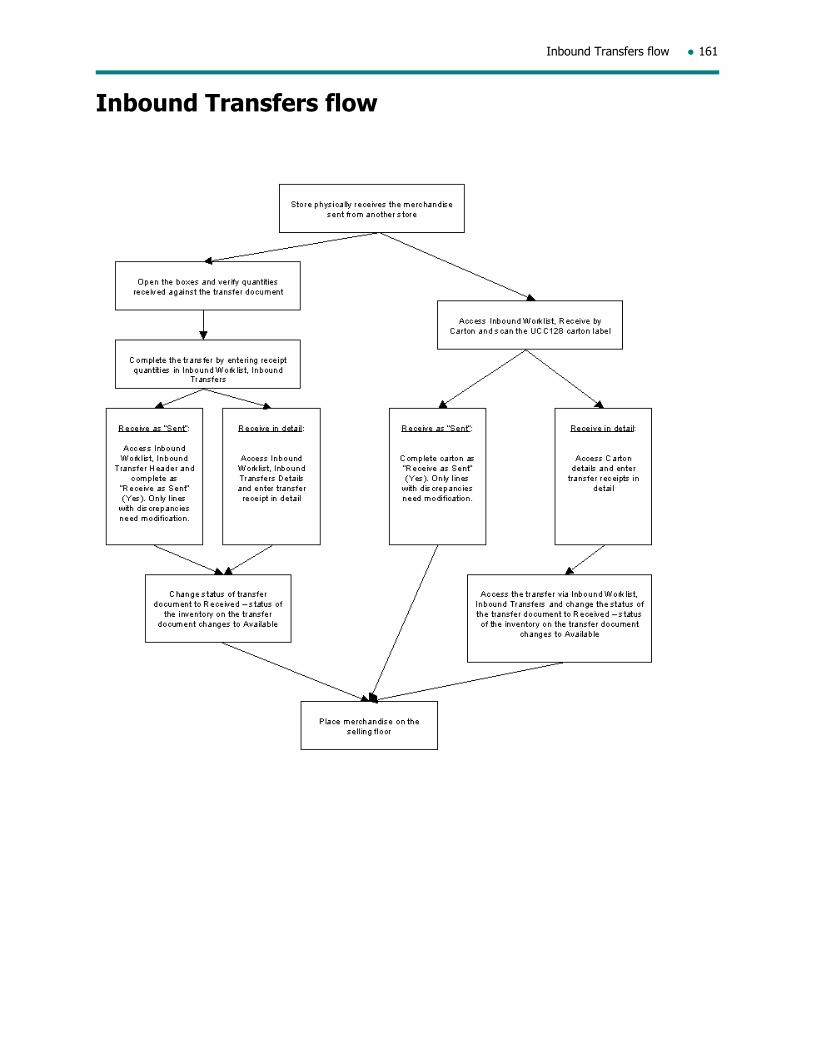
Inbound Transfers flow 161
Inbound Transfers flow
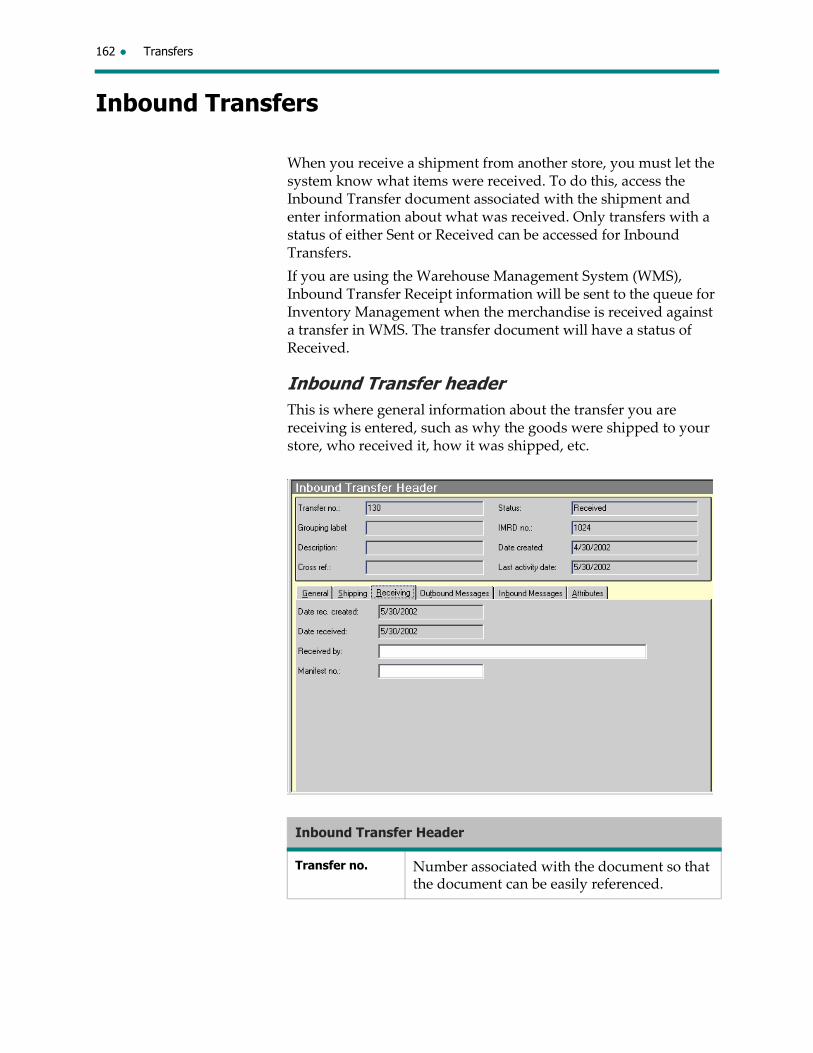
162 Transfers
Inbound Transfers
When you receive a shipment from another store, you must let the system know what items were received. To do this, access the Inbound Transfer document associated with the shipment and enter information about what was received. Only transfers with a status of either Sent or Received can be accessed for Inbound Transfers.
If you are using the Warehouse Management System (WMS), Inbound Transfer Receipt information will be sent to the queue for Inventory Management when the merchandise is received against a transfer in WMS. The transfer document will have a status of Received.
Inbound Transfer headerThis is where general information about the transfer you are receiving is entered, such as why the goods were shipped to your store, who received it, how it was shipped, etc.
Inbound Transfer Header
Transfer no. Number associated with the document so that the document can be easily referenced.

Inbound Transfers 163
Grouping label Max. 20 characters. A memo field used to link documents that have something in common for query purposes. The standards for what should be put in this field are decided by your company. For example, you could decide as a company that you will enter the department number here so that you can make a query on documents by department.
Description This is a description of what the shipment contains.
Cross ref. The cross‐reference field is a memo field used for referencing another document. For example, an item is sent to you from another store to fulfill a customer request, and you have printed customer information on a numbered form. The number of the form would be entered here by the sending location so that you can match the goods with the customer request.
Status This field shows at what stage of the transfer flow the document is located.
Sent: the Outbound Transfer shipment has been physically sent.
Received: the shipment has been physically received and entered in the system at the receiving store.
IMRD no. A reference to an Inventory Movement Request document, which is a request initiated from Head Office to move merchandise. This will be covered in more detail in the IMRD’s chapter in this manual. For transfers created to satisfy customer orders (Source field = Customer Order), this is the associated IMRD number.
Last activity date
The date the document was created or last modified.
Inbound Transfer Header

164 Transfers
Inbound Transfer Header, General tab
From: Location Where the merchandise was sent from.
Address type The address type of the location from where the merchandise was sent.
Address 1 Generally contains the street name and number of the location sending the merchandise.
Address 2 Contains additional address lines for the location sending the merchandise, usually for floor numbers, suite numbers etc.
City The city of the location sending the merchandise.
State The state of the location sending the merchandise.
Zip Code The zip code of the location sending the merchandise.
Country The country of the location sending the merchandise.
To: Location Your location number and name.
Address type The address type of your location.

Inbound Transfers 165
Address 1 The street name and number of your location.
Address 2 An additional line of your location’s address if required, usually for floor numbers, suite numbers etc.
City The city of your location.
State The state of your location.
Zip Code The zip code of your location.
Country The country of your location.
Reason Why the goods were transferred to your location.
Date created The date the Outbound Transfer document was first saved.
External system If the source of the document is other, the Outbound Transfer was created in another system and then interfaced to Inventory Management. This field shows what system the document is being interfaced from.
External document no.
If the Outbound Transfer document was created outside of Merchandising, the number of the document in the other system displays here.
Packed by The name of the employee packing the merchandise that was sent.
Printed check box
Indicates if the transfer has been printed by Head Office.
Source Shows where the document was originally created; will be Merchandising unless the document is interfaced from another system. For example, if the transfer was created in Merchandising Analytics, the source will be Merchandising Analytics. “In‐Store” will appear for documents created at POS.
Inbound Transfer Header, General tab
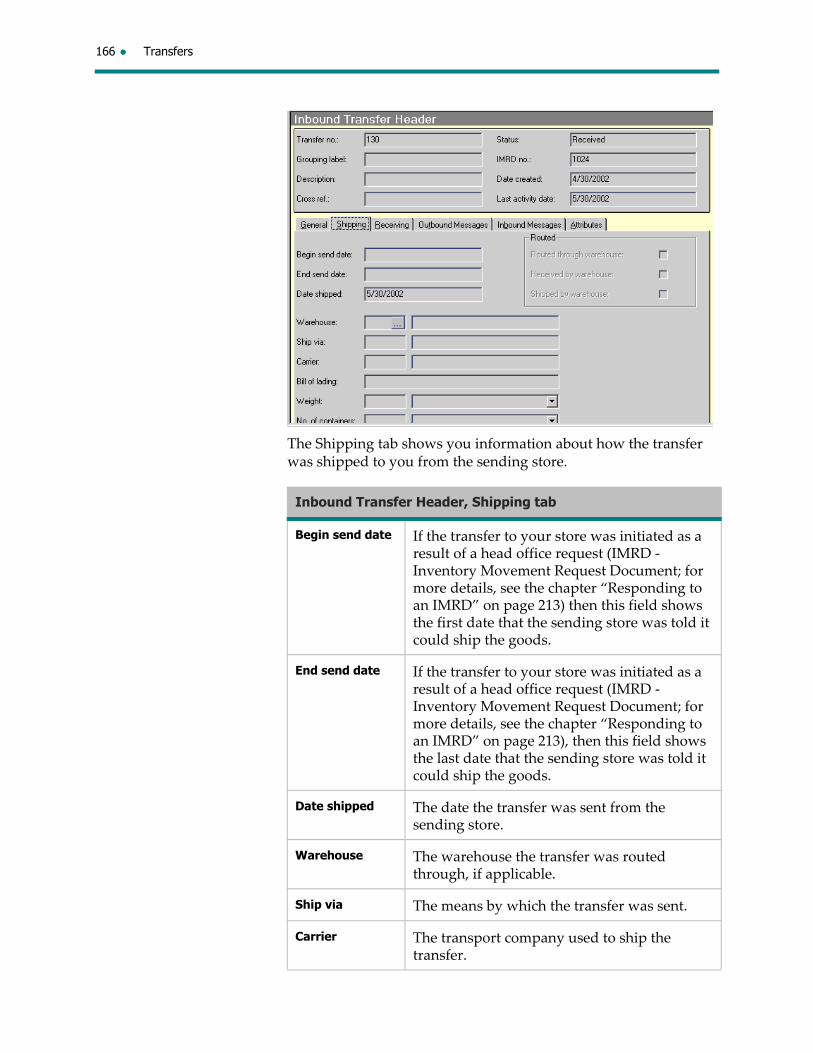
166 Transfers
The Shipping tab shows you information about how the transfer was shipped to you from the sending store.
Inbound Transfer Header, Shipping tab
Begin send date If the transfer to your store was initiated as a result of a head office request (IMRD ‐ Inventory Movement Request Document; for more details, see the chapter “Responding to an IMRD” on page 213) then this field shows the first date that the sending store was told it could ship the goods.
End send date If the transfer to your store was initiated as a result of a head office request (IMRD ‐ Inventory Movement Request Document; for more details, see the chapter “Responding to an IMRD” on page 213), then this field shows the last date that the sending store was told it could ship the goods.
Date shipped The date the transfer was sent from the sending store.
Warehouse The warehouse the transfer was routed through, if applicable.
Ship via The means by which the transfer was sent.
Carrier The transport company used to ship the transfer.
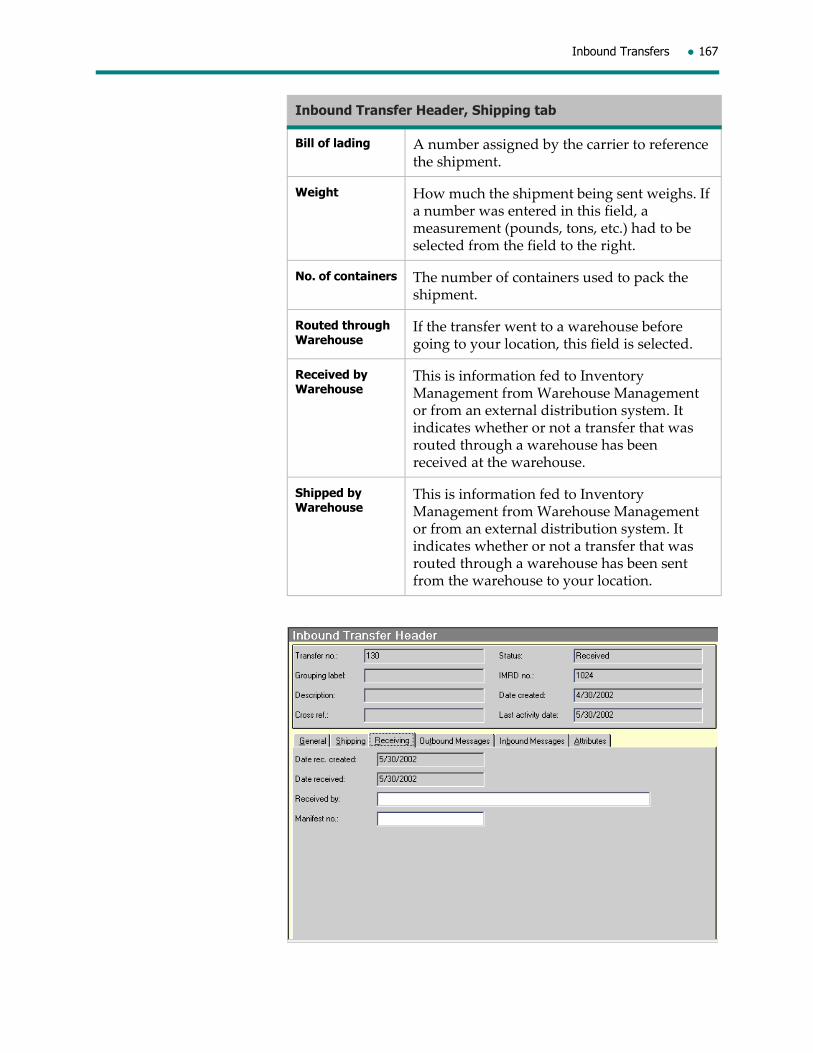
Inbound Transfers 167
Bill of lading A number assigned by the carrier to reference the shipment.
Weight How much the shipment being sent weighs. If a number was entered in this field, a measurement (pounds, tons, etc.) had to be selected from the field to the right.
No. of containers The number of containers used to pack the shipment.
Routed through Warehouse
If the transfer went to a warehouse before going to your location, this field is selected.
Received by Warehouse
This is information fed to Inventory Management from Warehouse Management or from an external distribution system. It indicates whether or not a transfer that was routed through a warehouse has been received at the warehouse.
Shipped by Warehouse
This is information fed to Inventory Management from Warehouse Management or from an external distribution system. It indicates whether or not a transfer that was routed through a warehouse has been sent from the warehouse to your location.
Inbound Transfer Header, Shipping tab
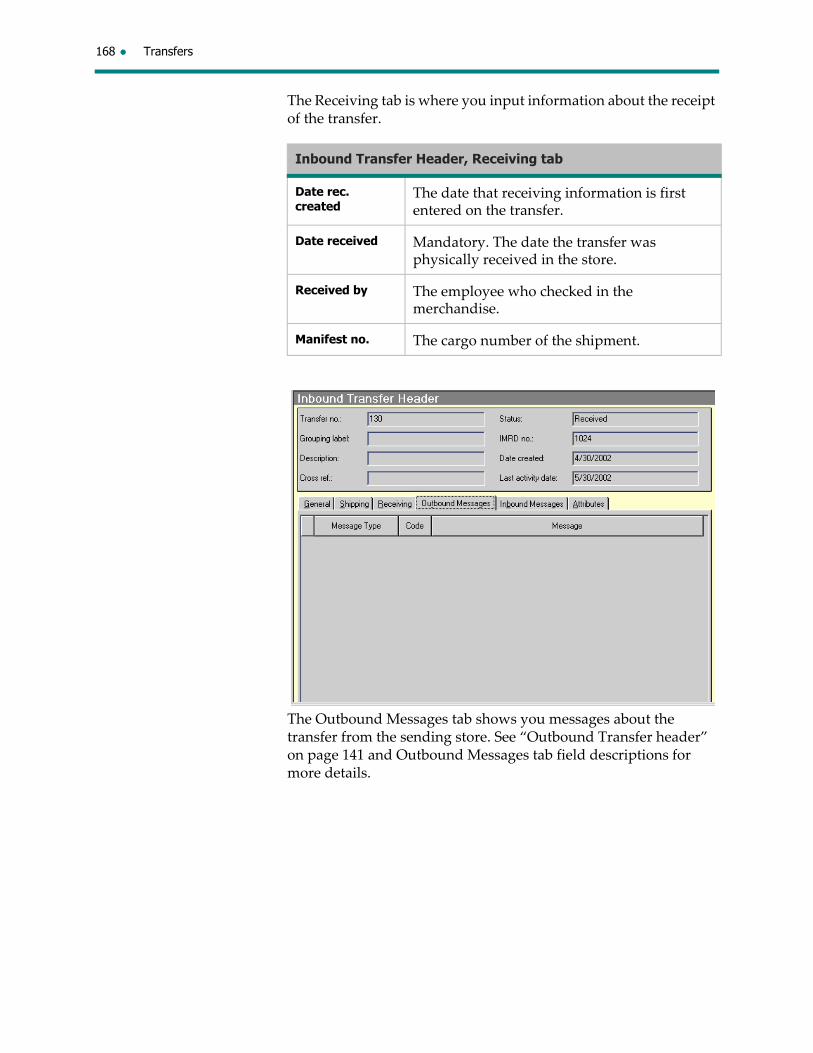
168 Transfers
The Receiving tab is where you input information about the receipt of the transfer.
The Outbound Messages tab shows you messages about the transfer from the sending store. See “Outbound Transfer header” on page 141 and Outbound Messages tab field descriptions for more details.
Inbound Transfer Header, Receiving tab
Date rec. created
The date that receiving information is first entered on the transfer.
Date received Mandatory. The date the transfer was physically received in the store.
Received by The employee who checked in the merchandise.
Manifest no. The cargo number of the shipment.
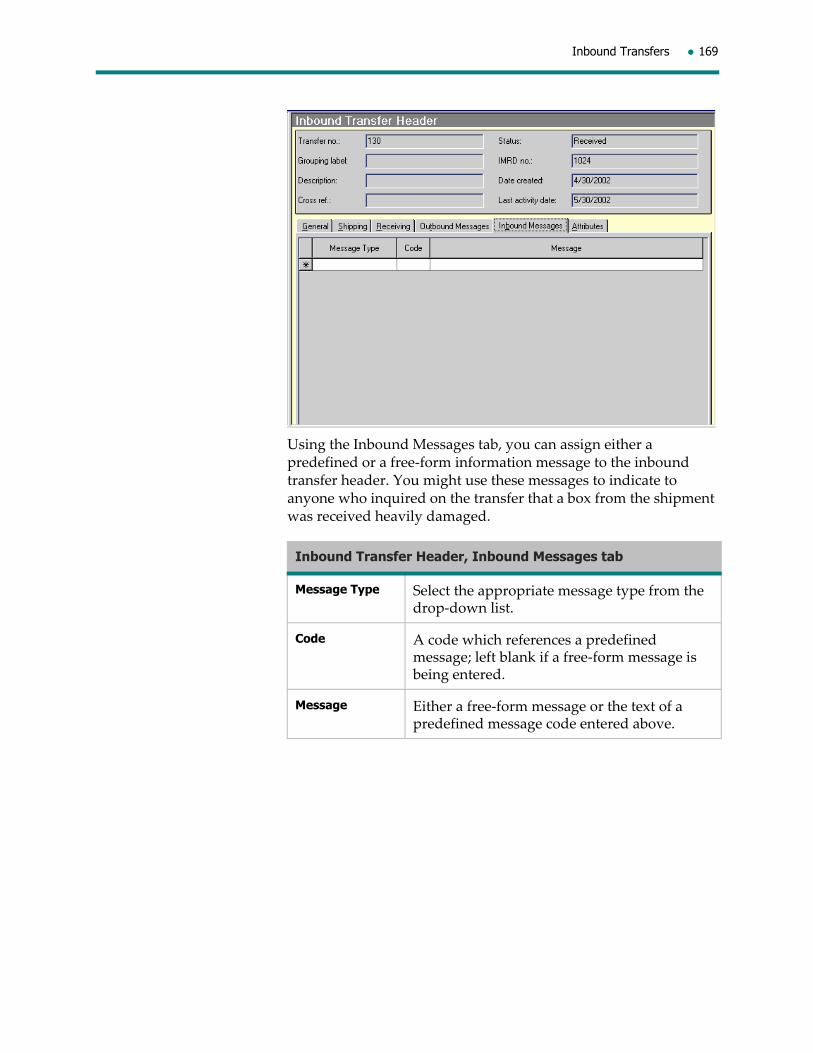
Inbound Transfers 169
Using the Inbound Messages tab, you can assign either a predefined or a free‐form information message to the inbound transfer header. You might use these messages to indicate to anyone who inquired on the transfer that a box from the shipment was received heavily damaged.
Inbound Transfer Header, Inbound Messages tab
Message Type Select the appropriate message type from the drop‐down list.
Code A code which references a predefined message; left blank if a free‐form message is being entered.
Message Either a free‐form message or the text of a predefined message code entered above.
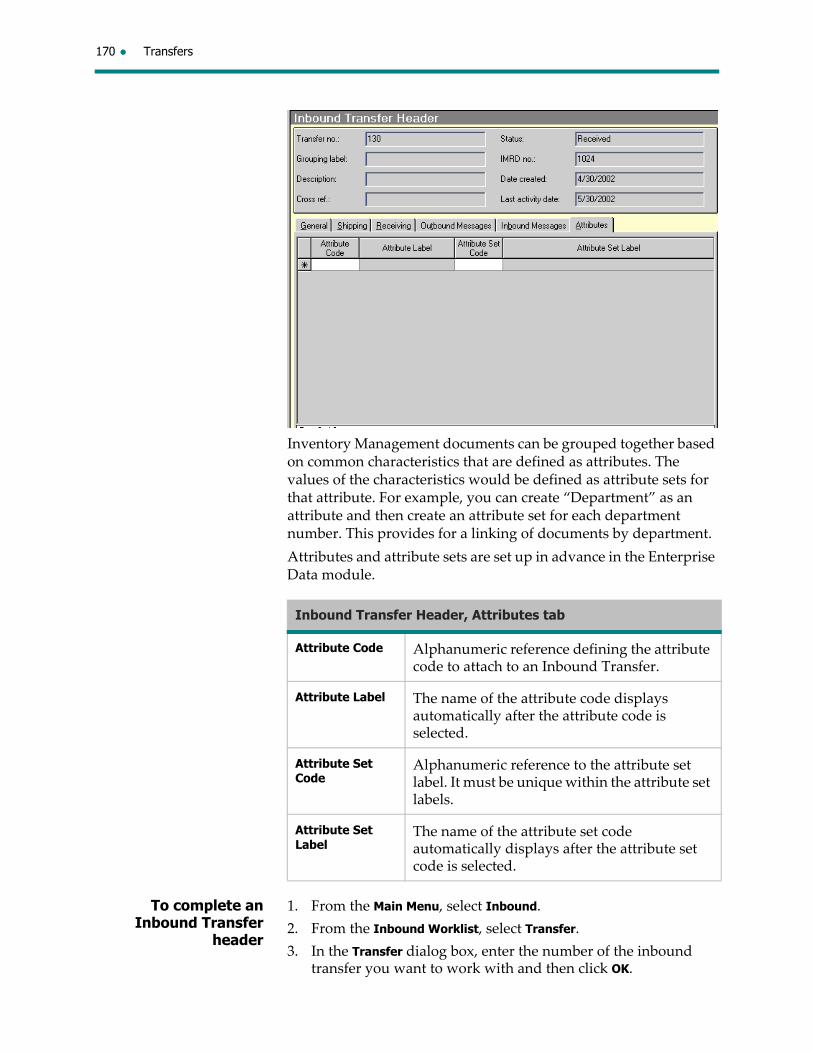
170 Transfers
Inventory Management documents can be grouped together based on common characteristics that are defined as attributes. The values of the characteristics would be defined as attribute sets for that attribute. For example, you can create “Department” as an attribute and then create an attribute set for each department number. This provides for a linking of documents by department.
Attributes and attribute sets are set up in advance in the Enterprise Data module.
To complete an Inbound Transfer
header
1. From the Main Menu, select Inbound.
2. From the Inbound Worklist, select Transfer.
3. In the Transfer dialog box, enter the number of the inbound transfer you want to work with and then click OK.
Inbound Transfer Header, Attributes tab
Attribute Code Alphanumeric reference defining the attribute code to attach to an Inbound Transfer.
Attribute Label The name of the attribute code displays automatically after the attribute code is selected.
Attribute Set Code
Alphanumeric reference to the attribute set label. It must be unique within the attribute set labels.
Attribute Set Label
The name of the attribute set code automatically displays after the attribute set code is selected.

Inbound Transfers 171
4. In the Receiving tab, enter the Date received and any other pertinent information.
5. Enter any messages on the Inbound Messages tab.
6. Save and acknowledge your input.
Inbound Transfer details
Use the Inbound Transfers Detail window to let the system know what items you actually received. There are three ways to do this:
1. Entering receipt units by SKU
2. Entering receipt units by UPC
3. Entering receipt units as sent
Discrepancies between the units recorded as being sent and what you have entered as being received appear in the Discrepancy Units column.
1. Entering receipt units by SKUEnter receipt units by SKU if you have written your receipt quantities on the transfer document that came with the transfer and are entering units line by line.
To enter Inbound Transfer receipt units
by SKU
1. Retrieve the Inbound Transfer you want to work with.
2. From the Inbound Transfer Header, select Detail.
3. Under Received Units, enter a value for each detail line.
4. Click Save. The cumulative total for Qty. received now reflects the units you have input.
5. Click OK.

172 Transfers
2. Entering receipt units by UPCThis allows you to scan the UPC of an item, or to manually enter the UPC and then enter the quantity received if the ticket is damaged.
To enter Inbound Transfer receipt units
by UPC
1. Retrieve the Inbound Transfer you want to work with.
2. From the Inbound Transfer Header, select Detail.
3. Click Enter Units by UPC.
4. In the Enter Units by UPC dialog box, enter the following information:
Carton
UPC: a valid UPC for this transfer
Quantity: the quantity for this UPC if different from the default.
5. Click Apply.
6. Repeat for each UPC on the transfer. When finished, click Close.
7. Save your input. The cumulative total for Qty. Received now reflects the units you have input.
8. Click OK.
3. Entering receipt units as sentThis allows you to set the received units by SKU equal to the sent units. If the majority of the SKUs on your transfer were received in quantities equal to what was sent, use this functionality, then modify the SKUs where the received quantity is not equal to the sent quantity.
To enter Inbound Transfer Receipt units
as sent
1. Retrieve the Inbound Transfer header you want to work with.
2. In the Inbound Transfer Header, click Receive as Sent.
3. To confirm your request to receive units as sent, click Yes.
4. Save and acknowledge your input.
Modifying an Inbound TransferYou can modify both the Inbound Transfer header and details if the information was entered incorrectly or forgotten. Transfer receipt information can be modified at any time until the document is deleted from the system.
If you are using the Warehouse Management System (WMS) and an inbound transfer is modified in WMS, the modification will be sent to the queue for Inventory Management.
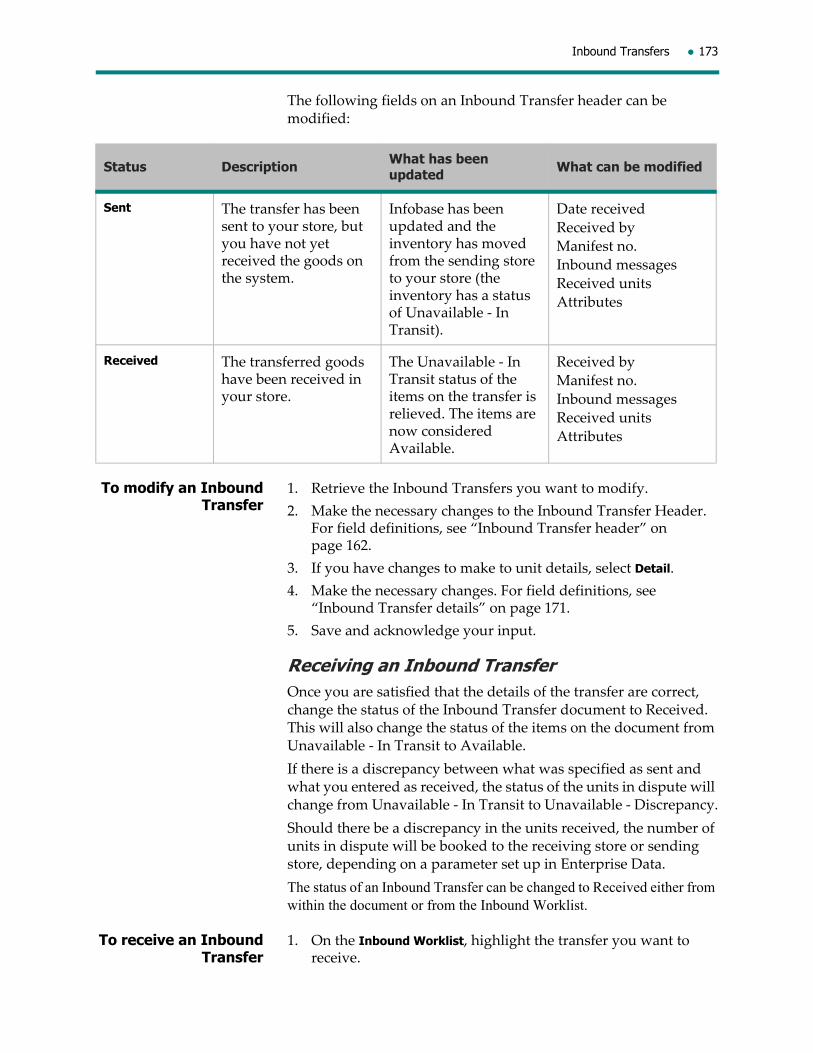
Inbound Transfers 173
The following fields on an Inbound Transfer header can be modified:
To modify an Inbound Transfer
1. Retrieve the Inbound Transfers you want to modify.
2. Make the necessary changes to the Inbound Transfer Header. For field definitions, see “Inbound Transfer header” on page 162.
3. If you have changes to make to unit details, select Detail.
4. Make the necessary changes. For field definitions, see “Inbound Transfer details” on page 171.
5. Save and acknowledge your input.
Receiving an Inbound TransferOnce you are satisfied that the details of the transfer are correct, change the status of the Inbound Transfer document to Received. This will also change the status of the items on the document from Unavailable ‐ In Transit to Available.
If there is a discrepancy between what was specified as sent and what you entered as received, the status of the units in dispute will change from Unavailable ‐ In Transit to Unavailable ‐ Discrepancy.
Should there be a discrepancy in the units received, the number of units in dispute will be booked to the receiving store or sending store, depending on a parameter set up in Enterprise Data.
The status of an Inbound Transfer can be changed to Received either from within the document or from the Inbound Worklist.
To receive an Inbound Transfer
1. On the Inbound Worklist, highlight the transfer you want to receive.
Status Description What has been updated What can be modified
Sent The transfer has been sent to your store, but you have not yet received the goods on the system.
Infobase has been updated and the inventory has moved from the sending store to your store (the inventory has a status of Unavailable ‐ In Transit).
Date received
Received by
Manifest no.
Inbound messages
Received units
Attributes
Received The transferred goods have been received in your store.
The Unavailable ‐ In Transit status of the items on the transfer is relieved. The items are now considered Available.
Received by
Manifest no.
Inbound messages
Received units
Attributes

174 Transfers
2. From the Actions menu, select Receive. The status of the transfer is now Received.
3. To acknowledge the status change, click OK.
4. Save and acknowledge your input.
Discrepancy ReportThe Discrepancy report can be generated from the Reports menu in Inventory Management. Simply highlight the report name and click Print. This report shows differences between units sent and units received for completed (received) transfers. Use this report to immediately follow up on the transfers listed.
Canceling and reinstating transfersA transfer with a status of Preliminary, Ready to send or Sent can be canceled. This might be required if you were asked to transfer an item for a customer and then the customer decided not to purchase the item before you had physically shipped the item. If a Sent Outbound Transfer document is canceled, the sent units from the document are moved back to the sending location’s inventory.
If you canceled a transfer by mistake, or the customer decided to purchase the item after all and you need to transfer the item, you can reinstate the transfer to a status of Preliminary. Only transfers with a status of Canceled can be reinstated.
If you are using the Warehouse Management System (WMS) and the Warehousing System field for the To Location on the transfer document is enabled, information will be sent to the queue for WMS when you cancel an Outbound Transfer with a Sent status.
If your system has locations using Interactive Non‐Sale (INS) or Store Inventory Tracking (SIT), an interface file will be generated when you cancel a transfer with a status of Sent or Ready to Send. A warning message will display to advise you that the document may have been downloaded and acted upon by the location, along with a list of the locations the document was downloaded to when canceling a transfer with a status of Ready to send.
To cancel or reinstate a transfer, you can either:

Inbound Transfers 175
highlight the document on the Inbound or Outbound Worklist and select the Cancel or Reinstate action on the Actions menu, or
open the document and select the Cancel or Reinstate action on the Actions menu.
To cancel a transfer Note: Instead of following the procedure below to cancel a transfer document, you can also highlight the document on the Outbound or Inbound Worklist and select the Cancel action on the Actions menu.
1. Retrieve the transfer you want to cancel.
2. From the Actions menu, select Cancel. The status of the transfer is now Canceled.
3. To acknowledge the status change, click OK.
4. Save and acknowledge your input.
To reinstate a transfer Note: Instead of following the procedure below to reinstate a transfer document, you can also open the document and select the Reinstate action on the Actions menu.
1. On the Outbound or Inbound Worklist, highlight the transfer you want to reinstate.
2. From the Actions menu, select Reinstate.
3. To acknowledge the status change, click OK.
4. Save and acknowledge your input.
System delete of transfersTransfers will be automatically deleted from the system (to keep your files clean) if the transfer has:
a status of Canceled, or
a status of Received, and
a predefined number of weeks has passed since the status was changed to Received
Deleting a transfer manuallyIf you need to clean up some of the Transfer documents that are no longer required, you can delete any that have a status of Preliminary, Ready to send, Canceled or Received.
If you are using the Warehouse Management System (WMS) and the Warehousing System field for the To Location on the transfer document is enabled, information will be sent to the queue for WMS when you delete an Outbound Transfer with a Received status.
If your system has locations using Interactive Non‐Sale (INS) or Store Inventory Tracking, a warning message will display when deleting outbound transfsers with a status of Ready to send to
176 Transfers
advise you that the document may have been downloaded and acted upon by the location, along with a list of the locations the document was downloaded to.
To delete an Outbound Transfer with a status of Preliminary, Ready to send or Canceled, access the Outbound Worklist, highlight the transfer document to be deleted and from the File menu select Delete.
To delete an Inbound Transfer with a status of Received, access the Inbound Worklist, highlight the transfer document to be deleted and from the File menu select Delete.

RTVs allows you to remove merchandise from your inventory and return it to the vendor. Generally, merchandise being returned is either damaged, defective or shipped outside of the agreed‐upon delivery periods.
In order to return the merchandise from the system, you must create an RTV document. The document consists of two parts: the header portion, which provides general information about the entire shipment, and the detail portion, which identifies each SKU and the quantities being returned.
Returns to vendor can be done as either a 1‐step or a 2‐step process.
In a 1‐step process, the quantities are removed from your inventory once the RTV document is Returned.
In a 2‐step process, you create and save the RTV document, make a request to the vendor for permission to return the merchandise, and change the status of the document to Requested. By initiating the request in this way, the inventory remains in the system but is flagged with an Unavailable ‐ Pending RTV status.
Once the authorization is received, the inventory can be returned thereby completing the second step of the process. At this time, the inventory is removed from the system.
Since each vendor manages its own return policy, the decision whether a 1‐step or 2‐step procedure is required is determined on a vendor‐by‐vendor basis. If a 2‐step process is required for any given vendor, this must be set up in the the Enterprise Data module vendor tables.
Invoice Matching will be updated whenever an RTV document is returned, modified or deleted.
4 Returns to Vendor

178 Returns to Vendor
Returns to Vendor flow: 1-step process
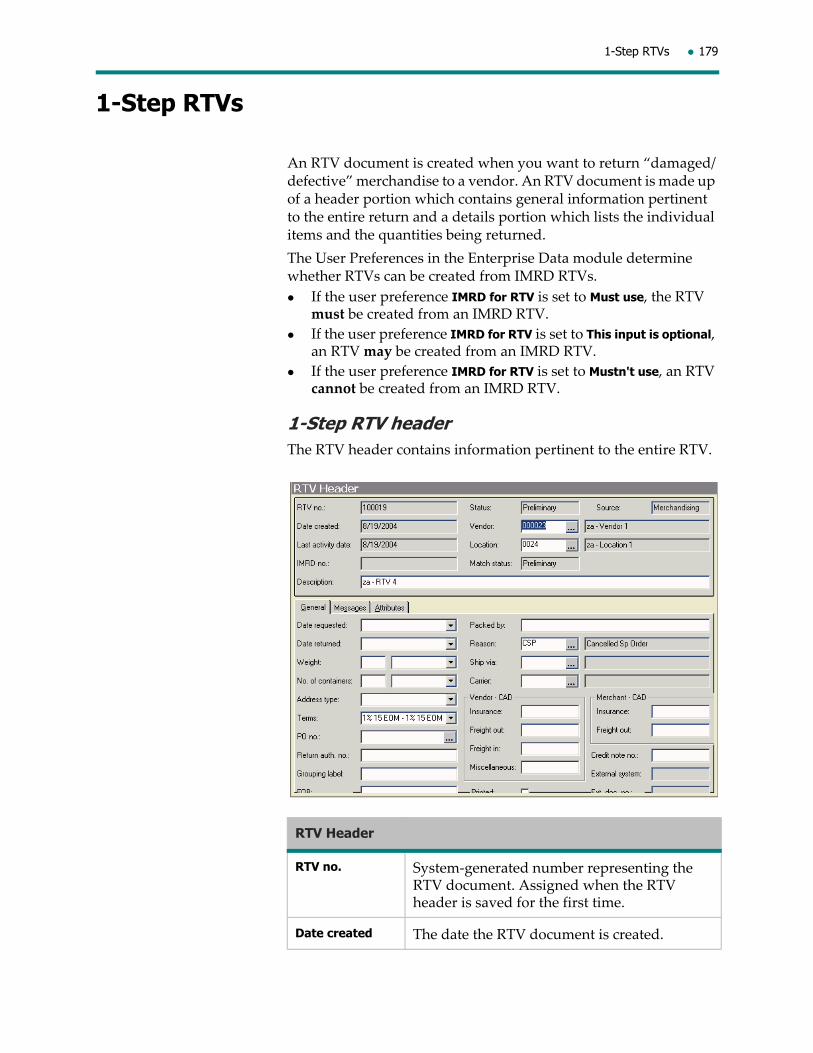
1-Step RTVs 179
1-Step RTVs
An RTV document is created when you want to return “damaged/defective” merchandise to a vendor. An RTV document is made up of a header portion which contains general information pertinent to the entire return and a details portion which lists the individual items and the quantities being returned.
The User Preferences in the Enterprise Data module determine whether RTVs can be created from IMRD RTVs.
If the user preference IMRD for RTV is set to Must use, the RTV must be created from an IMRD RTV.
If the user preference IMRD for RTV is set to This input is optional, an RTV may be created from an IMRD RTV.
If the user preference IMRD for RTV is set to Mustn't use, an RTV cannot be created from an IMRD RTV.
1-Step RTV headerThe RTV header contains information pertinent to the entire RTV.
RTV Header
RTV no. System‐generated number representing the RTV document. Assigned when the RTV header is saved for the first time.
Date created The date the RTV document is created.

180 Returns to Vendor
Last activity date
The date the RTV document was last accessed (either the date it was created or the date it was last modified).
IMRD no. The IMRD number that the RTV you are creating refers to. This number will only appear if the RTV was created from an IMRD (Inventory Movement Request Document; for more details, see the chapter “Responding to an IMRD” on page 213.
Status The status of the RTV document:
Preliminary: a new document or work in progress.
Released to W/H Mgmt.: Warehouse Management has been instructed to return the merchandise on the RTV document.
Returned: the merchandise on the RTV has been returned to the vendor.
Canceled: an RTV document has been canceled by the user.
Source Shows where the document was originally created; will be Merchandising unless the document is interfaced from another system: in that case, the name of the source will be other. “In‐Store” will appear for documents created at POS.
Vendor Mandatory. Code and description of the vendor to which the merchandise is being returned.
Location Mandatory. The location from which the merchandise is being returned. The default setting is your location code.
RTV Header

1-Step RTVs 181
Match status The status of the document in relation to Invoice Matching. Possible values are:
Preliminary – Invoice Matching has not been notified of the receipt.
Unmatched – Invoice Matching has referenced the return for Invoice Matching purposes, but has not matched any credit memos to the return.
Partially Matched – Invoice Matching has matched at least one credit memo to the return, but has not completely matched the value of the return.
Fully Matched – Invoice Matching has completely matched the value of the return with the credit memos from the vendor.
Description A user‐defined description of the RTV document.
RTV Header, General tab
Date requested Used in the 2‐step RTV process. Defaults to the current date and should not be changed in the 1‐step process.
RTV Header

182 Returns to Vendor
Date returned The date the status of the RTV document was changed to Returned. Defaults to the current date.
Weight The weight of the merchandise being returned. Based on the unit of measure specified.
No. of containers The number of containers (of the container type specified) of merchandise being returned to a vendor.
Address type The vendor’s address type. The default setting is defined in the Inventory Management system parameters.
Terms Mandatory. Default vendor’s payment terms as defined in the vendor worklist in Enterprise Data.
PO no. The purchase order number from which the merchandise being returned originated (if there is one).
Return auth. no. The number supplied by the vendor that “authorizes” the merchandise on an RTV request to be returned. This field is only used in the 2‐step RTV process.
Grouping label Max. 20 characters. A memo field used to link documents that have something in common for query purposes. The standards for what should be put in this field are decided by your company. For example, you could decide as a company that you will enter the department number here so that you can make a query on documents by department.
FOB A memo field used to describe the “freight on board” point. The FOB point determines:
the point to which the merchant pays the transportation charges; the point to which the merchant pays the transportation charges
when legal ownership of the goods passes to the vendor.
Packed by The name of the employee who packed the items for this return.
RTV Header, General tab

1-Step RTVs 183
Reason Mandatory. The reason the merchandise is being returned to the vendor. (The code is selected from a list of reasons defined under “RTV reason code” in the Reason Code table in Enterprise Data.)
Ship via The method by which the merchandise will be shipped to the vendor selected from a list of shipping methods defined in the Ship via table in Enterprise Data.
Carrier The carrier that will ship the merchandise back to the vendor selected from a list of carriers defined and maintained in the Carrier table in Enterprise Data.
Insurance Vendor amount
The amount of insurance the vendor is paying. Displayed in the home jurisdiction’s currency.
Insurance Merchant amount
The amount of insurance your company is paying. Displayed in the home jurisdiction’s currency.
Freight out Vendor amount
The amount of freight the vendor is paying for the shipment of the goods back to the vendor. Displayed in the home jurisdiction’s currency.
Freight out Merchant amount
The amount of freight your company is paying for the shipment of the goods back to the vendor. Displayed in the home jurisdiction’s currency.
Freight in Vendor amount
The amount of freight the vendor is paying for the original shipment of the goods to your company. Displayed in the home jurisdiction’s currency.
Miscellaneous Vendor amount
Any other amounts the vendor will be paying. Displayed in the home jurisdiction’s currency.
Printed check box
A flag set by the system showing if a user, with their User Preferences option “Must Use Location” set to YES, has printed the document.
Credit note no. The supplier’s credit note number.
RTV Header, General tab
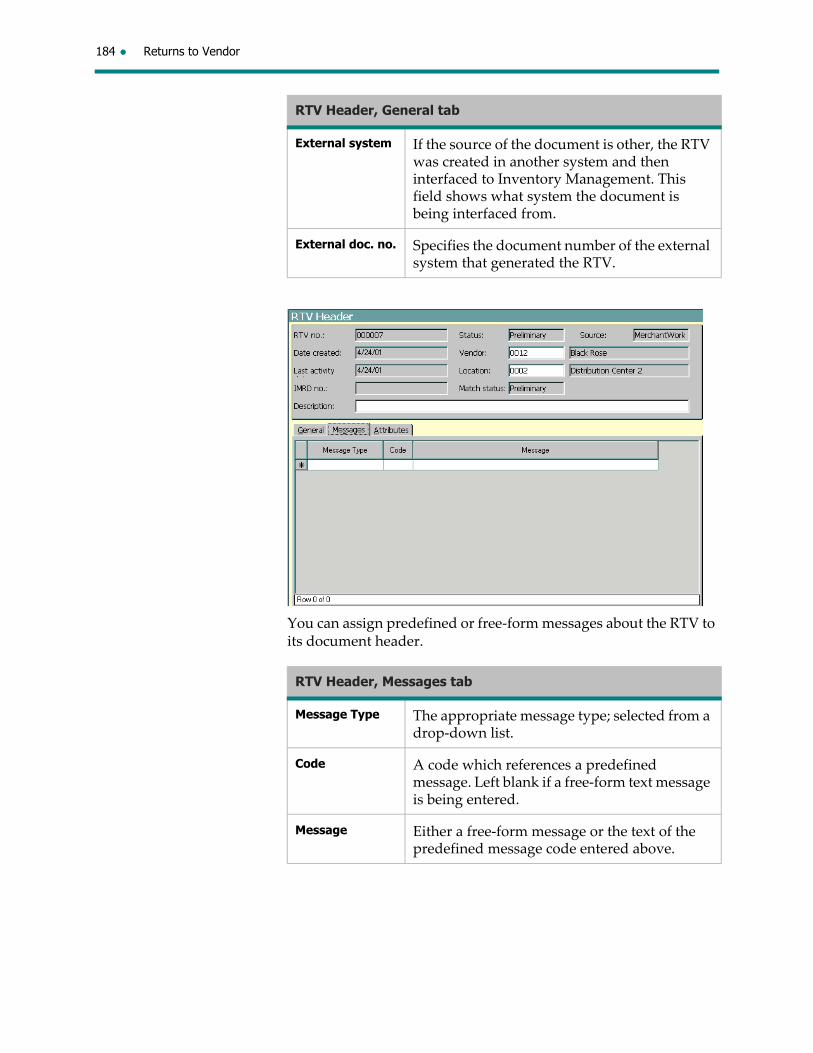
184 Returns to Vendor
You can assign predefined or free‐form messages about the RTV to its document header.
External system If the source of the document is other, the RTV was created in another system and then interfaced to Inventory Management. This field shows what system the document is being interfaced from.
External doc. no. Specifies the document number of the external system that generated the RTV.
RTV Header, Messages tab
Message Type The appropriate message type; selected from a drop‐down list.
Code A code which references a predefined message. Left blank if a free‐form text message is being entered.
Message Either a free‐form message or the text of the predefined message code entered above.
RTV Header, General tab
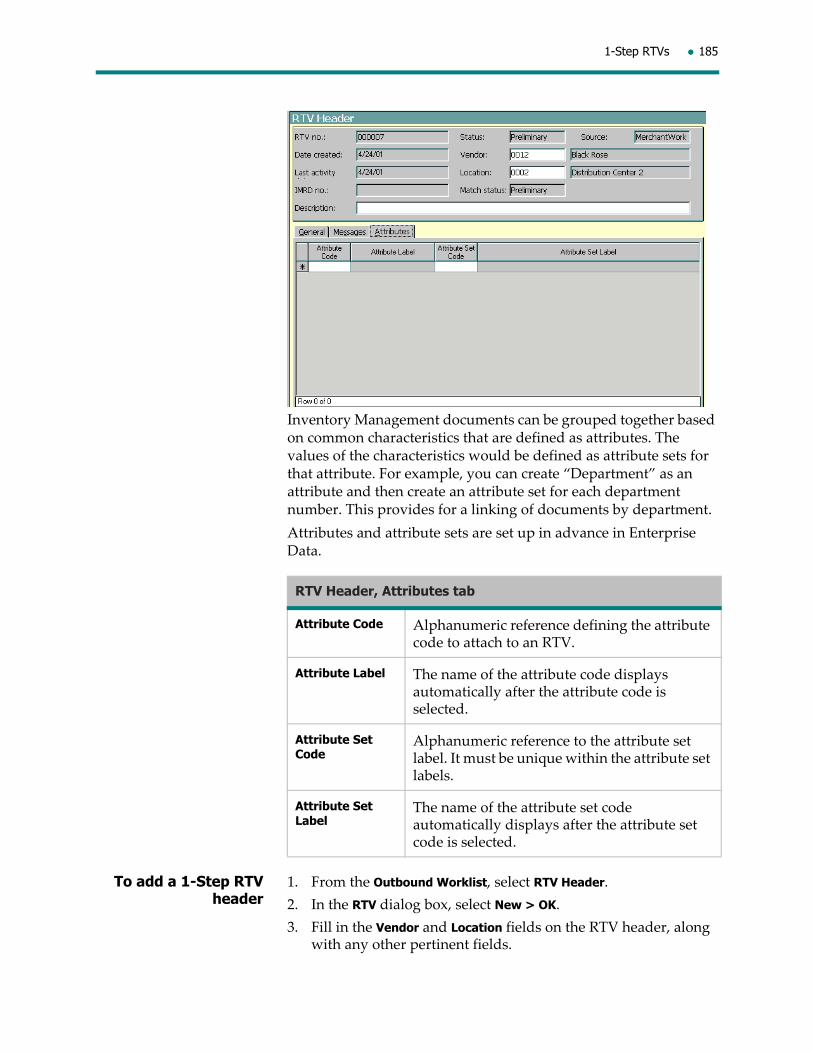
1-Step RTVs 185
Inventory Management documents can be grouped together based on common characteristics that are defined as attributes. The values of the characteristics would be defined as attribute sets for that attribute. For example, you can create “Department” as an attribute and then create an attribute set for each department number. This provides for a linking of documents by department.
Attributes and attribute sets are set up in advance in Enterprise Data.
To add a 1-Step RTV header
1. From the Outbound Worklist, select RTV Header.
2. In the RTV dialog box, select New > OK.
3. Fill in the Vendor and Location fields on the RTV header, along with any other pertinent fields.
RTV Header, Attributes tab
Attribute Code Alphanumeric reference defining the attribute code to attach to an RTV.
Attribute Label The name of the attribute code displays automatically after the attribute code is selected.
Attribute Set Code
Alphanumeric reference to the attribute set label. It must be unique within the attribute set labels.
Attribute Set Label
The name of the attribute set code automatically displays after the attribute set code is selected.
186 Returns to Vendor
4. On the General tab, fill in the Terms and Reason fields and any other pertinent fields.
5. Select the Messages tab to enter a Return to vendor type message.
6. Click Save. The RTV document is assigned a document number with the status of Preliminary.
7. Click OK.
1-Step RTV detailsEnter the items and quantities being returned on the RTV Detail screen. There are two ways to input the RTV details:
1. enter units by UPC, or
2. enter units by Size Grid
The default cost of the items entered is the per unit cost as specified in the Inventory Management parameters, and can be overridden.
1. Entering units returned by UPCIf you are scanning the tickets of the items you are returning, click Enter Units by UPC.
To enter 1-Step RTV units by UPC
1. Retrieve the RTV header for which you want to enter units returned details.
2. From the RTV header screen, select Detail.
3. Click Enter Units by UPC.
4. In the Enter Returned Units by UPC dialog box, click New Carton if generating carton labels for the carton(s) being packed and returned to the vendor. If you are adding items to an already opened carton, click More. From the list of carton numbers that are ʺopenʺ on the system, select the carton number you wish to continue packing merchandise into and then click OK.
5. Next:
scan the UPC barcode or enter the UPC number from the item you are returning.
the Quantity automatically defaults to 1. If there are multiple items of the same SKU (style/color/size), enter the number of items being returned.
at the From status field, enter the style status from which the merchandise will be released once it is returned.
enter the unit Cost (in the home jurisdiction’s currency) of the individual items being returned. The default cost for the item being returned is the per unit cost as specified in the IM parameters. You can manually override the cost which appears, if required. This field will only be displayed if you have been given access (via Enterprise Data Management > Employee > Access) to view or enter cost values.

1-Step RTVs 187
6. Click Apply. The cursor reappears in the UPC field. The carton remains ʺopenedʺ. Scan (or enter) any additional UPCs.
7. When all merchandise has been scanned (or entered) and packed into the carton, click Close.
8. The RTV Detail screen reappears so that you can review the items and quantities on this RTV document.
9. Once you are satisfied that all details entered are accurate, click Save > OK.
2. Entering units returned by Size GridIf you are entering the quantities being returned using the style code, click Enter Units by Size Grid.
To enter 1-Step RTV units returned by Size
Grid
1. Retrieve the RTV header for which you want to enter units returned details.
2. From the RTV header display, select Detail.
3. Click Enter Units by Size Grid.
4. In the Enter Returned Units by Size Grid dialog box, click New Carton if generating carton labels for the carton(s) being packed and returned to the vendor. If you are adding items to an already opened carton, click More. From the carton numbers that are ʺopenʺ on the system, select the carton number you wish to continue packing merchandise into and then click OK.
5. Next:
enter the Style code.
select the Color code for the style being returned.
enter the style status from which the merchandise will be released once it is returned at the From status field.
enter the unit Cost (in the home jurisdiction’s currency) of the item being returned. The default cost is the per unit cost as specified in the IM parameters. You can manually override the cost which appears, as required. This field will only be displayed if you have been given access (via Enterprise Data Management > Employee > Access) to view or enter cost values.
enter the quantities (by size) being returned.
6. Click Apply. The cursor reappears in the Style code field. The carton remains ʺopenedʺ. Enter additional styles being returned.
7. Once you have entered and packed all merchandise, click OK.
8. The RTV Detail screen reappears so that you can review the items and their quantities for this particular RTV document.
9. When you are satisfied that all details entered are accurate,
click Save OK.
188 Returns to Vendor
Returning a 1-step RTVOnce you are ready to send the goods back to the vendor you must “return” the RTV document to relieve your location’s inventory for the SKUs and quantities being returned.
If you are using the Warehouse Management System (WMS) to return merchandise on an RTV, a notice will be sent to the queue for Inventory Management.
To return an RTV document, select Return from the Actions menu.

Returns to Vendor flow: 2-step process 189
Returns to Vendor flow: 2-step process

190 Returns to Vendor
2-Step RTVs
An RTV is created when you want to return “damaged/defective” merchandise to a vendor. An RTV document is made up of a header portion that contains general information pertinent to the entire return and a details portion that lists the individual items and the quantities being returned. The 2‐step process is used when the vendor the goods are being returned to requires authorization.
The User Preferences in the Enterprise Data module determine whether RTVs can be created from IMRD RTVs.
If the user preference IMRD for RTV is set to Must use, the RTV must be created from an IMRD RTV.
If the user preference IMRD for RTV is set to This input is optional, an RTV may be created from an IMRD RTV.
If the user preference IMRD for RTV is set to Mustn't use, an RTV cannot be created from an IMRD RTV.
2-Step RTV headerInformation pertinent to the entire RTV must be entered.
RTV Header
RTV no. System‐generated number representing the RTV document. Assigned when the RTV document header is saved for the first time.
Date created The date the RTV document is created.

2-Step RTVs 191
Last activity date
The date the RTV document was last accessed (either the date it was created or the date it was last modified).
IMRD no. The IMRD number that the RTV you are creating refers to. This number will only appear if the RTV was created from an IMRD (Inventory Movement Request Document; for more details, see the chapter “Responding to an IMRD” on page 213.)
Status The status of the RTV document:
Preliminary: a new document or work in progress.
Requested: the merchandise on the RTV is “requested” for return to the vendor.
Released to W/H Mgmt.: Warehouse Management has been instructed to return the merchandise on the RTV document.
Returned: the merchandise on the RTV has been returned to the vendor.
Canceled: an RTV document that has been canceled by the user.
Source Shows where the document was originally created; will be Merchandising unless the document is interfaced from another system: in that case, the name of the source will be other. “In‐Store” will appear for documents created at POS.
Vendor Mandatory. Code and description of the vendor to which the merchandise is being returned.
Location Mandatory. The location from which the merchandise is being returned. Defaults to your location.
RTV Header

192 Returns to Vendor
Match Status The status of the document in relation to Invoice Matching. Possible values are:
Preliminary – Invoice Matching has not been notified of the receipt.
None – Invoice Matching has not looked at this receipt for Invoice Matching purposes.
Unmatched – Invoice Matching has referenced the receipt for Invoice Matching purposes, but has not matched any invoices to the receipt.
Partially Matched – Invoice Matching has matched at least one invoice credit memo to the receipt, but has not completely matched the value of the receipt.
Fully Matched – Invoice Matching has completely matched the value of the receipt with the invoices from the vendor.
Description A user‐defined description of the RTV document.
RTV Header

2-Step RTVs 193
RTV Header, General tab
Date requested The date the merchandise on the RTV document was requested for return. If no date is entered, this date will default to the current date when the status of the RTV becomes either “Requested” or “Released to W/H Management”.
Date returned The date the merchandise on the RTV document is returned to the vendor. Defaults to the current date.
Weight The weight of the merchandise being returned. Based on the unit of measure specified.
No. of containers The number of containers (of the container type specified) of merchandise being returned to a vendor.
Address type The vendor’s address type. It is the default setting defined in the Inventory Management system parameters.
Terms Mandatory. Defaults to the payment terms as defined in the vendor worklist in Enterprise Data.

194 Returns to Vendor
PO no. The purchase order number from which the merchandise being returned originated (if there is one).
Return auth. no. Mandatory. The number supplied by the vendor that “authorizes” the merchandise on an RTV request to be returned.
Grouping label Max. 20 characters. A memo field used to link document that have something in common for query purposes. The standards for what should be put in this field are decided by your company. For example, you could decide as a company that you will enter the department number here so that you can make a query on documents by department.
FOB A memo field used to describe the “freight on board” point. The FOB point determines:
the point to which the merchant pays the transportation charges
when legal ownership of the goods passes to the vendor,
Packed by The name of the employee who packed the items for this return.
Reason Mandatory. The reason the merchandise is being returned to the vendor. (The code is selected from a list of reasons defined under “RTV reason code” in the Reason Code table in Enterprise Data.)
Ship via The method by which the merchandise will be shipped to the vendor selected from a list of shipping methods defined in the Ship via table in Enterprise Data.
Carrier The carrier that will ship the merchandise back to the vendor selected from a list of carriers defined and maintained in the Carrier table in Enterprise Data.
Insurance Vendor amount
The amount of insurance the vendor is paying. Displayed in the home jurisdiction’s currency.
Insurance Merchant amount
The amount of insurance your company is paying. Displayed in the home jurisdiction’s currency.
RTV Header, General tab

2-Step RTVs 195
Freight out Vendor amount
The amount of freight the vendor is paying for the shipment of the goods back to the vendor. Displayed in the home jurisdiction’s currency.
Freight out Merchant amount
The amount of freight your company is paying for the shipment of the goods back to the vendor. Displayed in the home jurisdiction’s currency.
Freight in Vendor amount
The amount of freight the vendor is paying for the original shipment of the goods to your company. Displayed in the home jurisdiction’s currency.
Credit note no. The supplier’s credit note number.
Miscellaneous Vendor amount
Any other amounts the vendor will be paying. Displayed in the home jurisdiction’s currency.
External system If the source of the document is other, the RTV was created in another system and then interfaced to Inventory Management. This field shows what system the document is being interfaced from.
Printed check box
Shows if the document has been printed.
Ext. doc. no. Specifies the document number of the external system that generated the RTV.
RTV Header, General tab

196 Returns to Vendor
You can assign predefined or free‐form messages about the RTV to an RTV document header. For example, you might add a message for internal use about why the goods were returned.
If the message type was appropriately flagged in Enterprise Data, the message will print on the RTV document.
Inventory Management documents can be grouped together based on common characteristics that are defined as attributes. The values of the characteristics would be defined as attribute sets for that attribute. For example, you can create “Department” as an attribute and then create an attribute set for each department number. This provides for a linking of documents by department.
RTV Header, Messages tab
Message Type The appropriate message type; selected from a drop‐down list.
Message Code A code that references a predefined message. Left blank if a free‐form text message is being entered.
Message Either a free‐form message or the text of the predefined message code entered above.
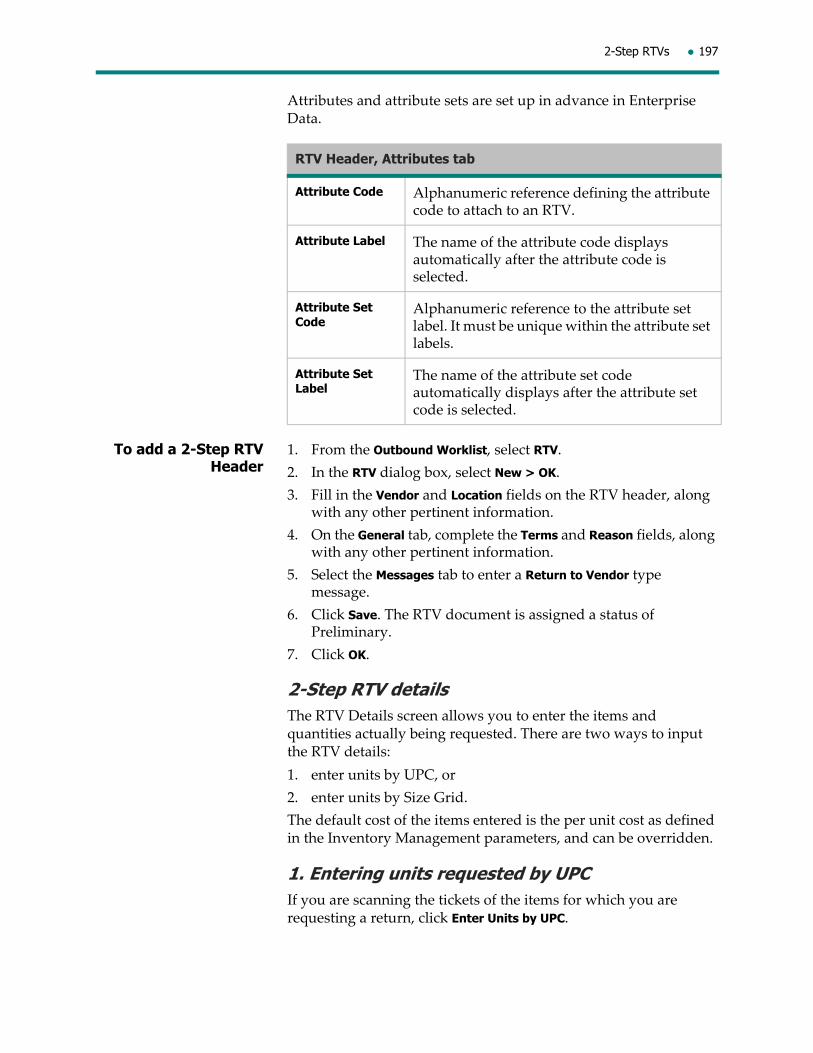
2-Step RTVs 197
Attributes and attribute sets are set up in advance in Enterprise Data.
To add a 2-Step RTV Header
1. From the Outbound Worklist, select RTV.
2. In the RTV dialog box, select New > OK.
3. Fill in the Vendor and Location fields on the RTV header, along with any other pertinent information.
4. On the General tab, complete the Terms and Reason fields, along with any other pertinent information.
5. Select the Messages tab to enter a Return to Vendor type message.
6. Click Save. The RTV document is assigned a status of Preliminary.
7. Click OK.
2-Step RTV detailsThe RTV Details screen allows you to enter the items and quantities actually being requested. There are two ways to input the RTV details:
1. enter units by UPC, or
2. enter units by Size Grid.
The default cost of the items entered is the per unit cost as defined in the Inventory Management parameters, and can be overridden.
1. Entering units requested by UPCIf you are scanning the tickets of the items for which you are requesting a return, click Enter Units by UPC.
RTV Header, Attributes tab
Attribute Code Alphanumeric reference defining the attribute code to attach to an RTV.
Attribute Label The name of the attribute code displays automatically after the attribute code is selected.
Attribute Set Code
Alphanumeric reference to the attribute set label. It must be unique within the attribute set labels.
Attribute Set Label
The name of the attribute set code automatically displays after the attribute set code is selected.
198 Returns to Vendor
To enter 2-Step RTV units requested by
UPC
1. Retrieve the RTV header for which you want to enter requested unit details.
2. From the RTV header screen, select Detail.
3. Click Enter Units by UPC.
4. In the Select Units to Enter dialog box, ensure Requested units is selected and then click OK.
5. In the Enter Requested Units by UPC dialog box, click New Carton if generating carton labels for the carton(s) being packed and returned to the vendor. If you are adding items to an already opened carton, click More. From the list of carton numbers that are ʺopenʺ on the system, select the carton number you wish to continue packing merchandise into and then click OK.
6. Next:
scan the UPC barcode or enter the UPC from the item you are returning.
the Quantity automatically defaults to 1. If there are multiple items of the same SKU (style/color/size), enter the number of items being returned.
enter the style status from which the merchandise will be released once it is returned at the From status field.
enter the unit Cost (in the home jurisdiction’s currency) of the individual items being returned. The default cost for the item being returned is the per unit cost as specified in the IM parameters. You can manually override the cost which appears, if required. This field will only be displayed if you have been given access (via Enterprise Data Management > Employee > Access) to view or enter cost values.
7. Click Apply. The cursor reappears in the UPC field. The carton remains ʺopenedʺ. Scan (or enter) any additional UPCs.
8. When all merchandise has been scanned (or entered) and packed into the carton, click Close.
9. The RTV Detail screen reappears so that you can review the items and quantities on this particular RTV document.
10. Once you are satisfied that all details entered are accurate, click Save > OK.
2. Entering units requested by Size GridIf you are entering the quantities being requested using the style code, use Enter Units by Size Grid.
To enter 2-Step RTV units requested by
Size Grid
1. Retrieve the RTV header you want to enter requested unit details against.
2. From the RTV header screen, select Detail.
3. Click Enter Units by Size Grid.
2-Step RTVs 199
4. In the Select Units to Enter dialog box, ensure Requested units is selected and then click OK.
5. In the Enter Requested Units by Size Grid dialog box, click New Carton if generating carton labels for the carton(s) being packed and returned to the vendor. If you are adding items to an already opened carton, click More. From the carton numbers that are ʺopenʺ on the system, select the carton number you wish to continue packing merchandise into and then click OK.
6. Next:
enter the Style code
Select the Color code for the style being returned.
At the From status field, enter the style status from which the merchandise will be released once returned.
Enter the unit Cost (in the home jurisdiction’s currency) of the individual item being returned. The default cost for the item being returned is the per unit cost as specified in the IM parameters. You can manually override the cost which appears, as required. This field will only be displayed if you have been given access (via Enterprise Data Management > Employee > Access) to view or enter cost values.
Enter the quantities (by size) being returned.
7. Click Apply. The cursor reappears in the Style code field. The carton remains ʺopenedʺ. Enter any additional styles.
8. Once all merchandise has been entered and packed into the carton, click OK.
9. The RTV Detail screen reappears so that you can review the items and quantities on this RTV document.
10. When you are satisfied that all details entered are accurate, click Save > OK.
Initiating an RTV Document Request within a 2-step processIf an RTV document requires authorization by the vendor before the merchandise can be returned, the document must be “requested” in Inventory Management. Initiating the request changes the document status from Preliminary to Requested, and changes the inventory status of the SKUs on the document from Available to Unavailable ‐ Pending RTV.
The status of a 2‐step RTV can be changed either from within the document or from the Inbound Worklist.
To initiate a 2-Step RTV document request
11. Retrieve the RTV document you want to request authorization for. Its status must be Preliminary.
12. From the Actions menu select Request.
13. Click OK to acknowledge the status change.

200 Returns to Vendor
Returning a “Requested” RTV Document within a 2-step processOnce you have received permission from the vendor to return the merchandise detailed on the RTV document, you must enter in returned units and “return” the RTV document in Inventory Management.
To enter in the returned units, you can either select the option from the Edit menu (or click Return as Requested to set all returned units equal to requested units), manually key in the returned units, enter returned units by size grid, or enter returned units by UPC.
You must then select Return from the Actions menu, and the status of the document will change from Requested to Returned, and the location’s inventory will be relieved of the SKU quantities on the document.
Once returned units have been entered, you can change the status to Returned from either within the document or from the Outbound Worklist.
If you are using the Warehouse Management System (WMS) to return merchandise on an RTV, a notice will be sent to the queue for Inventory Management.
To return a “Requested” 2-Step
RTV document
1. Retrieve a ʺRequestedʺ RTV document.
2. On the General tab, enter the following mandatory fields, along with any other pertinent information:
Date returned
Return auth. no.
3. From either the Header or Detail, select Return as Requested.
4. To confirm that you want to set all returned units equal to requested units, click Yes.
5. Save your changes.
6. On the Actions menu, select Return.
7. To acknowledge the status change, click OK.

Consolidation flow: 2-step process 201
Consolidation flow: 2-step process
See the chapter “Transfers” on page 139 for more details.

202 Returns to Vendor
See “Returns to Vendor flow: 1‐step process” on page 178 or “Returns to Vendor flow: 2‐step process” on page 189 to complete the RTV.
Consolidation: 2-step process 203
Consolidation: 2-step process
If the vendor requires that the merchandise being returned to a vendor be returned from a central location such as a warehouse rather than from each store, the stores transfer the merchandise to the central location. Once all merchandise has been received, the RTV document is created at the central location and the goods are shipped to the vendor.
The consolidation process is typically used to respond to a vendor’s recall of merchandise or end‐of‐season consolidations.
Use a Head Office IMRD to initiate the transfer of the merchandise from the stores to the central location. IMRDs may also be used to instruct stores to return merchandise directly to the vendor. See the chapter “Creating IMRDs at Head Office” on page 107 and the chapter “Responding to an IMRD” on page 213 for more details.
204 Returns to Vendor
Releasing an RTV Document to Warehouse Management
This step is required if your company uses Warehouse Management to manage incoming and outgoing merchandise and to maintain stock held in the warehouse. When damaged/defective merchandise is found in the warehouse or is being consolidated in the warehouse for return to the vendor, warehouse personnel must be notified when the RTV document has been processed in Inventory Management and the merchandise can be packed and shipped. This is done by releasing an RTV document to Warehouse Management.
First the RTV document, with the warehouse location listed as the “From location” must be created.
If the vendor is one‐step (no authorization required), the RTV document with a status of “Preliminary” must be released to Warehouse Management.
If the vendor is two‐step (authorization number required), the status of the RTV document should be changed to “Requested” — the document will be automatically released to Warehouse Management. Once the authorization number is know, it should be input and then the document should be “Released to Warehouse Management”. If the authorization number is known from the beginning, the Requested status change can be skipped—you can release to Warehouse Management immediately. This Release function will advise Warehouse Management to do the return. If Warehouse Management gets the authorization number, the return will be done and the information will be fed back to Inventory Management upon completion of the return function in Warehouse Management.
Once the RTV document has been released to Warehouse Management, the RTV document’s status changes to Released to W/H Mgmt. Warehouse Management will then be able to pack and ship the goods back to the vendor.

Printing an RTV Carton Label 205
Printing an RTV Carton Label
To produce a carton label for your shipment to the vendor, click Print Labels.
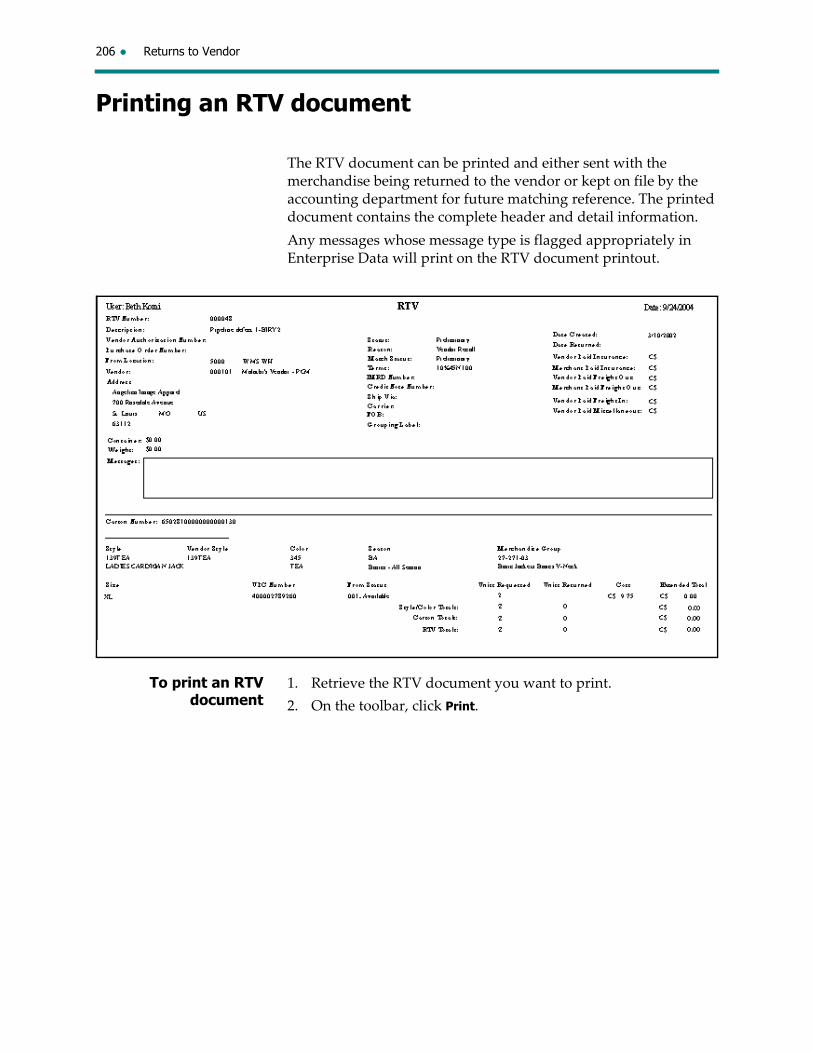
206 Returns to Vendor
Printing an RTV document
The RTV document can be printed and either sent with the merchandise being returned to the vendor or kept on file by the accounting department for future matching reference. The printed document contains the complete header and detail information.
Any messages whose message type is flagged appropriately in Enterprise Data will print on the RTV document printout.
To print an RTV document
1. Retrieve the RTV document you want to print.
2. On the toolbar, click Print.
Modifying an RTV Document 207
Modifying an RTV Document
If information was entered incorrectly or if information was forgotten, modifications can be done to both the RTV header and to the RTV details. For example, if after you have entered the RTV, you find two more units of a defective item, you will want to modify the returned units.
Modifications can be made to the header and details of an existing RTV document depending on the document’s status.
If you are using the Warehouse Management System (WMS) to return merchandise on an RTV, a notice will be sent to the queue for Inventory Management for any changes made to an RTV with a Returned status.
The table below list fields that can be modified based on the document status.
In addition, you can add a carton number to one or multiple detail lines.
Note: The Cost field will only be displayed if you have been given access (via Enterprise Data Management > Employee > Access) to view or enter cost values.
Status Description What has been updated What can be modified
Preliminary An RTV document has been created but is incomplete.
The document is still a work‐in‐progress. Nothing has been updated at this point.
All header and detail fields can be modified except:
Header: RTV no., Date created, Source, External system name, External document no.
Details: SKU ID
Requested Vendor requires acknowledgement before allowing merchandise to be returned; request for return authorization has been made to the vendor to allow the merchandise on the RTV document to be sent back to the vendor.
The RTV document’s status becomes Requested. If the location is a Warehouse Management
warehouse, the RTV interface to Warehouse Management is updated.
Date returned
Attributes

208 Returns to Vendor
To modify an RTV document
1. Retrieve the RTV document you want to modify.
2. Make the required changes to the RTV Header and Details. See “1‐Step RTV header” on page 179 and “1‐Step RTV details” on page 186 or “2‐Step RTV header” on page 190 and “2‐Step RTV details” on page 197 for field definitions.
3. Save and acknowledge your changes.
Released to W/H Mgmt.
The location must be designated a Warehouse Management
warehouse. Warehouse Management is alerted to the fact that the RTV document has completed its process within Inventory Management and that the warehouse personnel can physically pack and ship the merchandise to the respective vendor.
The RTV document’s status becomes Released to W/H Mgmt.. The RTV interface to Warehouse Management is updated with RTV information.
Date returned
Attributes
Returned The merchandise detailed on the RTV document is returned to the vendor.
The RTV document’s status becomes Returned.
Attributes
Note: For clients interfacing to Invoice Matching, once the status becomes Returned, the RTV document cannot be modified.
Canceled The RTV document has been canceled.
The RTV document status becomes Canceled and the document’s Last activity date becomes the current date. The Date requested and Date returned fields are set to Null.
The RTV document can no longer be modified.
Status Description What has been updated What can be modified

Releasing an RTV Document to Invoice Matching 209
Releasing an RTV Document to Invoice Matching
Note: If your company is using a third party Invoice Matching system, you will need to release PO receipts to this system using the functionality described below.
Once you have received permission from the vendor to return the merchandise and the document has been ‘returned’ within the system, you should release it to Invoice Matching. This alerts those responsible in the accounting department of the “credit” owed to your company because of the return.
Only RTV documents with a status of Returned (or Preliminary or Requested, as long as they adhere to the rules of Returned and whose location is not a Warehouse Management warehouse) may be released to Invoice Matching.
Once the RTV document has been released to Invoice Matching, the status of the document changes from Returned to Fully Matched.
Since a third party Invoice Matching system will be used (parameter “Invoice Matching Activated” is set to No), the information will be sent via a Pipeline segment to the interface for the third party Invoice Matching system, and the Pipeline segment will then update the status of the RTV document to Matched.
The status of an RTV document can be changed either from within the document or from the Outbound Worklist.
To release an RTV document to Invoice
Matching
1. Retrieve the RTV document you wish to release.
2. On the Actions menu, select Release to Invoice Matching. The RTV document status changes to Unmatched.

210 Returns to Vendor
Canceling and Reinstating an RTV Document
An RTV document with a status of Preliminary, Requested or Returned can be canceled. This might be needed if the RTV document was accidentally created or if the vendor denies permission to return the merchandise. If a Requested RTV document is canceled, the inventory status of the items requested will change from Unavailable ‐ Pending RTV to Available. If a Returned RTV document is canceled, items on the RTV document will be put back into your location’s inventory.
If an RTV document was accidentally canceled, it is possible to reinstate the document. Reinstating an RTV document returns it to a status of Preliminary. Only RTV documents with a status of Canceled may be reinstated.
If you are using the Warehouse Management System (WMS) to return merchandise on an RTV, a notice will be sent to the queue for Inventory Management when an RTV is canceled in WMS. Merchandise will be returned to available inventory.
To cancel or reinstate an RTV document, you can either:
highlight the document on the Outbound Worklist and select the Cancel or Reinstate action on the Actions menu, or
open the document and select the Cancel or Reinstate action on the Actions menu.
To cancel an RTV document
Note: Instead of following the procedure below to cancel an RTV document, you can also highlight the document on the Outbound Worklist and select the Cancel action on the Actions menu.
1. Retrieve the RTV document you want to cancel.
2. On the Actions menu, select Cancel.
3. To acknowledge the status change, click OK.
To reinstate an RTV document
Note: Instead of following the procedure below to reinstate an RTV document, you can also open the document and select the Reinstate action on the Actions menu.
1. On the Outbound Worklist, highlight the RTV document you want to reinstate.
2. On the Actions menu, select Reinstate.
3. To acknowledge the status change, click OK.
System Delete of RTV Documents 211
System Delete of RTV Documents
RTV documents will automatically be deleted from the system if the RTV document has
a status of Canceled, or
a status of Fully Matched, and
a predefined number of weeks has passed since the status was changed to Returned.
If you are using the Warehouse Management System (WMS), a notification will be sent to the queue for WMS when an RTV is deleted by the system.

212 Returns to Vendor
Deleting an RTV Document Manually
RTV documents with a status of Preliminary, Returned or Canceled may be deleted from the system manually as required.
If you are using the Warehouse Management System (WMS), a notification will be sent to the queue for WMS when an RTV is deleted manually.
To delete an RTV document, highlight the appropriate RTV document on the Outbound Worklist. From the File menu select Delete > Yes to confirm your request to delete. Save your changes.
An IMRD (Inventory Movement Request Document) is a directive sent from head office directing stores or warehouses to move inventory from one location to another. These directives can be used for RTVs and transfers.
A buyer can use IMRDs to request a transfer to balance out stock, consolidate merchandise in a location or recall merchandise to the warehouse. For RTVs, the buyer might want to notify stores of merchandise that should be returned directly, particularly when a general quality problem is found.
Stores can create RTV documents and Outbound Transfer documents using the information from the IMRD. All documents created from an IMRD must be for the styles requested on the IMRD; stores cannot add styles. This ensures that locations only move the items listed on the IMRD.
5 Responding to an IMRD
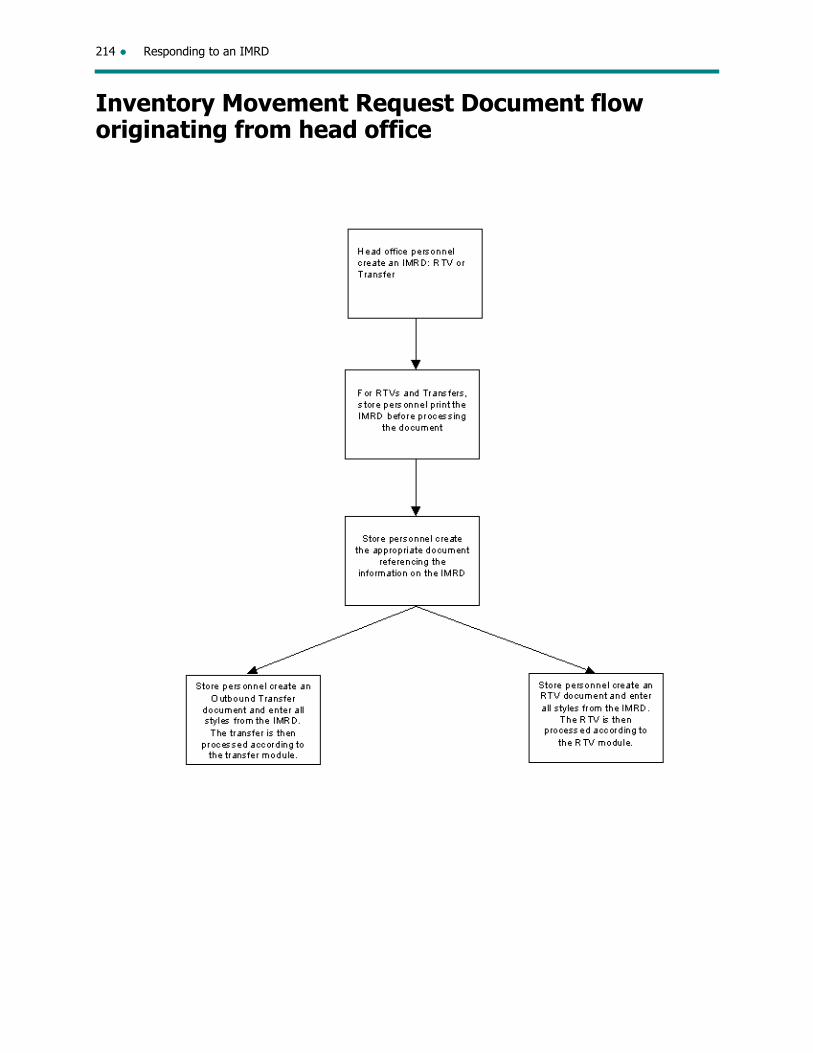
214 Responding to an IMRD
Inventory Movement Request Document flow originating from head office
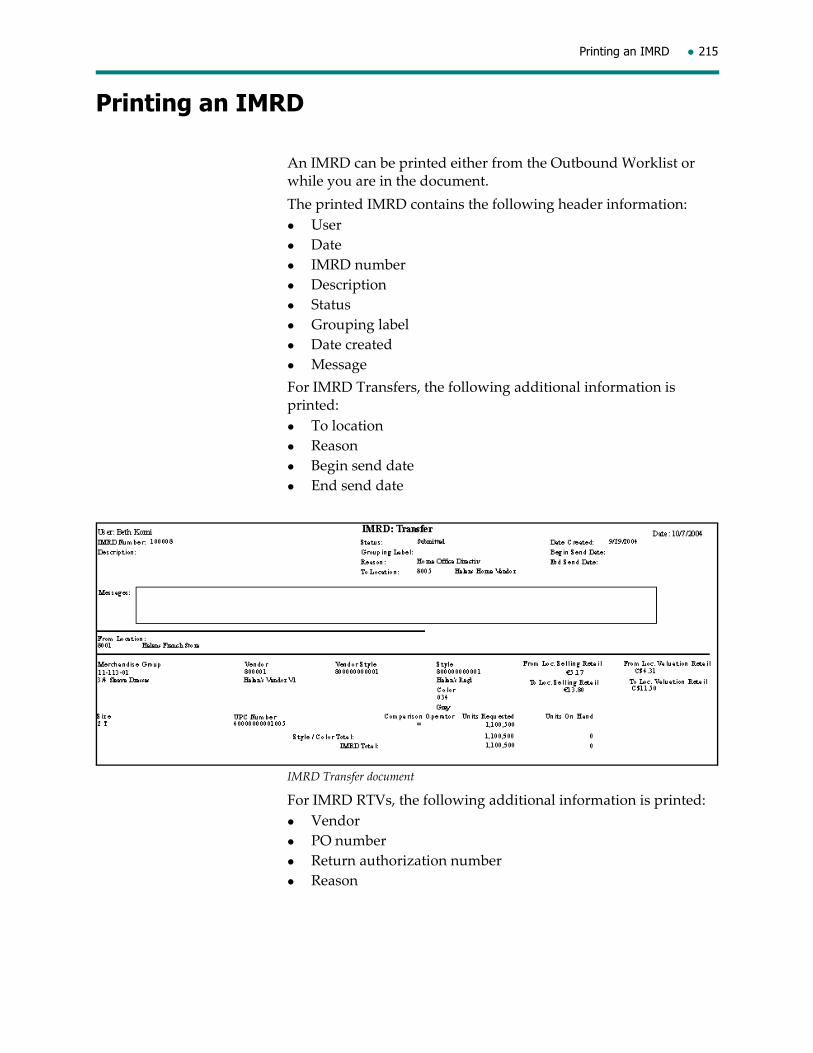
Printing an IMRD 215
Printing an IMRD
An IMRD can be printed either from the Outbound Worklist or while you are in the document.
The printed IMRD contains the following header information:
User
Date
IMRD number
Description
Status
Grouping label
Date created
Message
For IMRD Transfers, the following additional information is printed:
To location
Reason
Begin send date
End send date
IMRD Transfer document
For IMRD RTVs, the following additional information is printed:
Vendor
PO number
Return authorization number
Reason
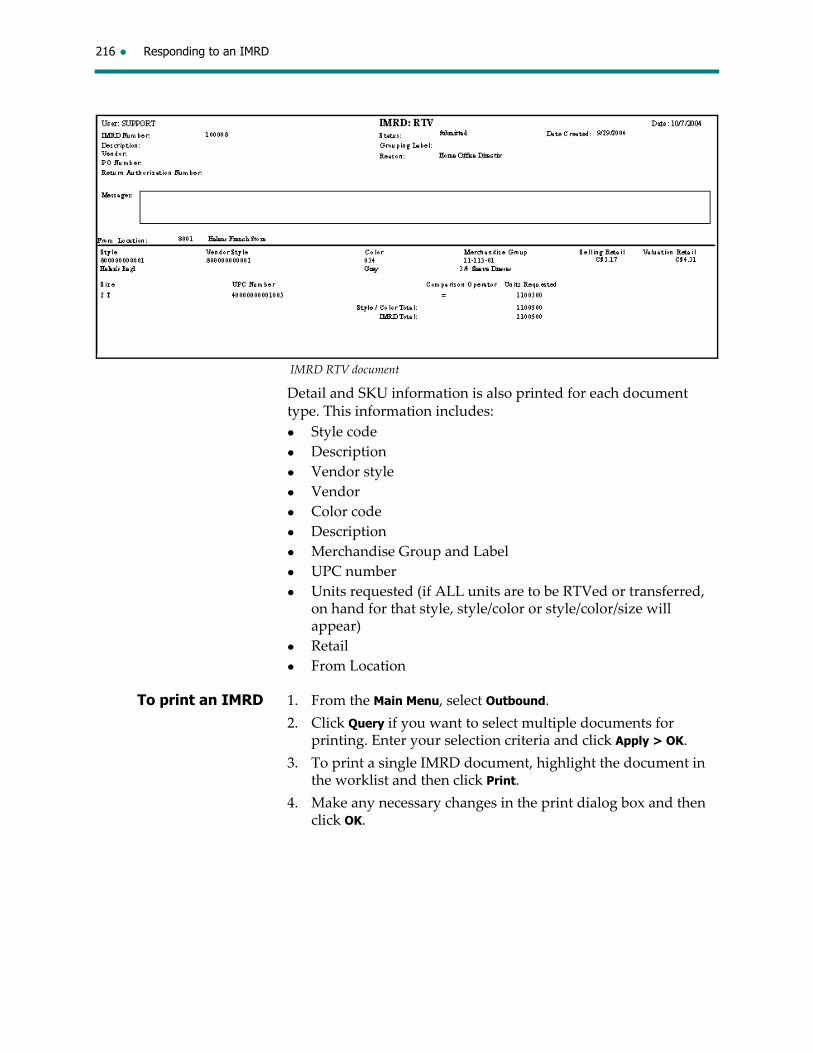
216 Responding to an IMRD
IMRD RTV document
Detail and SKU information is also printed for each document type. This information includes:
Style code
Description
Vendor style
Vendor
Color code
Description
Merchandise Group and Label
UPC number
Units requested (if ALL units are to be RTVed or transferred, on hand for that style, style/color or style/color/size will appear)
Retail
From Location
To print an IMRD 1. From the Main Menu, select Outbound.
2. Click Query if you want to select multiple documents for printing. Enter your selection criteria and click Apply > OK.
3. To print a single IMRD document, highlight the document in the worklist and then click Print.
4. Make any necessary changes in the print dialog box and then click OK.

IMRD Transfers 217
IMRD Transfers
An IMRD Transfer document directs locations to create an Outbound Transfer document with specific information, styles, and quantities by size and color. The Outbound Transfer document will be created off the IMRD Transfer by the sending location and the receiving location will complete it when the merchandise is received.
An IMRD Transfer can also be created in Merchandising Analytics. It will have a Preliminary status and can be accessed in Inventory Management. The Source field for these IMRDs will display ʺMerch. Anal.ʺ
IMRD Transfer headerThe IMRD header shows all general information relevant to the request from head office, such as the begin and end send dates, to and from locations and the reason for the transfer.
Inventory Movement Request Document Header
IMRD no. Automatically generated from the range of numbers specified in the system parameters (maximum: 20 numeric).
Date created The date that the IMRD document is first saved.

218 Responding to an IMRD
Grouping label Max. 20 characters. A memo field used to link documents that have something in common for query purposes. The standards for what should be put in this field are decided by your company. For example, you could decide as a company that you will enter the department number here so that you can make a query on documents by department.
Last activity date
The date the IMRD was last accessed (either the date it was created or the date it was last modified).
Document type IMRDs can be created for Transfers or RTVs. In this scenario, the document type will be Transfer.
Description An optional free‐form field which can be used for making a query. It can be used to identify the actual purpose of the IMRD. This field contains up to 60 characters.
Status Displays the IMRD status based on certain activity such as whether the document is newly created, submitted or canceled. An IMRD’s status may be one of the following:
Preliminary: a new document or work in progress that has not yet been submitted by Head Office.
Submitted: the document is ready to be processed by the locations. Only documents with a status of Submitted can be acted on.
Canceled: the document cannot be processed by the location. This status will cancel the IMRD request.
Date submitted The date that the IMRD status was changed to Submitted, making the IMRD available for locations to start processing.
Source Shows where the document was originally created; will be Merchandising unless the document is interfaced from another system: in that case, the name of the source will be other. If the IMRD was created in Merchandising Analytics, then Merchandising Analytics will appear here.
Inventory Movement Request Document Header

IMRD Transfers 219
External system If the source of the document is other, the IMRD was created in another system and then interfaced to Inventory Management. This field shows what system the document is being interfaced from.
External document no.
The number of the document on the system that the document was interfaced from.
Inventory Movement Request Document Header, General tab
Begin send date Merchandise cannot be sent before this date.
End send date Merchandise cannot be sent after this date.
To location Mandatory. Indicates where the transfer items are to be sent.
Reason Mandatory. Indicates the reason for the transfer.
From Locations Indicates the locations that are directed to transfer styles.
Inventory Movement Request Document Header

220 Responding to an IMRD
Messages may have been assigned to an IMRD Transfer on the Messages tab in order to communicate information to the stores/warehouses. For example, there may be special processing instructions such as the type of transportation to be used for the transfer or specific packing instructions.
Inventory Management documents can be grouped together based on common characteristics that are defined as attributes. The values of the characteristics would be defined as attribute sets for that attribute. For example, you can create “Department” as an attribute and then create an attribute set for each department number. This provides for a linking of documents by department.

IMRD Transfers 221
Attributes and attribute sets are set up in advance in Enterprise Data.
IMRD Transfer detailsThe IMRD details screen displays what items and quantities are to be transferred by size and color.
Inventory Movement Request Document Header, Attributes tab
Attribute Code Alphanumeric reference defining the attribute code to attach to an IMRD.
Attribute Label The name of the attribute code displays automatically after the attribute code is selected.
Attribute Set Code
Alphanumeric reference to the attribute set label. It must be unique within the attribute set labels.
Attribute Set Label
The name of the attribute set code automatically displays after the attribute set code is selected.
Inventory Movement Request Document Detail
Units requested The number of units by style/color/size that are to be transferred. This field works in conjunction with the ‘Compare’ field.

222 Responding to an IMRD
Compare This field works in conjunction with the ‘Units requested’ field. Valid options include:
<=: the number of units transferred by the store/ warehouse must be fewer than or equal to the number of units requested.
>=: the number of units transferred by the store/ warehouse must be more than or equal to the number of units requested.
=: the units transferred by the store/warehouse must be exactly the same as the number of units requested.
ALL: If this option is selected, the units requested field will be grayed out. This instructs the store/ warehouse to transfer all units in stock.
Style Code A unique internal code identifying the style within the system.
Style Description
Description of the style on the document.
Color A three digit alphanumeric code identifying the color for the style.
Color Description
Description of the color for the style.
Size Code Size descriptions for both the primary size and if applicable, the secondary size of the style. For example, a range of widths associated with a specific shoe size.
Vendor Code Number of the vendor the goods belong to.
Vendor Name of the vendor the item belongs to.
Vendor Style Usually supplied by the vendor and must be unique within the vendor. It is an alphanumeric reference to the style.
Merchandise Group Code
The code assigned to the group in the merchandise hierarchy that the style is assigned to.
Merchandise Group Label
The label assigned to the group in the merchandise hierarchy that the style is assigned to.
Inventory Movement Request Document Detail

IMRD Transfers 223
Creating an Outbound Transfer from an IMRD TransferThe User Preferences in the Enterprise Data module determine whether Transfers can be created from IMRD Transfers. If the user preference IMRD for Transfer is set to Must use or This input is optional, a transfer can be created in one of two ways:
either select an IMRD Transfer with a status of Submitted from the Outbound Worklist, or
select to add a new transfer by creating it from an IMRD transfer and then enter the IMRD transfer number.
When you have an IMRD Transfer that needs to be acted upon, be sure to verify the begin send date and end send date. An IMRD Transfer can only be acted upon within that range of dates. If the current date is within this range, physically gather the goods requested on the IMRD Transfer document, access the Outbound Worklist and create an Outbound Transfer document using the IMRD Transfer document as the reference. The rest of the transfer flow occurs as described in the Transfers chapter in this manual.
To create an Outbound Transfer from an
IMRD Transfer
1. Retrieve the IMRD Transfer you want to use to create a transfer.
2. From the IMRD Header screen, select a document from the Location list and then click Transfer.
3. In the Cross ref. field, enter a value.
4. In the General tab, enter your store number in the From location field and select the appropriate address type for both from and to location.
5. In the Shipping tab, enter the date the merchandise is being shipped, select how the merchandise is being sent and enter any other pertinent information.
6. Enter a message in the Outbound Messages tab, if applicable.
7. Select Detail.
8. For Batch totals: Qty. sent, enter a value.
9. Click Enter Units by UPC to enter transfer units by UPC.
10. On the Enter Units by UPC dialog box, enter a valid UPC and override the default quantity of 1, if applicable.
11. Repeat for each detail.
12. Click Apply > Close.
13. Save and acknowledge your input.
UPC The Universal Product Code is a numeric code to uniquely identify merchandise down to the color and size level.
Inventory Movement Request Document Detail

224 Responding to an IMRD
IMRD RTVs
An IMRD RTV is used to instruct the stores/warehouses to create a Return to Vendor document with specific information, styles, and quantities by size and color. The RTV document will be created off of the IMRD RTV by the store/warehouse.
IMRD RTV HeaderThe IMRD Header shows all general information relevant to the request from head office such as the return authorization number, which locations are to return the merchandise, reason codes and associated PO information.
Inventory Movement Request Document RTV Header
IMRD no. Automatically generated from the range of numbers specified in the system parameters (maximum: 20 numeric).
Date created The date the IMRD document is first saved.
Grouping label Max. 20 characters. A memo field used to link documents that have something in common for query purposes. The standards for what should be put in this field are decided by your company. For example, you could decide as a company that you will enter the department number here so that you can make a query on documents by department.
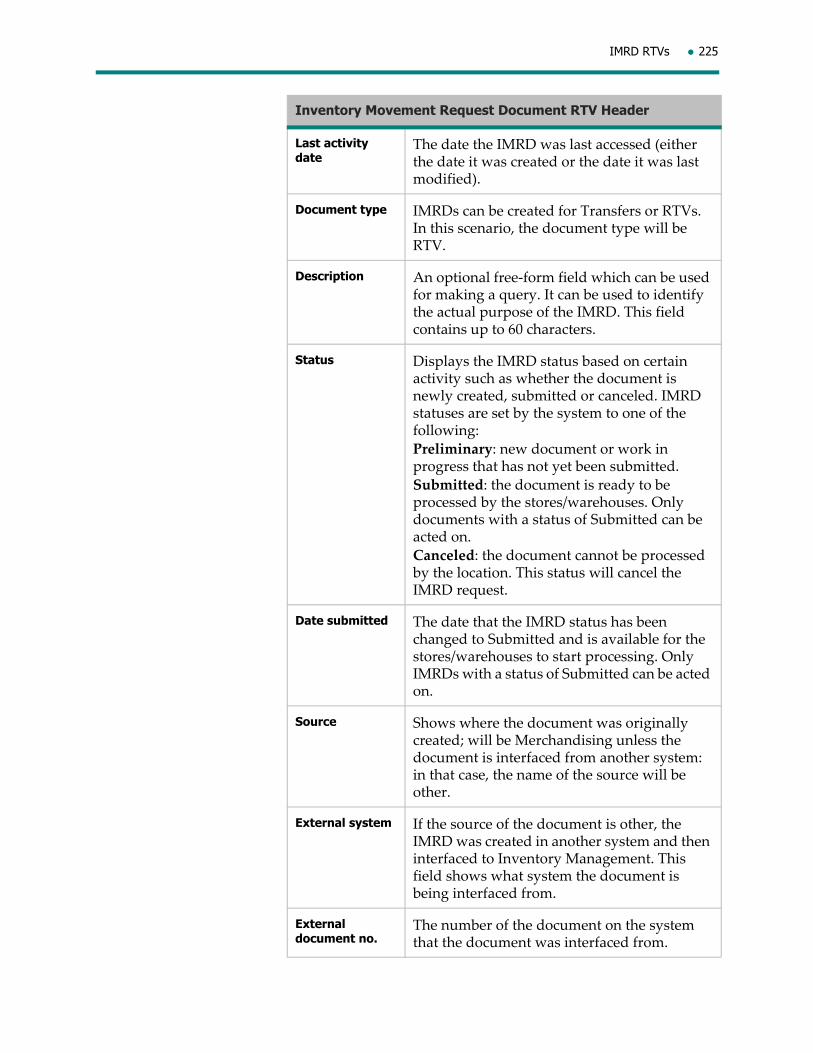
IMRD RTVs 225
Last activity date
The date the IMRD was last accessed (either the date it was created or the date it was last modified).
Document type IMRDs can be created for Transfers or RTVs. In this scenario, the document type will be RTV.
Description An optional free‐form field which can be used for making a query. It can be used to identify the actual purpose of the IMRD. This field contains up to 60 characters.
Status Displays the IMRD status based on certain activity such as whether the document is newly created, submitted or canceled. IMRD statuses are set by the system to one of the following:
Preliminary: new document or work in progress that has not yet been submitted.
Submitted: the document is ready to be processed by the stores/warehouses. Only documents with a status of Submitted can be acted on.
Canceled: the document cannot be processed by the location. This status will cancel the IMRD request.
Date submitted The date that the IMRD status has been changed to Submitted and is available for the stores/warehouses to start processing. Only IMRDs with a status of Submitted can be acted on.
Source Shows where the document was originally created; will be Merchandising unless the document is interfaced from another system: in that case, the name of the source will be other.
External system If the source of the document is other, the IMRD was created in another system and then interfaced to Inventory Management. This field shows what system the document is being interfaced from.
External document no.
The number of the document on the system that the document was interfaced from.
Inventory Movement Request Document RTV Header

226 Responding to an IMRD
Inventory Movement Request Document RTV Header, General Information tab
Return auth. no. A return authorization number from the vendor if it is required. This number can be entered on the RTV document to identify the return to the vendor when the merchandise is received.
Vendor Mandatory. The vendor that the return is being sent to.
PO no. If the return is associated with a particular PO number, this is indicated on the IMRD.
Reason Identifies the reason why the merchandise is being returned.
From Locations Identifies which locations are to return the style(s) indicated.

IMRD RTVs 227
Use the Messages tab to view messages may have been assigned to a IMRD RTV to communicate information to the stores/warehouses. For example, there may be special processing instructions such as the type of transportation to be used for the RTV or specific packing instructions.
Inventory Management documents can be grouped together based on common characteristics that are defined as attributes. The values of the characteristics would be defined as attribute sets for that attribute. For example, you can create “Department” as an attribute and then create an attribute set for each department number. This provides for a linking of documents by department.

228 Responding to an IMRD
Attributes and attribute sets are set up in advance in Enterprise Data.
IMRD RTV detailsThe IMRD details screen displays the items and quantities by size and color that are to be returned to the specified vendor.
Inventory Movement Request Document Header, Attributes tab
Attribute Code Alphanumeric reference defining the attribute code to attach to an IMRD.
Attribute Label The name of the attribute code displays automatically after the attribute code is selected.
Attribute Set Code
Alphanumeric reference to the attribute set label. It must be unique within the attribute set labels.
Attribute Set Label
The name of the attribute set code automatically displays after the attribute set code is selected.
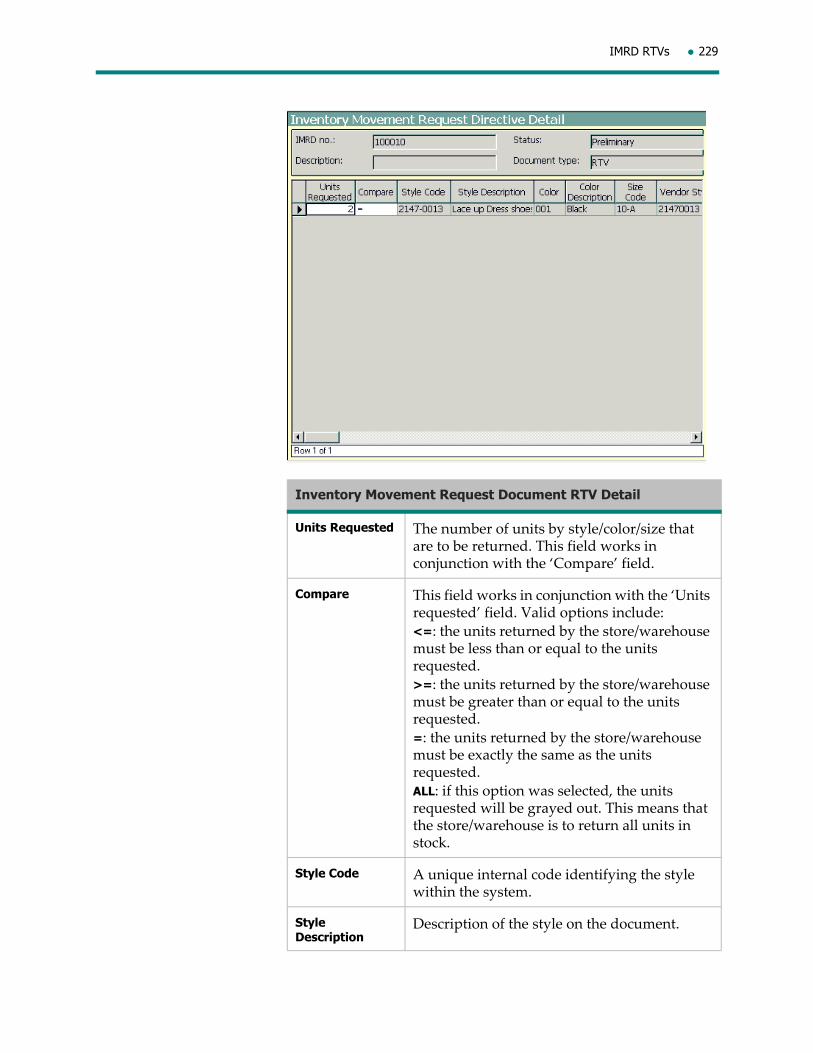
IMRD RTVs 229
Inventory Movement Request Document RTV Detail
Units Requested The number of units by style/color/size that are to be returned. This field works in conjunction with the ‘Compare’ field.
Compare This field works in conjunction with the ‘Units requested’ field. Valid options include:
<=: the units returned by the store/warehouse must be less than or equal to the units requested.
>=: the units returned by the store/warehouse must be greater than or equal to the units requested.
=: the units returned by the store/warehouse must be exactly the same as the units requested.
ALL: if this option was selected, the units requested will be grayed out. This means that the store/warehouse is to return all units in stock.
Style Code A unique internal code identifying the style within the system.
Style Description
Description of the style on the document.
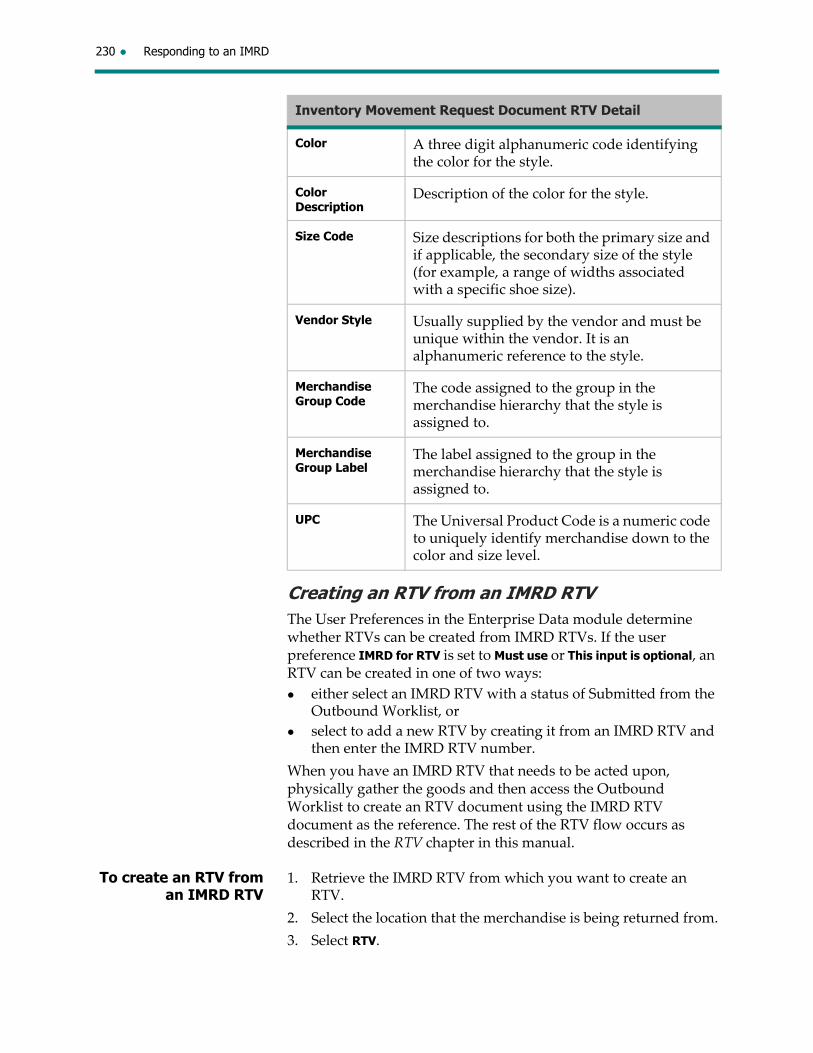
230 Responding to an IMRD
Creating an RTV from an IMRD RTVThe User Preferences in the Enterprise Data module determine whether RTVs can be created from IMRD RTVs. If the user preference IMRD for RTV is set to Must use or This input is optional, an RTV can be created in one of two ways:
either select an IMRD RTV with a status of Submitted from the Outbound Worklist, or
select to add a new RTV by creating it from an IMRD RTV and then enter the IMRD RTV number.
When you have an IMRD RTV that needs to be acted upon, physically gather the goods and then access the Outbound Worklist to create an RTV document using the IMRD RTV document as the reference. The rest of the RTV flow occurs as described in the RTV chapter in this manual.
To create an RTV from an IMRD RTV
1. Retrieve the IMRD RTV from which you want to create an RTV.
2. Select the location that the merchandise is being returned from.
3. Select RTV.
Color A three digit alphanumeric code identifying the color for the style.
Color Description
Description of the color for the style.
Size Code Size descriptions for both the primary size and if applicable, the secondary size of the style (for example, a range of widths associated with a specific shoe size).
Vendor Style Usually supplied by the vendor and must be unique within the vendor. It is an alphanumeric reference to the style.
Merchandise Group Code
The code assigned to the group in the merchandise hierarchy that the style is assigned to.
Merchandise Group Label
The label assigned to the group in the merchandise hierarchy that the style is assigned to.
UPC The Universal Product Code is a numeric code to uniquely identify merchandise down to the color and size level.
Inventory Movement Request Document RTV Detail

IMRD RTVs 231
4. On the General tab, enter the Date returned and any other pertinent information.
5. On the Messages tab, enter a message if applicable.
6. From the RTV Detail, click Enter Units by Size Grid.
7. In the Select Units to Enter dialog box, select Returned units > OK.
8. In the Enter Returned Units by Size Grid dialog box, enter a valid style code and color code and in the size grid, enter units being returned.
9. Click Apply.
10. Repeat steps 8 and 9 for each style being returned and then click OK.
11. Save and acknowledge your input. An RTV number will be assigned with a status of Preliminary.

Modifying an IMRD 232
Modifying an IMRD
You can modify both the IMRD header and details if information is entered incorrectly or additional information is needed. Once at least one location has acted on the IMRD, only then can some of the information be changed.
Status Description What has been updated What can be modified
Preliminary New document or work in progress
Nothing has been updated
Grouping label
Description
From Location
Messages
Units requested
Styles can be deleted
Styles can be added
Reason
Attributes
Begin Send Date
End Send Date
To Location
Submitted Document is ready to be worked on
Warehouse Management/external warehouse management system has received a manual allocation to work on.
For both IMRD RTVs and Transfers, if at least one location has acted on the IMRD, then the only fields that are modifiable are:
Grouping Label
Description
Can add a From Location but canʹt remove one that has acted on the IMRD
End Send Date
Messages
Attributes
Canceled Document has been canceled
Nothing has been updated
Grouping label Description
From Location
Messages
Units requested
Styles can be deleted
Styles can be added
Modifying an IMRD 233
To modify an IMRD 1. Retrieve the IMRD you want to modify.
2. Make the required changes. See the following sections in this manual for the applicable field definitions:
“IMRD Transfer header” on page 217
“IMRD Transfer details” on page 221
“IMRD RTV Header” on page 224
“IMRD RTV details” on page 228
3. Save and acknowledge your input.

234 Responding to an IMRD
Submitting an IMRD
Once an IMRD has been created, it can be saved as a Preliminary document. This means that information can still be changed in either the Header or the Details. The document cannot be acted upon until it is Submitted.
Once the document is Submitted, the status of the document will change to Submitted.
The status of an IMRD can be changed either from within the document or from the Outbound Worklist.
To submit an IMRD 1. Retrieve the IMRD you want to submit.
2. From the Actions menu, select Submit. The status of this IMRD is now set to Submitted.
3. Click OK.
Canceling and Reinstating an IMRD 235
Canceling and Reinstating an IMRD
IMRDs can be canceled and reinstated. If an IMRD was canceled by mistake, you can reinstate it to a status of Preliminary. Only IMRDs with a status of Canceled may be reinstated.
To cancel or reinstate an IMRD, you can either:
highlight the document on the Outbound Worklist and select the Cancel or Reinstate action on the Actions menu, or
open the document and select the Cancel or Reinstate action on the Actions menu.
To cancel an IMRD Note: Instead of following the procedure below to cancel an IMRD document, you can also highlight the document on the Outbound Worklist and select the Cancel action on the Actions menu.
1. Retrieve the IMRD you want to cancel.
2. From the Actions menu, select Cancel. The status of this IMRD is now set to Canceled.
3. To acknowledge the status change, click OK.
To reinstate an IMRD Note: Instead of following the procedure below to reinstate an IMRD document, you can also open the document and select the Reinstate action on the Actions menu.
1. On the Outbound Worklist, highlight the IMRD you want to reinstate.
2. From the Actions menu, select Reinstate.
3. To acknowledge the status change, click OK.
236 Responding to an IMRD
System Delete of IMRD Documents
IMRDs will be automatically deleted by the system if the IMRD has:
a status of Canceled, or
a status of Submitted, and
a certain user‐defined number of weeks has elapsed since these documents were updated with these statuses.
Deleting IMRD Documents Manually 237
Deleting IMRD Documents Manually
IMRD documents with a status of Submitted or Canceled may be deleted from the system manually as required.
To delete an IMRD document, highlight the appropriate IMRD document on the Outbound Worklistand from the File menu select Delete > Yes to confirm your request to delete.

238 Responding to an IMRD

The Print Worklist can be used as a daily “to do” list. It displays by location, all unprinted Transfers, RTVs and IMRDs (for Transfers and RTVs) that need to be acted upon. You can select one or multiple documents displayed in the worklist for viewing, print previewing or printing. If you select multiple documents, they must all be of the same document type.
The following documents appear in the worklist:
All unprinted IMRD RTVs (Submitted status only)
All unprinted IMRD Transfers (Submitted status only)
All unprinted Outbound Transfers (Ready to Send status only)
All unprinted RTVs (Preliminary status only, whose From location is not a Warehouse Management warehouse)
All unprinted RTVs for two‐step vendors (any status where the authorization number was just entered.
Retrieving worklist detailsTo save time, you can retrieve specific rows in a table when using tables that contain many rows.
From the Data menu, you can either:
6 The Print Worklist
240 The Print Worklist
Select Retrieve All to retrieve a list of all documents in the worklist, or
Select Query to retrieve specific documents.
See “Retrieving information from your database” on page 21 for more information
Printed statusDocuments in the worklist will be flagged as Printed when:
they are printed from the Print Worklist
they are printed from the Outbound Worklist
they are printed from within the document
Printing from the Reports menu or from within Print Preview mode will not set this option. It is recommended that printing be done from the Print Worklist to prevent the possibility of two people working on the same document at the same time.
If the “Must use Location” option is not set in the User Preferences in Enterprise Data, the documents will not be flagged as Printed since it is not known for which location it was intended to be printed for. Otherwise, it will be flagged as Printed.
As documents are printed, they will be flagged as Printed but will stay in the Worklist while the worklist remains open.
If you print a document by mistake from the Print Worklist and require that document to reappear in the Print Worklist, access the document you want to reinstate to the Print Worklist and on the General tab, clear the Printed check box and print the document for a second time.

There are four main types of adjustments available:
Stock Status Adjustments (SSAs)
Shrinkage Adjustments (SAs)
User‐Defined Adjustments (UDAs)
Average Cost Adjustments.(ACAs)
Three types of UDAs allow you to adjust either:
cost,
units, or
cost and units.
7 Adjustments

242 Adjustments
Stock Status Adjustments flow

Stock Status Adjustments 243
Stock Status Adjustments
A Stock Status Adjustment (or SSA) allows location personnel to change the inventory status of an item for a given period of time.
These adjustments are generally performed to flag items (and their respective quantities) as temporarily unavailable at a location. Although these items are considered temporarily unavailable, they are still owned by the location.
You might flag units as unavailable when:
Items have been sent out for repair
Items have been merchandised in a window or store display
Items have been lent out for a fashion show or advertising shoot
Items are being used at a trade show
In such cases, the stock status is changed from Available to Unavailable ‐ User‐Defined. When the merchandise is returned to the location, a Stock Status Adjustment must be done to reverse the status from Unavailable to Available.
If you are using the Warehouse Management System (WMS) to create or modify stock status adjustments, WMS will send a notice to the queue for Inventory Management when a UDA has been created or modified. The SSA will have a status of Submitted.

244 Adjustments
Stock Status Adjustment Header
Stock Status Adjustment Header
SSA no. A system‐generated number representing the Stock Status Adjustment document. Assigned when the SSA document header is created and saved.
Date created The date the Stock Status Adjustment document is created.
Last activity date
The date the SSA document was last accessed (either the date it was created or the date it was last modified).
Performed by The employee who created the document.
Submit date The date the Stock Status Adjustment document is submitted. The date defaults to the current date but may be back‐dated based on the allowable number of days set up in the Inventory Management system parameters.
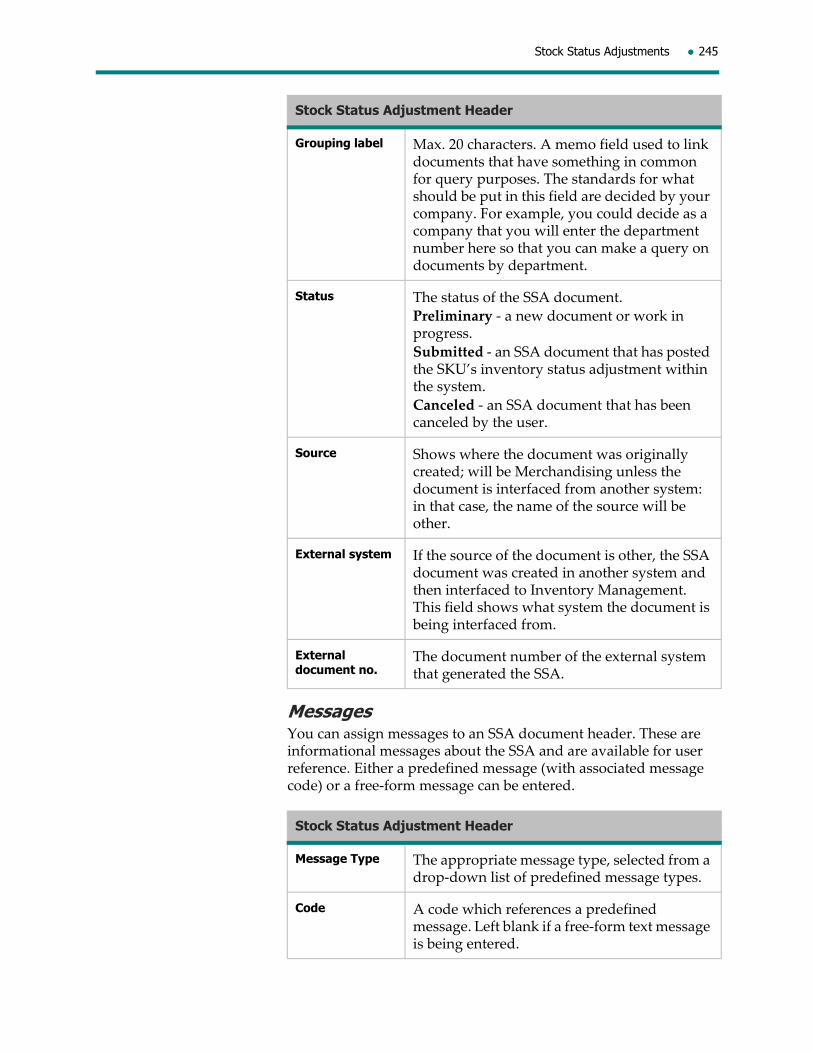
Stock Status Adjustments 245
MessagesYou can assign messages to an SSA document header. These are informational messages about the SSA and are available for user reference. Either a predefined message (with associated message code) or a free‐form message can be entered.
Grouping label Max. 20 characters. A memo field used to link documents that have something in common for query purposes. The standards for what should be put in this field are decided by your company. For example, you could decide as a company that you will enter the department number here so that you can make a query on documents by department.
Status The status of the SSA document.
Preliminary ‐ a new document or work in progress.
Submitted ‐ an SSA document that has posted the SKU’s inventory status adjustment within the system.
Canceled ‐ an SSA document that has been canceled by the user.
Source Shows where the document was originally created; will be Merchandising unless the document is interfaced from another system: in that case, the name of the source will be other.
External system If the source of the document is other, the SSA document was created in another system and then interfaced to Inventory Management. This field shows what system the document is being interfaced from.
External document no.
The document number of the external system that generated the SSA.
Stock Status Adjustment Header
Message Type The appropriate message type, selected from a drop‐down list of predefined message types.
Code A code which references a predefined message. Left blank if a free‐form text message is being entered.
Stock Status Adjustment Header

246 Adjustments
To add a Stock Status Adjustment header
1. From the Main Menu, select Adjustments.
2. From the Adjustments Worklist, select Stock Status.
3. In the Stock Status Adjustment dialog box, select New > OK.
4. Fill in the fields on the SSA header, as appropriate.
5. In the Messages section, enter an SSA message, if required.
6. Click Save. The SSA document is assigned a status of Preliminary and the date created and last activity date are defined.
7. To acknowledge the save, click OK.
Stock Status Adjustment detailsThe SSA Details screen allows you to enter the items and quantities for which you wish to change the inventory status. There are two ways to input the SSA details:
1. enter units by UPC
2. enter units by size grid
1. Entering units by UPCUse Enter Units by UPC to scan in the UPCs of the items whose status you are changing. You can also use this to manually enter in the UPCs of the items whose status you are changing if the tickets are damaged.
To enter SSA units by UPC
1. Retrieve the SSA for which you want to enter unit details.
2. From the SSA header screen, select Detail.
3. Click Enter Units by UPC.
4. In the Enter Units by UPC dialog box, enter or scan the UPC code and then enter:
a Quantity
the Location code where the SKUs being adjusted are owned (if your Must Use Location option is not true). If this option is true, the location displayed is the one set for you in the Enterprise Data module and cannot be modified.
select from the list in the From status field, the stock status from which the merchandise quantities will be released once the SSA is submitted.
select in the To status field, the stock status to which the merchandise quantities will be posted once the SSA is submitted.
Message Either a free‐form message or the text of the predefined message code entered above.
Stock Status Adjustment Header

Stock Status Adjustments 247
5. Click Apply. Repeat step 4 for each UPC to be adjusted.
6. When all merchandise has been scanned (or entered), click Close. The SSA Detail screen reappears so that you can review all items and their corresponding quantities.
7. Save and acknowledge your input.
2. Entering units by Size GridIf you are entering the style codes of the items whose status you are changing, use Enter Units by Size Grid.
To enter SSA units by Size Grid
1. Retrieve the SSA for which you want to enter unit details.
2. From the SSA header screen, select Detail.
3. Optionally, enter a unit batch total.
4. Click Enter Units by Size Grid.
5. In the Enter Units by Size Grid dialog box:
enter the style code
select the Color code for the SKU being adjusted.
enter the Location code where the SKUs being adjusted are owned (if your Must Use Location option is not true). If this option is true, the location displayed is the one set for you in Enterprise Data and cannot be modified.
at the From status field, select a stock status from the drop‐down list from which the merchandise quantities will be released once the SSA is submitted.
at the To status field, select a stock status from the drop‐down list to which the merchandise quantities will be posted once the SSA is submitted.
enter the quantity of units by size to be adjusted by the status change.
6. Click Apply. Repeat step 5 for each style being entered.
7. When all merchandise has been entered, click OK. Review all items and their corresponding quantities displayed in the SSA Detail screen.
8. Save and acknowledge your input.
Note: A warning message may appear if the batch total entered in Step 3 above does not match the actual detail totals on the SSA document. Click Yes to continue.
9. To acknowledge the save, click OK.
Submitting an SSA documentIn order for the adjustment to a style’s inventory status to take effect, the SSA document must be submitted. When you submit the document, these updates will be made:

248 Adjustments
the document’s status will change from Preliminary to Submitted
the Submit date on the document’s header will be set to the current date (can be back‐dated based on the number of allowable days to back‐date a transaction set within the Inventory Management Parameters)
the location’s inventory status for the given SKUs will be adjusted. The transaction is updated using the SKU’s average cost and current retail price at the time the SSA document is submitted.
A document with a status of Submitted cannot be re‐submitted. Any adjustments to a Submitted document will be posted with the differences between the old units and the new units within Infobase at the time the document is saved. The document’s Last activity date will also be updated.
When creating the SSA document, you have the opportunity to submit the document at that time. By submitting the document at the time of creation, saving the document is implicit by simply submitting it (two steps in one).
To submit an SSA document
1. Retrieve the SSA document you want to submit.
2. From the Actions menu, select Submit. The status of this adjustment now changes to Submitted.
3. To acknowledge the documentʹs status change from Preliminary to Submitted, click OK.
Printing an SSA documentThe Stock Status Adjustment document can be printed and filed for future reference purposes. It can serve as a reminder to change the inventory status of the items back to Available when they are returned to the locations after having been repaired, removed from a display window or returned from a fashion show.
The printed document contains both header and detail information.
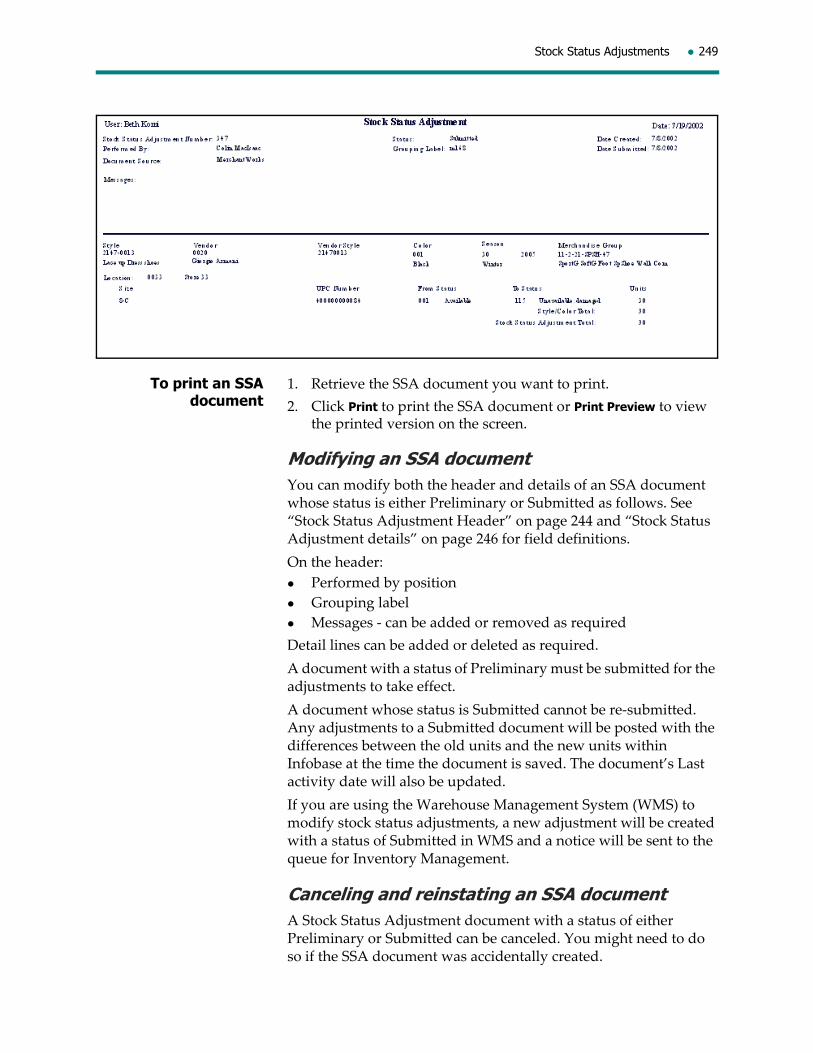
Stock Status Adjustments 249
To print an SSA document
1. Retrieve the SSA document you want to print.
2. Click Print to print the SSA document or Print Preview to view the printed version on the screen.
Modifying an SSA documentYou can modify both the header and details of an SSA document whose status is either Preliminary or Submitted as follows. See “Stock Status Adjustment Header” on page 244 and “Stock Status Adjustment details” on page 246 for field definitions.
On the header:
Performed by position
Grouping label
Messages ‐ can be added or removed as required
Detail lines can be added or deleted as required.
A document with a status of Preliminary must be submitted for the adjustments to take effect.
A document whose status is Submitted cannot be re‐submitted. Any adjustments to a Submitted document will be posted with the differences between the old units and the new units within Infobase at the time the document is saved. The document’s Last activity date will also be updated.
If you are using the Warehouse Management System (WMS) to modify stock status adjustments, a new adjustment will be created with a status of Submitted in WMS and a notice will be sent to the queue for Inventory Management.
Canceling and reinstating an SSA documentA Stock Status Adjustment document with a status of either Preliminary or Submitted can be canceled. You might need to do so if the SSA document was accidentally created.

250 Adjustments
If the SSA document is accidentally canceled, it is possible to reinstate the document. When you reinstate an SSA document, it returns to a Preliminary status. Only canceled SSA documents may be reinstated.
The status of an SSA document can be changed either from within the document or from the Adjustments Worklist.
To cancel an SSA document
Note: Instead of following the procedure below to cancel an SSA document, you can also highlight the document on the Adjustment Worklist and select the Cancel action on the Actions menu.
1. Retrieve the SSA document you want to cancel.
2. From the Actions menu, select Cancel. The status of the adjustment now changes to Canceled.
3. To acknowledge the documentʹs status change, click OK.
To reinstate an SSA document
Note: Instead of following the procedure below to reinstate an SSA document, you can also open the document and select the Reinstate action on the Actions menu.
1. On the Adjustments Worklist, highlight the SSA document you want to reinstate.
2. From the Actions menu, select Reinstate.
3. To acknowledge the documentʹs status change, click OK.
4. Save the document.
System delete of an SSA documentSSA documents will automatically be deleted by the system for you if the status is:
Canceled, or
Submitted, and
a predefined number of weeks has passed since the status was changed to Submitted.
Deleting an SSA document manuallySSA documents with a status of Preliminary, Submitted or Canceled may be deleted from the system manually as required. In order to delete an SSA document, highlight the appropriate SSA document from the Adjustments Worklist.
On the File menu, select Delete > Yes to confirm your request to delete. Save your changes.

Shrinkage Adjustments flow 251
Shrinkage Adjustments flow

252 Adjustments
Shrinkage Adjustments (SAs)
Generally, shrinkage adjustments are used to adjust the systemʹs on hand inventory picture when known shrink occurs at a given location (for example, stolen merchandise). Head Office personnel will have the option of updating the system with either Pending Shrink or Actual Shrink.
A shrinkage adjustment that updates Pending Shrink will change the inventory status of the items from ʺAvailableʺ to ʺUnavailable–Pending Shrinkʺ. The units being tracked with an inventory status of ʺUnavailable–Pending Shrinkʺ will be booked to shrink the next time a physical inventory is done and actual shrink is updated.
A shrinkage adjustment that updates Actual Shrink, will remove the inventory from the system and book the value to Actual Shrink within Stock Ledger.
Keep in mind that a shrinkage adjustment that is done to adjust inventory within a Warehouse Management warehouse location, will not update the inventory position within Warehouse Management.
Shrinkage Adjustment header
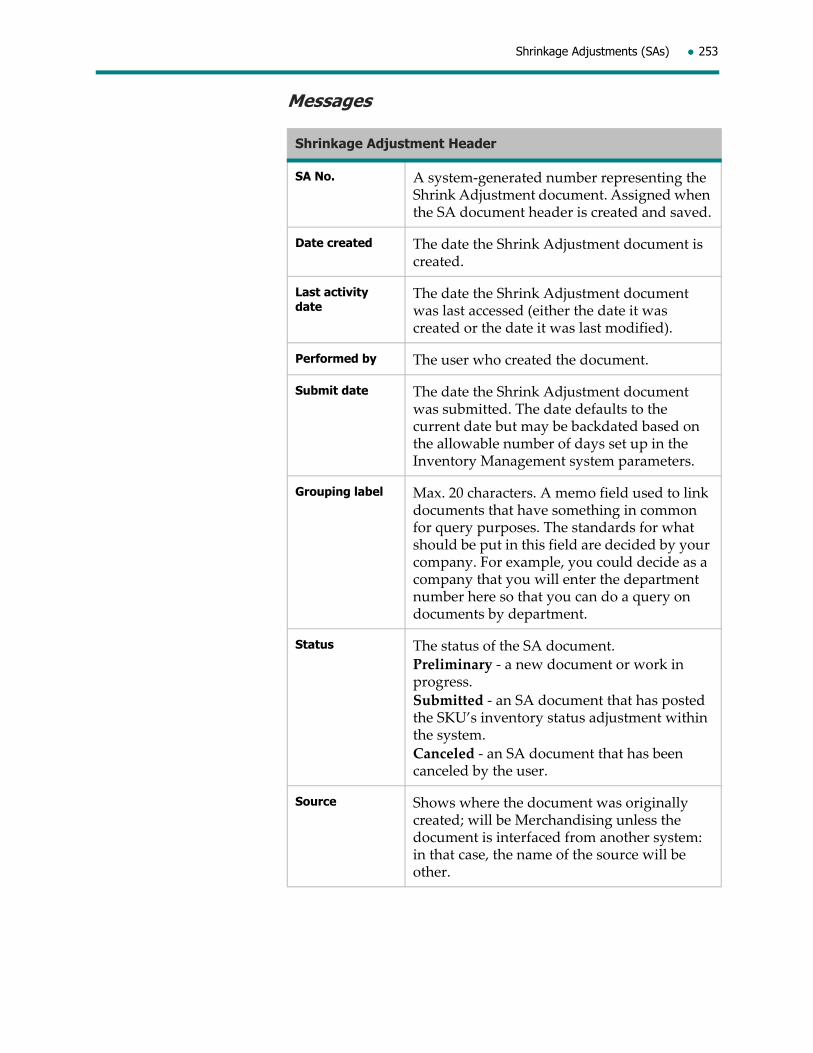
Shrinkage Adjustments (SAs) 253
Messages
Shrinkage Adjustment Header
SA No. A system‐generated number representing the Shrink Adjustment document. Assigned when the SA document header is created and saved.
Date created The date the Shrink Adjustment document is created.
Last activity date
The date the Shrink Adjustment document was last accessed (either the date it was created or the date it was last modified).
Performed by The user who created the document.
Submit date The date the Shrink Adjustment document was submitted. The date defaults to the current date but may be backdated based on the allowable number of days set up in the Inventory Management system parameters.
Grouping label Max. 20 characters. A memo field used to link documents that have something in common for query purposes. The standards for what should be put in this field are decided by your company. For example, you could decide as a company that you will enter the department number here so that you can do a query on documents by department.
Status The status of the SA document.
Preliminary ‐ a new document or work in progress.
Submitted ‐ an SA document that has posted the SKU’s inventory status adjustment within the system.
Canceled ‐ an SA document that has been canceled by the user.
Source Shows where the document was originally created; will be Merchandising unless the document is interfaced from another system: in that case, the name of the source will be other.
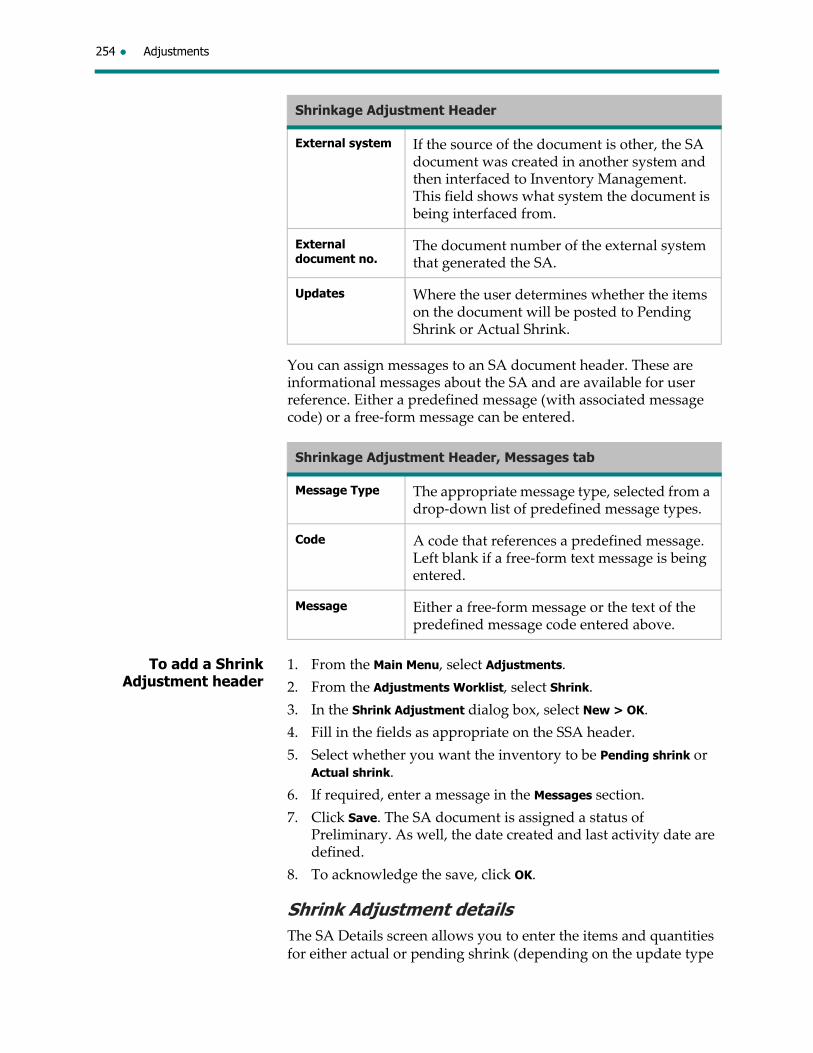
254 Adjustments
You can assign messages to an SA document header. These are informational messages about the SA and are available for user reference. Either a predefined message (with associated message code) or a free‐form message can be entered.
To add a Shrink Adjustment header
1. From the Main Menu, select Adjustments.
2. From the Adjustments Worklist, select Shrink.
3. In the Shrink Adjustment dialog box, select New > OK.
4. Fill in the fields as appropriate on the SSA header.
5. Select whether you want the inventory to be Pending shrink or Actual shrink.
6. If required, enter a message in the Messages section.
7. Click Save. The SA document is assigned a status of Preliminary. As well, the date created and last activity date are defined.
8. To acknowledge the save, click OK.
Shrink Adjustment detailsThe SA Details screen allows you to enter the items and quantities for either actual or pending shrink (depending on the update type
External system If the source of the document is other, the SA document was created in another system and then interfaced to Inventory Management. This field shows what system the document is being interfaced from.
External document no.
The document number of the external system that generated the SA.
Updates Where the user determines whether the items on the document will be posted to Pending Shrink or Actual Shrink.
Shrinkage Adjustment Header, Messages tab
Message Type The appropriate message type, selected from a drop‐down list of predefined message types.
Code A code that references a predefined message. Left blank if a free‐form text message is being entered.
Message Either a free‐form message or the text of the predefined message code entered above.
Shrinkage Adjustment Header
Shrinkage Adjustments (SAs) 255
selected on the header of the document). There are two ways to input the SA details:
1. enter units by UPC
2. enter units by size grid
1. Entering units by UPCUse Enter Units by UPC to scan or manually enter the UPCs of the items that will be posted to shrink.
To enter SA units by UPC
1. From the Shrink Adjustment Header, select Detail.
2. Click Enter Units by UPC.
3. In the Enter Units by UPC dialog box, enter or scan the UPC code and then enter:
a Quantity
the Location code where the SKUs being adjusted are owned
4. Click Apply. Repeat steps for each UPC to be adjusted.
5. When all merchandise has been scanned (or entered), click Close. The SA Detail screen reappears so that you can review all items and their corresponding quantities.
6. Save and acknowledge your input.
2. Entering units by Size GridUse Enter Units by Size Grid to enter the SKUs that will be posted to shrink.
To enter SA units by Size Grid
1. From the Shrink Adjustment Header, select Detail.
2. Optionally, enter a unit batch total.
3. Click Enter Units by Size Grid.
4. In the Enter Units by Size Grid dialog box:
enter the Style code.
select the Color code for the SKU being adjusted.
enter the Location code where the SKUs being adjusted are owned.
enter the Quantity of units by size to be adjusted by the status change.
5. Click Apply. Repeat step 4 for each style being entered.
6. When all merchandise has been entered, click Close. Review all items and their corresponding quantities displayed in the SA Detail screen.
7. Save and acknowledge your input.
8. A warning message may appear if the batch total entered in Step 2 above does not match the actual detail totals on the SA document. Click Yes to continue.
256 Adjustments
9. To acknowledge the save, click OK.
Submitting an SA documentIn order for the adjustment to take effect, the SA document must be submitted. When you submit the document, these updates will be made:
the document’s status will change from Preliminary to Submitted
the Submit date on the document’s header will be set to the current date (can be backdated based on the number of allowable days to back‐date a transaction set within the Inventory Management Parameters)
for update type Actual Shrink, the location’s inventory will be reduced by the shrink value and units that you posted. The transaction is updated using the SKU’s average cost and current retail price at the time the SA document is submitted.
for update type Pending Shrink, the location’s Available inventory will be reduced by the shrink value and units that you posted, and the location’s Unavailable ‐ Pending Shrink inventory will be increased by the shrink value and units that you posted.
A document with a status of Submitted cannot be re‐submitted. Any adjustments will be posted with the differences between the old units and the new units within Infobase at the time the document is saved once the modifications have been made. The document’s Last activity date will also be updated.
When creating the SA document, you have the opportunity to submit the document at that time. By submitting the document at the time of creation, saving the document is implicit by simply submitting it (two steps in one).
To submit an SA document
1. Retrieve the SA document you want to submit.
2. From the Actions menu, select Submit. The status of this adjustment now changes to Submitted.
3. To acknowledge the documentʹs status change from Preliminary to Submitted, click OK.
Printing an SA documentThe Shrink Adjustment document can be printed and filed for future reference purposes. For example, during a physical inventory, you may want to use these to reconcile against the preliminary shrinkage reports prior to posting the inventory. They may provide information as to a why certain shrinkage value may be being taken.
The printed document contains both header and detail information.
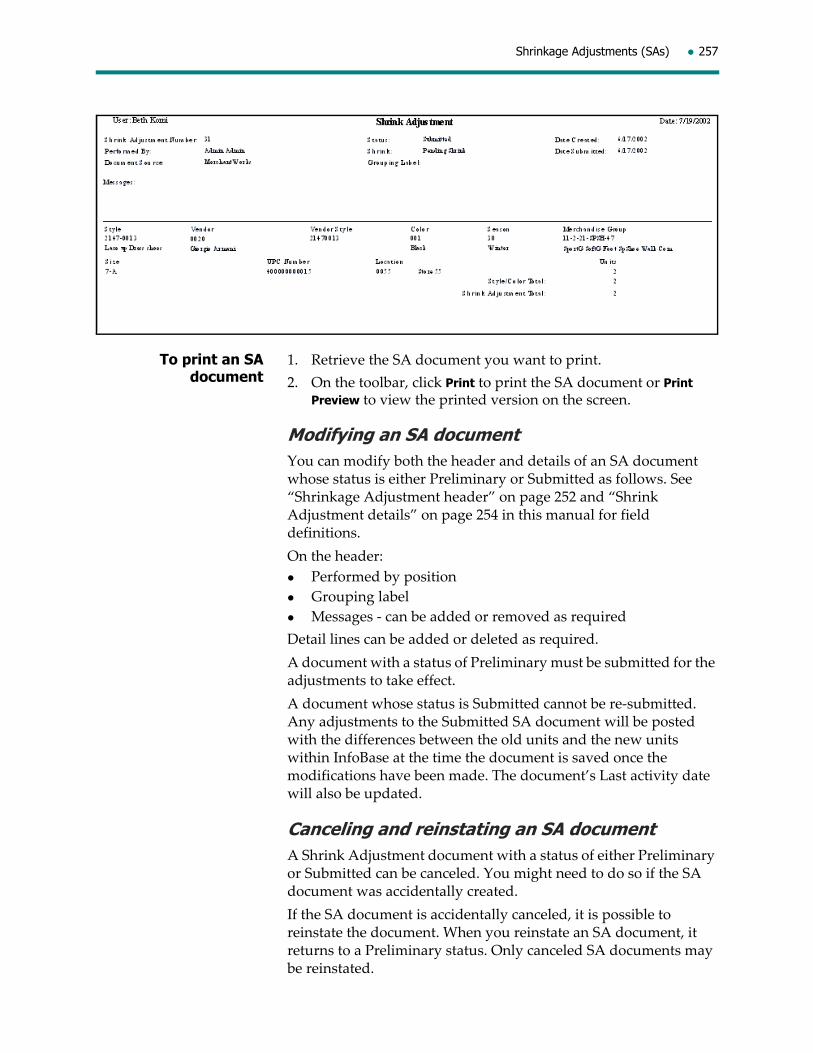
Shrinkage Adjustments (SAs) 257
To print an SA document
1. Retrieve the SA document you want to print.
2. On the toolbar, click Print to print the SA document or Print Preview to view the printed version on the screen.
Modifying an SA documentYou can modify both the header and details of an SA document whose status is either Preliminary or Submitted as follows. See “Shrinkage Adjustment header” on page 252 and “Shrink Adjustment details” on page 254 in this manual for field definitions.
On the header:
Performed by position
Grouping label
Messages ‐ can be added or removed as required
Detail lines can be added or deleted as required.
A document with a status of Preliminary must be submitted for the adjustments to take effect.
A document whose status is Submitted cannot be re‐submitted. Any adjustments to the Submitted SA document will be posted with the differences between the old units and the new units within InfoBase at the time the document is saved once the modifications have been made. The document’s Last activity date will also be updated.
Canceling and reinstating an SA documentA Shrink Adjustment document with a status of either Preliminary or Submitted can be canceled. You might need to do so if the SA document was accidentally created.
If the SA document is accidentally canceled, it is possible to reinstate the document. When you reinstate an SA document, it returns to a Preliminary status. Only canceled SA documents may be reinstated.
258 Adjustments
To cancel or reinstate an SA document, you can either:
highlight the document on the Adjustment Worklist and select the Cancel or Reinstate action on the Actions menu, or
open the document and select the Cancel or Reinstate action on the Actions menu.
To cancel an SA document
Note: Instead of following the procedure below to cancel an SA document, you can also highlight the document on the Adjustment Worklist and select the Cancel action on the Actions menu.
1. Retrieve the SA document you want to cancel.
2. From the Actions menu, select Cancel. The status of the adjustment now changes to Canceled.
3. To acknowledge the documentʹs status change, click OK.
To reinstate an SA document
Note: Instead of following the procedure below to reinstate an SA document, you can also open the document and select the Reinstate action on the Actions menu.
1. On the Inbound Worklist, highlight the SA document you want to reinstate.
2. From the Actions menu, select Reinstate.
3. To acknowledge the documentʹs status change, click OK.
4. Save the document.
System delete of an SA documentShrink Adjustment documents will be automatically deleted by the system for you if the status is:
Canceled, or
Submitted, and
a predefined number of weeks has passed since the status was changed to Submitted.
Deleting an SA document manuallySA documents with a status of Preliminary, Submitted or Canceled may be deleted from the system manually as required. In order to delete an SA document, highlight the appropriate SA document from the Adjustments Worklist.
On the File menu, select Delete > Yes to confirm your request to delete. Save your changes.

User-Defined Adjustments flow 259
User-Defined Adjustments flow

260 Adjustments
User-Defined Adjustments (UDAs)
A User‐Defined Adjustment (or UDA) allows head office personnel to adjust the cost or units of an item for a particular location. They can also be used to adjust a pseudo style’s total units, total retail and total cost.
These adjustments provide you with the flexibility to affect unit, cost and retail and inventory through the following three types of adjustments:
Affect Cost Only; for example, freight
Affect Unit Only; for example, receiving errors that require inventory adjustments only
Affect both Cost and Units; for example, write‐offs. Also use this type of UDA to adjust inventory total units, total retail (in domestic currency) and total cost for pseudo styles. You can create a one‐sided adjustment to affect a specific location or a two‐sided adjustment to affect both sending and receiving locations.
User‐defined adjustment types that affect cost only and units only can be entered by style or pack code. Use the option to enter unit details by size grid when entering by either style or pack.
If you are using the Warehouse Management System (WMS) to create or modify adjustments to cost or units, WMS will send a notice to the queue for Inventory Management when a UDA has been created or modified. The UDA will have a status of Submitted.
All three types of UDAs are adjustments and not replacements; for example, if you were to do an adjustment affecting cost only, changing your cost from $10.00 to $8.00, you would have to enter an amount of $‐2.00 in order to adjust the cost from $10.00 to $8.00.
Pseudo stylesA one‐sided user‐defined cost and units adjustment allows you to adjust the inventory total units, total retail and total cost of a pseudo style for a specific location.
A two‐sided user‐defined cost and units adjustment allows you to adjust the inventory total units, total retail and total cost of a pseudo style for both the sending and receiving location. Use this feature instead of a transfer or store shipment when you need to adjust units, total retail or total cost of a pseudo style. One adjustment value will be entered that will update both locations. If the value entered is negative, it will decrease the value of the sending location and increase the value of the receiving location. If the value entered is positive, it will increase the value of the sending location and decrease the value of the receiving location.
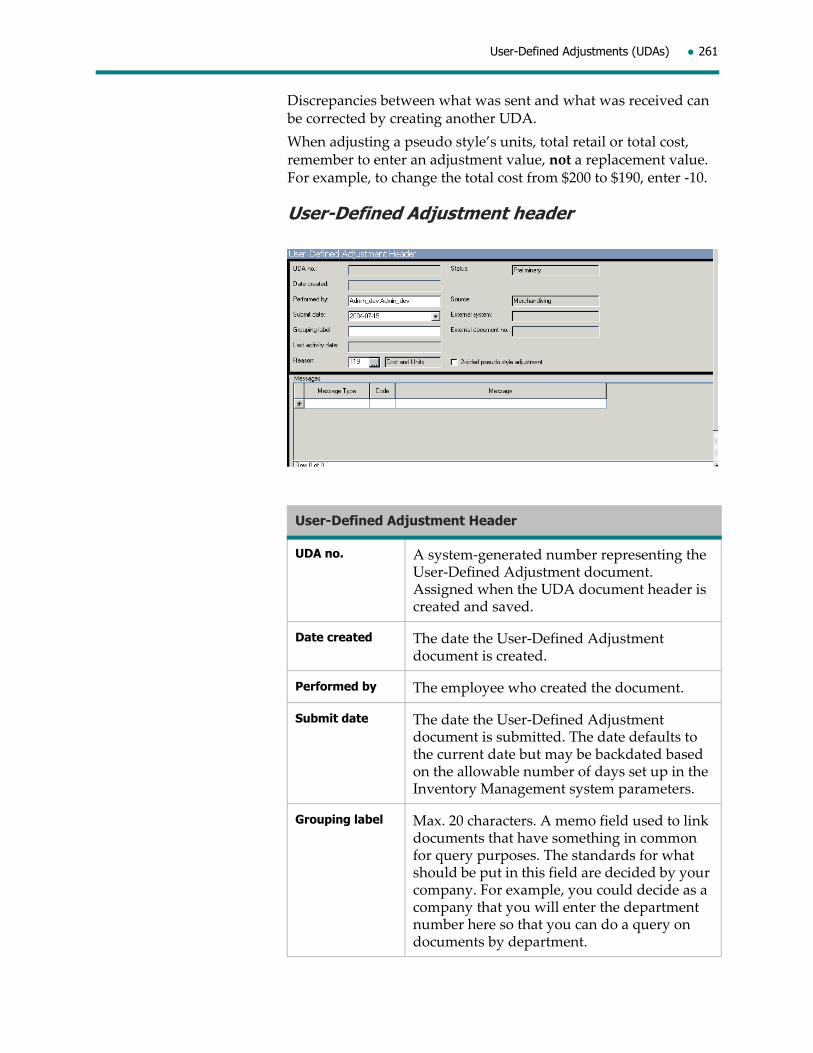
User-Defined Adjustments (UDAs) 261
Discrepancies between what was sent and what was received can be corrected by creating another UDA.
When adjusting a pseudo style’s units, total retail or total cost, remember to enter an adjustment value, not a replacement value. For example, to change the total cost from $200 to $190, enter ‐10.
User-Defined Adjustment header
User-Defined Adjustment Header
UDA no. A system‐generated number representing the User‐Defined Adjustment document. Assigned when the UDA document header is created and saved.
Date created The date the User‐Defined Adjustment document is created.
Performed by The employee who created the document.
Submit date The date the User‐Defined Adjustment document is submitted. The date defaults to the current date but may be backdated based on the allowable number of days set up in the Inventory Management system parameters.
Grouping label Max. 20 characters. A memo field used to link documents that have something in common for query purposes. The standards for what should be put in this field are decided by your company. For example, you could decide as a company that you will enter the department number here so that you can do a query on documents by department.
262 Adjustments
Last activity date
The date the UDA document was last accessed (either the date it was created or the date it was last modified).
Reason Mandatory; determines which type of UDA is being created — what component is to be affected.
Note: Only users who have been given cost access (via Enterprise Data Management > Employee > Access) can enter Cost $ Only or Units and Cost $ adjustments.
Adjustments of type:
Enter Units Only adjustments will update:
Retail ‐ using current retail of the item
Cost ‐ using average cost of the item
Units ‐ using the units entered.
Enter Units and Cost $ adjustments will update:
Retail ‐ using current retail of the item
Cost ‐ using the cost entered
Units ‐ using the units entered.
For pseudo styles, total units, total retail and total cost can be entered. Any one field or all fields can be entered.
Enter Cost $ Only adjustments will update: Retail ‐ not updated
Cost ‐ using the cost entered
Units ‐ not updated.
Status The status of the UDA document.
Preliminary ‐ a new document or work in progress
Submitted ‐ a UDA document that has posted the SKU’s inventory status adjustment within the system
Canceled ‐ a UDA document that has been canceled by the user.
Source Shows where the document was originally created; will be Merchandising unless the document is interfaced from another system: in that case, the name of the source will be other.
User-Defined Adjustment Header
User-Defined Adjustments (UDAs) 263
MessagesYou can assign messages to a UDA document header. These are informational messages about the UDA and are available for user reference. Either a predefined message (with associated message code) or a free‐form message can be entered.
User-Defined Adjustment detailsThe UDA Details screen allows location personnel to enter the location, style information (about the item being adjusted), as well as either the cost value, the units or the cost value and units depending on the reason for the adjustment. The system will prompt you for the information required for the adjustment being made.
External system If the source of the document is other, the UDA document was created in another system and then interfaced to Inventory Management. This field shows what system the document is being interfaced from.
External document no.
The document number of the external system that generated the UDA.
2-sided pseudo style adjustment
Active only if a cost and units type UDA Reason was selected. Choose this option if this UDA affects both sending and receiving locations for pseudo styles only. Note that once the header is saved, this field cannot be changed.
User-Defined Adjustment Header
Message Type The appropriate message type, selected from a drop‐down list of predefined message types.
Code A code that references a predefined message. Left blank if a free‐form text message is being entered.
Message Either a free‐form message or the text of the predefined message code entered above.
User-Defined Adjustment Header

264 Adjustments
Enter Cost Only adjustments
Note: Only users who have been given cost access (via Enterprise Data Management > Employee > Access) can enter Cost Only adjustments.
Only the style information and the total cost value amount of the adjustment will need to be entered. There are two ways to enter Cost Only adjustments:
1. enter cost adjustments by UPC
2. enter cost adjustment by Size Grid (Use this option to enter unit details by either style or pack code.)
1. Entering cost adjustments by UPCUse Enter Units by UPC to scan in the UPCs of the items whose cost you are adjusting. You can also use this to manually enter in the UPCs of the items whose status you are changing if the tickets are damaged.
To enter cost UDAs by UPC
1. From the User-Defined Adjustment Header, select Detail.
2. Click Enter Units by UPC.
3. In the Enter Units by UPC dialog box, enter or scan the UPC code and then enter:
a Quantity
the Location code where the SKUs being adjusted are owned
enter the adjustment cost of the item.
4. Click Apply. Repeat step 3 for each UPC to be adjusted.
5. When all merchandise has been scanned (or entered), click Close. The UDA Detail screen reappears so that you can review all items and their corresponding quantities.
6. Save and acknowledge your input.
2. Entering cost adjustments by Size GridIf you are entering the style codes or pack codes (only if the units were received by pack) of the items whose cost you are adjusting, use Enter Units by Size Grid. You will be prompted to enter the associated size code for the adjustment being made.
To enter cost UDAs by Size Grid
1. From the User-Defined Adjustment Header, select Detail.
2. Optionally, enter a unit Batch total.
3. Click Enter Units by Size Grid.
4. In the Enter Units by Size Grid dialog box:
enter the style code
select the Color code for the SKU being adjusted.
User-Defined Adjustments (UDAs) 265
in the Location field, enter the location code where the SKUs being adjusted are owned.
enter the adjustment value for your new cost.
click the size bucket (or All) that will be affected by this cost adjustment.
5. Click Apply. Repeat step 4 for each style being entered.
6. When all merchandise has been entered, click Close. Review all items and their corresponding quantities displayed in the UDA Detail screen.
7. Save and acknowledge your input.
8. A warning message may appear if the batch total entered in step 2 above does not match the actual detail totals on the UDA document. Click Yes to continue.
9. To acknowledge the save, click OK.
Submitting a UDA document affecting cost onlyIn order for the adjustment to a style’s cost to take effect, the UDA document must be submitted. When you submit the document, these updates will be made:
the document’s status will change from Preliminary to Submitted
the Submit date on the document’s header will be set to the current date (can be back‐dated based on the number of allowable days to back‐date a transaction set within the Inventory Management Parameters)
the total cost of the given SKUs for the location will be adjusted to reflect the additional cost for the document. The units will not change.
A document with a status of Submitted cannot be re‐submitted. The adjustments will be posted with the old cost replaced by the new cost within Infobase at the time the document is saved once the modifications have been made. The document’s Last activity date will also be updated.
To submit a UDA document affecting
cost only
1. Retrieve the UDA document you want to submit.
2. From the Actions menu, select Submit. The status of this adjustment now changes to Submitted.
3. To acknowledge the document’s status change from Preliminary to Submitted, click OK.
Enter Unit Only adjustmentsLocation personnel will need to enter both the style information and the quantity of units to be adjusted. The retail value of the transaction will be calculated using the itemʹs current retail based on the number of units entered.

266 Adjustments
Pseudo styles can be entered via Units only type adjustments. Total cost and total retail values can be modified for pseudo styles. The default total cost for the sending location is calculated as Total Cost $ On Hand / Total Valuation Retail $ On Hand.
There are two ways to enter Unit Only adjustments:
1. Enter unit adjustments by UPC
2. Enter units adjustments by Size Grid (Use this option to enter unit details by either style or pack code.)
1. Entering unit adjustments by UPCUse Enter Units by UPC to scan in the UPCs of the items whose units you are adjusting. You can also use this to manually enter in the UPCs of the items whose units you are adjusting if the tickets are damaged.
To enter unit only adjustments by UPC
1. From the User-Defined Adjustment Header, select Detail.
2. Click Enter Units by UPC.
3. In the Enter Units by UPC dialog box, enter or scan the UPC code and then enter:
a Quantity
the Location code where the SKUs being adjusted are owned
the adjustment cost value of the units by size to be adjusted.
4. Click Apply. Repeat step 4 for each UPC to be adjusted.
5. When all merchandise has been scanned (or entered), click Close. The UDA Detail screen reappears so that you can review all items and their corresponding quantities.
6. Save and acknowledge your input.
2. Entering unit only UDAs by Size GridIf you are entering the style codes or pack codes (only if the units were received by back) of the items whose units you are adjusting, use Enter Units by Size Grid.
To enter unit only UDAs by size grid
1. From the User-Defined Adjustment Header, select Detail.
2. Optionally, enter a unit Batch total.
3. Click Enter Units by Size Grid.
4. In the Enter Units by Size Grid dialog box:
enter the style code
select the Color code for the SKU being adjusted.
in the Location field, enter the location code where the SKUs being adjusted are owned.
enter the units by size to be adjusted.
5. Click Apply. Repeat step 4 for each style being entered.

User-Defined Adjustments (UDAs) 267
6. When all merchandise has been entered, click Close. Review all items and their corresponding quantities displayed in the UDA Detail screen.
7. Save and acknowledge your input.
Note: A warning message may appear if the batch total entered in step 2 above does not match the actual detail totals on the UDA document. Click Yes to continue.
8. To acknowledge the save, click OK.
Submitting a UDA document affecting units onlyIn order for the adjustment to a style’s units and cost to take effect, the UDA document must be submitted. When you submit the document, these updates will be made:
the document’s status will change from Preliminary to Submitted
the Submit date on the document’s header will be set to the current date (can be back‐dated based on the number of allowable days to back‐date a transaction set within the Inventory Management Parameters)
the units and cost for the location will be adjusted. The Cost $ inventory will be calculated using the item’s average cost based on the number of units entered.
A document with a status of Submitted cannot be re‐submitted. The adjustments will be posted with the old cost replaced by the new cost within Infobase at the time the document is saved once the modifications have been made. The document’s Last activity date will also be updated.
To submit a UDA document affecting
units only
1. Retrieve the UDA document you want to submit.
2. From the Actions menu, select Submit. The status of this adjustment now changes to Submitted.
3. To acknowledge the document’s status change from Preliminary to Submitted, click OK.
Enter both Cost and Units adjustments
Note: Only users who have been given cost access (via Enterprise Data Management > Employee > Access) can enter Cost and Units adjustments.
The adjustment requires entry of location and style information, as well as unit, retail and cost per unit. The retail value of the transaction will be calculated in domestic currency, using the itemʹs current retail based on the number of units entered. For a pseudo style, the total units and total retail are entered and a
268 Adjustments
default total cost value based on a cost to retail ratio for the pseudo style/location can be overridden.
There are three ways to input cost and unit adjustments:
1. enter by UPC: use for regular styles only
2. enter by size grid: use for regular styles only
3. enter adjustment for pseudo styles: use for 1‐ or 2‐sided adjustments for pseudo styles
1. Entering cost and unit adjustments by UPCUse Enter Units by UPC to scan in the UPCs of the items you are adjusting. You can also use this to manually enter in the UPCs of the items you are adjusting if the tickets are damaged.
To enter cost and unit UDAs by UPC
1. From the User-Defined Adjustment Header, select Detail.
2. Click Enter Units by UPC.
3. In the Enter Units by UPC dialog box, enter or scan the UPC code and then enter:
an adjustment Quantity
the Location code where the SKUs being adjusted are owned
the adjustment value of the cost of the item to be adjusted
4. Click Apply. Repeat step 3 for each UPC to be adjusted.
5. When all merchandise has been scanned (or entered), click Close. The UDA Detail screen reappears so that you can review all items and their corresponding quantities.
6. Save and acknowledge your input.
2. Entering cost and unit adjustments by Size GridIf you are entering the style codes of the items you are adjusting, use Enter Units by Size Grid.
To enter cost and unit UDAs by size grid
1. From the User-Defined Adjustment Header, select Detail.
2. Optionally, enter Batch totals for Units and Cost (in domestic (home) currency).
3. Click Enter Units by Size Grid.
4. In the Enter Units by Size Grid dialog box:
enter the style code
select the Color code for the SKU being adjusted.
in the Location field, enter the location code where the SKUs being adjusted are owned.
enter the new cost in the currency of the home jurisdiction country of the item to be adjusted.
enter the units by size to be adjusted for the item.
5. Click Apply. Repeat step 4 for each style being entered.
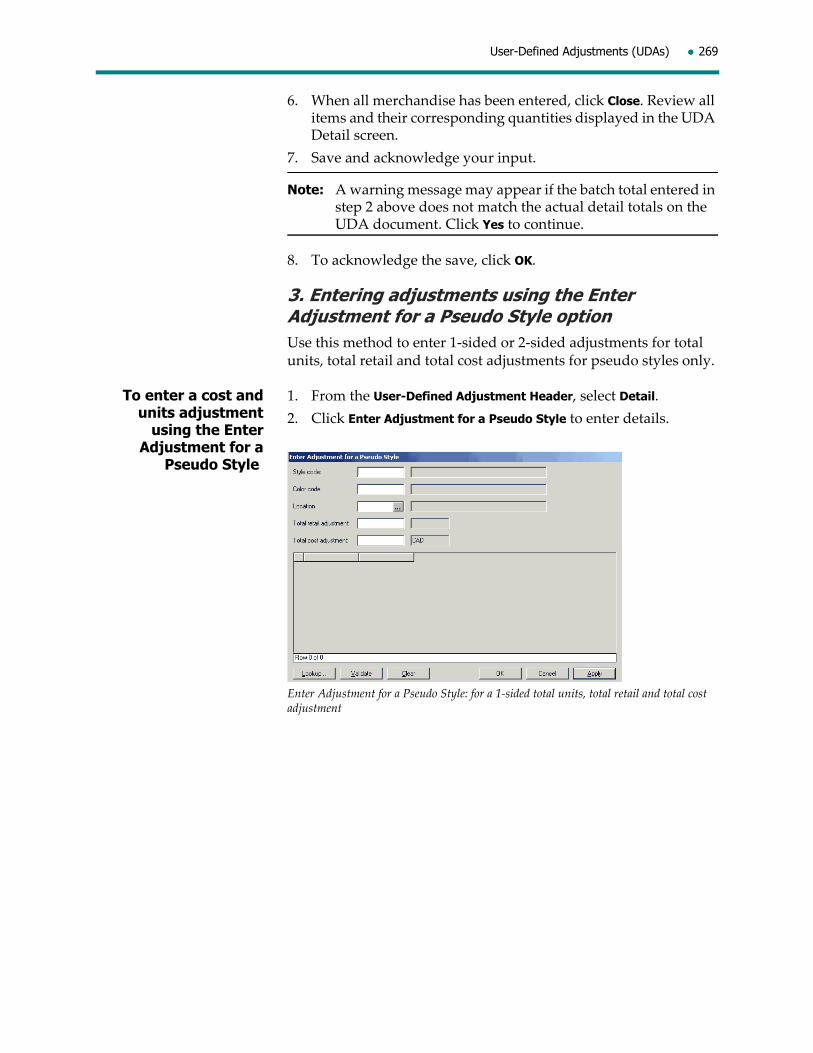
User-Defined Adjustments (UDAs) 269
6. When all merchandise has been entered, click Close. Review all items and their corresponding quantities displayed in the UDA Detail screen.
7. Save and acknowledge your input.
Note: A warning message may appear if the batch total entered in step 2 above does not match the actual detail totals on the UDA document. Click Yes to continue.
8. To acknowledge the save, click OK.
3. Entering adjustments using the Enter Adjustment for a Pseudo Style optionUse this method to enter 1‐sided or 2‐sided adjustments for total units, total retail and total cost adjustments for pseudo styles only.
To enter a cost and units adjustment
using the Enter Adjustment for a
Pseudo Style
1. From the User-Defined Adjustment Header, select Detail.
2. Click Enter Adjustment for a Pseudo Style to enter details.
Enter Adjustment for a Pseudo Style: for a 1‐sided total units, total retail and total cost adjustment

270 Adjustments
Enter Adjustment for a Pseudo Style: for a 2‐sided total units, total retail and total cost adjustment
3. When Enter Adjustment for a Pseudo Style is selected:
Perform a lookup and select the Style code of the pseudo style.
Color code (bypassed for pseudo styles).
Perform a lookup and select either the Location (for a 1‐sided adjustment) or Sending location and Receiving location (for a 2‐sided adjustment).
Enter the value of the Total retail adjustment to the Sending location (in the sending location’s currency) for a 2‐sided adjustment (this value is applied to both the sending and receiving location) or the Total retail adjustment (in the currency of the location’s country) for a 1‐sided adjustment. For a 2‐sided adjustment, if the value is negative, the sending location value is decreased and the receiving location value is increased. If the value is positive, the sending location value is increased and the receiving location value is decreased.
Enter the value of the Total cost adjustment to the Sending location (in the home jurisdiction’s currency) for a 2‐sided adjustment (this value is applied to both the sending and receiving location) or the Total cost adjustment (in the home jurisdiction’s currency) for a 1‐sided adjustment. This is the total net final cost for a pseudo style. When there is a quantity in inventory for a pseudo style, a value will be displayed here but can be modified. Note that the same rule as described above for Total retail adjustment to the Sending location also applies to the cost value entered here.
Enter the units affected by this adjustment.
4. Click Apply. Repeat step 3 for each style being entered.
5. When all merchandise has been entered, click OK. Review all items and their corresponding quantities displayed in the UDA Detail screen.
User-Defined Adjustments (UDAs) 271
6. Save and acknowledge your input.
Submitting a UDA document affecting cost and unitsIn order for the adjustment to a style’s units and cost to take effect, the UDA document must be submitted. When you submit the document, these updates will be made:
the document’s status will change from Preliminary to Submitted
the Submit date on the document’s header will be set to the current date (can be back‐dated based on the number of allowable days to back‐date a transaction set within the Inventory Management Parameters)
the units and cost for the location will be adjusted based on what was entered
the retail for the location will be adjusted based on the current retail.
A document with a status of Submitted cannot be re‐submitted. The adjustments will be posted with the new cost amount and the differences between the old units and the new units within Infobase at the time the document is saved once the modifications have been made. The document’s Last activity date will also be updated.
To submit a UDA affecting cost and
units
1. Retrieve the UDA document you want to submit.
2. From the Actions menu, select Submit. The status of this adjustment now changes to Submitted.
3. To acknowledge the documentʹs status change from Preliminary to Submitted, click OK.
Printing a UDA documentThe User‐Defined Adjustment document can be printed and filed for future reference purposes. It can serve as a reminder that there has been an adjustment made against a particular item.
The printed document contains both header and detail information.

272 Adjustments
To print a UDA document
1. Retrieve the UDA document you want to print.
2. On the toolbar, click Print to print the UDA document or Print Preview to view the printed version on the screen.
Modifying a UDA documentYou can modify both the header and details of a UDA document whose status is either Preliminary or Submitted as follows. See “User‐Defined Adjustment header” on page 261 and “User‐Defined Adjustment details” on page 263 in this manual for field definitions.
On the header, you can:
Performed by position
Grouping label
Messages ‐ can be added or deleted as required
Detail lines can be added or deleted as required.
If you are using the Warehouse Management System (WMS) to modify adjustments to cost or units, a new adjustment will be created with a status of Submitted in WMS and a notice will be sent to the queue for Inventory Management.
A document with a status of Preliminary must be submitted for the adjustments to take effect.
A document with a status of Submitted cannot be re‐submitted. Adjustments will be posted with the differences between the old units and the new units within Infobase at the time the document is saved once the modifications have been made. The document’s Last activity date will also be updated.
User-Defined Adjustments (UDAs) 273
Canceling and Reinstating a UDA documentA User‐Defined Adjustment document with a status of either Preliminary or Submitted can be canceled. You might need to do so if the UDA document was accidentally created.
If the UDA document is accidentally canceled, it is possible to reinstate the document. When you reinstate a UDA document, it returns to a Preliminary status. Only canceled UDA documents may be reinstated.
To cancel or reinstate a UDA document, you can either:
highlight the document on the Adjustment Worklist and select the Cancel or Reinstate action on the Action menu, or
open the document and select the Cancel or Reinstate action on the Actions menu.
To cancel a UDA document
Note: Instead of following the procedure below to cancel a UDA document, you can also highlight the document on the Adjustment Worklist and select the Cancel action on the Actions menu.
1. Retrieve the UDA document you want to cancel.
2. From the Actions menu, select Cancel. The status of the adjustment now changes to Canceled.
3. To acknowledge the documentʹs status change, click OK.
To reinstate a UDA Note: Instead of following the procedure below to reinstate a UDA document, you can also open the document and select the Reinstate action on the Actions menu.
1. On the Inbound Worklist, highlight the UDA document you want to reinstate.
2. From the Actions menu, select Reinstate.
3. To acknowledge the documentʹs status change, click OK.
4. Save the document.
System Delete of a UDA documentUDA documents will be automatically deleted by the system for you if the status is:
Canceled, or
Submitted, and
a predefined number of weeks has passed since the status was changed to Submitted.
Deleting a UDA document manuallyUDA documents with a status of Preliminary, Submitted or Canceled may be deleted from the system manually as required. In

274 Adjustments
order to delete a UDA document, highlight the appropriate UDA document from the Adjustments Worklist.
From the File menu, select Delete > Yes to confirm your request to delete. Save your changes.
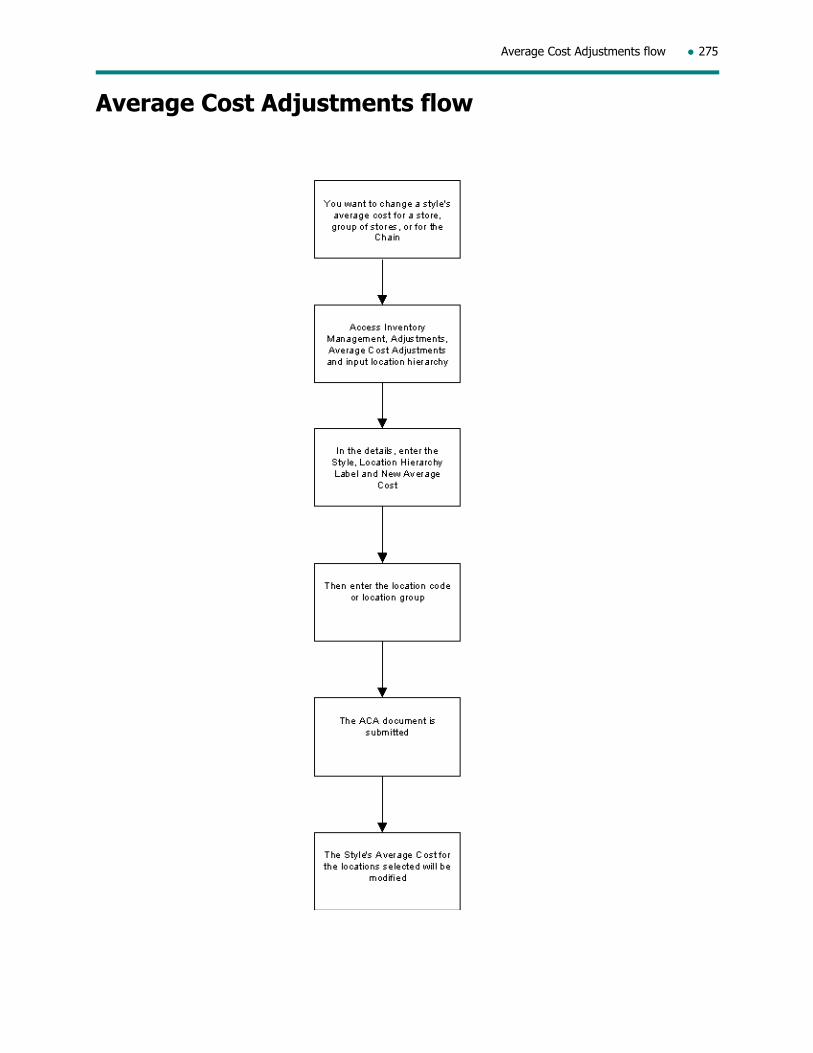
Average Cost Adjustments flow 275
Average Cost Adjustments flow
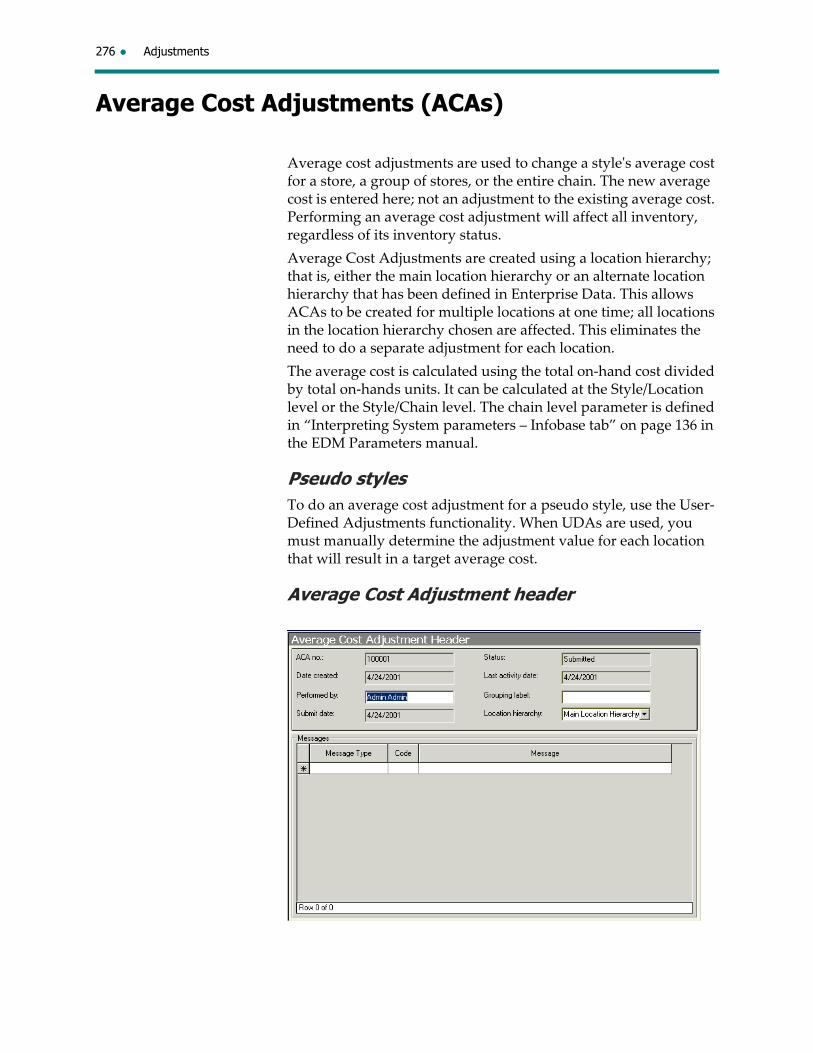
276 Adjustments
Average Cost Adjustments (ACAs)
Average cost adjustments are used to change a styleʹs average cost for a store, a group of stores, or the entire chain. The new average cost is entered here; not an adjustment to the existing average cost. Performing an average cost adjustment will affect all inventory, regardless of its inventory status.
Average Cost Adjustments are created using a location hierarchy; that is, either the main location hierarchy or an alternate location hierarchy that has been defined in Enterprise Data. This allows ACAs to be created for multiple locations at one time; all locations in the location hierarchy chosen are affected. This eliminates the need to do a separate adjustment for each location.
The average cost is calculated using the total on‐hand cost divided by total on‐hands units. It can be calculated at the Style/Location level or the Style/Chain level. The chain level parameter is defined in “Interpreting System parameters – Infobase tab” on page 136 in the EDM Parameters manual.
Pseudo stylesTo do an average cost adjustment for a pseudo style, use the User‐Defined Adjustments functionality. When UDAs are used, you must manually determine the adjustment value for each location that will result in a target average cost.
Average Cost Adjustment header

Average Cost Adjustments (ACAs) 277
Average Cost Adjustment Header
ACA No. A system‐generated number representing the Average Cost Adjustment document. Assigned when the ACA document header is created and saved.
Date created The date the Average Cost Adjustment document is created.
Performed by The employee who created the document.
Submit date The date the Average Cost Adjustment document is submitted. The date defaults to the current date but may be backdated based on the allowable number of days set up in the Inventory Management system parameters. This date can’t be earlier than the Date created.
Status The status of the ACA document:
Preliminary – a new document or work in progress;
Submitted – an ACA that has posted the SKU’s average cost adjustment within the system;
Canceled – an ACA document that has been canceled by the user.
Last activity date
The date the Average Cost Adjustment was last accessed (either the date is was created or the date it was last modified.
Grouping label Max. 20 characters. A memo field used to link documents that have something in common for query purposes. The standards for what should be put in this field are decided by your company. For example, you could decide as a company that you will enter the department number here so that you can do a query on documents by department.
Location hierarchy
The main location hierarchy or an alternate location hierarchy chosen for this ACA, as defined in the Enterprise Data module. The locations in the hierarchy selected will be affected by this ACA.

278 Adjustments
MessagesYou can assign messages to an ACA document header. These are informational messages about the ACA and are available for user reference. Either a predefined message (with associated message code) or a free‐form message can be entered.
To add an ACA header 1. From the Inventory menu, select Adjustments.
2. From the Adjustments Worklist, select Average Cost.
3. In the Average Cost Adjustment dialog box, select New > OK.
4. Complete the required fields on the ACA Header.
5. In the Messages section, enter a message, if required.
6. Click Save. The ACA document is assigned a status of Preliminary and the last activity date is assigned.
7. To acknowledge the save, click OK.
Average Cost Adjustment detailsThe Average Cost Adjustment Details screen allows you to enter the items by style only.
If your Must Use Location option in Enterprise Data is set to ʺYesʺ, the location hierarchy is set automatically to “Location” and cannot be modified. A Location code will not be requested and will not be visible when entering Average Cost Adjustment details.
To enter ACA details 1. From the Average Cost Adjustment Header, select Detail.
2. Click Enter Units by Size Grid.
3. In the Style Input dialog box:
enter the Style code
select the Hierarchy level label to be used for this style
enter the new Average cost (in the currency of the home jurisdiction)
4. Click Apply.
5. Repeat step 3 for all items and then click OK when done.
6. When all merchandise has been entered, click Close.
Average Cost Adjustment Header, Messages tab
Message Type The appropriate message type, selected from a drop‐down list of predefined message types.
Code A code that references a predefined message. Left blank if a free‐form text message is being entered.
Message Either a free‐form message or the text of the predefined message code entered above.

Average Cost Adjustments (ACAs) 279
7. Save and acknowledge your input.
Submitting an ACA documentIn order for the adjustment to take effect, the ACA document must be submitted. When you submit the document, these updates will be made:
the document’s status will change from Preliminary to Submitted
the Submit date on the document’s header will be set to the current date (can be backdated based on the number of allowable days to back‐date a transaction set within the Inventory Management Parameters)
A document with a status of Submitted cannot be re‐submitted. Any adjustments will be posted with the differences between the old average cost and the new average cost within Infobase at the time the document is saved once the modifications have been made. The document’s Last activity date will also be updated.
When creating the ACA document, you have the opportunity to submit the document at that time. By submitting the document at the time of creation, saving the document is implicit by simply submitting it (two steps in one).
To submit an ACA document
1. Retrieve the ACA document you want to submit.
2. From the Actions menu, select Submit. The status of this adjustment now changes to Submitted.
3. To acknowledge the documentʹs status change from Preliminary to Submitted, click OK.
Printing an ACA documentThe Average Cost Adjustment document can be printed and filed for future reference purposes. The printed document contains both header and detail information.
280 Adjustments
To print an ACA document
1. Retrieve the ACA document you want to print.
2. On the toolbar, click Print to print the ACA document or Print Preview to view the printed version on the screen.
Modifying an ACA documentYou can modify both the header and details of an ACA document whose status is either Preliminary or Submitted as follows. See “Average Cost Adjustment header” on page 276 and “Average Cost Adjustment details” on page 278 in this manual for field definitions.
On the header:
Performed by position
Grouping label
Location hierarchy
Messages ‐ can be added or removed as required
Detail lines can be added or deleted as required.
A document with a status of Preliminary must be submitted for the adjustments to take effect.
A document whose status is Submitted cannot be re‐submitted. Any adjustments to the Submitted ACA document will be posted with the differences between the old average cost and the new average cost within Infobase at the time the document is saved once the modifications have been made. The document’s Last activity date will also be updated.
System delete of an ACA documentAverage Cost Adjustment documents will be automatically deleted by the system for you if the status is:
Submitted, and
a predefined number of weeks has passed since the status was changed to Submitted.
Deleting an ACA document manuallyACA documents with a status of Preliminary or Submitted may be deleted from the system manually as required. In order to delete an ACA document, highlight the appropriate ACA document from the Adjustments Worklist.
From the File menu, select Delete > Yes to confirm your request to delete. Save your changes.

A physical inventory is taken to reconcile the system on‐hand inventory with actual inventory (units & value) owned by a company. Any variances that are the result of having taken a physical inventory take into account either procedural/paperwork errors or theft made throughout the year.
Typically, a retailer will take one Financial Physical Inventory a year. Others may choose to take several of them throughout the year. In this chapter, you will learn how the Physical Inventory process works within Inventory Management, from setting up for physical inventory, to loading inventory counts, modifying counts and posting the results. You will also learn how Warehouse Management can interface the counts from your warehouse system to Inventory Management.
Inventory Control Documents (ICDs) are the foundation of the physical inventory process in Inventory Management: an ICD tells the system which locations are being counted and what styles (including pseudo styles) within those locations you are counting. An ICD can be set up for one or many locations. In order for locations to share an ICD, they must have the same count date, valuation date and update type.
The Count Import function allows you to load inventory counts into Inventory Management from a file of information previously captured by way of scanning the UPCs into a hand held scanning device. The files that are being imported into Inventory Management can be in a fixed or delimited format.
From the time the counts are loaded on to the system until the posting process, one of the Preliminary Shrinkage reports can be run through Report Designer. These reports show the difference between the system on hand and the actual units counted. Variances can be easily be detected in the case where further investigation is required (i.e. having the store personnel recount merchandise that was either counted in error or missed during the original count).
Once a count has been posted, either print reports through Report Designer or Infobase according to your companyʹs requirements, as part of the count posting process to be your audit trail of what was posted during the Physical Inventory Count Posting process.
8 Physical Inventory

282 Physical Inventory
Counts can also be created within Warehouse Management. When these counts are sent to Inventory Management, an ICD is created automatically.

Physical Inventory Flow 283
Physical Inventory Flow

284 Physical Inventory
Setting up for Physical Inventory
The Inventory Control Document (ICD) is the foundation of your physical inventory within the Merchandising system.
To prepare for a physical count, an Inventory Control Document must be created to let the system know which locations will be counted and what merchandise within these locations will be counted. ICDs can be created for count/valuation dates prior to the current date. ICDs can be created for Warehouse Management or any other warehouse management system.
Pseudo styles will be included in physical counts.
Inventory Control Documents (ICDs)At the time that the ICD is created, the following information will be required:
location or list of locations that will be counted.
which merchandise will be counted.
the count date.
the valuation date.
the count update type.
An ICD can be set up for one or many locations. In order for locations to share an ICD, they must have the same count date, valuation date and update type. The ICD must exist within Inventory Management, prior to importing the physical counts on to the system.
If pack inventory is being loaded, create a separate ICD for locations (warehouses and distribution centers) with pack inventory.
The ICD is made up of a header and a details portion.
Inventory Control Document (ICD) HeaderThe ICD Header contains general information pertinent to a specific physical inventory.
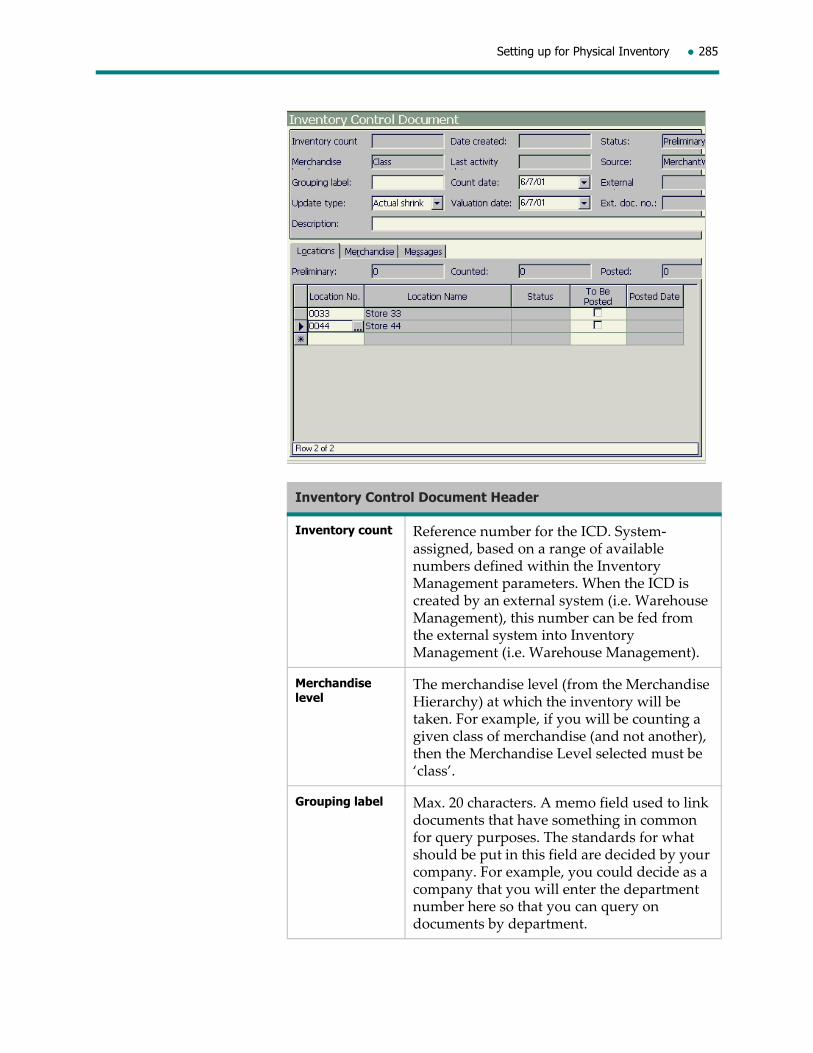
Setting up for Physical Inventory 285
Inventory Control Document Header
Inventory count Reference number for the ICD. System‐assigned, based on a range of available numbers defined within the Inventory Management parameters. When the ICD is created by an external system (i.e. Warehouse Management), this number can be fed from the external system into Inventory Management (i.e. Warehouse Management).
Merchandise level
The merchandise level (from the Merchandise Hierarchy) at which the inventory will be taken. For example, if you will be counting a given class of merchandise (and not another), then the Merchandise Level selected must be ‘class’.
Grouping label Max. 20 characters. A memo field used to link documents that have something in common for query purposes. The standards for what should be put in this field are decided by your company. For example, you could decide as a company that you will enter the department number here so that you can query on documents by department.

286 Physical Inventory
Update type What will be updated once the ICD/location is posted. Options include:
Beginning inventory: Loading the beginning inventory onto the system for a given location or the entire chain (i.e. System start‐up or a location start‐up) Note that count date and valuation date should be the day before the day of live (i.e. the last day of the period before live). The system will force an end‐of‐week date.
Actual shrink: Any monetary value variances between the system on‐hand and the actual counts will be booked as actual shrink. Unit discrepancies will be removed from the system’s on‐hand.
Pending shrink: Any variances (monetary value/units) between the system on‐hand and the actual counts will be booked as pending shrink. The inventory status of these units is changed ‘Unavailable – Pending Shrink’ and will be booked to actual shrink at the next physical inventory where the update type is ‘actual shrink’.
Description A description of the Inventory Control Document of up to 60 alphanumeric characters. This field can be used to perform a query on ICDs. For example, you can group all of your ICDs that are for Audited Counts by typing in “Audited Count”. Then, if you want to see all ICDs where the count was audited, you could do a query on the description “Audited Count” and all those ICDs would be displayed in the Physical Inventory Worklist for your review.
Date created The date the Inventory Control Document was created.
Last activity date
The date the Inventory Control Document was last accessed (either the date it was created or the date it was last modified).
Count date The date the system uses to determine the book quantity (a snapshot of the inventory is taken).
Inventory Control Document Header
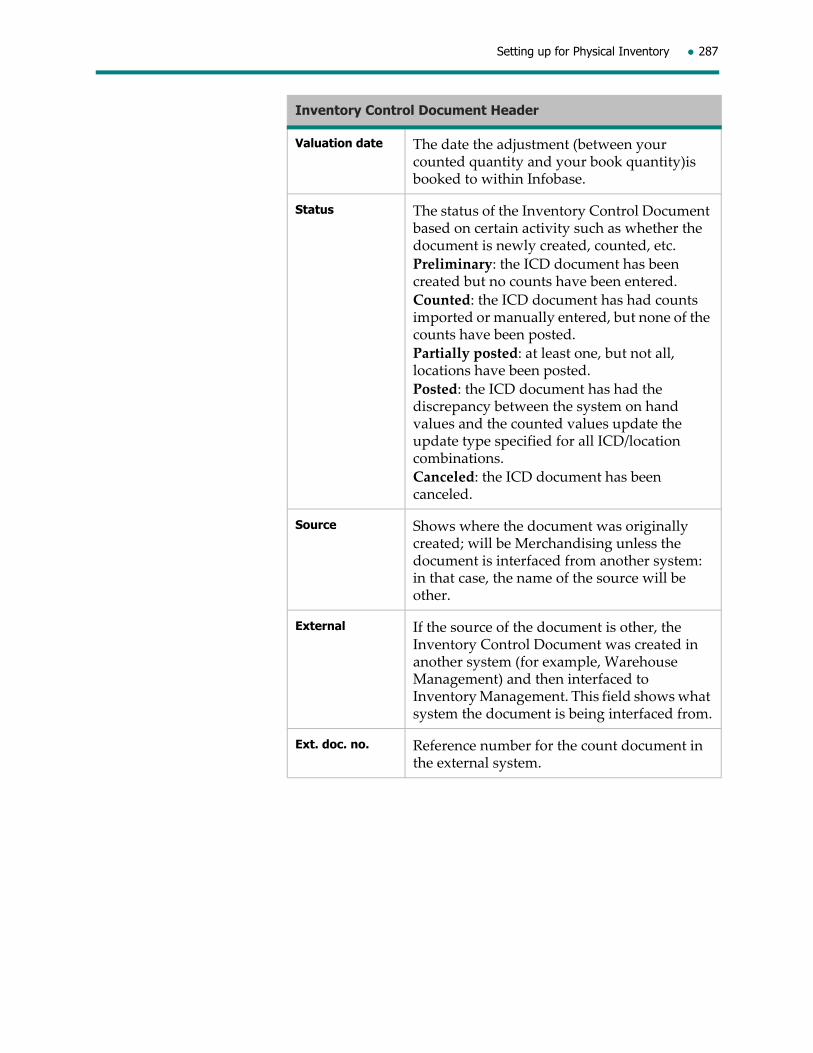
Setting up for Physical Inventory 287
Valuation date The date the adjustment (between your counted quantity and your book quantity)is booked to within Infobase.
Status The status of the Inventory Control Document based on certain activity such as whether the document is newly created, counted, etc.
Preliminary: the ICD document has been created but no counts have been entered.
Counted: the ICD document has had counts imported or manually entered, but none of the counts have been posted.
Partially posted: at least one, but not all, locations have been posted.
Posted: the ICD document has had the discrepancy between the system on hand values and the counted values update the update type specified for all ICD/location combinations.
Canceled: the ICD document has been canceled.
Source Shows where the document was originally created; will be Merchandising unless the document is interfaced from another system: in that case, the name of the source will be other.
External If the source of the document is other, the Inventory Control Document was created in another system (for example, Warehouse Management) and then interfaced to Inventory Management. This field shows what system the document is being interfaced from.
Ext. doc. no. Reference number for the count document in the external system.
Inventory Control Document Header
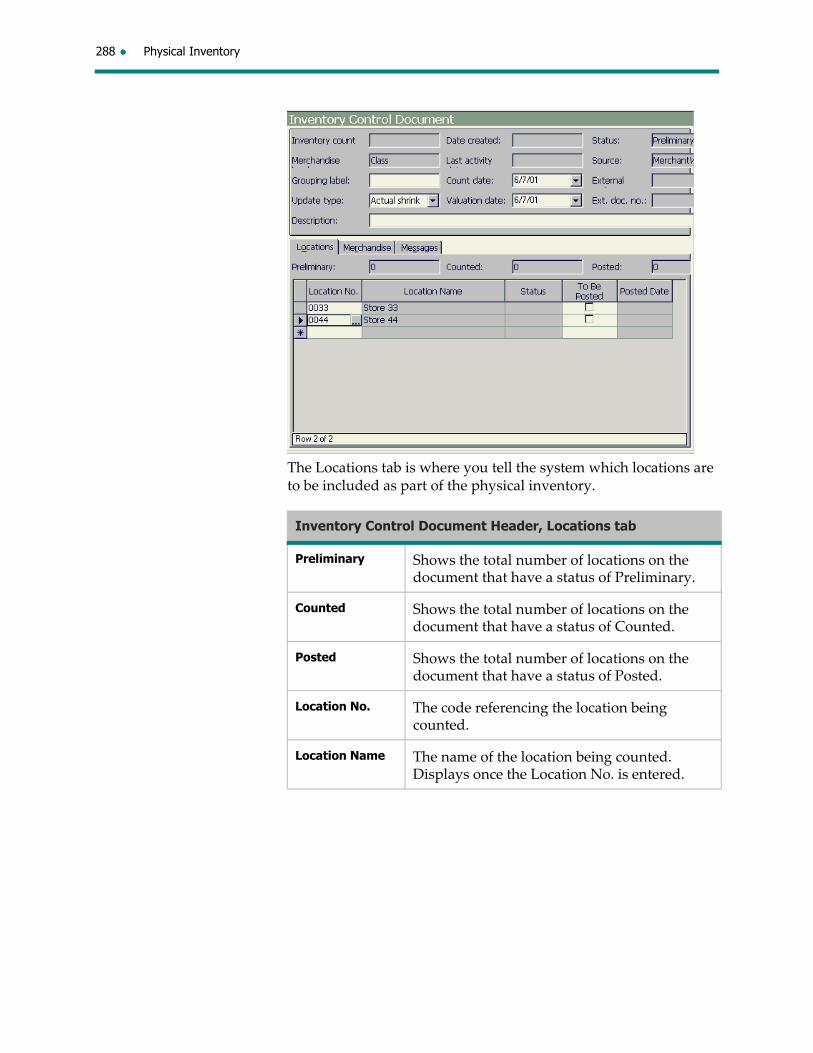
288 Physical Inventory
The Locations tab is where you tell the system which locations are to be included as part of the physical inventory.
Inventory Control Document Header, Locations tab
Preliminary Shows the total number of locations on the document that have a status of Preliminary.
Counted Shows the total number of locations on the document that have a status of Counted.
Posted Shows the total number of locations on the document that have a status of Posted.
Location No. The code referencing the location being counted.
Location Name The name of the location being counted. Displays once the Location No. is entered.
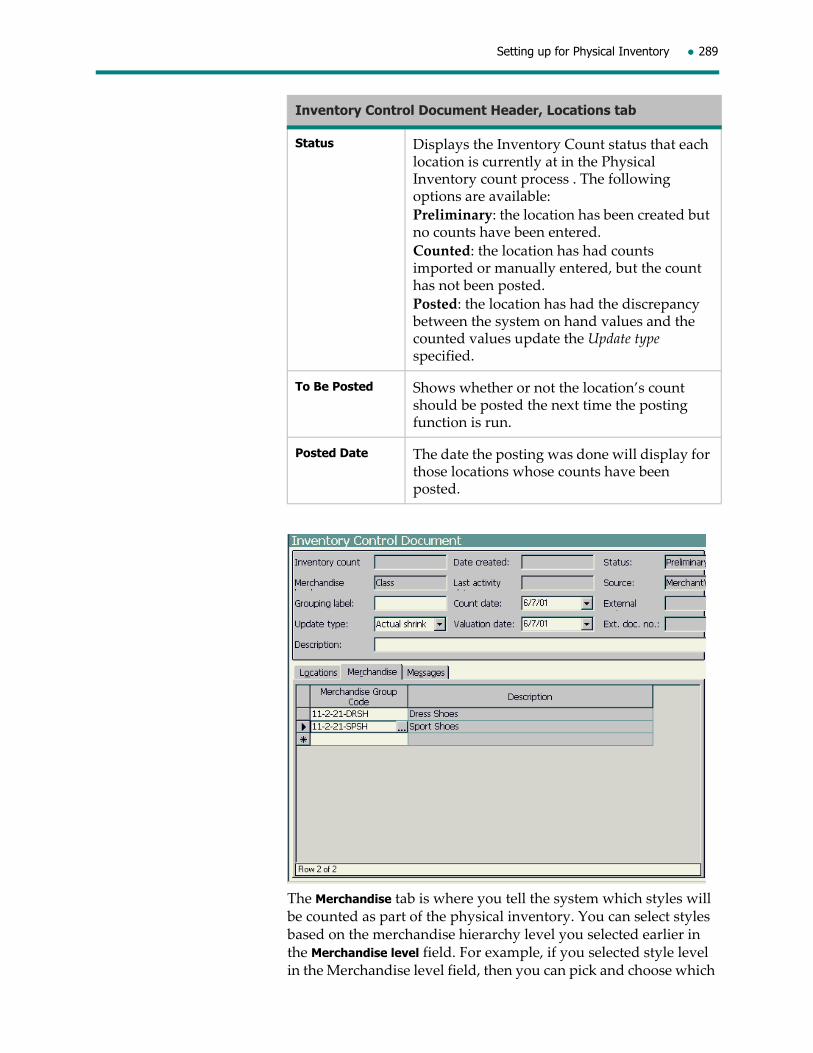
Setting up for Physical Inventory 289
The Merchandise tab is where you tell the system which styles will be counted as part of the physical inventory. You can select styles based on the merchandise hierarchy level you selected earlier in the Merchandise level field. For example, if you selected style level in the Merchandise level field, then you can pick and choose which
Status Displays the Inventory Count status that each location is currently at in the Physical Inventory count process . The following options are available:
Preliminary: the location has been created but no counts have been entered.
Counted: the location has had counts imported or manually entered, but the count has not been posted.
Posted: the location has had the discrepancy between the system on hand values and the counted values update the Update type specified.
To Be Posted Shows whether or not the location’s count should be posted the next time the posting function is run.
Posted Date The date the posting was done will display for those locations whose counts have been posted.
Inventory Control Document Header, Locations tab

290 Physical Inventory
styles will be counted. If you selected a higher level, then you can pick and choose which group(s) within that level will be counted. All the styles (including pseudo styles) that belong to those groups will be part of the physical inventory. If you are counting a selection of styles (i.e. cycle counts), ‘Style’ must be selected as the Merchandise type so that within the Merchandise tab, only those styles that you wish to include in the count can be defined.
Note: All styles should be loaded into Product Management prior to te count date or on the count date.
Note: Any price changes to bring the current retail up to date since the styles were loaded and live must have an effective date equal to or prior to the valuation/count date and must have been made effective on or prior to the valuation/count date.
Inventory Control Document Header, Merchandise tab
Merchandise Group Code
Displays Merchandising Groups at the level selected in the Merchandise level field that have been chosen for the count.
Description Alphanumeric representation of the Merchandising Group Code. Displays once the Merchandise Group Code is selected.
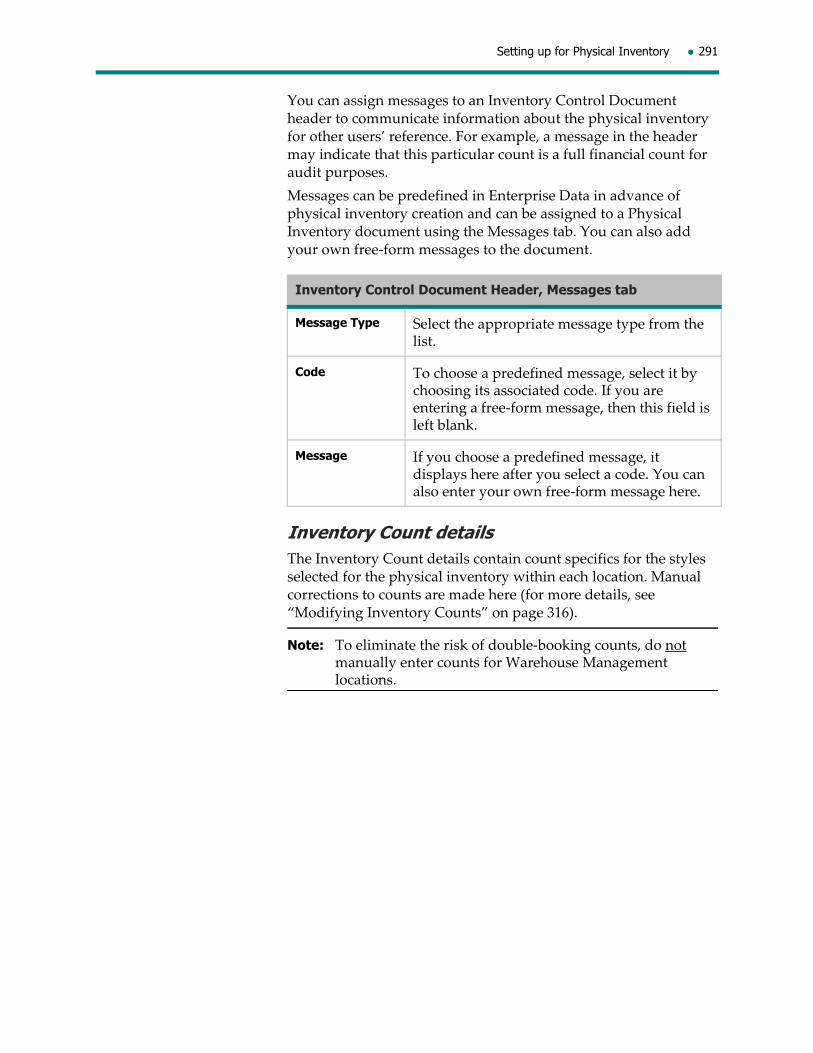
Setting up for Physical Inventory 291
You can assign messages to an Inventory Control Document header to communicate information about the physical inventory for other users’ reference. For example, a message in the header may indicate that this particular count is a full financial count for audit purposes.
Messages can be predefined in Enterprise Data in advance of physical inventory creation and can be assigned to a Physical Inventory document using the Messages tab. You can also add your own free‐form messages to the document.
Inventory Count detailsThe Inventory Count details contain count specifics for the styles selected for the physical inventory within each location. Manual corrections to counts are made here (for more details, see “Modifying Inventory Counts” on page 316).
Note: To eliminate the risk of double‐booking counts, do not manually enter counts for Warehouse Management locations.
Inventory Control Document Header, Messages tab
Message Type Select the appropriate message type from the list.
Code To choose a predefined message, select it by choosing its associated code. If you are entering a free‐form message, then this field is left blank.
Message If you choose a predefined message, it displays here after you select a code. You can also enter your own free‐form message here.
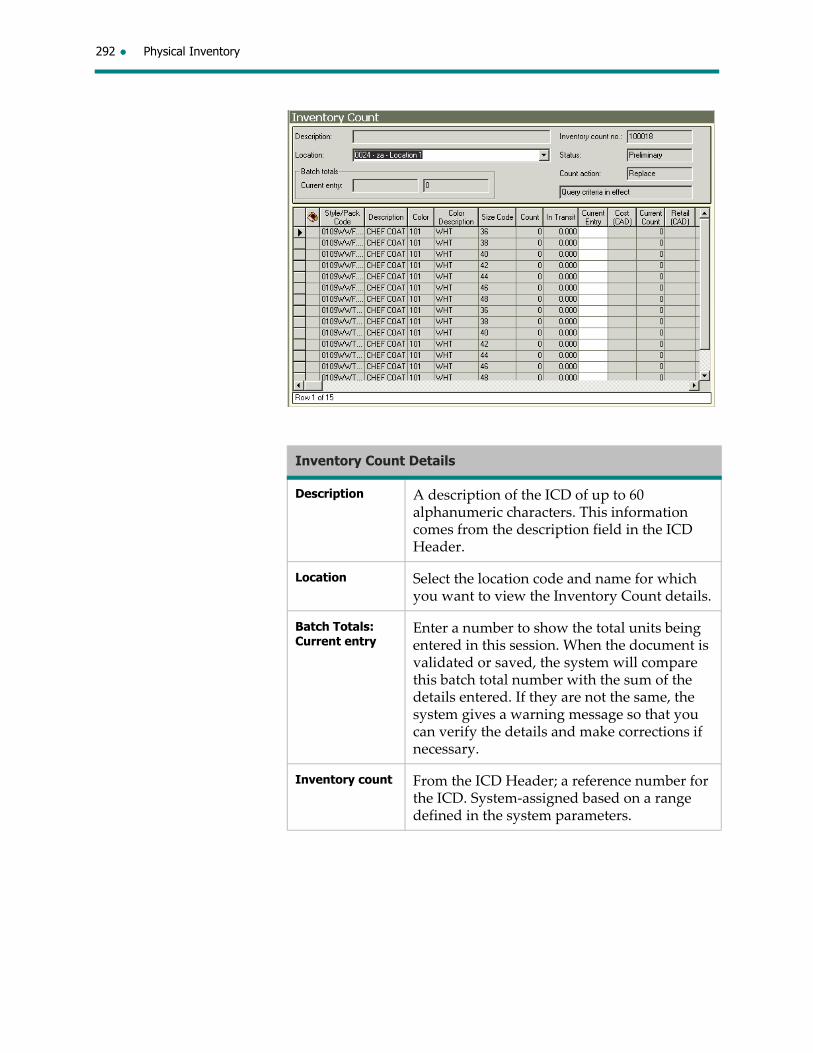
292 Physical Inventory
Inventory Count Details
Description A description of the ICD of up to 60 alphanumeric characters. This information comes from the description field in the ICD Header.
Location Select the location code and name for which you want to view the Inventory Count details.
Batch Totals: Current entry
Enter a number to show the total units being entered in this session. When the document is validated or saved, the system will compare this batch total number with the sum of the details entered. If they are not the same, the system gives a warning message so that you can verify the details and make corrections if necessary.
Inventory count From the ICD Header; a reference number for the ICD. System‐assigned based on a range defined in the system parameters.
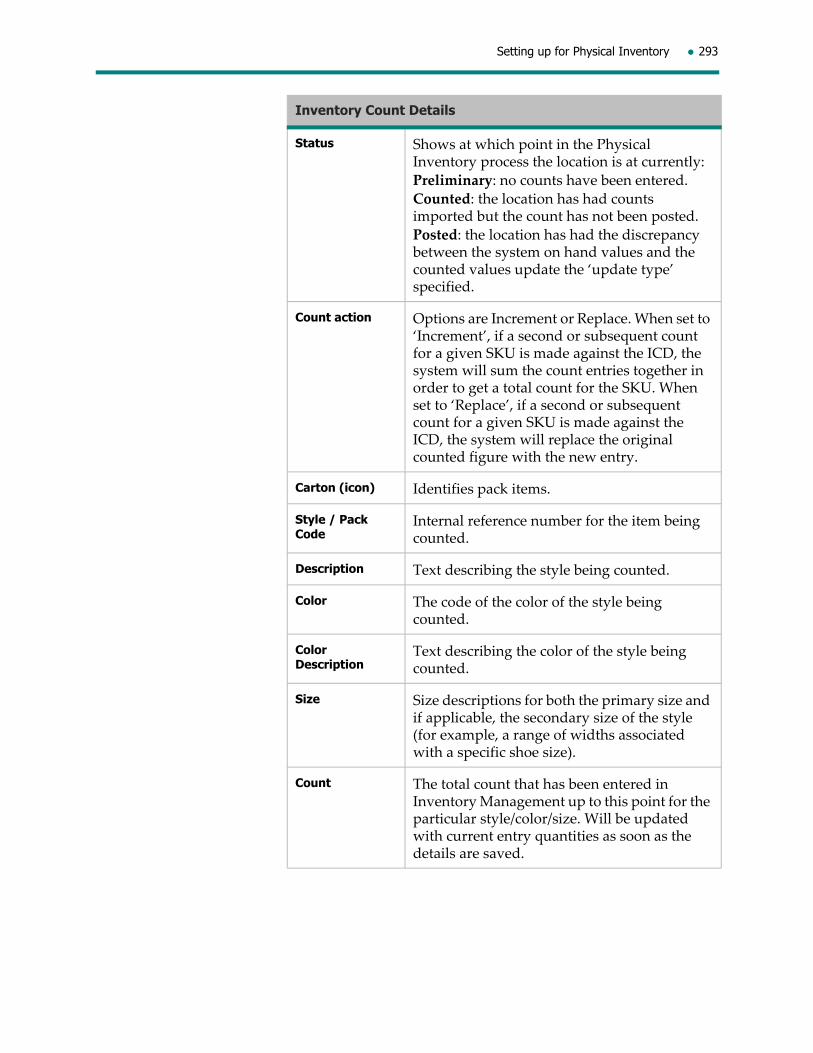
Setting up for Physical Inventory 293
Status Shows at which point in the Physical Inventory process the location is at currently:
Preliminary: no counts have been entered.
Counted: the location has had counts imported but the count has not been posted.
Posted: the location has had the discrepancy between the system on hand values and the counted values update the ‘update type’ specified.
Count action Options are Increment or Replace. When set to ‘Increment’, if a second or subsequent count for a given SKU is made against the ICD, the system will sum the count entries together in order to get a total count for the SKU. When set to ‘Replace’, if a second or subsequent count for a given SKU is made against the ICD, the system will replace the original counted figure with the new entry.
Carton (icon) Identifies pack items.
Style / Pack Code
Internal reference number for the item being counted.
Description Text describing the style being counted.
Color The code of the color of the style being counted.
Color Description
Text describing the color of the style being counted.
Size Size descriptions for both the primary size and if applicable, the secondary size of the style (for example, a range of widths associated with a specific shoe size).
Count The total count that has been entered in Inventory Management up to this point for the particular style/color/size. Will be updated with current entry quantities as soon as the details are saved.
Inventory Count Details
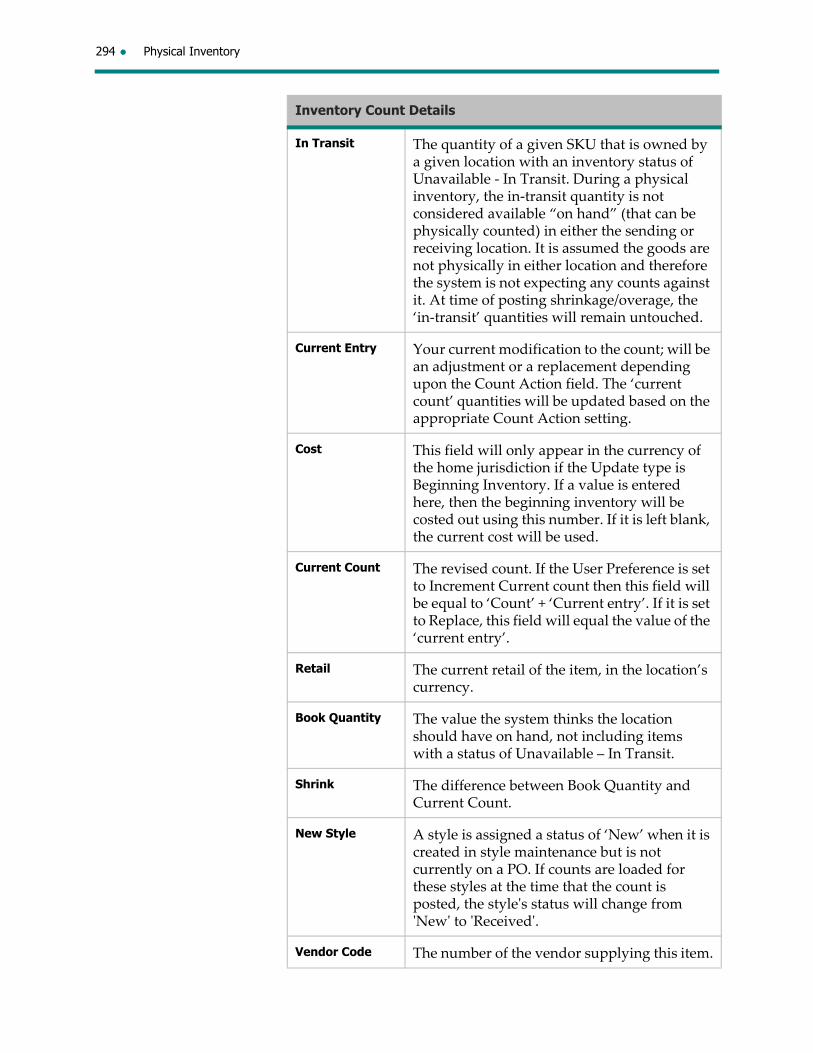
294 Physical Inventory
In Transit The quantity of a given SKU that is owned by a given location with an inventory status of Unavailable ‐ In Transit. During a physical inventory, the in‐transit quantity is not considered available “on hand” (that can be physically counted) in either the sending or receiving location. It is assumed the goods are not physically in either location and therefore the system is not expecting any counts against it. At time of posting shrinkage/overage, the ‘in‐transit’ quantities will remain untouched.
Current Entry Your current modification to the count; will be an adjustment or a replacement depending upon the Count Action field. The ‘current count’ quantities will be updated based on the appropriate Count Action setting.
Cost This field will only appear in the currency of the home jurisdiction if the Update type is Beginning Inventory. If a value is entered here, then the beginning inventory will be costed out using this number. If it is left blank, the current cost will be used.
Current Count The revised count. If the User Preference is set to Increment Current count then this field will be equal to ‘Count’ + ‘Current entry’. If it is set to Replace, this field will equal the value of the ‘current entry’.
Retail The current retail of the item, in the location’s currency.
Book Quantity The value the system thinks the location should have on hand, not including items with a status of Unavailable – In Transit.
Shrink The difference between Book Quantity and Current Count.
New Style A style is assigned a status of ‘New’ when it is created in style maintenance but is not currently on a PO. If counts are loaded for these styles at the time that the count is posted, the styleʹs status will change from ʹNewʹ to ʹReceivedʹ.
Vendor Code The number of the vendor supplying this item.
Inventory Count Details

Setting up for Physical Inventory 295
Vendor Name The name of the vendor supplying this item.
Vendor Style Vendor’s reference number for the style being counted.
Merchandise Group Code
Displays the style’s Merchandising Group (the lowest level in the Merchandising hierarchy).
Merchandise Group Label
Description of the Merchandising Group the style belongs to.
UPC The Universal Product Code is a numeric code to uniquely identify merchandise down to the color and size level.
Inventory Count Details

296 Physical Inventory
Importing Physical Inventory Counts
Typically, most retailers are capturing their Physical Inventory counts by having either their store personnel or a third party Inventory service (i.e. RGIS, Washington Services) scan their merchandise counts into a hand held scanning device. The data that is captured can be transmitted to a file. This file can then be imported into Inventory Management where it will populate the details of the Inventory Control Document already specified for the given location and group of merchandise. Before any counts can be imported, the file formats must be defined within the system.
If the count is for beginning inventory, the file format should include location, UPC, units and cost with the client providing the average cost of the style location. If the count is for actual or pending shrink, the file format should include location, UPC and units. Retail should only be provided in physical inventory files if inventory is being loaded for pseudo styles, and then it is a total retail. Cost for pseudo styles is total cost. Units in inventory records for packs should represent the number of packs (as opposed to total SKUs) and the cost should be a cost per SKU in the pack, not a cost per pack.
Count import definitionThe file format for importing inventory counts are defined within the Enterprise Data module. By defining the file format, Inventory Management will know which fields to expect and in the order in which they will appear in the file when the file is imported onto the system.
There are two formats of files that can be loaded in Inventory Management:
1. Fixed format
2. Delimited format
1. Fixed formatUsing a fixed format implies that each field in the file will be in a certain order and will occupy a fixed number of positions within the record. For example, within a particular file the location code will always be in positions 1 to 4 of a record, UPC will always be in positions 5 to 16 and the Quantity Counted of that UPC will always be in positions 17 to 20.
Notes:
Regular and pseudo styles can appear on the same document.
Beginning inventory documents for regular styles must include Units and Cost.

Importing Physical Inventory Counts 297
Beginning inventory documents for pseudo styles must inclulde Units and Retail.
If this is not a beginning inventory document, counts for regular styles must include Units only.
Count Import Definition window, Fixed format
Code A reference number you must assign to this definition. Alphanumeric, can be up to 8 characters.
Description Text describing the format so that a user knows which one to select.
Active Indicates that this entry is active. Selected by default.
Import type Fixed or delimited as selected when creating the count import definition.

298 Physical Inventory
To set up a fixed file format
1. Access Enterprise Data > General, Inventory > Count Import.
2. Click New.
3. For Import type, select Fixed > OK.
4. Enter a reference code (up to 8 alphanumeric characters) for this file format.
5. Enter a description for this file format.
6. For Type, select the first field to appear, the start position within the record and length of this field.
7. Repeat for each field appearing within a record.
8. When finished, click Save.
2. Delimited formatUsing a delimited format implies that each field in the file will be in a certain order, but could be a different length in each record. In order to separate the fields without knowing how long the field will be in any given record, a delimiter must be specified. This is simply a symbol that will be designated as the marker of the end of the field, so that every time the system sees that symbol, it knows that the field is changing. The most common delimiter is the comma, but any character can be used as long as it is set up in your count format. A delimited format file using a comma as a delimiter could be set up as follows: Location, UPC, Quantity Counted. This means that whether the location code is 2 digits or 20 digits, the system will know that all numbers up until the first comma in the file represent the location code.
Notes:
Type The field whose location within the record is being specified. Options are:
Cost – Unit cost for the item.
Location – The location code of the store or warehouse for which the count is being done.
Retail – Unit retail for the item. UPC ‐ The numeric code (Universal Product Code) uniquely identifying the merchandise that was counted down to the style/color/size level.
Units – The number of units counted of the UPC specified at the specified location.
Start Position The position number of the first character of the associated field.
Length The number of characters the field will take in the record.
Count Import Definition window, Fixed format
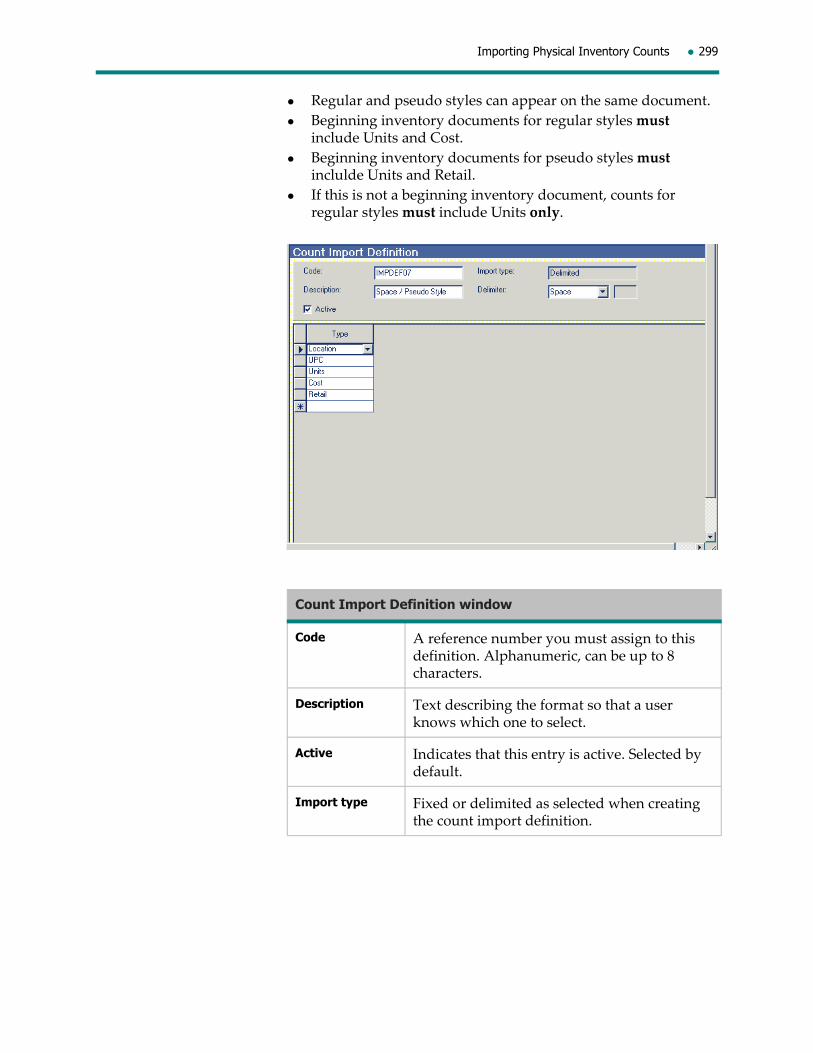
Importing Physical Inventory Counts 299
Regular and pseudo styles can appear on the same document.
Beginning inventory documents for regular styles must include Units and Cost.
Beginning inventory documents for pseudo styles must inclulde Units and Retail.
If this is not a beginning inventory document, counts for regular styles must include Units only.
Count Import Definition window
Code A reference number you must assign to this definition. Alphanumeric, can be up to 8 characters.
Description Text describing the format so that a user knows which one to select.
Active Indicates that this entry is active. Selected by default.
Import type Fixed or delimited as selected when creating the count import definition.

300 Physical Inventory
To set up a delimited file format
1. Access Enterprise Data, General, Inventory, Count Import.
2. Click New.
3. For Import type, select Delimited > OK.
4. Enter a reference code (up to 8 alphanumeric characters) for this file format.
5. Enter a description for this file format.
6. Select the delimiter to be used as a separator between each field in a record.
7. For Type, select the fields in the order in which they will appear in a record.
8. When finished, click Save
Count ImportOnce a location has been counted and the file is placed on the hard drive of your system , the file is ready to be loaded into Inventory Management. In order to import the counts, you must access the Import Counts function. You will need to specify the path and file
Delimiter Symbol that will indicate the end of a field. Options are:
tab
semi‐colon
comma
space
character
ASCII code
Once a symbol is selected, it will display in the field to the right, except in the case of character (where it will prompt you to enter character) and ASCII code (where it will prompt you to enter ASCII code).
Type The field whose location within the record is being specified. Options are:
Cost – Unit cost for the item.
Location – The location code of the store or warehouse for which the count is being done.
Retail – Unit retail for the item.
UPC ‐ The numeric code (Universal Product Code) uniquely identifying the merchandise that was counted down to the style/color/size level.
Units – The number of units counted of the UPC specified at the specified location.
Count Import Definition window

Importing Physical Inventory Counts 301
name of where the count file has been placed so that Inventory Management knows where the file is being imported from.
Note: Only one user can import a count at a time. The import can be done on any PC where Merchandising is installed.
Note: To eliminate the risk of double‐booking counts, do not import counts for Warehouse Management locations.
Records will only be imported for unit counts that are greater than zero.
When a count is imported:
a style’s status will be set to Received (if it is not already Received). The system will also ensure a style’s last net final PO cost is updated. If there is no last net final PO cost, the primary vendor’s current cost (in domestic currency) will be used. However, if there is no current cost, an error will display.
The inventory count detail table will be updated with book on hand units, costs and retails, average cost, and in transit units, costs and retails. The cost and retail values in this table will appear on reports.
Cost values are calculated using the average cost as of the count date. If book on hand in units is zero or negative, the last net final PO cost will be used.
Retail values are calculated using the current retail as of the count date.
Book on hand is the on hand at the end of the day of the count date (that is, it includes all transactions dated on the count date or earlier that were posted to Infobase prior to the count being imported. It is calculated by taking the total on hand for the SKU/location at the time the information is being asked for, minus all transactions that are dated after the count date. This calculation method takes into account that old transactions could have been cleaned up in Infobase.
If any changes are done to the book on hand (for example, backdating Inventory Management transactions or price changes for the count date or earlier), once the count has been imported, the Recalculate Count Values function must be run to update the counted values.
Count Import window
Import Action When the information is brought into your count file, do you want to add the units (increment) or do you want to replace what is there with the new value (replace).
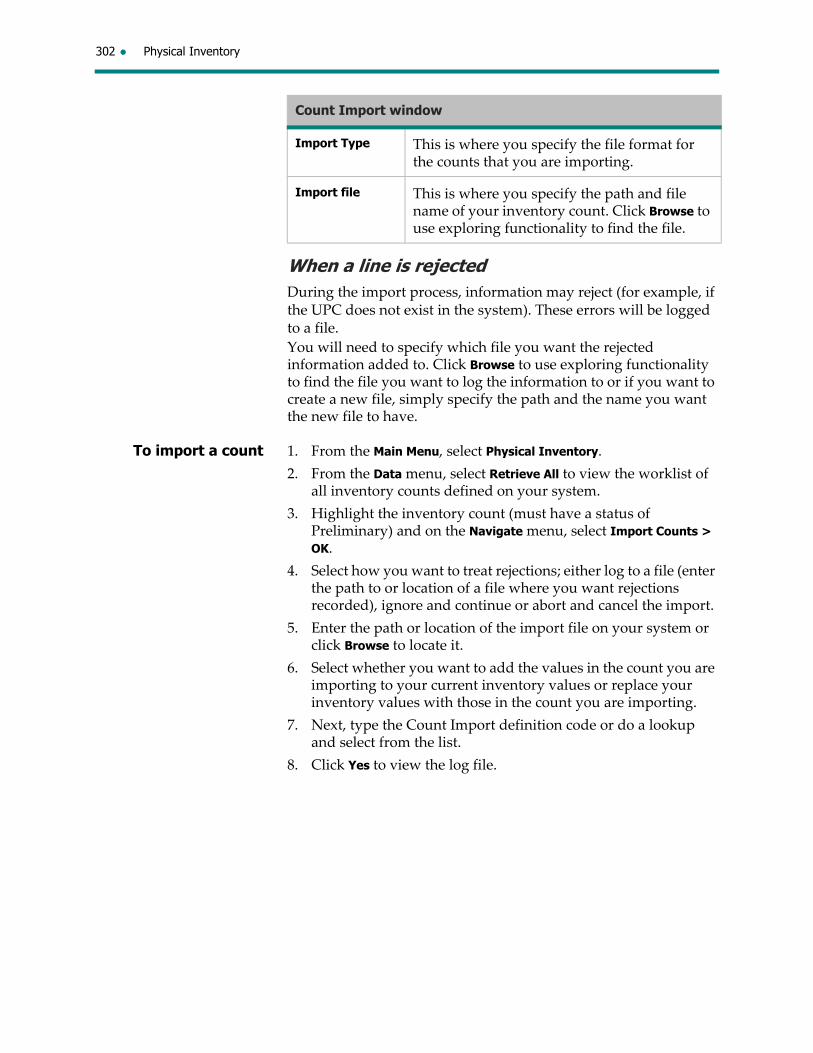
302 Physical Inventory
When a line is rejectedDuring the import process, information may reject (for example, if the UPC does not exist in the system). These errors will be logged to a file.
You will need to specify which file you want the rejected information added to. Click Browse to use exploring functionality to find the file you want to log the information to or if you want to create a new file, simply specify the path and the name you want the new file to have.
To import a count 1. From the Main Menu, select Physical Inventory.
2. From the Data menu, select Retrieve All to view the worklist of all inventory counts defined on your system.
3. Highlight the inventory count (must have a status of Preliminary) and on the Navigate menu, select Import Counts > OK.
4. Select how you want to treat rejections; either log to a file (enter the path to or location of a file where you want rejections recorded), ignore and continue or abort and cancel the import.
5. Enter the path or location of the import file on your system or click Browse to locate it.
6. Select whether you want to add the values in the count you are importing to your current inventory values or replace your inventory values with those in the count you are importing.
7. Next, type the Count Import definition code or do a lookup and select from the list.
8. Click Yes to view the log file.
Import Type This is where you specify the file format for the counts that you are importing.
Import file This is where you specify the path and file name of your inventory count. Click Browse to use exploring functionality to find the file.
Count Import window
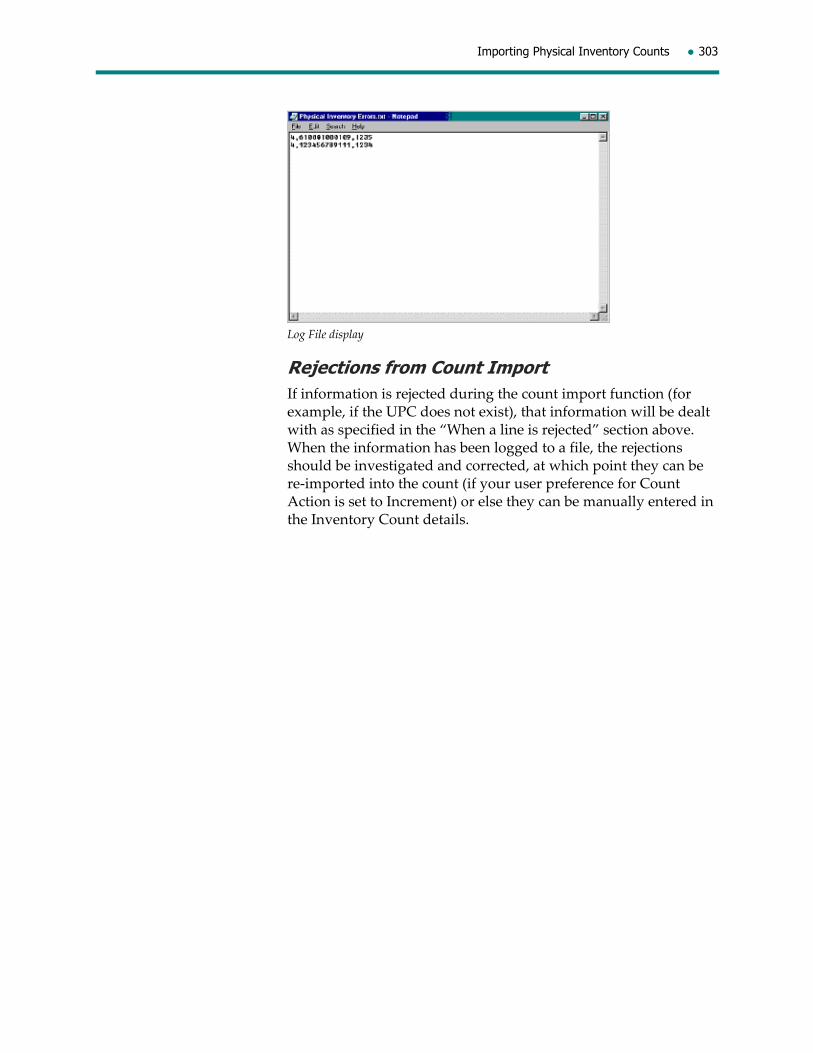
Importing Physical Inventory Counts 303
Log File display
Rejections from Count ImportIf information is rejected during the count import function (for example, if the UPC does not exist), that information will be dealt with as specified in the “When a line is rejected” section above. When the information has been logged to a file, the rejections should be investigated and corrected, at which point they can be re‐imported into the count (if your user preference for Count Action is set to Increment) or else they can be manually entered in the Inventory Count details.

304 Physical Inventory
Recalculating Count Values
Use this function to update book on hand values after importing counts. For example, you have counted goods that had not been received, and you want to backdate the receipt to prior to count count date and recalculate to make the receipt part of your book on hand.
To recalculate count values
1. From the Main Menu, select Physical Inventory.
2. From the Data menu, select Retrieve All to view the worklist of all inventory counts defined on your system.
3. Highlight the inventory count for which values are to be updated and on the Actions menu, select Recalculate Count Values.
The message Recalculate count succeeded displays when the recalculation is complete.

Modifying Inventory Counts 305
Modifying Inventory Counts
Once the counts have been imported, you should run a Preliminary Shrink report. This report will display the system’s book value, the counted quantities, and the variance between the two figures which will be logged as shrink. This report can make count entry errors or scanning errors visible. If you feel that certain variances require that additional counts be made or that further investigation is required (for example, a section of the stockroom was missed, or a rack was counted twice), then modifications can be made to the count within Inventory Management.
Preliminary Shrink ReportsThe Preliminary Shrink reports provide information about the counted quantities versus the system’s Book value at the time of the count (value of the inventory based on the valuation date). Any discrepancies between the two figures are displayed as shrink. This shrinkage figure should be evaluated to determine if in fact this value could be the result of true loss (theft) or due to scanning error. If it is theft, there is really nothing that can be done other than having the system post this figure as either shrink or opening shrink. If the shrinkage value seems to be due to scanning errors (i.e. having scanned an item twice) or due to errors in completing transactions on the system (i.e. not entering the receipt of a vendor shipment on the system, but placing the goods on the selling floor for physical inventory) then corrections to the count can be made.
These reports can be run as many times as you like until the count has been posted. For example, you may run one of the preliminary shrinkage reports once, make corrections to the counted values, and re‐run the report. If you make more corrections, you can run the report again to have the corrections reflected.
To run any of these reports, access Report Designer, ensure Physical Inventory is selected as the Active Topic and from the System Report folder, select to print one of the Preliminary Shrinkage Reports. See the Report Designer for Merchandising Analytics User Guide for more information.

306 Physical Inventory
Style Preliminary Shrink Report printed via Report Designer

Modifying Inventory Counts 307
SKU Preliminary Shrink Report printed via Report Designer

308 Physical Inventory
Style Preliminary Shrink Location Report, printed via Report Designer

Modifying Inventory Counts 309
Group Preliminary Shrink Report printed via Report Designer

310 Physical Inventory
Group Location Preliminary Shrink Report printed via Report Designer
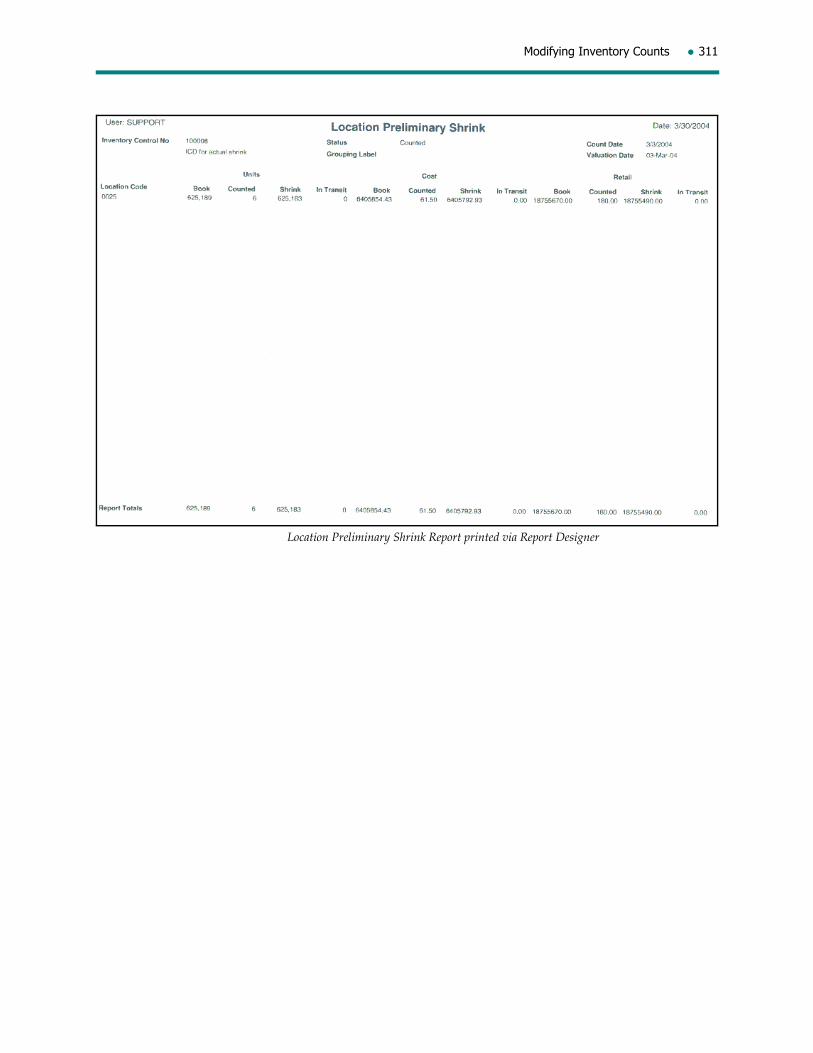
Modifying Inventory Counts 311
Location Preliminary Shrink Report printed via Report Designer

312 Physical Inventory
SKU Preliminary Shrink Location Units Report, printed via Report Designer
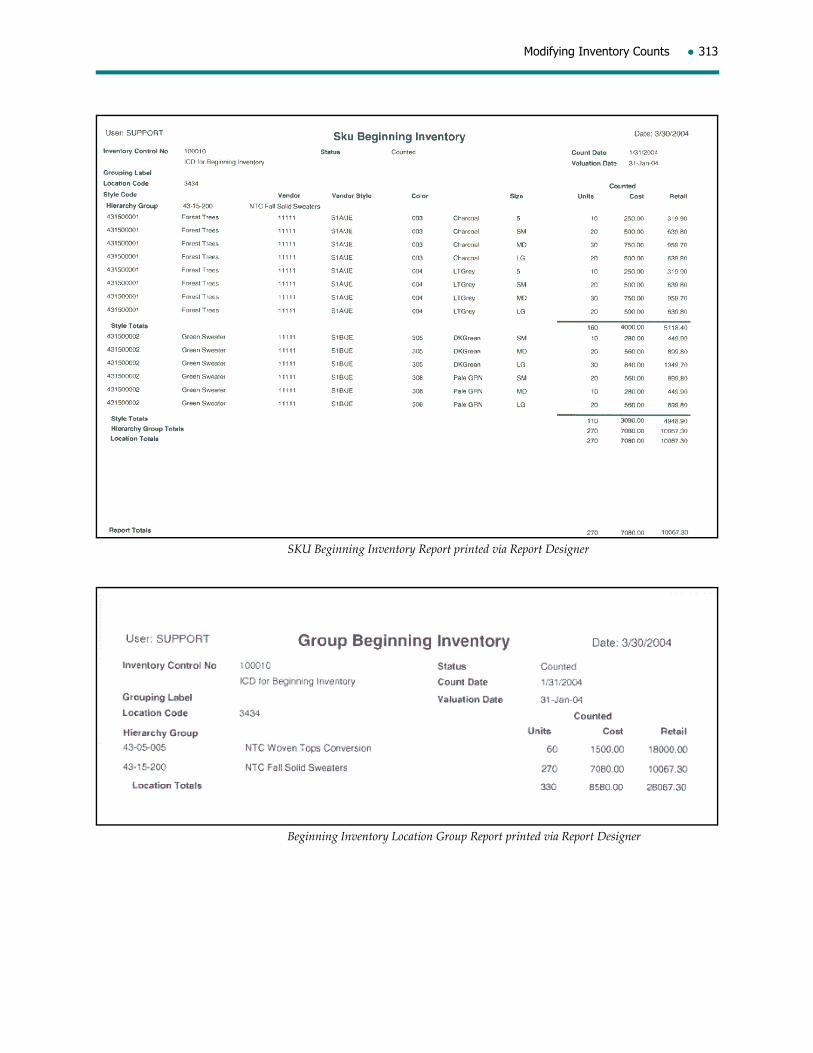
Modifying Inventory Counts 313
SKU Beginning Inventory Report printed via Report Designer
Beginning Inventory Location Group Report printed via Report Designer

314 Physical Inventory
Beginning Inventory Location Report printed via Report Designer
Beginning Inventory Style Location Report printed via Report Designer
Modifying the ICD HeaderIf more stores need to be added to the ICD, or there are styles that need to be added to the count, you can do this by modifying the ICD Header. The following chart shows what fields can be modified based on the status of the Inventory Control Document.
Status Description What has been updated What can be modified
Preliminary The Inventory Control Document has been created but the status has not been updated to Counted.
The document is still a work‐in‐progress; nothing has been updated yet.
Grouping label
Count date
Valuation date
Update type
Description
Location no.
Merchandising Group Code
Messages
Current Entry

Modifying Inventory Counts 315
To modify the ICD header
1. Retrieve the inventory count document (ICD) for the inventory count you want to modify.
2. Make the necessary changes. See “Inventory Control Document (ICD) Header” on page 284 for field definitions.
3. Save and acknowledge your input.
Counted The Inventory Control Document has had counts imported or manually entered, but none of the counts have been posted.
The document is still a work in progress; nothing has been updated yet.
Grouping label
Count date
Valuation date
Update type
Description
Location no.
To be posted
Merchandising Group Code
Messages
Current entry
Partially posted At least one, but not all, locations have been posted.
Inventory and Shrinkage have been updated for at least one location, but not all locations.
Grouping label Description To be posted field for unposted stores only
Messages
Current entry for unposted stores only
Posted The ICD document has had the discrepancy between the system on hand values and the counted values update the Update type specified for all ICD/location combinations.
Inventory and Shrinkage have been updated for all locations.
Grouping label Description
Messages
Canceled The Inventory Control Document has been canceled.
Nothing has been updated, but the counts are removed.
Grouping label
Count date
Valuation date
Update type
Description
Location no.
Merchandising Group Code
Messages
Inventory Count
Status Description What has been updated What can be modified

316 Physical Inventory
Modifying Inventory CountsIf you have discovered scanning errors as a result of reviewing the Preliminary Shrink Report, you can modify the quantities that were imported by accessing the Inventory Count details. The only field that can be modified is the Current Entry field. This field can be modified for a particular ICD/Location up until the time that ICD/Location is posted.
You can perform a query on specific fields in the count details in order to display only those details lines meeting the criteria you enter. In the Count Details window, from the Data menu, select Query and for example, to retrieve all detail lines for a specific color, select Color Code, enter your query criteria and then click OK to start the query. The Inventory Count Details window redisplays with the notation ʺQuery Criteria in effectʺ displayed on the right hand side of the screen below the Count action field. Next, select the location whose details you want to display. You will now see only details for the location selected which meet the query criteria you entered. To remove query criteria, in the Query dialog box, select Clear All.
Once you save your modifications, the Count, Current Count and Shrink columns will be updated to reflect your modifications.
To modify inventory counts
1. Retrieve the inventory count document (ICD) for the inventory count you want to modify.
2. Select Inventory Count if you want to view count details.
3. Make the changes required. See “Inventory Count details” on page 291 in this manual for field definitions.
4. Save and acknowledge your input.

Modifying Inventory Counts 317
Modifying an incorrect system on handIf you discover that there is a discrepancy between the system on hand and the counted values as a result of errors in completing transactions on the system, corrections can be made depending on the type of error. For example, if a Vendor receipt was not entered on the system, but the goods were placed on the floor and were counted, you can either remove the counted values, or you can do the PO Receipt flow, backdating the PO Receipt document to a date prior to the count date. Keep in mind that there is a limit on how far back you can backdate documents. This limit is based on a system parameter. Completing the PO Receipt flow and backdating the PO Receipt document will update your ICD and the changes will be reflected in any subsequent Preliminary Shrinkage Reports you run.
Canceling and reinstating an ICD If you have created an ICD by mistake, or if you have had to
stop the inventory process for some reason, you can cancel the ICD simply by selecting Cancel from the Actions menu.
If you canceled an ICD by mistake, to reinstate it simply select Reinstate from the Actions menu. This will reinstate the ICD to a status of Preliminary.
318 Physical Inventory
Posting Inventory Counts
Once you are confident that the counts entered reflect the units owned by a given location, and that the shrink value calculated on the most recent Preliminary Shrink Report is indeed company ‘loss’, you can post the store’s count. This is done simply by selecting a “ ” in the To Be Posted column on the Locations tab (save the changes), and then by running the Post function. To run the post function, you can select Post Inventory Counts from the Actions menu from within the ICD.
Posting inventory counts for each location on an ICD can be done separately. Once all of the locations on an ICD have been posted, the ICD’s document status changes from ‘partially posted’ to ‘posted’. The ‘posting’ inventory count function for each location will update the location’s inventory (units and value), book shrinkage (pending or actual).
Final Shrinkage ReportsPart of the Count Posting process involves producing Final Shrinkage reports, which are similar to the Preliminary Shrinkage reports. They show the actual values that have been posted to Pending Shrink, Actual Shrink or Beginning Inventory, depending on how your ICD was set up. These report will serve as your audit trail of what was posted during the Count Posting process.
To run these reports, access Report Designer, ensure the Active Topic selected is Physical Inventory and from the System Shortcut folder, select to print one of the Final Shrinkage reports. See the Report Designer for Merchandising Analytics User Guide for more information and the following final shrinkage report samples.

Posting Inventory Counts 319
Group Final Shrink Report printed via Report Designer

320 Physical Inventory
Group Location Final Shrink Report printed via Report Designer

Posting Inventory Counts 321
Location Final Shrink Report printed via Report Designer
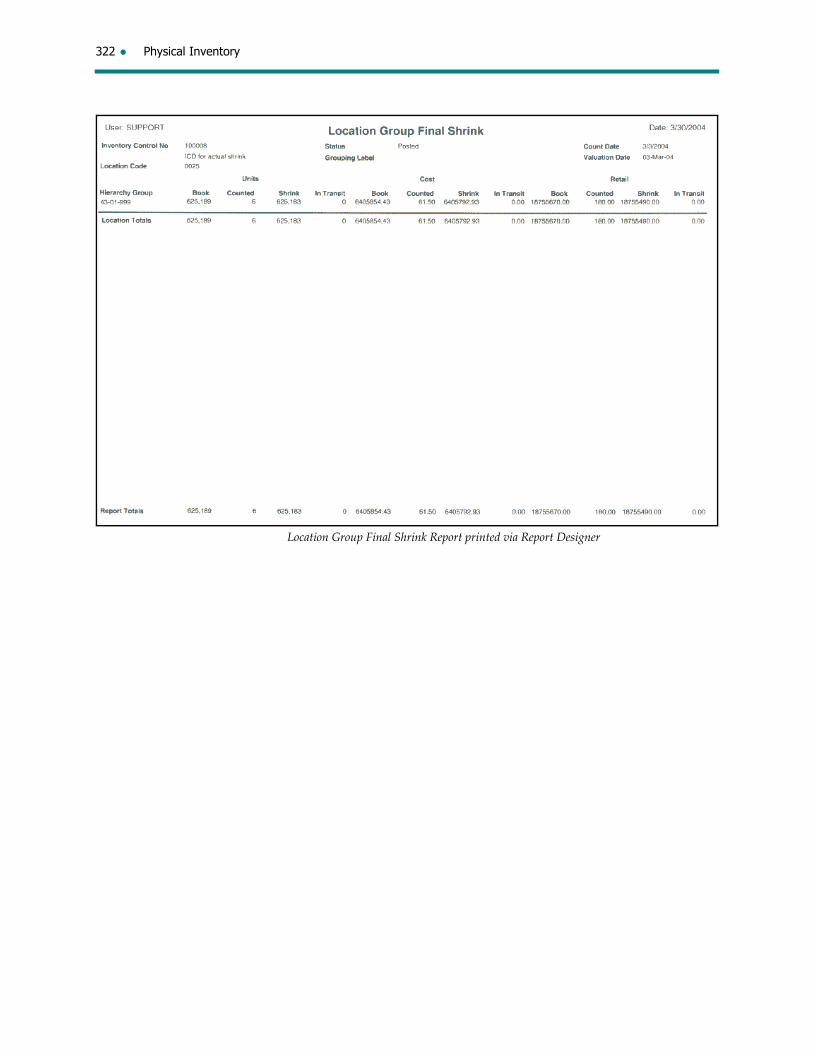
322 Physical Inventory
Location Group Final Shrink Report printed via Report Designer

Posting Inventory Counts 323

324 Physical Inventory
Style Final Shrink Report, printed via Report Designer

Posting Inventory Counts 325
Style Final Shrink Location Report, printed via Report Designer
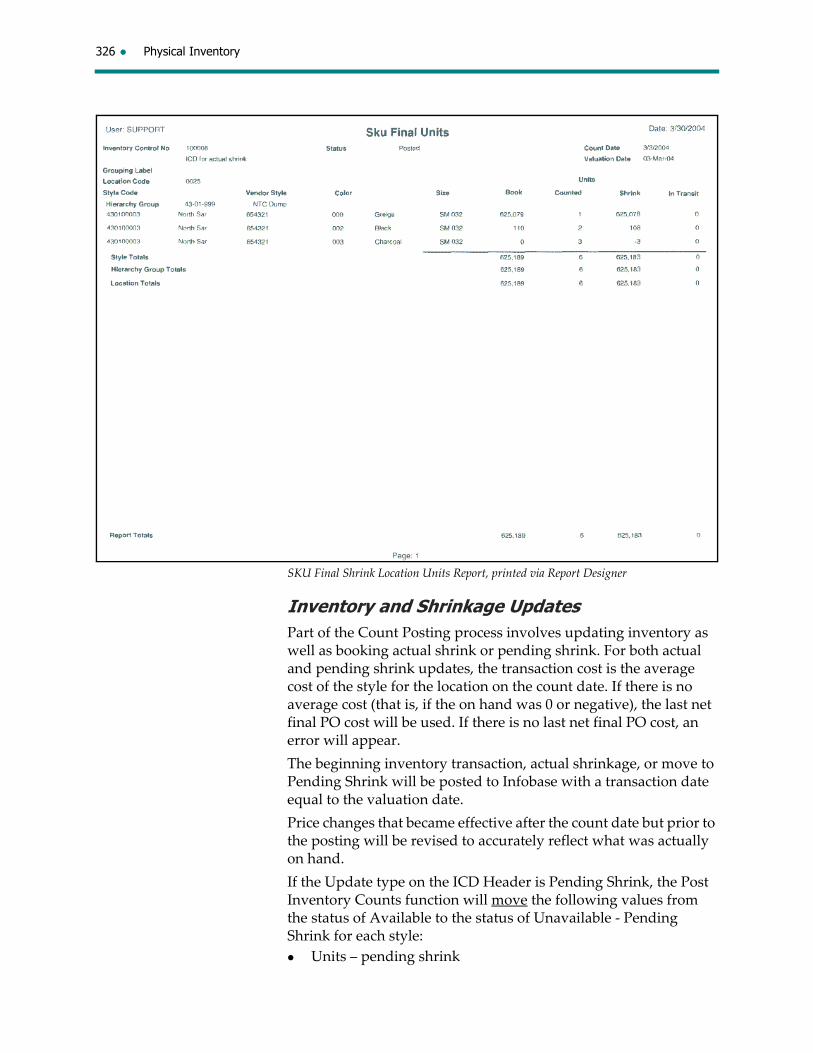
326 Physical Inventory
SKU Final Shrink Location Units Report, printed via Report Designer
Inventory and Shrinkage UpdatesPart of the Count Posting process involves updating inventory as well as booking actual shrink or pending shrink. For both actual and pending shrink updates, the transaction cost is the average cost of the style for the location on the count date. If there is no average cost (that is, if the on hand was 0 or negative), the last net final PO cost will be used. If there is no last net final PO cost, an error will appear.
The beginning inventory transaction, actual shrinkage, or move to Pending Shrink will be posted to Infobase with a transaction date equal to the valuation date.
Price changes that became effective after the count date but prior to the posting will be revised to accurately reflect what was actually on hand.
If the Update type on the ICD Header is Pending Shrink, the Post Inventory Counts function will move the following values from the status of Available to the status of Unavailable ‐ Pending Shrink for each style:
Units – pending shrink

Posting Inventory Counts 327
Cost value (units shrink X average cost of style)
Retail value (units shrink X retail of style)
If the Update type on the ICD Header is Actual Shrink, the Post Inventory Counts function will perform the following actions:
Remove: Units in Unavailable – Discrepancy and Unavailable – Pending
Shrink and add them to Available. Shrink will then be subtracted from Available.
Cost value (units shrink X average cost of style)
Retail value (units shrink X retail of style)
Actual Shrinkage is also updated with the total amount of units shrink, cost value of shrink and retail value of shrink.
If the Update type on the ICD Header is Beginning Inventory, the Post Inventory Counts function will add units, cost value (units X current cost, unless another cost is specified in the count file) and retail value (units X retail) to the style’s available inventory.
The inventory count detail table will be updated with shrink units, costs and retails. This will match ib_inventory.
If a specific SKU has 0 units on hand and cost on hand is not equal to 0 after the count (regardless whether there were shrink units or not), the cost will be shrinked out and reassigned to the other SKUs for the style in order to maintain the average cost of the style/location.
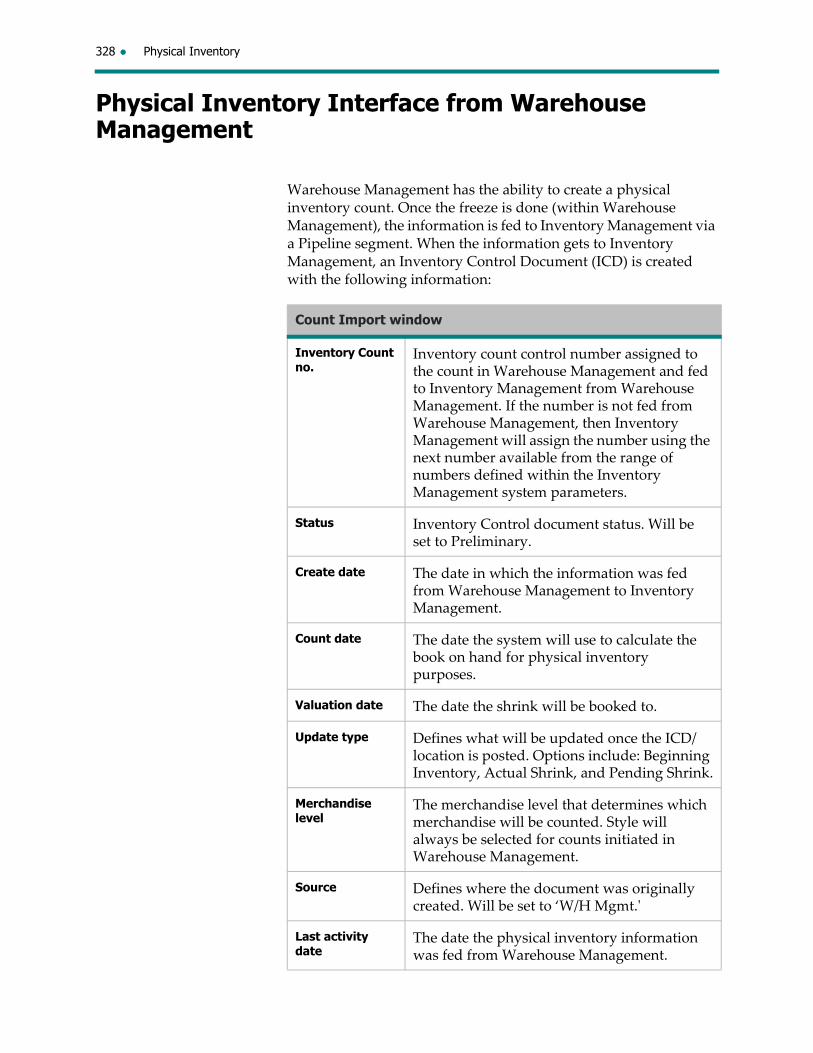
328 Physical Inventory
Physical Inventory Interface from Warehouse Management
Warehouse Management has the ability to create a physical inventory count. Once the freeze is done (within Warehouse Management), the information is fed to Inventory Management via a Pipeline segment. When the information gets to Inventory Management, an Inventory Control Document (ICD) is created with the following information:
Count Import window
Inventory Count no.
Inventory count control number assigned to the count in Warehouse Management and fed to Inventory Management from Warehouse Management. If the number is not fed from Warehouse Management, then Inventory Management will assign the number using the next number available from the range of numbers defined within the Inventory Management system parameters.
Status Inventory Control document status. Will be set to Preliminary.
Create date The date in which the information was fed from Warehouse Management to Inventory Management.
Count date The date the system will use to calculate the book on hand for physical inventory purposes.
Valuation date The date the shrink will be booked to.
Update type Defines what will be updated once the ICD/location is posted. Options include: Beginning Inventory, Actual Shrink, and Pending Shrink.
Merchandise level
The merchandise level that determines which merchandise will be counted. Style will always be selected for counts initiated in Warehouse Management.
Source Defines where the document was originally created. Will be set to ‘W/H Mgmt.ʹ
Last activity date
The date the physical inventory information was fed from Warehouse Management.

Physical Inventory Interface from Warehouse Management 329
The information for the following fields will be fed from Warehouse Management:
Description
Grouping label
External document no. (Warehouse Management reference number)
Message type
Message
Location
SKU
Count
Once the count has been completed in Warehouse Management, the process to ʺfinalizeʺ the counts will be done. The count information will then be fed to Inventory Management via a Pipeline segment.
If the counts are aborted within Warehouse Management, the information will feed to Inventory Management via a Pipeline segment, and Inventory Management will cancel the associated ICD.
Posting of the counts will then be done in Inventory Management. For more details on posting Inventory Counts, see “Posting Inventory Counts” on page 318 in this manual.
Location status Defines the status at which point the inventory count process is set for a given location. The locationʹs status will be set to Preliminary.
To be posted Defines whether or not the counts are ready ʺto be postedʺ. The setting will be unselected for these counts.
Count Import window

330 Physical Inventory

Sales Flow
9 Sales

332 Sales
Sales
Throughout the course of a day, sales transactions are made at the store by scanning the items being sold into the POS device. At the end of each day, the POS systems are polled and the information is brought into Head Office Sales Audit. Sales Audit will feed the information into Inventory Management in order to ensure sales are booked and inventory is decremented accordingly in Merchandising based on the sales transactions that are transpiring on a daily basis.
Note: Some clients may use the ‘Trickle Polling’ feature of NT Polling which allows them to pick up sale transactions throughout the day without having to wait until the end of the day.
How sales are updated within MerchandisingMerchandising is updated with sales information from Sales Audit on a daily basis. Transactions are passed from Sales Audit into Inventory Management. Inventory Management will verify the selling price of the item (UPC) being sold and then will feed this information into Infobase.
If any price variances are encountered while Inventory Management is verifying the selling prices of the items, Infobase will need to book these variances accordingly. Typically, price discrepancies are due to POS discounts or price overrides that had been entered at the cash register. POS discounts can be distinguished from overrides by the Transaction Reason Code attached to them when they are passed into Inventory Management. It is important to note that the Transaction Reasons must be defined within the Transaction Reason Code table (within the Enterprise Data module) in order for them to be interpreted properly when they are fed to Inventory Management.
The way in which this information is maintained within Infobase is as follows:
Infobase keeps three different categories of markdowns, identified by ʺTransaction Codeʺ – which are slightly different than a Transaction Reason”.
Transaction Codes within IB include:
700 – Permanent Price Changes
701 – Promotional Price Changes
601 – POS Discounts
Whenever a permanent price change becomes effective in Merchandising, the value of the inventory is reduced by the price

Sales 333
change value by posting a ‘700’ transaction which has zero units, and an extended retail amount based on the value of the price change.
When a promotional price change is in effect, markdown entries are booked at the time the sale is posted with a transaction code of 701. This way the price change value booked from a promotional price change are kept separate from the price change value booked from permanent price changes having taken effect.
For POS discounts, the markdown value is taken at the time that the sale is posted. Within Sales Audit and at POS, the POS Discounts being used must be defined. In Merchandising, the Transaction Reasons of type ‘POS Discount’ must be defined within Enterprise Data with the transaction reason code matching the POS Discount code. When Sales Audit sends sales data to Inventory Management, they include records for POS Discounts, separated by POS Discount code. Inventory Management posts these POS Discounts to Infobase as a transaction code 601 still separated by POS Discount code translated to a Merchandising Transaction Reason code.
The First and Last Sales Date will be updated by style/color/store for the selling location in InfoBase each time a sale gets fed through.
The following Sales transactions which affect Merchandising (Inventory Management) include:
Sale
Return
Layaway Sale
Employee Sale
Exchange
Layaway Pickup (final layaway payment)
Layaway return (cancel)
PLU/UP not found ($ amount entered manually)
Non‐SKU/UP sale (sold by department or class)
Customer Order Sale
Customer Order Return
These are the most basic transactions that can occur. It is important to note that any given transaction can be a combination of any of the above transactions (i.e. a layaway return which includes a POS Item Markdown and a subtotal discount).
Discounts and Markdowns
Item Discount: on specific item only
Subtotal Discount: on the subtotal of the entire transaction
Price Override: overriding system price
SKU with an Active Promotion: HO temporary markdown
Overlapping Promos (takes lowest price)
334 Sales
Possible reason codes Item Discount
Subtotal Discount
Price Override
Returns
Exchanges
There are three basic ways to enter a discount at the register:
Manual Override: A POS markdown is taken by overriding the selling price of the item at the time of the sale (an override key on the register is selected). The price discrepancy is booked as a POS Discount due to override (in Infobase).
Not Manual Override: A POS markdown is taken by overriding the selling price of the items at the time of the sale. The price discrepancy is booked as a POS Discount due to Variance (in Infobase).
Discount Key: A POS markdown is taken by selecting a POS discount key at the register. The price discrepancy is booked as a POS Discount due to The Transaction Reason defined (user‐defined reasons).

The reports described in this section contain summary information about the various documents in progress in Inventory Management. Their contents have been designed to flag situations requiring follow‐up.
Reports are available for the following document types:
Transfers
Store Shipments
PO Receipts (if third party Invoice Matching is being used)
10 Reports
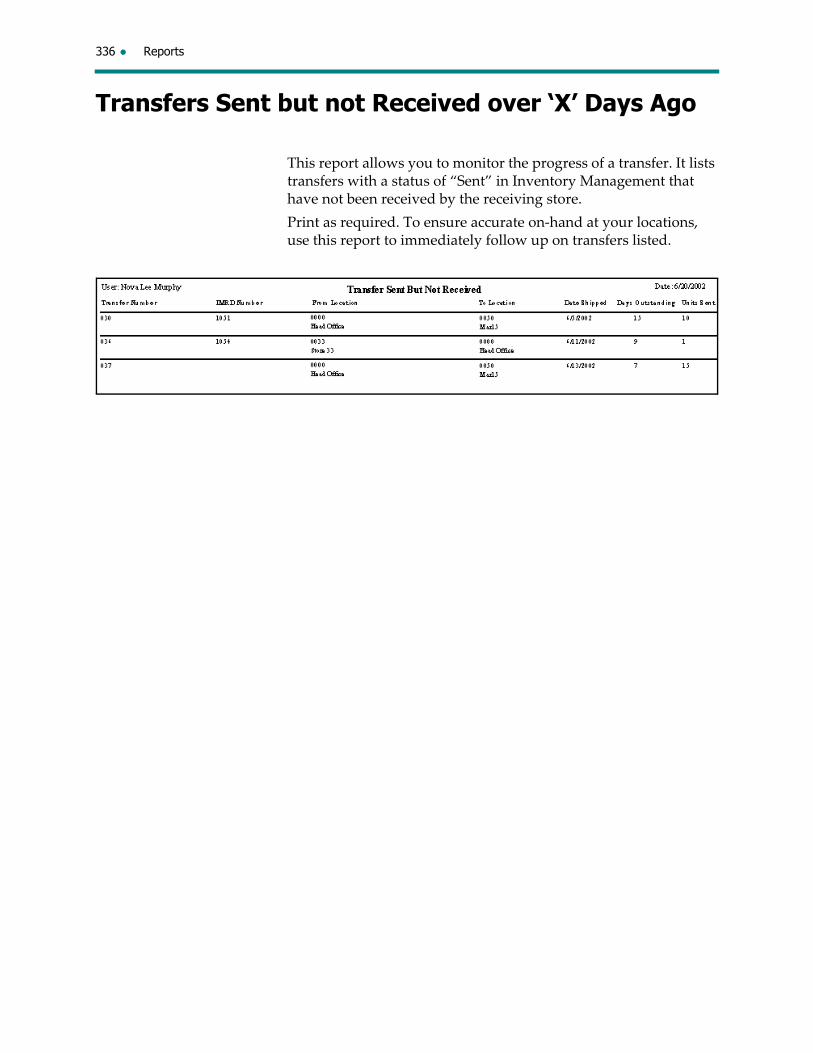
336 Reports
Transfers Sent but not Received over ‘X’ Days Ago
This report allows you to monitor the progress of a transfer. It lists transfers with a status of “Sent” in Inventory Management that have not been received by the receiving store.
Print as required. To ensure accurate on‐hand at your locations, use this report to immediately follow up on transfers listed.
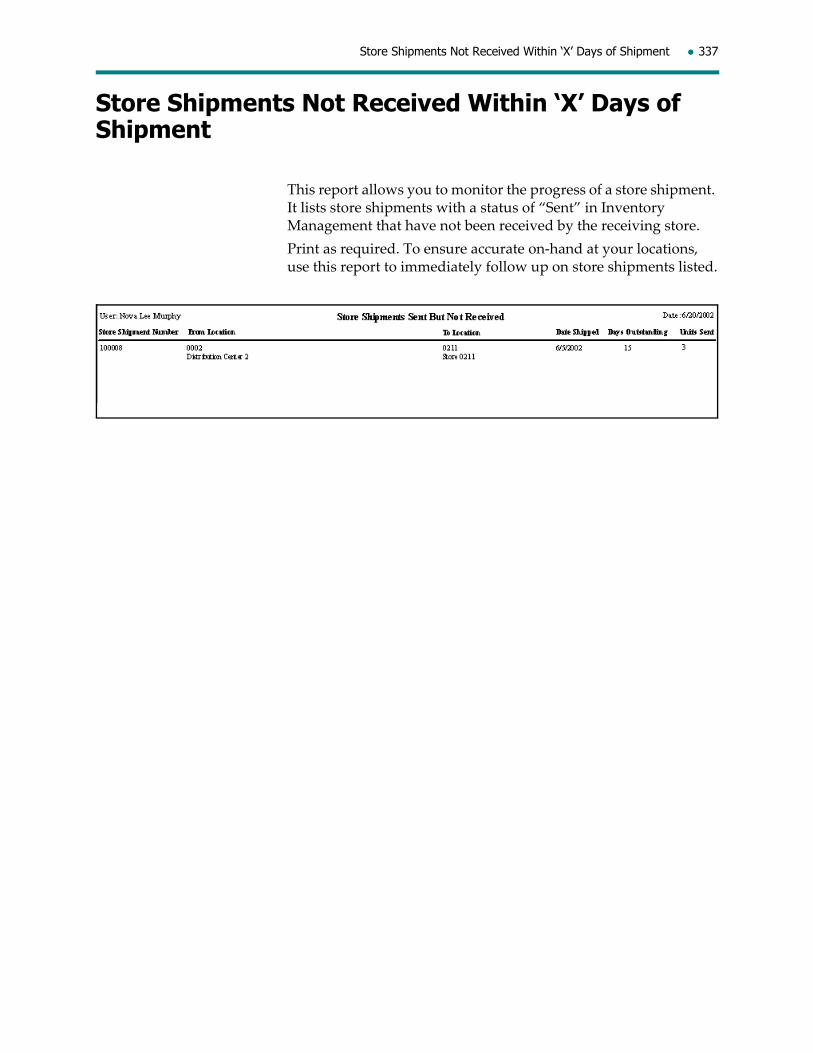
Store Shipments Not Received Within ‘X’ Days of Shipment 337
Store Shipments Not Received Within ‘X’ Days of Shipment
This report allows you to monitor the progress of a store shipment. It lists store shipments with a status of “Sent” in Inventory Management that have not been received by the receiving store.
Print as required. To ensure accurate on‐hand at your locations, use this report to immediately follow up on store shipments listed.

338 Reports
Discrepancy Report
Use this report to monitor discrepancies between units sent and units received for completed (received) transfers and store shipments.
Print as required. To ensure accurate on‐hand at your locations, use this report to immediately follow up on the transfers and store shipments listed.

PO Receipts Not Released to Invoice Matching Greater than ‘X’ Days After Receipt 339
PO Receipts Not Released to Invoice Matching Greater than ‘X’ Days After Receipt
Note: This report is only for clients who don’t have Merchandisingʹs Invoice Matching and are interfacing to a third party Invoice Matching system.
Use this report to track PO Receipts not yet released to Invoice Matching.
Print as required. To ensure vendors are paid for their merchandise, use this report to immediately follow up on the items listed.

340 Reports

The INS and SIT modules allow clients to perform non‐sale transactions at the store and have them feed to the Merchandising Inventory Management host module as scheduled (typically nightly). Stores with a constant network connection may choose to use the Inventory Management module to perform non‐sale type transactions (such as returns to vendor, inter‐store transfers, etc.) while stores without this connection can use one of the following NSB solutions:
either the NSB POS Store Inventory Tracking module (known as “SIT”), or
the NSB Storeworks Interactive Non‐Sale (known as “INS”) module.
The Sales Audit system is used by Head Office Inventory Control personnel to make corrections to Inventory Management transactions with audit concerns (for example, invalid statuses on particular documents, incorrect receiving or sending locations, etc.). In Sales Audit, these are known as Interface Rejects. Sales Audit provides you with the tools to isolate these transactions and then make the required changes so that the transactions can be revalidated in Sales Audit.
11Interactive Non-Sale (INS) / Store Inventory Tracking (SIT)

342 Interactive Non-Sale (INS) / Store Inventory Tracking (SIT)
INS / SIT Information flow
Merchandising (InventoryManagement, Enterprise
Data Management orProduct Management)
Multiple pipelinesegments (file
created by store)Sales Audit
File Transfer
POS
EDM,Product
Management,IM Data
ProcessedTransactions
EDM,Product
Management,IM Data (via
Polling)
IM Data,EDM,
ProductManagement(via Polling)
ProcessedTransactions
ProcessedTransactions
RejectedTransactions
ProcessedTransactions
Triggers for sending and re-sending documents 343
Triggers for sending and re-sending documents
The following lists by document type, the events causing documents to be sent or re‐sent to stores. An individual document cannot be re‐sent; instead, the poll file containing that document must be re‐sent.
IMRD Transfers An IMRD is downloaded to all “From” locations on the IMRD
when the status of the IMRD is set to Submitted.
An IMRD is downloaded (re‐sent) to all “From” locations if the “To” location is modified on an IMRD with a status of Submitted.
When a “From” location is added to an IMRD with a status of Submitted, the IMRD is downloaded only to the added location.
When a “From” location is deleted from an IMRD with a status of Submitted, a delete notification is downloaded only to the deleted location.
When a detail line is added, deleted or modified (Units Requested and/or Comparison Operator is modified) on an IMRD Transfer with a status of Submitted, the IMRD is downloaded (re‐sent) to all “From” locations on the IMRD.
When an IMRD Transfer with a status of Submitted is canceled, a delete notification is downloaded to all “From” locations on the IMRD.
When an IMRD Transfer with a status of Submitted is deleted, a delete notification is downloaded to all “From” locations on the IMRD.
Transfers A transfer is downloaded to the “From” location when the
status of the transfer is set to Ready to Send (INS only).
When the “From” location and/or the “To” location is modified on a transfer with a status of Ready to Send, the transfer is downloaded (re‐sent) to the “From” location (INS only).
When a detail is added, deleted or modified (Units Sent is modified) on a transfer with a status of Ready to Send, the transfer is downloaded (re‐sent) to the “From” location (INS only).
When a transfer with a status of Ready to Send is canceled, a delete notification is downloaded to the “From” location (INS only).
When a transfer with a status of Ready to Send is deleted, a delete notification is downloaded to the “From” location (INS only).
344 Interactive Non-Sale (INS) / Store Inventory Tracking (SIT)
A transfer is downloaded to the “To” location when the status of the transfer is set to Sent (INS and SIT).
When a detail is added, deleted or modified (Units Sent is modified) on a transfer with a status of Sent, the transfer is downloaded (re‐sent) to the “To” location (INS and SIT).
When a transfer with a status of Sent is canceled, a deleted notification is downloaded to the “To” location (INS and SIT).
Store Shipments A store shipment is downloaded to the “To” location when the
status of the store shipment is set to Sent.
Since a store shipment cannot be modified in Inventory Management (only entry of received units or status change to Received can be done), and WMS does not send modifications of store shipments, there are not any subsequent downloads (re‐sends) of a store shipment document to the “To” location.
IMRD RTVs (SIT only) An RTV is downloaded to the “From” location when the status
of the RTV is set to Submitted.
An RTV with a Submitted status is re‐sent when a modification to the following fields is made: RTV Header – From Location, Vendor; RTV Details – Quantity, Comparison Operator. When a “From” location is added, the document is downloaded to the added location only. When detail information is modified, the document is re‐sent to all locations.
When a “From” location is deleted, a delete notification is sent only to the location that was deleted.
When the status of an RTV is changed from Submitted to Canceled, the RTV is downloaded to the from locations using INS/SIT.
When an RTV with a Submitted status is deleted, a delete notification is sent to the From locations using INS/SIT.
PO and/or PO-ASN A separate document is created and sent for each PO
referenced on the ASN notice received by the system from the vendor.
A delete notification is downloaded whenever an ASN notice is deleted.
For dropship POs, if the vendor is not flagged as an EDI‐856 vendor, the PO is sent.
For dropshhip POs, if the vendor is flagged as an EDI‐856 vendor, the PO‐ASN (not the PO) is sent.

Introduction to using Sales Audit 345
Introduction to using Sales Audit
The Sales Audit module is made up of four tabs used to audit transactions. Monetary amounts are displayed in the local currency; that is, the currency assigned to the store in Sales Audit Table Maintenance.
The Guided Audit tab highlights any problematic data and provides a filtered list of only those store/register/sales date combinations that have audit concerns. Use this tab to investigate, verify, and correct the transaction data.
The Transaction tab is used to access transaction details for all transactions on file, as well as to modify transaction details in the process of correcting sales audit concerns. This tab also provides access to transaction attachment information. Transaction attachments contain additional/supplementary information about the transaction line. You may need to modify some of this information to correct interface rejects.
The Media Reconciliation tab is not used by Inventory Control personnel in the correction of interface rejects.
The Audit Status tab is used to view the transaction records that you have corrected.
Guided Audit tabThe Guided Audit tab is the default tab of the Sales Audit module. It provides a filtered list of the store/register/sales date records with audit concerns. Audit concerns include invalid statuses on particular documents, incorrect receiving or sending locations, and certain incorrect details for the transaction. Data is displayed as the alert color on white. Information is summarized by store/date while detail information is displayed by store/register/date. You can toggle between detail and summary views of the information in Sales Audit by using the View Summary button.
From the Guided Audit tab, you can drill down to the problem area and make the appropriate corrections or verify information. When all audit concerns are addressed for a particular store/register/sales date, the record is automatically removed from this window and can be accessed from the Audit Status tab. However, the record will remain in the Guided Audit window as long as audit concerns exist for it.
Accessing the Guided Audit tab
Click Sales Audit. The default tab is Guided Audit.

346 Interactive Non-Sale (INS) / Store Inventory Tracking (SIT)
Guided Audit tab, Detail view
Interpreting the Guided Audit window
Process Errors Appears at the bottom of the Guided Audit tab when an error occurred during the execution of any of the Sales Audit processing functions, such as the Edit, Day‐end, Period‐end or Move.
Translate Rejects
Appears at the bottom of the Guided Audit tab if any rejects occurred during the Translate function.
Halted Processes
Appears at the bottom of the Guided Audit tab when there is an abnormal termination of a process.
Day-end Issues Appears at the bottom of the Guided Audit tab when the day‐end process detects issues with tax tracking information.
Unreconciled Media
Click this button to display warnings of transactions affecting media totals which are unreconciled and which have been outstanding for longer than Unreconciled Tolerance Days or which total an amount greater than Unreconciled tolerance amount.
Store The number identifying a store with audit concerns.

Introduction to using Sales Audit 347
Currency Code The identifier of the local currency defined for the store and the default currency in which monetary amounts are reported for the store.
Register The number indicating a register with audit concerns.
Sales Date The date the transactions were rung up at the register.
Status A description of the phase at which a store/register/sales date combination is currently found in the auditing cycle. Each record is assigned one of the following statuses in the system:
Missing: No data was processed for the store/register/sales date combination, or no transactions came in for the store’s server‐register.
Invalid Store: The store number does not exist in the Store table.
Invalid Register: The register does not exist for the store in the Register tab of the Store table.
Invalid Date: The store/register/sales date combination polled was for an already accepted or completed date, or for a future date.
Edited: The store/register/sales date combination passed through the Edit successfully, but other audit concerns exist.
In Progress: The store/sales date is currently locked by a running process.
Status Date The date the status was last updated.
Short (Over) The total short or over amount for the store/register/sales date combination.
S/A Rejects Audit rejects. The number of transactions for which the processed data violates conditions defined by the system.
Interpreting the Guided Audit window

348 Interactive Non-Sale (INS) / Store Inventory Tracking (SIT)
I/F Rejects Interface rejects. The number of transactions for which the data does not meet the user‐selected conditions that allow it to interface with other subsystems. The five Inventory Management interface reject reasons are:
Stock Control validation failed;
Stock Control issue detected;
External system process error;
Stock Control pre‐validation failed;
Stock Control Validation failed selectively.
See “Introduction to Interface Rejects” on page 349 for a description of each of these I/F reject reasons.
Missing The total number of missing transactions for all sequential transaction series resulting from a break in any sequential transaction count at the register.
Exceptions The number of transactions flagged as audit concerns as a result of having met specific criteria defined by the user.
Duplicates The number of transactions having the same store number, register number, sales date, transaction number, and time (validated to the nearest second) as at least one other transaction.
Interpreting the Guided Audit window
Introduction to Interface Rejects 349
Introduction to Interface Rejects
Interface (I/F) rejects are transactions that do not meet specific user‐selectable and/or user‐defined conditions. They are therefore prevented from interfacing to or successfully updating other subsystems and/or applications (such as Merchandising) with inventory information.
These conditions are set so that transactions are held back in Sales Audit rather than being rejected in the receiving module (for example, Sales Audit verifying that the UPC is on file in the Merchandising database before posting to the interface file). I/F rejects are part of the sales audit totals (provided they are not also sales audit rejects; that is, transactions for which the processed data violates conditions defined by the system) but do not post to the appropriate interface file until they are corrected.
The INS/SIT interface reject reasons are as follows:
Stock Control validation failed: This reason applies to business rule violations where the user can’t force the transaction through by using the Override option. See procedures later in this chapter for instructions to correct this reject reason type.
Stock Control issue detected: This reason applies to business rule violations where the user can force the transaction through by using the Override option. It’s used for transfer receive and store shipment receipt where the item received was not indicated as previously sent. See procedures later in this chapter for instructions to correct this reject reason type.
External system process error: This reason applies to non‐business rule violations and occurs when there are rejections due to system problems, for example, the server is down. See procedures later in this chapter for instructions to correct this reject reason type.
Stock Control pre‐validation failed: This reason applies when more than one document is referenced in the same transaction (which is incorrect for INS/SIT transactions). See procedures later in this chapter for instructions to correct this reject reason type.
Stock control validation failed selectively: This reason applies to physical inventory counts only. If a portion of the transaction is correct, it will post to Merchandising and only the lines that could not be processed will be rejected. They will need to be resubmitted as part of a new transaction when corrected. See procedures later in this chapter for instructions to correct this reject reason type.

350 Interactive Non-Sale (INS) / Store Inventory Tracking (SIT)
Adding an interface rejection reasonYour organization may need to define its own interface rejection reasons in addition to those that are part of the Sales Audit system. We recommend you discuss this with your Sales Audit product specialist and if it is decided a custom interface rejection reason is required, refer to the Sales Audit User Guide for instructions.
Accessing the Interface Rejects
window
This window identifies all I/F reject reasons and their corresponding transactions. The data in the details section of the Interface Rejects window corresponds to the interface rejection reason you select for display.
1. Click Sales Audit. The Guided Audit tab appears.
2. Double‐click the actionable cell in the I/F Reject column or the column heading. The Interface Rejects window displays.
Interface Rejects fields
Interface rejection reasons
The reason the transaction was rejected from an interface perspective.
Store The number identifying the store with the interface reject.
Reg. The number of the register at which the rejected transaction was rung up.
Introduction to Interface Rejects 351
Note: The rest of the fields and command buttons vary according to which Interface Reject reason is selected in the header. See “Correcting Interface Rejects” on page 352.
Sales Date The date the transaction was rung up at the register.
Trans. No. The number indicating the transaction with an interface reject.
Cashier The number identifying the employee who rang up the transaction at the register.
Object-Action Object is the type of transaction line (for example, Transfer); action is what happened to the object (such as received).
Interface The type of Inventory Management transaction.
Failed Validation Why the transaction was rejected.
Reference No. Document number of the rejected transaction.
Interface Rejects fields

352 Interactive Non-Sale (INS) / Store Inventory Tracking (SIT)
Correcting Interface Rejects
The header portion of the Interface Rejects window lists interface reject reasons. In the Trans. Detail (Transactions detail) window, the I/F reject reason displays in the header and the rejected transaction line displays in red italics in the detail portion of the transaction.
Sample transaction line with reason why validation failed

Correcting Interface Rejects 353
The following sections describe how to correct/revalidate the INS/SIT rejects that may occur.
Note: The way the interface reject is corrected depends on the error.
Navigating the Transaction Details window
Transaction attachments
The Attachments field in the Transactions window indicates whether supplementary information is associated with a specific object‐action (for example, a transaction line).
To access transaction attachments
1. To view an attachment, drill down on the transaction line’s corresponding Attachments cell. The Transaction Attachments window appears.
2. Select the particular Attachment type you want to view. The corresponding details display.
For Stock Control I/F Rejects, possible Attachment types may include the following:
Stock Control Detail Table Dump
Stock Inbound Transfer Header
Stock Inventory Count
Stock Item Detail
Stock Outbound Transfer Header
Stock PO Receipt Header
Stock RTV Header
Stock Shipment Information.
Object-actions You can change an object‐action within a transaction or add an object‐action to an existing or new transaction. An object‐action is a description of what occurred in the detail line of the transaction (for example, merchandise returned to a vendor, merchandise transferred to another store). Object refers to the type of transaction line (such as merchandise), while action describes what happened to the object (such as transferred).
You make your changes in the Object‐Action list. The content of the Object‐Action Outliner or Object‐Action Association List is user‐defined and varies depending on the transaction category. You can set either the Object‐Action Outliner or the Object‐Action Association List as your default in Tools> Customize.
To change an object-action
1. Click Sales Audit. The Guided Audit tab appears.
2. Select the Transaction tab.
3. Select Go To Row. The Go To box appears.
4. Select the appropriate store/register/date record and click OK.

354 Interactive Non-Sale (INS) / Store Inventory Tracking (SIT)
5. Select the particular transaction you want to modify and click Trans. Detail. The corresponding Transactions detail window appears.
6. Select the appropriate transaction line and then drill down on the Object-Action field. This opens the Object-Action selection window (Outliner or Association List).
Object‐Action Outliner
7. In the Object-Action Outliner, select the Object type and the appropriate Object.
8. Select the required Action.
9. If you use the Association List, select the first letter of the object that you require (with your mouse pointer or using the Go to keypad). The cursor will now be positioned on the first action associated with the first object beginning with this letter. If necessary, continue selecting the same letter or use the scroll bar to locate the desired object. Then select the required action.
10. To return to the transaction, click OK.
11. Click Save.
Revalidating UPCs The Revalidate function allows you to revalidate UPCs not originally on file. Before using this feature, the missing UPCs must be created in the Product module of the Merchandising system and a Pipeline segment must be run so that the UPCs update the Sales

Correcting Interface Rejects 355
Audit UPC table. Then, when Revalidate is clicked, it verifies whether the UPCs now exist in the UPC table and if they do, the corresponding I/F rejects will be removed from the I/F Rejects window.
If the missing UPCs have been created in the Product module of the Merchandising system and added to the UPC Master database, click Revalidate.
Note: If the invalid UPCs are not going to be generated in the Merchandising system, they will need to be reassigned to another valid UPC. See Reassigning invalid UPCs in the Sales Audit User Guide.
I/F Reject reason: Stock Control Validation FailedSales Audit enables you to correct a reject where the Override option could not be used to force a transaction through.
To correct a Stock Control Validation
Failed I/F reject reason
1. Click Sales Audit. The Guided Audit tab appears.
2. Double‐click the actionable cell in the I/F Rejects column. The Interface Rejects window appears.
3. Select the interface rejection reason Stock Control Validation Failed.
4. You can:
Correct the information in the Stock Control attachment in the Transactions detail window (click Trans. Detail and make your changes); or
Revalidate the stock control transaction (click Revalidate).

356 Interactive Non-Sale (INS) / Store Inventory Tracking (SIT)
I/F Reject reason: Stock Control Issue DetectedSales Audit enables you to correct a reject that occurred for transfer and store shipment receipts for items not recorded as previously sent.
To correct a Stock Control Issue
Detected I/F reject reason
1. Click Sales Audit. The Guided Audit tab appears.
2. Double‐click the actionable cell from the I/F Rejects column. The Interface Rejects window appears.
3. Select the interface rejection reason Stock Control Issue Detected.
4. You can:
Correct the information in the Stock Control attachment in the Transactions detail window (click Trans. Detail and make your changes);
Revalidate the stock control transaction (click Revalidate); or
Override the issue (if the override option in Sales Audit Table Maintenance is active, select the Override option in the I/F Reject drill‐down). See “Overriding an I/F Reject” on page 360 for more information.
I/F Reject reason: External system process errorSales Audit enables you to correct rejects due to system problems; for example, server down.
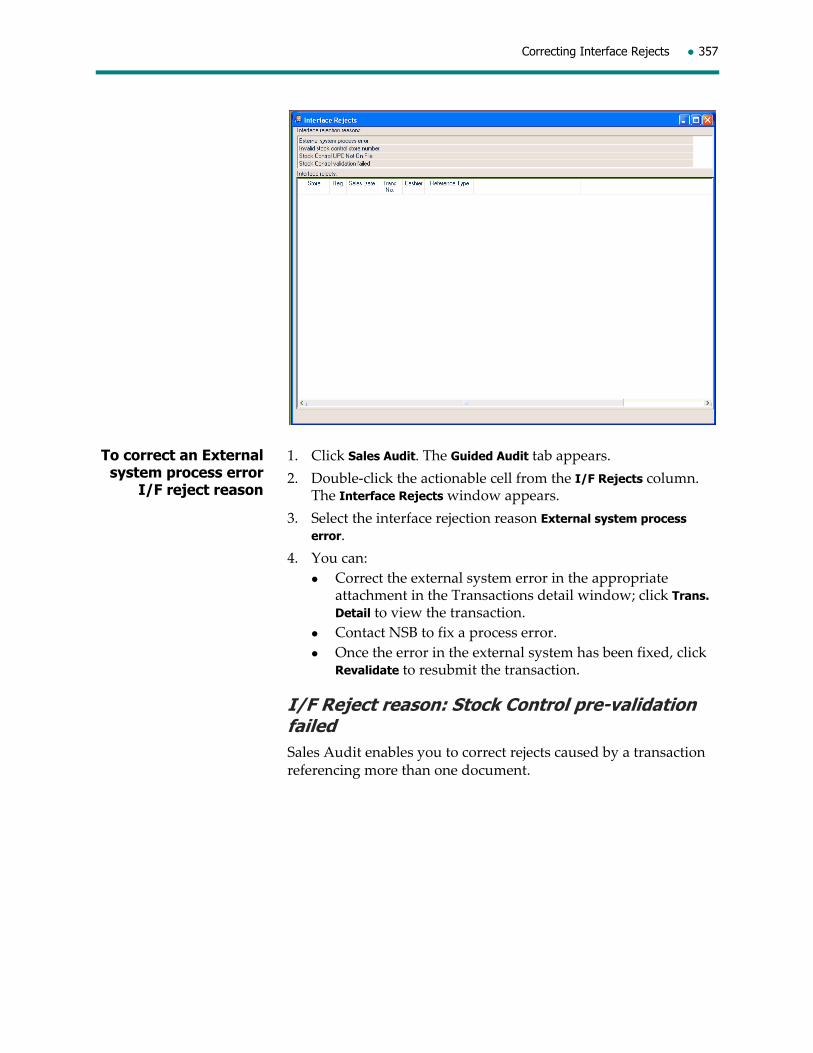
Correcting Interface Rejects 357
To correct an External system process error
I/F reject reason
1. Click Sales Audit. The Guided Audit tab appears.
2. Double‐click the actionable cell from the I/F Rejects column. The Interface Rejects window appears.
3. Select the interface rejection reason External system process error.
4. You can:
Correct the external system error in the appropriate attachment in the Transactions detail window; click Trans. Detail to view the transaction.
Contact NSB to fix a process error.
Once the error in the external system has been fixed, click Revalidate to resubmit the transaction.
I/F Reject reason: Stock Control pre-validation failedSales Audit enables you to correct rejects caused by a transaction referencing more than one document.

358 Interactive Non-Sale (INS) / Store Inventory Tracking (SIT)
Interface Rejects window – Stock Control UPC not on file (pre‐validation failed)
To correct a Stock Control pre-validation
failed I/F reject reason
1. Click Sales Audit. The Guided Audit tab appears.
2. Double‐click the actionable cell from the I/F Rejects column. The Interface Rejects window appears.
3. Select the interface rejection reason Stock Control pre-validation failed.
4. You can:
Correct the information in the Stock Control attachment in the Transactions detail window (click Trans. Detail and make your changes); or
Revalidate the stock control transaction after modifications have been made in Merchandising (click Revalidate).
I/F Reject reason: Stock control validation failed selectivelySales Audit enables you to correct rejects that apply to physical inventory counts.
Generally, all lines in an I/F reject are held back from the interface. However, in a physical inventory count situation, there might be many inventory count lines; therefore, this specific reject reason “failed selectively” sends lines without rejects and only holds back the rejected lines in a separate transaction so that they may be corrected.

Correcting Interface Rejects 359
To correct a stock control validation
failed selectively I/F reject reason
1. Click Sales Audit. The Guided Audit tab appears.
2. Double‐click the actionable cell from the I/F Rejects column. The Interface Rejects window appears.
3. Select the interface rejection reason Stock control validation failed selectively.
4. You can:
Correct the information in the Stock Control attachment in the Transactions detail window (click Trans. Detail and make your changes); or
Revalidate the transaction (click Revalidate); or
Override the issue (if the override option in Sales Audit Table Maintenance is active, select the Override option in the I/F Reject drill‐down). See “Overriding an I/F Reject” on page 360 for more information.

360 Interactive Non-Sale (INS) / Store Inventory Tracking (SIT)
Overriding an I/F Reject
Note: The option to allow some of the interface rejects to be overridden is set in Sales Audit Table Maintenance (Interface Rejects Maintenance, Interface Reject Rule tab, Override column check box).
Note: Use of this functionality should first be discussed with your Sales Audit product specialist.
You can use this feature to override an interface reject that is a warning alerting you to a suspicious situation that needs to be investigated. Once you find the transaction to be valid, you can override the I/F reject. It is then placed back in the queue to be reprocessed.
Not all I/F rejects can be set up for override; your Sales Audit product specialist would do this.
To override an I/F reject
1. Click Sales Audit. The Guided Audit tab appears.
2. Double‐click the actionable cell in the I/F Rejects column or the column heading. The Interface Rejects or All Interface Rejects window displays.
3. In the Interface Rejects window, select the appropriate interface rejection reason.
4. Select one or more transactions you want to override and click Override.
5. In the Selection Criteria dialog box, select either All rows or Selected rows and then click OK.

Overriding an I/F Reject 361
These rows will be removed and put back in the queue to be processed as usual (no errors encountered).
362 Interactive Non-Sale (INS) / Store Inventory Tracking (SIT)
Deferring an I/F reject
Note: The option allowing an interface reject to be deferred is set in Sales Audit Table Maintenance. It is set by interface reject reason.
Note: Use of this functionality should first be discussed with your Sales Audit product specialist.
This feature can be used to defer an interface reject so that you can work on the rejected transaction at a later date. This feature is most often used when it is necessary to close the fiscal period before the I/F rejects can be corrected. It is possible to set up any I/F reject for deferral; your Sales Audit product specialist would do this. However, if you defer I/F rejects, it results in the different subsystems being out of balance (for example, Sales Audit to Merchandising, to Customer Liability, etc.).
Note: Manual adjustments will be required in Merchandising since archived deferred rejects will not be fed to Merchandising.
Once an I/F reject has been set up to allow deferrals, the Defer I/F Reject button appears in the All Interface Rejects window for that interface rejection reason.
To defer an I/F reject 1. Click Sales Audit. The Guided Audit tab appears.
2. Double‐click the actionable cell in the I/F Rejects column or the column heading. The Interface Rejects or All Interface Rejects window displays.
3. In the Interface Rejects window, select the appropriate interface rejection reason.
4. Select the transaction you want to defer.
5. Click Defer I/F Reject. The deferred I/F rejects will be removed from the Interface Rejects window.

Deferring an I/F reject 363
Current Deferred I/F Rejects window
Viewing a deferred I/F rejectFrom the Deferred I/F Rejects window, you can view either archived or current deferred I/F rejects. Archived I/F rejects pertain to store/dates that have already been completed. Current deferred I/F rejects are associated with transactions not yet day‐ended.
To view a deferred I/F reject
1. From the View menu, select Deferred I/F Rejects.
2. In the Deferred I/F Rejects window, select the interface rejection reason you want to view.
3. Highlight the deferred I/F reject you want to view. You can select multiple transactions by using Shift and clicking and dragging the mouse, or a non‐contiguous range by using Ctrl and clicking each transaction.
4. Click Trans. Detail. If more than one transaction was selected, use the VCR buttons to navigate from one transaction to the next.
To undefer a current deferred I/F reject
1. From the View menu, select Deferred I/F Rejects > Current.
2. From the Current Deferred I/F Rejects window, select the interface rejection reason corresponding to the rejected transaction you want to undefer.
3. Highlight the deferred I/F reject you want to undefer. You can select multiple transactions by using Shift and clicking and dragging the mouse, or a non‐contiguous range by using Ctrl and clicking each transaction.
4. Click Undefer I/F Reject.
5. Return to Sales Audit and proceed in the normal manner with the correction of the I/F rejects that have been undeferred.
Verifying an archived deferred I/F rejectYou cannot undefer an archived deferred I/F reject since the store/date to which it belongs has already been day‐ended.

364 Interactive Non-Sale (INS) / Store Inventory Tracking (SIT)
Nevertheless, it is important to verify this I/F reject to remove it from the Archived Deferred I/F Rejects window.
To verify an archived deferred I/F reject
You also need to make the appropriate manual adjustments in the corresponding subsystem to take this transaction into account.
1. From the View menu, select Deferred I/F Rejects Archived.
2. From the Archived Deferred I/F Rejects window, select the appropriate interface rejection reason.
3. Select the interface reject you want to verify. You can select multiple I/F rejects by using Shift and clicking and dragging the mouse, or a non‐contiguous range by using Ctrl and clicking on each row.
4. Click Verify. The I/F rejects will now be removed from this window.
5. Make a manual entry to account for this transaction in the particular subsystem for which it was originally destined. Contact your Sales Audit product specialist for the appropriate course of action.
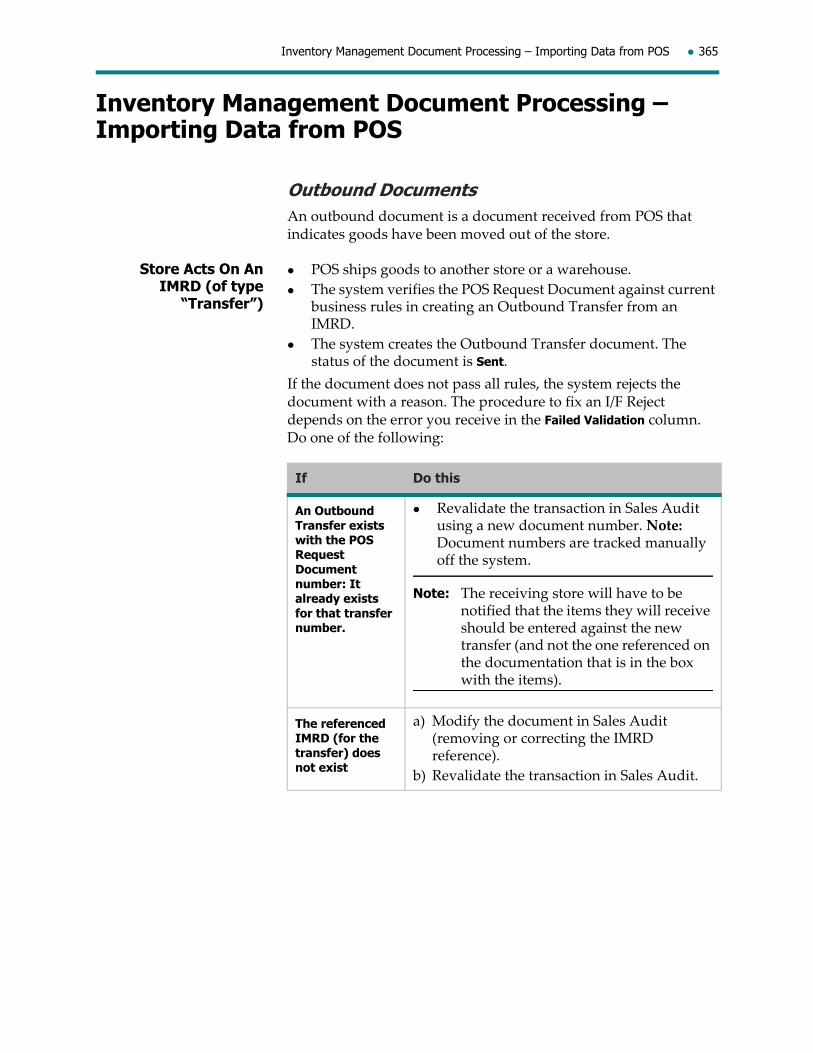
Inventory Management Document Processing – Importing Data from POS 365
Inventory Management Document Processing – Importing Data from POS
Outbound DocumentsAn outbound document is a document received from POS that indicates goods have been moved out of the store.
Store Acts On An IMRD (of type
“Transfer”)
POS ships goods to another store or a warehouse.
The system verifies the POS Request Document against current business rules in creating an Outbound Transfer from an IMRD.
The system creates the Outbound Transfer document. The status of the document is Sent.
If the document does not pass all rules, the system rejects the document with a reason. The procedure to fix an I/F Reject depends on the error you receive in the Failed Validation column. Do one of the following:
If Do this
An Outbound Transfer exists with the POS Request Document number: It already exists for that transfer number.
Revalidate the transaction in Sales Audit using a new document number. Note: Document numbers are tracked manually off the system.
Note: The receiving store will have to be notified that the items they will receive should be entered against the new transfer (and not the one referenced on the documentation that is in the box with the items).
The referenced IMRD (for the transfer) does not exist
a) Modify the document in Sales Audit (removing or correcting the IMRD reference).
b) Revalidate the transaction in Sales Audit.

366 Interactive Non-Sale (INS) / Store Inventory Tracking (SIT)
Referenced IMRD has a status of Canceled
a) Reinstate the IMRD and set the status to “Submitted” in IM.
b) Revalidate the transaction in Sales Audit; ‐or
If the system is set up to allow transactions that do not reference IMRDs (via Enterprise Data > Employee > User Preferences for creating transfers from an IMRD), modify the document by going to the transaction detail. Open up the header attachment, remove the reference to the IMRD and save the transaction. Modifying the rejected transaction will cause it to be revalidated in Sales Audit.
Note: When the status of the IMRD is set to “Submitted”, a download of this document will be triggered. All sending stores will have to be instructed to disregard and not act on this document.
A style, style color, or style size is not on the referenced IMRD
a) Add style to IMRD in IM.
b) Revalidate the transaction in Sales Audit; or
If the system is set up to allow transactions that do not reference IMRDs (via Enterprise Data> Employee > User Preferences for creating transfers from an IMRD), modify the document by going to the transaction detail. Open up the header attachment, remove the reference to the IMRD and save the transaction. Modifying the rejected transaction will cause it to be revalidated in Sales Audit.
Note: When the status of the IMRD is set to “Submitted”, a download of this document will be triggered. All sending stores will have to be instructed to disregard and not act on this document.
If Do this
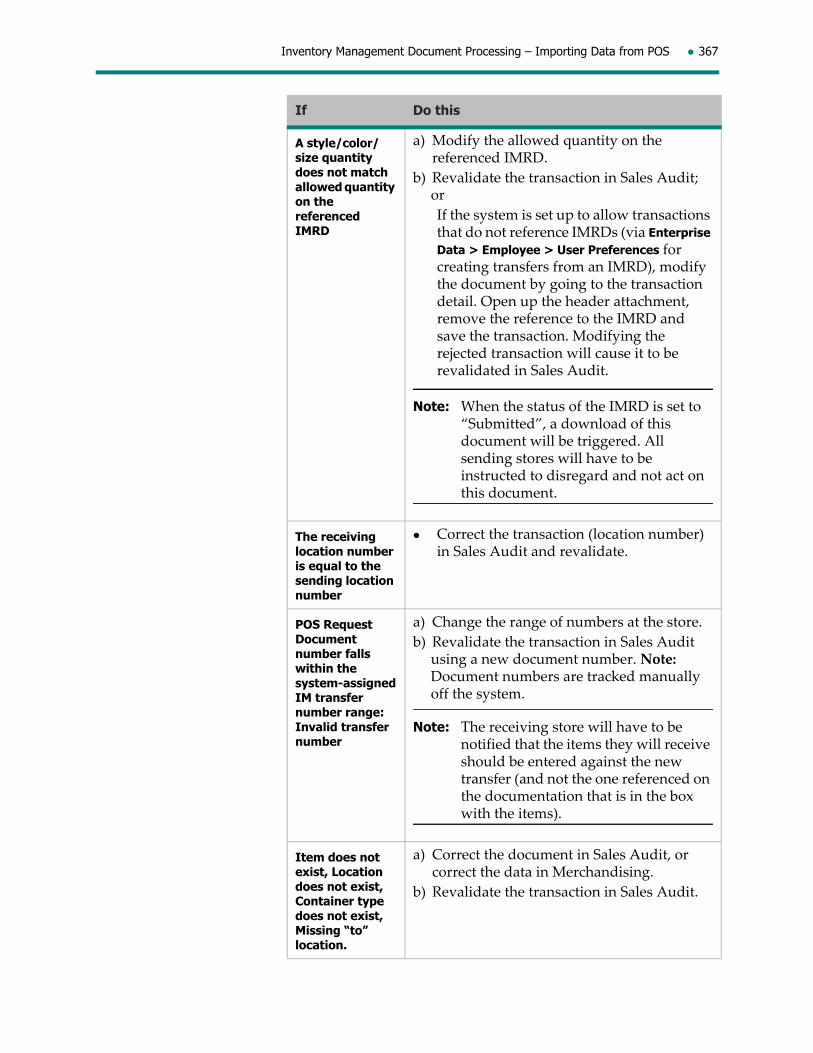
Inventory Management Document Processing – Importing Data from POS 367
A style/color/size quantity does not match allowed quantity on the referenced IMRD
a) Modify the allowed quantity on the referenced IMRD.
b) Revalidate the transaction in Sales Audit; or
If the system is set up to allow transactions that do not reference IMRDs (via Enterprise Data > Employee > User Preferences for creating transfers from an IMRD), modify the document by going to the transaction detail. Open up the header attachment, remove the reference to the IMRD and save the transaction. Modifying the rejected transaction will cause it to be revalidated in Sales Audit.
Note: When the status of the IMRD is set to “Submitted”, a download of this document will be triggered. All sending stores will have to be instructed to disregard and not act on this document.
The receiving location number is equal to the sending location number
Correct the transaction (location number) in Sales Audit and revalidate.
POS Request Document number falls within the system-assigned IM transfer number range: Invalid transfer number
a) Change the range of numbers at the store.
b) Revalidate the transaction in Sales Audit using a new document number. Note: Document numbers are tracked manually off the system.
Note: The receiving store will have to be notified that the items they will receive should be entered against the new transfer (and not the one referenced on the documentation that is in the box with the items).
Item does not exist, Location does not exist, Container type does not exist, Missing “to” location.
a) Correct the document in Sales Audit, or correct the data in Merchandising.
b) Revalidate the transaction in Sales Audit.
If Do this

368 Interactive Non-Sale (INS) / Store Inventory Tracking (SIT)
INS ONLY: Store Acts On A Transfer (of Status “Ready to
Send”)
POS ships goods to another store or a warehouse.
System verifies the POS Request Document against current business rules in updating an Outbound Transfer.
System updates the Outbound Transfer document. The status of the document is Sent.
If the document does not pass all rules, the system rejects the document with a reason. The procedure to fix an I/F Reject depends on the error you receive in the Failed Validation column. Do one of the following:
Ship past allowable backdate days Merchandising parameter: Ship Date must be between the current date and the current date less Allowable Backdate Days.
a) Correct the document in Sales Audit.
b) Revalidate the transaction in Sales Audit.
Send Date past allowable End send date specified: Send Date must be before End send date specified in the document
a) Correct the document in Sales Audit.
b) Revalidate the transaction in Sales Audit.
If Do this
If Do this
Referenced Transfer does not exist
a) Modify the document in Sales Audit (correcting the transfer number).
b) Revalidate the transaction in Sales Audit.
Referenced transfer is not of status Ready to send: The status of the transfer is Canceled, Sent or Received
If the transfer was canceled in IM:
a) Reinstate the transfer (setting the status of the transfer to “Ready to Send”).
b) Revalidate the transaction in Sales Audit. If the transfer status is “Sent” or “Received”: Investigate the situation (the store cannot do subsequent transfer sends for the same document).

Inventory Management Document Processing – Importing Data from POS 369
A style, style color, or style size is not on the referenced IMRD
a) Add style to IMRD in IM.
b) Revalidate the transaction in Sales Audit; or
If the system is set up to allow transactions that do not reference IMRDs (via Enterprise Data > Employee > User Preferences for creating transfers from an IMRD), modify the document by going to the transaction detail. Open up the header attachment, remove the reference to the IMRD and save the transaction. Modifying the rejected transaction will cause it to be revalidated in Sales Audit.
Note: When the status of the IMRD is set to “Submitted”, a download of this document will be triggered. All sending stores will have to be instructed to disregard and not act on this document.
A style/color/size quantity does not match allowed quantity on the referenced IMRD
a) Modify the allowed quantity on the referenced IMRD.
b) Revalidate the transaction in Sales Audit; or
If the system is set up to allow transactions that do not reference IMRDs (via Enterprise Data > Employee > User Preferences for creating transfers from an IMRD), modify the document by going to the transaction detail. Open up the header attachment, remove the reference to the IMRD and save the transaction. Modifying the rejected transaction will cause it to be revalidated in Sales Audit.
Note: When the status of the IMRD is set to “Submitted”, a download of this document will be triggered. All sending stores will have to be instructed to disregard and not act on this document.
Item does not exist
a) Correct the document in Sales Audit or Merchandising.
b) Revalidate the transaction in Sales Audit.
If Do this

370 Interactive Non-Sale (INS) / Store Inventory Tracking (SIT)
SIT ONLY: Store Acts On An IMRD (of type
“RTV”)
POS returns goods to a vendor.
System verifies the POS Request Document against current business rules in creating an RTV from an IMRD.
System creates the RTV Document. The status of the document is Returned.
If the document does not pass all rules, the system rejects the document with a reason. The procedure to fix an I/F Reject depends on the error you receive in the Failed Validation column. Do one of the following:
Ship past allowable backdate days Merchandising parameter: Ship Date must be between the current date and the current date less Allowable Backdate Days
a) Correct the document in Sales Audit.
b) Revalidate the transaction in Sales Audit.
Send Date past allowable End send date specified: Send Date must be before End send date specified in the document
a) Correct the document in Sales Audit.
b) Revalidate the transaction in Sales Audit.
If Do this
If Do this
An RTV already exists with the POS Request Document number
Revalidate the transaction in Sales Audit using a new document number.
The referenced IMRD (for the RTV) does not exist
a) Modify the document in Sales Audit (removing or correcting the IMRD reference).
b) Revalidate the transaction in Sales Audit.

Inventory Management Document Processing – Importing Data from POS 371
Referenced IMRD-RTV has a status of Canceled
a) Reinstate the IMRD and set the status to “Submitted” in IM.
b) Revalidate the transaction in Sales Audit; or
If the User Preference for creating RTVs from an IMRD is set to “Optional”, modify the document to be a store‐created RTV and revalidate the transaction in Sales Audit using a new document number.
Note: When the status of the IMRD is set to “Submitted”, a download of this document will be triggered. All sending stores will have to be instructed to disregard and not act on this document.
A style, style color, or style size, is not on the referenced IMRD
a) Add style to IMRD in IM.
b) Revalidate the transaction in Sales Audit; or
If the User preference for creating RTVs from an IMRD is set to “Optional”, modify the document to be a store‐created RTV and revalidate the transaction in Sales Audit using a new document number.
Invalid RTV number; POS Request Document number falls within the system-assigned IM RTV number range
a) Change the range of numbers at the store.
b) Revalidate the transaction in Sales Audit using a new document number. Note: Document numbers are tracked manually off the system.
Item does not exist; Location does not exist; Container type does not exist; Invalid vendor code
a) Correct the document in Sales Audit, or correct the data in Merchandising.
b) Revalidate the transaction in Sales Audit. Note: Document numbers are tracked manually off the system.
Vendor requires Return Authorization number, number missing
a) Investigate the transaction at POS.
b) Correct the transaction in Sales Audit. C) Revalidate the transaction in Sales Audit.
If Do this

372 Interactive Non-Sale (INS) / Store Inventory Tracking (SIT)
Transfer (Outbound) Created At POS
POS ships goods to another store or a warehouse.
System verifies the POS Request Document against current business rules in creating a Transfer (Outbound portion).
System creates the transfer. The status of the document is Sent.
If the receiving store is an offline inventory management (INS/SIT) store, the system downloads the transfer to the receiving location.
If the document does not pass all rules, the system rejects the document with a reason. The procedure to fix an I/F Reject depends on the error you receive in the Failed Validation column. Do one of the following:
Return date past allowable backdate days. Merchandising parameter: Return Date must be between the current date and the current date less Allowable Backdate Days
a) Correct the document in Sales Audit.
b) Revalidate the transaction in Sales Audit.
Multiple details exist on the POS document for the same SKU/carton but with different status codes
a) Correct the document in Sales Audit.
b) Revalidate the transaction in Sales Audit.
If Do this
If Do this
An Outbound Transfer already exists with the POS Request Document number
Revalidate the transaction in Sales Audit using a new document number. Note: Document numbers are tracked manually off the system.
When the status of the transfer is set to “Submitted”, a download of this document will be triggered. All sending stores will have to be instructed to disregard and not act on this document.
The receiving location number is the same as the sending location number
a) Correct the document in Sales Audit.
b) Revalidate the transaction in Sales Audit.
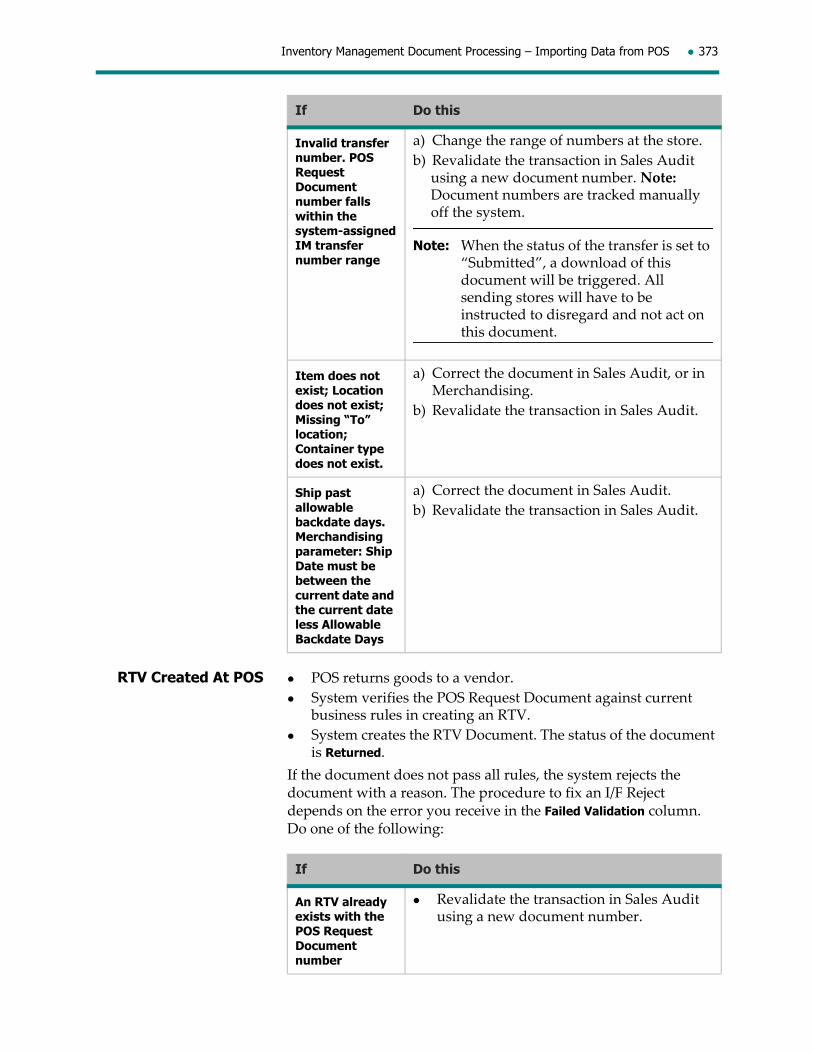
Inventory Management Document Processing – Importing Data from POS 373
RTV Created At POS POS returns goods to a vendor.
System verifies the POS Request Document against current business rules in creating an RTV.
System creates the RTV Document. The status of the document is Returned.
If the document does not pass all rules, the system rejects the document with a reason. The procedure to fix an I/F Reject depends on the error you receive in the Failed Validation column. Do one of the following:
Invalid transfer number. POS Request Document number falls within the system-assigned IM transfer number range
a) Change the range of numbers at the store.
b) Revalidate the transaction in Sales Audit using a new document number. Note: Document numbers are tracked manually off the system.
Note: When the status of the transfer is set to “Submitted”, a download of this document will be triggered. All sending stores will have to be instructed to disregard and not act on this document.
Item does not exist; Location does not exist; Missing “To” location; Container type does not exist.
a) Correct the document in Sales Audit, or in Merchandising.
b) Revalidate the transaction in Sales Audit.
Ship past allowable backdate days. Merchandising parameter: Ship Date must be between the current date and the current date less Allowable Backdate Days
a) Correct the document in Sales Audit.
b) Revalidate the transaction in Sales Audit.
If Do this
If Do this
An RTV already exists with the POS Request Document number
Revalidate the transaction in Sales Audit using a new document number.

374 Interactive Non-Sale (INS) / Store Inventory Tracking (SIT)
Invalid RTV number. POS Request Document number falls within the system-assigned IM RTV number range
a) Change the range of numbers at the store.
b) Revalidate the transaction in Sales Audit using a new document number. Note: Document numbers are tracked manually off the system.
RTV from a store. RTVs are allowed only from a warehouse (Merchandising parameter)
If stores are not allowed to create RTVs:
a) Remove the option to create RTVs from POS.
b) To allow this transaction to go through, temporarily change the Merchandising parameter to allow RTVs from a store.
c) Revalidate the transaction in Sales Audit.
d) Change the Merchandising parameter back to its original setting.
If the Merchandising parameter is set incorrectly and stores are allowed to create RTVs:
a) Change the Merchandising parameter to allow RTVs from a store.
b) Revalidate the transaction in Sales Audit.
Vendor RTVs not allowed
If stores are not allowed to create RTVs:
a) Remove the option to create RTVs from POS.
b) To allow this transaction to go through, temporarily change the Merchandising parameter to allow RTVs from a store.
c) Revalidate the transaction in Sales Audit.
d) Change the Merchandising parameter back to its original setting.
If the Merchandising parameter is set incorrectly and stores are allowed to create RTVs:
a) Change the Merchandising parameter to allow RTVs from a store.
b) Revalidate the transaction in Sales Audit.
If Do this

Inventory Management Document Processing – Importing Data from POS 375
Inbound DocumentsAn inbound document is a document received from POS that indicates goods have been received into the store.
Inbound Transfer POS receives goods from another store.
System verifies the POS Request Document against current business rules in updating a transfer.
System updates the transfer. The status of the document is Received.
The following parameters exist in Enterprise Data (Parameters > Inventory > Offline IM) for transfer receipts:
whether units on a subsequent transfer receipt document (that is, receipts for a transfer document that already has a Received status) should be added to or replace units already received, or if the subsequent transfer receipt document should be rejected. If this option is set to increment or replace units, an adjustment
Item does not exist; Location does not exist; Vendor does not exist; Invalid vendor code; Container type does not exist
a) Correct the document in Sales Audit or Merchandising.
b) Revalidate the transaction in Sales Audit.
Vendor requires Return Authorization number, number missing
a) Investigate the transaction at POS.
b) Correct the transaction in Sales Audit.
c) Revalidate the transaction in Sales Audit.
Return date past allowable backdate days. Merchandising parameter: Return Date must be between the current date and the current date less Allowable Backdate Days
a) Correct the document in Sales Audit.
b) Revalidate the transaction in Sales Audit.
Multiple details exist on the POS document for the same SKU/carton but with different status codes
a) Correct the document in Sales Audit.
b) Revalidate the transaction in Sales Audit.
If Do this
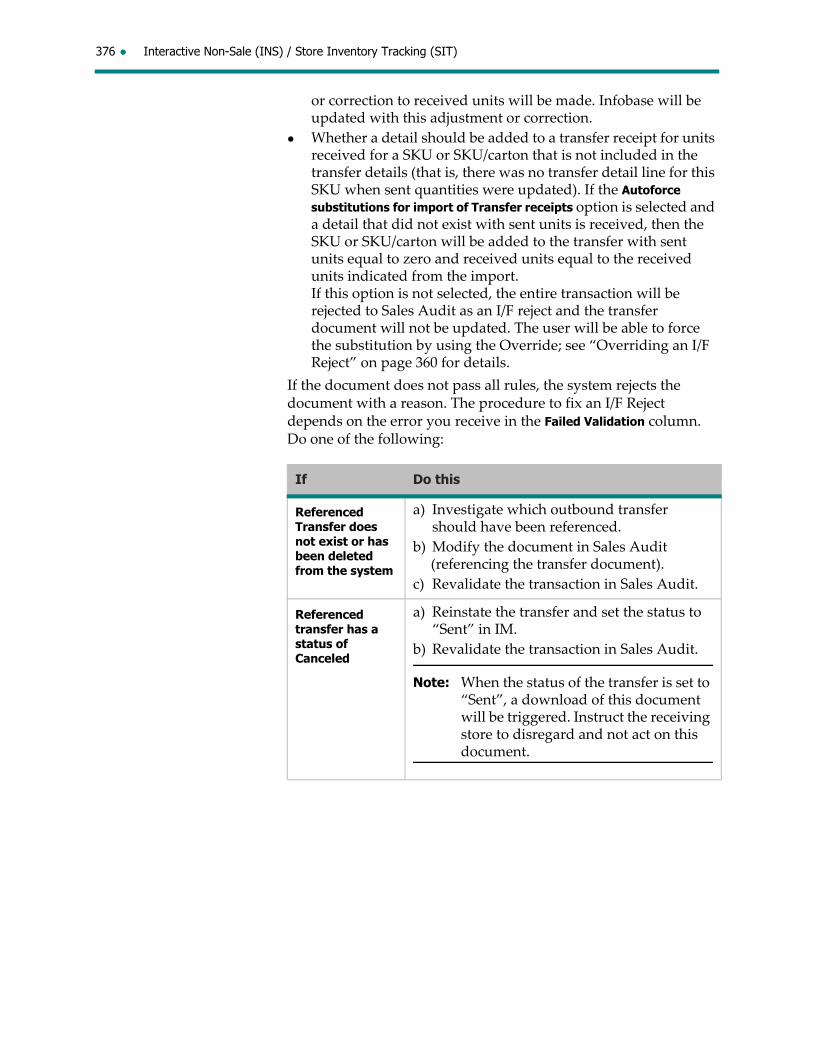
376 Interactive Non-Sale (INS) / Store Inventory Tracking (SIT)
or correction to received units will be made. Infobase will be updated with this adjustment or correction.
Whether a detail should be added to a transfer receipt for units received for a SKU or SKU/carton that is not included in the transfer details (that is, there was no transfer detail line for this SKU when sent quantities were updated). If the Autoforce substitutions for import of Transfer receipts option is selected and a detail that did not exist with sent units is received, then the SKU or SKU/carton will be added to the transfer with sent units equal to zero and received units equal to the received units indicated from the import.If this option is not selected, the entire transaction will be rejected to Sales Audit as an I/F reject and the transfer document will not be updated. The user will be able to force the substitution by using the Override; see “Overriding an I/F Reject” on page 360 for details.
If the document does not pass all rules, the system rejects the document with a reason. The procedure to fix an I/F Reject depends on the error you receive in the Failed Validation column. Do one of the following:
If Do this
Referenced Transfer does not exist or has been deleted from the system
a) Investigate which outbound transfer should have been referenced.
b) Modify the document in Sales Audit (referencing the transfer document).
c) Revalidate the transaction in Sales Audit.
Referenced transfer has a status of Canceled
a) Reinstate the transfer and set the status to “Sent” in IM.
b) Revalidate the transaction in Sales Audit.
Note: When the status of the transfer is set to “Sent”, a download of this document will be triggered. Instruct the receiving store to disregard and not act on this document.
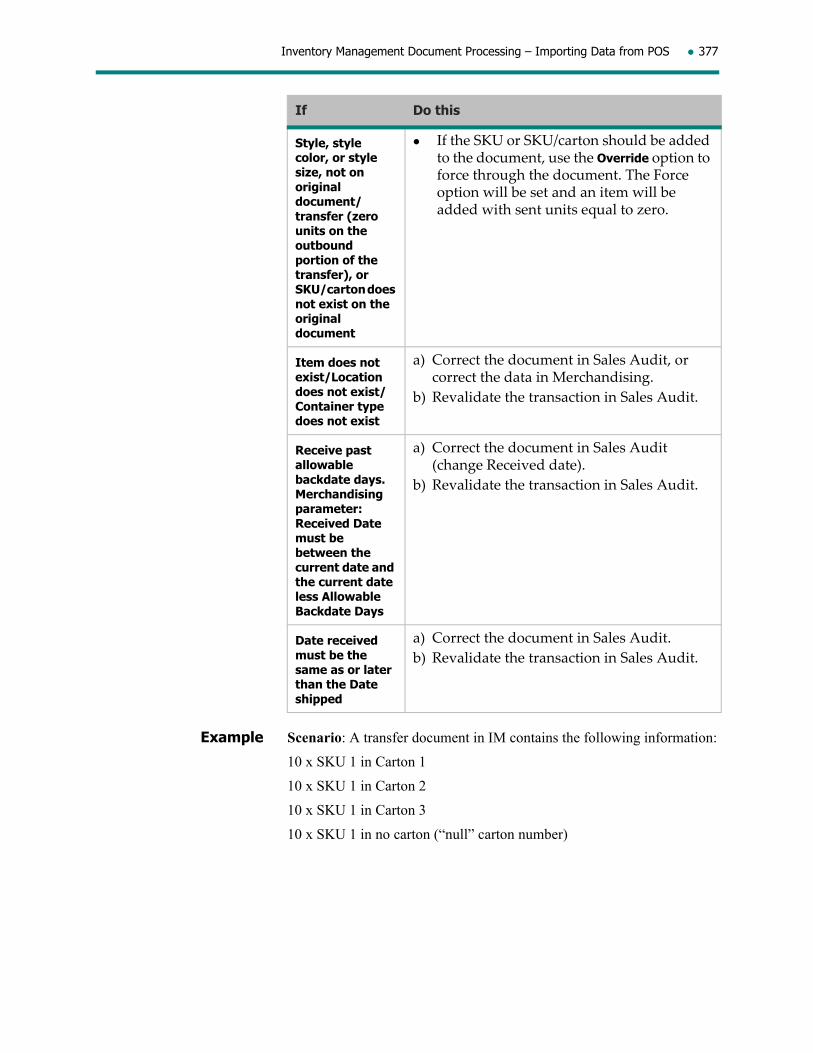
Inventory Management Document Processing – Importing Data from POS 377
Example Scenario: A transfer document in IM contains the following information:
10 x SKU 1 in Carton 1
10 x SKU 1 in Carton 2
10 x SKU 1 in Carton 3
10 x SKU 1 in no carton (“null” carton number)
Style, style color, or style size, not on original document/transfer (zero units on the outbound portion of the transfer), or SKU/carton does not exist on the original document
If the SKU or SKU/carton should be added to the document, use the Override option to force through the document. The Force option will be set and an item will be added with sent units equal to zero.
Item does not exist/Location does not exist/Container type does not exist
a) Correct the document in Sales Audit, or correct the data in Merchandising.
b) Revalidate the transaction in Sales Audit.
Receive past allowable backdate days. Merchandising parameter: Received Date must be between the current date and the current date less Allowable Backdate Days
a) Correct the document in Sales Audit (change Received date).
b) Revalidate the transaction in Sales Audit.
Date received must be the same as or later than the Date shipped
a) Correct the document in Sales Audit.
b) Revalidate the transaction in Sales Audit.
If Do this
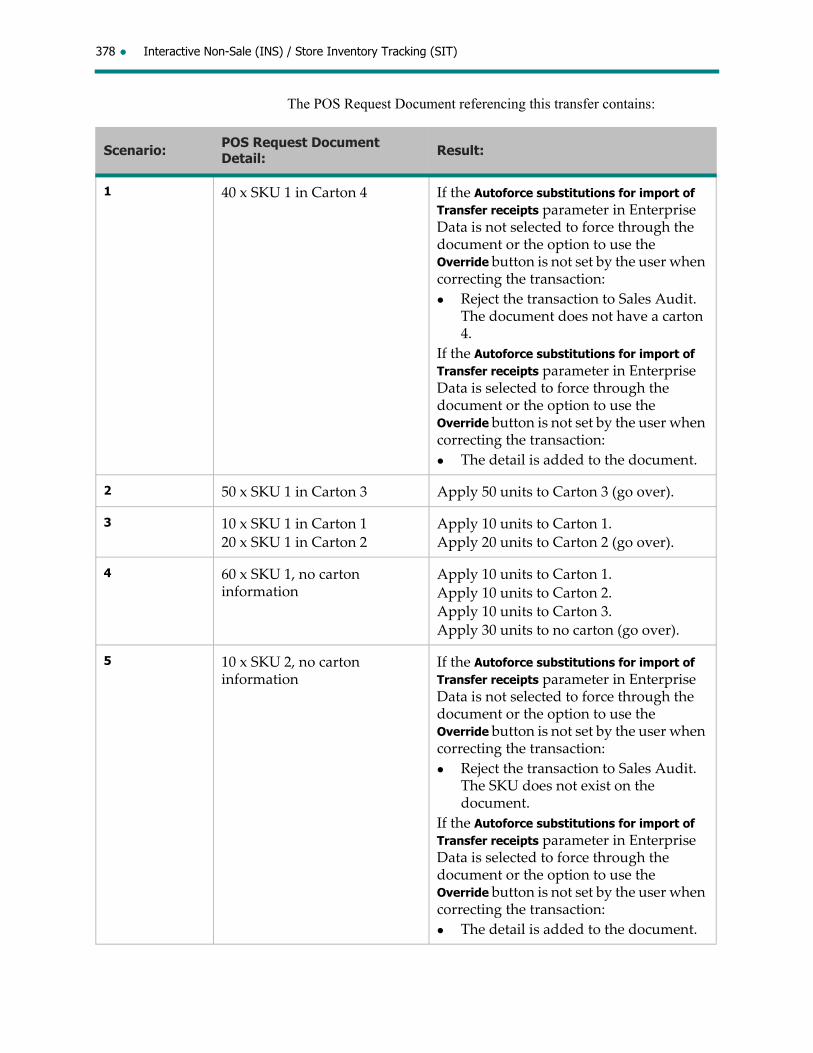
378 Interactive Non-Sale (INS) / Store Inventory Tracking (SIT)
The POS Request Document referencing this transfer contains:
Scenario: POS Request Document Detail: Result:
1 40 x SKU 1 in Carton 4 If the Autoforce substitutions for import of Transfer receipts parameter in Enterprise Data is not selected to force through the document or the option to use the Override button is not set by the user when correcting the transaction:
Reject the transaction to Sales Audit. The document does not have a carton 4.
If the Autoforce substitutions for import of Transfer receipts parameter in Enterprise Data is selected to force through the document or the option to use the Override button is not set by the user when correcting the transaction:
The detail is added to the document.
2 50 x SKU 1 in Carton 3 Apply 50 units to Carton 3 (go over).
3 10 x SKU 1 in Carton 1
20 x SKU 1 in Carton 2
Apply 10 units to Carton 1.
Apply 20 units to Carton 2 (go over).
4 60 x SKU 1, no carton information
Apply 10 units to Carton 1.
Apply 10 units to Carton 2.
Apply 10 units to Carton 3.
Apply 30 units to no carton (go over).
5 10 x SKU 2, no carton information
If the Autoforce substitutions for import of Transfer receipts parameter in Enterprise Data is not selected to force through the document or the option to use the Override button is not set by the user when correcting the transaction:
Reject the transaction to Sales Audit. The SKU does not exist on the document.
If the Autoforce substitutions for import of Transfer receipts parameter in Enterprise Data is selected to force through the document or the option to use the Override button is not set by the user when correcting the transaction:
The detail is added to the document.

Inventory Management Document Processing – Importing Data from POS 379
WMS Initiated Store Shipment
POS receives goods from a warehouse.
System verifies the POS Request Document against current business rules in updating a store shipment.
System updates the store shipment.
The following parameters exist in Enterprise Data (Parameters > Inventory > Offline IM) for store shipment receipts:
whether units on a subsequent store shipment receipt document (that is, receipts for a store shipment document that already has a Received status) should be added to or replace units already received, or if the subsequent store shipment receipt document should be rejected. If this option is set to increment or replace units, an adjustment or correction to received units will be made. Infobase will be updated with this adjustment or correction.
whether a detail should be added to a store shipment receipt for units received for a SKU or SKU/carton that is not included in the store shipment details (that is, there was no store shipment detail line for this SKU when sent quantities were updated). If the Autoforce substitutions for import of Store shipment receipts EDM parameter is set, a detail containing the SKU, carton number (if provided), distribution number (set to NA) sent units equal to zero and received units equal to the received units indicated from the import will be added to the store shipment. If this EDM parameter is not set, the entire transaction will be rejected and the store shipment document will not be updated.
If the document does not pass all rules, the system rejects the document with a reason. The procedure to fix an I/F Reject depends on the error you receive in the Failed Validation column. Do one of the following:
If Do this
Referenced store shipment does not exist
a) Investigate which store shipment should have been referenced.
b) Modify the document in Sales Audit (referencing the store shipment document).
c) Revalidate the transaction in Sales Audit.
Style, style color, or style size not on original document (zero units on the outbound portion of the transfer)
If the SKU or SKU/carton should be added to the document, use the Override option to force through the document. The Force option will be set and an item will be added with zero (0) units shipped

380 Interactive Non-Sale (INS) / Store Inventory Tracking (SIT)
Example Scenario: A Store Shipment document in IM contains the following information:
10 x SKU 1 in Carton 1, Distribution 1
10 x SKU 1 in Carton 2, Distribution 2
10 x SKU 1 in Carton 3, Distribution 3
10 x SKU 1 in no carton, Distribution 4
The POS Request Document referencing this Store Shipment contains:
Item does not exist; Container type does not exist
a) Correct the document in Sales Audit.
b) Revalidate the transaction in Sales Audit.
If Do this
Scenario: POS Request Document Detail: Result:
1 50 x SKU 1 in Carton 2 If the Autoforce substitutions for import of Store Shipment receipts parameter in Enterprise Data is not selected to force through the document or the option to use the Override button is not set by the user when correcting the transaction:
Reject the transaction to Sales Audit. The document does not have 50 x SKU 1 in carton 2.
If the Autoforce substitutions for import of Store Shipment receipts parameter in Enterprise Data is not selected to force through the document or the option to use the Override button is not set by the user when correcting the transaction:
The detail is added to the document.
2 50 x SKU 1 in Carton 1 Apply:
10 x SKU 1 in Carton 1,
Distribution 1. 10 x SKU 1 in Carton 1
Distribution 2. 30 x SKU 1 in Carton 1
Distribution 3 (go over)
3 50 x SKU 1, no carton information
Apply: 10 x SKU 1 in Carton 1
Distribution 1. 10 x SKU 1 in Carton 1
Distribution 2. 10 x SKU 1 in Carton 1
Distribution 3. 20 x SKU 1 in no carton (go over)
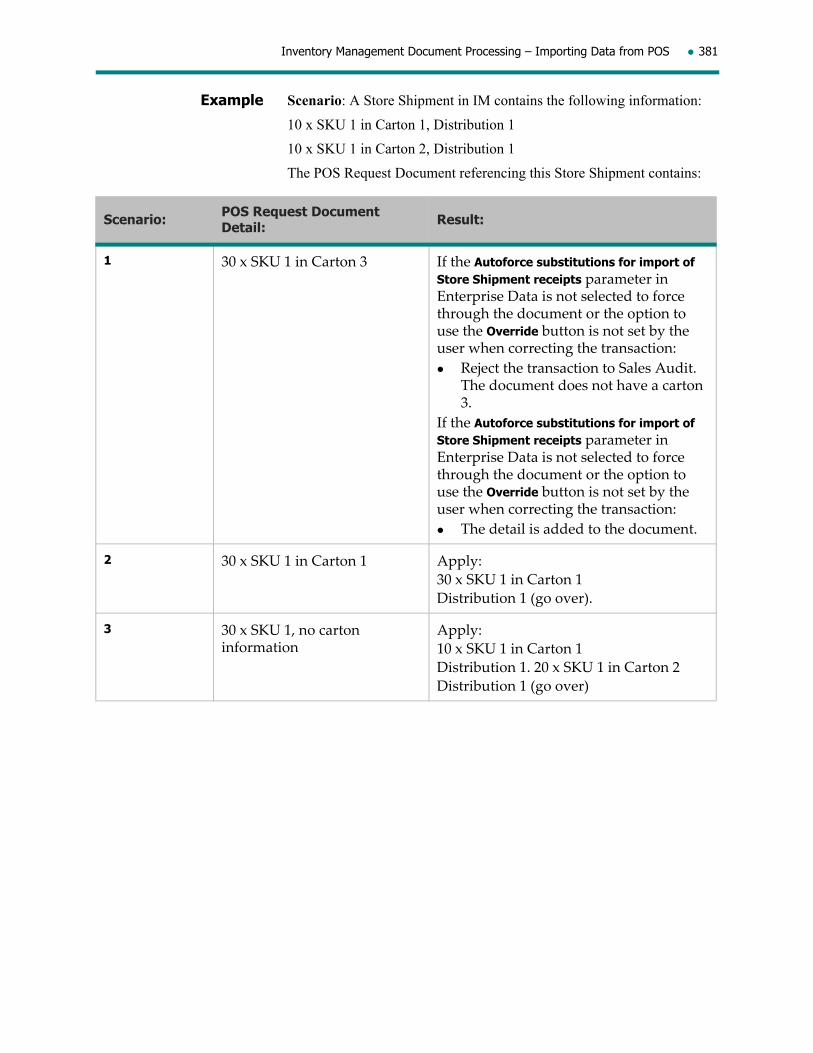
Inventory Management Document Processing – Importing Data from POS 381
Example Scenario: A Store Shipment in IM contains the following information:
10 x SKU 1 in Carton 1, Distribution 1
10 x SKU 1 in Carton 2, Distribution 1
The POS Request Document referencing this Store Shipment contains:
Scenario: POS Request Document Detail: Result:
1 30 x SKU 1 in Carton 3 If the Autoforce substitutions for import of Store Shipment receipts parameter in Enterprise Data is not selected to force through the document or the option to use the Override button is not set by the user when correcting the transaction:
Reject the transaction to Sales Audit. The document does not have a carton 3.
If the Autoforce substitutions for import of Store Shipment receipts parameter in Enterprise Data is not selected to force through the document or the option to use the Override button is not set by the user when correcting the transaction:
The detail is added to the document.
2 30 x SKU 1 in Carton 1 Apply:
30 x SKU 1 in Carton 1
Distribution 1 (go over).
3 30 x SKU 1, no carton information
Apply:
10 x SKU 1 in Carton 1
Distribution 1. 20 x SKU 1 in Carton 2
Distribution 1 (go over)

382 Interactive Non-Sale (INS) / Store Inventory Tracking (SIT)
PO Receipt POS receives goods from a vendor.
System verifies the POS Request Document against current business rules in creating a PO Receipt.
System creates the PO Receipt document using the POS request document number. The status of the document is Received.
If the document does not pass all rules, the system rejects the document with a reason. The procedure to fix an I/F Reject depends on the error you receive in the Failed Validation column. Do one of the following:
4 30 X SKU 2, no carton information
If the Autoforce substitutions for import of Store Shipment receipts parameter in Enterprise Data is not selected to force through the document or the option to use the Override button is not set by the user when correcting the transaction:
Reject the transaction to Sales Audit. The SKU does not exist on the document.
If the Autoforce substitutions for import of Store Shipment receipts parameter in Enterprise Data is not selected to force through the document or the option to use the Override button is not set by the user when correcting the transaction:
The detail is added to the document.
Scenario: POS Request Document Detail: Result:
If Do this
A PO Receipt already exists with the POS Request Document number
Revalidate the transaction in Sales Audit using a new document number.
The Referenced PO for the PO Receipt does not exist
a) Modify the document in Sales Audit (correcting the PO).
b) Revalidate the transaction in Sales Audit.
Referenced PO status is not approved
a) Approve the PO.
b) Revalidate the transaction in Sales Audit.
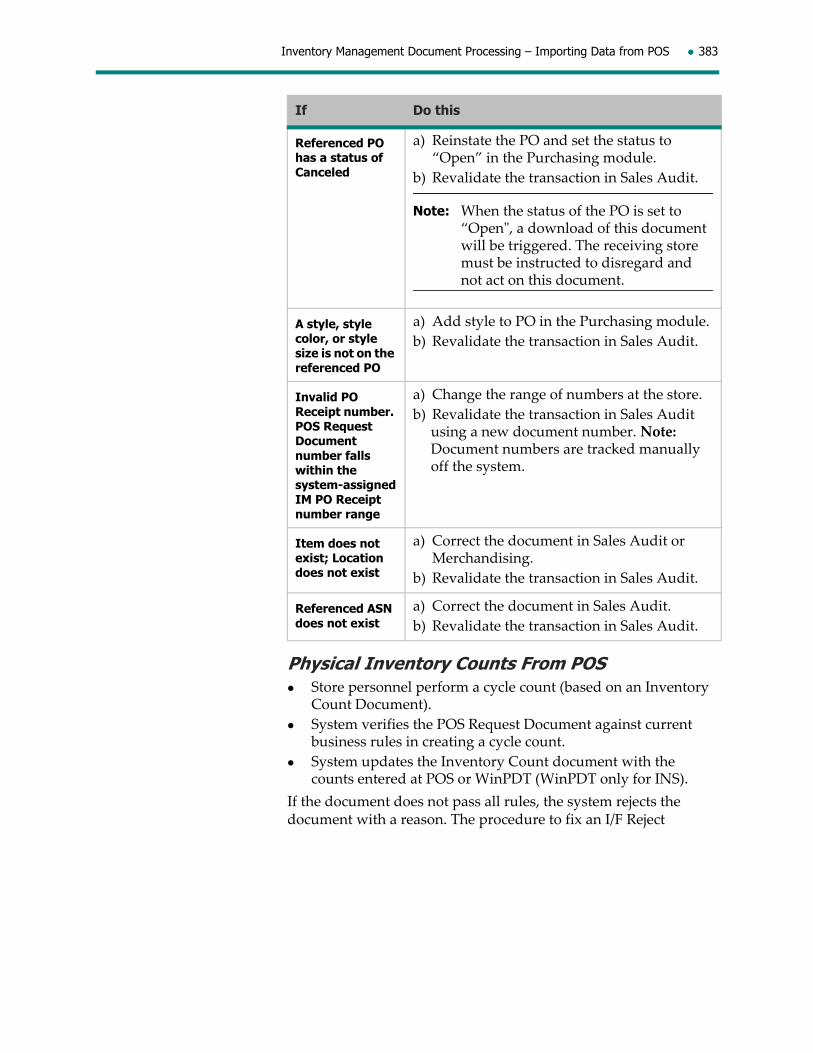
Inventory Management Document Processing – Importing Data from POS 383
Physical Inventory Counts From POS Store personnel perform a cycle count (based on an Inventory
Count Document).
System verifies the POS Request Document against current business rules in creating a cycle count.
System updates the Inventory Count document with the counts entered at POS or WinPDT (WinPDT only for INS).
If the document does not pass all rules, the system rejects the document with a reason. The procedure to fix an I/F Reject
Referenced PO has a status of Canceled
a) Reinstate the PO and set the status to “Open” in the Purchasing module.
b) Revalidate the transaction in Sales Audit.
Note: When the status of the PO is set to “Openʺ, a download of this document will be triggered. The receiving store must be instructed to disregard and not act on this document.
A style, style color, or style size is not on the referenced PO
a) Add style to PO in the Purchasing module.
b) Revalidate the transaction in Sales Audit.
Invalid PO Receipt number. POS Request Document number falls within the system-assigned IM PO Receipt number range
a) Change the range of numbers at the store.
b) Revalidate the transaction in Sales Audit using a new document number. Note: Document numbers are tracked manually off the system.
Item does not exist; Location does not exist
a) Correct the document in Sales Audit or Merchandising.
b) Revalidate the transaction in Sales Audit.
Referenced ASN does not exist
a) Correct the document in Sales Audit.
b) Revalidate the transaction in Sales Audit.
If Do this
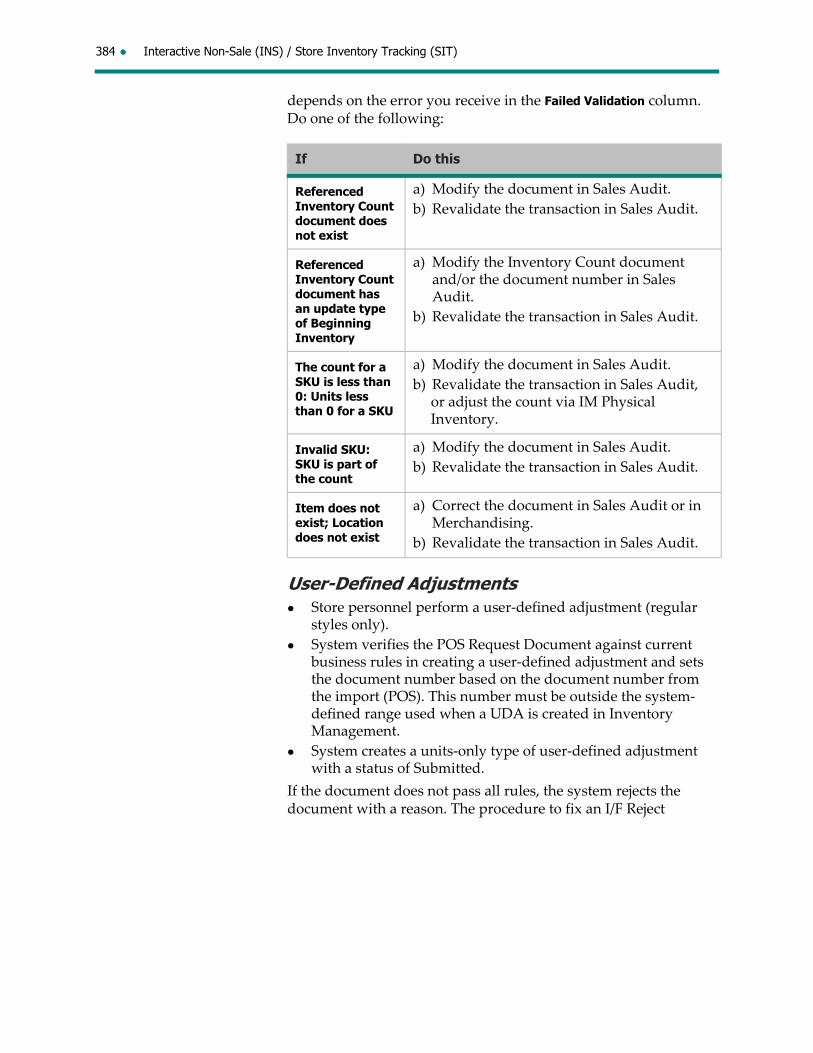
384 Interactive Non-Sale (INS) / Store Inventory Tracking (SIT)
depends on the error you receive in the Failed Validation column. Do one of the following:
User-Defined Adjustments Store personnel perform a user‐defined adjustment (regular
styles only).
System verifies the POS Request Document against current business rules in creating a user‐defined adjustment and sets the document number based on the document number from the import (POS). This number must be outside the system‐defined range used when a UDA is created in Inventory Management.
System creates a units‐only type of user‐defined adjustment with a status of Submitted.
If the document does not pass all rules, the system rejects the document with a reason. The procedure to fix an I/F Reject
If Do this
Referenced Inventory Count document does not exist
a) Modify the document in Sales Audit.
b) Revalidate the transaction in Sales Audit.
Referenced Inventory Count document has an update type of Beginning Inventory
a) Modify the Inventory Count document and/or the document number in Sales Audit.
b) Revalidate the transaction in Sales Audit.
The count for a SKU is less than 0: Units less than 0 for a SKU
a) Modify the document in Sales Audit.
b) Revalidate the transaction in Sales Audit, or adjust the count via IM Physical Inventory.
Invalid SKU: SKU is part of the count
a) Modify the document in Sales Audit.
b) Revalidate the transaction in Sales Audit.
Item does not exist; Location does not exist
a) Correct the document in Sales Audit or in Merchandising.
b) Revalidate the transaction in Sales Audit.

Inventory Management Document Processing – Importing Data from POS 385
depends on the error you receive in the Failed Validation column. Do one of the following:
If Do this
A UDA document already exists with the POS request document number
Revalidate the transaction in Sales Audit using a new document number.
Invalid UDA number. POS Request Document number falls within the system-assigned IM UDA number range.
a) Change the range of numbers at the store.
b) Revalidate the transaction in Sales Audit using a new document number. Note: Document numbers are tracked manually off the system.
Item does not exist; location does not exist
a) Correct the document in Sales Audit or Merchandising.
b) Revalidate the transaction in Sales Audit.
Invalid reason code
Reason code must be set to one that is of reason type code 7 – Adjust Units Only.
Correct the reason code and revalidate the transaction in Sales Audit.

386 Interactive Non-Sale (INS) / Store Inventory Tracking (SIT)
Ticket Printing is a module integrated with other Merchandising modules. It is designed so that tickets can be generated and printed from either a store location or head office, using user‐defined ticket formats.
Ticket printing preferences define the current user that is accessing Ticket Printing and determines if the user has access to the Change Location button.
Tickets must be generated before they can be printed. Automatic generation occurs as defined in Enterprise Data; for example, tickets can be automatically generated for new POs, ASNs (for EDI vendors), PO Receipts, Unsolicited Receipts and Price Changes. Tickets can also be generated manually by PO, Unsolicited Receipt, style or pack.
Ticket generation creates a file with the information required for printing tickets for styles chosen during the selection process.
Once ticket generation is done, the ticket printing function will actually send the file generated to the printer where the physical process of printing tickets occurs.
12 Ticket Printing

388 Ticket Printing
Ticket Printing Preferences
Ticket printing preferences are defined for each user who has access to ticket printing functions. Set by employee, these preferences define each user and either grants or denies the privilege to change the current location. Changing the location means that all work will be done for another location.
Ticket printing preferences contain the employee, company and location information, as well as ticket printing parameters.
Ticket Printing Preferences
Current User Preferences: Employee Code
The userʹs employee number.
Employee Name The userʹs first and last name.
Company ID The company you are connected to.
Company Name Your companyʹs name.
Location Your storeʹs name and address.
Application Parameters: Max. Return Rows
The maximum number of rows allowed to be returned after executing a selection. See “Get next dataset button” on page 389.
Max. Items The maximum number of items that can be displayed per worklist page.
Label Path The path to the location of the label format files (.Lab).

Ticket Printing Preferences 389
Changing locationsYou may need to change your user preference location; for example, when you are generating and/or printing tickets for a location other than your own. The Change Location button is enabled or disabled according to the rules defined in Enterprise Data > Employee > User Preferences, Must Use a Location field. If this field is not set for an employee, the Change Location button in Ticket Printing is enabled to permit changes. If it is set for an employee, the Change Location button in Ticket printing is disabled.
Click Change Location, highlight the new location code and name and then click OK.
Get next dataset buttonWhen the number of lines retrieved exceeds the maximum allowable lines (the value for Max. Return Rows above), the first ʹx lines are displayed on the screen with the button Get next dataset. When this button is clicked, the next ʹxʹ lines are displayed.
390 Ticket Printing
Generating and Printing Tickets by Location
Selecting ticketing functions by location implies that the functions will be done on a location‐by‐location basis.
There are two steps in the ticketing by location process: Ticket Generation and Ticket Printing. Tickets must be generated before they can be printed.
Ticket generation by location can be done automatically by the system based on parameters defined in Enterprise Data, or manually within Ticket Printing. Ticket generation will create tickets with all the information required by the ticket printing machine to print the tickets in the format and quantity required.
You will access the ticket printing functions to let Ticket Printing know which generated file should be sent to the ticket printing machine.
Generating tickets by locationFor purchase orders, tickets can be automatically generated for your location based on PO or PO Receipt quantities. This is defined on a PO‐by‐PO basis by the buyer inputting the purchase order.
If tickets will be automatically generated based on purchase orders, it will occur when the PO status becomes Open. Changes to an existing PO will be transferred to Ticket Printing when the PO is re‐approved.
If tickets will be automatically generated based on PO Receipts, it will occur when the status of the PO Receipt is saved.
Tickets can also be automatically generated based on ASNs (if it is an EDI order), Unsolicited Receipts and Price Changes. This is defined by parameters in Enterprise Data.
For ASNs, tickets are generated when the ASN is loaded.
For Unsolicited Receipts, tickets are generated with the status of the Unsolicited Receipt document becomes Received.
For Price Changes, tickets are generated when the Price Change status becomes Approved.
You can also manually generate tickets for your location in one of the following ways:
by Purchase Order: Use this method when you want to manually generate tickets for items by purchase order if you are receiving goods directly from the vendor. You can set up filtering criteria to narrow your search so that you select a specific PO, a specific PO type, expected receipt date, etc.
by Advance Shipped Notice: Use this method to manually generate tickets for items by ASN. You would normally do this after you have received an electronic notice (ASN) from the

Generating and Printing Tickets by Location 391
vendor via EDI letting you know exactly what is being shipped.
by Unsolicited Receipt: Use this method when you want to manually generate tickets for items by unsolicited receipt; for example, if your vendor is filling your shelves (vendor fill) and you need to ticket the goods with your companyʹs price tickets. You can set up filtering criteria to narrow your search so that you select a specific unsolicited receipt, a document status, style code, document create date, etc.
by Style: Use this method when you want to manually generate tickets by style; for example, if you lost the price ticket for an item, or if the ticket is damaged, or, if the item is returned by the client without a price ticket and you need to replace it. You can set up filtering criteria to narrow your search so that you select a specific style code, style status, UPC number, vendor code, etc.
by Pack: Use this method when you want to manually generate tickets by pack. You can set up filtering criteria to narrow your search so that you select a specific pack code, pack status, pack type, vendor code, etc.
The procedure and selection criteria for generating tickets is similar regardless of the method you use. The following pages illustrate and describe the different information displayed based on the method you use to generate tickets.
Generate tickets by Location – Purchase Order Criteria
Selection Criteria
Highlight the method you want to use to narrow down what you want to generate tickets for.
Methods Select either List or Range or use the default.
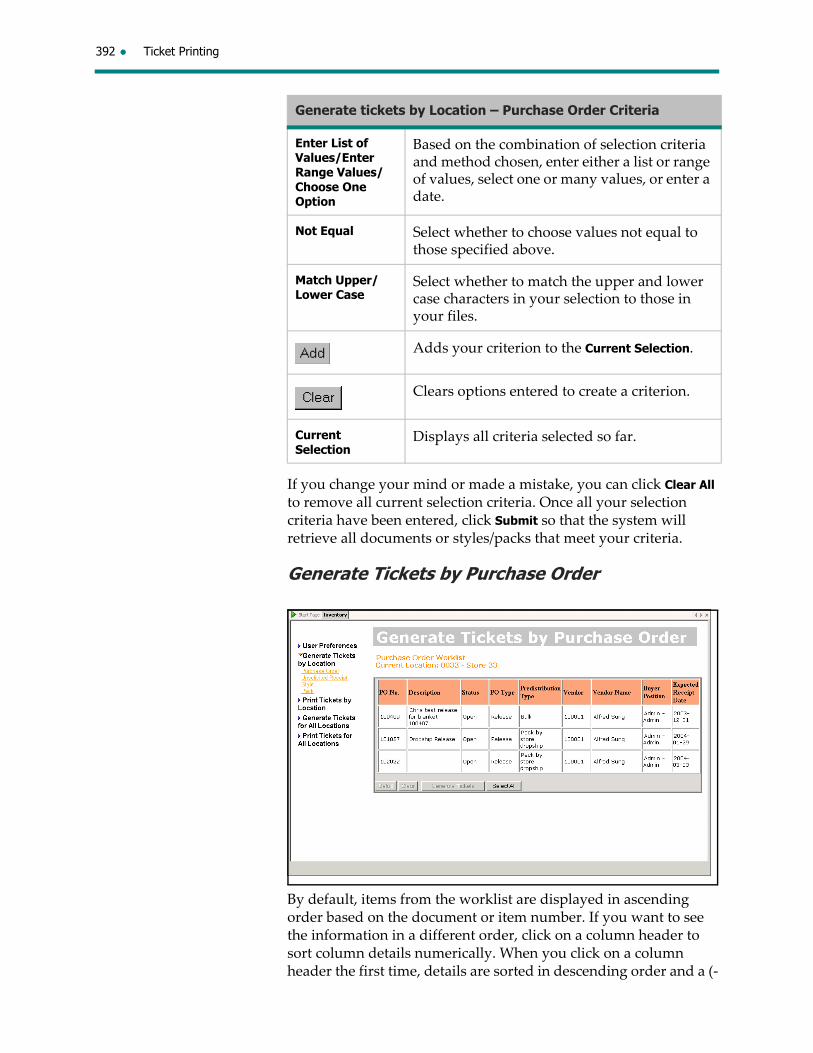
392 Ticket Printing
If you change your mind or made a mistake, you can click Clear All to remove all current selection criteria. Once all your selection criteria have been entered, click Submit so that the system will retrieve all documents or styles/packs that meet your criteria.
Generate Tickets by Purchase Order
By default, items from the worklist are displayed in ascending order based on the document or item number. If you want to see the information in a different order, click on a column header to sort column details numerically. When you click on a column header the first time, details are sorted in descending order and a (‐
Enter List of Values/Enter Range Values/Choose One Option
Based on the combination of selection criteria and method chosen, enter either a list or range of values, select one or many values, or enter a date.
Not Equal Select whether to choose values not equal to those specified above.
Match Upper/Lower Case
Select whether to match the upper and lower case characters in your selection to those in your files.
Adds your criterion to the Current Selection.
Clears options entered to create a criterion.
Current Selection
Displays all criteria selected so far.
Generate tickets by Location – Purchase Order Criteria

Generating and Printing Tickets by Location 393
) displays in the column header. When you click on the same column a second time, details are re‐sequenced in ascending order and a (+) displays in the column header.
Generate Tickets by Unsolicited Receipts
By default, details are displayed in ascending order based on the Unsolicited Receipt number. If you want to see the information in a different order, you can click on a column header to sort column
Generate tickets by Location by Purchase Order Worklist
PO No. The PO document identification number.
Description The PO description; from the PO document.
Status The status of the PO document: Preliminary, Submitted or Open.
PO Type The type of PO document; Standalone, Blanket or Release.
Predistribution Type
The PO predistribution type; either Bulk, Pack by store dropship, Pack by store crossdock or Bulk pre‐allocated.
Vendor The identification number of the vendor.
Vendor Name The name of the vendor.
Buyer Position The responsibility position assigned to the buyer that created the PO.
Expected Receipt Date
The date the buyer expects the goods to arrive at the receiving location.

394 Ticket Printing
details numerically. When you click on a column header the first time, details are sorted in descending order and a (‐) displays in the column header. When you click on the same column a second time, details are re‐sequenced in ascending order and a (+) displays in the column header.
Generate Tickets by Style
By default, details are displayed in ascending order based on the style number. If you want to see the information in a different order, click on a column header to sort column details numerically.
Generate tickets by Location by Unsolicited Receipt Worklist
Uns. Receipt Number
The Unsolicited receipt document identification number.
Description The description of the Unsolicited Receipt; from the Unsolicited Receipt document.
Status The status of the Unsolicited Receipt document; either Preliminary, Received, Unmatched, Partially Matched or Fully Matched.
Vendor The identification number of the vendor.
Vendor Name The name of the vendor.
Create Date The date the Unsolicited Receipt document was created.
Receive Date The date the merchandise on the Unsolicited Receipt document was received.

Generating and Printing Tickets by Location 395
When you click on a column header the first time, details are sorted in descending order and a (‐) displays in the column header. When you click on the same column a second time, details are re‐sequenced in ascending order and a (+) displays in the column header.
Generate Tickets by Pack
By default, details are displayed in ascending order based on the pack code. If you want to see the information in a different order, click on a column header to sort column details numerically. When you click on a column header the first time, details are sorted in descending order and a (‐) displays in the column header. When you click on the same column a second time, details are re‐
Generate tickets by Location by Style Worklist
Style Code The style identification number.
Description The description of the style. Appears in the location’s language.
Status The status of the style; either New, Preliminary, Ordered or Received.
Vendor Code The identification number for the vendor supplying this style.
Vendor Name The name of the vendor.
Ticket Format The format of the ticket assigned to this style. Defaults based on a parameter at time of style creation.

396 Ticket Printing
sequenced in ascending order and a (+) displays in the column header.
Using the buttons at the bottom of the window:
Note that the first four buttons shown above will not appear if your selection returned fewer rows than the value set for Max. Items in the Employee Preferences. See “Ticket Printing Preferences” on page 388 for more information.
Generate tickets by Location by Pack Worklist
Pack Code The identification number for a pack.
Description The description of the pack.
Status The status of this pack; either Preliminary, Ordered or Received.
Pack Type The type of pack; Master or Case.
Vendor The identification code of the vendor supplying this pack type.
Vendor Name The name of the vendor.
Vendor Pack Code
The vendorʹs code for this pack.
Ticket Format The print format of the ticket assigned to this pack.
Select To
Display the details of the pack(s) highlighted (see below).
Erase your selection of one or more packs.
Assign a ticket format other than the default for this pack. Select the new ticket format > OK.
Generate tickets for one or more packs highlighted on the worklist.
Select all packs in the list.

Generating and Printing Tickets by Location 397
Selecting Detail displays the following information. Note that the top portion shown in the screen sample below displays only when one pack was selected above.
Generate Tickets by Purchase Order

398 Ticket Printing
Generate Tickets by Unsolicited Receipt
Generate tickets by Location by Purchase Order Detail
PO no. The PO document identification number.
PO status The status of the PO document; Preliminary, Submitted, Open or Canceled.
PO type The type of PO document; Standalone, Blanket or Release.
Predistribution The PO predistribution type; either Bulk, Pack by store dropship, Pack by store crossdock or Bulk pre‐allocated.
Order date The date the purchase order was placed.
Description The PO description; from the PO document.
Vendor The identification number and name of the vendor.
Buyer The responsibility position assigned to your user preferences.
Receiving Location
The identification number and name of the location where the merchandise is being shipped.
Expected receipt date
The date the buyer expects the goods to arrive at the receiving location.
Ticket status Either Not Required, Not Applicable, Ticket Required, Print Pending, Ticket Printed or Reprint Pending.
EDI status The status of the EDI document; either None, Pending Send, Pending Resend or Resent.
Approval status The approval status of the PO; either Approved, Pending Approval, Rejected, Pending Reapproval, Reapproved, Pending Resubmit, Reapproval Rejected or None.
Approval category
The type of PO; either Standalone, Blanket, Release, Special or Replenishment.
Source The source of the PO; either Merchandising or External System.
Blanket PO no. If this is a blanket PO, the PO number.

Generating and Printing Tickets by Location 399
Selecting Detail displays the following information. Note that the top portion shown in the screen sample below displays only when one unsolicited receipt was selected above.
Release no. If this is a release PO, this number indicates which release it is against the particular blanket.
Reference PO no.
If the Buyer entered a PO number to refer back to, it will appear here.
Cancellation reason
If this PO has been canceled, the reason for cancellation; otherwise will be None.
External document no.
Document number used by the other system if the source of the PO is External System (i.e. the PO was interfaced into Purchasing).
New store Indicates the order is for a new store.
Special order Indicates if this is a special order.
Multiple shipments
Selected if the merchandise ordered will be received in multiple shipments.
Allocation completed
Indicates whether the allocations for this order have been completed.
Style The style identification number.
Description The style description. Appears in the location’s language.
Color The color of this style. The color description appears in the location’s language.
Size Code The size of this style. The size description appears in the location’s language.
Vendor Style The vendor style number for this style.
Ticket Format The format of ticket assigned to this style. Defaults based on a parameter at the time of style creation.
Quantity The number of tickets to be generated for this style; based on the purchase order quantity.
Generate tickets by Location by Purchase Order Detail

400 Ticket Printing
Generate tickets by Location by Unsolicited Receipt Detail
Document no. The unsolicited receipt document identification number.
Description The description of the unsolicited receipt; from the unsolicited receipt document.
Create date The date the unsolicited receipt document was created.
Receive date The date the merchandise on the unsolicited receipt document was received.
Status The status of the unsolicited receipt document; either Preliminary, Received, Unmatched, Partially Matched or Fully Matched.
Vendor code The identification number of the vendor.
Vendor name The name of the vendor.
Style Code The style identification number.
Color The color of this style. The color description appears in the location’s language.
Size Code The size of this style. The size description appears in the location’s language.
Vendor Style The vendor style number for this style.
Ticket Format The format of ticket assigned to this style. Defaults based on a parameter at time of style creation.
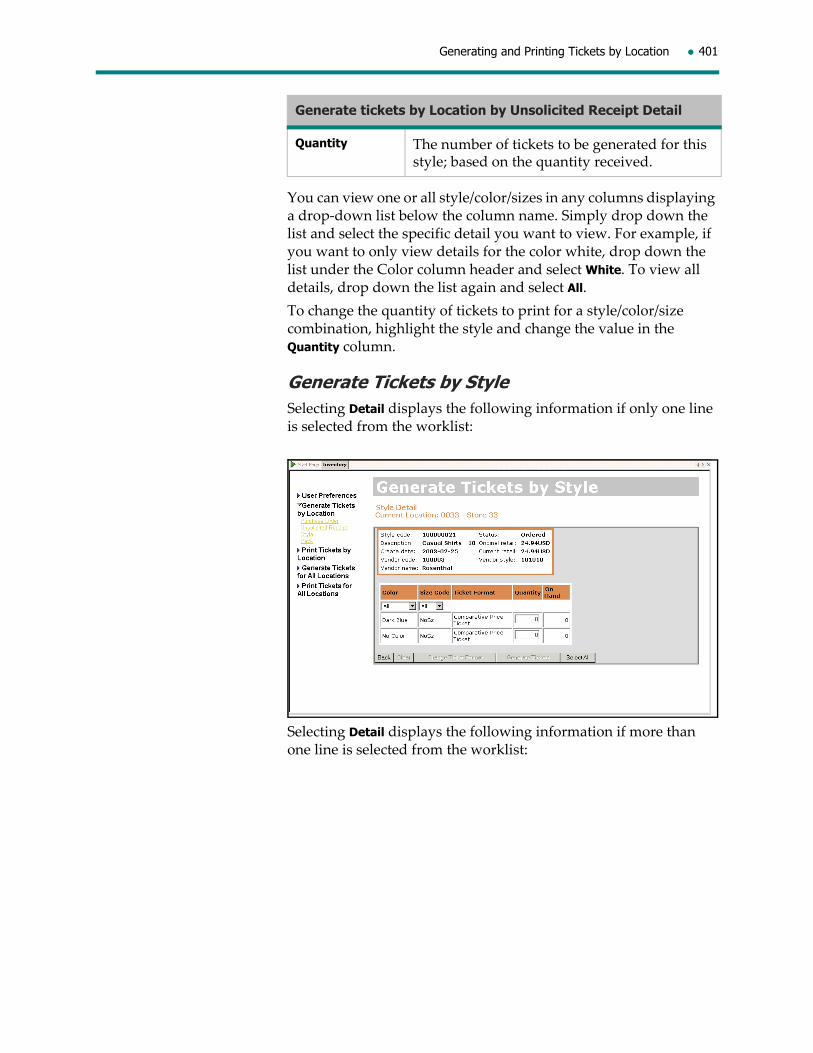
Generating and Printing Tickets by Location 401
You can view one or all style/color/sizes in any columns displaying a drop‐down list below the column name. Simply drop down the list and select the specific detail you want to view. For example, if you want to only view details for the color white, drop down the list under the Color column header and select White. To view all details, drop down the list again and select All.
To change the quantity of tickets to print for a style/color/size combination, highlight the style and change the value in the Quantity column.
Generate Tickets by StyleSelecting Detail displays the following information if only one line is selected from the worklist:
Selecting Detail displays the following information if more than one line is selected from the worklist:
Quantity The number of tickets to be generated for this style; based on the quantity received.
Generate tickets by Location by Unsolicited Receipt Detail

402 Ticket Printing
Generate tickets by Location by Style Detail
Style code The style identification number.
Description The description of the style. Appears in the location’s language.
Create date The date the style was first saved.
Vendor code The identification number for the vendor supplying this style.
Vendor name The name of the vendor.
Status The status of the style; can be New, Preliminary, Ordered, or Received.
Original retail The original retail price of this style.
Current retail The styleʹs current retail price as at the time of ticket printing.
Vendor style The vendor style number for this style.
Color The color of this style. The color description appears in the location’s language.
Size Code The size code for this style. The size code description appears in the location’s language.
Ticket Format The print format of the ticket assigned to this style.

Generating and Printing Tickets by Location 403
You can view one or all details in any columns displaying a drop‐down list below the column name. Simply drop down the list and select the specific detail you want to view. For example, if you want to only view details for the color white, drop down the list under the Color column header and select White. To view all details, drop down the list again and select All.
To change the quantity of tickets to print for a style/color/size combination, highlight the style and change the value in the Quantity column.
Generate Tickets by PackSelecting Detail displays the following information. Note that the top portion shown in the screen sample below displays only when one pack was selected above.
Quantity The number of tickets to be printed for this SKU. Defaults to the on hand quantity.
On Hand The quantity on hand of this SKU.
Generate tickets by Location by Pack Detail
Pack code The identification number for a pack.
Pack description The description of the pack.
Pack type The type of pack; Master or Case.
Style code The style identification number.
Generate tickets by Location by Style Detail

404 Ticket Printing
You can view one or all details in any columns displaying a drop‐down list below the column name. Simply drop down the list and select the specific detail you want to view. For example, if you want to only view details for the color white, drop down the list under the Color column header and select White. To view all details, drop down the list again and select All.
To change the quantity of tickets to print for a style/color/size combination, highlight the pack and change the value in the Quantity column.
Using the buttons at the bottom of the window:
Style description The description of the style. Appears in the location’s language.
Pack status The status of this pack; either Preliminary, Ordered or Received.
Vendor code The identification code of the vendor supplying this pack type.
Vendor name The name of the vendor.
Vendor pack code
The vendorʹs code for this pack.
Color The color of this style. The color description appears in the location’s language.
Size Code The size code of this style. The size description appears in the location’s language.
Ticket Format The print format of the ticket assigned to this style.
Quantity The number of tickets to be printed for this style.
Select To
Go back to the previous screen display.
Erase your selection of one or more lines.
Assign a ticket format other than the default for the highlighted line. Select the new ticket format > OK.
Generate tickets by Location by Pack Detail

Generating and Printing Tickets by Location 405
To generate tickets by Location by
Unsolicited Receipt
1. Enter your selection criteria and then click Add after each.
2. Click Submit to select unsolicited receipts meeting your criteria.
3. To view information about one unsolicited receipt, highlight the Unsolicited Receipt line and then click Detail.
4. You can then filter by column; use the drop‐down list in a column to select the specific detail you want to view.
5. If you need to change the quantity of tickets to be generated, enter the new value in the Quantity column.
6. Highlight the style or styles you want to generate tickets for (or click Select All) > Generate Tickets.
7. To view or generate tickets for all Unsolicited Receipts, click Select All and then click either Detail or Generate Tickets. Once tickets have been generated, the message Ticket Generation was successful displays.
Printing tickets by locationOnce tickets have been either automatically or manually generated, they can be printed.
Tickets must be printed using the same method as they were generated. For example, if tickets were generated by PO, they must be printed by PO.
Before printing, the number of tickets can be changed any time. The price can also be overridden if the parameter in the Enterprise Data module allows the price to be changed. If it is set, this means the retail price can be overridden on a location‐by‐location basis. Changing a price only affects the current ticket printing; the next time the same ticket is retrieved, the system will display the current retail for this item.
The Printed status field for a document will change to Yes on the Print Document Worklist screen once the status for all details from the details screen is Printed.
Selecting to print tickets already generatedTo select all tickets already generated, bypass the selection criteria and simply click Submit. (This method retrieves all generated documents with one or more items ordered for the current location.) Or, you can enter selection criteria as described below to choose specific generated tickets.
Generate tickets for the highlighted lines.
Select all lines in the list.
Select To

406 Ticket Printing
The procedure and selection criteria for printing tickets is similar regardless of the method you use. The following pages illustrate and describe the different information displayed based on the method you use to print tickets.
If you change your mind or made a mistake, you can click Clear All to remove all current selection criteria. Once all your selection
Print tickets by Location – Purchase Order Criteria
Selection Criteria
Highlight the method you want to use to narrow down which tickets to print.
Methods Select either List or Range.
Enter List of Values/Enter Range Values/Choose One Option
Based on the combination of selection criteria and method chosen, enter either a list of range of values, select one or many values, or enter a date.
Not Equal Select whether to choose values not equal to those specified above.
Match Upper/Lower Case
Select whether to match the upper and lower case characters in your selection to those in your files.
Adds your criterion to the Current Selection.
Clears options entered to create a criterion.
Current Selection
Displays all criteria selected so far.

Generating and Printing Tickets by Location 407
criteria have been entered, click Submit so that the system will retrieve all POs that meet your criteria.
Printing Tickets by Purchase Order
By default, details are displayed in ascending order based on the PO number. If you want to see the information in a different order, click on a column header to sort column details numerically. When you click on a column header the first time, details are sorted in descending order and a (‐) displays in the column header. When you click on the same column a second time, details are re‐sequenced in ascending order and a (+) displays in the column header.
Print tickets by Location by Purchase Order Worklist
PO No. The PO document identification number.
Description The PO description; from the PO document.
Status The status of the PO document; Preliminary, Submitted, Open or Canceled.
PO Type The type of PO document; Standalone, Blanket or Release.
Predistribution Type
The PO predistribution type; either Bulk, Pack by store dropship, Pack by store crossdock or Bulk pre‐allocated.
Vendor The identification number of the vendor.
Vendor Name The name of the vendor.

408 Ticket Printing
Printing Tickets by Advance Shipment Notice
By default, details are displayed in ascending order based on the ASN number. If you want to see the information in a different order, click on a column header to sort column details numerically. When you click on a column header the first time, details are sorted in descending order and a (‐) displays in the column header. When you click on the same column a second time, details are re‐sequenced in ascending order and a (+) displays in the column header.
Expected Receipt Date
The date the buyer expects the goods to arrive at the receiving location.
Print Status The ticket print status; either Generated or Printed.
Ticket Count The number of tickets generated for the PO.
Date Updated The date this record was last updated.
Print tickets by Location by ASN Worklist
ASN No. The ASN document identification number.
Carrier Code The code identifying the carrier.
Carrier The name of the carrier.
Vendor The identification code of the vendor supplying this ASN.
Print tickets by Location by Purchase Order Worklist

Generating and Printing Tickets by Location 409
Printing Tickets by PO Receipt
By default, details are displayed in ascending order based on the PO Receipt number. If you want to see the information in a different order, click on a column header to sort column details numerically. When you click on a column header the first time, details are sorted in descending order and a (‐) displays in the column header. When you click on the same column a second time,
Vendor Name The name of the vendor.
PO Count Number of POs associated to this ASN.
Create Date The date the ASN was first saved.
Expected Receipt Date
The date the buyer expects the goods to arrive at the receiving location.
Print Status The ticket print status; either Generated or Printed.
Ticket Count The number of tickets generated for the ASN.
Date Updated The date this record was last updated.
Print tickets by Location by ASN Worklist

410 Ticket Printing
details are re‐sequenced in ascending order and a (+) displays in the column header.
Print tickets by Location by PO Receipt Worklist
PO Receipt No. The PO Receipt document identification number.
Description The PO Receipt description; from the PO Receipt document.
Status The status of the PO Receipt document; Preliminary, Received, Unmatched, Partially Matched, Fully Matched, or Canceled.
Carrier Code The code identifying the carrier.
Carrier The name of the carrier.
PO No. The PO document identification number associated with this PO Receipt.
PO Description The PO description; from the PO document.
Vendor Code The identification code of the vendor supplying this PO Receipt.
Vendor Name The name of the vendor.
Create Date The date the PO Receipt was first saved.
Receive Date The date the merchandise was received.
Print Status The ticket print status; either Generated or Printed.
Ticket Count The number of tickets generated for the PO Receipt.
Date Updated The date this record was last updated.

Generating and Printing Tickets by Location 411
Printing Tickets by Unsolicited Receipt
By default, details are displayed in ascending order based on the Unsolicited Receipt number. If you want to see the information in a different order, click on a column header to sort column details numerically. When you click on a column header the first time, details are sorted in descending order and a (‐) displays in the column header. When you click on the same column a second time, details are re‐sequenced in ascending order and a (+) displays in the column header.
Print tickets by Location by Unsolicited Receipt Worklist
Uns. Receipt No. The unsolicited receipt document identification number.
Description The description of the unsolicited receipt; from the unsolicited receipt document.
Status The status of the unsolicited receipt document; either Preliminary, Received, Unmatched, Partially Matched or Fully Matched
Vendor The identification number of the vendor.
Vendor Name The name of the vendor.
Create Date The date the unsolicited document was created.
Print Status The status of the tickets for the unsolicited receipt; either Generated or Printed.
Ticket Count The number of tickets to be printed.

412 Ticket Printing
Printing Tickets by Price Change
By default, details are displayed in ascending order based on the document number. If you want to see the information in a different order, click on a column header to sort column details numerically. When you click on a column header the first time, details are sorted in descending order and a (‐) displays in the column header. When you click on the same column a second time, details are re‐sequenced in ascending order and a (+) displays in the column header.
Date Updated The date this entry was last updated.
Print tickets by Location by Price Change Worklist
Document No The Price Change document identification number.
Description The description of the price change; from the price change document.
Status The status of the price change document; either New, Preliminary, Submitted, Issued, Effective, Canceled, Completed, or No data.
Type The type of price change document; Marked Down, Marked Down Canceled, Marked Up, Marked Up Canceled.
Approval Status The approval status of the price change; Not Approved, Pending Approval, Approval, Approval Rejected or Rejected.
Print tickets by Location by Unsolicited Receipt Worklist
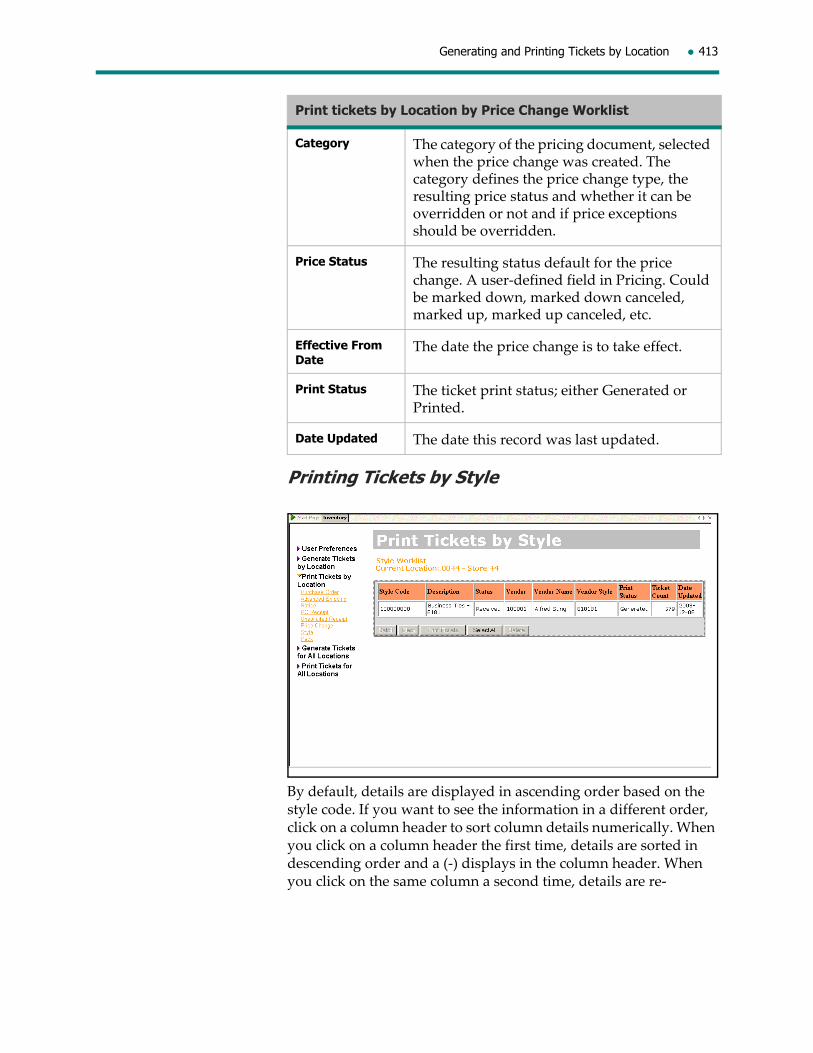
Generating and Printing Tickets by Location 413
Printing Tickets by Style
By default, details are displayed in ascending order based on the style code. If you want to see the information in a different order, click on a column header to sort column details numerically. When you click on a column header the first time, details are sorted in descending order and a (‐) displays in the column header. When you click on the same column a second time, details are re‐
Category The category of the pricing document, selected when the price change was created. The category defines the price change type, the resulting price status and whether it can be overridden or not and if price exceptions should be overridden.
Price Status The resulting status default for the price change. A user‐defined field in Pricing. Could be marked down, marked down canceled, marked up, marked up canceled, etc.
Effective From Date
The date the price change is to take effect.
Print Status The ticket print status; either Generated or Printed.
Date Updated The date this record was last updated.
Print tickets by Location by Price Change Worklist

414 Ticket Printing
sequenced in ascending order and a (+) displays in the column header.
Printing Tickets by Pack
By default, details are displayed in ascending order based on the pack code. If you want to see the information in a different order, click on a column header to sort column details numerically. When you click on a column header the first time, details are sorted in descending order and a (‐) displays in the column header. When
Print tickets by Location by Style Worklist
Style Code The style identification number.
Description The description of the style. Appears in the location’s language.
Status The status of the style; either New, Preliminary, Ordered or Received.
Vendor The identification number for the vendor supplying this style.
Vendor Name The name of the vendor.
Vendor Style The vendor style number for this style.
Print Status The print status for the tickets; either Generated or Printed.
Ticket Count The number of tickets to be printed for this style.
Date Updated The date this entry was last modified.

Generating and Printing Tickets by Location 415
you click on the same column a second time, details are re‐sequenced in ascending order and a (+) displays in the column header.
Using the buttons at the bottom of the window:
Print tickets by Location by Pack Worklist
Pack Code The identification number for this pack.
Description The description of the pack.
Status The status of this pack; either Preliminary, Ordered or Received.
Pack Type The type of pack; Master or Case.
Vendor The identification code of the vendor supplying this pack type.
Vendor Name The name of the vendor.
Vendor Pack Code
The vendorʹs code for this pack.
Print Status The print status for the tickets; either Generated or Printed.
Ticket Count The number of tickets generated.
Date Updated The date of the last modification made to this entry.
Select To
Go back to the top of the list.
Go back one page.
Go forward one page.
Go to the last page of the list.
Display the details of the highlighted pack(s) (see below).
Erase the highlighted pack(s).

416 Ticket Printing
Note that the first four buttons shown above will not appear if your selection returned fewer rows than the value set for Max. Items in the Employee Preferences. See “Ticket Printing Preferences” on page 388 for more information.
Selecting Detail displays the following:
Printing Tickets by Purchase Order
Prints tickets for the highlighted pack(s).
Select all packs in the list.
Deletes the highlighted pack from the list.
Print tickets by Location by Purchase Order Detail
PO No. The PO document identification number.
Description The PO description.
Style Code The style identification number.
Color The color of the style. The description appears in the location’s language.
Size The size of the style. The description appears in the location’s language.
Select To
Generating and Printing Tickets by Location 417
You can view one or all details in any columns displaying a drop‐down list below the column name. Simply drop down the list and select the specific detail you want to view. For example, if you want to only view details for the color white, drop down the list under the Color column header and select White. To view all details, drop down the list again and select All.
To change the quantity of tickets to print for a style/color/size combination, type in the new value in the Quantity column.
If you donʹt want the ticket file for one of the SKUs to print, change the Printed flag to Yes. Once all details on the PO have the Printed flag set to Yes (either because they were actually printed or because the flag was manually changed to Yes), the cleanup of the ticket files will occur based on a parameter in Enterprise Data. When an item with a Printed flag of Yes is selected, the message Do you want to reprint tickets that have already been printed? appears. If you answer Yes, the ticket will be printed again. If you answer No, tickets will not be printed for these items but the flag will be saved in the database as Yes.
Ticket Format The format of ticket assigned to this SKU.
Quantity The number of tickets to be printed for this SKU.
Price The current retail price at time of printing. Can be changed if the parameter is set to allow it.
Printed Flag indicating if tickets have been printed; either Yes or No.
Print tickets by Location by Purchase Order Detail
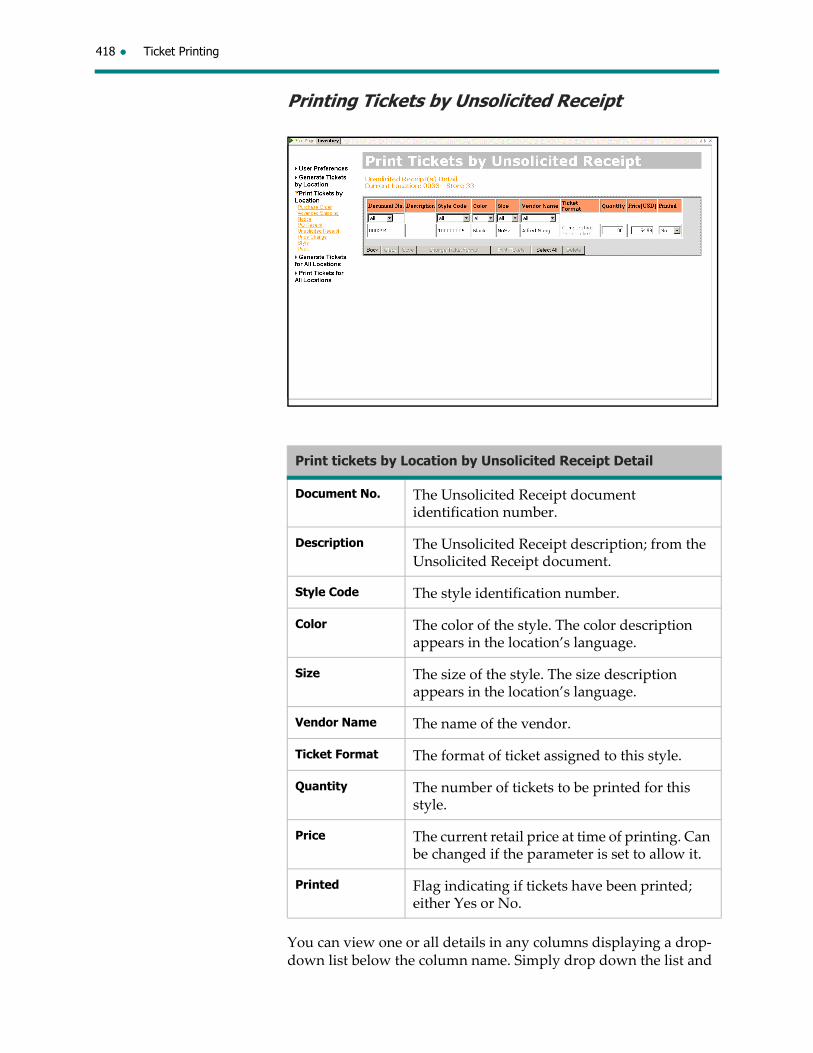
418 Ticket Printing
Printing Tickets by Unsolicited Receipt
You can view one or all details in any columns displaying a drop‐down list below the column name. Simply drop down the list and
Print tickets by Location by Unsolicited Receipt Detail
Document No. The Unsolicited Receipt document identification number.
Description The Unsolicited Receipt description; from the Unsolicited Receipt document.
Style Code The style identification number.
Color The color of the style. The color description appears in the location’s language.
Size The size of the style. The size description appears in the location’s language.
Vendor Name The name of the vendor.
Ticket Format The format of ticket assigned to this style.
Quantity The number of tickets to be printed for this style.
Price The current retail price at time of printing. Can be changed if the parameter is set to allow it.
Printed Flag indicating if tickets have been printed; either Yes or No.

Generating and Printing Tickets by Location 419
select the specific detail you want to view. For example, if you want to only view details for the color white, drop down the list under the Color column header and select White. To view all details, drop down the list again and select All.
To change the quantity of tickets to print for a style/color/size combination, type in the new value in the Quantity column.
The price can also be overridden if the parameter in the Enterprise Data module allows the price to be changed. Although the parameter is at the system level, if it is set, this means the retail price can be overridden on a location‐by‐location basis. Changing a price only affects the current ticket printing; the next time the same ticket is retrieved, the system will display the current retail for this item.
If you donʹt want the ticket file for one of the SKUs to print, change the Printed flag to Yes. Once all details on the purchase order have the Printed flag set to Yes (either because they were actually printed or because the flag was manually changed to Yes), the cleanup of the ticket files will occur based on a parameter in Enterprise Data.
Printing Tickets by Price Change
Print tickets by Location by Price Change Detail
Document No. The Price Change document identification number.
Description The description of the price change; from the price change document.
Style Code The style identification number.

420 Ticket Printing
You can view one or all details in any columns displaying a drop‐down list below the column name. Simply drop down the list and select the specific detail you want to view. For example, if you want to only view details for the color white, drop down the list under the Color column header and select White. To view all details, drop down the list again and select All.
To change the quantity of tickets to print for an SKU, type in the new value in the Quantity column.
If you donʹt want the ticket file for one of the SKUs to print, change the Printed flag to Yes. Once all details on the purchase order have the Printed flag set to Yes (either because they were actually printed or because the flag was manually changed to Yes), the cleanup of the ticket files will occur based on a parameter in Enterprise Data.
Color The color of the style. The color description appears in the location’s language.
Size The size of the style. The size description appears in the location’s language.
Ticket Format The format of ticket assigned to this SKU.
Quantity Number of tickets to be printed. Defaults to the sum of on hand + on order.
On Hand The quantity on hand of this SKU.
On Order The quantity on order of this SKU.
Retail The current retail price at time of printing. Can be changed if the parameter is set to allow it.
Print tickets by Location by Price Change Detail
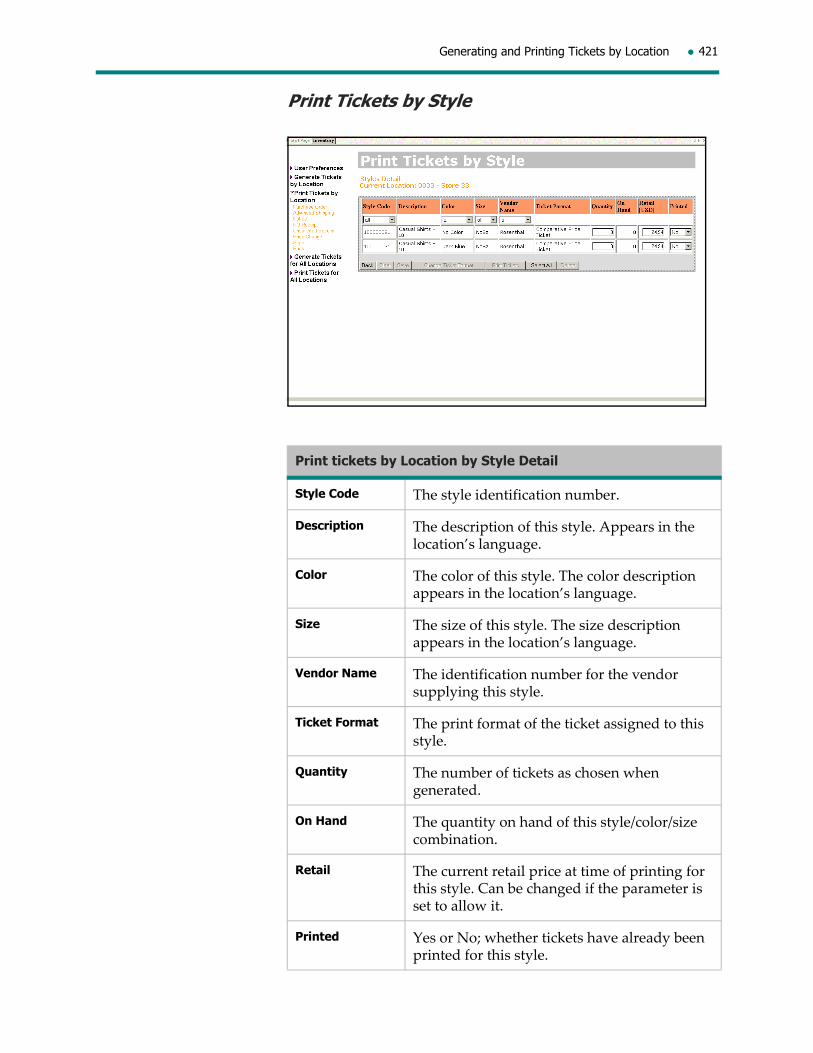
Generating and Printing Tickets by Location 421
Print Tickets by Style
Print tickets by Location by Style Detail
Style Code The style identification number.
Description The description of this style. Appears in the location’s language.
Color The color of this style. The color description appears in the location’s language.
Size The size of this style. The size description appears in the location’s language.
Vendor Name The identification number for the vendor supplying this style.
Ticket Format The print format of the ticket assigned to this style.
Quantity The number of tickets as chosen when generated.
On Hand The quantity on hand of this style/color/size combination.
Retail The current retail price at time of printing for this style. Can be changed if the parameter is set to allow it.
Printed Yes or No; whether tickets have already been printed for this style.

422 Ticket Printing
You can view one or all details in any columns displaying a drop‐down list below the column name. Simply drop down the list and select the specific detail you want to view. For example, if you want to only view details for the color white, drop down the list under the Color column header and select White. To view all details, drop down the list again and select All.
To change the quantity of tickets to print for a style/color/size combination, type in the new value in the Quantity column.
If you donʹt want the ticket file for one of the SKUs to print, change the Printed flag to Yes. Once all details on the purchase order have the Printed flag set to Yes (either because they were actually printed or because the flag was manually changed to Yes), the cleanup of the ticket files will occur based on a parameter in Enterprise Data.
Print Tickets by Pack
Print tickets by Location by Pack Code Detail
Pack Code The identification number for this pack.
Description The description of the pack.
Style Code The style identification number.
Color The color of the style in the pack. Description appears in the location’s language.
Size The size code for the style in the pack. Description appears in the location’s language.
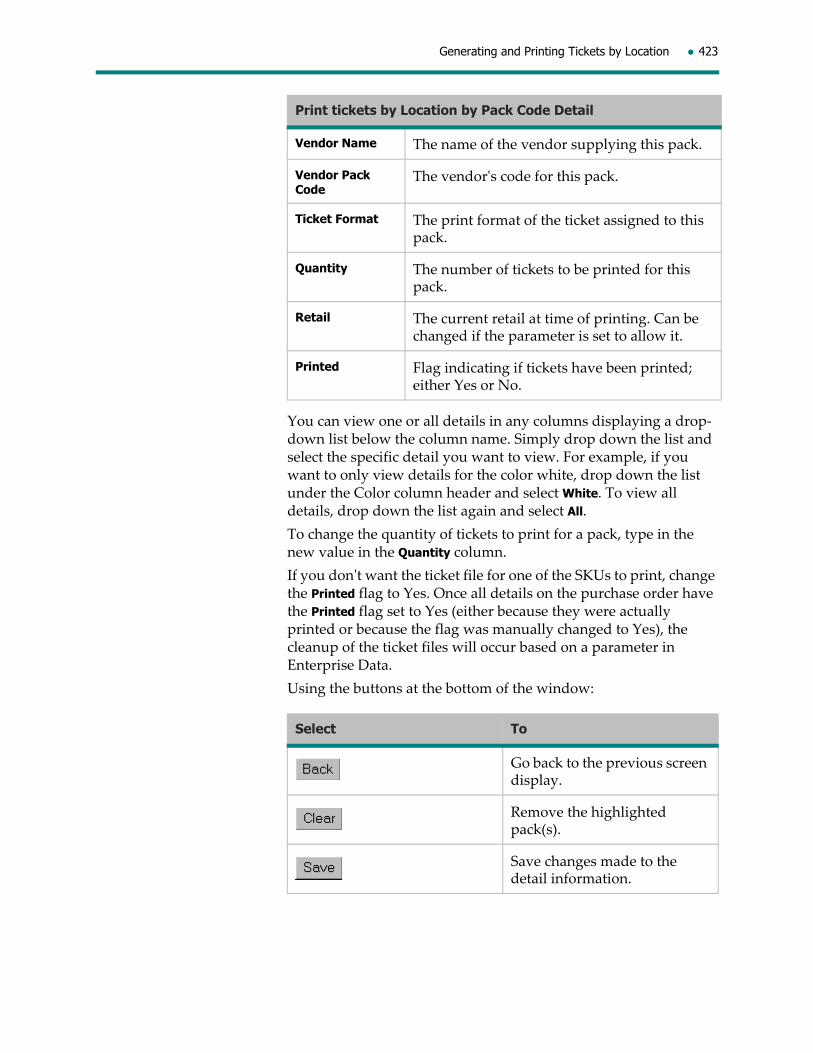
Generating and Printing Tickets by Location 423
You can view one or all details in any columns displaying a drop‐down list below the column name. Simply drop down the list and select the specific detail you want to view. For example, if you want to only view details for the color white, drop down the list under the Color column header and select White. To view all details, drop down the list again and select All.
To change the quantity of tickets to print for a pack, type in the new value in the Quantity column.
If you donʹt want the ticket file for one of the SKUs to print, change the Printed flag to Yes. Once all details on the purchase order have the Printed flag set to Yes (either because they were actually printed or because the flag was manually changed to Yes), the cleanup of the ticket files will occur based on a parameter in Enterprise Data.
Using the buttons at the bottom of the window:
Vendor Name The name of the vendor supplying this pack.
Vendor Pack Code
The vendorʹs code for this pack.
Ticket Format The print format of the ticket assigned to this pack.
Quantity The number of tickets to be printed for this pack.
Retail The current retail at time of printing. Can be changed if the parameter is set to allow it.
Printed Flag indicating if tickets have been printed; either Yes or No.
Select To
Go back to the previous screen display.
Remove the highlighted pack(s).
Save changes made to the detail information.
Print tickets by Location by Pack Code Detail

424 Ticket Printing
To print tickets by Location by Style
1. If you want to print tickets already generated, bypass the selection criteria and simply click Submit. Otherwise, enter your selection criteria, click Add after each and then click Submit to select Unsolicited Receipts meeting your criteria.
2. To view information about one style, highlight the style line and then click Detail.
You can then filter by column; use the drop‐down list in a column to select the specific detail you want to view.
If you need to change the quantity of tickets to be printed, enter the new value in the Quantity column.
If you donʹt want tickets to be printed for a specific SKU, change the SKUs Printed flag to Yes. If you select to print tickets for an SKU with a Printed flag of Yes, the message Do you want to reprint tickets that have already been printed? appears. Answer Yes to reprint the ticket(s) or No to bypass ticket printing for this SKU.
If you need to change the ticket format for a line, click Change Ticket Format, select the new format and then click OK.
If you want to change the retail price, enter the new value in the Retail column.
Click Save to save any changes made to the detail information.
Highlight the line or lines you want to print tickets for (or click Select All) > Print Tickets.
3. To view or print tickets for all styles, click Select All and the click either Detail or Print Tickets.
When you display all styles, you can make any changes required (see above for details). When finished, click Save > Print Tickets.
Assign a ticket format other than the default for the highlighted pack. Select the new ticket format and then click OK.
Print tickets for the highlighted pack(s).
Select all packs in the list.
Deletes the highlighted pack from the list.
Select To

Generating and Printing Tickets by Location 425
4. Before printing, ensure the correct ticket stock is on the printer and then click OK. Once tickets have been printed, the detail line(s) becomes deselected and the Printed flag changes to Yes.
426 Ticket Printing
Generating and Printing Tickets for All Locations
Selecting ticketing functions for all locations implies that the functions will be done for all locations, typically by Head Office.
There are two steps in the ticketing for all locations process: Ticket Generation and Ticket Printing. Tickets must be generated before they can be printed.
Ticket generation for all locations can be done automatically by the system based on parameters defined in Enterprise Data, or manually within Ticket Printing. Ticket generation will create tickets with all the information required by the ticket printing machine to print tickets in the format and quantity required.
You will access the ticket printing functions to let Ticket Printing know which generated tickets should be sent to the ticket printer.
Generating tickets for all locationsTickets can be automatically generated for all locations based on PO or PO Receipt quantities. This is defined on a PO‐by‐PO basis by the buyer inputting the purchase order.
If tickets will be automatically generated based on purchase orders, it will occur when the PO status becomes Open.
If tickets will be automatically generated based on PO Receipts, it will occur when the status of the PO Receipt becomes Received.
Tickets can also be automatically generated based on ASNs (if it is an EDI order), Unsolicited Receipts and Price Changes. This is defined by parameters in Enterprise Data.
For ASNs, tickets are generated when the ASN is loaded.
For Unsolicited Receipts, tickets are generated with the status of the Unsolicited Receipt document becomes Received.
For Price Changes, tickets are generated when the Price Change status becomes Open.

Generating and Printing Tickets for All Locations 427
You can also manually generate tickets by style for all locations.
Generating tickets manually for all locations by styleUse this method when you want to manually generate tickets for all locations for specific styles; for example, for clients who print tickets at the main office only. You can set up filtering criteria to narrow your search so that you select a specific style or styles, a specific vendor, color code, UPC number, etc.
For each style, you can select to generate tickets based on on hand and/or on order quantities.

428 Ticket Printing
If you change your mind or made a mistake, you can click Clear All to remove all current selection criteria. Once all your selection criteria have been entered, click Submit so that the system will retrieve all styles that meet your criteria.
Generate tickets for all Locations – Style Criteria
Selection Criteria
Highlight the method you want to use to narrow down which styles you want to generate tickets for.
Methods Select either List or Range.
Enter List of Values/Enter Range Values/Choose One Option
Based on the combination of selection criteria and method chosen, enter either a list or range of values, select one or many values, or enter a date.
Not Equal Select whether to choose values not equal to those specified above.
Match Upper/Lower Case
Select whether to match the upper and lower case characters in your selection to those in your files.
Adds your criterion to the Current Selection.
Clears options entered to create a criterion.
Current Selection
Displays all criteria selected so far.

Generating and Printing Tickets for All Locations 429
By default, details are displayed in ascending order based on the style code. If you want to see the information in a different order, click on a column header to sort column details numerically. When you click on a column header the first time, details are sorted in descending order and a (‐) displays in the column header. When you click on the same column a second time, details are re‐sequenced in ascending order and a (+) displays in the column header.
Using the buttons at the bottom of the window:
Generate tickets for all Locations by Style Worklist
Style Code The style identification number.
Description The description of the style. Appears in the default language.
Status The status of the style; either New, Preliminary, Ordered or Received.
Vendor The identification number for the vendor supplying this style.
Vendor Name The name of the vendor.
Ticket Format The format of the ticket assigned to this style. Defaults based on a parameter set at the time of style creation.
On Hand The quantity on hand of this SKU.
On Order The quantity on order of this SKU.
Select To
Go back to the top of the list.
Go back one page.
Go forward one page.
Go to the last page of the list.
Display the details of the highlighted style; only one line can be selected at a time (see below).

430 Ticket Printing
Note that the first four buttons shown above will not appear if your selection returned fewer rows than the value set for Max. Items in the Employee Preferences. See “Ticket Printing Preferences” on page 388 earlier in this chapter for more information.
Selecting Detail displays the following information.
Remove the highlighted style(s).
Assign a ticket format other than the default for the highlighted style. Select the new ticket format OK.
Generate tickets for the highlighted style(s).
Select all styles in the list.
Generate tickets for all Locations by Style Detail
Style Code The style identification number.
Description The description of the style. Appears in the default language.
Create Date The date the style was first saved.
Select To

Generating and Printing Tickets for All Locations 431
When generating tickets by style for all locations, the system uses the default of on hand for generating tickets. However, you can generate a ticket quantity that is based on either on order or both on hand and on order by selecting/deselecting the appropriate check box(es). The only restriction to doing so is that the quantity cannot be changed at printing time. If you need to change the print quantity, you must generate the tickets again. This will overlay the previous quantity generated.
Using the buttons at the bottom of the window:
Vendor Code The identification number for the vendor supplying this style.
Vendor Name The name of the vendor.
Status The status of the style; either New, Preliminary, Ordered or Received.
Original Retail The original retail price for this style.
Current Retail The current retail price of this style.
Vendor Style The vendorʹs style number for this style.
Location Code The identification number of the location receiving this style.
Location Name The name of the location.
Ticket Format The format of the ticket assigned to this style. Defaults based on a parameter set at the time of style creation.
Quantity The number of tickets to be printed for this style/location. Defaults to on‐hand.
On Hand The quantity on hand of this style.
On Order The quantity on order of this style.
Select To
Go back to the previous screen display.
Remove the highlighted location(s).
Generate tickets for all Locations by Style Detail

432 Ticket Printing
To generate tickets for all Locations by Style
1. Enter your selection criteria and then click Add after each.
2. Click Submit to select styles meeting your criteria.
3. To view information about one style, highlight the style line and then click Detail.
You can then filter by column; use the drop‐down list in a column to select the specific detail you want to view.
You can change how you want the tickets generated; based on either on hand (the default) and/or on order quantities. Select the appropriate line and column and make the appropriate change.
Highlight the style or styles you want to generate tickets for (or click Select All) > Generate Tickets.
4. To view or generate tickets for all styles, click Select All and then click either Detail or Generate Tickets. Once tickets have been generated, the message Ticket Generation was successful displays.
Printing tickets for all locationsOnce ticket files have been either automatically or manually generated, they can be printed.
When selecting a file to be printed, you must select it in the way it was generated. For example, if tickets were generated by purchase order, you must also select the tickets to be printed by purchase order.
When you print tickets for all locations, you are printing the price tickets for every location on the purchase order, as opposed to printing the tickets for your specific location.
The Printed status field for a style will change to Yes only when all locations have been printed.
To select all tickets from ticket files already generated, bypass the selection criteria and simply click Submit. (This method retrieves both generated and printed documents.) Or, you can enter selection criteria as described below to choose specific generated ticket files.
Assign a ticket format other than the default for the highlighted style. Select the new ticket format > OK.
Generate tickets for the highlighted style/location(s).
Select all style/location(s) in the list.
Select To
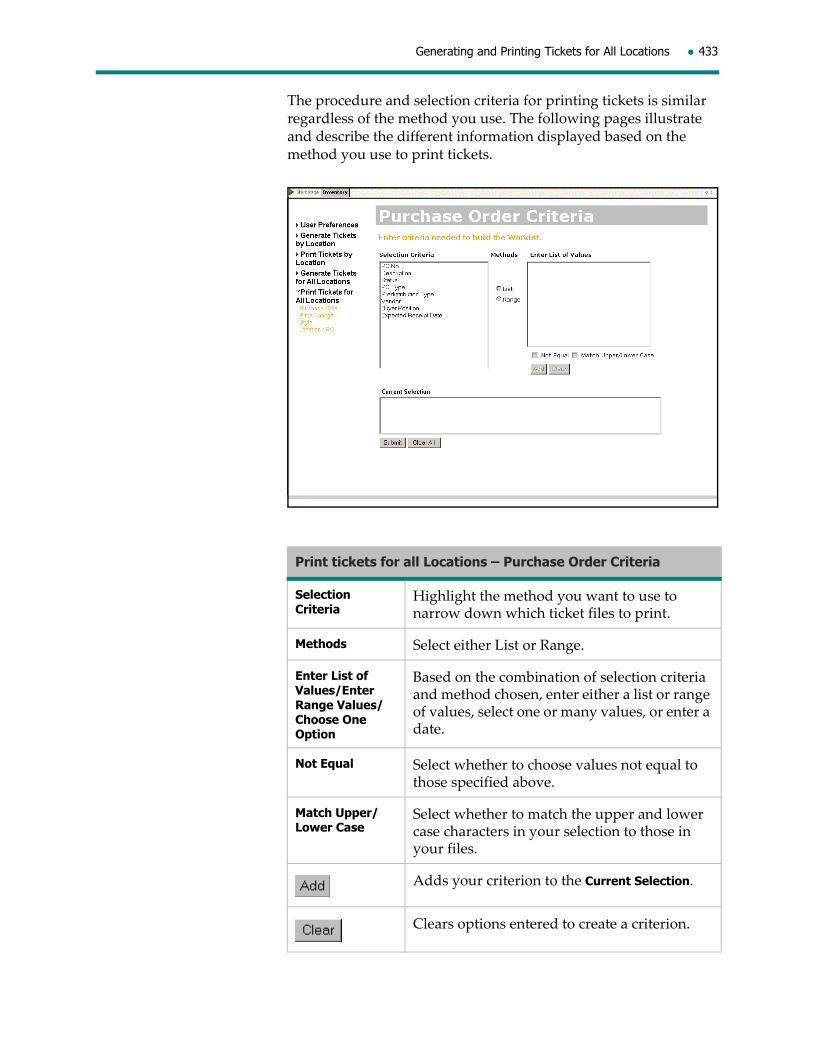
Generating and Printing Tickets for All Locations 433
The procedure and selection criteria for printing tickets is similar regardless of the method you use. The following pages illustrate and describe the different information displayed based on the method you use to print tickets.
Print tickets for all Locations – Purchase Order Criteria
Selection Criteria
Highlight the method you want to use to narrow down which ticket files to print.
Methods Select either List or Range.
Enter List of Values/Enter Range Values/Choose One Option
Based on the combination of selection criteria and method chosen, enter either a list or range of values, select one or many values, or enter a date.
Not Equal Select whether to choose values not equal to those specified above.
Match Upper/Lower Case
Select whether to match the upper and lower case characters in your selection to those in your files.
Adds your criterion to the Current Selection.
Clears options entered to create a criterion.
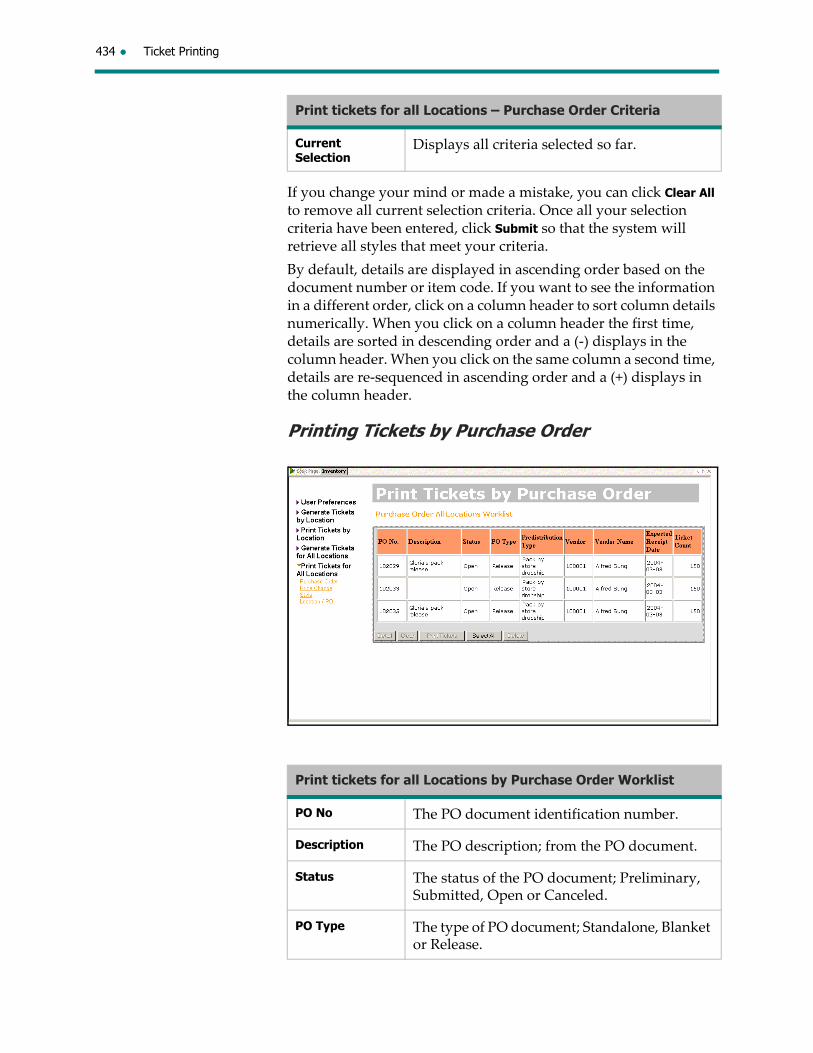
434 Ticket Printing
If you change your mind or made a mistake, you can click Clear All to remove all current selection criteria. Once all your selection criteria have been entered, click Submit so that the system will retrieve all styles that meet your criteria.
By default, details are displayed in ascending order based on the document number or item code. If you want to see the information in a different order, click on a column header to sort column details numerically. When you click on a column header the first time, details are sorted in descending order and a (‐) displays in the column header. When you click on the same column a second time, details are re‐sequenced in ascending order and a (+) displays in the column header.
Printing Tickets by Purchase Order
Current Selection
Displays all criteria selected so far.
Print tickets for all Locations by Purchase Order Worklist
PO No The PO document identification number.
Description The PO description; from the PO document.
Status The status of the PO document; Preliminary, Submitted, Open or Canceled.
PO Type The type of PO document; Standalone, Blanket or Release.
Print tickets for all Locations – Purchase Order Criteria

Generating and Printing Tickets for All Locations 435
Printing Tickets by Price Change
Predistribution Type
The PO predistribution type; either Bulk, Pack by store dropship, Pack by store crossdock or Bulk pre‐allocated.
Vendor The identification number of the vendor.
Vendor Name The name of the vendor.
Expected Receipt Date
The date the buyer expects the goods to arrive at the receiving location.
Ticket Count The number of tickets generated for the PO.
Print tickets for all Locations by Price Change Worklist
Document No. The Price Change document identification number.
Description The description of the price change; from the price change document.
Status The status of the price change document; either Preliminary, Submitted, Issued, Effective or Completed.
Type The type of price change document; Marked Down, Marked Down Canceled, Marked Up, Marked Up Canceled.
Print tickets for all Locations by Purchase Order Worklist

436 Ticket Printing
When tickets for price changes are printed, the quantity printed will be the default quantity of on hand + on order, or the value chosen above. (To change the default value, select the desired check box – either On Hand or On Order). The itemʹs price from the document is used on printed tickets.
Printing Tickets by Style
Approval Status The approval status of the price change; Not Approved, Pending Approval, Approval, Approval Rejected, Rejected.
Category The category of the pricing document, selected when the price change was created. The category defines the price change type, the resulting price status and whether it can be overridden or not and if price exceptions should be overridden.
Price Status The resulting status default for the price change. A user‐defined field in Pricing. Could be marked down, marked down canceled, marked up, marked up canceled, etc.
Effective From Date
The date the price change is to take effect.
On Hand If checked, tickets will be printed for the on hand quantity.
On Order If checked, tickets will be printed for the on order quantity. Note that the default is selected automatically but can be changed.
Print tickets for all Locations by Price Change Worklist
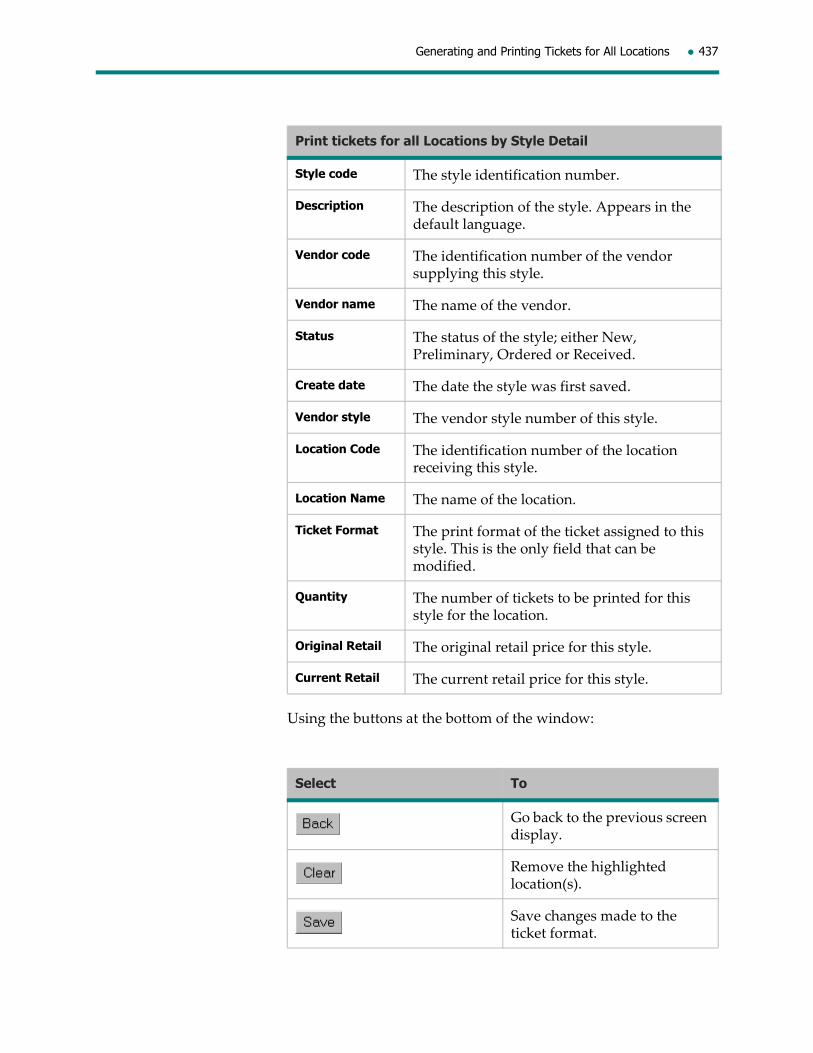
Generating and Printing Tickets for All Locations 437
Using the buttons at the bottom of the window:
Print tickets for all Locations by Style Detail
Style code The style identification number.
Description The description of the style. Appears in the default language.
Vendor code The identification number of the vendor supplying this style.
Vendor name The name of the vendor.
Status The status of the style; either New, Preliminary, Ordered or Received.
Create date The date the style was first saved.
Vendor style The vendor style number of this style.
Location Code The identification number of the location receiving this style.
Location Name The name of the location.
Ticket Format The print format of the ticket assigned to this style. This is the only field that can be modified.
Quantity The number of tickets to be printed for this style for the location.
Original Retail The original retail price for this style.
Current Retail The current retail price for this style.
Select To
Go back to the previous screen display.
Remove the highlighted location(s).
Save changes made to the ticket format.

438 Ticket Printing
To print tickets for all Locations by Purchase
Order
1. If you want to print tickets already generated, bypass the selection criteria and simply click Submit. Otherwise, enter your selection criteria, click Add after each and then click Submit to select purchase orders meeting your criteria.
2. To view information about one purchase order, highlight the purchase order line and then click Detail.
You can then filter by column; use the drop‐down list in a column to select the specific detail you want to view.
If you need to change the ticket format for a line, click Change Ticket Format, select the new format and then click OK.
Click Save to save any changes made to the detail information.
Highlight the line or lines you want to print tickets for (or click Select All) > Print Tickets.
3. To view or print tickets for all purchase orders, click Select All and then click either Detail or Print Tickets.
When you display all POs, you can make any changes required (see above for details). When finished, click Save > Print Tickets.
4. Before printing, ensure the correct ticket stock is on the printer and then click OK. Once tickets have been printed, the detail line(s) becomes deselected and the Printed flag changes to Yes.
Assign a ticket format other than the default for the highlighted style. Select the new ticket format and then click OK.
Print tickets for the highlighted location(s).
Select all locations in the list.
Select To

Merchandise Locator is a module that typically is run from your location and allows you to:
identify a missing UPC for any item
locate UPCs in other locations
check on‐hand information for UPCs in your location and other locations
view allocation information for your location
view price history for a UPC in your location and other locations
view a list of contacts in other locations
display multiple inventory statuses for your location and other locations.
request the transfer of an item from another location
view images of styles
13 Merchandise Locator
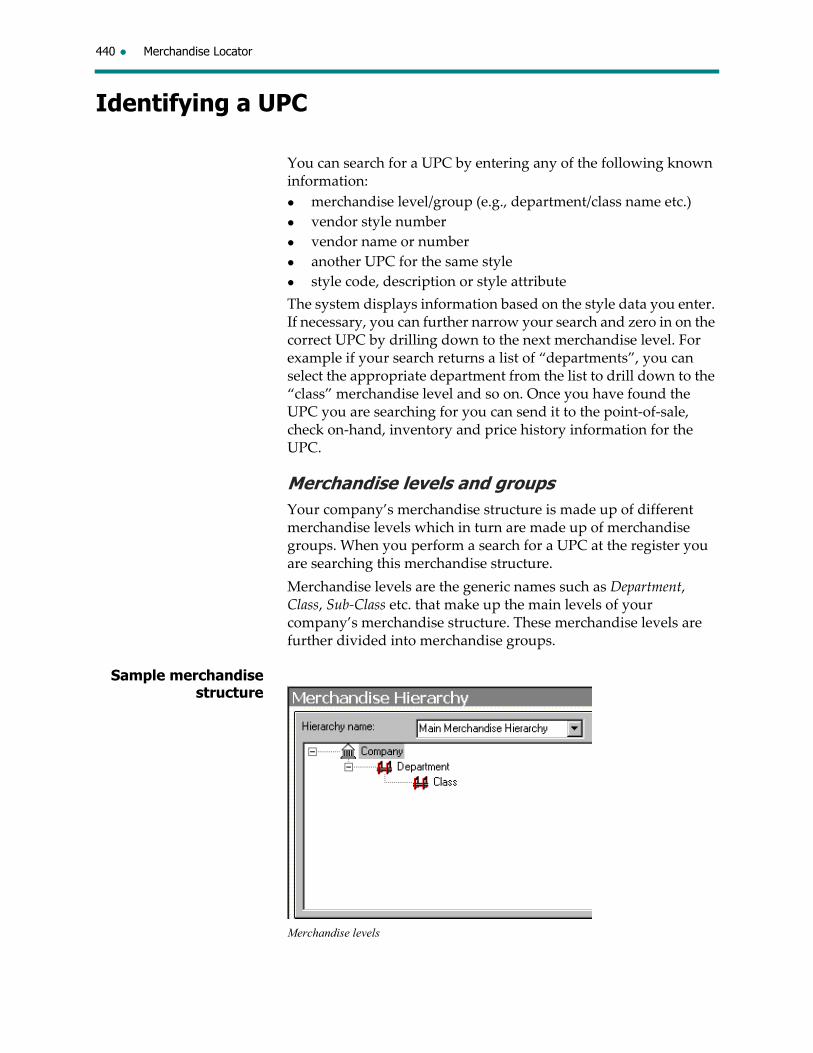
440 Merchandise Locator
Identifying a UPC
You can search for a UPC by entering any of the following known information:
merchandise level/group (e.g., department/class name etc.)
vendor style number
vendor name or number
another UPC for the same style
style code, description or style attribute
The system displays information based on the style data you enter. If necessary, you can further narrow your search and zero in on the correct UPC by drilling down to the next merchandise level. For example if your search returns a list of “departments”, you can select the appropriate department from the list to drill down to the “class” merchandise level and so on. Once you have found the UPC you are searching for you can send it to the point‐of‐sale, check on‐hand, inventory and price history information for the UPC.
Merchandise levels and groupsYour company’s merchandise structure is made up of different merchandise levels which in turn are made up of merchandise groups. When you perform a search for a UPC at the register you are searching this merchandise structure.
Merchandise levels are the generic names such as Department, Class, Sub‐Class etc. that make up the main levels of your company’s merchandise structure. These merchandise levels are further divided into merchandise groups.
Sample merchandise structure
Merchandise levels
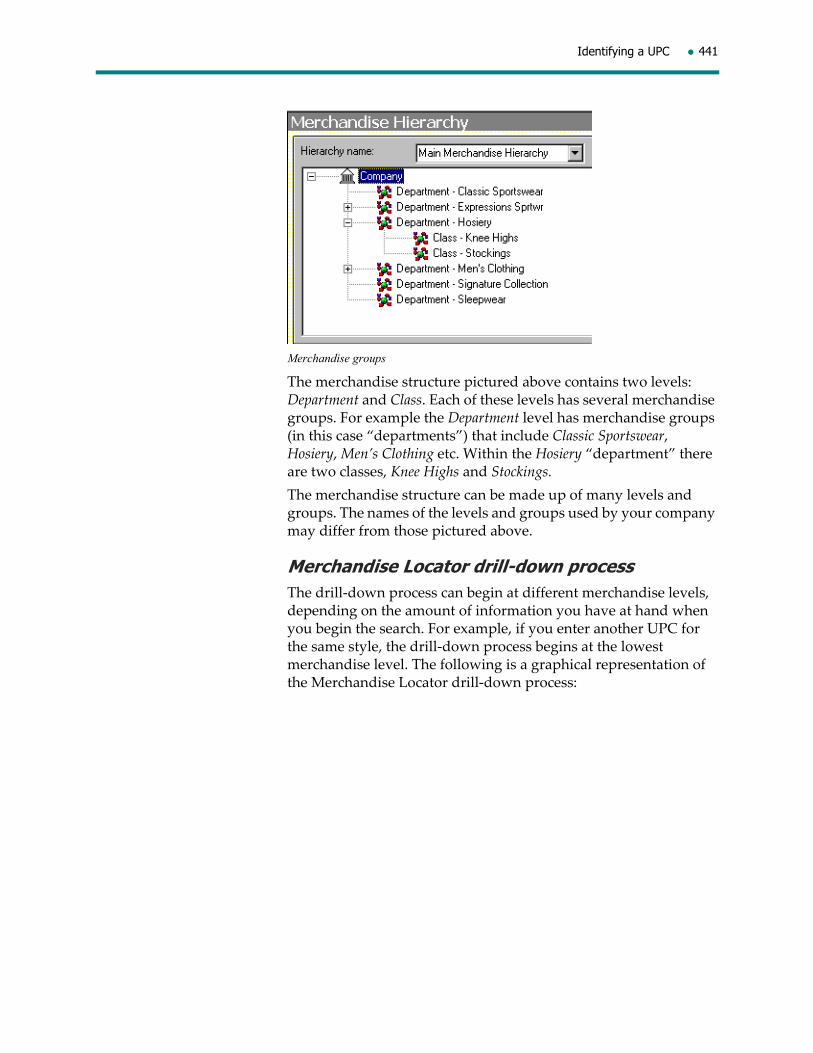
Identifying a UPC 441
Merchandise groups
The merchandise structure pictured above contains two levels: Department and Class. Each of these levels has several merchandise groups. For example the Department level has merchandise groups (in this case “departments”) that include Classic Sportswear, Hosiery, Men’s Clothing etc. Within the Hosiery “department” there are two classes, Knee Highs and Stockings.
The merchandise structure can be made up of many levels and groups. The names of the levels and groups used by your company may differ from those pictured above.
Merchandise Locator drill-down processThe drill‐down process can begin at different merchandise levels, depending on the amount of information you have at hand when you begin the search. For example, if you enter another UPC for the same style, the drill‐down process begins at the lowest merchandise level. The following is a graphical representation of the Merchandise Locator drill‐down process:
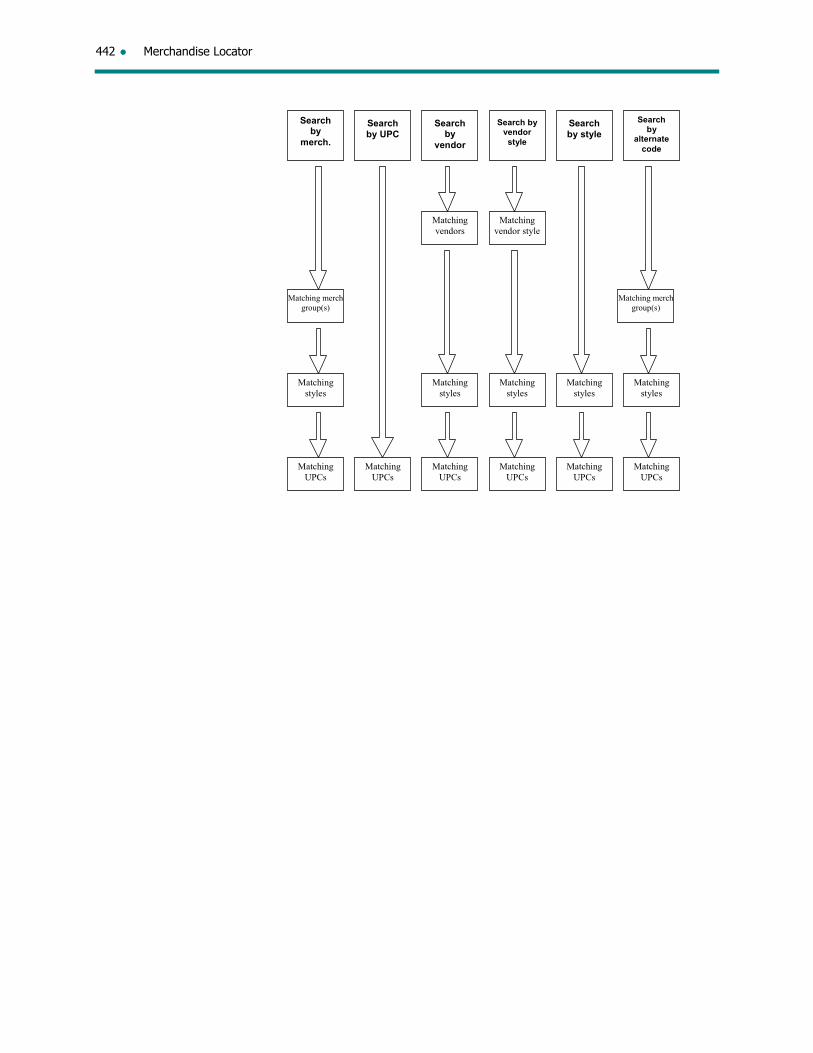
442 Merchandise Locator
Search by
merch.
Matching vendors
Matching vendor style
Matching styles
Matching styles
Matching styles
Matching styles
Matching styles
Search by UPC
Search by
vendor
Search by vendor style
Search by style
Searchby
alternate code
Matching merchgroup(s)
Matching UPCs
Matching UPCs
Matching UPCs
Matching UPCs
Matching UPCs
Matching UPCs
Matching merch group(s)
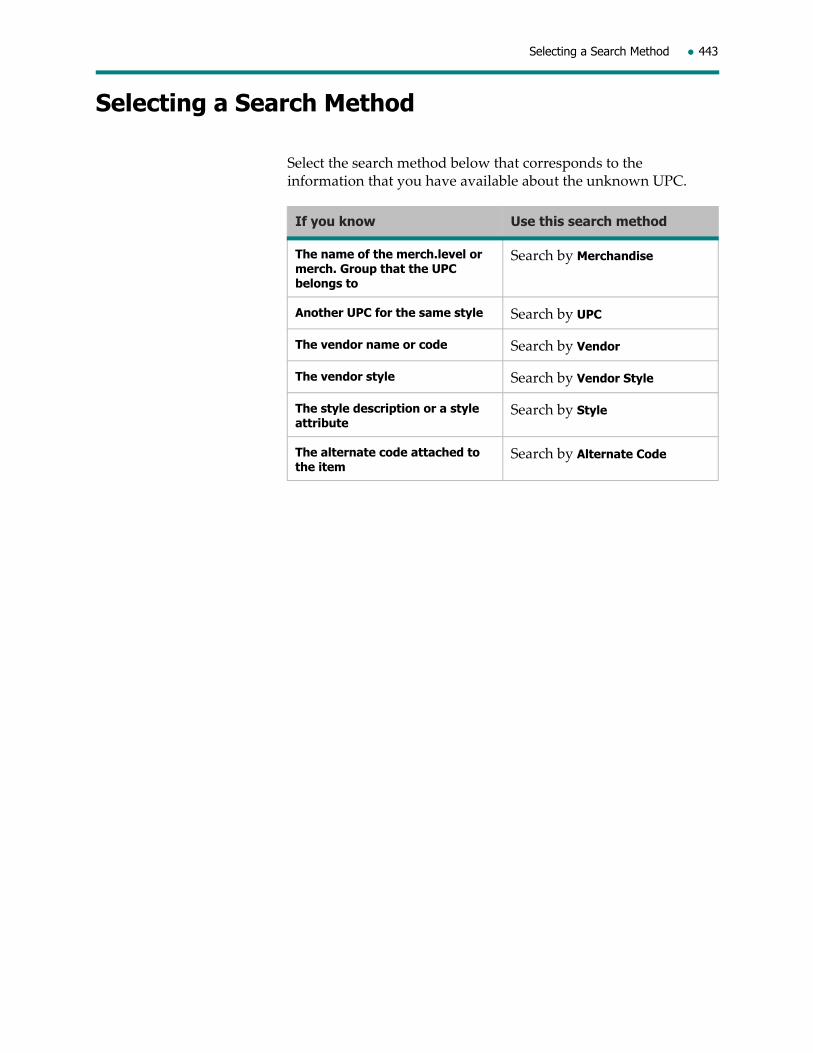
Selecting a Search Method 443
Selecting a Search Method
Select the search method below that corresponds to the information that you have available about the unknown UPC.
If you know Use this search method
The name of the merch.level or merch. Group that the UPC belongs to
Search by Merchandise
Another UPC for the same style Search by UPC
The vendor name or code Search by Vendor
The vendor style Search by Vendor Style
The style description or a style attribute
Search by Style
The alternate code attached to the item
Search by Alternate Code
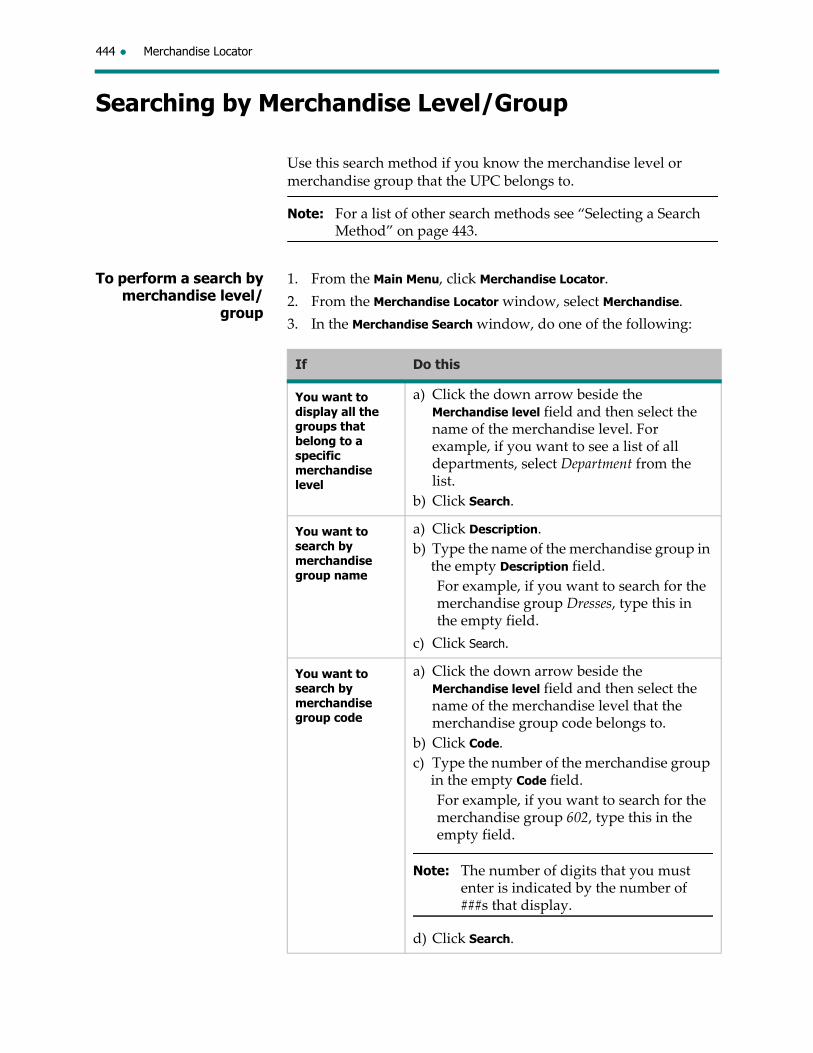
444 Merchandise Locator
Searching by Merchandise Level/Group
Use this search method if you know the merchandise level or merchandise group that the UPC belongs to.
Note: For a list of other search methods see “Selecting a Search Method” on page 443.
To perform a search by merchandise level/
group
1. From the Main Menu, click Merchandise Locator.
2. From the Merchandise Locator window, select Merchandise.
3. In the Merchandise Search window, do one of the following:
If Do this
You want to display all the groups that belong to a specific merchandise level
a) Click the down arrow beside the Merchandise level field and then select the name of the merchandise level. For example, if you want to see a list of all departments, select Department from the list.
b) Click Search.
You want to search by merchandise group name
a) Click Description.
b) Type the name of the merchandise group in the empty Description field.
For example, if you want to search for the merchandise group Dresses, type this in the empty field.
c) Click Search.
You want to search by merchandise group code
a) Click the down arrow beside the Merchandise level field and then select the name of the merchandise level that the merchandise group code belongs to.
b) Click Code.
c) Type the number of the merchandise group in the empty Code field.
For example, if you want to search for the merchandise group 602, type this in the empty field.
Note: The number of digits that you must enter is indicated by the number of ###s that display.
d) Click Search.

Searching by Merchandise Level/Group 445
4. Double‐click the merchandise group that the UPC you are searching for belongs to, from the list of merchandise groups that displays.
5. Click Select.
6. Repeat steps 4‐5 as many times as necessary to further narrow your search until the Style List displays.
Note: The Style List will only display if there is more than one style defined for the merchandise group. If there is only

446 Merchandise Locator
one style that belongs to the merchandise group, the Style View will display.
7. If required, click the style that the UPC belongs to from the Style List > Select.
8. All the UPCs for the style display in the Style View. For more information, see “Style view” on page 469.
Note: The UPC Details will only display if colors and sizes have been defined for the style. If no sizes or colors have been defined, the Style View window displays.
Note: The Retail, Compare at and Promo values for the location display in the currency of the location’s jurisdiction for the selected style.
9. In the Style View window, click to select the correct UPC and then choose from the available options:
If you want to Do the following
Send the UPC to the register Click Send to POS.

Searching by Merchandise Level/Group 447
Find the UPC in another location a) Click to highlight the UPC and then click Select. The UPC Details window displays.
b) Click the Locate tab.
For more information see “Finding a UPC in another location” on page 471.
View inventory information for your location
a) From Style View, click to highlight the UPC and then click Select. The UPC Details window displays.
b) Click the Inventory tab.
For more information see “Viewing inventory information for your location” on page 467.
View the price history for this UPC at your location
a) From Style View, click to highlight the UPC and then click Select. The UPC Details window displays.
b) Click the Price History tab.
For more information see “Viewing price history for your location” on page 468.
Sort the UPCs by color Click Sort by Color/Size.
View cost information for the style
Click Show Cost. Average cost is displayed in the currency of the location’s juridsiction for the selected style. Click OK to continue. (The Show Cost button is available from both the Style View and UPC Details windows.)
If you want to Do the following
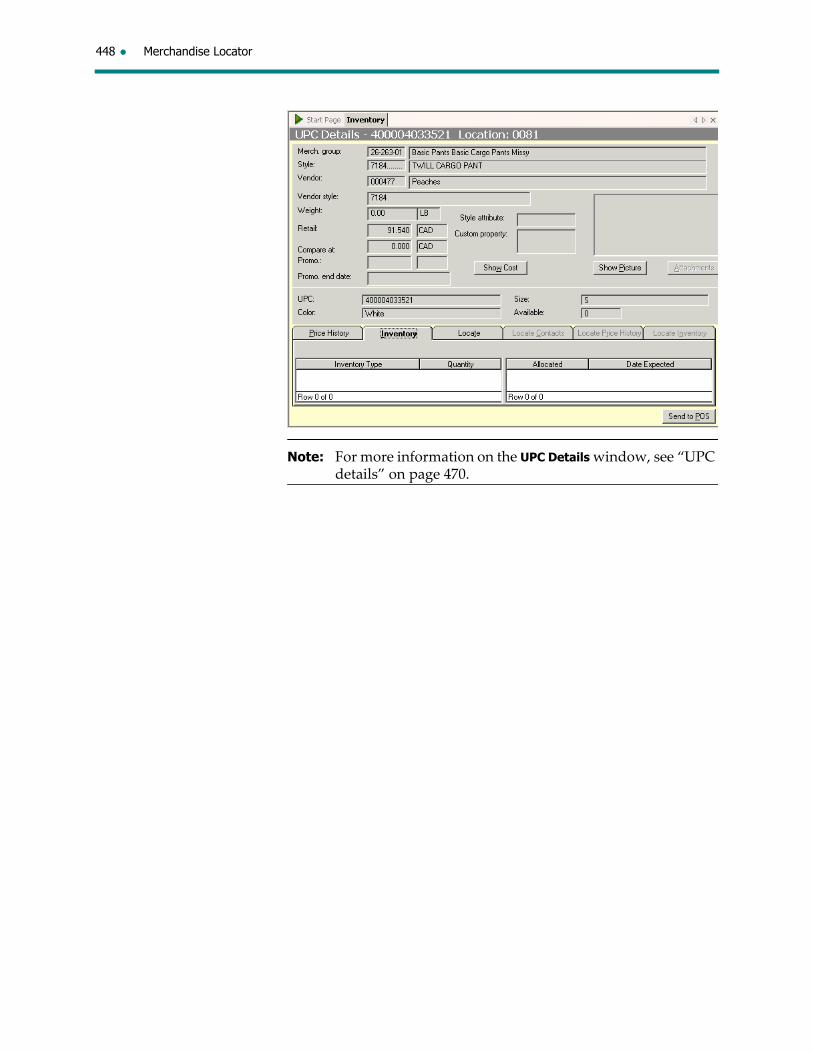
448 Merchandise Locator
Note: For more information on the UPC Details window, see “UPC details” on page 470.

Searching by UPC 449
Searching by UPC
Use this search method if you already have another UPC for the same style. For example, you might have a UPC for a particular sweater in brown, size medium and need to identify the UPC for the same sweater in pink, size small.
Note: For a list of other search methods see “Selecting a Search Method” on page 443.
To perform a search by UPC
1. From the Main Menu, click Merchandise Locator.
2. From the Merchandise Locator window, select UPC.
3. In the UPC Search window, enter the UPC belonging to the same style as the UPC you want to identify and then click Search. All the UPCs for the style display in the Style View. For more information, see “Style view” on page 469:
Note: The UPC Details will only display if colors and sizes have been defined for the style. If no sizes or colors have been defined, the Style View window displays.
Note: The Retail, Compare at and Promo values for the location display in the currency of the location’s jurisdiction for the selected style.

450 Merchandise Locator
4. In the Style View window, click to select the correct UPC and then choose from the available options:
If you want to Do the following
Send the UPC to the register
Click Send to POS.
Find the UPC in another location
a) Click to highlight the UPC and then click Select. The UPC Details window displays.
b) Click the Locate tab.
For more information see “Finding a UPC in another location” on page 471.
View inventory information for your location
a) From Style View, click to highlight the UPC and then click Select. The UPC Details window displays.
b) Click the Inventory tab.
For more information see “Viewing inventory information for your location” on page 467.
View the price history for this UPC at your location
a) From Style View, click to highlight the UPC and then click Select. The UPC Details window displays.
b) Click the Price History tab.
For more information see “Viewing price history for your location” on page 468.
Sort the UPCs by color
Click Sort by Color/Size.
View cost information for the style
Click Show Cost. Average cost is displayed in the currency of the location’s juridsiction for the selected style. Click OK to continue. (The Show Cost button is available from both the Style View and UPC Details windows.)
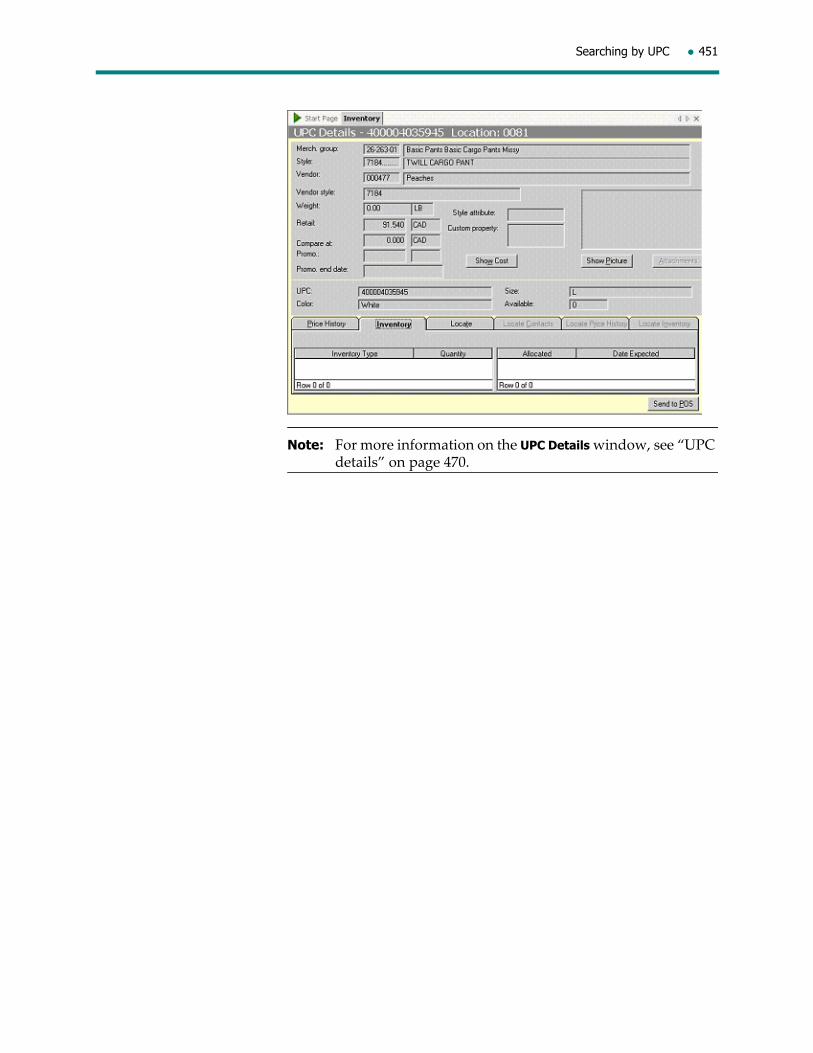
Searching by UPC 451
Note: For more information on the UPC Details window, see “UPC details” on page 470.

452 Merchandise Locator
Searching by Vendor Style
Use this search method if you know the vendor style for the item.
Note: For a list of other search methods see “Selecting a Search Method” on page 443.
To perform a search by vendor style
1. From the Main Menu, click Merchandise Locator.
2. From the Merchandise Locator window, select Vendor Style.
3. In the Vendor Style Search box, type the Vendor style in the empty field.
4. Click Search. The Style List displays:
Note: If only one style is found, the Style List will not display. Instead, the Style View will display automatically.
5. If required, click the style that the UPC belongs to from the Style List > Select.
6. All the UPCs for the style display in the Style View. For more information, “Style view” on page 469.

Searching by Vendor Style 453
Note: The UPC Details will only display if colors and sizes have been defined for the style. If no sizes or colors have been defined, the Style View window displays.
Note: The Retail, Compare at and Promo values for the location display in the currency of the location’s jurisdiction for the selected style.
7. In the Style View window, click to select the correct UPC and then choose from the available options:
If you want to Do the following
Send the UPC to the register
Click Send to POS.
Find the UPC in another location
a) Click to highlight the UPC and then click Select. The UPC Details window displays.
b) Click the Locate tab.
For more information see “Finding a UPC in another location” on page 471.
View inventory information for your location
a) From Style View, click to highlight the UPC and then click Select. The UPC Details window displays.
b) Click the Inventory tab.
For more information see “Viewing inventory information for your location” on page 467.
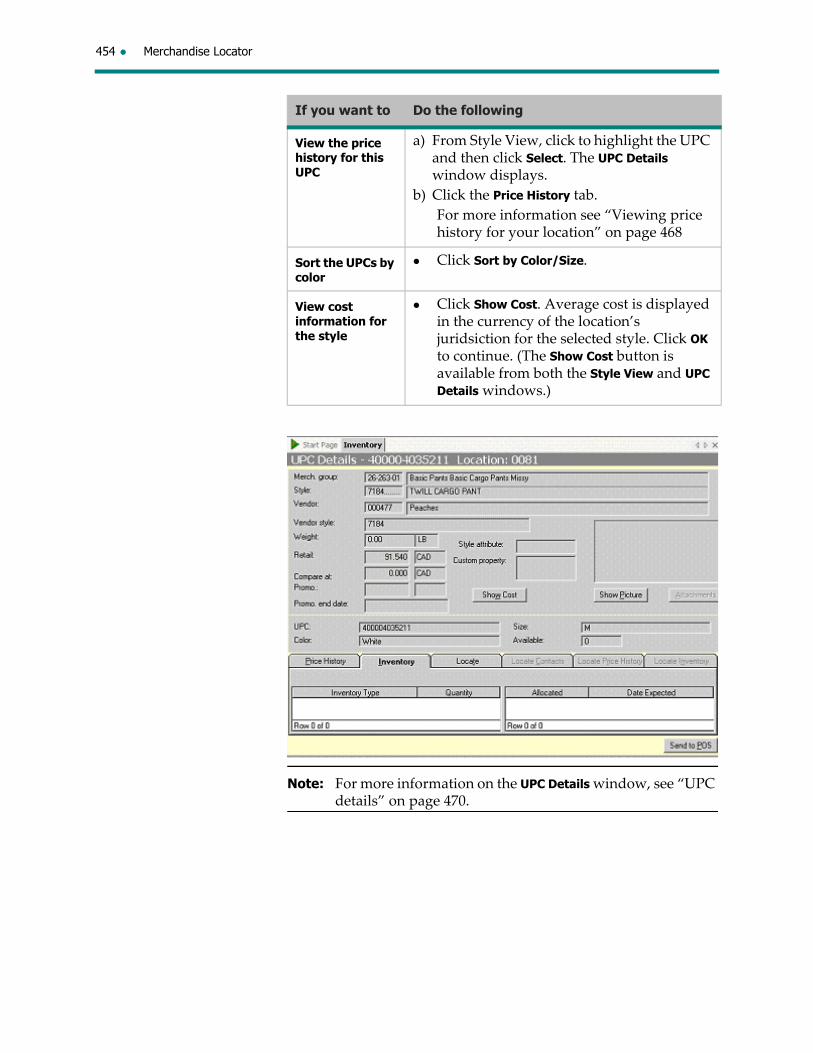
454 Merchandise Locator
Note: For more information on the UPC Details window, see “UPC details” on page 470.
View the price history for this UPC
a) From Style View, click to highlight the UPC and then click Select. The UPC Details window displays.
b) Click the Price History tab.
For more information see “Viewing price history for your location” on page 468
Sort the UPCs by color
Click Sort by Color/Size.
View cost information for the style
Click Show Cost. Average cost is displayed in the currency of the location’s juridsiction for the selected style. Click OK to continue. (The Show Cost button is available from both the Style View and UPC Details windows.)
If you want to Do the following
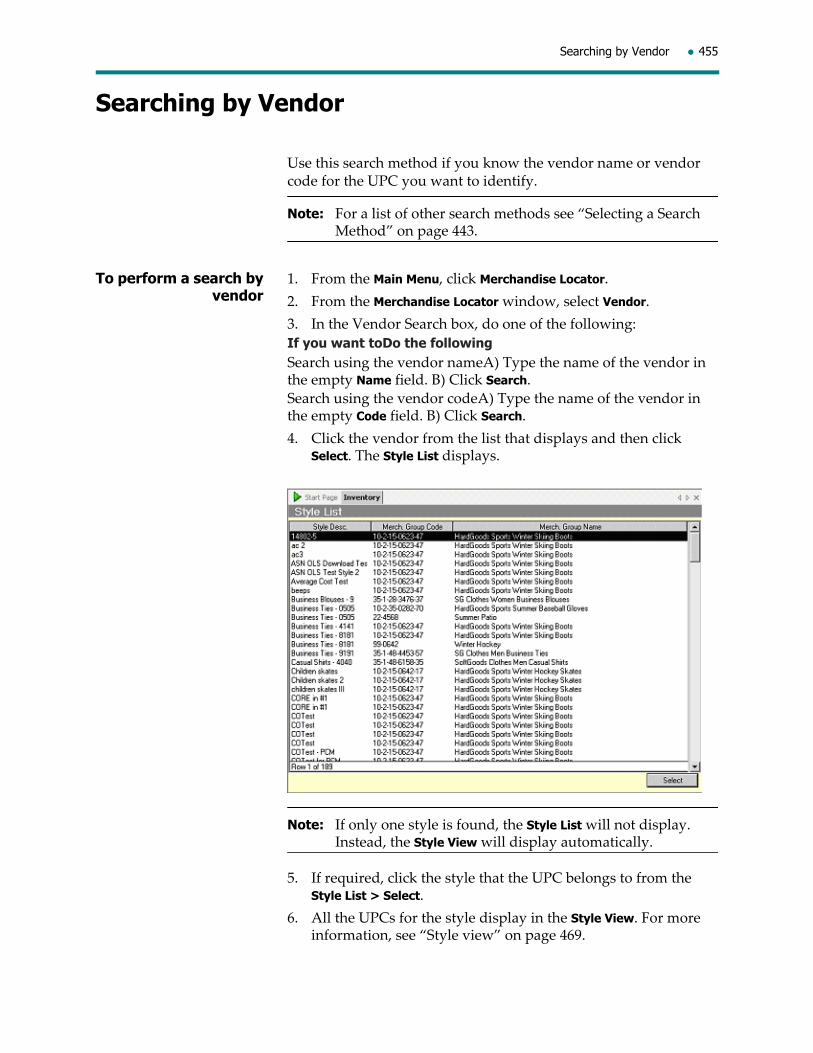
Searching by Vendor 455
Searching by Vendor
Use this search method if you know the vendor name or vendor code for the UPC you want to identify.
Note: For a list of other search methods see “Selecting a Search Method” on page 443.
To perform a search by vendor
1. From the Main Menu, click Merchandise Locator.
2. From the Merchandise Locator window, select Vendor.
3. In the Vendor Search box, do one of the following:
If you want toDo the followingSearch using the vendor nameA) Type the name of the vendor in the empty Name field. B) Click Search.Search using the vendor codeA) Type the name of the vendor in the empty Code field. B) Click Search.
4. Click the vendor from the list that displays and then click Select. The Style List displays.
Note: If only one style is found, the Style List will not display. Instead, the Style View will display automatically.
5. If required, click the style that the UPC belongs to from the Style List > Select.
6. All the UPCs for the style display in the Style View. For more information, see “Style view” on page 469.
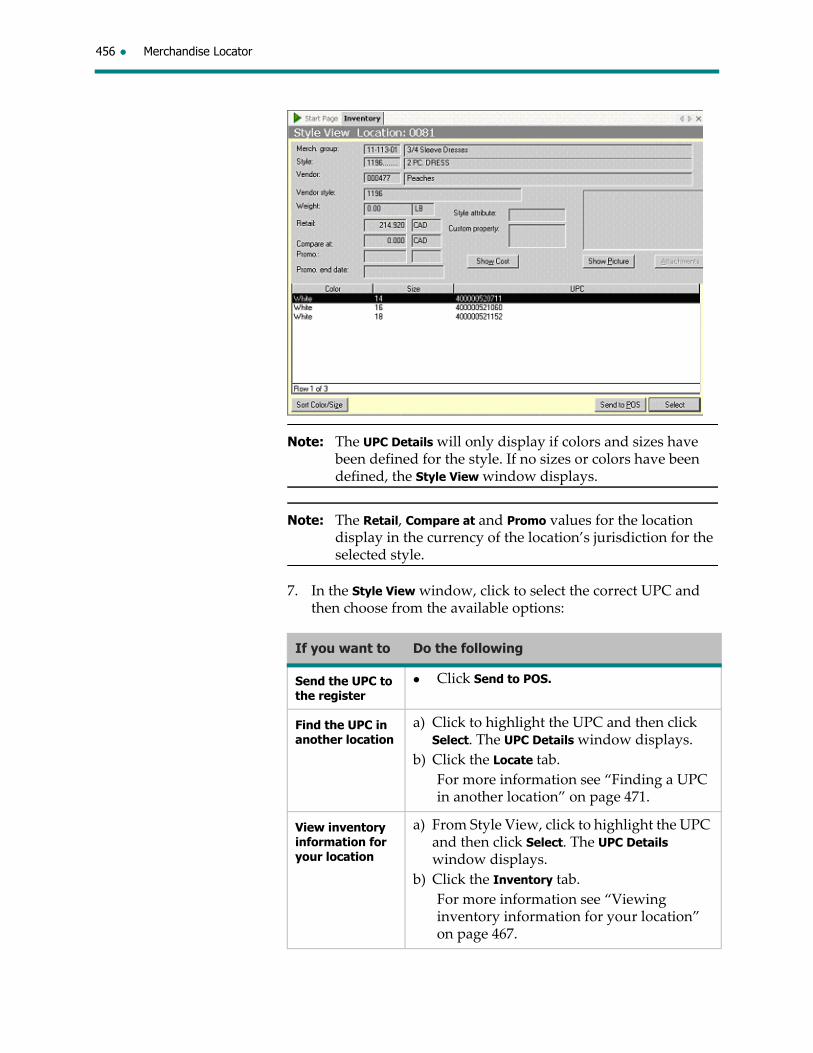
456 Merchandise Locator
Note: The UPC Details will only display if colors and sizes have been defined for the style. If no sizes or colors have been defined, the Style View window displays.
Note: The Retail, Compare at and Promo values for the location display in the currency of the location’s jurisdiction for the selected style.
7. In the Style View window, click to select the correct UPC and then choose from the available options:
If you want to Do the following
Send the UPC to the register
Click Send to POS.
Find the UPC in another location
a) Click to highlight the UPC and then click Select. The UPC Details window displays.
b) Click the Locate tab.
For more information see “Finding a UPC in another location” on page 471.
View inventory information for your location
a) From Style View, click to highlight the UPC and then click Select. The UPC Details window displays.
b) Click the Inventory tab.
For more information see “Viewing inventory information for your location” on page 467.

Searching by Vendor 457
Note: For more information on the UPC Details window, see “UPC details” on page 470
View the price history for this UPC
a) From Style View, click to highlight the UPC and then click Select. The UPC Details window displays.
b) Click the Price History tab.
For more information see “Viewing price history for your location” on page 468.
Sort the UPCs by color
Click Sort by Color/Size.
View cost information for the style
Click Show Cost. Average cost is displayed in the currency of the location’s juridsiction for the selected style. Click OK to continue. (The Show Cost button is available from both the Style View and UPC Details windows.)
If you want to Do the following

458 Merchandise Locator
Searching by Style
Use this search method if you know the style description or a style attribute for the UPC you want to identify.
Style attributes and valuesA style attribute is a type of characteristic that is associated with styles. For example, type of fabric could be a style attribute with possible values that include cotton, linen or wool. Attributes and their values are set up by your head office.
Note: For a list of other search methods see “Selecting a Search Method” on page 443.
To perform a search by style
1. From the Main Menu, click Style. The Style Search window appears.
2. Do one of the following:
If you want to Do the following
Search using the style description (for example, silk suit)
a) Type the style description in the empty Description field.
b) Click Search.
Search using the style code and a style attribute
a) Type the style description in the empty Code field.
b) Click the down arrow beside the Attribute field and then select the name of the attribute from the list.
c) Select the Value for this attribute from the list.
d) Click Search.
Search using the style description (for example, silk suit)
a) Type the style description in the empty Description field.
b) Click Search.
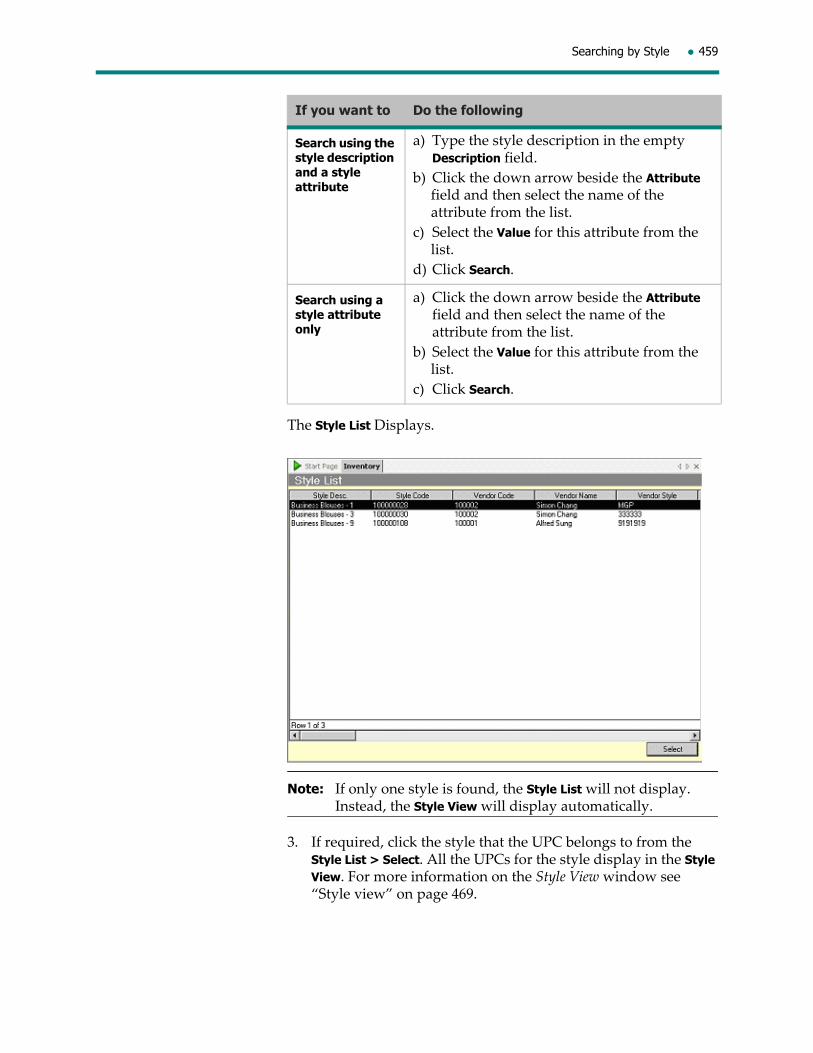
Searching by Style 459
The Style List Displays.
Note: If only one style is found, the Style List will not display. Instead, the Style View will display automatically.
3. If required, click the style that the UPC belongs to from the Style List > Select. All the UPCs for the style display in the Style View. For more information on the Style View window see “Style view” on page 469.
Search using the style description and a style attribute
a) Type the style description in the empty Description field.
b) Click the down arrow beside the Attribute field and then select the name of the attribute from the list.
c) Select the Value for this attribute from the list.
d) Click Search.
Search using a style attribute only
a) Click the down arrow beside the Attribute field and then select the name of the attribute from the list.
b) Select the Value for this attribute from the list.
c) Click Search.
If you want to Do the following

460 Merchandise Locator
Note: The UPC Details will only display if colors and sizes have been defined for the style. If no sizes or colors have been defined, the Style View window displays.
Note: The Retail, Compare at and Promo values for the location display in the currency of the location’s jurisdiction for the selected style.
4. In the Style View window, click to select the correct UPC and then choose from the available options:
If you want to Do the following
Send the UPC to the register
Click Send to POS.
Find the UPC in another location
a) Click to highlight the UPC and then click Select. The UPC Details window displays.
b) Click the Locate tab.
For more information see “Finding a UPC in another location” on page 471.
View inventory information for your location
a) From Style View, click to highlight the UPC and then click Select. The UPC Details window displays.
b) Click the Inventory tab.
For more information see “Viewing inventory information for your location” on page 467.

Searching by Style 461
Note: For more information on the UPC Details window, see “UPC details” on page 470.
View the price history for this UPC
a) From Style View, click to highlight the UPC and then click Select. The UPC Details window displays.
b) Click the Price History tab.
For more information see “Viewing price history for your location” on page 468.
Sort the UPCs by color
Click Sort by Color/Size.
View cost information for the style
Click Show Cost. Average cost is displayed in the currency of the location’s juridsiction for the selected style. Click OK to continue. (The Show Cost button is available from both the Style View and UPC Details windows.)
If you want to Do the following
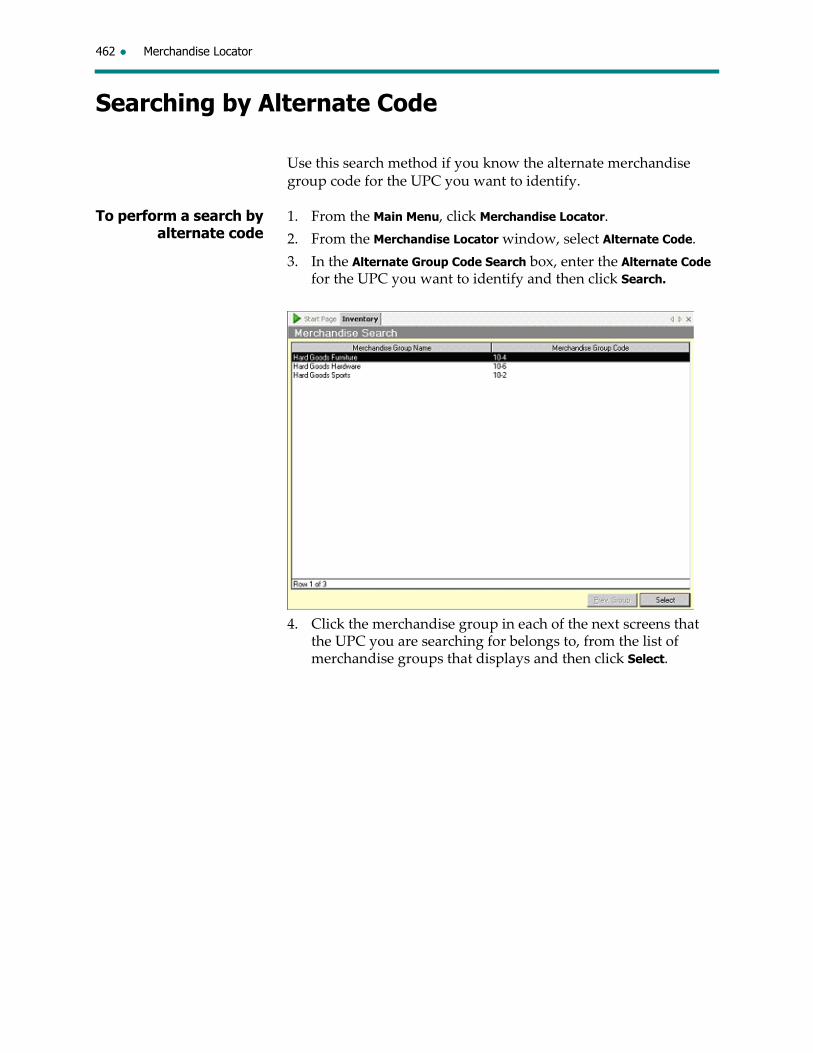
462 Merchandise Locator
Searching by Alternate Code
Use this search method if you know the alternate merchandise group code for the UPC you want to identify.
To perform a search by alternate code
1. From the Main Menu, click Merchandise Locator.
2. From the Merchandise Locator window, select Alternate Code.
3. In the Alternate Group Code Search box, enter the Alternate Code for the UPC you want to identify and then click Search.
4. Click the merchandise group in each of the next screens that the UPC you are searching for belongs to, from the list of merchandise groups that displays and then click Select.

Searching by Alternate Code 463
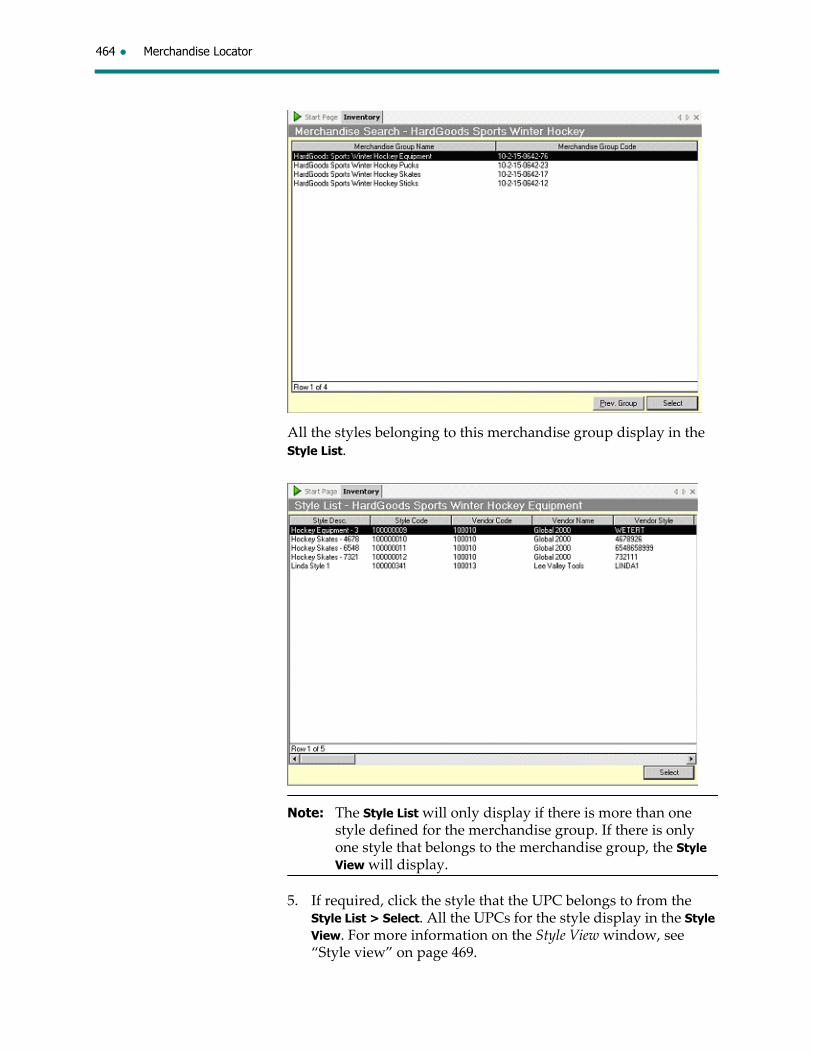
464 Merchandise Locator
All the styles belonging to this merchandise group display in the Style List.
Note: The Style List will only display if there is more than one style defined for the merchandise group. If there is only one style that belongs to the merchandise group, the Style View will display.
5. If required, click the style that the UPC belongs to from the Style List > Select. All the UPCs for the style display in the Style View. For more information on the Style View window, see “Style view” on page 469.

Searching by Alternate Code 465
Note: The UPC Details will only display if colors and sizes have been defined for the style. If no sizes or colors have been defined, the Style View window displays.
Note: The Retail, Compare at and Promo values for the location display in the currency of the location’s jurisdiction for the selected style.
6. In the Style View window, click to select the correct UPC and then choose from the available options:
If you want to Do the following
Send the UPC to the register
Click Send to POS.
Find the UPC in another location
a) Click to highlight the UPC and then click Select. The UPC Details window displays.
b) Click the Locate tab.
For more information see “Finding a UPC in another location” on page 471.
View inventory information for your location
a) From Style View, click to highlight the UPC and then click Select. The UPC Details window displays.
b) Click the Inventory tab.
For more information see “Viewing inventory information for your location” on page 467.

466 Merchandise Locator
Note: For more information on the UPC Details window, see “UPC details” on page 470.
View the price history for this UPC at your location
a) From Style View, click to highlight the UPC and then click Select. The UPC Details window displays.
b) Click the Price History tab.
For more information see “Viewing price history for your location” on page 468.
Sort the UPCs by color
Click Sort by Color/Size.
View cost information for the style
Click Show Cost. Average cost is displayed in the currency of the location’s juridsiction for the selected style. Click OK to continue. (The Show Cost button is available from both the Style View and UPC Details windows.)
If you want to Do the following

Viewing inventory information for your location 467
Viewing inventory information for your location
Depending on your setup, you may be able to view the following inventory information for any UPC at your location:
Quantities of the UPC that are available (and unavailable) for sale.
Quantity of the UPC that has been allocated to your location along with the date the stock is expected to be received.
To view inventory information for your
location
1. Use one of the search methods to identify the unknown UPC if you have not already done so. See “Selecting a Search Method” on page 443 for more information.
2. From the UPC Details screen, select the Inventory tab, if required.
Note: The Retail, Compare at and Promo values for the location display in the currency of the location’s jurisdiction for the selected style.

468 Merchandise Locator
Viewing price history for your location
Depending on your setup, you may be able to view the price history information for permanent prices for any UPC at your location. This is useful if, for example, a customer returns an item without a receipt.
Price history is displayed in the currency of the locationʹs jurisdiction for the selected style.
To view price history for your location
1. Use one of the search methods to identify the unknown UPC if you have not already done so. See “Selecting a Search Method” on page 443 for more information.
2. From the UPC Details screen, select the Price History tab, if required.
All past permanent and promotional prices for the UPC display by date in the Price History tab. The Lowest Price Sold column indicates the lowest price for this UPC.
Note: Depending on your setup, you may also be able to view future price changes.
Note: The Retail, Compare at and Promo values for the location display in the currency of the location’s jurisdiction for the selected style.

Style view 469
Style view
The Style View window displays detailed information for a style including a long description, vendor name, vendor style number, retail and promotional prices as well as attributes assigned to a style, if this information is available. All the UPCs for a style also display in the Style View window.
From the Style View window you can:
Select a UPC and send it to POS.
Sort the UPCs by Color/Size.
View the average cost for the style.
View a picture of the style, if one is available.
View the details for a selected UPC.
View UPC quantities available for sale at your location.
Note: Depending on your setup, some options may not be available to you.
The Retail, Compare at and Promo values for the location display in the location’s jurisdiction currency for the selected style. If attributes have been assigned to the style, they will display in the Style attribute field. Click Show Picture to see a picture of the style. Click Sort Color/Size to sort the list of UPCs by color/size. Highlight the correct UPC and click Send to POS to send the UPC to the register to complete a transaction. Only applicable if you are running Merchandise Locator from the same PC as your POS system. Highlight the correct UPC and click Select to see the details for the UPC. For more information see “UPC details” on page 470.

470 Merchandise Locator
UPC details
The UPC Details window displays detailed information for a UPC including a long description, vendor name, vendor style number, retail and promotional prices as well as attributes assigned to a style the UPC belongs to, if this information is available.
From the UPC Details window you can:
View the average cost for the style.
View a picture of the style, if one is available.
View the price history of the UPC at your location (in the Price History tab). For more information see “Viewing price history for your location” on page 468.
View inventory information for the UPC at your location (in the Inventory tab). For more information see “Viewing inventory information for your location” on page 467.
Find the UPC in another location (and view contact, price history and inventory information at that location). For more information see “Finding a UPC in another location” on page 471.
Note: Depending on your setup, some options may not be available to you.
If attributes have been assigned to the style, they will display in the Style attribute field. Click Show Picture to see a picture of the style. Click Show Cost to display the average cost in the in the location’s jurisdiction currency for the style the UPC belongs to.

Finding a UPC in another location 471
Finding a UPC in another location
If an item that a customer wants is not available at your location you can search for its UPC in another location. Once you have located the UPC, you can view contact information, and price history and inventory information for the location. Depending on your setup, you may also be able to create a transfer request for the item.
1. Use one of the search methods to identify the unknown UPC if you have not already done so. See “Selecting a Search Method” on page 443 for more information.
2. From the UPC Details screen, select the Locate tab.
3. Click Search.
4. From the Locate tab, click Search, The Locate UPC window displays.
5. Do one of the following:
Note: Depending how your system is set up, all of these search options may not be available to you.
The locations that have the UPC you are looking for display in the Locate tab, along with the Available quantity of the UPC found. You
If want to Do this
Search for a UPC in all locations in your company’s chain
a) Click Everywhere.
b) Click Search.
Search for a UPC in your transfer zone
a) Click Transfer zone.
b) Click Search.
Search for a UPC in a specific location
a) Click Location number(s).
b) Type one or more location numbers in the empty field.
Note: If required select List to see a list of all locations from which to make your selections.
c) Click Search.
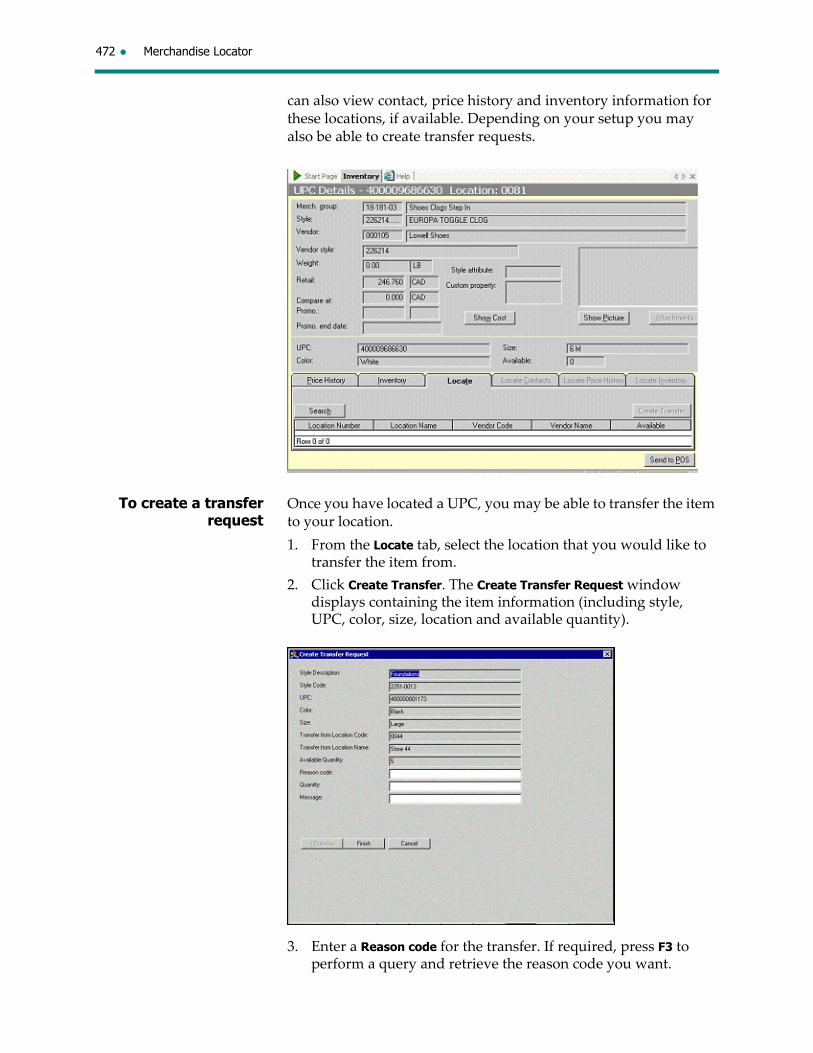
472 Merchandise Locator
can also view contact, price history and inventory information for these locations, if available. Depending on your setup you may also be able to create transfer requests.
To create a transfer request
Once you have located a UPC, you may be able to transfer the item to your location.
1. From the Locate tab, select the location that you would like to transfer the item from.
2. Click Create Transfer. The Create Transfer Request window displays containing the item information (including style, UPC, color, size, location and available quantity).
3. Enter a Reason code for the transfer. If required, press F3 to perform a query and retrieve the reason code you want.
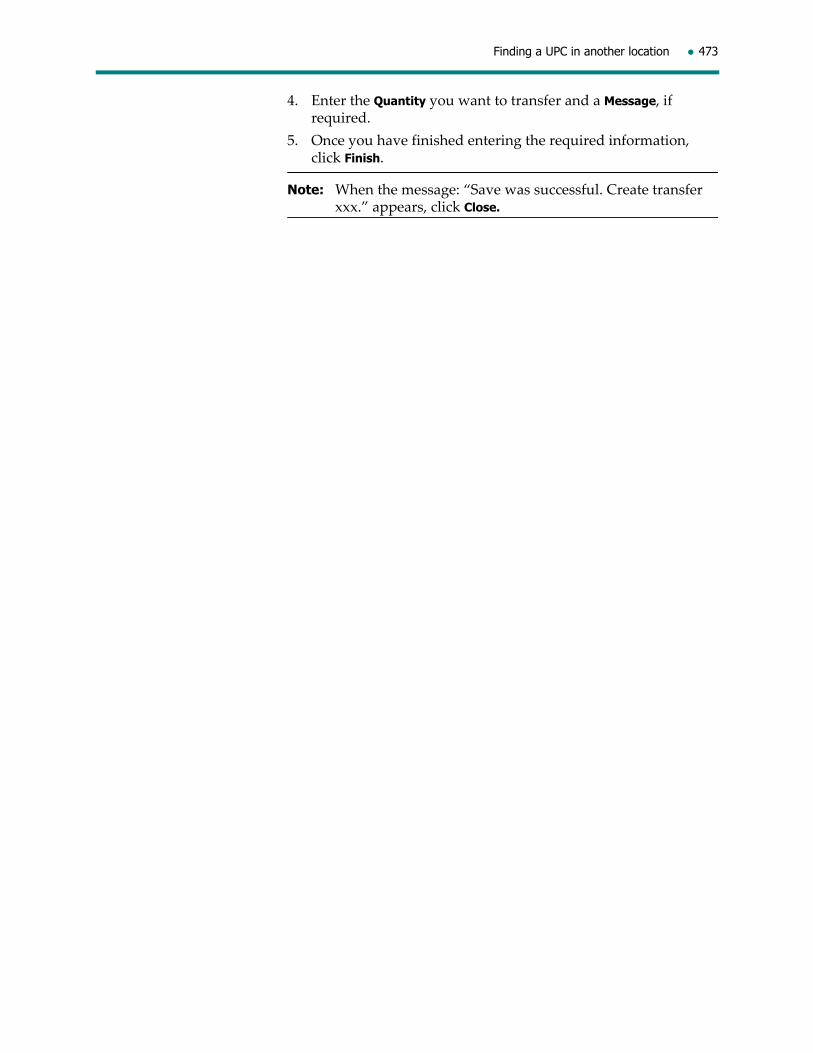
Finding a UPC in another location 473
4. Enter the Quantity you want to transfer and a Message, if required.
5. Once you have finished entering the required information, click Finish.
Note: When the message: “Save was successful. Create transfer xxx.” appears, click Close.

474 Merchandise Locator
Viewing price history for another location
Once you have found a UPC in another location, you may be able to view price history information for permanent prices for the item at the location where it was found.
Price history is displayed in the currency of the locationʹs jurisdiction for the selected item.
Note: Depending on your setup, you may also be able to view future price changes.
1. From the Locate tab, select the location that you would like to view price history for.
2. Click the Locate Price History tab. The price history displays.

Viewing inventory information for another location 475
Viewing inventory information for another location
Once you have found a UPC, you may be able to view inventory information for the item at the location where it was found. (Such as the quantities available (and unavailable) for sale as well as the allocated inventory and the date it is expected to be received at the location.)
Note: The inventory information that displays will depend on how your system is set up.
1. From the Locate tab, select the location that you would like to view allocation information for.
2. Click the Locate Inventory tab. The inventory information displays.

476 Merchandise Locator
This chapter contains all the tables found in the Modify section of each of the previous chapters of this user guide. These tables list the fields of each document that can be modified according to the document’s status.
These tables provide a quick reference for determining whether a field can or cannot be modified.
A Modification Tables

478 Modification Tables
Vendor and Warehouse Receipts Modifications
The following tables are also found in Chapter 1: Vendor and Warehouse Receipts.
PO Receipts
Status Description What has been updated What can be modified
Preliminary The PO Receipt document has been created but the status of the document has not been changed to Received.
The document is still a work‐in‐progress, nothing has been updated at this point.
Description
Date received
Weight
Number of containers
Payment Method
BOL total cartons
Grouping label
Packing list number
Packing list date
Received by
Trouble reason
Ship via
Carrier
Freight amount
Priority Appointment number
Pro no
Receipt messages
Header processing codes
Received units
Damaged units
SKU processing codes
Total Retail
Total Cost
Attributes
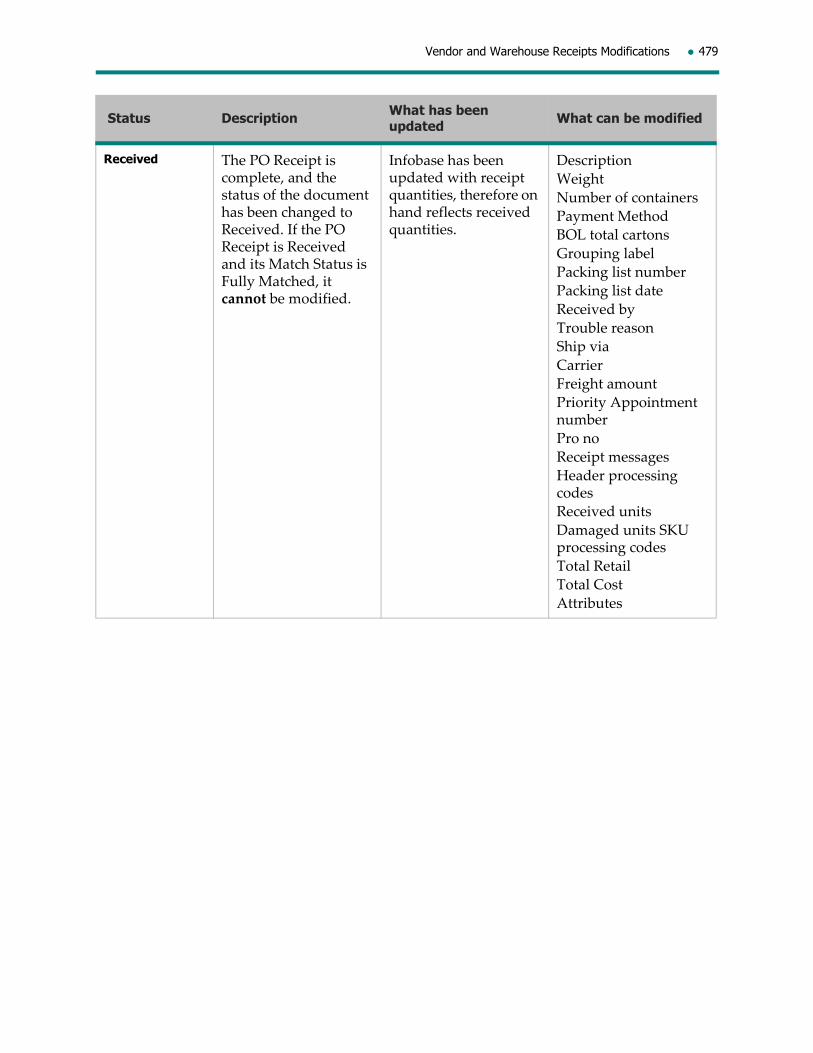
Vendor and Warehouse Receipts Modifications 479
Received The PO Receipt is complete, and the status of the document has been changed to Received. If the PO Receipt is Received and its Match Status is Fully Matched, it cannot be modified.
Infobase has been updated with receipt quantities, therefore on hand reflects received quantities.
Description
Weight
Number of containers
Payment Method
BOL total cartons
Grouping label
Packing list number
Packing list date
Received by
Trouble reason
Ship via
Carrier
Freight amount
Priority Appointment number
Pro no
Receipt messages
Header processing codes
Received units
Damaged units SKU processing codes
Total Retail
Total Cost
Attributes
Status Description What has been updated What can be modified

480 Modification Tables
ASNsSee “Modifying a PO Receipt ” on page 54 in this manual for details.
Canceled The PO Receipt has been canceled.
If a Preliminary PO Receipt has been canceled, nothing has been updated.
If a Received PO Receipt has been canceled, the received units from the document are reversed in Infobase.
Description
Date received
Weight
Number of containers
Payment Method
BOL total cartons
Grouping label
Packing list number
Packing list date
Received by
Trouble reason
Ship via
Carrier
Freight amount
Priority
Appointment number
Pro no
Receipt messages
Header processing codes
Received units
Damaged units
SKU processing codes
Total Retail
Total Cost
Attributes
Status Description What has been updated What can be modified
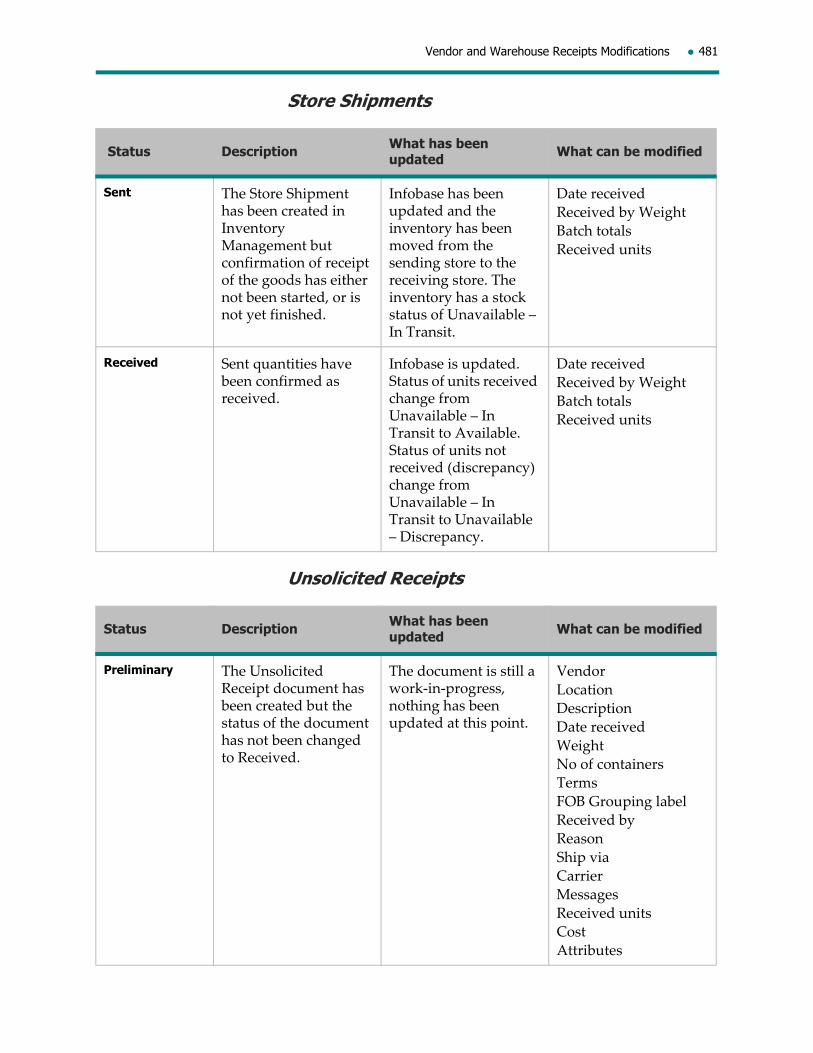
Vendor and Warehouse Receipts Modifications 481
Store Shipments
Unsolicited Receipts
Status Description What has been updated What can be modified
Sent The Store Shipment has been created in Inventory Management but confirmation of receipt of the goods has either not been started, or is not yet finished.
Infobase has been updated and the inventory has been moved from the sending store to the receiving store. The inventory has a stock status of Unavailable – In Transit.
Date received
Received by Weight
Batch totals
Received units
Received Sent quantities have been confirmed as received.
Infobase is updated. Status of units received change from Unavailable – In Transit to Available. Status of units not received (discrepancy) change from Unavailable – In Transit to Unavailable – Discrepancy.
Date received
Received by Weight
Batch totals
Received units
Status Description What has been updated What can be modified
Preliminary The Unsolicited Receipt document has been created but the status of the document has not been changed to Received.
The document is still a work‐in‐progress, nothing has been updated at this point.
Vendor
Location
Description
Date received
Weight
No of containers
Terms
FOB Grouping label
Received by
Reason
Ship via
Carrier
Messages
Received units
Cost
Attributes

482 Modification Tables
Received The Unsolicited Receipt has been completed. If the Unsolicited Receipt is Received and its Match Status is Fully Matched, it cannot be modified.
Infobase is updated with the receipt quantities.
Description
Weight
No of containers
Terms
FOB Grouping label
Received by Reason
Ship via Carrier
Messages
Received units
Cost
Canceled The Unsolicited Receipt has been canceled.
If a Preliminary Unsolicited Receipt document is canceled, nothing is updated.
If a Received Unsolicited Receipt document is canceled, the received units from the document are reversed.
Vendor
Location
Description
Date received
Weight
No of containers
Terms
FOB
Grouping label
Received by
Reason
Ship via
Carrier
Messages
Received units
Cost
Status Description What has been updated What can be modified
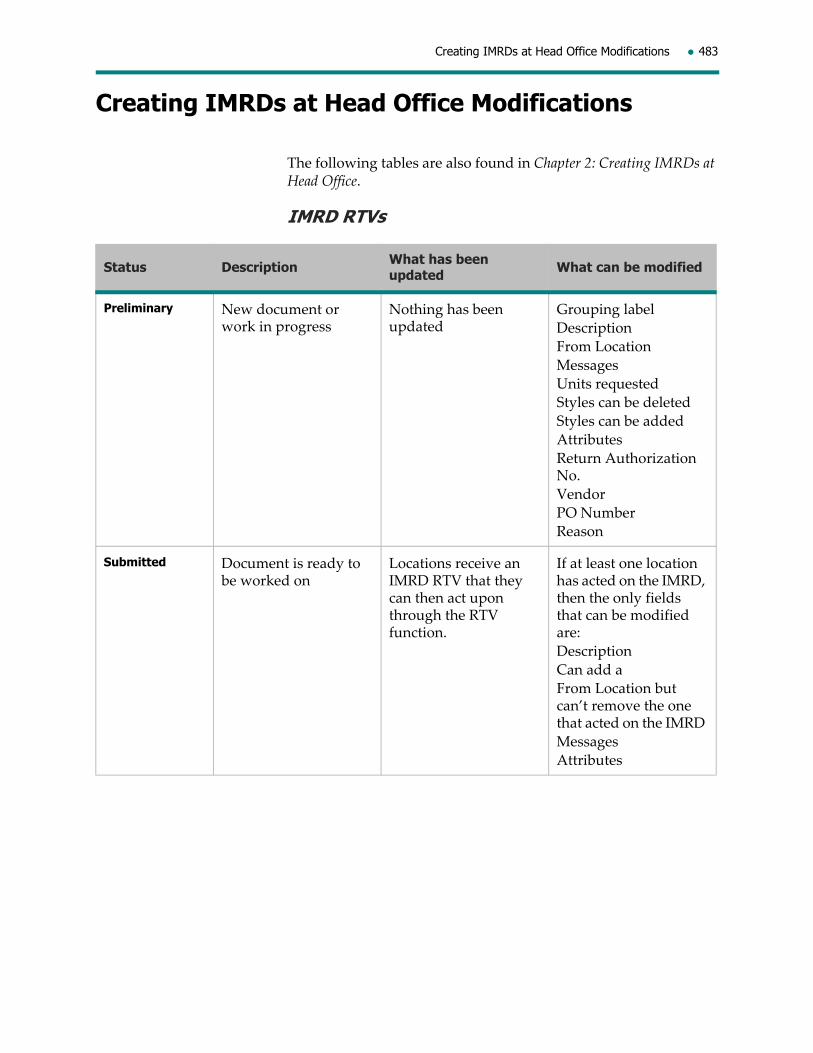
Creating IMRDs at Head Office Modifications 483
Creating IMRDs at Head Office Modifications
The following tables are also found in Chapter 2: Creating IMRDs at Head Office.
IMRD RTVs
Status Description What has been updated What can be modified
Preliminary New document or work in progress
Nothing has been updated
Grouping label
Description
From Location
Messages
Units requested
Styles can be deleted
Styles can be added
Attributes
Return Authorization No.
Vendor
PO Number
Reason
Submitted Document is ready to be worked on
Locations receive an IMRD RTV that they can then act upon through the RTV function.
If at least one location has acted on the IMRD, then the only fields that can be modified are:
Description
Can add a
From Location but can’t remove the one that acted on the IMRD
Messages
Attributes
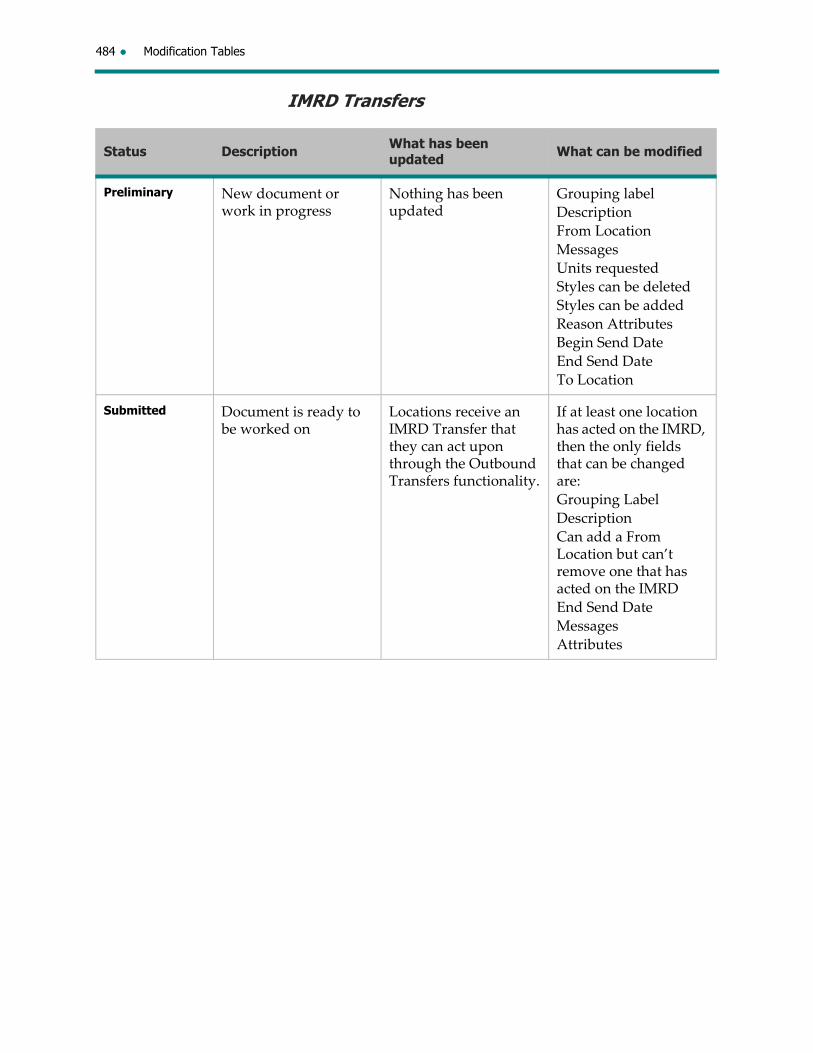
484 Modification Tables
IMRD Transfers
Status Description What has been updated What can be modified
Preliminary New document or work in progress
Nothing has been updated
Grouping label
Description
From Location
Messages
Units requested
Styles can be deleted
Styles can be added
Reason Attributes
Begin Send Date
End Send Date
To Location
Submitted Document is ready to be worked on
Locations receive an IMRD Transfer that they can act upon through the Outbound Transfers functionality.
If at least one location has acted on the IMRD, then the only fields that can be changed are:
Grouping Label
Description
Can add a From Location but can’t remove one that has acted on the IMRD
End Send Date
Messages
Attributes
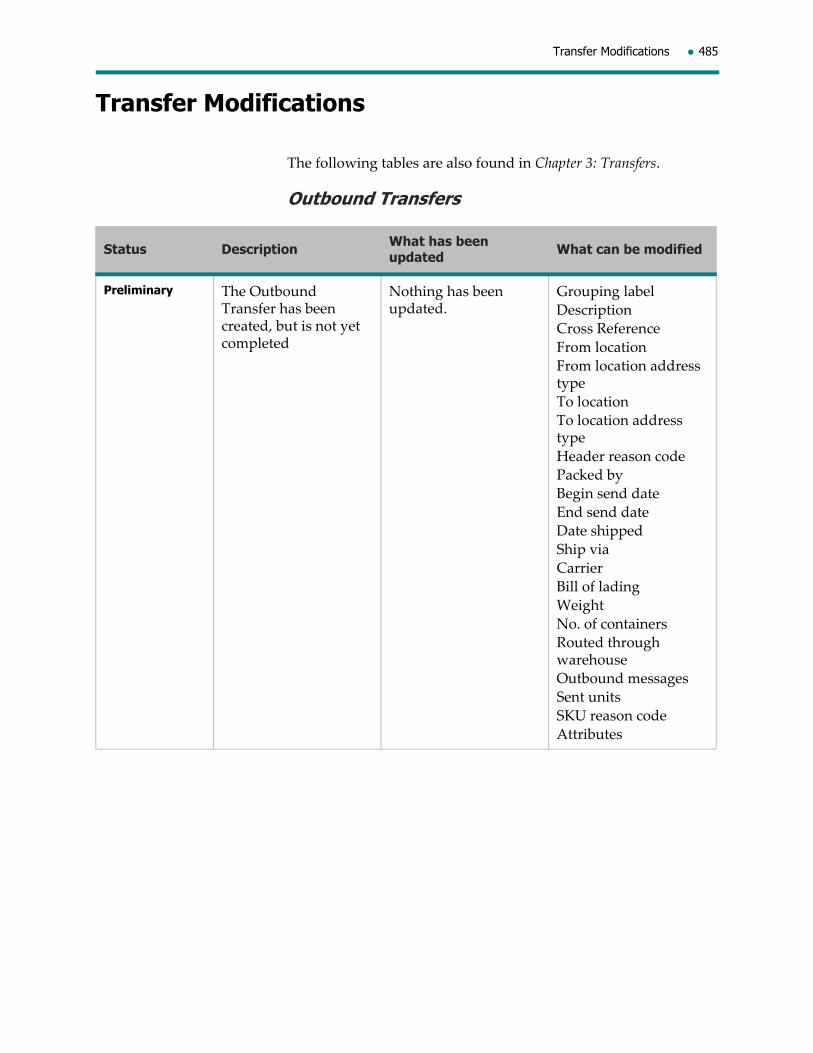
Transfer Modifications 485
Transfer Modifications
The following tables are also found in Chapter 3: Transfers.
Outbound Transfers
Status Description What has been updated What can be modified
Preliminary The Outbound Transfer has been created, but is not yet completed
Nothing has been updated.
Grouping label
Description
Cross Reference
From location
From location address type
To location
To location address type
Header reason code
Packed by
Begin send date
End send date
Date shipped
Ship via
Carrier
Bill of lading
Weight
No. of containers
Routed through warehouse
Outbound messages
Sent units
SKU reason code
Attributes

486 Modification Tables
Ready-to-send The Outbound Transfer has been completed, but has not yet been sent
Nothing has been updated
Grouping label
Description
Cross Reference
From location
From location address type
To location
To location address type
Header reason code
Packed by
Date shipped
Ship via
Carrier
Bill of lading
Weight
No. of containers
Routed through warehouse
Outbound messages
Sent units
SKU reason code
Attributes
Status Description What has been updated What can be modified

Transfer Modifications 487
Inbound Transfers
Canceled The Outbound Transfer has been canceled
If a Preliminary or Ready to Send Outbound Transfer document is canceled, nothing is updated.
If a Sent Outbound Transfer document is canceled, the send units from the document are moved back to the sending location’s inventory.
Grouping label
Description
Cross Reference
From location
From location address type
To location
To location address type
Header reason code
Packed by
Date shipped
Ship via
Carrier
Bill of lading
Weight
No. of containers
Routed through warehouse
Outbound messages
Sent units
SKU reason code
Attributes
Sent The transfer has been sent to the receiving store, but the receiving store has not yet received the goods on the system
Infobase has been updated and the inventory has moved from the sending store to the receiving store (the inventory now has a status of Unavailable – In Transit)
Grouping label
Description
Cross Reference
Header reason code
Packed by
Ship via
Carrier
Bill of lading
Weight
No. of containers
Outbound messages
Sent units
SKU reason code
Attributes
Status Description What has been updated What can be modified

488 Modification Tables
Status Description What has been updated What can be modified
Sent The transfer has been sent to your store, but you have not yet received the goods on the system.
Infobase has been updated and the inventory has moved from the sending store to your store (the inventory has a status of Unavailable – In Transit).
Date received
Received by
Manifest no.
Inbound messages
Received units
Attributes
Received The transferred goods have been received in your store.
The Unavailable – In Transit status of the items on the transfer is relieved. The items are now considered Available.
Received by
Manifest no.
Inbound messages
Received units
Attributes

Return to Vendor (RTV) Modifications 489
Return to Vendor (RTV) Modifications
The following table is also found in Chapter 4: Returns to Vendor (RTVs).
Status Description What has been updated What can be modified
Preliminary An RTV document has been created but is incomplete.
The document is still a work‐in‐progress. Nothing has been updated at this point.
All header and detail fields can be modified except:
Header:
RTV no.
Date created
Source
External system name
External document no. Details:
SKU ID
Requested Vendor requires acknowledgement before allowing merchandise to be returned; request for return authorization has been made to the vendor to allow the merchandise on the RTV document to be sent back to the vendor.
The RTV document’s status becomes Requested. If the location is a Warehouse Management
warehouse, the RTV interface to Warehouse Management is updated.
Date returned
Attributes

490 Modification Tables
Released to W/H Mgmt.
The location must be designated a Warehouse Management
warehouse. Warehouse Management is alerted to the fact that the RTV document has completed its process within Inventory Management and that the warehouse personnel can physically pack and ship the merchandise to the respective vendor.
The RTV document’s status becomes Released to W/H Mgmt.. The RTV interface to Warehouse Management is updated with RTV information.
Date returned
Attributes
Returned The merchandise detailed on the RTV document is returned to the vendor.
The RTV document’s status becomes Returned.
Attributes
Note: For clients interfacing to Invoice Matching, once the status becomes Returned, the RTV document cannot be modified.
Canceled The RTV document has been canceled.
The RTV document status becomes Canceled and the document’s Last activity date becomes the current date. The Date requested and Date returned fields are set to Null.
The RTV document can no longer be modified.
Status Description What has been updated What can be modified

Responding to Inventory Movement Request Document (IMRD) Modifications 491
Responding to Inventory Movement Request Document (IMRD) Modifications
The following table is also found in Chapter 5: Responding to IMRDs.
Status Description What has been updated What can be modified
Preliminary New document or work in progress
Nothing has been updated
Grouping label
Description
From Location
Messages
Units requested
Styles can be deleted
Styles can be added
Reason
Attributes
Begin Send Date
End Send Date
To Location
Submitted Document is ready to be worked on
Warehouse Management/external warehouse management system has received a manual allocation to work on.
For both IMRD RTVs and Transfers, if at least one location has acted on the IMRD, then the only fields that are modifiable are:
Grouping Label
Description
Can add a From Location but can’t remove one that has acted on the IMRD
End Send Date
Messages
Attributes
Canceled Document has been canceled
Nothing has been updated
Grouping label
Description
From Location
Messages
Units requested
Styles can be deleted
Styles can be added

492 Modification Tables
Adjustments Modifications
The following information is also found in Chapter 7: Adjustments.
Modifying an SSA documentYou can modify both the header and details of an SSA document whose status is either Preliminary or Submitted as follows.
On the header:
Performed by position
Grouping label
Messages – can be added or removed as required
Detail lines can be added or deleted as required.
A document with a status of Preliminary must be submitted for the adjustments to take effect.
A document whose status is Submitted cannot be re‐submitted. Any adjustments to a Submitted document will be posted with the differences between the old units and the new units within Infobase at the time the document is saved. The document’s Last activity date will also be updated.
Modifying an SA documentYou can modify both the header and details of an SA document whose status is either Preliminary or Submitted as follows.
On the header:
Performed by position
Grouping label
Messages – can be added or removed as required
Detail lines can be added or deleted as required.
A document with a status of Preliminary must be submitted for the adjustments to take effect.
A document whose status is Submitted cannot be re‐submitted. Any adjustments to the Submitted SA document will be posted with the differences between the old units and the new units within Infobase at the time the document is saved once the modifications have been made. The document’s Last activity date will also be updated.
Modifying a UDA documentYou can modify both the header and details of a UDA document whose status is either Preliminary or Submitted as follows.
On the header:
Performed by position
Grouping label

Adjustments Modifications 493
Messages – can be added or deleted as required
Detail lines can be added or deleted as required.
A document with a status of Preliminary must be submitted for the adjustments to take effect.
A document with a status of Submitted cannot be re‐submitted. Adjustments will be posted with the differences between the old units and the new units within Infobase at the time the document is saved once the modifications have been made. The document’s Last activity date will also be updated.
Modifying an ACA documentYou can modify both the header and details of an ACA document whose status is either Preliminary or Submitted as follows.
On the header:
Performed by position
Grouping label
Location hierarchy
Messages – can be added or removed as required
Detail lines can be added or deleted as required.
A document with a status of Preliminary must be submitted for the adjustments to take effect.

494 Modification Tables
Physical Inventory Modifications
The following tables are also found in Chapter 8: Physical Inventory.
ICD Header
Status Description What has been updated What can be modified
Preliminary The Inventory Control Document has been created but the status has not been updated to Counted.
The document is still a work‐in‐progress, nothing has been updated yet.
Grouping label
Count date
Valuation date
Update type
Description
Location no.
Merchandising Group Code
Messages
Current Entry
Counted The Inventory Control Document has had counts imported or manually entered, but none of the counts have been posted.
The document is still a work‐in‐progress, nothing has been updated yet.
Grouping label
Count date
Valuation date
Update type
Description
Location no.
To be posted
Merchandising Group Code
Messages
Current entry
Partially posted At least one, but not all, locations have been posted.
Inventory and Shrinkage have been updated for at least one location, but not all locations.
Grouping label
Description
To be posted field for unposted stores only
Messages
Current entry for unposted stores only
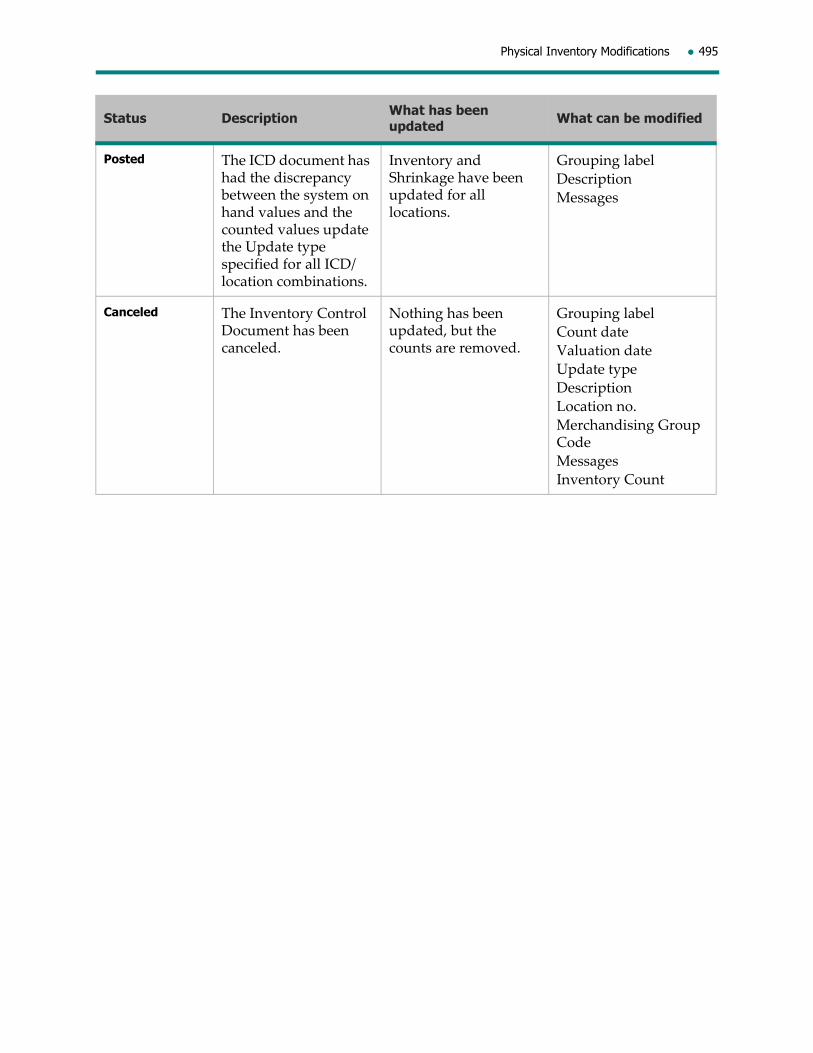
Physical Inventory Modifications 495
Posted The ICD document has had the discrepancy between the system on hand values and the counted values update the Update type specified for all ICD/location combinations.
Inventory and Shrinkage have been updated for all locations.
Grouping label
Description
Messages
Canceled The Inventory Control Document has been canceled.
Nothing has been updated, but the counts are removed.
Grouping label
Count date
Valuation date
Update type
Description
Location no.
Merchandising Group Code
Messages
Inventory Count
Status Description What has been updated What can be modified

496 Modification Tables
This section describes the following parameters:
Inventory Management parameters
Infobase parameters
System parameters for Ticket Printing
B Parameters

498 Parameters
Inventory Management Parameters
The following parameters will be the default settings for Inventory Management.
Inbound: PO Receipt ParametersThese parameters determine the range of numbers, retention periods and cleanup schedule for inbound documents.
Parameter Description Values Our Setting
Mask Mandatory. Can be modified
Determines the mask for auto‐assigned PO Receipt numbers. The numeric mask character is 9.
Up to 20 N
System default: 999999
Begin range Mandatory. Can be modified
Defines the first number that will be auto‐assigned. If modified, must conform to mask.
System default: 100000
End range Mandatory. Can be modified
Determines the last number that will be auto‐assigned. If modified, must conform to mask.
System default: 999999
Last generated Informational field indicating last number generated.
Default = NULL when the PO Receipt range parameters are defined.
No. of weeks for cleanup
Mandatory. Can be modified
Determines the number of weeks after receipt to automatically cleanup PO receipt transactions. No. of weeks
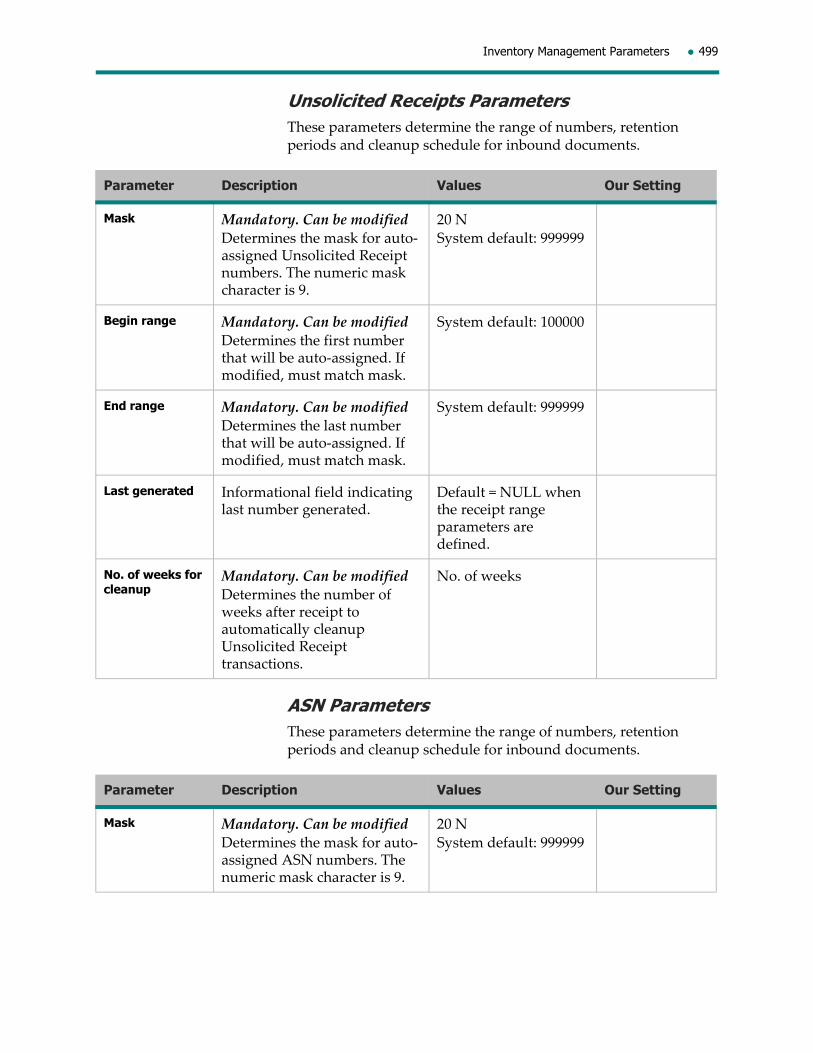
Inventory Management Parameters 499
Unsolicited Receipts ParametersThese parameters determine the range of numbers, retention periods and cleanup schedule for inbound documents.
ASN ParametersThese parameters determine the range of numbers, retention periods and cleanup schedule for inbound documents.
Parameter Description Values Our Setting
Mask Mandatory. Can be modified
Determines the mask for auto‐assigned Unsolicited Receipt numbers. The numeric mask character is 9.
20 N
System default: 999999
Begin range Mandatory. Can be modified
Determines the first number that will be auto‐assigned. If modified, must match mask.
System default: 100000
End range Mandatory. Can be modified
Determines the last number that will be auto‐assigned. If modified, must match mask.
System default: 999999
Last generated Informational field indicating last number generated.
Default = NULL when the receipt range parameters are defined.
No. of weeks for cleanup
Mandatory. Can be modified
Determines the number of weeks after receipt to automatically cleanup Unsolicited Receipt transactions.
No. of weeks
Parameter Description Values Our Setting
Mask Mandatory. Can be modified
Determines the mask for auto‐assigned ASN numbers. The numeric mask character is 9.
20 N
System default: 999999

500 Parameters
Begin range Mandatory. Can be modified
Determines the first number that will be auto‐assigned. If modified, must conform to mask.
System default: 100000
End range Mandatory. Can be modified
Determines the last number that will be auto‐assigned. If modified, must conform to mask.
System default: 999999
Last generated Informational field indicating last number generated.
Default = NULL when the ASN range parameters are defined.
No. of weeks for cleanup
Mandatory. Can be modified
Determines the number of weeks after receipt to automatically cleanup ASN transactions.
No. of weeks
Auto-generate PO receipt
Optional/Can be modified
Determines whether Inventory Management will automatically create a PO Receipt whenever a new ASN transaction is created.
Yes/No System default: No
Auto-generate PO receipt OIM Location
Optional/Can be modified
If OIM for the location is installed, determines whether Inventory Management will automatically create a PO receipt whenever an ASN is brought into the system.If Auto‐generate PO receipt is cleared, PO REceipt will not be generated regardless of the setting of this parameter.
Yes/No. System Default: No.
Parameter Description Values Our Setting

Inventory Management Parameters 501
Store Shipment ParametersThese parameters determine if store shipments are automatically received in store inventory and cleanup schedule for store shipments.
Parameter Description Values Our Setting
Mask Mandatory. Can be modified
Determines the mask for auto‐assigned store shipment numbers. The numeric mask character is 9.
20 N
System default: 999999
Begin range Mandatory. Can be modified
Determines the first number that will be auto‐assigned. If modified, must conform to mask.
System default: 100000
End range Mandatory. Can be modified
Determines the last number that will be auto‐assigned. If modified, must conform to mask.
System default: 999999
Last generated Informational field indicating last number generated.
Default = NULL when the store shipment range parameters are defined.
Autoreceive store shipments
Optional/Can be modified
Determines whether shipments sent from the warehouse will be automatically received in the stores’ inventory.
Yes/No
System default: No
No. of weeks for cleanup
Mandatory. Can be modified
Determines the number of weeks after receipt to automatically cleanup store shipment transactions.
No. of weeks
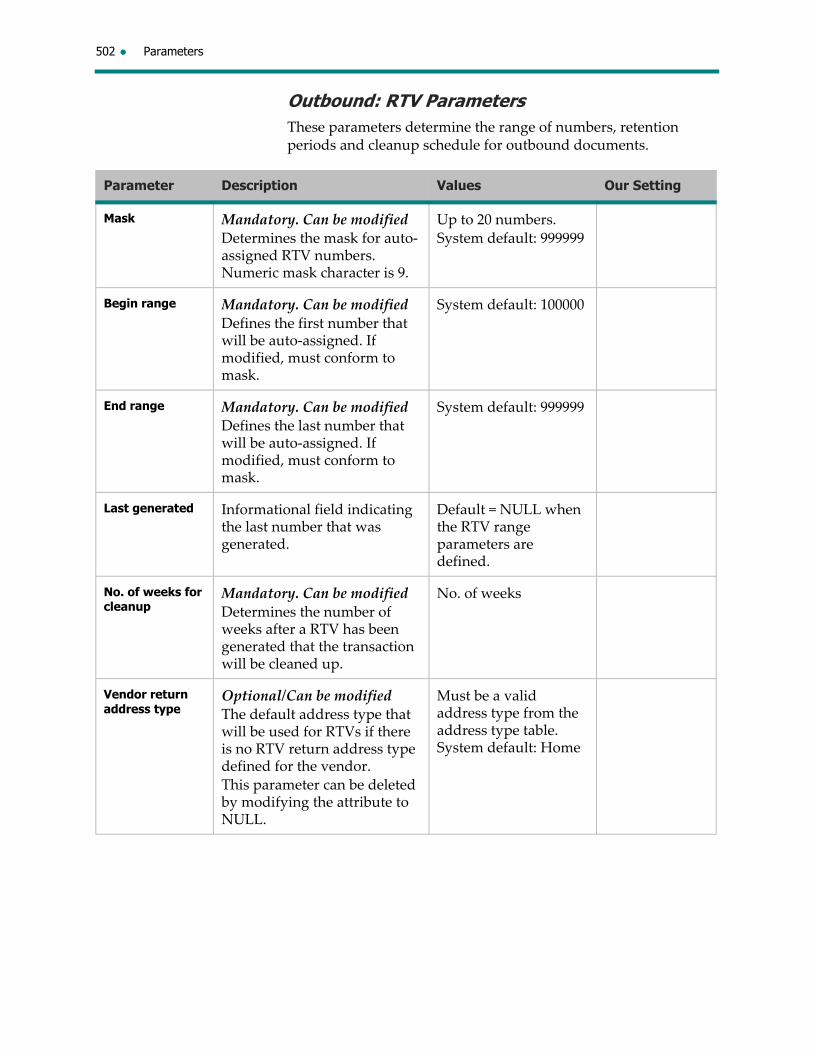
502 Parameters
Outbound: RTV ParametersThese parameters determine the range of numbers, retention periods and cleanup schedule for outbound documents.
Parameter Description Values Our Setting
Mask Mandatory. Can be modified
Determines the mask for auto‐assigned RTV numbers. Numeric mask character is 9.
Up to 20 numbers.
System default: 999999
Begin range Mandatory. Can be modified
Defines the first number that will be auto‐assigned. If modified, must conform to mask.
System default: 100000
End range Mandatory. Can be modified
Defines the last number that will be auto‐assigned. If modified, must conform to mask.
System default: 999999
Last generated Informational field indicating the last number that was generated.
Default = NULL when the RTV range parameters are defined.
No. of weeks for cleanup
Mandatory. Can be modified
Determines the number of weeks after a RTV has been generated that the transaction will be cleaned up.
No. of weeks
Vendor return address type
Optional/Can be modified
The default address type that will be used for RTVs if there is no RTV return address type defined for the vendor.
This parameter can be deleted by modifying the attribute to NULL.
Must be a valid address type from the address type table. System default: Home

Inventory Management Parameters 503
Transfer ParametersThese parameters determine the range of numbers, retention periods and cleanup schedules for outbound documents.
Vendor acknowledgment
Can be modified
Only required if RTVs are permitted. Indicates whether the supplier must be notified before an RTV is sent. If set to yes, a vendor acknowledgment must be provided before merchandise can be returned. Works in conjunction with a flag setting in the vendor maintenance table.
Yes/No System default: Yes
RTV flag default Optional/Can be modified
Determines whether RTVs are permitted and the location designation from where merchandise can be returned. This is the default value used when setting up a supplier and specifying the RTV policy of your organization.
Not permitted, From any store, or From W/H only. System default: From any store
Parameter Description Values Our Setting
Parameter Description Values Our Setting
Mask Mandatory. Can be modified
Determines the mask for auto‐assigned transfer numbers. Numeric mask character is 9.
20 N
System default: 999999
Begin range Mandatory. Can be modified
Determines the first number that will be auto‐assigned. If modified, must conform to mask.
First number in the range.
System default: 100000
End range Mandatory. Can be modified
Determines the last number that will be auto‐assigned. If modified, must conform to mask.
System default: 999999

504 Parameters
IMRD ParametersThese parameters determine the range of numbers, retention periods and cleanup schedule for outbound documents.
Last generated Informational field indicating the last number that was generated.
Default = NULL when the Transfer range parameters are defined.
No. of weeks for cleanup
Mandatory. Can be modified
Determines the number of weeks after a transfer has been received to clean up a transfer transaction.
No. of weeks
No. of days to complete sent transfers
Mandatory. Can be modified
Determines the number of days after the transfer ship date to automatically complete the transfer for the receiving location.
No. of days
Default transfer address type
Optional/Can be modified
Defines the default transfer address type to display and print on a transfer document. Will be used if no value is defined when transfer is created. This can be overridden at any time.
Billing, DC, Home, Main, Other, PO Address, RTV Address, Ship
System default: Home
Parameter Description Values Our Setting
Parameter Description Values Our Setting
Mask Mandatory. Can be modified
Determines the mask for auto‐assigned IMRD numbers. Numeric mask character is 9.
Up to 20 N
System default: 999999
Begin range Mandatory. Can be modified
Determines the first number in the range that will be auto‐assigned. If modified, must conform to mask
System default: 100000

Inventory Management Parameters 505
Shrink Adjustment ParametersThese parameters determine the range of numbers, retention periods and cleanup schedule for adjustment documents.
End range Mandatory. Can be modified
Determines the last number in the range that will be auto‐assigned. If modified, must conform to mask.
System default: 999999
Last generated Informational field indicates the last number that was generated.
Default = NULL when the IMRD range parameters are defined.
No. of weeks for cleanup
Mandatory. Can be modified
Determines the number of weeks after an IMRD has been generated that the transaction will be cleaned up.
No. of weeks
Parameter Description Values Our Setting
Parameter Description Values Our Setting
Mask Mandatory. Can be modified
Defines the mask for auto‐assigned Shrink Adjustment numbers. Numeric mask character is 9.
Up to 20 N
System default: 999999
Begin range Mandatory. Can be modified
Determines the first number in the range that will be auto‐assigned. If modified, must conform to mask.
System default: 100000
End range Mandatory. Can be modified
Determines the last number in the range that will be auto‐assigned. If modified, must conform to mask.
System default: 999999
Last generated Informational field indicating last number that was generated.
Default = NULL when the Shrink range parameters are defined.
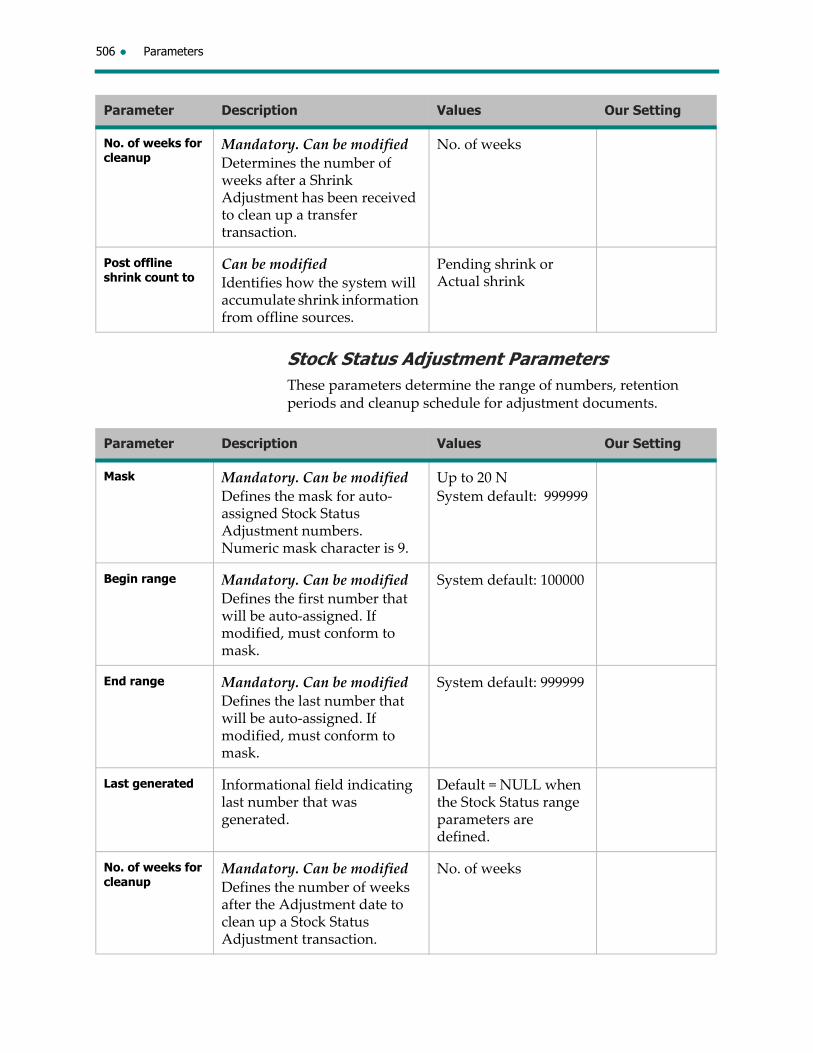
506 Parameters
Stock Status Adjustment ParametersThese parameters determine the range of numbers, retention periods and cleanup schedule for adjustment documents.
No. of weeks for cleanup
Mandatory. Can be modified
Determines the number of weeks after a Shrink Adjustment has been received to clean up a transfer transaction.
No. of weeks
Post offline shrink count to
Can be modified
Identifies how the system will accumulate shrink information from offline sources.
Pending shrink or Actual shrink
Parameter Description Values Our Setting
Parameter Description Values Our Setting
Mask Mandatory. Can be modified
Defines the mask for auto‐assigned Stock Status Adjustment numbers. Numeric mask character is 9.
Up to 20 N
System default: 999999
Begin range Mandatory. Can be modified
Defines the first number that will be auto‐assigned. If modified, must conform to mask.
System default: 100000
End range Mandatory. Can be modified
Defines the last number that will be auto‐assigned. If modified, must conform to mask.
System default: 999999
Last generated Informational field indicating last number that was generated.
Default = NULL when the Stock Status range parameters are defined.
No. of weeks for cleanup
Mandatory. Can be modified
Defines the number of weeks after the Adjustment date to clean up a Stock Status Adjustment transaction.
No. of weeks

Inventory Management Parameters 507
User-Defined Adjustment ParametersThese parameters determine the format, range and retention period for User Defined Adjustment numbers.
Average Cost Adjustment ParametersThese parameters determine the format, range and retention period for Average Cost Adjustment numbers.
Parameter Description Values Our Setting
Mask Mandatory. Can be modified
Defines the mask for auto‐assigned User‐Defined Adjustment numbers. Numeric mask character is 9.
Up to 20 N
System default: 999999
Begin range Mandatory. Can be modified
Determines the first number in the range that will be auto‐assigned. If modified, must conform to mask.
System default: 100000
End range Mandatory. Can be modified
Determines the last number in the range that will be auto‐assigned. If modified, must conform to mask.
System default: 999999
Last generated Informational field indicating last number that was assigned.
Default = NULL when range parameters are defined.
No. of weeks for cleanup
Mandatory. Can be modified
Determines the number of weeks after an adjustment has been received to cleanup an adjustment transaction.
No. of weeks
Parameter Description Values Our Setting
Mask Mandatory. Can be modified
Defines the mask for auto‐assigned Average Cost Adjustment numbers. Numeric mask character is 9.
Up to 20 N
System default: 999999

508 Parameters
General ParametersThese parameters provide default values for Inventory Management documents.
Begin range Mandatory. Can be modified
Determines the first number in the range that will be auto‐assigned. If modified, must conform to mask.
System default: 100000
End range Mandatory. Can be modified
Determines the last number in the range that will be auto‐assigned. If modified, must conform to mask.
System default: 999999
Last generated Informational field indicating last number that was assigned.
Default = NULL when range parameters are defined.
No. of weeks for cleanup
Mandatory. Can be modified
Determines the number of weeks after an adjustment has been received to cleanup an adjustment transaction.
No. of weeks
Parameter Description Values Our Setting
Parameter Description Values Our Setting
Allowable backdate days
Mandatory. Can be modified
Defines the number of days that a transaction can be backdated without generating an error message.
System default: 7
Cost default Mandatory. Can be modified
Default method for stating cost on an RTV and Unsolicited Receipt.
Avg. cost, Last Net PO cost, Based on the goal IMU%.
System default: Last Net PO cost
Last generated transfer carton no.
Informational field indicating last number that was generated.
Inserted by system
Last generated RTV carton no.
Informational field indicating last number that was generated.
Inserted by system
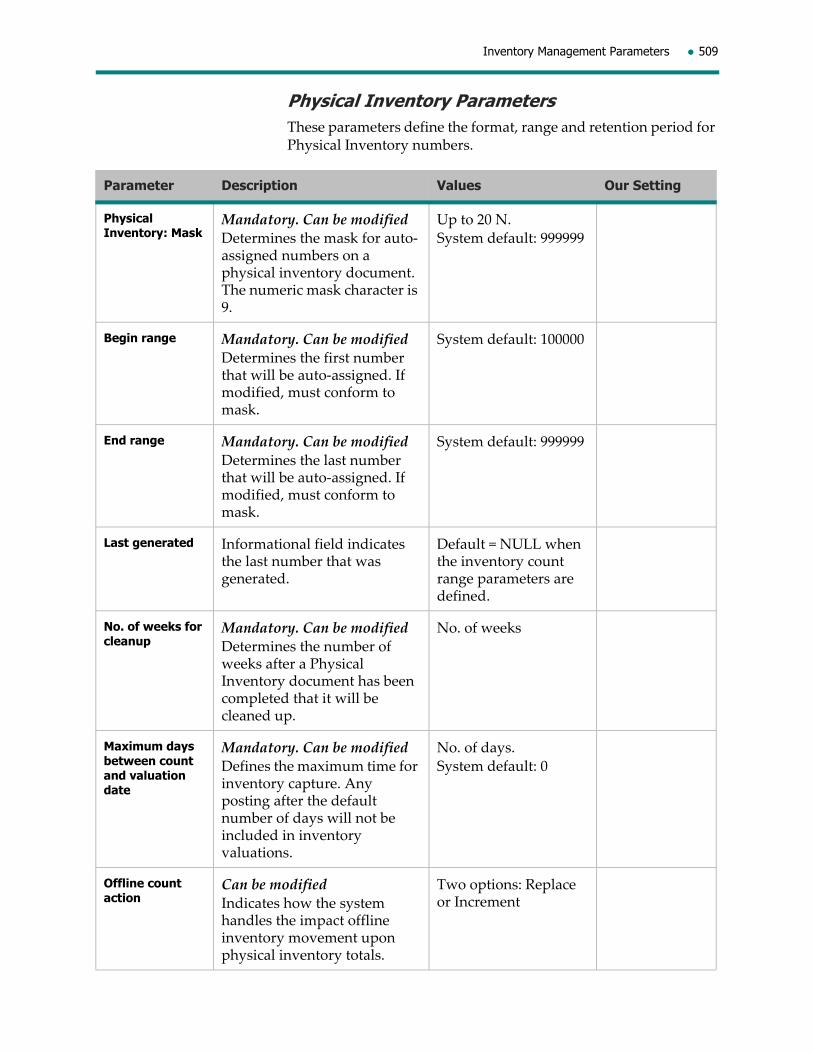
Inventory Management Parameters 509
Physical Inventory ParametersThese parameters define the format, range and retention period for Physical Inventory numbers.
Parameter Description Values Our Setting
Physical Inventory: Mask
Mandatory. Can be modified
Determines the mask for auto‐assigned numbers on a physical inventory document. The numeric mask character is 9.
Up to 20 N.
System default: 999999
Begin range Mandatory. Can be modified
Determines the first number that will be auto‐assigned. If modified, must conform to mask.
System default: 100000
End range Mandatory. Can be modified
Determines the last number that will be auto‐assigned. If modified, must conform to mask.
System default: 999999
Last generated Informational field indicates the last number that was generated.
Default = NULL when the inventory count range parameters are defined.
No. of weeks for cleanup
Mandatory. Can be modified
Determines the number of weeks after a Physical Inventory document has been completed that it will be cleaned up.
No. of weeks
Maximum days between count and valuation date
Mandatory. Can be modified
Defines the maximum time for inventory capture. Any posting after the default number of days will not be included in inventory valuations.
No. of days.
System default: 0
Offline count action
Can be modified
Indicates how the system handles the impact offline inventory movement upon physical inventory totals.
Two options: Replace or Increment

510 Parameters
Infobase Parameters
These parameters provide defaults for transactions that update Infobase. The values you select establish default settings for inventory movement from one location to another and determine which promotional price to use.
Parameter Description Values Our Setting
Inventory movement price discrepancy settings
Determines the appropriate price change type for price increases and decreases when inventory is moved from one location to another, and the unit retail price differs between the two locations.
Price increase:
Price change type
Mandatory. Can be modified
Defines how a price change is booked for an increase in price that results when inventory is moved from one location to another.
MU or MDC
(Markup or Markdown cancellation)
System default: MU
Location affected
Mandatory. Can be modified
Defines where a price change is booked for an increase that results when inventory is moved from one location to another.
Sending or Receiving
System default: Sending
Price decrease:
Price change type
Mandatory. Can be modified.
Defines how a price change is booked for a decrease in price that results when inventory is moved from one location to another.
MD or MUC (Markdown or Markup Cancellation)
System default: MD
Location affected
Mandatory. Can be modified
Defines where a price change is booked for a decrease in price that results when inventory is moved from one location to another.
Sending or Receiving
System default: Sending
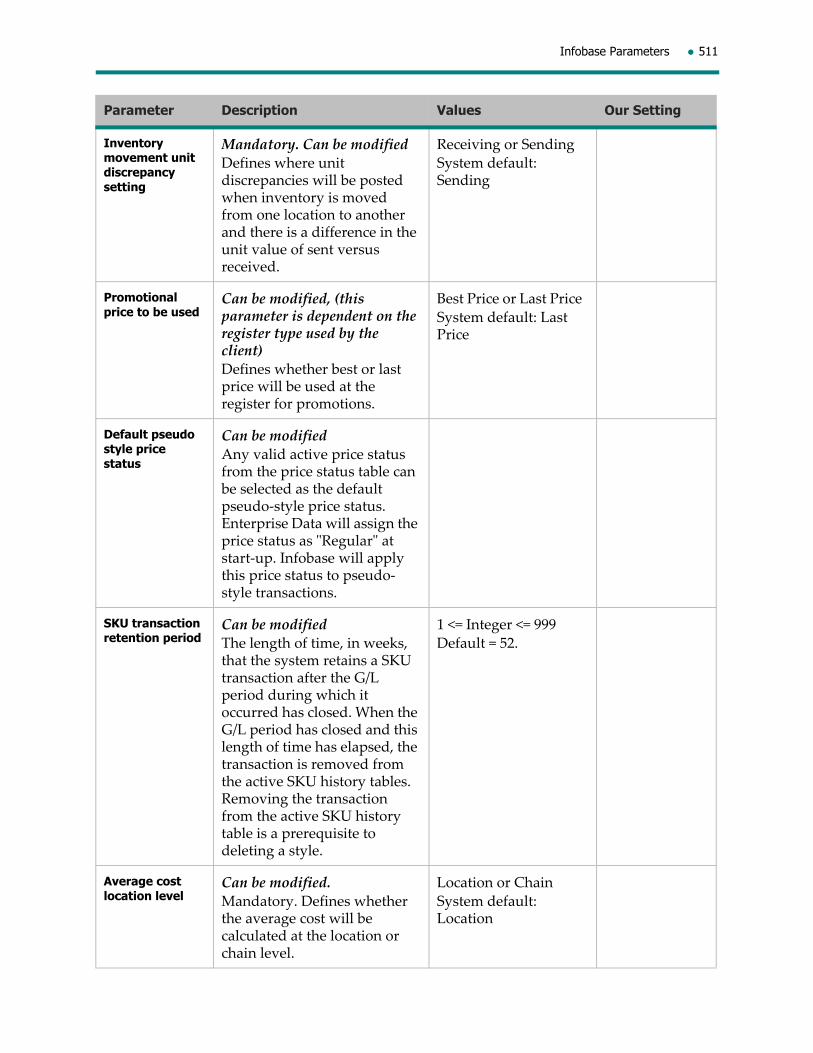
Infobase Parameters 511
Inventory movement unit discrepancy setting
Mandatory. Can be modified
Defines where unit discrepancies will be posted when inventory is moved from one location to another and there is a difference in the unit value of sent versus received.
Receiving or Sending
System default: Sending
Promotional price to be used
Can be modified, (this parameter is dependent on the register type used by the client)
Defines whether best or last price will be used at the register for promotions.
Best Price or Last Price
System default: Last Price
Default pseudo style price status
Can be modified
Any valid active price status from the price status table can be selected as the default pseudo‐style price status. Enterprise Data will assign the price status as ʺRegularʺ at start‐up. Infobase will apply this price status to pseudo‐style transactions.
SKU transaction retention period
Can be modified
The length of time, in weeks, that the system retains a SKU transaction after the G/L period during which it occurred has closed. When the G/L period has closed and this length of time has elapsed, the transaction is removed from the active SKU history tables. Removing the transaction from the active SKU history table is a prerequisite to deleting a style.
1 <= Integer <= 999
Default = 52.
Average cost location level
Can be modified.
Mandatory. Defines whether the average cost will be calculated at the location or chain level.
Location or Chain
System default: Location
Parameter Description Values Our Setting

512 Parameters
Ticket Printing System Parameters
These parameters define the default characteristics for ticket printing.
Parameter Description Values Our Setting
Override ticket price
Can be modified
Determines whether you can modify the price that will print on the ticket.
Yes/No
System default: No
Override ticket UPC validation
Can be modified
Determines if a ticket printing request can proceed if one of the SKUs being printed does not have a valid UPC.
Yes – UPC validation can be overridden. Tickets can be printed even if a SKU has an invalid UPC.
No – UPC validation cannot be overridden. Tickets cannot be printed if a SKU has an invalid UPC.
Yes/No
System default: No
Print on-hand Pricing tickets
Can be modified. The status of this check box indicates whether on‐hand Pricing tickets can be printed.
Yes ‐ On‐hand Pricing tickets can be printed.
No ‐ On‐hand Pricing tickets canʹt be printed.
Yes/No
System Default: No
Print on-order Pricing tickets
Can be modified. The status of this check box indicates whether on‐order Pricing tickets can be printed.
Yes ‐ On‐order Pricing tickets can be printed.
No ‐ On‐order Pricing tickets canʹt be printed.
Default: Not selected.
Yes/No
System Default: No
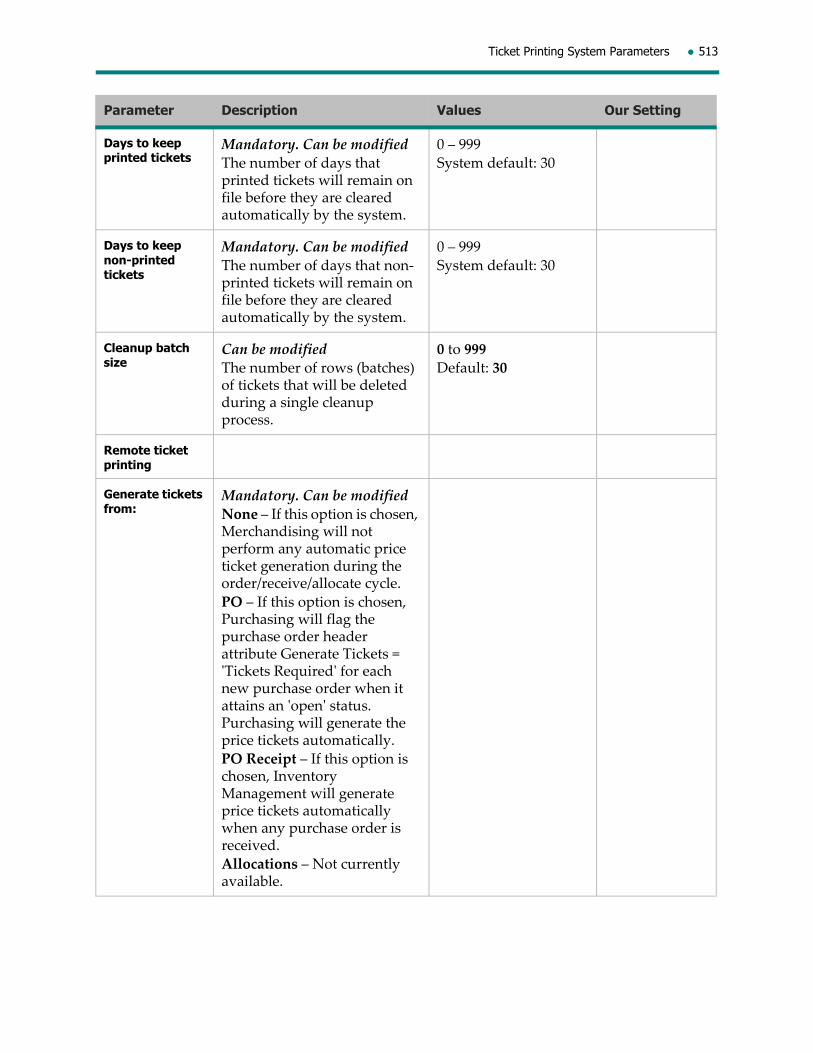
Ticket Printing System Parameters 513
Days to keep printed tickets
Mandatory. Can be modified
The number of days that printed tickets will remain on file before they are cleared automatically by the system.
0 – 999
System default: 30
Days to keep non-printed tickets
Mandatory. Can be modified
The number of days that non‐printed tickets will remain on file before they are cleared automatically by the system.
0 – 999
System default: 30
Cleanup batch size
Can be modified
The number of rows (batches) of tickets that will be deleted during a single cleanup process.
0 to 999
Default: 30
Remote ticket printing
Generate tickets from:
Mandatory. Can be modified
None – If this option is chosen, Merchandising will not perform any automatic price ticket generation during the order/receive/allocate cycle.
PO – If this option is chosen, Purchasing will flag the purchase order header attribute Generate Tickets = ʹTickets Requiredʹ for each new purchase order when it attains an ʹopenʹ status. Purchasing will generate the price tickets automatically.
PO Receipt – If this option is chosen, Inventory Management will generate price tickets automatically when any purchase order is received.
Allocations – Not currently available.
Parameter Description Values Our Setting
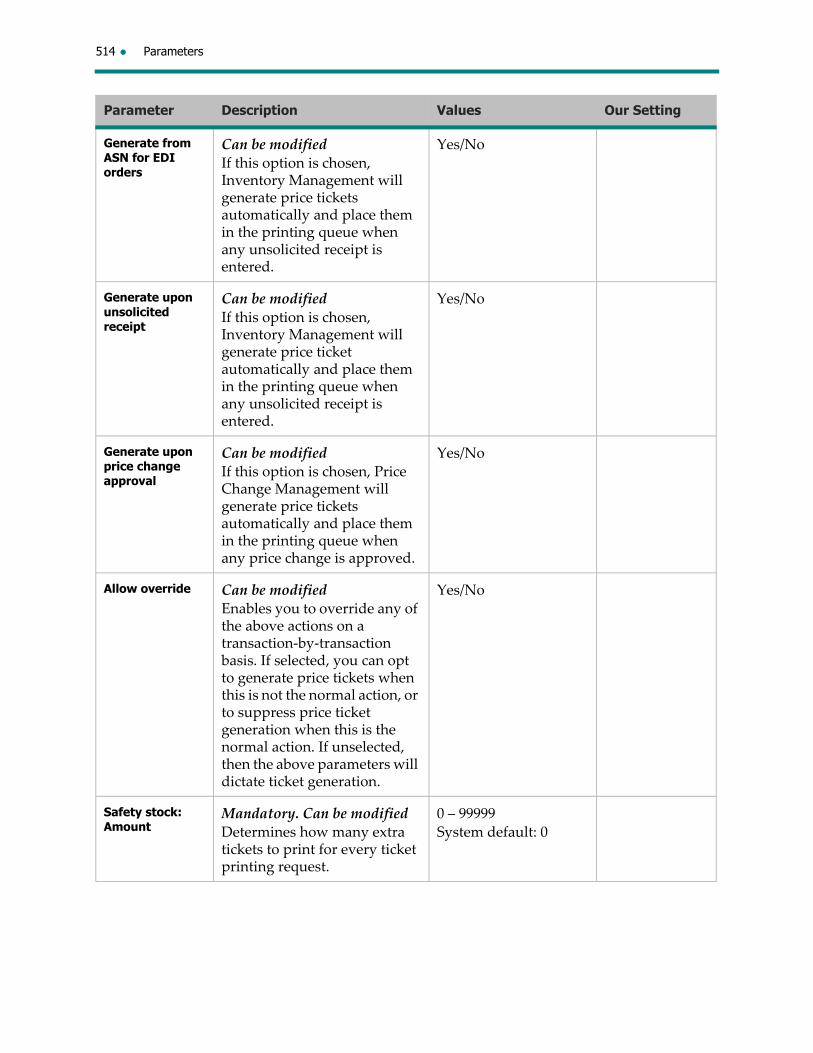
514 Parameters
Generate from ASN for EDI orders
Can be modified
If this option is chosen, Inventory Management will generate price tickets automatically and place them in the printing queue when any unsolicited receipt is entered.
Yes/No
Generate upon unsolicited receipt
Can be modified
If this option is chosen, Inventory Management will generate price ticket automatically and place them in the printing queue when any unsolicited receipt is entered.
Yes/No
Generate upon price change approval
Can be modified
If this option is chosen, Price Change Management will generate price tickets automatically and place them in the printing queue when any price change is approved.
Yes/No
Allow override Can be modified
Enables you to override any of the above actions on a transaction‐by‐transaction basis. If selected, you can opt to generate price tickets when this is not the normal action, or to suppress price ticket generation when this is the normal action. If unselected, then the above parameters will dictate ticket generation.
Yes/No
Safety stock: Amount
Mandatory. Can be modified
Determines how many extra tickets to print for every ticket printing request.
0 – 99999
System default: 0
Parameter Description Values Our Setting

Ticket Printing System Parameters 515
Percentage Mandatory. Can be modified
Determines what percentage of extra tickets to print based on the total number of tickets required. Works in conjunction with the ʺsafety stock maximum safety unitsʺ parameter and will print the lesser of the two.
0 – 100
System default: 0.00
Maximum safety units
Can be modified
Defines the maximum number of extra tickets to print. Works in conjunction with the ʺSafety Stock Percentageʺ parameter and will print the lesser of the two.
0 to 99999
Default: 0
Ticket UPC type order
Can be modified
Determines the preferred UPC to print on the ticket.
In-house only: Prints in‐house UPCs
Vendor only: Prints vendor UPCs
In-house then Vendor: Prints in‐house UPCs first but if none are available, it will print vendor
Vendor then In-house: Prints vendor UPCs first but if none are available, it will print in‐house. Default: In‐house only
Parameter Description Values Our Setting
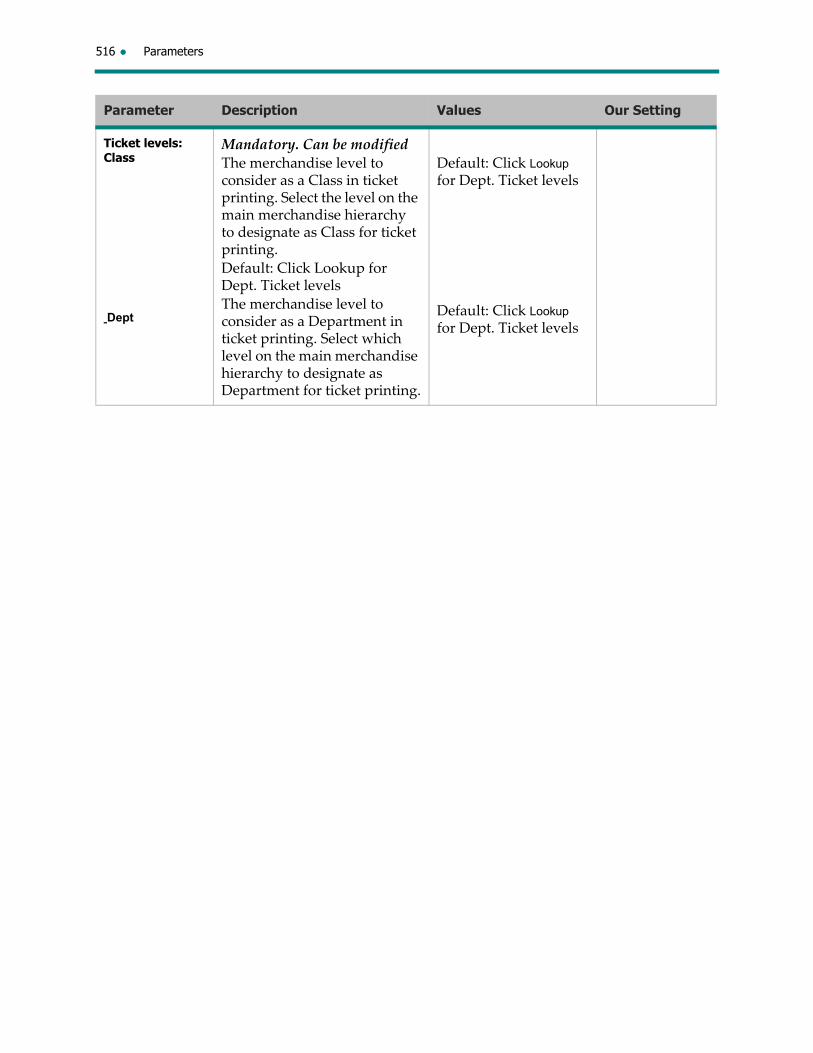
516 Parameters
Ticket levels: Class
Dept
Mandatory. Can be modified
The merchandise level to consider as a Class in ticket printing. Select the level on the main merchandise hierarchy to designate as Class for ticket printing.
Default: Click Lookup for Dept. Ticket levels
The merchandise level to consider as a Department in ticket printing. Select which level on the main merchandise hierarchy to designate as Department for ticket printing.
Default: Click Lookup for Dept. Ticket levels
Default: Click Lookup for Dept. Ticket levels
Parameter Description Values Our Setting

Index
AACA adjustments
print 279access interface rejects 350access transaction attachments 353
adding interface rejects 350Adjustments See average cost adjustments
Adjustments See Shrinkage Adjustments Adjustments
Adjustments See Stock Status Adjustments
Adjustments See User‐Defined Adjustments
Advance Shipping Notice See ASNs
alphanumeric 8ASN Parameters 499ASNs
details 66entering receipts against 68header 63information flow 61, 62manual delete 73modifying quantities
received 72system delete 73
Attribute 458Average Cost Adjustments
modify 280Average cost adjustments
details 278average cost adjustments 275
manual delete of 280messages 278pseudo styles 276submitting an ACA
document 279
system delete of 280
BBatch Import
information flow 88scanning carton labels 89
bin locations 32, 52, 91, 101
CCancel
Outbound Transfers 174PO Receipt 57
cancel
ICD 317IMRD RTV 118RTVs 210Shrinkage Adjustment 257Stock Status Adjustment 249Unsolicited Receipt 104User‐Defined Adjustment 273
Carton
delete 87entering receipts by 84modify receipts 86receive by, information flow 83
carton
enter receipt as sent 86enter receipts by detail 85enter receipts by UPC 86receive by 84, 426
carton labels 139print RTV 205printing Outbound
Transfer 158scanning or manually
entering 84UCC128 30, 139

518Index
change number of tickets to be printed 405
change object‐action 353change user preference location 389check boxes 9Code (vendor) 455Consolidation
RTV 2‐step flow 201consolidation
RTV, using a Head Office IMRD 203
correct I/F rejects
External system process error 356
Stock Control Issue Detected 356Stock Control pre‐validation
failed 357Stock Control Validation
Failed 355Stock Control validation failed
selectively 358correct interface rejects 352Cost Only User‐Defined Adjustments 264
count
import a 300post physical inventory 318recalculate values 304
count See Physical Count
Creating a transfer request 472Current Count 294
Ddefaults 8defer interface rejects 362deferred interface reject, verify archived 363
deferred interface reject, view 363delete 258, 273, 280
Stock Status Adjustments 250delete See manual delete
delete See system delete
delimited format 298Discrepancy Report 81, 174, 338Document Printing 53, 101
EEDI 391entity 8exiting Merchandising 15
Ffixed format 296flag 8
GGeneral Parameters 508, 512Get next dataset button 389Guided Audit tab 345
HHelp 15help
finding information through a search 19
finding information through the contents 19
help, online 19HTML help 19
IICDs See Inventory Control Documents
IMRD Parameters 504IMRD RTVs 109
create an RTV from an 119details 113header 109reinstate 118status 110
IMRD RTVs, modify 117IMRD RTVs, submit 118IMRD Transfer
details 124IMRD Transfers 120
create an outbound transfer from 130, 131
details 125header 120merge multiple 131merge multiple IMRD
Transfers 131

Index 519
modify 127reinstate 129status 121
IMRD Transfers, submit 129IMRDs 107, 203, 213
create an outbound transfer from IMRD transfer 223
flow, document originates from head office 108, 214
manual delete 135, 237printing 136, 215RTV 107, 213, 224RTV details 228RTV, header 224RTVs
creating an RTV from an IMRD RTV 230
system delete of 134, 236Transfer 107, 213transfer details 221transfer header 217
In Transit
Physical Inventory 294Inbound Transfers 139
details 171enter receipt units as sent 172Enter receipt units by SKU 171Enter receipt units by UPC 172header 162information flow 161manual delete 175modify 172receive 173system delete 175
Inbound Worklist 32Infobase Parameters 510INS 341
information flow 342sending/resending
documents 343interactive non‐sale (INS) 5, 117,
118, 127, 129, 135, 154, 174, 175Interactive Non‐Sale See INS
interface rejects 341accessing 350adding 350correct 352correcting inbound
documents 375correcting outbound
documents 365correcting physical inventory
counts (INS only) 383, 384defer 362External system process
error 356introduction to 349Inventory Management 348override 360reasons 349Stock Control Issue Detected 356Stock Control pre‐validation
failed 357Stock Control Validation
Failed 355Stock Control validation failed
selectively 358undef a current deferred 363verifying an archived deferred I/F
reject 363view deferred 363
Inventory
Available 4Unavailable 4
Inventory Control Documents 281,
284cancel 317count details 291Locations tab 288Messages tab 291modify header 314reinstate 317status 287
Inventory Location Documents
Merchandise tab 289Inventory Management
Adjustments 3

520Index
Inbound transactions 3information flow 6interface rejects 348Outbound transactions 3what is it? 3
Inventory Management Parameters 498
Inventory Movement Request Document (IMRD) Modifications 491
Inventory Movement Request Documents See IMRDs
Invoice Matching
release PO Receipt to third party 58
release RTV to 209release Unsolicited Receipt to
third party system 104
Llabel See carton label
labels
print RTV carton 205printing Outbound Transfer 158
location, change 389Lowest Price Sold 468
Mmanual delete
ASNs 73average cost adjustments 280IMRDs 135, 237Inbound and Outbound
transfers 175PO Receipts 59RTVs 212Shrinkage Adjustments 258Stock Status Adjustments 250Store Shipment 82Unsolicited Receipt 105User‐Defined Adjustments 273
Media Reconciliation tab 345Merchandise groups 440Merchandise levels and groups 440Merchandise Locator drill‐down process 441
Merchandise structure 440Merchandising
exiting 15starting 11
Merchandising Solution
Allocations and Replenishment 1Merging multiple IMRD Transfers 130
Modification Tables
Adjustments 492IMRDs 483Physical Inventory 494
Modify
Outbound Transfers 153modify
average cost adjustment 280carton receipts 86count 316ICD header 314IMRD RTV, details 117IMRD Transfer, details 127Inbound Transfers 172incorrect system on hand 317inventory counts 305PO receipt 54RTVs 207shrinkage adjustment 257, 493Stock Status Adjustment 249,
492Store Shipment 80unsolicited receipt 101user‐defined adjustment 272,
492module 8
NName (vendor) 455number of tickets to print, change 405
Oobject‐action 353
change 353online help 19Outbound Transfers 139

Index 521
cancel 174details 151enter sent units by size grid 151enter sent units by UPC 153header 141information flow 140manual delete 175modify 153print 158print carton labels 158pseudo styles 141reinstate 174send 160set status to Ready to Send 159system delete 175Transfers Sent but not received
over ‘X’ days ago report 160override interface reject 360
PParameters
General 512parameters
ASN 499General 508IMRD 504Inbound
PO Receipt 498Infobase 510Inventory Management 498Outbound
RTV 502Physical Inventory 509Shrink Adjustment 505Stock Status Adjustment 506Transfer 503Unsolicited Receipts 499user‐Defined Adjustment 507
Performing a search by alternate code 462
Performing a search by merchandise level/group 444
Performing a search by style 458Performing a search by UPC 449
Performing a search by vendor 455Performing a search by vendor style 452
Physical Count
details 291Physical Inventory 281
cancel 317count import rejections 303delimited file format 298fixed format file definition 296import a count 300interface from Warehouse
Management 328Inventory Control Documents
(ICDs) 281loading counts 296modify count 316modify counts 305posting counts 318Preliminary Shrink report 305recalculate count values 304reinstate 317
Physical Inventory Parameters 509PO Receipts
canceling 57details 44enter bin locations for items 52entering receipts as ordered 51entering receipts by size grid 49entering receipts by SKU 48entering receipts by UPC 49flow of information 31header 32manual delete 59modifying 54printing 53, 101pseudo styles 32receiving 56reinstating 57Releasing to a third party Invoice
Matching system 58system delete 59
PO Receipts vs. Ordered report 59

522Index
Preliminary Shrink Report
discrepancies 305Preliminary Shrink report 305price, change 405, 419print previewing 26print See reports
printing 26Printing See Reports
pseudo styles 32, 91, 139, 141, 260,
267, 269, 276
Rrecalculate count values 304Receipts
ASN 61PO 31
receipts
overview 29vendor 29warehouse 29
Receipts Not Released to Invoice Matching Greater than ‘X’ Days After Receipt 339, 388, 390
receipts not released to Invoice Matching greater than ‘X’ days after receipt report 58
receipts, store shipment 78receive
Store Shipment 81receive an Inbound Transfer 173receiving a PO Receipt 56Reinstate
PO Receipt 57reinstate
IMRD RTV 118IMRD Transfer 129Inventory Control
Document 317Outbound Transfers 174RTVs 210Shrinkage Adjustment 257Stock Status Adjustment 250Unsolicited Receipt 104User‐Defined Adjustment 273
Reports
Discrepancy Report 174, 338Outbound Transfers 158PO Receipt 53, 101PO Receipt (based on ASN) 72Receipts Not Released to Invoice
Matching Greater than ʹXʹ Days after Receipt 339
Store Shipment 79Store Shipments Not Received
within ʹXʹ Days of Shipment 337
Transfers Sent but not Received over ʹXʹ Days Ago 336
Transfers Sent but not received over ‘X’ days ago report 160
reports
ACA adjustment 279Discrepancy 81IMRD 136, 215PO Receipts vs. Ordered
report 59Preliminary Shrink 305receipts not released to Invoice
Matching greater than ‘X’ days after receipt 58
RTV 206Shrinkage Adjustment 256Stock Status Adjustment 248Store Shipments not received
within ‘X’ Days of Shipment 82
User‐Defined Adjustment 271retrieving information
all 21specific 21
Returns to Vendor (RTV) Modifications 489
revalidate UPC 354RTV
flow, 1‐step 178RTV IMRDs See IMRDs
RTV Parameters 502RTV, create from an IMRD RTV 119RTVs 177
1‐step 177, 1792‐step 177, 190

Index 523
2‐step, details 1972‐step, header 190cancel 210Consolidation, 2‐step flow 201creating an RTV from an IMRD
RTV 230details 186flow, 2‐step 189header 179initiating a document
request 199manual delete 212modify 207Printing 206reinstate 210release to Invoice Matching 209release to Warehouse
Management 204returning a requested RTV
document 200returning a Requested RTV
document in a 2‐step process 200
system delete 211
SSales
dates 333discounts and markdowns 333how sales are updated 332reason codes 334transactions affecting
Merchandising 333Sales Audit 341
Guided Audit tab 345introduction to 345Media Reconciliation tab 345Transaction Audit tab 345
Send to POS 469Show Cost 469Shrink Adjustment Parameters 505Shrinkage Adjustments 251
cancel 257details 254
header 253manual delete of 258messages 254modify 257, 493print 256reinstate 257status 253submitting an SA document 256system delete of 258
SIT 341information flow 342sending/resending
documents 343Sort Color/Size 469SSAs See Stock Status Adjustments
SSAs See User‐Defined Adjustments
starting Merchandising 11status
IMRD Transfers 121inventory control document 287
status See IMRD RTVs
Stock Status Adjustment Parameters 506
Stock Status Adjustments 243cancel 249details 246flow 242header 244manual delete of 250messages 245modify 249, 492print 248reinstate 249submitting a SSA document 247system delete of 250
store inventory tracking (SIT) 5,
117, 118, 127, 129, 135, 154, 174,
175Store Inventory Tracking See SIT
Store Shipment
enter receipts as sent 79enter receipts by SKU 78enter receipts by UPC 79

524Index
information flow 74manual delete 82modify 80printing 79receive 81system delete 82
Store Shipments Not Received Within ‘X’ Days of Shipment 337
Store Shipments not received within ‘X’ days of shipment report 82
Style attributes and values 458submit
IMRD RTV 118IMRD Transfer 129
system delete
ASNs 73IMRDs 134, 236Inbound and Outbound
transfers 175PO Receipts 59RTVs 211Store Shipment 82Unsolicited Receipt 105
system on hand
modify if incorrect 317
TTicket Printing overview 387tickets
auto‐generate 390, 426tickets, generate by location 390,
426transaction attachments 353
access 353Transaction Audit tab 345Transfer IMRDs See IMRDs
Transfer Parameters 503Transfer request, creating 472Transfer zone 471Transfers 139
pseudo styles 139transfers
create an outbound transfer from an IMRD transfer 223
Transfers Modifications 485
Transfers Sent but not Received over ‘X’ Days Ago 336
Uunavailable 243undefer interface reject 363Unsolicited Receipt Parameters 499Unsolicited Receipts
cancel 104details 97enter bin locations for items 101enter details 99enter units by size grid 100header 91information flow 90manual delete 105modify 101pseudo styles 91receiving 103reinstate 104release to third party Invoice
Matching system 104system delete 105
Unsolicited receipts
enter units by UPC 100UPC
revalidate 354User‐Defined Adjustment Parameters 507
User‐Defined Adjustments 259,
260affect cost only 264cancel 273cost and units 267details 263header 261manual delete of 273messages 263modifying 272, 492print 271pseudo styles 260, 269reinstate 273status 262

Index 525
submitting a SSA document (units and cost) 271
submitting a SSA document (units only) 267
submitting a UDA document (cost only) 265
system delete of 273three types 260units only 265
VValue 458Vendor and Warehouse Receipts Modifications 478
view deferred interface reject 363view interface rejects 350
Wworklist, Print 239worklists 14

526Index
Related Documents


