Historic, archived document Do not assume content reflects current scientific knowledge, policies, or practices.

Welcome message from author
This document is posted to help you gain knowledge. Please leave a comment to let me know what you think about it! Share it to your friends and learn new things together.
Transcript

Historic, archived document
Do not assume content reflects current
scientific knowledge, policies, or practices.


1/lenjUoO'
MEN'S
UNITED STATES
DEPARTMENT OF AGRICULTURE
MISCELLANEOUS PUBLICATION
NO. 482
MENDING MEN'S SUITSby
CLARICE L. SCOTT, associate home economics specialist
ANNE F. HAGOOD, assistant scientific aide
Bureau of Human Nutrition and Home Economics, Agricultural Research Administration
Ifshe has a knack with her needle, the home sewer can confidently undertake a good many of the simpler
repairs and alterations in a man's suit or overcoat. Success, however, does call for learning and using
some of the tried and tested methods of professional tailors.
A number cf these tailoring techniques, adapted to home use, are pictured and described in this publi-
cation. The home sewer can, for example
—
Patch or darn a worn spot at elbow or trouser knee so it will not be noticeable.
Fix frayed edges of sleeves and trouser cuffs.
Patch a vest badly worn at underarm.
Replace worn-out sleeve linings, inside pockets, and trouser seat.
Restore, by machine stitching, pin stripes that have rubbed off.
Repair worn buttonholes . . . small holes . . . three-corner tears.
Adjust trousers for good fit, comfort, and better wear when a man gains or loses weight or when a
boy keeps growing.
In addition to mending and altering, much suit saving can be done by guarding against wear—as shown
in the directions for putting wear guards in trouser legs, retreads in trouser knees and seats, and underarm
shields in coats. And the day of mending can be further postponed by giving a suit good care in every-
day use—for which suggestions are offered.
Issued January 1943
Washington, D. C. Slightly revised January 1946

/[/levuLUui (tialenlfiU
Before you rip . . . cut . . . stitch, make sure you have on hand mending supplies
that will make your work easier and your results better looking. Try to find thread,
lining cloth, buttons, and other materials that match as nearly as possible those in suits
on hand.
THREAD. Buy three-cord mercerized thread,
size 0. for stitching. This is stronger than thread
ordinarily used for home sewing. Buy darker
rather than lighter colors if you can't get an
exact match. Usually, black thread looks better
than blue on a navy suit because blue thread
works up much lighter than it appears on the
spool.
Best thread for stitching buttonholes is button-
hole twist made especially for men's suits. It is
heavier than that sold at notion counters for
women's clothes and lighter than the kind for
overcoats. This twist is sold by the yard, eight
strands braided together. Three-fourths of a
yard will make eight average buttonholes.
BEESWAX. A piece of beeswax is helpful in
waxing thread for sewing on buttons and rework-
ing worn buttonholes, and for waxing the cord
over which buttonholes are worked.
BUTTONS. Keep buttons from worn-out suits
to replace those lost or broken. If you haven't
done this, buy matching pants buttons at notion
counters. Thev are not expensive.
LINING. Get rayon lining materials that will
not melt when you press them. If there is no
label, ask vour dealer what kind of material it is.
Preshrink lining material before you cut it
—
otherwise it may sin-ink when cleaned so that
seams pull out. When you buy dark linings, ask
for those that will not rub off on white shirts.
POCKETING. If possible, get cotton twill madeespecially for inside trouser pockets. This is a
sturdy material that outlasts muslin. It comes
in 30-inch widths, so that two side pockets can be
cut from one length. The amount needed to
make two side pockets is about 16 inches. Pocket
lengths vary, so measure before you buy. Re-
member to allow some extra for seams.
GUARDS. Best wear guards for trouser cuffs are
made from wool cloth, the same as the suit. But
if you have no extra pieces of suiting, use heavy
cotton tape about five-eighths inch wide or sturdy
matching cotton turned under on each side.
PRESSING SUPPLIES. You need to steam-
press wool as you make most repairs if you want
the finished work to look well. So have on hand
a sponge and press cloths—one of cheesecloth for
quick pressing, one of firm cotton for the final
pressing.
When you press, dampen the place to be pressed
with warm water. Lay the press cloth over it.
Set the iron down squarely on the press cloth . . .
lift the iron . . . set it down again. Never
press moisture completely out of wool or it will
look hard and lifeless.
SCRAPS. Save scraps of matching suit material
for future repairs. If your suits are custom-made,
get a few scraps left over from fitting. On ready-
made suits, save the pieces cut off in making
alterations.

CAnanJL fracUt*Ak UUi
Make a suit wear longer, postpone more difficult repairs with shields, wear guards, and
retreads. Sew these into a suit when it is new. There is no need to wait until it shows
SHIELDS
Wear and perspiration can soon cause holes
under the arms in a suit lining . . . can stain and
mat the outer material of the coat. Guard against
this with shields that tack in.
Make underarm shields of fabric that matches
or is similar to the suiting in the coat. Or, if you
cannot get similar material, make shields of rayon
lining.
Cut two pieces of wool cloth the shape of
shields—one to be sewed in under each armhole.
1, Bind all around with rayon. Rip the lining
apart from the armhole just far enough to tack
the shield in place.
2. Slip-stitch shield to the coat lining around
the outer edge. Sew the lining back in around
the armhole.
WEAR GUARDS
Wear guards protect trouser legs from the rub
of shoes. To make them, use heavy tape about
five-eighths inch wide, or cloth cut from the leg
seams.
To put a wear guard on trousers with cuffs, first
turn down the cuff.
1. Baste the guard on just inside the leg next
to the fold that will be the bottom edge of the
trouser. Stitch bv machine along both edges of
the guard.
2. Turn the cuff back and tack it in place.
To put a wear guard on trousers without cuffs,
first rip open the hem. Baste, then stitch, a guard
on just inside the lower edge of the leg—on the
hem side of the bottom crease. Then rehem the
trousers.
KNEE RETREADS
These are rayon pieces set in from seam to seam
across the front where trouser legs get the most
wear and where they are often damaged bv per-
spiration. Retreads on the knees also help to
hold in a press.
Cut two rectangular pieces of rayon lining
material as wide as the front of the trouser leg
near the crotch, and as long as it is from the level
of shorts to 3 or 4 inches below the knee. Turn
under and stitch the top and bottom edges of each
retread.
Pin and baste the retread along the outside
trouser seam so it will extend below the knee 3 or
4 inches. Then pin and baste the top edge of the
retread to the trousers. Baste it along the front
trouser crease.

ialJjI iillljJllllllli,
1. Tack along one side of the trouser crease
with tailor's basting. Smooth the retread over to
the inseam. pin. and baste to the seam line. Trim
off excess material.
2. Slip-stitch the retread loosely to the trousers
along the top edge so that it will not hinder
dressing. Be sure the stitches do not show from
the right side. Leave the lower edge loose.
3. Stitch exactly on the original seam lines.
This must be done by turning the legs over and
stitching from the back of the seams, because the
retread covers the stitching at the front.
SEAT RETREADS
Retread the seat to protect against wear, per-
spiration, and scratchy material—and to make it
easier to keep a press in the suit.
1. Mark notches for matching, then rip the
back rise of the trousers from about 6 inches
below the top down through the crotch.
2. Rip the inseams down 3 or 4 inches from the
crotch. Press the seam creases out flat.
Cut a paper pattern for the retread. Fit and
shape it carefully. From this pattern, cut two
pieces from preshrunk rayon lining, one for each
side of the seat. Turn under and baste the
outside curved edges of these two pieces. Stitch
by machine close to the edge and press. Pin
each half retread in place with the seams carefully
matched. Baste loosely.
3. Start at the crotch point and tack each
retread smoothly in place with tailor's basting.
Make the basting stitches about one-half inch
apart and the rows of basting about one-half inch
apart—a little closer where the cloth is thin.
The basting should follow the lengthwise grain of
the cloth so no stitches show on the right side.
4. Slip-stitch the outer edge of the retreads to
the seat of the trousers. Be sure no stitches showon the right side.
Restitch the inseams, then stitch the back rise
twice for strength. Steam-press.
Co^£ 'R&fo&l'l*
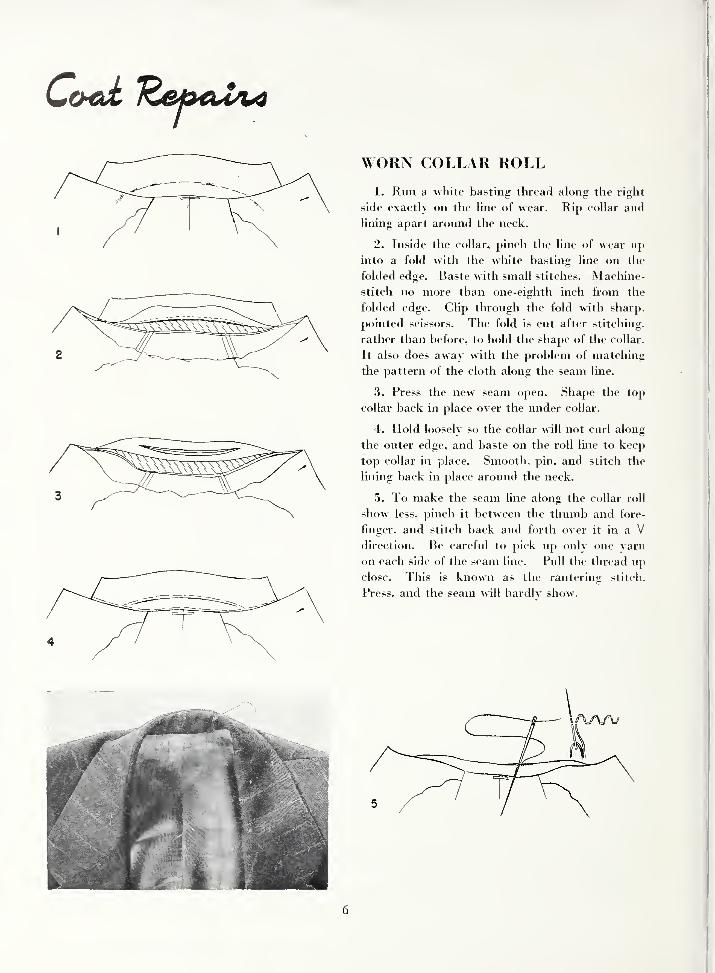
WORN COLLAR ROLL
1. Run a white basting thread along the right
side exactly on the line of wear. Rip collar and
lining apart around the neck.
2. Inside the collar, pinch the line of wear up
into a fold with the white basting line on the
folded edge. Baste with small stitches. Machine-
stitch no more than one-eighth inch from the
folded edge. Clip through the fold with sharp,
pointed scissors. The fold is cut after stitching,
rather than before, to hold the shape of the collar.
It also does away with the problem of matching
the pattern of the cloth along the seam line.
3. Press the new seam open. Shape the top
collar back in place over the under collar.
4. Hold loosely so the collar will not curl along
the outer edge, and baste on the roll line to keep
top collar in place. Smooth, pin. and stitch the
lining back in place around the neck.
5. To make the seam line along the collar roll
show less, pinch it between the thumb and fore-
finger, and stitch back and forth over it in a V
direction. Be careful to pick up onlv one varn
on each side of the seam line. Pull the thread up
close. This is known as the rantering stitch.
Press, and the seam will hardly show.
r
i l\J\/\i
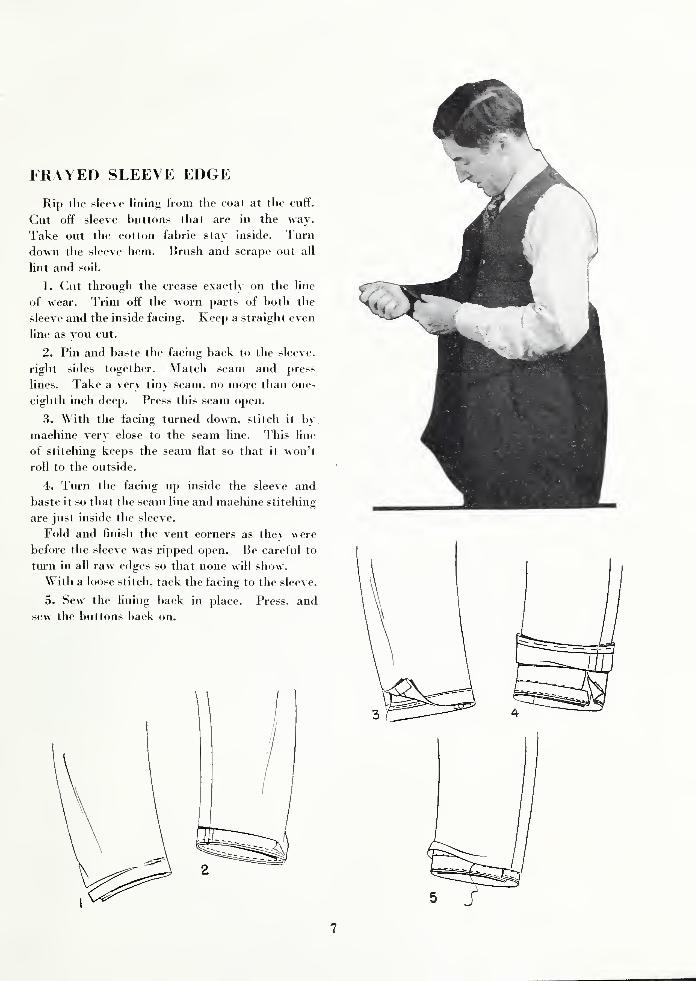
FRAYED SLEEVE EDGE
Rip the sleeve lining from the coat at the cuff.
Cut off sleeve buttons that are in the way.
Take out the cotton fabric stay inside. Turn
down the sleeve hem. Brush and scrape out all
lint and soil.
1. Cut through the crease exactly on the line
of wear. Trim off the worn parts of both the
sleeve and the inside facing. Keep a straight even
line as you cut.
2. Pin and baste the facing back to the sleeve,
right sides together. Match seam and press
lines. Take a verv tiny seam, no more than one-
eighth inch deep. Press this seam open.
3. "w ith the facing turned down, stitch it bymachine very close to the seam line. This line
of stitching keeps the seam flat so that it won't
roll to the outside.
4. Turn the facing up inside the sleeve and
baste it so that the seam line and machine stitching
are just inside the sleeve.
Fold and finish the vent corners as they were
before the sleeve was ripped open. Be careful to
turn in all raw edges so that none will show.
With a loose stitch, tack the facing to the sleeve.
5. Sew the lining back in place. Press, and
sew the buttons back on.
5 J"
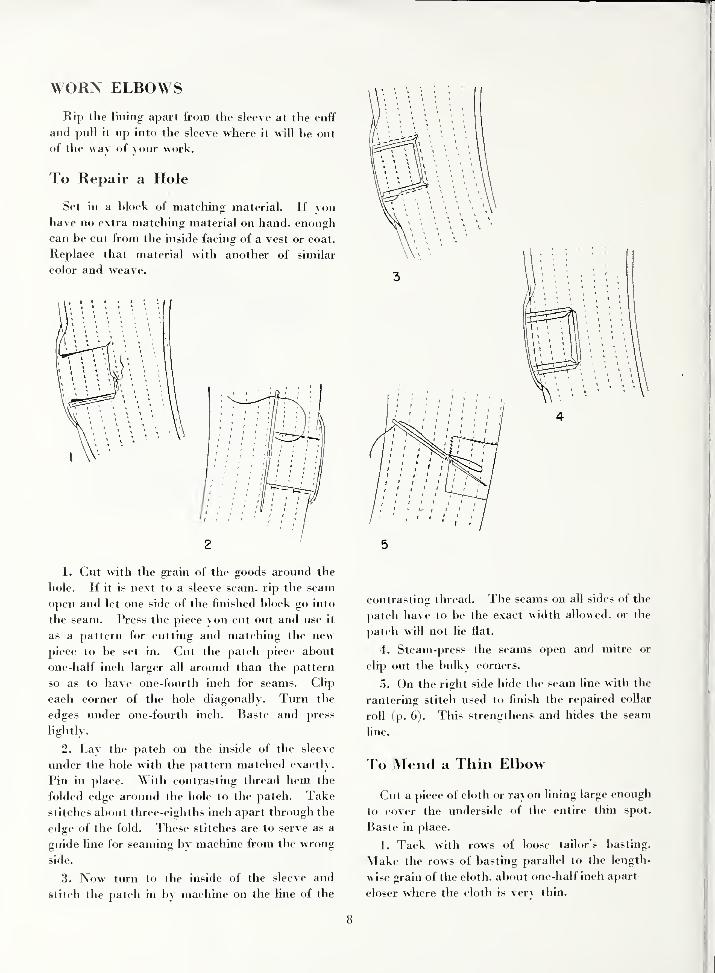
WORN ELBOWS
Rip the lining apart from the sleeve at the cuff
and pull it up into the sleeve where it will be out
of the way of your work.
To Repair a Hole
Set in a block of matching material. If vou
have no extra matching material on hand, enough
can be cut from the inside facing of a vest or coat.
Replace that material with another of similar
color and weave.
1. Cut with the grain of the goods around the
hole. If it is next to a sleeve seam, rip the seam
open and let one side of the finished block go into
the seam. Press the piece vou cut out and use it
as a pattern for cutting and matching the newpiece to be set in. Cut the patch piece about
one-half inch larger all around than the pattern
so as to have one-fourth inch for seams. Clip
each corner of the hole diagonally. Turn the
edges under one-fourth inch. Baste and press
lightly.
2. Lav the patch on the inside of the sleeve
under the hole with the pattern matched exactly.
Pin in place. With contrasting thread hern the
folded edge around the hole to the patch. Take
stitches about three-eighths inch apart through the
edge of the fold. These stitches are to serve as a
guide line for seaming h\ machine from the wrong
side.
3. Now turn to the inside of the sleeve and
stitch the patch in by machine on the line of the
contrasting thread. The seams on all sides of the
patch have to be the exact width allowed, or the
patch will not lie flat.
4. Steam-press the seams open and mitre or
clip out the bulky corners.
5. On the right side hide the seam line with the
rantering stitch used to finish the repaired collar
roll (p. 6). This strengthens and hides the seam
line.
To Mend a Thin Elbow
Cut a piece of cloth or rayon lining large enough
to cover the underside of the entire thin spot.
Baste in place.
1. Tack with rows of loose tailor's basting.
Make the rows of basting parallel to the length-
wise grain of the cloth, about one-half inch apart
—
closer where the cloth is verv thin.
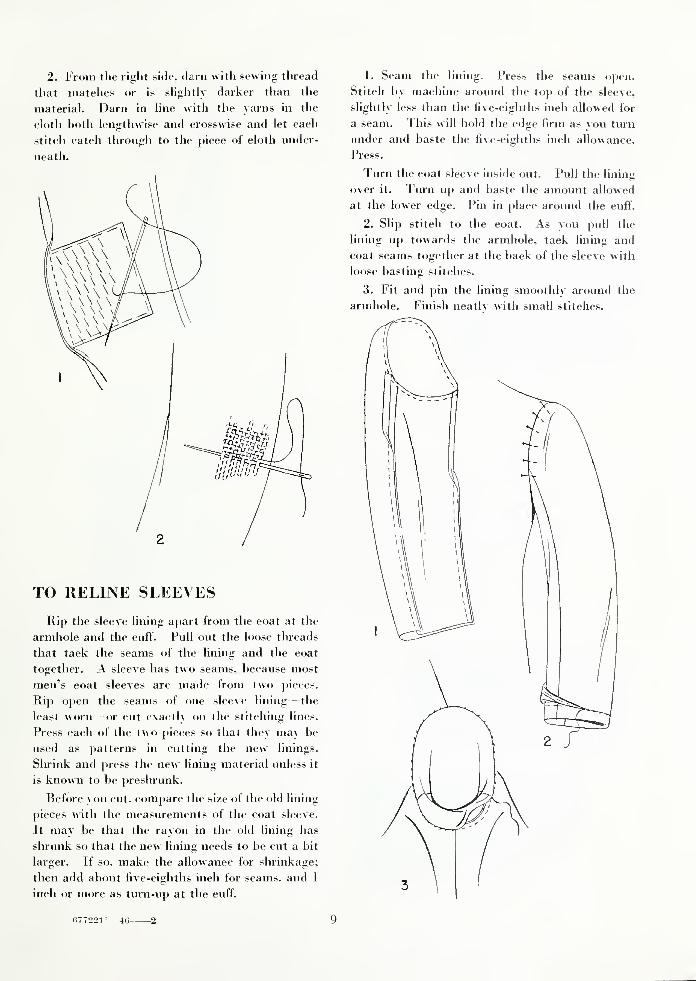
2. From the right side, darn with sewing thread
that matches or is slightly darker than the
material. Darn in line with the yarns in the
cloth both lengthwise and crosswise and let each
stitch catch through to the piece of cloth under-
neath.
TO RELINE SLEEVES
Rip the sleeve lining apart from the coat at the
armhole and the cuff. Pull out the loose threads
that tack the seams of the lining and the coat
together. A sleeve has two seams, because most
men's coat sleeves are made from two pieces.
Rip open the seams of one sleeve lining—the
least worn—or cut exactly on the stitching lines.
Press each of the two pieces so that they may be
used as patterns in cutting the new linings.
Shrink and press the new lining material unless it
is known to be preshrunk.
Before you cut. compare the size of the old lining
pieces with the measurements of the coat sleeve.
It may be that the rayon in the old lining has
shrunk so that the new lining needs to be cut a bit
larger. If so. make the allowance for shrinkage;
then add about five-eighths inch for seams, and 1
inch or more as turn-up at the cuff.
1. Seam the lining. Press the seams open.
Stitch by machine around the top of the sleeve,
slightly less than the five-eighths inch allowed for
a seam. This will hold the edge firm as vou turn
under and baste the five-eighths inch allowance.
Press.
Turn the coat sleeve inside out. Pull the lining
over it. Turn up and baste the amount allowed
at the lower edge. Pin in place around the cuff.
2. Slip stitch to the coat. As you pull the
lining up towards the armhole, tack lining and
coat seams together at the back of the sleeve with
loose basting stitches.
3. Fit and pin the lining smoothlv around the
armhole. Finish neatlv with small stitches.
/577221°—4G-
WORN COAT EDGE
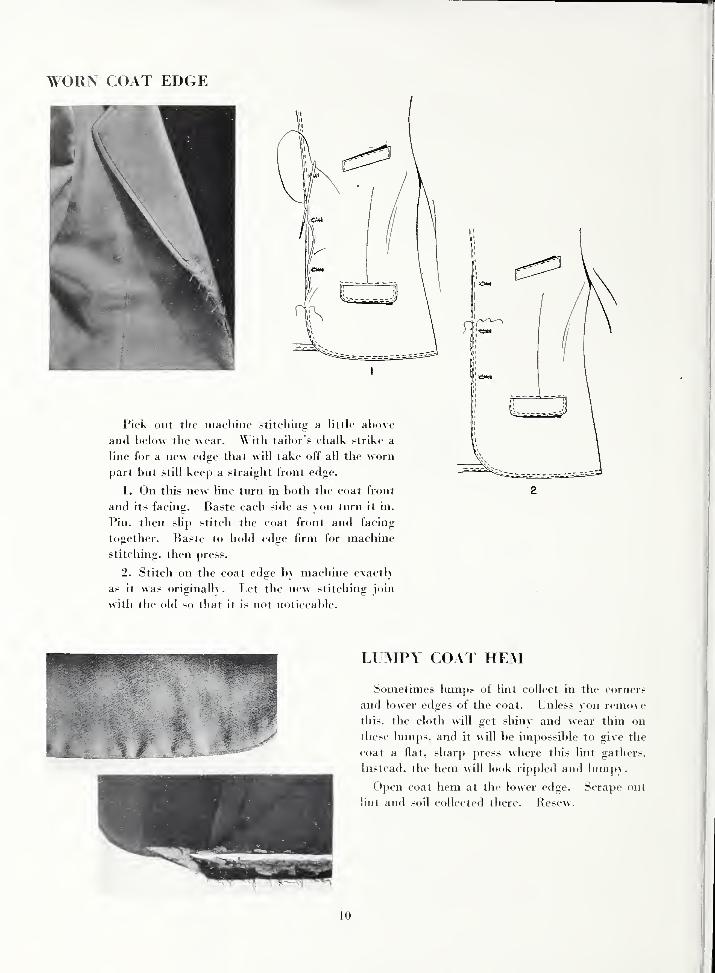
Pick out the machine stitching a little above
and below the wear. ^ ith tailor's chalk strike a
line for a new edge that will take off all the worn
part but still keep a straight front edge.
1. On this new line turn in both the coat front
and its facing. Baste each side as you turn it in.
Pin. then slip stitch the coat front and facing
together. Baste to hold edge firm for machine
stitching, then press.
2. Stitch on the coat edge bv machine exactly
as it was originally. Let the new stitching join
with the old so that it is not noticeable.
LUMPY COAT HEM
Sometimes lumps of lint collect in the corners
and lower edges of the coat. Unless you remove
this, the cloth will get shiny" and wear thin on
these lumps, and it will be impossible to give the
coat a flat, sharp press where this lint gathers.
Instead, the hem will look rippled and hunpy.
Open coat hem at the lower edge. Scrape out
lint and soil collected there. Resew.
10
UNDERARM PATCHES FOR COAT LINING
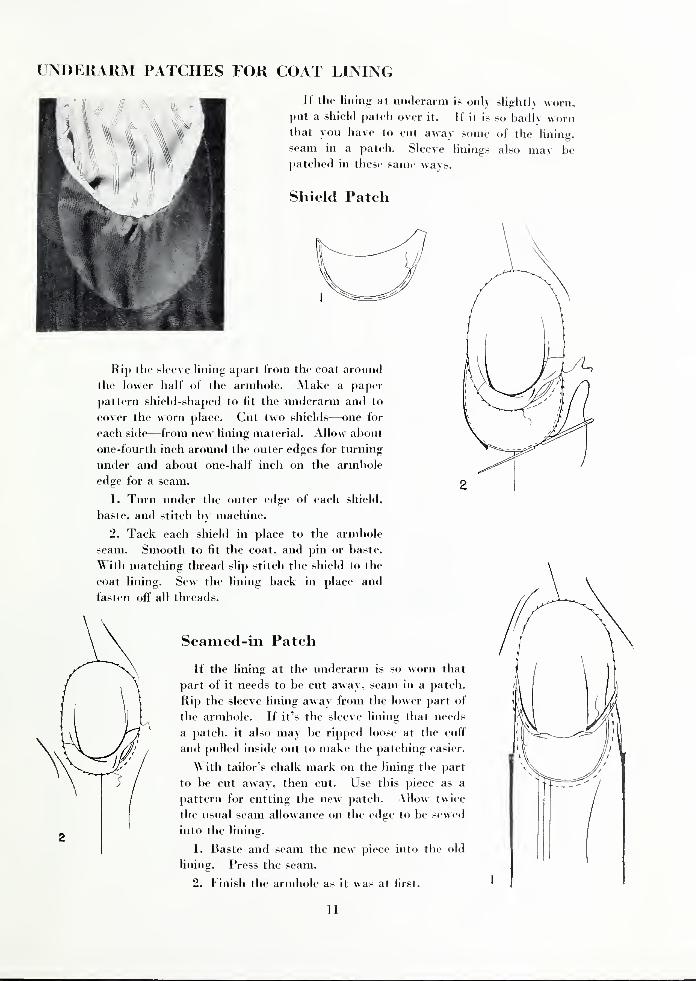
If the lining at underarm is only slightly worn,put a shield patch over it. If it is so badlv wornthat you have to cut away some of the lining,
seam in a patch. Sleeve linings also may be
patched in these same ways.
Shield Patch
Rip the sleeve lining apart from the coat around
the lower half of the armhole. Make a paper
pattern shield-shaped to fit the underarm and to
cover the worn place. Cut two shields—one for
each side—from new lining material. Allow about
one-fourth inch around the outer edges for turning
under and about one-half inch on the armhole
edge for a seam.
1. Turn under the outer edge of each shield,
baste, and stitch by machine.
2. Tack each shield in place to the armhole
seam. Smooth to fit the coat, and pin or baste.
^ ith matching thread slip stitch the shield to the
coat
fasten off all threads
ining. Sew the lining back in place and
Seamed-in Patch
If the lining at the underarm is so worn that
part of it needs to be cut away, seam in a patch.
Rip the sleeve lining awav from the lower part of
the armhole. If it's the sleeve lining that needs
a patch, it also may be ripped loose at the cuff
and pulled inside out to make the patching easier.
^ ith tailor's chalk mark on the lining the part
to be cut away, then cut. Use this piece as a
pattern for cutting the new patch. Allow twice
the usual seam allowance on the edge to be sewed
into the lining.
1. Raste and seam the new piece into the old
lining. Press the seam.
2. Finish the armhole as it was at first.
11
%WORN TROUSER CUFFS
Many suits still have cuffs that can be used to
make trousers give longer wear. Cuffs may be
repaired five or six times before trousers are
noticeably shortened.
Cuffs are about 1% inches deep and the facing
turned up inside the leg about 1 inch deep.
Starting with a pair of trousers with plain cuffs
you can make the following repairs one after
another . . .
First Repair—Plain Cuff
11— _7?
Pick out the tacks at the side of the cuff. Rip
open the lower edge.
1. With the cuff unfolded you will see three
sharp press creases. Cut off the cuff exactly on the
line of wear, which is the lowest crease. If the
wear is only on the very edge, no extra cutting
will be necessary. If the edge is worn up into the
inside hem. trim it so you have a straight edge, or
so vou can make a straight seam.
So little is taken off in the seams that the
trousers are not noticeably shortened.
2. Seam the piece you have cut off back to the
pants leg—with right sides of material together.
Take a very tiny seam, no more than one-eighth
inch wide. Do not press this seam open. In-
stead, press both sides of the seam toward the
facing.
Fold the cuff back in place and baste so that
the new seam line is held just inside the trouser
leg. Press to sharpen the creases. Now turn
down the cuff and stitch by machine on the facing
side next to the new seam line. Machine-stitch
again to hold the top edge in place. Handstitching here wears out too quickly. Put a wool
or tape guard in for longer wear (p. 4).
3. Turn the cuffs up and tack them at the sides.
Do this by hand from the inside or on the right
side by machine. To tack by machine, set the
machine needle in the seam line one-half inch
above the bottom of the trousers. Stitch up and
beyond the cuff top one -half inch.
Second Repair—French Cuff
Rip out machine stitching put in with the first
repair. Open the trouser cuffs as before.
1. There will be three sharp press lines. Cut
off along the worn seam line at the bottom. \t ith
tailor's chalk strike a line 1% inches above the
top crease. That marks where the top of the new
cuff must come.
12
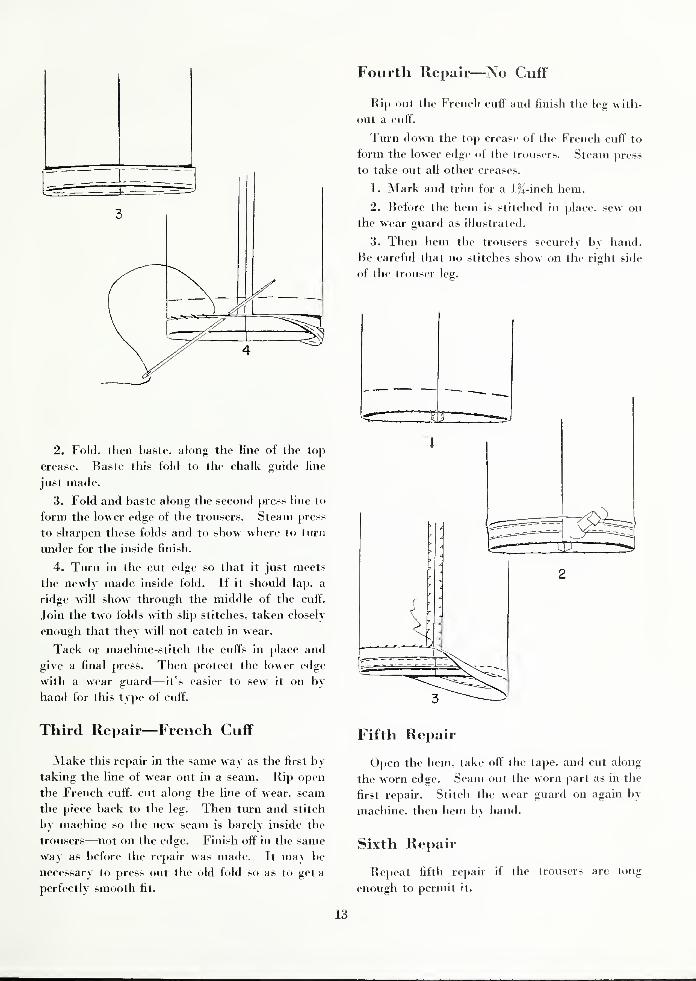
2. Fold, then baste, along the line of the top
crease. Baste this fold to the chalk guide line
just made.
3. Fold and baste along the second press line to
form the lower edge of the trousers. Steam press
to sharpen these folds and to show where to turn
under for the inside finish.
4. Turn in the cut edge so that it just meets
the newly made inside fold. If it should lap. a
ridge will show through the middle of the cuff.
Join the two folds with slip stitches, taken closely
enough that they will not catch in wear.
Tack or machine-stitch the cuffs in place and
give a final press. Then protect the lower edge
with a wear guard—it's easier to sew it on by
hand for this type of cuff.
Fourth Repair—No Cuff
Rip out the French cuff and finish the leg with-
out a cuff.
Turn down the top crease of the French cuff to
form the lower edge of the trousers. Steam press
to take out all other creases.
1. Mark and trim for a 1%-inch hem.
2. Before the hem is stitched in place, sew on
the wear guard as illustrated.
3. Then hem the trousers securely bv hand.
Be careful that no stitches show on the right side
of the trouser leg.
Third Repair—French Cuff
Make this repair in the same way as the first be-
taking the line of wear out in a seam. Rip open
the French cuff, cut along the line of wear, seam
the piece back to the leg. Then turn and stitch
by machine so the new seam is barely inside the
trousers—not on the edge. Finish off in the same
way as before the repair was made. It mav be
necessary to press out the old fold so as to get a
perfectly smooth fit.
Fifth Repair
Open the hem. take off the tape, and cut along
the worn edge. Seam out the worn part as in the
first repair. Stitch the wear guard on again by
machine, then hem bv hand.
Sixth Repair
Repeat fifth repair if the trousers are long
enough to permit it.
13

FRAYED POCKET EDGES
Slightly Frayed
1. If the edges of side pockets are worn but not
along the full length of the opening, rip the inside
facing apart from the pocket edge a little bevond
the worn part.
If the wear is slight, you need only turn in the
worn edges, slip stitch them together and finish
the same as before.
2. If the edges are more worn, trim off the worn
parts of both the facing and the pocket edge, but
be verv careful to keep a straight line. Reseamthe facing to the pocket edge by machine, taking
a verv tiny seam.
3. Roll the seam line so it is barely inside the
pocket opening, then baste and press.
Stitch the pocket edge by machine once or
twice, depending upon how it was finished in the
first place.
Entire Edge Frayed
j
7
If the pocket is worn along entire edge
—
Cut the bars at each end and rip the seams open
a little, just above and below the pocket. Rip
the facing apart from the pocket mouth. Trim
off the worn part, being careful to keep a straight
line, then reseam. If the facing is worn deeply,
rip the other side of it away from the cotton
pocketing and turn that side out to the pocket
edge.
1. Reseam the facing to the pocket mouth with
right sides of the two pieces together.
2. Turn facing back into the pocket with the
seam line just inside. Baste, press, and stitch as
it was before you ripped it. Resew the seams
above and below the pocket. Then bar pocket
ends bv stitching back and forth to strengthen
them.
TO REPLACE IXSIDE POCKET
First turn trousers inside out and rip out stitch-
ing that holds pocket to waist band.
Cut a paper pattern for the pocket. Mark the
side that is to be laid on the fold when you cut
the new pocket. Allow about three-eighths inch
for seams when you cut.
Cut off the old pocket next to the two wool
facings just inside the pocket mouth. This leaves
in some of the old pocketing that is stitched back
of the wool facing. If this part of the old pocket
were ripped out. it woidd be more difficult to put
in the new one.
14

1. Turn under the seam allowance along one
side of new pocket. Baste and stitch it back of
the wool facing, over the old pocketing, as illus-
trated. French-seam lower edge of pocket and
retrace the stitching at corners.
2. Smooth and pin in place the other side of the
pocket—the side that lies next to the trousers.
Pin this along the edge of the other wool facing.
It will be necessary to trim off or turn under a
little more of the pocketing on this side. Baste,
and stitch twice by machine.
3. Slip the top of the pocket underneath the
waist band, then stitch by machine from the right
side. Use dark thread on the spool and white in
the bobbin.
INSIDE POCKET REPAIRS
If the inside pocket has only a small hole in the
corner, restitch the lower edge of the pocket above
the hole. Do not cut off the pocket below the
stitching.
Half Pocket Repair
If only the lower part of the pocket is worn out.
make a half pocket repair.
1. Cutoff the worn part of the pocket. Lav the
folded edge of this old pocket bottom on a length-
wise fold of new pocketing. Cut a new half
pocket, adding three-eighths inch for seams at the
side and twice this amount for the top edge,
which will be seamed to the old pocket.
2. Sew the new half pocket to the old with the
seam outside. Press this seam up, trim awav the
under half, and finish as a flat fell. This keeps
the inside of the pocket smooth and comfortable
to use.
3. Turn the pocket inside out. Take a one-
eighth inch seam around the side and bottom.
4. Turn the pocket back into the trousers and
finish as a French seam by stitching one-fourth
inch from the edge. Fasten off the threads at the
end of the stitching.
Remember to keep the pockets on both sides of
the trousers exacth the same length.
15
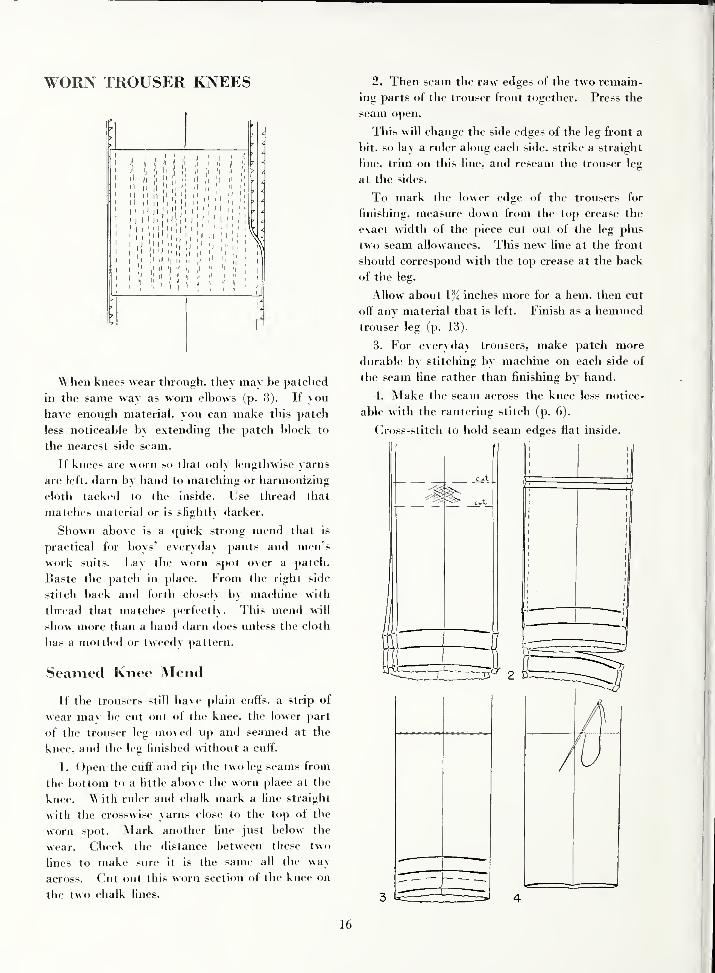
WORN TROUSER KNEES
\^ hen knees wear through, thev mav be patched
in the same way as worn elbows (p. 8). If you
have enough material, you can make this patch
less noticeable bv extending the patch block to
the nearest side seam.
If knees are worn so that only lengthwise yarns
are left, darn by hand to matching or harmonizing
cloth tacked to the inside. Use thread that
matches material or is slightly darker.
Shown above is a quick strong mend that is
practical for boys' evervday pants and men's
work suits. Lav the worn spot over a patch.
Baste the patch in place. From the right side
stitch back and forth closely by machine with
thread that matches perfectly. This mend will
show more than a hand darn does unless the cloth
has a mottled or tweedy pattern.
Seamed Knee Mend
If the trousers still have plain cuffs, a strip of
wear mav be cut out of the knee, the lower part
of the trouser leg moved up and seamed at the
knee, and the leg finished without a cuff.
1. Open the cuff and rip the two leg seams from
the bottom to a little above the worn place at tbe
knee. With ruler and chalk mark a line straight
with the crosswise yarns close to the top of tbe
worn spot. Mark another line just below the
wear. Check the distance between tbese two
lines to make sure it is the same all the way
across. Cut out this worn section of the knee on
the two chalk lines.
2. Then seam the raw edges of the two remain-
ing parts of the trouser front together. Press the
seam open.
This will change the side edges of the leg front a
bit. so lay a ruler along each side, strike a straight
line, trim on this line, and reseam the trouser leg
at the sides.
To mark the lower edge of the trousers for
finishing, measure down from the top crease the
exact width of the piece cut out of the leg plus
two seam allowances. This new fine at the front
should correspond with the top crease at the back
of the leg.
Allow about 1% inches more for a hem. then cut
off any material that is left. Finish as a hemmedtrouser leg (p. 13).
3. For evervdav trousers, make patch more
durable bv stitching bv machine on each side of
the seam line rather than finishing by hand.
4. Make the seam across the knee less notice-
able with the rantering stitch (p. 6).
Cross-stitch to hold seam edges flat inside.
-(/
/
16

TO RESEAT TROUSERS
When trousers are so badly worn in the seat
that you can no longer repair them with patches
and darns, reseat them. Cut material for reseat-
ing from a vest, from the more worn of two pairs
of matching trousers, or from a discarded coat.
Sometimes you can find swatches of matching
material in shops.
Make notches or marks that will serve as a guide
in reseaming.
1. Rip open the back rise beginning about 6
inches from the top of the trousers.
2. Rip the inseams down 3 or 4 inches.
Mark with chalk the worn part to be cut out.
If the suiting is striped or checked it will be easier
to hide the seam and match the piece if you cut
the worn place out with the crosswise and length-
wise yarns of the goods. If trousers are of plain
material, make the outer edge of the new seat
curved.
Use the piece you have cut out as a pattern for
matching and cutting the new seat. Allow double
seam allowance around this piece to make up for
the seam that must be taken from the trousers to
sew in the new seat.
3. Turn under and press lightly a seam allow-
ance around hole cut in trousers. Clip corners the
depth of the seam allowance. Lay the new seat
under this hole and match carefully from the right
side. Baste the trousers to the patch with loose
hemming stitches. Let these stitches catch only
in the edge of the folded trouser edge. Theyserve as a guide for the inside stitching and will be
pulled out later.
4. Turn the trousers inside out and stitch by
machine exactly on this line of hand stitching.
Press the seam open.
5. If the trousers won't be worn for "Sundaybest.
,,strengthen this seam by turning to the right
side and stitching by machine close to each side of
the seam. This will also hold the seam flat on
the wrong side.
To finish the seam so that it is less noticeable
—
instead of strengthening by machine stitching on
the right side, hide the seam line with the rantering
stitch used to finish the collar roll (p. 6).
6. Then, to hold the seam flat on the inside of
the trousers, catch stitch as illustrated.
Restitch the inseams and back rise of the trousers
and press.
17

Ue*i T&e&eiJbiA
Vests often need repairs at the underarm. Mend a small hole or worn spot here with
a shield patch. Use a panel patch for larger worn places.
SHIELD PATCH
1. Cut a paper pattern that will cover the worn
part of the vest. From this cut a patch of rayon
lining material. Allow about one-fourth inch
for turning under all around.
2. Turn under, baste, and press the curved edge
of the shield. Lav the right side of the rayon
patch back against the right side of the wool front
of the vest. Stitch in line with the underarm
seam of the vest.
PANEL PATCH
3. Turn the patch back in place over the worn
spot, then stitch by machine to the vest.
4. Turn the top edge of the shield over to the
inside of the vest and hem bv hand.
Even though both sides of the vest may not
need to be patched, it looks better to have a patch
on each side if a man goes coatless.
Cut a strip of rayon the length of the vest at the
underarm, plus a seam allowance for turning under
at both top and lower edge of the vest. Cut it
wide enough to cover the worn spot and allow
for about one-fourth inch turn under at each side.
1. Lav the right side of the patch back against
wool front of vest. Stitch along underarm seam.
2. Press the patch toward the back of the vest.
Turn under, baste, and press the other side of the
patch and stitch it to the vest, covering all the
wear.
3. Turn under and shape the patch over the top
and lower edges of the vest. Hem by hand to the
lining of the vest.
18
^HA*cdl Ke&c&L*
There are a number of minor repairs that may be needed on trousers, coat, or vest.
No matter where they are. the method for making the repairs is the same.
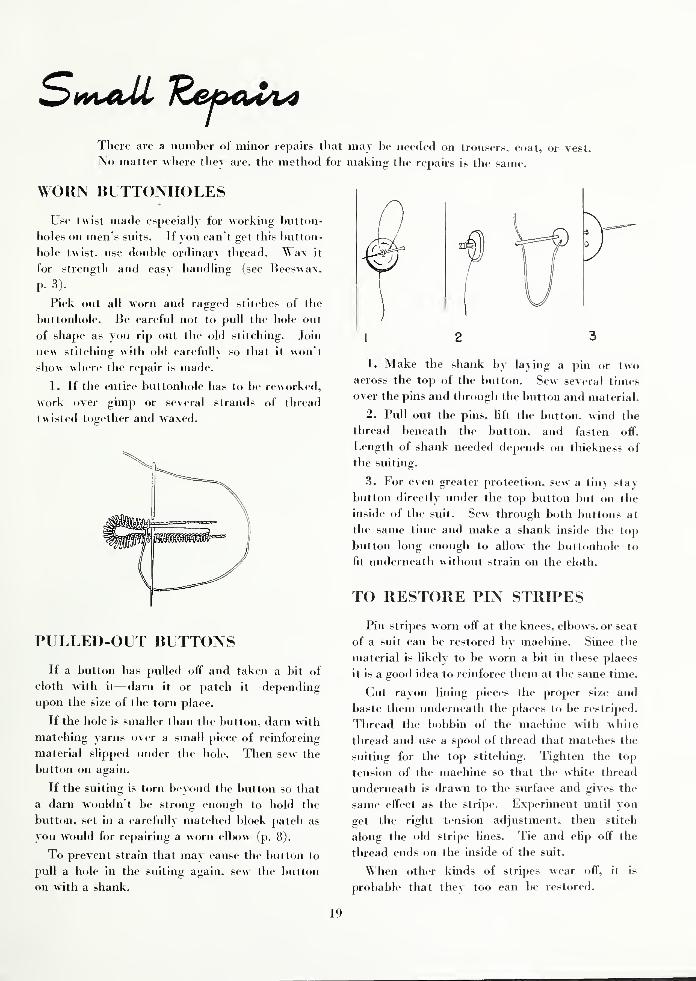
WORN BUTTONHOLES
Use twist made especially for working button-
holes on men's suits. If you can't get this button-
hole twist, use double ordinary thread. ^ ax it
for strength and easy handling (see Beeswax,
p. 3).
Pick out all worn and ragged stitches of the
buttonhole. Be careful not to pull the hole out
of shape as you rip out the old stitching. Join
new stitching with old carefully so that it won't
show where the repair is made. 1 ' Make the shank by laying a pin or two
1. If the entire buttonhole has to be reworked,aCTOSS the t0P of the button
-Sew severaI times
work oyer gimp or several strands of threadover the pins and through the button and material,
twisted together and waxed. 2 - Pul1 out the Pins - uft the button, wind the
thread beneath the button, and fasten off.
Length of shank needed depends on thickness of
the suiting.
3. For even greater protection, sew a tiny stay
button directly under the top button but on the
inside of the suit. Sew through both buttons at
the same time and make a shank inside the top
button long enough to allow the buttonhole to
fit underneath without strain on the cloth.
TO RESTORE PIN STRIPES
Pin stripes worn off at the knees, elbows, or seat
of a suit can be restored by machine. Since the
material is likely to be worn a bit in these places
it is a good idea to reinforce them at the same time.
Cut rayon lining pieces the proper size and
baste them underneath the places to be restriped.
Thread the bobbin of the machine with white
thread and use a spool of thread that matches the
suiting for the top stitching. Tighten the top
tension of the machine so that the white thread
underneath is drawn to the surface and gives the
same effect as the stripe. Experiment until you
get the right tension adjustment, then stitch
along the old stripe lines. Tie and clip off the
thread ends on the inside of the suit.
When other kinds of stripes wear off, it is
probable that they too can be restored.
19
PULLED-OUT BUTTONS
If a button has pulled off and taken a bit of
cloth with it—darn it or patch it—depending
upon the size of the torn place.
If the hole is smaller than the button, darn with
matching yarns over a small piece of reinforcing
material slipped under the hole. Then sew the
button on again.
If the suiting is torn beyond the button so that
a darn wouldn't be strong enough to hold the
button, set in a carefully matched block patch as
you would for repairing a worn elbow (p. 8).
To prevent strain that raav cause the button to
pull a hole in the suiting again, sew the button
on with a shank.
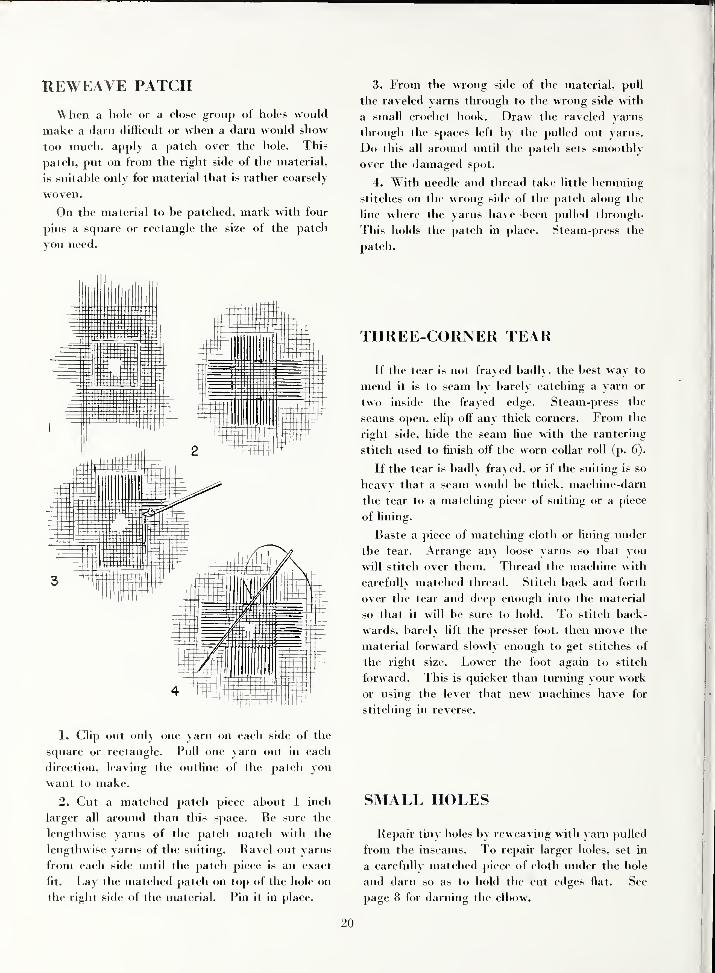
REWEAVE PATCH
When a hole or a close group of holes would
make a darn difficult or when a darn would show
too much, apply a patch over the hole. This
patch, put on from the right side of the material,
is suitable only for material that is rather coarsely
woven.
On the material to be patched, mark with four
pins a square or rectangle the size of the patch
you need.
3. From the wrong side of the material, pull
the raveled varns through to the wrong side with
a small crochet hook. Draw the raveled yarns
through the spaces left by the pulled out yarns.
Do this all around until the patch sets smoothly
over the damaged spot.
4. With needle and thread take little hemming
stitches on the wrong side of the patch along the
line where the varns have been pulled through-
This holds the patch in place. Steam-press the
patch.
1. Clip out only one yarn on each side of the
square or rectangle. Pull one yarn out in each
direction, leaving the outline of the patch you
want to make.
2. Cut a matched patch piece about 1 inch
larger all around than this space. Be sure the
lengthwise yarns of the patch match with the
lengthwise yarns of the suiting. Ravel out yarns
from each side until the patch piece is an exact
fit. Lay the matched patch on top of the hole on
the right side of the material. Pin it in place.
THREE-CORNER TEAR
If the tear is not frayed badly, the best way to
mend it is to seam bv barely catching a yarn or
two inside the frayed edge. Steam-press the
seams open, clip off any thick corners. From the
right side, hide the seam line with the rantering
stitch used to finish off the worn collar roll (p. 6).
If the tear is badlv frayed, or if the suiting is so
heavv that a seam would be thick, machine-darn
the tear to a matching piece of suiting or a piece
of lining.
Baste a piece of matching cloth or lining under
the tear. Arrange any loose yarns so that you
will stitch over them. Thread the machine with
carefullv matched thread. Stitch back and forth
over the tear and deep enough into the material
so that it will be sure to hold. To stitch back-
wards, barelv lift the presser foot, then move the
material forward slowly enough to get stitches of
the right size. Lower the foot again to stitch
forward. This is quicker than turning your work
or using the lever that new machines have for
stitching in reverse.
SMALL HOLES
Repair tiny holes by reweaving with yarn pulled
from the inseams. To repair larger holes, set in
a carefully matched piece of cloth under the hole
and darn so as to hold the cut edges flat. See
page 8 for darning the elbow.
20

^A&ut&eA, fleUuA&m&nts
When a man gains or loses weight or when a boy grows, trousers mav need to be
adjusted for good fit. comfort, and better wear.
TO LENGTHEN TROUSERS
Pick out the tacks at the sides of the cuff and
rip open the lower edge. Spread the cuffs out
full length. If the cuffs have never been repaired
or adjusted, there will be three sharp press lines.
The top crease marks the length the trousers have
been, so measure from this line when you mark
for a new length.
1. Measure down from the top crease the
amount you want to lengthen the trousers. Markaround the leg with tailor's chalk. Steam out
all old press lines.
Make a plain cuff or a French cuff, depending
upon how much you are lengthening the leg. If
1 inch or less is being added to trouser length,
finish again with a plain cuff. If trousers are
lengthened more than 1 inch, finish with a French
cuff.
Plain Cuff Finish
2. From the chalk mark, measure down 1%
inches and mark a line around the trouser leg.
Mark another line 1% inches below that.
Pick up, fold, and baste along the middle chalk
line. Pin the first and third lines together and
baste. Steam-press.
Fold to form the new cuff along the line where
the third and first chalk lines are basted together.
Baste to hold the cuff in place and press.
To finish the cut edge, which is turned up inside
the trouser leg, turn the cuff down again, baste,
and stitch it by machine. Finish with a wear
guard (see p. 4), then tack the cuffs at the side.
For illustrations that show details of plain cuffs.
see page 12.
French Cuff Finish
If you need to lengthen the trousers more than
an inch, finish with a French cuff.
1. From the chalk line that is the guide for the
new length, 2. strike two more lines—one 1%
inches above the first line, one 1% inches below.
Fold on the center line and baste. Lay this
fold against the top line and baste. Fold and
baste along the lower line, which marks the
bottom edge of the cuff. Steam-press.
Turn the cut edge up inside the pants and turn
in so that it just meets the top fold. Trim off
any extra material. Join the two folds with hand
stitches about one-fourth inch apart so they won't
catch on shoes. Put in a wear guard (see p. 4).
Steam-press and tack cuffs at the side.
For illustrations of details of French cuff, see
page 12.
21

TO SHORTEN TROUSERS
Pick out the tacks at the sides of the cuff and
rip open the lower edge. Spread the cuffs out
full length.
1. From the top press crease, which marks the
old length, measure up the amount the leg is to
be shortened. Mark around the leg at the new
length with tailor's chalk. Steam-press to take
out creases.
2. From the line just drawn, measure down and
mark two more lines \% inches apart. Strike a
fourth line about 1% inches below the bottom line
and cut away all goods below this line.
Finish as a plain cuff. Pick up, fold, and baste
along the middle chalk line. Pin the first and
third lines together and baste. Steam-press.
Fold to form the new cuff along the line where
the third and first chalk lines were basted to-
gether. Baste to hold the cuff in place and press.
To finish the cut edge, which is turned up inside
the trouser leg, turn the cuff down again, baste,
and stitch it by machine. Finish with a wear
guard (p. 4), then tack the cuffs at the side.
Illustrations on page 12 show details of finishing
the plain cuff.
LET OUT OR TAKE IN SEAT
At the back rise of most trousers there is a
generous seam allowance. Reseam along the
back rise to make the seat smaller or larger as the
need may be. Do this before you rip out the old
stitching, then rip the old seam, and steam-press
the new7 seam.
However, if there is some doubt about the fit,
baste the new seam line, rip out the old stitching,
and fit the trousers before stitching by machine.
LET OUT TOO-SHORT CROTCH
Rip the inseams down from the crotch point
about 12 inches. Open the back and front rise
slightly—just so the seam allowances of the
inseams are free. You will find plenty of seam
there for this purpose if the trousers have not
been adjusted before.
Let out the seam as needed and resew. tapering
off to meet the old stitching lines of the inseams.
Press open, then reseam the front and back rise,
and press again.
22
Ca&e Z}cum24 ^Ae^JiX^Here are a number of preventive measures that make a suit "live" longer and help
cut down on repair jobs.
BRUSH AND AIR. Brush suits often—in the
direction of the grain of the cloth. Brush inside
the suit as well as out, in and around pockets
. . . inside cuffs if there are any.
If a closet isn't well-ventilated, it's a good idea
to let a suit hang in the open to air before it goes
into the closet. From time to time, give suits an
outdoor airing.
HANG IT STRAIGHT. Put suit on a hangar
as soon as you remove it. Don't spoil the press by
laying it carelessly over a chair.
Put coat on a wooden hanger—one with broad
shoulders made especially for men's shoulders.
See that shoulders set squarely on the hanger.
Hang trousers on a special trouser hanger or
over the cross bar of a wooden hanger. If you
must use a wire hanger, place a heavy piece of
cardboard or a thick piece of paper over the cross-
bar first to help prevent crosswise creases on the
trousers. Pull trousers through the hanger as
far as the width of the hanger will allow so that
the thicker part of the trousers lies over the
hanger bar. Creases here show less than in the
middle of the trouser leg.
When there is no hanger at hand, use the loop
at the back of the neck to hang a coat. Or hang
it over the back of a chair. But save the shape
of the shoulders and collar . . . pinch up the
coat back so that the shoulders rest on the corners
of the chair.
REGULAR CLEANING AND PRESSING.Dirt grinds into wool and makes it wear out
more quickly. Take your soiled suits to a cleaner
who does a thorough cleaning job. More drastic
—
and therefore more wearing—cleaning methods
are needed for badly soiled suits.
If you press suits at home between cleanings,
look for spots before you press. A warm iron
"sets" spots so they will never come out. Always
steam press wool—never set the iron directly on
the wool itself (see Pressing Supplies, p. 3), and
be careful about scorch. Wool can scorch even when
you have a cloth over it if your iron is too hot.
PROTECT AGAINST MOTHS. Clothes moths
can undo all your saving of wool. Never leave
woolen clothing lying around on closet shelves.
If you have a woolen garment hanging in the back
of the closet, air and brush it once in a while.
Before storing wools away for a season have
them dry-cleaned, or brush and air them thorough-
ly in the sun.
Store wool suits and overcoats—or have them
stored—in paper bags, wrapped in paper, sealed
in boxes, or in trunks, chests, or tight closets.
Seal paper bags and packages. Trunks and chests
must have tight-fitting lids. A closet set aside
for storage of wools should have all cracks in
plaster and around baseboards filled up and a
gasket on the door so that it shuts tightly.
Plav safe by using flakes, crystals, or balls of
naphthalene in wool you store at home. As
these preparations evaporate they give off a gas
that first discourages the moth larvae from feeding
on wool and then, if concentrated enough, kills them.
About 1 pound of flake naphthalene is enough
for a small chest, trunk, or box. Sprinkle through
folds of clothing around cuffs and creases, tie in
sacks on hanger necks, slip into pockets, or hang
high in closets.
TIPS TO THE MAN WHO WEARS THESUIT. Remember that keys carried everyday
in the hip pocket rub against chairs and wear
holes through both pockets and outer cloth.
Overloading stretches and strains pockets
—
sometimes tears the corners.
Pens and pencils need clips and well-fitting tops
if they are not to stain or jab holes.
Thin pads on office chairs save the seat of
trousers from getting shiny so quickly.
A belt that fits easily through belt loops won't
rub the loops fuzzy as will a wider belt.
Trousers one-half inch above the heels don't
get so much rub and therefore wear longer about
the lower edge than longer trousers.
If you get a suit soaked in rain or snow, let
it drv slowly in a well-ventilated room, away
from heat. Brush the suit well after it dries.
23

ContentsPage
Mending materials 3
Guard against wear 4
Shields 4
Wear guards 4
Knee retreads . 4
Seat retreads 5
Coat repairs 6
Worn collar roll 6
Frayed sleeve edge 7
Worn elbows 8
To reline sleeves 9
Worn coat edge 10
Lumpy coat hem 10
Underarm patches for coat lining 11
Trouser repairs , 12
Worn trouser cuffs 12
Frayed pocket edges 14
To replace inside pocket 14
Inside pocket repairs 15
Worn trouser knees 16
To reseat trousers 17
Vest repairs 18
Shield patch 18
Panel patch . 18
Small repairs 19
Worn buttonholes 19
Pulled-out buttons 19
To restore pin stripes 19
Reweave patch 20
Three-corner tear 20
Small holes 20
Trouser adjustments 21
To lengthen trousers 21
To shorten trousers 22
Let out or take in seat 22
Let out too-short crotch 22
Care saves mending 23
U. S. GOVERNMENT PRINTING OFFICE: 1946
For sale by the Superintendent of Documents. U. S. Government Printing Office. Washington 25. D. C.
Price 10 cents

Related Documents