Project: JB3-CBS2 Mechanical, Power, and Thermal Subsystem Design for a CubeSat Mission A Major Qualifying Project Submitted to the Faculty of WORCESTER POLYTECHNIC INSTITUTE in partial fulfillment of the requirements for the Degree of Bachelor of Science in Aerospace Engineering by Joe Bauer Michael Carter Kaitlyn Kelley Ernie Mello Sam Neu Alex Orphanos Tim Shaffer Andrew Withrow 23 April 2012 Prof. John Blandino, Project Advisor

Welcome message from author
This document is posted to help you gain knowledge. Please leave a comment to let me know what you think about it! Share it to your friends and learn new things together.
Transcript

Project: JB3-CBS2
Mechanical, Power, and Thermal Subsystem Design
for a CubeSat Mission
A Major Qualifying Project
Submitted to the Faculty
of
WORCESTER POLYTECHNIC INSTITUTE
in partial fulfillment of the requirements for the
Degree of Bachelor of Science
in Aerospace Engineering
by
Joe Bauer
Michael Carter
Kaitlyn Kelley
Ernie Mello
Sam Neu
Alex Orphanos
Tim Shaffer
Andrew Withrow
23 April 2012
Prof. John Blandino, Project Advisor

i
Abstract The goals of this Major Qualifying Project (MQP) were the design of thermal,
mechanical, and power subsystems for a CubeSat supporting a university-led science
mission to orbit an X-ray spectrophotometer. The spacecraft thermal analysis included
calculation of unsteady temperature distributions over the course of several orbits. This
analysis included radiation from the sun and earth as well as a preliminary analysis of
heat generation from internal components. The mechanical design included component
and assembly-level, solid models of several spacecraft configurations and a preliminary
stress analysis. The power subsystem design included component selection for power
generation, management, and distribution as well as energy storage. Additionally, each
subsystem team proposed basic experiments in a vacuum chamber that would serve as
proof of concept testing and component validation.

ii
Acknowledgements We would like to extend our thanks to our advisor for his constructive advice and leadership throughout the project.
Professor John J. Blandino, Ph.D. Associate Professor, Aerospace Engineering Program Department of Mechanical Engineering, Worcester Polytechnic Institute
Additionally, we would like to thank Profs. Gatsonis and Demetriou and their respective teams for their contributions to the overall CubeSat mission design.
Professor Nikolaos Gatsonis, Ph.D. Director, Aerospace Engineering Program Department of Mechanical Engineering, Worcester Polytechnic Institute Professor Michael Demetriou, Ph.D. Professor, Aerospace Engineering Program Department of Mechanical Engineering, Worcester Polytechnic Institute

iii
Authorship Our project team was divided into three subsystems: mechanical, thermal and
power. The team of Joe Bauer, Ernie Mello and Alex Orphanos supplied sections
regarding the mechanical subsystem. Michael Carter, Sam Neu and Andrew Withrow
created the thermal sections. Kaitlyn Kelley and Tim Shaffer were the authors of the
power sections. However, due to the collaborative nature of the MQP, all members were
involved in the editing and revision of the project. The final report can be considered a
group effort, with multiple partners collaborating on each section.

iv
Table of Contents Abstract ................................................................................................................................ i
Acknowledgements ............................................................................................................. ii
Authorship.......................................................................................................................... iii
Table of Contents ............................................................................................................... iv
Table of Figures ................................................................................................................. vi
List of Tables ................................................................................................................... viii
Executive Summary ........................................................................................................... ix
1. Introduction ..................................................................................................................... 1
1.1 Project Goals and Objectives .................................................................................... 1
1.2 Mechanical Structure Subsystem Objectives ............................................................ 3
1.2.1 Recreate 3U CubeSat Structural Model for Design and Testing ....................... 3
1.2.2 Vacuum Chamber Structural Testing ................................................................. 3
1.2.3 Mechanical and Structural Support for Other Subsystems ................................ 4
1.3 Thermal Subsystem Objectives................................................................................. 4
1.4 Power Subsystem Objectives .................................................................................... 5
2. Background ..................................................................................................................... 6
2.1 CubeSat Specifications ............................................................................................. 6
2.2 Mechanical Subsystem.............................................................................................. 9
2.2.1 2010-2011 WPI CubeSat MQP Recommendations ........................................... 9
2.2.2 Commercially Available CubeSat Structures .................................................. 11
2.2.3 Summary of Structural Design Analysis Approaches ..................................... 15
2.2.4 CubeSat Launch Environment ......................................................................... 18
2.3 Thermal Subsystem ................................................................................................. 22
2.3.1 2010-2011 WPI CubeSat MQP Recommendations ......................................... 22
2.3.2 Space Thermal Environment............................................................................ 23
2.3.3 Spacecraft Thermal Control ............................................................................. 27
2.4 Power Subsystem .................................................................................................... 31
2.4.1 2010-2011 WPI CubeSat MQP Recommendations ......................................... 31
2.4.2 Determining the Acceptable Load ................................................................... 32
2.4.3 Power Management and Distribution .............................................................. 33

v
2.4.4. Battery Management ....................................................................................... 35
2.4.5 Power Fault Management ................................................................................ 36
3. Methodology ................................................................................................................. 38
3.1 Research .................................................................................................................. 38
3.2 System Engineering Group ..................................................................................... 39
3.3 Mechanical Design and Structural Analysis ........................................................... 39
3.3.1 Flight Option Baseline CAD model ................................................................. 39
3.3.2 Mechanical and Structural Subsystem Support ............................................... 42
3.3.3 Vacuum Chamber Structural Testing ............................................................... 43
3.4 Thermal Analysis .................................................................................................... 46
3.4.1 Modeling of External Components .................................................................. 46
3.4.2 Modeling of Internal Components ................................................................... 57
3.4.3 Laboratory verification of COMSOL model ................................................... 58
3.5 Power Analysis ....................................................................................................... 61
3.5.1 Power Budget ................................................................................................... 61
3.5.2 Baseline System Analysis ................................................................................ 62
3.5.3 Lab Option Solar Cell Baseline Testing .......................................................... 64
4. Analysis and Findings ................................................................................................... 68
4.1 Mechanical Subsystem............................................................................................ 68
4.2 Thermal Subsystem ................................................................................................. 71
4.2.1 Steady-State Heating in COMSOL .................................................................. 72
4.2.2 Multiple Orbits in COMSOL ........................................................................... 76
4.2.3 Internal Components ........................................................................................ 81
4.2.4 Lab Option Verification ................................................................................... 88
4.3 Power Subsystem .................................................................................................... 91
5. Conclusions and Recommendations ............................................................................. 94
5.1 Mechanical Subsystem Conclusions and Recommendations ................................. 94
5.2 Thermal Subsystem Conclusions and Recommendations ...................................... 97
5.3 Power Subsystem Conclusions and Recommendations .......................................... 98

vi
Table of Figures Figure 1 - The P-POD System [39]..................................................................................... 7 Figure 2 - CubeSat Specifications [4] ................................................................................. 8 Figure 3 - Monoblock Design 1 [2] .................................................................................. 10 Figure 4 - Monoblock Design 2 (Assembly with Subsystem Components from 2010-2011 MQP) [2] ........................................................................................................................... 11 Figure 5 - 3U Skeletonized CubeSat Structure Offered by CubeSat Kit (left) [6], and 2U Structure Offered by ISIS (right) [7] ................................................................................ 13 Figure 6 - Frequency Profile of GSFC-STD-7000 [5] ...................................................... 16 Figure 7 - Random Vibration Profile for Various CubeSat Launch Vehicles [19] .......... 21 Figure 8 - Effective Emittance vs. Number of Aluminized Layers for Multi-Layer Insulation [17] ................................................................................................................... 23 Figure 9 - Space Thermal Environment [21] .................................................................... 24 Figure 10 - Altitude vs. Visibility Factor F [17] ............................................................... 25 Figure 11 - Current-Voltage Curve [27] ........................................................................... 33 Figure 12 - Vacuum Chamber Test Fixture Structure ...................................................... 44 Figure 13 - Dimensioned Drawing of Caps ...................................................................... 45 Figure 14 - Vacuum Chamber Test Fixture with CubeSat and Fine Adjustment Device . 45 Figure 15 - COMSOL Mesh of the CubeSat .................................................................... 48 Figure 16 - Tests with Thermally Resistive and Conductive Layers ................................ 49 Figure 17 - Selecting the Boundaries for Highly Conductive Layers ............................... 53 Figure 18 - Analytic Function to Vary the Solar Flux over 10 Orbits .............................. 55 Figure 19 - CubeSat Model for Lab Option ...................................................................... 59 Figure 20 - Vacuum Chamber to be used for Testing the Lab Option ............................. 60 Figure 21 - Power Management and Distribution Architecture Block Diagram .............. 63 Figure 22 - Solar Cell Test Circuit Diagram ..................................................................... 65 Figure 23 - Solar Cell Testing In Progress........................................................................ 66 Figure 24 - I-V Curve for a Single Solar Cell ................................................................... 66 Figure 25 - Lab Option Solar Array .................................................................................. 67 Figure 26 - Von Mises Stress Output Based on Worst Case Frequency Curve ................ 69 Figure 27 - Deformation Output Based on Worst Case ASD Curve (x40000 scale) ....... 70 Figure 28 - Deformation Output Based on Worst Case ASD Curve ................................ 71 Figure 29 - Simplified CubeSat Structure ......................................................................... 72 Figure 30 - Solver Errors .................................................................................................. 73 Figure 31 - Successful Meshing of the Simplified CubeSat Model.................................. 74 Figure 32 - Steady-State Thermal Model.......................................................................... 75 Figure 33 - Variation of the Solar Flux vs. Time in MATLAB ........................................ 76 Figure 34 - Temperature Data vs. Time for 10 Orbits ...................................................... 78 Figure 35 - Thermal Envelope for External Satellite Components ................................... 79 Figure 36 - Temperature Distribution (in degrees Kelvin) during Full Illumination ....... 80

vii
Figure 37 - Temperature Distribution (in degrees Kelvin) during Eclipse ....................... 80 Figure 38 - Thermal Analysis of the Stack ....................................................................... 84 Figure 39 - Thermal Analysis of the GPS ......................................................................... 85 Figure 40 - Thermal Analysis of the Magnetorquer ......................................................... 86 Figure 41 - Thermal Analysis of the Payload ................................................................... 87 Figure 42 - LabView VI Front Panel ................................................................................ 89 Figure 43 - LabView VI Block Diagram .......................................................................... 89 Figure 44 - Basic Vacuum Chamber CAD Model ............................................................ 90 Figure 45 - Temperature of CubeSat during Simulated Cryopump Operation ................. 91 Figure 46 - Test Fixture .................................................................................................... 94 Figure 47 - Configuration of Threaded Rod ..................................................................... 95 Figure 48 – Top View of Connecting Adapters ................................................................ 96 Figure 49 - Bottom View of Connecting Adapters ........................................................... 96 Figure 50 - Power System Flow Cartoon .......................................................................... 99

viii
List of Tables Table 1 - Generalized Random Vibration Test Levels Components (STS or ELV) 22.7-kg (50-lb) or less [5] .............................................................................................................. 16 Table 2 - Typical Launch Loads of Past CubeSat Launch Vehicles [18] ......................... 20 Table 3 - Planetary Albedo Values [23] ........................................................................... 26 Table 4 - Component Power Demands ............................................................................. 62 Table 5 - Component Materials ........................................................................................ 81 Table 6 - Internal Components ......................................................................................... 83

ix
Executive Summary In 2010, WPI joined many universities participating in the CubeSat program.
Developed by California Polytechnic State University (San Luis Obispo, CA), the
program gives guidelines for designing a miniaturized satellite. WPI began to explore this
program in 2010 with the design of a CubeSat structure intended to house an infrared
spectrometer [2]. The 2011 project team has expanded this project by partnering with the
Space Research Center, Polish Academy of Sciences (Wroclaw, Poland) and the NASA
Goddard Space Flight Center (Greenbelt, MD) to design a CubeSat to house an
instrument developed by the Polish Academy of Sciences.
The 2011 CubeSat project teams were charged with designing the CubeSat
according to specifications of the instrument. The major design constraints were a polar
orbit, a tracking system that could pinpoint the sun with a high degree of accuracy, and a
high power requirement to run the instrument. Three different MQP teams were
responsible for designing the CubeSat under these constraints. The Design and Analysis
for a CubeSat Mission report [36] explains instrument selections and basic orbital
analysis. The Attitude Determination and Control Design for a CubeSat Mission report
[37] discusses the systems employed to control the CubeSat through de-tumble and
pointing maneuvers. This report details the contributions of the mechanical, thermal and
power subsystems.
In the following report, we outline the basic design for the mechanical, thermal
and power subsystems of the CubeSat design. Using tools like COMSOL and
SolidWorks, we performed analysis of possible designs. We also constructed additional
components for the 2010 MQP team’s “Lab Option,” a simplified CubeSat model

x
constructed and tested at WPI. Our baseline design and additions to the Lab Option
design provide a foundation for continuing CubeSat projects at WPI.

1
1. Introduction
1.1 Project Goals and Objectives Although designing and launching a satellite is a cornerstone of aerospace
engineering, the design process was often inaccessible to college students until the
CubeSat program was established. Developed by California Polytechnic State University
(Cal Poly) (San Luis Obispo, CA) and Stanford University’s Space Systems Lab, the
CubeSat program has allowed undergraduate students to gain valuable experience in
designing and launching their own picosatellites1. Each CubeSat must meet standardized
design guidelines before being launched in a standard deployment system, the P-POD [1].
These guidelines provide practical and fairly inexpensive satellite design opportunities to
undergraduate and graduate students. With over 60 universities in multiple nations
participating in the program [1], CubeSat has been a successful method for allowing
college students to access space.
Worcester Polytechnic Institute (WPI) recently initiated development of its own
CubeSat in 2010 under the guidance of Professors Gatsonis, Blandino and Demetriou.
The Aerospace Engineering program’s first CubeSat related MQP project explored the
potential of the CubeSat program at WPI [2]. This team of eleven fourth-year
undergraduates created an initial design and provided recommendations for future teams.
Our project, built upon the foundation of the previous year’s work, was composed of
fifteen fourth-year undergraduates divided into three subgroups, each headed by a faculty
advisor. This report details the work of the Mechanical, Thermal and Power Subsystem,
1 Picosatellites are the smallest type of miniaturized satellites or microsatellites.

2
which was advised by Professor Blandino. The other groups involved in this project
included the Attitude Determination and Control and the Mission Analysis group.
Unlike the previous WPI team’s evaluative project, this project involved
designing a CubeSat for specific requirements. WPI partnered with a team including
scientists from the Space Research Center, Polish Academy of Sciences (Wroclaw,
Poland) and the NASA Goddard Space Flight Center (Greenbelt, MD) to design a
CubeSat mission to support an x-ray spectrophotometer2. Our project team designed a
CubeSat based upon this specific instrument’s requirements, in addition to the
standardized CubeSat guidelines. As the initial design team, our group used specialized
analysis tools, such as COMSOL (COMSOL Multiphysics Burlington, MA), SolidWorks
(Dassault Systems SolidWorks Corp. Waltham, MA) and Satellite Tool Kit (STK) (AGI
Exton, PA) to evaluate and improve our designs. We also conducted preliminary testing
with a “Lab Option” structure and solar panel to assess our analytical results.
Our final product, a preliminary CubeSat design to support the x-ray
spectrophotometer, is the first step in the CubeSat deployment process. Future groups can
use this project team’s published conclusions and recommendations to prepare for
assembly, testing, and launch of the CubeSat.
2 The instrument is called the SphinX Next Generation (S-NG) soft X-ray spectrophotometer.

3
1.2 Mechanical Structure Subsystem Objectives
1.2.1 Recreate 3U CubeSat Structural Model for Design and Testing The original objective for the Mechanical and Structural Subsystem team was to
recreate the original (2010) MQP team’s SolidWorks model of the 3U CubeSat Structure.
This meant updating the structure every time there were design changes, adapting a
model with meshing capabilities to allow other subsystem teams to run simulations and
tests, and keeping an up-to-date parts and assembly directory. To accompany the
structural testing, we performed stress analysis of the structure through SolidWorks
Express to provide appropriate data on expected launch loads.
1.2.2 Vacuum Chamber Structural Testing The CubeSat Lab Option model was assembled last year using computer-aided
manufacturing (CAM) software as well as WPI’s computer numerical controlled (CNC)
machine tools located in Washburn Labs. This structure was intended to enable both
hardware and software testing in a vacuum chamber using a one-degree-of freedom
rotational test fixture. There were two fixture choices: an open ball bearing and a mount
clip for the top and bottom of the structure attached with a filament cable. The choice for
open ball bearings came from the lack of lubrication to reduce friction during movement,
which is important in a vacuum because most solid or liquid lubricants will outgas and
prevent proper testing. The mount clip and torsional filament used with the test stand
could create the same effects as the open ball bearings. The Lab Option structure would
be put under purely thrust loads and no axial loads during testing. While in orbit, the
CubeSat can be considered under no loads since the gravitational acceleration is balanced
by the centrifugal acceleration. The vacuum chamber testing on the Lab Option structure
can be simplified by applying purely thrust loads.

4
1.2.3 Mechanical and Structural Support for Other Subsystems Lastly, using the technical expertise gained during background research, the final
objective was to help other subsystems with structural hardware design, simulation test
modeling and part design and placement as needed. This was done through the integrated
3U computer aided design (CAD) model that was designed for two sets of conditions: a)
one to represent the “full” design and show part placement so as to act as a guide for
future changes, and b) the other as a simulation driven model which has been de-featured
to allow meshing by the various software tools used to model and test the CubeSat under
many different conditions, e.g. COMSOL or SolidWorks Express. Therefore, each group
could investigate certain problems by performing specially designed simulations. Also,
design decisions could be made regarding the placement, size, mass, and configuration of
each part and the assembly as a whole.
1.3 Thermal Subsystem Objectives The thermal design of a satellite is very important to ensure the health and
longevity of a spacecraft in earth orbit. The objectives of the Thermal Subsystem group
were to investigate the thermal space environment for our CubeSat’s orbit and any
potential conditions it might encounter. Once we determined the conditions it will meet,
we need to determine the survivability and operational temperature limits of every
component of the CubeSat. To do this, we performed a thermal analysis of a finite
element model of the CubeSat using COMSOL to determine how heat will propagate
through the structure, and which areas will require attention. Lastly, we sought to
investigate feasibility and design thermal control systems to ensure that no components
fall outside of the survivable or operational ranges.

5
1.4 Power Subsystem Objectives Power systems are vital to producing, storing and distributing power to the
various systems on a satellite. To this end, the power subsystem team had four primary
objectives. First, the team was responsible for determining the power generated
throughout the satellite’s orbit. This included analyzing the placement of solar panels,
determining the effects of the orbit on satellite illumination and using STK to provide
data for power at a given time. Second, the team was responsible for developing a power
budget. The team kept records for each component’s power demands and proposed a
system to keep each component powered as necessary. Third, the team was responsible
for developing the Power Management and Distribution (PMAD) architecture to outline
the overall power and data flow throughout the satellite’s systems. This PMAD system
was responsible for any conditioning, distribution and handling of power throughout the
satellite. The team researched how the various components within the satellite interfaced
with one another and where power would be required and delivered. Finally, the team
was also responsible for selecting and mapping power management components from
vendors.

6
2. Background
2.1 CubeSat Specifications CubeSats were originally developed as a result of a project-based learning
experiment at Stanford University in 1994 to study microsatellites [3]. The first CubeSats
were launched in 1994 and 1995, and due to their success, Cal Poly and Stanford formed
a relationship to educate and assist other student groups in building microsatellites.
Today, CubeSats have become a popular way for universities and other entities to launch
a cost-effective satellite. Standardized specifications were created in order to maintain the
relatively low cost and simplicity of launching a CubeSat.
The basic CubeSat design specifications ensure the safety of the launch vehicle,
CubeSat, and any other CubeSats piggybacking on the mission. The goal is to ensure that
if a CubeSat were to fail as a result of a poor or incompatible design choice, it would not
cause a failure of the entire launch system [4]. As a result, Cal Poly’s specifications
require safe deployment from the Poly Picosatellite Orbital Deployer (P-POD), a
standardized, Cal Poly designed, CubeSat deployment system. The P-POD has a set of
rails on which the CubeSat rests, and uses spring force to launch CubeSats once they are
ready for deployment. The specification sheet also notes that no part of the CubeSat is to
touch the P-POD aside from the rails.

7
Figure 1 - The P-POD System [39]
The basic dimensional specifications of the CubeSat state that the satellite is not
to exceed 100mm on the short sides, and 113.5mm per “U” (long side), or unit. The
113.5mm length includes the rails that must be integrated into the P-POD. Without the
rail protrusion, the CubeSat height cannot exceed 100mm (see Figure 2). CubeSats may
be up to 3U long, or 300mm + 13.5mm for the rail protrusion. The mass of a 3U CubeSat
is not to exceed 4kg, making the maximum mass of a 1U CubeSat 1.33kg. Important to
note is that the CubeSat center of gravity should not be more than 2cm from the
geometric center. Cal Poly restricts the choice of aluminum for the structure and rails to
Aluminum 7075 or 60613, with any other choices requiring a special waiver process.
More in depth specifications can be found on the Cal Poly Specification sheet shown in
Figure 2 [4].
3 Aluminum 7075 is very similar to 6061, where 7075 is made with zinc and can be made to be stronger than 6000 series aluminum.

8
Figure 2 - CubeSat Specifications [4]
The waiver process is important for any CubeSat developers whose design
choices violate a required specification or guideline. Cal Poly specifically states that the
waiver is meant to facilitate communication between the builder of the CubeSat and all
other potential handlers, such as the launch operators and the personnel responsible for
integrating the CubeSat and P-POD [4]. This process allows a designer to violate the
CubeSat specifications if they must do so, and ensures that any outside handlers of the
CubeSat have sufficient warning to modify any systems based on these changes.
CubeSats also have numerous electrical requirements during launch. The
specifications state that CubeSats must not have any electronics powered up during the
launch process [4]. This prevents any possible interference with the launch vehicle or
other CubeSats. This also includes having batteries deactivated or discharged prior to
launch. CubeSats are also required to have a switch installed in them that will be

9
depressed while in the P-POD, allowing the designer to have the CubeSat charge batteries
and run diagnostics during launch. In addition to these requirements, the specifications
call for a Remove Before Flight pin that can be installed on CubeSats which cuts power
until the satellite is situated in the P-POD prior to launch, should a CubeSat launch
without the batteries discharged [4].
The final part of the specifications outlines the testing a CubeSat must go through.
Testing is mandated to ensure that the CubeSat will be safely deployed from the P-POD
without incident. The six phases of testing are Random Vibration, Thermal Vacuum
Bakeout, Visual Inspection, Qualification, Protoflight, and Acceptance [4]. The specifics
of these tests are outlined by the provider of the launch vehicle. The CubeSat
specification sheet notes that in the case of an unknown launch provider, there is a basic
standard called GSFC-STD-7000, or the General Environmental Verification Standard.
This document can be found on the National Aeronautics and Space Administration
(NASA) website for further investigation [5].
2.2 Mechanical Subsystem
2.2.1 2010-2011 WPI CubeSat MQP Recommendations In their final report the 2010-2011 WPI CubeSat Mechanical Subsystem team
recommended that future groups use a monolithic design called “Monoblock Design 1”
for the primary structure, shown in Figure 3. They concluded that “This type of design
requires the least amount of assembly for the structure, which can significantly reduce the
overall weight.” They added: “WPI’s machining capabilities cannot support the complex
design of a monolithic structure, so the machining will have to either be outsourced to

10
more capable facilities, or a prefabricated CubeSat structure will have to be purchased
from a specialized company such as ISIS or Pumpkin” [2].
The 2010-2011 MQP team also suggested a design which they called “Monoblock
Design 2” should be considered for the primary structure in future projects. They noted
that it “has a similar appearance in structure to the CubeSat Kit model” and “the walls
consist of a cross lattice design in order to optimize mass and structural integrity” [2].
Monoblock Design 2 is shown in Figure 4.
Figure 3 - Monoblock Design 1 [2]

11
Figure 4 - Monoblock Design 2 (Assembly with Subsystem Components from 2010-2011 MQP) [2]
2.2.2 Commercially Available CubeSat Structures When selecting the framework for a CubeSat, developers can turn to companies
that specialize in the prefabrication of standardized, commercially available CubeSat
structures and components [2]. In today’s market, with respect to CubeSat flight heritage,
there are two companies stand out: Pumpkin Incorporated (Pumpkin) (San Francisco,
CA) and Innovative Solutions in Space (ISIS) (Delft, Netherlands). Both companies sell
sets of CubeSat structural components which adhere to the CubeSat specifications created
by Cal Poly and Stanford University. Once received, these components must then be
assembled by the developer [2].
Pumpkin, which refers to its CubeSat-related products as “CubeSat Kits”, regards
itself as the “de facto standard in the CubeSat universe” and provides the most space-
proven CubeSat structural components [6]. As noted on their website, the design

12
approach of Pumpkin’s structural components is based “specifically on several
interdependent aspects of structural design” [6]. The company delivers kits to developers
which contain all the components necessary for a relatively short and inexpensive
assembly.
In the aerospace industry, flight heritage is often a deciding factor in the
component selection process. The CubeSat Kit design is in its fourth generation and has
been delivered to more than 150 customers since 2003 [6]. The flight heritage of its 1U
and 3U structures alone is unsurpassed in the CubeSat domain, as they have together
been part of at least seven different CubeSat missions which have flown in space since
2007 [6]. In addition, Pumpkin offers downloadable CAD files of their completed
structures and individual components in various software versions. Although these files
generally need to be de-featured4 in order to run test simulations in software packages
such as COMSOL or SolidWorks Simulation, they still serve as valuable starting points
from which computer-aided alterations can be made.
The primary Pumpkin structure consists of six chassis walls made of 5052-H325
hard-anodized6 and alodined7 sheet aluminum. The walls are fastened together with ten,
M3 x 5mm non-magnetic stainless steel flathead screws [6]. For mass reduction,
Pumpkin also offers a “skeletonized” chassis wall design, which features various cut-outs
in the six structural panels. Both designs are covered with a cover plate assembly, which 4 Complex CAD drawings with large amounts of small features can cause problems when software packages such as SolidWorks or COMSOL try to mesh the drawing to perform simulations. 5 5052-H32 Aluminum – a common sheet metal that has moderate to high strength aluminum manganese alloy. Strain hardened and stabilized, it has good welding characteristics and high resistance to corrosion. 6 hard-anodizing – a process in which aluminum is bathed in sulfuric acid which a low-voltage electric current in order to increase the durability and hardness of aluminum. 7 alodining – the chemical application of a protective chromate conversion coating on aluminum to create a corrosive resistance and electrically conductible surface.

13
encloses the chassis wall outer-surface and is made from approximately 1.5mm thick
sheets of 5052-H32 aluminum. For adaptability, this cover plate assembly is designed to
be compatible with a wide variety of subsystem components and payloads specific to the
developer’s mission. No deviation waver needs to be submitted for using Al 5052-H32,
since the CubeSat Kit design is already preapproved. All other components are made
from 6061-T6 aluminum. The approximate mass of the primary 1U CubeSat structure is
241g, which would yield a structural mass fraction of 0.18 if the total CubeSat mass was
maximized. The skeletonized model reduces the overall mass by 85g (39.7%). The cost
of a complete 1U solid wall CubeSat structure from CubeSat Kit is about $1,725 (USD);
while a complete 3U solid wall assembly costs about $3,150 [2]. A model of the
“skeletonized” 3U structure from Pumpkin is shown in Figure 5.
Figure 5 - 3U Skeletonized CubeSat Structure Offered by CubeSat Kit (left) [6], and 2U Structure Offered by ISIS (right) [7]
Innovative Solutions in Space (ISIS) describes itself as “a company which
specializes in [the] miniaturization of satellite systems, with a particular emphasis on the

14
design and development of subsystems for micro- and nanosatellites” [7]. Specifically,
ISIS offers “generic primary satellite structures based on the CubeSat standard” [2].
Although the company has yet to have one of its CubeSat structures flown in space, their
website (last updated in 2011) notes that there are “multiple units slated for launch in the
upcoming 12 months” [7].
Compared to the CubeSat Kit design, the ISIS structure is much less complex. In
contrast to the monoblock design8 approach taken by Pumpkin, ISIS structures feature a
modular design which involves the assembly of multiple smaller components. A 1U
structure consists of two modular side frames which are connected to four ribs by M2.5 x
6mm screws. The ISIS structure also contains a secondary structure, which incorporates a
circuit board stack to enhance the structural integrity of the satellite [2]. The combined
mass of the complete 1U structure is 200g, while the cost is $3,100 [7]. Figure 5 shows a
2U model CubeSat from ISIS with both primary and secondary structures included.
In contrast to the commercially available option, a large number of CubeSat
structures have been independently built or custom-designed to meet the needs of specific
missions [2]. These structures are often built at universities or organizations and
encompass a variety of designs which differ significantly from those provided by ISIS
and Pumpkin [6-10]. These differences can be due to a number of reasons including
limited budgets and/or manufacturing capabilities [2].
8 Entire walls created from a single piece of aluminum.

15
2.2.3 Summary of Structural Design Analysis Approaches There are a few types of loads and stresses mentioned in the GSFC-STD-700,
including random vibration, structural loads, sine vibration and mechanical shock. The
analysis that is most critical and most physically taxing to the structure of a CubeSat is
the random vibrational analysis which ensures the structure survives the launch and can
be ejected from the launch vehicle safely. The von Mises stress, a general stress term
calculated from the stress tensor of a material at a given time, and structural deformation
are important considerations in the vibrational analysis. A material starts to deform when
the von Mises stress reach the yield strength of the material. The Cal Poly CubeSat
Specifications state that:
“3. Testing Requirements Testing shall be performed to meet all launch provider requirements as well as any additional testing requirements deemed necessary to ensure the safety of the CubeSats and the P-POD. If launch vehicle environment is unknown, GSFC-STD-7000 shall be used to derive testing requirements.” [4]
In addition to the GSFC-STD-700 requirements, the launch vehicle (LV) provider may
require additional testing. [4]
Table 1 and Figure 6 show the frequency profile for a worst-case scenario for the
acceleration spectral density from the GSFC-STD-7000 document titled General
Environmental Verification Standard (GEVS) for GSFC Flight Programs and Projects
from NASA which details the requirements for CubeSats to be able to survive the launch.
When performing a random vibrational analysis, the CubeSat must be able to pass a
worst-case scenario test for its own safety and the safety of the launch vehicle. Therefore
any analysis software to be considered for our random vibration analysis must allow the
user to input the force as a (non-constant) function of frequency.

16
Table 1 - Generalized Random Vibration Test Levels Components (STS or ELV) 22.7-kg (50-lb) or less [5]
Figure 6 - Frequency Profile of GSFC-STD-7000 [5]
We considered three different tools for performing structural analysis on the
CubeSat: SolidWorks, NASTRAN (MacNeal-Schwendler Corporation Santa Ana, CA),
and ANSYS (ANSYS Inc. Canonsburg, PA). We researched each program’s capabilities
and limitations. Our research primarily consisted of choosing a program that had the
ability to do random vibration analysis.

17
ANSYS is capable of both structural static analysis and transient dynamic
analysis. Transient dynamic analysis is used to determine the response of a structure
under the action of any general time-dependent loads. ANSYS calculates the time
varying values of displacement, strain, stress, and force as the simulated structure
responds to any combination of static, transient, and harmonic loads [11]. ANSYS is
capable of three different solution methods: full, mode-superposition, and reduced. A full
solution uses full system matrices, meaning there is no matrix reduction, to calculate
transient responses, so there is no matrix reduction, and allows all types of nonlinearities.
Mode-superposition sums factored mode shapes and accepts modal damping, but the only
nonlinearity allowed is simple node-to-node contact defined by a gap condition. Reduced
is a much simpler way to do the analysis, but much more constrained. In the reduced
solution method, no nonlinearity is allowed, the time step must be constant, and element
loads cannot be applied (e.g. pressures and temperatures) [12].
NASTRAN is a finite element analysis program that was originally developed for
NASA in the late 1960s under United States government funding for the aerospace
industry [13]. All input and output to the program is in the form of text files. However,
multiple software vendors market pre- and post-processors designed to simplify building
a finite element model and analyzing the results. These third-party software tools include
functionality to import and simplify CAD geometry, mesh with finite elements, and apply
loads and restraints [14]. In NASTRAN, random analysis is treated as a data reduction
procedure that is applied to the results of a frequency response analysis. The frequency
response analysis is performed for sinusoidal loading conditions, each a separate subcase,
at a sequence of frequencies. The results are outputted, and at this point “MSC Random”

18
is used throughout the interface to perform calculations of random responses such as auto
and cross power spectral densities and auto and cross correlation functions for all of the
result data [15]. The output request for a random response can only be made through the
XYOUT module, which is a manual user input of entries and restraints. This creates a
burden on a user to prepare XYPLOT or XYPRINT entries for each degree of freedom
for nodal responses, and for each stress/force component for element responses. For any
size model, a user has to prepare a large number of XYPLOT/XYPRINT entries [16].
SolidWorks is capable of many different analyses including, but not limited to,
static, frequency, linear dynamic, harmonic, and random vibration. Random analysis in
SolidWorks requires the force, material type, fixtures, global damping, minimum
frequencies, maximum frequencies, and frequency profiles to be defined. SolidWorks has
a built in library of materials the user can select from, and is relatively easy to use
compared to ANYSYS and NASTRAN. SolidWorks can output von Mises stress,
displacement (deformation), velocity, and acceleration from random vibration analysis
data. Due to our group’s familiarity with SolidWorks, as well as its relatively easy to use
interface, we chose to do our random vibrational analysis in SolidWorks.
2.2.4 CubeSat Launch Environment For most spacecraft, including CubeSats, the greatest force loading occurs during
the launch. Thus, when conducting virtual or physical tests on a satellite to determine
whether or not the spacecraft is ready for the expected mission environment, developers
place a great deal of importance on the launch environment. During liftoff, static loads
are applied along the longitudinal axis of the spacecraft due to the vehicle’s acceleration
against gravity. Additionally, random vibrations radiate upward from the engine along
with the vibroacoustics created from aerodynamic turbulence as the vehicle passes

19
through the transonic portion of its flight [17]. Pyrotechnic shocks can also cause random
vibrations of high acceleration and high frequencies as a result of the explosive
separation events which occur during boosting [17]. These types of excitations can cause
significant problems in the large-area and low-mass structures common in satellites. In
many cases, however, the exact launch vehicle for a CubeSat is unknown during the
assembly and testing, which creates problems when mission planners look to test their
satellites for static or random vibration loads that are specific to different launch vehicles.
To account for this issue, NASA has released the GSFC-STD-7000 document, which
“provides requirements and guidelines for environmental verification programs for GSFC
payloads, subsystems and components and describes methods for implementing those
requirements” [5].
In order to estimate the typical loading on a CubeSat when the launch vehicle is
unknown, mission planners often compare the loads and vibrations of launch vehicles
that have been previously used for CubeSats. Most of these vehicles have well
documented information on the longitudinal and lateral g-loading, as well as random and
harmonic vibration loading over different frequencies [2]. Table 2 lists the maximum
longitudinal and lateral loads for three frequently used launch vehicles, while Figure 7
shows the random vibration profile of multiple, frequently-used launch vehicles. These
figures are shown in an acceleration spectral density (ASD) versus frequency plot [18,
19]. This type of plot “describes the frequency content of the vibration and is equal to the
mean-square acceleration (g2) in the selected frequency band divided by the width, in Hz,
of that band. The square root of the area under this curve represents the time history’s

20
root mean square (RMS) value, which is equivalent to one standard deviation, σ, or the
random acceleration” [5].
With this type of information, mission planners are able to find and test for the
highest recorded loads and vibrations, based on previous launches. The results from
simulated or physical tests under these conditions are then compared with the GSFC-
STD-7000’s minimum probability-level requirements for each type of load to investigate
how well the CubeSat responds to each type of load, and to determine whether or not it is
ready for launch. If the structure or any component within the spacecraft happens to fail
any of these tests, developers must choose different structural or internal layouts in order
to prepare the vehicle for a survivable mission. Table 2.4-1, Structural and Mechanical
Verification Test Requirements, in the GSFC-STD-7000 document explains the nature of
all required verification tests on a component level. This includes whether or not actual,
physical tests are required in contrast to simulations. According to Cal Poly’s CubeSat
Design Specifications, these requirements must be met when a Launch Vehicle (LV)
provider is unknown.
Table 2 - Typical Launch Loads of Past CubeSat Launch Vehicles [18]
Launch Vehicle
Max. Longitudinal G-Loading and Time
Max. Lateral G-Loading and Time
Dnepr +8.3 g’s at 2nd Stage Burn 0.8 g’s after LV exit from
transport launch canister Eurockot
+8.1 g’s at Stage I Engine
Cut-Off +/-0.9 g’s due to max.
dynamic pressure Minotaur I
+6.6 g’s at 2nd Stage Ignition +1.6 g’s at Liftoff

21
Figure 7 - Random Vibration Profile for Various CubeSat Launch Vehicles [19]
To make this process easier, NASA’s GSFC-STD-7000 document defines a
“worst case scenario” random vibration profile, shown in Figure 7 by the green line. This
profile defines the acceleration spectral density as a function of the frequency during a
“worst case scenario” launch, and can be used as a guideline during simulated or physical
testing. By performing a random vibration analysis under this specific condition, mission
planners can be sure that they have tested for the highest vibrational loads that the
CubeSat will likely encounter.

22
2.3 Thermal Subsystem
2.3.1 2010-2011 WPI CubeSat MQP Recommendations The thermal analysis from the 2010-2011 Major Qualifying Project, “Design and
Analysis of Subsystems for a CubeSat Mission,” suggests that the greatest concern facing
the CubeSat is the loss of thermal energy while the satellite is in eclipse. The team
suggested that multi-layer insulation (MLI) should be installed to reduce the amount of
heat lost while the satellite was not in sunlight. MLI is a type of thermal blanket used on
various satellites because of its low mass, low volume, and simplicity.
MLI is made up of multiple, thin layers of a low conductivity material. The most
common type of layer is made out of a 0.25mm thick sheet of Mylar. The sheets are
constructed so that there are few points of contact between the layers, which minimizes
the conductive heat paths. As the number of layers increase, the heat transfer decreases;
the lowest heat transfer is normally achieved at approximately 25 layers [17]. From past
missions, the expected emissivity9 for a multi-layer insulation blanket is between 0.015
and 0.030 [17]. Figure 8 shows the relationship between number of layers of MLI and
effective emittance.
9 Emissivity is the relative ability of a surface to emit radiation. Emissivity is also defined as “effective emittance” by Wertz and Larson.

23
Figure 8 - Effective Emittance vs. Number of Aluminized Layers for Multi-Layer Insulation [17]
The 2010-2011 Major Qualifying Project, found that the surface temperature of
the satellite during a period of eclipse was 260.8K on the Earth facing side, and 249.1K
on the sun facing, solar paneled side. They assumed a surface emissivity of 0.83 the
silicon solar cells, and 0.85 for the sides of the satellite with a simulated coating of black
paint. The team used 3K for the equivalent blackbody temperature of space, and a flux of
231𝑊𝑚2 from the earth.
2.3.2 Space Thermal Environment For a small spacecraft in low Earth orbit, there are three primary sources of
thermal radiation that the spacecraft will encounter, which can be seen in Figure 9.
Radiation from direct sunlight, which occurs when the spacecraft is not in eclipse, is the
largest factor. The fraction of sunlight that is reflected off of the earth, albedo, is also
another thermal consideration for spacecraft in Earth orbit. There is also the thermal
radiation that the Earth emits at infrared wavelengths that is present regardless of eclipse.

24
A fourth case, although rare, is that a spacecraft may also encounter free-molecular
heating in very low Earth orbits [20].
Figure 9 - Space Thermal Environment [21]
In space, the thermal energy from the three most intense sources, direct sunlight,
albedo, and thermal radiation, can be modeled as radiant heat fluxes [2]. Depending on
the time of year, the integrated, radiative flux in low earth orbit from the sun can vary
from 1414 𝑊𝑚2 during the winter solstice and to 1322 𝑊
𝑚2 in the summer solstice. This
variation is due to varying distances between the Earth and sun at certain times during the
year [22]. The direct solar intensity can be modeled using Equation 2.1:
𝐽𝑠 =𝑃
4𝜋𝑑2
Where 𝐽𝑠 is the total solar intensity, P is the power output of the sun (3.856 x 1026W), and
d is the distance from the sun in meters [17].
The albedo is the amount of solar radiation that is reflected by the planetary
surface expressed as a fraction as seen in Figure 10. Characterized by variable a, the
(2.1)

25
albedo can be used in an equation to calculate the total intensity of Earth-reflected
radiation:
𝐽𝑎 = 𝐽𝑠𝑎𝐹
F is a visibility factor that is multiplied by 𝑎, which is the planetary albedo fraction,
and 𝐽𝑠, which is the previously calculated solar intensity [17]. The determination of this
visibility factor can be seen in Figure 10, where it is a function of altitude and the angle
between the spacecraft nadir vector and the sun’s rays, β [17].
Figure 10 - Altitude vs. Visibility Factor F [17]
However, albedo calculations can become very complex should a large spacecraft have
several surfaces elements in different orientations. The albedo value a will vary
depending on the orbital body in question (see Table 3).
(2.2)

26
Table 3 - Planetary Albedo Values [23]
Planet Solar Radiation Intensity, Js
(Percentage of solar intensity at 1 AU) Planetary Albedo
Mercury 667 .06 - 0.10 Venus 191 .06 - 0.76 Earth 100 0.31 - 0.39 Moon 100 0.07 Mars 43.1 0.15 Jupiter 3.69 0.41 - 0.52 Saturn 1.1 0.42 - 0.76 Uranus 0.27 0.45 - 0.66 Neptune 0.11 0.35 - 0.62 Pluto 0.064 0.16 - 0.40
The final environmental thermal source for the spacecraft is thermal energy
emitted at infrared wavelengths from the body that the spacecraft is orbiting. For Earth,
the amount of energy radiated is dependent on the region of the Earth from which
sunlight is reflected, as warmer areas emit more radiation more than colder ones.
However, since the entirety of the Earth’s disc is visible, the variations in thermal
radiation from geographical location can be considered negligible [17]. The value of the
thermal radiation is:
𝐽𝑝 = 237 �𝑅𝑟𝑎𝑑𝑅𝑜𝑟𝑏𝑖𝑡
�2
Where 𝐽𝑝 is the value of the thermal radiation intensity in 𝑊𝑚2, and 𝑅𝑟𝑎𝑑 and 𝑅𝑜𝑟𝑏𝑖𝑡 are the
values of the Earth’s radiating surface and orbit radius. It is recommended that the value
for 𝑅𝑟𝑎𝑑 be equal to the radius of the Earth’s surface as it can be very difficult to
determine. It is important to note that this thermal radiation should not be neglected
(2.3)

27
because it cannot be deflected with thermal control coatings because of its short
wavelength. It is because of this that the blackbody radiation must be considered for
spacecraft in LEO. The blackbody temperature for the Earth can be modeled as 218K for
the atmosphere, and 288K for the surface.
Another important aspect of the space environment is atmospheric drag in low
Earth orbits. Due to the residual atmosphere at relatively low orbital altitudes, spacecraft
can experience drag forces. While this may be negligible on small spacecraft, larger ones
will often have to boost themselves back up to their design orbit periodically. However,
in many cases these forces can be neglected, with atmospheric pressure less than
10−7millibar [17]. While some texts note that this drag force can cause some heat via
free-molecular flow a spacecraft would have to be in an abnormally low altitude for this
to be a design concern [23].
2.3.3 Spacecraft Thermal Control Spacecraft are often subjected to environmental extremes as discussed in the
previous section, and as such it is imperative to ensure that the thermal characteristics of
the spacecraft are understood and regulated. The success or failure of a mission often
depends on a spacecraft’s ability to stay within two defined ranges of temperature: the
operational temperature range and the survival temperature range [17]. The temperature
of surfaces in the spacecraft, relative to these two ranges, are checked by doing a “Worst
Case Conditions” analysis in which the temperature extremes the spacecraft could
encounter are determined. Usually these extremes correspond to the full illumination of a
spacecraft, also known as the “Hot Case,” and the full eclipse of the spacecraft, also
known as the “Cold Case” [25]. The function of the Thermal Subsystem is to regulate,

28
either through active or passive heat transfer methods, the temperatures throughout the
spacecraft [26].
The operational temperature range is the range between the maximum and
minimum temperature within which the components of a spacecraft are expected to
behave normally as reported by the manufacturer. This range can either be listed for a
single component an instrument package, or as is sometimes the case, the range within
which all of the combined systems of a spacecraft can operate. For the latter case, the
temperature range may potentially be very narrow, as component operational ranges
might have very little overlap. A particular mission may need to occasionally exceed
operational temperatures for components but as long as they are eventually brought back
within range, the component should continue to function as expected.
The survivable temperature range is similar to the operational temperature range,
except deviation outside of the range will cause the spacecraft or component in question
to potentially malfunction and may even cause the failure of the mission. As stated
before, this may either refer to the range of a single component or the spacecraft as a
whole.
As it is unfeasible to design a spacecraft or component to exist at a specific
temperature, a Worst Case Analysis is often used while examining the thermal profile of
a mission. During such an analysis the engineer considers the extremes that might likely
be encountered in a mission, and then takes steps to either compensate for these extremes
or ensure that the survivable and operational temperature ranges are not exceeded. Often,
in a thermal analysis these extremes are divided into a case of full-illumination, which

29
would cause a maximum temperature, and a full-shadow (or full eclipse), which would
cause a minimum temperature.
The first case to consider is the Hot Case, which is when a combination of
environmental effects cause the spacecraft to reach the maximum temperature that will be
achieved on a mission. This status is determined using a collection of factors including
orbital analysis, blackbody radiation, and any resultant radiation from the albedo effect.
The other case encountered is the Cold Case, which is the opposite of the
previously mentioned case. As the satellite will continue to receive blackbody radiation
from the Earth, the minimum temperature will be found when the thermal effect from
direct exposure to the sun and the reflected light from albedo are lowest.
All heat transfer can be modeled as a combination of three key modes;
conduction, convection, and radiation. Conduction occurs when energy is directly
transferred between two bodies by the molecular interaction of their shared boundary.
Conduction heat transfer is present in spacecraft through the direct contact of various
structures, systems, and components and plays a large part in the dissipation of heat
throughout a spacecraft. Convection occurs as a result of energy being transported from
one body to another by means of a participating fluid media. While convection heat
transfer could play a role on some spacecraft (e.g. one which uses heat pipes), it is not a
factor in determining the total heat flux imparted on the spacecraft by the local space
environment. Radiation (more specifically thermal radiation) occurs when energy is
transferred due to the excitation of electron configurations of atoms as a result of
electromagnetic waves. Radiation is the primary method of heat transfer through which a

30
spacecraft receives heat from the local environment and also plays a role in controlling
the thermal energy balance inside of a spacecraft.
The thermal energy that the spacecraft receives from the environment was
discussed in Section 2.3.2, and as such, this section will focus on how a spacecraft may
compensate and manage such heat for survival and mission completion.
One option an engineer may consider when completing the thermal design of a
spacecraft is a Passive Heat Transfer system. These systems are called passive because
they operate without any additional power or control in order to maintain a thermal
balance. Passive systems are common on a wide range of spacecraft due to their low cost,
lack of complexity, and moderate level of effectiveness. A few examples of passive
thermal control systems are: heat pipes, radiators, surface coatings, and insulation. These
systems allow the engineer to select surface emissivity levels, control conduction paths,
and set thermal capacities of insulation systems.
Active Heat Transfer is a method in which a system receives power and control,
and as a result a heat exchange is produced. While active systems are undeniably more
complex than passive systems, they have the advantage of increased capabilities and
higher effectiveness. Heat pumps, switches, shutters/louvers, and electric heaters (or
coolers) are examples of various active thermal control systems. These systems are
typically only used when analysis has shown that passive systems will not keep the
spacecraft or components within operational and survival ranges and are most often used
for very temperature-sensitive missions with scientific payloads (optics, batteries, and
sensors).

31
2.4 Power Subsystem
2.4.1 2010-2011 WPI CubeSat MQP Recommendations The previous WPI CubeSat MQP, completed in 2011 [2], provided a foundation
for the power subsystem. This team evaluated two different power system options, one
for lab testing and another for flight. Since this year’s project is intended to eventually
launch, the 2011 “Flight Option” recommendations provided our baseline. For the Flight
Option, the previous team researched CubeSat hardware providers, ClydeSpace and
CubeSat Kit, and recommended ClydeSpace as the power system provider [2]. The 2011
MQP team chose ClydeSpace due to its extensive flight heritage, conformance to
CubeSat specifications and the relatively wide selection of compatible components [2].
The company sells all required power system components for the CubeSat, including
solar arrays, batteries and power load management systems. The previous team
specifically recommended the following ClydeSpace components: the 3U solar arrays,
the 10Whr Lithium-Polymer battery and the Electrical Power System (EPS) [2]. The
2011 team chose these components on the basis of their MQP’s requirements and
instrument specifications. However, their analysis methods and research proved useful to
the present project. We used these recommendations as a starting point for this year’s
analysis.
The 2010-2011 MQP also began development of a Lab Option solar array. They
developed a power management and distribution design, intended to regulate power
inputted through an umbilical system [2]. This design was used as a baseline for our
project’s power management and distribution system. The design and the parts purchased
were incorporated into this year’s Lab Option design.

32
2.4.2 Determining the Acceptable Load Solar arrays should be designed to meet the power requirements at the end of the
satellite’s life (EOL). This results in the satellite producing excess power at the beginning
of the mission, which has to be accounted for. At the beginning of the mission (BOM) the
array has a power per unit area that can be found using Equation 2.4 [17].
𝑃𝐵𝑂𝐿 = 𝑃𝑜𝐼𝑑 cos 𝜃
Where θ is the angle measured between the spacecraft-sun vector and the vector normal
to the solar array. 𝑃𝑜 is the ideal solar cell output, which is typically between 202𝑊𝑚2 and
253𝑊𝑚2, based on silicon and gallium arsenide solar cells respectively [8]. 𝐼𝑑 is the
inherent degradation of the solar array. The inherent degradation is a measurement of
how the solar arrays lose efficiency through use. The amount of degradation to the solar
array of the satellite is determined by Equation 2.5, in which the satellite’s life is
measured in years [17].
𝐿𝑑 = �1 −𝑑𝑒𝑔𝑟𝑎𝑑𝑎𝑡𝑖𝑜𝑛
𝑦𝑒𝑎𝑟�𝑠𝑎𝑡𝑒𝑙𝑙𝑖𝑡𝑒 𝑙𝑖𝑓𝑒
From which the end of life performance [17] can be calculated by Equation 2.6.
𝑃𝐸𝑂𝐿 = 𝑃𝐵𝑂𝐿𝐿𝑑
The current-voltage characteristic can be described by a curve that is dependent
on temperature. The temperature coefficient is defined as the percent degradation of
performance with increasing temperature [17]. The temperature coefficient for the solar
array is dependent solar cell type, actual operating temperature, and radiation
environment [17]. The peak power point of the current-voltage curve depends on the
(2.4)
(2.5)
(2.6)

33
array’s operating temperature; an array often produces the most power coming out of
eclipse because the array is at its coldest. The temperature coefficient is used to establish
how the peak power point changes based on temperature changes. Figure 11 is an
example of a current-voltage curve for a solar array using silicon solar cells. Through the
use of thermal analysis the power the solar array will produce at any given time based on
the temperature of the solar array is better understood
Figure 11 - Current-Voltage Curve [27]
2.4.3 Power Management and Distribution Perhaps the most vital function of the power subsystem is power distribution.
Because a CubeSat is extremely limited in its power generation due to its mass, volume
and area restrictions, the available power must be budgeted in order to sustain every
component. After the team knows how much power the satellite needs, it is imperative
that the PMAD system deliver the available power properly. In addition, the PMAD

34
system must prevent damage to components, manage the battery and provide other power
conversion and conditioning. All CubeSats launched in 2010 have included a PMAD
system. There are a few commonly used approaches that can fulfill these basic
requirements. A direct voltage through the battery and into the components system can be
used to power systems directly from the solar panels, though it does not allow for much
control and lacks overcurrent protection. As power systems are the most common reason
for CubeSat failure, this approach is used only when absolutely necessary [28]. A second
option is to custom design a circuit to condition the power and deliver it to each
individual component. This approach affords some control and protection over the direct
voltage system, but relies upon excellent circuit design and lacks flight heritage due to
the unique design. Instead, most flight-ready PMAD systems are vendor-purchased and
can reliably handle a wide array of missions since they often have some degree of flight
heritage. Another advantage to these is that they are pre-installed with industry-standard
R232 and I2C connections such that they can easily connect with components from
different vendors [29].
For a flight design exercise not intended to develop a new power system, it makes
the most sense to simply use a vendor-purchased PMAD system. Since the primary
mission of this CubeSat is to gather data from the Sun rather than testing new technology,
many other components will also be vendor-purchased and will use the same
connections. In addition, the flight-proven components and the power conditioning
capabilities of a vendor’s system will increase the entire system’s reliability over an
unproven, custom design.

35
2.4.4. Battery Management The primary purpose of a battery on a spacecraft is to store energy generated by
the solar arrays. This stored energy is then discharged to components when power
demand is greater than what the solar arrays provide or during eclipse (when the solar
arrays provide no energy). The charging and discharging of the battery is regulated, often
by a peak power tracking system and/or a shunt regulator [9]. This protects the battery
from over-current and under-voltage situations. As explained in Space Mission Analysis
and Design, a peak power tracking system is a complex set-up that monitors the power
system and adjusts the voltage or amperage to avoid an over or under-powered situation.
A simpler shunt system diverts excess power into a shunt where it is dissipated [17].
Without this regulation, the battery could be damaged, eliminating the satellite’s energy
storage capability.
Most satellites incorporate a battery design to store energy, but these designs are
based upon the specific mission requirements. Some missions, such as the Delfi-C3, do
not even incorporate a battery because the all components are shut down when the
satellite is in eclipse [30]. Since the satellite has no power demand in eclipse, only the
solar arrays are needed to supply power. However, most satellites do incorporate a
battery designed for their mission. These different battery designs range from one battery
per cube [31], to four batteries connected in parallel [32]. Most CubeSat designs use
Lithium-Ion batteries because they have a relatively high energy density (120-150𝑊ℎ𝑟𝑘𝑔
)
and can operate for over 5,000 charge and discharge cycles while in LEO [2]. Spacecraft
often have more than one of these batteries as an added redundancy in case the primary
battery fails.

36
Engineers have developed different regulation systems for the variety of battery
designs available. However, there is no one design that is commonly utilized because
designers often build these regulatory systems individually. If designers do not want to
build their system from scratch, customizable systems can also be purchased from
satellite components manufacturers, such as ClydeSpace. ClydeSpace in particular, sells
an EPS that provides battery regulation. This type of system was recommended by the
previous CubeSat MQP team [2] and was analyzed as a Flight Option design.
2.4.5 Power Fault Management The power fault management system is used to detect, isolate, and correct faults
within the power subsystem. The most common type of failure is a short circuit, which
draws extra power and may endanger the mission [17]. In order to prevent a mission
failure from one short circuit, the electric power subsystem isolates the short through the
use of fuses, which can be reset. If required for a particular mission, fault-detection
circuits can be used to locate where the fault has occurred.
There are two types of fuses that are generally used on spacecraft, fuse lines and
power switches. Fuse lines are connected directly from the power system to the
component. These cannot be reset once the fuse is activated, whether the activation is
accidental or not. However, the advantage of the fuse lines is that they do not require a
dedicated circuit board, and thus take less space than power switches [33]. Power
switches are the most versatile method of fault management. These “can be considered as
an electronic fuse that automatically switches off when the current drawn by the
subsystem becomes larger than a pre-programmed value” [33]. Power switches can be
reset after they are activated, just as they would switch power to the subsystem on and

37
off. Although the fuse lines are simpler, the power switches are better for this CubeSat
because they allow for better power control.

38
3. Methodology
3.1 Research Throughout our project, previous CubeSat design reports guided us in developing
our analytical tools and choosing components. Our primary reference was the 2010-2011
MQP report, Mechanical, Power and Propulsion Design for a CubeSat [2], which
suggested software tools available at WPI and provided recommendations for
components. The previous team also compiled an extensive list of CubeSat references,
which included other reports about CubeSat development. Our team used these references
as additional sources throughout our project.
In addition to utilizing the previous MQP team’s work, we found other resources,
such as online research and local experts. Since a large portion of our project was
component selection, we read specifications and examined CAD drawings available on
manufacturer’s websites. When the online resources did not provide enough information,
we directly contacted representatives at companies such as ClydeSpace and Pumpkin for
additional information. We also utilized previous reports and online tutorials to learn
analysis software such as SolidWorks and COMSOL. To provide additional assistance
with these tools, we also contacted professors and other local experts. These experts also
guided us when we had specific research questions. Communication with experts, reports
and specifications available online, and the 2010-2011 MQP were the primary resources
used during our analysis.

39
3.2 System Engineering Group In addition to the mechanical, thermal, and power subsystem groups represented
within this report, two additional groups were integral to the overall satellite design. The
Mission and Environmental Analysis team was responsible for identifying and
monitoring expected conditions for the orbit of the satellite. The Attitude Determination
and Control team was responsible for ensuring that both the satellite’s orbit and pointing
could be maintained. As each subsystem on a satellite is interdependent, it was necessary
to coordinate with the other teams throughout the entire design process. To assure this
coordination, all three groups met in weekly System Engineering Group (SEG) meetings
along with project advisors to discuss any updates or revisions to their respective aspect
of the satellite’s design. The work of these other two teams is fully documented in the
corresponding MQP reports, References [36] and [37].
3.3 Mechanical Design and Structural Analysis The following section explains the methodology which the mechanical and
structural subsystem group used to model and test the Flight Option CubeSat. The section
also includes the group’s process of designing and building a test fixture which will
eventually be used to hold the Lab Option CubeSat in WPI’s vacuum chamber for testing.
3.3.1 Flight Option Baseline CAD model In order to meet the objectives of this project, the mechanical and structural
subsystem was tasked with keeping an updated CAD model of the Flight Option
CubeSat. This model existed only as a SolidWorks assembly file, unlike the Lab Option
CubeSat which was partially manufactured at WPI by the 2010 CubeSat MQP group. The
components of the Flight Option were selected and integrated based on recommendations
by this year’s three CubeSat MQP groups. Throughout the project, the CAD model

40
served as an organizing, visual aid during SEG meetings, where decisions that affected
the internal and external layout of the CubeSat were discussed. The CAD model also
provided the mechanical and structural subsystem with a way to test the structural
integrity of the CubeSat framework through static and random vibrational loading
simulations.
Due to the nature of this continuing MQP, the Mechanical and Structural
Subsystem team was immediately given access to the 2010 project’s CAD drawings.
These models provided a starting point for the 2011 project’s CubeSat design, though
differences in the two projects’ mission requirements called for numerous, large-scale
alterations. While the 2010 MQP focused on a Lab Option, our project focused primarily
on a Flight Option, which was designed with the intent that it would eventually be
launched in the future.
The Mechanical and Structural Subsystem team began organizing the satellite’s
component layout around a commercially available, 3U CubeSat structure from Pumpkin.
This model was chosen due to its well documented flight heritage and the experience of
its manufacturer [6]. A simplified drawing of this structure was created by the mechanical
and structural subsystem from scratch based on downloadable CAD drawings provided
on Pumpkin’s website. This simplified drawing avoided any problems associated with
mating or meshing of the drawing within SolidWorks since it did not incorporate all of
the small features (or require the amount of computer memory) that the downloadable
drawings from Pumpkin’s website did. From there, CubeSat components were added
based on the project’s mission requirements and recommendations from each subsystem.

41
The Flight Option CAD drawing also allowed the mechanical and structural
subsystem to simulate static and random vibrational loading on the Pumpkin structural
design. This process was done using SolidWorks Simulation, an office product of
SolidWorks Professional (provided at no cost to WPI students). Using the Simulation
Wizard within the SolidWorks program, the user begins by simply choosing from a list of
different tests including static, frequency, buckling, thermal, nonlinear, linear dynamic,
etc. After selecting the type of test, the program asks the user to define the model’s
material, any fixtures applied to the model being tested, external loads, connections, and
other parameters based on which type of test is being run. After defining these
parameters, the user can run the simulation and obtain results from graphs generated.
For this project, we ran both static and random vibration tests using SolidWorks
simulation in order to investigate how the Pumpkin structure responded to typical launch
loads. Although producing results for the static load simulation was fairly easy with a
basic knowledge of SolidWorks, the random vibration simulation was a little more
involved. As mentioned above, the first step involved selecting the “random vibration”
test from the “linear dynamic” branch of the test type list. Next, the material was chosen
to correspond with that of the Pumpkin 3U structure (Al 5052-H32), and fixtures were
applied to the structure in order to simulate the satellite being held inside the P-POD
device during launch. A difficult part of this process was defining the external load. To
simulate the vibroacoustics of a typical launch condition, we started by choosing the
“selected base excitation” option from the dropdown list of external load types. We then
selected the “acceleration” option with units of 𝑔2
𝐻𝑧 and manually input the ASD variation
with frequency. Since we wanted to simulate the “worst case scenario” launch, we

42
entered an ASD vs. frequency curve into SolidWorks based on the General
Environmental Verification Standards (GEVS) data from the “Vibroacoustics
Qualification” section of NASA’s GSFC-STD-7000 document (see Section 2.2.4) [5].
The simulation was then run using these inputs, and the resulting displacements and von
Mises stress were generated. These results were then compared to the material’s yield
strength and the GSFC-STD-7000 document’s qualification specifications to confirm that
the structure could handle a typical launch without failing.
3.3.2 Mechanical and Structural Subsystem Support In order to keep the Flight Option CAD model up-to-date, the Mechanical and
Structural Subsystem group maintained frequent communication with other subsystem
teams. In many cases, things such as power requirements or component locations called
for multiple, large-scale changes in the CubeSat’s layout each week. For each new layout,
a CAD drawing was created and brought to that week’s subsystem and SEG meetings
where it was discussed. These 3D images gave group members and advisors something to
visually refer to when describing potential changes or additions to the CubeSat, and
ensured that each design complied with Cal Poly’s specifications for size and mass. In
some instances, for example with respect to the number of necessary solar arrays and the
magnetometer boom mechanism, changes to the CubeSat were decided upon only to be
subsequently changed back to the original design. To account for the constant changes, it
was the mechanical and structural subsystem’s responsibility to keep an organized folder
of the SolidWorks part and assembly files by revision and date. This organization
allowed the Mechanical and Structural Subsystem team to easily add or remove
components from the updated assembly drawing to make quick changes to the model. If
that change ended up being retracted, it was easy to go back and replace the drawing with

43
its previous model. Also, when necessary, component drawings could be sent out to other
subsystems or to our partners at the Space Research Center, Polish Academy of Sciences.
3.3.3 Vacuum Chamber Structural Testing In addition to the Flight Option, we also made progress with the Lab Option
CubeSat which had been partially constructed by the 2010 CubeSat MQP group. As the
mechanical and structural subsystem, our main objective for the Lab Option CubeSat was
to design and build a test fixture that would hold the CubeSat while being tested in WPI’s
vacuum chamber. In order to do this, we began by taking measurements of WPI’s
vacuum chamber, which is located in the basement floor of Higgins Laboratories. After
getting the necessary dimensions for the vacuum chamber, we began drafting preliminary
designs for the test fixture. These designs were brought to team meetings where
simplifications and alterations were suggested to make the fixture affordable and
buildable before the project’s deadline. Initial designs featured extensive structural
support and complex mechanisms for functionality. After two or three drafts, we decided
on a simplified test fixture which allowed us to affordably purchase and assemble the
parts of the test fixture at WPI. For convenience, we decided to make the structural
portion of the test fixture completely from T-slotted extruded aluminum since it easily
mated with the T-slotted mounting rails inside the vacuum chamber. The finalized design
is shown in Figure 12, which features an adjustable arm that can be used for different
sized CubeSats. All materials including a 10-foot long T-slotted aluminum section, seven
brackets, and all necessary fasteners were ordered from McMaster Carr. The process of
cutting the 10 ft. T-slotted aluminum into the required sections was done using a chop
saw located in WPI’s Washburn Laboratories.

44
Figure 12 - Vacuum Chamber Test Fixture Structure
To accurately test the CubeSat while minimizing external forces such as friction,
the plan was to suspend the CubeSat between a top and bottom rail using monofilament
line. This design allows only a single degree of freedom, rotationally about the Y-axis
(long axis), of the CubeSat. In order to do this, the Mechanical and Structural Subsystem
group designed removable caps to secure one end of the monofilament lining to each end
of the CubeSat. The other ends of monofilament line would then be secured to the top
and bottom center rails of the test fixture and would tighten to suspend the CubeSat in the
center of the test fixture. As stated above, this would give the CubeSat the ability to rotate
about the long axis of the structure with only the torsional restoring force of the
monofilament lining as external resistance. A dimensioned drawing of the CubeSat caps
is shown below, with all dimensions shown in centimeters.

45
Figure 13 - Dimensioned Drawing of Caps
Figure 14 - Vacuum Chamber Test Fixture with CubeSat and Fine Adjustment Device
Though not completed by this year’s MQP group, the plan for this test fixture also
featured a “fine adjustment” device, which would allow the users to adjust the tension in
the monofilament line once the height of the top rail was set. One option for this fine
adjustment device is to use two threaded rods which can secure the ends of the
monofilament line opposite the caps and be mounted in the top and bottom rails of the

46
test fixture. Once the threaded rods are set in pre-drilled holes in the top and bottom rails
of the test fixture and secured using lock nuts, the rods could be turned to finely adjust
the tension in the monofilament lining (which is attached to both the rods and the caps on
the CubeSat). Due to time constraints of the project, we were not able to build this fine
adjustment device into the structure of the test fixture. A drawing of what the finished
CubeSat test fixture will look like is shown in Figure 14 (without the monofilament line
or the threaded rod in the bottom rail included in the drawing). This test fixture serves as
one potential option for future WPI CubeSat teams to explore.
3.4 Thermal Analysis The goal for the thermal analysis was to model the expected CubeSat temperature
distribution in orbit. In order to do this, we sought to model the temperature distribution
to help us come up with recommendations to keep components of the satellite within their
required temperature ranges. Additionally, we planned to make any other thermal
recommendations that became apparent throughout this process. Our approach to the
thermal modeling of the satellite was to split the modeling tasks into separate models of
external and internal components, and then to combine the two models once we were
confident in each.
3.4.1 Modeling of External Components Our group decided to use COMSOL to perform a thermal analysis of the CubeSat
model. COMSOL is a finite element method solver that can simultaneously integrate
multiple physics modes (e.g. structural and thermal analysis). COMSOL was chosen due
to its ability to import SolidWorks models and for its extensive thermal modeling
capabilities. Another option considered, but not used, was the thermal modeling tool

47
within SolidWorks. The 2011 CubeSat MQP cautioned that while it was easy to share
models with other design teams, it was not as powerful as COMSOL.
Our first task was to understand how COMSOL imported SolidWorks models.
This was important because the Mechanical and Structural Subsystem group was using
SolidWorks to create their drawings. COMSOL could import SolidWorks models easily,
albeit with some caveats. Our group ran into issues importing models that had been made
using specialized techniques or assemblies saved as “welds,” which is a SolidWorks
feature that specifies the way components are mated. In cases like these, COMSOL was
able to import the model, but not able to mesh it without errors. Due to this, many of the
components downloaded from suppliers’ websites could not be directly imported into
COMSOL, and instead had to be recreated. Because of the CPU-intensive nature of
meshing, many geometries were simplified or altered in order to avoid long mesh times.
Figure 15 shows an example of a refined mesh for our model, in which large flat areas
like the solar panels could use coarser mesh elements, where more complicated areas
needed extremely fine mesh elements.

48
Figure 15 - COMSOL Mesh of the CubeSat
To assume the heat generated from sunlight, we used COMSOL’s built-in physics
package for a general inward heat flux. There were three options to choose from for the
heat flux, which were “General inward heat flux”, which added a value in 𝑊𝑚2 to the total
heat flux the solver would normally compute across the selected boundary. “Inward heat
flux” and “Total heat flux” were other two options, which were designed for heat fluxes
that depended on the geometry shape. For this reason we chose to use the “General
Inward heat flux” boundary condition. For the purposes of model simplification, the heat
fluxes were only applied to flat surfaces of the spacecraft, which were the solar panels
and flat aluminum faces.

49
Another set of boundary conditions we used in COMSOL were the thermally
resistive and conductive layers. It was brought to our attention that the default boundary
interfaces COMSOL uses between assemblies might not adequately represent real life
interfaces. In order to assume adequate contact between different assemblies, the
thermally resistive layer was used. This was done primarily by experimentation on
simpler geometries to visualize the effect that it would have on the final CubeSat model,
and to verify that they would have the desired effect.
Figure 16 shows our implementation of thermally resistive and conductive
physics nodes in tandem on a simple geometry. In this case, the thermally conductive
layer is used between the thin square plate and the thicker square box. As expected, the
steady-state temperature between the two geometries is nearly identical, proving that the
thermally conductive layer allows for adequate heat transfer. Between the cube and the
cone at the top of the assembly was a thermally resistive layer.
Figure 16 - Tests with Thermally Resistive and Conductive Layers

50
The knowledge of the thermally conductive and resistive layers was applied to
points of interest on the CubeSat model, namely the hinges between the solar panels and
the CubeSat body. The equation for a highly conductive layer found in COMSOL is as
follows:
−𝑛 ∙ 𝑞 = 𝑑𝑠(𝑄 − 𝜌𝑠𝐶𝑠𝜕𝑇𝜕𝑡
)−∇𝑡 ∙ (−𝑑𝑠𝑘𝑠∇𝑡𝑇)
The variable q defines the net outward heat flux through each face of the layer,
where n defines the unit normal vector. The layer thickness 𝑑𝑠 is used to describe the
layer between the two surfaces. 𝐶𝑠, the layer heat capacity, 𝜌𝑠, the layer density, and 𝑘𝑠,
the layer thermal conductivity, are all defined with COMSOL’s built-in materials
database. T is the temperature, calculated by the iterative solver. In our analysis, we
typically used default values provided by COMSOL. It was within our best interest to
assume the layer thickness was small enough to be realistic with our model, and every
other value was filled in by the solver itself.
While designing our model, we realized that, in order to accurately model
radiation to space, we needed to find a boundary condition that would allow selected
boundaries to radiate to space modeled as a blackbody. In order to simulate radiation to
space, the Surface-to-Ambient module of COMSOL was used. It is defined by the
equation:
𝑞 = 𝜀𝜎(𝑇𝑎𝑚𝑏4 − 𝑇4)
Where q is the total inward heat flux, ε is the surface emissivity, and σ is the Stefan-
Boltzmann constant, which is predefined as 5.67 × 10⁻⁸ 𝐽𝑠−1𝑚−2𝐾−4 . 𝑇𝑎𝑚𝑏4 is the
(3.1)
(3.2)

51
fourth power of the ambient temperature, and 𝑇4 is the fourth power of the body’s
temperature. Though an iterative process, COMSOL is able to determine how much heat
is radiated in the form of an internal heat flux over time.
The only parameters that must be defined are the surface emissivity and the
ambient temperature. We found that surface emissivities are purely a function of the
finish on a material, which is useful for thermal control. An emissivity of 1 signifies that
the body is a perfect blackbody, while an emissivity of 0 indicates that the body will emit
radiation at a fraction of its perfect black body state. The surface-to-ambient radiation
was computed by simplifying the spacecraft into three main materials: aluminum for the
body, silicone for the solar panel substrate, and copper for electronic components. We
defined each material’s emissivity individually, as COMSOL’s built in model library did
not have default values.
Through our literature review, we determined that aluminum can have vastly
different emissivities, as a result of the coating choice or finishing choice of the
aluminum. For the purposes of our model, we started with the value for simple anodized
aluminum, which has an emissivity of 0.77 [35]. With this as a baseline, the value can be
changed depending on the needs of the thermal control engineer.
The emissivity assumed for copper was 0.83, which was found through our
literature review and raised by a small factor because of its assumed use as a conductor
[35]. This value can be changed based on the electronic components being used in the
spacecraft. The solar panel substrate was assumed to be silicon, based on the information
from ClydeSpace, with an emissivity of 0.85, assumed to be controlled by ClydeSpace.

52
Our group’s next task was to experiment with and learn how to use COMSOL’s
physics packages, such as the Heat Transfer module. This was accomplished by using
COMSOL’s Heat Transfer in Solids module on increasingly more complicated CubeSat
models. We chose to use the “Heat Transfer with Radiation” option because it provided
us with the ability to choose physics that allowed any surface of our satellite to radiate to
a vacuum. Within the Heat Transfer with Radiation option, we could specifically radiate
energy to space by using a boundary condition called “Surface-to-Ambient” radiation, in
which we defined boundaries that would radiate heat. As we became more comfortable
with COMSOL, we advanced to more detailed CubeSat skeletons and began to use
materials that we could encounter on the Flight Option CubeSat.
In order to model the entire satellite accurately, we needed to import SolidWorks
assemblies into COMSOL. Our literature review indicated that the satellite temperature
depended heavily on the interface between the solar panels, hinges, and chassis. In order
to alter boundary interfaces in assemblies, we used two boundary conditions, “Highly
Conductive Layer” and “Thin Thermally Resistive Layer” to model the interface
boundary conditions. An example of the selection of these faces is seen in Figure 17. We
made extensive use of the Highly Conductive Layer to ensure that the solar panels
behaved as if they were a part of one contiguous structure. This allowed us to assume a
case where most of the heat was transmitted out of the solar panels and in to the CubeSat
structure.

53
Figure 17 - Selecting the Boundaries for Highly Conductive Layers
We ensured that our COMSOL model made use of COMSOL’s built in materials
library in order to more correctly model heat transfer. Based on the CubeSat
specifications, models were initially run with the structure made of Aluminum 6069.
However, Pumpkin, the company that manufactures the CubeSat skeleton, uses
aluminum 7071. Once our group had decided to use the Pumpkin structure, the models
were changed to the correct material.
After the completion of a basic COMSOL model, the next step in our satellite
analysis was to determine if there were any trends over multiple orbits. Previously, all
satellite thermal simulations were done with a stationary model, in which the analysis is
performed until a steady state solution is reached. This had not allowed us to view what
happened over any given time, so instead we chose to use a time-dependent model. This

54
allowed us to specify a time range to compute solutions, and also to specify a solution
time step. Varying the solar flux over time in COMSOL involved setting up a varying
analytic function. This was accomplished by specifying a rectangular function in
COMSOL, which represented one period. The rectangular function was defined as:
𝑟𝑒𝑐𝑡(𝑡) = � 0 𝑖𝑓 𝑡<3601 𝑖𝑓 360>𝑡>3136.8
COMSOL called for the rectangular function to have a defined upper limit. We
defined the upper limit as one-half of the 400km orbit period (5553.6 seconds) shifted
360 seconds, which came to 3136.8 seconds. The amplitude of the rectangular function
varied from 0 to 1. The rectangular function had “smoothing” applied to reduce solver
errors and to approximate a transitional period in which the satellite is partially obscured
by the Earth. We found that sudden shifts in the function may have caused errors. The
rectangular function in COMSOL allows the user to define an area as a transition zone, in
which the function will gradually increase to 1. To solve this, we defined the transition as
360 seconds, as it was the lowest value which did not return an error. The function was
shifted forward 360 seconds in response to the function’s starting to transition before 0
seconds. The smoothing effect can be seen in Figure 18, where the function gradually
increases and decreases between two values as opposed to abrupt transitions.
Next, an analytic function was defined to periodically repeat the rectangular
function over time. This was accomplished by using the expression:
(mod(t[1/s],p1_400))
(3.3)
(3.4)

55
Where p1_400 was a parameter defining the period time of the 400km orbit. The
modulus function repeated the orbit, with the plot parameters allowing the function to
repeat out to 10 times the orbit. The resulting output is shown below in Figure 18.
Figure 18 - Analytic Function to Vary the Solar Flux over 10 Orbits
With the periodic function defined, the next step was to incorporate it into the
physics module. We entered the heat flux as a function of the thermal constant multiplied
by the analytic function varying over time. We used two separate sub-modules in order to
model both the front and the rear of the satellite over the entire orbit. The equation used
for the front of the satellite was:
earthflux + (an1(t)· sunflux) (3.5)

56
Where earthflux was the heat flux of the earth blackbody (245 𝑊𝑚2), and sunflux was
defined in COMSOL’s parameters as the solar flux constant minus the earth flux constant
(1121 𝑊𝑚2). The function an1(t) called the varying periodic function with respect to time t.
When the function returned 0, meant that the satellite was in eclipse and the only heat
flux it could be receiving was from the earthflux, or 245 𝑊𝑚2,. When the an1(t) function
returned 1, it meant that the satellite was in direct sunlight and receiving 1366 𝑊𝑚2, the
maximum value that can be received. We defined the heat flux on rear of the satellite in a
similar manner:
(an1(t) ·earthflux)
When an1(t) returned 1, the satellite was in a position between the earth and the sun so
that the rear of the satellite was receiving a heat flux from the earth blackbody. When the
function returned 0 and the satellite was in eclipse, the rear of the satellite would no
longer receive any heat flux.
After the framework for the external time varying heat flux conditions was set up,
the next goal in the thermal analysis was to integrate the internal components of the
satellite. One of the main goals of our thermal analysis was to be able to support
recommendations to modify the structure or placement of components based on the
predicted thermal results. A large part of this analysis was dependent on the operational
and survivable temperature ranges of many components throughout the satellite.
Several internal components were modeled separately from the external model.
Due to the complexity of the external mesh, internal components were created and
(3.6)

57
meshed independently and tested in COMSOL for mesh errors before they were
integrated into the external model. Once each internal component was verified in
COMSOL for consistency, we could add it to the SolidWorks model of the final satellite
and reimport it into COMSOL. The following section describes the details of how we
modeled and added these internal components to the final model.
3.4.2 Modeling of Internal Components
During a mission, the spacecraft’s internal components affect the overall
temperature profile through conduction and radiation. The internal components transmit
heat through radiation and conduction. However, the radiation flux produced by the
internal components is much less than that produced by the Sun or the Earth. For this
reason the internal component radiation is neglected as a source of heat. The primary
source of heat transfer for the internal components is assumed to be conduction.
A thermal model of each internal component was created in COMSOL in order to
evaluate the thermal properties of the spacecraft. We used COMSOL because the rest of
the thermal analysis was already being done in the same software suite. COMSOL also
has a large number of predefined physics models for different applications. One of these
predefined physics models is radiative heat transfer from surface to surface.
Each of the COMSOL models for the internal components had to simulate the
materials and the level of power dissipated as heat. Most of the information about the
internal components for this project was not readily available from the manufacturers.
This made creating an accurate model difficult and required some engineering judgment
with respect to the model. COMSOL has difficulty modeling complex systems, and takes

58
a long time to run any realistic simulation. Since each internal component was to be
included in a final model which incorporated all of the components and effects from the
earth and sun, it was important to make the models as simple as possible without
sacrificing accuracy. The simplification was done by having the solid models in
SolidWorks retain only the most important features, and the thermal model in COMSOL
assumed all heat released by a given component could be modeled as a singular heat
source.
Once the model for the flight option CubeSat was created, we set the framework
for a Lab Option CubeSat thermal analysis. Our team set out to verify our COMSOL
model with an experiment in the large vacuum chamber. The goal of this approach was to
ensure that the temperature results from a COMSOL simulation would be comparable to
results found from the Lab Option model.
3.4.3 Laboratory verification of COMSOL model
This subsection outlines our plan for the verification of our COMSOL model
using an experiment in a vacuum chamber. We planned to place an aluminum CubeSat
model into the large vacuum chamber in the basement (HL016) of Higgins Laboratory on
a test stand designed by the Mechanical and Structural Subsystem team. A cryopump on
one side of the vacuum chamber (see the left side of Figure 20) would be used to pump
the chamber down below 50 milliTorr and would also provide the model with a view
towards a cold surface, simulating the cold of space. On the opposite side, a halogen lamp
would simulate the radiant heat flux from the sun.

59
.
Figure 19 - CubeSat Model for Lab Option
Last year’s CubeSat model, shown in Figure 19, was used in the vacuum
chamber, due to its similarity with our planned geometry and material, and the relative
ease with which it could be modeled in COMSOL. A simple COMSOL model was a
necessity in order to ensure that mesh errors or complicated geometries would not add
additional variables or errors to the output.
Due to the expense of a true sun-simulating heat lamp, we chose simple halogen
lamps to simulate heat flux. It was important to note that these lamps would have to
function in a vacuum. In addition, to ensure that the Lab Option matched the COMSOL
model, we have to determine the theoretical radiative output of the lamps.
In order to get accurate temperature data from the aluminum structure, the plan
was to place five thermocouples at various spots in order to measure temperature. These

60
thermocouples would be placed at the structure’s intersections, facing the cryopump, and
facing the heat lamp. We then created A LabView Virtual Instrument to read the data
from the thermocouples and output it in a temperature vs. time plot.
The temperature data collected from the tests in the vacuum chamber could be
compared to the COMSOL model by using the point select tool. In the COMSOL results
window, new plots can be created that allow the temperature at a given point on the
structure to be displayed as a function of time. The COMSOL model would be created as
a time-dependent solution, with the total time being the same as the time set in the lab
experiment.
Figure 20 - Vacuum Chamber to be used for Testing the Lab Option
Results from the Lab Option test were designed to help verify the Flight Option
COMSOL model. If results from the Lab Option COMSOL model show a significant

61
discrepancy with those found in the vacuum chamber tests, additional research will be
required in order to investigate any discrepancies that are found.
3.5 Power Analysis
3.5.1 Power Budget One of the primary objectives of the power subsystem team was maintaining a
detailed power budget (listing supply and demand for different operational modes during
the mission). The power from the solar cells changed as the structure of the CubeSat
evolved. For example, in the design where the magnetometer used an additional solar
array as a boom, the power supply increased. We constantly updated the calculated BOL
(Beginning of Life) power supply using the equations explained in Section 2.4.2 of this
report. This process was simplified because we were able to use a MATLAB code
developed by Andrew Bigelow (member of 2010-2011 Design of a CubeSat [2]) to
quickly calculate the BOL power. This code took sunlight vectors from an STK orbit and
multiplied them by the solar constant to get sunlight vectors over a particular orbit. The
assumptions made in the code to calculate BOL power were full illumination (Θ = 90°),
and no inherent degradation. ClydeSpace guarantees a minimum efficiency of 28.3 %,
which accounts for degradation. The other required values for solar array area and
efficiency were given by ClydeSpace. We verified our results by comparing them to
ClydeSpace’s results.

62
Table 4 - Component Power Demands
Component Part Number Peak Power (W)
Nominal Power (W)
Quiescent Power (W)
Current (mA)
Voltage (V)
GPS SGR-05U .080 0.080 .080 16 5 OBC Pumpkin 0.300 0.300 0.000 TBD TBD Magnetorquers (3) Zarm Technik AG
MTO 2.1 (Optimized)
0.420 0.420 0.420 28 5
Sun Sensor ComTech AeroAstro
0.050 0.050 0.050 3.5 N/A
Gyro ADXRS450 0.030 0.030 0.030 6 Variable Magnetometer Honeywell
HMC5883L 0.001 0.001 0.000 0.25 3.6 (max)
Instrument 8.000 8.000 1.000 TBD TBD EPS Board ClydeSpace 0.1 < 0.1 < 0.1 TBD TBD PDM Board ClydeSpace 0.160 0.160 0.160 TBD TBD PPM ARM922T 0.180 0.180 0.180 TBD TBD UHF Transceiver 2.000 2.000 0.000 TBD TBD Total 11.321 11.321 2.020 Total Available 12.520 12.520 12.520 Margin 1.199 1.199 10.500
During the course of our project, we also tallied the power demands of
components chosen by the other subsystem groups. The power requirements of each
component were then tabulated as shown in Table 4. Values that labeled TBD were not
published. Peak power is the most power that the device will require during operation.
Nominal values reflect the power at which the device typically operates. Quiescent power
is how much power the device uses while off or in “sleep mode.” The totals at the bottom
sum the peak, nominal and quiescent power requirements. Once the total values were
determined, they were compared to the calculated PEOL to verify that the number of solar
cells would be sufficient.
3.5.2 Baseline System Analysis In order to adhere to a power budget, it was necessary to determine how both
power and data (necessary to control power through a feedback loop) would flow

63
throughout the system. By developing a baseline component setup of the system, it would
become clear how each component interacts and where they fit with regard to power
distribution. To this end, the team developed a diagram to visualize where power would
need to be directed, as well as the required and available voltages. This allowed us to
trace the required power path for each component and ensure each component receives
the appropriate voltage. Furthermore, such a diagram can also serve as a preliminary
wiring diagram as it indicates which components need to be directly connected.
Figure 21 - Power Management and Distribution Architecture Block Diagram10
As seen in Figure 21, power is generated by the solar array and routed through an
EPS. The EPS then delivers this power either to the battery to be stored or to the PDM,
where it will be it will be controlled and distributed along three buses: +3.3 volts, +5
volts, or the raw battery voltage (shown here as +12 volts, but is actually equal to the
10 For the sake of space, this diagram uses the following acronyms: “OBC” stands for On-Board Computer. “ADC” stands for Attitude Determination and Control. “GPS” stands for Global Positioning System.

64
unaltered voltage provided by the battery). In addition to dividing the power along three
buses, the PDM also features on/off switches to regulate power for individual
components. From the PDM, each component is connected to one of the three buses,
whichever is closest to its required voltage. As the PDM is only able to condition power
by turning a switch on or off, each component that operates within a range of voltages
will need to perform some fine conditioning itself.
In addition to power flow, Figure 21 also outlines data flow to describe the
process for controlling power throughout the system. As seen above, signals pass from
the various sensors to the On-Board Computer (OBC). The OBC then performs the
necessary calculations to determine how much power each component needs at a given
time and gives commands to the PDM. The OBC is also responsible for processing any
other data from the instrument.
3.5.3 Lab Option Solar Cell Baseline Testing In order to verify our proposed power system, it was necessary to determine if our
solar arrays were capable of producing the required power during flight. To accomplish
this, the team applied a multi-tiered approach, beginning with theoretical calculations as
discussed in Section 2.4. Since the theoretical calculations looked promising, the team
moved forward with practical Lab Option tests using solar cells from Hobby Engineering
purchased by the previous MQP group.
The team began by verifying the solar cells were functioning properly and had not
been damaged since the 2010 MQP. As seen in Figure 22, the team connected a single
solar array (drawn as a source) in parallel with a voltmeter and in series with both an
ammeter and a resistor (to simulate a load). Our test setup placed the solar cell in full

65
illumination approximately 22.75 inches below a one million candle-power halogen light.
This allowed us to determine if the solar cells were producing approximately the same
voltages and verify that they were delivering a current.
Figure 22 - Solar Cell Test Circuit Diagram
After verifying that all eight solar cells were working, the team needed to
determine the maximum power point for the solar cells in order to determine the
amperage and voltage at which the solar cells operate at their maximum capacity. By
changing the resistance used to test the solar cell, it is possible to generate different
values for both voltage and amperage. Plotting these points allows us to see where the
product of both is as large as possible (i.e. generating the most power). This plot is
known as an I-V curve (see Figure 24 for an example). The team connected a solar cell
using the same setup as for our functionality testing, using a potentiometer instead of a
resistor. This simple change would allow us to test the solar cell at several different
resistances without needing to exchange components, thereby reducing error. Figure 23
shows this test in progress. This test would allow us to construct the I-V curve in Figure
24 that suggested a maximum power point at approximately 2.29mA and 5.67V.

66
Figure 23 - Solar Cell Testing In Progress
Figure 24 - I-V Curve for a Single Solar Cell
0
1
2
3
4
5
6
7
0 0.5 1 1.5 2 2.5 3
Vol
tage
(V)
Amperage (mA)

67
Due to time constraints, the team was unable to test a full array, but this would
represent the next phase of testing. In preparation for the 2012-2013 MQP, the team built
a solar array with four solar cells wired in series. This array was sized to fit the existing
Lab Option CubeSat structure and mounted on circuit prototyping board. A quick test of
these cells showed that they were properly wired in series, providing somewhere near 25
volts.
Figure 25 - Lab Option Solar Array

68
4. Analysis and Findings
4.1 Mechanical Subsystem The random vibrational testing for the structural analysis on our CubeSat was
conducted with the SolidWorks Simulation Professional 2012 tool. The test was to
simulate typical launch environments where the highest static and vibrational loads
would occur on our structure. This included tests for static loads using parameters from
typical launch environments and random vibrations using parameters to prepare for
worst-case scenarios as documented in GSFC [5]. Tests provide estimates of typical von
Mises stress and displacements that could occur in typical launch environments. The
structure materials’ yield strength would be compared to the results and further
investigations on critical regions could be addressed, if needed.
For the SolidWorks Simulation tool to produce the desired results, there were
several inputs that fall under the capabilities of this program. There were two study types
performed, linear dynamic and random vibration. The linear dynamic mode was used to
compute any static loads that occur during the launch environment when the CubeSat is
mounted in the launch vehicle. The random vibration mode was used to investigate
vibrational loads the structure would endure in typical launch environments. A material
must be selected to perform simulations of the structure’s behavior, which for this study
was the Pumpkin structure consisting of AL 5052-H36. The fixtures for the test structure
assumed for our testing constraints were based on the P-POD constraints. The force
option selected was “Base Excitation”, simulating loads at the top and bottom faces of
the CubeSat where the forces would be acting due to the location of mounting points on
those faces. The input was the ASD versus frequency curve from the worst-case scenario

69
launch profile found in NASA’s GEVS document, referenced in Section 2.2.4. This was
chosen as the highest load bearing launch vehicle.
We computed the von Mises stress in the SolidWorks Simulation tool. The
fixtures were placed at the each of the rails on the bottom and top faces of the structure,
as depicted below. This value, when compared to the materials’ yield strength, shows the
stress loads the CubeSat endures during the launch. This comparison is important for the
structure because if the material chosen cannot withstand the launch loads, the CubeSat
will not survive long enough to be deployed.
Figure 26 - Von Mises Stress Output Based on Worst Case Frequency Curve
The results provided us with von Mises stress varying from 0 𝑁𝑚2 to approximately
4000.0 𝑁𝑚2. Even if the stress had reached the largest value on the scale, approximately
7500.0 𝑁𝑚2, the yield strength of the Al 5052-H36 is 195000.0 𝑁
𝑚2. The areas affected the

70
most by the von Mises stress occur in the second and middle unit of the CubeSat. The
test showed that the material used on the Pumpkin structure, assumed for our CubeSat,
should be able to withstand the vibrational loads throughout the launch period for any of
the launch vehicles provided likely to be used.
The next area of concern was the deformation that occurs during launch from
random vibrations and static loads. If the loads are too great, the structure could deform
and cause massive damage to the internal components. SolidWorks was able to produce
values for our worst case scenario. The results showed a scaled (x40000) bowing of the
structural walls both inward and outward.
Figure 27 - Deformation Output Based on Worst Case ASD Curve (x40000 scale)

71
Figure 28 - Deformation Output Based on Worst Case ASD Curve
But when the values of the physical deformation are looked at, they only vary from
1000 ∙ 10−30 𝑚𝑚 to 7.087 ∙ 10−5 𝑚𝑚. These values are extremely small and can be
considered negligible with respect to the integrity of the structure during launch, as this
set of results represents a worst-case scenario. The critical points of deformation seem to
occur once again in the central unit of the 3U structure, but seem to pose no threat as the
material is more than strong enough to withstand the loads.
4.2 Thermal Subsystem In the following section we present our analysis on the internal and external modeling of
the CubeSat in COMSOL. The sections are presented in the following order:
1. The beginning of our analysis that started with a simplified steady-state study
and simplified geometry.
2. The addition of multiple orbits and time-dependent analysis and more
complex geometry

72
3. The completion of our model with the inclusion of the models of internal
components.
4.2.1 Steady-State Heating in COMSOL Our approach to the thermal analysis was to assume that the heat flux from the
sun was a constant, and did not vary with time. This allowed us to start with a simpler
steady-state model in which only the inward heat flux and surface to ambient radiation
would be defined so that a simple model could be viewed.
We started with a simple geometry, which can be seen in Figure 29. This model
was made by defining temperature on one of the sides of the CubeSat, which we realized
was not enough. We had to define an inward heat flux in order to correctly simulate the
effects of the sun’s radiation on the body. In addition, this was one of the first models in
which we defined the material correctly from the library, which made results more
accurate as a result of the correct material properties in place.
Figure 29 - Simplified CubeSat Structure
The next step was to increase complexity of the model and add heat flux, surface
to ambient radiation, and conductive boundary layers. We ran into problems with

73
meshing many of our models. As more complex geometries were imported into
SolidWorks, we noticed more mesh errors that prevented equations from being solved.
We found that an effective model should have enough mesh elements to ensure
that it is adequately represented, but those elements should not be so fine as to slow down
the simulation. In our analysis, we noticed that many mesh errors could be solved by
simply decreasing the minimum element size in the mesh creation settings. While this
approach was effective for ensuring models would not have errors, they were
computationally inefficient. Smaller minimum mesh element sizes meant longer
computation times, which led to the inability to test new ideas or add new physics
quickly. The key to creating an efficient mesh is to use the “mapped” function, in order to
refine mesh elements in specific areas of the CubeSat where problems are occurring.
In the example shown in Figure 30, the joints between the top of the aluminum
skeleton and the sides were often an issue in meshing due to their small radii.
Figure 30 - Solver Errors
The dense mesh would often cause solver errors, which would render COMSOL
unable to compute the temperature through the satellite. In order to fix these solver errors,

74
we tried re-importing the models as different file formats which did not help. As a result,
much of the thermal analysis done was completed with simpler versions, created by both
our Mechanical and Structural Subsystem and Thermal Subsystem teams. These
simplified models can be seen in Figure 31.
Figure 31 - Successful Meshing of the Simplified CubeSat Model
The simpler model of the CubeSat was designed in SolidWorks to closely match
the model being created by the Mechanical and Structural Subsystem team. The models
were re-created from the ground up in SolidWorks in order to ensure that there were no
features of extra parts that were causing errors. The simpler CubeSat model allowed our
analysis to continue, and the beginnings of our model were beginning to take shape. The
final steady state results are seen in Figure 32.

75
Figure 32 - Steady-State Thermal Model
The model in Figure 32 was created as a proof-of-concept, by proving that we
could mesh geometries with complex features, and mesh with the addition of assemblies
and small elements. In this particular case, the displayed temperature range was changed
to show the specific distribution of a certain temperature in the body, which would be
useful for isolating locations where the temperature may be above or below required
limits.
Once comfortable with the steady-state model, we decided to move on to the more
complicated approach of varying the solar flux with time. In the following section, we

76
detail our analysis of adding a time-dependent study to our COMSOL model in order to
compute the effect of multiple orbits.
4.2.2 Multiple Orbits in COMSOL
The next step in our thermal model was to increase the complexity to include
orbits that varied with time. Our initial approach to varying the solar flux with time was
to generate a series of data points in MATLAB to import into COMSOL’s solver. It was
planned that COMSOL would be able to take these data points and apply them to the
model at specified time steps. Early results can be seen in Figure 33, where the solar flux
was to be varied on the face of the CubeSat vs. time.
Figure 33 - Variation of the Solar Flux vs. Time in MATLAB

77
We decided importing solar fluxes from MATLAB was unnecessary for several
reasons. Due to the sun-synchronous nature of our CubeSat’s orbit and the instrument’s
need to be pointed at the sun with a small margin of error, we determined that the sun-
facing surface of the CubeSat would not stray much from being perpendicular to the
vectors of the sun’s radiation. Importing MATLAB code into COMSOL to use in a time-
dependent analysis proved more difficult than previously thought. In order to maintain
the ability to vary the sun flux based on possible eclipses, we decided to design an
equation in COMSOL that could vary the solar flux.
One of the tasks of our thermal analysis was to analyze if there were trends in
multiple orbits between being in direct sunlight and eclipse. Using the equations
developed in Chapter 3, we generated several thermal envelopes that showed the heating
and cooling over multiple orbits. Initially, we created a thermal envelope over the first 10
orbits for the external components, as the internal components had not been added.
There were several obstacles to overcome with this approach. The method used to
compute multiple orbits was time-dependent studies. This involved setting a range of
times to perform the study over, and a time step that specified when iterative equations
were applied. In order to compute multiple orbits, we specified the total orbital period as
5553.6 seconds, which was supplied by the Mission Analysis team. This number was
multiplied by 10 and used as the upper bound in COMSOL’s time dependent solver.
The time step was specified in order to ensure that the computation time would
not be too long. A time step of one second was used, in order to maintain data with a high
resolution. For quicker computations, a larger time step was used to ensure that the final
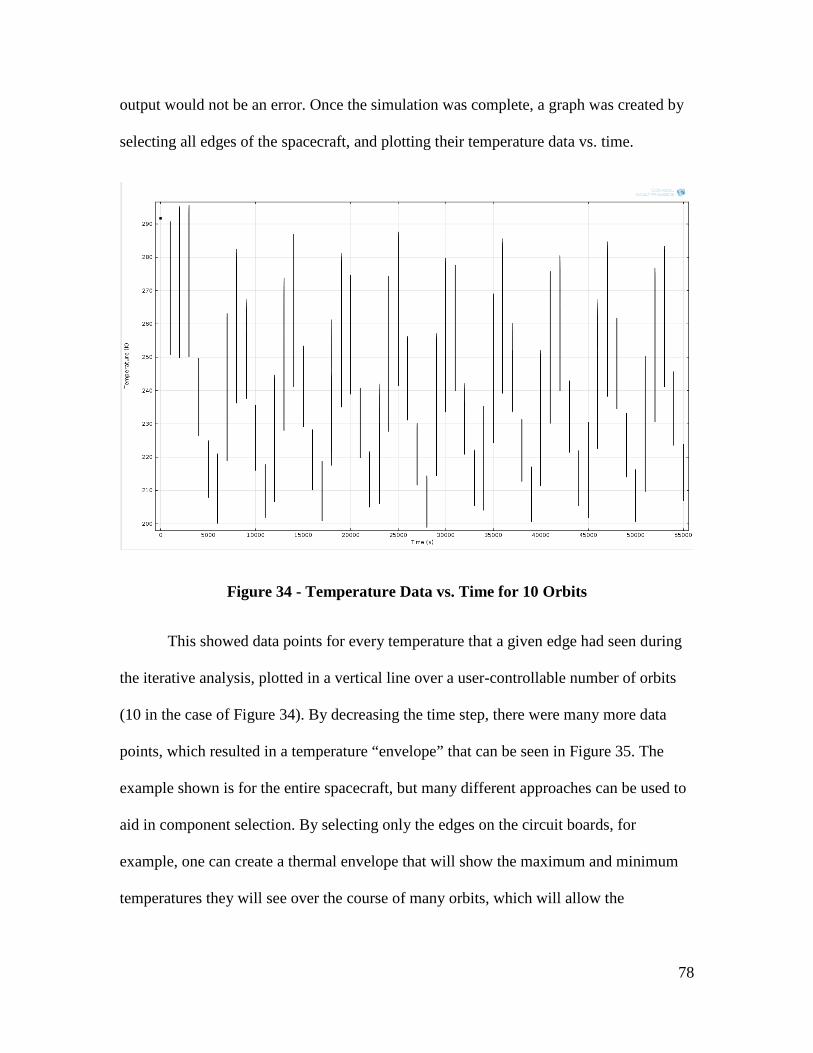
78
output would not be an error. Once the simulation was complete, a graph was created by
selecting all edges of the spacecraft, and plotting their temperature data vs. time.
Figure 34 - Temperature Data vs. Time for 10 Orbits
This showed data points for every temperature that a given edge had seen during
the iterative analysis, plotted in a vertical line over a user-controllable number of orbits
(10 in the case of Figure 34). By decreasing the time step, there were many more data
points, which resulted in a temperature “envelope” that can be seen in Figure 35. The
example shown is for the entire spacecraft, but many different approaches can be used to
aid in component selection. By selecting only the edges on the circuit boards, for
example, one can create a thermal envelope that will show the maximum and minimum
temperatures they will see over the course of many orbits, which will allow the

79
component selection engineer to select parts that fit within survivable and operational
ranges.
Figure 35 - Thermal Envelope for External Satellite Components
In addition, snapshots of specific times could be used to see the thermal
distribution of the satellite in eclipse or full sunlight, which can be seen in Figures 36 and
37. In order to better compare the data, COMSOL’s output was adjusted to show the
same temperature scale regardless of the data being represented.

80
Figure 36 - Temperature Distribution (in degrees Kelvin) during Full Illumination
Figure 37 - Temperature Distribution (in degrees Kelvin) during Eclipse

81
These results represent the point where our external thermal analysis had come far
enough to begin to add the internal heat generating components to our model. The next
subsection details the specifics of their addition.
4.2.3 Internal Components The internal heat components we identified as the most important from a thermal
design standpoint and selected for detailed analysis were the battery, EPS, GPS,
magnetometer, magnetorquer, OBC, instrument payload, PDM, and sun sensor. Each
component was made of different materials and generated a different heat output. The
materials and heat generation for each component are outlined in this section.
To determine the heat transfer from each component, we used the efficiency to
calculate an estimate of the likely power dissipation. Since these components are made of
many individual parts and sub-assemblies, in order to model them we needed to
determine an equivalent density and heat capacity for each. Table 5 lists the material
properties for all materials assumed in the analysis.
Table 5 - Component Materials
Material Density (kg/m3)
Heat Capacity (J/kgK)
Thermal Conductivity (W/mK)
References
Aluminum 6061 2700 950 170 [34] 1.6 mm thick multi-layer PCB
140 409 2.71 [40]
Silicon Dioxide 2150 750 1.5 [35] steel screws with Zinc plate Clear Chromate finish
7600 490 14.9 [36]
Nickel-Chromium 8400 419 9.9 [37] Carbon Fiber Casing 1680 754 13 [38] Aluminum Mounting Brackets
2670 910 239 [34]
Lithium Polymer 530 3450 70 [39]

82
These properties are needed for COMSOL to accurately determine the amount of
heat transferred between the different materials and the total heat transferred by the
components. The heat transfers between the solids are determined by Equation 4.1, as
defined by COMSOL.
𝛒𝐂𝐩𝐝𝐓𝐝𝐭
+ 𝛒𝐂𝐩𝐮𝐭𝐫𝐚𝐧𝐬𝛁𝐓 = 𝛁(𝐤𝛁𝐓) + 𝐐
Where ρ is the materials density, Cp is the material’s heat capacity, T is the temperature,
k is the thermal conductivity of the material, Q is the energy transferred, and utrans is the
thermal transmittance between two materials.
All components simulated started with an initial temperature of 273K and as the
simulation ran, the heat sources changed the temperature for all components. Table 6 lists
the different components, their nominal power consumption, and the assumed
efficiencies. The OBC is designed specifically for each satellite, since the efficiency is
unknown for this satellite’s OBC, the efficiency will be assumed based on the GPS
circuit board.
(4.1)

83
Table 6 - Internal Components
Component Required Nominal Power (W)
Efficiency (%)
Efficiency References
Payload 10 20 GPS (SGR-05U) .800 38.4 [41] Magnetorquer (Zarm Technik AG MTO 2.1 (Power Optimized))
.140 50 [42]
OBC .300 40 EPS Board (CS-3UEPS2-N) 13 90 [43] PDM (CN-USM-5025-DLR-SW) .16 75 [44] Battery (CS-3UEPS2-N) 12 90 [45]
The thermal analysis of the internal components was divided into several
subassemblies. The first subassembly analyzed was the circuit board stack; this stack
included the following components (in order from farthest to closest to the CubeSat side
wall): the battery, the EPS, the PDM, and the OBC. We assumed that the heat was only
transferred from one board to the other via conduction through the screws. In order to
make the model simpler, we also assumed that all of the heat (from a given board) was
dissipated from one place on the board. Each of the boards was modeled as a large, multi-
layer printed circuit board connected to the others and to the spacecraft by M2.5mm
fasteners, which are steel screws with zinc plating and a clear chromate finish. The
battery board will have two lithium polymer batteries as heat sources. The other boards
will have a silicon dioxide chip to represent the different parts that will produce heat.
The circuit board stack dissipates heat generated by two lithium polymer battery
cells mounted on the battery board, and the silicon dioxide cells on the EPS, PDM and
OBC. Each of these heat components are simulated as a uniform heat source throughout
the whole volume. These heat sources are mounted on a printed circuit board. The circuit

84
board has dimensions of 90mm x 97mm. The board is then attached to the rest of the
stack and the stack to the spacecraft by steel screws with zinc plating. The screws have a
height of 10mm and a diameter of 5.3mm. The screws will have the circuit boards
separated by 10mm. Based on this analysis the hottest component will be the EPS (See
Figure 38). This component will have an average temperature of about 450 K. The stack
will have an average heat flux of 350 𝑊𝑚2 at the base of the screws which will be
transferred to the rest of the spacecraft through the mounting screws.
Figure 38 - Thermal Analysis of the Stack
Another similar subassembly is the GPS, which is simulated as a single level
circuit board. The GPS, was thermally modeled as a single silicon dioxide cell mounted
on a circuit board. The silicon dioxide cell was modeled as a heat source distributed
uniformly throughout the volume. The board is then attached to the rest of the stack by

85
steel screws with zinc plating. The board is 70mm by 45mm and the screws have a
diameter of 5.35mm and a height of 10mm. The GPS will have an average heat flux of 10
𝑊𝑚2 at the base of the screws which will be transferred to the rest of the spacecraft through
the mounting screws.
Figure 39 - Thermal Analysis of the GPS
The third subassembly modeled was the magnetorquer. The heat is dissipated
through a nickel chromium core which comprises the interior of the magnetorquer. The
core is surrounded by a carbon fiber plastic casing; the casing was modeled as being
directly in contact with the surface of the core. The casing was modeled to be a length of
86mm and a diameter of mm. The magnetorquer is then attached to the spacecraft with
aluminum mounting brackets, which have a height of 10mm. The outside of the carbon

86
fiber casing and the mounting brackets have an average temperature of about 293K. It
will dissipate an average of 10-8 𝑊𝑚2 at the base of the aluminum mounting brackets to the
satellite sides.
Figure 40 - Thermal Analysis of the Magnetorquer
The fourth subassembly modeled was the instrument payload. The payload was
approximated as a 1U cube. For this analysis, we were not concerned with the internal
components of the payload, just the heat produced by it. We assumed that two of the six
sides were radiators that reject a total of 75 % of the heat generated by the internal
components. We assumed a worst case, 20 % efficiency for the payload. The payload
requires a total of 10W, which means that a worst case requires dissipation of 8W. We
assume that the payload box is made out of Aluminum 6061 and will have radiators on

87
two sides that have radiators that will dissipate 3W each. This means that the remaining
four sides will each dissipate 0.5W of heat each. The payload is secured to the rest of the
satellite along the edge of the cube. Through these connections the payload will conduct
heat to the rest of the satellite. This simulation had little to no impact on this simulation
because this simulation was based off of heat fluxes because of the unknown interior
components.
Figure 41 - Thermal Analysis of the Payload
After reviewing the power consumption for the magnetometer, we decided to
exclude it from our thermal analysis because of the minimal amount of heat that it
produces. The magnetometer is assumed to be 90 % efficient and requires a maximum of
14.85mW during operation [46]. As a result, the amount of heat dissipated is 1.5mW.
This amount of heat dissipation is negligible compared to other components.

88
Lastly, it is important to note that the sun sensor requires no power to be supplied
to it and generates its own power from the sun. For this reason it was not listed in Table
6. The power generated is a maximum 50mW. The efficiency of the sun sensors and most
photodiodes are 80 % or above [47]. This means that the maximum amount of heat
dissipated is 10mW. This level of heat dissipation over a small area has very little impact
on the overall thermal balance of the spacecraft and was considered negligible.
The next subsection details the analysis and what we have found from setting up
the laboratory verification of COMSOL, as outlined in Chapter 3.4.3.
4.2.4 Lab Option Verification Due to time constraints, we were unable to finish the lab verification of COMSOL
results as outlined in the methodology chapter, but were able to set the framework for
future groups to verify COMSOL results. This will be accomplished by conducting
experiments in the vacuum chamber using a LabView Virtual Instrumentation (VI)
program, a collection of thermocouples, and a data processing unit. The LabView VI has
been constructed and tested using a single thermocouple outside of the vacuum. The VI
has been created with functionality allowing the adjustment and modification of several
experimental parameters including; thermocouple material composition, switching data
channels, and the expected minimum and maximum range expected. In addition, the VI
has a graphical representation of the temperature at each measurement location and the
option to write the results to an Excel sheet.

89
Figure 42 - LabView VI Front Panel
Figure 43 - LabView VI Block Diagram

90
However, due to the temperature range expected inside the test environment,
calibration of the VI may be needed in order to produce accurate results. Once calibrated,
the five thermocouples should be placed at locations of interest throughout the chamber
depending on which area of the COMSOL model is being verified. The following is a
basic model of the expected configuration of the test chamber that was used when
considering placement of thermocouples, however at the time of creation the test stand
had not been designed by the Mechanical and Structural Subsystem.
Figure 44 - Basic Vacuum Chamber CAD Model
In Figure 45, the expected temperature distribution of the model is shown in a plot
of temperature vs. time. Each point on the graph corresponds to a temperature at a
specific edge chosen on the model. Should the laboratory model be tested, the results
found from the thermocouples in a similar spot could be compared to these results found
on the COMSOL model.

91
Figure 45 - Temperature of CubeSat during Simulated Cryopump Operation
4.3 Power Subsystem Since the power subsystem is integral to almost every other system within the
satellite, its components are typically chosen to suit the needs of every other subsystem.
For our project, we would need to make three primary choices: The type of PMAD
system, the specific components of the PMAD system and the solar panels. Each choice
was made according to the demands of the components needed by the other subsystems
and their reliability as suggested by their flight heritage.
As mentioned in Chapter 2, there are several choices for a PMAD system. Among
these are direct power systems, custom PMAD systems and vendor-purchased PMAD
systems. For our application, we were primarily concerned with the reliability of the

92
system, as it is a common point of failure [28]. Since custom PMAD systems would
either require a dedicated flight test or fly untested, they were ruled out immediately.
Similarly, direct power systems can be risky due to the lack of controls in power
distribution. In addition, our CubeSat would employ magnetorquers for attitude
determination and control. By nature of their operation, these actuators require a variable
power supply. Vendor-purchased systems, however, have both been flight tested and
include controls to provide specific voltages and turn on or off components.
As a result, we decided to opt for a vendor-purchased system. To develop a
complete system, would need some form of power control as well as a battery to store
power. Once again, reliability and flight heritage would be our primary deciding factor.
We found that ClydeSpace systems offered a complete PMAD system consisting of both
an EPS and a PDM. These components have flown on many CubeSat missions and
provided the control we would need for our components. In addition to this flight
heritage, both components included overcurrent protection and were customizable upon
request. Since these components were designed to be used together, they also interface
easily. ClydeSpace also sells a battery specifically designed for the EPS and PDM in
sizes ranging from 10 to 30Whr.
Finally, our solar panel selection was primarily driven by a combination of power
and geometric demands. Not only did the solar panels need to provide enough power to
sustain each component on the satellite, they would also need to be shaped such that they
did not interfere with the instrument or attitude control hardware. Due to this, our solar
panels would be restricted to a 2U size. For the purpose of power budgeting, our
instrument had been allocated a power of approximately 12W, while the other

93
components were allocated approximately 1W. As such, it was decided to use an array
that consisted of one 2U panel and two deployable 2U panels. This choice provided
approximately 16W. Once data for the instrument was received, it was determined that
this amount of power may be insufficient. If this is the case, it would be necessary to use
ClydeSpace’s double deployable panels to add an extra two panels to each side.

94
5. Conclusions and Recommendations
5.1 Mechanical Subsystem Conclusions and Recommendations The members of this project decided to go forward with a Lab Option to do
testing on various subsystems, specifically thermal and power, in WPI’s vacuum
chamber. For this Lab Option, it is recommended that the test structure be completed as
well as the connecting adapters for the top and bottom of the CubeSat.
Figure 46 - Test Fixture
The structure needs to be completed by drilling holes in the top and bottom
“cross-bars”, labeled 1 and 2 in Figure 46, for threaded rods (the holes need no
threading). The threaded rod will be held in place by nuts both above and below the

95
extruded aluminum, as shown in Figure 47. A small hole would need to be drilled for
attaching the monofilament line to the threaded rod. With the monofilament line being
stretched between the CubeSat connecting adapters, this setup gives the user freedom to
make small adjustments to put the monofilament line in tension by simply tightening
either of the nuts. This configuration is shown in Figure 47:
Figure 47 - Configuration of Threaded Rod
Figures 48 and 49 show a suggested design for the connecting adapters that attach
to the CubeSat model to be made at WPI’s rapid prototyping machine; threaded holes
would be drilled near the corners on each side for set screws to hold the structure in
place. The connecting adapters would attach to the monofilament line via a hook (not
pictured) on the top which in turn is tied onto the threaded rods both at the top and
bottom.

96
Figure 48 – Top View of Connecting Adapters
Figure 49 - Bottom View of Connecting Adapters
For the Flight Option CubeSat, it is recommended that the 3U structure from
Pumpkin be purchased rather than building one at WPI or a local fabricator. While
fabricating a structure at WPI would cost less, Pumpkin offers structures through their
CubeSat Kit that have been evaluated using random vibration analysis and that also have

97
flight heritage. It is also recommended that solar arrays be bought from ClydeSpace
because they offer a variety of solar panels that are built to be compatible with the
Pumpkin structures. ClydeSpace offers 2U and 3U deployable solar arrays that simply
flip out from the side of the satellite and also solar arrays
5.2 Thermal Subsystem Conclusions and Recommendations The following section will detail the conclusions and recommendations we came
to from our analysis. Several methods of thermal management exist as discussed in
Chapter 2. The Flight Option satellite will most likely depend on passive methods of heat
transfer, with the exception of the instrument payload. Most likely, we will use a
combination of several strategically placed surface coatings and internal insulation. It
would be advantageous to choose a surface coating that responded to the thermal needs of
the spacecraft.
The multiple orbital analyses in COMSOL indicated that we would not see much
variation in the temperature after the first orbit has been completed. Future MQP groups
should consider studying the initial conditions the CubeSat will encounter in the moments
before ejection from the P-POD as that temperature had a significant impact on predicted
values.
Our thermal model in COMSOL helped us to determine worst case temperature
ranges and how the flux varies across the body of the spacecraft. This rudimentary model
combined with our preliminary assumptions about the power consumption and efficiency
of the payload allows our team to draw an initial conclusion. This would call for the other
major heat generating components to be as far from the payload as possible. This
placement makes thermal management a more straightforward task as the distance helps

98
to isolate the systems with the potential for a radiator or other method of thermal outflow
in between the two heat sources. When the rest of the team is considering their
component selection, the survivability and operating temperatures should be considered a
high figure of merit.
In conclusion, with respect to thermal management; spacecraft components
should be intelligently selected with largely overlapping temperature ranges and no
extreme outliers. Once component requirements and energy outputs are known the
thermal team can ensure mission survival. This would be done with the heritage proven
and vendor purchased insulation and surface coatings that analysis based on the work
performed as part of this MQP will deem necessary.
5.3 Power Subsystem Conclusions and Recommendations The final iteration of the 2011-2012 CubeSat Flight Option power system design
resulted in the selection of the following components (Figure 50):
- Three (3) 2U solar panels - One (1) Electrical Power System (EPS) - One (1) Power Distribution Module (PDM) - One (1) EPS-mounted ClydeSpace battery

99
Figure 50 - Power System Flow Cartoon
Although there are other power options available, this is the best commercially
available power system for our project. ClydeSpace products have extensive flight
heritage. The components are also some of the best available, using Spectrolab’s high
efficiency solar cells for the solar array and the latest Li-ion battery technology. By using
one supplier, we assured that all the components can be easily integrated. These
components easily work together to supply and regulate power for the entire CubeSat.
Our team began initial testing for the Lab Option of the CubeSat design. We
verified that all components were functional and constructed a four-cell solar array. The
solar cells are connected in series to provide the maximum voltage. The 2012-2013
CubeSat design team can continue testing with this array. Possible tests include:
generating an I-V curve, determining the effect of the angle of incidence on the array and
thermal-vacuum testing. The procedures for generating an I-V curve are outlined in Solar
Cell Baseline Testing (3.5.3) where we describe use of this method to characterize a

100
single cell. Additional testing with the solar array could verify the analytical solutions
that we calculated over the course of this project.

101
References
[1] CubeSat.org [homepage on the internet], “Mission Statement” [updated 2011; cited 5 December 2011]. Available from: http://www.cubesat.org/index.php/about-us/mission-statement
[2] Cote, K et al. “Mechanical Power and Propulsion Design for a CubeSat.” MQP Report. Department of Mechanical Engineering, Worcester Polytechnic Institute, Worcester, MA, 2011.
[3] Heidt, H. “CubeSat: A new Generation of Picosatellites for Education and Industry Low-cost Space Experimentation,” 14th Annual/USU Conference on Small Satellites
[4] Cal Poly SLO. “CubeSat Design Specification Rev. 12”, The CubeSat Program.
[5] Harper, A, Ryschkewitsch, M, Obenschain, A, Day, R. “General Environmental Verification Standard,” April 2005. [http://standards.gsfc.nasa.gov/gsfc-std/gsfc-std-7000.pdf. Accessed 12/7/2011]
[6] Pumpkin Inc. (2008). CubeSat Kit. Retrieved December 4, 2011, from cubesatkit.com: http://www.cubesatkit.com/index.html
[7] ISIS. (2010). Innovative Solutions in Space. Retrieved December 5, 2011, from isispace.nl: http://www.isispace.nl/index.php?option=com_content&task=view&id=61&Itemid=68
[8] AAU CubeSat – University of Aalborg (Denmark). Retrieved December 4, 2011, from cubesat.auc.dk: http://www.space.aau.dk/cubesat/
[9] Stras, L., Kekez, D.D., Wells, G.J., Jeans, T., Zee, R.E., Pranajaya, F., and Foisy, D. “The Design and Operation of the Canadian Advanced Nanospace experiment (CanX-1).” Report. University of Toronto Institute for Aerospace Studies, Ontario, Canada (2004) Retrieved December 5, 2011 from http://utias.sfl.net/nanosatellites/CanX1/CanX1system.html
[10] Indian Space Research Organisation (ISRO). 2008. Rincon 9.1. Retrieved December 6, 2011, from isro.org: http://www.isro.org/scripts/disclaimer.aspx
[11] ANSYS Blog | Realize Your Product Promise. ANSYS. Web. 09 Nov. 2011. <http://blog.ansys.com/>.
[12] ANSYS Structural Analysis Guide. Tech. ANSYS, Apr. 2009. Web. <www1.ansys.com/customer/content/documentation/120/ans_str.pdf>.

102
[13] Bendat, J. S. MSC/NASTRAN Random Vibration Analysis and Applications. Los Angeles, CA: MacNeal-Schwendler Corporation, July 1987. Print.
[14] "MSC Nastran for Integrated, Multidiscipline FEA Solution." MSC Nastran. MSC Software Corporation. Web. 12 Nov. 2011. <http://www.mscsoftware.com/Contents/Products/CAE-Tools/MSC-Nastran.aspx>.
[15]"Random Analysis of a Simple Structure." MSC/NASTRAN Application Manual. Los Angeles, CA: MacNeal-Schwendler Corporation, April 1982. Print.
[16] Barbela, Mohan. Random Analysis in Using MSC/Nastran ISHELL Module. Tech. MSC/Nastran. Web. 12 Nov. 2011. <http://www.mscsoftware.com/support/library/conf/auc97/p04897.pdf>.
[17] Wertz, J. R., & Larson, W. J. (Eds.). (1999). Space Mission Analysis and Design (3rd Edition ed.). New York, NY; Hawthorne, CA: Springer; Microcosm Press.
[18] CubeSat. (2010). Past Launches. Retrieved November 11, 2011 from www.cubesat.org: http://www.cubesat.org/index.php/missions/past-launches/17-dnepr-launch-2
[19] CubeSat. (2009). Testing. Retrieved December 6, 20011 from strath.ac.uk: http://me-wserver.mecheng.strath.ac.uk/group2009/d/testing_page.html
[20] Diaz-Aguado, M. “Small Satellite Thermal Design, Test, and Analysis”, University of Texas at Austin. [http://fastrac.ae.utexas.edu/documentation/Diaz_Aguando_10.1109.pdf. Accessed 12/7/2011]
[21] Gilmore, D. “Chapter 2: Spacecraft Thermal Environments”. [http://www.globalspec.com/reference/26420/203279/chapter-2-spacecraft-thermal-environments. Accessed 12/13/2011]
[22] Spremo, S. “Low Cost Rapid Response Space Spacecraft (LCRRS).” Report. NASA Ames Research Center. Retrieved December 5, 2011 from http://my.wpi.edu
[23] Griffin, M, French, J. “Space Vehicle Design Second ed.”, 2004. [http://books.google.com/books?id=31GqndM3fk8C&pg=PA436&lpg=PA436&dq=space+thermal+environment&source=bl&ots=9R6EghTs6X&sig=RZeclBTasfBVkAIG1WlhGxW-E1M&hl=en&ei=BsnfTpm8HKTh0QHoqNmgBw&sa=X&oi=book_result&ct=result&resnum=7&ved=0CE4Q6AEwBg#v=onepage&q=space%20thermal%20environment&f=false. Accessed 12/7/2011]

103
[24] University of Tennessee Dept. of Physics and Astronomy. The Cosmic Background Radiation. [http://csep10.phys.utk.edu/astr162/lect/cosmology/cbr.html Accessed 12/8/2011]
[25] Savage, Chris J. Spacecraft Systems Engineering 4th edition. 2011, John Wiley & Sons.
[26] Brown, Charles D. Elements of Spacecraft Design. 2002, American Institute of Aeronautics and Astronautics
[27] J. den Haan, Solar Power Information. 2009. http://www.solarpower2day.net/solar-cells/efficiency/
[28] Clark, C., Strain, A., Mazarias, A.L., “A High Performance, Very Low Cost Power System for Microspacecraft,” Eighth European Space Power Conference, University of Applied Science, Konstanz, Germany, 2008, pp. 1-11.
[29] “CubeSat | Small Satellite | Nanosatellite | Power | Batteries | Solar Panel | DC DC Converter | CubeSat Shop | Spacecraft” ClydeSpace Ltd., Glasgow, Scotland October 2011. [http://www.ClydeSpace.com. Accessed December 18, 2011.]
[30] Rotteveel, J., Aalbers, G.T., Bonnema, A.R., van Breuklen, E.D., Doorn, J.H., van den Eikhoof, R., Van Der Linden, E., Hamaan, R.J., Verhoeven, C.J.M., and Monna, G.L.E., “Delfi-C3: a Student Nanosatellite Test-Bed for in-Orbit Demonstration of Micro Systems Technology.” Delft University of Technology, The Netherlands. Retrieved December 5, 2011 from https://escies.org/download/webDocumentFile?id=1678
[31] Hoyt, R., and Twiggs, R., “The Multi-Application Survivable Tether (MAST) Experiment.” Report. Stanford University, Stanford, CA. Retrieved December 5, 2011 from www.tethers.com/papers/MASTJPC2003Paper.pdf
[32] Imai, K., Miyashita, N., Iai, M., Omagari, K., Asami, M. Miyazawa, W., Yabe, H., Miyamoto, K., Usuda, T., Fujiwara, K. Masumoto, S. and Matunaga, S. “Tokyo Tech Small Satellite Development Projects.” Report. Tokyo Institute of Technology, Tokyo, Japan. Retrieved December 5, 2011 from http://lss.mes.titech.ac.jp/ssp/cute1.7/subsystem_eps_e.html
[33] Wu Zhifei; You Zheng; Salvignol, J. "Tsinghua-1 Micro-satellite power system architecture and design," Power Electronics and Motion Control Conference, 2000. Proceedings. IPEMC 2000. The Third International, vol.3, no., pp.1045-1049 vol.3, 2000F
[34] Fortescue, P. W. and Swinerd, G. G. (2011) Attitude Control, in Spacecraft Systems Engineering, Fourth Edition (eds P. Fortescue, G. Swinerd and J. Stark), John Wiley & Sons, Ltd, Chichester, UK. doi: 10.1002/9781119971009.ch9

104
[35] The Engineering Toolbox. “Emissivity Coefficients of Some Common Materials.” Web. 12 Mar. 2012. http://www.engineeringtoolbox.com/emissivity-coefficients-d_447.html
[36] Dopart, C. et al. “Design and Analysis for a CubeSat Mission.” MQP Report NAG-1102. Department of Mechanical Engineering, Worcester Polytechnic Institute, Worcester, MA, 2012.
[37] Dawson, E. et al. “Attitude Determination and Control System for a CubeSat Mission.” MQP Report MAD - D11A. Department of Mechanical Engineering, Worcester Polytechnic Institute, Worcester, MA, 2012.
[38] Oliva, Andrew et al. “Design and Analysis of Subsystems for a CubeSat Mission” MQP Report NAG-1102. Department of Mechanical Engineering, Worcester Polytechnic Institute, Worcester, MA, 2011.
Related Documents