BAUERFEIND.COM MEASURING INSTRUCTIONS STOCKINGS AND TOE CAPS

Welcome message from author
This document is posted to help you gain knowledge. Please leave a comment to let me know what you think about it! Share it to your friends and learn new things together.
Transcript

BAUERFEIND.COM
MEASURING INSTRUCTIONS STOCKINGSAND TOE CAPS

LYMPHOLOGICAL MEASUREMENTS WE WILL SUPPORT YOU
• Definition of circumference measurement:• Phlebological measurement = measurement
next to the skin• Light lymphological tension = usually with soft
tissue: - up to initial skin resistance - for cD and when measuring the edging
• Firm lymphological tension = usually with firm (taut) tissue
• Measurements are ideally taken after lymphatic drainage
• Photo documentation is helpful in difficult cases• Do not measure in skin folds
GENERAL INFORMATION ABOUT MEASUREMENTS:
Customers with disorders of the lymphatic system need your particular attention because treating lymphological conditions is a specialist area within compression therapy requiring a high level of expert knowledge. The products ensure that as little fluid as possible accumulates in the extremities, thus preventing severe swelling. To guarantee successful treatment outcomes with medical compression stockings, the patient has to be measured correctly. These guidelines are intended to help you with this task. We also recommend the following supplementing brochure:
Measuring instructions for arm sleeves including glovesItem no. 271 4210 2021 003
Measure next to the skin
Light lymphological tension
Firm lymphological tension
MEASURING INSTRUCTIONS ARM SLEEVESINCLUDING GLOVES
BAUERFEIND.COM
54
lK1–lT lK2–lT
cA
cY
cB
cB1
cC
cD
cE
cF
cH
cT
cG
cA
cY
cB
cB1
cC
cD
cE
cF
cG
lBlB
lB1lB1
lClC
lDlD
lElE
lFlF
lK2 / lG
lK1
lK2 / lG
lH
lT
MS* MT*
MT* MS*
DOWNLOAD:
Lymphology order sheets: Order sheet for custom-made VenoTrain curaflow products – leghttps://www.bauerfeind-group.com/en/service/downloads
MEASUREMENTS FOR LYMPHOLOGICAL STOCKINGS
1 MARKING LEG MEASURING POINTS
Marking measuring point A (inside)• Medial side: base of the big toe
• With light pressure, run the pen from the big toe toward the ball of the toes –> look for the suspension point!
• Alternatively: second big toe fold with bent toe
Marking measuring point A (outside)• Lateral side: base of the little toe
• With light pressure, run the pen from the little toe toward the midfoot –> look for the suspension point!
• Alternatively: little toe fold with bent toe
Marking measuring point B• One finger width above the medial malleolus
Marking measuring point D• Two finger widths below the patella• Alternatively: put your hand into the back of the
knee from the medial side and follow the knee fold Put the mark one finger width below the knee fold extending to the medial side
VIDEOS WITH MEASUREMENT INSTRUCTIONS
Left leg Left legRight leg Right leg
Width(cm) Length
(cm)
(Rear panty area)
* MS = Measurement next to the skin | MT = Measurement with tape tightened
(Front panty area)

76
Marking measuring point B1 • Determine the distance between B and D using a
lymphological tape measure, then divide into three equal sections
• B1: lower third
Marking measuring point C• Determine the distance between B and D using a
lymphological tape measure, then divide into three equal sections
• C: upper third
Marking measuring point E• One finger width above the patella
Marking measuring point G• Two finger widths below the crotch
Marking measuring point F• Determine the distance between E and G using a
lymphological tape measure, then divide into two equal sections
Measuring point cB• Measure next to the skin• Measure with firm
lymphological tension
Measuring point cY• Circumference around the heel and instep in
dorsiflexion with tensed tendons• Measure next to the skin• Do not measure with tape tightenedSpecial request: 90° heel• For patients who are immobile, sit a lot and
patients with a pronounced heelSpecial request: instep widening• For patients with excess tissue over the anterior
ankle region
Measuring point cB1• Measure next to the skin• Measure with firm
lymphological tension
Measuring point cC• Measure next to the skin• Measure with firm
lymphological tension
Measuring point cD• Measure next to the skin• Measure with light
lymphological tensionSpecial request: slanted edging on the side• Always recommended
1 MARKING LEG MEASURING POINTS 2 LEG CIRCUMFERENCE MEASUREMENT

98
Measuring point cE• Measure next to the skin• Measure with firm
lymphological tension Special request: without anatomical knee (knee ellipse)• For patients with pronounced tissue around the knee,
with a sudden change in knee diameter or padding at the back of the knee
Measuring point cT• Edging
• Ideally, look for the anatomical suspension point or below the breast
• Should be above the navel –> Drainage divide
• Measure next to the skin• Measure with light lymphological tension;
use phlebological measurement, if required
Measuring point cF• Measure next to the skin• Measure with firm
lymphological tension
Measuring point cH• At the widest part of the buttocks• Measure next to the skin• Measure with firm
lymphological tension
Measuring point cG• Ask the patient to stand up from lying down• Position the lymphological tape measure
along the gluteal fold, not on the marking!• Measure next to the skin• Measure with • firm lymphological tension for AT • light lymphological tension for AGSpecial request: slanted edging on the side• Always recommendedSpecial request: higher leg at the front for anatomical shape• Always recommended• Only available with slanted edging
Measuring point cA• With full weight on foot• Measure next to the skin (from marking to
marking)• Measure with light
lymphological tension• Caution! Foot shape must not
changeSpecial request: hallux• For patients with pronounced hallux
for pressure relief in the hallux region
Special request: anatomical foot (measuring points cA1 and lA1)• Circumference in the widest or narrowest
area of the midfoot• Measure with phlebological to
light lymphological tension• Length from heel to midfoot along the medial sidePlease note: Measuring point A1 is positioned differently if a toe cap is required
2 LEG CIRCUMFERENCE MEASUREMENT
1110
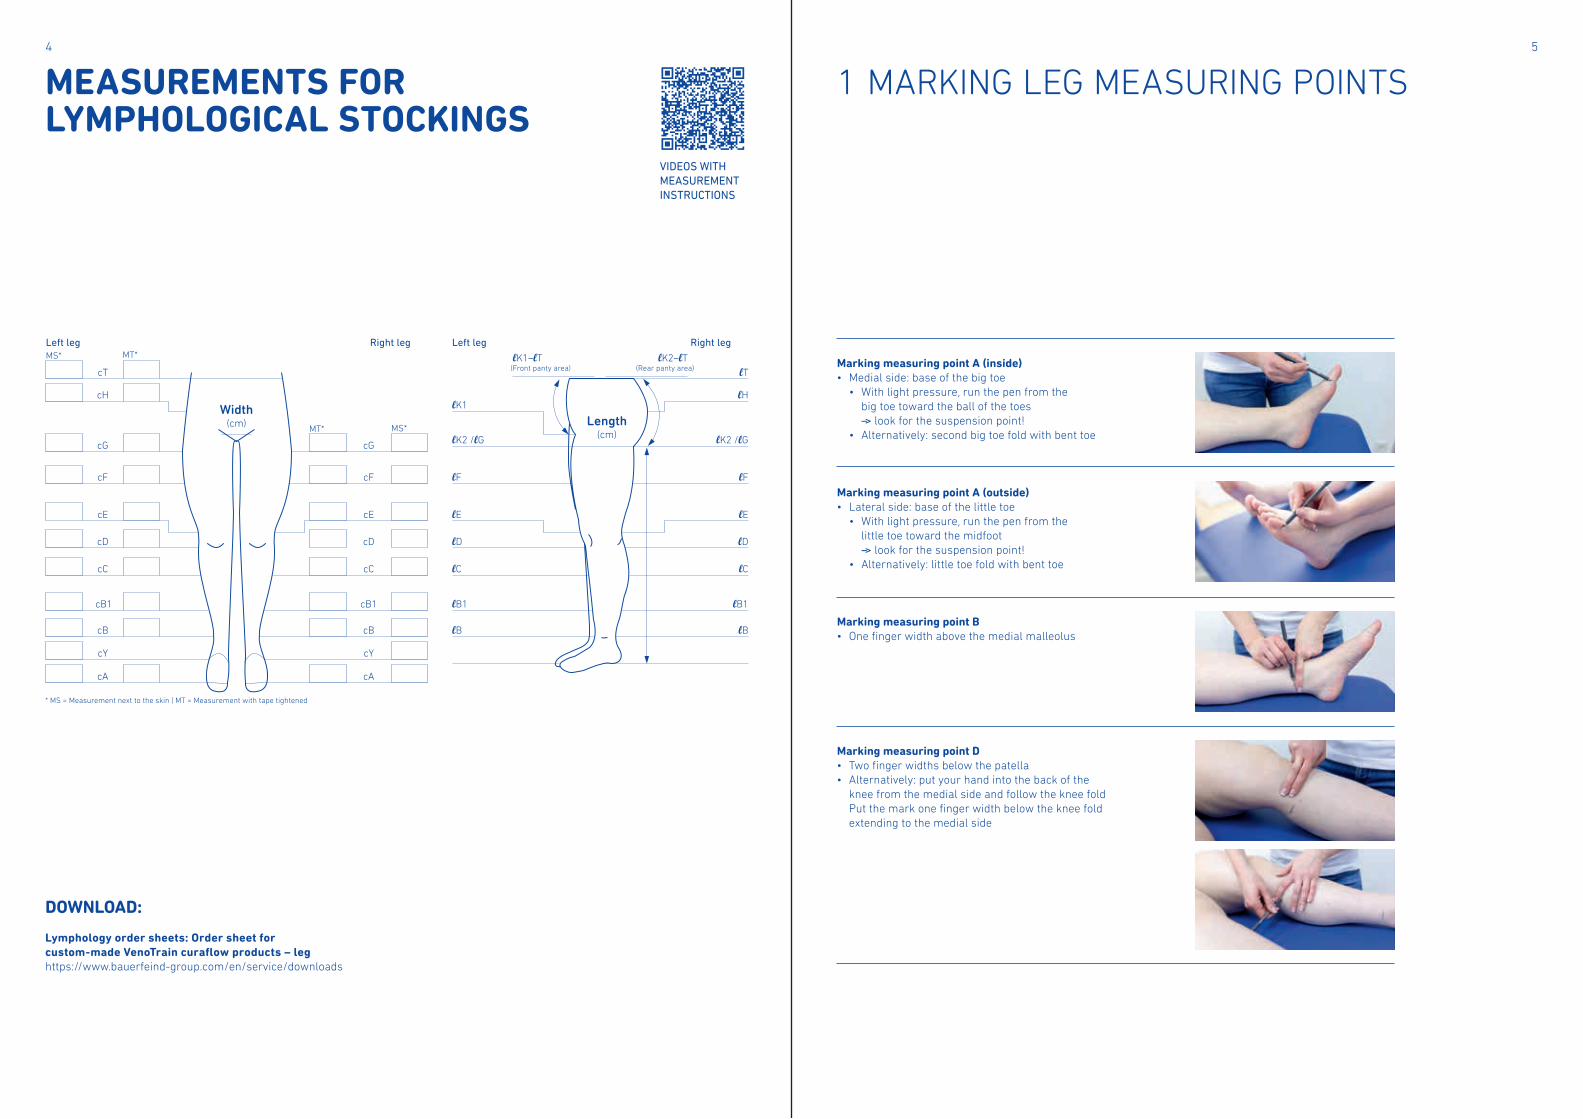
Measuring point lC• Measured along the medial side• Perpendicular from the sole of the foot to marking C
Measuring point lD• Measured along the medial side• Perpendicular from the sole of the foot to marking D
Measuring point lE• Measured along the medial side• Perpendicular from the sole of the foot to marking E
Measuring point lF• Measured along the medial side• Perpendicular from the sole of the foot to marking F
Measuring points lZ, lAi, lA• lZ:
Entire length of foot: distance from heel to end of big toe or second toe
• lAi: Length of medial foot side: distance from heel to big toe skin fold
• lA: Length of lateral foot side: distance from heel to little toe skin fold
Measuring point lB• Measured along the medial side• Perpendicular from the sole of the foot to marking B
Measuring point lB1• Measured along the medial side• Perpendicular from the sole of the foot to marking B1
3 LEG LENGTH MEASUREMENT

1312
VISCOELASTIC PELOTTES
Measuring point lK1 – lT (front panty area)• Measure next to the skin• From K1 to panty area edging T
Measuring point lH• Measured along the lateral side• Perpendicular from the sole of the foot to the widest
part of the buttocks
Measuring point lT• Measured along the lateral side• Perpendicular from the sole of the foot to the panty
area edging
Measuring point lK1• Measured from the front• Perpendicular from the sole of the foot to the groin at
the level of the pubic bone (halve the thigh, then halve it again)
TIP: Position the tape measure with the zero on the groin and include the front panty area height in your measurement.
Measuring point lK2 – lT (rear panty area)• Measure next to the skin• From the gluteal fold to the panty area edging T• Ask the patient to bend forward
Measuring point lG / lK2• Measured from the back• Perpendicular from the sole of the foot
to the gluteal foldTIP: Position the tape measure with the zero on the gluteal fold and include the rear panty area height in your measurement.
Measuring point P1• Circumference from the medial malleolus to the
lateral malleolus via the Achilles tendon
Measuring point P2• Circumference from the medial malleolus to the
lateral malleolus via the sole of the foot
3 LEG LENGTH MEASUREMENT

1514
AA1 AB AB1 AD AF AG AT ATE
FT ET CT BT BD BG B1G CG
AD
AD
AG
B1T
B1T
ET
T
T
T
H
H
H
G
G
G
F
F
F
E
E
E
D
D
D
C
C
C
B1
B1
B1
B
B
B
STOCKING DESIGNS
VenoTrain® curaflow AG with silicone dotted band
VenoTrain® curaflow AT with open foot
VenoTrain® curaflow AD with diagonal, closed toe
VenoTrain® curaflow with 90-degree heel
VenoTrain® curaflow AD with open toe
CUSTOM-MADE SOLUTIONS
VenoTrain® curaflow AG with slanted edging
1. Patient benefits:• Easy to put on• Easier everyday handling
2. Benefits from a therapist’s point of view:• Individual treatment options
in problematic areas• Increased stiffness and therefore higher
compression
No double compressionAD with B1T pantyhose
• AD stocking • Measure next to the skin• Measure with tape tight-
ened / slightly tightened • B1T pantyhose
• Measure next to the skin only from B1 to D
• from E standard method- Measure next to the skin and with tape tightened
Double compressionAD with B1T pantyhose
• AD stocking • Measure next to the skin• Measure with tape tight-
ened / slightly tightened • B1T pantyhose
• Measure next to the skin only at B1• C to D – Measure next to the skin
and with tape slightly tightened depending on the edema (tape should only be slightly tightened)
• From E standard method – Measure next to the skin and with tape tightened
No double compressionAG with ET pantyhose
• AG stocking • Measure next to the skin• Measure with tape tight-
ened / slightly tightened • ET pantyhose
• Measure next to the skin only from E to G
• from H standard method Measure next to the skin and with tape tightened /slightly tightened
REASONS FOR MULTI-PART COMPRESSION STOCKINGS:
EXAMPLES OF MULTI-PART COMPRESSION STOCKINGS:
• The patient must be able to wear only the lower part of the product. That is why the relevant measurements are taken according to the standard method.
• For straight bottom edging such as for BT or ET, the lower circumference is measured next to the skin only. Alternatively, a few cm can be added.
• In areas that overlap and are not suitable for double compression, only measurements next to the skin are taken for the uppermost product.
• If double compression is required, measure the overlapping area at your own discretion with light tension.
GENERAL INFORMATION ABOUT MEASUREMENTS:
MULTI-PART COMPRESSION STOCKINGS
16 17
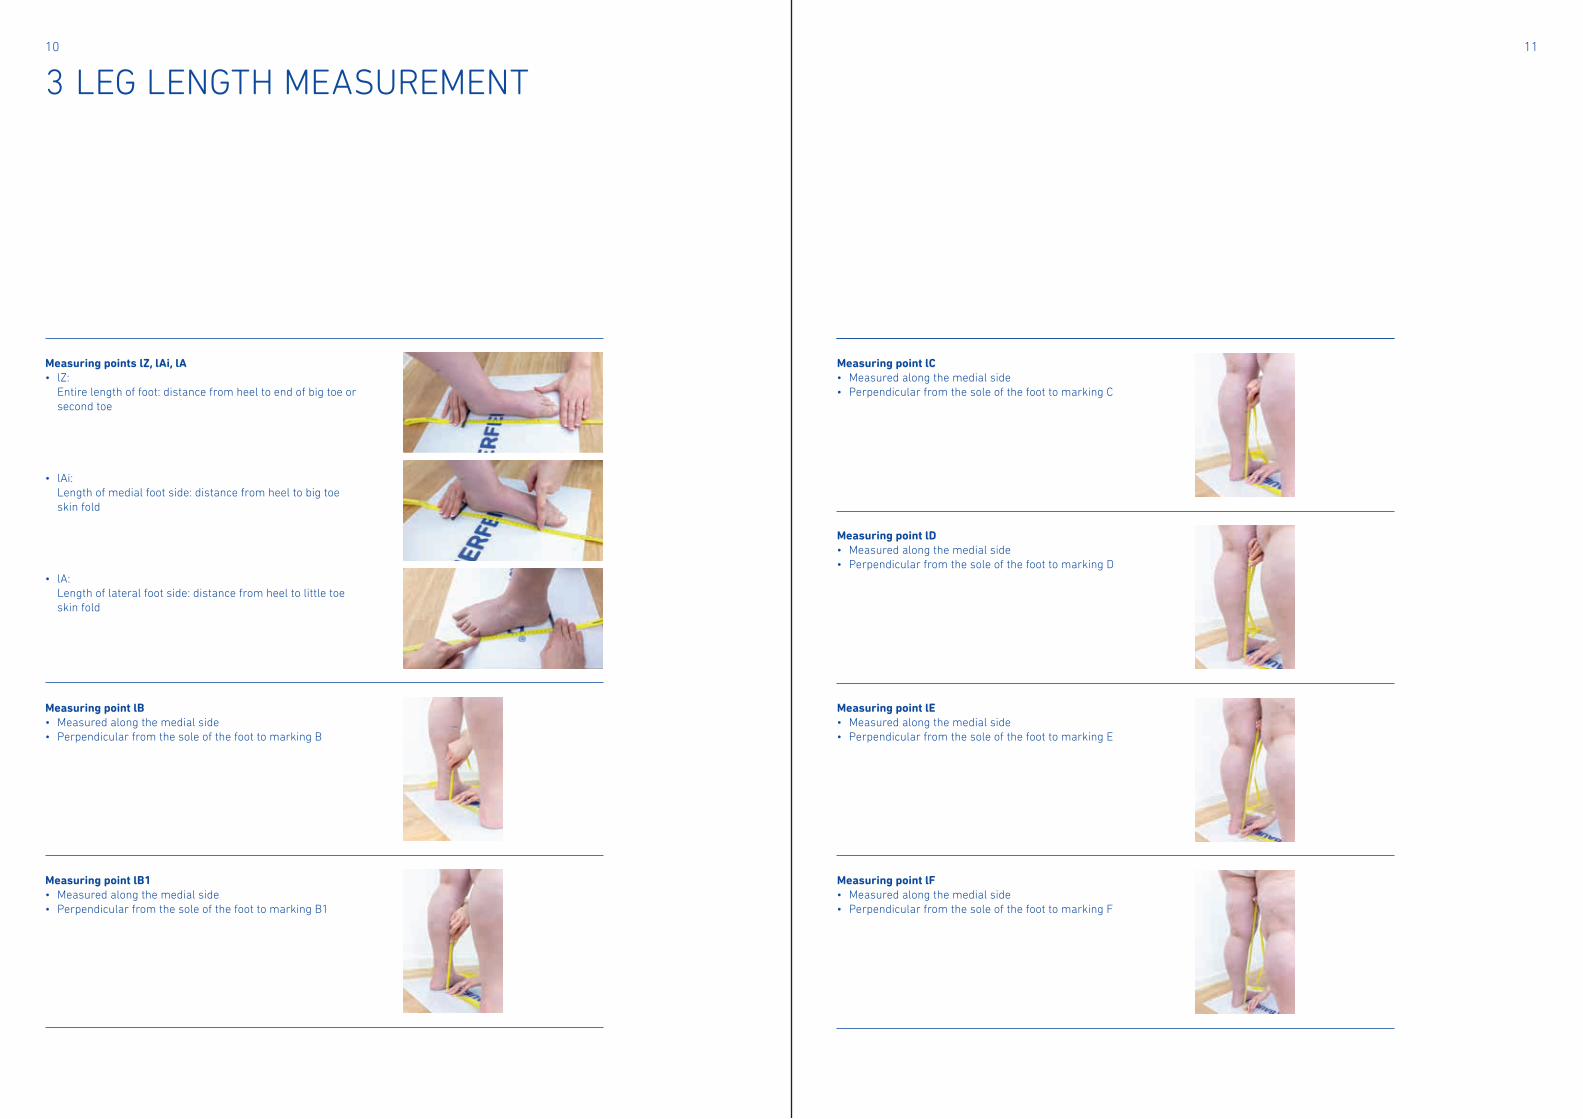
cZ
cX
X–Z
cZ
cX
ZZ
XX
DOWNLOAD:
Lymphology order sheets: Order sheet for custom-made VenoTrain curaflow products – toe caphttps://www.bauerfeind-group.com/en/service/downloads
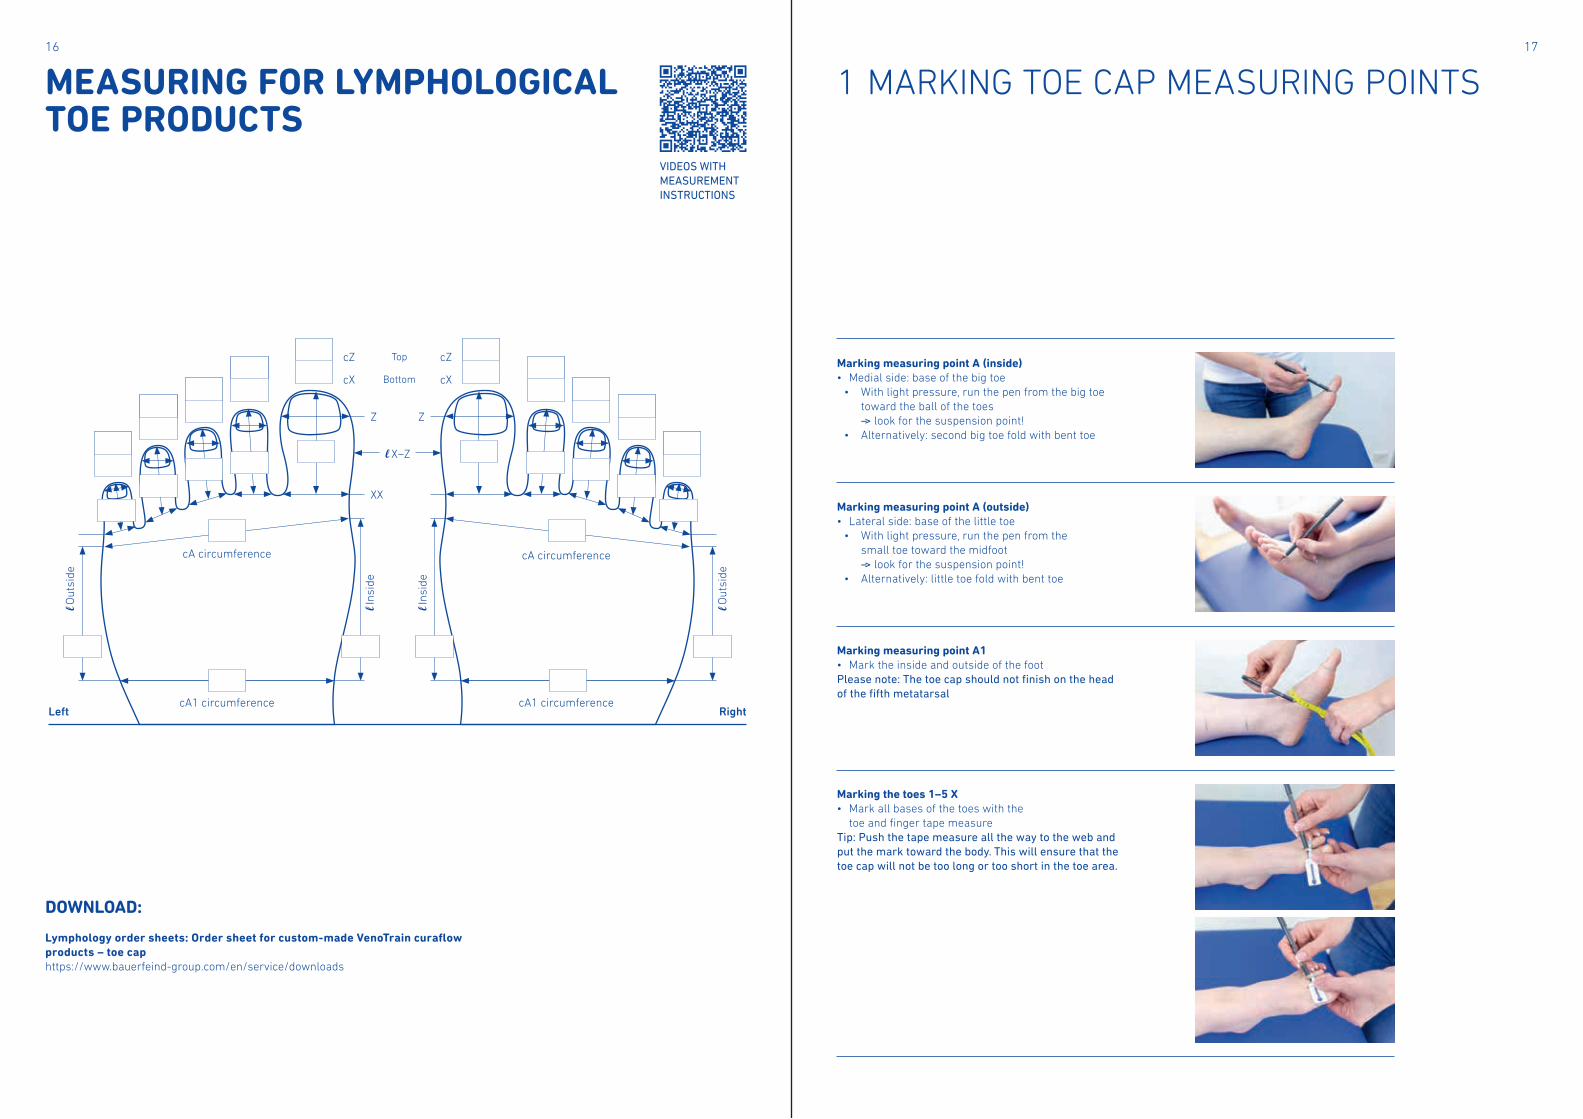
Marking measuring point A (inside)• Medial side: base of the big toe
• With light pressure, run the pen from the big toe toward the ball of the toes –> look for the suspension point!
• Alternatively: second big toe fold with bent toe
Marking measuring point A (outside)• Lateral side: base of the little toe
• With light pressure, run the pen from the small toe toward the midfoot –> look for the suspension point!
• Alternatively: little toe fold with bent toe
Marking measuring point A1• Mark the inside and outside of the footPlease note: The toe cap should not finish on the head of the fifth metatarsal
Marking the toes 1–5 X• Mark all bases of the toes with the
toe and finger tape measureTip: Push the tape measure all the way to the web and put the mark toward the body. This will ensure that the toe cap will not be too long or too short in the toe area.
MEASURING FOR LYMPHOLOGICAL TOE PRODUCTS
VIDEOS WITH MEASUREMENT INSTRUCTIONS
1 MARKING TOE CAP MEASURING POINTS
Top
Bottom
cA circumference cA circumference
cA1 circumference cA1 circumferenceRightLeft
Insi
de
Insi
de
Out
side
Out
side
18 19
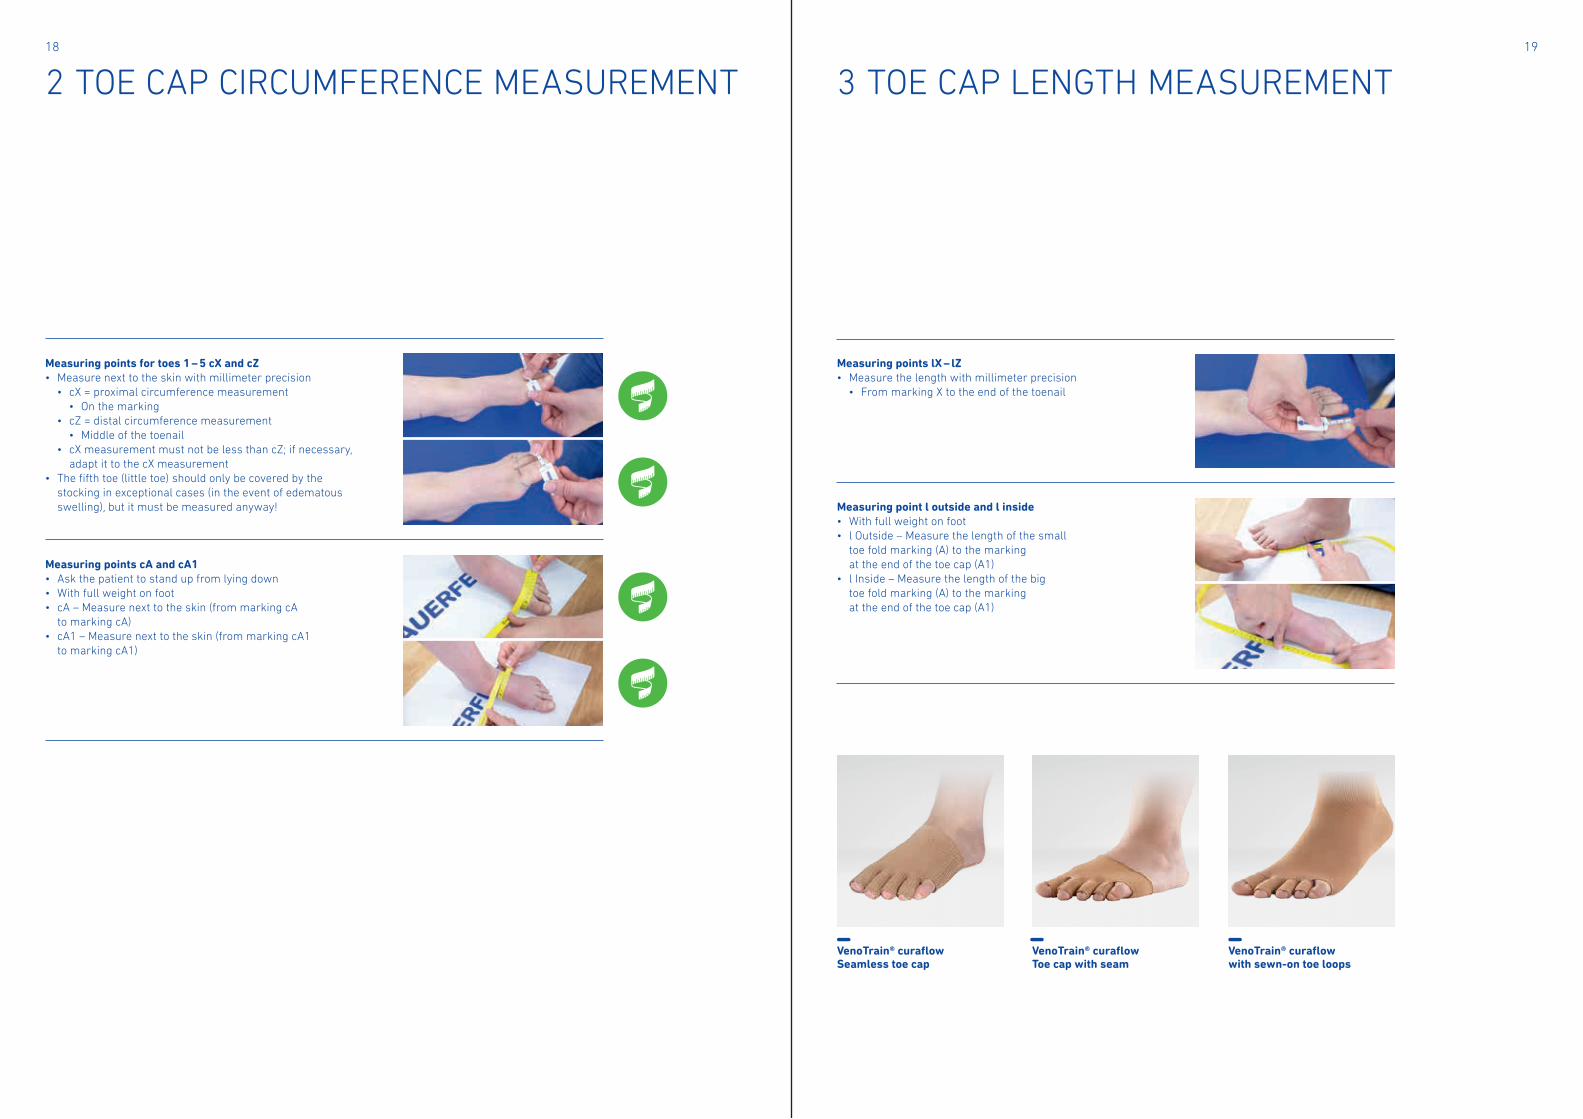
Measuring points for toes 1 – 5 cX and cZ• Measure next to the skin with millimeter precision
• cX = proximal circumference measurement• On the marking
• cZ = distal circumference measurement• Middle of the toenail
• cX measurement must not be less than cZ; if necessary, adapt it to the cX measurement
• The fifth toe (little toe) should only be covered by the stocking in exceptional cases (in the event of edematous swelling), but it must be measured anyway!
Measuring points lX – lZ• Measure the length with millimeter precision
• From marking X to the end of the toenail
Measuring points cA and cA1• Ask the patient to stand up from lying down• With full weight on foot• cA – Measure next to the skin (from marking cA
to marking cA)• cA1 – Measure next to the skin (from marking cA1
to marking cA1)
Measuring point l outside and l inside• With full weight on foot• l Outside – Measure the length of the small
toe fold marking (A) to the marking at the end of the toe cap (A1)
• l Inside – Measure the length of the big toe fold marking (A) to the marking at the end of the toe cap (A1)
2 TOE CAP CIRCUMFERENCE MEASUREMENT 3 TOE CAP LENGTH MEASUREMENT
VenoTrain® curaflowSeamless toe cap
VenoTrain® curaflowToe cap with seam
VenoTrain® curaflow with sewn-on toe loops

20 21
DONNING HELPERS AND ACCESSORIES:
CARING FOR MEDICAL COMPRESSION STOCKINGS:
VENOTRAIN® DONNING GLOVESThese rubber gloves make putting on and taking off VenoTrain compression stockings particularly easy. Thanks to the gripping surface, the knitted fabric is easy to smooth out evenly across the leg. At the same time, the stockings are protected from damage (e.g. caused by fingernails) more effectively. Combined with the VenoTrain glider, the Bauerfeind rubber gloves are the perfect solution for easy and correct donning and doffing of compression stockings.
BAUERFEIND CARE FOAM* • Protects and soothes the skin using
panthenol, without leaving oily residues. • Compression stockings can be put on more
easily and provide additional support.• Forms an invisible protective layer to guard
against germs and fungi • Regulates and stabilizes: the skin returns to
its normal state and becomes smooth • Especially suitable for patients with diabetes
or allergies • Care foam for use in the morning• With this care foam, Bauerfeind is expanding
its range of care products to allow for different skin types and requirements.
VENOTRAIN® LOTION*This intensive care product for dry skin was developed in cooperation with Sebapharma. The gentle care lotion is based on an oil-in-water mixture with chamomile extract and allantoin. VenoTrain lotion ensures a natural moisture balance that can be felt straight away:• Noticeably increased elasticity• Stabilization of the skin’s acid mantle• Relieves feelings of tension and itching
For use in the evening after taking off the stockings
PRACTICAL DONNING AIDVenoTrain glider is a practical aid for putting on and taking off medical compression stockings. This useful aid made of silicone-coated polyamide makes it easy to slide the stocking (or sleeve) over the leg (or arm). It is compact, time-saving and reusable, meaning that the VenoTrain glider is also ideal for traveling.
Whether open or closed toe – with the VenoTrain glider, you can put on any compression stocking in next to no time:1. Position the non-slip foam base on the floor with the tip pointing
forward.2. Place the VenoTrain glider on top of the base with the white side up.3. Place the toes in the marked semicircle, then push the foot gently
forward.4. Let the foot glide into the donning aid.5. Smooth the compression stocking, together with the VenoTrain glider,
upward over the foot (starting, as usual, from the toe). The stocking can now easily be put on the leg.
6. Finally, using the tape, pull the VenoTrain glider up out of the stocking.
VENOTRAIN® DETERGENT* FOR THE DAILY CARE OF COMPRESSION STOCKINGS
Gentle and highly efficient cleaning for all stockings: this special liquid detergent has a fresh, pleasant scent and lasts for at least 10 washes per bottle. Also suitable for use in washing machines. Caution: Never use fabric softener because this can impair the medical effectiveness of compression stockings.
• Gentle care• Lasting protection• For all elastic textile materials
VENOTRAIN® LINGERIE BAGSecure protection in the washing machine: the zip-up bag made from a durable and particularly fine mesh helps with the sorting of laundry and offers reliable protection against runs and snags in compression stockings.
• Hard-wearing• For 1–2 pairs of stockings
* only available in selected countries
• Avoid ironing and dry-cleaning.• Increase the useful life of compression stockings
by hand-washing them daily or using a gentle machine wash cycle (please note the care instructions on the label of the stockings).
• The product can be tumble-dried provided a delicate cycle is chosen (refer to the information on the label).
• However, direct heat must be avoided (radiators, sunshine).
• Use a mild detergent only and avoid the use of additives like fabric softener, optical brighteners or stain removers.
• Please wipe the silicone top band on the inside once a day with a damp cloth.
• Store the VenoTrain compression stockings in a dry place away from direct light.

22 2323
YOUR OWN NOTES

Do you have any questions, suggestions or requests? Just get in touch:
BAUERFEIND.COM
Rev
. 2 –
202
1-10
_271
421
0 20
21 0
02
BAUERFEIND AGTriebeser Straße 16 07937 Zeulenroda-TriebesGermanyP +49 (0) 36628 66-10 00 F +49 (0) 36628 66-19 99E [email protected]
UNITED KINGDOMBauerfeind UKRegents Place85 Tottenham Court RoadLondonW1T 4TQP +44 (0) 121 446-5353F +44 (0) 121 446-5454E [email protected]
USABauerfeind USA, Inc.75 14th St NESuite 2350Atlanta, GA 30309 P +1 800 423-3405 P +1 404 201-7800 F +1 404 201-7839E [email protected]
Related Documents