MCS-3000 Series USB Software for OS X JLCooper makes no warranties, express or implied, regarding this software’s fitness for a particular purpose, and in no event shall JLCooper Electronics be liable for incidental or consequential damages, loss of profits, loss of data or data being rendered inaccurate, or losses sustained by third parties even if JLCooper Electronics has been advised of the possibility of such damages.

Welcome message from author
This document is posted to help you gain knowledge. Please leave a comment to let me know what you think about it! Share it to your friends and learn new things together.
Transcript

MCS-3000 Series USB Software for OS X
JLCooper makes no warranties, express or implied, regarding this software’s fitness for a particular purpose, and in no event shall JLCooper Electronics be liable for incidental or consequential damages, loss of profits, loss of data or data being rendered inaccurate, or losses sustained by third parties even if JLCooper Electronics has been advised of the possibility of such damages.
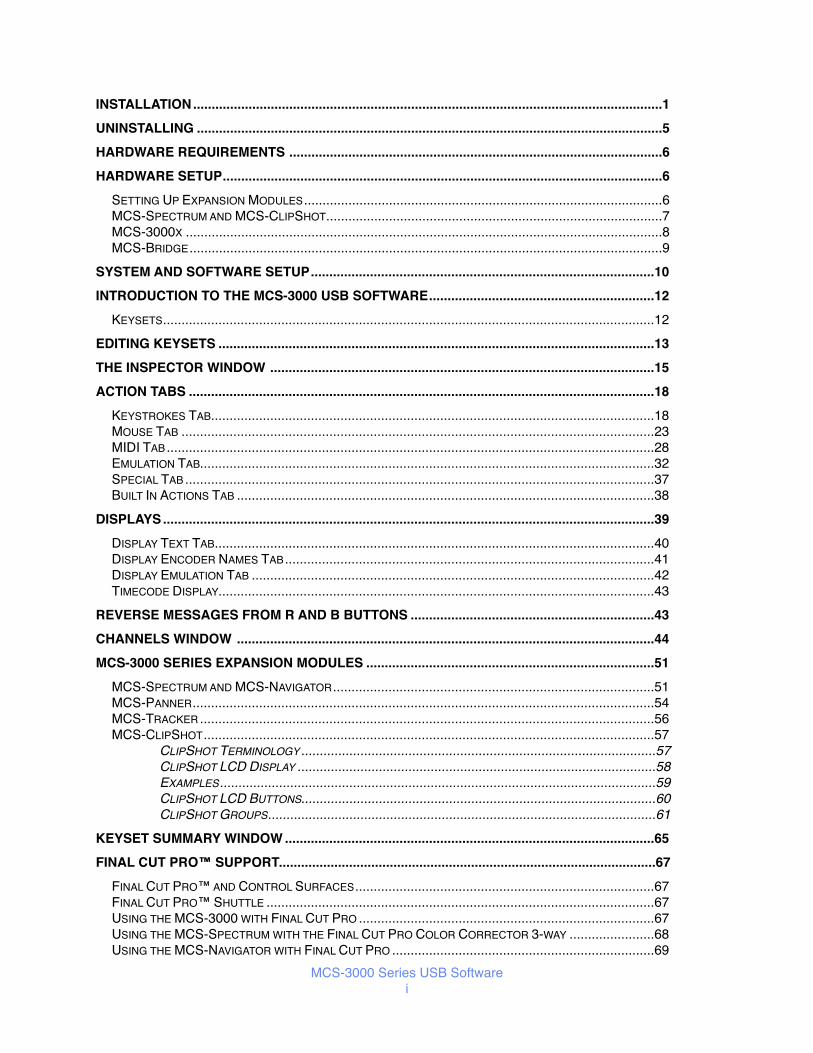
...............................................................................................................................INSTALLATION ! 1..............................................................................................................................UNINSTALLING! 5
.....................................................................................................HARDWARE REQUIREMENTS! 6.......................................................................................................................HARDWARE SETUP! 6
SETTING UP EXPANSION MODULES.................................................................................................! 6MCS-SPECTRUM AND MCS-CLIPSHOT...........................................................................................! 7MCS-3000X .................................................................................................................................! 8MCS-BRIDGE................................................................................................................................! 9
.............................................................................................SYSTEM AND SOFTWARE SETUP! 10.............................................................INTRODUCTION TO THE MCS-3000 USB SOFTWARE! 12
KEYSETS.....................................................................................................................................! 12
......................................................................................................................EDITING KEYSETS! 13........................................................................................................THE INSPECTOR WINDOW ! 15
..............................................................................................................................ACTION TABS! 18KEYSTROKES TAB........................................................................................................................! 18MOUSE TAB ................................................................................................................................! 23MIDI TAB ....................................................................................................................................! 28EMULATION TAB...........................................................................................................................! 32SPECIAL TAB ...............................................................................................................................! 37BUILT IN ACTIONS TAB .................................................................................................................! 38
.....................................................................................................................................DISPLAYS! 39DISPLAY TEXT TAB.......................................................................................................................! 40DISPLAY ENCODER NAMES TAB ....................................................................................................! 41DISPLAY EMULATION TAB .............................................................................................................! 42TIMECODE DISPLAY......................................................................................................................! 43
..................................................................REVERSE MESSAGES FROM R AND B BUTTONS! 43.................................................................................................................CHANNELS WINDOW ! 44
..............................................................................MCS-3000 SERIES EXPANSION MODULES! 51MCS-SPECTRUM AND MCS-NAVIGATOR.......................................................................................! 51MCS-PANNER.............................................................................................................................! 54MCS-TRACKER ...........................................................................................................................! 56MCS-CLIPSHOT..........................................................................................................................! 57
CLIPSHOT TERMINOLOGY ................................................................................................! 57CLIPSHOT LCD DISPLAY .................................................................................................! 58EXAMPLES......................................................................................................................! 59CLIPSHOT LCD BUTTONS................................................................................................! 60CLIPSHOT GROUPS.........................................................................................................! 61
....................................................................................................KEYSET SUMMARY WINDOW ! 65......................................................................................................FINAL CUT PRO™ SUPPORT! 67
FINAL CUT PRO™ AND CONTROL SURFACES.................................................................................! 67FINAL CUT PRO™ SHUTTLE .........................................................................................................! 67USING THE MCS-3000 WITH FINAL CUT PRO ................................................................................! 67USING THE MCS-SPECTRUM WITH THE FINAL CUT PRO COLOR CORRECTOR 3-WAY .......................! 68USING THE MCS-NAVIGATOR WITH FINAL CUT PRO .......................................................................! 69
MCS-3000 Series USB Softwarei

THE MCS-3000 FINAL CUT PRO KEYSET......................................................................................! 69
..................................................................................................FINAL CUT PRO X™ SUPPORT! 78...............................................................................................SOUNDTRACK PRO™ SUPPORT! 81
THE SOUNDTRACK PRO KEYSET...................................................................................................! 81
.............................................................................................................LOGIC PRO™ SUPPORT! 83THE LOGIC PRO KEYSET ..............................................................................................................! 83
..................................................................................................................NUENDO™ SUPPORT! 88............................................................................................................PRO TOOLS™ SUPPORT! 91
PRO TOOLS KEYSET ....................................................................................................................! 91
MCS-3000 Series USB Softwareii

Installation
Follow the hardware setup instructions for the MCS-3000 Series modules in your system. Hardware manuals will be installed into the folder /Applications/MCS-3000 USB Software. They are also available in the Help menu of the MCS-3000 application. The most up to date hardware manuals are located on the JLCooper website JLCooper Manuals page. Also, the section in this manual on Hardware Setup covers the basics of setting up your hardware, and the help display in the installer dialog can guide you through this process.
Note: if you have previously installed a version of the MCS-3000 software earlier than 3.5, you must uninstall it before installing this version.
After downloading and double-clicking the Install_MCS-3000_USB_Software.dmg file, you should see the following window:
Drag the icon labeled MCS-3000 USB Software over the icon labeled Applications alias then release the mouse. This will cause the Finder to copy the MCS-3000 software to your Applications folder.
MCS-3000 Series USB Software1

Once the copy is complete, open the /Applications/MCS-3000 USB Software/ folder and double-click on the MCS-3000 USB application.
If this is the first time you are installing this software, or if you are installing a newer version, an installation dialog will appear. Click on Continue to finish the installation, or Cancel if you want to finish it the next time you run the MCS-3000 USB application. The installation must be completed before the MCS-3000 software will be fully functional.
MCS-3000 Series USB Software2

Once all the software components have been installed, click on the Finish button.
This will take you to the initial setup dialog.
MCS-3000 Series USB Software3

Here you set information about your hardware setup. These settings are identical to the ones found in the Preferences dialog. Please see the section on the Preferences dialog for more details. There is also a help display to guide you through the setup process.
After you have changed the settings to match your MCS-3000 hardware, click on Apply. You can also click on Setup Later. In this case you can adjust these settings in the Preferences dialog.
Once you have clicked on Apply, a connection will be established between the MCS-3000 software and the MCS-3000 hardware, and you can start working with the software.
MCS-3000 Series USB Software4

Uninstalling
To uninstall run the MCS-3000 USB Uninstaller located in the /Applications folder. Click on the Uninstall button to begin. When the uninstall is finished, click on the Quit button.
If there are multiple user accounts on this Mac, there may be multiple installations of the MCS-3000 software, one for each user. Each user shares the MCS-3000 USB application and the MCS-3000 USB uninstaller, but other software components are installed separately for each user account. For this reason, the uninstaller does not remove itself or the MCS-3000 USB Software folder. Before deleting either of these, please make sure that the software has been uninstalled from all user accounts.
After uninstalling, you may notice that the MCS-3000 driver still appears in the Audio/MIDI Setup ( /Applications/Utilities/ ) MIDI window. This is because the Mac OS X tries to remember the state of your MIDI setup, even if there are changes such as removing or powering down equipment or removing drivers.
To remove the driver from Audio/MIDI Setup, disconnect the MCS from the Mac and wait for the driver’s icon in Audio/MIDI Setup to be dimmed as in the graphic below.
Click on the MCS3k USB icon to select it, then hit the DELETE key on the Mac keyboard or choose Delete from the Edit menu. Quit Audio/MIDI Setup.
The MCS-3000 software’s preference file is not removed by the uninstaller. It takes up relatively little space and should have no impact on the operation of other software once the MCS-3000 software is uninstalled. If you want to remove it, just delete the file ~/Library/Preferences/com.jlcooper.MCS3000.plist.
MCS-3000 Series USB Software5

Hardware Requirements
In order to communicate with your computer over USB, the MCS-3000 (or MCS-3800 or MCS-3400) must have an MCS-3000 USB Card Installed.
Hardware Setup
Setting Up Expansion Modules
There are several expansion modules which can be connected to an MCS-3800, 3400 or 3000, including the MCS-3000x Fader Expander, MCS-Bridge, MCS-Navigator, MCS-Tracker, MCS-Panner, MCS-Spectrum and MCS-ClipShot. They are all connected by modular “telephone-type” connectors, provided by JLCooper.
Warning: Use the cable provided by JLCooper. Do not use a standard “telephone handset” cable. If you use a standard “telephone handset” cable, you will short out and possibly damage the MCS-3000 modules.
Most modules have two expansion connectors on the back. They are chained together by connecting a cable from the master (usually an MCS-3800, 3400 or 3000) to an expansion connector on one of the modules, then another cable from that module’s second connector to the next module.
Connect expander to expander in a similar manner, using the cables provided. The system is engineered so that it does not matter which of the two connectors you use, nor in what order you chain the expanders.
MCS-3000 Series USB Software6

MCS-Spectrum and MCS-ClipShot
The MCS-Spectrum and MCS-ClipShot each have only one expansion connector. This means that they will have to go at the end of the chain. It also means that a system can not have both a Spectrum and a ClipShot connected at the same time.
The Spectrum and ClipShot both have standalone modes. If they are equipped with an optional USB card, they can be operated without being connected to an MCS-3800, 3400 or 3000.
Your Spectrum or ClipShot will arrive pre-configured for either Standalone or Slave mode depending on the options you ordered. If you ever need to change that configuration, please see the Spectrum and ClipShot hardware manuals.
MCS-Spectrum MCS-ClipShot
MCS-3000 Series USB Software7

MCS-3000x
Up to seven MCS-3000x fader expanders can be connected to an MCS-3800 or 3400, and up to eight 3000x’s can be connected to an MCS3000. This makes it possible to have as many as 64 physical faders and associated Mute, Solo, Aux and Select buttons.
MCS-3000x
The MCS-3000x expanders should all be chained to the master unit in the manner described above.
If the master unit has faders (MCS-3800 or MCS-3400), its first fader is always fader #1. The first expander’s faders are numbered starting one higher than the main unit’s last fader. If the master unit is an MCS-3000, which has no faders, then the first fader on the first expander is fader #1.
On the rear of each expander is a small cluster of four switches, known as DIP switches. These switches set the ID# of each Expander, so the system knows which Expander represents channels 1 through 8, 9 through 16, etc. It is important that each expander has a unique ID. A multiple expander system will not operate correctly if two or more units are set to the same ID.
MCS-3000 Series USB Software8
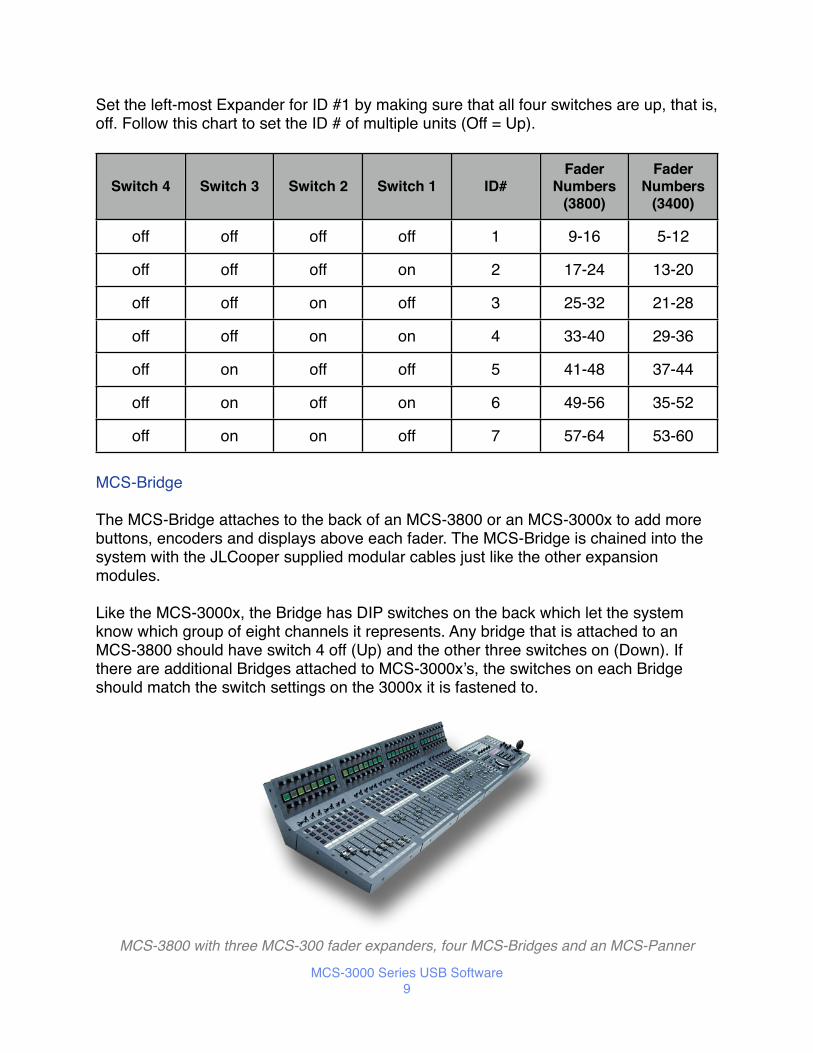
Set the left-most Expander for ID #1 by making sure that all four switches are up, that is, off. Follow this chart to set the ID # of multiple units (Off = Up).
Switch 4 Switch 3 Switch 2 Switch 1 ID#Fader
Numbers (3800)
Fader Numbers
(3400)
off off off off 1 9-16 5-12
off off off on 2 17-24 13-20
off off on off 3 25-32 21-28
off off on on 4 33-40 29-36
off on off off 5 41-48 37-44
off on off on 6 49-56 35-52
off on on off 7 57-64 53-60
MCS-Bridge
The MCS-Bridge attaches to the back of an MCS-3800 or an MCS-3000x to add more buttons, encoders and displays above each fader. The MCS-Bridge is chained into the system with the JLCooper supplied modular cables just like the other expansion modules.
Like the MCS-3000x, the Bridge has DIP switches on the back which let the system know which group of eight channels it represents. Any bridge that is attached to an MCS-3800 should have switch 4 off (Up) and the other three switches on (Down). If there are additional Bridges attached to MCS-3000x’s, the switches on each Bridge should match the switch settings on the 3000x it is fastened to.
MCS-3800 with three MCS-300 fader expanders, four MCS-Bridges and an MCS-Panner
MCS-3000 Series USB Software9
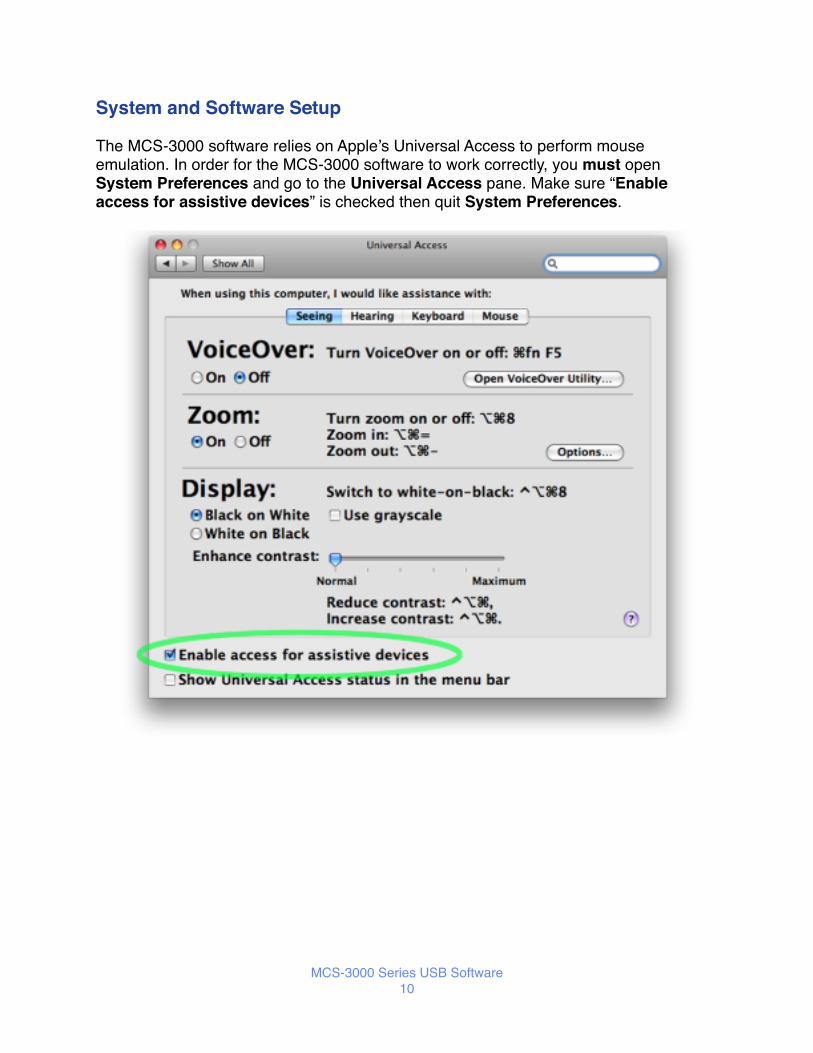
System and Software Setup
The MCS-3000 software relies on Apple’s Universal Access to perform mouse emulation. In order for the MCS-3000 software to work correctly, you must open System Preferences and go to the Universal Access pane. Make sure “Enable access for assistive devices” is checked then quit System Preferences.
MCS-3000 Series USB Software10

There is an additional one time step to perform. Open the application “MCS-3000 USB”. It is located in /Applications/MCS-3000 USB Software/. Choose Preferences… from the MCS-3000 USB menu.
The software needs to know about certain MCS-3000 Series peripherals in your system and how they are connected, namely, the MCS-Spectrum, MCS-ClipShot and MCS-Navigator. Not every combination of these peripherals is possible. For example, there can’t be a Spectrum and a ClipShot in the same setup. The Preferences dialog will keep you from picking an impossible combination. If you are not using these peripherals, leave them all set to None.
MCS-3000 Series USB Software11

Introduction to the MCS-3000 USB Software
The MCS-3000 Software extends the MCS-3000 Series hardware’s ability to control various applications running on your Macintosh™. It does this by communicating with applications via MIDI and other messaging protocols built into the Mac OS. It can also simulate mouse clicking and dragging, keystrokes and can even emulate other control surfaces if necessary.
Keysets
The MCS-3000 software uses “keysets” which are sets of various actions that are taken when MCS-3000 controls are pressed or turned. Different keysets can be applied to different applications, and the MCS-3000 will choose the correct keyset for whichever application is in the foreground. If no keyset has been created for the current foreground application, the MCS-3000 will use a built in keyset called the “Default” keyset.
To create or edit MCS-3000 keysets, open the application, “MCS-3000 USB”. To create a new keyset, choose New Keyset in the File menu and navigate to the application that will use the new keyset. You can also use Import Keyset from the File Menu to get an existing keyset. Keysets that ship with the MCS-3000 are located at /Applications/MCS-3000 USB Software/keysets/. You only need to use New Keyset or Import Keyset once for a given application. After that, keysets are stored with the MCS-3000 software’s preferences.
Each application’s keyset can have up to 4 layers, thus quadrupling the number of physical controls on the MCS-3000. To choose which layer to edit, click on one of the Layer buttons at the bottom of the main window.
You can use Export Keyset from the File Menu to save a copy of a keyset so it can be transported to another Mac or archived for safekeeping. You don’t need to use Export in your daily use of the MCS-3000. As previously pointed out, your changes are added to the MCS-3000 software’s preferences file automatically.
There are several sample keysets included in this package, including ones for Final Cut Pro™ and Color™.
MCS-3000 Series USB Software12

Editing Keysets
The application presents a graphical representation of the MCS-3000 front panel. When you click on an on-screen control (or move a control on the MCS-3000 itself), that control is selected and information about it appears in the floating Inspector window.
There are also windows representing the various MCS-3000 Series expansion modules you may have connected to your system. These windows can be opened from the Window > Peripherals menu.
MCS-3000 Series USB Software13

You can choose which keyset to edit within the MCS-3000 Series application using the Keysets menu. The menu lists all keysets that you have created or imported. The name of the currently selected keyset will be displayed at the bottom of the main window.
MCS-3000 Series USB Software14

The Inspector Window
The Inspector window is where all your work takes place. It displays information about the currently selected control and contains the facilities for editing that information.
The User Name text box allows you to give a control a more descriptive name than “M1”, “W3” or “F7”. In the example above, the “Page 5” button has been assigned an action that opens the Final Cut Pro Browser window, so naming the button “Show Browser” conveys more information than “Page 5”.
Immediately below the User Name are editing controls that vary depending on what kind of MCS-3000 control is being edited. If the control is a button, you will see a “Latched” checkbox that lets you choose between a momentary (pressing the button turns it “on”, releasing it turns it “off”) or latched (pressing and releasing it turns it “on” and pressing and releasing it a second time turns it “off”) behavior.
MCS-3000 Series USB Software15

If the control is a trackball, there will be controls that let you set its color and brightness. Other types of MCS-3000 controls don’t have any special editing controls here.
Next is a description of the action that is to take place when the selected MCS-3000 control is pressed or turned while the target application is active. Below that is the area where this action can be edited. There are a series of tabs representing the different kinds of actions that can be performed and clicking on one of these tabs will display controls for editing its kind of action. The available actions are Built In, Keystrokes, Mouse, MIDI, Special and Emulation.
Any changes made in one of these tabs are immediately applied to the selected control. The MCS-3000 software allows multiple levels of Undo, so you can easily get back to any starting point.
MCS-3000 Series USB Software16
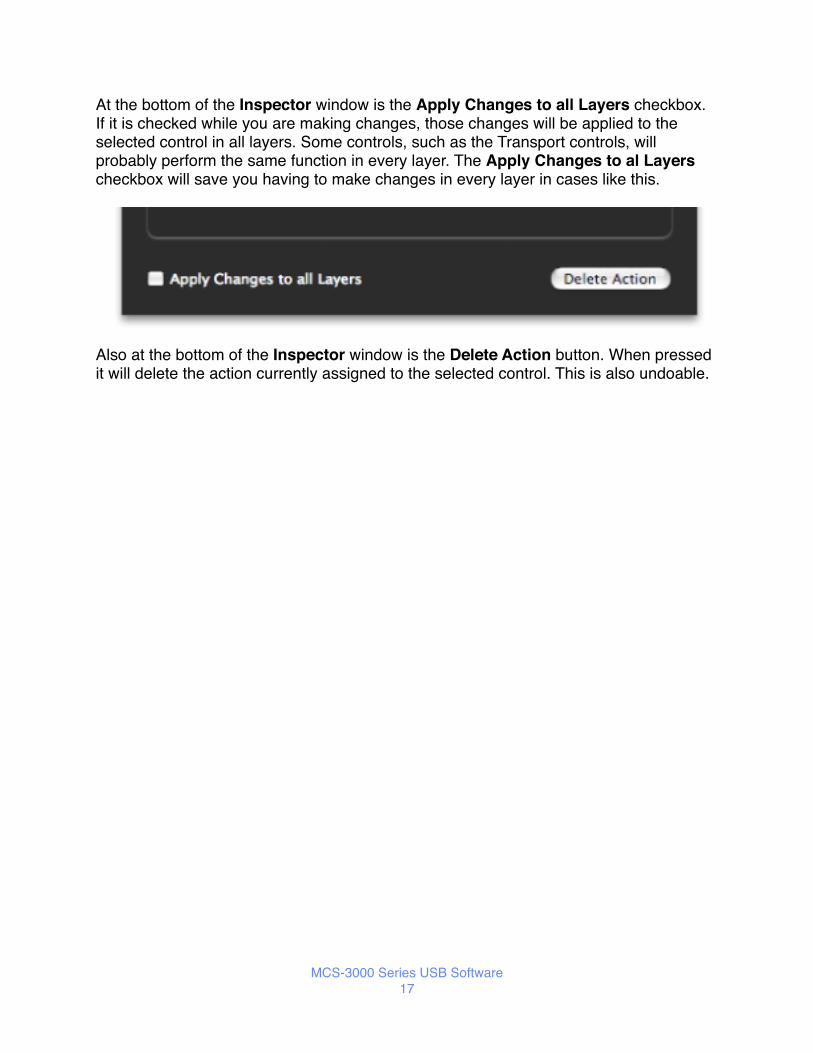
At the bottom of the Inspector window is the Apply Changes to all Layers checkbox. If it is checked while you are making changes, those changes will be applied to the selected control in all layers. Some controls, such as the Transport controls, will probably perform the same function in every layer. The Apply Changes to al Layers checkbox will save you having to make changes in every layer in cases like this.
Also at the bottom of the Inspector window is the Delete Action button. When pressed it will delete the action currently assigned to the selected control. This is also undoable.
MCS-3000 Series USB Software17

Action Tabs
Keystrokes Tab
The MCS-3000 controls can be assigned to send a sequence of keystrokes to an application just as if they were typed on the Mac keyboard. These assignments are set up in the Keystrokes Tab.
Select a control to edit, place the cursor in the Keystroke field and type a key. If you hold down any modifier keys (command, shift, option or control) while typing this key, the modifier checkboxes will be set up accordingly. You can also manually change the modifier checkboxes by clicking on them.
MCS-3000 Series USB Software18
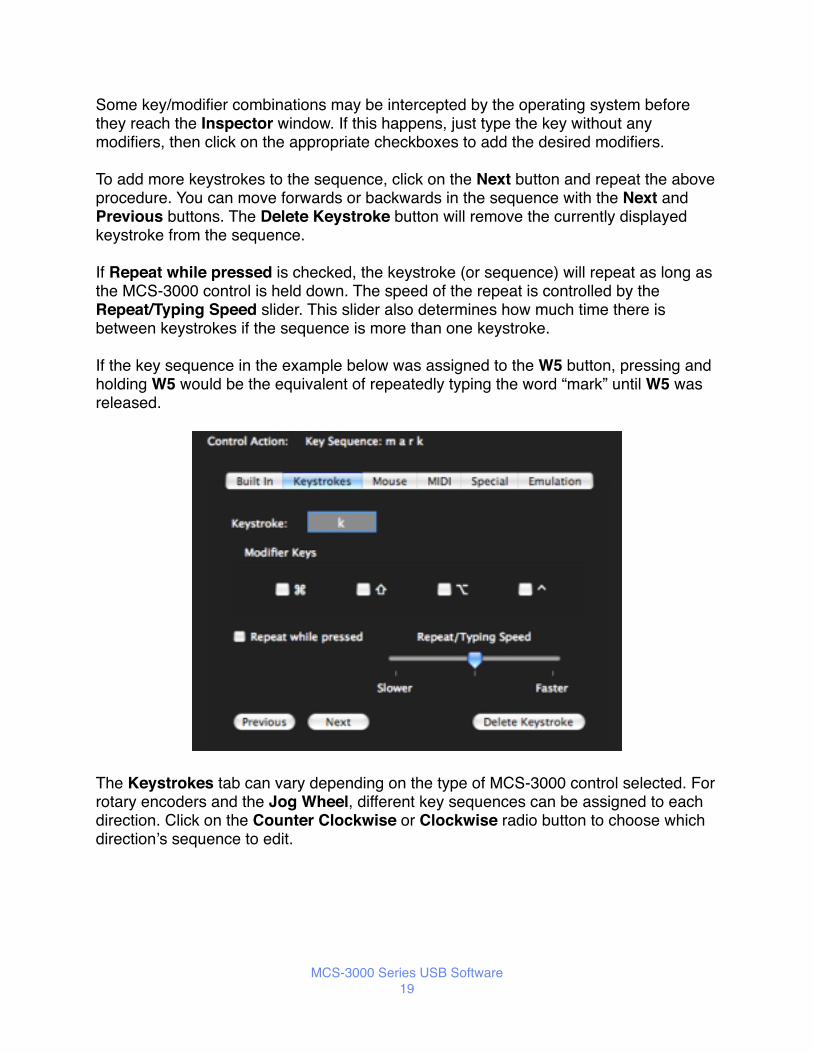
Some key/modifier combinations may be intercepted by the operating system before they reach the Inspector window. If this happens, just type the key without any modifiers, then click on the appropriate checkboxes to add the desired modifiers.
To add more keystrokes to the sequence, click on the Next button and repeat the above procedure. You can move forwards or backwards in the sequence with the Next and Previous buttons. The Delete Keystroke button will remove the currently displayed keystroke from the sequence.
If Repeat while pressed is checked, the keystroke (or sequence) will repeat as long as the MCS-3000 control is held down. The speed of the repeat is controlled by the Repeat/Typing Speed slider. This slider also determines how much time there is between keystrokes if the sequence is more than one keystroke.
If the key sequence in the example below was assigned to the W5 button, pressing and holding W5 would be the equivalent of repeatedly typing the word “mark” until W5 was released.
The Keystrokes tab can vary depending on the type of MCS-3000 control selected. For rotary encoders and the Jog Wheel, different key sequences can be assigned to each direction. Click on the Counter Clockwise or Clockwise radio button to choose which direction’s sequence to edit.
MCS-3000 Series USB Software19

In the example below, a counter clockwise turn would send a “-” and a clockwise turn would send a “+”.
MCS-3000 Series USB Software20

Trackballs and joysticks can have a different key sequence for Up, Down, Left and Right movements. In the example below, the trackball would send a corresponding Arrow key for each direction.
MCS-3000 Series USB Software21

The Shuttle Ring can have a key sequence assigned not only to its counter clockwise and clockwise directions, but also to it’s center detent. The example below implements JKL shuttling which is used by several nonlinear video editors. In other words, the shuttle will send a “j” when being turned counter clockwise, an “l” when being turned clockwise and a “k” when it is returned to the center position.
MCS-3000 Series USB Software22

Mouse Tab
The controls on the MCS-3000 can be made to emulate the Macintosh mouse. Buttons can perform clicks, rotary encoders, the Jog Wheel and the Shuttle Ring can perform horizontal and vertical moves and drags, and trackballs and joysticks can perform 360° moves and drags.
MCS-3000 Series USB Software23

The Mouse Action popup lists the actions available for the selected control. For example, if the Jog Wheel is selected the popup would look like this:
The Starting Location popup lets you choose where the click, move or drag will originate.
If you choose Don’t Capture, the mouse action will always begin at the current location of the Mouse pointer. If you choose any other option, you will be prompted to pick a point in one of the target application’s windows. The options in this menu determine how the MCS-3000 will find that point in the event that the destination window has been resized or moved.
Option When Destination Window is Resized or Moved
Relative to Window Top Left The start point will stay the same distance from the top left corner of the window.
Relative to Window Top Right The start point will stay the same distance from the top right corner of the window.
Relative to Window Top Percentage of Width The start point will stay the same distance from the top of the window, but it’s horizontal position will be a percentage of the window’s width..
MCS-3000 Series USB Software24

Option When Destination Window is Resized or Moved
Relative to Window Bottom Left The start point will stay the same distance from the bottom left corner of the window.
Relative to Window Bottom Right The start point will stay the same distance from the bottom right corner of the window.
Relative to Window Bottom Percentage of Width The start point will stay the same distance from the bottom of the window, but it’s horizontal position will be a percentage of the window’s width..
Relative to Screen Top Left The start point will stay the same distance from the top left corner of the screen, no matter what the size or position of the window.
For example, let’s say that a particular application has an onscreen shuttle slider in the lower right hand corner of it’s Timeline window, and the center of that slider is 100 pixels from the right of the window and 20 pixels from the bottom of the window. When the window is resized, the slider stays at 100 pixels from the right and 20 pixels from the bottom of the window.
Suppose the only way to access this program’s shuttle function is by dragging this slider left or right. You could program the MCS-3000 Shuttle Ring to do a horizontal drag starting at 100, 20 Relative to Window Bottom Right.
MCS-3000 Series USB Software25
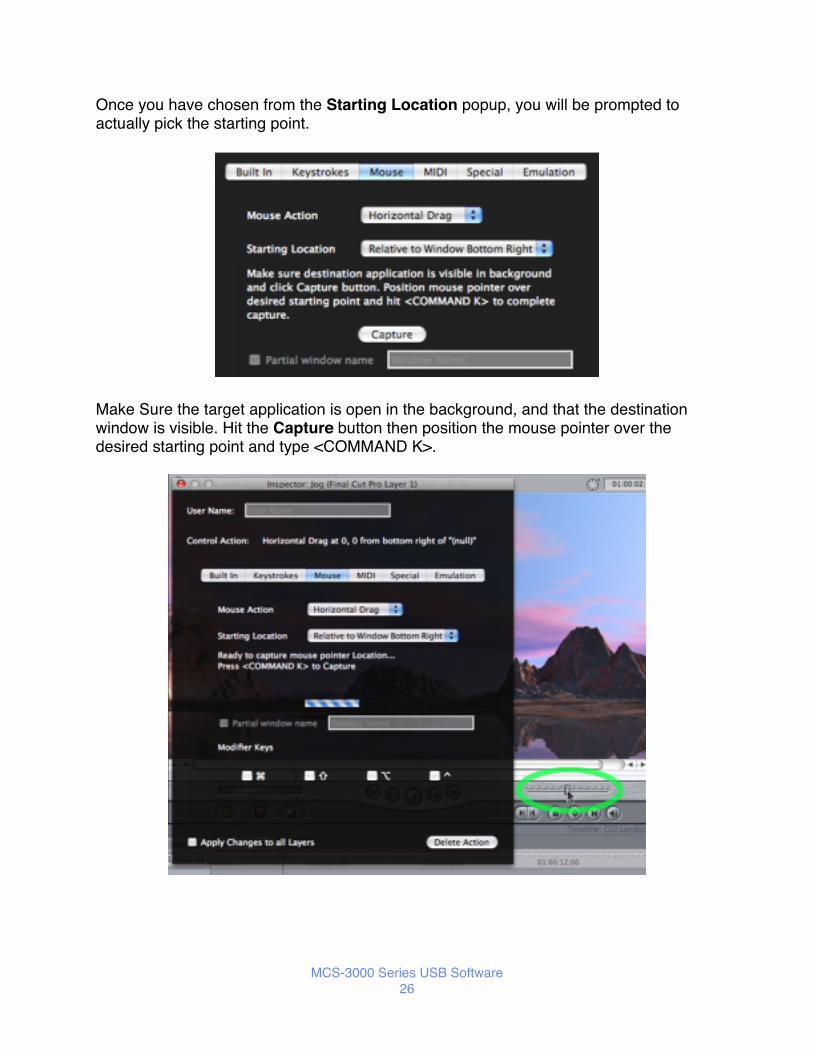
Once you have chosen from the Starting Location popup, you will be prompted to actually pick the starting point.
Make Sure the target application is open in the background, and that the destination window is visible. Hit the Capture button then position the mouse pointer over the desired starting point and type <COMMAND K>.
MCS-3000 Series USB Software26
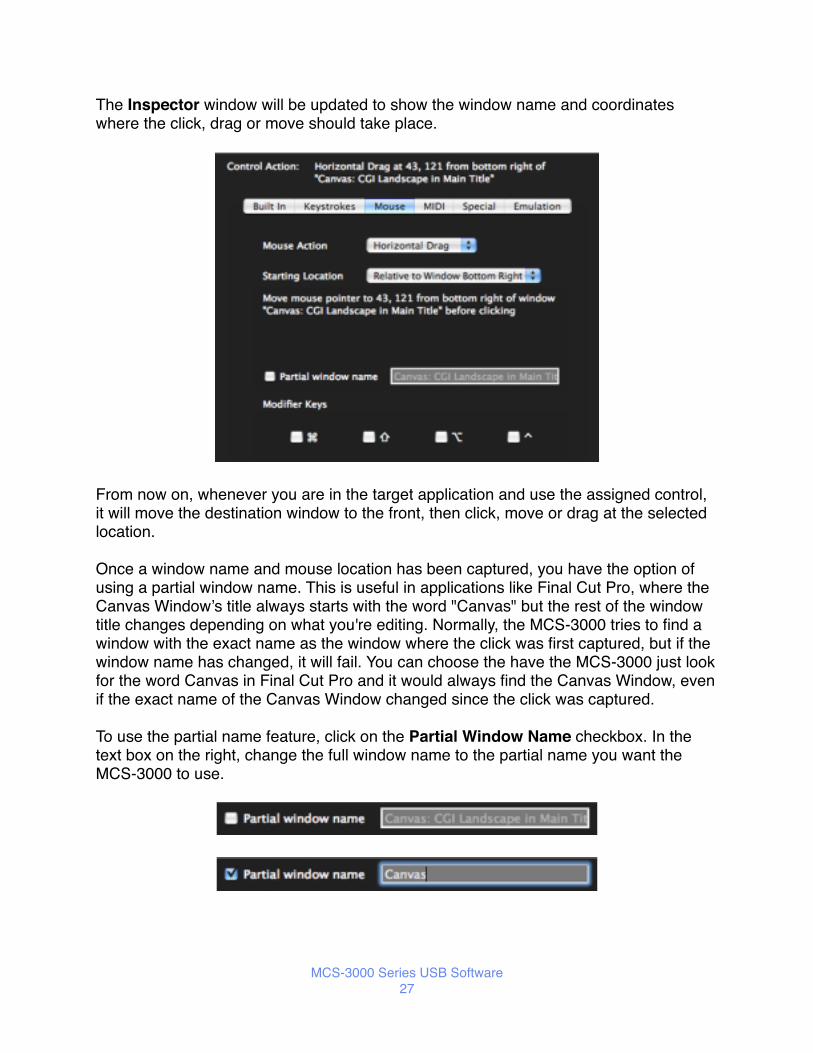
The Inspector window will be updated to show the window name and coordinates where the click, drag or move should take place.
From now on, whenever you are in the target application and use the assigned control, it will move the destination window to the front, then click, move or drag at the selected location.
Once a window name and mouse location has been captured, you have the option of using a partial window name. This is useful in applications like Final Cut Pro, where the Canvas Window’s title always starts with the word "Canvas" but the rest of the window title changes depending on what you're editing. Normally, the MCS-3000 tries to find a window with the exact name as the window where the click was first captured, but if the window name has changed, it will fail. You can choose the have the MCS-3000 just look for the word Canvas in Final Cut Pro and it would always find the Canvas Window, even if the exact name of the Canvas Window changed since the click was captured.
To use the partial name feature, click on the Partial Window Name checkbox. In the text box on the right, change the full window name to the partial name you want the MCS-3000 to use.
MCS-3000 Series USB Software27

MIDI Tab
An MCS-3000 can be made to appear as a MIDI device to MIDI applications. Any MCS-3000 control can be programmed to send and respond to a MIDI message.
There are three radio buttons for choosing the type of MIDI message to assign.
None No MIDI message for the selected control. If some other type of action has already been assigned, the None button will be selected. Clicking on the None button will delete the currently assigned action.
Native MIDI Native MIDI actions send and respond to the MCS-3000 hardware’s built MIDI protocol. You would typically use this setting with an application which directly supports the MCS-3000 Series protocol. It could also be used with an application that has a MIDI “Learn” feature.
For convenience, choosing Set all Controls to Native MIDI in the Actions menu will assign Native MIDI actions to all of the MCS-3000 controls on all layers in the current keyset.
Custom MIDI Custom MIDI actions send and respond to user defined MIDI messages.
MCS-3000 Series USB Software28

When Custom MIDI is chosen, more controls will become visible for editing the custom messages.
The MIDI Message Type popup lets you choose any of the basic MIDI messages except for system exclusive and MIDI Time Code.
The first group of messages in the popup include a MIDI channel. If you choose one of these message types, a channel editor appears. You can either type or use the up and down arrows to set the channel. This editor accepts values from 1 through 16.
MCS-3000 Series USB Software29
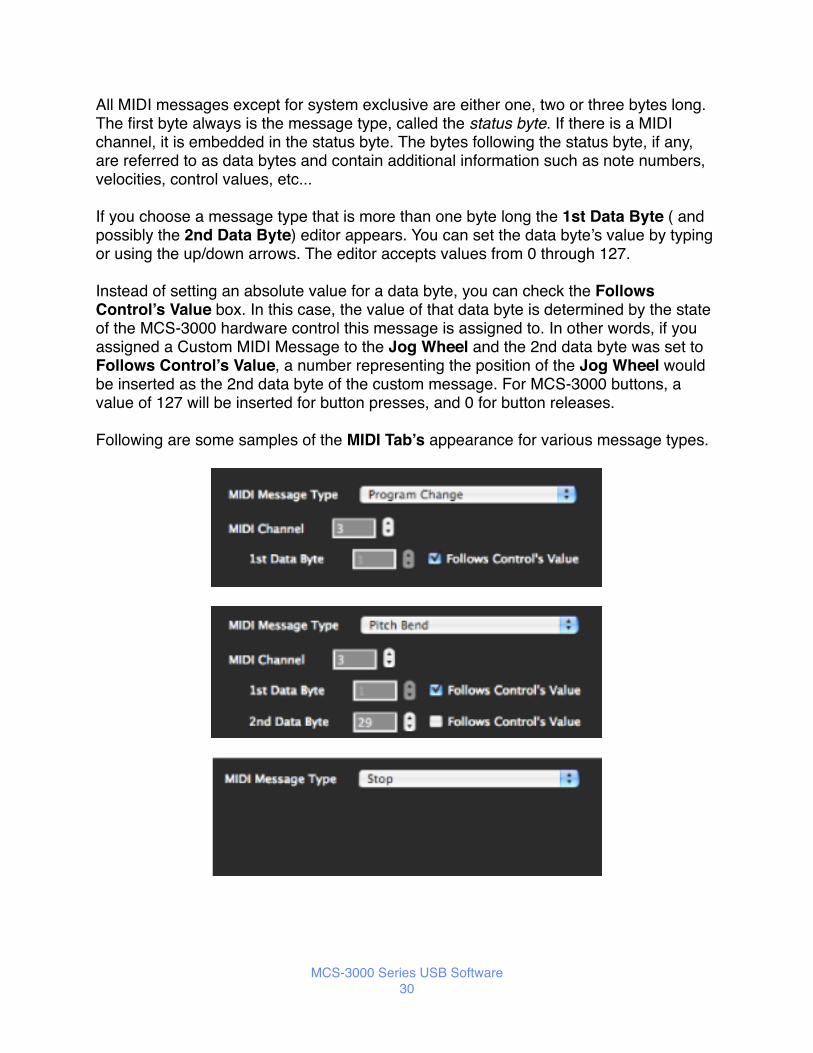
All MIDI messages except for system exclusive are either one, two or three bytes long. The first byte always is the message type, called the status byte. If there is a MIDI channel, it is embedded in the status byte. The bytes following the status byte, if any, are referred to as data bytes and contain additional information such as note numbers, velocities, control values, etc...
If you choose a message type that is more than one byte long the 1st Data Byte ( and possibly the 2nd Data Byte) editor appears. You can set the data byte’s value by typing or using the up/down arrows. The editor accepts values from 0 through 127.
Instead of setting an absolute value for a data byte, you can check the Follows Control’s Value box. In this case, the value of that data byte is determined by the state of the MCS-3000 hardware control this message is assigned to. In other words, if you assigned a Custom MIDI Message to the Jog Wheel and the 2nd data byte was set to Follows Control’s Value, a number representing the position of the Jog Wheel would be inserted as the 2nd data byte of the custom message. For MCS-3000 buttons, a value of 127 will be inserted for button presses, and 0 for button releases.
Following are some samples of the MIDI Tab’s appearance for various message types.
MCS-3000 Series USB Software30

When assigning Custom MIDI messages to a trackball, you set different messages for each axis of the trackball. You can also set either axis to None.
To access the MCS-3000’s MIDI messages in your MIDI application, connect your application’s MIDI input and output ports to the ports labeled “MCS3k”. Depending on the application, the ports may be labeled “MCS3k USB”. The exact method for connecting to MIDI ports varies from application to application. Consult the manuals of the MIDI applications you are using to learn how to do this.
MCS-3000 Series USB Software31
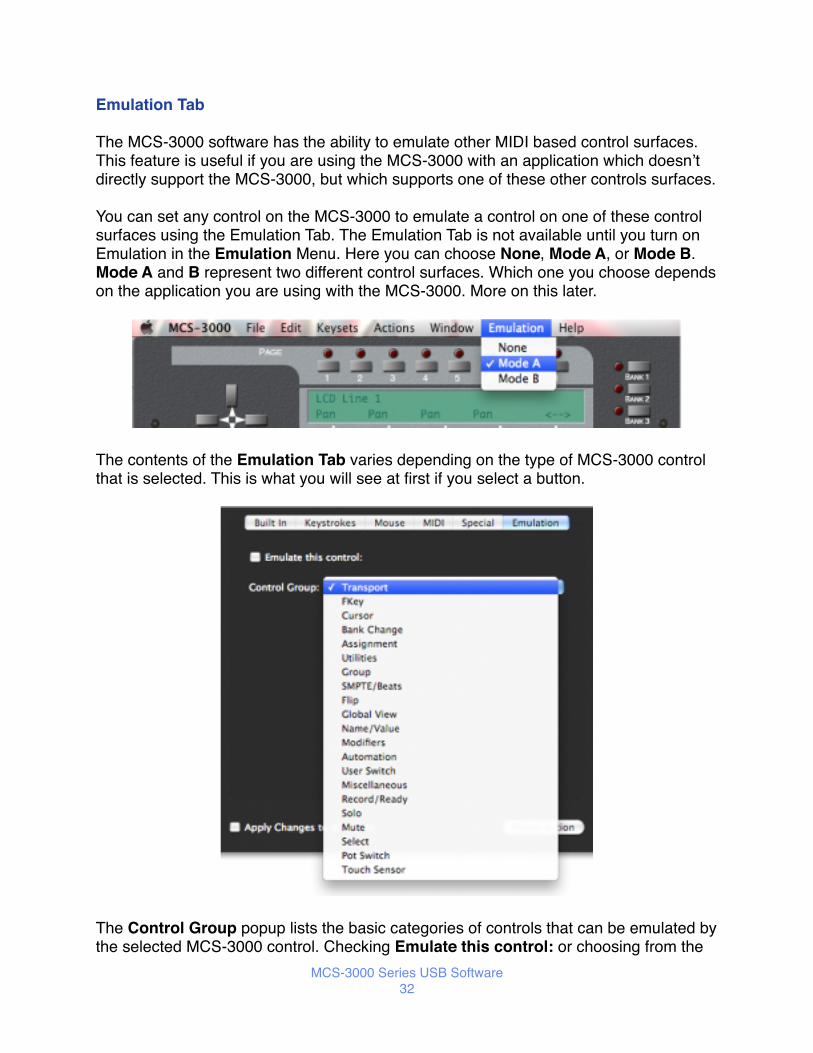
Emulation Tab
The MCS-3000 software has the ability to emulate other MIDI based control surfaces. This feature is useful if you are using the MCS-3000 with an application which doesn’t directly support the MCS-3000, but which supports one of these other controls surfaces.
You can set any control on the MCS-3000 to emulate a control on one of these control surfaces using the Emulation Tab. The Emulation Tab is not available until you turn on Emulation in the Emulation Menu. Here you can choose None, Mode A, or Mode B. Mode A and B represent two different control surfaces. Which one you choose depends on the application you are using with the MCS-3000. More on this later.
The contents of the Emulation Tab varies depending on the type of MCS-3000 control that is selected. This is what you will see at first if you select a button.
The Control Group popup lists the basic categories of controls that can be emulated by the selected MCS-3000 control. Checking Emulate this control: or choosing from the
MCS-3000 Series USB Software32
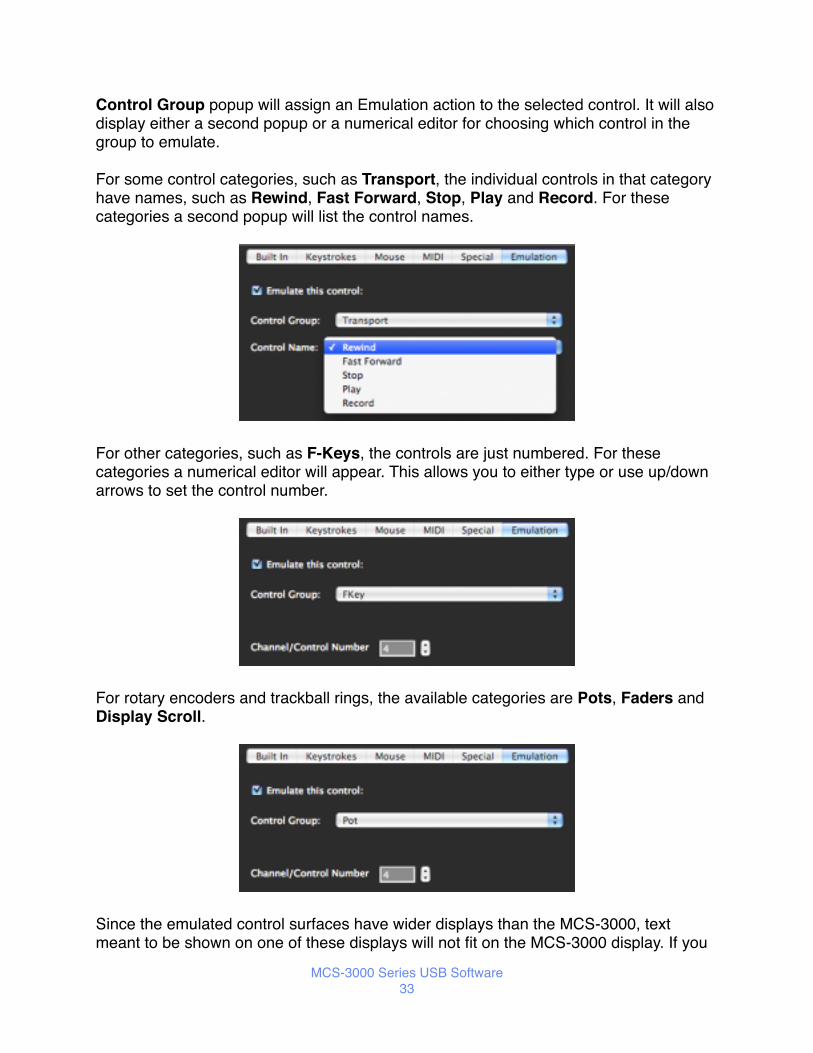
Control Group popup will assign an Emulation action to the selected control. It will also display either a second popup or a numerical editor for choosing which control in the group to emulate.
For some control categories, such as Transport, the individual controls in that category have names, such as Rewind, Fast Forward, Stop, Play and Record. For these categories a second popup will list the control names.
For other categories, such as F-Keys, the controls are just numbered. For these categories a numerical editor will appear. This allows you to either type or use up/down arrows to set the control number.
For rotary encoders and trackball rings, the available categories are Pots, Faders and Display Scroll.
Since the emulated control surfaces have wider displays than the MCS-3000, text meant to be shown on one of these displays will not fit on the MCS-3000 display. If you
MCS-3000 Series USB Software33

assign Display Scroll to a knob on the MCS-3000, you can use that knob to scroll the display left and right so you can see all of the text.
The Jog Wheel only has one choice, Emulate Jog Wheel.
You cannot assign Emulation actions to the Shuttle Ring or Trackballs because none of the emulated control surfaces have these functions.
For convenience, choosing Set all Controls to Emulation in the Actions menu will assign Emulation Actions to many of the MCS-3000 controls on all layers in the current keyset. Some MCS-3000 Series controls do not correspond to any controls on the emulated control surfaces, so those controls are left unassigned.
The following assignments are made when Set all Controls to Emulation is chosen.
MCS-3000 Control Assignment
Up Cursor Up
Down Cursor Down
Left Cursor Left
Right Cursor Right
F1 - F8 F1 - F8
SHIFT SHIFT
MCS-3000 Page 1 - MCS-3000 Page 4
Mute Channel 1 - Mute Channel 4
MCS-3000 Page 5 - MCS-3000 Page 8
Solo Channel 1 - Solo Channel 4
MCS-3000 Encoders 1 - 4 Pots 1 - 4
MCS-3000 Encoder 5 Display Scroll
M1 SMPTE/Beats
M2 Global View On/Off
M3 Global View: Inputs
M4 Global View: Audio Tracks
MCS-3000 Series USB Software34

MCS-3000 Control Assignment
M5 Global View: AUX
Bank 1 Bank Left
Bank 2 Bank Right
Bank 3 Channel Left
Bank 4 Channel Right
W1 Automation: Read/Off
W2 Automation: Write
W3 Automation: Trim
W4 Automation: Touch
W5 Automation: Latch
Keypad ENTER ENTER
Keypad CLEAR/CANCEL CANCEL
Jog Wheel Jog
Rewind Rewind
Fast Forward Fast Forward
Stop Stop
Play Play
Record Record
MCS-3800/MCS-3000XMute 1 - 8
Mute Channel 1 - 8
MCS-3800/MCS-3000XSolo 1 - 8
Solo 1 - 8
MCS-3800/MCS-3000XAux 1 - 8
Pot Switch 1 - 8
MCS-3800/MCS-3000XSelect 1 - 8
Select 1 - 8
Fader Touch Sensor 1 - 8 Fader Touch 1 - 8
MCS-3000 Series USB Software35

MCS-3000 Control Assignment
MCS-3800/MCS-3000XFader 1 - 8
Channel Volume 1 - 8
MCS-TrackerArm 1 - 8
Record Ready 1 - 8
MCS-Bridge B Buttons1 - 8
Pot Switch 1 - 8
MCS-Bridge LCD Buttons1 - 8
Record Ready 1 - 8
MCS Bridge B Encoders1 - 8
Pots 1 - 8
MCS-3000 Series USB Software36

Special Tab
The Special Tab is a collection of actions that don’t easily fit into other categories. Different choices are available depending on what type of control is selected.
The choices are:
None No Special Action for the selected control. If some other type of action has already been assigned, the None button will be selected. Clicking on the None button will delete the currently assigned action.
Layer Selectors When assigned to an MCS-3000 button, that button can be used to switch between layers. When a Layer Selector Special Action is assigned to an MCS-3000 button, that assignment is automatically copied to that button on all layers.
Trackball Sensitivity When assigned to an MCS-3000 rotary encoder, that encoder can be used to control the responsiveness of the MCS-Spectrum and MCS-Navigator trackballs.
Developer Mode This is intended for use with applications which directly support the MCS-3000. This action uses messaging protocols built into Mac OS X to communicate with these applications.
You normally wouldn’t use this mode unless you knew that an application you were using supported it. 3rd party developers who support this mode would typically ship MCS-3000 keysets along with their applications.
For convenience, choosing Set all Controls to Developer Mode in the Actions menu will assign Developer Mode Special Actions to all of the MCS-3000 controls on all layers in the current keyset.
MCS-3000 Series USB Software37

Built In Actions Tab
The built in actions are actions that are predefined for specific applications. When you choose a keyset, the built in actions appropriate to that keyset’s application are displayed. If no built in actions have been defined for the current application, the display will be blank.
The built in actions are presented in two columns. The left hand column lists basic categories and the right hand column lists the actual actions. Clicking on a category in the left hand column will change the list of actions displayed on the right. Double-click an action name to assign it to the selected MCS-3000 control.
Most of the categories and actions correspond to the keyboard shortcuts listed in the target application's manual. However, there are also actions defined by JLCooper that are not simple keyboard shortcuts. These actions will always appear at the beginning of the list, and there will be a separator line between them and other built in actions.
MCS-3000 Series USB Software38
Displays
The MCS-3000 has an LCD display and a Timecode display. Some of the MCS-3000 Series peripherals, such as the MCS-Spectrum have LCD displays as well. The LCD displays are each have two lines. Each line is treated like a separate display. You can assign functions to these displays in much the same way as you assign actions to controls.
NOTE: If you are using an application that communicates with the MCS-3000 via MIDI or Developer Mod, you should probably not assign any functions to the displays in the keyset for that application. The application will probably be writing its own information to the displays.
When you click on a display to select it, information about it appears in the Inspector window. This information includes a User Name, a description of the function assigned to the display and Tabs which contain controls for editing the display’s function.
For the LCD displays, the available Tabs are Text, Encoder Names and Emulation.
MCS-3000 Series USB Software39
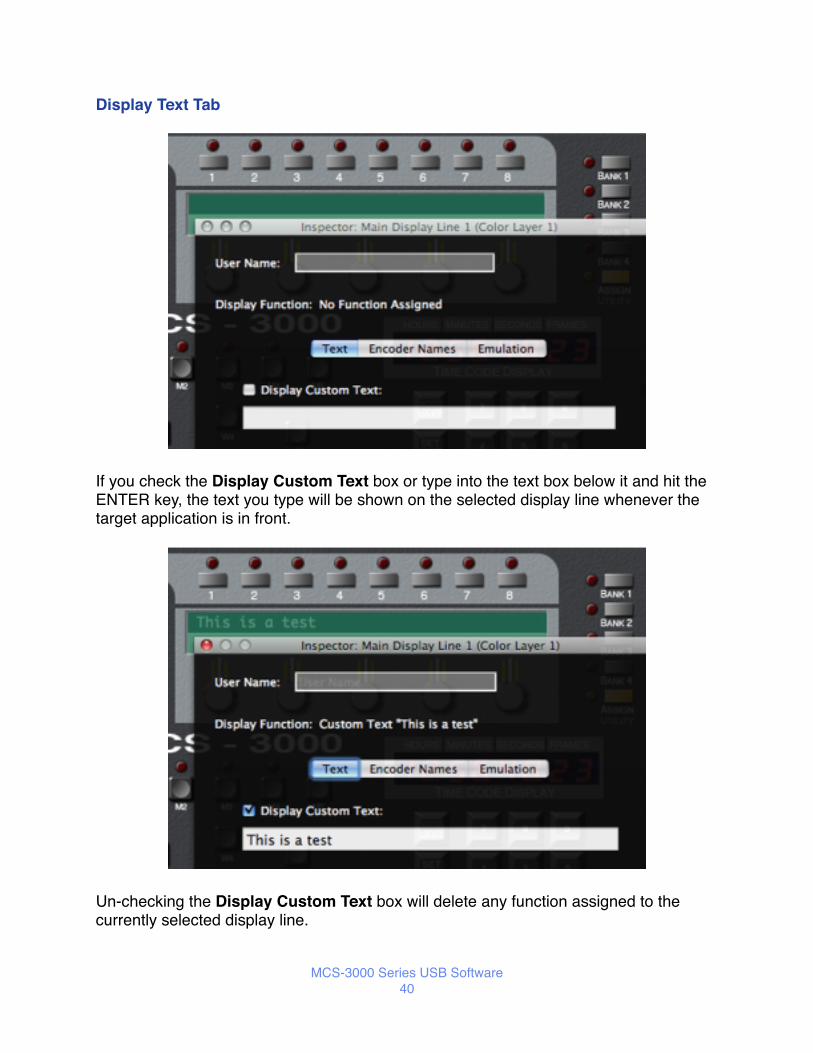
Display Text Tab
If you check the Display Custom Text box or type into the text box below it and hit the ENTER key, the text you type will be shown on the selected display line whenever the target application is in front.
Un-checking the Display Custom Text box will delete any function assigned to the currently selected display line.
MCS-3000 Series USB Software40

Display Encoder Names Tab
If you check the Display Names Above Encoders box the User Names of the encoders below the selected display will be shown on the selected line whenever the target application is in front.
The display will update whenever the name of one of the encoders changes. If an encoder does not have a user name, then the display directly above it will be blank.
Un-checking the Display Names Above Encoders box will delete any function assigned to the currently selected display line.
MCS-3000 Series USB Software41

Display Emulation Tab
If you have enabled Emulation in the current keyset, you can have any display on the MCS-3000 show the same information that the target application would display on the emulated control surface.
Click on the Emulate Mode X Display checkbox to enable display emulation. Click on None to delete the current display line’s function. You can choose to emulate line one of the display, line 2 of the display or to display the values of the pots directly below the display (not currently implemented).
The MCS-3000 software’s on-screen display will read “LCD Display Line 1” or “LCD Display Line 2”, but when you are using the target application, the MCS-3000 display will show text sent to it by that application.
MCS-3000 Series USB Software42
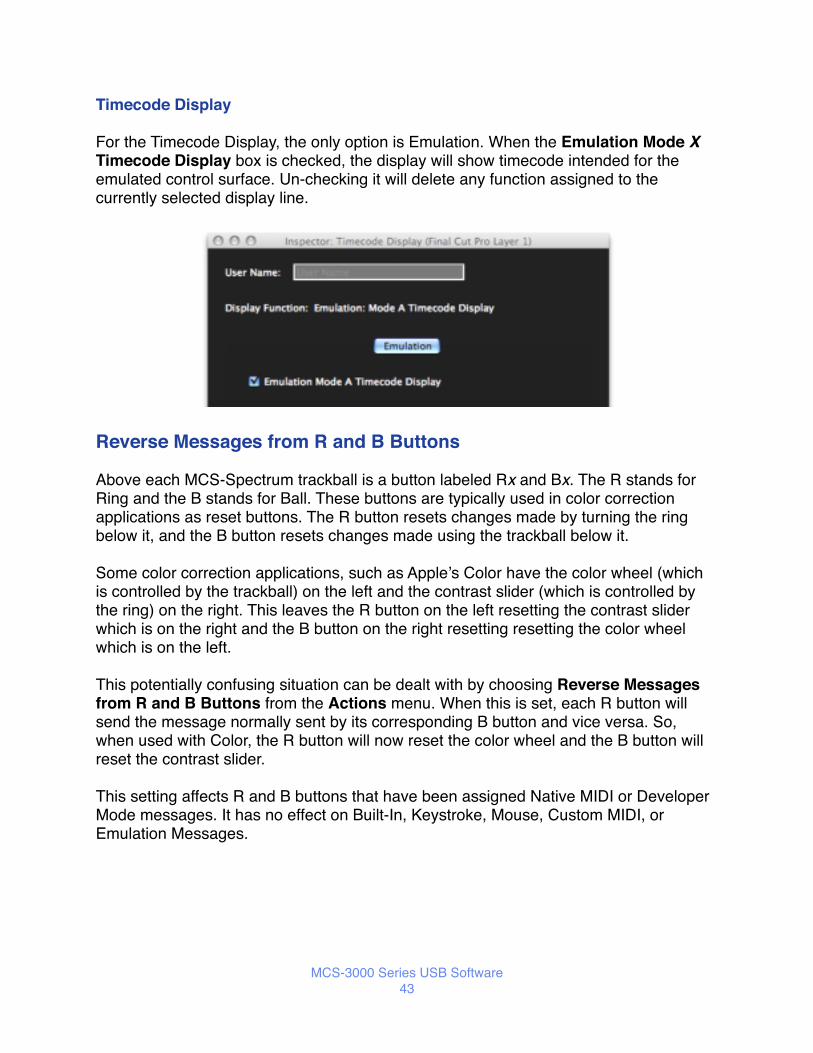
Timecode Display
For the Timecode Display, the only option is Emulation. When the Emulation Mode X Timecode Display box is checked, the display will show timecode intended for the emulated control surface. Un-checking it will delete any function assigned to the currently selected display line.
Reverse Messages from R and B Buttons
Above each MCS-Spectrum trackball is a button labeled Rx and Bx. The R stands for Ring and the B stands for Ball. These buttons are typically used in color correction applications as reset buttons. The R button resets changes made by turning the ring below it, and the B button resets changes made using the trackball below it.
Some color correction applications, such as Apple’s Color have the color wheel (which is controlled by the trackball) on the left and the contrast slider (which is controlled by the ring) on the right. This leaves the R button on the left resetting the contrast slider which is on the right and the B button on the right resetting resetting the color wheel which is on the left.
This potentially confusing situation can be dealt with by choosing Reverse Messages from R and B Buttons from the Actions menu. When this is set, each R button will send the message normally sent by its corresponding B button and vice versa. So, when used with Color, the R button will now reset the color wheel and the B button will reset the contrast slider.
This setting affects R and B buttons that have been assigned Native MIDI or Developer Mode messages. It has no effect on Built-In, Keystroke, Mouse, Custom MIDI, or Emulation Messages.
MCS-3000 Series USB Software43
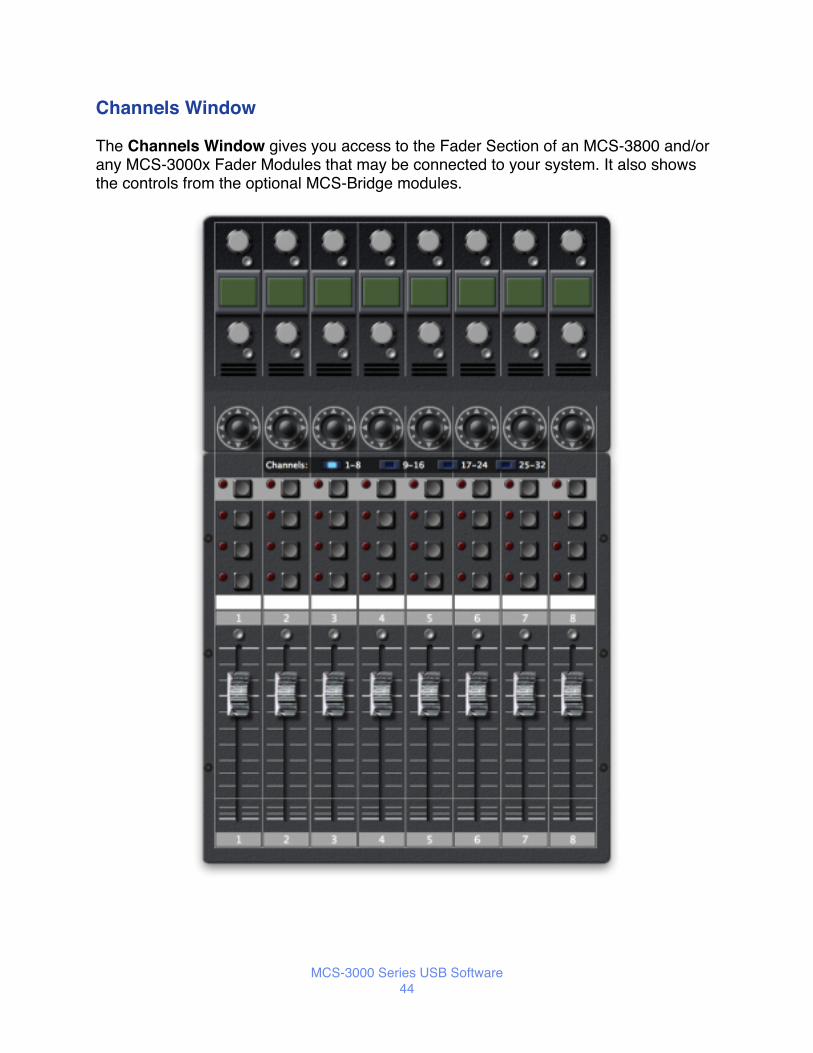
Channels Window
The Channels Window gives you access to the Fader Section of an MCS-3800 and/or any MCS-3000x Fader Modules that may be connected to your system. It also shows the controls from the optional MCS-Bridge modules.
MCS-3000 Series USB Software44

As with the MCS-3000 Main Window, selecting a control in this window, or moving a corresponding hardware control, causes information about that control to appear in the Inspector Window.
There are eight vertical “channel strips” shown at a time. If you have more than 8 physical faders in your system (as with an MCS-3800 and one or more MCS-3000x expanders, or an MCS-3000 with two or more expanders), you can view a different bank of eight channels by clicking on one of the Channels buttons in the center of the window.
MCS-3000 Series USB Software45
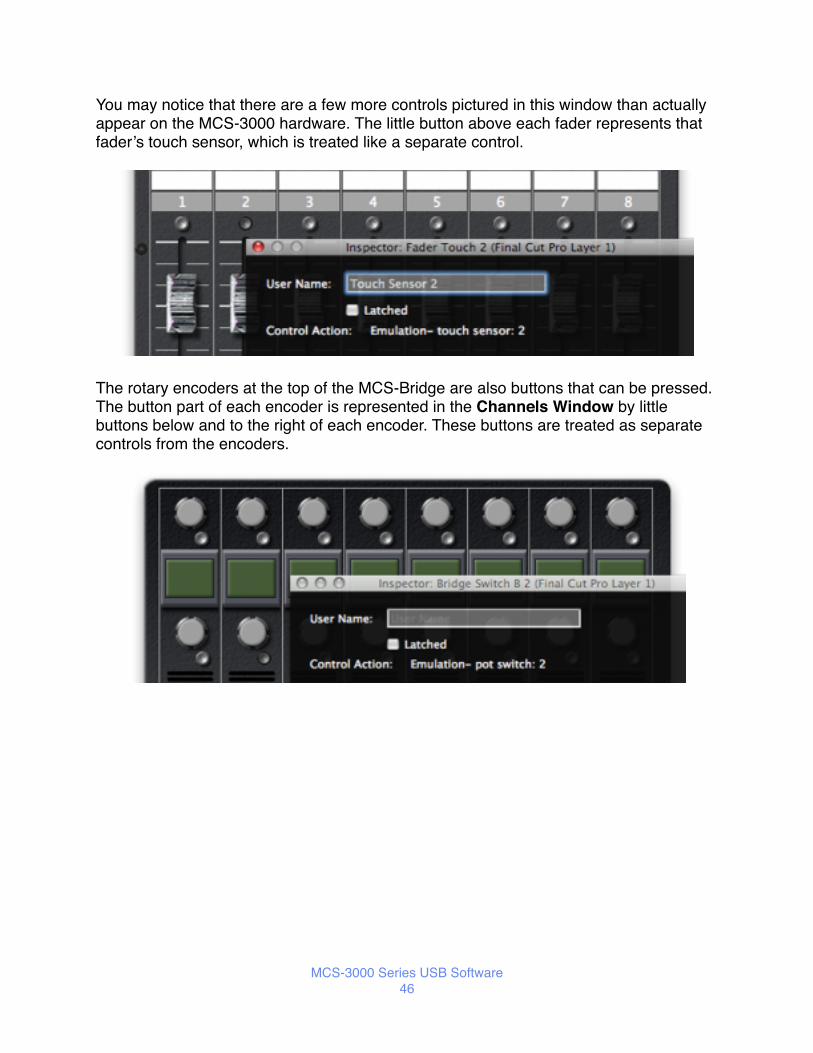
You may notice that there are a few more controls pictured in this window than actually appear on the MCS-3000 hardware. The little button above each fader represents that fader’s touch sensor, which is treated like a separate control.
The rotary encoders at the top of the MCS-Bridge are also buttons that can be pressed. The button part of each encoder is represented in the Channels Window by little buttons below and to the right of each encoder. These buttons are treated as separate controls from the encoders.
MCS-3000 Series USB Software46

The Faders can be assigned Native and Custom MIDI Actions, Developer Actions, and Fader Emulation Actions. For Emulation Actions, you can assign a channel.
All of the buttons can be assigned the same actions that can be assigned to buttons in the rest of the system. The same goes for the rotary encoders.
Since none of the emulated control surfaces have an equivalent to the joysticks, Emulation is not available for the joysticks. The available actions for the joysticks are Built In, Keystrokes, Mouse, Native and Custom MIDI, and Developer Special Actions.
MCS-3000 Series USB Software47

Near the top of the MCS Bridge is a row of LCD Buttons. These are actually buttons with small 6 character by 3 line LCD displays on them.
The software treats the button and the display as two separate items. To select the button for editing, click on the button’s frame, or press the hardware button on an MCS-Bridge. Besides being able the assign all of the actions available to other buttons, you can also change the On and OFF colors for the LCD Buttons by clicking on the color swatches near the top of the Inspector Window.
To edit what is displayed on an LCD button, click in its display area. The display area will turn a lighter color and information about the display will appear in the Inspector.
MCS-3000 Series USB Software48
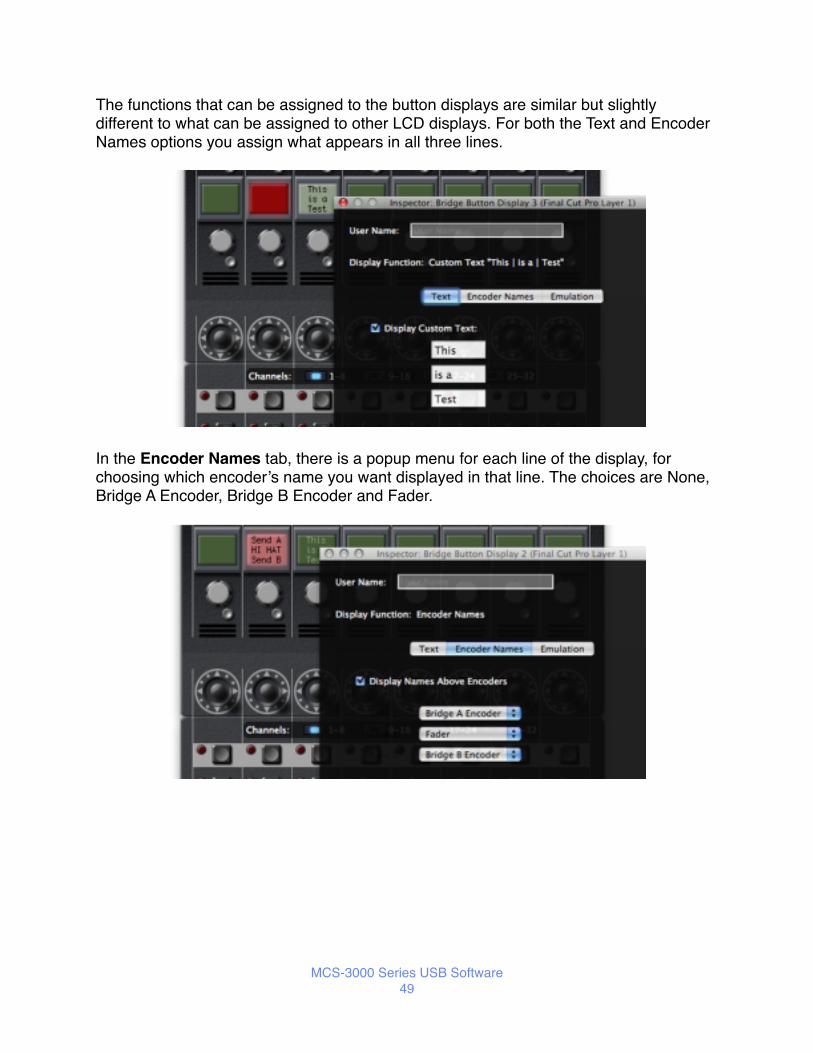
The functions that can be assigned to the button displays are similar but slightly different to what can be assigned to other LCD displays. For both the Text and Encoder Names options you assign what appears in all three lines.
In the Encoder Names tab, there is a popup menu for each line of the display, for choosing which encoder’s name you want displayed in that line. The choices are None, Bridge A Encoder, Bridge B Encoder and Fader.
MCS-3000 Series USB Software49

In the Emulation tab, you have the same choices as for other LCD displays, but they operate differently. If you choose LCD Display Line 1 or 2, the MCS-3000 software can determine if the target application is attempting to display a series of track names on the chosen line of the emulated control surface’s main LCD. It will then break the line up into individual track names and display each name on the appropriate LCD button.
MCS-3000 Series USB Software50
MCS-3000 Series Expansion Modules
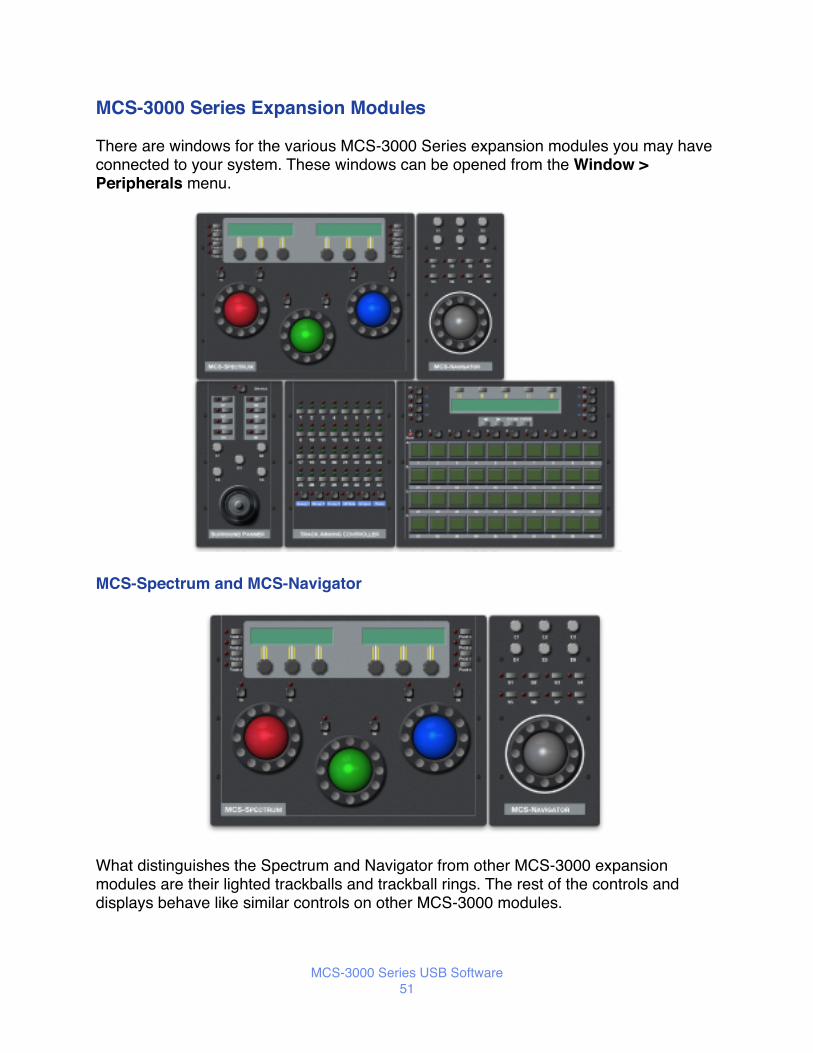
There are windows for the various MCS-3000 Series expansion modules you may have connected to your system. These windows can be opened from the Window > Peripherals menu.
MCS-Spectrum and MCS-Navigator
What distinguishes the Spectrum and Navigator from other MCS-3000 expansion modules are their lighted trackballs and trackball rings. The rest of the controls and displays behave like similar controls on other MCS-3000 modules.
MCS-3000 Series USB Software51

If a trackball is selected, there will be controls near the top of the Inspector window that let you set its color and brightness.
The Built In, Mouse, and Special Tabs are just like those for other encoders.
The Keystrokes Tab lets you assign different key sequences for each direction. In the example below, when the trackball is rolled to the left it would type the letter “L”, to the right it would type “R”, up it would type “U” and down, “D”.
MCS-3000 Series USB Software52

For Custom MIDI actions, you can assign different MIDI messages to the horizontal and vertical axes. In the example below, a controller 15 message on channel 1 will be sent when the trackball is rotated left or right, and a controller 7 message on channel 1 will be sent when it is rotated up and down.
MCS-3000 Series USB Software53

MCS-Panner
The MCS-Panner has buttons, rotary encoders and a joystick. The buttons and encoders have the same functionality as other buttons and encoders in the system.
The joystick is actually three separate controls: a standard joystick, referred to as Joystick XY, a rotating knob, referred to as Joystick Z, and a button on the top of the joystick, referred to as Panner Stick.
To select the Panner Stick, click on the button image in the center of the joystick or press the actual Panner Stick on the MCS-Panner. To select Joystick Z, click on the gray ring surrounding the Panner Stick, or rotate the actual Joystick Z. To select the Joystick XY, click on the dark outer ring, or move the Joystick XY on the MCS-Panner.
MCS-3000 Series USB Software54

The Panner Stick and the Joystick Z work just like other buttons and encoders in the rest of the system. As with the trackballs and MCS-Bridge joysticks, the Joystick XY can be assigned Built In, Keystrokes, Mouse, MIDI and Special actions. For Keystroke actions, a different key sequence can be assigned for each direction.
Available Mouse actions are 360° Move and 360° scroll. Separate Custom MIDI actions can be assigned to the Vertical and Horizontal axes.
MCS-3000 Series USB Software55
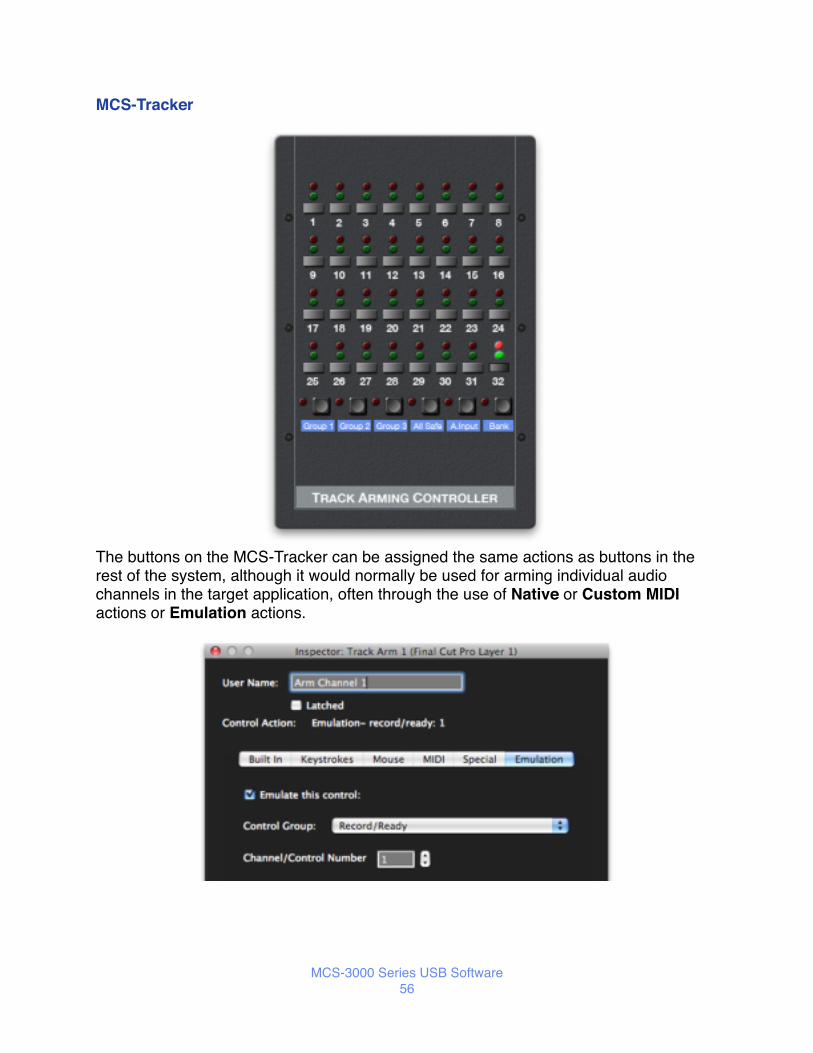
MCS-Tracker
The buttons on the MCS-Tracker can be assigned the same actions as buttons in the rest of the system, although it would normally be used for arming individual audio channels in the target application, often through the use of Native or Custom MIDI actions or Emulation actions.
MCS-3000 Series USB Software56

MCS-ClipShot
While the MCS-ClipShot operates similarly to other MCS-3000 Series modules, it has several unique features. With ten banks of 40 LCD buttons, it can be turned into almost any kind of control surface you want.
ClipShot Terminology
At the bottom are 40 LCD buttons. Both the buttons and their displays can be programmed. Above them are ten Bank buttons for selecting banks of LCD buttons. So altogether, there are 400 LCD buttons. Actions can not be assigned to the Bank buttons, although the bank can be changed by the target application via Native MIDI or Developer messages.
The eight FKeys along either side at the top serve as bank selectors for the five Parameter buttons, which themselves serve as bank selectors for the four Action buttons. This effectively gives 40 banks (8 FKeys x 5 Parameter banks) of Action buttons. Both the FKeys and Parameter buttons can have actions assigned to them in addition to their bank select duties.
MCS-3000 Series USB Software57

The Action buttons with the left and right arrows above them are commonly referred to as the Decrement and Increment buttons. When you assign a User Name to an FKey, that name will appear next to the FKey in blue. The name of the most recently selected FKey will be displayed in red instead of blue. It will stay red even other controls are selected. Since the FKeys are bank selectors in addition to being editable, the red is an indicator of the current Parameter bank, which will stay in effect until a different FKey is selected.
ClipShot LCD Display
The LCD display editor has a Text tab and an Emulation tab just like other LCD displays, but there is one tab unique to the ClipShot, Control Names.
Display Names of Parameter Buttons will show the names of the five buttons above the display. Display Names of Current Parameter and Action Banks will show the name of the currently selected FKey (which is also the name of the parameter bank), and the currently selected Parameter button (which is also the name of the action bank). In the examples below, the top line of the display is set to Display Names of Parameter Buttons and the bottom line is set to Display Names of Current Parameter and Action Banks.
MCS-3000 Series USB Software58

As you can see, for each FKey, there is a different set of Parameter button assignments. And for each Parameter button, there is a different set of Action button assignments.
Examples
Although there are many ways to use these the FKeys, Parameter buttons and Action buttons, here is one possibility. Use an FKey to open a dialog box, either using Built In or Keystroke actions. Pressing the FKey will also switch to a bank of Parameter buttons which are assigned actions specific to that dialog box. These actions might select various parameters in the dialog box. Then the Action buttons (whose function changes depending on the current Parameter bank and Action bank) could perform the actual edit on that parameter.
A more concrete example is shown below. The F2 button is setup to open a dialog box that handles ethernet connections for a fictitious application. Besides opening the dialog, pressing F2 also switches to the 2nd Parameter bank where the Parameter buttons are setup to select the various text fields in the Connection dialog, possibly using mouse clicks.
The Decrement and Increment buttons might send Down and Up arrows which this fictitious application uses to change the value of the selected text field. The 2nd line of the LCD display shows which parameter is being operated on by the Action buttons.
The Clear button could be programmed to send the ESCAPE key (for Cancel) and the Enter button could send the ENTER key for Okay.
MCS-3000 Series USB Software59

ClipShot LCD Buttons
The button part of each LCD button functions just like the LCD buttons on the MCS-Bridge. That is, the On and Off colors can be set, and all the same actions can be assigned. As with the Bridge LCD buttons, click on the button’s frame to select it.
To select the display part, click in the display area of the LCD button. The editor for the ClipShot LCD button displays has two tabs, Text and Icon. The Text tab behaves just like the Text tab for the MCS-Bridge LCD buttons.
MCS-3000 Series USB Software60

The ClipShot LCD buttons each have 40 built in icons. At times an icon might give a better visual cue to the function of the button than plain text would. To choose an icon to display, use the Icon tab.
Click on the red icon to open a list of the available icons then click on one of the icons to assign it. Click on the Inspector window’s background to close the icon list.
ClipShot Groups
The ClipShot LCD buttons can be formed into groups. Within any group, only one button can be on at a time, just like Macintosh radio buttons. When a new button in a group is pressed, any button in the same group that was on, will be turned off. Groups can span banks. A button in bank 1 can be in the same group as a button in bank 8.
MCS-3000 Series USB Software61

When the ClipShot Window is in front, a ClipShot Menu appears in the Menu Bar. This menu contains all the commands for creating, deleting and selecting ClipShot Groups.
To create a group, SHIFT-CLICK on the frame of every LCD button you want to be part of that group. The frames of the selected buttons will turn blue. If you select one by mistake, just SHIFT-CLICK it again to deselect it. Then go to the ClipShot Menu and choose Create Group for Selected Buttons.
A dialog will open where you can name the group.
MCS-3000 Series USB Software62
In the above example, pressing any control in the group, “Transport Controls” will turn off any other control in that group, which is the behavior you would usually want from transport controls.
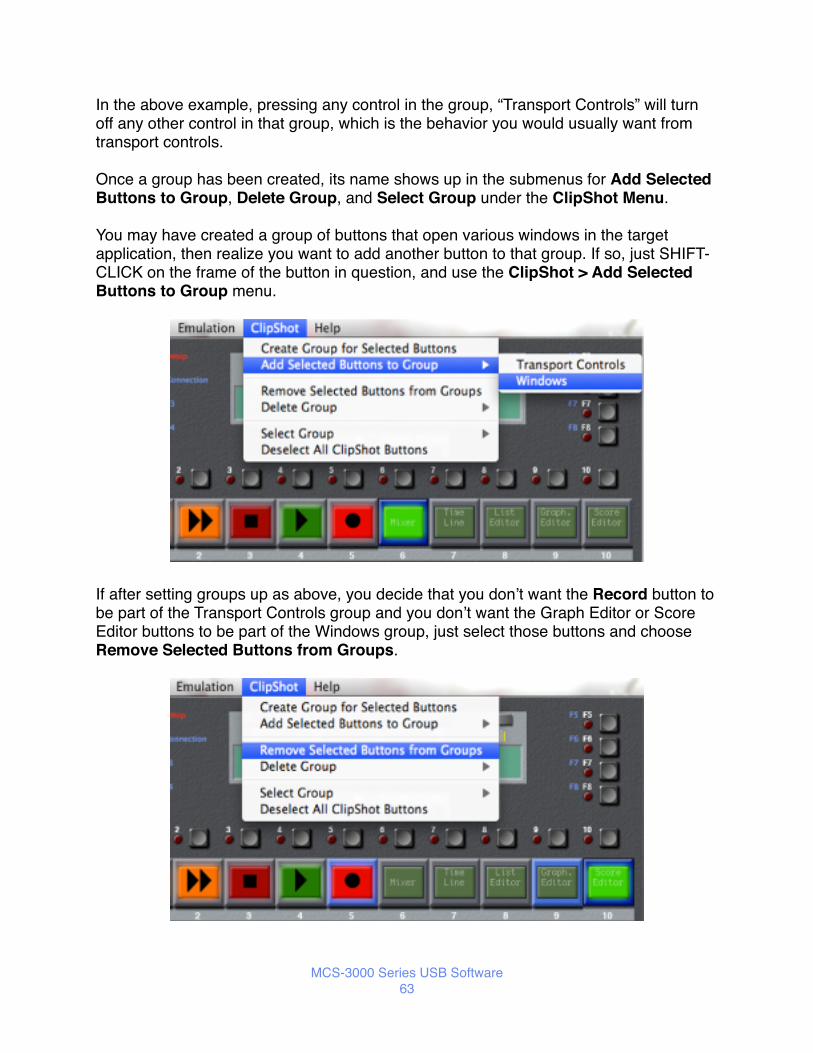
Once a group has been created, its name shows up in the submenus for Add Selected Buttons to Group, Delete Group, and Select Group under the ClipShot Menu.
You may have created a group of buttons that open various windows in the target application, then realize you want to add another button to that group. If so, just SHIFT-CLICK on the frame of the button in question, and use the ClipShot > Add Selected Buttons to Group menu.
If after setting groups up as above, you decide that you don’t want the Record button to be part of the Transport Controls group and you don’t want the Graph Editor or Score Editor buttons to be part of the Windows group, just select those buttons and choose Remove Selected Buttons from Groups.
MCS-3000 Series USB Software63

To completely delete a group, go to Delete Group and choose the group you want to delete from the submenu.
If you ever forget which buttons are in a particular group, go to Select Group, and choose the name of the group you are interested in from the submenu. All members of the group will be highlighted in blue.
As mentioned earlier, SHIFT-CLICKING on a selected button will deselect it, but if there are a lot of selected buttons, it would take a while to deselect all of them using this method. Deselect All ClipShot Buttons will deselect them all in one operation.
MCS-3000 Series USB Software64

Keyset Summary Window
The Keyset Summary Window displays information about several controls at once, making it easier to tell at a glance how a particular keyset is set up. You choose the Keyset Summary from the Windows menu.
The window has four columns. The first column lists the currently active keysets. These are the same keysets that appear in the Keysets Menu. Clicking on a keyset in this column will change the selected keyset, just as if you had chosen a keyset from the Keysets Menu. Conversely, choosing a new keyset from the Keysets Menu will cause that keyset to be selected in the Keyset Summary Window.
The second column shows the selected keyset’s layers. Clicking on a layer in this column has the same effect as clicking on one of the layer buttons at the bottom of the main MCS-3000 Main Window. Clicking on a layer button in the main window will cause that layer to be selected in the Summary Window.
MCS-3000 Series USB Software65

The third column lists controls grouped by function, such as Transport, Trackballs, Encoders, etc. Selecting one of these groups will cause the fourth column to display all of the controls in that group. Each control name is followed by its User Name, if any, and a description of its assigned function. Clicking on a control in this column will cause that control to be selected in the main window and its information to be displayed in the Inspector Window for editing. In the case of trackballs, the descriptions are shown in the trackballs’ assigned colors.
MCS-3000 Series USB Software66

Final Cut Pro™ SupportFinal Cut Pro™ and Control Surfaces
With FCP version 5 some support for MIDI control surfaces was added. Unfortunately, only audio parameters and transport functions are controllable via MIDI. Fortunately, the MCS-3000 software not only emulates the supported control surfaces, it also can control many other parameters in FCP.
The MCS-3000 has a large advantage over other control surfaces when used with Final Cut Pro because it is not limited to just the functions included in Final Cut’s MIDI control surface support. With its built in functions and the ability to emulate the mouse and keyboard coupled with FCP’s control surface support, virtually every function in Final Cut Pro can be controlled with the MCS-3000.
Final Cut Pro™ Shuttle
The FCP Built In Shuttle command works equally well in the Timeline, Canvas, Viewer and Log and Capture windows.
Using the MCS-3000 with Final Cut Pro
To use the MCS-3000 with FCP, first run the MCS-3000 application and import the Final Cut keyset provided by JLCooper. Now run Final Cut and open the Control Surfaces dialog from the Tools menu. Click on the “+” button to add a control surface and choose Mackie Control. Then choose MCS3k USB - MCS3k for the input connection and output connections. Click OK to exit the dialog.
Final Cut requires the Audio Mixer (Tools Menu) to be open in order for control surface support to be active. You might want to save a window layout that has the Audio Mixer open.
MCS-3000 Series USB Software67

Using the MCS-Spectrum with the Final Cut Pro Color Corrector 3-way
To use the Spectrum for color correction in Final Cut, Color Corrector 3-way must be applied to a clip, that clip must be open in the Viewer, and the Color-Corrector 3-way tab must be open in the Viewer. You can not drag the Color Corrector 3-way tab out of the Viewer window.
Assign the various color correction related built in actions to appropriate MCS-Spectrum controls (this has already been done in the JLCooper supplied FCP keyset).
There are two sets of color correction related actions in the FCP built in commands list, Color Corrector 3-way actions and Color Corrector 3-way w/Effect Limits actions. The first set is to be used when the Limit Effect controls at the bottom of the window are hidden. The second set of actions should be used when the Limit Effect controls are visible.
Using the Color Corrector 3-way w/Effect Limits actions when the Limit Effect controls are hidden and vice versa will not work in most cases.
MCS-3000 Series USB Software68

The Limit Effect controls can be shown and hidden by clicking on the small triangle in the bottom left corner of the Viewer/Color Corrector 3-way window.
In the JLCooper-supplied Final Cut keyset, the Color Corrector 3-way actions are assigned to controls in layer 1 and the Color Corrector 3-way w/Effect Limits actions are assigned to controls in layers 2 and three. The Spectrum Page 1, Page 2 and Page 3 buttons can be used to switch between layers 1, 2. and 3.
Using the MCS-Navigator with Final Cut Pro
The MCS-Navigator has a single trackball and trackball ring. There are some built in commands especially designed to make using the Navigator without a Spectrum easier in FCP. For buttons, there are three actions, Select Black Balance, Select Mid Balance, and Select White Balance. For the trackball, there is the Balance Wheel - Selected action and for the ring there is the Selected Levels action. There are corresponding actions for the Color Corrector 3-Way with Limit Effect controls visible.
By using these actions, you can easily select one of the onscreen balance and level controls with a Navigator button, then adjust that balance and level with the trackball and ring.
The MCS-3000 Final Cut Pro Keyset
The MCS-3000 Final Cut Pro keyset uses a combination of emulated controls, mouse emulation, keystrokes and built-in commands. It is fully customizable using the techniques presented in this manual, so you can easily adapt it to your working style.
MCS-3000 Series USB Software69

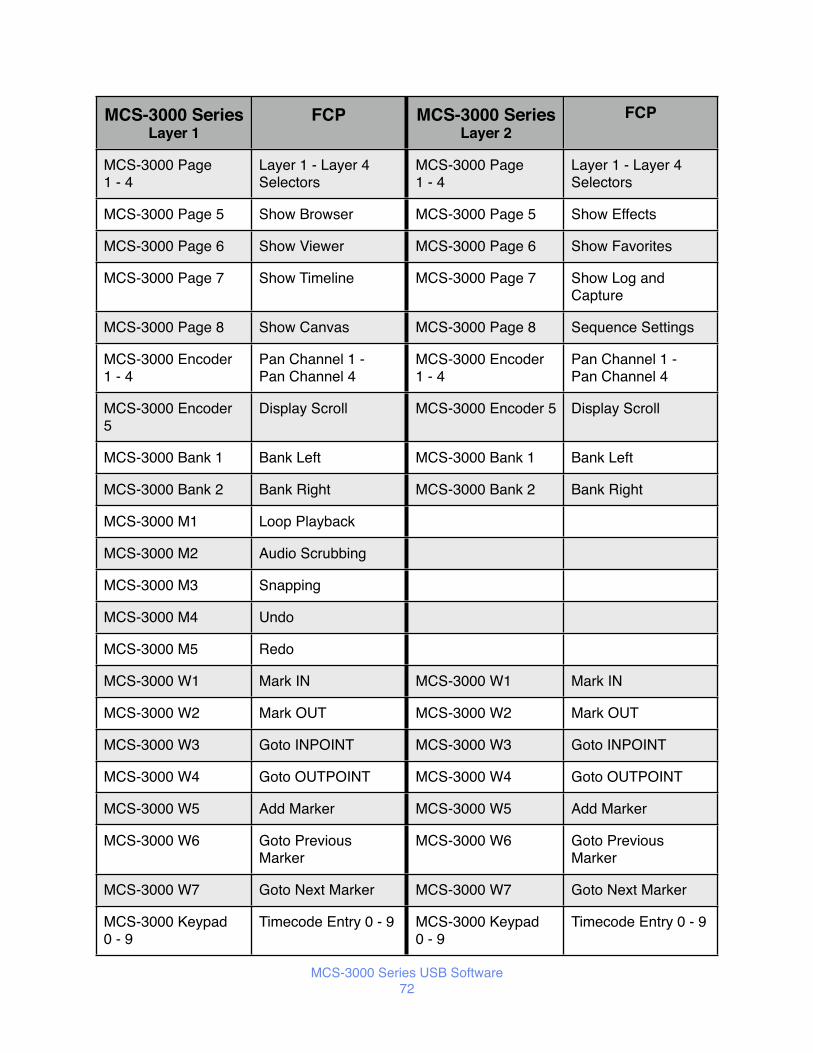
Here are the control assignments in the current version of the FCP keyset:
MCS-3000 SeriesLayer 1
FCP MCS-3000 SeriesLayer 2
FCP
Spectrum Page 1 Layer 1 Selector Spectrum Page 1 Layer 1 Selector
Spectrum Page 2 Layer 2 Selector Spectrum Page 2 Layer 2 Selector
Spectrum Page 3 Layer 3 Selector Spectrum Page 3 Layer 3 Selector
Spectrum Page 4 Layer 4 Selector Spectrum Page 4 Layer 4 Selector
Spectrum Encoder 1 Color Corrector3-way Saturation
Spectrum Encoder 1 Color Corrector3-way w/effect limits Saturation
Spectrum Encoder 2 Color Corrector3-way w/effect limits Color Gradient
Spectrum Encoder 3 Color Corrector3-way w/effect limits Saturation Gradient
Spectrum Encoder 4 Color Corrector3-way w/effect limits Luma Gradient
Spectrum Encoder 5 Color Corrector3-way w/effect limits Edge Thinning
Spectrum Encoder 6 Trackball Sensitivity Spectrum Encoder 6 Color Corrector3-way w/effect limits Softening
Spectrum R1 Color Corrector3-way Reset Black Level
Spectrum R1 Color Corrector3-way w/effect limits Reset Black Level
Spectrum B1 Color Corrector3-way Reset Black Balance
Spectrum B1 Color Corrector3-way w/effect limits Reset Black Balance
Spectrum R2 Color Corrector3-way Reset Mid Level
Spectrum R2 Color Corrector3-way w/effect limits Reset Mid Level
MCS-3000 Series USB Software70

MCS-3000 SeriesLayer 1
FCP MCS-3000 SeriesLayer 2
FCP
Spectrum B2 Color Corrector3-way Reset Mid Balance
Spectrum B2 Color Corrector3-way w/effect limits Reset Mid Balance
Spectrum R3 Color Corrector3-way Reset White Level
Spectrum R3 Color Corrector3-way w/effect limits Reset White Level
Spectrum B3 Color Corrector3-way Reset White Balance
Spectrum B3 Color Corrector3-way w/effect limits Reset White Balance
Spectrum Trackball 1 Color Corrector3-way Balance Wheel Blacks
Spectrum Trackball 1 Color Corrector3-way w/effect limits Balance Wheel Blacks
Spectrum Trackball 2 Color Corrector3-way Balance Wheel Mids
Spectrum Trackball 2 Color Corrector3-way w/effect limits Balance Wheel Mids
Spectrum Trackball 3 Color Corrector3-way Balance Wheel Whites
Spectrum Trackball 3 Color Corrector3-way w/effect limits Balance Wheel Whites
Spectrum Trackball Ring 1
Color Corrector3-way Black Levels
Spectrum Trackball Ring 1
Color Corrector3-way w/effect limits Black Levels
Spectrum Trackball Ring 2
Color Corrector3-way Mid Levels
Spectrum Trackball Ring 2
Color Corrector3-way w/effect limits Mid Levels
Spectrum Trackball Ring 3
Color Corrector3-way White Levels
Spectrum Trackball Ring 3
Color Corrector3-way w/effect limits White Levels
Up Goto Beginning Up Goto Beginning
Down Goto End Down Goto End
Left Left Arrow Key Left Zoom Out
Right Right Arrow Key Right Zoom In
MCS-3000 F1 - F8 F1 - F8 MCS-3000 F1 - F8 F1 - F8
MCS-3000 Series USB Software71
MCS-3000 SeriesLayer 1
FCP MCS-3000 SeriesLayer 2
FCP
MCS-3000 Page1 - 4
Layer 1 - Layer 4Selectors
MCS-3000 Page1 - 4
Layer 1 - Layer 4Selectors
MCS-3000 Page 5 Show Browser MCS-3000 Page 5 Show Effects
MCS-3000 Page 6 Show Viewer MCS-3000 Page 6 Show Favorites
MCS-3000 Page 7 Show Timeline MCS-3000 Page 7 Show Log and Capture
MCS-3000 Page 8 Show Canvas MCS-3000 Page 8 Sequence Settings
MCS-3000 Encoder 1 - 4
Pan Channel 1 -Pan Channel 4
MCS-3000 Encoder 1 - 4
Pan Channel 1 -Pan Channel 4
MCS-3000 Encoder 5
Display Scroll MCS-3000 Encoder 5 Display Scroll
MCS-3000 Bank 1 Bank Left MCS-3000 Bank 1 Bank Left
MCS-3000 Bank 2 Bank Right MCS-3000 Bank 2 Bank Right
MCS-3000 M1 Loop Playback
MCS-3000 M2 Audio Scrubbing
MCS-3000 M3 Snapping
MCS-3000 M4 Undo
MCS-3000 M5 Redo
MCS-3000 W1 Mark IN MCS-3000 W1 Mark IN
MCS-3000 W2 Mark OUT MCS-3000 W2 Mark OUT
MCS-3000 W3 Goto INPOINT MCS-3000 W3 Goto INPOINT
MCS-3000 W4 Goto OUTPOINT MCS-3000 W4 Goto OUTPOINT
MCS-3000 W5 Add Marker MCS-3000 W5 Add Marker
MCS-3000 W6 Goto Previous Marker
MCS-3000 W6 Goto Previous Marker
MCS-3000 W7 Goto Next Marker MCS-3000 W7 Goto Next Marker
MCS-3000 Keypad0 - 9
Timecode Entry 0 - 9 MCS-3000 Keypad0 - 9
Timecode Entry 0 - 9
MCS-3000 Series USB Software72

MCS-3000 SeriesLayer 1
FCP MCS-3000 SeriesLayer 2
FCP
MCS-3000 Keypad ENTER
ENTER MCS-3000 Keypad ENTER
ENTER
MCS-3000 Keypad CLEAR/CANCEL
CANCEL MCS-3000 Keypad CLEAR/CANCEL
CANCEL
MCS-3000 Shuttle Ring
Shuttle MCS-3000 Shuttle Ring
Shuttle
MCS-3000 Jog Wheel
JOG MCS-3000 Jog Wheel
JOG
MCS-3000 Rewind Rewind MCS-3000 Rewind Rewind
MCS-3000 Fast Forward
Fast Forward MCS-3000 Fast Forward
Fast Forward
MCS-3000 Stop Stop MCS-3000 Stop Stop
MCS-3000 Play Play MCS-3000 Play Play
MCS-3000 Record Record MCS-3000 Record Record
Left Spectrum Display Line 2
Encoder Names Left Spectrum Display Line 2
Encoder Names
Right Spectrum Display Line 2
Encoder Names Right Spectrum Display Line 2
Encoder Names
MCS-3000 Display Line 1
Emulated LCD Display Line 1
MCS-3000 Display Line 1
Emulated LCD Display Line 1
MCS-3000 Display Line 2
Encoder Names MCS-3000 Display Line 2
Encoder Names
Faders 1 - 7 Channel Volume 1 - 7
Faders 1 - 7 Channel Volume 1 - 7
Fader 8 Master Volume Fader 8 Master Volume
Fader Touch Sensors1 - 7
Fader Touch 1 - 7 Fader Touch Sensors1 - 7
Fader Touch 1 - 7
Fader Touch Sensor 8
Master Touch Fader Touch Sensor 8
Master Touch
Mutes 1 - 7 Mute 1 - Mute 7 Mutes 1 - 7 Mute 1 - Mute 7
MCS-3000 Series USB Software73

MCS-3000 SeriesLayer 1
FCP MCS-3000 SeriesLayer 2
FCP
Mute 8 Master Mute Mute 8 Master Mute
Solos 1 - 7 Solo 1 - Solo 7 Solos 1 - 7 Solo 1 - Solo 7
MCS-Bridge Encoders 1 - 7
Pan 1 - Pan 7 MCS-Bridge Encoders 1 - 7
Pan 1 - Pan 7
MCS-Navigator E1 Saturation MCS-Navigator E1 Saturation (w/Limits)
MCS-Navigator E2 MCS-Navigator E2 Color Gradient (w/Limits)
MCS-Navigator E3 MCS-Navigator E3 Saturation Gradient(w/Limits)
MCS-Navigator E4 MCS-Navigator E4 Luma Gradient(w/Limits)
MCS-Navigator E5 MCS-Navigator E5 Edge Thin
MCS-Navigator E6 MCS-Navigator E6 Softening
MCS-Navigator S1 Select Blacks MCS-Navigator S1 Select Blacks
MCS-Navigator S2 Select Mids MCS-Navigator S2 Select Mids
MCS-Navigator S3 Select Whites MCS-Navigator S3 Select Whites
MCS-Navigator S4 Reset Black Balance MCS-Navigator S4 Reset Black Balance
MCS-Navigator S5 Reset Black Level MCS-Navigator S5 Reset Black Level
MCS-Navigator S6 Reset Mid Balance MCS-Navigator S6 Reset Mid Balance
MCS-Navigator S7 Reset Mid Level MCS-Navigator S7 Reset Mid Level
MCS-Navigator S8 Reset White Balance MCS-Navigator S8 Reset White Balance
MCS-Navigator Trackball
Selected Balance MCS-Navigator Trackball
Selected Balance
MCS-Navigator Trackball Ring
Selected Level MCS-Navigator Trackball Ring
Selected Level
MCS-3000 Series USB Software74

MCS-3000 SeriesLayer 3
FCP MCS-3000 SeriesLayer 4
FCP
Spectrum Page 1 Layer 1 Selector Spectrum Page 1 Layer 1 Selector
Spectrum Page 2 Layer 2 Selector Spectrum Page 2 Layer 2 Selector
Spectrum Page 3 Layer 3 Selector Spectrum Page 3 Layer 3 Selector
Spectrum Page 4 Layer 4 Selector Spectrum Page 4 Layer 4 Selector
Up Goto Beginning Up Goto Beginning
Down Goto End Down Goto End
Left Left Arrow Key Left Zoom Out
Right Right Arrow Key Right Zoom In
MCS-3000 F1 - F8 F1 - F8 MCS-3000 F1 - F8 F1 - F8
MCS-3000 Page1 - 4
Layer 1 - Layer 4Selectors
MCS-3000 Page1 - 4
Layer 1 - Layer 4Selectors
MCS-3000 Page 5 Show Browser MCS-3000 Page 5 Show Effects
MCS-3000 Page 6 Show Viewer MCS-3000 Page 6 Show Favorites
MCS-3000 Page 7 Show Timeline MCS-3000 Page 7 Show Log and Capture
MCS-3000 Page 8 Show Canvas
MCS-3000 Encoder 1 - 4
Pan Channel 1 -Pan Channel 4
MCS-3000 Encoder 1 - 4
Pan Channel 1 -Pan Channel 4
MCS-3000 Encoder 5
Display Scroll MCS-3000 Encoder 5 Display Scroll
MCS-3000 Bank 1 Bank Left MCS-3000 Bank 1 Bank Left
MCS-3000 Bank 2 Bank Right MCS-3000 Bank 2 Bank Right
MCS-3000 W1 Mark IN MCS-3000 W1 Mark IN
MCS-3000 W2 Mark OUT MCS-3000 W2 Mark OUT
MCS-3000 W3 Goto INPOINT MCS-3000 W3 Goto INPOINT
MCS-3000 W4 Goto OUTPOINT MCS-3000 W4 Goto OUTPOINT
MCS-3000 W5 Add Marker MCS-3000 W5 Add Marker
MCS-3000 Series USB Software75

MCS-3000 SeriesLayer 3
FCP MCS-3000 SeriesLayer 4
FCP
MCS-3000 W6 Goto Previous Marker
MCS-3000 W6 Goto Previous Marker
MCS-3000 W7 Goto Next Marker MCS-3000 W7 Goto Next Marker
MCS-3000 Keypad0 - 9
Timecode Entry 0 - 9 MCS-3000 Keypad0 - 9
Timecode Entry 0 - 9
MCS-3000 Keypad ENTER
ENTER MCS-3000 Keypad ENTER
ENTER
MCS-3000 Keypad CLEAR/CANCEL
CANCEL MCS-3000 Keypad CLEAR/CANCEL
MCS-3000 Shuttle Ring
Shuttle MCS-3000 Shuttle Ring
Shuttle
MCS-3000 Jog Wheel
JOG MCS-3000 Jog Wheel
JOG
MCS-3000 Rewind Rewind MCS-3000 Rewind Rewind
MCS-3000 Fast Forward
Fast Forward MCS-3000 Fast Forward
Fast Forward
MCS-3000 Stop Stop MCS-3000 Stop Stop
MCS-3000 Play Play MCS-3000 Play Play
MCS-3000 Record Record MCS-3000 Record Record
Left Spectrum Display Line 2
Encoder Names Left Spectrum Display Line 2
Encoder Names
Right Spectrum Display Line 2
Encoder Names Right Spectrum Display Line 2
Encoder Names
MCS-3000 Display Line 1
Emulated LCD Display Line 1
MCS-3000 Display Line 1
Emulated LCD Display Line 1
MCS-3000 Display Line 2
Encoder Names MCS-3000 Display Line 2
Encoder Names
Faders 1 - 7 Channel Volume 1 - 7
Faders 1 - 7 Channel Volume 1 - 7
Fader 8 Master Volume Fader 8 Master Volume
MCS-3000 Series USB Software76

MCS-3000 SeriesLayer 3
FCP MCS-3000 SeriesLayer 4
FCP
Fader Touch Sensors1 - 7
Fader Touch 1 - 7 Fader Touch Sensors1 - 7
Fader Touch 1 - 7
Fader Touch Sensor 8
Master Touch Fader Touch Sensor 8
Master Touch
Mutes 1 - 7 Mute 1 - Mute 7 Mutes 1 - 7 Mute 1 - Mute 7
Mute 8 Master Mute Mute 8 Master Mute
Solos 1 - 7 Solo 1 - Solo 7 Solos 1 - 7 Solo 1 - Solo 7
MCS-Bridge Encoders 1 - 7
Pan 1 - Pan 7 MCS-Bridge Encoders 1 - 7
Pan 1 - Pan 7
MCS-3000 Series USB Software77

Final Cut Pro X™ SupportUnlike Final Cut Pro 7, FCP X includes no built-in support for control surfaces. However, the MCS-3000 is still quite useful with FCP X because JLCooper has converted all of the FCP X keyboard shortcuts into MCS-3000 Built-In Commands.
JLCooper has included a Final Cut Pro X keyset which has assigned Built-In Commands to many of the MCS controls, but which still leaves room for customization.
Following is a list of the FCP X keyset assignments.
Layers 1 and 2
MCS Layer 1 FCP X MCS Layer 2 FCP XM1 Arrow Tool M1M2 Blade Tool M2M3 Crop Tool M3M4 Hand Tool M4M5 Trim Tool M5Rewind Play Reverse Rewind Play ReverseFast Forward Play Forward Fast Forward Play ForwardStop Stop Stop StopPlay Play Play PlayJog Jog Jog JogShuttle Shuttle Shuttle ShuttleW1 Set Selection Start W1 Select ClipW2 Set Selection End W2 Previous ClipW3 Add Marker W3 Next ClipW4 Delete Marker W4W5 Go To Previous MarkerW5W6 Go To Next Marker W6Right Encoder 1 Zoom Right Encoder 1Bank 1 Select Layer 1 Bank 1 Select Layer 1Bank 2 Select Layer 2 Bank 2 Select Layer 2Bank 3 Select Layer 3 Bank 3 Select Layer 3Bank 4 Select Layer Bank 4 Select Layer Right Page 1 Event Browser Right Page 1 Color BoardRight Page 2 Timeline Right Page 2 Project LibraryRight Page 3 Viewer Right Page 3 Timeline IndexRight Page 4 Inspector Right Page 4Right Page 5 Event Library Right Page 5 HistogramRight Page 6 Audio Enhancements Right Page 6 Vectorscope
MCS-3000 Series USB Software78

MCS Layer 1 FCP X MCS Layer 2 FCP XRight Page 7 Audio Meters Right Page 7 WaveformRight Page 8 Effects Browser Right Page 80 0 key 0 0 key1 1 key 1 1 key2 2 key 2 2 key3 3 key 3 3 key4 4 key 4 4 key5 5 key 5 5 key6 6 key 6 6 key7 7 key 7 7 key8 8 key 8 8 key9 9 key 9 9 keyEnter Enter Enter EnterClear/Cancel Esc / Cancel Clear/Cancel Esc / CancelUp Go To Beginning UpRight Forward Ten Frames RightDown Go To End DownLeft Back 10 Frames Left
MCS-3000 Series USB Software79
Layers 3 and 4
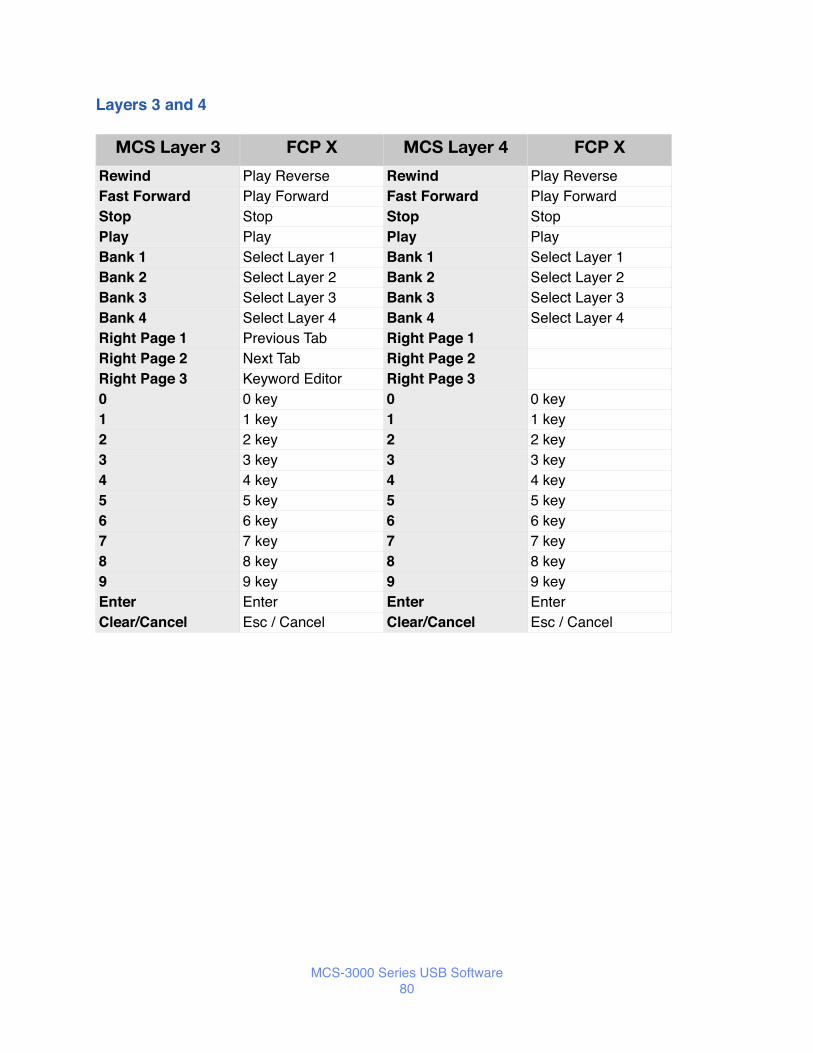
MCS Layer 3 FCP X MCS Layer 4 FCP XRewind Play Reverse Rewind Play ReverseFast Forward Play Forward Fast Forward Play ForwardStop Stop Stop StopPlay Play Play PlayBank 1 Select Layer 1 Bank 1 Select Layer 1Bank 2 Select Layer 2 Bank 2 Select Layer 2Bank 3 Select Layer 3 Bank 3 Select Layer 3Bank 4 Select Layer 4 Bank 4 Select Layer 4Right Page 1 Previous Tab Right Page 1Right Page 2 Next Tab Right Page 2Right Page 3 Keyword Editor Right Page 30 0 key 0 0 key1 1 key 1 1 key2 2 key 2 2 key3 3 key 3 3 key4 4 key 4 4 key5 5 key 5 5 key6 6 key 6 6 key7 7 key 7 7 key8 8 key 8 8 key9 9 key 9 9 keyEnter Enter Enter EnterClear/Cancel Esc / Cancel Clear/Cancel Esc / Cancel
MCS-3000 Series USB Software80

Soundtrack Pro™ SupportSetting up the MCS-3x00 for use with Soundtrack Pro is almost identical to setting up for Final Cut Pro.
Open the MCS-3000 application and Import the Soundtrack Pro keyset or create a keyset of your own. If you create your own, start by setting the Emulation Mode to A then choosing Set All Controls to Emulation from the Actions menu. Later on you can customize this keyset with built-in commands, key sequences and mouse actions.
The next time you run Soundtrack Pro, open the Preferences dialog from the Soundtrack Pro menu then go to the Control Surfaces panel. Click on the “+” button to add a control surface and choose Mackie Control. Choose MCSk USB - MCS3k for the input connection and output connections. Click OK to exit the dialog.
The Soundtrack Pro Keyset
The Soundtrack Pro keyset is a combination of emulated actions, keystrokes and built in commands.
MCS-3000 Series Soundtrack Pro
Faders 1-7 Channel Volume 1 - 7
Fader 8 Master Fader
Faders Touch Sensors 1-7 Fader Touch 1 - 7
Fader Touch Sensor 8 Master Touch
Mutes 1-7 Channel Mutes 1 - 7
Solos 1-7 Channel Solos 1 - 7
Aux 1-7 Center Pans 1 - 7
Select 1-7 Channel Select 1 - 7
Bridge B Encoders 1 - 7 Pan 1- 7
Bridge LCD Buttons Channel Record Ready
MCS-3000 Encoders 1-4 Pan 1-4
MCS-3000 Page 1-4 Mute 1-4
MCS-3000 Page 5-8 Solo 1-4
MCS-3000 Series USB Software81

MCS-3000 Series Soundtrack Pro
Up Zoom Out
Down Zoom In
Left Move Playhead to Previous Second
Right Move Playhead to Next Second
Bank 1 Bank Left
Bank 2 Bank Right
W1 Insert Time Marker
W2 Add region marker for selection
W3 Add time markers at beginning and end of selection
W4 Insert Beat Marker
W5 Goto Previous Marker
W6 Goto Next Marker
Keypad 0-9 Types 0-9 for setting locate points
Keypad Last Types “.”
Keypad +/- Types “-”
Keypad Clear/Cancel Cancel
Keypad Enter Enter
Rewind Move Back
Fast Forward Move Forward
Stop Stop
Play Play
Record Record
MCS-3000 Series USB Software82

MCS-3000 Series Soundtrack Pro
Jog Wheel Jog
Logic Pro™ SupportOpen the MCS-3000 application and Import the Logic Pro keyset or create a keyset of your own. If you create your own, start by setting the Emulation Mode to B then choosing Set All Controls to Emulation from the Actions menu. Later on you can customize this keyset with built-in commands, key sequences and mouse actions.
Next run Logic Pro and choose Preferences > Control Surfaces > Setup from the Logic Pro Menu. In the resulting window’s New menu, choose Install, and in the next window click on Scan. In a moment, Logic should tell you that it is connected to a Logic Control on the Input and Out Port named MCS3k. If it isn’t successful then select Logic Control from the list and click on Add. Then manually connect the control surface to the Input and Out Port named MCS3k.
The Logic Pro Keyset
All of the assignments in the Logic Pro keyset are to Emulation Mode B. Consult the Control Surfaces Support document found under Logic’s Help menu for details on using the Logic Control with Logic.
MCS-3000 Series Logic Pro
M1 Emulation- smpte/beats
M2 Emulation- global view: global view on/off
M3 Emulation- global view: inputs
M4 Emulation- global view: audio tracks
M5 Emulation- global view: aux
Rewind Emulation- transport: rewind
Fast Forward Emulation- transport: fast forward
Stop Emulation- transport: stop
Play Emulation- transport: play
MCS-3000 Series USB Software83

MCS-3000 Series Logic Pro
Record Emulation- transport: record
Jog Emulation- jog
W1 Emulation- automation: read/off
W2 Emulation- automation: write
W3 Emulation- automation: trim
W4 Emulation- automation: touch
W5 Emulation- automation: latch
MCS-3000 Encoder 1 Emulation- pot: 1
MCS-3000 Encoder 2 Emulation- pot: 2
MCS-3000 Encoder 3 Emulation- pot: 3
MCS-3000 Encoder 4 Emulation- pot: 4
MCS-3000 Encoder 5 Emulation- display scroll
F1 Emulation- fkey: 1
F2 Emulation- fkey: 2
F3 Emulation- fkey: 3
F4 Emulation- fkey: 4
F5 Emulation- fkey: 5
F6 Emulation- fkey: 6
F7 Emulation- fkey: 7
F8 Emulation- fkey: 8
Bank 1 Emulation- bank_change: bank left
Bank 2 Emulation- bank_change: bank right
Bank 3 Emulation- bank_change: channel left
Bank 4 Emulation- bank_change: channel right
MCS-3000 Series USB Software84

MCS-3000 Series Logic Pro
MCS-3000 Page 1 Emulation- mute: 1
MCS-3000 Page 2 Emulation- mute: 2
MCS-3000 Page 3 Emulation- mute: 3
MCS-3000 Page 4 Emulation- mute: 4
MCS-3000 Page 5 Emulation- solo: 1
MCS-3000 Page 6 Emulation- solo: 2
MCS-3000 Page 7 Emulation- solo: 3
MCS-3000 Page 8 Emulation- solo: 4
Enter Emulation- utilities: enter
Clear/Cancel Emulation- utilities: cancel
Up Emulation- cursor: up
Right Emulation- cursor: right
Down Emulation- cursor: down
Left Emulation- cursor: left
Shift Emulation- modifiers: shift
Mute 1 Emulation- mute: 1
Mute 2 Emulation- mute: 2
Mute 3 Emulation- mute: 3
Mute 4 Emulation- mute: 4
Mute 5 Emulation- mute: 5
Mute 6 Emulation- mute: 6
Mute 7 Emulation- mute: 7
Solo 1 Emulation- solo: 1
Solo 2 Emulation- solo: 2
Solo 3 Emulation- solo: 3
Solo 4 Emulation- solo: 4
Solo 5 Emulation- solo: 5
MCS-3000 Series USB Software85

MCS-3000 Series Logic Pro
Solo 6 Emulation- solo: 6
Solo 7 Emulation- solo: 7
Aux 1 Emulation- pot switch: 1
Aux 2 Emulation- pot switch: 2
Aux 3 Emulation- pot switch: 3
Aux 4 Emulation- pot switch: 4
Aux 5 Emulation- pot switch: 5
Aux 6 Emulation- pot switch: 6
Aux 7 Emulation- pot switch: 7
Select 1 Emulation- select: 1
Select 2 Emulation- select: 2
Select 3 Emulation- select: 3
Select 4 Emulation- select: 4
Select 5 Emulation- select: 5
Select 6 Emulation- select: 6
Select 7 Emulation- select: 7
Fader Touch 1 Emulation- touch sensor: 1
Fader Touch 2 Emulation- touch sensor: 2
Fader Touch 3 Emulation- touch sensor: 3
Fader Touch 4 Emulation- touch sensor: 4
Fader Touch 5 Emulation- touch sensor: 5
Fader Touch 6 Emulation- touch sensor: 6
Fader Touch 7 Emulation- touch sensor: 7
Fader Touch 8 Emulation- touch sensor: 9(master)
Fader 1 Emulation- fader: 1
Fader 2 Emulation- fader: 2
MCS-3000 Series USB Software86

MCS-3000 Series Logic Pro
Fader 3 Emulation- fader: 3
Fader 4 Emulation- fader: 4
Fader 5 Emulation- fader: 5
Fader 6 Emulation- fader: 6
Fader 7 Emulation- fader: 7
Fader 8 Emulation- fader: 9(master)
MCS-3000 Series USB Software87

Nuendo™ SupportSteinberg Nuendo has built in support for the MCS-3000.
The Nuendo keyset has all controls set to Native MIDI. To setup Nuendo to work with the MCS, the first time you run it go to Device Setup in the Devices menu. On the left hand side of the dialog choose JLCooper MCS-3000 under Remote Devices. On the right hand side choose MCS3k USB MCS3k for both the MIDI Input and MIDI Output then click OK.
MCS-3000 Series USB Software88

Here are the mappings from the Eclipse controls to Nuendo functions. More details can be found in the document Remote Control Devices supplied with Nuendo.
MCS-3000 Series Nuendo
Faders 1 - 32 Volume on channels 1 - 32
Mutes 1 - 32 Mutes on channels 1 - 32
Solos 1 - 32 Solos on channels 1 - 32
Sel 1 - 32 Select channels 1 - 32 for editing
Bank 1 Select channels 1 - 8
Bank 2 Select channels 9 - 16
Bank 3 Select channels 17 - 24
Bank 4 Select channels 25 - 32
MCS-3000 Page 1 MCS-3000 Encoder Bank 1
MCS-3000 Page 2 MCS-3000 Encoder Bank 2
MCS-3000 Page 3 MCS-3000 Encoder Bank 3
MCS-3000 Page 4 MCS-3000 Encoder Bank 4
MCS-3000 Encoders Bank 1
Encoder 1 Pan
Encoder 2 Effect Send 1
Encoder 3 Effect Send 2
Encoder 4 Effect Send 3
Encoder 5 Effect Send 4
MCS-3000 Encoders Bank 2
Encoder 1 EQ 1 Gain
Encoder 2 EQ 1 Freq
Encoder 3 EQ 1 “Q”
MCS-3000 Series USB Software89

MCS-3000 Series Nuendo
Encoder 4 EQ 1 Low Limit
Encoder 5 EQ 1 High Limit
MCS-3000 Encoders Bank 3
Encoder 1 EQ 2 Gain
Encoder 2 EQ 2 Freq
Encoder 3 EQ 2 “Q”
Encoder 4 EQ 2 Low Limit
Encoder 5 EQ 2 High Limit
MCS-3000 Encoders Bank 4
Encoder 1 EQ 3 Gain
Encoder 2 EQ 3 Freq
Encoder 3 EQ 3 “Q”
Encoder 4 EQ 3 Low Limit
Encoder 5 EQ 3 High Limit
Set Locate(followed by typing an ID and pressing RETURN)
Create a Marker
Locate(followed by typing an ID and pressing RETURN)
Go to a Marker
Rewind Rewind
Fast Forward Fast Forward
Stop Stop
Play Play
MCS-3000 Series USB Software90

Pro Tools™ SupportThe MCS-3000 Series hardware has a built-in Pro Tools mode. When Pro Tools is running, it automatically puts the MCS-3000 into Pro Tools mode. Pro Tools mode overrides any actions that may have been assigned to various MCS-3000 controls.
In Pro Tools choose Setup > Peripherals and click on the MIDI Controllers tab. Choose HUI from the Type popup and MCS-3000 from both the Receive From and Send To popups. Click on the OK button.
Pro Tools Keyset
The Pro Tools keyset has all controls set to Native MIDI. It is not editable.
For more information on using the MCS-3000 with Pro Tools see the document MCS-3000 Pro Tools Addendum, which can be found in both the MCS-3000 application’s Help menu and in the folder /Applications/MCS-3000 Series USB Software/documentation/.
MCS-3000 Series USB Software91
Related Documents