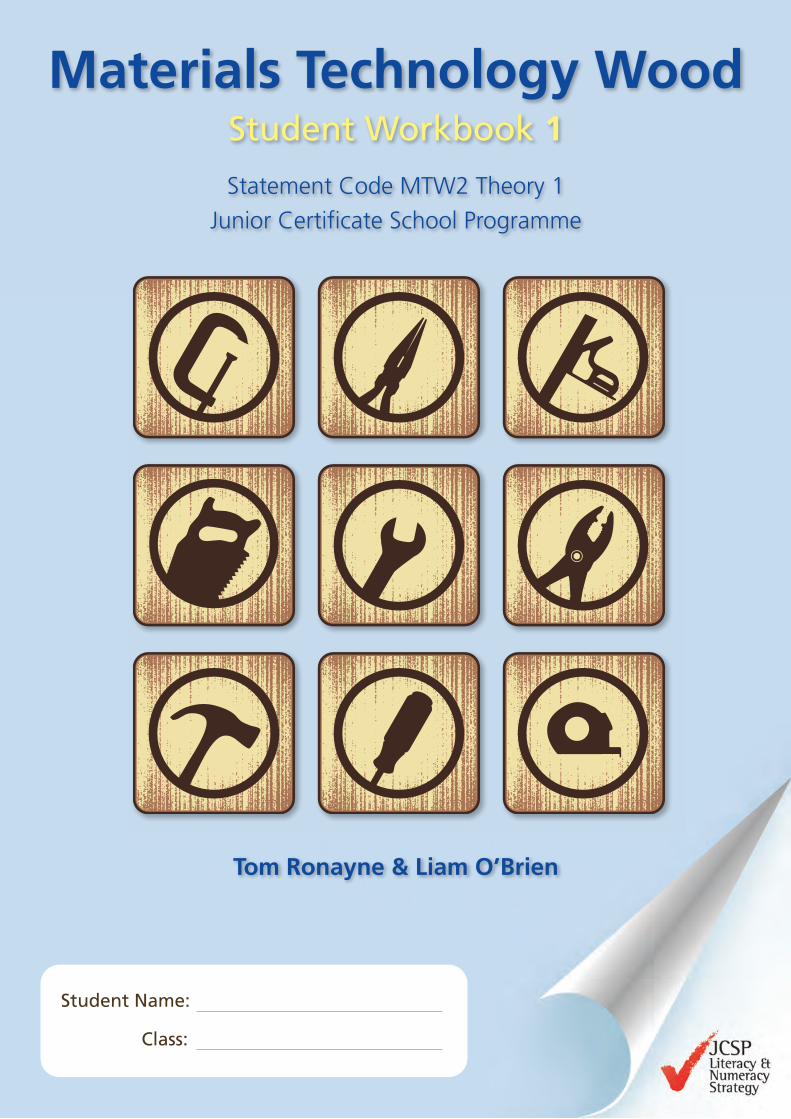
Student Name: Class: Materials Technology Wood Student Workbook 1 Statement Code MTW2 Theory 1 Junior Certificate School Programme Tom Ronayne & Liam O’Brien

Welcome message from author
This document is posted to help you gain knowledge. Please leave a comment to let me know what you think about it! Share it to your friends and learn new things together.
Transcript
Student Name:
Class:
Materials Technology WoodStudent Workbook 1
Statement Code MTW2 Theory 1
Junior Certificate School Programme
Tom Ronayne & Liam O’Brien
Published in 2012 byProfessional Development Service for Teachers (PDST)Junior Certificate School ProgrammeBlackrock Education CentreKill AvenueDún LaoghaireCo. DublinPhone: 01 236 5000Fax: 01 236 5071Email: [email protected]: www.jcsp.ie
Copyright © PDST, 2012
The Professional Development Service for Teachers (PDST) is funded by theTeacher Education Section of the Department of Education and Skills under theNational Development Plan 2007-2013.
The Junior Certificate School Programme Literacy and Numeracy Strategy and theDemonstration Library Project are funded by the Early Literacy Initiative and theDelivering Equality of Opportunity in Schools (DEIS) Action Plan within the TeacherEducation Section of the Department of Education and Skills.
Written by Tom Ronayne & Liam O’BrienEdited by Mary Clare Higgins, JCSP Associate, Laura Davis, National AdministratorLiteracy and Numeracy JCSP
MTW Statement Code No. 2 Theory 1
LEARNING TARGETS
At Junior Certificate Level the student can:
Display basic background knowledge of woodwork theoryPage
Target 1: List safety procedures in a workshop 1
Target 2: Label a simple diagram for hardwood (deciduous) or softwood (coniferous) trees 2
Target 3: Recognise at least three trees by their leaves 5
Target 4: Have a basic knowledge of the growth of trees 12
Target 5: Recognise four different manufactured boards 17
Target 6: Identify at least three common wood defects 22
Target 7: Identify and label the common Hand Tools and state their uses 26
Target 8: Identify and label four given power tools and describe their safe usage 42
Target 9: Identify other relevant Materials and understand their safe usage (e.g. fabrics, metals, ceramics etc.) 51
Target 10: Identify four different methods of Fixing and Fastening 54
Target 11: Identify four common joints and state where they would be used 61
Target 12: Identify four different applied finishes and explain their use 63
Contents

SAFETY
Keywords
Think Safety for both yourself and others when you enter the Woodwork room. There are many potentiallydangerous hand/power tools and harmful substances in this room. Follow the teacher’s instructions at all times.
MTW Statement Code No. 2 Theory 1 1
Target 1 List safety procedures in a workshop
SAFETY PROCEDURES FOR OUR WOODWORK ROOM
1
2
3
4
5
6
7
8
9
10
11
12
13
Safety Rules Procedures
Target 2 Label a simple diagram for hardwood (deciduous)or softwood (coniferous) trees
MTW Statement Code No. 2 Theory 12
PARTS OF A TREE
Keywords
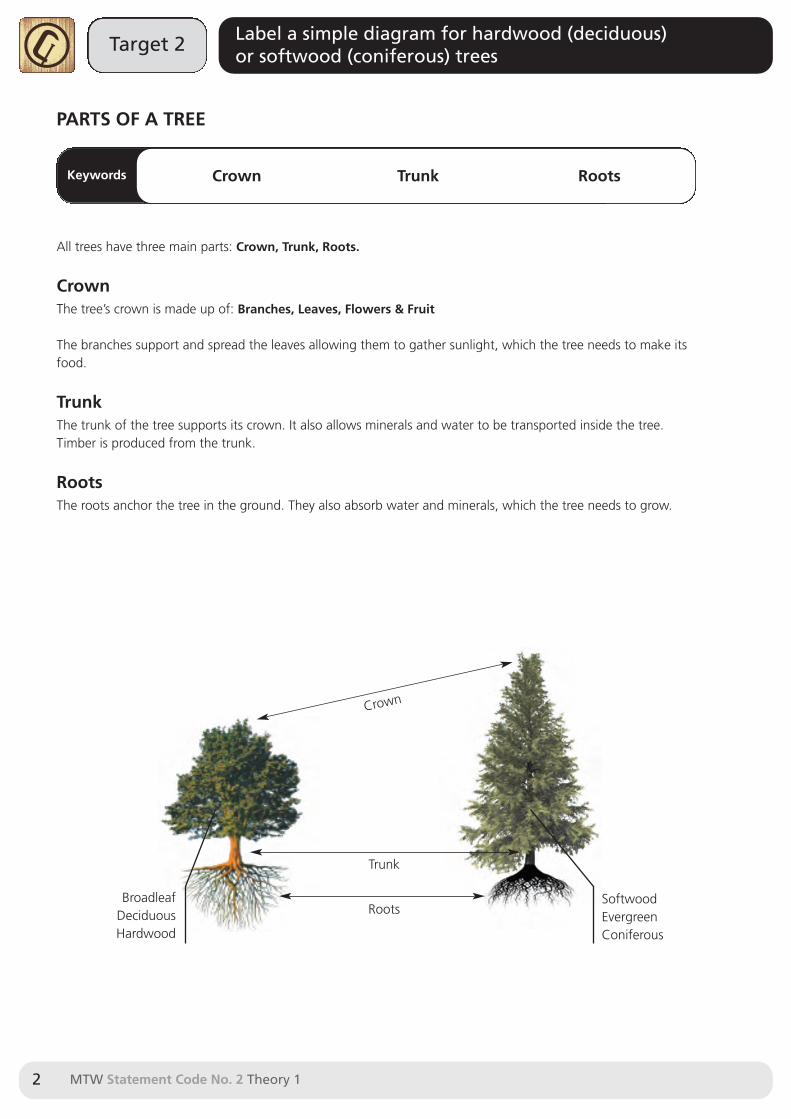
All trees have three main parts: Crown, Trunk, Roots.
CrownThe tree’s crown is made up of: Branches, Leaves, Flowers & Fruit
The branches support and spread the leaves allowing them to gather sunlight, which the tree needs to make itsfood.
TrunkThe trunk of the tree supports its crown. It also allows minerals and water to be transported inside the tree.Timber is produced from the trunk.
RootsThe roots anchor the tree in the ground. They also absorb water and minerals, which the tree needs to grow.
Broadleaf Deciduous Hardwood
SoftwoodEvergreenConiferous
Crown
Trunk
Roots
Crown Trunk Roots

MTW Statement Code No. 2 Theory 1 3
Target 2 Label a simple diagram for hardwood(deciduous) or softwood (coniferous) trees
TYPES OF TREES
Keywords
Trees are the largest type of plant, some reaching a height of 400 feet. Some live for centuries. Trees take carbondioxide out of the air and produce oxygen. Trees also produce timber and fruits
Trees can be divided into two main types: Coniferous and Broadleaf.
Coniferous TreesMost coniferous trees have needle-like or scaly leaves and produce woody cones that contain their seeds. Many are pyramid shaped and almost all are evergreen - this means they keep their leaves all year round.EXCEPTION: The Larch Tree
The wood from these types of trees is usually called softwood. Coniferous trees are also known as evergreenand softwood trees.
Carbon Dioxide
Coniferous
Deciduous
Oxygen
Broadleaf
Timber
Evergreen
Softwood
Hardwood
SoftwoodEvergreenConiferous
Needle-like leaves andseed bearing cones
Target 2 Label a simple diagram for hardwood(deciduous) or softwood (coniferous) trees
MTW Statement Code No. 2 Theory 14
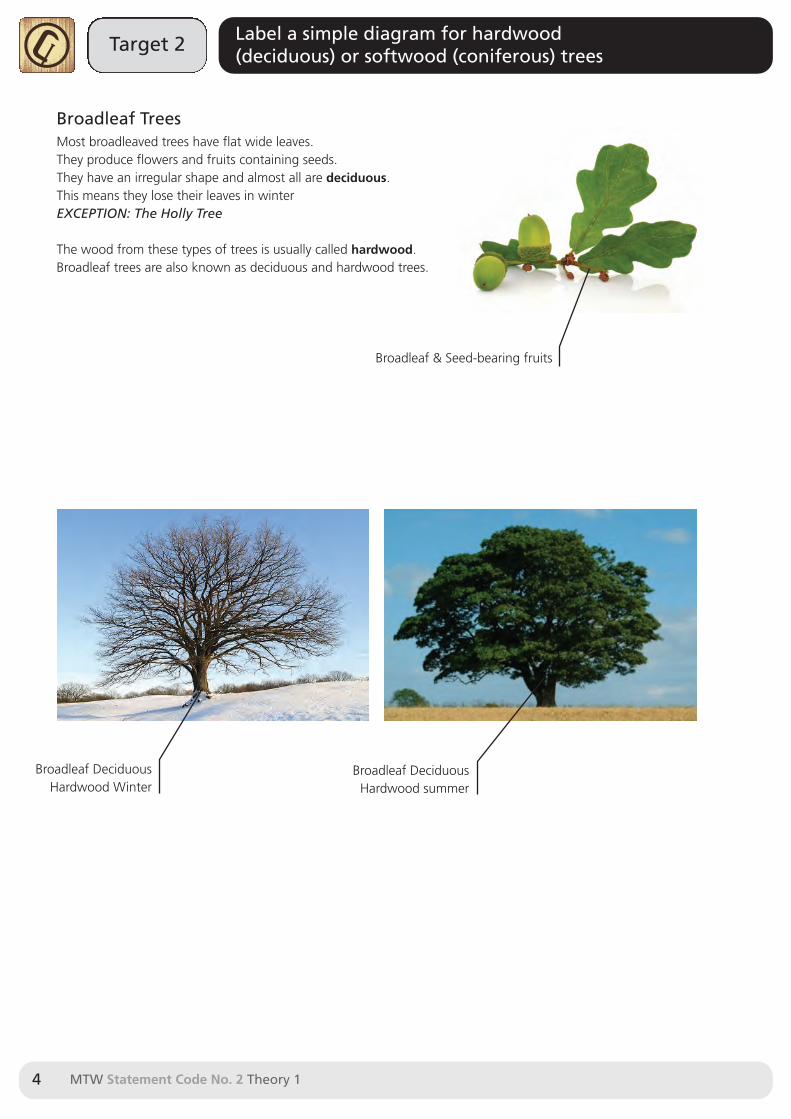
Broadleaf TreesMost broadleaved trees have flat wide leaves.They produce flowers and fruits containing seeds.They have an irregular shape and almost all are deciduous. This means they lose their leaves in winterEXCEPTION: The Holly Tree
The wood from these types of trees is usually called hardwood.Broadleaf trees are also known as deciduous and hardwood trees.
Broadleaf & Seed-bearing fruits
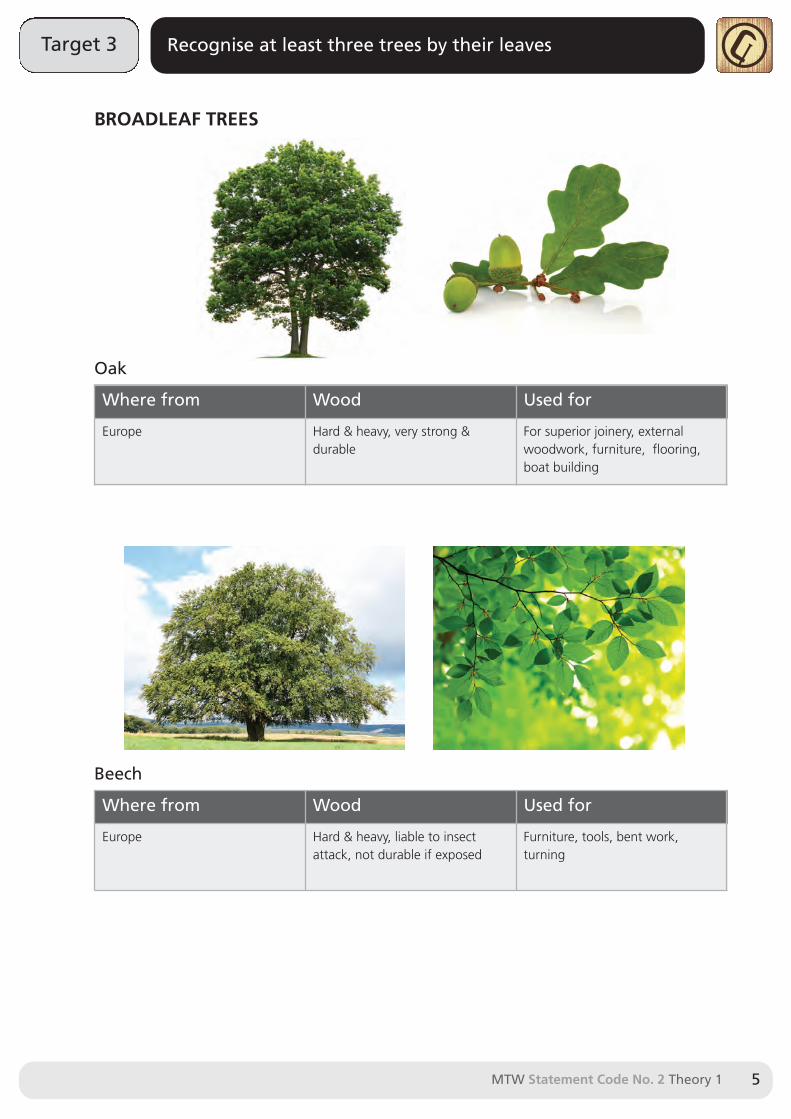
Broadleaf DeciduousHardwood summer
Broadleaf DeciduousHardwood Winter
BROADLEAF TREES
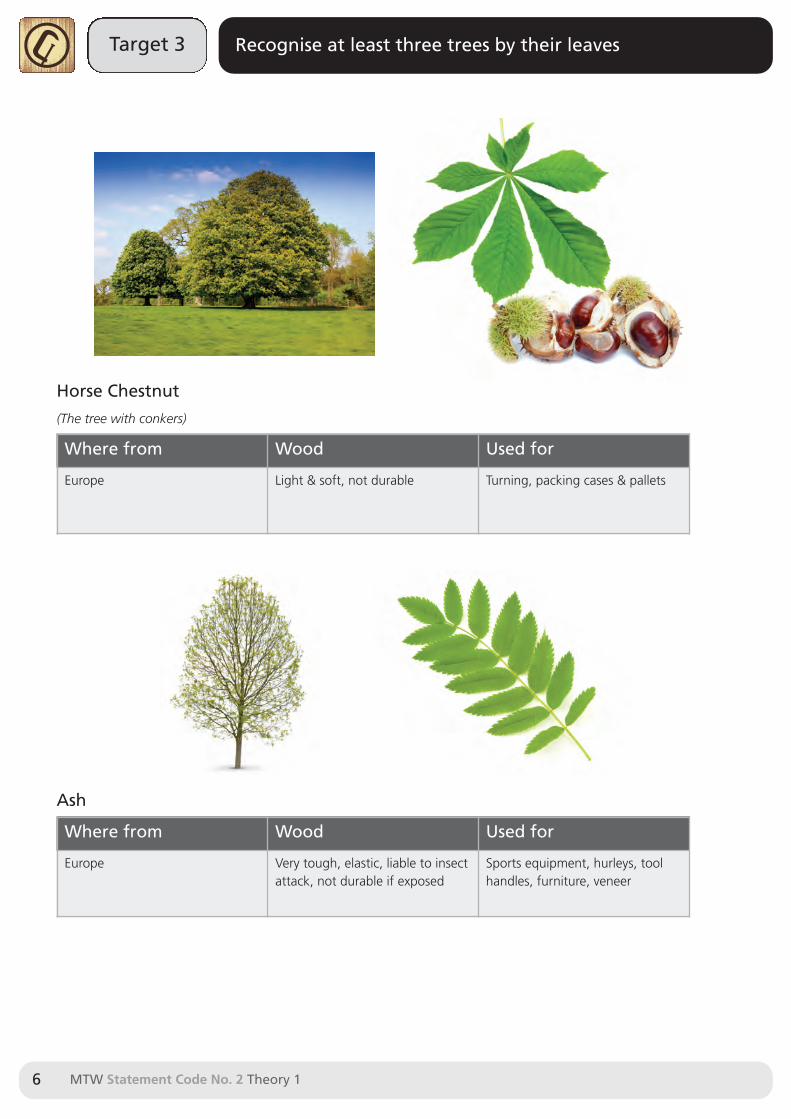
Oak
Beech
Where from Wood Used for
Europe Hard & heavy, very strong &durable
For superior joinery, externalwoodwork, furniture, flooring,boat building
Where from Wood Used for
Europe Hard & heavy, liable to insectattack, not durable if exposed
Furniture, tools, bent work,turning
MTW Statement Code No. 2 Theory 1 5
Target 3 Recognise at least three trees by their leaves
Target 3 Recognise at least three trees by their leaves
MTW Statement Code No. 2 Theory 16
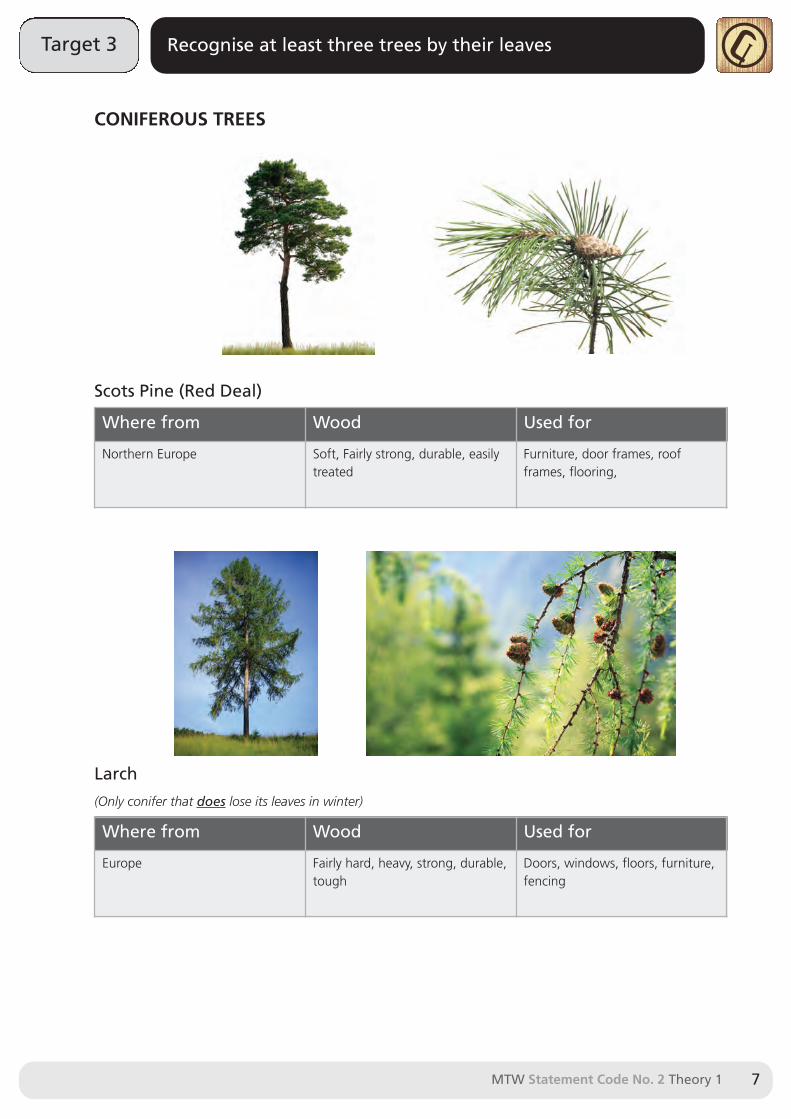
Horse Chestnut
(The tree with conkers)
Ash
Where from Wood Used for
Europe Light & soft, not durable Turning, packing cases & pallets
Where from Wood Used for
Europe Very tough, elastic, liable to insectattack, not durable if exposed
Sports equipment, hurleys, toolhandles, furniture, veneer
MTW Statement Code No. 2 Theory 1 7
Target 3 Recognise at least three trees by their leaves
CONIFEROUS TREES
Scots Pine (Red Deal)
Larch
(Only conifer that does lose its leaves in winter)
Where from Wood Used for
Northern Europe Soft, Fairly strong, durable, easilytreated
Furniture, door frames, roofframes, flooring,
Where from Wood Used for
Europe Fairly hard, heavy, strong, durable,tough
Doors, windows, floors, furniture,fencing
Target 3 Recognise at least three trees by their leaves
MTW Statement Code No. 2 Theory 18
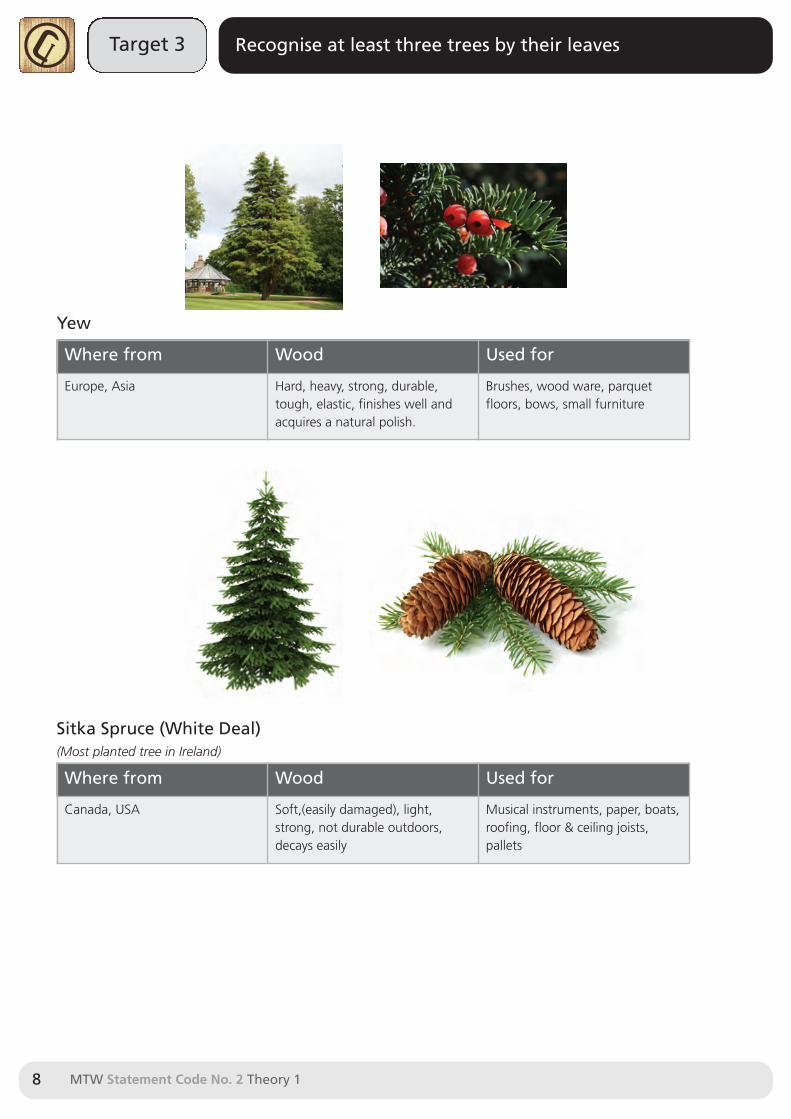
Yew
Sitka Spruce (White Deal)(Most planted tree in Ireland)
Where from Wood Used for
Europe, Asia Hard, heavy, strong, durable,tough, elastic, finishes well andacquires a natural polish.
Brushes, wood ware, parquetfloors, bows, small furniture
Where from Wood Used for
Canada, USA Soft,(easily damaged), light,strong, not durable outdoors,decays easily
Musical instruments, paper, boats,roofing, floor & ceiling joists,pallets
MTW Statement Code No. 2 Theory 1 9
Target 3 Recognise at least three trees by their leaves
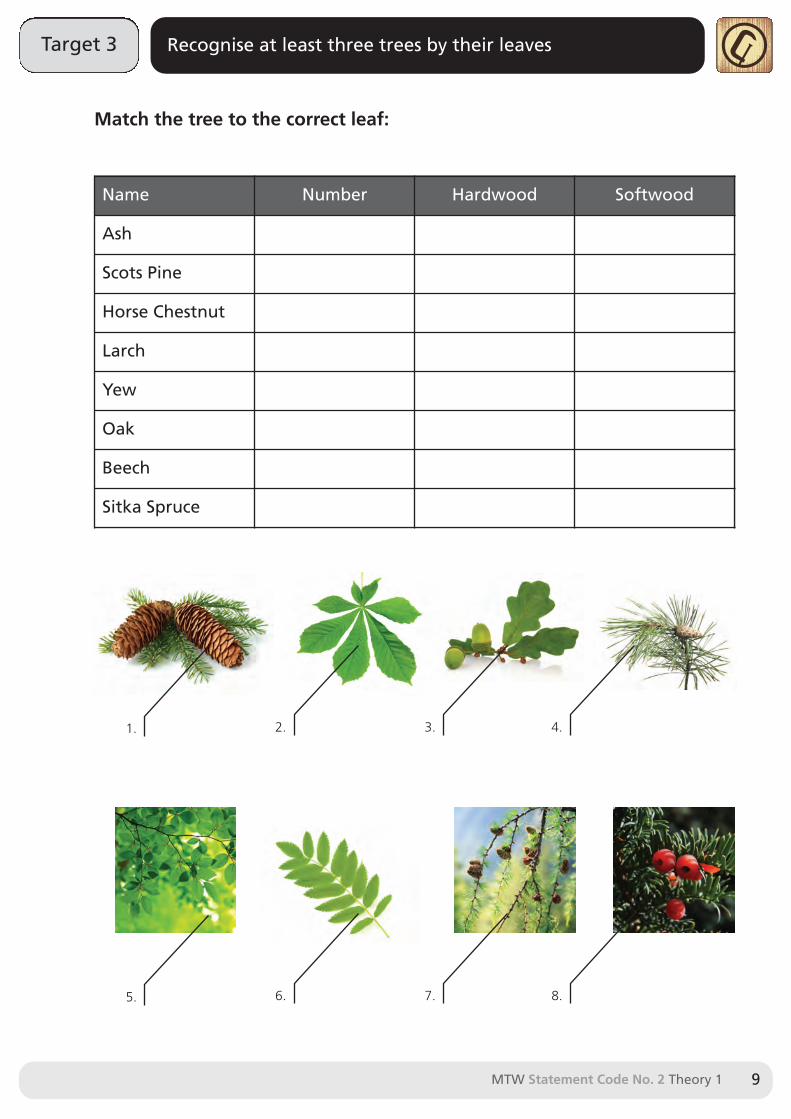
Match the tree to the correct leaf:
Name Number Hardwood Softwood
Ash
Scots Pine
Horse Chestnut
Larch
Yew
Oak
Beech
Sitka Spruce
1. 2. 3. 4.
5. 6. 7. 8.
Target 3 Recognise at least three trees by their leaves
MTW Statement Code No. 2 Theory 110
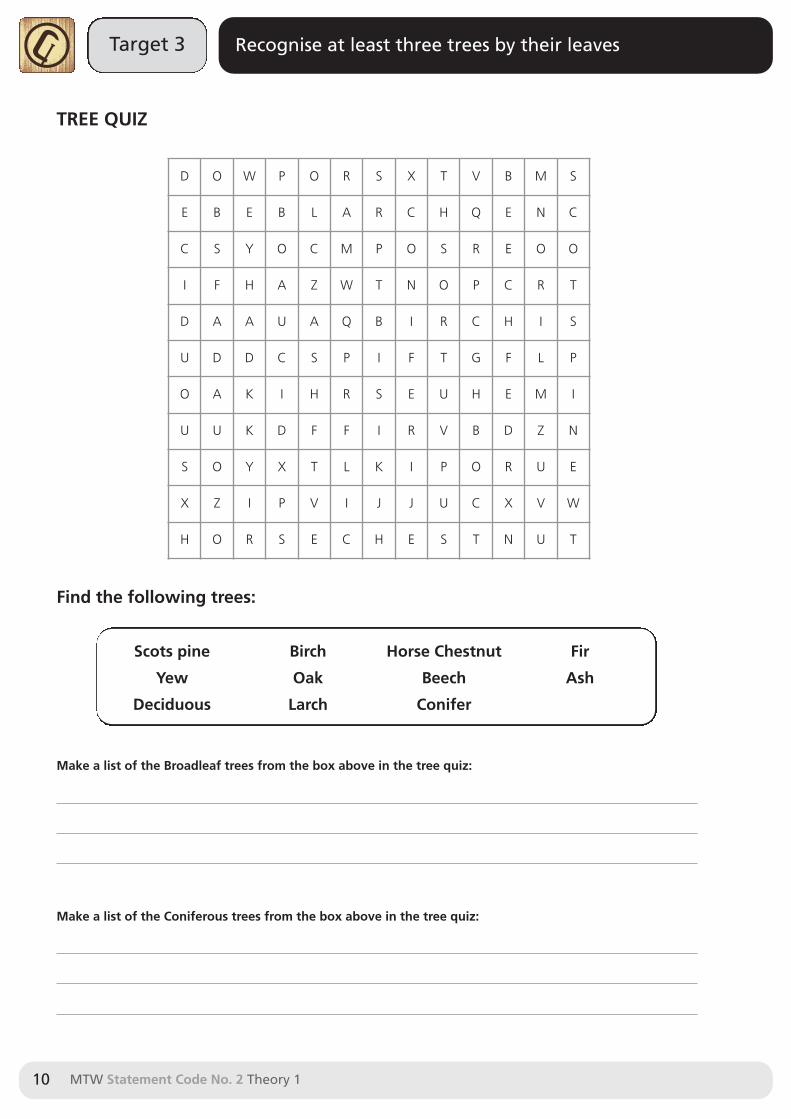
TREE QUIZ
Find the following trees:
D O W P O R S X T V B M S
E B E B L A R C H Q E N C
C S Y O C M P O S R E O O
I F H A Z W T N O P C R T
D A A U A Q B I R C H I S
U D D C S P I F T G F L P
O A K I H R S E U H E M I
U U K D F F I R V B D Z N
S O Y X T L K I P O R U E
X Z I P V I J J U C X V W
H O R S E C H E S T N U T
Scots pine
Yew
Deciduous
Birch
Oak
Larch
Horse Chestnut
Beech
Conifer
Fir
Ash
Make a list of the Broadleaf trees from the box above in the tree quiz:
Make a list of the Coniferous trees from the box above in the tree quiz:
MTW Statement Code No. 2 Theory 1 11
Target 3 Recognise at least three trees by their leaves
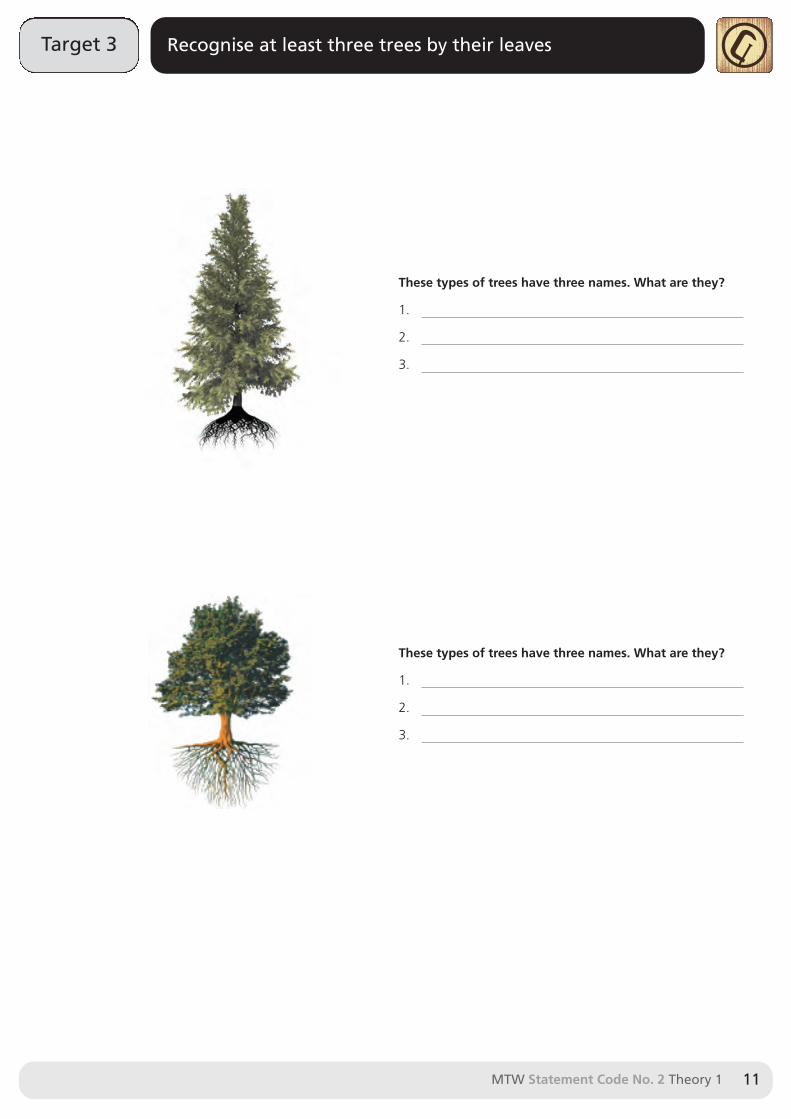
These types of trees have three names. What are they?
1.
2.
3.
These types of trees have three names. What are they?
1.
2.
3.
Target 4 Have a basic knowledge of the growth of trees
MTW Statement Code No. 2 Theory 112
HOW A TREE GROWS
Keywords
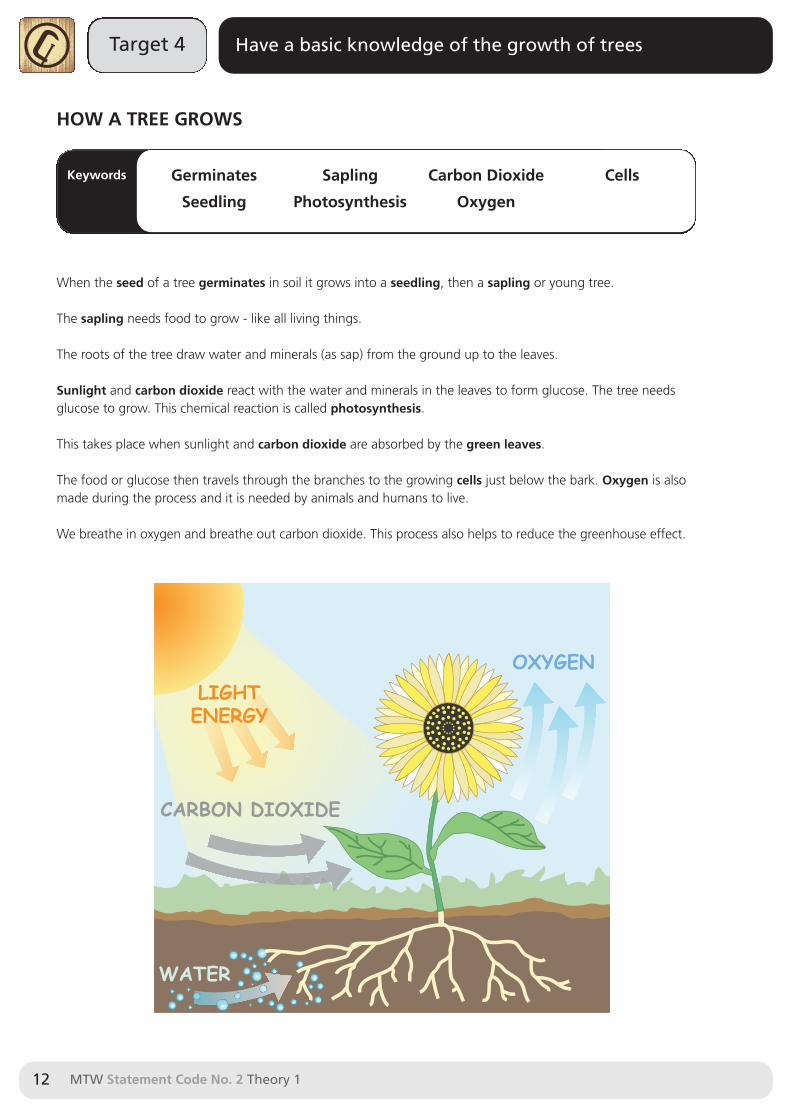
When the seed of a tree germinates in soil it grows into a seedling, then a sapling or young tree.
The sapling needs food to grow - like all living things.
The roots of the tree draw water and minerals (as sap) from the ground up to the leaves.
Sunlight and carbon dioxide react with the water and minerals in the leaves to form glucose. The tree needsglucose to grow. This chemical reaction is called photosynthesis.
This takes place when sunlight and carbon dioxide are absorbed by the green leaves.
The food or glucose then travels through the branches to the growing cells just below the bark. Oxygen is alsomade during the process and it is needed by animals and humans to live.
We breathe in oxygen and breathe out carbon dioxide. This process also helps to reduce the greenhouse effect.
Germinates
Seedling
Sapling
Photosynthesis
Carbon Dioxide
Oxygen
Cells
OXYGEN
WATER
CARBON DIOXIDE
LIGHTENERGY
MTW Statement Code No. 2 Theory 1 13
Target 4 Have a basic knowledge of the growth of trees
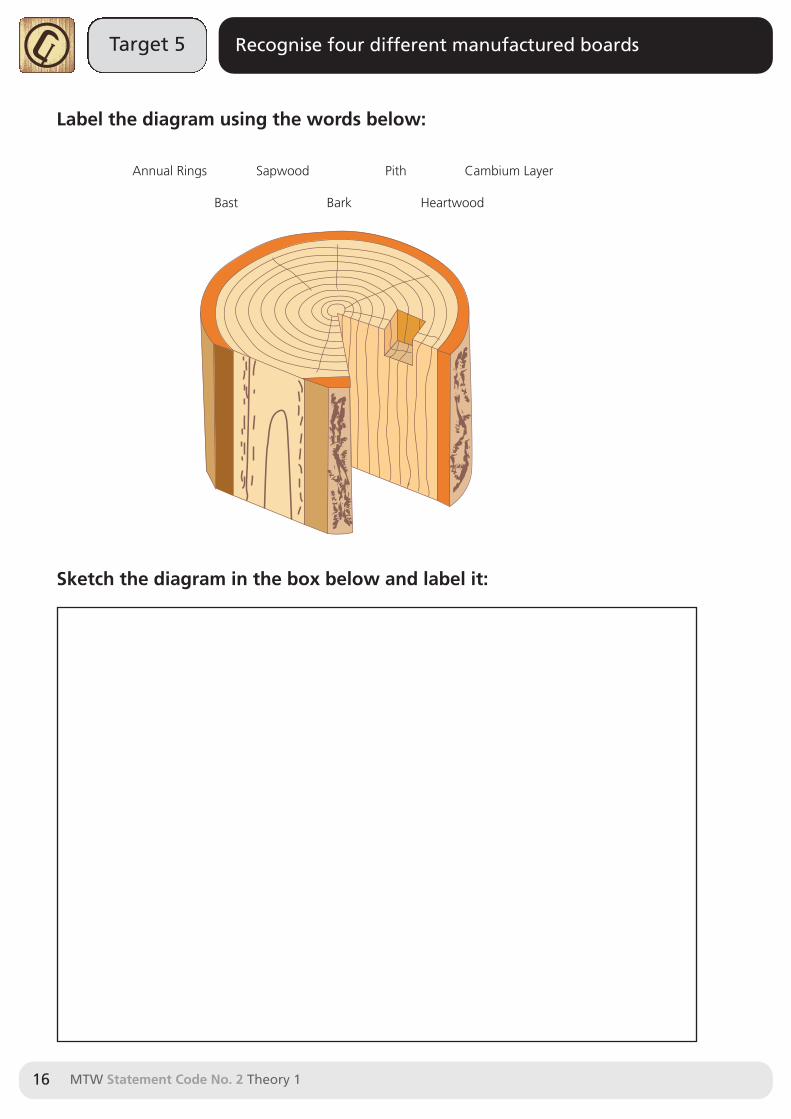
STRUCTURE OF A TREE
Keywords
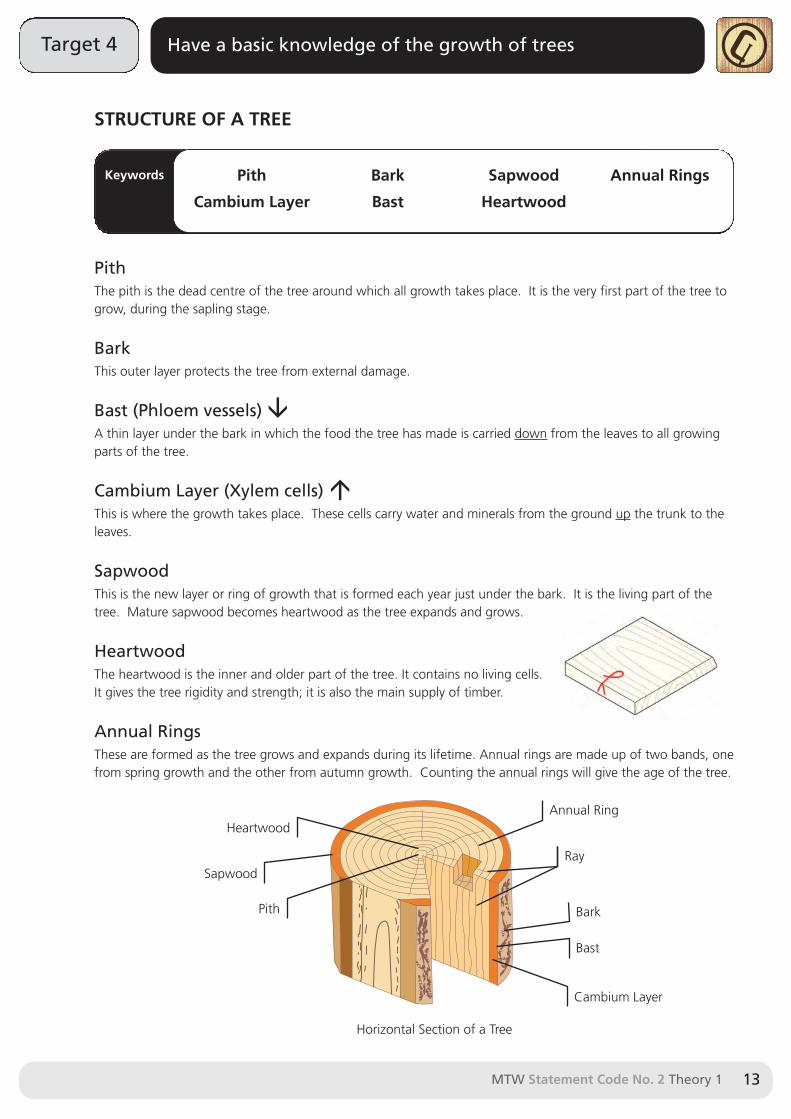
PithThe pith is the dead centre of the tree around which all growth takes place. It is the very first part of the tree togrow, during the sapling stage.
BarkThis outer layer protects the tree from external damage.
Bast (Phloem vessels) A thin layer under the bark in which the food the tree has made is carried down from the leaves to all growingparts of the tree.
Cambium Layer (Xylem cells) This is where the growth takes place. These cells carry water and minerals from the ground up the trunk to theleaves.
SapwoodThis is the new layer or ring of growth that is formed each year just under the bark. It is the living part of thetree. Mature sapwood becomes heartwood as the tree expands and grows.
HeartwoodThe heartwood is the inner and older part of the tree. It contains no living cells.It gives the tree rigidity and strength; it is also the main supply of timber.
Annual RingsThese are formed as the tree grows and expands during its lifetime. Annual rings are made up of two bands, onefrom spring growth and the other from autumn growth. Counting the annual rings will give the age of the tree.
Pith
Cambium Layer
Bark
Bast
Sapwood
Heartwood
Annual Rings
Sapwood
Cambium Layer
Bast
Annual Ring
Bark
Ray
Heartwood
Pith
·
‚
Horizontal Section of a Tree
Target 4 Have a basic knowledge of the growth of trees
MTW Statement Code No. 2 Theory 114
STRUCTURE OF A TREE
Match the meanings in the table below:
Write each word and its meaning below. Match the numbers and letters
1.
2.
3.
4.
5.
6.
7.
1. Pith
2. Bark
3. Bast
4. Cambium Layer
5. Sapwood
6. Heartwood
7. Annual Rings
A. This is the new layer of growth.
B. This gives the tree rigidity and strength; it is also the main supply of timber.
C. This outer layer protects the tree from external damage.
D. These are formed as the tree grows and expands during its lifetime.
E. The dead centre of the tree around which all growth takes place.
F. A thin layer under the bark in which the food is transported.
G. This is where the growth takes place.
Write down the meanings of the tree parts:
Annual Rings
Sapwood
Pith
Cambium Layer
Bast
Bark
Heartwood
MTW Statement Code No. 2 Theory 1 15
Target 4 Have a basic knowledge of the growth of trees
Target 5 Recognise four different manufactured boards
MTW Statement Code No. 2 Theory 116
Label the diagram using the words below:
Annual Rings Sapwood Pith Cambium Layer
Bast Bark Heartwood
Sketch the diagram in the box below and label it:
MTW Statement Code No. 2 Theory 1 17
Target 5 Recognise four different manufactured boards
Keywords
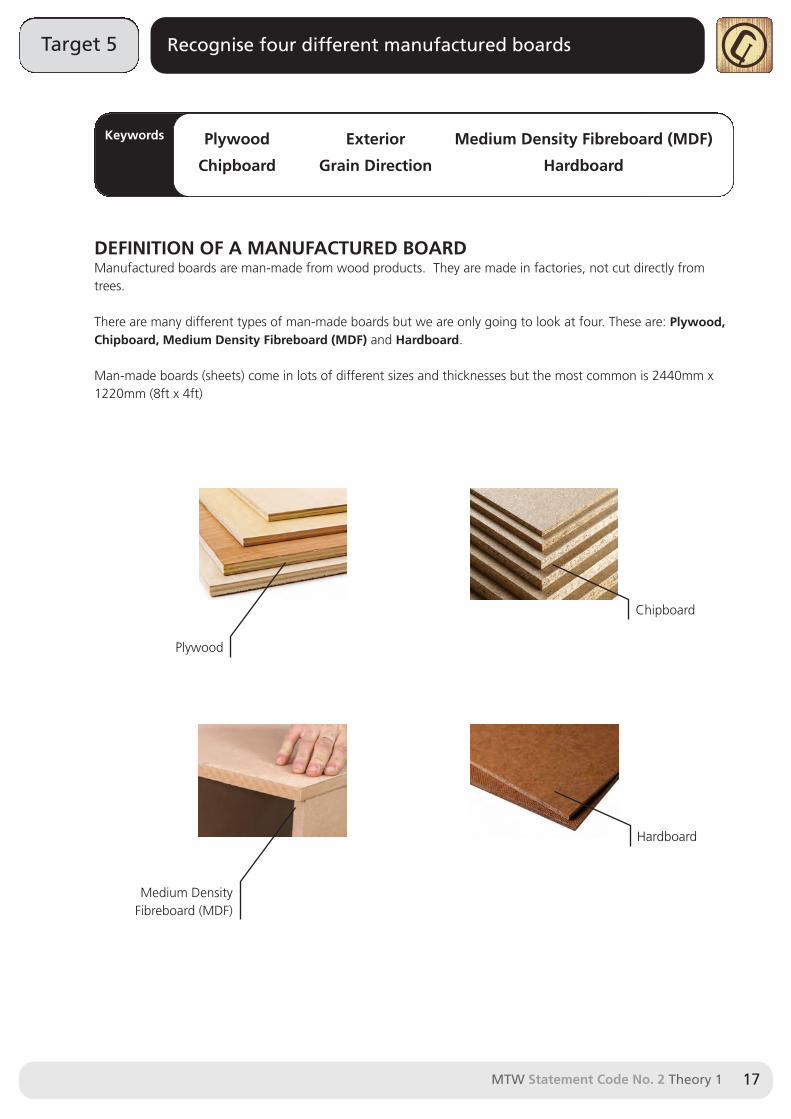
DEFINITION OF A MANUFACTURED BOARDManufactured boards are man-made from wood products. They are made in factories, not cut directly fromtrees.
There are many different types of man-made boards but we are only going to look at four. These are: Plywood,Chipboard, Medium Density Fibreboard (MDF) and Hardboard.
Man-made boards (sheets) come in lots of different sizes and thicknesses but the most common is 2440mm x1220mm (8ft x 4ft)
Plywood
Chipboard
Exterior
Grain Direction
Medium Density Fibreboard (MDF)
Hardboard
Medium DensityFibreboard (MDF)
Plywood
Hardboard
Chipboard
Target 5 Recognise four different manufactured boards
MTW Statement Code No. 2 Theory 118
PLYWOOD
Keywords
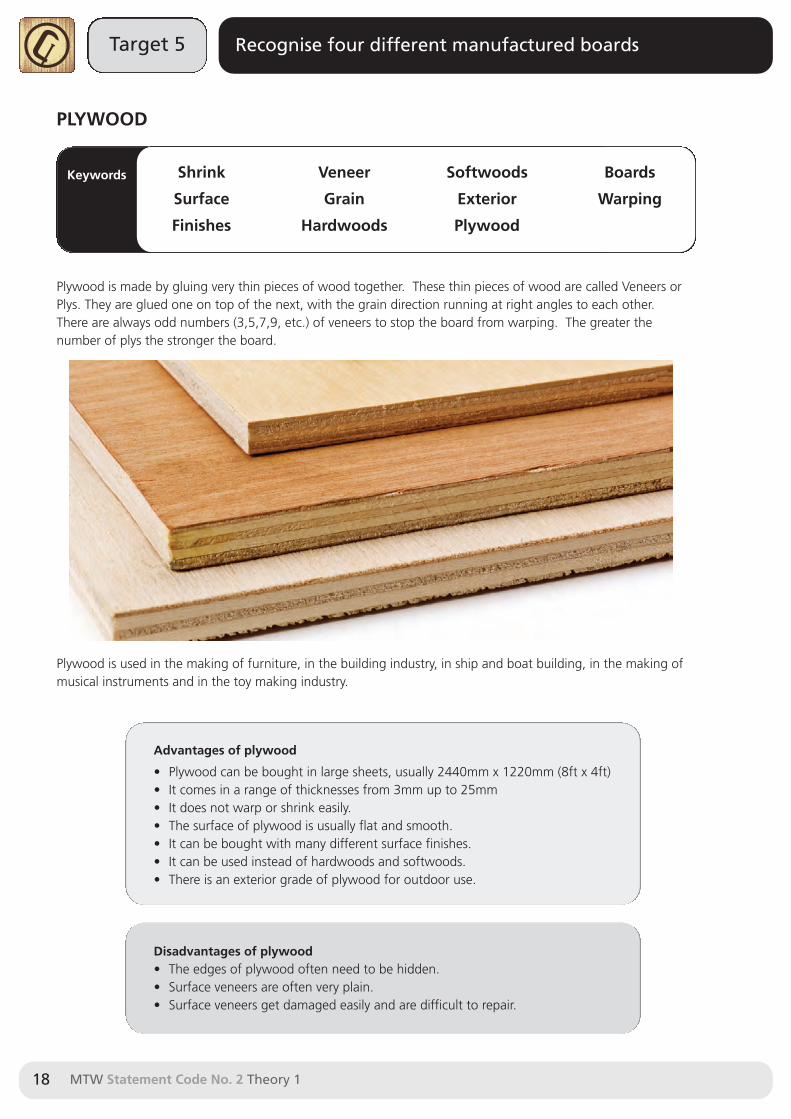
Plywood is made by gluing very thin pieces of wood together. These thin pieces of wood are called Veneers orPlys. They are glued one on top of the next, with the grain direction running at right angles to each other.There are always odd numbers (3,5,7,9, etc.) of veneers to stop the board from warping. The greater thenumber of plys the stronger the board.
Plywood is used in the making of furniture, in the building industry, in ship and boat building, in the making ofmusical instruments and in the toy making industry.
Shrink
Surface
Finishes
Veneer
Grain
Hardwoods
Softwoods
Exterior
Plywood
Boards
Warping
Advantages of plywood
• Plywood can be bought in large sheets, usually 2440mm x 1220mm (8ft x 4ft)• It comes in a range of thicknesses from 3mm up to 25mm• It does not warp or shrink easily.• The surface of plywood is usually flat and smooth.• It can be bought with many different surface finishes.• It can be used instead of hardwoods and softwoods.• There is an exterior grade of plywood for outdoor use.
Disadvantages of plywood• The edges of plywood often need to be hidden.• Surface veneers are often very plain.• Surface veneers get damaged easily and are difficult to repair.
MTW Statement Code No. 2 Theory 1 19
Target 5 Recognise four different manufactured boards
CHIPBOARD
Keywords
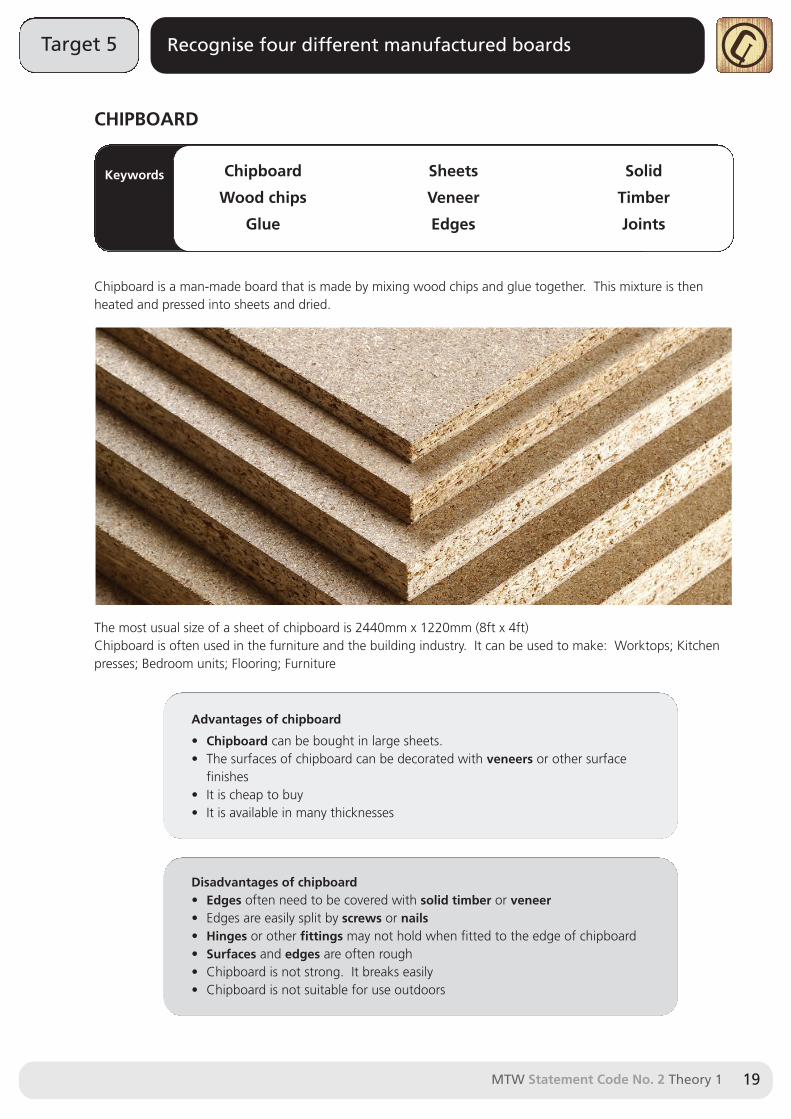
Chipboard is a man-made board that is made by mixing wood chips and glue together. This mixture is thenheated and pressed into sheets and dried.
The most usual size of a sheet of chipboard is 2440mm x 1220mm (8ft x 4ft)Chipboard is often used in the furniture and the building industry. It can be used to make: Worktops; Kitchenpresses; Bedroom units; Flooring; Furniture
Chipboard
Wood chips
Glue
Sheets
Veneer
Edges
Solid
Timber
Joints
Advantages of chipboard
• Chipboard can be bought in large sheets.• The surfaces of chipboard can be decorated with veneers or other surface
finishes• It is cheap to buy• It is available in many thicknesses
Disadvantages of chipboard• Edges often need to be covered with solid timber or veneer• Edges are easily split by screws or nails• Hinges or other fittings may not hold when fitted to the edge of chipboard• Surfaces and edges are often rough• Chipboard is not strong. It breaks easily• Chipboard is not suitable for use outdoors
Target 5 Recognise four different manufactured boards
MTW Statement Code No. 2 Theory 120
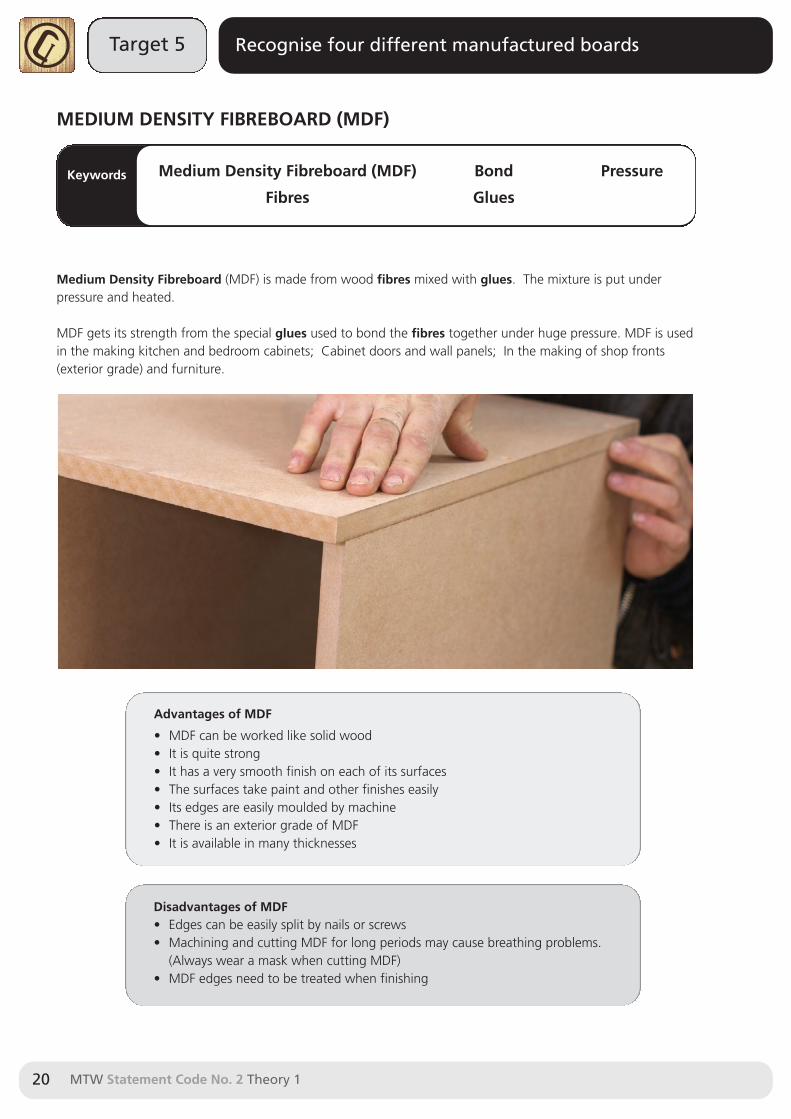
MEDIUM DENSITY FIBREBOARD (MDF)
Keywords
Medium Density Fibreboard (MDF) is made from wood fibres mixed with glues. The mixture is put underpressure and heated.
MDF gets its strength from the special glues used to bond the fibres together under huge pressure. MDF is usedin the making kitchen and bedroom cabinets; Cabinet doors and wall panels; In the making of shop fronts(exterior grade) and furniture.
Advantages of MDF
• MDF can be worked like solid wood• It is quite strong• It has a very smooth finish on each of its surfaces• The surfaces take paint and other finishes easily• Its edges are easily moulded by machine• There is an exterior grade of MDF• It is available in many thicknesses
Disadvantages of MDF• Edges can be easily split by nails or screws• Machining and cutting MDF for long periods may cause breathing problems.
(Always wear a mask when cutting MDF)• MDF edges need to be treated when finishing
Medium Density Fibreboard (MDF)
Fibres
Bond
Glues
Pressure
MTW Statement Code No. 2 Theory 1 21
Target 5 Recognise four different manufactured boards
HARDBOARD
Keywords
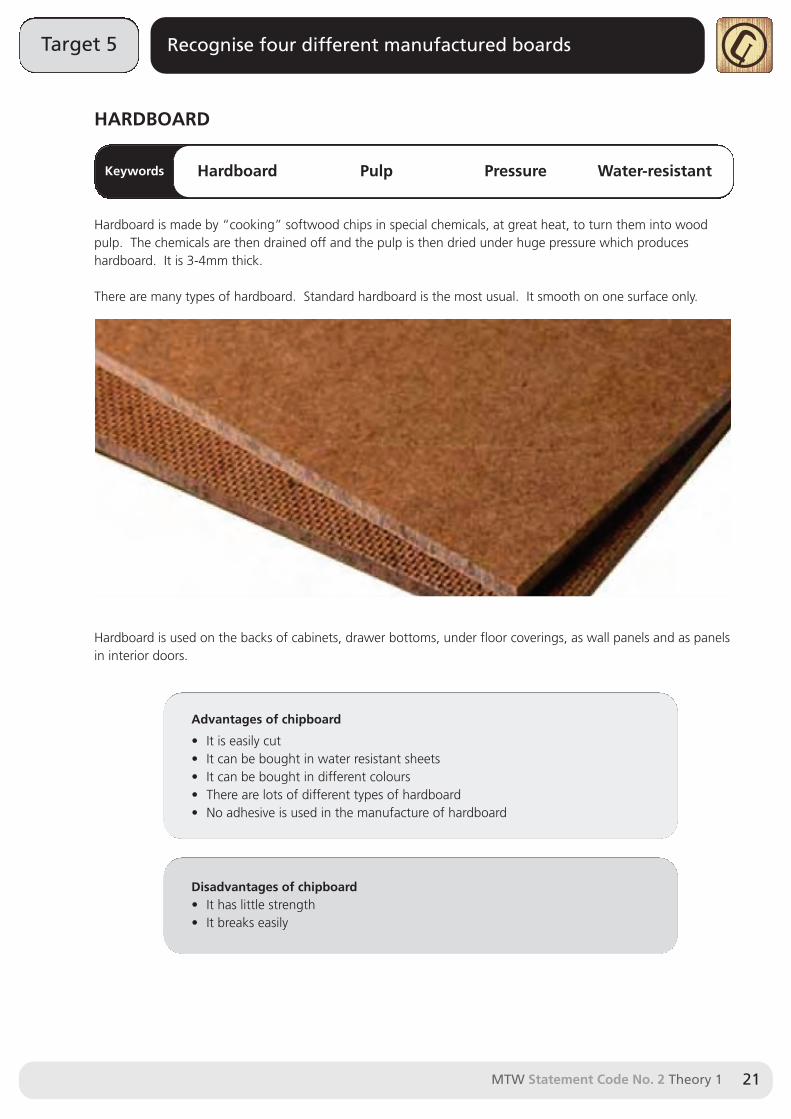
Hardboard is made by “cooking” softwood chips in special chemicals, at great heat, to turn them into woodpulp. The chemicals are then drained off and the pulp is then dried under huge pressure which produceshardboard. It is 3-4mm thick.
There are many types of hardboard. Standard hardboard is the most usual. It smooth on one surface only.
Hardboard is used on the backs of cabinets, drawer bottoms, under floor coverings, as wall panels and as panelsin interior doors.
Hardboard Pulp Pressure Water-resistant
Advantages of chipboard
• It is easily cut• It can be bought in water resistant sheets• It can be bought in different colours• There are lots of different types of hardboard• No adhesive is used in the manufacture of hardboard
Disadvantages of chipboard• It has little strength• It breaks easily
Target 6 Identify at least three common wood defects
MTW Statement Code No. 2 Theory 122
WOOD DEFECTS
Keywords
All trees are different: their shape, size and rate of growth will affect the quality of timber they produce. How and when the tree is cut down and stored also affects the timber quality. These factors can produce anumber of defects in the timber.
Defects can be divided into two groups NATURAL and ARTIFICIAL. However, defects can occur on their own orin combinations.
Natural
Artificial
Defects
Shakes
Knots
Cupping
Warping
NATURAL DEFECTS
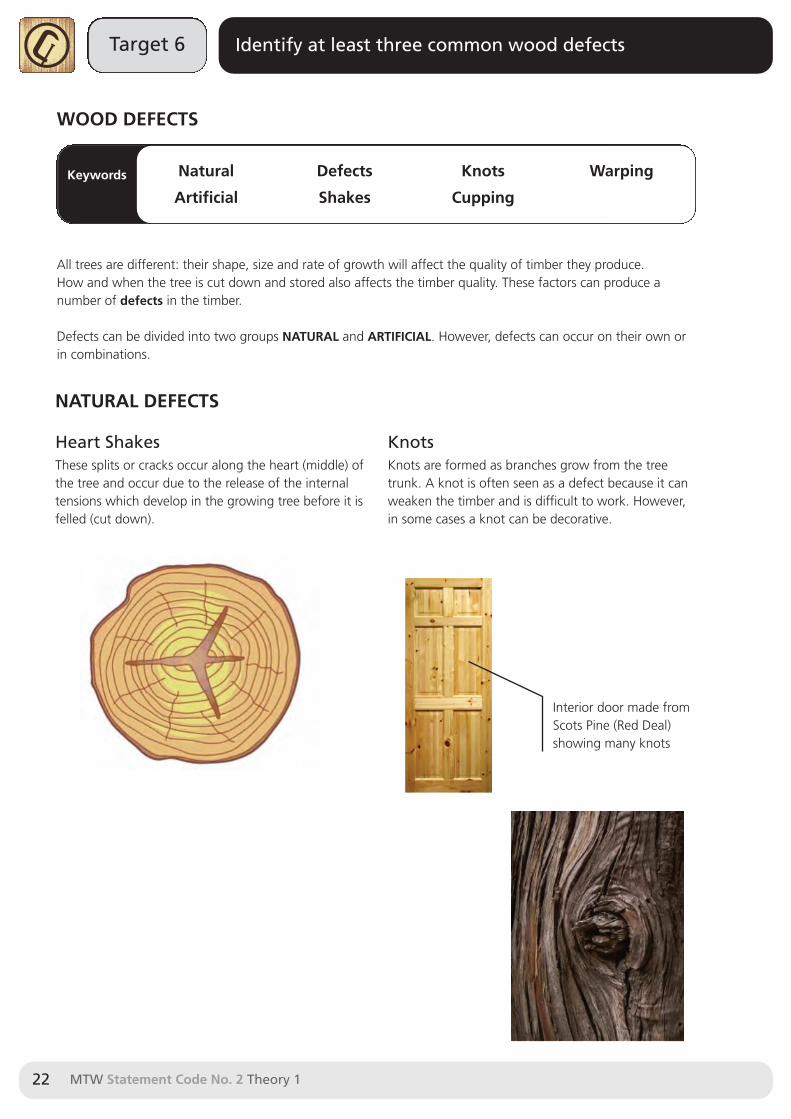
Heart ShakesThese splits or cracks occur along the heart (middle) ofthe tree and occur due to the release of the internaltensions which develop in the growing tree before it isfelled (cut down).
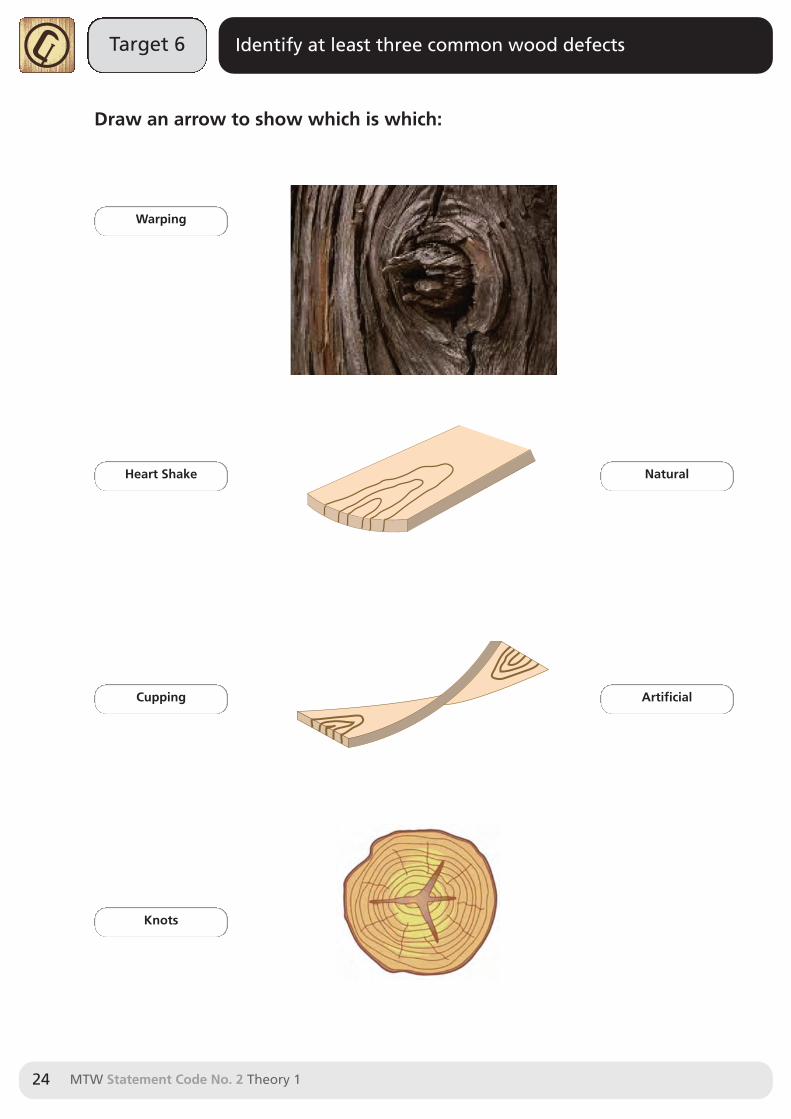
KnotsKnots are formed as branches grow from the treetrunk. A knot is often seen as a defect because it canweaken the timber and is difficult to work. However,in some cases a knot can be decorative.
Interior door made fromScots Pine (Red Deal)showing many knots
MTW Statement Code No. 2 Theory 1 23
Target 6 Identify at least three common wood defects
ARTIFICAL DEFECTS
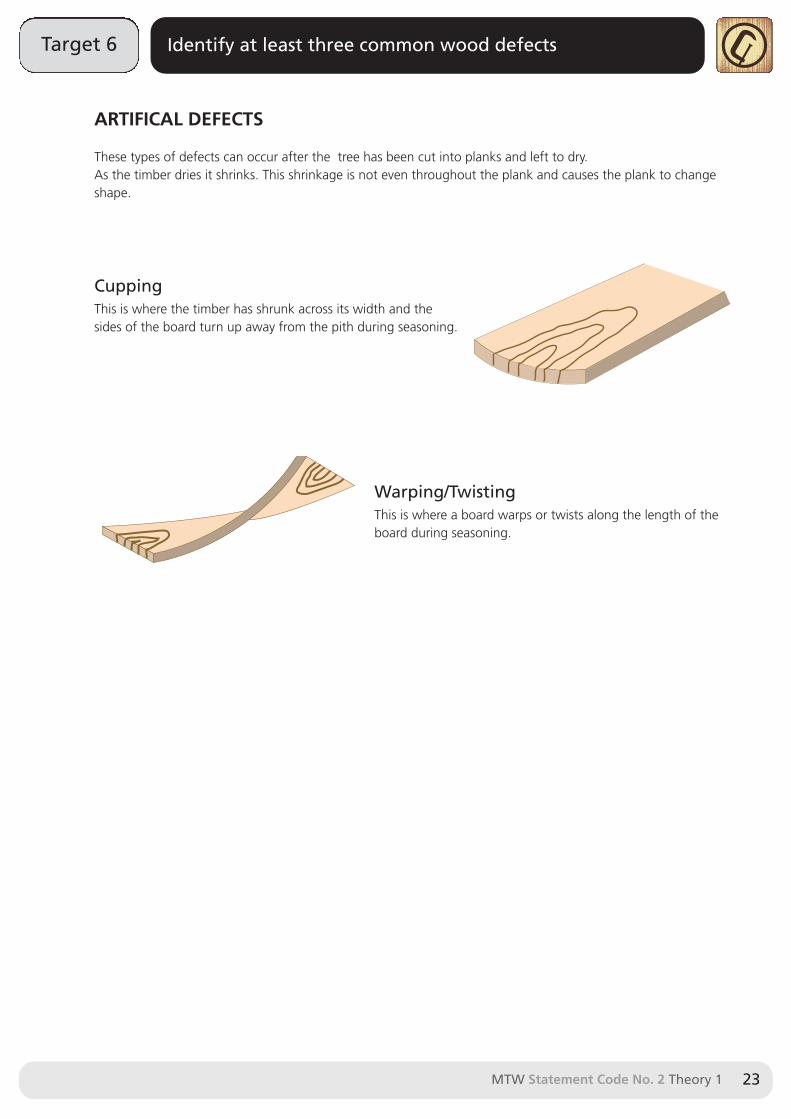
These types of defects can occur after the tree has been cut into planks and left to dry.As the timber dries it shrinks. This shrinkage is not even throughout the plank and causes the plank to changeshape.
CuppingThis is where the timber has shrunk across its width and thesides of the board turn up away from the pith during seasoning.
Warping/TwistingThis is where a board warps or twists along the length of theboard during seasoning.
Target 6 Identify at least three common wood defects
MTW Statement Code No. 2 Theory 124
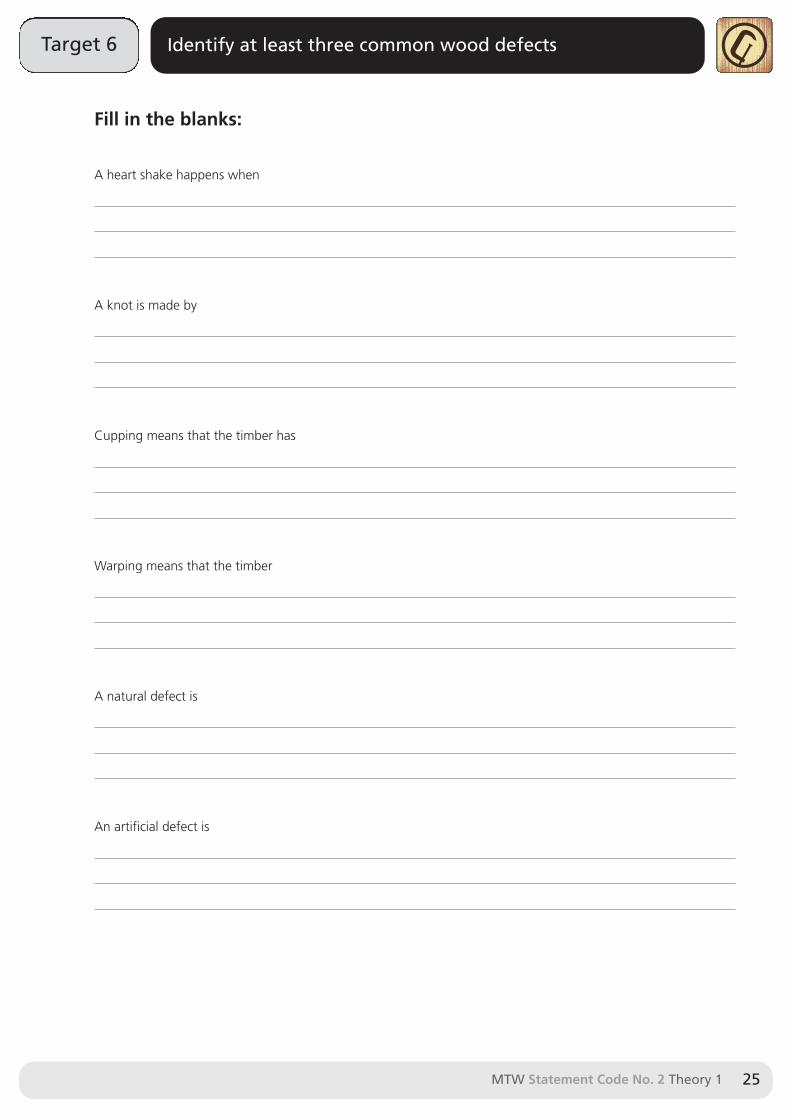
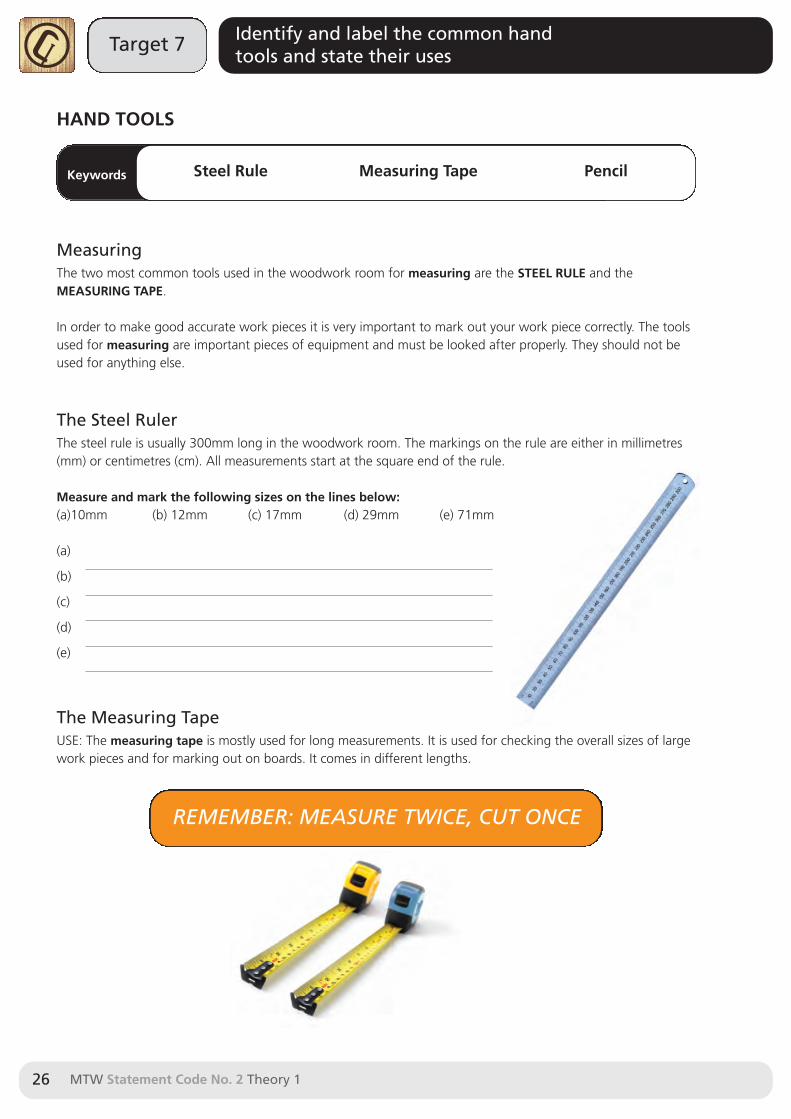
Draw an arrow to show which is which:
Warping
Heart Shake
Cupping
Natural
Artificial
Knots
MTW Statement Code No. 2 Theory 1 25
Target 6 Identify at least three common wood defects
Fill in the blanks:
A heart shake happens when
A knot is made by
Cupping means that the timber has
Warping means that the timber
A natural defect is
An artificial defect is
Target 7 Identify and label the common handtools and state their uses
MTW Statement Code No. 2 Theory 126
HAND TOOLS
Keywords
MeasuringThe two most common tools used in the woodwork room for measuring are the STEEL RULE and theMEASURING TAPE.
In order to make good accurate work pieces it is very important to mark out your work piece correctly. The toolsused for measuring are important pieces of equipment and must be looked after properly. They should not beused for anything else.
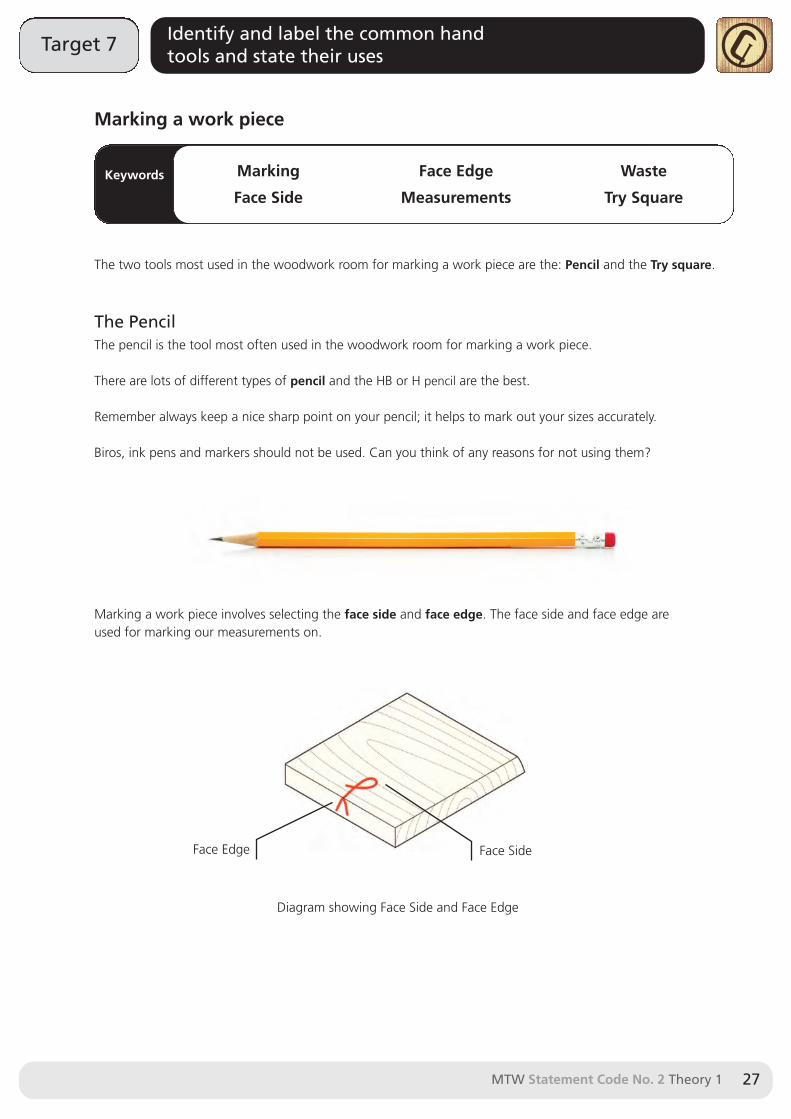
The Steel Ruler The steel rule is usually 300mm long in the woodwork room. The markings on the rule are either in millimetres(mm) or centimetres (cm). All measurements start at the square end of the rule.
Measure and mark the following sizes on the lines below:(a)10mm (b) 12mm (c) 17mm (d) 29mm (e) 71mm
(a)
(b)
(c)
(d)
(e)
The Measuring TapeUSE: The measuring tape is mostly used for long measurements. It is used for checking the overall sizes of largework pieces and for marking out on boards. It comes in different lengths.
REMEMBER: MEASURE TWICE, CUT ONCE
Steel Rule Measuring Tape Pencil
MTW Statement Code No. 2 Theory 1 27
Target 7 Identify and label the common handtools and state their uses
Marking a work piece
Keywords
The two tools most used in the woodwork room for marking a work piece are the: Pencil and the Try square.
The PencilThe pencil is the tool most often used in the woodwork room for marking a work piece.
There are lots of different types of pencil and the HB or H pencil are the best.
Remember always keep a nice sharp point on your pencil; it helps to mark out your sizes accurately.
Biros, ink pens and markers should not be used. Can you think of any reasons for not using them?
Marking a work piece involves selecting the face side and face edge. The face side and face edge are used for marking our measurements on.
Marking
Face Side
Face Edge
Measurements
Waste
Try Square
Face SideFace Edge
Diagram showing Face Side and Face Edge
Target 7 Identify and label the common handtools and state their uses
MTW Statement Code No. 2 Theory 128
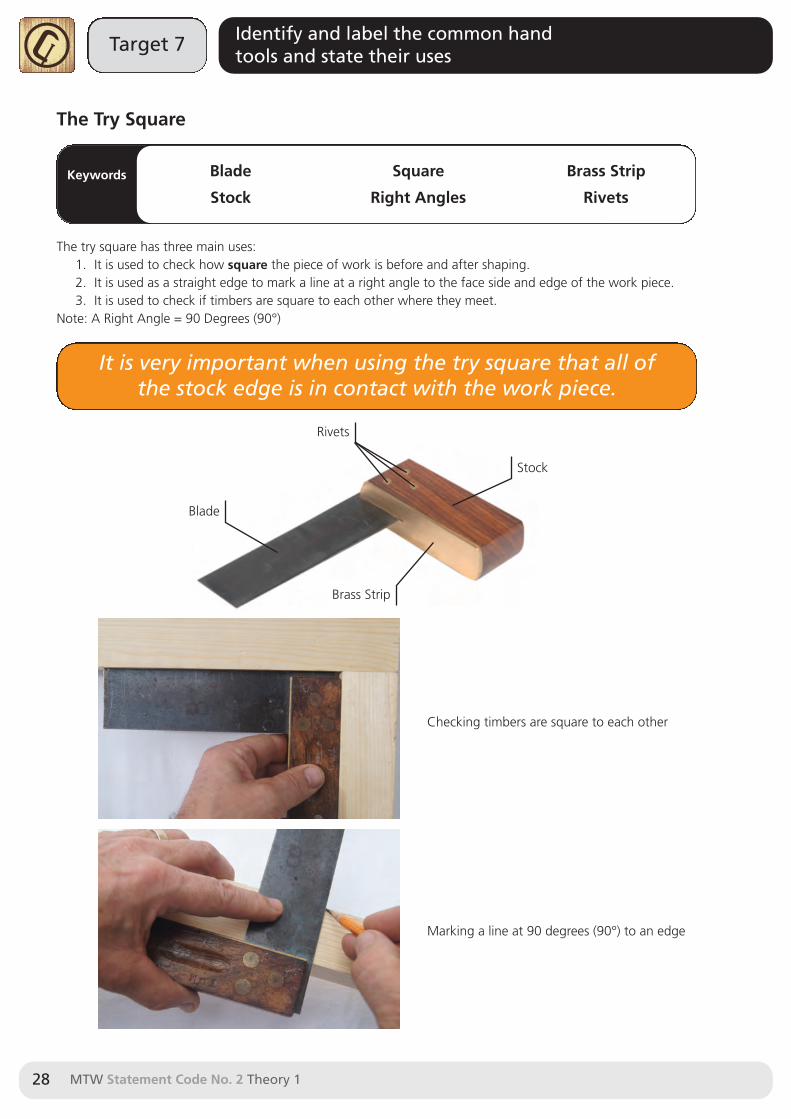
Blade
Stock
Rivets
Brass Strip
The Try Square
Keywords
The try square has three main uses:1. It is used to check how square the piece of work is before and after shaping.2. It is used as a straight edge to mark a line at a right angle to the face side and edge of the work piece.3. It is used to check if timbers are square to each other where they meet.
Note: A Right Angle = 90 Degrees (90°)
Blade
Stock
Square
Right Angles
Brass Strip
Rivets
Checking timbers are square to each other
Marking a line at 90 degrees (90°) to an edge
It is very important when using the try square that all of the stock edge is in contact with the work piece.
MTW Statement Code No. 2 Theory 1 29
Target 7 Identify and label the common handtools and state their uses
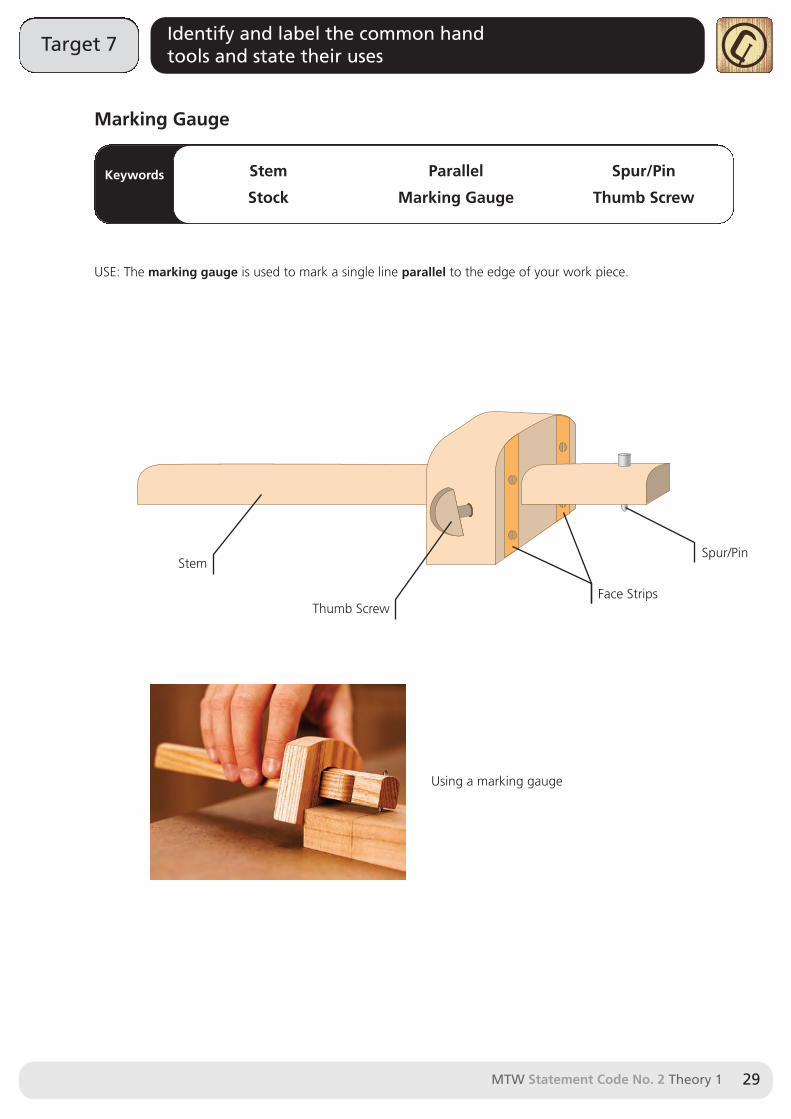
Marking Gauge
Keywords
USE: The marking gauge is used to mark a single line parallel to the edge of your work piece.
Stem
Stock
Parallel
Marking Gauge
Spur/Pin
Thumb Screw
Thumb Screw
Stem
Face Strips
Spur/Pin
Using a marking gauge

Target 7 Identify and label the common handtools and state their uses
MTW Statement Code No. 2 Theory 130
The Mortise Gauge
Keywords
USE: The mortise gauge is most commonly used for marking mortise and tenonjoints.
The mortise gauge has two spurs / pins. One is fixed (it does not move) and the other can be moved using athumb screw, which slides the pin along the stem. The fixed spur is the closest spur to the end of the stem.
The mortise gauge is used to mark two parallel lines in line with the edge of a work piece. It is used in the sameway as a marking gauge.
Stem
Stock
Parallel
Mortise Gauge
Thumb Screw
Spur/Pin
Set Screw
Note: Some mortise gauges have a third pin which allows it to be used
as a marking gauge as well as a mortise gauge
Stock
Stem AdjustableSpur/Pin
FixedSpur/Pin
Thumb Screw
Set Screw

MTW Statement Code No. 2 Theory 1 31
Target 7 Identify and label the common handtools and state their uses
Sketch a Try Square here:
Label the stock, blade, rivets and brass strip
A try square is used to check how s a piece of work is.

Target 7 Identify and label the common handtools and state their uses
MTW Statement Code No. 2 Theory 132
Sketch a Marking Gauge here:
Label the stock, stem and spur/pin and thumb screw
The marking gauge is used to mark lines to the edge of your work piece.

MTW Statement Code No. 2 Theory 1 33
Target 7 Identify and label the common handtools and state their uses
Sketch a Mortise Gauge here:
Label the stock, stem, fixed and adjustable spur/pin, thumb screw, set screw
The mortice gauge is most commonly used for marking and joints.

Target 7 Identify and label the common handtools and state their uses
MTW Statement Code No. 2 Theory 134
WOODWORKING HANDSAWS
Keywords
USE: Handsaws are used for cutting wood metal or plastic.
A handsaw is a tool which has a metal blade with a lot of sharp V-shaped teeth. A handsaw blade can vary fromflat and wide to narrow and thin. The size and shape of handsaw teeth differ a lot and depend on what the sawis to be used for.
Saw CareYou must take great care of saws because the teeth can be easily damaged. Blunt or damaged saw teeth will notcut properly and could cause you to have an accident.
Saw TeethThe number of teeth on a saw blade is very important when choosing a saw. The more teeth a saw blade has,the smoother but slower the cut.
The less teeth a saw blade has the rougher but faster the cut.
Saw teeth are measured in: Points Per Inch (25mm) (PPI) orTeeth Per Inch (25mm) (TPI)
A coarse tooth blade (2, 3 TPI) should be used for sawing wood up to 200mm wide or thick.
A fine toothed blade (18 to 32 TPI) should be used for thinner wood or plasticsunder 5mm.
On most saws the teeth are wider than the saw blade because the teeth are flaredout sideways (Set). This allows the blade to move through the cut easily withoutgetting stuck. The width of a saw cut is called the Kerf.
Handsaw Blade Teeth Kerf Set
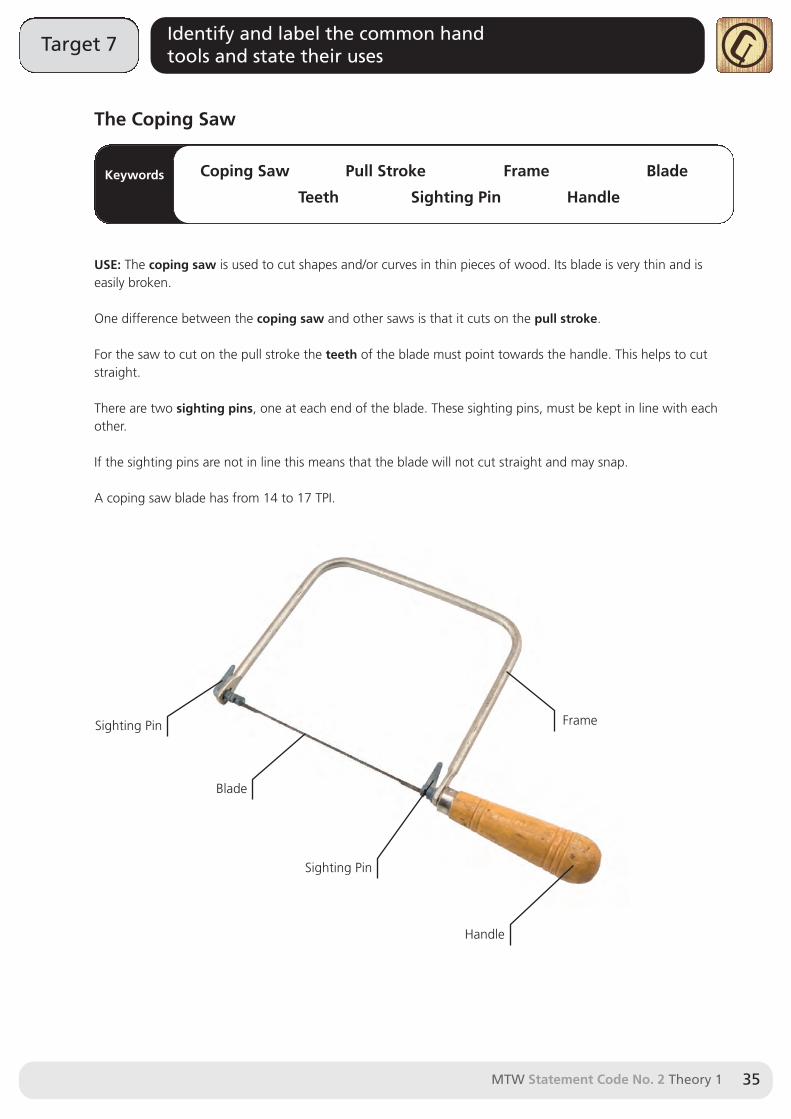
The Coping Saw
Keywords
USE: The coping saw is used to cut shapes and/or curves in thin pieces of wood. Its blade is very thin and iseasily broken.
One difference between the coping saw and other saws is that it cuts on the pull stroke.
For the saw to cut on the pull stroke the teeth of the blade must point towards the handle. This helps to cutstraight.
There are two sighting pins, one at each end of the blade. These sighting pins, must be kept in line with eachother.
If the sighting pins are not in line this means that the blade will not cut straight and may snap.
A coping saw blade has from 14 to 17 TPI.
MTW Statement Code No. 2 Theory 1 35
Target 7 Identify and label the common handtools and state their uses
Coping Saw Pull Stroke Frame Blade
Teeth Sighting Pin Handle
Blade
Sighting Pin
Sighting Pin
Handle
Frame
Target 7 Identify and label the common handtools and state their uses
MTW Statement Code No. 2 Theory 136
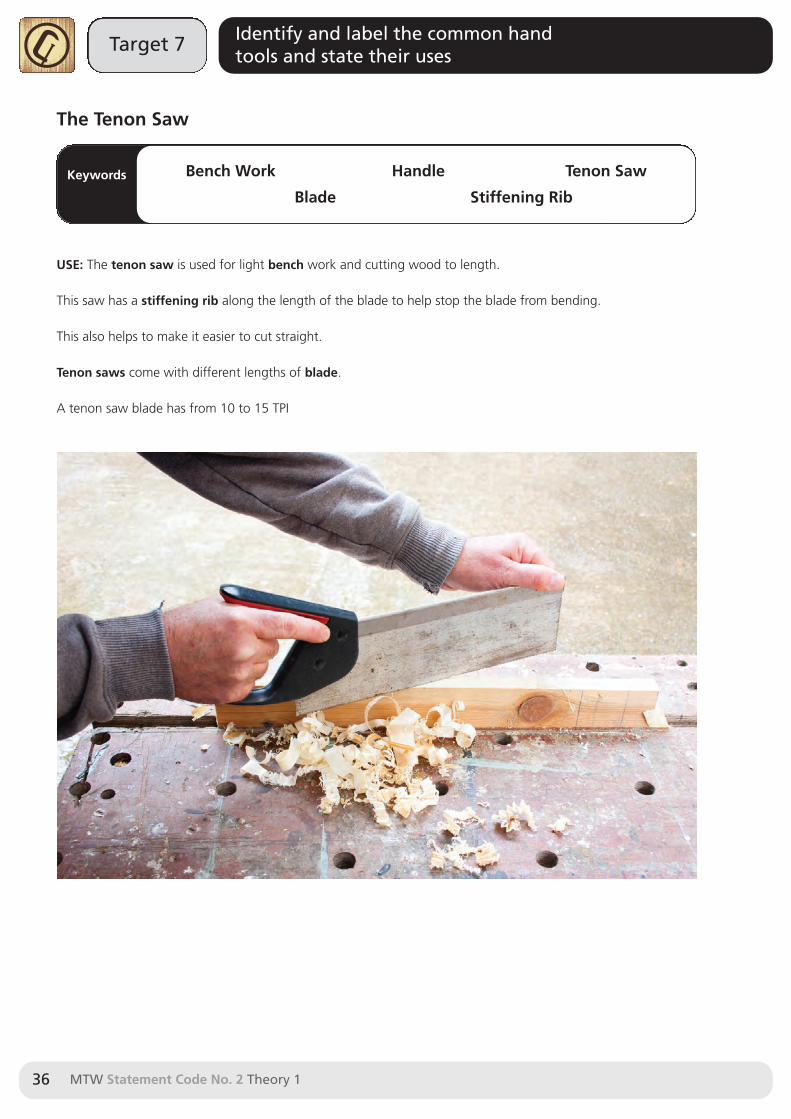
The Tenon Saw
Keywords
USE: The tenon saw is used for light bench work and cutting wood to length.
This saw has a stiffening rib along the length of the blade to help stop the blade from bending.
This also helps to make it easier to cut straight.
Tenon saws come with different lengths of blade.
A tenon saw blade has from 10 to 15 TPI
Bench Work Handle Tenon Saw
Blade Stiffening Rib
MTW Statement Code No. 2 Theory 1 37
Target 7 Identify and label the common handtools and state their uses
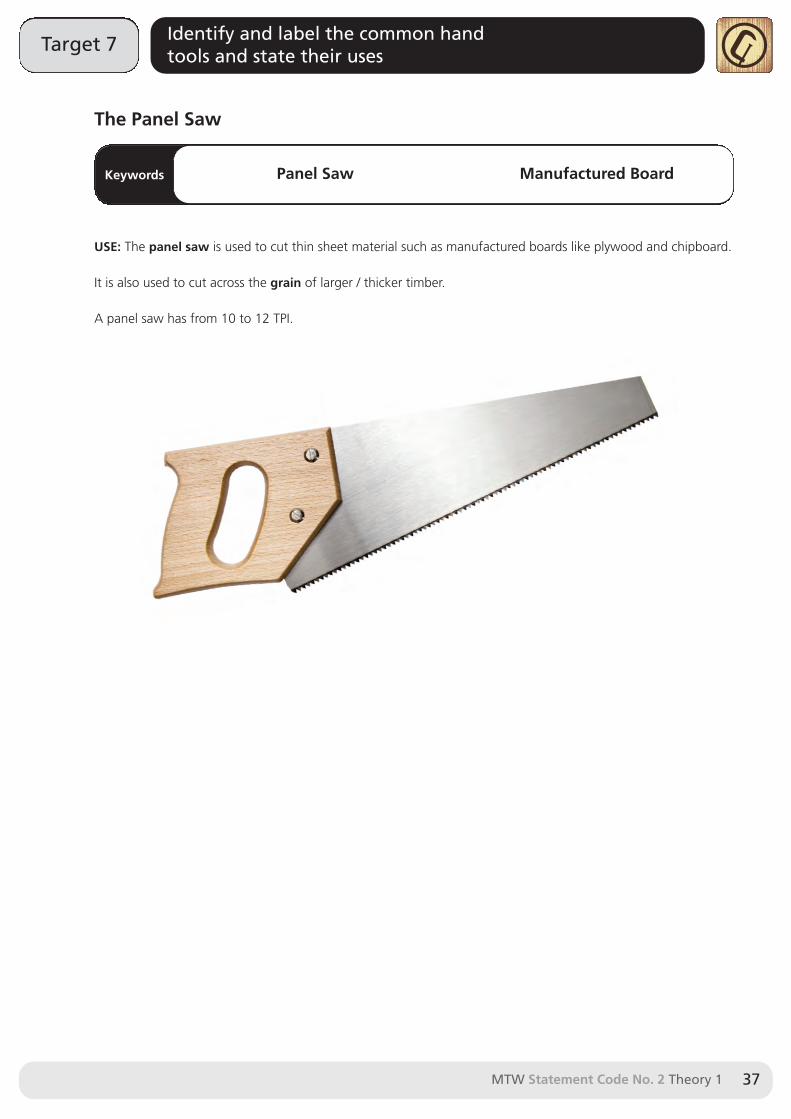
The Panel Saw
Keywords
USE: The panel saw is used to cut thin sheet material such as manufactured boards like plywood and chipboard.
It is also used to cut across the grain of larger / thicker timber.
A panel saw has from 10 to 12 TPI.
Panel Saw Manufactured Board
Target 7 Identify and label the common handtools and state their uses
MTW Statement Code No. 2 Theory 138
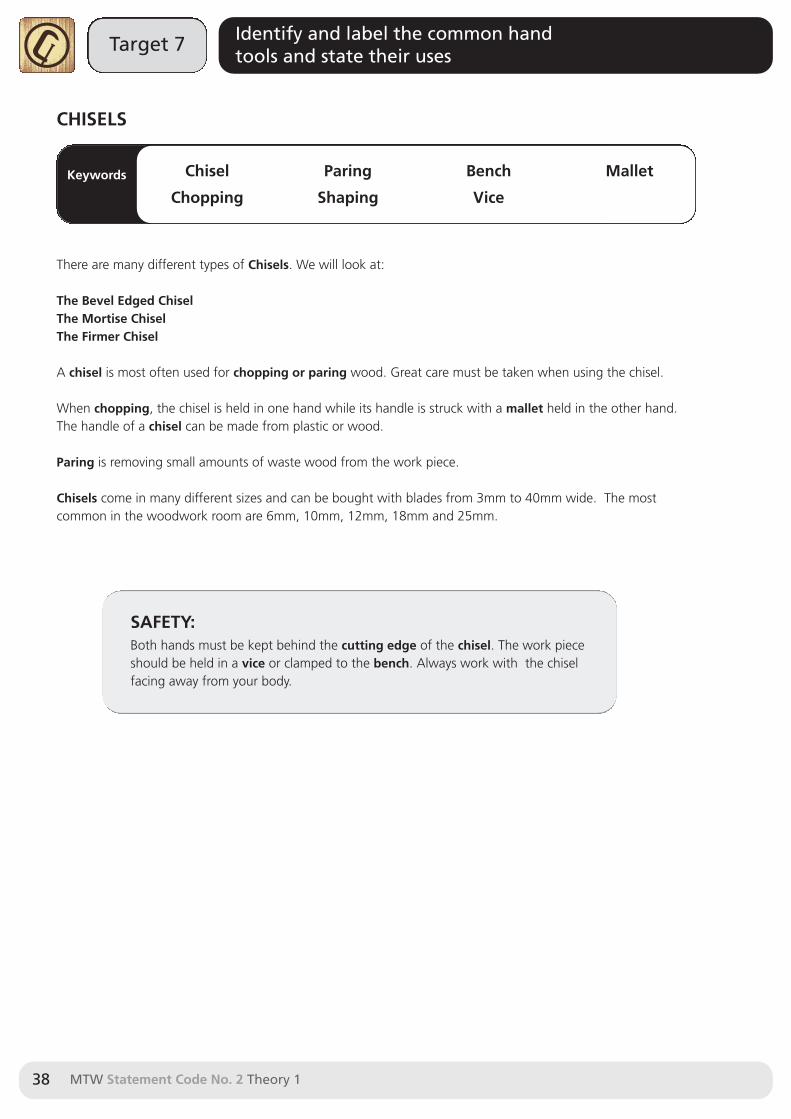
CHISELS
Keywords
There are many different types of Chisels. We will look at:
The Bevel Edged ChiselThe Mortise ChiselThe Firmer Chisel
A chisel is most often used for chopping or paring wood. Great care must be taken when using the chisel.
When chopping, the chisel is held in one hand while its handle is struck with a mallet held in the other hand.The handle of a chisel can be made from plastic or wood.
Paring is removing small amounts of waste wood from the work piece.
Chisels come in many different sizes and can be bought with blades from 3mm to 40mm wide. The mostcommon in the woodwork room are 6mm, 10mm, 12mm, 18mm and 25mm.
Chisel
Chopping
Paring
Shaping
Bench
Vice
Mallet
SAFETY:Both hands must be kept behind the cutting edge of the chisel. The work pieceshould be held in a vice or clamped to the bench. Always work with the chiselfacing away from your body.
MTW Statement Code No. 2 Theory 1 39
Target 7 Identify and label the common handtools and state their uses
Keywords
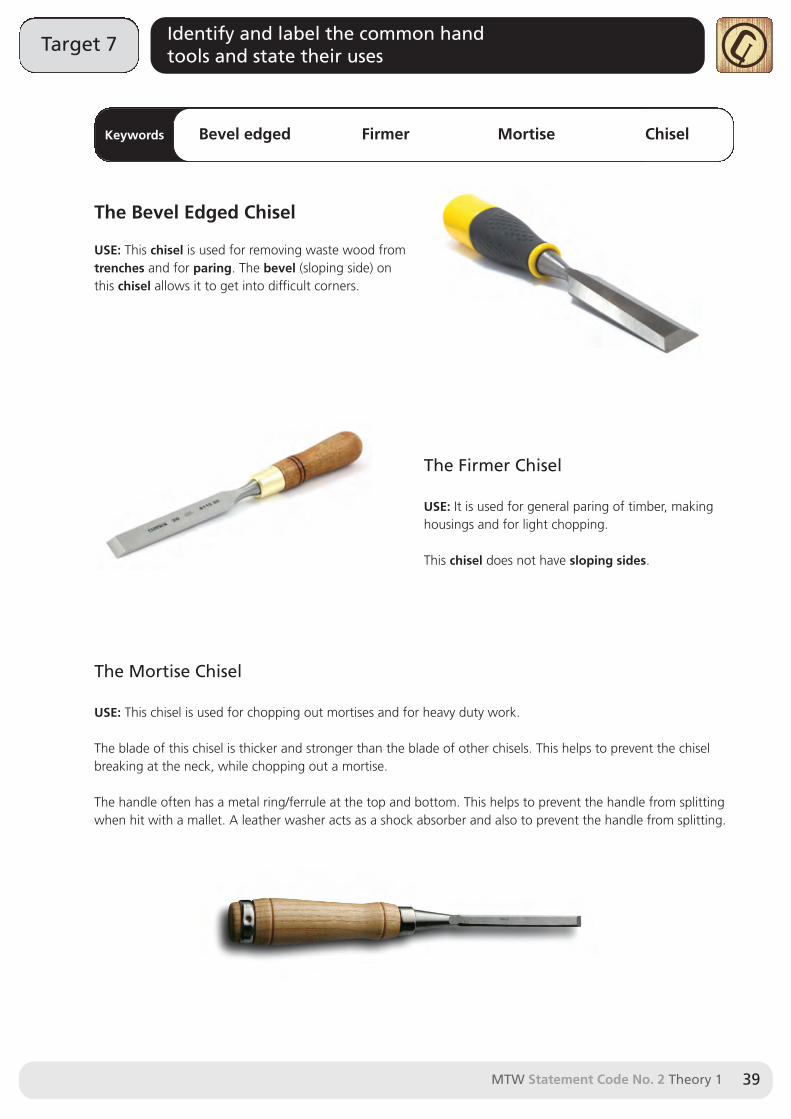
The Bevel Edged Chisel
USE: This chisel is used for removing waste wood fromtrenches and for paring. The bevel (sloping side) onthis chisel allows it to get into difficult corners.
The Firmer Chisel
USE: It is used for general paring of timber, makinghousings and for light chopping.
This chisel does not have sloping sides.
The Mortise Chisel
USE: This chisel is used for chopping out mortises and for heavy duty work.
The blade of this chisel is thicker and stronger than the blade of other chisels. This helps to prevent the chiselbreaking at the neck, while chopping out a mortise.
The handle often has a metal ring/ferrule at the top and bottom. This helps to prevent the handle from splittingwhen hit with a mallet. A leather washer acts as a shock absorber and also to prevent the handle from splitting.
Bevel edged Firmer Mortise Chisel
Target 7 Identify and label the common handtools and state their uses
MTW Statement Code No. 2 Theory 140
Mallet
Keywords
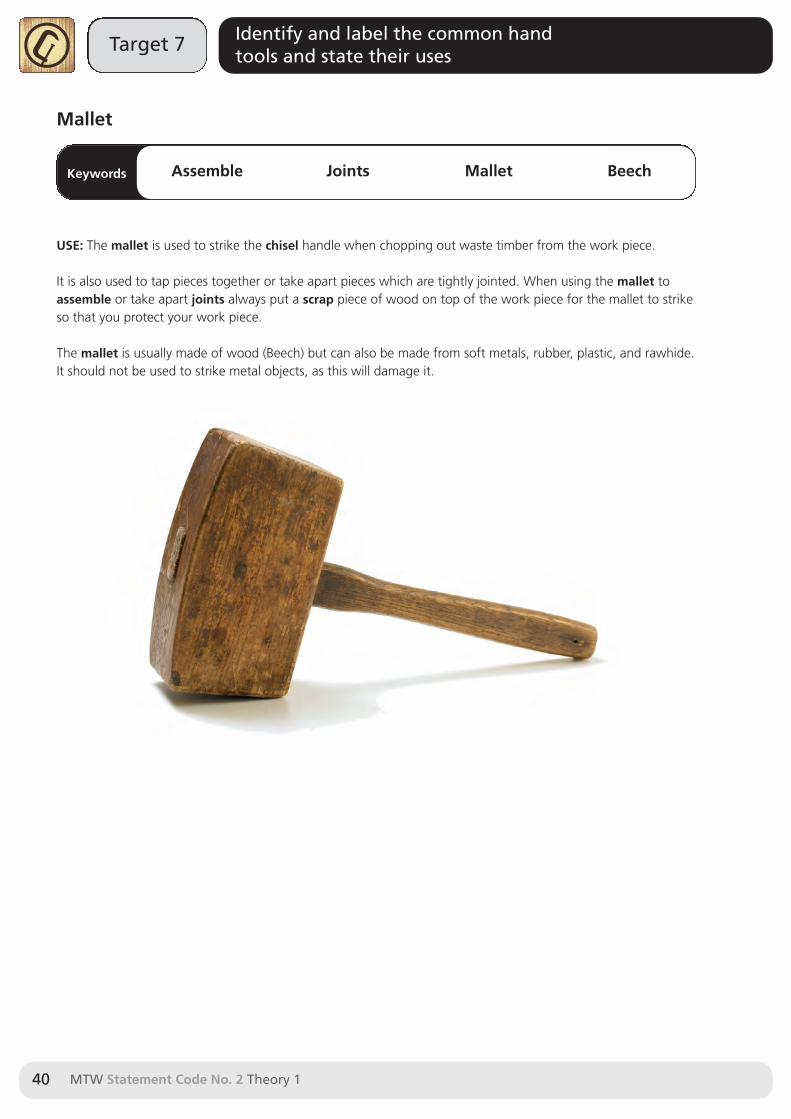
USE: The mallet is used to strike the chisel handle when chopping out waste timber from the work piece.
It is also used to tap pieces together or take apart pieces which are tightly jointed. When using the mallet toassemble or take apart joints always put a scrap piece of wood on top of the work piece for the mallet to strikeso that you protect your work piece.
The mallet is usually made of wood (Beech) but can also be made from soft metals, rubber, plastic, and rawhide.It should not be used to strike metal objects, as this will damage it.
Assemble Joints Mallet Beech
MTW Statement Code No. 2 Theory 1 41
Target 7 Identify and label the common handtools and state their uses
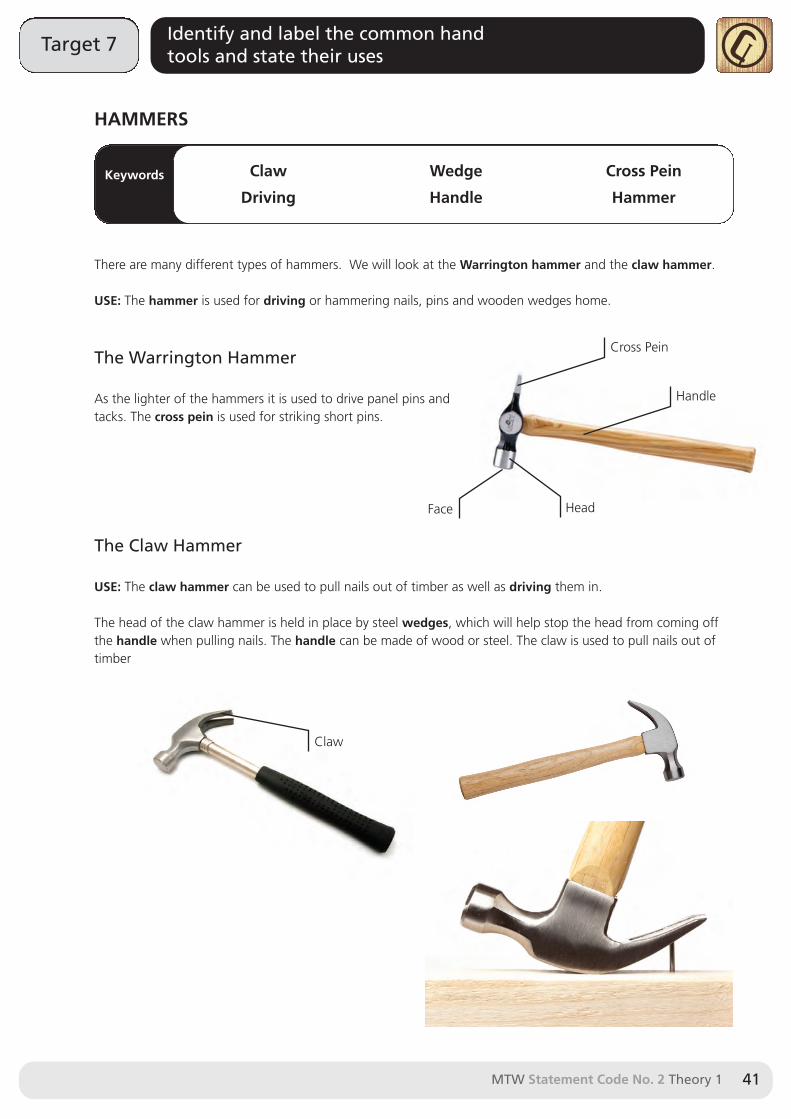
HAMMERS
Keywords
There are many different types of hammers. We will look at the Warrington hammer and the claw hammer.
USE: The hammer is used for driving or hammering nails, pins and wooden wedges home.
The Warrington Hammer
As the lighter of the hammers it is used to drive panel pins andtacks. The cross pein is used for striking short pins.
The Claw Hammer
USE: The claw hammer can be used to pull nails out of timber as well as driving them in.
The head of the claw hammer is held in place by steel wedges, which will help stop the head from coming offthe handle when pulling nails. The handle can be made of wood or steel. The claw is used to pull nails out oftimber
Claw
Driving
Wedge
Handle
Cross Pein
Hammer
Face Head
Cross Pein
Handle
Claw
Target 7 Identify and label the common handtools and state their uses
MTW Statement Code No. 2 Theory 142
WOOD PLANES
Keywords
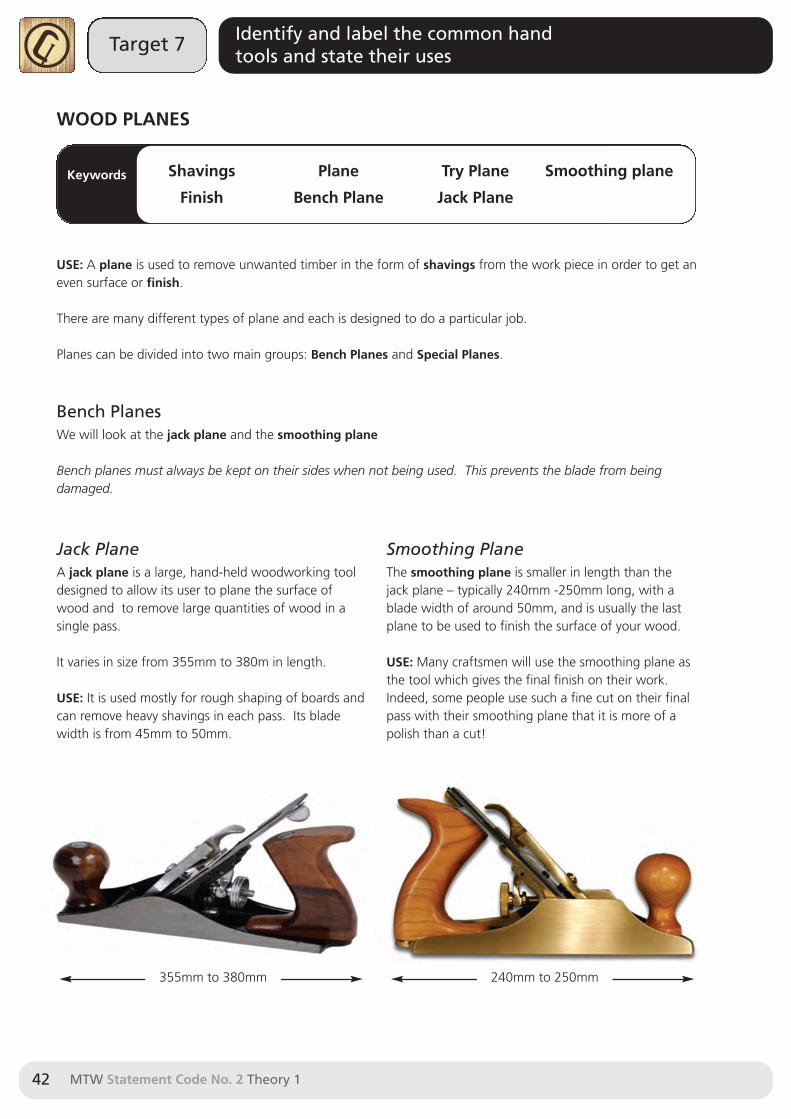
USE: A plane is used to remove unwanted timber in the form of shavings from the work piece in order to get aneven surface or finish.
There are many different types of plane and each is designed to do a particular job.
Planes can be divided into two main groups: Bench Planes and Special Planes.
Bench PlanesWe will look at the jack plane and the smoothing plane
Bench planes must always be kept on their sides when not being used. This prevents the blade from beingdamaged.
Shavings
Finish
Plane
Bench Plane
Try Plane
Jack Plane
Smoothing plane
355mm to 380mm 240mm to 250mm
Jack PlaneA jack plane is a large, hand-held woodworking tooldesigned to allow its user to plane the surface ofwood and to remove large quantities of wood in asingle pass.
It varies in size from 355mm to 380m in length.
USE: It is used mostly for rough shaping of boards andcan remove heavy shavings in each pass. Its bladewidth is from 45mm to 50mm.
Smoothing PlaneThe smoothing plane is smaller in length than thejack plane – typically 240mm -250mm long, with ablade width of around 50mm, and is usually the lastplane to be used to finish the surface of your wood.
USE: Many craftsmen will use the smoothing plane asthe tool which gives the final finish on their work.Indeed, some people use such a fine cut on their finalpass with their smoothing plane that it is more of apolish than a cut!
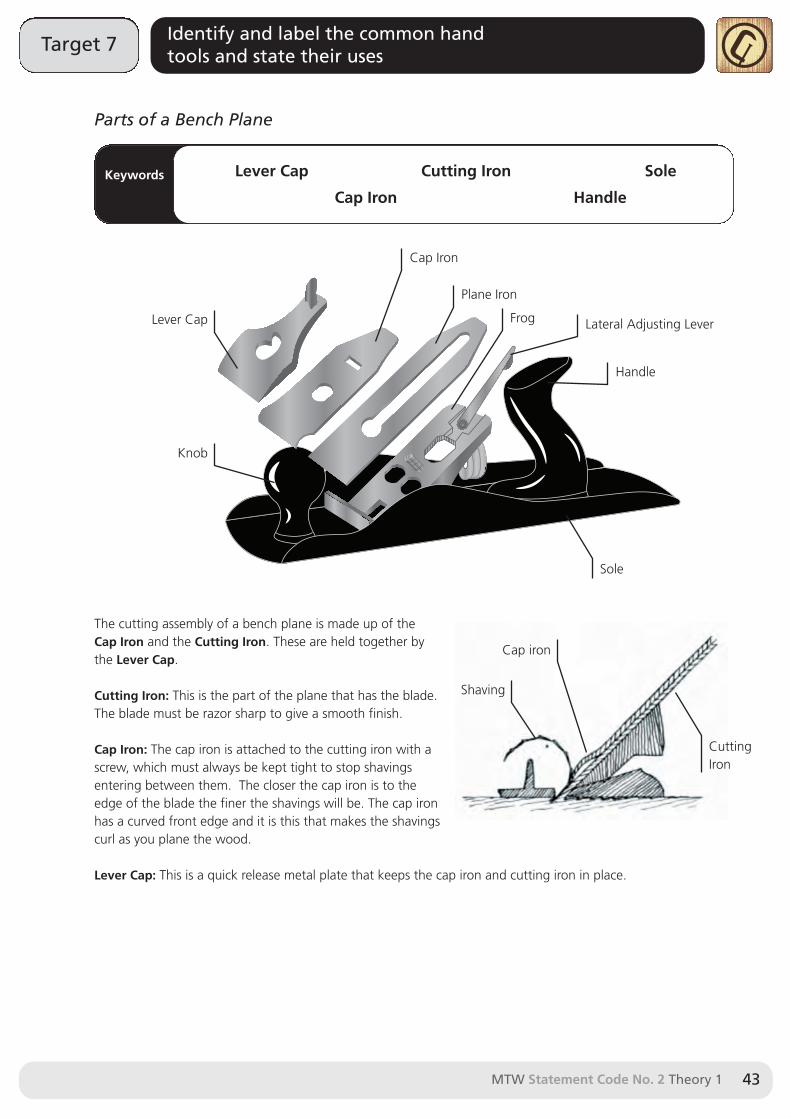
Parts of a Bench Plane
Keywords
The cutting assembly of a bench plane is made up of theCap Iron and the Cutting Iron. These are held together bythe Lever Cap.
Cutting Iron: This is the part of the plane that has the blade.The blade must be razor sharp to give a smooth finish.
Cap Iron: The cap iron is attached to the cutting iron with ascrew, which must always be kept tight to stop shavingsentering between them. The closer the cap iron is to theedge of the blade the finer the shavings will be. The cap ironhas a curved front edge and it is this that makes the shavingscurl as you plane the wood.
Lever Cap: This is a quick release metal plate that keeps the cap iron and cutting iron in place.
MTW Statement Code No. 2 Theory 1 43
Target 7 Identify and label the common handtools and state their uses
Lever Cap Cutting Iron Sole
Shaving
Lever Cap
Knob
Cap Iron
Plane Iron
Frog Lateral Adjusting Lever
Handle
Cap iron
CuttingIron
Sole
Cap Iron Handle
Target 7 Identify and label the common handtools and state their uses
MTW Statement Code No. 2 Theory 144
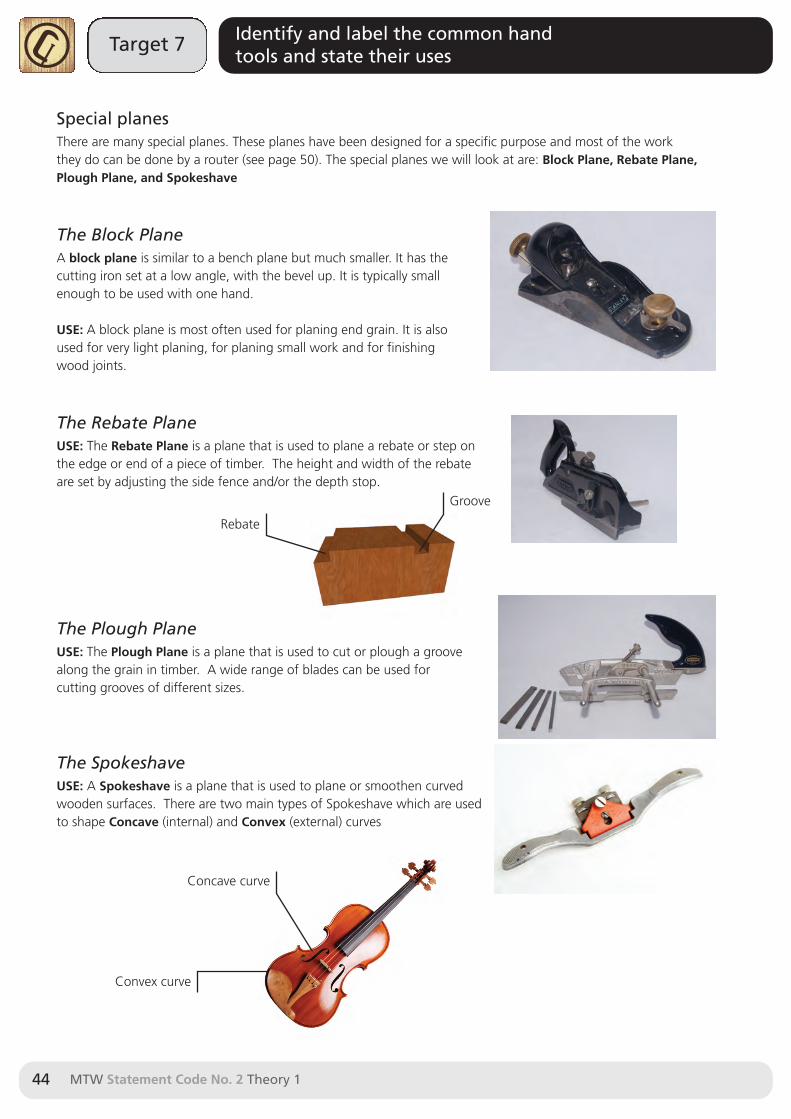
Special planesThere are many special planes. These planes have been designed for a specific purpose and most of the workthey do can be done by a router (see page 50). The special planes we will look at are: Block Plane, Rebate Plane,Plough Plane, and Spokeshave
The Block PlaneA block plane is similar to a bench plane but much smaller. It has thecutting iron set at a low angle, with the bevel up. It is typically smallenough to be used with one hand.
USE: A block plane is most often used for planing end grain. It is alsoused for very light planing, for planing small work and for finishingwood joints.
The Rebate PlaneUSE: The Rebate Plane is a plane that is used to plane a rebate or step onthe edge or end of a piece of timber. The height and width of the rebateare set by adjusting the side fence and/or the depth stop.
The Plough PlaneUSE: The Plough Plane is a plane that is used to cut or plough a groovealong the grain in timber. A wide range of blades can be used forcutting grooves of different sizes.
The Spokeshave USE: A Spokeshave is a plane that is used to plane or smoothen curvedwooden surfaces. There are two main types of Spokeshave which are usedto shape Concave (internal) and Convex (external) curves
Groove
Rebate
Concave curve
Convex curve
MTW Statement Code No. 2 Theory 1 45
Target 7 Identify and label the common handtools and state their uses
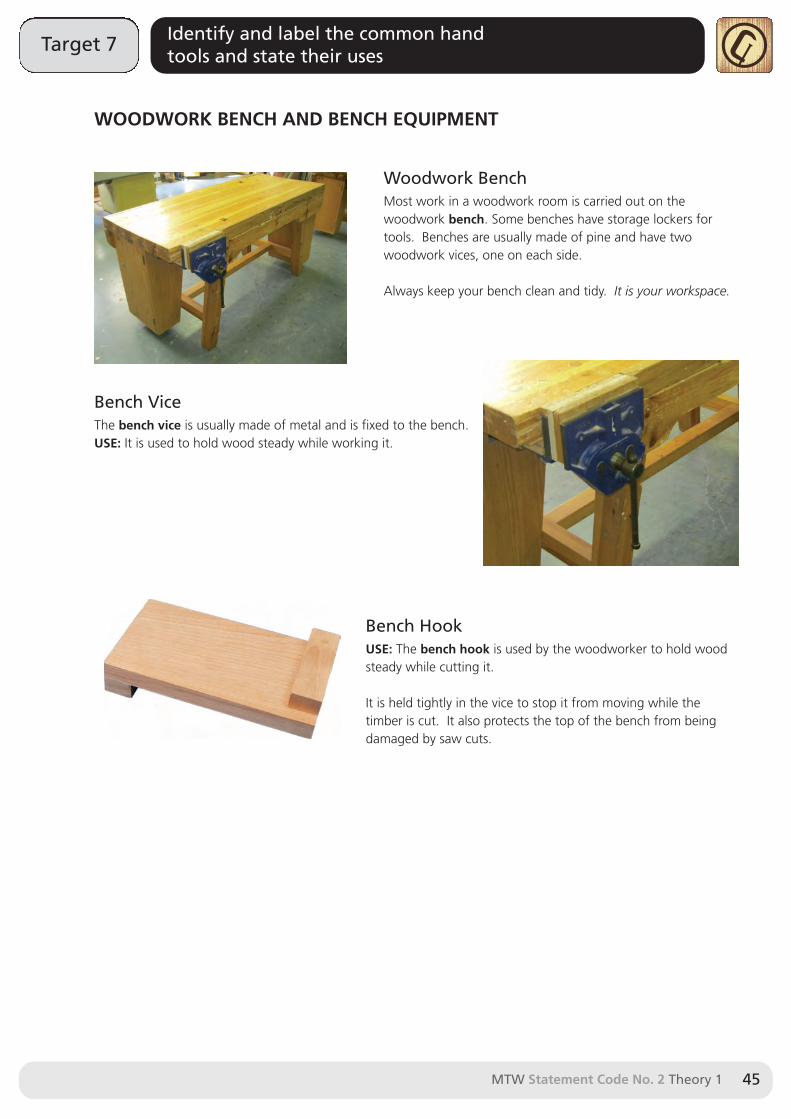
WOODWORK BENCH AND BENCH EQUIPMENT
Woodwork BenchMost work in a woodwork room is carried out on thewoodwork bench. Some benches have storage lockers fortools. Benches are usually made of pine and have twowoodwork vices, one on each side.
Always keep your bench clean and tidy. It is your workspace.
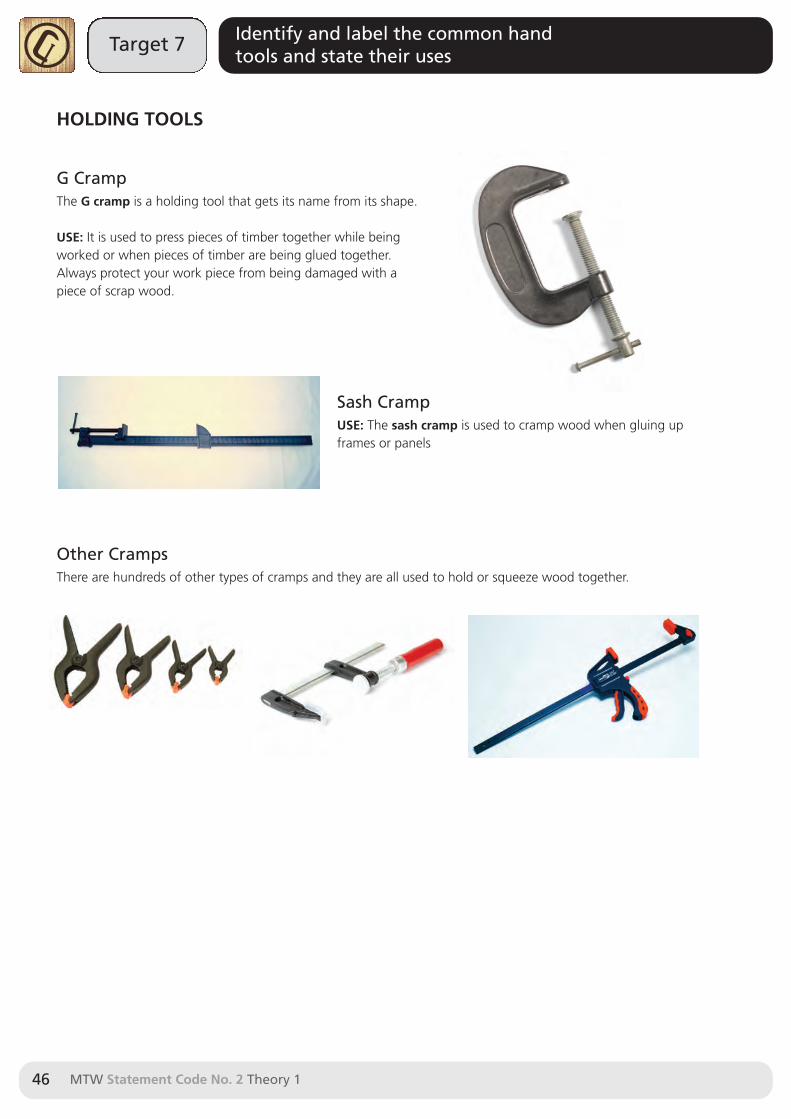
Bench ViceThe bench vice is usually made of metal and is fixed to the bench. USE: It is used to hold wood steady while working it.
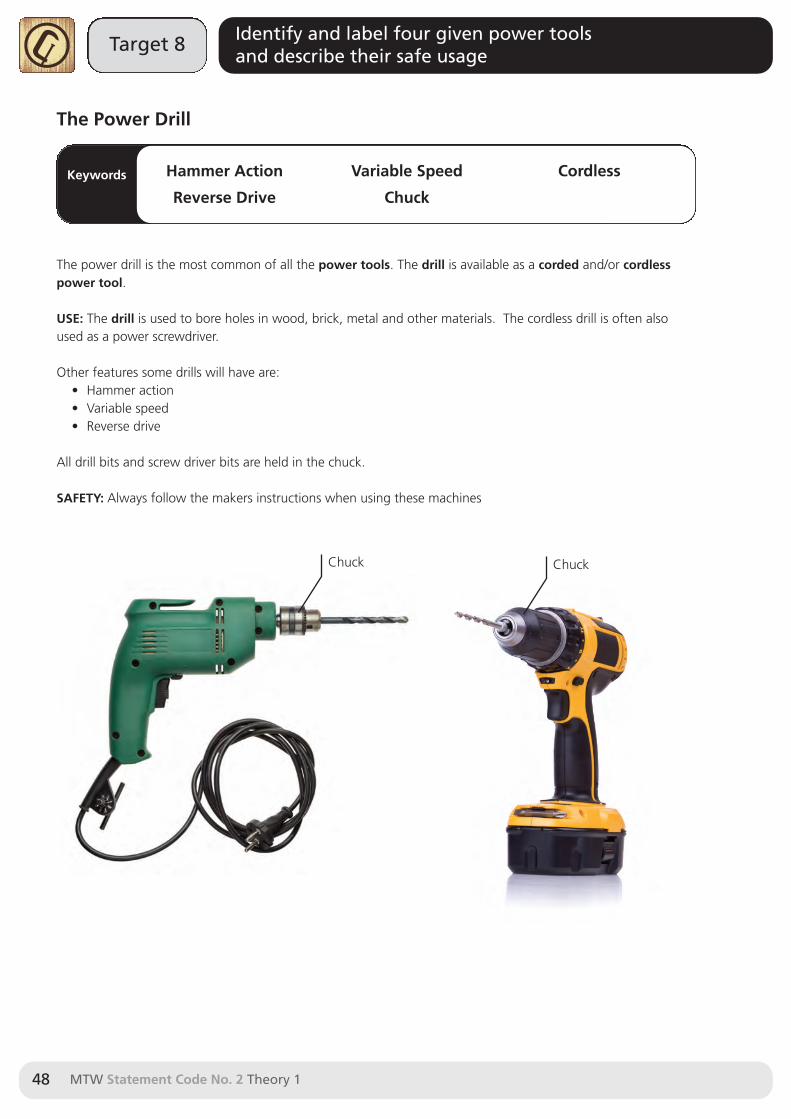
Bench HookUSE: The bench hook is used by the woodworker to hold woodsteady while cutting it.
It is held tightly in the vice to stop it from moving while thetimber is cut. It also protects the top of the bench from beingdamaged by saw cuts.
Target 7 Identify and label the common handtools and state their uses
MTW Statement Code No. 2 Theory 146
HOLDING TOOLS
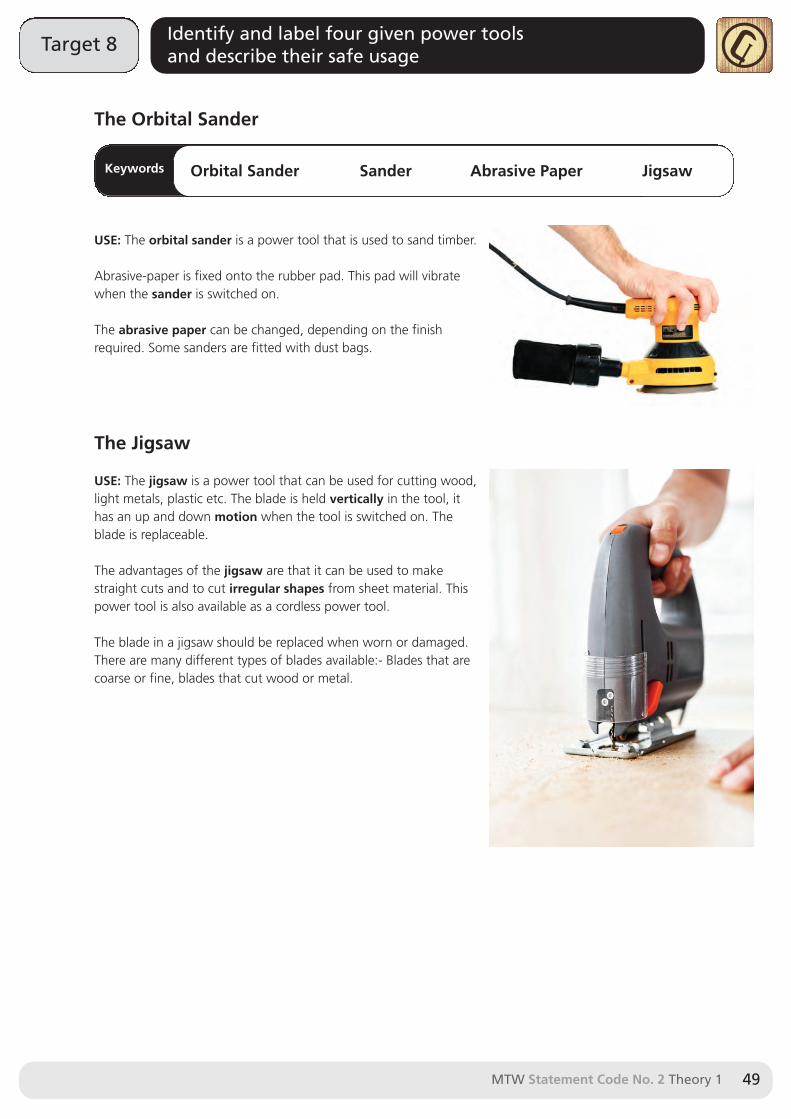
G CrampThe G cramp is a holding tool that gets its name from its shape.
USE: It is used to press pieces of timber together while beingworked or when pieces of timber are being glued together.Always protect your work piece from being damaged with apiece of scrap wood.
Sash CrampUSE: The sash cramp is used to cramp wood when gluing upframes or panels
Other CrampsThere are hundreds of other types of cramps and they are all used to hold or squeeze wood together.

MTW Statement Code No. 2 Theory 1 47
Target 8 Identify and label four given power toolsand describe their safe usage
POWER TOOLS
Power tools allow us to get jobs done more quickly. Power tools are defined as tools that use a form of powersuch as electricity, battery or air to drive the tool.
Most of the power tools that we will use in the woodwork room use mains electricity or battery (cordless powertools).
Cordless power tools have a number of advantages over corded (plugged into the mains) power tools.
• They can be used anywhere once the batteries have been charged.
• There are no trailing leads, so there is no danger of being electrocuted.
Great care must be taken when using all power tools.
ALWAYS FOLLOW THE GIVEN INSTRUCTIONSFOR THE POWER TOOL THAT YOU ARE USING
Target 8 Identify and label four given power toolsand describe their safe usage
MTW Statement Code No. 2 Theory 148
The Power Drill
Keywords
The power drill is the most common of all the power tools. The drill is available as a corded and/or cordlesspower tool.
USE: The drill is used to bore holes in wood, brick, metal and other materials. The cordless drill is often alsoused as a power screwdriver.
Other features some drills will have are:• Hammer action• Variable speed• Reverse drive
All drill bits and screw driver bits are held in the chuck.
SAFETY: Always follow the makers instructions when using these machines
Hammer Action
Reverse Drive
Variable Speed
Chuck
Cordless
Chuck Chuck
MTW Statement Code No. 2 Theory 1 49
Target 8 Identify and label four given power toolsand describe their safe usage
The Orbital Sander
Keywords
USE: The orbital sander is a power tool that is used to sand timber.
Abrasive-paper is fixed onto the rubber pad. This pad will vibratewhen the sander is switched on.
The abrasive paper can be changed, depending on the finishrequired. Some sanders are fitted with dust bags.
The Jigsaw
USE: The jigsaw is a power tool that can be used for cutting wood,light metals, plastic etc. The blade is held vertically in the tool, ithas an up and down motion when the tool is switched on. Theblade is replaceable.
The advantages of the jigsaw are that it can be used to makestraight cuts and to cut irregular shapes from sheet material. Thispower tool is also available as a cordless power tool.
The blade in a jigsaw should be replaced when worn or damaged.There are many different types of blades available:- Blades that arecoarse or fine, blades that cut wood or metal.
Orbital Sander Sander Abrasive Paper Jigsaw
Target 8 Identify and label four given power toolsand describe their safe usage
MTW Statement Code No. 2 Theory 150
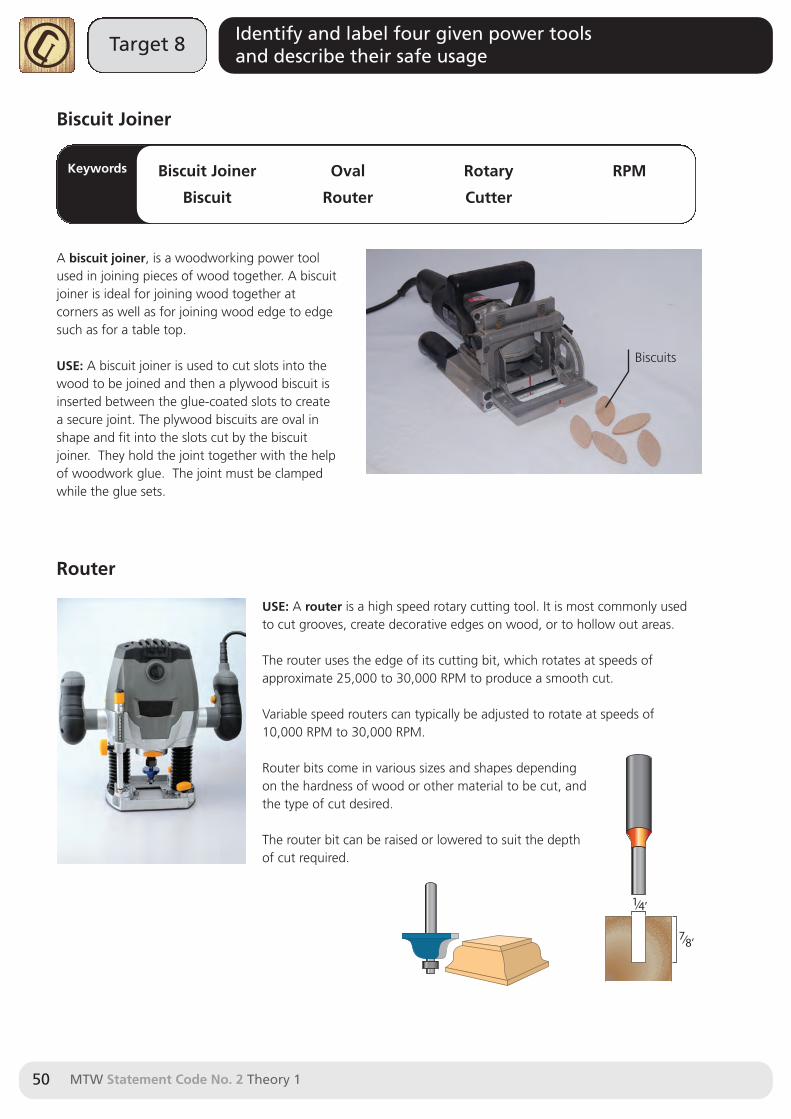
Biscuit Joiner
Keywords
A biscuit joiner, is a woodworking power toolused in joining pieces of wood together. A biscuitjoiner is ideal for joining wood together atcorners as well as for joining wood edge to edgesuch as for a table top.
USE: A biscuit joiner is used to cut slots into thewood to be joined and then a plywood biscuit isinserted between the glue-coated slots to createa secure joint. The plywood biscuits are oval inshape and fit into the slots cut by the biscuitjoiner. They hold the joint together with the helpof woodwork glue. The joint must be clampedwhile the glue sets.
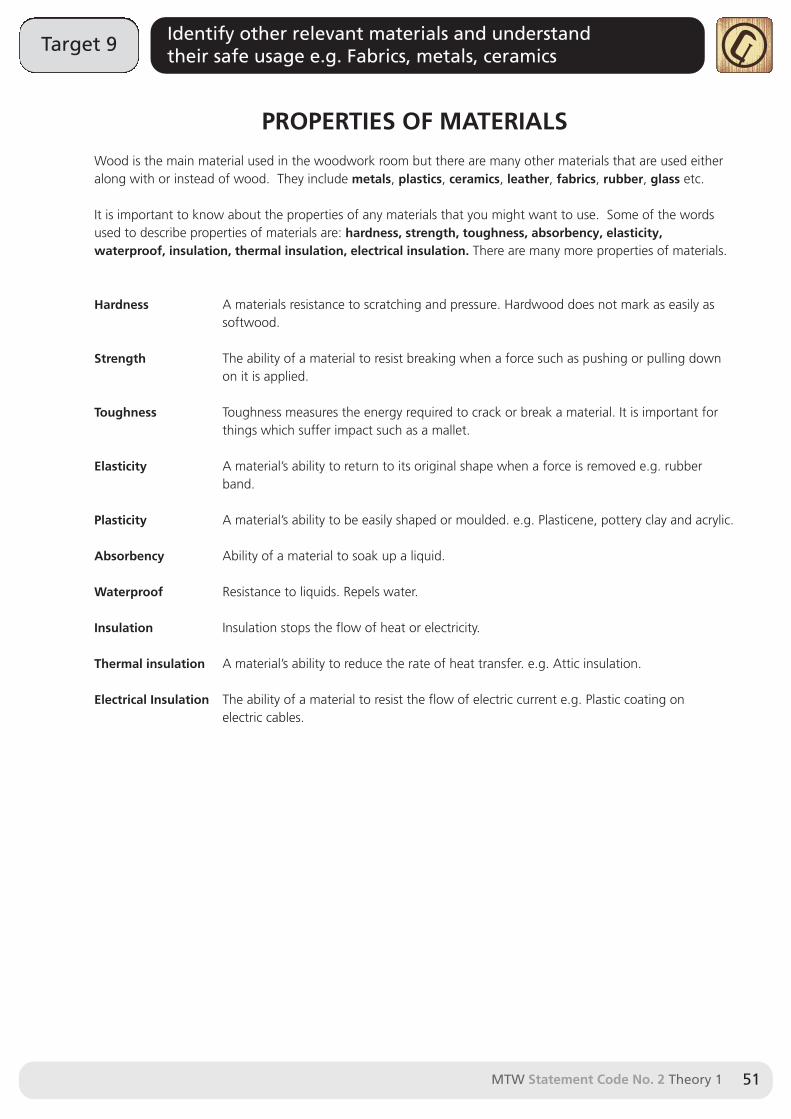
Router
USE: A router is a high speed rotary cutting tool. It is most commonly usedto cut grooves, create decorative edges on wood, or to hollow out areas.
The router uses the edge of its cutting bit, which rotates at speeds ofapproximate 25,000 to 30,000 RPM to produce a smooth cut.
Variable speed routers can typically be adjusted to rotate at speeds of10,000 RPM to 30,000 RPM.
Router bits come in various sizes and shapes dependingon the hardness of wood or other material to be cut, andthe type of cut desired.
The router bit can be raised or lowered to suit the depthof cut required.
Biscuit Joiner
Biscuit
Oval
Router
Rotary
Cutter
RPM
14’
78’
Biscuits
MTW Statement Code No. 2 Theory 1 51
Target 9 Identify other relevant materials and understandtheir safe usage e.g. Fabrics, metals, ceramics
PROPERTIES OF MATERIALS
Wood is the main material used in the woodwork room but there are many other materials that are used eitheralong with or instead of wood. They include metals, plastics, ceramics, leather, fabrics, rubber, glass etc.
It is important to know about the properties of any materials that you might want to use. Some of the wordsused to describe properties of materials are: hardness, strength, toughness, absorbency, elasticity,waterproof, insulation, thermal insulation, electrical insulation. There are many more properties of materials.
Hardness A materials resistance to scratching and pressure. Hardwood does not mark as easily assoftwood.
Strength The ability of a material to resist breaking when a force such as pushing or pulling downon it is applied.
Toughness Toughness measures the energy required to crack or break a material. It is important forthings which suffer impact such as a mallet.
Elasticity A material’s ability to return to its original shape when a force is removed e.g. rubberband.
Plasticity A material’s ability to be easily shaped or moulded. e.g. Plasticene, pottery clay and acrylic.
Absorbency Ability of a material to soak up a liquid.
Waterproof Resistance to liquids. Repels water.
Insulation Insulation stops the flow of heat or electricity.
Thermal insulation A material’s ability to reduce the rate of heat transfer. e.g. Attic insulation.
Electrical Insulation The ability of a material to resist the flow of electric current e.g. Plastic coating on electric cables.
Target 9 Identify other relevant materials and understandtheir safe usage e.g. Fabrics, metals, ceramics
MTW Statement Code No. 2 Theory 152
Fabrics
Keywords
Fabric refers to any material made through weaving or knitting of fibres that may be used in the production offurther goods (garments, etc.). Fibres are long thin pieces of a natural or artificial substance, similar to a threador hair in shape. There are two types of fibres. Natural or Man-made.
Natural fibres come from both animals and plants.
Animal fibres include: Wool - Fibres from animal coats: Sheep, goats, rabbits. Leather - Animal hide or skin.Silk - Fibres from the cocoon of the silkworm
Plant fibres include: Cotton - Fibres from the cotton plant’s seed pod.Linen is a textile made from the fibres of the flax plant.
Man-made fibres are made by man from chemicals. They do not exist in nature. There are two types of man-made fibres:Synthetic fibres are made from coal, oil and/or chemicals.Regenerated fibres are made from plant materials but they have chemicals added.
Fabric
Fibres
Natural
Man-made
Synthetic
Animal
Wool
Silk
Leather
Plant Cotton
Linen
Regenerated
Natural Fibres
Animal Fabric
Natural Fibres
Plant
Man
-Mad
e Fibres
Synthetic
Man-M
ade Fibres
Regenerated
Fabric Properties Uses
Wool Wool is hard wearing, elastic, comfortable, absorbs water. Coats, blankets, toys, clothing,insulation, carpets.
Leather Flexible, extremely durable, does not tear easily, is lightweight. Sporting goods, coats, bags, beltsand shoes
SilkIs the strongest natural fibre, very comfortable, absorbsmoisture, cool to wear in summer.
Blouses, dresses, scarves, pants,ties
CottonNatural resource that is fully renewable, strong and durable,soft and comfortable.
Blouses, shirts, shorts, jackets,pants.
LinenTwo to three times as strong as cotton, quite stiff and wrinkleseasily, absorbs moisture and dries quickly.
Dresses, Suits, Coats, Shirts,Children’s wear, Bed sheets
PolyesterInexpensive; superior strength and resilience; lightweight; hasan unusually high melting point.
All types of clothing, bedspreads,sheets, pillows.
AcrylicQuick drying to move moisture from body surface, Easilywashed, retains shape, Resistant to moths, oil, and chemicals.
Sweaters, socks, sportswear,children’s wear, Blankets.
NylonExceptionally strong, Elastic, Easy to wash, Can be pre-coloured or dyed in wide range of colours.
Clothes, raincoats, cyclewear,windbreakers, swimwear
Acetate Luxurious feel and appearance, Wide range of colours, soft,fast drying, Shrink, moth and mildew resistant
Blouses, dresses, weddingclothing, home furnishings
Viscose Greater elasticity than cotton & linen, Creases easily, Goodconductor of heat, One of the most absorbent of all textiles,dyes easily.
Extremely thin continuous threads,clothing
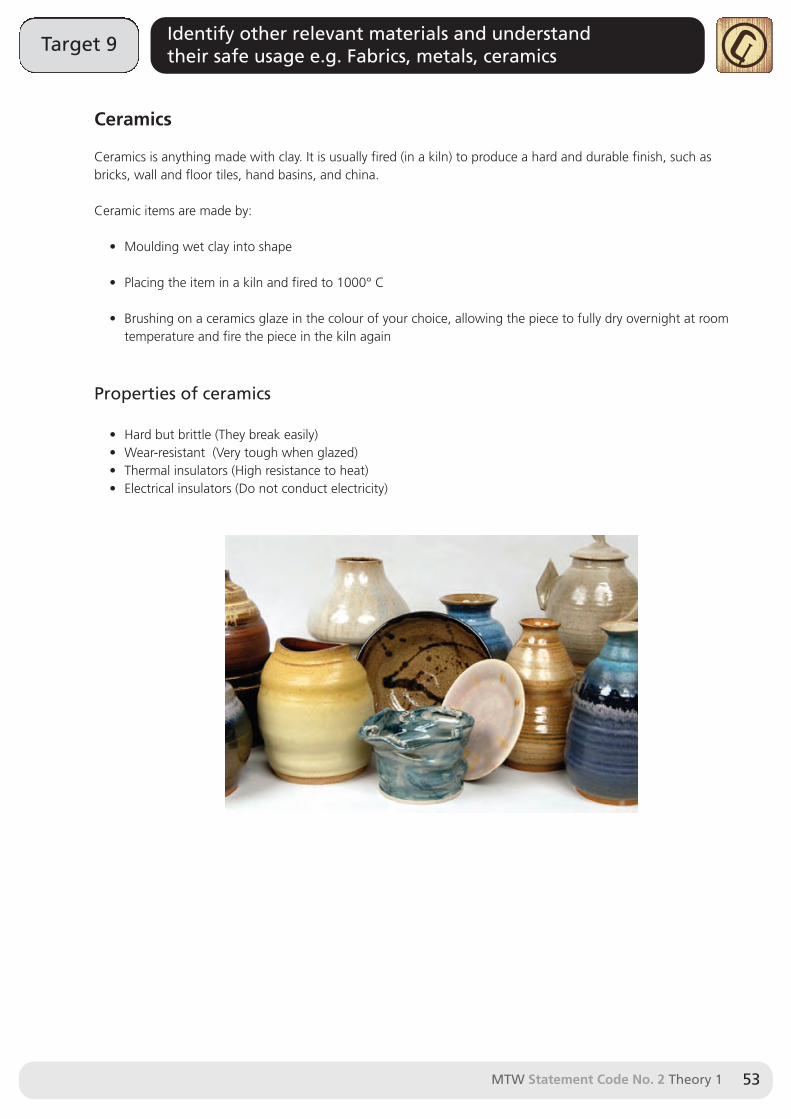
Ceramics
Ceramics is anything made with clay. It is usually fired (in a kiln) to produce a hard and durable finish, such asbricks, wall and floor tiles, hand basins, and china.
Ceramic items are made by:
• Moulding wet clay into shape
• Placing the item in a kiln and fired to 1000° C
• Brushing on a ceramics glaze in the colour of your choice, allowing the piece to fully dry overnight at roomtemperature and fire the piece in the kiln again
Properties of ceramics
• Hard but brittle (They break easily)• Wear-resistant (Very tough when glazed)• Thermal insulators (High resistance to heat)• Electrical insulators (Do not conduct electricity)
MTW Statement Code No. 2 Theory 1 53
Target 9 Identify other relevant materials and understandtheir safe usage e.g. Fabrics, metals, ceramics
Target 10 Identify four different methods of fixing and fastening
MTW Statement Code No. 2 Theory 154
JOINING WOOD TO WOOD
A wood joint is the intersection of two pieces of wood that are connected together. The connection may bemade by fasteners, like screws or nails, by glue, by wood joints, or by any combination of these.
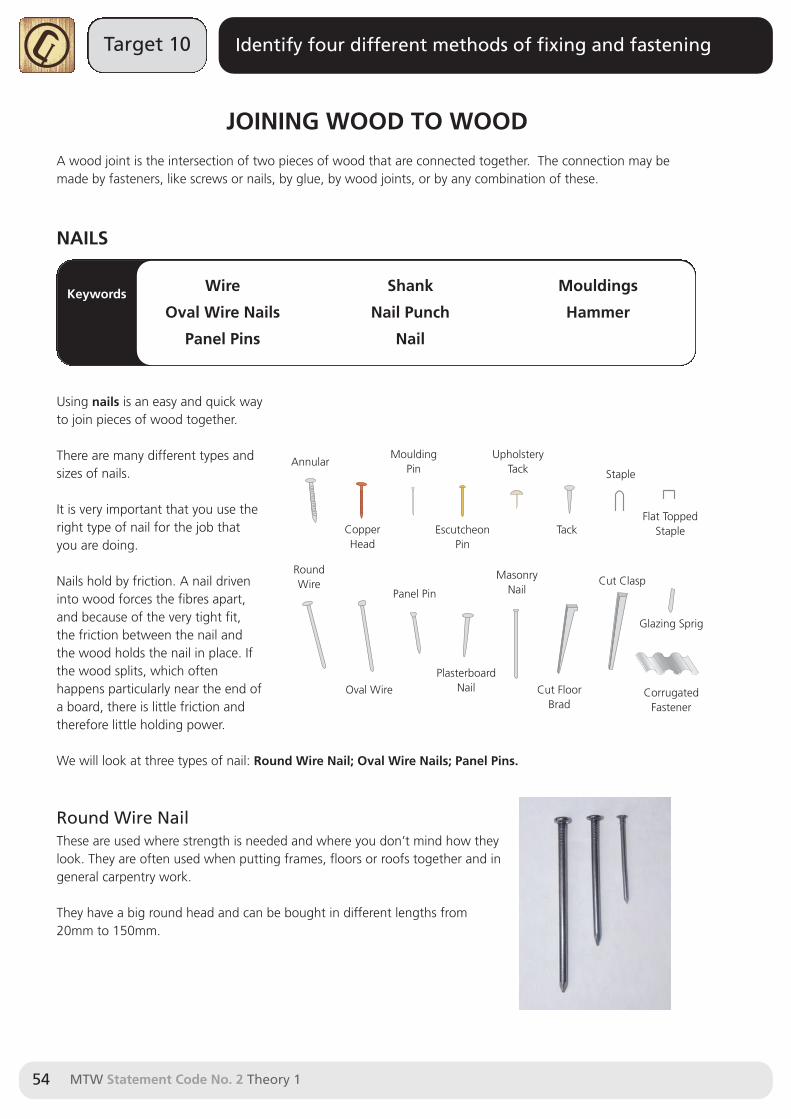
NAILS
Keywords
Using nails is an easy and quick wayto join pieces of wood together.
There are many different types andsizes of nails.
It is very important that you use theright type of nail for the job thatyou are doing.
Nails hold by friction. A nail driveninto wood forces the fibres apart,and because of the very tight fit,the friction between the nail andthe wood holds the nail in place. Ifthe wood splits, which oftenhappens particularly near the end ofa board, there is little friction andtherefore little holding power.
We will look at three types of nail: Round Wire Nail; Oval Wire Nails; Panel Pins.
Round Wire NailThese are used where strength is needed and where you don’t mind how theylook. They are often used when putting frames, floors or roofs together and ingeneral carpentry work.
They have a big round head and can be bought in different lengths from 20mm to 150mm.
Wire
Oval Wire Nails
Panel Pins
Shank
Nail Punch
Nail
Mouldings
Hammer
Annular
RoundWire
CopperHead
Oval Wire
Panel Pin
PlasterboardNail
MasonryNail
Cut FloorBrad
Cut Clasp
Glazing Sprig
CorrugatedFastener
MouldingPin
EscutcheonPin
UpholsteryTack
Tack
Staple
Flat ToppedStaple
MTW Statement Code No. 2 Theory 1 55
Target 10 Identify four different methods of fixing and fastening
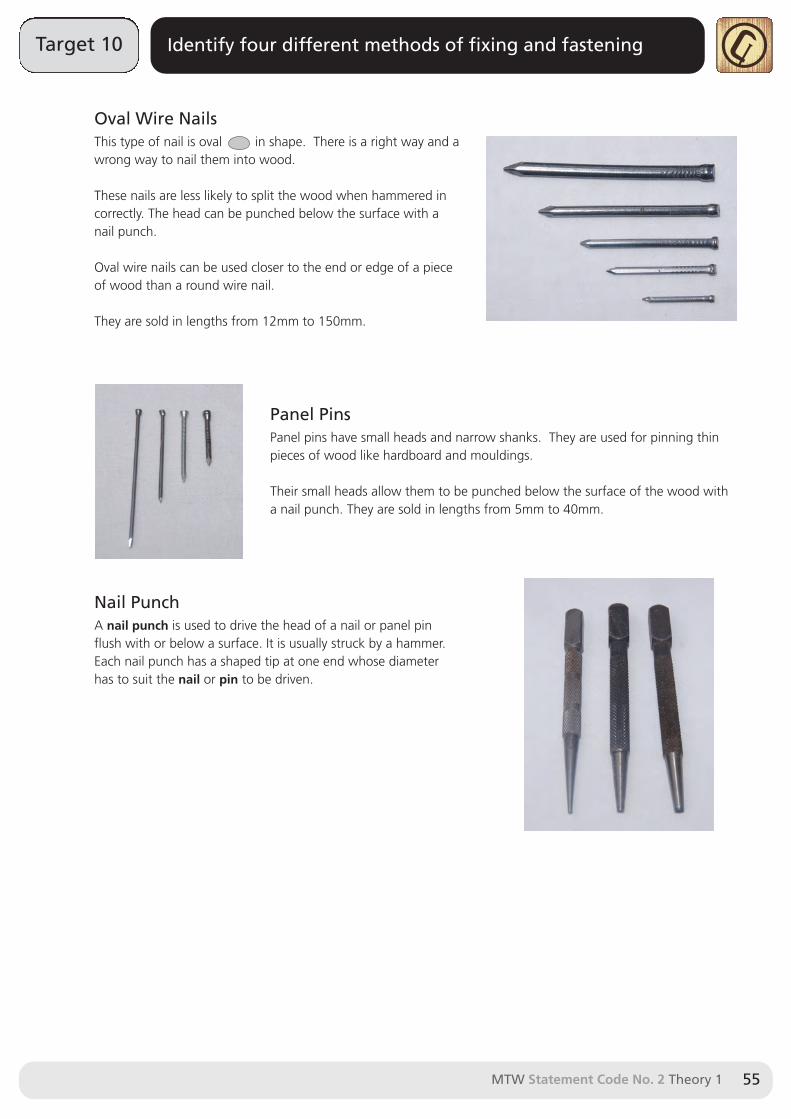
Oval Wire NailsThis type of nail is oval in shape. There is a right way and awrong way to nail them into wood.
These nails are less likely to split the wood when hammered incorrectly. The head can be punched below the surface with a nail punch.
Oval wire nails can be used closer to the end or edge of a piece of wood than a round wire nail.
They are sold in lengths from 12mm to 150mm.
Panel PinsPanel pins have small heads and narrow shanks. They are used for pinning thinpieces of wood like hardboard and mouldings.
Their small heads allow them to be punched below the surface of the wood witha nail punch. They are sold in lengths from 5mm to 40mm.
Nail PunchA nail punch is used to drive the head of a nail or panel pinflush with or below a surface. It is usually struck by a hammer.Each nail punch has a shaped tip at one end whose diameterhas to suit the nail or pin to be driven.
Target 10 Identify four different methods of fixing and fastening
MTW Statement Code No. 2 Theory 156
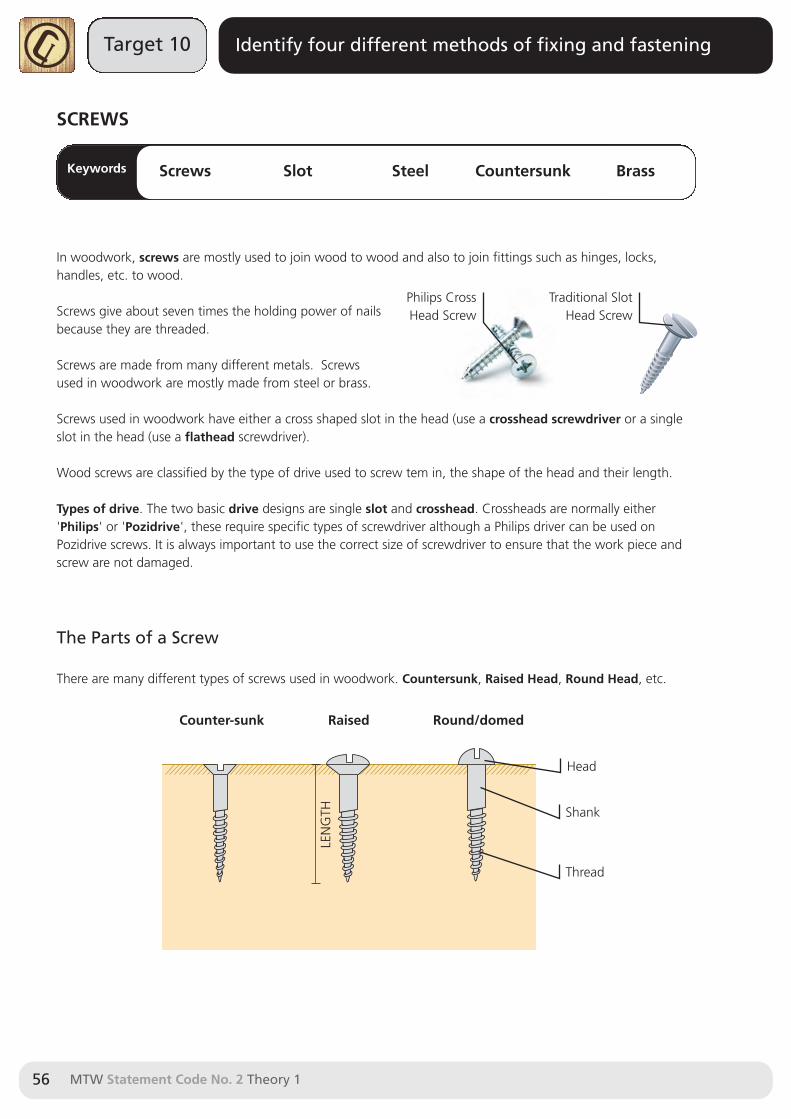
SCREWS
Keywords
In woodwork, screws are mostly used to join wood to wood and also to join fittings such as hinges, locks,handles, etc. to wood.
Screws give about seven times the holding power of nailsbecause they are threaded.
Screws are made from many different metals. Screwsused in woodwork are mostly made from steel or brass.
Screws used in woodwork have either a cross shaped slot in the head (use a crosshead screwdriver or a singleslot in the head (use a flathead screwdriver).
Wood screws are classified by the type of drive used to screw tem in, the shape of the head and their length.
Types of drive. The two basic drive designs are single slot and crosshead. Crossheads are normally either'Philips' or 'Pozidrive', these require specific types of screwdriver although a Philips driver can be used onPozidrive screws. It is always important to use the correct size of screwdriver to ensure that the work piece andscrew are not damaged.
The Parts of a Screw
There are many different types of screws used in woodwork. Countersunk, Raised Head, Round Head, etc.
Screws Slot Steel Countersunk Brass
Philips CrossHead Screw
Traditional SlotHead Screw
Head
Shank
Thread
Counter-sunk
LEN
GTH
Raised Round/domed
MTW Statement Code No. 2 Theory 1 57
Target 10 Identify four different methods of fixing and fastening
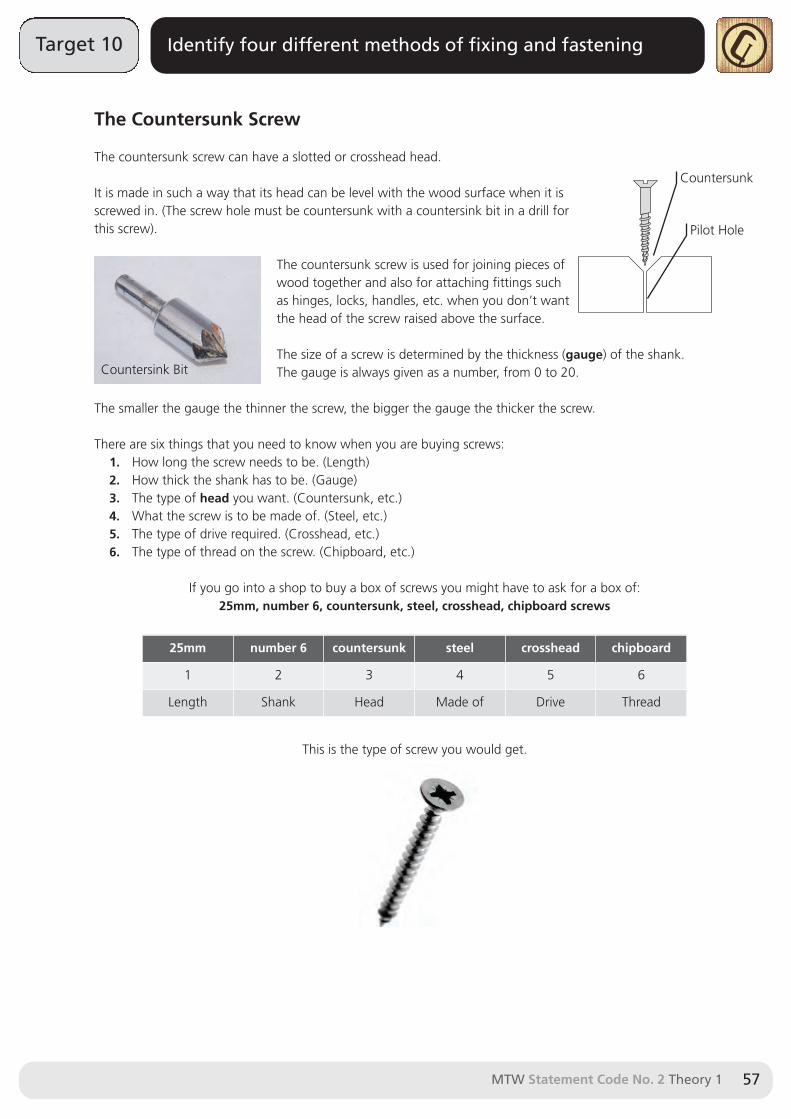
The Countersunk Screw
The countersunk screw can have a slotted or crosshead head.
It is made in such a way that its head can be level with the wood surface when it isscrewed in. (The screw hole must be countersunk with a countersink bit in a drill forthis screw).
The countersunk screw is used for joining pieces ofwood together and also for attaching fittings suchas hinges, locks, handles, etc. when you don’t wantthe head of the screw raised above the surface.
The size of a screw is determined by the thickness (gauge) of the shank. The gauge is always given as a number, from 0 to 20.
The smaller the gauge the thinner the screw, the bigger the gauge the thicker the screw.
There are six things that you need to know when you are buying screws:1. How long the screw needs to be. (Length)2. How thick the shank has to be. (Gauge)3. The type of head you want. (Countersunk, etc.)4. What the screw is to be made of. (Steel, etc.)5. The type of drive required. (Crosshead, etc.)6. The type of thread on the screw. (Chipboard, etc.)
If you go into a shop to buy a box of screws you might have to ask for a box of: 25mm, number 6, countersunk, steel, crosshead, chipboard screws
This is the type of screw you would get.
25mm number 6 countersunk steel crosshead chipboard
1 2 3 4 5 6
Length Shank Head Made of Drive Thread
Countersunk
Countersink Bit
Pilot Hole
Target 10 Identify four different methods of fixing and fastening
MTW Statement Code No. 2 Theory 158
FITTINGS
The main ways of joining wood to wood are by using metal or plastic fittings or by using woodworking joints.
Keywords
The fittings we will look at are; Hinges; Knock-Down (KD) fittings; Locks; Catches
HingesHinges are fittings that allow doors, gates or lids, etc. to be opened or closed while staying attached. The hingeswe will look at are the butt hinge the piano hinge and the concealed hinge.
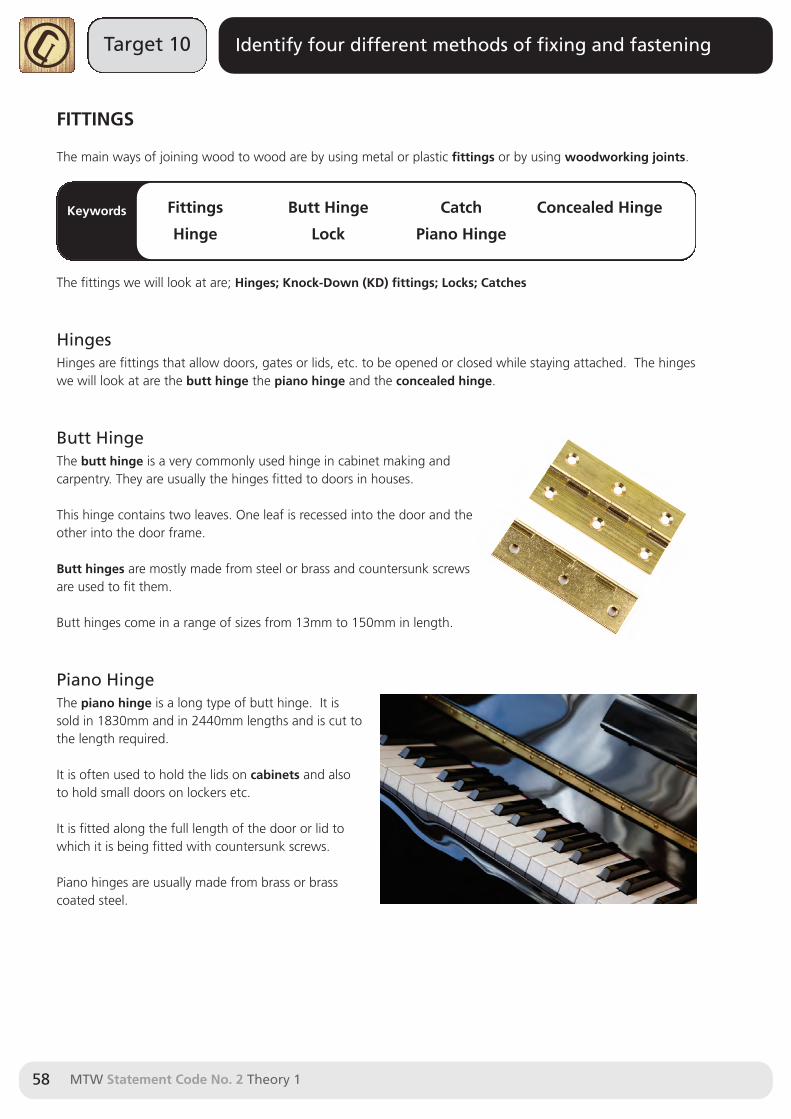
Butt HingeThe butt hinge is a very commonly used hinge in cabinet making andcarpentry. They are usually the hinges fitted to doors in houses.
This hinge contains two leaves. One leaf is recessed into the door and theother into the door frame.
Butt hinges are mostly made from steel or brass and countersunk screwsare used to fit them.
Butt hinges come in a range of sizes from 13mm to 150mm in length.
Piano HingeThe piano hinge is a long type of butt hinge. It issold in 1830mm and in 2440mm lengths and is cut tothe length required.
It is often used to hold the lids on cabinets and alsoto hold small doors on lockers etc.
It is fitted along the full length of the door or lid towhich it is being fitted with countersunk screws.
Piano hinges are usually made from brass or brasscoated steel.
Fittings
Hinge
Butt Hinge
Lock
Catch
Piano Hinge
Concealed Hinge
MTW Statement Code No. 2 Theory 1 59
Target 10 Identify four different methods of fixing and fastening
Keywords
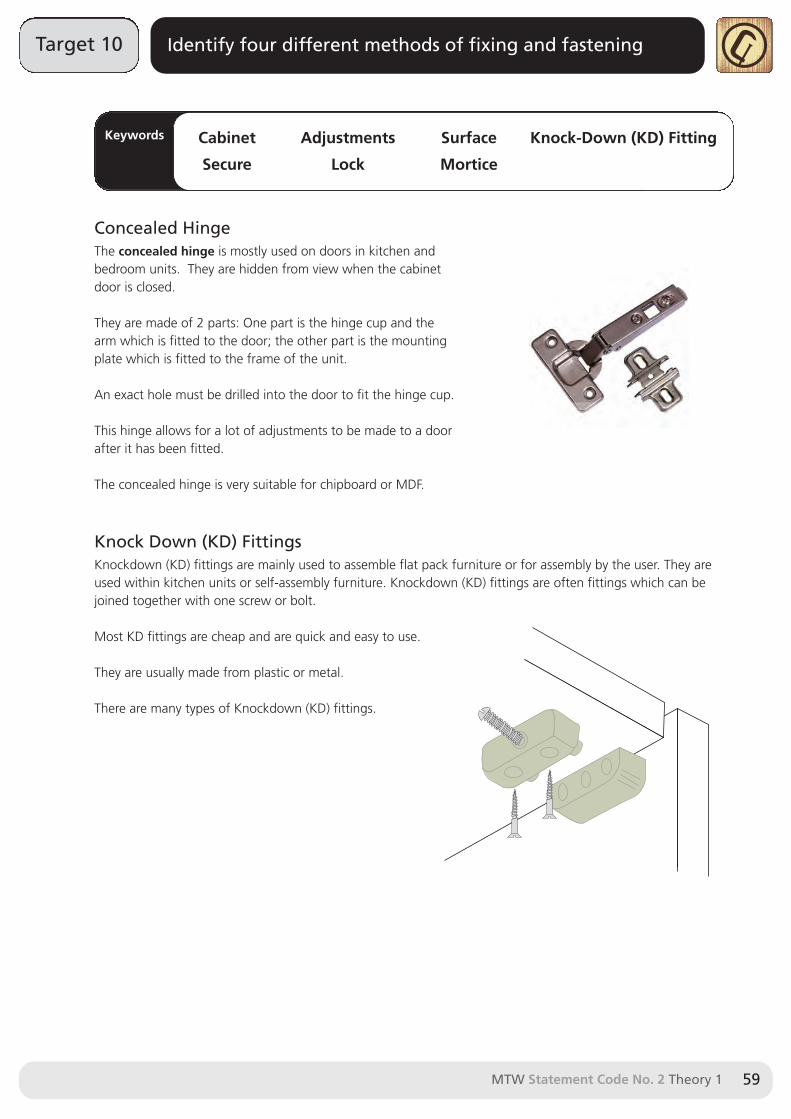
Concealed HingeThe concealed hinge is mostly used on doors in kitchen andbedroom units. They are hidden from view when the cabinetdoor is closed.
They are made of 2 parts: One part is the hinge cup and thearm which is fitted to the door; the other part is the mountingplate which is fitted to the frame of the unit.
An exact hole must be drilled into the door to fit the hinge cup.
This hinge allows for a lot of adjustments to be made to a doorafter it has been fitted.
The concealed hinge is very suitable for chipboard or MDF.
Knock Down (KD) FittingsKnockdown (KD) fittings are mainly used to assemble flat pack furniture or for assembly by the user. They areused within kitchen units or self-assembly furniture. Knockdown (KD) fittings are often fittings which can bejoined together with one screw or bolt.
Most KD fittings are cheap and are quick and easy to use.
They are usually made from plastic or metal.
There are many types of Knockdown (KD) fittings.
Cabinet
Secure
Adjustments
Lock
Surface
Mortice
Knock-Down (KD) Fitting
Target 10 Identify four different methods of fixing and fastening
MTW Statement Code No. 2 Theory 160
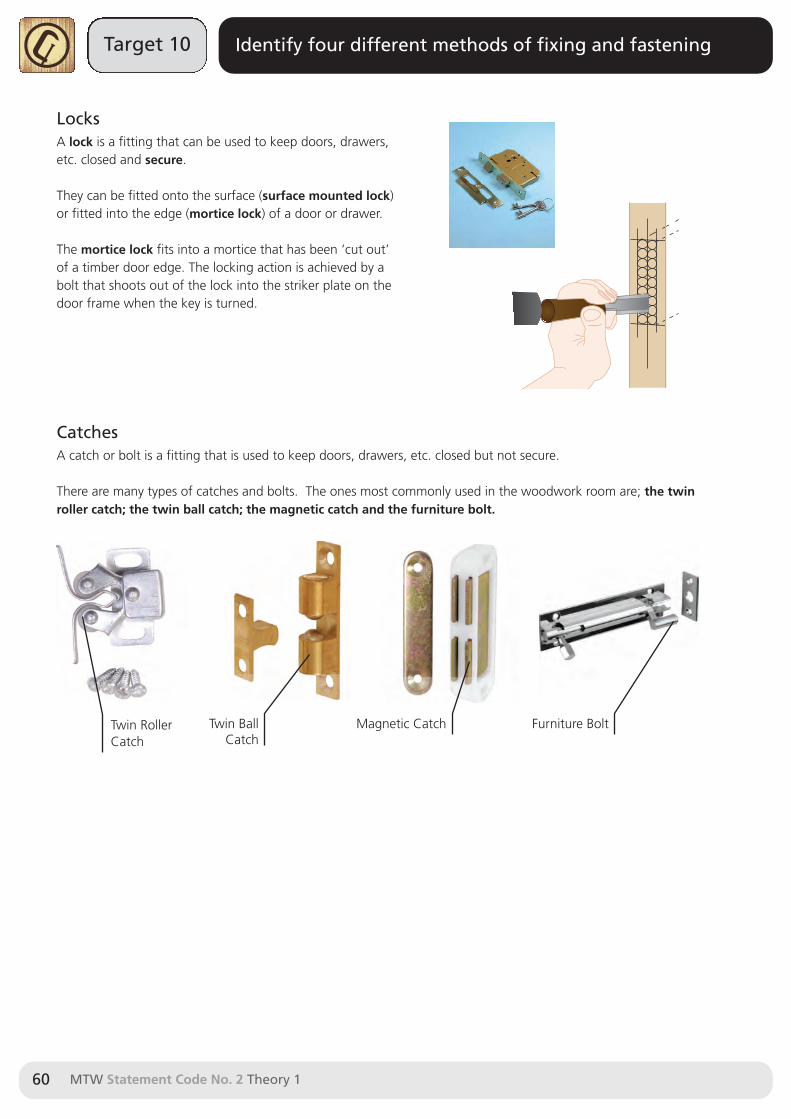
LocksA lock is a fitting that can be used to keep doors, drawers,etc. closed and secure.
They can be fitted onto the surface (surface mounted lock)or fitted into the edge (mortice lock) of a door or drawer.
The mortice lock fits into a mortice that has been ‘cut out’of a timber door edge. The locking action is achieved by abolt that shoots out of the lock into the striker plate on thedoor frame when the key is turned.
CatchesA catch or bolt is a fitting that is used to keep doors, drawers, etc. closed but not secure.
There are many types of catches and bolts. The ones most commonly used in the woodwork room are; the twinroller catch; the twin ball catch; the magnetic catch and the furniture bolt.
Twin RollerCatch
Twin BallCatch
Magnetic Catch Furniture Bolt
MTW Statement Code No. 2 Theory 1 61
Target 11 Identify four common joints and statewhere they would be used
WOOD JOINTS
Keywords
In order to make a successful woodwork project it is essential to know the right joint to use, and to know how tomake that joint in the right way.
Always consider how strong the joint needs to be, how much of a gluing surface there will be and how thefinished joint will look.
The direction of force on the joint should also be considered.
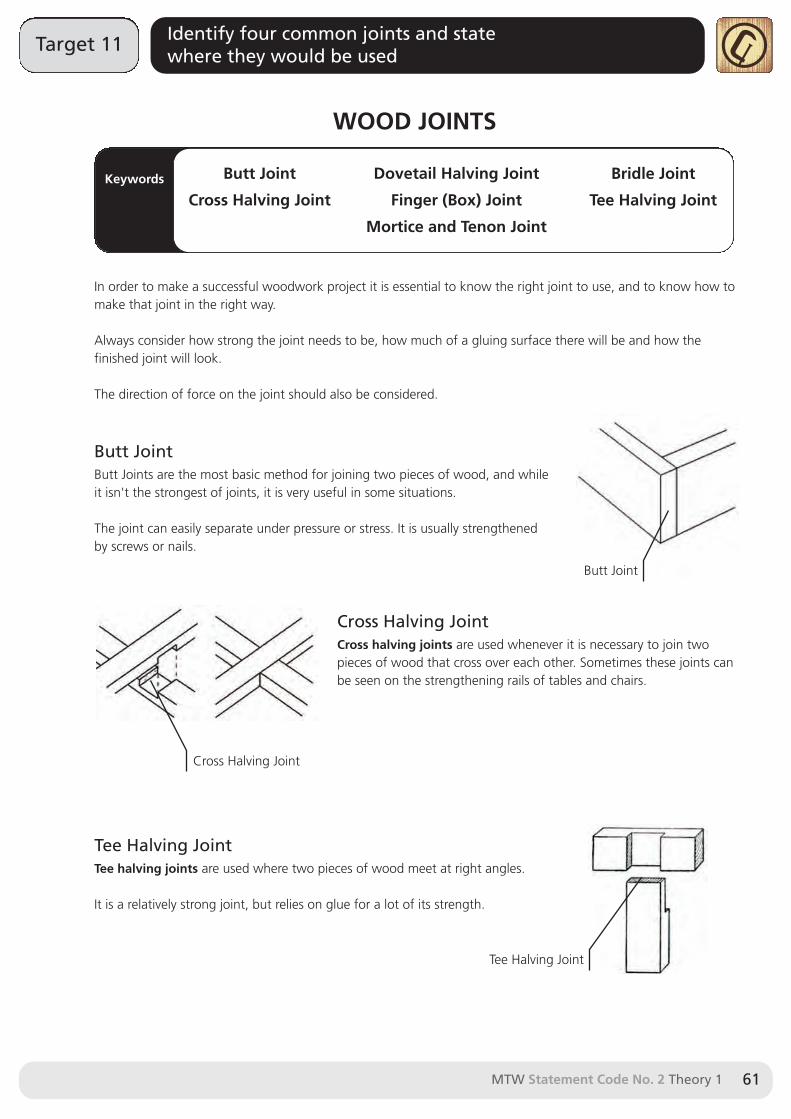
Butt JointButt Joints are the most basic method for joining two pieces of wood, and whileit isn't the strongest of joints, it is very useful in some situations.
The joint can easily separate under pressure or stress. It is usually strengthenedby screws or nails.
Cross Halving JointCross halving joints are used whenever it is necessary to join twopieces of wood that cross over each other. Sometimes these joints canbe seen on the strengthening rails of tables and chairs.
Tee Halving Joint Tee halving joints are used where two pieces of wood meet at right angles.
It is a relatively strong joint, but relies on glue for a lot of its strength.
Butt Joint
Cross Halving Joint
Dovetail Halving Joint
Finger (Box) Joint
Mortice and Tenon Joint
Bridle Joint
Tee Halving Joint
Butt Joint
Tee Halving Joint
Cross Halving Joint
Target 11 Identify four common joints and statewhere they would be used
MTW Statement Code No. 2 Theory 162
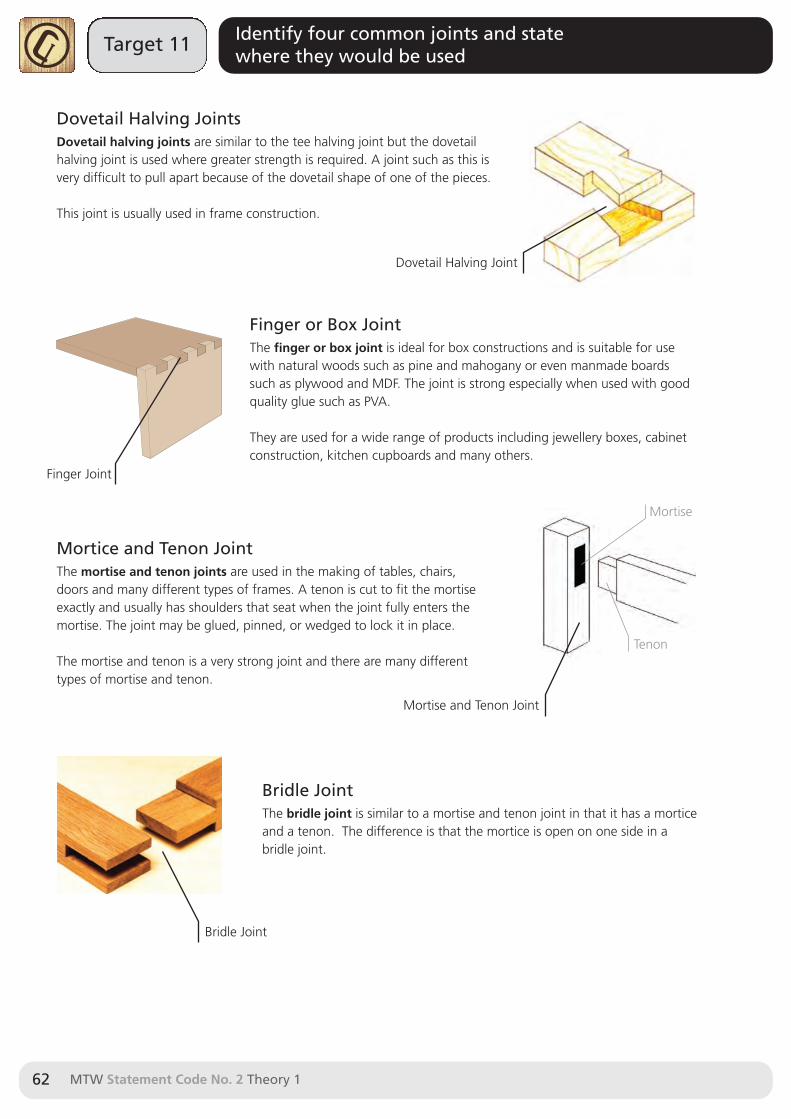
Dovetail Halving JointsDovetail halving joints are similar to the tee halving joint but the dovetailhalving joint is used where greater strength is required. A joint such as this isvery difficult to pull apart because of the dovetail shape of one of the pieces.
This joint is usually used in frame construction.
Finger or Box JointThe finger or box joint is ideal for box constructions and is suitable for usewith natural woods such as pine and mahogany or even manmade boardssuch as plywood and MDF. The joint is strong especially when used with goodquality glue such as PVA.
They are used for a wide range of products including jewellery boxes, cabinetconstruction, kitchen cupboards and many others.
Mortice and Tenon JointThe mortise and tenon joints are used in the making of tables, chairs,doors and many different types of frames. A tenon is cut to fit the mortiseexactly and usually has shoulders that seat when the joint fully enters themortise. The joint may be glued, pinned, or wedged to lock it in place.
The mortise and tenon is a very strong joint and there are many differenttypes of mortise and tenon.
Bridle JointThe bridle joint is similar to a mortise and tenon joint in that it has a morticeand a tenon. The difference is that the mortice is open on one side in abridle joint.
Dovetail Halving Joint
Mortise and Tenon Joint
Finger Joint
Bridle Joint
Mortise
Tenon
MTW Statement Code No. 2 Theory 1 63
Target 12 Identify four different appliedfinishes and explain their use
FINISHING
Keywords
If you're going to spend a lot of time making a woodwork project, it makes sense that you would want the finishto be able to show off your handiwork and protect it for years to come. The difference between a goodwoodwork project and a great one is often how well the project is finished.
A surface finish is applied to seal or protect the timber from moisture, dirt, heat, insect and fungal attack. Beforeany finish can be applied to wood, it must first be prepared. This means it must be – clean, smooth and free ofmarks.
The process of finishing starts with surface preparation, either by sanding by hand (usually with a sanding blockor power sander), scraping, or planing.
Removing MarksCommon marks which should be removed are – dents/humps, glue stains, holes/cracks, scratches and pencilmarks.
Dents can be removed in two ways:a. By using a plane to remove the surrounding timber b. By applying heat and moisture to the dent, which makes the wood swell to its original size.
Humps (large) can also be removed by planing the wood. Smaller bumps can be removed by scraping orsanding.
Glue stains can be removed by scraping or sanding.
Holes and cracks need to be filled with suitable filler.
Scratches can be removed by using abrasive paper.
Abrasive Paper Filler Plane Surface
Target 12 Identify four different appliedfinishes and explain their use
MTW Statement Code No. 2 Theory 164
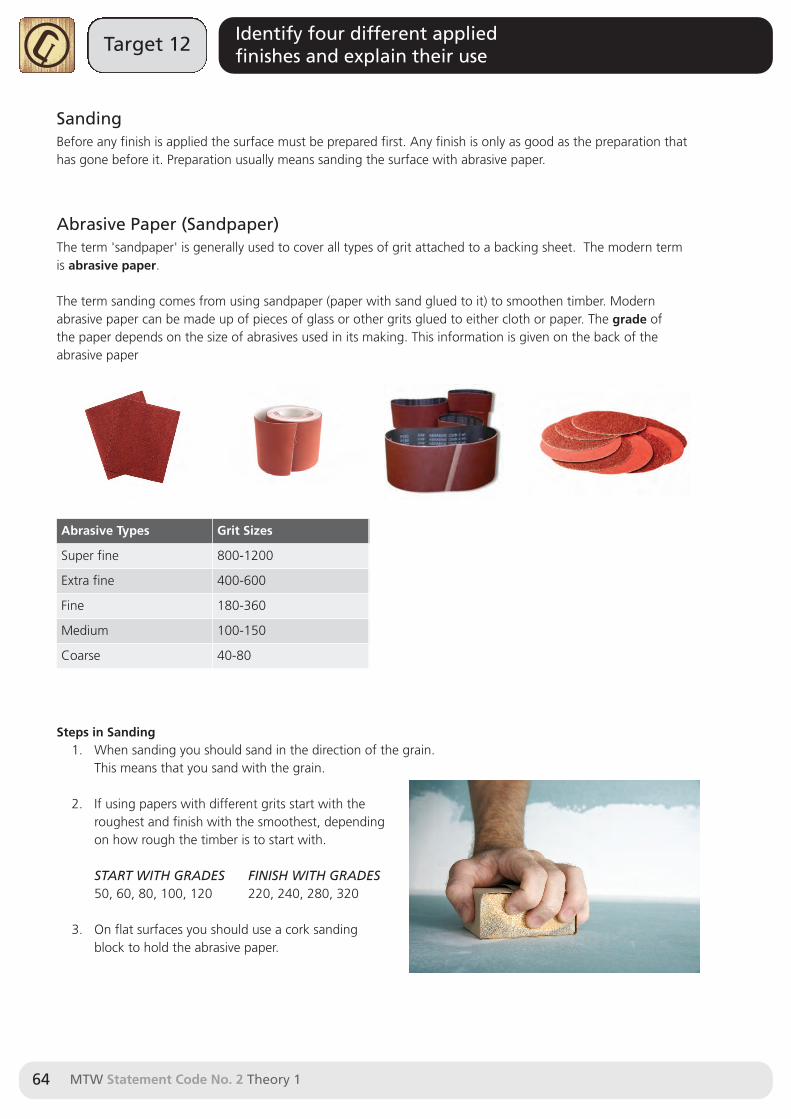
Abrasive Paper (Sandpaper)The term 'sandpaper' is generally used to cover all types of grit attached to a backing sheet. The modern term is abrasive paper.
The term sanding comes from using sandpaper (paper with sand glued to it) to smoothen timber. Modernabrasive paper can be made up of pieces of glass or other grits glued to either cloth or paper. The grade of the paper depends on the size of abrasives used in its making. This information is given on the back of theabrasive paper
Steps in Sanding1. When sanding you should sand in the direction of the grain.
This means that you sand with the grain.
2. If using papers with different grits start with theroughest and finish with the smoothest, dependingon how rough the timber is to start with.
START WITH GRADES FINISH WITH GRADES50, 60, 80, 100, 120 220, 240, 280, 320
3. On flat surfaces you should use a cork sandingblock to hold the abrasive paper.
Abrasive Types Grit Sizes
Super fine 800-1200
Extra fine 400-600
Fine 180-360
Medium 100-150
Coarse 40-80
SandingBefore any finish is applied the surface must be prepared first. Any finish is only as good as the preparation thathas gone before it. Preparation usually means sanding the surface with abrasive paper.
MTW Statement Code No. 2 Theory 1 65
Target 12 Identify four different appliedfinishes and explain their use
APPLIED WOOD FINISHES
Keywords
There are many different types of finishes available but the most commonly used in the woodwork room are:
STAINS VARNISH PAINT OILS
The choice of finish you choose to use will depend on; What the item will be used for; Where it will be used –indoors/outdoors; Safety – food, children, etc.; Your own personal taste.
NOTE: Finishes can only be mixed within their own type. i.e. Water based with water based.
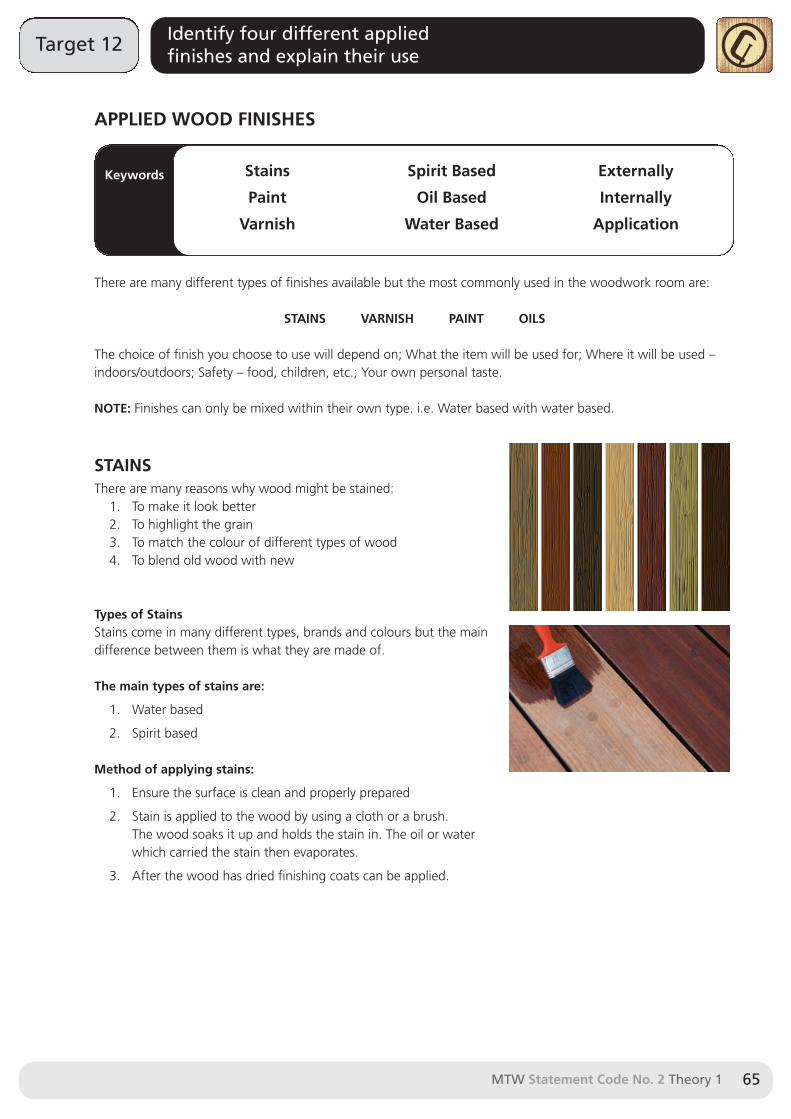
STAINSThere are many reasons why wood might be stained:
1. To make it look better2. To highlight the grain3. To match the colour of different types of wood4. To blend old wood with new
Types of StainsStains come in many different types, brands and colours but the maindifference between them is what they are made of.
The main types of stains are:
1. Water based
2. Spirit based
Method of applying stains:
1. Ensure the surface is clean and properly prepared
2. Stain is applied to the wood by using a cloth or a brush. The wood soaks it up and holds the stain in. The oil or waterwhich carried the stain then evaporates.
3. After the wood has dried finishing coats can be applied.
Stains
Paint
Varnish
Spirit Based
Oil Based
Water Based
Externally
Internally
Application
Target 12 Identify four different appliedfinishes and explain their use
MTW Statement Code No. 2 Theory 166
VARNISH
Varnish is commonly found in the woodwork room. It is a clear finish, which is also available with a slight colourtint. They are hard wearing, waterproof and heat resistant.
Types of VarnishVarnish is available in gloss and matt finishes. It is also available with stain mixed in. There are two types:
1. Water based2. Spirit based
Uses of VarnishVarnish can be used both internally and externally on a wide range of objects such as boats, furniture, toys,doors, windows and floors.
Method of applying varnish:1. Ensure the surface is clean and properly prepared.2. The first coat of varnish seals the timber.3. Brush the varnish onto the timber, finishing off in the same direction as the grain.4. Allow the varnish to dry and then sand lightly using fine abrasive paper.5. Apply a second coat, which is full strength.6. A third coat can be applied when dry.
Properties of varnish:• Varnish is resistant to heat and alcohol.• Varnish is resistant to wear and solvents.• It is water and water vapour resistant (resistant to humidity).• It has a long curing time (slow to dry).• Its long curing time makes it easy to brush, but can cause problems with dust getting into the finish.• It tends to yellow more over time than other finishes.
Varnish cures by being exposed to oxygen. When left in a can that has air in it, it will skin over in time. If thevarnish hasn't begun to gel under the skin, it's still okay to use. Remove the skin and strain the remainingvarnish into a smaller can (or glass jar), and seal.
PAINT
Keywords
Paint is available in a wide range of colours and finishes. It is hardwearing and easily cleaned.
Uses of paintPaint can be used both internally and externally on any article made from wood or wood products.
Method of applying paint:1. Ensure the surface to be painted is clean and properly prepared.2. Apply a primer paint, which seals the timber.3. Apply an undercoat, which is right for the finishing coat.4. Allow to dry and then sand lightly using fine sandpaper. 5. Apply the final coat of paint and leave to dry.
Care of paint brushes:1. Wipe the brush in a cloth after use.2. It can then be cleaned in a liquid like white spirits, if an oil / spirit finish was used. If the finish
was water based the brush can be cleaned in water.3. Dry the brush in a cloth for further use.
MTW Statement Code No. 2 Theory 1 67
Target 12 Identify four different appliedfinishes and explain their use
White Spirits Primer Undercoat
Target 12 Identify four different appliedfinishes and explain their use
MTW Statement Code No. 2 Theory 168
OILS
Keywords
Oil finishes have been used for centuries to treat and preserve wood. Oil finishes seep into the wood andpenetrate the wood’s fibres. Because of this, oil finishes cannot be built up to a thick coat like varnish can.
Oil finishes are probably the easiest finish to apply, but they offer less protection. Another advantage is thatminor repairs can be accomplished by simply wiping on more oil.
Applying Oil FinishesA good oil finish, when done well, produces a magnificent finish, but it is a time consuming procedure whichneeds a lot more effort than simply brushing or spraying on a topcoat such as varnish.
Oil finishes soak into the grain of wood rather than sit on the surface like varnish, which is the property thatmakes it such an attractive finish.
Oil finishes are simply wiped onto the surface of wood with a clean cotton rag.
Most oil finishes require 5-6 coats to achieve a decent finish. Allow the piece to dry for 48 hours (or more) beforeapplying the next coat. Wet the piece with oil again, and keep it wet for a minimum of 20 minutes beforeallowing it to dry again.
Always sand lightly between coats.
Vegetable Oil can be used as a finish on wooden products which need to be non-toxic, such as salad bowls,wooden spoons, toys etc.
Some vegetable oils cause allergic reactions.
Toxic Non-toxic Vegetable Oil
IMPORTANT SAFETY NOTEAny rags and cloths you use are very likely to spontaneously combust (Go on fire).This can occur when the solvents evaporating from your rags do not havesufficient air to evaporate into and heat builds up in the rag.
When you are finished with an oily rag always place it in water to prevent fire.

MTW Statement Code No. 2 Theory 1 69
Target 12 Identify four different appliedfinishes and explain their use
SAFETY WHEN USING FINISHES
1. Always follow the manufacturer’s instructions carefully.
2. All finishes should be applied in a well-ventilated area.
3. Wear safety goggles, a respirator or face mask, wherenecessary
4. Wear protective clothing and/or PVC gloves where necessary.
5. Do not smoke, eat or drink while using finishes.
6. Wash your hands after use.
7. Do not pour waste finishes into drains.
8. When you are finished with an oily rag always place it inwater to prevent fire.

Notes
MTW Statement Code No. 2 Theory 170
NOTES


Related Documents