Mastercam X4 BOAT CAT TOOLPATHS Page 24-1 Rough Pocket and Finish Blend Toolpaths for Cat Hull Rough Pocket and Finish A. Stock Setup. Step 1. Click Machine Type Menu > Mill > Default. Step 2. If necessary, display Operations Manager. Use Alt-O Step 3. Expand Properties (click the +) in the Toolpaths Manager, Fig. 1. Step 4. Click Stock Setup in the Toolpaths Manager, Fig. 1. Step 5. Click All Entities box button in the Stock Setup dialog box, Fig. 2. Step 6. Click the left front top corner of the stock to move the origin, Fig. 2. After you click corner the arrow will point to corner. Step 7. Click OK in the Ma- chine Group Properties, Fig. 2. B. Create Loft Surface for Blend. Step 1. Click Create Menu > Surface > Ruled/Lofted. Step 2. Click the Single button in the Chaining dialog box, Fig. 3. Step 3. Click Chain 1 and Chain 2 at the bottom of the bounding box, Fig. 4. If the chaining directions arrows are not point- ing in the same direction - click Reverse . Step 4. Click OK in the Chain dialog box, Fig. 3. Step 5. If necessary, turn on the shading. Use Alt-S. Step 6. Save . Use Alt-F S. Fig. 1 Fig. 2 Fig. 3 Fig. 4 Ch Mastercam Chapter 24 Click corner to o move arrow 11/24/10 © Cudacountry.net Tech Ed http://www.cudacountry.net email:[email protected]

Welcome message from author
This document is posted to help you gain knowledge. Please leave a comment to let me know what you think about it! Share it to your friends and learn new things together.
Transcript

Mastercam X4 BOAT CAT TOOLPATHS Page 24-1Rough Pocket and Finish Blend
Toolpaths for Cat HullRough Pocket and Finish Blend
A. Stock Setup.Step 1. Click Machine Type Menu > Mill > Default.
Step 2. If necessary, display Operations Manager. Use Alt-O
Step 3. Expand Properties (click the +) in the ToolpathsManager, Fig. 1.
Step 4. Click Stock Setup in the Toolpaths Manager, Fig. 1.
Step 5. Click All Entities box button in the Stock Setup dialog box, Fig. 2.
Step 6. Click the left front top corner of the stock to move the origin, left front top corner of the stock to move the origin, left front top corner of the stock Fig. 2. After you click corner the arrow will point to corner.
Step 7. Click OK in the Ma-chine Group Properties, Fig. 2.
B. Create Loft Surface for Blend.
Step 1. Click Create Menu > Surface > Ruled/Lofted.
Step 2. Click the Single button Step 2. Click the Single button
in the Chaining dialog box, Fig. 3.
Step 3. Click Chain 1 and Chain 2 at the bottom of the bounding box, Fig. 4. If the chaining directions arrows are not point-ing in the same direction - click Reverse ing in the same direction - click Reverse
.
Step 4. Click OK in the Chain dialog box, Fig. 3.
Step 5. If necessary, turn on the shading. Use Alt-S.
Step 6. Save . Use Alt-F S.
Fig. 1
Fig. 2 Fig. 3
Fig. 4Fig. 4
Chain 1Chain 1
Chain 2
Toolpaths for Cat HullRough Pocket and Finish Blend
Alt-O.
MastercamChapter 24
Click corner to Click corner to move arrow
11/24/10
© Cudacountry.net Tech Edhttp://www.cudacountry.net email:[email protected]

Mastercam X4 BOAT CAT TOOLPATHS Page 24-2Rough Pocket and Finish Blend
C. Rough Pocket Toolpath.Step 1. Click the down arrow of Set Planes button
in the toolbar and click Top (WCS), Fig 5.
Step 2. Click Toolpaths Menu > Surface Rough > Pocket.
Step 3. Click OK in the NC name dialog, Fig. 6.
Step 4. Click Activate solid selection button in the Solids selection ribbon bar and click Select
body and unselect others, Fig. 7.
Step 5. Click the boat hull. The solid edges will highlighted when selected, Fig. 8.
Step 6. Press ENTER to accept solid selection Press ENTER to accept solid selection Press ENTERand press ENTER again to accept Drive surfaces.
Step 7. Click Containment Select button, Fig. 9.
Step 8. Click the C-plane in the Chaining dialog box, Fig. 10.
Step 9. Click the Chain button in the Chain-ing dialog box, Fig. 10.
Step 10. Click a top line bounding box. The top rect-angle should be selected, Fig. 11. Click the OK button angle should be selected,
in the Chaining dialog box.
Step 11. Click the OK button in the Toolpath/surface selection dialog box.
Fig. 5
Fig. 6Fig. 6Fig. 6
Fig. 7Fig. 7
Fig. 8
Fig. 9 Fig. 10
Fig. 11
Edges highlighted when Edges highlighted when solid is selected
Containment
Containment Containment chain

Mastercam X4 BOAT CAT TOOLPATHS Page 24-3Rough Pocket and Finish Blend
D. Set Tool and Params.Step 1. Click Select library tool button, Fig. 12.
Step 2. Click the Filter button, Fig. 13.
Step 3. Under Tool Types, click None button, Fig. 14.
Step 4. Click Endmill2 Sphere button (second button top row), Fig. 14 and click OK.
Step 5. Click 252 1/4 BALL ENDMILL,Fig. 15 and click OK.
Step 6. Set the Feed rate: 40 Fig. 12.
Step 7. Set the Plunge rate: 20
Step 8. Click the Surface param-eters tab at the top of the dialog box, Fig. 12.
Fig. 12
Fig. 13
Fig. 14
Fig. 15

Mastercam X4 BOAT CAT TOOLPATHS Page 24-4Rough Pocket and Finish Blend
Step 9. Check Clearance and set: .05 and clickAbsolute, Fig. 16.
Step 10. Uncheck Retract.
Step 11. Set Feed plane: .1 and click Incremen-and click Incremen-and clicktal.
Step 12. Set Stock to leave on drive: .04.
Step 13. Click the Rough parameters tab at the top of the dialog box, Fig. 17.
Step 14. Set Maximum stepdown: .15 Fig. 17
Step 15. Unclick Entry Helix button.
Step 16. Click Cut depths button.
Step 17. Set Adjustment to top cut: .05 and click OK
Adjustment to top cut. Fig. 18
Step 18. Click the Pocket parameters tab at the top of the dialog box, Fig. 19.
Step 19. Set Cutting method: Zigzag
Step 20. Set Stepover percentage: 75
Step 21. Set Roughing angle: 90
Step 22. Check: Use quick zigzag
Step 23. Uncheck: Finish
Step 24. Click OK .
Step 25. Click OK to warn-
Fig. 18
Fig. 16
Fig. 17
Fig. 19
Step 25. Click OK to warn-ing of large amount of material.
Fig. 20

Mastercam X4 BOAT CAT TOOLPATHS Page 24-5Rough Pocket and Finish Blend
E. Finish Blend Toolpath.Step 1. Use Alt-T to turn off toolpath display.
Step 2. Click Toolpaths Menu > Surface Finish > Blend.
Step 3. Click the fl at surface at the bottom of the bounding box, Fig. 21.
Step 4. Click Activate solid selec-
tion button
Step 4. Click Activate solid selec-
in the Solids selection ribbon bar and click
Select body and unselect others, Fig. 22.
Step 5. Click the boat hull solid, Fig. 21. The solid edges will highlight when selected.
Step 6. Press ENTER twice to accept surface and solid selection as drives surfaces.
Step 7. Click Blend Select button, Fig. 23.
Step 8. Click the Single button in the Chain-ing dialog box, Fig. 24.
Step 9. Click Chain 1 and Chain 2 at the top of the bounding box, Fig. 25. If the chaining direc-tions arrows are not pointing in the same direc-tion - click Reverse tions arrows are not pointing in the same direc-
.
Step 10. Click OK in the Chain dialog box, Fig. 24.
Step 11. Click the OK button in the Toolpath/surface selection dialog box.
Fig. 21
Flat surfaceFlat surface
Hull solid
Fig. 22
Fig. 24Fig. 23
Blend
Fig. 25
Chain 1Chain 1
Chain 2

Mastercam X4 BOAT CAT TOOLPATHS Page 24-6Rough Pocket and Finish Blend
Step 12. Set the Feed rate: 60 Fig. 26.
Step 13. Set the Plunge rate: 30
Step 14. Click the Surface parameters tab at the top of the dialog box.
Step 15. Check Clearance and set: .05 and clickAbsolute, Fig. 27.
Step 16. Uncheck Retract.
Step 17. Set Feed plane: .1 and click Incrementaland click Incrementaland click .
Step 18. Click the Finish blend parameters tabat the top of the dialog box.
Step 19. Set Max. stepover: .03, Fig. 28.
Step 20. Click the Total tolerance button.
Step 21. Set the 3 sliders to: Fig. 29Normal - NC program lengthGood - Surface qualityNormal - Calculation time
Step 22. Uncheck all Create Arcs checkboxes, Uncheck all Create Arcs checkboxes, UncheckFig. 29.
Step 23. Click OK .
Fig. 26
Fig. 27
Fig. 29Mastercam X4 BOAT CAT TOOLPATHS Page 24-6
Fig. 29Mastercam X4 BOAT CAT TOOLPATHS Page 24-6
Fig. 28
Mastercam X4 BOAT CAT TOOLPATHS Page 24-7Rough Pocket and Finish Blend
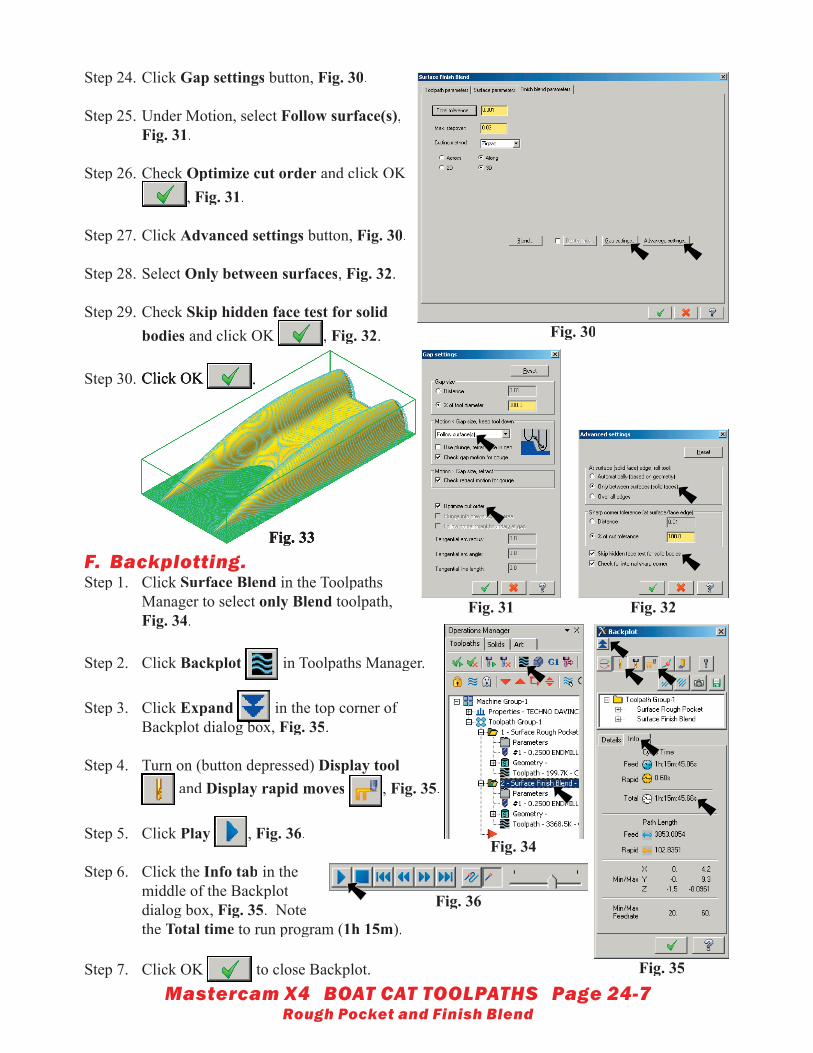
Step 24. Click Gap settings button, Fig. 30.
Step 25. Under Motion, select Follow surface(s),Fig. 31.
Step 26. Check Optimize cut order and click OK Step 26. Check , Fig. 31.
Step 27. Click Advanced settings button, Fig. 30.
Step 28. Select Only between surfaces, Fig. 32.
Step 29. Check Skip hidden face test for solid bodies and click OK
Skip hidden face test for solid , Fig. 32.
Step 30. Click OK
F. Backplotting.Step 1. Click Surface Blend in the Toolpaths
Manager to select only Blend toolpath, Fig. 34.
Step 2. Click Backplot in Toolpaths Manager.
Step 3. Click Expand in the top corner of Backplot dialog box, Backplot dialog box, Fig. 35.
Step 4. Turn on (button depressed) Display toolStep 4. Turn on (button depressed) and Display rapid moves , Fig. 35.
Step 5. Click Play , Fig. 36.
Step 6. Click the Info tab in the middle of the Backplot dialog box, Fig. 35. Note the Total time to run program (1h 15m).
Step 7. Click OK to close Backplot.
Fig. 30
Fig. 31 Fig. 32
Step 30. Click OK .
Fig. 33Fig. 33
Fig. 34
Fig. 35
Fig. 36

Mastercam X4 BOAT CAT TOOLPATHS Page 24-8Rough Pocket and Finish Blend
G. Verify the Program.Step 1. Click Toolpath Group1 in the Toolpaths
Manager to select both toolpaths, Fig. 37.
Step 2. Click Verify in the Toolpaths Manager, Fig. 37.
Step 3. Click Machine quickly in Verify dia-log box, Fig. 38.
Step 4. Turn on (button depressed) Simulate toolStep 4. Turn on (button depressed) .
Step 5. Click the Play in the Verify dialog box to start the machining.
Step 6. Click OK to close Verify dialog box.
Step 7. Save . Use Alt-F S.
H. Create NC Program (Posting).Step 1. Click Toolpath Group1 in the Toolpaths Manager to select both
toolpaths, Fig. 37.
Step 2. Click Post in the Toolpaths Manager, Fig. 37.
Step 3. Uncheck Edit check box and uncheck NCI fi le in Posting pro-cessing dialog box, Fig. 40. Click OK .
Step 4. In Save As dialog box, set Save in: to My Documents, Fig. 41.
Step 5. Key-in hull and your fi rst name for a fi lename and click OK .
Fig. 38
Fig. 37
Fig. 40
Fig. 41
Fig. 39
Related Documents