USER MANUAL IMPORTANT: READ AND SAVE THESE INSTRUCTIONS

Welcome message from author
This document is posted to help you gain knowledge. Please leave a comment to let me know what you think about it! Share it to your friends and learn new things together.
Transcript
U S E R M A N U A L
IMPORTANT: READ AND SAVE THESE INSTRUCTIONS
T H A N K YO U F O R YO U R P U RC H A S E !
I N D E X
Unpacking & Inspection...... . . . . . . . . . . . . . . . . . . . . . . . . . . . . . . . . . . . . . . . . . . . . . . . . . . . . . . . . . . . .Page 2
Production Dimensions...... . . . . . . . . . . . . . . . . . . . . . . . . . . . . . . . . . . . . . . . . . . . . . . . . . . . . . . . . . . . . . .Page 3
Safety Information...... . . . . . . . . . . . . . . . . . . . . . . . . . . . . . . . . . . . . . . . . . . . . . . . . . . . . . . . . . . . . . . . . . . . . .Page 4
Operation...... . . . . . . . . . . . . . . . . . . . . . . . . . . . . . . . . . . . . . . . . . . . . . . . . . . . . . . . . . . . . . . . . . . . . . . . . . . . . . . . . . .Page 5
Settings...... . . . . . . . . . . . . . . . . . . . . . . . . . . . . . . . . . . . . . . . . . . . . . . . . . . . . . . . . . . . . . . . . . . . . . . . . . . . . . . . . . . . . .Page 6
DMX Diagram....... . . . . . . . . . . . . . . . . . . . . . . . . . . . . . . . . . . . . . . . . . . . . . . . . . . . . . . . . . . . . . . . . . . . . . . . . . . .Page 7
Warranty Information...... . . . . . . . . . . . . . . . . . . . . . . . . . . . . . . . . . . . . . . . . . . . . . . . . . . . . . . . . . . . . . . . . .Page 8
1
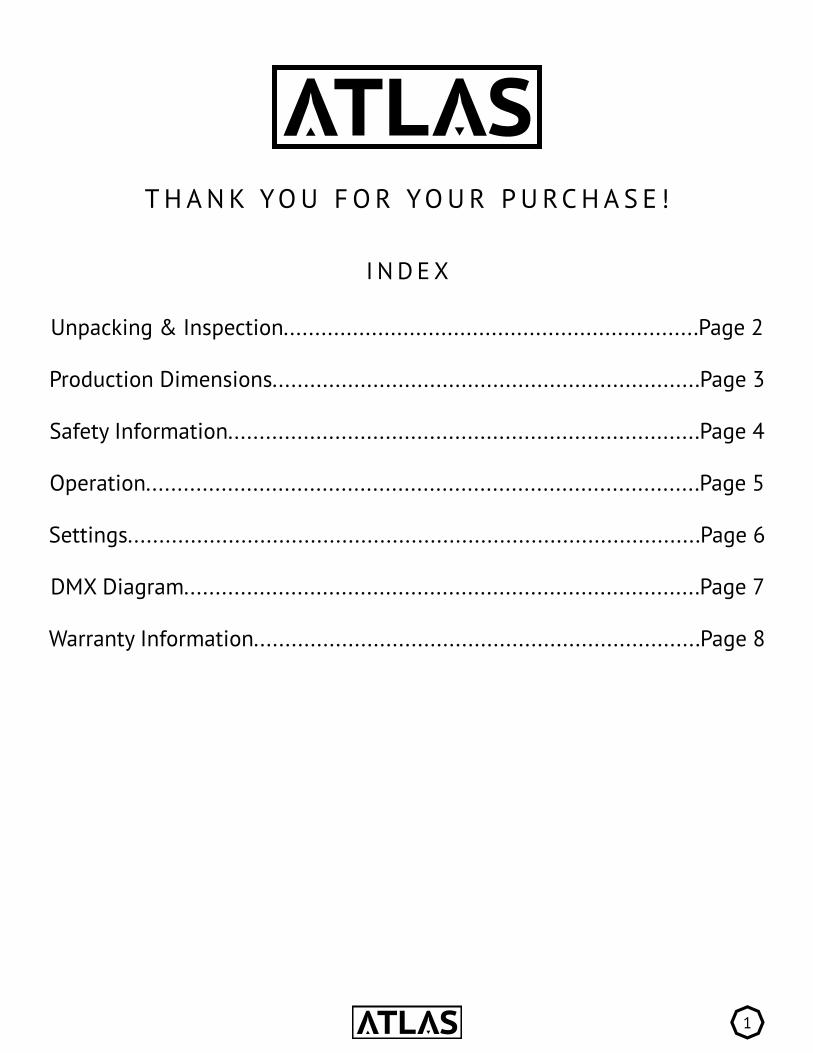
U N PA C K I N G & I N S P E C T I O N
Upon receiving your Atlas, open the package and carefully remove contents to verify all components are accounted for and have been shipped and handled with care. If any parts
are damaged or missing, notify your Master FX dealer. Packing list includes, but is not limited to:
2
- (1) Atlas
- (1) Neutrik PowerCon TRUE1 Power Cable
- (1) 3 Liter Container
- (1) Quick Connect Hose Set Up
- (1) Mounting Bracket
D I M E N S I O N S & O V E RV I E W
SPECIFICATIONS Weight: 51lb
120V Model
Rated Voltage: 120vacFrequency: 50/60hz
Power Consumption: 1700WBreaker: 15A 250V
220V Model
Rated Voltage: 220vacFrequency: 50/60hz
Power Consumption: 1700WBreaker: 15A 250V
14” 9”
19”
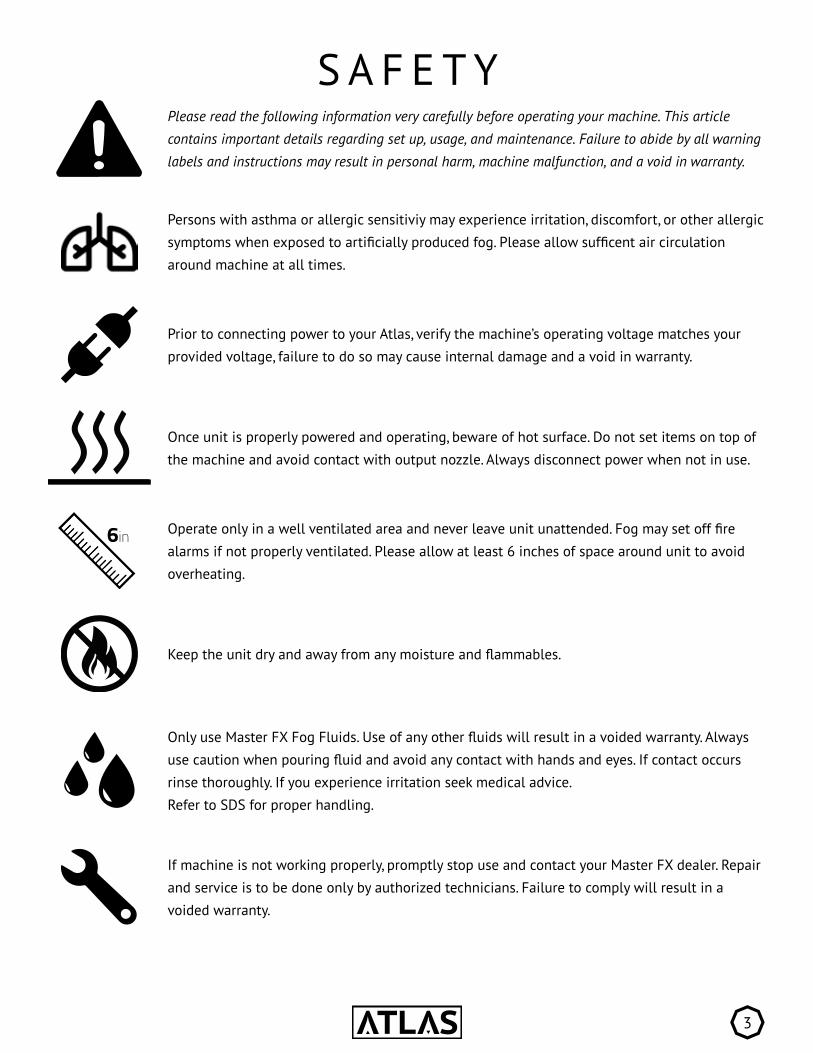
S A F E T YPlease read the following information very carefully before operating your machine. This article contains important details regarding set up, usage, and maintenance. Failure to abide by all warning labels and instructions may result in personal harm, machine malfunction, and a void in warranty.
Prior to connecting power to your Atlas, verify the machine’s operating voltage matches your provided voltage, failure to do so may cause internal damage and a void in warranty.
Operate only in a well ventilated area and never leave unit unattended. Fog may set off fire alarms if not properly ventilated. Please allow at least 6 inches of space around unit to avoid overheating.
Keep the unit dry and away from any moisture and flammables.
Only use Master FX Fog Fluids. Use of any other fluids will result in a voided warranty. Always use caution when pouring fluid and avoid any contact with hands and eyes. If contact occurs rinse thoroughly. If you experience irritation seek medical advice. Refer to SDS for proper handling.
If machine is not working properly, promptly stop use and contact your Master FX dealer. Repair and service is to be done only by authorized technicians. Failure to comply will result in a voided warranty.
3
6in
Once unit is properly powered and operating, beware of hot surface. Do not set items on top of the machine and avoid contact with output nozzle. Always disconnect power when not in use.
Persons with asthma or allergic sensitiviy may experience irritation, discomfort, or other allergic symptoms when exposed to artificially produced fog. Please allow sufficent air circulation around machine at all times.
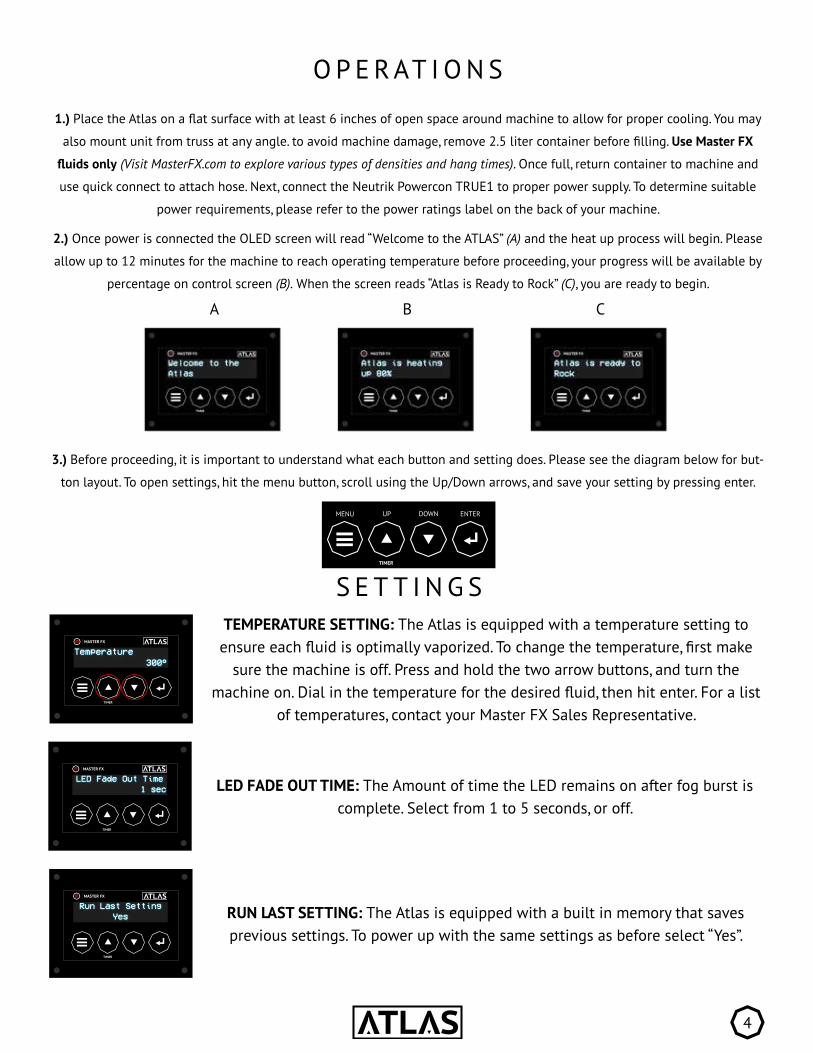
O P E R AT I O N S
2.) Once power is connected the OLED screen will read “Welcome to the ATLAS” (A) and the heat up process will begin. Please
allow up to 12 minutes for the machine to reach operating temperature before proceeding, your progress will be available by
percentage on control screen (B). When the screen reads “Atlas is Ready to Rock” (C), you are ready to begin.
3.) Before proceeding, it is important to understand what each button and setting does. Please see the diagram below for but-
ton layout. To open settings, hit the menu button, scroll using the Up/Down arrows, and save your setting by pressing enter.
1.) Place the Atlas on a flat surface with at least 6 inches of open space around machine to allow for proper cooling. You may
also mount unit from truss at any angle. to avoid machine damage, remove 2.5 liter container before filling. Use Master FX
fluids only (Visit MasterFX.com to explore various types of densities and hang times). Once full, return container to machine and
use quick connect to attach hose. Next, connect the Neutrik Powercon TRUE1 to proper power supply. To determine suitable
power requirements, please refer to the power ratings label on the back of your machine.
4
TIMER
MENU UP DOWN ENTER
A B C
TEMPERATURE SETTING: The Atlas is equipped with a temperature setting to ensure each fluid is optimally vaporized. To change the temperature, first make
sure the machine is off. Press and hold the two arrow buttons, and turn the machine on. Dial in the temperature for the desired fluid, then hit enter. For a list
of temperatures, contact your Master FX Sales Representative.
Temperature300°
TIMER
MASTER FX
S E T T I N G S
LED FADE OUT TIME: The Amount of time the LED remains on after fog burst is complete. Select from 1 to 5 seconds, or off.
LED Fade Out Time1 sec
TIMER
MASTER FX
RUN LAST SETTING: The Atlas is equipped with a built in memory that saves previous settings. To power up with the same settings as before select “Yes”.
Run Last SettingYes
TIMER
MASTER FX
5
A B C
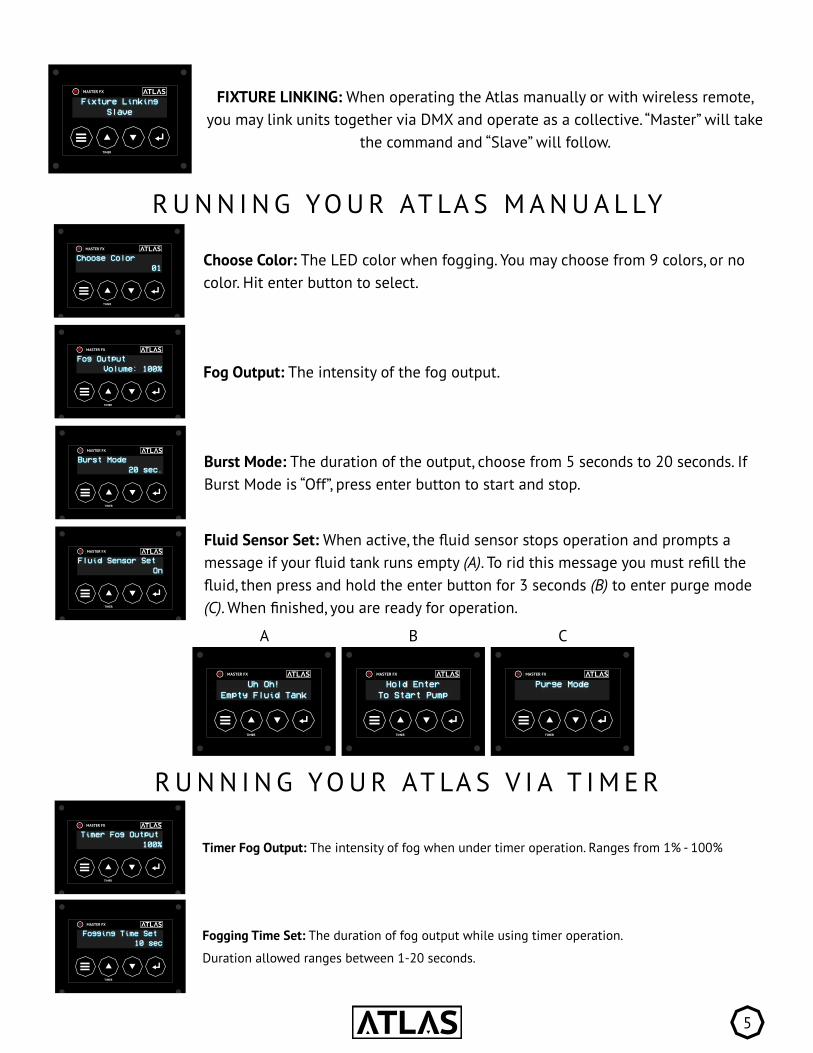
Fluid Sensor Set: When active, the fluid sensor stops operation and prompts a message if your fluid tank runs empty (A). To rid this message you must refill the fluid, then press and hold the enter button for 3 seconds (B) to enter purge mode (C). When finished, you are ready for operation.
Fluid Sensor SetOn
TIMER
MASTER FX
Purge Mode
TIMER
MASTER FX
Uh Oh!Empty Fluid Tank
TIMER
MASTER FX
Hold EnterTo Start Pump
TIMER
MASTER FX
R U N N I N G YO U R AT LA S M A N U A L LY
Choose Color: The LED color when fogging. You may choose from 9 colors, or no color. Hit enter button to select.
Choose Color01
TIMER
MASTER FX
Fog Output: The intensity of the fog output.Fog Output
Volume: 100%
TIMER
MASTER FX
Burst Mode: The duration of the output, choose from 5 seconds to 20 seconds. If Burst Mode is “Off”, press enter button to start and stop.
Burst Mode20 sec.
TIMER
MASTER FX
FIXTURE LINKING: When operating the Atlas manually or with wireless remote, you may link units together via DMX and operate as a collective. “Master” will take
the command and “Slave” will follow.
Fixture LinkingSlave
TIMER
MASTER FX
Timer Fog Output: The intensity of fog when under timer operation. Ranges from 1% - 100%Timer Fog Output
100%
TIMER
MASTER FX
Fogging Time Set: The duration of fog output while using timer operation.
Duration allowed ranges between 1-20 seconds.
Fogging Time Set10 sec
TIMER
MASTER FX
R U N N I N G YO U R AT LA S V I A T I M E R
6
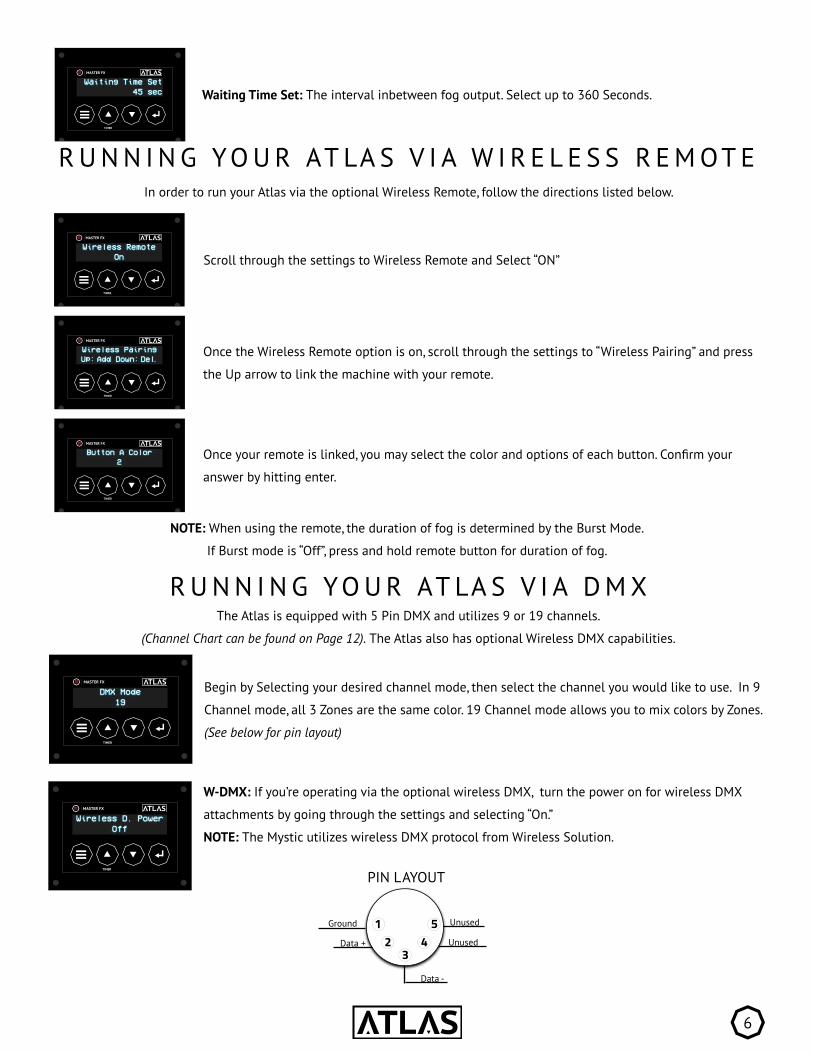
R U N N I N G YO U R AT LA S V I A W I R E L E S S R E M OT E
Scroll through the settings to Wireless Remote and Select “ON”Wireless Remote
On
TIMER
MASTER FX
Once the Wireless Remote option is on, scroll through the settings to “Wireless Pairing” and press
the Up arrow to link the machine with your remote.
Wireless Pairing Up: Add Down: Del.
TIMER
MASTER FX
Once your remote is linked, you may select the color and options of each button. Confirm your
answer by hitting enter.
Button A Color2
TIMER
MASTER FX
In order to run your Atlas via the optional Wireless Remote, follow the directions listed below.
NOTE: When using the remote, the duration of fog is determined by the Burst Mode.
If Burst mode is “Off”, press and hold remote button for duration of fog.
Waiting Time Set: The interval inbetween fog output. Select up to 360 Seconds.Waiting Time Set
45 sec
TIMER
MASTER FX
R U N N I N G YO U R AT LA S V I A D M X
Begin by Selecting your desired channel mode, then select the channel you would like to use. In 9
Channel mode, all 3 Zones are the same color. 19 Channel mode allows you to mix colors by Zones.
(See below for pin layout)
DMX Mode19
TIMER
MASTER FX
The Atlas is equipped with 5 Pin DMX and utilizes 9 or 19 channels.
(Channel Chart can be found on Page 12). The Atlas also has optional Wireless DMX capabilities.
W-DMX: If you’re operating via the optional wireless DMX, turn the power on for wireless DMX
attachments by going through the settings and selecting “On.”
NOTE: The Mystic utilizes wireless DMX protocol from Wireless Solution.Wireless D. Power
Off
TIMER
MASTER FX
12
34
5Ground
Data +
Data -
Unused
Unused
PIN LAYOUT
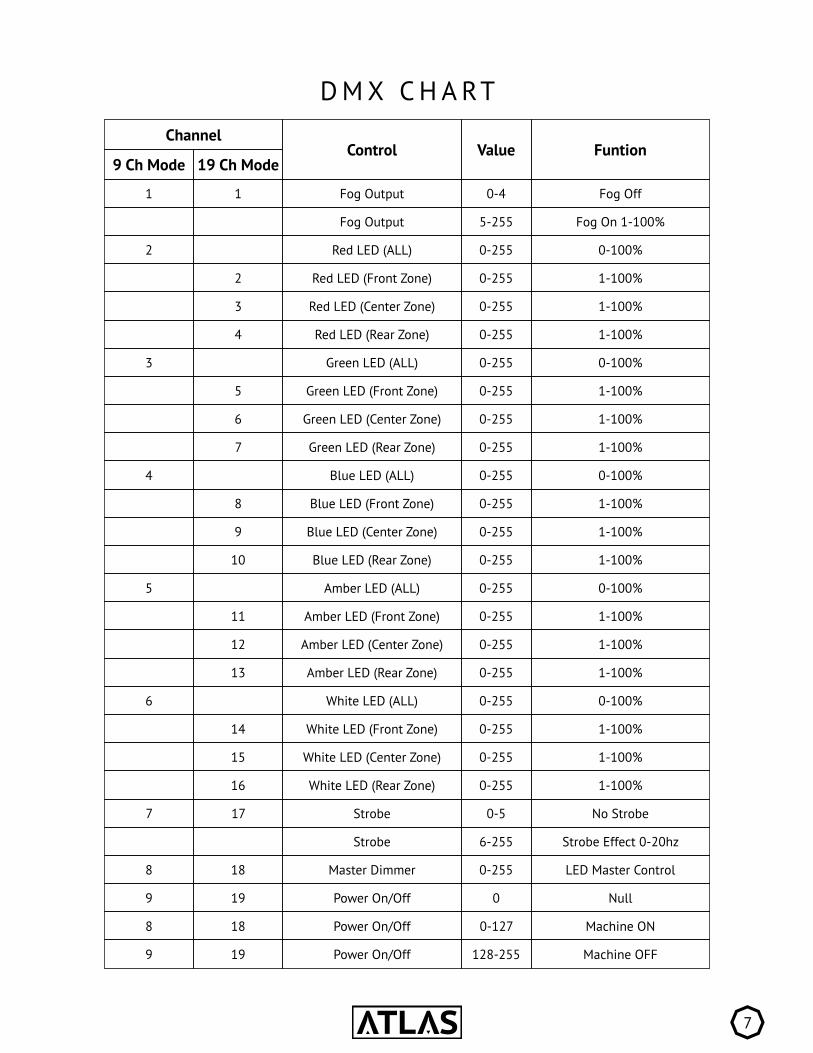
Channel
9 Ch Mode 19 Ch Mode
1 1
2
2
3
4
3
5
6
7
4
8
9
10
5
Control Value Funtion
Fog Output 0-4 Fog Off
Fog Output 5-255 Fog On 1-100%
Red LED (ALL) 0-255 0-100%
Red LED (Front Zone) 0-255 1-100%
Red LED (Center Zone) 0-255 1-100%
Red LED (Rear Zone) 0-255 1-100%
11
12
13
6
14
15
16
7 17
8 18
9 19
8 18
9 19
Green LED (ALL) 0-255 0-100%
Green LED (Front Zone) 0-255 1-100%
Green LED (Center Zone) 0-255 1-100%
Green LED (Rear Zone) 0-255 1-100%
Blue LED (ALL) 0-255 0-100%
Blue LED (Front Zone) 0-255 1-100%
Blue LED (Center Zone) 0-255 1-100%
Blue LED (Rear Zone) 0-255 1-100%
Amber LED (ALL) 0-255 0-100%
Amber LED (Front Zone) 0-255 1-100%
Amber LED (Center Zone) 0-255 1-100%
Amber LED (Rear Zone) 0-255 1-100%
White LED (ALL) 0-255 0-100%
White LED (Front Zone) 0-255 1-100%
White LED (Center Zone) 0-255 1-100%
White LED (Rear Zone) 0-255 1-100%
Strobe 0-5 No Strobe
Strobe 6-255 Strobe Effect 0-20hz
Master Dimmer 0-255 LED Master Control
Power On/Off 0 Null
Power On/Off 0-127 Machine ON
Power On/Off 128-255 Machine OFF
D M X C H A RT
7
8
W A R R A N T Y T E R M S*Please Visit MasterFX.com/Warranty to Register your Atlas
How to Get Service
To inquire about repairs, email [email protected] or call 877.578.6577
The warranty is valid to the original purchaser only and covers all internal components and required labor for the first 3 years from date of purchase. Master FX and approved dealers will still perform repairs and regular maintenance outside of the 3 year warranty at the owner’s expense. Timeline of repair is at the discresion of Master FX and approved dealers. All repairs must have an RA (Return Authorization) number clearly noted on the box prior to returning for service, any packages without an RA will not be accepted. To schedule repairs and receive a RA, please email [email protected] or call 877.578.6577. The customer is responsible for any shipping cost that may incur.
Insignificant deviations of the regular production quality does not guarantee repair or replacement rights. Moreover, the warranty does not cover faults or defects caused by misuse or negligence; e.g. improper ventilation, dropping machine, exposure to moisture, etc. The use of any fluids other than Master FX Fog Fluids is strictly prohibited, failure to comply will void warranty. Moreover, tampering with the internals and modifications will also void warranty. All service is to be done by Master FX authorized technicians only. Master FX is not liable for repair delays due to fire, strikes, or causes beyond our control.
Master FX reserves the right to alter the following terms and conditions if contingencies develop which were not apparent at the time of sale.
Related Documents