Imaging Data Registration SOP v2.3 | Updated 3.20.19 | MarkVCID Coordinating Center | Page | 1 MarkVCID Imaging Data Registration Standard Operating Procedure Version 2.3, March 2019 MarkVCID Consortium By the MarkVCID Coordinating Center (Data Core Director Karl Helmer, PhD) The MarkVCID Consortium is funded by the National Institutes of Health through the National Institute of Neurological Disorders and Stroke and National Institute on Aging (Cooperative Agreement U24NS100591).

Welcome message from author
This document is posted to help you gain knowledge. Please leave a comment to let me know what you think about it! Share it to your friends and learn new things together.
Transcript

Imaging Data Registration SOP v2.3 | Updated 3.20.19 | MarkVCID Coordinating Center | Page | 1
MarkVCID Imaging Data Registration
Standard Operating Procedure
Version 2.3, March 2019 MarkVCID Consortium
By the MarkVCID Coordinating Center (Data Core Director Karl Helmer, PhD)
The MarkVCID Consortium is funded by the National Institutes of Health
through the National Institute of Neurological Disorders and Stroke and National
Institute on Aging (Cooperative Agreement U24NS100591).

Imaging Data Registration SOP v2.3 | Updated 3.20.19 | MarkVCID Coordinating Center | Page | 2
MarkVCID Imaging Data Registration Standard Operating Procedure Version 2.3 | Effective Date: 3/20/19 | Planned Review Date: 6/20/19
The procedures in this SOP should be followed exactly. If changes to the SOP are
needed, please send suggested edits to the MarkVCID Coordinating Center.
I. Scope
This standard operating procedure (SOP) describes the methods to be performed when
registering a MRI scan session and transferring the scan data to the MarkVCID
Coordinating Center (CC).
II. Procedures
Users will register a MRI scan session through the MarkVCID website Imaging Data
Registration page. This will apply to both the study participant scans and the phantom scans. At
the end of this process, users will receive an imaging data ID number that will identify the scan
session. Users will first anonymize the MRI data following the MarkVCID Data Anonymization
SOP and then transmit the data to the MarkVCID Coordinating Center (CC) using the Globus
service following the MarkVCID Globus Data Transfer SOP. Note that phantom data does not
have to be anonymized.
Registering an MRI Scan Session a. Click "Log in" at the top of the MarkVCID website (www.markvcid.org) b. Go to the "Data Portals” menu and select “Imaging Data Registration” c. Users will see the screen below
Imaging Data Registration SOP v2.3 | Updated 3.20.19 | MarkVCID Coordinating Center | Page | 3
d. Fill out the form using the correct Subject ID and scan date. Select “MRI” for the Data Modality.
e. There is a new field called “Subproject”. This field is only to be used for data generated for the two MarkVCID subprojects: “Test-Retest” and “Traveling Human Phantom”. Consult your site coordinator for information regarding these subprojects.
f. If the data you are registering is either the first or second scan from a subject being used in the “Test-Retest” subproject, then select that choice. You will then be prompted to choose the “Session Type”, either “test” (first scan session) or “Retest” (second scan session).
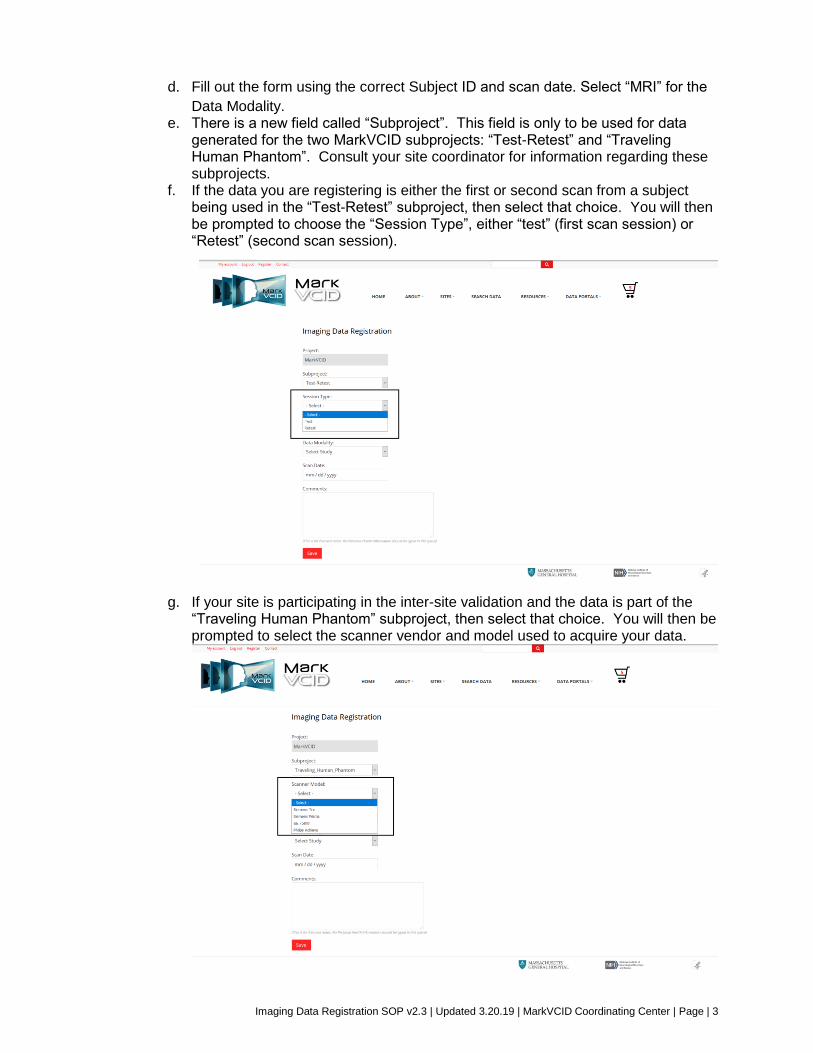
g. If your site is participating in the inter-site validation and the data is part of the “Traveling Human Phantom” subproject, then select that choice. You will then be prompted to select the scanner vendor and model used to acquire your data.

Imaging Data Registration SOP v2.3 | Updated 3.20.19 | MarkVCID Coordinating Center | Page | 4
h. If the data you are registering is from neither of those subprojects, leave the field as “None”.
i. Click "Save" when finished. j. The screen after a successful ID creation will give you the created ID:

Imaging Data Registration SOP v2.3 | Updated 3.20.19 | MarkVCID Coordinating Center | Page | 5
k. Paste the created Imaging Data ID into the MarkVCID Imaging Data Log so that you have a record that the scan session was registered. You will also receive an email with the information in green above for your records.
Individual Patient Record (Reg ID and Imaging DocID)
Updated [insert date] Record the patient's information and COPY and PASTE the Patient's MarkVCID website Imaging DocID into this document.
You will also receive a copy of each ID in email.
MarkVCID Patient ID (generated from
MarkVCID Website)
Imaging Scan Date (MM/DD/YY)
MarkVCID Image Data DocID (generated from
MarkVCID Website)
Site's Internal Patient ID (if applicable)
Comments
EX. 1599fff5c9 7/24/2018 c52b36814586f78e70282fe400a398 E01
l. Now anonymize the data following the procedure detailed in the MarkVCID Data Anonymization SOP. The phantom data does not have to be anonymized.
m. Once you have anonymized the data for the scan session you should name a
folder using the following schema: /<subject_ID>/<scan_type>/<run_number>-
anon. For example: “/4cbb32f887/DiffWTD/1-PA-anon” would be the schema for
a single run of a diffusion-weighted MRI scan in the “PA” direction of subject
4cbb32f887 that has already been anonymized. Note that to correctly handle the “PA” and “AP” diffusion scans, the correct naming convention would be
“/4cbb32f887/DiffWTD/1-PA-anon” and “/4cbb32f887/DiffWTD/2-AP-anon” for
subject 4cbb32f887. If there are multiple diffusion runs, the naming
convention is: 1-PA-anon,2-AP-anon, 3-PA-anon,and 4-AP-anon.
Please do not add subfolders to this folder structure.
Please note that the consortium has agreed to collect the 3D-GRE data in
magnitude/phase (Siemens) or real/imaginary (Philips) format rather than the
resulting QSM or SWI maps calculated on the scanner. Please place all the
DICOM files of both types in a single folder and label using the
/<subject_ID>/<scan_type>/<run_number>-anon format. In this case, the
<scan_type> would be “T2STARWTD” and there is no need for any further
labeling (e.g., “phase”).
n. Phantom scans: The ADNI phantom scans do not have to be anonymized and therefore have a slightly different file-naming convention. The main convention is the same, using subject ID and scan type, but there is no “anon” in the name of the folder named for the run number, e.g., “/4cbb32f887/DiffWTD/1-AP” for one of the diffusion-weighted scans and “/4cbb32f887/T1WTD/1” for the first phantom T1-weighted scan. There should not be any subfolders below this level.
o. Create a zip archive of the data directory containing the anonymized data. Name the archive using the Imaging Data ID that you received at the successful completion of the registration process, e.g. “a7b560abdca414e2a200600a901ba7b.zip”. Please do not compress each
individual DICOM file. Also, please do not include NIfTI formatted versions of
the data, DICOM SR files, and miscellaneous files that often accompany the
data as it is stored on your file system (for example, “syngo_fV” folders,
“Autorun.inf”, “DICOMDIR”, ‘autorun.exe” or “cdinfo” files often found on
Siemens systems.)
p. Use the MarkVCID Globus Data Transfer SOP and instructions to transfer the
archive file to the MarkVCID shared endpoint (markvcid#martinosglobus)
“register” folder. You will only have “write” access to your site’s subfolder.

Imaging Data Registration SOP v2.3 | Updated 3.20.19 | MarkVCID Coordinating Center | Page | 6
Note for site certification scans:
For the initial site-certification scans, the scans should be placed in the
/transfer/test_files/<your-site> directory on the project Globus endpoint. The
subject or phantom do not need to be registered as a subject for this step. Data
should be zip compressed as in the instructions above, but the naming
convention for the zip archive should be <your-site>-test_human.zip and <your-
site>-test_phantom.zip. The scan-type folder naming convention for the phantom
data is the same as for the human data, as given in the MarkVCID Data
Anonymization SOP. Please do not send an uncompressed folder containing
your data as this may affect the available bandwidth at your site. Also, please do
not compress the individual DICOM files – only compress the highest-level folder
containing the subfolder for each scan type.
Related Documents