Market Basket with Handcrafted •D' Handle GH PRODUCTIONS

Welcome message from author
This document is posted to help you gain knowledge. Please leave a comment to let me know what you think about it! Share it to your friends and learn new things together.
Transcript

Market Basket with Handcrafted
•D' Handle
GH PRODUCTIONS
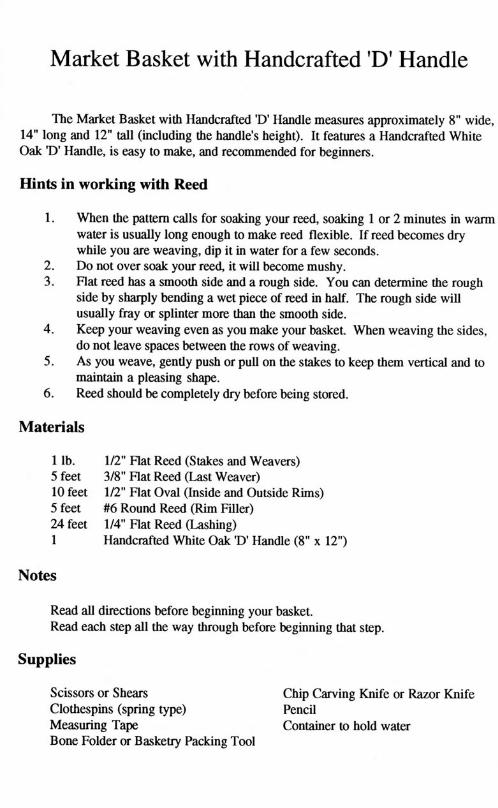
Market Basket with Handcrafted 'D' Handle The Market Basket with Handcrafted 'D' Handle measures approximately 8" wide,
14" long and 12" tall (including the handle's height). It features a Handcrafted White Oak 'D' Handle, is easy to make, and recommended for beginners.
Hints in working with Reed 1. When the pattern calls for soaking your reed, soaking 1 or 2 minutes in warm
water is usually long enough to make reed flexible. If reed becomes dry while you are weaving, dip it in water for a few seconds.
2. Do not over soak your reed, it will become mushy. 3. Flat reed has a smooth side and a rough side. You can determine the rough
side by sharply bending a wet piece of reed in half. The rough side will usually fray or splinter more than the smooth side.
4. Keep your weaving even as you make your basket. When weaving the sides, do not leave spaces between the rows of weaving.
5. As you weave, gently push or pull on the stakes to keep them vertical and to maintain a pleasing shape.
6. Reed should be completely dry before being stored.
Materials 1 lb. 1/2" Flat Reed (Stakes and Weavers) 5 feet 3/8" Flat Reed (Last Weaver) 10 feet 1/2" Flat Oval (Inside and Outside Rims) 5 feet #6 Round Reed (Rim Filler) 24 feet 1/4" Flat Reed (Lashing) 1 Handcrafted White Oak 'D' Handle (8" x 12")
Notes Read all directions before beginning your basket. Read each step all the way through before beginning that step.
Supplies Scissors or Shears Clothespins (spring type) Measuring Tape Bone Folder or Basketry Packing Tool
Chip Carving Knife or Razor Knife Pencil Container to hold water
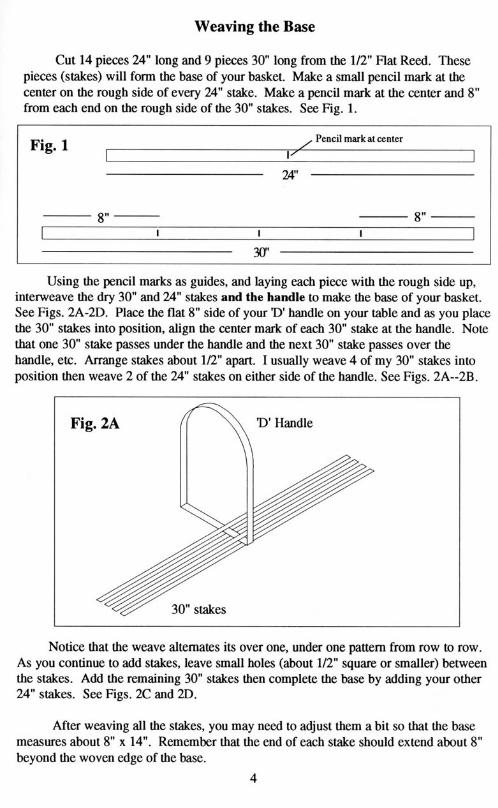
Weaving the Base Cut 14 pieces 24" long and 9 pieces 30" long from the 1/2" Flat Reed. These
pieces (stakes) will form the base of your basket. Make a small pencil mark at the center on the rough side of every 24" stake. Make a pencil mark at the center and 8" from each end on the rough side of the 30" stakes. See Fig. 1.
Pencil mark at center
24"
8 8"
30f' Using the pencil marks as guides, and laying each piece with the rough side up,
interweave the dry 30" and 24" stakes and the handle to make the base of your basket. See Figs. 2A-2D. Place the flat 8" side of your TD' handle on your table and as you place the 30" stakes into position, align the center mark of each 30" stake at the handle. Note that one 30" stake passes under the handle and the next 30" stake passes over the handle, etc. Arrange stakes about 1/2" apart. 1 usually weave 4 of my 30" stakes into position then weave 2 of the 24" stakes on either side of the handle. See Figs. 2A-2B.
Notice that the weave alternates its over one, under one pattern from row to row. As you continue to add stakes, leave small holes (about 1/2" square or smaller) between the stakes. Add the remaining 30" stakes then complete the base by adding your other 24" stakes. See Figs. 2C and 2D.
After weaving all the stakes, you may need to adjust them a bit so that the base measures about 8" x 14". Remember that the end of each stake should extend about 8" beyond the woven edge of the base.
4

Fig. 2C
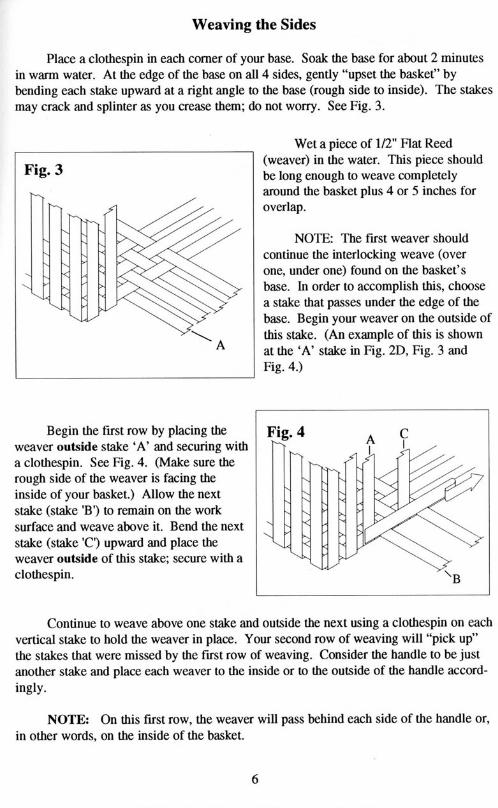
Weaving the Sides Place a clothespin in each comer of your base. Soak the base for about 2 minutes
in warm water. At the edge of the base on all 4 sides, gently "upset the basket" by bending each stake upward at a right angle to the base (rough side to inside). The stakes may crack and splinter as you crease them; do not worry. See Fig. 3.
Wet a piece of 1/2" Hat Reed (weaver) in the water. This piece should be long enough to weave completely around the basket plus 4 or 5 inches for overlap.
NOTE: The first weaver should continue the interlocking weave (over one, under one) found on the basket's base. In order to accomplish this, choose a stake that passes under the edge of the base. Begin your weaver on the outside of this stake. (An example of this is shown at the 'A' stake in Fig. 2D, Fig. 3 and Fig. 4.)
Begin the first row by placing the weaver outside stake 'A' and securing with a clothespin. See Fig. 4. (Make sure the rough side of the weaver is facing the inside of your basket.) Allow the next stake (stake 'B') to remain on the work surface and weave above it. Bend the next stake (stake 'C') upward and place the weaver outside of this stake; secure with a clothespin.
Continue to weave above one stake and outside the next using a clothespin on each vertical stake to hold the weaver in place. Your second row of weaving will "pick up" the stakes that were missed by the first row of weaving. Consider the handle to be just another stake and place each weaver to the inside or to the outside of the handle accordingly.
NOTE: On this first row, the weaver will pass behind each side of the handle or, in other words, on the inside of the basket.
6
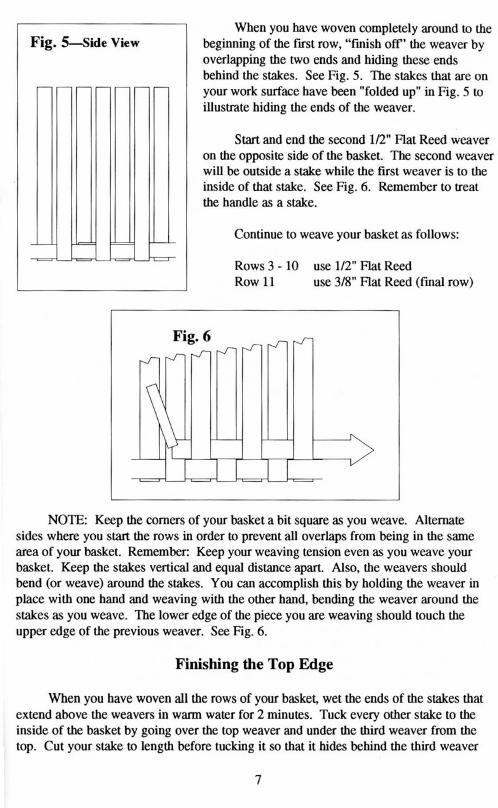
Fig. 5—Side View When you have woven completely around to the
beginning of the first row, "finish off the weaver by overlapping the two ends and hiding these ends behind the stakes. See Fig. 5. The stakes that are on your work surface have been "folded up" in Fig. 5 to illustrate hiding the ends of the weaver.
Start and end the second 1/2" Flat Reed weaver on the opposite side of the basket. The second weaver will be outside a stake while the first weaver is to the inside of that stake. See Fig. 6. Remember to treat the handle as a stake.
Continue to weave your basket as follows: Rows 3 -10 use 1/2" Flat Reed Row 11 use 3/8" Flat Reed (final row)
NOTE: Keep the comers of your basket a bit square as you weave. Alternate sides where you start the rows in order to prevent all overlaps from being in the same area of your basket. Remember: Keep your weaving tension even as you weave your basket. Keep the stakes vertical and equal distance apart. Also, the weavers should bend (or weave) around the stakes. You can accomplish this by holding the weaver in place with one hand and weaving with the other hand, bending the weaver around the stakes as you weave. The lower edge of the piece you are weaving should touch the upper edge of the previous weaver. See Fig. 6.
Finishing the Top Edge When you have woven all the rows of your basket, wet the ends of the stakes that
extend above the weavers in warm water for 2 minutes. Tuck every other stake to the inside of the basket by going over the top weaver and under the third weaver from the top. Cut your stake to length before tucking it so that it hides behind the third weaver
7

from the top and is not visible on the inside of your basket. A bone folder or basketry tool will help open the weaver to accept the stake. Cut the remaining stakes even with the top of the basket. See Fig. 7.
Rims Cut a length of 1/2" Flat Oval Reed for the outside rim and a length of 1/2" Flat
Oval Reed for the inside rim. The length of your outside rim is equal to the distance around the top of your basket plus 4" (for overlap). The inside rim is 2" shorter than the outside rim. Soak the rims for 5 minutes.
In order to form a smooth joint where the rims overlap, you must carve or whittle both ends of each rim. Whittle the round side of one end at an angle and the flat side of the other end at the same angle. See Fig. 8.
Fig. 8 ^ Top View
Side View
I) < ^ = " )
To determine exactly where you should carve, attach the outside rim around the top of your basket (with clothespins) fitting it tightly against the basket, flat side touching the basket. Mark the rims where they overlap—mark the round side of one end of the rim and the flat side of the other end. Remove the rim and carve the rim (carve the flat side of one end and the round side of the other end) to form a smooth overlapping joint as illustrated in Fig. 8.
Repeat this process with the inside rim: clothespin it in place, (flat side against the basket) mark the overlap, remove the rim and carve the overlapped sections.
8
After carving the rims, make sure they are still pliable (if not, soak again). With the flat side of the rim touching the basket, place the inside rim inside the basket and square the comers—secure with clothespins. Position the inside rim overlap on one of the long sides of the basket near the handle. Place the outside rim around your basket with its flat side against the basket, and clothespin in place. Locate the overlapping sections of the rims on opposite sides of the basket. See Fig. 9.
Cut the #6 Round Reed into two pieces and soak it for a minute in warm water. Place the #6 Round Reed around the top of your basket, one piece on either side of the basket from handle to handle. Push the Round Reed down between the inside and outside rims—removing then replacing the clothespins as you work around the top of your basket. You will be able to keep the Round Reed more securely in place as you begin the lashing.
At this point you may want to shape your rims. Grasp rims at comers and gently bend them to square the comers. Do not bend the comers too much or the rims might crack.
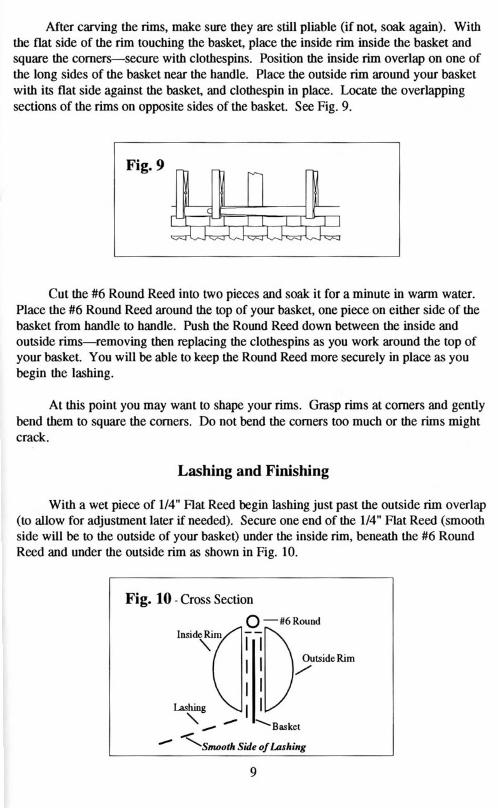
Lashing and Finishing With a wet piece of 1/4" Flat Reed begin lashing just past the outside rim overlap
(to allow for adjustment later if needed). Secure one end of the 1/4" Flat Reed (smooth side will be to the outside of your basket) under the inside rim, beneath the #6 Round Reed and under the outside rim as shown in Fig. 10.
Fig. 10 - Cross Section InsideRiiH/
L.ashing
Q—"6 Round i
Outside Rim
-Basket •Smooth Side of Lashing
9

Working left to right from the outside of your basket, bring the longer end of the 1/4" Flat Reed over the rims and between two stakes to the inside of the basket just
below the bottom of the rims.
NOTE: Secure and insert the 1/4" Flat Reed with the smooth side continuously to the outside.
Pull the Reed through to the inside until you have about one arm's-length of Reed
on the inside of your basket. Now, insert the Reed between the next two stakes and pull
it to the inside until you have a small loose loop of Reed around the rims.
After making three or four loops around the rims and between the stakes, tighten the loops of Reed-one at a time-from left to right by pulling to the inside. See Fig. 11 illustrated from the inside of the basket.
Fig. 11 - Inside of Basket
Repeat the looping process working your way around the basket. If the Reed
becomes dry, simply soak it again before continuing. Remove the clothespins as you
progress.
. From the inside of your basket, finish the lashing by bringing the end of the 1/4" Flat Reed over a weaver and upward behind the same weaver. Trim the end.
See Fig. 12. Should the 1/4" Flat Reed not be long enough to lash completely around
your rims, begin the second piece of 1/4" Flat Reed and then finish as described above.
Fig. 12- Inside of Basket
Enjoy your Market Basket!
10
Related Documents