March 28, 2012 Deborah Barksdale OSI Contractor Trainin g

Welcome message from author
This document is posted to help you gain knowledge. Please leave a comment to let me know what you think about it! Share it to your friends and learn new things together.
Transcript

March 28, 2012Deborah Barksdale
OSI Contractor
Training

Insert e-mail
Password
Logging on to DataCation

Managing “Fields Mapping” and “Fields”
• “Fields Mapping” allows site administrator to label demographic fields such as ethnicity and disability status by name instead of number
• “Fields” allows site administrator to determine whether or not income on free and reduced meal data will be displayed in the system

Fields Mappings
• Field Mapping – Put indicators on data fields: Quarter, Ethnic Code, ESL, and SPED. Use Field drop down menu under Filters to select the data field. On the right side of the screen, select the key in the drop down menu and then type the value name in the value box. Click Add Mapping.
1. Select Quarter, Ethnic Code, SPED, ESL from this menu. Example:Select Ethnic Code. The example selects Ethnic Code.
2. Select Key 1 for the ethnic code. Go to step 3. Repeat steps 2 & 3 for the next ethnic code.
3. Type Hispanic and click on Add Mapping. Type the name for next ethnic code. Now instead of a number for the Ethnic Code, reports will display the descriptive term for the ethnicity of a student.
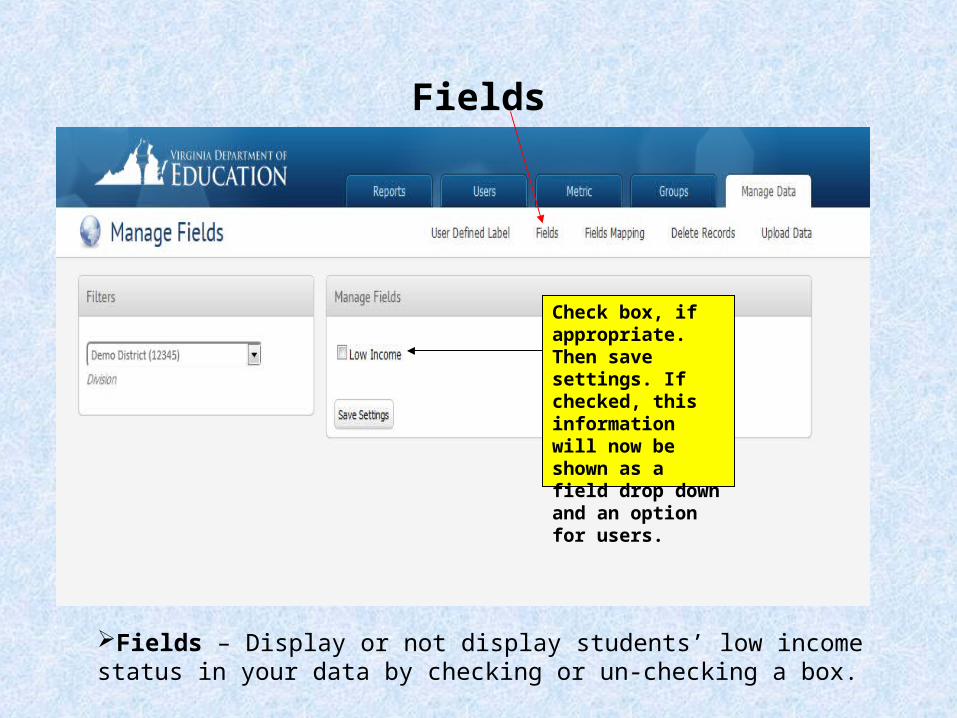
Fields
Check box, if appropriate. Then save settings. If checked, this information will now be shown as a field drop down and an option for users.
Fields – Display or not display students’ low income status in your data by checking or un-checking a box.

“User Defined Labels”• Five Optional Data Points the user can populate with
student data information– Optional 1, 2, 3, 4, 5 (see flat file template)– Use the “Manage User Field Label” drop down menu and
find the Optional Fields 1 to 5, then type the label to name the field
– For example, if Option 1 was your school’s PALS ’ 2011 data, find Field 1 in the Manage User Field Label drop down menu. Then type “PALS ’11” in the Label Box. Then click Add Label.
• Find the school’s optional data here, if uploaded.• You must know prior to this step what the optional data is, if
any, and which data field it was assigned (option 1, 2, 3, 4, or 5) in the upload.

User Defined Labels
Label the data here. Click Add Label.
When added, User Defined Labels are displayed here.
Find the school’s optional data here, if uploaded.

Setting Metrics – Divisions and schools are now able to add multiple metrics to view data
Multiple Metrics

Creating multiple metrics may make it easier to identify students for remediation. For example, creating grade level metrics or course metrics based on content allows the viewer to quickly view only those students captured in the metric via the Metric drop down menu in Performance Reports. The sample shows Metric 1.

ConditionsOnce a Metric has been created, the next step is setting the conditions for the Metric.
After naming a metric, click on Conditions.

Below is a partial list of the available conditions and parameters for each metric.

Add/Edit Conditions
Conditions are given color codes which enables quick identification.Schools set parameters in the manner appropriate for the school and division. If you do not wish to include a condition in a metric, you must put 0 in the from column and 0 in the to column. See below.
Conditions are given color codes which enables quick identification.
Example of how to exclude a condition in a metric.

Add/Edit Conditions (continued)
Complete fields and click Add Condition.

Sample Metric• Let us use the 5th Grade Metric for an example. The student data in the grade will be
displayed according to the set conditions and parameters. Schools divisions vary in naming their conditions. Here are some examples:
• Level 1 could be for advanced students who fall within a specific range of parameters• Level 2 could be for proficient students who fall within a specific range of parameters• Level 3 could be students to watch who fall within a specific range of parameters• Level 4 could be at-risk students who fall within a specific range of parameters
• Excellent• Good• Fair• Failing
• Advanced• On Track• Off Track• At-Risk
It is data YOUR way!!!!

Groups for Intervention and Remediation Click Groups

Creating multiple metrics, by grade/subject for example, simplifies identifying students for intervention and remediation. If only one metric is created for ALL students in the school, then all students will be populated alphabetically in the box on the left. See below.
You must hold down the Ctrl key to select/highlight multiple students in the left column. Click Add to Group and the students will be displayed in the column on the right.
Highlighted students will move to this column after you click Add to Group.

Once all students are identified for the specific group and moved to the box on the right, type the Group Name in the box then click on Add Group.
Name the Intervention Group and Add Group. Add to Group icon is below the Group Name.

IDENTIFYING STUDENTS FOR INTERVENTION
Student identification for remediation is based on the conditions and parameters the school/division sets up in DataCation. Examine your pie charts. Those students at risk of being unsuccessful fall in the lowest range of your metrics’ conditions. Common conditions are off track, borderline, watch, etc. Click on this portion of the specific content pie chart and the students’ data will be displayed in excel format. This file may be exported to an excel worksheet and names, grades, and data sorted. Print the sheet and use to assign students to specific remediation. If multiple metrics have been created by grade/subject, in Performance Reports, click on the Metric Name drop down menu and select the Metric (Example: Grade 5 Math).
Ultimately, it is what is easiest for YOU. DataCation is a tool that compiles, organizes, and displays student data YOUR way. It will assist in guiding instructional decisions and monitoring student achievement.

In Performance Reports, select the Intervention Group(s) from the Student Group drop down menu to see data specific to that group. Based on the data, is the intervention working?

Activity: Creating Groups
• Go to the Performance Reports Tab• Select a pie chart targeted for interventions…i.e. subject average,
attendance, discipline, etc.• Click on the section of the pie with the lowest % of students meeting the
condition (i.e . your division might have named this section Off Track, Failing, Poor, or Watch)
• Student data will populate into an excel chart within DataCation.• Click on the excel icon in the top right hand corner of the chart to export
into an excel worksheet so you can sort the data by grade or homeroom if you desire.
• Print the worksheet (Note: you can hide columns to reduce unnecessary printed sheets). Determine which intervention(s) students will receive.
• Go back to the Groups tab, using the printed excel worksheet, to assign students to a specific intervention group for monitoring.
Related Documents